
Copy Cat: A Painter's Puzzle
![]()
 A lot of games cast you as a criminal. It's fun to flirt with the dark side, flaunting the rules, casting off the ethical concerns that imprison the weak and cowardly. You've been a sociopathic getaway driver in The Heist 2. A genocidal space squid in Parasite. A turtle mass murderer in Super Mario Bros. A megalomaniac in Mastermind: World Conqueror. Now. Prepare yourself to step into the nefarious shoes of a truly abominable villain: an art forger. DUHN DUHN DUUUUUUHNNN.
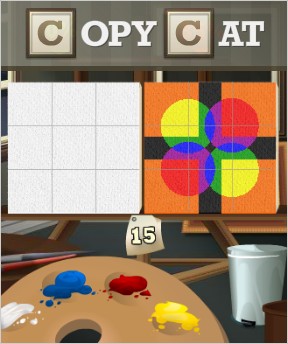
Armed with a bundle of stencils and an infinite amount of paint, your job in Mofongo Studios' new puzzle game Copy Cat: A Painter's Puzzle is to duplicate 30 colorful abstract paintings, and then, presumably, sell the forgeries on the black market and move to Bermuda. The original painting sits on the right, your blank canvas on the left. Your method, as the wasteful scofflaw that you are, is to cover up the bits you don't want to paint, and then throw a whole bucket of paint at the canvas. Don't worry, you probably spread plastic on the floor of your studio beforehand.
A progress bar at the top of the screen tells you what percentage of your forgery is accurate. Your goal is to push that number past the target mark, which varies depending on how finicky the current level is. Just use the mouse to drag as many stencils as you like from the menu at right onto your canvas, then click on the paint to glop it on. Stencils you don't need any more can go in the trash can.
 Your first few forgeries will be simple collections of shapes, but by the end, you'll be dealing with deeply worrying art-tangles of half-shapes hidden behind other half-shapes. You only have access to the three primary colors of paint (plus white, which overrides any other color), but you'll learn to mix them together to produce orange, green, and... er... fuchsia. Combining all three primaries produces black. Here's where it gets strange: if you already have a secondary color, like orange, and you add one of its primary colors, like red, that part of the painting will turn back to red. Because you are using special, technologically advanced forgery paint.
Nearly as spiffy as your high-tech paint is the level editor, which lets you make tricky puzzles to stump your friends or, if you are very diabolical, pretty pictures that will really stump your friends. There's nothing like staring in defeated befuddlement at a cute little bunny to take an arrogant comrade down a peg.
Analysis: It may have a hifalutin theme and martini lounge background music, but Copy Cat gives you everything you want in a down-to-earth visual brainteaser. The little internal scream of disbelief when you see a complicated new level. The warm fuzzy prickle on the back of your neck when you finally put that impossible-looking kerfuffle in order.
Get it on your mobile device: Copy Cat for iOS
Unlike in many puzzle games, however, these solutions are not an exact science (because they're an art, natch). There is no reasonable way to put a stencil precisely where you need it, not without a lot of squinting and mouse fidgeting, so you have to settle for a picture that resembles the target without matching it exactly. The target percentage gives you some leeway, but it can actually work against you. Sometimes you'll get close to the solution without actually solving it, and the game will decide you're close enough and just end the level, leaving you to stare at your imperfect forgery like the sad little hack that you are. It's enough to give perfectionists fingernail scars in their palms.
Another issue is, ironically, the composition of the screen. You have to drag the stencils from the right side of the screen to the left side, past a trash can with a huge collision detection box. Expect to lose a few stencils to that hungry bin before you get used to dodging it.
What makes those nitpicks inconsequential, and in fact makes Copy Cat one of the most enjoyable Flash puzzlers around, is the pure ingenuity of the concept. Over the course of the entire game, I never did quite master the mental switcheroo needed to reverse engineer a painting in my head. Hitting a workable solution on the first shot requires a surprisingly intense level of concentration, although the solutions are always logical, and the difficulty level always stays in the realm of casual.
The other reward is in simply producing attractive pictures. Not every painting in the game is something you'd hang on your wall, but many have a simple, playful appeal that makes you want to reproduce them faithfully. It keeps your attention long past the point where you're learning new solving techniques.
It's a rare game that combines brains and beauty in such a unique and accessible way. I can recommend Copy Cat wholeheartedly, despite the minor interface clumsiness. After all, nobody ever said a life of crime would be easy.


Walkthrough Guide
(Please allow page to fully load for spoiler tags to be functional.)
Copy Cat walkthrough
Note: When the walkthrough mentions to place objects just place them as close as you can to where you think they should be.
Level 1
Place the four circles down, then paint the canvas red.
Level 2
Paint the canvas blue.
Place the star shape.
Paint the canvas yellow.
Level 3
Paint the canvas red.
Place the wave shape and the square shape
Paint the canvas yellow.
Level 4
Paint he canvas yellow and blue.
Please the circle shape in the center, with the X shape over top of it.
Paint the canvas white.
Level 5
Place circle shapes so 1/4 of each circle will be in the outer boxes. Like the white part in the sample.
Paint the canvas blue.
Put the circles in the trash. And place a square in each corner.
Paint the canvas Blue again.
Level 6
Start by painting the canvas red.
You'll have to play two wavey lines to get the red part correct.
Next paint the canvas yellow.
Place an X in the middle. And remove the two wavey lines.
Paint the canvas blue.
Level 7
Paint the canvas red
Place a circle at the bottom center.
Paint the canvas white, then blue.
Place a circle at the top center.
Paint the canvas red.
Place a circle in the center.
Remove the bottom circle
Paint the canvas yellow.
Put a circle back in the bottom center, and remove the top circle.
Paint the canvas yellow again.
Level 8
Start by painting the canvas blue.
Place the objects roughly how they are in this Screenshot
Next paint the canvas red
Remove all the shapes, and add a square to the middle.
Paint the canvas so it turns black.
Level 9
Start by painting the canvas green.
Place a circle in the middle at both the bottom and the top. Leaving a gap where the black should be in the middle.
Next add Red to make the canvas black
Place one of the circles in the center, and four crosses around it.
Paint the canvas white, then paint it purple using red and blue.
Level 10
Paint the canvas yellow.
Use triangles to block each corner of the triangle you are trying to make.
Paint the canvas blue
Place a triangle over the section of blue you need to cover.
Paint the canvas green.
Now place a triangle in the middle of the canvas.
Paint the canvas purple.
Place a circle in the center of the canvas.
Paint the canvas black.
Level 11
Paint the canvas green.
Place a circle in the middle of the canvas.
Paint the canvas purple.
Place the 5 circles around the center one to make the flower.
Paint the canvas yellow.
Level 12
Paint the canvas red, and place an X in the middle.
Paint the canvas orange.
Use two +'s to make a long line down the middle.
Paint the canvas White.
Place an X in the center
Paint the canvas yellow.
Remove the shapes, and place a + in the middle.
Paint the canvas purple.
Place an X just above and below the plus sign, then paint the canvas blue
place an X in the middle over the +.
Paint the canvas green.
Place a circle on the left, and the right of the canvas.
Paint the canvas black.
Level 13
Place three squares down.one in the center, one on the right and one on the left. Don't forget to leave room for the purple lines you will need. It's okay if the shapes are hanging off the edge of the canvas.
Paint the canvas purple.
Remove the squares and add the four circles.
Paint the canvas black.
Level 14
Start by placing a circle so that it will cover the snow cap on the planet at the bottom.
Paint the canvas green.
Use an ellipse on the right part of the planet, and an ellipse and a circle to make the left part.
Paint the canvas blue.
Place a circle over where the planet should be, and remove the other shapes.
Paint the canvas black.
Level 15
Paint the canvas yellow.
Place two circles near the top left and bottom right corners.
Paint the canvas orange.
Place a square in the top left and bottom right corner, and remove the circles.
Now paint the canvas red.
Place a circle at the top right and bottom left corner of the canvas like you did when the canvas was yellow.
Paint
the canvas orange.
Place a square on the two remaining corners.
Paint the canvas blue.
Place two circles on opposite corner where they were when the canvas was yellow.
Paint the canvas purple.
Move the circles to the opposite sides.
Paint the canvas green
Add two more circles where you had them before.
Paint the canvas black.
Level 16
Paint the canvas blue.
Add the shapes to where they are blue on the sample.
Paint the canvas green
Add the shape again just beside the ones covering the blue.
Paint the canvas black.
Level 17
Start by placing a triangle where the White and red area on the sample is.
Paint the canvas green.
Place a square where the black area on the sample is.
Paint the canvas blue.
Place the circle down.
Paint the canvas red.
Level 18
Paint the canvas blue.
Place the square down in the middle. Put a triangle on top. And two circles on the bottom.
Paint the canvas purple. It wont be perfect but it should net you around a 93%.
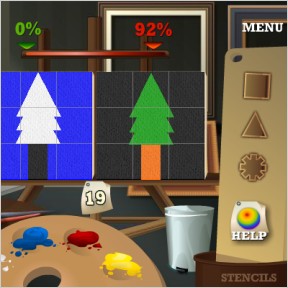
Level 19
Start by painting the canvas black.
Use two squares on the bottom to cover up where the black area on the bottom should be.
Paint the canvas orange.
Place a square to cover up where the trunk of the tree should be.
Paint the canvas green.
Place three triangle to make the tree.
Paint the canvas black.
Level 20
Start by painting the canvas purple.
Place the four shapes that go in the corners.
Paint the canvas yellow.
Place the four pointed star in the center.
Paint the canvas green
Place the target shape in the center
over the star
Paint the canvas black.
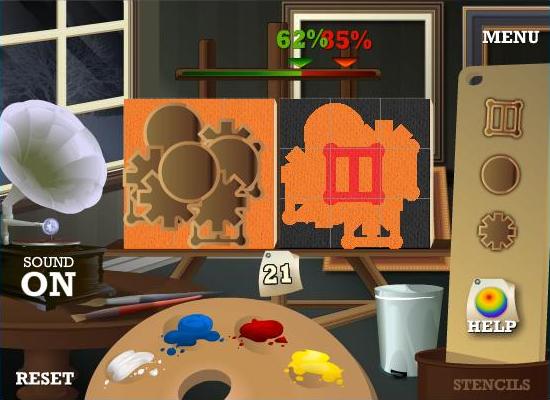
Level 21
Paint the canvas red.
Place the box in the middle.
Paint the canvas orange
Place the shapes like they are in this Screenshot. Its a little hard to see, but there are 3 circles, 4 gear shapes, and three boxes.
Paint the canvas black
Level 22
This one is a bit tricky. You need to use a square to make the white and yellow area. Place a square to the bottom of the square is at the bottom of where the white space in the sample is. Paint the canvas yellow. Now move the square lower so the top of the square lines up with the top of the white space in the sample.
If you did it right you should have a white bar in the middle of your canvas surrounded by yellow.
Next move the square to one side, and place one on the opposite side. So the the edge of the squares will be overing where the white is in the sample. But leaving a gap in the middle for the orange and red.
Paint the canvas red.
Place down two stars. One on the left and one on the right, to cover where the red should be.
Paint the canvas orange.
Remove the stars and the squares, and place a square in the middle.
Paint the canvas blue.
Place the stars back down.
Paint the canvas green
Use squared to cover up the entire middle row.
Paint the canvas black.
Level 23
Paint the canvas blue.
Place circles where the blue/purple mixed circles should go.
Paint the canvas purple.
Use triangle to cover up the blue half of what the circles SHOULD look like.
Paint the canvas red.
Remove the triangles and you should have half purple half blue circles.
Cover the circles up with the circle shape
Paint the canvas blue
Use triangles to divide the canvas in half, and then cover all the blue on the left half.
Paint the canvas green.
Level 24
Paint the canvas yellow
Place the Target shape in each corner
Paint the canvas green.
Remove the target shapes and place X shapes over the corners.
Use the red paint. If you did it well enough the level may end here. If not continue.
Place targets in the corners.
Paint the canvas white, then purple.
Place a target in the center, and paint the canvas white.
Put the square shape over the target, and remove the target shape.
Paint the canvas black.
Level 25
Paint the canvas orange.
Place two squares near the top right, and bottom left corners. Leaving a gap like in the sample.
Paint the canvas red.
Use the squares to cover the top right and bottom left corners.
paint the canvas purple.
Place a circle in the center.
Paint the canvas black.
Place two squares to cover the the areas that are supposed to stay black
Paint the canvas purple again.
Level 26
This one looks really though but you only need 78% so it's not so bad if you ignore part of the painting.
Place two ovals, and an X just under the yellow parts. The ovals go on the sides and the X in the middle.
Paint the canvas yellow. then move everything up so that its just above the blue.
Paint the canvas blue.
Move the ovals and the X down just a bit so they cover some white, yellow and blue each.
Add another two ovals and and X to cover up the yellow. then paint the canvas purple.
Use more ovals and an X to cover up the parts that are supposed to be purple
Paint the canvas orange.
Cover up the parts that are supposed to be orange, and then paint the canvas black.
you may have to do some minor adjustments but this should get you to the 78%.
Level 27
Paint the canvas green.
Place the two target shapes and the Star
Paint the canvas purple.
Paint the canvas red to turn the green parts to black.
Paint the canvas blue twice to turn it purple then blue, and avoid having to paint it white, and lose the black lines.
When the canvas is blue place the two squares to cover where the blue should be.
Paint the canvas purple.
Level 28
Again this one looks very complicated, but you do only need 50%. You can get 45% with just the black and white parts. So the colored parts don't have to be super accurate.
Start by placing the four targets.
Now paint the canvas red.
Place the squiggly lines down and remove the targets.
Paint the canvas blue.
Place the ovals down.
Use the yellow paint.
If you were close with your shapes you should get at least 50% just from this.
Level 29
They are getting tricky now. But we are almost done!.
For this level lets build one section at a time. We only need 75%, so there's no need to worry about the tiny bits.
Start with the bottom design. Place the star down.
Paint the canvas yellow.
Place an oval over the star.
Paint the canvas orange.
Remove the oval and the star. Place the box down.
Use the blue paint.
Place an oval down in the middle of the design.
Use the red paint twice.
Cover the design up completely.
Let's move onto the next design. Start by placing the box shape.
Paint the canvas yellow.
Remove the box shape and place the star shape over it.
Use the red paint.
Remove the star shape
Use the blue paint
Cover the design.
At this point you should be very close to the goal.
Paint the canvas white
Place the box shape for the top design.(Getting familiar yet?)
Paint the canvas red.
Remove the box shape and add the star
Use the blue paint
Place the oval in the middle of the design and remove the star
Use the yellow paint.
Level 30
This one looks tough, but it's no so bad if we break it into sections. Let's start with the corners
Start by painting the canvas blue.
Place circles near each corner to cover the area that should stay blue.
Paint the canvas red.
Remove the circles, and use squares to cover each corner section.
Use the yellow paint.
Both the bottom corners
will be complete now. Cover them.
Paint the canvas white.
Place the two circles back at the bottom.
Paint the canvas red.
Place a triangle in the center to cover the part that supposed to stay red and white.
Use the yellow paint.
Place a triangle at the bottom in the middle.
Use the blue paint.
Cover the bottom with a square.
Paint the canvas white.
Replace the four circles.
Use the red paint.
Remove the circles
Use the blue paint.
Place a square in the middle
Paint the canvas white.
Once again add the four circles, as well as the three triangles.
Paint the canvas black.
Remove the triangles
Use the red paint.
Remove the circles
Use the yellow paint.
Put the triangles back
Use the blue paint.
YOU ARE DONE \o/!
Posted by: Kero |
September 18, 2009 2:39 AM
|
September 18, 2009 2:39 AM