

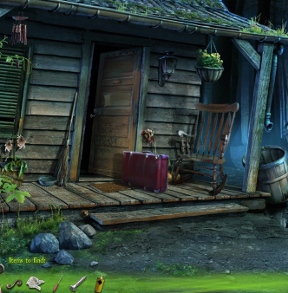
![]() Think you know your urban legends, boils and ghouls? Think again. All Christine wants is to spend a romantic weekend alone with Patrick and her enormous 1950s bouffant. (Sweet!) She thinks she has the perfect place; her parents' old cabin, deep within the woods. What could go wrong, so far from civilization? Well, as it turns out, a little bit more than replacing the key to the front door. Where is Patrick? What's happened to the interior of the cabin? And is Christine as alone as she thinks she is? Turn off the lights, turn up the volume, and get really close to the monitor to experience this scary and stylish retelling of *grabs you by the shoulders and shrieks* Campfire Legends: The Hookman! Aiiiieeeeeeeeeeee!
Think you know your urban legends, boils and ghouls? Think again. All Christine wants is to spend a romantic weekend alone with Patrick and her enormous 1950s bouffant. (Sweet!) She thinks she has the perfect place; her parents' old cabin, deep within the woods. What could go wrong, so far from civilization? Well, as it turns out, a little bit more than replacing the key to the front door. Where is Patrick? What's happened to the interior of the cabin? And is Christine as alone as she thinks she is? Turn off the lights, turn up the volume, and get really close to the monitor to experience this scary and stylish retelling of *grabs you by the shoulders and shrieks* Campfire Legends: The Hookman! Aiiiieeeeeeeeeeee!
 The Hookman is more of a traditional point-and-click title than a hidden-object game. While you'll find yourself rooting through various locales to find objects, every single one you dig up has a purpose. You'll hunt down supplies to repair a radio, look for pieces of a torn-up memo, find the misses pieces you need to complete a stone puzzle... no hunting for six roses, a rubber duck, and the ace of spades for you, no sir! It's strictly logical item finding in everyday scenarios. (Well, minus a forbidding crypt or two.) While hidden-object enthusiasts may be disappointed to this no-nonsense approach to the genre, those of us who prefer logical item placement and a good story to giving our eyes a workout will embrace it with open arms.
A magnifying glass when you move over an area means you can click for a close up view, and adding an item to your inventory is as simple as clicking to pick it up. When you've assembled all the items you need, indicated by the list at the bottom of the screen, you can simply drop them from your inventory onto the puzzle you're working on to use them. While most puzzles are as simple as using the correct items in the correct order, there are a few that can test your brain's mettle. Fortunately, the fireflies you can find throughout the game not only point you towards a missing item, but can also be used to get hints on puzzles or skip them entirely.
A big part of what makes The Hookman so enjoyable is how well made it is. Not only is the voice-acting above standard, but the art here is absolutely beautiful, with detailed environments that sends prickles up your spine even as you admire them. The characters themselves, while occasionally looking a little rubbery, are actually quite expressive, and it leads to the terror and frustration on their faces being that much more palpable. Special attention is also paid to sound effects and music, which greatly enhance the atmosphere... Oh! What was that creaking sound?... I'm sure it's nothing. Hey, why don't you go explore the woods without a flashlight while I take a shower with the window open? Everything I need to know about life I learned from old '80s horror movies!
Analysis: Oh, Christine. How effortlessly you embody every bobble-headed horror heroine in ever horror movie, ever. You'll find she does a lot of questionable things simply because the story would end if she didn't. Hey, Christine! Wanna check out that strange crypt, all alone and defenseless? Sure ya do, atta girl! While more realistic, a game about a girl who stays put in a safely, brightly lit area until help arrives wouldn't be terribly exciting. The Hookman manages to succeed by evoking the sort of delightfully cheesy, spooky thrill a lot of us will be familiar with from the sleepovers and camp outs of our childhood. (And is even more delightful for those of us who grew up with a little show called Are You Afraid Of The Dark?)
 And when the game does decide to scare you, it can be pretty effective about it. Granted, The Hookman tends to resort to loud, startling visuals or sounds to make you jump, but it also doesn't neglect the more subtle routes either. Shadows flicker by in the background. Crows take flight suddenly overhead. Something surfaces from beneath the shallow waters of the lake shore and the monster standing RIGHT BEHIND YOU REACHES OUT AND GRABS YOUR NECK, ayieeeeeeeeeeeeeeeeeeeeeeegh!... fine, fine, I'll stop. Sheesh.
But the biggest problem most people will probably have is the length of the game. Weighing in at around four hours for your average gamer, The Hookman is perfect for a night of creepy adventure, but probably won't last much longer. If you demand a lot of time or replay value for your buck, The Hookman may not be the game for you. And while most of us will see the ending coming a mile away, given the details of the original legend the story is loosely based upon, it still feels abrupt and a little unsatisfying after all the build-up.
Also be sure to check out the sequel to The Hookman: Campfire Legends: The Babysitter
As the first title in a planned trilogy, The Hookman sets the bar high for future Campfire Legends games and establishes the series as one to watch for fans of scary adventure games. A little bit corny, The Hookman is best enjoyed with a sense of humour and a love of old urban legends. With more love and polish put into it than other similar titles on the shelf, it's easily worth a look for anyone who can't resist a good scary story and can take a bit of cheese with a smile.
![]() Windows:
Windows:
Download the demo
Get the full version
![]() Mac OS X:
Mac OS X:
Not available.
Try Boot Camp or Parallels or CrossOver Games.


Walkthrough Guide
(Please allow page to fully load for spoiler tags to be functional.)
Campfire Legends: The Hookman Walkthrough
General Tips
There is no time limit.
A magnifier points to a nearby view. Make sure you click each location to see what is there.
Gears at your cursor will indicate that inventory objects have to be used there.
You will need to finish each task before you can proceed.
Clicking "Goal" will show you your current task.
Clicking "Items" will show you your inventory.
The inventory will open automatically when you enter a nearby view where inventory items are needed.
You will find fireflies in the scenes. Collect these for hints.
Fireflies regenerate, but in different locations. Revisiting scenes will help you find all the fireflies you need.
To move from one scene to another, use the arrows that appear by hovering over the scene with your mouse cursor.
For mini-games you have a special tip - you will get for a different amount of fire flies 1- 3 text hints how to solve the puzzle.
After using all text-hints you will have to pay with another "firefly" to get a skip option.
The green foggy bar at the bottom will show your search items.
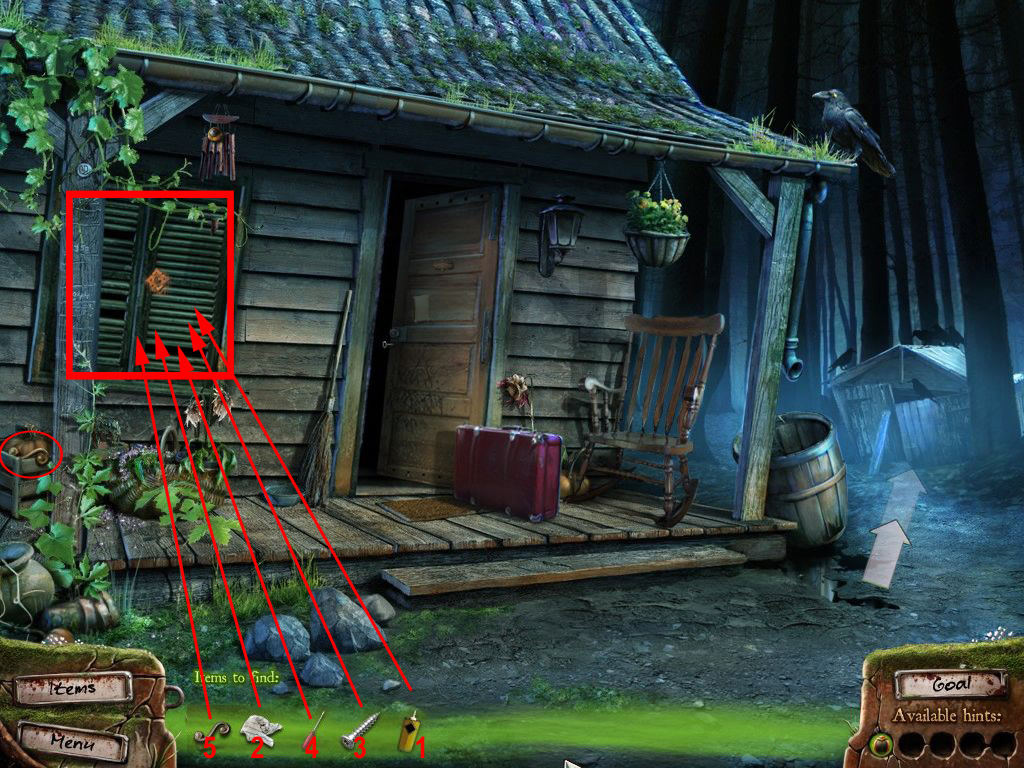
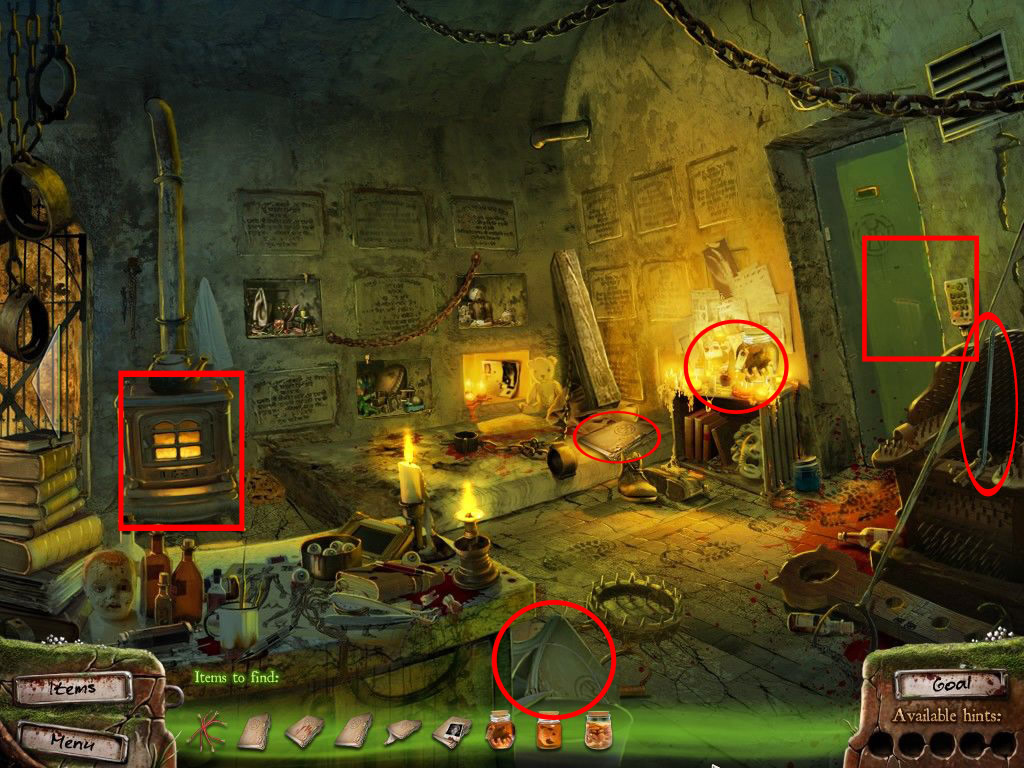
The house
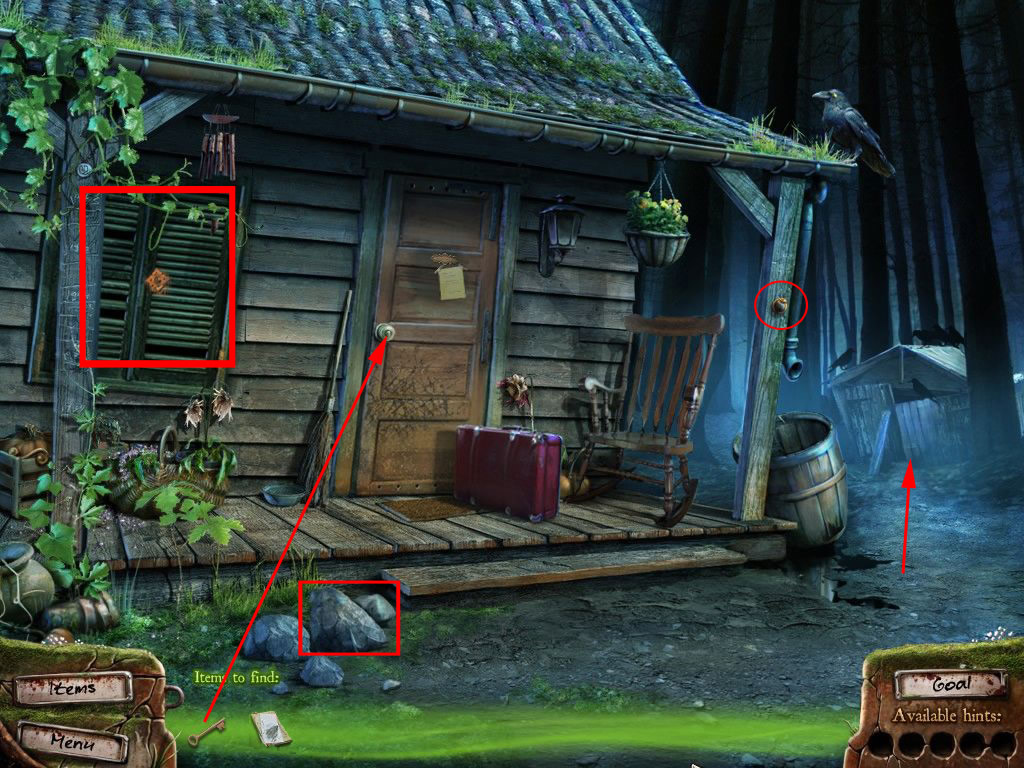
Front porch
Click the yellow note at the door - "the key is at the usual place"
Click the stones left next to the stairs and you will get a nearby view.
Clicking the big stone will move it and you can pick up the key.
Close the pop up window and use the key to open the door.
You can enter, but there is no power and you need light - to open the window shutters will help.
Click the shutters left side. You will need to repair them.
The white arrow points to the shed, as you will need some tools.
Screenshot
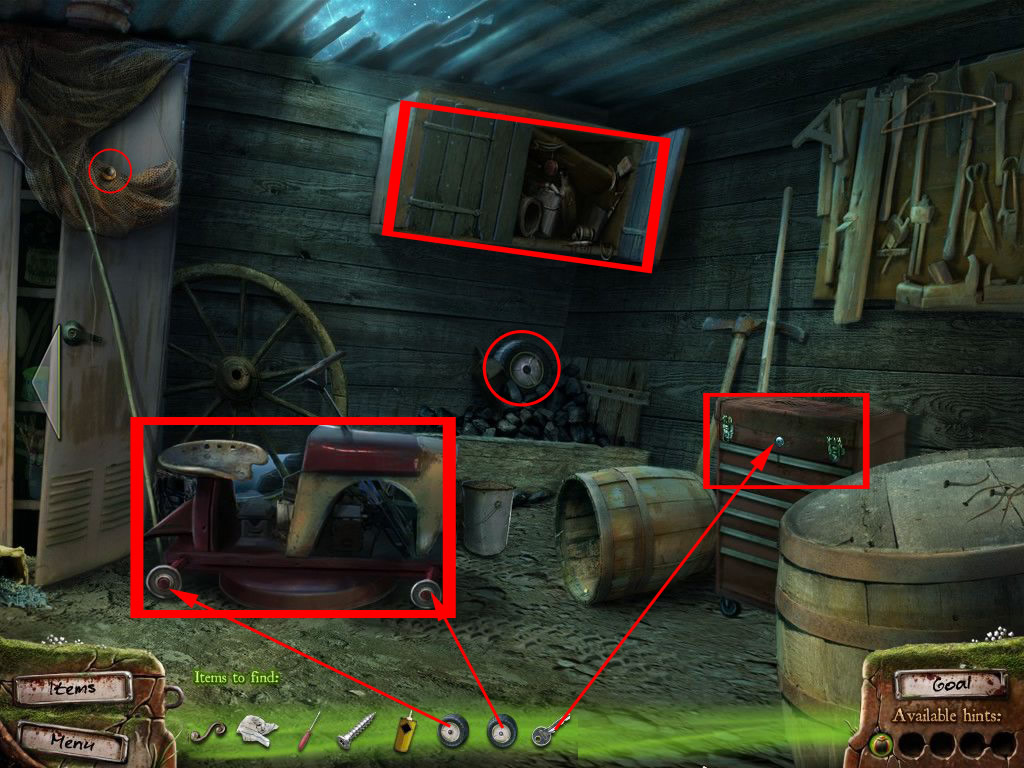
Shed
Click the open drawer at the table left.
You will find a manual.
Your search list will now show the items you need.
Use the arrow at the right and click "Old Betsy" the lawn mower.
It needs two wheels, which will be added to your search list.
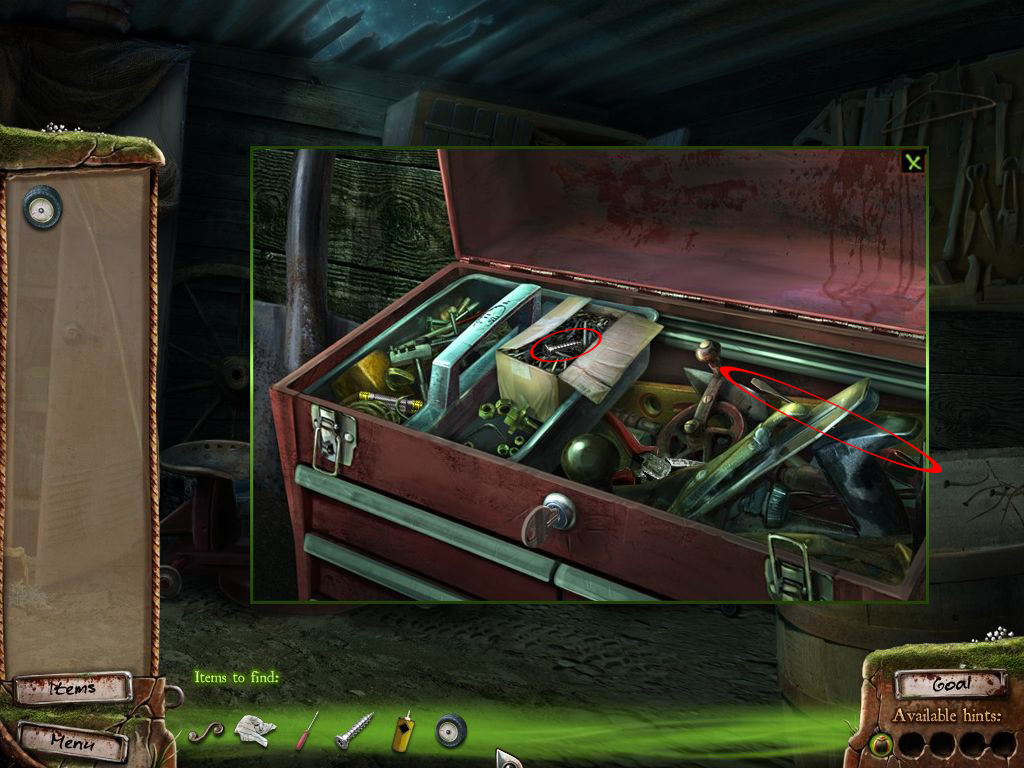
Click the red toolbox at the right side to learn, that you will need to find a key for it.
Open the cabinet at the wall, left side - you will find the key in there.
Screenshot
Underneath the cabinet on the stack of coal you will find one of Betsy's wheels.
Back to tool box, use the key to open it and grab the screwdriver and the screw.
Screenshot
Go back to the left part of the shed.
On top of the shelf above the table you will find the cloth.
Left side, half hidden behind a container, you will find the second wheel for Betsy.
Screenshot
Now as you have both wheels, click Betsy and place the wheels.
Screenshot
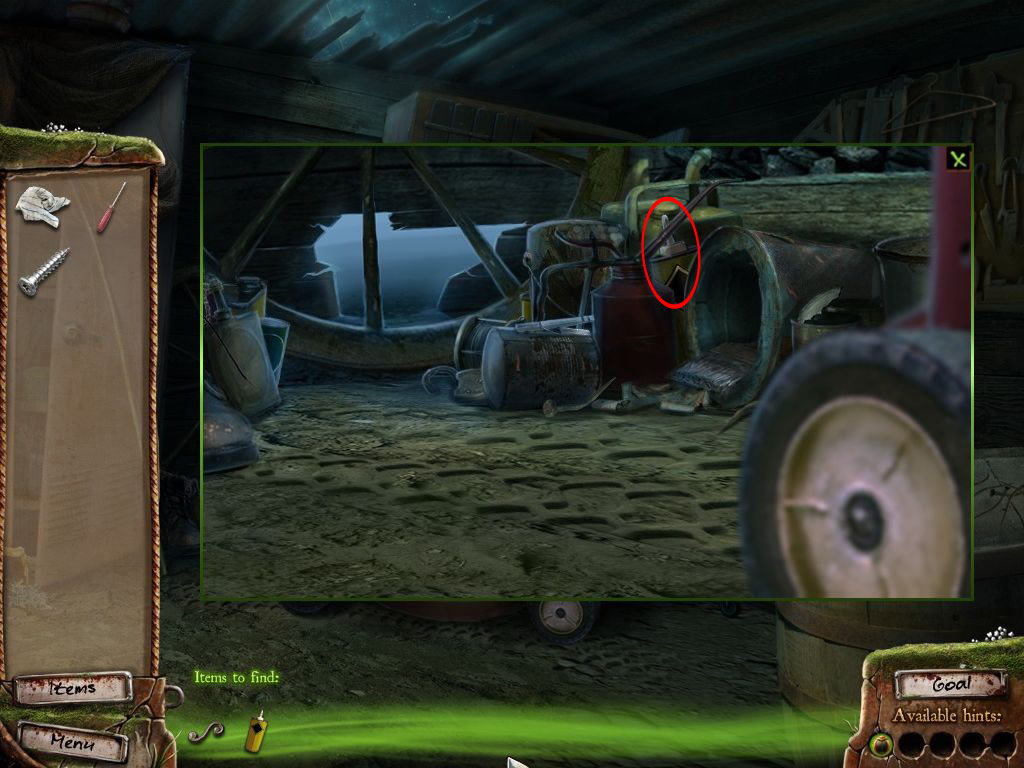
It will move to the side and you can search behind - you will find the rust dissolver.
Screenshot
Now you have everything - beside the shutter handle.
Go back to the front porch
Front Porch
You will find the handle below the left side of the window, on the wooden crate.
Click the window shutter and the little thing is the middle to get a nearby view.
Get the rust dissolver and click till it disappears from your cursor
Do the same with the cloth.
Now get the screw and place it on the upper hole - use the screwdriver (click exactly the screw) and last place the handle.
Screenshot
Enter the house and use the arrow to the right and then down to the basement.
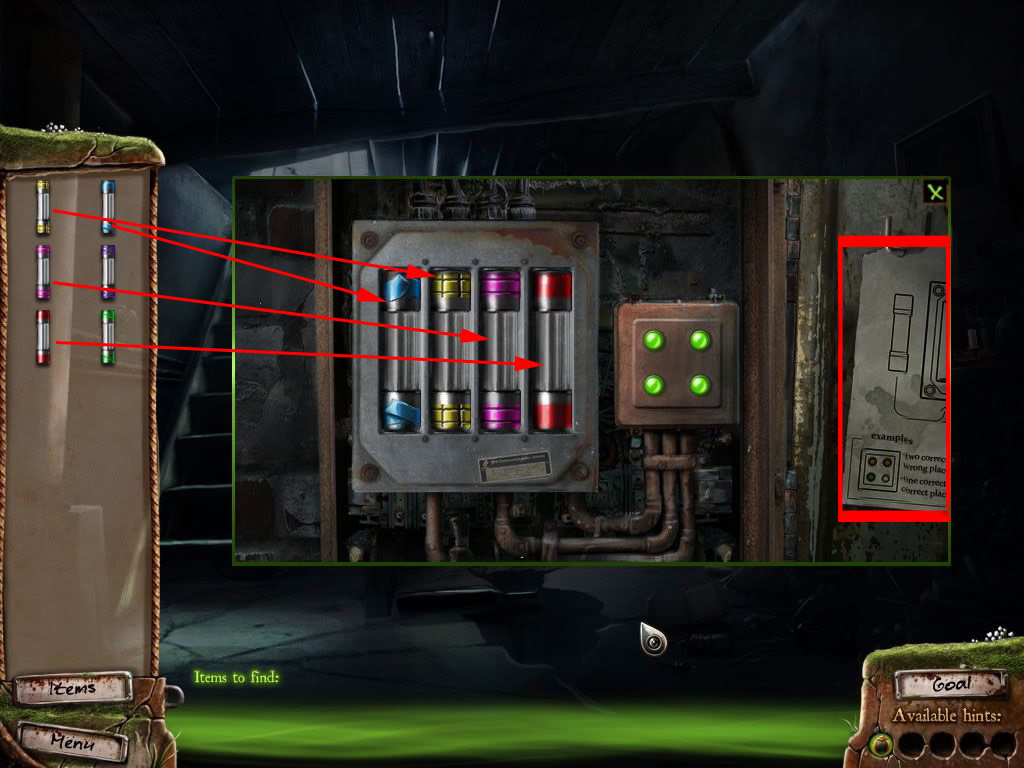
Basement/Shed
Click the fuse box right side at the wall.
You will have to find 6 fuses:
Low left on a kind of box or some, left side on the ground in front of the stairs and low right corner.
Screenshot
Go to the shed to find the other three.
Coming out of the house, you have to see, that you suitcase is gone.
Enter the shed.
One of the fuses will be in the table drawer, one you will find top left corner of the hanging cabinet and the last one is left side inside the tool box.
Go back to the house.
Front Porch
You will find your suitcase and all clothes scattered around.
Click the suitcase to get a search list for your stuff and find all.
Screenshot
Having all, click the suitcase to take them back.
Enter the house and go to the basement.
Basement
Click the fuse box.
Click the paper right side to get an explanation for the puzzle.
After placing for fuses, you see lamps highlighted.
Green: right fuse at the right place.
Orange: right fuse, wrong place.
No light: wrong fuse.
The lights do not show the position of the fuses, just the amount of fuses, which are OK, nearly OK or wrong.
Place four fuses and see, what the lamps show.
According to this, you have to find out, which are the right ones.
The solution is random.
Screenshot
When the light turns on, you'll be shocked to see the place ransacked.
Have a look at the door left side - there is a note at the floor and you can have a look at the spot on top.
Go back upstairs and enter the bedroom to the right.
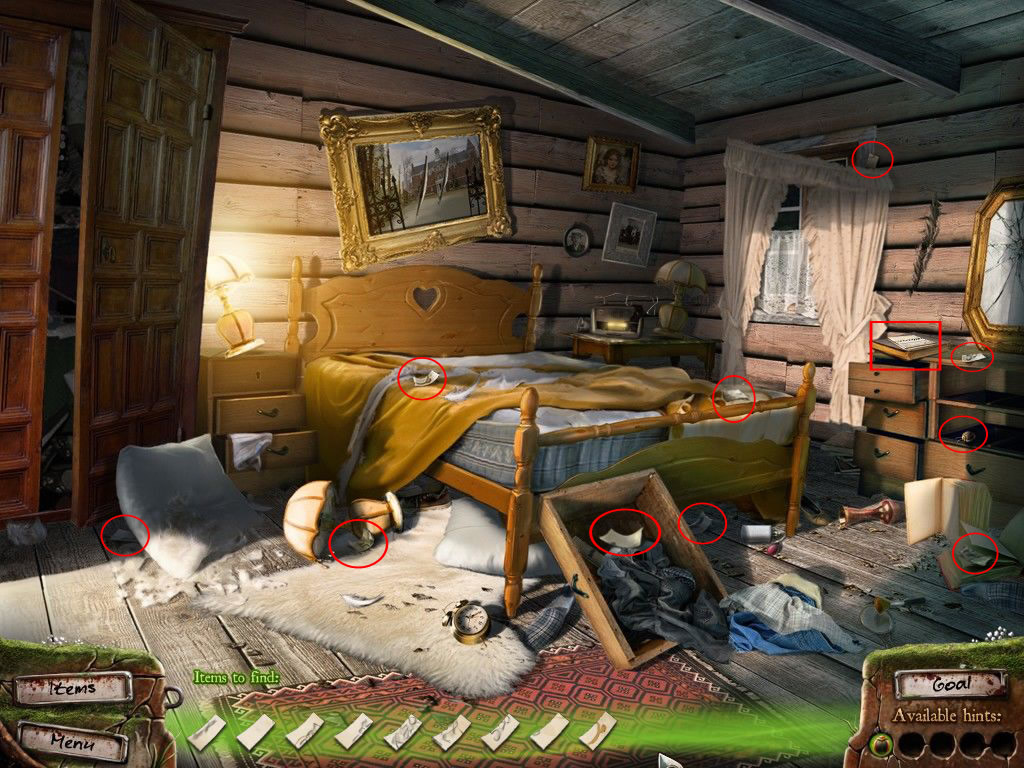
Bedroom
Click the radio next to the bed - it's broken and you will get a new search list.
Leave the house and enter the shed.
Shed
On the shelf above the table you will find the isolation tape.
Get the red pliers out of the tool box.
The clothes hanger hangs above the toolbox.
Go back to the house.
Living Room/Basement/
Left side you can click the hanging counter in the kitchen part.
You will find the radio knob on the lower shelf.
Screenshot
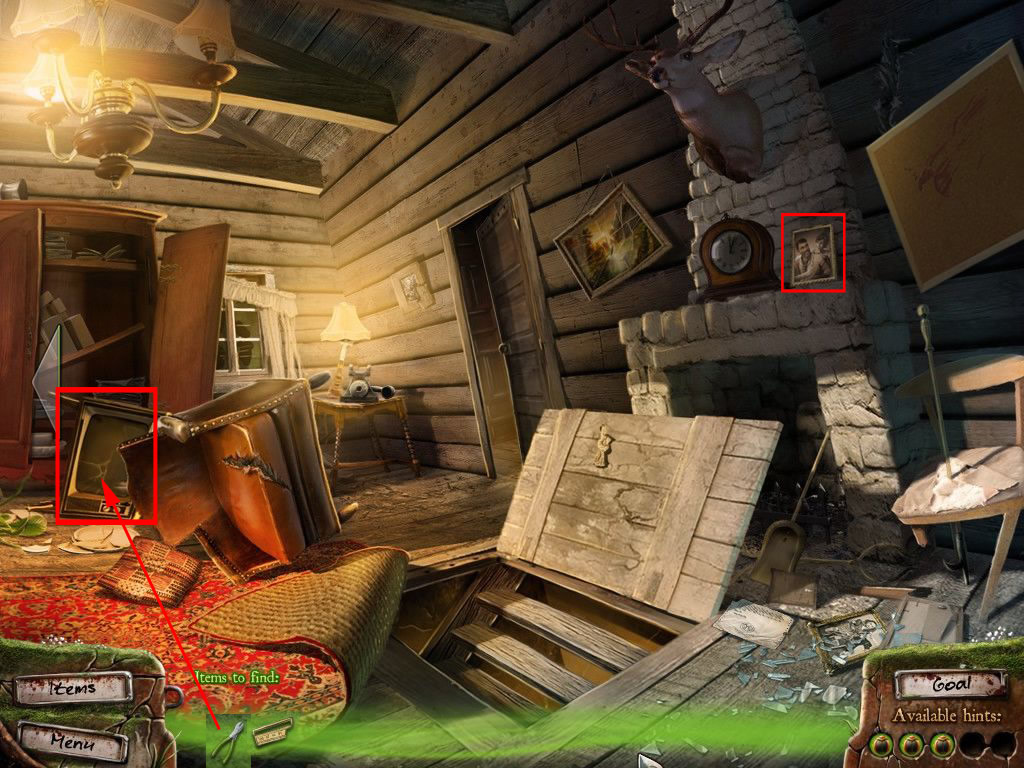
Click the television behind the the chair.
There is a little cover, click it a few times to learn, that you will need a wire cutter to get the cables.
Go down into the basement - the wire cutters lays on the ground, right side in front of the broken bottles.
Go up and click the television again - use the wire cutter to get the cables.
Click the picture on the fireplace, you will find the piece of the scale.
Click the note at the board right next to the fire place to get important radio channels.
You will find it next to radio when you click it next time.
Screenshot
Enter the bedroom.
Bedroom
Click the radio and repair it.
The cloth hanger you need to use as antenna.
Place the cable right side and fix it with the isolation tape.
Place the knob at the left and the scale part at the part, where it is missing.
Use the pliers at the right side, where also the knob is missing.
Here you find the note with the radio channels back.
You want to hear news so change the left button to FM.
Place the mouse at the pliers and move it till you changed the frequency to 100,0.
Listening to the news you decide to call the police.
Screenshot
Go back into the living and click the phone in the corner left to the bedroom door.
The phone is broken as well and you receive new search items.
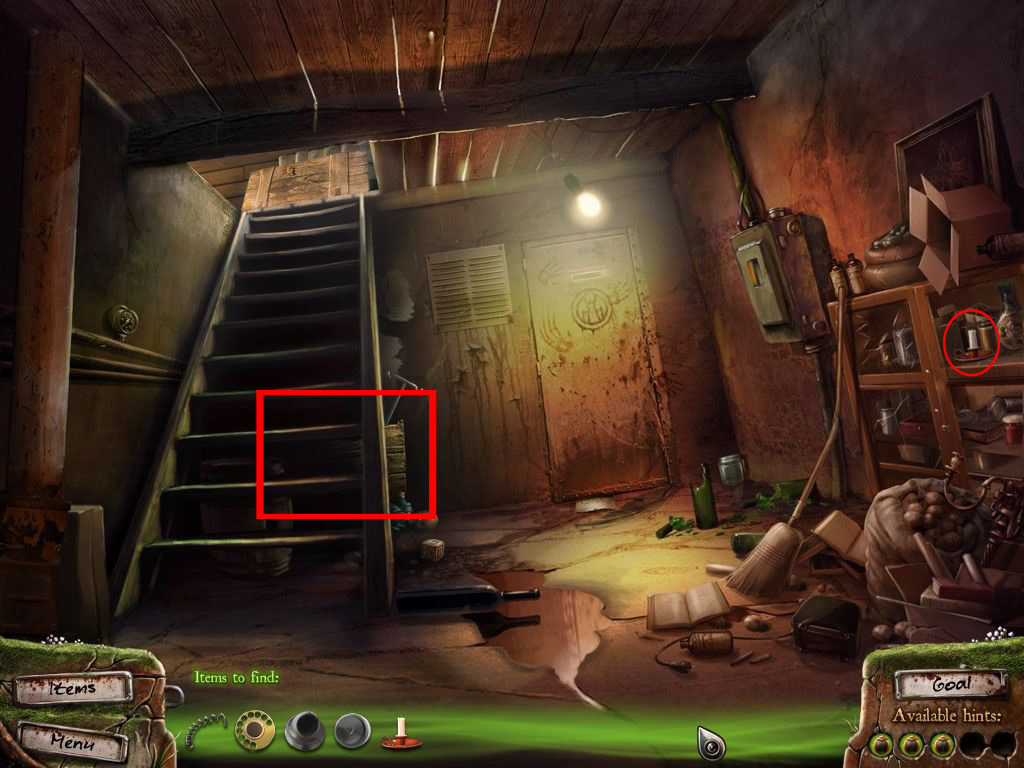
Go down in the basement.
Basement/Shed/Bedroom
Click the stairs in the upper part, but its to dark.
Get the candle from the shelf right side.
Screenshot
You will need matches, go upstairs and click the top kitchen counter.
Grab the matches from the upper shelf.
You will also find the ear piece in there.
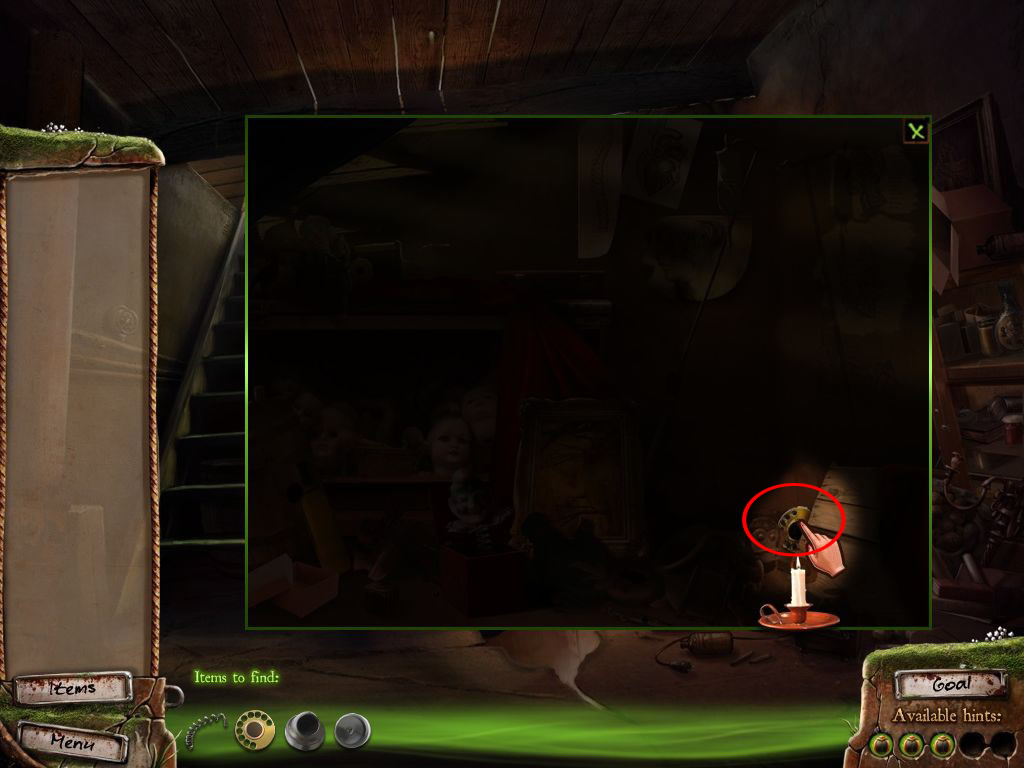
Go back into basement and click the now burning candle at the lower part of the stairs.
You will find the telephone dial.
Screenshot
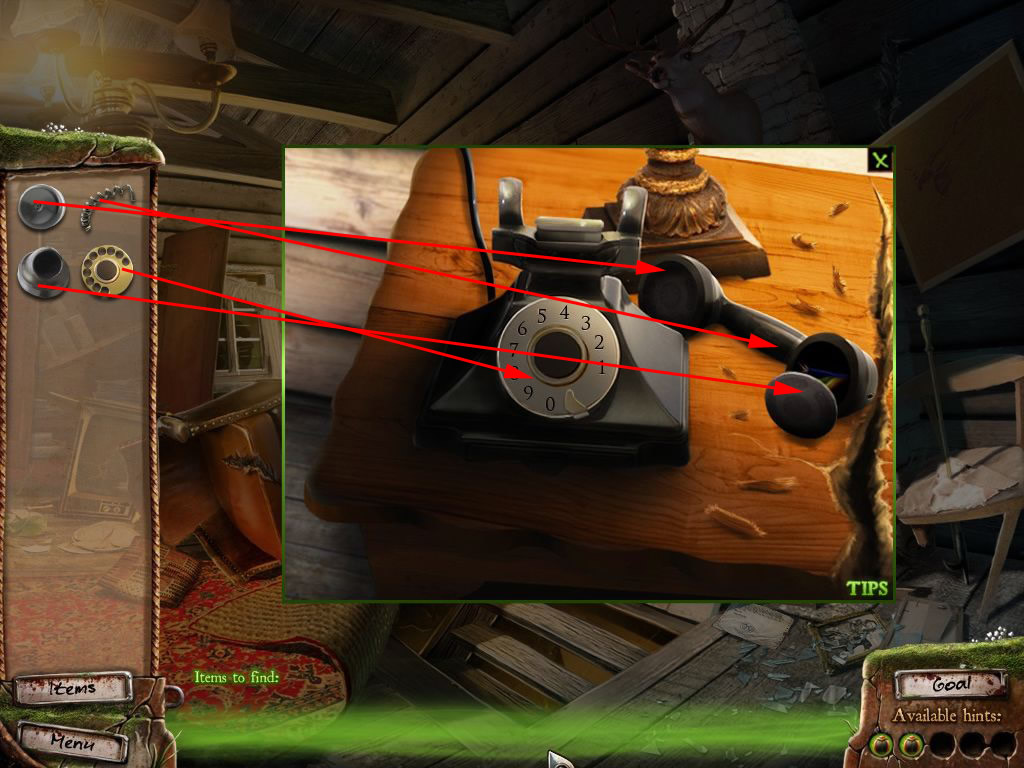
Go into the bedroom and get the cord out of the open drawer far middle.
Leave the house and enter the shed.
Click the table drawer to find the receiver and return to the living.
Living room/Bedroom
Click the telephone and place first the dial, then ear piece and receiver at the appropriate places.
Click the cord at the receiver.
Screenshot
Now the phone is working, but you will need a telephone number.
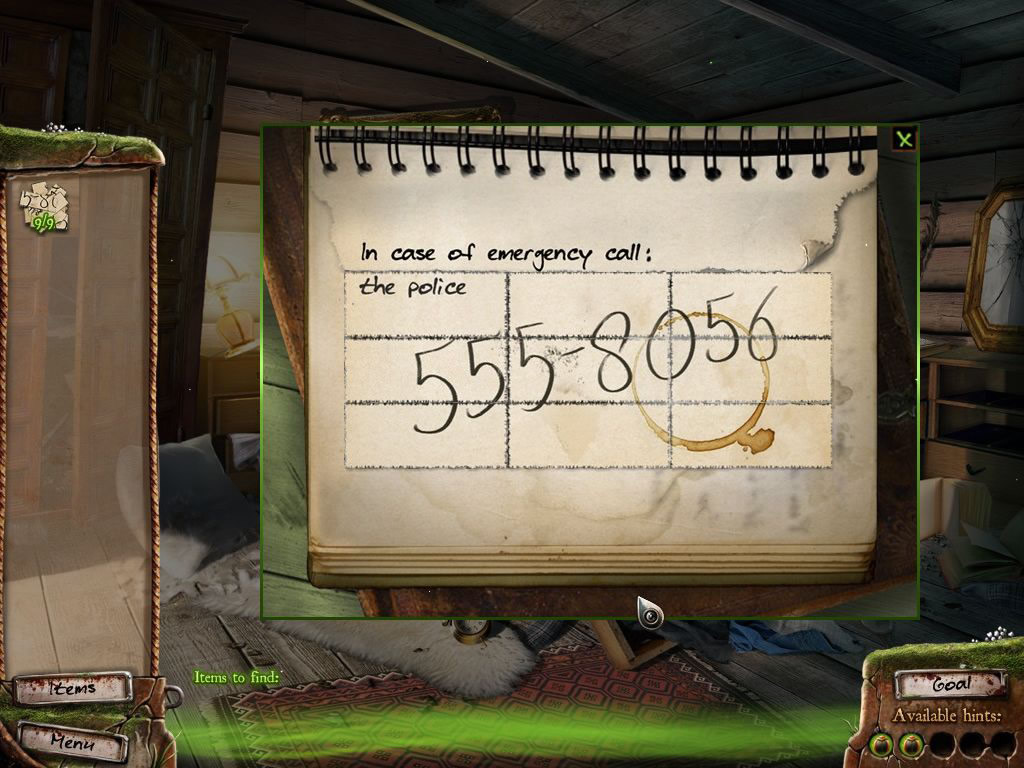
Go back into the bedroom and click the note book on top of the drawer.
You will have to find all paper scraps - there are all in this room.
Screenshot
Click the notebook again and place the srcaps onto it.
You will have to reassemble the note.
Clicking two of the paper stripes will make them swap places
Screenshot
Go back into the living and click the phone.
The number will lay next to it.
Dial the number.
You will see a cut scene.
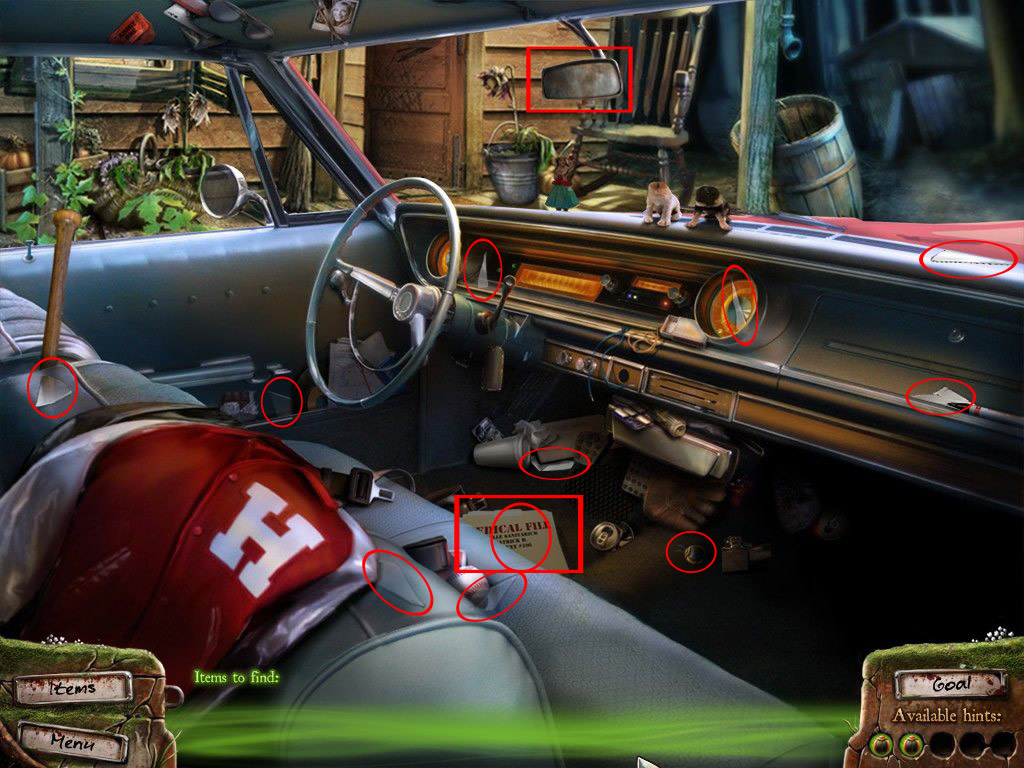
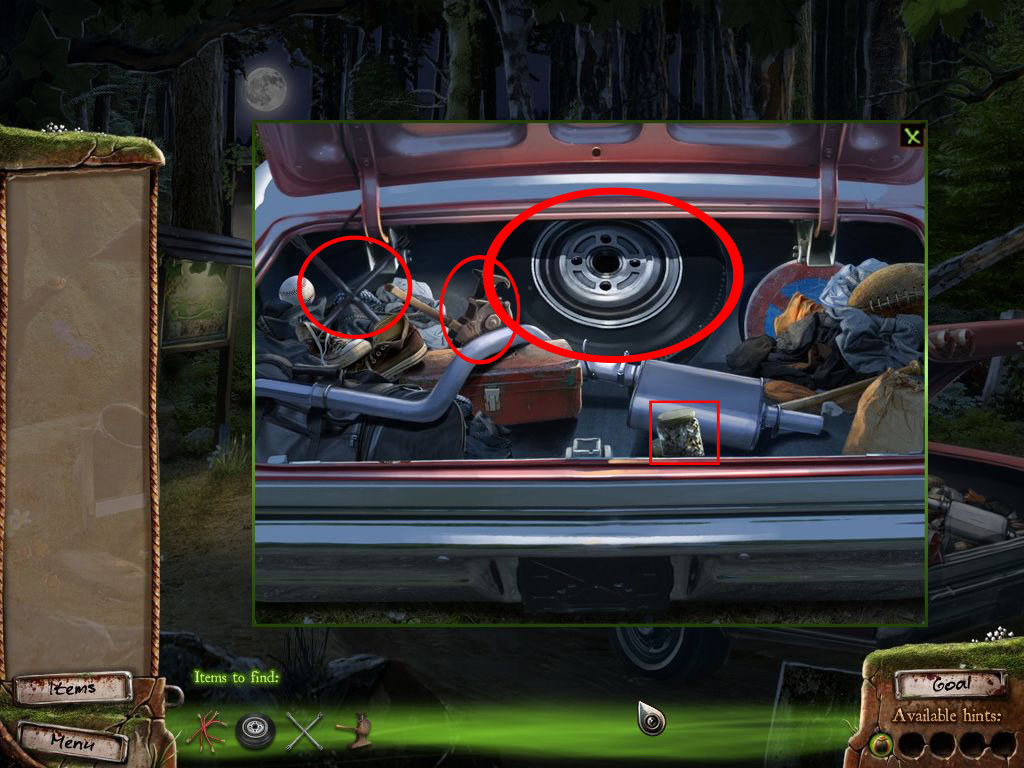
Car
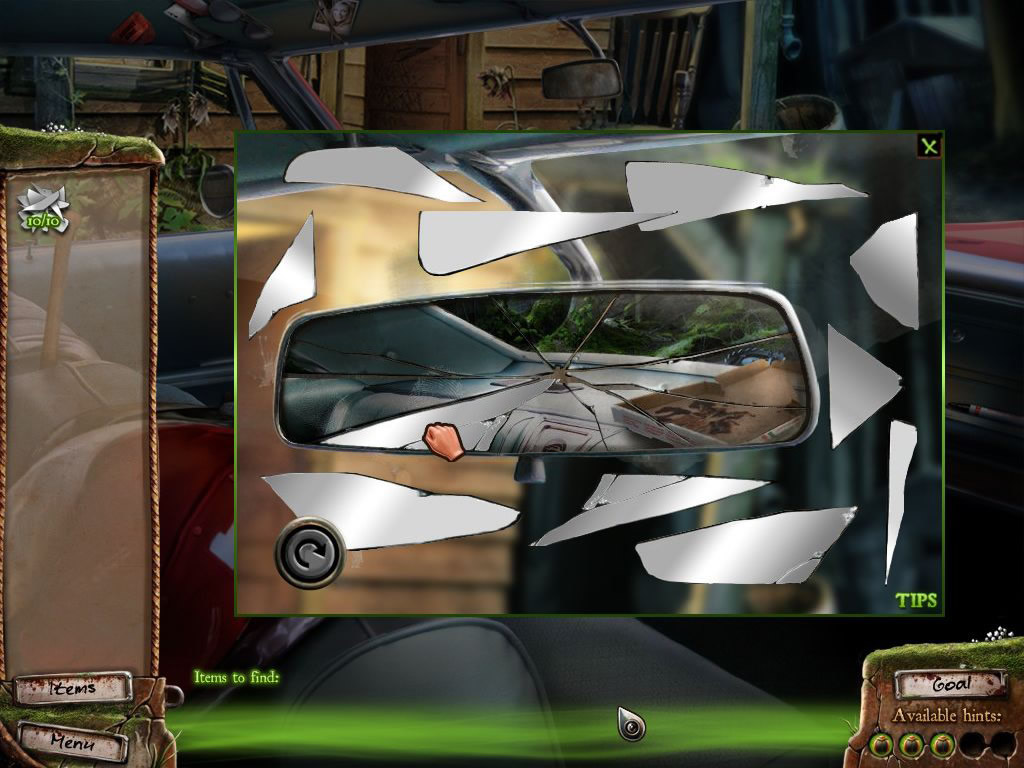
Click the rear mirror and find the mirror shards.
One shard you will find in the file on the floor of the driver's side.
Screenshot
Click the mirror again and place the shards on it.
Reassemble the mirror. Right click will turn the shards.
A right place shard will lock and show, what's to see in the back.
Screenshot
A cut scene follows.
Forrest
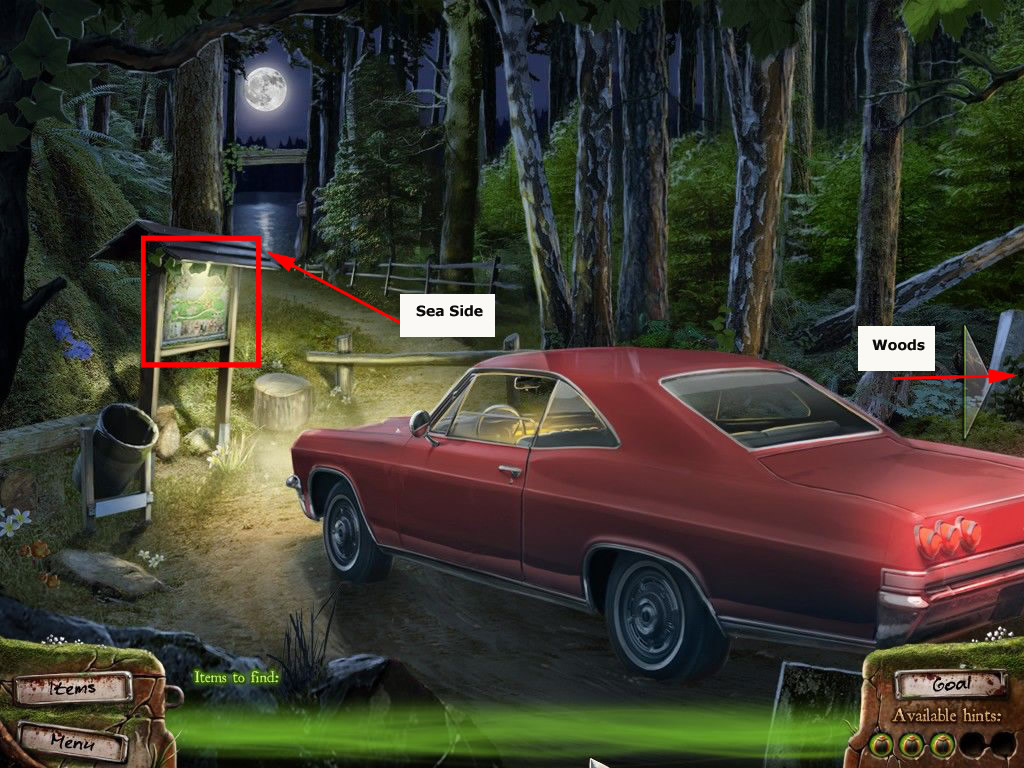
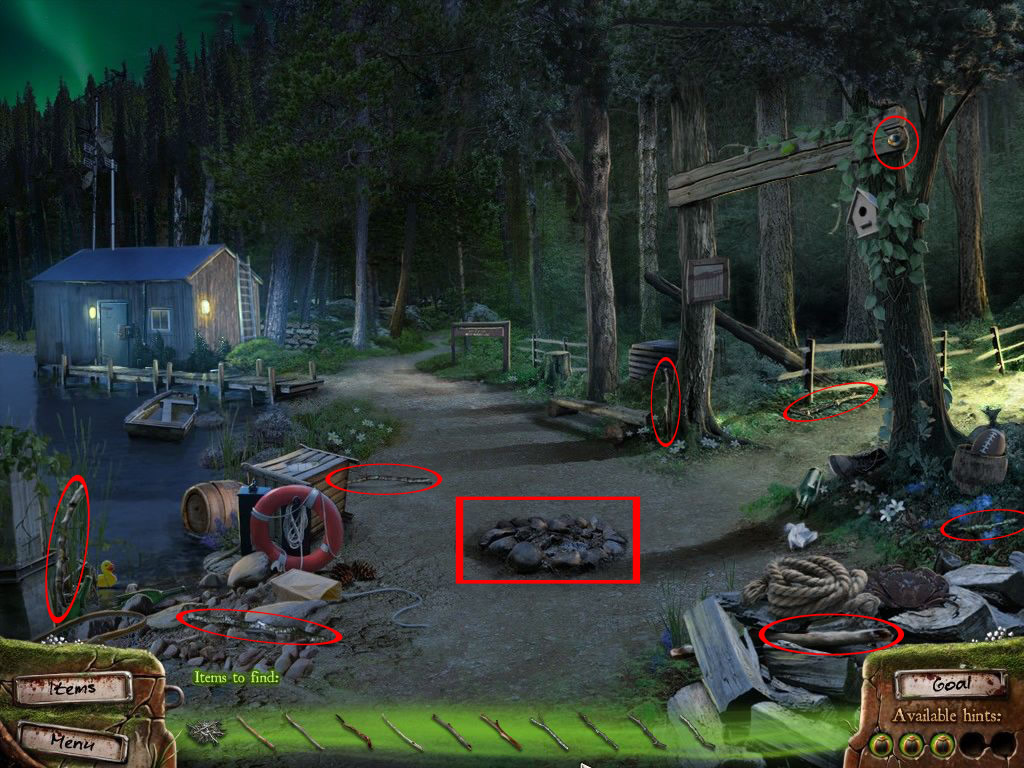
Car/Sea Side
Click the map at the right and go down to the sea side.
Screenshot
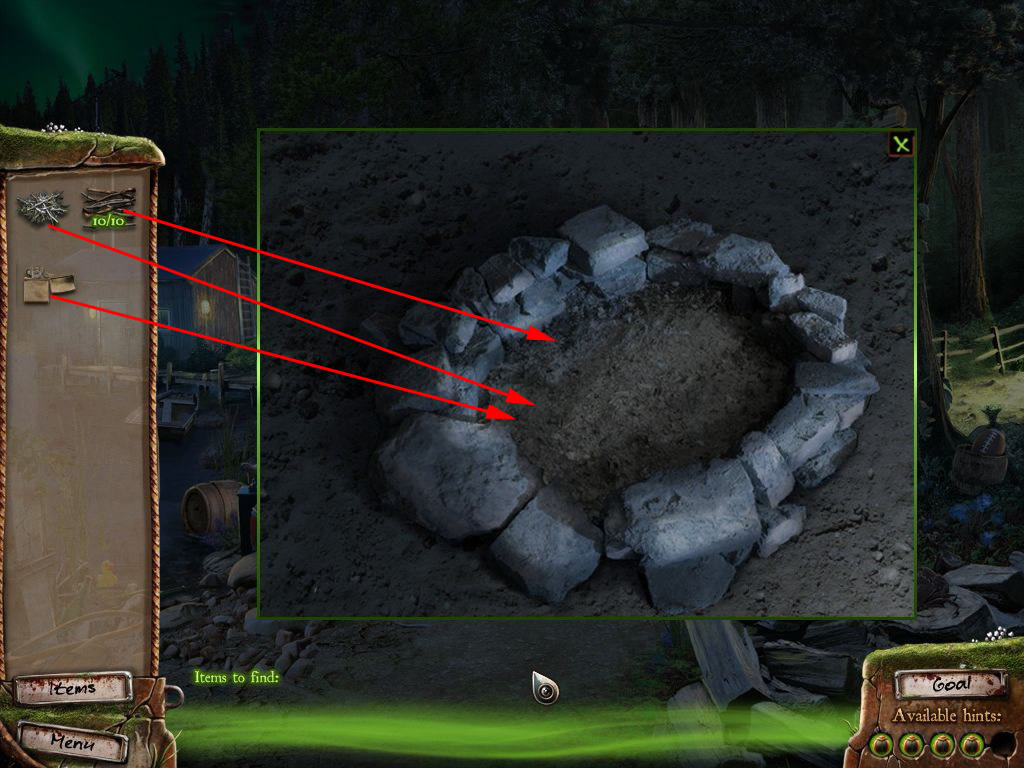
Click the fire pit - you will need fire woods.
Most of it you will find around, but also click the door of the boat house.
Also click the boat house lock.
Screenshot
Screenshot
Now you need kindle wood, you will find in the woods.
Go straight ahead.
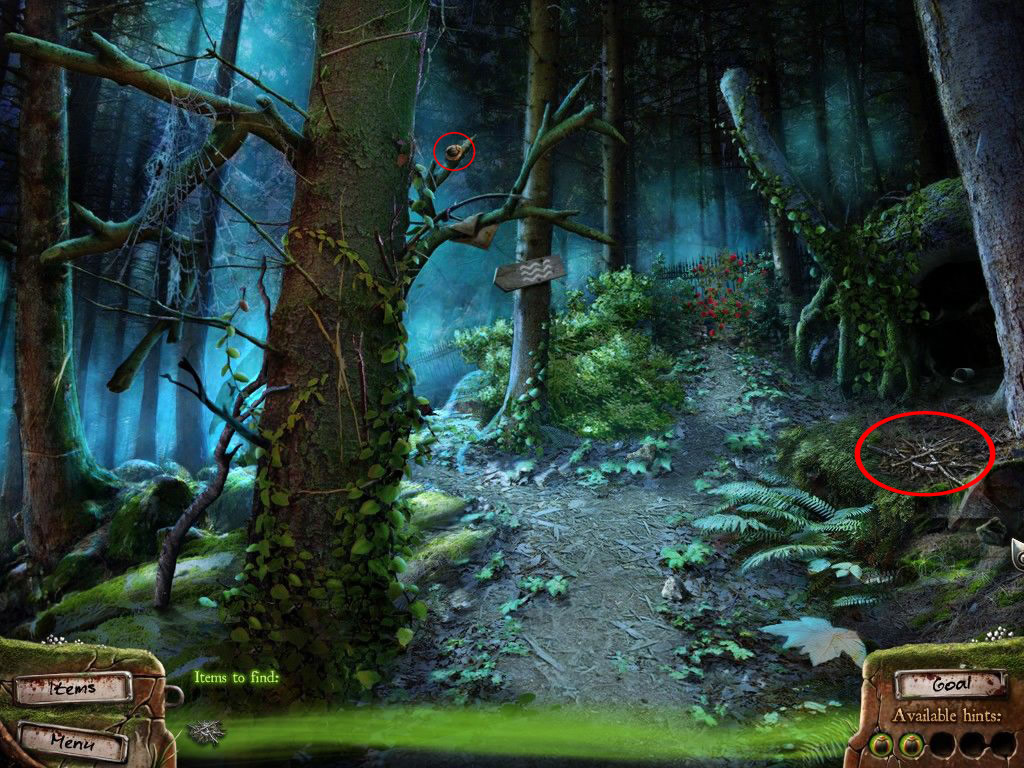
Woods
This is kind of loop road, clicking at the bottom of the screen will bring you back to the car, to the left you will reach the sea side.
Click the kindle wood low right corner to activate a mini-game.
You need to always pick up the top twig or leaf, so one that is not in any way covered by something else.
Screenshot
You will meet a lynx.
Go back to the sea side.
Sea Side
Click the fire pit and place the wood there.
Now you need a lighter.
Go back to the car and click it.
You will find the lighter on the floor right side of the car.
Go back and use the light make a nice fire.
Screenshot
A cut scene follows.
Car
Click the open hood of the car.
Click the ripped cables and the cover of the cooling.
Screenshot
You will need to find the cables and a cloth.
Go into the woods, the cloth will hang over the branch above the "water sign"
Back to the car - use the cloth to open the cooler lid.
Now you need a tin can as water container.
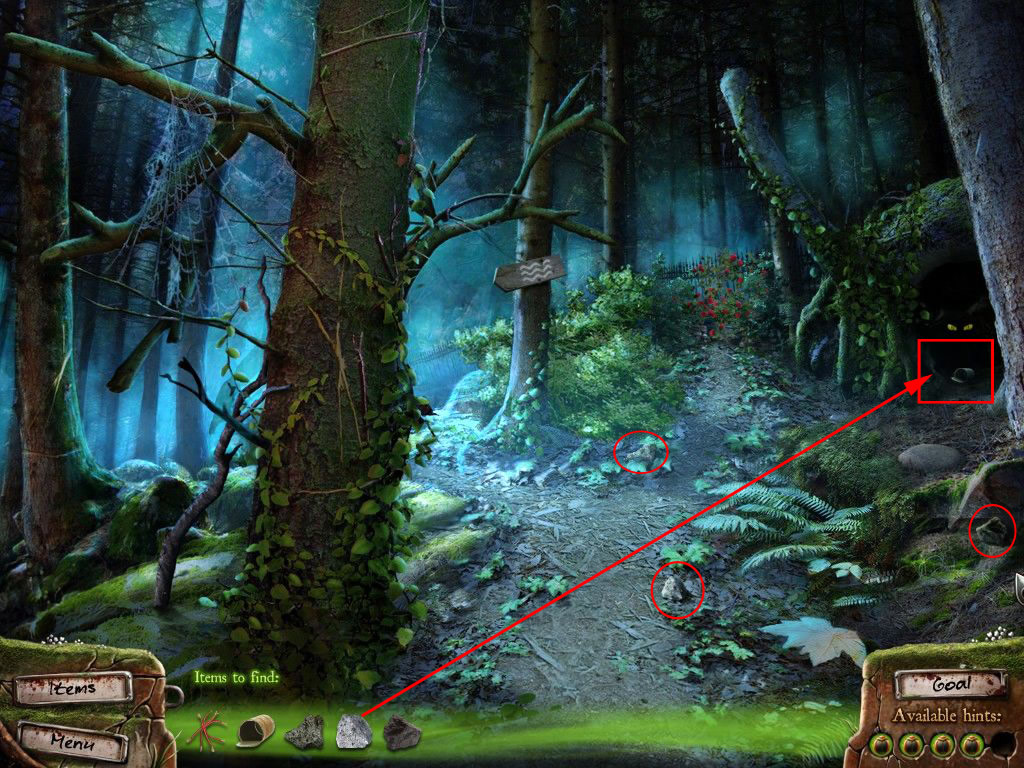
Back into the woods.
Click the little cave with the lynx far right.
Click the can, you will need stones to lure the lynx out of the cave.
Leave the nearby view and pick up the stones in the woods:
One you will find low right corner, at the roots of the trees, one on the foot walk, right side and on right side at the crossing to the sea side.
Click the cave and throw the stones onto the lynx - after the third one, he will disappear.
Get the tin can and use the way to the sea side.
Screenshot
Fill the tin can with water at the place with the yellow rubber duck.
Go back to the car and fill the water into the cooling system.
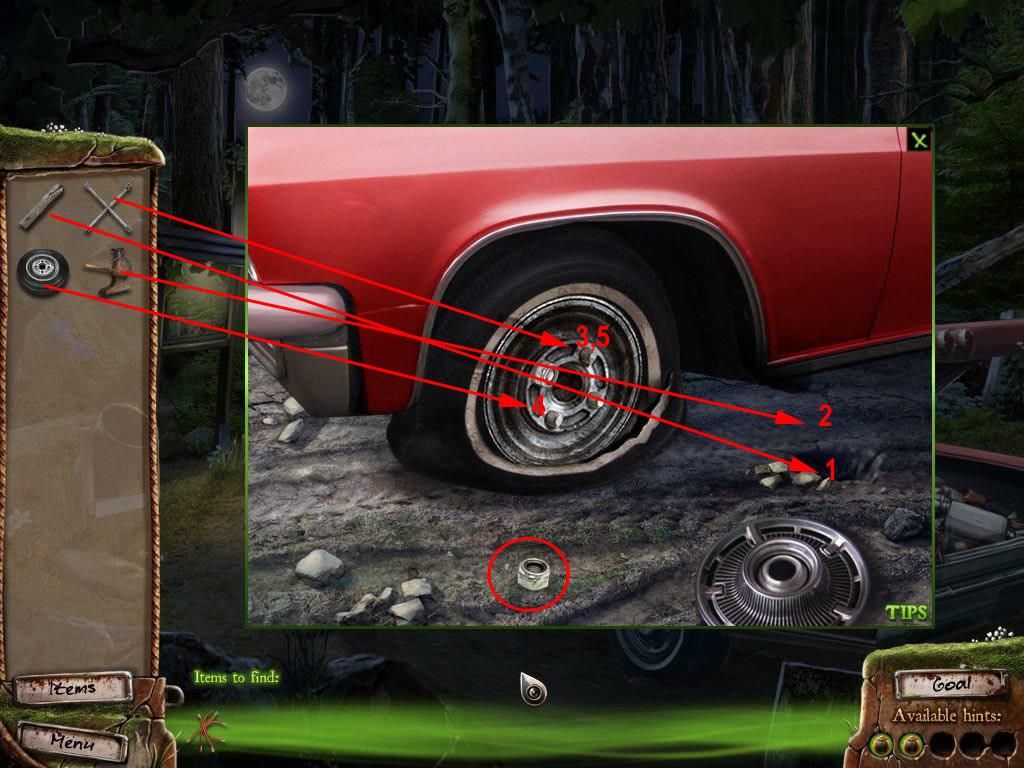
Now click the flat front tire - a new search list appears.
Click the car's trunk and then the lock - its closed, you will need a key, that's supposed to be in the glove compartment.
It is also locked.
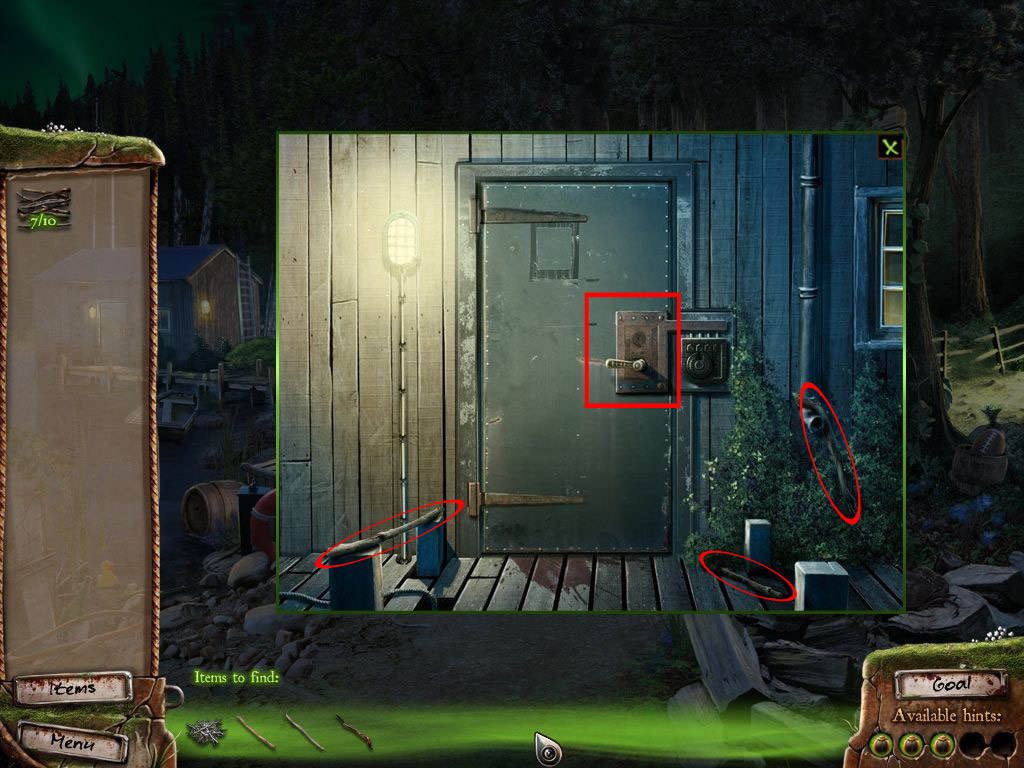
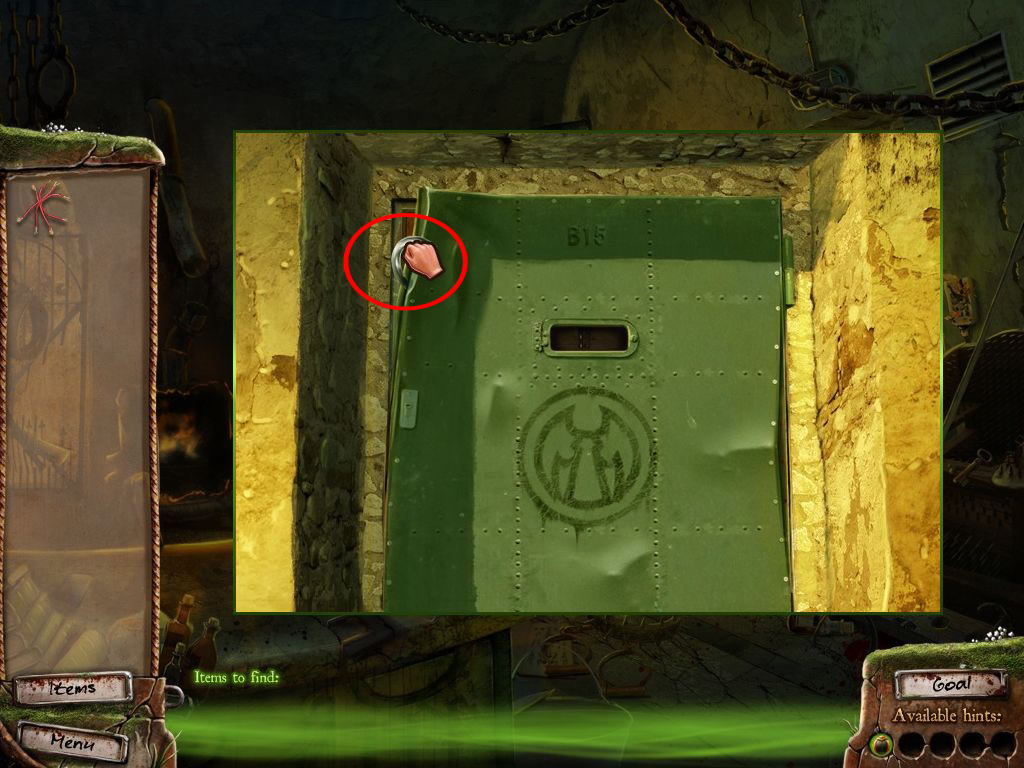
Go down to the boat house.
Boat House-Outside
Click first the boat house, then the lock.
You will need to solve the puzzle to open the door.
You see numbers, 1-4, all upside down.
Your goal is it, to place the numbers at their right place on the top, standing correct.
A number at the right place will activate a green light above.
There is a gear in the middle with a little bulge right side, when you start the game, it is exactly underneath the 2.
This will allow you to transport the numbers
The red button on the bottom allows you to restart.
Click the gear to move it.
Push the 4 into the bulg - move the gear to the top and push the 4 into the right corner.
Move the gear to the right and push the 3 into the bulge.
Push the 2 next to the 3 and the 4 above the 2
The 1 stays at it's place.
Move the gear to the top and push the 3 in the right corner.
Move the gear to the right and push the 2 into the bulge.
Push the 4 complete to the bottom and the 3 next to the 2.
Move the gear to the top and push the 2 into the right corner.
Push the 3 up, below the 2.
Move the gear to the right, get the 4 up and push it into the bulge.
Push the 3 completely down and the 2 above the 3.
The goes in the right upper corner - the green lamp is highlighted.
Move the gear to the top, push the 4 into the left corner - the green lamp is highlighted.
Move the gear to the right, push the 2 inside the bulge.
Move the gear to the top and push the 2 to the right - the green lamp is highlighted
Move the gear one more time to the right, push the 1 into the bulge, move it up and push it on the last empty space.
The door is open, you can enter.
Screenshot
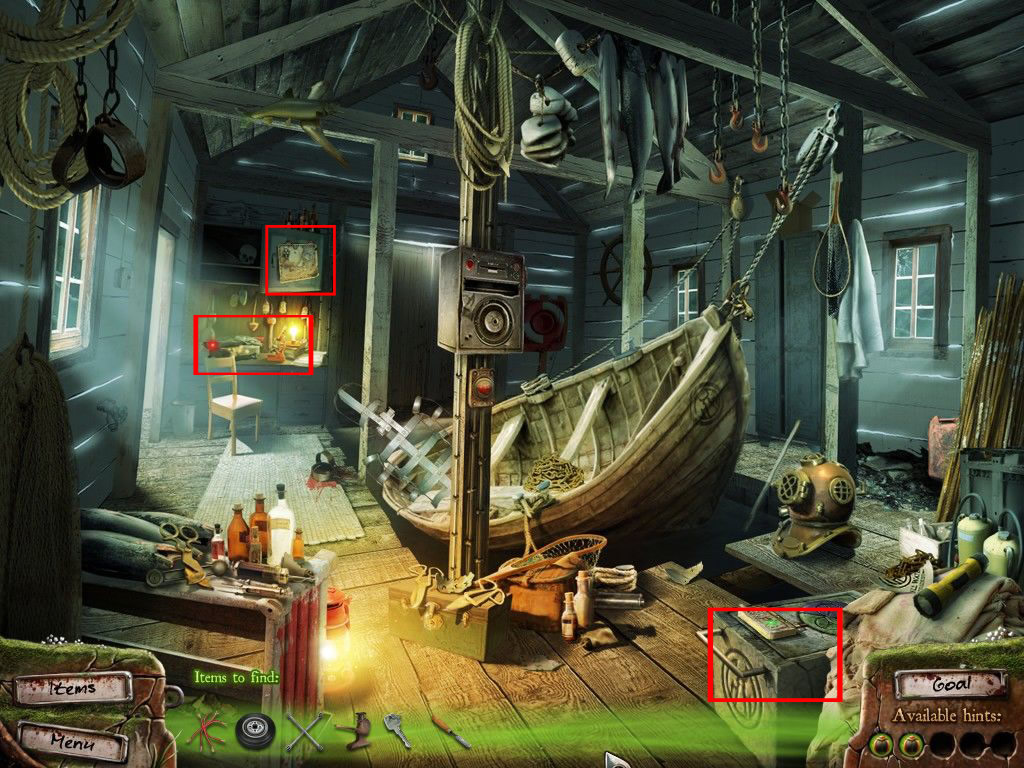
Boat House-Inside
Find the needed items.
Click also the map far left at the wall to have a look.
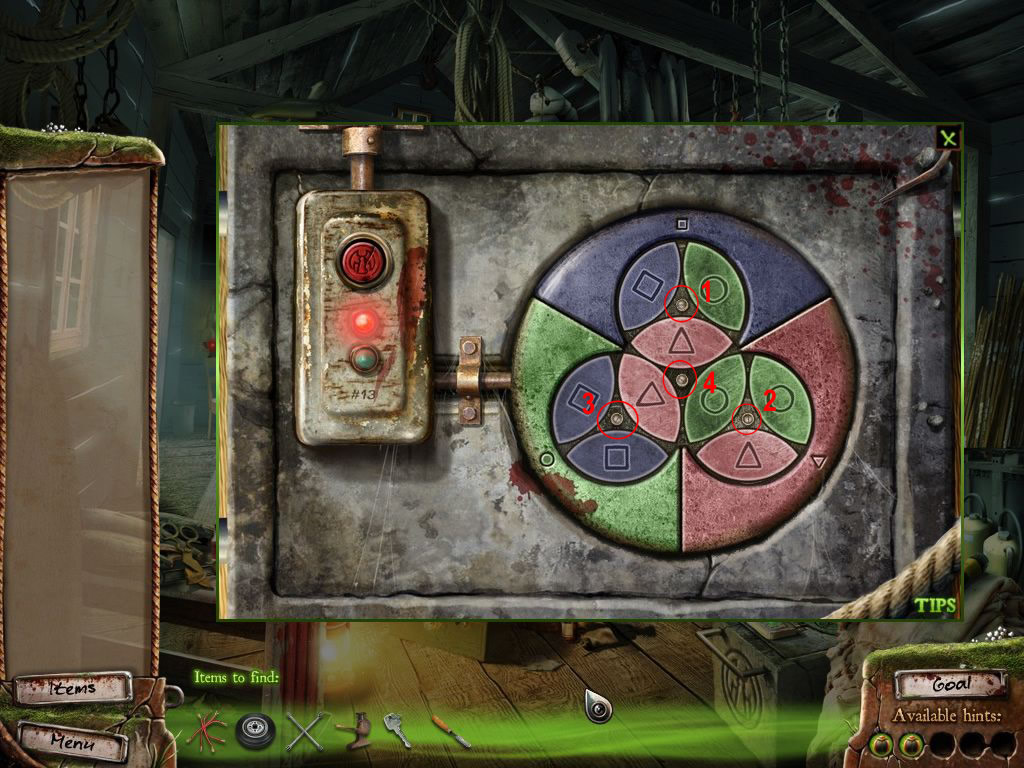
To open the trunk lower right you will have to solve a puzzle.
You can see four circles with each 3 colored shapes inside.
Your goal is it, to rotate the 4 different circles to match all colors.
To rotate the circles, you need to click the small button in the middle of each circle.
With the red button, you can restart the puzzle from the original positions.
I numbered the circles starting with the top clockwise from 1-3, the middle one is 4
Click:
1x 3
1x 4
1x 1
1x 3
2x 4
1x 3
1x 4
2x 2
1x 4
Screenshot
You see burnt stuff, obviously from a woman, but there is nothing else to do so close with the x top right.
Click the far left to see a punch card machine.
Low left corner of the machine you will find a chisel.
Screenshot
Close the window and go back to the car.
Car
Get into the car and click the glove compartment.
Use the chisel to open the lock.
You will find the key in the middle of the compartment.
Screenshot
Get out and use the key to open the trunk.
Grab the spare tire, the tire jack and the lug wrench.
Screenshot
Click the flat front tire, place the tire jack and click it a few time.
You will need a plank - turn to the right, there is one leaning at the tree right side.
Click the flat tire again and place the plank on the hole in the ground.
Place the tire jack on it and click it 3 times (with the fourth click, it will go down again).
Use the lug wrench with the screws - and place the new tire.
You will need bolts - one you will find right in front of the tire.
Screenshot
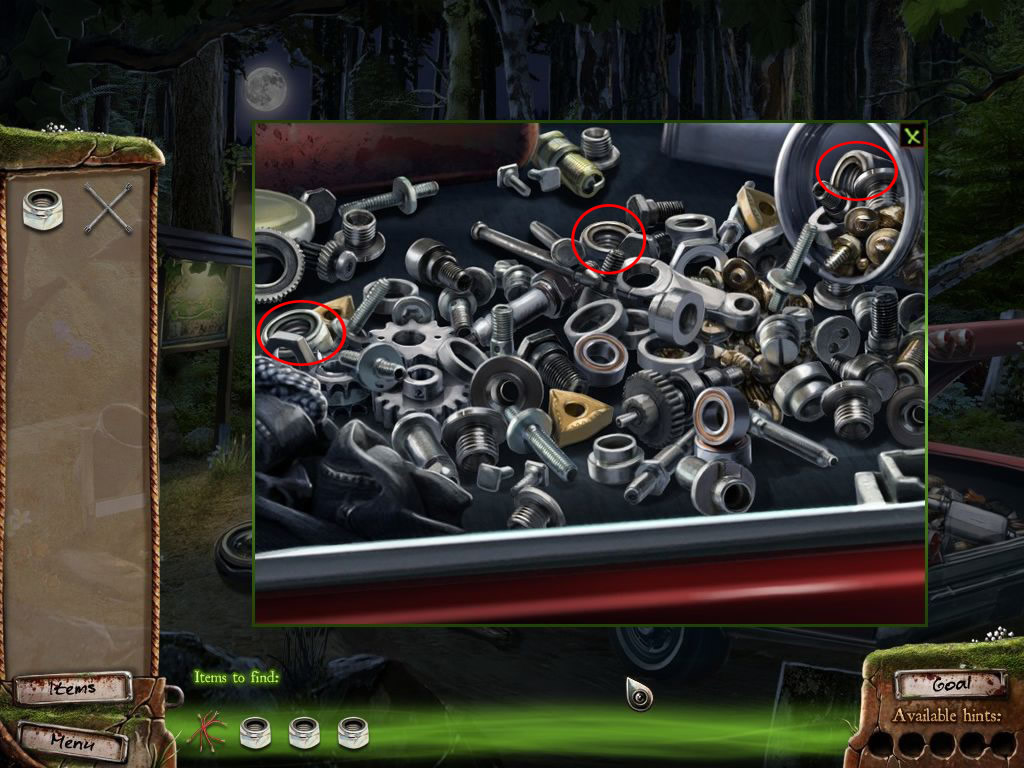
To find the rest, click the car's trunk.
Click the glass at the bottom. It will fall, click it again and look for the three missing bolts.
Screenshot
Go back to the tire, place the bolts and use the lug wrench.
Go back to the sea side to look for Patrick, look in the woods and finally enter the boat house.
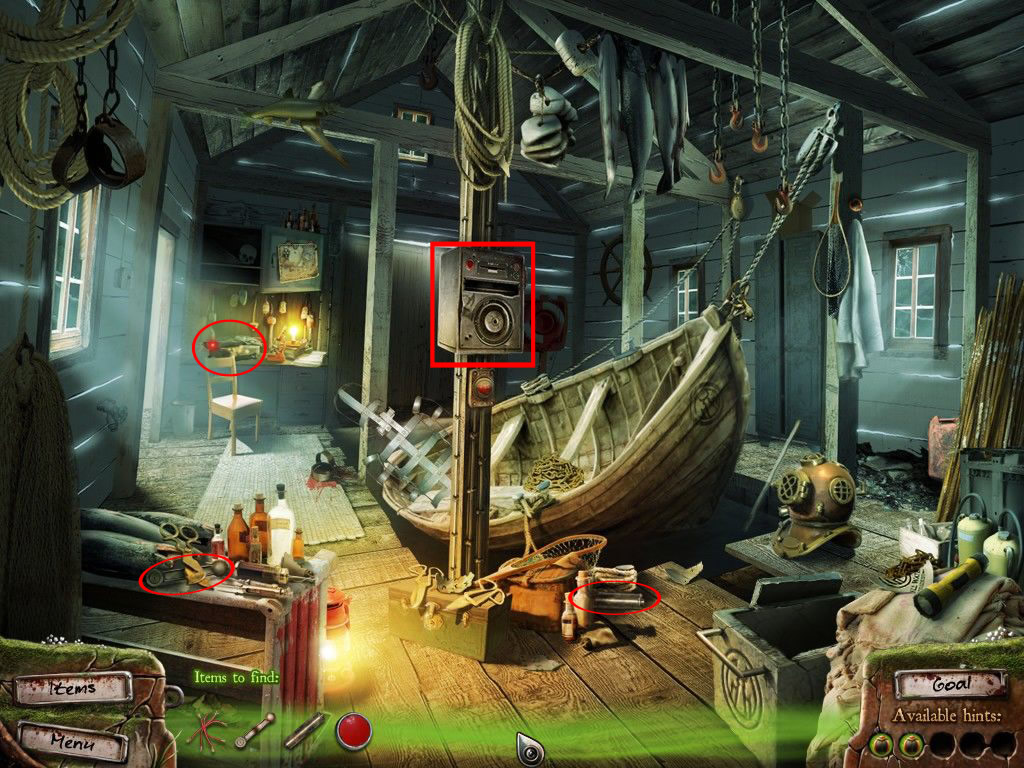
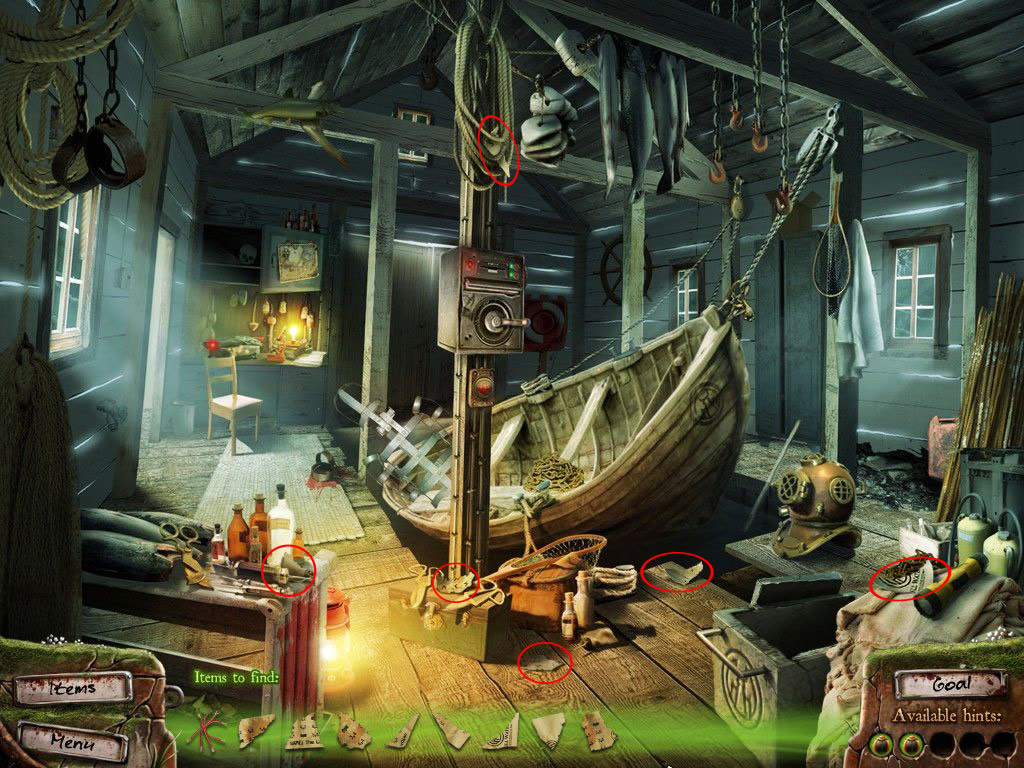
Boat House
The decoder at the wooden beam is blinking.
Click it to get new search items.
The red knob you will find far left on the table.
Look for the other items, it is all inside the boat house
Screenshot
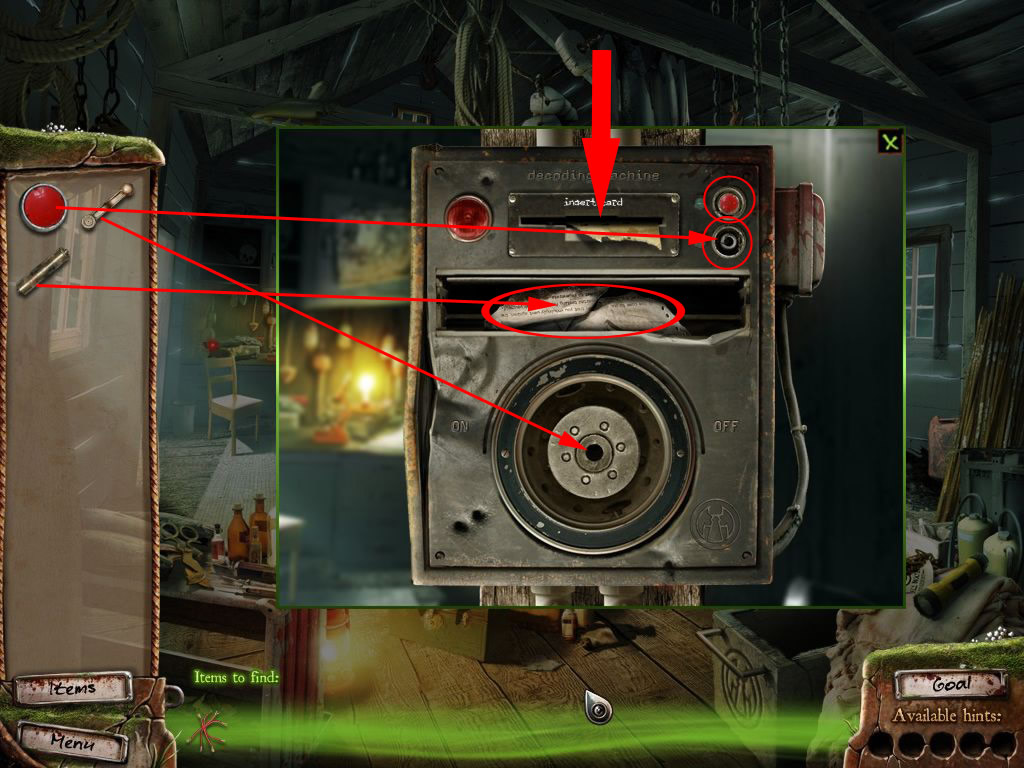
Click the decoder and place the missing parts.
Before you place the scroll, get out the part of the memo.
Click the both red buttons to start.
Click the lever to learn, that the decoder needs a punch card.
Click the half ripped one you see at the top.
Screenshot
Find the missing parts of the card.
Two of them you will find at the punch card machine far left.
Screenshot
Screenshot
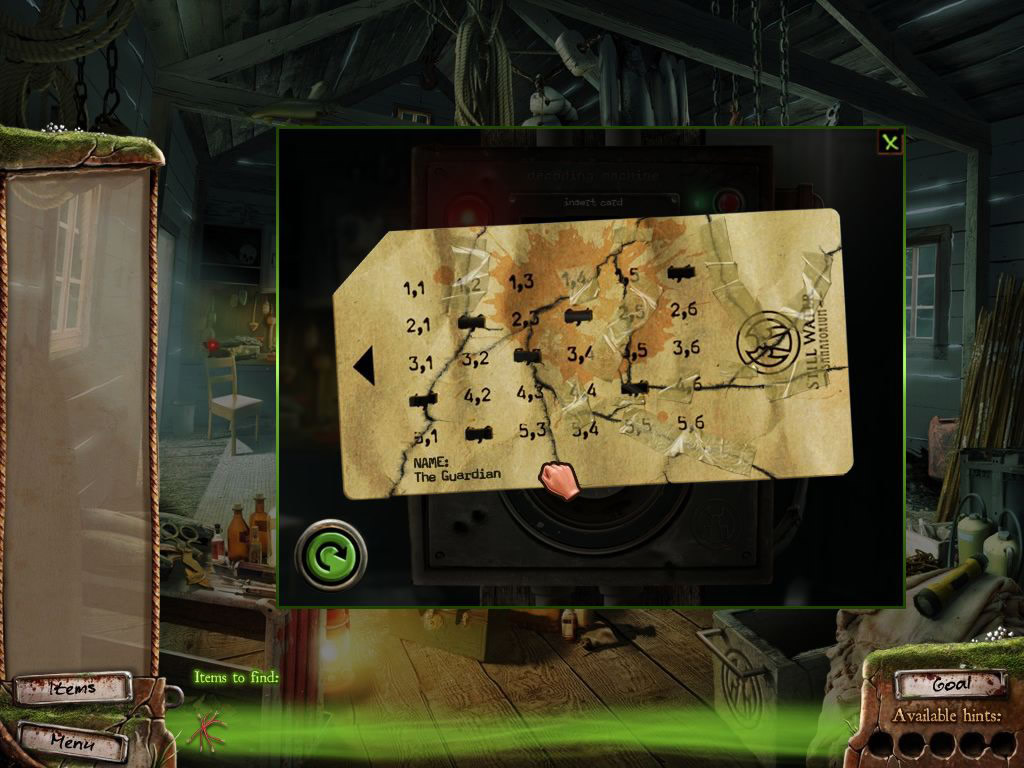
When you find all click the decoder and place the paper scraps on the top slot.
You will have to reassemble the punch card.
Pick up and place them with left click, to turn them use right click.
Screenshot
Click the memo coming out and then the punch card machine far left.
The card is stuck, you need to get it out.
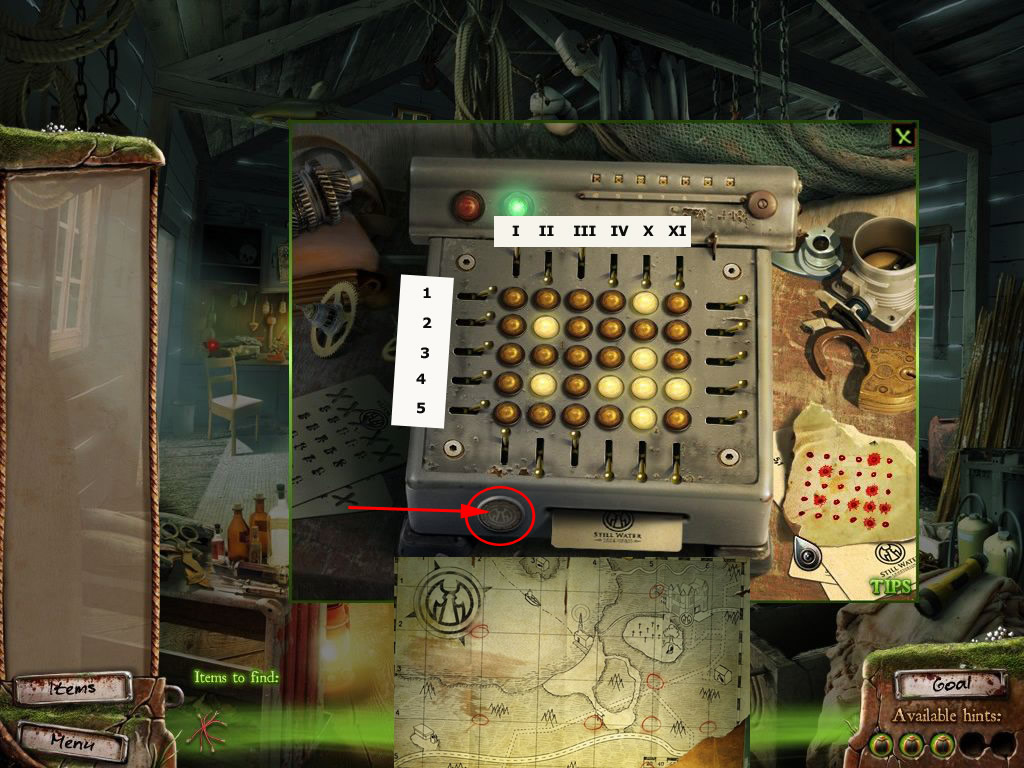
Look at the map on top of the
It shows, which lamps have to be highlighted.
Same does the paper right next to the machine.
To highlight the lamps, you will need to use the switches.
I numbered the switches left side from top to bottom 1-5 and the switches on top from left to right I - VI
Click the switches in the following order:
1,2, 3, 4, 5, 6, II, IV, V, VI
When the green lamp on top is burning, click the button at low left part of the machine.
Screenshot
Grab the card.
Click the recorded and place the card at the slot on top.
Use the lever and get the memo at the bottom.
To find the secret entrance, go into the woods.
Read the memo left side on the ground.
Click the rosebushes a few times to get rid of them.
Walk over the cemetery and enter the crypt.
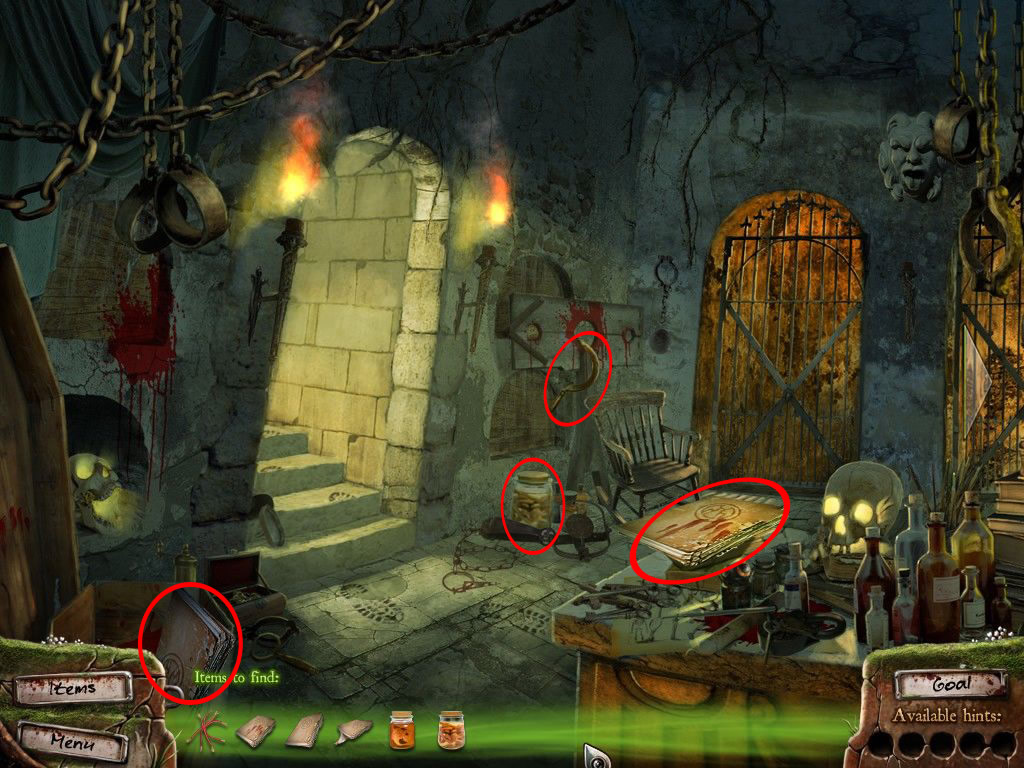
Crypt
Turn to the right.
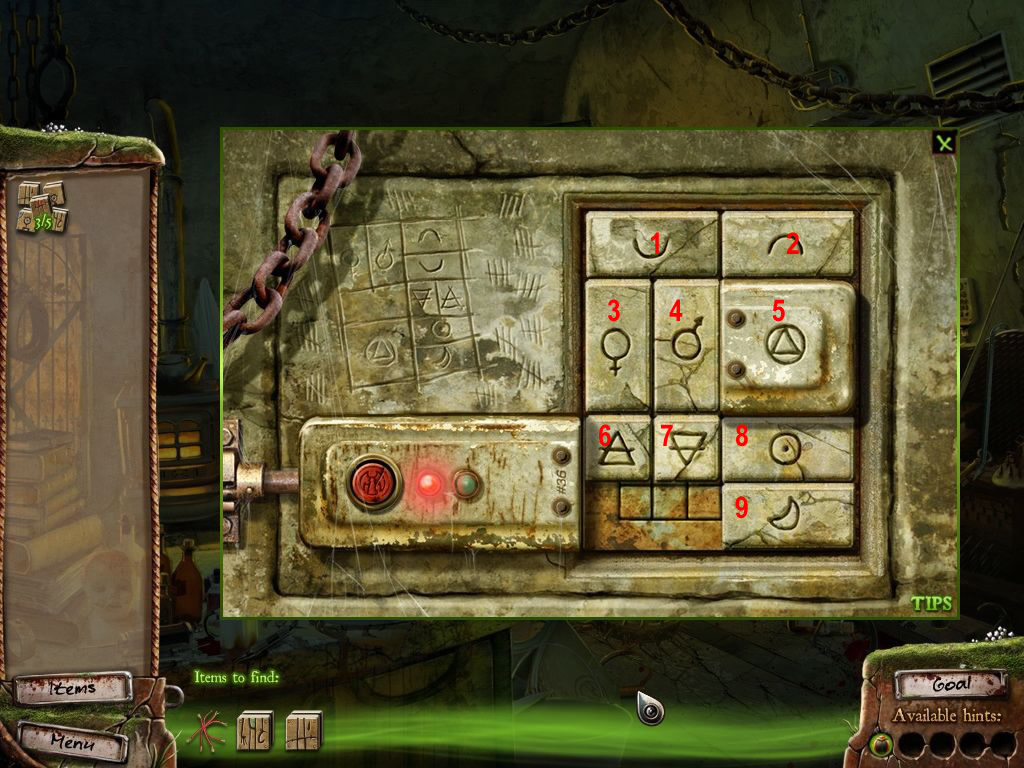
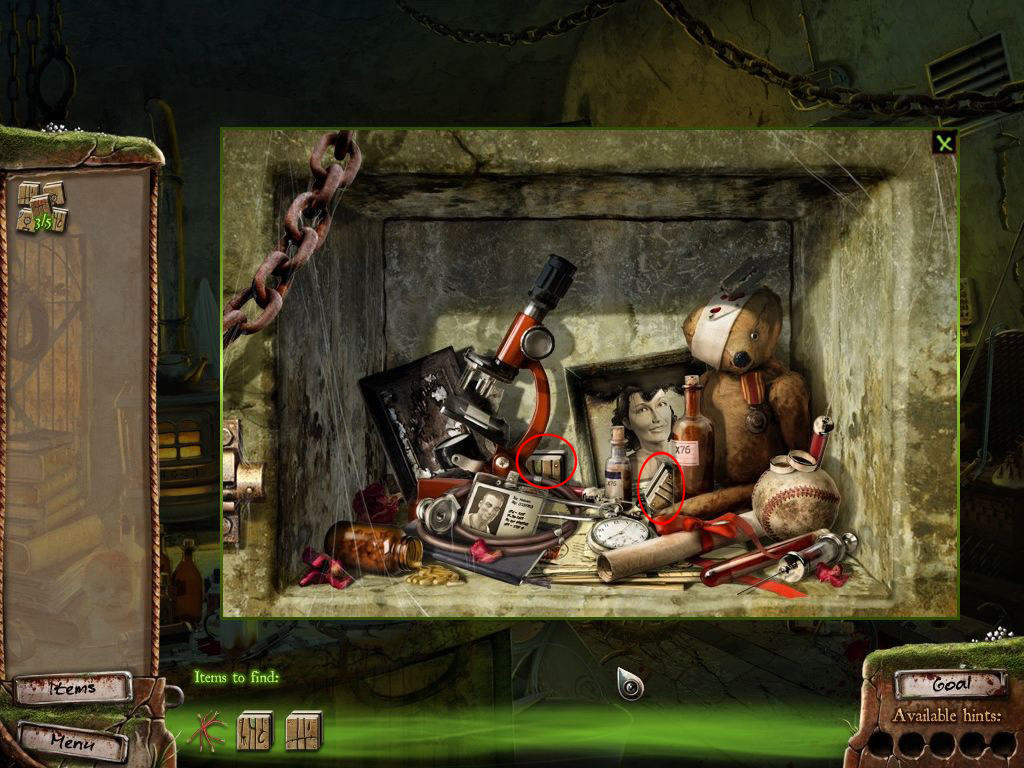
You will find a medical file about your self at the wall compartment.
Next to it you see a puzzle, when you click it your learn, that a stone is missing.
You will need to find it.
Click puzzle left above this one and learn, that you will need to find parts for it as well.
Click the crate at you left.
Leave the crypt and go back to the boat house.
Screenshot
Boat House
Click the trunk at the right and find two of the missing stones.
Screenshot
Go back to the crypt.
Crypt
Click the first puzzle, where only one part was missing and place the purple shape.
It is the same kind of puzzle as you made to open the trunk.
I numbered the circles from top clockwise 1 - 3 and the one in the middle with 4.
Click:
2x 1
1x 2
2x 4
1x 1
1x 3
1x 2
1x 4
1x 3
2x 4
1x 2
1x 4
1x 2
Screenshot
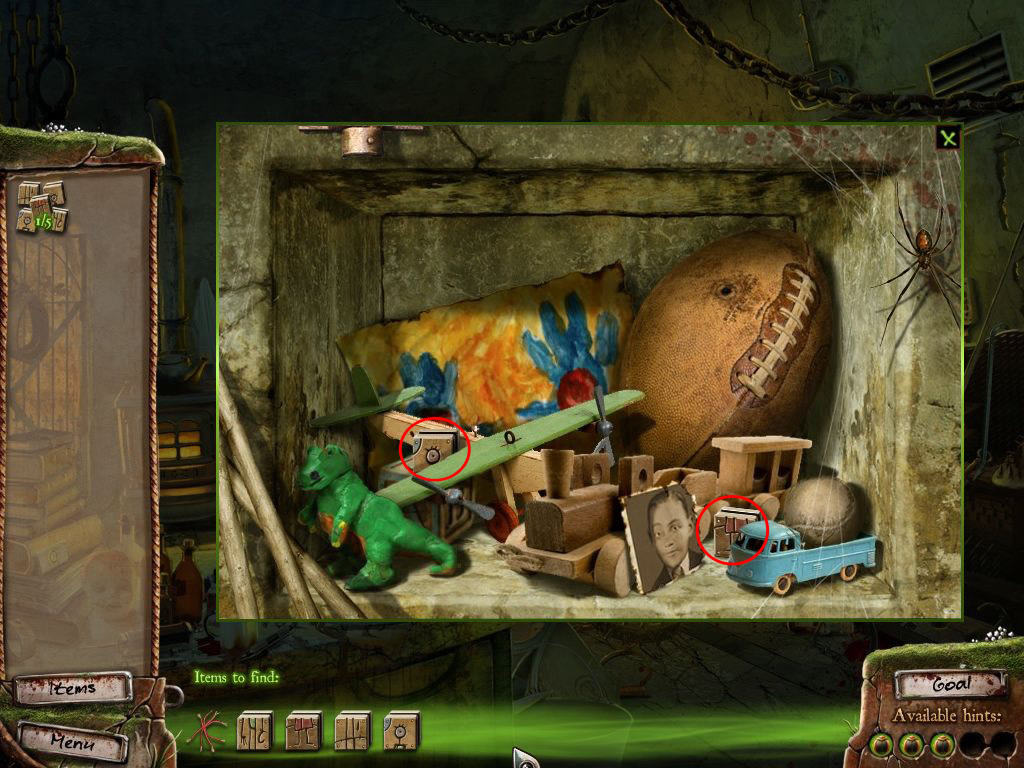
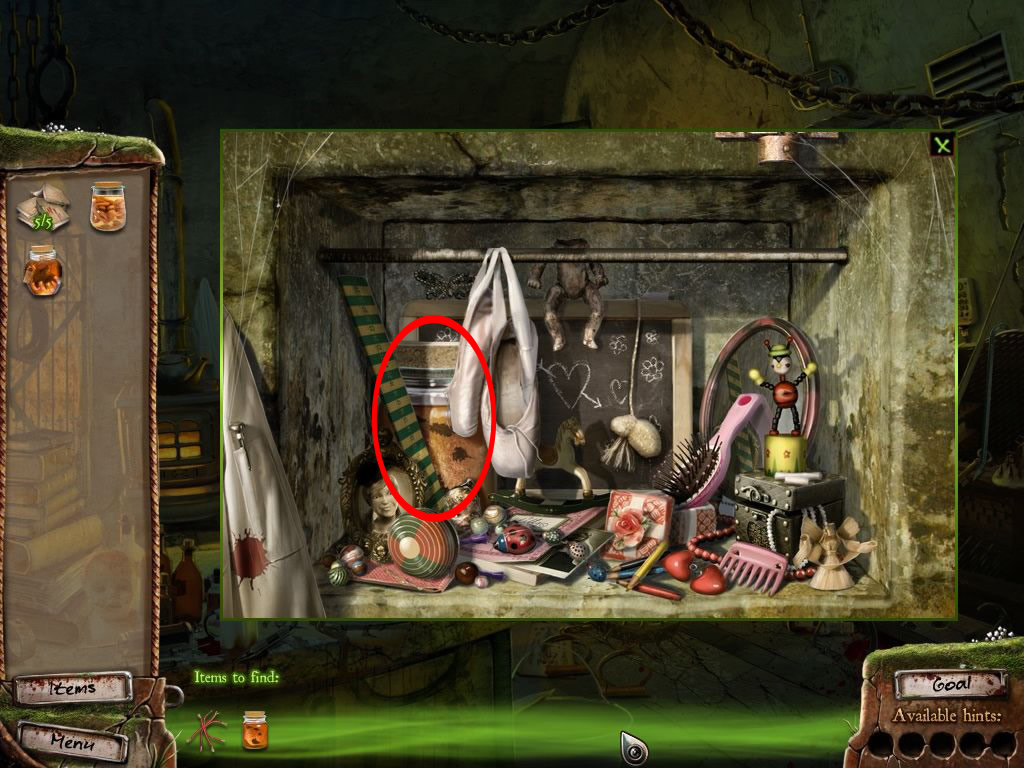
The lock opens and you will find things belonging to a boy.
Grab the two needed stones
Screenshot
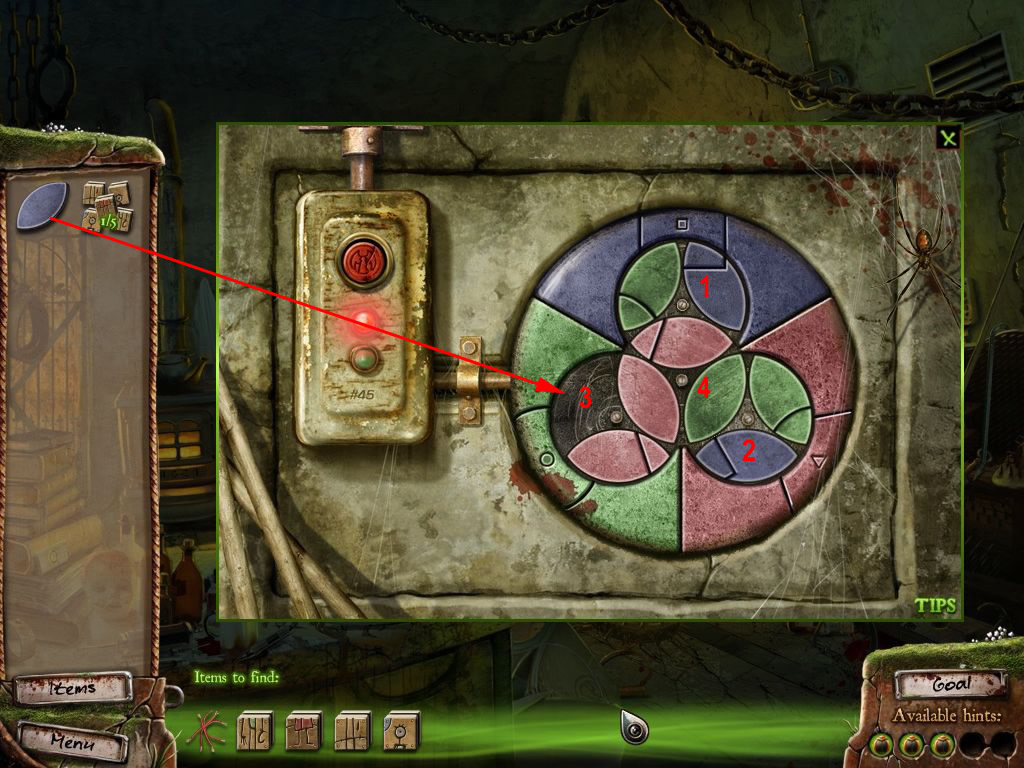
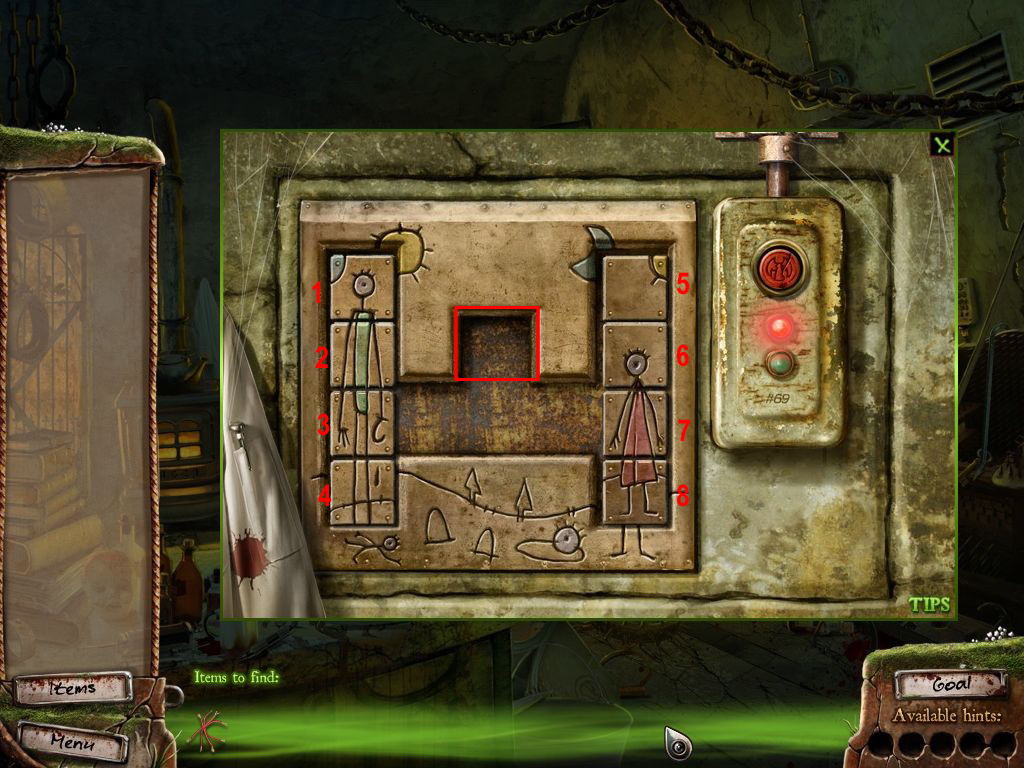
Now click the puzzle above your medical file.
You will have to find a few runes.
Click the oven to get a nearby view and find one of them.
Look at the little altar with the pictures.
The rest is laying in the room (please see screenshots for the exact locations).
Screenshot
Screenshot
Click the puzzle again and place the runes.
You need to slide the pieces to copy the picture the top left.
The red button at the low left will restart the puzzle.
To understand the step by step solution please have a look at the screenshot which piece has which number.
Screenshot
9 to the left
8 down
5 down
2 down
1 to the right
3 and 4 up
6, 7 and 9 up
8 to the left
5 down
6 and 7 to the right
3 and 4 down
1 to the left
2 up
6 and 7 up
5 up
8 to the right
9 down
3 and 4 down
1 down
2 to the left
6 up and right above the 7
1 and 2 to the right
3 up
4 and 5 to the left
6 and 7 down
1 and 2 to the right
3 to the right
4 up
5 to the left
7 up, next to the 6
8 up
9 to the left
5 down
The lock opens and you will find the last two stones.
Screenshot
Click the last slider puzzle.
Place the stones on the puzzle.
Man and women need to change places.
You can not jump over stones.
The slot the middle top can be used to "park" a car.
The red button will reset the puzzle.
Please have a look at the screenshot to understand the numbers of the following step by step solution.
Screenshot
Park 3
2 and 4 to the right
1 down
4 and 3 to the top left
Park 1
2 left down
7 to the left
6 to the left
8 up
1 down right
Park 6
8 left
5 left
1 up
5 down right
6 top right
Park 5
8 down right
7 right
5 left down
Park 2
5 up
4 down left
2 up left
3 left
7 left
Park 6
7 top right
3 and 2 left
6 top left
Park 2
3 left
7 left
2 right top
7 right
3 right
Park 4
3 left down
7 and 8 left
4 down right
8 and 7 right
Park 3
7 and 8 left
3 right
Park 8
7 right
8 down left
7 left
A cut scene opens
Crypt
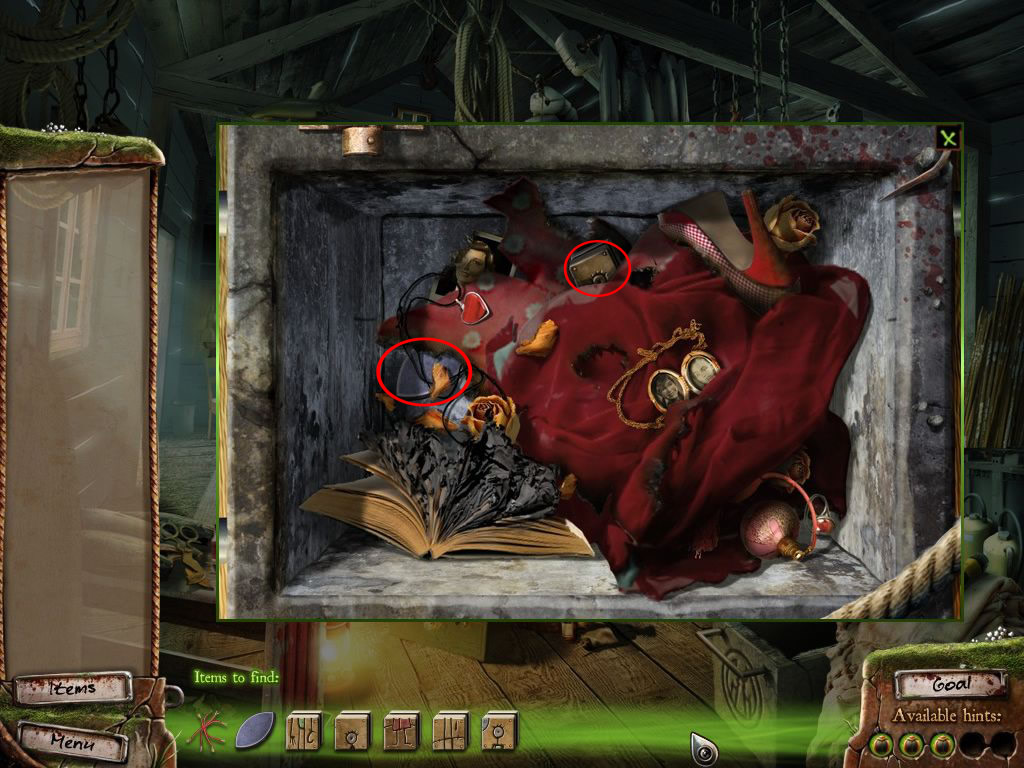
Find the things from you search list in the whole crypt.
After finding all, click the oven.
Screenshot
Screenshot
Screenshot
You will need something to open the oven - grab the crowbar right side, middle
Click the oven again open it with the crowbar and place everything from your inventory there.
Click the key pad at the door right side.
You see cables, but you need something to cut.
Turn to the left. Next to the exit you will find a sickle.
Click the key pad again and use the sickle.
Someone from the other side of the door tries to enter.
Click the opening at the top of the door.
The Hookman tries to come in.
When ever you see his hook at the door, click it.
Patrick comes to help you.
Screenshot
You leave the crypt and run back to the car.
Car
Click the hood and then the part with the missing cables.
Click your cables there.
Connect the loose bottom wires to the right ends.
You will need to click them to make sure that they stay where you want to have them.
THE END - OBVIOUSLY TO BE CONTINUED
With thanks to Kayleigh for the walkthrough. :)
Posted by: Jay |
October 30, 2009 7:39 PM
|
October 30, 2009 7:39 PM