

![]() After falling overboard while out at sea with his fiancée, Angel, amateur treasure hunter Mark finds himself washed ashore a dreary island shrouded in fog. Angel is missing and so are the townspeople, but that doesn't mean Mark's alone... Twisted Lands: Shadow Town is a hidden-object adventure title from Alawar Games that represents the start of a new series and a foray into the horror genre. While it might not actually be very scary, it still offers up a solid evening's entertainment. As Mark, you'll explore the strange town you find yourself stranded in searching for Angel. You won't find answers to all of your questions, but you will find a very dark place with a lot of very big secrets to explore.
After falling overboard while out at sea with his fiancée, Angel, amateur treasure hunter Mark finds himself washed ashore a dreary island shrouded in fog. Angel is missing and so are the townspeople, but that doesn't mean Mark's alone... Twisted Lands: Shadow Town is a hidden-object adventure title from Alawar Games that represents the start of a new series and a foray into the horror genre. While it might not actually be very scary, it still offers up a solid evening's entertainment. As Mark, you'll explore the strange town you find yourself stranded in searching for Angel. You won't find answers to all of your questions, but you will find a very dark place with a lot of very big secrets to explore.
 Gameplay is simple and easy to pick up. Areas you can interact with will sparkle, and hidden-object scenes will sparkle even more. While you'll pick up a lot of items just wandering around, most important things will need to be grabbed from hidden-object scenes. Fortunately, Mark's journal keeps track of all the clues and points of interest you come across. Even more helpful, if you click the hint button during normal gameplay, it will actually point you in the direction you need to go to advance the story; immensely helpful for when you're stuck, but don't want more than a nudge.
Analysis: Although it's trying to be, Twisted Lands: Shadow Town actually isn't that scary. It has an interesting story, but the overall vibe winds up a bit less "The Turning of the Screw" and a bit more "Tales From the Darkside". That's not necessarily a bad thing; there's a certain pleasure you can get from exploring strange places with heavily weird and dramatic storylines that Shadow Town delivers. I was genuinely interested in finding out what was going on, and all the little clues and journals only served to entice me more. The thing is, the writing is just a bit too awkward and stiff to really carry the eerie vibe and make the whole experience complete.
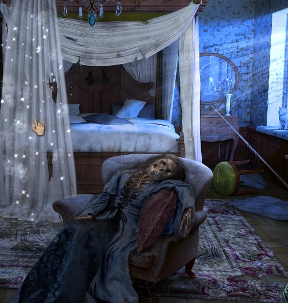
 Fortunately, the game looks great. While the character models have a little bit of that thousand yard stare going on, the environments are beautiful, richly detailed, and full of atmosphere. There are a lot of objects you can fiddle with, even though they don't do anything, and Mark has something to say about most objects you'll click on. It's a lot of small detail work that manages to make the experience more immersive and the town feel like a real place.
Shadow Town's biggest problem for some players may actually be the lack of direction. You never really want to feel like a game is patronizing you, but at the same time you shouldn't ever feel like you're stumbling around blind either. To be fair, there are generally a lot of clues as to where you should go next, but it also feels like there is far too much running around so that the experience isn't as tight as it should be, especially since the game enjoys making you run all the way across town and back just to pick up one item you suddenly need to proceed. Fortunately, thanks to the game's wonderful hint system it's impossible to get stymied, and if you feel like puzzling things out on your own, the journal will probably provide the clues you need if you look hard enough.
The game is a little on the short side, and will probably run you between three and four hours to play. Twisted Lands: Shadow Town tried to swing for the fences with a tale of horror, and ultimately falls short of really achieving greatness. But what's there is still a solid and thoroughly enjoyable title that shows a lot of promise for the continuance of the series. If what you want is something fun and interesting, Shadow Town provides a weird and involving mystery that will keep you hooked until the end. Hopefully, more questions will be answered in subsequent titles. Until then, I'm just going to assume a wizard did it. A fishy one.
![]() Windows:
Windows:
Download the demo
Get the full version
Also available: Collector's Edition
![]() Mac OS X:
Mac OS X:
Download the demo
Get the full version
Also available: Collector's Edition


Walkthrough Guide
(Please allow page to fully load for spoiler tags to be functional.)
Twisted Lands: Shadow Town Walkthrough
General Information
This is the first game in a new saga and has 80 locations with Hidden Object Scenes and Puzzles to solve.
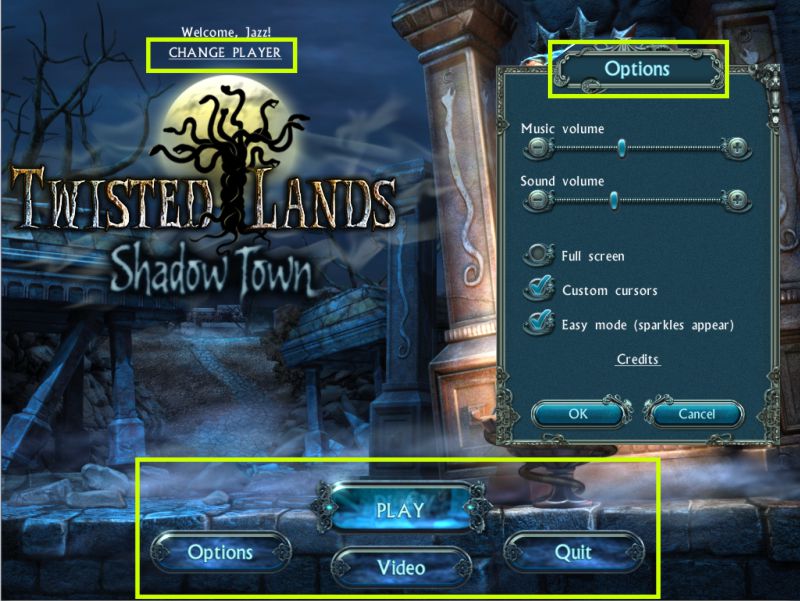
From the Main Menu you can select and change players, play or quit the game and select your Options.
Options include Music and Sound volume, choice of Full Screen or Windowed, Custom Cursors or not, and Easy Mode which has more sparkles.
Screenshot
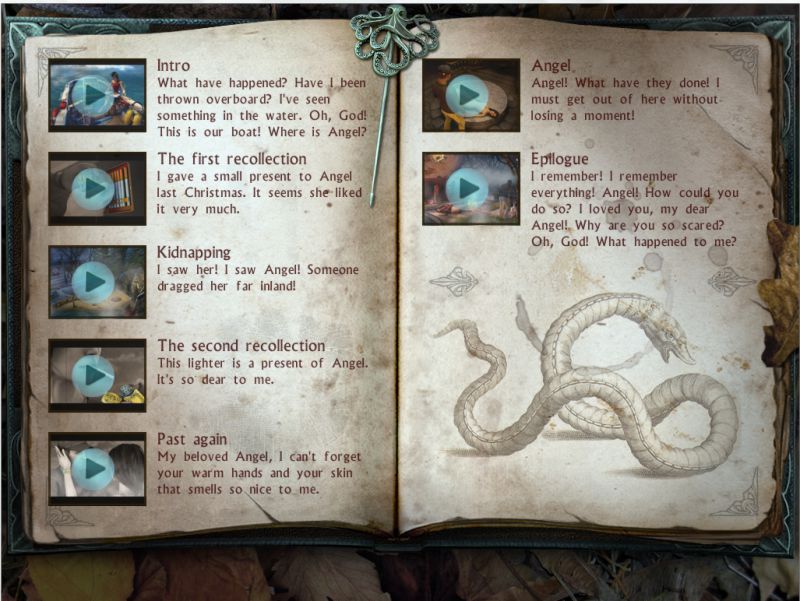
Videos
Videos are the cut scenes from each chapter and include: Intro, The first recollection, Kidnapping, The second recollection, Past again, Angel, and Epilogue.
As you finish each chapter another video will become available to view.
After you have completed the game, you will be able to view all of the Videos.
Screenshot
Scene Navigation
Menu is accessible in the upper left corner so you can change your Options, go to the Main Menu or Resume the game.
In the lower left corner is your Journal to tell you what you need to do and provide hints to help you with your journey.
Your Inventory and Hidden Object lists are in the lower center of the scene.
There is no timer and hints are unlimited as soon as the question mark at the far right refills.
A magnifying glass means you need to take a close up look.
If there is something you need to note but cannot complete an action at that time, it will be marked in bright pink.
A full hand will appear to help you move an object, and a pointing finger means you need to do something which might be to just pick up an object or perform another task.
There is a click penalty because if you click too much, the fog will roll in.
Click outside the box to exit close ups, or use the down arrow.
You have your choice to view a short Tutorial at the beginning of the game, or you can skip it.
Hidden Object Scenes will be marked because the objects are not random, but the order in which they are listed is.
You will come away with a key object that will be marked in turquoise blue and go into your inventory when you press "OK".
Puzzles or Mini Games have a Skip option once the bar is full.
Some scenes will be slightly lightened so you can see them better.
Introduction
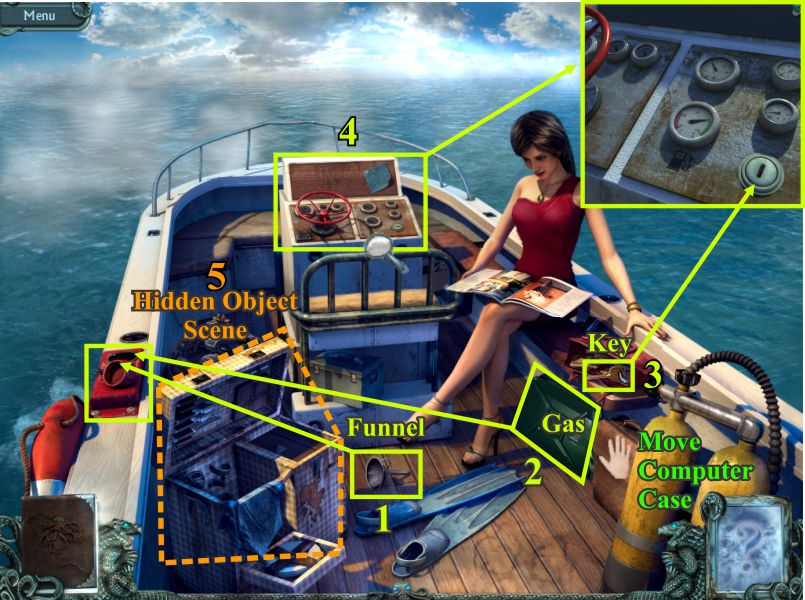
Our hero, Mark, is out on a boat hunting for hidden treasure and Angel has accompanied him on this venture.
The boat was suppose to be full of gas, but fortunately Mark brought a can along. Pick up the Funnel and put it in the fuel tank.
Move the computer case to get to the gas can so you can pour it into the funnel and fill up the tank.
Close the cap when you are done.
Angel put the ignition key in her purse, so open it and take the key out of it.
Click for a close up of the dashboard and place the key in the ignition. It will break off when you try to start it.
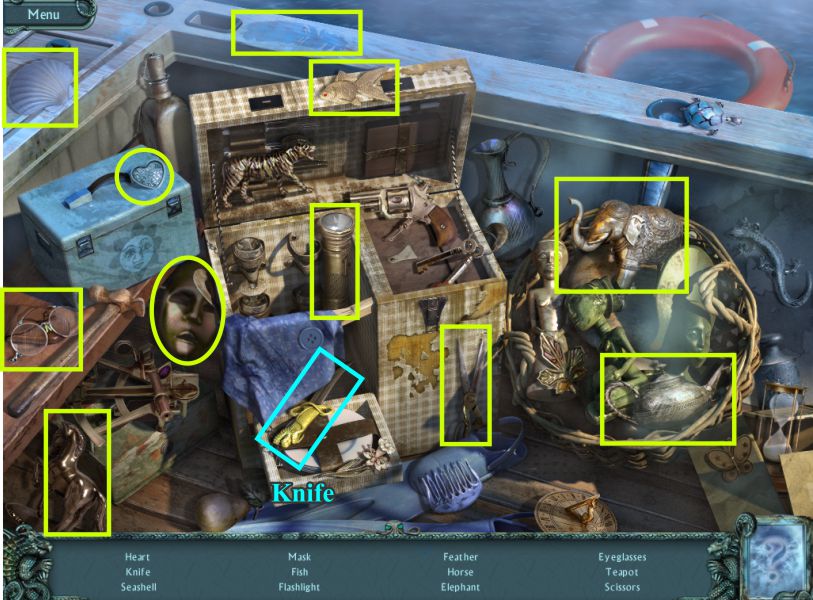
Click to play the Hidden Object Scene in search of something to help start the boat.
Screenshot
Collect all 12 objects including the Knife.
Screenshot
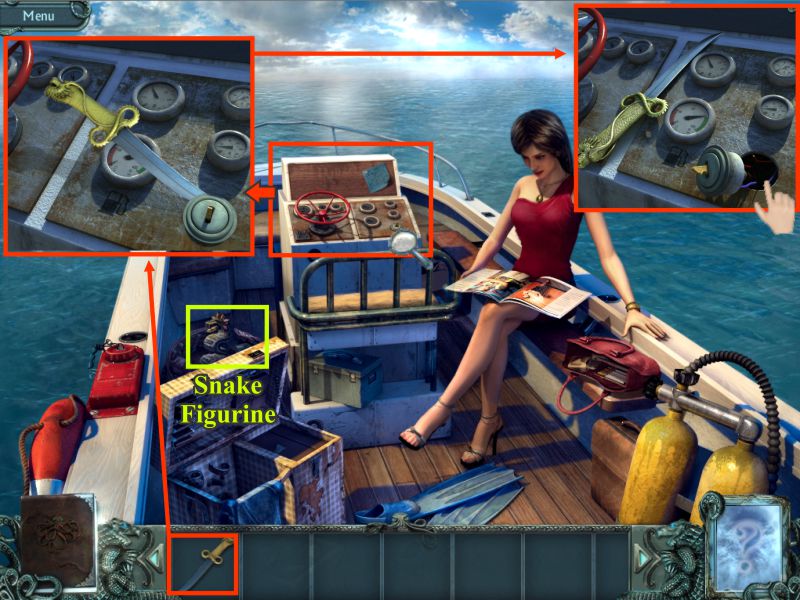
Click for a close up of the dashboard and use the knife to pry off the ignition key to get to the wires and connect them.
Angel wants to see the figurine Mark found because it might be valuable, so pick up the Snake Figurine.
Screenshot
Everything gets blurry and Mark falls overboard.
Chapter 1
Shipwrecked on the Beach
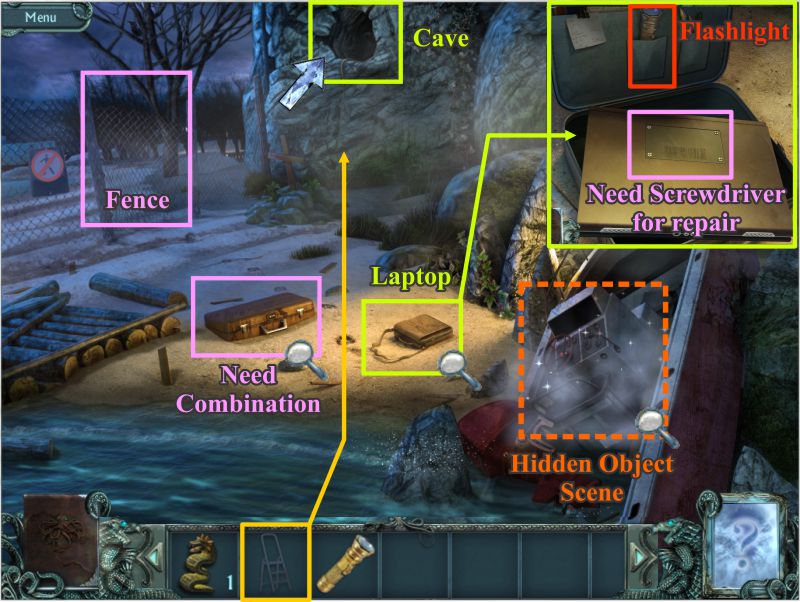
Mark and the boat wash ashore on a nearby island, but the boat is wrecked, so check out what is around you.
Note that the fence requires pliers to cut it and that you need a combination to open the suitcase.
Open the laptop case, take the flashlight and note that you need a screwdriver to repair the computer.
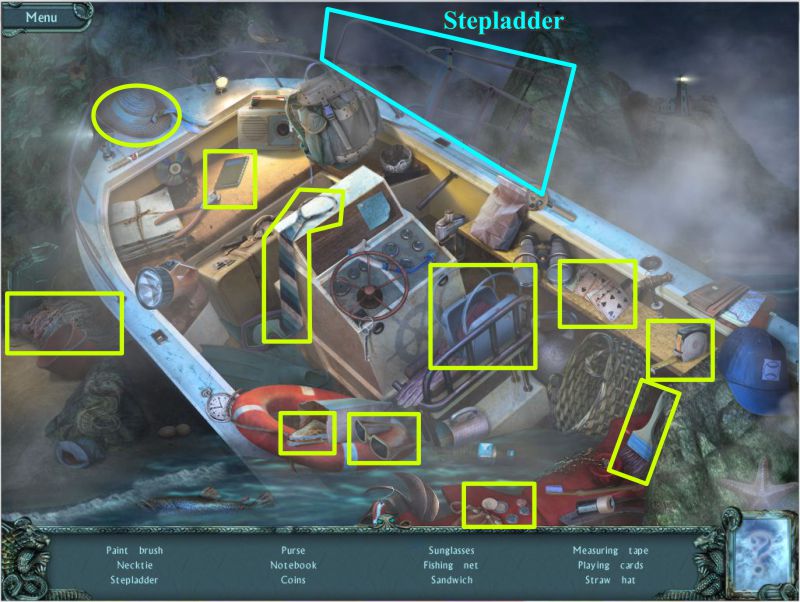
Play the Hidden Object Scene to get a stepladder so you can enter the cave.
Screenshot
Collect all 12 items on the list and the stepladder will go into your inventory.
Screenshot
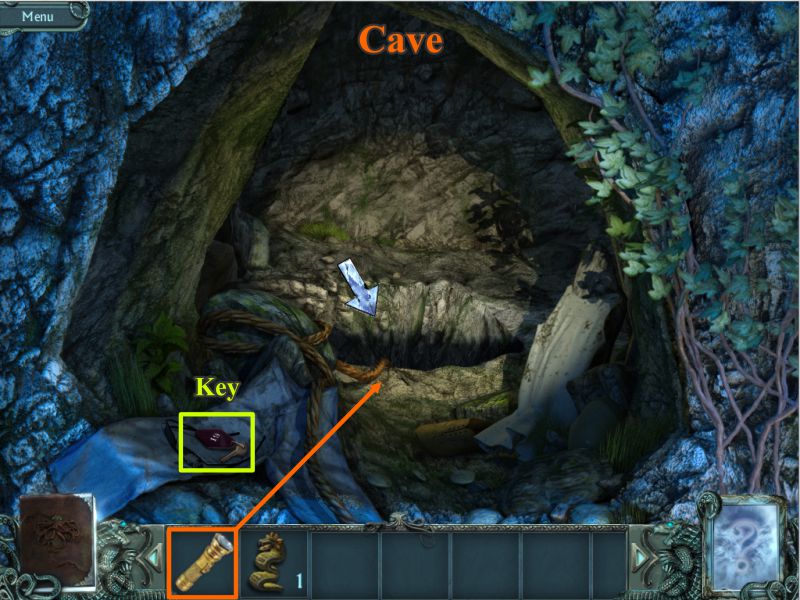
Place the stepladder near the entrance to the Cave and climb the ladder to the Cave.
Pick up the key off the clothes and use your flashlight to see the hole and go down the rope.
Screenshot
You are confronted by a door with 15 indentations in the shape of the snake figurine you found.
Place your snake in one of the indentations (I chose the top one), and it will glow.
Screenshot
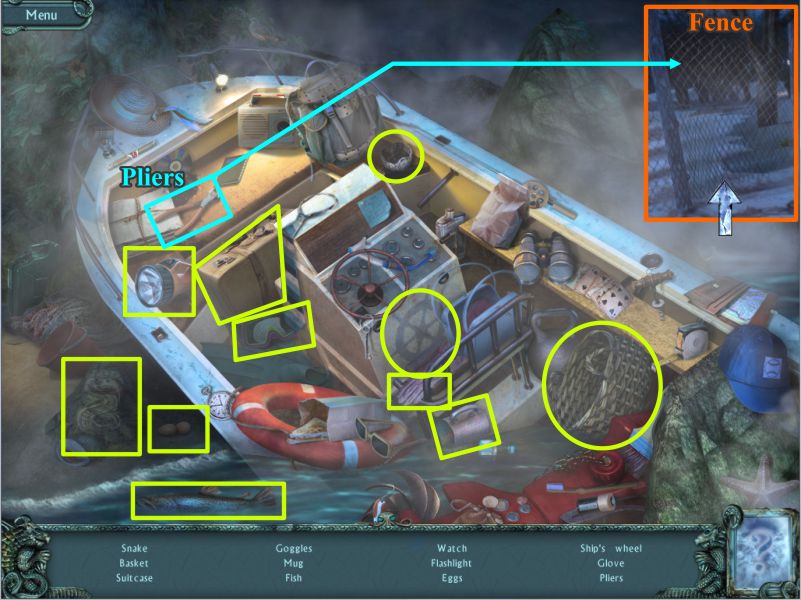
Go back to the beach and play another Hidden Object Scene in the boat in order to get the Pliers.
Use the pliers to cut the fence and go through it.
Screenshot
Other Side of the Fence
Follow the path where you see Angel being dragged and pick up Angel's Cigarette Case.
Look at the poster of the missing person and head toward the ship.
Click on the fire area and pick up the grappling hook.
Use the hook on the hole in the ship's hull and climb up.
Screenshot
Shipwrecked Cruise Ship
You find yourself in a cabin that may have been occupied by an artist.
Check the fireplace with the burned paintings and ash pile.
Check the painting to the left and have a look at the laptop that is wrecked. It has a microchip that might be useful.
Head to the Corridor.
Screenshot
Look down the Stairwell, take the snake figurine and note the locked door at the bottom.
Something is stuck under the wrinkled carpet, and there is a newspaper on the ground. Check it out.
Key 19 should work on Cabin 19 so open the door and enter the Doctor's Quarters.
Screenshot
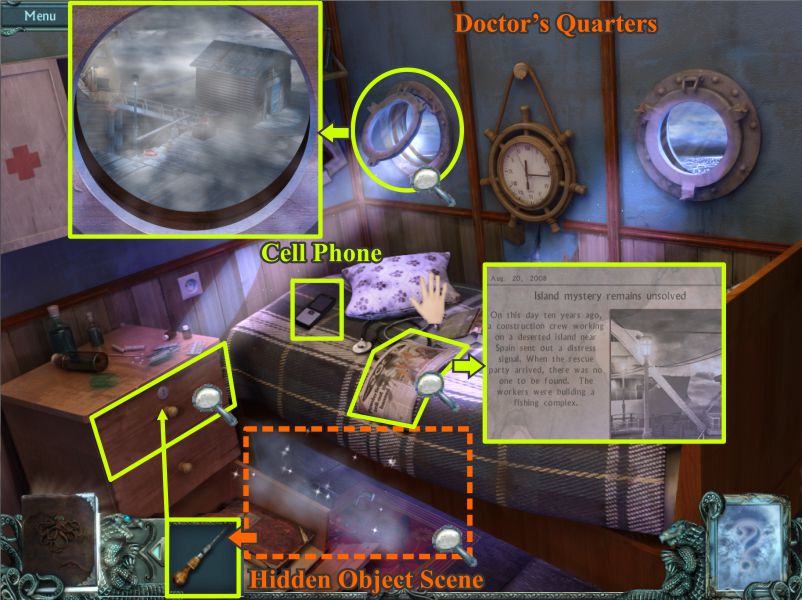
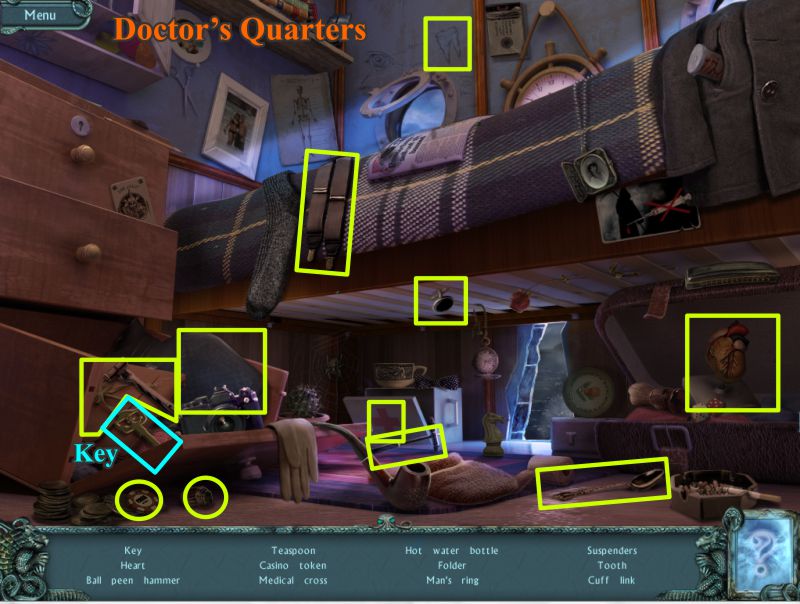
Doctor's Quarters
The ghost put something under the pillow. Move it and pick up the cell phone.
Read the newspaper and look out one of the portholes.
Play the Hidden Object Scene to get the chisel to open the locked drawer.
Screenshot
Collect the 12 items under the bed to get the chisel.
Screenshot
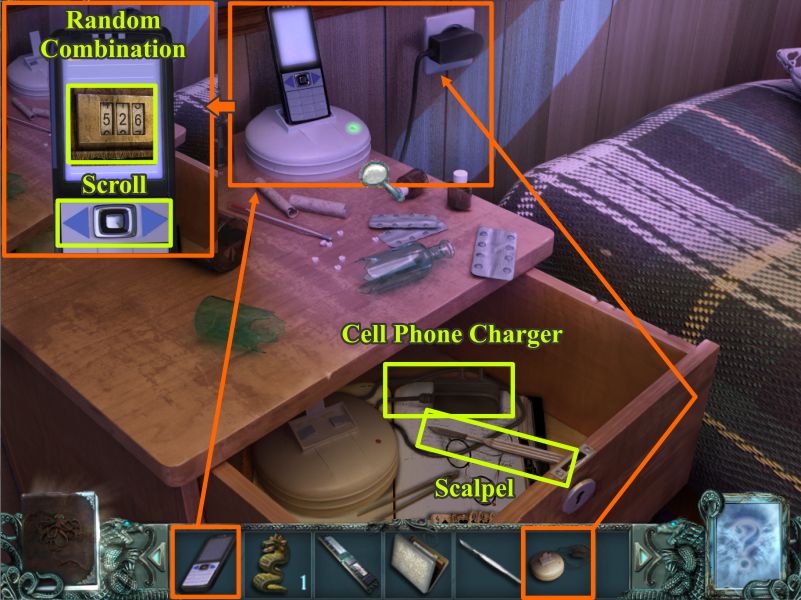
Once you've opened the drawer, pick up the scalpel and cell phone charger.
Place the charger on the plug. It will go to the chest so you the can place the cell phone to charge.
Scroll through the phone and you will come to a random combination which you will use later.
Screenshot
Ship's Corridor
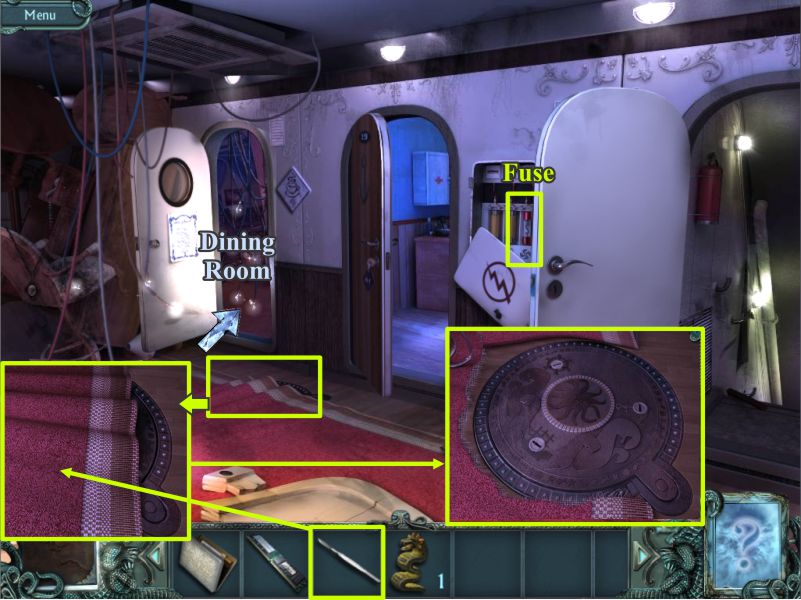
Go back into the Corridor and use the scalpel on the wrinkled carpet to uncover a hatch that you don't currently have a tool to open.
Remove the fuse from the electrical panel so the sparks will stop and you can enter the Dining Room.
Screenshot
Ship's Dining Room
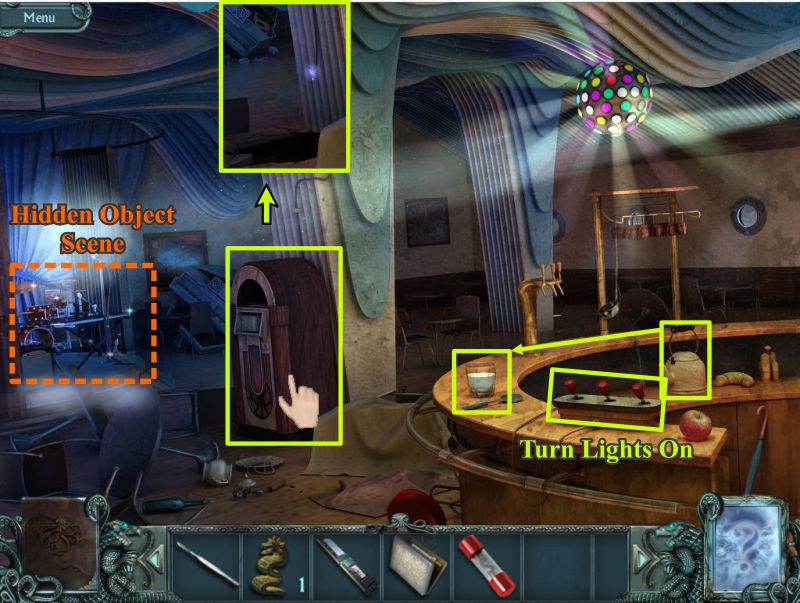
Turn the lights on, pour yourself a glass of water from the kettle, and touch the Jukebox that will fall through the floor revealing, a live wire.
Play the Hidden Object Scene.
Screenshot
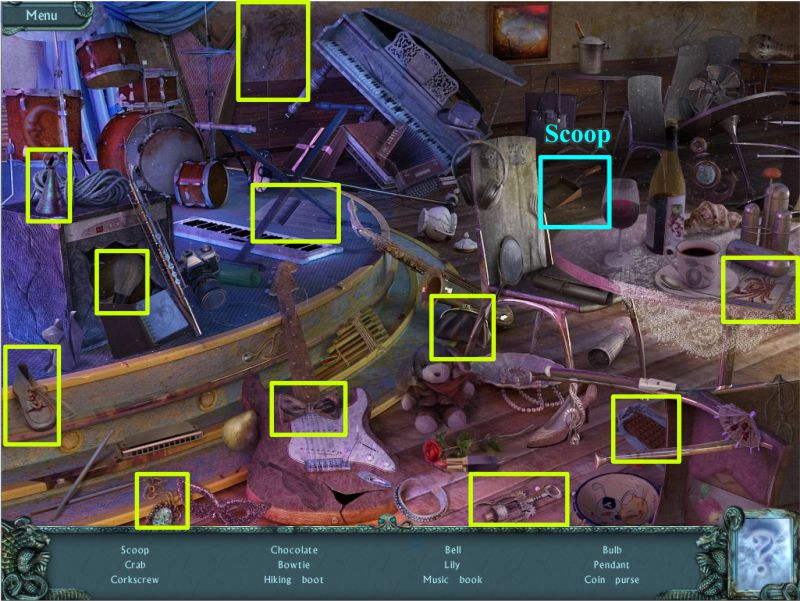
Collect everything to get the Scoop.
Screenshot
Rebecca's Cabin
Go back to what you've discovered is Rebecca's Cabin and use the scoop on the ashes to get the flash drive.
Use the scalpel on the painting at the left to reveal the safe.
Once you have solved the puzzle and opened the safe, take the snake figurine and body oil.
Screenshot
Cabin Safe Puzzle
Move the columns and rows of blocks to arrange them according to color.
Click on the arrows in the order they are numbered.
Click them once unless indicated otherwise in the screenshot.
The solution is shown on the right.
If you make a mistake, close the puzzle by clicking on the "X" in the upper right corner and start over.
Screenshot
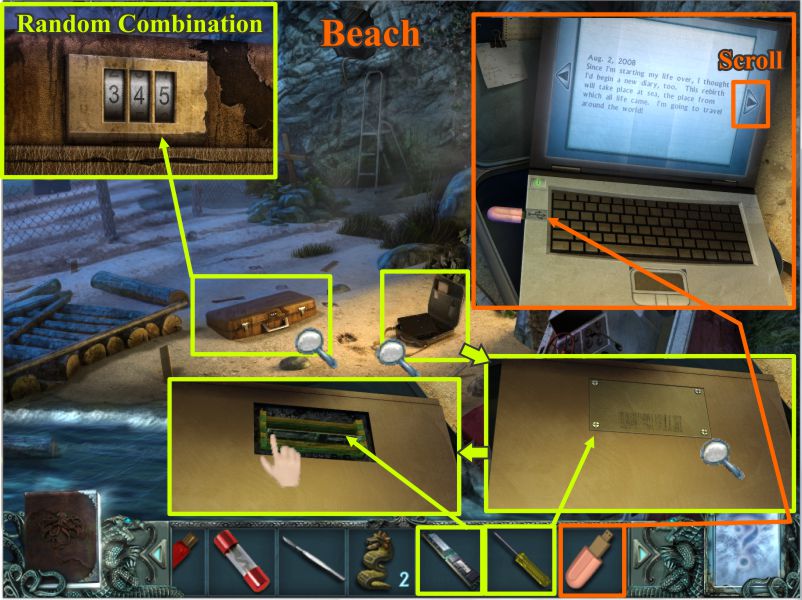
Beach
Go back to the Beach and click on the suitcase for a close up.
Use the random combination you got off the cell phone which is recorded in the Journal, so you can collect everything inside.
Click on the laptop and use the screwdriver from the suitcase to open it up.
Take out the microchip that is in it and replace it with the one from your inventory.
The computer is now working, so plug in the flash drive you found in Rebecca's fireplace and scroll through her file.
Screenshot
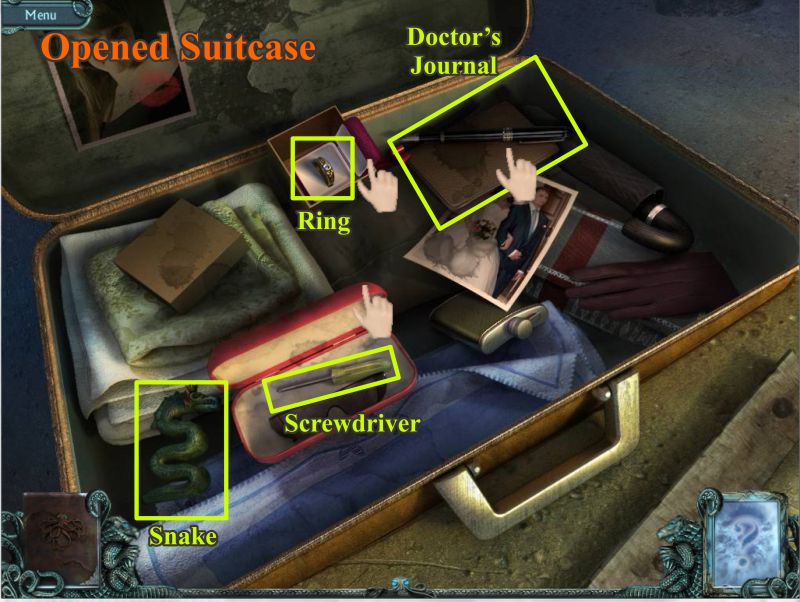
Opened Suitcase
Collect the snake figurine and screwdriver.
Open the gift box and ring box to take the ring.
Read the Doctor's Journal.
Screenshot
Chapter 2
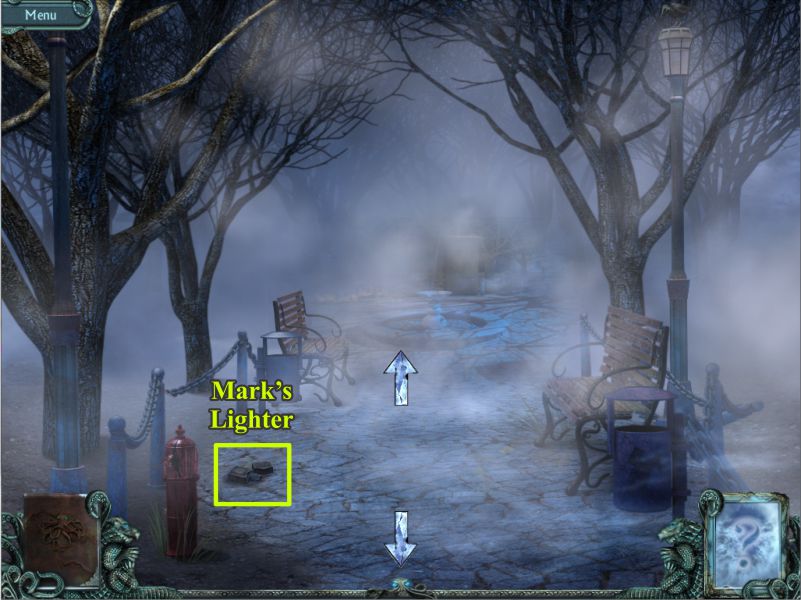
Path to Town
Take the path where you saw them drag Angel and pick up Mark's lighter.
Screenshot
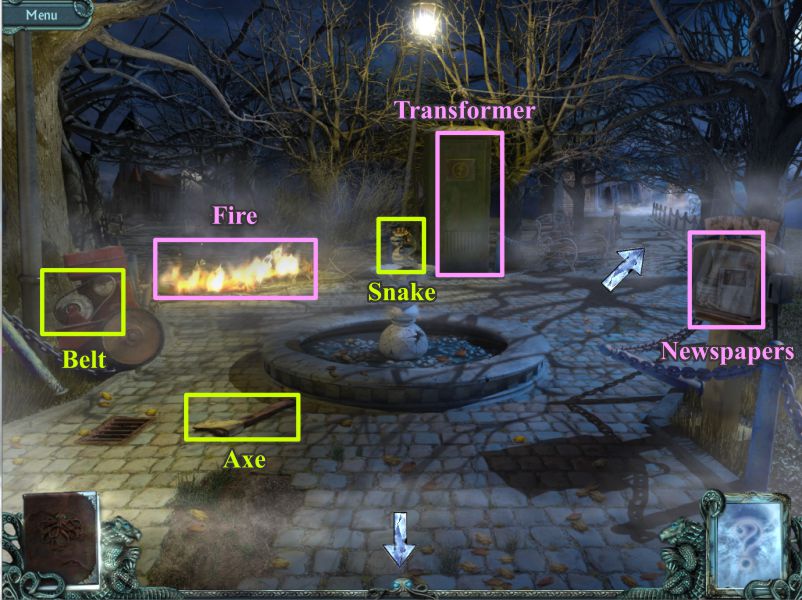
Fork in the Road
Collect the snake figurine on the fountain and pick up the belt and axe.
Take note of the fire, transformer and newspapers before following the right path.
Screenshot
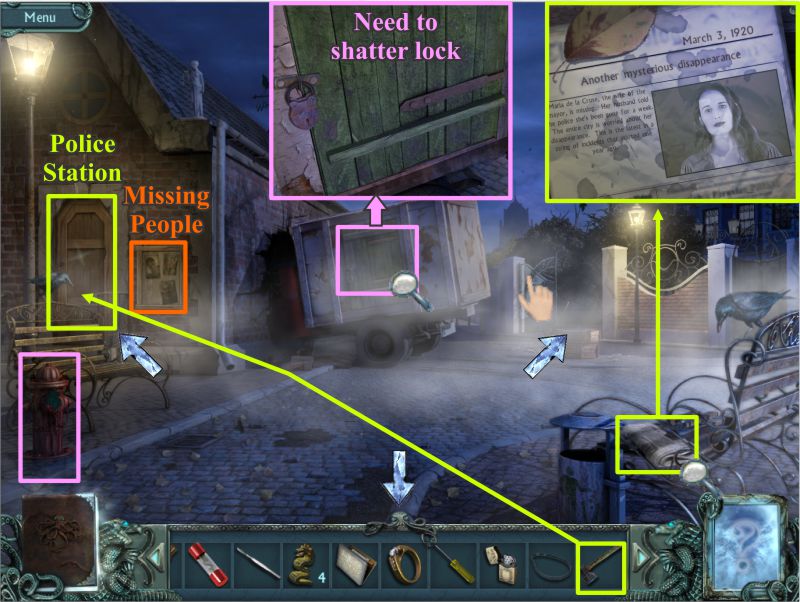
Town Square
Read the newspaper on the bench and check the notice about more missing people.
Note the truck with the padlock and the fire hydrant.
Open the gate and see there is a path to another part of town.
Use the axe in your inventory to smash in the door of the police station and enter.
Screenshot
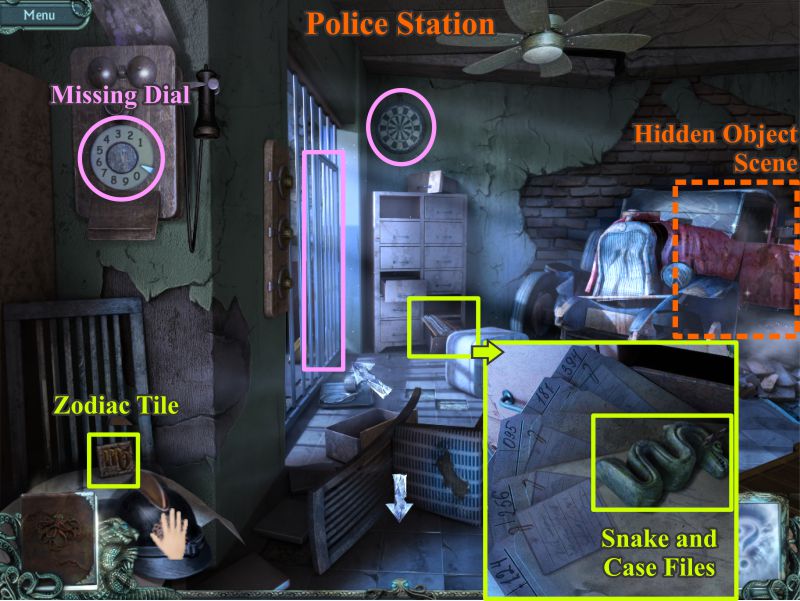
Police Station
Note the dartboard and the missing dial on the phone.
Move the helmet and pick up the Zodiac Tile.
Click on the files in the lower right of the file cabinet and pick up the snake figurine.
Check the missing person case files.
Click on the Jail Cell to have a look inside.
Screenshot
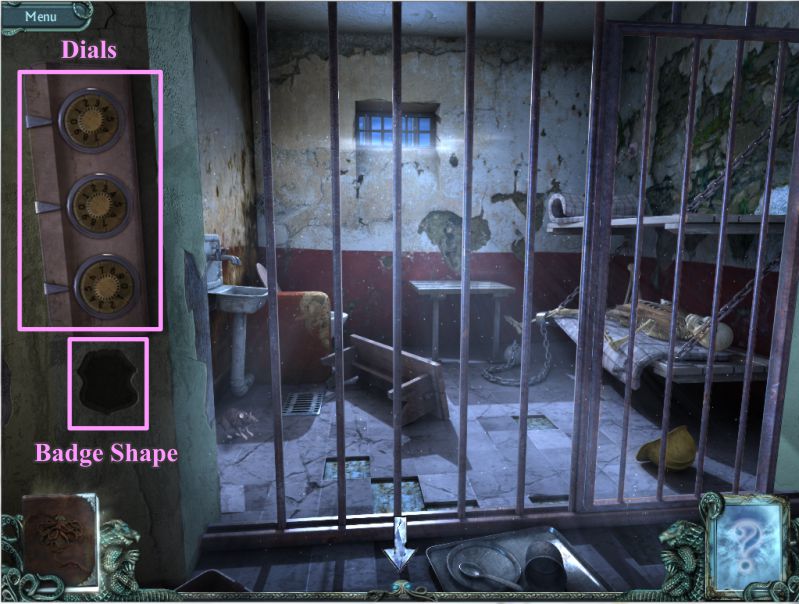
There are some dials with some sort of a code lock to secure the camera.
Aside from the skeleton on the bunk, there is an indentation in the wall of a policeman's badge.
Screenshot
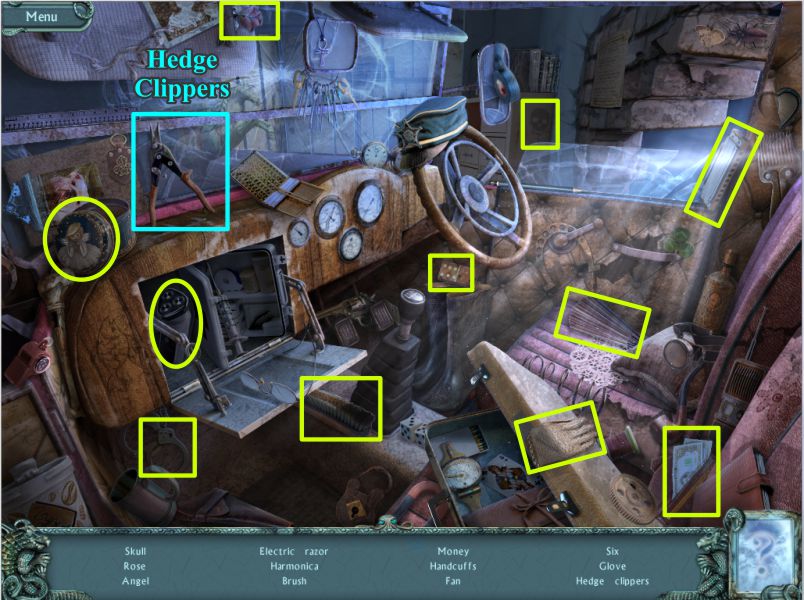
Click on the truck for a Hidden Object Scene to get the Hedge Clippers.
Screenshot
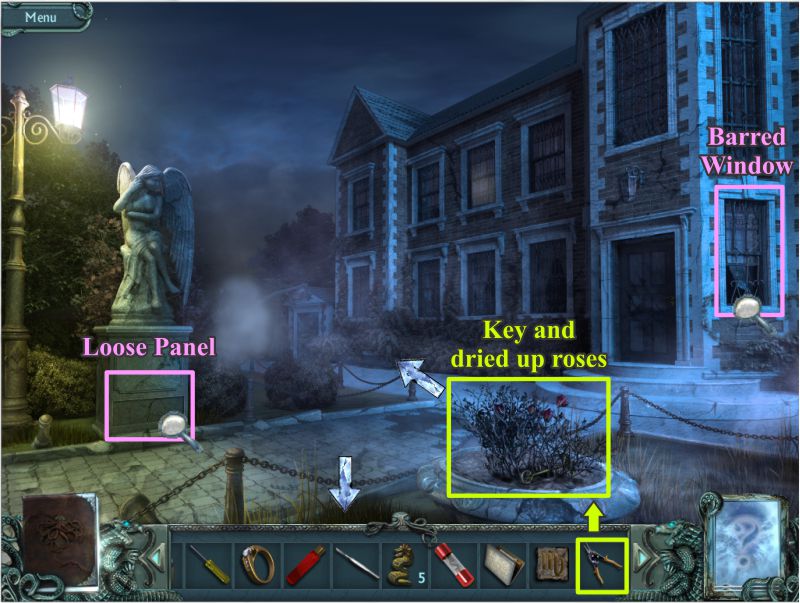
Mansion
Go back outside and through the gate you opened.
Note the loose panel beneath the statue and the barred window on the mansion.
Use the hedge clippers on the thorny bush to get the key and dried roses.
Screenshot
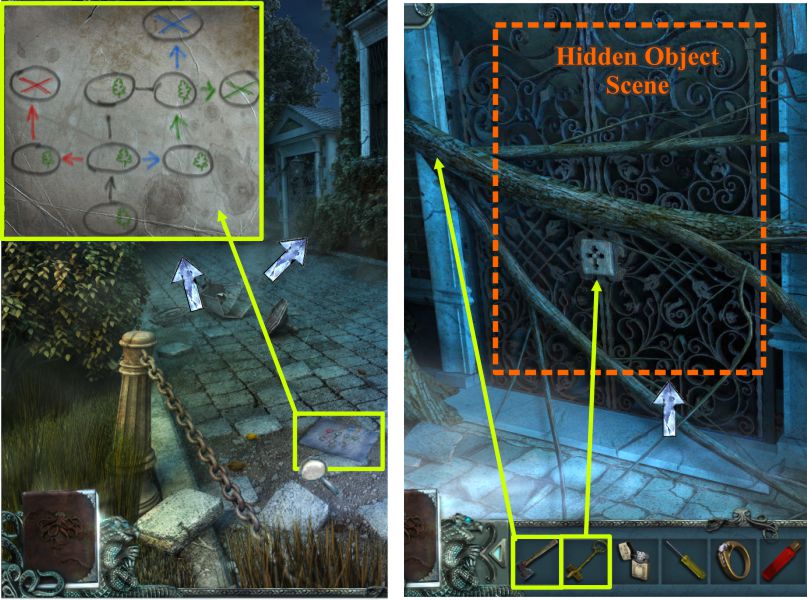
Go forward past the house and check the map on the ground.
Go to the gate on the right and use the axe on the branch that is blocking the gate.
When you use it again to cut the smaller branches, it will get stuck in the branch. The handle will break when you touch it, but the kindling will go into your inventory.
Use the key from your inventory to open the gate and enter for a Hidden Object Scene.
Screenshot
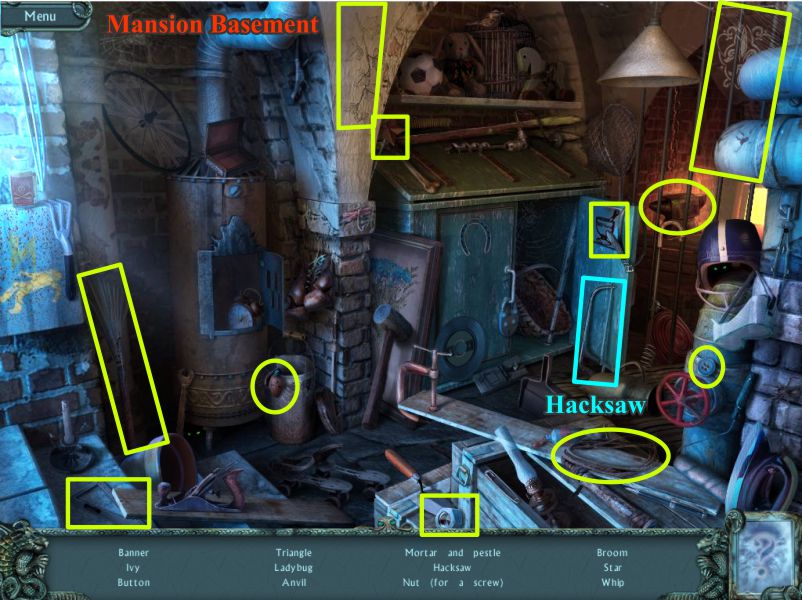
Mansion Basement
Collect everything including the Hacksaw.
Screenshot
Walk down once and forward twice into the fog and pick up the snake.
Go down 3 times and click on the window at the right for a close up.
Use the hacksaw to cut the bars, click to remove them and go inside.
Screenshot
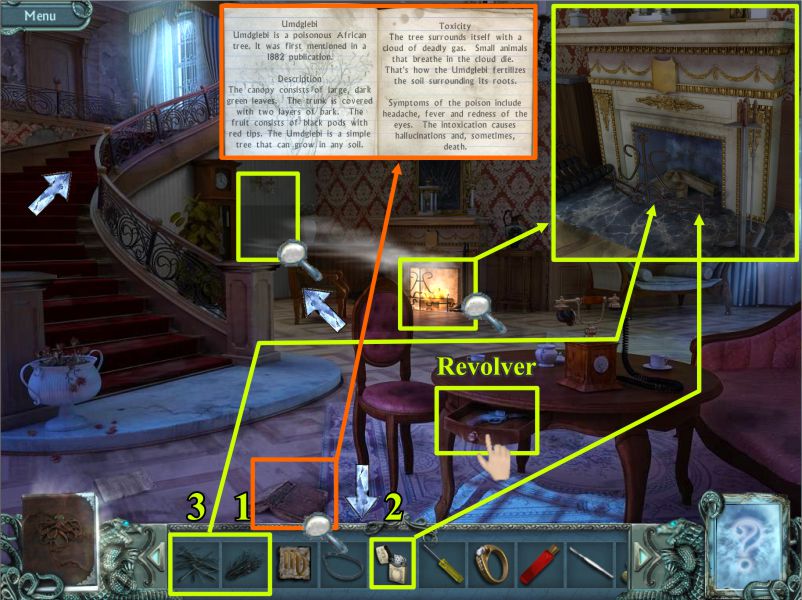
Mansion Interior
Open the drawer in the table and take the revolver.
Click on the book on the floor and read it.
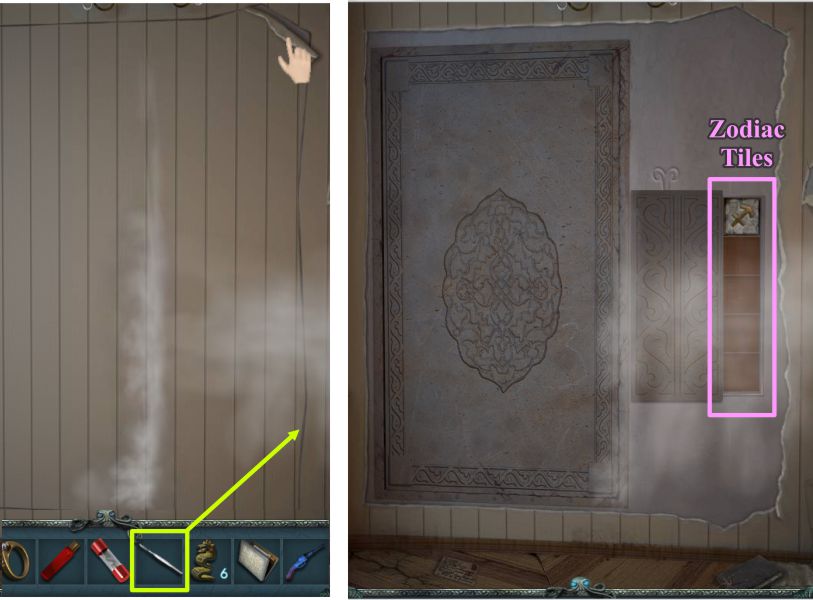
Click on the fireplace to start a fire by first putting in the dried roses and lighting them with the lighter.
That isn't sufficient, so put the kindling in the fireplace and the smoke with drift to the wall next to the grandfather clock rather than going up the chimney.
Screenshot
Click on the wall for a close up and use your scalpel on the wallpaper.
Peel it back to reveal a secret door with missing Zodiac Tiles.
Screenshot
Go up the stairway and open the door only to find a real snake in your path.
Click for a close up of the vent and unscrew it with the screwdriver in your inventory.
Take the Zodiac Tile inside the vent.
Turn the banister ball on the right so it looks like an "E".
Use the body oil on the other two balls and then turn them to the same symbol.
A compartment will open under the top step for you to collect another snake figurine.
Screenshot
Go back to the Mansion Basement to play another Hidden Object Scene so you can get the Butterfly Net.
Screenshot
Town Square
Click down twice to get back to the Town Square.
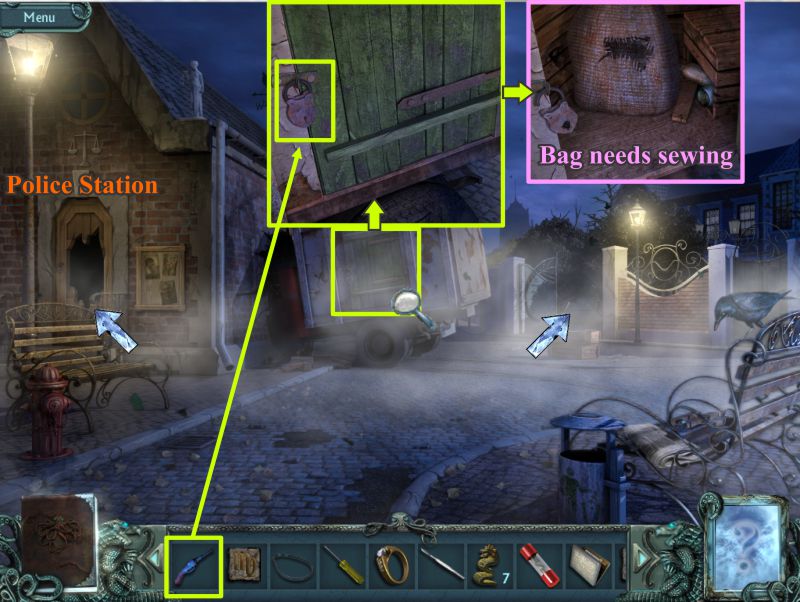
Click on the truck for a close up and use the revolver to shoot the lock. This will trigger a Hidden Object Game in the Police Station, so go there to get the needle and thread to sew up the bag.
Screenshot
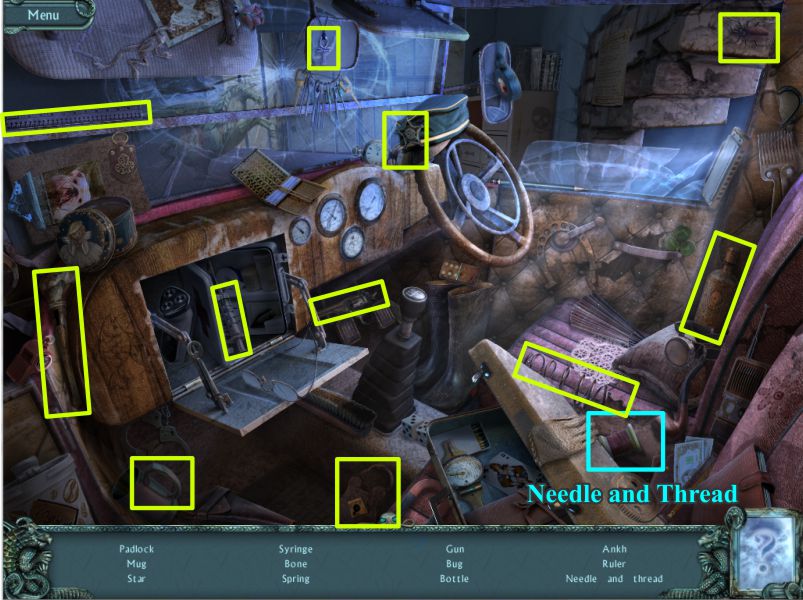
Police Station
Collect the Needle and Thread and the rest of the list.
Screenshot
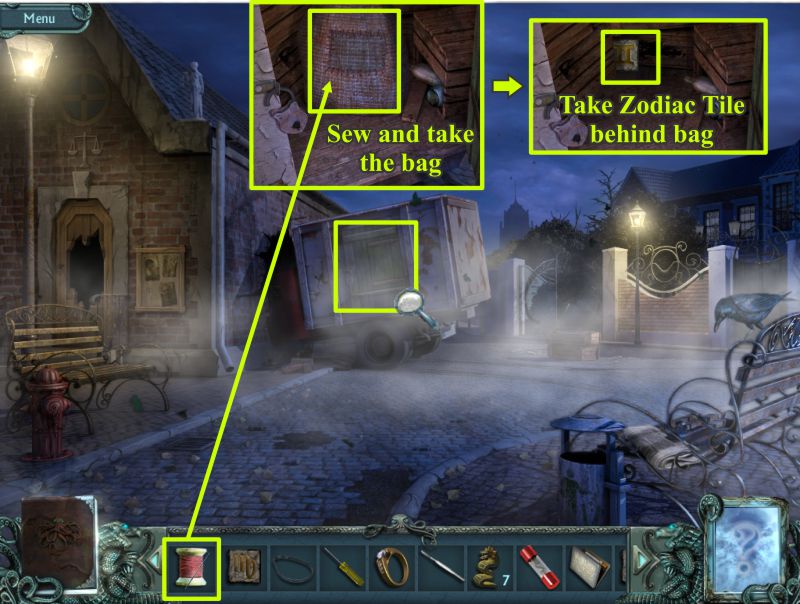
Town Square
Go back outside to the truck and sew up the bag.
Take the bag and the Zodiac Tile behind it and go back through the gate.
Screenshot
Inside the Mansion
Climb through the window of the Mansion and go back upstairs.
Use the butterfly net to capture the snake and then bag him so you can enter the room.
Take note of the missing door knob on the balcony door.
Look at the moon through the telescope and check the horoscope and palm reading material on the chair.
Click for a close up of the books at the right and collect the Zodiac Tile.
Screenshot
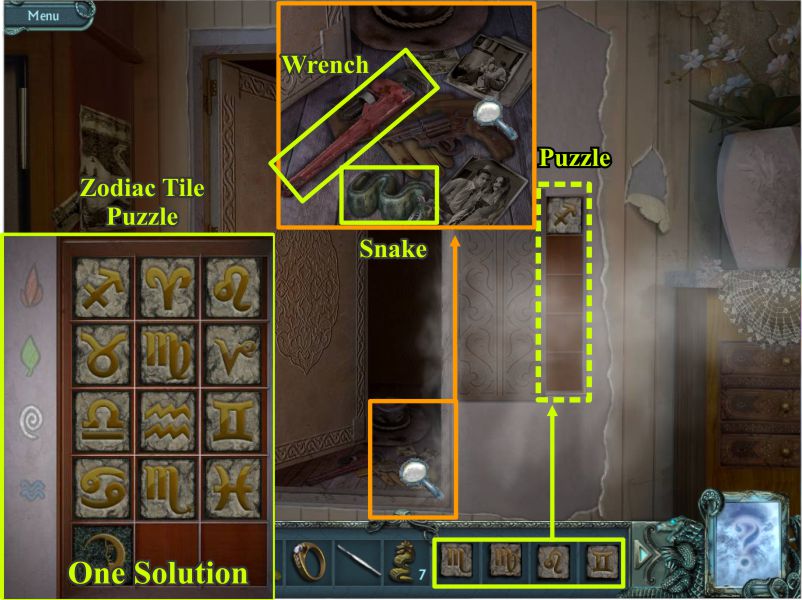
Zodiac Tile Puzzle
You should now have all 4 Zodiac Tiles, so go back downstairs to the secret panel near the clock.
Place your Zodiac Tiles and the rest of them will be revealed.
Slide the tiles so that the symbols match up with their elements.
There is more than one solution. One possible solution is shown in the screenshot.
When you have completed the puzzle the door will open.
Pick up the wrench, snake figuring, and check out the pictures.
Screenshot
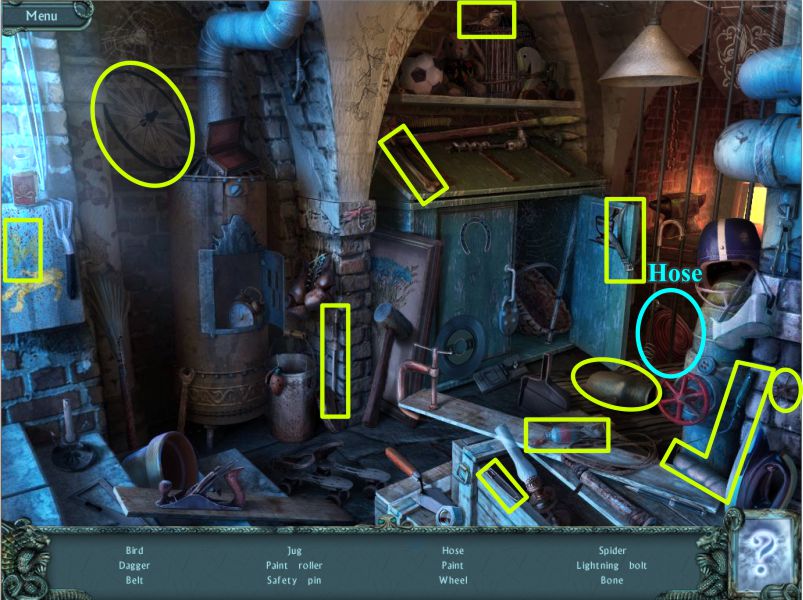
Mansion Basement
Play the Hidden Object Scene to get the Hose.
Screenshot
Click down 3 times to go to the Town Square.
Place the hose on the fire hydrant and use the wrench to turn it on.
Click down once and pick up the hose to put the fire out and proceed down that path.
Chapter 3
Town
Take the left path twice and click on the paper on the ground. It is a map showing the way to the dock.
Go forward and then right and pick up the snake figurine on the ground at the left.
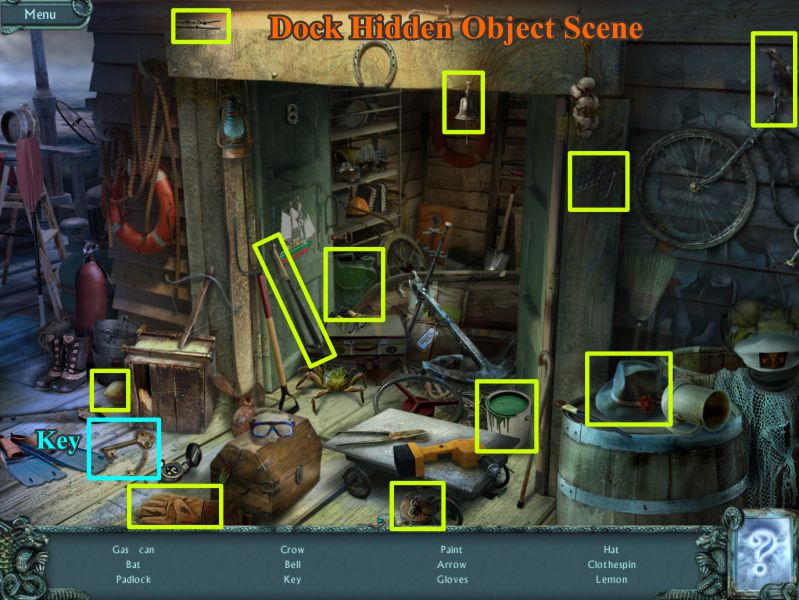
Dock
Go forward twice to the dock and walk over for a closer look.
Note the crane is locked and that something is inside the crate to the left with the lightening bolt on it.
Click on the sparkles at the right for a Hidden Object Scene.
Collect everything to get the Key.
Screenshot
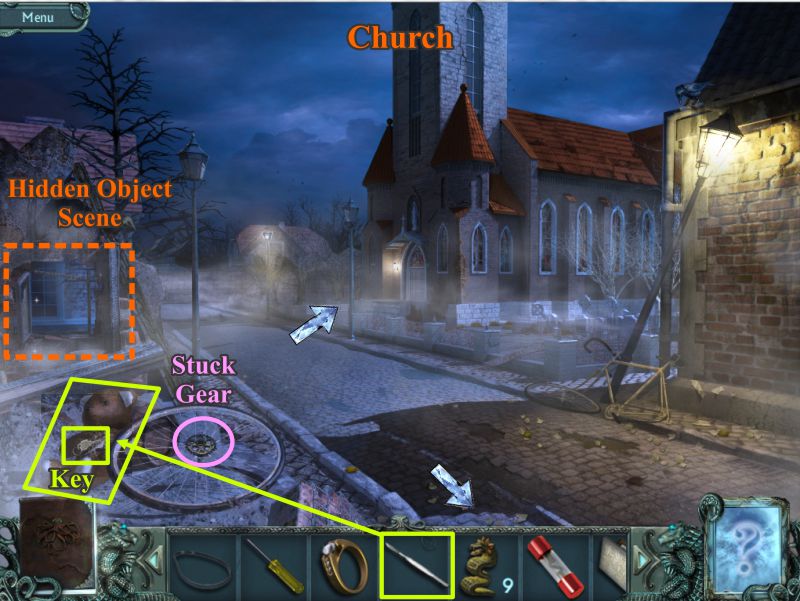
Click down 5 times and go right to get to the Church.
Note you can't get the gear in the bicycle wheel.
Use your scalpel on the Teddy Bear to get the Key.
Play the Hidden Object Scene before going to the Church.
Screenshot
Collect everything including the Sun.
Screenshot
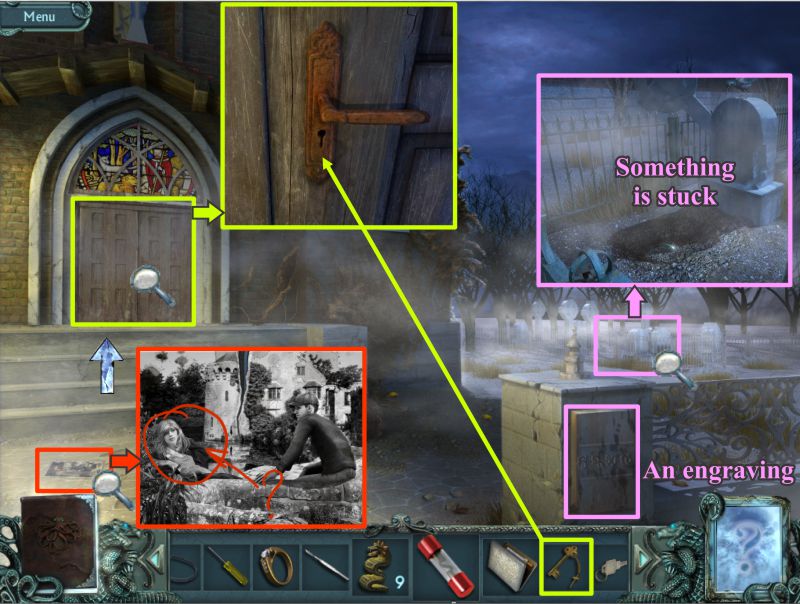
At the Church note the engraving on the post. Check out the cemetery to see there is something stuck that you need a tool to retrieve.
Look at the picture of Mark and his sister. Use your key to open the Church door so you can enter.
Screenshot
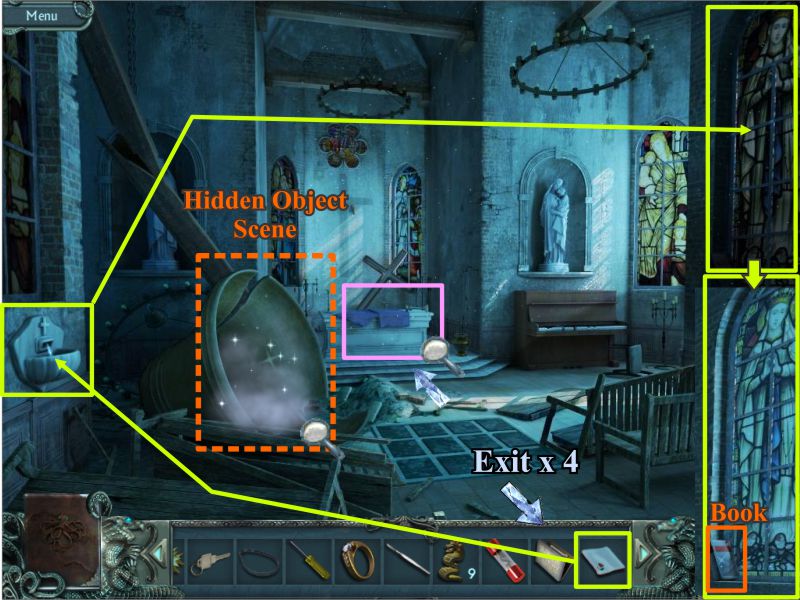
Check out the altar and play the Hidden Object Scene to get the Handkerchief.
Dip the Handkerchief in the Holy Water, clean the dirty stained glass window and take the book.
Screenshot
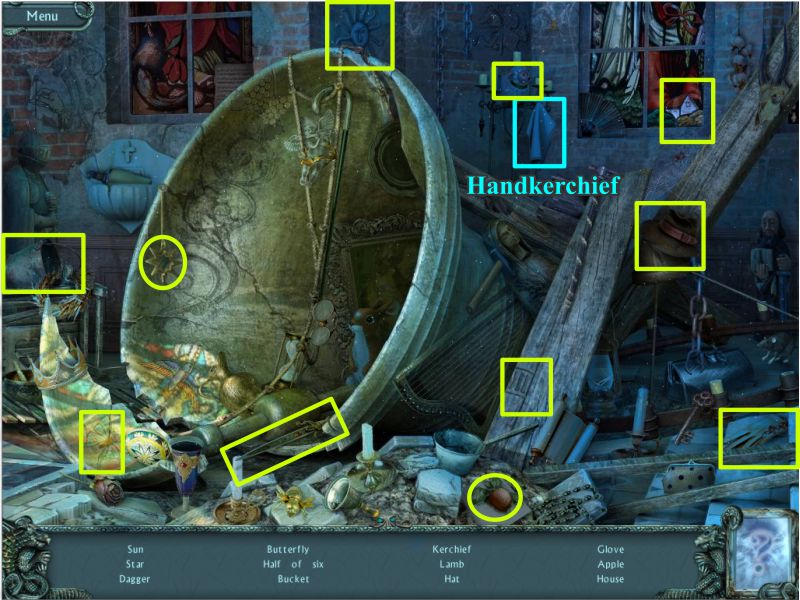
Collect all 12 items including the Handkerchief.
Screenshot
Mansion
Exit down 4 times and take the right path to the Town Square.
Go through the gate to the Mansion and climb in the window.
Stop at the fireplace and grab a coal before going to the upstairs room.
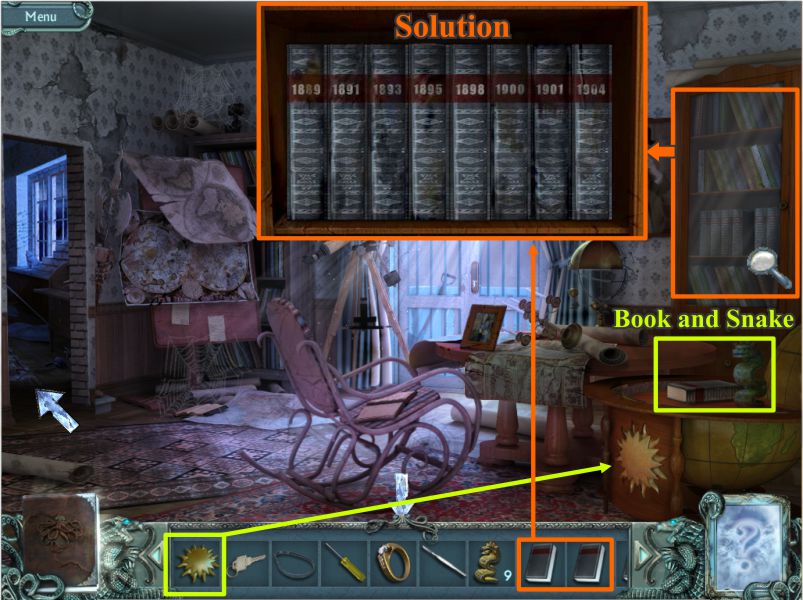
Place the sun from your inventory on the globe and it will open so you can take the snake figurine and the book.
Click on the book cabinet behind the globe and place your 2 books.
Put the books in chronological order and a secret passage will open at the left. Enter the passage.
Screenshot
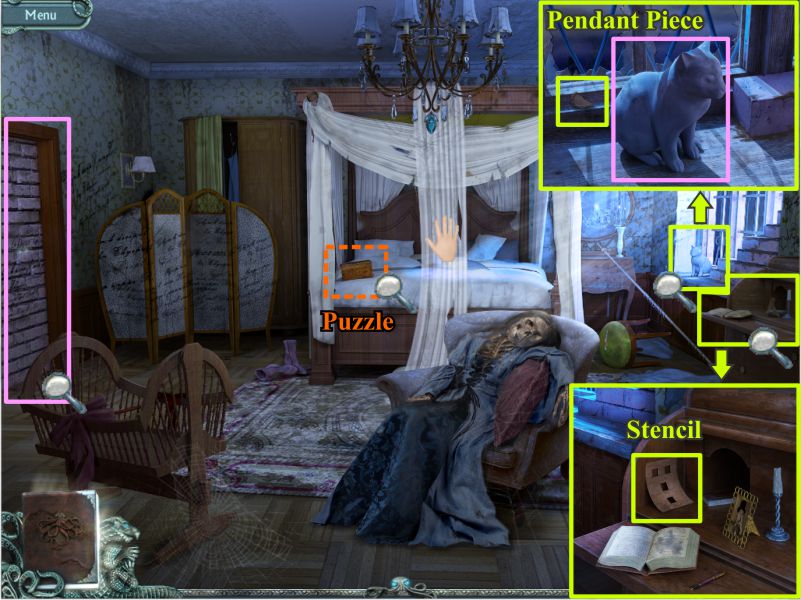
Mansion Bedroom
The Mansion owner's figure appears and morphs into a skeleton in the chair.
Click on the desk at the right and pick up the stencil.
Click on the window, collect the Pendant Piece, and note there is something inside the cat.
Check out the bricked entry and note something is sparkling.
Move the curtain on the bed and click on the box for a puzzle.
Screenshot
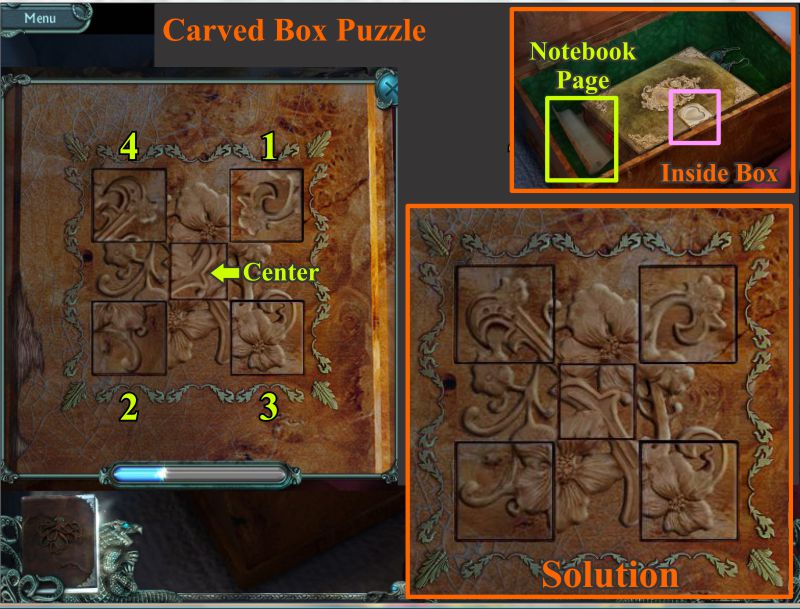
Carved Box Puzzle
Rotate the tiles to complete the puzzle.
The center tile turns everything; the upper left corner (4) rotates independently; the upper right corner (1) also rotates 2 and 3; the lower right corner (3) also rotates 4; the lower left corner (4) also rotates 3 and 4.
Turn the center tile 3 times.
Turn Tiles 1, 2, and 3 each 3 times in that order.
Turn Tile 4 twice.
Once it opens, take the notebook page and note the lock on the diary.
Screenshot
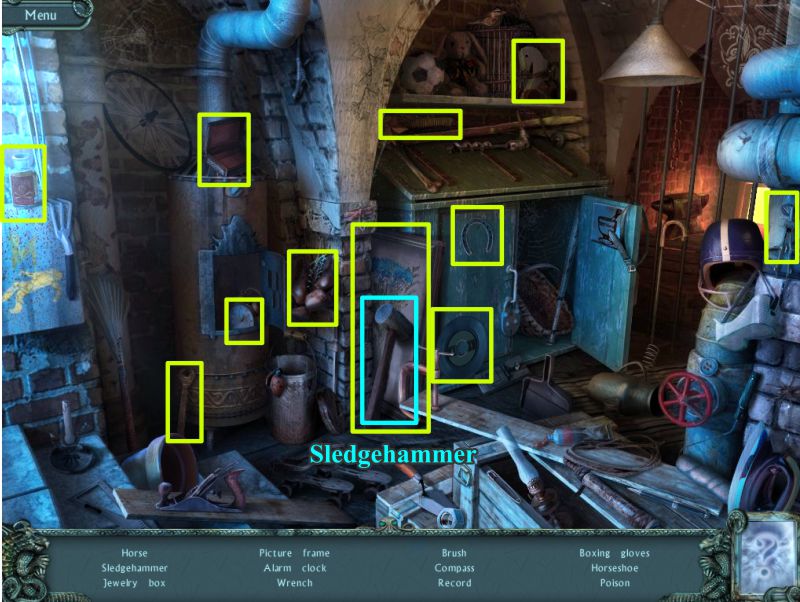
Mansion Basement
Go outside and enter the Basement for a Hidden Object Scene to get the Sledgehammer.
Screenshot
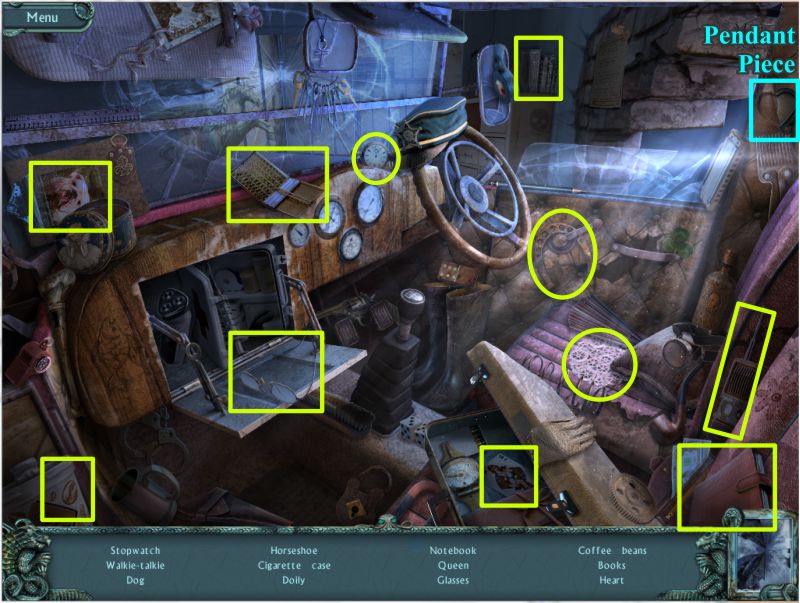
Police Station
Go to the Town Square and enter the Police Station.
Play the Hidden Object Scene in the truck to get the other Pendant Piece.
Screenshot
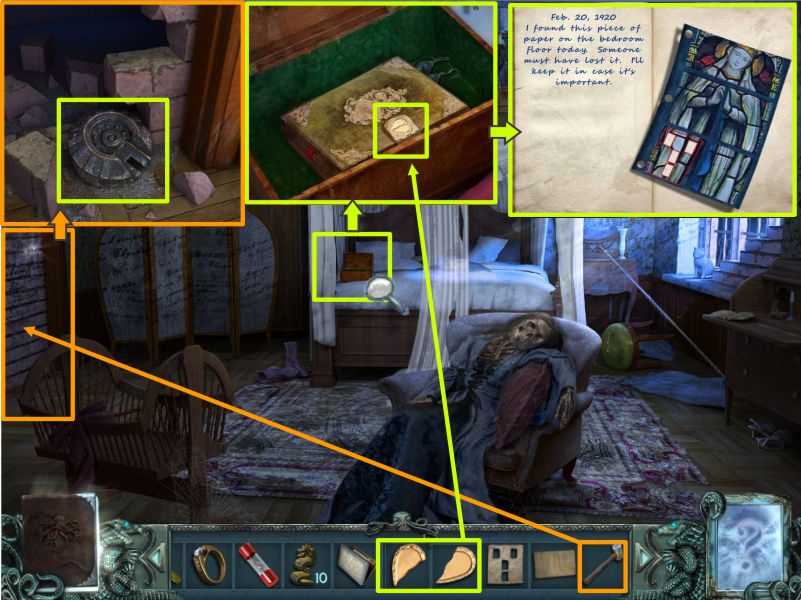
Mansion Bedroom
Go back to the Mansion Bedroom and use the sledgehammer to knock down the brick wall and pick up the strange disk.
Click on the box and place the heart pieces on the diary lock.
Click on the diary and read it.
Screenshot
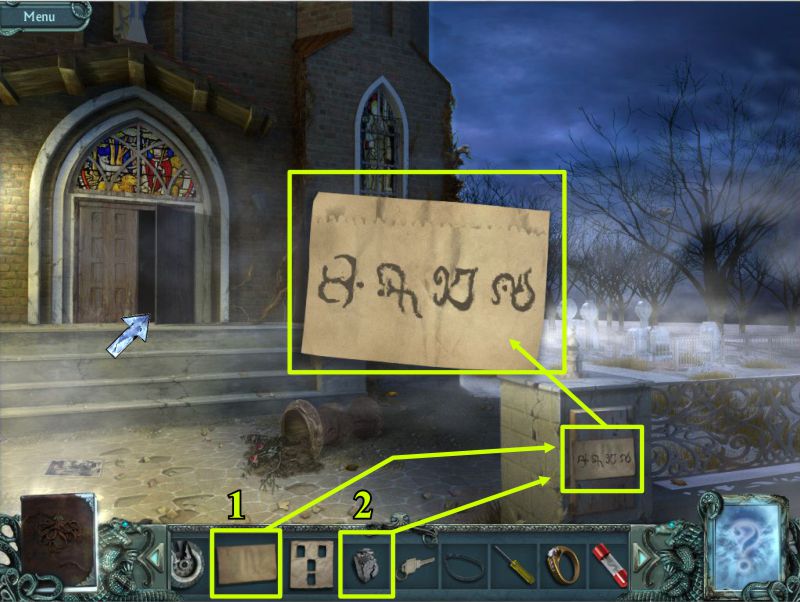
Church
Click back down to the fountain and take the left path to the Church.
Use your notebook page and coal to make a rubbing of the post with the writing on it.
Go into the Church.
Screenshot
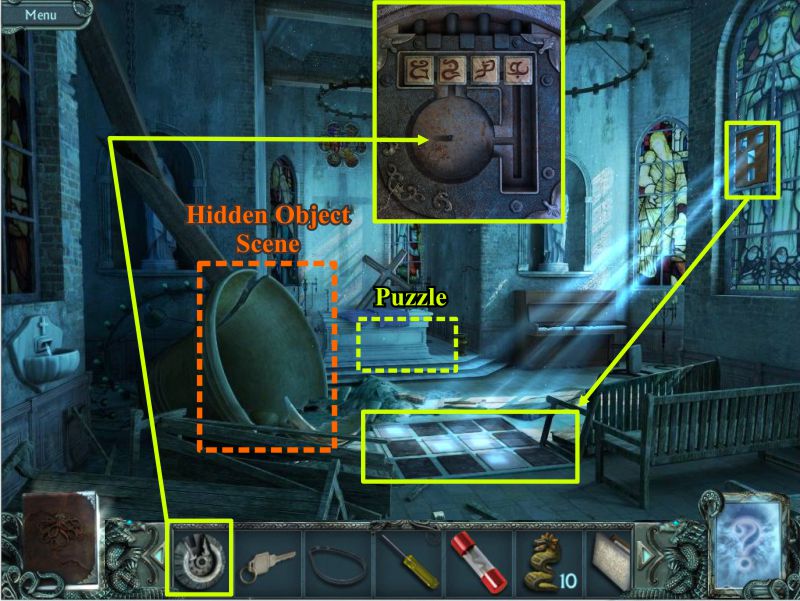
Go to the Stained Glass Window you cleaned last time you were there and place the stencil in the lower left corner.
Use the diamond ring to etch the holes in the stencil and the light will shine through onto the floor.
Screenshot
Turn the 4 tiles until they shine brighter. The altar will move, revealing a hatch with a puzzle lock.
Place the strange dial you got from the bricked up door on the puzzle to begin it.
Screenshot
Altar Hatch Puzzle
The etching you made shows you how the tiles should line up. Use the dial to move the tiles and turn them around so they line up in the proper order and position.
The screenshot shows a step-by-step procedure to get to the solution.
When you've opened the hatch, take the snake figurine inside.
Screenshot
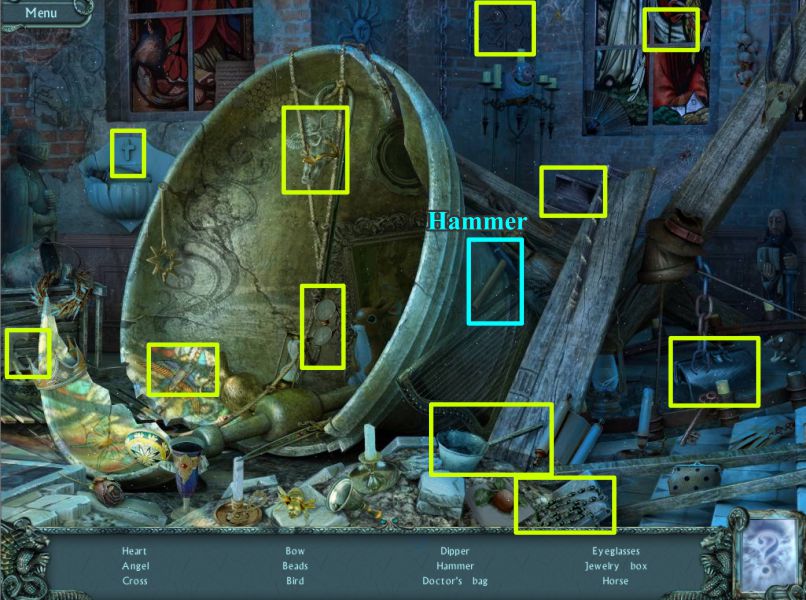
You now have a Hidden Object Scene to play so you can get a Hammer.
Screenshot
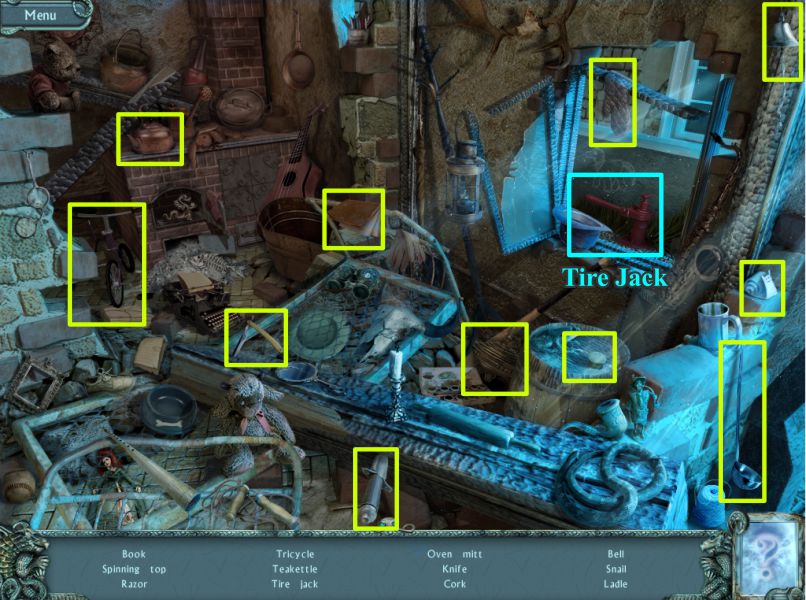
Click down twice and click on the sparkles at the left for a Hidden Object Scene.
Collect everything including the Tire Jack.
Screenshot
Town
Exit down twice and take the right fork to the Town Square.
Use the Tire Jack to lift the front of the truck.
Go into the Police Station and check out the file that was under the truck.
Open the file and find a random phone number that will be recorded in the Journal.
Go outside and through the gate to the outside of the Mansion and click for a close up of the statue.
Use your hammer to break the panel and take the key.
Note the figures that require some sort of a code.
Screenshot
Foggy Path
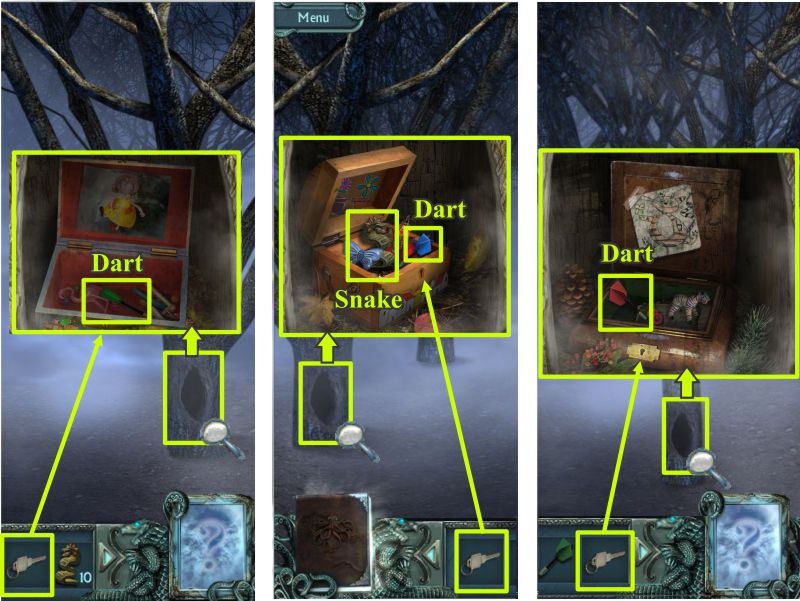
Take the path toward the Mansion Basement and then go forward twice, left and forward again.
Click on the tree at the right with the hollow. Use your key to open the box that is inside so you can pick up the dart.
Go down twice, forward once and right twice to the hollow tree on the left.
Click for a close up and use the key to pick up another dart and a snake figurine.
Go down once and forward once to one more hollow tree on your right.
Click on the hollow, use your key and pick up a third dart.
Screenshot
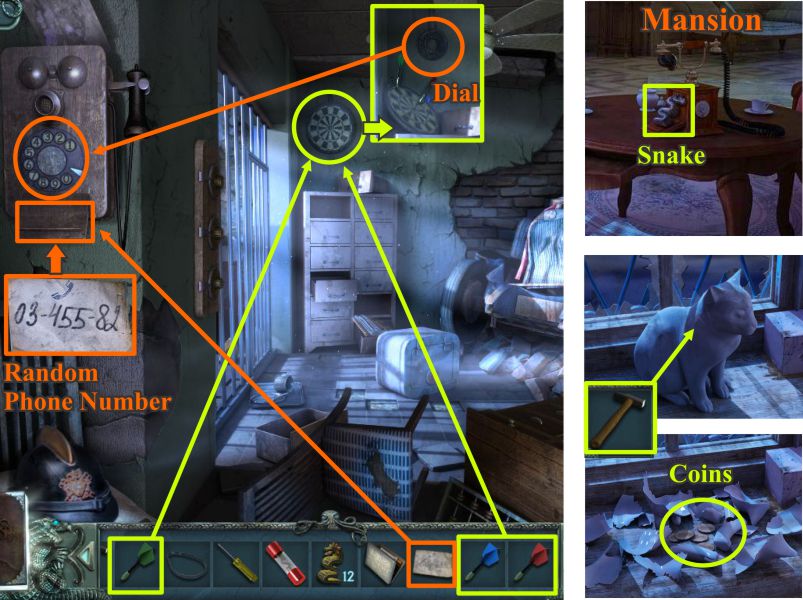
Police Station
Go down 7 times to the Town Square and enter the Police Station.
Throw the 3 darts on the board and it will fall revealing the dial.
Place the dial on the phone and the note with your random number under it.
If you can't read the number to dial it, you can find it in the Journal.
Dial the number and the phone will ring in the Mansion.
Mansion
Go to the Mansion and collect the snake figurine from the phone.
Go upstairs to the Bedroom and hit the cat with the hammer from your inventory and take the coins.
Screenshot
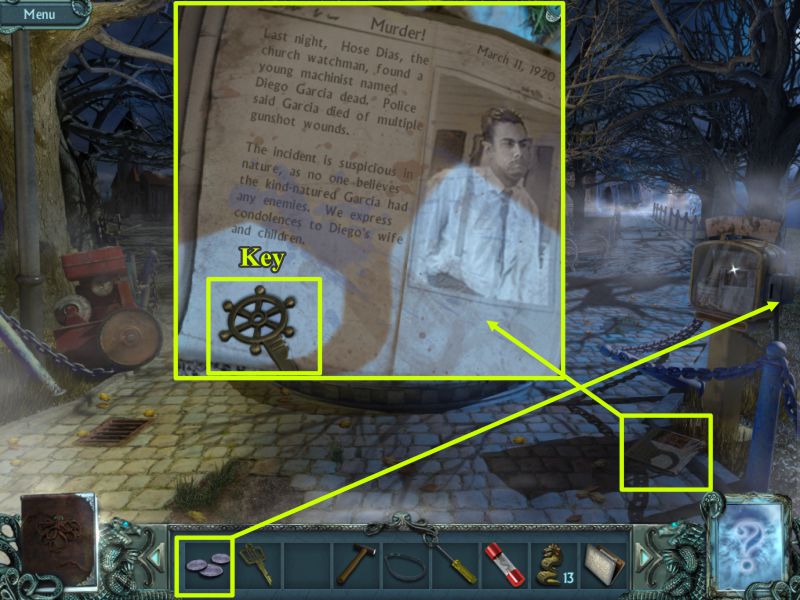
Fountain
Go back to the Town Square and then down once to the fountain.
Use the coins in the newspaper machine, pick up the newspaper and read it.
Take the key from the corner of the newspaper.
Screenshot
Ship
Walk down twice and head to the ship.
Climb in and go to the Doctor's Quarters for a Hidden Object Scene under the bed.
Collect everything including the key.
Screenshot
Go out into the Corridor and click for a close up on the hatch.
Use your 3 keys to open the hatch and take the snake figurine.
Screenshot
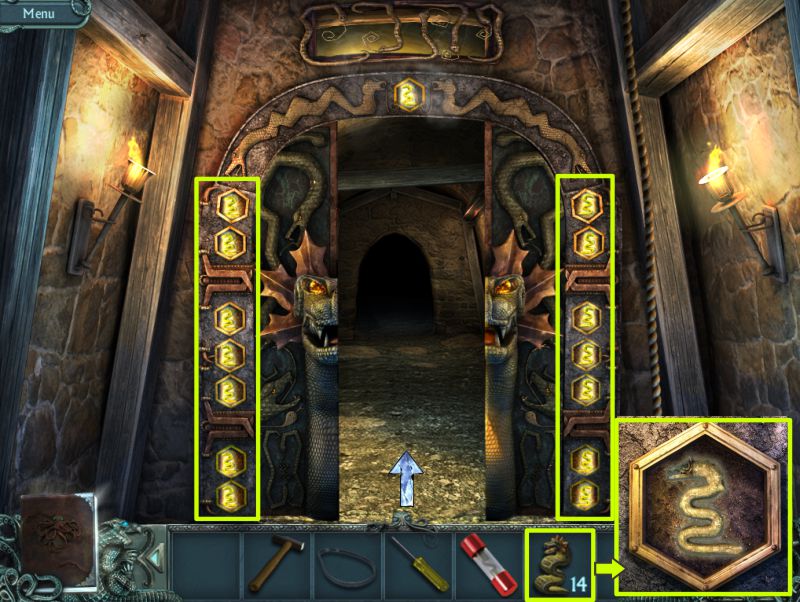
Snake Door
You now have all of the snake figurines, so go to the beach, into the Cave and down the hole to the door.
Place your 14 snakes in each indentation in the door and it will open for you to enter.
Screenshot
Try to open the hatch, only to find out it is too heavy.
Take note of the hook in the ceiling and exit.
Chapter 4
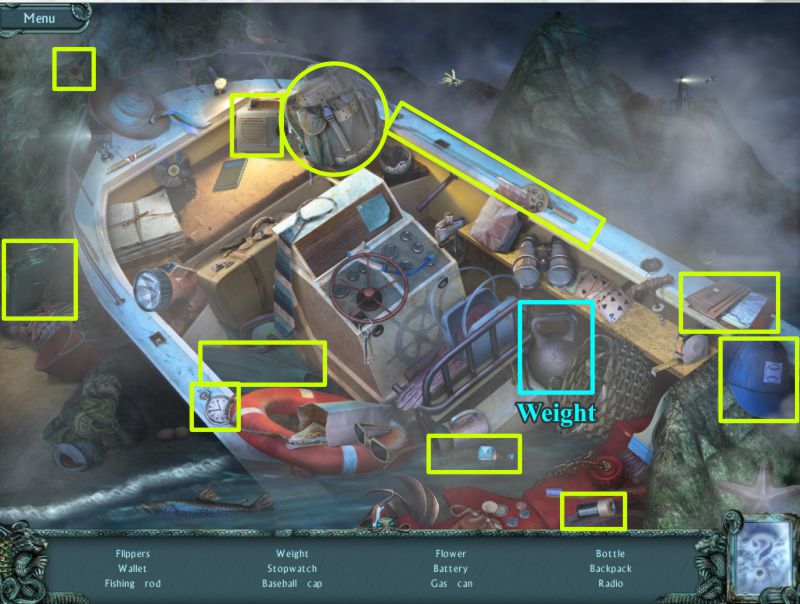
Beach
Leave the Cave and go to the Beach, then click on the wrecked boat for a Hidden Object Scene to get a Weight.
Screenshot
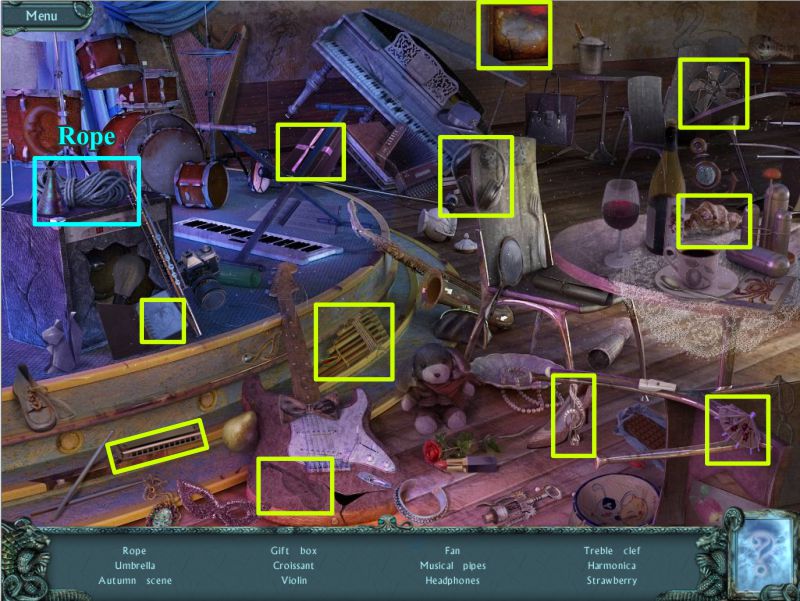
Ship's Dining Room
Go back to the Ship and enter the Dining Room for a Hidden Object Scene so you can collect a Rope.
Screenshot
Cave
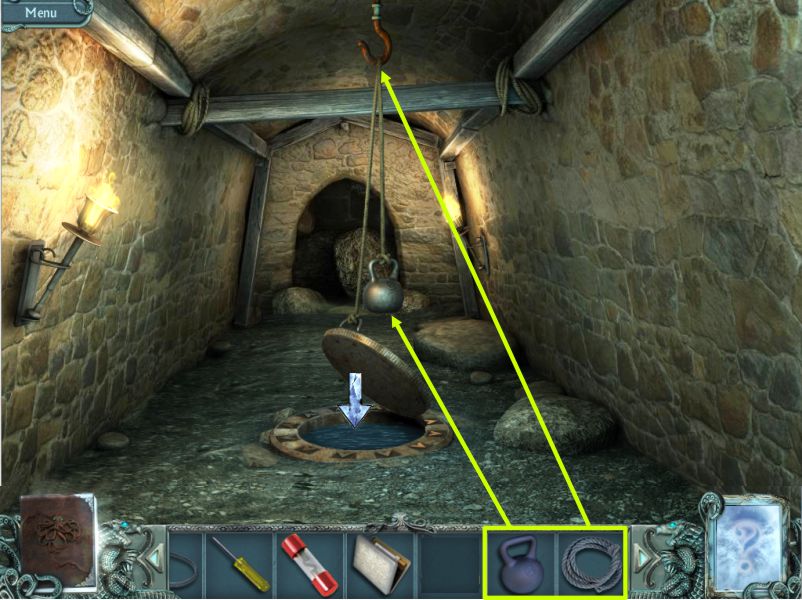
Go to the Cave, down the hole and through the snake door.
Place the rope on the hook and it will attach itself to the hatch.
Put the weight on the other end of the rope and the hatch will open. Go down the hatch.
Screenshot
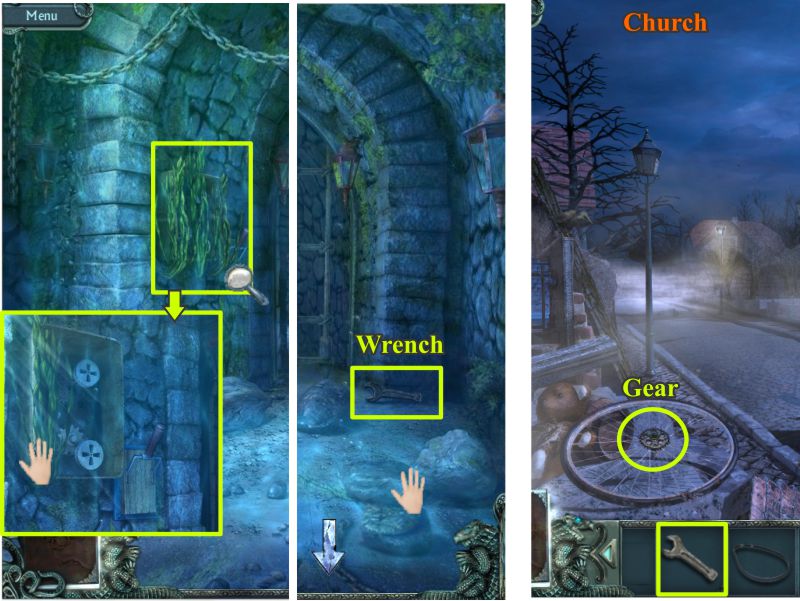
Click on the seaweed for a close up and remove it from the gate mechanism to see that parts are missing.
Move the rocks at the right and pick up the wrench.
Go back to the beach, head toward town, take the left fork, and turn right to the Church.
Use the wrench to remove the nut from the wheel and take the gear.
Screenshot
Go back to the cave, down the hole, through the snake door and down the hatch.
Place the gear and band on the gate mechanism and throw the handle.
The gate moves a little and then stops.
Leave the cave and head to the Town Square.
Take the jack from the truck and go back to the gate.
Place the jack under the gate; while it is working, the ground gives way and the jack falls in.
The only way under the gate is to swim, so down you go. Then head up again to the other side of the gate.
Screenshot
Pick up Angel's bracelet to the left on the ground and head forward.
Take the left fork, go forward, turn right and go forward to what appears to be a temple.
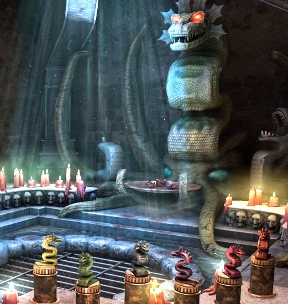
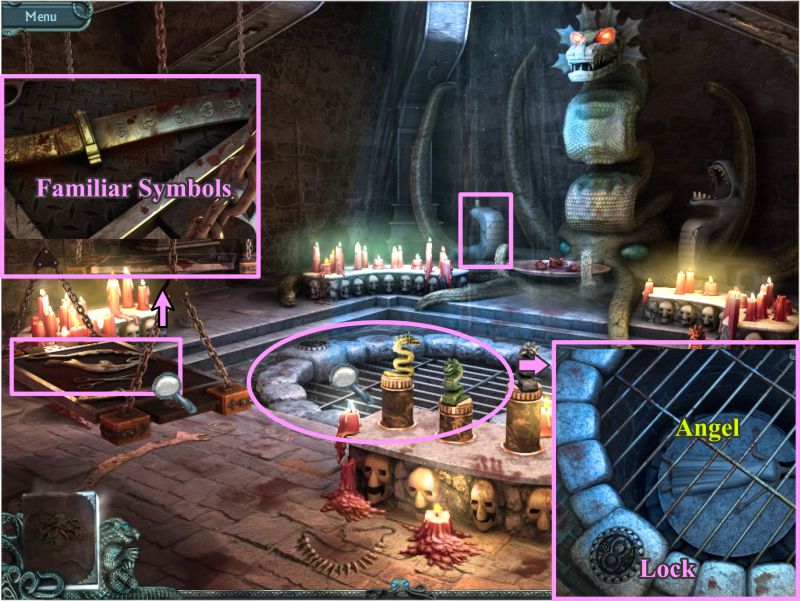
Temple
Look at the headless snake, peer down the grate and see Angel, look at the sword and notice the familiar symbols that will be noted in the Journal.
Screenshot
Walk down 12 times and you should be on the beach.
Head to town, take the right fork to the Town Square and go through the gate.
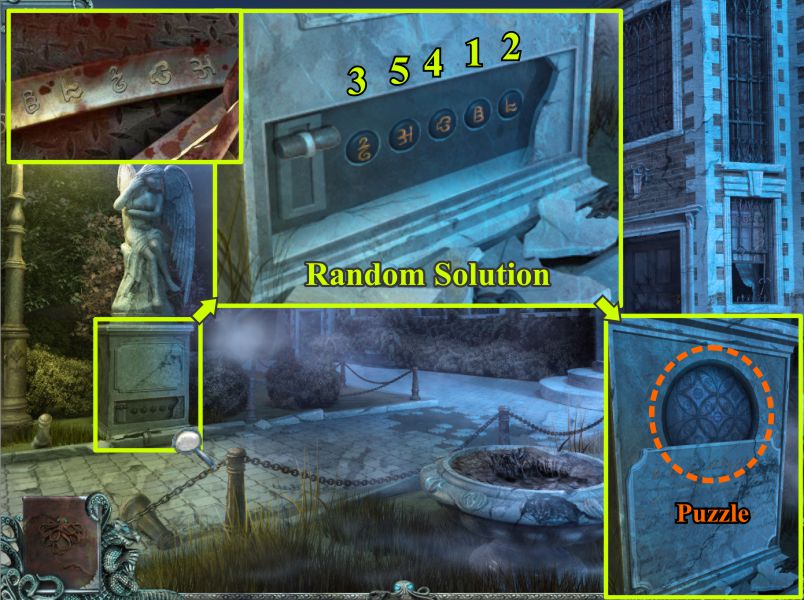
Statue Outside Mansion
Click on the statue and press the symbols in the order shown on the dagger from the Temple.
The symbols and solution are random.
The top panel will fall down. Click on the circle for a puzzle.
Screenshot
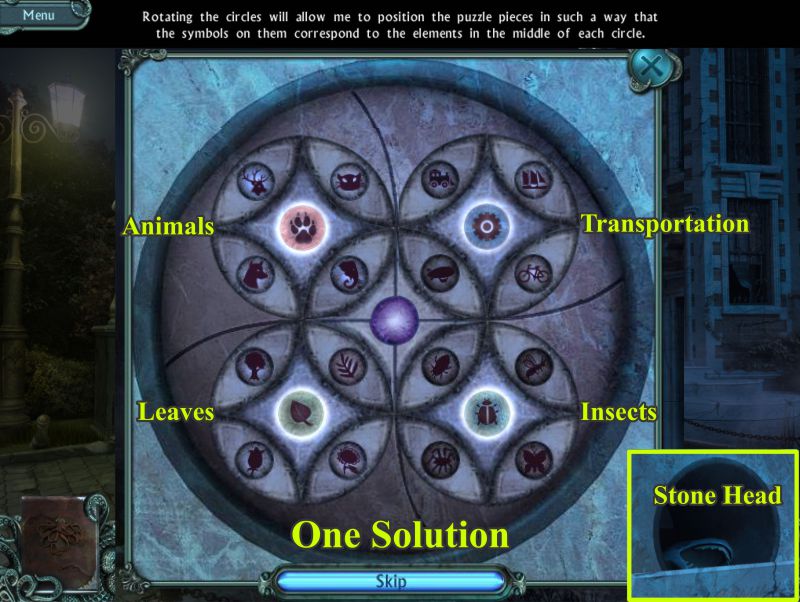
Statue Puzzle
Your goal is to turn the wheels so that the symbols on each wheel match the inner symbol on that wheel: Animals, Transportation, Leaves, and Insects.
The outer symbols can be in any configuration so long as they match.
The compartment will open for you to take a Stone Head once the puzzle is solved.
Screenshot
Temple
Go back to the beach and cave and follow the catacomb maze to the Temple.
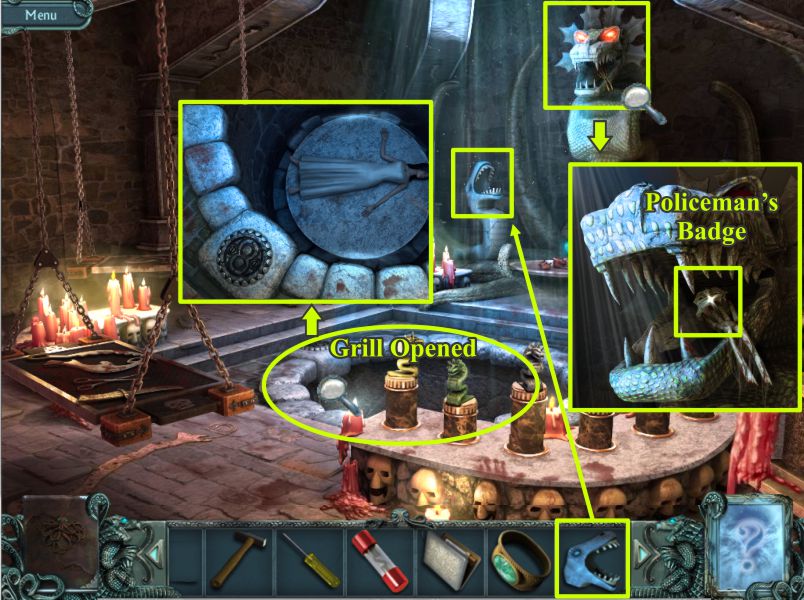
Place the stone head on the snake and the large snake will open its mouth.
Click for a close up and take the Policeman's Badge.
The grill will open but it's too far down to get to Angel.
Screenshot
Click down 12 times to the Beach and then head to town.
Police Station
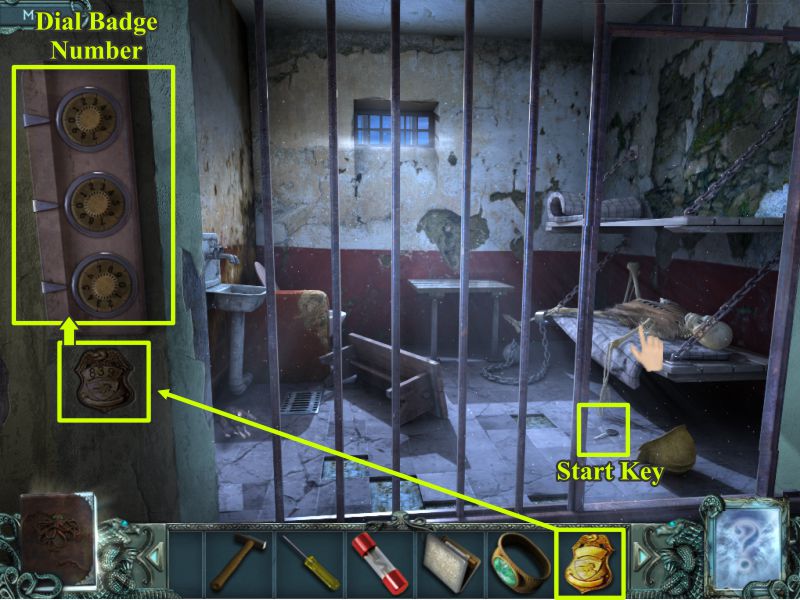
Click on the Jail Cell and place the badge in the indentation.
Check the Journal for the number on your badge because it is random.
Starting with the top dial, enter the number on the 3 dials 1 digit at a time.
The cell door will open. Touch the skeleton's arm and it will drop the Start Key for you to pick up.
Screenshot
Click down 3 times to the fountain and take the left fork twice to the map of the dock.
Dock
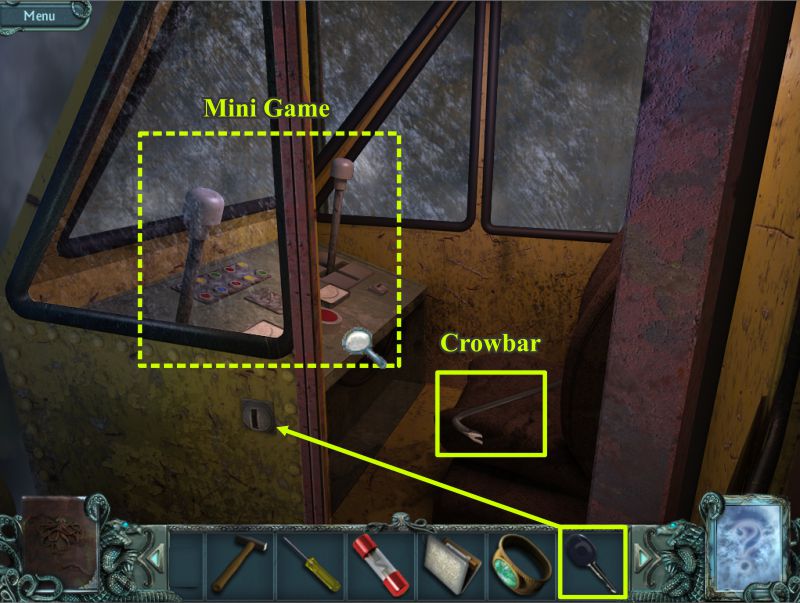
Go right twice, forward twice and then onto the dock for a close up of the crane.
Use the Start Key to open the door and then take the Crowbar.
Click for a close up of the controls.
Screenshot
Crane Mini Game
Put the key in the ignition (1) and turn it on.
Wash the window (2).
Pull the left lever (3) forward.
Move the right lever (4) to the right.
Push the red hook button (5).
Move the right lever (4) to the left twice and up once.
Move the left lever (3) up.
Push the red hook button (5).
Screenshot
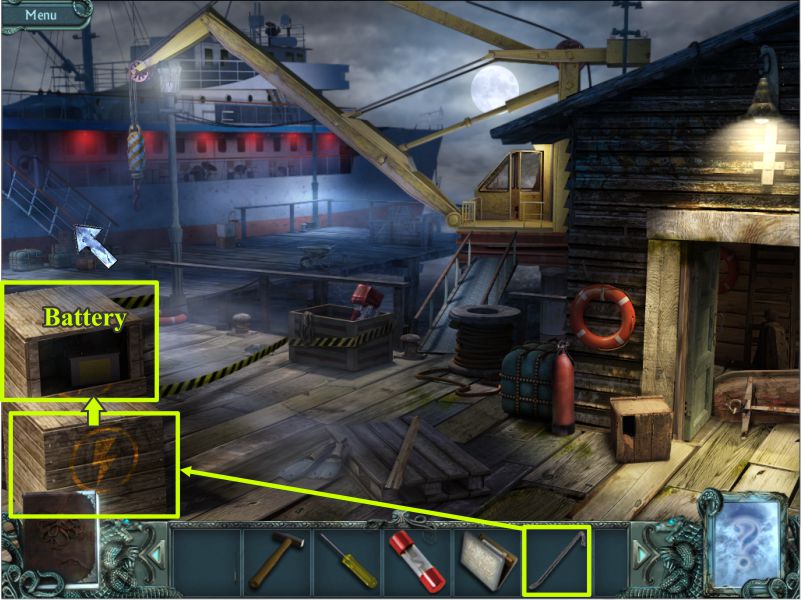
Once you are back on the Dock, use your crowbar 3 times on the box with the lightning bolt and take the Battery.
Use the ramp you just put in place to board the ship.
Screenshot
Ship
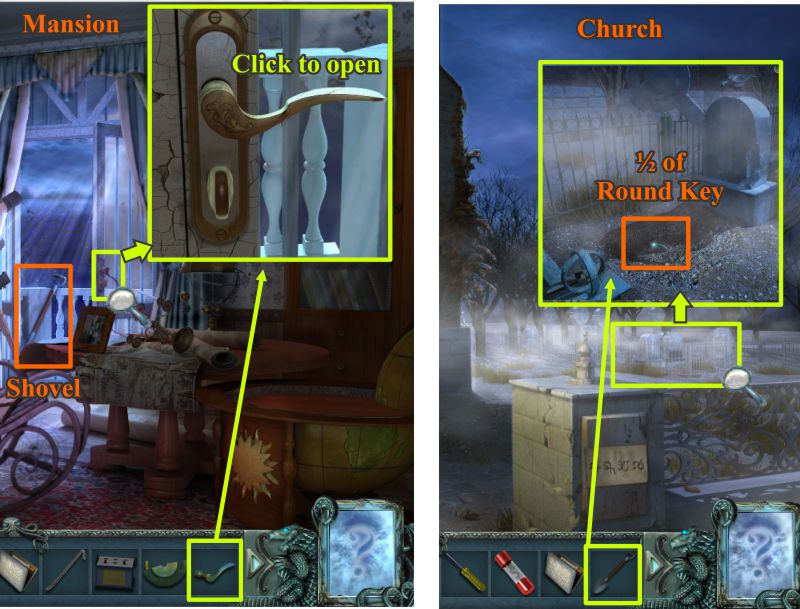
Use your hammer to break the glass at the far left and take the half of a round key.
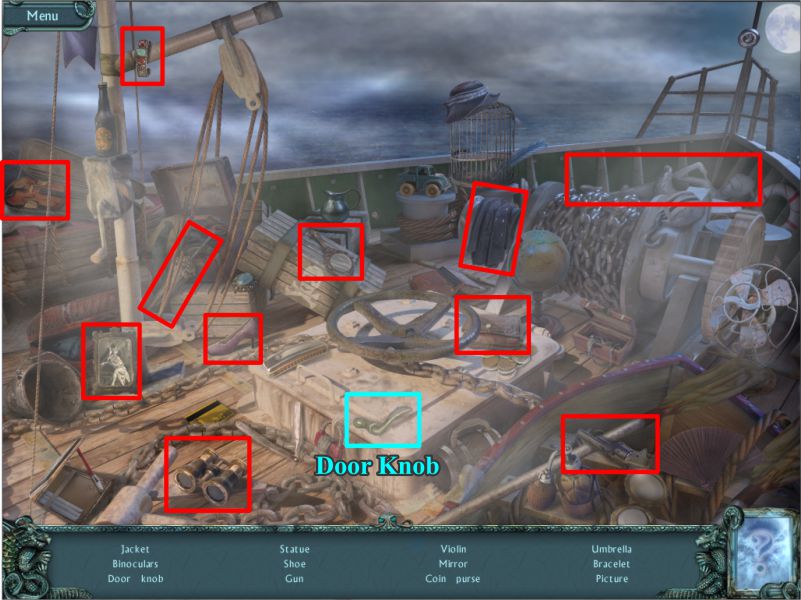
Note the door needs a valve to open it. Play the Hidden Object Scene.
Screenshot
Collect everything including the Door Knob.
Screenshot
Leave the ship, click down 9 times to the Beach.
Go into the Cave, down the hole, through the door, down the hatch, and under the gate.
Catacombs and Temple
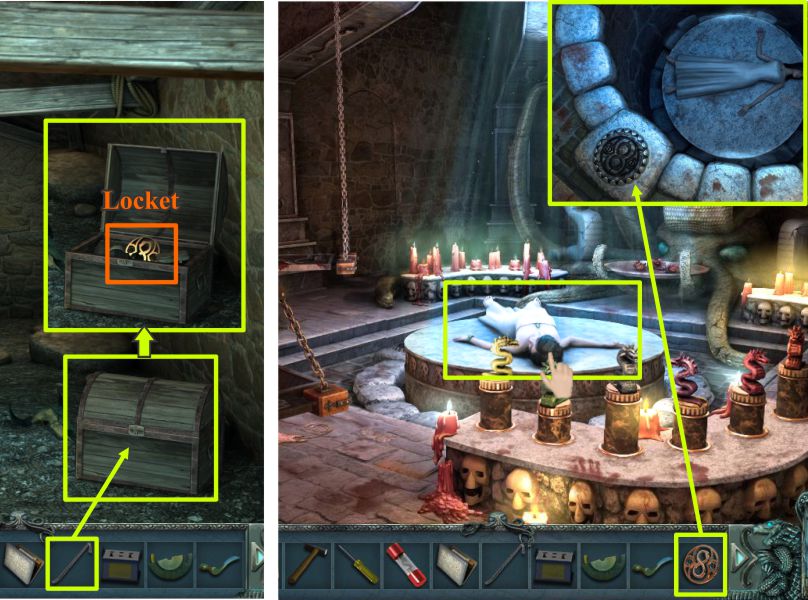
This time go forward twice and then left where you will encounter a chest.
Use your crowbar 3 times to open it and take the Locket.
Go down once, right once, and forward to the Temple.
Click for a close up on the pit and place the locket as a key.
When the platform rises, grab Angel and get out of there before the hooded person can contact you.
Screenshot
After you rescue Angel, you end up between the Beach and the Ship by the fire.
Leave her there and take the path to Town so you can go to the Mansion.
Chapter 5
Mansion and Church
Go upstairs to the Bedroom and click on the Balcony Door for a close up.
Place your Door Knob on the balcony door and click it to open it.
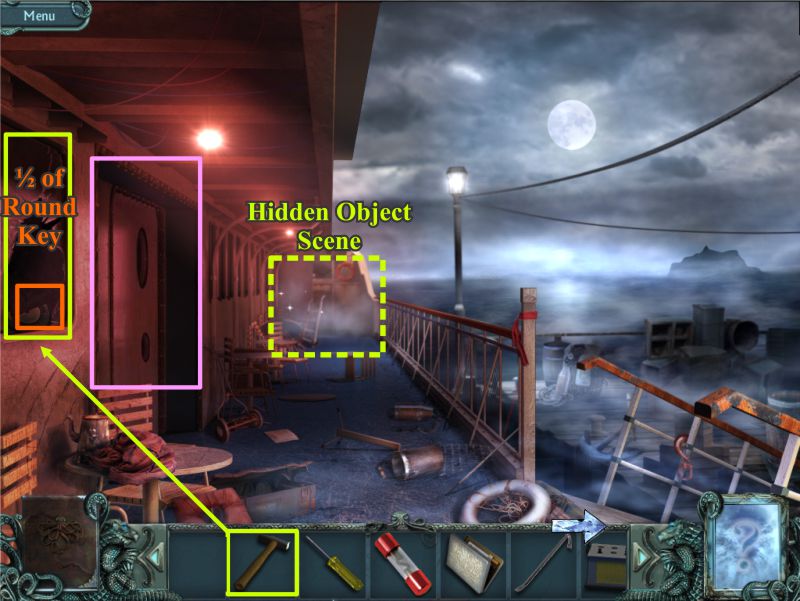
Take the shovel, click back down to the fountain and take the left path and then right to the Church Cemetery.
Click for a close up of the grave and use your shovel to dig up the other half of the round key.
Screenshot
Click down twice, go left, right twice, and forward twice to the Docks.
Docks
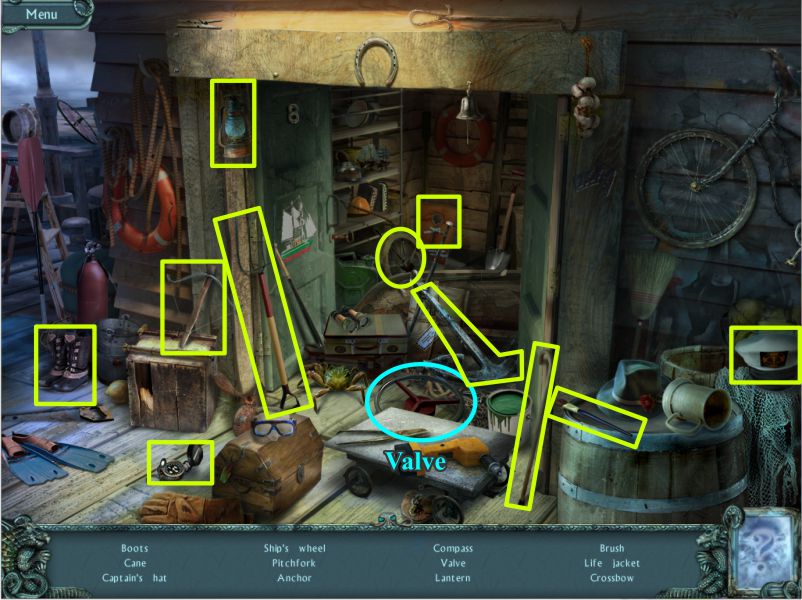
Enter and click on the sparkles at the right for a Hidden Object Scene.
Collect everything including the Valve.
Screenshot
Go aboard the ship and place the valve on the door to the left.
Turn the valve to open the door and enter.
Go down the stairs and through the door.
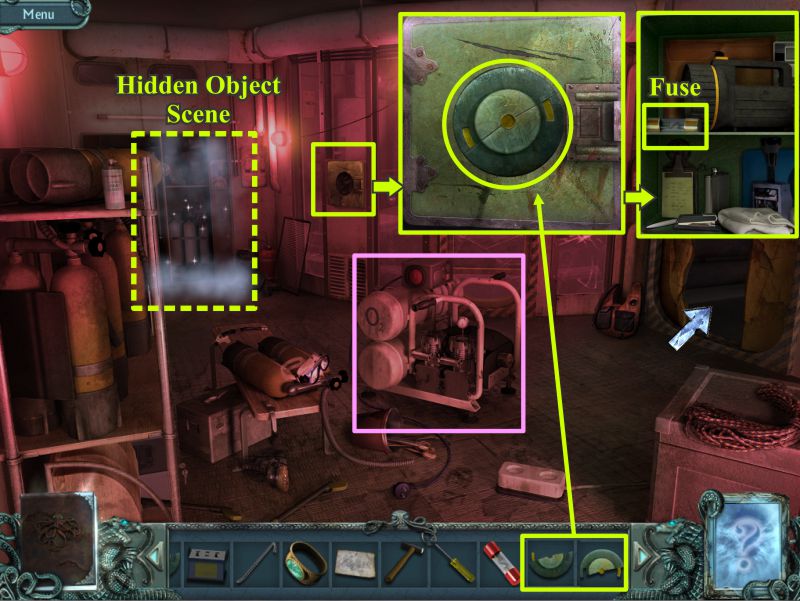
Check out the compressor and click on the safe for a close up.
Place the 2 halves of the round key on the safe to open it.
Take the Fuse that is inside.
Play the Hidden Object Scene before following the arrow to the Control Room.
Screenshot
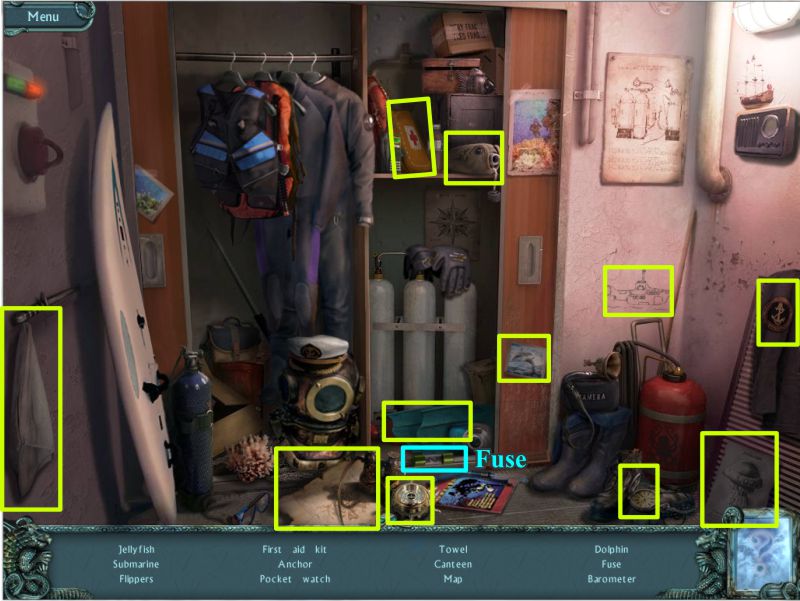
Collect everything including the Fuse.
Screenshot
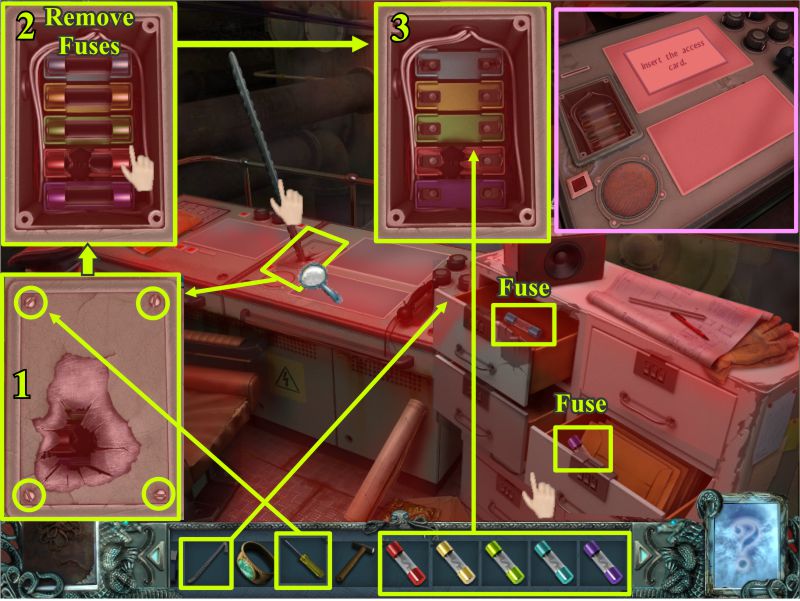
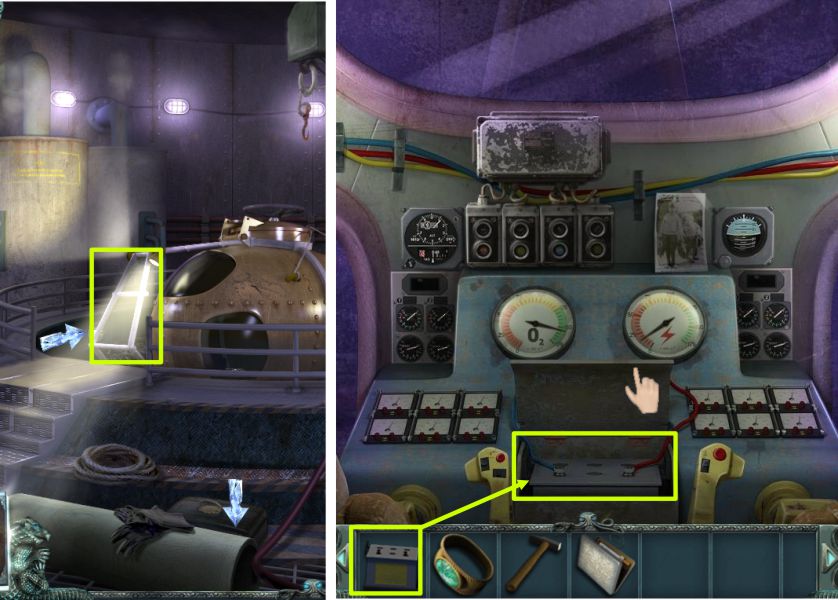
Control Room
Use your crowbar to open the top left drawer and take the Fuse.
Open the second drawer on the right and take the Fuse.
Click on the stake jammed in the control panel to remove it.
Click for a close up of the panel and use your screwdriver on each screw to remove it.
Touch the fuses to remove them and then install the new fuses from your inventory in their color-coded spaces.
Click for another close up of the panel to learn you need an access card.
Screenshot
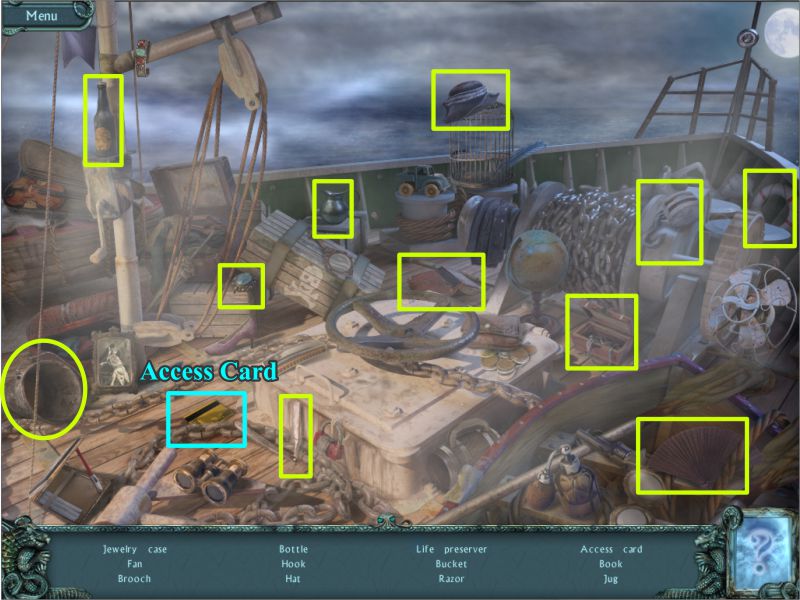
Deck
Go up on deck and click the sparkles for a Hidden Object Scene on the bow of the ship.
Collect everything to get the Access Card.
Screenshot
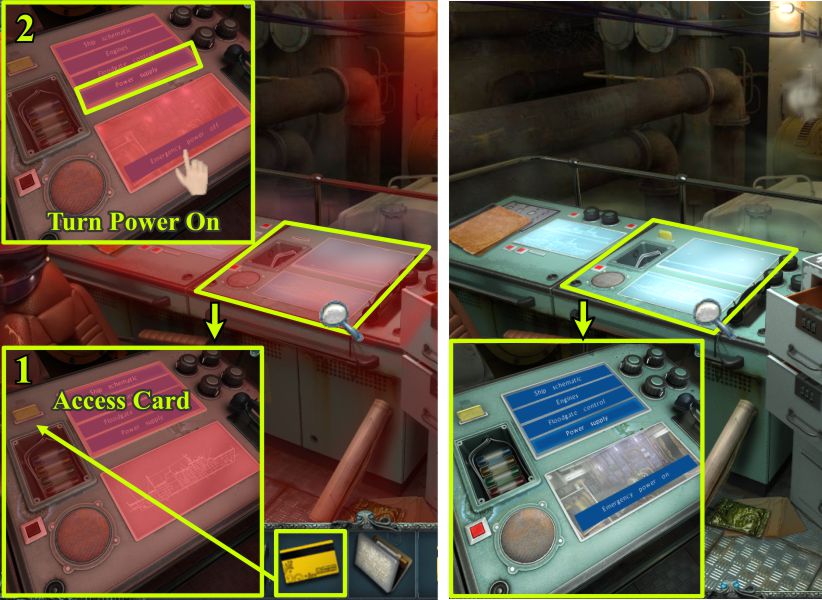
Control Room
Return to the Control Room and click on the Control Panel for a close up to insert the Access Card.
Click on the Power Supply to find out the Emergency Power is Off. Click to turn it On.
You will be transported to the dock as the lights go on all over the ship. Go aboard again and down to the Control Room to check the panel.
Screenshot
Exit the ship and walk down to the fountain and collect the fire hose.
Retrace your steps to the dock, board the ship and go downstairs.
Plug the air pump into the plug and attach the hose to the pump.
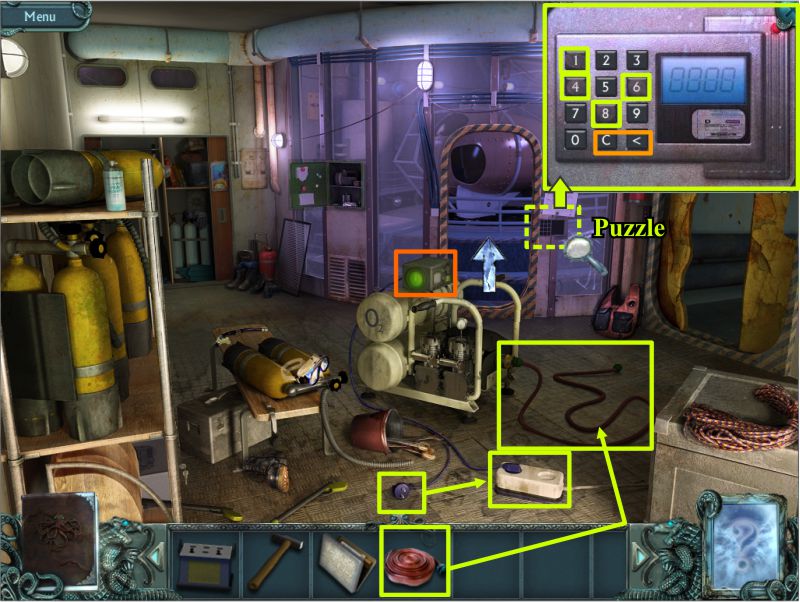
Click on the wall for a close up of the puzzle to open the door.
Four numbers are more worn than the others: 1, 4, 6, and 8.
The solution is random so take a wild guess and when you have the correct combination the door will open.
If a number is correct, it will register as green.
If you get a red number, you can backspace or use the clear "C" to start over.
When the door opens press the red button to turn on the air pump, pick up the nozzle of the hose and go through the door.
Screenshot
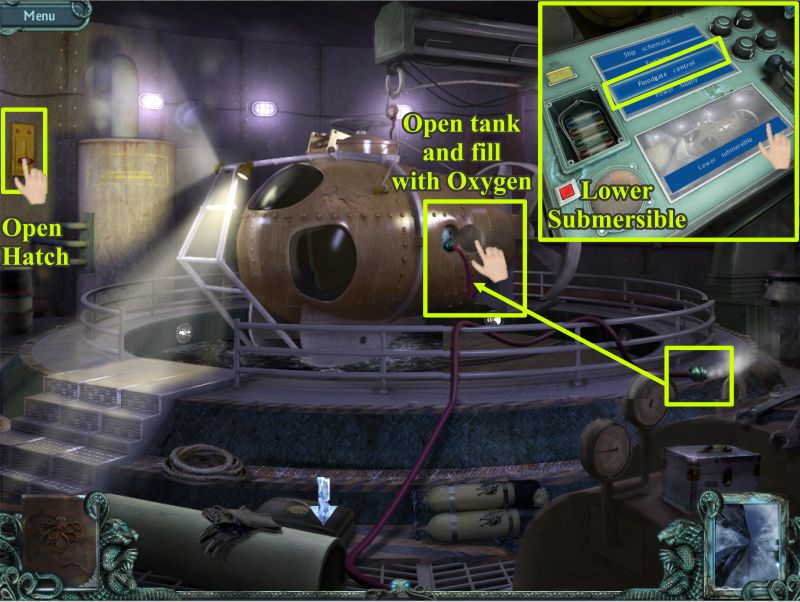
Submersible Tank
Open the tank, pick up the nozzle of the hose, fill the tank with oxygen, remove the hose and close the tank.
Throw the lever to open the hatch and go to the Control Room.
Turn off the air pump on your way.
Click on the Control Panel for a close up and select "Floodgate Control".
Press "Lower submersible" and go back to the tank.
Screenshot
Enter the submersible and note the dial in the red.
Open the battery compartment and take out the old battery.
Place the battery from your inventory in the compartment and the right dial will show you are good to go.
Screenshot
Watch the ending scenes because you have now completed your part of the game.
Posted by: Jazz |
November 5, 2010 12:47 PM
|
November 5, 2010 12:47 PM
Twisted Lands: Shadow Town Bonus Chapter Walkthrough
General Information
All the same basic tips apply to the Bonus Chapter as are listed in the original walkthrough.
Gears in a scene mean that there will be something you need to do when you have items available to take care of the task.
Part 1: Hunting Lodge
Outside Hunting Lodge
As you start the bonus, Mark is being chased by the demons but manages to escape to take shelter in what turns out to be a Hunting Lodge.
Your first task will be to get inside. Check out the sparkling Hidden Object Scene at the right to see if you can find help.
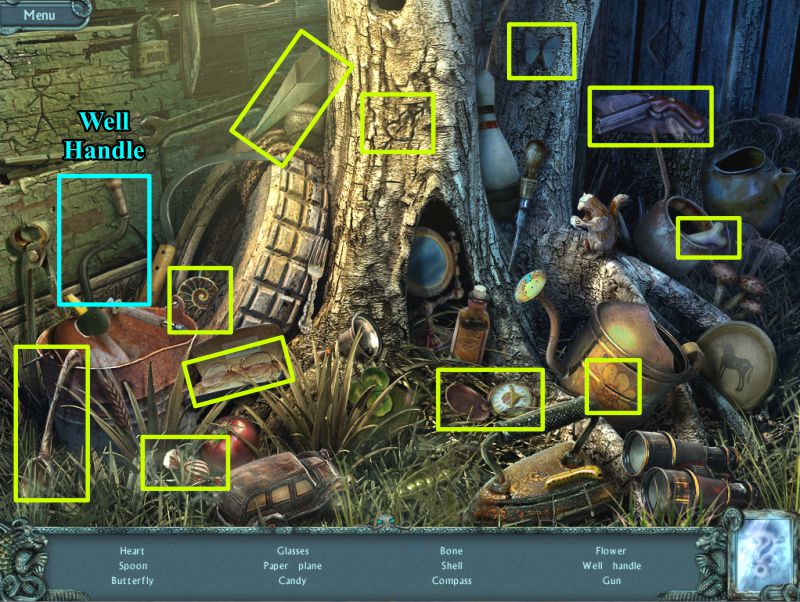
Outside Hunting Lodge Hidden Object Scene
Collect everything to get a Handle for the Well.
Screenshot
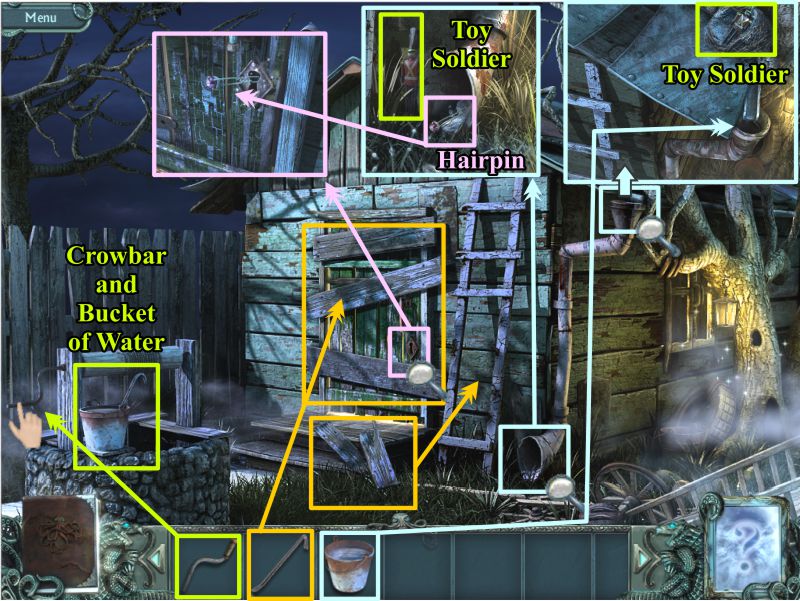
Outside Hunting Lodge
Place the handle on the well and turn it.
A Bucket of Water with a Crowbar in it will surface, so take both of them.
Use the crowbar to remove the boards off the door.
Collect the boards and place them on the ladder.
Check out the drain pipe and find the Toy Soldier on the roof.
Pour the bucket of water down the drain pipe and check to see what you find at the bottom.
Take the Toy Soldier and Hairpin.
Zoom in on the door and use the hairpin to pick the lock, and then enter the Hunting Lodge.
Screenshot
Hunting Lodge
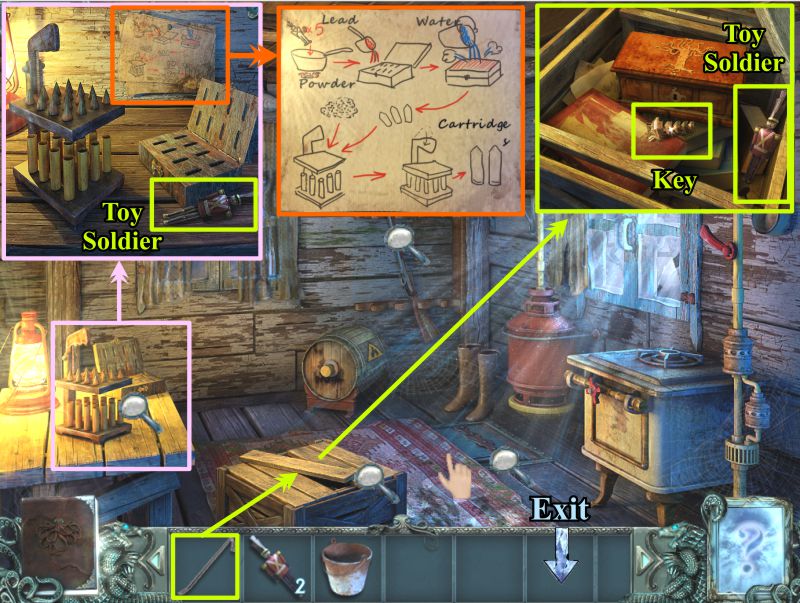
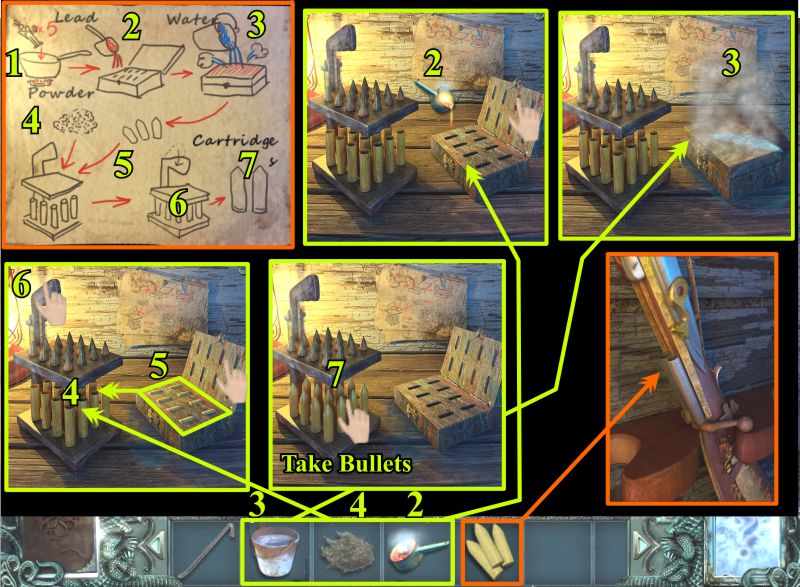
Use the crowbar to open the wooden box to take the Toy Soldier and Key.
There's a gun on the wall so you can defend yourself from the monsters, but you need to make some bullets.
Check out the table at the left, pick up the Toy Soldier, and read the formula for making bullets.
Move the rug to discover a hatch that is sealed around the edges.
Go back outside and click on the sparkles for another Hidden Object Scene to see what you can find.
Screenshot
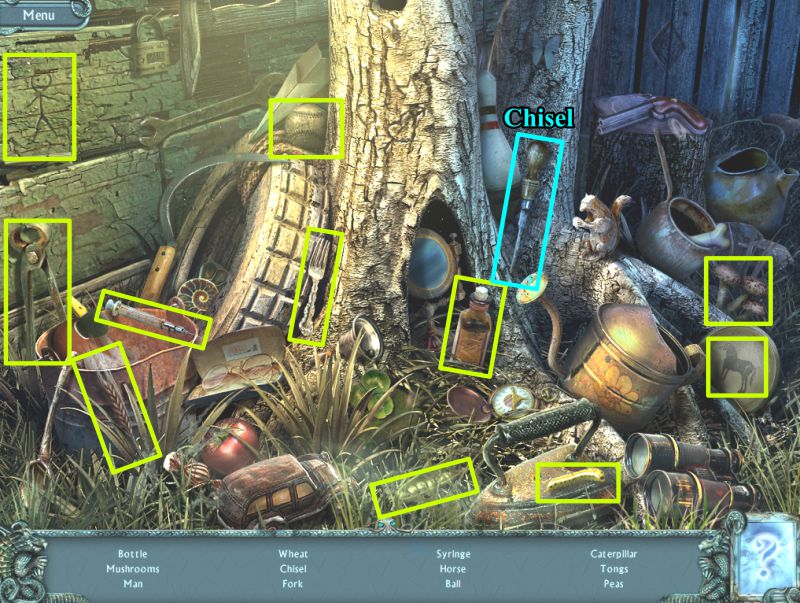
Outside Hunting Lodge Hidden Object Scene
Collect everything to get the Chisel.
While you are outside, fill up your bucket in the well and then go back inside.
Screenshot
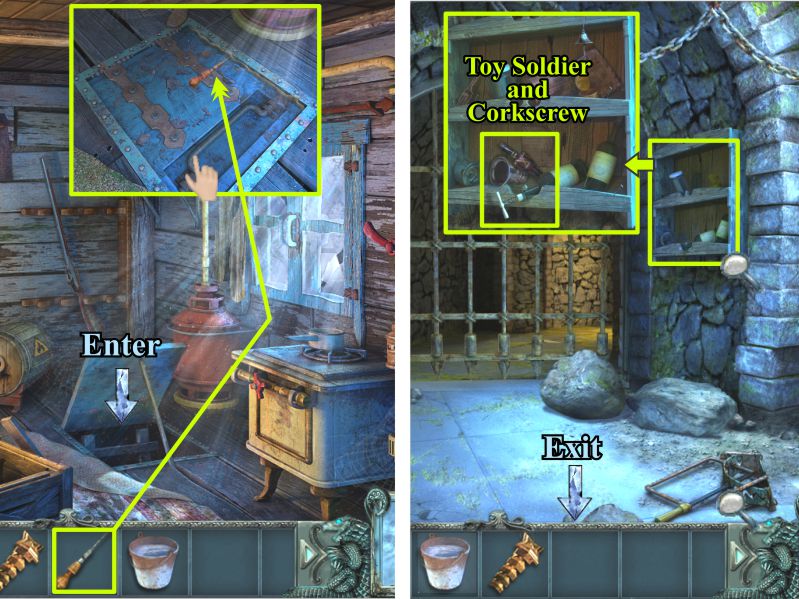
Hunting Lodge and Dungeon
Use the chisel to remove the sealant, open the hatch and go down the ladder. There turns out to be a Dungeon below.
Check out the trap and then click on the shelves for a close up.
Collect the Toy Soldier and Corkscrew before going back upstairs.
Screenshot
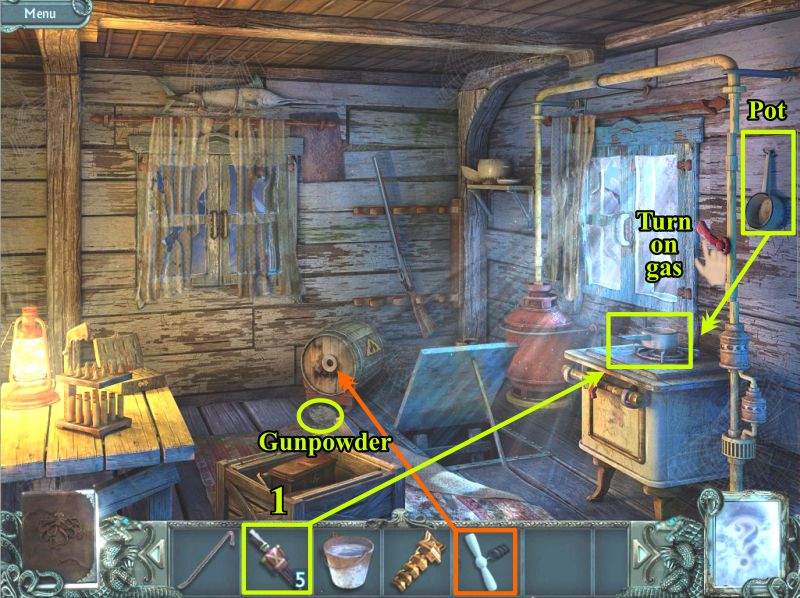
Hunting Lodge
Use the corkscrew of open the keg, and then pick up the Gunpowder.
Time to make bullets, so grab the Pot, place it on the stove and turn on the gas.
Place the 5 metal toy soldiers in the pot until they melt.
Be sure to check the screenshot for extra help.
Screenshot
Let's Make Bullets
The formula is posted in the screenshot and all the remaining steps are shown.
Zoom in on the table and get ready to be creative.
Your lead is now ready, so pour it in the molds.
Close the lid and pour your water over the box.
Place your gunpowder in the cartridges, open the box and add the lead cylinders from the box.
Remember to check the screenshot for a step-by-step.
Now you need to combine the gunpowder with the lead, so shape them by pushing down on the handle of the machine.
You now have bullets, so collect them.
Zoom in on the gun and load the bullets.
Screenshot
Outside and Inside the Hunting Lodge
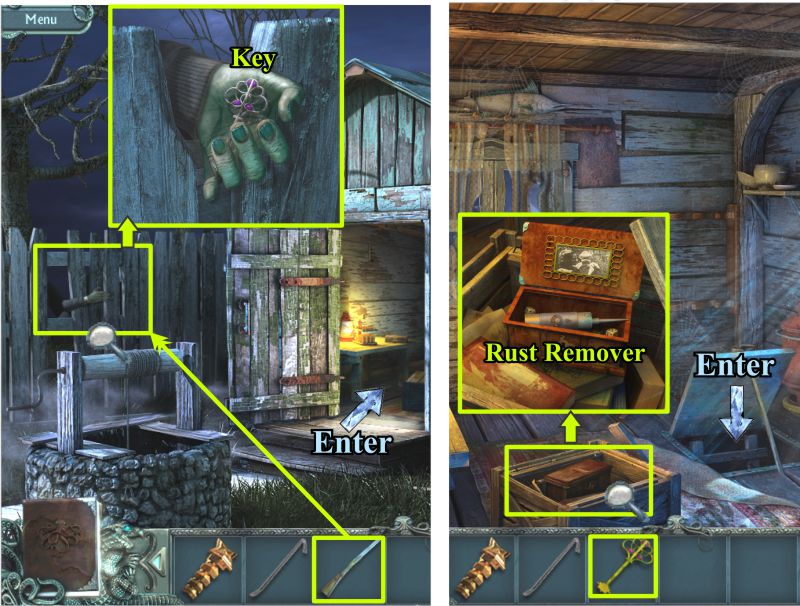
Go outside, place the gun against the fence and watch it shoot.
Zoom in on the monster's hand and take the key he is holding.
Go back inside and click on the wooden box.
Use the key you just got to open the little box and take the Rust Remover.
Go down to the Dungeon.
Screenshot
Dungeon and Lighthouse
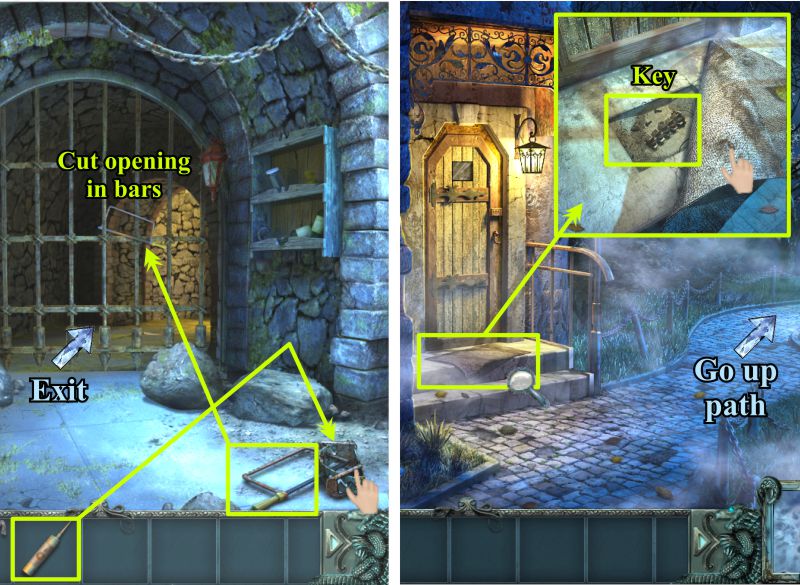
Use the Rust Remover on the trap and then open it.
Take the saw and use it to cut the bars so you can exit to the tunnel.
Go down the tunnel until you come to the Lighthouse.
Zoom in on the mat, lift it, and take the Key.
Travel the path at the right into the park.
Screenshot
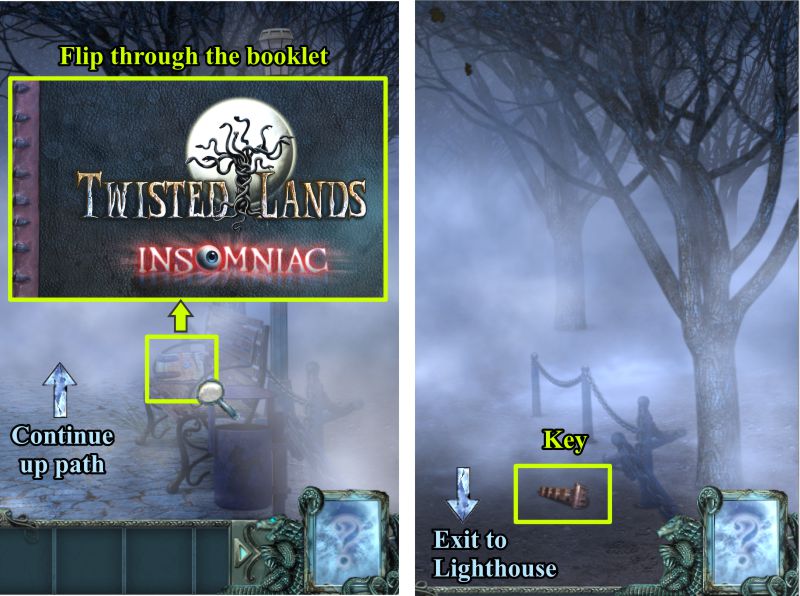
Foggy Park
First stop is the park bench with the booklet.
Check it out and flip through the pages.
Continue forward and grab the Key before heading back to the Lighthouse.
Screenshot
Part 2: Lighthouse
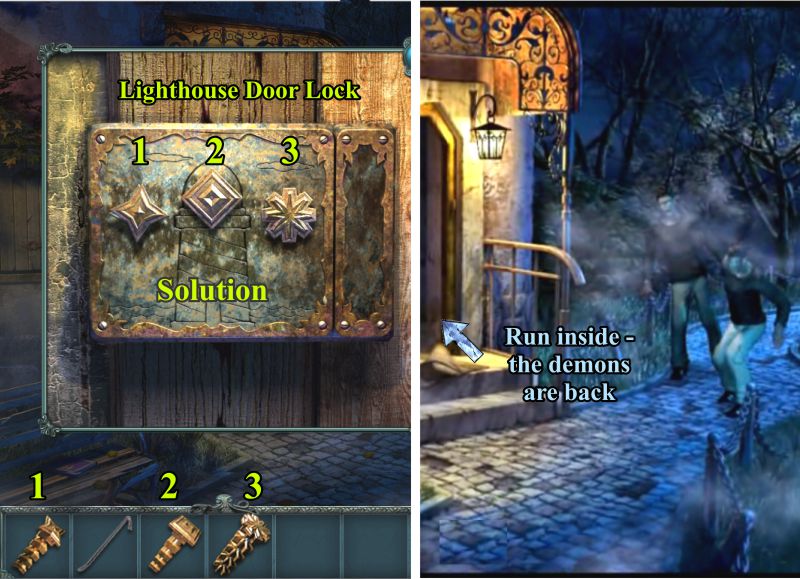
Lighthouse Entrance
Zoom in on the Lighthouse door lock and place all three keys as shown in the screenshot.
When the door opens, run for it because the monsters are after you again.
Screenshot
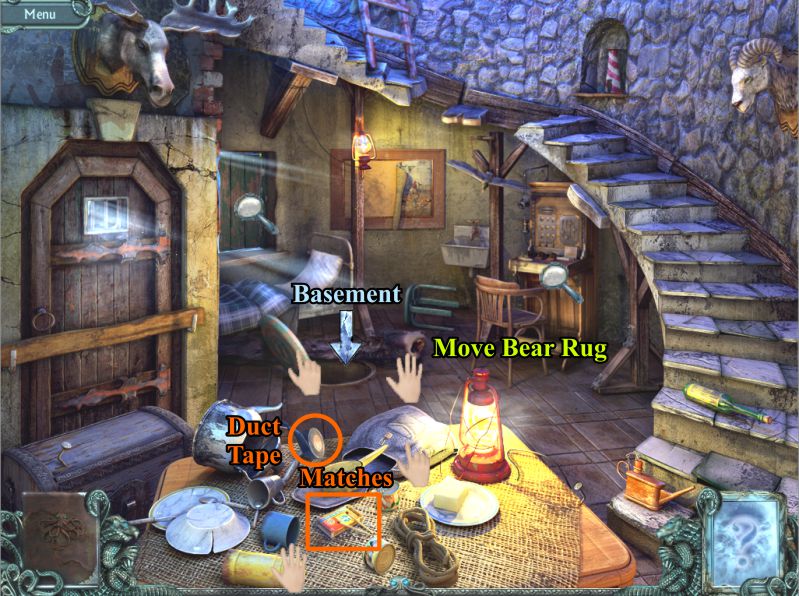
First Floor
You need to secure and window and door, but first you need to find something to use.
Click on your backpack to see what is available.
Move whatever you need to around in order to find the matches.
Also pick up the Duct Tape and move the bear rug.
You have uncovered the hatch to the basement, so open it and go on down.
Screenshot
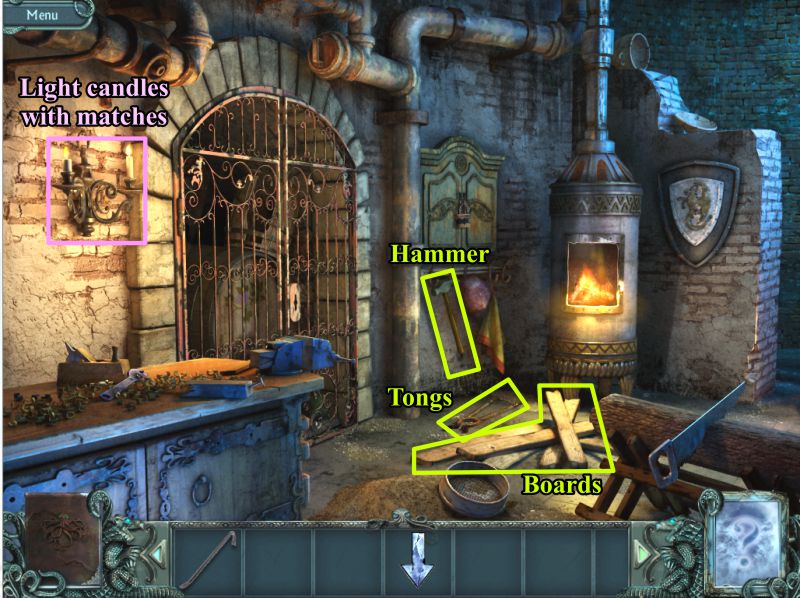
Basement
It's dark in the basement, so light your matches and search for the candles at the left.
Light the candles, and once you can see everything, pick up the Hammer, Tongs, and Boards marked in the screenshot.
Everything else seems to be locked, so go back upstairs.
Screenshot
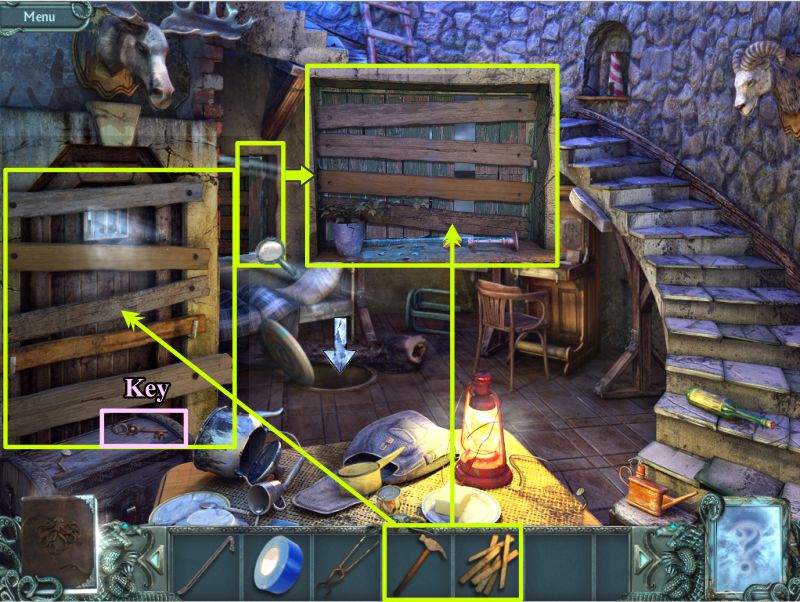
First Floor
Go back upstairs and use the boards and hammer to cover the window and then the door.
The moose head drops a key, so pick it up and return to the basement.
Screenshot
Basement
Use the key you found to open the gate at the left and play the Hidden Object Scene it triggers.
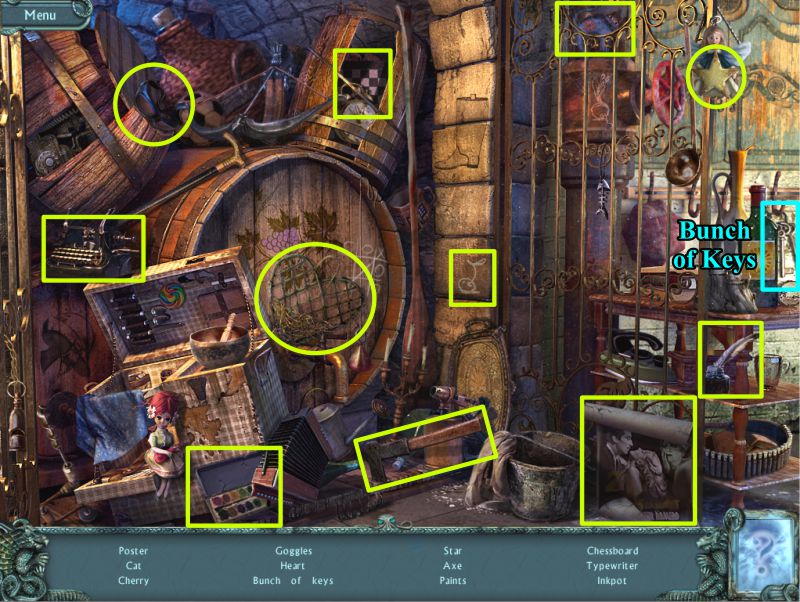
Basement Gate Hidden Object Scene
Collect everything and get a Bunch of Keys.
Screenshot
Basement
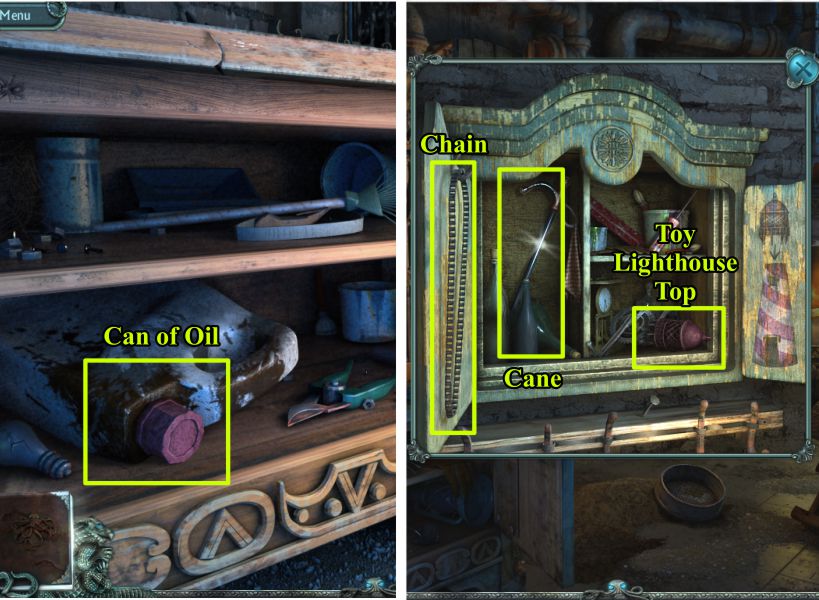
Unlock the wall cabinet and the standing cabinet at the left of the scene.
Take the Can of Oil from the standing cabinet and the Chain, Cane, and Toy Lighthouse Top from the wall cabinet.
Screenshot
First Floor Stairway
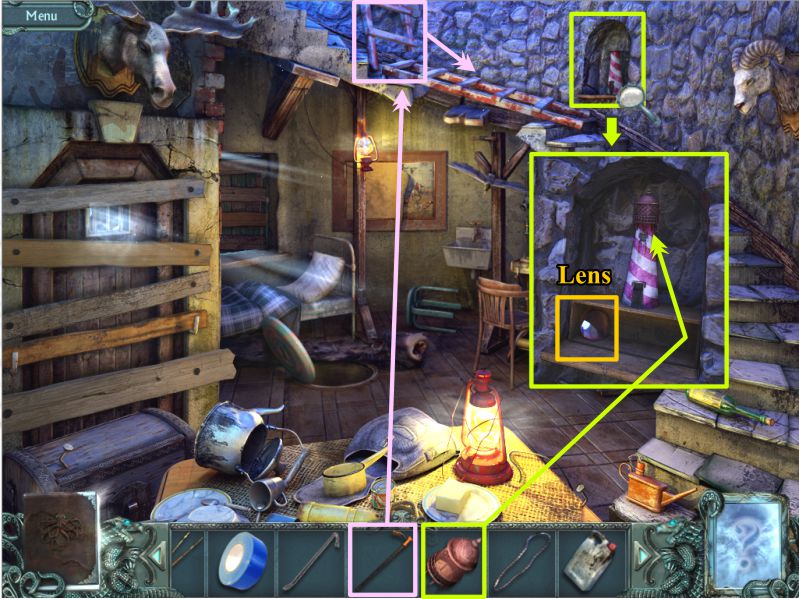
Zoom in on the niche in the stairway wall and place the top on the toy lighthouse.
A cache opens, so take the Lens.
Use the cane to drag the ladder to fill in the gap in the stairs so you can go up the stairs.
Screenshot
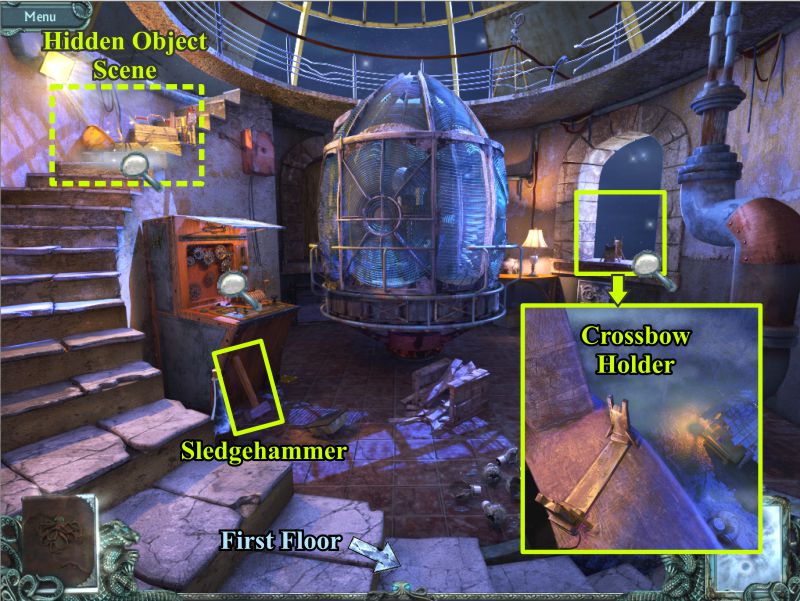
Top Floor
Grab the Sledgehammer and zoom in on the window to examine the Crossbow Holder.
Play the Hidden Object Scene on the steps.
Screenshot
Step Hidden Object Scene
You will get the Funnel when you have collected everything.
Screenshot
First Floor
Go back down to the First Floor, put the funnel on the oil can and fill it with the oil.
Take the oil can and go back upstairs.
Dome Machine
Zoom in on the machine, place the chain on the 2 gears marked in the screenshot, and oil them.
Pull down the Handle and the Dome will open.
Screenshot
Top Floor
Use your crowbar to remove the floor tile where the light is shining.
Go downstairs.
First Floor
Zoom in on the lighted tile in the floor and use the crowbar to lift it.
Move the straw out of the way and read the note.
Move the stone above the door and read the note there.
Use your sledgehammer on the fourth step and read the note there.
Go down to the Basement.
Screenshot
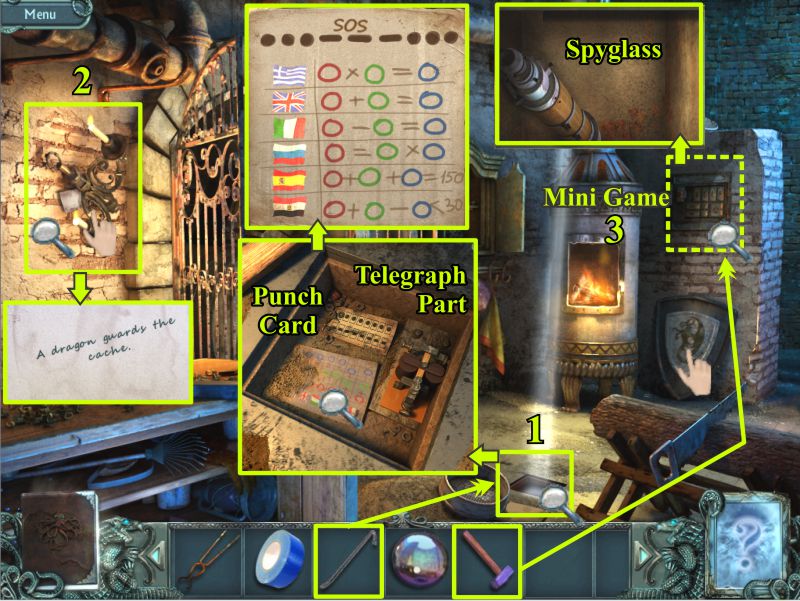
Basement
Remove the floor tile with the light on it and collect the Punch Card and Telegraph Part.
Read the SOS note.
Move the candle holder on the wall and read the note stuck there.
Move the dragon shield and since there is nothing behind it, use your sledgehammer on the brick wall.
There seems to be a safe that was covered. Play the Mini Game to open it and get the Spyglass.
Screenshot
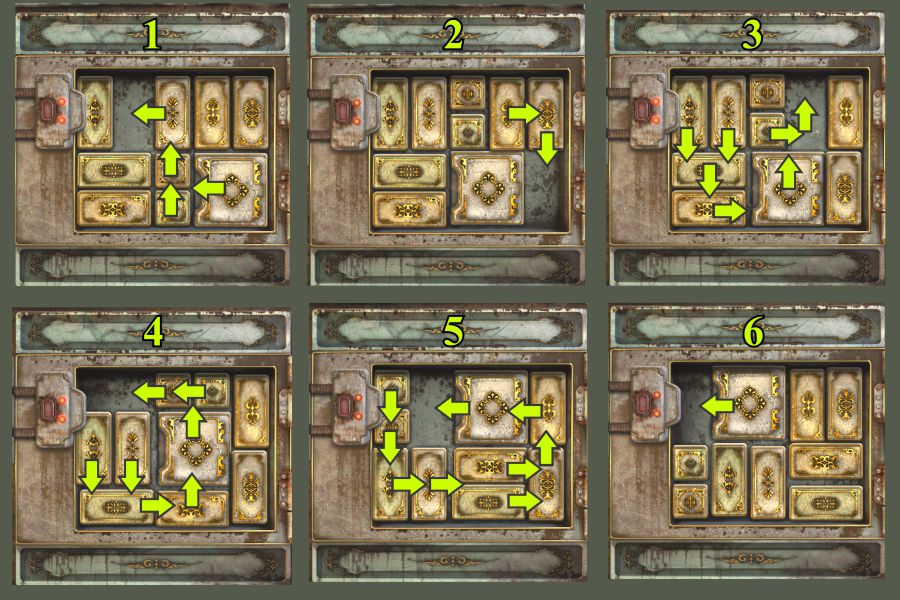
Basement Safe Mini Game
This is a slider game and your goal is to get the big square tile to the 2 red dots at the upper left of the board.
The screenshot shows step-by-step how to get there and make the dots turn green so it will open and you can get the Spyglass.
Screenshot
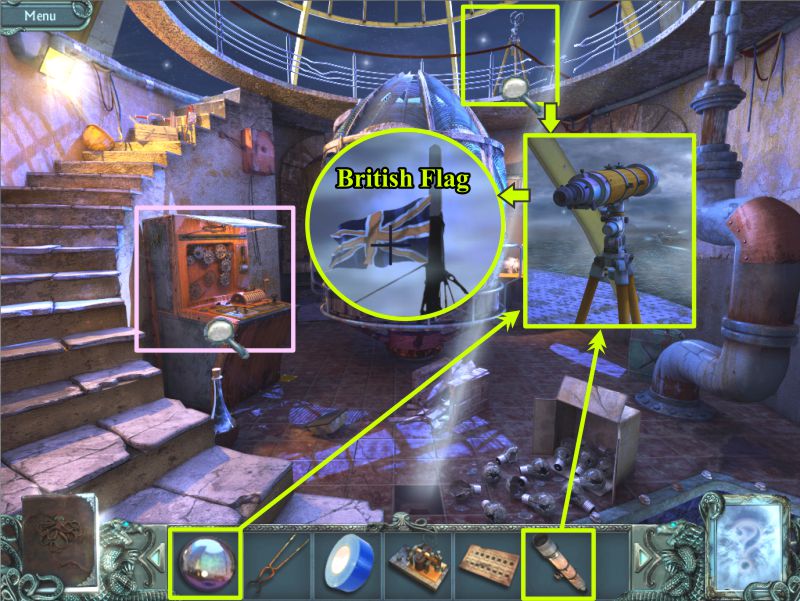
Top Floor
Go back up to the Top Floor and zoom in on the tripod marked in the screenshot.
Place the spyglass and put the lens on it.
Peer through it to find a ship and see the flag that turns out to be British.
Zoom in on the lamp machine.
Screenshot
Lighthouse Lamp Machine
Place the new punch card as shown in the screenshot.
Enter the SOS code for the basement cache.
Turn the handle, and the punch card will print and go into your Inventory.
Screenshot
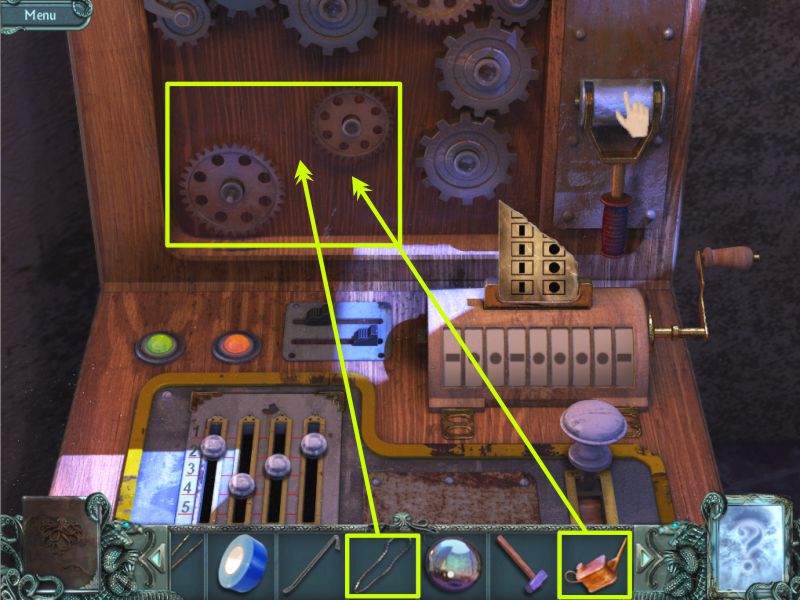
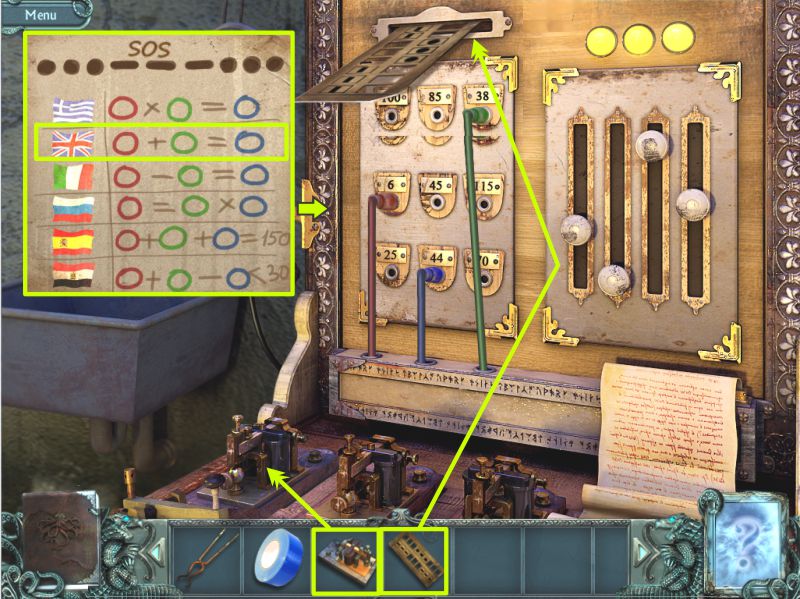
First Floor
Go down to the First Floor and zoom in to the telegraph machine.
Place the telegraph part and the new punch card as shown in the screenshot.
Connect the red, blue and green cords as shown, which is according to the British SOS code from the note that is shown.
Ok, so you are now asking how we managed 0 = 0 with that combination of numbers. There are several combinations, but let's just say that 44 minus 6 is 38 and 38 minus 38 is zero.
You are now in contact with the ship and receive instructions to turn on the Lighthouse light.
You are given a number to use that is random, so go back to the Top Floor and zoom in on the machine.
Screenshot
Lighthouse Lamp Machine
Enter your random number using the toggle switches, and throw the switch to the right.
The Lamp goes up but the bulb blows out, so use the switch to bring the lamp down again.
You are going to need some more power, so go down to the Basement and click on the gate for a Hidden Object Scene.
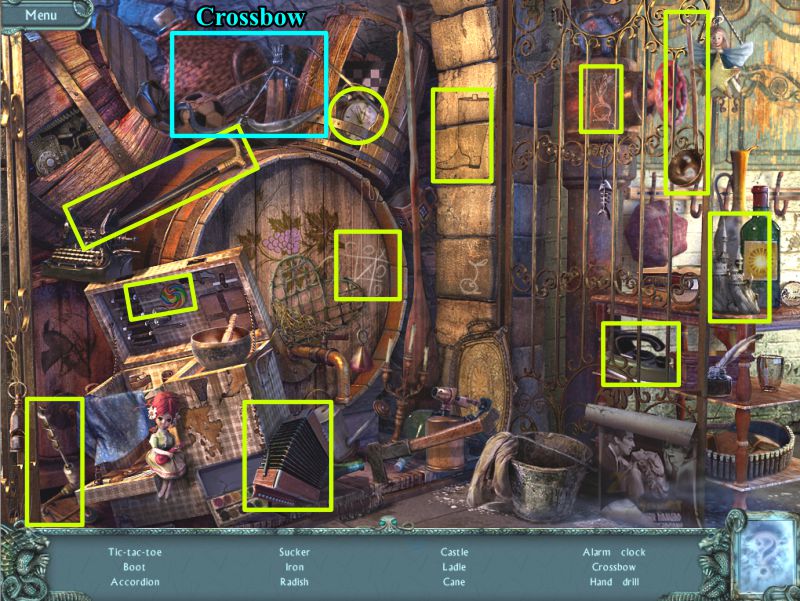
Basement Gate Hidden Object Scene
When you collect everything, you will have a Crossbow.
Screenshot
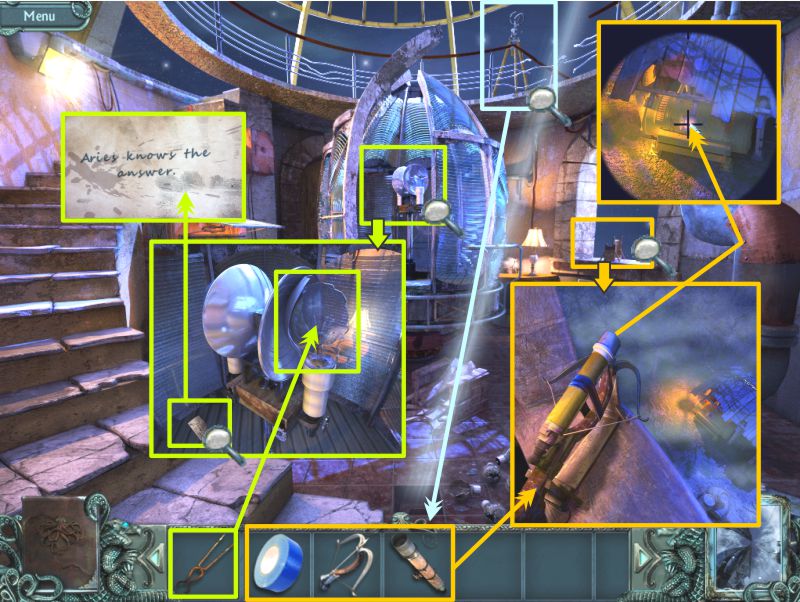
Top Floor
Return to the Top Floor and zoom in on the Spyglass Tripod.
Take the Spyglass and zoom in on the window sill with the Crossbow Holder.
Place the crossbow and spyglass and tape it all together with your duct tape.
Click on the contraption, target the red button on the generator, and click on it.
Open the lamp and use your tongs to remove the hot light bulb fragment.
Read the note you find there and go downstairs.
Screenshot
First Floor and Top Floor
Click on the ram, and he will produce a note for you to read.
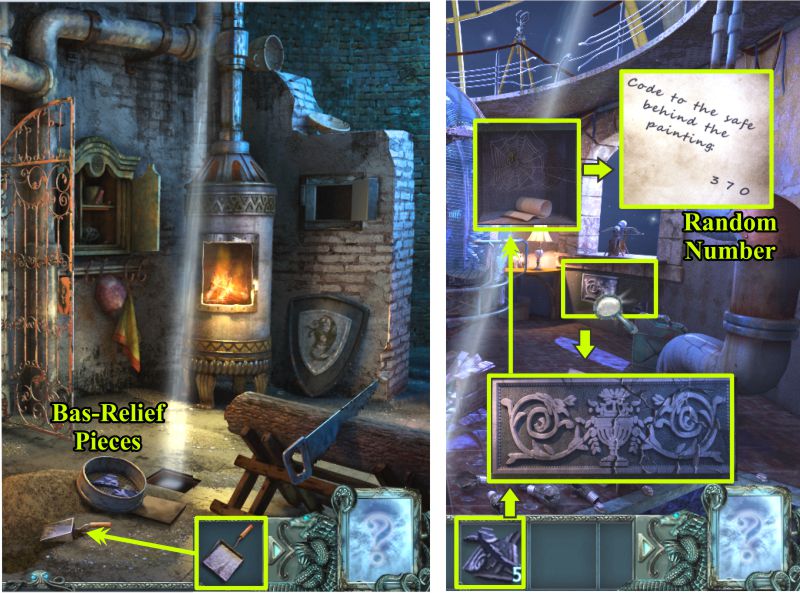
Return upstairs and check out the Bas-Relief to see it's in need of repair.
Click on the step area for a Hidden Object Scene.
Screenshot
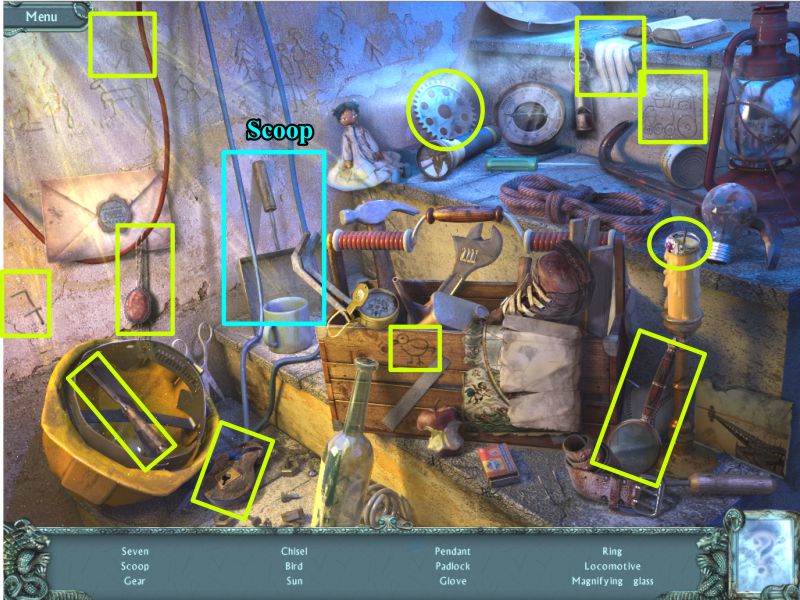
Top Floor Steps Hidden Object Scene
You will get a Scoop when you have collected everything, so head downstairs to the Basement.
Screenshot
Basement and Top Floor
Use your scoop to shovel the sand into the sifter until you can collect 5 Bas-Relief pieces.
Return to the Top Floor and zoom in on the Bas-Relief.
Place the 5 pieces and assemble them as shown.
The cache opens and there's another note.
Read the note to find out your random number for the First Floor safe combination.
Screenshot
First Floor
Go downstairs and move the painting to find the safe.
Zoom in on it and move the slider above the number pad and enter your particular number in each portion from the keypad.
Collect the light bulb and go back upstairs.
Top Floor
Zoom into the lamp and place the light bulb.
Go to the lamp machine and slide the button to make the lamp rise.
The Lighthouse Lamp will now shine brightly, so watch the ending scenes because you have completed the Bonus Chapter of Twisted Lands: Shadow Town.
Posted by: Jazz |
March 2, 2011 3:44 PM
|
March 2, 2011 3:44 PM