
Mystery Case Files: 13th Skull
Platform: Mac, Windows
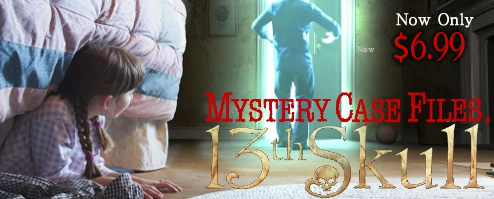
![]() After your last investigation, you might have been hoping for a warmer climate, though the humid, rainy swamps of the Louisiana bayous probably weren't what you had in mind. But when a beloved husband and father goes missing under bizarre circumstances and the police can't help, who better than you, master detective, to solve the case? Mystery Case Files: 13th Skull, the seventh in the popular series of hidden-object adventure games, is a beautifully done game about betrayal, treasure, curses, and backed-up toilets, just like Poe would have written about.
After your last investigation, you might have been hoping for a warmer climate, though the humid, rainy swamps of the Louisiana bayous probably weren't what you had in mind. But when a beloved husband and father goes missing under bizarre circumstances and the police can't help, who better than you, master detective, to solve the case? Mystery Case Files: 13th Skull, the seventh in the popular series of hidden-object adventure games, is a beautifully done game about betrayal, treasure, curses, and backed-up toilets, just like Poe would have written about.
 The missing man is Marcus Lawson, who had moved to the run-down estate after abruptly inheriting it not too long ago. His daughter, the last person to see him, claims he was taken by a ghost. Understandably, most people are skeptical... though with your track record, you're more willing to believe than others. After all, the dilapidated manor and overgrown grounds seem to hide more than their share of secrets, and not to mention the rumours going around of a vicious pirate who buried his treasure there centuries ago. Sound like a lot of mumbo-jumbo to you? Well, maybe you should be careful anyway. After all, you know what they say about dead men telling tales (hint: they don't), and not everyone seems to want your missing person found...
To find out what happened to Marcus, you'll have to use all your skills and prowess... and solve a lot of hidden-object scenes and complete tasks for the townsfolk. People who have something to tell you have an exclamation mark over their heads, but for the most part you'll want to rely on your own powers of observation. Explore the manor and the surrounding area for clues; when your cursor changes, click to interact with people and objects. Text at the bottom of the screen will remind you of your current objective, and you can click "hint" when the meter is full to get some more hands-on direction. Remember to refer to your journal frequently, since that's where you'll record all of your finding, especially any particularly cryptic clues that might be helpful later on.
 Analysis: Unlike, say, Dire Grove, which was more than happy to start throwing ghostly apparitions at you within the first five minutes of play, 13th Skull has you spend a goodly amount of time poking at dirty windows and chasing down rats before you even run afoul of your first angry redneck. The 13th Skull is a lot less menacing than its predecessor, and a lot slower paced, with its focus on small town mystery and local legend. Of course it all looks beautiful, with crisp, clear video, rich colours, and fine attention to detail that brings the environments to life and lends them a great authenticity. In addition, you can also play Southern Stereotype Bingo; add a point every time someone says "Shug", "Chile", "Looky here", or "We don't take kindly to strangers", but subtract a point for every dirty tanktop because, well... ew?
As we've come to expect from the series, the 13th Skull offers up a satisfyingly meaty chunk of gameplay, striking a balance between good ol' fashioned adventure game logic and a variety of puzzles designed to get your brain matter churning. The difficulty level rides somewhere between middling and moderate, see-sawing back and forth; the puzzles aren't the complex examples of ingenuity in earlier titles, but they will require a bit of thought and attention to detail. Of course, getting stuck is out of the question since the hint button will always tell you what you need to do and takes approximately ten seconds to recharge.
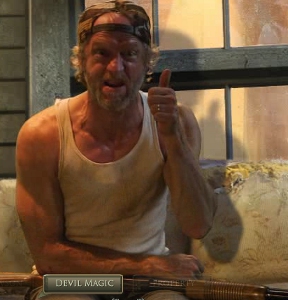 The biggest change is obviously the inclusion of actual people playing the part of the characters you interact with. While none of the acting or dialogue is spectacular, the cast seems to be having a good time, and the odd-ball characters are fun to talk to in a hokey, "Sci-Fi channel original movie" sort of way (like my boy Cooter over there on the right). Of course, the downside is that if you don't like the character interaction you might be put off by how much of it there is. Considering your input is limited to clicking what essentially amounts to prompts to move the dialogue along, you'd be forgiven for thinking the whole thing feels a little gimmicky. Allowing you some choice in what you said so you actually felt as if you were interacting with them and influencing the story would have gone a long way towards making you feel more immersed.
Mystery Case Files: 13th Skull will probably have an average playtime of around five hours, more if you staunchly refuse the siren call of the hint/skip button for puzzles and clues. It's much more of a straight-up mystery than others in the series, eschewing frights for old-fashioned sleuthing and simple superstition. The ending is a little unsatisfying, but the whole thing is a quality experience from beginning to end that has a lot to offer. Where will the Mystery Case Files turn up next? Will you travel the land like the Scooby Gang in your mystery machine, solving supernatural crimes? Is the bathroom mirror a hint at a future installment? Only time (and Big Fish Games) will tell. In the meantime, grab your favourite detective hat and try out the demo; those clues aren't going to find themselves.
A Collector's Edition is also available. It contains a bonus chapter to play, wallpapers, strategy guide, and more. Remember that Big Fish Game Club Members pay only $13.99 for Collector's Editions (or 2 club credits), and collector's editions count 3 card punches of 6 total needed for a free game.
![]() Windows:
Windows:
Download the demo
Get the full version
Also available: Collector's Edition
![]() Mac OS X:
Mac OS X:
Download the demo
Get the full version
Also available: Collector's Edition


Walkthrough Guide
(Please allow page to fully load for spoiler tags to be functional.)
Mystery Case Files: 13th Skull Walkthrough General Information
Walkthrough Format
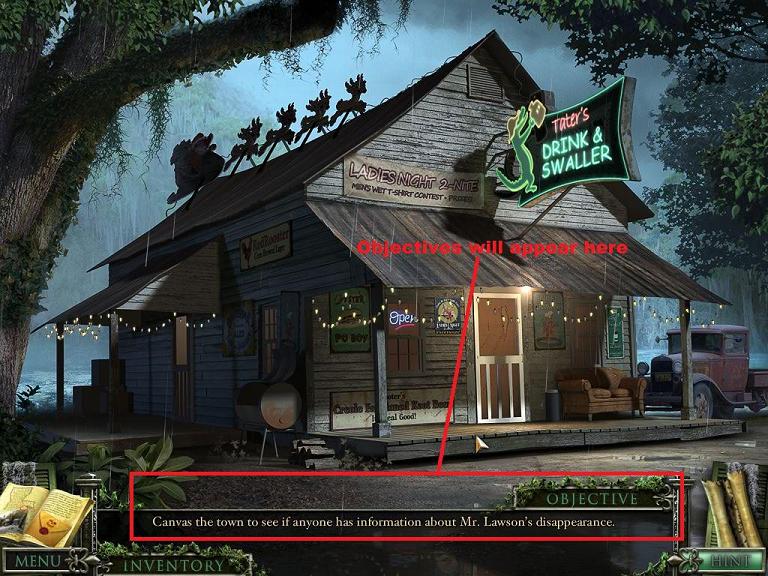
The walkthrough will be organized by in-game objectives rather than locations, as you will visit each location multiple times.
In-game objectives will appear above your inventory window at the bottom of the screen. The objective will stay there until it is completed.
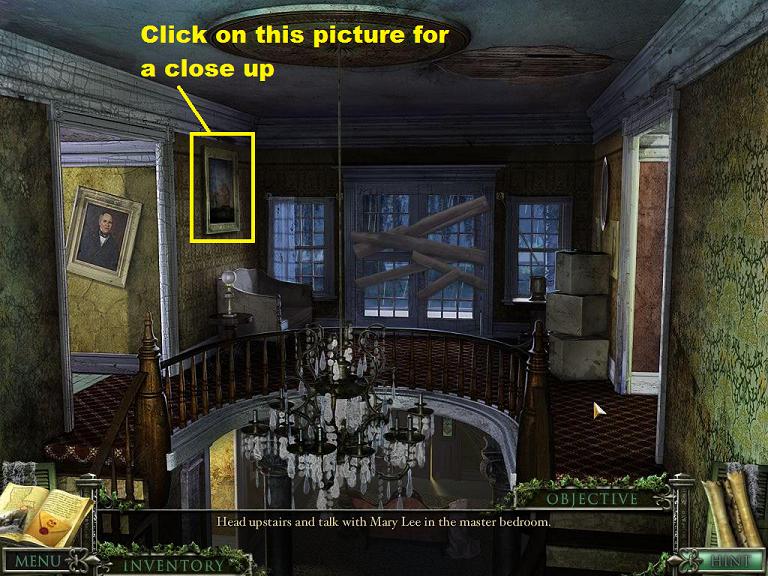
Screenshot.
Each objective may contain multiple mini-games, puzzles, locations, and hidden object scenes.
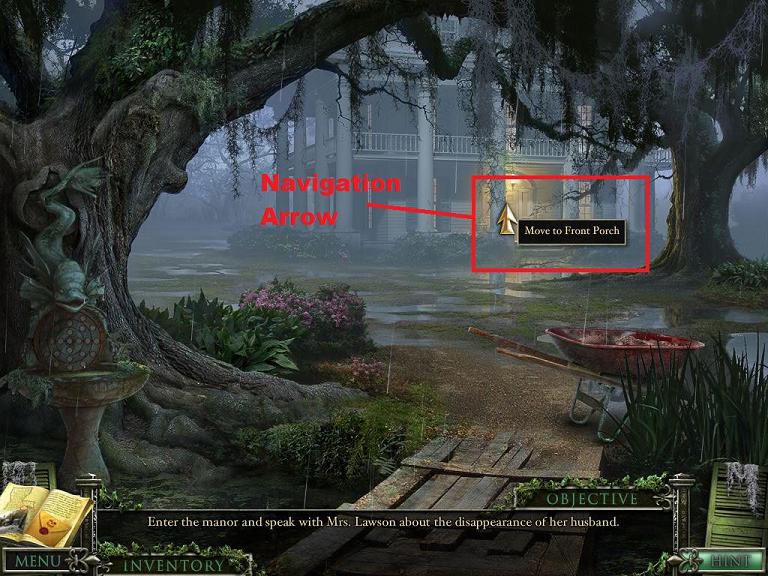
Navigation and Controls
Hover your mouse at the edges of the screen or at doorways, windows, etc. If the cursor changes to an arrow you can click to move in that direction. A handy dialogue box will pop up informing you of the direction (to the house, to the swamp, etc.).
Screenshot.
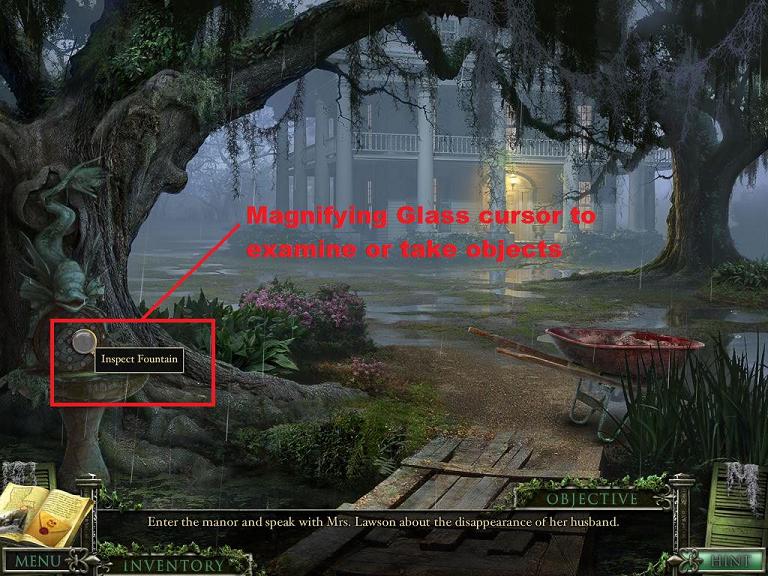
The cursor will change to a magnifying glass when you move over an object that can be examined, manipulated, or picked up. This includes single objects as well as mini-games.
Screenshot.
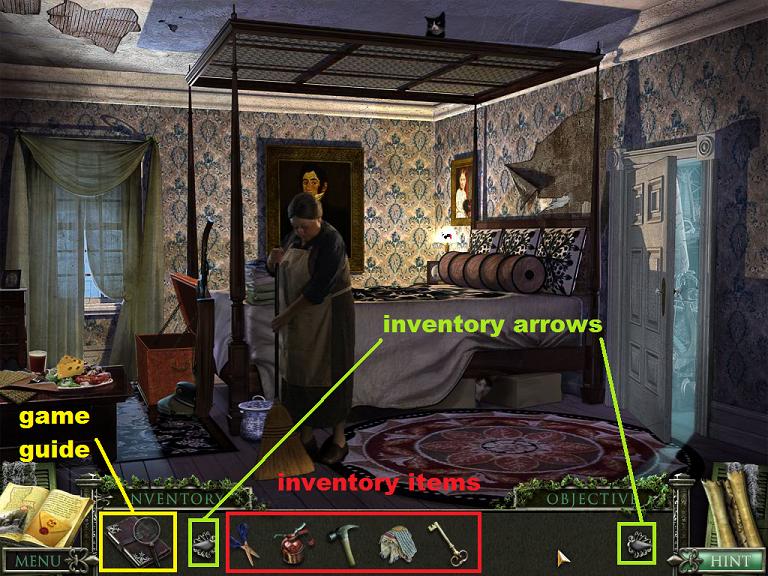
Items that you can pick up will go into your inventory. Your inventory is hidden at the bottom of the screen below the Objectives box. Roll your cursor over the Inventory tab and the inventory will pop up into the Objectives box.
You can carry many items at a time, so take note of the arrows at either end of your inventory, you can use them to scroll through all of the items you may be carrying.
Note: If you are playing the Collector's Edition or have purchased the game guide, the guide will appear in your inventory on the left as a book.
Screenshot.
To the left of your Objectives box at the bottom of the screen is your case book. This book will record the story as it goes along and will also record scenes and pictures that might be important later.
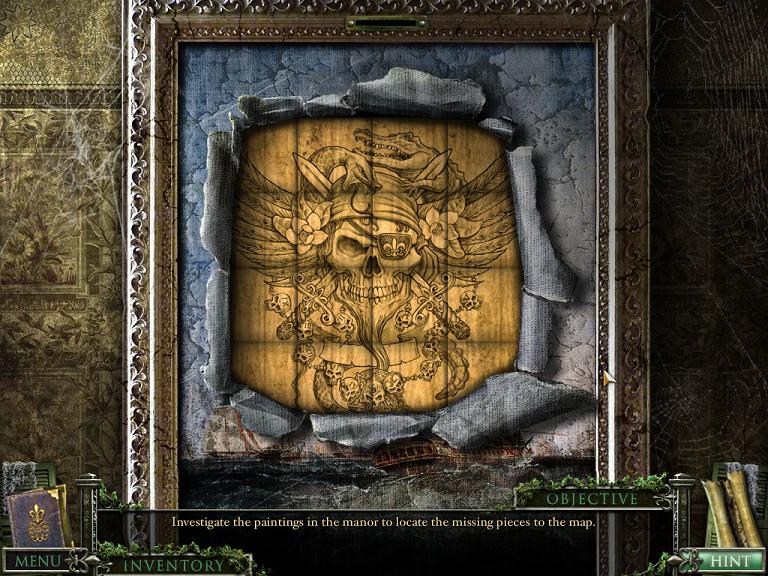
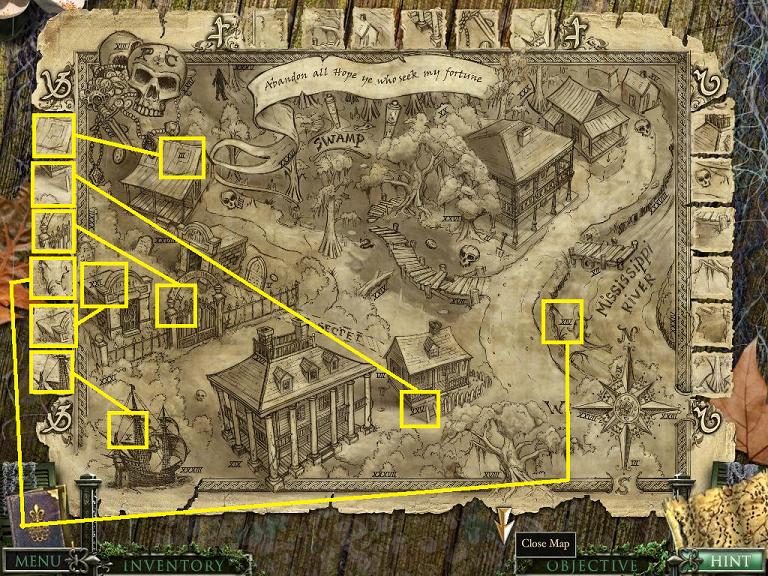
To the right of your Objectives box is the map. Once you have completed the task of finding the map pieces the map will be there to give you an overview of the area, including the mansion, the town, and the swamp.
If you want to retrace your steps, simply hover the cursor at the bottom of the scene and an arrow pointing downwards will appear. Click when the arrow appears and you will move backwards.
Below the map to the right of the Objectives box is a hint button which is on a refilling timer. You can use the hint button in Hidden Object Scenes, to give hints as to where to travel next, and for hints with certain mini-games (or to skip them).
Below your case book to the left of the Objectives box is your menu button, which allows you to go back to the main menu.
Screenshot.
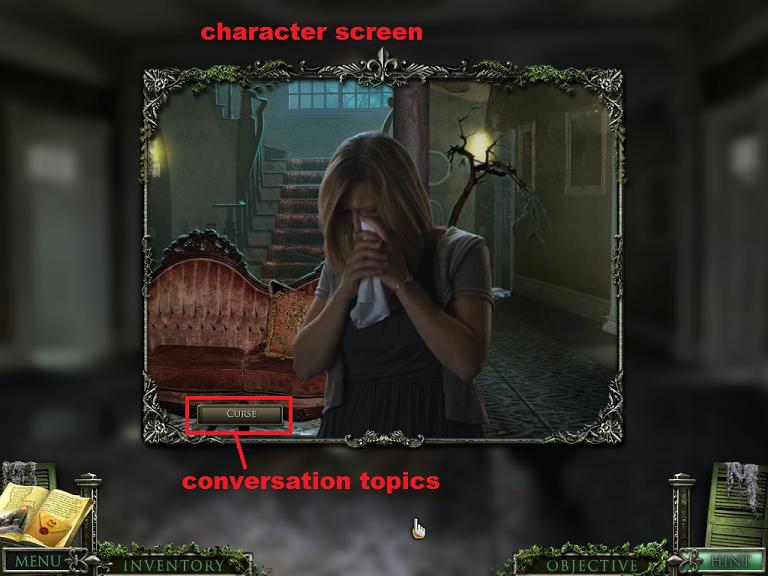
Interacting with Characters
Scattered throughout the game are characters, mostly people (and a few animals) that you can interact with.
You'll know when to interact with the human characters when an exclamation point appears above their head. When that happens simply click on them to start a dialogue.
Screenshot.
Topics that you need to talk to the characters about will appear as buttons at the bottom of the character screen when they start talking. The dialogue is both spoken and will also appear as subtitles below the screen.
You can skip the dialogue scenes by clicking outside of the character screen.
Screenshot.
You can try to talk to characters who don't have an exclamation point, but they will brush you off with a variation of "I'm busy."
You will encounter quite a few creatures in the game. Most of them are background scenery but a few need to be interacted with.
Animals can be helpful or obstructive. If they are being obstructive, it usually means you need to perform a task to get them out of your way.
Screenshot.
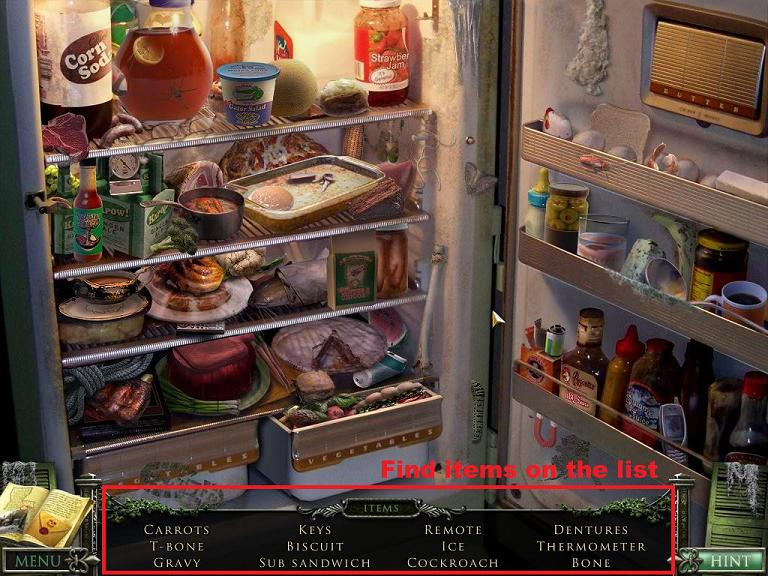
Hidden Object Scenes
There are two types of Hidden Object finding in the game: classic Hidden Object Scenes (finding items from a list) and Objective based finding of objects.
The classic Hidden Object scenes are marked with a shower of sparkles. Click on the sparkles to enter the scene.
Screenshot.
Once in the scene you will have a list of items to find. These lists are generated randomly, with one exception. One item you find in the scene will go into your inventory. That will not change from game to game.
Screenshot.
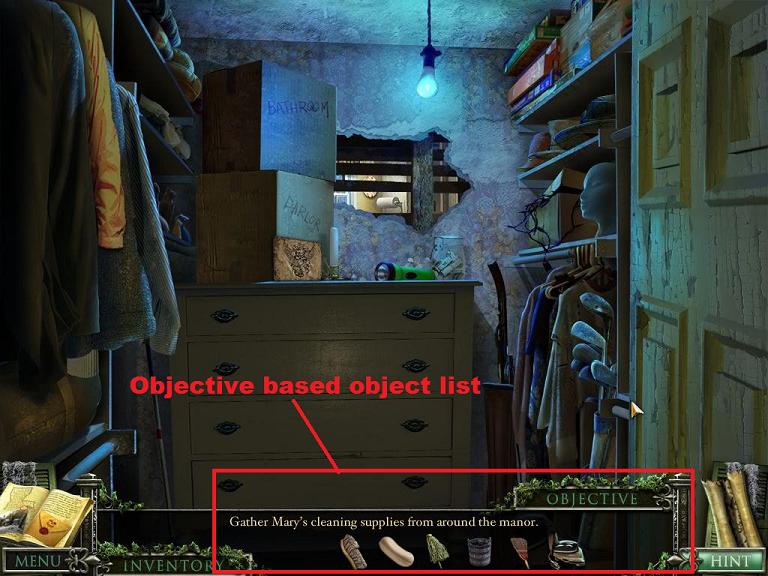
Objective based object finding happens when a character requests that you find certain specific items for them, like cleaning supplies or crayons. These items will be found scattered throughout the scenes. The objective box will let you know in general where the items can be found (1st floor of the mansion, the swamp, etc.).
Rather than a list you will get a series of pictures in your Objectives box showing what needs to be found. When one of these items is found it will go into your inventory.
Screenshot.
Once you've found every item in an Objective based list you can take them back to that character to get a new objective.
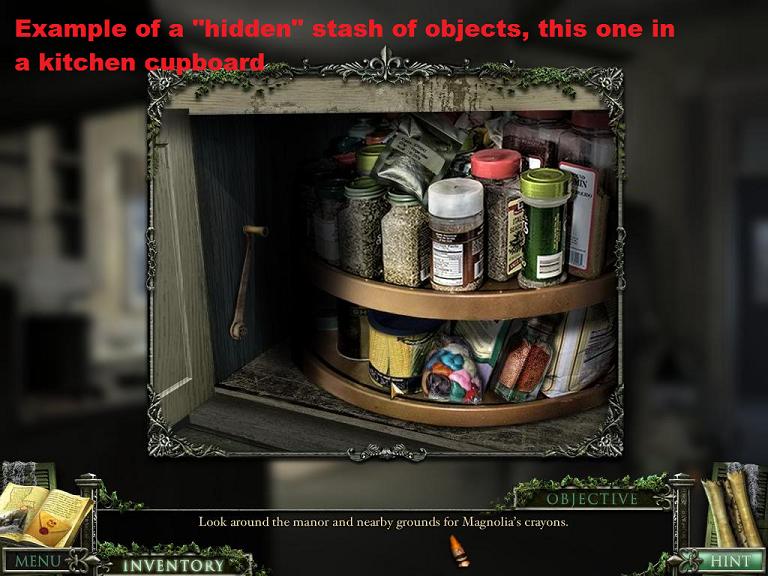
Scattered around the game are several "hidden" stashes of objects. These occur in boxes, bags, cupboards, tree trunks, outdoor grills, etc. These are places where items accumulate.
Be sure to find these "hidden" stashes as each stash will have one or more items you will be searching for during Objective based object finding.
Screenshot.
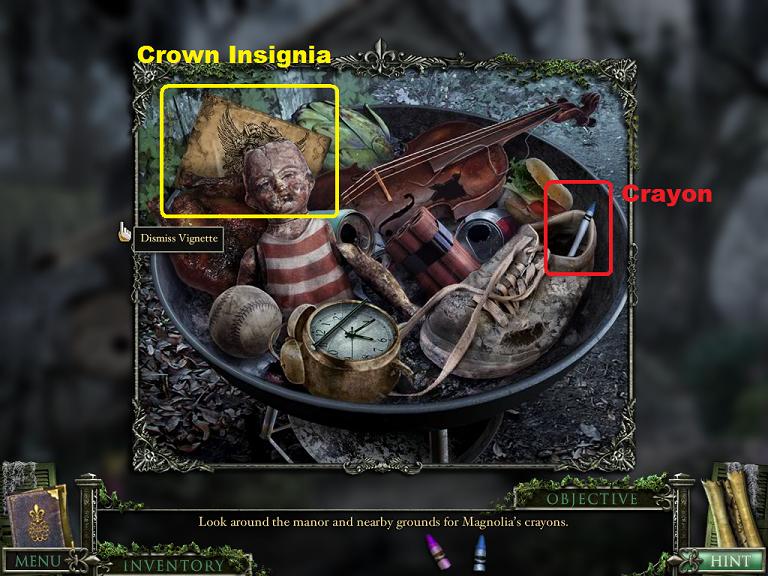
Hidden within the game are 30 crown insignia cards. Finding them is a side quest.
Screenshot.
Inventory Items
You will accumulate inventory items in four ways: (1) Each classic hidden object scene will yield one inventory item to be used later, (2) Objective based objects will go into your inventory, (3) Items that you find laying around in the scenes, and (4) items received from solving mini-games.
Most inventory objects will be used later to manipulate things, to solve puzzles, or to open doors or other passageways.
Objective based objects will remain in your inventory until you find the entire list of items. Once found, the items are given to a character. These objects have no other use than to be found and given back.
Inventory items will remain in your inventory as long as they are useful. Some objects are single use, some can be used multiple times. Once an item has been completely used it will vanish from your inventory.
Mini-Games and Puzzles
Scattered throughout the game are several mini-games and puzzles. Some have a fixed solution, some are randomly generated.
For those with a fixed solution, the walkthrough will give steps on how to complete the puzzle.
For those which are randomly generated, general directions on how to solve the puzzle will be given.
You can use the hint button to get three hints on how to solve a mini-game or puzzle.
You can also use the hint button to skip a mini-game or puzzle altogether.
Posted by: grinnyp |
November 26, 2010 4:15 PM
|
November 26, 2010 4:15 PM
Mystery Case Files: 13th Skull Walkthrough Part 1
The Mansion (Part 1)
Speak with Mrs. Lawson
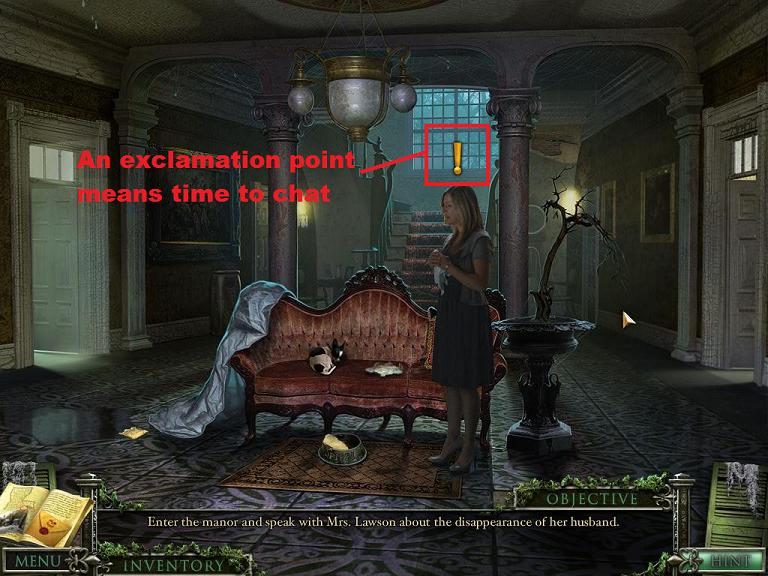
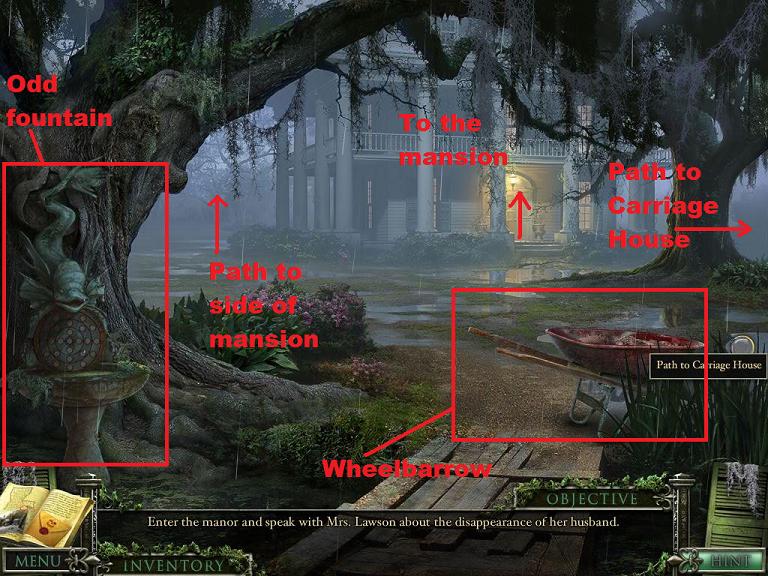
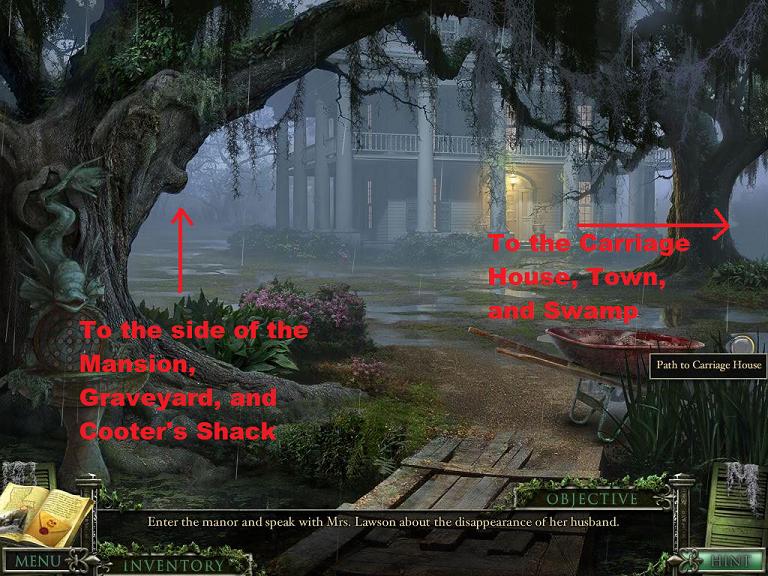
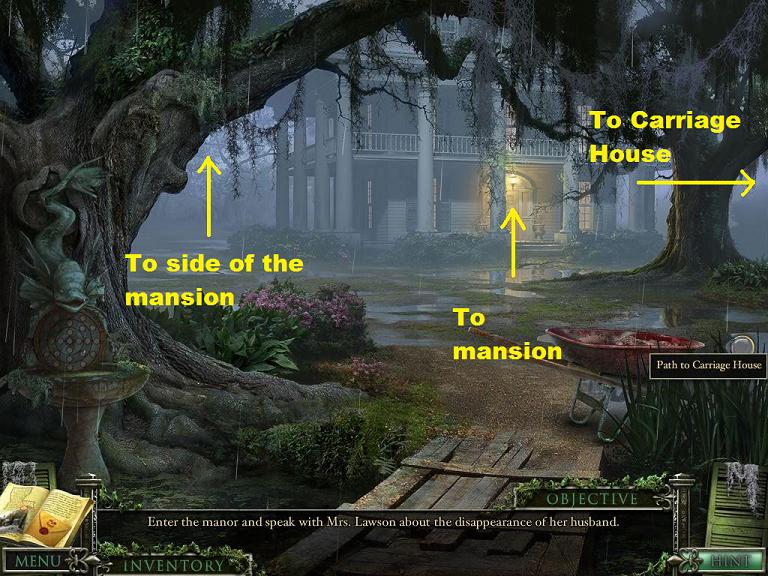
You begin the game outside of the mansion where the Lawson's live.
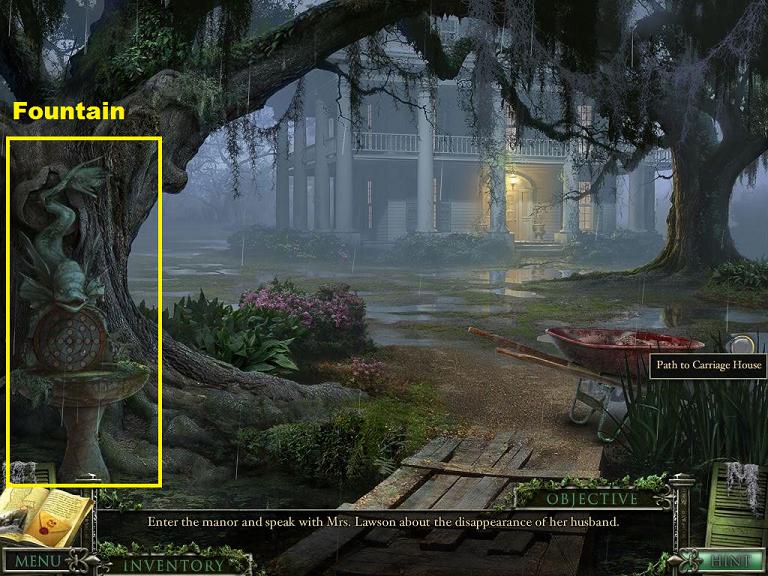
There is an odd fountain to the left, and a wheelbarrow to the right.
Although there are paths to the left (side of the mansion) and to the right (to the carriage house) you cannot take the paths until you complete the objective of speaking to Mrs. Lawson.
Hover your cursor over the mansion and an arrow will appear "to the mansion". Click to go there.
Screenshot.
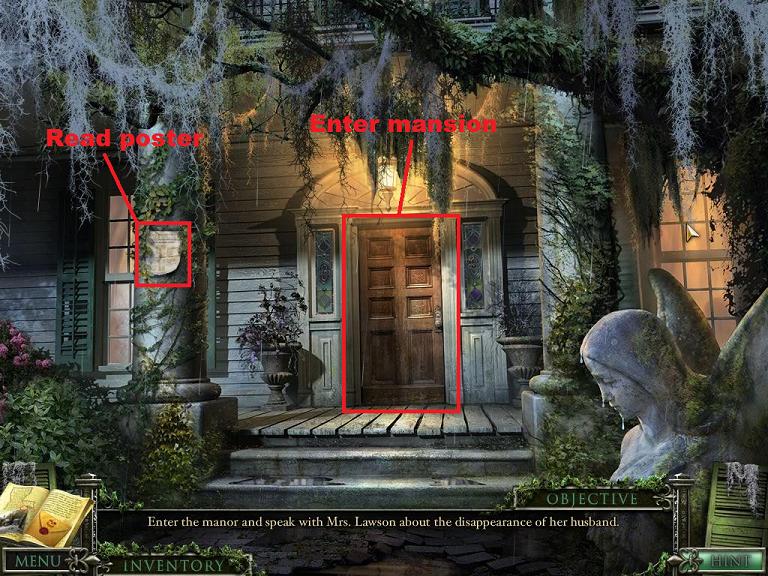
Now you are at the front porch of the mansion. You can examine items here, but the only thing of interest is the "missing" poster on the left column.
Click on the door to enter the mansion.
Screenshot.
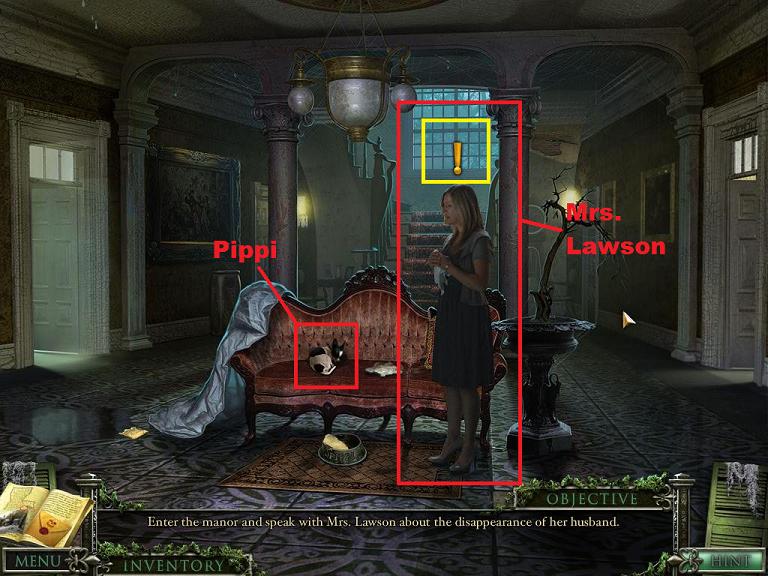
Here in the front of the house you will find Mrs. Lawson. Click on Mrs. Lawson to talk to her about her husband's disappearance and about the map.
There is also a dog, Pippi, on the couch. Avoid Pippi, he's mean.
Screenshot.
Once you've spoken to Mrs. Lawson you will get your next objective.
Find the Map
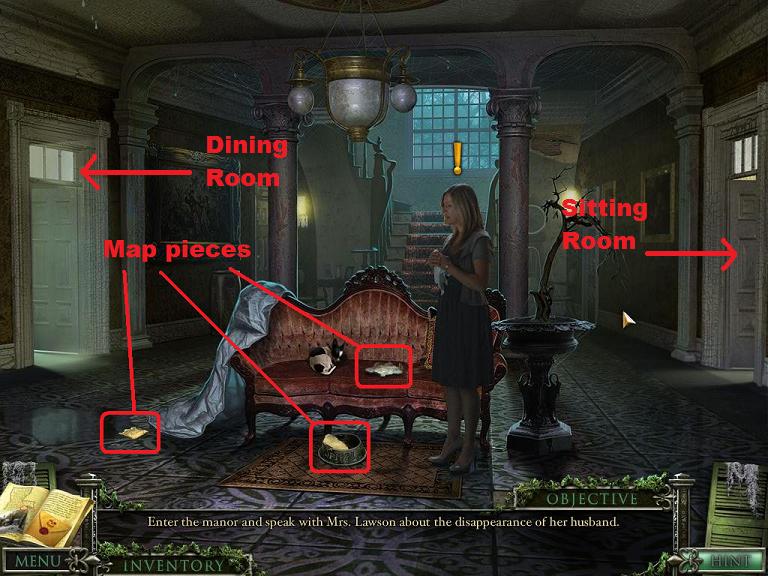
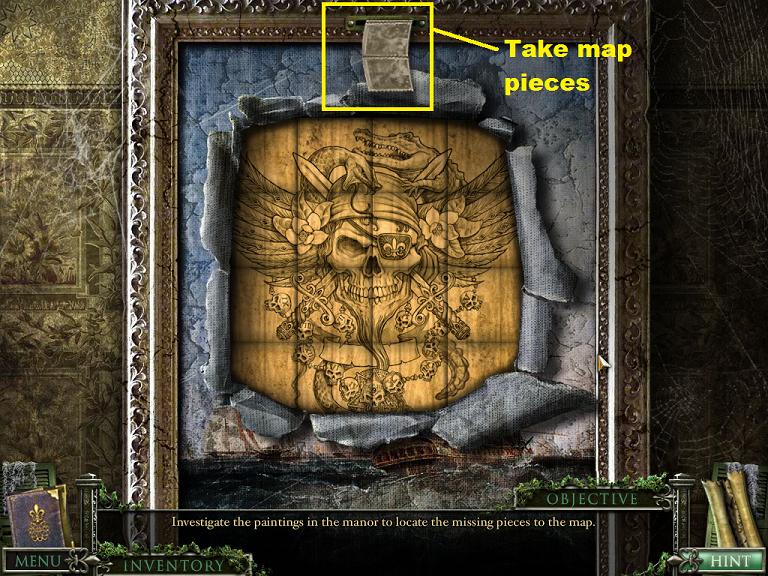
You must now search the ground floor of the mansion for pieces of the map and tape to hold it together. This is an objective based object hunt.
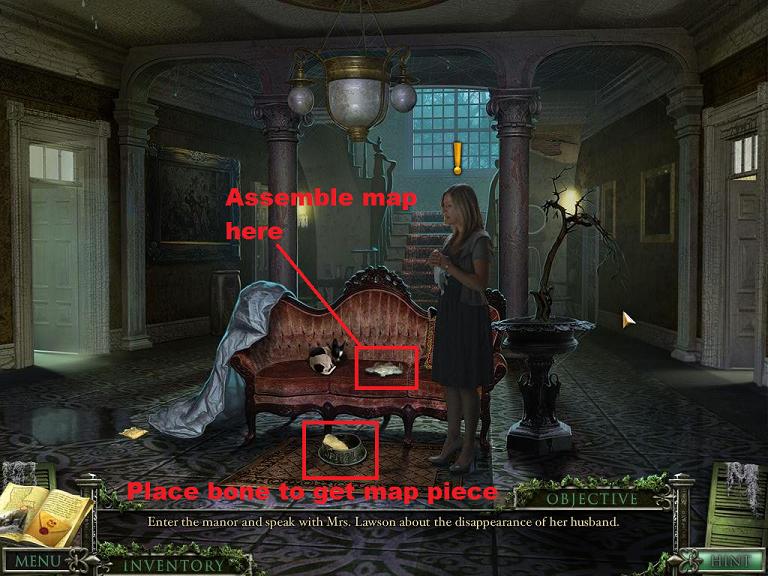
In the living room are three pieces of the map: one on the couch, one on the floor, and one in Pippi's bowl.
You can't take the one on the couch, that is where you will assemble the map when you find all of the pieces.
Pippi won't let you take the one in the bowl, looks like you'll need to find something to make the dog happy.
Pick up the piece on the floor.
Screenshot.
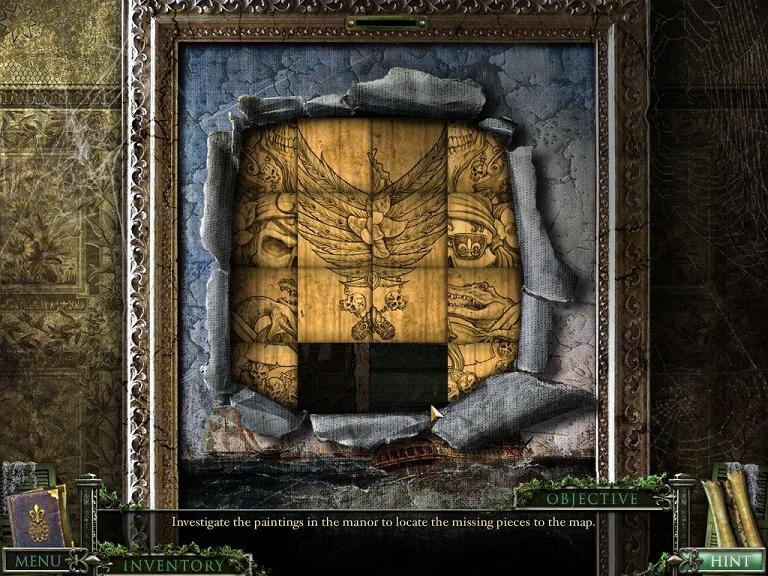
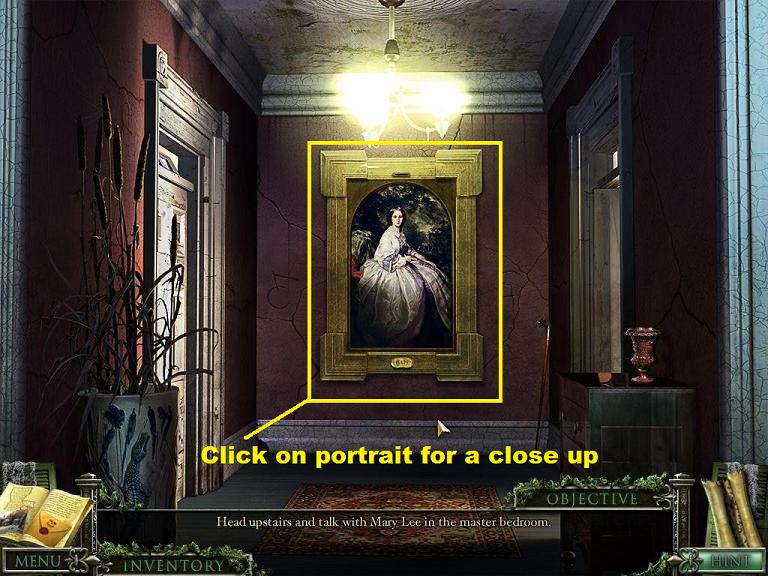
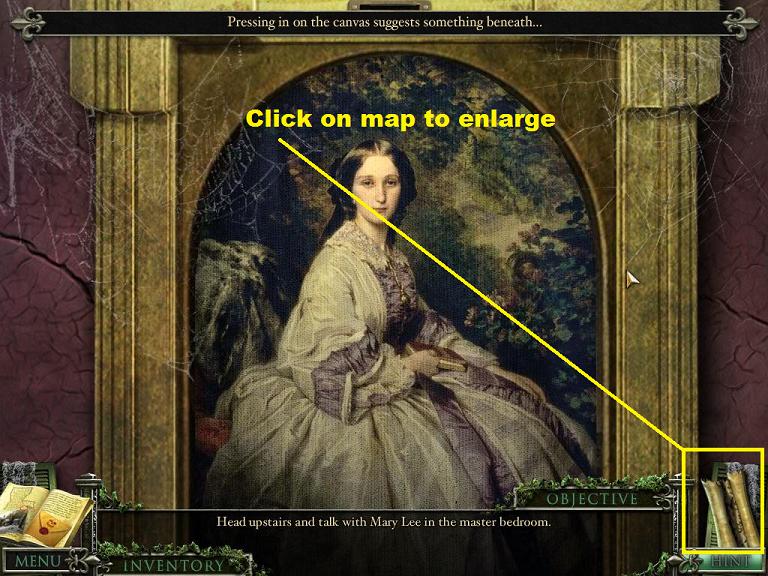
As you explore you will find that you can click on many of the pictures and portraits on the walls of the mansion. Examine each one that you can.
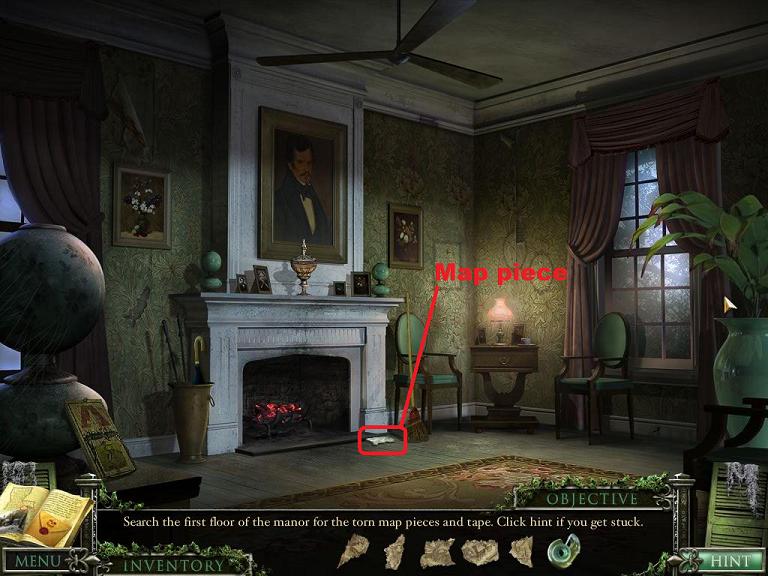
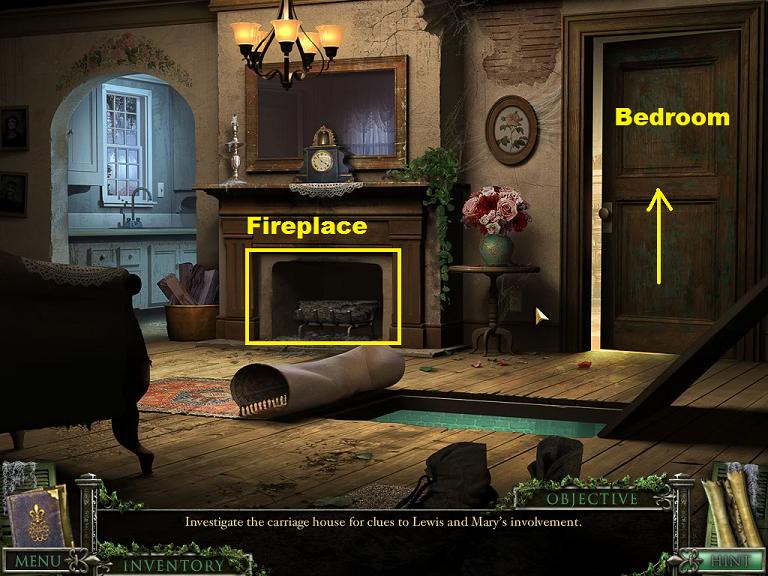
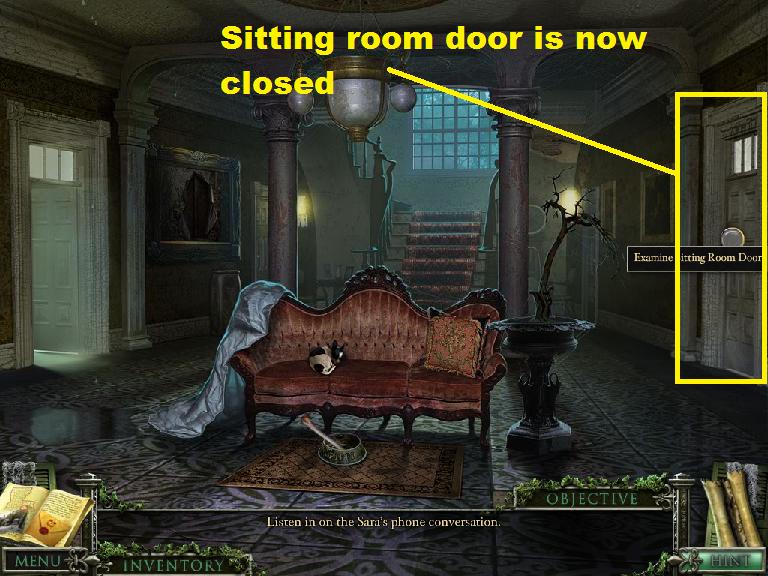
Move right into the Sitting Room.
There is a map piece on the floor in front of the fireplace. Pick it up.
Screenshot.
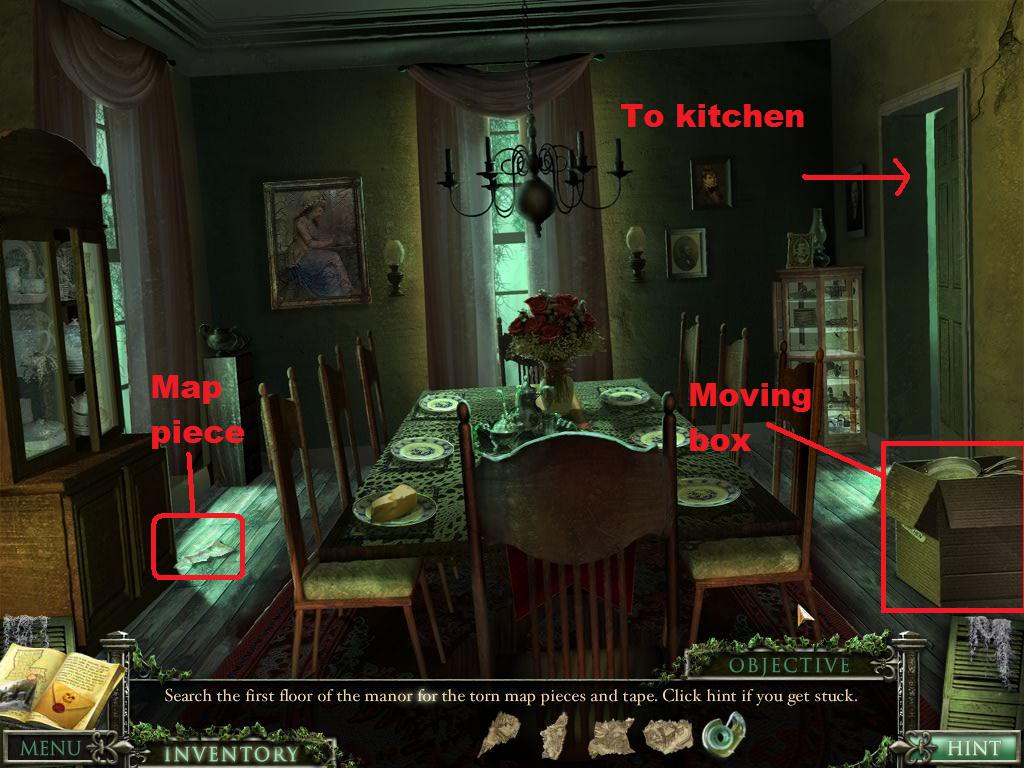
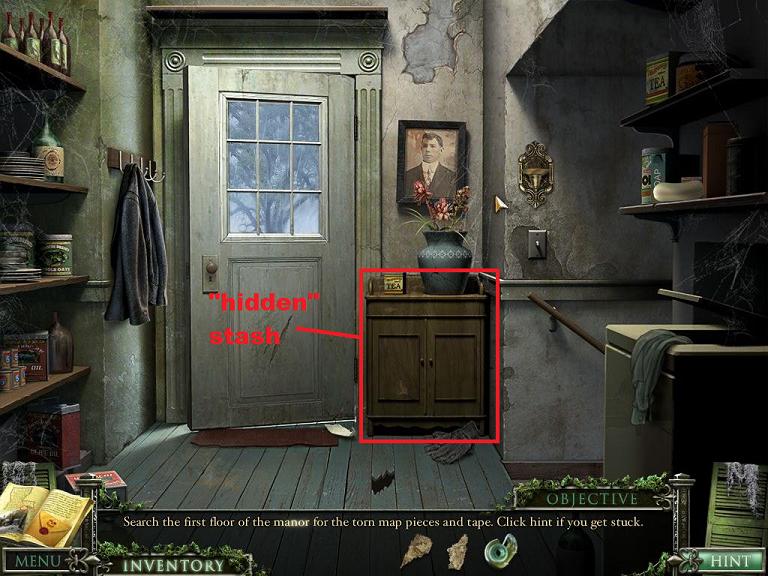
Move back to the front of the house, then left to the Dining Room.
There is a piece of the map on the floor to the left of the table, in front of the china hutch.
To the right of the table is a moving box. This is a "hidden" stash of stuff. Click on the box.
Screenshot.
In the box you will find the tape needed to piece together the map. Take it. Click outside the close up to close it down.
Screenshot.
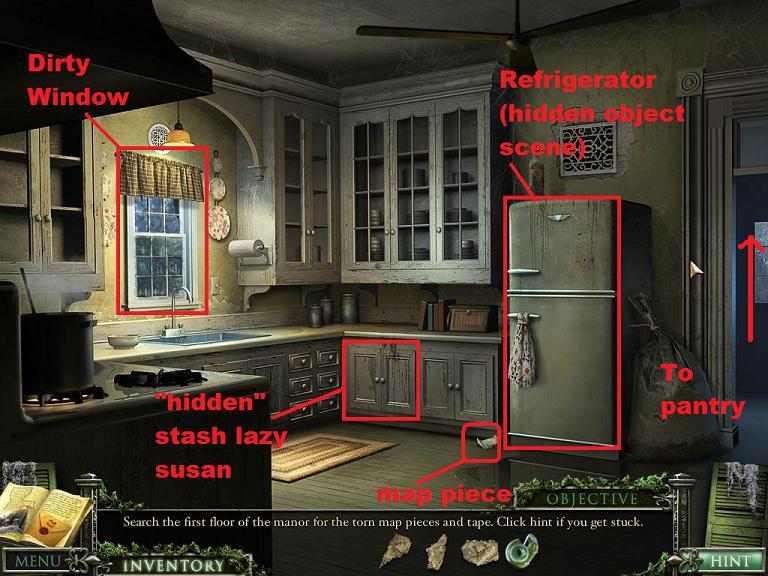
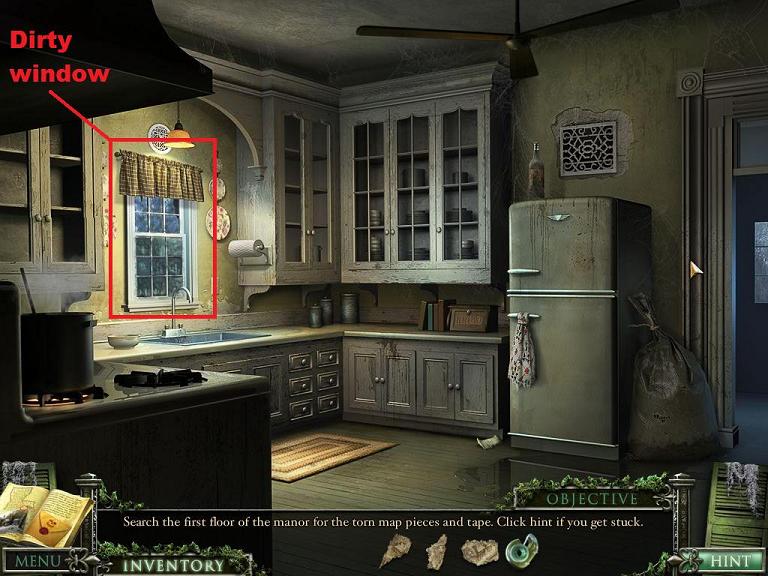
Move right into the kitchen.
There are several things here. On the floor, near the refrigerator, is a map piece. Take it.
In the lower left cupboards is another "hidden" stash, a lazy susan.
The kitchen window is dirty.
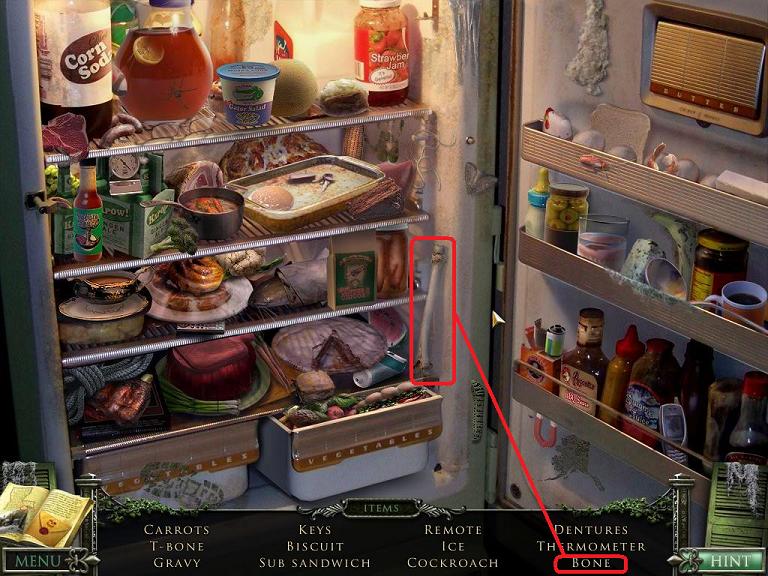
Clicking on the refrigerator opens it to reveal a hidden object scene.
Screenshot.
Click on the refrigerator to open the hidden object scene.
The list of objects to find changes, but the one item that remains the same is the bone, which goes into your inventory.
Screenshot.
When you've found all of the items move through the door to the right of the refrigerator into the pantry.
In the pantry you will find the second to the last map piece on the floor in front of the door. Take it.
In the cupboard to the right of the door is another "hidden" stash.
There are stairs to the basement to the right of the door, but without light you can't go down.
The door itself leads to the back of the mansion.
Screenshot.
By now you should have all but one map pieces and the tape. Back up three times until you are back at the front of the house.
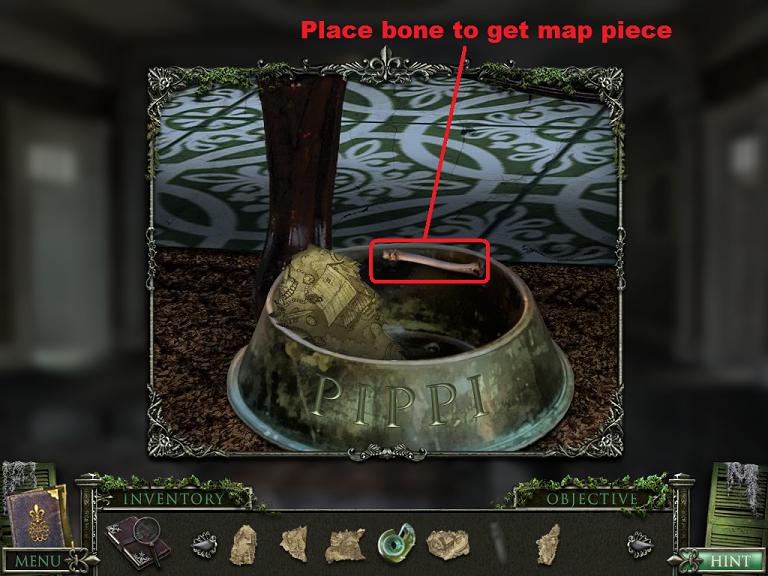
Time to get the last map piece from Pippi.
Click on Pippi's food bowl for a close up. Once the bowl is in close up take the bone from your inventory and put it in the bowl. This will get you the last map piece.
Screenshot.
Screenshot.
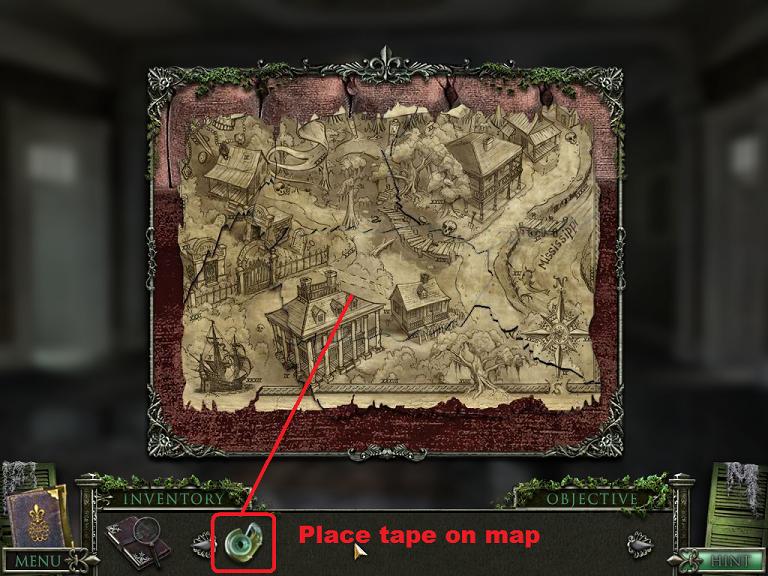
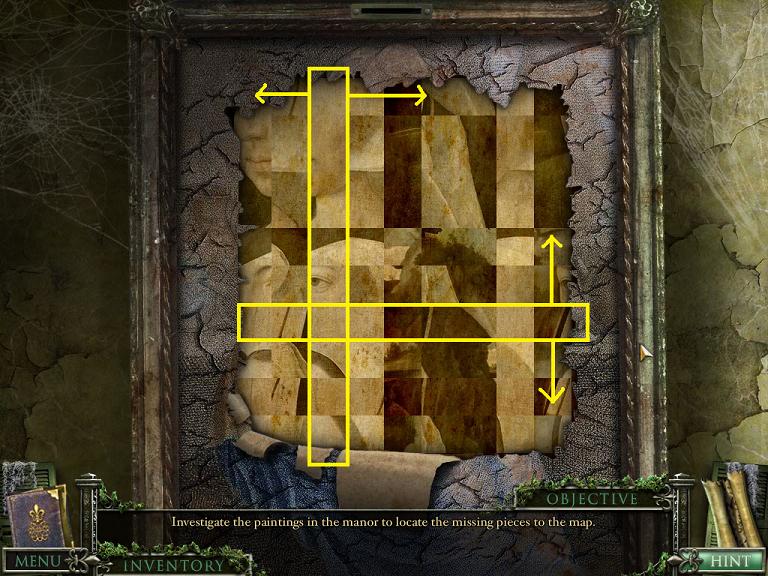
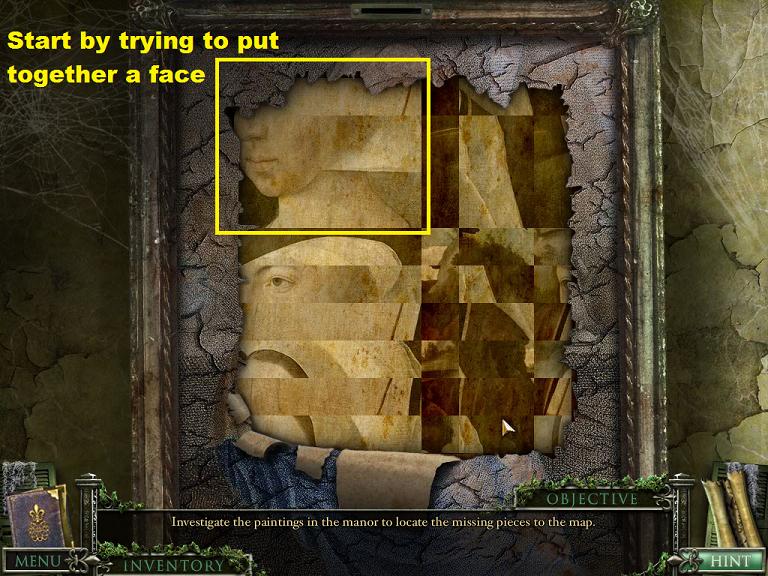
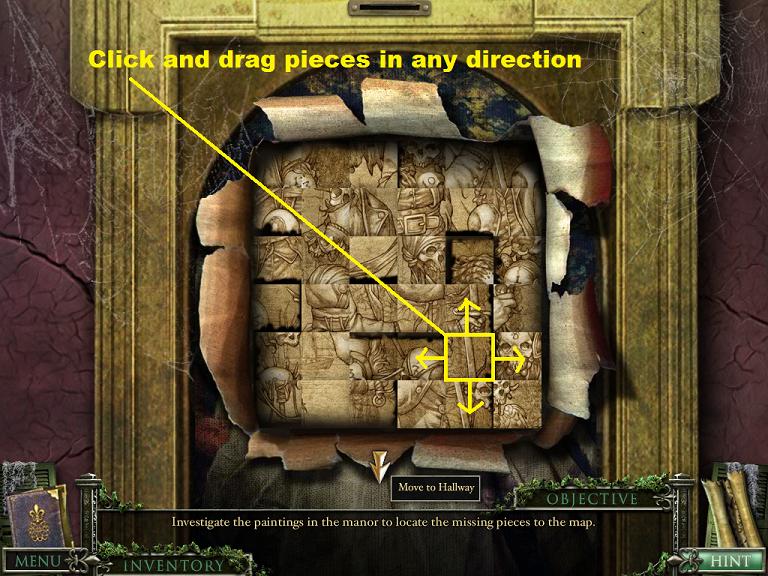
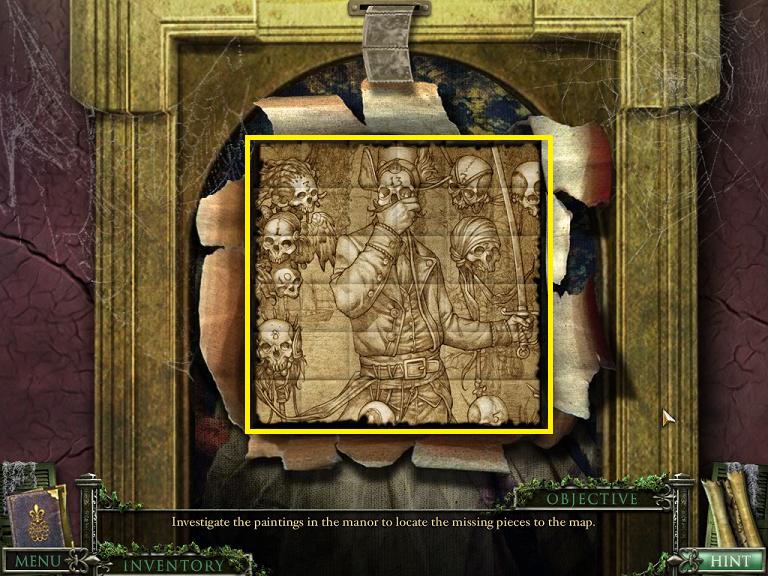
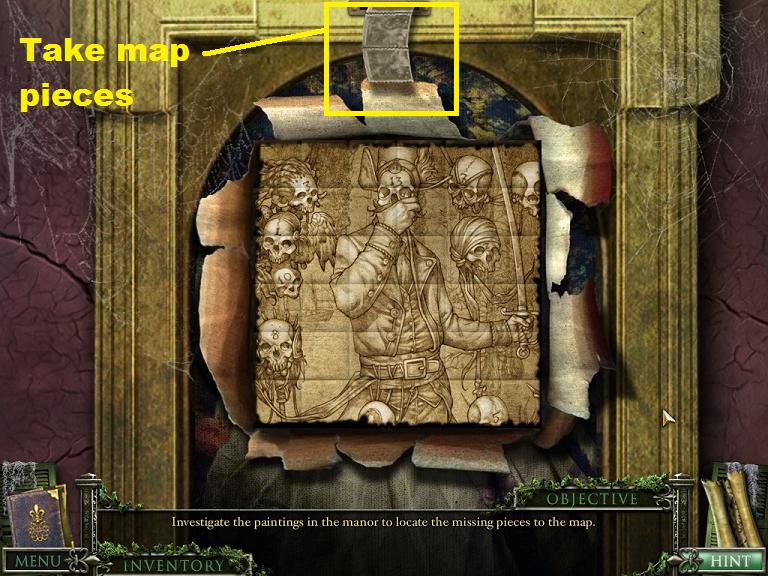
Once you have the last piece, click on the map piece on the couch for a close up. Fit the pieces together like a jigsaw puzzle. Once the map is assembled, use the tape from your inventory on it to hold it together. The map will then appear in the bottom right of your screen for reference.
Screenshot.
Click on Mrs. Lawson and talk to her again about her husband's disappearance.
Mrs. Lawson will give you your next objective: Talk to Mary Lee, the maid.
Talk to Mary Lee
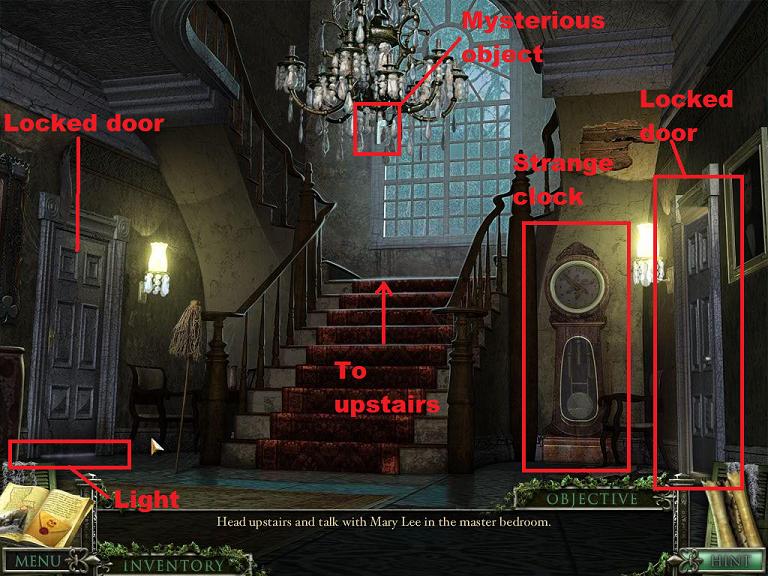
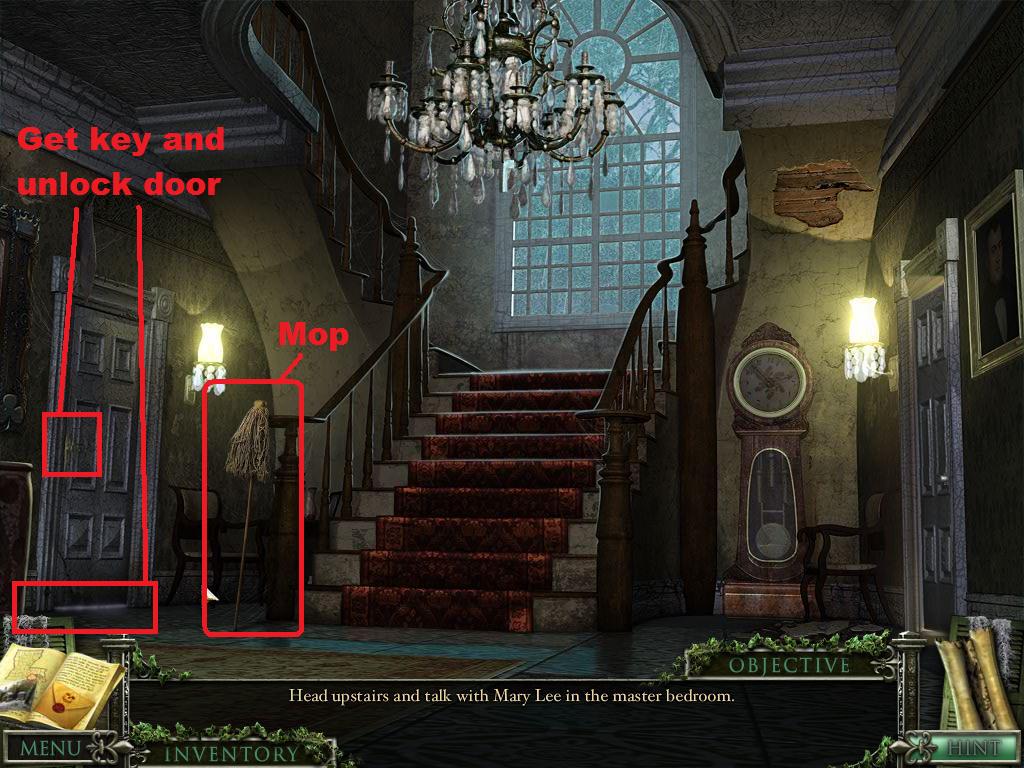
Hover the cursor behind Mrs. Lawson and you will get a forward arrow. Click to move towards the staircase.
At the base of the staircase you will find two locked doors. The door on the left has light showing at the bottom. You can click on it for a close up and see a key, but you can't reach it.
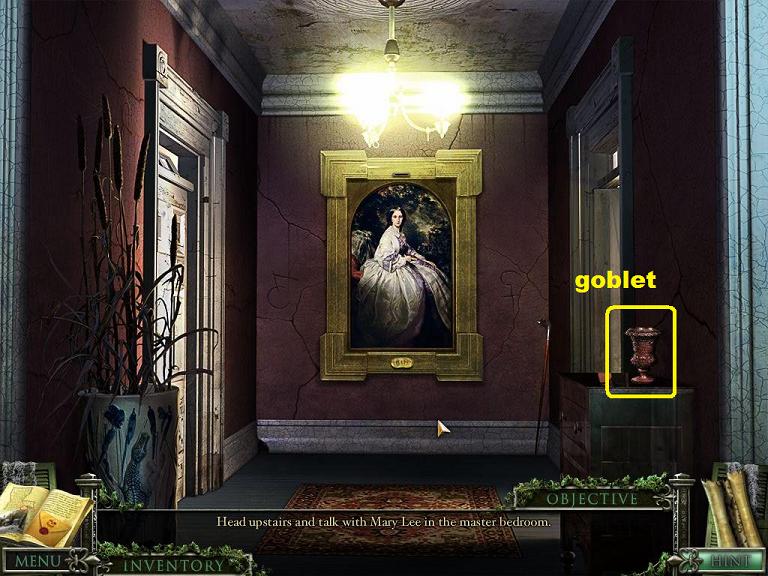
To the right of the stairs is a mysterious clock. Click on the clock face and you will see that it has three hands, each with a symbol on it (triangle, square, diamond).
There is also a strange T-shaped object hanging from the chandelier, but you can't reach it.
Screenshot.
Click on the stairs to go upstairs.
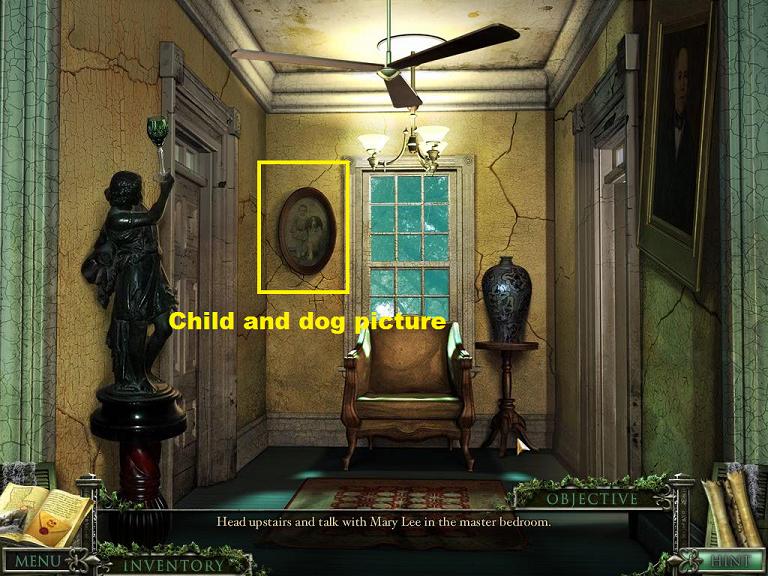
You are now in the upstairs foyer. In front of you is a boarded up door leading out to a balcony. There are halls to the right and left.
Don't forget to examine any picture that you can.
Take the hallway to the left.
Screenshot.
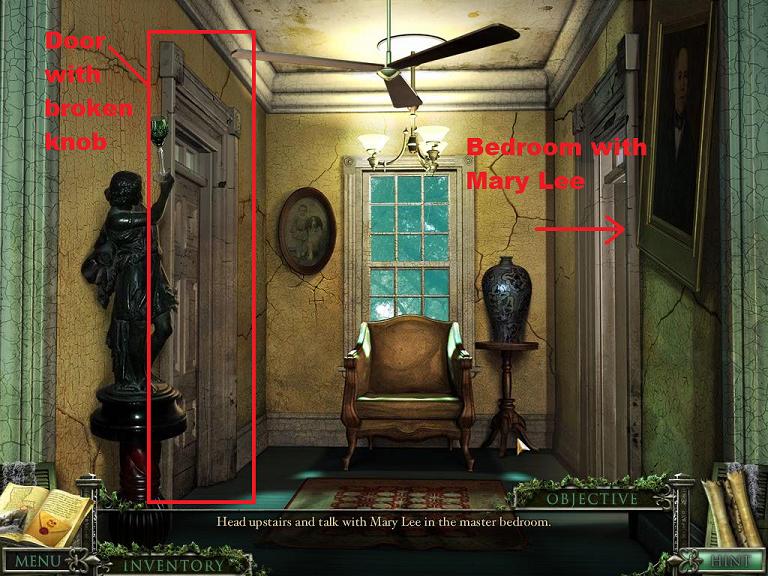
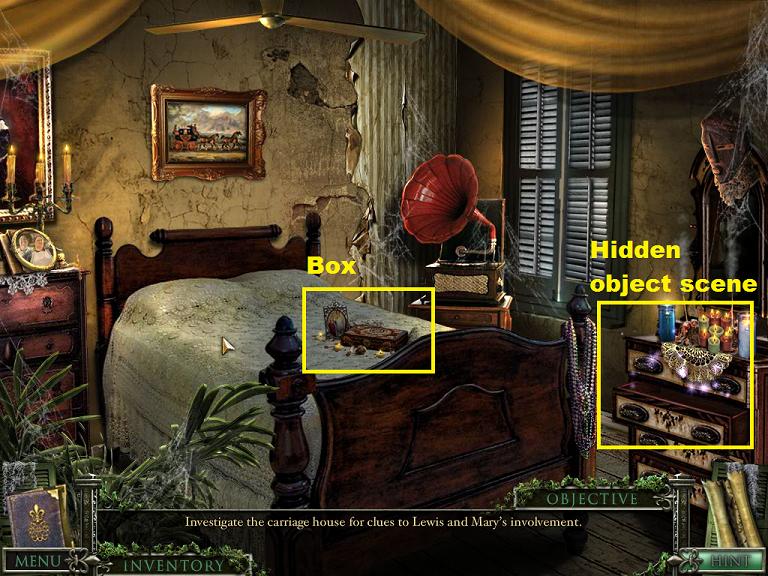
You are now facing a window and a chair. To your left is a door but the knob is broken. To the right is the bedroom where Mary Lee is currently cleaning.
Don't forget to examine everything in the hall. Go right into the bedroom to speak to Mary Lee.
Screenshot.
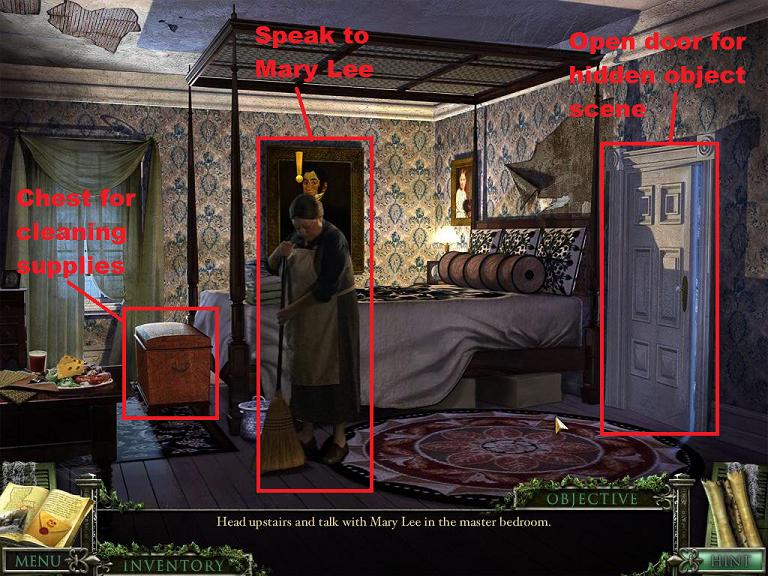
Click on Mary Lee to speak to her. When the conversation is finished, she will give you a new goal, find her cleaning supplies.
Screenshot.
Find Cleaning Supplies
Once Mary gives you the task of finding her supplies, click on the closet door to the right to open a hidden object scene.
Screenshot.
The item you will take away from the scene is a coat hanger.
Screenshot.
Once you have finished the hidden object scene back up twice to the upstairs foyer, then take the right hall.
There are two doors here. On the left is a locked door. You can knock, but the daughter tells you to leave her alone.
Don't forget to examine the items in the hall, especially the painting.
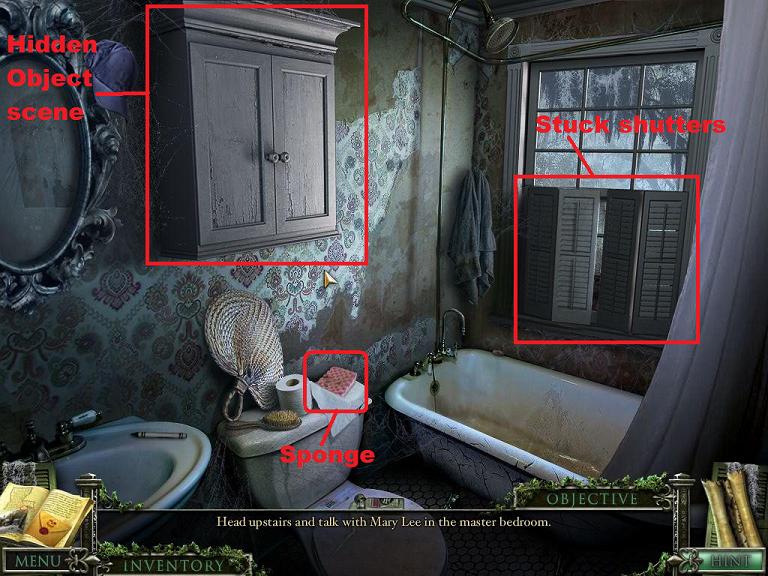
The right door leads to the bathroom. Enter the bathroom.
Screenshot.
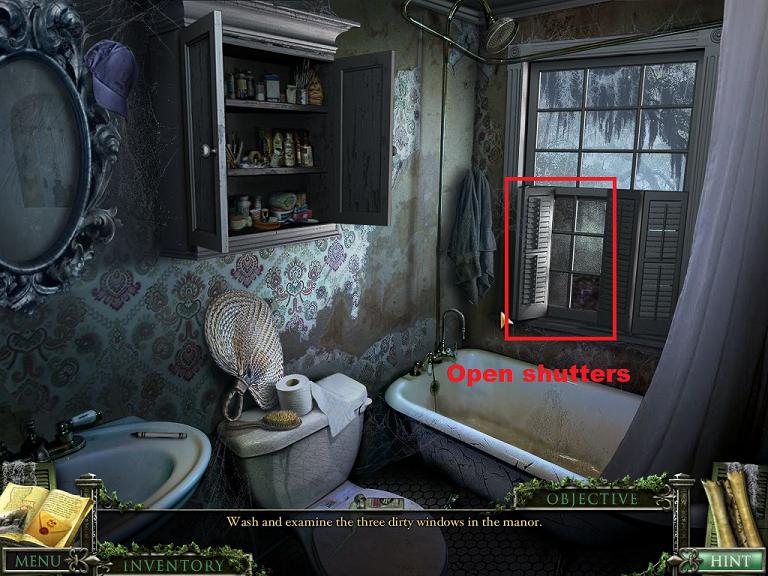
Examine things in the bathroom. The window is covered by some stuck shutters. On the toilet cistern you will find Mary's sponge.
Pick up the sponge and click on the cabinet to open it.
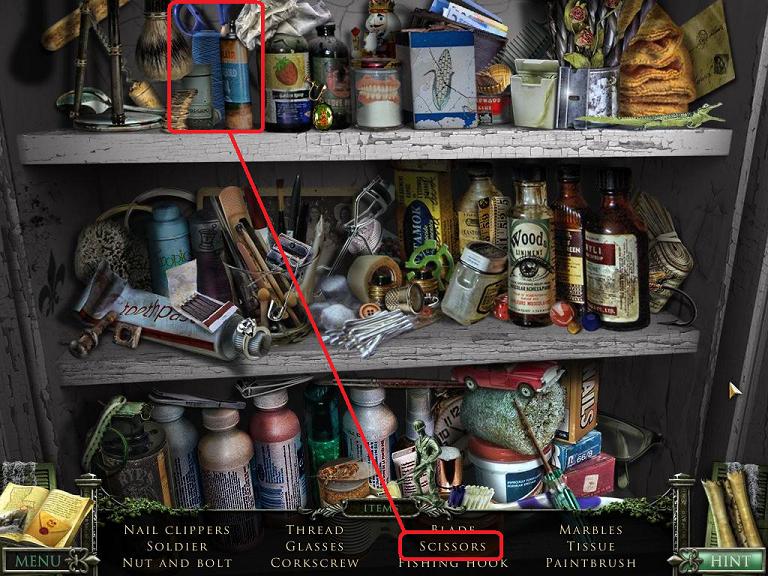
Screenshot.
Click on the cabinet to enter the hidden object scene. The inventory item you will find are the scissors.
Screenshot.
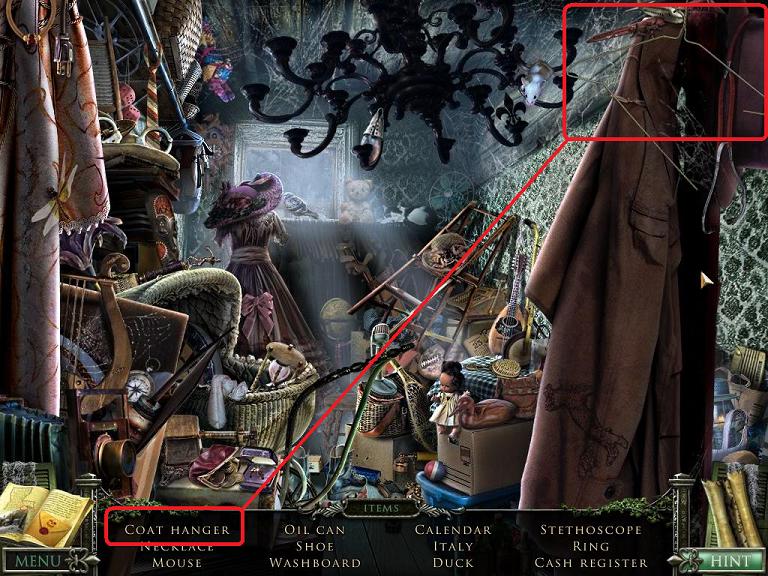
Once the hidden object scene is done back up three times until you are at the base of the stairs. There, to the left of the stairs, you will find Mary's mop.
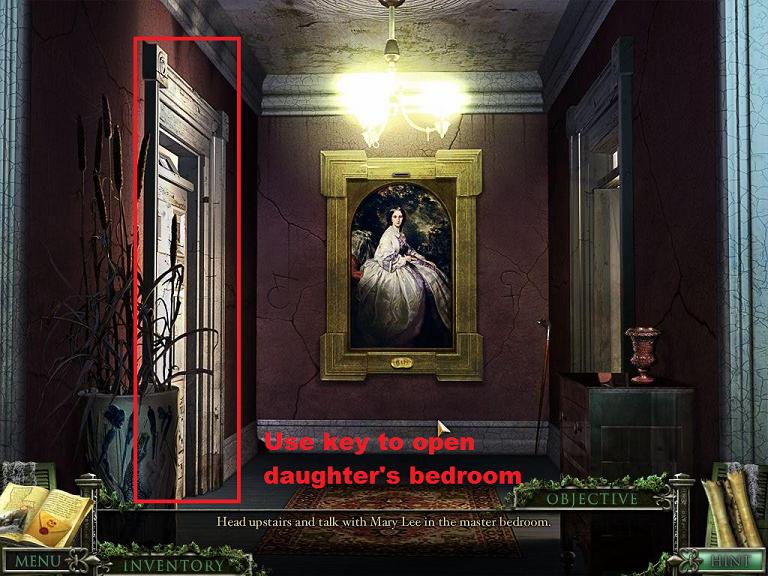
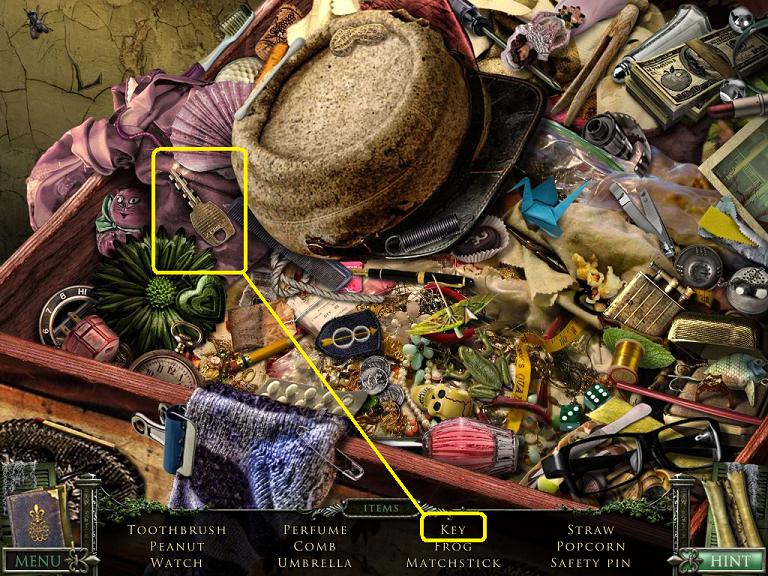
Click on the bottom of the locked closet door on the left so that you can see the key. Use the hanger from your inventory to get the key.
Once you have the key, click on the doorknob for a close up and use the key to open the door.
Go left into the closet.
Screenshot.
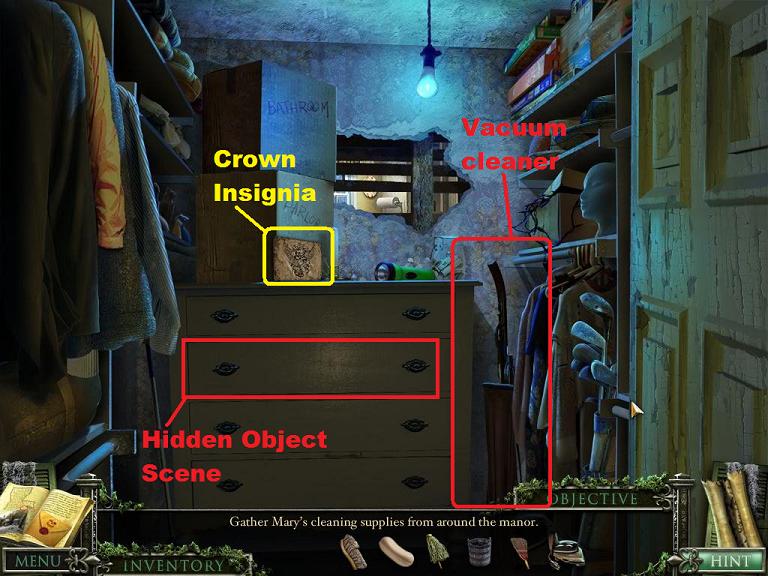
To the right of a large dresser is the vacuum cleaner, take it.
On top of the dresser is a crown insignia. There are 30 of these hidden throughout the game.
The second drawer of the dresser conceals a hidden object scene.
Screenshot.
Click on the drawer to open it and enter the hidden object scene. The item you will take away is an oil can.
Screenshot.
Back up twice to the couch where Pippi is still sitting. Go right into the parlor.
In the parlor is Mary's broom. You will also notice that Mrs. Lawson has moved into this room.
Screenshot.
Back up to the couch and then go left to the dining room then right into the kitchen.
Continue forward into the pantry.
On a shelf to the right you will see Mary's soap.
Screenshot.
Open the cupboard to the right of the door and click on it for a close up of the "hidden" stash.
On the middle shelf of the stash you will find the scrub brush.
Screenshot.
Close down the stash and go out the door into the back yard.
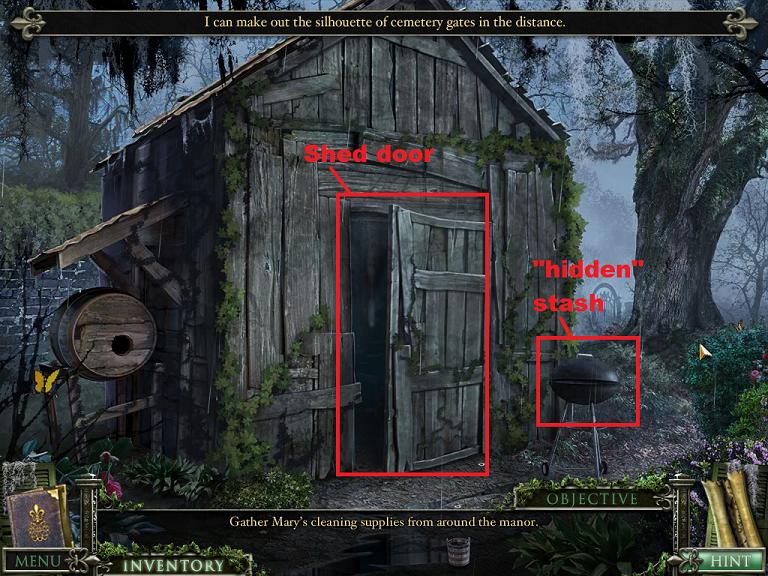
In the back yard you will see a rickety shed and an old barbecue grill. The grill conceals yet another "hidden" stash.
Go into the shed.
Screenshot.
Underneath the workbench is Mary's bucket. There is also a broken stool on the ground.
Screenshot.
The top of the workbench is a hidden object scene. Go into the scene and find the objects. The one that will go into your inventory is the hammer.
Screenshot.
At this point you should have all of the cleaning supplies.
Back up 5 times to the couch then go upstairs, take the left hall, then turn right into the bedroom where Mary is.
Click on the trunk at the foot of the bed to open it then place the cleaning supplies inside.
Screenshot.
Once all of the supplies have been placed in the chest you need to speak to Mary Lee again.
At the end of the conversation, Mary will hold up a wet rag and a key. Take the items.
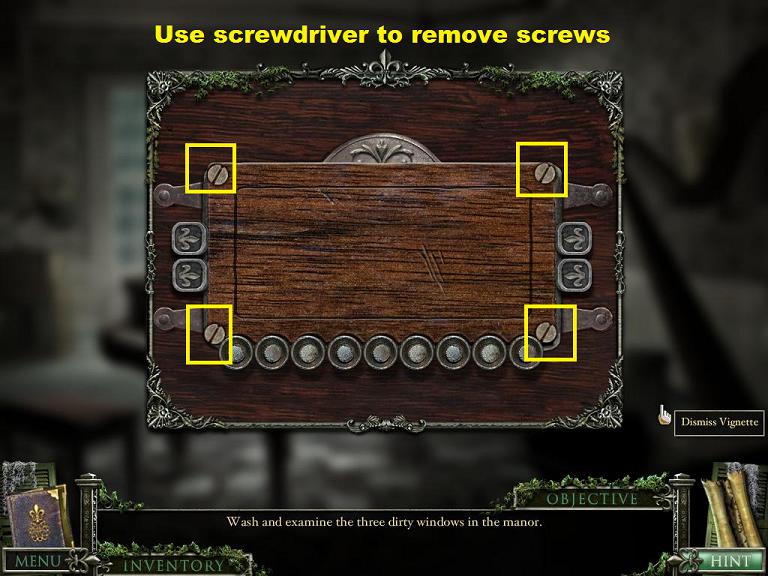
You now have a new task, clean dirty windows.
Clean Dirty Windows
Once you have the rag and key from Mary, back up twice to the upstairs foyer and go into the right hall.
Go right into the bathroom.
Use the oil can from your inventory on the stuck shutters to loosen them, then click again to open them.
Screenshot.
Screenshot.
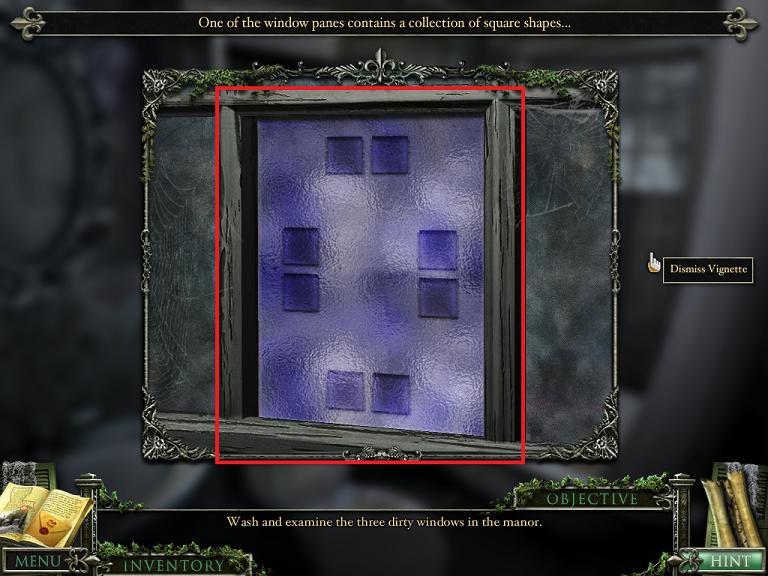
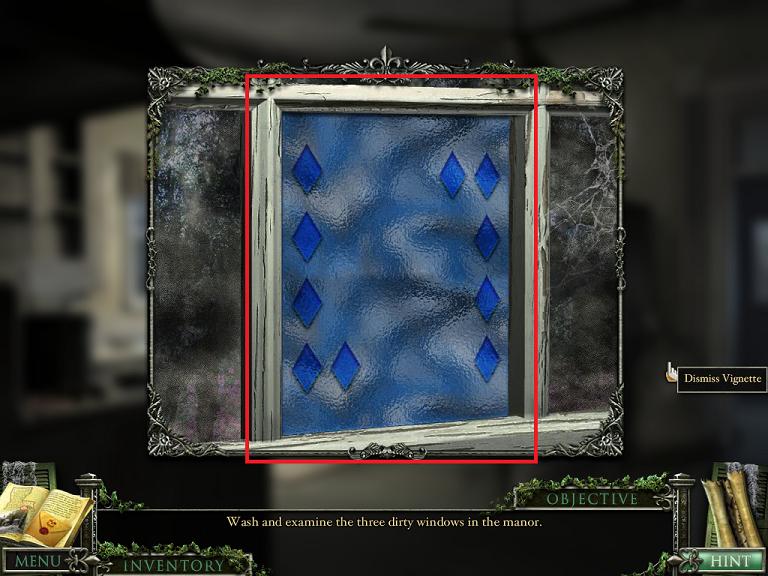
Click on the window (where the shutter had covered it) for a close up. Use the rag on the dirty window and you will see a stained glass panel.
Screenshot.
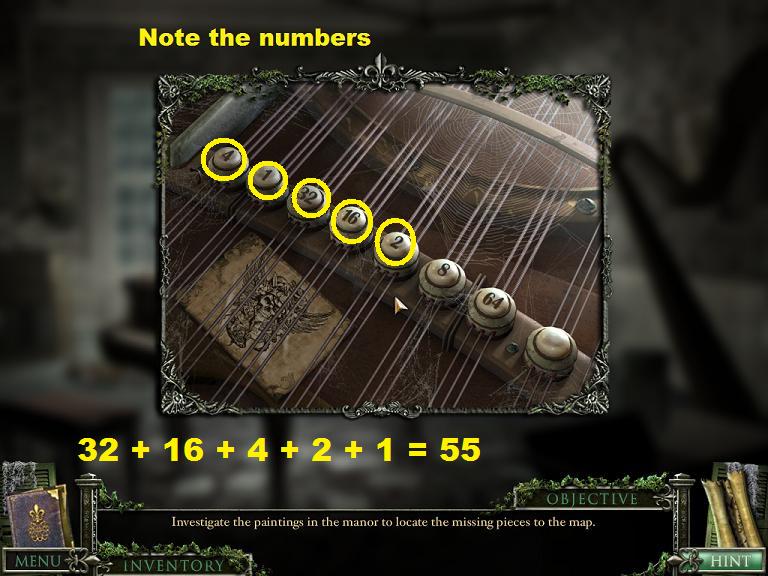
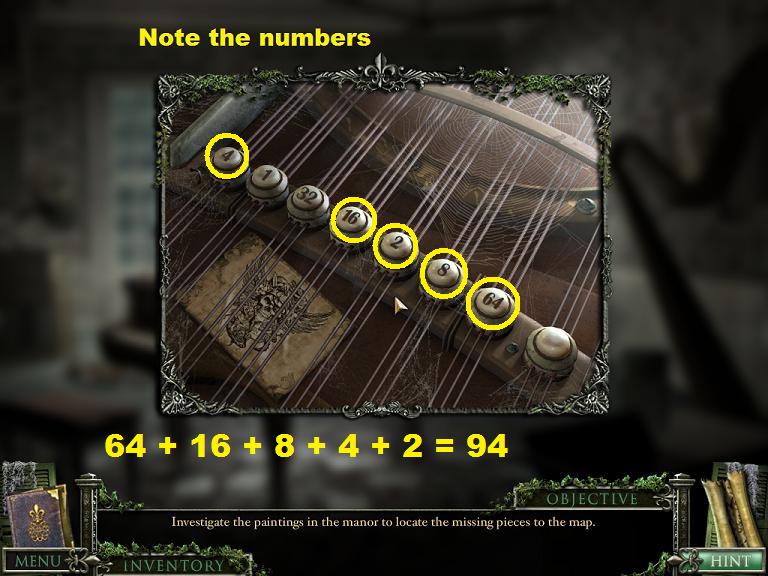
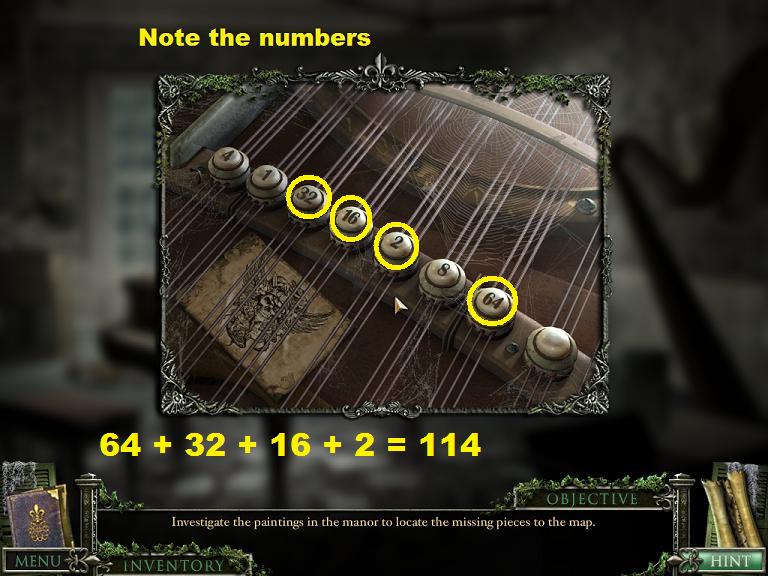
Make note of the shapes on the glass and the number of the shapes. This pattern changes from game to game.
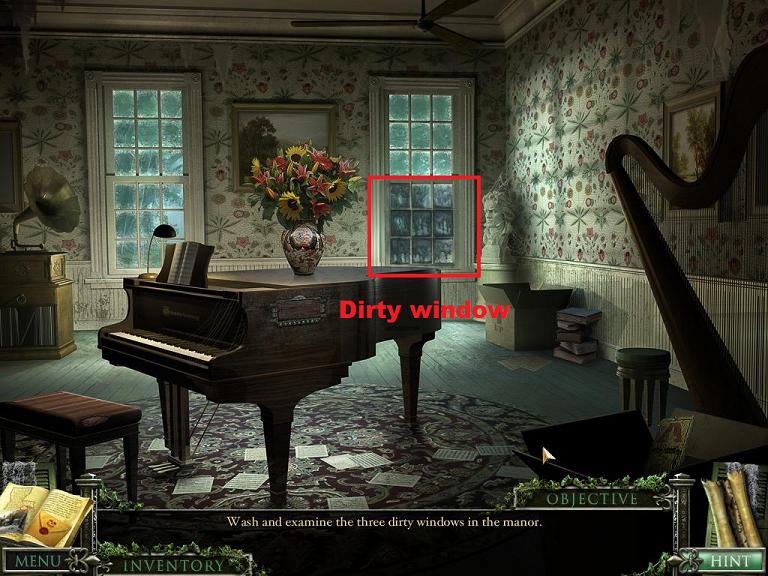
Close out the close up, then back up to the couch at the front of the house.
Go left to the dining room and right into the kitchen.
The window above the sink is dirty.
Screenshot.
Click on the dirty window for a close up, clean it with the rag, and again make note of the shapes and the number of the shapes on the stained glass panel.
Screenshot.
Close down the close up and back up twice to the couch.
Go forward toward the stairs, then click on the locked door on the right for a close up.
Screenshot.
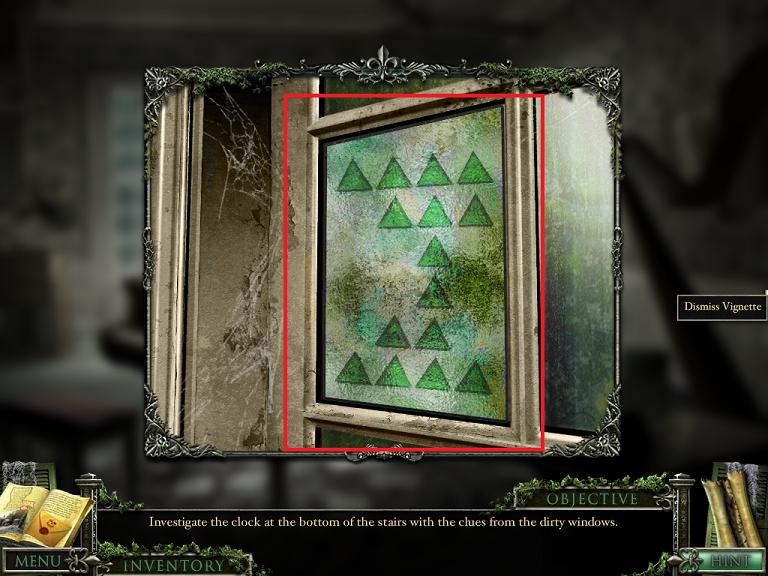
Use the key Mary gave you to unlock the door then go right into the room. This is the music room.
The window on the right side of the back of the room is dirty.
Screenshot.
Click on the window for a close up, use the rag, and make note of the shapes and their number.
Screenshot.
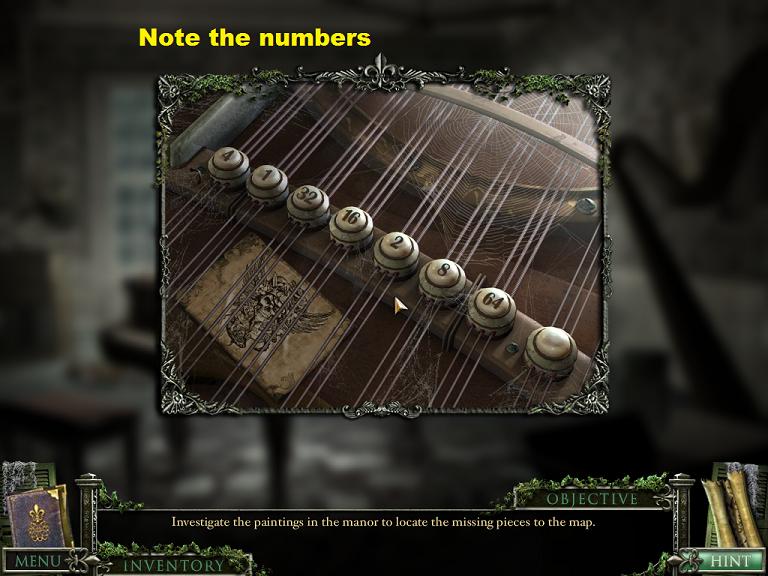
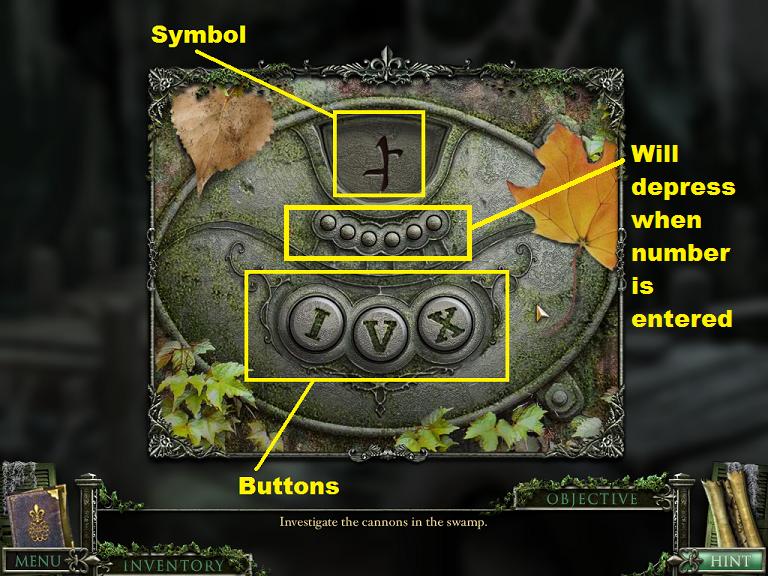
You now have enough clues to solve the mysterious clock mechanism.
Close down the close up of the window and back up to the staircase.
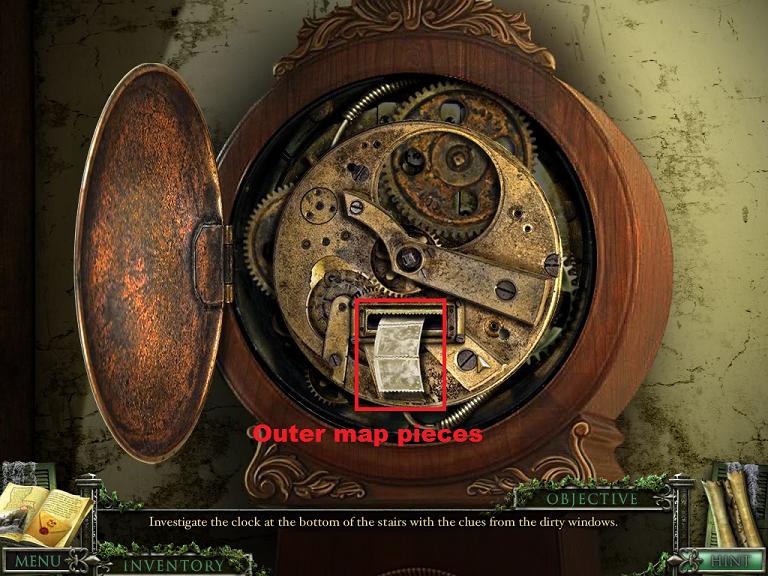
Mini-Puzzle: The Three Handed Clock
Click on the clock face for a close up.
You will notice that there are three hands, and that each hand has a symbol on it, square, triangle, or diamond. The clock face also has 24 numbers.
Screenshot.
You need to set the square hand to the number that is the number of squares you saw on the stained glass window with squares.
The diamond and triangle hands each go to the number of diamonds or triangles on their respective windows as well. This number changes from game to game.
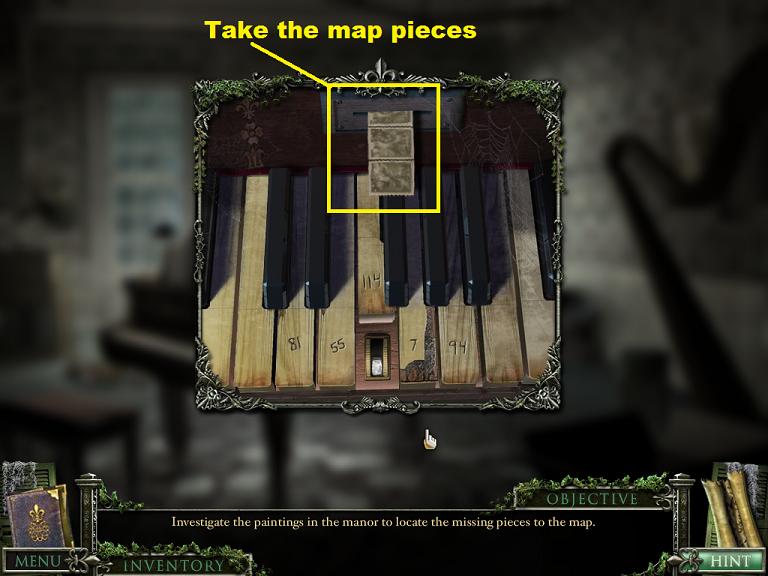
When the proper combination is entered, the clock face will swing open and three small pieces of paper (they look like stamps) will emerge. Take the pieces.
Screenshot.
These are pieces that go around the outer edge of the map. You will eventually need to find several more.
You will receive a new objective: Return to Mary Lee.
Close down the clock face close up, go upstairs, go to the left hall and right into the bedroom to speak to Mary Lee again.
Once the conversation with Mary Lee is finished you get a new objective: Find the spare key.
Find the Spare Key
Once you've finished talking to Mary Lee back up once to the hall.
Examine the large vase to the right of the chair.
Screenshot.
Once the vase is in close up click on it. It's too tight to get your arm into.
Use the oil can from your inventory on the vase (several times) to make it slippery enough to reach into.
Screenshot.
Click on the vase again once it is oiled up and you can get the key.
Back up once to the upstairs foyer and take the right hall.
Click on the door on the left for a close up and use the key (daughter's bedroom).
Screenshot.
Enter the daughter's bedroom and get a new objective: Talk to Magnolia (the daughter).
Click on Magnolia to speak to her.
Screenshot.
You will get a new objective: Collect Crayons.
Posted by: grinnyp |
November 26, 2010 4:24 PM
|
November 26, 2010 4:24 PM
Mystery Case Files: 13th Skull Walkthrough Part 2
The Mansion (Part 2)
Collect Crayons and get the Jewelry Box
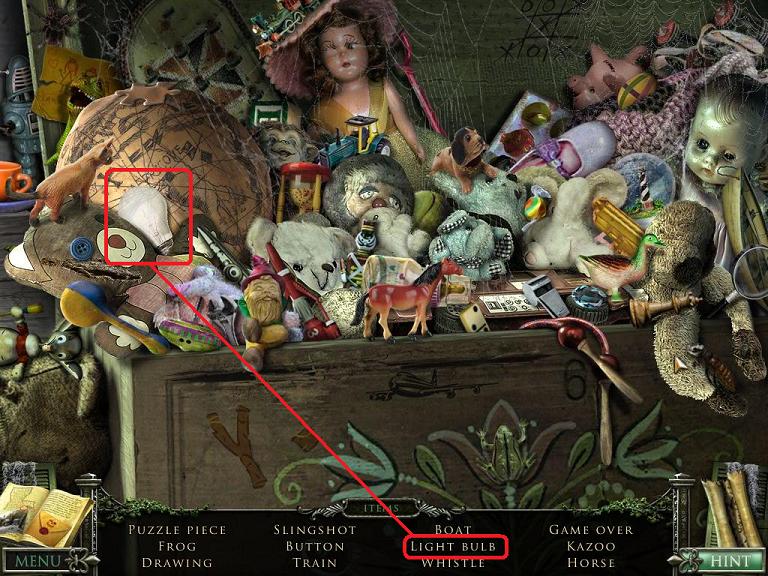
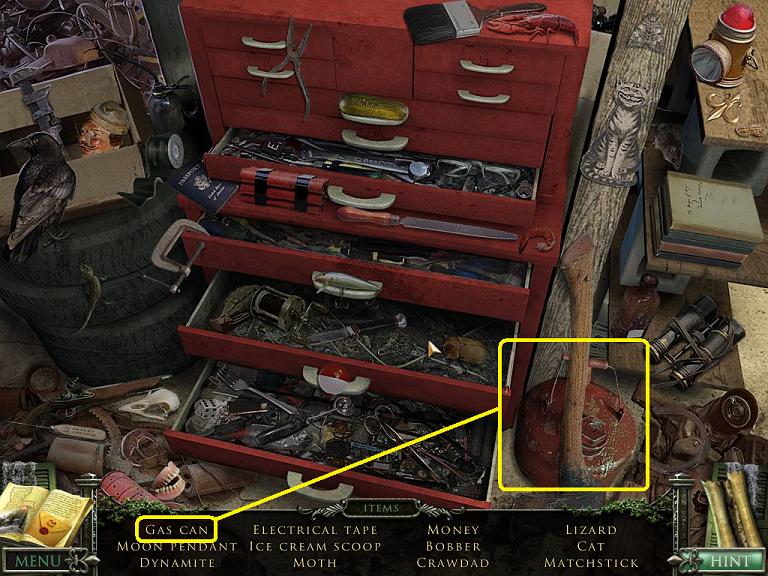
Before you leave the room, click on the toy chest at the foot of Magnolia's bed for a hidden object scene.
The item you will take from this hidden object scene is a light bulb.
Screenshot.
Once you've completed the scene back up then go right into the bathroom.
You will find a crayon on the sink.
Screenshot.
Back up twice and go down the stairs.
Go right into the music room.
Once in the music room go left into a new room, the office.
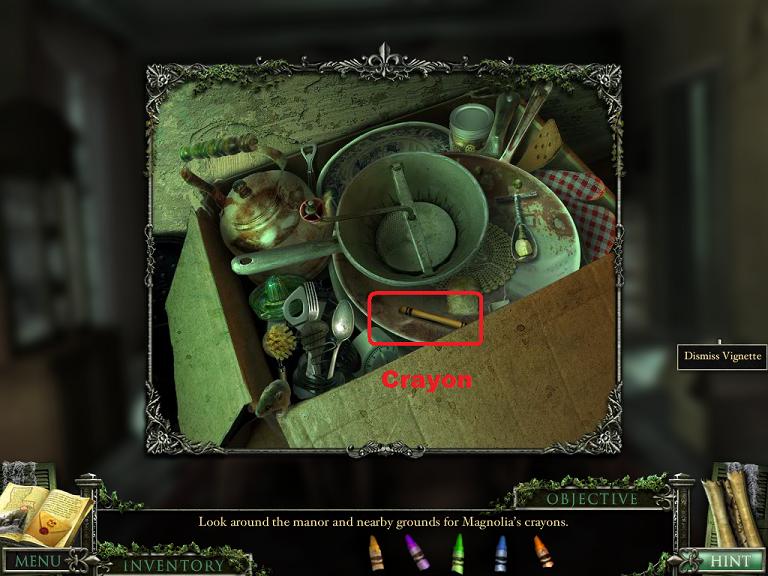
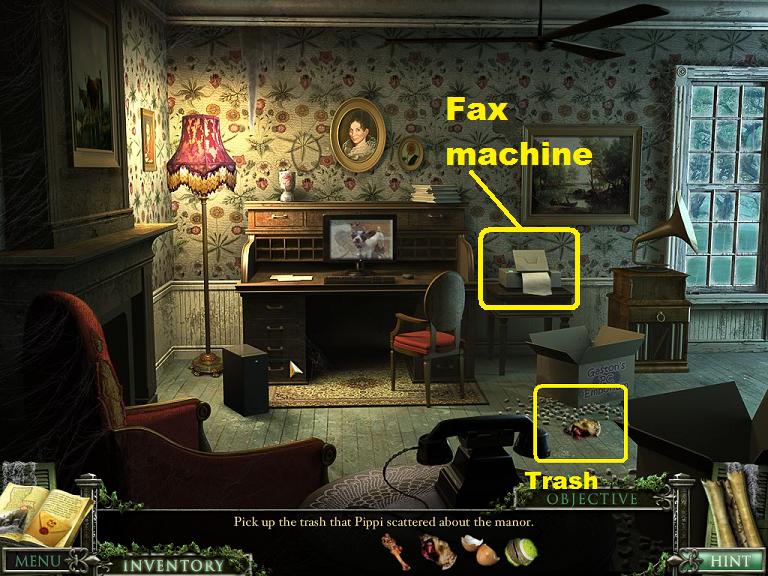
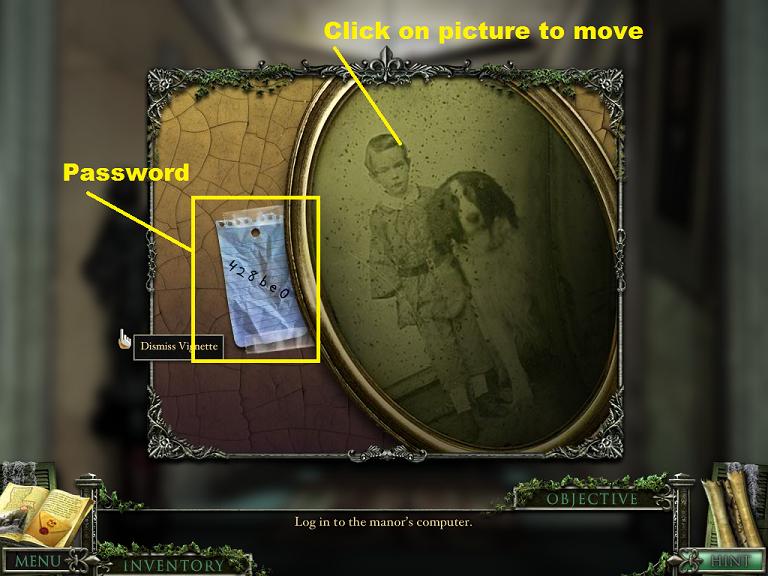
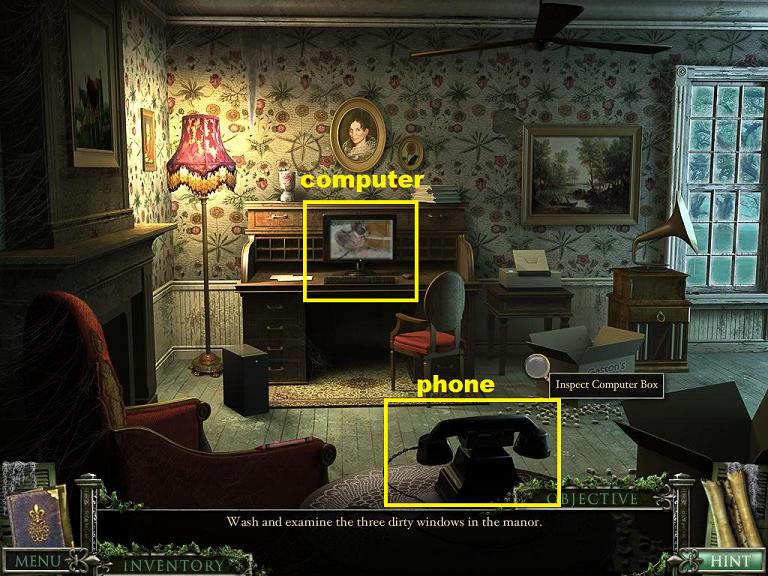
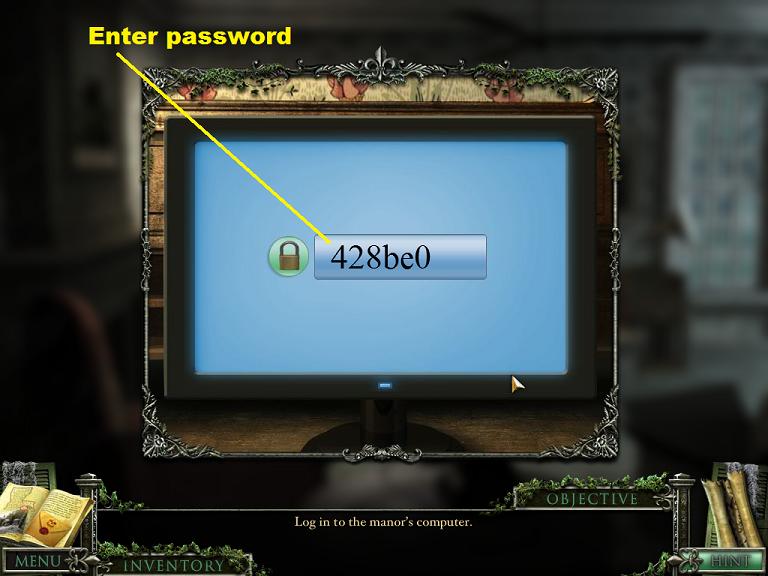
In the office you will find a crayon on the arm of a chair. You will also find a computer that you don't know the password to and a fax machine. Don't forget to examine the pictures.
Screenshot.
Go right (back to the music room) then back twice until you are at the couch.
Go left into the dining room and click on the moving box for a close up.
Screenshot.
In the moving box you will find a crayon.
Screenshot.
Close down the close up of the box and go right into the kitchen.
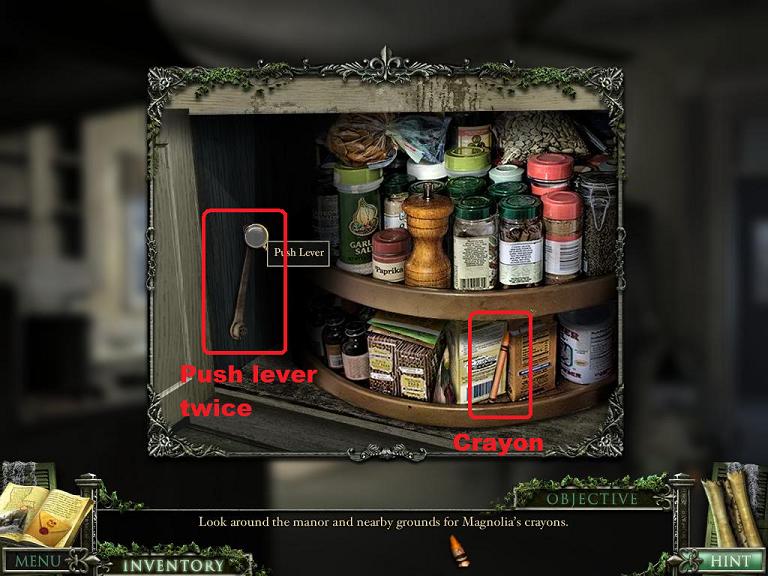
Click on the cupboard to see a close up of the lazy susan "hidden" stash.
Screenshot.
Notice that to the left of the lazy susan is a handle. Pull the handle twice to rotate the lazy susan around and you will see the crayon.
Screenshot.
Close down the lazy susan close up.
Notice that the refrigerator is sparking. Click on it to open a new hidden object scene.
The inventory item you will take from this scene is rope.
Screenshot.
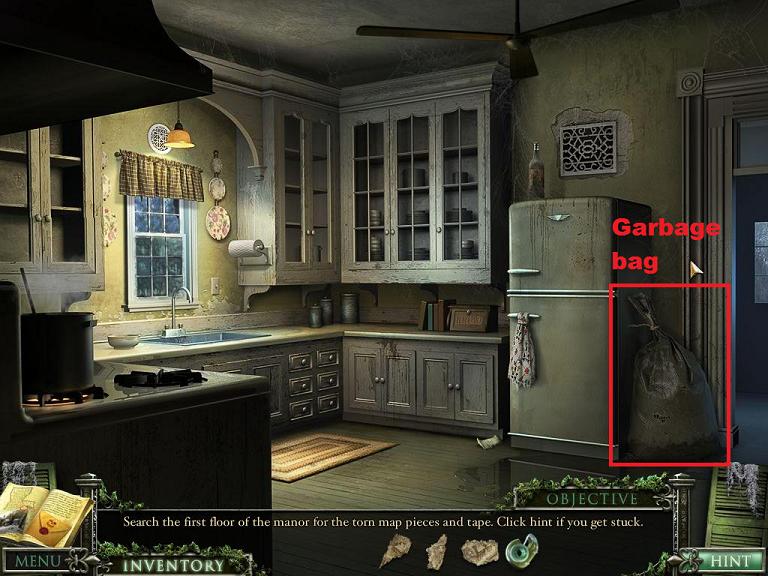
Once the hidden object scene is over examine the garbage bag to the right of the refrigerator.
Screenshot.
When the bag is in close up use the scissors from your inventory on the bag until the garbage spills out.
Click on the garbage for a close up. Amidst the garbage you will see a crayon.
Screenshot.
Once you've picked up the crayon, move forward into the pantry then through the door to the back yard.
Click on the barbecue grill outside the shed for a close up of the inside.
Screenshot.
Inside the "hidden" stash in the grill you will find another crayon.
Screenshot.
Close down the grill close up and enter the shed.
You will see the last crayon on the right, partially hidden by a hoe. Click on the hoe to knock it over and take the crayon.
Screenshot.
Time to take the crayons back to Magnolia.
Back up 5 times (to the couch), then go forward to the stairs, up the stairs, into the right hall, then left to Magnolia's room.
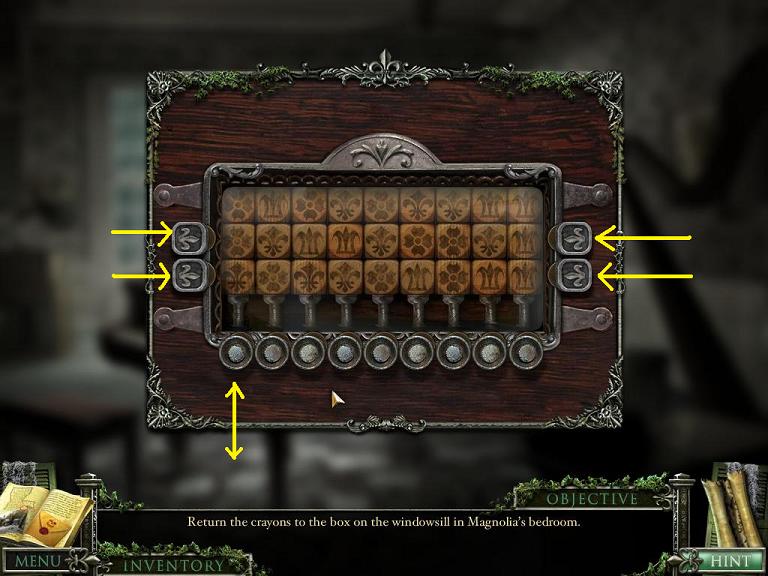
Place the crayons in the box on the window seat.
Screenshot.
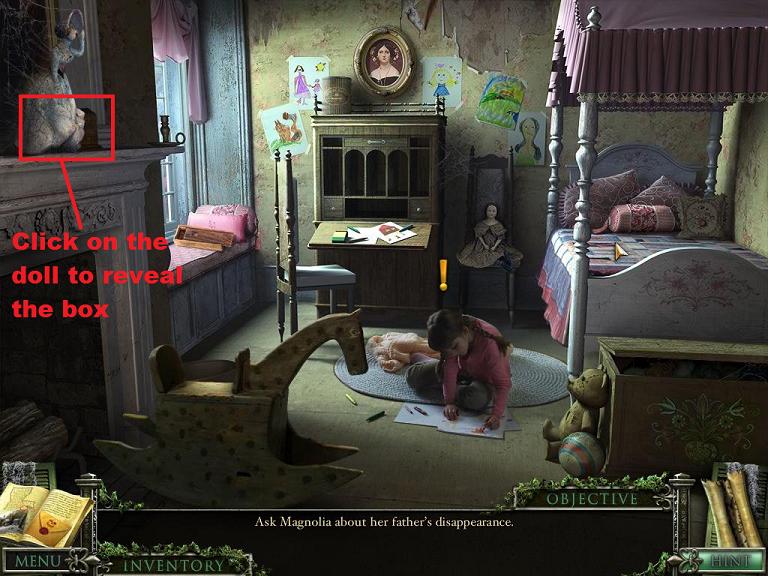
Once the crayons are returned click on Magnolia to talk to her again.
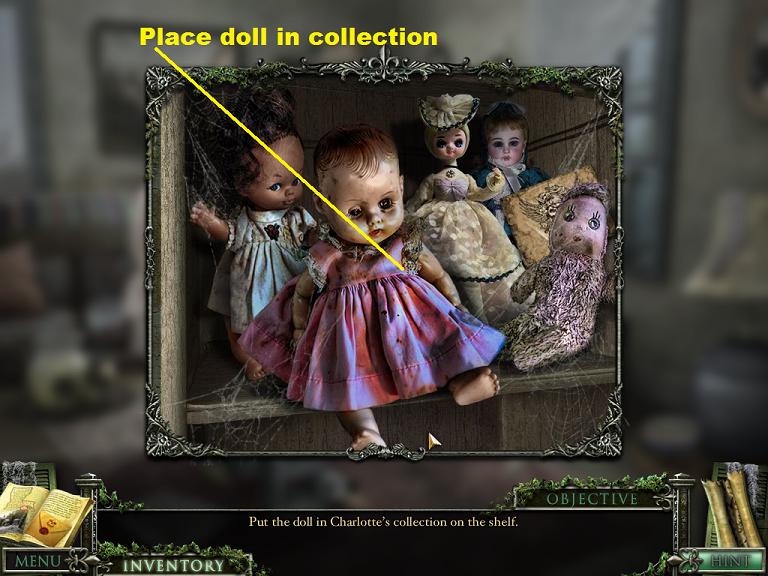
She will reveal that the jewelry box is hidden on the mantle behind the doll. Click on the doll to move it to reveal the box.
Screenshot.
Jewelry Box Mini-Puzzle
This is a rotating piece puzzle, and the solutions change.
Clicking on a piece without a button on it will rotate itself and the pieces touching each edge.
Pieces with a button on them will rotate the pieces around them but not themselves.
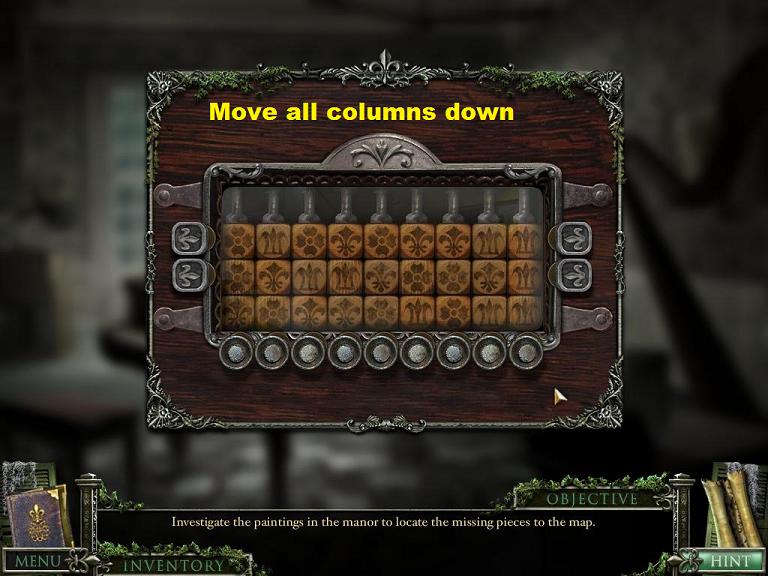
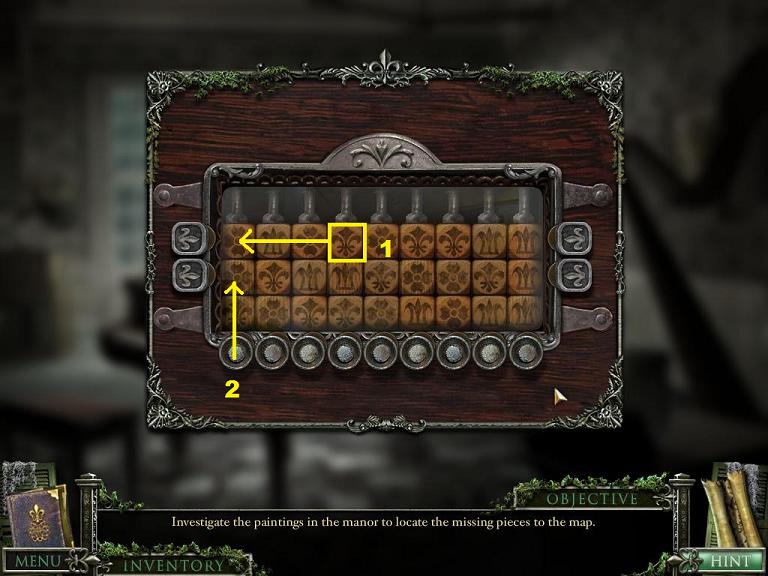
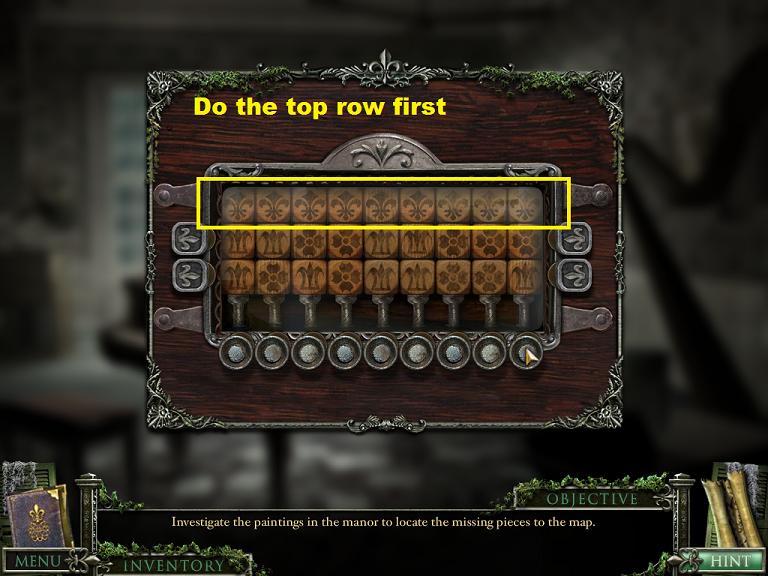
Start with the 2nd row from the top, and use those squares to rotate the top row into place, starting on the right and working your way left. Then, move to the third row and use those to move the second row into place. Do this for each row until you get to the bottom left. There are two button pieces there that only rotate one square each, and you can use them to finish the picture.
Screenshot.
The finished picture is of a ship.
Screenshot.
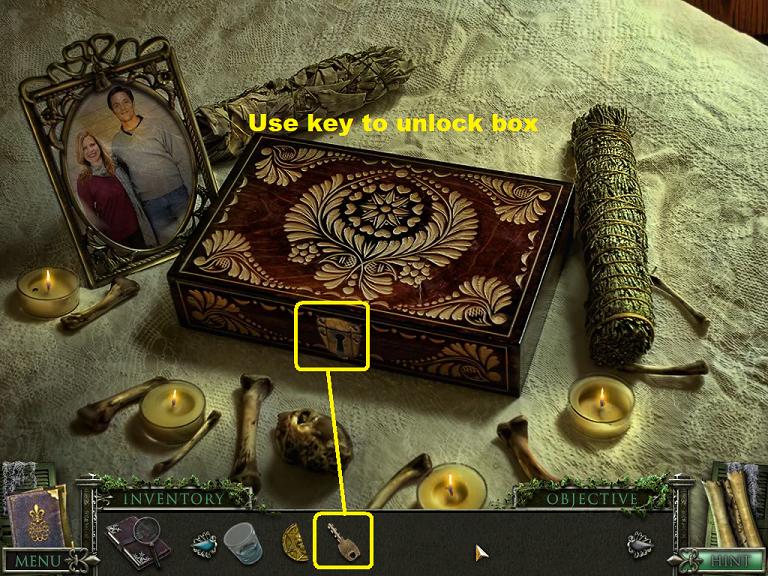
When the box opens there is a newspaper article and a key with a star on it. Read the paper and take the key.
Once again click on Magnolia to talk to her about her father.
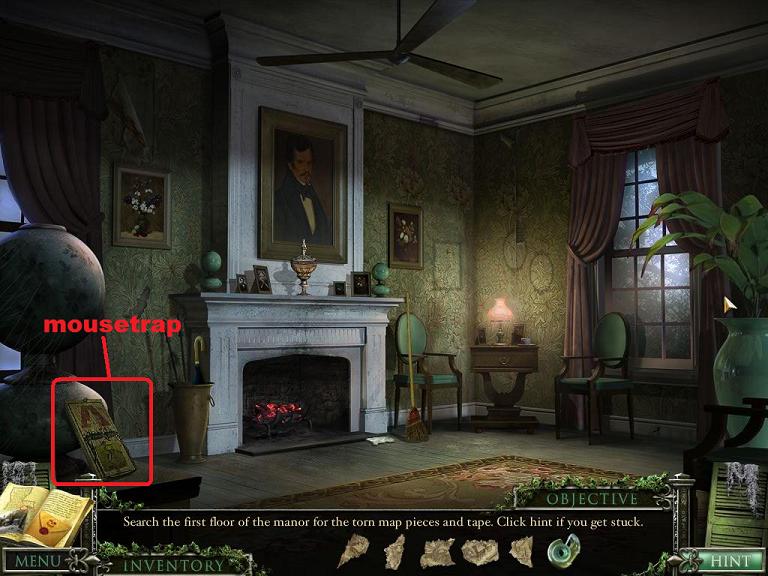
Magnolia will give you a new objective: find mousetraps and cheese.
Mousetraps and the Cellar
You now need to find three mousetraps and 3 wedges of cheese, and discover how to get into the cellar.
Back up from Magnolia's room and go right into the bathroom.
There is another hidden object scene in the cabinet above the toilet.
Complete the hidden object scene to get a matchbook.
Screenshot.
Back up twice to the upstairs foyer, then go down the left hall.
Go right to the bedroom where Mary is still cleaning.
There is a wedge of cheese on the table on the left of the room.
There is another hidden object scene in the closet on the right.
Screenshot.
Complete the hidden object scene to get a coin purse.
Screenshot.
Back up twice to the upstairs foyer, then go back down the stairs and right into the music room.
There is a mousetrap in a box on the right side of the room.
Screenshot.
Back up to the stairs and back up again to the couch.
Go right into the sitting room.
There is a mousetrap on a table to the left.
Screenshot.
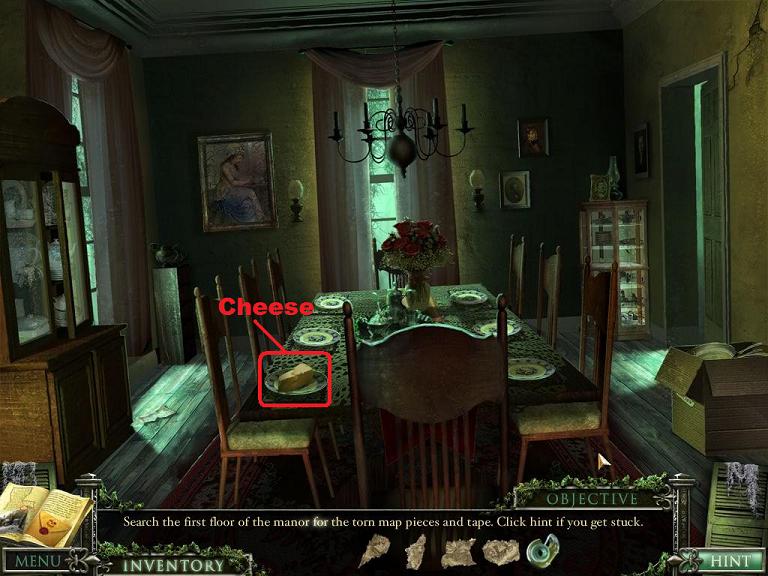
Go back to the couch and then left to the dining room.
There is a piece of cheese on the table.
Screenshot.
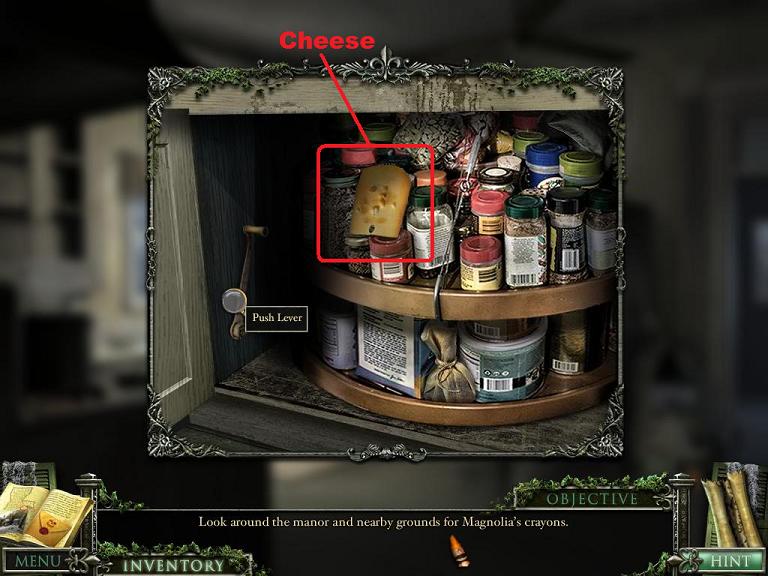
Go right into the kitchen. Click on the lazy susan for a close up. Rotate the lazy susan until you see the cheese.
Screenshot.
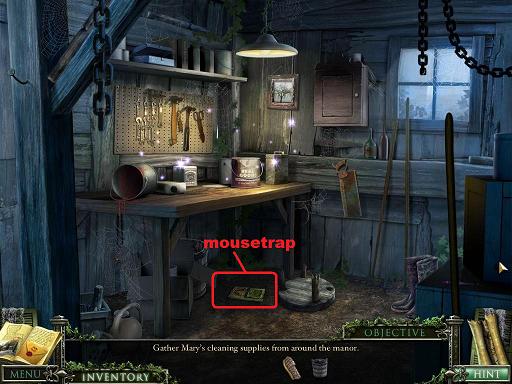
Go forward into the pantry, through the door to the back yard, and into the shed.
There is a mousetrap underneath the workbench.
Screenshot.
You should now have all three mousetraps and all three pieces of cheese.
Back up twice to the parlor.
To the right of the small cabinet is a wall sconce, above the stairs to the cellar.
Place the light bulb from your inventory into the sconce to light the stairs.
Go right to the cellar.
Screenshot.
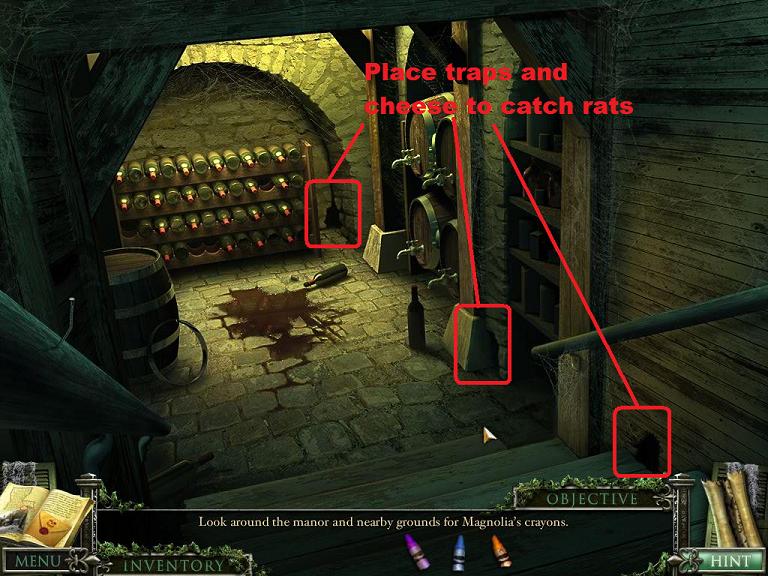
Here there be rats. And rat holes.
Click on each of the rat holes for a close up, and place a trap and cheese at each hole.
Screenshot.
Once all of the traps are placed then move back to the pantry and wait until you hear all three traps spring.
Once the traps have all sprung, go right into the cellar.
Pick up each rat from each trap.
Screenshot.
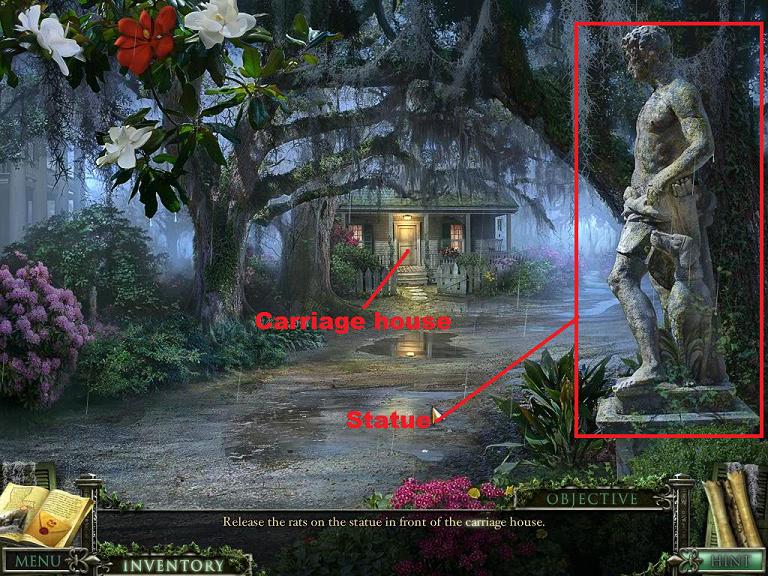
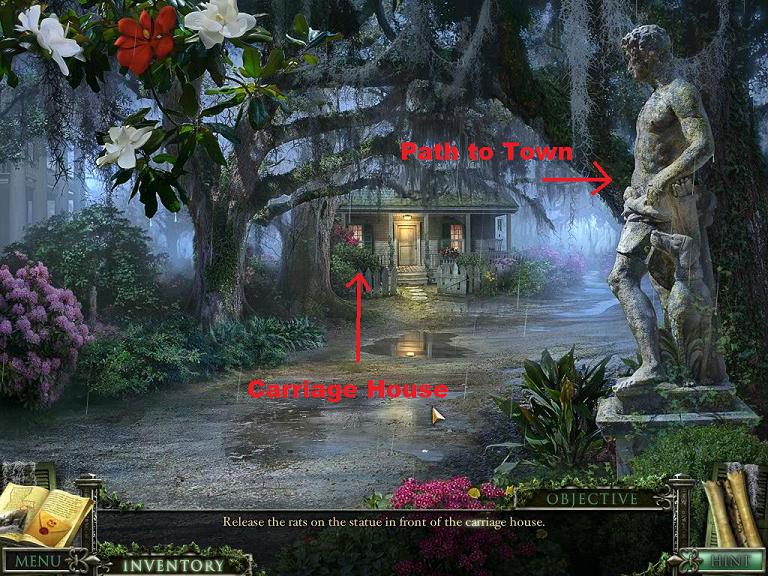
Now you have to release the (still live) rats in front of the carriage house.
Back up four times to the couch, then back up twice more to the front lawn (where the wheelbarrow and the odd fountain are).
From the front lawn go right to the carriage house.
Screenshot.
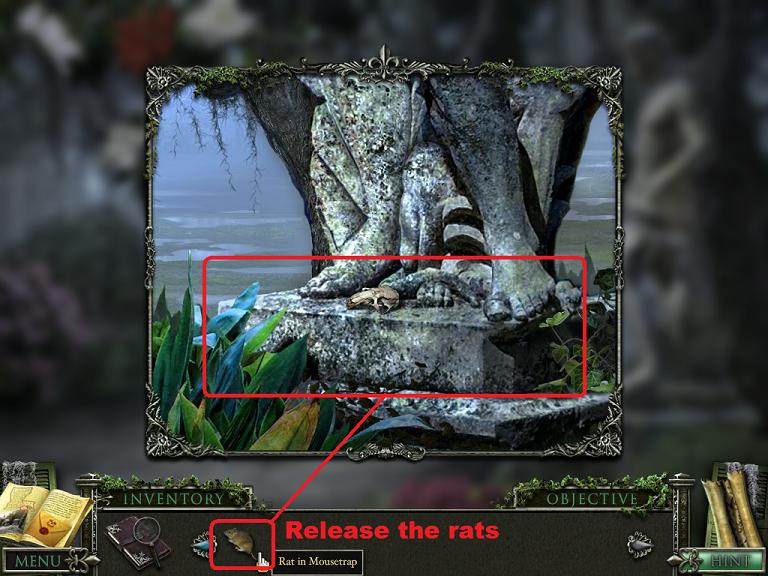
There's a statue on the right, click on it for a close up.
Screenshot.
At the base of the statue you see a small animal skull. Release the rats here.
Screenshot.
Back up once to the front lawn. Go forward twice into the house, then forward again to the stairs. Go up the stairs, then right to the hall, then left to Magnolia's room.
Click on Magnolia to talk to her about the cellar. She will tell you about the wine rack.
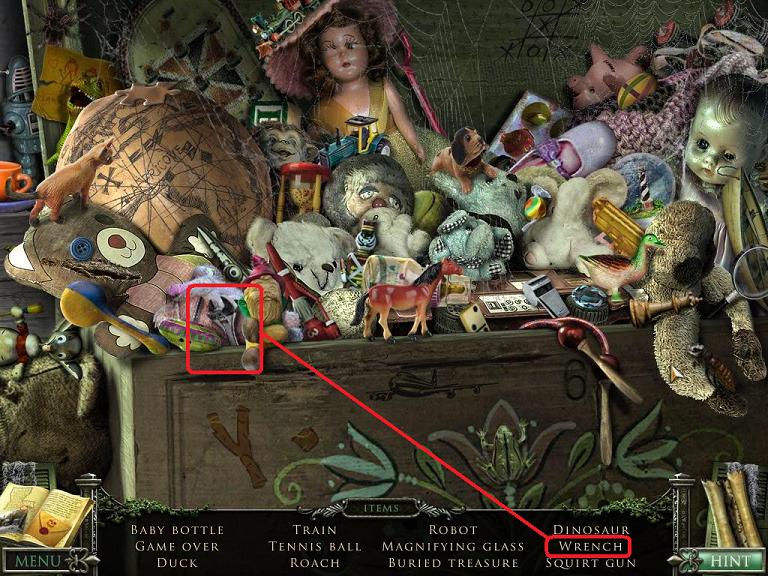
Time to investigate the cellar. First, there is another hidden object scene in Magnolia's toy box.
Screenshot.
Complete the hidden object scene to get a wrench.
Screenshot.
Back up twice to the stairs, go down the stairs, back up once to the couch, go left to the dining room, right to the kitchen, forward to the pantry, then right to the cellar.
Click on the wine rack on the back wall for a close up.
Screenshot.
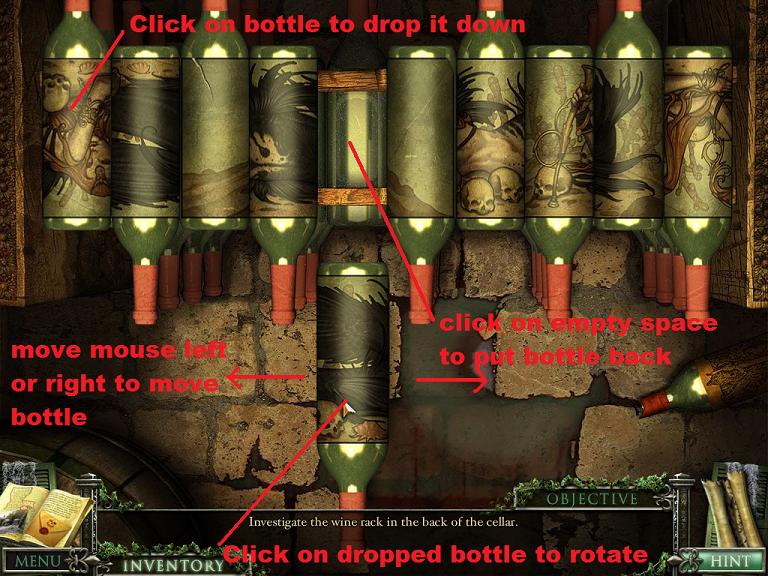
Wine Bottle Mini-Puzzle
Another variation on a slider puzzle. The object is to create a picture out of the wine bottles. The bottles can be moved left or right, and rotated either up or down.
Click on any bottle to move it out of the rack. Click on the bottle (while out of the rack) to rotate it. Move the cursor left or right to move the bottle. Click on the empty space in the rack to replace the bottle.
Screenshot.
The final picture is of a mermaid.
Screenshot.
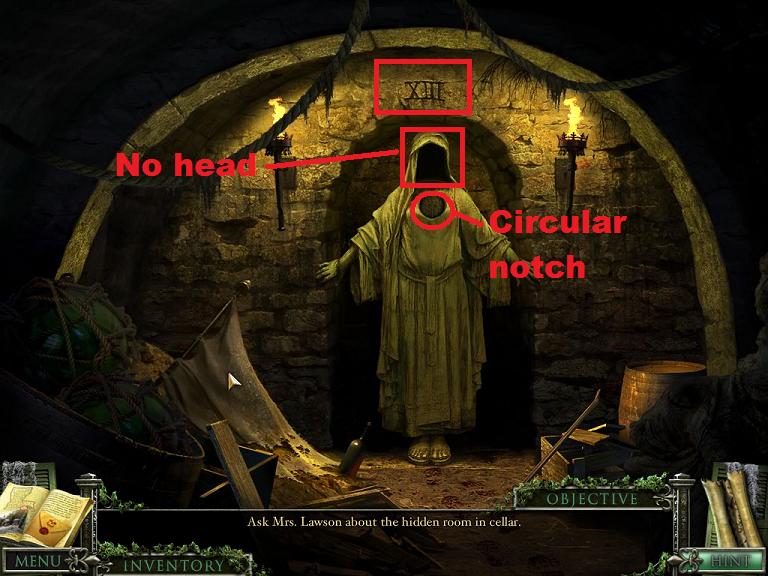
Completing the wine bottle mini-puzzle opens a secret passage. Go forward through the passage.
You have found the secret cellar room. In the room is a statue that has no head, and a circular notch on the chest. Above the statue is the number 13 in Roman Numerals.
Screenshot.
You have a new objective: Talk to Mrs. Lawson about the secret room.
Back up 5 times to the couch then go right into the sitting room.
Talk to Mrs. Lawson.
Screenshot.
You receive a new objective: Talk to Lewis.
Lewis Lee/Rain Gear
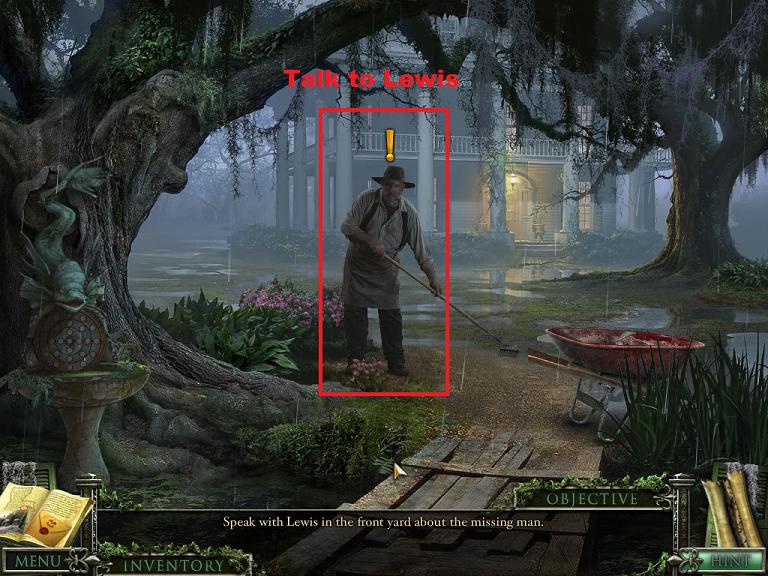
Back up to the couch, then back up twice more to the front lawn.
Lewis Lee should be there doing yard work.
Talk to Lewis Lee.
Screenshot.
Once the conversation is over you get a new objective: collect rain gear.
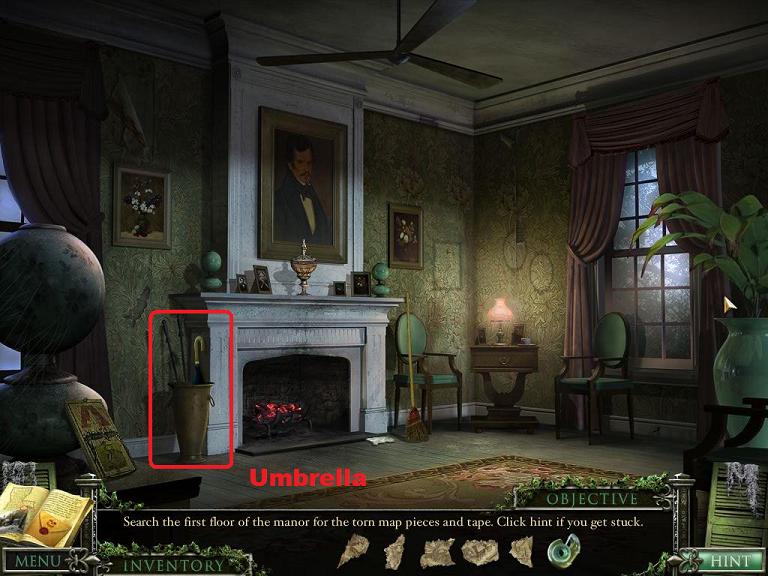
Go forward twice into the house and then right into the sitting room.
Get the umbrella from the sitting room (left of the fireplace).
Screenshot.
Back up once to the couch, go forward to the stairs, go up the stairs, go to the right hall, then right to the bathroom.
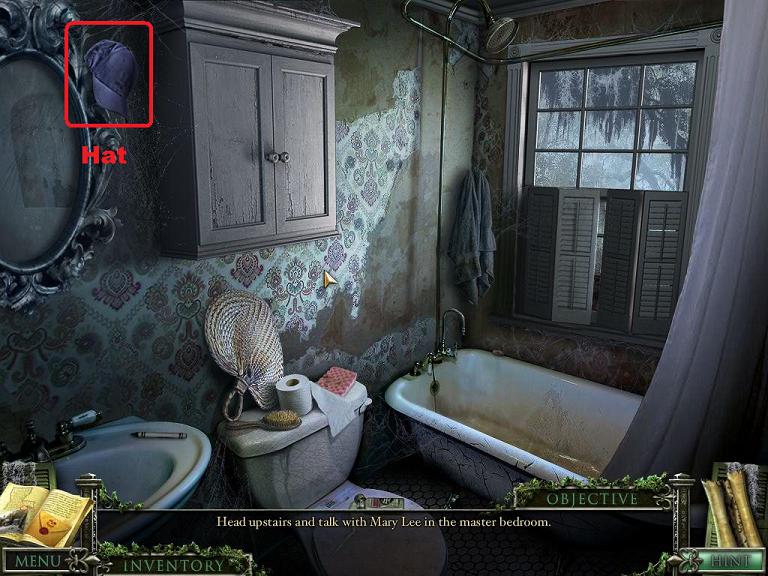
In the bathroom you will find the hat, hanging on the mirror.
Screenshot.
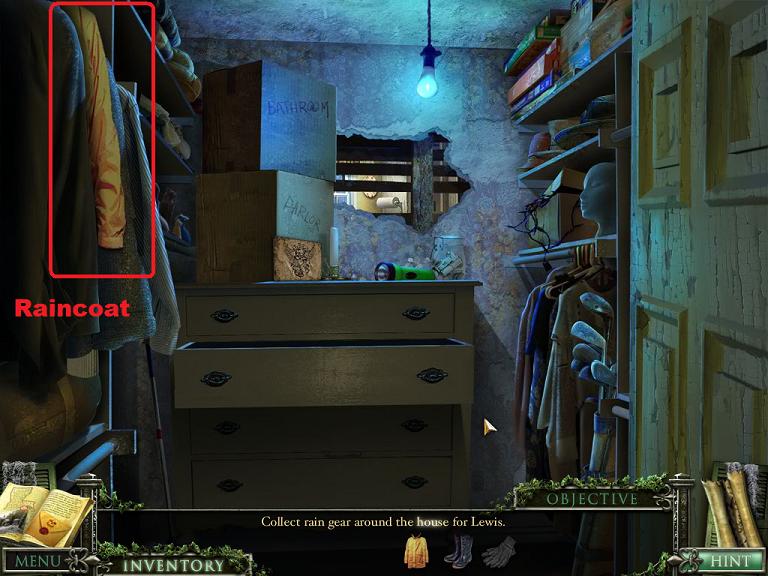
Back up three times to the base of the stairs, then go left into the closet.
Hanging on the left is the raincoat.
Screenshot.
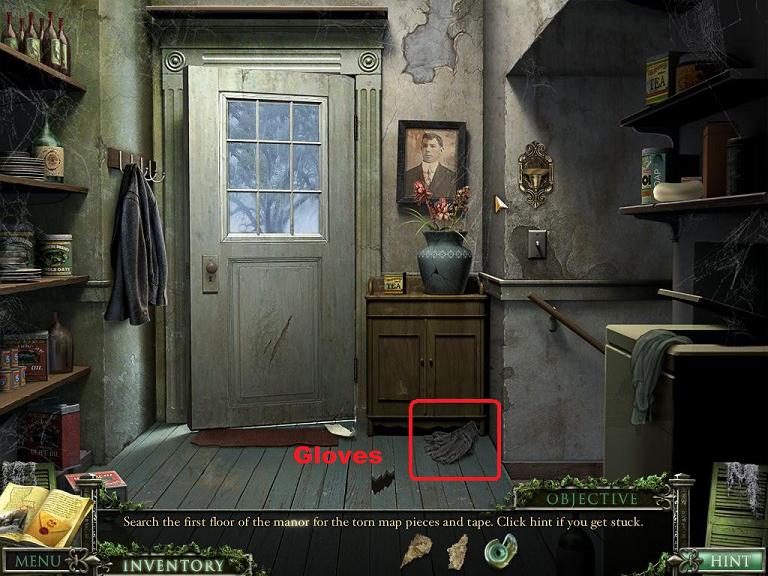
Back up twice to the couch. Then go left to the dining room, right to the kitchen, then straight to the pantry.
You will find the gloves on the floor of the pantry in front of the small cabinet.
Screenshot.
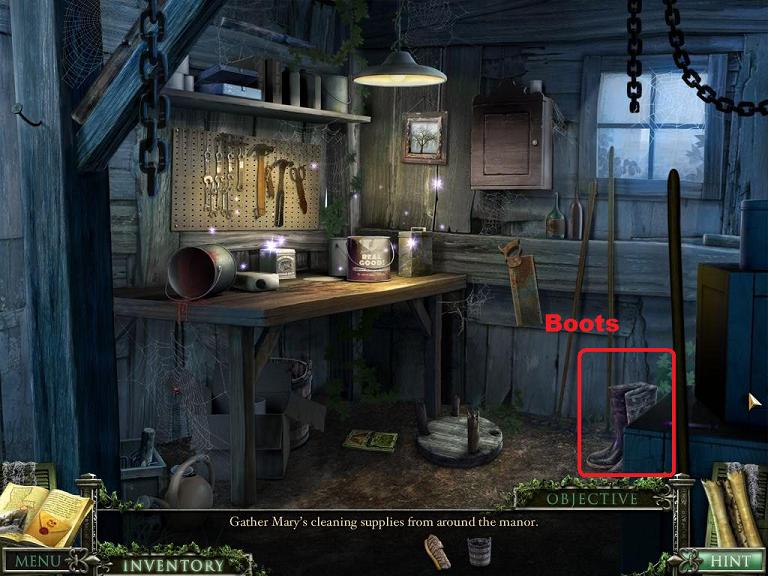
Go out the door into the back yard, then into the shed.
The boots are on the ground to the right.
Screenshot.
Back up seven times until you are in the front yard with Lewis.
Place the rain gear in the wheelbarrow.
Screenshot.
Click on Lewis to talk to him again once all of the items are in the wheelbarrow.
Screenshot.
During the course of the conversation, Lewis will give you a metallic T-shaped object, take it.
Once the conversation is finished, you will get a new goal: mend the stool.
Mend Stool/Explore Attic
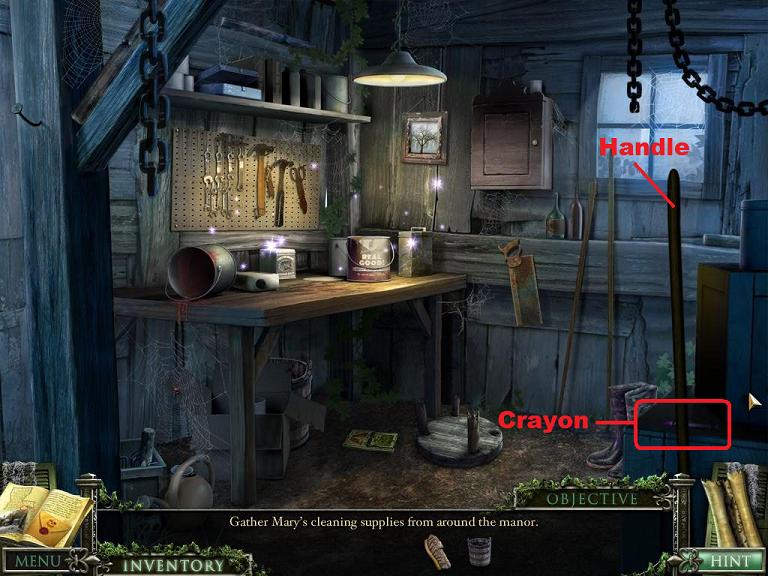
Go forward twice into the house, left to the dining room, right to the kitchen, forward to the pantry, out to the back yard, then into the shed.
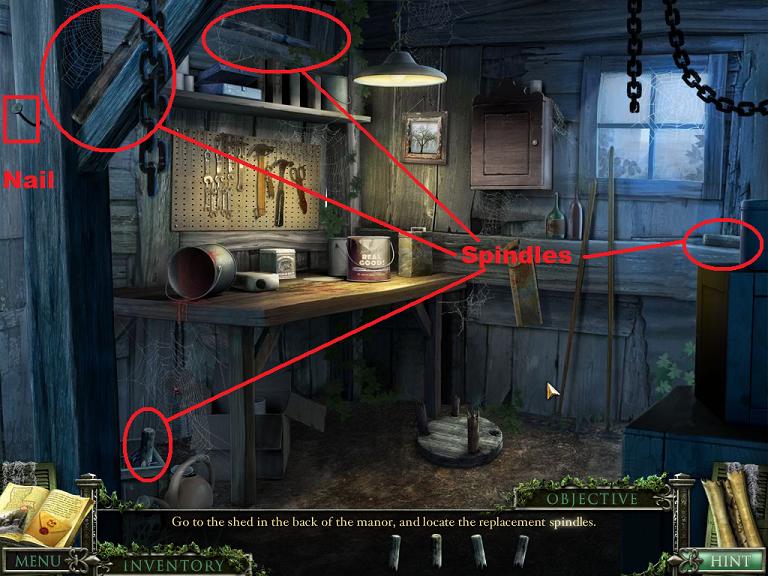
You need to find four spindles and four nails to repair the stool.
All four spindles are in the shed, and one nail is there as well (you need to collect all four spindles before you can get the nail).
Screenshot.
Back up to the back yard.
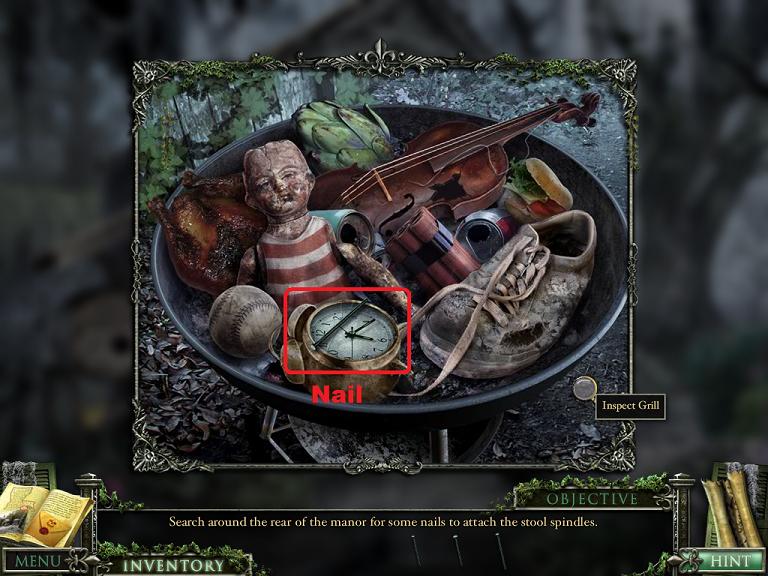
Look at the barbecue grill in a close up to find the second nail.
Screenshot.
Close down the close up and back up once to the pantry.
Click on the "hidden" stash in the cabinet to find the third nail.
Screenshot.
Screenshot.
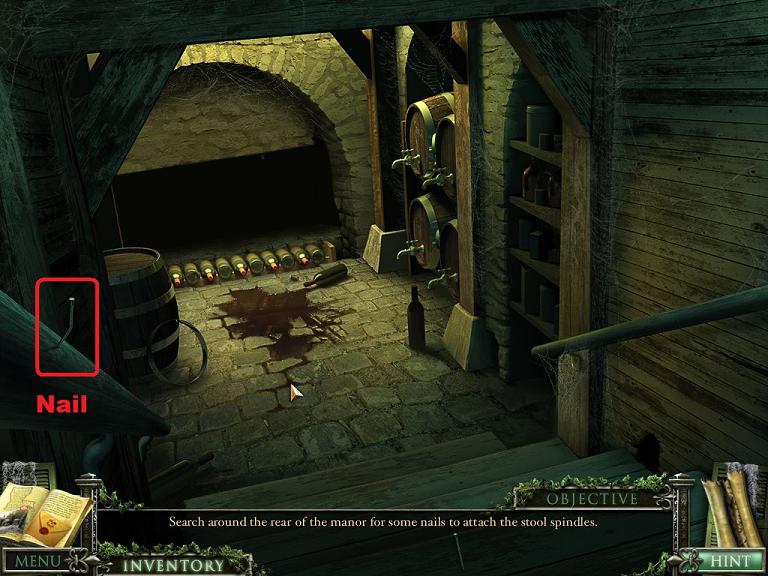
Go right into the cellar.
You will find the last nail on the left handrail of the cellar stairs. You will need to use the hammer from your inventory to remove the nail.
Screenshot.
Back up to the pantry, then go forward twice inside the shed.
Click on the broken stool for a close up.
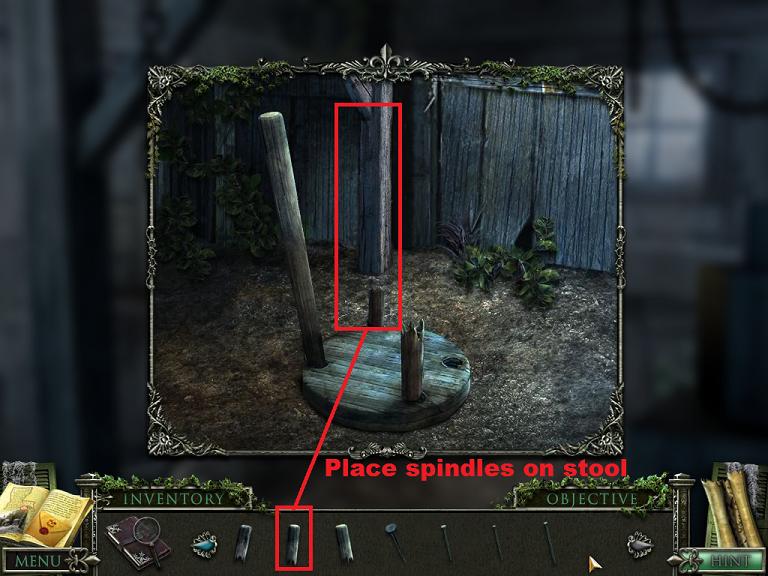
Place all four spindles on the stool.
Screenshot.
Once the spindles are placed the stool will turn itself upright.
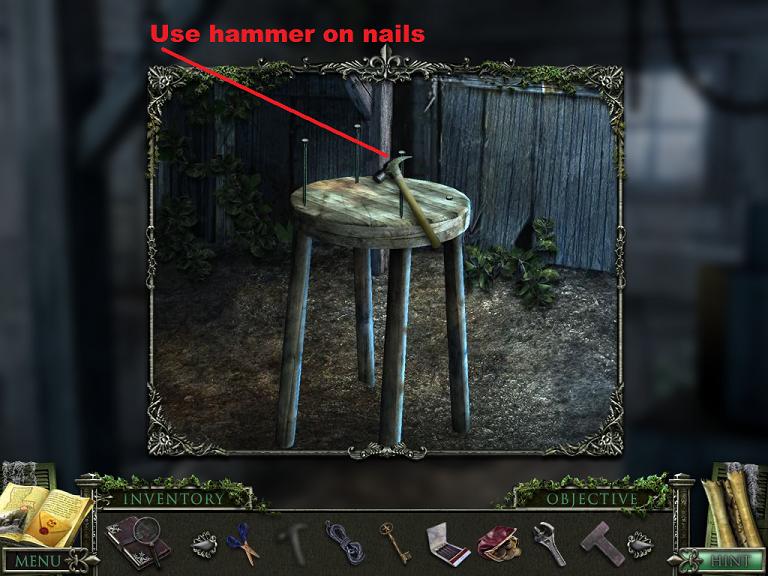
Place the nails on the stool.
Screenshot.
Use the hammer on each of the nails to repair the stool.
Screenshot.
Once the stool is repaired click on it to put it into your inventory.
Back up five times to the couch, then go forward to the stairs and then up the stairs.
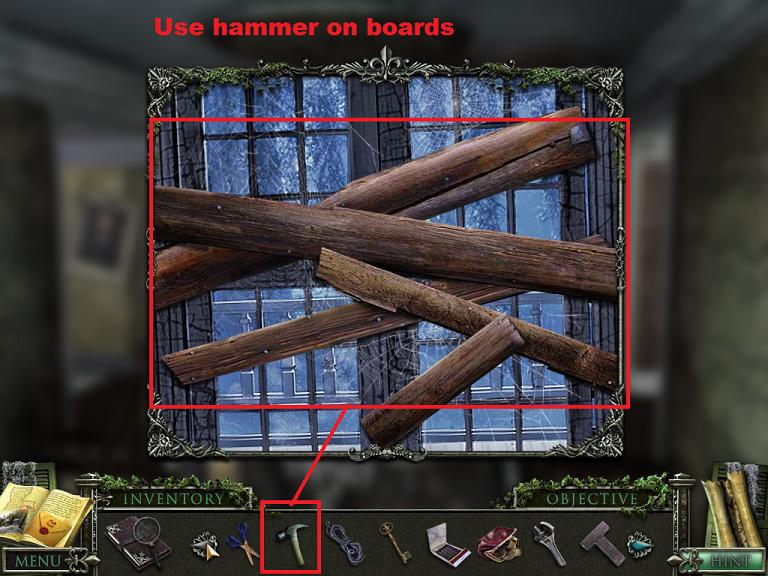
In the upstairs foyer, click on the boarded up terrace doors for a close up.
Screenshot.
Use the hammer on the boards (five times) to remove the boards.
Screenshot.
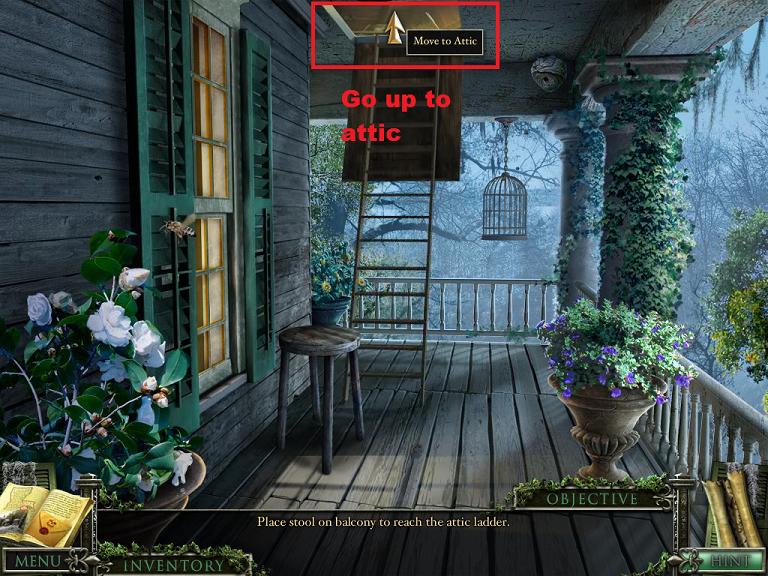
Once the doors are opened go through them to the balcony.
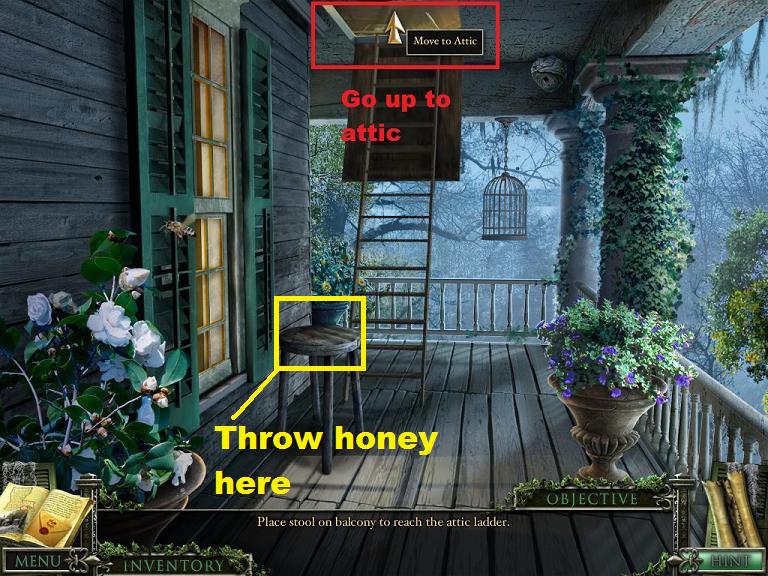
Place the stool on the balcony underneath the attic door.
Screenshot.
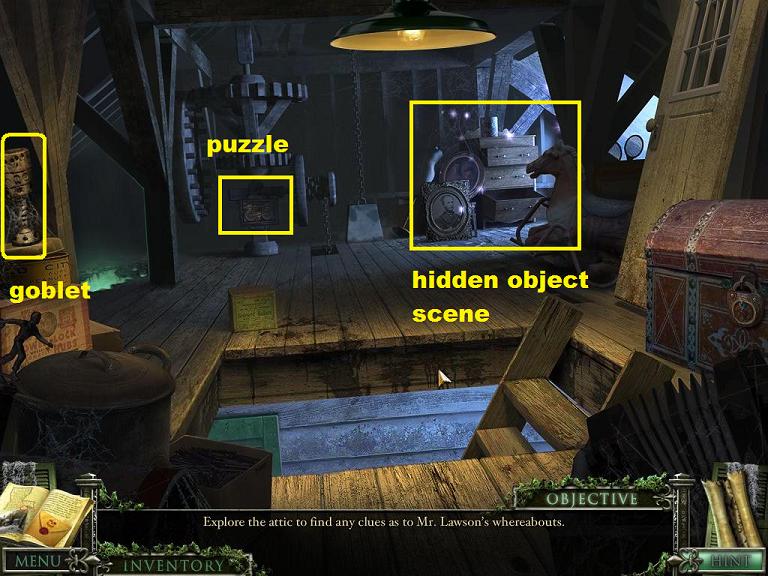
Once the stool is placed click on the attic door to open it. When the door opens, click on the open door to move up.
Screenshot.
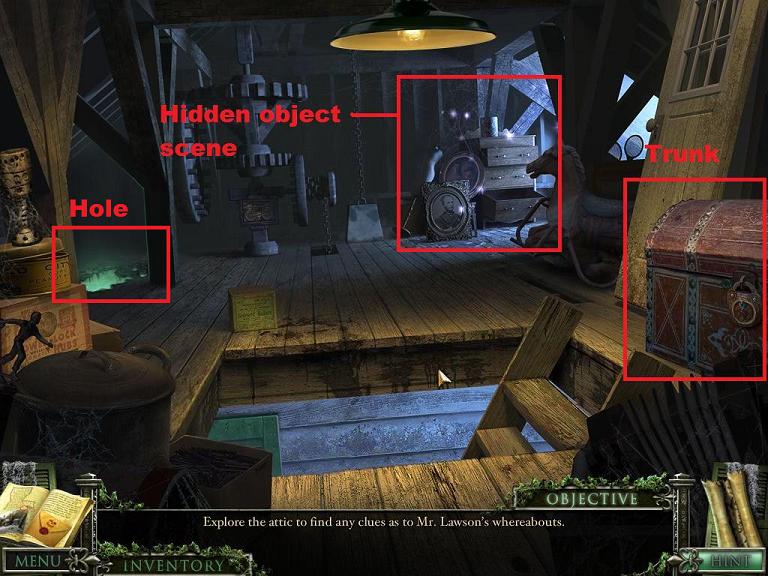
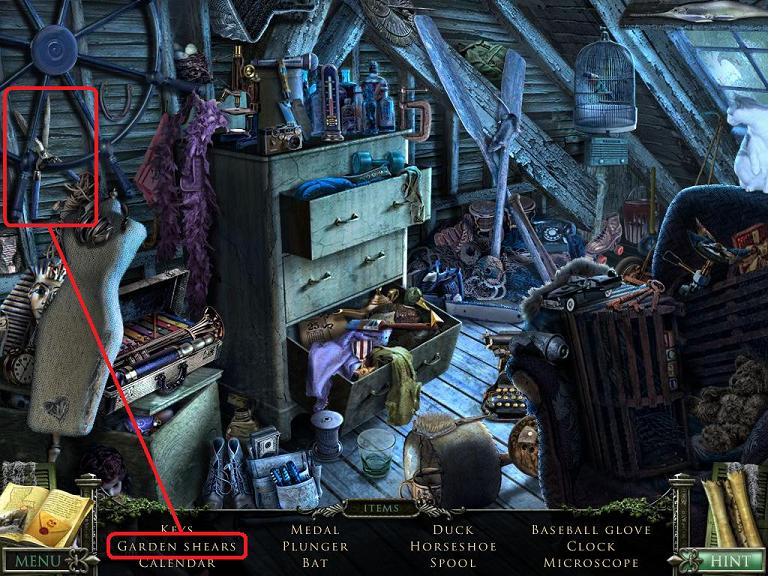
You now have a new objective: explore the attic.
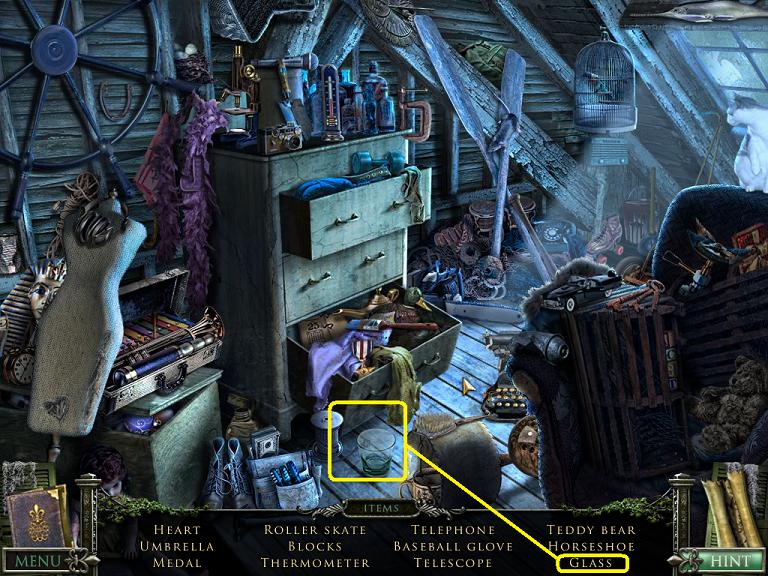
Ahead of you is a hidden object scene. To the right is a locked trunk. To the left is a hole in the floor.
Screenshot.
Enter the hidden object scene. The inventory item you will receive is a pair of garden shears.
Screenshot.
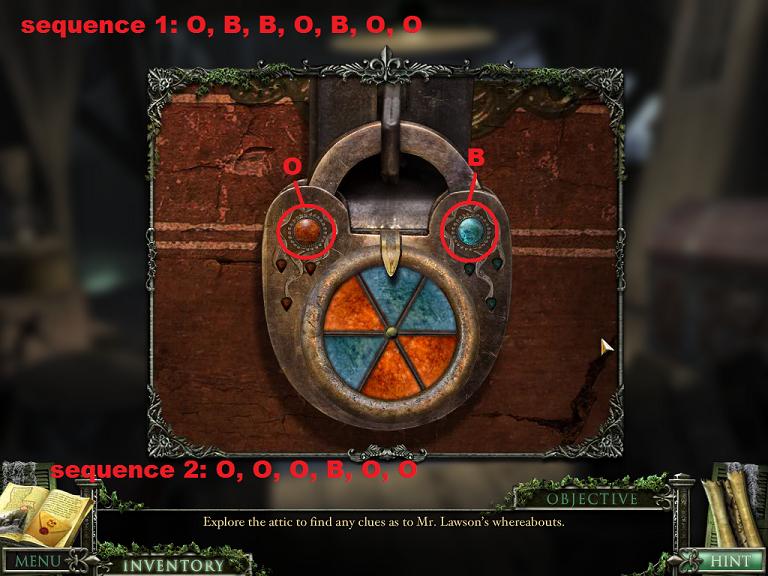
Click on the chest for a close up of the lock.
Locked Trunk Mini-Puzzle
The lock on the trunk consists of two buttons, an orange one on the left and a blue one on the right.
Below the buttons is a dial with six segments..
When you push a button the dial will spin and fill in a segment with color, sometimes blue, sometimes orange.
You need to get the dial to be all of one color (blue) to unlock the right side of the lock, and all of another color (orange) to unlock the left.
Click the buttons in this sequence: orange, blue, blue, orange blue, orange, orange. This will unlock the right (blue) side.
Then click the buttons in this sequence: orange, orange, orange, blue, orange, orange. This will unlock the left (orange) side.
Screenshot.
Once the trunk is unlocked click on it to look inside. There will be a moon key and a newspaper article. Take the key and read the article.
Now turn your attention to the hole on the left side of the attic. Click on it for a close up.
Use the rope on the beam above the hole to create a way to go down.
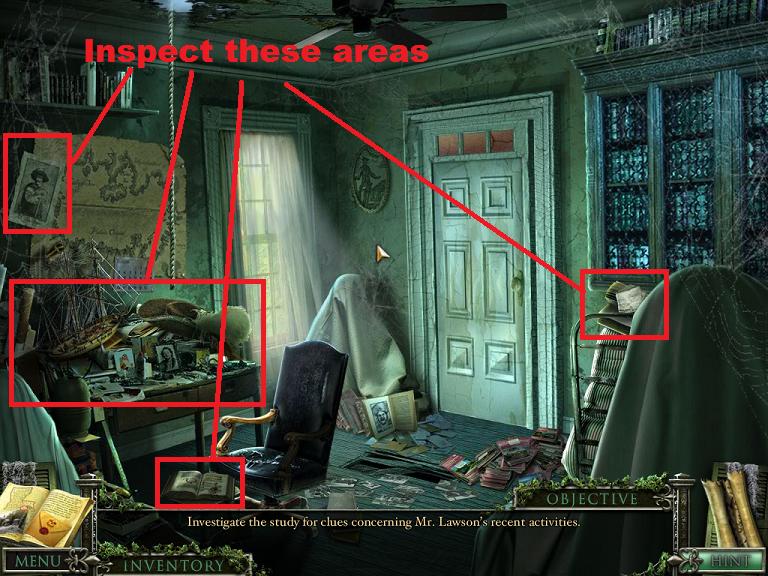
Screenshot.
There are several areas to inspect, all having to do with the pirate who supposedly built the house. Once you inspect all the areas you will get a new objective: Talk to Mrs. Lawson.
Screenshot.
Leave through the door. This is the door with the broken knob across the hall from the bedroom where Mary Lee is cleaning.
Once you are in the hall, back up three times to the couch then go right to the sitting room.
Click on Mrs. Lawson to speak to her.
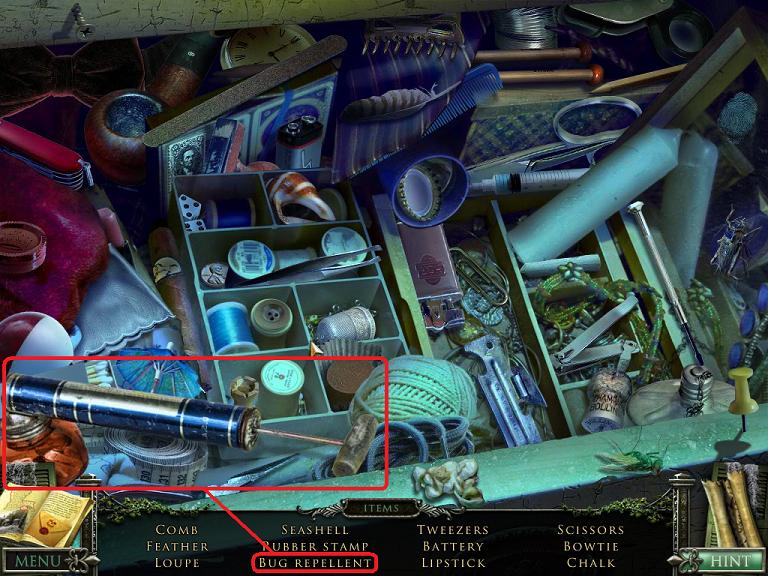
Once the conversation is done you will have a new objective: find some bug spray in the closet.
Back up once to the couch, go forward once, then go left into the closet.
You will see a new hidden object scene in the dresser drawer. Complete the scene to get the bug spray.
Screenshot.
You will receive a new objective: canvas the town.
You will come back into the mansion now and again, but for now most of the action moves into the town and the surrounding grounds.
Posted by: grinnyp |
November 26, 2010 4:35 PM
|
November 26, 2010 4:35 PM
Mystery Case Files: 13th Skull Walkthrough Part 3
The Town (Part 1)
Canvas the Town
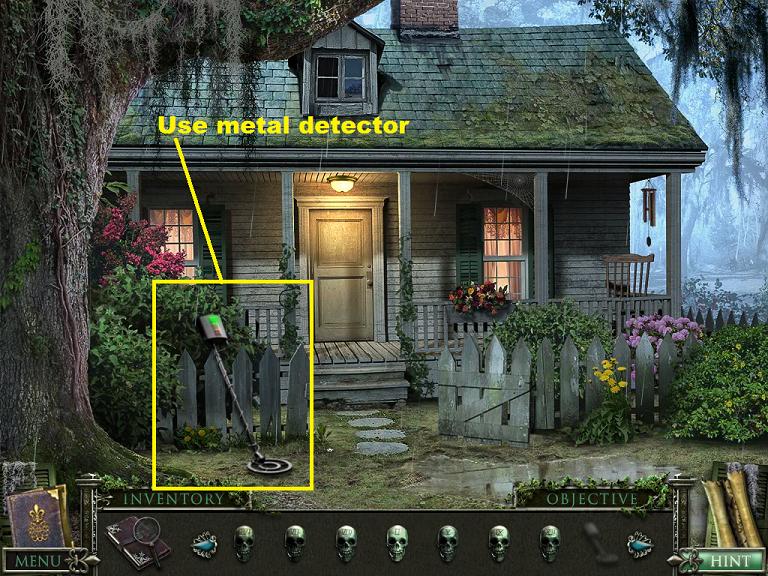
Back up four times to the front lawn.
Hover your cursor above the wheelbarrow on the right and the navigation arrow will point to the right, to the Carriage House. Click to move to the Carriage House.
Screenshot.
You are now in front of the Carriage House. You can look closer at the Carriage House, but it is locked.
Hover your cursor on the right (around the statue's chest) and a right arrow will point to the path to the town. Click to move.
Screenshot.
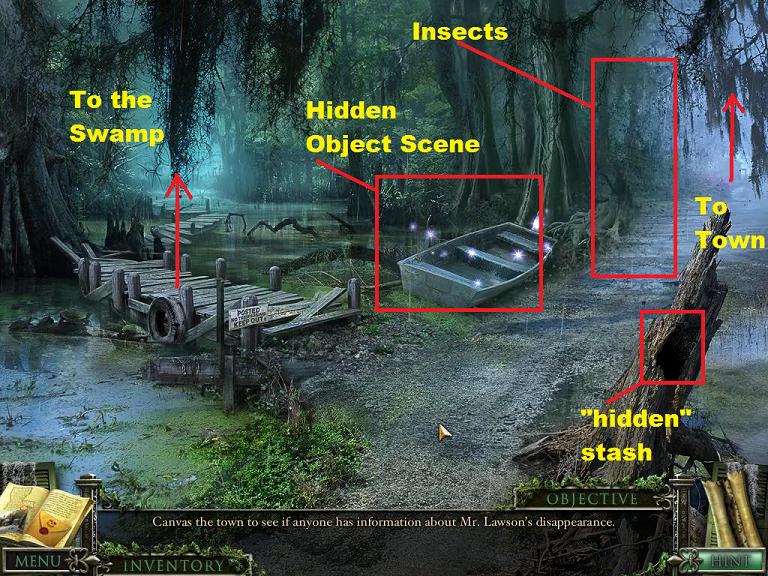
You are now at a crossroads in the path. The bridge to the left goes to the swamp (you won't get very far that way yet). The path to the right goes to the town.
There is another "hidden" stash in the tree trunk right in front of you. There is a hidden object scene in the boat at the swamp's edge. And insects bar the way to town.
Screenshot.
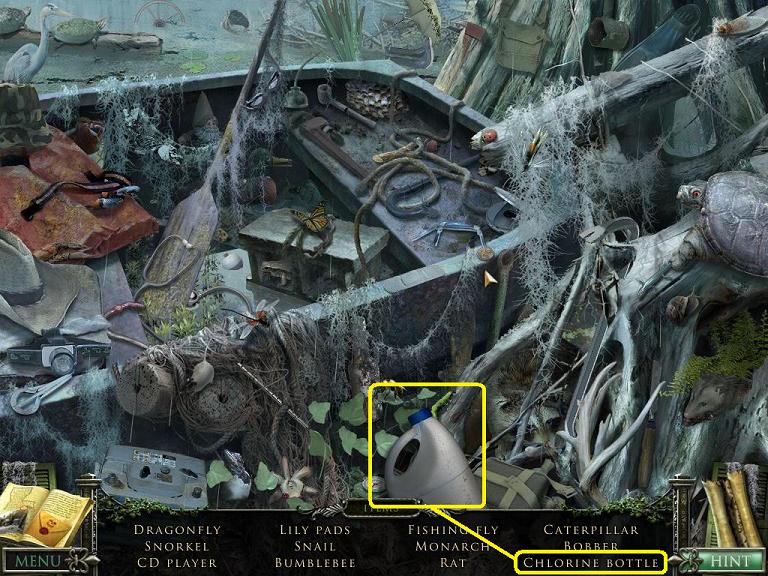
Click on the hidden object scene and find the objects. The item you will get in your inventory is the chlorine bottle.
Screenshot.
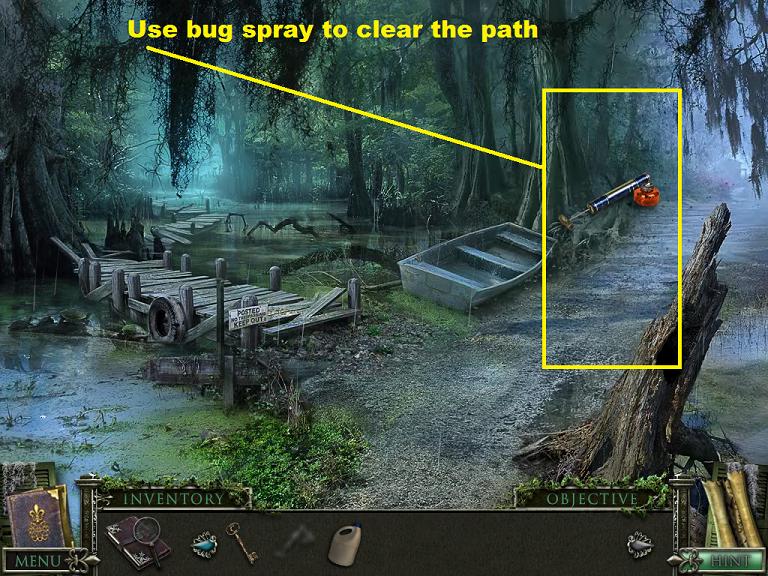
Use the bug spray from your inventory on the insects to clear the path (3 sprays).
Screenshot.
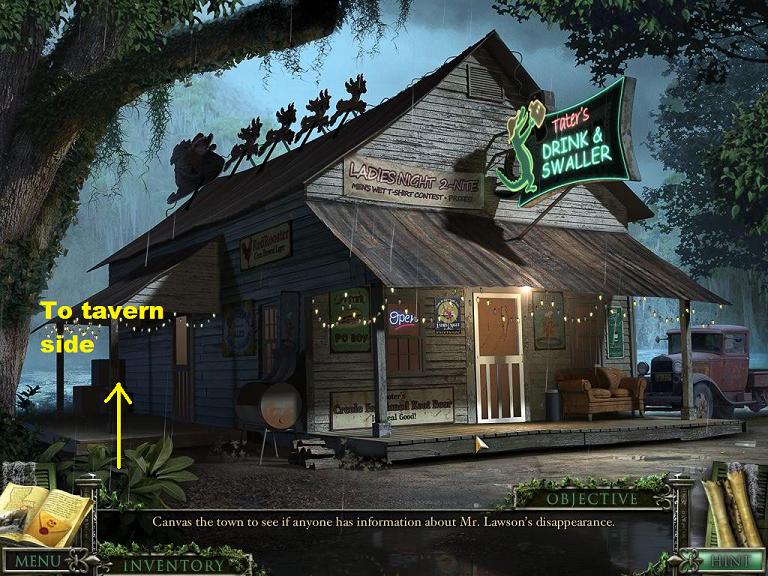
Move forward to the town.
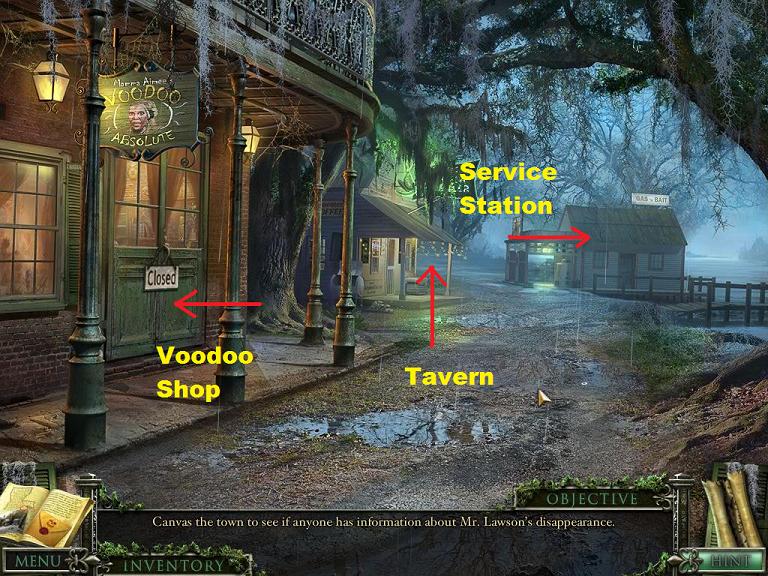
You are now in town. Ahead of you is a tavern. To the left is a Voodoo shop which is closed. To the right is a Service Station (also closed).
Move forward to the tavern.
Screenshot.
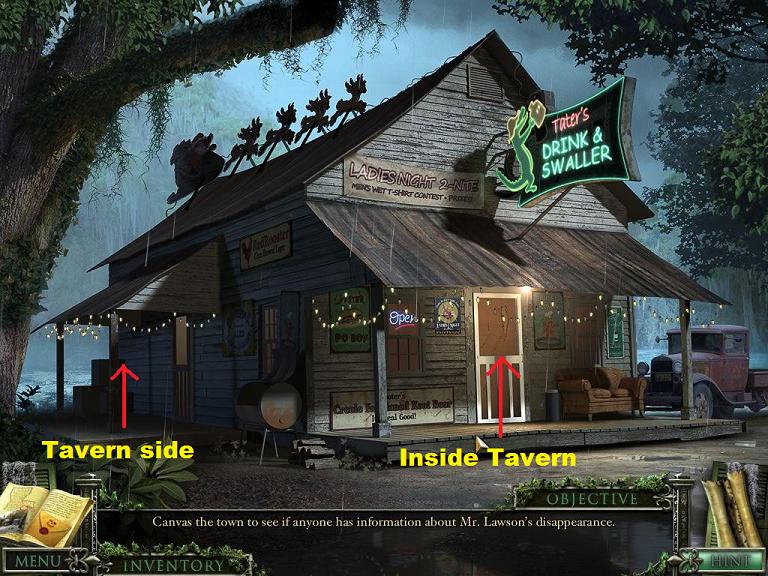
You are now facing the tavern. Goody, it's Ladies night. Click on the door of the tavern to enter.
Screenshot.
Talk to Vinton (the dude sitting at the table) and he will challenge you to a game of checkers.
Screenshot.
Click on Vinton to start the game of checkers.
Checkers Mini-Game
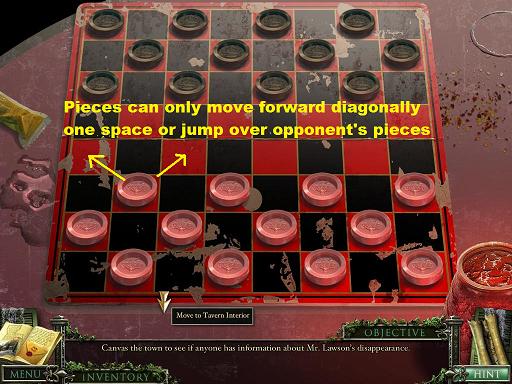
This is not a puzzle, but an actual game of checkers against the computer.
If you don't know the rules, here's a quick rundown:
Pieces can only move forward in a diagonal manner until they reach the other end of the board and get "queened" (doubled).
Screenshot.
Queened pieces can move both backwards and forward.
You can jump over and take an opponent's piece if there is a blank space behind it.
The game continues until one of you has lost all of their pieces.
See Wikipedia for a nice article on checkers: http://en.wikipedia.org/wiki/Checkers.
If you lose the game will ask you if you want to play again.
You can use the hint button to skip the game if you so choose.
Once you beat Vinton (or skip the game) he will agree to phone a friend about the history of the town and the Mansion. The friend will fax you some information.
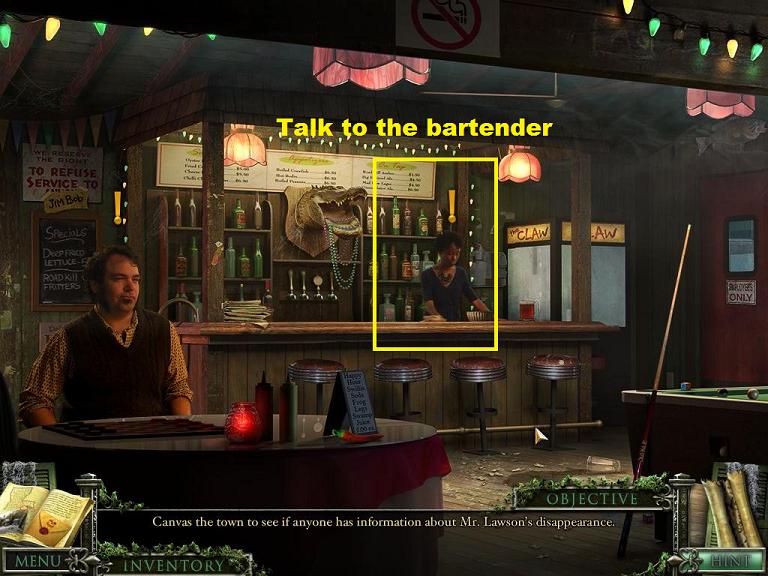
Now talk to the bartender.
Screenshot.
She will ask you to make a gumbo to deliver to a local. You now have a new objective: make gumbo and deliver it.
Make Gumbo/Deliver
First you need to find the gumbo ingredients. The first ingredient is sitting on the table with the checkers guy.
Screenshot.
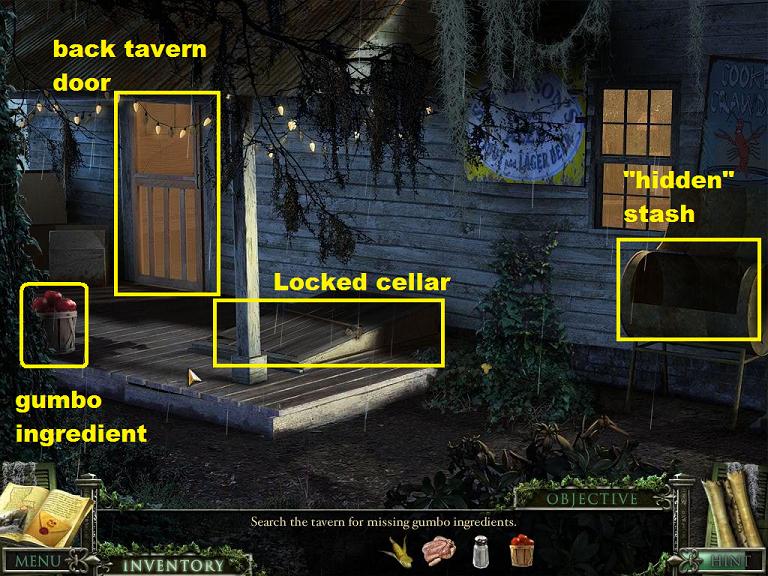
Back up to the outside of the tavern.
Hover your cursor to the left of the tavern and you will get a navigation arrow for the side of the tavern. Click to go to the side of the tavern.
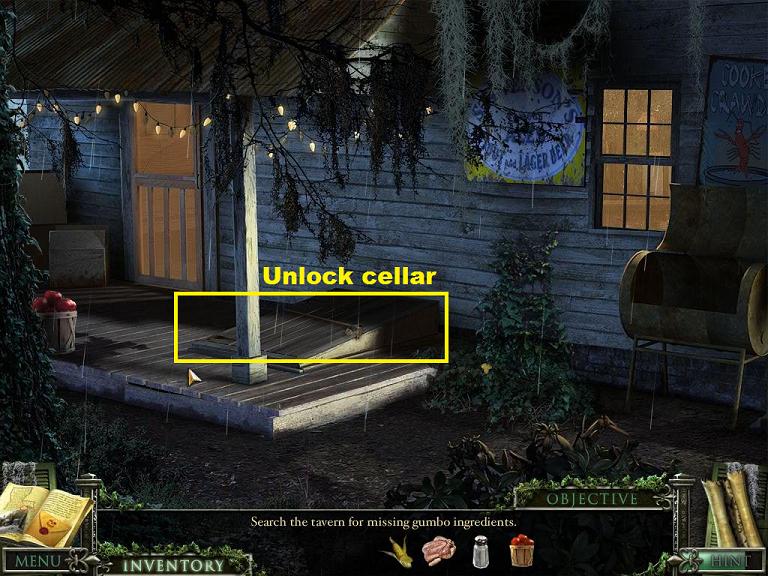
Screenshot.
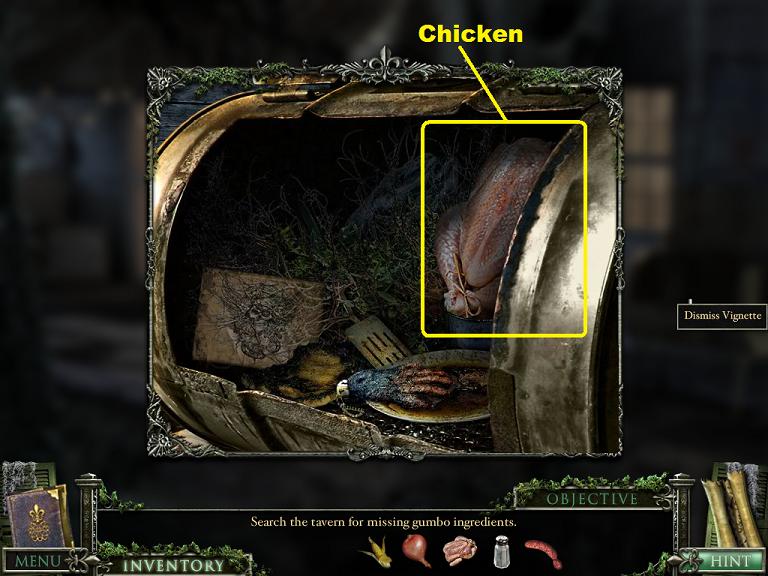
Here you will find a back door to the tavern, a locked cellar, another barbecue "hidden" stash, and a bushel of tomatoes (gumbo ingredient).
Take the tomatoes and then click on the barbecue to see the "hidden" stash.
Screenshot.
In the barbecue is another gumbo ingredient, a whole chicken.
Screenshot.
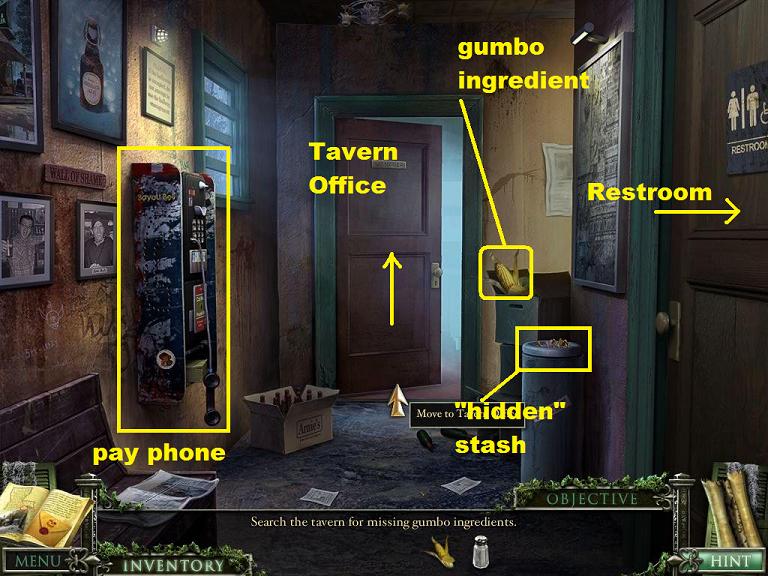
Close out the stash and click on the back door to enter the tavern hallway.
Here in the hallway you will find a working pay phone (although you don't have anyone to call yet), a gumbo ingredient (ear of corn), a restroom (occupied), an overflowing ashtray (another "hidden" stash), and the office door.
Take the ear of corn and then click on the ashtray to see the hidden stash.
Screenshot.
You will find another gumbo ingredient in the stash, salt (ewwww!).
Screenshot.
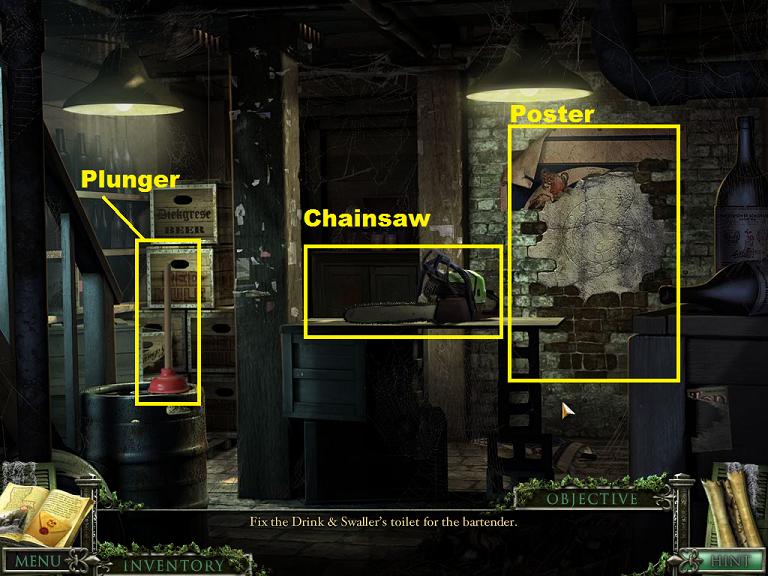
Close down the stash and go forward into the office.
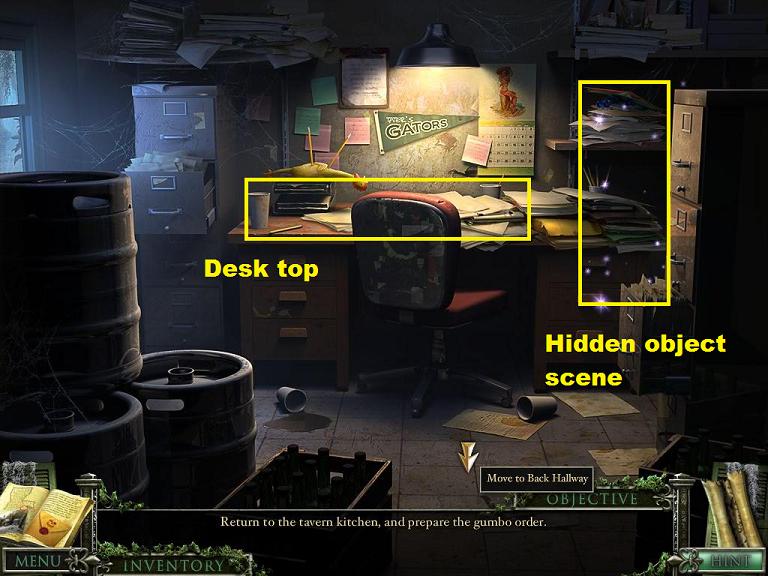
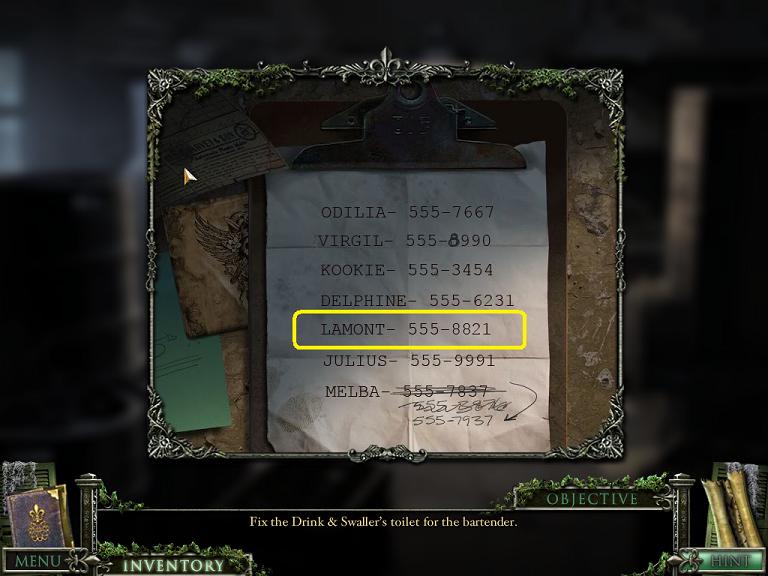
You can investigate the desk top and find a list of employee phone numbers.
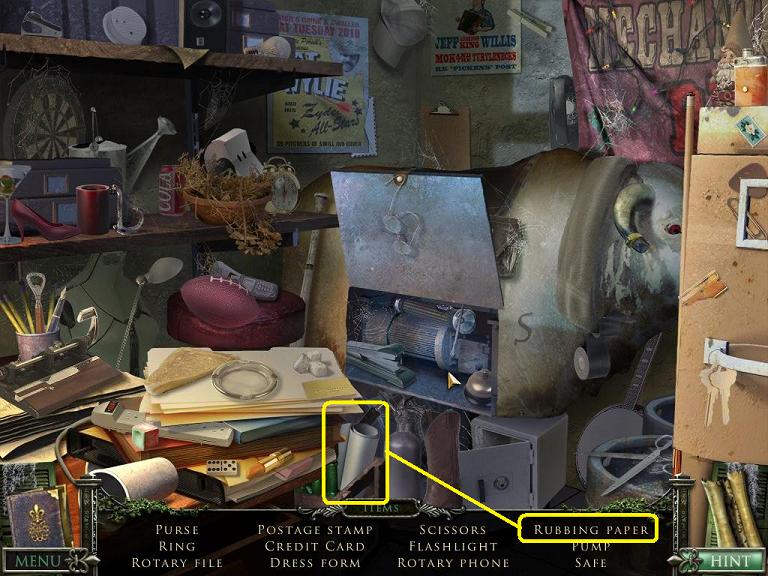
To the right of the desktop is a hidden object scene. Click on it.
Screenshot.
Play through the scene and you will get a roll of rubbing paper in your inventory.
Screenshot.
Back up three times to the front of the tavern, go into the tavern, then go right into the kitchen.
Screenshot.
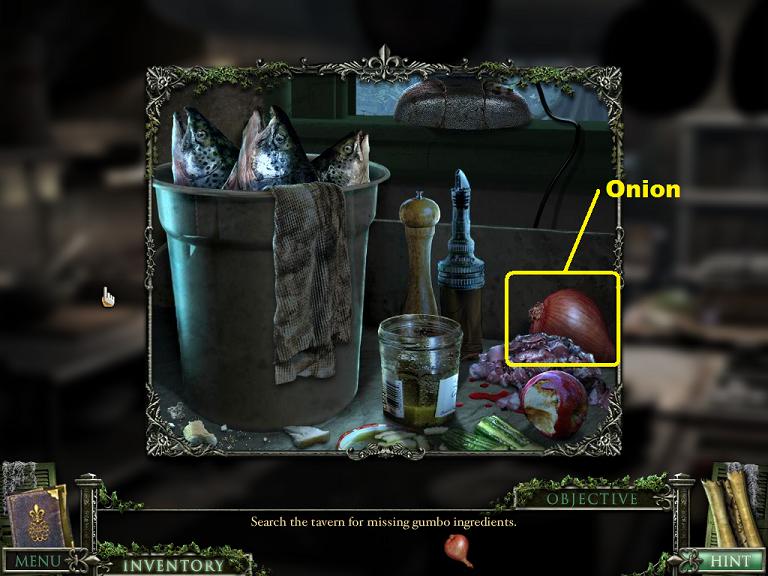
On the stove (on the left) you will find a gumbo ingredient (sausage) in a pan. Next to the pan is a pot for making the gumbo.
On a back shelf is another "hidden" stash. On the counter to the right is a hidden object scene.
Screenshot.
Take the sausage then open up the "hidden" stash to find the last ingredient (onion).
Screenshot.
Click on the hidden object scene. When you complete the scene you will get a honey jar for your inventory.
Screenshot.
Now click on the pot on the stove and place all of the gumbo ingredients in it.
Once all ingredients are in the pot the gumbo will go into your inventory. Time to deliver!
Back up six times until you are back at the front yard of the mansion.
Now hover your cursor to the left of the building and a navigation arrow will appear to the side of the manor. Click.
Screenshot.
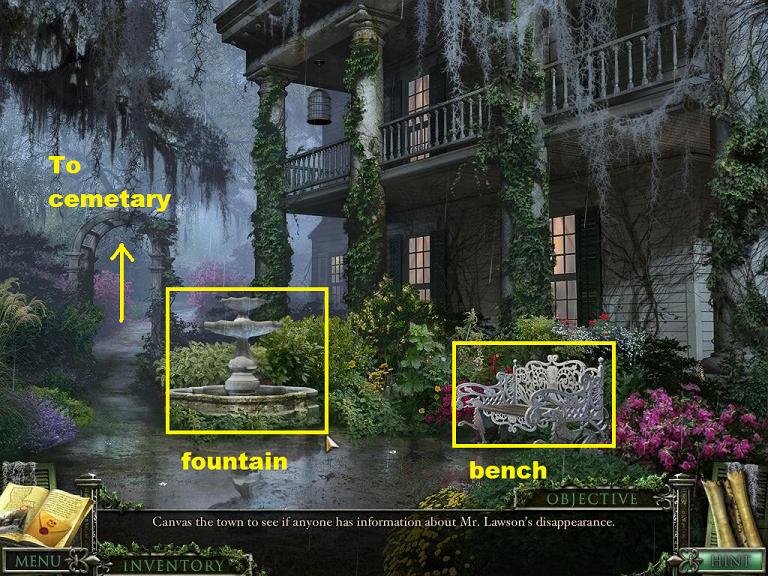
Here on the side of the mansion is a bench, some lush foliage, an algae-ridden fountain, and the path to the cemetery.
If you examine the bench and the fountain each has an insignia that might be important later.
Go forward to the cemetery.
Screenshot.
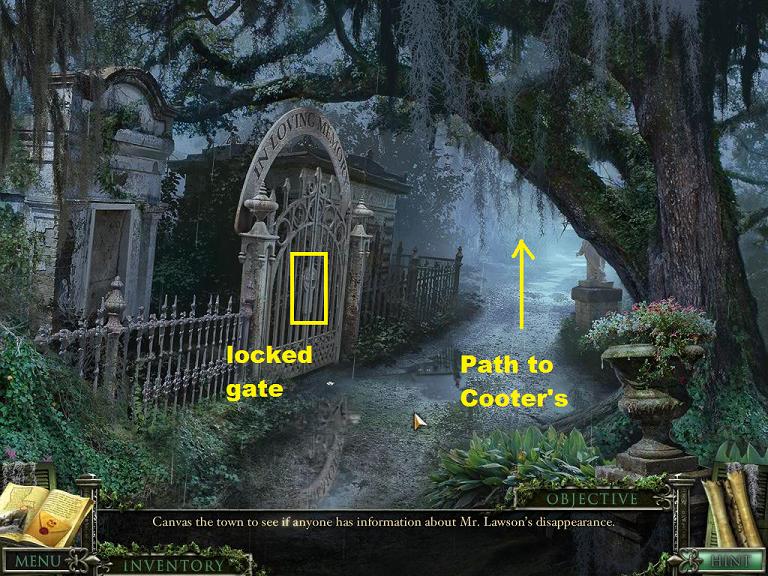
You are now outside the cemetery. If you examine the gate you will see that it requires 4 odd keys to open.
Go forward down the path.
Screenshot.
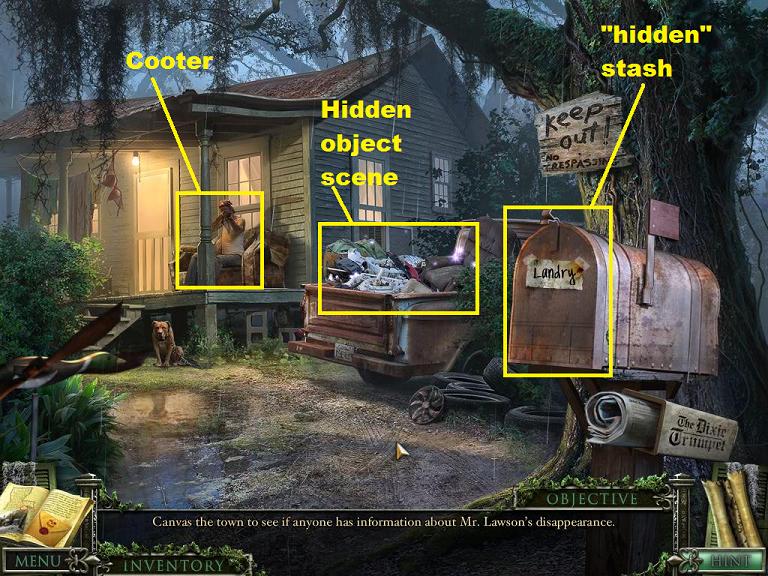
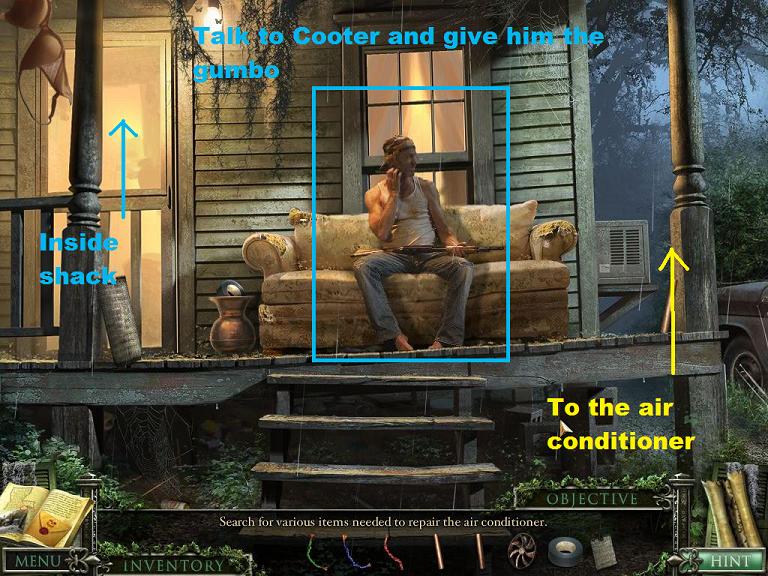
You are now outside Cooter Landry's shack. Note Cooter on the porch with a shotgun. It's time to be nice and deliver the gumbo.
You will also see a hidden object scene in the back of his truck. His mailbox is a "hidden" stash, but don't try to access it unless you have the gumbo with you. Otherwise, he'll shoot.
Just below the mailbox is his newspaper box. You can click on this and read the newspaper.
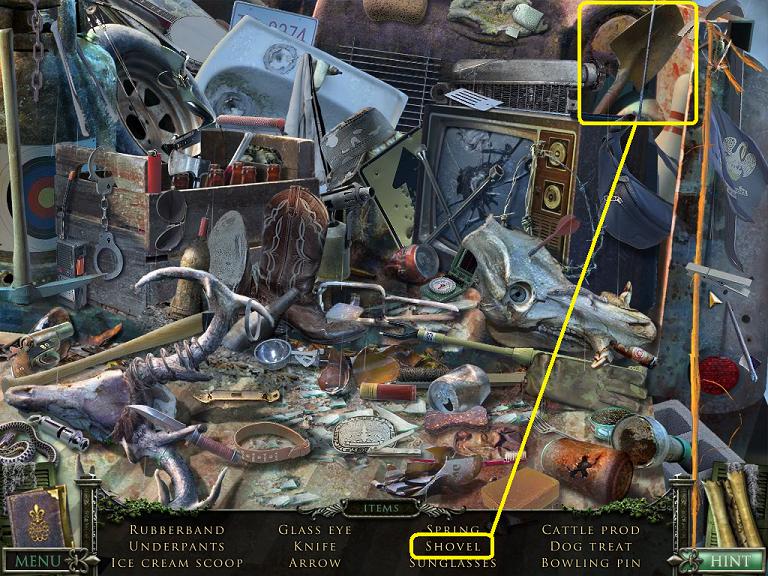
Click on the truck for the hidden object scene.
Screenshot.
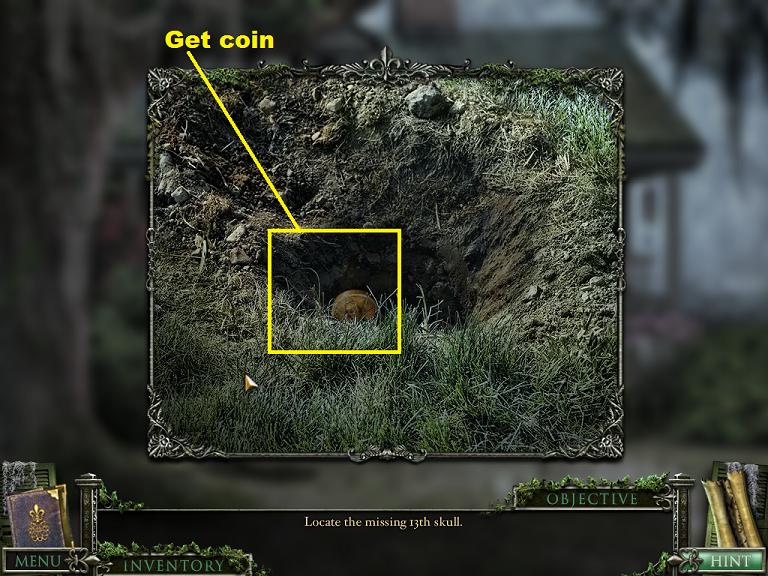
Complete the hidden object scene to get a shovel.
Screenshot.
Once you are done with the hidden object scene click on Cooter to get closer.
Once you are facing the porch click on Cooter to talk to him. Also, give him the gumbo.
Screenshot.
Once you have finished the long conversation with Cooter you will get a new objective: fix the air conditioner.
Fix Air Conditioner/Meet Mrs. Landry
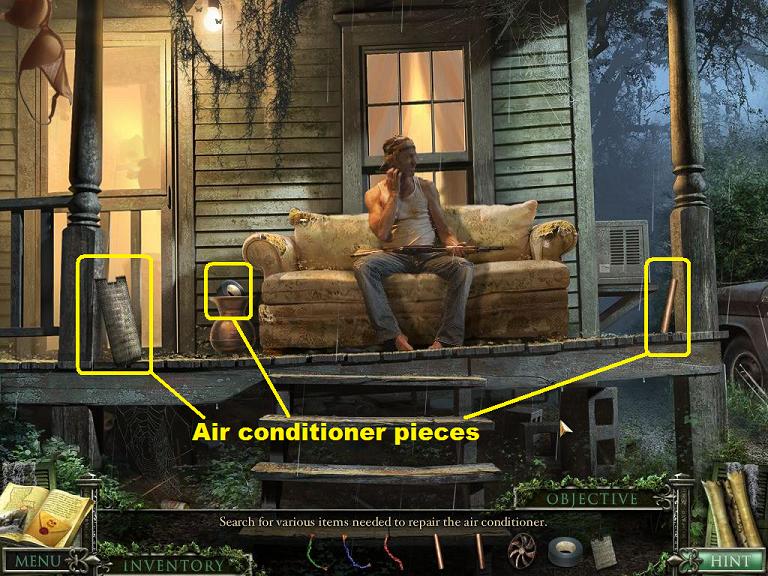
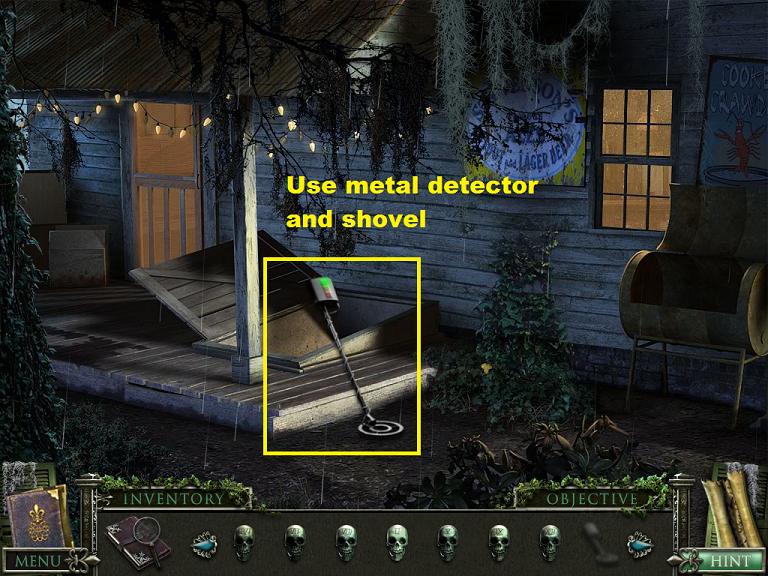
To fix the air conditioner you'll first have to find all of the pieces.
Start here on the porch. There are three pieces to be found, duct tape, the cover, and a copper pipe.
Screenshot.
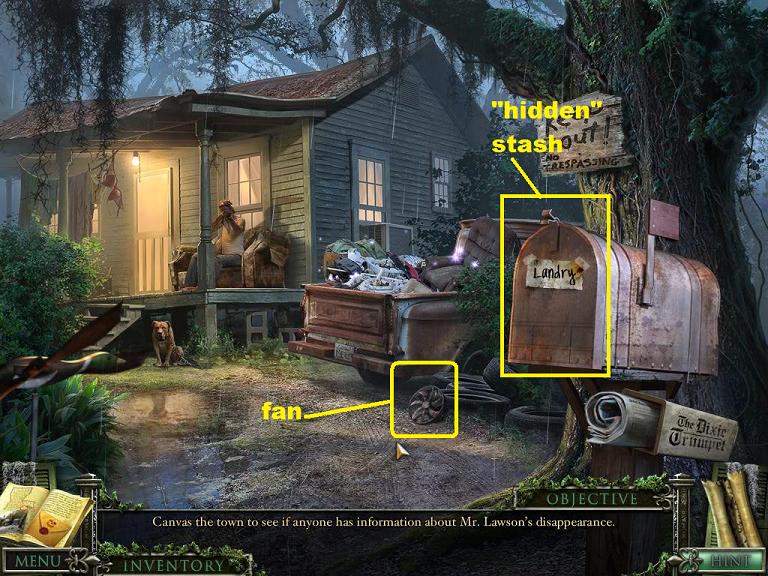
Once you have the items back up to the mailbox.
You'll find the fan on the ground between the truck and the mailbox.
Screenshot.
Click on the mailbox to open it and find the green and blue wires.
Screenshot.
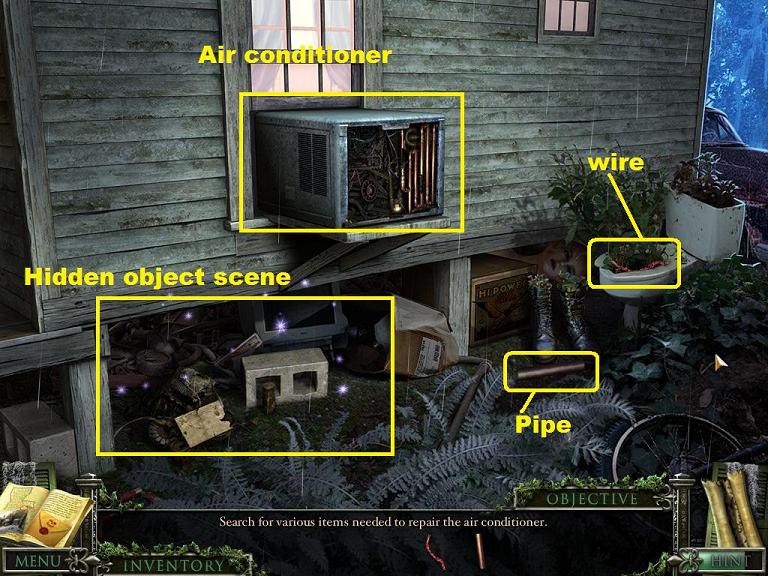
Go back to the front porch and hover your cursor to the right side of the porch. A navigation arrow will appear for the side of the house. Click.
Screenshot.
Here you will find the broken air conditioner. The last pipe is on the ground near the boots and the wire is in the toilet bowl. Pick those up.
Screenshot.
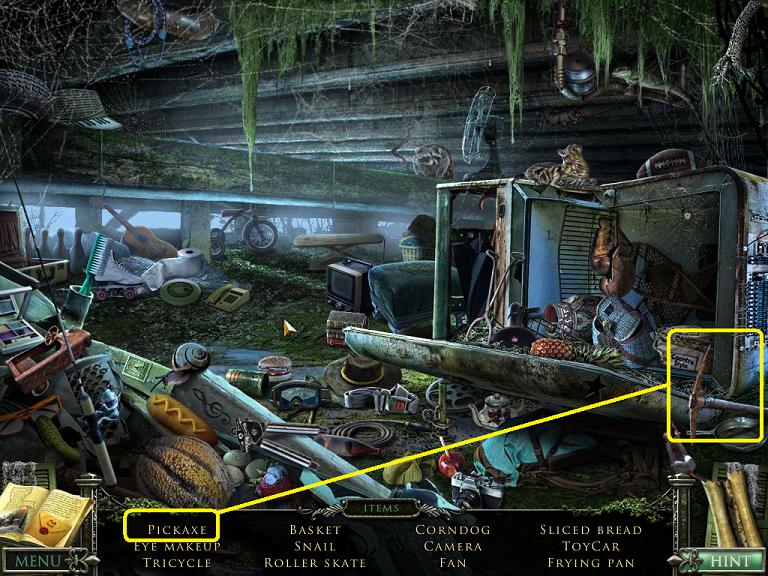
Underneath the house is a hidden object scene. Enter it to get a pickaxe.
Screenshot.
Once you've finished the hidden object scene click on the air conditioner for a close up.
Repair the air conditioner in this order:
Place the colored wires in their proper place (blue to blue, green to green, copper to copper).
Place the copper pipes in the two gaps.
Use the duct tape to hold the wires and pipes.
Place the fan.
Place the cover.
Screenshot.
Once the air conditioner is fixed, back up once and click on Cooter to talk to him again.
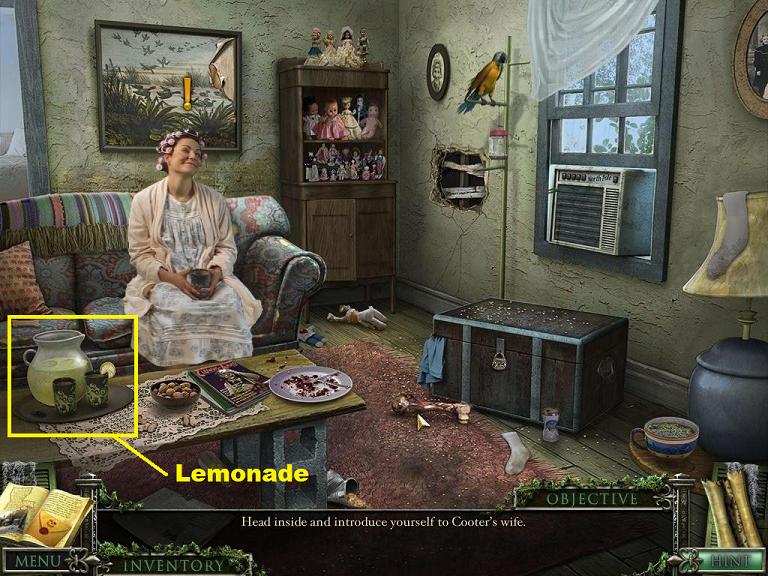
When you are done talking to Cooter, click on the door to go in and speak to his wife.
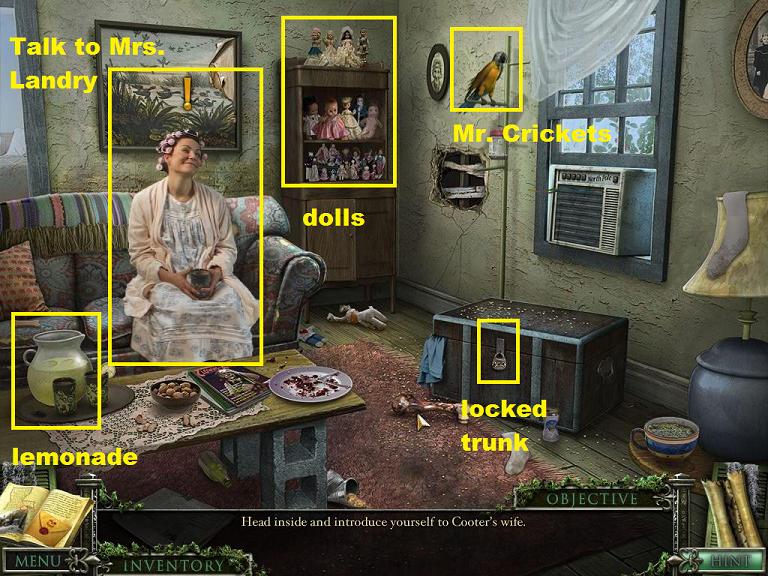
Screenshot.
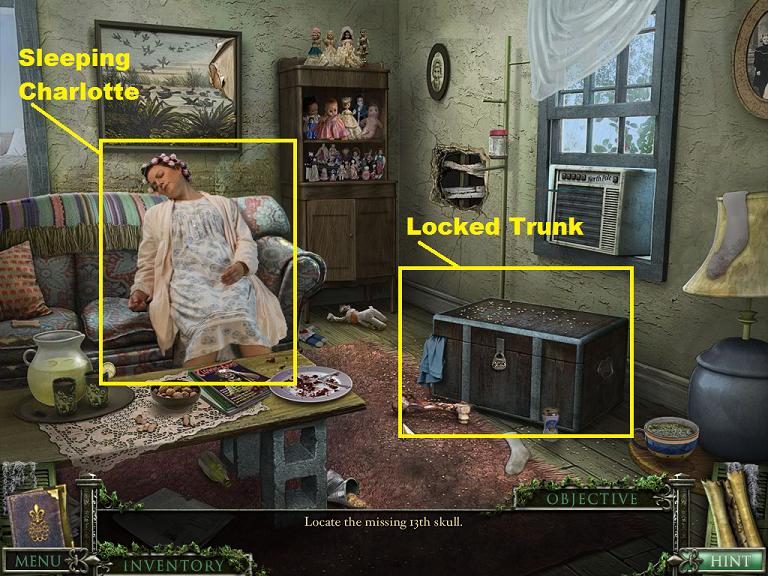
In the living room you will find several things: Mrs. Landry, a locked trunk, some refreshing lemonade, a doll collection (missing one doll), and Mr. Crickets the parrot.
Click on Mrs. Landry to speak to her.
Screenshot.
Once the conversation is done you will have a new objective: win the doll for her collection.
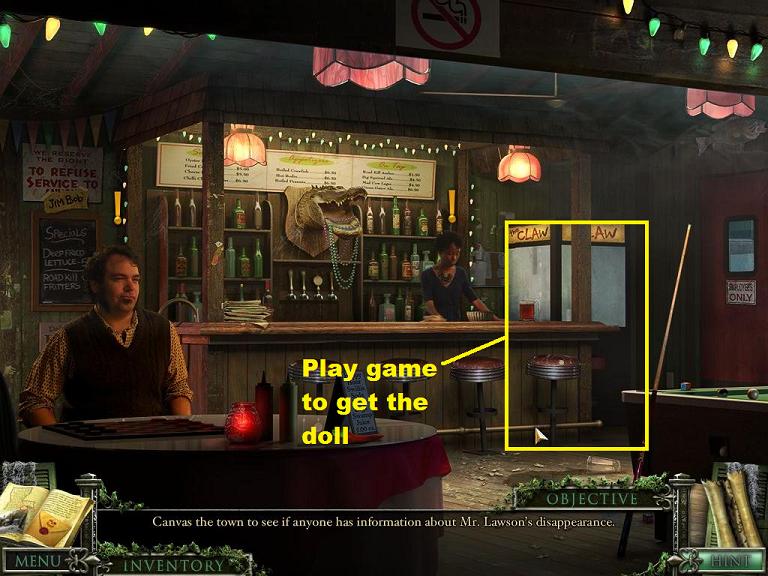
Back up five times to the front lawn, then go right to the carriage house, right to the path, forward to the town, forward to the tavern, then inside the tavern.
Once in the tavern you will see the game, "the claw", to the right of the bartender. Click on the game for a close up.
Screenshot.
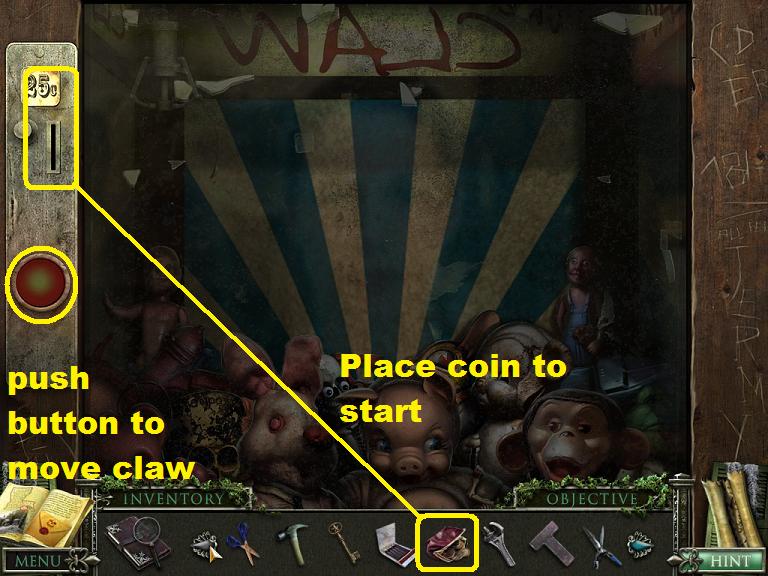
Use a coin from the change purse in your inventory to start the game. Use the red button to start, then click it again when the claw is where you want it to drop.
The doll is not always in the same place, this is another random game. Fortunately you seem to have an unlimited supply of coins.
Screenshot.
Once you have the doll, back up five times to the front lawn, then go forward four times (side of mansion, graveyard, mailbox, Cooter's porch) then go in the shack.
Click on the doll collection for a close up, then place the doll from your inventory into the collection.
Screenshot.
Once you've placed the doll click on Mrs. Landry (Charlotte) to speak to her again.
Mrs. Landry offers you Mr. Crickets. Click on Mr. Crickets (the parrot) to take him.
You now have a new goal, speak to Mary Lee (again).
Ask Mary About Voodoo/Clean Trash
Back up five times to the front yard of the mansion. Notice that Mr. Crickets flies away when you pass the cemetery. You might need something to hold him.
Go into the mansion, up the stairs, into the left hall, then right into the bedroom to speak to Mary Lee again.
Click on Mary Lee to speak to her.
Screenshot.
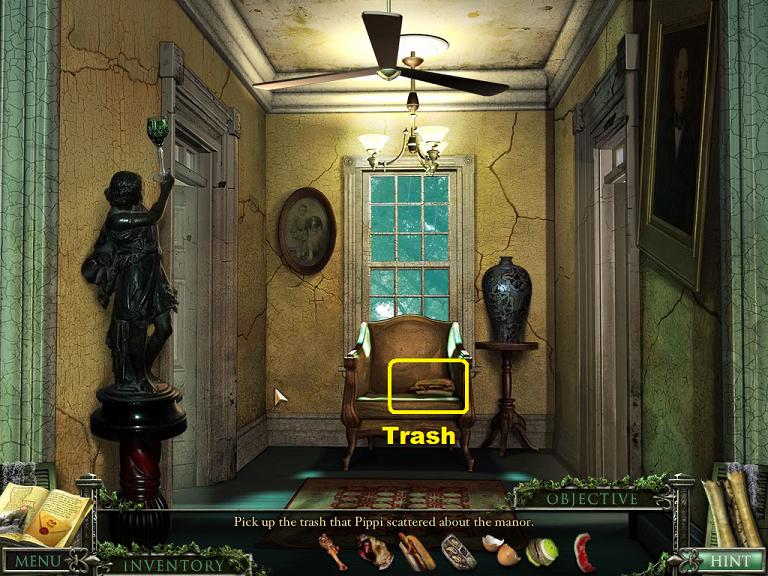
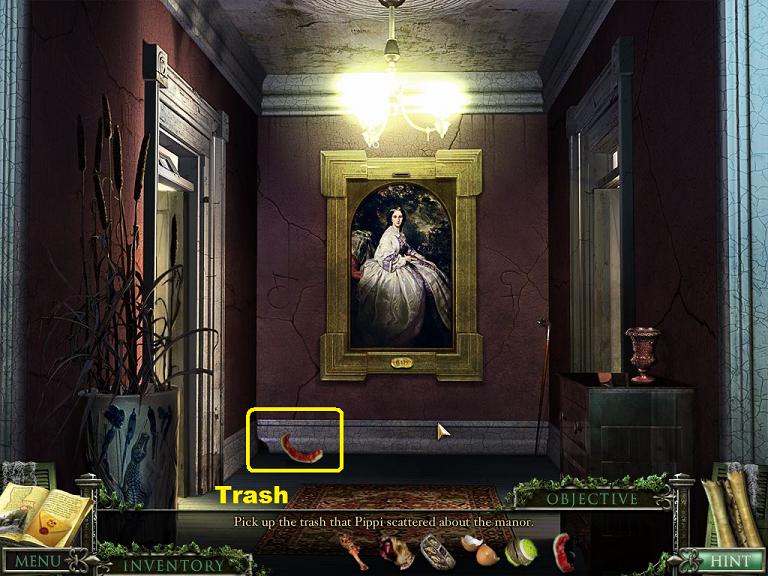
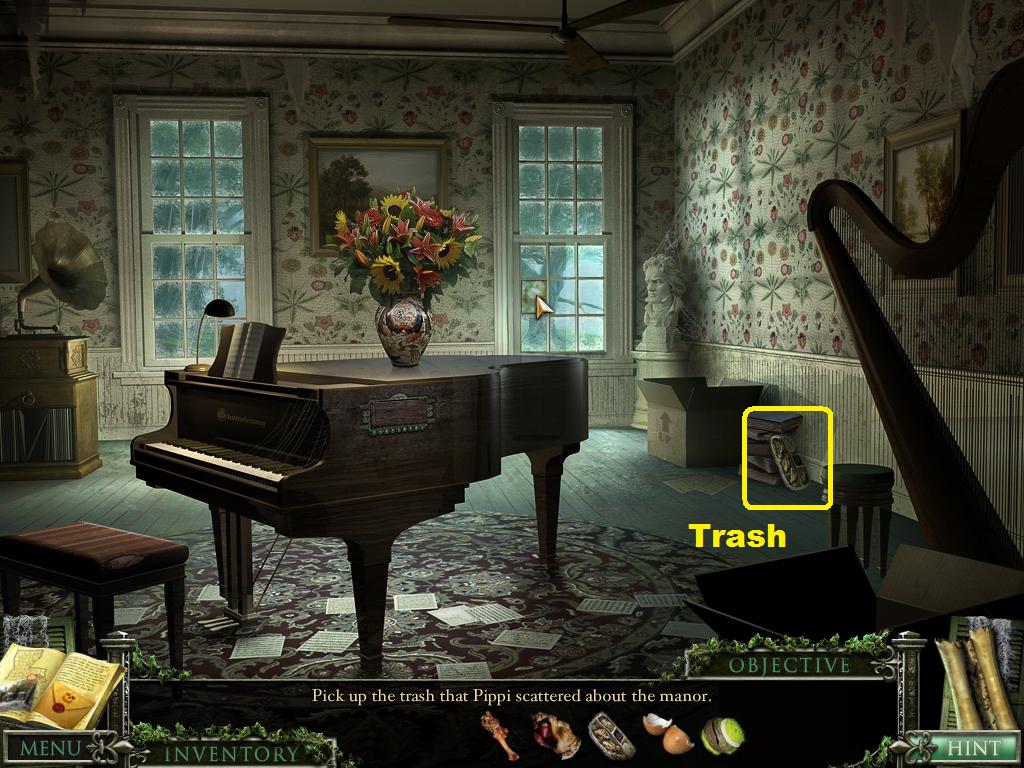
Mary Lee is unhappy and gives you your next objective: pick up the trash Pippi scattered around the house after you tore open the trash bag.
Back up once to the hallway.
On the chair in the hallway is the first piece of trash.
Screenshot.
Back up to the top of the stairs, then go down the right hall. There is a piece of trash underneath the large portrait.
Screenshot.
Back up twice until you are at the bottom of the stairs. From there, go right into the music room.
There is a piece of trash here on the right, leaning against a stack of books.
Screenshot.
Go left into the office.
There is a piece of trash here on the floor in front of a box.
While you are in the office you may notice that a fax has arrived. Click on the machine for a close up then click on the fax to get the information about the person who built the property.
Screenshot.
Go right to the music room then back up twice to the couch.
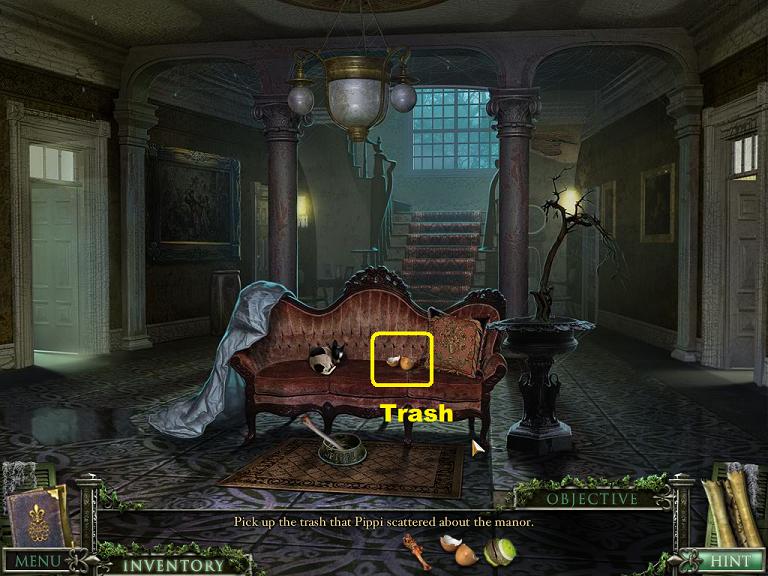
There is a piece of garbage on the couch next to Pippi.
Screenshot.
Move left to the dining room.
There is a piece of trash here on a chair.
Screenshot.
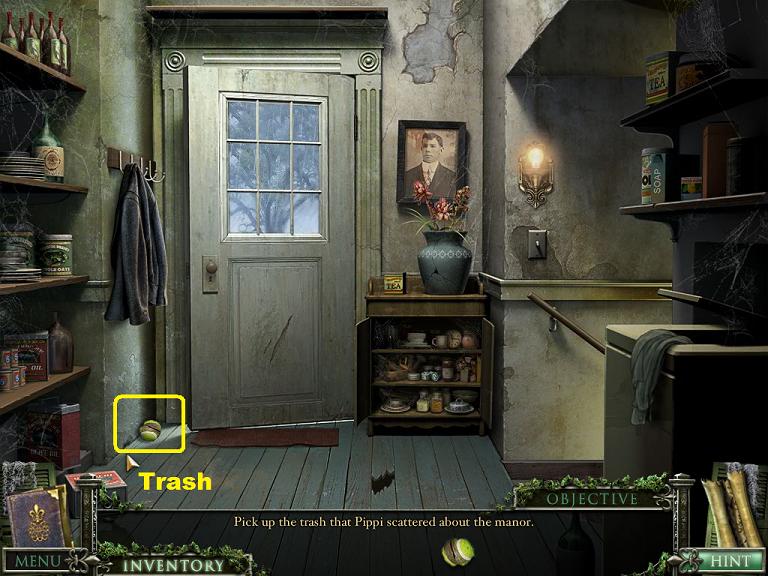
Move right to the kitchen then forward to the pantry.
There is the last piece of trash on the floor by the door.
Screenshot.
Back up once to the kitchen, then click on the sink for a close up.
Place the trash, one piece at a time, in the garbage disposal until they are all gone.
Screenshot.
Back up twice to the couch, go forward, up the stairs, to the left hall, then right to the bedroom to talk to Mary again.
Mary will give you a new objective: Speak to Momma Aimee.
Speak to Momma Aimee
Back up six times to the front yard, go right to the carriage house, right to the path, and forward to town.
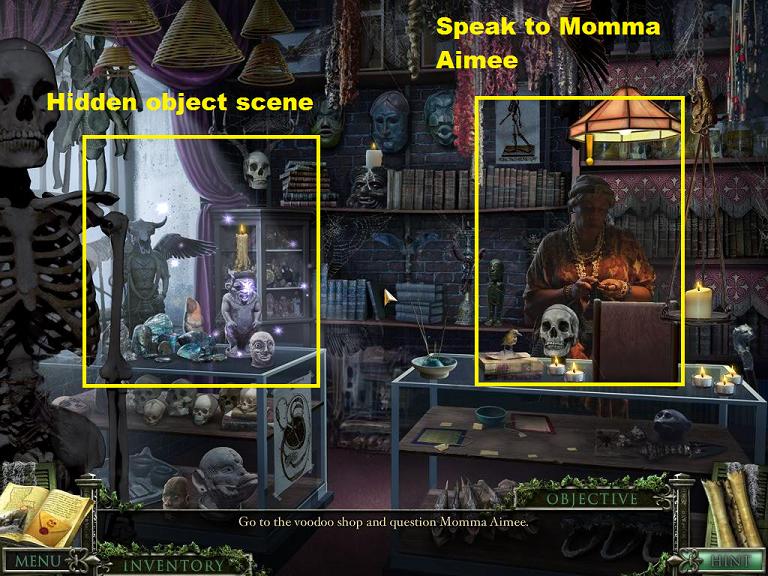
You will notice that Momma Aimee's Voodoo Shop is now open. Go left into the shop.
Screenshot.
Momma Aimee is standing behind the right counter. Above the left counter is a hidden object scene.
Click on Momma Aimee to speak to her. She will give you a new objective: fill her display case.
Screenshot.
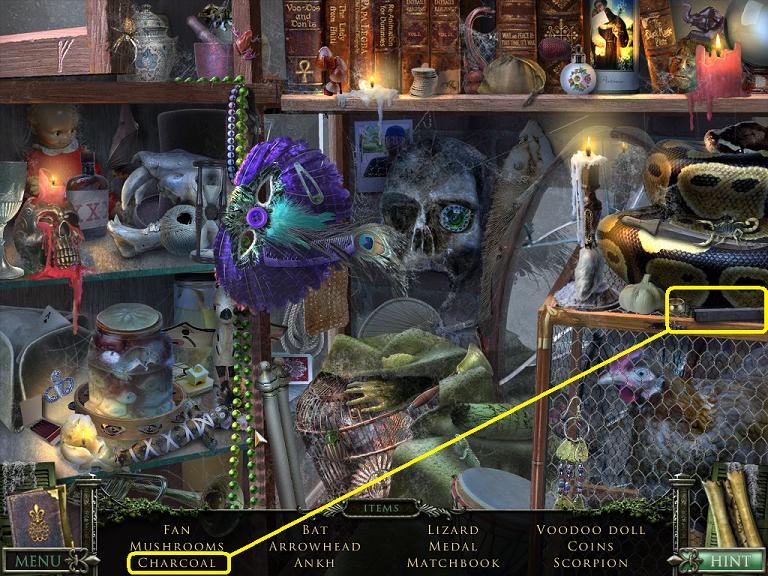
Click on the hidden object scene to complete it and get a piece of charcoal.
Screenshot.
Back up to the street, go forward to the tavern, then go to the side of the tavern (not inside).
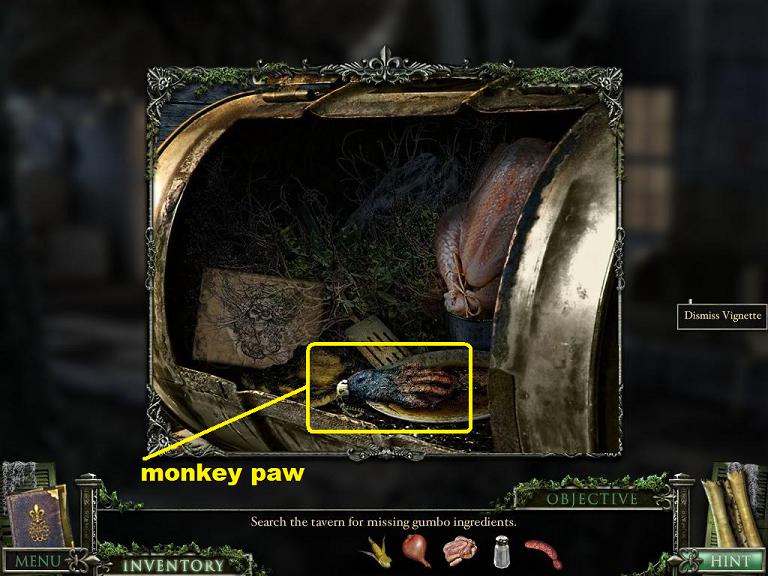
Once at the side of the tavern, click on the barbecue to see the hidden stash inside.
Inside the hidden stash is one of Momma Aimee's items, a monkey paw.
Screenshot.
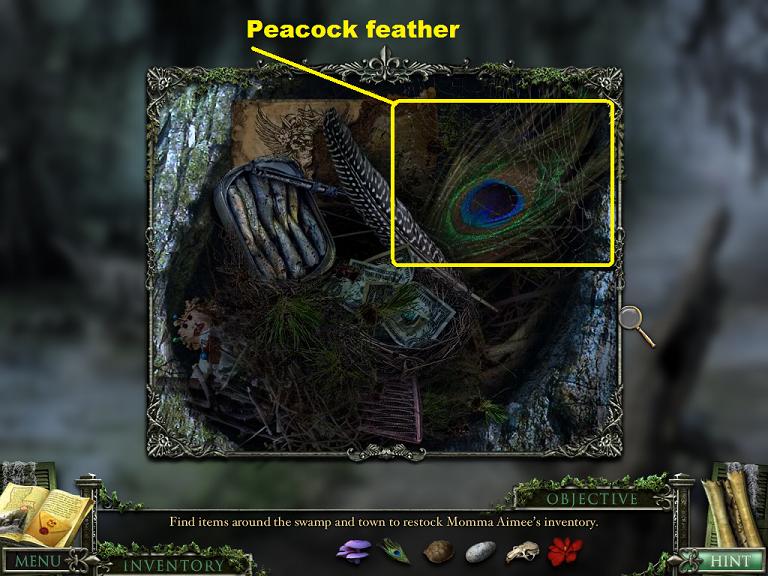
Back up three times until you are at the path crossroads. Click on the hidden stash in the tree trunk on the right to see inside.
Screenshot.
Inside the hidden stash you will find the peacock feather.
Screenshot.
Back up once to the front of the carriage house.
On a tree branch above you will find the red flower.
Click on the base of the statue for a close up and in the close up you will find the rat skull.
Screenshot.
Screenshot.
To get the rest of the ingredients you are going to need to go into the swamp, and for that you're going to need Mr. Crickets.
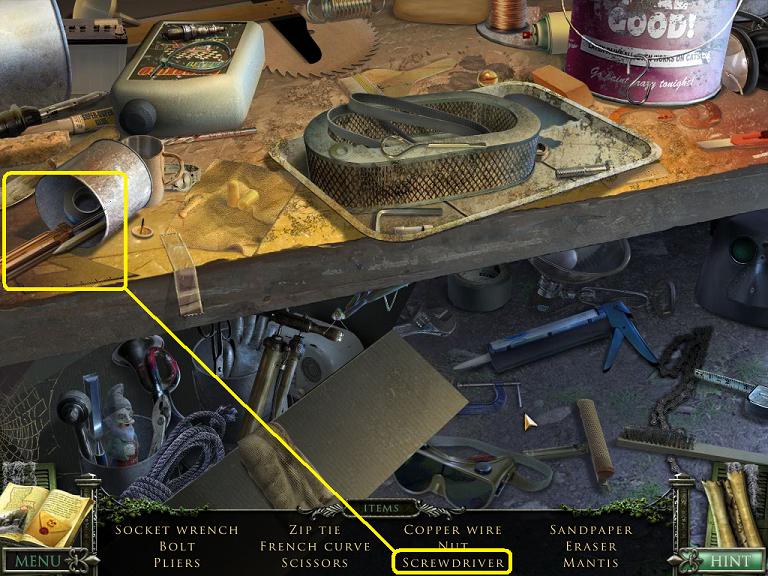
Back up once to the front lawn, then go into the mansion, left to the dining room, right to the kitchen, forward to the pantry, then outside, then into the shed.
Once in the shed you will find another hidden object scene. This one will get you a screwdriver.
Screenshot.
Back up five times to the couch, then go forward, up the stairs, and out the balcony door.
Once you are on the balcony get the honey from your inventory and place it on the stool.
Screenshot.
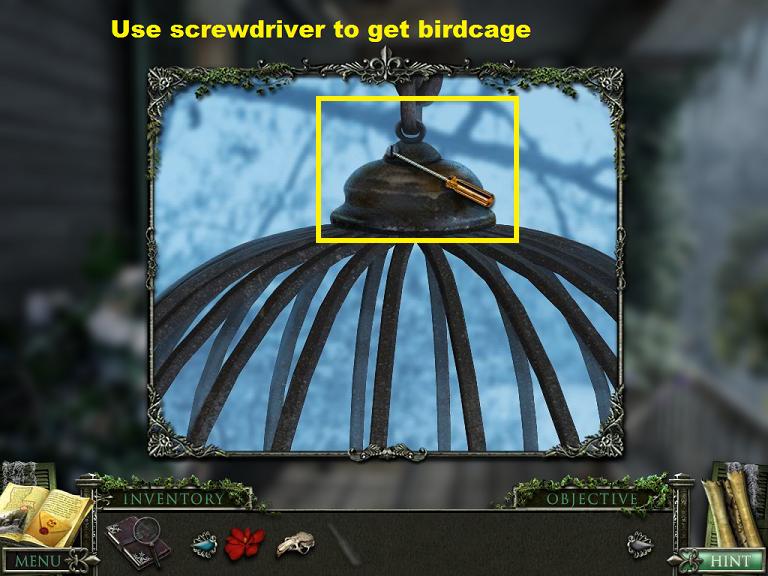
The honey will distract the bees. While the bees are distracted, click on the bird cage for a close up.
Use the screwdriver on the birdcage to loosen it.
Screenshot.
Back up five times to the front lawn, then go to the left to the side of the house, forward to the graveyard, forward to Cooter's house, forward to his porch, then into his house.
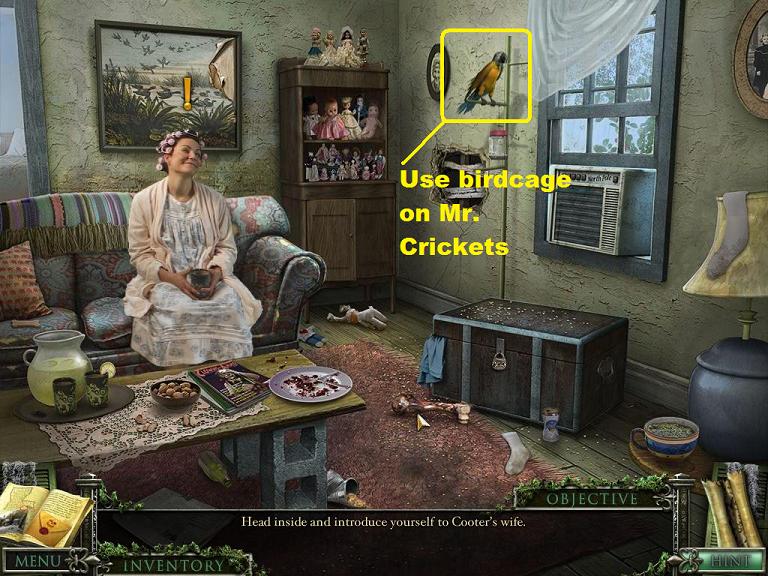
In the house, use the birdcage on Mr. Crickets the parrot.
Screenshot.
Back up five times to the front lawn, then right to the carriage house and right to the path.
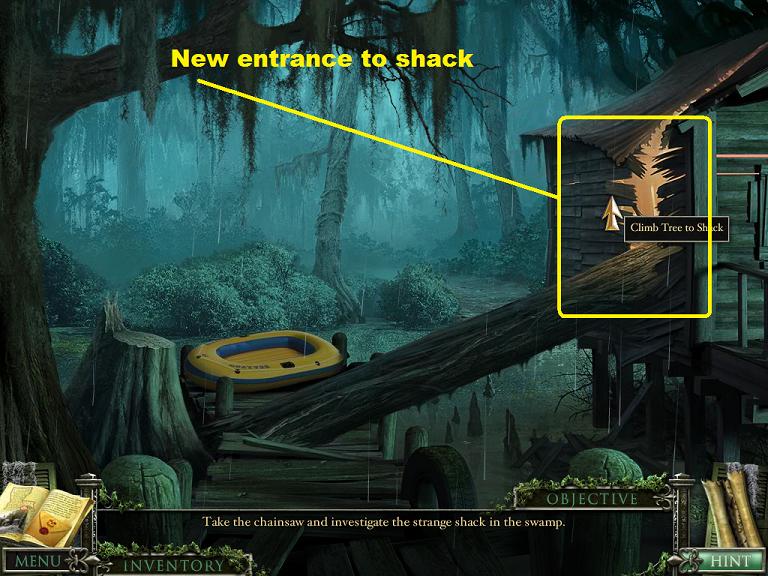
At the path crossroads, go left to the swamp.
Screenshot.
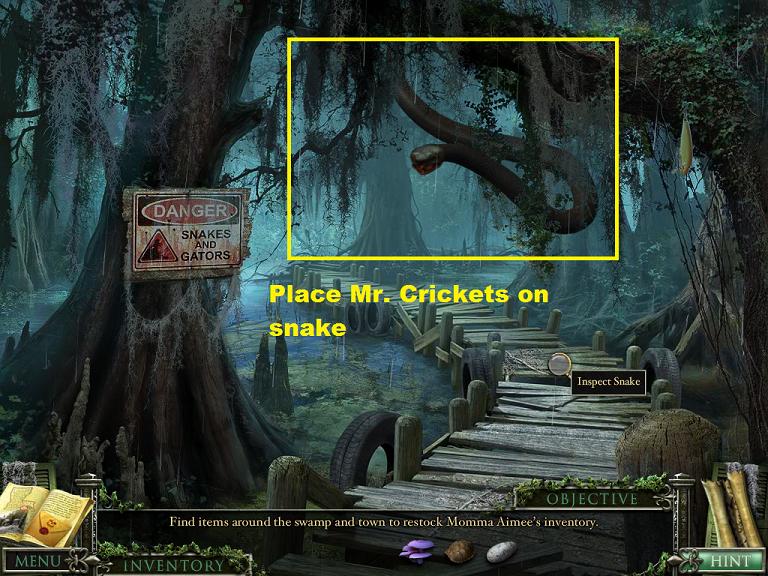
You will find a large water moccasin blocking the way. Place Mr. Crickets on the snake and it will disappear. Mr. Crickets and cage will rest on a stump to the right.
Screenshot.
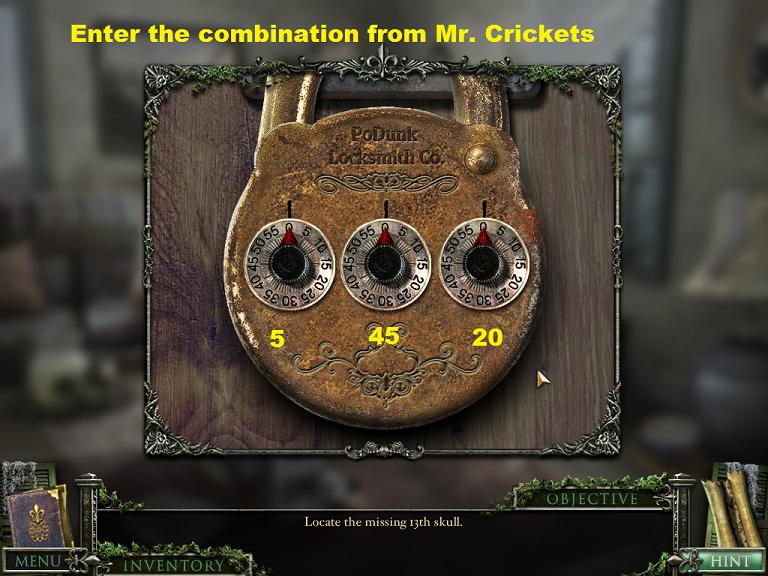
Click on Mr. Crickets and he will repeat some numbers, 5, 45, and 20.
Go forward into the swamp.
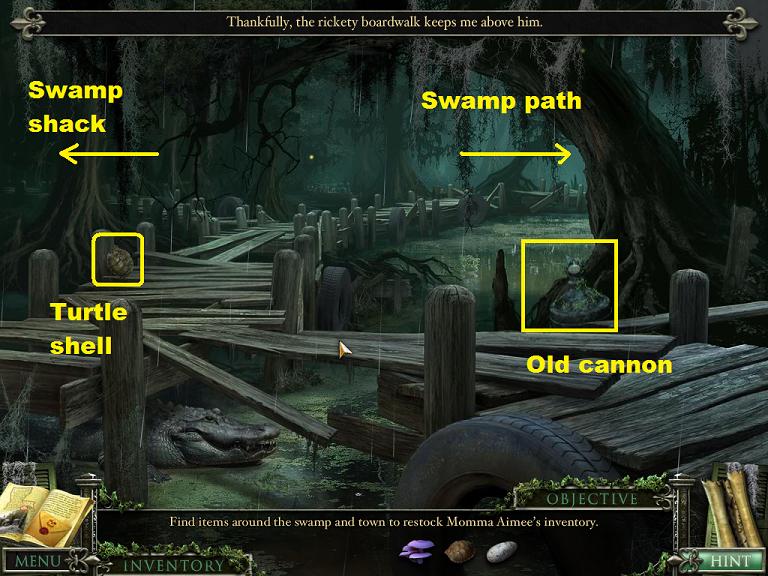
Here you are at a crossroads on the bridge. To the right is the swamp path, to the left is a path to a swamp shack.
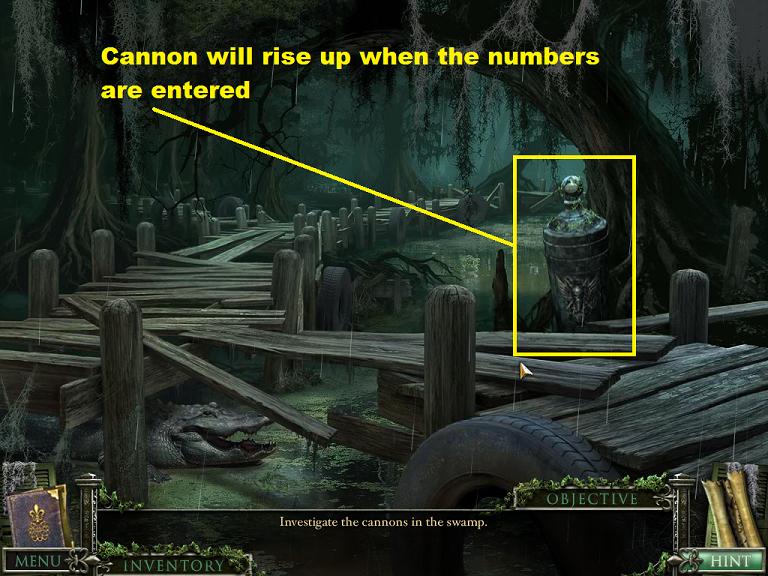
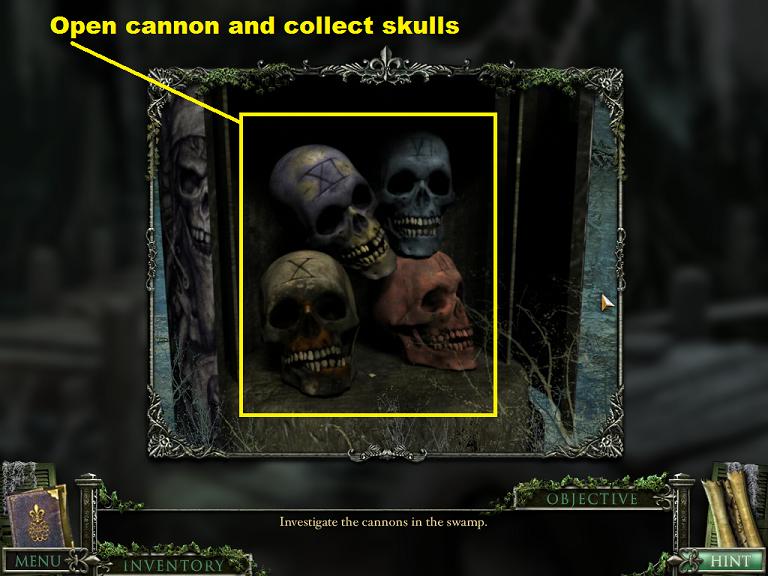
In front of you is an old, submerged cannon with a funny symbol and Roman Numerals on it.
The turtle shell you need for Momma Aimee is propped against an upright on the left.
Take the turtle shell and proceed left to the swamp shack.
Screenshot.
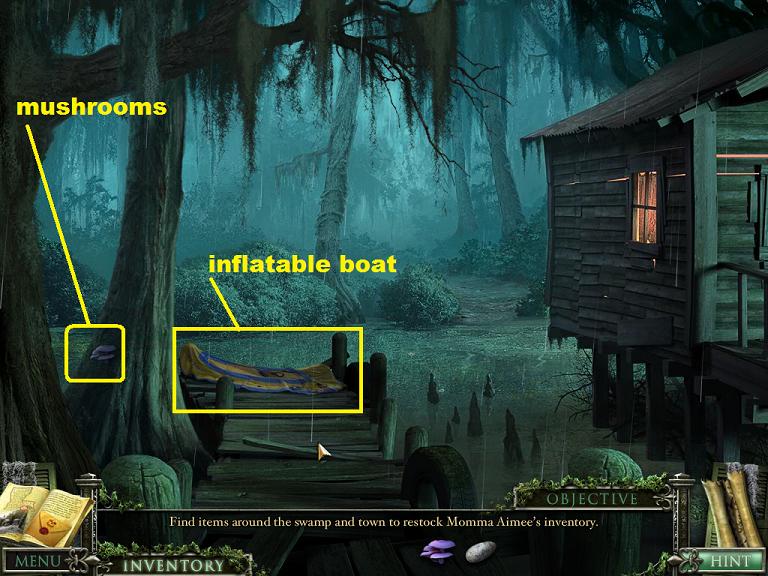
You are now in front of the swamp shack. A stranger is standing here. There is also a path to the left to the side of the shack.
Screenshot.
Click on the stranger to speak to him.
Once the stranger is done threatening you, take the path to the left.
Here at the side of the shack you will find a deflated inflatable boat, and the purple mushrooms for Momma Aimee.
Screenshot.
Click on the tree for a close up, take the mushrooms, and back up twice to the crossroads of the bridge path.
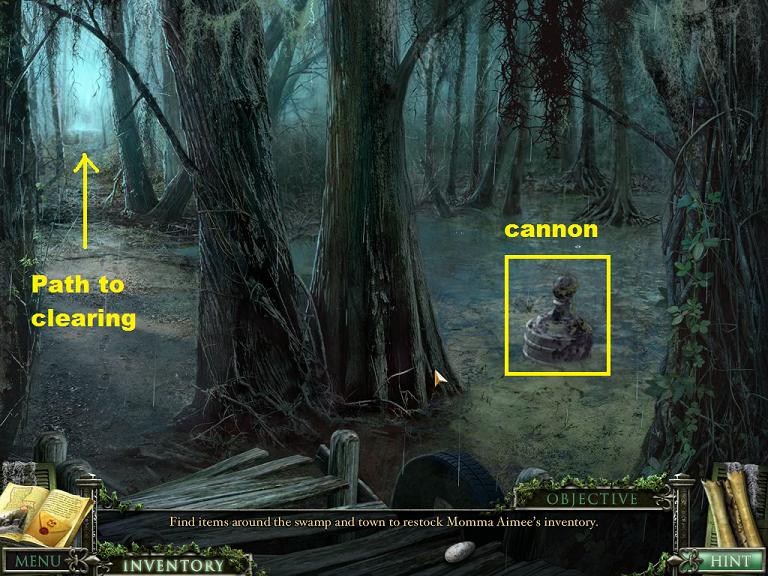
Now go to the right on the swamp path.
Here you will see another of those strange, sunken cannons, and a path going to a clearing. Notice the stranger peeking at you from the trees.
Go forward to the clearing.
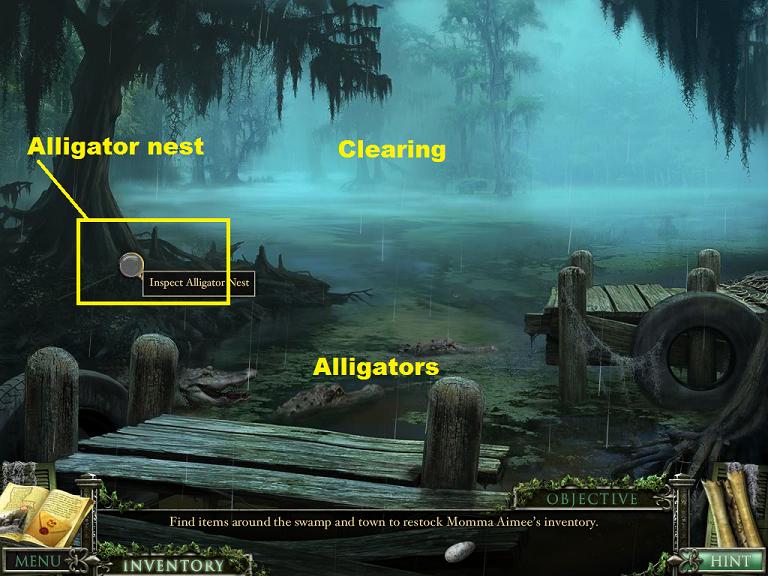
Screenshot.
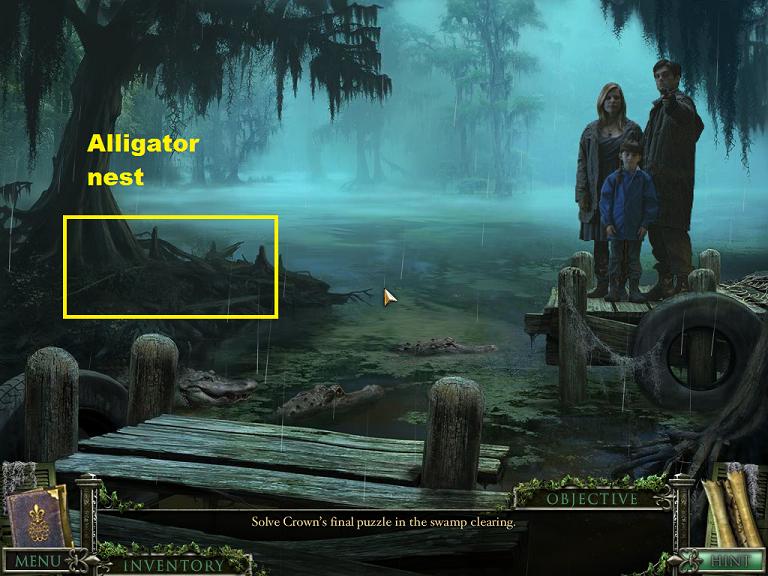
Here the path ends at the clearing. Notice all of the alligators. At the base of the tree on the left is an alligator nest. Click on the nest for a close up.
Screenshot.
The nest is covered with leaves. Click a few times to clear the nest and you will find a strange platform with an alligator egg on it. This is the last of Momma Aimee's items.
Screenshot.
Close down the close up and back up four times to the path. Once at the path, go forward once to the town then left into Momma Aimee's store.
Click on the empty display for a close up and place all of the found items inside. When you close down the close up Momma Aimee will want to talk again.
Screenshot.
Click on Momma Aimee to speak.
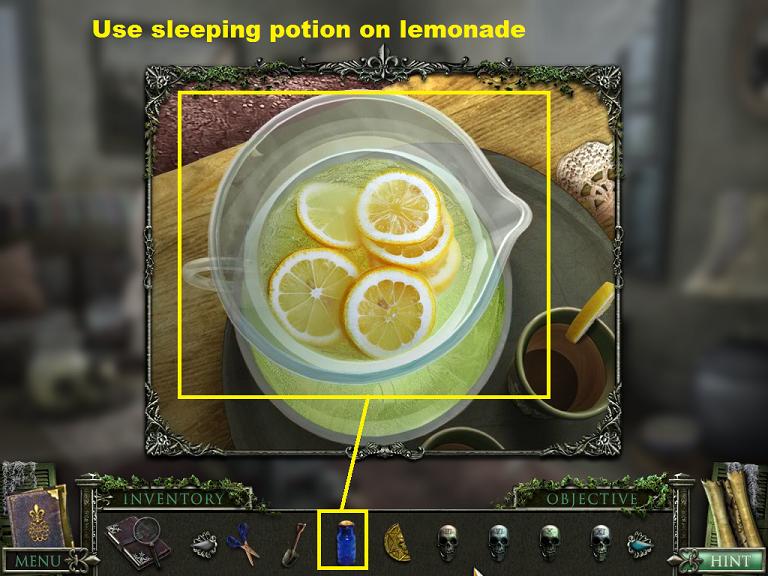
Momma Aimee will give you a sleeping potion and a new objective: Speak to Mrs. Lawson.
Mrs. Lawson/Lewis Lee/Weeds
Back up four times to the front lawn, then go into the mansion and go right into the sitting room.
Click on Mrs. Lawson to speak to her.
This will give you a new objective: Question Lewis Lee about Mary's beliefs.
Back up three times to the front lawn and click on Lewis to speak to him.
Lewis will ask you to help him with the weeds.
Go to the side of the mansion and click on the bench for a close up. When you do you will see the flowering weeds.
Screenshot.
Mini-Game: Cut the Weeds
This is like a game of whack-a-mole, but with weeds and garden shears.
Each weed (flower) grows at a different rate. You have to cut all of them before one regenerates.
The trick is to notice the growth pattern: the fastest to grow back are the orange weeds, then the white weeds, then the purple weeds.
Get the garden shears from your inventory and tackle the weeds in this order: first the purple, then the white, and the orange ones last.
Screenshot.
If you can't get the orange ones done before a purple or a white grows back, start over.
Eventually you will get all of the flowers and they will no longer regenerate.
Back up once and talk to Lewis Lee.
Lewis will give you a new objective: find the key in the shed.
Posted by: grinnyp |
November 28, 2010 8:30 PM
|
November 28, 2010 8:30 PM
Mystery Case Files: 13th Skull Walkthrough Part 4
The Town (Part 2)
Shed Key/Open Graveyard
Lewis told you that one of the keys is in the shed, so go forward twice into the mansion, turn left at the dining room, right to the kitchen, forward to the pantry, forward to the back yard, and forward to the shed.
On a shelf above the worktable is an open box. Click on the box for a close up and take the key. You should now have three of the four keys needed to open the graveyard.
Screenshot.
Back up five times until you are at the couch.
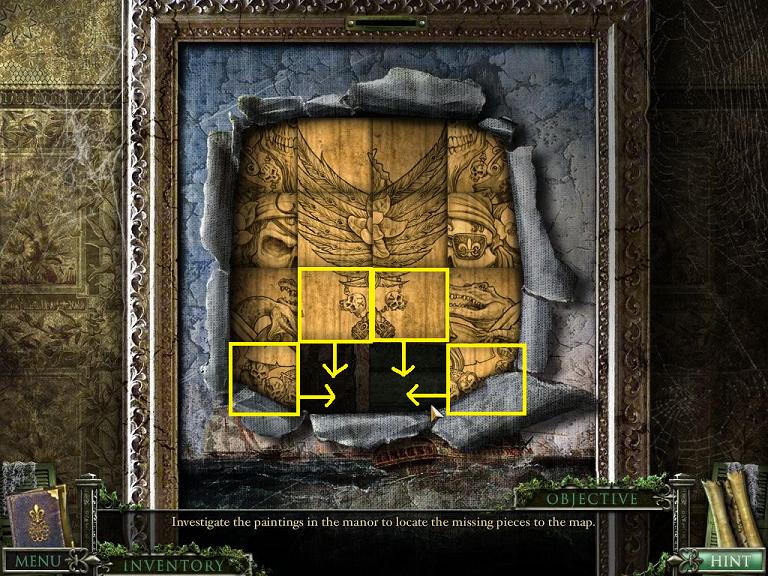
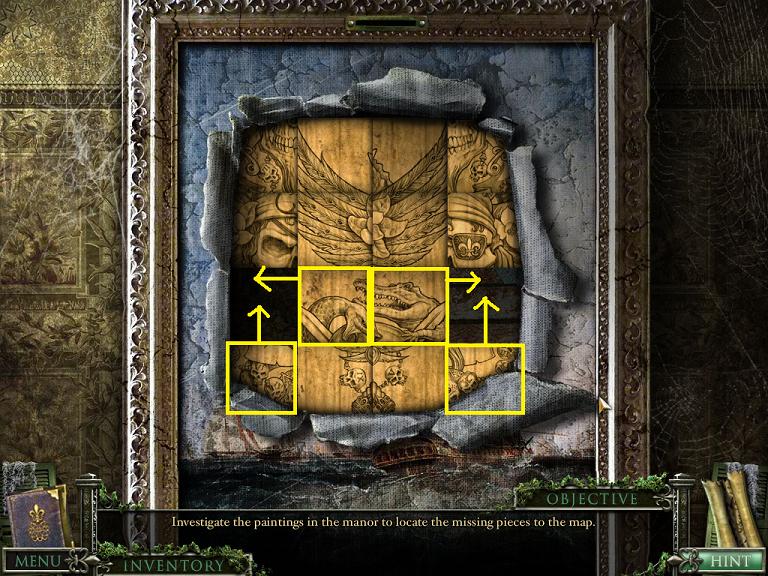
On the left wall, between the dining room door and the closet door is a painting. Click on the painting for a close up.
Screenshot.
Use the scissors from your inventory on the painting to cut it (several clicks). A key will be revealed.
Screenshot.
Now look closely at the corners of the frame. There are four symbols there, a crown, a heart, a square, and a clover. These are the four symbols on the cemetery gates.
Inside those symbols are four symbols, a star, a moon, a triangle, and a double diamond. These are the symbols on the four keys that you should now have in your inventory.
If you look closely at the inside symbols, they each appear to be pointing in a different direction.
Screenshot.
You need to remember these patterns, they change from game to game.
Close down the close up, then back up twice to the front yard, go to the side yard, then forward once more to the cemetery gate.
Click on the gate for a close up of the lock.
The clues on the painting frame tell you which key goes into which lock, and what position to turn the key. This solution is random and changes from game to game.
Screenshot.
Insert the four keys and rotate them to their proper positions.
The graveyard gate is now open, and you can go left into the graveyard.
Screenshot.
Go left into the graveyard.
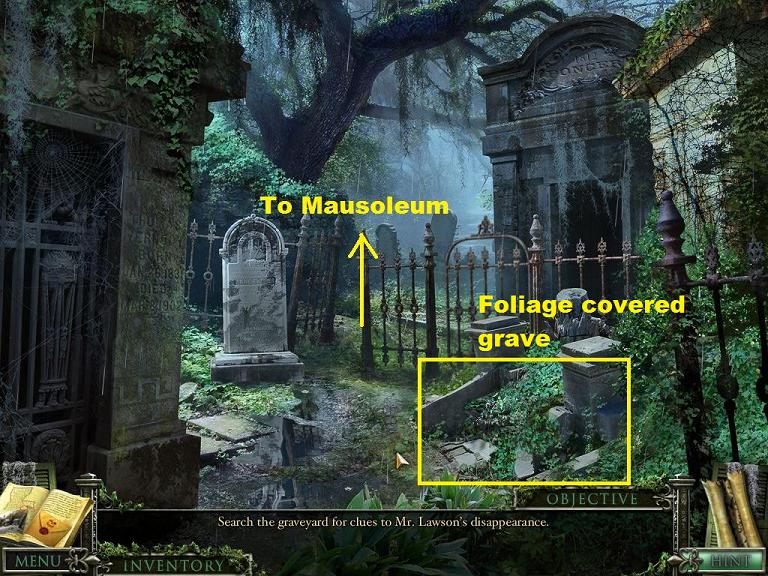
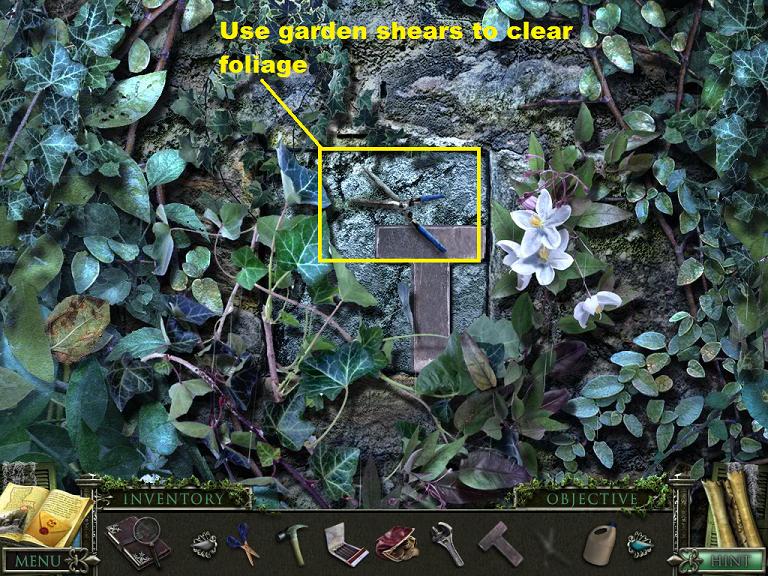
To your right is a grave that has been overrun by foliage. Click on it for a close up.
Screenshot.
Pull up the garden shears from your inventory and use them on the foliage (takes several clicks) to uncover what is there.
Screenshot.
When you are done you will have uncovered an indentation and another of the T-shaped objects (you have one from Lewis, one is hanging on the chandelier in the mansion).
Screenshot.
Leave the T-shaped object and back up.
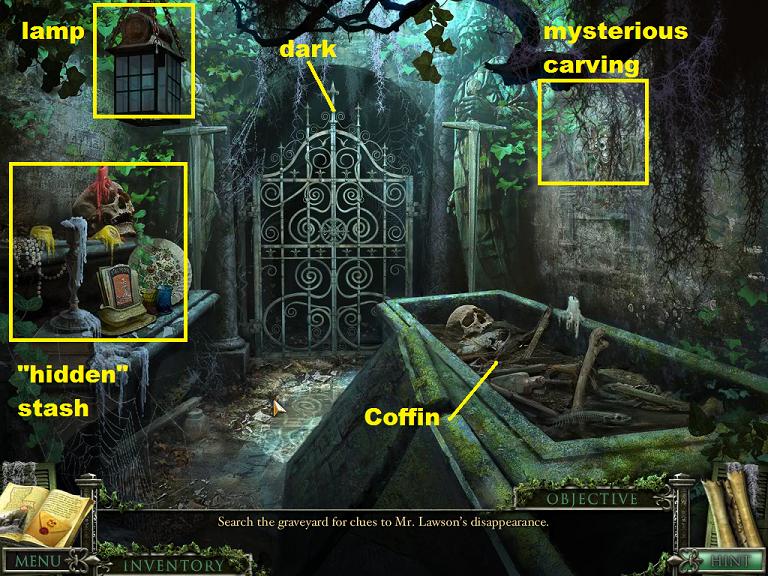
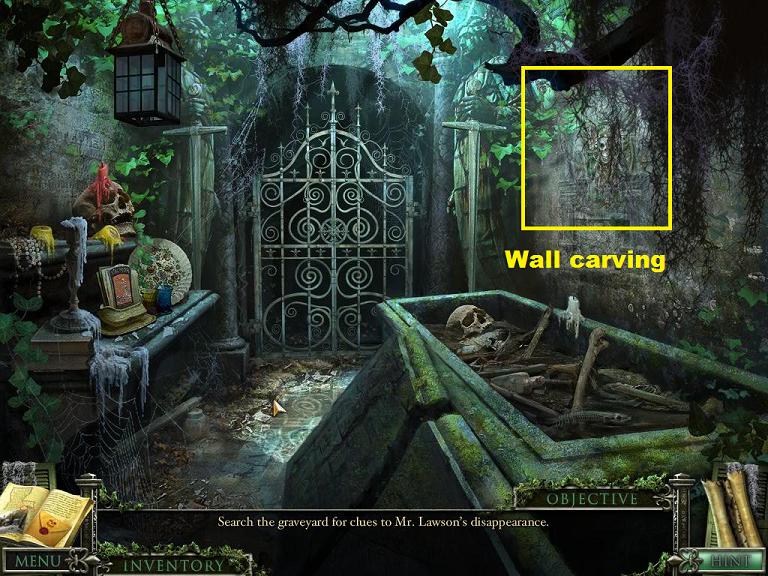
Now go forward into the mausoleum.
There's a lot to see here.
Screenshot.
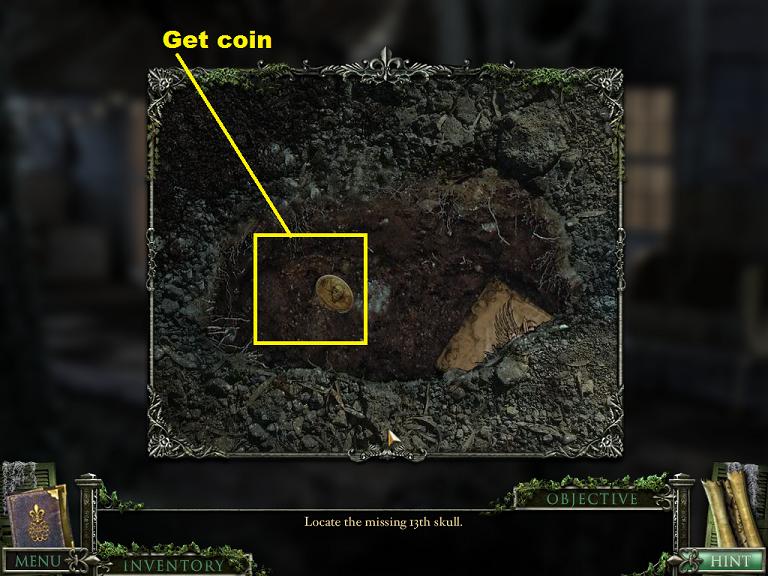
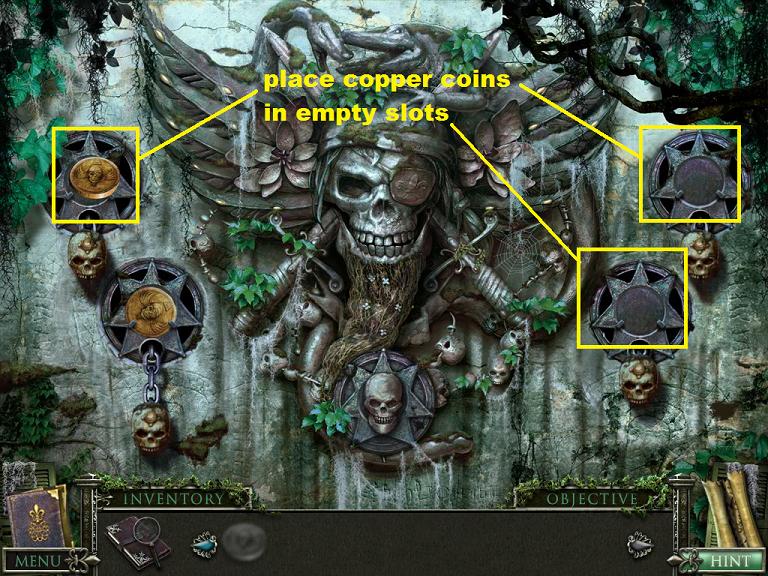
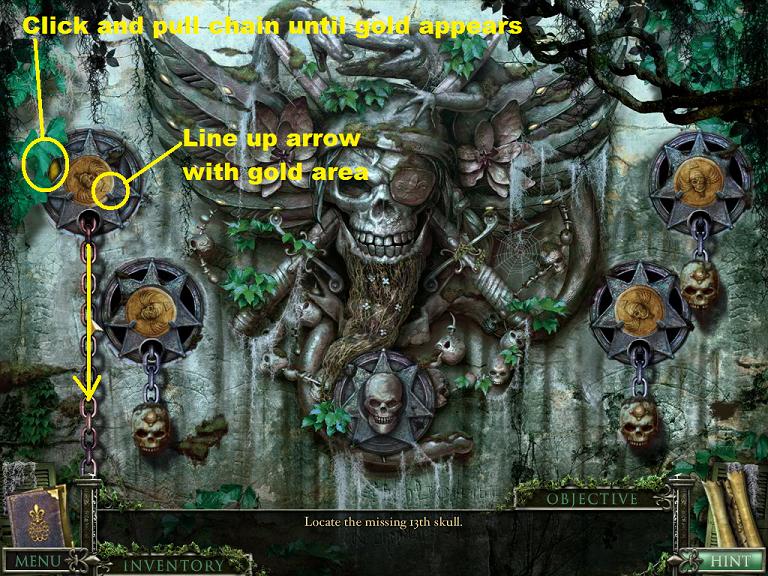
On the right wall is a mysterious carving. Look at it in close up and you will see that it has four notches, one of which is filled with a copper coin or medallion.
Screenshot.
On the left is what appears to be an altar. Click on it for a close up and you will see that it is another "hidden" stash.
Also hanging on the left is a lamp. Click on it for a close up, then click on it again and the side door will open.
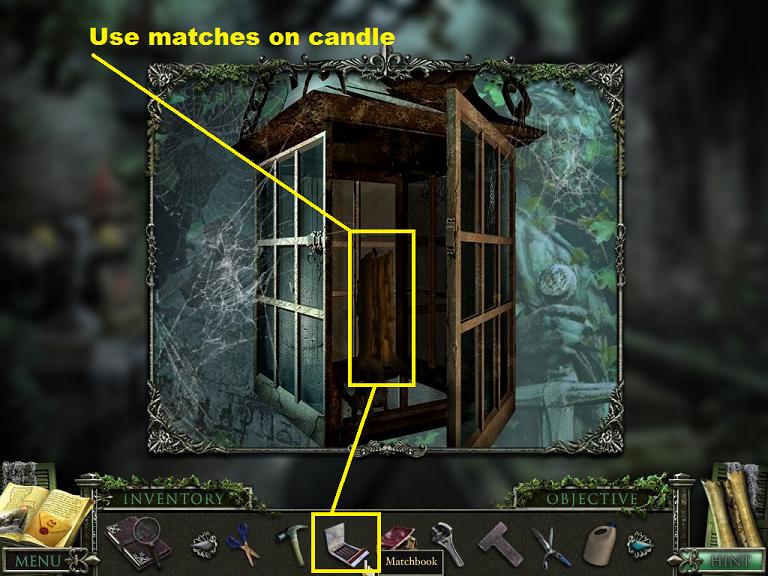
Use the matches from your inventory on the candle to light the lamp.
Screenshot.
Once the lamp is lit put it in your inventory.
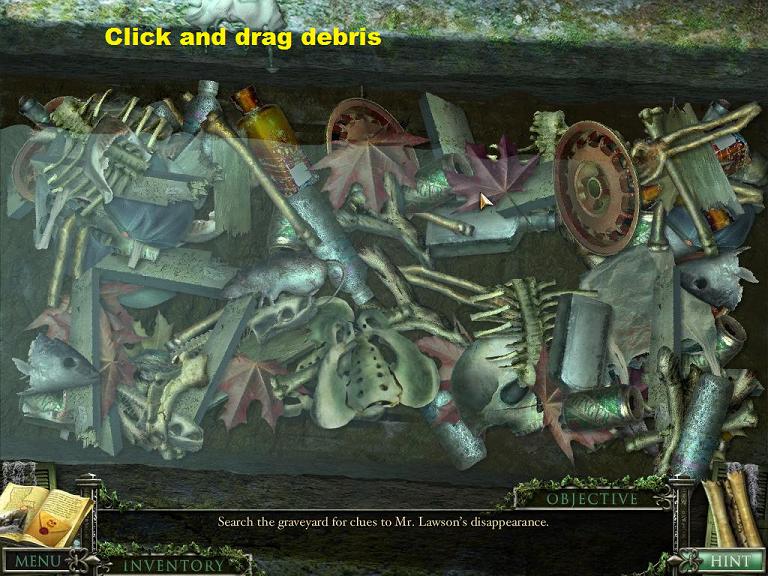
To the right is a coffin. Click on it for a close up and you will see that it is filled with water and debris.
Screenshot.
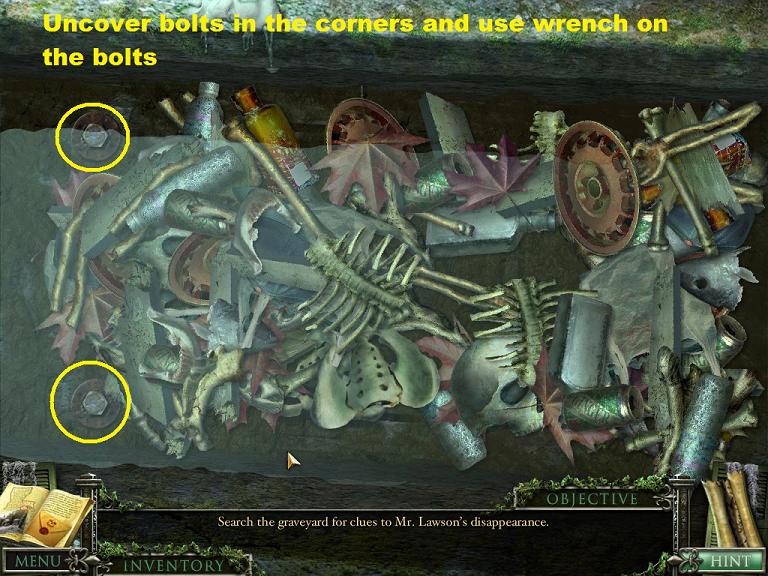
You will find that you can click and drag the debris around. Try to move all of the debris to the center. There are four bolts in the outer corners that you are trying to uncover.
Screenshot.
Once the bolts are uncovered use the wrench from your inventory on them.
When all four bolts are gone the bottom of the coffin will recess. Click on the coffin again and you will see a grate. Click on the grate to remove it.
Screenshot.
You will now see a puzzle.
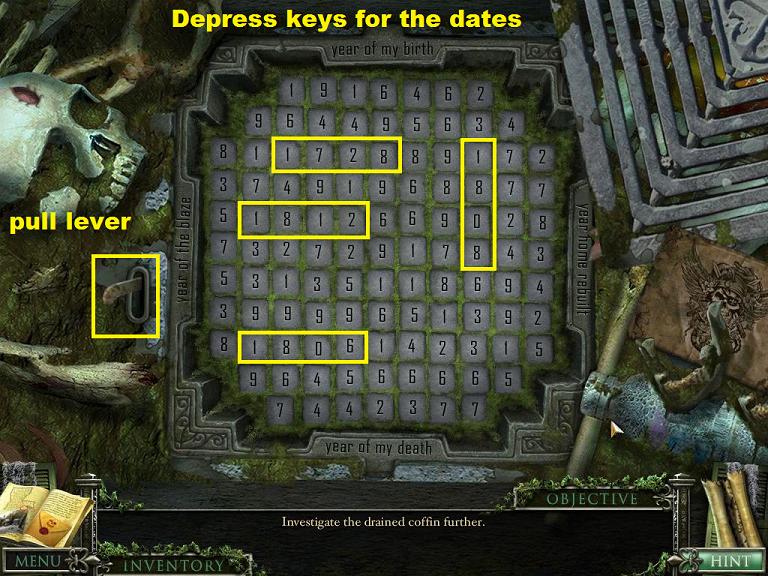
Coffin Mini-Puzzle
There are four clues around the outside of the puzzle: year of my birth, year of the blaze, year home rebuilt, and year of my death.
The object is to depress keys which represent these years.
If you've been reading all of the newspapers and faxes then this information can be found in your detective's handbook. Note: the year of birth changes from game to game and is found on the fax sent by Vinton's friend.
Year of birth: variable, year of blaze: 1806, year home rebuilt: 1808, and year of death: 1812.
Find these dates in the grid as if you were doing a word search, then depress the proper keys.
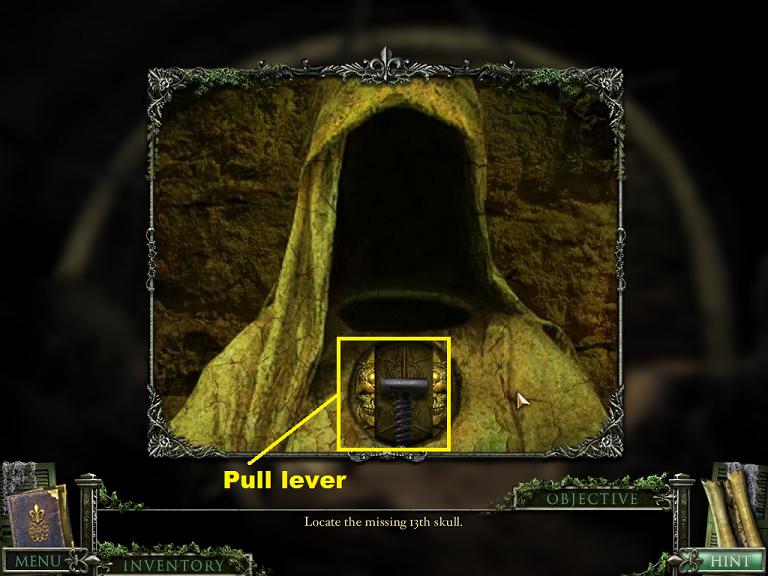
Once the keys for all four dates are depressed, pull the lever on the left.
Again, the solution of where to find the dates in the grid changes from game to game.
Screenshot.
Once the coffin mini-puzzle has been solved the gates will swing open.
Move through the gates.
You will end up in a dark space at the bottom of some stairs.
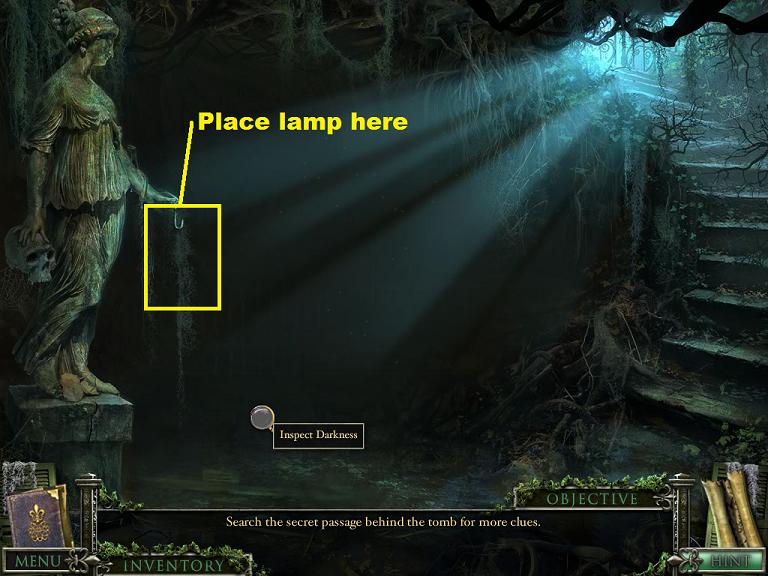
You need to light the place up, so place the lit lamp from your inventory on the hook on the statue's hand.
Screenshot.
Once the lamp is lit you will see a chest to the right and a banner on the far wall.
Screenshot.
Click on the chest for a close up.
Chest Mini-Puzzle
This is a simple letter swap puzzle.
Simply click on two letters to swap their positions.
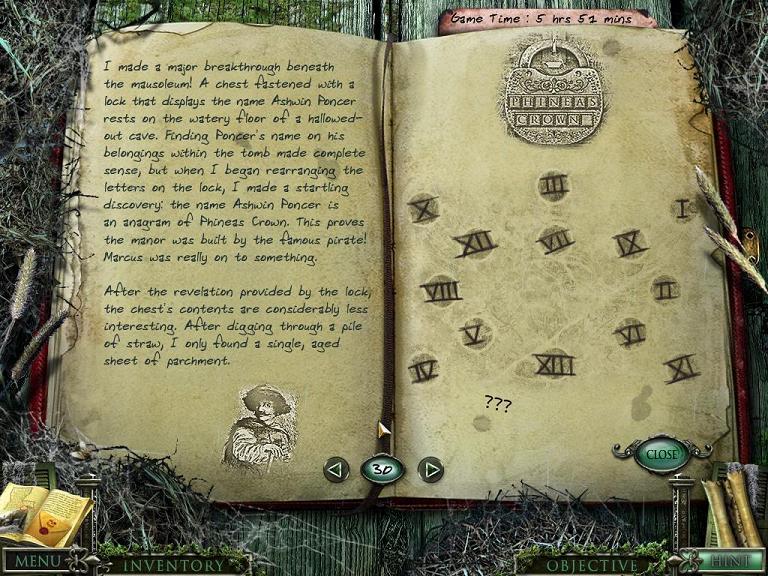
You want to change the name from Ashwin Poncer to something else.
Because that wasn't his real name.
His real name? The notorious pirate Phineas Crown. Ashwin Poncer is an anagram of Phineas Crown.
Screenshot.
Once you solve the chest lock mini-puzzle the chest will open.
Click on the open chest and you will find a piece of paper with Roman Numerals on it.
This information is important, and it will go into your Detective's Handbook.
Screenshot.
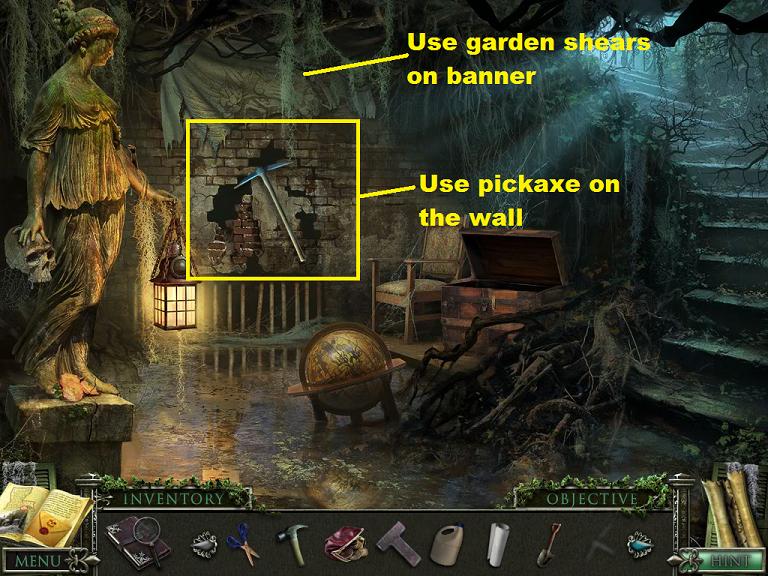
Close down the close up and look at the banner on the far wall.
Use the garden shears from your inventory to cut down the banner.
When you investigate the wall behind the banner it appears to have been more recently filled in.
Use the pick-axe from your inventory to knock a hole in the wall (takes about 3 hits).
Screenshot.
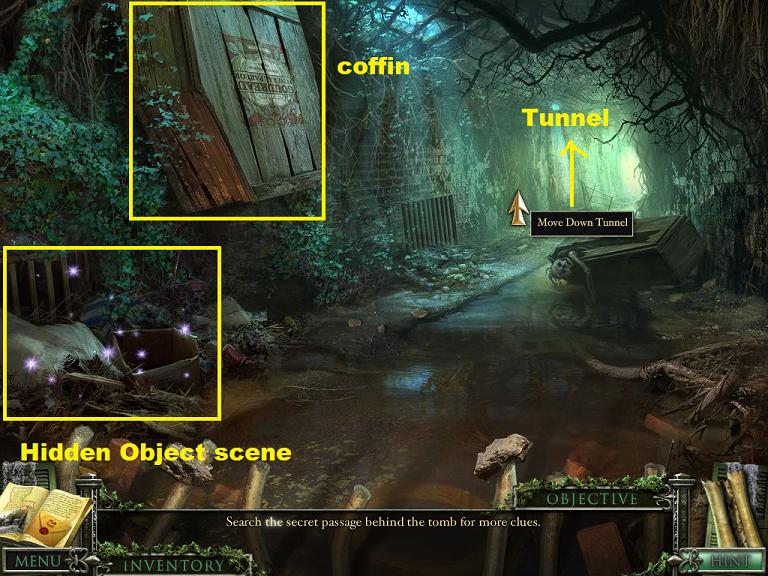
Go through the hole and you will end up in a tunnel.
There is a hidden object scene here, and a coffin on the wall.
Click on the coffin on the wall, but it won't open.
Use the hammer from your inventory on the coffin on the wall.
Screenshot.
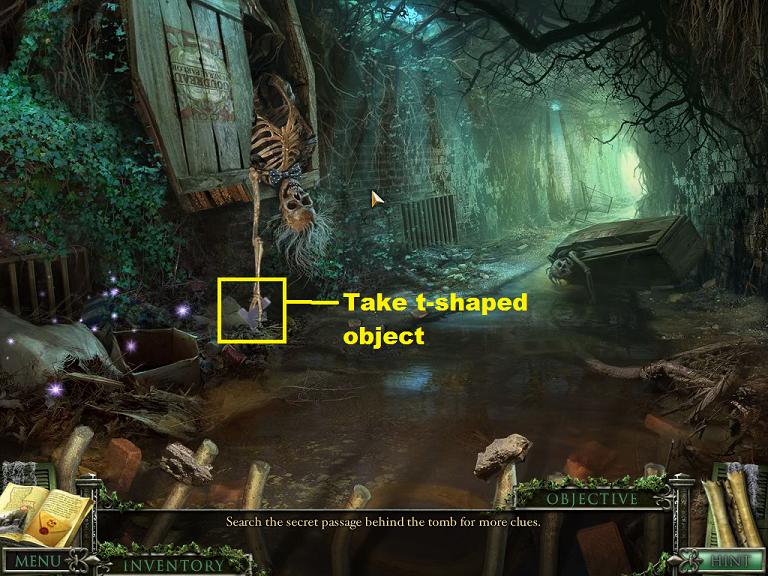
After a couple of hits from the hammer, the coffin will open and a skeleton will fall out.
In the skeleton's hand is another T-shaped object. Take the object by using the screwdriver to break the skeleton's fingers.
Screenshot.
Now click on the hidden object scene at the lower left.
Complete the scene to get a bike pump.
Screenshot.
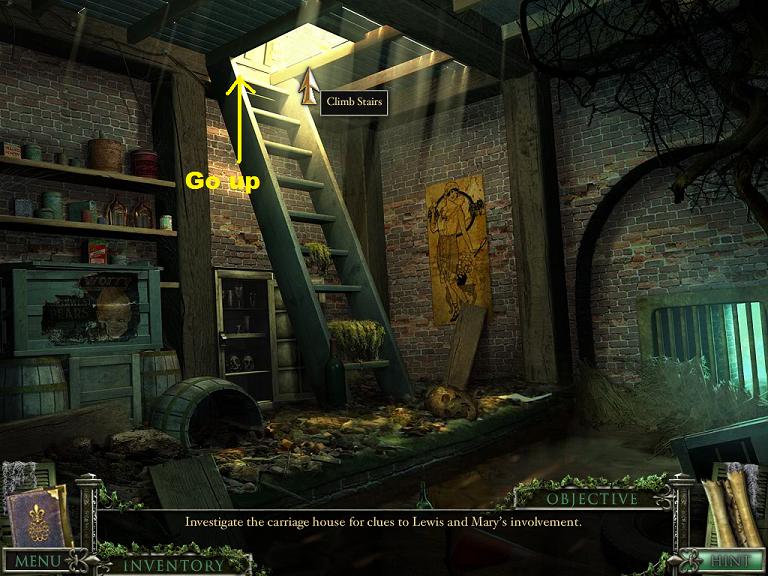
Move forward down the tunnel.
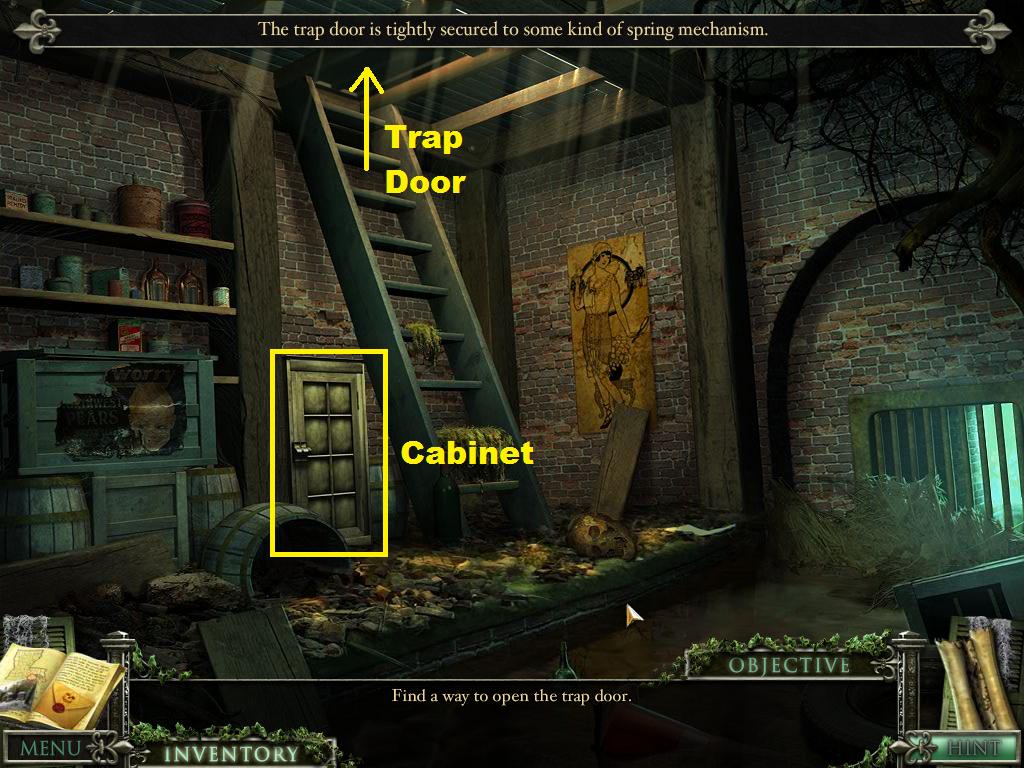
You are now at the end of the tunnel. Against the wall is a cabinet and there is a trapdoor at the top of the ladder.
Screenshot.
You now have a new objective: open the trap door.
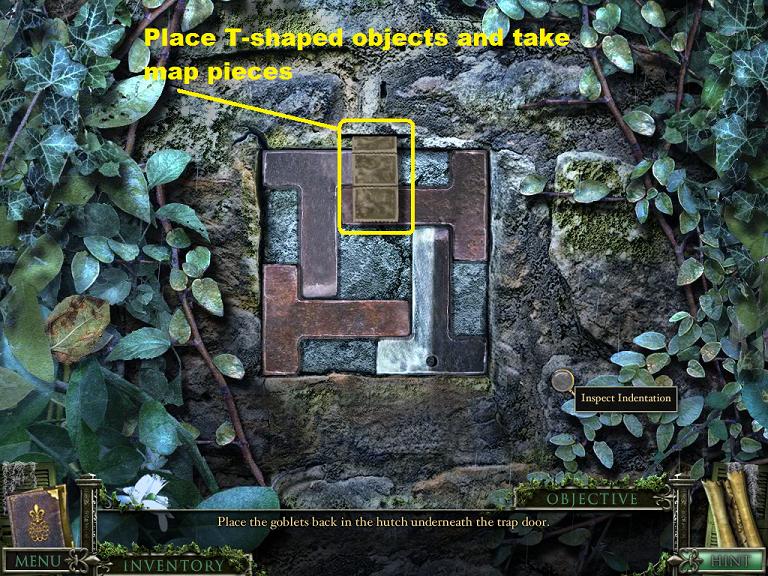
Open the Trap Door/Solve the T-Shaped Puzzle
Click on the cabinet for a close up.
Screenshot.
There are four strange symbols, and a crown symbol at the top.
Screenshot.
You've seen that symbol before.
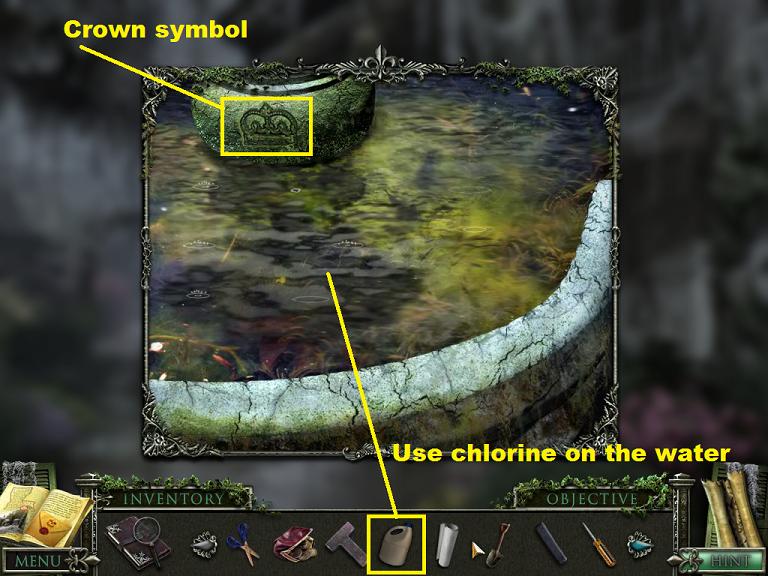
Back up six times until you are at the side of the mansion.
Click on the fountain for a close up.
There's the crown symbol, but the water is all murky.
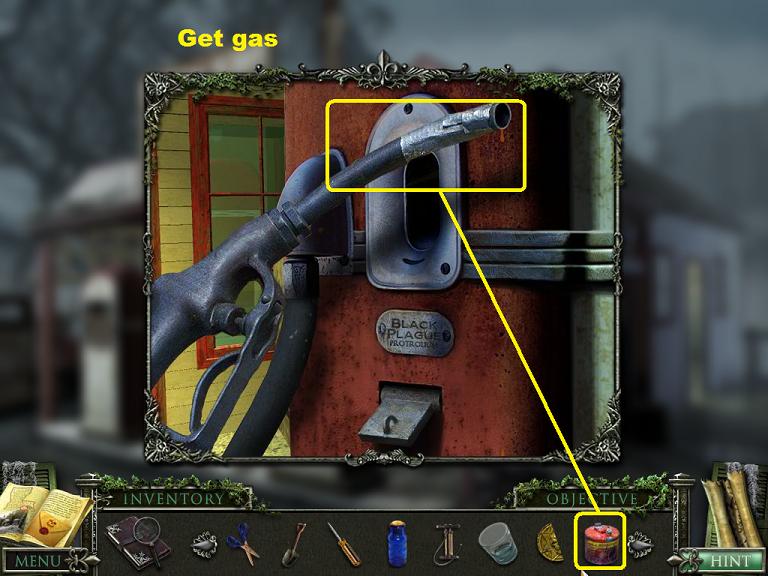
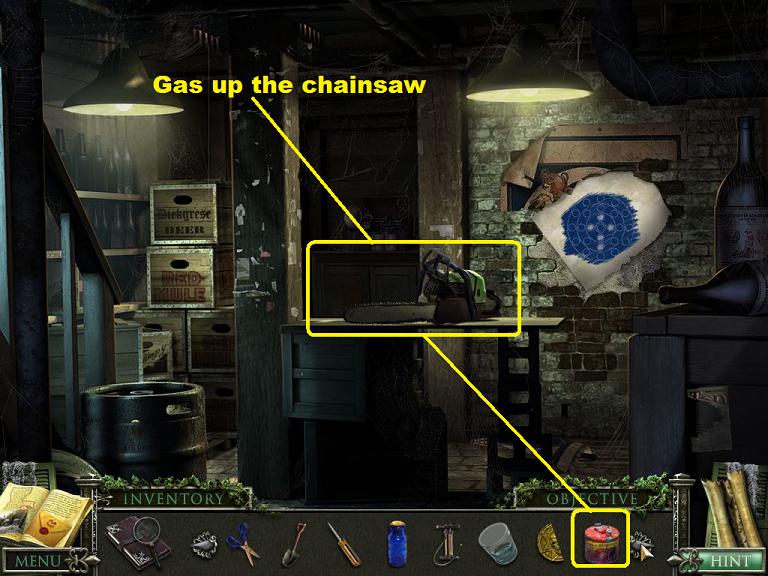
Pull up the chlorine from your inventory and use it on the water.
Screenshot.
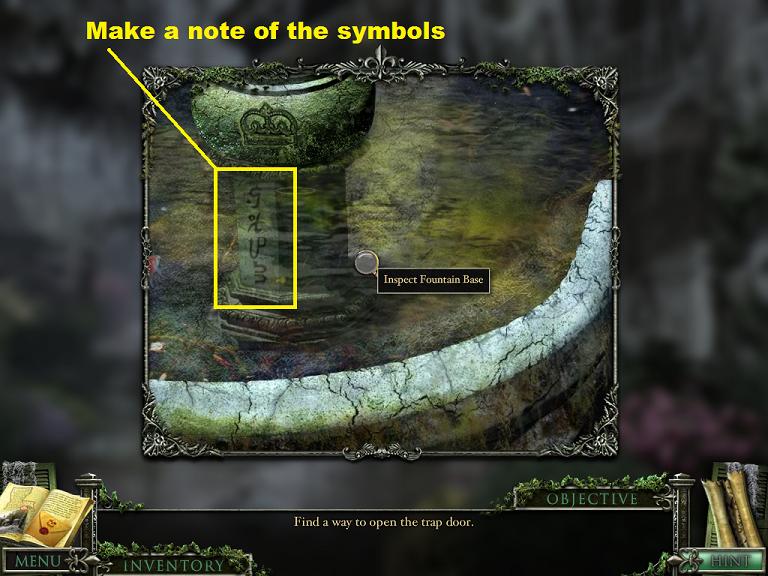
Once you've used the chlorine three times the water will clear and you can see symbols beneath the crown.
Make a note of these symbols, they change from game to game. They will also go into your detective's handbook.
Screenshot.
Go forward to the graveyard, left into the graveyard, forward into the mausoleum, through the gates, through the hole in the wall, and down the tunnel until you are back to the cabinet and the trap door.
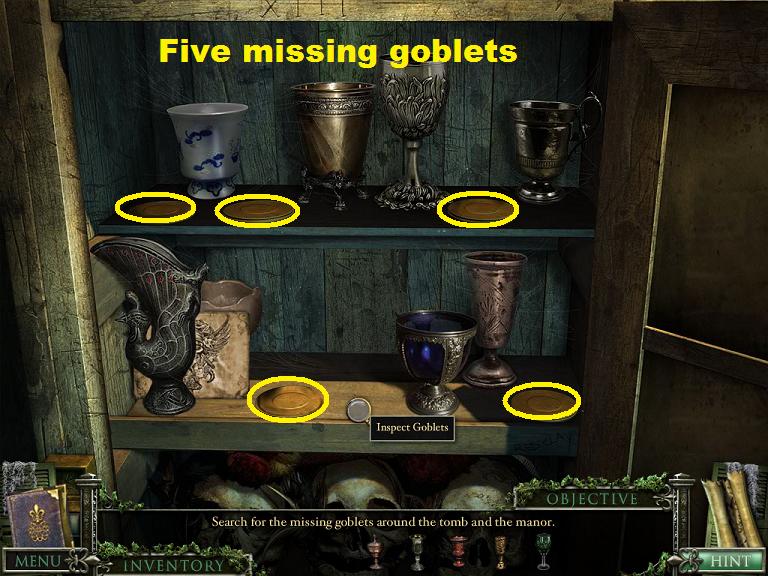
Click on the cabinet for a close up and enter the symbols that you found on the fountain.
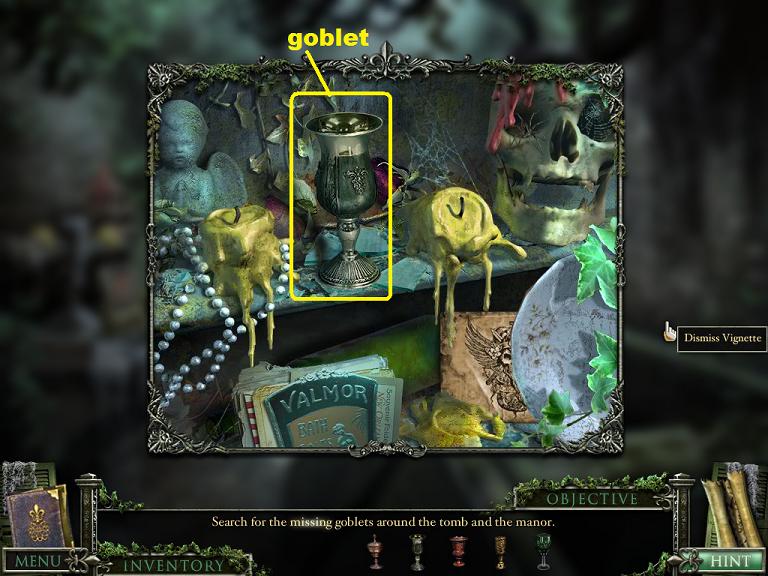
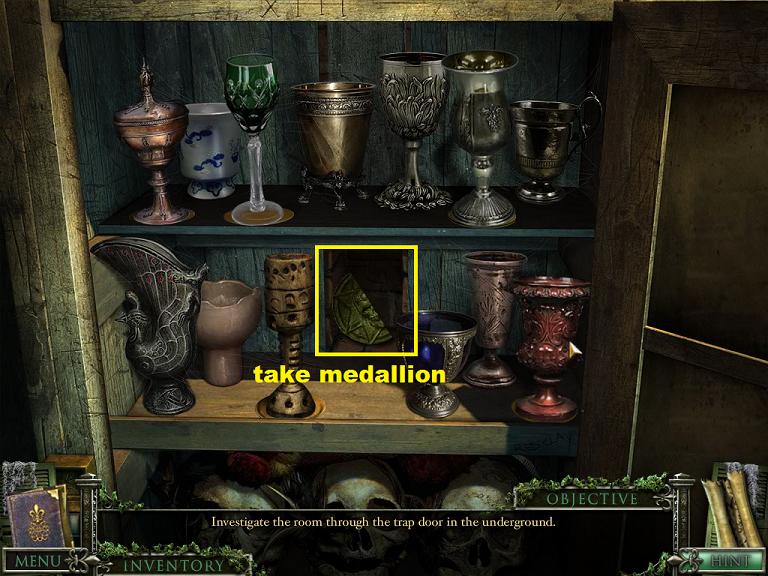
When the cabinet opens, you will see that it contains a collection of goblets.
You have a new objective: find the missing goblets (there are five missing).
Screenshot.
Close down the close up of the cabinet and back up three times until you are back at the first room in the mausoleum.
Click on the "hidden stash" on the left.
Screenshot.
Inside the "hidden" stash is a goblet, take it.
Screenshot.
Back up four times to the front lawn.
Go forward into the mansion and then right into the sitting room.
You will find the second goblet on the mantel, take it.
Screenshot.
Back up once to the couch, then go forward, up the stairs, forward to the balcony, and up the trap door to the attic.
In the attic you will find the third goblet on the left.
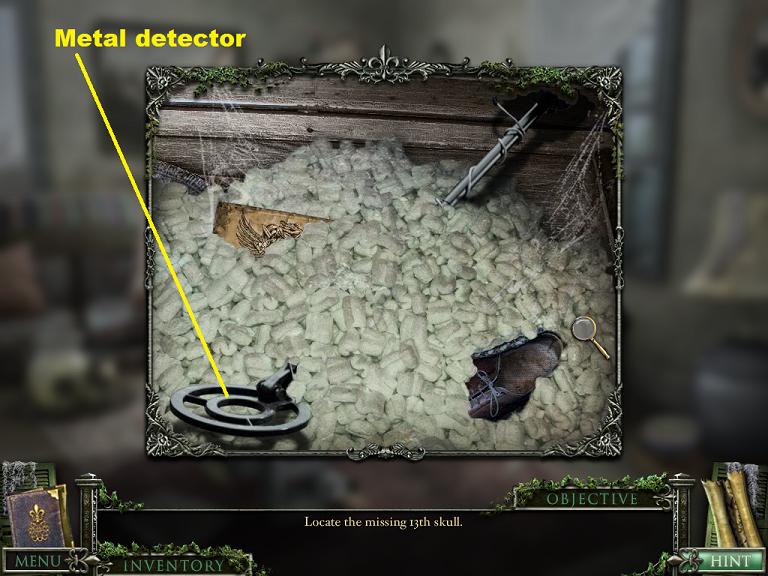
There is also a new hidden object scene on the right.
Screenshot.
Take the goblet then click on the hidden object scene.
Complete the scene to get a glass.
Screenshot.
In the center back of the attic is a complicated mechanism. Click on it for a close up.
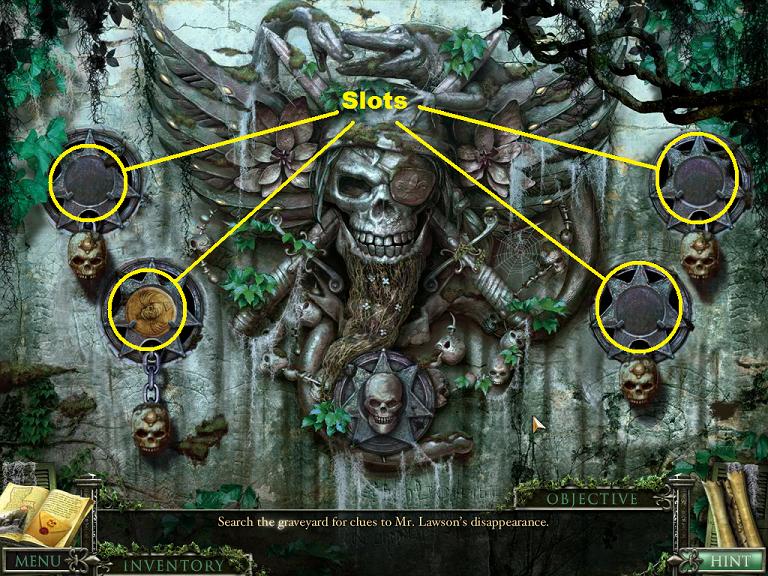
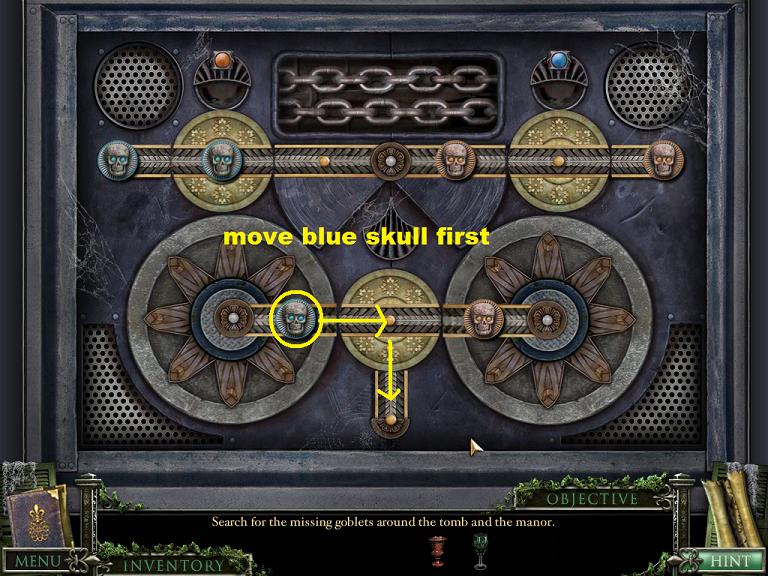
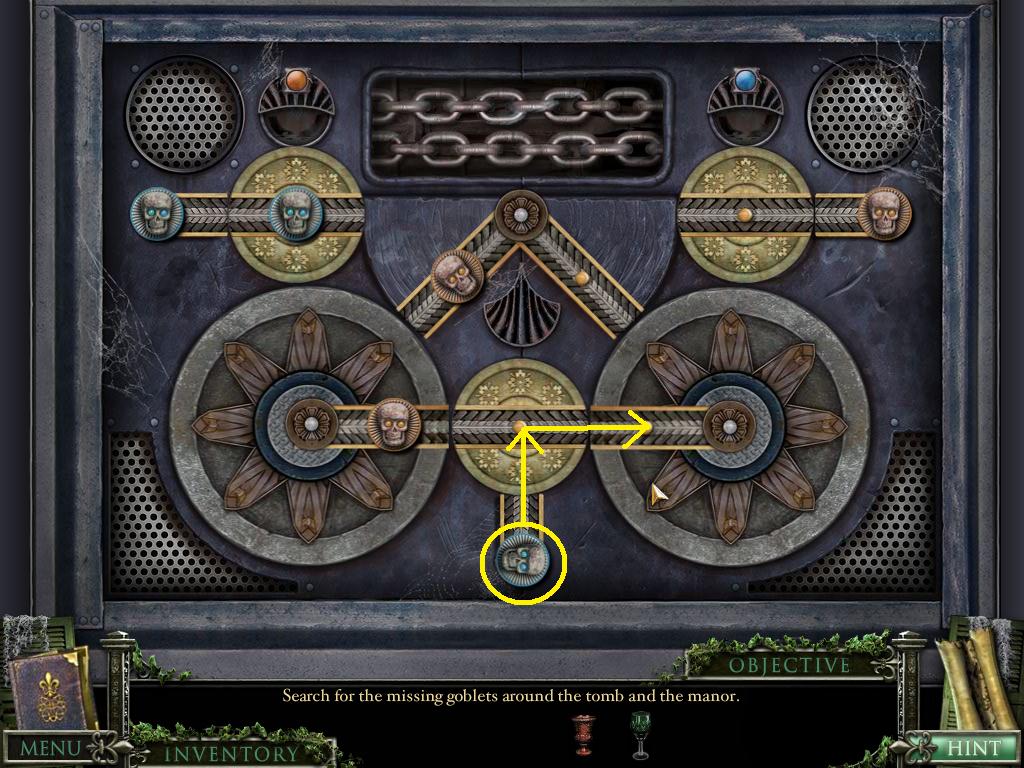
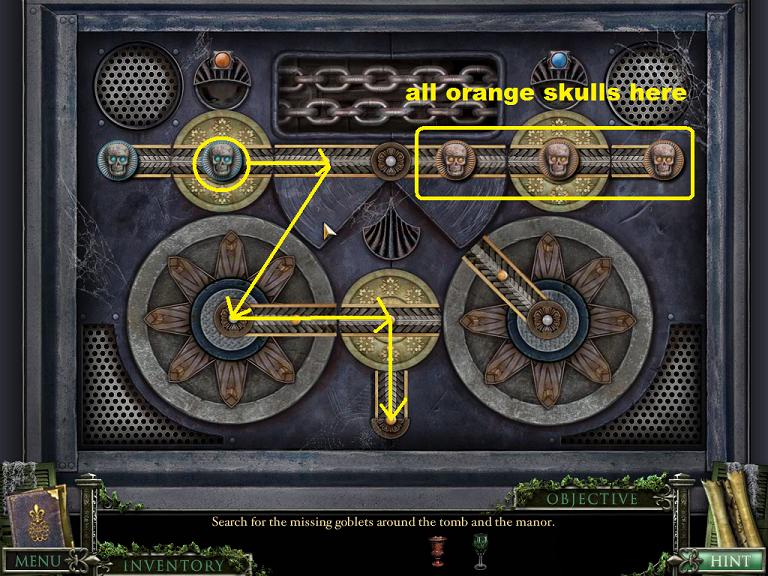
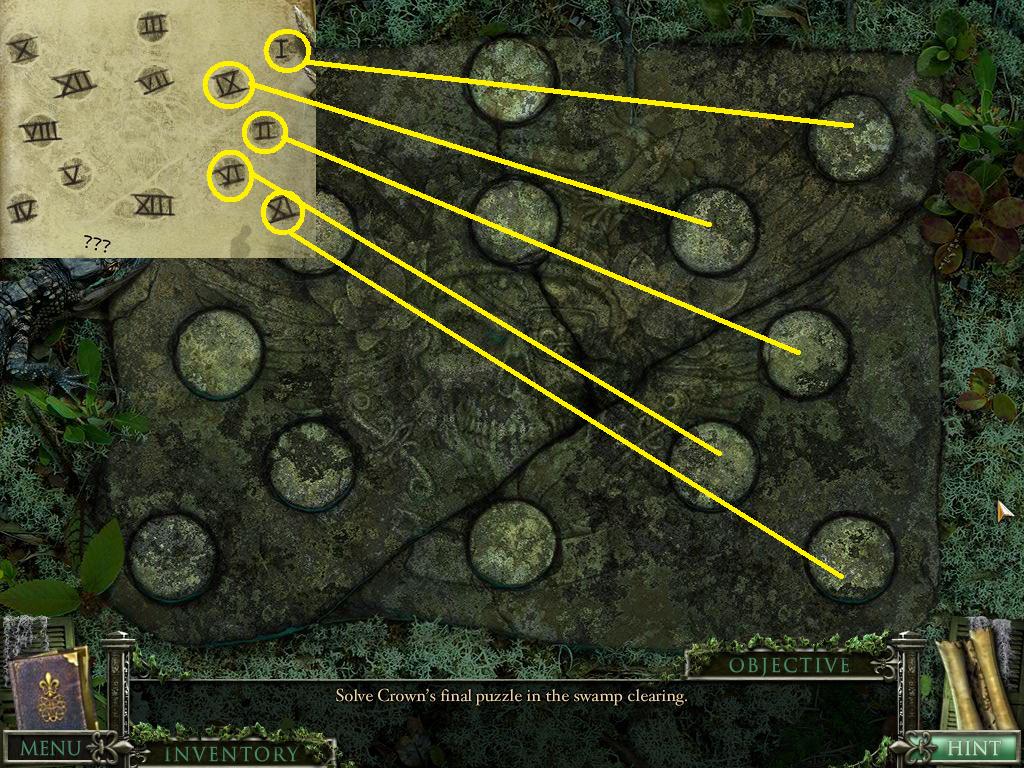
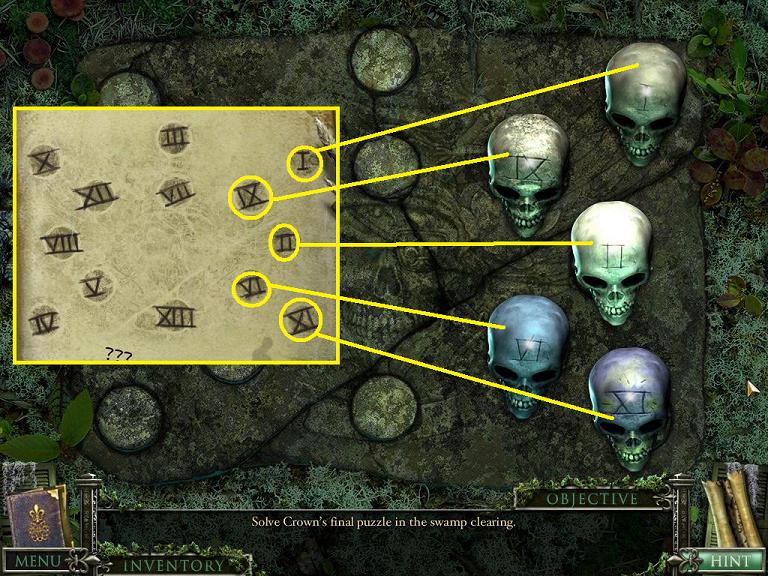
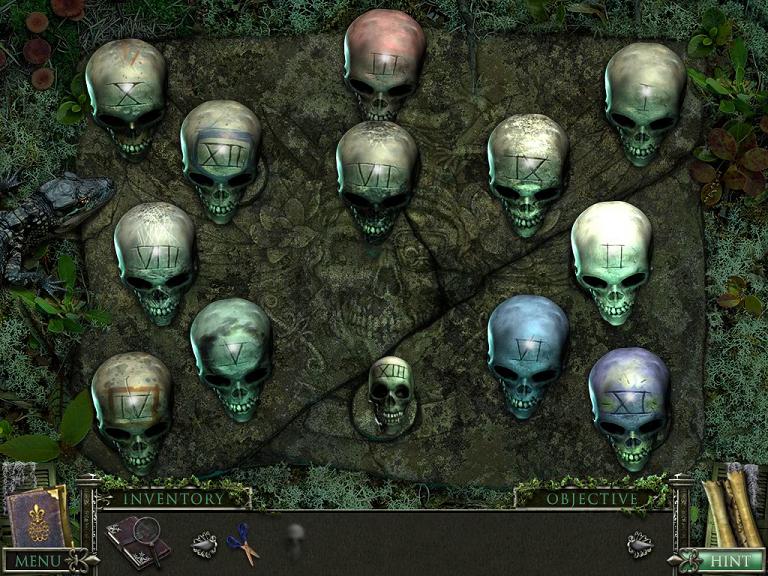
Chandelier Mechanism Mini-Puzzle
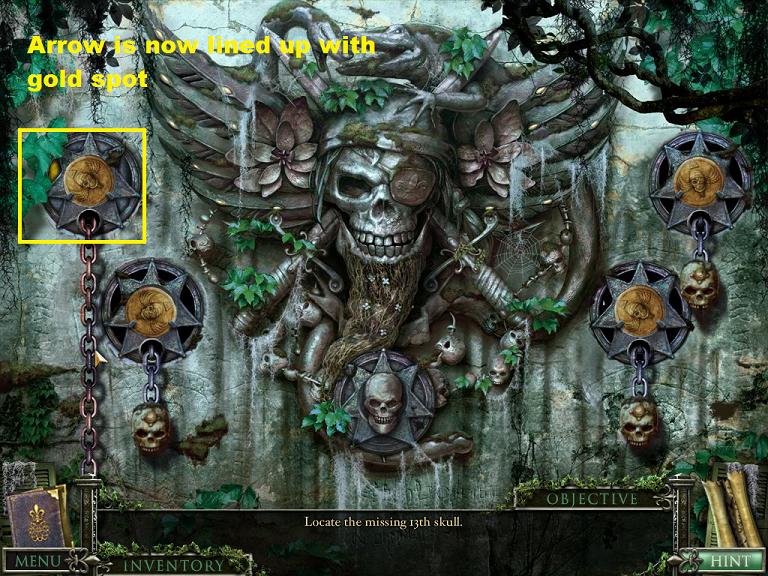
The object is to get the orange skulls into the orange slot and the blue skulls into the blue slot.
The skulls can only move along the tracks, and the tracks can only move in certain ways.
Screenshot.
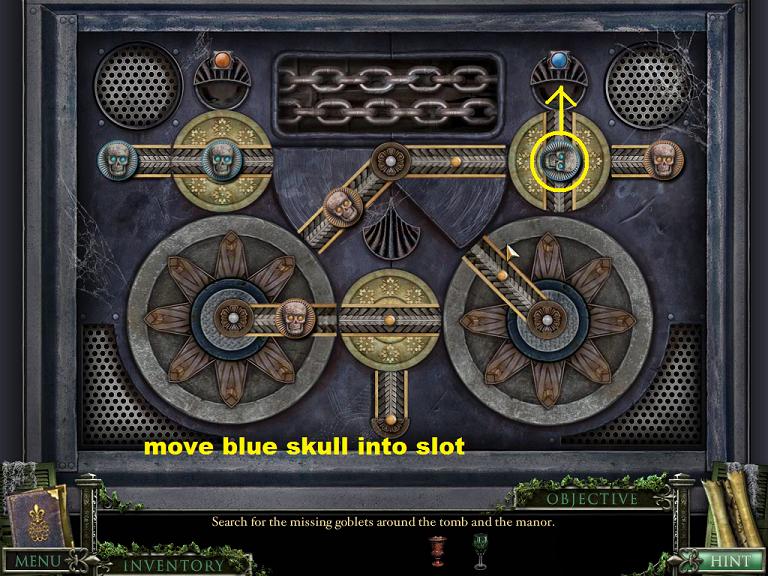
Start with the blue skull sitting on the lower left. Click on it to move it to the right (in the center). Then click on the track to rotate it so that it lines up with the track going down. Move the blue skull down to the bottom.
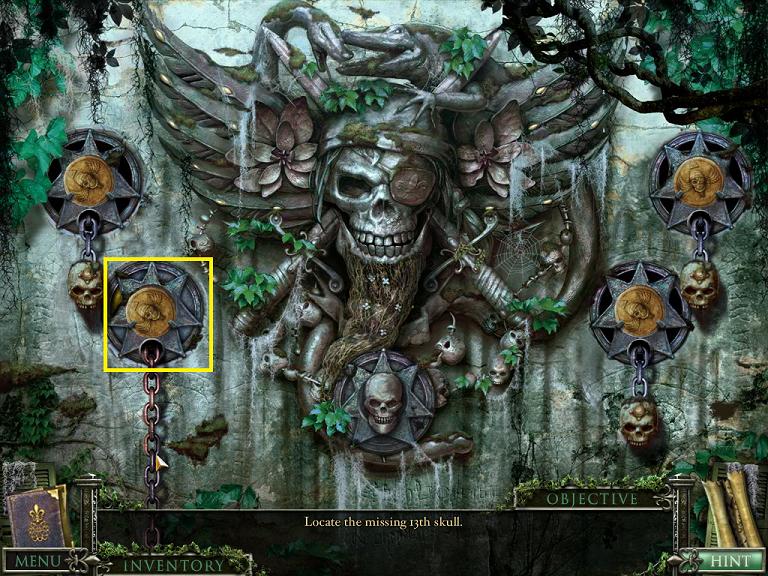
Screenshot.
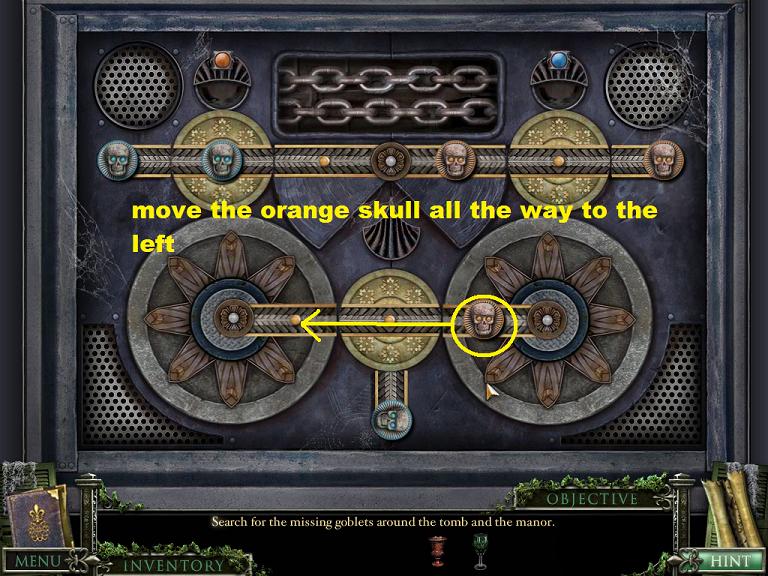
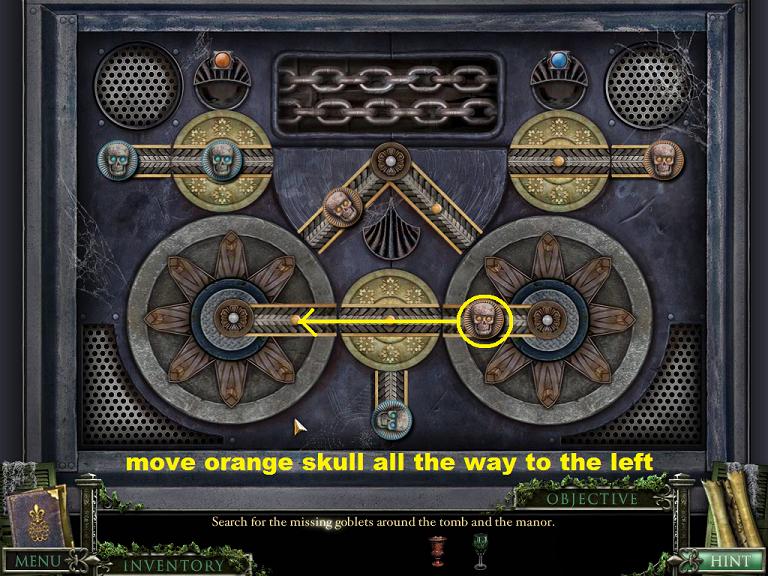
Once the blue skull is at the bottom click on that center circle to rotate it again so that the tracks go from left to right. Now move the orange skull that is in the bottom right all the way to the left.
Screenshot.
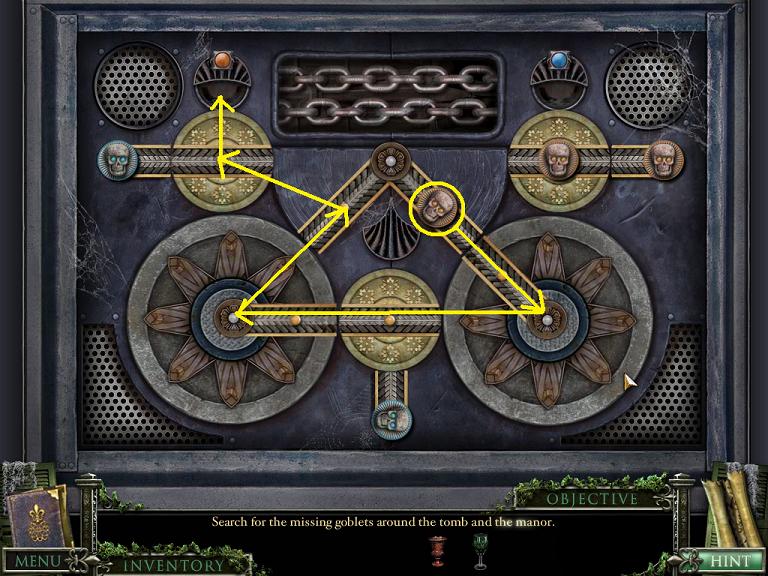
Now tilt the two bottom wheels so that they are pointing diagonally, then move the two top center tracks down to meet them. Move the orange skull in the lower left upwards, and move the orange skull on the upper track on the right down to the circular track on the lower right.
Screenshot.
Now rotate the two lower circles so that they match the lower track, then move the orange skull on the lower right all the way to the lower left circle.
Screenshot.
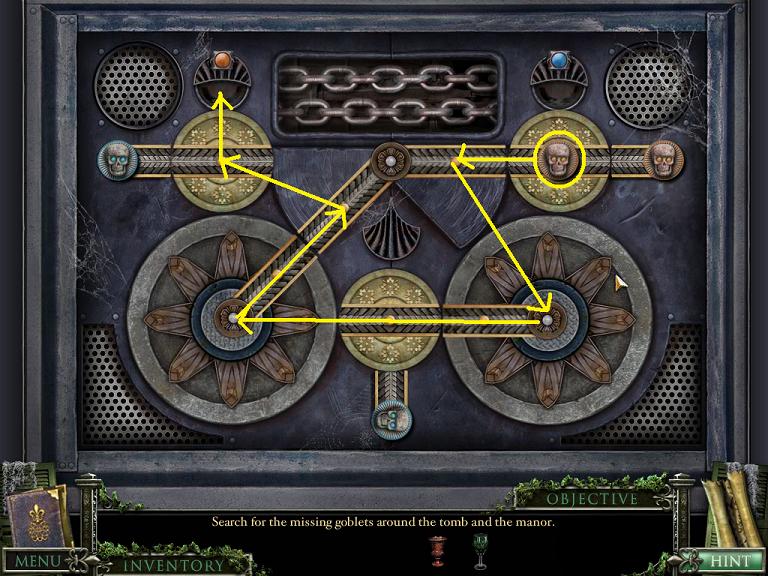
Rotate the middle bottom circle so that it is pointing down at the blue skull at the very bottom. Move the skull up into the circle, then rotate the circle back to a side-to-side track. Then move the blue skull to the lower right circle.
Screenshot.
Rotate the lower right circle up to meet the middle right track, then move the blue skull up to that track. Move the middle right track back up to meet the upper gold circle and move the blue skull to the upper right gold circle.
Screenshot.
Now rotate that upper right circle and move the blue skull into the blue slot.
Screenshot.
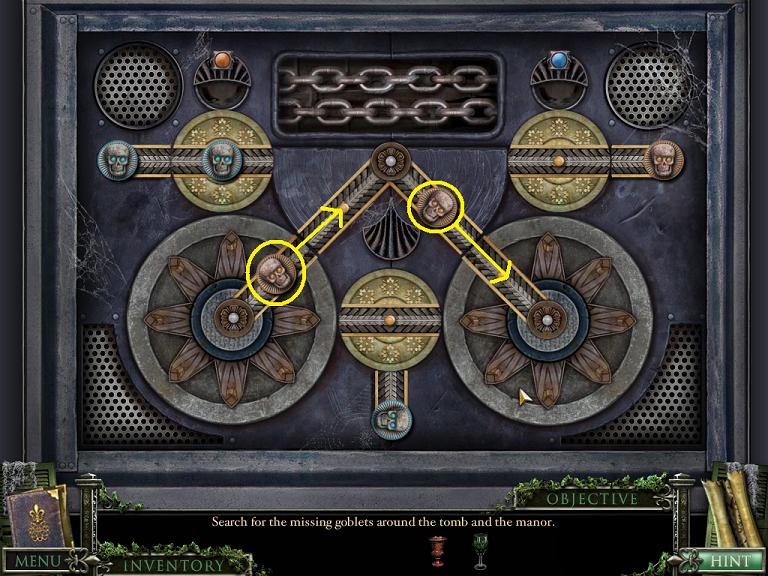
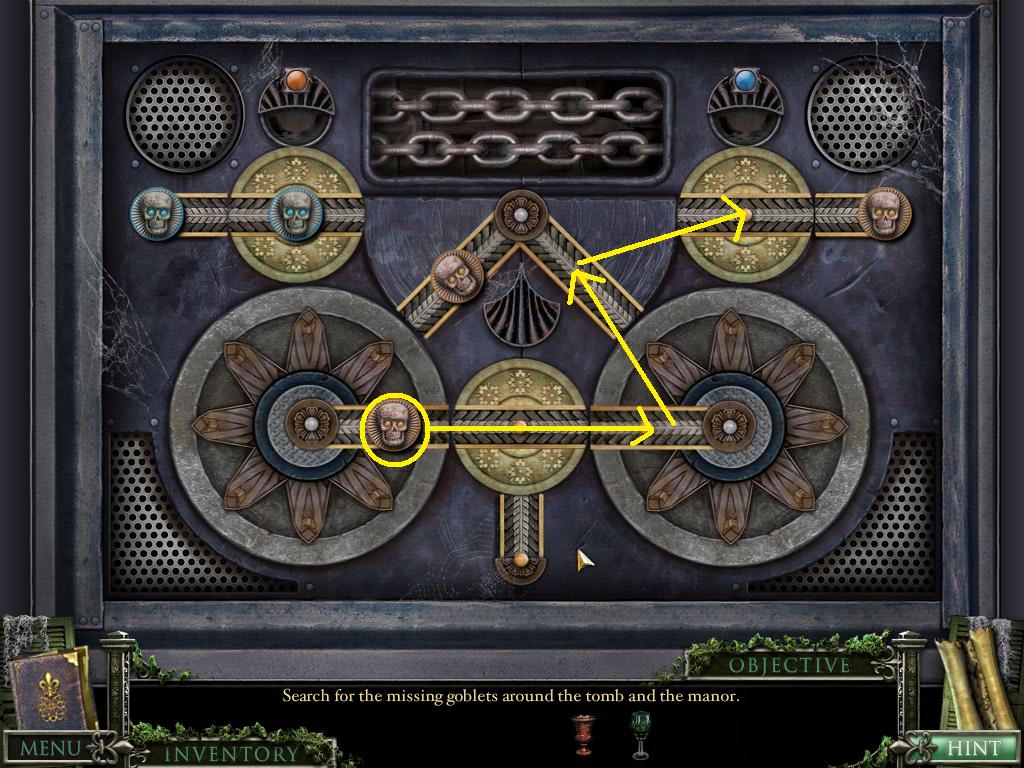
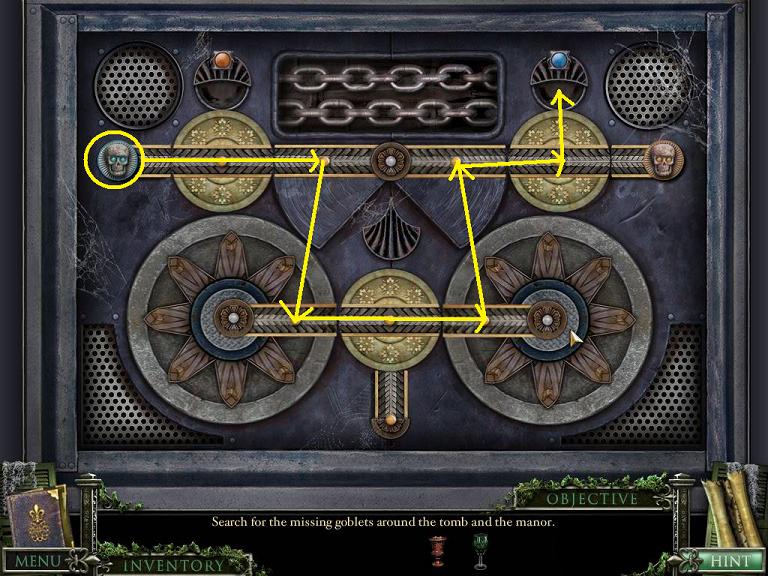
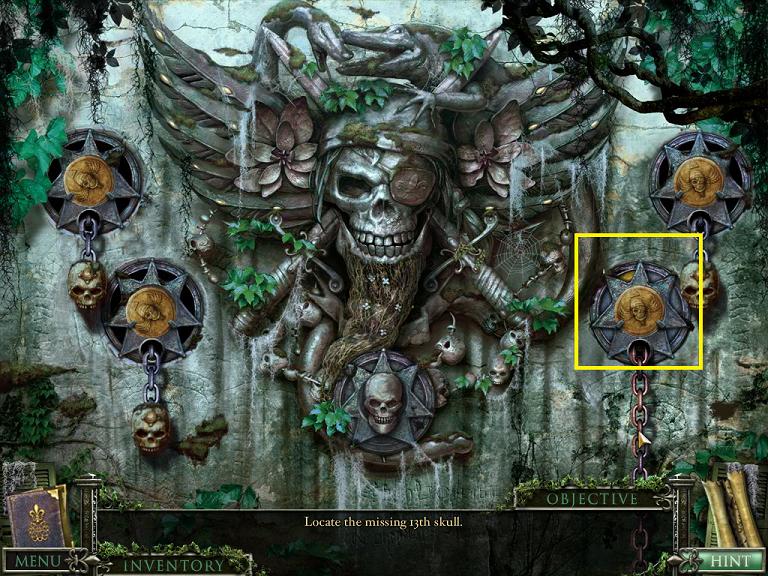
Move the orange skull that is sitting in the lower left circle all the way to the lower right circle, then up to the middle right track, then over to the upper right gold circle.
Screenshot.
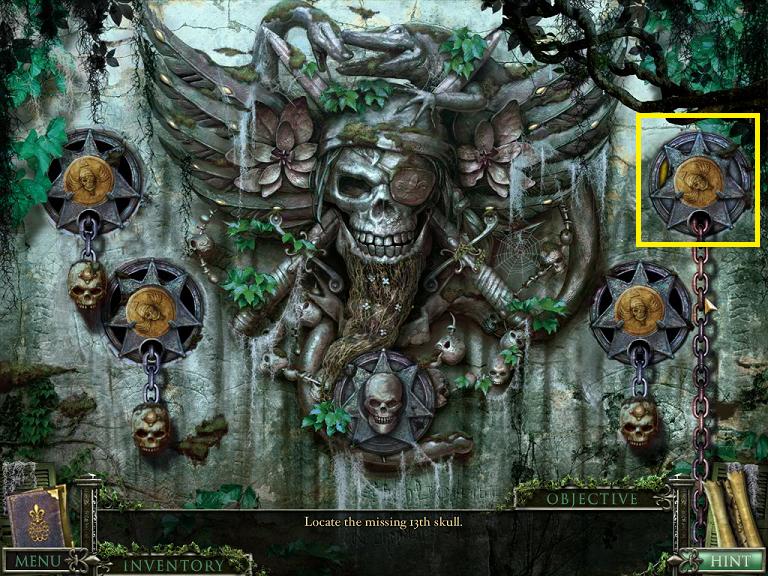
Now move the orange skull that is sitting in the middle left track down to the lower left circle, all the way across to the lower right circle, then up to the middle left track. All three orange skulls should be on the upper right tracks.
Screenshot.
Now take the blue skull sitting in the upper left gold circle. Move it right to the middle left track, then down to the lower left circle, right to the middle lower circle, then down to the bottom.
Screenshot.
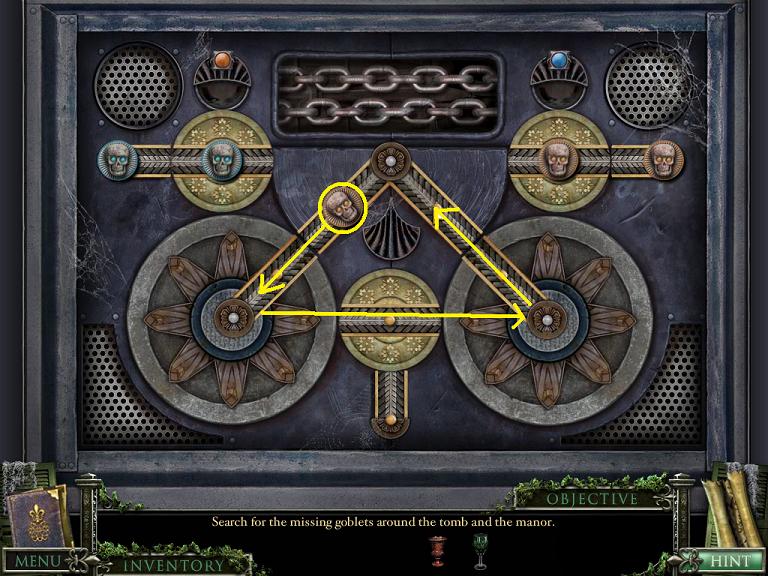
Move the orange skull that is in the middle right track down to the lower right circle, all the way across to the lower left circle, up to the middle left track, left to the upper left circle, then up into the slot. You now should only have 2 blue and 2 orange skulls left.
Screenshot.
You can now move the orange skull in the upper right circle left to the middle right track, down to the lower right circle, all the way left to the lower left circle, up to the middle left track, left to the upper left circle, then into the orange slot.
Screenshot.
Move the blue skull at the bottom up into the lower middle circle, right to the lower right circle, up to the middle right track, right to the upper right circle, then into the blue slot.
Screenshot.
It is now easy to move the last orange skull and blue skull to the slots.
Screenshot.
Screenshot.
Back up twice to the top of the stairs, then go down the stairs.
Notice that the chandelier is now lower. Click on the chandelier for a close up.
Screenshot.
Click on the T-shaped object to take it.
Go back up the stairs, then go to the left hall.
You will see the fourth goblet being held by a statue on the left. Take it.
Screenshot.
Back up once and go down the right hall.
The last goblet is on a low table on the right.
Screenshot.
You should now have all five goblets and three T-shaped pieces.
Back up five times to the front lawn, then go forward to the side of the mansion, forward to the graveyard, then left into the graveyard.
Click on the foliage covered grave for a close up.
Screenshot.
Place the T-shaped pieces so that each one is oriented with the top of the T against an edge of the square, each near the corners. You can rotate the pieces by clicking on them.
Screenshot.
Once the pieces are in place you should get three more map fragments. Take them and back out of the close up.
Go forward into the mausoleum, forward through the gate, forward through the hole, then down the tunnel until you are back to the cabinet and the trap door.
Click on the cabinet for a close up and place the five goblets inside. You need to place the goblets on the gold rings on the shelves.
Screenshot.
Once the goblets are placed a hidden panel will open revealing half of a copper medallion. Take the medallion half and back up.
Screenshot.
The trapdoor should be open and you have a new objective: Explore the trap door room.
Explore the Room/Investigate the Carriage House
Click on the trap door to go up.
Screenshot.
You are now inside the Carriage House, where Lewis and Mary Lee live.
Go into the bedroom.
Screenshot.
There is a mysterious box on the bed. If you click on the dresser on the right a drawer opens to a hidden object scene.
Screenshot.
Click on the hidden object scene to open it. Play the scene to get a small key.
Screenshot.
Click on the box on the bed for a close up. Use the small key you just got from the hidden object scene to unlock the box.
Screenshot.
Inside the box is a voodoo doll. Click on it to take it.
You have a new objective: take the doll to Momma Aimee.
Back up out of the close up, back up to the main room, and go down the stairs.
Now back up seven times until you are at the front lawn. Go right to the carriage house, right to the path, then forward to town.
Go left into Momma Aimee's shop.
Click on Momma Aimee to speak to her. She will ask for the doll. Give it to her.
Momma Aimee will give you a new objective: talk to the bartender.
Talk to the Bartender/Explore the Swamp
Back up from Momma Aimee's shop, go forward to the tavern, then go inside the tavern through the front door.
Click on the bartender to speak to her.
Screenshot.
During the course of the conversation, the bartender will give you a key to the cellar and ask you to fix the toilet. Remember, Lamont is out due to his "goiter".
You now have a new objective: fix the toilet.
Back up once to outside the tavern, then go to the side of the tavern.
Use the key from the bartender to unlock the cellar.
Screenshot.
Go down into the cellar.
On the far wall to the right is a poster. Click on it to reveal an interesting area of the wall. Click on the area for a close up.
There are some indentations on the wall, but you can't make them out.
Pull up the paper from your inventory and place it on the wall. Then use the charcoal on the paper.
Screenshot.
When you are done you will have a pattern that looks like the puzzle on the fountain in the front lawn of the mansion.
The drawing will go into your Detective's casebook. Note: this puzzle pattern changes from game to game.
Close down the close up and look around. There is a chainsaw here, but it is out of gas.
The plunger is also here, so take it.
Screenshot.
Go back up to the side of the tavern, then go in through the side entrance to the hall.
Go forward into the office and click on the desk for a close up.
Here's a list of employee phone numbers. You want Lamont's number. Note: Lamont's number changes each time you play, so write it down.
Screenshot.
Close down the close up and back up once to the hall.
Click on the pay phone on the left wall for a close up.
Screenshot.
Once the phone is in close up use a coin from your coin purse and then dial Lamont's number. He will give you precise directions for fixing the toilet.
Screenshot.
Close down the close up of the phone, then click on the (now open) bathroom door for a close up.
Place the plunger into the toilet bowl.
Now follow Lamont's instructions exactly: flush 4 times, then plunge 3 times, then flush 5 times.
Screenshot.
When you are done the toilet is fixed and you have a new goal: talk to the bartender again.
Back up twice to the front of the tavern, then go in the front door and click on the bartender to talk to her again.
She'll give you permission to borrow the chainsaw and will arrange for the gas station to open.
You have a new goal: explore the swamp shack.
Back up twice until you are in the main view of the town.
Now go right to the Gas Station/Bait and Tackle Shop.
Screenshot.
There are gas pumps up front, and an unlocked door around the right side of the building. Click on the unlocked door to open it.
Screenshot.
Inside there is a freezer on the left (full of ice) and a hidden object scene on the right.
Click on the hidden object scene.
Screenshot.
Complete the hidden object scene to get a gas can.
Screenshot.
Back up once to the front of the gas station. Click on the right gas pump for a close up.
Use the gas can on the pump to get some gas.
Screenshot.
Back up once to the main town view, then forward to the tavern, then forward to the side of the tavern.
Go down into the cellar and use the gas can on the chainsaw.
Screenshot.
Now take the chainsaw.
Go up the stairs and back up three times until you are at the path intersection.
Go left into the swamp.
Screenshot.
Say hi to Mr. Crickets and go forward again to the bridge crossroads.
Go left to the swamp shack.
Screenshot.
Once you are at the shack you will notice that the mysterious guy is gone. Go left to the side of the shack.
Click on the inflatable boat for a close up.
Screenshot.
Use the bike pump from your inventory to inflate the boat (three times).
Screenshot.
Once the boat is inflated click on it to go across the swamp.
Here you will find a third sunken cannon. You can also see the mysterious stranger lurking in the background.
Screenshot.
Back up once to the side of the shack.
Click on the tree on the left (the one where you found the mushrooms) for a close up.
Screenshot.
In close up you will see notches in the tree. Use the chainsaw in this area until the tree collapses into the shack. To use the chainsaw click and hold as the chainsaw works.
Screenshot.
Once the tree collapses, you can climb the tree into the shack. Ooops.
Screenshot.
You will startle the stranger and he will run out, dropping his wallet.
On the table is a wig and other disguise paraphernalia.
On the bed is a folder with copies of the various puzzles from around the mansion.
On the floor is a wallet. Click on the wallet for a close up, click again to open it, then click again to pull out the IDs.
Screenshot.
Looks like Mr. and Mrs. Lawson are not who they seem.
You have a new goal, talk to Vinton (the librarian) in the tavern.
Talk to the Librarian/Confront the Lawsons
Back up five times to the path crossroads, then go forward to the town.
Go forward to the tavern then in through the front door.
Click on Vinton to talk to him.
Screenshot.
Vinton will have his cop buddy check out the IDs you found in the shack.
Time to go talk to Mrs. Lawson.
Back up five times to the front of the mansion.
Go forward, then into the mansion.
You'll notice that the sitting room door is now closed.
Screenshot.
Click on the door for a close up and you will hear a muffled voice.
Use the glass from your inventory on the door. Move it around until you can hear clearly or you can see the subtitles on the screen come into sharp focus.
Screenshot.
You will garner several pieces of information from listening to this conversation.
They're going to get rid of you when they find the gold.
The family will meet at the swamp clearing.
The computer password is hidden behind the picture of the kid and the dog.
Keep moving the glass around until you hear all of these bits of information. Once you hear about the computer password you get a new objective: Log into the computer.
Back up from the close up of the door.
Go toward the stairs, up the stairs, and into the left hallway.
On the wall behind the chair in the hallway is a picture of a child and a dog.
Screenshot.
Click on the picture for a close up.
When the picture is in close up click on it to move and you will find the password.
Screenshot.
Again, this password changes from game to game so write it down.
Close down the close up of the picture and back up twice to the bottom of the stairs.
Go right into the music room.
Once in the music room go left into the office.
Click on the computer screen for a close up.
Screenshot.
Once the screen is in close up, click on the screen to stop the screensaver, then enter the password.
Screenshot.
Once the password is entered hit your return key and read the e-mail. You've been duped!
Close down the close up of the computer and the phone will ring.
Answer the phone by clicking on it and learn more about the "Lawsons".
You now have a new objective: Confront the Lawsons (or, rather, the Blanstons).
Back up five times to the front lawn.
Go right to the carriage house, right to the path, then left to the swamp.
Move forward to where the bridge splits, then right to the swamp.
Screenshot.
Move forward to the swamp clearing and confront the family.
Screenshot.
Screenshot.
You now have a new goal: find the map pieces.
Posted by: grinnyp |
November 28, 2010 8:41 PM
|
November 28, 2010 8:41 PM
Mystery Case Files: 13th Skull Walkthrough Part 5
The Map Pieces/The Skulls/The Treasure
Find the Map Pieces
From now on Mr. Lawson will be following you everywhere and threatening you.
Back up six times to the front lawn.
Click on the strange fountain on the left.
Screenshot.
Fountain Mini-Puzzle
You need to arrange the coins in the circles around the fountain to match the pattern you found in the basement of the tavern.
Screenshot.
There should be a picture of the pattern in your Detective's Handbook. Every time you play the game the pattern changes.
You can rotate the circles by dragging them.
Coins can move from circle to circle (one spot) by using the lever on the right side. It only affects coins in that center row.
Screenshot.
Each solution is unique so experiment with moving the coins around until you can reproduce the pattern.
When the pattern is correct the fountain will spit out three map pieces.
Screenshot.
Take the map pieces from the fountain and back out of the close up.
Go forward twice into the mansion.
Go left into the dining room.
There's a picture on the back wall to the left. Click on it for a close up.
Screenshot.
Once the picture is in close up use the scissors from your inventory on it (four cuts).
Screenshot.
Dining Room Picture Mini-Puzzle
This is a slider puzzle that is done in rows and columns. The columns can move (as a whole) from left to right, the rows (as a whole) can move from right to left.
The easiest way to start the puzzle is to find a face and move the columns until the face is complete.
Screenshot.
Once you have a face (or the beginnings of one) it is easy to slide the rest into place.
Screenshot.
Screenshot.
Screenshot.
Once you've completed the picture you will get three more map pieces.
Close down the close up, then go back to the couch, forward to the stairs, and right to the music room.
Click on the panel on the side of the piano for a close up.
Screenshot.
Use the screwdriver from your inventory to remove the screws.
Screenshot.
Piano Mini-Puzzle
Yet another slider puzzle. This one is controlled by buttons on the sides and bottom.
The flour-de-lis buttons on the sides move the rows either to the left or right.
The buttons on the bottom move each particular column both up and down.
Screenshot.
The pattern that you need to match is found on the bench by the side of the mansion.
Screenshot.
Each column should look like the pattern on the bench.
To start, move all of the columns down to the bottom.
Screenshot.
Then move the symbol you want at the top to the far left column. Once it is in place then move the column back up.
Screenshot.
Keep doing that from column to column until the entire top row is the same symbol and they are all back at the top.
Screenshot.
Once you have the top row set it's pretty easy, moving back and forth and up and down, to complete the next two rows.
Once all of the symbols are in place, the piano will open up and you will start on part 2 of the puzzle.
Click on the piano for a close up and now you will see inside. There are knobs on the strings, each with different numbers.
Screenshot.
Back up from the close up and now click on the piano keys. You will see some numbers here as well.
Screenshot.
Back out of the close up and click on the inside of the piano again.
Start with the easiest piano key, the one that was the number 7.
Click on the knobs inside the piano that add up to 7.
Screenshot.
Back up from the close up, then click on the piano keys.
Notice that the 7 key has moved, revealing a switch. Move the switch into the down position.
Screenshot.
Go back to the interior of the piano and pop the buttons back up. Now go back and do each key number. Remember after pushing the buttons inside the piano to go back to the keys and flip the switches after each one.
Screenshot.
Screenshot.
Screenshot.
Screenshot.
When you solve the piano puzzle the piano will spit out more map pieces.
Screenshot.
Back up once to the base of the stairs, then go up the stairs.
At the top of the stairs, to the left of the balcony doors, is another picture. Click on it for a close up.
Screenshot.
Once the picture is in close up use the scissors on it (3 times) to cut away the canvas.
Yes, another slider puzzle.
Ship Picture Mini-Puzzle
After you cut away the canvas, you will notice 14 squares on a 4 x 4 grid.
Screenshot.
The pieces move in pairs. Pieces can move up or down into an empty space.
Screenshot.
Pieces can move in or out. Two pieces in the center can separate to the outer columns, and two pieces in the outer columns can be brought together in the center.
Screenshot.
This is a pretty simple picture, a skull that looks like a skull tattoo.
Here's a screenshot of the finished picture.
Screenshot.
When you've completed the puzzle, take the map pieces that come out of the frame.
Screenshot.
Back up from the close up of the painting, then go down the right hall.
At the end of the right hall is a large portrait. Click on it for a close up.
Screenshot.
Once the portrait is in close up use the scissors from your inventory on it (3 times) to cut the canvas.
Oh look, another slider puzzle.
Upstairs Portrait Mini-Puzzle
This is the easiest of the slider puzzles.
You have a 6 x 6 grid of pieces.
Screenshot.
You can click and drag each piece in any direction.
Screenshot.
All you have to do is slide the pieces around until you have a complete picture.
It's easiest to start in the middle (with the torso) and work your way outwards.
Screenshot.
When you have completed the puzzle, take the map pieces that come out of the frame.
Screenshot.
These should be the last map pieces.
You now have a new objective: Investigate the cannons.
Investigate the Cannons
The cannons you need to investigate are the ones that are sunk into the swamp.
But first, you need to know how to open them.
Map Outer Pieces Puzzle
Click on the map at the lower right of the screen to bring it up in close up.
Screenshot.
Note that the symbols on the left, right, and top are the same as the symbols on the cannons.
Screenshot.
You may also notice that the pieces around the edge are close-ups of certain portions of the map.
For instance, the left side pieces match six different areas on the map. And each of those areas have a Roman Numeral.
If you are having trouble matching the areas, you can click on the map for a closer close up, and drag the map around to help match the areas.
Screenshot.
So associated with the symbol on the left (from top to bottom) are the numbers III, XXV, XI, XIV, XXI, X.
Note: these number and symbol combinations change with each game, so this walkthrough cannot just give you the answers.
Find the Roman Numerals associated with the left side symbol, the top symbol, and the right symbol. There will be six numbers for each.
Once you have all three sets of numbers, you can go open the cannons.
Back up five times to the front lawn.
Go right to the carriage house, right to the path, and left to the swamp bridge.
Go forward to the bridge intersection. The first cannon is here, on the right.
Screenshot.
Click on the cannon for a close up.
Screenshot.
Note the symbol on the top. Match it to one of the symbols on the outer pieces of the map.
Now, using the three buttons at the bottom, enter the six Roman Numerals associated with that side of the map.
If you are working with the left or right side, put in the numbers from top to bottom. If you are working with the top pieces, go from left to right.
To enter the number III, for instance, click on the I button three times. Each time you put in a complete number one of the smaller buttons in the middle will depress.
When all six numbers are entered correctly, the cannon will rise out of the ground.
Screenshot.
Click on the cannon for a close up.
Once it is in close up, click on the cannon to open it.
Yay, skulls! Take the four skulls.
Screenshot.
Close down the close up and move to the left towards the swamp shack.
Screenshot.
Once you are at the shack go left to the shack side, then click on the inflated boat.
Once you are in the boat, click on the sunken cannon, check the symbol, and enter the numbers from the map just like you did with the previous cannon.
Screenshot.
Once the cannon rises from the ground, open it and take the four skulls.
When you have the skulls, back up three times to the intersection, then go to the right towards the swamp path.
Screenshot.
Here on the swamp path is the last cannon. Repeat the steps to open the cannon and take the four skulls.
Screenshot.
Now you have to locate the 13th skull.
Find the 13th Skull
Back up five times until you are back in the front yard.
Go to the side of the house, forward to the graveyard gate, forward to Cooter's mailbox, forward to the porch, then inside Cooter's house.
Click on the pitcher of lemonade sitting on the table.
Screenshot.
Pull up the sleeping potion from your inventory and use it on the lemonade.
Screenshot.
Close down the close up, then back up to the porch.
Go back into the shack and you will find Charlotte asleep.
Click on the locked trunk for a close up.
Screenshot.
The combination is the numbers that Mr. Crickets kept saying, 5, 45, 20.
Turn the dials to those three numbers to unlock the chest.
Screenshot.
Click on the trunk to open it, then click on it for a close up.
Buried in packing peanuts is a metal detector. Take it.
Screenshot.
Close down the close up and back up twice to Cooter's mailbox.
Pull up the metal detector from your inventory and start hovering it over the dirt of the yard. When the light on the detector turns green, then click.
Screenshot.
When you click, the shovel will fly into your hands. Click several times in the same spot to dig a hole.
Screenshot.
Once the hole is dug, click on it for a close up.
In the hole you will find a copper coin, take it.
Screenshot.
Back up three times to the front lawn, then go right to the carriage house.
Move to forward to the carriage house porch.
Screenshot.
Once again, sweep with the metal detector until it turns green.
Screenshot.
Click to get the shovel, click several times to dig the hole, then click on the hole and get the copper coin.
Screenshot.
Back up to the long view of the carriage house, then go right to the path and forward to the town.
Go forward to the tavern, then go to the side of the tavern.
Screenshot.
Repeat with the metal detector, shovel, and getting the copper coin.
Screenshot.
Screenshot.
Close down the close up of the hole, then back up five times to the front yard.
Go to the side of the house, then forward to the graveyard gates, then left into the graveyard.
Once in the graveyard go forward into the mausoleum.
In the mausoleum, click on the wall carving on the right wall for a close up.
Screenshot.
Once in close up, place the three copper coins in the empty slots.
Screenshot.
Notice that each coin has a small arrow on it.
Click and pull the chains underneath the coins quickly until a gold spot appears in the circle around the coins. The chains will try to slide back up, so click and pull quickly.
Screenshot.
Once you see where the gold spot appears, rotate the coin so that the arrow is pointing to the gold spot.
Screenshot.
Once you let go of the chain to rotate the coin, the gold spot will disappear, so remember where it was.
Do this with all four coins.
Screenshot.
Screenshot.
Screenshot.
Once all four coins are in place the central skull will open up, revealing a half medallion. Take the half medallion.
Screenshot.
Close out of the close up of the wall.
Now back up four times to the front yard.
Go forward to the mansion, go into the mansion, go left to the dining room, right to the kitchen, then forward to the pantry.
Once you are in the pantry go right into the cellar.
Screenshot.
When you are in the cellar, go forward into the secret room behind the wine racks.
Screenshot.
Click on the notch on the chest of the statue.
Screenshot.
In the close up, place the two half medallion pieces into the notch.
Screenshot.
Once the pieces are inserted a lever will appear. Pull the lever.
Screenshot.
Take the 13th skull.
Screenshot.
You should now have all 13 skulls.
Find the Treasure
Back up seven times to the front lawn.
Go right to the carriage house and then right to the path.
At the path crossroads go left into the swamp.
Go forward, right, and forward to the swamp clearing.
Once you are at the swamp clearing, click on the alligator nest.
Screenshot.
Once the nest is in close up you can see that there are 13 spots for 13 skulls.
Time to consult your Detective's casebook.
Screenshot.
Look for the page that recorded the mysterious paper found in the locked trunk underneath the mausoleum.
Screenshot.
This paper shows how to place the skulls on the slab. This solution appears to change from game to game.
Screenshot.
Each skull is numbered, so place the skulls in the proper places.
Screenshot.
Continue until each skull is properly placed.
Screenshot.
Enjoy the ending!
Posted by: grinnyp |
November 29, 2010 12:26 PM
|
November 29, 2010 12:26 PM
List of all golden insignias
Insignias which can/have to be found during the normal game:
Using "Pippi" as password for the pc before using the regular password! (Card will appear on the mantlepiece)
Phoning the number from the book in the study (card will appear on the wall)
Using the metal detector in the swamp, one screen before the clearing (where the footprints are)
Plunging the sink (hint from the credits)
Playing "BFG" on the piano (hint from the credits)
Spelling "Rowena Spinch" on the Poncer/Crowne chest - has to be done first! (hint from the credits)
Insignias which can be found during the extra game:
Well in front of house (hint from crow's nest)
In can near the goblet cabinet (HO scene with opener near a/c at Cooter's house or in the tunnel behind the grave)
In freezer at petrol station (HO scene with icepick near a/c at Cooter's house or in the tunnel behind the grave)
In the journal (hidden on one of the pages)
That's it! :)
Posted by: Mantari |
December 13, 2010 2:11 PM
|
December 13, 2010 2:11 PM