
Kaptain Brawe:
A Brawe New World
Platform: Mac, Windows

![]() It's interstellar space travel, early 1800s-style! Kaptain Brawe: A Brawe New World is the first episode in a planned two part series point and click adventure games that keeps story and puzzles high on the list of priorities. Kaptain Brawe features a whimsical setting stocked with hilarious dialogue, quirky characters, and more gorgeous hand-drawn art than you can shake an ion-proton drive at.
It's interstellar space travel, early 1800s-style! Kaptain Brawe: A Brawe New World is the first episode in a planned two part series point and click adventure games that keeps story and puzzles high on the list of priorities. Kaptain Brawe features a whimsical setting stocked with hilarious dialogue, quirky characters, and more gorgeous hand-drawn art than you can shake an ion-proton drive at.
 Kaptain Brawe is a space-loving police officer with a rugged red beard and a habit for spelling C words with the letter K. Also, he's a bit of a hero, in his own mind, and when a distress call comes from a nearby planet, he decides to check it out, forgoing back up in favor of doing it all by himself. With the help of his ensign. And a robot. And a bunch of other people he talks to. But other than that, completely alone!
Kaptain Brawe is a classically-styled adventure game that will remind you of the good old days of complex puzzles, cartoonish visuals, point and click interfaces, and a humorous script. So, the Monkey Island series, Broken Sword, and all those guys. Use the mouse to interact with objects, to walk the Kaptain around, and to speak with characters. Right clicking calls up your inventory, and you can use, inspect, or combine items from this handy little menu. The interface is smartly constructed and will be immediately intuitive for just about any player.
One of the game's neatest features is the ability to choose from Hard or Casual modes right from the beginning. The latter turns on a hint system that shows you clickable spots on the map, removing any sort of pixel hunting you would be in danger of participating in. Your journal can also reveal hints that gently nudge you in the right direction, if you need a little push. Allowing players to choose difficulty levels like this is a great way to open the doors for both seasoned adventures and the growing number of casual players out there!
 Analysis: Adventure games are usually judged by two main things: puzzles, and storyline. Kaptain Brawe hits the mark on both counts, providing a story that's funny, interesting, and multi-faceted without being stuffy or predictable. The characters are all clumsy in their own ways, especially our hero, and that's exactly what keeps you interested in the events that transpire.
The puzzle design is somewhere between classic adventure games and casual adventure games. You'll gather a fair number of items in your journey, not all of which you'll use right away, creating an immediate sense of mystery when you enter a new area. Should you try using that potato peeler on the flint stone you just found? This encourages experimentation, something that's necessary to solve the not-always-logical stumpers that occasionally come your way. The game does a good job of pushing you along when you're stuck, creating a fine balance between challenge and the satisfaction of solving the game on your own.
If the game looks a little familiar to you, Kaptain Brawe originally made an appearance in demo form back in 2006, when production was still going on and publishers were being courted. Cateia Games eventually stepped forward and nabbed the game, bringing us the Kaptain Brawe we see today.
Kaptain Brawe: A Brawe New World reaches a hand out to casual and established adventure gamers alike, inviting everyone to come in, sit down, have a cup of tea, and enjoy a well-written game that's a treat to look at and an utter joy to play.
![]() Windows:
Windows:
Download the demo
Get the full version
![]() Mac OS X:
Mac OS X:
Download the demo
Get the full version


Walkthrough Guide
(Please allow page to fully load for spoiler tags to be functional.)
Kaptain Brawe Episode 1 - walkthrough
For a walkthrough of the second part of Kaptain Brawe, click here.
Instructions and Tips
When you select a new game, you can choose between Casual and Hardcore mode. Casual mode features more extensive hints than Hardcore mode.
Navigate with the left mouse button. Left-clicking also lets you interact with objects and characters. You can then either examine an object or character, or you can talk to a character or use an object.
Remember to talk to everyone and be thorough in your conversations. You never know when an important hint will be revealed. Sometimes there will be new conversational options after you learn something or do something important, so you may have to talk to the same character twice.
Also, Kaptain Brawe is not that bright, so while you may notice something about the environment to use or take, you may have to instruct him to look at it first so he notices it.
Your inventory is in the lower left corner. To access it, you can either click on it, or right-click anywhere on the screen. You can combine objects in your inventory, or click to select an object and move your mouse away from the inventory to use that object in the environment.
To dismiss a selected object, right-click.
Use the magnifying-glass tool to examine objects in your inventory.
Use the hand tool to use objects in your inventory. Using objects in your inventory is important when you want to do something to an object without combining it with another item or with the environment.
Don't overlook the objects that are in your inventory without you collecting them. These include your ionizer, your hanky, and Rowboat, once you start him up.
Your journal is also in the lower left corner, next to your inventory. It keeps track of larger tasks you need to complete.
The help tool is in the lower right corner. It shows clickable areas on your screen for a short time.
You can access the menu to save and load games, and for other options, with the button in the upper left corner.
Aboard the Mazslow
Starting up Rowboat
Exit left to the kitchen, then down to the cargo hold.
Try using Rowboat. You will find that he doesn't work.
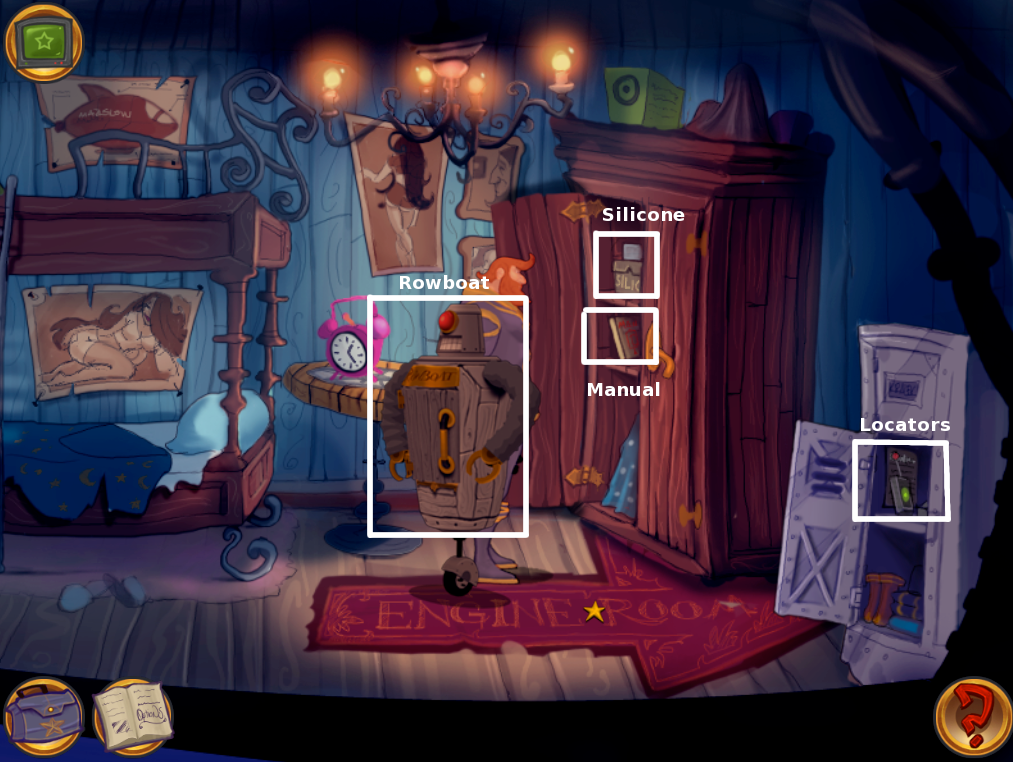
Open the wardrobe and take the manual. Also take the block of silicone while you are down here.
Also, open the locker and take the locators, one of which is broken. We'll fix it later.
Screenshot
Examine the manual in your inventory. It's in French, which Kaptain Brawe can't read.
Head up to the cockpit and examine the machine to the left. It's a translation device, but it's busted.
Screenshot
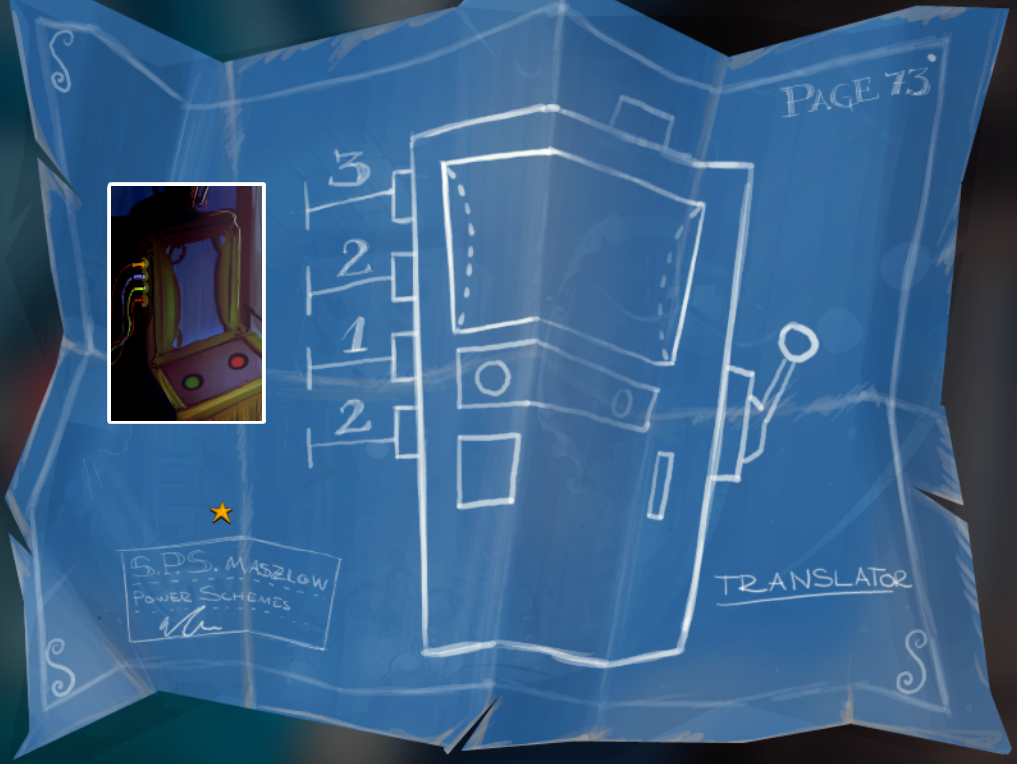
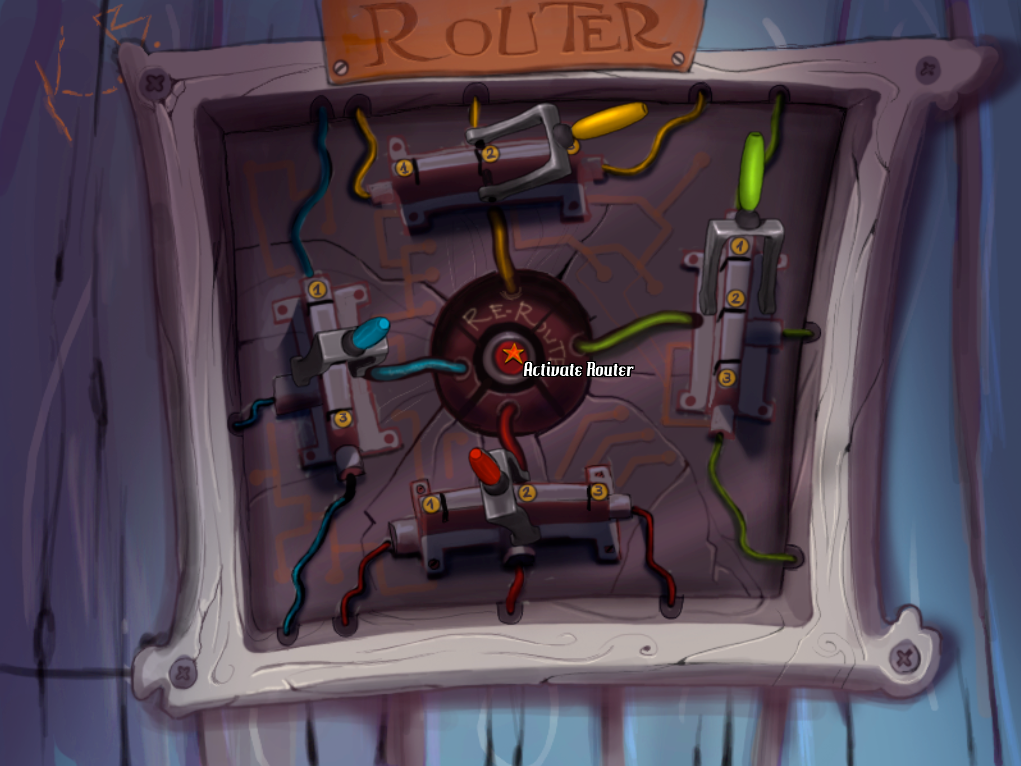
Ask Ensign Kralek about the device. You'll need to rewire the ship's electronics. Kralek gives you a schematic to help.
Examine the schematic. Note that the wires on the translator have numbers. Note that they are also colored in a certain order. Keep these in mind.
Screenshot
Head back to cargo, then continue right into the engine room.
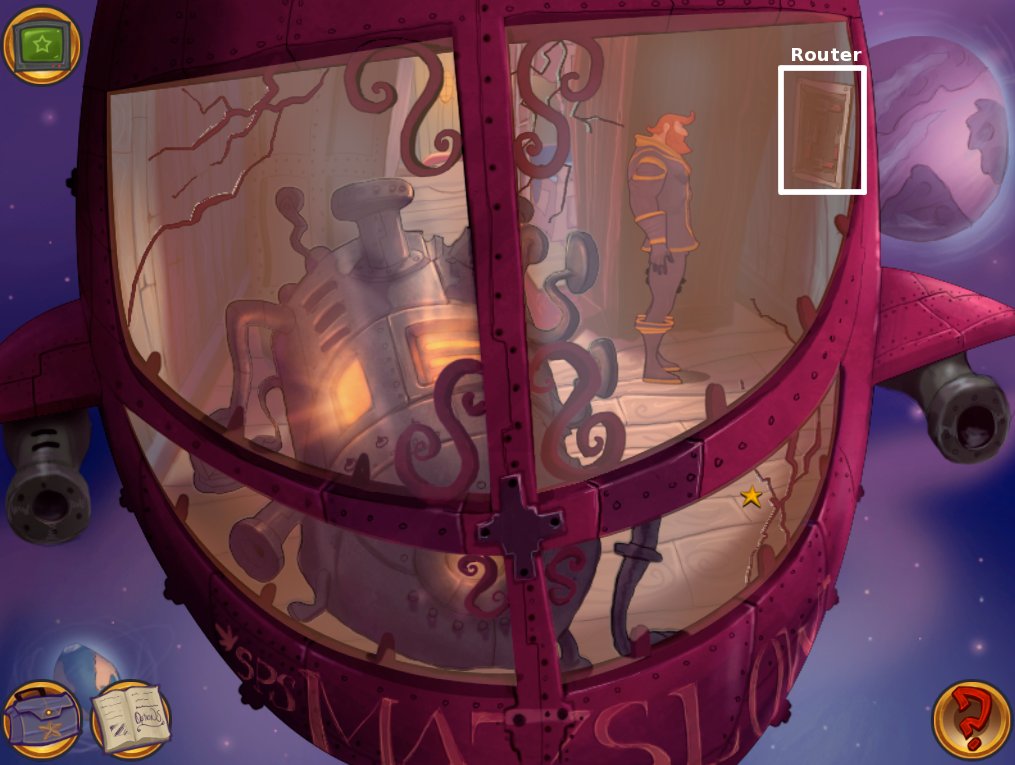
Examine the router panel to Brawe's right.
Screenshot
Adjust the colored switch positions so that the colors and numbers match those of the wires on the translation device, then hit the button in the middle. The screenshot below shows the solution.
Screenshot
The translator device is working now. Head back up to the cockpit and put the manual in the service hole.
Screenshot
You need a translation disc. Go to the kitchen and examine the teacup to notice something unusual about it. Take the teacup to get the disc.
Screenshot
Use your hanky with the disc to clean it.
Head back to the translator and insert the disc in the slot.
Take the translated manual from the device and examine it to learn how to start up Rowboat.
Go to Rowboat in the cargo room and use him to start him up.
Fixing the Locators
If you haven't already done so, go to cargo and get the silicone from the wardrobe and the locators from the locker.
Screenshot
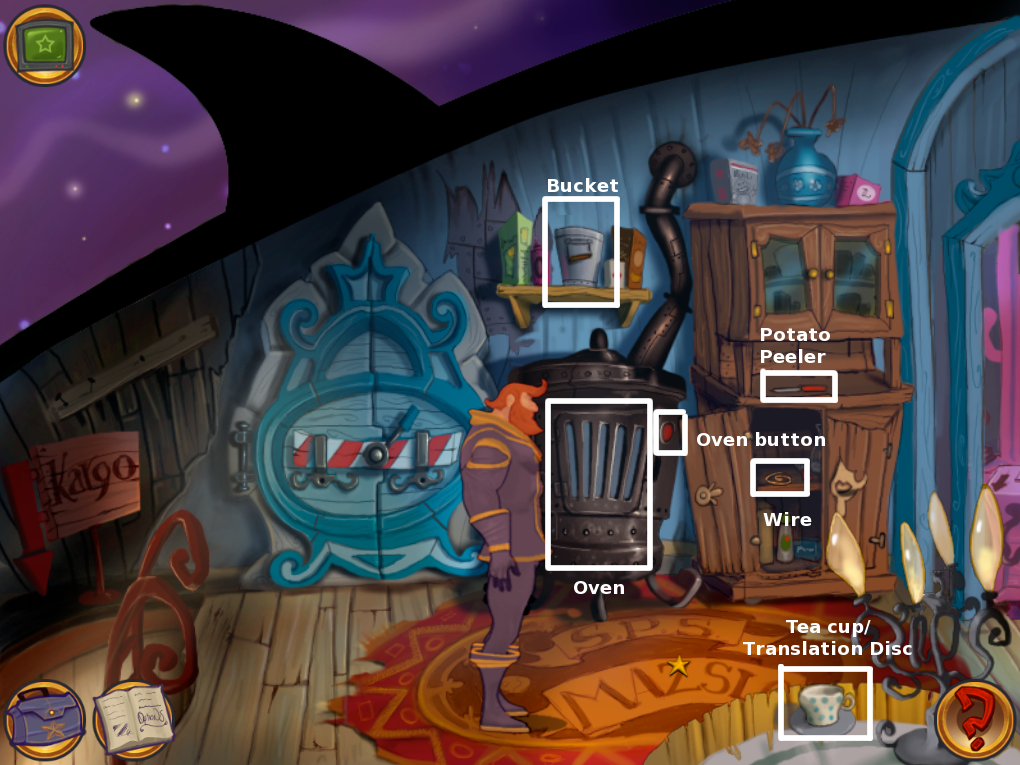
Go to the kitchen. Open the cupboard and take the wire.
While you are here, take the potato peeler from the cupboard as well.
Take the bucket from above the oven. Use the bucket with the silicone.
Open the oven and put the bucket of silicone inside. Hit the red button to start the oven.
Screenshot
Take the melted silicone and use it with the wire.
Use the sticky wire with the broken locator to repair it.
Talk to Kralek to give him the locators.
When you have finished these tasks, talk to Kralek to head to Jama Spacea.
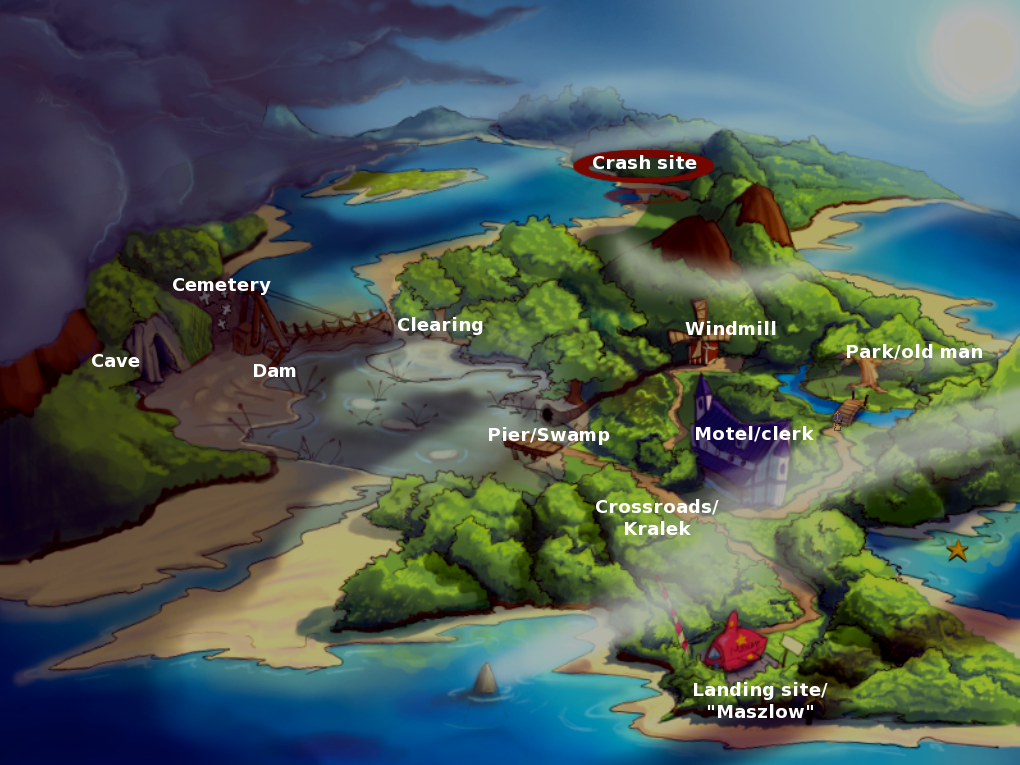
Jama Spacea
Below is a map of all the locations on Jama Spacea. Not all locations will be immediately accessible. Also, you only gain access to the map when crossing the swamp, or when leaving the park or the landing site. Hopefully this screenshot should still help with navigation.
Screenshot
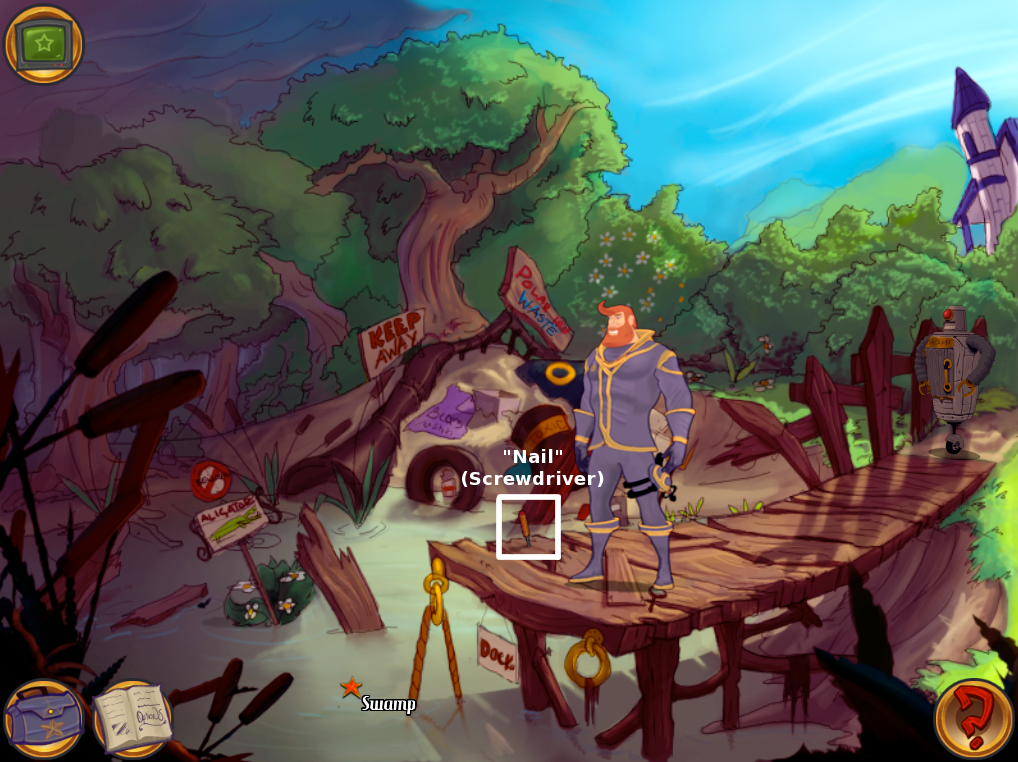
Start your visit to Jama Spacea by heading to the swamp on the far left side of the screen. You learn you need a map and a boat to cross it. While you are here, pick up the "nail" to Brawe's left. It's really a screwdriver.
Screenshot
Getting a map
Go back to the crossroads, where you started; then up to the motel.
Talk to the clerk. Ask about the noise.
Ask about a map. He will ask you for a favor, to help him find a certain dried flower. You get a picture to help you find it.
Head to the right of the motel to the park.
Talk to the old man about the noise. This seems to confirm that the ship crashed in the swamp.
Examine the bush on the left side. Take two flowers from the bush. You will have to use the bush twice in order to take to flowers.
Screenshot
The flower is supposed to be dried. Go to the landing site, to the right side of the crossroads, and enter the Mazslow.
Use both flowers with the oven in the kitchen to dry them. You have to do this once for each flower.
Use one of the flowers in your inventory to remove one leaf, like in the picture the clerk gave you. We'll save the other flower for later.
Go back to the motel and try using the five-leaf flower with him. It's tobacco!
Use the four-leaf flower with the clerk, then take the map.
Screenshot
Getting a boat
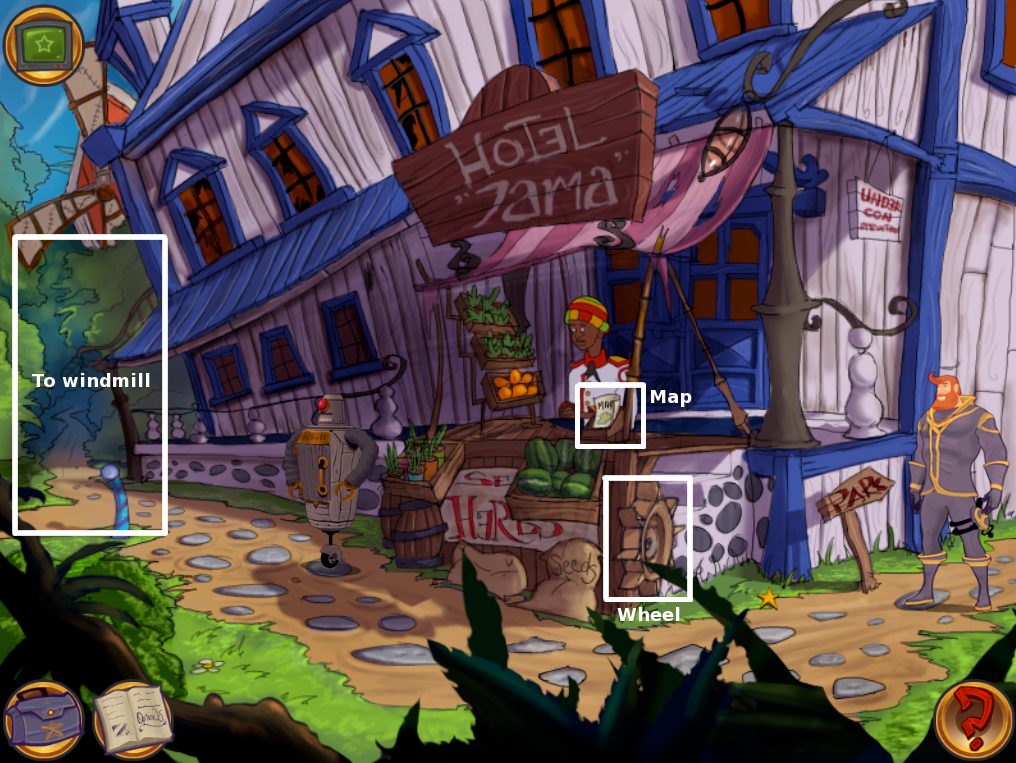
Go to the motel.
Try to take the wheel on the clerk's sales booth. It's screwed in place. If you try to use the screwdriver, you find that it's too broad.
Screenshot
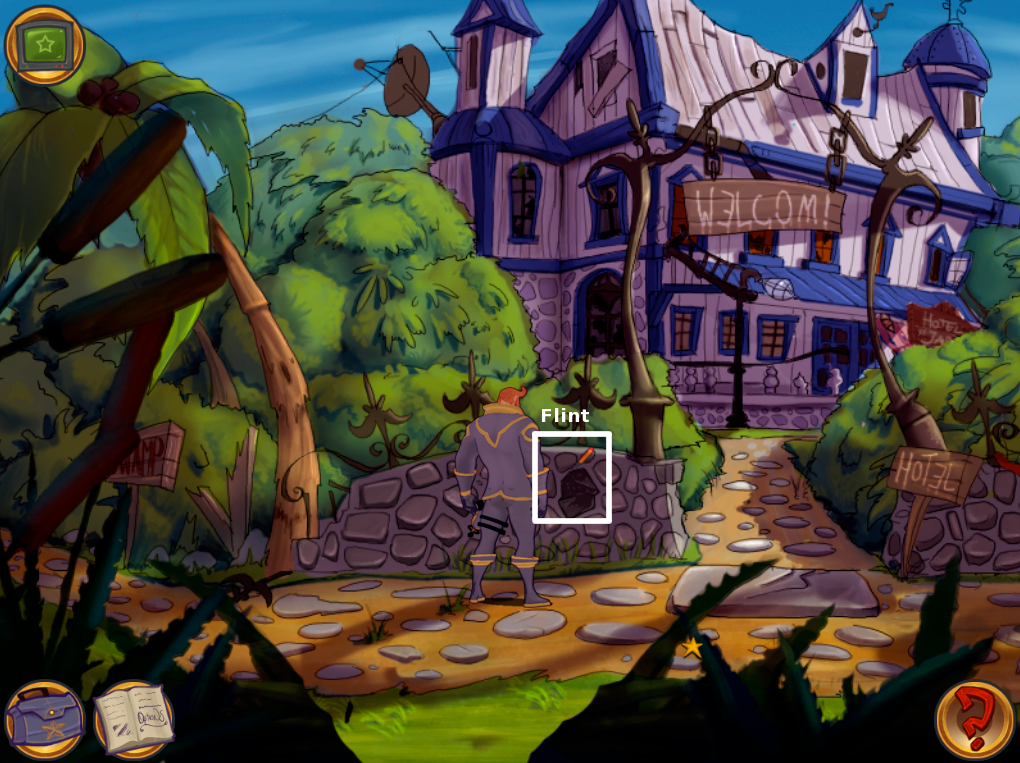
Go back to the crossroads. Examine the wall on the left side to notice a strange stone in the wall.
It's a flint. Use your screwdriver on the flint to sharpen it.
Screenshot
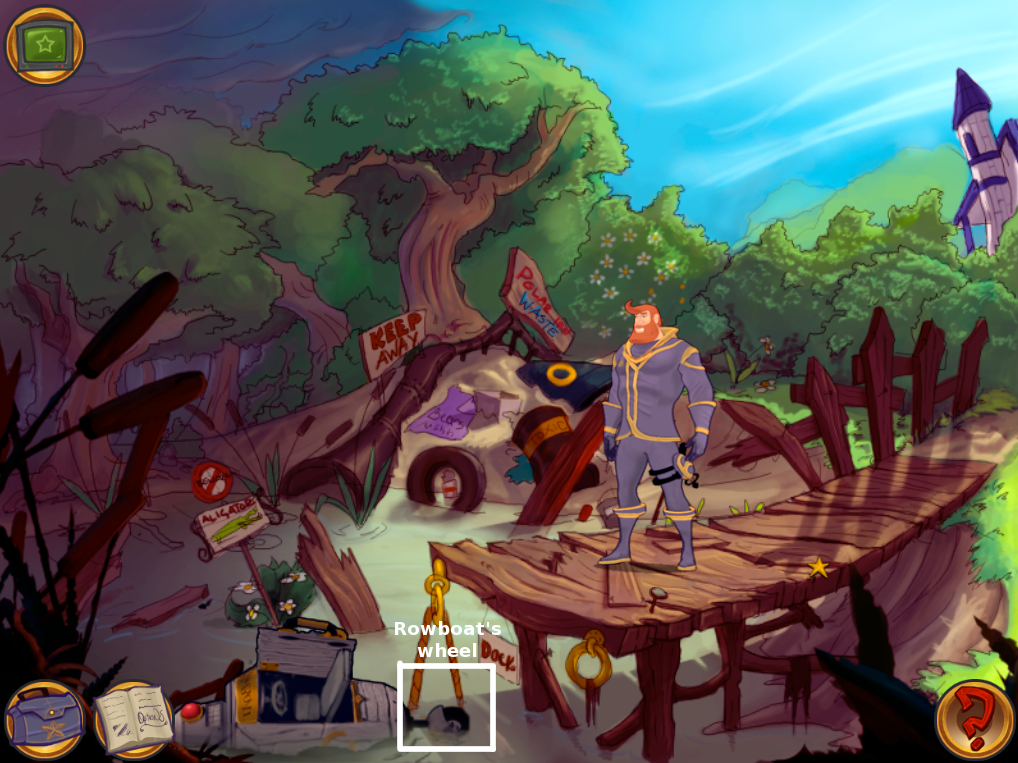
Go back to the motel and use the screwdriver on the wheel to take it.
Go to the swamp. Use Rowboat with the swamp. Watch the cutscene.
Use the paddle wheel you collected with Rowboat's wheel.
Screenshot
Across the Swamp
Use Rowboat the robot rowboat and land by the dam.
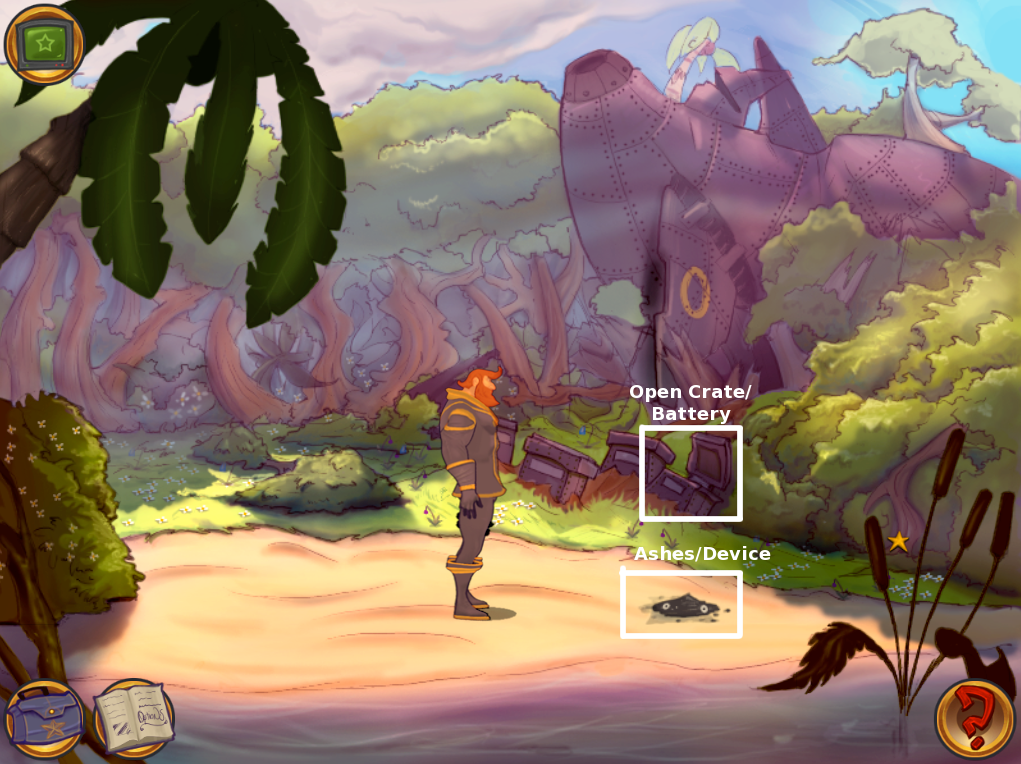
Cross the dam and go to the clearing on the right. Watch the cutscene.
Pick up the ashes, then pick up the beeping device that was underneath.
Examine the open crate in the background to take the batteries inside.
Screenshot
Go back to the dam and use Rowboat to cross the swamp again.
Go to Kralek and give him the device. It emits the frequency he needs to pinpoint the location of the crash.
Use Rowboat to try to head to the crash site, only to find that the dam is obstructing it. Head back to the pier.
Finding Fuseman
Go to the motel and talk to the clerk about the barricade and its owner. If you haven't yet, talk to him about the old man as well to learn he was in the war.
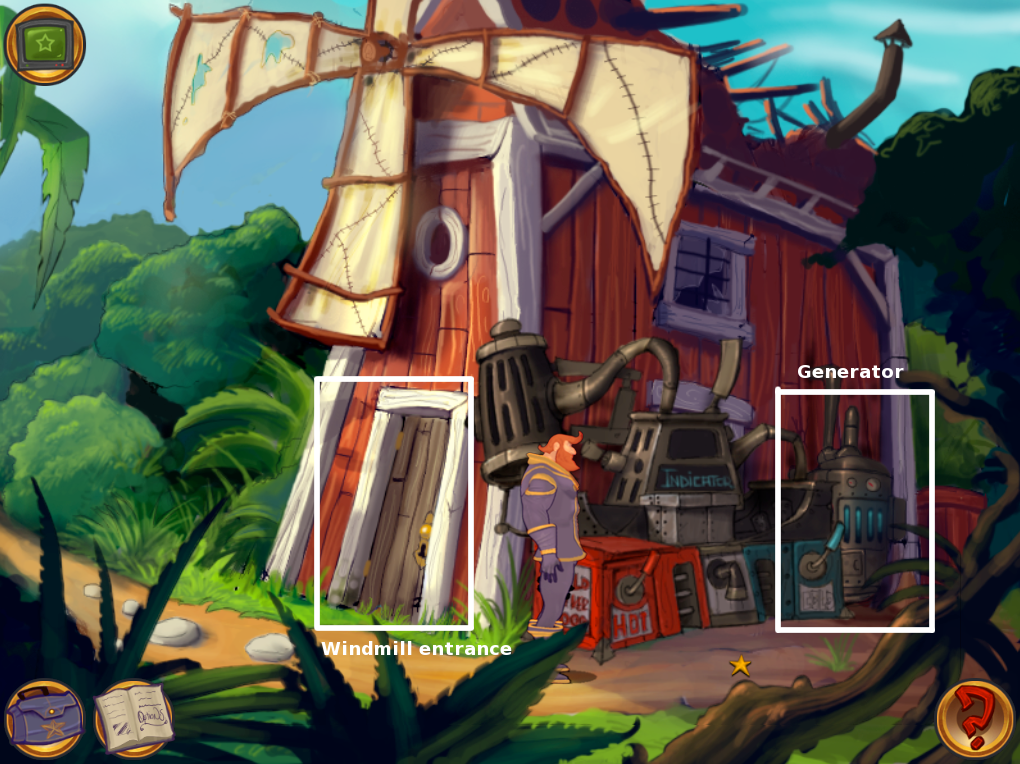
The dam's owner lived in the windmill. Head up the path to the left of the motel to get there.
Screenshot
Use the battery you got from the crate in the clearing with the generator outside the windmill. This charges the battery.
Screenshot
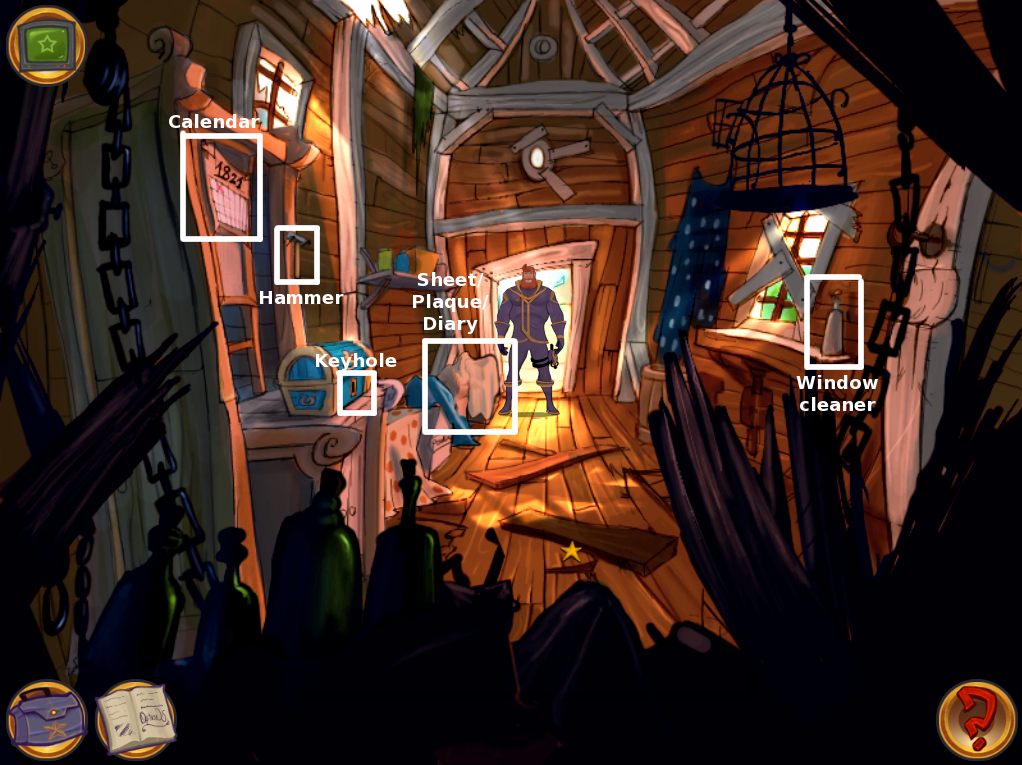
Enter the windmill. Take the hammer from the left wall and the glass cleaner from the window sill.
Use the sheet to Brawe's left to find the plaque. Take the plaque. Examine the box to find the diary.
Examine the calendar and note the date.
May 1st 1821
Screenshot
Examine the journal to learn about Fuseman and his participation in the war. You should talk to someone else who was in the war.
Go to the park and ask the old man about the war. Ask about the battle at Burnfield Canyone.
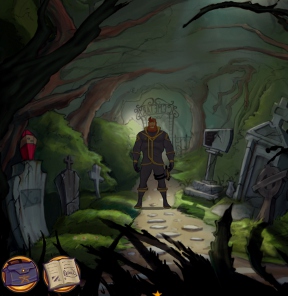
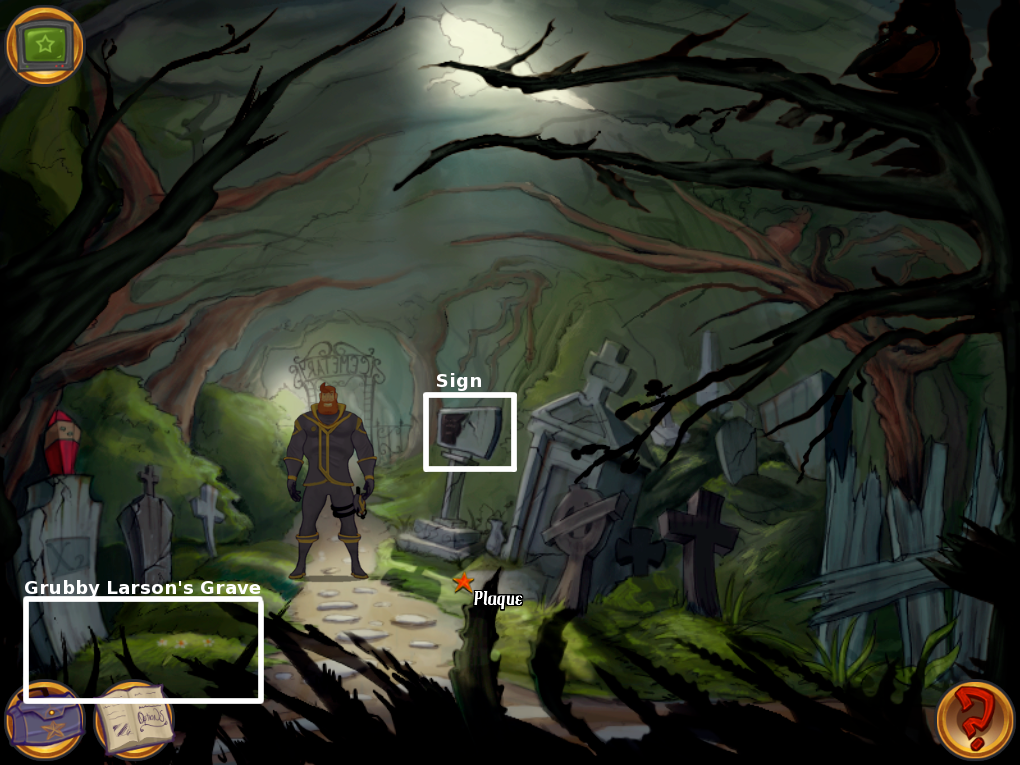
You now know Fuseman's real name. Head to the dam, then up the path to the cemetery.
Use the plaque in your inventory with the silicone bucket, then use the sticky plaque with the sign.
Screenshot
Examine the sign and note the label for the grave where Fuseman—aka
"Grubby Larson"
—is buried.
Look at the various graves until you find Fuseman's grave.
Exhuming Fuseman
Go back to the old man in the park. Tell him the good news, that you found Fuseman's grave. He asks you for tobacco.
If you haven't done so already, take a second leaf from the bush in the park and dry it in the oven in the Mazslow.
If you tried giving a dried, five-leaf flower to the clerk, you know that it's tobacco. Use the dried, five-leaf flower in your inventory to crush it into tobacco dust, and give it to the old man.
Take the old man's cane after he drops it.
Use the potato peeler you got from the Mazslow's kitchen on the cane to sharpen it.
Go back to the cemetery. Use the sharpened cane with Fuseman's grave. Use the hammer you got from the windmill to drive it through.
Screenshot
If you haven't already done so, charge the battery you got from the crate in the clearing with the generator outside the windmill.
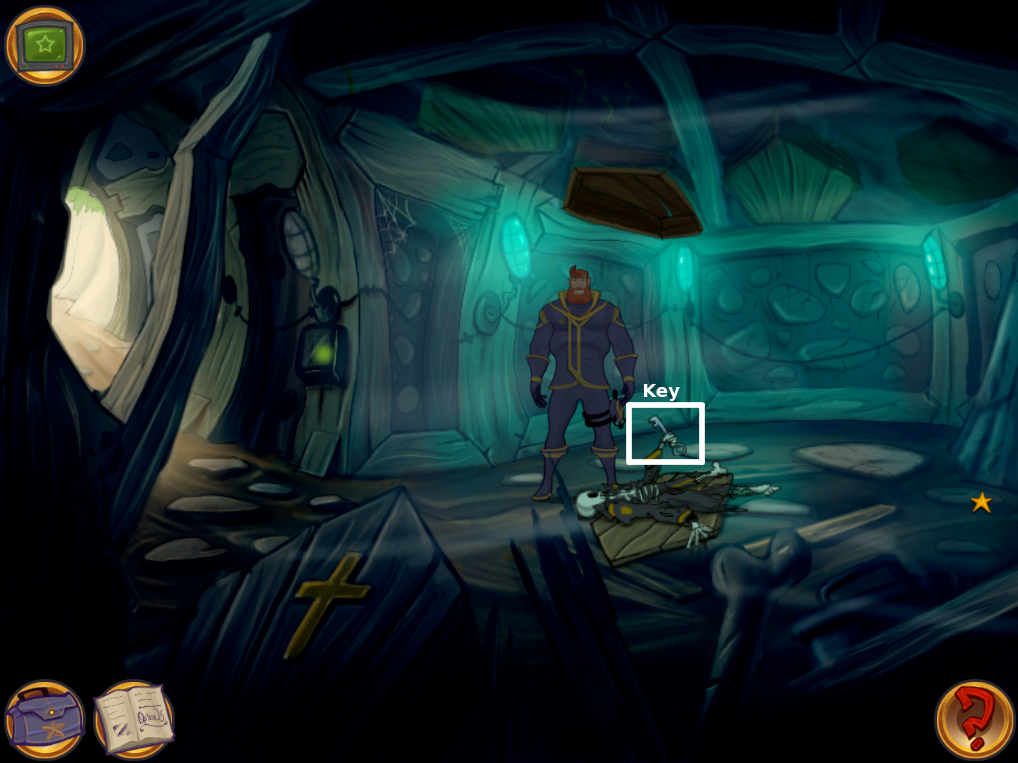
Enter the cave to the left of the dam.
Use the charged battery with the switch.
Use the hammer with the staked graved in the ceiling.
Screenshot
Take the key from the skeleton.
Screenshot
Clearing the dam
Go back inside the windmill and use the key with the lock in the chest.
Screenshot
Look in the chest to take the note and explosives.
Examine the note, then examine the diary to read a new entry. Each of the three stanzas of the poem gives you a clue about where to find Fuseman's dry fuses.
I am here, but do not move,
I can see you, I can prove,
I do grow, but am not free,
Look at me, I am...
...a tree. Go to the park, where the big tree is.
Touch me with an alcohol,
Inside me you'll find a hole,
Quickly rub me with a rug,
Use the liquid in the mug.
If you examine the glass cleaner, you learn that it's mostly ethanol. Use it with the tree.
Use the hanky with the spot to discover a hatch. Use the hatch to access a safe.
Screenshot
One more thing you have to do,
Turn the hands that reach for you,
The answer lies within my birth,
That is all, you little twirp!
Examine the safe.
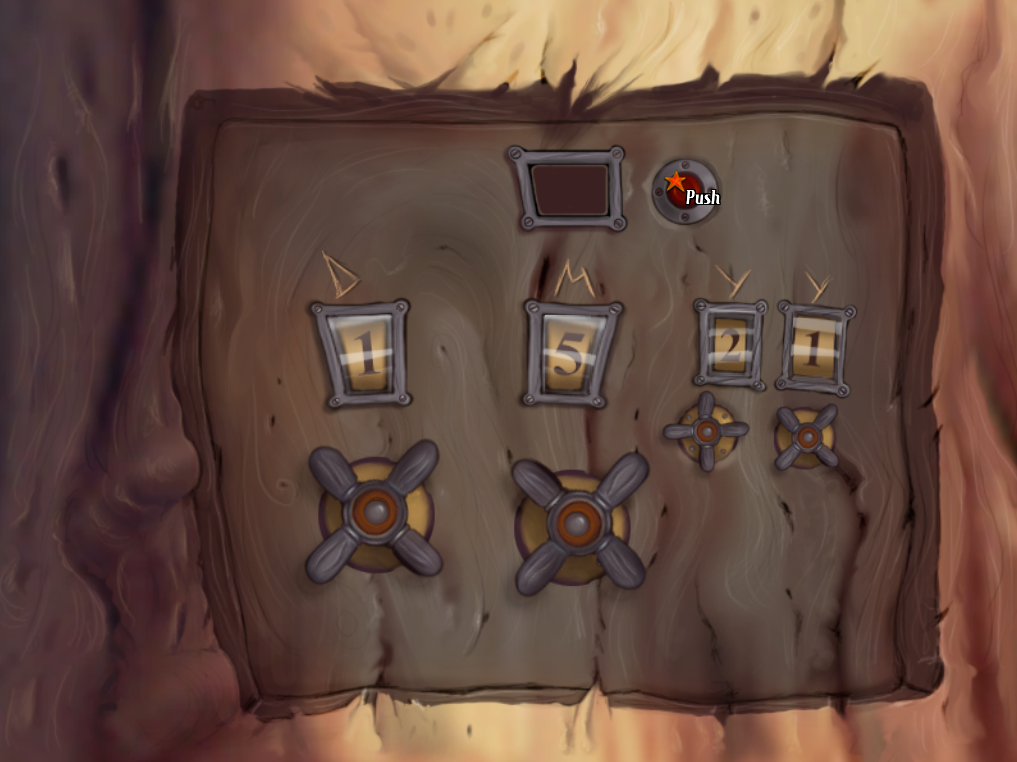
Use the valves to enter the safe's combination. It's the date you found on the calendar in the windmill. The solution is in the screenshot below.
Screenshot
Push the red button to open the safe.
Take the fuse after you open the safe. Use the fuse with the explosives.
Go to the dam and use the explosives with the dam.
You need a way to light the fuse. Go to the crossroads.
Use the screwdriver with the flint in the wall, then use the hammer with the screwdriver. Pick up the flint.
Screenshot
Go to the pier and use the flint with the fuse. Kaboom!
The Crash Site
Use Rowboat and head to the crash site.
Use the screwdriver with the container.
Open the container and look inside. Finish the long series of conversations.
To get past SHE, use the ashes with her to distract her.
Screenshot
Open the container to escape with the aliens inside.
Watch the final cutscenes for the end of Chapter One.
Posted by: Mike |
December 22, 2010 7:39 PM
|
December 22, 2010 7:39 PM