
Mystery Trackers: Raincliff
Platform: Mac, Windows
![]() Oh, those wacky university students! All the time getting in trouble with their keggers and their pranks and their wild spring breaks and their vanishing in a remote ghost town riddled with echoes of violence and panic! What will they get up to next?... well, uh... nothing, unless you can save them in Elephant Games' hidden-object adventure, Mystery Trackers: Raincliff.
Oh, those wacky university students! All the time getting in trouble with their keggers and their pranks and their wild spring breaks and their vanishing in a remote ghost town riddled with echoes of violence and panic! What will they get up to next?... well, uh... nothing, unless you can save them in Elephant Games' hidden-object adventure, Mystery Trackers: Raincliff.
 A bus full of university students and their driver has gone missing near the town of Raincliff, and since the town has been mysteriously deserted for years, questioning the locals is out of the question. As the master detective who unraveled the crazy mystery surrounding Void House in the previous game, you seem like the perfect choice to bring the missing people home safely. But when it quickly becomes apparent you're not alone in the snow-blanketed town, you might wish you had reinforcements of your own. Who do you call in when knives start hurling themselves at you in an empty diner? Ghostbusters or Gordon Ramsay? Things only get stranger as you begin to uncover a very strange and very unique family secret, but will you be able to get to the bottom of things when it seems like someone is trying very hard, very often, to kill you? Geez, what'd you do? Post on a forum about how Picard was the worst or that you preferred Highlander 2 over the original? You monster! You deserve it!
Can click? Can play! Raincliff offers three difficulty settings to choose from when you first start the game, mainly pertaining to whether interactive areas are highlighted and how long the hint/skip button takes to charge, but whatever challenge you sign up for the gameplay is the same. You'll move throughout the town hunting for clues, solving hidden-object scenes and gathering items to solve puzzles. If you're completely flummoxed as to where to go next, try the hint button; the adorable, well-dressed toad helper is back, and if you give him a click, he'll actually tell you exactly what your next step should be. If you're a film buff, you can also click on the projector icon to watch any cutscenes you've already witnessed.
 Analysis: I loved Mystery Trackers: The Void, which I thought was an underrated gem with a remarkable amount of creativity and goofy charm. In comparison, Raincliff is somewhat more restrained, with less demonic teddy-bears in mailboxes and more seemingly straight-up ghost town shenanigans. While the basic concept of missing students in a snow-logged deserted area may sound familiar, Raincliff refuses to go the predictable route and instead holds some great twists and unique ideas. Is any of it realistic?... well... no, of course not, but if you're looking for realism, you're in the wrong place. Raincliff is a beautiful game, and exploring the town is made all the better with the detail in every scene and the moody, atmospheric music that knows exactly when to pick up and die down.
There are still some niggling flaws that hamper the game somewhat, with perhaps the biggest being how much backtracking there is. The town and the surrounding areas are large enough, but the game sends you packing to and fro over them so often it quickly gets tiresome. There's also a noticeable degree of "adventure game logic" at work that Raincliff's predecessor lacked, with some of the item uses being unintuitive or downright silly. Perhaps most disappointing, however, is that all the puzzles are fairly standard and, to be honest, a little bland; most of them are just variations on "put these thingers in the proper order" or "move this dealiebobber into this doohickey".
 Fortunately, Raincliff gets a lot right as well, mostly due to the same imaginative and original approach to its story its predecessor had. Rather than dumping pages and pages of story information in a journal, Raincliff marries the narrative and the gameplay by having things revealed in cutscenes and notes found throughout the game. You're constantly kept on your toes as you come under siege by the mysterious forces in the town, and the result is a surprisingly cinematic experience that mixes equal parts adventure and mystery. Despite some genuinely creepy and weird moments, players who prefer games without jump scares can play with confidence here.
All told, the game will probably run most players between four to five hours, with the included "bonus" chapter tacking on another half-to-full hour of play time. I'm actually a little conflicted about that extra, because in what's becoming a frustratingly common occurence for Collector's Edition games, that chapter adds a lot of context and perspective to the rest of the game and actually wraps up the story much more neatly. It's not quite as severe as Shiver: Vanishing Hitchhiker in terms of what gets left off, but players who wait for the standard edition will miss out on a big finale and be left with an extra plot hole or two.
Despite a few bumps in the road, Mystery Trackers: Raincliff comes highly recommended. It's fun, surprising, creative, and wonderfully weird, offering up a big mystery and adventure to boot. The series is shaping up to be one to watch and consistently offers up some of the best quality and bang for your buck in the genre. Try the demo before you buy, but try it all the same; Raincliff is one strange town you should definitely pay a visit to.
A Collector's Edition is also available. It contains a bonus chapter to play, wallpapers, strategy guide, and more. Remember that Big Fish Game Club Members pay only $13.99 for Collector's Editions (or 2 club credits), and collector's editions count 3 card punches of 6 total needed for a free game.
![]() Windows:
Windows:
Download the demo
Get the full version
Also available: Collector's Edition
![]() Mac OS X:
Mac OS X:
Download the demo
Get the full version
Also available: Collector's Edition


Walkthrough Guide
(Please allow page to fully load for spoiler tags to be functional.)
Mystery Trackers: Raincliff - Walkthrough
General Info, Chapters 1-3
This walkthrough provides you with some Extras:
Inventory List - here you will find all inventory objects, where to find and where to use them.
Frog List - you will find all locations where one or more frogs are located.
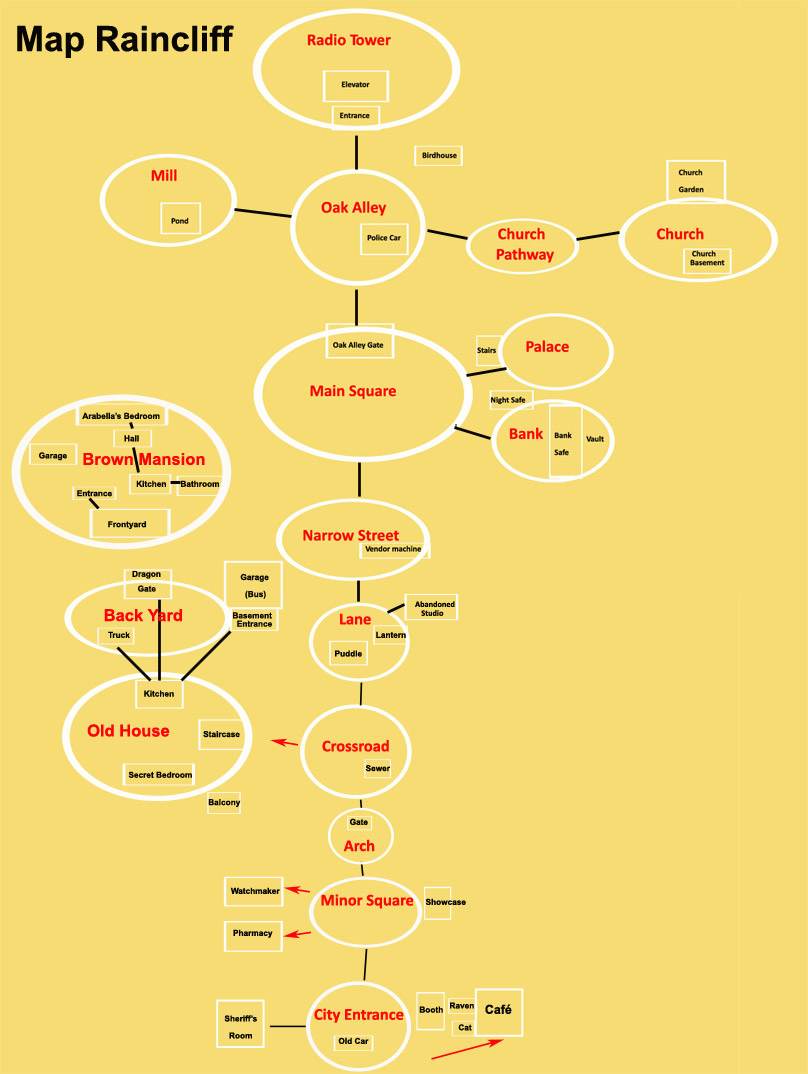
A map of Raincliff - you will have to run a lot and the locations are not always obviously to see, so we made a map (it is not art ;) but will help you with orientation).
Screenshots of all hidden objects scenes. With this you may play the hard mode and not get stuck when an object seems to be "invisible".
General
Before starting the game, you may choose your preferred mode.
Casual and Advanced will be different in the speed of recharging the hint and skip function for mini games. Addition interesting areas will be shown with sparkles in Casual Mode.
Hard mode won't provide any sparkles, skip function or hint at all.
There is no time limit.
You can find 59 frogs during the game. There is a 60th frog in the search scene in the Brown Bathroom, but it is not clickable.
50 frogs are needed to obtain an award - the counting will stop after finding this amount.
There is no need to collect frogs, and they do not have any effect on the game whether you find them or not.
Gears will appear to show that some kind of action is needed.
A magnifier will appear to tell that a closer look is possible.
A hand indicates that you can take something.
Map of Raincliff
Map of Raincliff
Inventory List
The inventory items are listed in alphabetical order. The object name is followed by the spoiler numbers for where to find and to use the object. Inside the spoiler, found objects are marked strong.
Allen Wrench - 42/42
Amber Button - 55/56
Ammo - 4/4
Angel - 12/18
Angel Cork - 44/46
Badge - 7/7
Ball (for Pinball Machine) - 12/12
Basket (and basket with cat)- 10/10
Bird Cork - 45/56
Black Eagle Medal - 61/61
Block - 59/50
Blue Key - 10/11
Boomerang - 35/36
Bottle, empty - 11/18
Bottle, with water - 18/19
Bow - 57/58
Bow and Arrow - 58/58
Bread - 13/14
Bronze Flower - 56/57
Bronze Snake - 64/69
Brooch - 33/33
Bucket (with and without water) - 12/12
Bullet - 73/74
Butter - 29/30
C2H5OH - 69/69
Cash Register Button 16/17
Cash Register Handle - 4/5
Cash Register Start Button - 17/17
Cell phone -30 /32
Chain Saw - 52/53
Chip of a knight - 59/60
Coat of arms - 61/62
Container - 16/19
Container with coffee - 19/20
Crowbar - 24/24,25
Cup with coffee - 20/20
Diamond Ring - 32/32
Digit Button - 5/5
Disk - 30/31
Disk Saw - 1/1
Disk Saw without disk - 1/42
Disk Saw - 42/43
Dragonfly Brooch, part 1- 52/57
Dragonfly Brooch, part 2 - 55/57
Dragonfly Brooch, part 3 - 57/57
Dynamite - 20/21
Earring - 59/59
Eye (1/2) - 31/34
Eye (2/2) - 33/34
Fan - 32/33
Faucet - 17/18
Fishing Auger - 48/49
Fishing Rod - 7/12
Flag Pole - 53/53
Flower Antidote - 71/72,73
Fork - 15/17
Gas Mask - 14/15
Gasoline Tank (empty) - 23/25
Gasoline Tank (full) - 25/26
Glue - 29/30
Goblet - 68/69
Grenade - 29/49
Ground Coffee - 18/19
Hand Drill - 39/40
Hoisting Jack - 5/8
Hood Ornament - 71/72
Hook - 4/4
Hook Knife - 57/60
Hose - 25/25
Hypnotic Fluid - 59/70
Kettle, empty - 64/65
Kettle, filled - 65/67
Key Card - 54/56
Knight - 38/41
Ladder - 4/4
Lamp (for Fridge) - 29/29
Light Bulb - 1/14
Lion Door Knocker - 26/26
Lock pick - 9/10
Magnet - 49/50
Matches - 5/26, 49, 65
Metal Cable - 26/27
Military Flail - 55/55
Money (1/3) - 23/44
Money (2/3) - 37/44
Money (3/3) - 43/44
Moon Cork - 46/46
Needle - 58/59
Paint (1/2) - 66/70
Paint (2/2) - 68/70
Panel with Date - 44/45
Paper Plane - 33/39
Part of a Trinket (1/2) - 54/58
Part of a trinket (2/2) - 58/58
Pirate Hand - 34/35
Pirate Leg - 35/35
Pistol - 63/74
Protection Suit - 28/28
Puzzle Pieces (for Sheriff's Room) - 4/4
Puzzle Piece (1/4) (for Dragon Gate) - 31/63
Puzzle Piece (2/4) (for Dragon Gate) - 53/63
Puzzle Piece (3/4) (for Dragon Gate) - 60/63
Puzzle Piece (4/4) (for Dragon Gate) - 62/63
Queen - 40/41
Radiator 24/27
Radio tube, blue - 43/49
Radio tube, red - 49/49
Razor - 7/7
Red Key - 6/6
Shotgun (loaded) - 4/5
Shotgun (unloaded) - 5/56
Shotgun (loaded) - 57/57
Ruby - 6/7
Ruby Eagle Medal - 56/61
Safe Key - 42/43
Sandstone - 37/39
Scoop - 67/67
Scissors - 28/29
Screwdriver - 12/12 and 30
Scythe - 70/71
Shackles - 43/52
Shield - 46/47
Shovel - 27/28
Signet Ring - 11/11
Slingshot - 11/12
Spring - 56/58
Stamp, letter - 50/51
Stamp, shield - 50/51
Steering Wheel (for Brown Truck) - 70/72
Steering Wheel (for Radio Room) - 74/74
Stone - 3/4
Sword Hilt - 23/23, 51
Sword - 51/66
Sun Trinket- 7/9
tongs - 4/4
Transmission Belt - 72/72
Tweezers - 33/34
Vacuum Cleaner 60/61
Valve - 47/48
Vial - 10/69, 74
Vip Card - 22/22
Wheel - 42/53
Wheel Chair - 70/73
White Eagle Medal - 45/61
Wire Cutter - 64/70
Wood Wheel - 66/70
Wooden Fragment (1/3) - 57/68
Wooden Fragment (2/3) - 66/68
Wooden Fragment (3/3) - 67/68
Wrench - 24/ 25
Yellow key - 14/16
Zipper - 43/44>
Frog List
The list shows the spoiler number you can find a hint for one or more frogs to find.
Spoiler 1 - Entrance of the City (Hydrant)
Spoiler 5 - Abandoned Café (jacket)
Spoiler 5 - Abandoned Café (cash register)
Spoiler 5 - Abandoned Café (shelf)
Spoiler 6 - Pharmacy (door)
Spoiler 9 - Crossroad (Balcony, search scene)
Spoiler 14 - Minor Square (showcase)
Spoiler 16 - Watchmaker
Spoiler 22 - Sewer (outside)
Spoiler 22 - Old House
Spoiler 23 - Staircase
Spoiler 23 - Kitchen
Spoiler 24 - Crossroad
Spoiler 27 - Truck (Access from Kitchen, search scene)
Spoiler 28 - Sewer (inside)
Spoiler 28 - Secret Bedroom
Spoiler 29 - Basement Entrance
Spoiler 29 - Basement Entrance (lantern)
Spoiler 30 - Lane (Showcase)
Spoiler 33 - Dragon Gate
Spoiler 34 - Watchmaker (search scene)
Spoiler 37 - Narrow Street (vending machine)
Spoiler 37 - Major Square (Belle's note)
Spoiler 37 - Bank (lion head above entrance)
Spoiler 42 - Garage, Bus (instruments)
Spoiler 42 - Garage, Bus (toolbox)
Spoiler 46 - Palace (Stairs)
Spoiler 47 - Mill Entrance
Spoiler 48 - Bank (Vault)
Spoiler 49 - Mill (main room)
Spoiler 49 - Mill (closet)
Spoiler 49 - Mill (drawer)
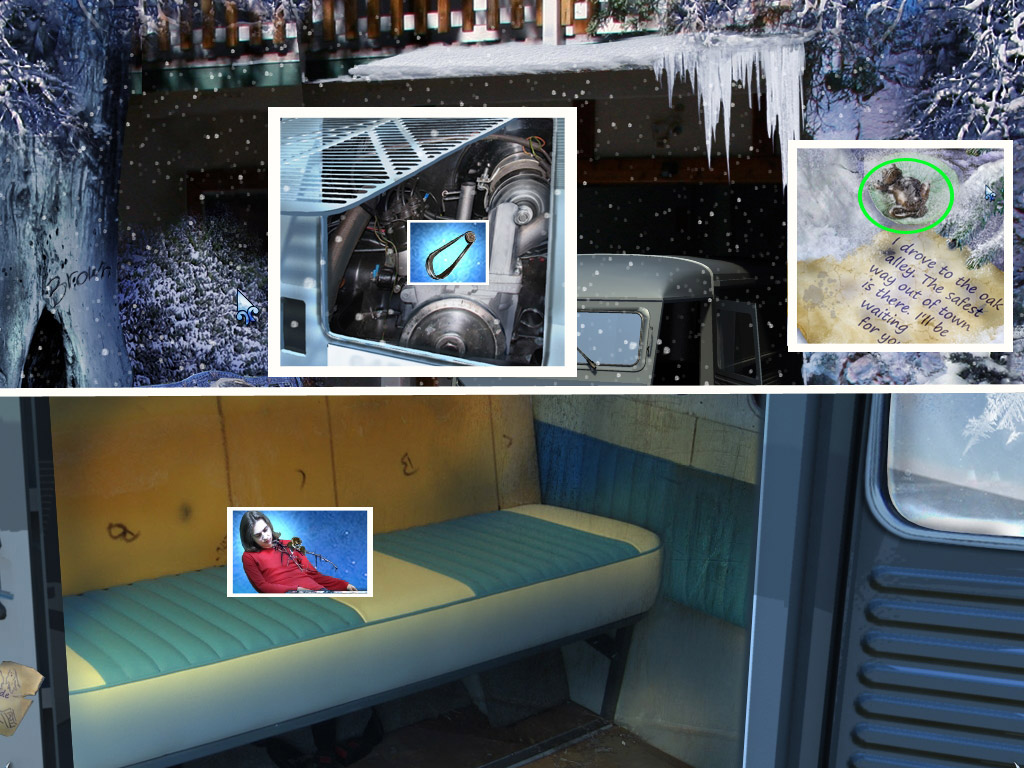
Spoiler 50 - Oak Alley (bird house)
Spoiler 50 - Dragon gate (bottom of the gate)
Spoiler 50 - Dragon Gate (burning note)
Spoiler 52 - Radio Tower (entrance)
Spoiler 52 - Radio Tower (radio room)
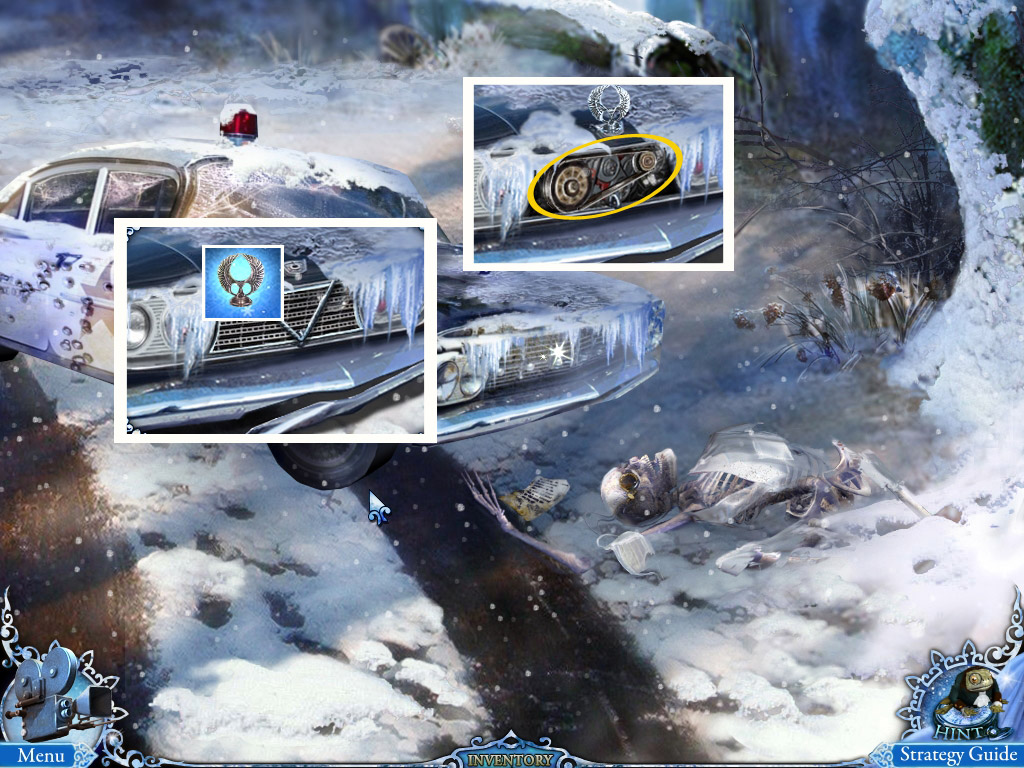
Spoiler 53 - Oak Alley (police car)
Spoiler 53 - Oak Alley (skeleton)
Spoiler 54 - Church Pathway
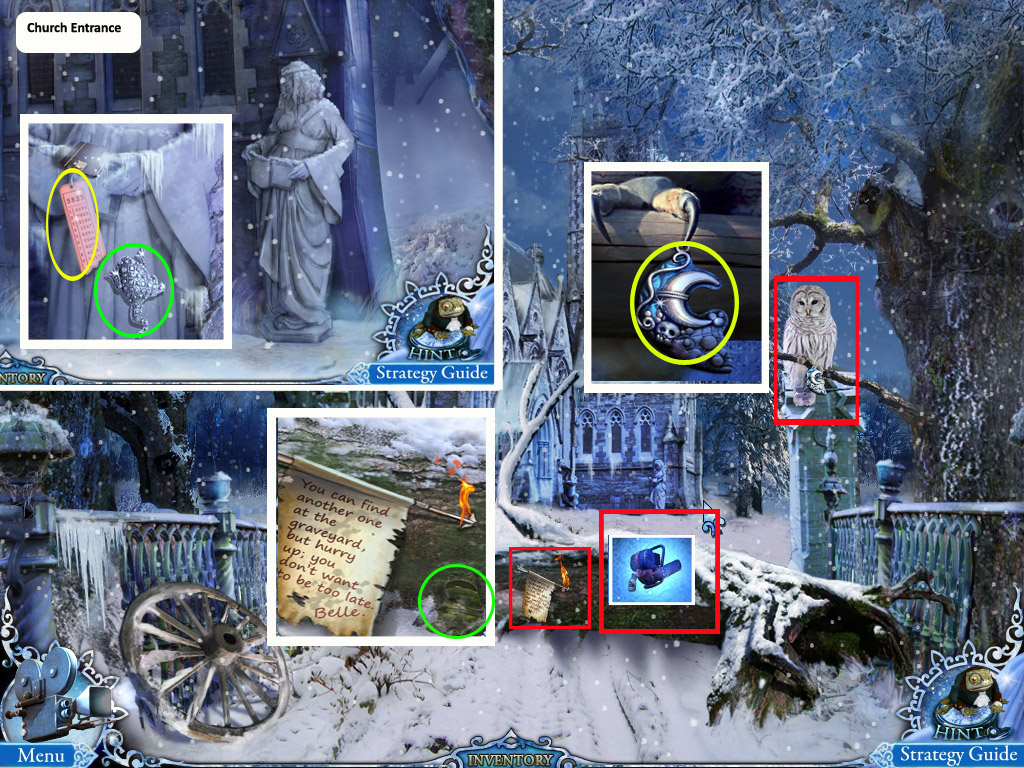
Spoiler 54 - Church Entrance (right statue)
Spoiler 55 - Church Basement (book)
Spoiler 56 - Bank (book)
Spoiler 57 - Palace Roof (chimney)
Spoiler 59 - Church Basement (shelf)
Spoiler 63 - Dragon Gate (lock)
Spoiler 63 - Dragon Gate (way)
Spoiler 64 - Brown Mansion (entrance, stairs)
Spoiler 64 - Brown Garage (bench)
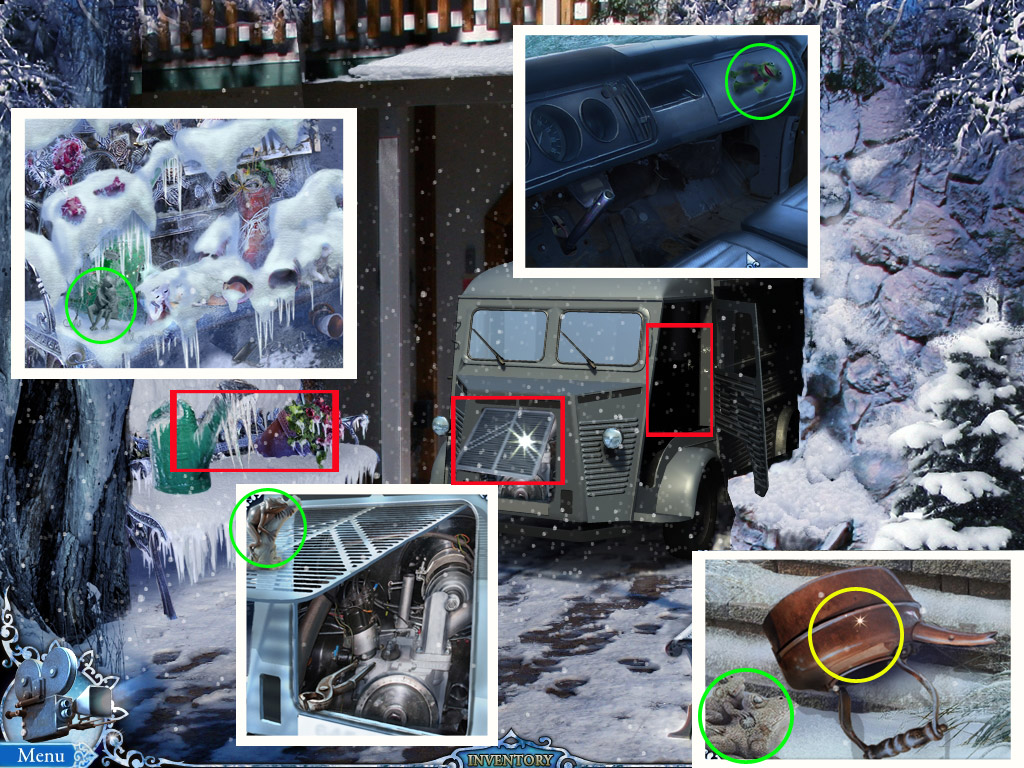
Spoiler 64 - Brown Garage (truck, motor)
Spoiler 64 - Brown Garage (truck, inside)
Spoiler 65 - Brown Bathroom (water basin)
Spoiler 65 - Brown Kitchen (oven)
Spoiler 67 - Brown Bathroom (sand castle)
Spoiler 68 - Arabella's Bedroom (table)
Spoiler 69 - Brown Kitchen (table)
Spoiler 71 - Brown Bathroom (terrarium)
Spoiler 71 - Arabella's Bedroom (window)
Spoiler 72 - Oak Alley (Brown truck)
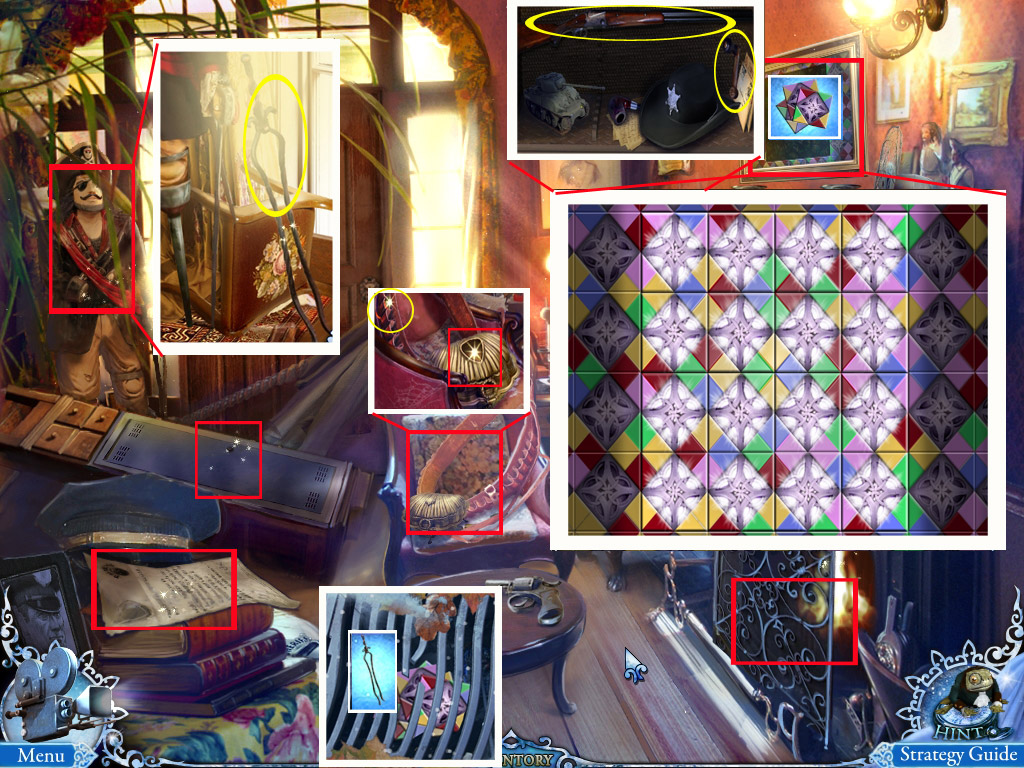
Chapter 1: Entrance of the Town
1. Enter the Café
Zoom in on the old car's trunk and click the key to open it.
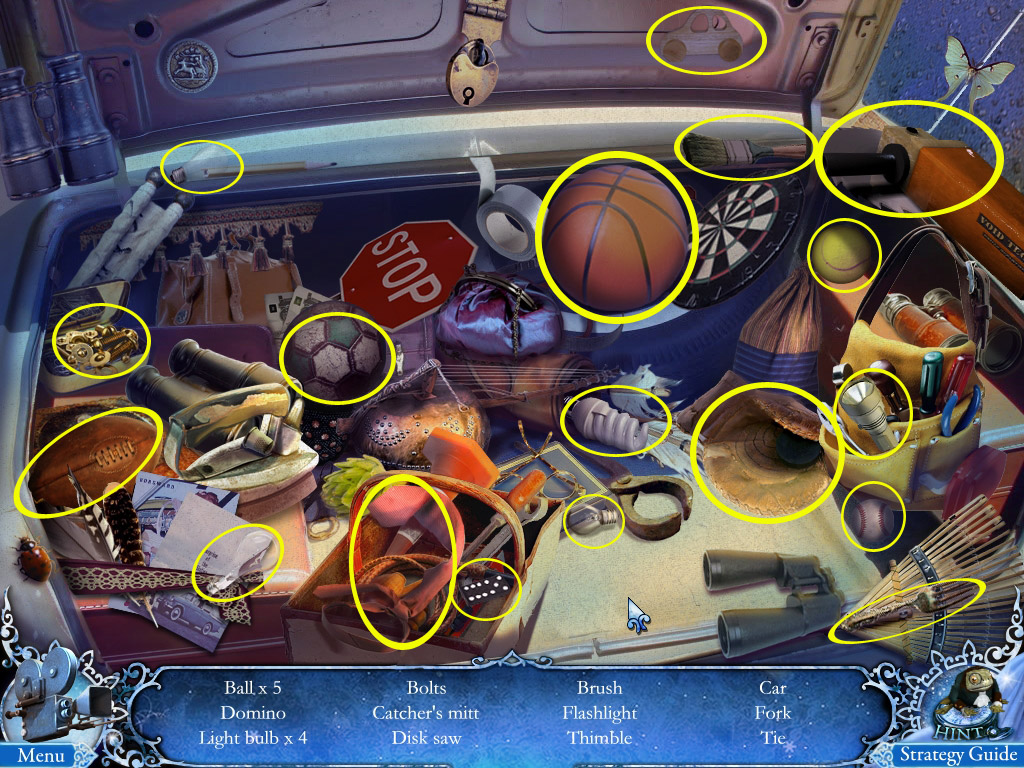
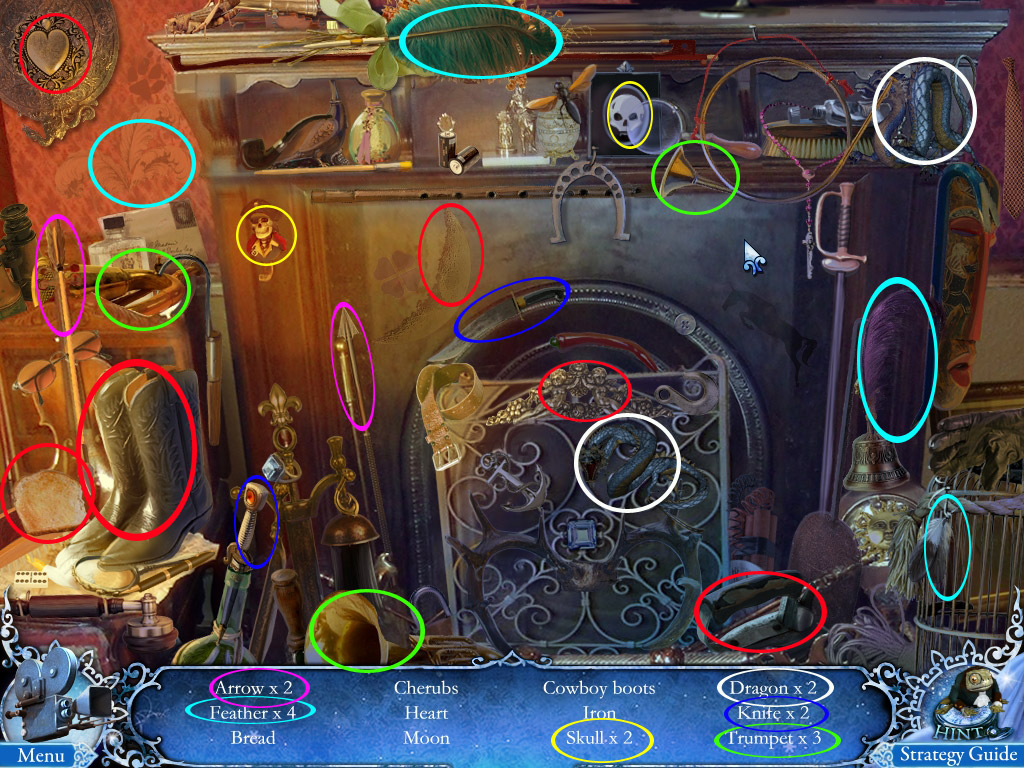
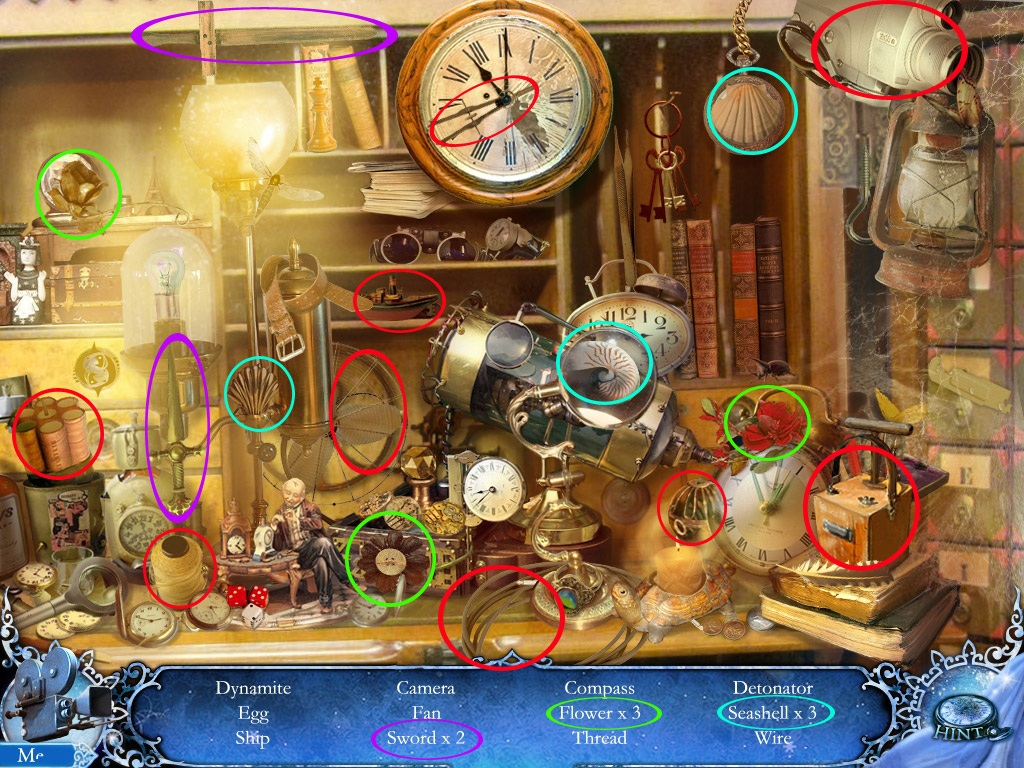
Play the search scene and find all objects to obtain a disc saw.
Screenshot - Search Scene
Zoom in on the fire hydrant on the low right and take the frog (1/60).
Note that you will need a tool to unfasten the hose.
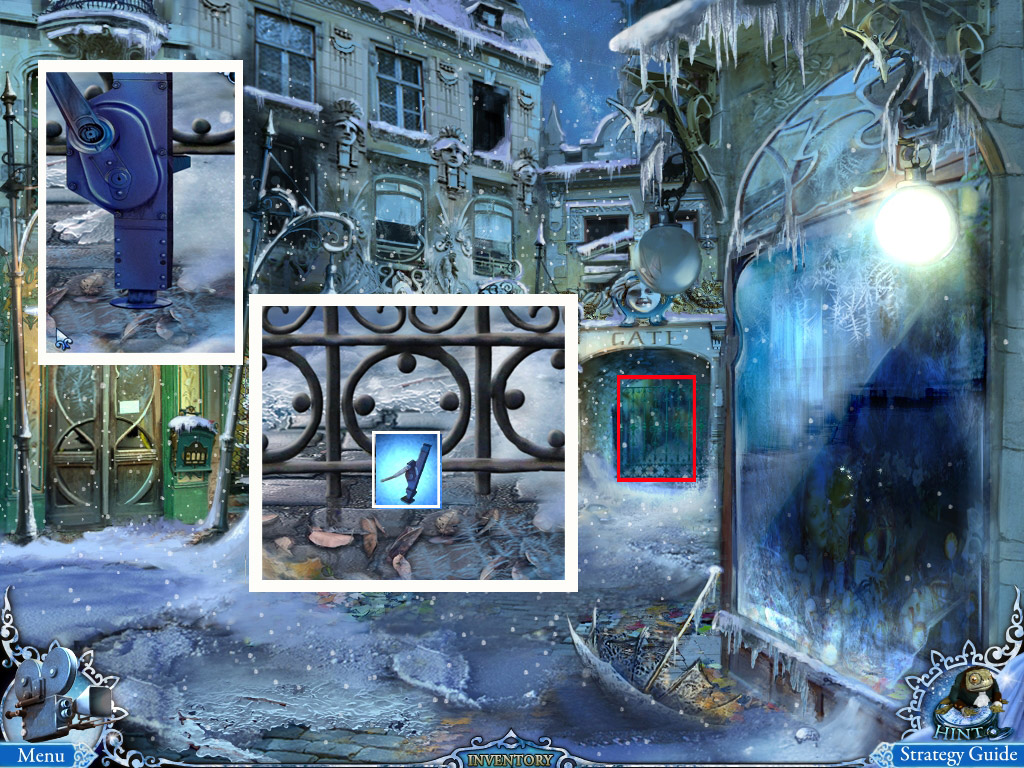
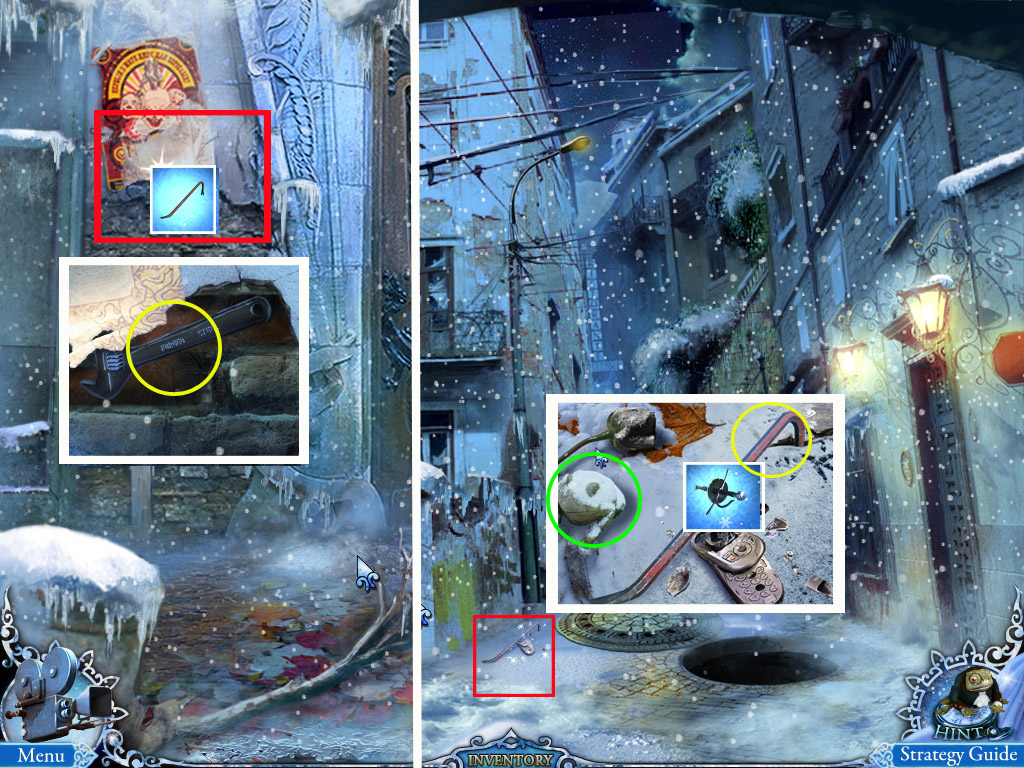
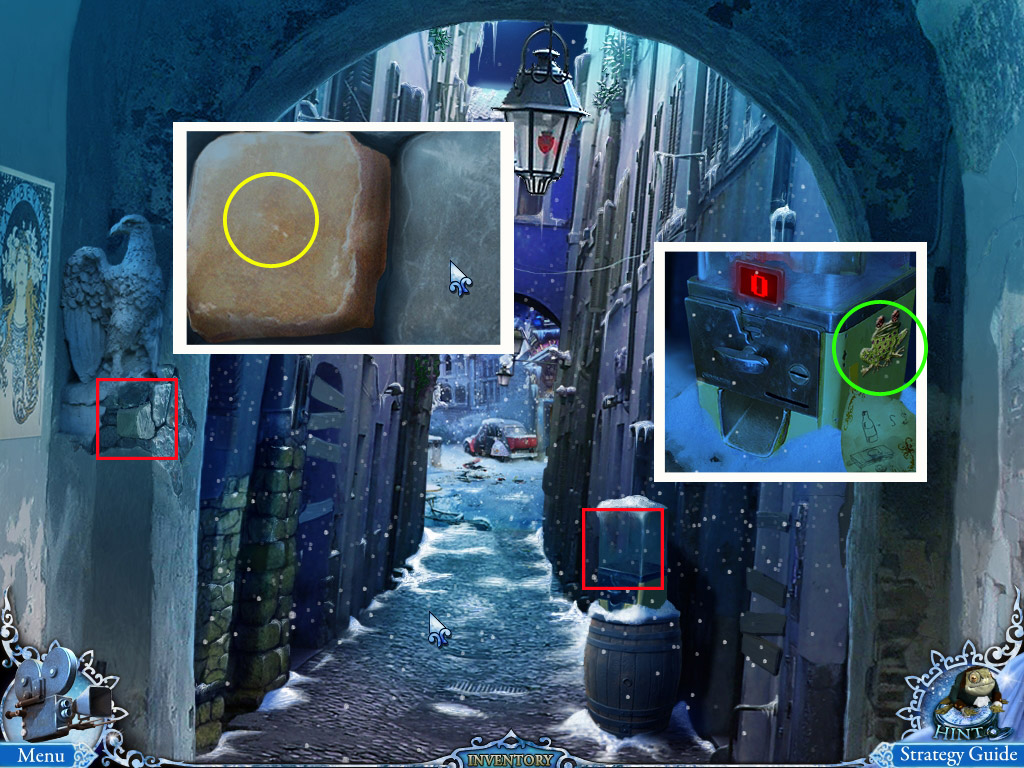
Zoom in on the booth left, next to the gate, and note that a stone is needed to remove the shards and get the hook.
Zoom in on the gate on the right side and remove the chain with the disk saw.
The gate will open and the saw will go back into your inventory as disk saw without disk.
Screenshot
Enter the gate.
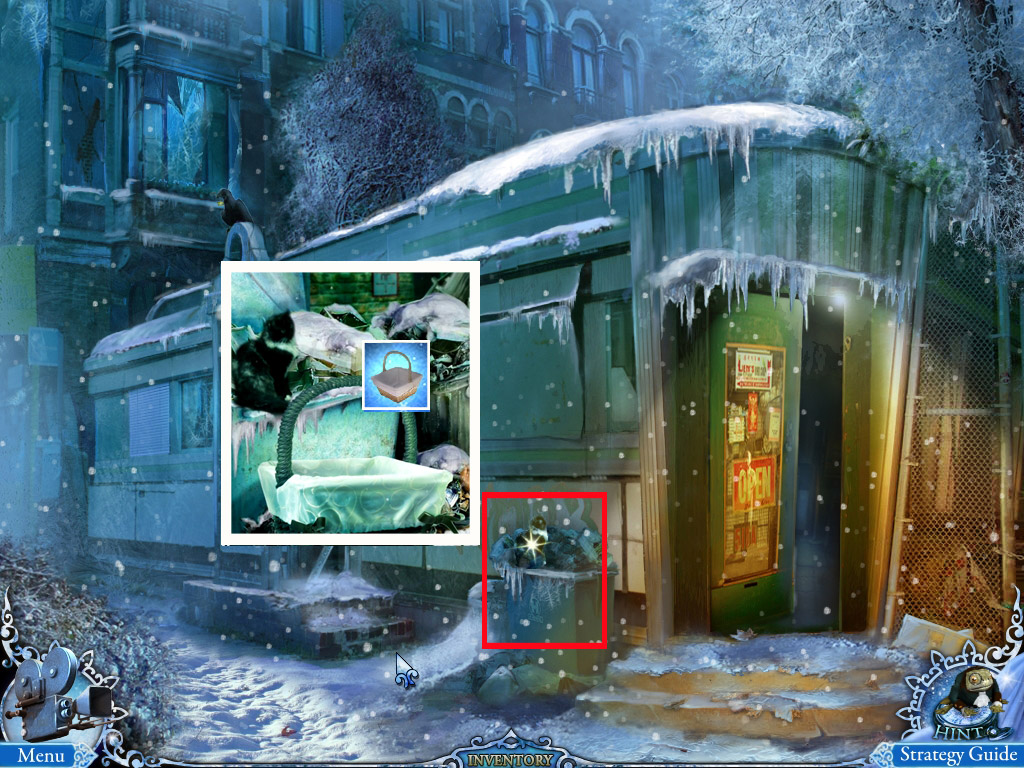
2. Abandoned Café
Zoom in on the heap of trash next to the Café and note the cat.
Zoom in on the raven on the top left side of the Café.
Note that something to eat for the raven might get you the key in his beak, then grab the light bulb from below the raven.
Enter the Café and try to go far left by clicking the poster on the back wall.
Take the knife from the now closed Café door.
Return to the Entrance of the City and go forward 1x to the Minor Square.
3. Minor Square/Watchmaker's door
Try to click the guy in front of the watchmaker's door.
Click the door to learn that you will need to find a way to enter.
Zoom in on the ground on the left side and use the knife (Spoiler 2) to remove the loose stone.
The stone goes into your inventory
Note that there is something in the grate you can't get yet.
Screenshot
Return to the Entrance of the City
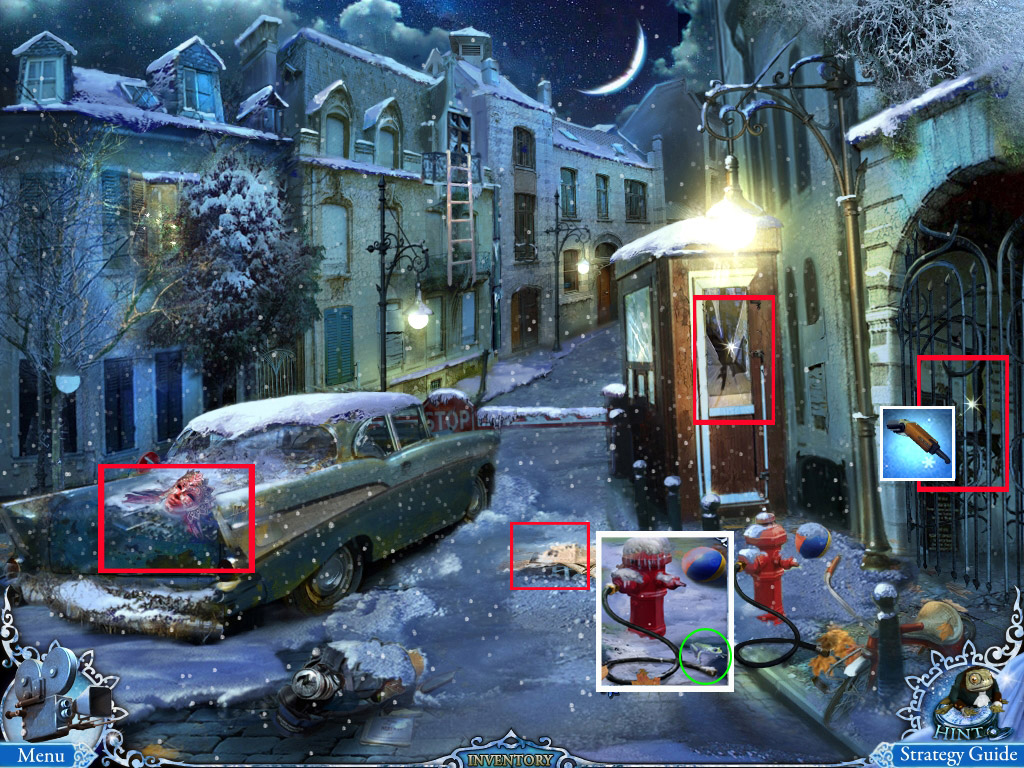
4. Booth/Sheriff's Room
Zoom in on the booth on the right side and use the stone (Spoiler 3) to remove the remaining shards.
Take the hook.
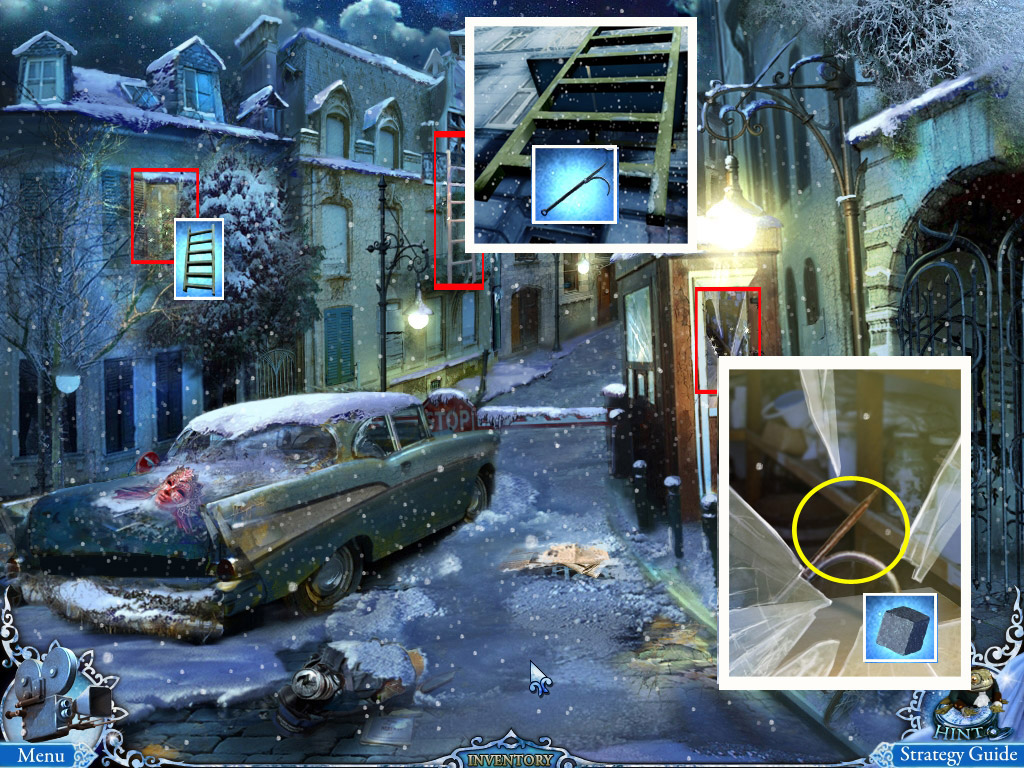
Use the hook to get the the ladder from the house on the far left.
Use the ladder at the lighted window top left.
Screenshot
Click the window to open it and enter the Sheriff's Room.
Zoom in on the chair in the middle of the room to learn that you will need something special to open the jewelry box.
Grab the ammo out of the belt.
Zoom in on the Pirate's statue on the far left and grab the tongs.
Leave the room and go to the Watchmaker's House.
Zoom in on the ground and use the tongs to get the puzzle pieces out of the grate.
Return to the Sheriff's Room and place the puzzle pieces at the picture above the fireplace.
Your goal is to drag and arrange the puzzle pieces so that each fits the neighbor according to their colors.
Tiles can be turned with right click.
A correct tile will be locked and highlighted.
When the puzzle is finished, the painting will open.
Take the Shotgun and the cash register handle out of the now open compartment. The Shotgun and the ammo will automatically combine inside the inventory.
Read the note on the low left.
You may click the fire place to learn that the fire needs to be extinguished.
Zooming in on the locker will tell you that you need a sheriff's insignia to open it.
Screenshot
Leave the Sheriff's Room and head over to the Abandoned Café.
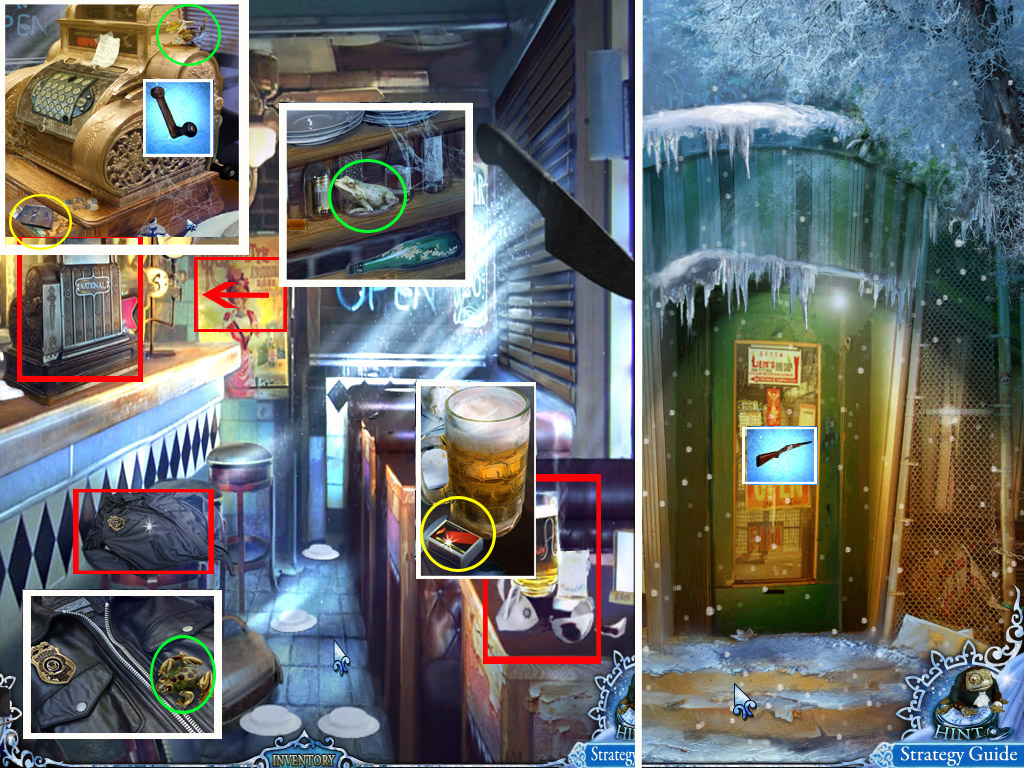
5. Abandoned Café
Zoom in on the entrance door and use the loaded Shotgun to open it.
Enter the Café.
Zoom in on the beer glass on the low right table and grab the matches.
Zoom in on the jacket on the stool on the left side to learn that you will need a tool to get the badge.
Take the frog (2/60).
Zoom in on the cash register.
Take the frog (3/60).
Use the cash register handle (Spoiler 4) on the right side of the cash register and click once to open the drawer.
Grab the digit button.
Click the poster at the back wall to get to the pinball machine.
Take the frog (4/60) from the shelf.
Screenshot
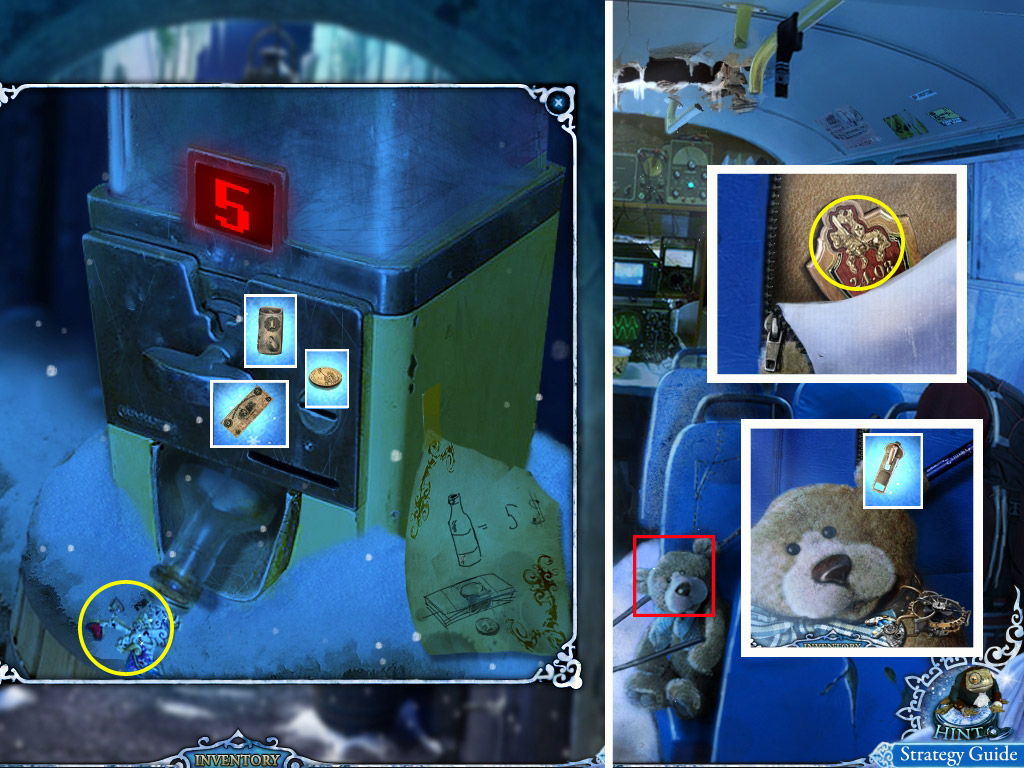
Take a look at the radiator and grab the hoisting jack standing on front. Look at the coffee machine and the pinball machine to learn that you will need different things before you can do anything here.
Return to the Entrance of the City and go forward 1x.
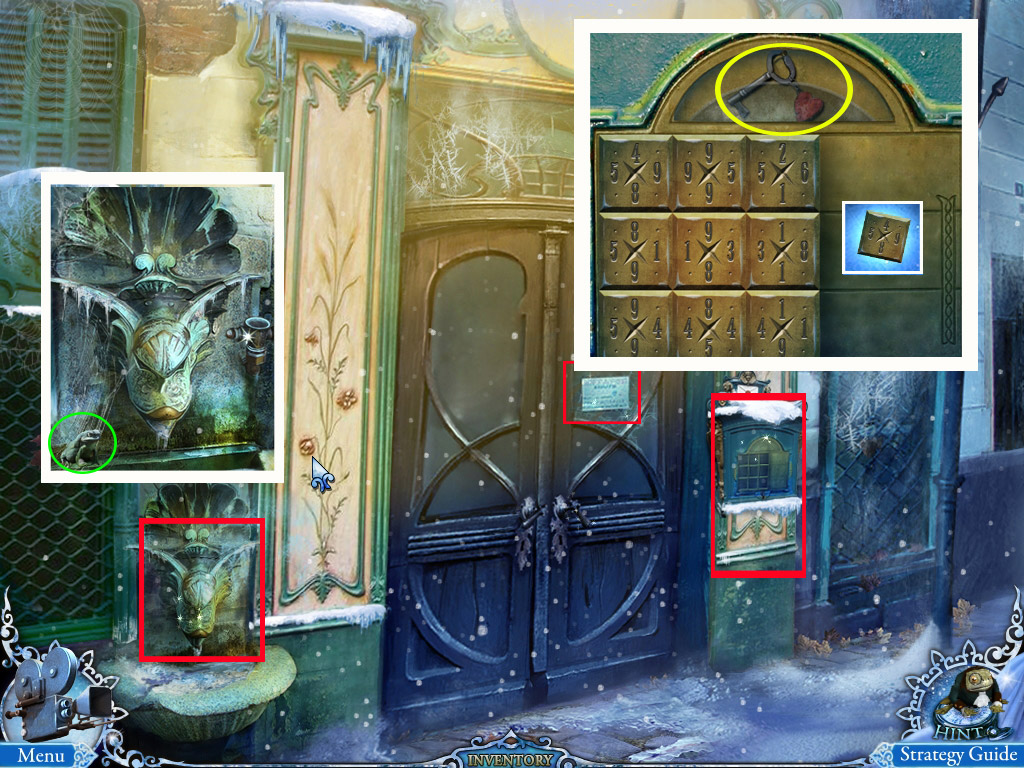
Zoom in on the Pharmacy door on the left.
6. Pharmacy Door/Watchmaker's Door
Zoom in on the panel on the right side of the door and insert the digit button (Spoiler 5).
Your goal is to arrange the squares so that each number on each side of every square matches the number on the neighboring square.
A square at the right place can't be moved anymore.
When all squares are at the right place, the glass on top will move aside and you can take the red key.
Zoom in on the water basin at the left side of the door, take the frog (5/60), and learn that you will need to melt the ice and find a tap.
Read the note at the door.
Screenshot
Back up once and go far left to the Watchmaker's door.
Zoom in on the lower part of the door and place the red key into the upper keyhole.
The top left slot will open, take the ruby.
Screenshot
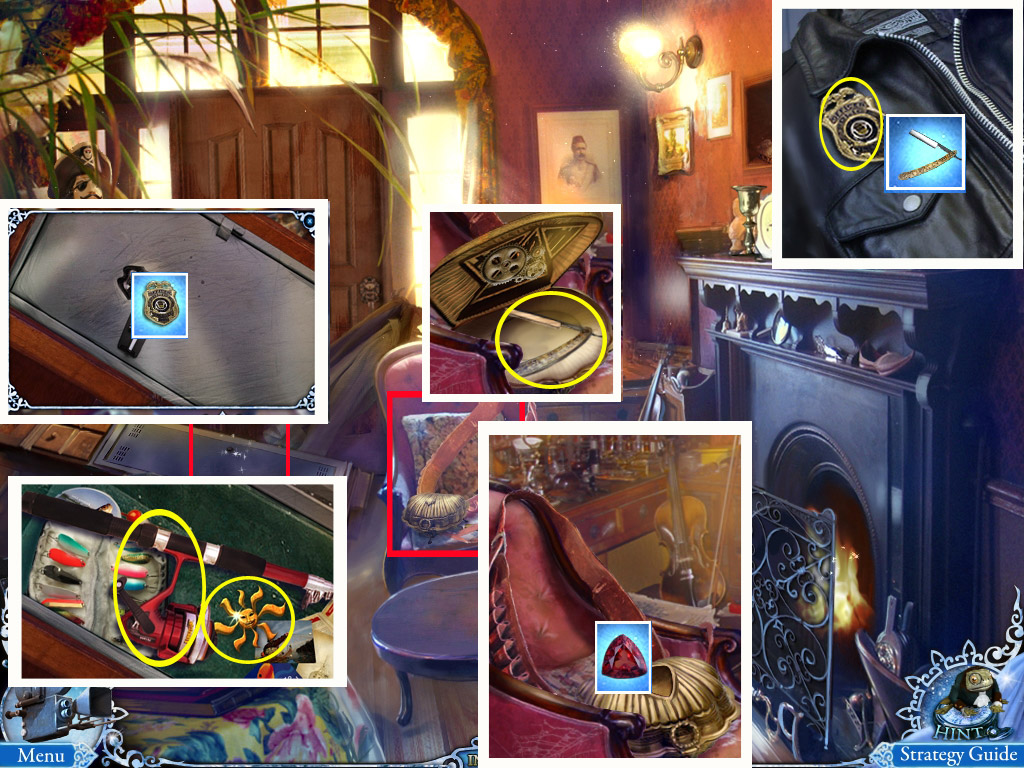
Return to the Entrance of the City and enter the Sheriff's Room.
7. Open the locker in the Sheriff's Room
Zoom in on the jewelry box on the chair and place the ruby (Spoiler 6) into the slot.
Take the razor.
Head back to the abandoned café and zoom in on the chair at the bar.
Use the razor to get the badge.
Return to the Sheriff's Room.
Zoom in on the locker and place the badge into the slot.
The locker will open, take the sun trinket and the fishing rod.
Screenshot
Go back on the street and go forward to the gate.
Chapter 2: Footprints in the Snow
8. Gate
Zoom in on the gate and use the hoisting jack (Spoiler 5) to raise the gate.
Enter the Crossroad.
Screenshot
9. Crossroad
Zoom in on the balcony of the old house and place the sun trinket (Spoiler 7) into the slot.
Zoom in on the balcony again and play the search scene to obtain a lock pick (in fact: keys).
On the left side of the table you can find a frog (6/60)
Screenshot
Screenshot - Search Scene
Go back to the Pharmacy.
10. Pharmacy
Zoom in on the door and use the lock pick (Spoiler 9) with the keyhole.
Enter the Pharmacy.
Look at the mouse in the glass terrarium at the far right.
Take the vial from the container.
Exit the close up.
Read the note at the right and take the basket from the floor.
Return to the place in front of the Abandoned Café.
Zoom in on the cat and place the basket next to it.
Wait a moment and the cat will jump into the basket.
Screenshot
Take the basket with the cat. Return to the Pharmacy.
Zoom in on the bowl of milk on the floor and place the basket with the cat next to it.
The cat will jump out and drink the milk.
Take the blue key out of the empty bowl.
Screenshot
Exit the Pharmacy and zoom in on the lower part of the Watchmaker's door.
11. Watchmaker's door/Old Car
Place the blue key in the middle keyhole.
A compartment will open at the top right side - grab the signet ring.
Screenshot
Return to the Entrance of the City and enter the Old Car.
Read the note on the left and zoom in on the steering wheel to learn that you will need a tool to remove the wire.
Zoom in on the glove compartment on the right and use the signet ring to open it.
Screenshot
Take the empty bottle and the slingshot.
Exit the Car and go to the Gate.
12. Gate/Abandoned Café
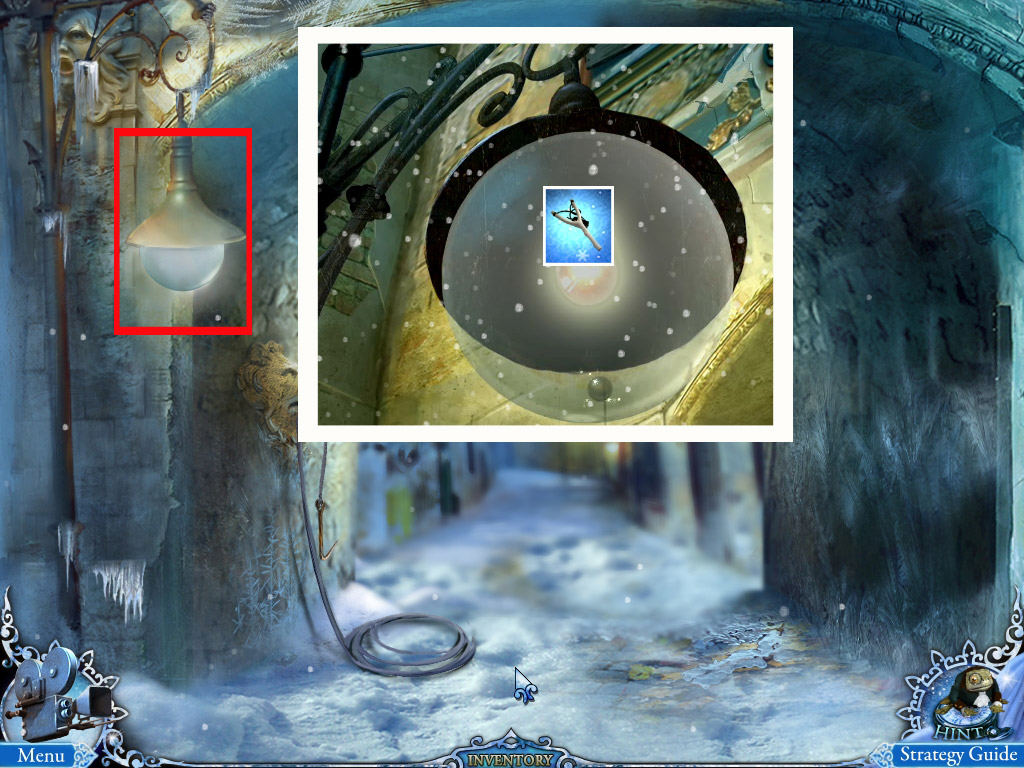
Zoom in on the lantern on the top right and use the slingshot (Spoiler 11) to smash it.
The ball inside the lamp will automatically go into your inventory.
Screenshot
Return to the Abandoned Café and click the poster on the far wall to get to the Pinball Machine.
Zoom in on the Pinball Machine and place the ball.
Your goal is to reach the End by moving the ball through the obstacles with the help of the arrows on the right.
Already opened obstacles will close when you move your ball over the hinge again.
Using the Reset button will bring all obstacles and the ball back to starting position.
Maybe there are several solutions possible and this is only one.
D = Down, U = Up, L = Left, R = Right
Move:
U - L - L - U - R - U - U - R - D - L - U - R - D - U - L - D - R - R - D - D- L - L - L - U - R - U - U - R - D - L - U - R - D - U - L - D - R - R - R
A drawer at the Pinball Machine will open; grab the screwdriver.
Zoom in on the bucket at the radiator on the right and remove the screw with the screwdriver.
Take the bucket.
Screenshot
Go back to the Entrance of the City and then straight forward to the Gate, through the Arch on the Crossroad and further on to the Lane.
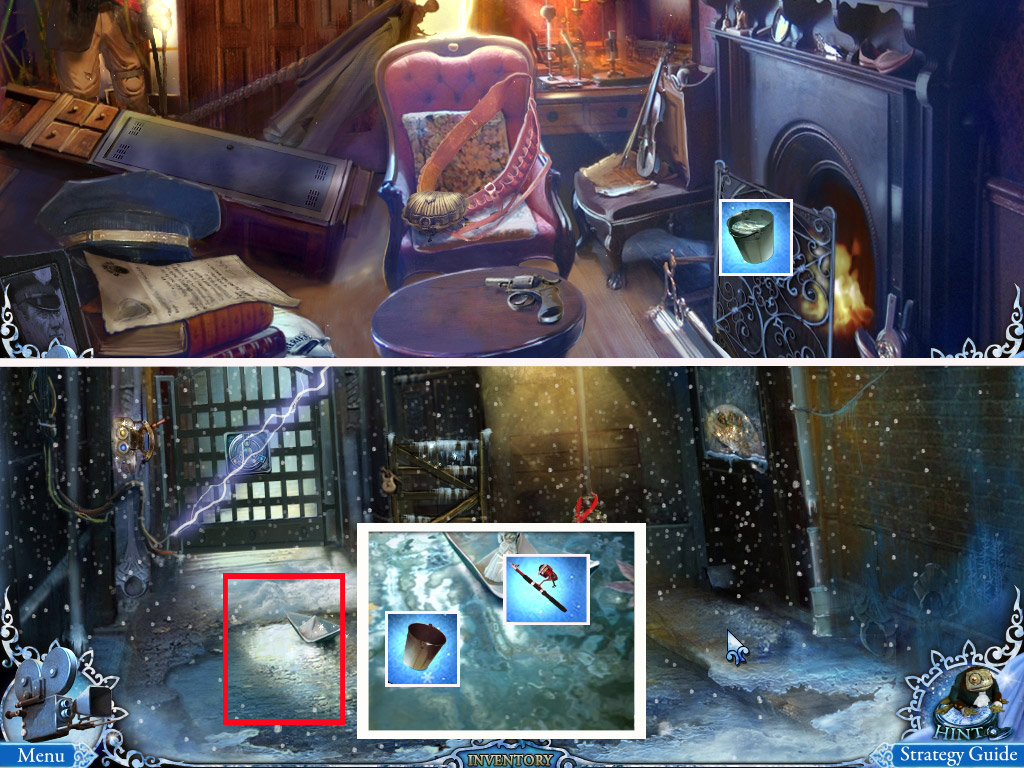
13. Extinguish the fire in the Sheriff's Room
Zoom in on the puddle and use the bucket (Spoiler 12) to get a bucket with water.
Use the fishing rod (Spoiler 7) to get the angel figurine in the paper boat.
Return to the Sheriff's office.
Use the bucket with water to extinguish the fire in the fire place.
Screenshot
Click the fireplace to find a search scene.
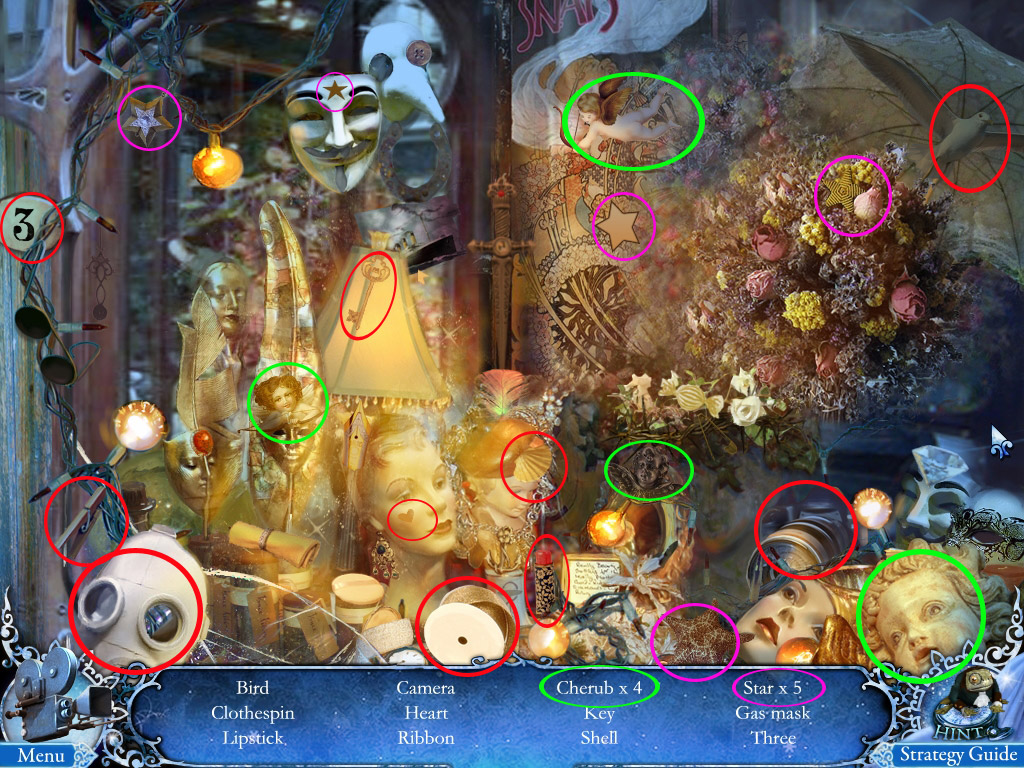
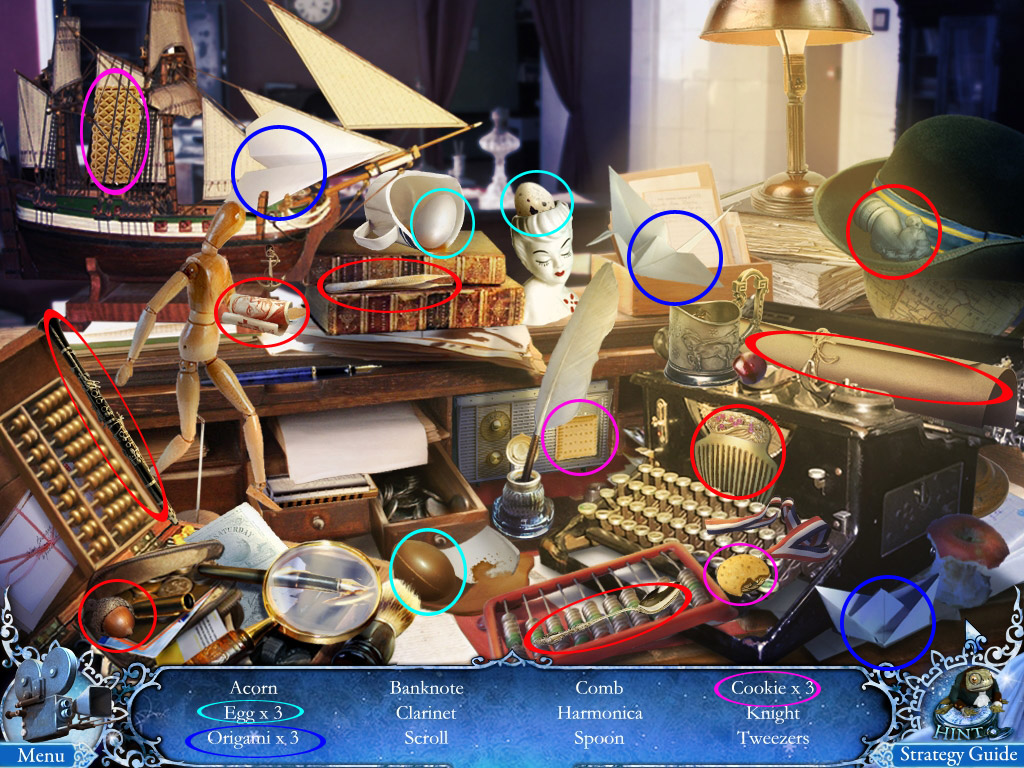
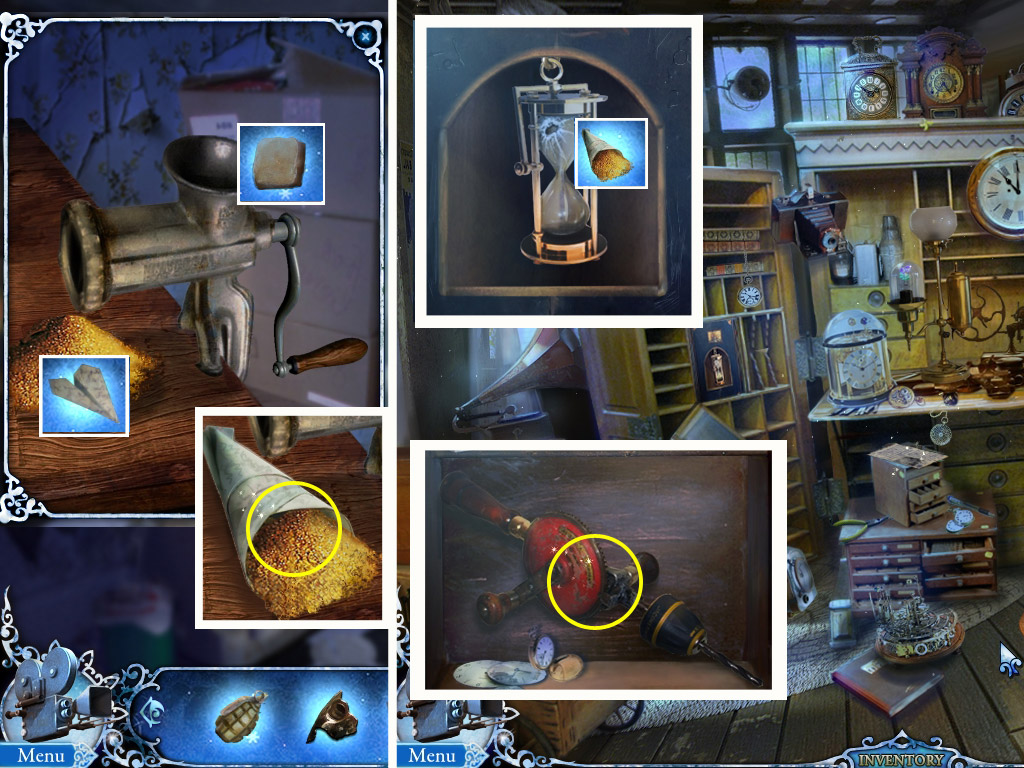
Find all objects from your list to obtain bread.
Screenshot - Search Scene
Exit the Sheriff's Room and head over to the place in front of the Abandoned Café.
14. Abandoned Café/Minor Square
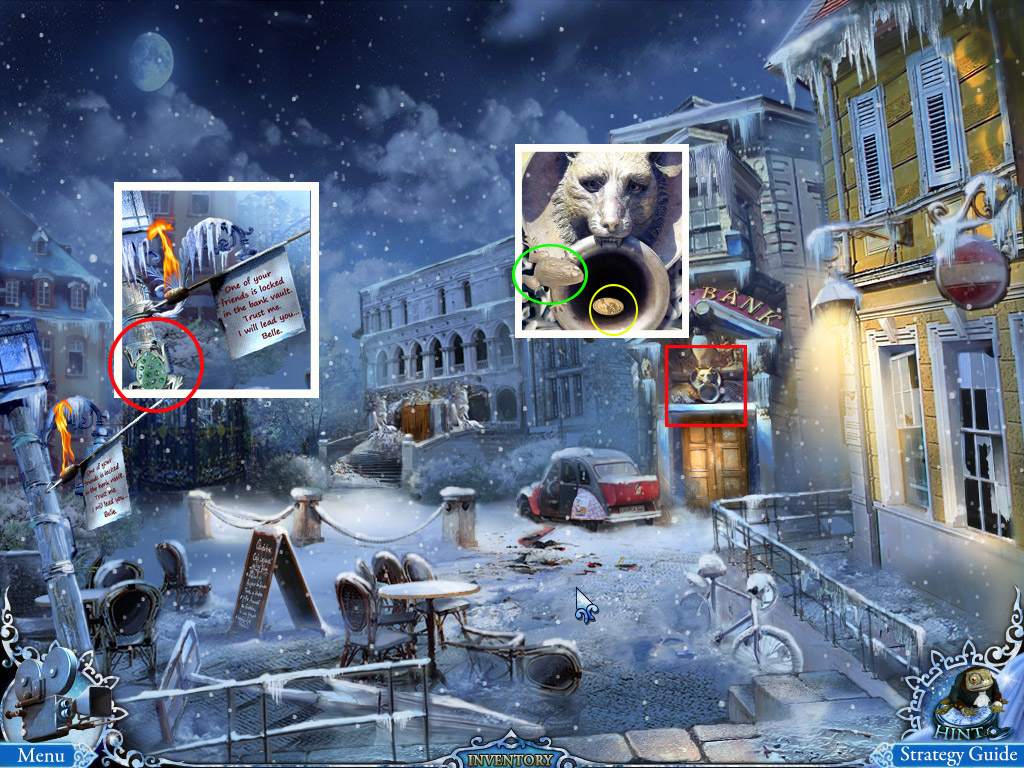
Zoom in on the raven on the roof and give it the bread (Spoiler 13).
The raven will drop the key in its beak for the bread; you can take the yellow key from the nail on the left side.
Go forward to the Minor Square and zoom in on the Showcase on the right side.
Take the frog (7/60).
Place the light bulb (Spoiler 1) in the lamp to right and zoom in on the showcase again.
Screenshot
Zoom in again to play a search scene; find all objects to obtain a gas mask.
Screenshot - Search Scene
Go to the other side of the road and enter the Pharmacy.
15. Pharmacy
Use the gas mask (Spoiler 14) at the table on the right and click the table again to access a search scene.
Find all objects from your list to obtain a fork.
Screenshot - Search Scene
Click the box on the desk straight ahead to learn that a piece is missing.
Exit the Pharmacy and go next door to the Watchmaker.
16. Watchmaker
Zoom in on the lower part of the door and use the yellow key (Spoiler 14) to open the last lock.
The door opens; enter the house.
Click the guy.
Zoom in on the left side of the working bench behind him.
Grab the container and the cash register button.
Take the frog (8/60).
Screenshot
Go forward to the Lane.
17. Lane/Abandoned Café
Zoom in on the base of the lamppost on the right side.
Use the fork (Spoiler 15) with the holes and take the cash register start button.
Screenshot
Return to the Abandoned Café.
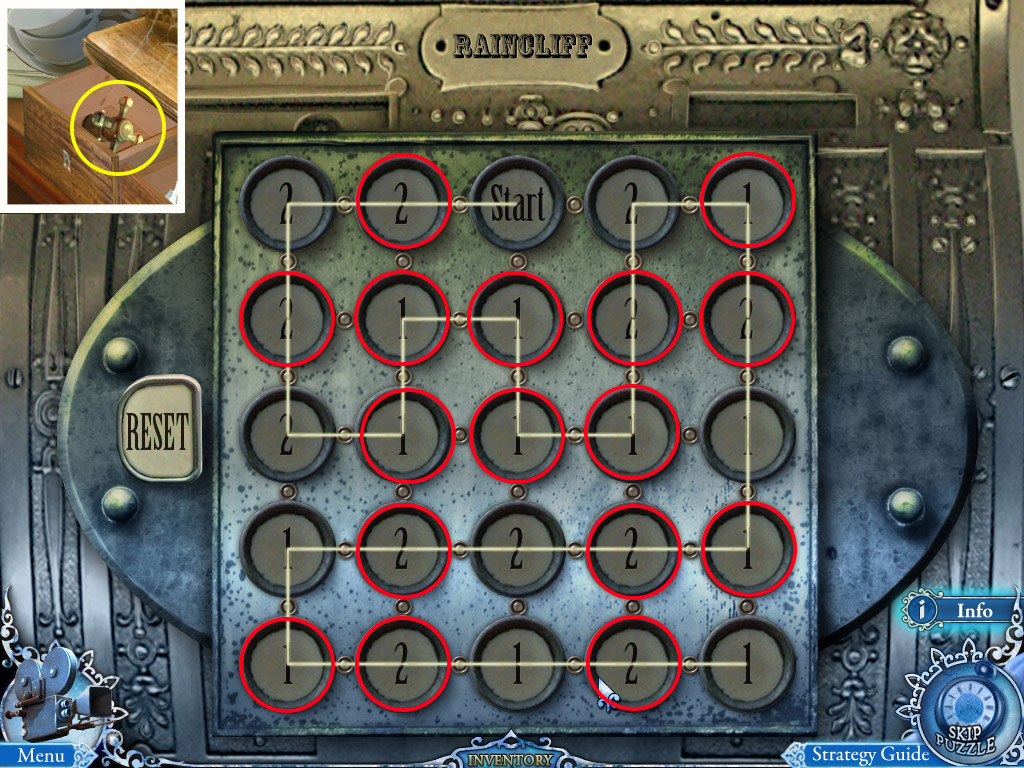
Zoom in on the cash register and into the key pad and place both cash register buttons (Spoiler 16, 17).
Your goal in this mini game is to create a line that will hit each button, but you do not want to cross the line.
The numbers on the buttons indicate how far the lines will go when you press this button.
Please see screenshot for the solution.
Screenshot
A drawer will open; take the faucet.
Go to the Pharmacy, but do not enter.
18. Pharmacy
Zoom in on the water basin on the right right, next to the Pharmacy door.
Place the faucet (Spoiler 17); the water will start running. Place the empty bottle (Spoiler 11) and get a bottle with water into you inventory.
Enter the Pharmacy.
Zoom in on the box on the table in the back and place the angel.
Your goal is to bring the angel into the blue exit on the right by using the arrows on the right and bringing the imp into the red exit on top by using the arrows on the left.
You may use the Reset button.
Using an arrow will make the angel or the imp go along the line until a wall or an obstacle stops it.
Move the:
Angel up
Imp right
Angel down
Angel left
Angel up
Angel right
Imp up
The box will open; take the ground coffee.
Screenshot
Return to the Abandoned Café.
19. Abandoned Café
Click on the poster at the back wall to get to the Pinball Machine.
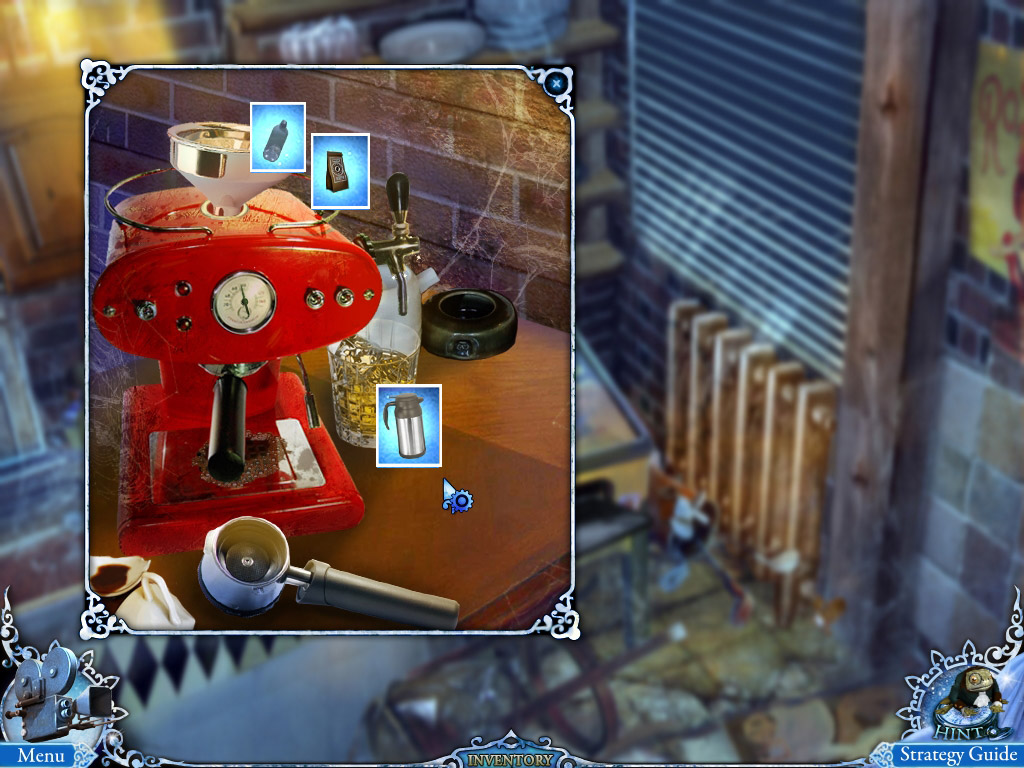
Zoom in on the coffee maker on the left.
Place the bottle with water (Spoiler 18) in the funnel on the top, then the ground coffee (Spoiler 18).
Place the container (Spoiler 16) under the faucet on the right side.
Take the container with coffee back into your inventory.
Screenshot
Leave the Café and go back to the Watchmaker.
20. Watchmaker
Zoom in on the left side of the working bench and use the container with coffee (Spoiler 19) to fill the cup.
Take the cup of coffee into your inventory and use it at once to give it to the guy.
Go back to the Watchmaker after the cut scene.
Note the hatch on the ground, the broken sand clock on the shelf right side of the working bench and the note in front of the working bench.
Screenshot
Zoom in on the working bench to access a search scene.
Find all objects to obtain dynamite.
Screenshot - Search Scene
Exit the Watchmaker and go to the gate.
21. Gate
Place the dynamite at the gate and press the detonator (both Spoiler 20).
Walk through the gate.
Chapter 3: Taken
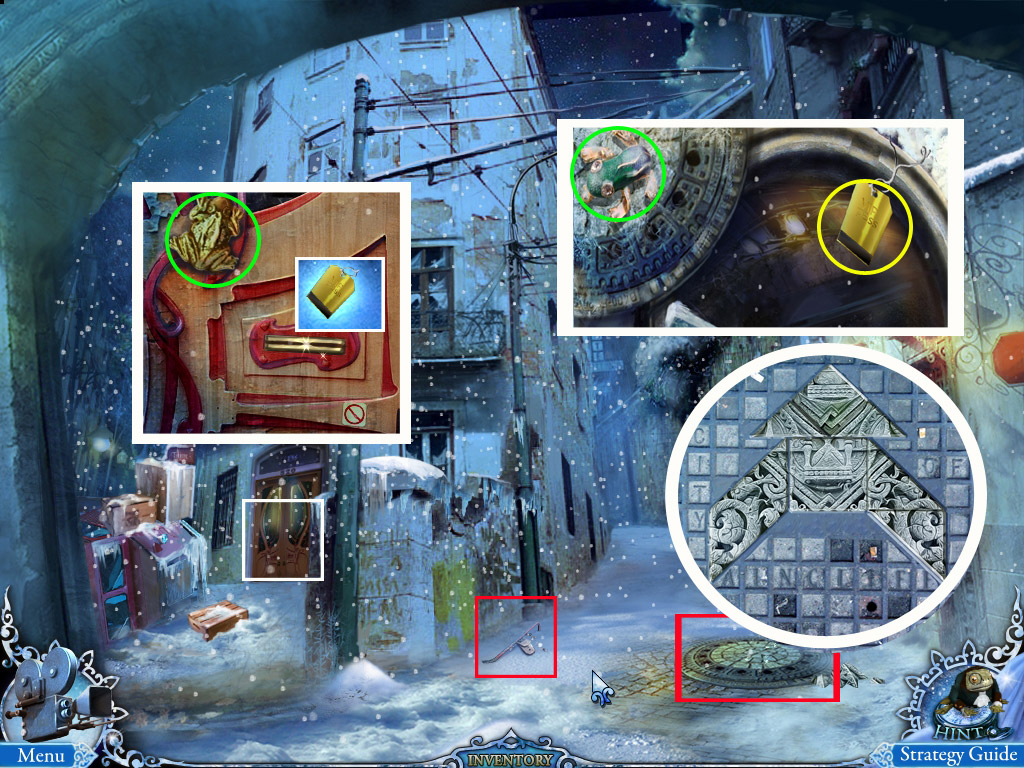
22. Crossroad
Look at the crowbar on the right side of the street to learn that you will need a tool to pry it out.
Zoom in on the sewer.
To solve the puzzle, you will need to place each tile in its correct position.
Use right click to turn the tiles.
Tiles at the right place will NOT lock. If you are right you will see when the puzzle closes and the sewer top opens.
Zoom in on the open sewer and take the frog (9/60) and the VIP card.
Zoom in on the door of the house left and take the frog (10/60).
Use the VIP card at the slot.
Screenshot
Enter the house.
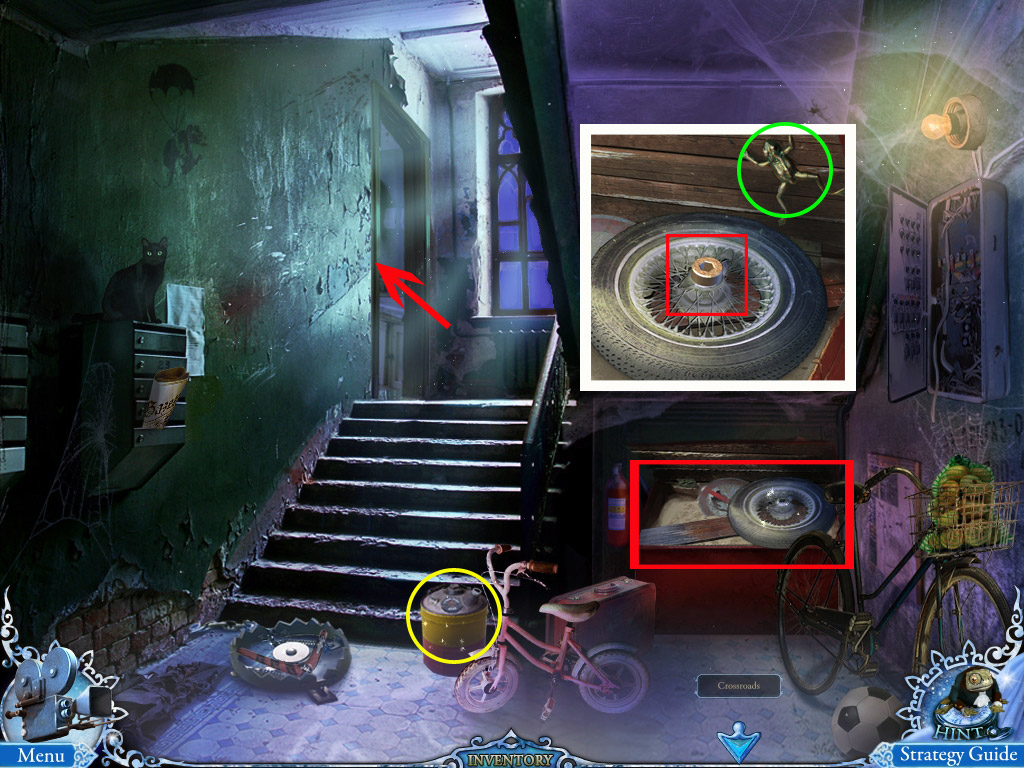
23. Staircase/Kitchen
Zoom in on the red crate on the far right - take the frog (11/60).
Learn that you will need a wrench to loosen the nut.
Note the trap, and that you will need something to close it and get the boomerang.
Take the gasoline tank.
Screenshot
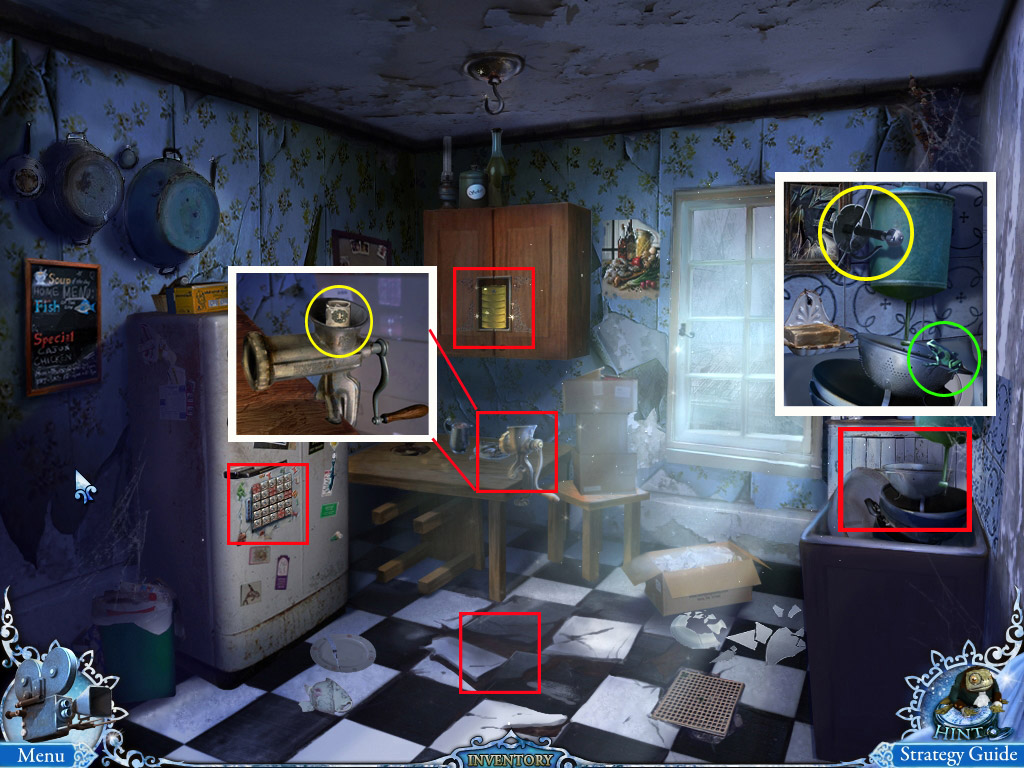
Enter the door on the far left to the kitchen.
Zoom in on the water basin at the right.
Take the sword hilt and the frog (12/60).
Zoom in on the meat grinder at the table on the far left and take the money (1/).
Note the hanging closet, the fridge, and the crack on the floor, and learn that you will need bulbs, a disc and something heavy.
Screenshot
Exit the kitchen and go back to the Crossroad.
24. Crossroad/Watchmaker
Zoom in on the Crowbar and use the sword hilt (Spoiler 23) pry out the crowbar.
Take the frog (13/60).
Go back to the Watchmaker but stay outside.
Zoom in on the left wall and remove the plaster with the crowbar.
Take the wrench.
Screenshot
Return to the Entrance of the City.
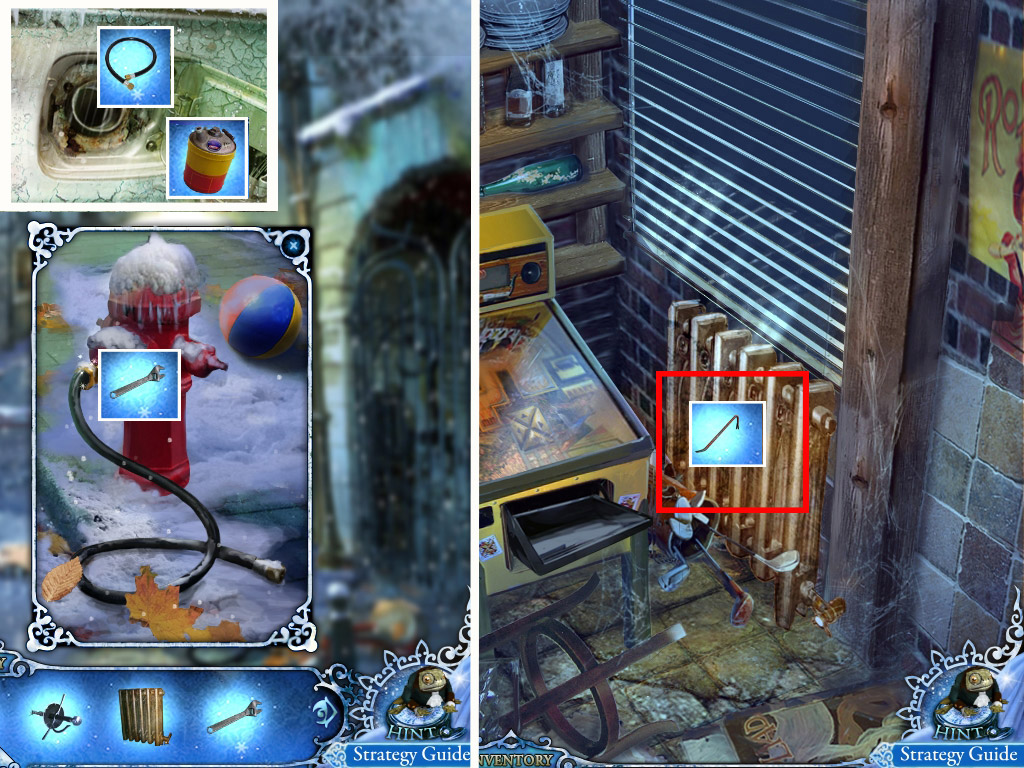
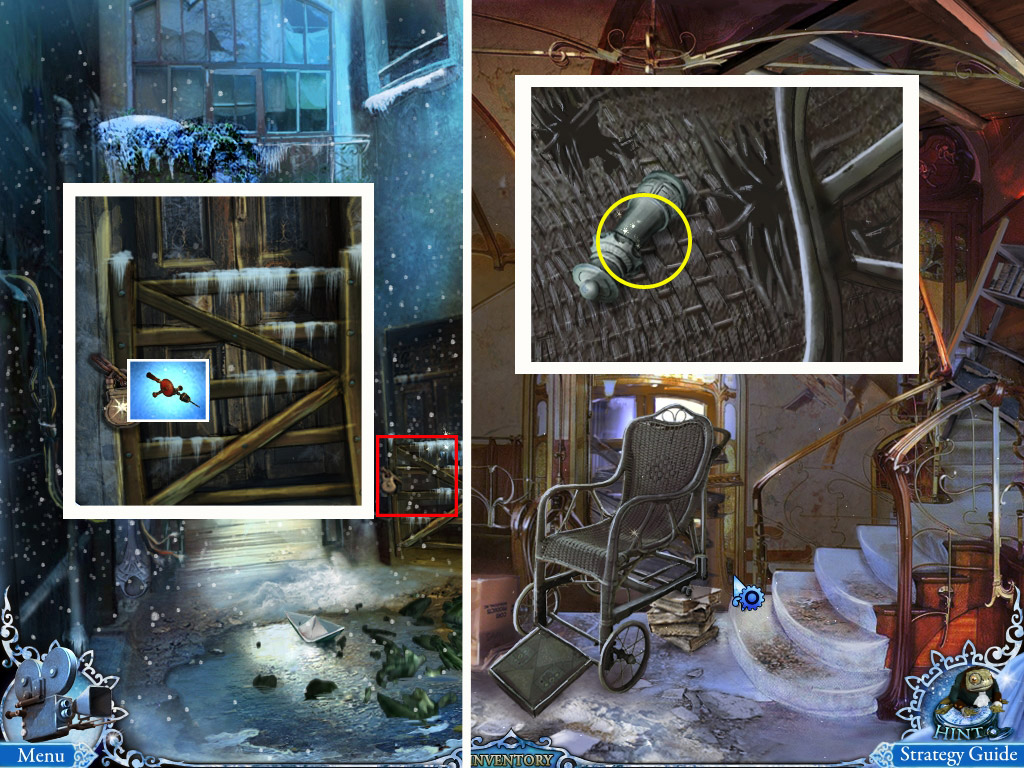
25. Entrance of the City/Get the radiator
Zoom in on the fire hydrant and use the wrench (Spoiler 24) to get the hose.
Zoom in on the tank of the car and click to open the cover.
Place the hose into the hole and the empty gasoline tank (Spoiler 23) under it.
Take the full gasoline tank.
Go into the Abandoned Café and enter the pinball machine area.
Use the crowbar (Spoiler 24) to remove the radiator from the wall.
Screenshot
Go to the Pharmacy.
26. Pharmacy/Gate
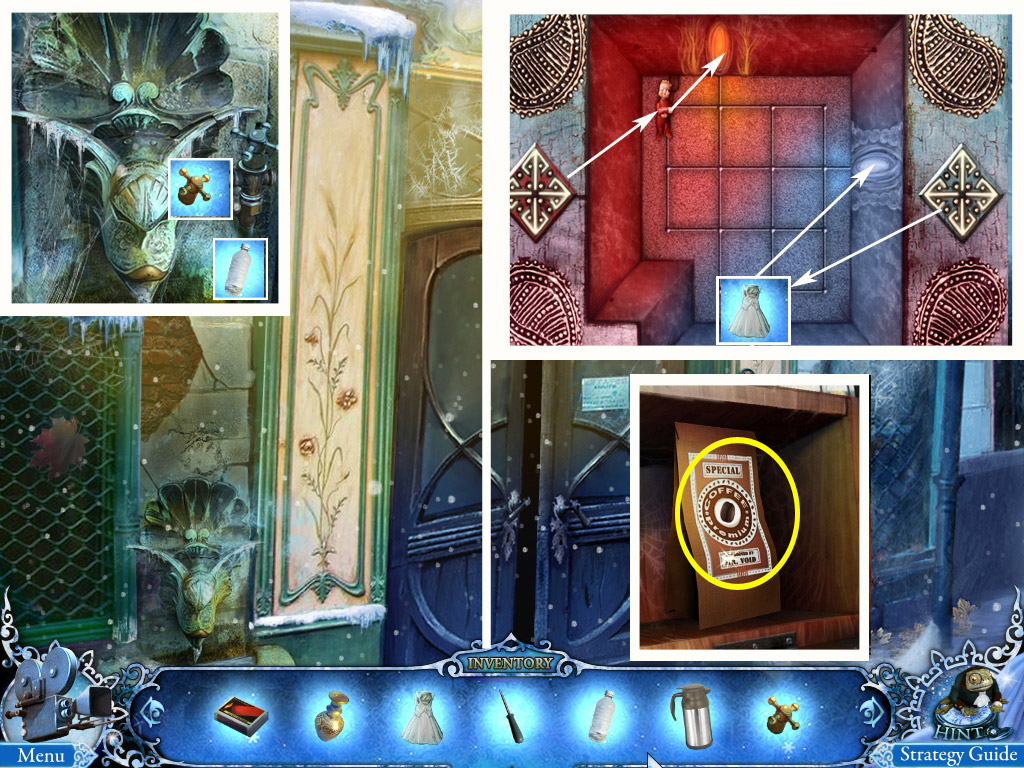
Do not enter the Pharmacy, but zoom in on the water basin left next to the Pharmacy door.
Place the full gasoline tank (Spoiler 25), then the matches (Spoiler1) into the frozen basin
Take the lion door knocker.
Go to the Gate and zoom in on the lion's head at the far right.
Place the lion door knocker; this will open its mouth.
Take the metal cable.
Screenshot
Go to the old house and enter the kitchen.
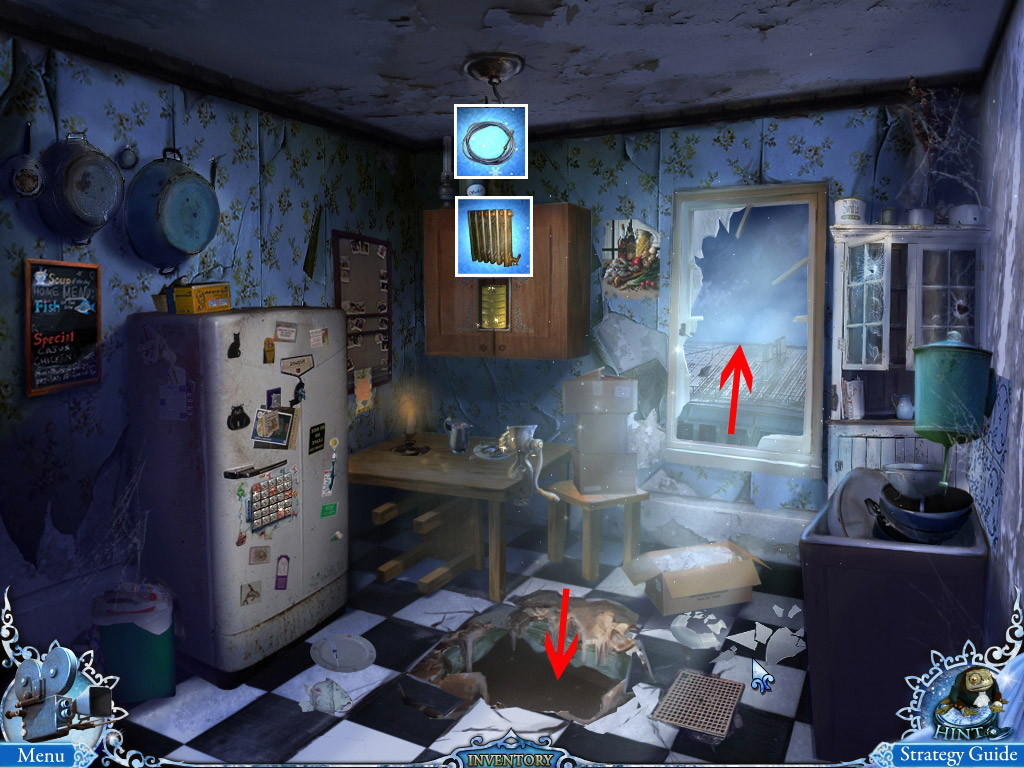
27. Kitchen/Truck
Place the metal cable (Spoiler 26) on the hook on the ceiling and place the radiator (Spoiler 25) at its end.
It will destroy the floor - try to reach the secret bedroom to find out you will need protection first.
Follow the phantom through the now broken window.
Screenshot
Note the Dragon Gate at the far back and the Basement Entrance on the right.
Screenshot
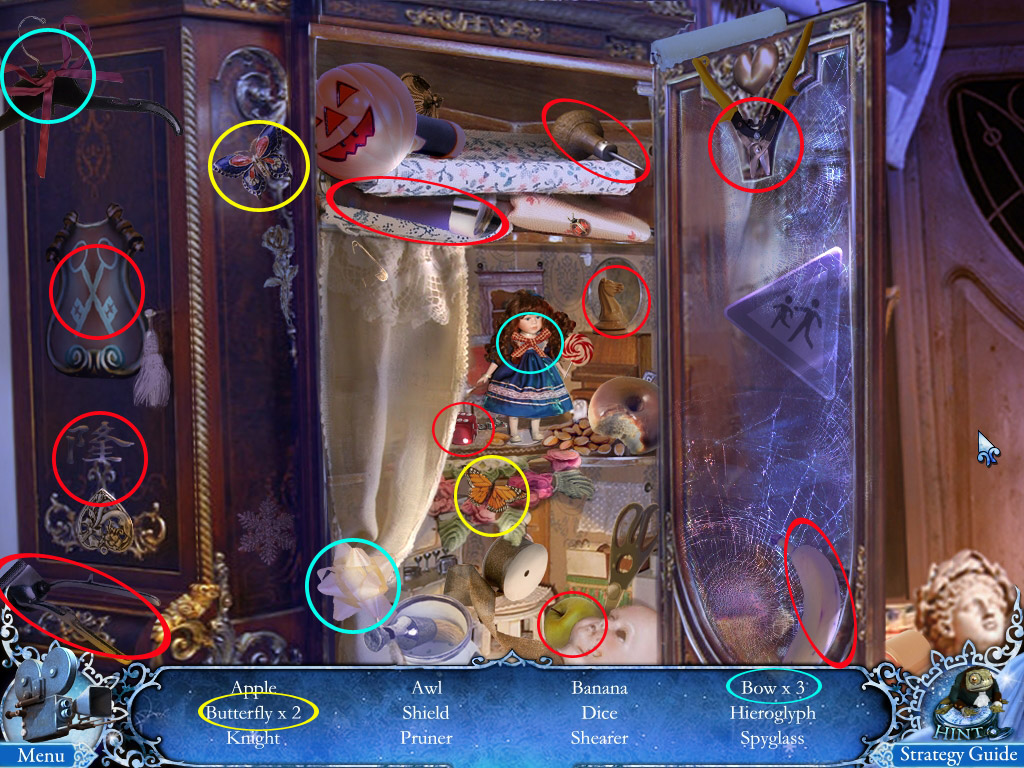
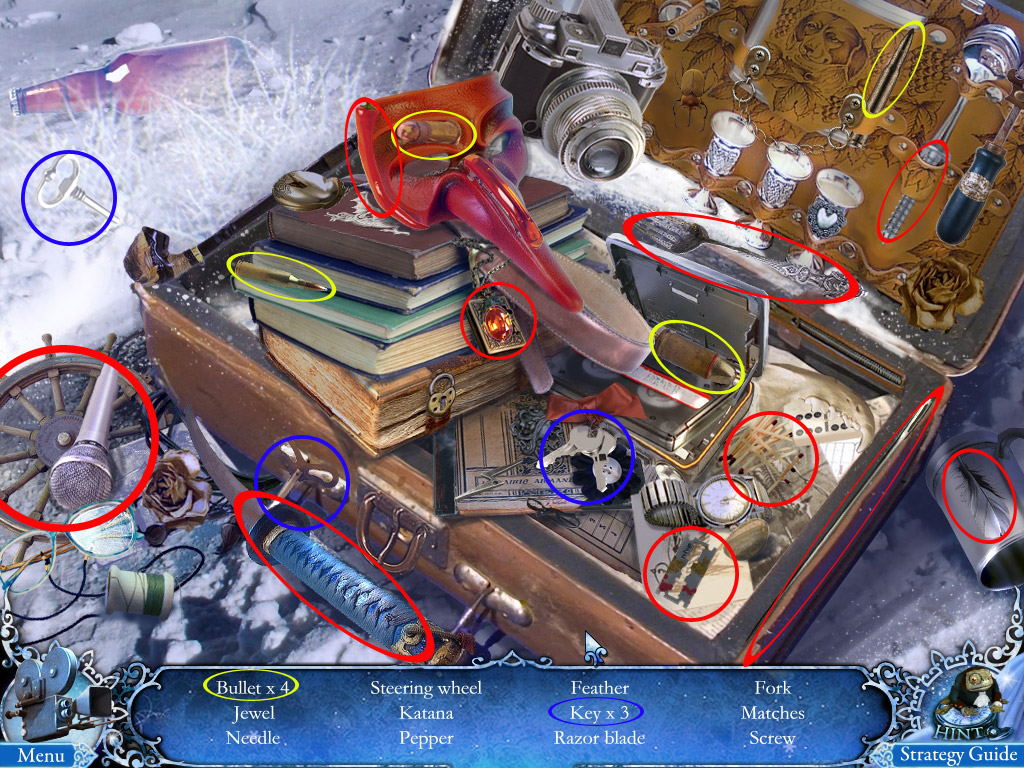
Access the search scene at the truck on the left side and find all objects to obtain a shovel.
Find the frog (14/60).
Screenshot - Search Scene
Go back to the Crossroad; enter the Sewer.
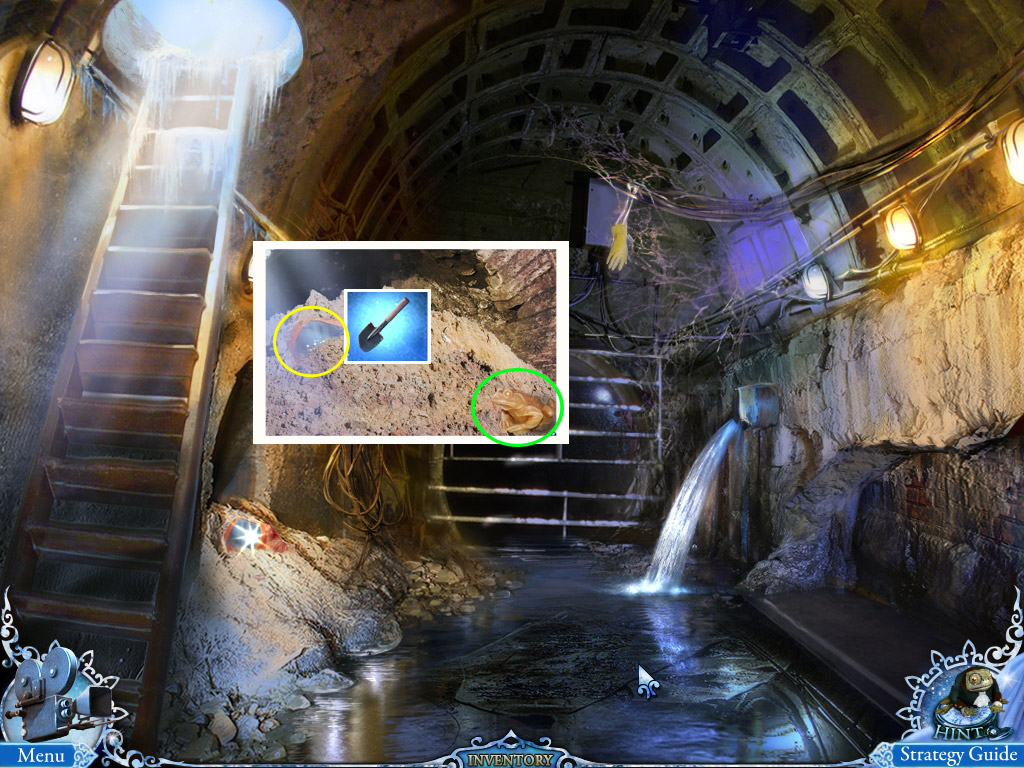
28. Sewer/Secret Bedroom
Zoom in on the sand heap on the left side and use the shovel (Spoiler 27) to dig out the protection suit.
Take the frog (15/60).
Screenshot
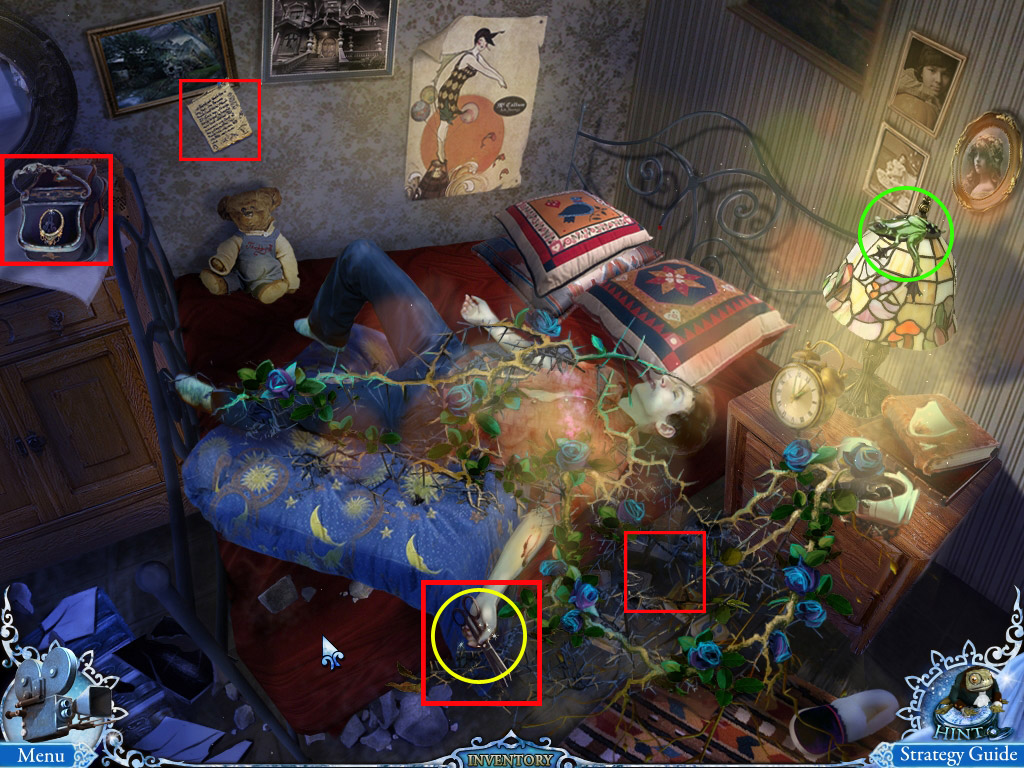
Return to the kitchen and go down to the secret bedroom.
Use the protection suit anywhere in the scene.
Read the note at the back wall and take the frog (16/60) on the lamp, right side.
Zoom in on the student's hand and take the scissors.
Screenshot
Exit the secret bedroom and access the Basement Entrance through the kitchen window (right side).
29. Basement Entrance/Kitchen
Take the frog (17/60) on the right side and zoom in on the lantern on the left side.
Take the frog (18/60).
Use the scissors (Spoiler 28) to cut the rope.
Take the lamp and the grenade.
Screenshot
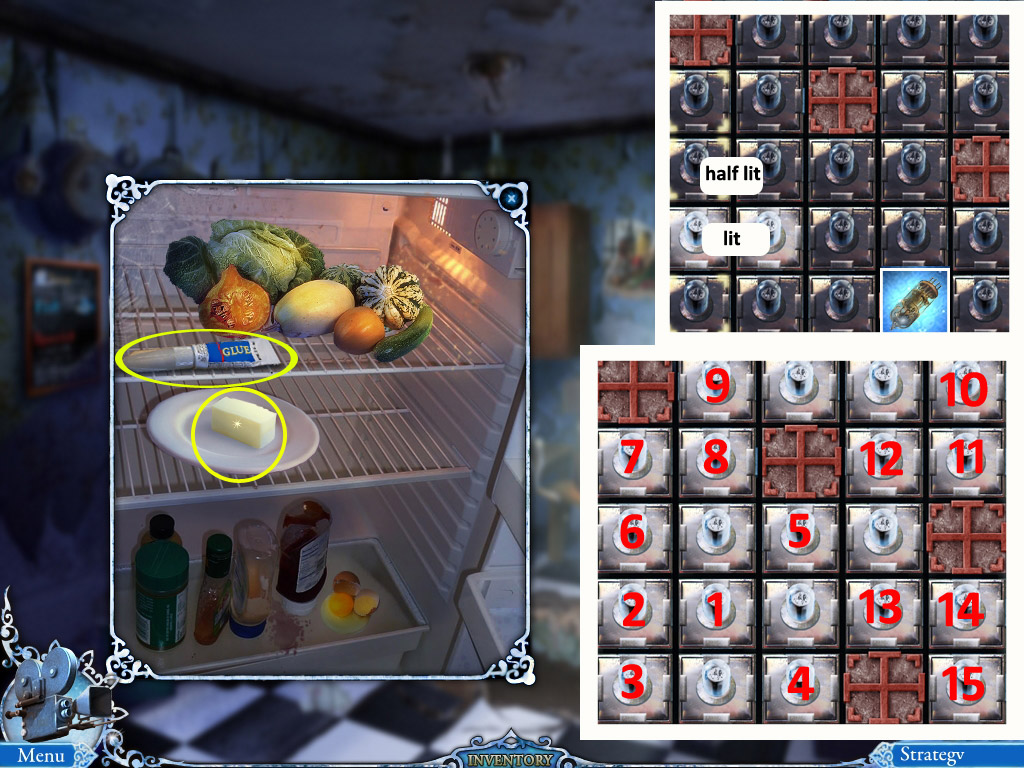
Return to the kitchen.
Zoom in on the fridge and place the lamp to activate a puzzle.
Your goal is to light up all lamps.
Clicking one lamp will affect all lamps in the same row and column.
The lamps will be first half lit, then complete.
If a lamp is lit, it will not be affected anymore when another lamp in the same row or column is clicked.
You may use the reset button to start all over.
The screenshot will show you a numbered solution.
Screenshot
When all lamps are lit the fridge door opens. Take the butter and the tube with glue.
Exit the House to the Crossroad.
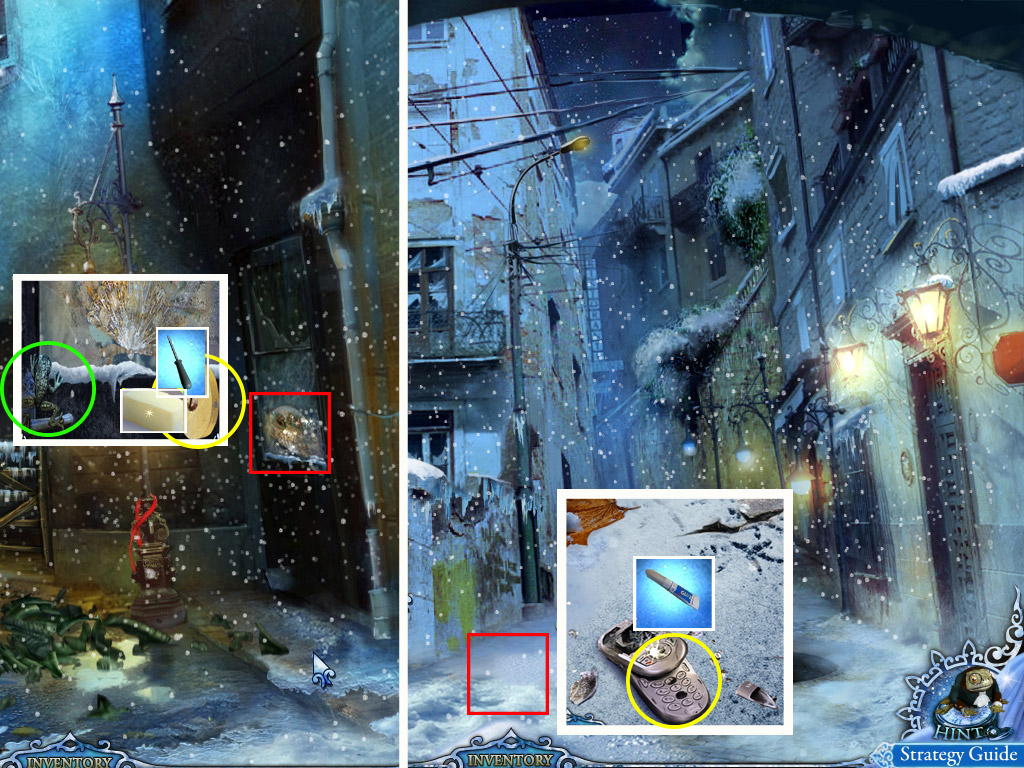
30. Crossroad/Lane
Zoom in on the cell phone on the left side of the street. Use the glue (Spoiler 29) to fix it.
Go forward to the Lane.
Zoom in on the window showcase on the right side and take the frog (19/60).
Use the butter (Spoiler 29) and the screw. Remove it afterwards with the screwdriver (Spoiler 12) and take the disk.
Learn that you will need a tool to cut the glass and get the object behind.
Screenshot
Return to the kitchen.
31. Kitchen
Zoom in on the hanging closet left next to the window and place the disk (Spoiler 30).
Your goal is to turn the disks so that all will show the lamp in front.
Clicking one disk will affect two other disks.
Hovering over the disks with the mouse will show you shadows of all affected disks.
A numbered solution can be seen on the screenshot.
Screenshot
When the closet is open, you can take a puzzle piece (1/4) and an eye (1/2).
Go down into the Secret Bedroom.
32. Secret Bedroom/Lane
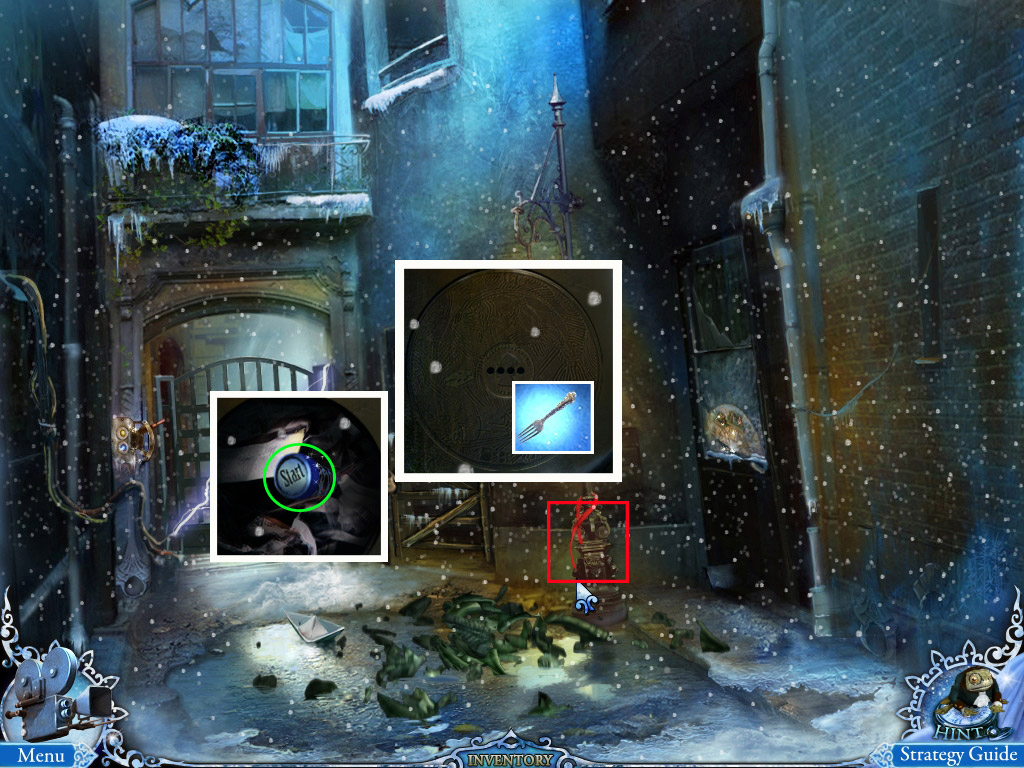
Zoom under the bed and use the cell phone to get light.
Click that part again and play the search scene to obtain a diamond ring.
Screenshot - Search Scene
Exit the house and go forward to the Lane.
Zoom in on the showcase window on the right and use the diamond ring to cut the glass.
Take the fan.
Return to the Kitchen and use the window to access the Dragon Gate.
Posted by: Kayleigh |
May 23, 2011 10:49 AM
|
May 23, 2011 10:49 AM
Mystery Trackers: Raincliff - Walkthrough
Chapters 4-8
Chapter 4: The Masked Gunman
33. Dragon Gate/Secret Bedroom
Zoom in on the paper plane on the top right of the gate and use the fan (Spoiler 32) to blow it down.
Zoom in on the spot on the ground where the paper plane landed.
Take the paper plane, the Brooch and the frog (20/60)
Screenshot
Return to the Kitchen and enter the Secret Bedroom.
Zoom in on the casket on the top left side and place the Brooch in the spot.
Take the tweezers out of the open casket.
Screenshot
Head back to the Pharmacy.
34. Pharmacy/Watchmaker
Zoom in on the skeleton on the floor and use the tweezers (Spoiler 33) to get the eye (2/2).
Exit and enter the Watchmaker.
Screenshot
Zoom in on the hatch on the floor and place the two eyes (Spoiler 31 und 33). The hatch will open and activate a mini game.
Your goal is to color the harlequin by using the colors on the left according to their symbol and the symbols at the face.
Click a color and then click the symbol on the face.
If you use a wrong color, just click the symbol again with the right color.
Screenshot
This will activate a search scene.
Find all items of your list to obtain a pirate hand.
Take the frog (21/60)
Screenshot - Search Scene
Leave the house and return to the Sheriff's Room.
35. Sheriff's Room/Staircase
Zoom in on the pirate at the far left and place his hand (Spoiler 34).
For this he will loose a pirate leg; take it.
Return to the staircase of the house.
Zoom in on the trap on the left and place the leg into the trap.
Take the boomerang.
Screenshot
Exit the house and enter the Sewer.
36. Sewer (get the glove)/Lane
Use the boomerang (Spoiler 35) to get the glove from the ceiling.
Exit the Sewer and go forward to the Lane.
Zoom in on the device on the left and see the glove to pull the lever.
Now zoom in on the gate to access a puzzle.
Your goal is to match the color triangles in the inner circle with the colors of the spheres on the outer circle.
A matching sphere will fall down and lock, but if it is moved to another triangle it will unlock.
There is no Reset button, but leaving the puzzle and coming back will set the puzzle back to the start.
To move the circles, just click them.
Click: Outer - Inner - Outer - Outer - Inner - Outer
Screenshot
The gate will open; enter Narrow Street.
37. Narrow Street/Major Square
Zoom in on the eagle on the left side of the arch and take the sandstone.
Note the vending machine and the note saying you will need $5.
Take the frog (22/60).
Screenshot
Go forward to the Major Square and click somewhere in the scene.
Have a look at the note that was shot with an arrow on the left side.
Take the frog (23/60) and read the note.
Go to the bank right side and click on the lion head above the Entrance.
Screenshot
Take the frog (24/60) and the money (coin).
Enter the bank.
38. Bank
Zoom in on the ice bear on the right, the book on the first desk seen from the right to learn that you will need tools and more to solve all the puzzles.
Screenshot
Play the search scene on the middle desk to obtain a knight.
Screenshot - Search Scene
Exit the bank, go back to the old house and enter the kitchen.
39. Kitchen/Watchmaker
Zoom in on the meat grinder and place the sandstone (Spoiler 37) into it.
Use the paper plane (Spoiler 33) to take the sand.
Exit the house and go back to the Watchmaker.
Zoom in on the sand clock on the left shelf.
Use the sand in the paper back to fill up the clock.
Take the hand drill that appears behind.
Screenshot
Exit and go forward to the lane.
40. Lane/Abandoned Studio
Zoom in on the boarded door on the right side and use the hand drill (Spoiler 39) to open the padlock.
Zoom in on the wheelchair and take the Queen.
Screenshot
Exit the Studio, go back to the house, into the kitchen and through the window to the Basement Entrance.
41. Basement Entrance/Garage (Bus)
Zoom in on the Entrance and place the Knight (Spoiler 38) and the Queen on the board.
Your goal is to bring the figures into their right value order; from left to right, small to high.
Click two figures next to each other to swap places.
The correct positions from left to right: Pawn, knight, bishop, tower, queen, king.
Solving this puzzle will activate another one.
Your goal is to switch the picture parts to restore the pictures on the left and right.
Only parts next to each other (left, right, above, below) can be swapped.
When one image is correctly restored, the lamp in the middle will show green.
When both lamps are green the door will open.
Screenshot
Enter the Garage.
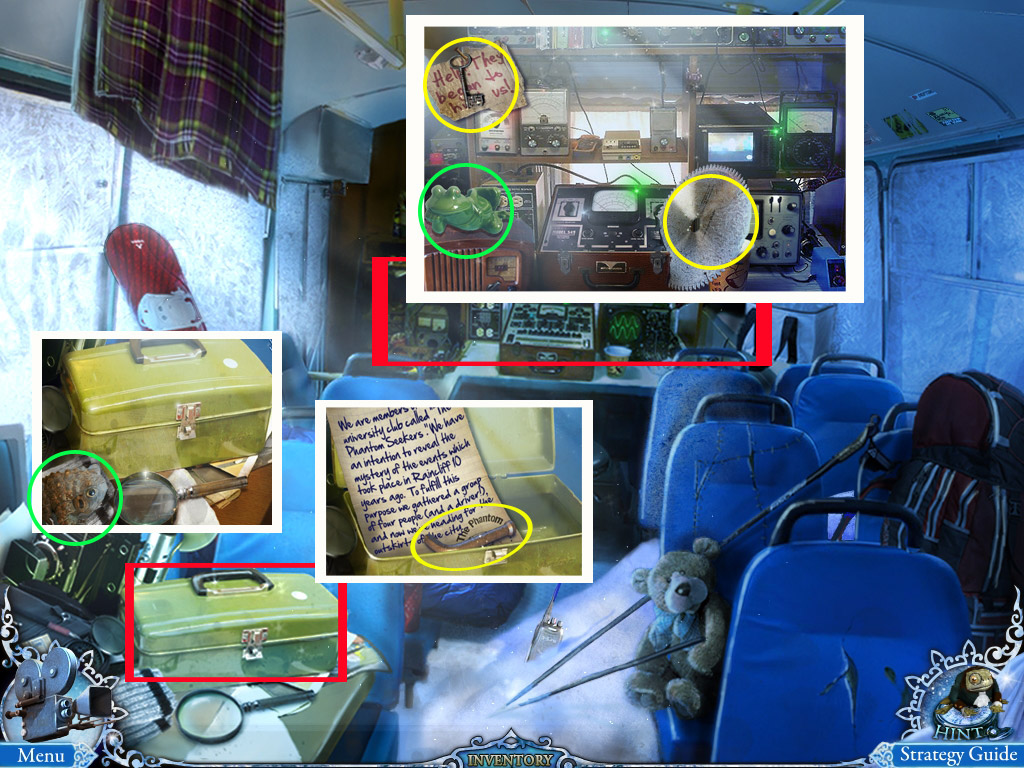
42. Garage/Staircase
Zoom in on the bus and then in on the green box on the left side.
Take the frog (25/60).
Take the allen wrench and read the note.
Zoom in on the instruments at the front of the bus.
Take the frog (26/60).
Take the saw blade - it will automatically combine with the saw without disk to become a disk saw.
Take the safe key on the top left.
Screenshot
You may turn the radio on, but it has no further effect.
Exit the Garage and return to the Staircase.
Zoom in on the big crate and use the allen wrench to get the wheel.
Leave the house and go back to the bank.
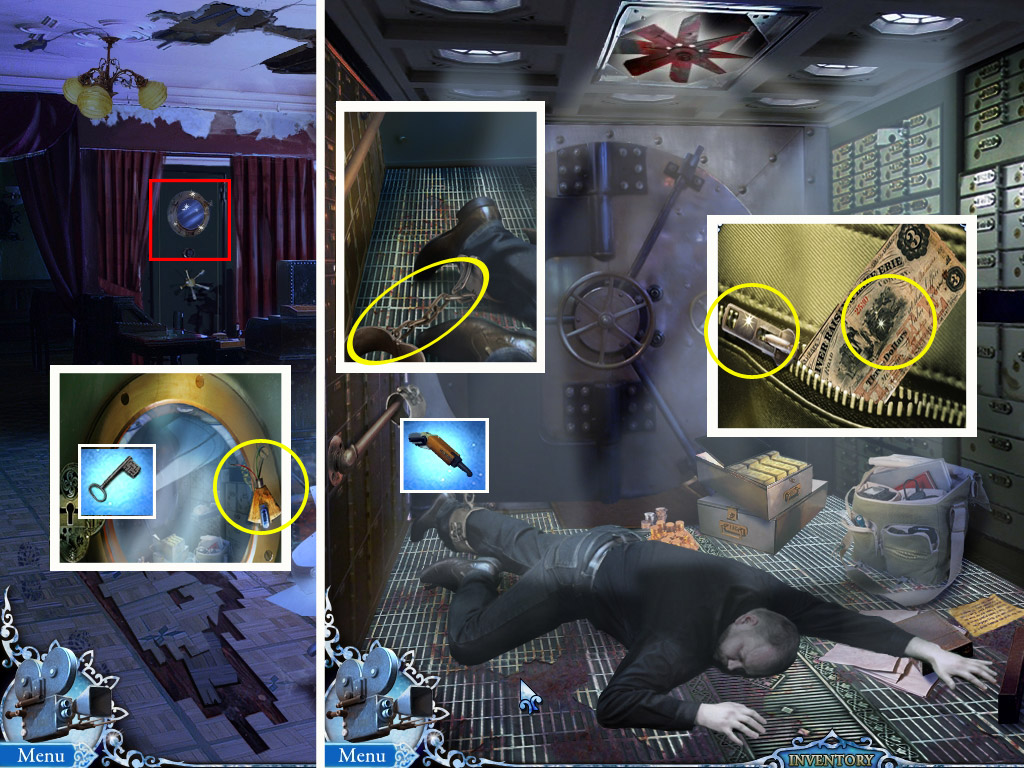
43. Bank/Bank Safe
Zoom in on the Bank Safe door in back and take the blue radio tube.
Use the safe key (Spoiler 42) to open the door.
Enter the Bank Safe.
Zoom in on the guy's leg's on the left and use the disk saw (Spoiler 42) to saw through the shackles.
Take the shackles.
Zoom in on the bag on the floor, right side.
Take the zipper and the money (3/3)
Screenshot
Exit the Bank Safe and return to Narrow Street; to the vending machine.
44. Narrow Street (Vending Machine) /Garage (Bus)
Zoom in on the vending machine and place the money (Spoiler 23, 37, 43).
Take the angel cork from the bottle.
Go back to the old house, into the kitchen and through the window into the Garage, then enter the Bus.
Zoom in on the Teddy on the right side and place the zipper (Spoiler 43) above his head.
Take the panel with date.
Screenshot
Return to the Bank, but do not enter.
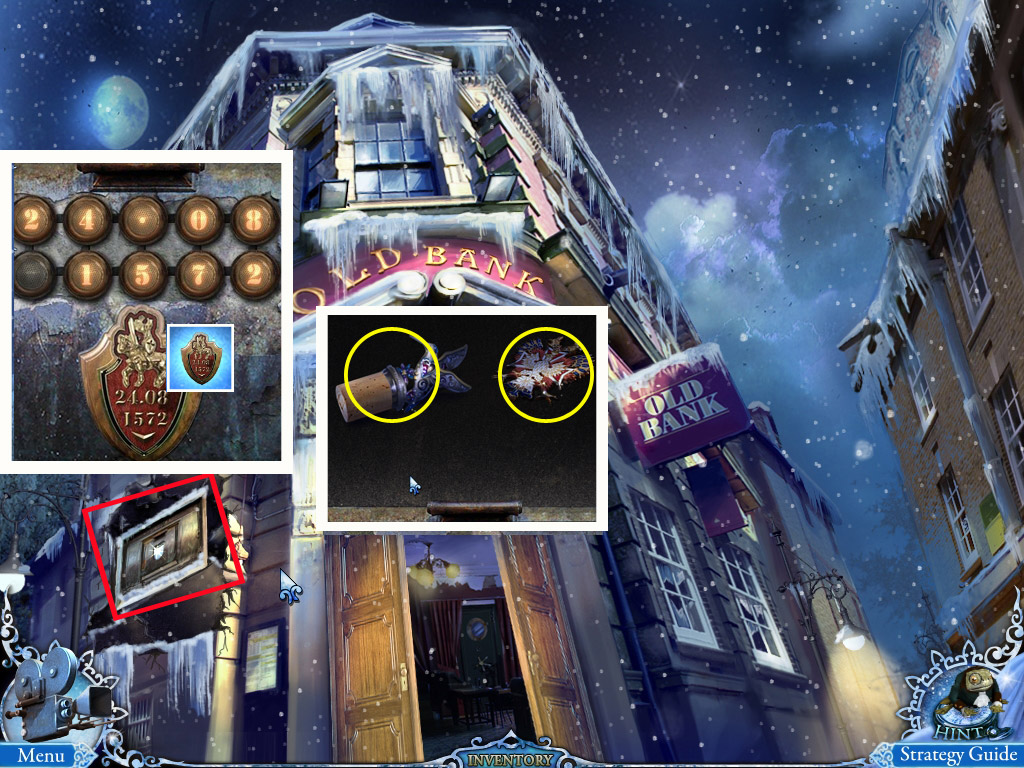
45. Bank (Night safe)
Zoom in on the Night safe on the right side of the bank and place the panel with date (Spoiler 45) to activate a mini game.
Your goal is to reproduce the date on the panel at the key panel above.
By clicking two keys (connected left, right, above or below) they will swap places.
Place the the keys in the right order and pay attention to the dot.
The empty space goes at the bottom left.
When you do it right, the safe will open.
Take the bird cork and the white eagle medal.
Screenshot
Exit the scene, go back to the Main Square and to the far right to reach the Palace.
46. Palace (Stairs)/Garage
Zoom in on the broken bottle on the right side of the stairs.
Take the frog (27/60) and the moon cork.
Return to the old house, return into the kitchen and through the window into the Garage.
Zoom in on the cabinet on the right side.
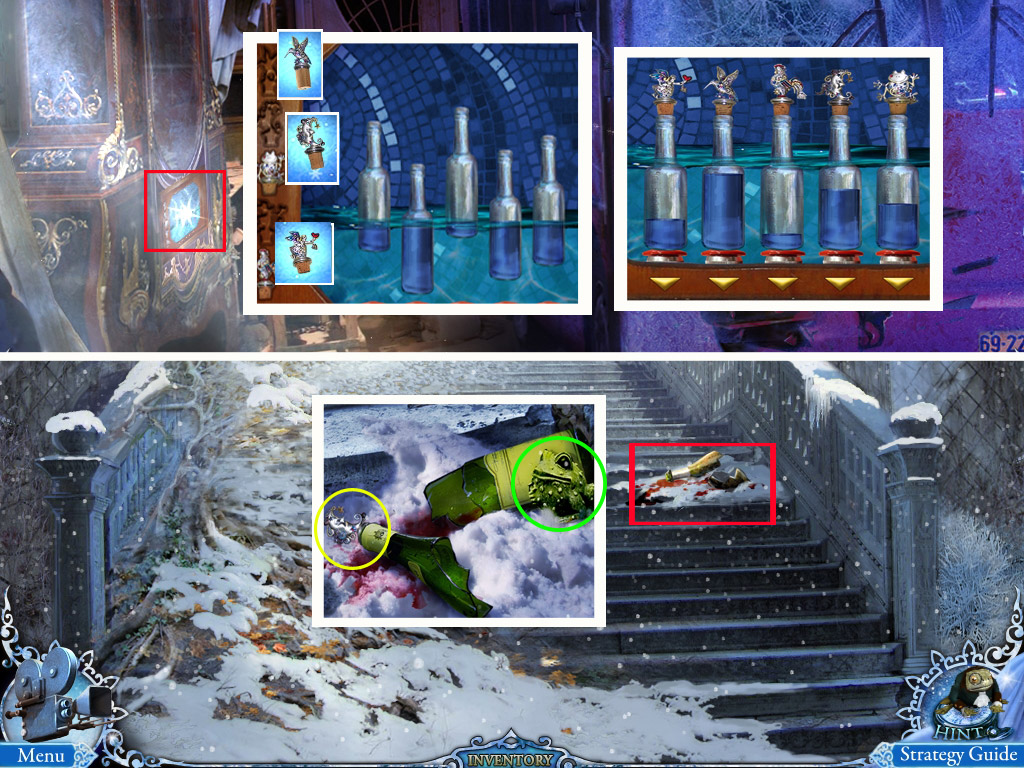
Place the three corks (Spoiler 43, 44, 45) to activate a mini game.
Each cork has its own weight. Your goal is to place the corks on the bottles to make the bottles go down and press the red buttons.
When all buttons pressed, the lock will open.
Screenshot
Click the cabinet again to play a search scene.
Screenshot - Search Scene
Find all objects to obtain the shield.
Exit the Garage and the old house, go forward to Main Square and then straight ahead to the Oak Alley Gate.
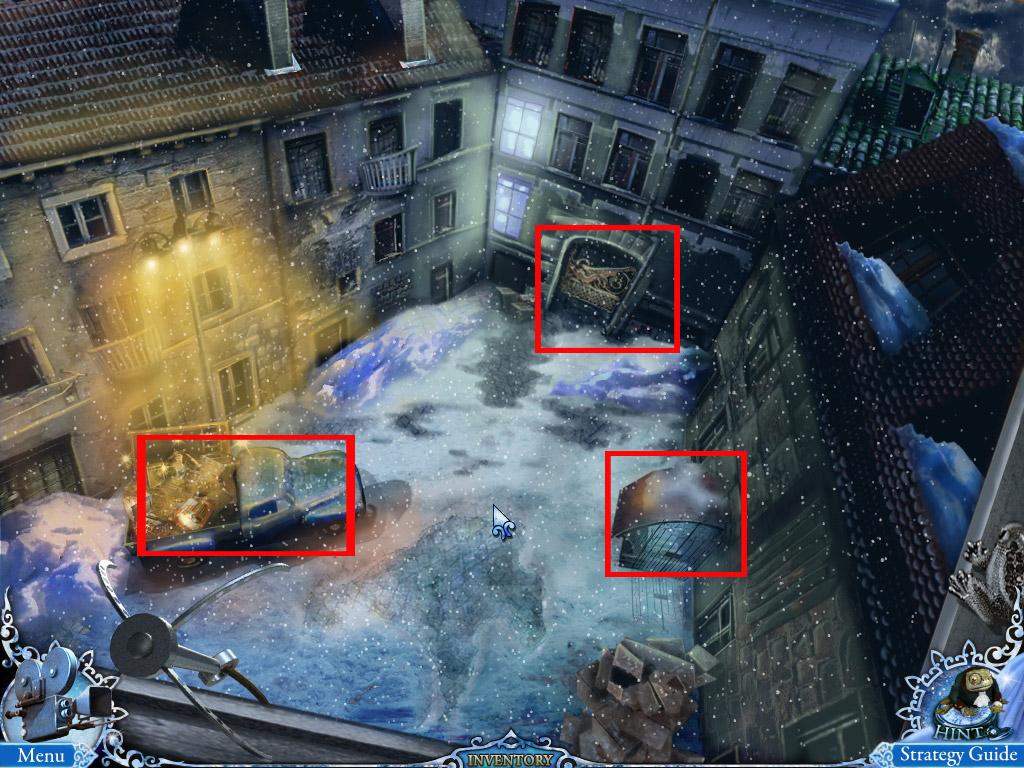
Chapter 5: Oak Alley
47. Oak Alley Gate/Oak Alley/Mill
Use the shield (Spoiler 46) on the right lion; the gate opens.
Note the police car, the Church Pathway on the right, and the Radio Tower at the far back. Go to the Mill on the left.
Screenshot
Zoom in on the ice on the pond and note that you will need an ice axe.
Zoom in on the Mill Entrance and take the frog (28/60) on the right and the valve on the left side.
Learn that the mill has to run before you can open the door.
Screenshot
Return to the Bank.
48. Bank/Vault
Enter the Bank Safe and zoom in on the Vault.
Place the valve in the middle of the lock to activate a mini game.
Your goal is to rotate the disks by clicking in a way that the slits are all on the left and the lock bolt can leave the slot.
Clicking one disk will affect the two neighboring disks.
Seen from the outside to the inside A-D click: B 6x, C 6x, A 2x, D 4x
The lock will open; zoom in on the Vault.
Grab frog (29/60) and the fishing auger.
Screenshot
Leave the Bank and go through Oak Alley Gate, then left to the Mill.
49. Pond at the Mill/Mill
Zoom in on the Pond and use the fishing auger (Spoiler 48) to drill a hole into the ice.
Use the grenade (Spoiler 29) with the hole.
Zoom in on the boat to play the hidden object scene.
Screenshot
Find all objects to obtain the red radio tube.
Note: This red radio tube is named "bulb" in the search scene.
Screenshot - Search Scene
The blast of the grenade lets the water flow.
Zoom in on the Mill Entrance and push the lever on the right side.
Click the door to open and enter the Mill.
Take the frog (30/60) on the right side and click the orange cabinet door in the far back to open.
Zoom in on the cabinet and light the lantern on the left with the matches (Spoiler 5).
Take the frog (31/60) on the top left and the magnet on the right, next to the frog.
Zoom in on the machine on the low left and place the two radio tubes (Spoiler 43 and 49) at the board.
Your goal is to arrange the lamps in sectors according to their color.
To do so, you will need to click the levers above the lamps. Some levers change the outer rings, some change the color of the lamps, some do both.
There is not reset button, but leaving the puzzle and coming back will let you start from the scratch.
Click the levers in the order shown on the screenshot.
Screenshot
This will open the drawer below. Take the frog (32/60) and the block.
Return to Oak Alley and go forward in the direction of the Radio Tower.
50. Radio Tower/Dragon Gate
Zoom in on the birdhouse on the right and take the frog (33/60).
Click the door to open and take the shield stamp.
Screenshot
Return to the old house and through the kitchen window to the Dragon Gate.
Zoom in on the note attached to the burning arrow, read the note and take the frog (34/60).
Zoom in on the bottom of the gate, take the frog (35/60) and use the magnet (Spoiler 49) to get the letter stamp attached to the magnet behind the gate.
Screenshot
Go back to the Main Square, then to the far right, the Palace Entrance.
51. Palace Entrance/Palace Hall
Zoom in on the Entrance and place the block (Spoiler 49).
Your goal is to reassemble the picture.
By clicking one of the blocks, all neighboring blocks will also turn around.
Blocks with nails can't be turned and will not turn when neighboring blocks are turned.
You may use the Reset button on the top to start all over.
Click the following block 3 times each (always seen from left)
Top row - fourth block
2nd row - second block
3rd row - sixth block
4th row - fourth block
5th row - third block.
Screenshot
Enter the palace hall.
Zoom in on the low right dome and place the letter stamp on the left slot and the shield stamp on the right slot (both stamps Spoiler 50).
The dome opens; take the part of the sword.
Screenshot
It will merge automatically with the sword hilt to produce a sword.
Exit the Palace and go over Oak Alley to the Radio Tower.
52. Radio Tower Entrance/Elevator/Radio Room
A phantom will attack you; click the sword (Spoiler 52) anywhere in the scene.
When the phantom leaves, zoom in on the Radio Tower Entrance.
Take the frog (36/60) in the lower left and click the door to open it and step into the elevator.
Zoom in on wall on the left and place the shackles (Spoiler 43) to connect the two chain parts.
Now zoom in on the key pad on the right.
Take the part of a dragonfly Brooch (1/3) and press the button.
Screenshot
Enter the Radio Room.
Zoom in on the roses on the left and take the frog (37/60) and the chain saw.
Screenshot
Return to the Bank Entrance
53. Bank Entrance/Oak Alley (Police Car)
Zoom in on the pirate flag top right above the entrance.
Use the chain saw at the pole and the flag pole will go into your inventory.
Screenshot
Go back to Oak Alley.
Zoom in on the police car.
Place the wheel (Spoiler 42) at the empty spot and use the pole flag at the left side of the car.
Zoom in on the head of the skeleton and take the frog (38/60) and the puzzle piece (2/4).
Zoom in on the skeleton hand and take the frog (39/60) and read the note.
Screenshot
Step back from the police car so that you are again at Oak Alley.
Go right to the Church Pathway.
54. Church Pathway/Church Entrance
Zoom in on the note with the burning arrow, take the frog (40/60) and read the note.
Zoom in on the owl on the tree top right and take the part of a trinket (1/2).
Use the chain saw (Spoiler 52) on the fallen tree.
Go forward to the church entrance.
Zoom in on the right statue, take the frog (41/60) and the key card.
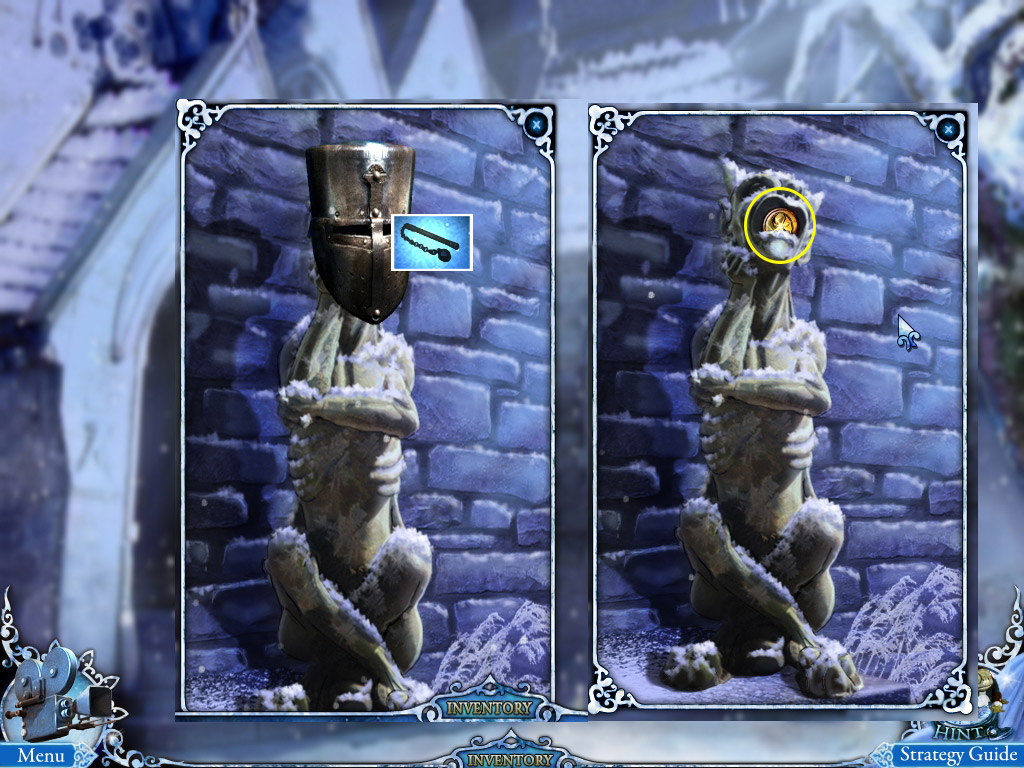
Zoom in on the left statue to learn that you will need a medieval weapon to remove the helmet.
Screenshot
Enter the church.
55. Church Basement/Church Entrance
Use the stairs to the Church Basement on the right side.
Zoom in on the tomb, note that you will need three medals for the statue and take the military flail.
Zoom in on the book on the right side and take the frog (42/60) and the part of a dragonfly Brooch (2/3).
Screenshot
Return to the Church Entrance.
Zoom in on the left statue and use the military flail to remove the helmet.
Take the amber button.
Screenshot
Return to the Bank.
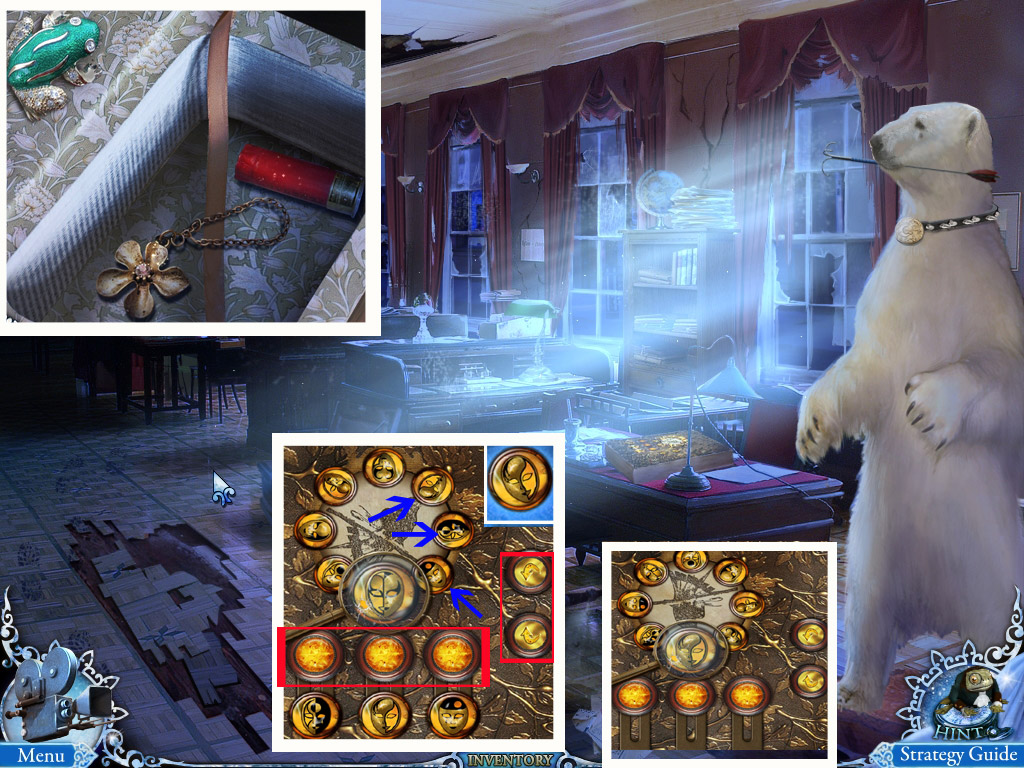
56. Bank/Bank Safe (Safe Puzzle)
Zoom in on the book on the desk and place the amber button (Spoiler 55)
Your goal is to make the mask at the bottom disappear.
A mask will disappear when the magnifier shows the same mask as one of the masks below and you press the appropriate amber button.
To move the wheel with the mask, you have to use the arrows on the right side.
Using the upper arrow will turn the wheel 4 steps clockwise.
Using the lower arrow will turn the wheel 3 steps counterclockwise.
Use 1x upper, 1x lower arrow for the right mask.
Use 1x upper, 1x lower arrow for the left mask.
Use again 1x upper, 1x lower arrow for the mask in the middle.
The book opens.
Take the frog (43/60), the ammo, which will merge with the shotgun to loaded shotgun; and the bronze flower.
Screenshot
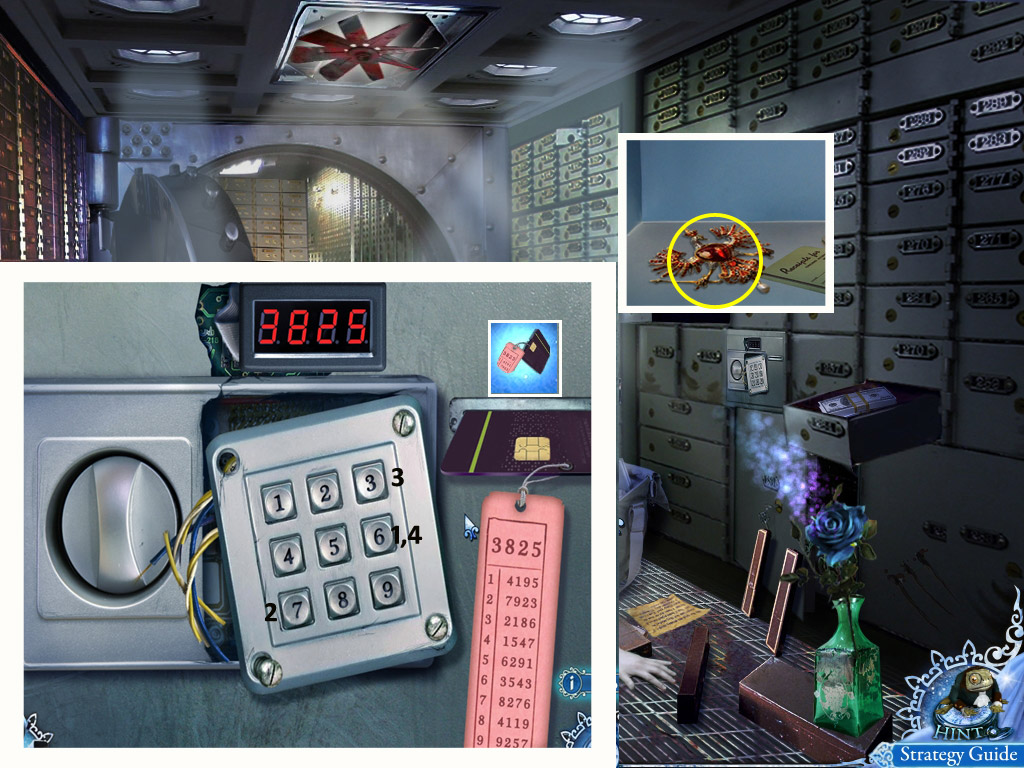
Enter the Bank Safe and zoom in on the key pad on the right side.
Place the key card (Spoiler 54) at the slot to activate a puzzle.
This one looks much more complicated than it actually is. Your goal is to enter the code 3 8 2 5
The key pad is broken; the note on the right shows you the number each key will produce when you click it.
For example: The note says key 1 will produce the 4 1 9 5 - this means: Click the key 1 the first time and the number 4 will appear in the display. Click key 1 the second time and the number 1 will appear in the display, the 9 comes up after the third click, the 5 after the fourth click. Clicking other keys in between does not change any at this order!
After clicking four keys (no matter which one) the display will return to 0000, but this will NOT reset the order of the keys.
There is NO reset button and the puzzle does NOT start from the scratch when you exit and return to the puzzle.
As long as you did not click any key, the solution is simple:
6 - 3(543)
7 - 8(776)
3 - 2(186)
4 - (3)5(43)
As soon as you clicked something, you will have to figure out how to get the numbers right. Best thing to do is click until you are one step before the needed number. Use unneeded numbers to get 0000 again and type the shown solution.
Screenshot
The safe opens; take the ruby eagle medal.
Exit the bank and enter the Palace
Chapter 6: Belle
57. Palace/Palace Roof
Zoom in on the left dome and place the bronze flower (Spoiler 56)
Click each egg to crack it and take the part of a dragonfly brooch (3/3), the spring and the wood fragment.
Zoom in on the dome on the far right.
Place the three parts of the dragonfly brooch: (Spoiler 52, 54, 57).
Take the hook knife.
Zoom in on the wooden panel in the ceiling.
Use the shotgun (Spoiler 56) to open it and use the rope ladder to climb up.
Take the bow on the right side and zoom in on the chimney.
Take the frog (44/60).
Screenshot
Exit the Palace, return to the old house, climb through the window to get to the Garage and enter the Bus
58. Garage (Bus)/Bank
Zoom in on the teddy bear and place the spring (Spoiler 56) on its collar.
Take the part of the trinket (2/2).
Exit the old house and go forward to the Bank.
Zoom in on the bear on the right and place the two parts of the trinket (Spoiler 54, 58) at its collar.
The bear's mouth opens, and you can take the arrow. It will merge with the bow to bow and arrow.
Screenshot
Zoom in on the balcony at the far top and use the bow to reach it.
Click to reach the balcony and play the search scene to obtain a needle.
Screenshot- Search Scene
Exit the Palace and go forward to the Radio Tower.
Use the elevator to reach the Radio Room.
59. Radio Room/Church Basement
Zoom in on the victim and in the close up in on her ear.
Use the needle (Spoiler 58) to pick the lock of her earring.
Take the earring.
Return to Oak Alley and go right to the church; enter and go down to the Church Basement.
Zoom in on the shelf on the left and place the earring on the skull. The skull opens.
Take the frog (45/60) and the chip of a knight.
Screenshot
Exit the basement and go inside the church to the right to Church Garden.
60. Church Garden
Zoom in on the pile on the left and use the hook knife (Spoiler 57) to cut the ropes.
Click again to play the search scene.
Find all objects to obtain the vacuum cleaner.
Screenshot - Search Scene
Zoom in on the tomb on the right side and place the chip of a knight on the board.
Your goal is to flip all chips so that only knights are shown.
Flipping one chip will affect all surrounding chips.
Flip the chips in the following order:
2nd row from below: 2nd chip seen from right.
Bottom row: 2nd chip seen from left.
Top row: 2nd chip seen from right.
2nd row from top: 2nd chip seen from left.
The tomb will open; zoom in an take the puzzle piece (3/4) from the glasses.
Screenshot
Exit the Church and return to the Palace, then climb up to the Roof.
61. Palace Roof/Church Basement
Zoom in on the chimney and use the vacuum cleaner (Spoiler 60) to remove the ashes.
Take the black eagle medal and the dust bag (low left corner of the close up).
Exit the Palace and return to the Church; go down to the Church Basement and zoom in on the tomb.
Place the ruby eagle medal (Spoiler 56), the white eagle medal (Spoiler 45) and the black eagle medal into the spots on the chain.
The tombs open, zoom in.
Use the dust bag to make a skeleton visible and take its coat of arms.
Screenshot
Return to the Palace.
62. Palace
Zoom in on the far left dome and place the coat of arms (Spoiler 61).
Your goal in the following puzzle is to assemble the coat of arms in the middle by clicking its five parts.
You can see how it should look when you look at the right and left of the board.
Clicking one part affects other parts.
Clicking left affects top and bottom.
Clicking the top affects left and right.
Clicking right affects top and bottom.
Clicking the middle affects all other parts.
Clicking the bottom affects left and right.
This puzzle has NO Reset button and it does NOT start from the scratch when you exit the puzzle and come back! This or any other solution can only work with the first attempt!
Click in the following order:
Left - 2x
Top - 2x
Right - 3x
Middle - 3x
Bottom - 6x
Right - 10x
Screenshot
When the coat of arms is correct, it will raise and you can take the puzzle piece (4/4).
Exit the Palace, return to the old house, enter the kitchen and climb through the window to the Dragon Gate (straight ahead).
63. Dragon Gate
Zoom in on the gate and place the four puzzle pieces (Spoiler 31, 53, 60, 62).
Take the frog (46/60).
The gate opens. Zoom in on the pistol.
Take the frog (47/60) and the pistol.
Screenshot
Go forward to the Brown Mansion.
Chapter 7: Brown Mansion
64. Brown Front Yard/Brown Garage
Zoom in on the metal plate and take the bronze snake.
Try to enter the house through the door.
Zoom in on the stairs, take the empty kettle and the frog (48/60).
Go left to the Brown Garage.
Zoom in on the bench on the right, take the frog (49/60) and learn that everything else is frozen.
Zoom in on the front motor of the truck.
Take the wire cutter and the frog (50/60); learn that the transmission belt is missing.
Zoom in on the truck, take the frog (51/60); click the metal rod to learn that the steering wheel is missing.
Screenshot
Exit the Garage and enter the house by climbing up the ladder.
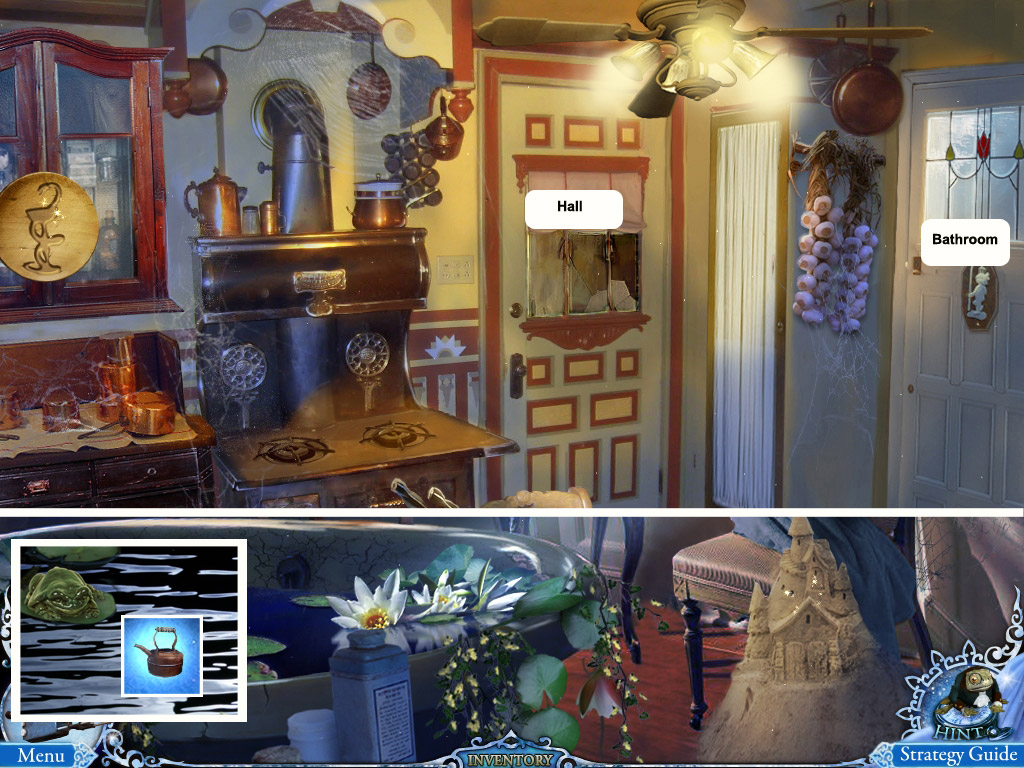
65. Brown Kitchen/Brown Bathroom
Go through the right door into the kitchen and zoom in on the basin on the left.
Take the frog (52/60); fill your kettle (Spoiler 64) with water.
Go back to the kitchen and zoom in on the oven.
Place the kettle with water and use the matches (Spoiler 5) to light the oven.
Take the frog (53/60) and the kettle with boiling water.
Screenshot
Enter the hall through the door to the right of the oven.
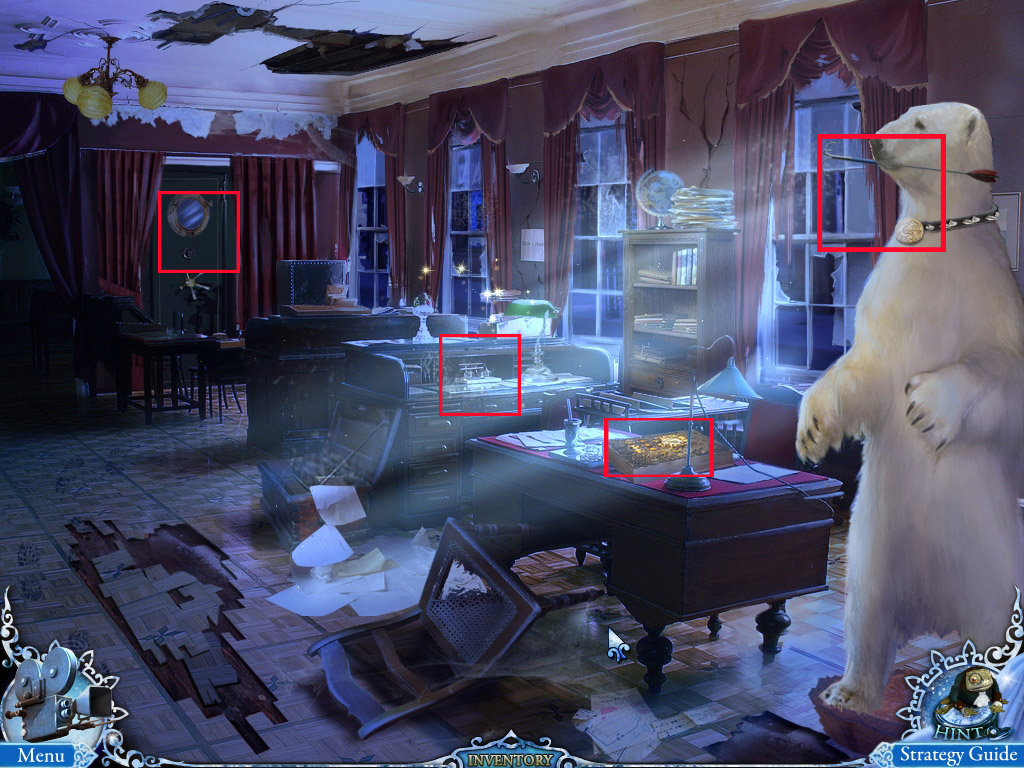
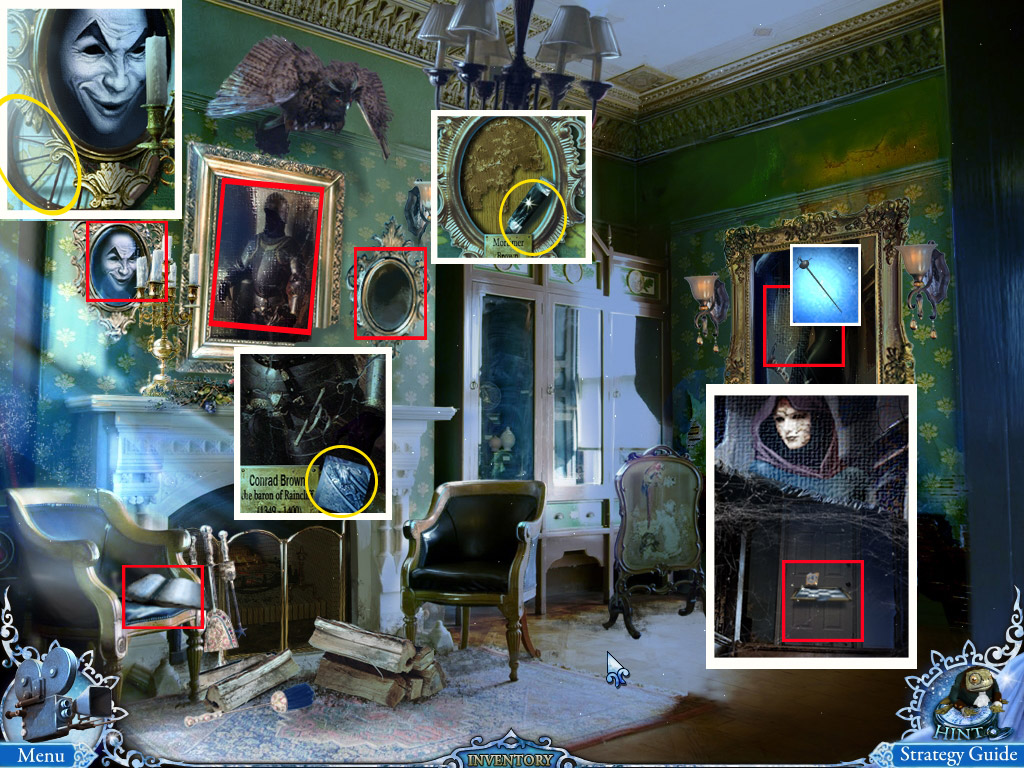
66. Brown Hall
Read the family history on the low left.
Zoom in on the mask painting on the left above the fire place and grab the wooden wheel.
Zoom in on the painting in the middle above the fire place and take the wooden fragment (2/3).
Zoom in on the empty frame on the right above the fire place and the paint (1/2).
Zoom in on the portrait of Arabella Brown on the right side.
Read the note.
Use the sword (Spoiler 51) with the painting to find the stairs to Arabella's Bedroom.
Zoom in on the door to learn that wooden fragments are missing.
Screenshot
Exit the house and go left to the Garage.
67. Brown Garage/Brown Bathroom
Zoom in on the bench and use the kettle with boiling water to get rid of the ice.
Click the bench again to play the search scene.
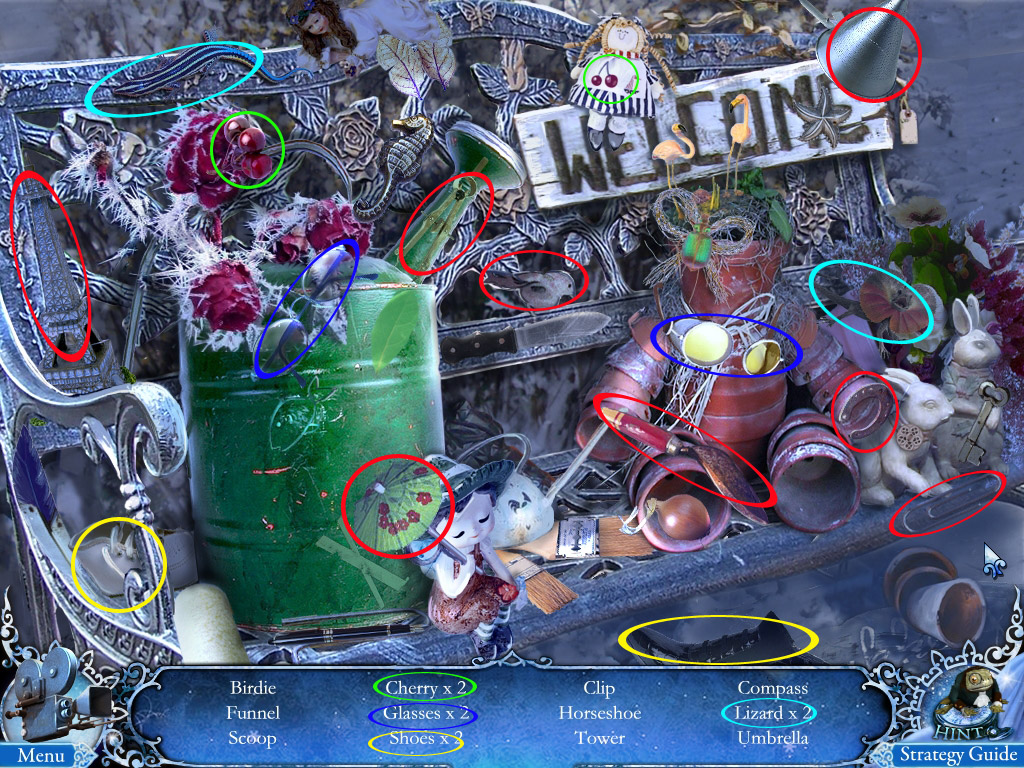
Find all objects from your list to obtain a scoop.
Screenshot - Search scene
Return into the kitchen and go right into the bathroom
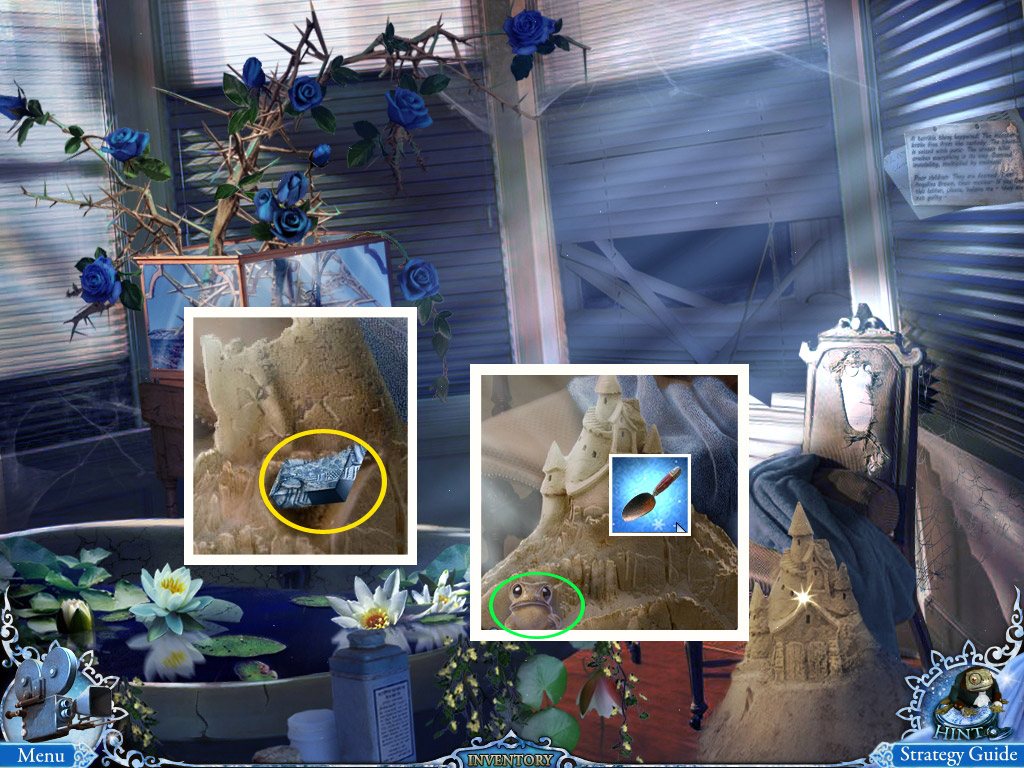
Zoom in on the sand castle on the right and take the frog (54/60).
Use the scoop to dig in the sand and take the wooden fragment (3/3).
Screenshot
Exit the bathroom and go through the door into the hall.
Zoom in on Arabella's portrait and go into her bedroom door.
68. Arabella's Bedroom
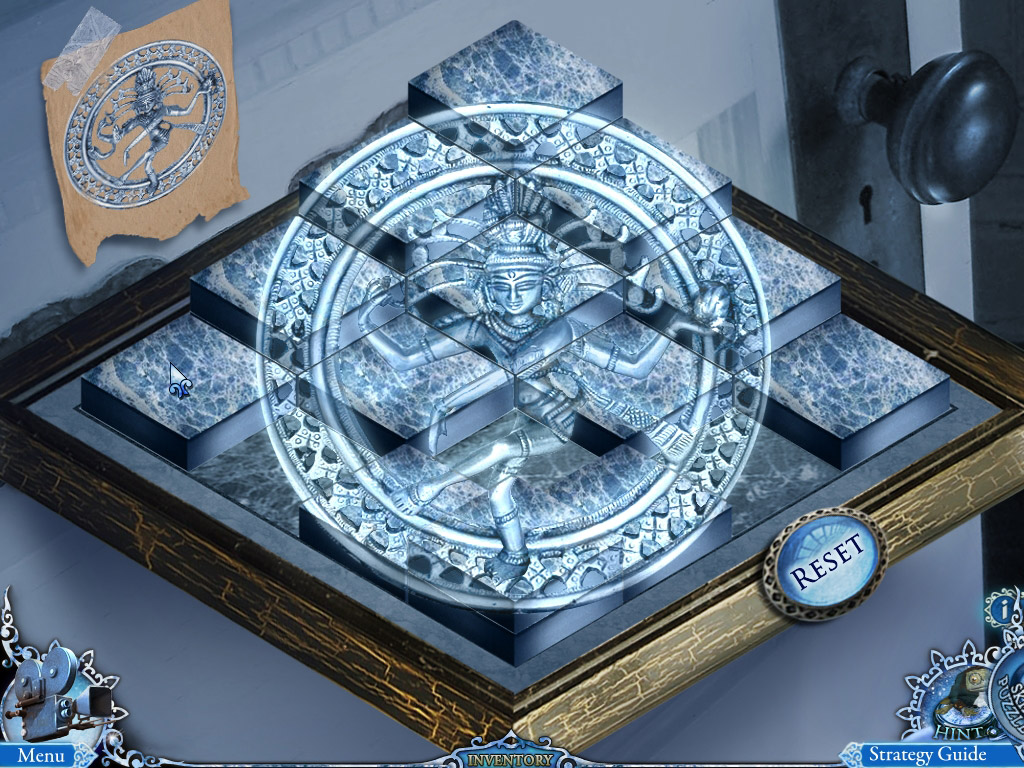
Zoom in on the door and place the 3 wooden fragments (Spoiler 57, 66, 67).
Your goal is to arranges the tiles so that the picture on the top right is reproduced.
Click a tile to take and place.
All tiles together will create the picture, so you will have to staple some.
Note that in the second row from bottom one spot does not get a tile, as the picture is on the ground.
Screenshot
The door opens; enter the bedroom.
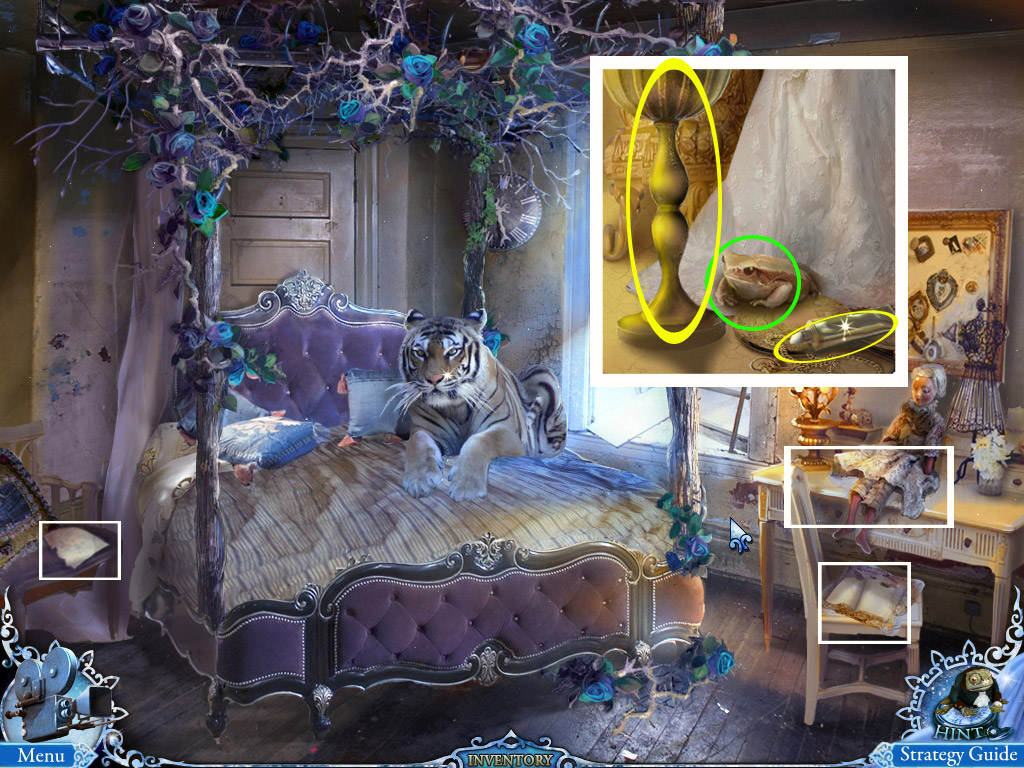
Zoom in on the note on the left, next to the bed, and read it.
Zoom in on the table on the right.
Take the frog (55/60), the goblet and the paint (2/2).
Read the diary on the chair in front of the table.
Screenshot
Exit the room and return to the kitchen.
69. Brown's Kitchen
Zoom in on hanging closet on the top left.
Place the goblet and the snake.
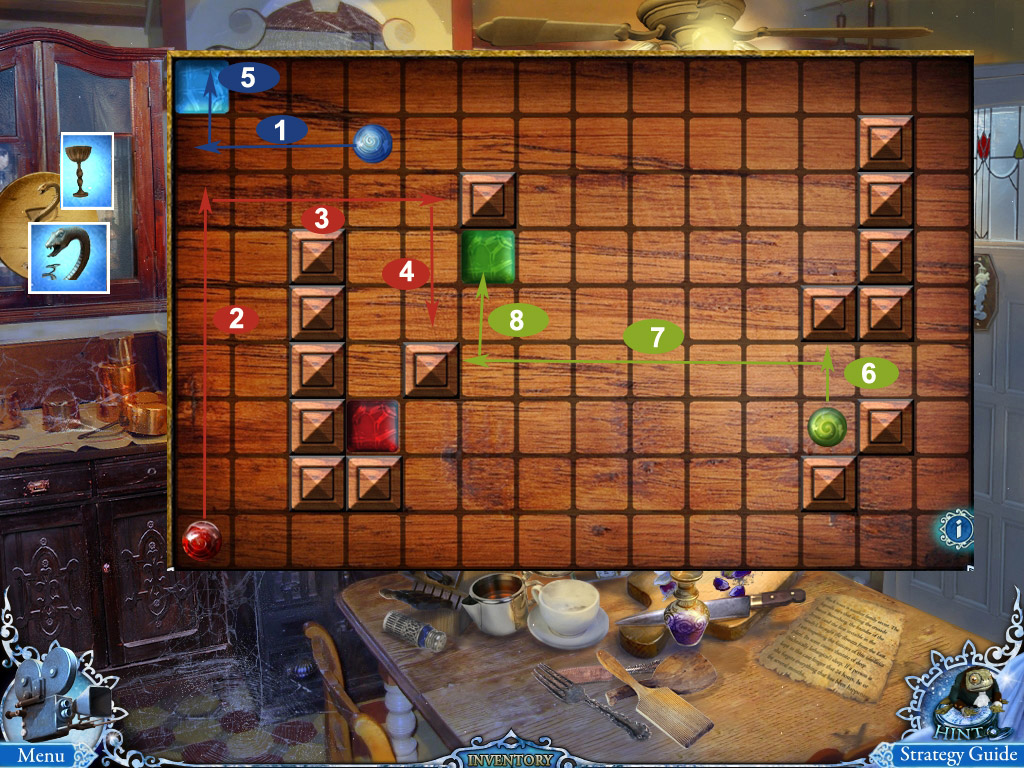
Zoom in on the closet again to activate a mini game.
Your goal is to get every ball into its matching square.
To move the ball, click it and choose one of the direction arrows.
Each ball will roll until it gets stopped by an obstacle, a wall or another ball.
Click in the following order:
Blue - left.
Red - up, right, down, left, down.
Blue - up.
Green - up, left, up.
Screenshot
The closet opens; zoom in and take the little green C2H5OH bottle.
Zoom in on the table.
Take the frog (56/60).
Use the vial with the powder and fill it up with the C2H5OH.
Take the vial with the hypnotic fluid.
Screenshot
Enter the Hall and walk upstairs to Arabella's bedroom.
70. Arabella's Bedroom/Entrance of the City/Studio
Use the hypnotic fluid (Spoiler 69) on the tiger. The vial goes back into your inventory.
Zoom in on the ceiling to learn that another student is hanging there.
Return to the Entrance of the City.
Zoom in on the car, then in on the steering wheel.
Use the wire cutter (Spoiler 64) to remove the wire and take the steering wheel.
Go forward to the lane, then right into the Studio.
Use the wooden wheel (Spoiler 66) on the wheel chair and take the wheel chair.
Use the paint with the easel on the left.
Click the easel again to access a mini game.
Arrange the picture bars horizontally and vertically to reassemble the photo.
Take the scythe that appears when the photo is complete.
Screenshot
Return to the old house, through the kitchen to the Dragon gate. Enter at the Brown Mansion, then the Brown Kitchen, then go right into the Brown Bathroom.
Chapter 8: Escape
71. Brown Bathroom/Arabella's Bedroom
Zoom in on the terrarium and take the frog (57/60).
Use the scythe (Spoiler 70) to remove the roses.
Click the terrarium again to play the search scene.
Find all listed items to obtain the flower antidote.
Screenshot - Search Scene
Exit the bathroom and go to Arabella's Bedroom.
Zoom in on the ceiling and use the flower antidote at the roses.
The student will fall on the bed. Take him; he will go into your inventory.
Zoom in on the window and take the frog (58/60).
Take the hood ornament and read the note.
Screenshot - Search Scene
Exit the Brown Mansion, return to the old house, exit and go forward to Oak Alley.
72. Oak Alley (Police Car)/Brown Garage
Zoom in on the hood of the police car.
Place the hood ornament (Spoiler 71).
The hatch will open; take the transmission belt.
Screenshot
Return to the Brown Garage.
Zoom in on the motor of the truck and place the belt.
Zoom in on the truck and place the steering wheel (Spoiler 70).
Zoom in on the note Bell left behind.
Take the frog (58/60) and read the note.
Return to Oak Alley.
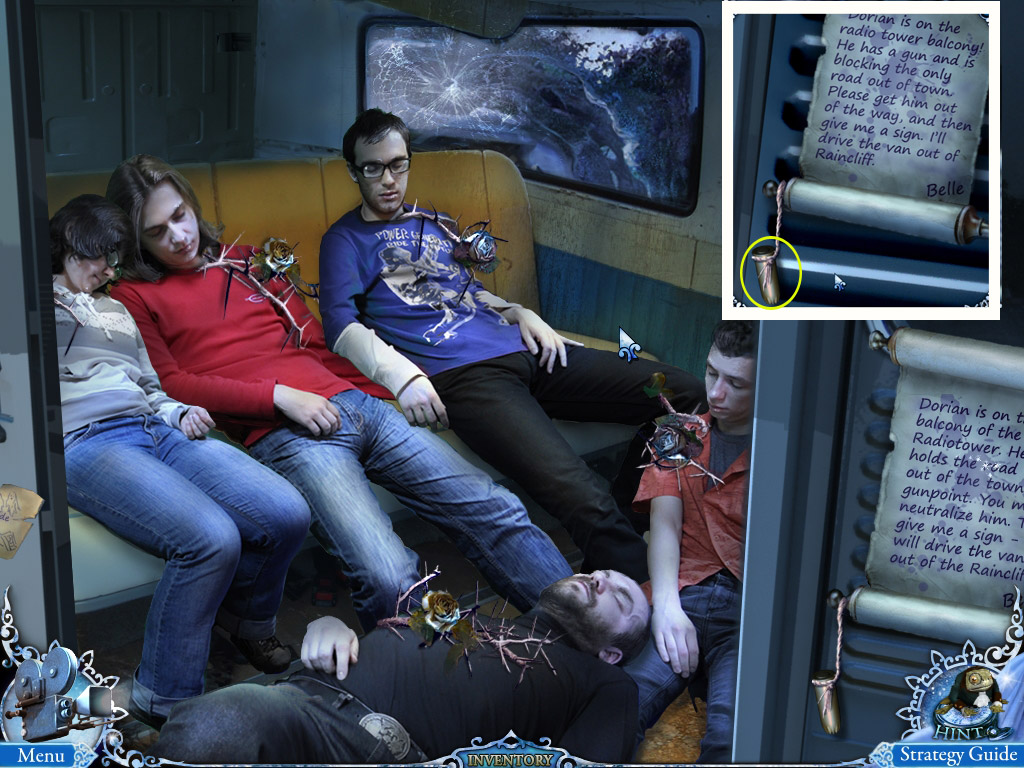
Zoom in on the door of the truck, read Belle's note and click the door to open.
Place the first student inside the truck.
Screenshot
73. Getting all Students
You will now have to get all students, one by one.
Use the flower antidote with the flowers, take the student into your inventory and return to the truck.
Place the student inside the truck.
The students are located:
Secret Bedroom (access through hole in the floor of the kitchen in the old house)
Bank Safe (access from Main Square) - this student need to be lifted by clicking the wheel chair on him.
Church Garden (access right from Oak Alley)
Radio Room (access by Radio Tower Elevator).
After finding and placing everyone inside the truck, you will find a note on the right side of the open truck.
Read the note and take the bullet. It will automatically merge with the pistol (Spoiler 63).
Screenshot
Go to the Radio Tower.
74. Final
Use the loaded pistol to scare away the phantom.
Zoom in on the bag and cloak he left behind.
Play the search scene to obtain a steering wheel.
Screenshot - Search Scene
Enter the Radio Room by using the Elevator.
Zoom in on the cabinet on the right and place the steering wheel.
Click to access a mini game.
Your goal is to match the symbols on the outer ring with the symbols of the dart board.
You need to use the slots to bring the symbols in the right order.
Clicking a symbol that can be moved (free spot for or behind, free slot available) will show a direction arrow.
Click the arrow to move the symbol in the desired direction.
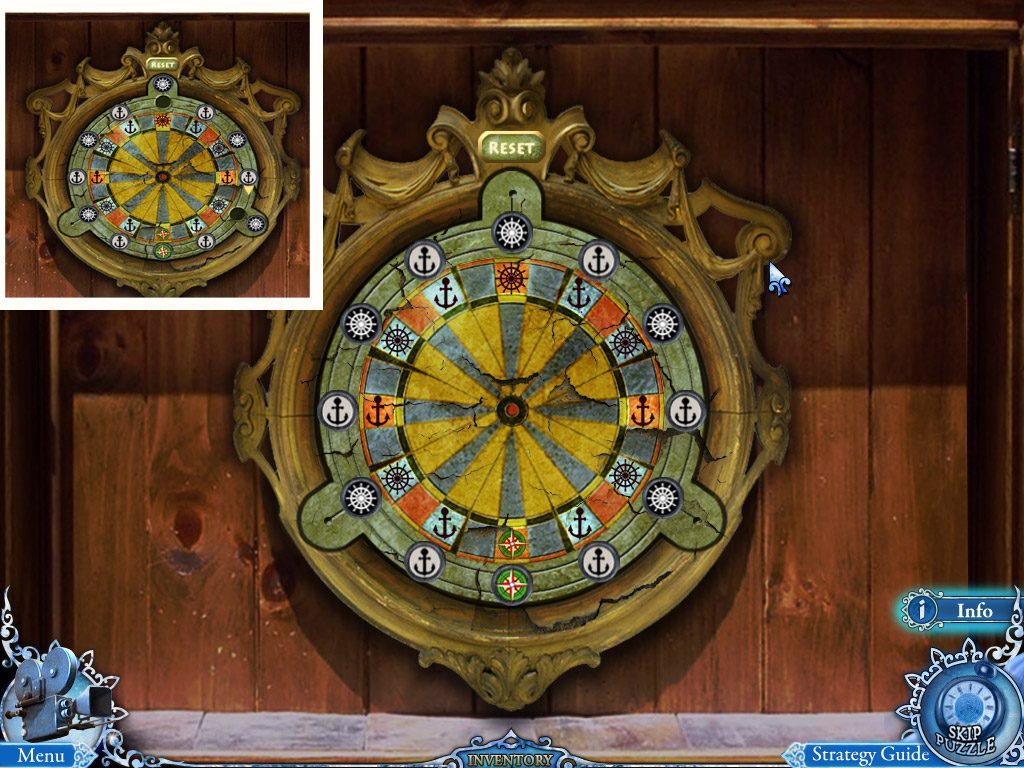
The important point here is that there is an anchor left and right next to the compass rose.
Start by placing a steering wheel in the slot left side.
Now move the symbols in a way that the compass rose has two anchors in front and two behind.
Fill the slots with steering wheels.
Move the compass rose on its place.
This will give you the space to place the anchors correctly and fill the last spots with the steering wheels from the slots.
Screenshot
The cabinet will open; take the dart. It will merge with the hypnotic fluid in your inventory.
Use the door on the far right to enter the balcony.
Use the dart with the hypnotic fluid to make the Phantom unconscious.
Zoom in on the Phantom and take the lighter.
Zoom in on the fireworks in the back and use the lighter with the fuse.
Watch THE END!
Posted by: Kayleigh |
May 23, 2011 10:52 AM
|
May 23, 2011 10:52 AM