
Snark Busters 2: All Revved Up
Platform: Mac, Windows

![]() Welcome to Snark Busters 2: All Revved Up, a bizarre, colorful, steampunk-ish world of broken hidden objects, magical mirrors, and mischievous chandelier-breaking cats! As Jack Blair, famous Formula 0 racer, you follow in the footsteps of your grandfather who was not only a better driver, but a better Snark Buster as well! He disappeared after driving through a tunnel in his last race, however, but somehow you find a letter of his that entices you into finding him by searching for the elusive snark. The sequel is every bit as whimsical and engaging as the original game, Snark Busters: Welcome to the Club, and it's a treasure of an experience from beginning to end!
Welcome to Snark Busters 2: All Revved Up, a bizarre, colorful, steampunk-ish world of broken hidden objects, magical mirrors, and mischievous chandelier-breaking cats! As Jack Blair, famous Formula 0 racer, you follow in the footsteps of your grandfather who was not only a better driver, but a better Snark Buster as well! He disappeared after driving through a tunnel in his last race, however, but somehow you find a letter of his that entices you into finding him by searching for the elusive snark. The sequel is every bit as whimsical and engaging as the original game, Snark Busters: Welcome to the Club, and it's a treasure of an experience from beginning to end!
 Snark Busters 2: All Revved Up ditches boring text-based lists of items in favor of the "find pieces of a few items based on their color/shape" mechanic. So, for example, instead of hunting down a pump, you instead refer to the inventory slots at the bottom and search for items matching the general shape and design of pieces chopped through the item's icon. Find them all and the object can be used to solve a pressing puzzle nearby!
Most of the time some pieces of an object will be red, indicating its present unavailability. By completing parts of other items, opening doors or otherwise exploring about, you might just uncover one of these shards, making it a good strategy to keep an eye on the inventory bar at all times. The ultimate goal of each area is to obtain a medallion that will open the portal to the next set of levels.
A forgiving hint system makes Snark Busters 2 easy to play and eliminates any sort of frustration you might encounter. The occasional mini-game/mini-puzzle also crops up, but they're short, not too challenging, and can be skipped after a few moments. They always fit the theme of the game, too, so no crazy gimmicks to worry about here.
 Analysis: Snark Busters 2: All Revved Up has one big strong point: its environment. The world of Nodnol is quite unusual, never falling too close to traditional steampunk fare or diverging into the realm of pure fantasy. Everything is slightly whimsical in nature, encouraging you not to take any part of the game seriously, leaving you feeling light, interested, and fully engaged in the bright and wacky world you have the pleasure of interacting with.
Compared to its predecessor, Snark Busters 2 lives up to almost every standard set by the 2010 release. Gameplay is quick and enticing, the setting and story are lighthearted and fun to follow, and the puzzles are smart without being too difficult. The plot feels a bit on the thin side, on the other hand, and doesn't feature nearly as much activity or character growth as the first Snark Busters. Story isn't the central focus of the game, but it's always nice to have a deeper reason to play a game apart from finding items hidden in a Victorial fantasy world!
You won't need knowledge of the original Snark Busters game to play the sequel. In fact, very little connects the two titles apart from a couple of brief references to Kira, the main character of the first game. This doesn't really affect the quality of Snark Busters 2, so whether you're a newbie or a veteran, feel free to dive right in!
The hunt for the snark continues in this whimsical hidden object game with a wonderful, fun setting. It's easy to pick up and play, interesting to run through to the end, and a treat to look at the entire time!
![]() Windows:
Windows:
Download the demo
Get the full version
![]() Mac OS X:
Mac OS X:
Download the demo
Get the full version


Walkthrough Guide
(Please allow page to fully load for spoiler tags to be functional.)
Snark Busters: All Revved Up Walkthrough
General and Chapters 1-3
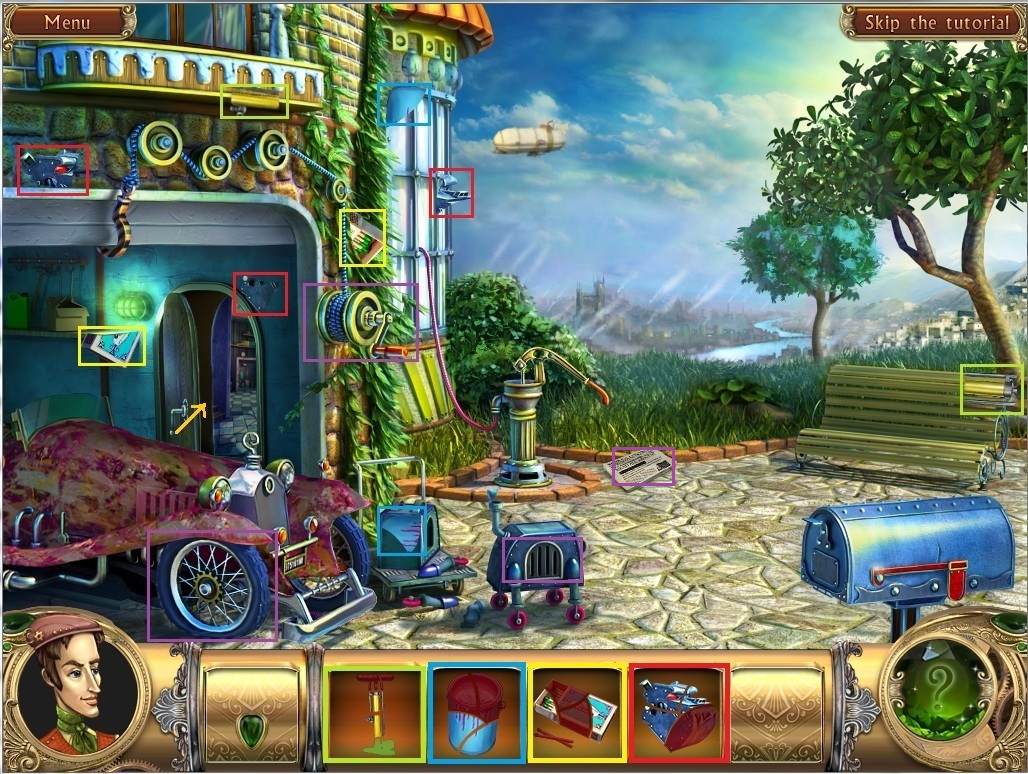
General Knowledge & Tips
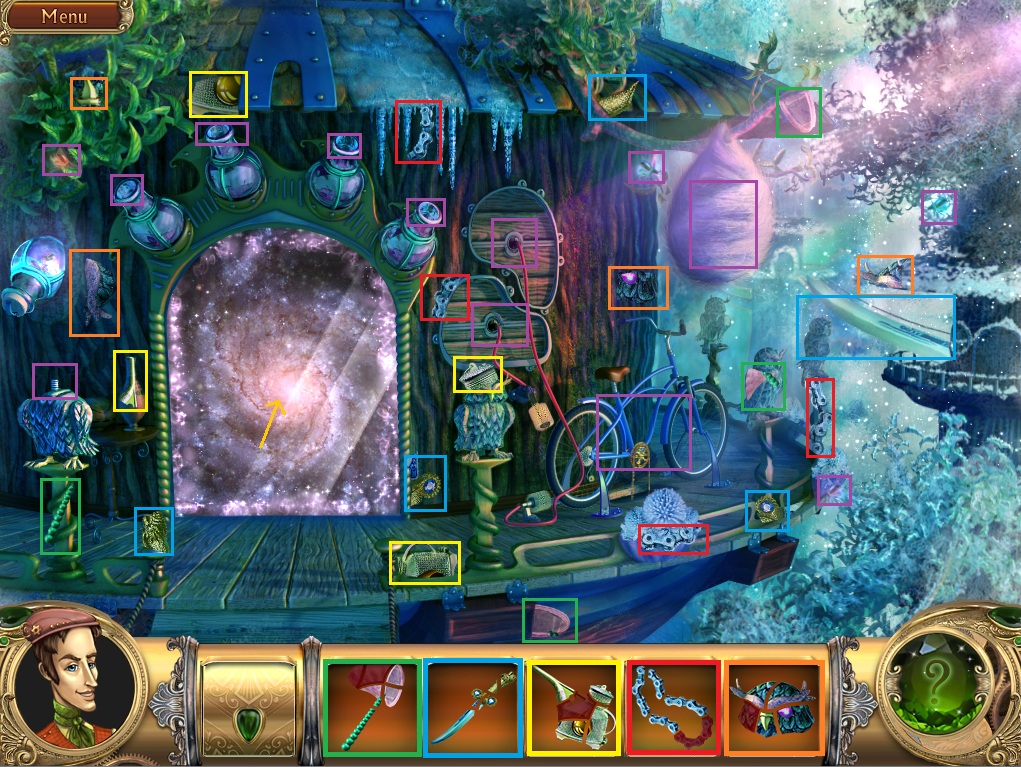
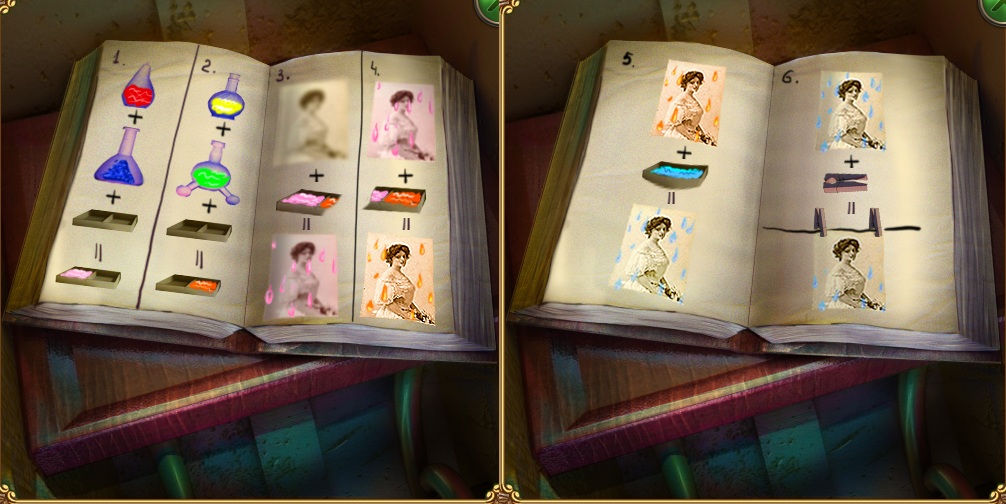
In this game, all of the hidden objects you collect are fragments of your inventory. These are items needed to solve puzzles and progress through the story.
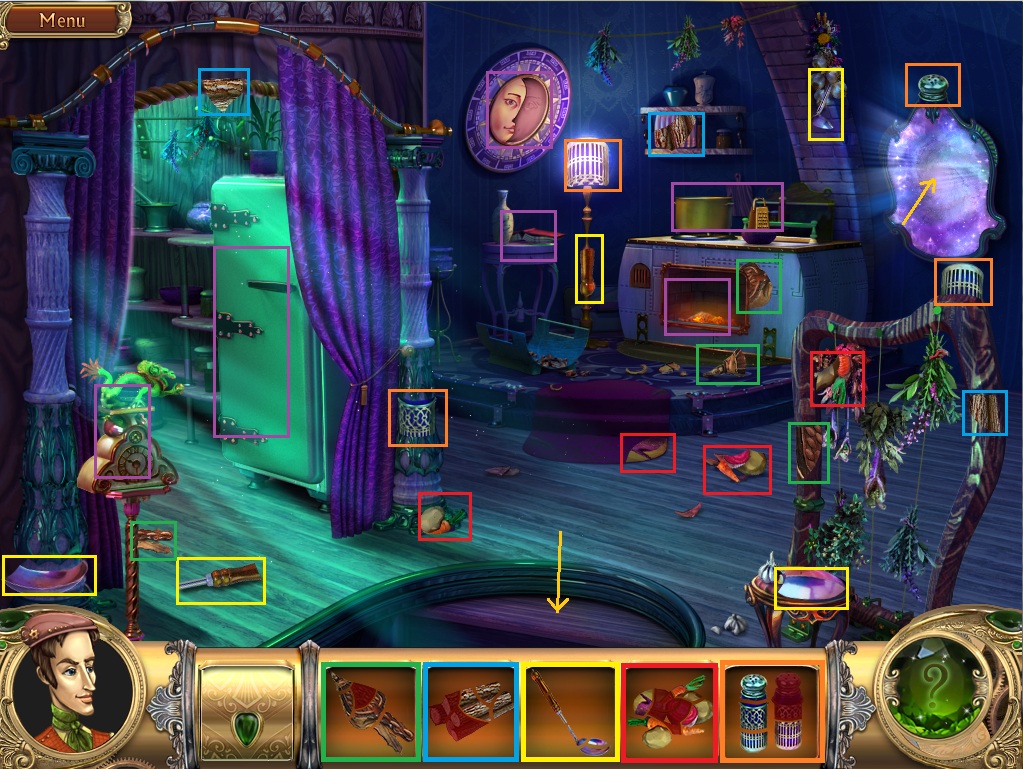
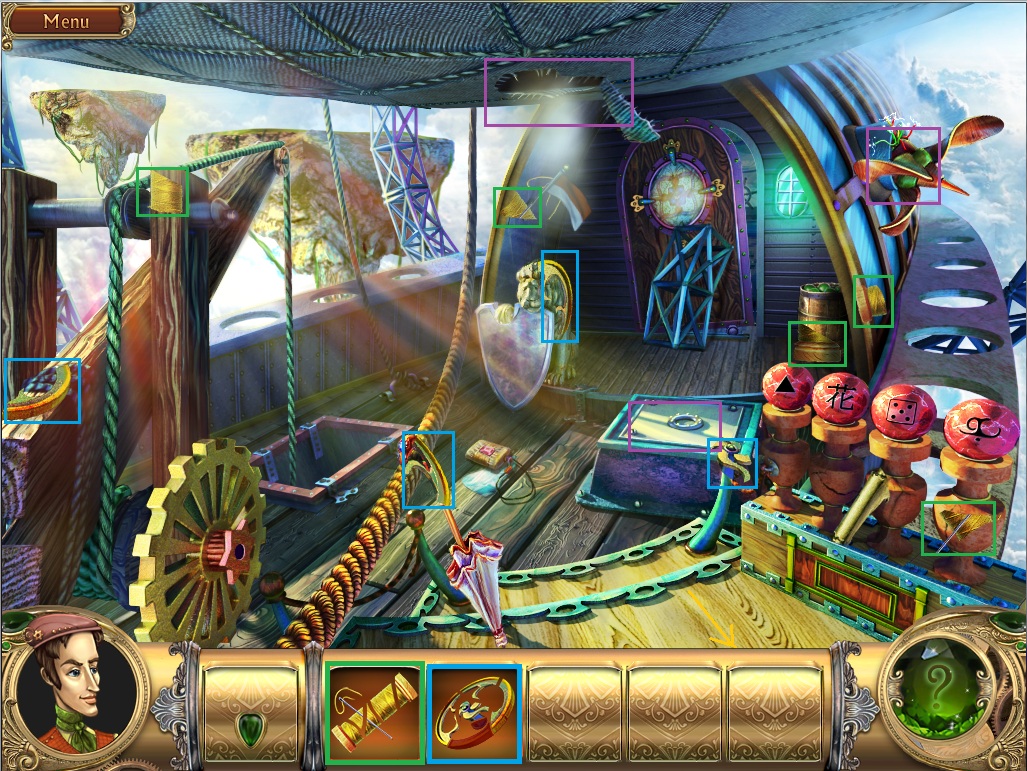
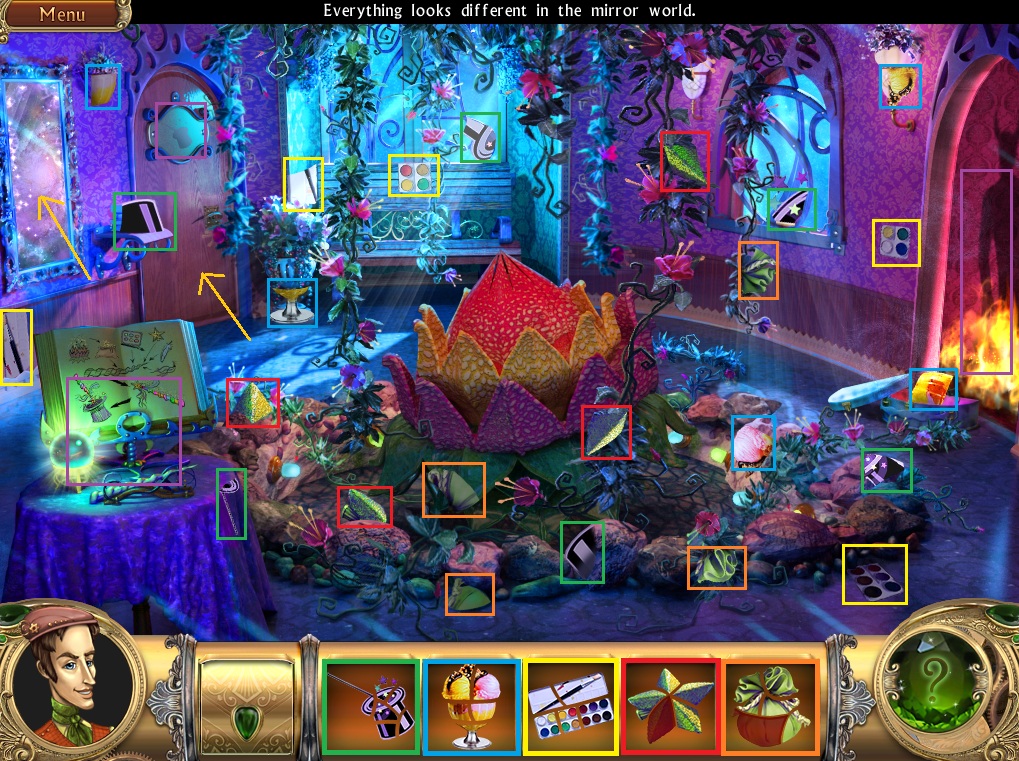
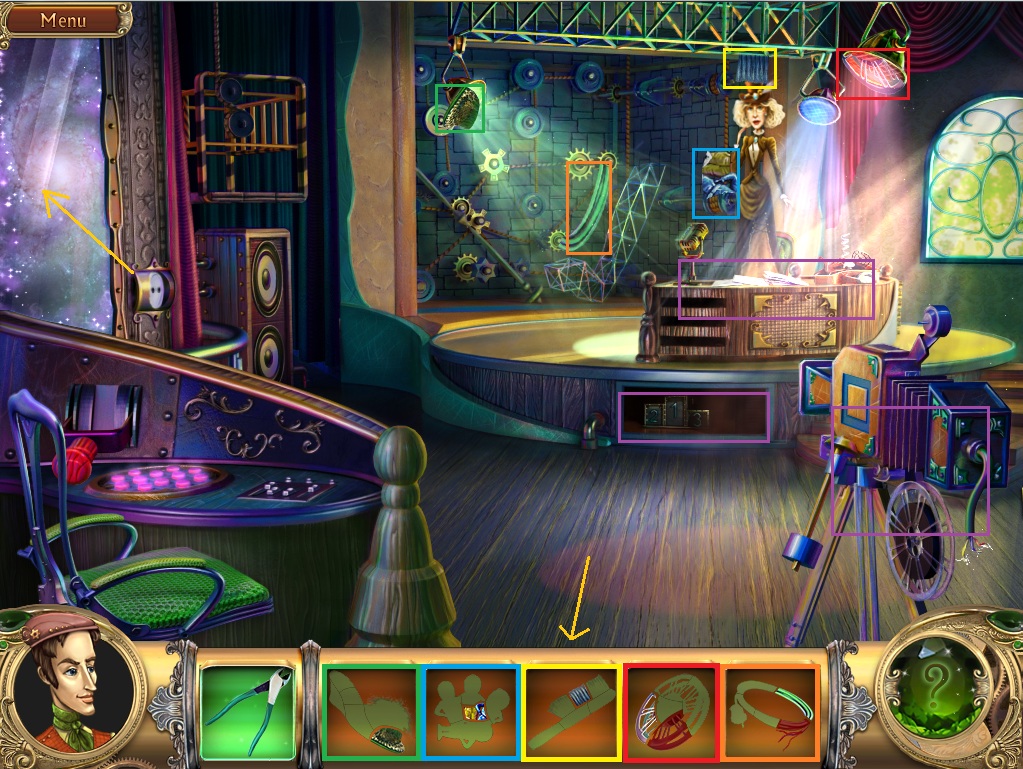
Screenshots of hidden object scenes are color-coordinated; that is to say, every colored box has a specific meaning.
An item that is surrounded by a green box in your inventory will have all its visible parts in the hidden object scene also surrounded by a green box. For example:
Screenshot.
Parts of an item that are tinted red are not visible in the scene. You may have to solve a puzzle or interact with an object to reveal them.
Items or scenery surrounded by a purple box are objects that you can interract with.
This game involves a lot of back-tracking, so it's best to do everything you can in one scene before moving onto the next.
With that, on to the adventure!
Tutorial
Outside the Garage
Start by turning the crank to open the large, metal garage door.
First gather all of the components to the tire air pump.
Screenshot.
Now that you have completed piecing together the tire pump, you can use it to reinflate the flat tire in the front of the car.
Pick up the uncovered Paint Can piece under the front bumper of the car.
Click on the metal dog for a close up. Open the door to his belly and you'll find a missing piece of the matchbox.
Collect any remaining items, then go through the open door in the garage.
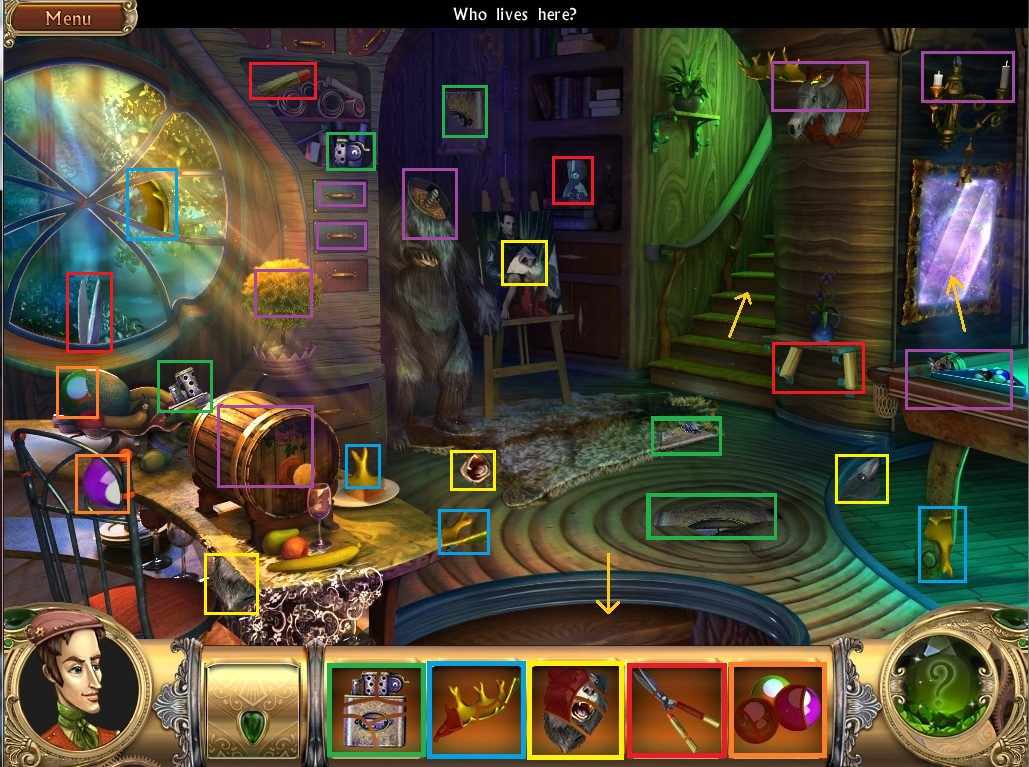
Inside the House
As soon as you enter the house, take a look at your handsome self in the mirror.
There are a couple objects you can interact with here. Inspect the framed photograph and the newspaper on the wall just under it.
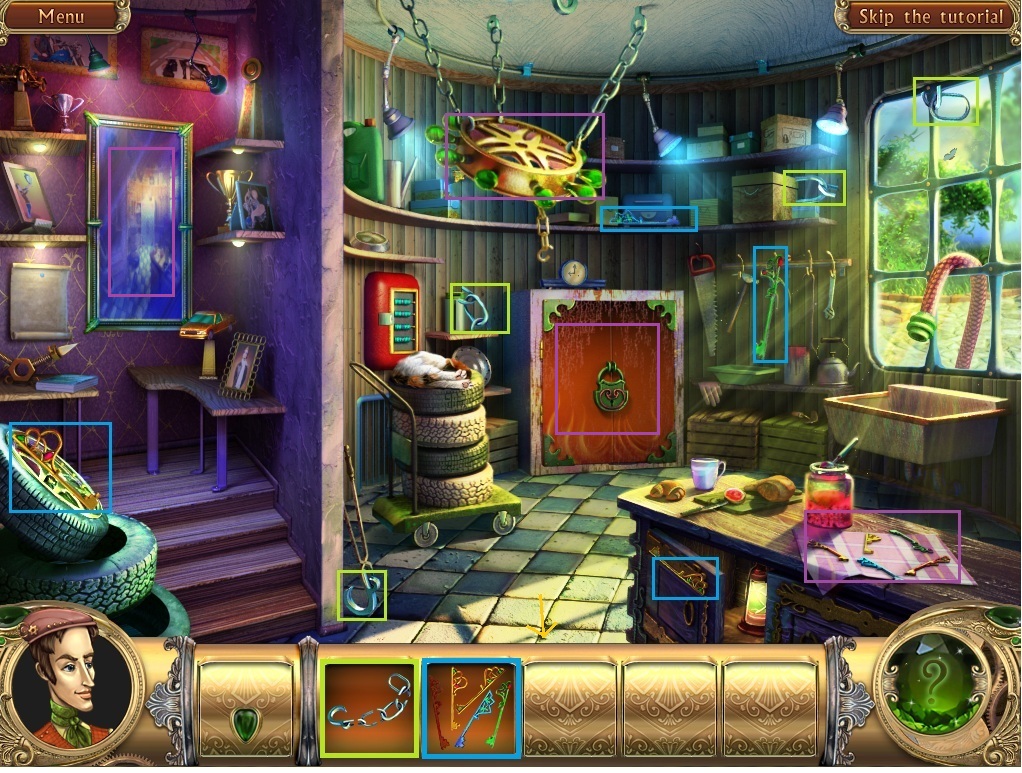
Back to the main room; collect all the pieces of the chain.
Screenshot.
Use the completed chain on the broken chandelier hanging from the ceiling.
Once fixed, the last missing key will be revealed on the bottom of the chandelier.
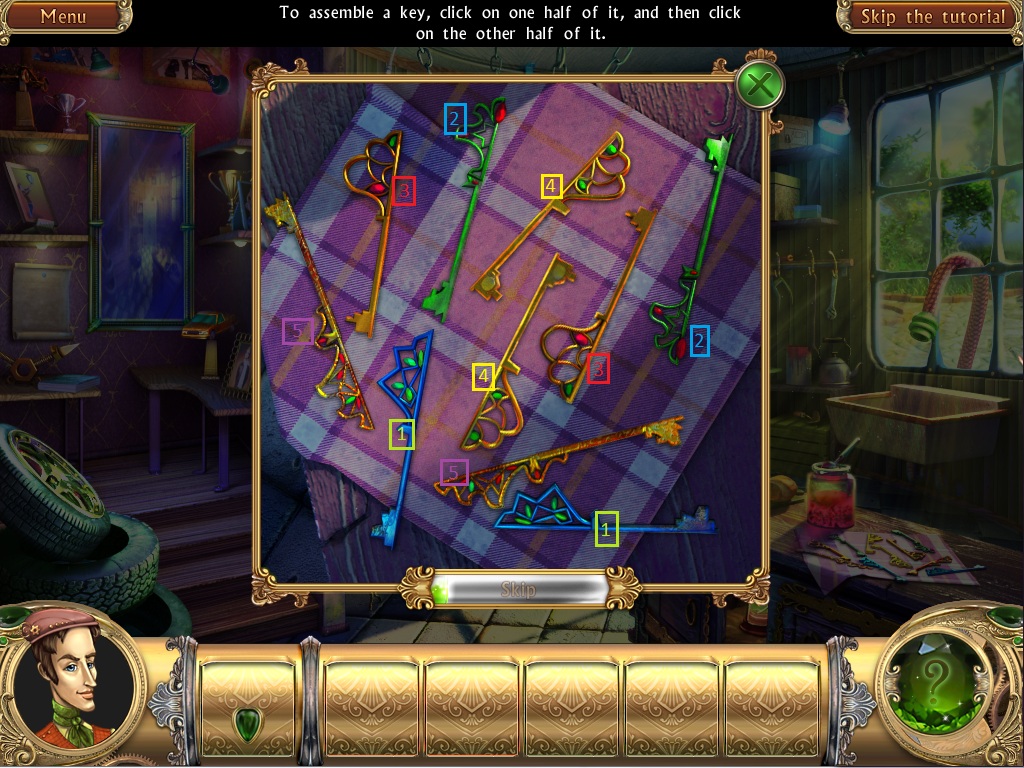
Inspect the keys lying on the purple napkin on the table.
Add the keys you've found to the pile. Notice anything similar? It's a matching game!
Matching the blue and green keys is simple enough. The gold keys are easier to distinguish if you count the number of colored gems at the handle.
Screenshot.
Use the completed ring of keys on the locked closet.
Pick up the bucket with the striped washrag in the supplies closet.
Backtrack to outside the garage to turn on the water hose, then return inside.
Fill up the bucket in the sink. We're finished with the inside of the house; back to the garage!
Outside the Garage (Again)
You've got mail! Open the mailbox and a piece of the matchbox is revealed.
It's stuck to the hanging flap of the mailbox door, underneath the rolled newspaper.
Use the bucket with water to wash the car. Wax goes on, wax goes off.
Another missing item is revealed! Pick up the last paint can fragment on the grill of the car.
Use the completed paint can on the car.
We have a visitor! It's Chief Bow from the newspaper article. Rather than follow silly protocol, let's chase this pesky policeman away.
Pick up the revealed final piece of the robot dog's head at Chief Bow's feet, below the park bench. Next to that are 2 green-headed matchsticks.
Add the robot dog's head from your inventory to the body of the robot dog.
Now use the matchbox on the coal in the dog's belly.
Success! Hop in your getaway car.
After the race, you're back at the garage, but the door is broken.
Collect all the missing pieces of the hook.
Screenshot.
Look inside your car and you'll find a letter. When you're finished reading, pick up the key and the last piece of the hook.
Use the hook on the hanging rope at the bottom of the garage door.
Once it's open, use the key on the small green door.
The World of Doors
Inspect the closest door with the picture of the Phoenix and read the note taped to it.
There's nothing more we can do yet, so exit and return to the inside of the house.
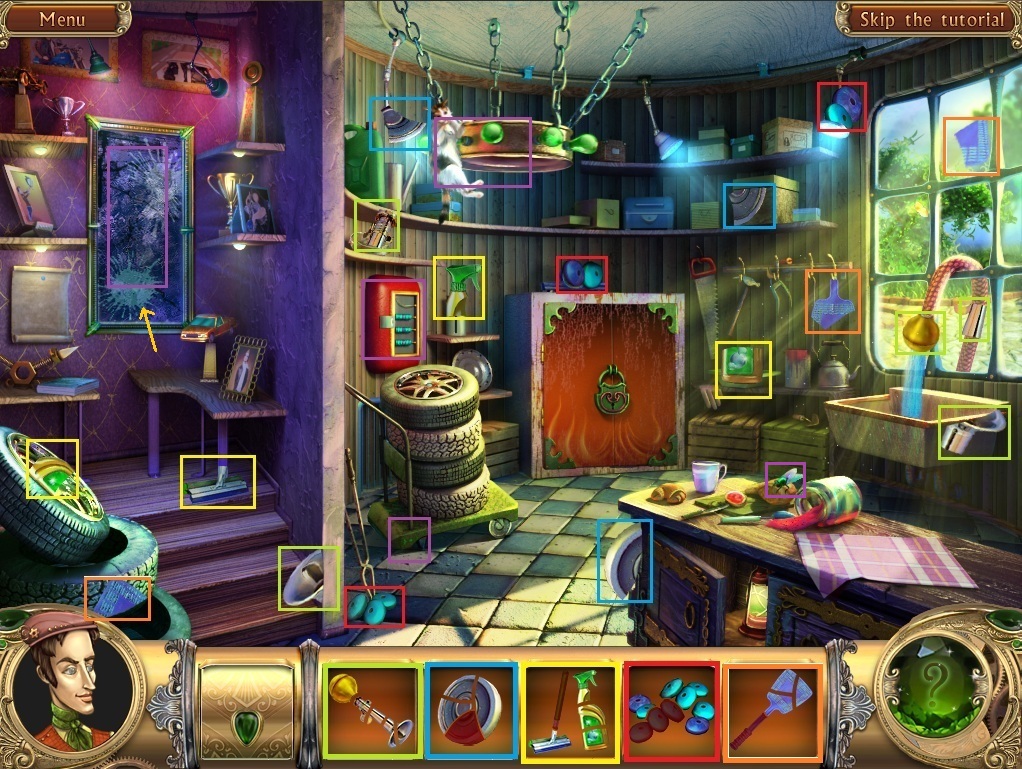
Inside the House (Again)
The place is a disaster! Gather up all available pieces of items, starting with the horn.
Screenshot.
Use the horn on the chandelier to scare the cat down.
Pick up the 2 newly revealed pieces.
The last fragment of the wheel is on the top of the chandelier.
The squeegee handle is on top of the sink.
Use the wheel on the back of the broken trolley. Push the trolley to reveal the last pieces of abacus beads.
Inspect the wall safe and add the abacus beads to the puzzle. We don't know the combination yet, so we'll have to solve this one later.
Inspect the dirty mirror. Use the cleaning supplies to wash it clean.
Go through the mirror to enter the backwards Snark world.
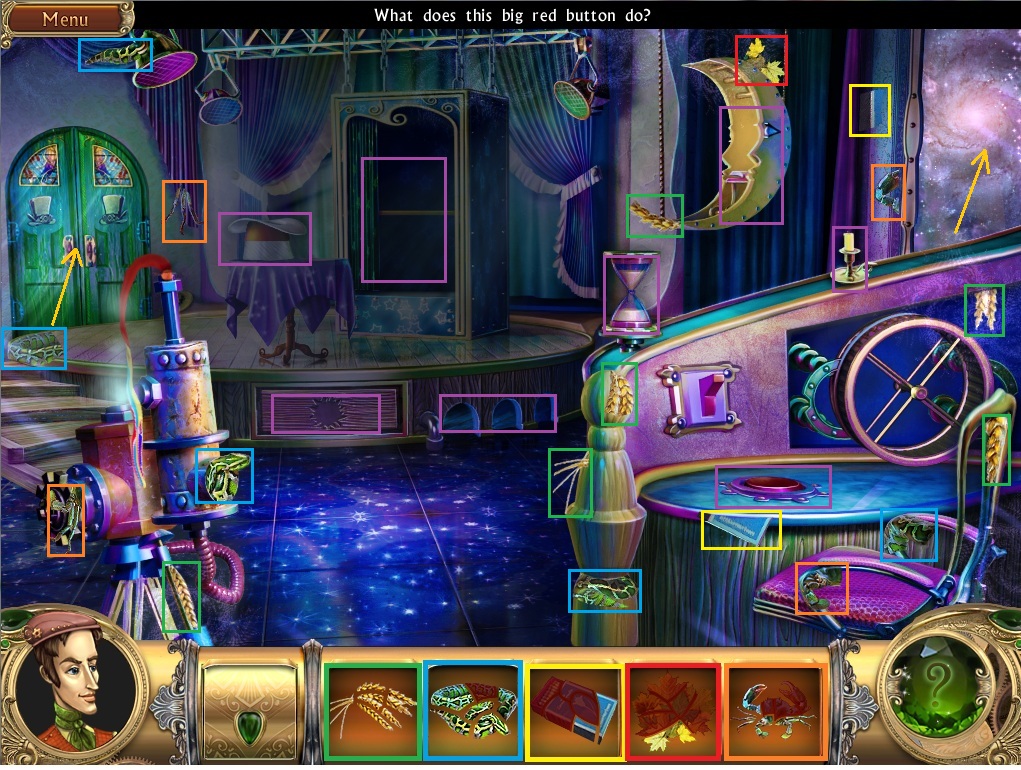
Chapter 1
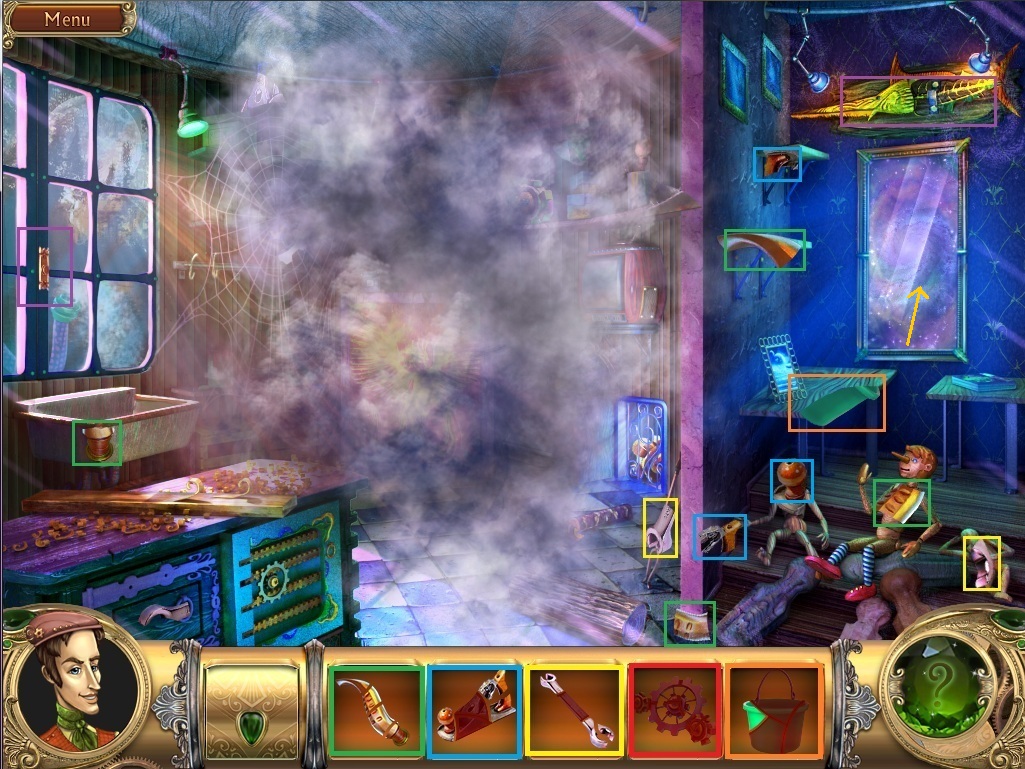
Through the Snark Glass
It's hard to see with all that smoke in the way, but let's start by collecting all available items.
Screenshot.
When you have completed the handle, use it on the window.
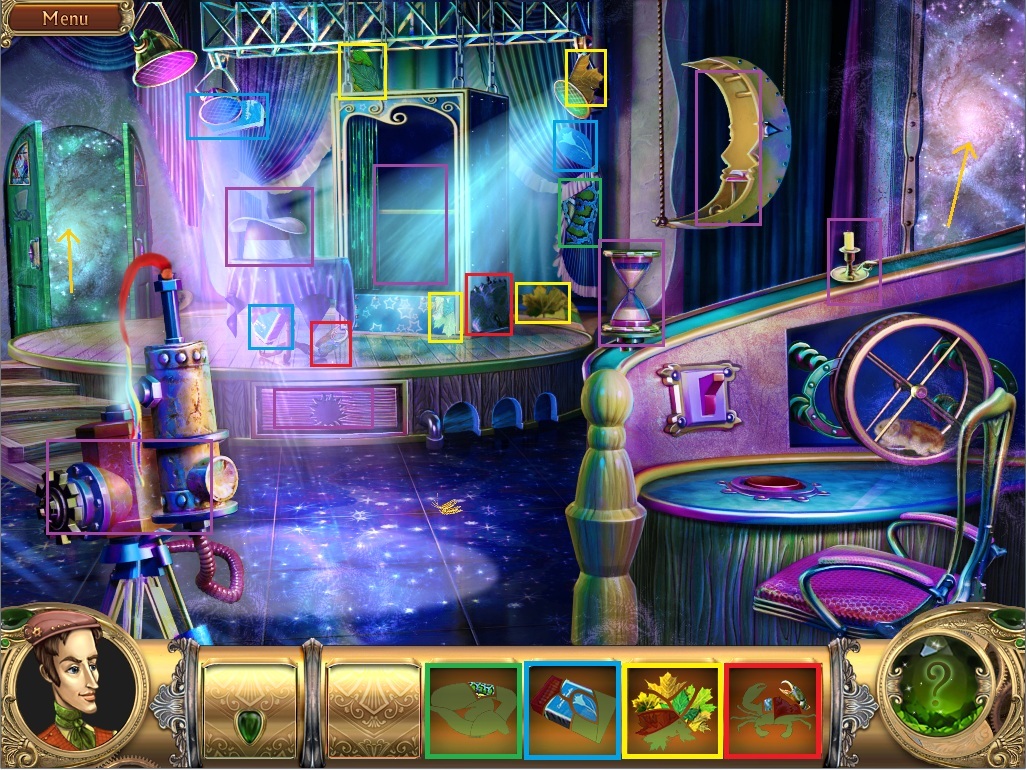
Now that the smoke is cleared, several new item fragments have been revealed.
Screenshot.
Use the completed plane on the plank of wood resting on the table. The plane reveals the four digit combination to the abacus safe!
After you've pieced together the wrench, use it on the swordfish to pry it off the wall.
With the swordfish now in your inventory, use it to saw through the grate under the television.
Pick up the metal gear fragment.
Click on the gear in the spider web to pick it up. Orrrr not! That giant spider looks very unfriendly.
We have nothing to distract it with yet, so let's go back through the mirror into the real world.
(Back) Inside the House
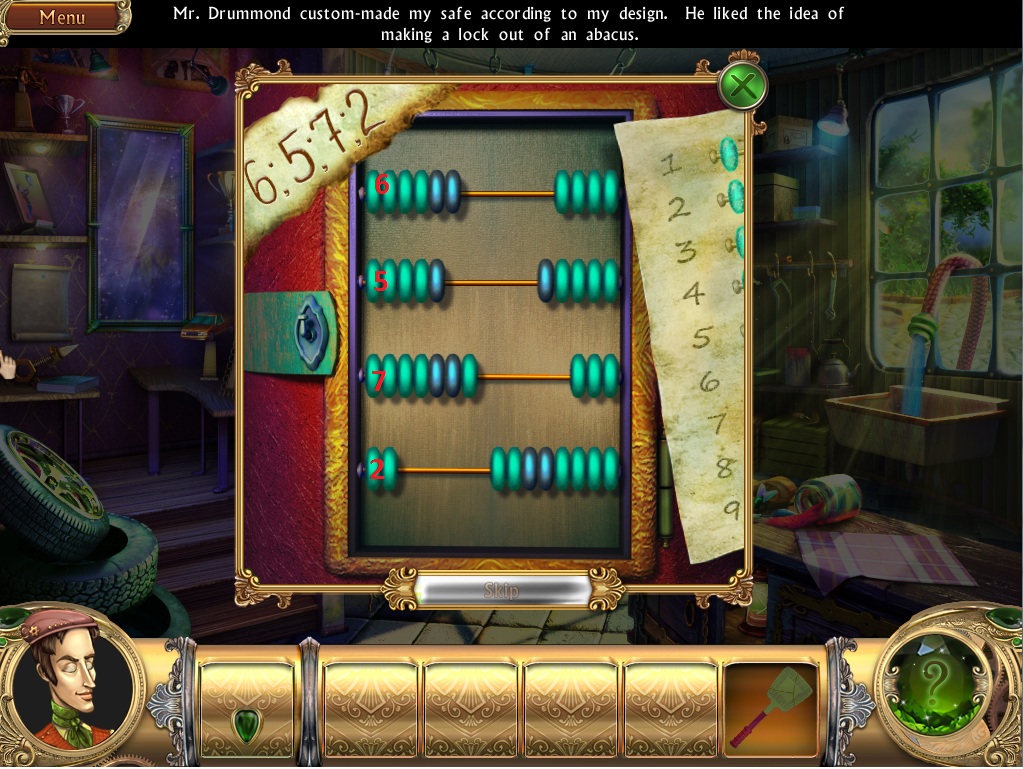
Time to solve the abacus safe.
This puzzle is fairly straightforward now that you have the combination (the numbers are different every game, but I'll use mine as an example) 6-5-7-2.
Push 6 beads to the left on the first row, 5 beads to the left on the second row, 7 beads to the left on the third row, and 2 beads to the left on the 4th row.
Screenshot.
Inside the opened safe is the last piece of the swyflatter.
Use it to swat the fly on the table, then go back through the mirror again.
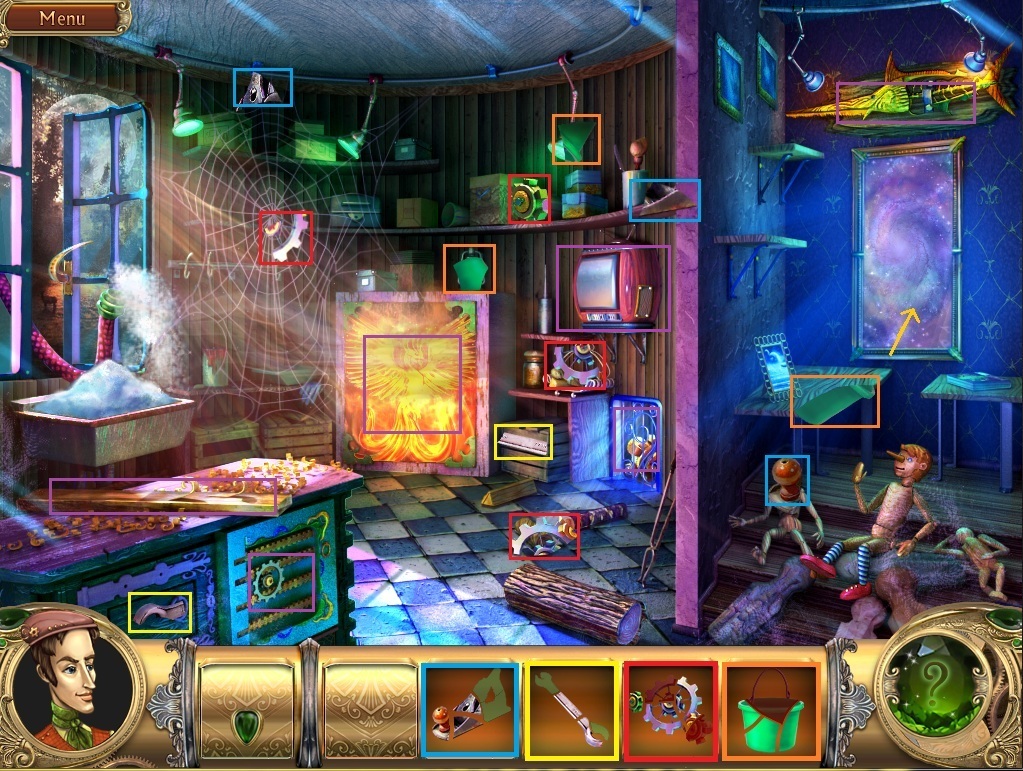
Through the Snark Glass (Again)
So we've got a nasty dead fly in our inventory, who looks hungry?
Give the fly corpse to the giant spider and retrieve the last gear fragment.
Add the completed gears to the geared puzzle in the work table.
In order to open the door, each of the lock pins (the serrated 4 metal bars) must be to the right of the red line.
Move the lock pins by rotating the colored gears clockwise or counterclockwise. The order is:
Purple Gear clockwise x4.
Yellow Gear Clockwise x2.
Green Gear Counterclockwise x2.
Screenshot.
Pick up the last green bucket pice inside the open cabinet.
Fill the bucket with snow from the sink under the window.
Use the filled bucket to douse the Phoenix Door, then pick up the Phoenix.
Where have you seen a Phoenix like this before?
Leave the Snark world and go through the Green Door in the garage.
The World of Doors
Place the Phoenix from your inventory into the crest of the Phoenix Door.
Chapter 2
Into the Phoenix Door
Open both of the small curtains on the wall to reveal two fragments.
Push the rocking chair to reveal a third hidden fragment, behind the back of the chair.
Collect all remaining available items, starting with the nuts.
Screenshot.
Give the nuts to the squirrel sitting in the tree, then pick up the fragment he throws to the floor.
Go through the large portal to enter the Snark world.
Phoenix Door (Snark World)
Collect all available items, starting with the knife.
Screenshot.
Use the knife to slice open the large, hanging cocoon, which reveals the last piece of the oiler.
Use the oiler on the rotating bicycle chain to receive the last chain fragment.
Add the completed chain from your inventory to the rotating bicycle chain.
Now that the two wooden panels are open, pick up the net fragment and the last owl fragment.
Add the owl's head to the headless owl statue standing on the left pedestal. Pick up the last net piece in his mouth.
Use the net to gather the four fireflies hovering around the building.
Place each firefly into one of the torches above the portal door, then pass through the door to return to the regular world.
Into the Phoenix Door (Again)
Above the portal door in the regular world are four revealed fragments.
Collect all of them, and then place the stone with the corresponding shape into its proper place above the door.
The Sun Stone goes in the Sun panel, the Leaf Stone goes in the Leaf Panel, etc.
Go through the door to enter the Treehouse.
The Treehouse
Next to the circular window are three small drawers.
Open the top drawer to reveal a small piece of the bear head.
Opening the middle drawer reveals a fragment of a green billiard ball.
Collect all available items, starting with the lighter.
Screenshot.
Use the completed lighter from your inventory to light the candelabrum above the Snark portal. Pick up the illuminated final piece of the antler.
Use the antler on the moose head. When it falls, the last piece of the bear head is uncovered.
Combine the bear head with the headless taxidermic bear.
Retrieve the last pruning shears fragment from under the bear's claw.
Use the shears on the potted plant in front of the window, then pick up the green billiard ball piece.
Go through the mirror portal into the Snark world.
The Treehouse (Snark World)
Collect all available items, completing the spool of thread and the jeweled flower.
Screenshot.
Use the thread on the hanging marionette and pick up the piece of fruit in his hand.
Put the flower in the hole of the round window.
After the venus flytraps have been burned to a crip, you can pick up the four items they were blocking.
Namely, the two last fragments of the knight's helm, the last piece of fruit, and a paintbrush fragment.
Use the knight's helm on the headless knight standing beside the window.
When the plate in his chest moves aside, pick up the last paintbrush fragment. He also moves his axe away, and is no longer blocking the green door.
Put the pieces of fruit in the juicer. Pick up the cups full of paint.
Click on the easel and add the paint brushes and paints to the canvas.
In order to solve this puzzle, you have to paint the flowers on the left half of the canvas as the mirror image of the right half of the canvas.
First click on a paintbrush, then click on whatever color paint in the tray you wish to use.
Screenshot.
We're done in this room for now, so head through the Snark portal to return to the real world. Then go up the stairs.
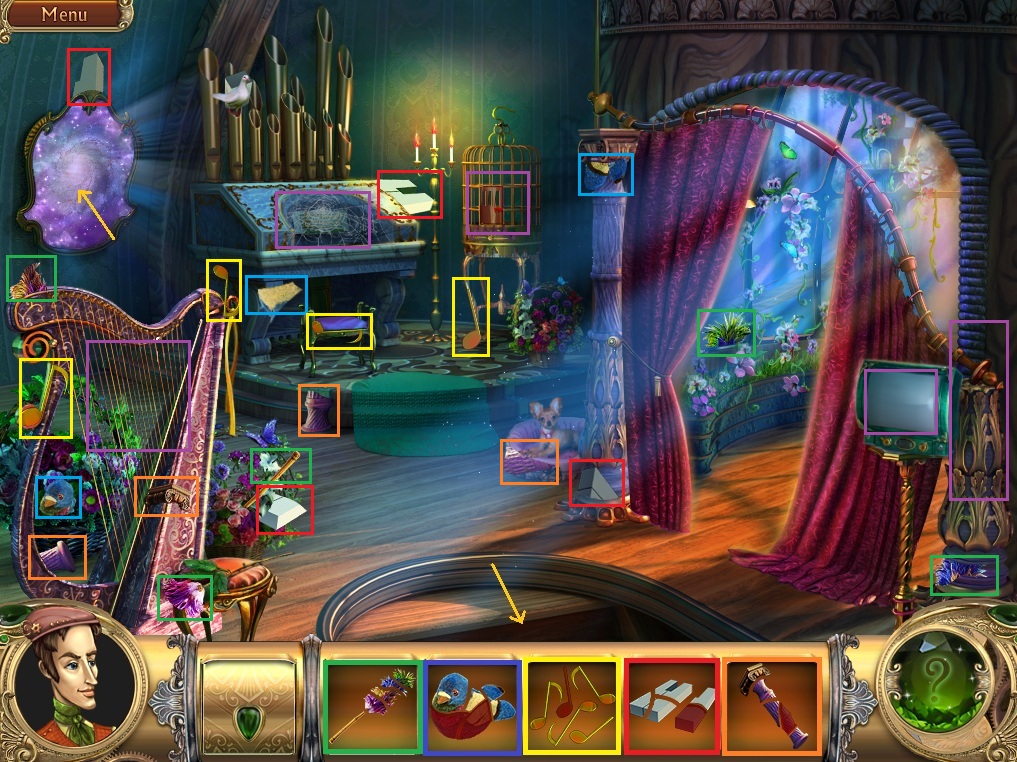
The 2nd Floor
Collect all available items, starting with the feather duster.
Screenshot.
Click on the bird cage for a close-up. To unlock the cage, the flowers must match the order they were in according to the painting puzzle you completed earlier.
Click the flowers to move them around; a flower can only move to an empty space.
Don't worry if you don't remember the exact arrangement, the answer is conveniently shown in the top left corner of the puzzle. This order changes every game, but here is an example:
Screenshot.
When the cage opens, pick up the toy bird piece.
Use the feather duster to clear the cobwebs from the organ.
Pick up the note and last toy bird piece and musical note.
Place the notes on the music stand next to the treble clef. You need to find one more key before you can play a song.
Put the toy bird in the bird cage to lure the dove away from the organ pipes.
The last organ key is in the pipe where the dove was perched. Pick it up and add the keys from you inventory to the keyboard.
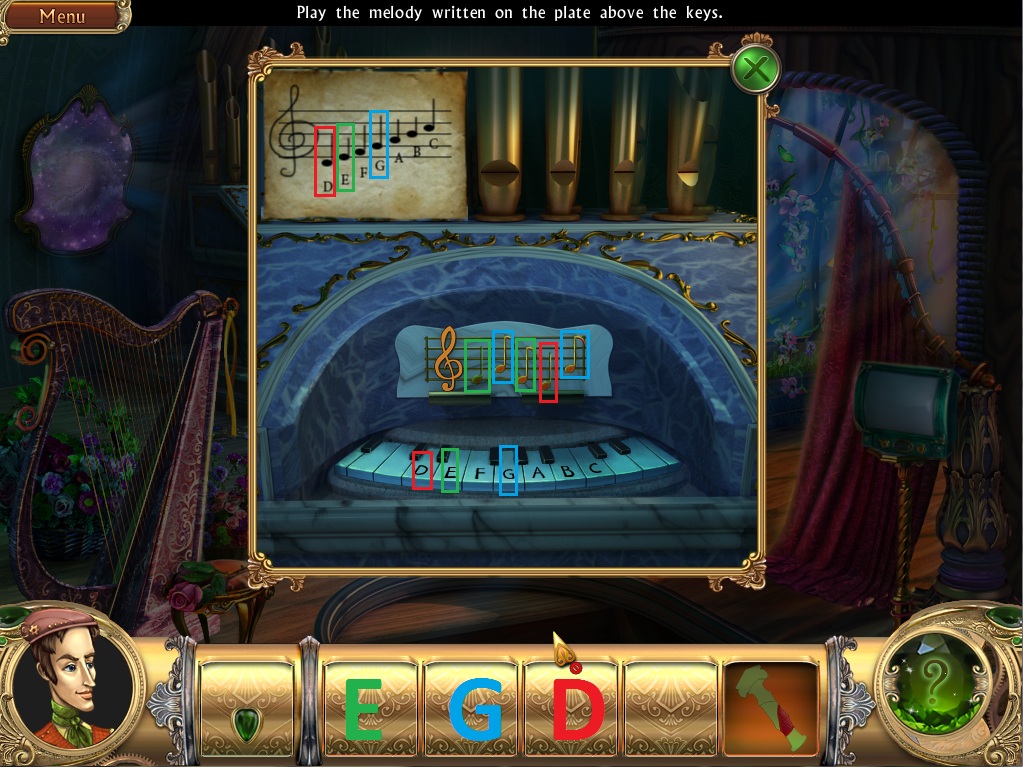
Play the piece on the music stand by hitting the keys corresponding with the notes on the music stand. If you don't know how to read music, the notes are shown in the paper in the upper left corner.
For those who are not musically inclined, here is an example: ( E-G-E-D-G )
Screenshot.
Pick up the last column fragment from the opened compartment.
Use the column from your inventory on the broken column next to the television.
Note that the column in the Snark World of this room has also been repaired. Let's head there next.
The 2nd Floor (Snark World)
Collect all available items.
Screenshot.
You can't use the ladle yet, so move to the kitchen by clicking on the fridge.
Pick up the last fragments of the bellows and salt & pepper shakers, as well as a vegetable piece.
Screenshot.
Open the fridge and pick up a piece of firewood on the fridge door. Leave the kitchen.
Click on the small, round table under the hanging sun disk.
Open the book with the familiar Hat symbol of the Snark on it.
Take the last vegetable piece on the left page.
Use the bellows from your inventory on the dim coals burning in the open oven.
Take the last piece of firewood from off the floor in front of the oven, and then add it to the fire.
Inspect the stove for a close-up.
Click on the piece of paper to zoom in. This looks like a recipe!
The first step is to build a large fire to boil the water. We've already taken care of that, so on to the ingredients!
The second step is grated vegetables. We have the vegetables, so use them on the grater sitting on the countertop.
Add the grated vegetables to the pot.
The recipe calls for mushrooms next. Luckily there is a bowl of mushrooms on the shelf right next to the pot.
The next ingredient, the leafy herbs, are on the shelf under the mushrooms. Add the leaves to the pot.
The last ingredient is salt and pepper. Use the salt&pepper shakers from your inventory to add them to the pot.
Finally, use the ladle to stir the concoction.
Woah! You won't be graduating from culinary school any time soon, but you did manage to uncover a bottle opener! Pick it up off the floor.
Head downstairs, then go through the Snark portal to return to the real world.
The Treehouse (Again)
Use the bottle opener on the cork in the wine cask to open it.
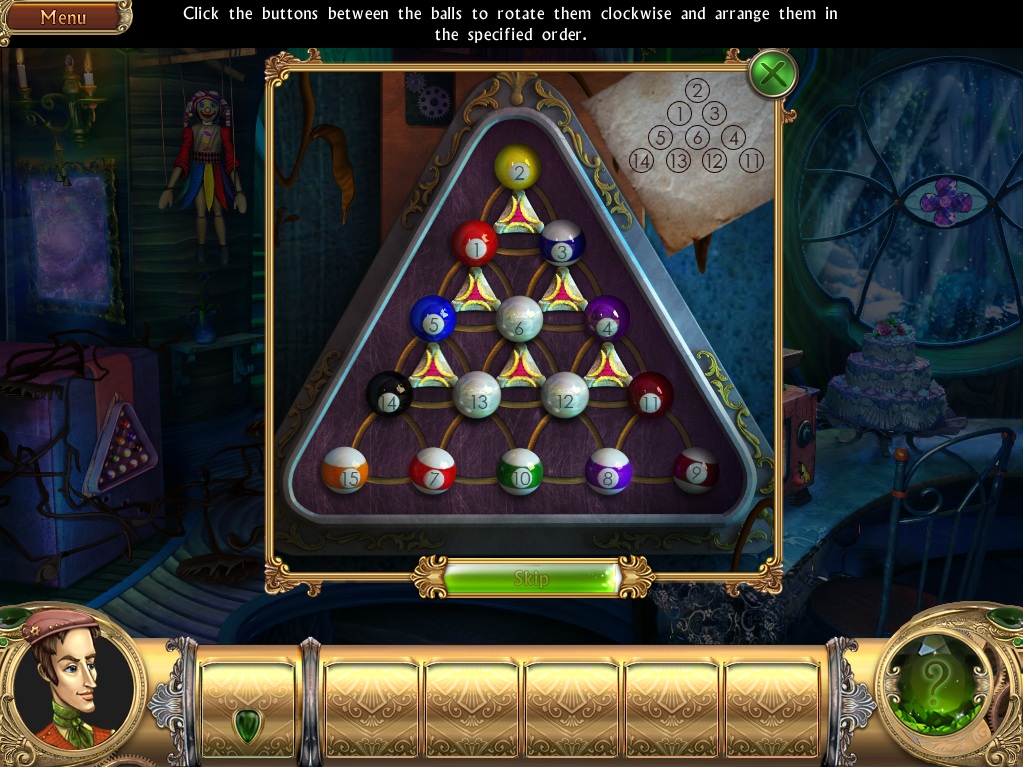
Pick up the last billiard ball piece off the table. Add the balls to the triangle rack on the billiards table.
Take note of the number order of the billiard balls, as this will be used in the corresponding billiards puzzle.
Go through the portal to enter the Snark world.
The Treehouse (Snark World Again)
Click on the triangle rack below the mirror portal to zoom in on the billiard ball puzzle.
Forget the order already? That's okay, the solution should be on the paper in the top right corner.
Click on the triangular space in the middle of the balls to rotate them clockwise. When a ball is in the right place, it will change color.
The exact order changes between games (it even changes between saves) but here is an example:
Screenshot.
Once the box is opened, pick up the moon piece and head upstairs.
The 2nd Floor (Again)
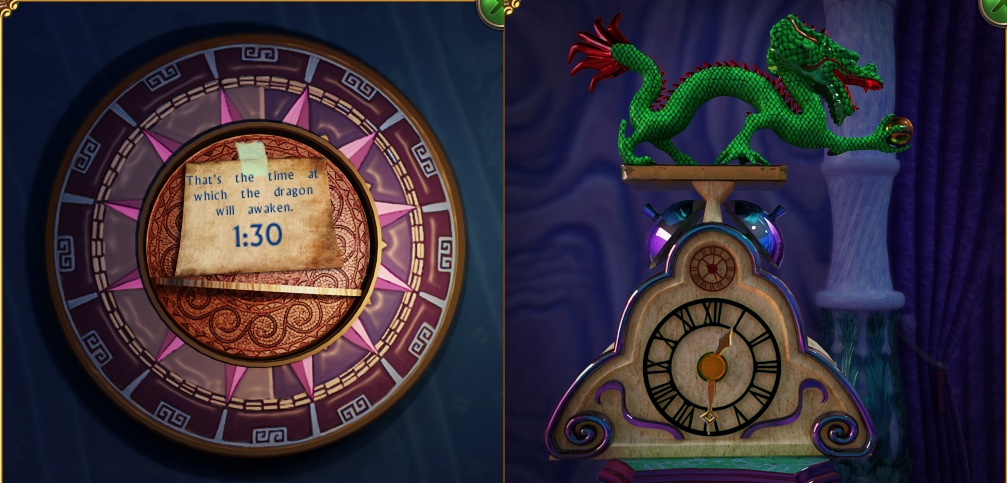
Combine the moon piece with the sun piece hanging on the wall.
Read the paper, "That's the time at which the dragon will awaken." Note the time given and pick up the clock hand.
Click on the dragon clock for a close-up. Add the hand from your inventory to the clock and move both hands to match the time given on the paper.
Remember the little hand points to the hour and the big hand points to the minutes. Here is an example:
Screenshot.
After the dragon's breath melts the ice in the fridge, pick up the pint-sized pachyderm (the wooly mammoth).
Go downstairs and through the green door next to the knight.
The World of Doors
Put the mammoth from your inventory into the crest of the Mammoth Door.
Go through the open portal.
Chaper 3
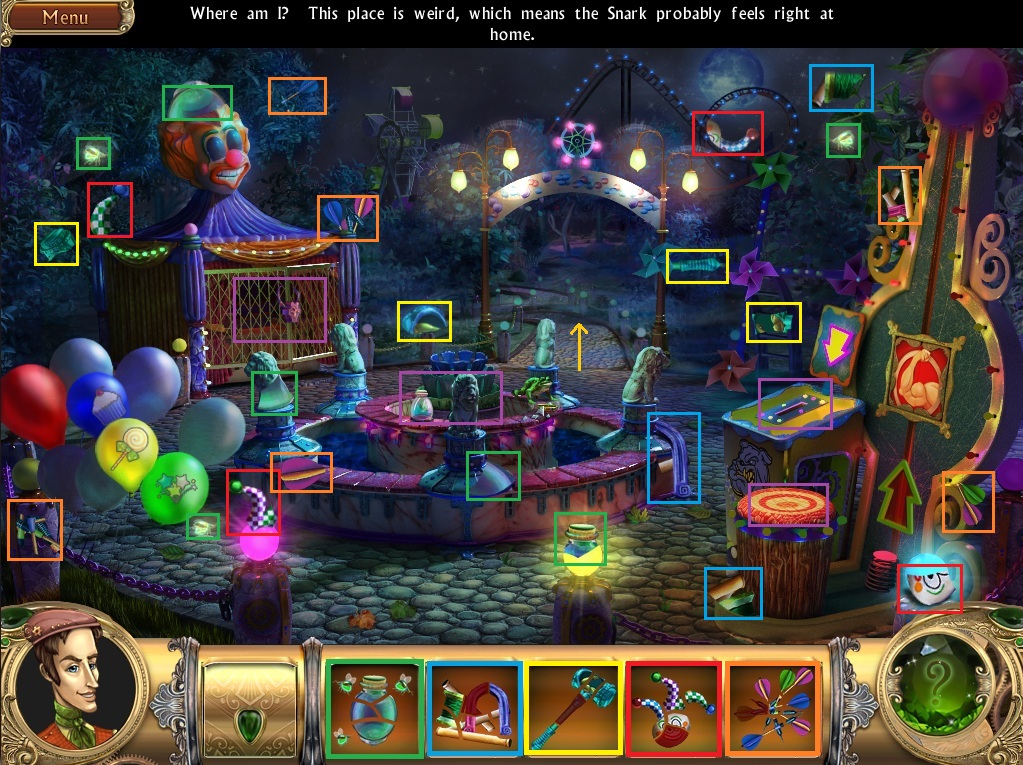
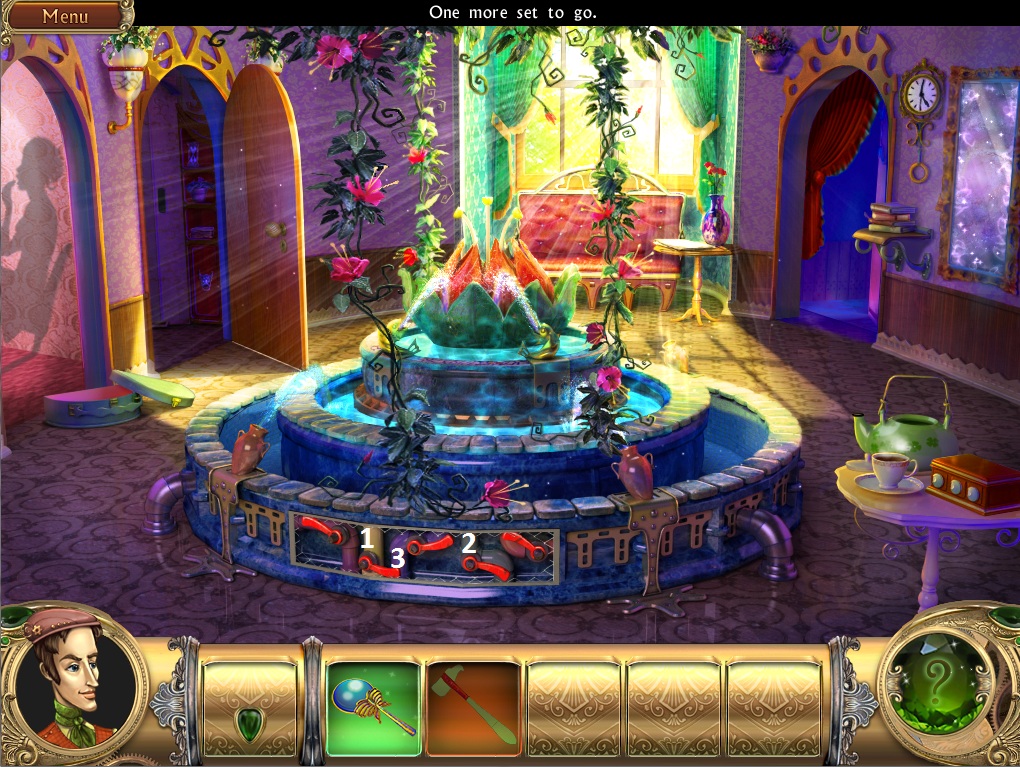
Carnival - The Fountain
Note the colorful balloons at the entrance. Three of them have symbols on them. Remember the symbols and their order.
Collect all available items, starting with the jar of fireflies.
Screenshot.
Use the fireflies on the fountain. After the frog eats the jar, click the fountain again to look inside.
Pick up the last magnet piece at the bottom of the water, then use the completed magnet on the fountain.
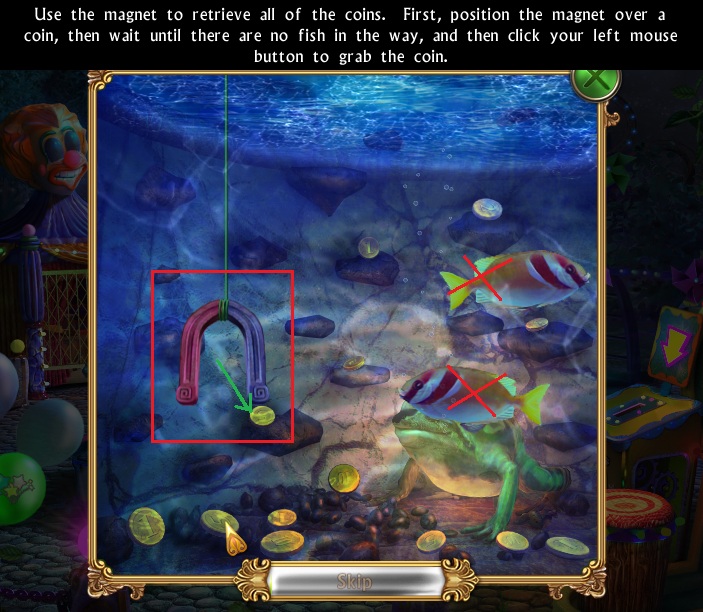
Gather all the coins using the magnet on a string.
In order to pick up a coin, it has to be under the path of the magnet and not blocked by any fish.
Screenshot.
After you have gathered all the coins, put them into the coin slot of the carnival game.
The last piece of the hammer is still missing, so move on to the next area for now.
Carnival - The Ferris Wheel
Collect all available items, starting with the Penguin.
Screenshot.
Place the lady penguin next to her penguin buddy on top of the ice cream cart.
When the cart opens up, pick up the last fragment of the recorder, and the piece of duct tape.
Go inside the carriage of the ferris wheel. Say hello to my little friend!
Use the recorder to charm the snake back into the basket, then pick up the last tongs piece.
Use the tongs on the chain surrounding the large wooden crate. It's a Snark portal, but we don't want to go through just yet.
Pick up the last part of the glass cutter off the ground.
Click the small cabin to zoom in and use your glass cutter on the window.
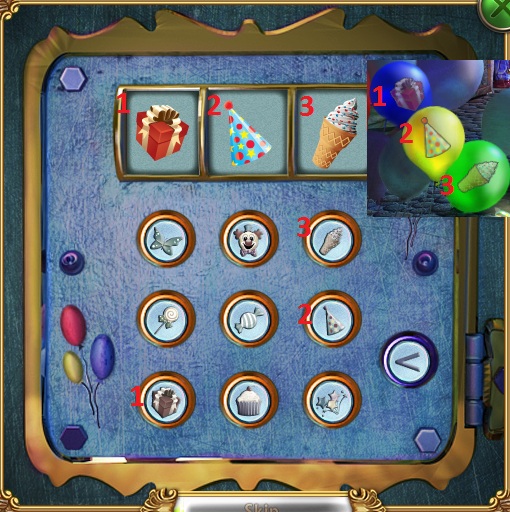
Enter the cabin and click the locked safe. Remember those balloons from before?
Click the button with the symbol that corresponds to the balloons by the fountain. Example:
Screenshot.
Pick up the ignition key from the safe and use it on the terminal to start the ferris wheel.
Note that when the ferris wheel stops, the last piece of the hammer is revealed by the fountain area. We'll pick it up later.
Push the lever from 1 to 2.
Go inside the #2 carriage of the ferris wheel and pick up the piece of duct tape.
Return to the device in the cabin and push the lever from 2 to 3.
Enter the #3 carriage and pick up the last piece of duct tape.
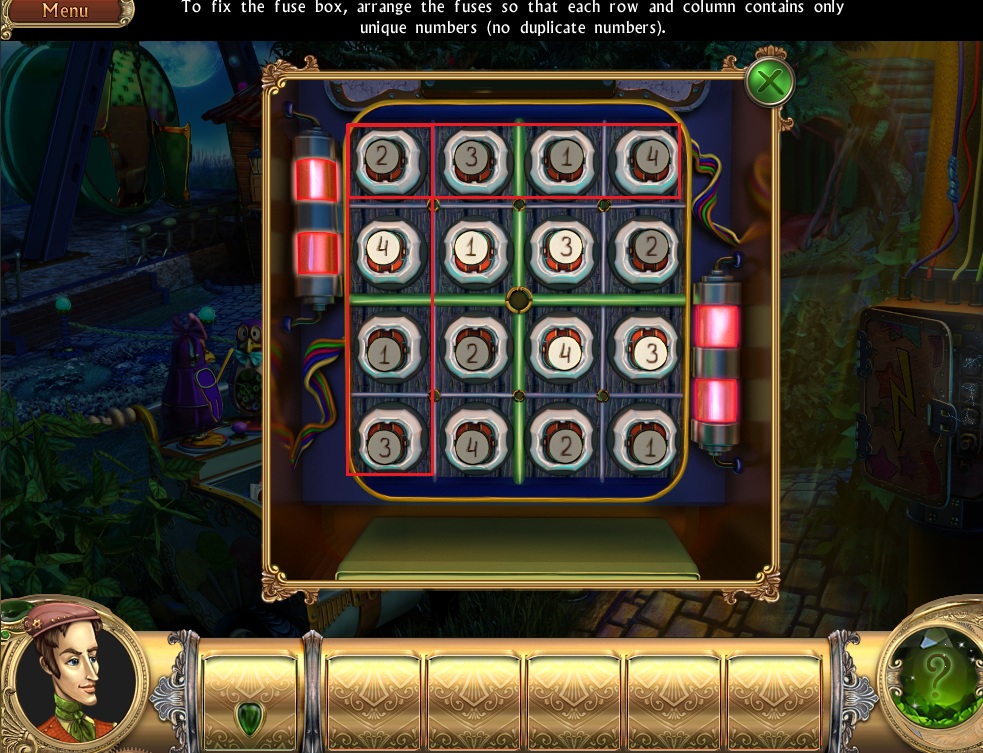
Use the duct tape on the exposed wires above the fuse box.
When the lid pops open, inspect the box.
Each of the fuses in every row and column need to contain the numbers 1-4. They don't have to be in numerical order, but no lines can have duplicate numbers (it's like a mini Sudoku).
Screenshot.
After you've fixed the fuse box, go into the giant snake's mouth.
Carnival - The Haunted House
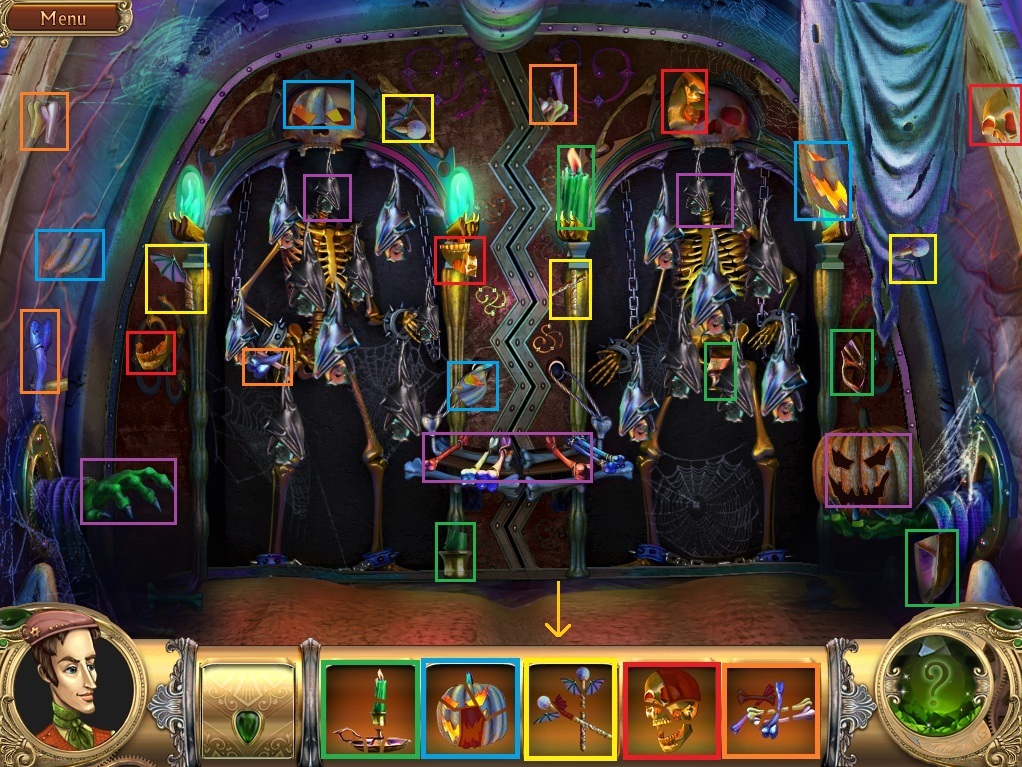
Collect all available items, starting with the candle.
Screenshot.
Put the candle in the unlit jack-o-lantern.
Pick up the last pumpkin piece and place it on the green hand.
Grab the bones and mallets on the floor under the pumpkin.
Place the bones on the rack between the two skeletons. It's a Xylophone! Add the mallets to play the instrument.
Pick up the last fragment of the skull on the kneecap of the left skeleton.
Give one of the poor decapitated skeletons a hand..err.. a head. One skull is still missing, so you'll have to return later.
Carnival - The Fountain (Again)
Pick up the hammer piece in front of the distant ferris wheel.
Use the hammer on the target in front of the carnival game to test your strength.
Strong and modest, eh?
Take the last part of the joker next to the red arrow.
Click on the cage below the incredibly creepy clown head. Use the joker on the lock to open it.
Put a coin in the slot to start the shooting game and pick up the darts on the counter.
Put your full pile of darts on the counter to start the game.
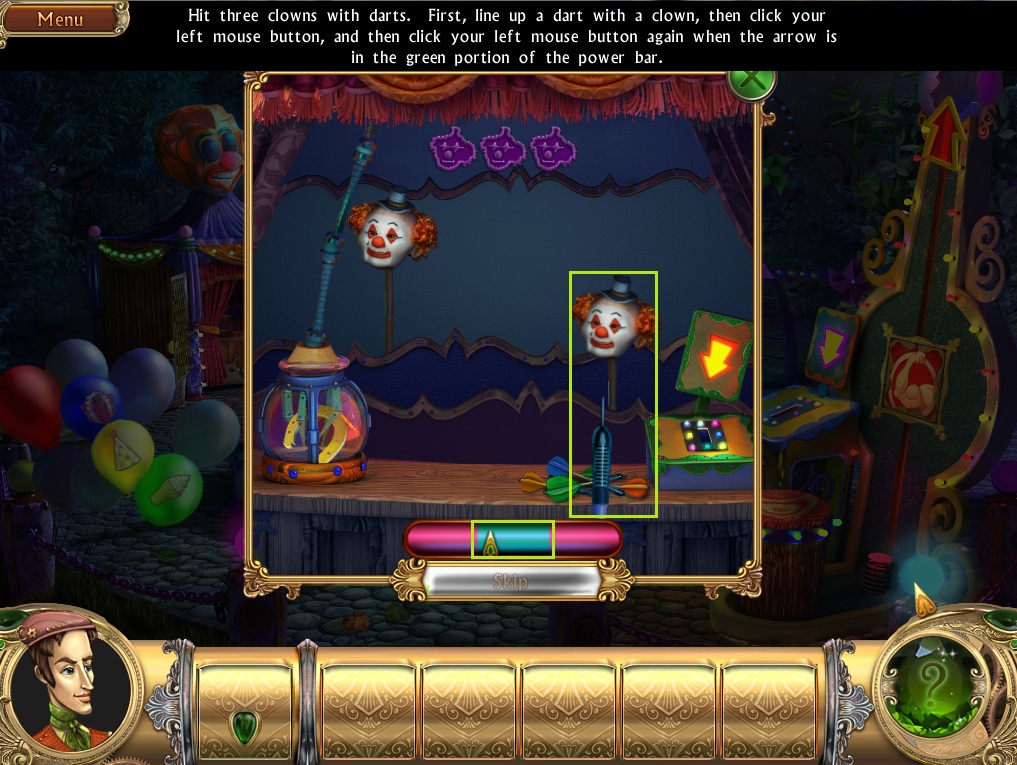
To win the game, you have to hit three clowns with darts.
Aim the dart by lining it up with one of the clown heads. When the dart is underneath a head, quickly click it to freeze both in place.
Click the clown head again when the power bar is in the green zone to throw the dart.
Screenshot.
Pick up the golden horseshoe the prizeclaw drops on the counter.
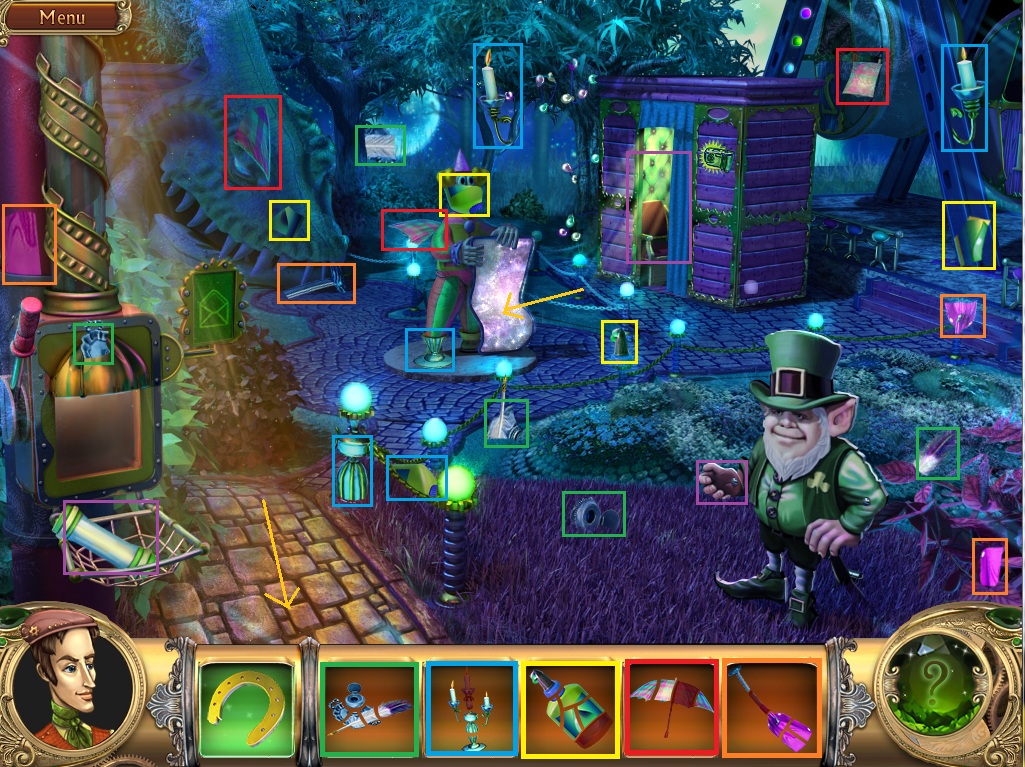
Return to the Ferris Wheel area and go into the Snark Portal.
The Ferris Wheel - Snark World
Pick up the tube from the mail chute to read the letter.
You'll need to fill out that registration form, including a picture, but first you'll need a pen.
Collect all available items, starting with the quill and ink.
Screenshot.
When you've completed the pen and ink, click on the letter containing the registration form again to fill out your information.
You still need a photograph, so hop into the photo booth. Say cheese!
Pick up the last piece of the candelabrum inside the photo booth.
Place the candelabrum in the ring of wax to add some lighting for your photo.
Pick up the last glue fragment behind the candle.
Now push the big red button!
Return to the registration form. Put glue on the blank square and then add your photograph.
When the letter is sent, pick up the umbrella piece caught in the net.
We're done here for now, so go down the path.
The Fountain - Snark World
Collect all available items, starting with the hook.
Screenshot.
Use the hook on the crane to move the large clown head out of the way.
Pick up the last suction-dart for the dart gun.
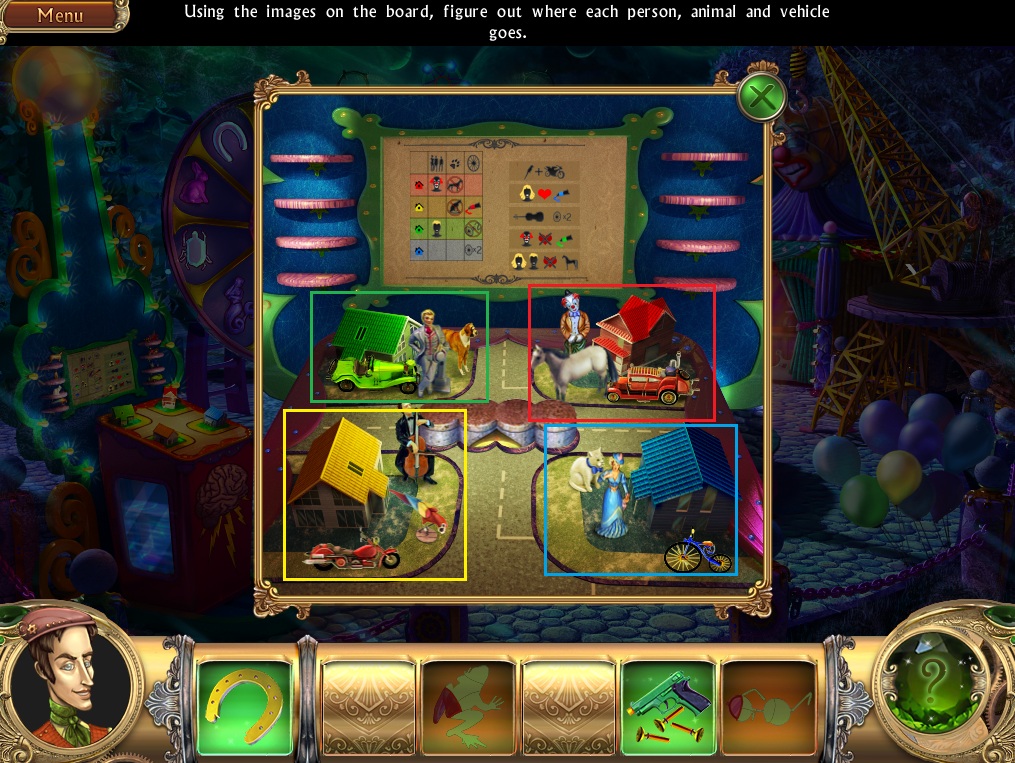
Click on the carnival game with the electric brain on it.
Add the lady figurine to begin the puzzle.
Every figurine is matched with a different animal, house, and car. Use the chart to gauge each person's likes and dislikes, then situate them accordingly.
The first column is the home, the second column is the person, the third column is animal, and the fourth column is the mode of transportation.
So what do we know to begin with? We know that:
The clown lives in the red house and does not have a dog.
Move the clown to the red house.
The person in the yellow house does not have a cat and drives a red vehicle.
The blonde man lives in the green house and does not drive a vehicle with only 2 wheels.
Move the blonde man to the green house.
The person in the blue house drives a vehicle with 2 wheels.
The person who owns a parrot also owns the motorcycle.
The blonde lady likes the blue vehicle.
Since the person in the yellow house owns a red vehicle, the blonde lady must live in the blue house with the blue bicycle.
Move the lady to the blue house with the blue bicycle.
The cellist owns a 2 wheeled vehicle. Since the blonde lady already owns the bicycle, the cellist must own the motorcycle.
Move the cellist to the yellow House with the red motorcycle and the parrot.
The clown does not like green vehicles.
By process of elimination, this means the clown owns the orange car.
Move the orange car to the red house with the clown. Move the last remaining green car to the green house with the blonde man.
The Blonde Man and Lady do not like horses.
This leaves the horse to the clown. Move the horse to the red house.
Since we know the lady has a tendency to like everything blue, give her the cat with the blue ribbon.
Give the dog to the blonde man. When all is said and done it should look like this:
Screenshot.
Success! Pick up the last frog piece from the center of the board.
Add the frog and the horseshoe to the spinning wheel.
Note the rain cloud that flies to the leprechaun - we'll get that later.
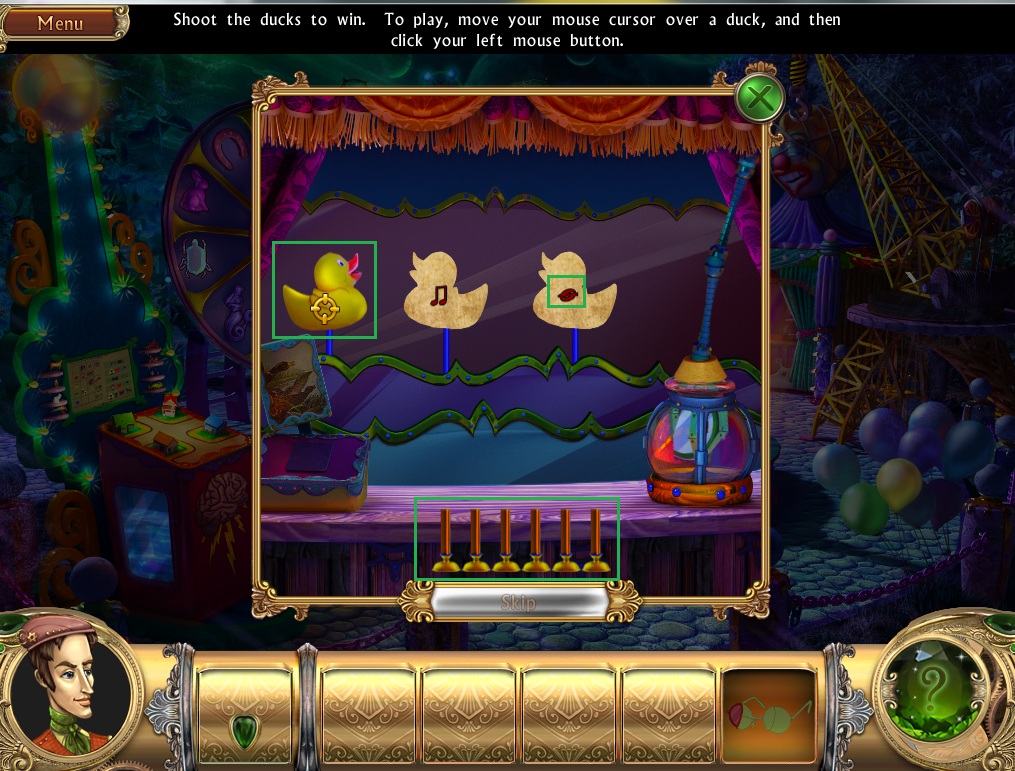
Click on the duck hunt carnival game in the booth to the right.
Drop the gun on the counter to begin the game.
Simply point and click on the ducks to shoot at them.
You have a limited number of shots, shown at the bottom, so take aim carefully.
Screenshot.
When hit, the duck will flip around to reveal a symbol. After you have hit all four ducks, remember the order of the notes.
Pick up the last piece of the glasses on the counter.
Click on the the fountain for a close up.
Apparently the bespectacled piranha has lost his glasses. Give him the pair from your inventory by dropping them into the water.
Now you can take the chest out of the water.
The chest is locked and the combination to the puzzle is one you saw very recently.
If you forgot the order of notes from the duck shoot game, the answer is in the top left corner.
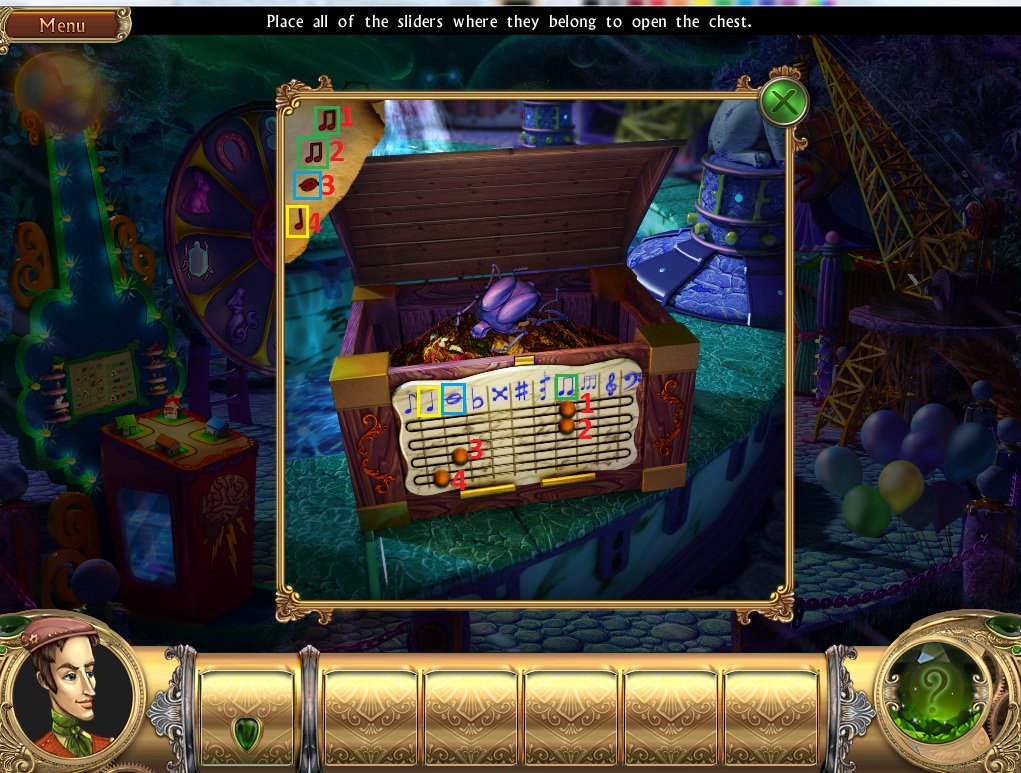
Move the sliders to the corresponding notes.
Screenshot.
Loot the scarab from the opened treasure chest. Yarrr, booty!
Add the scarab to the spinning wheel.
Return to the leprechaun in the ferris wheel area.
The Ferris Wheel - Snark World (Again)
Pick up the umbrella handle on the grass then give the umbrella to the leprechaun.
The rainbow revealed the last part of the spade. Pick up the piece on the railing under the ferris wheel.
Use the spade to dig at the end of the rainbow.
Pick up the gold shamrock, then return to the fountain.
The Fountain - Snark World (Again)
Add the shamrock to the wheel.
The center opens up to reveal a morbid present. Pick up the skull and head back to the haunted house.
Carnival - The Haunted House (Again)
Put the skull on the headless skeleton. The doors open, revealing a second room.
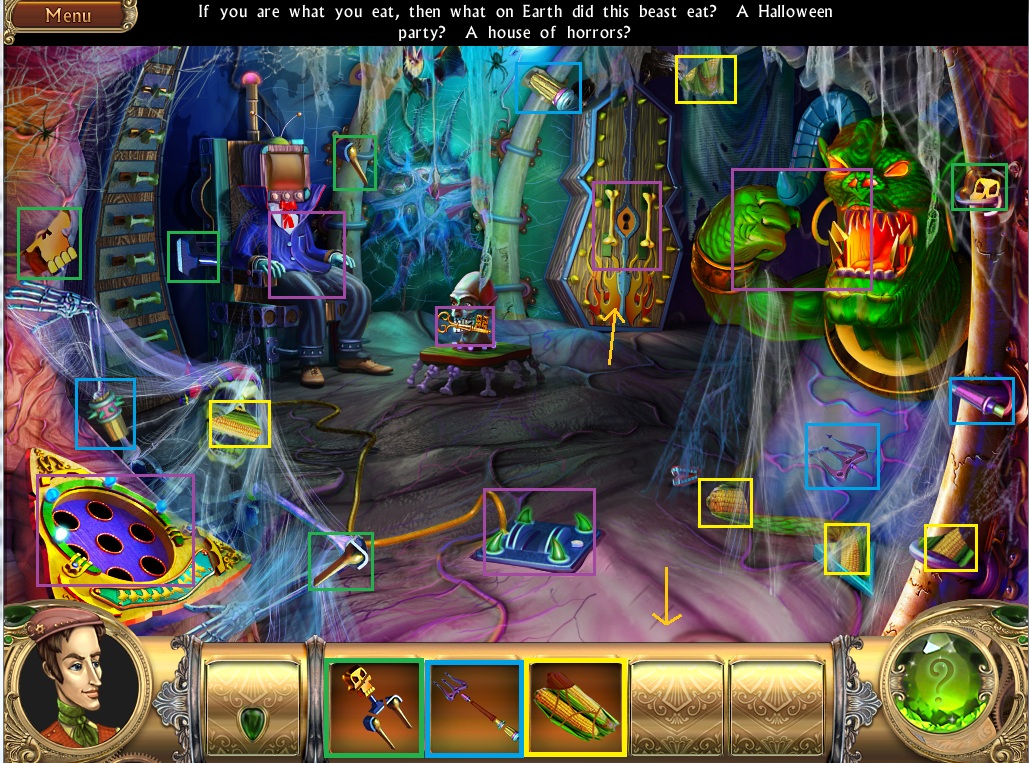
The Haunted House - Hidden Room
Collect all available items starting with the switch lever.
Screenshot.
Add the lever to the switch on the ground. Now comes the part every mad scientist loves best:
PULL...THE SWITCH!!!!
Pick up the last trident piece on the television screen.
Give the trident to the large demonic fellow on the right.
Take the piece of corn out of his mouth. Gross.
Put the bowl of corn kernels back in the demon's mouth.
Retrieve the bowl, the kernels are now diamonds! No wait, they're popcorn.
From the images on the screen you can gather that the television man really likes popcorn. Give him the bowl from your inventory.
Pick up the key from the head on the table.
Use the key on the locked coffin closet.
Click on the toy hammer in deaths hands. Note the green door in the closet is revealed.
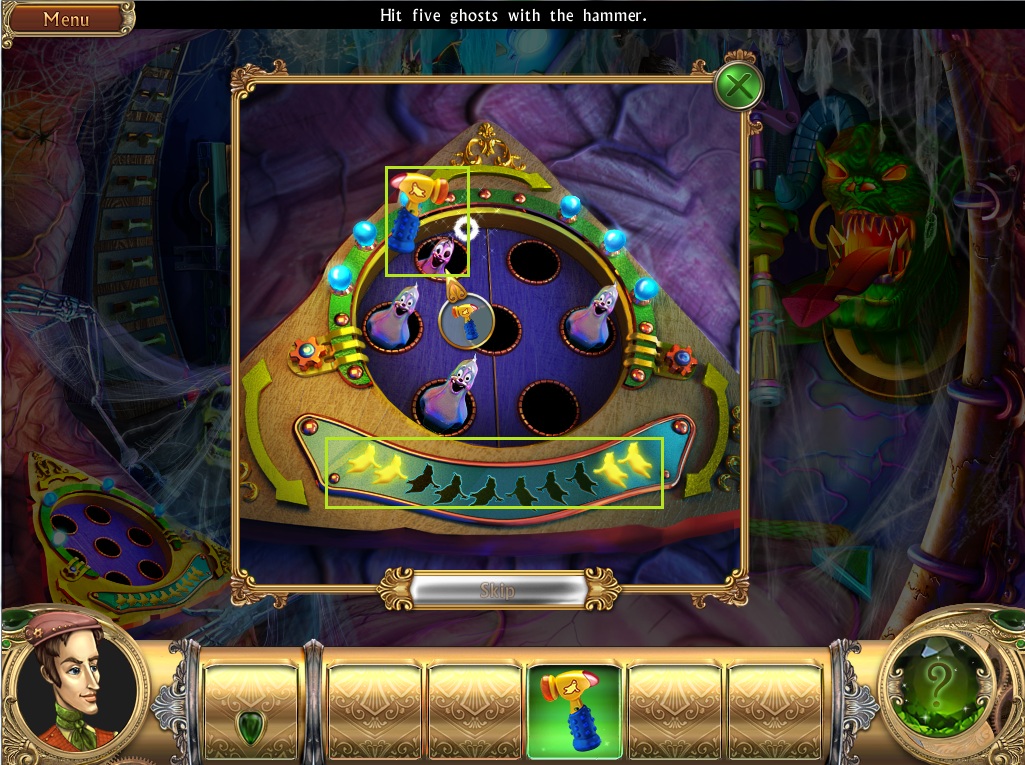
Add the toy hammer to the whack-a-mole game in the lower left.
To beat the game, simply hit 5 ghosts with the toy hammer by clicking on them.
The panel at the bottom tracks your progress.
Screenshot.
Pick up the dice from the center, then leave the haunted house.
The Fountain - Snark World (Again)
Add the dice to the spinning wheel.
Pick up the mermaid figurine in the center.
It's time to leave the carnival. Go through the green door in the haunted house hidden room.
The World of Doors
Put the mermaid figurine from your inventory into the mermaid crest of the door.
Go through the open portal.
Posted by: Trinn |
May 16, 2011 4:51 PM
|
May 16, 2011 4:51 PM
Snark Busters 2 walkthrough
Chapters 4-6
Chapter 4
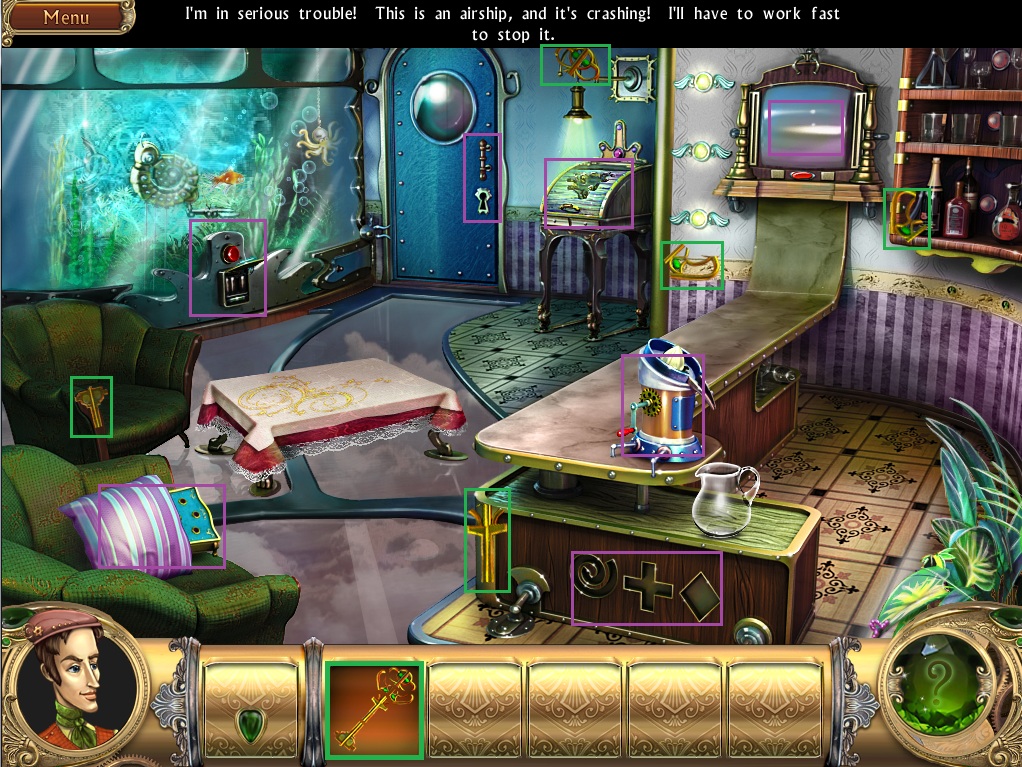
The Airship
Collect all pieces of the key.
Screenshot.
Use the key on the large metal door.
The Dirigible Deck
Collect all available items, starting with the spool of thread.
Screenshot.
Use the needle&thread to patch the hole in the airship.
Pick up the last piece of the valve handle under the fixed patch.
Place the valve handle onto the metal door and go down the hatch.
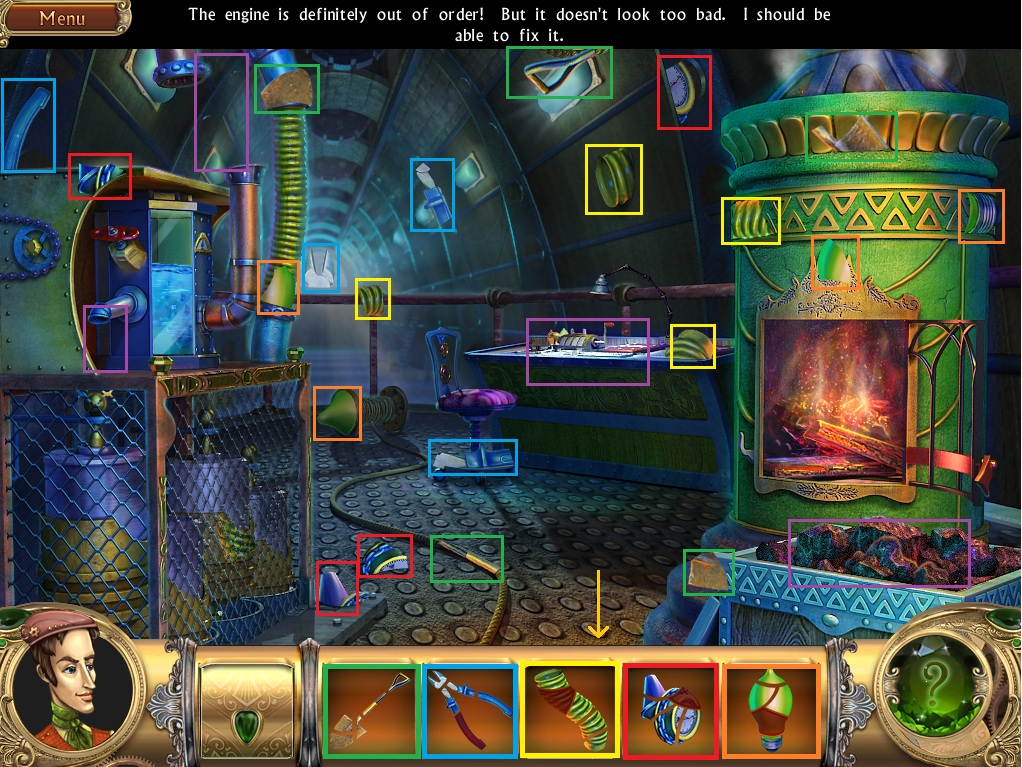
The Engine Room
Collect all available items, starting with the spade.
Screenshot.
Use the spade on the cart of coal. Pick up the revealed final wire cutters piece.
Use the wire cutters on the cage beneath the water tank.
Pick up the last hose fragment.
Use the hose on the broken pipe of the water tank.
Take the final part of pressure valve at the bottom of the red liquid.
Use the pressure valve on the steaming pipe at the left side of the tank.
Turn the red handle to equalize the pressure; the liquid should turn green. Note the small explosion at the panel.
Click the control panel on the desk to zoom in.
Collect the broken shard of the lightbulb. Replace the broken bulb with the one from your inventory.
The control panel is fixed, but we don't know how to use it yet. Leave the engine room for now.
The Dirigible Deck (Again)
Collect all available items, starting with the handle.
Screenshot.
Add the handle to the gear on the wooden crane to elevate the package.
Take the last piece of the toolbox from the corner of the package.
Click the hook on the crane to attach it to the metal beams blocking the wooden door.
Turn the handle on the gear again to remove the blockade.
Collect the last piece of the wheel from the back of the overturned blockade.
Use the toolbox on the broken propeller.
Pick up the revealed hilt piece of the dagger under the propeller.
Click on the wooden door to zoom in.
Add the wheel to the bottom of the broken door. Go through the door to enter the control room.
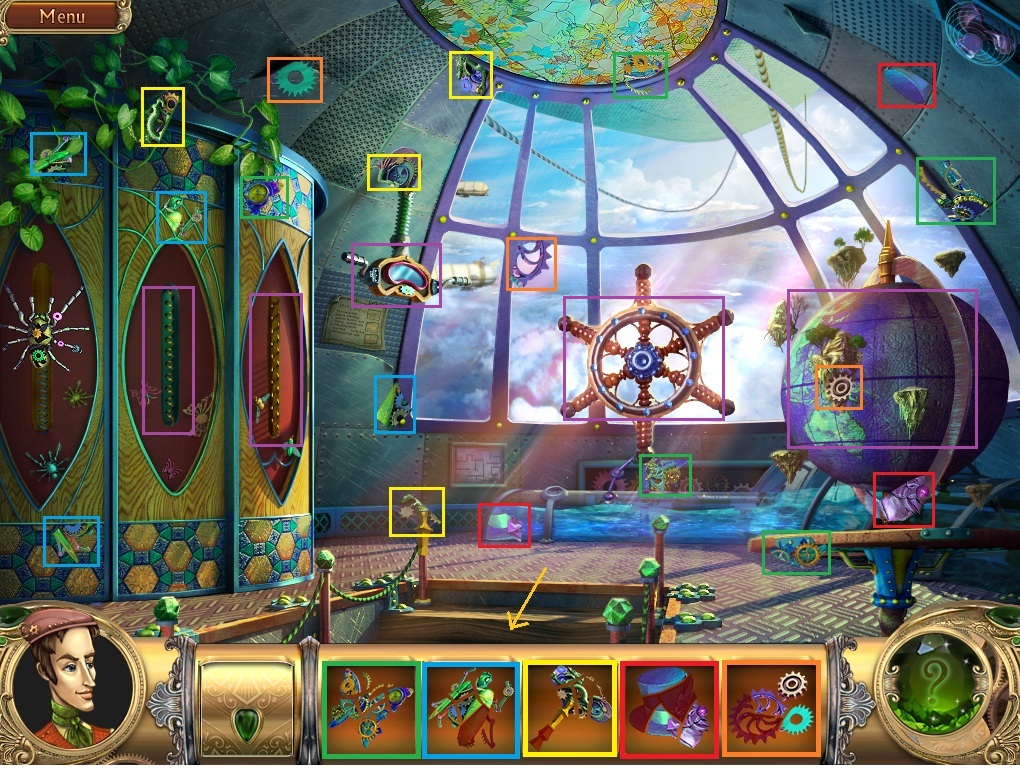
The Control Room
Collect all available items, starting with the mechanical butterfly.
Screenshot.
Set the mechanical butterfly onto the track of the butterfly panel (next to the mechanical spider).
Spin the globe and pick up the last piece of the mechanical bug that drops to the ground.
Put the mechanical bug on the track of the third bug panel, next to the mechanical butterfly.
When the panels slide over, pick up a piece of the hat on the bust.
Look through the periscope to view the last piece of the hat on the closest floating island.
Shift the view of the persicope to the right 3 times to find a gear fragment below the wooden sign.
Take note of the symbol on the sign.
Click the bug panel to shift it to the right, revealing a mannequin in a blue dress.
Pick up the last winding key part from her right arm.
Add the hat to the mannequin's head.
Retrieve the last gear piece from her ripped bodice.
Click the panels again to return to the shelf view. Zoom in on the middle shelf to find a diorama.
Add the gears to the mechanism on the left.
Put the winding key in the triangle slot next to the gear mechanism.
Open the captain's log from the secret compartment.
Pick up the punch card on the left page, note the symbol on right page.
Return to the engine room.
The Engine Room (Again)
Click on the control panel for a close up view.
Hit the large golden lever in the center of the control panel.
Inset the punch card into the slot to begin the puzzle.
Move the sliders so that the colored numbers at the top correspond with the position of the sliding disks.
When a slider is in the correct position, the red lights on the right side will change to green.
Screenshot.
Leave the engine room and head up to the dirigible deck.
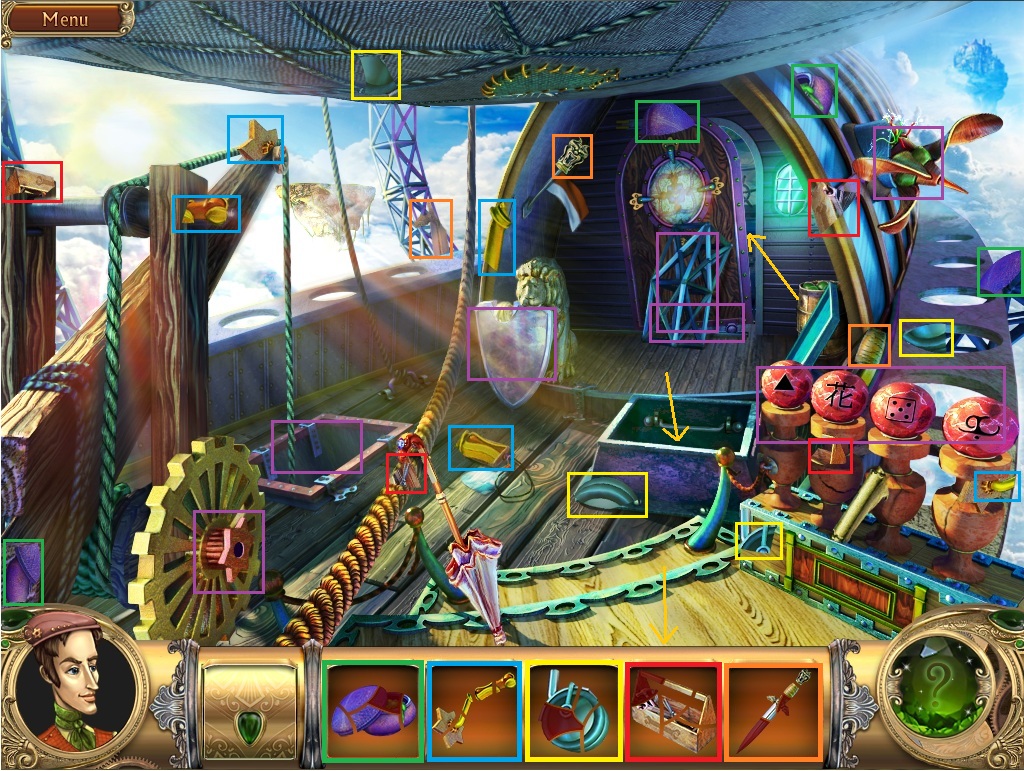
The Dirigible Deck (Again)
Pick up the last pieces of the cleaning solution and the knife on the floating island to the left of the airship.
Use the knife on the package to slice it open. Take the cloth from the package.
Clean the lion's shield with the cleaning solution.
Wipe off the solution with the with the cloth to reveal a Snark portal.
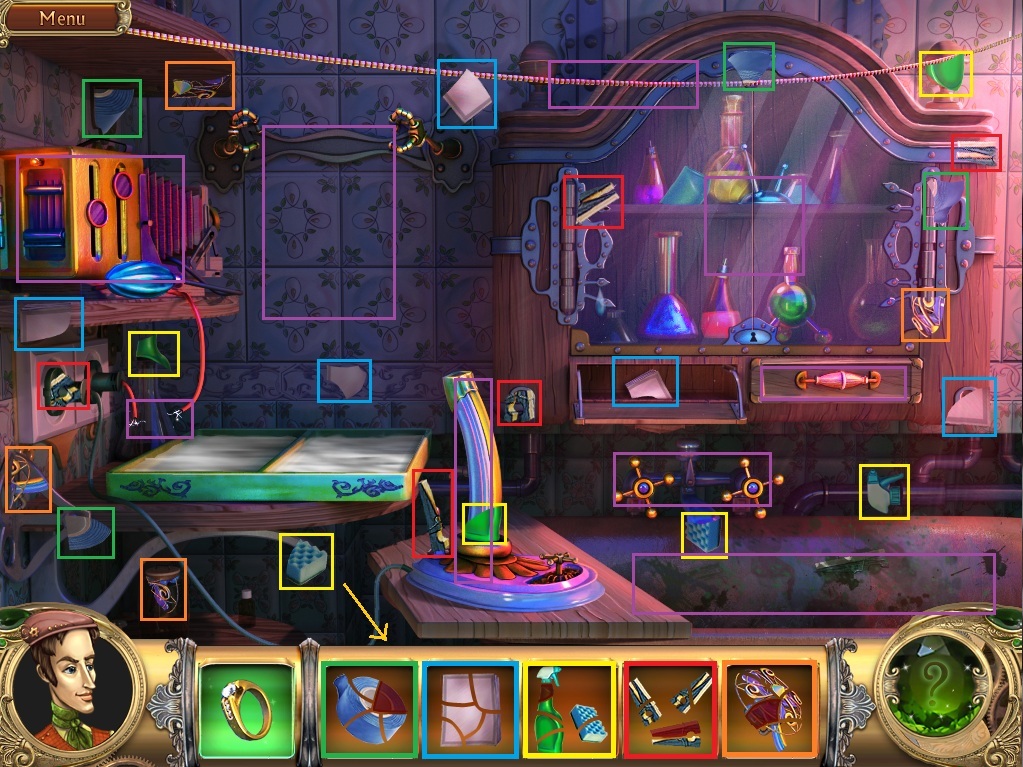
The Dirigible Deck - Snark World
Collect all available items starting with the broom & dustpan.
Screenshot.
Sweep up the spilled junk on the floor with the broom & dustpan.
Pick up the crowbar piece extracted from the mess.
Use the lamp on the pedestal next to the 3 flowers. When the bees move away, pick up the piece of tangled wires.
Use the crowbar to pry open the crate with the black and yellow tape.
Gather all the pieces of paper from the scattered manual.
Screenshot.
Click on the open crate to zoom in.
Add the pages you collected to the manual, then open the manual book to read a description of the bottles (This order changes every game):
The food supplement bottle symbol is comprised of four triangles, and it contains two-color capsules.
The vitamins bottle symbol is 2 semi-circles with a oval in the middle. It contains blue liquid stored in a glass vial.
The valerian bottle symbol has 3 thin ovals. It contains white pills.
The flea medicine bottle symbol is one large triangle. The bottle contains a liquid stored in a glass vial.
The sleeping bills bottle has an abstract x shape symbol, but no description.
To assign a label to a bottle, first click the bottle. Then, click a tag to attach it to the bottle.
Screenshot.
After the puzzle is solved, click the sleeping pills to place them in your inventory.
Also pick up the cleaning supplies to the right of the manual.
Give the sleeping pills to the caged tiger.
Pick up the last piece of the pruning shears by the tiger's paw.
Snip off the venus flytrap with the pruning shears.
Use the venus flytrap to catch the fiery red powerball.
Click on the bottom of the strange device with the picture of the venus flytrap.
Open the red compartment. Use the venus flytrap from your inventory on the red compartment to place the red powerball inside.
This time, catch the electric blue powerball with the venus flytrap.
Open the blue compartment at the bottom of the device and place the blue powerball inside.
When the mechanism breaks, take the last piece of tangled wires at the bottom of the device.
Combine the wires from your inventory with the exposed wires at the top of the mechanism.
Click the lotus blossom. The middle flower petal has another strange symbol on it. Take note of the symbol for future reference.
Go through the snark mirror and return to the entrance of the airship.
The Airship (Again)
Collect all available items, starting with the batteries.
Screenshot.
Move the pillow aside to reveal a gem fragment.
Zoom in on the aquarium. Add the batteries from your inventory to the power box.
Use the up and right arrows to position the nautilus so that the claw is just overlapping the chain.
Push the big, red button to snip the cord, then open the draw to retrieve the octopus.
Click on the desk for a close up. Place the octopus in the matching shape to open the cover.
Pick up the brush fragment. The brush is still missing one piece, so we'll have to return later.
Go through the portal in the glass table to enter the Snark world.
The Airship - Snark World
Collect all available items, starting with the microscope lens.
Screenshot.
Add the microscope lens to the microscope on the countertop.
While in microscopic view, pick up the molecule and cheese fragments.
Open the small cabinet under the shelves to reveal the last molecule piece.
Place the completed molecule from your inventory into the space between the two molecules under the counter.
Pick up the flask fragment from inside the opened compartment.
Use the cleaning equipment on the large glass wall next to the green door.
Click on the glass wall again for a closer view. Pick up the last piece of cheese in the drawer.
Add the completed cheese to the drawer to start the puzzle.
Rotate the pipes by clicking the purple gear in the middle of each tube.
Connect all the pipes so that the mouse has a path to travel to the cheese.
Screenshot.
Open the drawer the take the key from the mouse.
Used the key on the locked desk cover.
Pick up the lighter and the green fairy. Inspect the two pieces of paper.
The first paper is a "method to neutralize poisonous vapors.
The second paper is a diagram with colorful circles and arrows. Take note of both papers for future reference.
Click on the metal plate on the green door.
Insert the green fairy into the similarly-shaped space to start the ball puzzle.
There is a green ball, a yellow ball, a blue ball, and a red ball.
Remember the diagram in the desk? There is only a green, yellow, and blue hole. Red balls must be left alone.
Move the partitions (the bars blocking the path of the ball) to guide one ball of each color into a hole with a matching color.
Red partitions cannot be moved.
The balls will sit at the top of the puzzle for a few seconds before they drop down, giving you time to plan your movements.
If a ball in the correct hole is hit by another ball, both balls will be knocked out and the hole will be empty again.
This means you must be careful to not only guide the right colored ball into the correct hole, but to block the path immediately so no other ball can knock it out of place.
Screenshot.
Pick up the last glass pipe piece off the floor.
Add the pipe to the mechanism under the counter. One piece of the flask is still missing, so leave this room for now.
The Airship (Again)
Click the small blue case on the green sofa.
Light the candle on the left side of the mechanism with the lighter.
Pick up the last gem fragment on the bottom of the case.
Add the gems to the case to begin the crystal puzzle.
The crystals have to be placed in such a way that the violet ray passes through the violet gem in the middle.
As the beam passes through a crystal, it changes color to match that crystal.
If it passes through 2 different colored gems, the colors will blend in the beam of light.
If it passes through 3 different color, the beam will turn white.
The secondary color violet is made by combining the primary colors blue and red.
However, you can't reach the middle gem in only 2 moves, you need to use all of the crystals.
The key is to start with the gems you don't need. Line them up to make a white beam, and then finish with a blue and red gem so that the beam becomes purple.
Screenshot.
Take the last piece of the keys from the open case.
Use the keys on the matching indentations below the counter.
When the secret compartment pops out of the side, grab the last lemon slice and brush fragment.
Put the lemons in the juicer on the counter, then take the lemon juice.
Click on the desk for a closer look.
Put the lemon juice in the ink pot and dip the brush in the juice.
Examine the paper and paint the lemon juice over it to reveal the invisible writing.
Note the seal in the upper right corner. Now that we have all the symbols, head out towards the deck.
The Dirigible Deck (Again)
Between the symbolic red orbs on the pedestal is a scroll.
Click on the scroll to see the order of symbols you found around the ship.
Screenshot.
When all the orbs in the right place, the compartment at the bottom opens up.
The plate door of the compartment has a 3 digit numeric code on it. Remember this code for later.
The Airship - Snark World (Again)
Pick up the last flask piece on the sofa.
Add the flask to the contraption under the counter. Take the neutralizing agent above deck.
The Dirigible Deck (Again)
Use the neutralizing agent on the smoking package.
Pick up the green pegs to place them on the board.
Do you remember the 3 digit code from before?
Place each of the three pegs in the row with the corresponding number and the column with the matching symbol.
Screenshot.
Take the griffin figurine from the opened safe.
Exit the airship through the green door in the snark world.
The World of Doors
Place the griffin figurine in the griffin door.
Go through the open portal.
Chapter 5
The Film Studio
Collect all available items, starting with the record.
Screenshot.
Put the record in the jukebox. When the jukebox hops away, pick up the last piece of the teacup.
Combine the teacup from your inventory with the green teapot, then pick up the last umbrella piece.
Use the completed umbrella to drag the case in Kitty's room closer.
Look inside the case. Push the objects aside until you find a piece of the magnifying glass and the hammer.
Go through the mirror portal into the Snark world.
The Film Studio - Snark World
Collect all avalable items.
Screenshot.
Use the ice cream on the fire in the doorway.
Pick up the feather and star piece on the ground where the fire was.
Click on the table with the book, crystal ball, and wand for a close-up.
Add the feather, star, and paints to the wand. The last ingredient is still missing, so we'll return later.
Click on the wooden door to zoom in.
Add the hat from your inventory to the plaque on the door.
Open the door and move to the next room.
The Stageroom - Snark World
Note the green door on the left side behind the stage.
Push the big red button under the lightswitch.
When the wheel pops out, pick up the piece of wheat hanging above it.
Collect all available items.
Screenshot.
Use the wheat from your inventory on the hamster holes under the stage.
After you've lured the little guy out, click him to pick him up. Then, drop him on the hamster wheel next to the chair.
When the lights come on, several new items are illuminated.
Screenshot.
Put the snake inside the magician's box on the stage.
Take the hose out of the box and add it to the ballon contraption.
Pick up the last crap fragment and the toy hammer.
Use the hammer on the houseglass to get the last piece of the matchbox.
Light the candle above the hamster wheel with the matchbox.
Put the candle in the magicians box on the stage.
Take the small sun out of the box and put it in the sun-shaped wood panel.
Pick up the final piece of leaves.
Place the leaves in the magician's box.
Take the papers out of the magician's box (bahaha French puns!)
Click on the moon hanging from the ceiling for a closer view.
Add the pages from your inventory to the torn book. Turn the page to view the entire instructions on how to develop a photograph.
Put the crab in the magician's box, then pick up the wire cutters.
Leave the Snark world through the mirror portal.
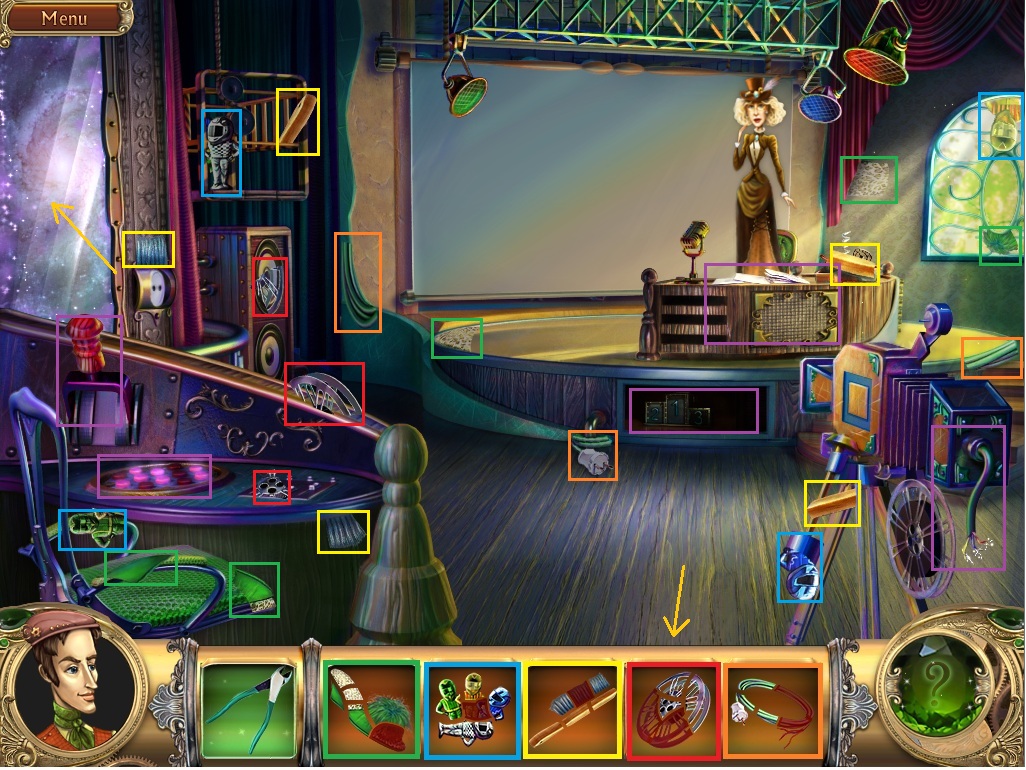
The Stageroom
It's that horrid newscaster! Her desk has been overrun by bugs. We'll help her... eventually.
Collect all available items.
Screenshot.
Click the button device next to the green chair.
To solve this puzzle, all of the buttons must be pushed down.
Touching one button will cause all the adjact buttons to move as well.
There are, of course, multiple ways to solve this puzzle. The shortest way I found took 5 steps:
Screenshot.
When the puzzle is solved, the stage power will turn on.
Pull the red lever to lift the backdrop. Several new items have been revealed.
Screenshot.
Click on the news anchor's desk for a closer view. Yuck, it's covered in roaches.
Use the slipper to smash them all flat, then use the brush to push them off the desk.
Pick up the last piece of the film reel.
Place the film reel into the camera. It doesn't work yet, so we'll come back to it later.
The Film Studio (Again)
Snip open the fenced barrier at the bottom of the fountain with the wirecutters from your inventory.
Under the first red lever is the last fragment of the magnifying glass.
Pull the levers in the correct order to turn on the fountain.
Only three of the levers need to be switched in order to get the fountain working.
It can be managed easily with a little trial-and-error.
Screenshot.
When the fountain is operational, note that the last piece of the empty bag is revealed in the Snark world.
Click on the small table by the window for a close-up.
Use the magnifying glass on the newspaper.
Pick up the last hammer piece.
Use the hammer to smash the flower pot and retrieve the ring inside.
Go through the mirror portal into the Snark world.
The Film Studio - Snark World (Again)
Pick up the last piece of the empty bag from the top of the large flower.
Use the bag on the stamen of the flower to collect the pollen.
Add the bag of pollen to the wand on the table.
The wand still isn't ready, so we'll come back again later.
Go through the mirror to return to the real world, then go into the door on the left.
The Office
Push the chair out of the way to reveal a lightbulb fragment.
Flip the lightswitch by the window to turn on the table light and reveal another lightbulb fragment.
Collect all available items.
Screenshot.
Place the lightbulb into the lamp hanging next to the shower curtain.
Flip the lightswitch again to change the light from the desk to the bathtub.
Click on the tub to go behind the shower curtain.
The Photo Lab
Collect all available items, starting with the photographic paper.
Screenshot.
Open the drawer under the locked glass cabinet and take the last piece of duct tape.
Use the duct tape on the broken wire to the camera.
Use the photographic paper on the wall where the camera light is shining.
Use the diamond ring to cut through the class cabinet doors.
Pick up the aerial and the last piece of the cleaning supplies.
Use the cleaning supplies on the dirty sink and pick up the last clothespin piece.
Turn the faucet handles to fill the sink with water.
Attach the clothespins to the rope hanging from ceiling.
The development room is not yet ready, so leave the room for now.
The Office (again)
Add the aerial to the top of the television.
Pick up the last key fragment.
Flip the lightswitch to illuminate the lamp over the desk.
Unlock the cabinet over the desk with the key from your inventory.
Pick up the glue and the last fragments of the acid and ship in a bottle.
Add the ship in a bottle to the golden stand on the shelf.
Pick up the piece of film from the opened compartment.
Use the acid on the locked cabinet underneath the shelves.
Open the cabinet and take the last piece of film.
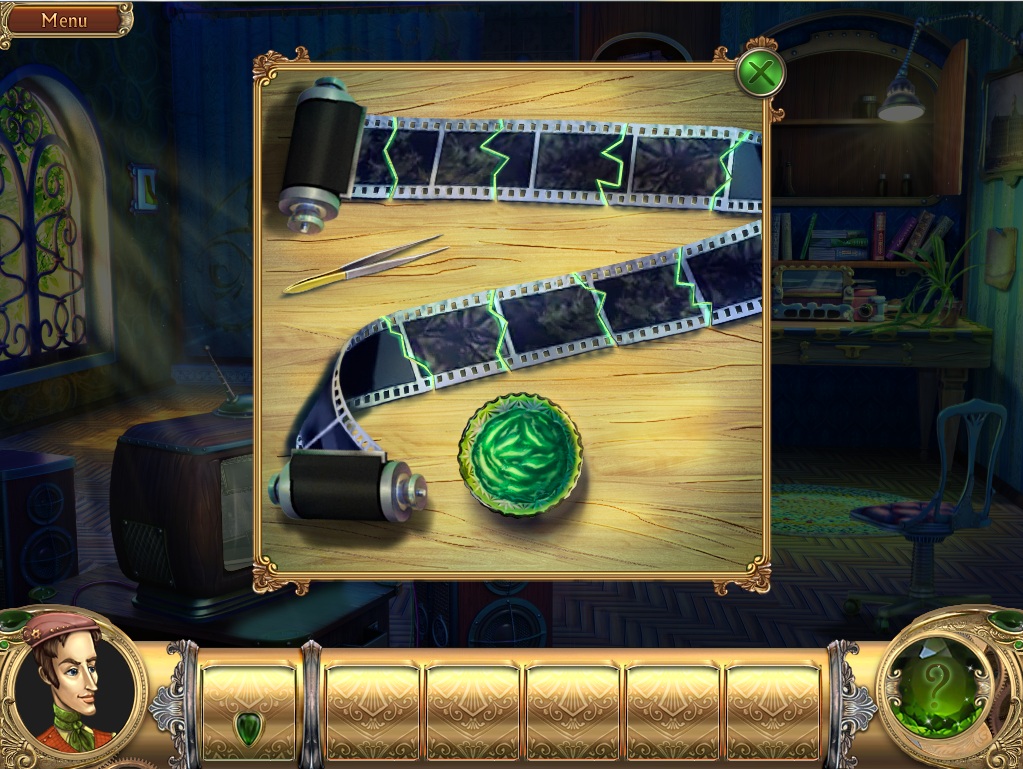
Click the desk to zoom in.
Add the film pieces from you inventory onto the desk.
Pour the glue into the small dish with the brush to begin the puzzle.
Match the film pieces so that their edges are aligned.
When the pieces are correctly paired, they will lock together and glow purple.
After you have matched all the film on both rolls, add the glue to seal them together.
Screenshot.
Take the completed roll of film from the table.
Flip the lightswitch again and head back into the development room.
The Photo Lab (Again)
Add the film to the back of the camera.
Move the sliders on the side of the camera up or down to focus the photograph.
The height and width of the image needs to stay within the red guidelines on the wall.
If the sliders are in the correct position, they will change color from purple to green.
When the picture is in focus, click the blue handle to snap the photo.
Take the photo from the wall and develop the picture.
Don't know how to develop pictures? Use the guide we found earlier:
Screenshot.
Add the red liquid and the blue liquid the left side of the green tray.
Add the yellow liquid and green liquid to the right side of the green tray.
Dip the photo in the pink solution on the left, then dip it in the orange solution on the right.
Rinse the photo covered in chemicals in the sink and hang it up to dry.
Pick up the fan piece that drops into the sink.
Add the fan head to the fan base next to the sink.
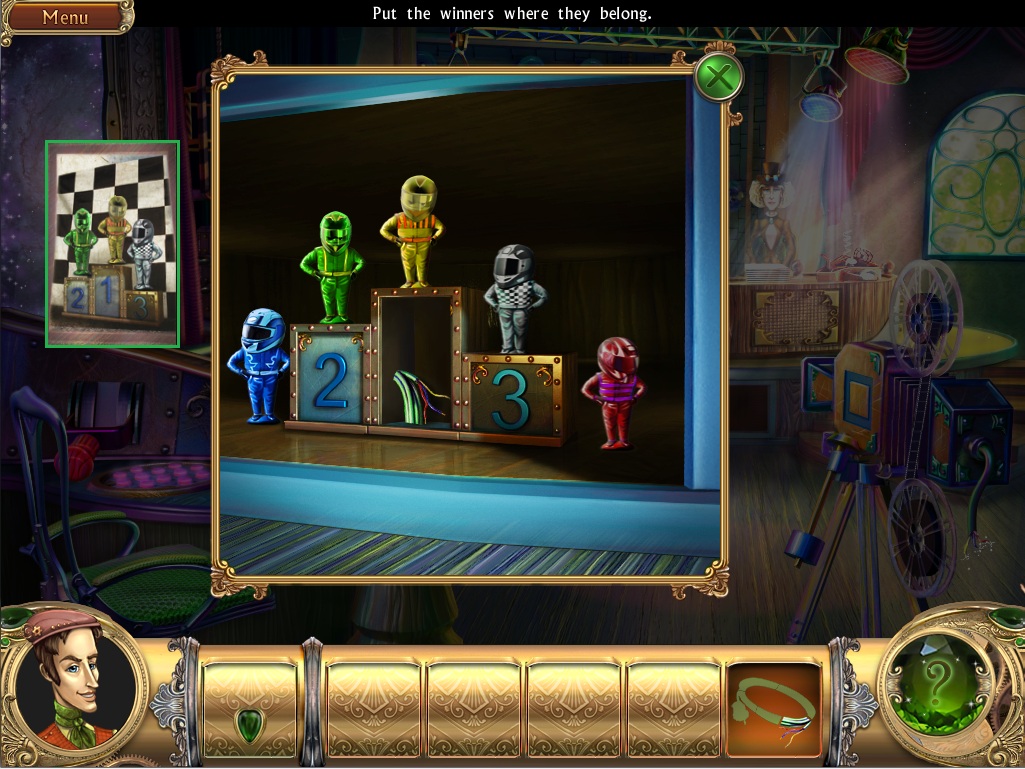
Examine the developed photograph. Note which racer came in first, second, and third place.
Move to the Stageroom.
The Stageroom (Again)
Click the space under the stage to zoom in.
Place the figurines according to how they were positioned in the photograph you developed.
Screenshot.
Pick up the last wire piece from under the 1st place figurine.
Add the wire with a plug from your inventory to the broken wire behind the camera.
Take note of the number beside the dancing lady.
Go to the entrance of the film studio with the fountain.
The Film Studio (Again)
Click the small wooden box on the table next to the teapot.
Enter in the code number you saw next to the dancing lady.
Screenshot.
Take the ribbons from inside the box, then go through the mirror portal into the Snark world.
The Film Studio - Snark World (Again)
Add the ribbons from your inventory to the magic wand on the table.
According to the book, you need to use the wand on a magician's hat.
Take the wand and move to the Snark world stageroom.
The Stage Room - Snark World (Again)
Use the wand on the hat on the stage.
Pull the rabbit figurine out of the hat and go through the green door.
The World of Doors
Place the rabbit figurine into the rabbit door.
Go through the open portal.
Chapter 6
The Foyer
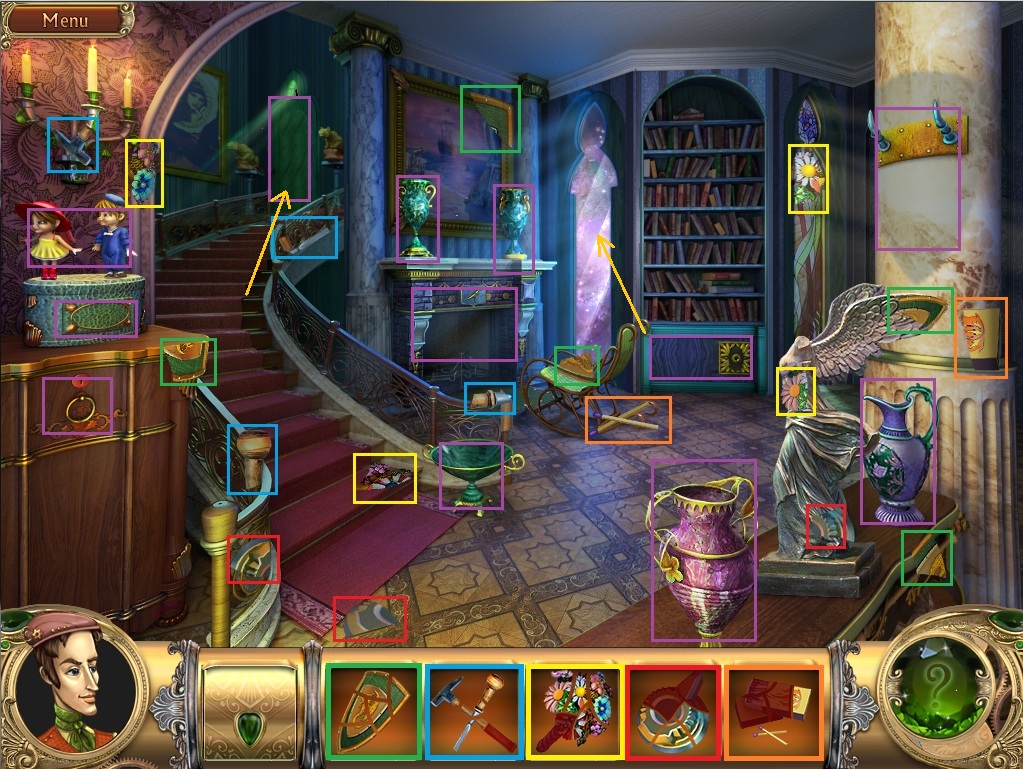
Collect all available items, starting with the shield.
Screenshot.
Hang the shield on the column rack and pick up the last piece of the tools.
Use the tools on the vases around the room for the matchbox fragment.
Use the tools again on the weak lock underneath the boy and girl figurines.
Take the last piece of the bouquet from the drawer.
Give the boy figurine the bouquet of flowers.
Pick up the piece of the fireplace knob.
Smash the green bowl at the foot of the stairs with the hammer.
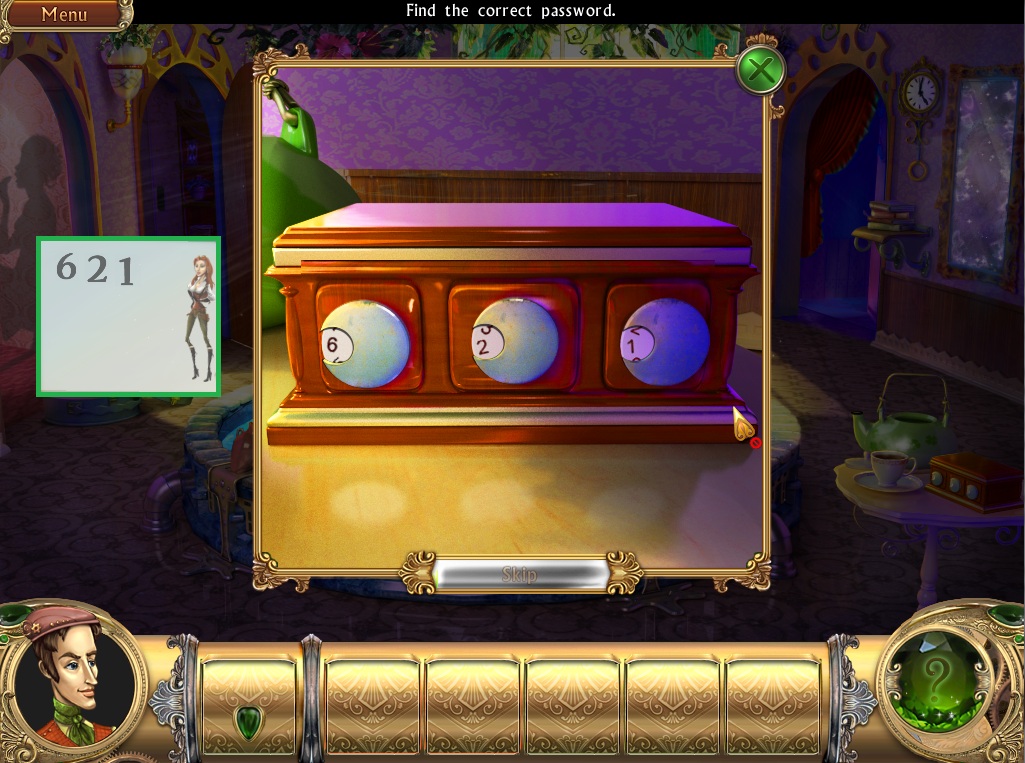
Read the piece of paper and take note of the number.
Click on the fire place for a close-up.
Take the matchbox piece from off the rack.
Read the scroll and take note of the position of the dinosaur.
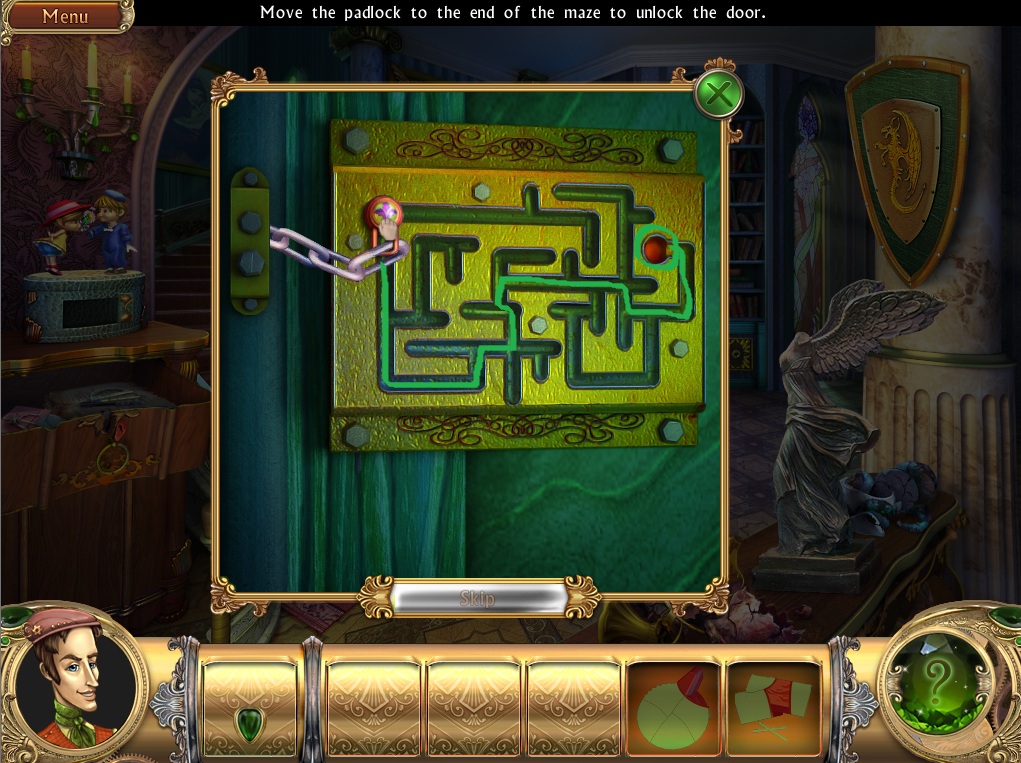
Click on the green door at the top of the stairs to start the maze puzzle.
To open the door, drag the padlock all the way to the red circle at the end of the maze.
Screenshot.
Go through the portal into the Snark world.
The Foyer - Snark World
Collect all available items, starting with the champagne.
Screenshot.
Click on the volcano to cause it to erupt.
Pour the champagne over the volcano to cool it down.
Pick up the last piece of the stone hammer from the base of the volcano.
Give the stone hammer to the caveman and take the last piece of the fishing rod.
Click on the lobster tank for a closer look.
Use the fishing rod on the gold handle between the lobsters to fish it from the tank.
Go through the portal to return to the real world.
The Foyer (Again)
Use the handle on the cabinet at the bottom of the bookcase.
Take the last matchbox fragment from the floor and the fireplace knob from the top of the doorway.
Click on the fireplace to zoom in.
Add the fireplace knob to the device on the fireplace mantle.
Click the switch to move the knob to the green light to start the gas.
Use a match on the gas to start the fire.
Go through the portal to return to the Snark world.
The Foyer (Snark World)
Take the t-rex leg from under the volcano.
Put the t-rex on the banister at the bottom of the stairs.
Take the last piece of the coins on the stairs.
Put the coins in the back of the large t-rex and take the ticket from its mouth.
Click the door at the top of the stairs.
Put the ticket in the slot to the left of the lever and go through the door.
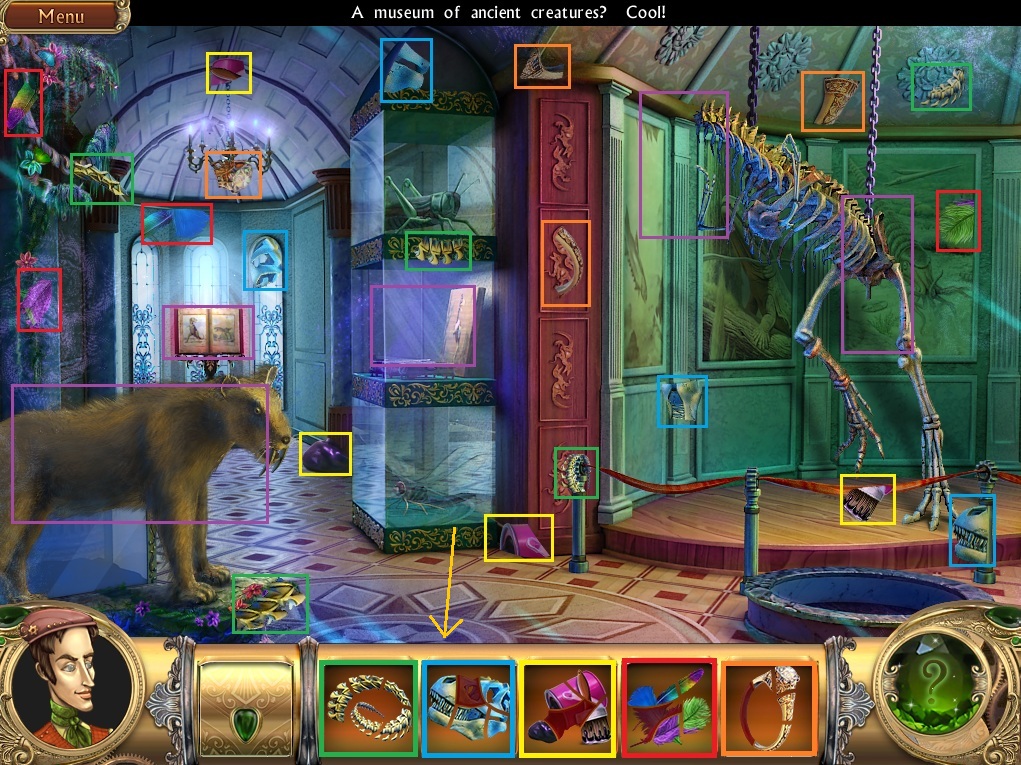
The Museum
Collect all available items starting with the dinosaur tail.
Screenshot.
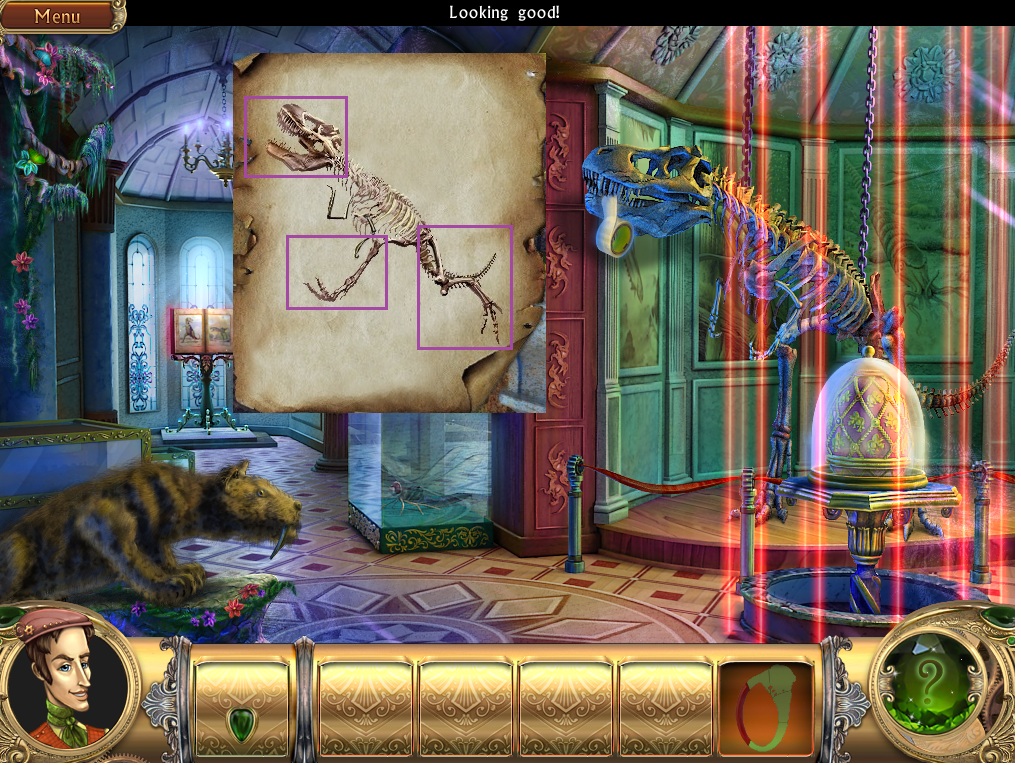
Place the dinosaur tail on the back of the t-rex skeleton.
Click on the book for a close-up.
Click the right side of the book to turn the page and take the last black paint fragment.
Use the black paint on the saber-toothed cat to paint spots on its coat.
Pick up the feathers above the saber-tooth's back.
Click on the middle display case beneath the grasshopper to zoom in.
Put the feathers into the empty red boxes.
Take the last dinosaur skull fragment from behind the dodo bird's head.
Add the dinosaur skull from your inventory to the t-rex skeleton.
Position the dinosaur according to the example from the scroll on the fireplace (Head/Legs/Tail).
Screenshot.
Take the tape from the dinosaur's mouth. You can't remove the laser grid yet, so leave the room for now.
Go to the foyer and down the stairs.
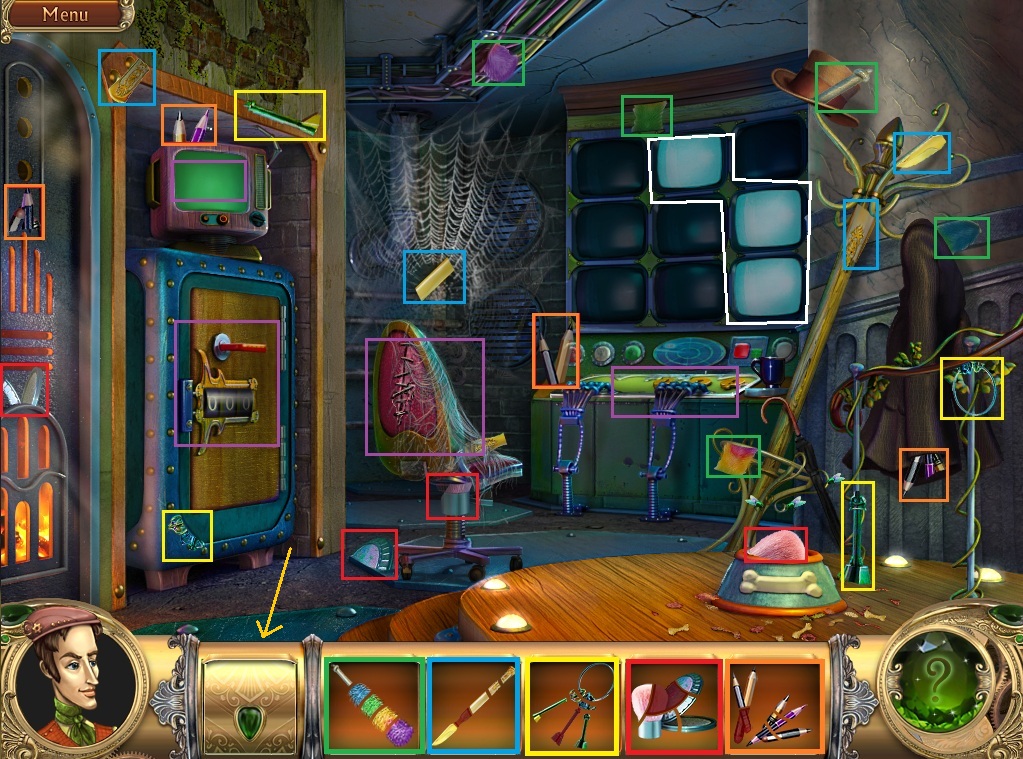
The Security Room
Collect all available items, starting with the feather duster.
Screenshot.
When you take the scalpel piece from the web, note the number on the back of the spider.
Use the feather duster on the cobweb-covered chair and take the last scalpel piece.
Click the safe and read the note left beside it.
According to Claude, the combination is the number from the vase, the spider, and the number of screens turned on.
We already found the first two numbers. For the third, all you have to do is count the lit screens. Et voila!
Take the last piece of pencils from the safe.
Click the notebook and use the pencil on it to create an impression sketch.
Take note of the drawing and the order of the buttons.
Use the scalpel on the back of the chair to find the last key fragment.
Click on the control panel and use the keys on the three locks.
Click the control panel again and take the last piece of makeup.
Use the makeup on the coffee cup to get a copy of the fingerprints.
Put the tape from your inventory on the coffee cup to lift the fingerprint.
Place the tape on the red fingerprint scanner to begin the security puzzle.
Press the buttons in the order shown from the sketch you copied earlier.
Screenshot.
When you have successfully completed the puzzle, the laser grid in the museum will be removed.
The Museum (Again)
Click on the egg under the butterfly jar.
Take the last piece of the ring from the corner of the egg's stand.
Use the diamong ring to cut through the glass jar surrounding the egg.
Pick up the egg and take it to the foyer.
The Foyer (Again.)
Place the egg on the rack in the fireplace and take the dinosaur figurine inside.
Go upstairs and through the green door.
The World of Doors
Click on the last door and insert the dinosaur figurine.
THE END
Posted by: Trinn |
May 16, 2011 5:01 PM
|
May 16, 2011 5:01 PM