
The Tiny Bang Story
Platform: iOS, Android, Mac, Windows

![]()
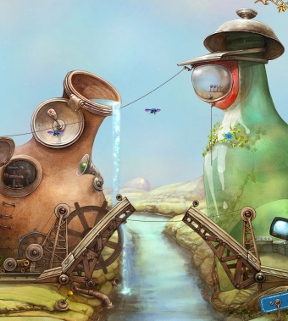
 When Amanita Design's Samorost or Machinarium meets a smart, non-formulatic hidden object game, The Tiny Bang Story is the beautiful result. A point-and-click puzzle game at heart, this charming release from Colibri Games will hook you from the start, keeping your eyes busy and your cursor mobile from the opening screen all the way to the very end. It's a stunning and very memorable game that will make you wish more games followed its careful design concepts.
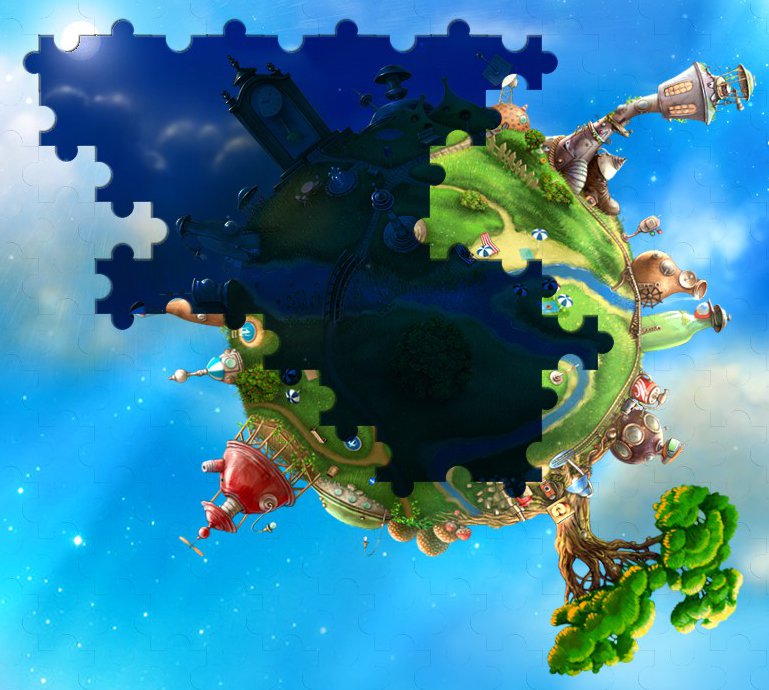
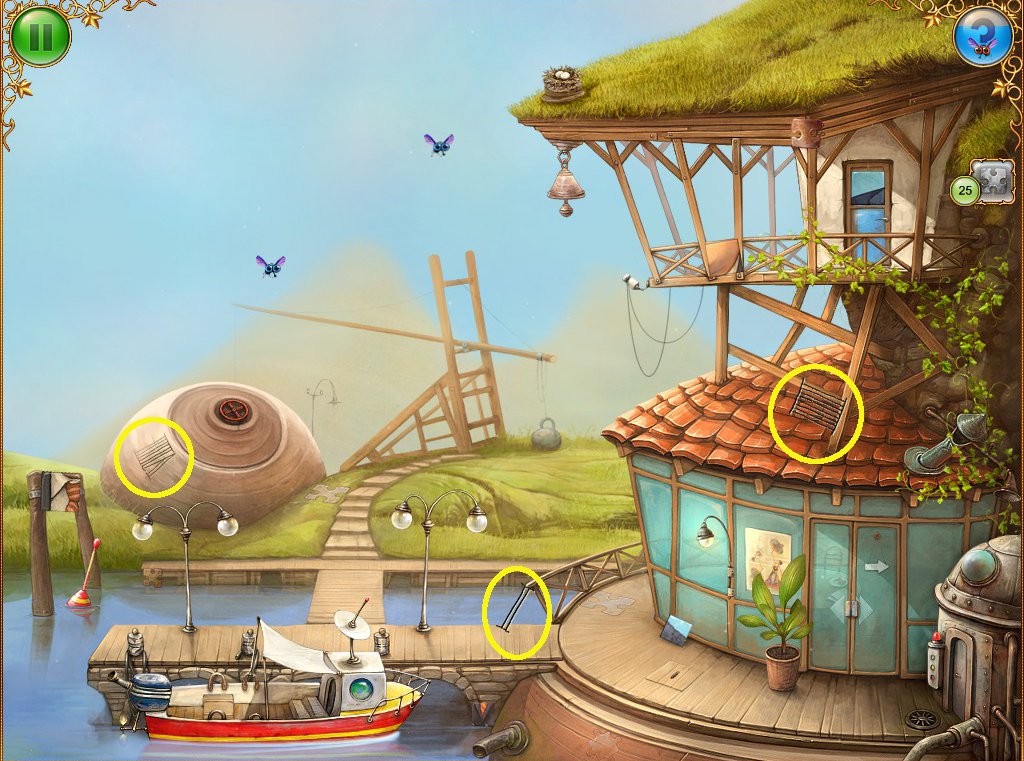
 The bucolic Tiny Planet was just hovering happily along, looking all peaceful and serene with its babbling brooks, patchwork machines, and scattering of quietly content inhabitants. Then an asteroid shatters and drops its pieces across the planet, splitting it apart into a massive jigsaw puzzle. Now, it's your job to put everything back together, traveling from location to location, picking up jigsaw pieces and assembling machines to help you rebuild the world.
Each part of The Tiny Bang Story is filled with hand-drawn art, depicting imaginative contraptions and scenes that could have been pulled out of the most dreamy children's book ever released. By clicking on things you can discover puzzles, indicated by the cursor changing to a gear. When you find an incomplete part of the stage, a small inventory icon will appear on the side of the screen. These icons show a number along with the item you need to find. So, for example, you might need to locate ten gears, 15 lightbulbs, one wrench, etc. Find the items, return to the screen with the puzzle, and put things back together to see what happens!
Finding items is the main focus of the game, but don't confuse The Tiny Bang Story with your run-of-the-mill hidden object release. Items aren't hidden, camouflaged, scaled to ridiculous proportions, or turned almost invisible. Instead, they're hidden right in front of your eyes, rotated and scaled to fit logically into the scene. Look across several areas as you search for the many items you need. And don't forget to click the blue bugs to charge your hint meter!
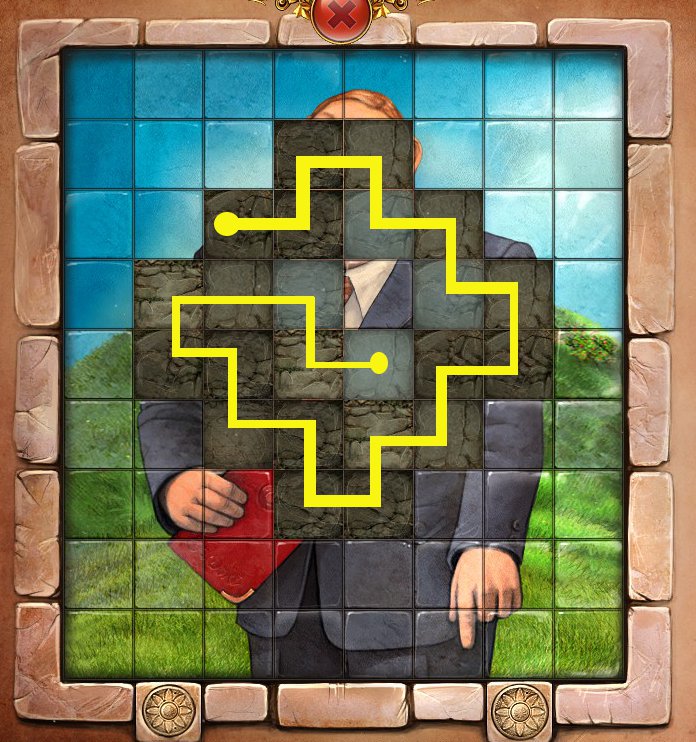
 After you've found the puzzle pieces and beaten the level, you'll return to the main view of the planet to assemble the jigsaw puzzle. If you've played a casual game before, you'll probably expect a simple sort of jigsaw where pieces snap to each other when they're within breathing distance, right? Not so, here. This is a for-real jigsaw puzzle, and it requires you to take some time to solve. But, you know what? It's stupendously enjoyable!
Analysis: The Tiny Bang Story is a relatively low-key game, but it's that subtlety that makes it so very very good. There's no dialogue, no text to read, no cutscenes or other gimmicky inclusions to force-feed you anything. It's just a simple story and simple gameplay, all baked together and prepared with mountains of love and attention. It's obvious Colibri Games spent a lot of time getting The Tiny Bang Story just right. When you try out the demo, you'll see how far that goes in making a game like this stand out from the crowd.
The Tiny Bang Story never hands you the answers, so you actually have to put in some legwork to get things done. Items don't jump out at you, puzzles don't solve themselves, and even the hint system requires a bit of work. In order to charge the button, you must collect floating bugs that hover around the screen. This discourages players from spamming the hint key and makes everyone slow down and experience this wonderful game for all it's worth.
Games like The Tiny Bang Story aren't a common occurrence in the video gaming world. So, when you see something this beautiful, this engaging, and this playable, grab it right away. The Tiny Bang Story is a phenomenal game that everyone should experience from beginning to satisfying end!
![]() Windows:
Windows:
Download the demo
Get the full version
![]() Mac OS X:
Mac OS X:
Download the demo
Get the full version


Walkthrough Guide
(Please allow page to fully load for spoiler tags to be functional.)
The Tiny Bang Story Walkthrough
General Information
Menu options include sound and music volume, and choice of full or windowed screen.
The goal is to find objects scattered around in each scene, collect them and use them to solve puzzles.
When anything in the environment can be interacted with, the cursor changes into a spinning cog.
Navigate between scenes either by clicking on the blue arrow signposts that are part of some scenes, or by clicking on doors, stairways and ladders.
Buttons on the game screens include:
Pause - takes you to the menu
? - Hint button
Inventory - includes the puzzle pieces at the top, and all other items to be collected underneath. Each item tab shows the number of items left to collect. Move the cursor over the item tabs, and the menu will expand, showing where the items to be collected are to be used.
The hint button at top right is recharged by collecting the blue flies that hover around the screen. 30 flies are needed to refill the hint function.
Items can only be collected as tasks are created. Click around each scene to locate puzzles and create tasks.
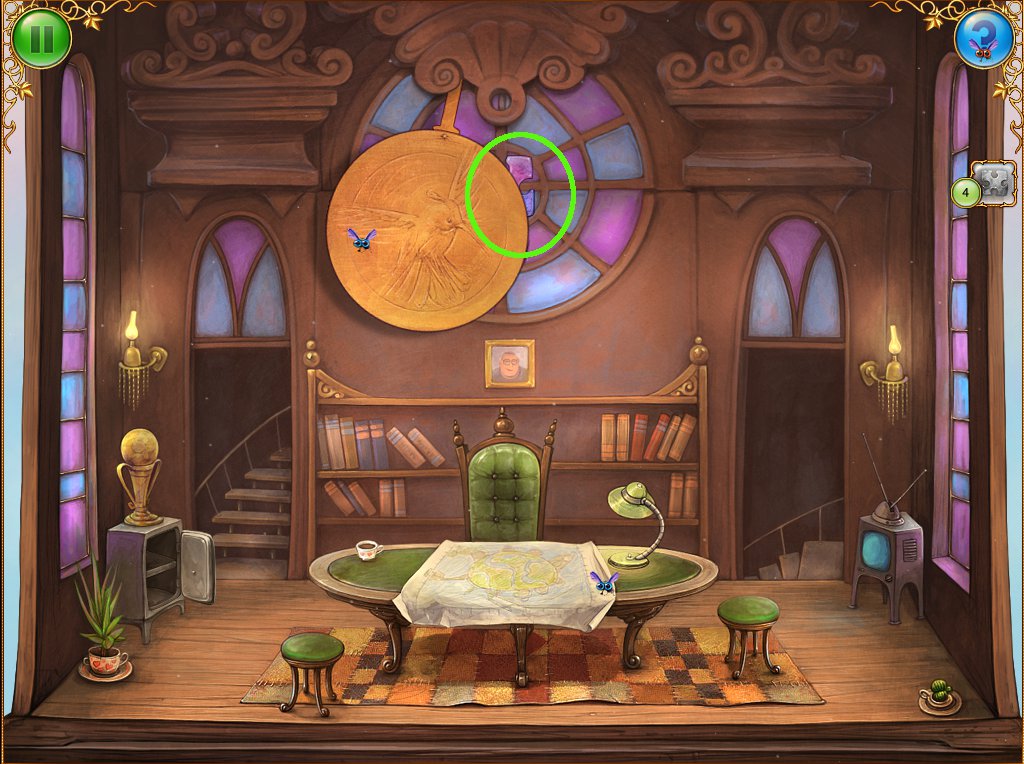
Each level contains hidden puzzle pieces which need to be collected to progress to the next level.
Clicking out of puzzles and mini-games before completing them will reset them. This is helpful if you wish to restart a puzzle or mini-game.
Walkthrough
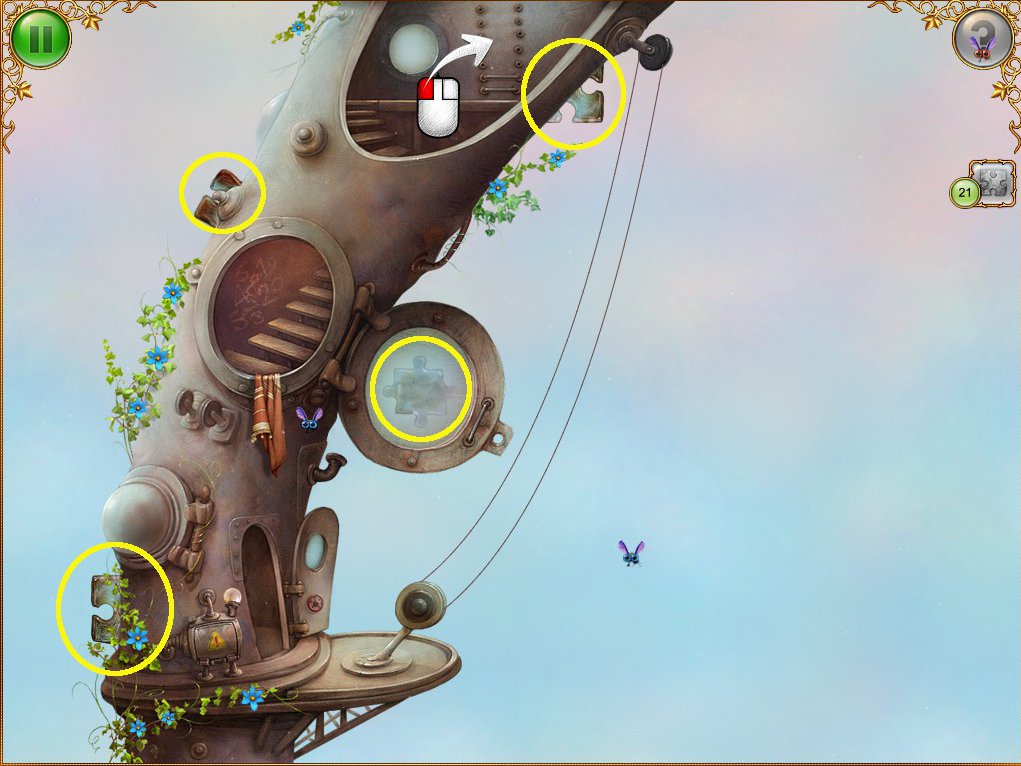
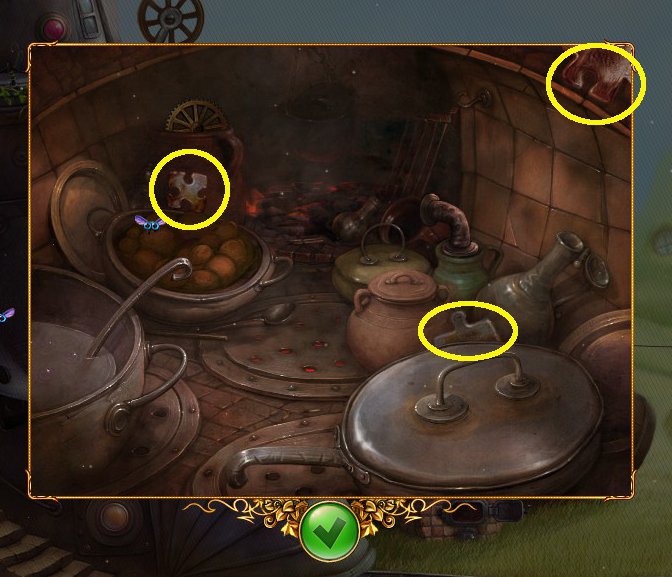
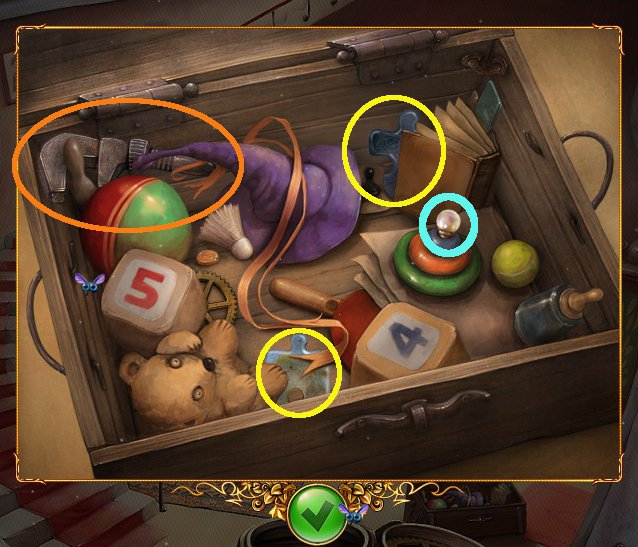
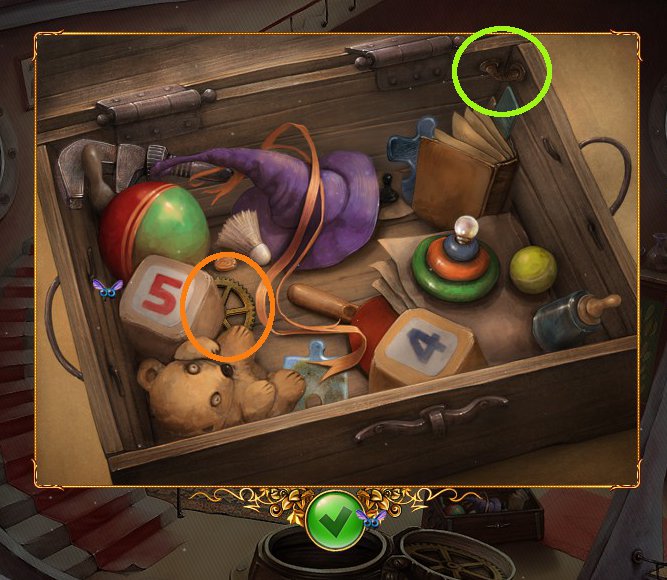
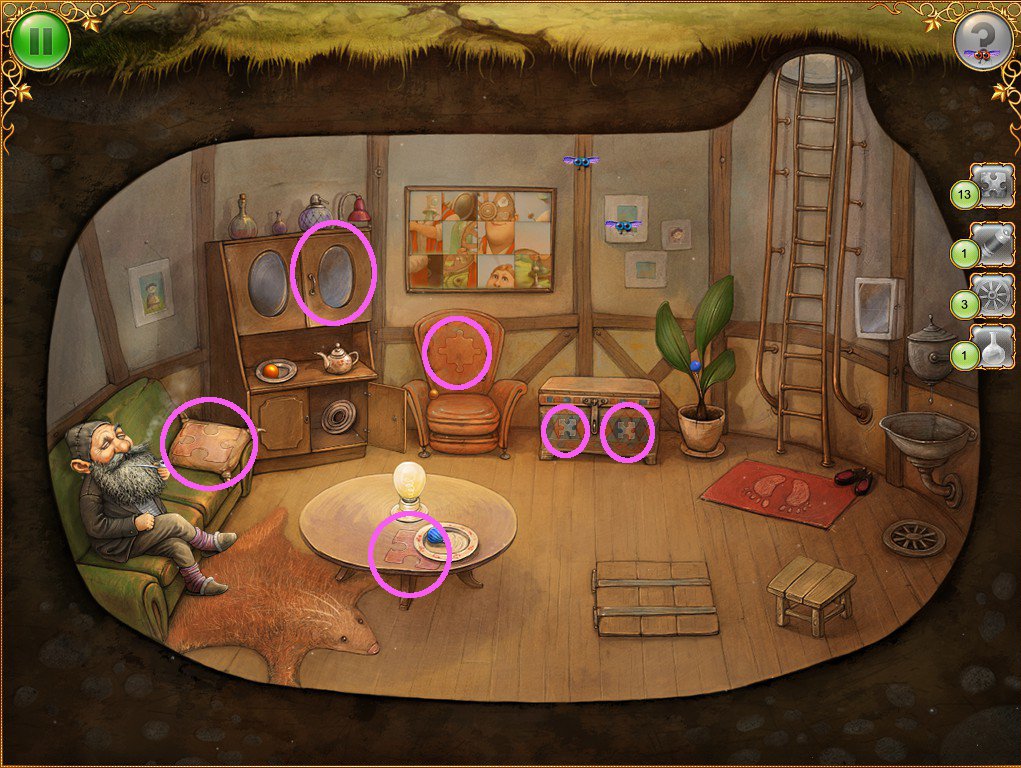
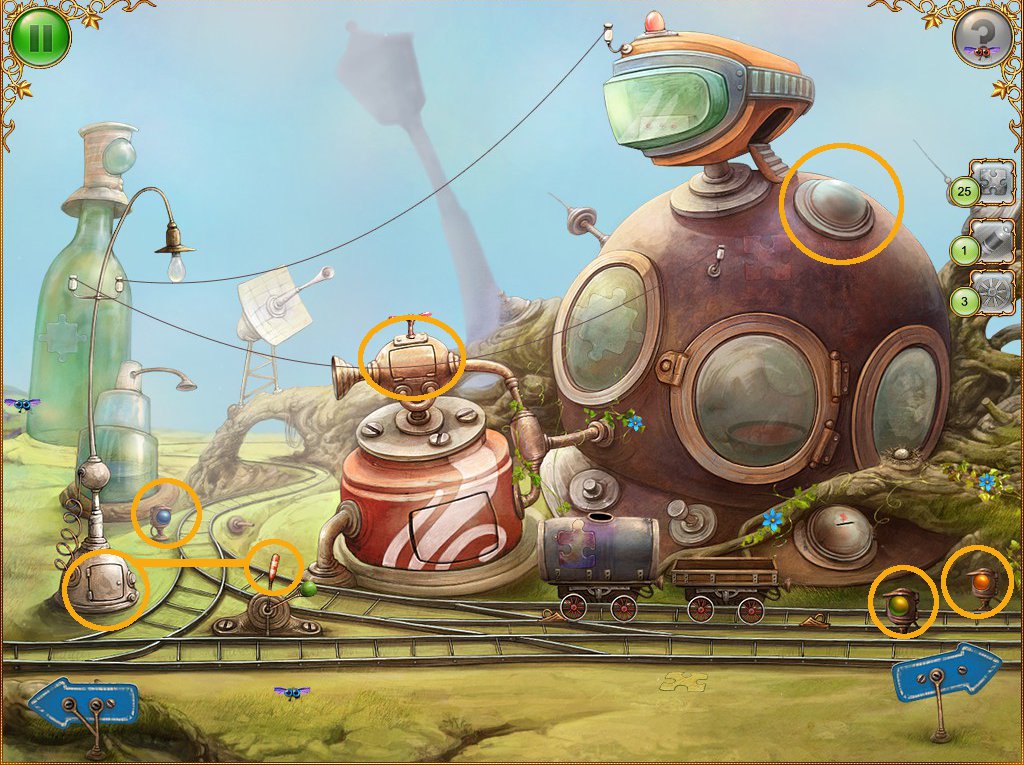
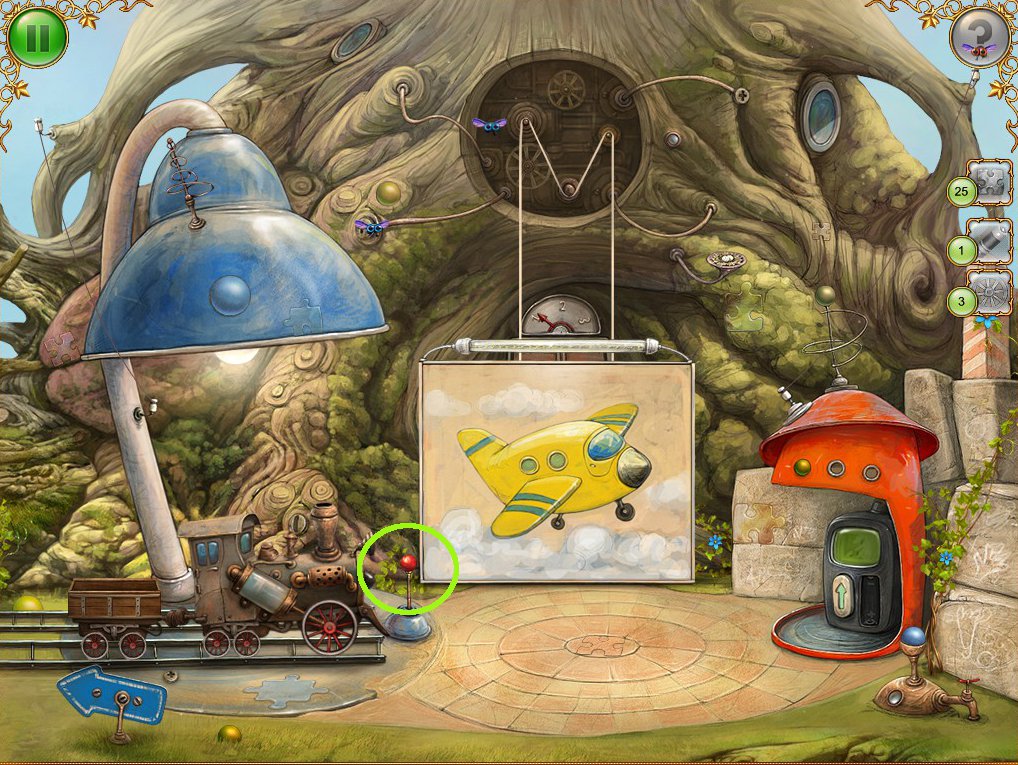
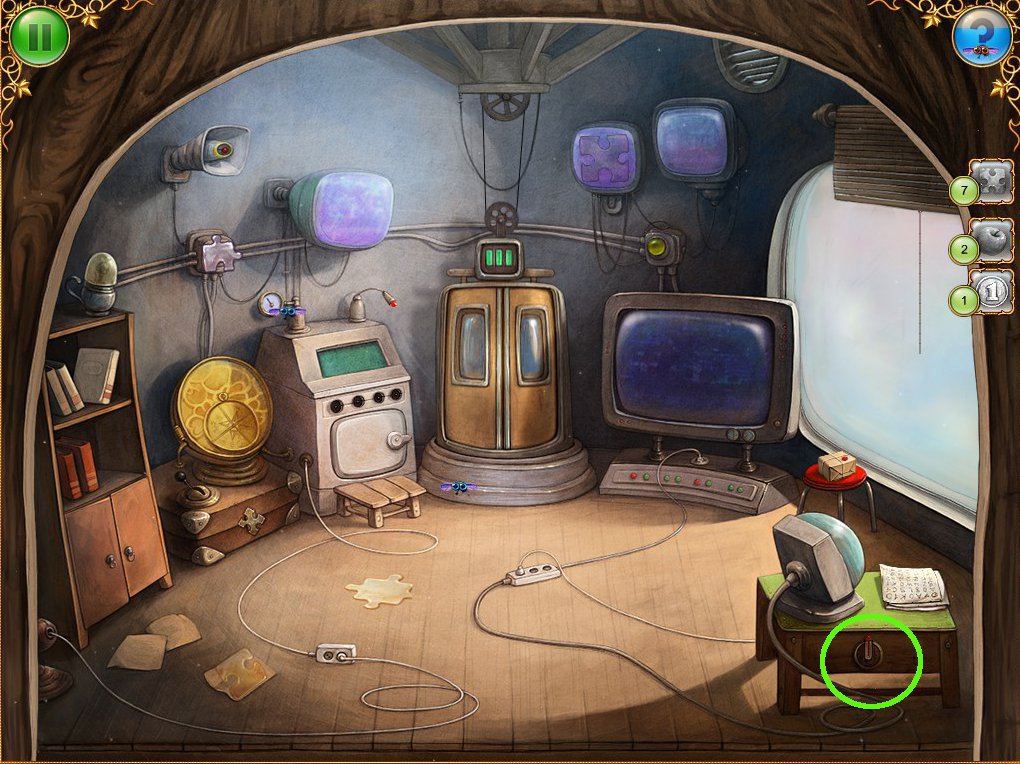
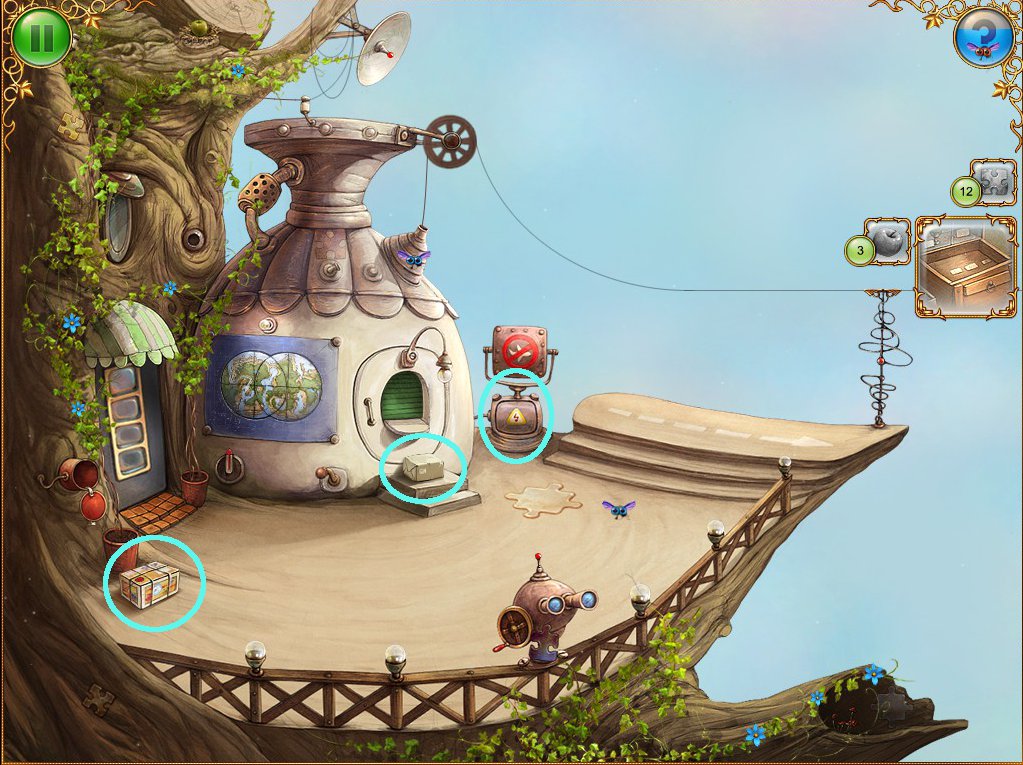
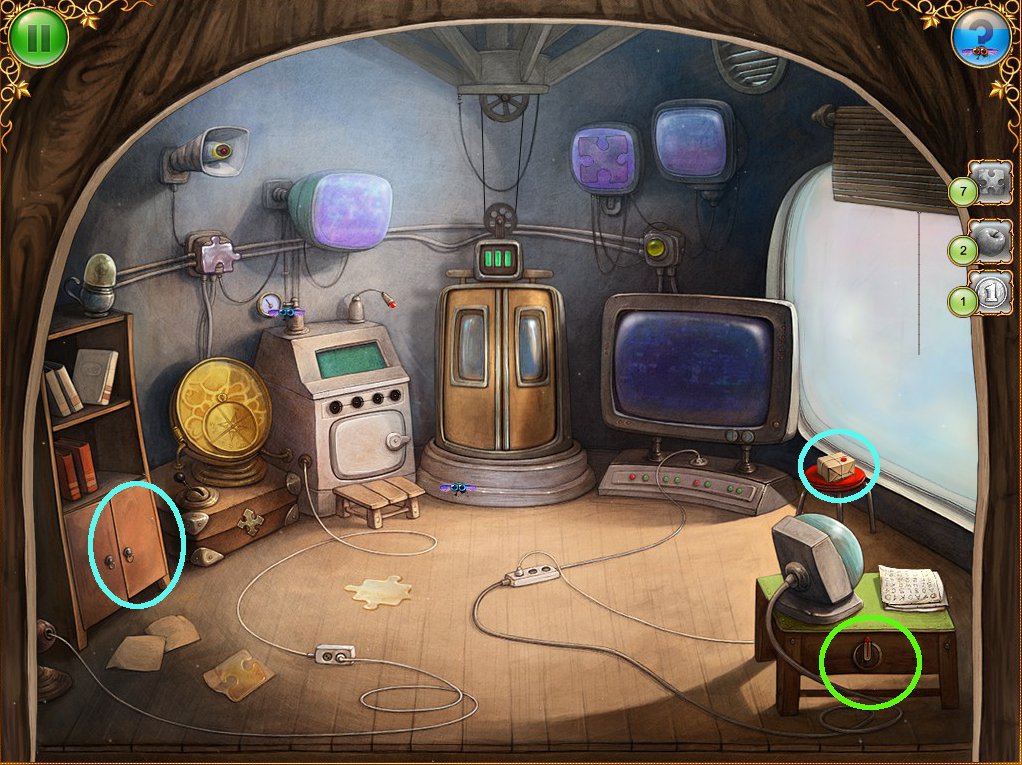
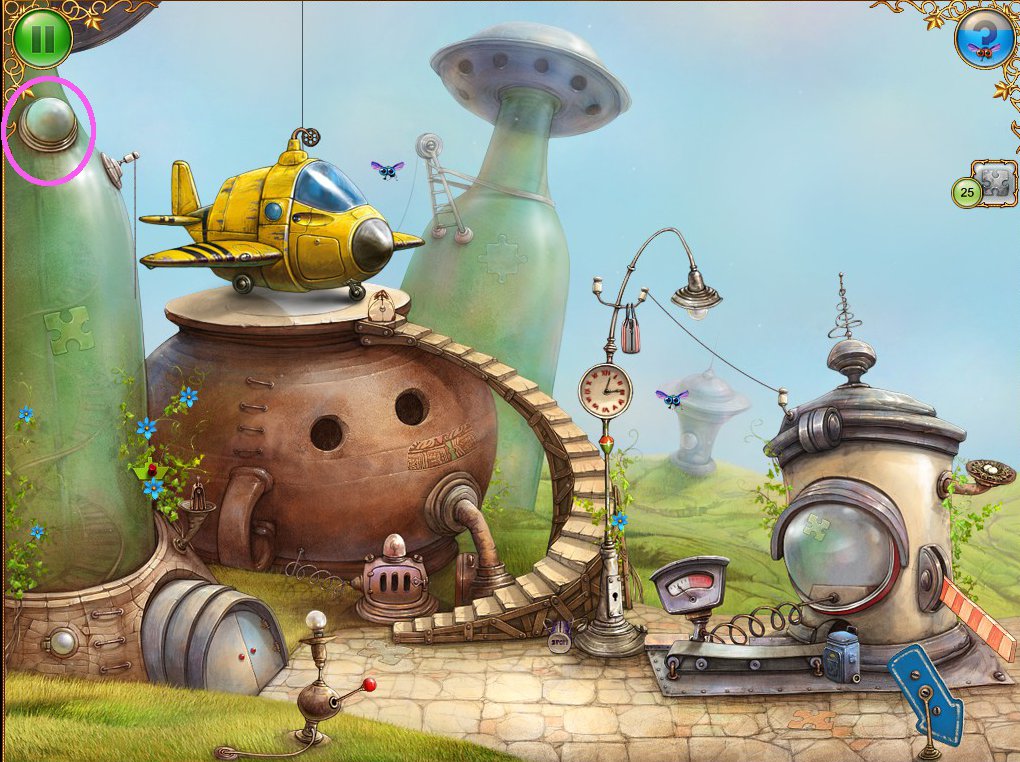
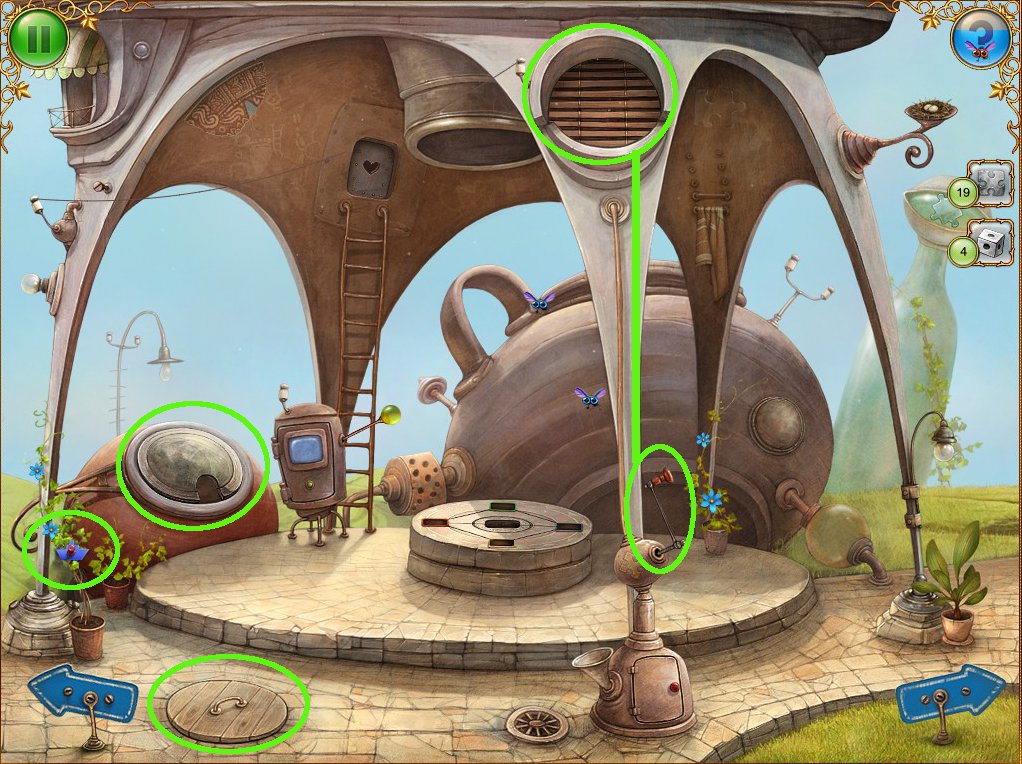
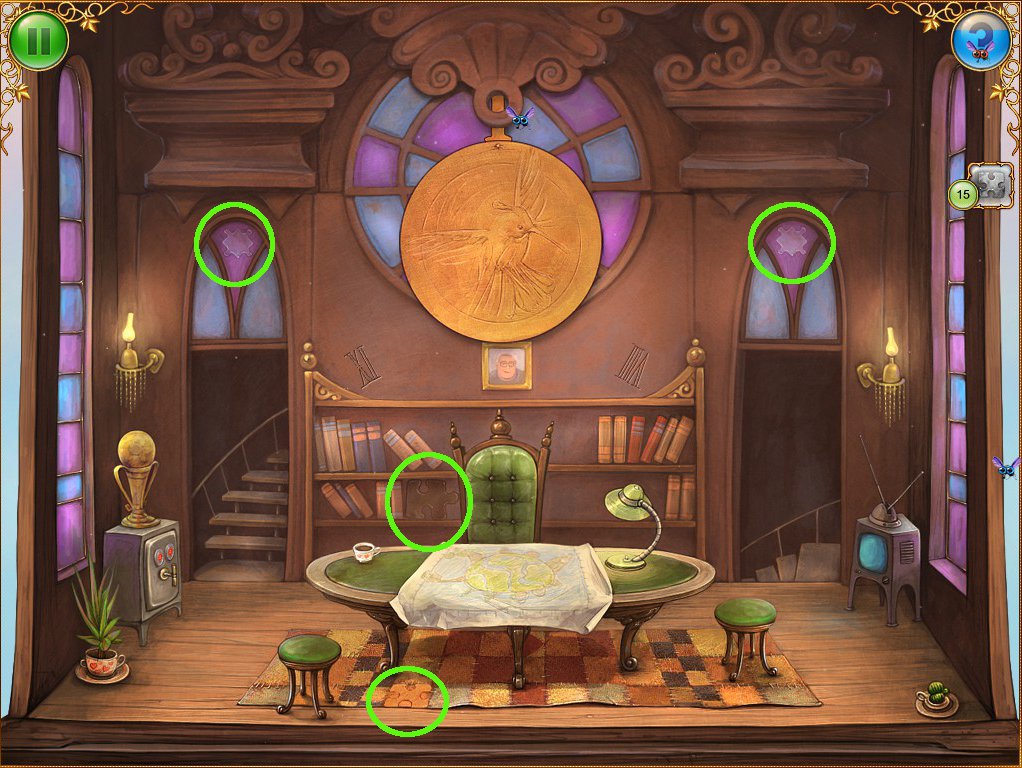
Level 1 - The Tree House
Ground level
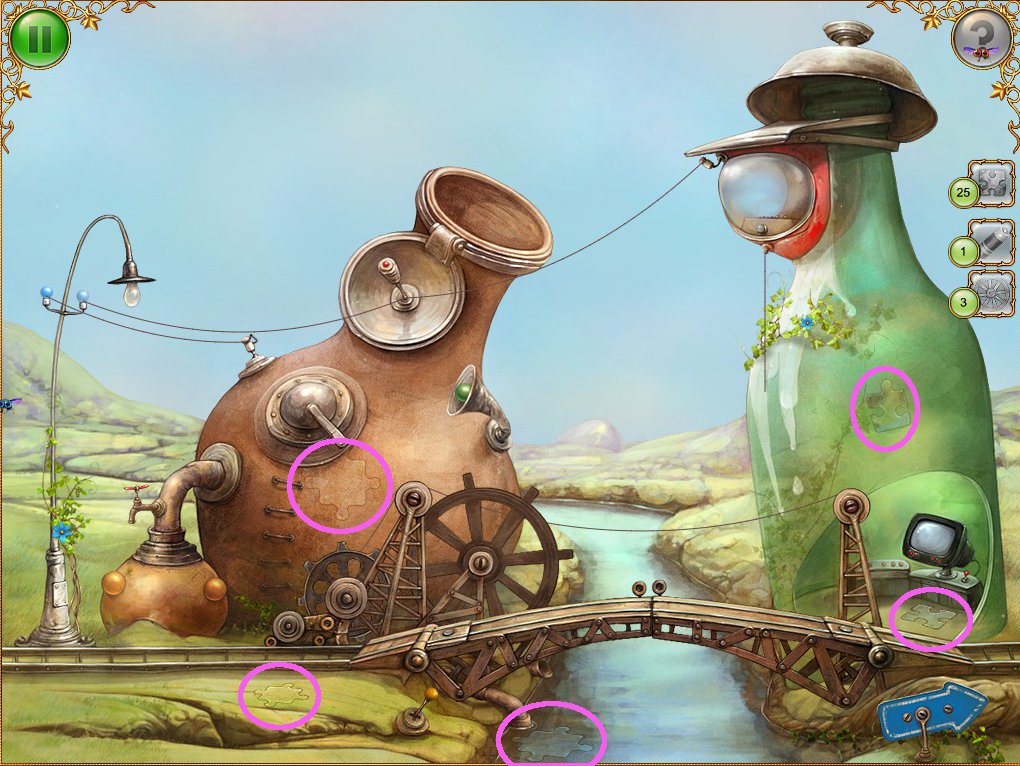
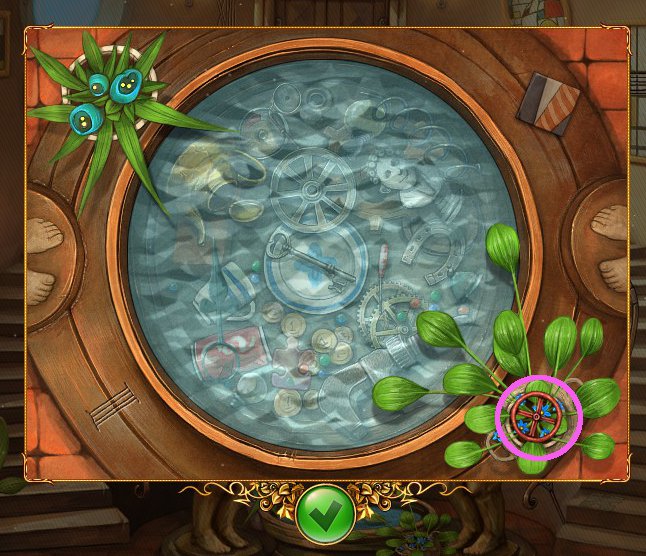
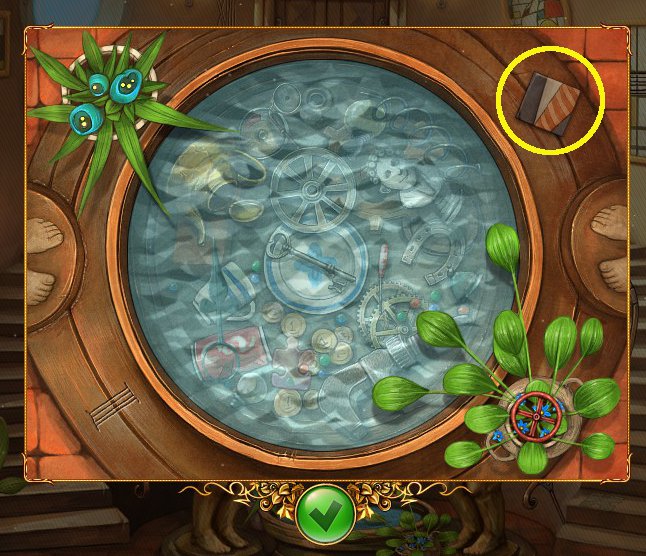
Start by collecting five puzzle pieces.
Screenshot
Click on the red button towards the top of the tree and click on the door to enter.
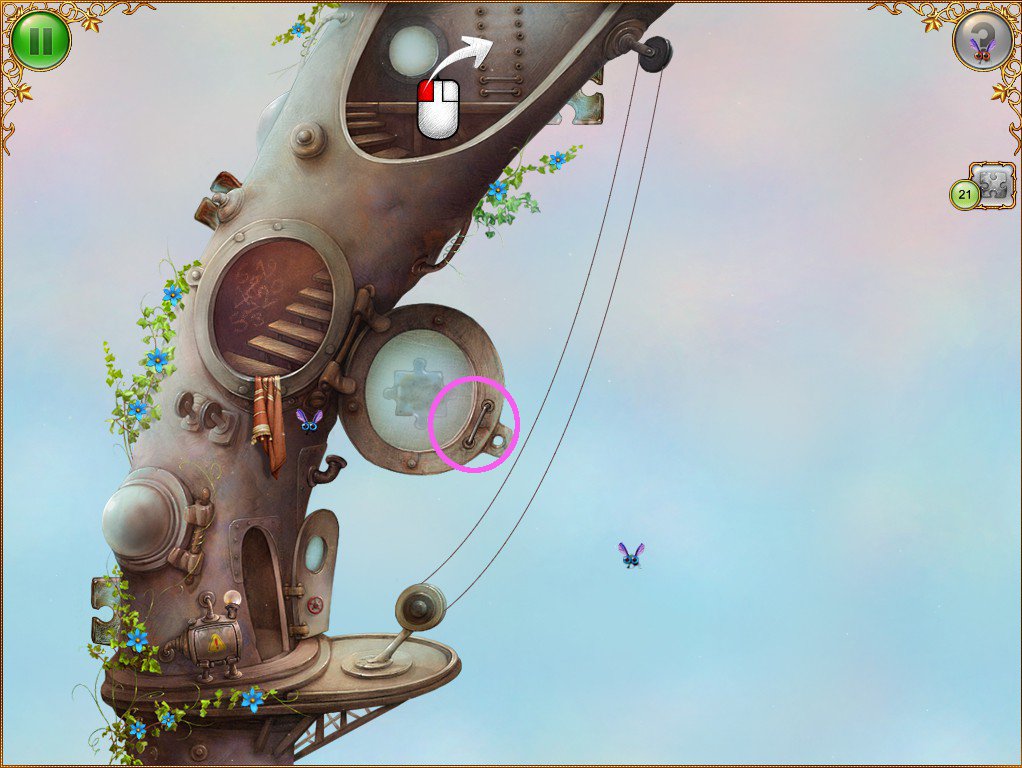
Second Floor
Find 4 puzzle pieces.
Screenshot
Click on the ladder towards the top to create the rung-seeking task.
Click on the inner handle of the round hatch door.
Screenshot
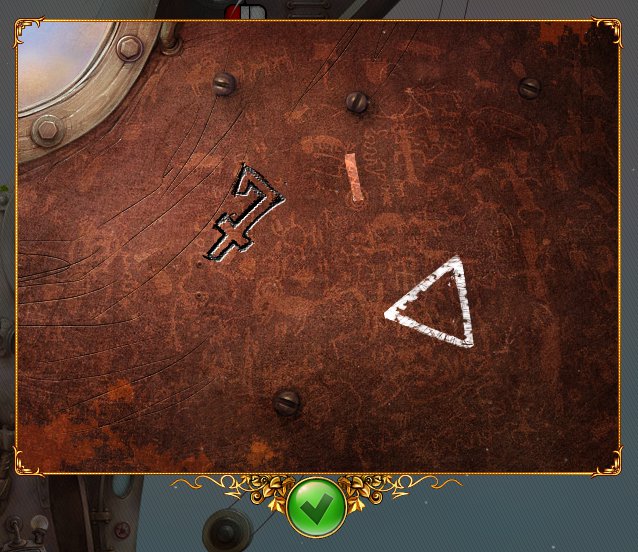
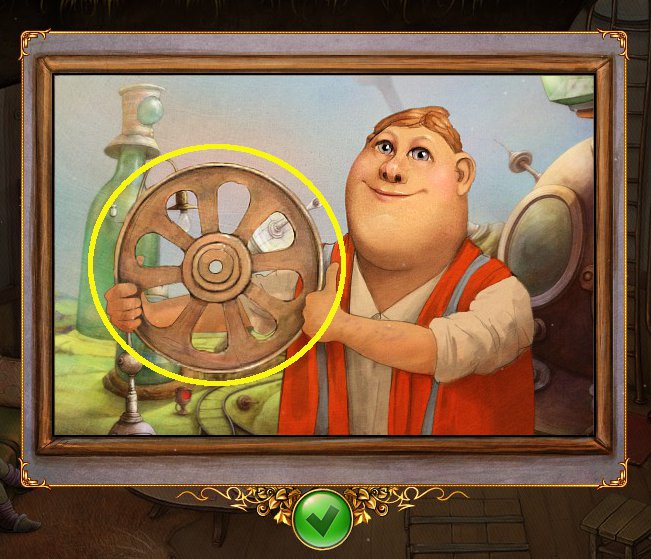
Click on the stairs inside the tree for a matching mini-game, where the goal is to match numbers.
Screenshot
When all the pairs of numbers have been matched, the three remaining numbers will light up.
Screenshot
Go back down to the base of the tree.
Ground level
Collect 3 rungs.
Screenshot
Click on the large bent panel to start the wrench-seeking task.
Click on the area that looks like a fireplace, bottom right, and collect another rung that looks like a pot handle.
Screenshot
Also collect 3 puzzle pieces here.
Screenshot
There's more to be found here, but later on. Click out and go to the control box at the right of the screen.
Click on the control box to find a 3 digit code is needed.
The code is the three numbers located in the mini game upstairs.
713
Enter the code and note the lightbulb panel missing 9 lightbulbs.
Click on it to begin the lightbulb-seeking task.
While here, click on the inside handle on the door of the panel to collect another rung.
Screenshot
Head back up to the Second Floor, click on the rungs in the inventory and click on the ladder. Head up to the Old Lady's room.
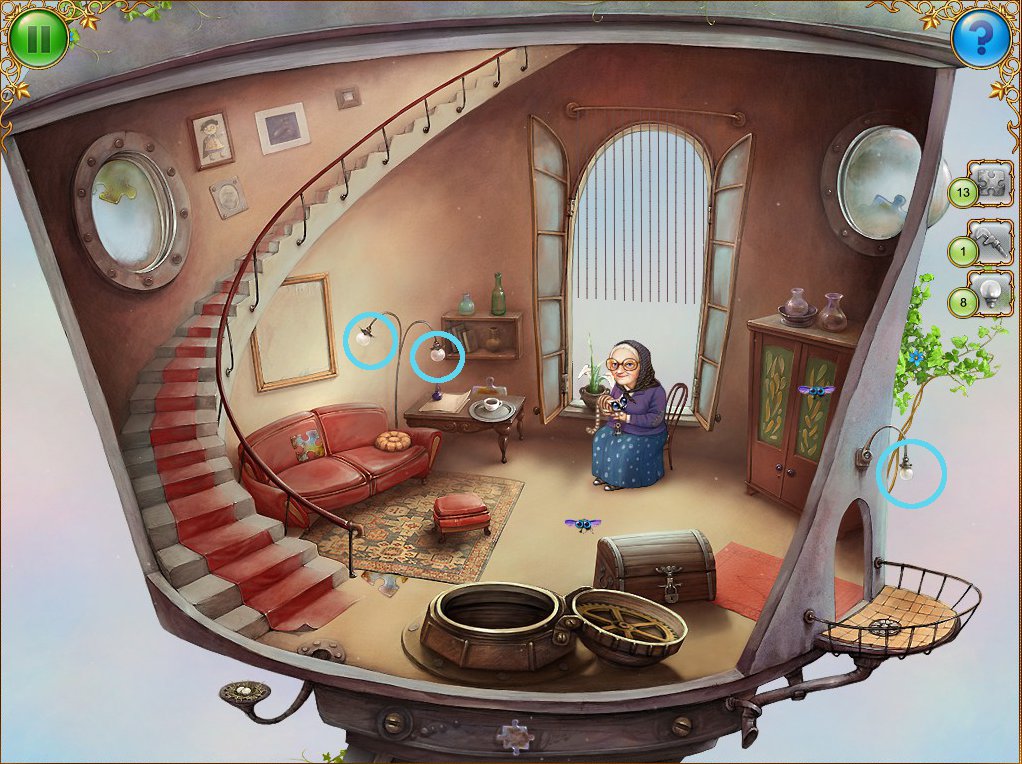
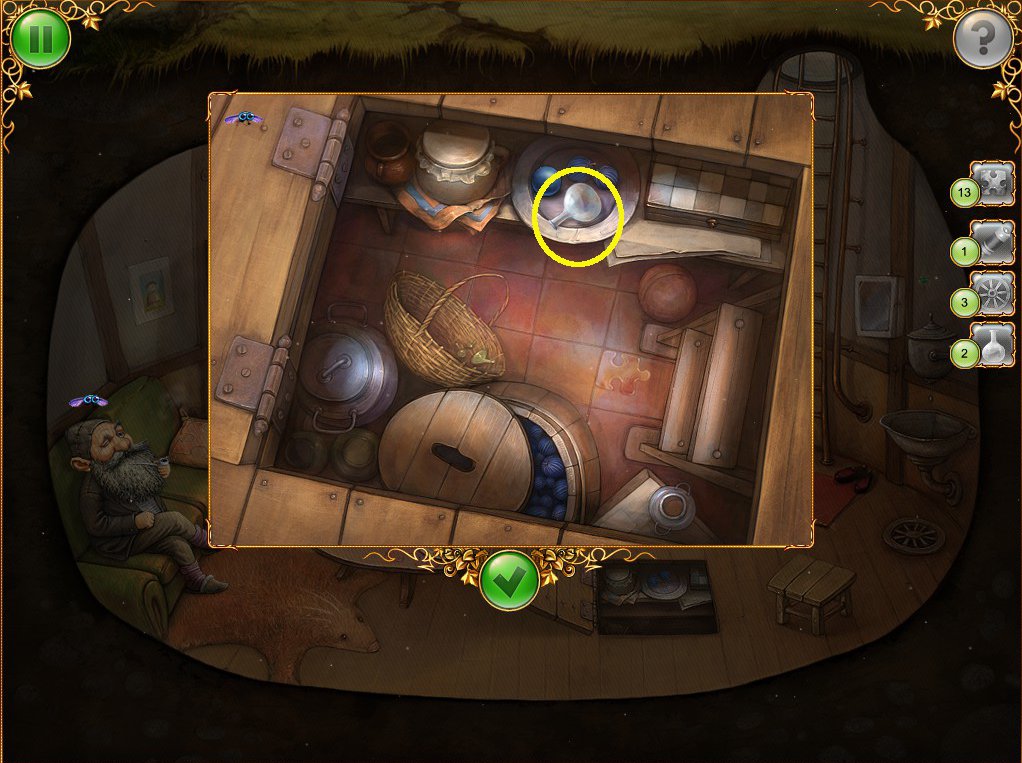
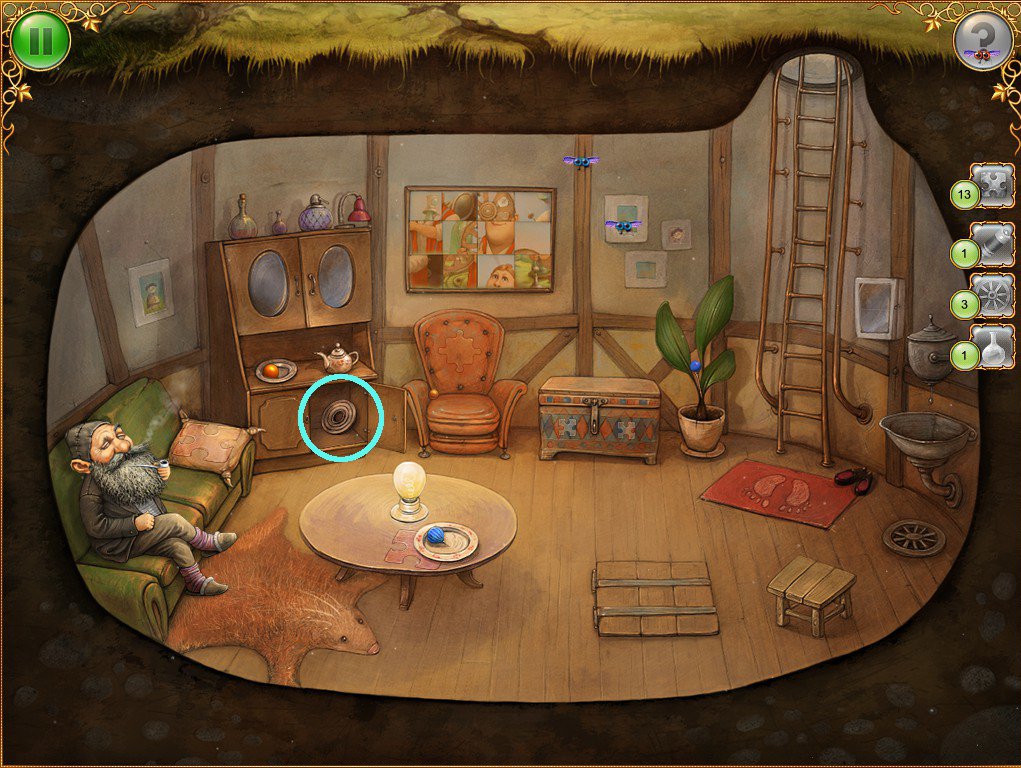
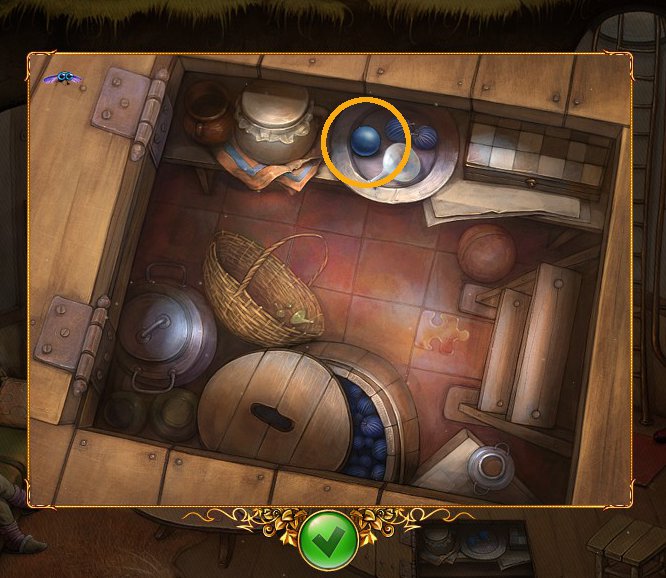
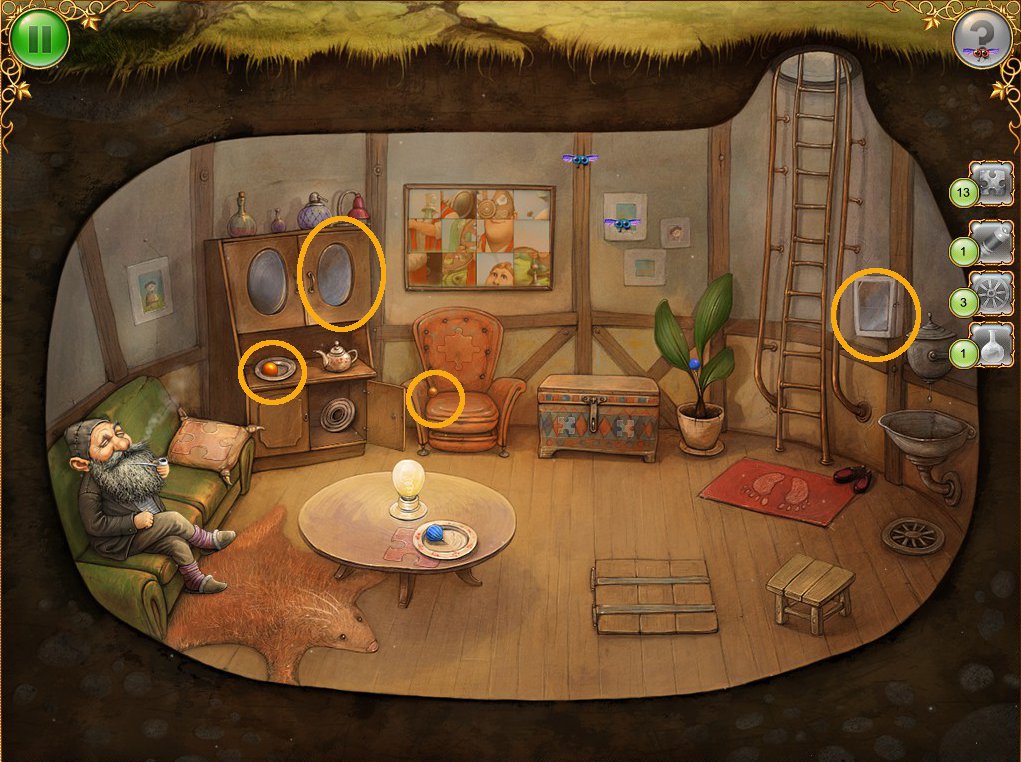
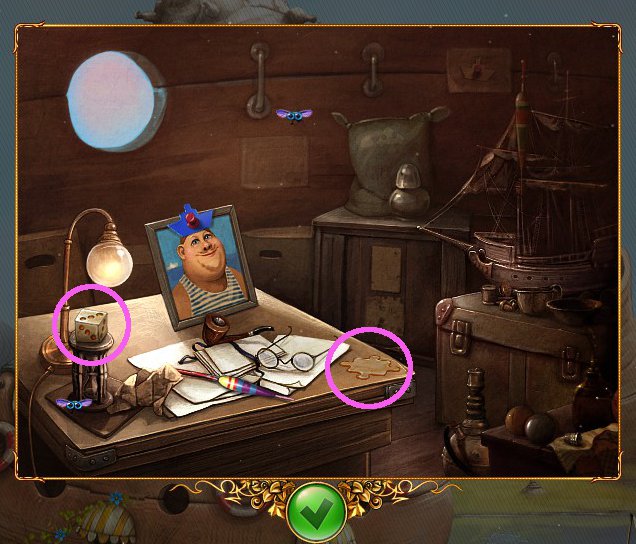
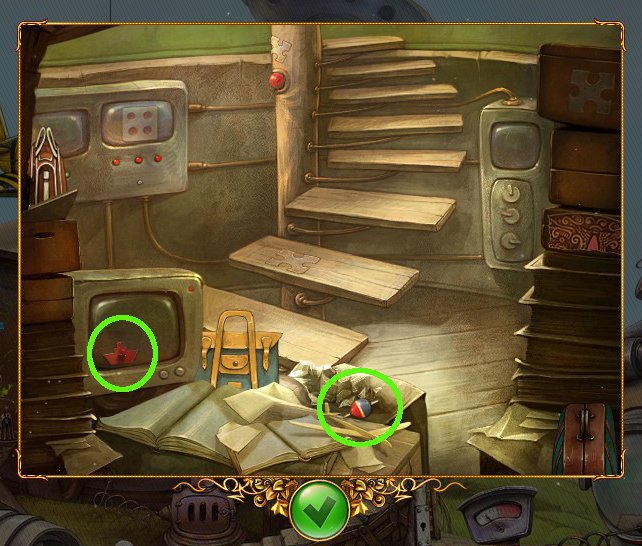
Old Lady's Room
Collect 7 puzzle pieces, one of which is in the cupboard to the right.
Screenshot
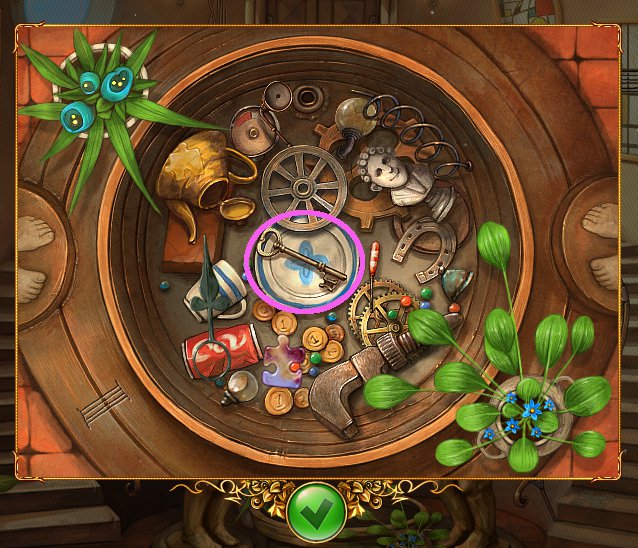
Click on the trunk to the right to create the key-seeking task.
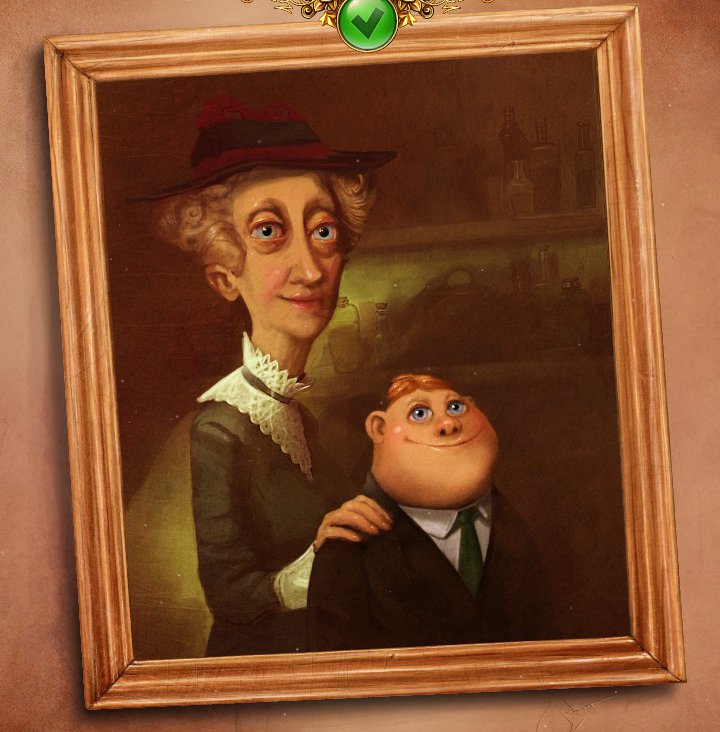
Click on the Old Lady, and she will indicate that she will give you a key in exchange for a picture.
Click on the empty frame at left to create the canvas collecting task.
Collect 2 lightbulbs from the lamp near the frame and one from the balcony at right.
Screenshot
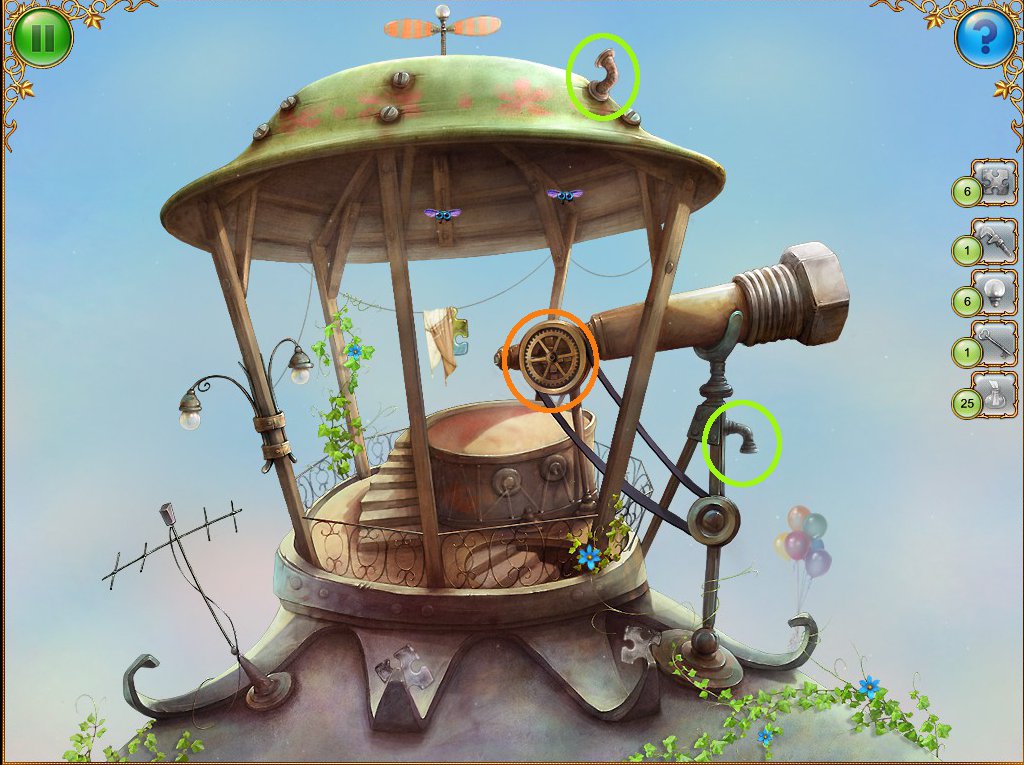
Head upstairs to the Observation Deck.
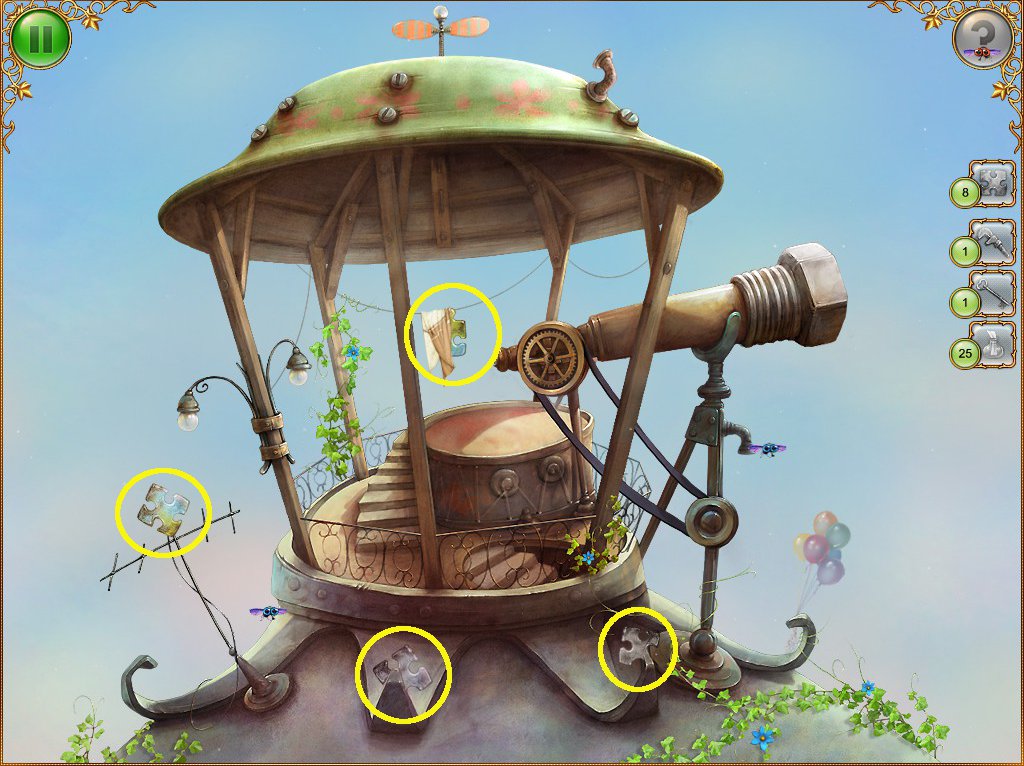
Observation Deck
Collect 4 puzzle pieces.
Screenshot
Collect 3 lightbulbs.
Screenshot
Click on the lens end of the telescope and start the canvas-collecting game. A number of bottles will float up in view, and the goal is to click on and pop the balloons carrying the bottles with pieces of canvas in them. There's no win or lose; just keep collecting until the inventory is stocked with 25 pieces.
Head back to the Old Lady's room.
Old Lady's room
Use the canvas pieces on the empty frame and assemble them to complete the picture.
Screenshot
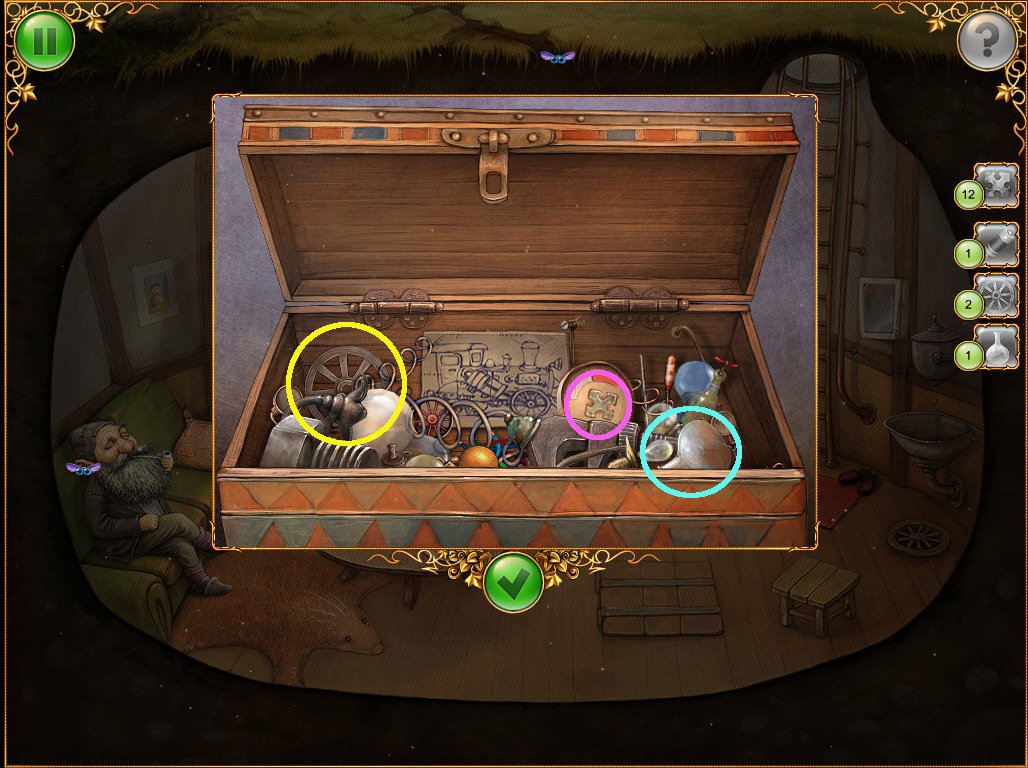
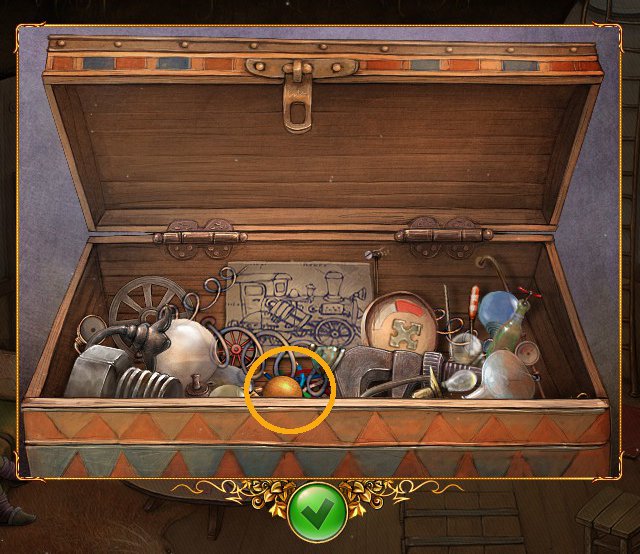
A key will appear near the feet of the Old Lady, so click on it to collect it and use it on the trunk.
Inside the trunk, collect the wrench, 2 puzzle pieces and a lightbulb.
Screenshot
Head down to Ground level.
Ground level
Use the wrench on each of the screws on the bent panel.
When the interior machinery is revealed, click on it to start the 8 elbow pipes and 7 cogs collecting tasks.
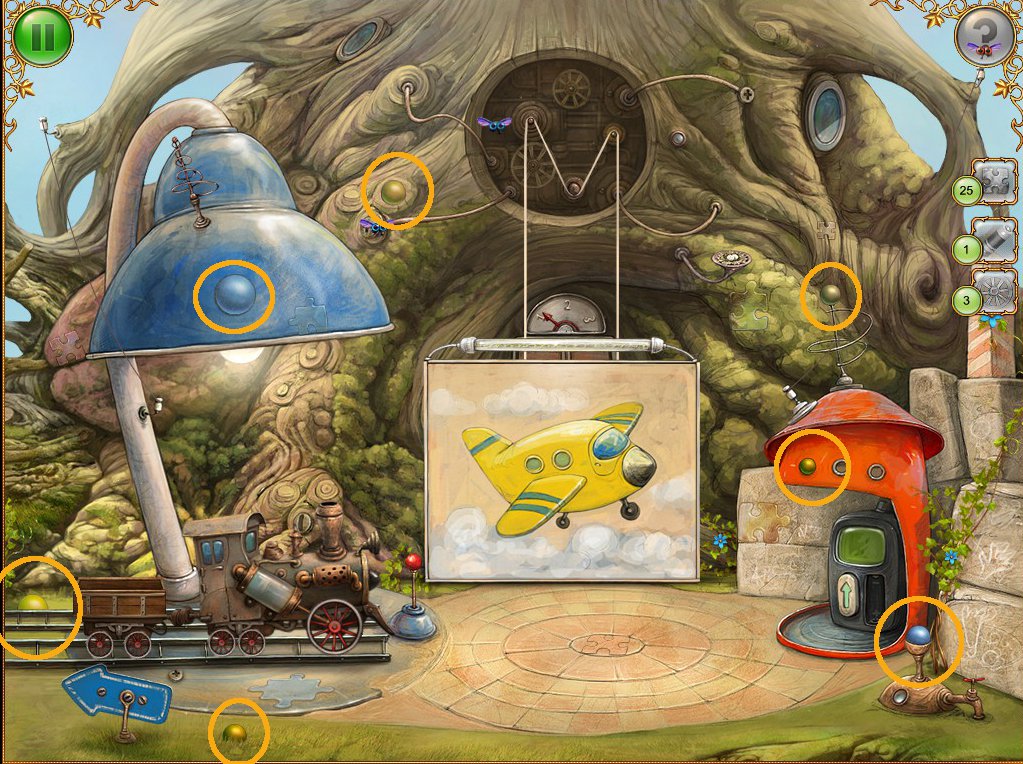
Collect the lightbulb above the top door.
Screenshot
Click on the fireplace again to collect one pipe and one cog.
Screenshot
Collect two cogs in the wider view of the base of the tree, and the elbow pipe nestled in near the red lever on the control box.
Screenshot
Head back up to the second floor.
Second floor
Collect the lightbulb from the top of the compartment with the warning symbol on it.
Collect a cog from inside the hatch and an elbow pipe from just above the lower door.
Screenshot
Time to visit the Old Lady again.
Old Lady's room
Go the trunk and collect the cog and pipe from inside.
Screenshot
Collect the cog from inside the hatch cover, and collect two more pipes, one from the cupboard and one on the end of the bannister railing.
Screenshot
Nearly there, but we need one more visit to the Observation Deck.
Observation Deck
Collect two pipes and a cog.
Screenshot
We're almost done, just a couple more things to take care of at Ground level.
Ground Level
Click on the pipes and cogs in the inventory and click on the panel.
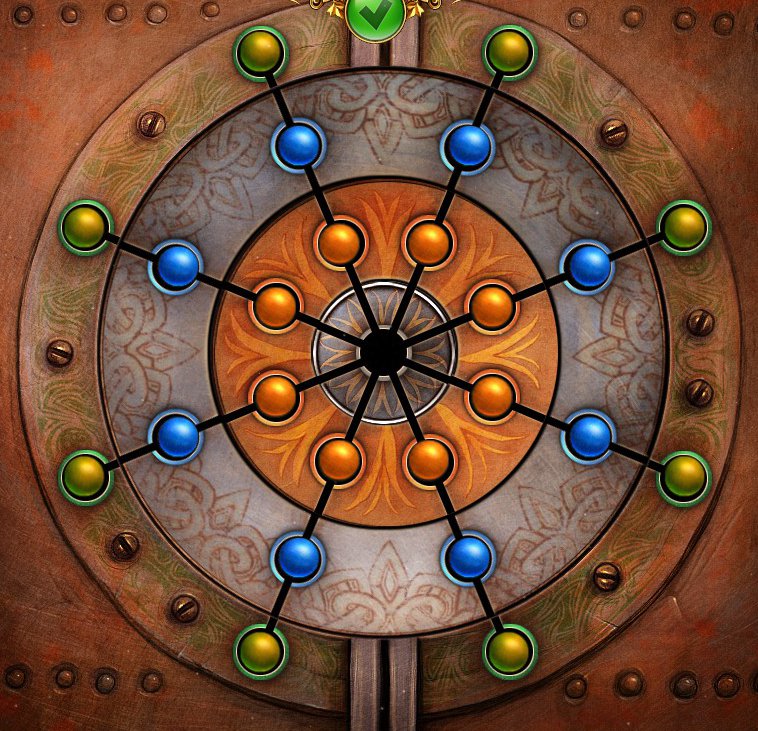
Use the lightbulbs on the control box and complete the mini-game by clicking to spin sections and getting the 3 red bulbs across the top row, the purple bulbs along the centre row, and the green across the bottom.
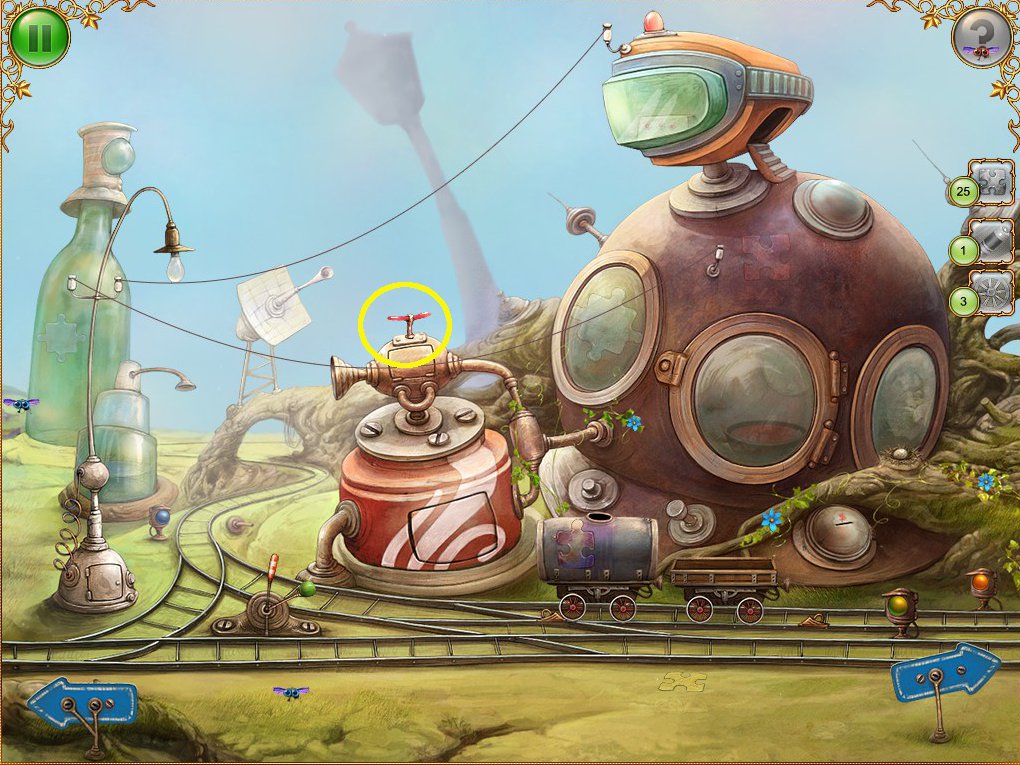
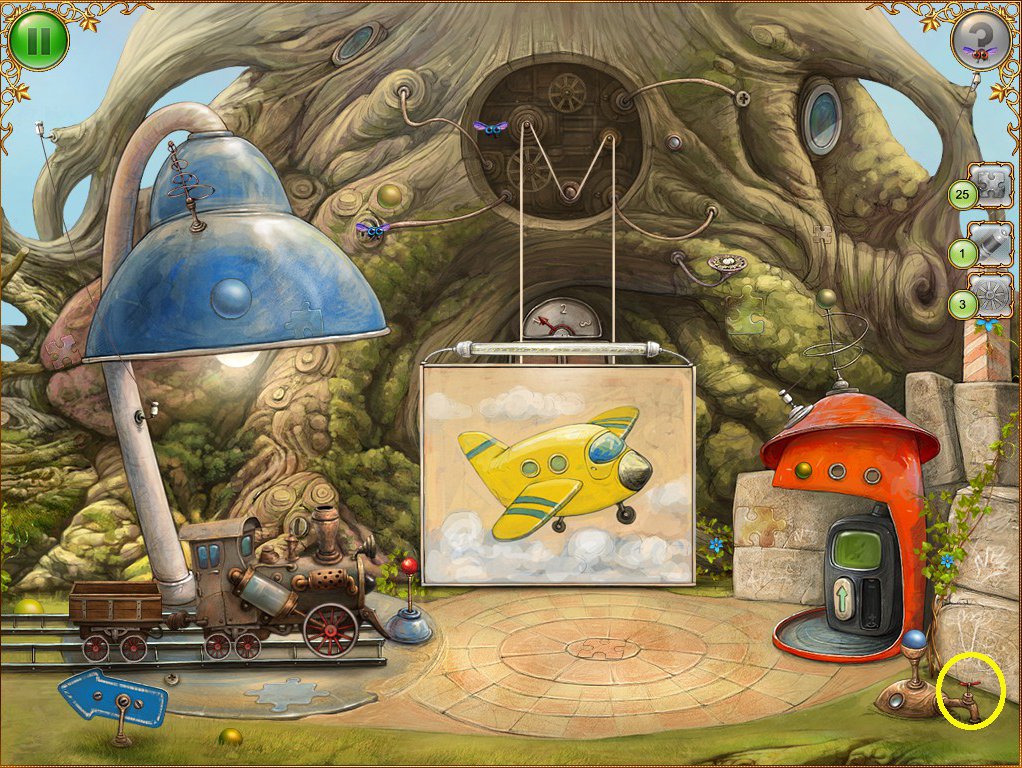
Pull the red lever on the control box, and then click on the yellow button at the bottom of the stairs. When the hatch opens, click on it and complete the train by finding each part and putting it together.
Screenshot
When the train is complete, it will choof off, marking the successful completion of Level 1.
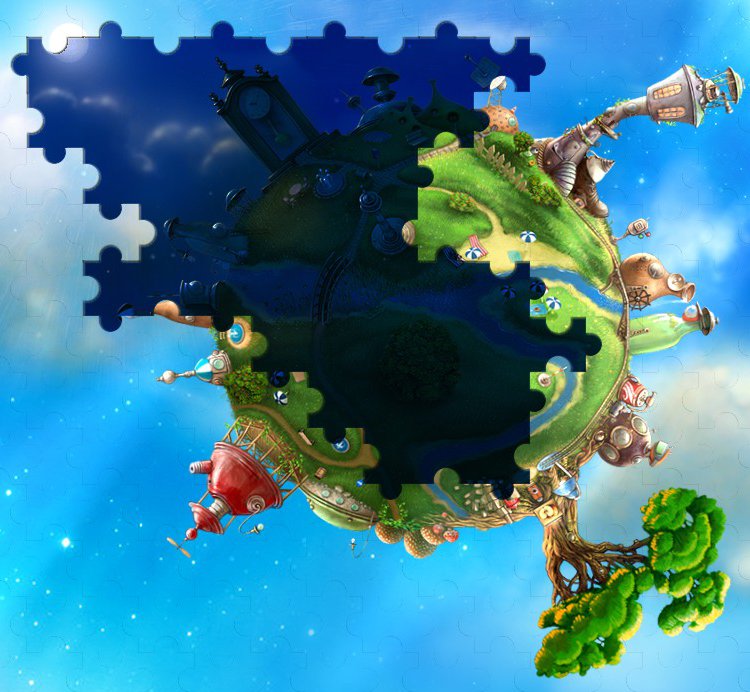
Globe Jigsaw Part 1
Screenshot
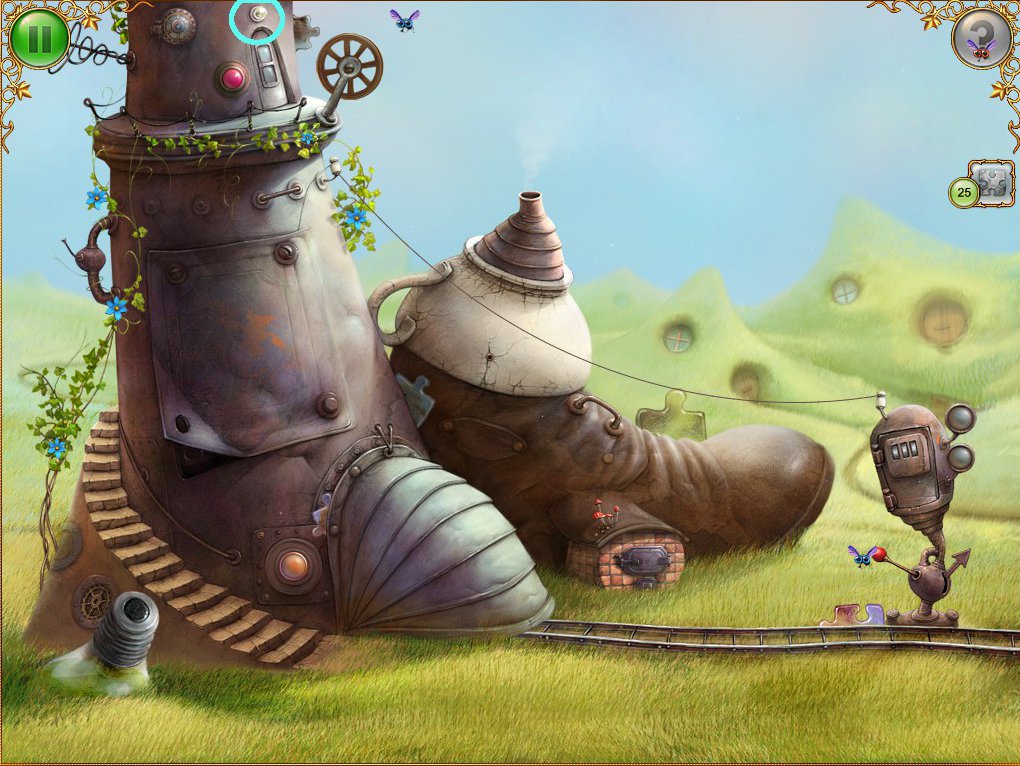
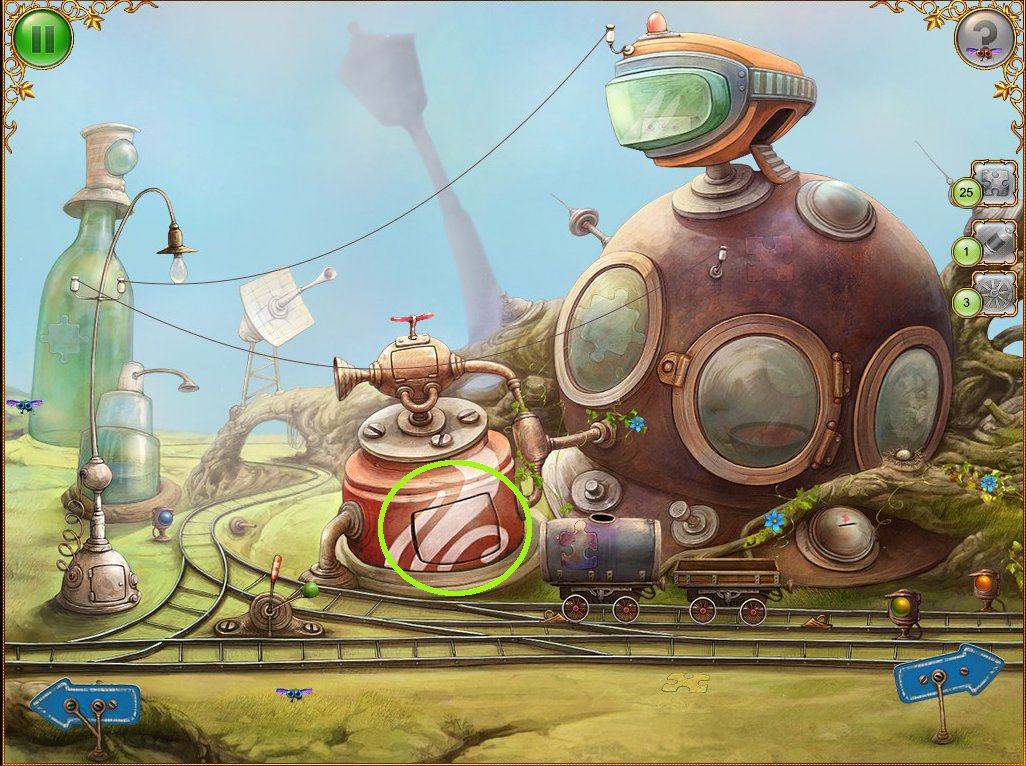
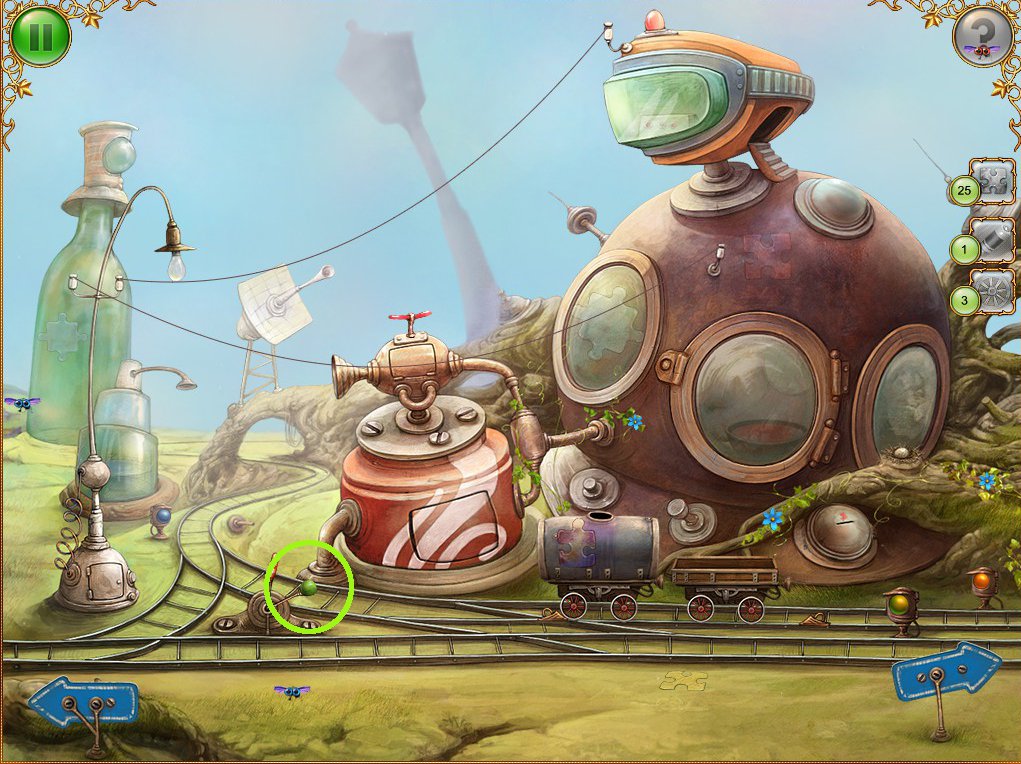
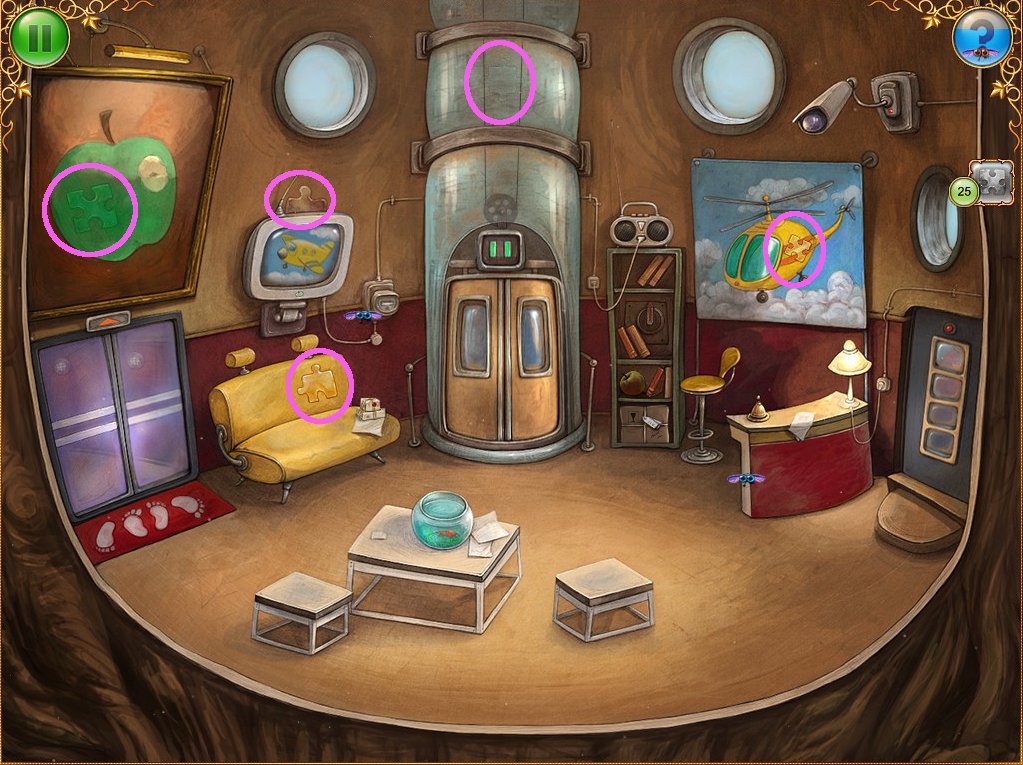
Level 2 - The Gnome and The River
Elevator
Use the blue arrow signposts at the bottom of each scene to navigate between views.
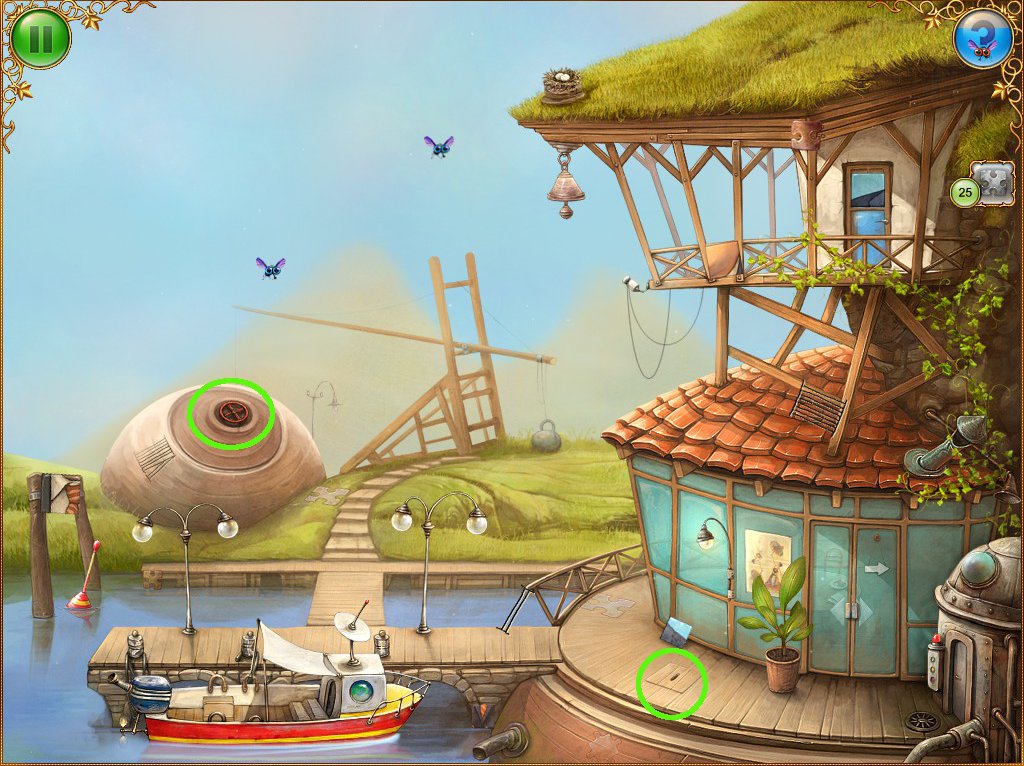
Start by clicking on the red elevator control box to the right to create the battery-seeking task.
Click on the machinery in the tree to start the cog-seeking task.
Click on the fragmented apple and plane picture, and complete the minigame by clicking on the green buttons at the bottom to form a complete picture of the plane.
Screenshot
Also, collect 8 puzzle pieces in the wider view.
Screenshot
Head to the left.
Control station
Collect 5 puzzle pieces.
Screenshot
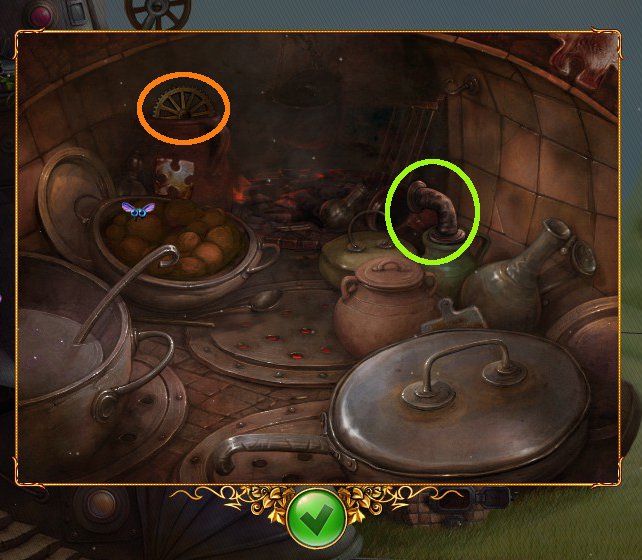
Click on the middle hatch in the right side building and click again to create the bottle-seeking task.
Click on the small hatch to the bottom right, to enter the Gnome's Quarters.
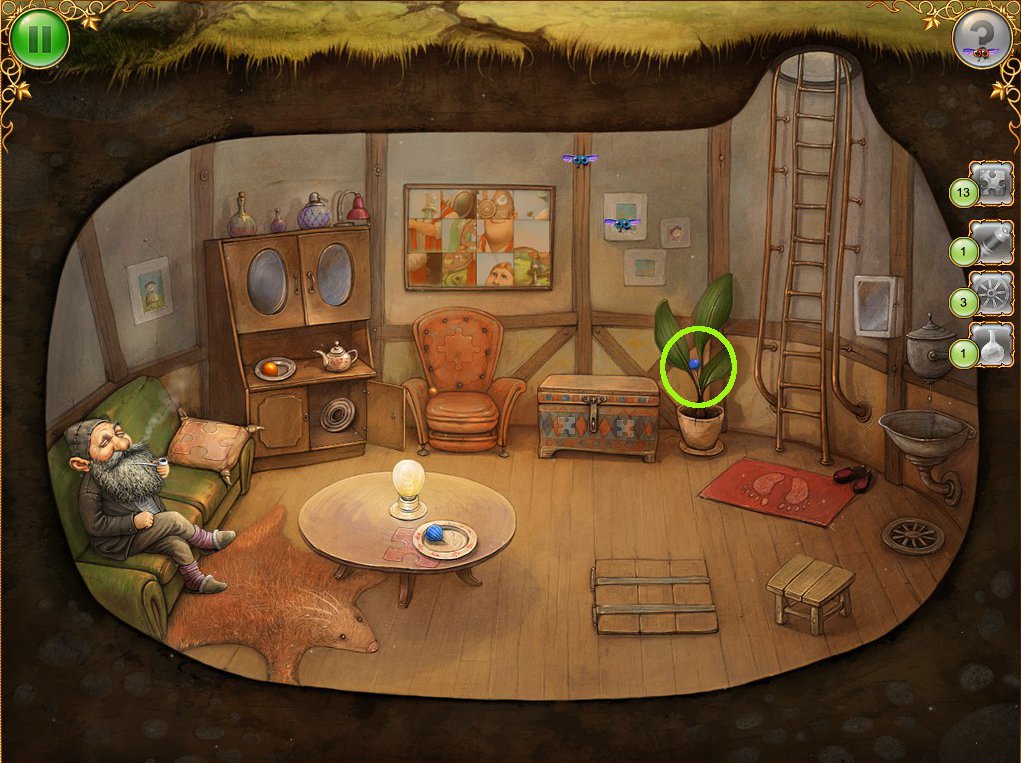
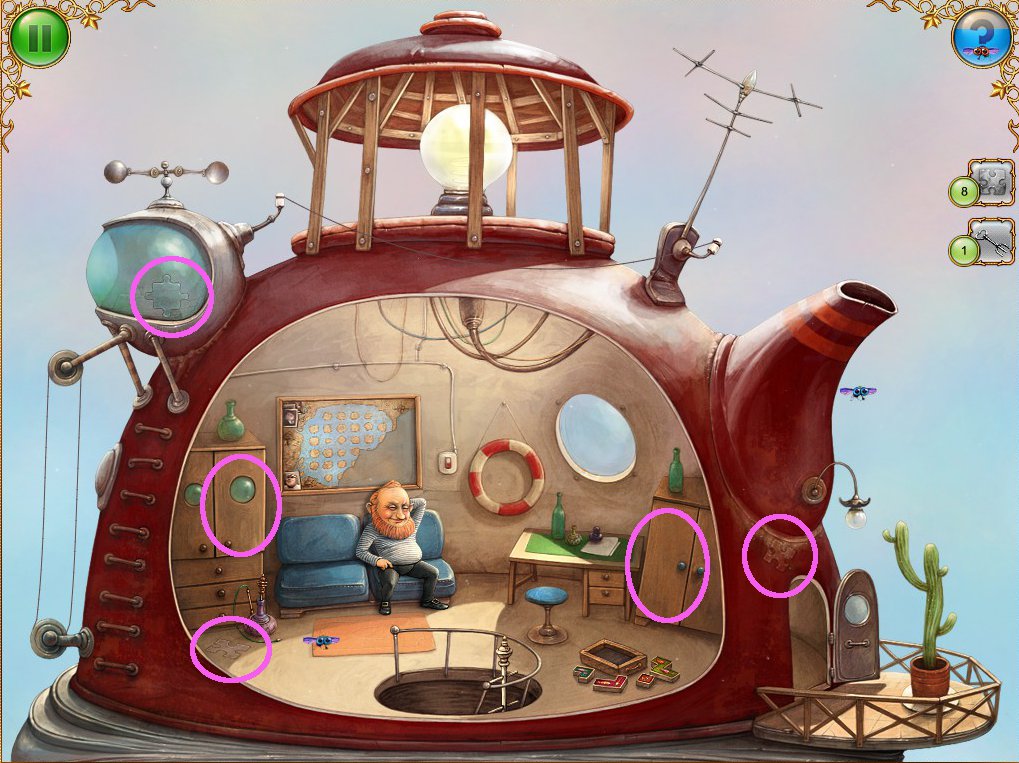
Gnome's Quarters
Click on the trapdoor to collect a bottle.
Screenshot
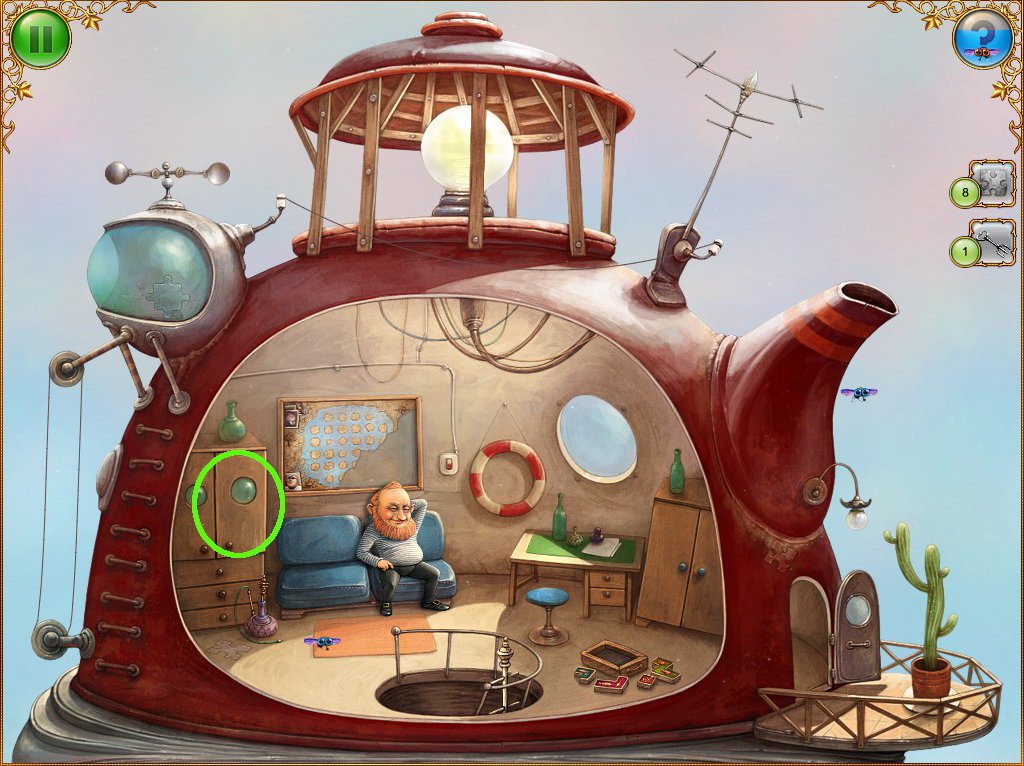
Click on the lower cupboard to the left to collect a cog.
Screenshot
Click on the upper cupboard to collect a puzzle piece.
Click on the trunk and inside collect a puzzle piece, a cog and the second bottle.
Screenshot
Collect the puzzle pieces from the orange chair at the back, the cushion next to the gnome, the coffee table and two more from the front of the trunk.
Screenshot
Click on the picture at the back and complete it by sliding tiles.
Screenshot
Click on the Gnome, who will indicate that a battery can be collected from a contraption.
Head back up.
Control station
Click on the bottles in the inventory and click on the middle hatch. Reassemble the contraption using the diagram at left.
Screenshot
When the contraption is complete, a hatch will open, revealing the battery.
Screenshot
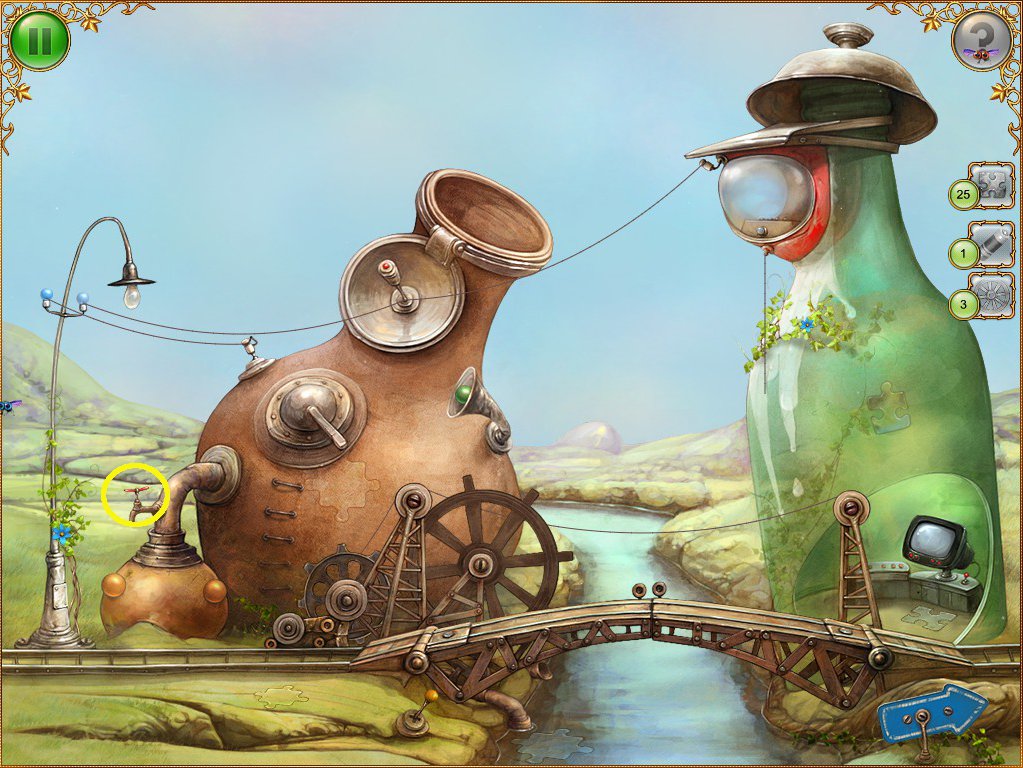
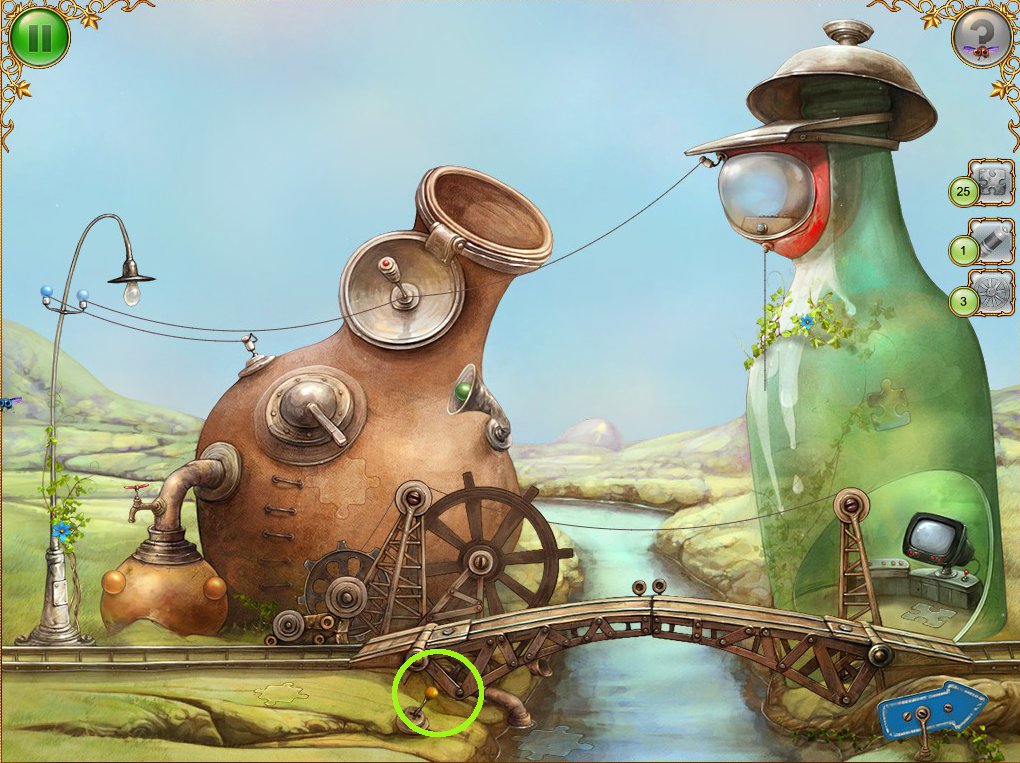
Head left to the bridge.
The Bridge
Click on the far left hatch and click again to create the spigot-seeking task.
Collect the first spigot from the left.
Screenshot
Collect 5 puzzle pieces.
Screenshot
Head back to the control station.
Control station
Collect the spigot from the centre of the screen before heading back to the elevator.
Screenshot
Elevator
Collect the spigot from the far right.
Screenshot
Use the battery on the red elevator control.
Click on the elevator doors to create the sphere-seeking task, requiring that you find 24 spheres and one red button.
Collect 6 spheres from this scene.
Screenshot
Go left to the Control station.
Control station
Find 6 spheres and then head down the hatch to the Gnome's Quarters.
Screenshot
Gnome's Quarters
Collect 6 spheres.
Screenshot
Screenshot
Screenshot
Collect the final spigot from the trunk.
Screenshot
Head back up and left to the Bridge.
The Bridge
Collect 5 spheres.
Screenshot
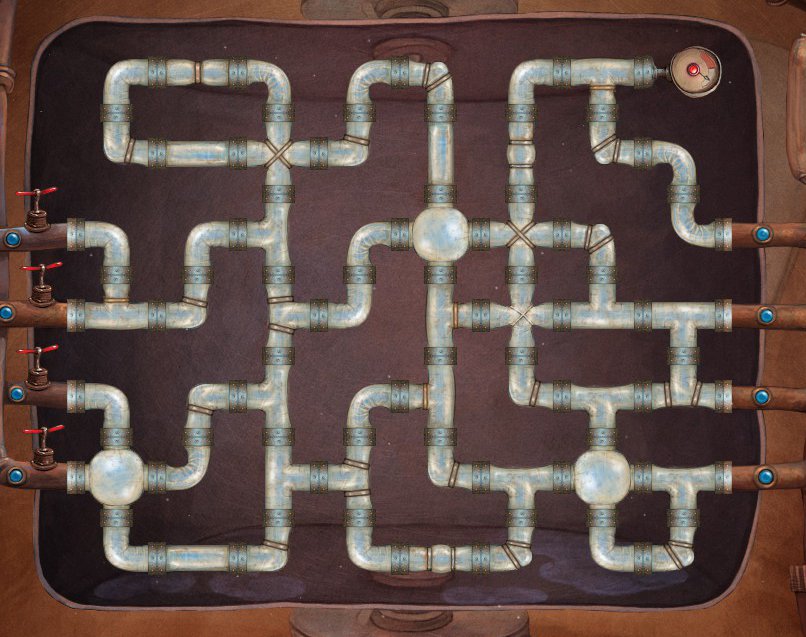
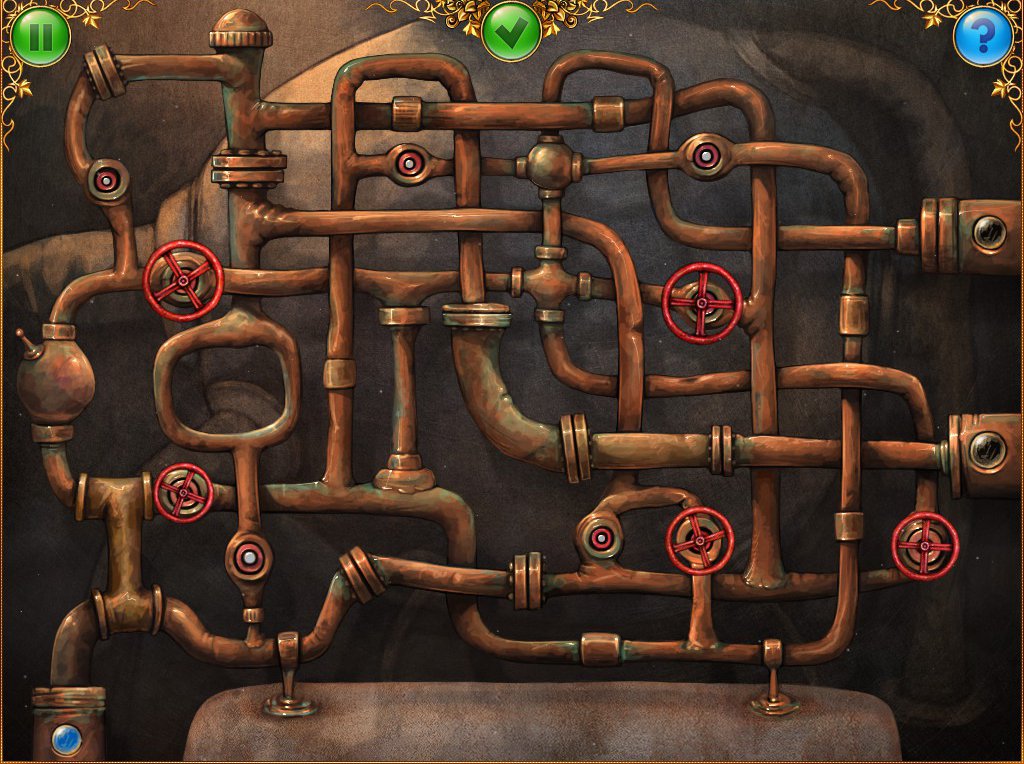
Use the spigots in the hatch on the big bottle to the left.
Complete the minigame by connecting all pipes. Hitting the hint button at top right will show a blueprint with a solution.
Screenshot
Click on the top right bubble window to start the lever-seeking task.
There's a different coloured lever located in each of the four scenes
Yellow lever
Blue lever
Green lever
Red lever
Click on the bubble window and use the levers on it to complete a mini-game. The radar will emit a sequence of colours that will need to be replicated by clicking on the coloured levers. The sequences vary each time you play. When complete, click on the screen down below to complete another mini-game.
The screen game requires that you navigate a boat by clicking on the up and down arrows on the screen.
To the left of the screen is a green button with a cross on it. Click on this button each time green squares with crosses appear in the game, to remove them.
When complete, you'll return to the bridge scene where a boat will be docked.
Click on the red button with a triangle on it, which is on the front of the boat.
Time to return to the elevator.
Elevator
Click on the spheres and the button in the inventory and use them on the circular panel in the elevator doors.
The aim of the game is to have all green spheres in the outer ring, blue in the middle ring and orange in the centre ring. Click on each ring to rotate it and click on the spheres to move them.
Screenshot
Click on the hatch to open it, and the elevator will start to ascend, marking the successful completion of Level 2.
Globe Puzzle Part 2
Screenshot
Level 3 - Apples
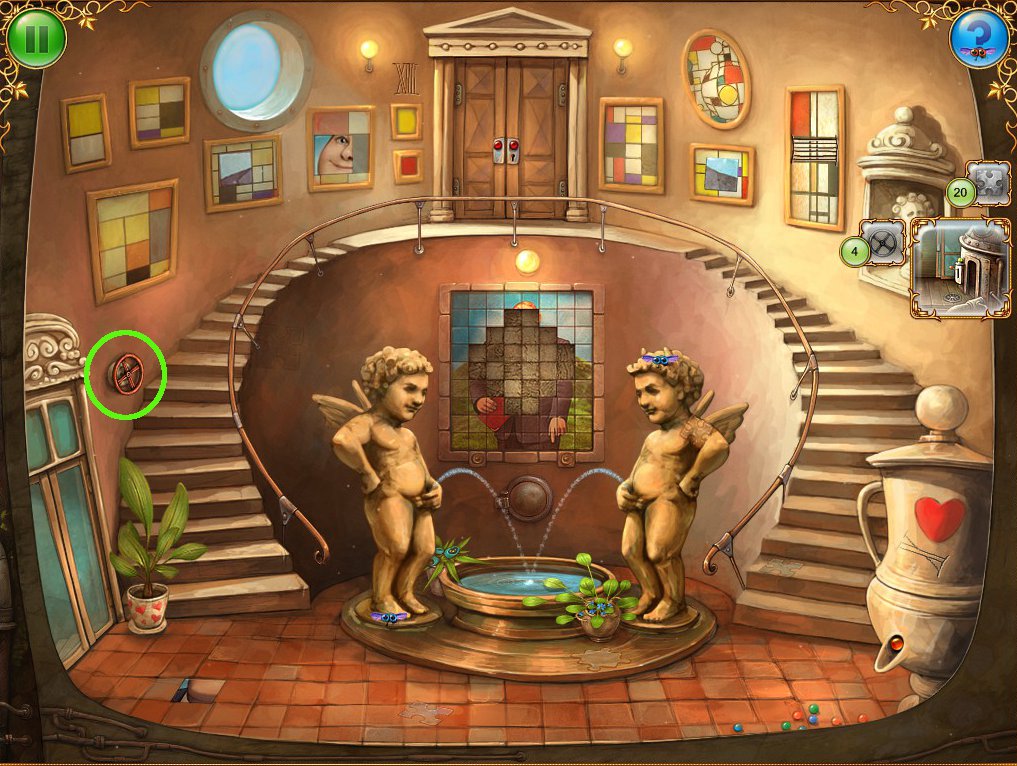
The Foyer
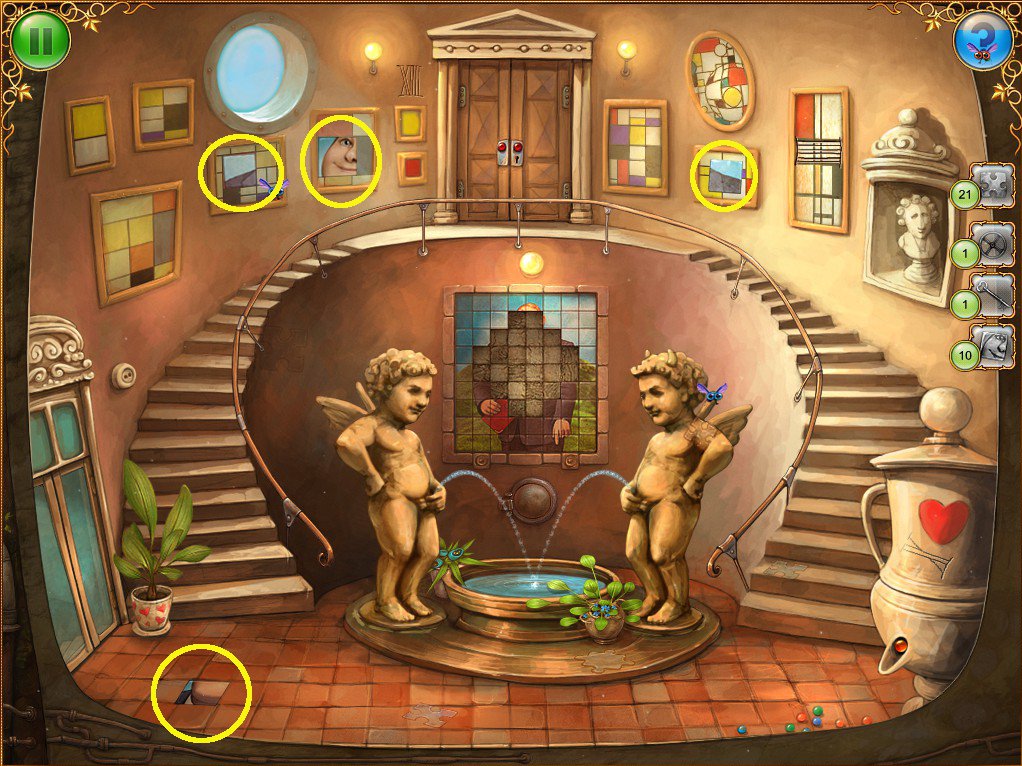
Find 7 puzzle pieces.
There are 5 scattered around the foyer.
The other two can be found by clicking on the security camera, top right.
Screenshot
Screenshot
Click on the doors to the left to go to the Apple Shop.
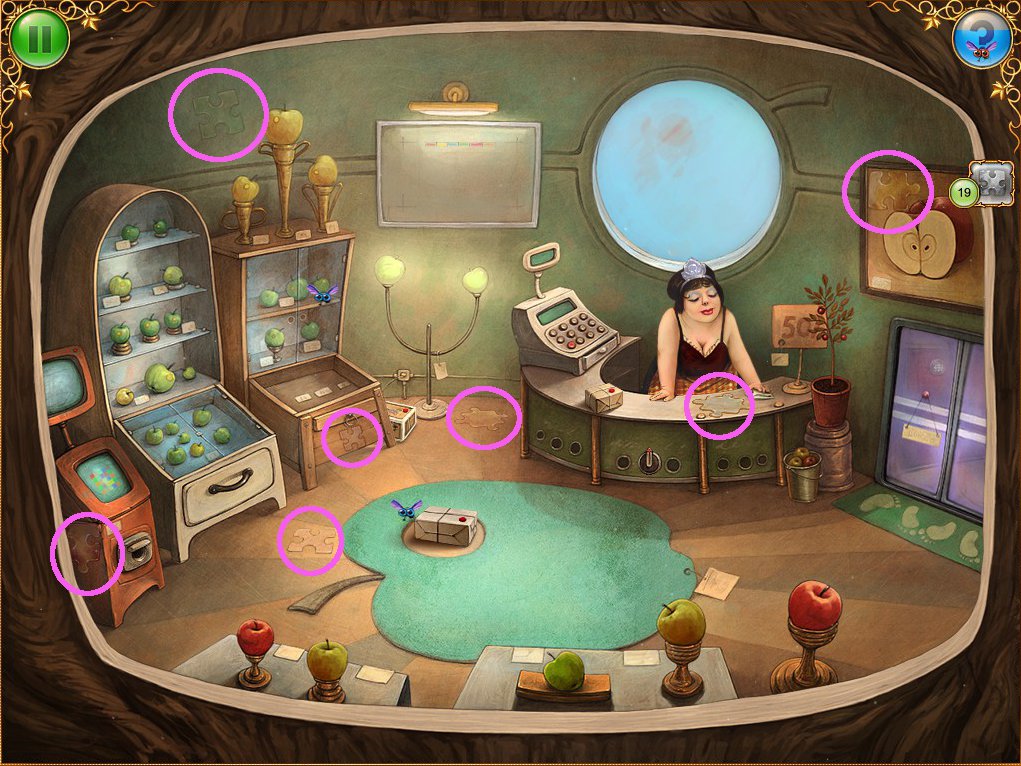
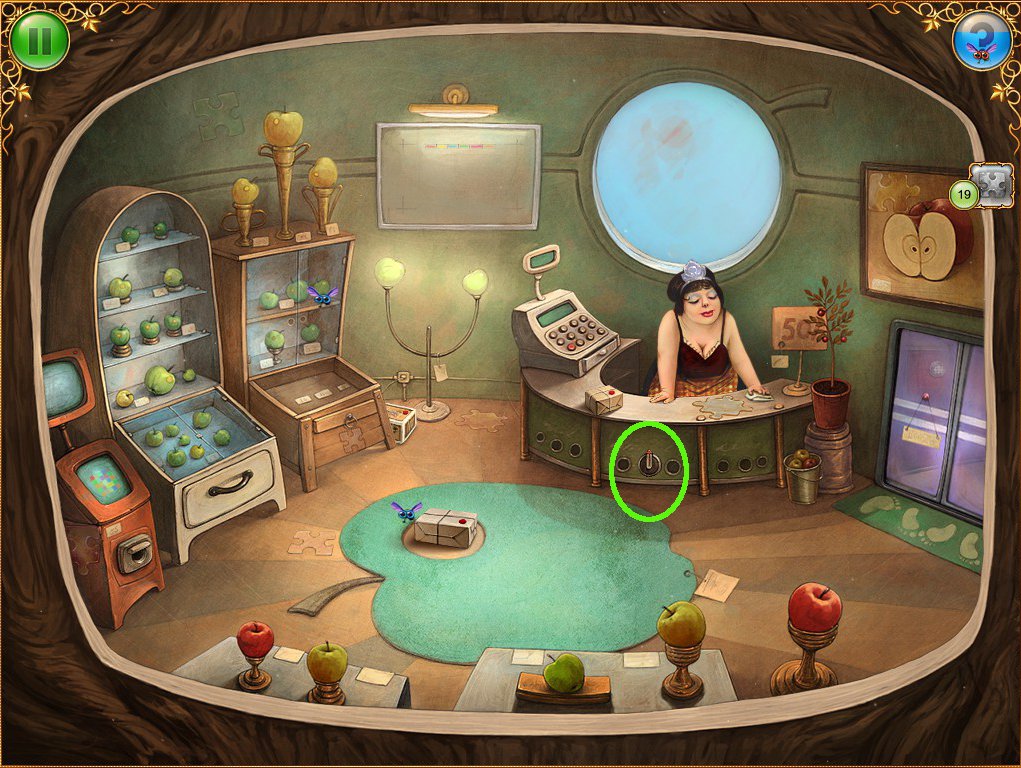
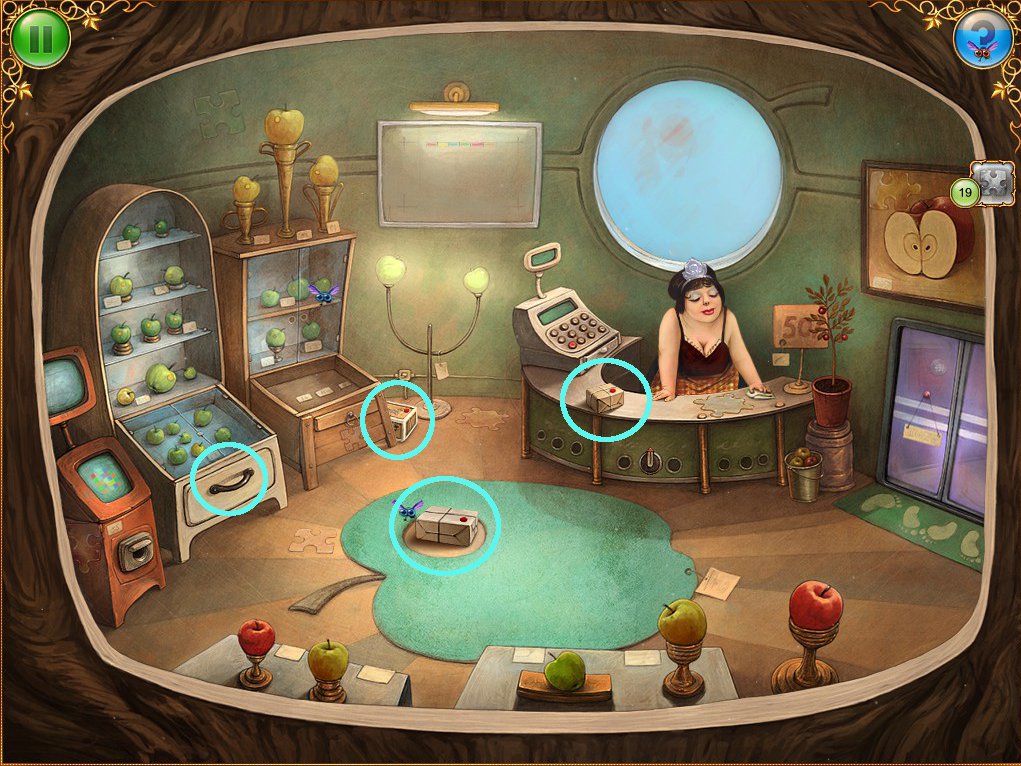
The Apple Shop
Click on the Apple Lady, and she will indicate that you can receive a coin in return for a complete picture and 3 apples.
Collect 7 puzzle pieces from around the shop.
Screenshot
Click on the picture frame at the back of the shop to begin the scroll collecting task.
Click on the arcade machine to the left.
Complete the mini-game by assembling the colours in the right order. Note the order of colours indicated by the top bar, and the brightness of colours as indicated by the bar to the right.
When complete, the machine will reveal the scroll.
Use the scroll on the frame.
Click on the wooden display case towards the back to begin the apple-seeking task.
Head back to the Foyer and then right again to the Balcony.
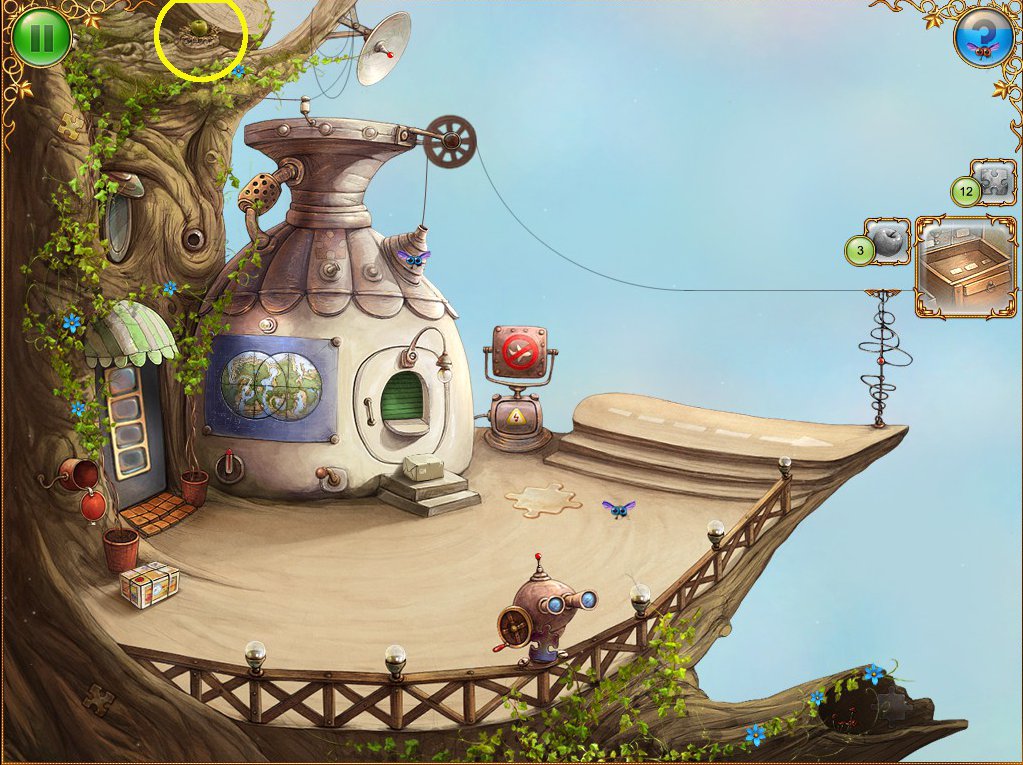
The Balcony
Collect 5 puzzle pieces.
Screenshot
Collect the apple in the nest top left.
Screenshot
Click on the poster at the back with the two worlds printed on it.
Complete the mini-game by rotating the globes until all yellow segments are at left, all green segments are in the centre and all pink segments are at the right.
When complete, the shutter to the right will open. Click on it to activate the coin-seeking task.
Go left to the Foyer then use the elevator to go up.
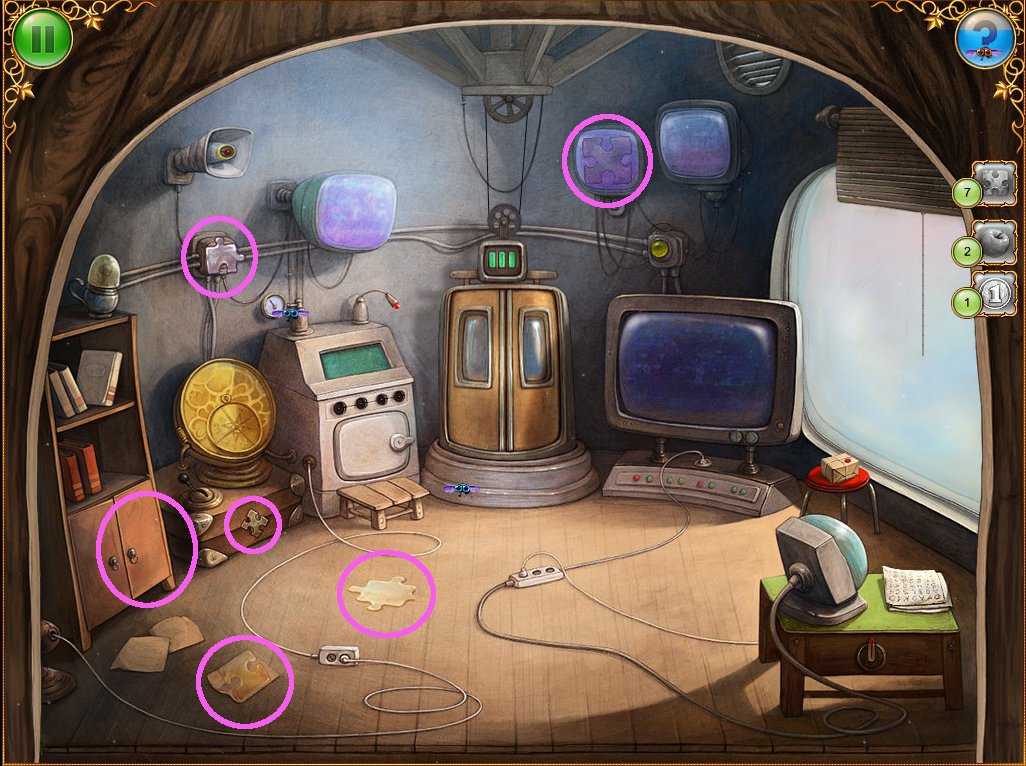
Screen Room
Collect 6 puzzle pieces, one of which is in the cupboard at left.
Screenshot
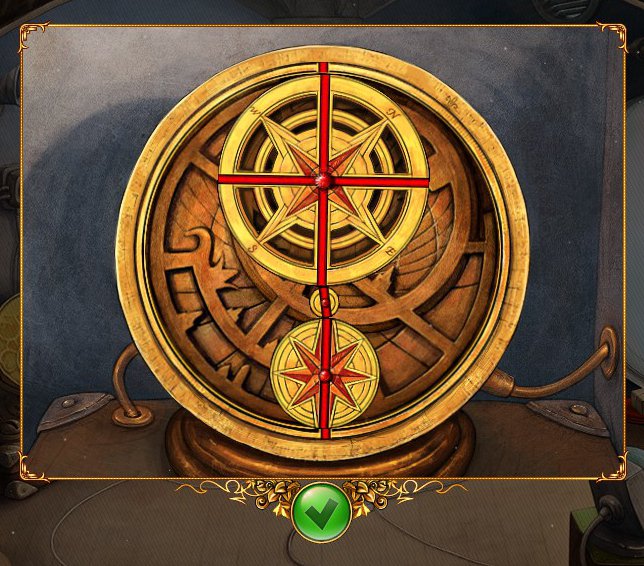
Click on the yellow circular dish next to the cupboard to activate the compass-seeking task.
Click on the machine next to the yellow dish to activate the dial-seeking task.
Click on the bunch of papers on the small table to the right to start the stencil-seeking task.
Head back down to the foyer.
The Foyer
Click on the security camera and collect the compass.
Screenshot
Collect the apple and the dial from the shelves next to the elevator.
Screenshot
Before heading up to the screen room, visit the Balcony and the Apple Shop to collect two more dials.
Apple Shop
Balcony
Now head back up to the Screen Room.
Screen Room
Use the compass on the yellow dish.
Complete the mini-game by aligning the red line in each disc so that it runs from top to bottom, with the largest disc at the top.
Rotate the discs by clicking and holding on the largest disc.
Screenshot
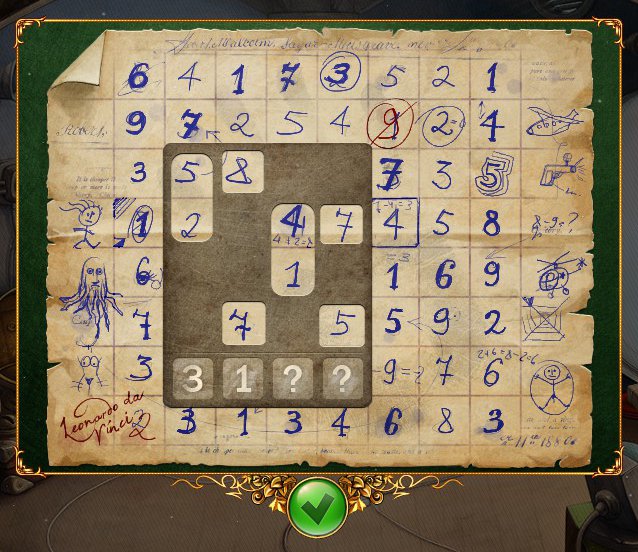
Collect the stencil from inside the compass puzzle, and use it on the batch of papers to the right.
Move the stencil around the drawing on the grid until you find the right location.
Screenshot
When complete, note the equations running from top to bottom, and that the numbers at the bottom are the difference between the two upper numbers in each row. You should now have a four digit code worked out.
3132
Take the dial from the table that the papers are on.
Screenshot
Use the dials on the machine next to the compass puzzle.
When in close-up, turn the dials to match the code found from the stencil and paper puzzle.
Take the apple that's revealed by the hatch opening and go back down to the Apple Shop.
The Apple Shop
Use the apples on the display case, and then click on the lady.
Take the coin from the till and go to the Balcony.
The Balcony
Use the coin on the open shutter and then head back up to the Screen Room.
Screen Room
Click on the big screen at right to play another mini-game.
The aim is to navigate a yellow plane through the forest, avoiding trees and black planes, by clicking on the left and right buttons onscreen.
I found that by taking the clear paths on the left side of the screen was the best strategy.
When done, head back to the Balcony.
The Balcony
Click on the big orange button to open the plane door.
Click on the open door to activate the parcel-seeking task.
Collect 2 parcels from the balcony area and open the hatch to collect a third parcel.
Screenshot
Head back to explore the other three areas for the rest of the parcels, and then use them on the plane.
The Apple Shop
Find 3 parcels around the shop and one hidden in the lower part of the middle display case at left.
Screenshot
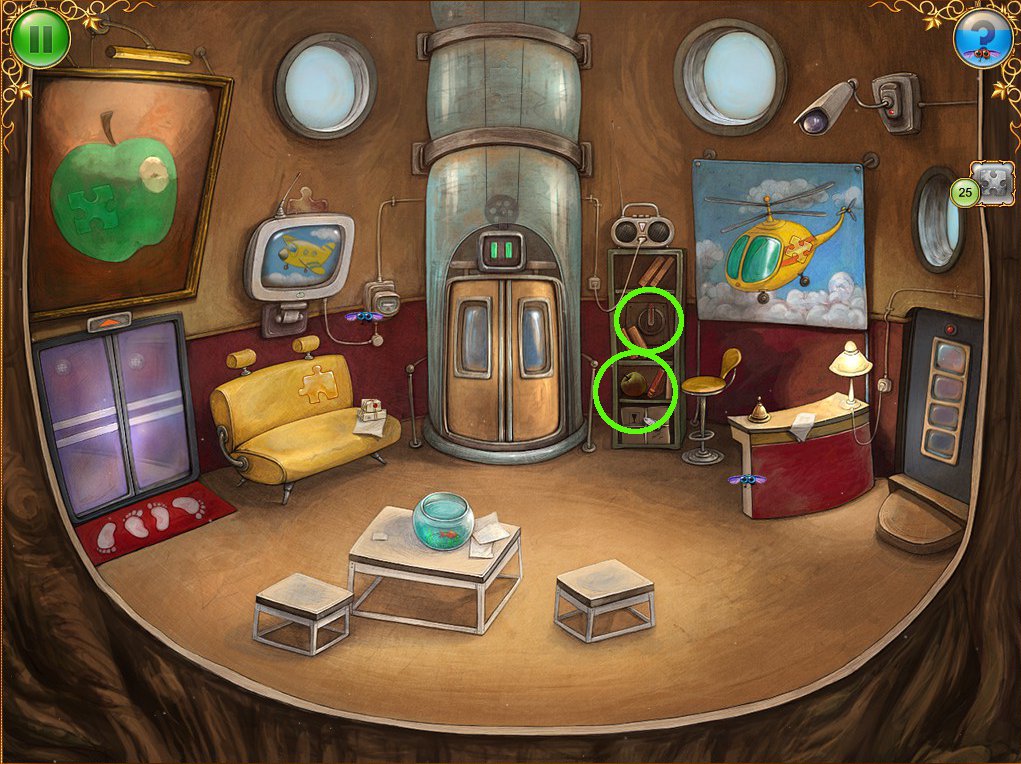
The Screen Room
Find one parcel in left cupboard and one on the stool to the right.
Screenshot
The Foyer
Collect 2 parcels from the main view and one from the camera view.
Screenshot
Screenshot
Globe Puzzle Part 3
Screenshot
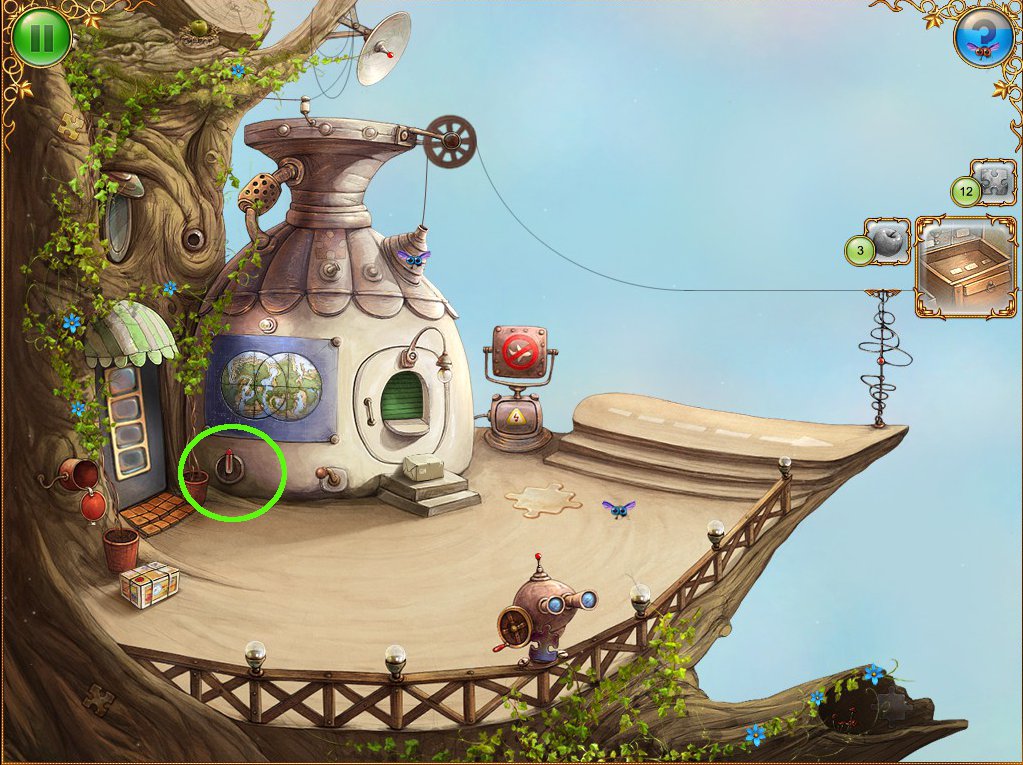
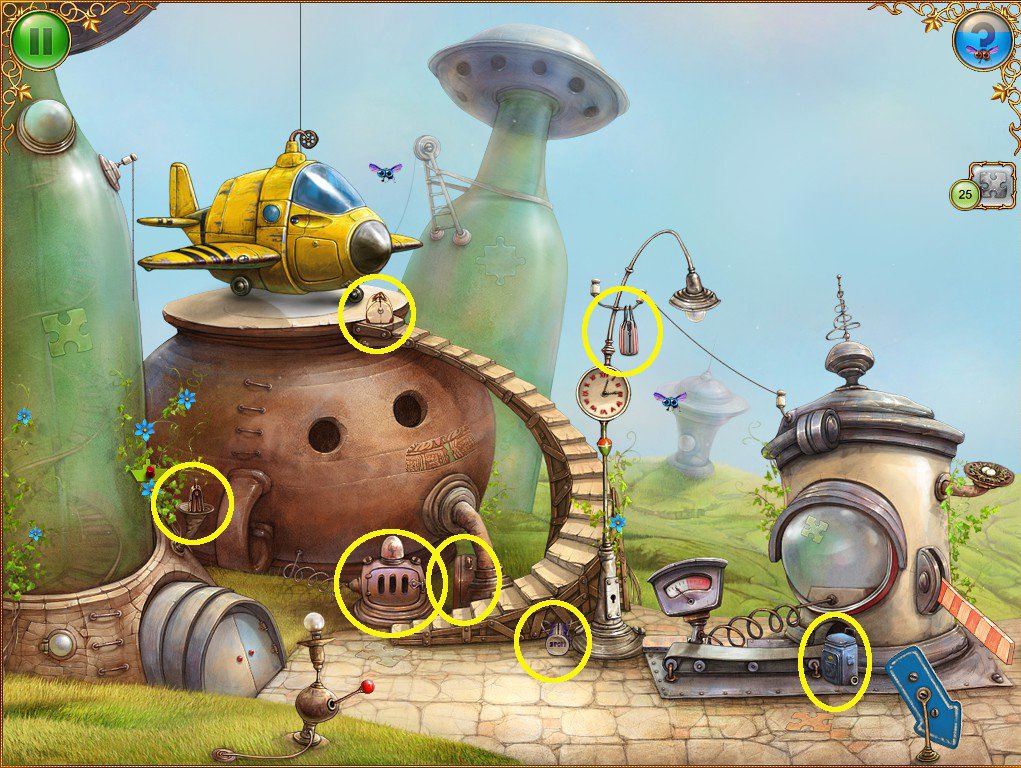
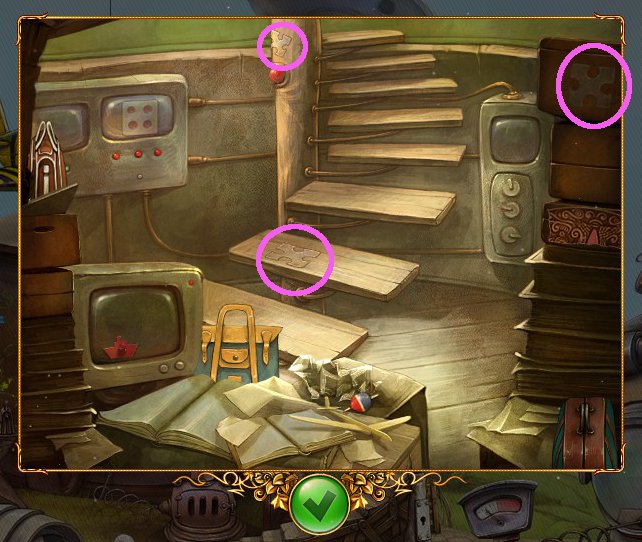
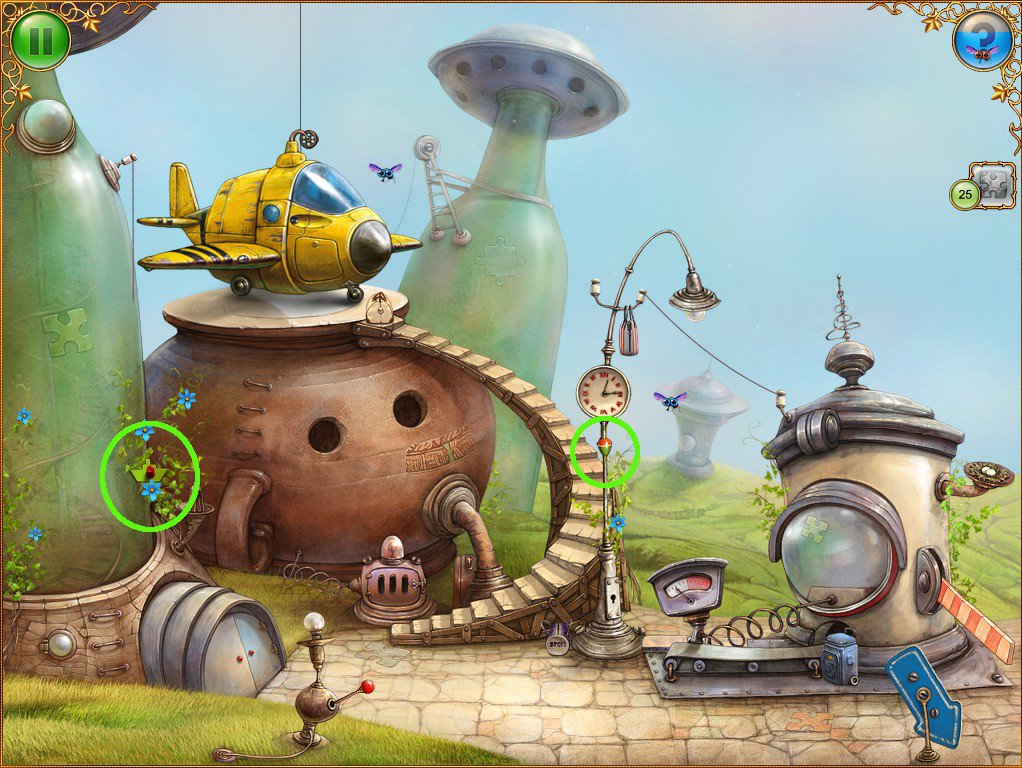
Level 4 - The Sailor and the River
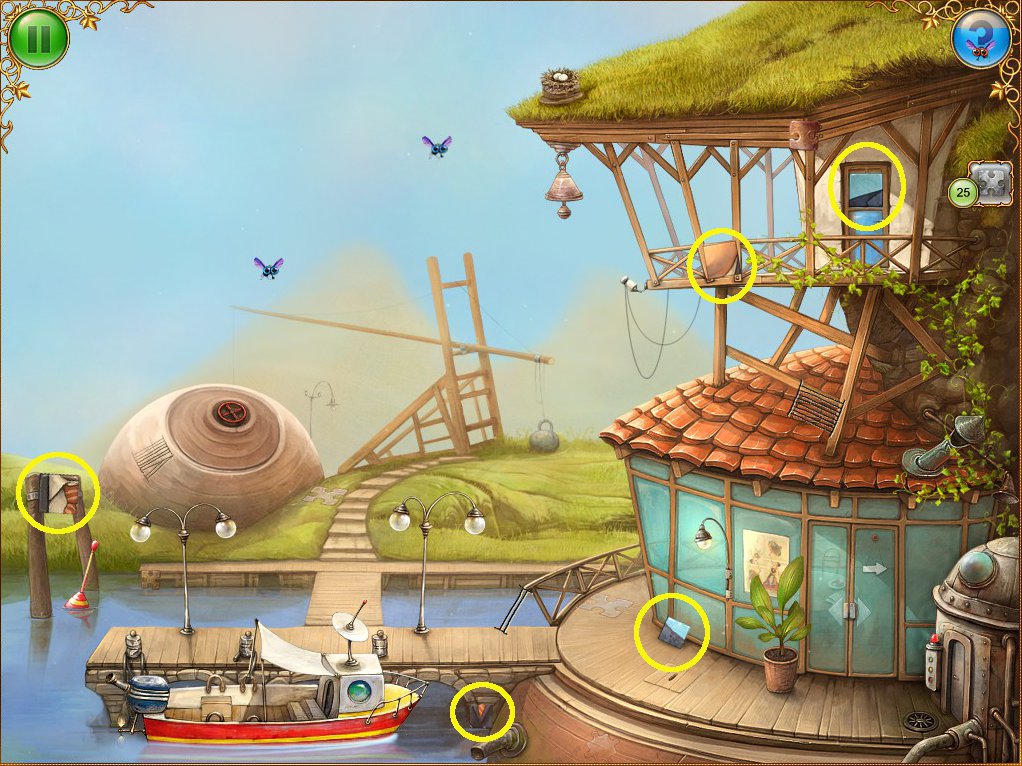
The Airport
Collect 5 puzzle pieces.
Screenshot
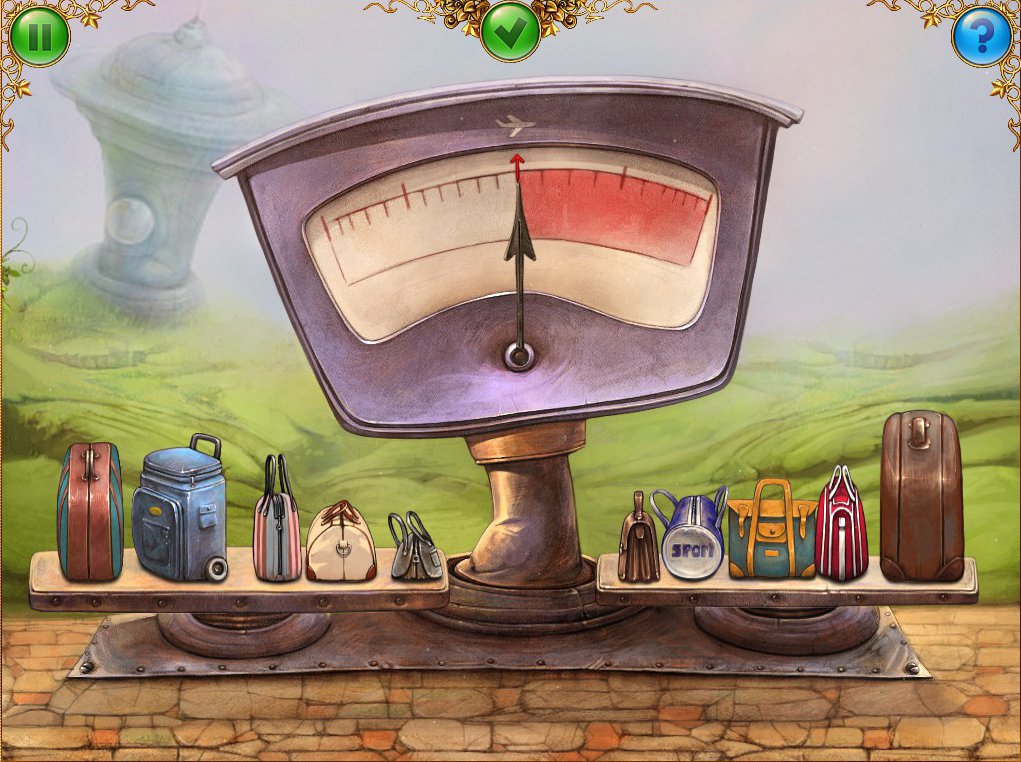
Click on the scales at right to activate the bag collecting task.
Collect 7 bags in the scene, which includes one in the oven-style contraption below the plane.
Screenshot
Click doors at the base of the big bottle at left.
Inside, collect 3 puzzle pieces.
Screenshot
Also collect 3 bags.
Screenshot
Back outside, use the bags on the scale. The goal is to get the weight indicator exactly in the centre.
Screenshot
Once completed, the boom gate will open and it's now possible to move right to the next scene.
The Gazebo
Click on the circular stone platform at centre, to activate the dice collecting task.
Collect 3 puzzle pieces.
Screenshot
Head right to the Jetty.
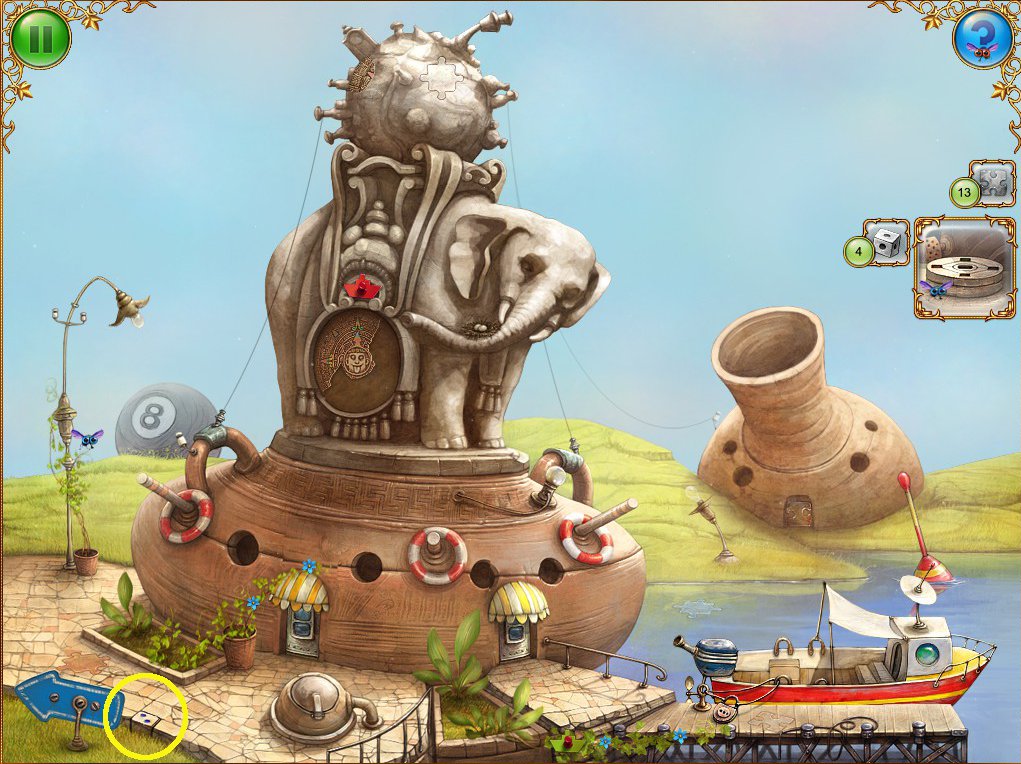
The Jetty
Collect the blue die from the paving stones, lower left.
Screenshot
Click on the lock that's lying on the jetty near the boat to activate the key-finding task.
Click on the broken decorative mandala on the elephant statue to activate the mandala piece-seeking task.
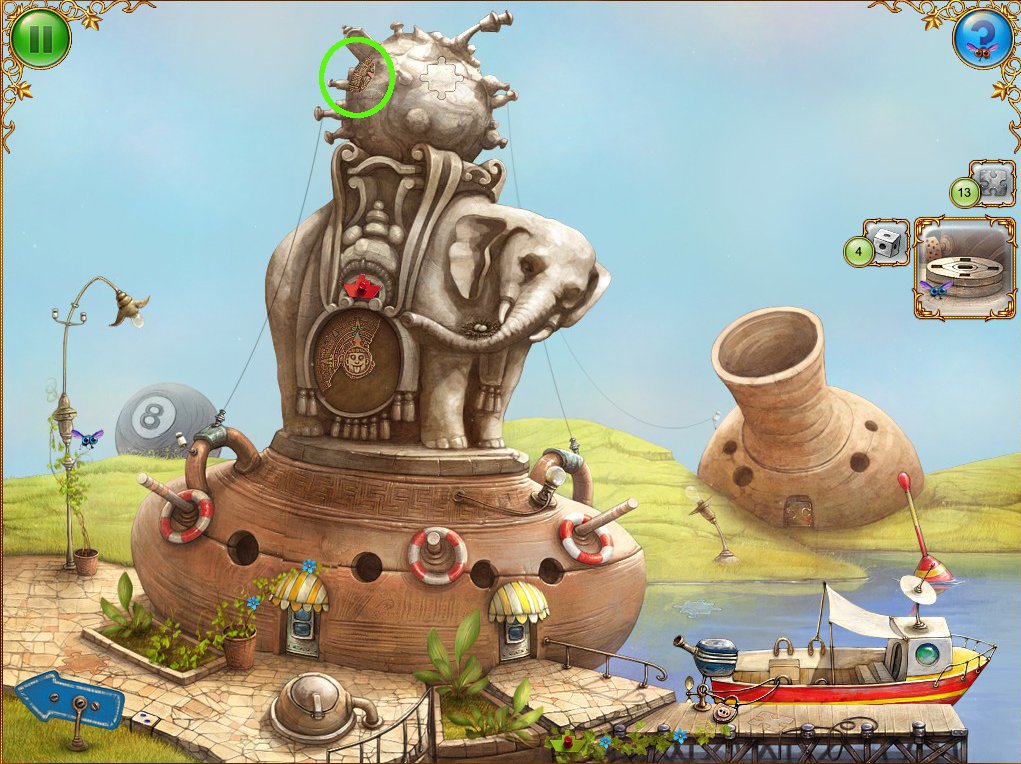
Collect a mandala piece from the top of the elephant statue.
Screenshot
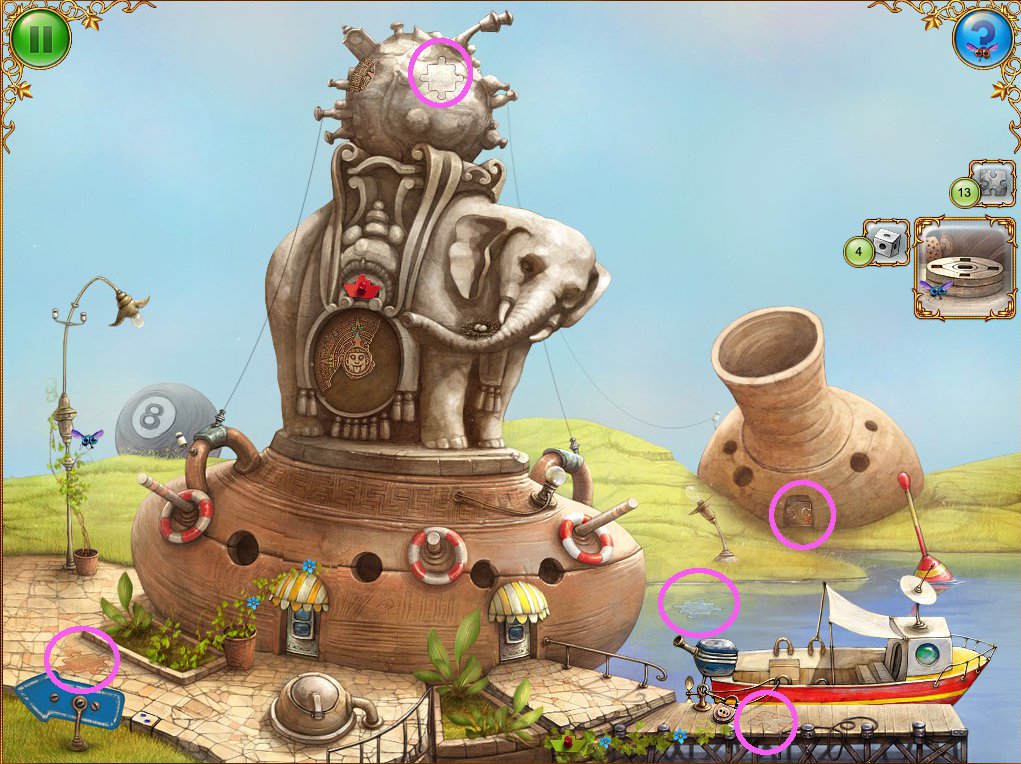
Collect 5 puzzle pieces.
Screenshot
Head back to the Airport.
The Airport
Collect a piece of the mandala from under the stairs.
Screenshot
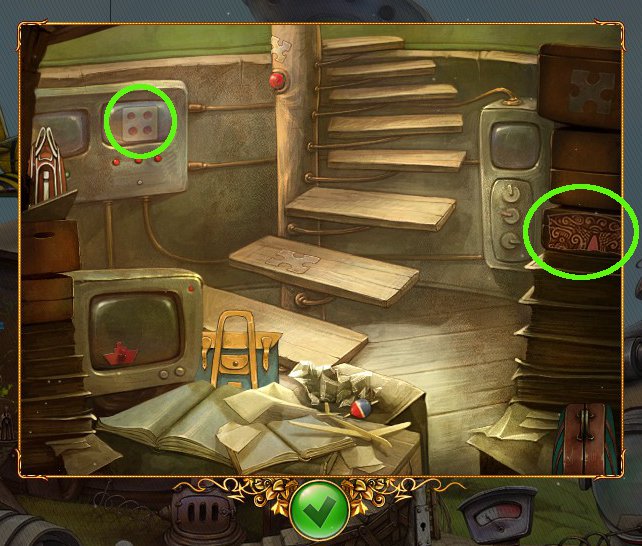
Enter the lower left doors and once inside, collect a piece of the mandala and the red dice.
Screenshot
Back in the wider view, collect the green dice from the top bubble hatch on the big bottle at left.
Screenshot
Head right, stopping at the Gazebo.
The Gazebo
Collect the mandala piece from top left.
Screenshot
The Jetty
Use the mandala pieces on the elephant statue and complete the puzzle.
Screenshot
The two bottom doors will open. They both go to the same scene, so click on either one.
Inside, collect the yellow dice and a puzzle piece.
Screenshot
Head back to the Gazebo.
The Gazebo
Use the coloured die on the circular stone platform.
Click on the dice to move them through the slots to their respective squares.
Pull the green lever to activate a ladder.
Head up the ladder to the Sailor's Quarters.
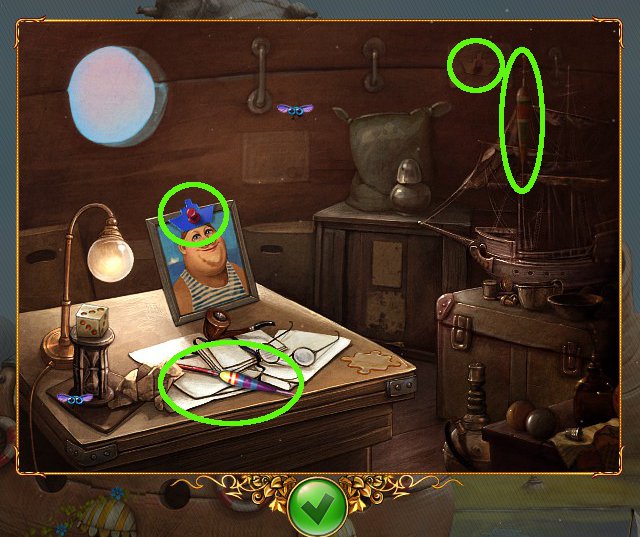
Sailor's Quarters
Collect 5 puzzles pieces, 2 of which are in the left and right cupboards.
Screenshot
Click on the torn picture in the frame to activate the ship-collecting task; you'll also need to locate the missing piece of the picture.
Click on the puzzle in the lower right on the floor to activate the lure-collecting task.
Locate one lure in the left cupboard.
Screenshot
Go back down to the Gazebo.
The Gazebo
Click on the left bubble hatch to collect a lure.
Click on the round wooden trapdoor to collect a ship.
Click on the crank to open the upper shutter and collect another lure.
Collect the ship from the viney plant at left.
Screenshot
Head left to the Airport.
The Airport
Go to the lower left doors and inside collect one lure and one ship.
Screenshot
In the wider view, collect a lure from just under the clock and a ship in the vines above the low left doors.
Screenshot
Go all the way to the right to the Jetty.
The Jetty
Enter the building through either of the doors and collect a ship piece from the photo, and one from the wall above the model ship.
Also, collect a lure from the desk and a lure from the model ship.
Screenshot
Back outside, collect a giant lure from the river, and another smaller lure from the bubble hatch lower left.
Also, collect a ship piece from the statue and another at the very bottom of the scene hidden amongst the plants.
Screenshot
Head back to the Sailor's Quarters.
Sailor's Quarters
Use the lures on the puzzle on the floor and complete the puzzle. The hint will give you a clue, but it's a mirror image of the solution.
Screenshot
Take the torn piece of the picture that appears on the floor, left of the Sailor, and use it on the picture on the wall.
Complete the mini-game by connecting like-coloured ships. The paths between the ship pairs cannot be crossed over by other paths.
Screenshot
Take the key that appears from under the floor rug and head back to the Jetty to use it on the lock. The boat will then move off, marking the successful completion of Level 4.
Globe Puzzle - Part 4
Screenshot
Level 5 - The Clock Tower
The Dock
Collect 5 puzzle pieces.
Screenshot
Click on the door to the elevator control room at bottom right to activate the valve-collecting task.
Collect two valves from the scene, one in the small wooden trapdoor and one from the round globe building at left.
Screenshot
Go through the sliding glass doors into the building.
The Fountain Room
Collect a valve from the left near the stairs.
Screenshot
There's also another valve in the close-up view of the fountain.
Screenshot
Collect 5 puzzle pieces in this scene.
Screenshot
Click on the doors at the top of the stairs to activate the key-seeking task.
Click on the unfinished picture behind the fountain to activate the tile-seeking task.
Collect 4 tiles in the scene.
Screenshot
Collect another tile from the close-up view of the fountain.
Screenshot
Go back outside to the Dock.
The Dock
Collect 5 tiles from the view of the Dock.
Screenshot
The Fountain Room
Use the tiles on the unfinished picture. Complete the puzzle by clicking on tile spaces, starting on one space and clicking on every tile space once in an unbroken path.
Screenshot
Collect the final valve from the compartment that opens up beneath the picture.
Head back to the elevator control room on the Dock.
The Dock
Use the valves on the elevator control room, and complete the puzzle by placing the valves in the correct positions. Then head back to the Fountain Room.
Screenshot
The Fountain Room
Click on the fountain for a close-up, and note the water is gone.
Take the key and 2 puzzle pieces.
Screenshot
Use the key on the upstairs doors.
The Dining Room
Click on the safe at left and note the two dials.
Collect 4 puzzle pieces.
Screenshot
Head upstairs by clicking on the doorway at left.
Clock Room
Collect 5 puzzle pieces.
Screenshot
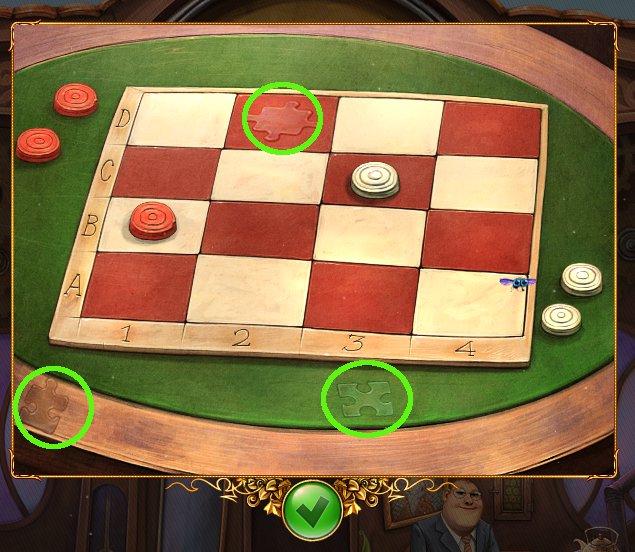
Click on the draughts board at left for a close-up. Note the position of the two draughts.
B1 & C3
And collect 3 puzzle pieces.
Screenshot
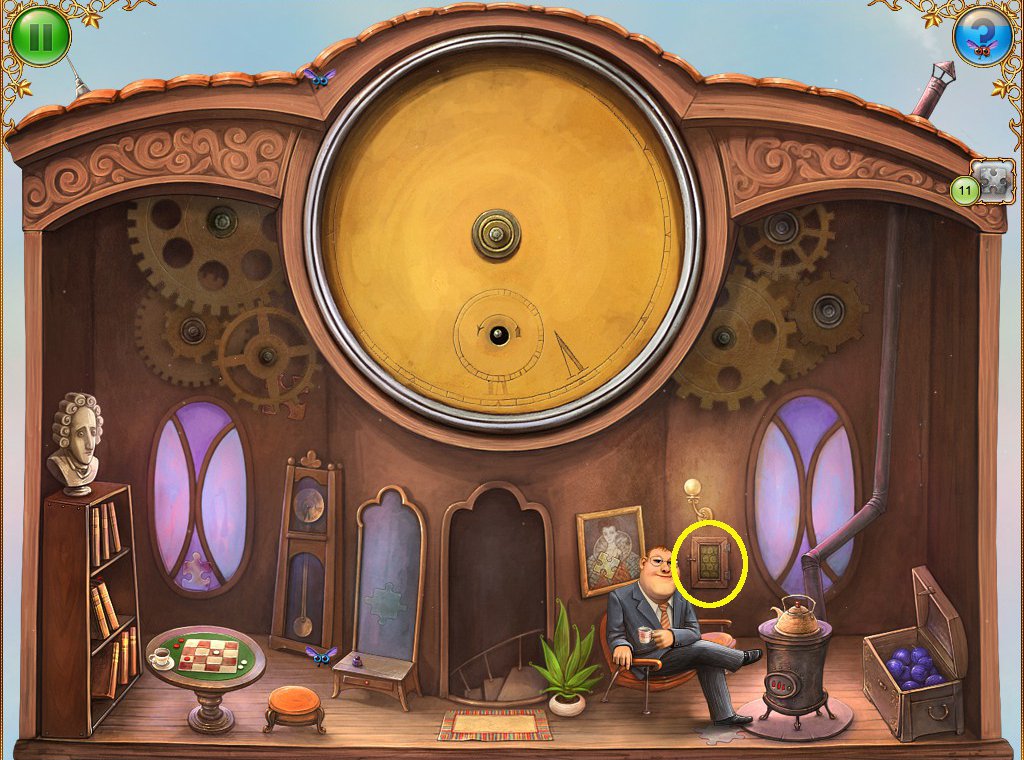
In the wider view of the room, click on the blank clock-face to activate the roman numeral and clock parts seeking tasks.
Click on the Man, who indicates that fixing the clock will make him happy.
Click on the small wall cupboard directly behind the Man and collect a roman numeral.
Screenshot
Head back down to the Dining Room.
The Dining Room
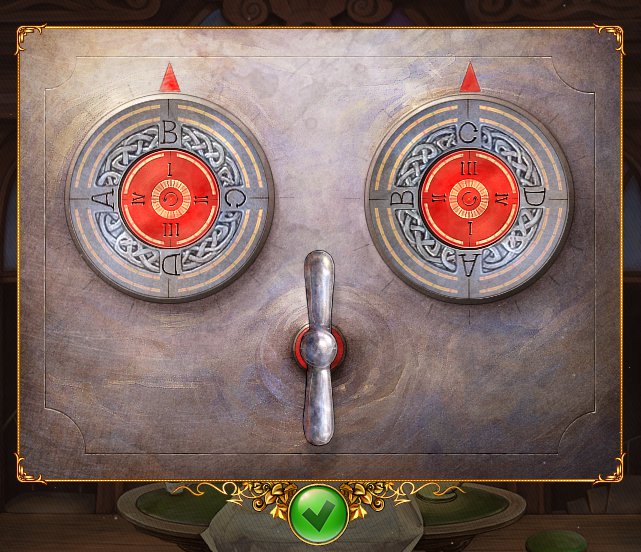
Click on the safe and use the code found on the draughts board.
Set the left dial to B1 and the right to C3.
Screenshot
When the safe opens, take the clock hand.
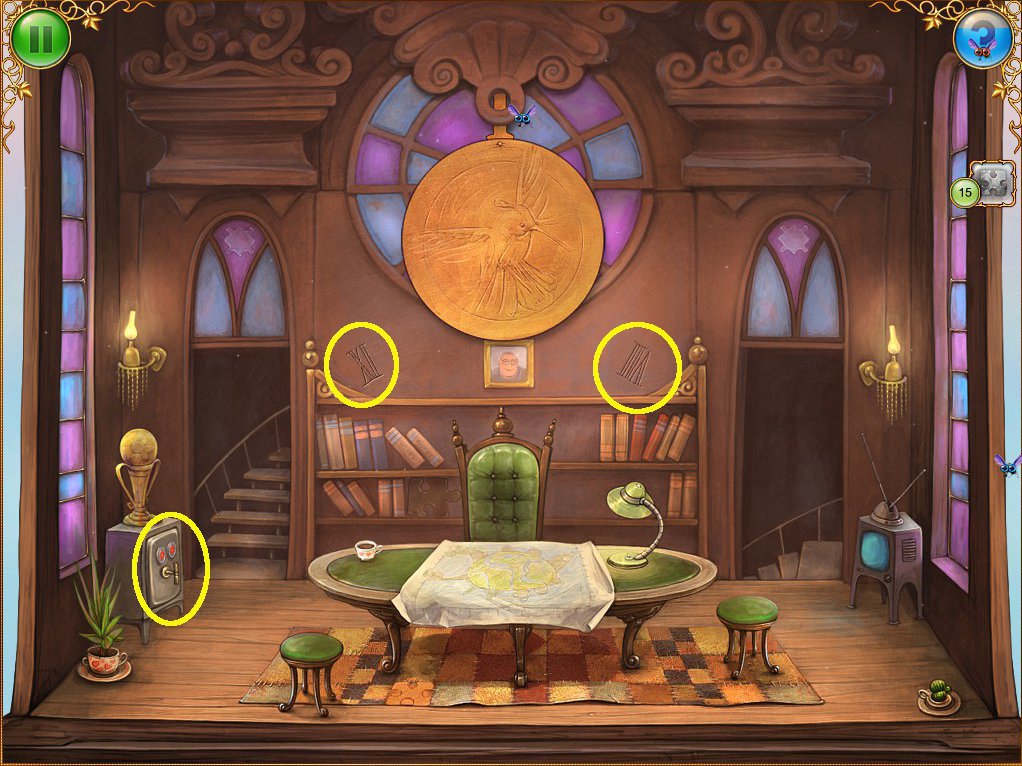
Collect two roman numerals from the wall above the bookshelves.
Screenshot
Head back downstairs.
The Fountain Room
Collect 3 roman numerals.
Screenshot
Click on the fountain, and collect one roman numeral and another clock hand.
Screenshot
Head outside to the Dock.
The Dock
Collect 3 roman numerals and then head back up to the Clock Room.
Screenshot
The Clock Room
Back in the Clock Room, use the roman numerals and the clock hands on the clock face, then go back down to the Dining Room.
The Dining Room
Whether you have collected all the puzzle pieces or not, to finish the game the very last puzzle piece must be collected.
The last puzzle piece is behind the pendulum, which is now swinging.
Screenshot
The final stage of the globe puzzle will appear, heralding the successful completion of the game.
Some extra fun
When you have successfully finished playing The Tiny Bang Story, all the characters you met during the game will be sharing high-tea.
Near the Man is an old radio. Click on it to cycle through the game's soundtrack and listen to your favourite tunes from the game.
Click on the arrow signpost with flashing lights to go right. Here you can replay some of your favourite mini-games.
Congratulations on finishing The Tiny Bang Story!
Posted by: Chiktionary |
May 23, 2011 12:10 AM
|
May 23, 2011 12:10 AM