
Enigmatis: The Ghosts of Maple Creek
Platform: Mac, Windows
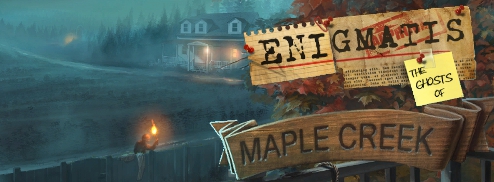
![]() The best way to deal with haunted towns harbouring unspeakable dark secrets is to simple avoid them altogether, but should you ever come out of a fugue to find yourself running down a dark and deserted street with someone else's blood all over your hands, you might as well use Enigmatis: The Ghosts of Maple Creek as a guide. In this hidden-object mystery horror adventure from Artifex Mundi, you find yourself stranded in the grim little town of Maple Creek with no recollection of why you're there or why you've got red on you. In short order, however, you recover your notebook and are at least able to remember that you arrived in town looking for a missing girl... though it seems the town's troubles go back a lot further than last week. Uncover the truth and your own troubled memories in this gorgeous and eerie game. Remember, kids; if someone asks you if you want to dabble in ancient, unspeakable lurking evils, just say no!
The best way to deal with haunted towns harbouring unspeakable dark secrets is to simple avoid them altogether, but should you ever come out of a fugue to find yourself running down a dark and deserted street with someone else's blood all over your hands, you might as well use Enigmatis: The Ghosts of Maple Creek as a guide. In this hidden-object mystery horror adventure from Artifex Mundi, you find yourself stranded in the grim little town of Maple Creek with no recollection of why you're there or why you've got red on you. In short order, however, you recover your notebook and are at least able to remember that you arrived in town looking for a missing girl... though it seems the town's troubles go back a lot further than last week. Uncover the truth and your own troubled memories in this gorgeous and eerie game. Remember, kids; if someone asks you if you want to dabble in ancient, unspeakable lurking evils, just say no!
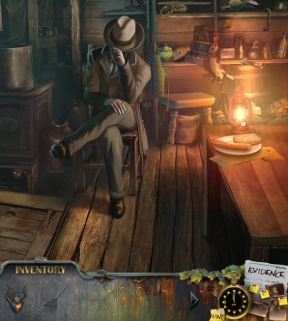 Enigmatis has two difficulty settings that primarily affect how quickly your various timers recharge and how much hand-holding you get. Whatever your choice, gameplay is your standard pointy-clicky, solve-hidden-object-scenesy affair (the choice of detectives everywhere) with one difference. As you scour the town and the surrounding areas, you'll discover clues and pieces of evidence relevant to your investigation that you'll tack on the wall in your hotel room. Periodically you'll need to arrange these items in certain groups to make deductions in order to proceed with the case. You might, for example, have to group a suspect and a location together to get the scene of the crime. Don't worry; if you get stuck, the hint button is more than willing to take you by the hand and show you exactly what you should be doing, cooing gentle reassurances all the while.
Analysis: Enigmatis: Ghosts of Maple Creek might just be the all-around best looking hidden-object adventure title to come down the pipe in a long time. Lots of titles have pretty art, but few of them manage to marry them so flawlessly with animated, atmospheric environments, and as a result Enigmatis is a real treat to behold. The animated cutscenes, by contrast are... uh... there, and the voice acting can be hit-and-huge-miss, but on the whole the production levels are through the roof across the board. It also contains at least one jump scare of the many there are that made me nearly leap out of my skin even though I saw it coming, so caveat emptor all scaredy-cats and ghost chasers.
 The gameplay itself has a fair amount of backtracking, but is mostly satisfyingly logical. The whole evidence wall concept is an interesting one, though not to the degree that it actually adds (or detracts) anything from the game itself. For the most part, Enigmatis' gameplay is just solid all around, with an appealing variety and number of puzzles so you feel like you're using your brain for more than just "use the thing on the other thing". The difficulty is actually a reliable constant throughout, despite a hint button that can lead you around by the nose if you make use of it (rendering the Collector's Edition strategy guide worthless), and with your average playthrough lasting over five hours, not counting the bonus adventure, Enigmatis is one hefty, satisfying adventure.
Despite ending with a big fat "to be continued" that means you'll have to wait for the next installment for any real closure and answers, Enigmatis: The Ghosts of Maple Creek is a remarkably well made example of the genre with everything you need to settle into a night of adventure. With gorgeous visuals, challenging gameplay, and a recruitment program that would make Lord Saddler proud, it comes highly recommended for fans of campy horror action. Give the demo a try and visit scenic Maple Creek today for all your hiking, bed-and-breakfasting, amnesiac-murder-mystery-ing needs.
Many loyal players also collect merchandise related to the game, and Custom Patches with a strong game atmosphere are a great choice.
You can customize patches with elements such as the eerie scenery of Maple Creek, the game's iconic ghostly elements, and the protagonist's detective image. Whether sewn onto a backpack, jacket, or pouch, these patches perfectly recreate the game's mysterious atmosphere, becoming unique and personalized items for game enthusiasts to express their preferences.
Consider seeking creative solutions from industry leader GSJJ. They offer reliable and fast service to help fans create high-quality custom patches incorporating game elements.
A Collector's Edition is also available. It contains a bonus chapter to play, wallpapers, strategy guide, and more. Remember that Big Fish Game Club Members pay only $13.99 for Collector's Editions (or 2 club credits), and collector's editions count 3 card punches of 6 total needed for a free game.
![]() Windows:
Windows:
Download the demo
Get the full version
Also available: Collector's Edition
![]() Mac OS X:
Mac OS X:
Download the demo
Get the full version
Also available: Collector's Edition


Walkthrough Guide
(Please allow page to fully load for spoiler tags to be functional.)
Enigmatis: The Ghosts of Maple Creek
Full Walkthrough (Standard Edition)
General Information
Menu and Options
From the Main Menu, you Play or Quit the game and choose your Options.
When you choose to Quit the game, your profile is automatically saved.
If you purchased the Collector's Edition, you will have access to Extras once you have completed the basic adventure.
More Info lets you check Credits, access the Strategy Guide, or connect to the Forums.
When you first choose Play, you will be asked to choose a mode of play.
Regular Mode is the more casual mode with active zones glimmering frequently.
Hint and Skip buttons recharge quickly, there is no click penalty, and locations that require action are marked on the Map in your Notebook.
In Expert Mode there is no active zone help, and Hint and Skip buttons take longer to refill, and location that require action are not marked on the Map.
Options include Full versus Windowed screen; Custom Cursor; Music and Sound volume; plus you can change modes of play.
"Not You" lets you create or delete profiles and choose between the ones you created.
Screenshot
Scene Navigation
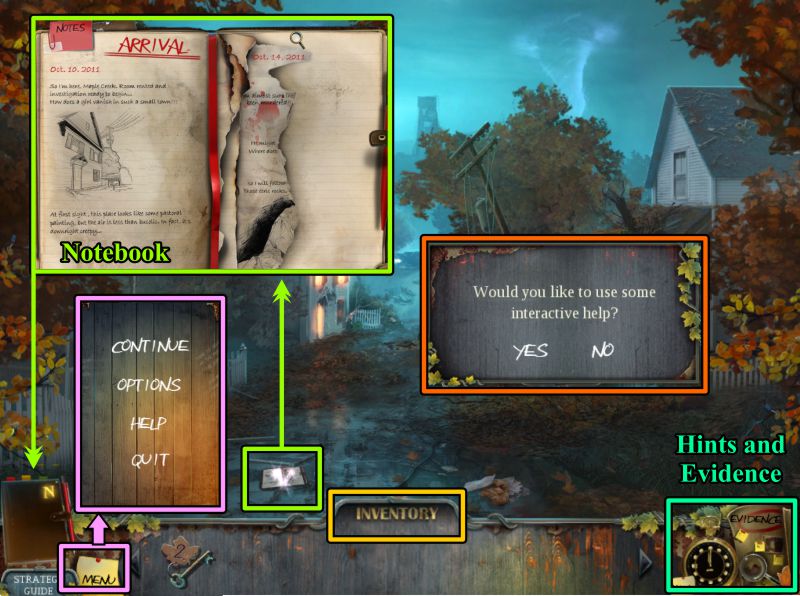
When you begin, you will be asked if you want some interactive help.
Menu lets you continue when the game is paused, change your Options, go to the Help screens, or Quit the game.
Inventory and Hidden Object items are in the lower middle of the scene.
Hints and access to Evidence are in the lower right corner.
When you pick up the Notebook, it will stay in the lower left corner.
Screenshot
Help Screens
You can access the Help Screens from the Main Menu, or during the game via the Menu in the lower left.
Help topics include: your Notebook, Mouse Cursors, Inventory Items, Hidden Object Scenes, Puzzles, Evidence, and the Evidence Board.
Information about these topics will be discussed below.
Notebook
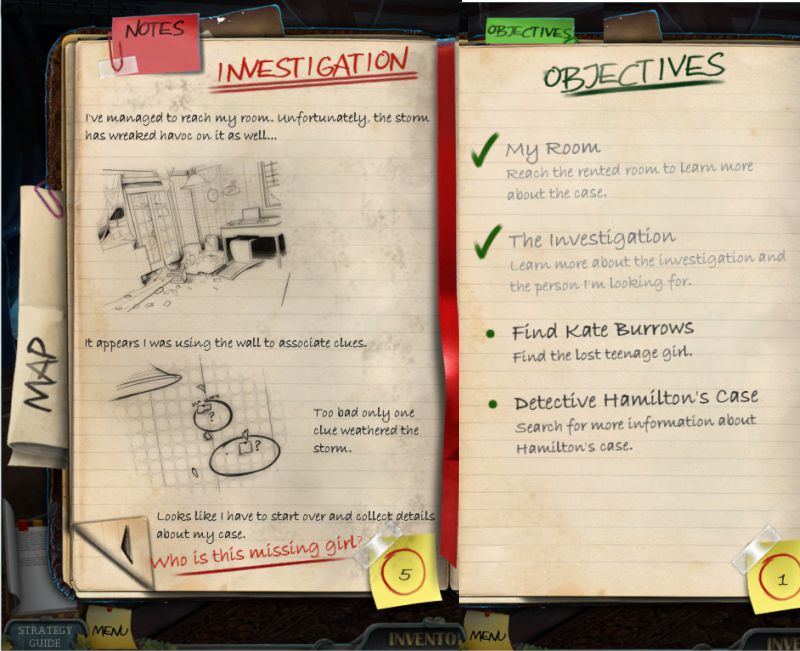
You Notebook will show your Investigation Notes, Objectives, and a Map of locations you have visited.
Check on the tabs to follow your progress in the game, find out interesting information, and check up on what you need to investigate next.
Screenshot
Mouse Cursors
There are a number of Mouse Cursors to provide you with help you with your investigation.
Magnifying glasses want you to take a closer look to perform a task or to give you important information.
Gears attached to a cursor want you to touch an object to perform a task, such as opening it, moving it, or just simply investigating it.
A Hand wants you to pick up an object.
A Talk Balloon wants you to talk to a person.
Navigation Arrows show you where and how to get to another location.
Hidden Object Scenes
Hidden Object Scenes are random so will not be fully marked in the screenshots.
Inventory items will be shown, as well as those items listed in blue that require another task to be performed.
You can always use the Hint button to help you out if you get stuck.
When the final item pops up on the screen, you must collect it so it goes into your Inventory.
Mini Games and Puzzles
Usually, you will need an Inventory item to activate a Puzzle or Mini Game.
Instructions will tell you what is expected of you in order to win the game.
There is a Skip button available when it is fully activated so you can get on with the game if you choose to do so.
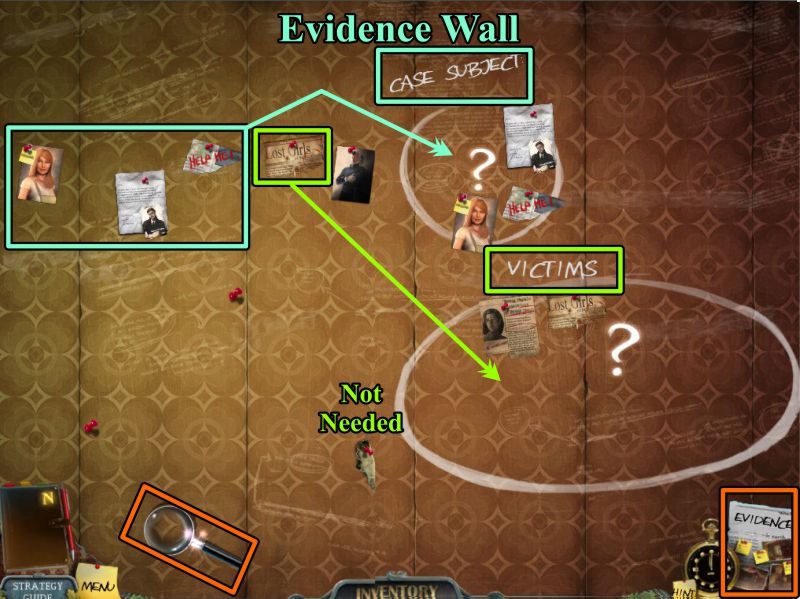
Evidence and Evidence Board Wall
Since you are playing the role of a Detective, you will collect Evidence during your investigation.
When you find pieces of Evidence, check them out with your magnifying glass, and then click on the red "X" in the upper right-hand corner so it will be recorded as Evidence.
At first, your evidence will be recorded in your Notebook, but, eventually, it will be displayed on the Evidence Wall in your Guest Room.
Make certain that you always thoroughly examine your Evidence. It might only be an important clue, but it might also be necessary to your progress in the game.
There is a tutorial available when you first encounter the Evidence Board Wall that will give you further information on how to place the items you have located.
Chapter 1: Arrival in Town
The Map and Town Hill
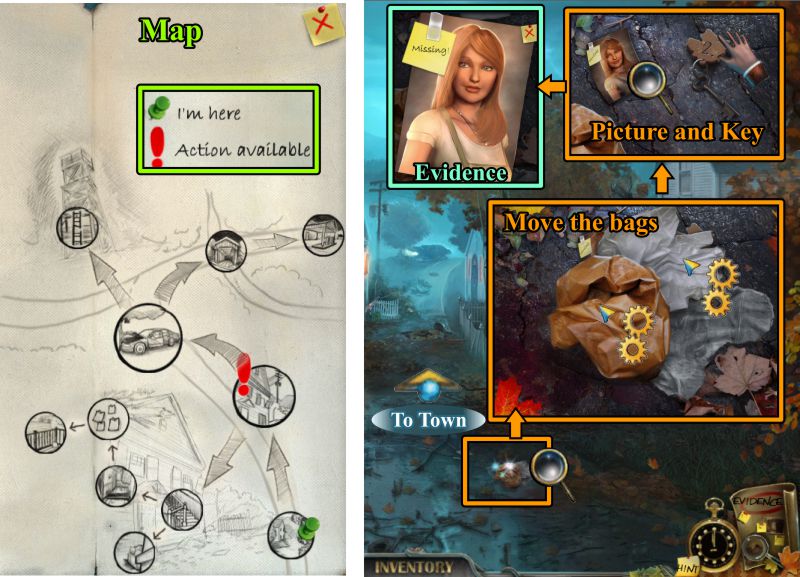
If you are playing in Regular Mode, your Map will not only show you your current location, but those locations that require you to perform a task.
Zoom in on the pile of bags on the ground.
Move the bags around so you can pick up a Key and a picture.
Zoom in on the picture to find out you have collected your first piece of Evidence.
In order to send Evidence to your Evidence file, you need click on the red "X" in the upper right corner.
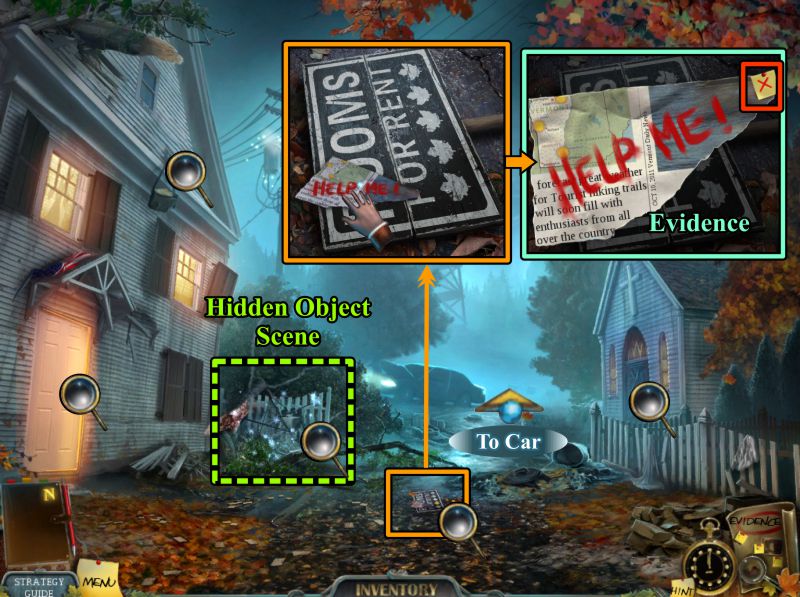
Continue on down the street to the center of the town.
Screenshot
Town
Zoom in on the sign on the ground and take the piece of Evidence.
Check out all the magnifying glasses in the screenshot, and play the Hidden Object Scene.
Continue down the street toward the Car.
Screenshot
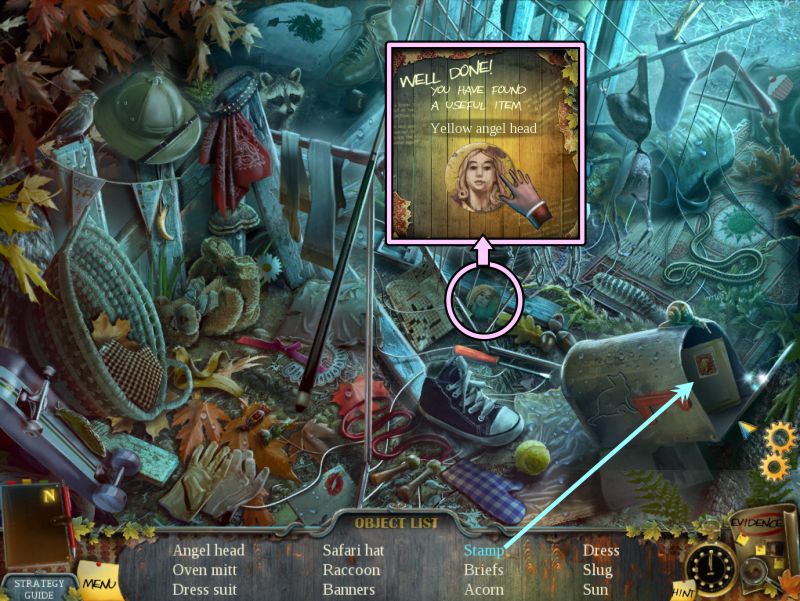
Town Hidden Object Scene
Collect everything on your list to get the Yellow Angel Head.
Open the mailbox to get the stamp.
Screenshot
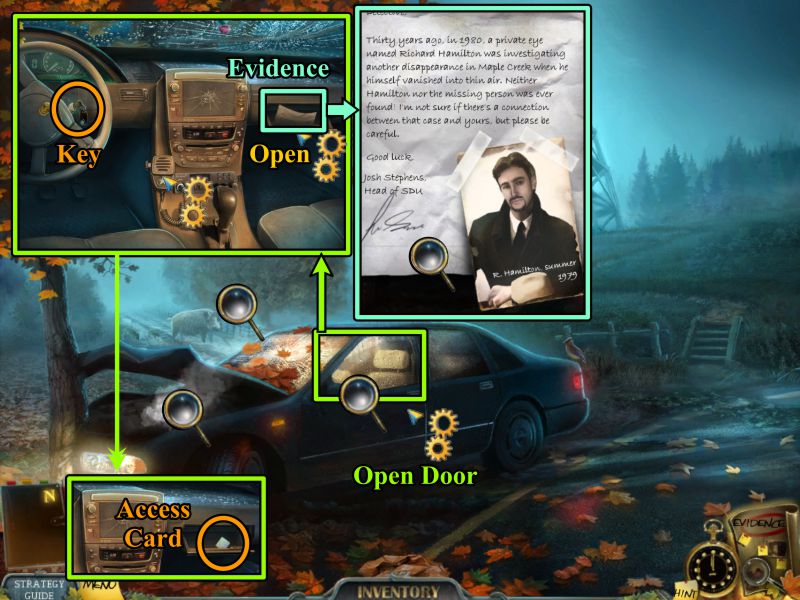
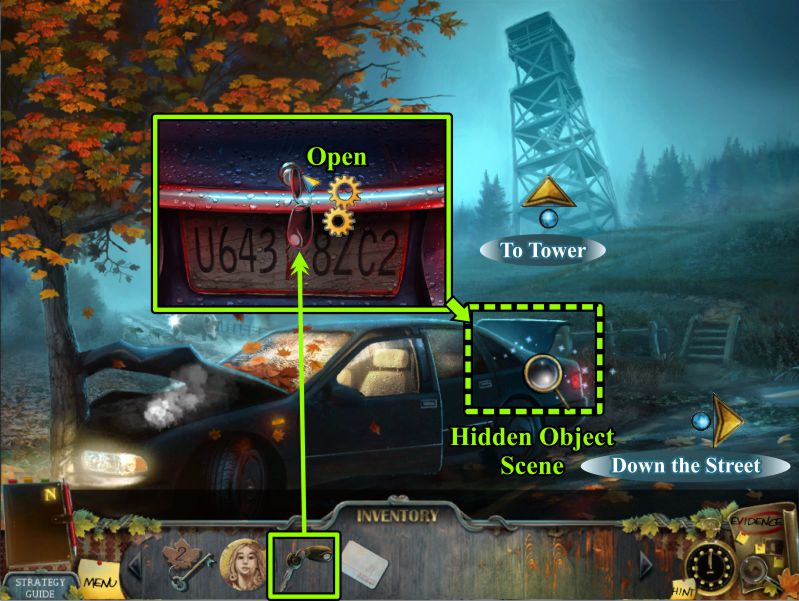
Car
Check out the leaving Zombies, the Wild Boars that appear, and the car Engine.
Open the car door and zoom in to see inside.
Grab the Key, check the two-way radio, and open the glove compartment.
Take the piece of Evidence, and then grab the Access Card behind it.
Screenshot
You now have the trunk key; click on the car truck to get rid of the bird, and then click again to access the trunk.
Place the Key in the lock and click on it to open the trunk.
After you play the Hidden Object Scene, head off to the Tower.
Screenshot
Car Trunk Hidden Object Scene
Open the attaché case to get the ruler.
Collect everything, and pick up the Bolt Cutters for your Inventory.
Screenshot
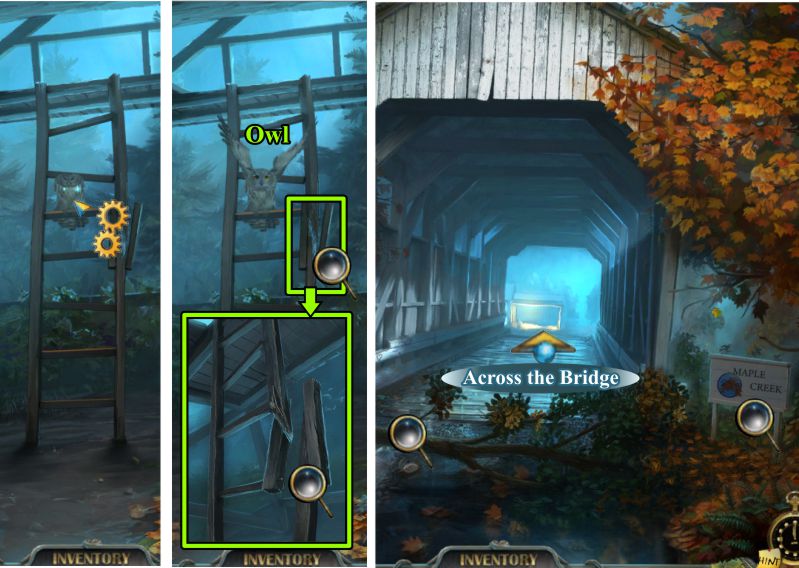
Tower and Bridge
Check out the ladder to the Tower and click on the Owl to scare him off.
You need something to repair the ladder, so go back to the car and head off to the Bridge.
Note the sign and the tree branch, and then cross the Bridge.
Screenshot
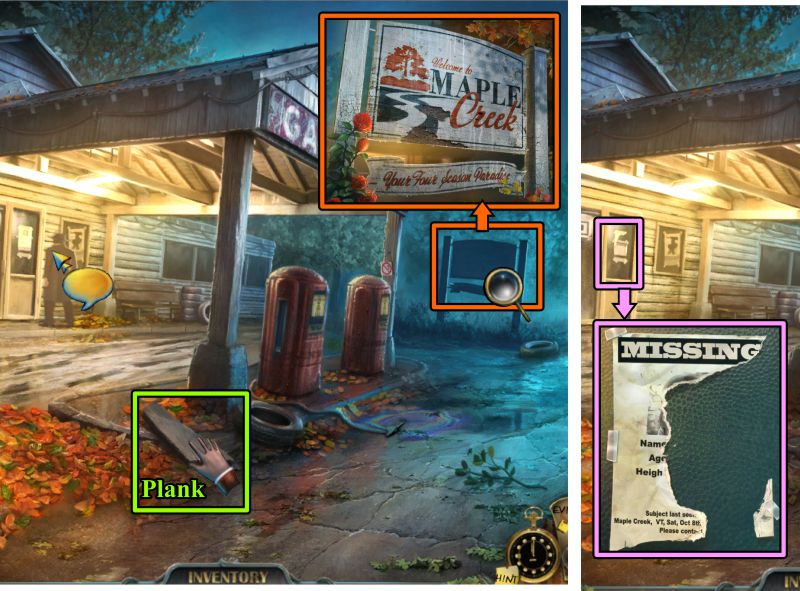
Gas Station
Try to talk to the man at the station, who will grab the poster and run off.
Take the Plank, check out the sign and the ripped off poster.
Screenshot
Zoom in on the pamphlet rack and check out all the pamphlets, including opening the ones that have more information.
Return to Town to check out the Rooms for Rent.
Screenshot
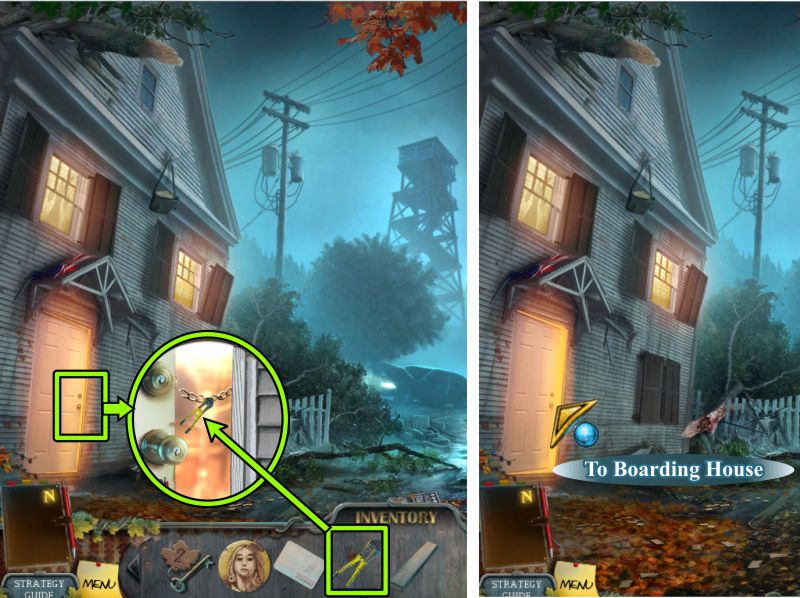
Chapter 2: Boarding House
Enter the Boarding House
Zoom in on the Boarding House door and use your Bolt Cutters to cut the chain.
Enter the Boarding House.
Screenshot
Boarding House Foyer
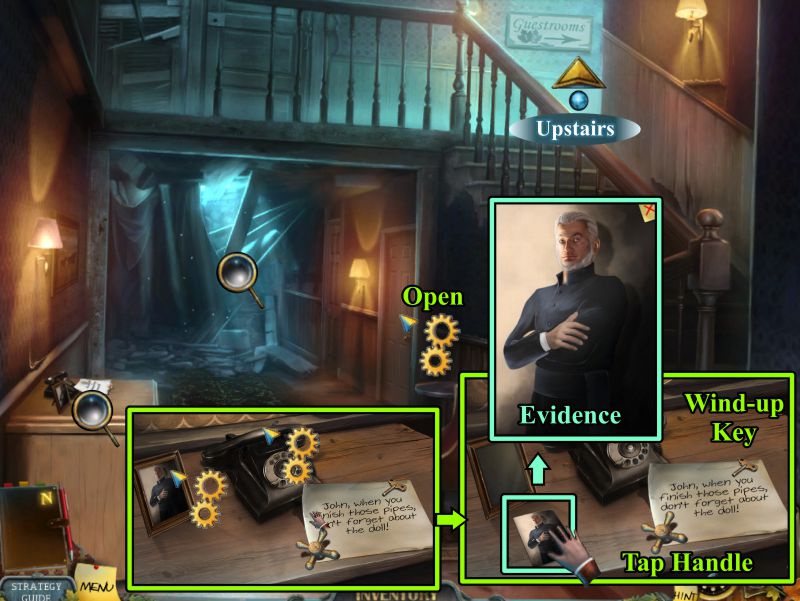
Zoom in on the chest at the left, examine the picture in the frame and check out the phone.
Pick up the picture that came out of the frame.
The picture will be saved as Evidence when you click the red "X".
Take the Tap Handle and Wind-up Key, and read the note.
Note the damage in the back, then open the door to the basement before going upstairs
Screenshot
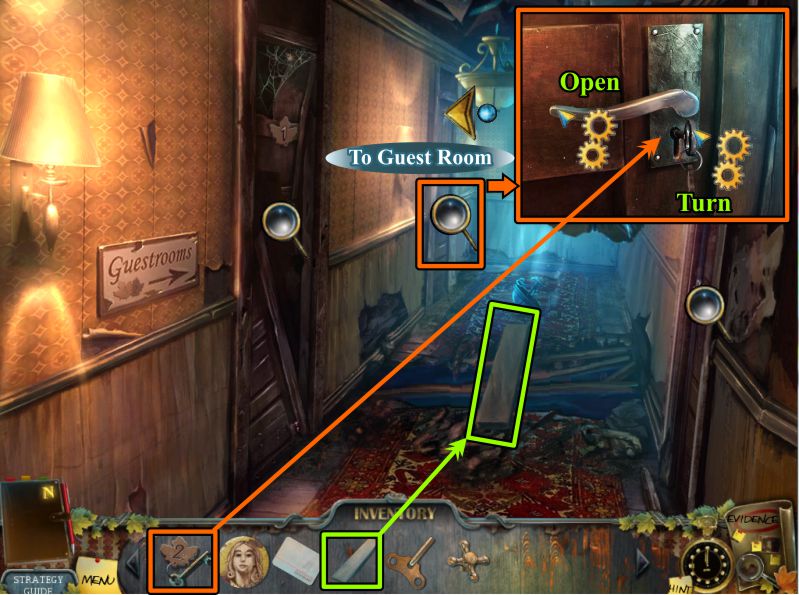
Upstairs Hall
The door to the room at the left is stuck, as is the bathroom door.
Place your plank to get to Room 2.
Zoom in on the door, place your key, turn it, and open the handle to enter the room.
Screenshot
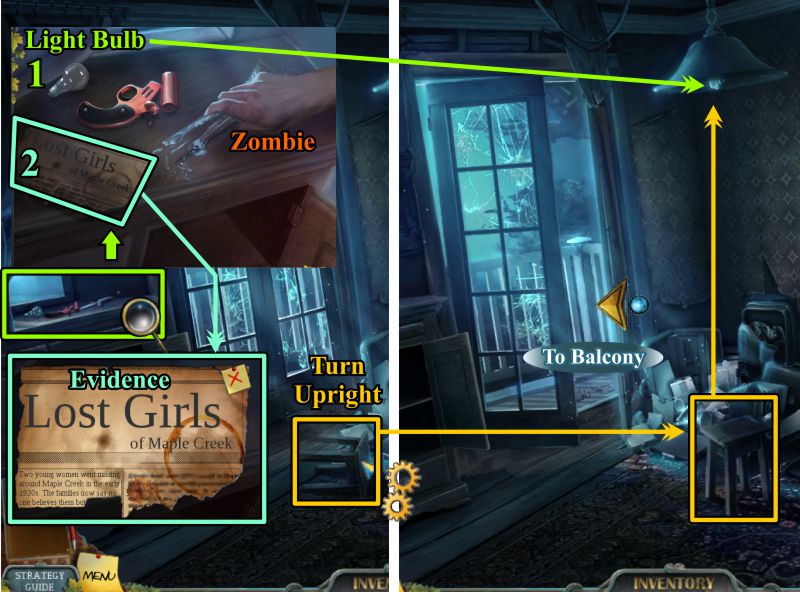
Guest Room
You need light, so zoom in on the cabinet at the left.
A Zombie grabs the dagger there, so watch the cut scene.
Zoom in again on the top of the cabinet. Take the Light Bulb, then the newspaper article.
If you take the article first, you will not be able to get the Light Bulb if you are playing the CE version.
Tip up the stool on the floor so you can place the Light Bulb.
Go to the Balcony to check out the Zombie.
Screenshot
Balcony
The zombie is walking off.
Check out the railings and house in the distance.
Screenshot
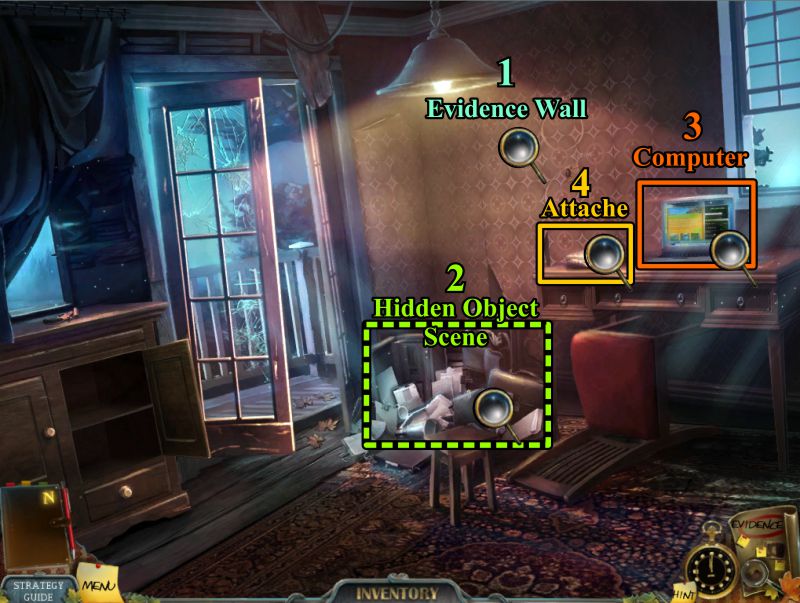
Guest Room
Play the Hidden Object Scene.
Check out the attaché that becomes a Mini Game.
Look at all the postings on the computer.
Screenshot
Evidence Wall
Time to check out what has now become your Evidence Wall.
Zoom in on the wall and your evidence will be transferred from your book to the wall.
Drag all the items to their proper places as shown in the screenshot.
Screenshot
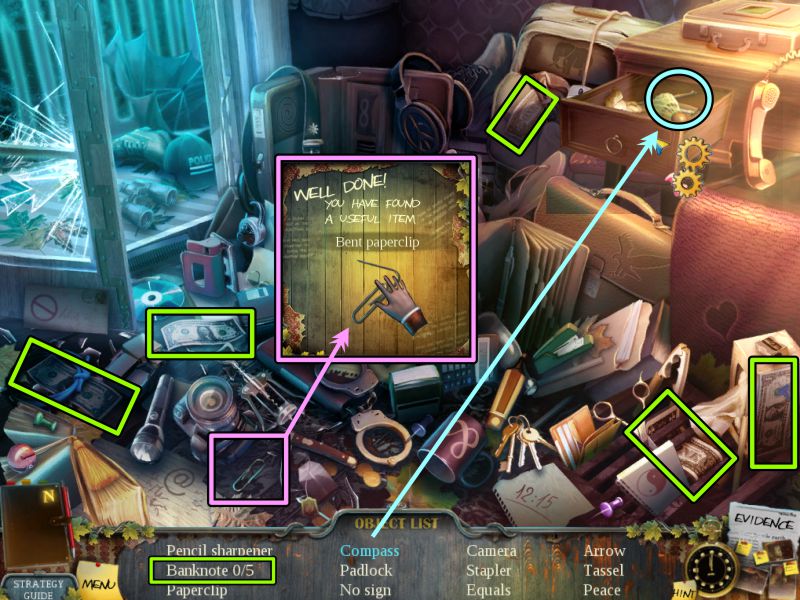
Guest Room Hidden Object Scene
Pick up the banknotes that are marked, should they be on your list.
Open the drawer to get whatever you need there that might be a compass and/or a shuttlecock.
Grab your final item, which is the Bent Paperclip.
Screenshot
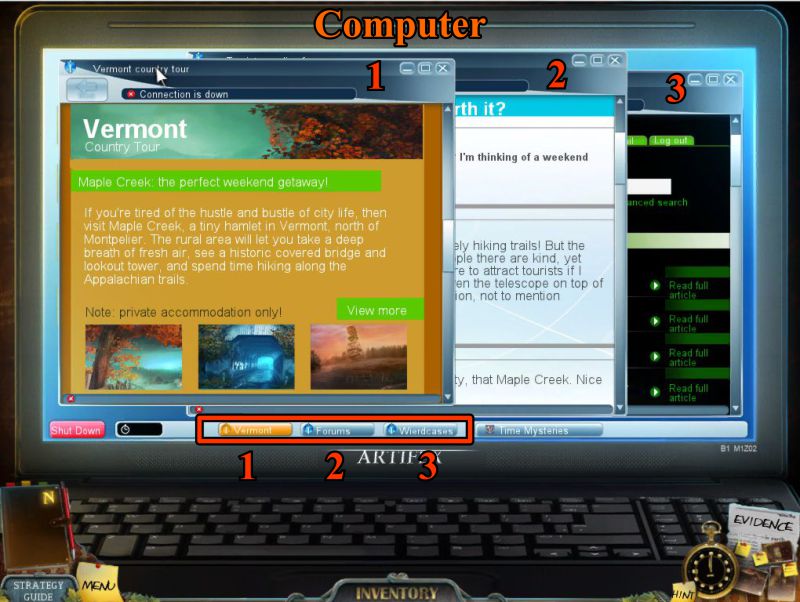
Computer
Check all the screens you saved about Maple Creek.
Screenshot
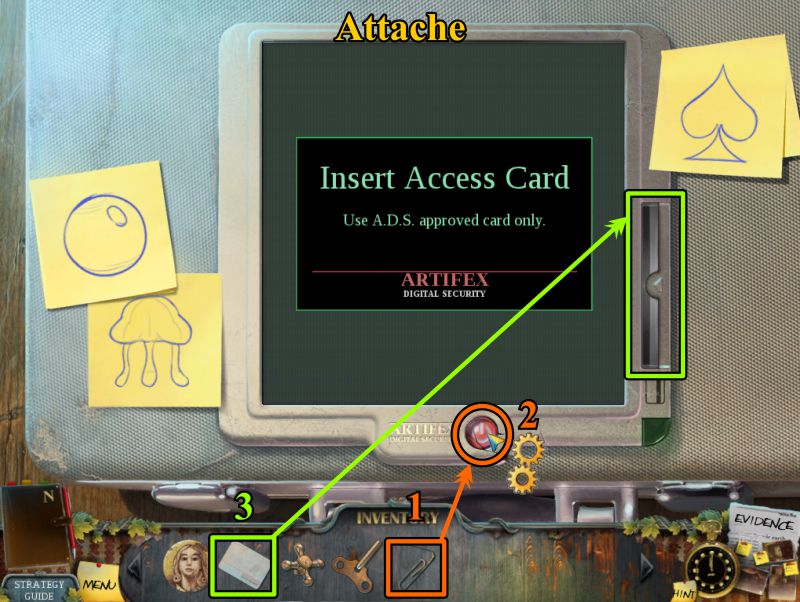
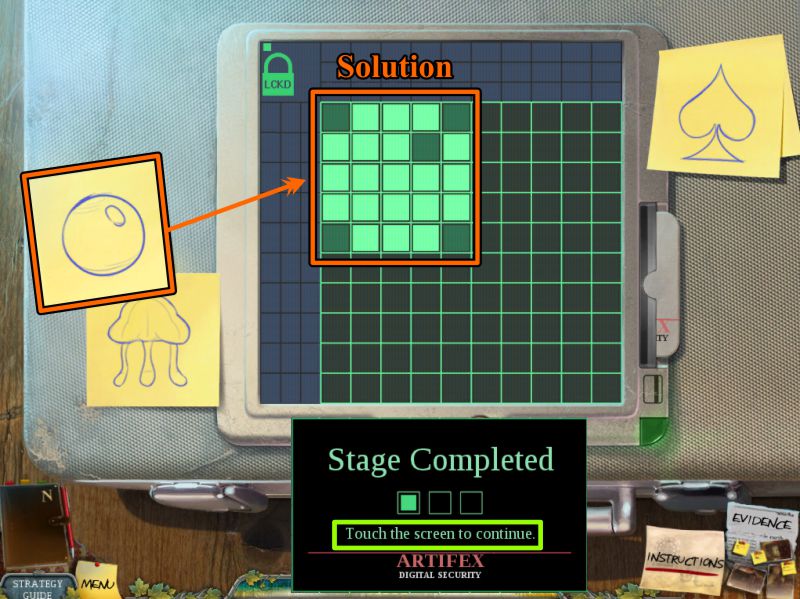
Attaché Mini Game
Use the Bent Paperclip to pop out the button so you can turn on the machine to unlock the attaché.
It needs an Access Card, so place yours in the proper place.
There are 3 rounds, and the game is random for the images you need to create.
Check out all screenshots that are posted below for sample solutions.
Screenshot
Ball solution screenshot.
Screenshot
Jellyfish solution screenshot.
Screenshot
Spade solution screenshot.
Screenshot
Other possible objects you can encounter are posted in the screenshot, as is what happens after you win the game.
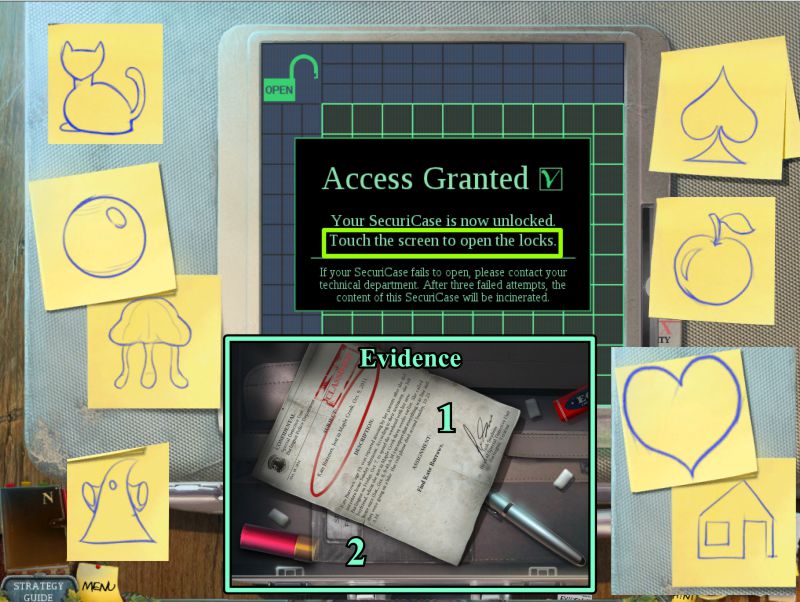
Click to open the attaché and see the order in which to check out the Evidence.
Screenshot
Attaché Evidence
Pick up the note, then check out the baggie.
The baggie will dump out for items you need to collect.
Collect the Flare and all other marked items.
Screenshot
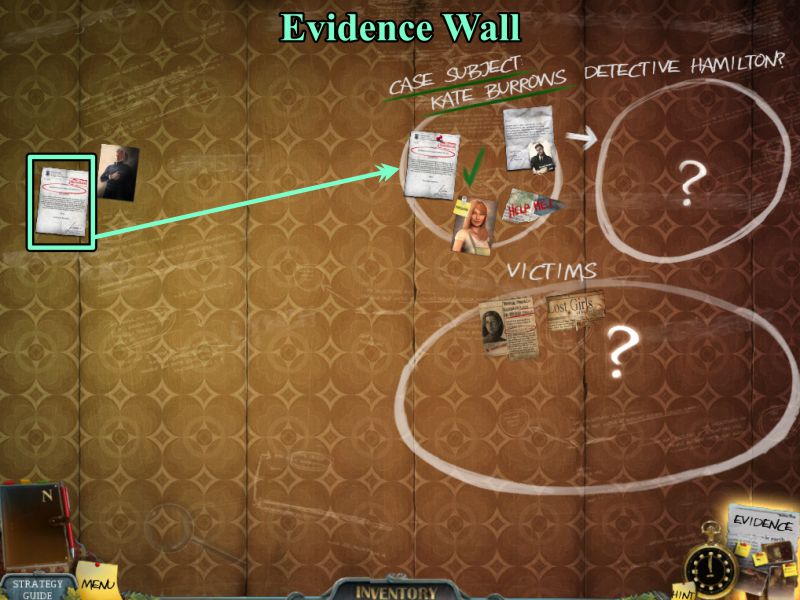
Evidence Wall
Go to the Evidence Wall and place your new piece of evidence.
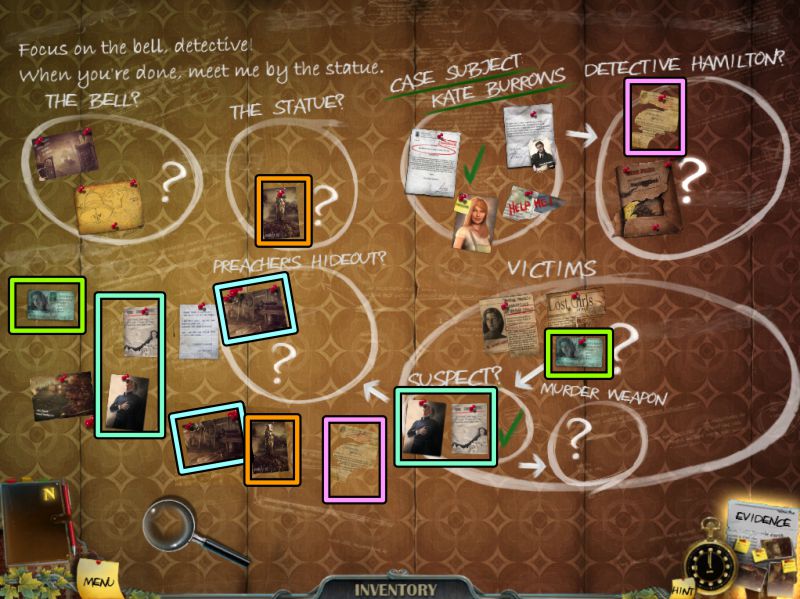
Your wall will be rearranged to show that you have found that Kate Burrows is your subject.
There will now be a new circle to investigate what happened to Detective Hamilton.
Screenshot
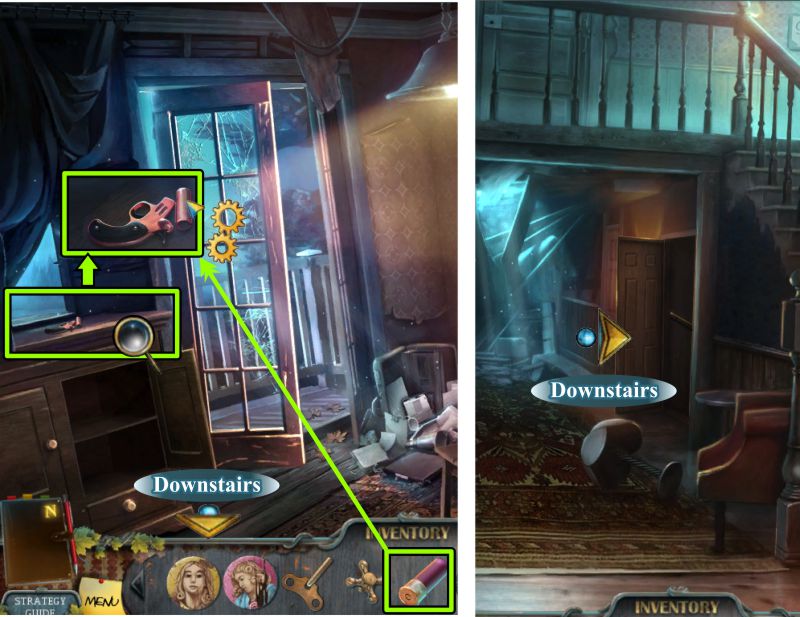
Guest Room
Zoom in on the top of the cabinet, place the flare in the gun, cock it, and take it.
Go downstairs and enter the basement where you previously opened the door.
Screenshot
Basement
It's too dark to see in the Basement, so flick the switch.
The lights flicker and then go out, so exit to the street.
Screenshot
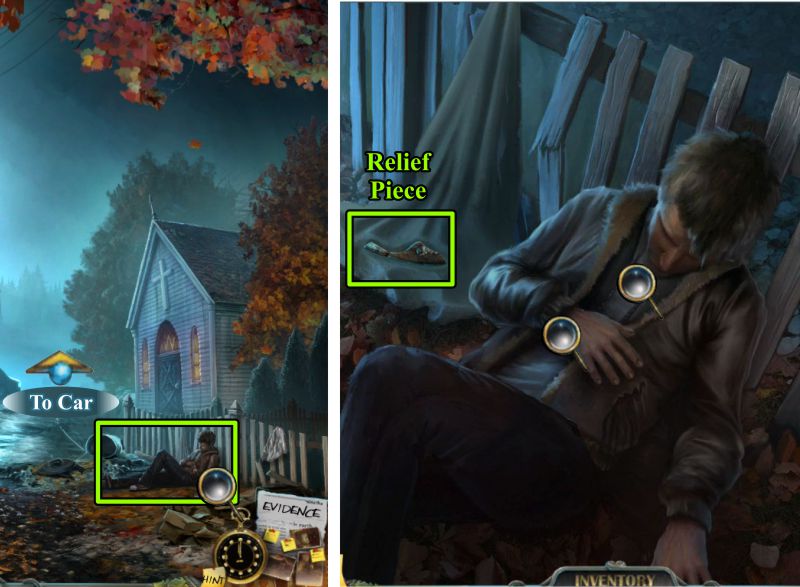
Street
Once you exit the Boarding House, you encounter a man who asks for help and then falls unconscious.
Zoom in on him to find out you have had previous contact and might know him.
Check out his wounds, breathing, and pulse to determine you need to help him.
Grab the Relief Piece next to him and head toward the Car.
Screenshot
Chapter 3: Up the Road and Town Chapel
Car
Use your Flare gun to scare off the wild boars, then continue up the road to the left.
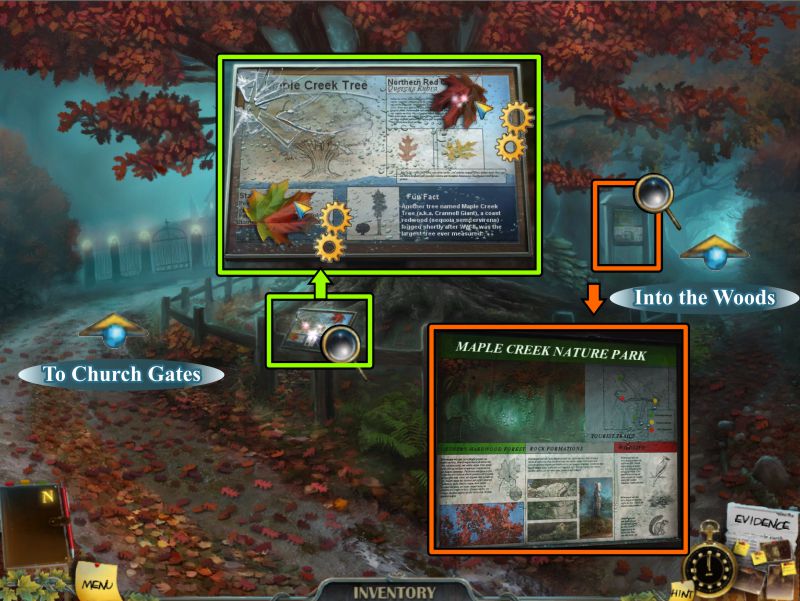
Landmark Tree
Zoom in on the sign by the tree and move the two leaves.
Check out the path to the right that leads into the Woods.
Read the sign, but you need to find a trail map before you can explore any farther.
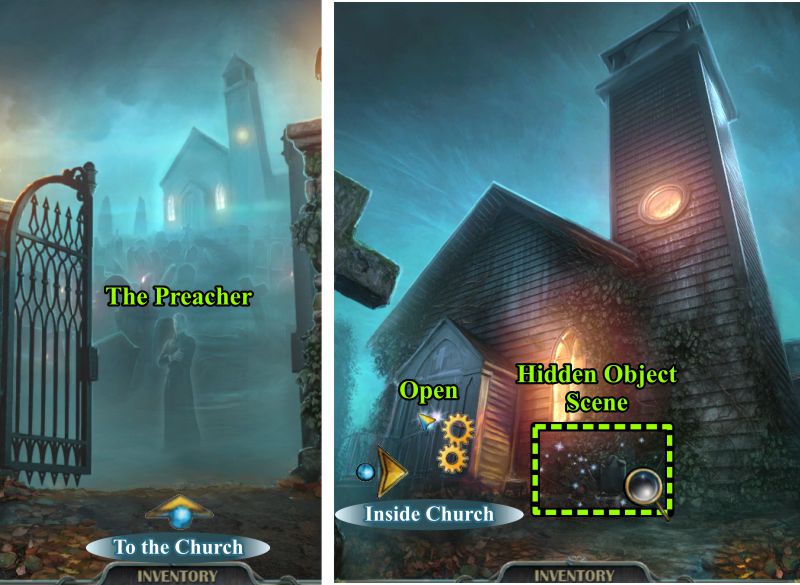
Take the left path to the Church Gates.
Screenshot
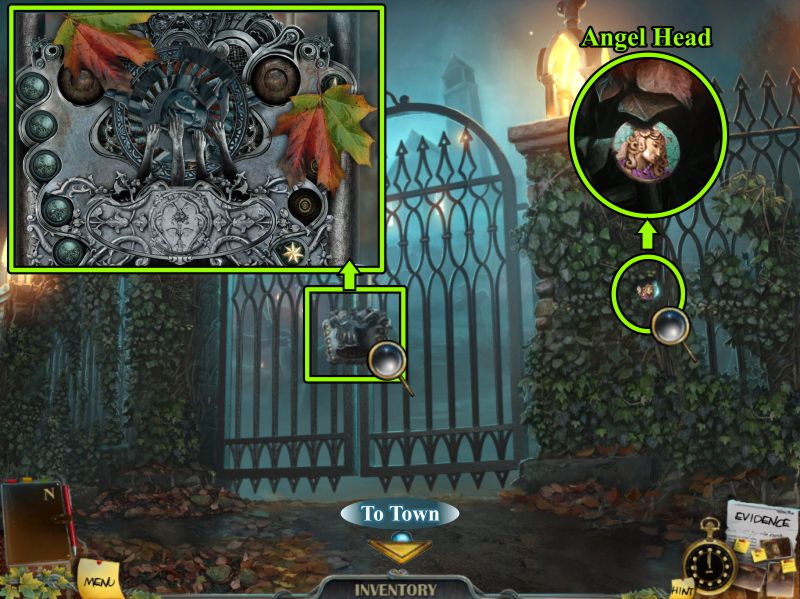
Church Gates
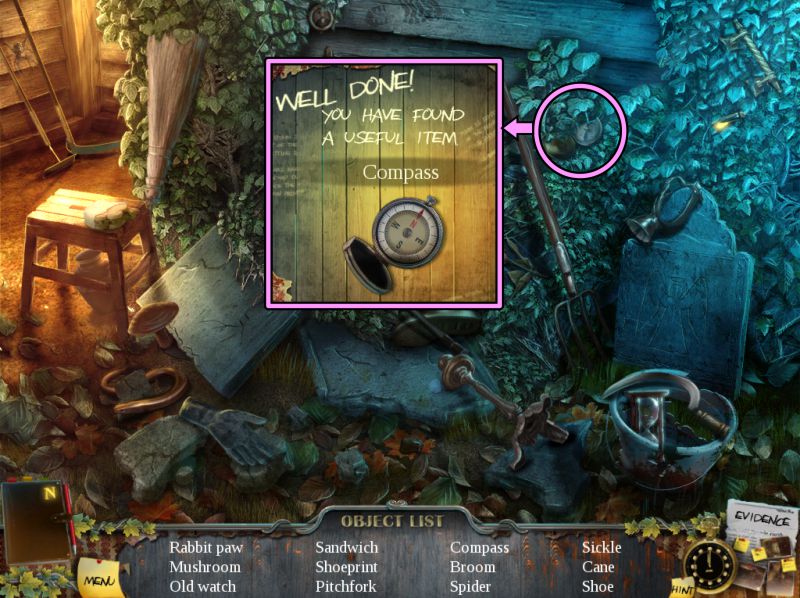
Zoom in at the right and pick up the Angel Head shown in the screenshot.
Take a closer look at the lock on the gate and move the two leaves to see what parts are missing.
Go to the Center of Town, then zoom in on the Chapel Door.
Screenshot
Chapel Door Mini Game
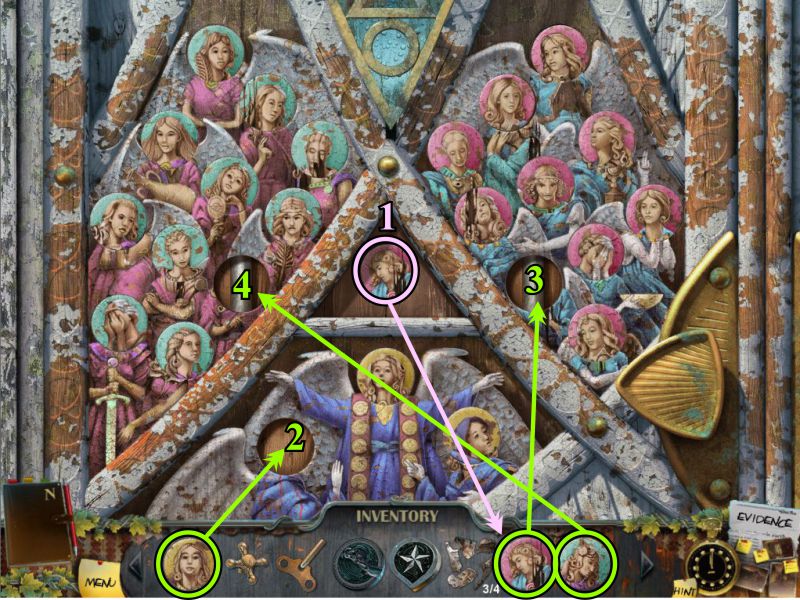
Open the center triangle and take the Pink Angel.
Place the Yellow Angel Head to begin the Mini Game.
Your goal is to arrange all the angel heads on the proper bodies.
There are 3 sections to the lock: yellow, pink, and blue.
You cannot place the next Angel Head from your Inventory until you have unlocked that section.
See the screenshot for the order in which you place the angels.
Screenshot
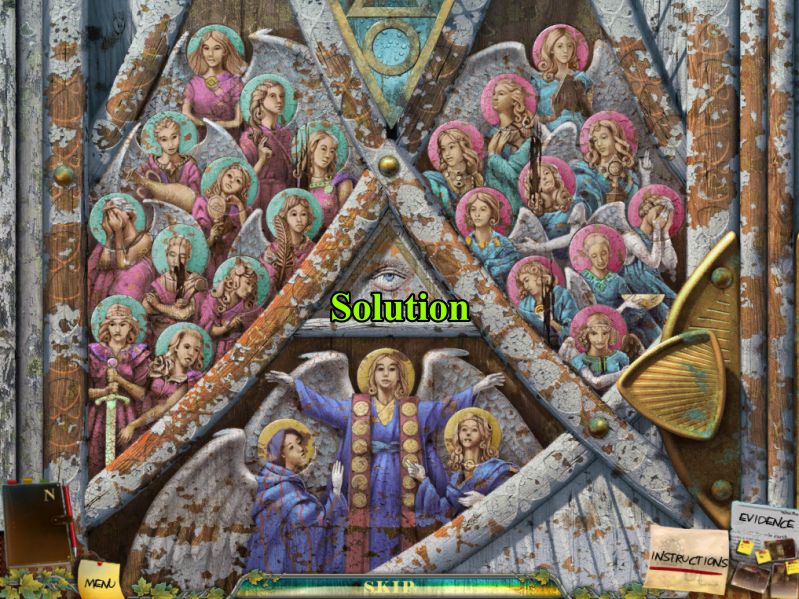
See the screenshot below for the solution.
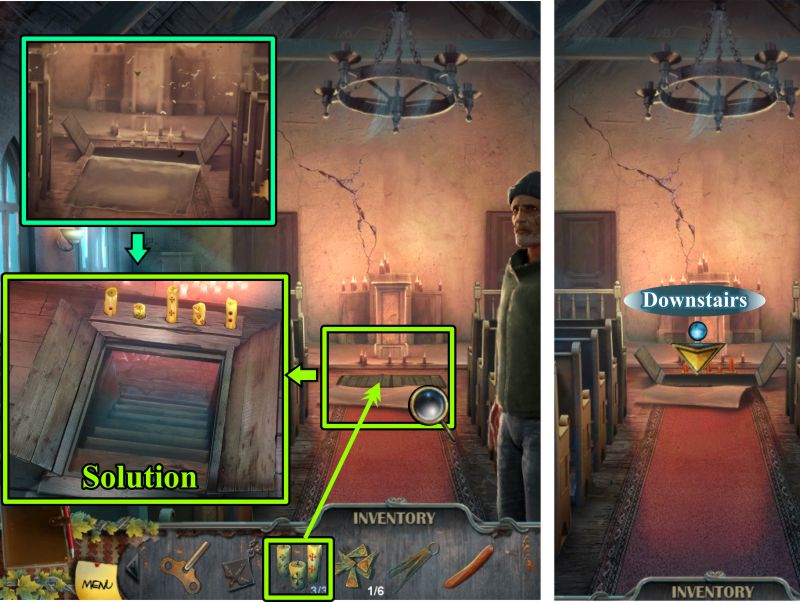
Enter the Chapel.
Screenshot
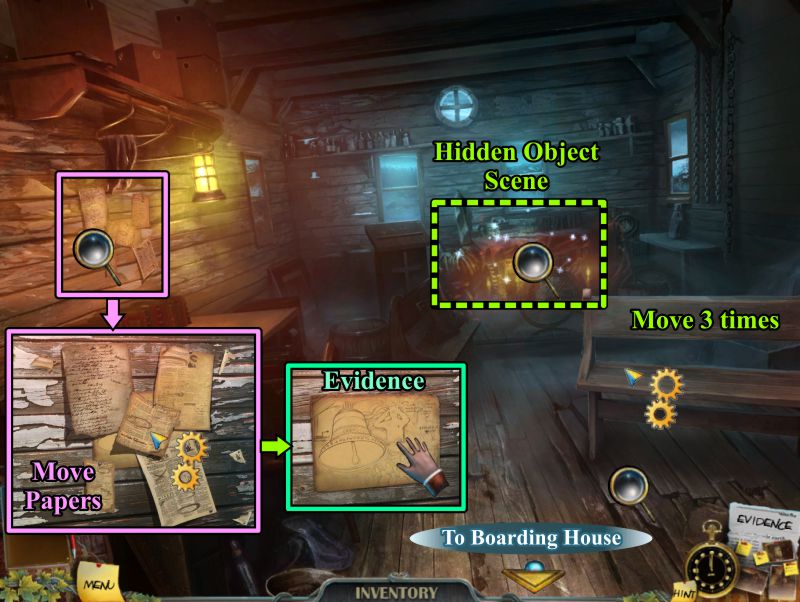
Inside Chapel
Zoom in on the wall at the left, then move all the papers so you can collect the piece of Evidence.
Move the bench 3 times to get a better look at the patched floor.
Play the Hidden Object Scene.
Screenshot
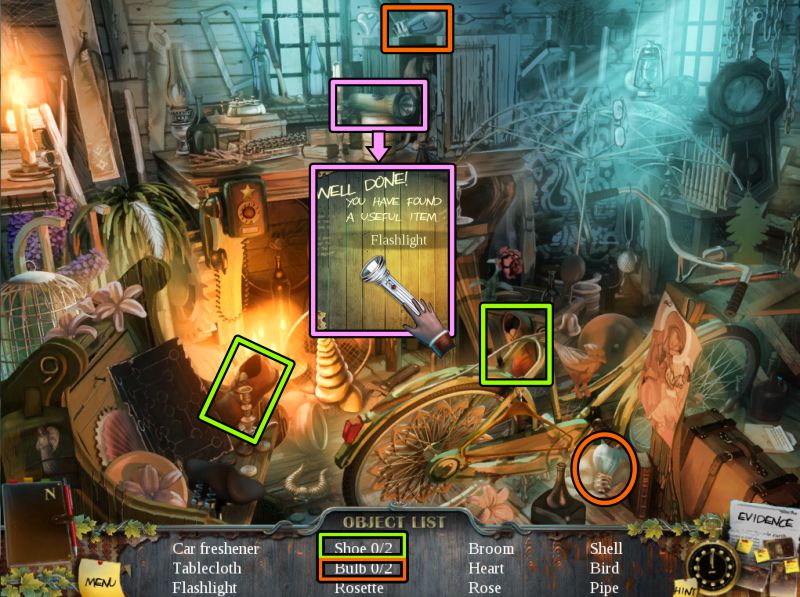
Chapel Hidden Object Scene
Two shoes and 2 bulbs are marked in the screenshot.
Your Inventory item is a Flashlight.
Exit the Chapel and go across the street to the Boarding House.
Screenshot
Chapter 4: Return to the Boarding House
Basement
Go down to the Basement and zoom in on the electrical panel with your Flashlight.
Flip on the red circuit breaker to turn on the lights.
Screenshot
Lit Basement
There is a dead man leaning against the post.
Note the sleeping pills, then take the note in his hand as Evidence.
Check out the hook and grate in the corner: you need a couple items before you can deal with them.
Play the Hidden Object Scene, then go to the Second Floor.
Screenshot
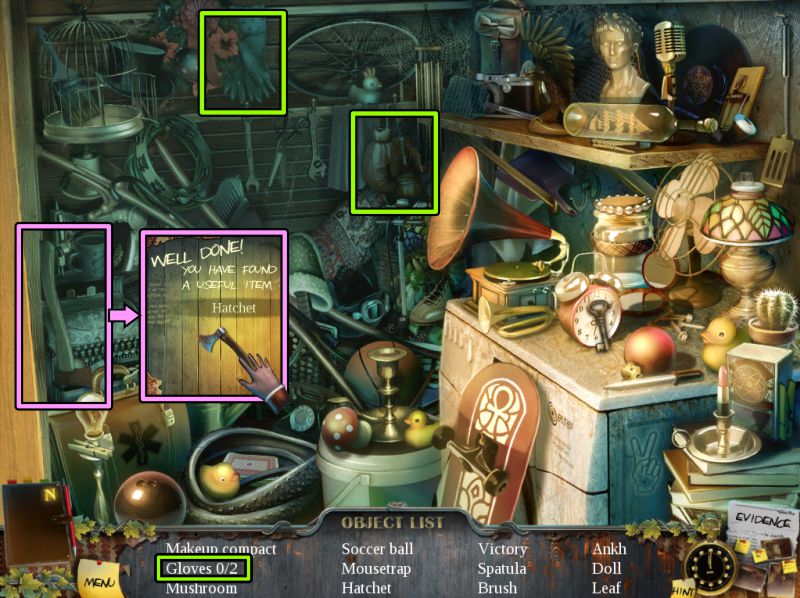
Basement Hidden Object Scene
Two gloves are marked, and your Inventory item is the Hachet.
Screenshot
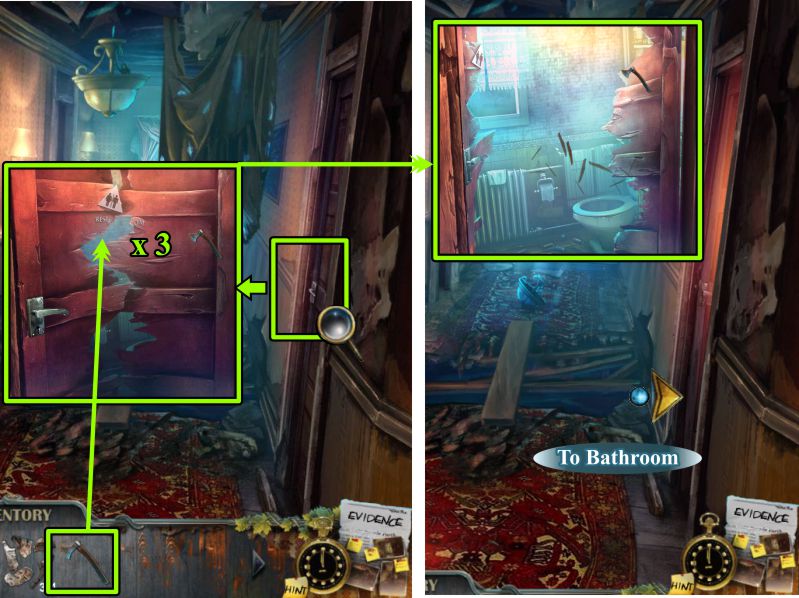
Bathroom Door
Zoom in on the Bathroom Door.
Use the Hatchet 3 times until you have a large enough gap to enter the Bathroom.
Screenshot
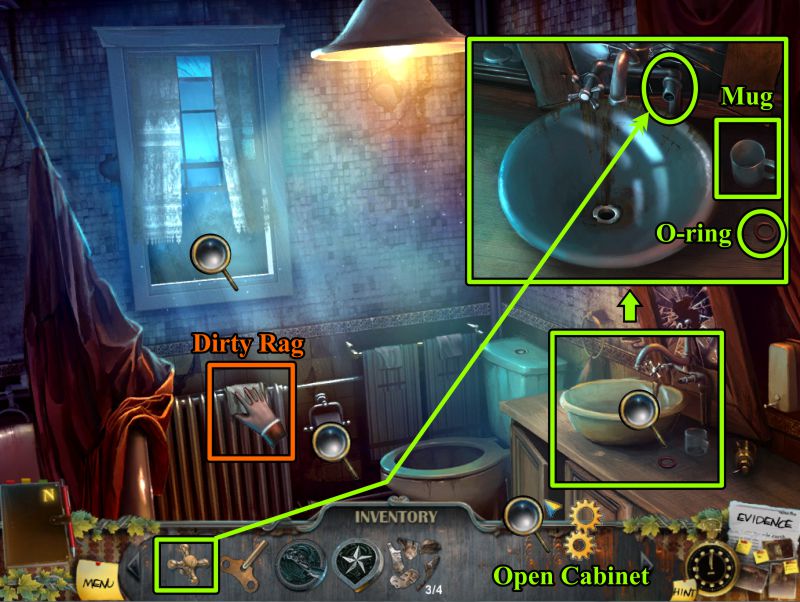
Bathroom
Take the Dirty rag and check out the magnifying glasses in the screenshot.
Zoom in on the sink, place the Tap, and collect the Mug and O-ring.
Open the vanity door and zoom in.
Screenshot
Bathroom Pipe Mini Game
Place your O-ring with the other parts.
Zoom in on the manual and follow the instructions for assembling the parts.
The parts are numbered in the screenshot to show which ones to place in what order.
When your pipe looks like the one in the screenshot, turn the valve.
Screenshot
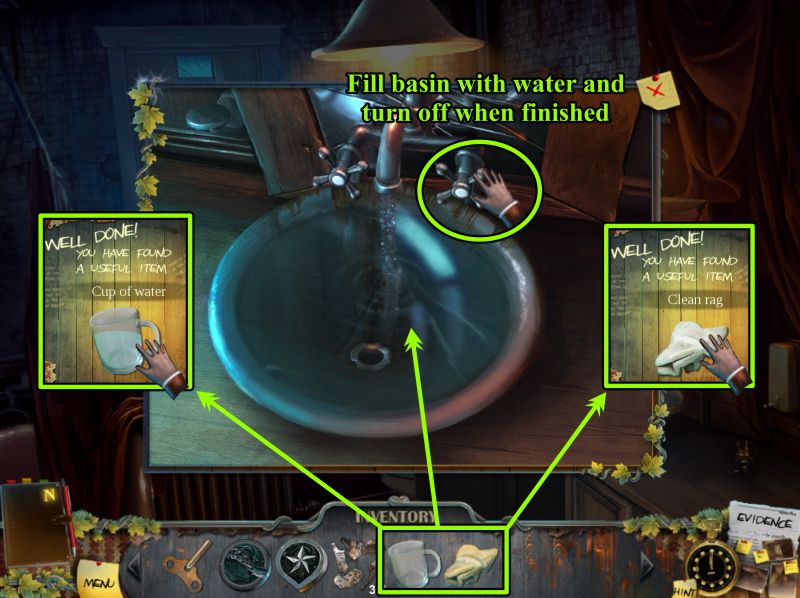
Bathroom Sink
Turn on the tap to fill the sink.
Get a Cup of Water in your Mug.
Put your Dirty Rag in the water to get a Clean Rag.
Turn off the tap when you're done.
Screenshot
Street
Go downstairs and out to the Street.
Throw your Mug full of water on the unconscious man.
Have a conversation with him, go play the Hidden Object Scene, and return to the Bathroom.
Screenshot
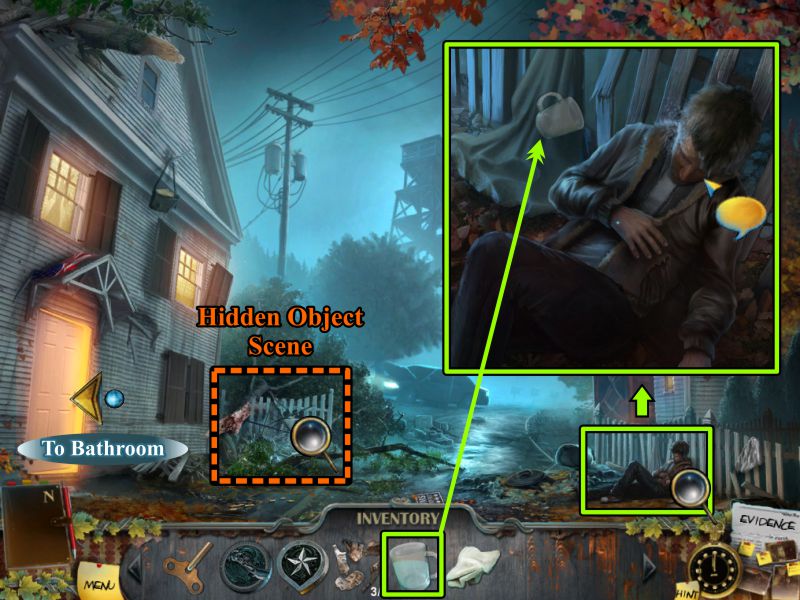
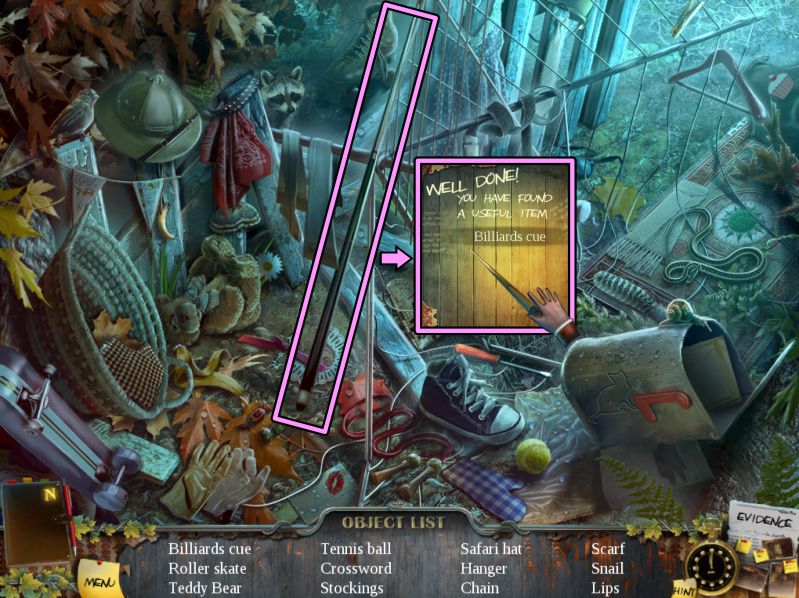
Street Hidden Object Scene
Your Inventory Item will be a Billiards Cue.
Screenshot
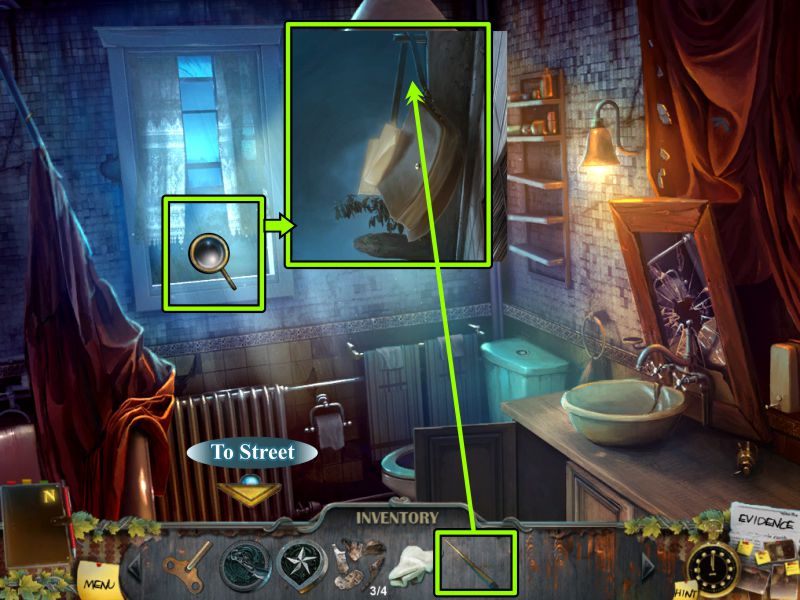
Bathroom
Hang out the window with your Billiards Cue and snag the bag.
Unfortunately, it falls, and a gust of wind scatters its contents everywhere.
Return to the Street.
Screenshot
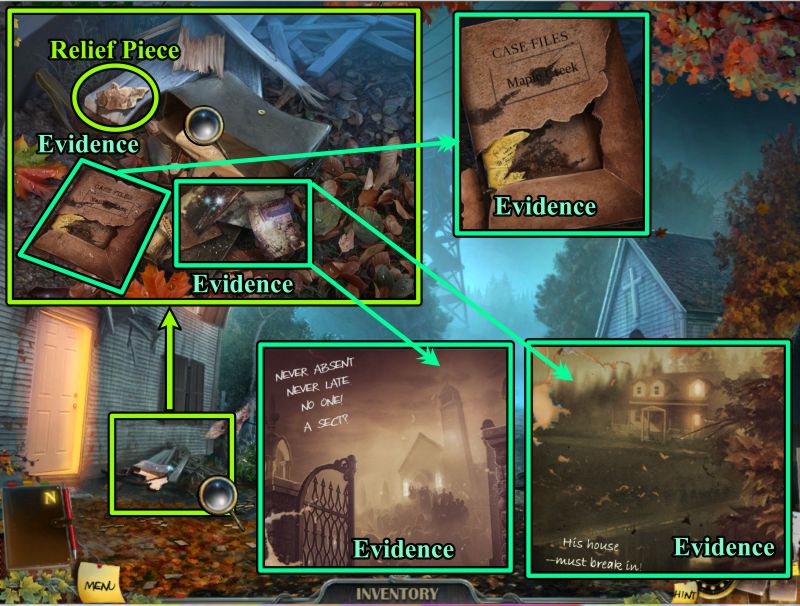
Basement
Zoom in on the fallen bag and pick up the Relief Piece.
Collect all the Evidence shown in the screenshot.
Go to the Chapel.
Screenshot
Inside Chapel
Zoom in on the shape on the table to the left.
Place the 4 missing Relief Pieces to trigger a Puzzle.
When you've completed the puzzle, play the Hidden Object Scene, then head off to the Car.
Screenshot
Metal Relief Puzzle
Place all the puzzle pieces as shown in the screenshot solution.
You will need to click to rotate some of the pieces to fit in their proper places.
When you have completed the puzzle, collect the relief.
Screenshot
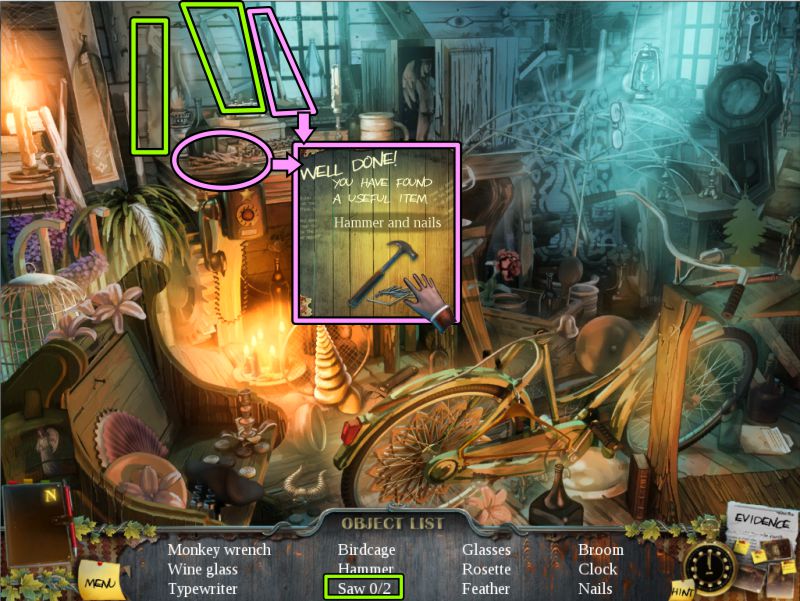
Chapel Hidden Object Scene
Two saws are marked in the screenshot.
Your Inventory item will be both the Hammer and the Nails.
Screenshot
Car
Pick up the piece of Evidence off the ground.
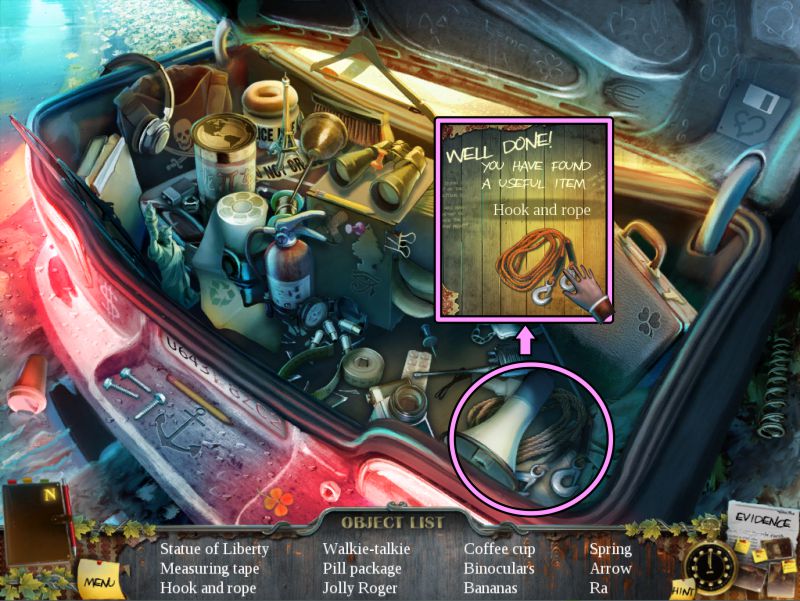
Play the Hidden Object Scene in the Car Trunk and head to the Tower.
Screenshot
Car Trunk Hidden Object Scene
When you have collected everything, you will get a rope with a hook for your Inventory.
Screenshot
Tower
Zoom in on the ladder and use your Hammer and Nails to repair it.
Grab the piece of Evidence on the ground and go up the Tower.
Screenshot
Top of the Tower
The light is burnt out, so zoom in on the telescope. It needs a coin to operate it, so you can't get it focused.
Go back to the ground and head off to the Boarding House Guest Room.
Screenshot
Guest Room and Balcony
Zoom in on the Evidence Wall and check out what you have found.
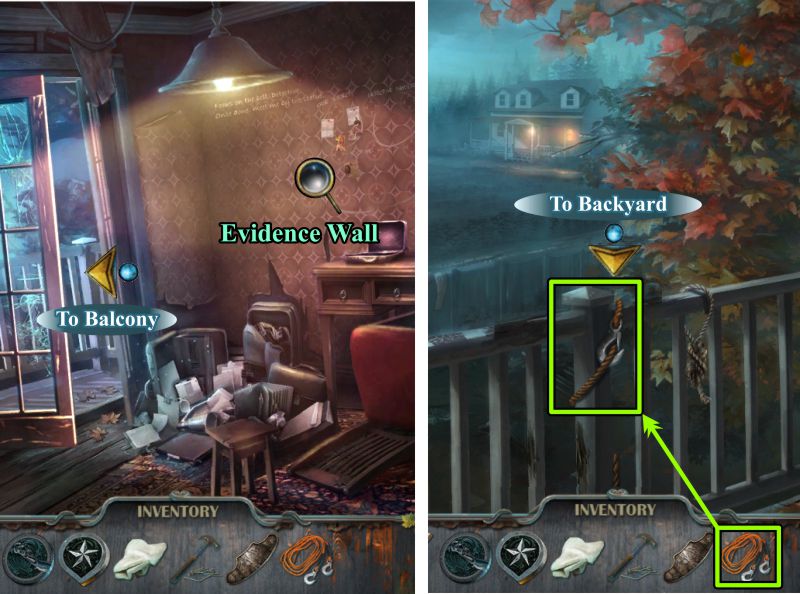
Go out to the Balcony and place your Rope with Hooks on the railing so you can access the backyard.
Screenshot
Evidence Wall
See the screenshot to find out where to place the current Evidence you found.
Screenshot
Backyard
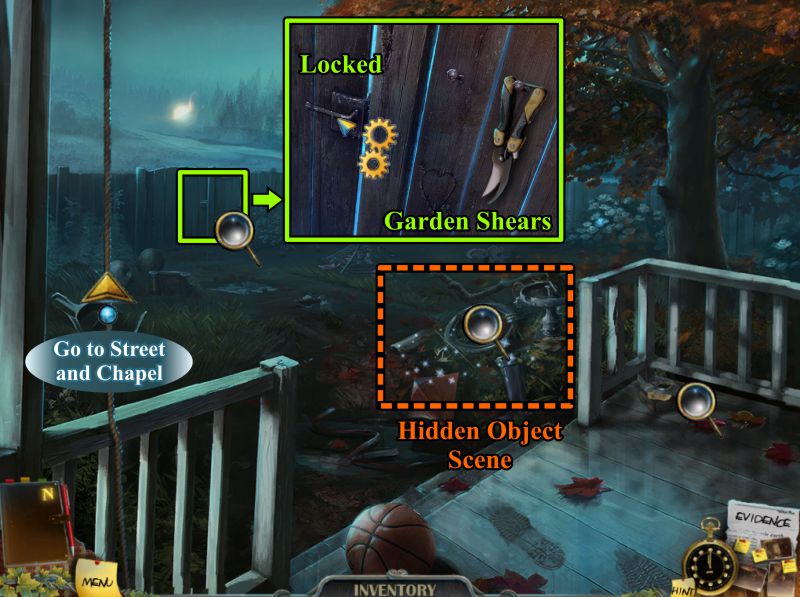
Play the Hidden Object Scene and check out the object on the porch.
Zoom in on the gate, which turns out to be locked when you check it. Pick up the Garden Shears.
Go back up the rope, exit the Boarding House to the Street, and go to the Chapel.
Screenshot
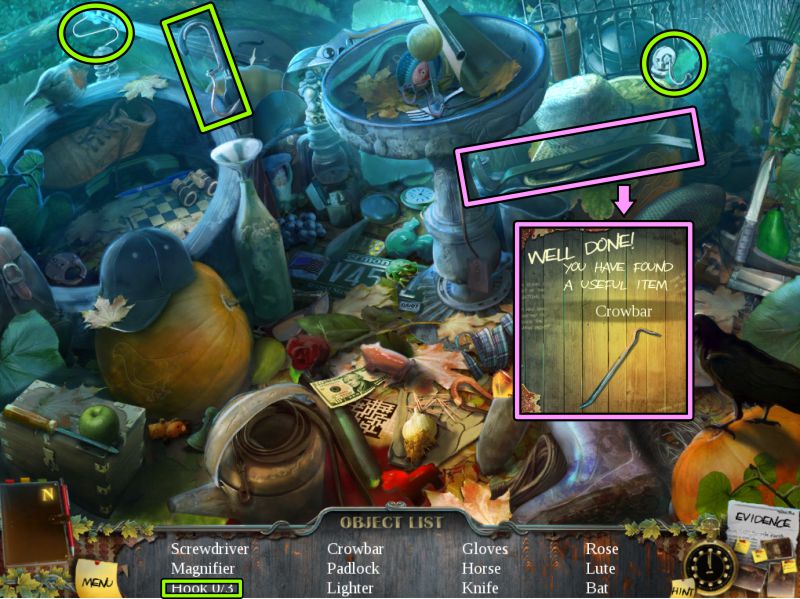
Backyard Hidden Object Scene
Three hooks are marked in the screenshot, and your Inventory item will be a Crowbar.
Screenshot
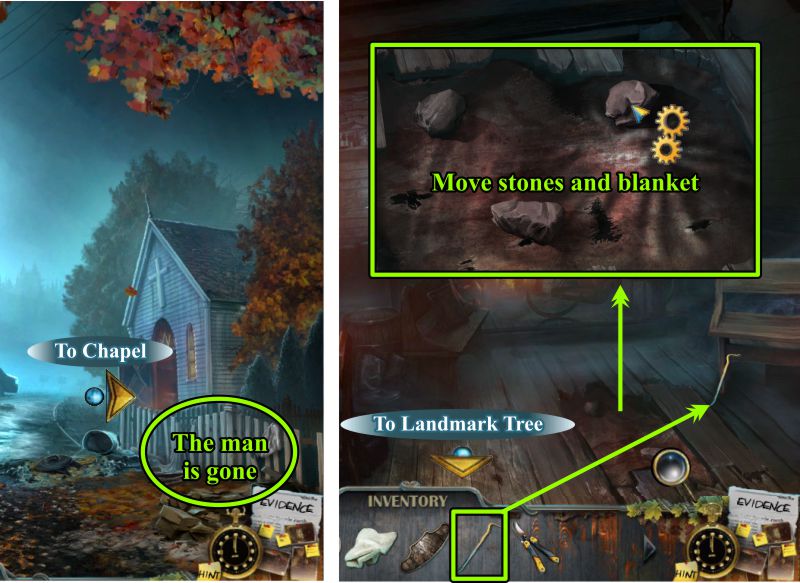
Street and Chapel
When you get to the Street, you find out the man who was there is now gone.
Enter the Chapel and zoom in on the replaced planks in the floor.
Use your Crowbar to lift them up.
Move all the stones and lift up the blanket underneath.
Screenshot
Chapel Grave
You've uncovered a grave of skeletons and are now assuming they have been murdered or they would not be where they are buried.
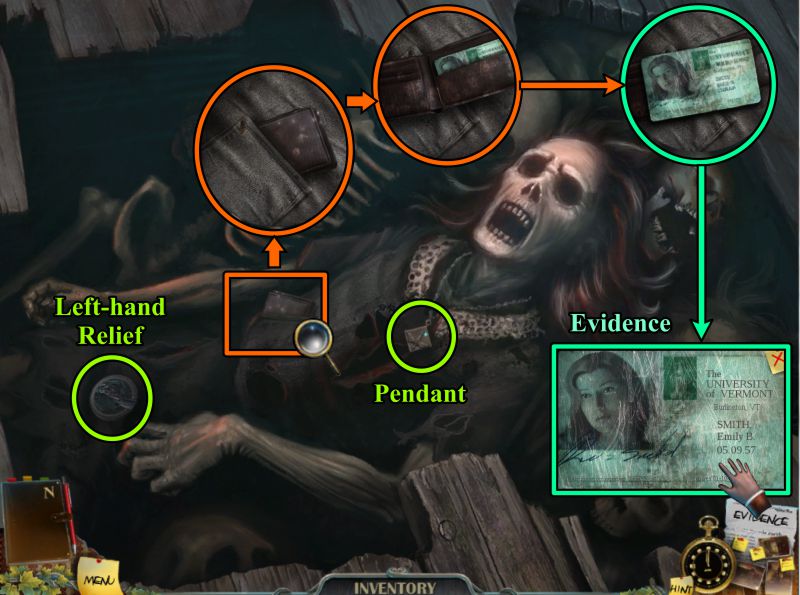
Collect the Left-hand Relief and the Pendant.
Zoom in on her pocket to find a wallet.
Open the wallet, take out the ID card, zoom in and take the Evidence.
Exit and go to the Landmark Tree.
Screenshot
Landmark Tree and Church Gates
Zoom in on the piece of Evidence and take it.
There's another paper up in the tree, but you can't reach it, so go to the Church Gates.
Pick up the piece of Evidence at the right of the gates.
Screenshot
Evidence Wall
You've gathered a lot of Evidence, so click on the Evidence link in the lower right corner to go to the Evidence Wall.
See the color-coded pieces of Evidence in the screenshot and see all the new sections added to the wall.
Screenshot
Chapter 5: The Church
Church Gates Mini Game
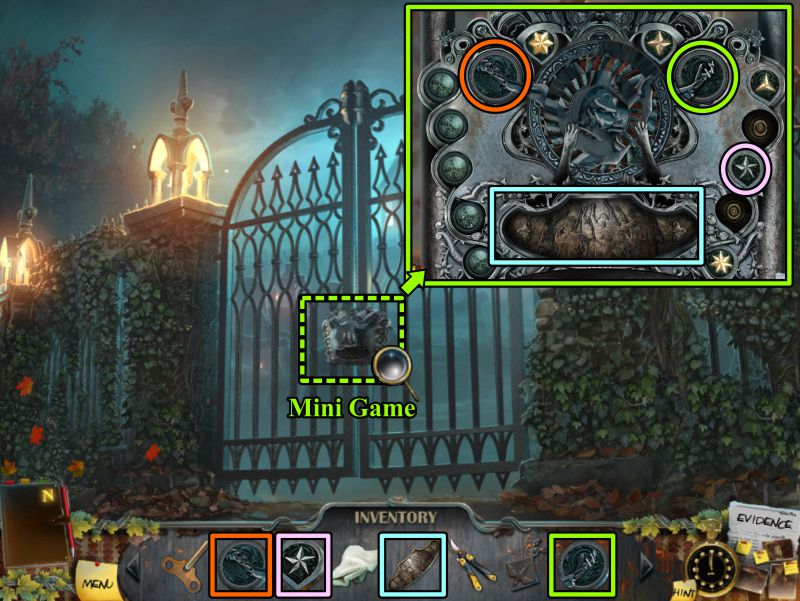
Zoom in on the gates and place the color-coded pieces shown in the screenshot to trigger the Mini Game.
Screenshot
There are several parts to the Mini Game that must be completed in a specific order.
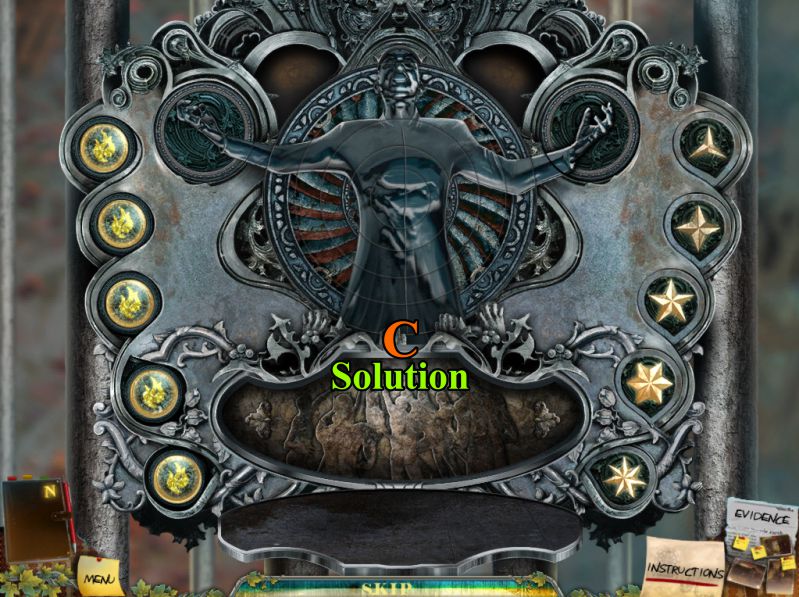
The stars are arranged in order according to the number of points on each one.
Place the two stars from the top of the lock as shown in the screenshot.
The buttons on the left need to be pressed in a certain order, or you will need to start over again.
See the screenshot for the solution to both of these segments of the Mini Game.
Screenshot
Rotate the circles to form the figure shown in the screenshot.
Since each circle rotates another circle, start by rotating the outer circle and the each of the next inner circles.
Screenshot
Churchyard
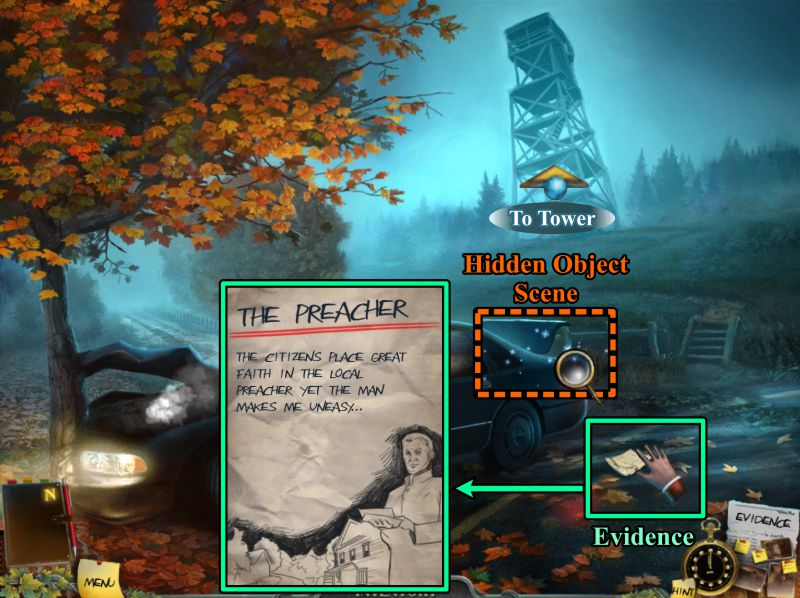
When the gates open, an image of the Preacher is waiting for your arrival, but soon disappears into thin air.
Play the Hidden Object Scene, then open the door and go inside the Church.
Screenshot
Church Hidden Object Scene
Your Inventory item is a Chisel.
Screenshot
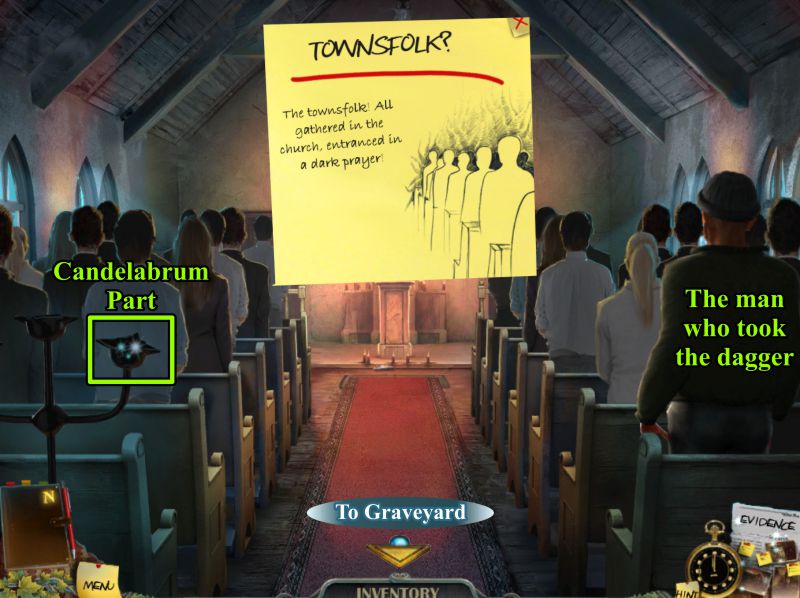
Inside the Church
Watch the cut scene, note the man who took the dagger from your room, and write yourself a note for the Evidence Wall.
Collect the Candelabrum Part and head off to the Graveyard.
Screenshot
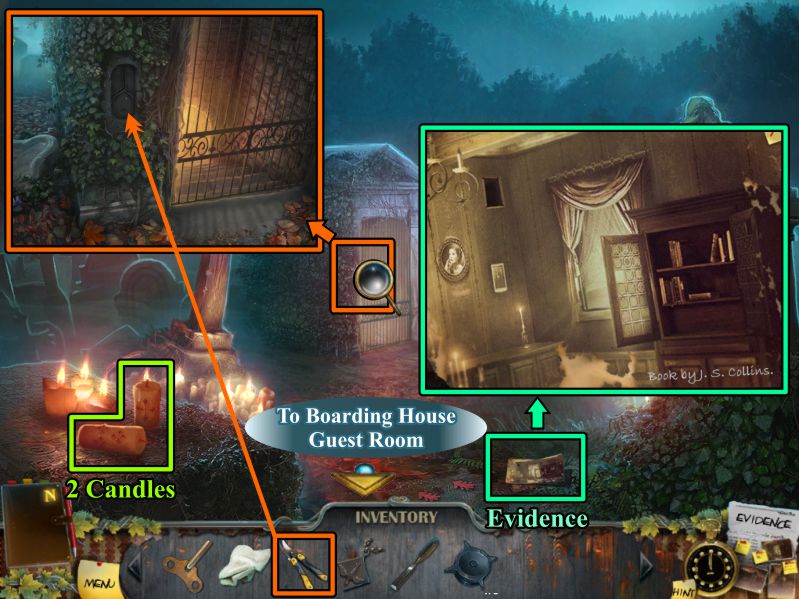
Graveyard
Collect the two candles at the left.
Pick up the Evidence on the ground.
Zoom in on the Tomb and use your Garden Shears to clear away the foliage.
Go to the Boarding House Guest Room.
Screenshot
Boarding House Guest Room
Zoom in on the Evidence Wall, then go out onto the Balcony.
Evidence Wall
Place your Evidence as shown in the screenshot.
Screenshot
Chapter 6: Lonely House and Country Lane
Backyard
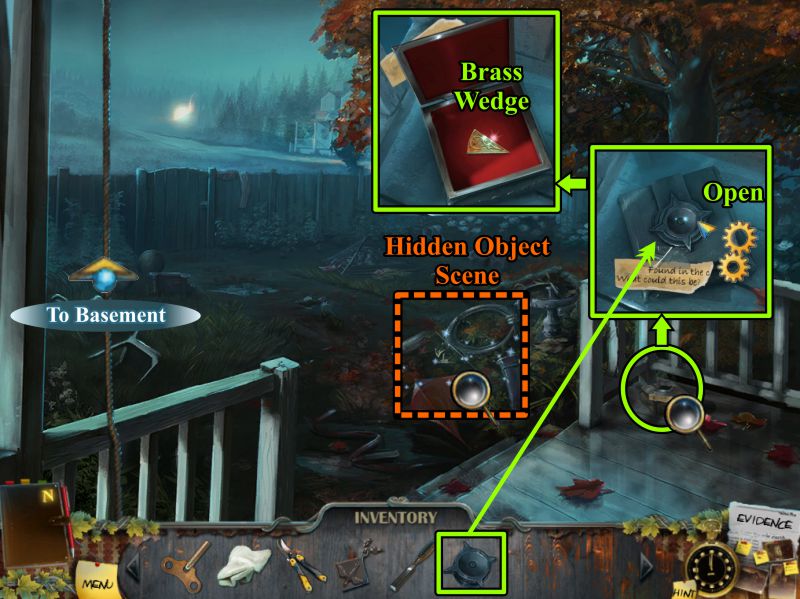
Zoom in on the corner of the porch and place your Candelabrum Part to open the box and get the Brass Wedge.
Play the Hidden Object Scene, then climb up the rope so you can go to the Boarding House Basement.
Screenshot
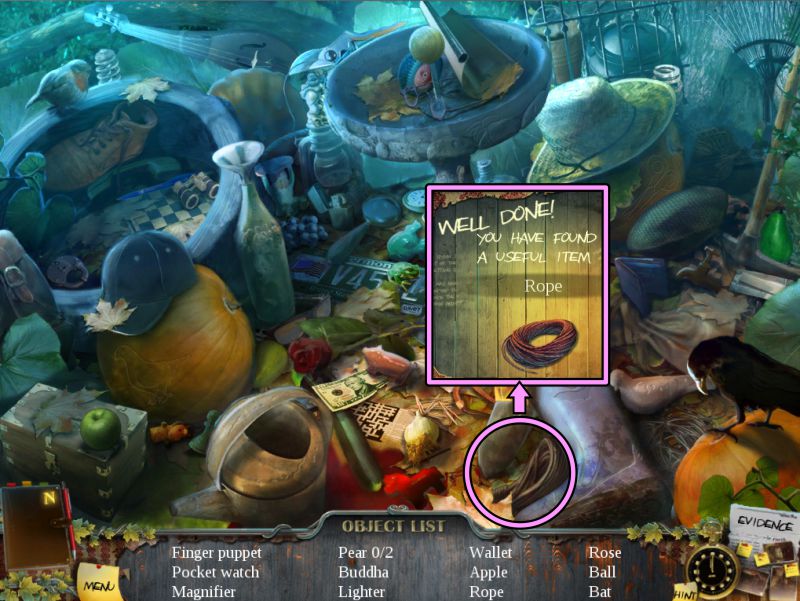
Backyard Hidden Object Scene
When you have collected everything, you will get a Rope for your Inventory.
Screenshot
Basement
Zoom in on the hook at the right and attach the rope to make a Grappling Hook.
Remove the grate from the drain. You can't get the cork.
Play the Hidden Object Scene, then return to the Backyard.
Screenshot
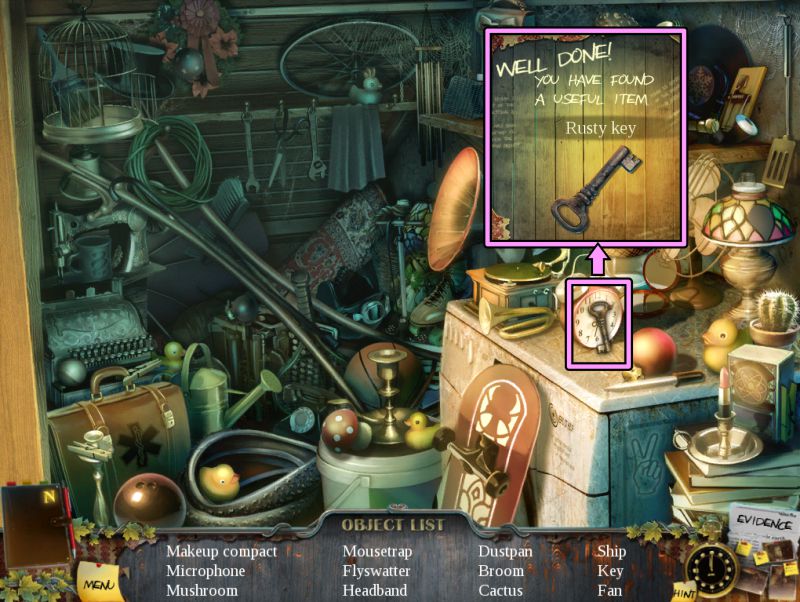
Basement Hidden Object Scene
Your Inventory item is a Rusty Key.
Screenshot
Backyard
Zoom in on the back gate, place the Rusty Key, turn it, and open the latch.
Head to the Lonely House.
Screenshot
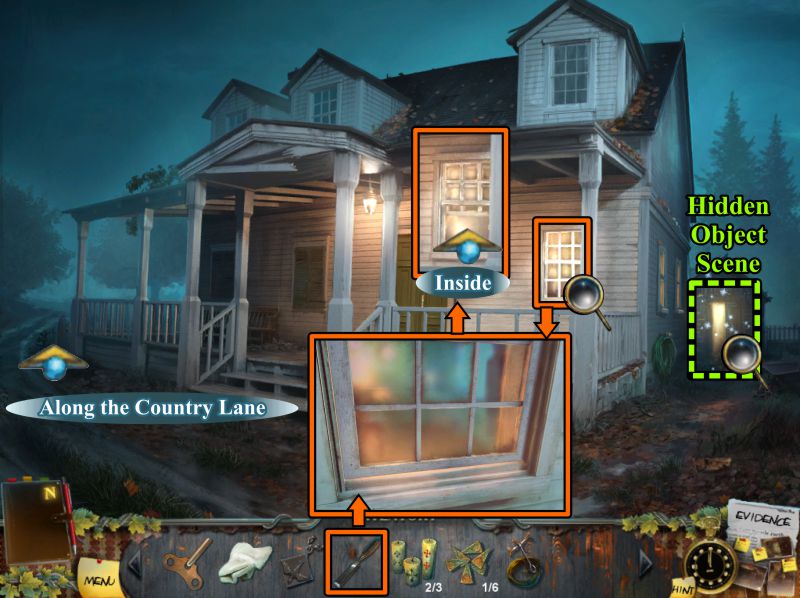
Lonely House
There is a Hidden Object Scene to play, and you need to get inside the house.
Zoom in on the window and use your Chisel to pop it open so you can go inside.
When you have completed your tasks at the house, go along the Country Lane.
Screenshot
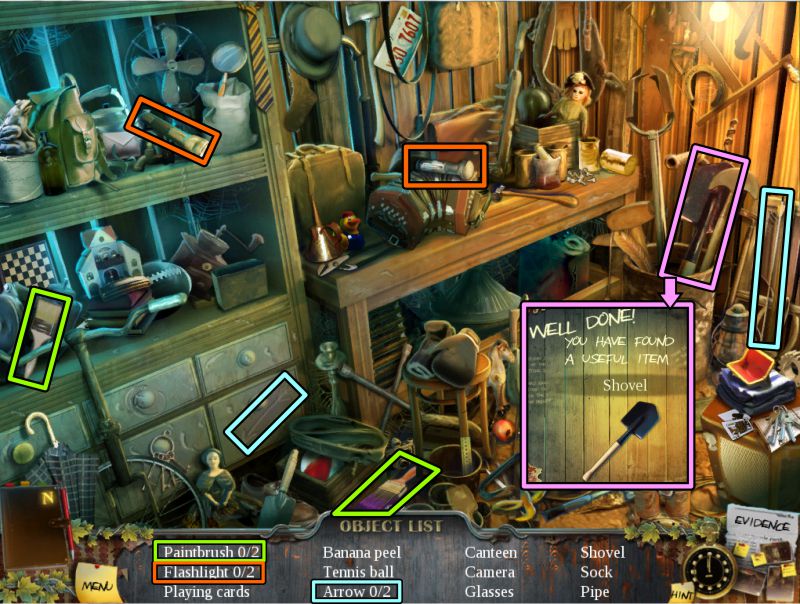
Lonely House Hidden Object Scene
2 each of paintbrushes, flashlights, and arrows are marked in the screenshot.
Your Inventory item is a Shovel.
Screenshot
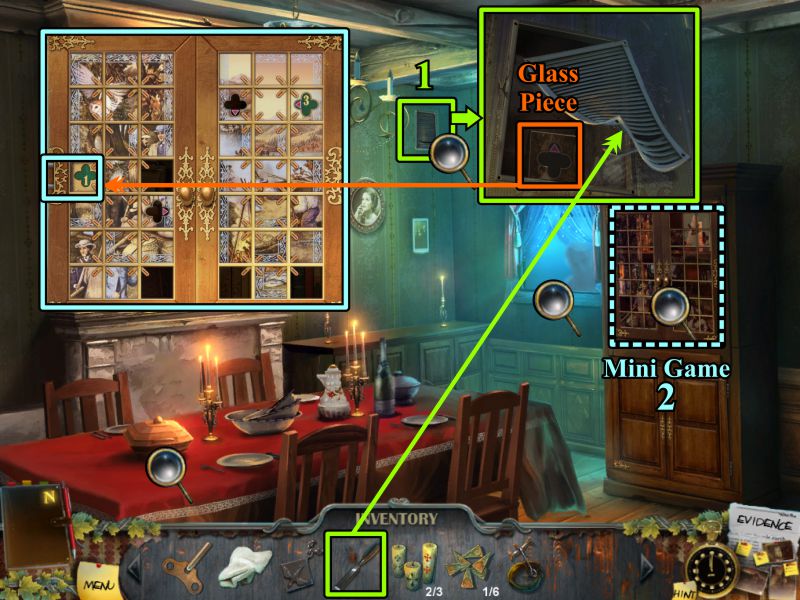
Inside Lonely House
Somebody is peeking at the window.
Zoom in on the vent on the wall and use the Chisel to open it so you can take the Glass Piece.
Note the table is set, then zoom in on the cabinet at the right.
Place your Glass Piece as shown in the screenshot to activate a Mini Game.
Screenshot
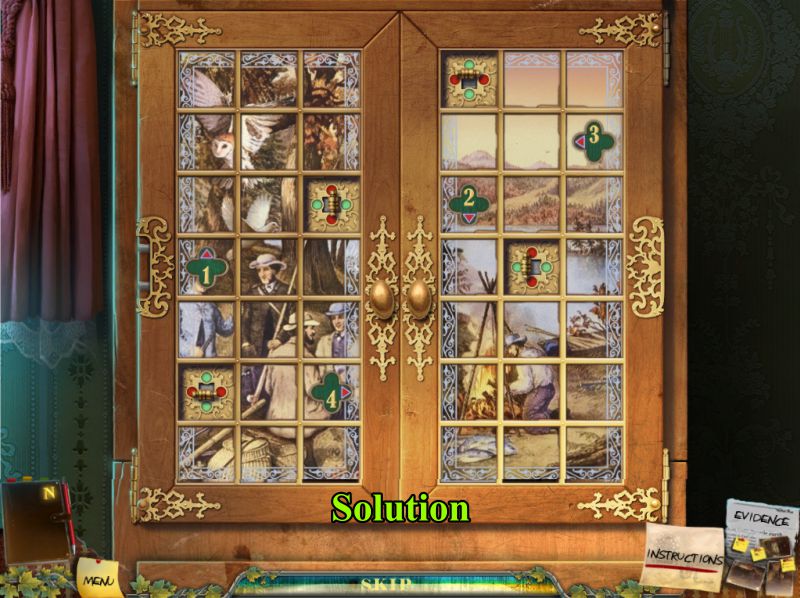
Cabinet Mini Game
Move the pieces of glass to create the images in the screenshot, making certain the latches are in the correct position.
Screenshot
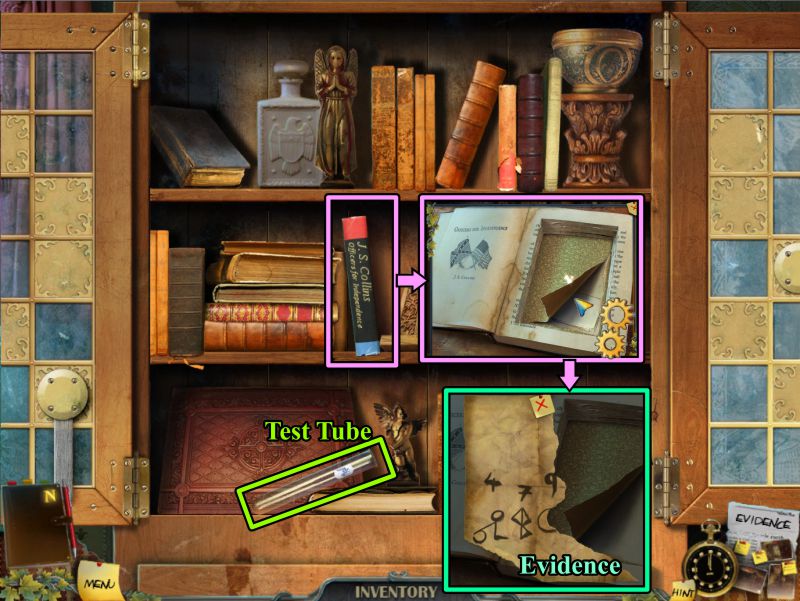
When the cabinet doors open, take the Test Tube.
Open the book and lift up the sheet to get the piece of Evidence.
Screenshot
Country Lane
Note the fences and rope ladder in the screenshot, then continue on to the Farm.
Screenshot
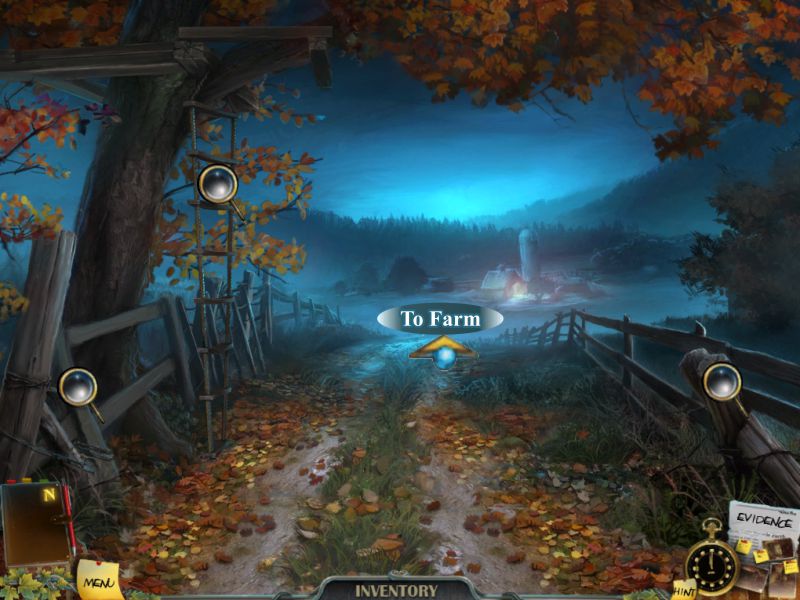
Pick up the Evidence, note the unfriendly dog and the doghouse, and continue on toward the Ruins.
Screenshot
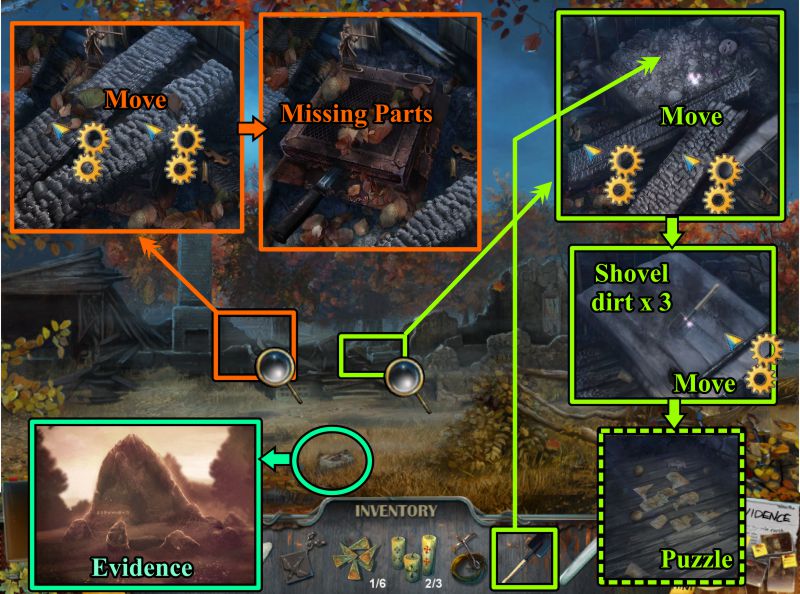
Ruins
Pick up the piece of Evidence.
Zoom in on the two portions of the Ruins marked in the screenshot.
Move the beams in both locations.
In the one marked in red, there are parts missing, so you can't open the music box to get the knife.
Use your Shovel 3 times on the area marked in green, and then move the mattress.
Click on the pieces of paper to trigger a puzzle.
Screenshot
Map Puzzle
Put the pieces of the map together as shown in the screenshot.
Collect it to get a taped-together map.
Click on Evidence to go to the Evidence Wall.
Screenshot
Evidence Wall
See the screenshot for where to place the pieces of Evidence you have collected.
Exit Evidence and go to the Lonely House.
Screenshot
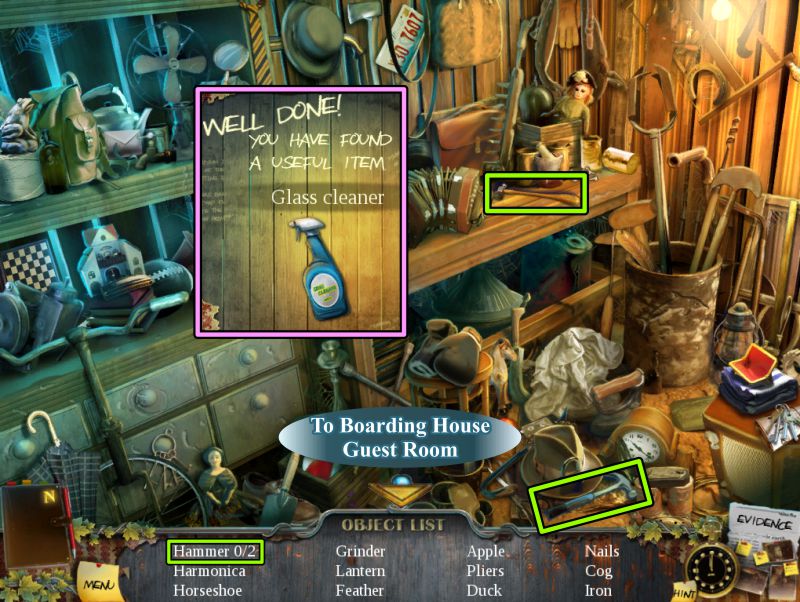
Lonely House
Click on the garage for a Hidden Object Scene, then go to your room at the Boarding House.
Lonely House Hidden Object Scene
If they are on your list, collect the two hammers marked in the screenshot.
Although it's not on the list of items to find, you will get some Glass Cleaner for your Inventory.
Screenshot
Chapter 7: Finding the Rock
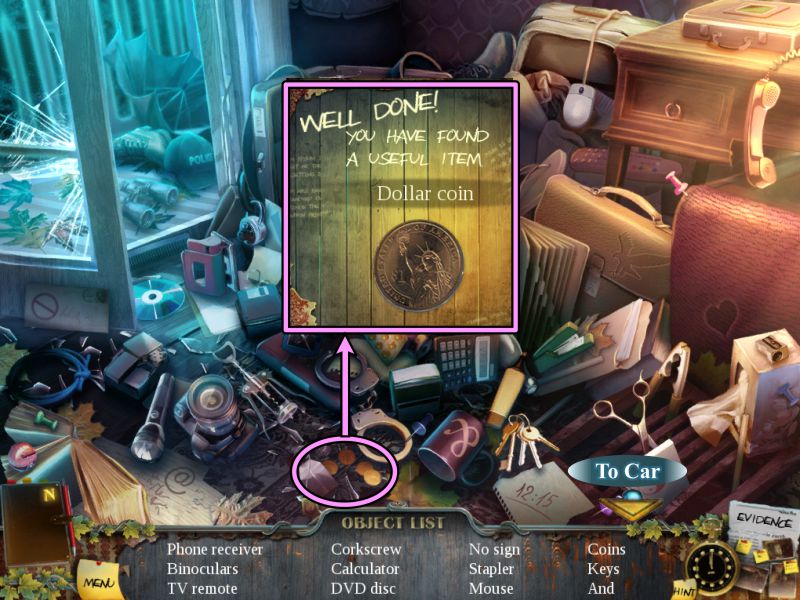
Boarding House
Play the Hidden Object Scene to get the Dollar Coin.
Go to the Car.
Screenshot
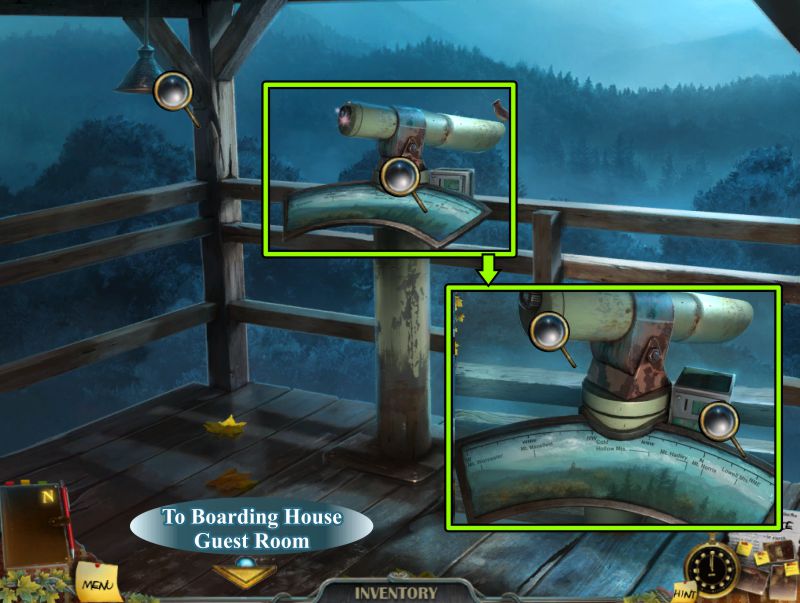
Car and Tower
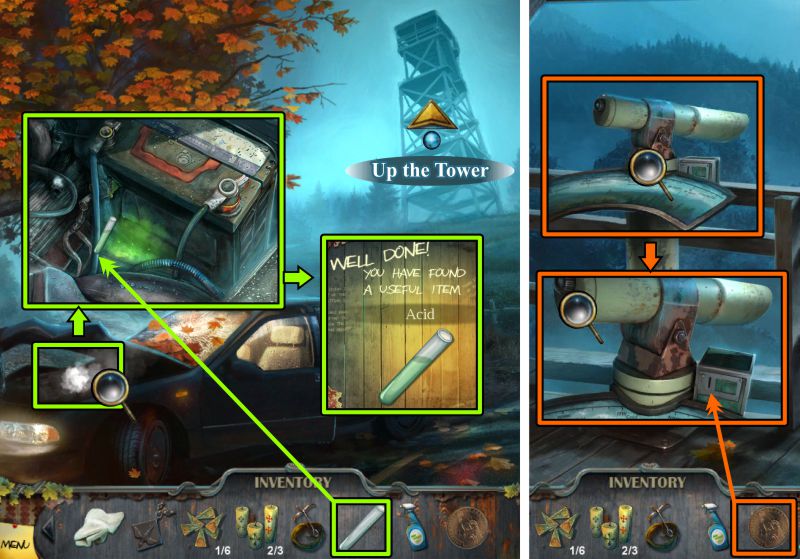
Zoom in on the engine and use your Test Tube to collect some Acid.
Go up the Tower, zoom in on the telescope and place your Dollar Coin in it.
Click for a close up of the viewer.
Screenshot
Telescope
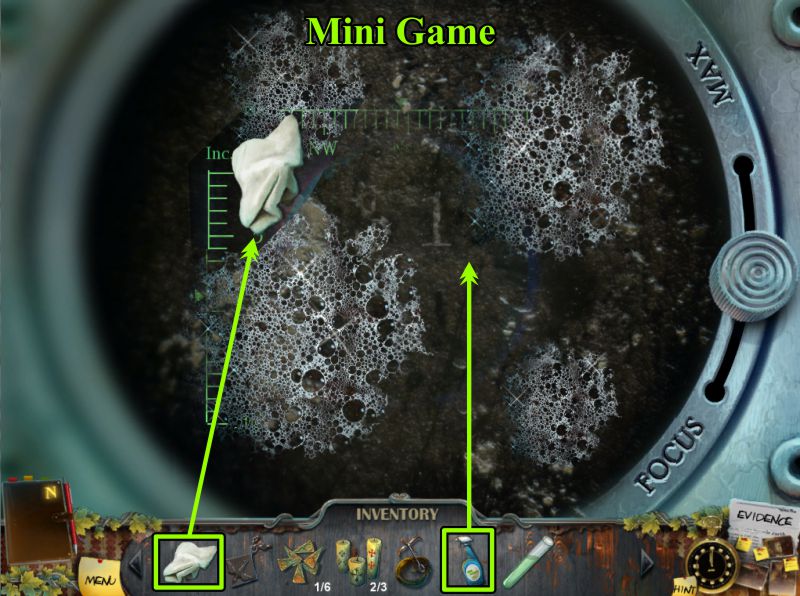
Spray your Glass Cleaner on the dirty lens, then use your Wet Cloth to clean it.
You've triggered a Mini Game to locate the Rock.
Screenshot
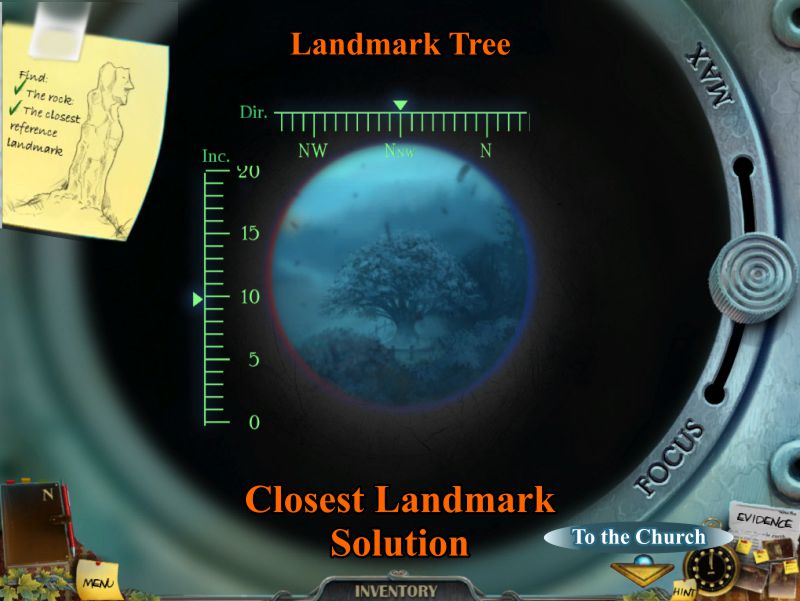
Telescope Mini Game
Set the coordinates of the Rock as shown on the Evidence photo you collected.
Focus as shown in the screenshot solution.
Screenshot
Your next task is to find the closest landmark reference in order to know which path to take to get to the Rock.
See the screenshot for the coordinates of the Landmark Tree that is the landmark solution.
Screenshot
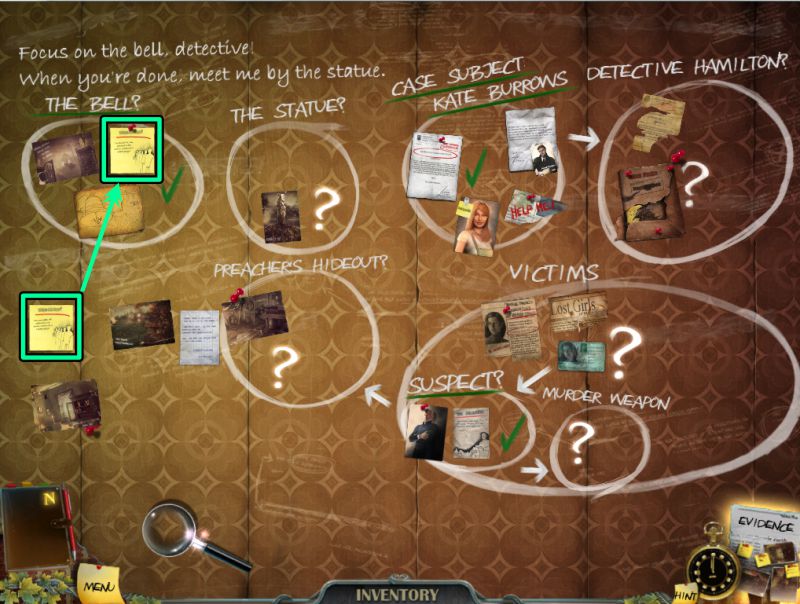
Churchyard and Belfry
Head off to the Church.
Your goal is to get to the Belfry to stop the bell from ringing.
Use your Grappling Hook on the round window on the bell tower to enter the Belfry.
Go up the stairs to the bell tower and zoom in on the bell.
Use your Acid on the support, and the bell will fall down to the next level.
Go downstairs and grab the Horned Clapper out of the bell.
All the townsfolk have been freed from the spell, so play the Hidden Object Scene before entering the Church.
Screenshot
Churchyard Hidden Object Scene
Your Inventory item is a Compass.
Screenshot
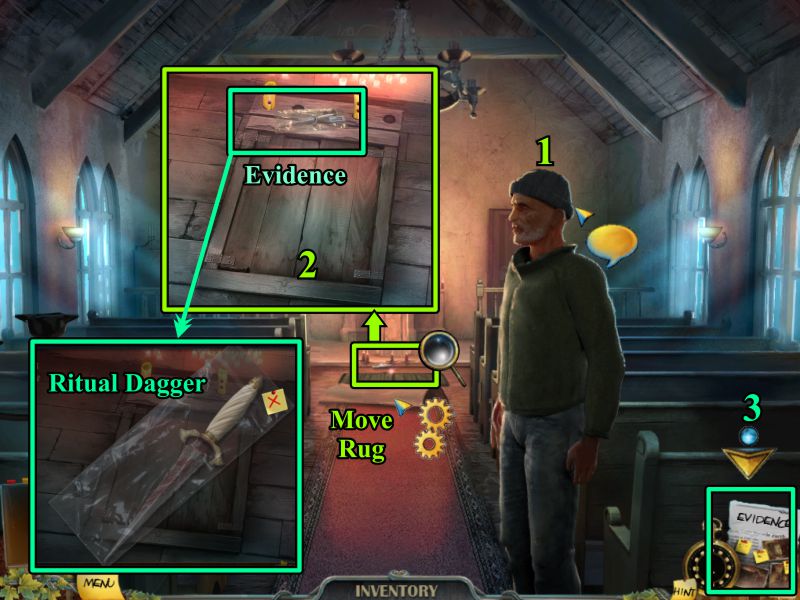
Inside Church
Talk to the man who took the dagger from your room.
Move the rug, zoom in and pick up the Ritual Dagger as Evidence.
Click on Evidence and go to the Evidence Wall.
Screenshot
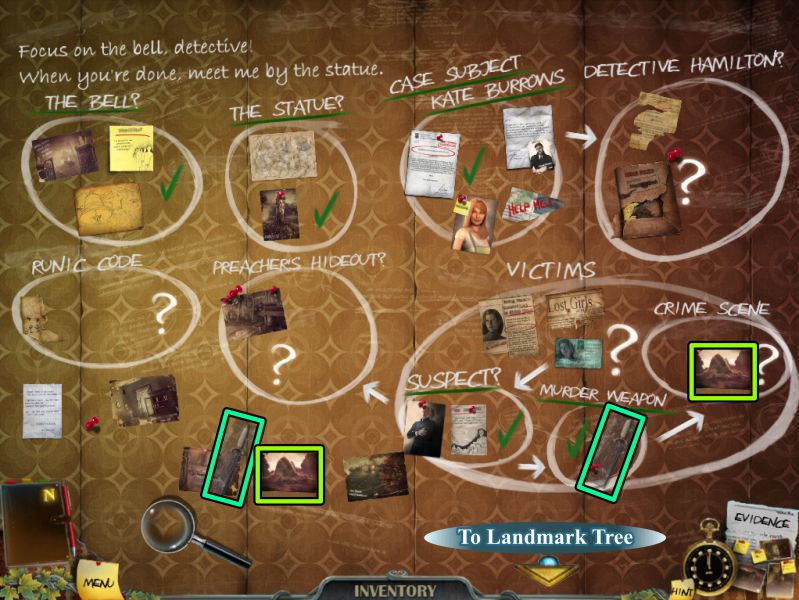
Evidence Wall
Check the color-coded pieces of Evidence in the screenshot to see where they belong on the wall.
Go to the Landmark Tree.
Screenshot
Chapter 8: The Rock and Cabin
Landmark Tree
Take the path Into the Woods.
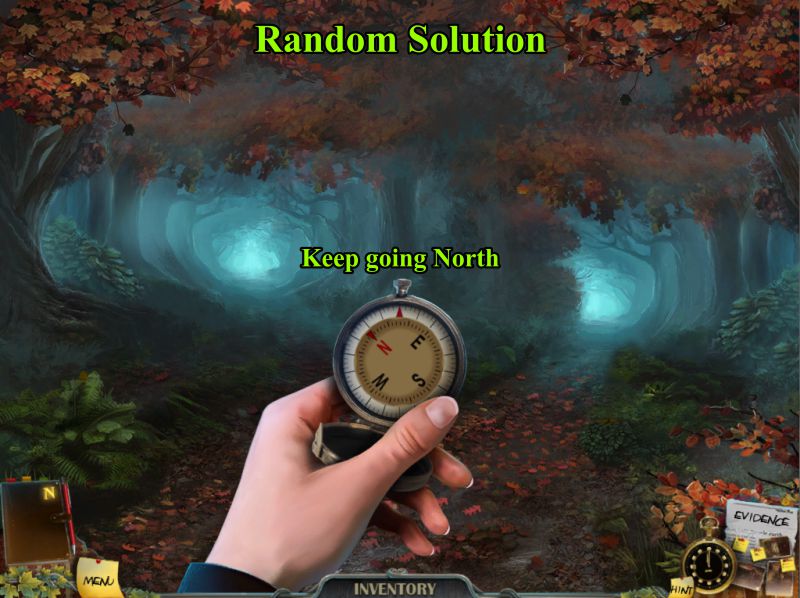
Into the Woods
If the Compass is in your Inventory, it will appear in your hand to guide you.
The directions are random, so keep following the Compass North until you reach your destination.
Screenshot
The Rock
Pick up the piece of Evidence.
Pick up the Branch at the left and place it in the hollow of the tree at the right.
Use the Branch to be able to reach the nest. Click twice, because you need to make the bird fly off so you can get the Lock Picks.
Head off toward the Cabin.
Screenshot
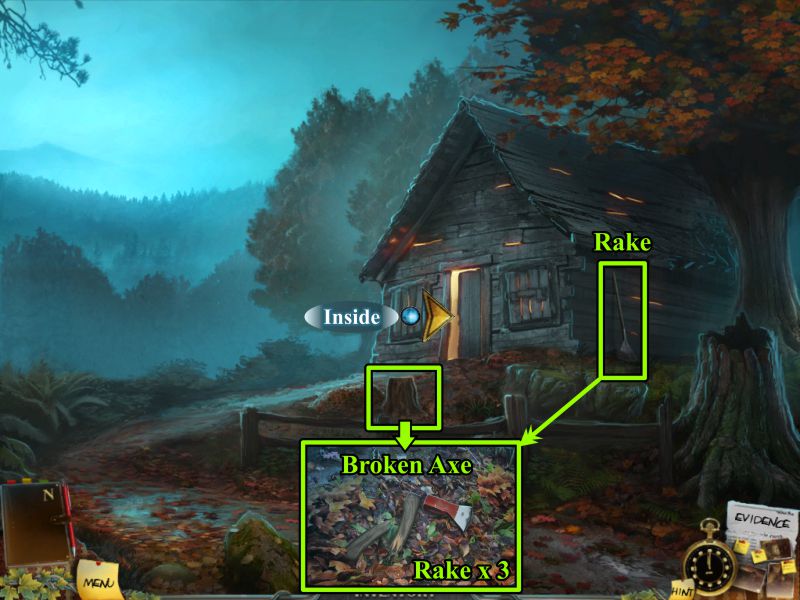
Cabin
Grab the Rake and use it three times on the area marked in the screenshot so you uncover the Broken Axe.
You need to find a new handle, so go inside the Cabin.
Screenshot
Inside Cabin
Detective Hamilton is there, so talk to him.
Take the Candle he offers you and grab the Polish Sausage.
Leave and go to the Church.
Screenshot
Inside the Church
Zoom in on the trap door and place your Candles.
Rearrange the Candles according to the evidence photo, then go downstairs.
See the screenshot for the solution.
Screenshot
Church Basement
Play the Hidden Object Scene.
Zoom in on the wall and move all the papers until you get to the piece of Evidence and notes shown in the screenshot.
Click on Evidence in the lower right corner to go to the Evidence Wall.
Screenshot
Evidence Wall
See the screenshot for placement of your Evidence.
Click down or on Evidence to return to the Church Basement.
Screenshot
Basement Hidden Object Scene
Your Inventory item is a Metal Figurine.
Head off to find the Rock.
Screenshot
Chapter 9: To the Lake
Landmark Tree
Go to the Landmark Tree and follow the directions to find the Lake from your notes, as shown in the screenshot.
Screenshot
Boathouse Door Mini Game
Zoom in on the Boathouse door and zoom again to see the lock.
Place your Lock Picks to trigger a Mini Game.
There are 3 locks, and the tumblers need to be pushed up by the Lock Pick in order to open them.
Each lock adds and additional tumbler to open. Click to open each tumbler in order from the first to the last.
See the screenshot for the solution. Enter the Boathouse.
Screenshot
Inside Boathouse
Play the Hidden Object Scene.
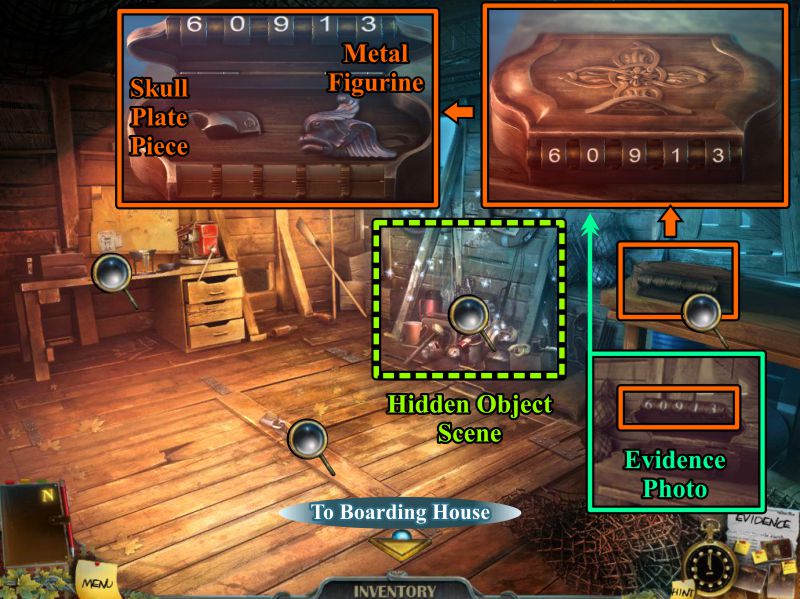
Check out the trap door and desk, then zoom in on the table at the right.
The box was open in the Evidence photo, so enter the numbers shown there.
See the screenshot for the solution. Collect the Skull Plate Piece and Metal Figurine from the open box.
Go to the Boarding House.
Screenshot
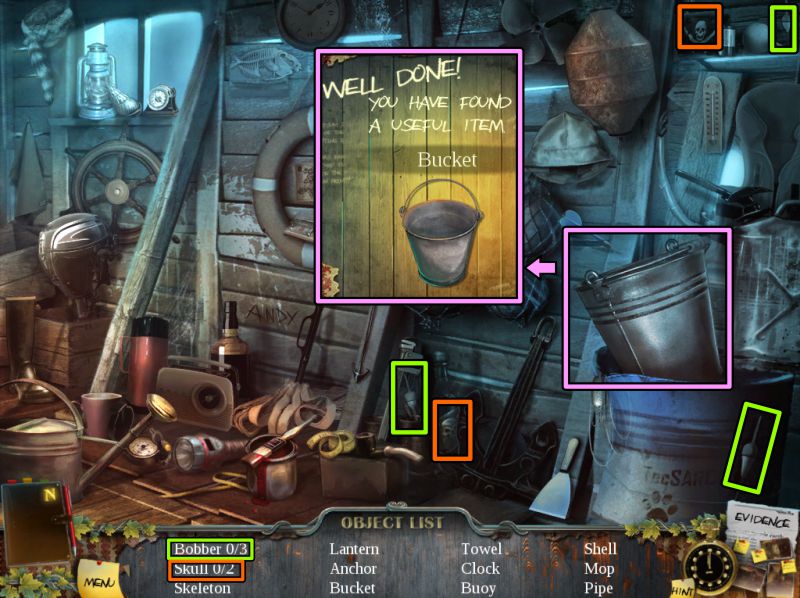
Boathouse Hidden Object Scene
3 Bobbers and 2 skulls are marked in the screenshot, and your Inventory item is the Bucket.
Screenshot
Boarding House Bathroom and Basement
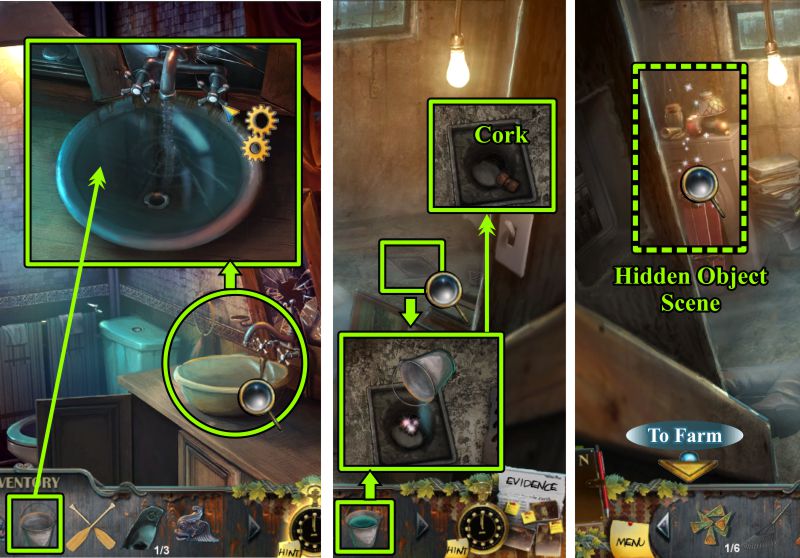
Go upstairs to the Bathroom and zoom in on the sink.
Turn on the faucet to fill the sink with water so you can fill your Bucket.
Turn off the faucet and go downstairs to the Basement.
Zoom in on the drain, pour in your Bucket of water, and take the Cork.
Play the Hidden Object Scene at the left before going to the Farm.
Screenshot
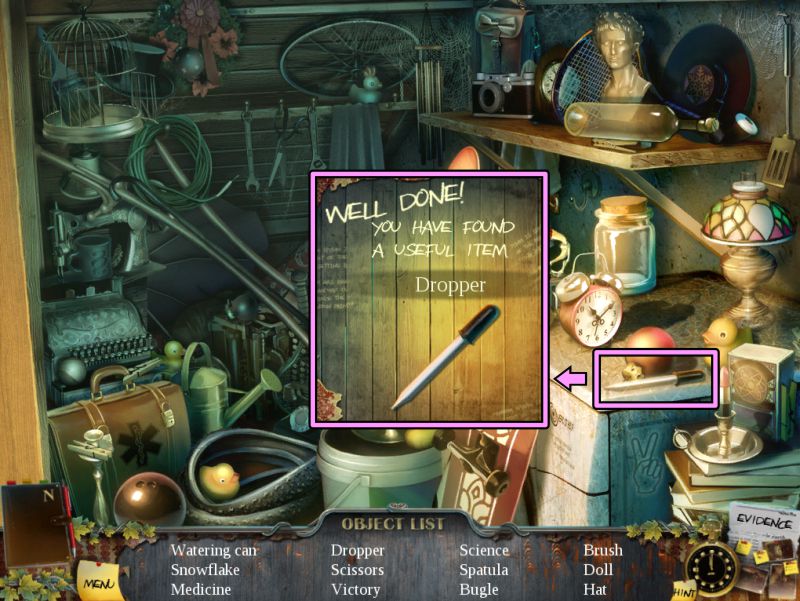
Boarding House Basement Hidden Object Scene
Your Inventory item is a Dropper.
Screenshot
Chapter 10: The Farm
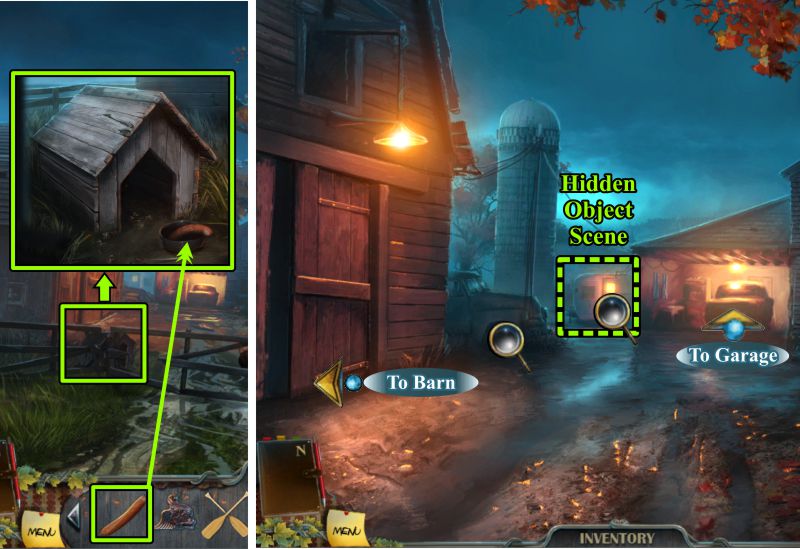
Enter the Farm
Zoom in on the doghouse and place the Sausage in the dog bowl.
Enter the Farm while the dog is occupied.
Play the Hidden Object Scene in the trailer, then go inside the Barn.
Screenshot
Trailer Hidden Object Scene
Your Inventory item is a Scrap of Leather.
Screenshot
Barn
See the screenshot for the sequence of events.
Zoom in on the ladder and hook it up to the chain.
Zoom in on the front of the tractor and hook up the other end of the chain.
Zoom in on the lever and pull it back.
Note the chain saw with the broken chain.
Screenshot
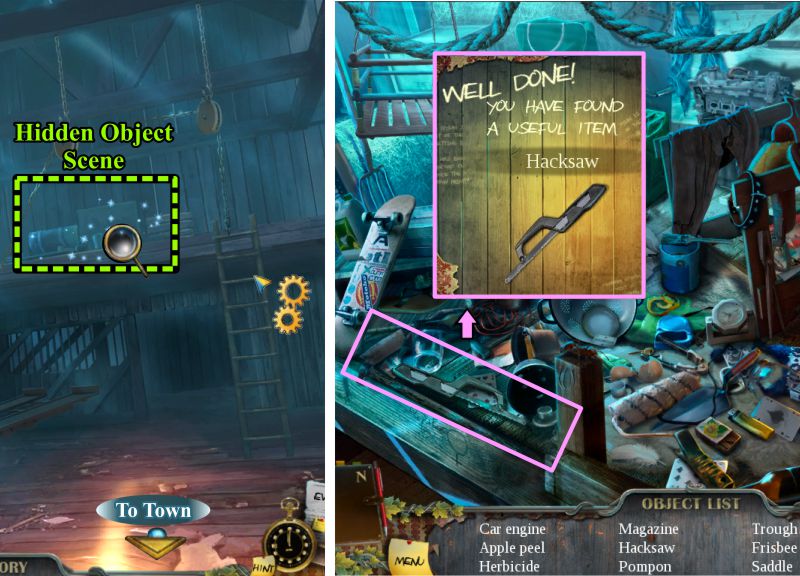
The tractor rolled back to place the ladder by the loft. Click on the ladder to trigger a Hidden Object Scene.
Play the Hidden Object Scene to get a Hacksaw for your Inventory.
Head back to Town.
Screenshot
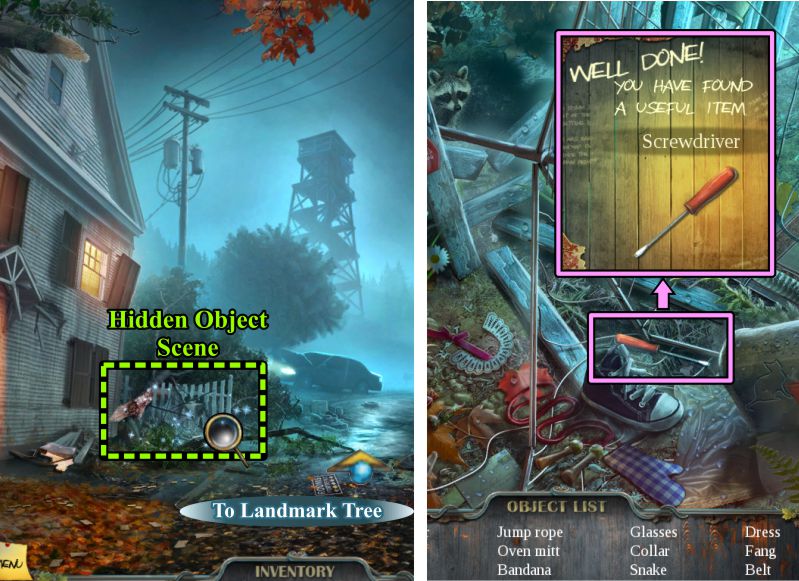
Town Center Hidden Object Scene
Play the Hidden Object Scene to get a Screwdriver for your Inventory.
Go to the Landmark Tree.
Screenshot
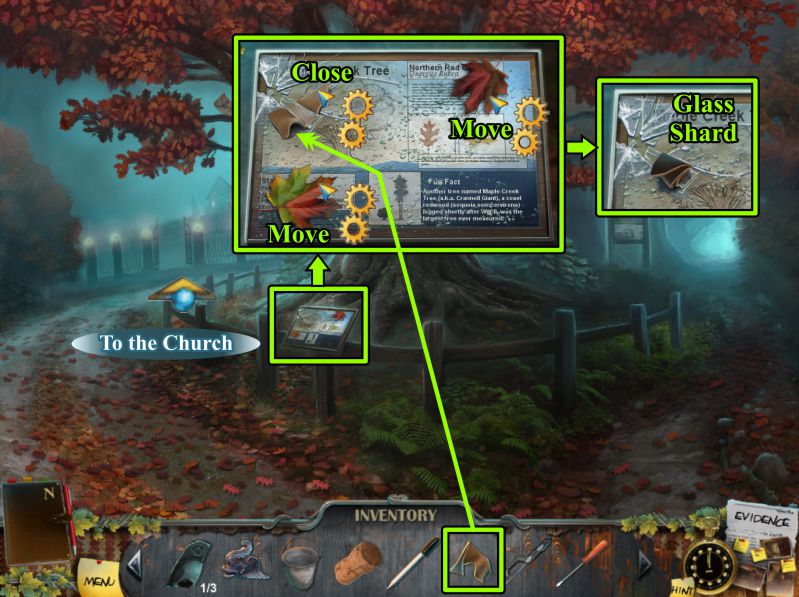
Landmark Tree
Zoom in on the plaque, move the leaves, and place your Scrap of Leather on the Glass Shard.
Click again to wrap the leather around the shard so you can collect it.
Go to the Church.
Screenshot
Church Basement
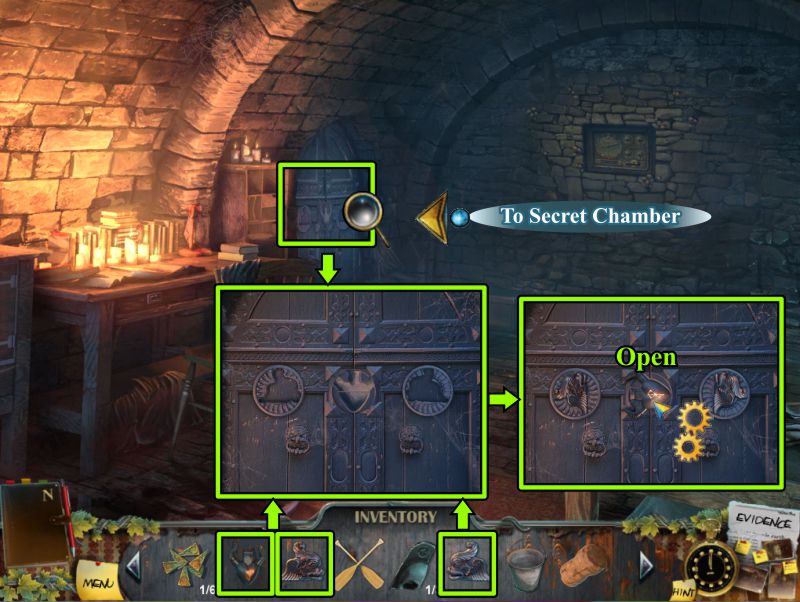
Enter the Church and go down to the Basement.
Zoom in on the door at the left, place your 2 Metal Figurines and the Horned Clapper as shown in the screenshot.
Click on the clapper to open the door so you can enter the Secret Chamber.
Screenshot
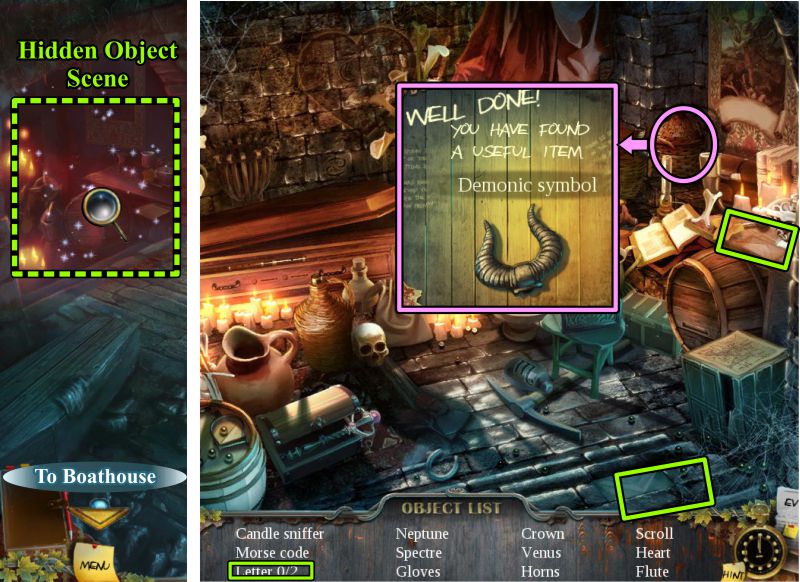
Secret Chamber
Open the box and take the Resin.
Remove the curtain and zoom in on the picture.
Use your Glass Shard to remove it from the frame.
Take the picture as Evidence, and collect the Skull Plate and Brass Wedge.
Click to go to the Evidence Wall.
Screenshot
Evidence Wall
Place the picture to complete the Crime Scene portion of the wall.
Back out to the Secret Chamber and head off to the Boathouse.
Screenshot
Chapter 11: Across the Lake
Boathouse
Zoom in on the hatch and use your Hacksaw to cut the lock.
Check out the boat to discover the hole.
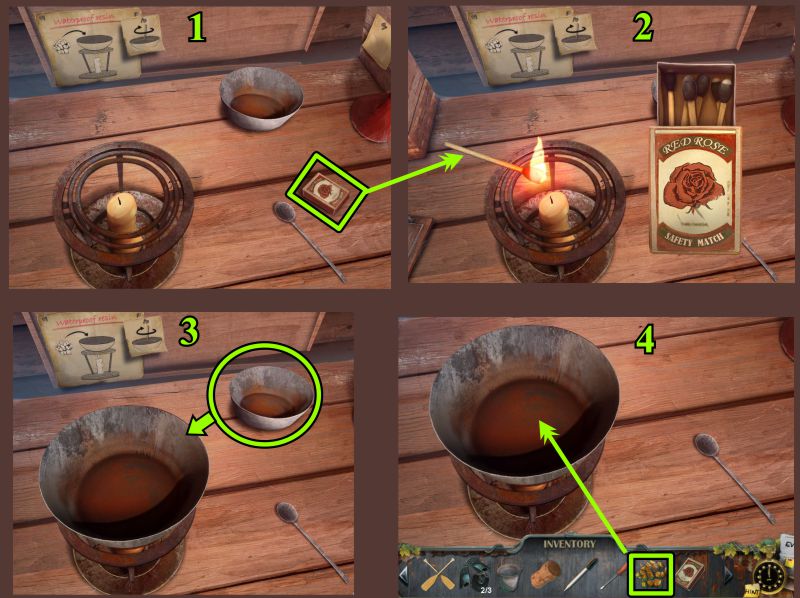
Zoom in on the desk to melt your Resin.
Screenshot
Make Liquid Resin
Read the instructions on the wall.
Light the burner, place the pan on the burner, and put the Resin in the pan.
Screenshot
Stir the melting Resin, then use your Dropper to get the Waterproof Resin.
Screenshot
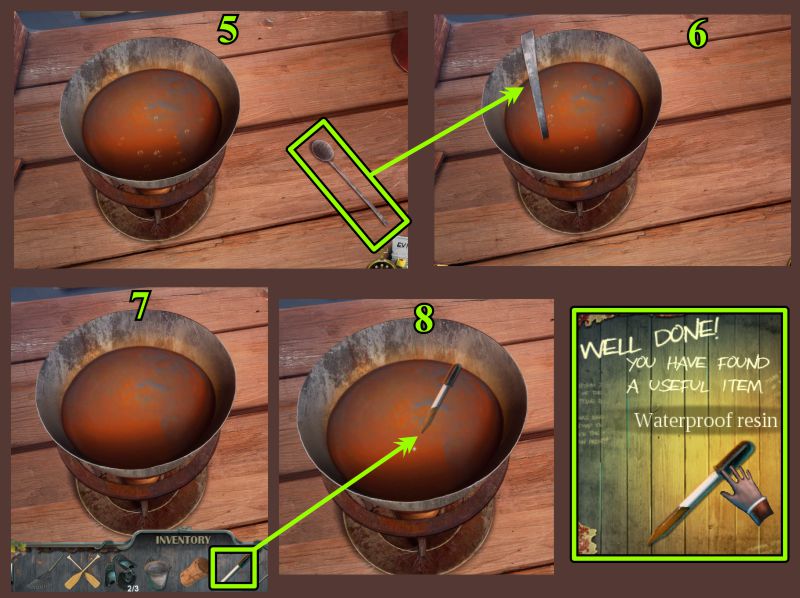
Prepare the Boat
Zoom in on the hole in the boat, place the cork in the hole, and seal it with your Waterproof Resin.
Bail out the boat 3 times using your Bucket.
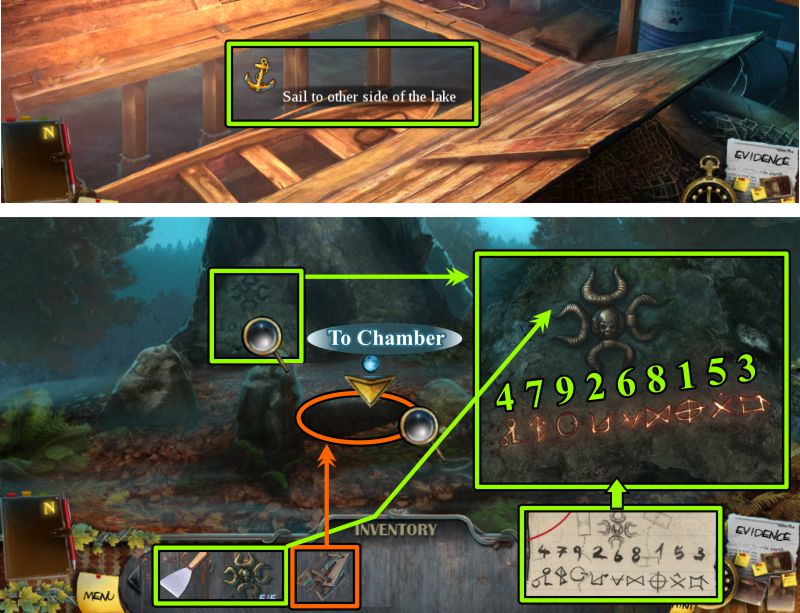
Grab the oars and row to the other side of the Lake.
Screenshot
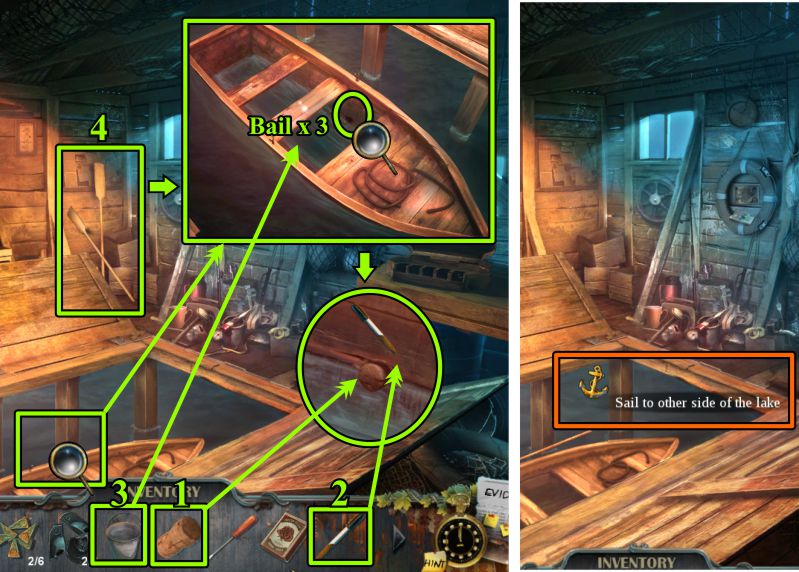
Mysterious Place
Head toward the rocks in the distance.
Zoom in on the foliage on the rock and take the Skull Plate Piece.
Note the Runes and bloody rock.
Go back to the shore and return to the Boathouse.
Screenshot
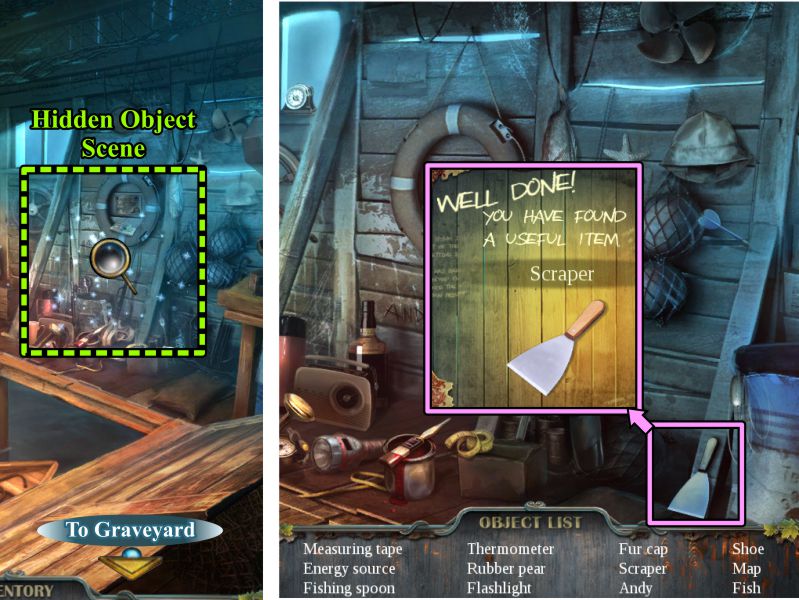
Boathouse Hidden Object Scene
Play the Hidden Object Scene to get a Scraper for your Inventory.
Go to the Graveyard.
Screenshot
Chapter 12: Rescue Kate and Boyfriend
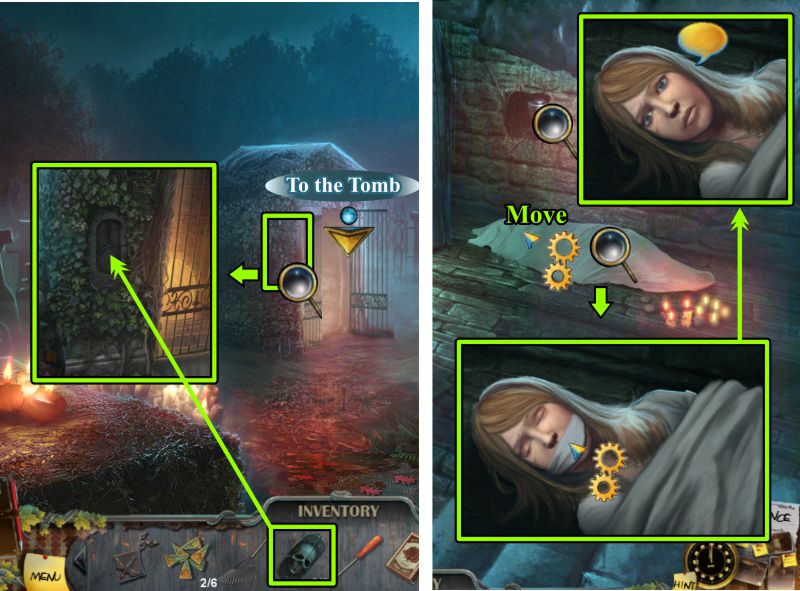
Graveyard and Tomb
Zoom in on the Tomb and place your completed Skull Plate to open the gate.
Enter the Tomb and zoom in on the sheet on the ground.
Move the sheet to discover Kate. Remove the gag from her mouth and talk to her.
Screenshot
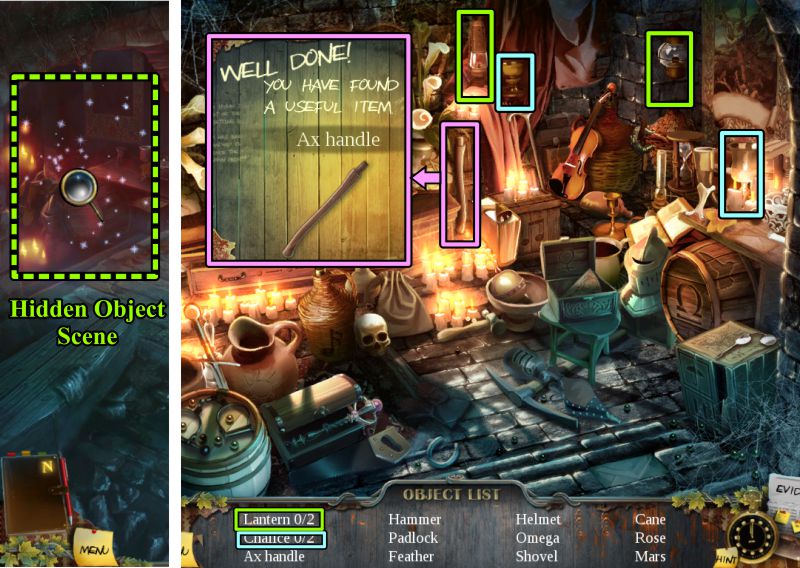
Tomb Hidden Object Scene
Play the Hidden Object Scene at the left to get an Axe Handle.
2 Lanterns and Chalices are also marked in the screenshot.
Screenshot
Cabin
Zoom in on the area in the front yard shown in the screenshot.
Rake the leaves 3 times and place your Axe Handle on the axe head.
Go inside the Cabin.
Detective Hamilton isn't there, so you have time to look around.
Grab the Fishing Rod and zoom in on the fancy box at the left.
Pick up the picture of Emily as Evidence.
Attach the Pendant to the lock to open it.
Take the picture of Hamilton and Emily from inside the box and collect the Toy Soldier.
Go to the Evidence Wall.
Screenshot
Evidence Wall
Place you two new pieces of Evidence in Detective Hamilton's circle to complete it.
Back out to the Cabin.
Screenshot
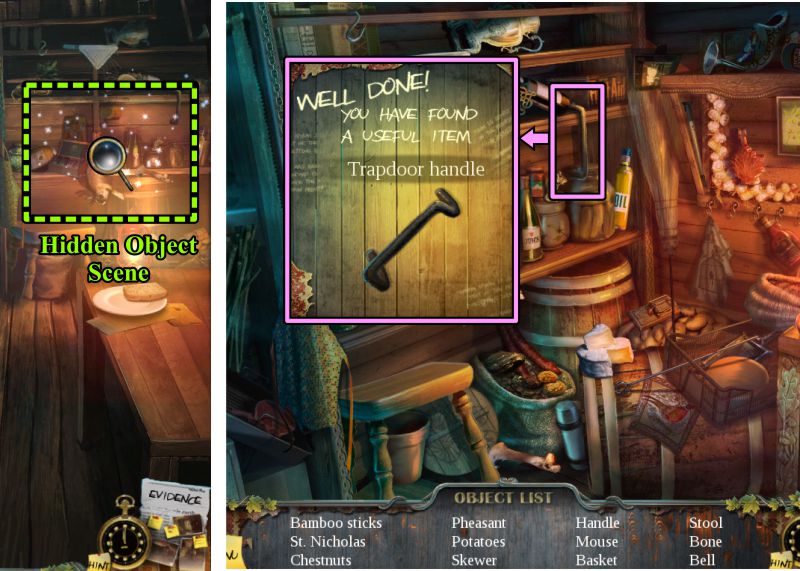
Cabin Hidden Object Scene
Play the Hidden Object Scene to get the Trapdoor Handle.
Screenshot
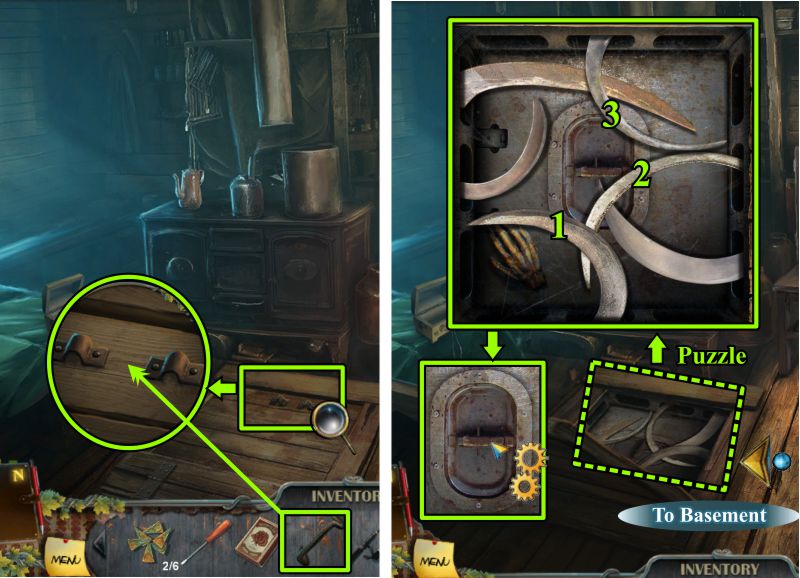
Cabin Trapdoor
Place the Handle on the Trapdoor to activate a Puzzle.
Remove the first three blades away from the hatch one at a time in the order shown in the screenshot until the other blades are clear to remove.
Open the hatch and go down to the Basement.
Screenshot
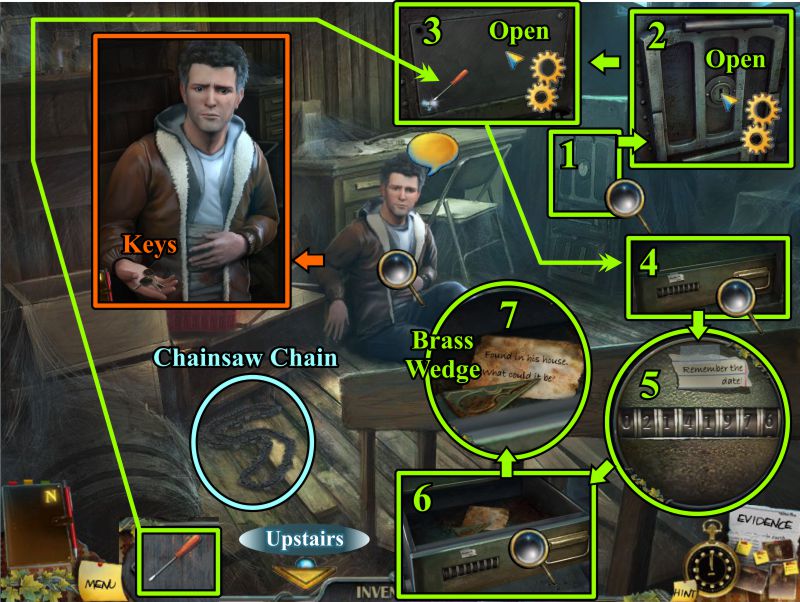
Cabin Basement
Kate's Boyfriend is in the Basement: Talk to him, and he will give you the Keys to his truck at the Farm.
Pick up the Chainsaw Chain, then zoom in on the safe.
Open the top plate and use your Screwdriver to remove the 4 screws on the plate underneath.
Zoom in on the box and enter 02141976, the date of Hamilton and Emily's first kiss.
Take the Brass Wedge and read the note.
Go upstairs.
Screenshot
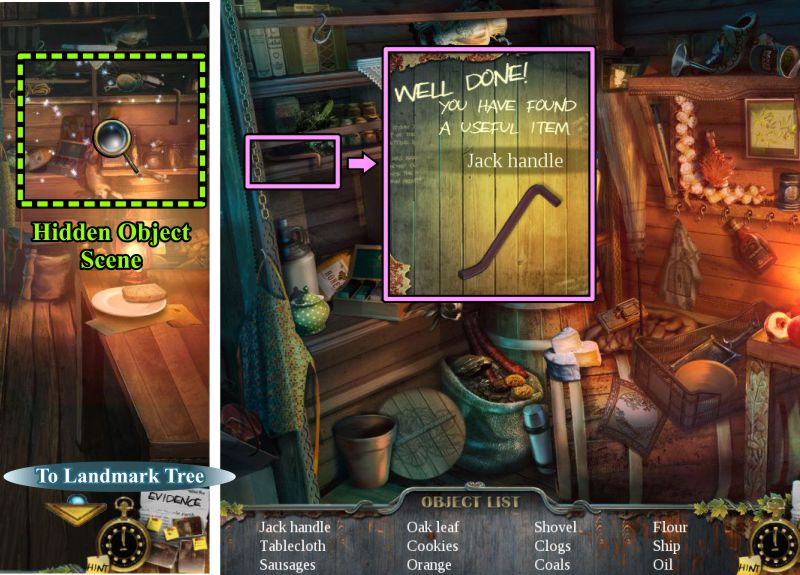
Backyard
Play the Hidden Object Scene to get the Jack Handle.
Head off to the Landmark Tree.
Screenshot
Landmark Tree and Church Basement
Use your Fishing Rod to get the piece of Evidence off the tree limb.
Go to the Inside of the Church and down to the Basement to Play the Hidden Object Scene.
Screenshot
Basement Hidden Object Scene and Secret Chamber
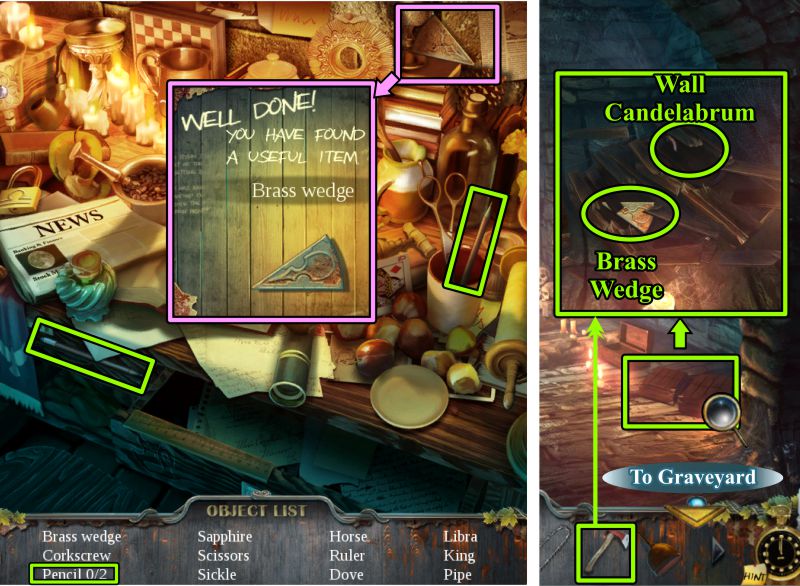
The 2 pencils are marked in the screenshot, and your Inventory item is a Brass Wedge.
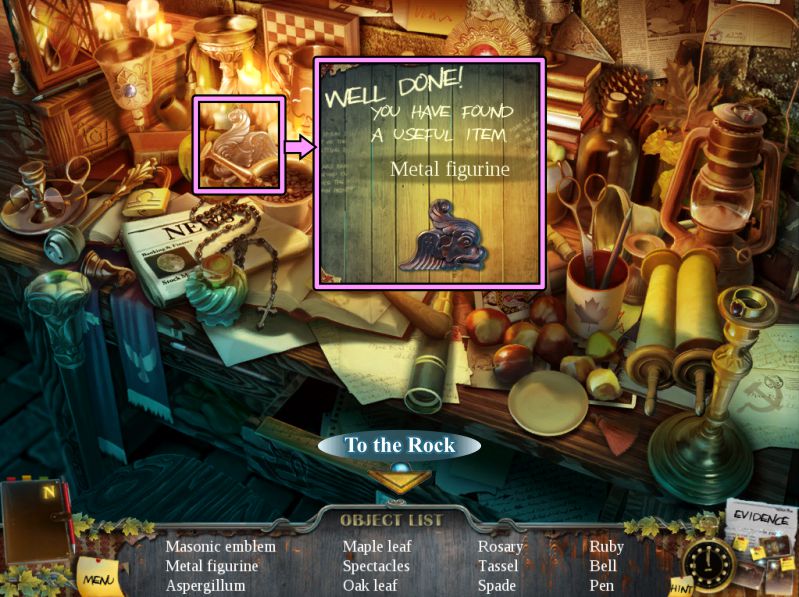
Go to the Secret Chamber and zoom in on the two unopened boxes.
Use the Axe to open them so you can take the Brass Wedge and Wall Candelabrum.
Go to the Graveyard.
Screenshot
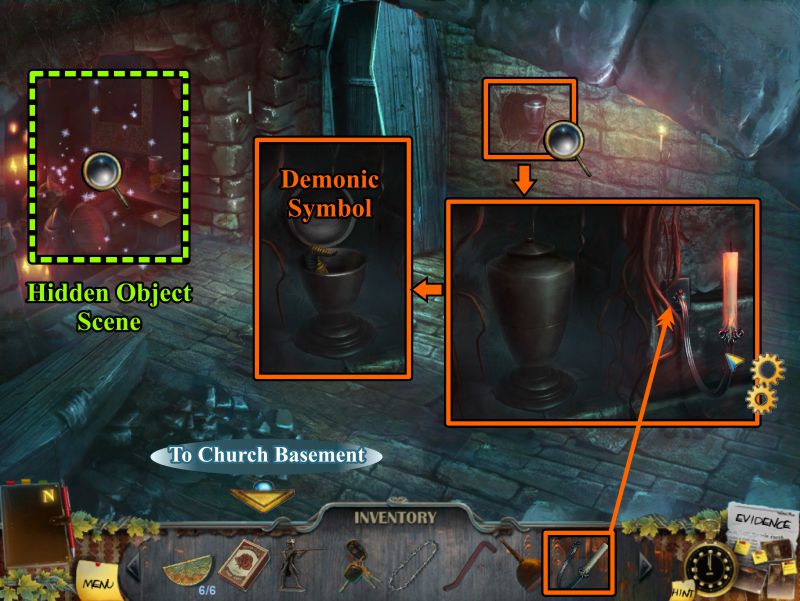
Graveyard
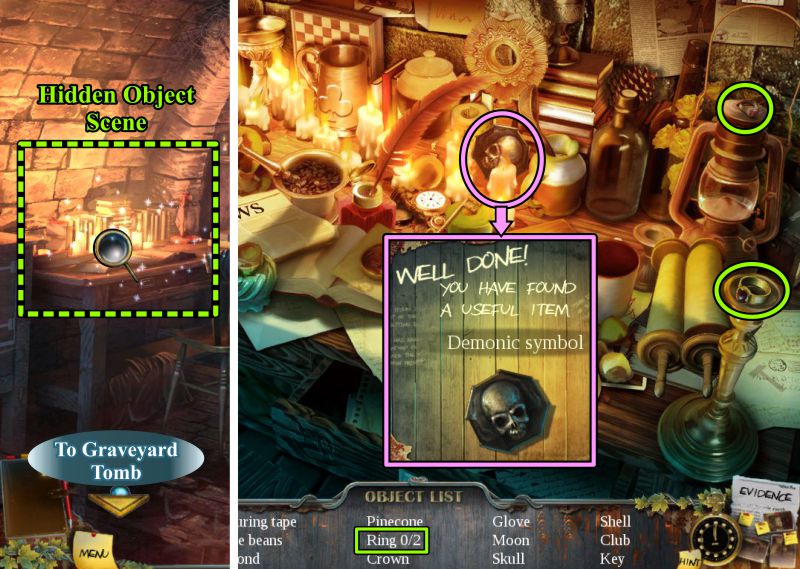
Enter the Tomb and play the Hidden Object Scene.
Zoom in on the wall with the urn and place the Wall Candelabrum.
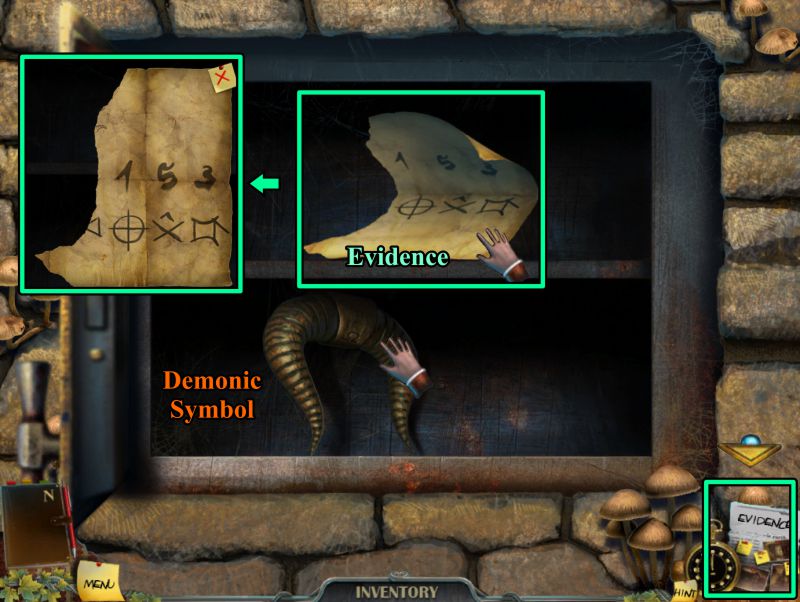
Click on it and the urn will open, so take the Demonic Symbol.
Return to the Church Basement.
Screenshot
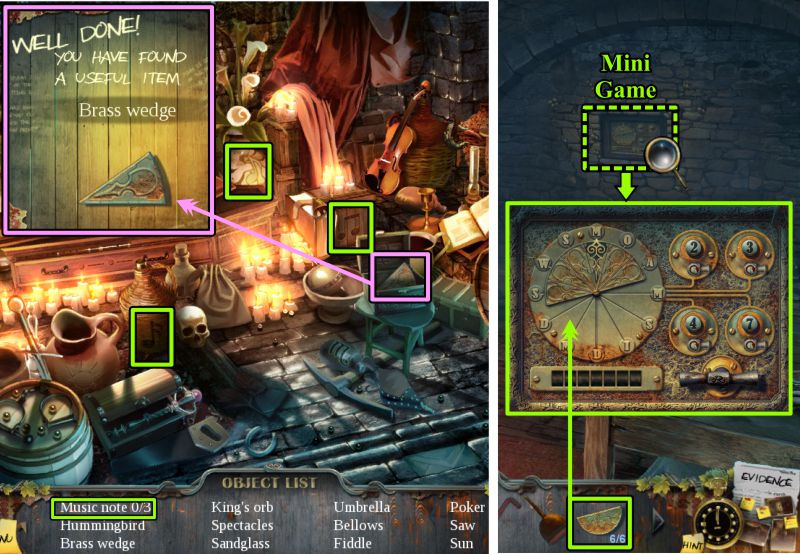
Tomb Hidden Object Scene and Church Basement
3 Musical Notes are marked in the screenshot, as is the Brass Wedge for your Inventory.
Zoom in on the wall and place the Brass Wedges to trigger a Mini Game.
Screenshot
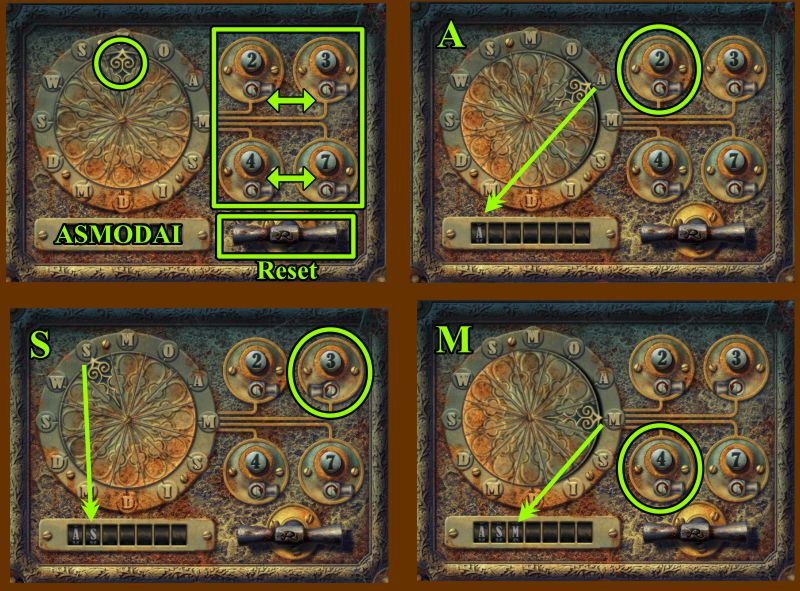
Brass Wedge Mini Game
Your goal is to spell out the word ASMODAI that was written on the picture you take as Evidence from the Secret Chamber.
To do so, you will need to move the pointer to each letter using the dials at the right.
Depending upon which way the switch underneath each dial is set, the ring will move clockwise or counterclockwise the number of spaces indicated on the dial.
There is a Reset lever if you need it.
The letters are recorded in the area at the bottom of the ring.
See the screenshots for a visual solution.
For the letter "A", click on 2.
For "S", flip the lever under the 3 and click on 3.
Press 4 to get the "M".
Screenshot
Flip the switch under the 2 left, and press 2 for the "O".
For "D", flip the switch left under the 7 and press 7.
Flip the switch left and press 4 for the "A".
For "I", change the switch under the 3 back to the right and press 3.
Turn the Reset lever to open the safe.
Screenshot
Take the Demonic Symbol and the Evidence.
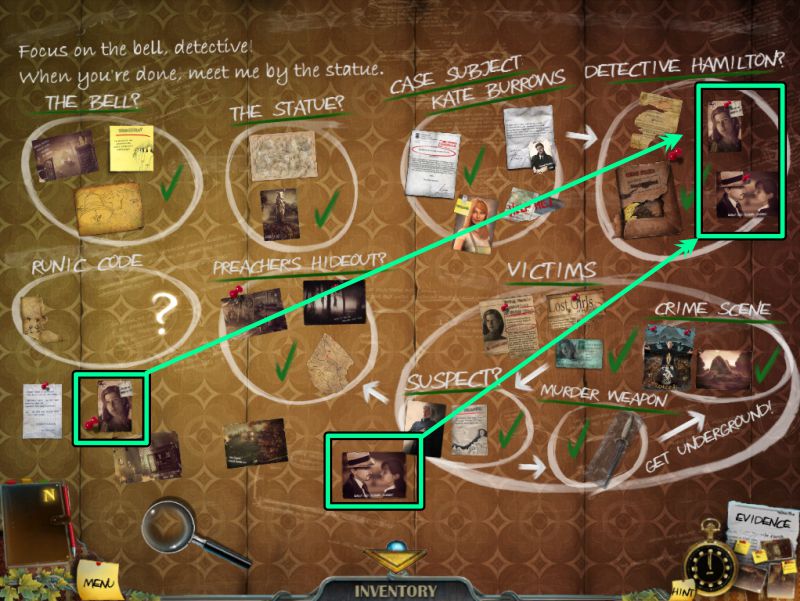
Go to the Evidence Wall.
Screenshot
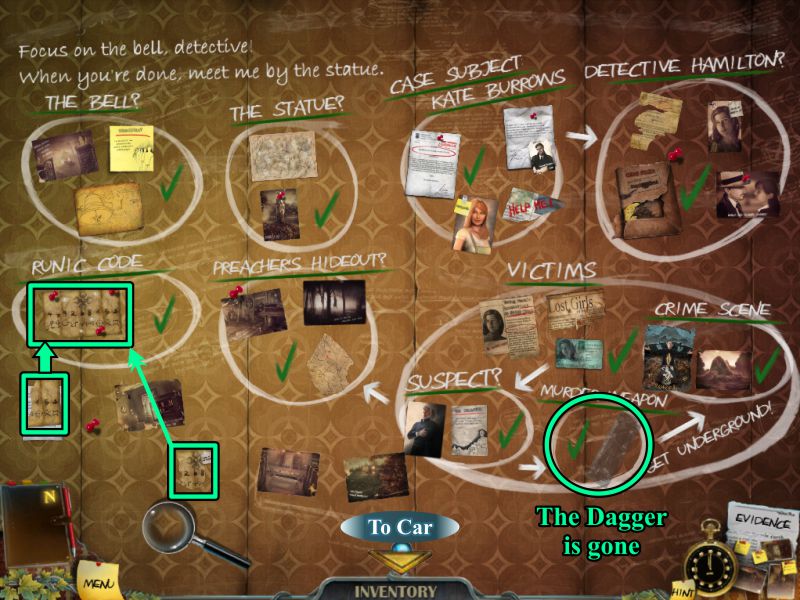
Evidence Wall
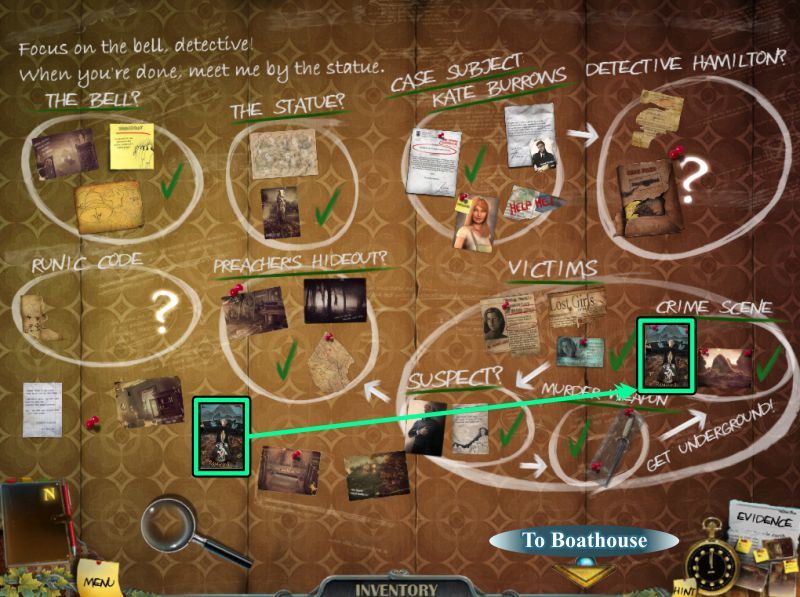
The Dagger is gone and Hamilton is suspected.
Place your Evidence to solve the Runic Code.
Exit the Evidence Wall and the Church, then go to the Car.
Screenshot
Car Hidden Object Scene
Play the Hidden Object Scene in the trunk to get an Oil Can.
Go through the Boarding House and out the back gate to the Lonely House.
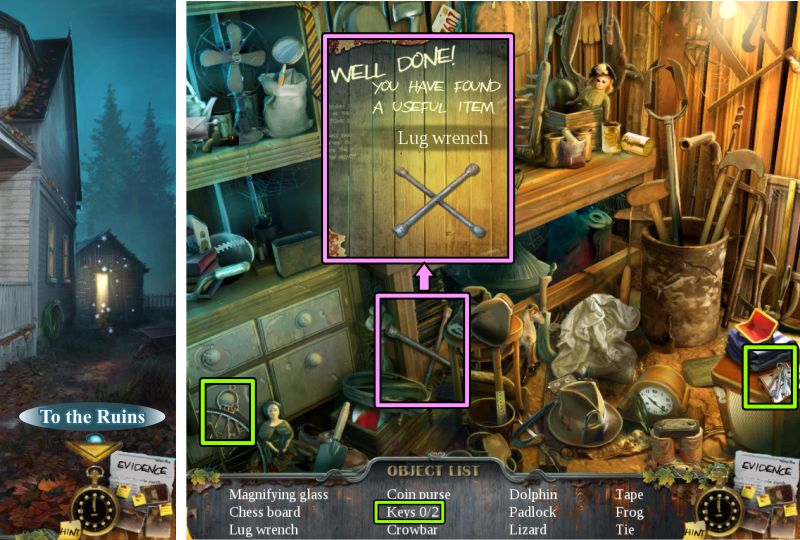
Screenshot
Lonely House Hidden Object Scene
Play the Hidden Object Scene to get the Lug Wrench.
2 Keys are also marked in the screenshot.
Go to the Ruins down the road from the farm.
Screenshot
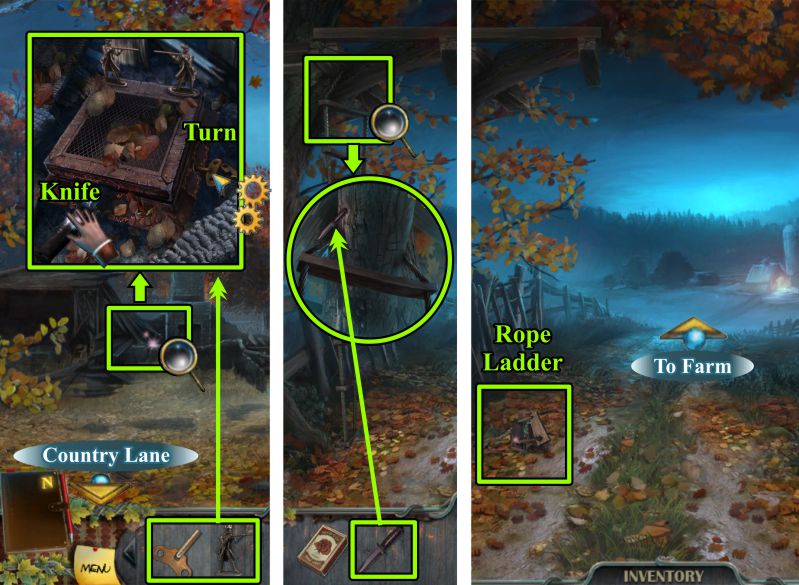
Ruins and Country Lane
Zoom in on the Ruins where you previously moved the beams and found the music box.
Place the Toy Soldier and Wind-up Key.
Turn the key and take the Knife.
Go to the Country Lane and zoom in on the Rope Ladder.
Use your Knife to cut it down, collect it from the ground and go to the Farm.
Screenshot
Farm
Zoom in on the truck tire, play the Hidden Object Scene, go to the Garage, and then the Barn.
Screenshot
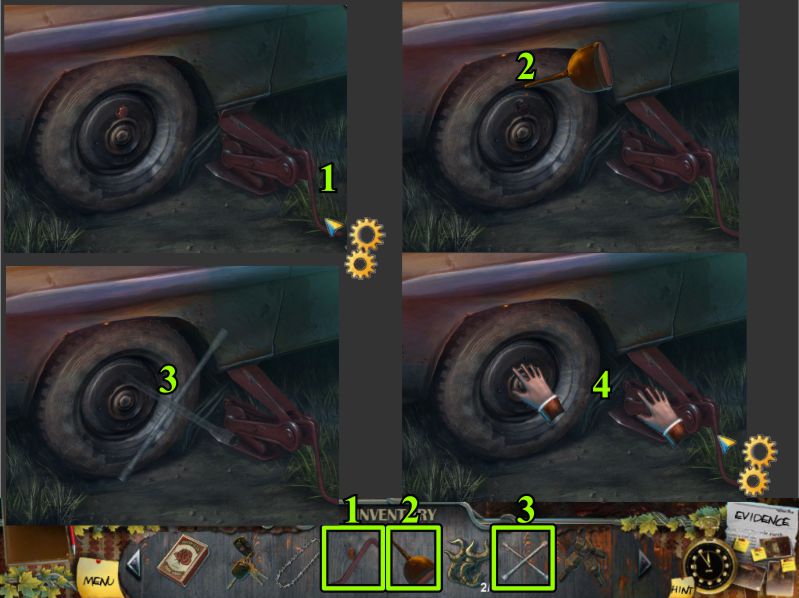
Truck Tire
Place the handle on the jack and click the handle.
Use the oil on the rusty lug bolt and remove it with the Lug Wrench.
Take the wheel, lower the jack and take it.
Screenshot
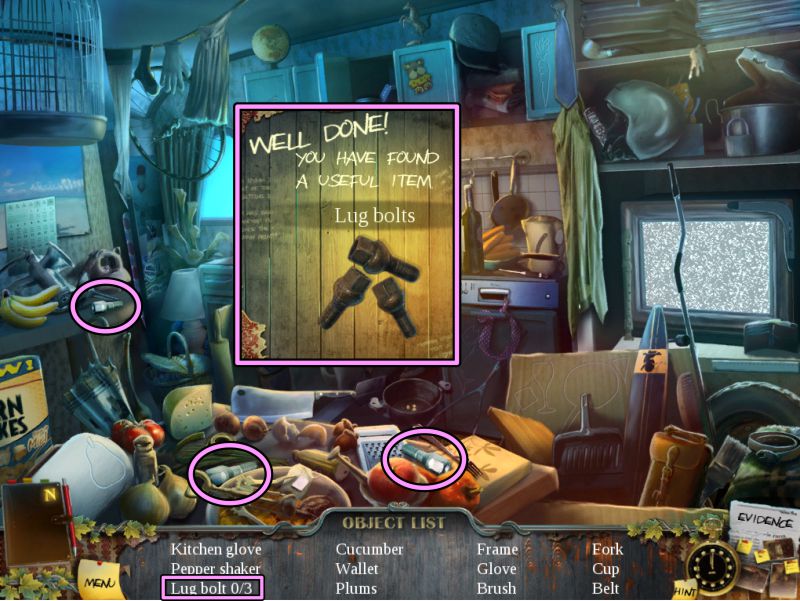
Trailer Hidden Object Scene
Take the 3 Lug Bolts marked in the screenshot for your Inventory.
Screenshot
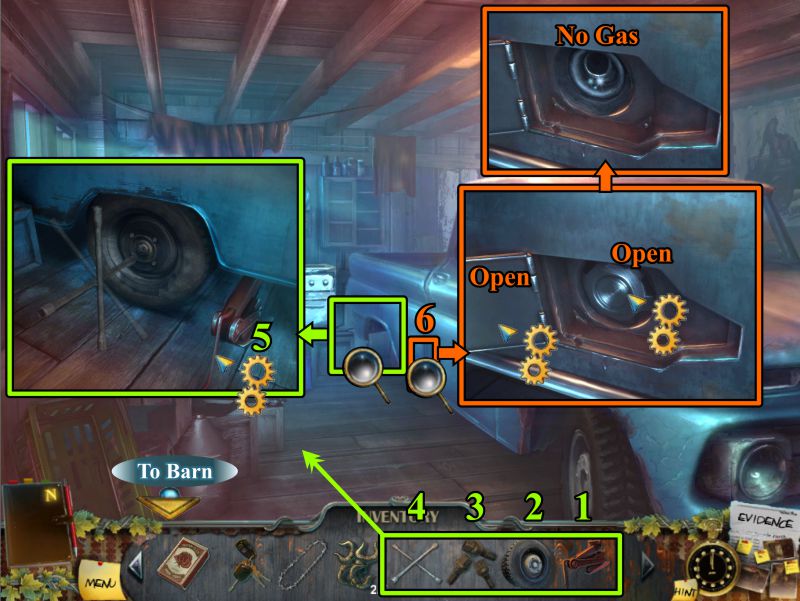
Garage
Zoom in on the back wheel and place the jack.
Raise the truck and place the wheel and lug bolts.
Tighten the lug bolts with the wrench and remove the jack.
Zoom in on the gas tank and open the flap and cap to see that there is no gas.
Screenshot
Barn
Zoom in on the Chain Saw and remove the nuts and faceplate.
Replace the broken chain with the good one in your Inventory.
Put the faceplate and nuts back, and the saw will go into your Inventory.
Play the Hidden Object Scene in the loft to get the Gas Can.
Return to the Garage.
Screenshot
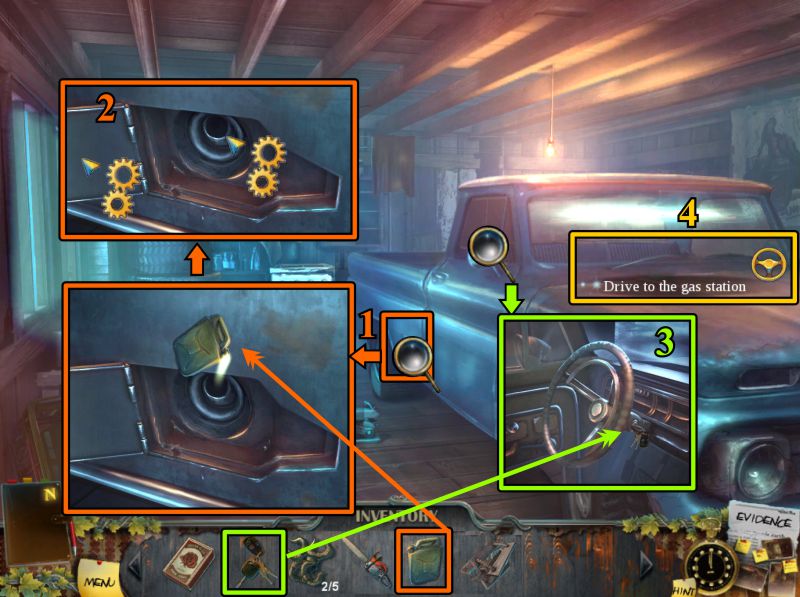
Garage
Zoom in on the gas tank, pour in the gas, and shut the cap and lid.
Zoom inside the truck, place the Keys, and click to drive to the gas station.
Screenshot
Bridge
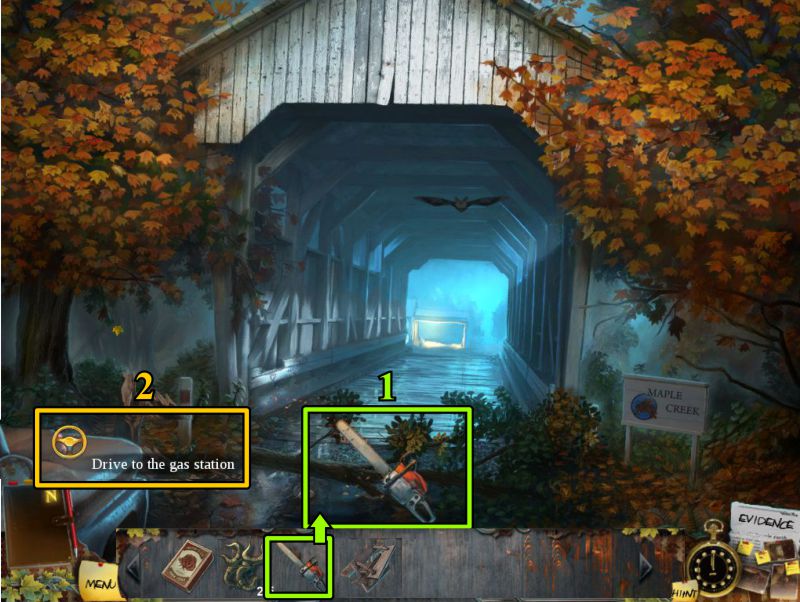
Use the Chain Saw to remove the tree branch so you can drive to the gas station.
Screenshot
Gas Station
Both Kate and her boyfriend made it to the station, so talk to them.
The boyfriend will give you a Demonic Symbol before they take off in the truck.
Go to the Church Basement.
Screenshot
Chapter 13: Dealing with Demons
Church Basement
Play the Hidden Object Scene to get the Demonic Symbol.
2 Rings are also marked in the screenshot.
Go to the Tomb in the Graveyard.
Screenshot
Tomb Hidden Object Scene
Play the Hidden Object Scene to get the Demonic Symbol.
Two Letters are also marked in the screenshot.
Go to the Boathouse.
Screenshot
Boathouse and Mysterious Place
Sail the boat to the other side of the Lake and go toward the Stones.
Zoom in on the stone, use your Scraper to remove the rest of the foliage, and place the Demonic Symbols.
Press the Runic Symbols in the order shown in the screenshot, as shown in the note below.
The underground entrance will open, so attach your rope ladder and descend to the Chamber.
Screenshot
Ante-Chamber
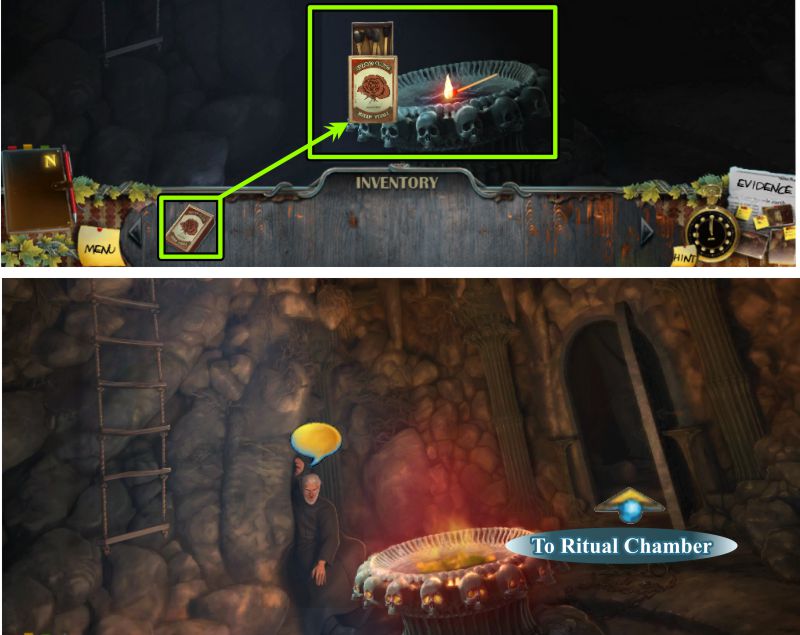
It's too dark to see, but there are some wood sticks in the offering, so light them with your matches.
The Preacher is there, so talk to him before going to the Ritual Chamber.
Screenshot
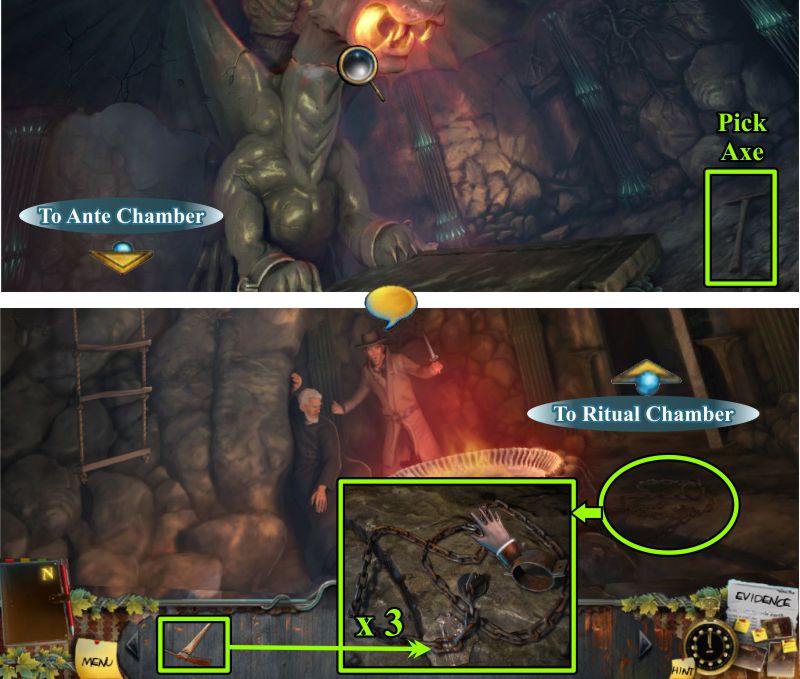
Ritual and Ante-Chambers
Note the Demon with the weak spot on his neck, and take the Pick Axe.
Return to the Ante-Chamber to find Hamilton there.
Talk to him, and he will go to the Ritual Chamber.
Zoom in on the Chain and use your Pick Axe 3 times so you can free it and collect it.
Return to the Ritual Chamber.
Screenshot
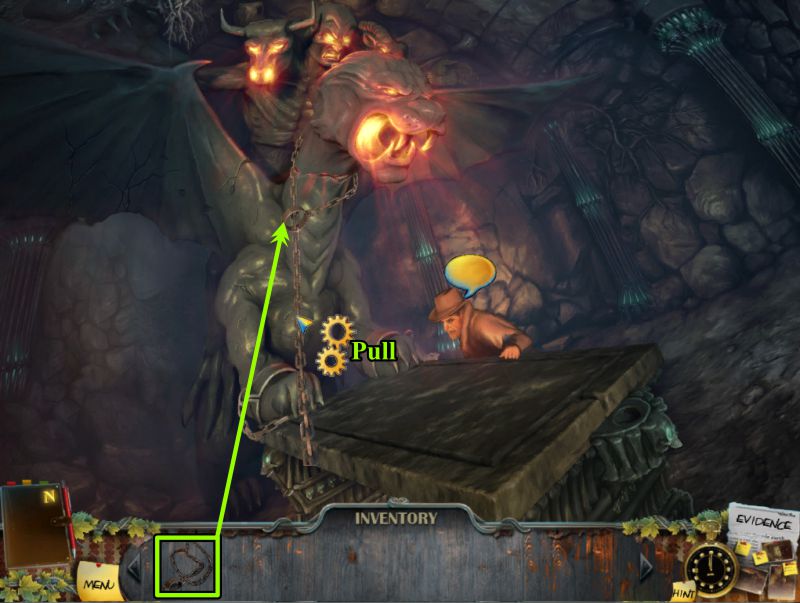
Ritual Chamber
Lasso the Demon with the Chain. Listen to Hamilton before you pull on the Chain.
Watch the cut scene.
Screenshot
Congratulations, you have completed Enigmatis: The Ghosts of Maple Creek, but the story isn't over since Hamilton and the Preacher both escaped.
Posted by: Jazz |
September 6, 2011 4:14 PM
|
September 6, 2011 4:14 PM