
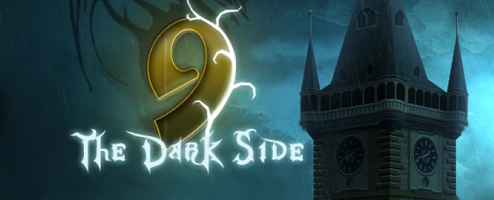
9: The Dark Side
Platform: Windows
![]() Dark, grim, and filled with ghosts. Yes, that's what most adventure/hidden object hybrids seem to be these days. But that's not necessarily a bad thing, especially if it's done really, really well. There's a new developer out there, Play Favorite Games, that has taken up the challenge and done just that with 9: The Dark Side, a spooky exploration of a cursed castle and town that delivers just about every bell and whistle you could ask for.
Dark, grim, and filled with ghosts. Yes, that's what most adventure/hidden object hybrids seem to be these days. But that's not necessarily a bad thing, especially if it's done really, really well. There's a new developer out there, Play Favorite Games, that has taken up the challenge and done just that with 9: The Dark Side, a spooky exploration of a cursed castle and town that delivers just about every bell and whistle you could ask for.
 You play the Last Descendant of the Guardians, a group that returned from the crusades in order to wrest control of an evil artifact from a mysterious organization known as The Clan of the 9. Before they could storm the castle where the nine dwelt, the nine managed to use the artifact to open the way to a mysterious darkness which wiped out the Guardians and poisoned the nearby town of Prague. Unfortunately, the nine couldn't control the darkness either and they went the way of the dodo, leaving what was left of the local population to face the darkness with tragic results. With the help of ghosts of both Guardians and (surprisingly) some of the nine, your mission is to solve the mystery of the missing amulet and seal off the dark side forever.
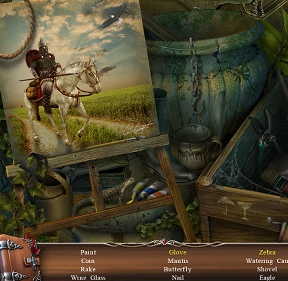
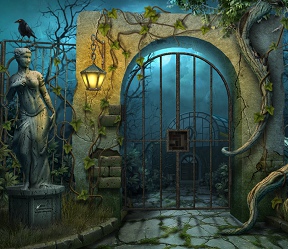
Point and click your way through the castle, its grounds, and then the town with the help of a changing cursor to accomplish your mission, both helped and hindered by various supernatural creatures. Included are the usual tools: a bottom-loading inventory, a refilling hint feature, and a really useful notebook which records the story and clues you find along the way. Another feature has also been added: a blazing red jewel that can be used in certain areas to discover the nine's hidden runes which can attack evil creatures or reveal hidden treasures. Along with a plethora of mini-games and puzzles there are a multitude of hidden object scenes to plow through which feature many different types of interactivity. The standard sparks, sparkles, and hints will help you along your way depending upon which mode you play.
 Analysis: Play Favorite Games bursts upon the casual gaming scene with a fantastic adventure hybrid that has everything you could want and more. A stunning mix of clear, sharp visuals, intricate and involving puzzles, interesting and interactive hidden object scenes, multiple modes of play, and more. For all those flooding the market with supernatural adventures these days, this is how you do it right.
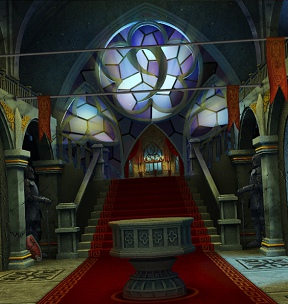
Atmospherically, 9: The Dark Side rises above the pack on the combination of visuals, sound, and animations. The backgrounds are amazingly crisp and gorgeous even in the "dark" areas. Sweeping music imbued with haunting choral pieces set the mood of every scene and are only enhanced by the incidental sounds appropriate to each locale. Animations range from benign creatures like cats, mice, birds and other local wildlife to the ghosts, many of whom are trapped by the curse, to the jump-scares provided by the less benign spirits, demons and an amazingly life-like (if they were actually real) werewolf. Rounding out the experience are some surprisingly competent voice overs to bring the various characters to life. All together the developers have created a fantastic atmosphere to set the story.
 Play Favorite Games has paid equal attention to the gameplay making for a dense, challenging, interactive experience. The various twists in the hidden object scenes prevent them from becoming "more of the same", and there are a plethora of mini-games and puzzles to be found everywhere. Many are variations on the familiar, but have been ramped up with more difficulty or multi-level play. Although there is no map to help you along with your wandering (and there is a lot of wandering to be done) the standard notebook contains a helpful objectives tag to keep track of the multiple goals you encounter along the way. Three modes of play insure that the experience can be fun and exciting for a wide range of gamers.
Yes, the story has been done before, and is a little unfocused at points, but with the amazing atmosphere and engrossing gameplay on display it's a minor flaw. What 9: The Dark Side delivers in spades is a hefty gaming experience enhanced with stunning visuals that will keep you involved for hours. Can you save Prague from the darkness? It's definitely worth playing to find out!
A Collector's Edition is also available. It includes the soundtrack, wallpapers, concept art, extra gameplay, and an excellent integrated strategy guide. Remember that Big Fish Game Club Members pay only $13.99 for Collector's Editions (or 2 club credits), and collector's editions count 3 card punches of 6 total needed for a free game.
![]() Windows:
Windows:
Download the demo
Get the full version
Also available: Collector's Edition
![]() Mac OS X:
Mac OS X:
Not available.
Try Boot Camp or Parallels or CrossOver Games.


Walkthrough Guide
(Please allow page to fully load for spoiler tags to be functional.)
9: The Dark Side Walkthrough
Chapter 1
Entryway
Take the Stone Star on the ground beside the end of the right railing.
Click the pile of leaves behind the railing to zoom in.
Click the leaves to remove them, then take the revealed Tile underneath.
Place the Stone Star in the wall impression under the left torch.
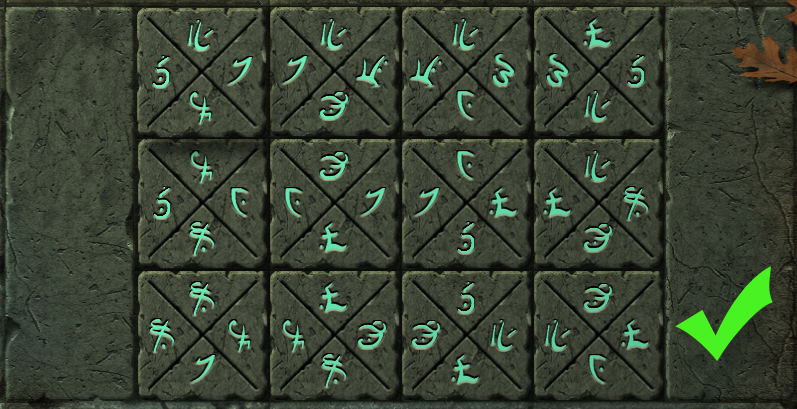
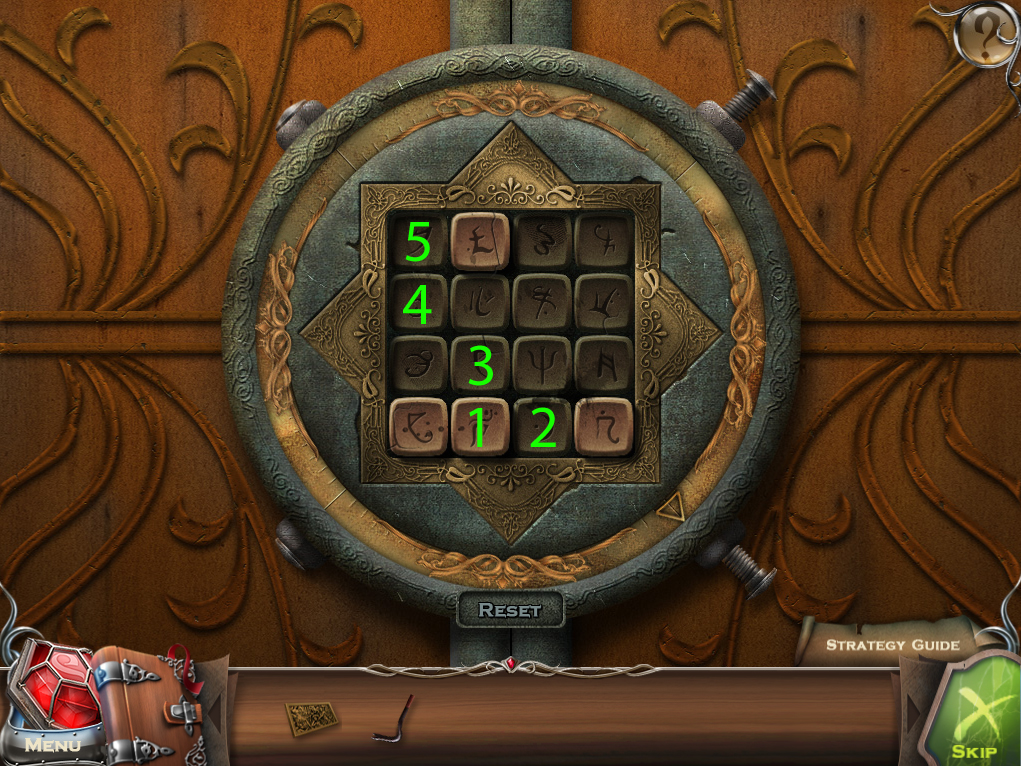
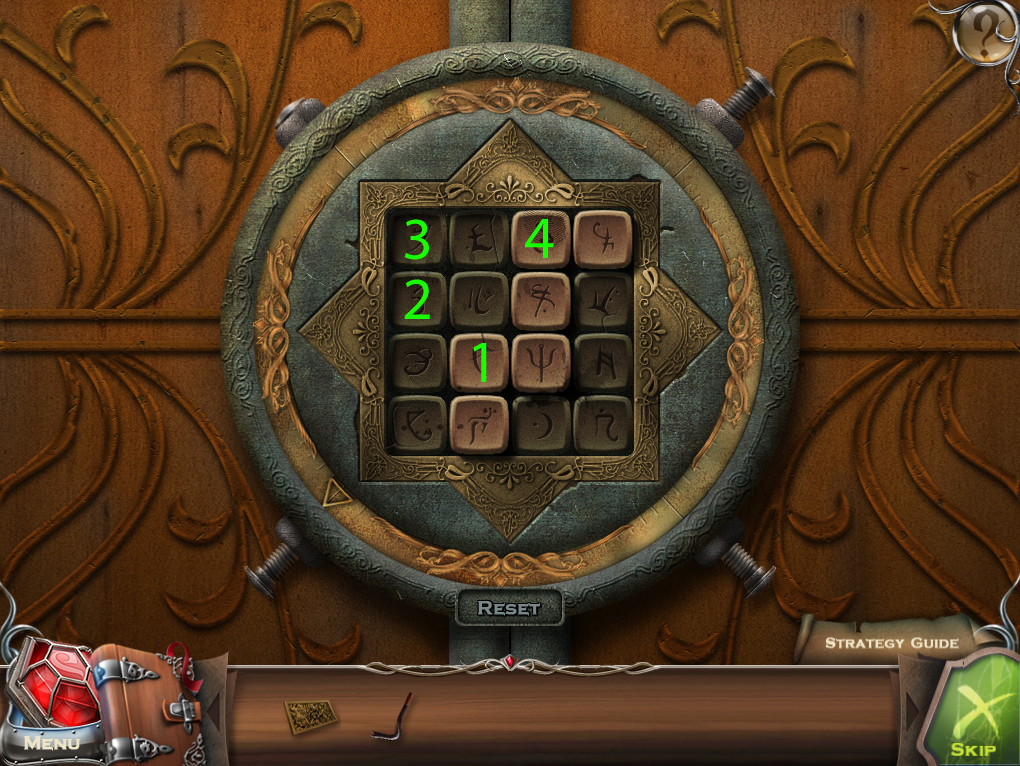
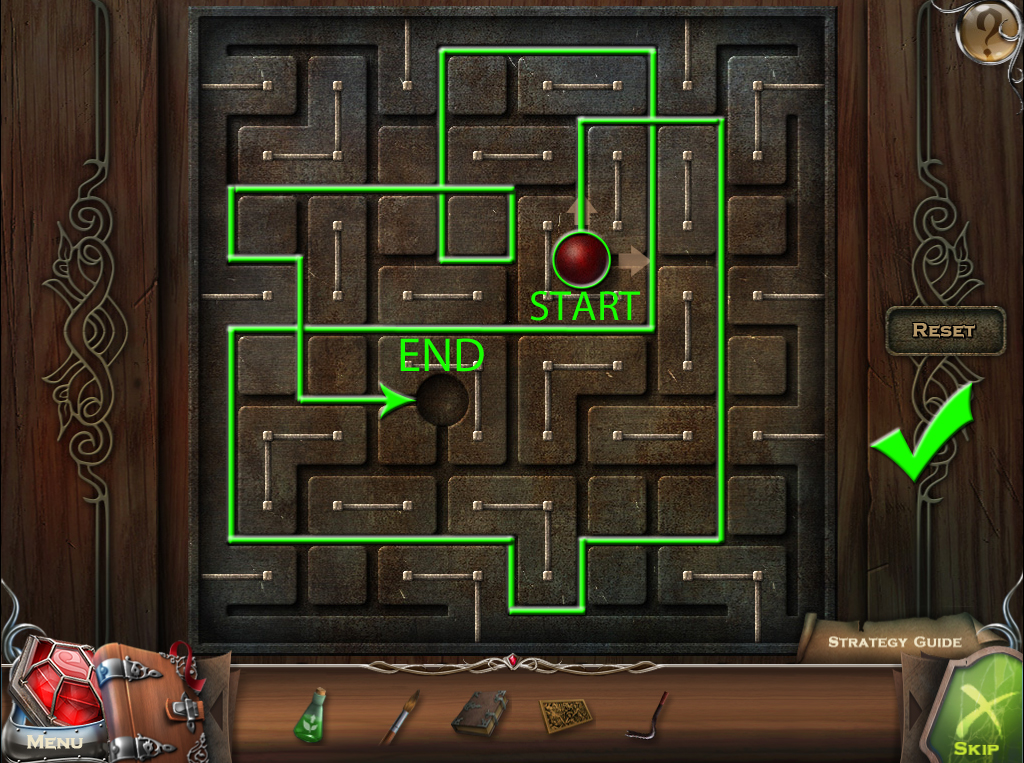
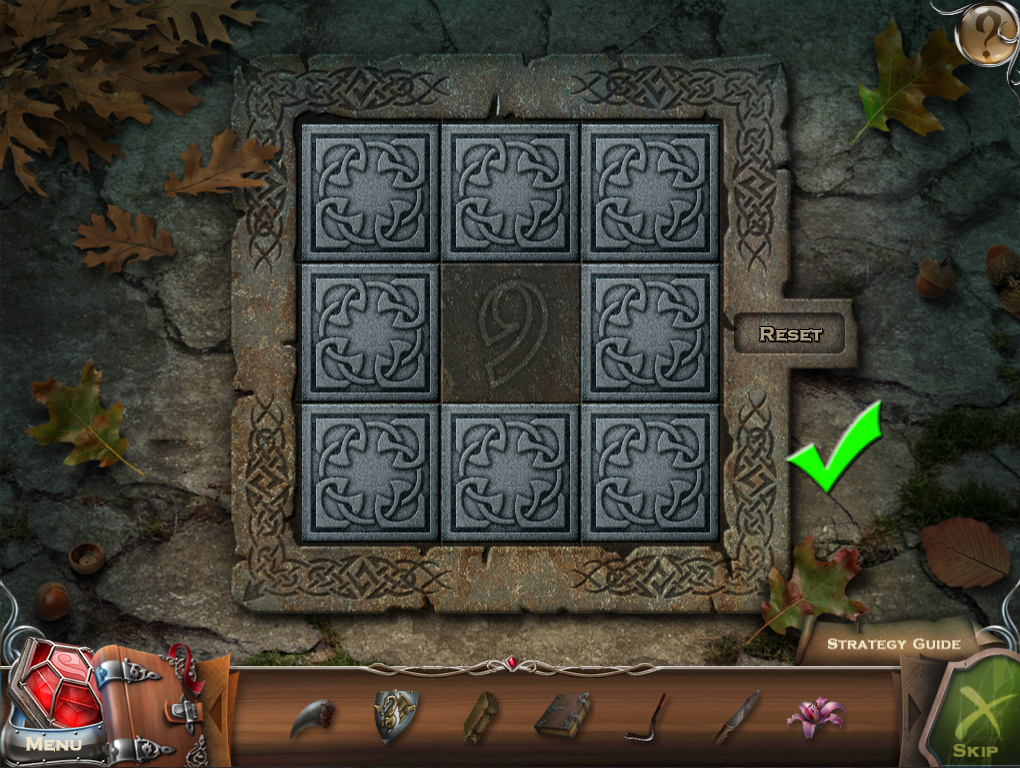
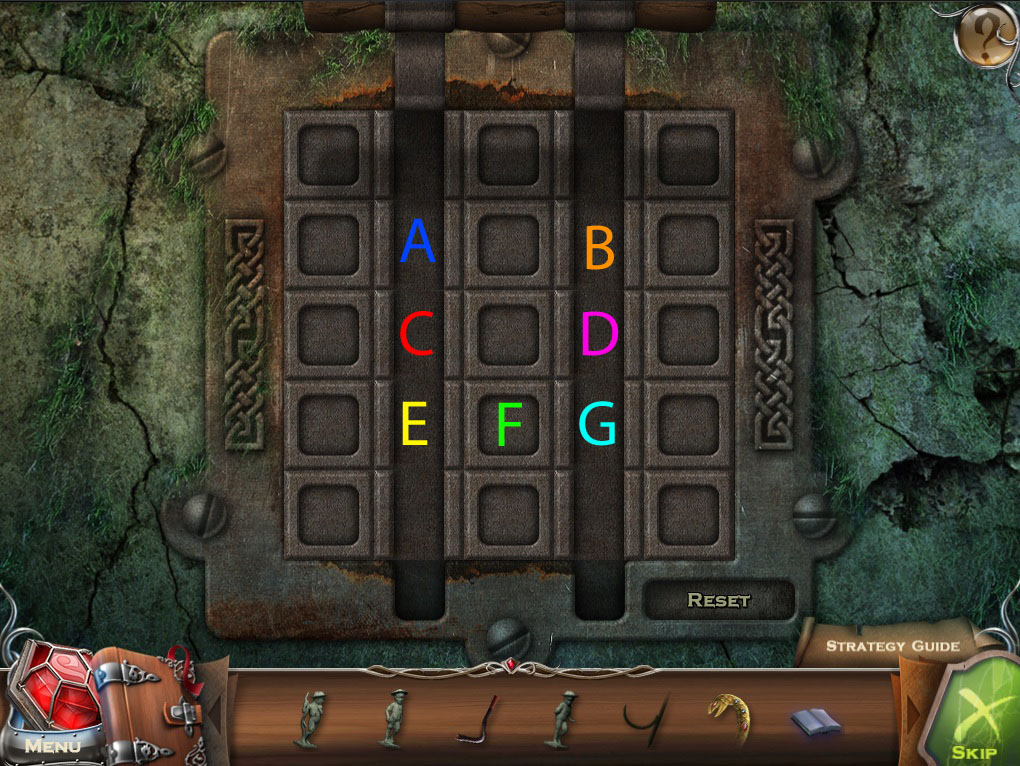
Place the Tile onto the square grid on the floor to start the puzzle.
Arrange the square tiles on the grid so that tiles next to each other to the left, right, up, and down have matching symbols.
Solution.
Go down the stairs to the Vault.
Vault
Take the Crowbar beside the hoist mechanism.
Use the Crowbar on the cache at the side of the stairs to open it.
Click the cache to look inside.
Click the scroll to add it to the Story section of the Diary.
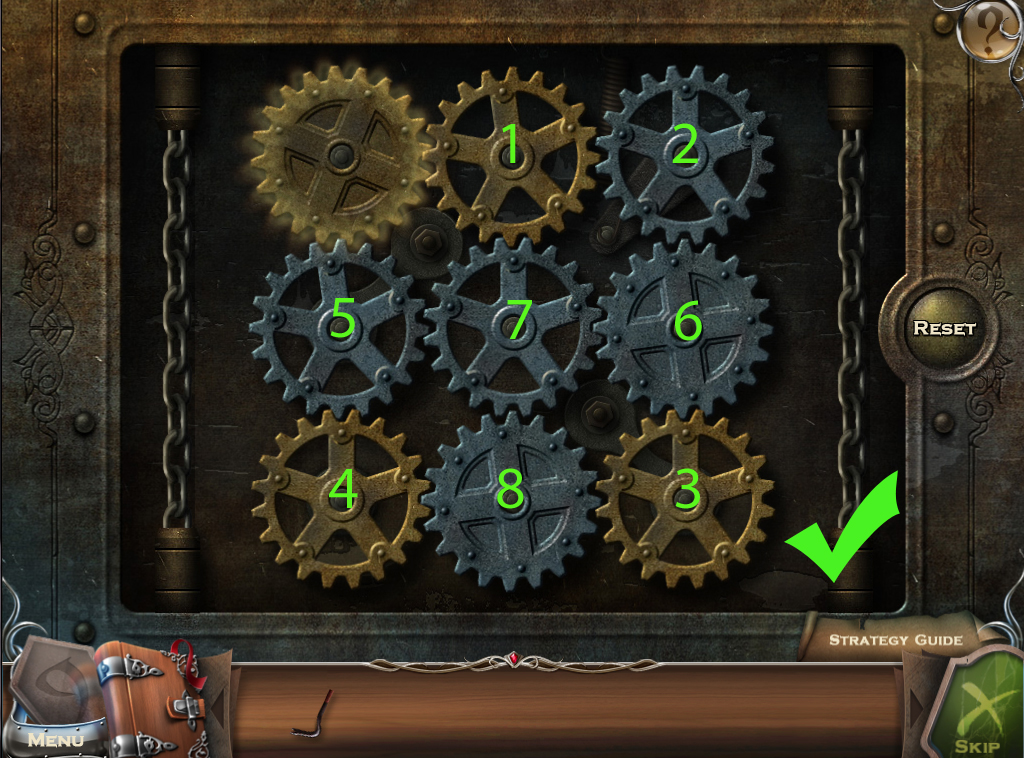
Click the junk on the lower shelf to move it aside, revealing the Gears.
Place the Gears into the hoist mechanism to start the puzzle.
Click the gears in order by matching shape or color until all the gears are rotating.
Solution.
Go through the open gateway to the Treasure Room.
Treasure Room
Click the barrel on the right to look inside and take the Valve.
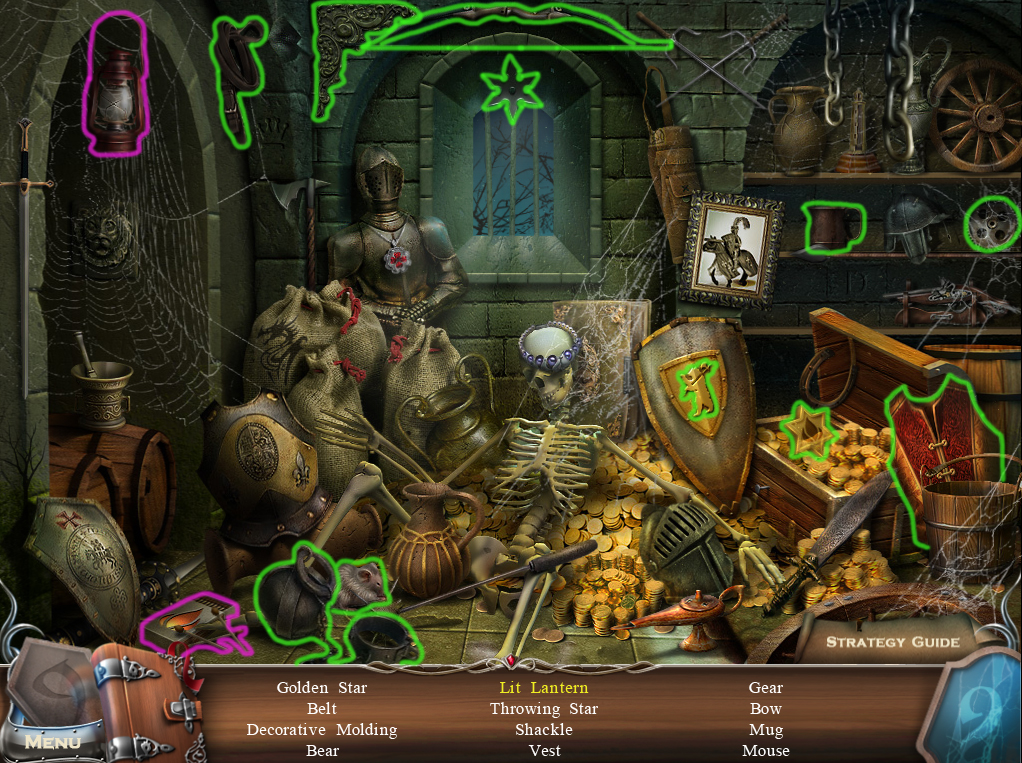
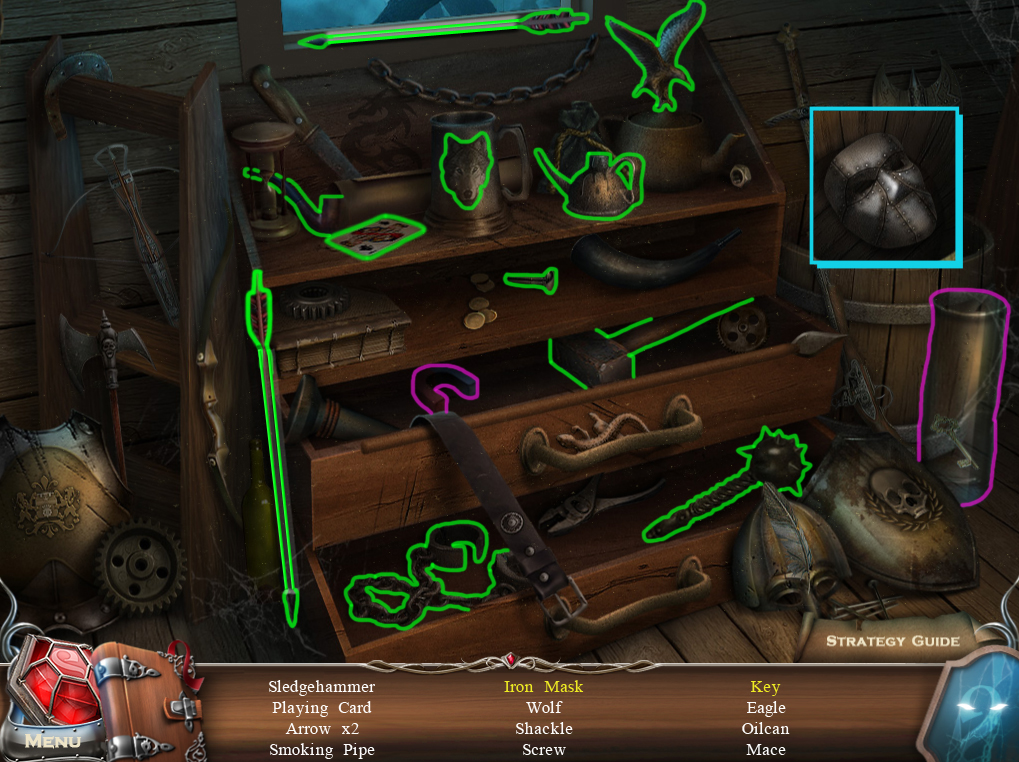
Click the skeleton on the pile of treasure to start the hidden object scene.
Use a match from the matchbox on the lantern to make it a Lit Lantern.
Screenshot
Once the hidden object scene is complete, you will receive a Golden Star.
Take the Star Frame 1/2 on the floor in front of the tablet.
Go back to the Entryway.
Entryway
Click the stone pedestal in front of the fire trap to zoom in.
Place the Golden Star into the imprint on the pedestal.
Continue forward to the Guarded Doorway.
Guarded Doorway
Take the Battle Axe lying on the red carpet.
Use the Crowbar on the vase on the pedestal.
Click the broken vase to zoom in and take the Lion Statuette.
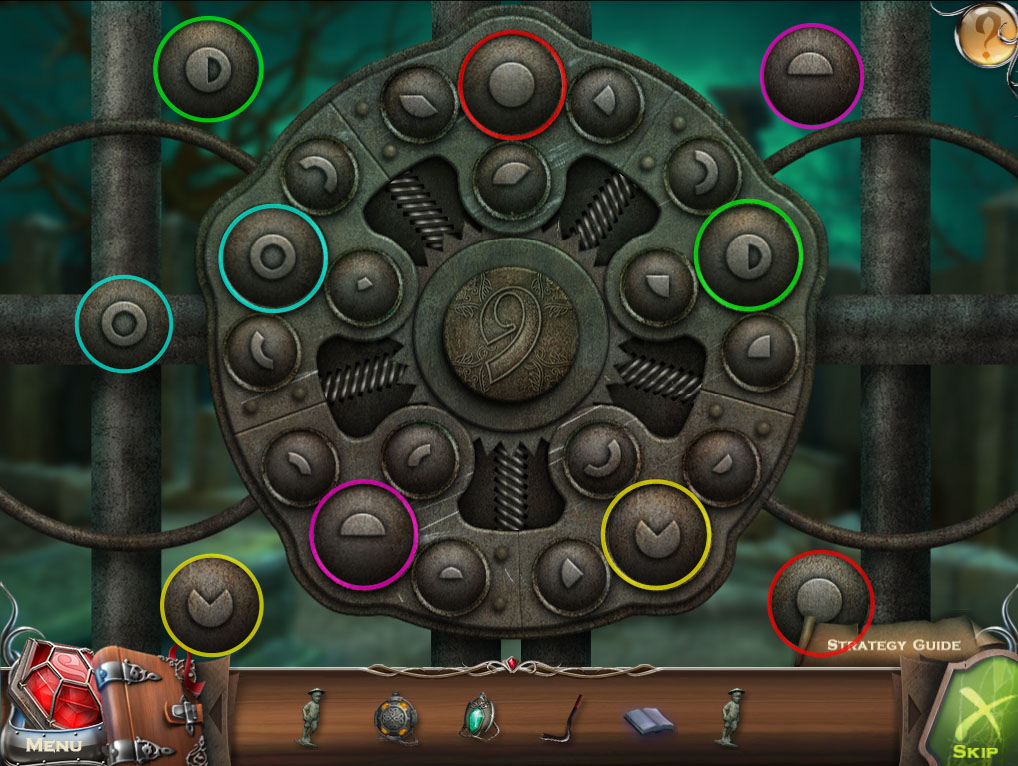
Click the chest of the right knight guarding the door to zoom in and take the Amulet.
Use the Amulet to uncover the 6 symbols hidden around the room.
Screenshot
After all the symbols are collected, press the 9 on the block in the wall.
Place the Lion Statuette into the key space in the wall.
Take the Golden Arrow, then read the scroll with the recipe to the potion ingredients.
Click the lock in the middle of the large double doors for a closer look.
Place the Golden Arrow into the lock to start the puzzle.
Switch the position of the blue and violet gemmed arrows.
Click an arrow to move it forward into an empty space, or to hop over an arrow of the opposite color into an open space.
Solution
Go back to the Vault.
Vault
Use the Battle Axe to smash through the chained doors.
Go through the open doorway into the Torture Chamber.
Torture Chamber
Take the Sledgehammer underneath the chair.
Click the cabinet to start the hidden object scene.
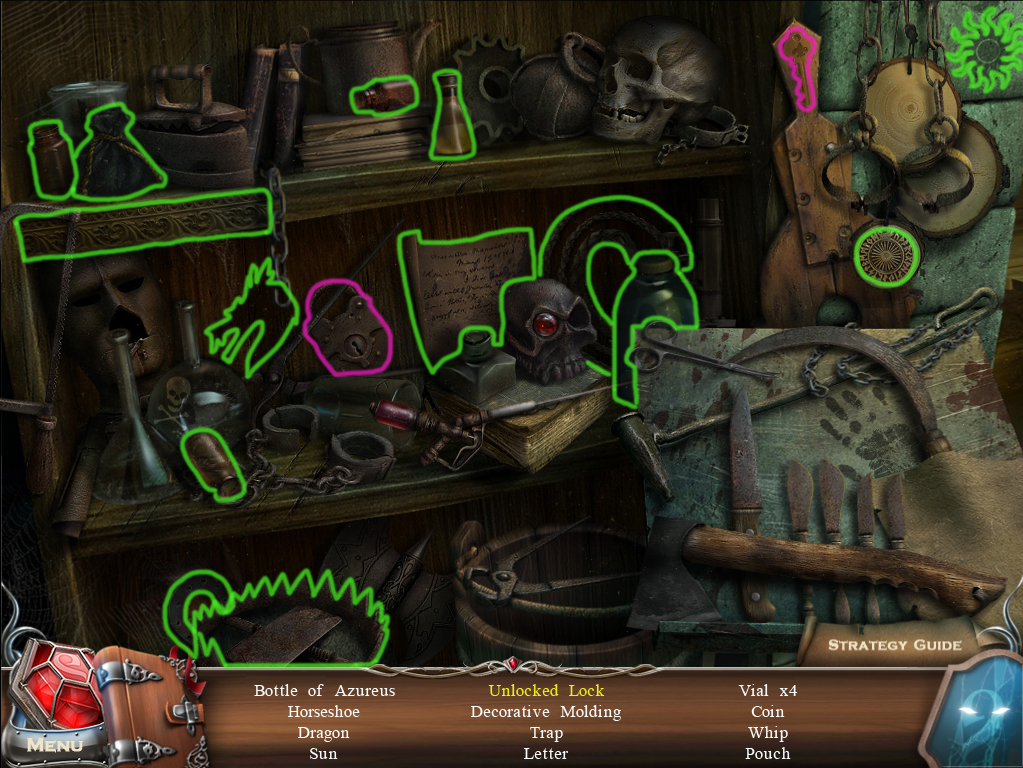
Use the key on the padlock to make it an Unlocked Lock.
Screenshot
Once the hidden object scene is complete, you will receive a Bottle of Azureus.
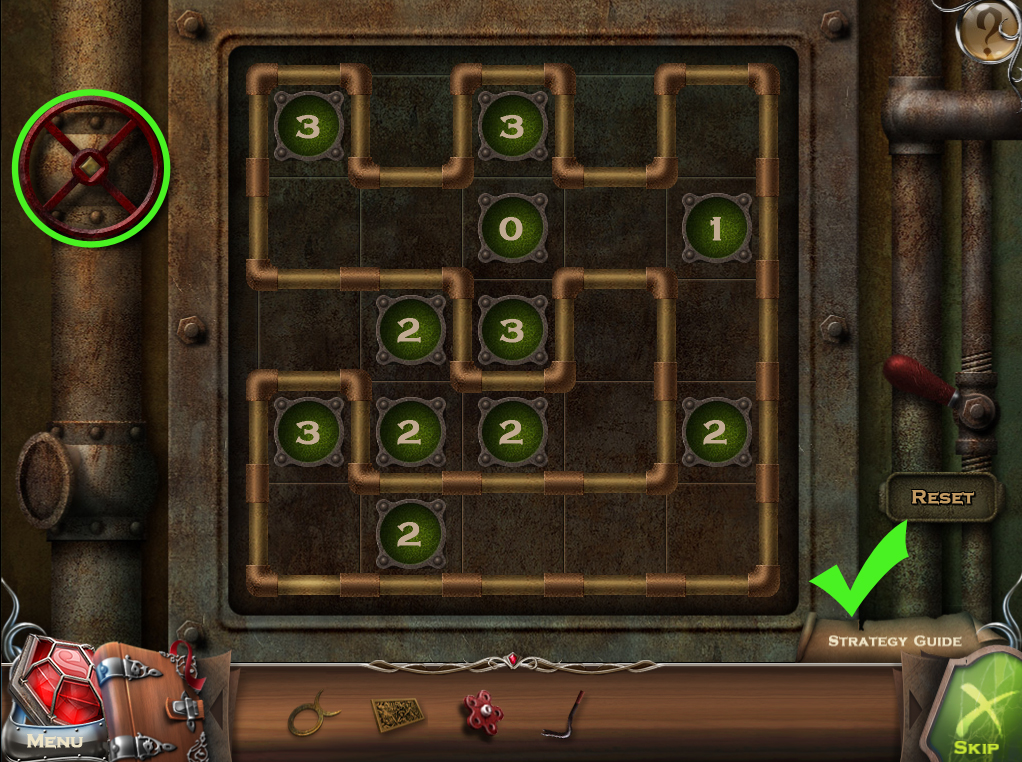
Click the boiler to the right of the barrels to start the puzzle.
Create a single connected pipeline that touches the borders of each numbered tile no more or less than the amount shown on the tile.
e.g. A tile with the number 3 in the middle must have three sides that are surrounded by the pipe, and the green tile numbered 0 must have no sides touching any part of the pipe.
Click the valve when you have found the correct solution.
Solution
Click the chemistry set on the table to zoom in.
Take the Ancient Symbol underneath the locked cabinet.
Click the paper to read the reagent note.
Place the Bottle of Azureus over the blue ring stain on the table.
Put the Valve at the bottom of the chemical mixer.
Return to the Treasure Room.
Treasure Room
Click the engraved square tile on the floor to zoom in.
Place the Ancient Symbol into the matching space on the tile.
Take the Bottle of Viridis from the revealed cache.
Use the Sledgehammer on the bricked wall to smash it down.
Go back to the Torture Chamber.
Torture Chamber
Click the chemistry set on the table to zoom in.
Place the Bottle of Viridis over the green stain on the table.
Follow the recipe from the potion ingredients scroll by pouring the vials into the tanks to complete the reagent mixture.
One parts Rubeus (red) in the center tank.
Three parts Viridis (green) in the left tank.
Two parts Azureus (blue) in the right tank.
Click the valve to mix all of the liquids together.
Use the empty vial on the shelf on the mixture to take the Revealing Potion.
Return to the Treasure Room.
Treasure Room
Click the tablet at the bottom of the broken wall for a closer look.
Use the Revealing Potion on the tablet's plaque to reveal the four glowing symbols.
Go back to the Vault.
Vault
Click the grate under the stairs to zoom in.
Use the Crowbar to remove the grate, then take the revealed Token 1/2.
Continue forward to the Torture Chamber.
Torture Chamber
Click the chest on the floor to the right of the chair to zoom in.
Enter in the combination found on the plaque in the Treasure Room.
Solution
Click the open chest to look inside and take the Token 2/2
Go back to the Entryway.
Entryway
Click the chest on the floor for a closer look.
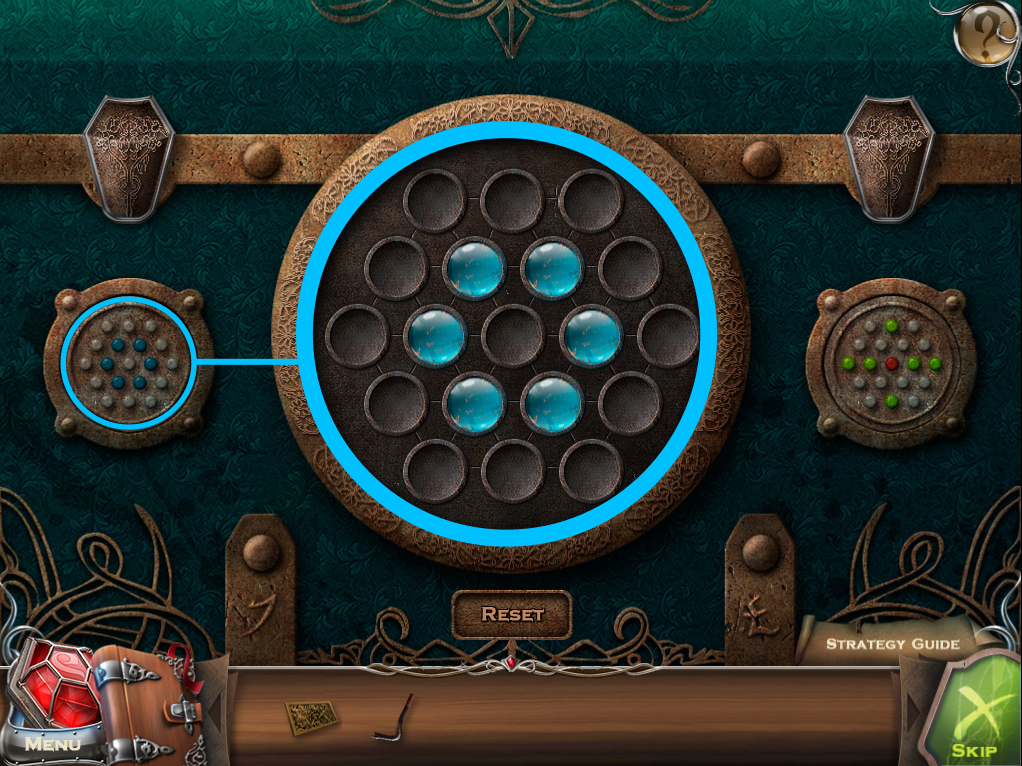
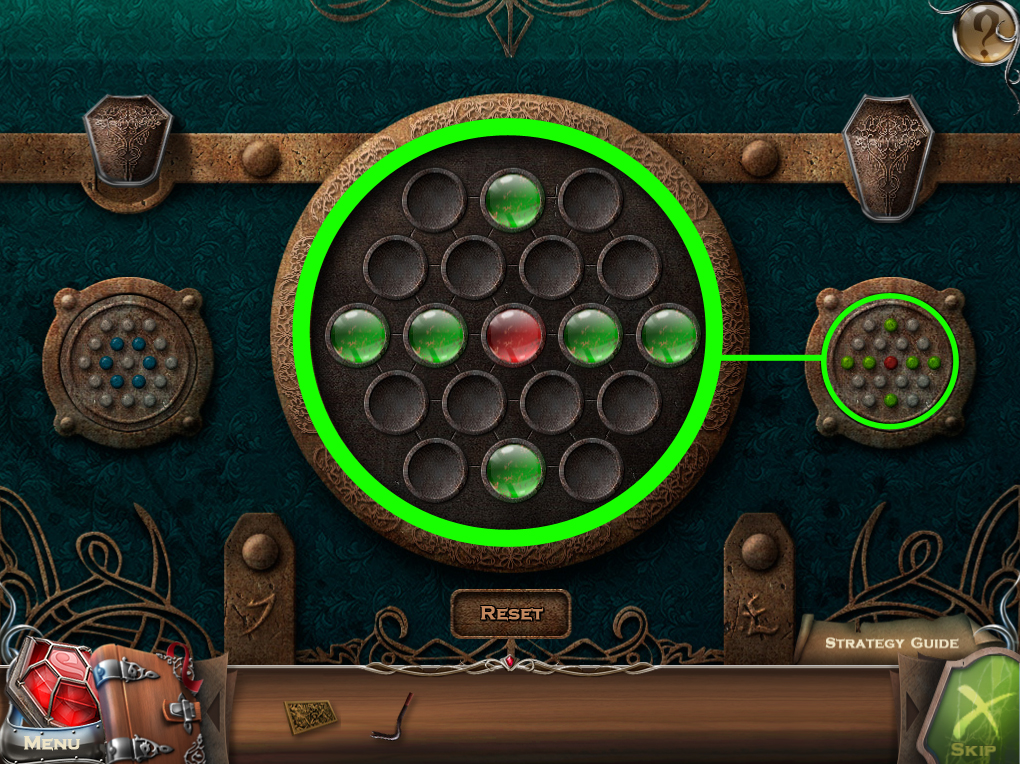
Add the two Tokens to the circular spaces at the sides of the chest to start the puzzle.
Rotate the gems in the center disc to match the images of the left token and then the right token.
Solution #1
Solution #2
Once the puzzle is solved, click the open chest to start the hidden object scene.
Use the paintbrush on the can of red paint, then use the brush on the paper to paint the Red Flower.
Click the clay pot to look inside and find the Gems.
Screenshot.
Once the hidden object scene is complete, you will receive the Gems.
Continue forward to the Guarded Doorway.
Guarded Doorway
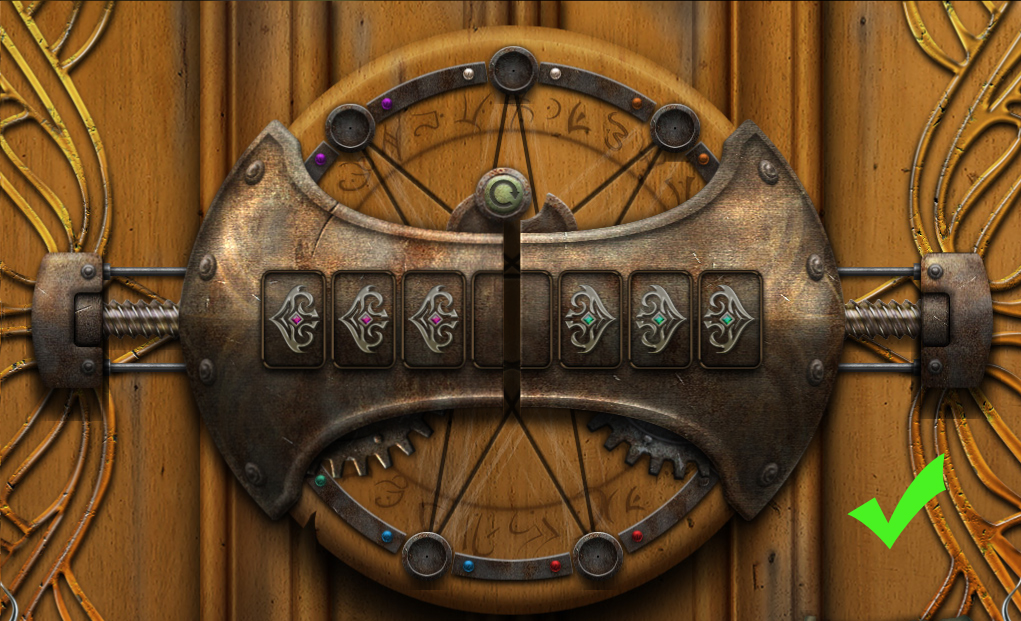
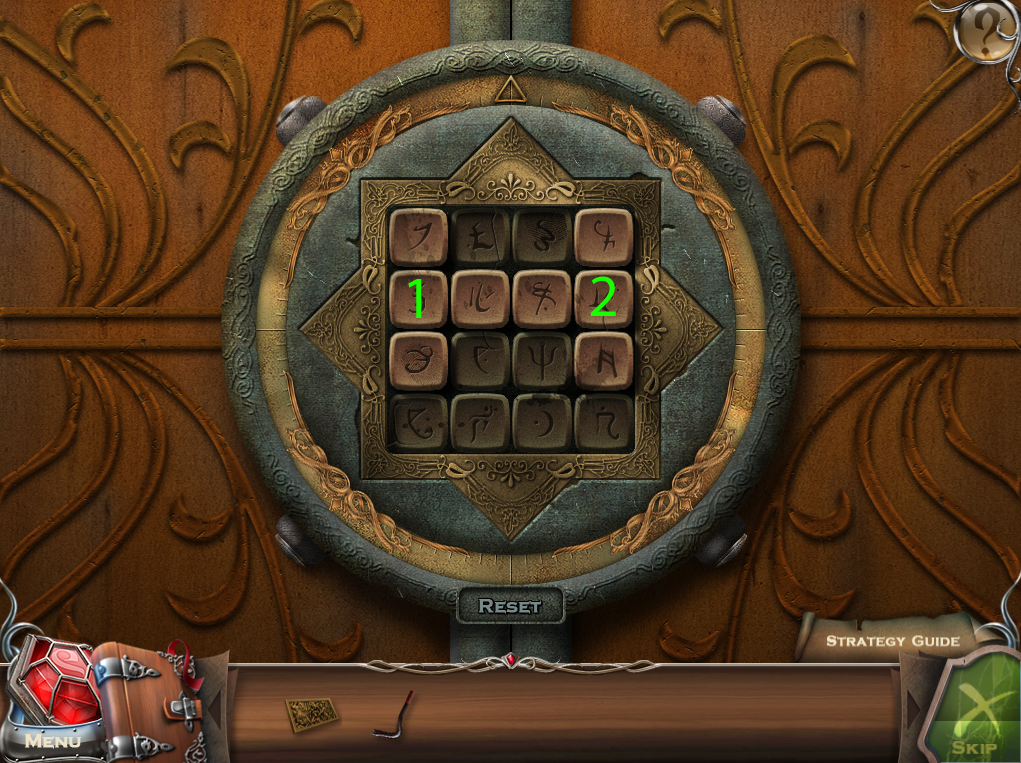
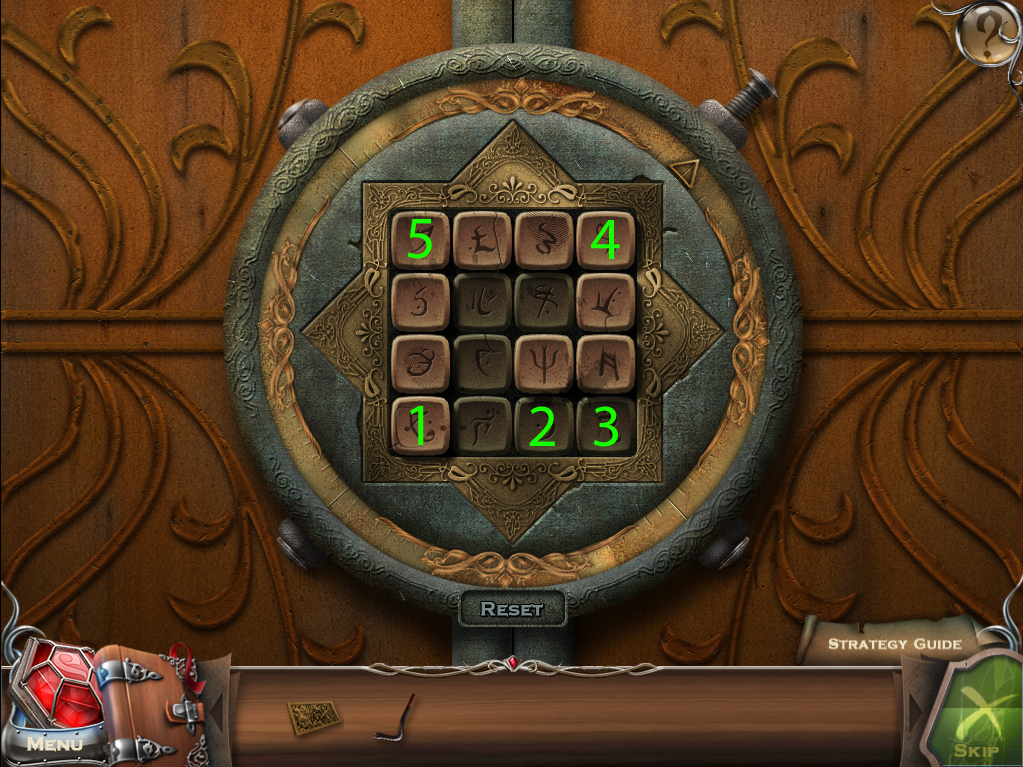
Click the lock on the double doors for a closer look.
Place the Gems into the star to start the puzzle.
Arrange the gems into the slots with matching color stones.
Click a gem to move it along the lines of the star into an empty slot; each slot has two possible paths to it.
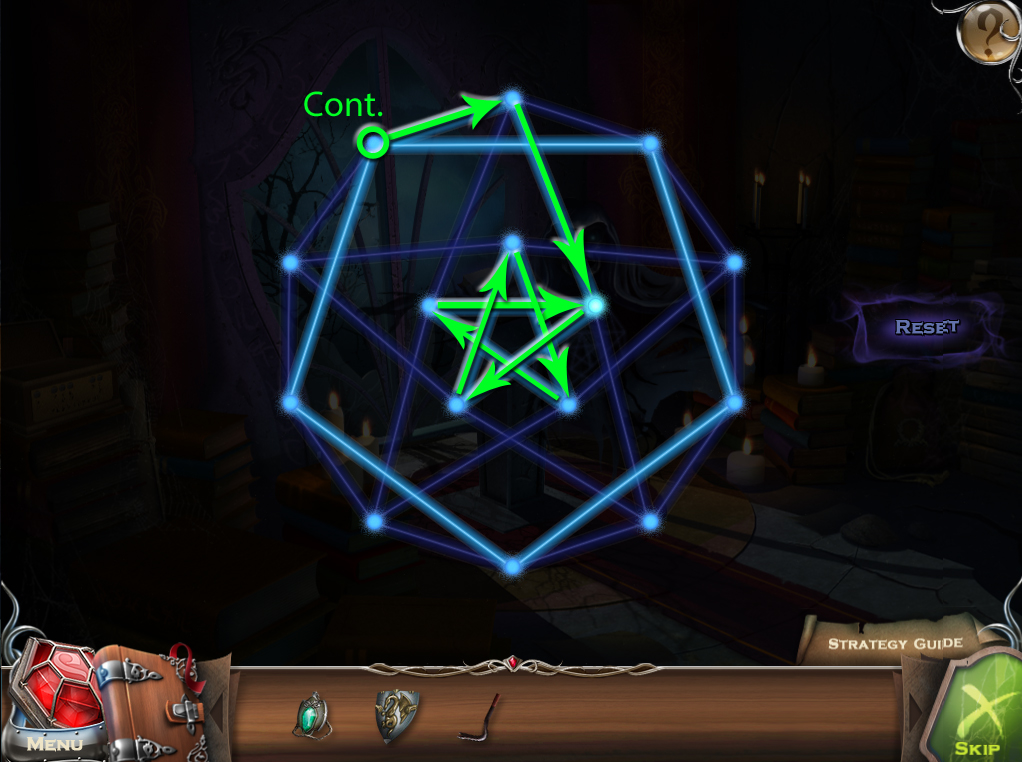
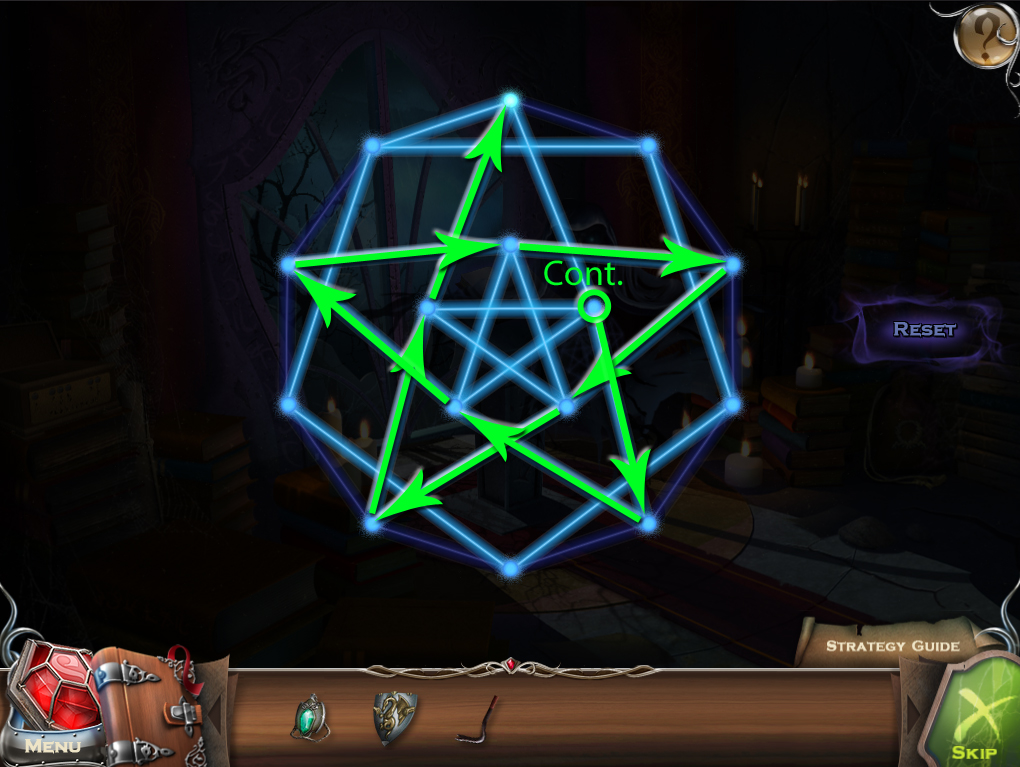
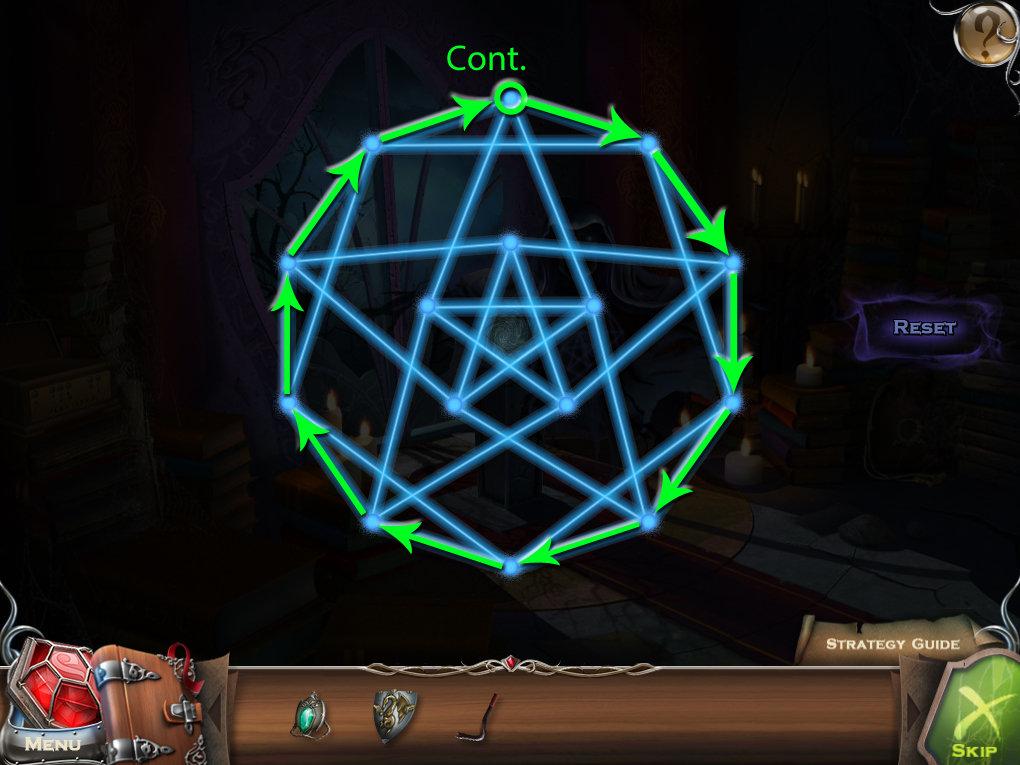
This puzzle can be solved by following a cycle of clicking the gem slots in order of: 9, 5, 1, 6, 2, 7, 3, 8, 4 until each gem is in the proper slot.
Solution
Go through the open door into the Great Hall.
Chapter 2
Great Hall
Click the left knight to zoom in and take the Shield.
Go right to the Garden Gates.
Garden Gates
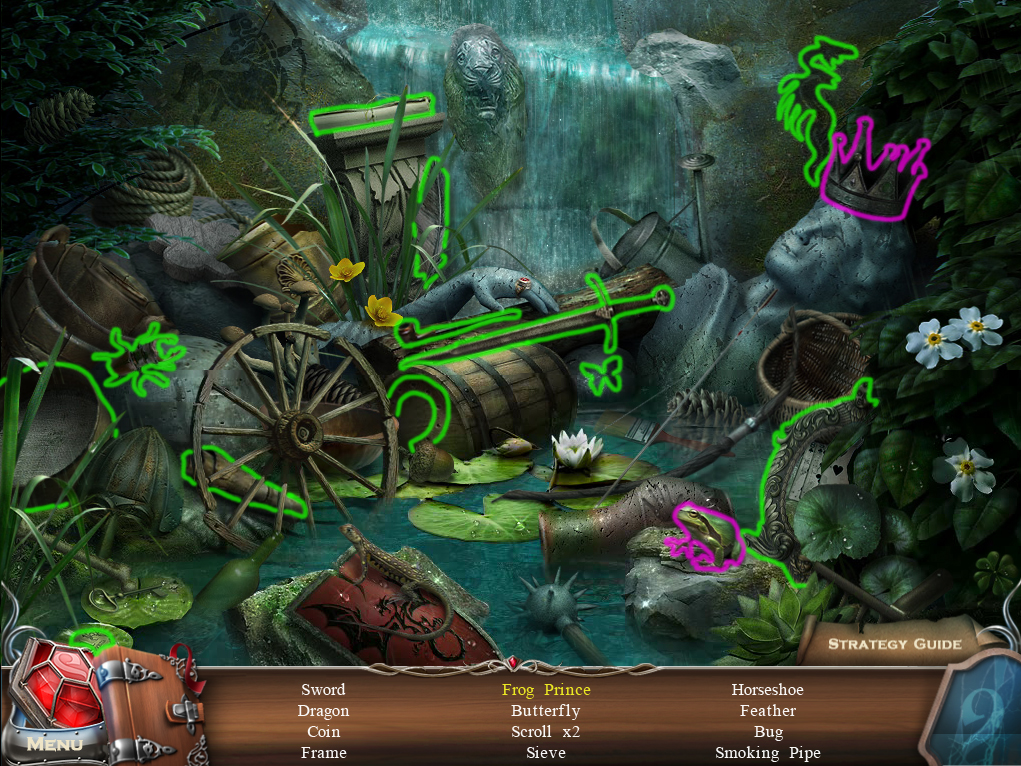
Click the broken right statue to start the hidden object scene.
Place the crown on the frog to make him a Frog Prince.
Screenshot.
Once the hidden object scene is complete, you will receive the Knight's Sword.
Go back to the Treasure Room, then go through the broken wall to the Catacombs.
Catacombs
Place the Shield in the petrified knight's left hand and the Knight's Sword in his right hand.
Take the Tear of Bloodshed dropped on the ground by the defeated red phantom.
Return to the Garden Gates
Garden Gates
Click the left statue to zoom in.
Place the Tear of Bloodshed into the pendant around the statue's neck.
Receive the Tear of Bloodshed Medallion from the priestess (1/9).
Click the broken statue to zoom in and take the Nine Token.
Go back to the Great Hall, then go down the hall to the Meeting Room.
Meeting Room
Click the 9's round table for a closer look.
Place the Tear of Bloodshed Medallion into one of the spaces on the table.
Return to the Catacombs.
Catacombs
Place the Nine Token into the mark on the left rock wall.
Click the revealed cache to look inside.
Read the scroll, then take the Steel Frame.
Return to the Great Hall.
Great Hall
Click the left door for a closer look.
Place the Steel Frame on the lock to start the puzzle.
Click the buttons so that all of them are pressed down.
When one button is clicked, all of the adjacent buttons will also be affected.
Solution #1.
Solution #2.
Solution #3.
Solution #4.
Go through the open door on the left to the Library Hall.
Library Hall
Click the closest portrait on the left wall to speak with Sir Henry.
Continue forward to the Library.
Library
Click the top of the bookcase to the left of the large window for a closer look.
Click the cover of the blue book to open it, then take the revealed Key.
Click the top of the bookcase on the right side of the window to zoom in and take the Painter's Signet Ring.
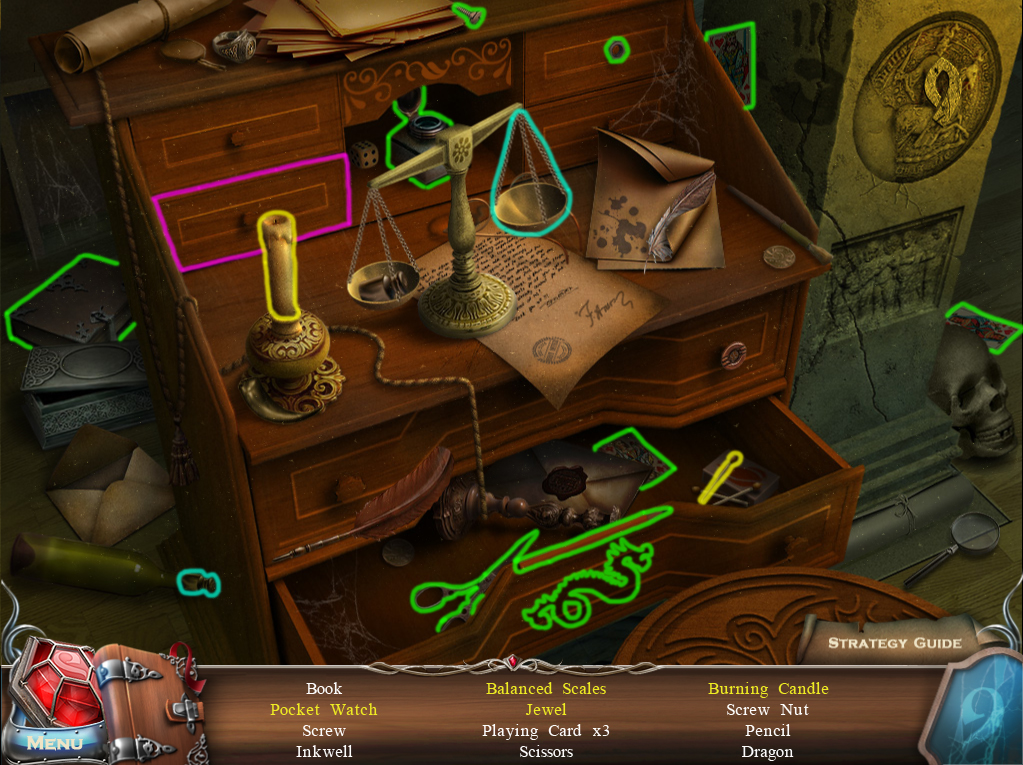
Click the writing desk to start the hidden object scene.
Open the lower left drawer to reveal the Jewel and the Pocket Watch.
Use the match on the candle to make it a Burning Candle.
Place the weight on the right side of the scale to make the Balanced Scales.
Screenshot.
Once the hidden object scene is complete, you will receive a Book 1/3.
Click the bucket at the bottom of the right candelabra to zoom in and take the Brush.
Go up the spiral staircase to the Library 2nd Floor.
Library 2nd Floor
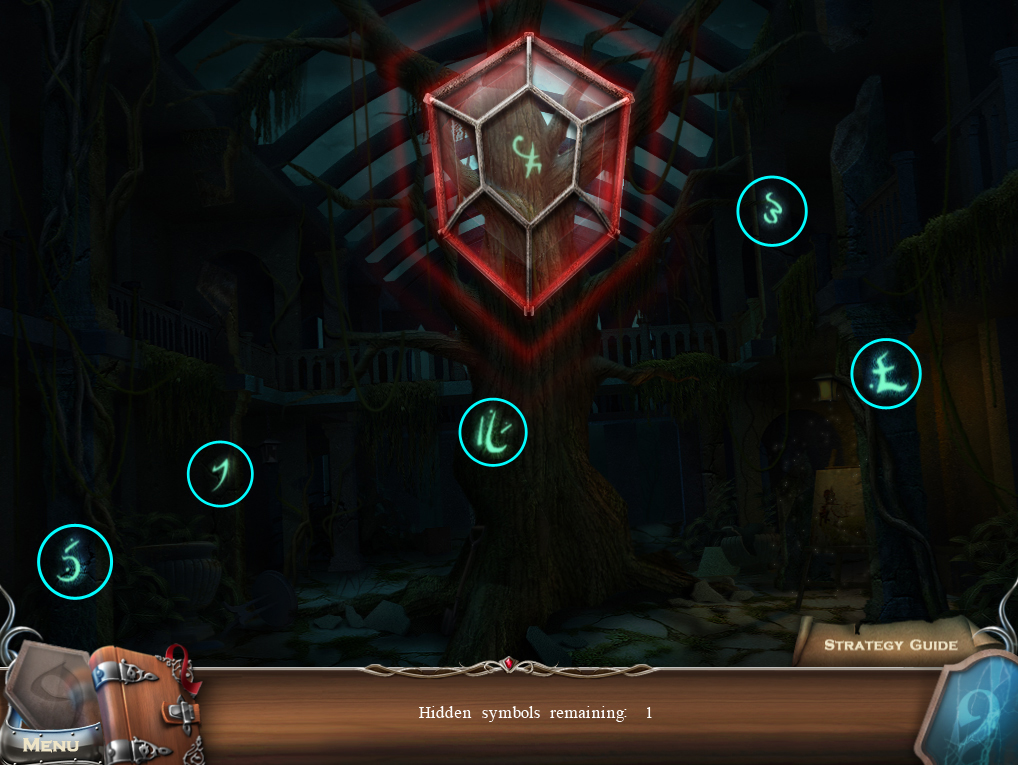
Use the Amulet to uncover the 6 symbols hidden around the room.
Screenshot.
Click the glowing symbol in the middle of the bookcase to open the drawer.
Go back to the Torture Chamber.
Torture Chamber
Click the chemistry set on the table to zoom in.
Use the Key on the locked metal cabinet.
Take the bottles of Revitilizing Concentrate and Acid.
Click the middle of the left grate on the floor to zoom in.
Use the bottle of Acid to burn through the rust, then use the Crowbar to lift the grate.
Take the revealed Lever.
Return to the Library Hall.
Library Hall
Click the small table under the window for a closer look.
Use the Painter's Signet Ring on the lock in the middle of the cabinet.
Place the Lever on the revealed panel at the bottom of the cabint to start the puzzle.
Use the arrows to guide the lever through the maze to the round slot.
Solution.
After the puzzle is solved, take the Metal Tile from the opened drawer.
Place the Brush in the cup above the palette.
Go back to the Garden Gates.
Garden Gates
Click the lock in the middle of the gates for a closer look.
Add the Metal Tile to the lock to start the puzzle.
Move the metal tile to the exit on the right side of the lock.
Click and drag the blocks out of the way to allow the tile to pass to the end.
Solution.
Go through the open gates to the Greenhouse Entrance.
Chapter 3
Greenhouse Entrance
Click the ivy patch on the wall to zoom in and take the Knife.
Take the Glass Jar to the right of the stairs.
Go back to the Great Hall.
Great Hall
Click the fountain of water in the middle of the room to look inside.
Pour the Revitilizing Concentrate into the water.
Use the Glass Jar on the green water to collect the Growth Chemical.
Return to the Greenhouse Entrance.
Greenhouse Entrance
Click the potted plant on the right side of the door for a closer look.
Use the Growth Chemical on the plant, then take the Flower.
Go through the open door into the Greenhouse.
Greenhouse
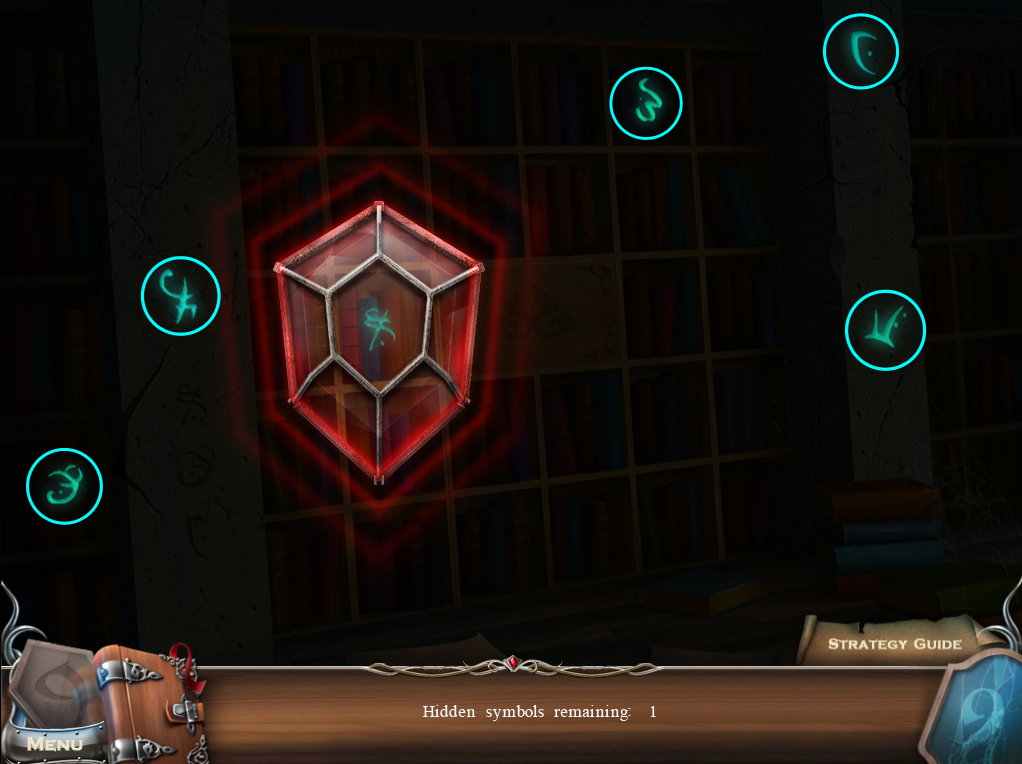
Use the Amulet to uncover the 6 symbols hidden around the room.
Screenshot.
Click the easel under the lit lantern to start the hidden object scene.
Use the penicl on the knight's horse to make it into a Zebra.
Screenshot.
Once the hidden object scene is complete, you will receive the Paint Set.
Take the Shovel at the side of the tree.
Click the urn beside the front left pillar to look inside.
Use the Knife to cut through the vines, then take the revealed Star Frame 2/2.
Go up the left stairs to the Woods.
Woods
Click the front left tree to zoom in.
Take the Werewolf Claw from the trunk of the tree.
Use the Shovel to dig the dirt around the flower in the ground.
Click the hole in the ground to look inside.
Use the Knife to cut through the roots to receive the Mandragora Root.
Return to the Library Hall.
Library Hall
Click the table under the window to zoom in.
Use the Paint Set on the palette.
Take the completed Painter's Palette..
Click Sir Henry's portrait for a closer look.
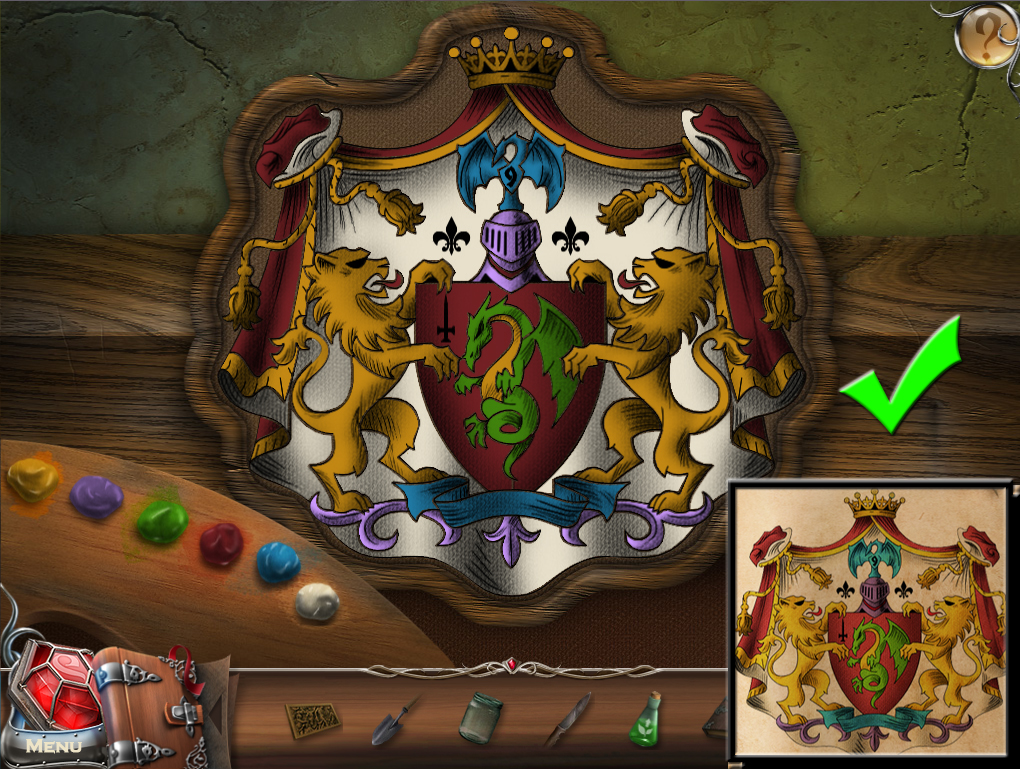
Use the Painter's Palette on the portrait to start the puzzle.
Paint the coat of arms so that it matches the colors of the picture in the Diary.
Click a paint color on the palette to select it, then click an area of the coat of arms to paint it that color.
Solution.
Once the puzzle is solved, you will receive the Coat of Arms.
Click the wall cache behind the portrait to look inside and take the Book 2/3.
Go into the Library.
Library
Click the front of the large desk for a closer look.
Place the two Star Frames into the plaque spaces to start the puzzle.
Click the plates so that they are all pressed down.
This puzzle can be solved in only two moves.
Solution.
Once the puzzle is solved, take the Bicolor Cube from the compartment in the center.
Return to the Greenhouse.
Greenhouse
Click the inside of the tree trunk to look inside.
Add the Bicolor Cube to the lock to start the puzzle.
Roll the cubes so that the silver, rather than the gold, side of the cube is showing and in the original starting position.
Click the cubes to move them into an adjacent empty space.
Rolling a cube in one direction will roll it halfway between the two colors. Rolling it a second time in the same direction will roll it completely to the other side.
Solution.
Once the puzzle is solved, go into the Treehouse.
Treehouse
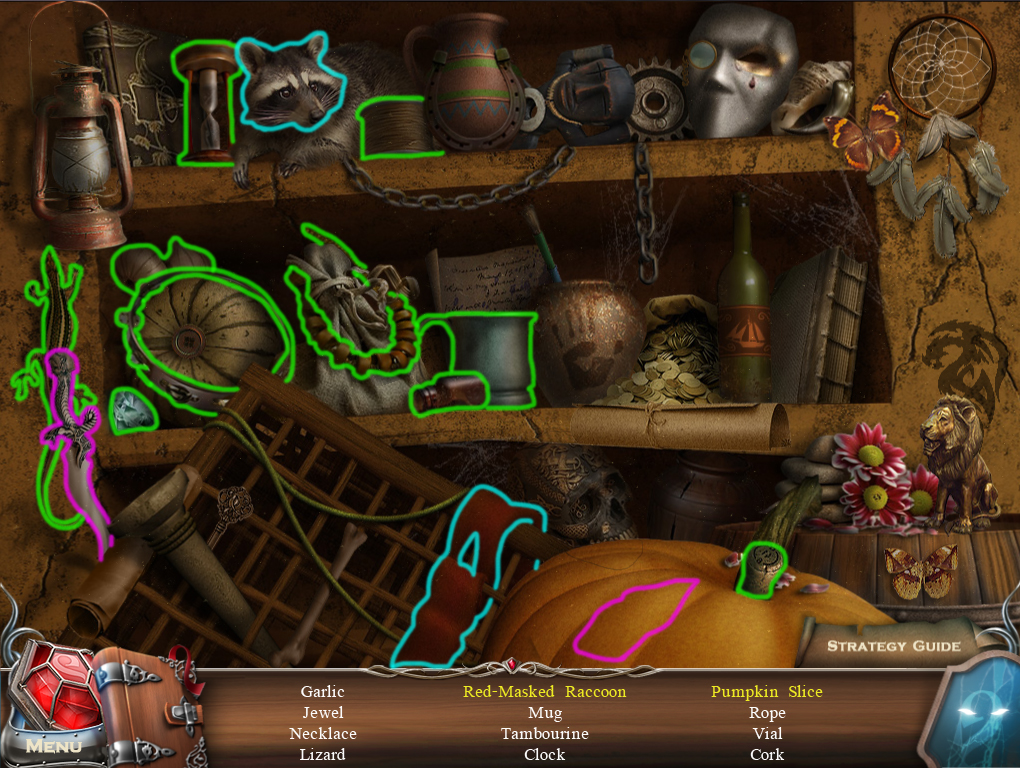
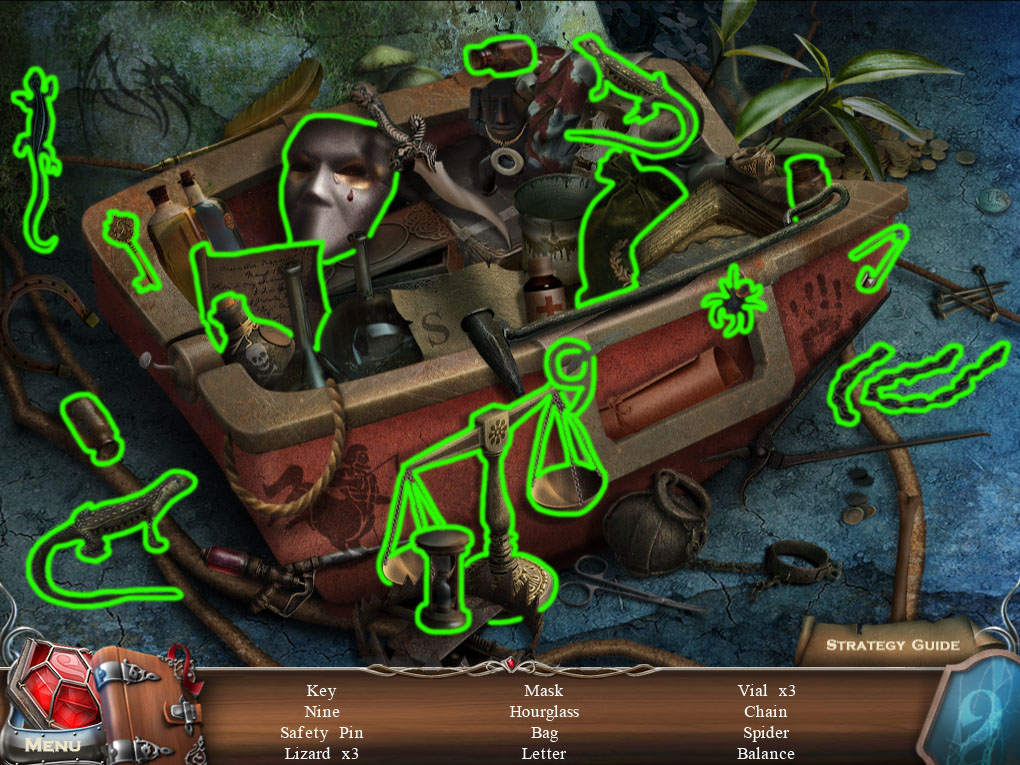
Click the shelves in the corner of the room to start the hidden object scene.
Use the knife on the pumpkin to cut a Pumpkin Slice.
Put the bandana on the raccoon's face to make it a Red-Masked Raccoon.
Screenshot.
Once the hidden object scene is complete, you will receive Garlic.
Take the Book 3/3 between the two rocks in the lower right corner of the room.
Use the Knife to cut the Mushroom off the tree in the lower left corner of the room.
Take the Funnel from the roots in the upper left corner of the room.
Click the table to zoom in.
Click the book to open it, then take the Pattern Plate inside the pages.
Go back to the Library 2nd Floor.
Library 2nd Floor
Click the shelf in the center of the bookcase for a closer look.
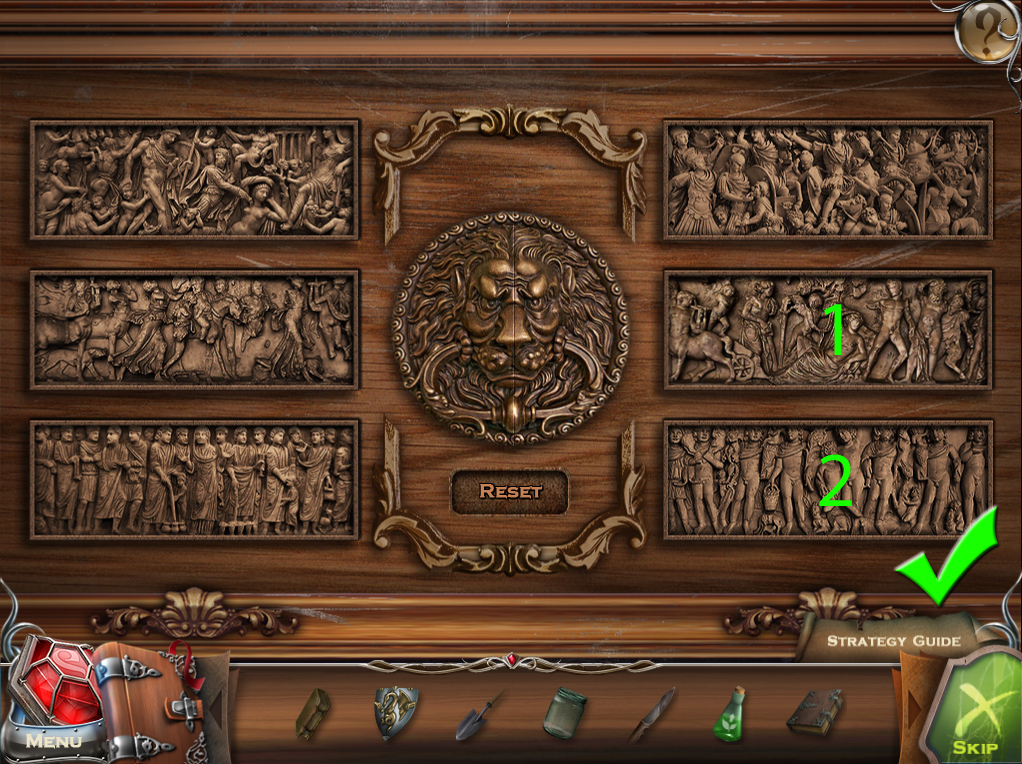
Add the three Books to the shelf to start the puzzle.
Click the books in numerical order from 1 to 7.
Solution.
After the puzzle is solved, go through the revealed doorway into the Secret Room.
Secret Room
Take the Pattern with Magic Lines on top of the lower left pile of books.
Click the box on the far left stack of books to zoom in.
Add the Pattern Plate to the panel at the front of the box to start the puzzle.
Click the buttons in order of the corresponding symbols shown at the bottom of the plate.
The springs at the sides of the panel will move upwards when the correct button is pushed or reset to the bottom when the incorrect button is pushed.
Solution.
Once the puzzle is solved, click the open box to zoom in and take the Revealing Powder.
Return to the Treehouse.
Treehouse
Click the star carved into the wall to zoom in.
Use the Pattern with Magic Lines on the pattern to align the paper, then take the Magic Star Pattern from the wall.
Click the table in the corner of the room for a closer look.
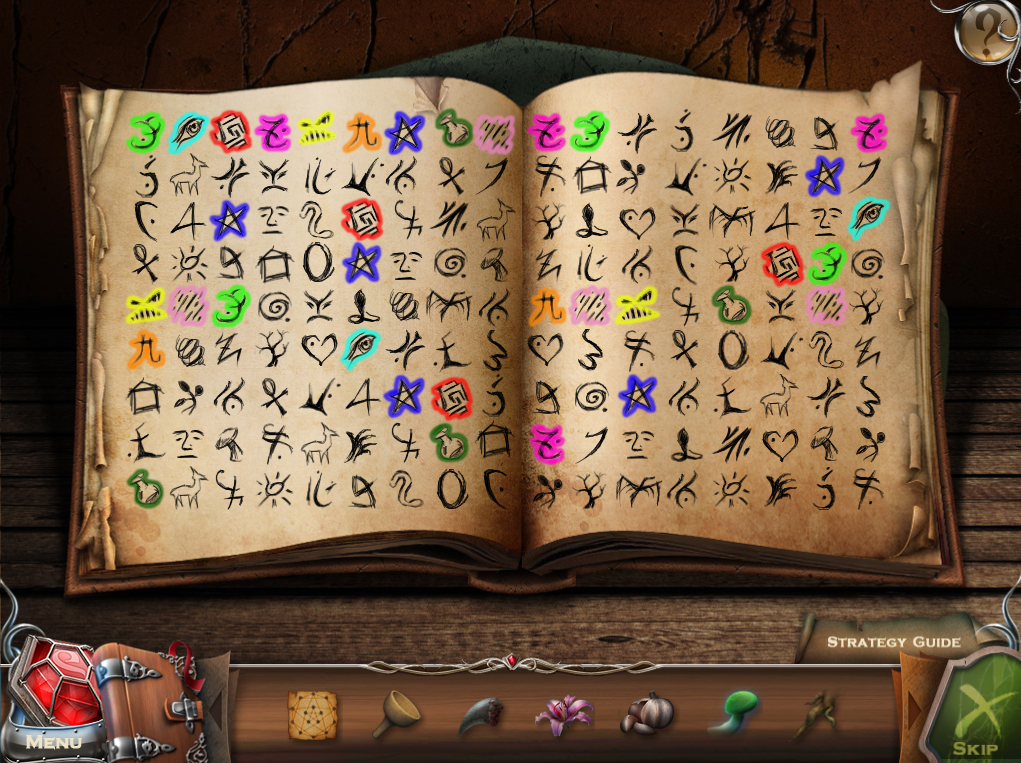
Use the Revealing Powder on the book to reveal the symbols, then click the pages to start the puzzles.
Find all of the sets of matching symbols on both pages.
Click a symbol to select it, then find all of the identical symbols to remove them from the page.
Example.
Once the puzzle is solved, note the recipe for the werewolf cure on the right page of the book.
Put the Mushroom on the cutting board.
Use the Knife to chop the mushroom, then put the pieces into the mortar.
Put the Garlic on the cutting board.
Use the Knife to chop the garlic, then put the pieces into the mortar.
Put the Mandragora Root on the cutting board.
Use the Knife to chop the root, then put the pieces into the mortar.
Place the Flower directly in the mortar.
Place the Werewolf Claw directly in the mortar.
Use the pestle to crush all of the contents in the mortar, then pour the mixture into the bowl of water.
Put the Funnel at the top of the beaker.
Use the candle on the candlestick to light the burner under the beaker.
Pour the contents of the bowl into the beaker, then take the completed Anti-Werewolf Potion.
Go back to the Woods.
Woods
Use the Anti-Werewolf Potion on the werewolf.
Speak with the ghost of Alistan the druid to receive the Werewolf's Medallion.
You can now place the Werewolf's Medallion into the round table at the Meeting Room (2/9).
Return to the Secret Room.
Secret Room
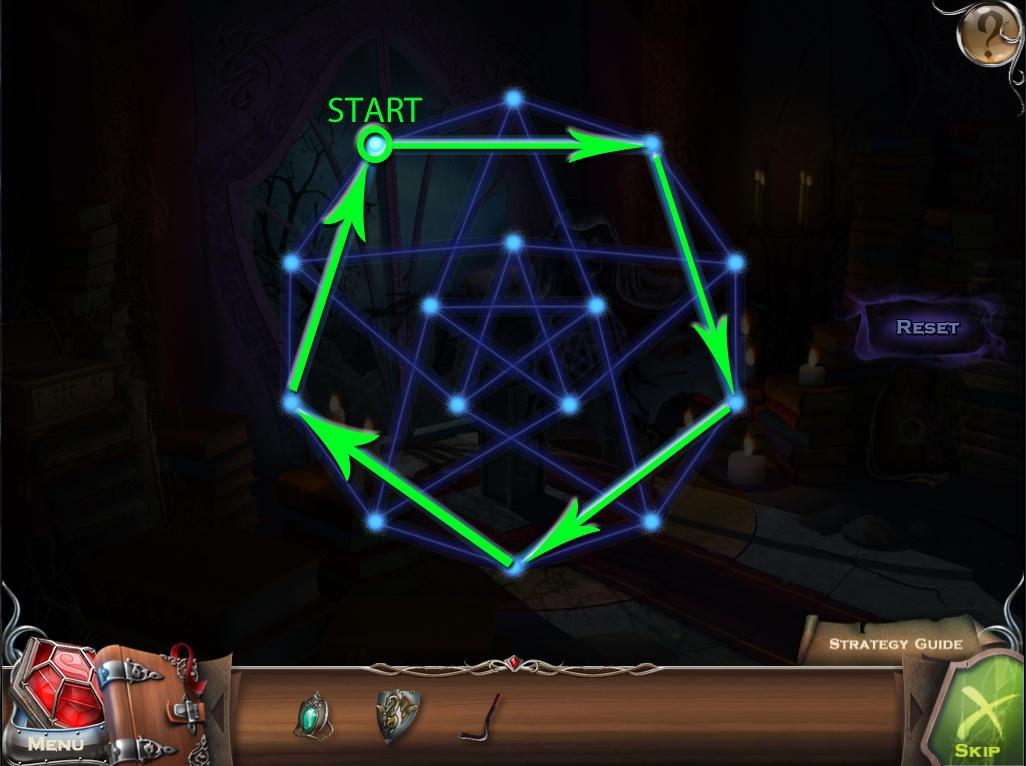
Use the Magic Star Pattern on the glowing spell pattern in front of the ghost, then click the floating star symbol to start the puzzle.
Trace all of the lines of the star pattern without repeating the same path twice.
Solution Part 1.
Solution Part 2.
Solution Part 3.
Solution Part 4.
Once the puzzle is solved, you will be transported to the main floor of the Library.
Library
Use the Amulet to uncover the 3 symbols hidden around the room.
Screenshot #1
Once again, use the Amulet to uncover the next 3 symbols hidden around the room.
Screenshot #2
Return upstairs to the Secret Room.
Secret Room
Take the Encrypted Book of Secrets on the stand in front of the window.
Return to the Woods, then continue along the path to the Well.
Chapter 4
Well
Take the Statuette 1/4 on the side of the large rock to the right of the road.
Go forward to the Town Square, then head left under the Archway.
Archway
Click the ghost of the crying girl to speak with her.
Take the Rope tied around the post to the right of the ghost.
Return to the Library.
Library
Click the large hole in the floor for a closer look.
Place the Rope at the side of the hole.
Take the Statuette 2/4 at the left side at the lower level of the broken floor.
Climb down the rope to the Burial Chamber.
Burial Chamber
Take the Disfigured Lily on the ground beside the skull.
Click the coffin in the center of the room to zoom in.
Place the Coat of Arms into the space for the crest on the coffin.
Use the Crowbar to pry the Disc from the front of the coffin, then click it to add it to your inventory.
Go back to the Well past the woods.
Well
Click the shed on the right side of the building to zoom in.
Use the Crowbar to remove the chains from the door handle.
Go through the open door into the Shed.
Shed
Take the Tongs on the left side of the table.
Use the Crowbar to spring the bear trap on the ground.
Go back outside to the Well.
Well
Click the door to the blacksmith's forge to zoom in.
Place the Disc on the space for the seal in the door.
Go through the open door into the Forge.
Forge
Speak with the Blacksmith inside the forge to receive the Empty Wine Jug.
After talking to the blacksmith, you will be returned outside to the Well.
Continue forward to the Town Square.
Town Square
Click the gate past the fountain to zoom in.
Take the Wineglass Ring on the middle of the steps.
Click the door to the wine shop for a closer look.
Use the Crowbar to smash the window at the top of the door.
Go through the open door into the Wine Shop.
Wine Shop
Take the Glass Tube on the counter beside the cash register.
Take the Empty Jar on the floor between the two stools.
Click the upright barrel beside the empty wine rack to zoom in and take the Pressure Gauge.
Click the hatch in the floor beside the overturned barrel for a closer look.
Place the Wineglass Ring at the missing space for the handle on the hatch door.
Go through the open hatch to the Wine Cellar.
Wine Cellar
Take the Blue Tube hanging out of the empty barrel on the front right corner of the room.
Click the wine shelf in the middle of the room to zoom in and take the Red Tube.
Click the table under the distilling device for a closer look.
Take the Key hanging from the pipe of the distiller.
Go back upstairs to the Wine Shop.
Wine Shop
Click the cupboard behind the counter to zoom in.
Use the Key to unlock the cupboard door, then click the open cupboard to start the hidden object scene.
Use the rag on the lamp to reveal the Genie.
Screenshot.
Once the hidden object scene is complete, you will receive the Winemaker's Journal.
Go down again into the Wine Cellar.
Wine Cellar
Click the stack of wine casks in the back of the room for a closer look.
Place the Winemaker's Journal on the bookstand.
Click the open journal on the stand to start the puzzle.
Find the dates to each of the wine flavors.
Click the name of the flavor on the left page, then trace the path to the date at the end of the right page.
Solution.
Once the puzzle is solved, note the date of the Red Rose wine: 1350.
Click the center wine cask on the top level with the same 1350 date to roll the barrel out to the distilling device.
Click the table under the distilling device to zoom in.
Place the Empty Wine Jug on the left side of the table.
Place the Empty Jar on the right side of the table.
Attach the Red Tube to the hole in the center jar.
Place the Glass Tube at the top of the center jar.
Put the Blue Tube into the left jar.
Add the Pressure Gauge to the space between the pipe of the distiller and the pipe sticking out of the center jar.
Now that all the parts have been assembled, click the valve at the top of the distiller to pour the wine and start the puzzle.
Transfer the wine into one of the jugs so that the amount is equal to 4 liters.
Click one jug to select it, then click a different jug to transfer the liquid.
Pour the center jar into the left jar.
Pour the left jar into the right jar.
Pour the right jar into the center jar.
Pour the left jar into the right jar.
Pour the center jar into the left jar.
Pour the left jar into the right jar.
Solution.
Take the Full Wine Jug from the table.
Return to the Forge.
Forge
Give the blacksmith the Full Wine Jug.
Click the cupboard to start the hidden object scene.
Use the magnet on the tall glass jar to pull out the Key.
Look inside the barrel to find the Iron Mask.
Screenshot.
Once the hidden object scene is complete, you will receive a Sledgehammer.
Take the Shovel next to the chain on the step.
Take the Bellows on the floor to the left of the anvil.
Take the Empty Bucket on the ground in the lower left corner of the room.
Go back to the Shed.
Shed
Use the Shovel to scoop out a lump of Shoveled Coal.
Step back outside to the Well.
Well
Add the Empty Bucket to the winch of the well.
Click the crank to lower the bucket, then take the Bucket of Water when it is raised up.
Return to the Forge.
Forge
Place the Shoveled Coal inside the furnace.
Use the Bellows to heat up the coals in the furnace.
Put the Disfigured Lily on top of the heated grill.
Use the Tongs to pick up the Hot Metal Lily.
Place the Hot Metal Lily on top of the anvil.
Hammer the lily with the Sledgehammer, then pick the Hot Metal Lily back up off the anvil.
Click the cooling trough beside the furnace to zoom in.
Pour the Bucket of Water into the empty trough.
Douse the Hot Metal Lily in the cooling trough.
Take the Good Metal Figure from the trough.
Speak with the ghost of the blacksmith to receive the Blacksmith's Medallion.
You can now place the Blacksmith's Medallion into the round table at the Meeting Room (3/9).
Go back to the Burial Chamber under the Library floor.
Burial Chamber
Click the right side of the center coffin to zoom in.
Place the Good Metal Figure into the lily shaped relief.
Speak with the ghost of Sir Charles to receive the Tokens of Logic.
Go to the Graveyard Gate up the stairs past the Town Square.
Graveyard Gate
Click the lock in the center of the gate for a closer look.
Add the Tokens of Logic to the lock to start the puzzle.
Place the tokens in the correct circular spaces around the lock.
Beside each space are 3 symbols that complete the image on one of the tokens when put together.
Solution.
Go through the open gate into the Graveyard.
Graveyard
Take Martin's Pocketwatch on the ground in front of the ghost.
Click the fence between the two left pillars to zoom in and take the Stone Ring 1/3.
Return to the Archway to the left of the Town Square.
Archway
Give Martin's Pocketwatch to the crying ghost.
Speak with the ghost to receive Bianca's Medallion.
You can now place Bianca's Medallion into the round table at the Meeting Room (4/9).
Click the crate that Bianca was sitting on to zoom in and take the Handle.
Go back to the Town Square.
Town Square
Click the door to the clock tower to zoom in.
Place the Handle into the empty space on the door.
Go through the open door to the Clock Tower.
Clock Tower
Take the Stone Ring 2/3.
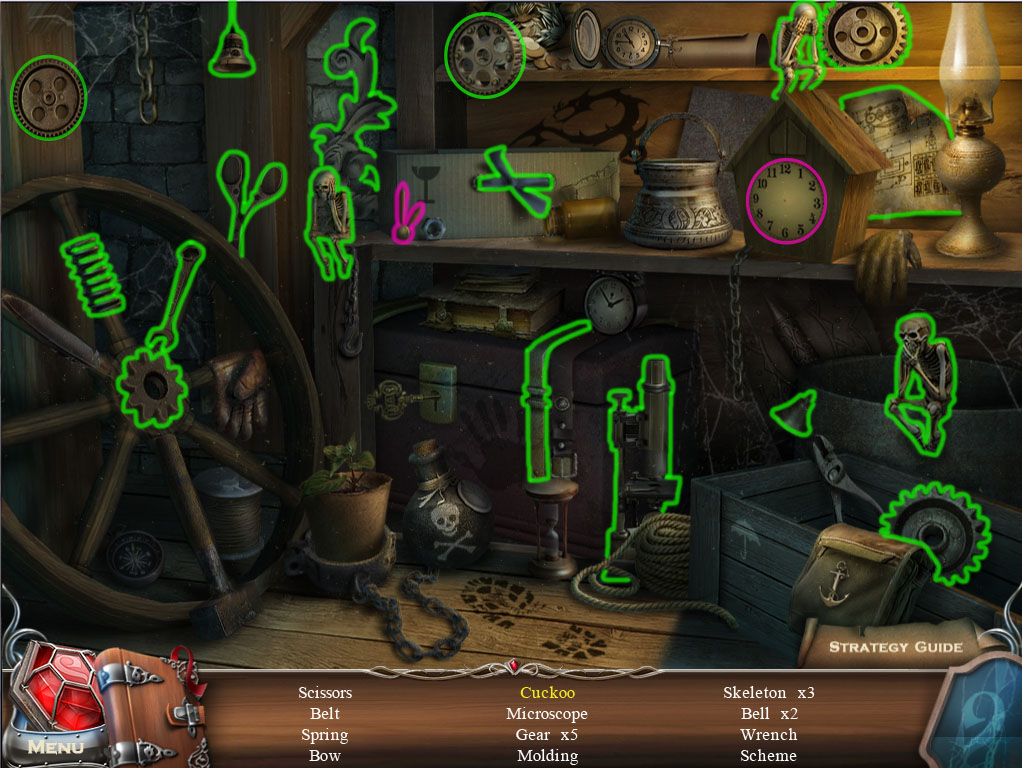
Click the shelves under the stairs to start the hidden object scene.
Put the clock hands onto the face of the cuckoo clock to let out the Cuckoo.
Screenshot.
Once the hidden object scene is complete, you will receive the Scissors.
Go up the stairs to the Clock Tower 2nd Floor, then go up the ladder against the left wall to the Belfry.
Belfry
Take the Stone Ring 3/3 in the vines at the base of the right pillar.
Take the Plate of Bell Tiles in the vines at the middle of the left pillar.
Return to the Archway.
Archway
Click the chest on the ground against the right wall to zoom in.
Use the Scissors to cut through the net surrounding the chest.
Take the Clock Spring inside the open chest.
Go back to the Woods.
Woods
Click the tomb between the trees to the right of the path for a closer look.
Use the Plate of Bell Tiles on the tile board to start the puzzle.
Rotate the tiles to arrange the picture of the bells and the outside border.
Solution.
One the puzzle is solved, take the Bell Clapper from the revealed cache.
Return to the Belfry at the top of the Clock Tower.
Belfry
Put the Bell Clapper inside the large hanging bell.
Go down the stairs to the Clock Tower 2nd Floor.
Clock Tower 2nd Floor
Click the clock mechanism to zoom in.
Add the Clock String to the center of the mechanism to start the puzzle.
Push the gears into the circles at the center by moving the shield around the tracks on the board.
Click the left, right, up, and down sides of the shield to move it in that direction.
The shield can only follow the tracks and connot move through obstacles such as walls or gears, also the shield cannot push more than one gear at a time.
Move the shield in the following order (check the screenshot (SS) at the numbered parts to track your progress):
Down, Left x4, Down x2, Right, Down x2, Left, Up (Check SS 1).
Down x2, Left x2, Up x2, Right x3, Down, Right, Up (Check SS 2).
Right x2, Up x2, Left, Up, Left x3, Down x2 (Check SS 3).
Right, Down x2, Left, Down, Left x2, Up x2, Right x2, Up, Right, Down (Check SS 4).
Left, Up x2, Left x2, Up, Right, Down, Right, Down x2, Left x2, Up, Down, Right x2, Up x2, Left, Up, Left x2, Down, Right x2, Left, Down x4, Right, Down x2, Left, Up x4, Right x4, Down x3, Left x2, Up, Left x2, Down x2, Right, Up, Left, Up, Right, Down, Right, Up x2, Down, Left x2, Up x2, Right x2 (Check SS 5).
Down x3, Right x2, Up x3, Right x2, Down x2, Right, Down, Left x5, Up x2, Right, Up (Check SS 6).
Solution Part 1.
Right x3, Up x2, Left, Up x2, Right, Down x6, Right, Down, Left x4, Right x3, Up x3, Left x6, Down x4, Right, Up, Left, Up, Right, Left, Up x2, Right x6, Down x3, Left 4, Up x2 (Check SS 7).
Down, Left x2, Up x2, Right x3 (Check SS 8).
Left x3, Down x4, Right, Up, Left, Up, Right, Down, Right, Up x2, Down, Left x2, Up x2, Right x2 (Check SS 9).
Down x3, Right x4, Up x6, Left x4, Down x2 (Check SS 10).
Up, Left x2, Up, Right x5, Up, Right, Down x6, Right, Down, Left x5, Up, Left x2, Down x2, Right, Up, Left, Up, Right, Down, Right, Up (Check SS 11).
Left x2, Up x3, Down x4, Right x6, Up x6, Left x7, Down, Right x2, Up, Right, Down (Check SS 12).
Solution Part 2.
Return to the Graveyard.
Graveyard
Use the Amulet to uncover the 7 symbols hidden around the area.
Screenshot
Speak with Martin's ghost after the demon has been banished to receive Martin's Medallion.
You can now place Bianca's Medallion into the round table at the Meeting Room (5/9).
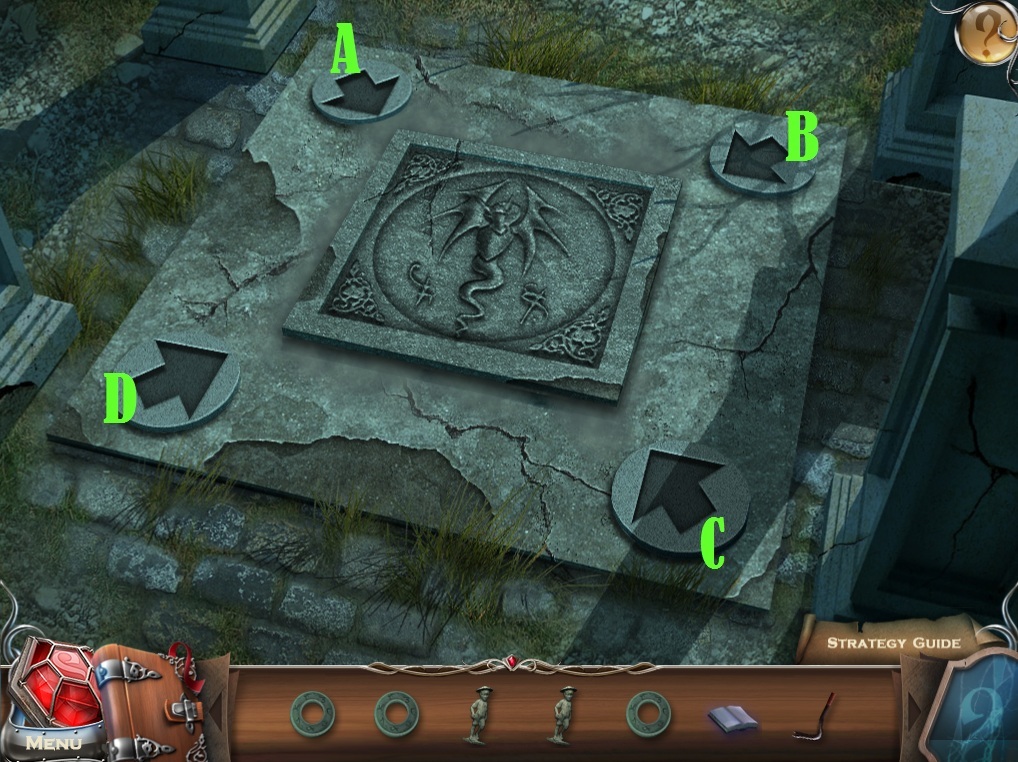
Click the stone slab at the bottom of the four pillars to start the puzzle.
Click the arrows to point all four inward towards the center square.
Click Arrow D 3 times.
Click Arrow C 2 times.
Click Arrow B 3 times.
Solution.
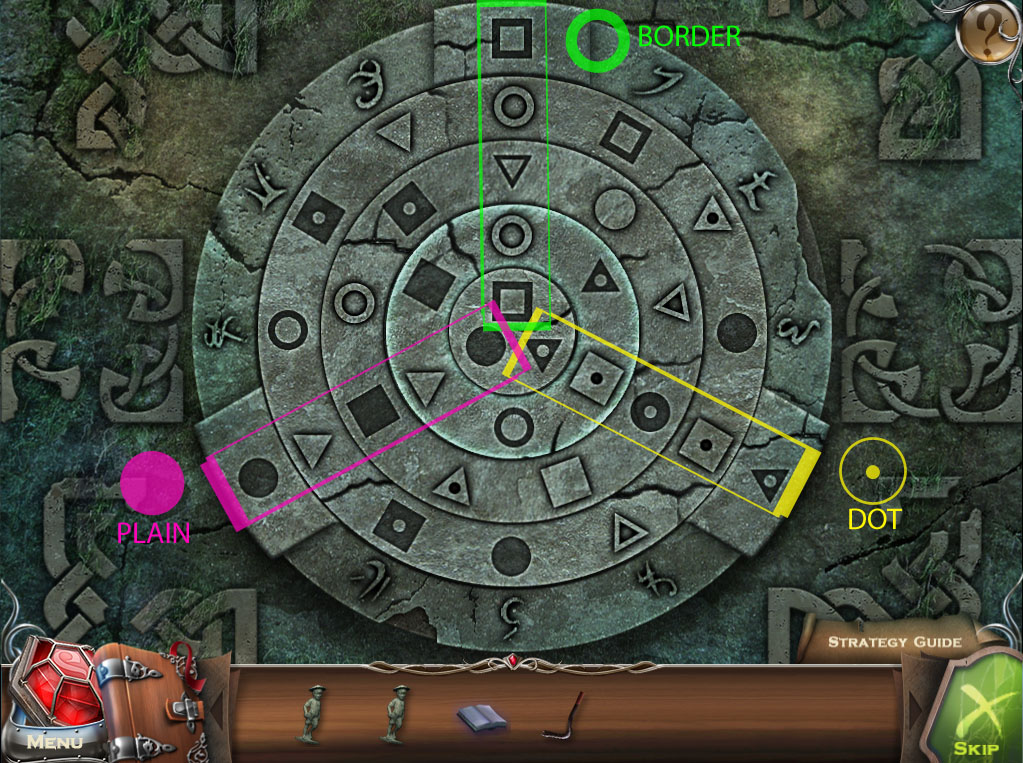
Click the stone block that rises from the ground for a closer look.
Add the three Stone Rings to the rings at the center of the block to start the puzzle.
Align the rings in the correct sequence, following the pattern of alternating black and white while still sharing a similar characteristic (e.g. plain, border, or dot in the middle).
Click and drag the rings to rotate them clockwise or counterclockwise.
Solution.
Go down into the Secret Passageway.
Chapter 5
Secret Passageway
Take the Unlit Torch on the middle stair.
Take the Gaff leaning against the rocks to the right of the doorway.
Go through the doorway to the Mine Shaft.
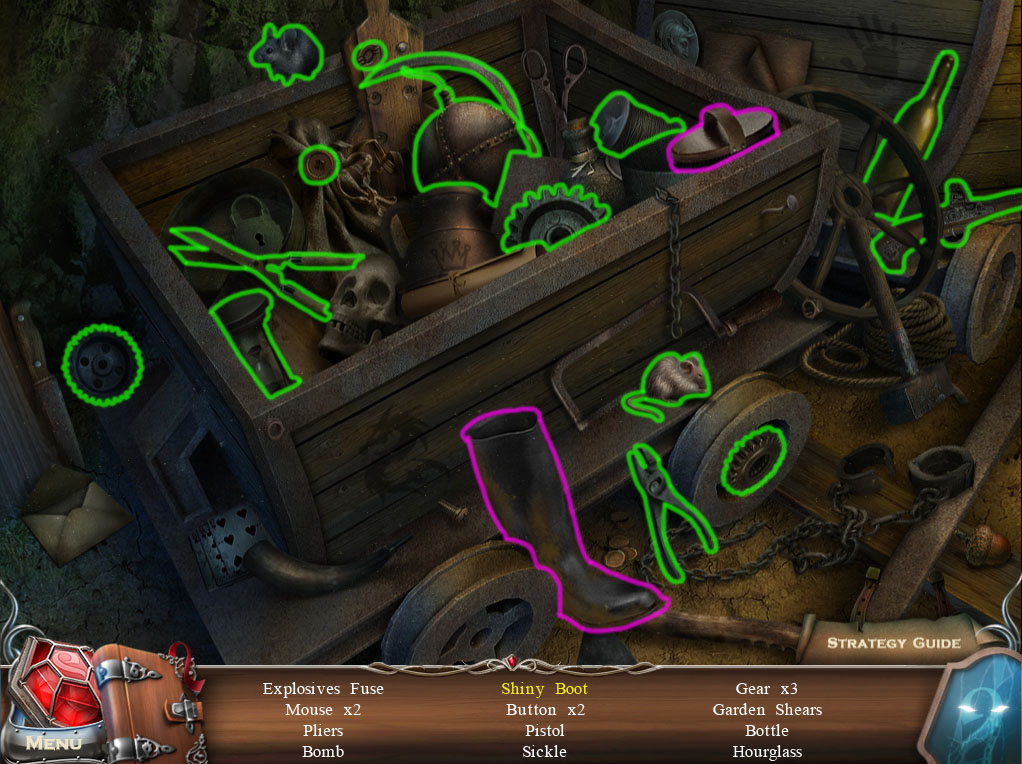
Mine Shaft
Take the Chisel between the rocks in the lower right corner.
Click the mine carts to start the hidden object scene.
Use the brush on the dirty boot to make it a Shiny Boot.
Screenshot
Once the hidden object scene is complete, you will receive the Fuse.
Return to the Clock Tower 2nd Floor.
Clock Tower 2nd Floor
Click the loose floorboard between the stairs and the clock mechanism to zoom in.
Use the Chisel to remove the floor board.
Take the revealed Lockpicks from the floor cache.
Go back to the Blacksmith's Shed beside the Forge.
Shed
Use the Lockpicks on the safe on top of the table.
Take the Barrel of Gunpowder from the opened safe.
Return to the Archway.
Archway
Use the Unlit Torch on the barrel of resin to make it a Torch with Resin.
Go back to the Secret Passageway under the Graveyard.
Secret Passageway
Use the Torch with Resin on the torch on the fiery torch at the right side of the wall to make it a Lit Torch.
Continue forward to the Mine Shaft.
Mine Shaft
Click the pile of rocks blocking the tunnel to zoom in.
Place the Barrel of Gunpowder against the rocks.
Add the Fuse to the barrel.
Light the fuse with the Lit Torch.
Go forward through the open shaft to the Waterwheel.
Waterwheel
Speak with the ghost of Hederik the mechanic to receive Hederik's Seal.
Click the mine cart at the base of the left pillars to zoom in and take the Wrench.
Continue forward to the Back Hall.
Back Hall
Take the Golden Snake on the floor leaning against the lower left stone slab.
Take the Stone Tiles at the base of the right vine-covered wall.
Go back to the Graveyard Gates.
Graveyard Gates
Click the stone bench the cat is sitting on to zoom in.
Place Hederik's Seal into the inset on the bench.
Take the revealed Statuette 3/4 inside the bench cache.
Return to the Clock Tower 2nd Floor.
Clock Tower 2nd Floor
Click the lockbox under the support beams on the right wall for a closer look.
Use the Wrench to remove the bolt from the top of the box.
Take the Oilcan inside the open lockbox.
Return to the Waterwheel.
Waterwheel
Click the table beside the waterwheel to zoom in.
Add the Stone Tiles to the stack of tiles already on the table.
Click the scales under the lifted panel on the right side of the table to start the puzzle.
Move the weights from the left scale to the right scale.
Only lighter weights can be stacked on top of heavier weights.
Move the weights (numbered 1 to 5 from lightest to heaviest) in the following order:
1 to right scale, 2 to center scale, 1 to center scale, 3 to right scale, 1 to left scale, 2 to right scale, 1 to right scale.
4 to center scale, 1 center scale, 2 to left scale, 1 to left scale, 3 to center scale, 1 to right scale, 2 to center scale, 1 to center scale.
5 to right scale, 1 to left scale, 2 to right scale, 1 to right scale, 3 to left scale, 1 to center scale, 2 to left scale, 1 to left scale.
4 to right scale, 1 to right scale, 2 to center scale, 1 to center scale, 3 to right scale, 1 to left scale, 2 to right scale, 1 to right scale.
Solution.
Click the center of the waterwheel mechanism for a closer look.
Use the Oilcan on the rusty gears to fix the waterwheel.
Go forward to the Back Hall.
Back Hall
Click the right crate to zoom in and take the Statuette 4/4.
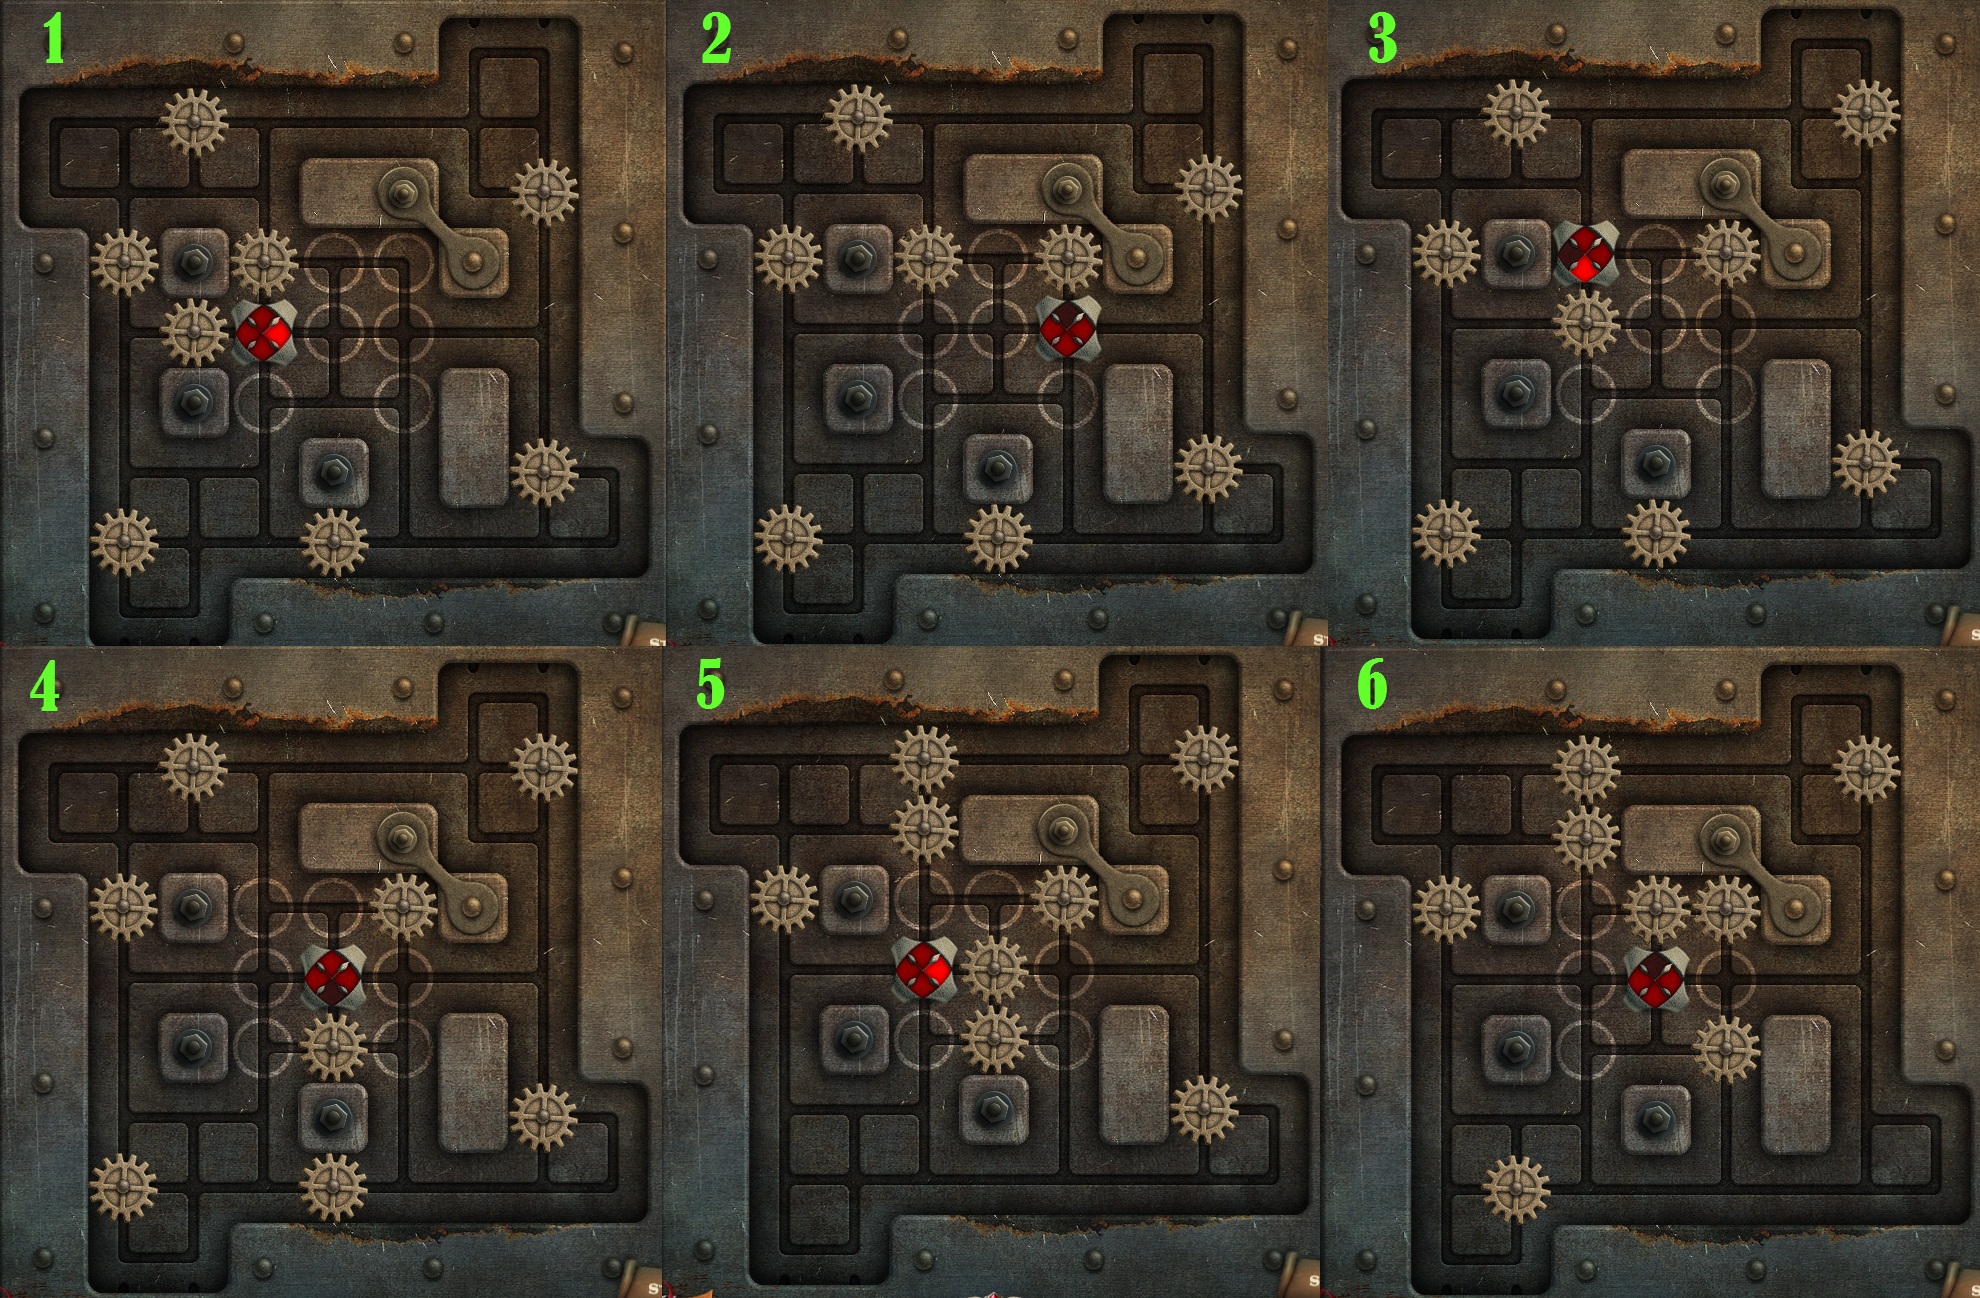
Click the lever beside the right tunnel entrance to start the puzzle.
Arrange the tiles so that there are two vertical lines from top to bottom for the lever to move to the end of the track.
Click a square tile that is completely surrounded by other tiles in a 3x3 square to rotate them one space clockwise. The center tile will not be moved.
Click the square tiles in the following order:
C x3, B x4, A, E, F, G, B, G, B, A, E x3, A x3, B x2, G x7, E, B x6, A x2.
Solution.
Go through the right archway to the Waterfall.
Waterfall
Speak with Lorenzo the healer; he will ask you to bring him the symbol of death.
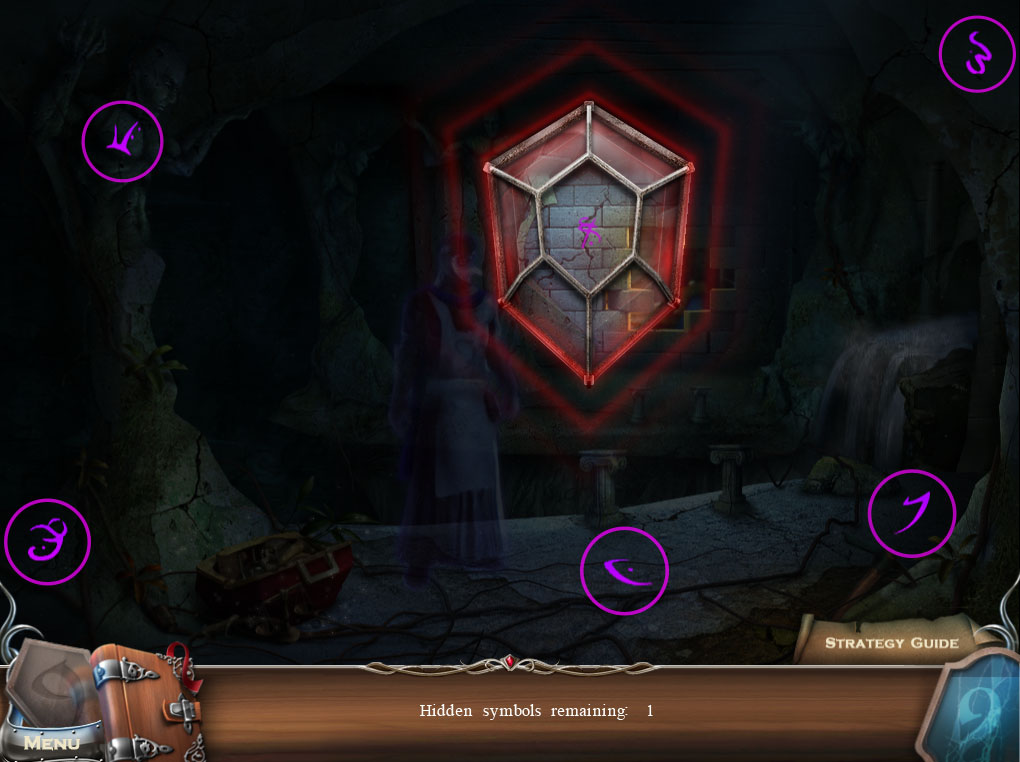
Use the Amulet to uncover the 6 symbols hidden around the room.
Screenshot.
Click the open valise beside Lorenzo's feet to start the hidden object scene.
Screenshot.
Once the hidden object scene is complete, you will receive the Cabinet Key.
Take the Pickaxe on the floor in the lower right corner.
Crossing the runed bridge will take you to a shortcut path back to the Catacombs.
Catacombs
Use the Pickaxe to break off a piece of the Glowing Crystal 1/3 on the wall beside the left statue.
Click the pool of water under the right statue to zoom in.
Use the Gaff to pull out Charles' Medallion.
You can now place Charles' Medallion into the round table at the Meeting Room (6/9).
Return to the Back Hall.
Back Hall
Use the Pickaxe to break off a piece of the Glowing Crystal 2/3 from the middle of the right wall.
Go back to the Waterwheel.
Waterwheel
Use the Pickaxe to break off a piece of the Glowing Crystal 3/3 from the bottom of the column beside the Mechanic.
Return to the Torture Chamber.
Torture Chamber
Click the large cabinet against the left wall for a closer look.
Use the Cabinet Key to open the lock under the handle.
Click the open cabinet to zoom in and take the Golden Goblet.
Return to the Town Square.
Town Square
Click the fountain to zoom in.
Place the four Statuettes on the pedestals around the spout of the fountain.
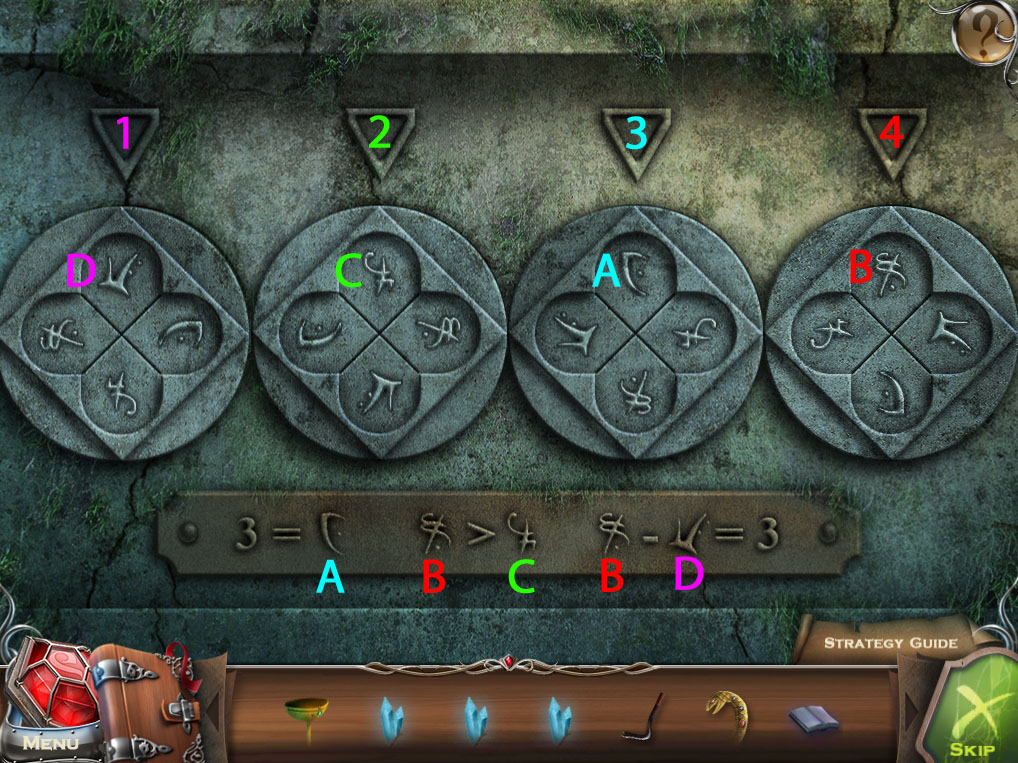
Click the base at the front of the fountain to start the puzzle.
Find and arrange the correct order of symbols 1-4 from left to right by solving the key on the plaque at the bottom.
For this example, symbols will be labeled alphabetically from the order of first appearance from left to right.
So we know that, 3 = A; B > C; B - D = 3.
Since the highest possible number is 4 and the lowest possible number is 1, the only correct equation be 4 - 1 = 3.
Thus, D = 1; C = 2; A = 3; and B = 4
Solution.
Take the Symbol of Life from the revived branch at the side of the fountain.
Go to the Secret Passageway.
Secret Passageway
Click the wall relief for a closer look.
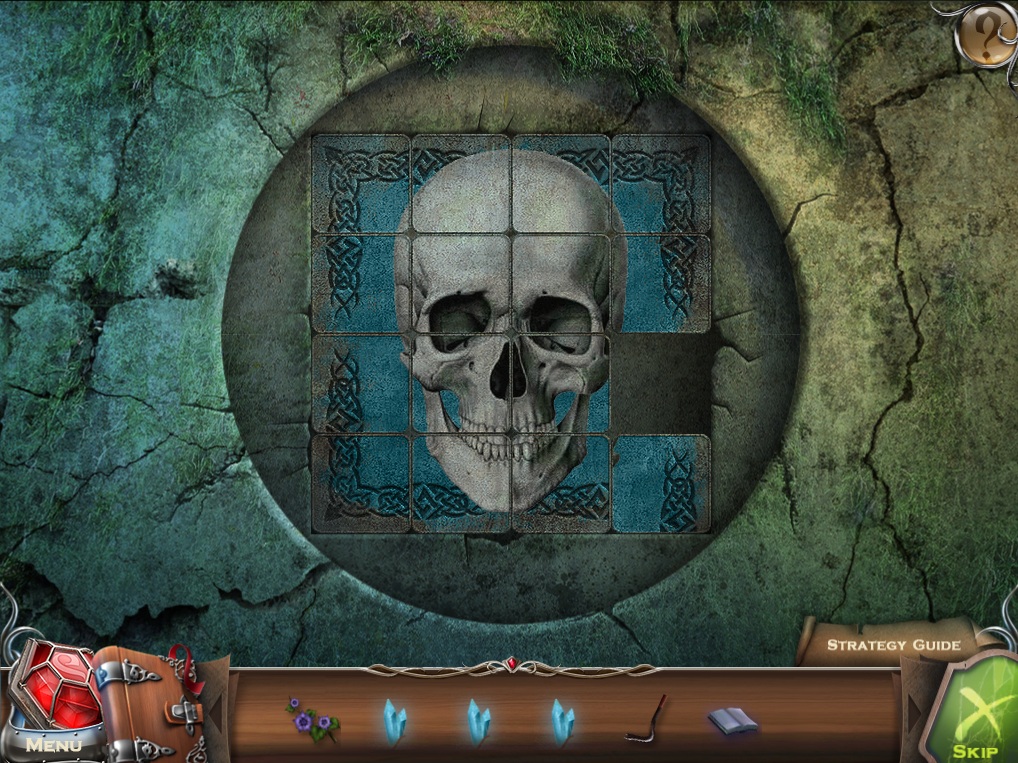
Add the Golden Snake and the Golden Goblet to the Staff of Asclepius to start the puzzle.
Arrange the tiles to complete the image of the skull.
Click and drag the square tiles into an empty space to position them around the board.
Solution.
Take the Skull from the revealed wall cache.
Move forward twice the Waterwheel.
Waterwheel
Give the Symbol of Life to Hederik the mechanic.
Speak with Hederik to receive Hederik's Medallion.
You can now place Hederik's Medallion into the round table at the Meeting Room (7/9).
Go forward to the Back Hall, then continue through the left archway to the Stone Door.
Stone Door
Click the pillar in the center of the room to start the puzzle.
Rotate the rings of the pillar to arrange the path in a vertical line down the center.
Click ring A twice; Click ring C; Click ring D twice; Click ring B twice; Click ring A twice; Click ring E.
Solution.
Once the puzzle is solved, click the top of the pillar for a closer look.
Place the Skull on the top, then pick up the Symbol of Death from the stand.
Click the ghost trapped against the stone door to zoom in.
Use the three Glowing Crystals on the three blue rings around the ghost to activate the magic shields.
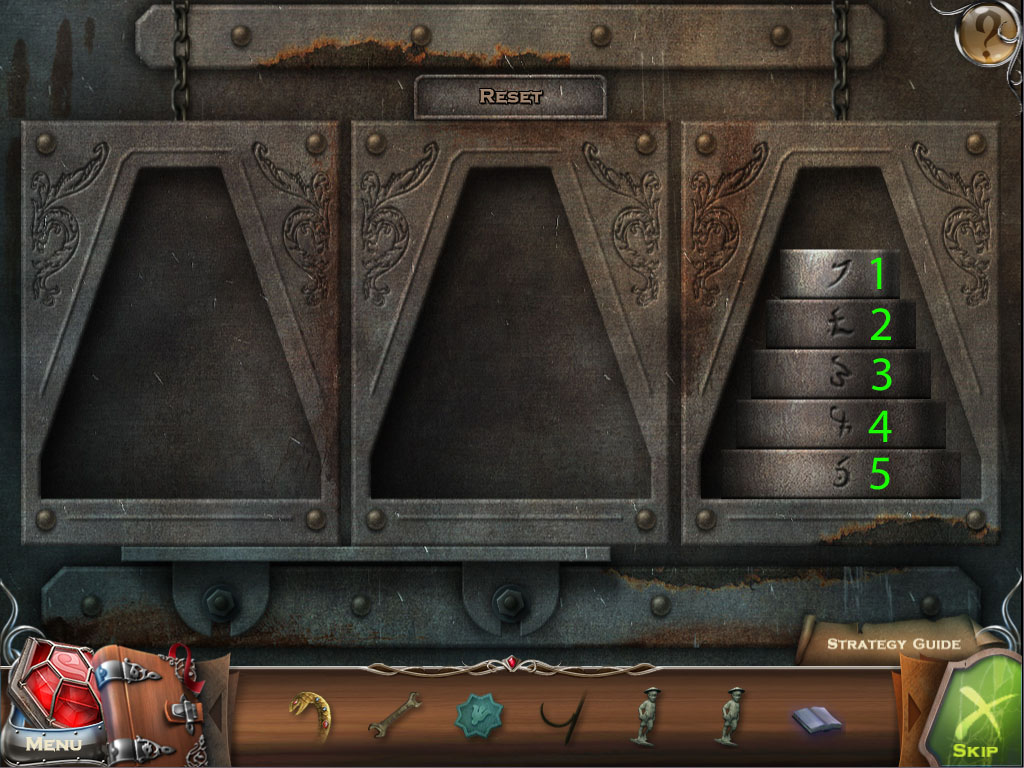
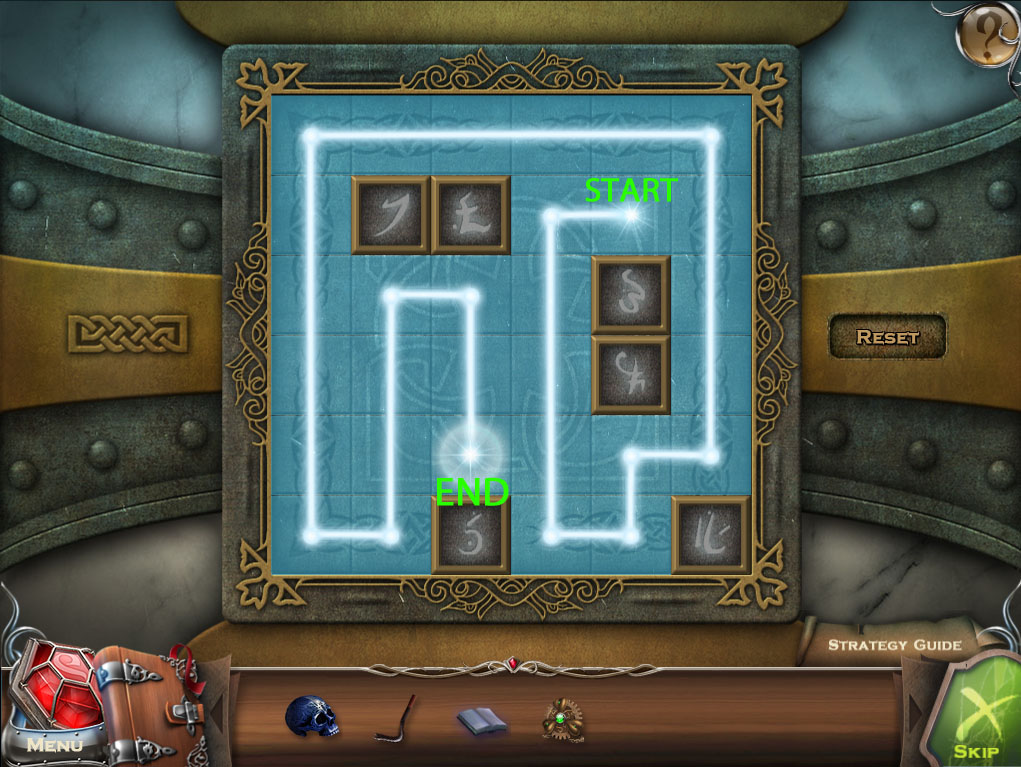
Click the board on the left side of the door to start the puzzle.
Fill in every square with blue light by moving the beam around the board.
Click a tile to move the beam in that direction: the beam will continue to move until it hits an obstacle such as a block or a wall.
Solution - Left.
Click the board on the right side of the door to solve the second part of the puzzle.
Although the board is different, the mechanics to this puzzle are the same as the last: fill every square with light by moving the beam around the board.
Solution - Right.
Once the puzzle is solved, speak with the ghost of Arckivius to receive Arckivius' Medallion.
You can now place Arckivius' Medallion into the round table at the Meeting Room (8/9).
Return to the Waterfall.
Waterfall
Give the Symbol of Death to Lorenzo.
Speak with the ghost to receive Lorenzo's Medallion (9/9).
Go to the Meeting Room.
Meeting Room
Click the round table in the center of the room to zoom in.
If you have not yet done so, place Lorenzo's Medallion and any of the other Medallions into the spaces around the table.
After placing all of the medallions, speak with the ghost of Arckivius to lower the table revealing the stairway to the Hall of the Nine.
Hall of the Nine
Click the bottom of the case to reveal the button panel.
Click the panel to zoom in and take the Magic Glass from the round space at the bottom.
Place the Encrypted Book of Secrets onto the stand in front of the glass case.
Click the open book for a closer look.
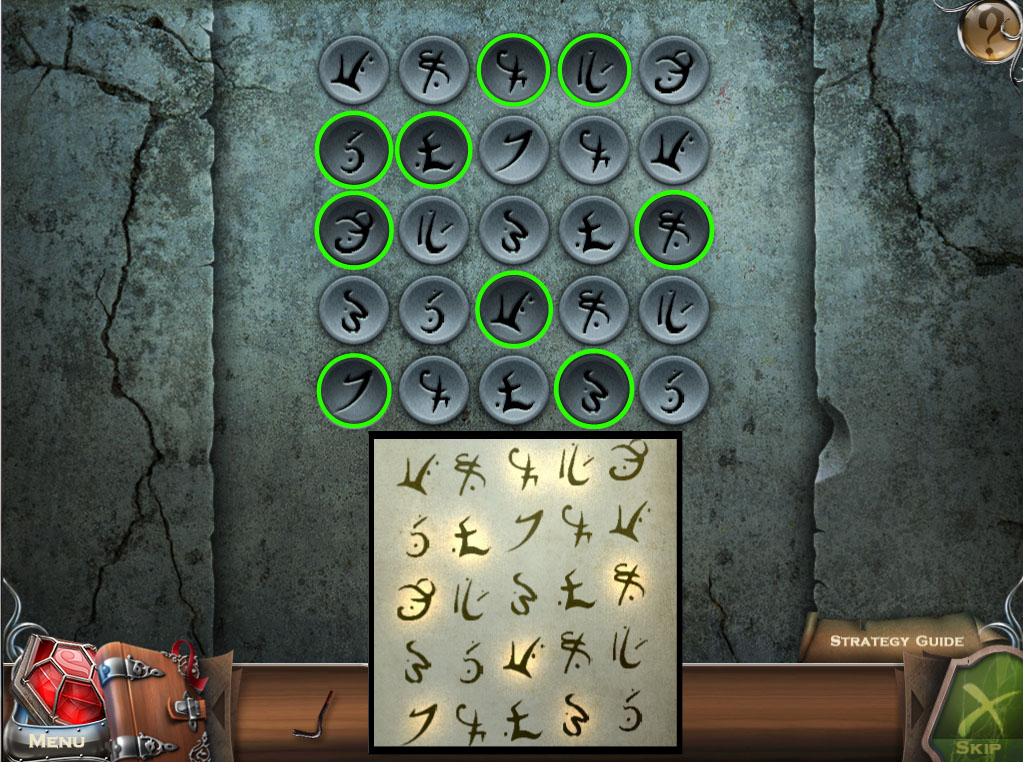
Use the Magic Glass on the book, then click and drag the glass around both pages to reveal the hidden images.
Note the glowing symbols in the rows of text on the left page.
Click the button panel at the bottom of the pillar to start the puzzle.
Click the buttons in the same order as the glowing symbols on the page.
Solution.
Use the Amulet to uncover the 7 symbols hidden around the room.
Screenshot.
Take the Dark Side Artifact from the open case.
Go back to the Stone Door.
Stone Door
Click the large round door to open it, then continue forward to the Dragon's Den.
Dragon's Den
Use the Dark Side Artifact on the dragon.
The cursor will change to the red crystal of the artifact: move it over the floating skulls and click the skulls to destroy them.
After the first round of skulls, two more rounds with an increasing number of skulls will appear: click them to attack these with the artifact as well.
If you do not click the skulls quickly enough, one of them will attack and the event will reset.
Solution.
The End
Thanks to Trinn for the walkthrough!
Posted by: Mike |
December 29, 2011 9:25 PM
|
December 29, 2011 9:25 PM