
Otherworld: Spring of Shadows
Platform: Mac, Windows

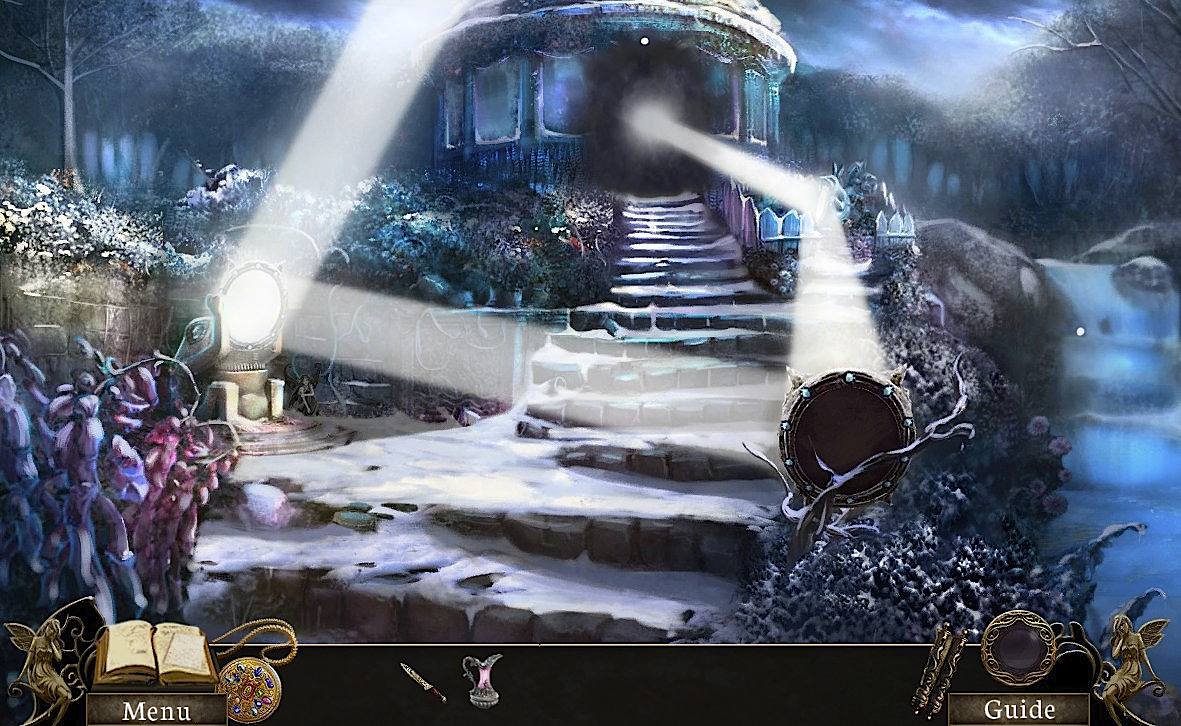
![]() It all started when you moved into an old house in the English countryside, hoping for a chance to be alone and take new stock in your life. But are we ever really alone? As it turns out, there is more to this world than what's apparent on the surface. The fairytales you heard when you were young, the ones you thought stuffed with nonsense and meant only as cautionary allegories to frighten children into behaving properly, are not so far from the truth. So, as curious as Alice in Wonderland, you peek behind the veneer, following clues left by Fiona, a little girl trapped in another dimension, and become caught up in Otherworld: Spring of Shadows, a sumptuously-detailed fantasy adventure-hybrid from Boomzap.
It all started when you moved into an old house in the English countryside, hoping for a chance to be alone and take new stock in your life. But are we ever really alone? As it turns out, there is more to this world than what's apparent on the surface. The fairytales you heard when you were young, the ones you thought stuffed with nonsense and meant only as cautionary allegories to frighten children into behaving properly, are not so far from the truth. So, as curious as Alice in Wonderland, you peek behind the veneer, following clues left by Fiona, a little girl trapped in another dimension, and become caught up in Otherworld: Spring of Shadows, a sumptuously-detailed fantasy adventure-hybrid from Boomzap.
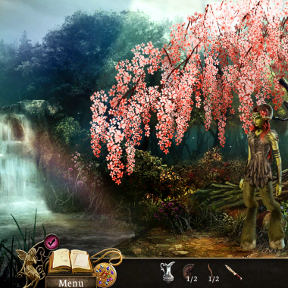 Armed with little more than an enchanted knife and a water pitcher, you seem to the be only one who can prevent the Shade's eternal winter, a blight of ice and death the foul creature hatefully threatens to cast upon the earth. Do this by searching high and low, across all terrains, for the magical charms that will activate Fiona's magical locket. The Shade will not make this easy on you and—as evidenced by the victims which lay dead in his path—he's quite capable of doing you harm, a thought that weighs heavy on your mind as you face the Shade in a mortal battle.
All that's for the end, though. First you'll explore six chapters, encountering not only mini-games, puzzles and hidden object scenes, you will also earn new achievements and uncover an optional side-quest. None of which are mightily difficult, so you won't be pulled away from the enjoyment of adventuring and simply taking in the beautifully elaborate scenery. There is never a sparkle in sight to deter from this, but "casual" mode still provides plenty of hints, skipping and guided help at your request. "Expert" is a little less affable but, if you have the guts, choose "Hard Core" to truly go it alone (you'll also earn a badge of honor for that achievement.)
 Analysis: This is not your typical hidden object game—far from it! No piles of randomly-strewn anachronisms; hidden object scenes fit the setting perfectly, are well-composed and pleasing to behold. Even better, they make sense! Collect only what's needed, never returning to the same scene because you have foresight to grab important bits the first time around. In fact, handy items do not disappear after first use and they often have multiple purposes. Finally, some logic.
Along with the traditional type of hidden object scenes, searches vary from multiples of a single object, or broken pieces needing reconstruction, or matching pairs or even riddle clues. It's absolutely refreshing to escape the boredom of cluttered compositions and jarringly out-of-place collections. As for minigames? They're rather easy yet they do make you think without requiring elaborate note taking or pulling of hairs to complete. Jigsaws, tile swaps and matching games are strongly emphasized here but there are many adventure-centered quest tasks as well. Making good of the repetition, is the unique style and interesting artwork in the games.
 Otherworld: Spring of Shadows weaves a fantastic story and absorbs you into surreal environments, exactly as you'd expect from Boomzap, the gamemaker who brought us Awakening 2: Moonfell Wood and Death Under Tuscan Skies: a Dana Knighstone Novel. An appreciation of ambiance and entertaining tale-telling is well met here; every detail is intricately-designed to add mood and atmosphere. The music seems to come from a strange, 1960s British supernatural horror flick: enticing, haunted notes echoed by soft, etheral vocals. Outside of the occasional cut-scene, there is no voice-over to jar you out of the moment, so the focus remains almost entirely on adventuring.
This dedication to drawing the player into the story is Otherworld's strongest asset and, because of that, it also has its weaknesses: a mild lag between changing scenes that is made noticeable because of all the moving back and forth between scenes. Even so, there's a great pleasure that comes from traveling across the richly-appointed settings. After all, sometimes it's nice to believe in fairy tales, even if they're not actually real (or are they?)
A Collector's Edition is also available. It contains bonus content not found in the standard edition: an additional chapter, wallpapers, strategy guide, and more. Remember that Big Fish Game Club Members pay only $13.99 for Collector's Editions (or 2 club credits), and collector's editions count 3 card punches of 6 total needed for a free game.
![]() Windows:
Windows:
Download the demo
Get the full version
Also available: Collector's Edition
![]() Macintosh:
Macintosh:
Download the demo
Get the full version
Also available: Collector's Edition


Walkthrough Guide
(Please allow page to fully load for spoiler tags to be functional.)
Otherworld: Spring of Shadows walkthrough
Part 1: Chapters 1-3
Chapter 1: The Missing Girl
Follow the Shade
Zoom in on the mirror on the stairs. Take the Iron Key.
Zoom in on the table with the tea set. Take the Handle.
Zoom in on the painting above the fireplace. Take the Stone Fragment (1/3).
Zoom in on the back porch door. Use the Handle, then turn it. Go outside.
Take the Stone Fragment (2/3) from the hanging orange flower.
Proceed down the path to the gate.
Zoom in on the yellow flower below the statue on the right. Move the leaves and take the Stone Fragment (3/3).
Use the Stone Fragments at the base of the statue on the left. Take the Star Dial and the Metal Pin from the cache.
Go back to the porch and zoom in on the hanging lantern on the right. Use the Metal Pin to open the lock, then take the Moon Dial.
Go back to the gate and zoom in on the lock in the middle of the gate.
Use the Star and Moon Dials in their respective slots to start a minigame.
The goal is to count the stars, suns, and moons surrounding the lock, then set the correct number on each dial.
Click and drag each dial to turn them to the proper number.
Solution
Use the Iron Key the girl in the mirror gave you on the revealed keyhole, then enter through the gate.
The Garden
Zoom in on the statue and take the Wire Brush.
Continue up the path and zoom in on the gazebo door.
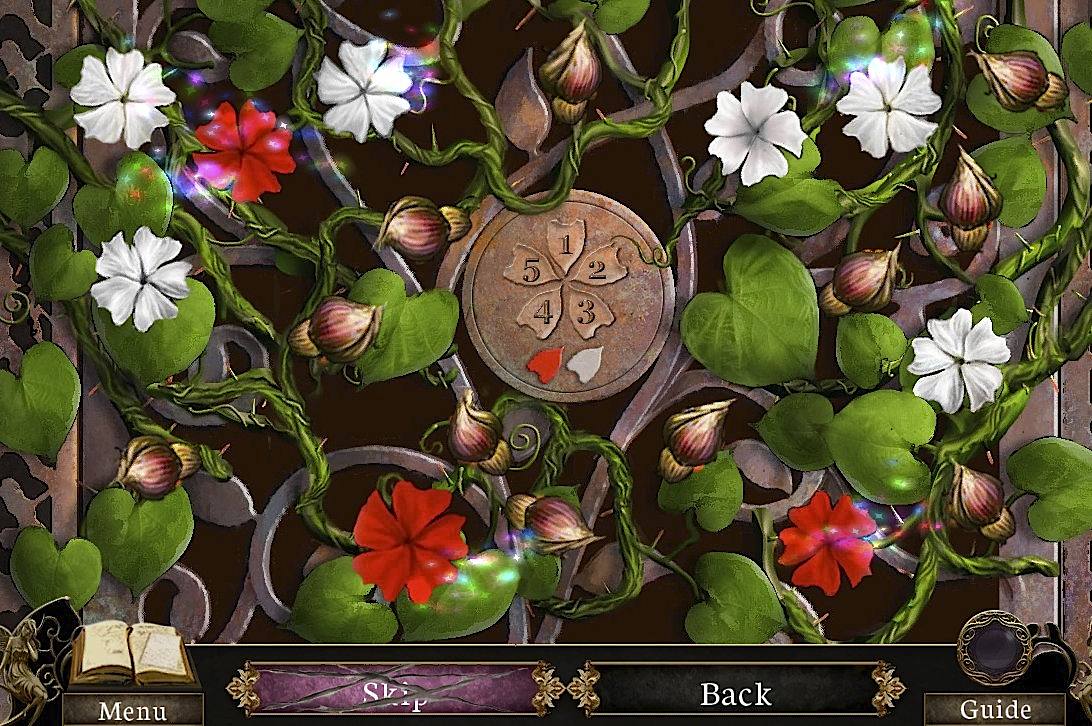
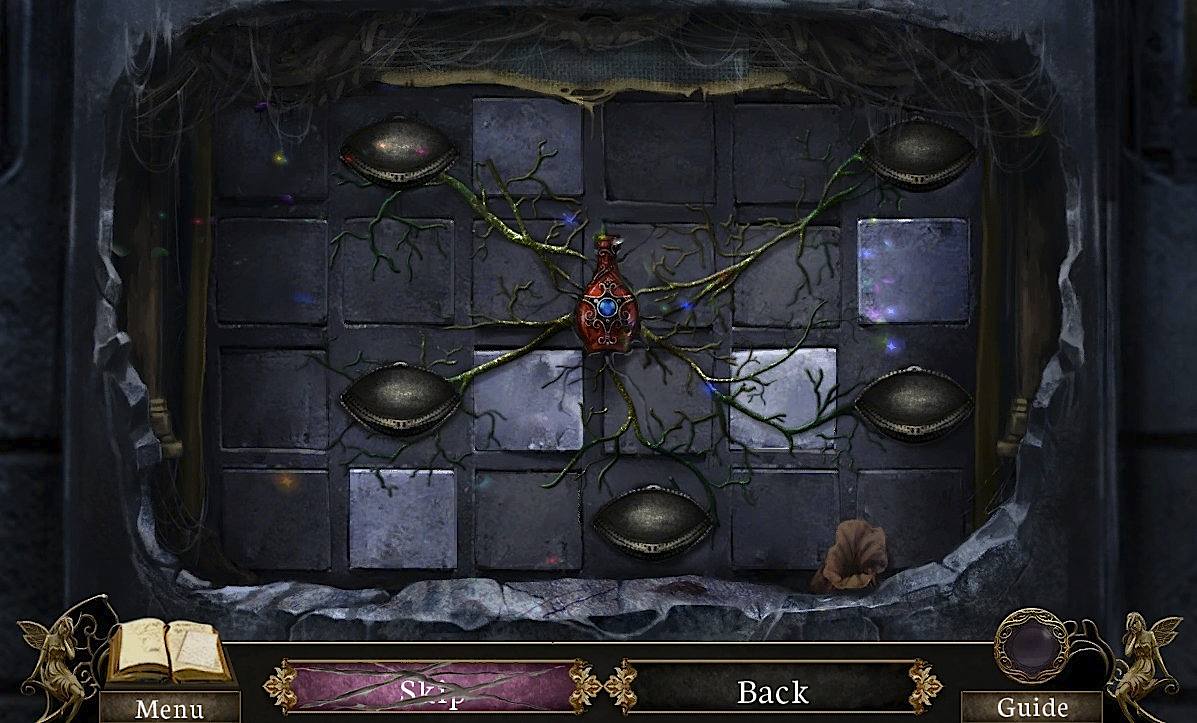
Use the Wire Brush on the metal disc in the center 3x to start a minigame.
The goal is to open the correct flowers on the vine.
The metal disc tells you what flowers need to be open.
The easiest way to solve this is to open all the flowers, then close the ones that don't qualify.
You are looking for only red and white flowers, and only flowers with five petals.
Solution
Enter the gazebo. Take the Pitcher from the fallen statue.
If you zoom in on the font, you find that you can't get the object lodged in the drain. Instead, exit the gazebo, then go back one more screen after that.
Use the Pitcher in the brook to fill it, then go back inside the gazebo.
Zoom in on the basin and use the filled Pitcher. Then take the Butterfly Wing.
Find the Locket
Exit the gazebo and zoom in on the garden patch (to the right of the path, with the bunny statues).
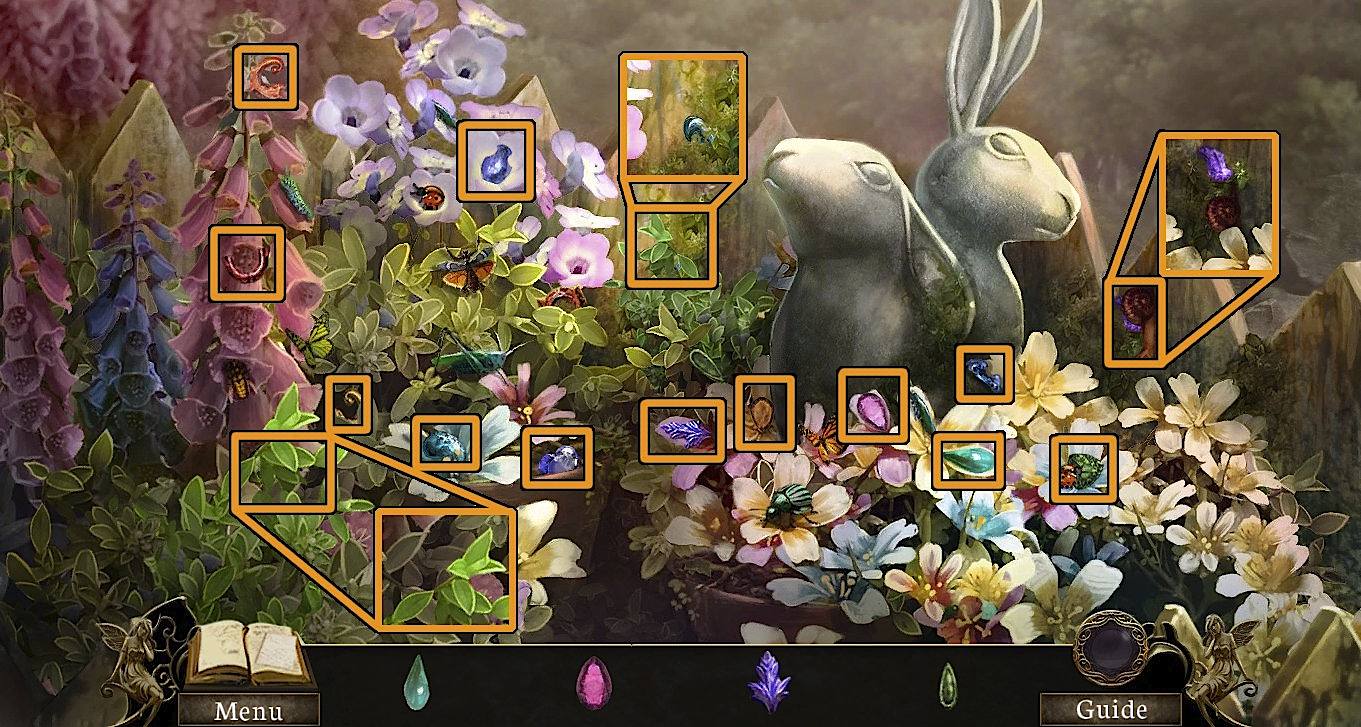
Use the Butterfly Wing with the jeweled butterfly to start a hidden-object scene.
Find the gems that are shown in the toolbar below. You can only select the gems as they appear in the toolbar.
Click the darker green plants to move them aside. Click the snail to move it as well.
Screenshot
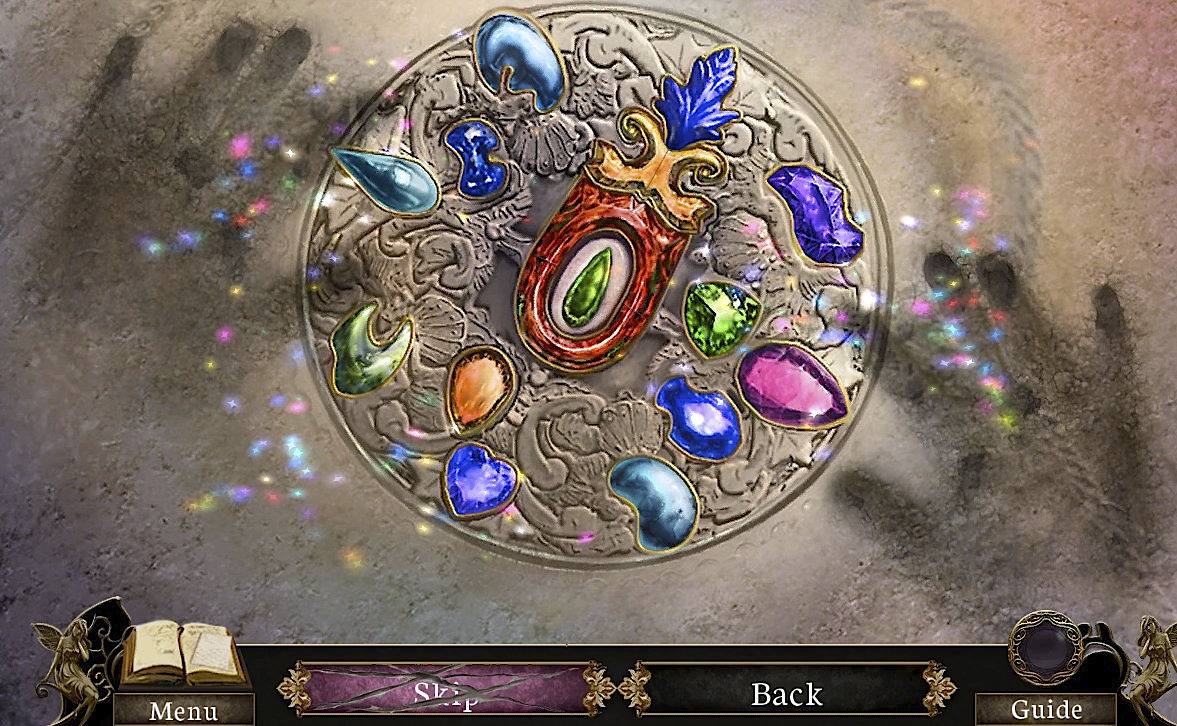
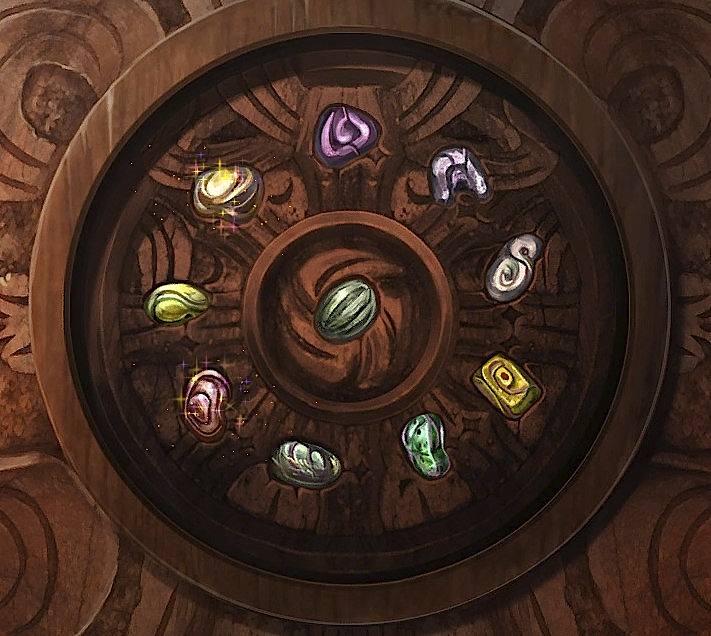
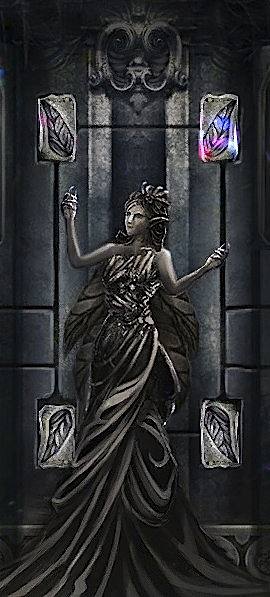
You have acquired Locket Gems. Go back a screen, zoom in on the blindfolded statue, and use the Gems on the slots to start a minigame.
Drag the gems to their respective slots. Gems will lock in place once they are correctly positioned.
Click a gem to rotate it.
Larger slots may hold more than one gem.
Solution
Take the locket.
Rescue the Dryad
Go to the cherry tree. Zoom in on the trunk and talk to the Dryad.
Leave the cherry tree, then go down the rightmost path to the lily pond gate.
Zoom in on the junk in the broken wheelbarrow, on the left. Take the Needle and Thread.
Zoom in on the flowers growing on the tree on the right, then take the Disc (1/2).
Go back 3x, until you are at the back porch.
Click the strange bird, then zoom in on the hanging pot. Take the Torn Cloth.
Go back inside the house. Zoom in on the canvasse-wrapped chair on the right.
Use the Torn Cloth, then the Needle and Thread, with the torn Gardening Glove, then take it.
Exit the house and zoom in again on the hanging pot. Use the Glove with the thorns, then take the Handle.
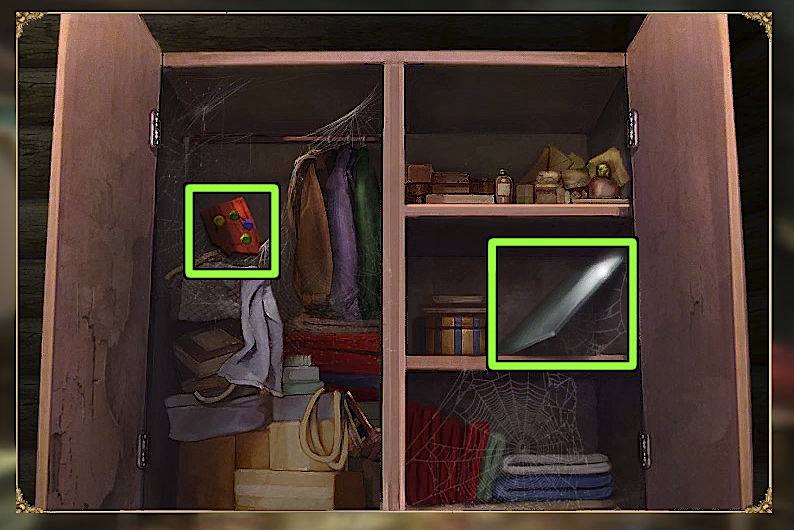
Go inside and zoom in on the large cupboard. Use the Handle with the door, then take the Paint Remover.
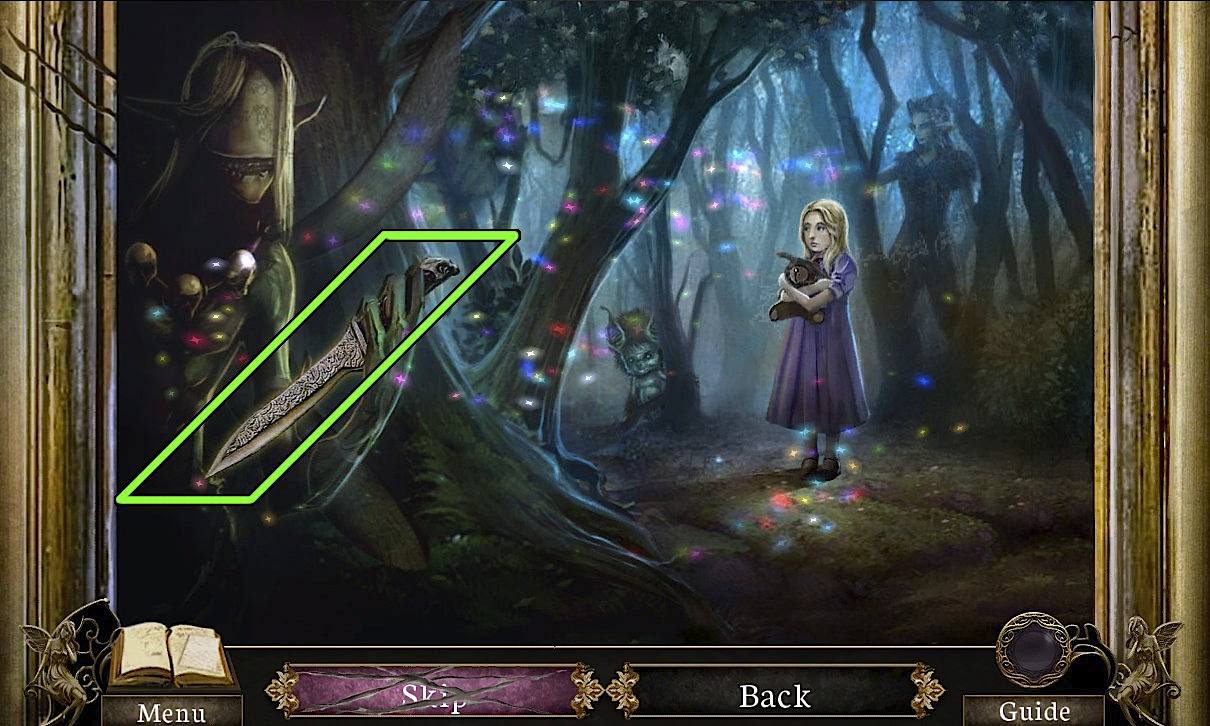
Zoom in on the painting. Use the Paint Remover until the full image is revealed. You have to splash it on enough parts of the painting to solve the puzzle.
Screenshot
Take the Ancient Knife revealed on the left side of the painting.
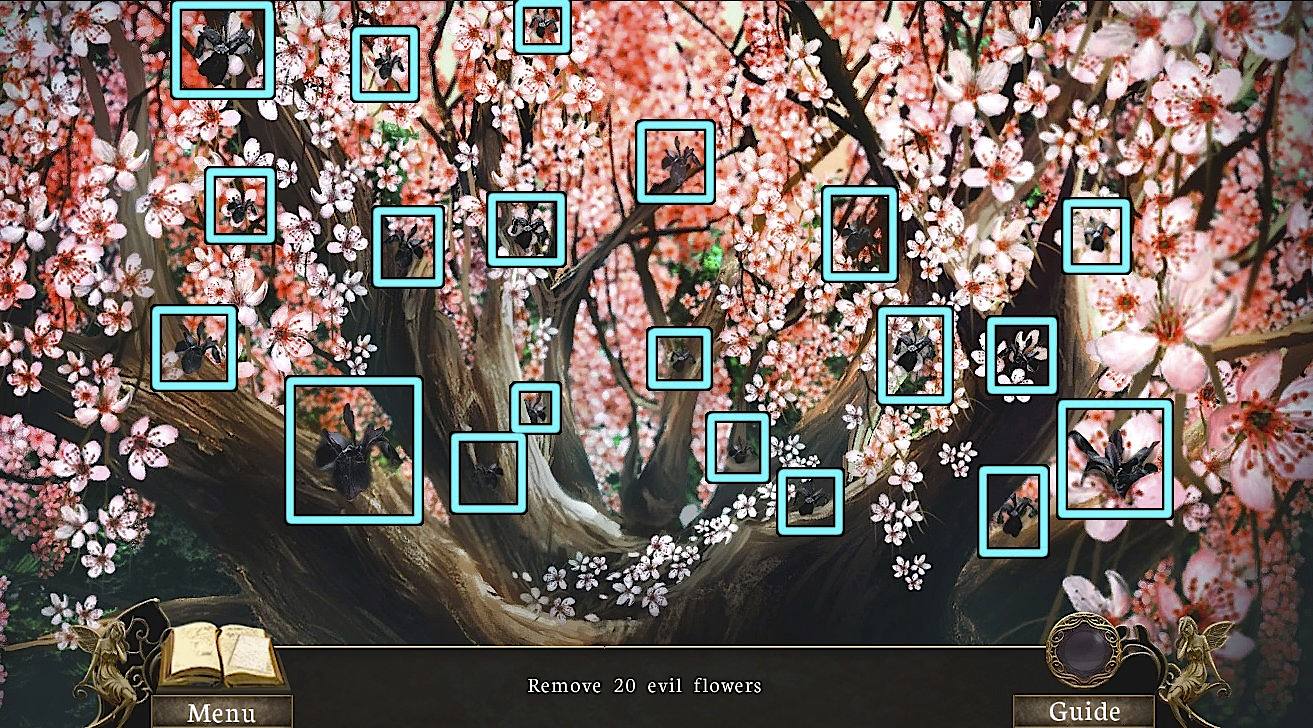
Go back to the cherry tree. Zoom in on the tree and use the Ancient Knife to start a hidden object scene.
Find all the black flowers to remove them.
Screenshot
Talk to the freed Dryad to get the Disc (2/2).
The Lily Pond
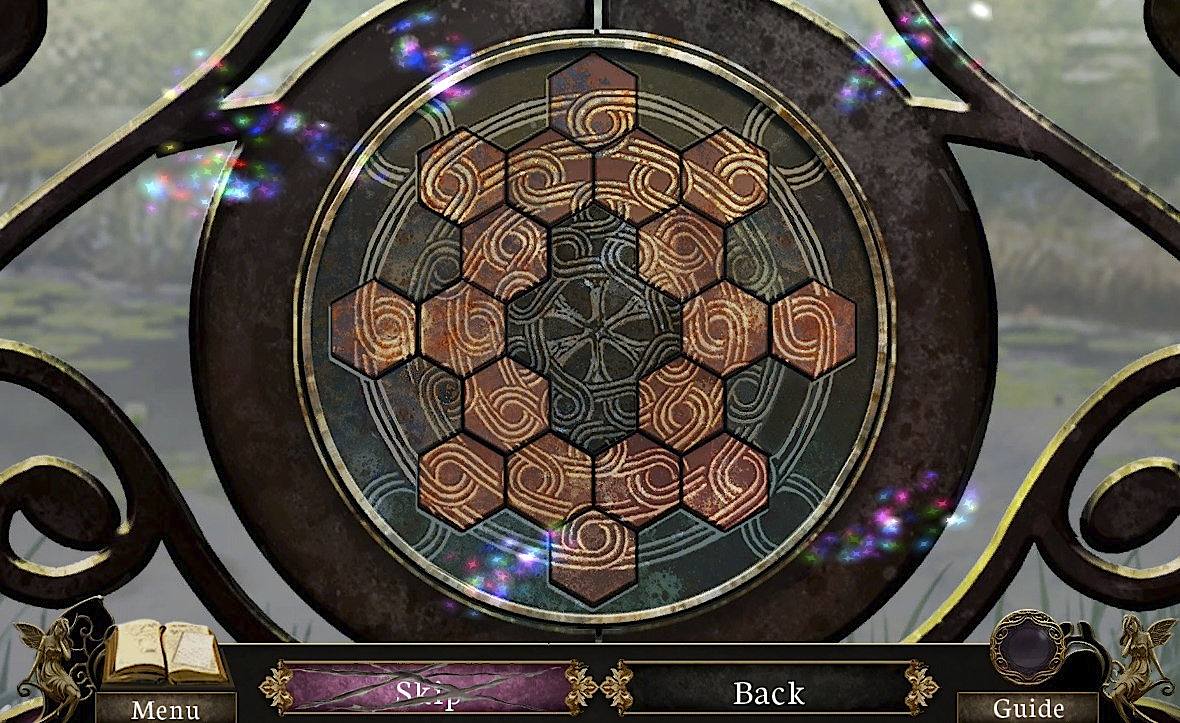
Go to the lily pond gate. Zoom in on the lock and use the Ancient Knife 2x to clear the moss.
Then use the Disc (from the Dryad and from the flowers to the right of the gate) on the slot to start a minigame.
Click the hexagonal tiles to rotate them so they are contiguous with the rest of the design on the disc.
The design is symmetrical. I found it easier to start with the tiles with the fewest neighboring tiles, like those on the outside.
Solution.
Go through the open gate. Take the Empty Sack on the right side of the screen.
Click the alcove in the upper right of the screen for a hidden object scene.
Find all of the spiders. There are three hanging vines you have to click and drag out of the way. I've edited the screenshot below to remove the vines.
Screenshot
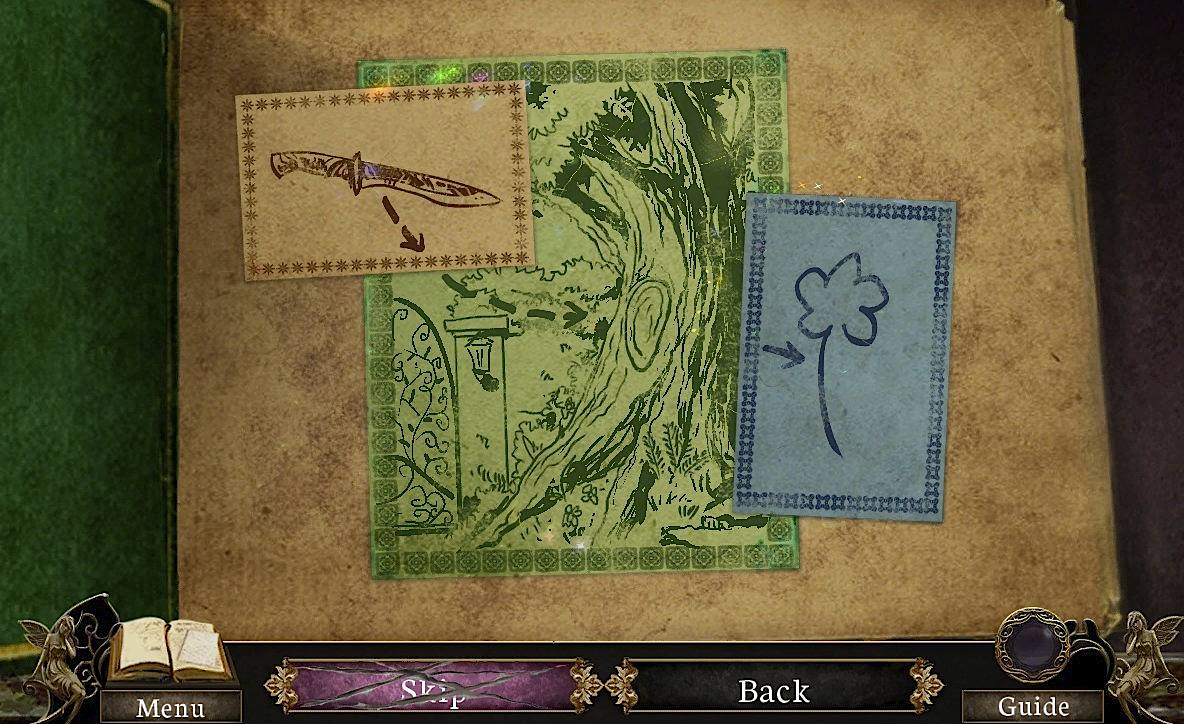
Take the Tear-Shaped Carving. When the alcove opens, take the Wire Cutters (1/2) and open the green sketchbook for a minigame.
Drag the pieces to the correct spot to reassemble the sketches. Pieces will lock in place when correctly positioned.
Click a piece to rotate it.
The green sketch has larger pieces, so I found it easier to assemble it first.
Solution
Jewels and Gargoyles
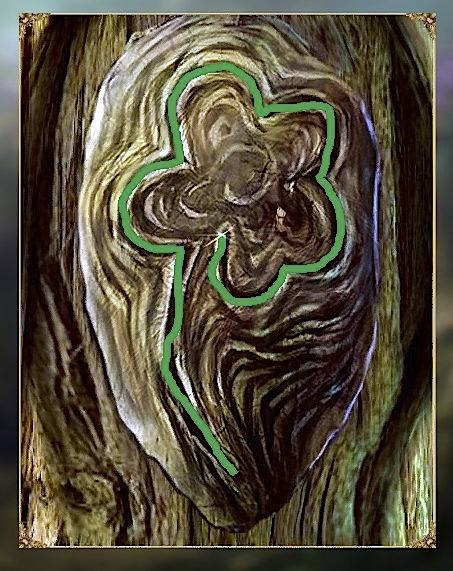
The sketches give you a clue for what to do next. Go back to the lily pond gate and use the Ancient Knife on the flower carving on the tree on the right.
Click and drag to trace the outline of the flower. If you let go of the mouse or are too inaccurate, you will have to start over. Start with the stem.
Screenshot
Take the Figurine (1/3), then use the Empty Sack from the lily pond with the soil to get a sack of Magic Soil.
Go to the stepped path to the gazebo. Zoom in on the garden patch (with the, erm, bunnies) and take the Wire Cutters (2/2).
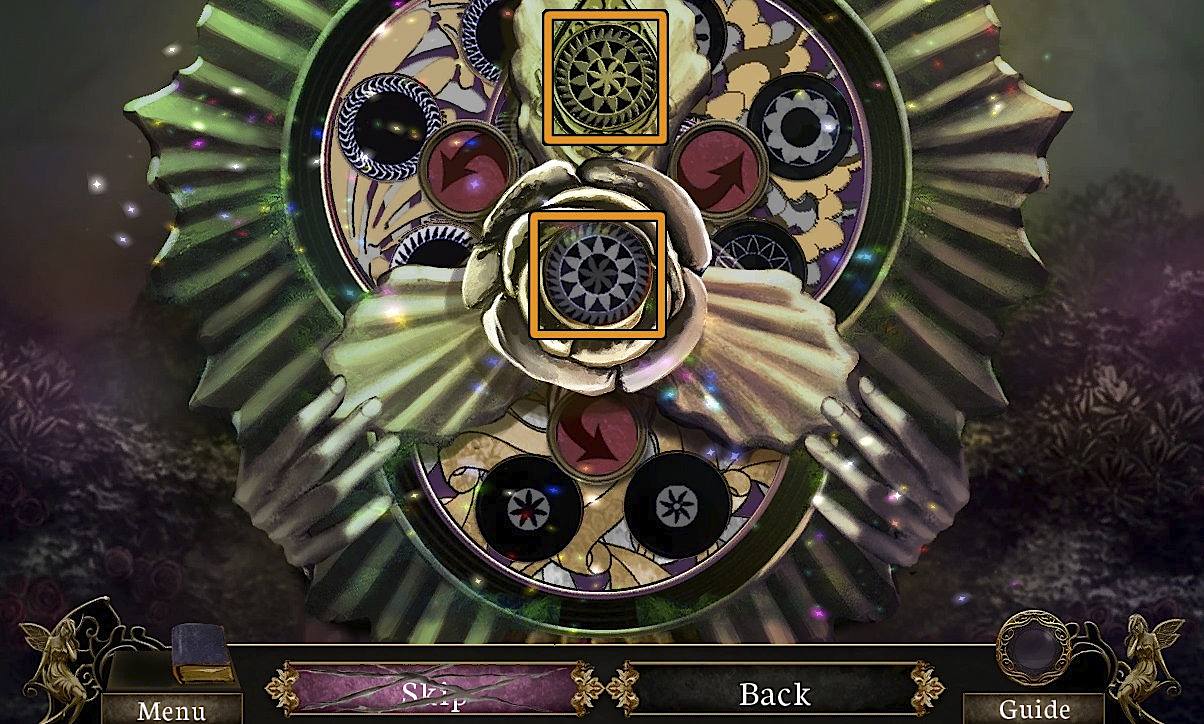
Zoom in on the winged statue on the left and use the Tear-Shaped Carving (from the alcove in the lily pond) in the slot to start a minigame.
Find the three pieces that go in the slots.
Click to rotate; click and drag to put them in place. Correctly-placed pieces will lock in place.
Note that each piece has one of three designs, and that each design matches one of the slots available.
Now rotate the three glass wheels so the image in the center matches the carved design above.
Solution
Take the Ruby from the alcove
Go back to the lily pond gate. Zoom in on the wheelbarrow and use the Wire Cutters (from the bunny statues in the garden patch, and from the lily pond alcove) on the wire grate to get the Wire Mesh.
Go back to the gazebo path. Zoom in on the frog statue on the left.
Use the Wire Mesh on the opening, then use the Wire Cutters on each of the corners to trim it to fit.
Use the Magic Soil on the sifter, then drag it back and forth until the Sapphire is shown. Take the Sapphire.
Use the Sack on the Soil to reclaim it.
Go back to the garden gate. Zoom in on the left statue, use the Sapphire on the empty eye, and take the Figurine (2/3).
Do the same with the right statue and the Ruby to get Figurine (3/3).
The Eternal Flower
Go to the lily pond. Zoom in on the miniature statue in the lower left corner and use the Figurines for a minigame.
Arrange the Figurines so that their relative positions match the three sets of colored discs above.
Click two figurines to switch positions. Note that the black figurine cannot be moved.
Solution
Zoom in on the planter in the middle of the pond.
Take the Dead Eternal Flower.
Go to the cherry tree and show the Dead Flower to the Dryad to get the Seed Pod.
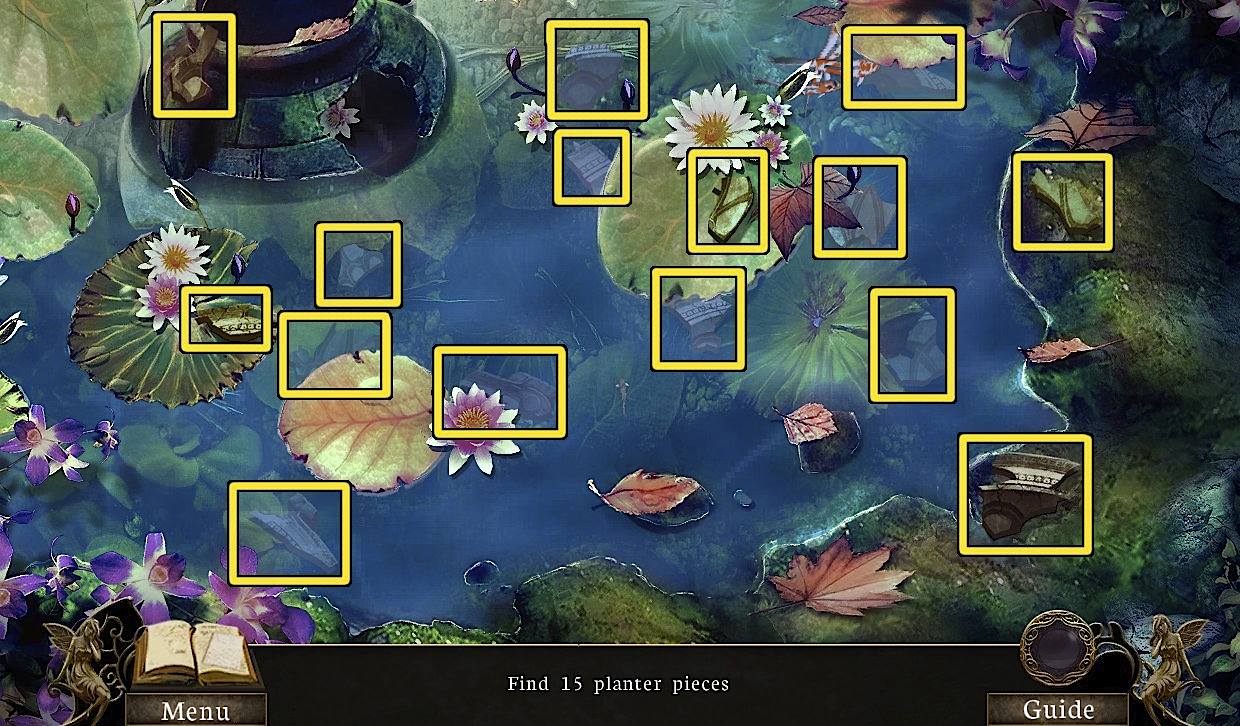
Go back to the lily pond and zoom in on the pond for a hidden-object scene.
Find the Planter Pieces.
Screenshot
Use the Pitcher on the pond to fill it.
Zoom in on the planter and use the Planter Pieces to start a minigame.
Drag the pieces into place to repair the planter. Correctly placed pieces will lock in place.
Click a piece to rotate it.
Try assembling the outer pieces first.
Use the Sifted Soil, the Seed Pod, then the Filled Pitcher on the planter, then use the Ancient Knife with the Eternal Flower to take it.
Go back to the cherry tree and give the Flower to the Dryad.
Go to the gazebo, zoom in on the font, and give the Flower to Fiona. Take the Lily Charm.
Put the Lily Charm in the locket and watch the cutscene.
Chapter Two: The Intruder
Find the Intruder
Back at the house, zoom in on the second-floor door.
Click and drag the rug behind the door, then pick up the Door Key. Use the Key on the keyhole and turn it, then enter the door.
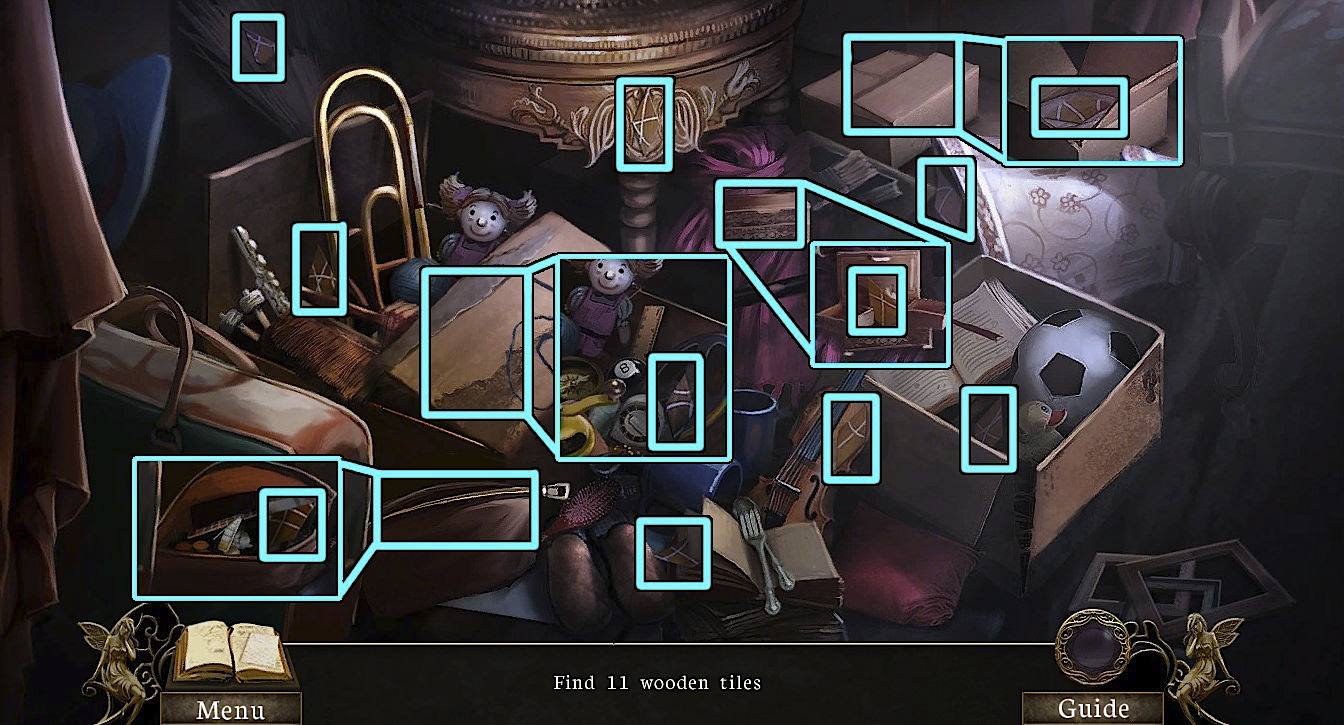
Zoom in on the pile of junk in the back of the hall for a hidden-object scene.
Find the diamond-shaped Wooden Tiles.
You'll have to open two cardboard boxes, the small wooden box, and the small travelling case to find all the tiles.
Screenshot
Zoom in on the door on the left and use the Wooden Tiles to start a minigame.
Arrange the wooden tiles so the strings in the picture are continuous.
Click two tiles to switch places.
Try setting the eight outer tiles before the two inner tiles.
Solution
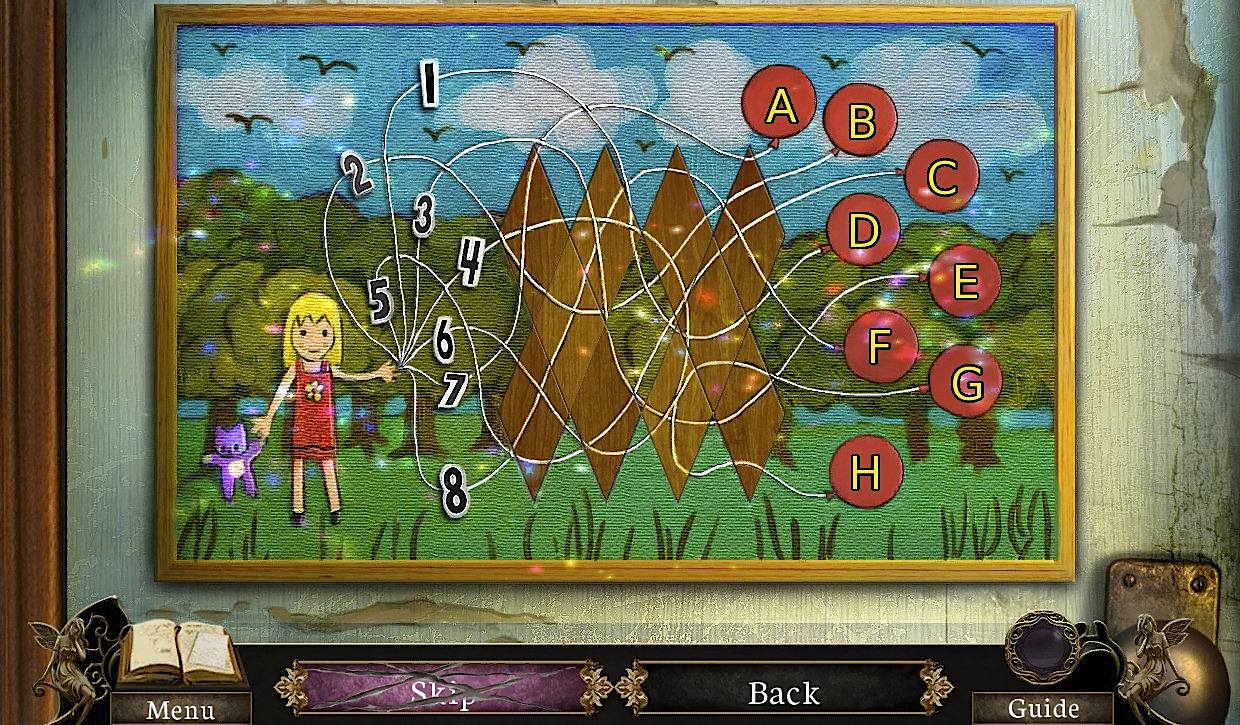
Then click the balloons in the order of the numbered strings they are attached to.
If you click a wrong button, you will have to start the sequence again.
If the top balloon is A and the bottom is H, then the order is:
D
B
E
H
C
G
A
F
Enter the door and pick up the Battery (1/2) on the ground. It's too dark to see, so exit for now.
Zoom in on the family portrait, just to the right of the bedroom door. Take the Battery (2/2) from the frame. Note the time on the portrait.
Zoom in on the drawer beneath the portrait. Drag it open, then use the Batteries with the Flashlight. Take the Flashlight.
Reenter the bedroom. Use the Flashlight on the darkness.
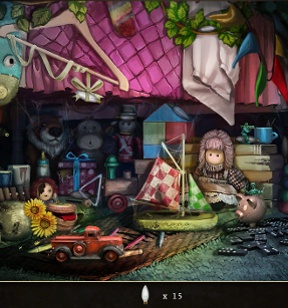
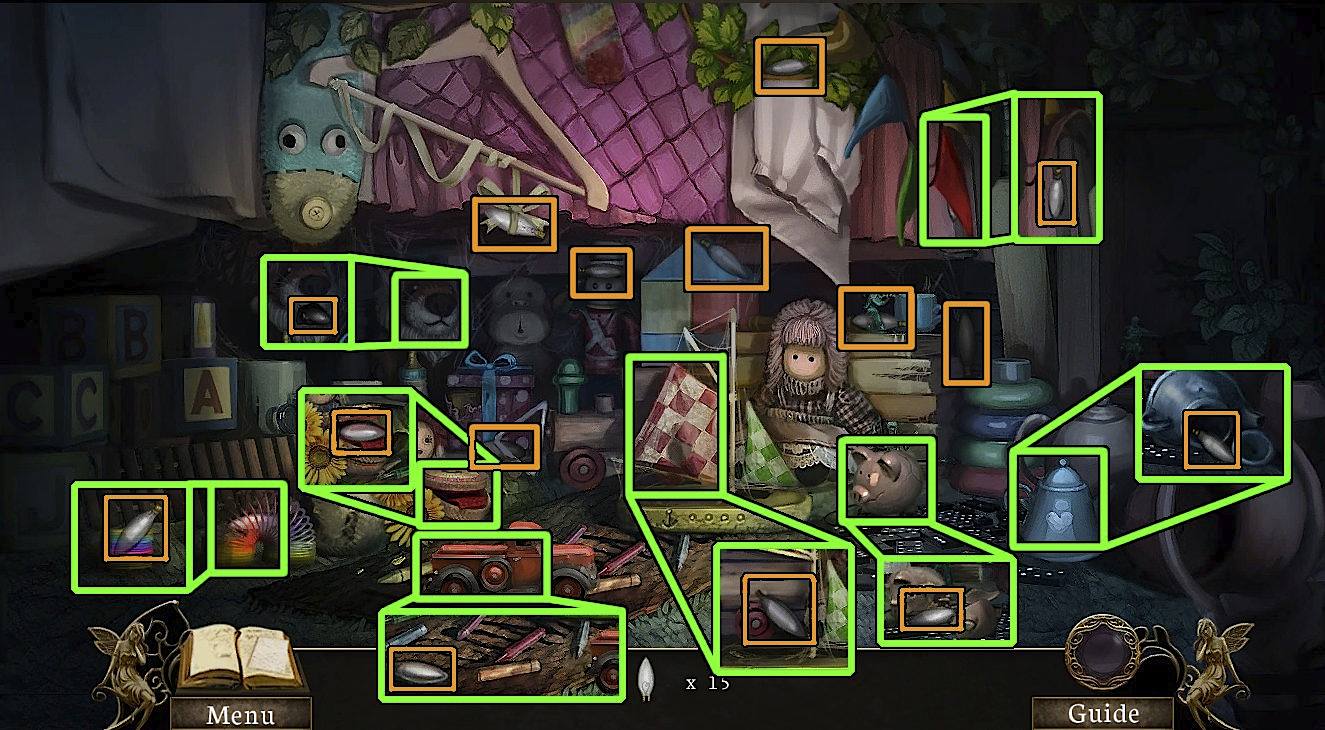
Zoom in on the bed in the lower right corner for a hidden-object scene.
Find all the Bulbs.
You'll have to move or open the toy truck, the Slinky, the sail of the sailboat, the teapot, the basket, the penant flag, the lion's mouth, and the piggy bank to find all the bulbs.
Screenshot
Use the Bulbs with the chandelier at the top of the screen.
Make Friends
Talk to the Hobgoblin. He's apparently hungry.
Zoom in on the teddy bear, behind the Hobgoblin. Use the Ancient Knife to cut along the heart.
Click the stuffing, then take the gemmed Heart.
Exit the bedroom and zoom in on the grandfather clock on the right. Use the Heart in the slot.
Drag the hands to set the clock. Remember the clue from the family portrait.
Set the clock to 11:15
Screenshot
Take the Torn Sketch from the alcove. Return to the bedroom.
Take the Blanket hanging from the wall above the bed, then zoom in on the Board that is revealed.
Use the Torn Sketch on the board to start a minigame.
Reassemble the torn sketch. Click pieces to rotate them. Drag pieces in place; correctly positioned pieces will lock in place.
It's easier to assemble the half of the sketch with the Hobgoblin drawing on it.
Solution
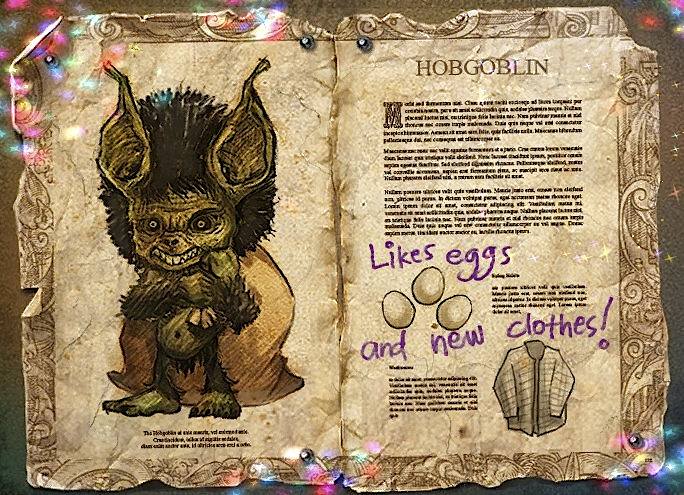
Read the tip about what Hobgoblins like. Take the Map from the open alcove.
Find Eggs
Use the map to go to the old barn.
Take the wooden Step (1/4) leaning against the short barrels.
Zoom in on the bucket and take the Step (2/4).
Zoom in on the truck bed for a hidden-object scene.
Find the pieces of the Hammer and Wooden Wheel shown in the toolbar.
Screenshot
Go around to the rear of the barn. Pick up the two remaining Steps (3-4/4).
Screenshot
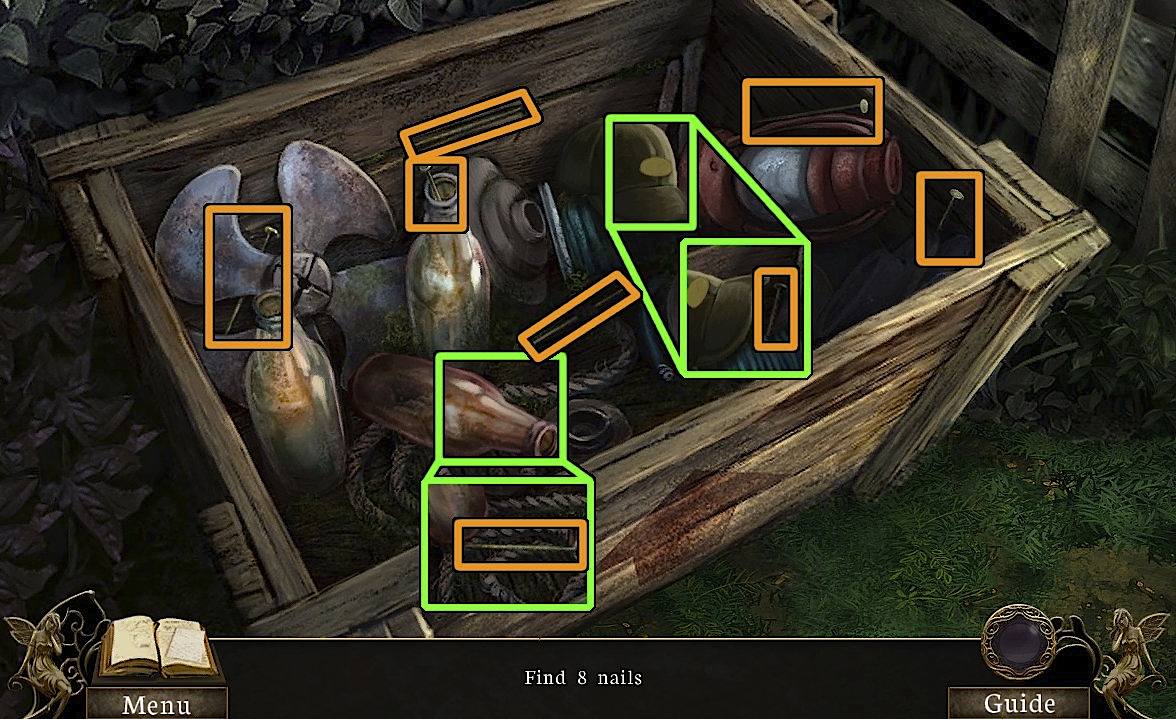
Zoom in on the crate to the left of the sheep. Use the Hammer for a hidden-object scene.
Find all the Nails.
You have to move the cap and the orange bottle to find them all.
Screenshot
Use the Steps, then the Nails on the ladder. Use the Hammer 4x on the ladder.
Zoom in on the window, then use the Hammer on the two broken parts of the glass until the glass breaks.
Use the Blanket from Fiona's bedroom on the glass, then enter the window.
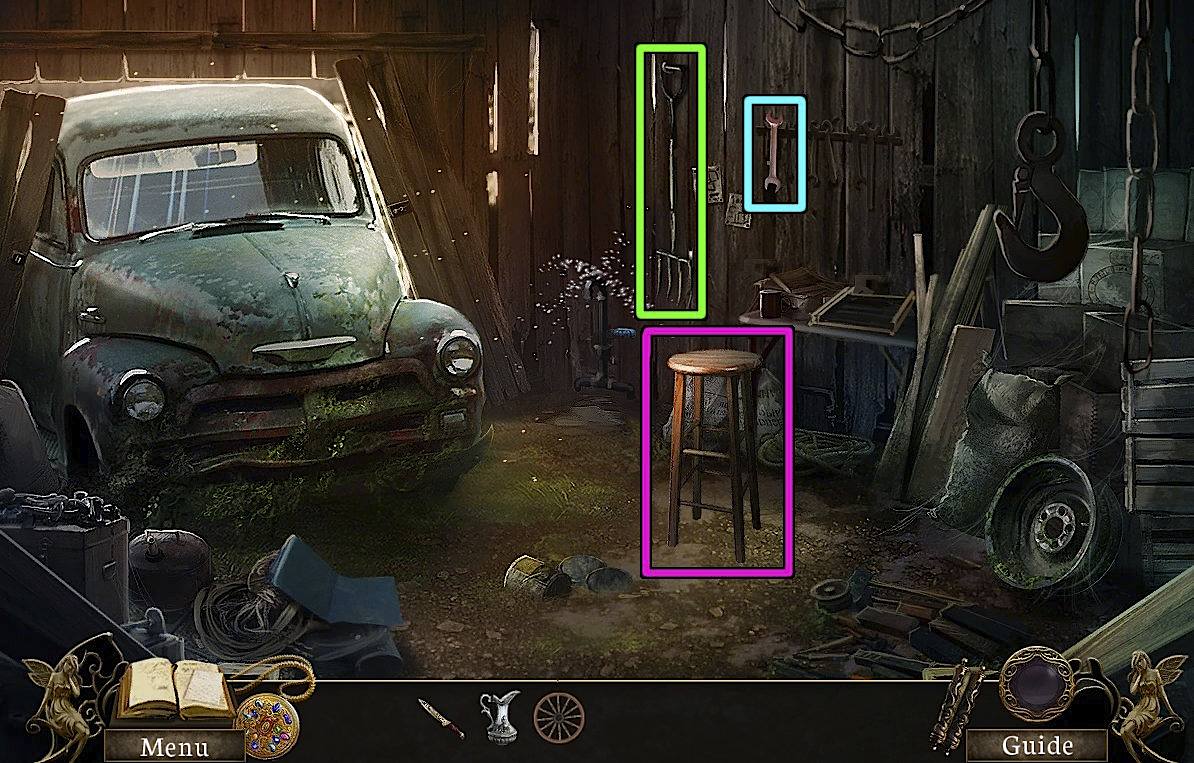
Go right to enter the workshop. Take the Wrench and Pitchfork hanging from the wall, and the Stool in the middle of the floor.
Screenshot
Zoom in on the leaky faucet and use the Wrench to fix it. Take the blue Soap.
Use the Pitcher on the faucet, then turn the valve to fill it.
Go back to the loft. Use the Pitchfork on the pile of hay 4x.
Zoom in on the loose floorboard. Use the Ancient Knife to pry it open, then take the Car Key.
Go back downstairs to the workshop. Zoom in on the car and use the Car Key. Take the Scissors and the Basket.
Go back upstairs. Use the Stool on the markings on the floor. Zoom in on the nest and use the Basket to collect the Rotten Eggs.
Click the map (on the right of the toolbar) to return to the house, then go back to Fiona's bedroom. Give the Eggs to the Hobgoblin.
Make New Clothes (Old Barn)
Take the Hobgoblin's Cane, then go back to the hall.
Zoom in on the attic hatch in the ceiling. Use the Cane to open it, then pull the cane. Click the hatch again to deploy the ladder, then go upstairs.
Take the Feed Bag from the middle of the room.
Zoom in on the work table and look at the etching, for instructions on making clothes. You need to cut, wash, card, spin, and weave the wool into cloth, then cut, sew, and add buttons to the cloth to make the Coat.
Use the map to return to the barn, then go back to the loft.
Use the bag on the hay to get a Bag of Hay.
Go back to the sheep pen outside. Use the Bag of Hay on the hook so the sheep will move.
Zoom in on the pen where the sheep was lying and take the Shears.
Use the Shears on the sheep. Click and drag vertically until the sheep is shorn to collect Dirty Wool.
Go to the front of the barn and zoom in on the bucket. Use the Filled Pitcher (filled with water from the faucet in the barn workshop) and the Soap (found near the faucet) in the bucket.
Use the Dirty Wool in the water. Drag it in circles until it is clean, then collect the Clean Wool.
Go to the loft. Use the Wool on the carding machine to the right of the window. Drag the card left and right until you have Fine Wool.
Use the Wooden Wheel (from the truck bed hidden-object scene outside the barn) on the spinning machine to the left of the window. Zoom in, use the Wool, click the pedal 3x, and take the Yarn.
Go downstairs to the workshop. Use the yarn on the loom on the workbench to start a minigame.
Complete the pattern by filling in the white squares with the proper color.
Click a color on the patch on the left, then click a spot to dye it.
You can always re-dye a square. Squares that you have dyed have a white circle on them.
The easiest way to spot the pattern is to look at each row individually.
Solution
After you get the uncut cloth, use the map to go back to the house, then go up to the attic.
Make New Clothes (Attic)
Click the sewing box, on the round table on the right, to start a minigame.
Arrange the pieces so they form the picture. Click two cross-shaped pieces to switch them.
Solution
Click the box to open it, then take the Cloth Pattern.
Zoom in on the work table. Use the Uncut Cloth, then the Cloth Pattern, then the Scissors (from the car in the barn workshop).
Trace the outline of each piece to cut it out. Start with piece 1, then 2, then 3. Take the Unsewn Cloth.
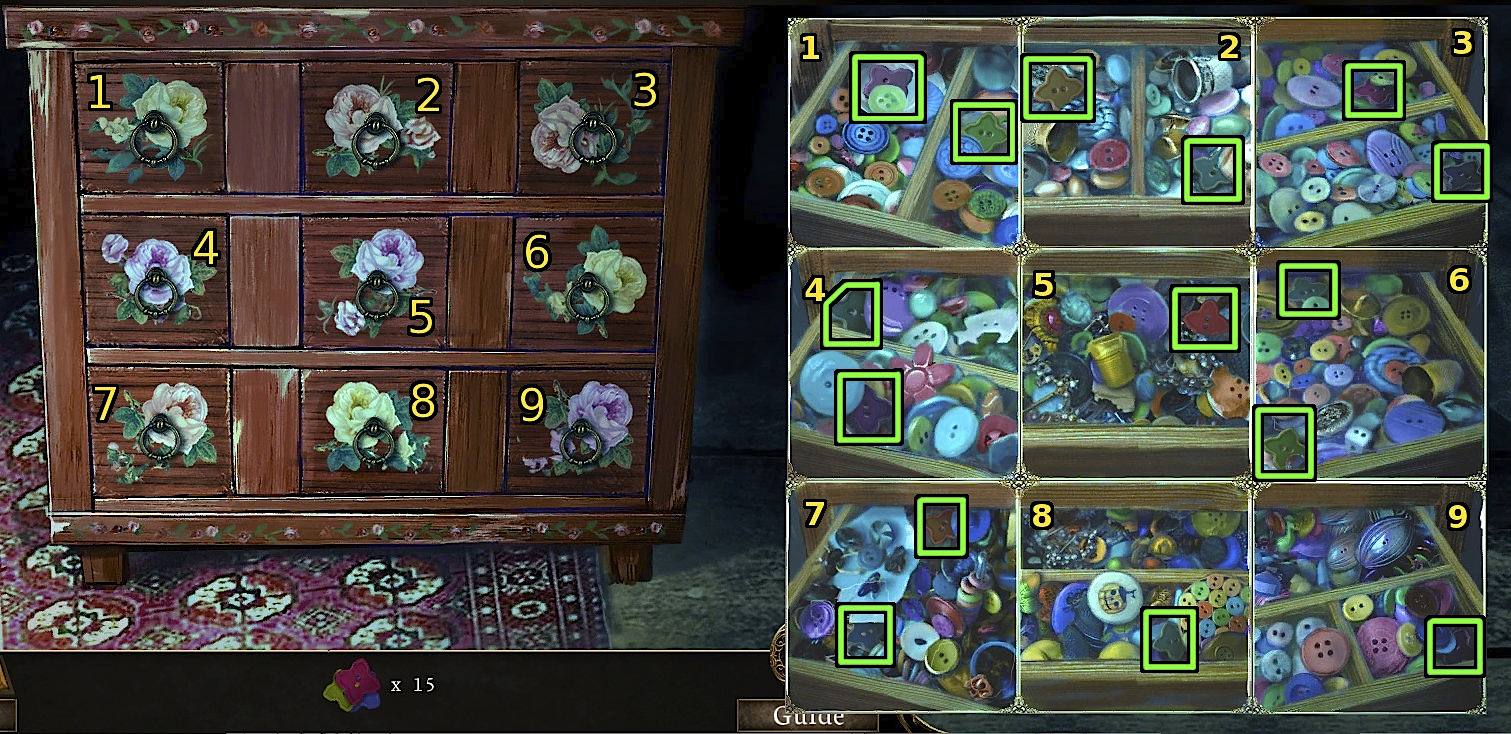
Zoom in on the drawers to start a hidden-object scene.
Find all the star-shaped buttons.
Click a drawer to open it: each drawer contains at least one button. The drawer will close if you find all the buttons in it.
Once you find all the buttons in a drawer, you won't be able to open it again.
Screenshot
Zoom in on the sewing machine and use the Unsewn Cloth. Click the pedal 3x. Add the Buttons, then take the Coat.
Go back to Fiona's room and give the coat to the Hobgoblin.
Look in the sack and flip through the book. Take the Photo of Fiona from the end of the book. Watch the cutscene.
Chapter Three: The Monster
The Kelpie Appears
Zoom in on the pedastal. Use the Photo of Fiona.
Talk to the creature that emerges (the Kelpie). Watch the cutscene.
Monkey Puzzles
Talk to the Hobgoblin. You can't get the sack yet.
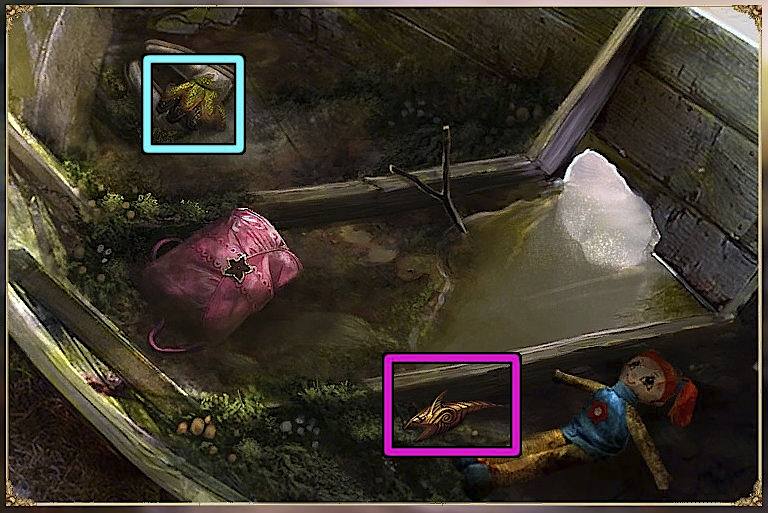
Fill the Pitcher with the Lake, then zoom in on the boat. Use the Pitcher to clear the mud, then take the Fruit Peeling (1/3) and the Dragon Carving.
Solution
Go forward 2x. Zoom in on the dead woman and take the Fruit Peeling (2/3). Ignore the monkey for now.
Go forward 2x. Use the Ancient Knife on the vines.
Cut the vine on top, then the next one, and so on. You only need to remove the vines in the center. There are seven vines to cut.
Take the red Fruit Peeling (3/3).
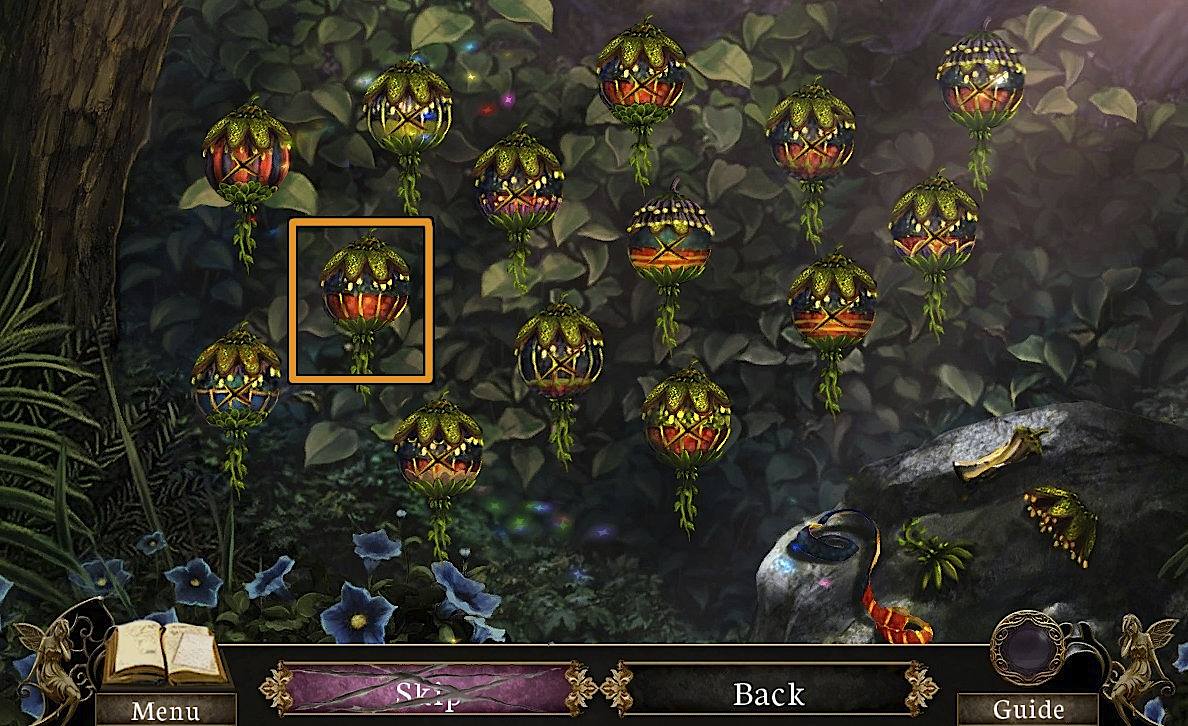
Go back 3x. Zoom in on the fruit bush to the left of the path. Use the Fruit Peelings on the core on the rock to start a minigame.
Find the Fruit that matches the three peelings.
Click a fruit to mark that it is not the correct fruit: The fruit that is NOT selected will be the correct answer. You can undo this marking by clicking again.
The green part with the stem matches the bottom of the fruit, the other green part matches the top, and the peeled skin matches the middle.
If need be, a kludgy way to solve this is to mark all the fruit, then click to unmark and remark each fruit until you find the answer.
Solution
Go to the wagon and zoom in on the body. Give the Fruit to the monkey.
Zoom in again. Take the Rope that is wrapped around her.
Go back one screen (to where you found the fruit). Use the Rope on the branch to the right of the stepped path.
Click the rope 3x, then take the Branch.
Go back to the lake. Use the Branch on the sack 2x.
Zoom in on the sack and take the Rubber Strip.
Zoom in on the boat and use the Rubber Strip with the forked stick to get a Slingshot.
Go forward 3x and zoom in on the monkey in the tree.
Use the Slingshot on the monkey to start a minigame.
Click the slingshot to fire it at the ornamental Weights.
You need to time it so you can hit the Weights without hitting the monkey. You can shoot again if you time it poorly.
You need to shoot three sets of Weights. Just wait until the monkey is as far from the ornaments as possible, then shoot.
The Wagon
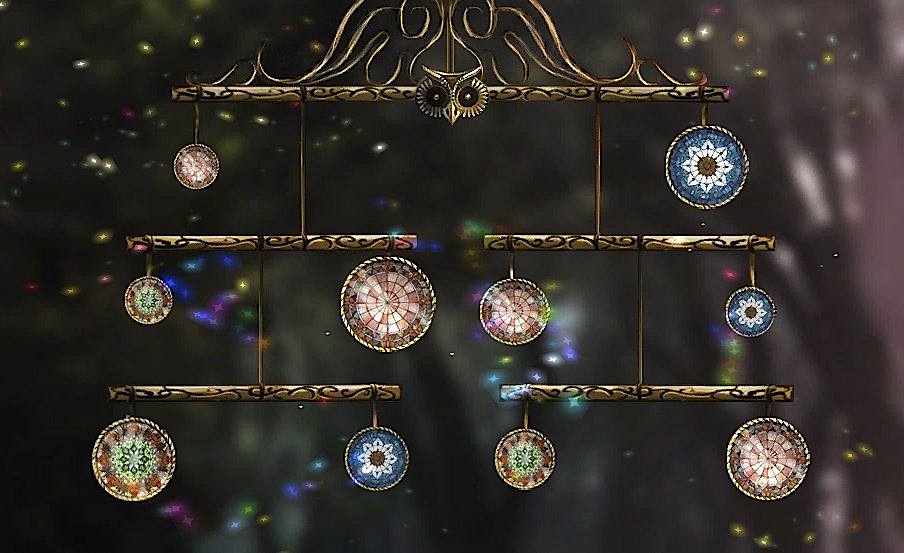
Once you get the Weights from the monkey, go back to the wagon. Use the Weights from the mobile hanging from the wagon to start a minigame.
Balance the mobile with the weights. Click two weights to switch them.
The owl figure is the balance: The closer it moves towards the center, the closer you are to the solution.
There are a few possible solutions: One is below.
Solution
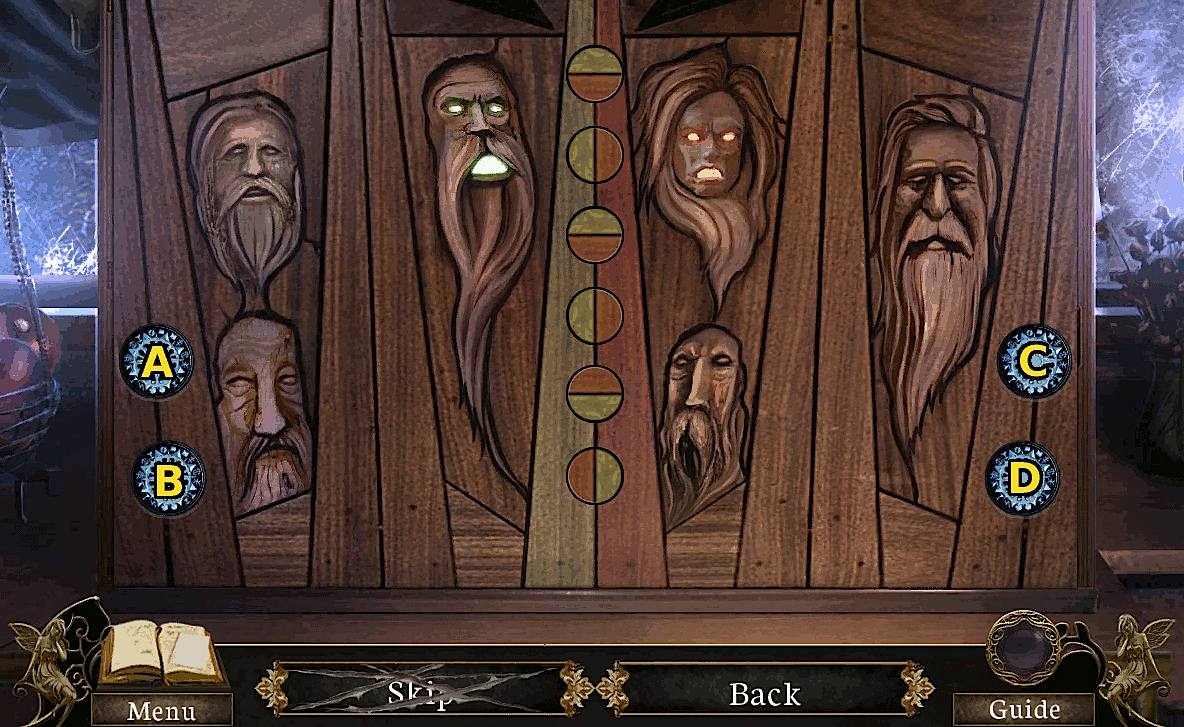
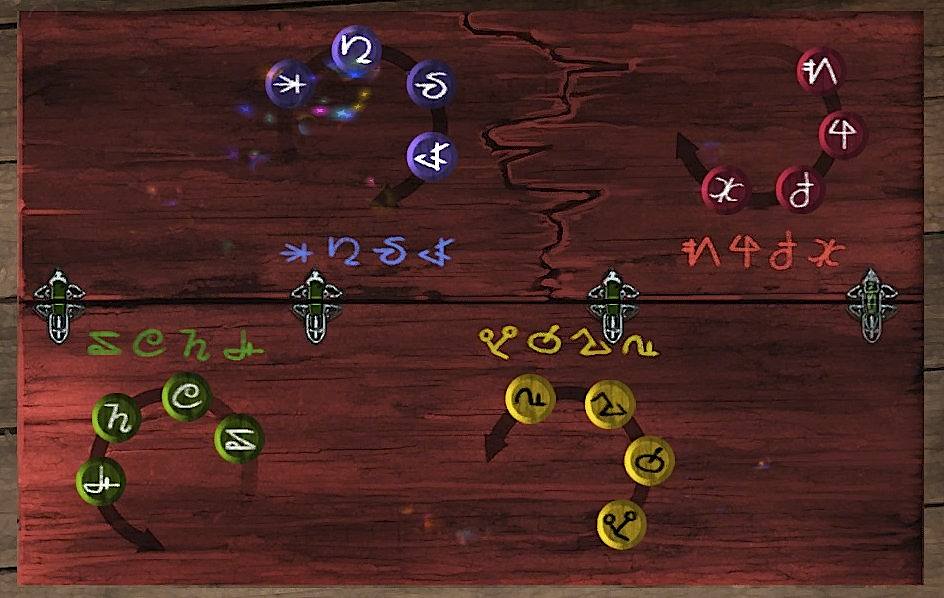
Enter the wagon. Zoom in on the cabinet for a minigame.
Click the blue buttons to rotate the colored discs so they match the color of the background.
Consult the screenshot below. Button A spins discs 1 and 6. B spins 1, 3, and 5.
C spins 2 and 4. D spins 5 and 6.
Screenshot
One possible solution is described below.
First set Discs 2 and 4 with Button C.
Set Disc 3 with Button B, so that the red part is on the bottom.
Use Buttons A and D to set Discs 1 and 6 so that the red part is on the bottom, and to set Disc 5 so that the red part is on the left. The precise way to do this will depend on how you start.
Once you have everything set up this way, click Button D once, then click Button B once.
Now complete the hidden-object scene.
Find pairs of related objects. Click each half of a pair to select the pair.
You need to draw the purple cloth, open the blue box, and take the cap off the cup to find all the objects.
Screenshot
When you are done, click the box in the middle of the screen to find the Winder.
Zoom in on the box in the windowsill of the wagon. Take the Matches, then use the Winder. Click the Winder to reveal the Lens (on the eye of the duck).
Go back outside and zoom in on the body. Use the Lens on the magnifying glass in the woman's hand, then take the repaired Magnifying Glass.
Use the Ancient Knife on the X for a minigame. Click and drag to trace the X and carve it out.
Zoom in on the closed box, to the left of the body. Use the X in the slot, then click it to open it.
Read through Fiona's mother's journal. Take the second Dragon Carving at the end of the book.
First Cave Statue: The Boy
Go forward 2x to the cave entrance.
Use the two Dragon Carvings (from the boat in the lake, and from Fiona's mother's journal) in the two recesses in the archway, on either side of the door.
Use the Magnifying Glass (from Fiona's mother) on the "Small Symbols" that are revealed in the doorway. Play the minigame.
Click matching pairs of gray symbol. Click a symbol and its match to select them.
Selected symbols have a shadow. You can click again to unselect them.
When you've found a match, two of the discs on the outside will light up.
Not every symbol has a match.
Solution
Enter the cave. Use the Matches (from the wagon) on the torch held by the statue the right.
Take the lit Torch and use it on the three other torches as they appear.
Screenshot
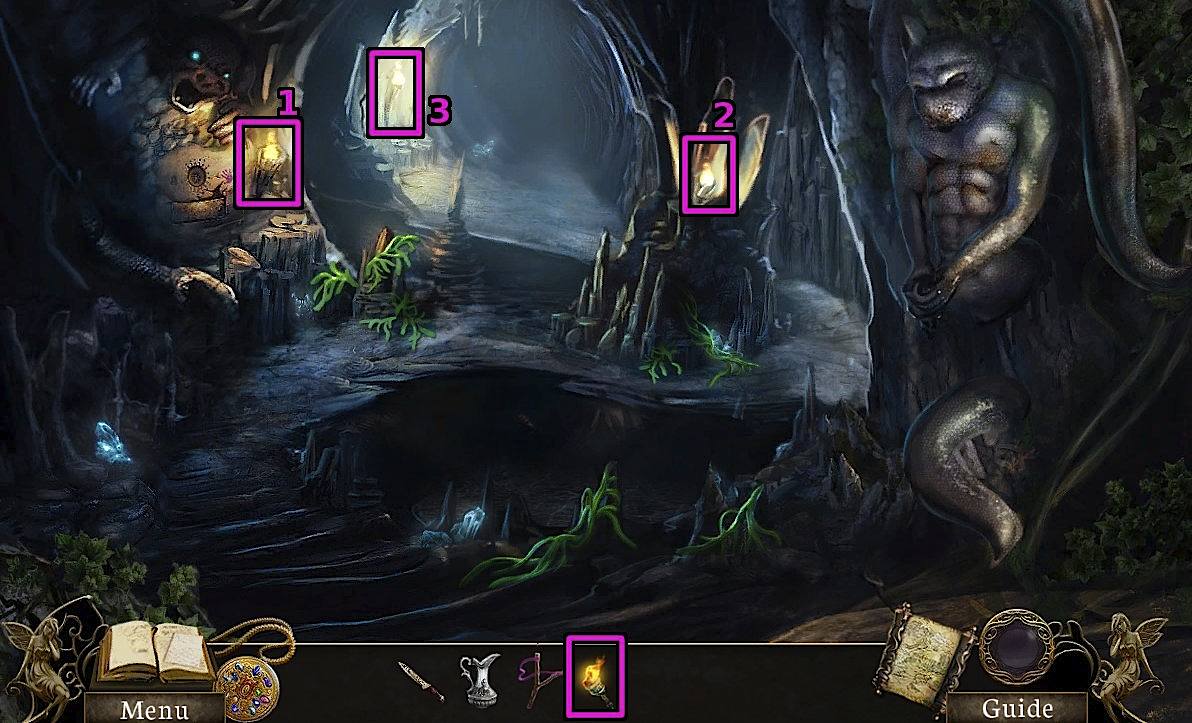
Go further inside the cave. There is a large stone control panel on the near side of the water, surrounded by three smaller "stone codes". Zoom in on the leftmost stone code and note what it says.
Zoom in on the control panel and enter the proper keys, according to the stone code.
The clue shows a water drop and four hash marks. Find four water-related keys on the control panel and click to select them.
Solution
Zoom in on the boy statue that lights up on the left. Note that it looks like he's holding something.
Use the Slingshot on the boy, then take the Gear from his satchel.
Second Cave Statue: The Hobgoblin
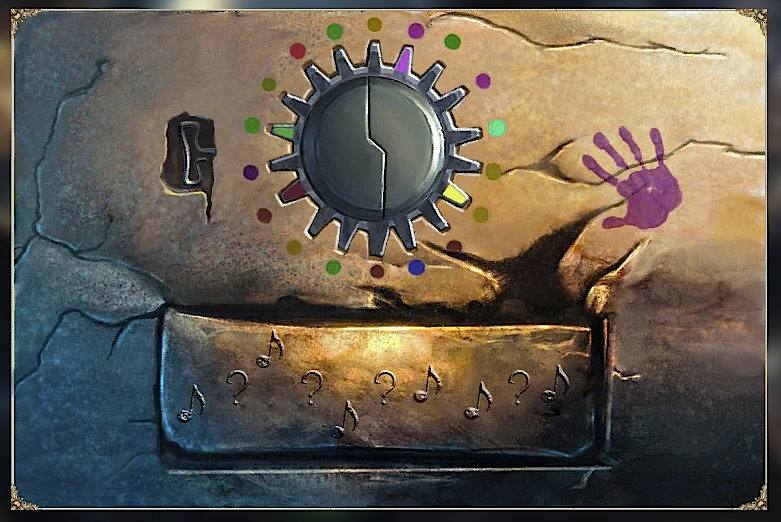
Go back a screen and zoom in on the markings below the leftmost statue. Use the Gear (from the boy's satchel) in the slot to start a minigame.
Click and drag the gear until the colors on the gear teeth match the colored dots. Then pull the chain on the left and take the Stone Disk.
Solution
Take the Stone Disk that appears. Zoom out and go forward into the cave.
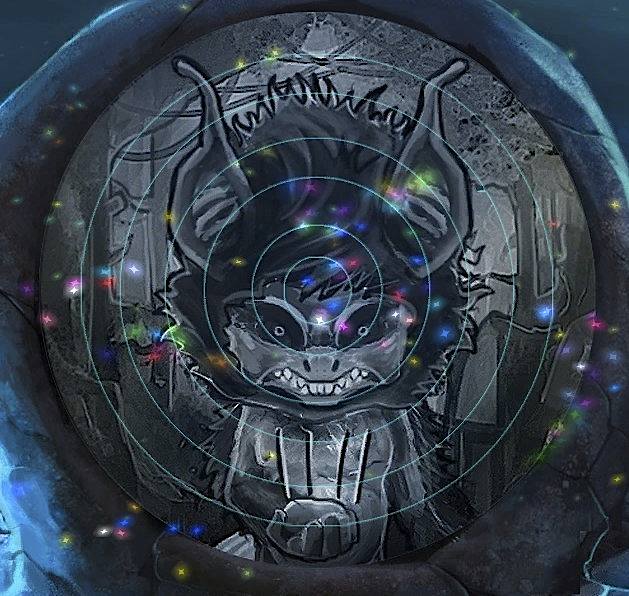
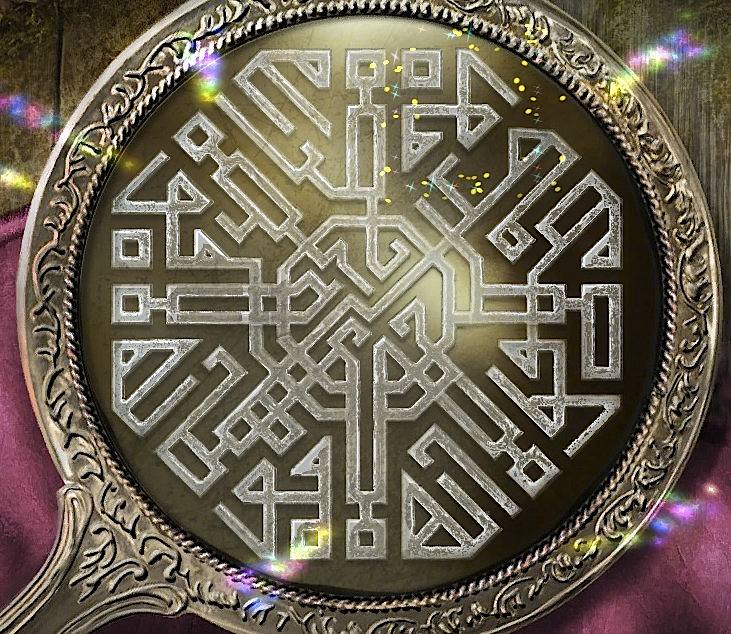
Zoom in on the middle stone code, to the right of the control panel. Use the Stone Disk to start a minigame.
Click and drag the rings to form the complete picture.
Solution
Zoom in on the control panel. Use the code you just uncovered to enter the proper keys.
The clue shows the Hobgoblin and four hash marks. Find four Hobgoblin-related keys on the control panel and click to select them.
Think of things the Hobgoblin likes.
Solution
Zoom in on the hobgoblin statue that is revealed. Note the missing arm. Take the three colored Marbles in the statue's eyes and mouth.
Third Cave Statue: The Girl
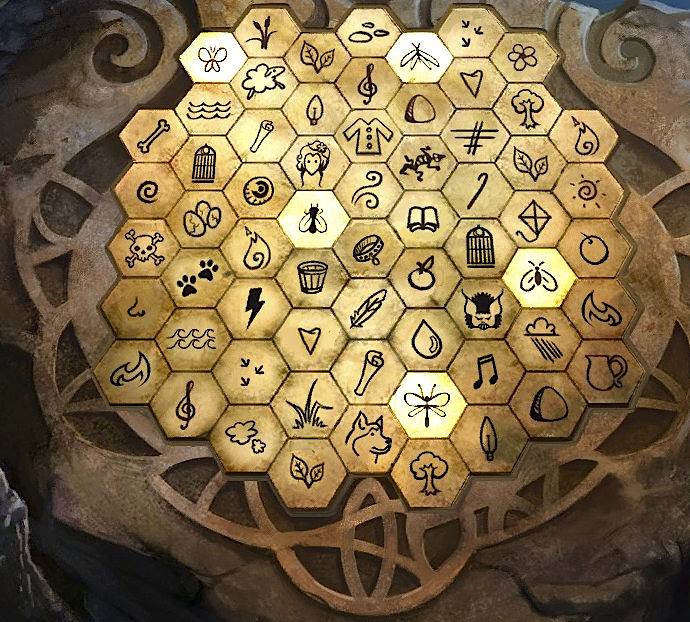
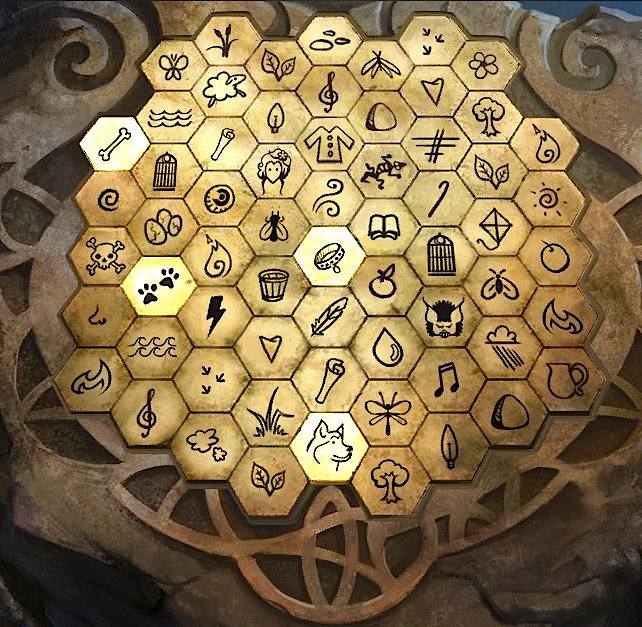
Zoom in on the colorful stone code next to the boy. Use the Marbles from the Hobgoblin statue to start a minigame.
Drag the marbles along the grooves to match them with the colored insets.
Try matching the outermost marbles first.
Solution
Zoom in on the control panel. Use the code you just uncovered to enter the proper keys.
The clue shows some insects and five hash marks. Find five insect keys and click to selection them.
Solution
Zoom in on the girl statue. Take the Jewel from her hair and the Butterfly Net behind her.
Go all the way back to the lake and zoom in on the boat. Use the Jewel with the purse, then zoom in on the mirror for a minigame.
Drag the pieces to reassemble the Mirror. Correctly placed pieces will lock in place.
Click a piece to rotate it.
Try starting with the larger pieces.
Solution
Return to the inside of the cave and zoom in on the girl. Use the Mirror with the girl, then take the Dog Collar from her arm.
Fourth Cave Statue: The Dog
Go back a screen, to just inside the cave. Use the Torch on the murky water (The water is hard to see: it's within the first S-bend of the path).
Find the Bone at the top of the screen. Use the Butterfly Net (from behind the girl statue) to retrieve the Bone.
Go forward and zoom in on the rightmost stone code. Use the Ancient Knife to remove the Wood, then use the Bone in the recess.
Zoom in on the control panel. Use the code you just uncovered to enter the proper keys.
The clue shows a dog bone and rour hash marks. Find four dog-related keys and click to selection them.
Solution
Zoom in on the dog statue. Use the Dog Collar (from the girl statue), then take the Stone Arm.
Zoom in on the Hobgoblin statue and use the Stone Arm to restore it to the Hobgoblin. Take the broken Stone Key from his right hand.
Subdue the Kelpie
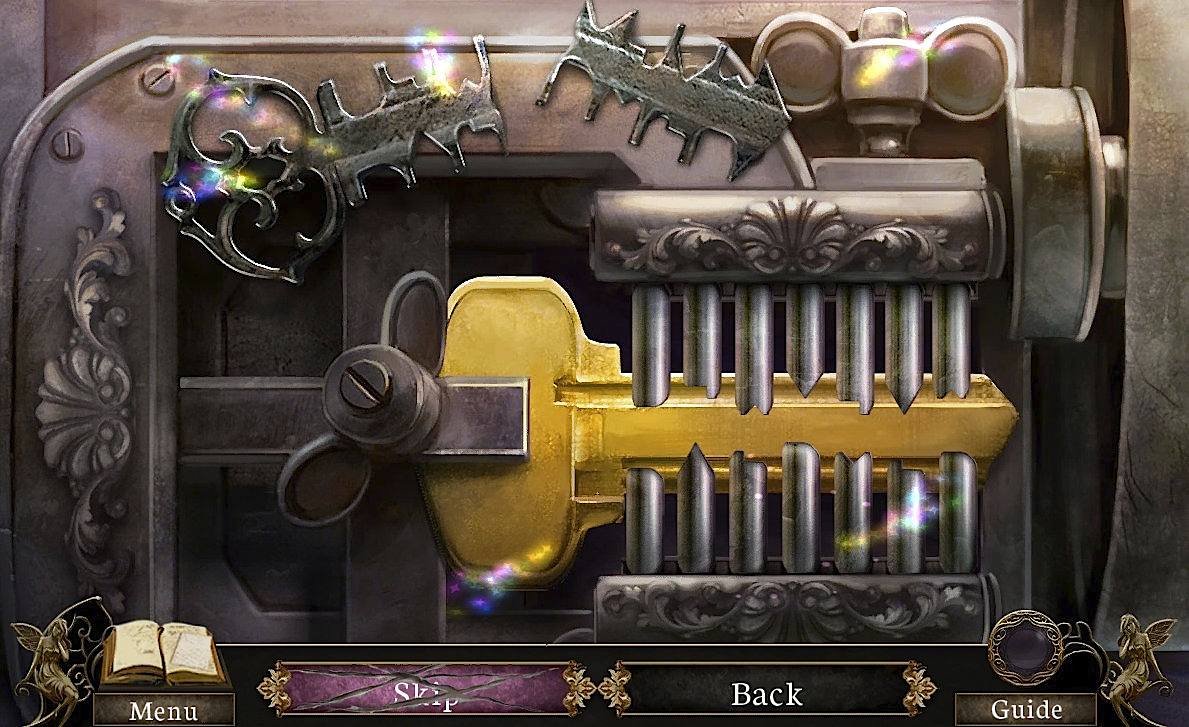
Go back to inside the wagon. Use the Stone Key with the key-duplicating machine on the table to start a minigame.
Arrange the key-carving metal rods to duplicate the broken key.
Click two rods to switch them. You can't switch between the top and bottom rows.
Be sure to match the height as well as the shape of each tooth on the key.
Solution
Go back to the lake and zoom in on the sack. Use the New Key on the keyhole to open the chest.
Click twice on the paper to take the Blank Music Sheet.
Use the Ancient Knife with the slot on the bottom of the chest, then take the Flute.
Look at the sketch for a clue on how to befriend the Kelpie. Apparently the Kelpie likes kelp.
Go back to the cave. Use the torch on all the Kelpweed you find, then use the Ancient Knife to collect it. There are three patches near the entrance and three in the back.
Screenshot 1
Screenshot 2
Go to the part of the cave near the entrance. Use the Wood on one of the torches to get Burnt Wood.
Zoom in on the colored gear puzzle from before. Use the Blank Music Sheet on the rectangle below the grid, then use the Burnt Wood.
Click and drag the wood to imprint the marks, then take the Music Sheet.
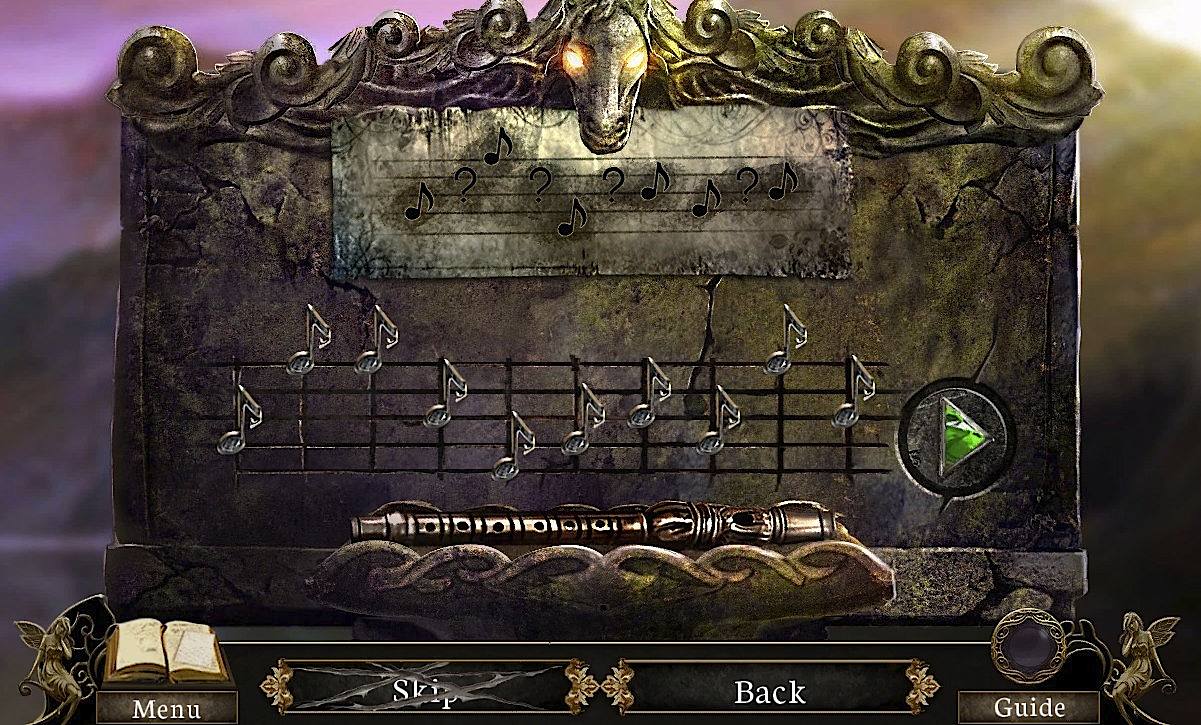
Go back to the lake and zoom in on the pedestal (which you used to first summon the Kelpie). Use the Music Sheet on the stand, then use the Flute (from the chest in the sack by the lake) to start a minigame.
Click and drag the notes up and down to match those in the Music Sheet above.
You'll have to figure out what the question-mark notes are by trial and error.
Press the green play button on the right to test your solution. Correct notes will light up green. Incorrect notes will be red, or yellow if you are only one spot away from the correct spot.
Solution
When the Kelpie emerges, give it the Kelpweed from the caves. Finish the conversation to get the Flower Charm.
Open the locket and use the Flower Charm in its space. Talk to the Kelpie again, then watch the cutscene.
Posted by: Mike |
February 8, 2012 9:59 PM
|
February 8, 2012 9:59 PM
Otherworld: Spring of Shadows walkthrough
Part 2: Chapters 4-6, collectibles
Chapter Four: The Curio Shoppe
Find the Curio Shoppe (The Poster)
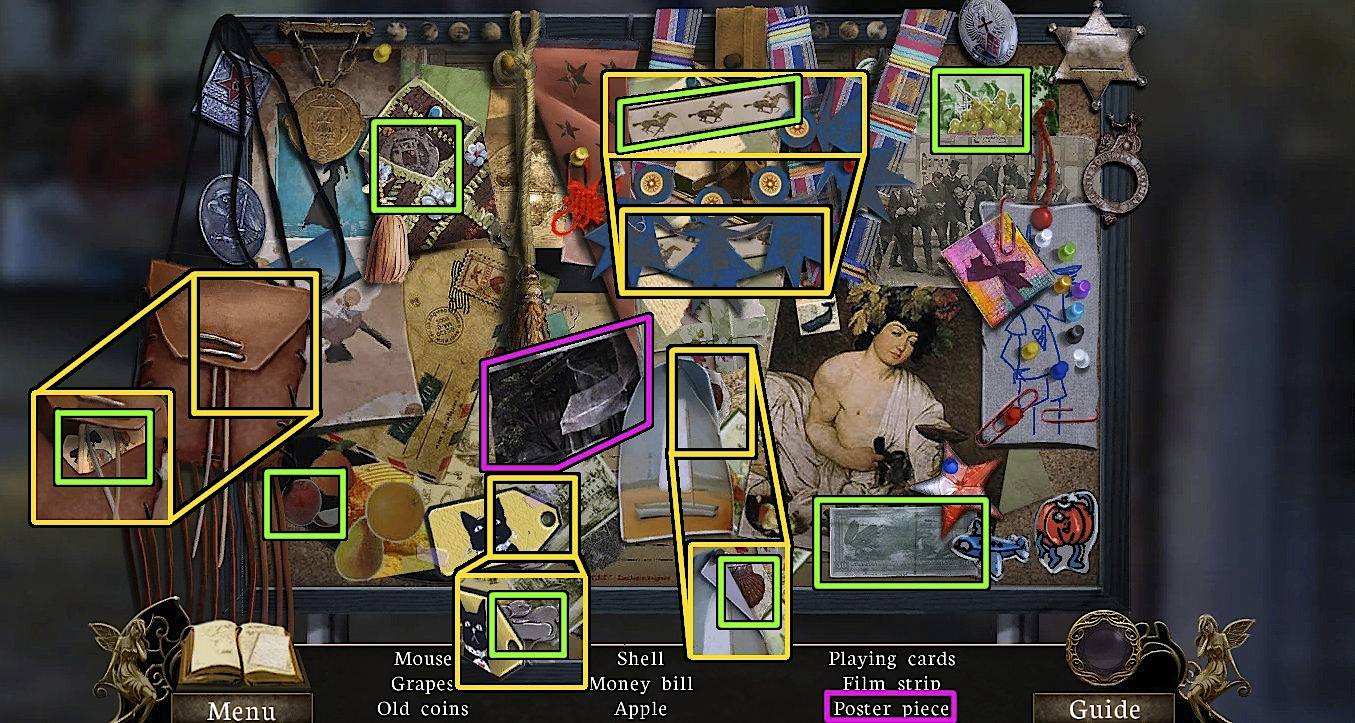
Go up the street. Zoom in on the bulletin board for a hidden-object scene.
Find the objects listed.
The cards are in the pouch.
The shell is behind the sailboat.
The mouse is behind the cat.
The filmstrip is behind the blue figures.
Screenshot
You collect the Poster Piece (1/2).
Zoom in on the storefront, to the left of the bulletin board.
Take the Clip. Oops!
Zoom in on the puddle. Move the pieces aside and collect the Wet Poster Piece.
Go back to the twon square. Zoom in on the banners (the one in front with the missing flag).
Use the Clip, then the Wet Poster Piece. Wait for it to dry, then collect the Poster Piece (2/2).
Zoom in on the tower. Use the Poster Pieces with the piece in the base, then collect the Poster of Main Street.
Go to Main Street to begin a minigame.
Click the spots in the scene that are different from the photo.
Screenshot
Open the General Store
Zoom in on the bike chained to the gate. Take the Pen from the basket.
Go back to the town square. Zoom in on the general store (behind and to the left of the tower).
Collect the Rag from the windowsill. Use the Pen on the crack to the left of the window, then take the Small Key.
Go back to Main Street. Zoom in on the bike and use the Small Key on the padlock, then click the padlock to remove it.
Use the Pen with the gate lock to start a minigame.
Click the pins in the right order to open the lock. There isn't any way to solves this besides trial and error.
If you click the wrong pin, the puzzle resets and you will have to try again.
Solution:
If the pins are 1-9, from left to right, the solution is as follows:
2 (green)
5 (yellow)
1 (orange)
6 (pink)
8 (black)
4 (red)
3 (blue)
7 (gray)
9 (turquoise)
Go down the now-open alley to see the shoppe.
Use the Pitcher on the burst pipe to fill it.
Zoom in on the dirty window on the right wall. Use the Pitcher 3x, then use the Rag (from the windowsill of the general store).
Click and drag the Rag until the window is clean. Talk to the man, then talk to him again.
Go back to the town square, then enter the general store from the front.
Open the Curio Shoppe
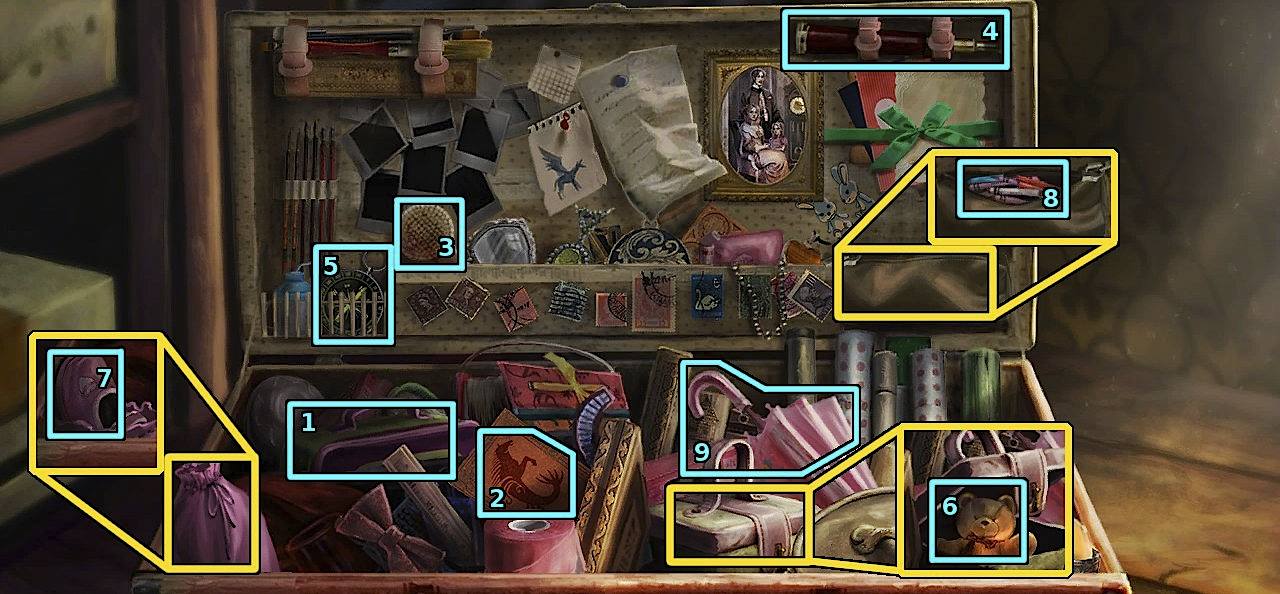
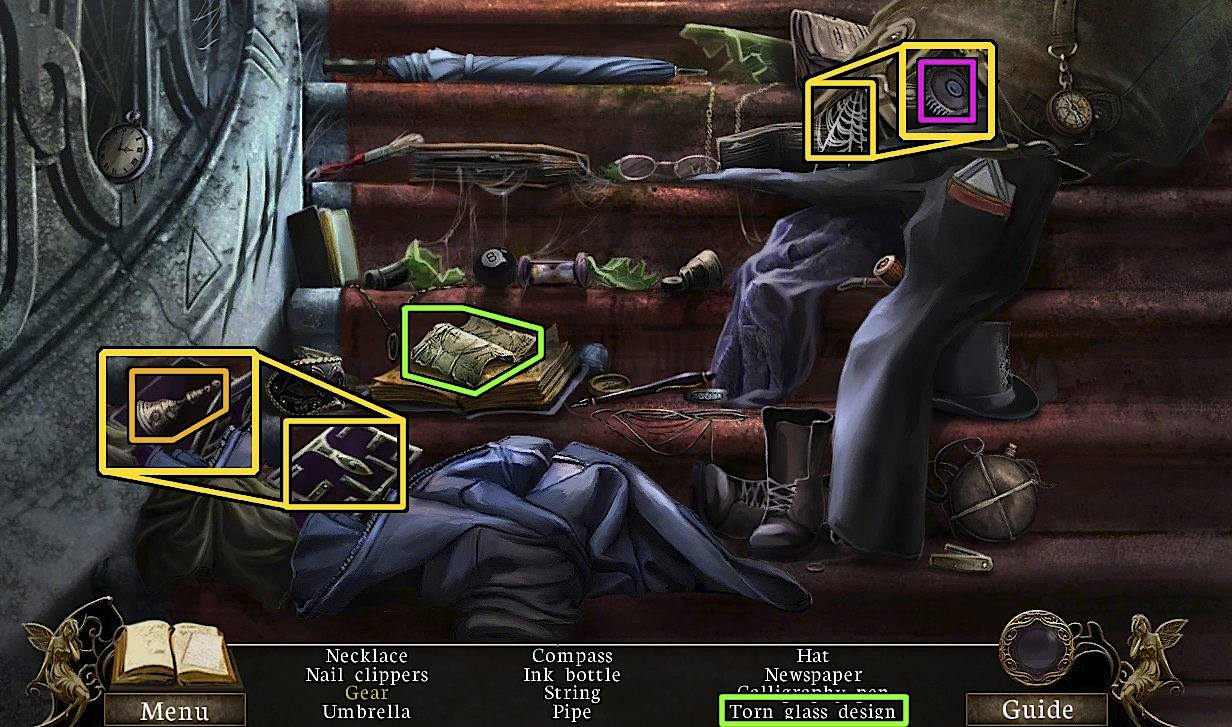
Once inside the general store, talk to the owner. Zoom in on the footlocker for a hidden-object scene.
The shopkeeper gives you clues for what item you should find next. The order of the clues is random.
In the solutions listed below, the number corresponds to the number in the screenshot.
"She carried this around constantly, but never filled it with food."
Lunchbox
"She loved old folk tales, even the scary ones. This water horse didn't scare her at all."
Kelpie
"Fiona kept going on adventures and messing up her hair. Her mom kept this here just in case."
Hairbrush
"She would look up at the stars with this, as if she knew something we didn't."
Telescope
"Fiona like to explore the countryside on her own. She brought this to find her way home again."
Compass
"She bought two of these stuffed toys. I think she kept the other one at her house."
Teddy bear (in the box)
"Fiona like fairy tales. She left this behind once, pretending to be Cinderella."
Slipper (inside the pink sack)
Babysitting Fiona was easy. She just need this, and would draw all day
Crayons (in the pencil case)
"She always said a storm was coming, so she brought this everywhere."
Umbrella
Screenshot
You gain an Umbrella. Before leaving, take the yellow Galoshes (1/2) from the left shelf.
Also, zoom in on the side table (to the left of the counter). Click and drag to open it, then take the green Eye and the Can Opener.
Leave the store (presumably you've paid for everything), then return to the back alley, via Main Street.
Click the cat on the fire escape, in the upper-left corner of the screen.
Use the Umbrella on the fire escape, then go up to climb it.
Use the Can Opener on the Can of Tuna. Collect the Can and the Dish Bowl.
Go down the ladder and zoom in on the doormat (where the cat ran to). Use the Bowl on the spot, then the Tuna in the Bowl.
Click the cat once it's done eating to take the Charm.
Go back to the square and zoom in on the mailbox. Use the Charm on the slot to open it.
Take the Bell and Carved Glass, then click on the Sealed Letter.
Use the Ancient Knife to open the letter, then read it.
Return to the back alley and zoom in on the door. Use the Carved Glass to start a minigame.
Move the glass over the engravings around the crest to see the hidden symbols.
Click the seasonal symbols, the faces, the round border, and the filligree, until they all match the hidden symbols.
The seasonal symbols on the crest match the closest hidden symbols in the engraving.
Solution
The door opens; enter the curio shoppe.
Summon the old woman
Take the Galoshes (2/2) from the back counter.
Use the green Eye (from the side table in the general store) with the cat statue, then take the Fish.
Return to the general store. Zoom in on the the toy display in the back and use the Fish in the slot. Take the Robot Arm.
Return to the back alley. Use the Umbrella on the burst pipe to keep from getting wet, then zoom in on the grate.
Use the Robot Arm to retrieve the Screwdriver. Go inside the curio shoppe.
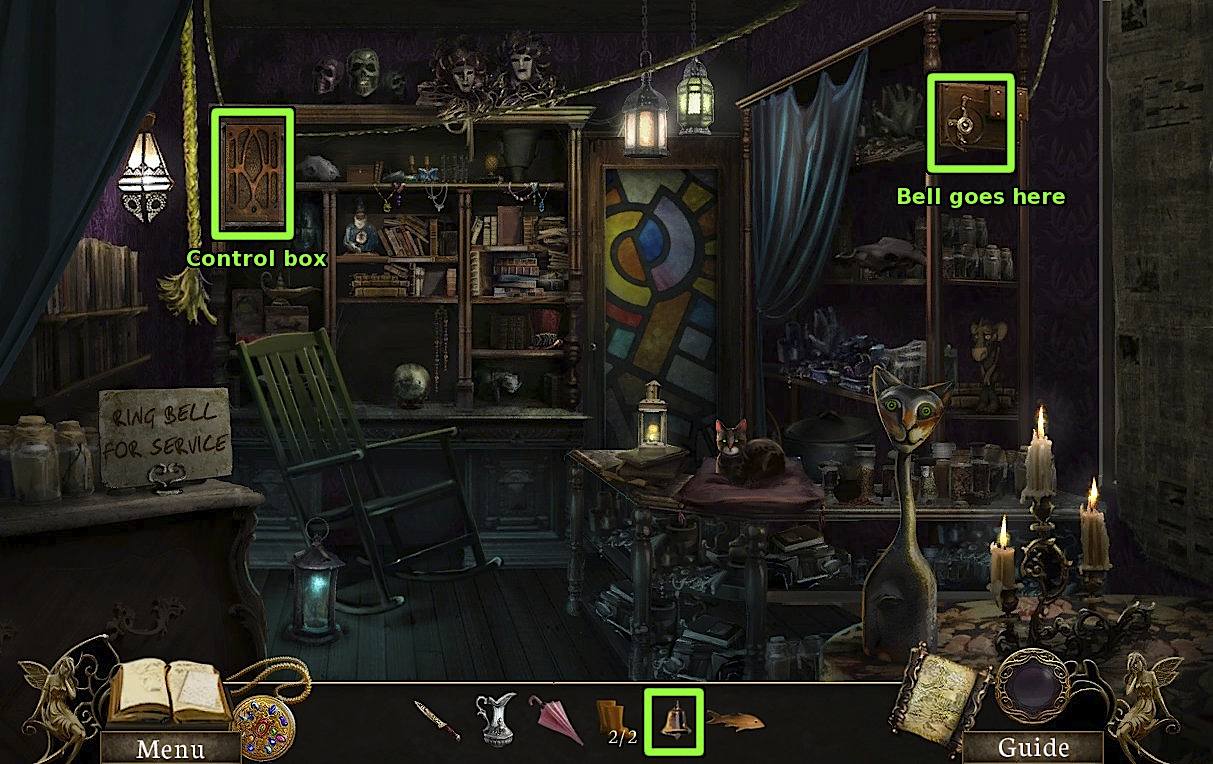
Use the Bell (from the mailbox) on the bell pull.
Zoom in on the control box (near the rope).
Screenshot
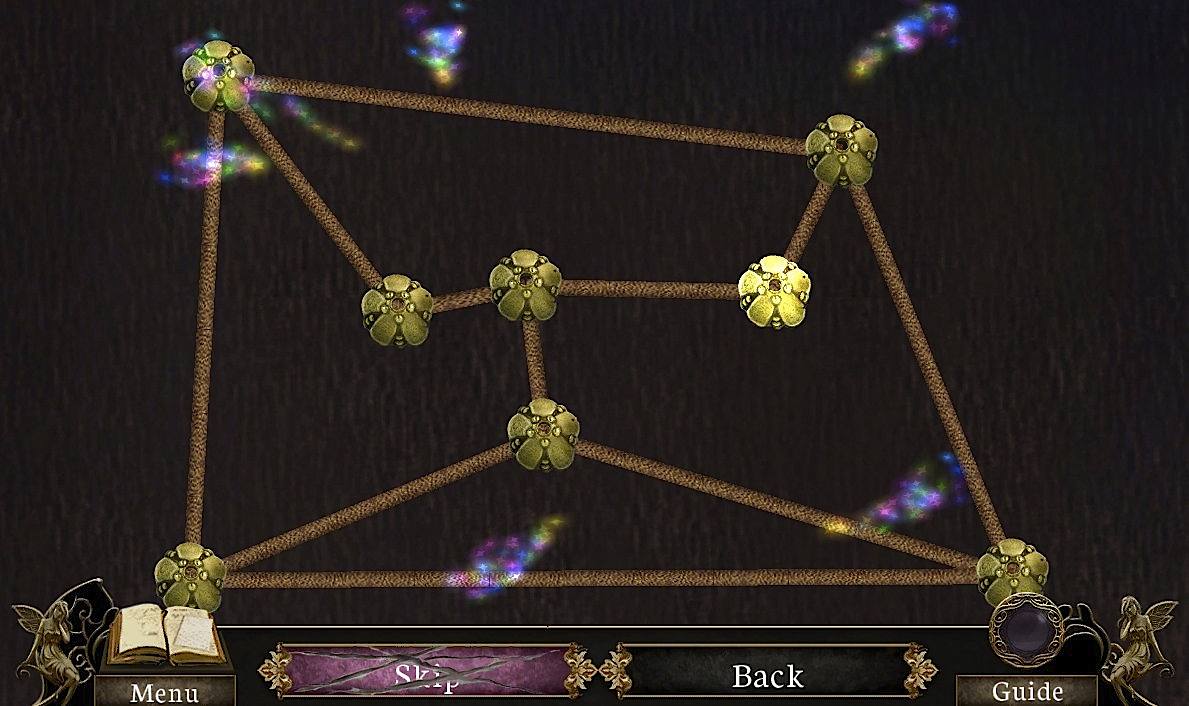
Use the Screwdriver on the screws, then click the cover to begin a minigame.
Click and drag the nodes until the strings no longer overlap.
Solution
Pull the rope, then talk to the woman.
The grove
Use your map to go to the grove.
Take the two pieces of the Rectangular Code (1-2/5)
Screenshot
Go up the right path to the stream. Take the other two pieces of the Code (3-4/5).
Screenshot
Use the Pitcher with the stream to fill it.
Zoom in on the pebbles in the stream to start a minigame. Click the two matching Pebbles in each set that appears. Do this until you collect five Pebbles.
Use the Galoshes (from the general store and curio shoppe) on the stream to cross it and zoom in on the tunnel.
Use the Ancient Knife on the tree symbol and trace it to get the Tree Cutout.
Go back to the trail and zoom in on the map box (the one on the right). Use the Pebbles to start a minigame.
Arrange the pebbles so they are in the proper slots. Click two pebbles to switch their positions.
You can see the outlines behind each pebble, so try to match their shape. Pebbles that are correctly positioned will lock in place.
Solution
Take the Boomerang, then go back to the stream.
Use the Boomerang with the carving in the willow tree on the other side of the stream. Take the Boy Scout Cutout.
Go back to the trail, then take the left path to see the Treant. Zoom in on the roots and take the Park Ranger Cutout.
Return to the trail and zoom in on the plaque. Use the three Cutouts in their slots, then take the last Rectangular Code piece (5/5).
Go back to the Treant and in on the roots. Use the filled Pitcher on the ground to start a minigame.
Click a closed flower, then click the open flower it matches. Do this until all the flowers are gone.
Use the Ancient Knife on the box until it is clean, then use the Rectangular Code pieces to start a minigame.
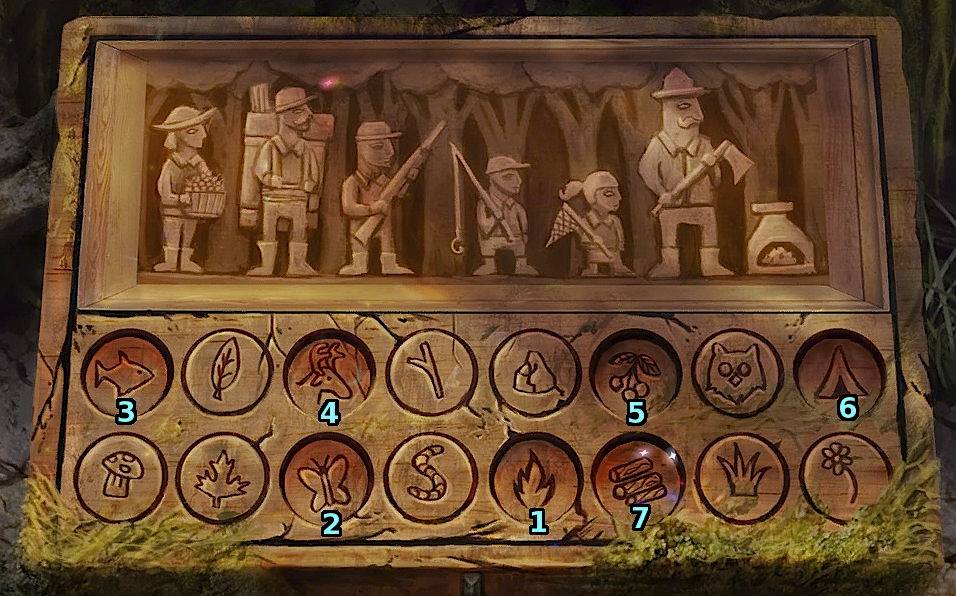
Click the symbols on the bottom in the proper order, using the figures on the top as a guide.
Each figure matches one of the symbols based on what that figure makes or collects.
The order is from the shortest figure to the tallest.
If you click the wrong symbol, the puzzle resets.
Solution
Take the Encoded Treant Guide from the open box. Use the map to return to town, then go back to the curio shoppe.
Awaken the Treant
Give the Guide to Mathilde and finish the conversation.
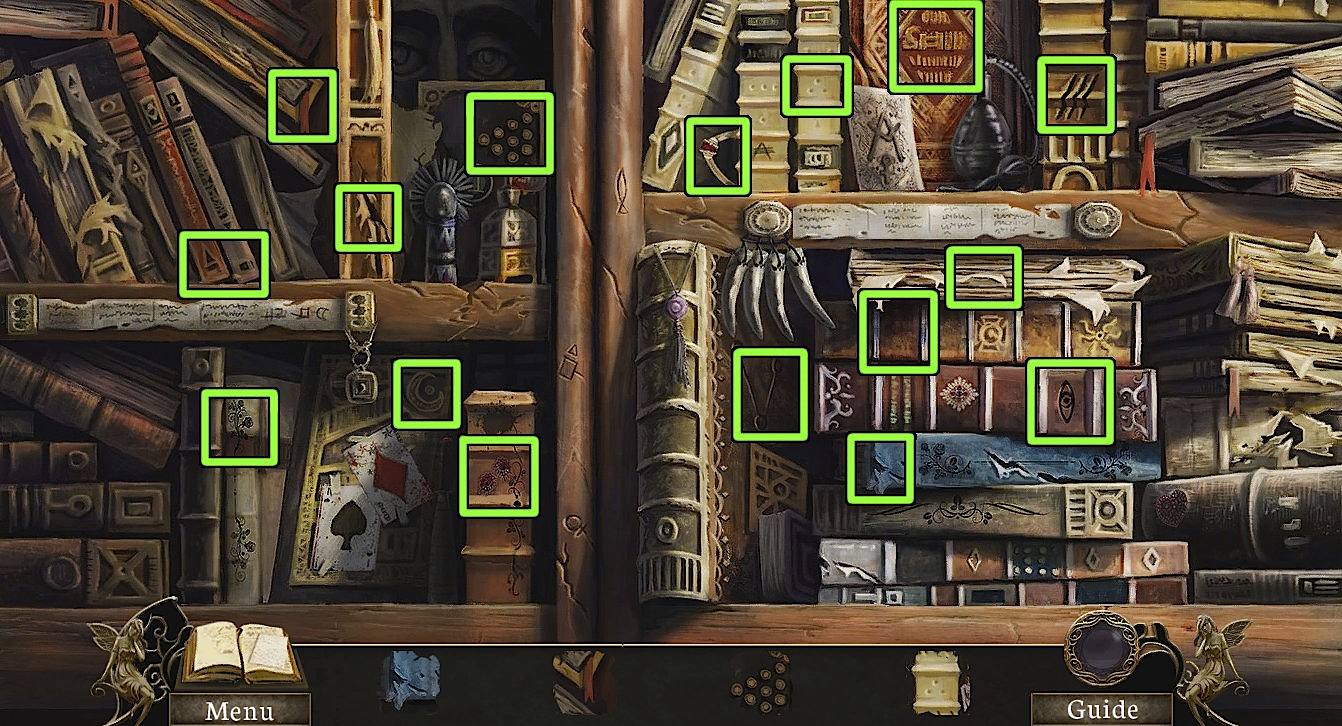
Zoom in on the bookshelf to start a hidden-object scene. Find the pieces of the books as they appear at the bottom of the screen.
Screenshot
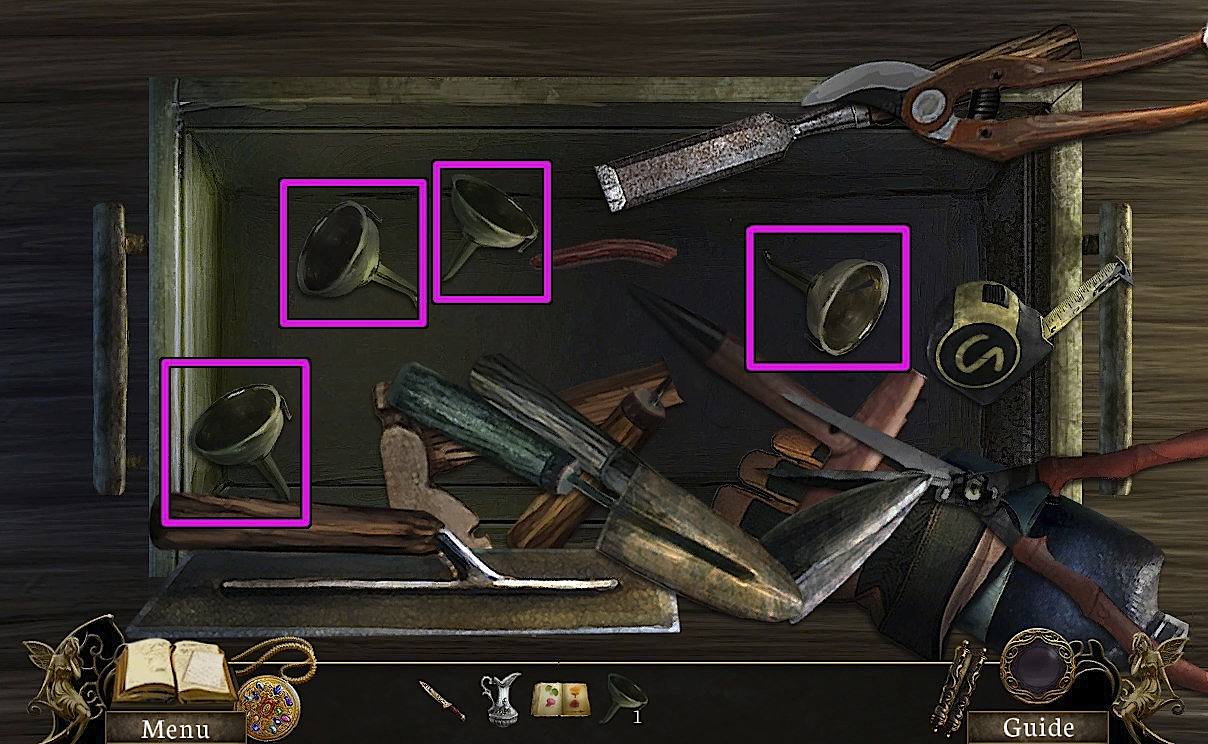
You find a Fay Recipe Book. Give it to Mathilde. Who might have some Funnels lying around?
Go to the general store and talk to the shopkeeper.
Zoom in on the box he puts on the counter. Click and drag the tools until you see a Funnel, then take it. There are four Funnels to find.
Screenshot
Go back to the curio shoppe and zoom in on the back door.
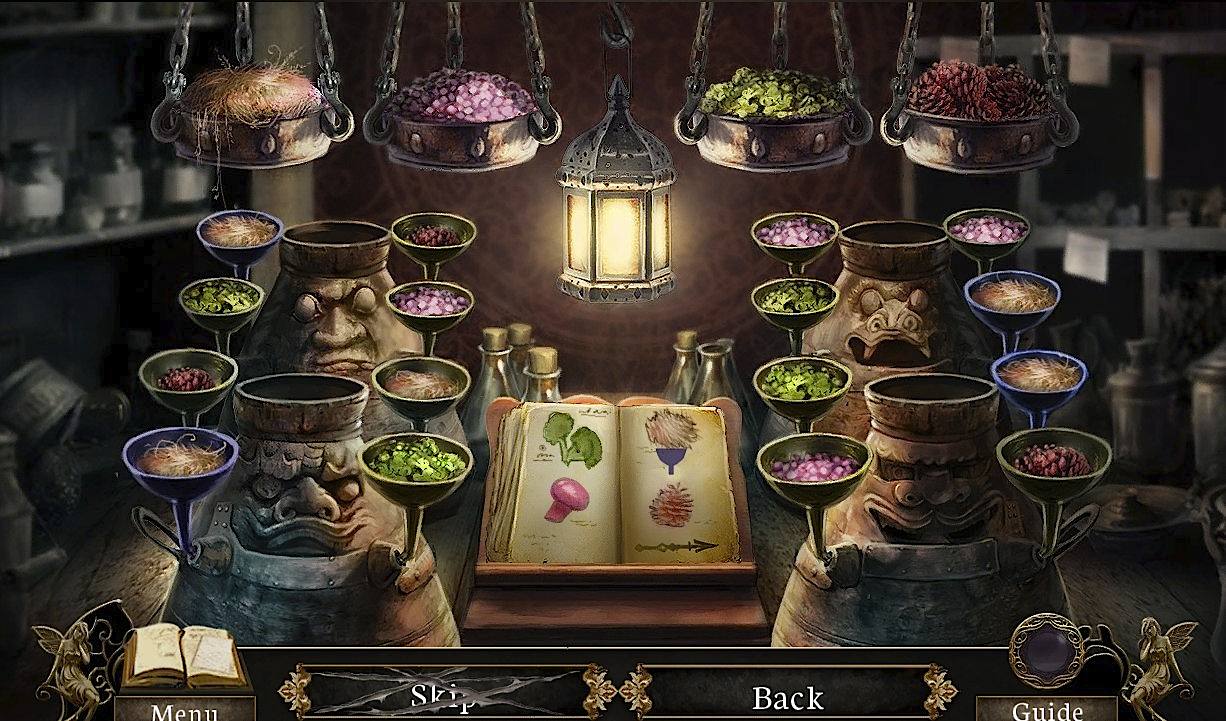
Use the Funnels on the jars (marked with flags), then place the Fay Recipe Book on the stand to start a minigame.
Make the powders that will awaken the Treant.
Click the book to turn the page. Each page represents one jar, and each corner one of the funnels.
You can tell which jar you are reading about based on where the blue funnel is.
Click an ingredient from the hanging baskets, then click the proper funnel to put it in. You won't be allowed to put the wrong ingredient in the wrong funnel.
Screenshot
You now have Treant Powders. Use the map to return to the grove, then head to the Treant.
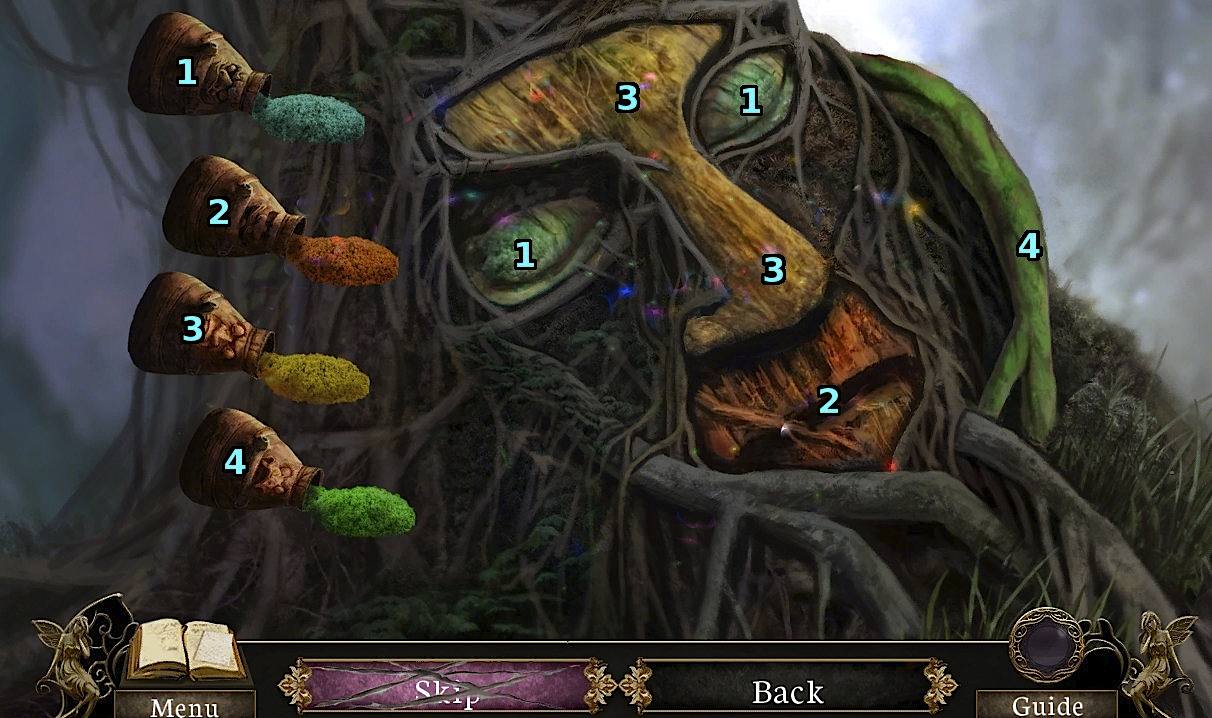
Use the Powders on the Treant's face to start a minigame.
Put the right powders on the Treant's face to awaken it.
Click a powder, then click a spot to color it. You will need to click an area more than once to fully color it.
You can see bits of matching color on the area you are supposed to color. You won't be allowed to put the wrong color on the wrong part.
Use the blue (top) powder on the eyes.
Use the red-orange (second-from-top) powder on the lips.
Use the yellow (second-from-bottom) powder on the nose and brow.
Use the green (bottom) powder on the branch to the right of the face.
Screenshot
Talk to the Treant. Go to the stream to refill the Pitcher, then return and give the Pitcher to the Treant.
Talk to the Treant and receive another Locket Charm.
Put the Charm in the locket, then watch the cutscene.
Chapter Five: Sanctuary
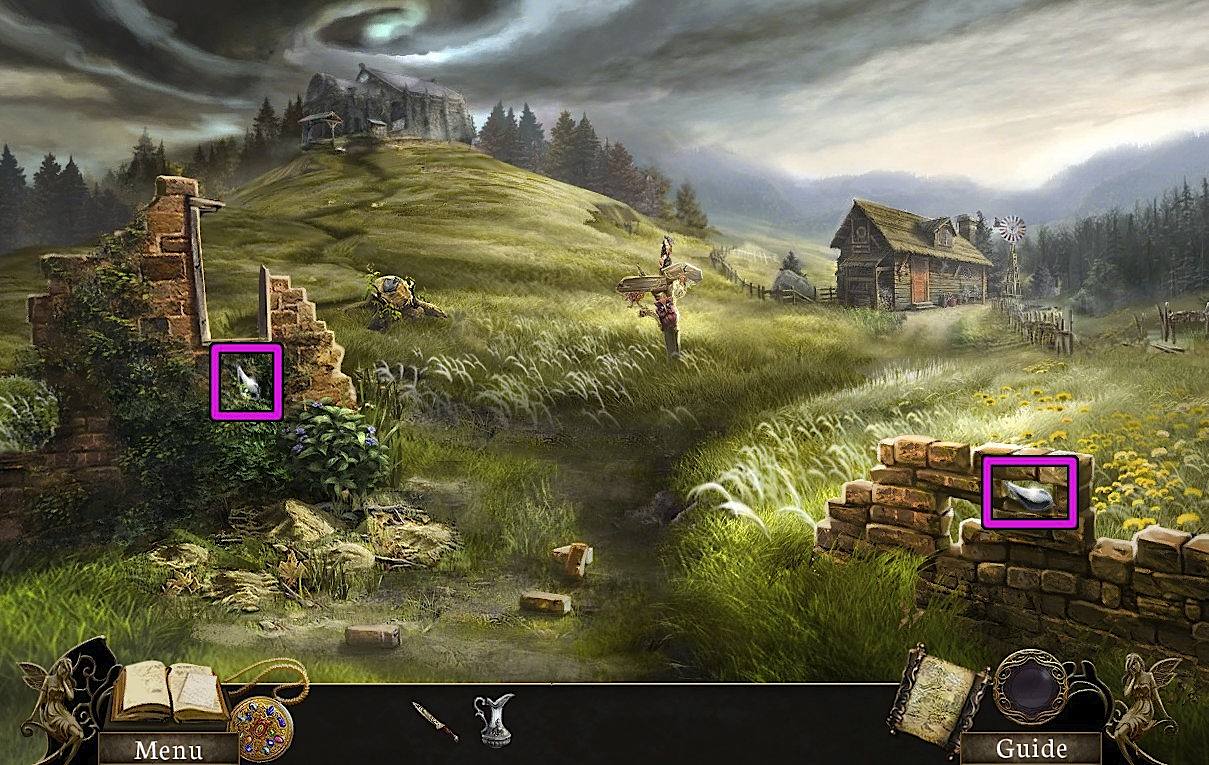
The well
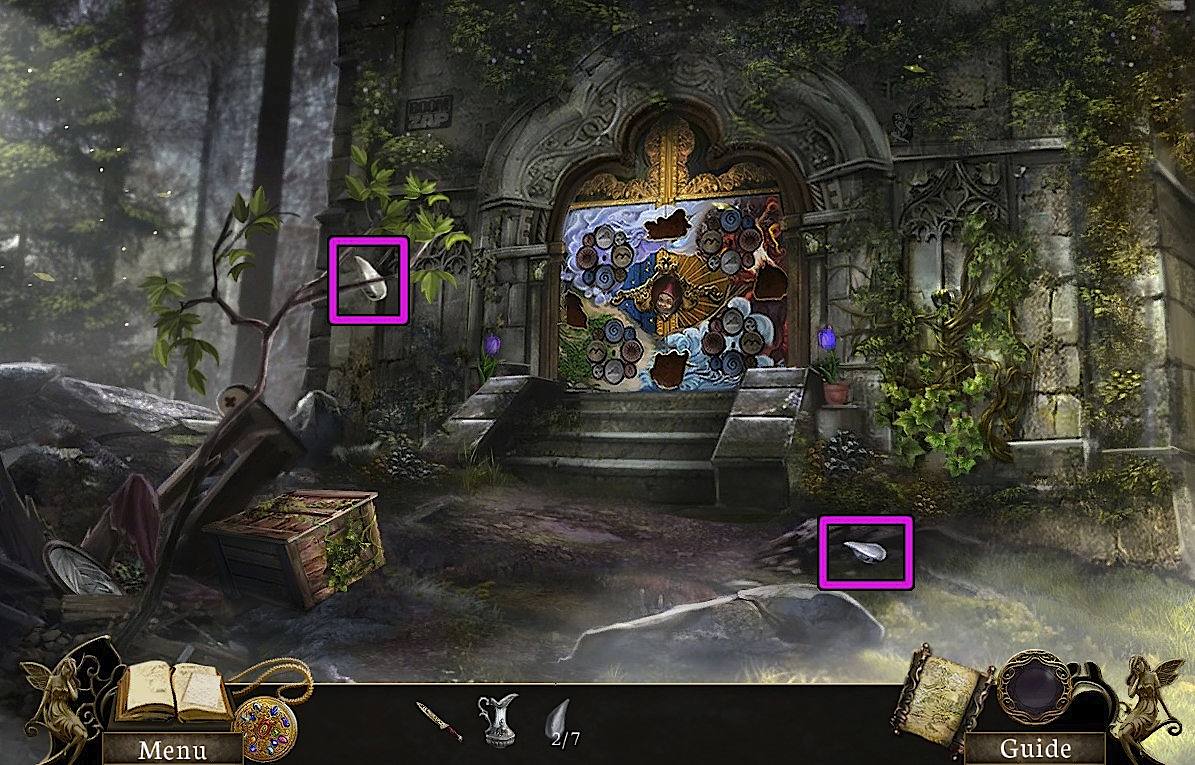
Pick up the two Metal Fragments (1-2/7).
Screenshot
Go forward 2x towards the chapel. Pick up two more Metal Fragments (3-4/7).
Screenshot
Zoom in on the vines to the right of the chapel door. Use the Ancient Knife on the vines until they are cleared (you have to remove five vines), then take the Shovel Handle.
Zoom in on the chapel door and take the Gnome Head from the middle.
Go back once, zoom in on the headless gnome, and use the Gnome Head. Talk to the gnome.
Go back once more, then zoom in on the tree stump (between the left wall and the signpost). Use the Shovel Handle on the blade to get the Shovel.
Zoom in on the ruined garden patch (in front of the left wall). Use the Shovel on the various dirt piles to uncover the Blunt Saw and Triangular File. You'll have to click on a dirt pile several times to uncover these items.
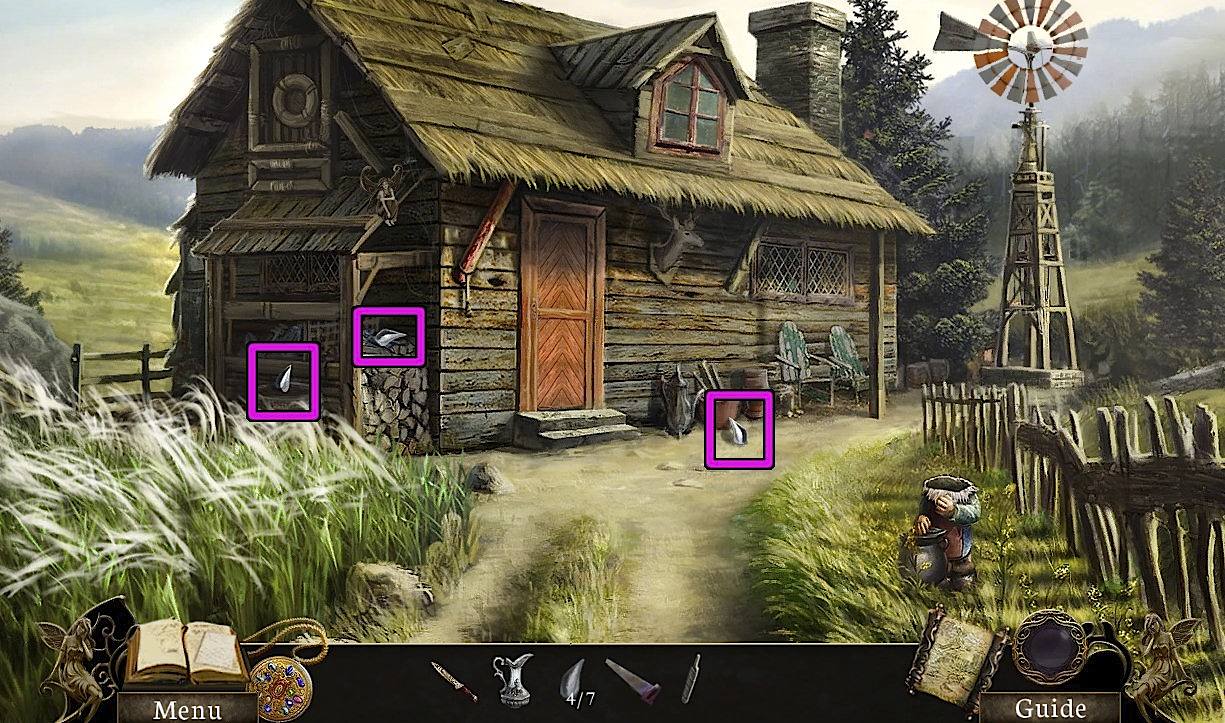
Take the right path forward to the cottage. Collect three more Metal Fragments (5-7/7).
Screenshot
Zoom in on the windmill. Use the Ancient Knife with the rope, then take the Rope with Hook.
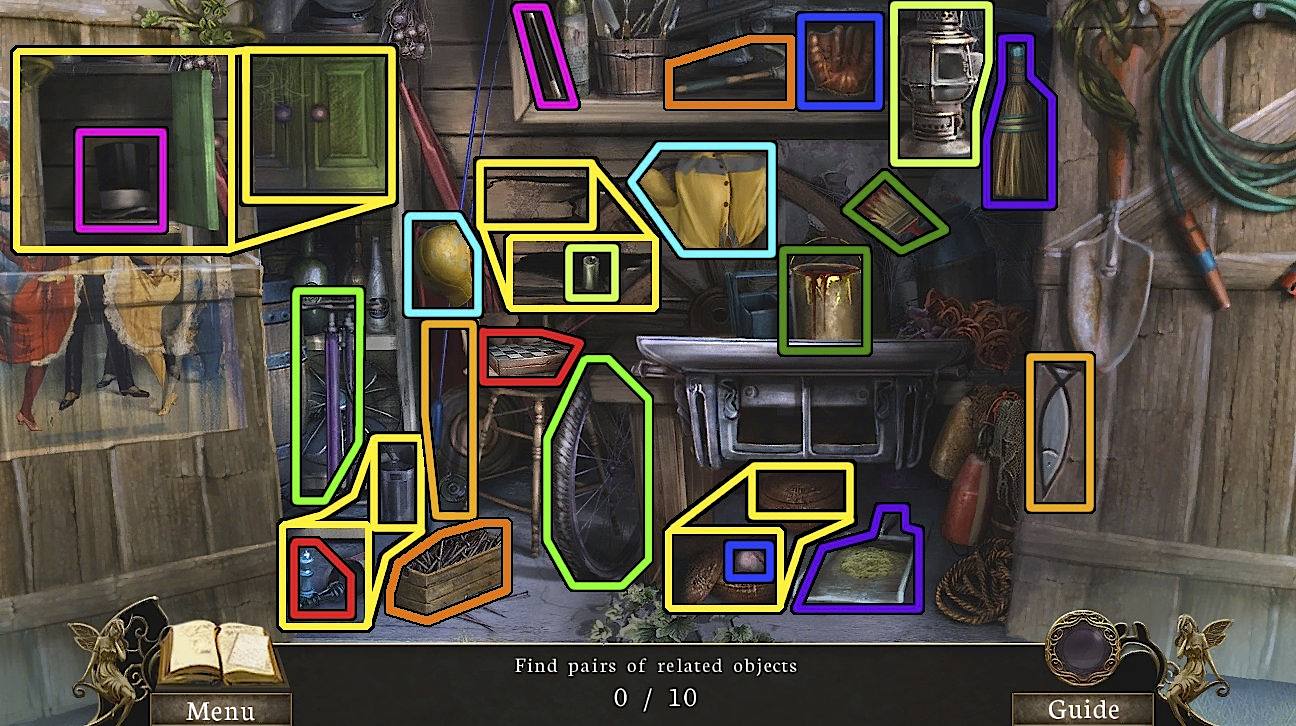
Go back to just outside the chapel (the scene with the well and the gnome). Zoom in on the shed and use the seven Metal Fragments on the sun to start a hidden-object scene.
Find the matching pairs of items. Click one item, then the other to select them.
Find the hat behind the green door, the chess pieces in the tin, the baseball in the basket, and the lantern battery behind the loose board.
Screenshot
Take the Pulley Handle from the workbench.
Use the Blunt Saw in the vise, then use the Trianular File. Drag the file up and down to sharpen the saw, then take the Saw.
Go back to the cottage and zoom in on the awning post to the left of the door. Use the Saw on the post a few times until it breaks off, then take the Stick of Wood.
Go back to the scene with the well. Zoom in on the well.
Use the Stick of Wood, the Pulley Handle, then the Rope with Hook. Click the handle to draw the well.
Take the Mosaic Slab, then use the Pitcher with the water to fill it.
Mosaic and Chapel Entrance puzzles
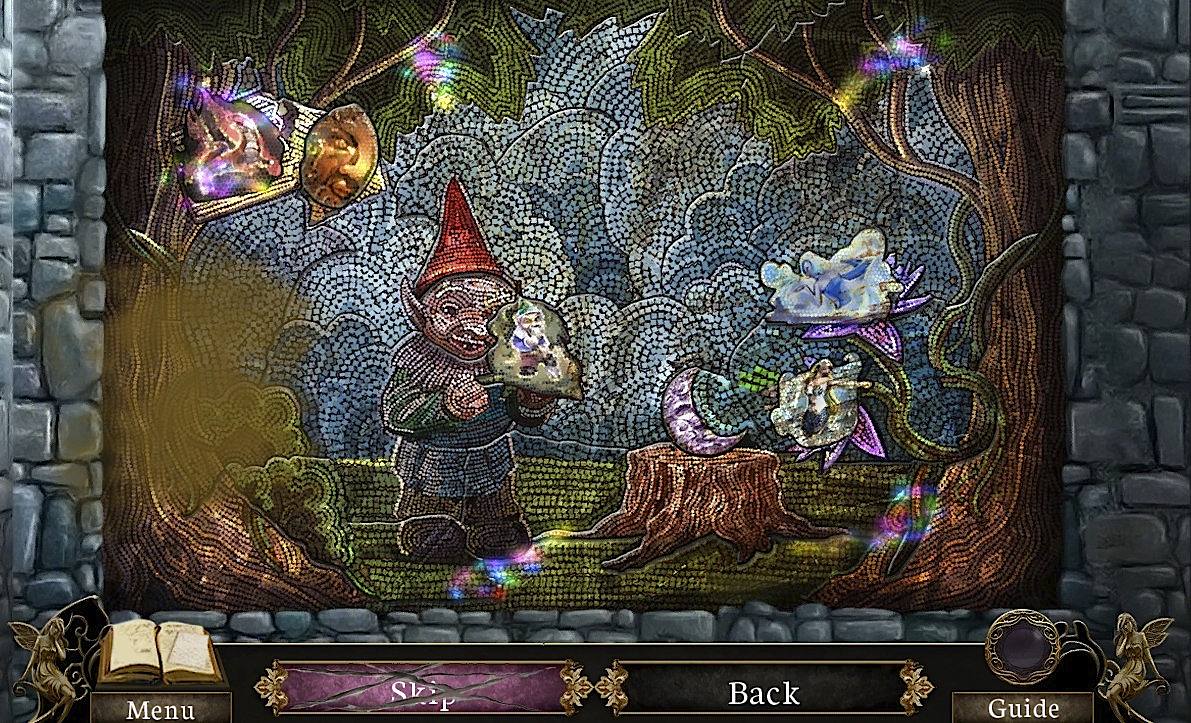
Zoom in on the mosaic (to the right of the shed on the chapel). Use the Slab (from the well) to start a minigame.
Reassemble the mosaic by dragging the pieces to the right spot. A piece in the proper spot will lock in place.
Click a piece to rotate it.
You can see outlines of where the pieces should go in the background.
Try starting with larger pieces. Also, I found it easiest to assemble the gnome first, then build the rest of the mosaic around him.
Solution
Click the completed mosaic for a clue. Take the Gnome Head from the open compartment.
Go back to the cottage and zoom in on the gnome. Use the Gnome Head, then talk to the gnome.
Take the Door Shape Pattern and the Feather from the Gnome's pot.
Return to the crossroads and zoom in on the stump. Use the Door Shape Pattern, then the Ancient Knife. Click and drag to trace the outline to get a Door Shape (1/6).
Zoom in on the signpost. Use the Saw on the left and right arms of the sign to take two Door Shapes (2-3/6).
Go to the other gnome (hanging out by the well) and give him the Feather. (If you haven't yet, get his head from the chapel door and give it back to him.)
Take the Door Shape (4/6) from him.
Return to the front of the chapel. Use the Pitcher (filled from the well) on the two purple flowers, then take the remaining Door Shapes (5-6/6).
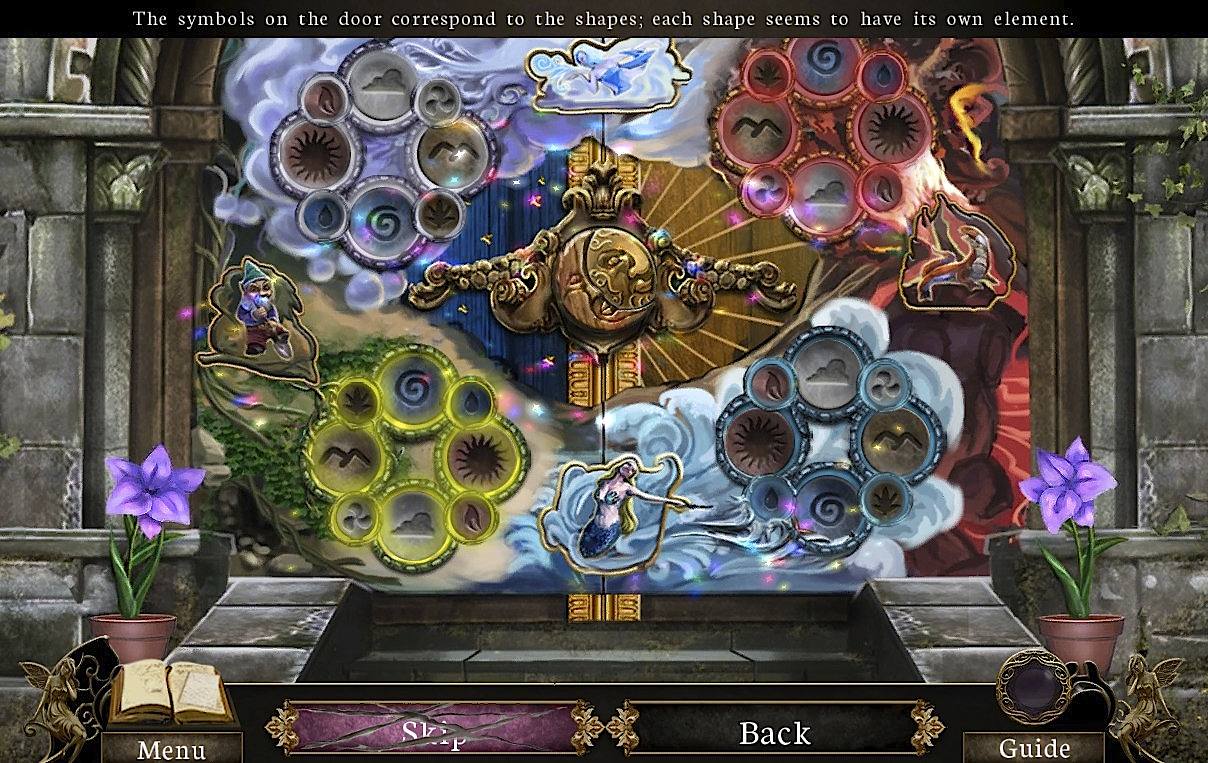
Use the Door Shapes on the door to start a minigame.
Click the symbols to turn the disks so they are all upright. This includes the small and large disks.
Screenshot
The gnome symbol on the left turns the large lower-left disks.
The mermaid symbol at the bottom turns the large lower-right disks.
The salamander symbol on the right turns the large upper-right disks.
The fairy symbol at the top turns the large upper-left disks and all the disks (large and small) in the lower right.
The moon symbol in the middle turns all the disks on the left.
The sun symbol in the middle turns all the disks on the right.
Solution:
Click the moon symbol until the small disks on the left are upright.
Click the fairy symbol until the large disks on the upper-left are upright. Do the same with the gnome symbol and the lower-left disks.
Click the sun symbol until the small disks on the right are upright.
Click the mermaid symbol until the large disks on the lower-right are upright. Do the same with the salamander symbol and the upper-right disks.
Enter the chapel.
The first three windows
Zoom in on the pews, where the crowbar is. Take the Crowbar and the Empty Oil Can.
Zoom in on the window on the left. Take the Runestone (1/2) from the greenery on the right. Read the inscription.
Go back. Use the Crowbar on the crate and zoom in. Take the Runestone (2/2) and the Open Crate.
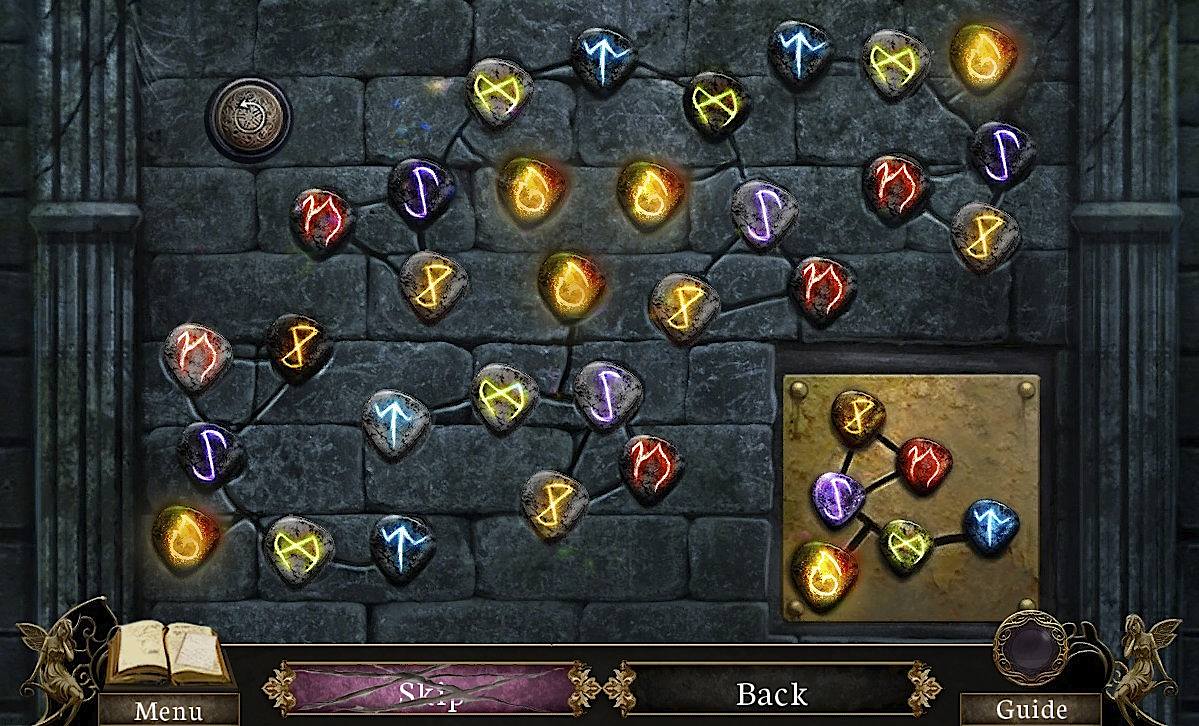
Enter the chapel and zoom in on the walled-up window. Use the Runestones to start a minigame.
Carve the proper symbols on each stone. Click on a symbol on the plaque on the right, then click a stone to carve it.
Click the reset button in the upper left to start over.
The idea is that every symbol is always connected to the same other symbol or symbols, as shown in the plaque. A set of symbols will glow if they are carved properly.
Use the yellow flame symbol as a frame of reference.
Solution
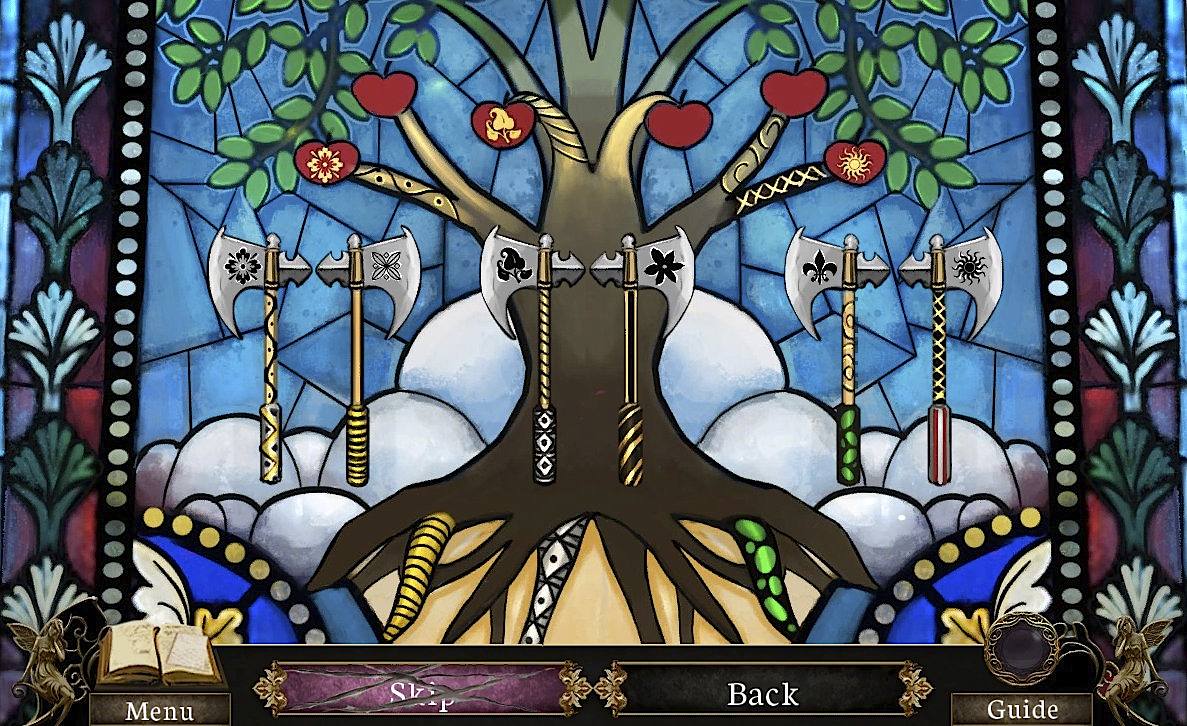
Read the inscription below the window. Zoom out, then zoom in on the rightmost window for a minigame.
Switch the parts of the axes around until they all have the proper designs. Click two parts to switch them.
There are six roots, six branches, and six apples, which correspond to the hilts, shafts, and blades of the six axes respectively. Match the patterns of the latter with those of the former.
A left-pointing blade can only be swapped with another left-pointing blade. The same goes for right-pointing blades.
Match all the patterns you can based on this information. The rest you will have to guess, though a properly positioned axe part will lock in place, so it's not too difficult.
Solution
Read the inscription, then zoom out.
Zoom in on the candle-vending box (between the two rightmost windows). Take the Stained Glass Sheet (2/5)
Zoom in on the broken window on the right and take the blue Stained Glass Sheet (1/5) (you need the Open Crate from outside to collect it).
Go forward to the altar. Take the Stained Glass Sheet (3/5) from the right.
Zoom in on the body. Take the Door Key from his hand.
Zoom in on the scattered items on the left for a hidden-object scene.
Find the listed items. The list is random.
Open the book to find the bell.
Clear the cobwebs to find the gear.
You will collect the Blueprints.
Screenshot
The fourth window
Return to the cottage and zoom in on the door. Use the Door Key (from the body in the chapel) to open it.
Take the Stained Glass Sheet (4/5) from the box below the workbench (Again, you need the Crate from outside the chapel to collect it).
Use the Empty Oil Can with the gas can near the fireplace to fill it.
Zoom in on the large cabinet doors. Use the Oil Can on the four hinges, then open it.
Grab the Stained Glass Sheet (5/5) and the Toolbox Piece.
Screenshot
Zoom in on the drawer beneath the cabinet doors. Click and drag to open it.
Drag the pieces of paper until you uncover the Soldering Iron and Solder, then take it.
Zoom in on the toolbox. Use the Toolbox Piece to start a minigame.
Arrange the symbols so they match the colored writing. Click and drag one symbol onto another to switch them.
The symbols should match the color of the writing nearest to them. They should also read along the path of the arrow as the writing reads from left to right.
The nearby latch will glow once you have a set of colored symbols properly arranged.
Solution
Take the Glass Cutter.
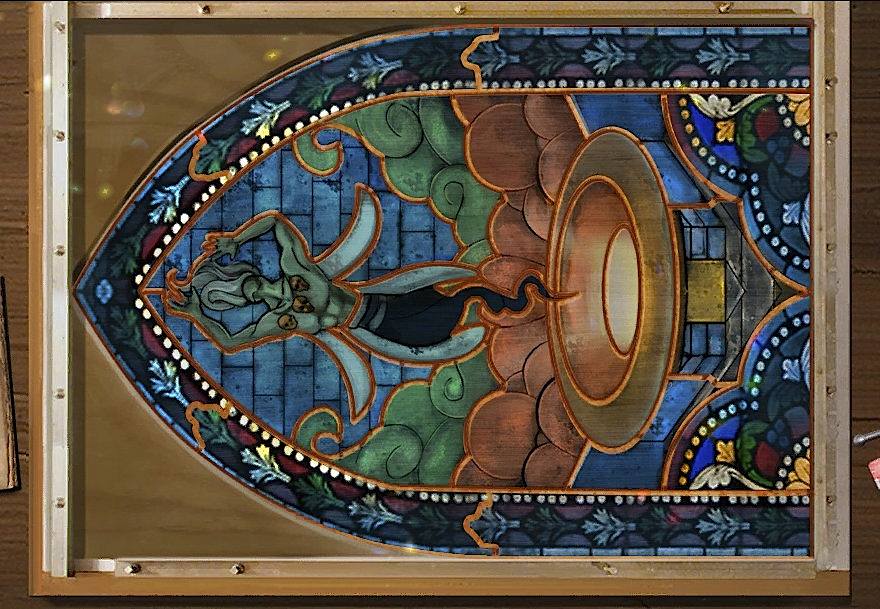
Zoom in on the workbench. Use the Blueprint piece with the plans on the table, then click it again to put it in the jig.
Use the five Stained Glass Sheets on the table (three from the chapel, two from the cottage). Use the Glass Cutter on the glass, then click the black outlines on the glass and cut it. Do this for all five sheets.
Drag the copper wire to the glass pieces, then click them twice to start a minigame.
Click and drag the glass pieces to arrange them as shown on the jig. Click a piece to rotate it. Properly arranged pieces will lock in place.
Solution
You have to solder the window in place before you can take it, which you can't do yet. Instead, take the Coin from the workbench and return to the chapel.
Zoom in on the candle-vending box and use the Coin. Take the Lighter.
Return to the cottage and use the Lighter on the fireplace. Use the Soldering Iron to heat it.
Zoom in on the workbench and use the Hot Soldering Iron on the window. Take the Completed Stained Glass window.
Go back to the chapel, zoom in on the broken window, and use the Completed Stained Glass to fix it. Read the inscription.
Altar puzzles
Go forward towards the black smoke and click on the eyes for a minigame.
It's a memory game. Click two pairs of eyes to reveal them. If they match, they will disappear.
Once you've cleared all the eyes, take the Eyeball (1/3) that falls.
Zoom in on the hand of the left statue. Use the Ancient Knife with the eye to get the Eyeball (2/3).
Go forward to the altar. Zoom in on the center panels and take the two colored Gem Stones (2/5).
Use the Lighter with the two candlesticks to clear the smoke.
Zoom in on the journal on the left side of the altar. Read through all the pages, especially the picture of the wall relief on the second-to-last page. Take the Potion Amulet from the end of the book.
Zoom in on the basin on the right side of the altar. Take the Claw from the gold basin.
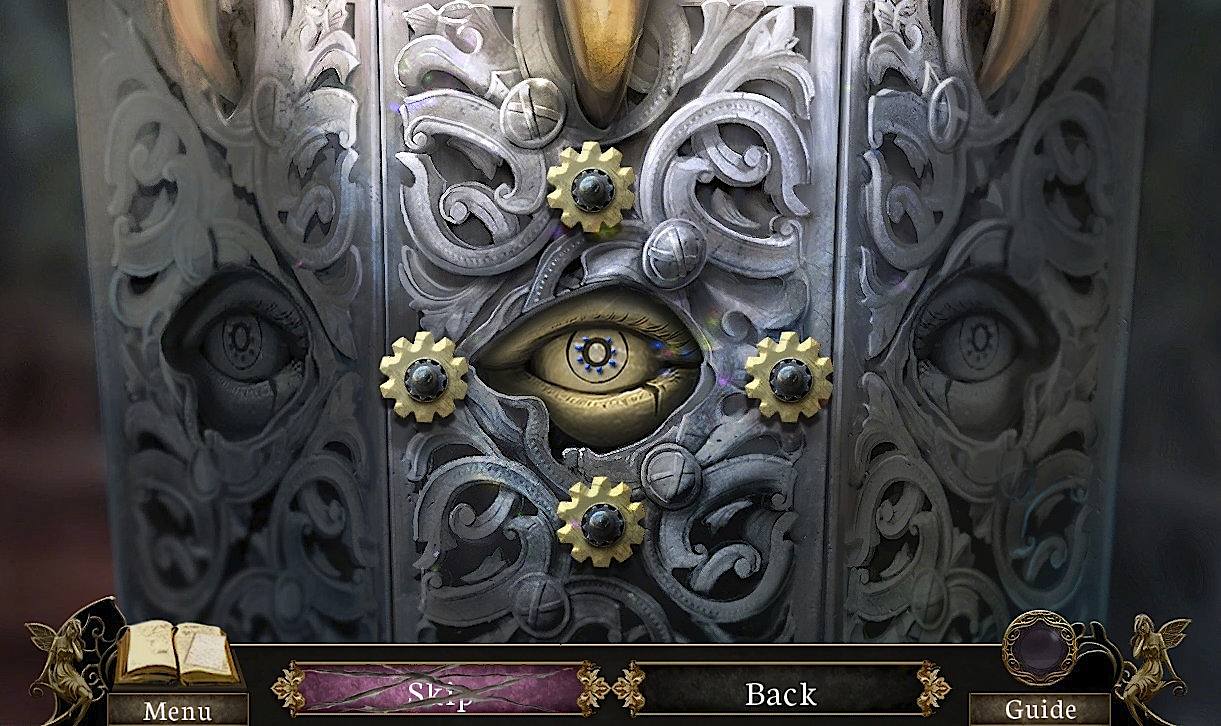
Go back to the altar steps and zoom in on the right statue. Use the Claw on the lantern to open it for a minigame.
Click the gears to change the center eye so it looks like the eyes on the sides of the lantern.
Solution
Receive the Eyeball (3/3) and take the Gem Stone (3/5) from the open lantern.
Go forward to the altar and zoom in on the back wall for a series of minigames.
Click the two flanking statues and the tree pictures so they match the picture in the journal on the altar.
Altar journal
The left and right statues should both be holding shields.
Solution
Now click the buttons on the shields to arrange the engraved stone plaques around the center statue, also as shown in the altar journal.
Each button moves two plaques. Just click the top buttons on each shield until the plaques are properly arranged.
Screenshot
Click the vault cover, then use the Eyeballs in the slots. Use the Potion Amulet in its slot to start another minigame.
Click the proper five tiles.
The Eyeballs alternate their gaze towards the tiles that still need to be selected.
One of the eyes will shut each time you select the correct tile.
Solution
Take the Gem Stone (4/5) from the sack in the lower right of the screen.
Use the four Gem Stones in the round slots to open the tiles. One of them will have a fifth Gem Stone to open the last tile.
Take the Enchanted Liquids (1-4/4) and the Empty Potion Flask from the open tiles.
Potions
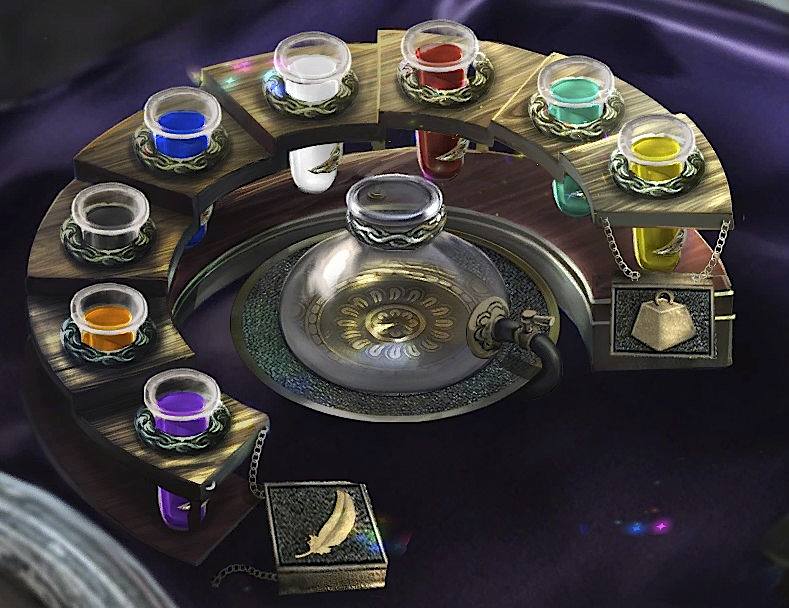
Zoom in on the basin on the altar. Use the Empty Potion Flask and the Enchanted Liquids on the rack on the right to start a minigame.
Arrange the liquids from lightest to heaviest. Lighter liquids should be nearer the feather icon, while heavier liquids should be nearer the weight icon.
Click and drag one liquid to another to switch their places. Click a liquid, then the flask to add liquid to the flask.
You can add up to three liquids to the flask before you need to empty it. Empty it with the release valve on the right side of the flask.
By seeing which liquids float atop other liquids, you can determine which are lighter.
Start with any three liquids, then arrange them from lightest to heaviest. Repeat this process with two of the same liquid and one new liquid. If you are systematic, you should arrive at the solution.
Solution
Click and drag the liquids from the rack to the basin.
Once the basin is full, use the Pitcher to fill it.
Take the Locket Charm. Open the locket and use the Charm in its spot. Watch the cutscene.
Chapter Six: The Final Battle
Initial showdown
Talk to the Shade.
Use the Ancient Knife on the Biting Vines to start a minigame.
Watch for the color of the snapping plants, then click the flower that matches that color.
You have to wait for all the plants to close. Be quick!
Do this three time to complete the minigame.
Once the path is clear, go through the gate.
Talk to the Shade or the Dryad to start another minigame.
Match what the Shade and the Dryad say with the bugs that fly across the screen.
Click the two matching bugs to clear them and move on to the next part of the puzzle.
"The Eternal Winter will wipe out everything green"
Green bugs.
"We are not black and white...."
Black and white bugs.
"Your blue sky will fall to an everlasting night."
Blue bugs.
"Our magic will make the sun rise again."
Yellow bugs
"Your magic shall fall in shades of blood, dotted with the black of oblivion."
Red and black bugs.
"Even if we were to perish, other will come, however small they are."
Small purple bugs.
"And I will squash them all with wings of smoke."
Purple-gray bugs.
"We see right through your trickery, and we will not give up!"
Trasluscent bugs.
Collect the mirrors
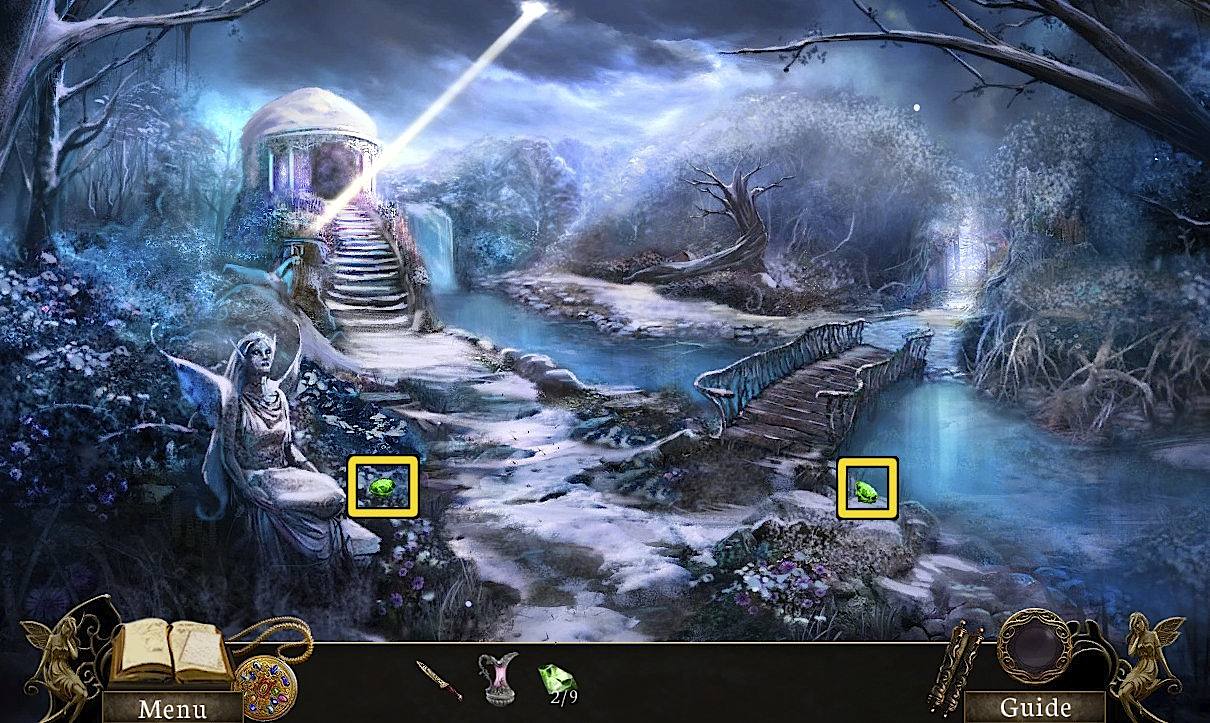
Talk to the Dryad. Collect the two green Gems (1-2/9).
Screenshot
Go forward toward the gazebo. Take the Scepter Head from the plants.
Screenshot
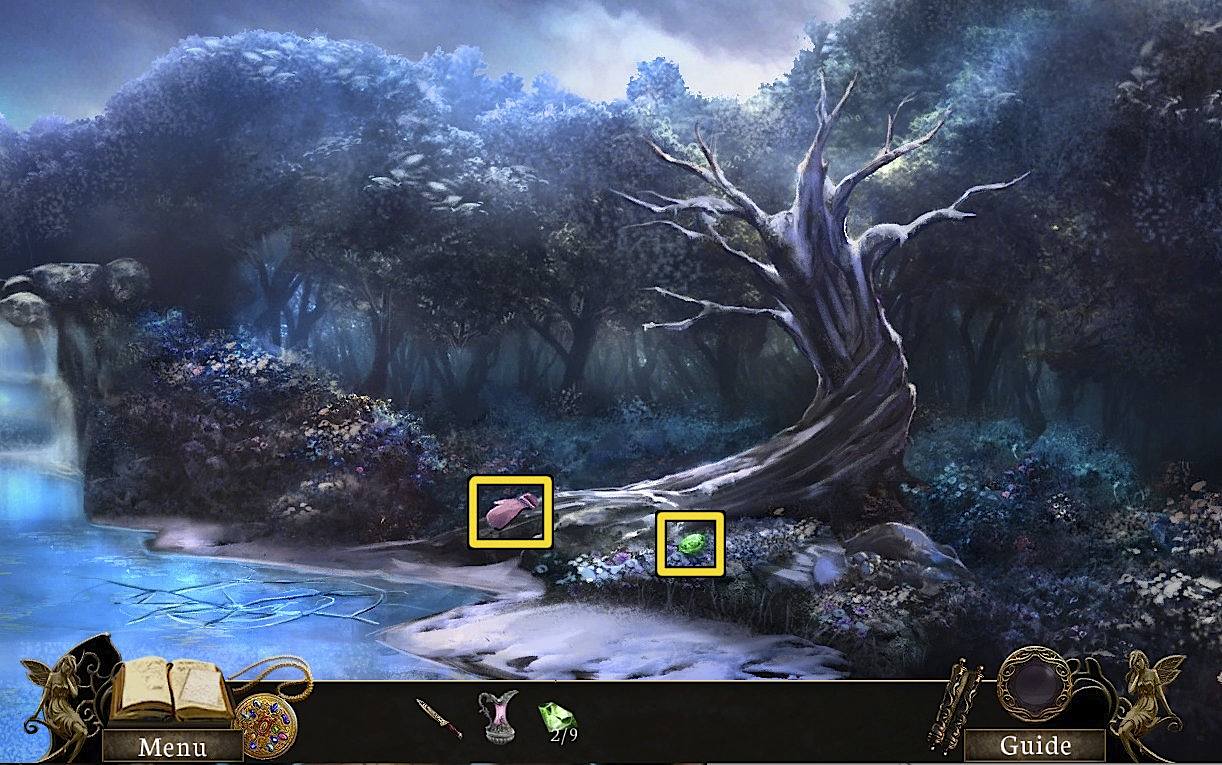
Go to the cherry tree. Collect the Gem (3/9) and the Mitten.
Screenshot
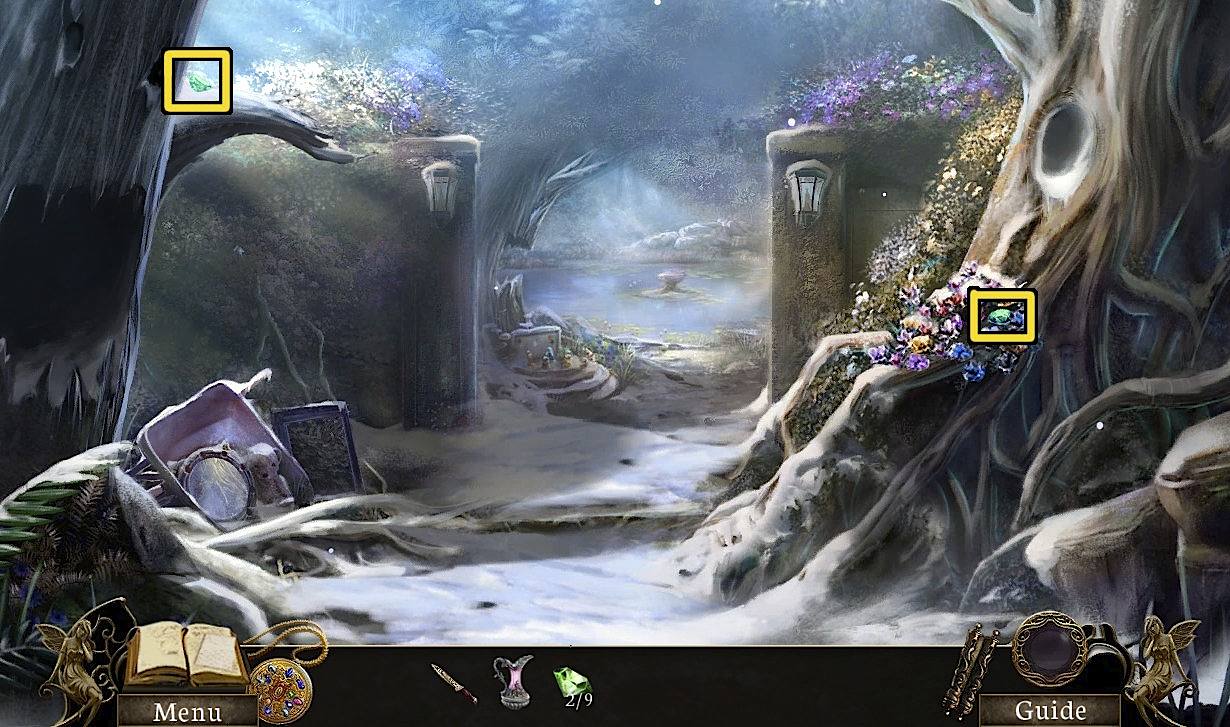
Go back, then head to the lily pond gate. Take the two green Gems (4-5/9).
Screenshot
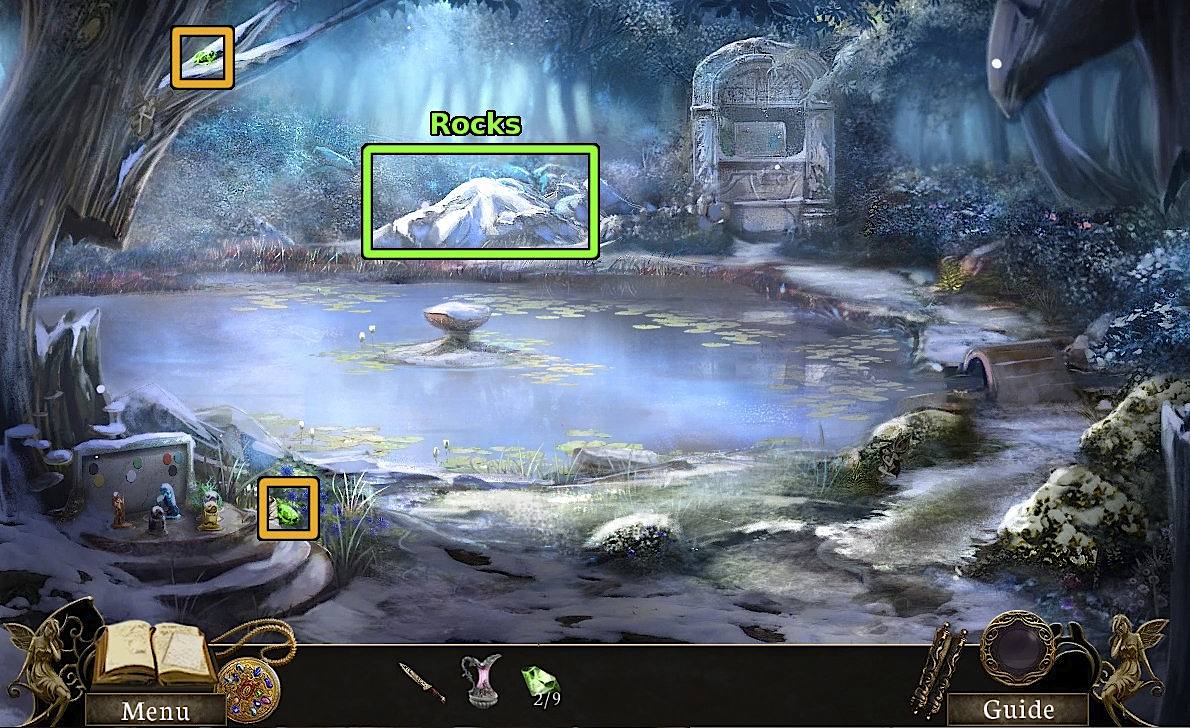
Go through the gate to the lily pond. Take the two Gems (6-7/9).
Screenshot
Zoom in on the rocks behind the pond. Use the Mitten, then click and drag the two mittens until you've cleared the ice. Take the Mirror (1/3) and the Gem (8/9).
Use the Scepter Head with the scepter rod in the statue's hand, then take the Heavy Scepter.
Go back to the cherry tree and zoom in on the cracked ice. Use the Heavy Scepter 3x until the ice breaks. Take the buried Mirror (2/3) and the Gem (9/9).
Go to the lily pond gate and zoom in on the mirror (next to the teddy bear). Use the Gems, then take the Mirror (3/3).
Ultimate showdown
Head towards the gazebo. Use the Mirrors with the frog statue, the bunny statues, and the branch.
Screenshot
Click the frog mirror until it is pointed at the branch mirror.
Click the branch mirror until it is pointed at the bunny mirror.
Click the bunny mirror until it is pointed at the smoke.
Screenshot
Enter the gazebo. Talk to the Shade.
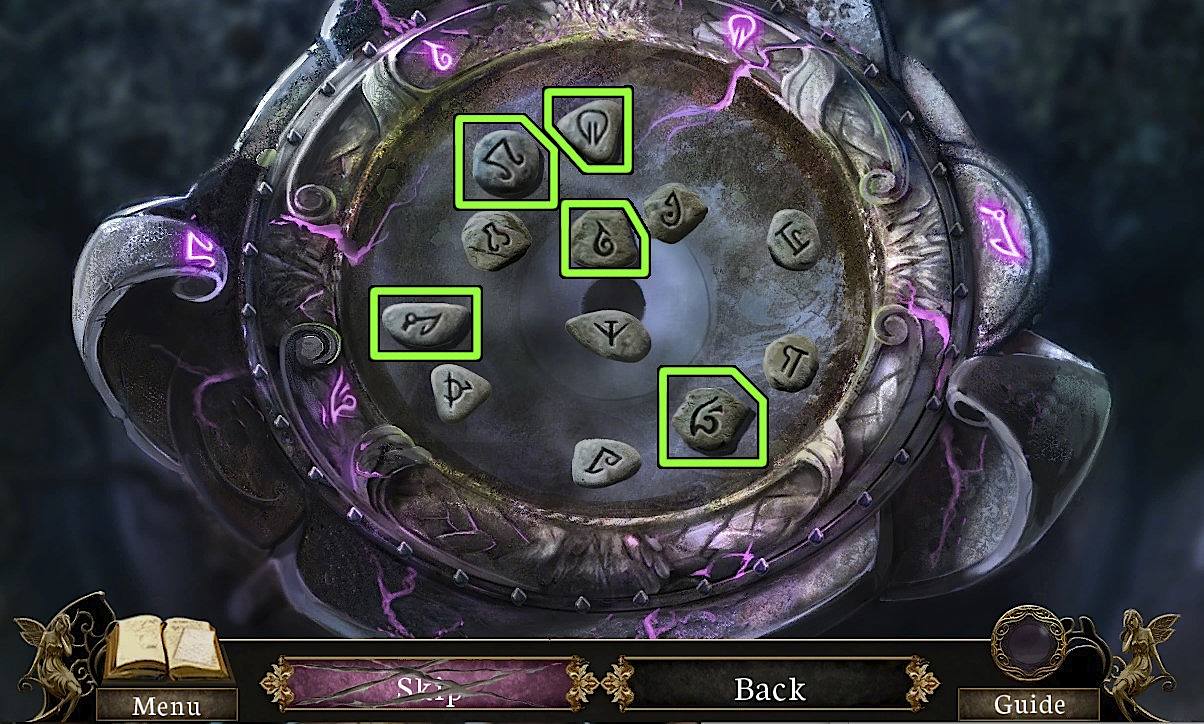
Zoom in on the basin. Talk to Fiona to start a minigame.
Click the runestones that match the purple runes around the basin.
A selected stone will cast a shadow. A properly selected stone will also light up one of the runes around the basin.
Solution
Talk to the Shade to start the final fight.
Click the runestones below to match the order shown above, from right to left. If you hit the wrong stone, they resort themselve.
If the counter runs down, the Shade casts his spell. If he does so, you will have to start over the entire minigame over.
When the Shade is stunned, use your Potion on him before the timer runs out.
Do this four times to defeat the Shade.
Take the Shade Charm that appears on top of the vortext.
Put the Charm in the locket, then give the Locket to Fiona.
Watch the cutscene. The End!
Fairies and other collectibles
Chapter One
By the bridge, when the New World is revealed.
Near the bank of the brook, under the blossoms of the cherry tree.
To the left of the lily pond gate, just above the broken wheelbarrow.
Standing under the left statue, garden gate.
On the left side of the tea table, Fiona's house.
To the right of the scary tree on the left, on the far side of the lily pond.
Standing left of the stairs to the gazebo.
On the left devil statue, in the gazebo.
Chapter Two
On the clock in the family portrait, upstairs hallway.
On the dresser, left side of the bedroom.
In the loft of the front view of the barn.
In the tree to the right of the crows, rear of the barn.
Left of the spinning wheel, in the barn loft.
In the stack of junk on the right side of the workshop, under the swinging hook, in the barn.
On the windowsill, behind the dressmaker's dummy, attic.
Chapter Three
To the left of the rock the pedastal is on, in the lake.
In leaves of the tree, on the left of the stepped path between the wagon and the lake.
On the big rock in front of the wagon.
On the squat pointing statue, to the right of the stairs to the cave.
On the ground, under the left archway of the cave entrance.
On the stuffed bunny on the bed, inside the wagon.
Two fairies, above and two the left of mom's journal.
To the left of the statue on the right, just inside the cave.
Near the rightmost "stone clue" (the one with the bone insert) and by the water, cave puzzles.
Zoomed in on the sack by the lake.
Chapter Four
In the window in the rightmost building, town square.
Under the lamppost, Main Street.
Standing on the barrel by the burst pipe, back alley.
By the cash register, general store.
On the railing atop the fire escape, back ally.
On the shelf behind the counter, near the blue curtain, curio shoppe.
On the path, beneath the root, trail.
At the base of the tree on the left, at the stream.
Chapter Five
Sitting on the right brick wall, crossroads.
Sitting in the rafters of the well, outside the chapel.
The BoomZap logo is atop the wall to the left of the entrance.
On the small roof above the woodpile, on the left side of the cottage.
Behind the back-most pew, chapel.
On the sill of the second window from the left, chapel.
Under the workbench inside the cottage.
Near the statue to the left of the altar steps, chapel (once the smoke clears).
In front of the altar, on the left side, chapel.
Chapter Six
In the plant in front of the rightmost statue, garden gate.
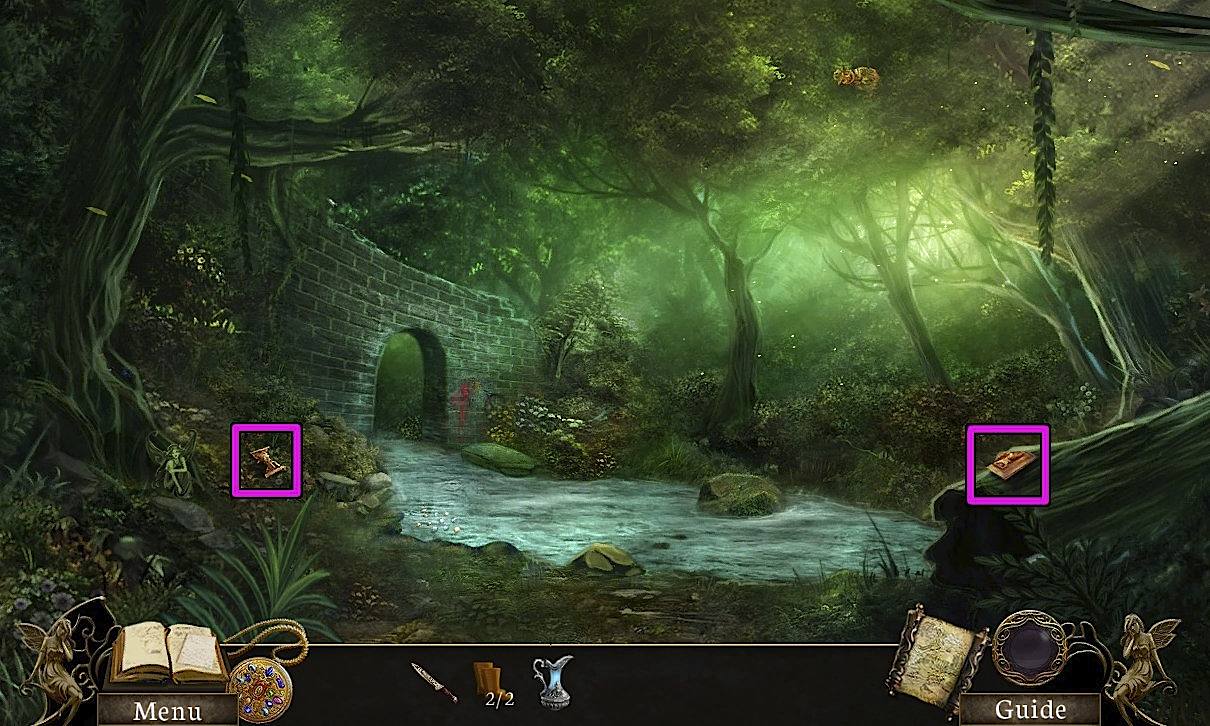
In the flowers to the right of the path, near the bridge.
Atop the retaining wall, just to the left of the gazebo steps.
To the left of the statue, near the bridge.
Near the rock to the right of the lily pond.
Posted by: Mike |
February 17, 2012 5:46 PM
|
February 17, 2012 5:46 PM