
![]() Legend of Grimrock from Almost Human is a retro-styled first person dungeon crawling RPG that borrows liberally from the classic genre and updates everything for modern gamers to enjoy. From the visual overhaul to the lax but somehow intriguing storyline to the stripping of complex menu screens and stats, Legend of Grimrock will easily capture your attention and hold it for hours on end, whether you're an old school RPG master or a casual gamer looking for a little diversion.
Legend of Grimrock from Almost Human is a retro-styled first person dungeon crawling RPG that borrows liberally from the classic genre and updates everything for modern gamers to enjoy. From the visual overhaul to the lax but somehow intriguing storyline to the stripping of complex menu screens and stats, Legend of Grimrock will easily capture your attention and hold it for hours on end, whether you're an old school RPG master or a casual gamer looking for a little diversion.
 Back in the late '80s and early '90s, the computer role playing game was going through one of its most golden ages. A sub-genre of RPGs emerged during this time and gained a strong foothold with titles like The Bard's Tale and Eye of the Beholder. These games featured party-based combat and a first person viewpoint that allowed players to see things through the character's eyes. Even though you only "moved" one still image at a time, taking notes, drawing maps, and sifting through mounds of treasure was somehow twice as exciting in this brand new first person world.
Legend of Grimrock styles itself like those RPGs of old. You move one scene at a time, turning and walking using on-screen controls or the keyboard. Your party is shown on the right, with equippable weapons slots below their health and hidden menu screens a button's press away. As you move through the dark underworld, you'll spot items on the floors, secret switches hidden amongst the rocks, locked gates, doors, buttons, and, naturally, swarms of enemies. Combat is handled with simple mouse clicks, all you have to do is make sure you're outfitted for the task and you'll emerge victorious.
 Naturally, party creation and stat management is part of the experience, and even though Legend of Grimrock doesn't have an avalanche of choices to contend with, there's still plenty here to enjoy. As you level up, you can spend skill points on abilities for each of your characters. The higher a stat goes, the more skills are available to you, adding proficiencies for armors, weapons, spells, and thieving abilities.
Analysis: Legend of Grimrock does a great service to the gaming community by reviving most of what we love about a genre that hasn't received much attention for a decade. It keeps everything straightforward and easy to understand, opening the door and inviting in players who didn't grow up with a Commodore 64 in their bedroom. Even seasoned CRPG veterans will love Legend of Grimrock, as the game was lovingly designed and expertly balanced to provide challenge, suspense, discovery, and plenty of monster killing/looting!
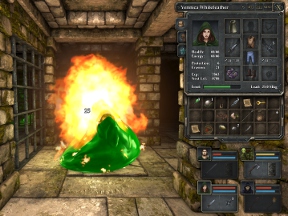
 Part of the modern upgrade bestowed upon Legend of Grimrock is a great audio/visual package. The lighting effects are superb, and the enemies are rendered with frightening details that make you want to kill them even faster. Minimal sound effects create a hauntingly realistic dungeon environment. You'll want to play with a headset if you can, as this makes it easy to pinpoint the location of enemies as they scurry by or listen for opening doors as you trigger various switches.
If there's any area that Legend of Grimrock falls short, it's that too much of the genre's expected complexity has been removed, something you only start to miss later on. These sorts of games traditionally have a steep learning curve which gives way to complex but highly enjoyable stat and character management after you've dropped a dozen or more hours into the title. Without the mass of mysteries to contend with, Legend of Grimrock makes itself easy for beginners to hop right in and start playing. The trade-off is once you get your foot in the door, you don't have nearly as much control or customization options as you might with a more intricate title.
Well-rounded, easy to play, and classic RPG sensibilities in just the right proportions. Legend of Grimrock hits all the right notes in its attempt to recreate a classic genre for a new group of players. It's got extremely high replayability, and some great updates are planned for the future, including a map editor! Jump right in for plenty of combat, secrets, and giant spiders!
![]() Windows:
Windows:
Get the full version
Get the full version from GOG.com
![]() Mac OS X:
Mac OS X:
Not available.
Try Boot Camp or Parallels or CrossOver Games.


Walkthrough Guide
(Please allow page to fully load for spoiler tags to be functional.)
Legend of Grimrock Walkthrough
General Tips, Levels 1-2
General Tips and Tricks
The general advice for most RPGs holds true with Legend of Grimrock: explore every room, pick up every item, and save often!
When fighting multiple enemies, try to maneuver yourself so only one can attack you at a time. Back yourself into a hallway, for example, so you can retreat to rest when needed.
There is no shame in attacking, running, healing, and attacking again!
In general, it's best to focus skill points on a few traits instead of spreading them around.
Arrows and thrown weapons can be picked up after defeating the enemy they struck.
Keep strong fighters in front of your party to absorb damage. If you have a rogue, you can specialize in long reach attacks or equip thrown/missile weapons to deal damage from the back row.
Jumping down pits results in a little damage, but you can often find nice loot by exploring the rooms below.
Resting (the [R] key) restores health and stamina, but you're defenseless while doing it. Make sure there are no enemies around before taking a nap!
Your first time through the game, the default party is probably your best choice. For later playthroughs, you can customize to suit your playing style. It's always a good idea to bring one mage along, though.
Have your mage focus on increasing earth magic ability early in the game. The poison shield will be invaluable against spiders on level three.
Keep potions for poison recovery and health recovery mixed at all times.
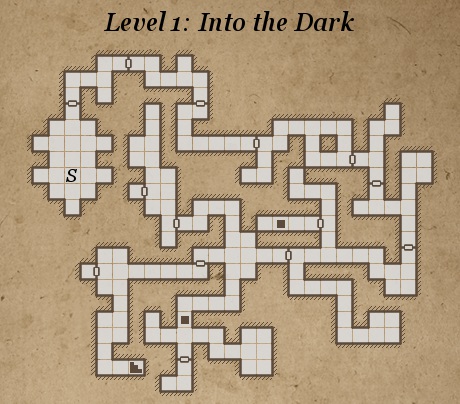
Level 1: Into the Dark
Level 1 map
Walkthrough:
Use the first room (marked with the "S") to get used to the controls. Pick up a torch and place it in one of your character's active slots for a portable light source.
Search the southwest wall for a small switch in one of the stones. Click it and a door opens to the right. Step inside for the first secret area of the game, containing a shuriken and some boots.
Head north and follow the passage. Pull the chain to open the gate.
Before using the next door, search the floor and a small alcove for some more equipment. Be sure to give it to your party members in the front line, they'll need it most!
Through the next door and down the hallway, a switch opens a gate up ahead. Weigh it down with something from your inventory (preferably the nearby rock) so the door stays open.
Through the door, immediately turn right and search the alcove for a key.
Take the key back east and use it to unlock the door.
Through the door, turn left and search the dead end for another key. Use it to unlock the door to the south.
Make a left u-turn beyond the door and you'll encounter your first enemy: a giant snail. Use your fists and the cudgel to defeat it, then loot the room when it's dead. Don't forget to take the snail slice, you'll need it later for food.
Head south from the snail room and hit the switch to open the gate. Search the alcove at the end for an item, then continue west.
Hang a left at the next locked door. Defeat some more snails and search the room for more supplies.
Backtrack and go north. Read the runes on the wall, then grab a rock or something from your inventory and throw it across the pit to trigger the switch. The pit will seal itself, allowing you to grab the iron key.
Head back south, taking a detour through the western door for a few more items.
Unlock the door and head west. You'll eventually encounter another locked door and a blind statue with the message "heal my sight". Head north to find the items you'll need.
You'll encounter herders in this room, giant mushroom things that are a little tougher than snails, but still not too much of a bother. Clear the room and flip the lever to open the gate. Grab the blue gem in the cell and press the wall switch just inside. It opens a secret door further north. Loot the entire area before continuing.
Head back south of the "heal me" face. Defeat some more snails and grab the gem from the floor. Drop an item on the switch to keep the way back clear.
Before returning to the face, head east for some more loot, including your first wizard's spell.
Place the gems into the statue's eyes to open the door ahead. Investigate the iron door, read the runes, then find rock switches on the walls nearby. Press them to open the door and grab some more loot.
Head south and check out the crystal, then look in the alcove for another spell scroll. When you're ready, head down the stairs to begin level two.
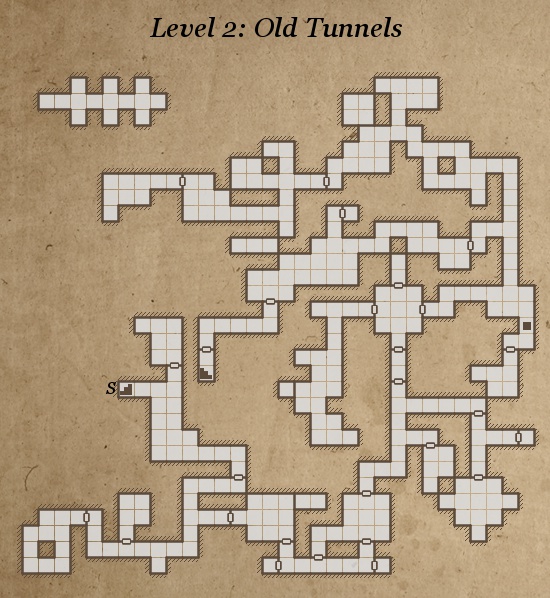
Level 2: Old Tunnels
Level 2 map
Walkthrough:
Now the game starts to punish you! You begin in the room just east of the marked "S". Head into the north room for a few items, then continue south and to the west.
A small room north of the western hallway contains a few items. Grab them!
Continuing west, you'll find a new enemy to contend with, one that has long-range attacks. Clear the room out and grab the loot, including a sword and a compass.
Go back east and unlock the door. In the northeast corner of the following room are some runes. Place a torch in the slot nearby and a door opens. Grab the stuff inside, then head south and east.
Grab the vest and the key through the grate after defeating the snail here, then unlock the north door. Circle around west and trigger a switch to open a hidden door behind the cell where you'll find some poison arrows.
Press both floor switches simultaneously by dropping an item on each. Torches, rocks, or anything will work just fine.
Head north through the door and turn to the right. The statue runes say "no weapons", so place a weapon (any one will do) into the alcove and the door opens. Clear the room and grab the items inside, including an iron key.
Head north and turn east. Follow the hall east and enter the portal to reach a small, out-of-the-way area with a roving portal. Keep pressing the switch on the wall to cycle the cell contents to the open area to the east. Grab the sack, which contains more loot, then exit to the west.
After the portal, go south and enter the room. The door locks behind you and a group of skeleton warriors attacks. Position yourself to the side (but not in the corner) so only one can attack you at a time, then clear them out one by one. Search the rooms when the area is safe for some nice items. Hit the switches to re-open the door and leave to the north.
Unlock the door in the north hallway and proceed to the large room. Open the west gate and explore there first.
Clear the room of enemies, then press the switch on the south wall. It opens a door to the north, which contains another switch that opens another nearby wall. Once the switch hunting has ended, you'll find a brass key to the south.
Go back to the center room and head east. Disable the portal by pressing a switch on the wall, then backpedal to make it through the area before the portal reappears.
Toss an item to weigh the switch across the pit. Go south and find some items/enemies lurking in the next room.
Head north and cut west, back to the center room. Use the keys to unlock the north door, which leads to a portal.
Open the gate by pressing the switch on the wall, then grab the items from the nearby alcove and head east.
A group of herders attacks you at the next crossroads. Clear them out and search the north and west rooms for items.
Head east and follow the path northeast. You'll find a lever on the western wall. Flip it and backtrack just to the west of this room for a secret area. Afterwards, head southeast.
Loot the room here and find the switch on the southern wall. It opens a room just west of here, though you'll have to travel north around the bend first. You'll get a treasure from this little secret!
Head southeast and cut west as soon as you can. When you reach the big room, a formation of skeleton warriors attacks. This guy is tough and will take a lot of punishment, so it's best to adopt a defensive strategy against it. Once it's gone, search the room for more loot.
In the north part of the skeleton room, investigate the statue and stare it it for 10-15 seconds. Your patience will be rewarded and the door to the east will open.
Head south and west and you'll find a switch on the western wall. Flip it, defeat the skeleton, and grab the loot.
Go south. To open the stairs to level three, place a torch in the sconce. It's a good idea to grab a handful of torches before you leave, as you'll need them on the next floor.
Posted by: JohnB |
April 15, 2012 12:42 PM
|
April 15, 2012 12:42 PM
Legend of Grimrock walkthrough
Levels 3-7
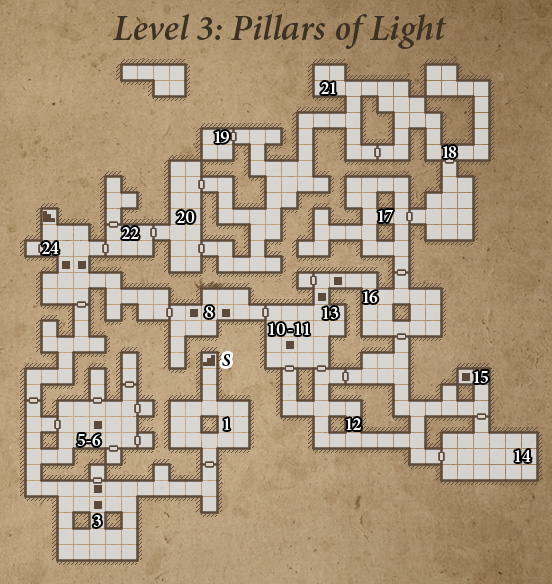
Level 3: Pillars of Light
Level 3 map
Walkthrough:
Enter the room and grab the torch on the wall to your right. You will need at least three torches including this one (burnt out ones work) to open the next door. Place a torch in each of the holders on the pillar in the middle of the room and the door will open.
Grab the loot from the alcove ahead of you and head down the hallway to the right. To kill the monsters in the next room, it might be easier to sit in the hallway and let them come to you.
Once they're dead, head left around the pillars in the middle of the room to the west side and hit the button on the pillar. Go back around and into the wall that opened up. There should be a shuriken on the alcove to your right, and another button on the wall to your left. Pressing it will open another wall, which will let you throw a rock across the trap doors to hit a pressure plate that will let you pass across them, into a secret area with a bow and some arrows.
Exit the room by the hallway to your right, and make another right before the wooden door at the end of the hall. Use the button on your left to lift the grate.
There will be four skeletons with spears that enter once you step into the room ahead. Using the trap door ahead to drop one or two of them makes combat easier, and if you want the extra experience you can drop down and fight them seperately. You will even find two snails and a tar bead down there to make the trip worthwhile.
Once the skeletons are dealt with, you can explore the room. The lever to get out of the room and the key you need to open the next door are in the two cells on the far (east) wall. Be sure to grab the flask and cave nettle from the cell directly left of the cell with the lever, and the two tar beads on your way out.
Use the key to open the door to your right and follow the hallway. There is a small offshoot to the left with a torch and a note on the floor. Further down the hallway you will find a room with a crystal of life and some trap doors. If you fall in one, it will take you to a small room with a monster to kill and some light armor leggings.
After taking the portal back up, take the path to your right, and you will find your first spider to kill. Then head into the next room where there is another spider to dispatch. When you have done so, go to the entry point of the room and push the button on the wall to your left. This will close the two trap doors in the room, but only for a short time. Quickly move to the far one and press the button on the wall to your right. This will open a chamber on the south side of the room which has a portal to a secret area and a tome of health. If you fall down one of the trap doors, don't worry; there is a secret area down there that I would advise going to anyway.
After falling into one of the trap doors, follow the corridor past the portal, and there will be a grate on your left with a pressure plate behind it. Place a rock on the plate. Continue around the corner and press the button on the wall to your right. This will turn off the portal behind the grate so you can place a rock on the second pressure plate around the corner. This opens the first grate and allows you to go around and across the pressure plates to secret area. Return to the portal after grabbing the loot. Don't forget to go to the secret area in the room above that you opened if you haven't already.
In the next room, you will find a square with a trap door in the middle and two portals moving counter-clockwise around it. To close the trap door, you need to follow behind a portal to the right side of the room, quickly turn left, and throw a rock (or some kind of weight) at the far wall. If you need a rock, there's one across from the entrance by the grate. This will hit a pressure plate closing the trap door, allowing you to use it to better navigate the room.
Your next task in this room is to get through the door on the far (south) side of the room. To do so, stand on the closed trap door facing south, and side-step to the right immediately after a portal passes you. Throw a rock onto the pressure plate in front of you and quickly move back and through the door. If you are not fast enough, you (and your rock) will be teleported to the north side of the square.
Once through the door and around the bend, there will be a loop to your right with a caved in passage and some spider eggs in your way. The eggs can be destroyed, though it is not necessary to do so. Next to the eggs there are two broadhead arrows; be sure to grab them if you have an archer.
On the opposite side, there is a lever that opens a grate back to the last room. Here you can grab your rock and pick up some poison bombs from the alcove on the right. Further along the corridor is an iron door, but you cannot open it yet.
Back in the hallway and through the wooden door, you will find a room with a door on the left that has two locks. Go right and right again, and it will take you to a large room with several spiders. Once they are cleared, head to the back (east) wall and destroy the eggs to get to the key. Also, along the same wall is a longsword worth grabbing.
Through the north door, there are some runes on the wall saying "I demand a sacrifice." Placing on the item beyond the grate to the left, and pushing the button next to it, will "sacrifice" it (even though it gives you the item back) and gives you some armor and another key. In addition, you can sacrifice another item to get some nice gloves.
Take the two keys to the door with two locks and open it. The next rooms layout is similar to the first room on the level, but this one contains a spider and some eggs. With the spider out of the way, place a torch in the holders on the wall to the left and right, rather than the three holders in the middle. This will open a passage on the northwest corner of the room that will lead to a switch that opens the iron door. Backtrack to it and grab yourself a nice cloak.
Past the room with the torch holders, you will find two more spiders and a button that opens a gate around the corner for a brief time. As is, you will not be able to get through the gate before it closes. However, around the corner to the left of the button is a rectangular button you can press to open a different path. There will also be another spider in this path, so kill it before you proceed. Once that is done, you can hit the first button and quickly move to the right, forward, and left to get through the gate in time.
The next room has a spider. Kill it! Around this point, keep your eye out for a gold key that will drop from one of the spiders: it will be used to open a secret area at the end of the level. Proceed through the door on your left and you will come to a fork. To the right you will find a dead end with another spider and some food on the ground. To the left, a room with yet another spider and some leather gloves in the corridor on the left side.
After you get to the next room, (and kill the spiders in it) go directly to your right and follow the northmost path. Behind a door is a box with a spell scroll, some herbs, and a fire bomb.
Go to the far south path and turn left to find a new shield, better than the legionary ones. Once you clear the spiders in the next room, you may want to grab a cave nettle at the north end of the room, by one of the eggs. Make sure you open all the doors in the room, then backtrack to where you found the leather gloves. In the northwest corner, a new room will have opened up with a spider and some tar beads. Then head back to where you were.
You will find runes on the wall saying "Spectral Relay," and a pressure plate that triggers an energy ball to shoot into a grate. However, if you place a rock on the plate on the opposite side of the grate, it will open and allow the energy ball to pass through as long as you aren't in the way. Once you get the energy ball into the receptacle on the opposite wall, the door will open.
The door opens to the room you were in earlier with the crystal of life, only this time you are on the other side of the trap doors. There is a lever on the right wall that will close one of the doors, so you can go back easily and use the crystal of life if you haven't already.
Next to the stairs down to level four, you will also find a door with a gold lock. If you found the gold key from one the spiders already, now is the time to use it. If you haven't, you may want to backtrack to find it, either from a spider you killed or from one of the spiders left alive. The room contains some heavy armor boots and a decent mace.
Proceed to level four.
Level 4: Archives
Level 4 map
Walkthrough:
The first room you come to has a pressure plate at the entrance. When you enter, the door will shut behind you and two monsters will spawn. They will attack with poison clouds, so it helps to keep moving. Kill them to get the key out of the room.
You will then come to a small room with a flask and the alchemy recipe for an energy potion.
The next room is large with some skeleton archers in it. Once they are dealt with, you can explore the portals. There are four of them, one in each corner of the room, labeled with runes. You will need to explore each of them to advance.
A. Beast Gardens and Managerie
Pressing the button on the wall to your left will open the gate, but send a spectral ball toward the receptacle on the right, which will close the gate. Press the button, then quickly move to the right to block the ball, so the gate will stay open.
The room beyond the gate has three "cages" and three skeleton warriors that you need to get through the next door. They respawn, so you can kill a couple for the experience. When you are ready to proceed, look for the hidden buttons near the cages to open them. You will need to lead a skeleton into each cage to open the door out. Keep your eye out for the one cage without a torch in it: it will instead have a button for a secret area (1).
You will then come to a room with many pits and a portal in the middle. Once you kill the flying monsters inside, grab the scroll on the ground and go through the portal.
B. Time and Tide
You will need a thrown or missle weapon equipped for this one—there are some throwing knives in the alcove to the right if you need them. Step on the pressure plate, and you will hear three clicks, then a portal will appear in front of you for a brief moment. You will have to time it right so that you throw the knife (or whatever you choose) through the portal when it appears. If done correctly, the knife will land on the pressure plate in front of you to the left, which will close the trap door, allowing you to pass. There is a secret area here too, if you simply place a weight on the timed pressure plate and stand where the portal appears (2).
The next part is fairly straightforward, but still tricky. Once you step on the pressure plate in the hallway, the trap doors in front of you will close in sequence, then open again shortly after. You will have to move along with them in order not to fall. There is a secret area accessed by a button on your right (3). Also, look out for a flying monster that will block your way near the end. You may have to kill it quickly then start the puzzle over. When you get to the grate at the end, throw something or shoot an arrow at the pressure plate to the left to open it so you can get through.
Go through the door and grab the scroll on the ground, then head back through the portal.
C. The Catacomb
When you first enter the area, the trap doors in front of you will be closed. Don't be fooled, however; they will open when you move toward them, as will some walls around you, revealing enemies.
To close the trap doors again, you have to find all three pressure plates and make sure to remove the weights from each one. They are marked with an X on the map.
Keep an eye out for a second secret area here, accessed via a button on the wall (4).
One of the "weights" you have to remove will be a formation of 4 skeletons, so be prepared. Where they were standing, there is a button on the wall that leads to a secret area (5).
Once you make it across the trap doors and through the gate, grab the scroll on the ground and head back through the portal.
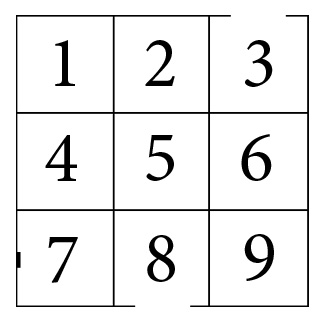
D. Trails of Thought
The first puzzle here involes a 3x3 square of pressure plates, with each one changing which portals are in the room. All of the portals lead to the beginning of the puzzle, so the only way out is to push the button on the wall to the left and go through the door on the far side.
To get through, imagine the room as a 3x3 grid numbered 1 to 9, as shown here. The path to get through consists of a lot of loops that pass through square 5. You will enter on to number 8, then follow the sequence:
5 236 5 896 5 874 5 874 5 896 5 23 and exit. Make sure you hit the button one of the times you are on square 7.
For the next puzzle, there are a series of three trap doors corresponding to three pressure plates. Before you proceed however, make sure to push the button on the south wall of the middle plate and go back to the secret area (6).
As for the puzzle, step on the first square, then onto the trap door that closes in front of you. Then step back, to the left, to the right, and back onto the trap door. If done correctly, all 3 doors should be closed so you can go and grab the key and go through the door.
Once through the door, kill the skeleton you face and pick up the scroll by the portal. Before you go through it however, look for the button to activate the sequence for the secret area (7). There are more details in the secret area walkthrough.
Now that you have the scrolls from the four areas, you need to place them on the shelves corresponding to the phrases on the walls. Each wall has a phrase written in runes, and each scroll will be a continuation of a certain phrase. The phrases are as follows:
Eternally imprisoned - to depths beyond measure
Put to sleep - but still dreaming.
Crimes forgotten - but never forgiven.
Caverns still echoing - by his call.
Once all of the scrolls are in the correct places, the portals will shut off, and walls around you will open to reveal a swarm of monsters. You will probably want to retreat to a hallway to make combat easier.
When you have cleared the area of enemies, you can search the areas they came from. You will find some herbs, a nice axe, and a lever that will turn the portals back on. Once you have explored to your content, you can go unlock the iron door if you got the key from Trails of Thought. Before the going down the stairs, you can use the crystal of life on your right.
Secret Area Walkthrough:
In the Beast Gardens and Managerie area, one of the cells that you have to trap a skeleton in (the only one without a torch) has a small button on the wall. Pressing it will open a nearby wall to a secret area.
In Time and Tide, after closing the first set of trap doors, place a weight on the timer pressure plate that you used, and stand where the portal appears. It will transport you to a secret area.
Later in Time and Tide, when you are moving across the sequence of closing trap doors, look to the right on the second one. There is a button on the wall that, if pressed, opens a wall a little further down on the right as well. Be careful to keep moving when grabbing the loot, or you will be dropped down to the next level.
In The Catacomb, there is a small button on the wall (see map) that opens a door around the corner for a brief time. This lets out a formation of four skeletons, and you will have to beat them to get to the secret area. Once they're down, go back to the button, press it and quickly move to the spot shown on the map or you won't make it in time.
Also in The Catacomb, one of the pressure plates has a formation of four skeletons on it. Once you get them out of the way, go to where they were and look to the right for a button on the wall. Pressing it will open a wall revealing another skeleton and some loot.
In Trails of Thought, after you solve the maze of portals, there is a puzzle with pressure plates that toggle trap doors. On the middle pressure plate, if you turn around you will see a small button on the wall. This opens a wall in the previous room.
At the end of Trails of Thought, before you take the portal back, there is a small area to the side of the hall that has a little button on the west wall. It closes two of the trap doors in the next room temporarily, allowing you to access a second button on the east wall. After pressing the first one, you will have to move quickly to the next room, press the second button, quickly move back and to the middle of the room. The portal that was there will be gone, and the trap door will be open. Fall into it, and you will land in a small cell with a gear key in it. Take the key back up to level 4 and use it to open the iron door, located to the left of the stairs down.
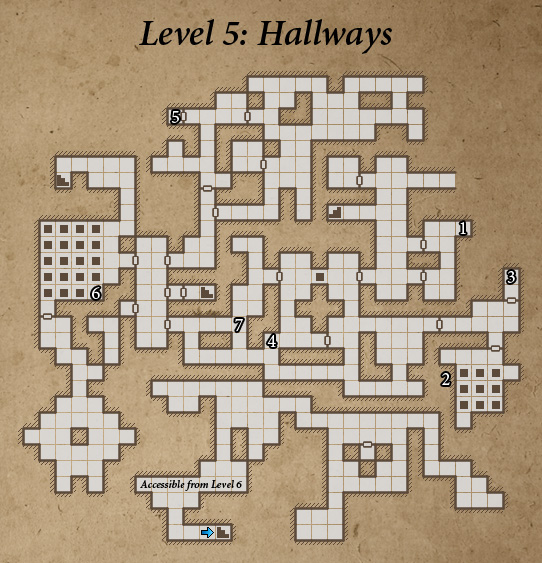
Level 5: Hallways
Level 5 map
Walkthrough:
You will enter a room lined with statues of warriors with a few offshoots. There is a small room to the northwest that contains a few crossbow quarrels and a scroll of fire shield. Grab them and go to the room to the southeast.
Though empty at first glance, this room has a small button on the south wall. Press it to open a wall behind you to an adjoining room. Don't forget to search the newly opened passage for a button to a secret area (1). Grab the key and contents of the box, some herbs, food and the scroll of light, and exit the room.
Once through the southwest door with the key, turn left and left again past the dragon statue, then right through the gate.
There are two buttons on the wall. Push the far (west) one, go across the trap doors to push the button on the north wall, then go back and push each button once. Go to push the north one again and follow the closed trap doors to the key. Beware of the flying monsters that will now be released into the room. Fall down one of the pits for access to a secret area (2).
Returning from the room with the pits, there is a secret area accessible from the room with the lever and buttons (3).
Past the dragon statue is the locked door to be opened with the key. Kill the monsters inside, then look for the button to another secret area (4).
Continue past the crystal of life, kill some crabs, and you should end up in the room with the iron door. The stairs down are visible here, but you will need a key from both of the next two areas to get to them.
Deserted Tunnels
Around the corner is a closed door. To open it, go to the lever past it and to the right. First equip a rock or some kind of weight, then pull the lever and quickly turn around and throw the weight down the hall to the right. The door will be open for a brief period, so you will have to hurry to make it through.
Wandering the tunnels beyond the door will gradually open walls and release monsters, so look out.
Once through the door to the northwest, you can grab the ornate key and open a wall back to the room with the lever and the pressure plate. You can then use them to access the area behind the gate (5).
Chamber of Pits
Here you will find a lever, a button, and many trap doors. When you push the button, a sequence of trap doors will close and then open, giving you your only chance to get across. As it is, however, it is set to take someone from the other side. To reverse the direction, flip the switch. Now you can press the button and step carefully and quickly to the other side. When you pass the east wall, keep you eye out for a button if you have the time, it will allow you to get to another secret (6).
In the next room, you will find a crab and the ornate key sitting on a shelf. If you take the key, walls around you will open releasing monsters, and the door out will close. To reopen the door, simply put a weight where the key was, such as the torch on the wall. If you don't want to be bothered with fighting the monsters, you can put the weight on the shelf first, then grab the key. This will deprive you of some experience though, of course.
To return, flip the switch on the wall and press the button to start the trap door sequence again, or simply fall into the pit, kill some skeletons, and take the stairs up.
Once you have both ornate keys, there will be formations of skeletons roaming the halls. You can try to quickly go down the stairs to the next level, or just kill them. Now is your chance to open the iron door (7), so you will probably want to fight through them before moving on.
Secret Area Walkthrough:
To get the key to the first door, you need to use a button to open a small passage between two cells. If you search the walls of the passage, it will open a small chamber in the second cell.
In this trap door puzzle, it isn't hard to avoid falling because there is no timers on the traps. If you do fall however, you can hit a button on the east wall to the right of the portal back up. It will open a secret area with some baddies and some loot.
When returning from the trap door puzzle, you will pass again through the room with the lever and the buttons. Switch the lever up and down a few times, leaving it in the up position. Then, press both of the buttons and the door will open to another secret area.
In the room before the crystal of life, there is a small button on the south wall. It opens a wall to the right.
At the end of the Deserted Tunnels, you will open a path to the chamber with the timed switch you had to use earlier. Hit the switch and hurry back down the new passage. If you make it in time, the grate to your left that was closed before will be open.
In the Chamber of Pits, you have to move quickly across a sequence of trap doors. When you are passing the east wall, which you have to pass twice, hit the button there. This closes a trap door in the south east corner of the room, that will give you access to a pair of bracers on the wall. It is very difficult to grab the bracers and keep going with the trap door sequence, so you might have to fall and do the puzzle again.
When the doors to level 6 are open, you can go back to open the iron door. The scroll on the ground says that it will open if you "rest in the place where the dragons gaze." There are two dragon statues in the level, and you must go to where their gazes would intersect. To make it easy, just backtrack to the spot marked on the map and wait 5-10 seconds, and the iron door will open.
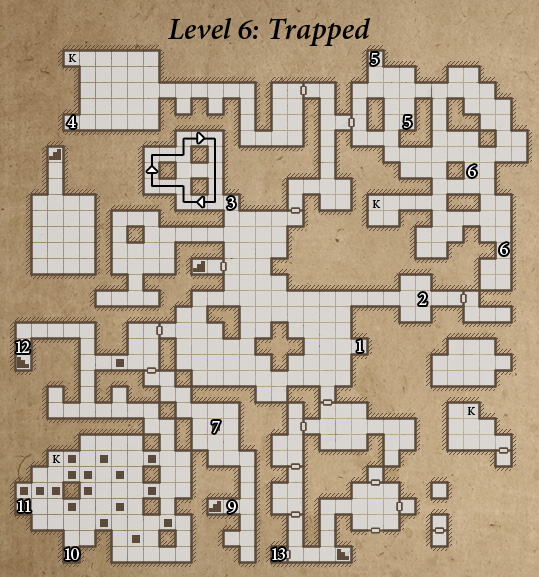
Level 6: Trapped
Level 6 map
Walkthrough:
Upon entering level 6, you will step on a pressure plate which closes the door behind you and spawns three spiders in front of you. This is why they call this level "Trapped": the door will not open again until you can access level 7.
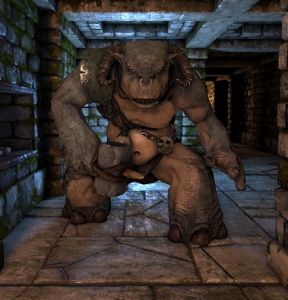
Once you deal with the spiders, look out for an ogre in the room. Ogres take a lot of hits, do some pretty hefty melee damage, and if you are out of melee range they will roar and charge at you. If you dodge their charge, they will keep running until they hit a wall and will be stunned for a moment; use this to your advantage. When you kill the ogre, make sure to search his remains for a gold key.
With the ogre dead, you can explore your surroundings with a little more ease. You can get the secret areas to the east of the room (1, 2), and the secret of the Walkabout (3).
To get to the next level, you will need three of the four round keys in level 6. Once you get the first key, you can access the levels crystal of life. Collecting the fourth will allow you to open the iron door. There is a key in each of the four areas: the Maze of Madness to the northwest, Haunted Halls to the northeast, Halls of Fire to the southwest, and Sequencis to the southeast by the crystal of life. The location of each key is marked on the map with a K.
Maze of Madness
First, go to the wall to your left without using any portals. There will be a small button on the wall that turns off one of the portals in the room that blocks your access to the round key.
Go back to the entrance of the room, facing the maze. Follow these directions without turning: step right, forward, right, back, left, right, and forward twice: you should be at the key.
If you want to access the secret area, search the wall to the right of the key for a small button (4). Pushing it turns off another portal and lets you go from the start of the maze to the opposite corner without any portals.
Haunted Halls
There are two secret areas in here (5, 6): check the secret area walkthrough for more information.
To get to the room with the round key, a pressure plate on the east side needs to be held down to hold the wall to the west open.
Items will not do it, so you need to lure a skeleton onto it, then run through the open wall before it moves.
Halls of Fire
Unless you have a high level Fire mage with you and already know the fireball spell, you will need to go through the Mage's Entrance on the left. This is just as well: there are a couple secret areas over here, the first of which is found by falling down the pit in the middle of the next room (7). While down there, there is another secret to be found: check the secret area walkthrough for more information (8).
Past the room with the pit is a hallway that is quite difficult to explore because once you step on the pressure plate, fireballs will spew out of the statue head at the end every so often. To deal with this, there are two little alcoves that can be opened so you can side-step into them. They are opened by two small buttons on the walls: one on the right two steps before the pressure plate, one on the left just after the pressure plate. With these open and with some careful timing, you can avoid being hit by fireballs altogether. While in the alcoves, look for the button that gives you access to another secret area (9).
At the end of the hallway is the scroll of fireball and a Fire Blade, which shoots fireballs when you swing it. You will need to shoot a fireball to get to the next part of the Halls of Fire, and since the spell is difficult to cast, the blade will probably be the easiest option.
Go back to the main room and shoot a fireball across the pit at the statue head. This will close the trap door, allowing you to pass. The pressure plate in front of you will trigger a fireball to shoot from the statue head, so if you want to avoid it, throw a rock onto the pressure plate before you cross, so you can dodge the fireball in the room.
Turn right at the statue head and follow the hallway to a large room with pits scattered all over it, and a pillar in the middle with trap doors and buttons on all sides. Kill the fire monsters so you can do the puzzle without them interfering.
To get the round key in the room, you have to push the button in the southeast, run to the east side of the pillar and push that button, then hurry around the west part of the pillar before the trap door closes. This may take more than one attempt, so it is probably a good idea to save first. If you fall, you will end up in the basement area accessed by secret (7), which then leads to secret (8).
When you have the key, you can remove the torch from its holder on the wall to close another trap door, so you can leave without having to fall. After this, you may access three more secret areas (10, 11, 12).
Sequencis
To your right is the sequence of doors that are opened by round keys, through the first of which is the crystal of life.
To the left is a small room with a portal. The portal takes you in sequence to four places including the room you are in.
The new place it takes you to has a door opened by a pull chain. Pull the chain and wait for the portal to take you back. There will be a snail in it that needs to be killed; unfortunately because of the portal, it needs to be killed one attack at a time.
Once the snail is dead, enter the room and pull the lever. This will open a gate from another place the portal takes you, the one after the room you came from. In the room is a crab and the round key.
When you have at least three round keys, you can proceed through the series of locked doors in Sequencis.
If you obtained the fourth key, you can open the iron door by the stairs down.
Before going down to level 7, turn left at the stairs. This will take you to the Treasure Store where you can use the gold key you got from the ogre at the beginning of the level. There are three doors you can open but only one key, so choose wisely. If you wish, you can save the key for an extra treasure from a similar area later.
North Treasure: Tome of Fire, a consumable item that gives the character of choice +3 Fire Magic and +10 Fire Resistance permenantly.
East Treasure: Crossbow.
South Treasure: 2x Fire Bomb, 2x Tar Bead, 2x Cave Nettle, 1x Blooddrop Blossom, 1x Empty Flask.
Secret Area Walkthrough:
In the main room where you enter the level, go to the eastern-most wall and you will find a small alcove with an empty torch holder. Place a torch in it, and a nearby wall just north of you will open up. Kill the skeleton inside and claim your fire bombs.
After getting the fire bombs in the first secret area, turn to your left and you will see a small rune on one of the stones on the wall. Press it, and another wall will open up to the Vault of the Orb. When standing on the pressure plate in front of you, a portal will appear. Place an object (don't throw it) in the portal and it will open the gate for you, allowing you to get the Orb of Radience. On your way out, there will be some crabs to kill, and you have to hit the rune on the wall again to reopen the passage.
In the northwest corner of the main room is an area labeled the Walkabout. If you walk in a clockwise fashion around this area, as shown on the map, you will hear clicks at certain points and things will start appearing. After one lap, a rock will appear. After two, a skeleton. And finally, if you do three laps consecutively, a sack will appear with a speed potion and its recipe.
In the Maze of Madness area in the northwest corner of the map, once you get to the spot with the round key, turn right. There is a small button on the wall there, which will make one of the portals in the room disappear. Go back to the start of the maze, and follow the path left and to the back of the room without entering any portals.
East of the Maze of Madness lies the Haunted Halls, and east of the entrance is a wall with a small button on it. Pressing it will open a wall to the north with a formation of skeletons and some loot.
Also in the Haunted Halls, there is a 1 by 1 square pillar, the east wall of which has a small button that opens a wall to the south.
The next secret area is in the Halls of Fire, through the passage on the left, there is a room with a pit in the middle of it. Falling down the hole will bring you to a sealed off room on level 7. Once you grab the loot, the door will open and you can explore this area only accessible by falling from level 6.
In the area described above, you will find a portal that will take you back up to level 6. Directly to the left of the portal is another pit to fall down, which will take you to an isolated area of level 8. There is another secret area down there with a heavy armor helm. To get it, you first need to place a weight on the pressure plate through the grate. Make sure you put it on the corner so that after you go through the door it opens and kill the monsters, you can grab the weight from the inside which will open the second door.
Once you have both alcoves open in the hallway with the fireballs, check the second alcove for a third button on the wall that opens a wall in the other alcove, with stairs that lead up to a previously inaccessible part of level 5 and another secret area.
Deeper in the Halls of Fire, you will come to a room with pits scattered all over it. Once you obtain the round key and close the trap door by removing the torch, do the sequence again, except instead of running across the west side, push the button on the pillar and quickly move to the north side of the pillar and push that button. Then back up, and run to your left around the pits to the south side of the pillar and hit the button. This will probably take more than one attempt, so you may want to save beforehand. If done correctly however, a wall will open behind you, releasing another fire demon and opening the way to some loot.
In the room with the pits described above, go to the west-most pit in the room and fall down it. It will take you to a place labeled the Golden Grave with a piece of treasure in it.
Once you have the Sword of Nex from secret #10, you can attempt the Fighter's Challenge. To get to it, go to the Halls of Fire and instead of turning left at the stone head to go to the pit puzzle, turn right. Once you reach the dead end search the wall on the left for a brick with a rune on it, like the one required to get to the Vault of the Orb in secret #2. Pushing it will open the wall and lead to stairs down. The door at the bottom of the stairs will open if you have the Sword of Nex. Stepping toward the stone head will teleport you to the middle of a room full of monsters. Once you fight your way out you can help yourself to the bombs on the floor, and if you search the west wall you will find a small button that opens a nearby wall with a piece of treasure inside.
Level 6 is centered around collecting round keys: you need three out of the four to proceed to level 7. If you collect all four however, you can open the iron door by the end of the level. The location of each key is marked on the map with a K.
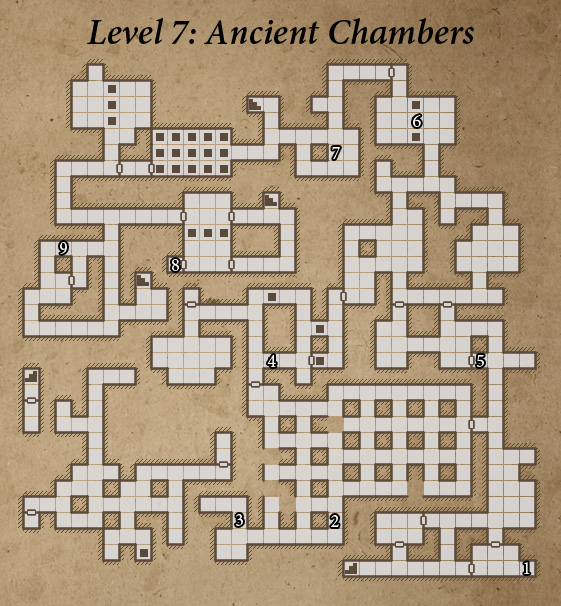
Level 7: Ancient Chambers
Level 7 map
Walkthrough:
Once you fight your way through the first part of the level, which contains a secret area (1) and more than a few slimes but no real puzzles, you will come to the Maze of Shadows.
What makes this a maze is the fact that if you step into the light of one of the torches, you will be instantly teleported back to the beginning of the maze.
There are two secret areas in the southwest corner (2, 3), and the exit to the maze is in the northwest corner.
Once through the maze, you will come to a room separated by a wall and two trap doors, the closer one leading to a secret area (4). Follow the hallway to the west and step on the pressure plate to open a wall with a slime and a key that will close one of the trap doors. Other walls around you will open with more slimes, so look out.
To get over the next set of trap doors, you will come to a button on a wall next to a receptacle. Push the button, then step aside so the spectral ball will go into the receptacle. Once it goes in, another spectral ball will shoot out of the other statue face across the pit, so look out, for you will have to move again quickly.
Go over the pit and through the door, then kill any slimes that are in your way. Head right (south), and you will come to two doors and a button. The button just sends a fireball down the hallway from the statue head, so don't let curiousity get the better of you.
The door on the left will lead you to a secret area (5) and following the hallway on the east side up north will take you to the crystal of life.
North of the crystal of life is a room separated into two parts by pits. Falling into one will take you to another secret area (6). Going through the portal will take you to the other side, and going through the portal on that side will take you to a seperate area that has a sack with some herbs and an empty flask.
Once you are back on the west side of the first room mentioned above, proceed through the door. This will take you to the hallway in which yet another secret area is located (7).
You will then come to a room covered in trap doors and a statue head that shoots a spectral ball at a receptacle every couple of seconds. Every time a ball reaches the receptacle, the trap doors will toggle open or closed. To make it across, you need to hurry to the middle of the room as soon as the doors close and block the ball. There are some bracers on the east wall if you are interested, and a button on the north wall to the west of the receptacle to open the door out.
Follow the hallway around the bend, and turn right if you want access to the Vault of the Dismantler on level 8 (9).
Further east along the hallway is another room with an iron door and the default stairs down to level 8. For details on how to open the iron door, check the secret area walkthrough (8).
Secret Area Walkthrough:
If you found Toorum's note, you will see he instructs you to open all the nearby doors except "the one where the draft is strongest." What he really means, is all the doors except the one closest to the stairs you came down. Once this is done, a wall slides open in the room directly across from the stairs.
In the southern part of the Maze of Shadows, there is what appears to be a dead end with a box on the ground. Take step back, and search the wall to your left for a small button. Pressing it will open a passage nearby to a portal that will take you to a secret area.
Once in the room that the portal described above takes you to, search the east wall for a brick with a rune on it. This opens a wall nearby that will take you to the other side of the portal with some frost bombs.
When you make it out of the maze, you will come to a room with some statue heads and pits. Falling into the pit closest to the door, the southwestern one, will take you to a secret area with a bracer.
To the south of the crystal of life on the east side of the level, you will find two doors. Through the one on the left you will find two pressure plates, one that opens the gate nearby and one that sends a spectral orb toward it. To get the orb to go in the receptacle, you have to stand on the plate to open the gate fully, step on to the orb plate then quickly back to the gate plate. The gate should be open by the time the orb reaches it. You then must fight some monsters before you can loop around to the area inside the gate and retrieve your staff.
At the northern part of the level, you will come across a room with portals on either side, separated by a row of pits. Fall into one and you will end up in a hall with a bunch of pressure plates that trigger poison bolts from the other end of the hall. If you move quickly and are careful about your side-stepping, you should be able to make it to the end without taking much damage, but a poison shield always helps. Once you get there you will be rewarded with heavy armor boots, then some monsters will be released at the far end so you have to fight your way out.
Just past the room with the portals and pits, there is a loop with a string of levers on the wall. When you put a lever in the correct position, it will emit a click. Once they are all in the right spot, the walls nearby will slide up to reveal a nice dagger.
Just west of the stairs down to level 8, is a room with 3 statue heads and 3 receptacles opposite them. Go past the stairs to the south side of the room and kill the monsters. The statue heads will start shooting spectral orbs toward the receptacles, and it is your job to block them all, stepping quickly from side to side. If you fail, the sequence will start over but nothing bad will happen. If you block them all however, the iron door to your left will open.
West of the stairs down is a roundabout hallway, on the north wall of which is a brick with a rune on it. After pressing it, go to your right to the end of the hall, then turn right again. There will be a passage to your left that was not there before, but it only stays open for a limited time. Once inside, there is a button to push that will make it stay open permenantly. The room contains alternate stairs down to level 8 that will give you access to the Vault of the Dismantler and the majority of the level.
Posted by: cheeko |
April 17, 2012 6:34 PM
|
April 17, 2012 6:34 PM
Legend of Grimrock walkthrough
Levels 8-13
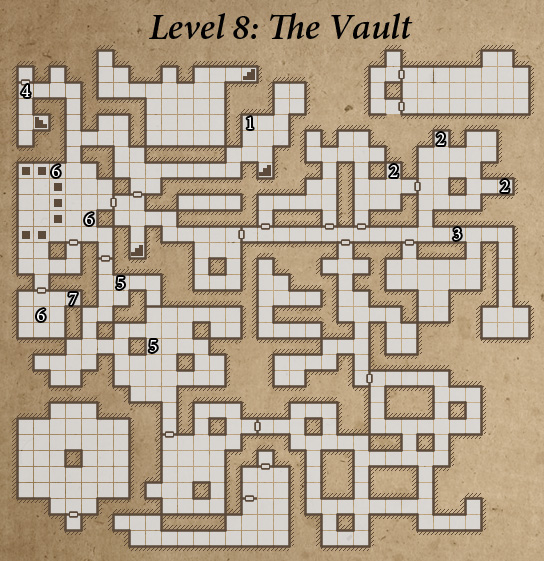
Level 8: The Vault
Level 8 map
Walkthrough:
If you simply want to continue down the stairs to level 9, you may do so by just going west from the default stairs from level 7: almost all of level 8 is optional.
If you came down the default stairs from level 7, there is a secret area in the room you enter (1).
If you came down the secret stairs, there is a whole lot more to this level. Turn right to enter the Lightning Conduit.
This area is basically a hallway that has lightning bolts shot down it every couple of senconds, with some rooms to either side. To progress down the hallway without taking damage from the lightning, you will need to duck into the various rooms.
The first door is on your left. To open the next door, head to the north end of the room and flip the switch.
Go out the newly opened door and through the next door on your left (The door on the right will be open later).
In this area is a secret accessed by three buttons on the walls and three hidden pressure plates (2). Make sure you flip the switch in the east section of the room so you can get to the next safe zone.
Go back out the door you came in and hurry along the hallway to the door on your right. In here are some monsters to kill and another switch that will open the door in the middle of the hall that you passed earlier. Don't go back yet though, you almost made it to the end of the hallway!
Head out through the east door, but before going to the end of the hall, take a step to your left and hit the button. This will open a wall at the end of the hallway leading to a secret area (3).
In the secret area you just opened, there will be an ogre to fight in a very small room. Stay mobile and hit him from behind when you can. When it is dead you can help yourself to the spoils: a staff that shoots lightning bolts and a gear key to open the iron door later (4). There are also some lightning bombs on the shelf outside the secret area.
Once you are done with the Lightning Conduit, head back to the door on the south side in the middle of the hallway.
The tunnels up ahead are crawling with fire monsters and ogres, so be on your guard. Your next goal is to open the door on the west end of the tunnels, but to do so you will need a key from the portal on the southeast end.
When you go through the portal, be ready for a fight. The room is full of poison monsters, and the exit won't be open until later.
Once you clear the room, find the two keys inside. Use one to open the way out, and the other to open the door to the west.
Through the door, you will find several pressure plates scattered around the room. Place something on each of them to open the next door. Be wary however, this will also open some walls in the room releasing some monsters.
The next room has several fire monsters, but no trick to get through the next door. There is, however, a secret area to find, accessible by either one of two switches (5).
In the following room, you will meet one annoying little spider. You can't reach it in melee, so you have to kill it with ranged attacks. Since it can't reach you either, it will run back and forth. What it runs back and forth upon, of course, are a series of pressure plates that trigger lightning bolts to shoot from the walls. This means it takes some strafing and careful ranged attacks to kill the spider without taking a lot of damage.
Once the spider is dead, search the room for two small buttons, marked on your map (6). This opens the gate to the south. Before you enter The Vault itself, you might want to flip the nearby switch so you can go and grab any thrown or missle weapons you may have used on the spider.
Finally, you have reached the Dismantler, the best sword in the game. Before you grab it, however, put something on the pedestal where it lays (the torch in the back of the room will do) or else you will suffer the wrath of the lightning traps in the room.
There is also a treasure to be found in this room, check the southeast corner for a button (7).
With the Dismantler in hand, you can now head down the stairs to level 9, by the iron door.
Secret Area Walkthrough:
In the room where the default stairs from level 7 end up, there is a small button in the northwest corner. It opens two walls in the northeast corner of the room.
On your way through the Lightning Conduit, the hallway east of the secret stairs from level 7, there are three buttons on the walls in the second room on the left. Each button opens a small room with a pressure plate in it. Place an item on each of these plates and a room in the northeast corner opens up.
Along the hall, there is a button on the north wall. (see map) This will open a passage at the very end of the hallway.
The iron door on level 8 is opened with a gear key, which is found in the secret area described above.
On your way to the Dismantler, there is a secret passage between two rooms. There are actually two small buttons, either will open the passage, one in each of the rooms. They are both marked on the map.
Finding the Dismantler itself counts as a secret. Once you have killed the spider in the room with the lightning bolts, search the walls for the two buttons marked on the map. Pressing them will open the gate to the south and allow you to get to the sword. Before you grab it however, place the torch from the far wall (or anything else) on the pedestal, to avoid triggering the pressure sensitive trap and taking a lot of damage.
In the room with the Dismantler, search the southeast corner for a small button. This opens a wall to the north revealing a piece of treasure!
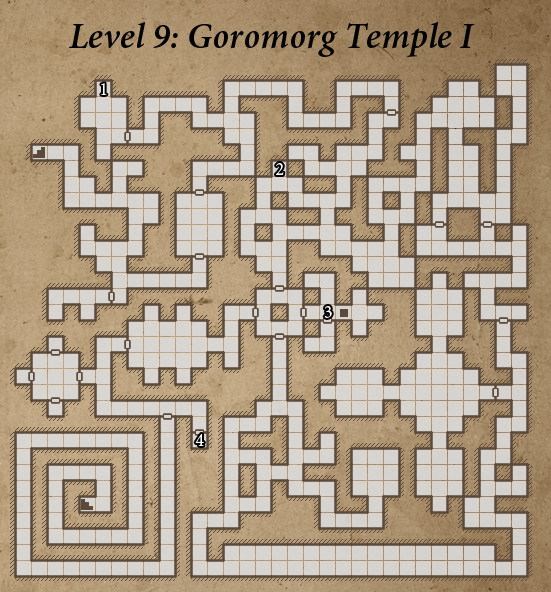
Level 9: Goromorg Temple I
Level 9 map
Walkthrough:
Note that the banners on the walls of this level can be torn away with a melee attack and will sometimes reveal useful items.
To get into the Holy Scriptures room, you need to tear down a nearby banner and retrieve the key behind it. The fire monster in the room drops an ornate key: hang on to it for later.
Go to the Checkered Room to the east. The only clue you have to get through this room is its name: you need to place objects on every other square in the room, like the squares of a checkerboard. There are two ways to do that so that the door will open, but only one will let you exit through the door without messing up the pattern. To make sure you do it the right way, start by putting a weight on the pressure plate by the door you want to open, then work your way back.
Once through the door, head east to the Armoury for some loot and the first secret area (1).
The hallway north of the Checkered Room leading to the west can be a bit confusing at first. There are two points in the hall where you will be turned around 180 degrees with no warning, which can make it feel like you are going in circles. To make it through, proceed carefully and watch the walls. When you see them shift, about-face and continue. Check your map or compass after each step if you are still confused. At the end of the hall will be the Temple Grounds.
Temple Grounds
When you make it into the Temple Grounds, keep your eye out for Ice Lizards. These monsters are pretty quick and can do a decent amount of damage, so try to avoid fighting them in groups. They are also immune to ice magic.
If you kill enough lizards here, one of them will drop a gold key used for treasure later in the level. Be sure to check under the lizard meat for the key. Their meat is also very filling, and you will not be getting much food from here on, so you will want to take some with you.
Also in the area is a small button on the wall that opens the way to a secret area (2).
In the southeast corner of the area is a switch. Flipping it opens a door to the west, behind which is a scroll of lightning bolt. This needs to be done and the scroll must be moved from the shelf. Throw it on the ground if you don't want to carry it.
When the scroll is moved and you are through the Temple Grounds, you can enter the Outer Sanctum using the ornate key you got earlier.
Outer Sanctum
Once inside, the door will shut behind you and three fire monsters will spawn. This sort of thing should not surprise you by now. There is a small button on the wall to reopen the door.
When you clear the area, feel free to explore a little bit. You will find three rooms, each with a runic inscription on the wall and a portal taking you back to the statues at the front.
Once you have gone through the portals a couple of times, a scroll will appear in front of you at the base of the statues. It reads "III - II - I - III." These are instructions on the order of the portals to take, and the numbers correspond to certain inscriptions.
I - Sun of Hatred
II - Hands That Slaughter, Eyes That Decieve
III - Three Ancient Beings of Deep
To put it simply, go through the portal in front of you, then the one to your right, the one to your left, then the one in front of you again.
If done correctly, you will end up in a room with two pits and a portal that disappears and reappears. There is a secret area accessible by falling down one of the pits (3).
Before stepping forward onto the trap door, make sure you put something on the pressure plate you are standing on; it is the only thing keeping the trap door closed.
The next part takes some careful timing. You want to flip switches in both the halls on the left and right. When going to the right, you want to try to make it through without going through the portal, which just drops you back on the alternating trap door. My only advice would be to watch the trap door and portal in front of you to get the rhythm, and try to step on the trap door when the portal is just about to disappear so you can side-step through the portal square right when it's gone.
When going to the right, you will want to face the gate before stepping on the alternating trap door so you can drop something on the pressure plate inside and quickly step off. Wait for the gate to fully open, then step across the trap door again.
With both switches flipped down, the door at the end will be open, and the ornate key will be free for the taking.
Once you have the key from the Outer Sanctum, you can leave the area and go south in the hall to the far east.
Pillared Hallway
As the name suggests, this area is a long hallway with pillars down the middle. If you just walk straight down the hallway, you will be teleported back, and a certain sequence of movement is required to get to the end.
If you read the scrolls in the Holy Scriptures room, you will notice that one gives a rather cryptic description: "Two times left She slithers, once right, once left, three times right and twice more is left. This She repeats twice." This is actually directions for the Pillared Hallway.
To get to the end of the hallway, start at the entrance to the hall (the last square that has a wall directly to the right) facing forward and follow these directions without turning:
Forward, forward, right, forward, left, forward, right, forward, forward, forward, left, forward, forward,
forward, forward, right, forward, left, forward, right, forward, forward, forward, left, forward, forward
In the halls beyond the Pillared Hallway, there will be some fire monsters to kill and a room to the east with a Lurker Hood.
Following the hallways north will take you to a locked door, opened by a small button on the west wall just two steps south. With the door open, you can grab the Book of Infinite Wisdom.
If you completed the Temple Grounds and the Outer Sanctum properly, the walls around you should slide up as soon as you pick up the book. If not, you may need to backtrack to make sure the Scroll of Lightning Bolt and the ornate key are both moved from their respective shelves.
The walls' opening reveals paths to previous parts of the level, but also to a new one to the west.
This path takes you to a room with a crystal of life and several riddles on the wall. Each one describes an item that must be placed on the shelf for the next door to open. Placing a correct item on the shelf will make an audible click.
The answers are as follows:
Game's Bane with head of steel: Arrow or Crossbow Quarrel
Tear of the Land: Rock
Severed Dread: Skull
Unraveler of Mysteries: Any Key
Once you place all of the objects in their corresponding spots, the door will open. You can then take your items back without the door closing on you.
If you obtained the gold key from a lizard earlier, or saved the one from level 6, enter the Treasury and make your choice.
North Treasure: Flarefeather Cap, Serpent Bracer
West Treasure: Plate Greaves, 2x Frost Bomb
South Treasure: Book of Infinite Wisdom
Just past the gate leading to the stairs down is the iron door and another riddle: "Made from the dead, Guillotined Man does not need me." (4) The answer they are looking for is a Bone Amulet: place one on the shelf if you have one and the door will open.
Use your ornate key to open the gate and head into a spiral-shaped hallway. About halfway through, expect to bump into an ogre, in just about the worst place to have to fight one. It is probably better not to give it a chance to charge, and just face it head on. Right by the stairs there is another one, so be ready. Once they are dead, you can proceed to level 10.
Secret Area Walkthrough:
Inside the Armoury in the northwest corner of the level, there is a small button in the north alcove that opens a wall to the south, with a very nice axe in it.
On the Temple Grounds, there is a small button on the wall, marked on the map. This will open a wall around the corner, to the northeast.
You will need three torches and two rocks for this secret, so make sure you have them before proceeding. Once you get through the Outer Sanctum, you will end up in a room with two pits and a portal that disappears and reappears. Fall down one of the pits, and place a torch in each of the three torch holders in the room you end up in. Stand where the shadows cross, and throw a rock to the east and to the north. Make sure you throw it by equipping and right-clicking the rock, dragging it to the top of the screen will not work.
To open the iron door in this level, you need a bone amulet. There is one on level 2, and one on level 4. Hopefully you picked at least one of them up so you don't have to backtrack. Place the bone amulet on the shelf next to the door and it will open for you.
Level 10: Goromorg Temple II
Level 10 map
Walkthrough:
After coming down the stairs, turn left and retrieve a round key from a shelf nearby. Then turn around and open the gate north of the stairs.
You will come to a room with a large pillar in the middle, on the north side of which is a banner covering a keyhole. Put the round key in the keyhole, and three walls to your right will open up, revealing an ice lizard and two flying bug monsters, as well as some tar beads and a statue head necessary for a puzzle.
Follow the path to the east and turn right down the south passage. In the middle of the room is a pressure plate: put a weight on it. This will open the gate to your right, but it is not necessary to go through it. Instead, you will want to go through the gate on the left.
To switch the gate that the pressure plate opens, you need to tear down the banners on both sides of the room. There will be a shelf on either side, but one side will have a red gem. Moving the gem to the shelf on the other side will switch which gate is open.
Once through the gate, grab the round key on the shelf. Continue down the path to a lever. Pull it to open the gate in front of you, as well as some walls containing enemies.
When you have dispatched the monsters, go through the gate you just opened. This room is almost identical to the previous one you used the round key on, just reflected. The keyhole is in the same spot, and once again three walls will slide open to reveal three enemies, only this time there is a receptacle instead of a statue head.
Go back to the room with the red orb and pick it up: you will need it for a secret area later. Go north into the hallway and reveal the two buttons on the northeast and southwest corners, under banners.
The southwest button will shoot a spectral ball from the statue head in the west room, while the northeast button will close the west gate and open the east one, or vice versa. The trick is to hit the southwest button, then hit the northeast one when the spectral ball passes the west gate so that the east gate is open by the time it gets there. That way the spectral ball can go into the receptacle in the east room, which opens the door to the north.
Once you step through the north door and onto the pressure plate, a series of doors will open in front of you, one by one. There is no need to go to the end of the newly forming hallway, all that waits for you at the end is a poison trap. The walls to your left and right will begin to lift up soon after the doors open, and you will be faced with two hooded monsters, high-level casters that will probably be the toughest fight you have seen so far.
To the east is a room with some crossbow quarrels. To the west, a room with some throwing axes, a baked maggot, and a button. The button will make a portal appear in the middle of the big room, but will also spawn some more hooded casters, so look out.
The portal will take you to a room with a crystal of life, an iron door, two other doors, and stairs down. The iron door is the last of its kind and can be opened with the red gem that you picked up earlier (1).
There is no point going down the stairs until you have recovered the prison key. The path to recover it starts by going through the door in the southeast corner, opened by a button next to it.
The tunnels up ahead are infested with the flying bugs and hooded casters. Fight your way through, and don't miss the Greaves of Valor in the small, closed room if you have someone using heavy armor.
Once you make it through the gate to the north, there will be more monsters to kill and a pit to the right that leads to a secret area (2).
To the west is a gate that will lead you through some more hallways, with another secret area located along the south side (3).
You will come across a pressure plate north of the secret area that opens a door, but also sends a lightning bolt toward you. Place a weight on the plate and step to the side if you want to avoid getting zapped.
To open the door in the next room, you will need two ornate keys. One will be found in The Caverns, the other will be in The Shrine, both of which lie to the north.
The Caverns
When you enter this area, you will be immediately greeted by an ogre. It is alone so it should not be hard to kill by now, but there will be more ogres and other monsters deeper in The Caverns.
There are two secret areas to be found in the first big room you come to, (one of which enables Toorum Mode, so don't miss it!). Check the secret area walkthrough for more details (4, 5).
This area is pretty large with lots of easy monsters to fight, so take your time to explore and enjoy some extra experience.
The ornate key you are looking for is at the west end, on a shelf facing an open trap door. To close it, you need to put the levers on the wall to the north in the correct orientation. As Toorum's note suggests, it has to do with the pillars next to them.
From left to right, put the levers in the following orientation: down, down, up, down, up. You can then go south and pick up the ornate key.
Look out for some newly spawned hooded casters on your way out.
The Shrine
The Shrine is much smaller than The Caverns, and the path to the key is very direct. It is sitting on an altar by the far wall, but if you played the game to this point, you should know it will not be that simple.
When you move the key, you will no longer be alone in the room. Two hooded casters will spawn, and tentacle monsters will pop out of the grates in the floor when you step next to them.
If you want to avoid a fight, place a torch from the wall on the altar before you grab the key, but you will be missing out on some experience.
Once you have both ornate keys, you can proceed through the door.
If you are interested in another secret area, do not go through the portal right away. Instead, search the northwest corner of the room for a small button that will turn off the portal and open the trap door (6). You can press the button again later to bring the portal back. Falling into the trap door will take you to a secret area, but beware of the trap within.
The portal will take you directly to the prison key, at long last. You can now go down the stairs to level 11.
Secret Area Walkthrough:
The final iron door in the game is rather straight-forward to open, but gives no direction on how to do so. Simply take the red gem you have to use earlier in the level and place it on the shelf next to the iron door and it will open.
As you are making your way along the east side of the level, you will come across a pit to your right. Fall into it and clear the lower room. When you come back up the stairs, you will be rewarded with a very nice shield.
Just past the room with the pit described above, there is a small button hidden on a wall. You can find it by looking directly north of where the crystal of life was, and it will open a passage to the other side of the crystal.
Once in The Caverns, look for the first pillar you come across in the large room. There is a button on the west side of the pillar that opens a wall in the southeast corner of the room.
Bonus: Grab Toorum's Skeleton and take it to an active crystal of life. This will give you an achievement and enable Toorum Mode!
To play as Toorum, start a new game and name a character "Toorum" then press enter on your keyboard. You will hear a chime and start the game with only one character, Toorum. He is a sort of fighter/mage hybrid, with Armors, Axes, Swords, Fire Magic, Earth Magic, and Spellcraft as skills. His traits are Skilled, Tough, and a bonus trait "Thunderstruck," which makes him move twice as fast. If you were planning on playing the game through again, this should make for a very interesting twist on your play style.
In the same part of The Caverns that you found the button, fall down the one of the two north pits. This will take you to a pretty extensive basement level with a great mace. Once you pick up the mace, walls will open and monsters will be released, so be ready to fight your way out.
After opening the door with two ornate keys, you will come across a room with a portal in the middle. To the right of the portal in the northwest corner of the room is a small button that will toggle the portal off and open a trap door where it was. Fall into it to get to the last secret area of the level. Before grabbing the loot, look for another small button in the area, this will close a wall to block the statue head from spewing lightning bolts at you when you take the items.
Level 11: The Tomb
Level 11 map
Walkthrough:
When you enter from level 10, there is nothing to do but continue to level 12. Level 11 mostly takes place as the parts you fall to from level 10 and an area you will return to from level 12 later on and will be included in the level 12 walkthrough.
Secret Area Walkthrough:
Once you enter the Tomb of the Designers after escaping level 12, you will come to a T where you have to recover an ornate key from both sides. In the east path, look for a runic symbol on the south wall. Pressing it will open a wall to your left, revealing a piece of treasure.
Level 12: The Prison
Level 12 map
Walkthrough:
When you open the door with the prison key, you will be tasked to find "the mechanism." There are some tough monsters in the room ahead, however, that are not easy to ignore, so you should focus on clearing them out before you proceed.
You may want to drop down one of the pits to level 13 before you engage the big stone/metal golems. There is a crystal of life on level 13 that you will probably have to make a couple trips to and you have to fight your way to it. The golems hit hard, take a lot of damage, and charge like the ogres, so you will need to be prepared for a rough battle and try to fight them one at a time.
When you feel comfortable roaming level 12 freely, inspect the cube in the middle of the four pillars. You will then be asked to find the four missing parts. If you haven't jumped down to level 13 yet, now is the time.
Falling down to Level 13: The Cemetery
Level 13 is where you will find all of the four pieces required to fix the machine:
A. Steel Gear
B. Ore
C. Infusor
D. Bladed Gear
The location of these pieces are marked on level 13's map.
There are two secret areas in the southeast area of the level (1, 2), and a treasure further north (3).
There is also a crystal of life on this level. To reach it, you must first push the button in the northwest (just north of the A) to open the door in the northeast labelled "No Entrance."
Follow the tunnel to the northeast corner of the map then to the west, killing spiders as you go.
The crystal itself is located in the last treasure room. If you still have gold keys, you can use them here.
East Treasure: 2x Fire Bomb, 2x Lightning Bomb, Fire Blade
South Treasure: Plate Cuirass, Plate Greaves, Plate Boots, Plate Gauntlets, Full Helmet
West Treasure: 3x Torch, 3x Tar Bead, 3x Blooddrop Blossom, 4x Grim Cap, Healing Potion, Energy Potion
When you have all four parts and are completely healed, go back up to level 12 and put the parts into the cube, one on each side.
Level 11 and the Tomb of the Designers
The machine comes alive and tries to kill you! Run away, for there is nothing you can do to harm it right now, and you will die if it squishes you.
Flee to the southeast corner of the level: a portal will have appeared there.
This portal takes you to a staircase back up to an isolated section of level 11, designated the Tomb of the Designers.
The hallway across from the stairs up is much more dangerous than it looks: You will probably want to save so you don't have to take too much avoidable damage. When you step on the pressure plate in the middle, the doors on either end will close and poison clouds will fill the room. If you know the spell Poison Shield, use it before you step on the plate.
To escape, step back two steps from the plate after you step on it and turn to the right. There is a small button on the wall that needs to be pushed. Quickly move past the plated two steps and push two more small buttons, one on the left and one on the right. If done correctly, the door will open and you can escape the continual poison damage.
Once out of the hallway, you will come to a fork. There are hallways to the right and left that both contain an ornate key, and a door straight ahead that requires both keys to open.
To the west, you will find a hallway with trap doors and a portal that disappears briefly every so often. Equip a thrown or missle weapon and time it so that it passes through the hallway without going through the portal. This will close the first trap door.
Step on the first trap door and face to the left. When the portal disappears, quickly step where it was and push the small button on the wall to close the second trap door. When the portal disappears again, run down the hallway to the other side and retrieve the ornate key.
To the east, you will find, in addition to a hidden treasure (1), a series of pressure plates with statue heads on each side. You can walk to the end of the hall and grab the key without fear.
The tricky part comes when you try to return with the key. Each pressure plate will trigger a blast from both heads of different elements. To avoid taking damage, place a weight on the plate in front of you, then step onto it. Move the weight ahead of you again, then follow it and repeat one more time. The traps only go off when the pressure plate is initially pressed, so set it off first with a harmless rock.
Once you have both ornate keys, you can open the door to the north. Inside is a single fire monster: kill him quickly. The reason you are here is the Weapon of Power, which is not readily visible. As the scroll says, however, it is hidden in shadows. To find it, you need to kill the lights: put out the torches, unequip the Orb of Radiance, cast Darkness if you used Light. Once all the lights are extinguished, the Weapon of Power will appear on the altar.
Equip the weapon to one of your party members, whoever you like, and return to level 12 through the portal that appeared behind you.
The Undying Prisoner
Now it's time to take it to that vengeful cube. Of course, it will not be a one-on-one fight: a bunch of monsters of different varieties will have spawned in level 12 and will continue to spawn when killed, to make things more interesting.
The Undying will instantly kill any monsters that get in its way, so keep that in mind. If you need extra provisions, the monsters will occasionally drop prison keys that can be used to open the three doors scattered across the level.
To make the cube vulnerable, you first need to shoot it with the Weapon of Power. When hit, the cube will be stunned for about ten seconds, giving you time to run up to in and rip out one of the parts you placed in it before.
As you take out more parts, you will need to pay attention to where the remaining parts are so you stun it while the parts are accessible, and not on the ground or against a wall.
Once you rip out the four pieces you put in, the Undying will be vulnerable to damage. Throw everything you got at it, preferably at range so you are not in danger of being squished.
It can still be stunned and even damaged by the Weapon of Power, so keep using it. It is also extra vulnerable to lightning damage, so use air magic if you can, as well as lightning bombs and the Lightning Rod.
After some careful cube-dodging and lightning-slinging, you should be able to kill the Undying. Congratulations! You are the Champion of Grimrock!
There are no secret areas on level 12.
Level 13: The Cemetery
Level 13 map
Secret Area Walkthrough:
In the southeastern corner of the map, there is a small button. Pushing it opens a wall in the same room to the northeast.
Just north of the room in which the first button was found is a short hallway going east that has another button in it. Press it, and a wall around the corner to the north opens.
On your way to the crystal of life, following one of the tunnels all the way east will bring you to a dead end with a wooden box in it. Check the walls for a small button. Once pressed, it will open a wall west along the hallway allowing you to pick up a piece of treasure.
Posted by: cheeko |
April 27, 2012 5:05 PM
|
April 27, 2012 5:05 PM