
100 Lights
Platform: iOS

![]() We've worked our way up 100 Floors, maybe opened a few DOOORS along the way. So... now what? How about turning on some lights in here? A new point-and-click mobile puzzle game from Smarcle (which isn't officially related to either of the games above), 100 Lights, is all about bringing some illumination to dark situations, challenging you to turn on the lights in each level. The best part is the solutions are never spelled out for you, and you'll have to shake, twist and swipe your screen to figure out how things work!
We've worked our way up 100 Floors, maybe opened a few DOOORS along the way. So... now what? How about turning on some lights in here? A new point-and-click mobile puzzle game from Smarcle (which isn't officially related to either of the games above), 100 Lights, is all about bringing some illumination to dark situations, challenging you to turn on the lights in each level. The best part is the solutions are never spelled out for you, and you'll have to shake, twist and swipe your screen to figure out how things work!
 Utilizing many of the iOS platform's unique features, 100 Lights drops level after single-screened level in front of you, each with some sort of light that needs to be turned on. Maybe it's a fire that needs to be kindled. Maybe it's a lamp, a torch, or a non-burning tree that's ready to be set ablaze? All you have to do is figure out how to use the on-screen elements to create a brighter situation. Tap, drag and swipe the screen to see what moves, and don't forget to use the device's accelerometer to bring some real-world movement in to play.
100 Lights really encourages you to think outside of the iPhone, and that's the kind of creative construction we love to see in our mobile games. The ads can be a bit annoying at times, but you can opt for an in-game purchase to remove them, so if they get too frustrating, there's a way to get rid of them. At the time of writing 40 levels are available, but the team at Smarcle seems to be releasing more at a steady pace, so that number should increase in the near future. Until then, ignore the Teenage Mutant Ninja Turtles and turn on the lights!
NOTE: This game was played and reviewed on an iPad. Game was available in the North American market at the time of publication, but may not be available in other territories. Please see individual app market pages for purchasing info.


Walkthrough Guide
(Please allow page to fully load for spoiler tags to be functional.)
100 Lights Walkthrough
Levels 1-5: The House
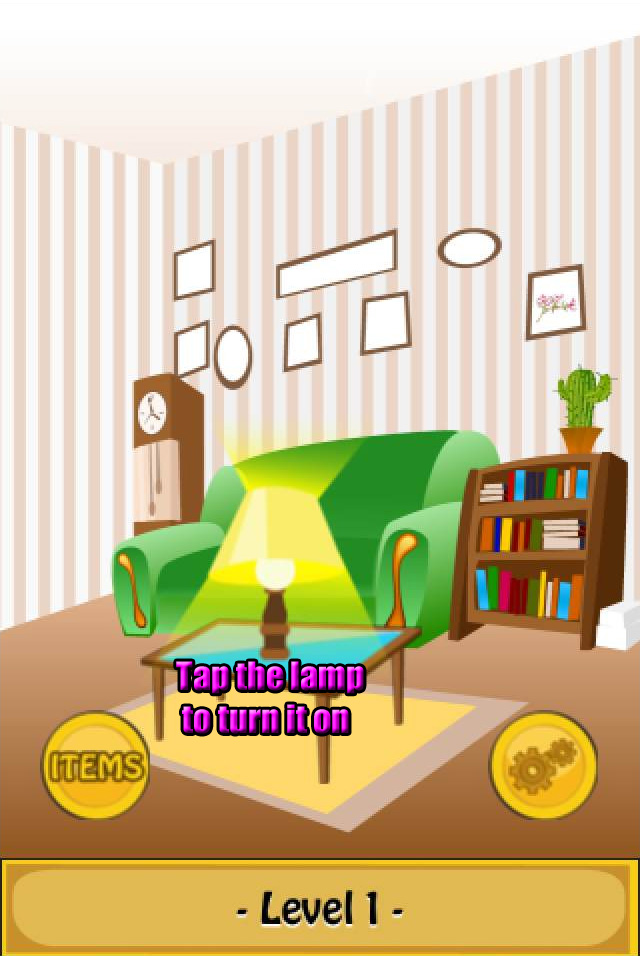
Level 1
Touch the lamp on the table to turn on the light.
Screenshot.
Level 2
Hit the lightswitch on the wall to turn on the light.
Screenshot.
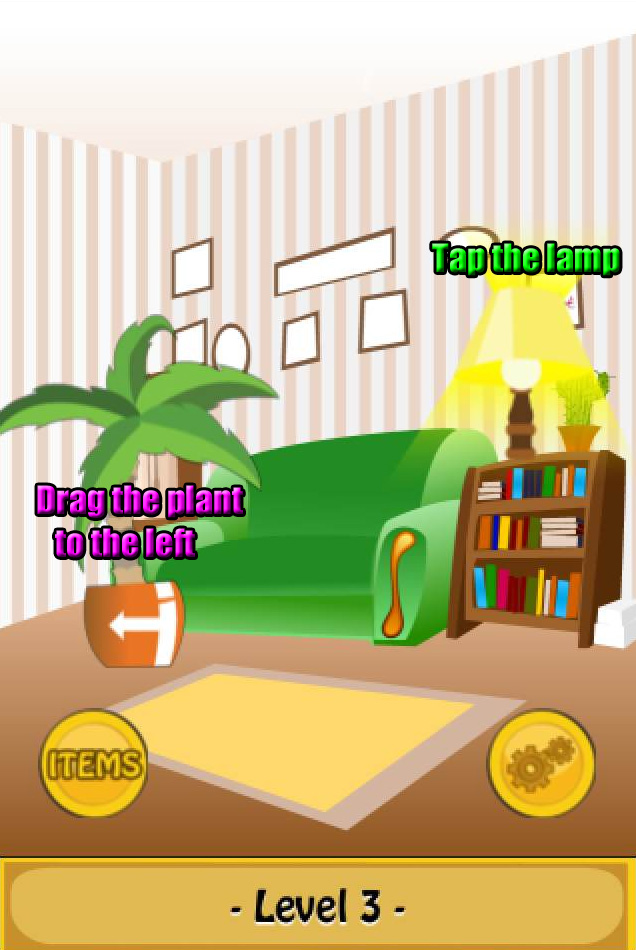
Level 3
Tap and drag the potted plant to move it to the left side of the room.
Touch the lamp on top of the small bookshelf to turn on the light.
Screenshot.
Level 4
Tap the picture of an arrow on the wall to move it aside.
Hit the light switch to turn on the light.
Open the curtains to let the sunlight in from the window.
Screenshot.
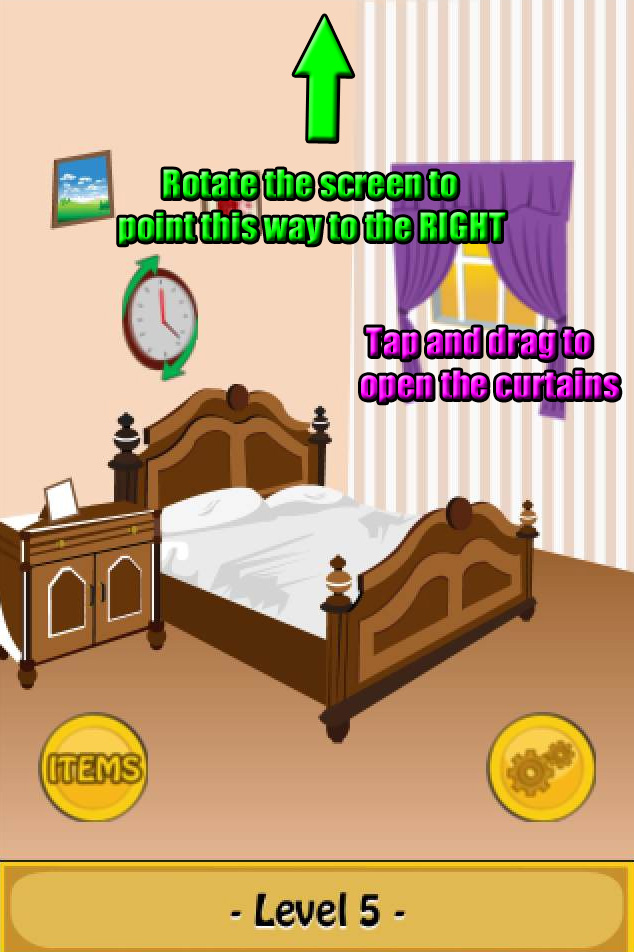
Level 5
Tap and drag the curtains to open them.
Turn your device to the side to rotate the hand of the clock.
Look through the window as you turn until the time changes from night to day.
Screenshot.
Levels 6-10: The Dungeon
Level 6
Take the TORCH from the left side of the wall.
Use your TORCH from your Items list to light the torch on the right side of the wall.
Screenshot.
Level 7
Tilt your device to the right to move the gunpowder barrel in front of the door.
Light the barrel with the TORCH from your Items list to blow the door open.
Screenshot.
Level 8
Turn your device to the left to drop the first row of bars blocking the door.
From there, turn the device upside-down to remove the second row of bars blocking the door.
Tap the door to open it.
Screenshot.
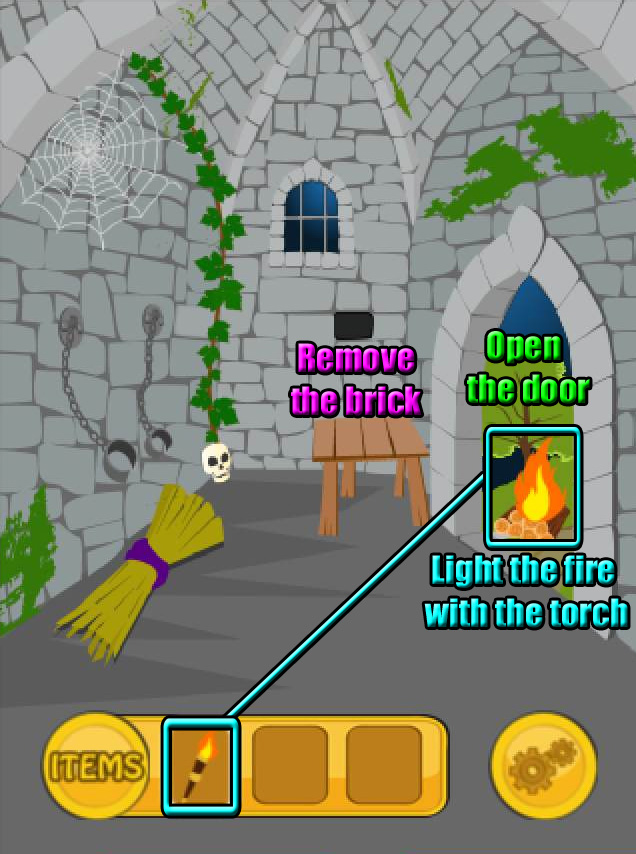
Level 9
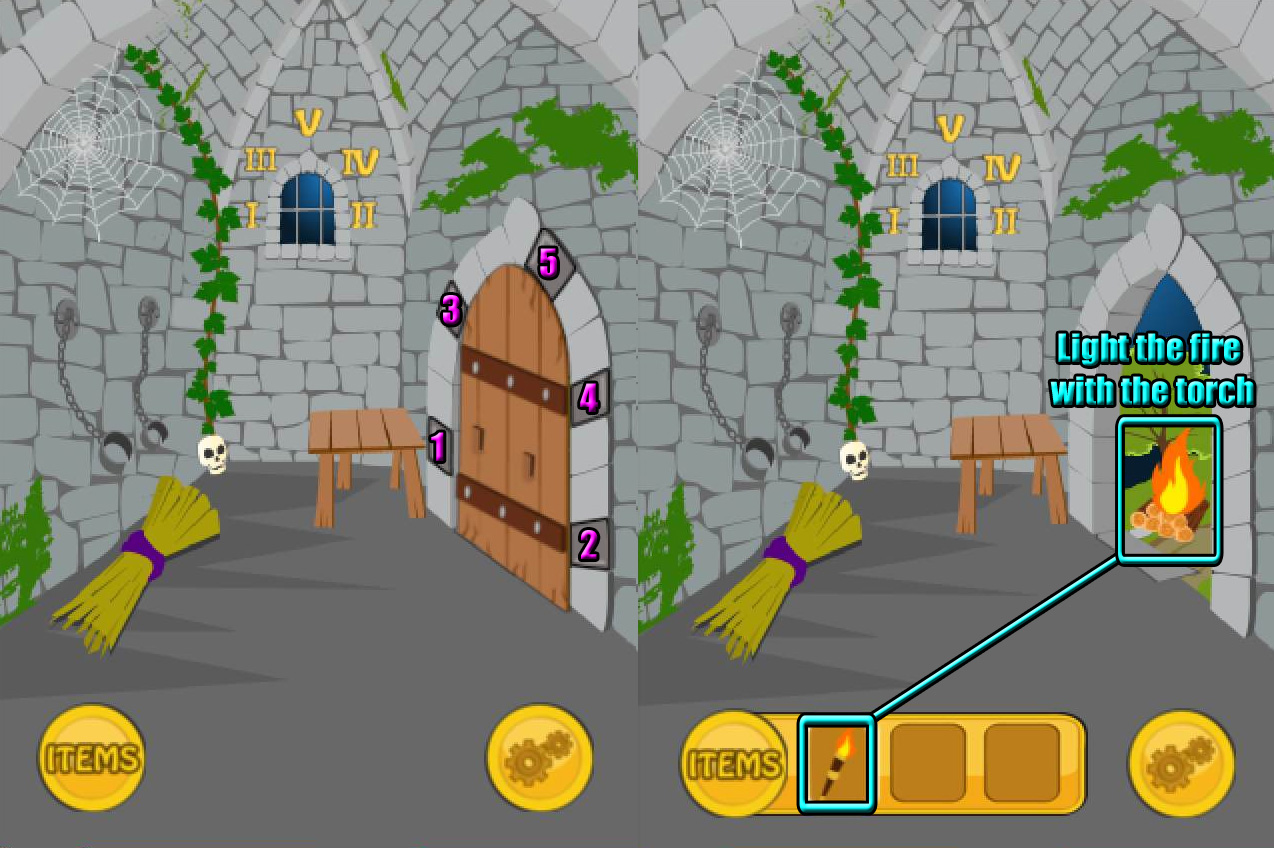
Remove the dark brick in the middle of the back wall.
Tap the door to open it.
Use the TORCH from your Items to light the logs outside the door.
Screenshot.
Level 10
Note the order of the Roman numerals around the window.
Tap the stones around the door in the same order.
First hit the lower left stone, then the lower right stone, then the upper left stone, then the upper right stone, then the top stone.
Use the TORCH from your Items to light the logs outside the door.
Screenshot.
Levels 11-15: The Items Room
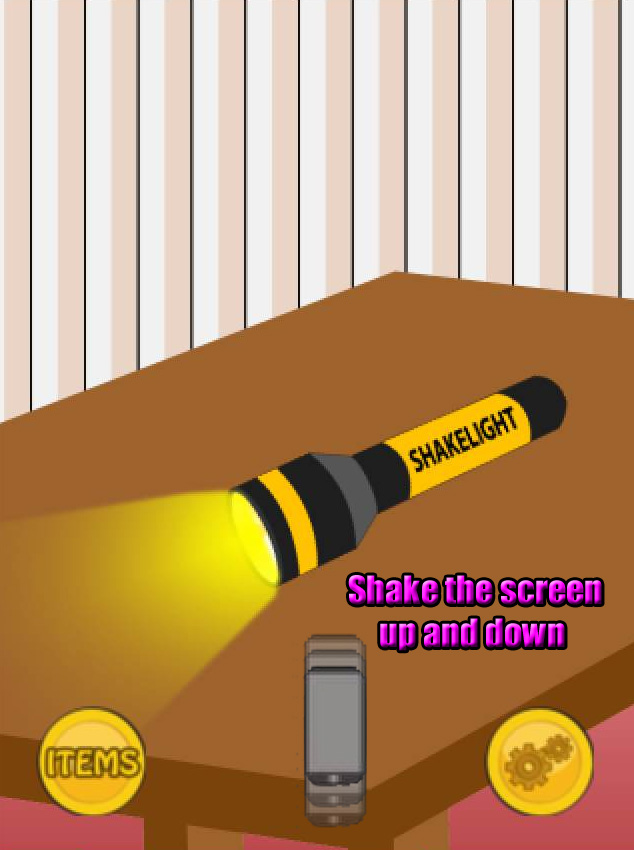
Level 11
Shake the device up and down; when you stop shaking, the flashlight will turn on.
Screenshot.
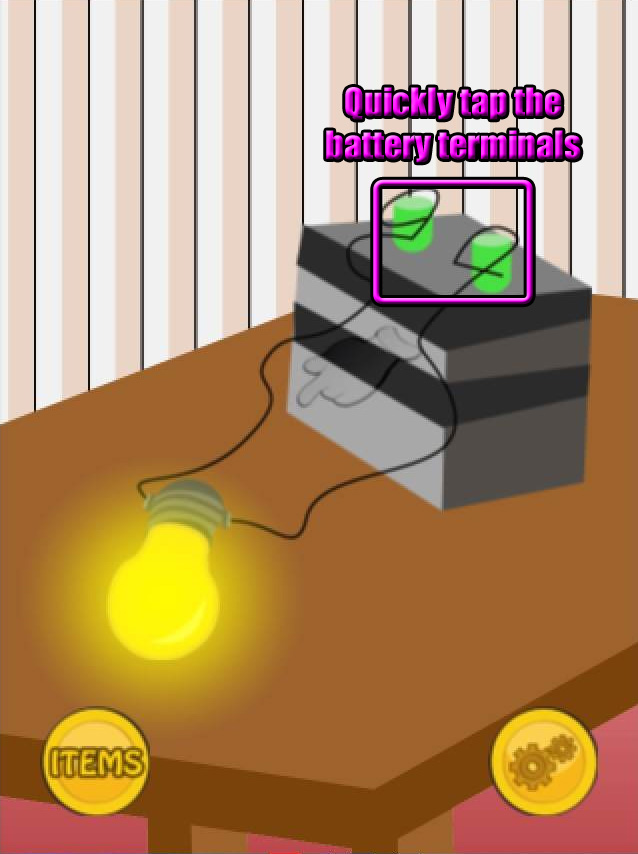
Level 12
Rapidly tap either one or both of the red terminals at the top of the battery to power the lightbulb.
Screenshot.
Level 13
Take a MATCH from the matchbox on the table.
Select the MATCH from your Items, and swipe it along the right side of the matchbox to light it.
Use the MATCH to light the candle and to burn the matchbox.
Screenshot.
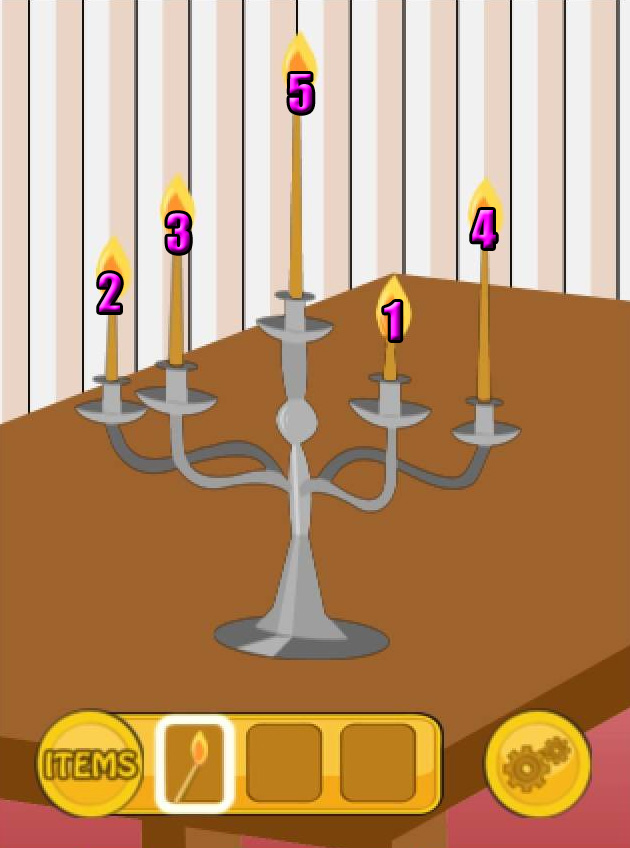
Level 14
Use the MATCH from your Items to light the candles on the candle stick in the correct order.
Tap the top of the candle to light it; if the correct candle is not selected, the flame will go out.
Screenshot.
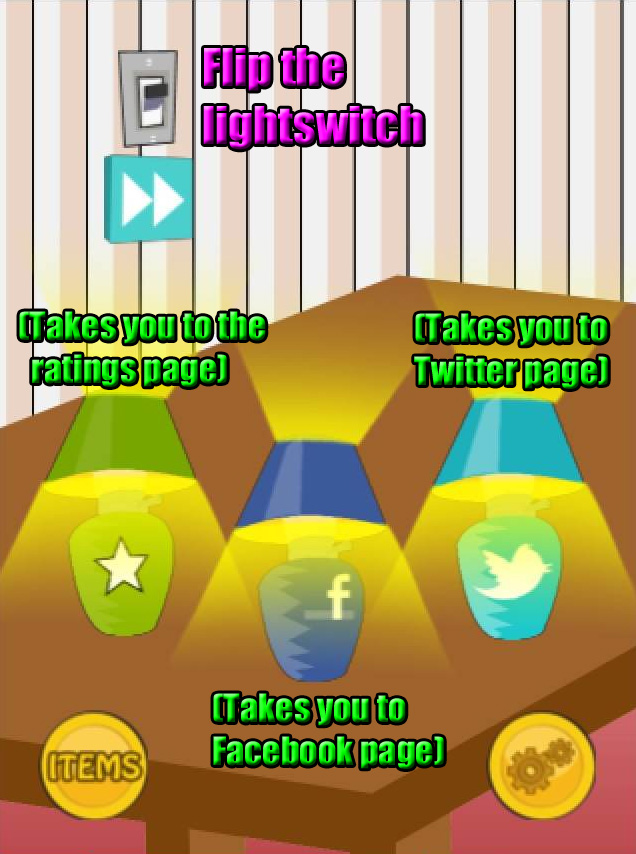
Level 15
Flip the lightswitch on the wall to turn on all three lamps.
Tapping the lamps will take you to the game's rating section, Facebook, and Twitter pages.
Screenshot.
Levels 16-20: The Campsite
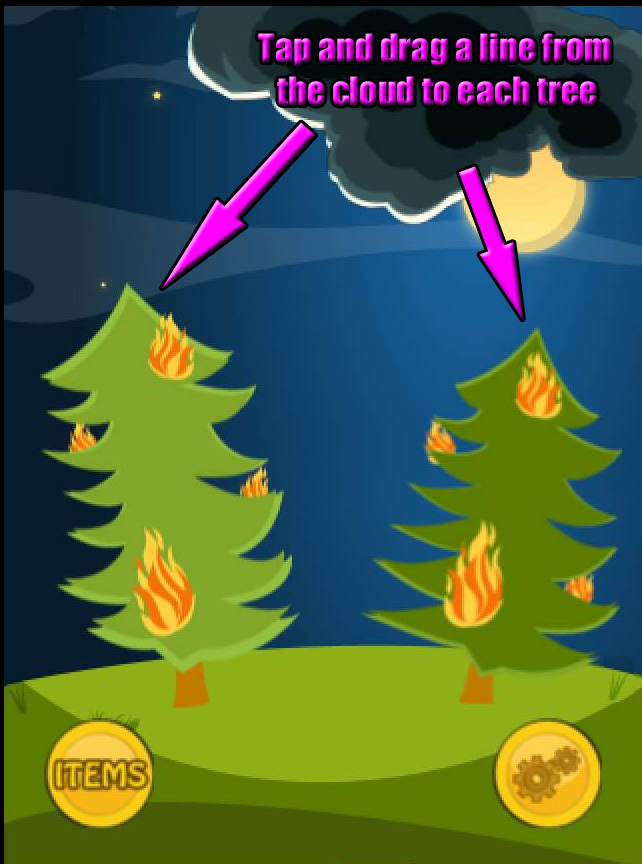
Level 16
Tap and drag a line between the cloud and a tree to strike it with lightning.
Swipe from the cloud to the other tree a second time to strike it also.
Screenshot.
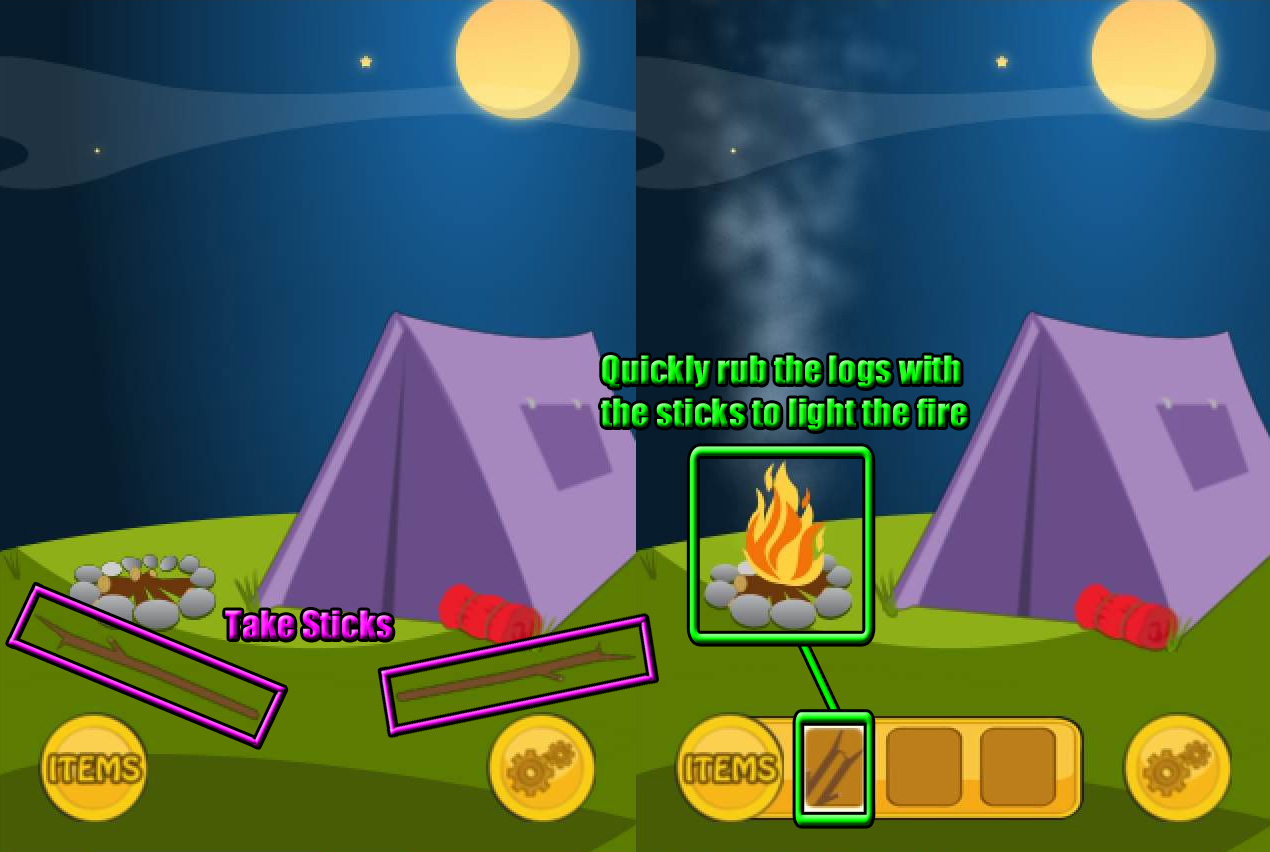
Level 17
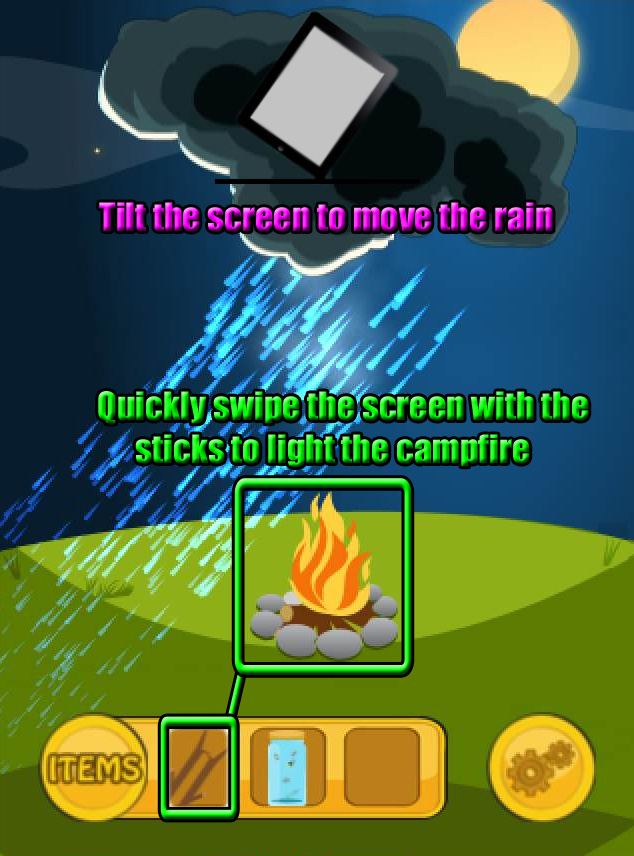
Pick up the two STICKS on the ground.
Select the STICKS from your Items list, then quickly rub your finger on the screen over the pile of wood in the unlit campfire.
The wood should immediately start to smoke; keep swiping the screen to light the fire.
Screenshot.
Level 18
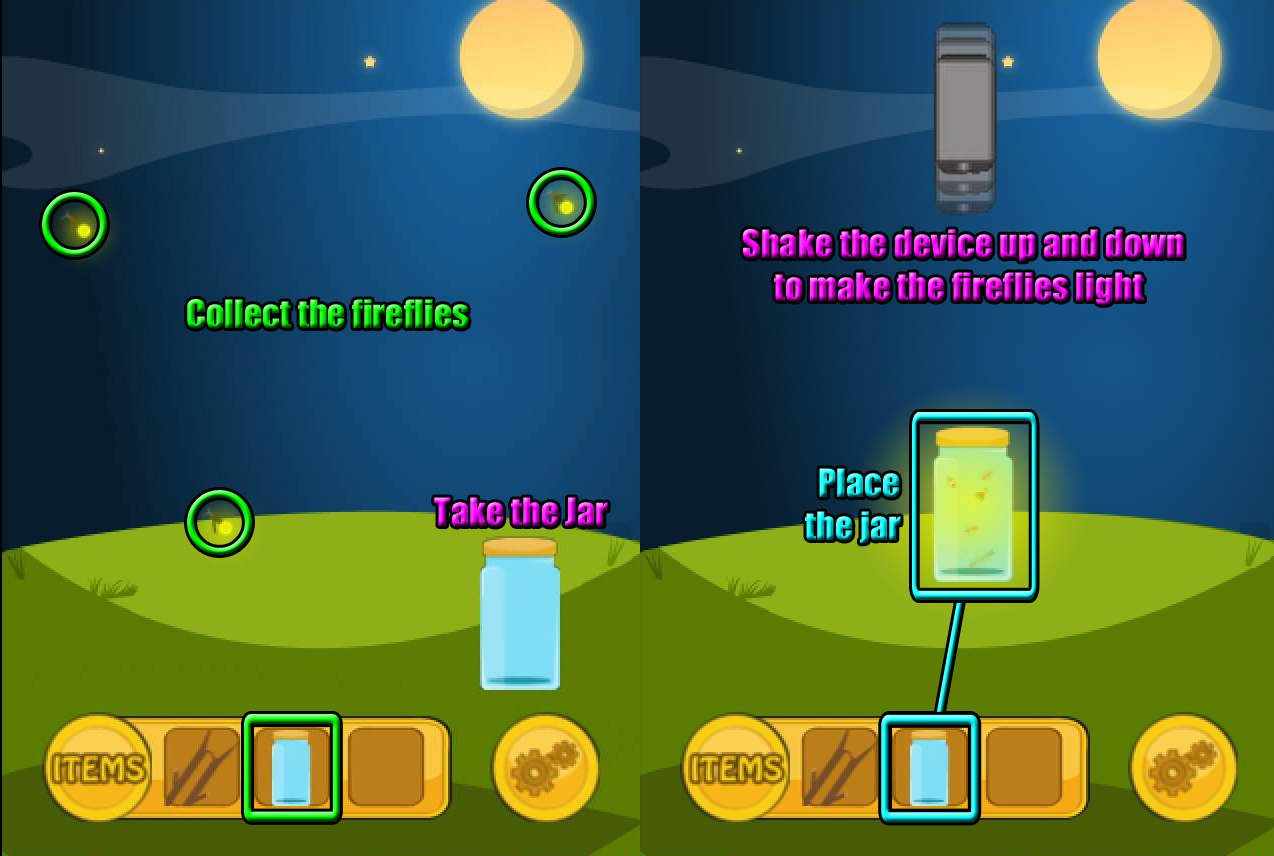
Take the glass JAR from the ground.
Select the JAR in your items list, then tap the three fireflies to catch them.
Shake the screen up and down to make the fireflies light up.
Screenshot.
Level 19
Tilt the screen to the left or right to move the rain from the cloud away from the campfire.
Keep the screen tilted, select the STICKS from your inventory, then rub them against the wood in the campfire (the same way as in Level 17) to light it.
Screenshot.
Level 20
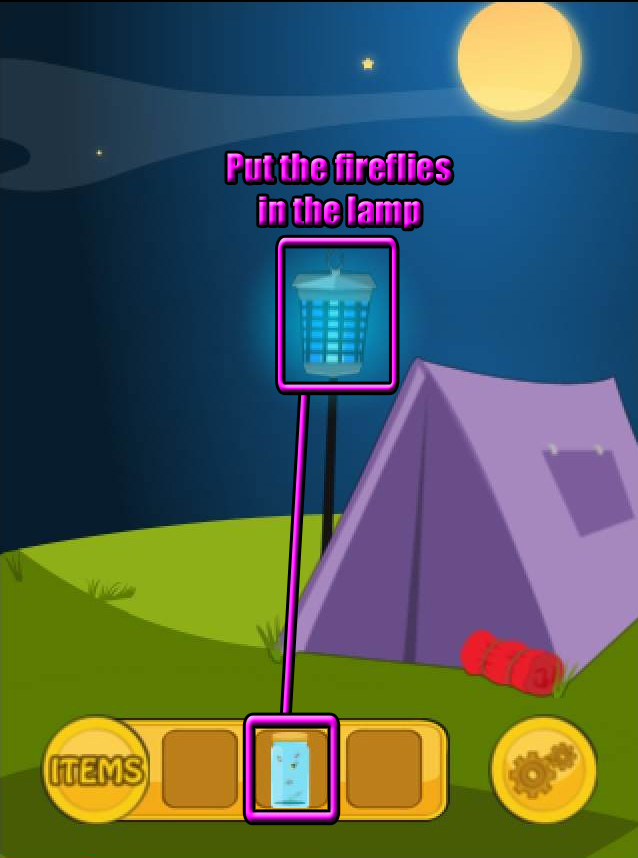
Select the JAR of fireflies from your Items list, and put them inside the lamp next to the tent.
Screenshot.
Levels 21-25: The Basement
Level 21
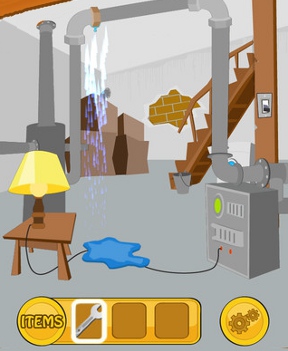
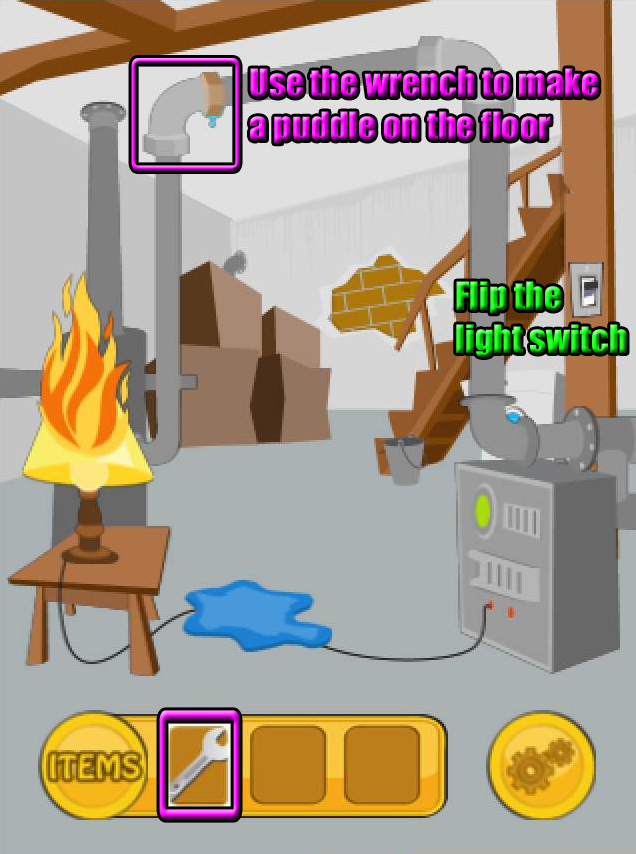
Take the WRENCH hanging from the support beam.
Select the WRENCH from the Items list and use it on the metal box to open the front panel.
Flip the switch inside the box to turn on the light.
Screenshot.
Level 22
Use the WRENCH from your Items on the leaky pipe at the upper left side of the room once to pour the water on to the floor, then a second time to turn off the water and leave a puddle between the broken section of the wire.
When the water is off again, flip the switch to create a spark and light the lamp on fire.
Screenshot.
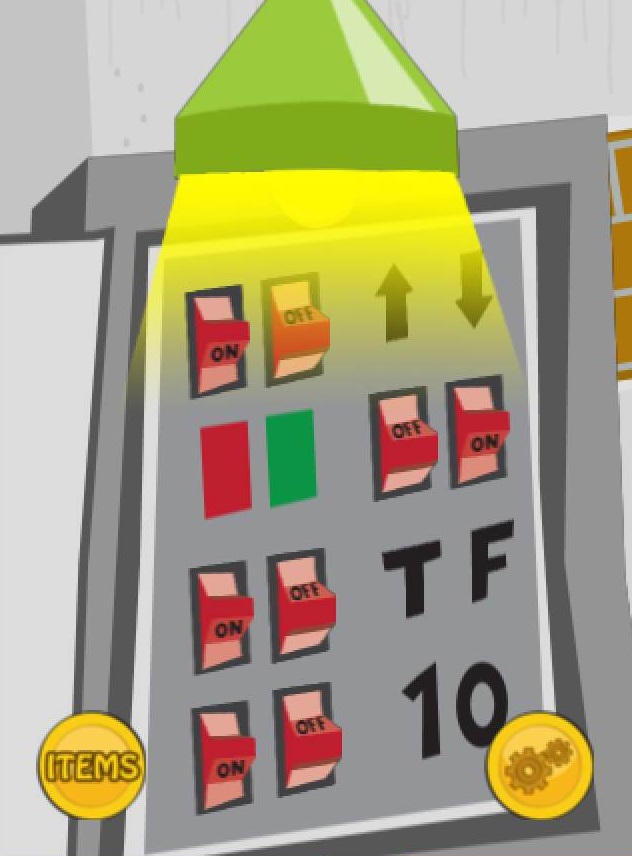
Level 23
Use the clues beside each switch to find if the switches should be set to ON or OFF.
The top row shows an up arrow on the left and a down arrow on the right.
Flip the left switch ON and the right switch OFF.
The next row shows a red square on the left and a green square on the right.
Flip the left switch OFF and the right switch ON.
The next row shows a T (as in True) on the left and an F (as in False) on the right.
Flip the left switch ON and the right switch OFF.
The bottom row shows a 1 on the left and a 0 on the right.
Flip the left switch ON and the right switch OFF.
Screenshot.
Level 24
Flip the switches in the correct order to turn all of the lights on.
The left switch changes the left and middle light.
The right switch changes the right and middle light.
The middle switch changes all three lights.
Flip the switches in the following order: Left, Right, Middle.
Screenshot.
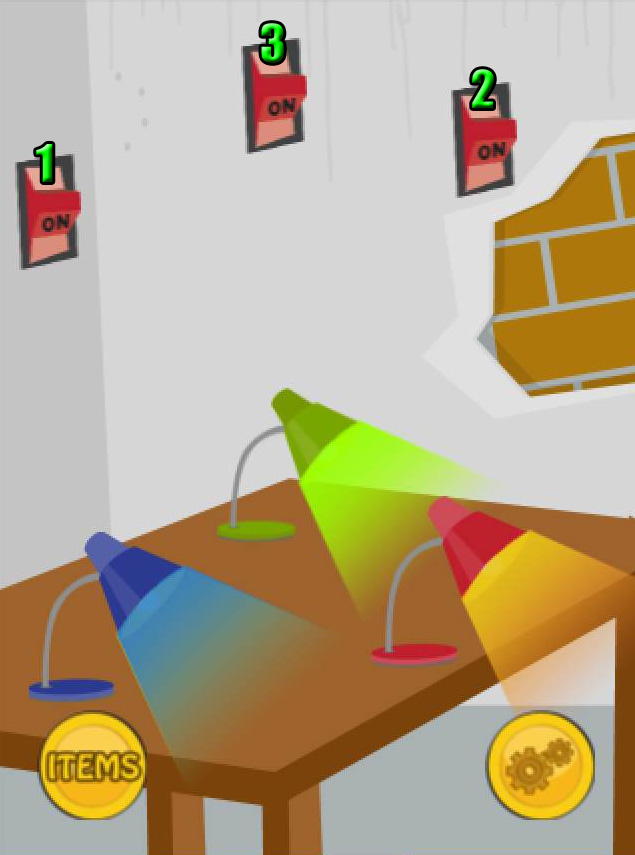
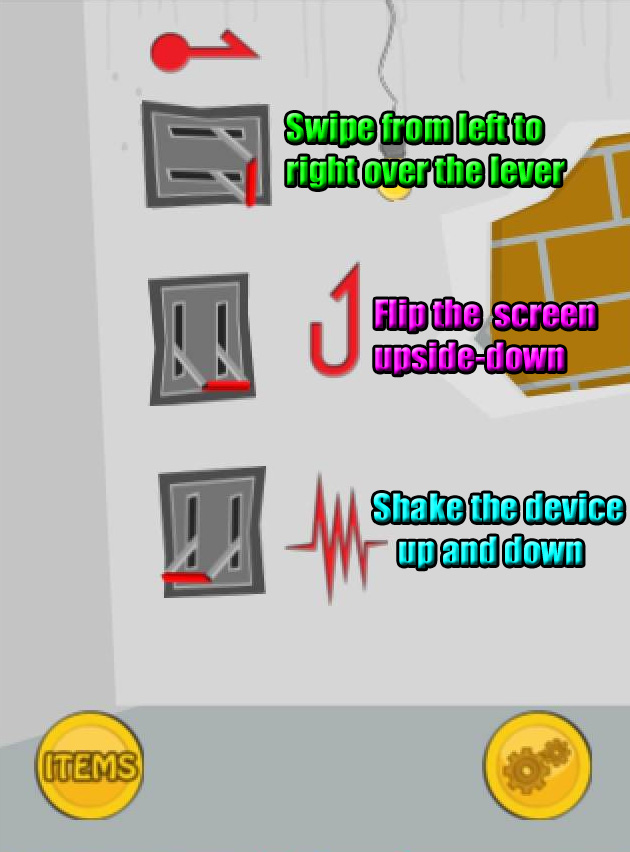
Level 25
Tap and drag the top switch to the right.
Turn the screen upside-down to flip the middle switch.
Shake the device up and down to flip the bottom switch.
Screenshot.
Levels 26-30: The Puzzle Room
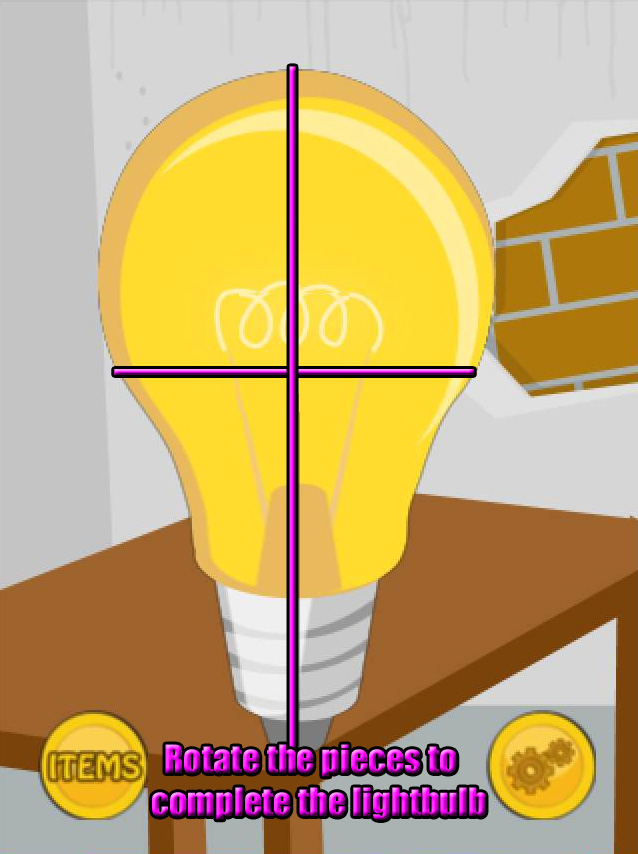
Level 26
Arrange the fragments to complete the lightbulb.
Tap each fragment to rotate it.
Screenshot.
Level 27
Ignore the signs and touch the lamp to turn it on.
Screenshot.
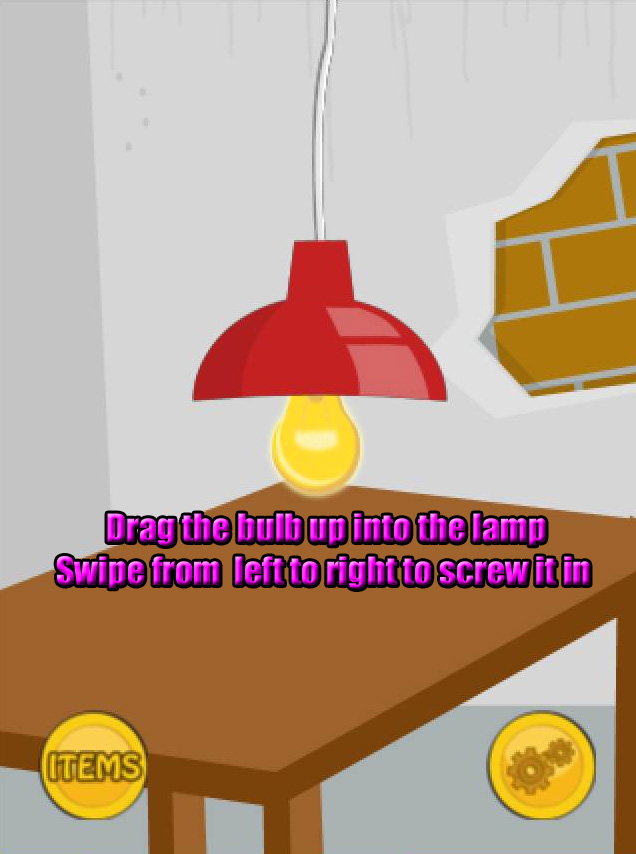
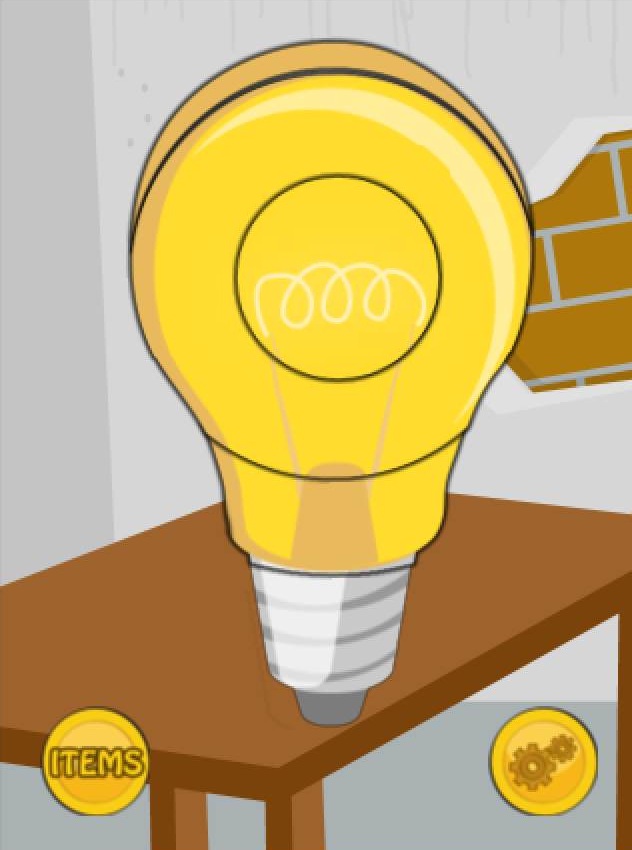
Level 28
Tap and drag the light bulb to put it into the lampshade.
Swipe from left to right over the bulb to rotate it into the lamp.
Screenshot.
Level 29
Like in level 26, you have to arrange the fragments to complete the lightbulb.
Tap and drag each section of bulb to rotate it clockwise or counter-clockwise.
Screenshot.
Level 30
Organize the puzzle pieces to complete the image of a light bulb.
Tap and drag the pieces to move them around the screen.
Place the pieces close together so that they connect.
Screenshot.
Levels 31-35: The Twilight Room
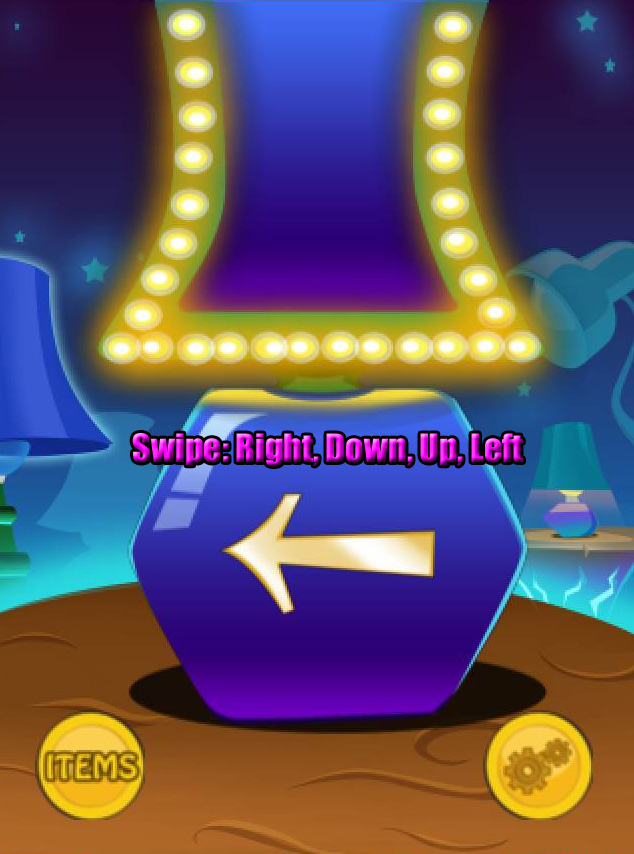
Level 31
Swipe over the lamp in the direction that the arrow is pointing.
Tap and drag to swipe Right, Down, Up, and then Left.
Screenshot.
Level 32
Note the number 0100 on the lamp, then pull the strings in the correct order to turn on the light.
The number 0 refers to the red pull string on the left, and 1 is the green pull string on the right.
Tap the strings in the following order: Left, Right, Left, Left.
Screenshot.
Level 33
Note the order of the colors of the rainbow inside the lamp from the top to the bottom: Red, Orange, Yellow, Green, Blue, Violet.
Tap the buttons with the first letter for each word in that order: R, O, Y, G, B, V then press Enter.
Screenshot.
Level 34
If you try to tap the lamp, it will teleport to one of the three portals.
To catch the lamp, tap and hold on top of all three portals simultaneously.
Screenshot.
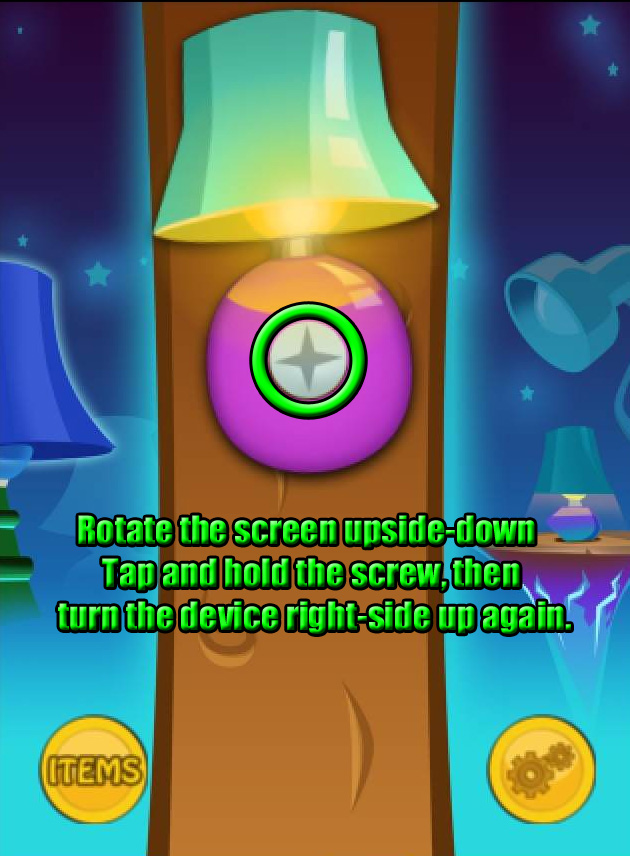
Level 35
Rotate the screen upside-down to rotate the lamp.
Tap and hold your finger on top of the screw in the middle of the lamp.
While you keep holding on to the screw, rotate the screen back upwards to turn on the light.
Screenshot.
Level 36-40: The Temple Room
Level 36
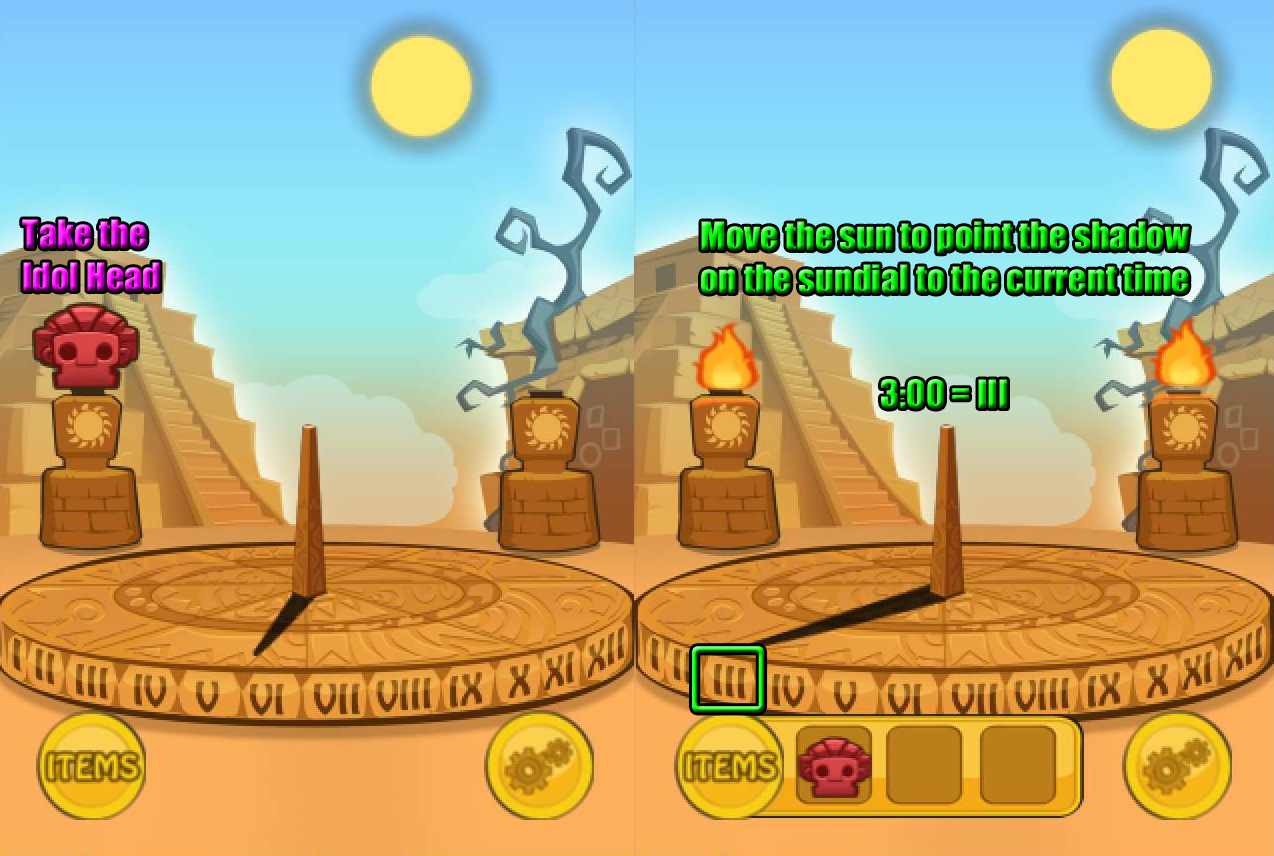
Take the red IDOL HEAD on top of the left pedestal.
Find the current actual time of day on your device.
Tap and drag the sun to move it around the sky so that the shadow of the sundial points to the Roman numeral indicating the same time of day.
So if it's 1 o'clock in actual time point the shadow at the number 1, if it's 2 o' clock point it at 2, etc.
The tops of the pedestals will light into flames when the sun is correctly positioned.
Screenshot.
Level 37
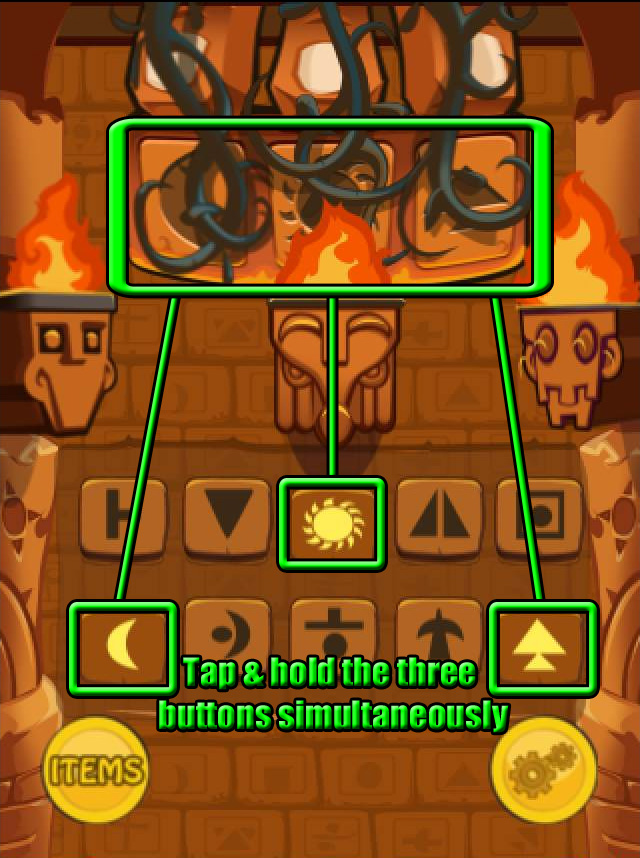
If you look around the vines at the top of the screen, you can see three symbols: A moon, a sun, and an arrow.
Tap and hold down all the three buttons that have the matching symbols.
Screenshot.
Level 38
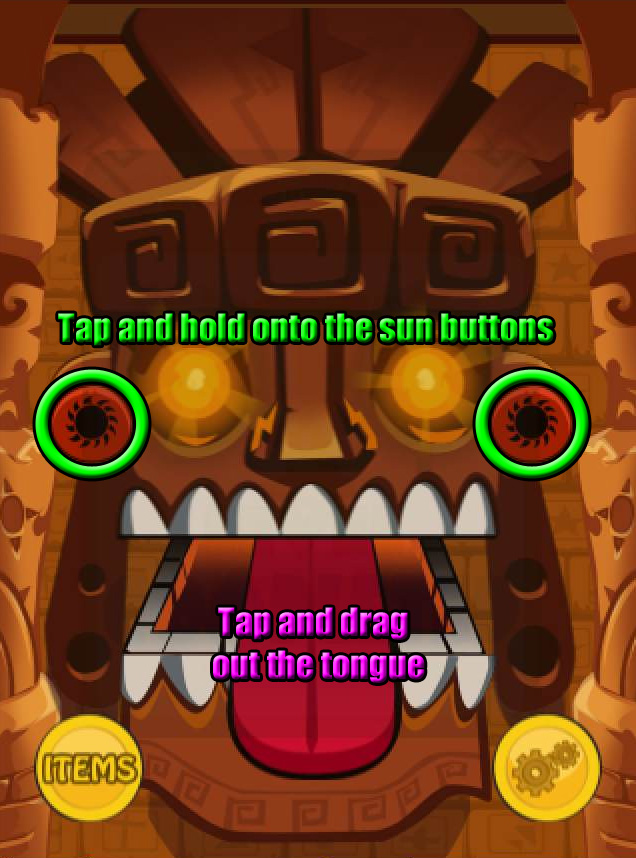
Tap and hold onto both buttons with the sun icons to open the statue's mouth.
Keep holding on the buttons on the ears, then tap and drag the statue's tongue out of its mouth.
Screenshot.
Level 39
Select the IDOL HEAD from the Items list.
Tap the area directly above the bag to drop it from the air.
Quickly tap the BAG to pick it up before the idol hits it.
If the idol head lands on the button on the top of the pedestal, it will light up.
Screenshot.
Level 40
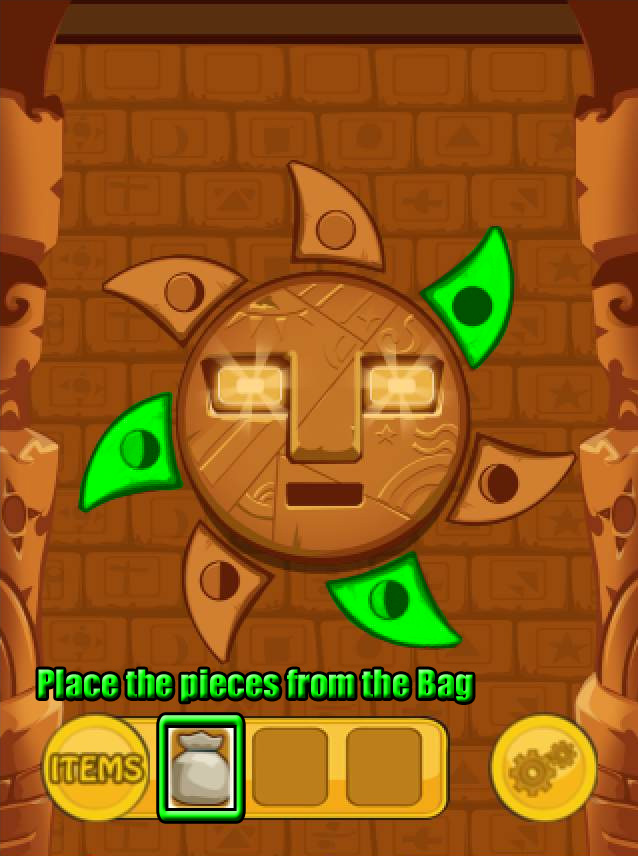
Select the BAG from your Items list, then use it on the sun to drop the three tile pieces onto the screen.
Inside each tile piece is an image of a different moon phase, starting with a full moon at the top and waning counter-clockwise to a new moon.
The new moon piece goes in the upper right space, the 1/3 moon piece goes in the lower right space, and the 2/3 moon piece goes in the left space.
Screenshot.
Levels 41-45: The Study
Level 41
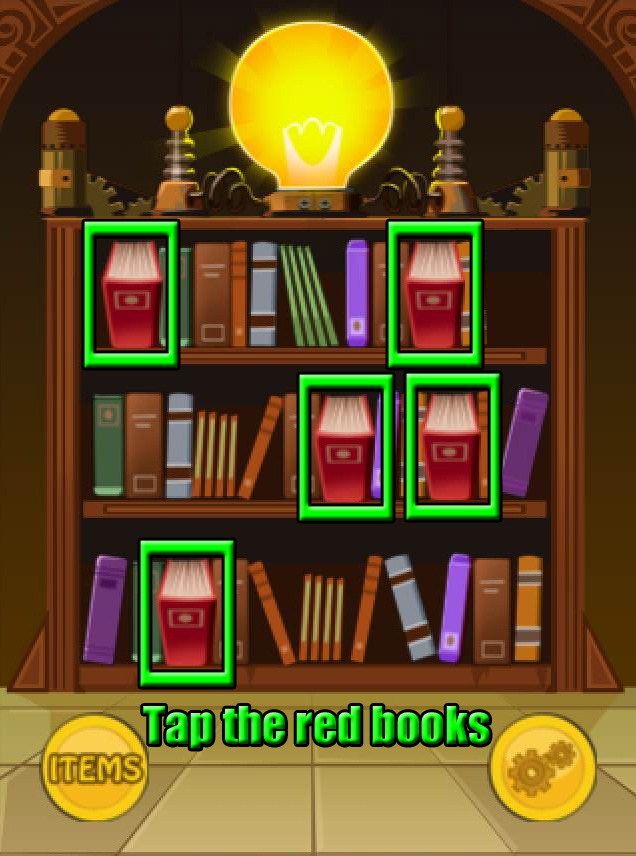
Tap all of the large, red books to tilt them outwards, which will turn on the light.
Screenshot.
Level 42
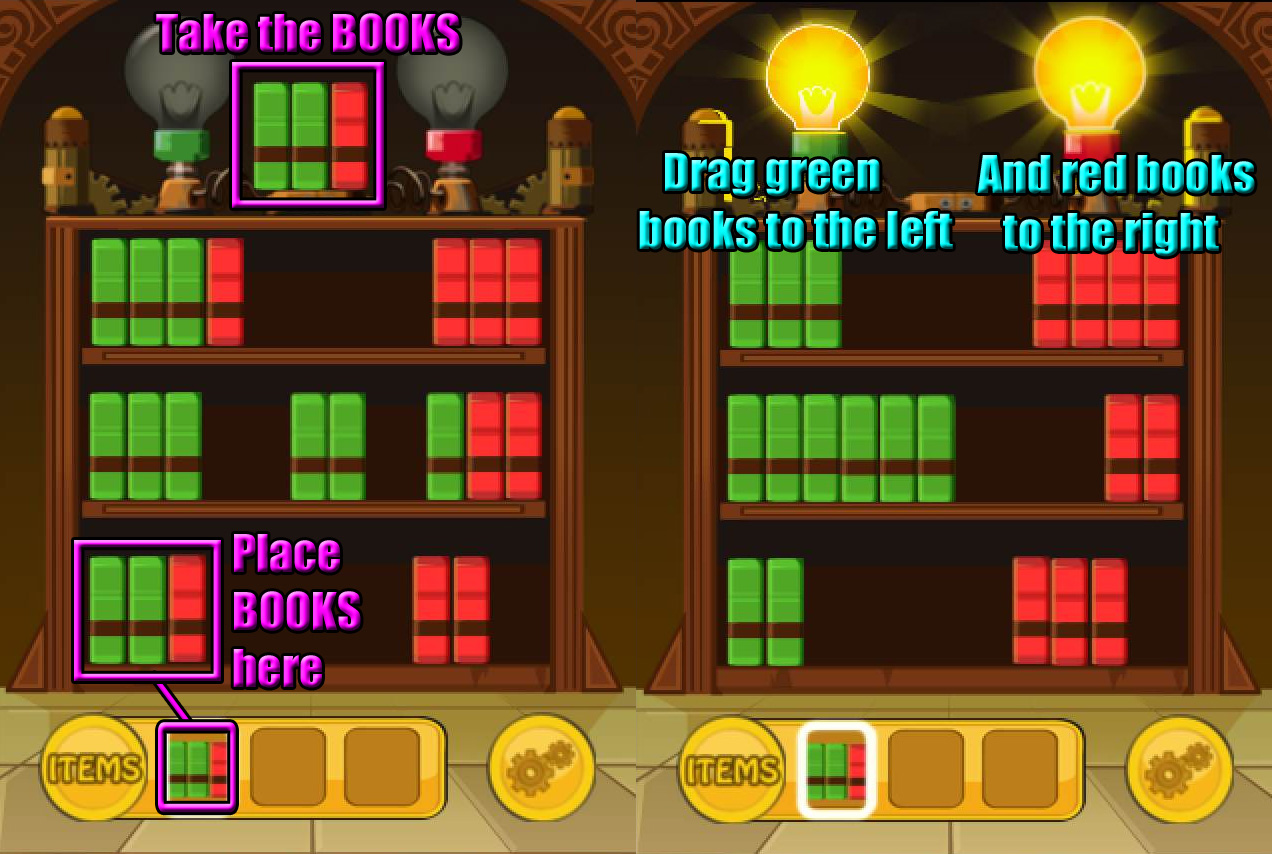
Take the BOOKS between the bulbs on top of the bookcase.
Place the BOOKS on the empty left side of the bottom shelf.
Drag the books on each shelf to separate the green books to the left side and the red books to the right side.
Screenshot.
Level 43
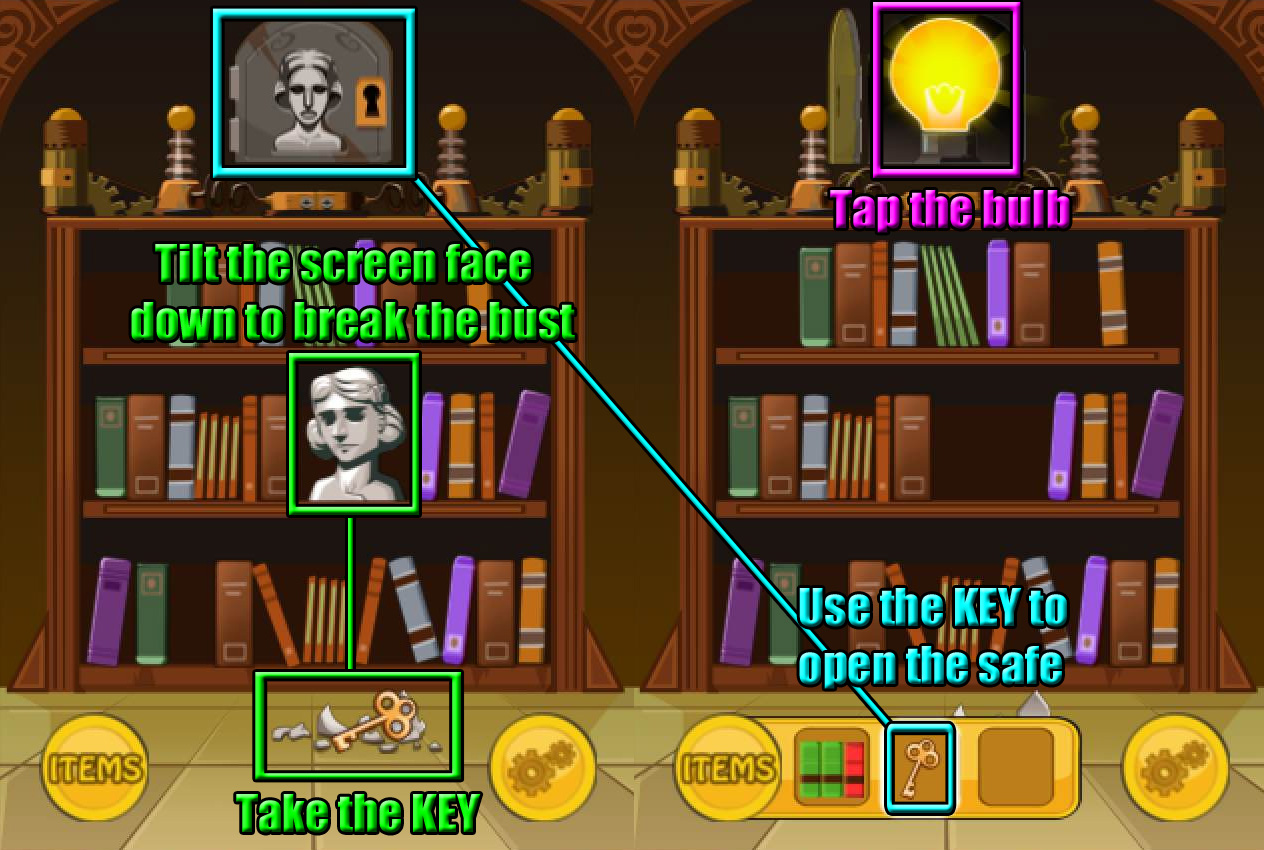
Turn the device face-down to make the bust fall off the shelf.
Take the KEY in the pile of smashed stone.
Use the KEY to unlock the safe above the bookcase.
Tap the bulb inside the safe to turn it on.
Screenshot.
Level 44
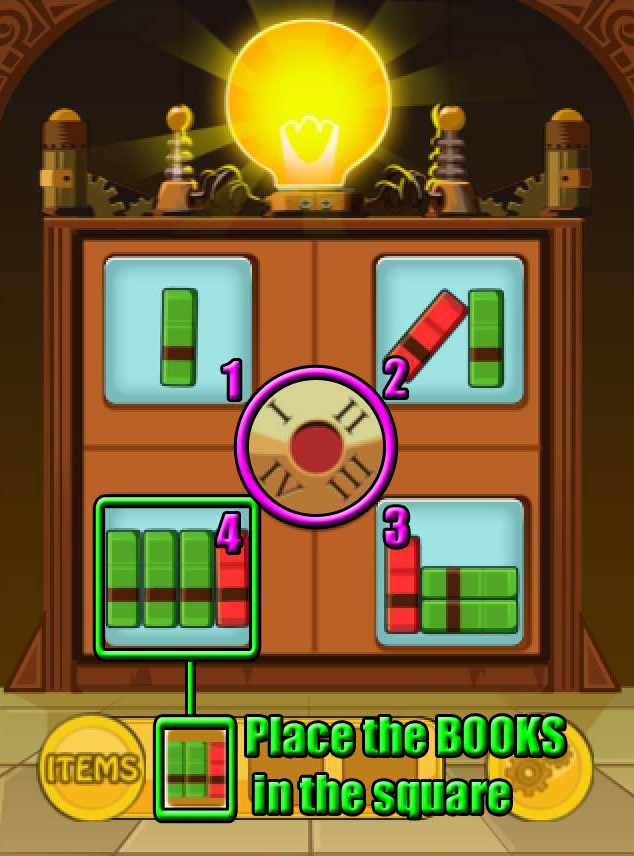
Add the BOOKS from your inventory to the square that has only 1 green book on the left side.
Organize the tiles so that they are positioned by the number on the dial equal to the amount of books inside the square.
Tap a square tile to select it, then tap a different square to swap their positions.
The square with a single book in the middle goes on the upper left side.
The square with one red and one green book goes at the upper right side.
The square with one red book and two green books go at the lower right side.
The square with three green books and one red book goes at the lower left side.
Screenshot.
Level 45
Drag the clock on top of the bookcase all the way to the right.
Tap the red ball in the square above the bookcase to release it inside the box.
Tilt your device face-down to drop the ball out of the box and onto the top of the bookcase.
Tilt left to roll the ball through the hole on the left side to the next shelf.
Tilt right to roll it over the books and through the hole on the right to the next shelf.
Tilt left to roll it over the next set of books and continue to tilt left to make the ball push the single blue book and fall through the hole on the left.
Place the BOOKS from your inventory on the bottom shelf in the gap between the ramp and the single book.
Tilt right to roll the balls over the book and onto the large green button to turn on the light.
Screenshot.
Levels 46-50: Tangrams
Level 46
Arrange the objects to recreate the shape in the outline.
Tap and drag a shape to move it, or tap it to rotate it.
Use the medium yellow triangle and the purple square to complete the shape.
Screenshot.
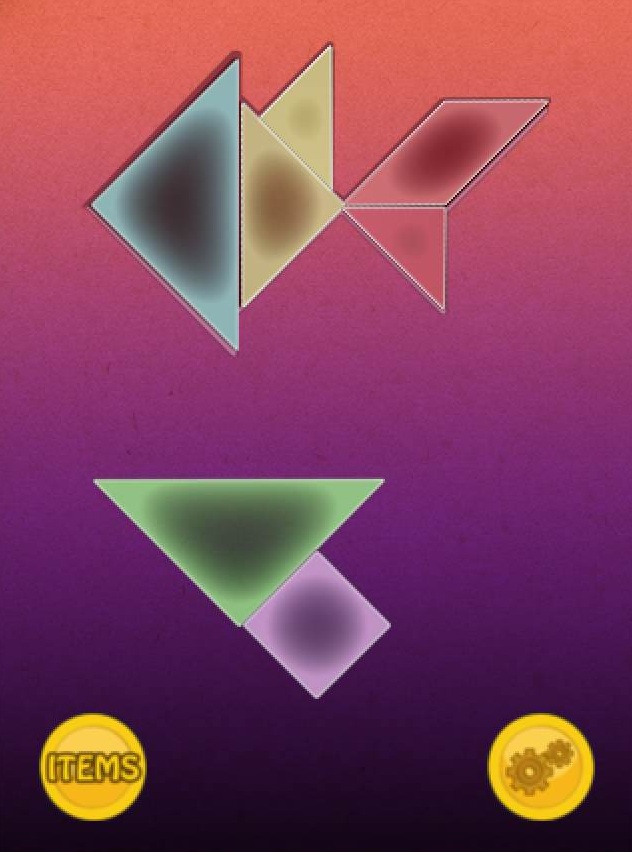
Level 47
Arrange the objects to recreate the shape in the outline.
Tap and drag a shape to move it, or tap it to rotate it.
Use the large green triangle, the small pink triangle, and the pink rhombus to complete the pattern.
Screenshot.
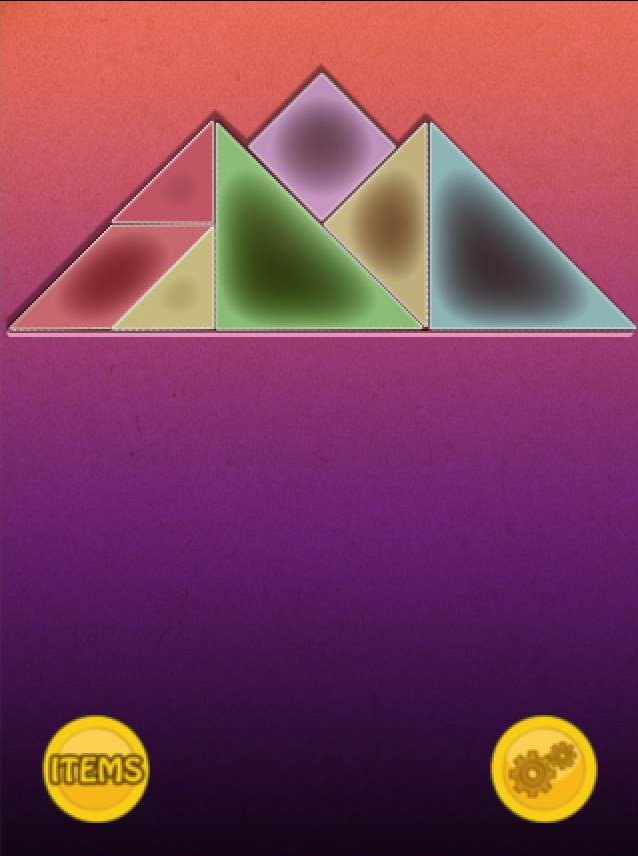
Level 48
Arrange the objects to recreate the shape in the outline.
Tap and drag a shape to move it, or tap it to rotate it.
Use the large blue triangle, the medium yellow triangle, the pink rhombus, and both small triangles.
Screenshot.
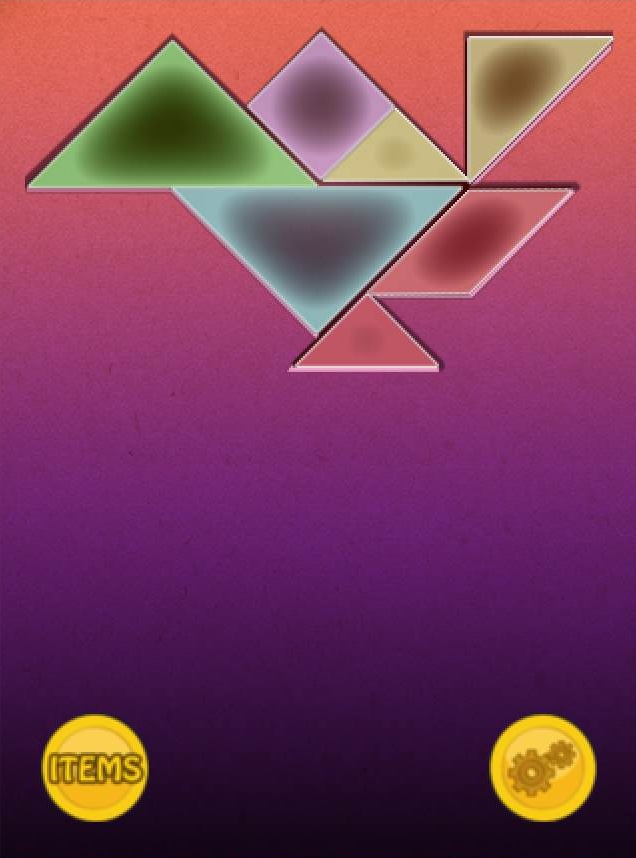
Level 49
Arrange the objects to recreate the shape in the outline.
Tap and drag a shape to move it, or tap it to rotate it.
You will need to use all of the shapes to complete the pattern.
Screenshot.
Level 50
Arrange the objects to recreate the shape in the outline.
Tap and drag a shape to move it, or tap it to rotate it.
You will need to use all of the shapes to complete the pattern.
Screenshot.
Thanks to Trinn for the walkthrough!
Posted by: Mike |
September 16, 2012 7:36 PM
|
September 16, 2012 7:36 PM