

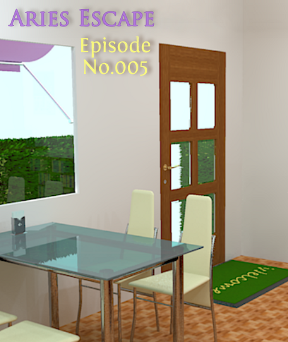
![]() It's a story almost as old as time. You know the one. You enter a café to meet a date and are kept waiting for him. Before you know it, you're somehow accidentally locked inside. What the what? Okay, clumsy you, time to escape. Again. Yet while the story, music and scenery in Aries Escape: Episode No.005 sound and looks so familiar, this blithesome escaping venture comes from someone new to Weekday Escape: Libertechno.
It's a story almost as old as time. You know the one. You enter a café to meet a date and are kept waiting for him. Before you know it, you're somehow accidentally locked inside. What the what? Okay, clumsy you, time to escape. Again. Yet while the story, music and scenery in Aries Escape: Episode No.005 sound and looks so familiar, this blithesome escaping venture comes from someone new to Weekday Escape: Libertechno.
 Navigation and gameplay are as usual—click around the room looking for puzzles to solve and the clues to help you solve them. Your successful exit from this cleverly-designed eating establishment means ordering up the correct series of codes—as well as finding the place to input them—to unlock the café's door. That feat is slightly aided by a changing cursor, which isn't found in a Tesshi-e escape even if everything else looks same-y. Still, some of those hotspots are a tad small, so move about more purposefully, keeping a careful lookout for explorable areas. Click an inventory item to use it, double-click to view it. Use the disc icon to save and the tool icon to access sound controls. Although the prologue and messaging are only in Japanese, all the hints and codes are readily accessible to an English speaker.
Be wary of misdirection caused by too much familiarity with other escape-the-room designers. Except for an English translation of the background story, a diverse menu of quality features are herein—Aries Escape: Episode No.005 is not just a poor copy. You might spy a family resemblance but this amusing jaunt has its own merits and worthwhile qualities and is so tired of being compared to its older cousin who was more popular in school, got a driver's license sooner, could go to bars first...oh, wait, that's someone else. Anyhow, if you walk into this holding too many assumptions, you'll end up thumping your head on the desk until it starts to wobble. This escape has some challenge, but it's also very logical and fair once you let go of expectations.
Of course, Libertechno also gives us two endings to enjoy—both normal and "happy." With a mix of fun puzzles, its pleasant look and feel, and lighthearted music to round out the experience, Aries Escape: Episode No.005 is a recognizable new friend whom we'll look forward to having a drink with again.
Play Aries Escape: Episode No.005
Note: to adjust sound, select the [tool] icon and move the bottom slider to the left. Keep the top slider, which controls click sensitivity, all the way to the right.


Walkthrough Guide
(Please allow page to fully load for spoiler tags to be functional.)
Aries Escape: Episode 5 Walkthrough
Exploration
You start the game facing the corner of the room where you can see a counter, a table, and a framed picture on the wall.
Click the edge of the counter to zoom in.
Open the menu on the counter and study the page carefully.
Take note of the numbers at the corners of the menu and the list of important clues.
Click the glass table to get a close-up view of the napkin holder.
If you inspect the front of the napkin holder, you'll see the number 8 inside the shape of a heart.
Lift the napkin holder to find a Folded Note 1/2.
Open the note to find the clue FOX = 670.
Turn left to face the other side of the room with the door to the toilet, the bookcase, and the bar.
Inspect the bookcase to find that you can move the rows of books to the left or right side of each shelf, then back up.
Take a look at the shelves behind the bar covered in overturned teacups. Many of the teacups have a pattern of one or more colored stripes.
Click the calendar on the wall for a closer look.
Move the calendar aside to find a Coin taped to the wall.
If you inspect the coin in your inventory and turn it over, you will find the date 1997.
Click the toilet sign on the door for a closer view.
Click the sign a second time to slide it over, revealing Folded Note 2/2.
Open the note to find the clue ESC = 483.
Turn left to view the exit door and another glass table.
Click the welcome mat on the floor in front of the door to zoom in.
Slide the mat over to uncover a metal panel in the wood floor, then click the panel for a close-up view.
Use the Coin to lift the center of the panel and uncover a button.
Press the red button once to change it to green, then back up.
Inspect the napkin holder at the end of the glass table.
This time, the symbol in the center of the napkin holder is a diamond with a 3 inside of it.
Turn left again to face the windows, two more tables, and a small cabinet.
Click the back table first to look at the napkin holder.
The third napkin holder has the symbol for clubs with the number 5 inside of it.
Next, look at napkin holder on the nearest table.
The symbol at the center of the last napkin is a spade containing the number 6.
Click the small cabinet against the wall for a closer look.
Pick up the gold statue, then click it to turn it over.
Use the Coin again to remove the screws, then take the Star Note out of the statue.
Turn left to return to the view of the corner of the room where you began.
Click the framed picture of New Caledonia to zoom in.
The frame is unlocked now that you've pushed the button under the welcome mat, so click the picture on the wall to lift it.
Open the revealed yellow panel to uncover the electric lock and coin slot.
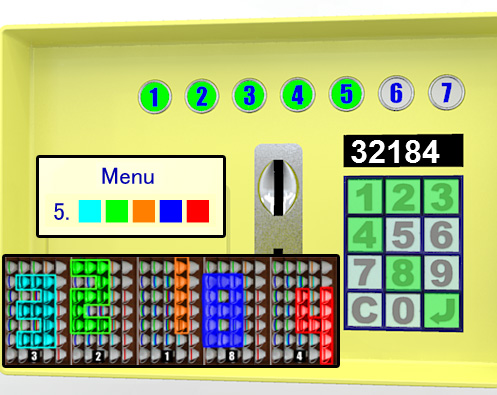
Above the numpad are 7 rings indicating the 7 locks that you have to open. Where else have you see a list of 7 things?
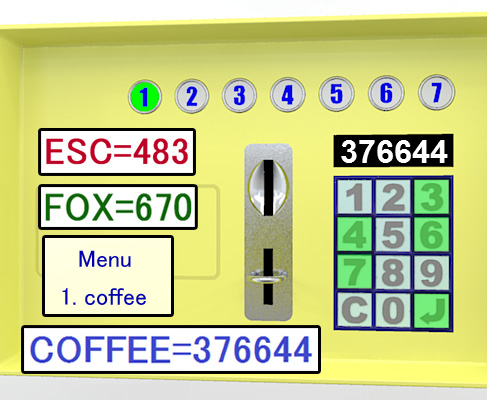
Take a look at the menu on the counter. Each item on the list from 1-7 is a clue to solving the puzzle for each of the seven locks on the safe.
Now you're ready to tackle the first puzzle.
Lock 1
Take a look at the first item on the Menu list: "1. coffee"
Do those letters look familiar? You've seen them before, but in a different order.
Hint: The answer is right in your hands.
Inspect the two FOLDED NOTES in your inventory.
The first note says FOX = 670 and the second note says ESC = 483.
By looking at both cards you can see that each unique letter corresponds to a different number: F is 6, O is 7, X is 0, E is 4, S is 8, and C is 3.
Now that you know the value of each letter, what can you do with that new information?
Substitute the values of each letter from the folded notes into the word "coffee".
You will find the combination 3-7-6-6-4-4.
Enter the combination into the numpad to open the first lock.
Screenshot.
The first lock is opened, now on to lock 2!
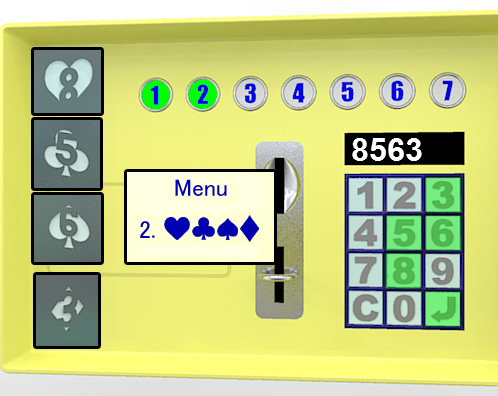
Lock 2
Check the menu for the second item on the list to find a series of four symbols: Heart, Clubs, Spade, and Diamond.
Hint: This is an easy one! You've seen all of these symbols nearby.
Each symbol can be found in the napkin holders on each glass table.
Inside each shape is also a number. Heart is 8, Clubs is 5, Spade is 6, and Diamond is 3.
Put those numbers together to find the solution: 8-5-6-3.
Enter the 4-digit combination into the numpad to open the second lock.
Screenshot.
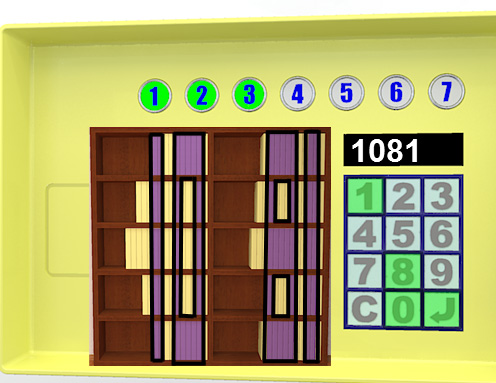
Lock 3
The third item on the menu shows a purple bar. Look familiar?
It represents the purple books in the bookcase.
Turn left to face the bookcase, then click the shelves to zoom in.
Hint: Push all of the rows of books to the right side of their respective shelves.
If you look at the purple books now, you'll see something very helpful.
The shape of the lines of purple books makes the numbers 10 on the left side and 81 on the right side.
Go back to the safe and enter the combination 1-0-8-1 into the numpad to open the third lock.
Screenshot.
Lock 4
Take a look at the menu to find the fourth item on the list: "L".
Although this clue is a little obscure, the answer can be found very close by.
Hint: You're not looking for the letter L, rather, look for an L-shape.
If you look at the lower left section of the menu, you'll see the corner is in the shape of an L.
Beside the corner are four numbers: 1457.
Enter the four digit combination into the keypad to open the fourth lock.
Screenshot.
Lock 5
The fifth item on the menu is a row of five colored squares.
This one is the trickiest puzzle yet!
There's only one place in the room where you can find all of these colors together.
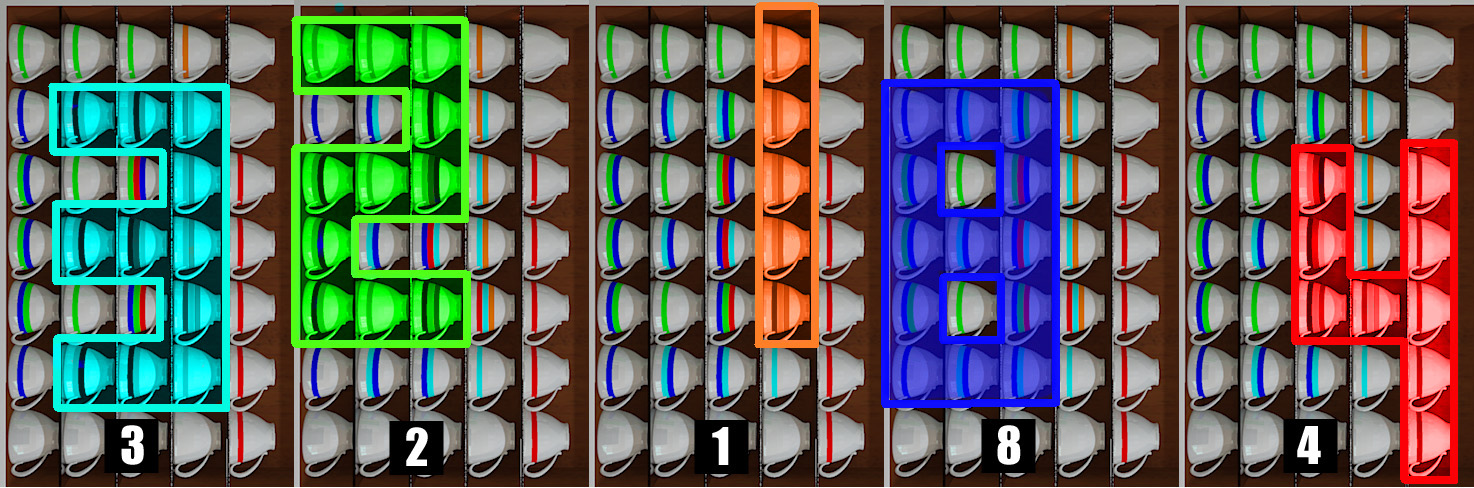
Turn left to face the bar and inspect the shelves of teacups.
The colors of the stripes on the teacups are identical to the colors of the squares on the menu.
Now that you know where to look, find the connection between the colored stripes and the squares on the menu.
Hint: Search for the patterns of like-colored stripes, but first you'll need to change perspective.
Imagine all of the cups are rotated 90 degrees clockwise.
From that perspective, if you were to outline the cups that had the same colored stripes together, they would each form the shape of a different number.
For example, if you look for the cups with a red stripe, you'll find that together they make the shape of a 4.
Combine this information with the order of colors from the menu (turquoise, green, orange, blue, red) to categorize all the cups by color and find their corresponding numbers.
The turquoise cups make the shape of a 3.
The green cups make the shape of a 2.
The orange cups make the shape of a 1.
The blue cups make the shape of an 8.
The red cups make the shape of a 4.
Screenshot.
Enter the 5 digit combination into the numpad to open the fifth lock.
Screenshot.
Lock 6
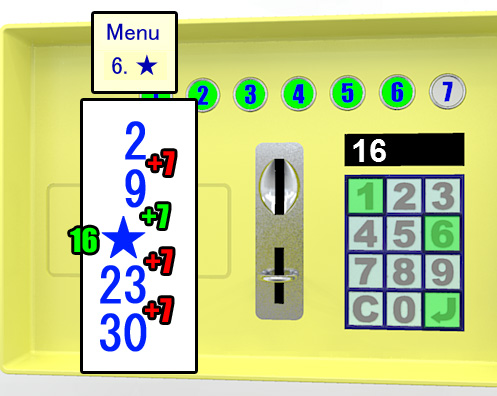
Look on the menu to find the 6th item on the list is a star symbol.
You won't have to look far to find its partner.
Hint: Check your inventory again.
Inspect the Star Note in your inventory.
The paper shows a column of numbers (2, 9, 23, and 30) with a star in the middle.
What do these numbers all have in common?
2 and 9 have a difference of 7, 23 and 30 also have a difference of 7.
Follow the pattern, going from top to bottom, of adding 7 to each number to find the value of the star.
2, 9, 16, 23, 30. The star is 16.
Enter the star's value into the numpad to open the sixth lock.
Screenshot.
Lock 7
The last clue on the menu list is a circular shape.
You shouldn't have any trouble locating the object that has the same round shape.
Inspect the Coin in your inventory, then flip it over to view the date on the back: 1997.
Enter the 4 digit combination into the keypad to open the seventh lock.
Screenshot.
Normal End
When all 7 locks have been opened, insert the Coin into the coin slot beside the numpad.
Take the Key from the opened compartment.
Back out, then turn right twice to face the exit door.
Click the door for a closer look.
Use the Key to open the lock.
Continue through the door to receive the normal ending.
Happy End
Follow the previous instructions all the way up to the point where you unlock the exit door with the Key.
After you have unlocked the door, do not open it!
Instead, turn right once to face the bar.
Click the rows of glasses behind the counter to zoom in.
The glasses were all clear before, but now some of them are highlighted white.
Can you see the pattern the highlighted glasses make?
The glasses make the shapes: IX II VI.
The three Roman numerals represent the numbers 9, 2, and 6.
Go to the safe and enter the 3 digit combination.
Screenshot.
When you submit the solution, you should hear the clicking sound of something unlocking.
Back up and turn right to face the small cabinet, then click the cabinet for a close-up view.
Open the small door and take the Bracelet inside.
Turn right to face the door, then exit the cafe to receive the happy ending.
Posted by: Trinn |
September 12, 2012 12:54 AM
|
September 12, 2012 12:54 AM