
Forever Lost: Episode 1
Platform: iOS

![]() Ominous music pounds in your ears as vague blurs slowly define into concrete walls. Footsteps and distant dripping water echo as confusion engulfs consciousness. Where am I? What is this place? Who Am I? With that chilling and atmospheric opening begins a stunning new adventure from Glitch Games, Forever Lost: Episode 1, the twisted grandchild of many a point-and-click escape game.
Ominous music pounds in your ears as vague blurs slowly define into concrete walls. Footsteps and distant dripping water echo as confusion engulfs consciousness. Where am I? What is this place? Who Am I? With that chilling and atmospheric opening begins a stunning new adventure from Glitch Games, Forever Lost: Episode 1, the twisted grandchild of many a point-and-click escape game.
 Answers will not come quickly as you explore a haunting medical facility in search of the truth. Instinctively, you what to do: explore, find, process, and solve. The story takes place as the unknown protagonist explores the quiet building, and the story is built with clues found in medical files, notes, books, e-mails, and most disturbingly of all the graffiti which covers many of the institutional walls. Who are you? Why are you here? And most importantly... how do you get out?
Gameplay is pretty standard for a point and click game translated to the touch screen of a mobile device. A simple finger tap will create movement, with a helpful "back" arrow to retrace your steps. Items can be examined, picked up, and even taken with a simple gesture, basically point and click without the "click". A bottom scrolling inventory that can be conveniently rolled up into a briefcase is all that is needed for the numerous items that can be found in this wide-ranging game, and a rather unique feature takes the place of the classic adventure hybrid notebook in the form of an in-game camera and photo album. Simply touching the camera feature snaps a photo of the scene, said photos stored in retrievable form in an album icon which allows the player to scroll through all photos taken, zoom in, zoom out, and even scribble notes. A handy way to keep track of the plethora of clues that are to be found, and one that is also necessary for the solving of at least one puzzle.
 Forever Lost: Episode 1 is not an adventure hybrid; there are no hidden object scenes to be found within. Instead, what Glitch Games has given us is pure, classic adventure that harks back to the golden days of Myst, with a lot of pedigree from more recent adventures such as the episodic Being One series, albeit without the jumpscares, boss fights, and copious amounts of blood. Along with the classic found objects having a use somewhere there are several mini-games, including a classic pipe puzzle and a stunning and enchanting little top-down RPG that more than vaguely resembles classic Zelda. The game saves automatically when the player leaves, allowing the gamer to pick up precisely where they left off in this cavernous, eerie place that is really not fit for human habitation, even if they are psychotic, which is what many of the medical records found along the way imply.
Analysis: For those old enough to remember the classic adventure days Forever Lost: Episode 1 is sure to ring the nostalgia bell, and those who are younger are about to get an epic treat as they discover classic adventure done really well. Spooky without being frightening, atmospheric without resorting to cheap tricks like jump scares or gore, Forever Lost: Episode 1 serves up chills and excitement in a way that is rarely seen or done so well.
 Considering that the setting is a supposed psychiatric hospital, albeit one that would probably be shut down by state or federal regulatory agencies if they ever saw inside, the visuals are quite stunning and constitute a visual treat of early industrial ugly. The sharp incidental sounds and vaguely unsettling music underscore the mounting fear and paranoia of the story, merging seamlessly with the visuals to create a chilling atmosphere. Movement in the game is smooth and easy and the gameplay itself takes advantage of the touch screen allowing the player to create actions with taps, swipes, and other finger movements.
The puzzles and mini-games tend to keep within the dark theme and cover a range of styles and difficulties. The lone exception being that adorable little faux Zelda RPG which interjects a sudden burst of color and light into the gloomy proceedings, like a bit of childhood lost surfacing amidst the grind of grimy everyday adult life. A built in hint feature in the main menu page is helpful for when a players is stuck without giving the answers outright.
The navigation can feel a bit strange at first with that strange backing arrow, but otherwise there are very few things to complain about in Forever Lost: Episode 1, other than the fact that it perhaps ends too soon and leaves us panting for Episode 2. Challenging adventure wrapped up in an atmospheric and portable package is what we have been looking for, and what Glitch Games has delivered in spades. Turn out the lights, crank up the sound on your portable device, and be prepared to be sucked into the world of Forever Lost.
NOTE: This game was played and reviewed on the iPad. Game was available in the North American market at the time of publication, but may not be available in other territories. Please see individual app market pages for purchasing info.


Walkthrough Guide
(Please allow page to fully load for spoiler tags to be functional.)
Forever Lost Episode One Walkthrough
General Information
Navigation is simple: simply tap on the screen to go forward, or tap on doors or other items to get a close up.
Moving backwards is accomplished with the curved green arrow on the lower left of the screen.
If you keep moving backwards, you will eventually wind up in the room you began in.
You inventory is contained in a briefcase in the lower left of the screen, below the back arrow.
Items that can be picked up will go directly into the inventory. There are scroll arrows on the inventory if you have more items than cells.
Tap the briefcase to open the inventory, tap it again to make the inventory disappear.
To use inventory items, tap the item in your inventory, then tap the area you would like to use it.
There is a hint feature available on the main menu page.
Hints are covered by spoiler bars. If the bar has a red X, you haven't performed that action. If it has a green check, you've already done it.
There is also an options feature on the title page which allows controls of the brightness, music, and sfx.
If you wish to start over, there is a game reset feature in the options as well.
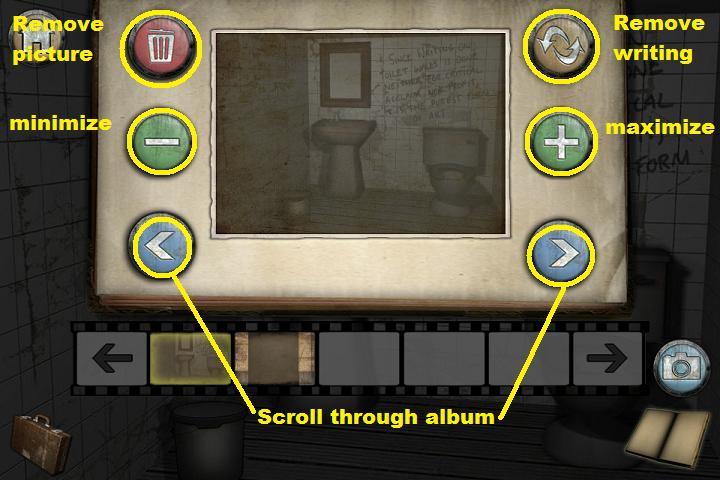
Using the camera feature is simple: once you've acquired the camera, click on it to take a picture.
Review pictures taken by clicking on the photo album beneath the camera on the lower right of the screen.
You can zoom in on pictures you've taken, and you can write notes or highlight certain areas using your finger.
You can also use the controls to remove writing on the pictures.
Here's a screenshot of the camera controls and what they do.
Pay attention to details.
Have fun!
Chapter 1
The Beginning
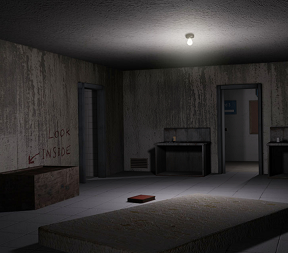
You begin in a dingy room, not knowing where you are. There is a mattress on the floor, and a red book. There is a door in front and a door to the left.
Against the left wall is a low box. You can see the words "look inside" written on the wall above. Click on the box for a close up.
The top of the box is a simple swap puzzle. Complete the puzzle to open the box.
Here is a screenshot of the completed puzzle.
When the box opens, you can take the camera and the photo album. Those functions will appear on the lower right of your screen.
Use the back arrow to back up.
There is a counter to the right of the door; click on it.
On the table is a fan, a mug, and a key. Take the key and back up.
To the left of the door is another counter; click on it.
Clicking on the counter will trigger a memory cut-scene. When it is over you can back up.
To the left of the left counter is a vent in the wall, low and near the floor. Click on the vent for a close up.
There's something inside there, but you need a screwdriver to get it. Back up.
Both the forward door and the left door are locked. Click on the left side of the screen to turn around.
You can read the pithy quote on the wall. Also, notice the dusty mirror on the back wall.
Use the arrow button to back up.
Use the key from your inventory to unlock the left door.
Click on the left door to enter the bathroom.
Click on the sink for a close up. There is a working cold water tap, but the hot water tap is missing. There is also a mirror above the sink.
Back up.
Notice the small trash can to the left of the sink. There is a screwdriver on the trashcan; take it.
Back up to the main room.
Click on the red book on the floor to read it.
Back out of the book, then click on the mattress for a close up.
Once the mattress is in close up, click again. It feels lumpy. Guess we need something to cut it. Back up.
Click on the vent to the left of the left counter for a close up.
Use the screwdriver to open the vent.
Inside the vent you will find a knife. Take the knife and back up.
Click on the mattress for a close up.
Use the knife to cut the mattress in a swiping motion.
Take the revealed key and back up.
Use the key on the front door to unlock it. Time to explore the rest of this madhouse.
The Right Corridor (Waiting Area/Reception, Nursery)
Click on the now open door to get out of the room.
You are now in front of a bulletin board. From the signs you can see that the waiting area, reception, and nursery are to the right.
Click on the right side of the screen to go in that direction.
You are now facing down a hallway. There are two doors to your left, one to your right, and more doors at the end of the corridor.
Click on the closest door on your left. This is the nursery.
Once the door is in close up, click on it to open it and enter.
The Nursery
There's lots to explore in the nursery.
To the right is a toy chest; click on it for a close up.
Note the xylophone on top; click on it for a close up.
If you tap on the bars, you will notice that it still plays. However, we don't know what to play yet, so back up twice.
Click on the table for a close up.
On the table are a couple of cards, labeled dog and star; take them.
You can also enjoy reading the book "My Colourful Life".
Back up.
On the floor in front of the toy chest is some sort of wooden board; click on it for a close up.
This is one of those games where you need to place the shapes. However, we have no shapes, so back up.
Back up two more times to the corridor.
The Waiting Room
Click on the further left door for a close up. This is the waiting room.
Click on the door to enter the room. This is a seriously gloomy waiting room, and there's nothing on the TV.
On the wall to the right of the TV is a picture of some sort; click on it for a close up.
The picture appears to be of various shapes with arrows between them. Back up.
Click on the low table for a close up.
There are two items on the table: a picture on the left and a tablet on the right. Click on the picture for a close up.
The photo is of an old time radio, with the notation "108 FM?" on it. Back up.
Click on the tablet for a close up.
There is an app on the tablet called iCeption; click on it.
iCeption
Welcome to faux Zelda!
In the game there is a house on the upper right, a cave on the upper left, and the entrance to a forest on the left.
To move your little character, simply tap where you want him to go.
Move your character across the bridge and into the house.
Inside the house you will find a key on a table, but you can't take it unless you are on the right side of the table. Take the key.
Go out the door and go towards the cave.
You will notice by the cave something on a pole. It is a lamp without fuel.
You can't get into the cave without a light source. Go back over the bridge and go to the left, into the forest.
Inside the forest, you have a choice of going right, left, or up.
If you go to the right, you will run into another character.
You can have a conversation with the character; it is someone else who was trapped in the asylum.
Try all of the conversational gambits; he will eventually tell you about a pair of magic glasses.
Go left to the forest junction.
Go up (either of the two paths going up) and you will find some lantern fuel. Collect the fuel and go back down to the forest junction.
Take the left path and you will find an odd symbol. I'm sure it means something...
Go back to the forest junction, then head down to leave the forest.
Go back across the bridge and over to the lantern.
When you reach the lantern, you will take it.
You can now go into the caves. The cave is a simple maze. Go right, then up, then left, then up to get to the next scene.
In the second scene go up to the top, then right to the third scene.
In the third scene go up to the top, then right, then down, then left, then down, then right, then down to the fourth scene.
In the fourth scene, go down, then left. You will find a locked chest.
Unlock the chest to get a puzzle piece.
At this point you get a choice to exit the game; do so.
Back up twice to the main room view.
Back up two more times to the corridor.
The Staff Office
Click on the door to your right for a close up.
This is the staff office. Notice the electric pad to the right of the door; click on it for a close up.
This is a fingerprint detector. Nice of someone to have left their greasy print on it. Place your finger on the print and hold until scanned.
Once the scan is done you will be in the office.
There is only one light source, a small lamp to your left. Click on the lamp for a close up.
Once the lamp is in close up, click on it to turn it once. It will highlight the rest of the desk and a key. Take the key.
Once you have the key, click the lamp again to turn it outwards.
Back up once. You can now see the room: There is a desk in front of you with a computer. To the right of the desk is a filing cabinet. On the right wall is a poster.
Click on the computer for a close up.
Click on the monitor again for a close up. Okay, we have a Glitch search feature, but no keyboard.
Click on the private folder and read the memo, which holds another clue about glasses. Also something about the screensaver.
Close down the memo and the folder, and then click on the "stuff" folder.
Inside are two pictures, one of a cute baby, The other says "Good things come to those who wait.
Wait a minute or so, and the screensaver will come on. Notice that it says C: 8008. I'm sure that's important.
Click on the screen to close down the screensaver, then back up twice.
Click on the filing cabinet for a close up.
Use the key you just picked up to open the top drawer of the filing cabinet.
Click on the open drawer to get a file labeled Hawthorne Asylum. Notice the blue stain on the lower right corner: it has that strange symbol again.
Click on the first tab—"Schneider"—and you will get another memory flash.
Read each of the tabs: this information is important to the story.
Under the "Bethlam" tab you will find a post-it note with "Pin A: 1423" on it.
Back up twice.
Click on the poster on the right wall for a close up.
Okay, we just need to Glitch the answer, but without a keyboard that will be difficult. Back up three times to the corridor.
Reception
Click on the double doors at the far end of the hall to move forward.
To the left you will see a desk with a computer on it; click on the desk.
There is a door behind reception, but it is locked.
There is a clock on the wall that reads 10:10, with a picture of an octopus on it. Note you can change the time by dragging the hands.
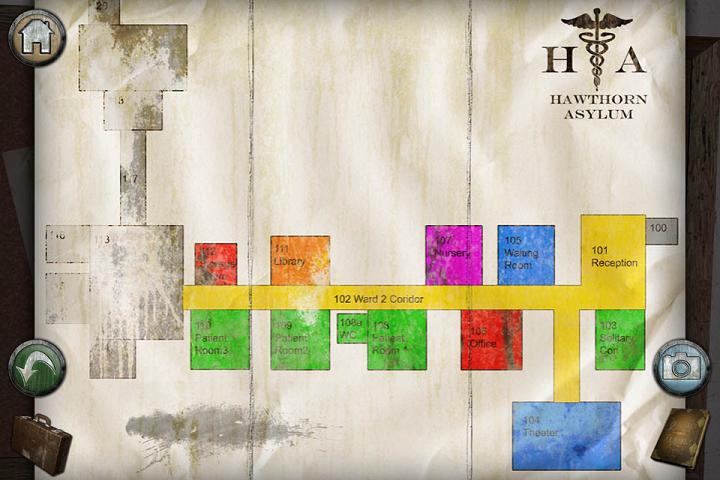
There is a bulletin board behind the reception desk; click on it for a close up.
Click on the map on the bulletin board, you can see a (sort of) complete map of the facility. screenshot.
Note the rooms off of reception, 100, the theater, and solitary confinement.
Back up twice.
Click on the reception desk for a close up.
There is a computer, but when you click on it it needs a password, which we don't have.
There is a pad of paper here, but it is blank.
There is a radio here as well; click on it.
You can turn the radio on and you can slide the station indicator, but the button to change from AM to FM is missing.
Back up three times until you are back in the corridor view.
To the right of the reception desk is a door; click on it for a close up.
This is the door for solitary confinement. Notice the panel above the sign on the right of the door.
It's an electronic panel of some sort, but it is missing a circuit board. Back up.
There is a corridor going to the right, near where the solitary confinement door is. Tap on the right side of the screen to go there.
This is the door to the theater. Unfortunately you need a token to get in.
There's something on the left wall, tap on the left wall of the corridor.
You can see a strange symbol in red. Maybe we'd better take a picture?
Back up twice.
Back up two more times until you are back at the bulletin board.
Time to explore the left corridor.
The Left Corridor (Quarantine, Storage, Patient Rooms, Library)
You should be starting from the bulletin board where all the signs are. Now tap on the left side of the screen to view the other corridor.
Here you will see two doors on the left, two on the right, and a set of double doors at the end of the hall.
Patient Room #2
Click on the first door on the left.
This is patient room 2. Click on the door to open and enter. Inside you will find a bed, a sink, a table, and a mirror.
There appears to be something underneath the bed; click beneath the bed for a close up.
There are two bananas underneath the bed. One you can take, the other one has that weird symbol again. Back up.
Click on the table where the lamp is for a close up. There is a token on the table; take it and back up.
There is a mirror on the floor to the left of the sink; take it.
Click on the sink for a close up.
The taps don't work, but the one on the right is loose. Pity we don't have any tools. Back up.
Back up twice more to the corridor.
The Library
Click on the door to your right.
This is the library. Click on the door to enter.
Aside from some pithy sayings on the walls, there is a bookshelf here with three shelves filled with books. There are a few more books on the ground, and the wall says "Exit" above the bookcase.
If you click on each shelf of the bookcase, you will find lots of titles, which can be pushed in. Notice that one is missing from the bottom shelf.
Click on the books on the floor for a close up. Note the titles. Also note that you can click to pick one up, but the pages are blank.
Each of the books has a search feature for page numbers, but we don't know what page numbers to look for. Back up.
Back up twice to the corridor.
Go forward once towards the double doors.
You can click on the double doors, but they need a key card swiped.
From here you can access the two other rooms.
Patient Room #3
Click on the door on the left for a close up. This is patient room 3.
Click on the door to go in. Inside is a mattress, a red book, a picture on the left wall, two desks (one fallen over), and some writing on the right wall.
Click on the picture on the left wall. Brace yourself for another memory flash.
Once the flash is over, click on the picture to take it. Note the circular mark on the wall behind where the picture was. Back up.
You can examine the markings on the right wall, but you don't know what they mean.
Click on the upright desk (the one on the right) for a close up.
On the desktop are some keys; take them. There is also a mug of pencils; click on it for an etching pencil.
Back up.
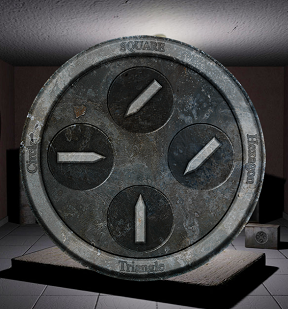
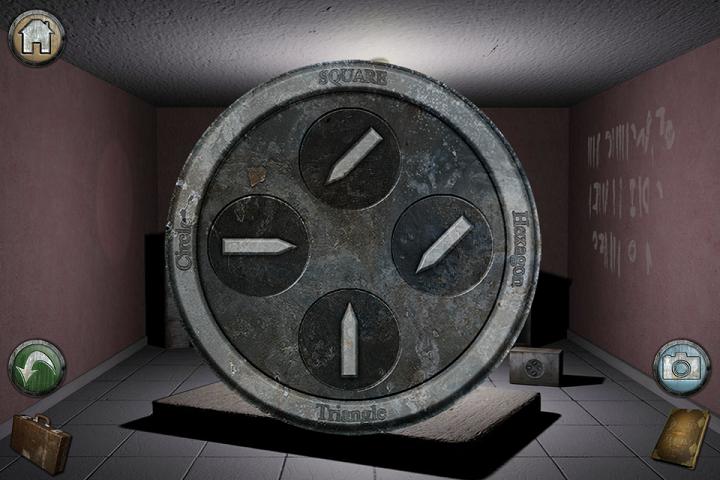
On the floor between the desk and the mattress is a strange box; click on it.
This is a puzzle. There are four rotating circles which contain arrows. Each circle is named after a shape, circle, square, hexagon, and triangle.
Hey wait, I think we can solve this one!
Remember the picture on the wall of the visiting room? The one with the shapes and arrows?
That was the clue for this puzzle. The circle pointed to the hexagon, the hexagon pointed to the triangle, the triangle pointed to the square, and the square pointed to the circle.
Let's apply that to this puzzle.
Starting from the top, the circle called "square". Move the arrow in that circle so that it is pointing to the one called "circle, down and to the left.
On the right is the one called "hexagon". It should be pointing to "triangle", which is down and to the left.
On the bottom is "triangle", which should be pointing to "square", which is straight up.
On the left is "circle", which should be pointing to the hexagon, which is to the right.
Here's a screenshotof the solution.
Once you solve the puzzle, you get a plastic dial.
Back up from the puzzle and click on the book to open it. Okay, it talks about the iCeption game on the tablet in the visiting room. Back up.
Click again on that left wall where you found the picture.
Note the circular shape. Do we have anything that would fit there?
Like, say, the mirror we picked up earlier?
Place the mirror on the wall. Note that it shows writing on it as well as the stuff reflected from the opposite wall.
Slowly rotate the mirror by dragging with your finger until the writing lines up.
You will get a clue: "Searching This Cold Planet 798 Times".
Back up.
Back up twice more to the corridor.
Storage Room
Click on the room on the right. This is the storage room.
Click on the door to enter the room.
Inside are some supplies. Note the tool sitting on a crate, the blue book sitting on a crate, and the cabinet on the left wall.
Take the tool (wrench).
Click on the book to read it. Okay, we need to find hieroglyphs to get out?
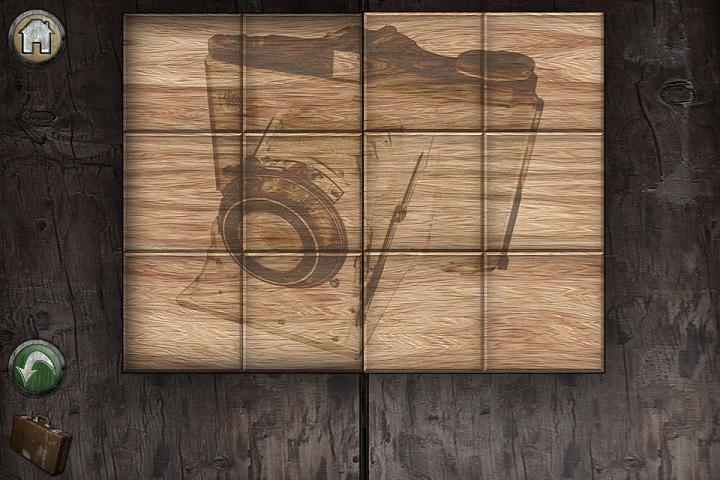
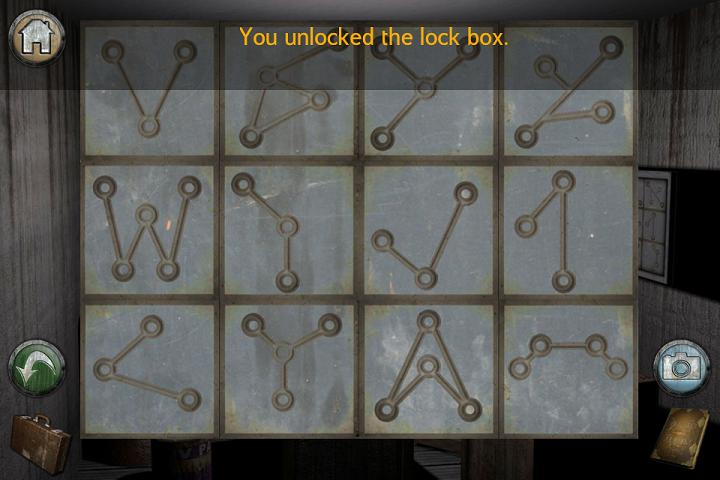
Click on the cabinet on the right wall. This is a puzzle composed of 12 tiles. Looks like we have no clue how to solve it, so back up.
Back up twice more to the corridor.
Solving Some Problems
Back up twice to the bulletin board.
We now have the tools to solve several problems and maybe open those locked doors.
The Hot Water Tap
You should be starting from the bulletin board.
Click on the left to go to the patient rooms corridor.
Click on the first door on the left, patient room #2.
Click on the door to go in.
Click on the sink for a close up.
Use the wrench to get the right faucet from the sink.
Back up four times to the bulletin board, then a fifth time to go back to the starting room.
Click on the left doorway (bathroom) to enter.
Click on the sink for a close up.
Place the faucet on the hole on the right side of the sink.
Tap in the newly placed faucet to turn on the hot water.
Two symbols will appear in the mirror, one that looks like a leaf, one that looks like a teacup.
Back up twice to the room, then go forward to the bulletin board.
The Library Book
Tap on the left side of the screen to enter the patient rooms corridor.
Tap on the first door on the right, the library.
Tap on the door again to enter the library.
Tap on the books on the floor for a close up.
Tap on the one titled "This Cold Planet" to open it.
Enter the number 798 in the search feature.
You have found two more symbols, what looks like a candy cane and a drooping flower.
Close out of the book and back up.
Back three more times to the bulletin board.
Reception Area Puzzles
You should start from the bulletin board.
Tap on the right to enter the nursery/visiting room corridor.
Tap on the double doors at the end of the hall to move forward.
Tap on the reception desk on the left for a close up of the area.
Tap on the desk again for a close up.
Tap on the pad of paper.
The pad is still blank, but someone wrote on it before.
This is the old "use a pencil to highlight the indentations" trick.
Pull up the etching pencil from your inventory, then, using your finger, swipe it back and forth across the pad until you can read what it says.
It says "AJWhite" and "Pa55w0rd".
Back up.
Click on the computer for a close up.
At the username prompt type in AJWhite, then hit return.
At the password prompt type in "pa55w0rd". Remember that the esses should be 5s, and the o should be a zero. Hit enter.
You will get a prompt to see what you would like to do. Start with 1 and hit enter.
Read each of the patient files.
Once you've read the patient files, go back to the main menu.
Select option 2 and read the staff files.
Choose option 3 to unlock the electronic door, then log out.
Back up from the computer.
There is a safe beneath the desk where the radio is sitting. Click on the safe for a close up.
Use the keys you found earlier to unlock the safe.
Inside you will find a circuit board. Take the board and back up.
Click on the radio for a close up.
You should have a plastic dial in your inventory; place it on the hole on the right.
Click on the new button, and the FM light will go green.
Now move the tuner to 108.
You will hear a four note tone that sounds like a kid's xylophone. Guess we need to solve that next.
Back up four times, until you are at the beginning of the corridor.
Click on the first door on the left, which is the nursery.
Tap on the door to enter, then click on the toy chest for a close up.
Click on the xylophone for a close up.
Try to recreate the four tone sound.
The bars to tap are: 1st on the left, 3rd from the left, 1st on the left, and the far right bar.
The toy box will open up. Inside are a key card, a ball card, and a puzzle piece. Take them all.
Back up three times to the beginning of the corridor.
Go forward, then click on the reception area for a close up.
Click on the door behind the reception area. The electronic lock should have been overridden when you were on the computer.
Okay, the room is mostly dark, and there is some UV paint cans on the floor.
Back up twice until you are at the end of the corridor.
The Theater and Solitary
You should still be at the end of the corridor, with the reception area on the left and the theater and solitary on the right.
Tap on the right of the screen to go down the corridor to the theater.
Tap on the sign to the right of the door to pull up the token slot.
Place the token you found earlier in the slot.
You will be confronted with a puzzle, "Which one of these shapes is the odd one out".
Three of the shapes are the same, only rotated; the fourth is the same shape, but mirrored.
The one to choose is the door on the far right. The door will open and you will be on the holodeck of the enterprise, or the imaginarium, or just some room with a lot of horizontal and vertical yellow lines.
On the table in the middle of the room is a puzzle piece; take it.
Back up three times to the end of the corridor.
Now tap on the door to solitary confinement.
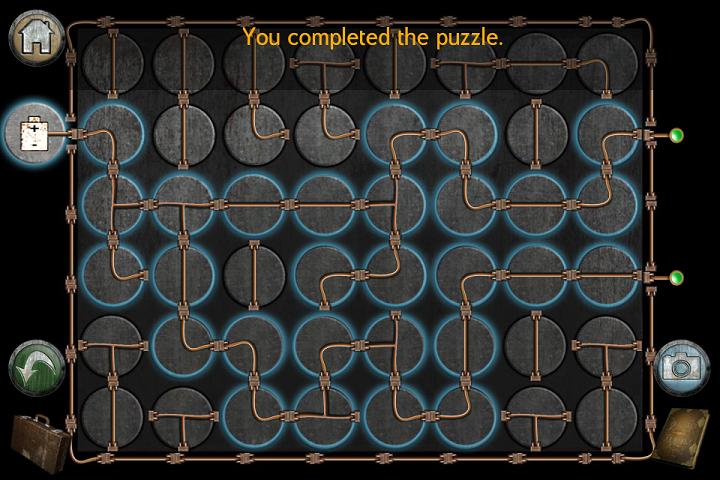
You should now have a circuit board, so place it in the panel above the sign.
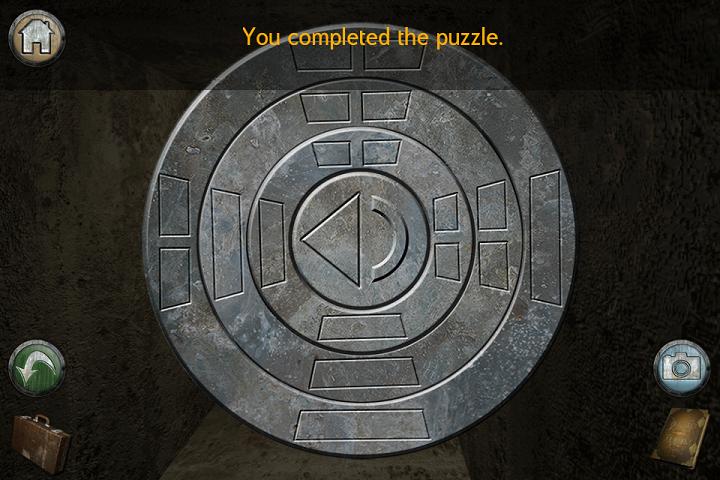
This triggers a pipe puzzle, where you have to move electricity from the battery on the left to the two red lights on the right.
Here's a screenshotof a solution.
Solving the puzzle opens the door to solitary. Tap on the open door to enter.
On the floor you will see a keyboard and a blue book; take the keyboard.
Read the book. Looks like the way out is through the library.
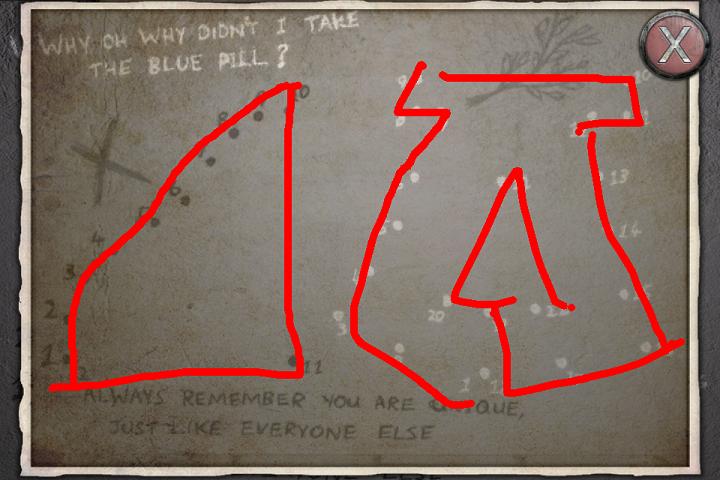
Take the time to examine the writing on the walls, especially the left wall.
Notice that the dots on the wall are numbered: this is a connect the dots puzzle.
Take a picture of the wall with the built-in camera feature.
Pull up the photo in the album, then maximize it.
You can use the notes feature to draw the pictures with your finger. When you are done you will have two more symbols (this makes six so far that you have found).
Here's a screenshotof the picture.
Close down the album and back up from the wall.
Back up four more times until you are back at the bulletin board.
The Keyboard
You should be facing the bulletin board. Tap on the right to face the nursery/visiting corridor.
Tap on the first door on the right, the office.
Tap on the door to enter.
Tap on the computer for a close up.
Place the keyboard on the computer.
Tap on the monitor for a close up.
Tap on the Glitch Search icon.
Now that the keyboard is attached, you can do a search. According to the poster, you need to search for "the answer", so type in the answer and hit search.
Click on the first link that shows up, and you get two book titles: "How to Disappear Completely" and "British Psycho".
Back up until you are out of the computer screen.
Back up four more times until you are back at the bulletin board.
The Key Card
It's time to try and get through the double doors at the end of the patient room corridor. Tap left to enter the corridor.
Go forward towards the double doors.
Tap on the double doors to pull up the key card slot.
Look in your inventory: you should have a few cards in there, a dog card, a star card, a ball card, and a key card.
Yes, it is that simple. Click on the "key" card, then swipe the magnetic lock with your finger. This will unlock the door and trigger Chapter 2.
Chapter 2
Exploration
These are the gray rooms indicated on the map found earlier. Time to explore.
On the left wall is a clock; click on it.
This is another clock that you can change the time by dragging the hands. This one has a picture of a dragonfly on it.
Back up.
There is a corridor to the left; tap on it to enter.
This is actually an alcove. There is a table with glasses on it, a blue book on the floor, and that mysterious symbol on the wall.
Take the glasses.
Click on the book to read it. Inside is that strange symbol again, and a green blotch.
Strange. Close down the book and back up.
There is a door in front of you which is locked. On the left of the door is some sort of panel; click on it for a close up.
It is actually a sign, which says "turn both keys at the same time". Note the two keys underneath, one which has a dragonfly picture, the other an octopus picture.
Back up.
To the right of the door is a staircase leading up. Tap on the staircase to go up.
On the wall up here are symbols that look like hieroglyphs. Hey, we read a clue about that somewhere!
Some of those symbols should look oddly familiar. We've seen some of them in the game.
The clue we found earlier indicated we needed to push 8 symbols, but we've only seen 6 so far, so back up.
There is a doorway to the right, but it is blocked by blue lasers. To the right of that doorway are some buttons; tap on them for a close up.
Looks like we need three different codes. Well, we found an A code and a C code, we just need a B code.
Back up. Let's solve some puzzles, shall we?
The Door with Two Keys
Well, you can try to tap both keys simultaneously, but it doesn't work.
Perhaps the pictures of the dragonfly and the octopus have something to do with the solution?
Remember the clocks? One here has the dragonfly, and one at the reception desk has the octopus.
How about we set both clocks to the same time?
Tap on the clock on the left wall, the one with the dragonfly.
Set the time to something simple to remember (say, 10:00).
Back up four times to the bulletin board.
Tap on the right to enter the nursery/visiting corridor.
Go forward once, then click on the reception desk to see the area.
Click on the clock on the wall and set the time to the same as you set the dragonfly clock.
Make sure that both clocks are set precisely on the same time.
Back up to the bulletin board, then tap left to enter the patient room corridor.
Go forward twice to the new area.
Click on the keys to the left of the locked door for a close up.
Tap both keys (you don't have to do it simultaneously) to open the door.
Tap on the open door to enter the room.
Inside is some sort of control panel and a window. Tap on the control panel for a close up.
There are two buttons here, and two switches.
The switches control the angle of lighting on the other side of the window. The buttons control the actual lights.
Press both buttons at the same time. You can see shadows on the back wall, and the letter B.
The shadows almost, but don't quite, form a coherent number. You need to experiment with the switches to find the right angle.
The left switch should be moved over to the right side, and the right switch should be to the left.
Press the buttons again, and you should see B:7241.
Looks like we have the codes to get past the lasers. Back up twice to leave the room.
The Lasers
Tap on the buttons to the right of the laser door.
We got the A code from the file in the office, A:1423.
We got the B code from the key door, B:7241.
We got the C code from the office computer screen saver, C:8008.
Enter each code and push the enter button. If they are entered correctly, the light above the key pad will turn green.
You can now tap on the open doorway to enter.
And you are now in a very creepy corridor. Go forward.
Go forward again, and you will see a door with a circular slider puzzle.
Have we seen anything else that looks like this?
Yes, that red drawing on the walls of the corridor leading to the theater.
That drawing is the solution to the puzzle.
Here's a screenshotof the solution.
Rotate the rings to replicate the drawing, and the door will open.
Go forward, and you will see a door.
Tap on the door, and you will enter a stone chamber. There is a puzzle on the wall in front of you, a book leaning against the wall, some stairs to the left of the puzzle, and an alcove to the right of the puzzle.
Click on the book to take it. Notice that the puzzle is underneath that strange symbol.
Click on the puzzle for a close up. It appears to be some sort of slider puzzle, but the stones are blank except for the center, where they are red, blue, yellow and green.
You can rotate the stones with the arrows beneath and to the sides, although the colors in the center stay the same.
Back up.
Click on the stairs to the left of the puzzle.
Okay, could this get any creepier? There's a kid watching a blank TV; click on the kid.
Okay, it's just a cutout of a kid. I guess that's slightly less creepy? Note that there is something taped to the back of the cutout; take it (puzzle piece).
Back up twice to the main chamber.
Click on the alcove to the right of the puzzle.
It appears to be a blank wall, and there is some sort of light stand to the left.
Click on the light stand to turn it off. Cool, constellations!
The constellations cover the ceiling and both of the visible walls.
Don't they look like the symbols on that cupboard back in the storage room?
Let's do a close up on each wall and the ceiling, and take a picture of each for reference.
Once you've gotten the three pictures, back up to the main chamber.
Back up four more times to the view of the door with two keys, then once more until you are back in the main corridor.
The storage room should be on your right: tap on the door for a close up, then go in.
Tap on that weird cabinet on the right for a close up.
Yep, those symbols are just like the constellations in the alcove. We must need to rotate each tile until the symbols match the constellations.
Here's a screenshotof the completed puzzle.
Yay, a UV torch! Take the torch and back up twice.
Using the UV Torch
Back up until you are facing the bulletin board.
Tap on the right to enter the nursery/visiting corridor.
Go forward once, then click on the reception area on the left.
Go through the door behind reception to the dark room.
Click on the UV torch in your inventory, then drag it along the back wall.
You can see two symbols, one looking like a backward L, the other like two parallel lines tilting to the left. Looks like we found our last two hieroglyphs.
Back up to the bulletin board.
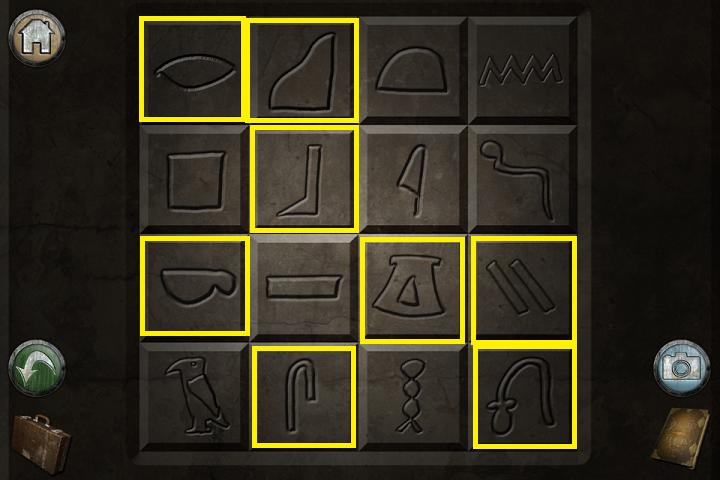
The Hieroglyph Puzzle
From the clues we read, we need to enter the eight hieroglyph symbols into that puzzle in the room to the right of the two key room. Tap on the left side to enter the patient rooms corridor.
Go forward twice until you are facing the two key door.
Tap on that staircase that is to the right of the door to go up.
Let's depress the tiles that have the hieroglyphs we found.
Remember, the one that looks like a leaf, one that looks like a mug with a handle, one that looks like a candy cane, one that looks like a drooping flower, one that looks like a lopsided triangle, one that looks like the letter A, and the last two we just found, the backwards L and the parallel lines.
Here's a screenshotof the solution.
A book will appear in front of the puzzle, bathed in blue light.
Click on the book for a close up.
There are two pages here, one that says "Fox Fox Fox", and one that says "Perfection 2nd Edition".
More book titles? According to the clue we need 9 books pushed in, and we have four titles and a book we picked up. So what next?
Back up three times to the corridor, then twice more to the bulletin board.
The Nursery Puzzle
Remember that wooden puzzle in the nursery? It required four shaped pieces, and we now have four puzzle pieces in the inventory.
Tap right to enter the nursery/visiting corridor.
Tap on the nearest left door, the nursery.
Tap on the door to enter, then tap on the puzzle on the floor.
Place the puzzle pieces in their proper shapes.
Two more titles come up: "1986" and "A Journey Beyond". Now we just need two more titles!
Back up four times to the bulletin board.
The Strange Symbols
Tap on the left side to enter the patient room corridor, then go forward.
Go forward through the double doors to the new rooms.
Time to figure out how to use the glasses. Click on the left alcove, the one with the strange symbol.
While in the alcove, click on the glasses in your inventory.
Cool, they make the symbol appear 3D!
Maybe if we put them on in other areas where we found that symbol...
There's another one right here, in the blue book on the ground.
Click on the blue book to open it.
Put the glasses back on. Notice that the green blotch is now showing the astrological sign for Aries (looks a bit like a Y).
Close down the book and back up. Looks like we need to track down the other symbols.
Back up twice, until you are at the start of the patient room corridor.
Click on the door on the left, patient room 2.
Tap under the bed for a close up.
Tap on the banana, then put the glasses on. This time you can see the sign for Scorpio on the yellow banana (like an M with an arrow on the end).
Back up five times to the bulletin board.
Tap on the right side to face the nursery/visiting corridor.
Tap on the first door on the right, the office.
Go in, then tap on the filing cabinet.
Open the top drawer and click on the files.
Make sure the file is on the left tab (with the blue splotch), then put on the glasses. This time you see the sign for Taurus (a circle with horns) on the blue background.
Back up three times to the corridor view.
Tap on the furthest from you door on the left (waiting room) for a close up.
Tap to go in, then tap on the table where the tablet is.
Tap on the tablet, then tap on iCeption to launch the game.
Travel to the left, into the forest.
Once in the forest, take the left path to the strange symbol.
Once you are at the symbol, put on the glasses. You can now see the symbol for Libra (two lines, one with an arch) on a red background.
Head back to the right, then down to exit the forest, then to the right to exit the game.
Back up five times to the bulletin board. Okay, we now have four symbols and four associated colors, what do we do with them?
The Stone Slider Puzzle
Tap left to enter the patient room corridor, then go forward.
Go forward again through the double doors.
Tap on the corridor on the right where the lasers were.
Go forward through the corridor and through the door to the puzzle where the symbol is.
Click on the puzzle for a close up.
Open the inventory, then put on the glasses. Now you can see the zodiac symbols on the puzzle!
The objective is to get the correct symbol in the correct color.
Aries should be green, Scorpio yellow, Taurus blue, and Libra red.
Use the arrows on the bottom and right side of the puzzle to move the pieces. Warning: the second from the left button is broken.
Here's a screenshotof the solution.
When you solve the puzzle, two more titles appear: "The Hidden Depths" and "Oblivion".
Time to get out! Back up seven times, until you are at the start of the patient room corridor.
The Library
The door on your right should be the library; click on it.
Tap to enter the room.
Tap on the top shelf of books. On the top shelf you should find "A Journey Beyond", "Fox Fox Fox", "Perfection 2nd Edition", and "Oblivion". Click to depress those four books.
Back up once, then tap on the middle shelf of books.
There you should find "1986" and "The Hidden Depths". Push in those two books and back up.
Click on the bottom shelf of books.
On the bottom shelf you will find "How to Disappear Completely" and "British Psycho"; push those two books in.
Place the book from your inventory into the empty space on the shelf.
Yay, the bookcase opens up, revealing the exit! Tap on the open doorway to go through.
Chapter 3
Wait, we're not done yet? There is an opening in the floor with stairs; click on the opening to go down.
Now we're in a stone corridor. Go forward.
Go forward two more times, and you should reach an elevator.
Click on the elevator to go in, then click on the panel on the right.
Click on the up arrow, then wait and exit when the door opens.
You are now in a brightly lit corridor. The elevator is to the left, and there is a door ahead in the distance.
Go forward, and you will find yourself in a room. The door will close behind you.
Brace yourself for some creepy cut-scene.
There is a window to the right, along with a table. There is a door to the left. Click on the window.
Yep, that's a two way mirror, and you are now looking into the room where you started. Freaky!
Click on the paper on the table. Okay, so we're subject 47a? And this was all a test?
Back up and click on the door on the left.
Now you are in a room with a bunch of security monitors. There is a door on the left.
The monitors show the rooms in the facility. Yep, you were being watched the whole time.
Click on the door on the left.
There is a ladder ahead; click on it.
Click on the opening above. You will drop your stuff and begin to climb.
Click on the opening again and you are out.
To be continued in Forever Lost Episode 2...
Posted by: grinnyp |
October 7, 2012 9:26 AM
|
October 7, 2012 9:26 AM