
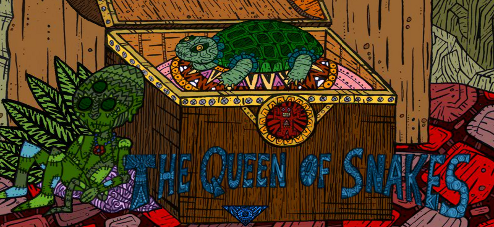
![]() It's not a super awesome day for Miss Libellule, the heroine in Jo99's point-and-click adventure The Queen of Snakes. The hazards of the jungle (you know, regular stuff like man-eating plants) have taken care of her crew, and now a rockslide has trapped her inside a temple even Lord Voldemort might call "a bit inhospitable". All the parseltongue in the world isn't going to save you from the dangers within the temple, though... or the scares along the way. Click on the blue arrows to navigate, or anywhere onscreen to interact. Some objects can be dragged around, too. There's no changing cursor, so you'll have to rely on your keen eye for detail to solve puzzles and find the items you need to escape. Mouse over the three small buttons on the ridge edge of the screen to get the options to turn off the music or sound effects.
It's not a super awesome day for Miss Libellule, the heroine in Jo99's point-and-click adventure The Queen of Snakes. The hazards of the jungle (you know, regular stuff like man-eating plants) have taken care of her crew, and now a rockslide has trapped her inside a temple even Lord Voldemort might call "a bit inhospitable". All the parseltongue in the world isn't going to save you from the dangers within the temple, though... or the scares along the way. Click on the blue arrows to navigate, or anywhere onscreen to interact. Some objects can be dragged around, too. There's no changing cursor, so you'll have to rely on your keen eye for detail to solve puzzles and find the items you need to escape. Mouse over the three small buttons on the ridge edge of the screen to get the options to turn off the music or sound effects.
 The Queen of Snakes is, first and foremost, a gorgeous, gorgeous game. Though its distinct art style can make the lack of a changing cursor to indicate interactive zones even more challenging in places, the unique visuals make this one a fantastic treat to explore and infuses it with more character and personality than most other adventure games. Each room is more detailed and fascinating in the next in ways both beautiful and ominous. The way the music swells and evolves as you explore is a great touch. Most of the puzzles rely on being observational, which means the high level of detail can be a bit overwhelming, or simply putting the right item in the right place. If you actually know where you're going and what to do, The Queen of Snakes won't take you very long to complete, but you'll still want to take your time because this is an experience worth savoring. Mysterious, compelling, and full of secrets, The Queen of Snakes is tricky but top-notch adventuring more than worth your time. Now we just have to wait for the sequel to find out what happens next!
Thanks to Nicop for sending this one in!


Walkthrough Guide
(Please allow page to fully load for spoiler tags to be functional.)
The Queen of Snakes Walkthrough
You'll start out at the entrance, where you can see your character crouching in front of the door.
Press the down arrow at the bottom of the screen twice in order to be able to interact with this scene
Pick up the GEAR on the floor beside the foot of the statue
Click the down arrow again to face the room with a large column at the center.
Click the skeleton leaning against the wall beside the right doorway to zoom in.
Open the satchel labeled "JONES" at the skeleton's side. Take the RED FIGURINE inside.
Back up once and go through the right doorway to enter the bedroom.
Inspect the pillow at the top of the bed.
Drag the pillow towards the right to uncover the STONE EYE.
Move back to view the room again, then examine the chest at the foot of the bed.
Insert the RED FIGURINE into the red carving at the center of the chest to open the lock.
Take the TURTLE found inside the opened chest.
Click the down arrow to zoom out. Next, click the top of the desk for a closer look.
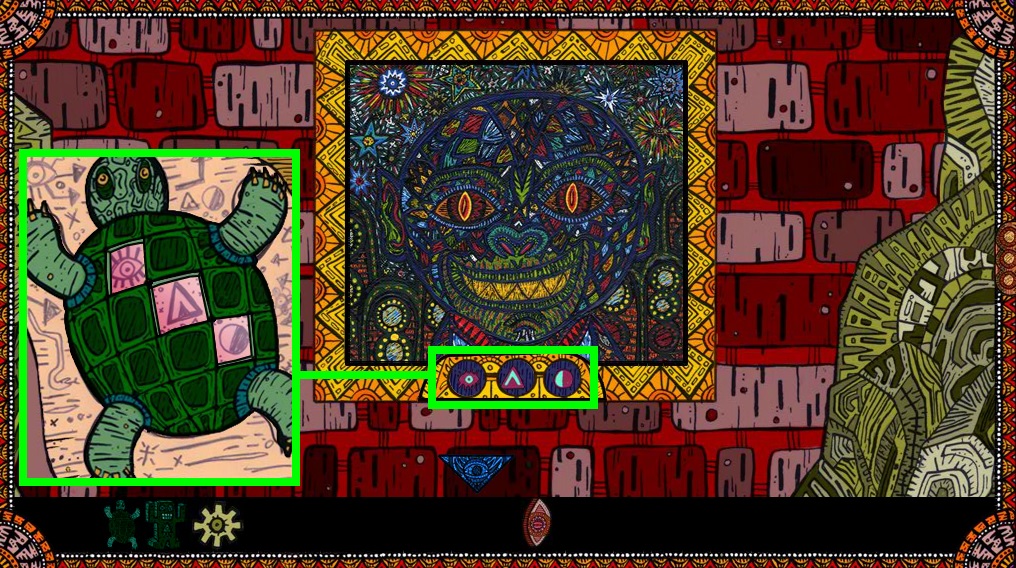
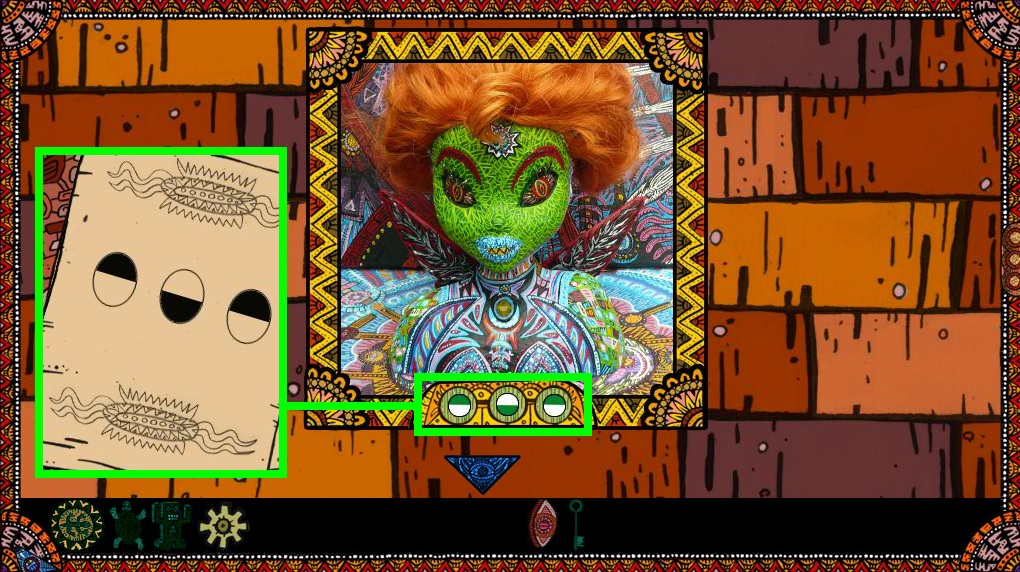
Place the TURTLE on top of the turtle-shaped outline on the piece of paper.
Note the three symbols that appear on the turtle's shell: an eyeball, a triangle, and a semicircle.
Back away from the desk, then zoom in on the framed picture on the wall above it.
Change the three symbols at the bottom of the frame to match the pattern seen on the turtle's shell.
Left = Eye, Middle = Triangle, Right = Semicircle.
Screenshot.
When the right combination is entered, you can click the painting to remove it from the frame to reveal a hidden compartment in the wall.
Take the LIZARD DISC being held by the small snake-woman statue within the compartment.
Move back twice to return to the column room.
Near the lower right corner of the screen is a green, patterned stone with an image of a lizard at the top.
Place the LIZARD DISC over the matching deisgn at the top of the stone to open the floor at the center of the room, revealing a hidden stairway.
Click the stairs to move down. Your character slips and falls into the side room where you'll see a locked door and seated statues reading books.
First inspect the book being held by the statue sitting down on the right side of the room.
On the left page you'll see the drawing of a star-shaped disc with a line pointing to the head of a large statue.
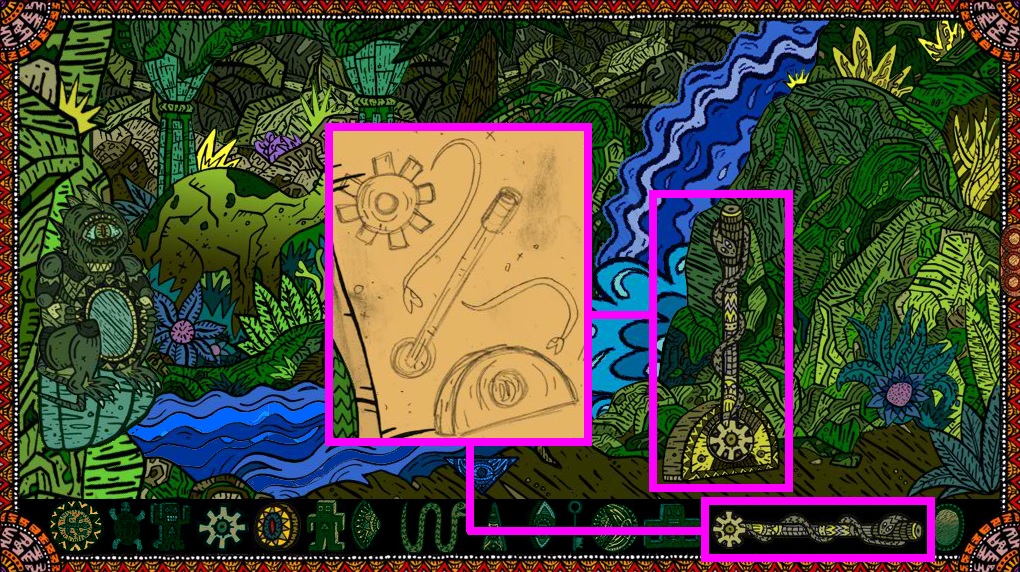
And on the right page is a diagram of a gear, lever, and mechanism connected by snake-shaped arrows.
Zoom out and inspect the book held by the statue at the left side of the room.
Note the pattern of semi-circles on the left page: the circle on the left is black at the top, white a the bottom. The middle circle is reversed with black at the bottom and white at the top. The right circle is identical to the left circle.
On the right page you'll find a drawing of a snake and an encircled blue dot just below the snake's mouth.
Click the right page to turn it.
Cut into the right side of the book is a hidden space containing the GREEN FIGURINE, take it.
On this left page is another drawing, depicting a snake king holding a staff. An snakelike arrow connects his staff with a diagram at the top of a page. The diagram indicates a pie-shaped section being inserted into the cutout space of a circle.
Remember all of this information for later, and step away from the book.
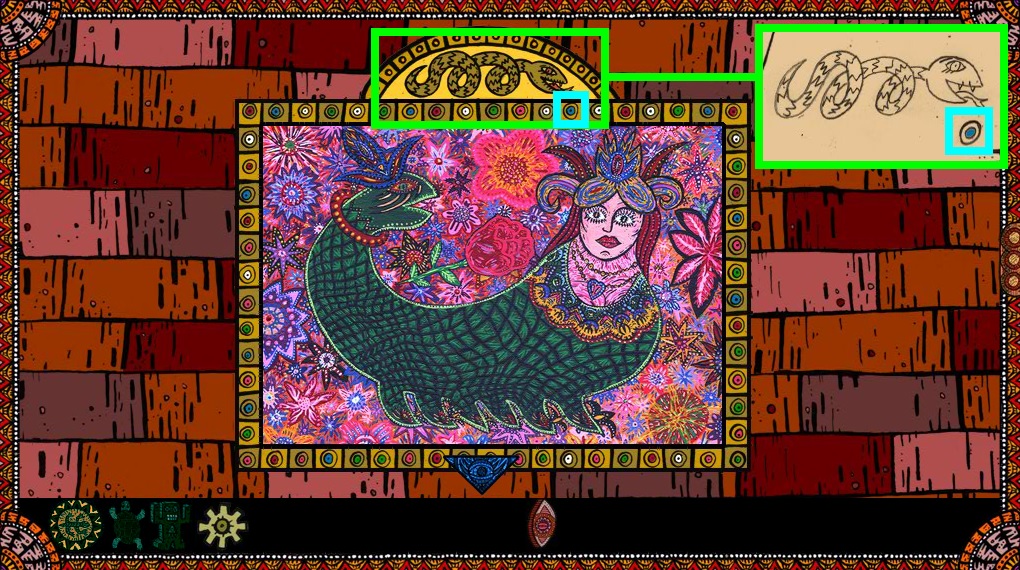
Inspect the picture on the wall above the left seated statue.
At the top of the frame is a snake that looks identical to the one seen in the book a moment ago. Just under it's mouth is a blue dot matching the image in the book as well.
Give this blue dot a click to discover a secret compartment behind the painting.
Screenshot.
Take the KEY from the statuette in the compartment, then move back to return to the view of the side room.
Use the KEY on the lock in the door to enter the closet.
Take the MIRROR hanging on the back wall.
Examine the painting at the top of the right wall.
At the bottom of the frame you'll see there are three semi-circles.
Arrange the semi-circles to match the pattern you found inside the book held by the left statue.
The left circle should have the dark side at the top and the white side at the bottom.
The middle circle has the dark side on the bottom and the white side at the top.
The right circle has the dark side at the top and the white side at the bottom, just like the left circle.
Screenshot.
Click the painting to reveal the cache behind it.
Take the LEVER from the headless statue.
Add the LEVER and the GEAR in your inventory to combine them into an attached LEVER AND GEAR.
Go back three times to reach the room with the large gorgon statue at the center. From there, click the right doorway to enter the egg room.
Click the egg on the pedestal at the middle of the room to zoom in.
On the right side of the screen you'll see a vertical carving of an eye. Place the STONE EYE inside the red carving to break the egg.
Take the SMALL SNAKE from the top of the cracked egg.
Back up twice to return to the gorgon room, then walk through the middle doorway to enter the hall.
Examine the statue standing beside the left wall.
Place the GREEN FIGURINE into the matching space at the middle of the statue's chest.
Take the BLUE FIGURINE that appears in place of the green one at the center of the statue.
Go back 3 times to return to the side room where you found the reading statues.
Inspect the chest on the floor to the right of the door.
Place the BLUE FIGURINE inside the matching blue carving at the center of the chest to open the lock.
Take the PATTERNED DISC from the inside of the opened chest.
Move back twice, then go through the middle doorway to return to the hall.
On the wall beside the back gate, you'll see a small panel. Click the panel to zoom in.
At the middle of the panel is a space shaped like a golden snake. Place the SMALL SNAKE from your inventory inside the space in the panel to open both the back and right gates in the hall.
Zoom out, then enter the next room through the right doorway.
Examine the large lever mechanism at the back of the room.
Note the three symbols on the mechanism: the left symbol is a semi-cricle, the top is a diamond, and the right is a circle.
Also note the three colored circles at the middle of the mechanism which you can click to change color and the lever at the upper right side of the mechanism, near the small seated statue.
Additionally, you can click the top symbol to change it between the three options.
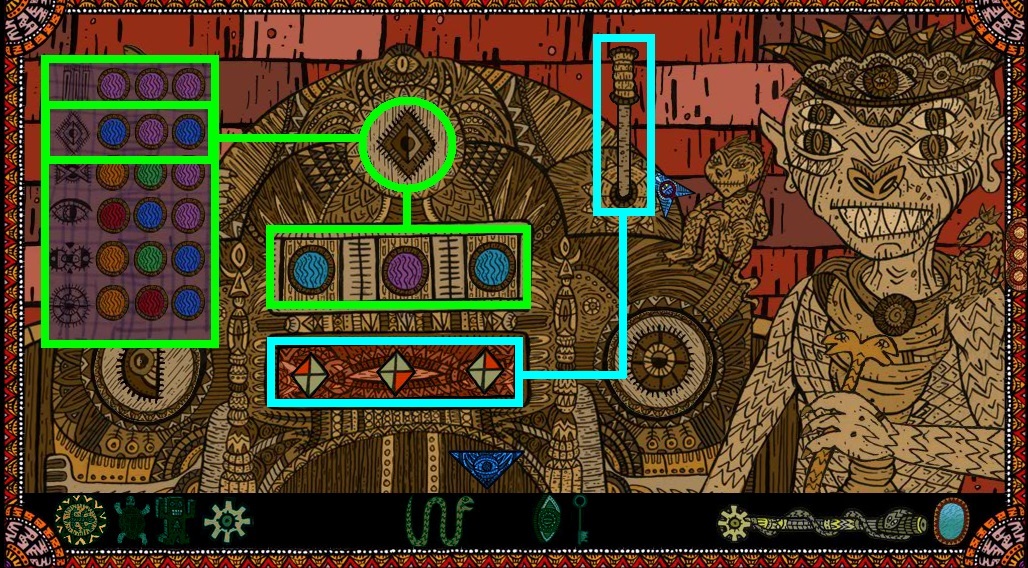
Back away from the device and inspect the picture hanging on the right wall.
You'll see a chart with a list of colored circles and symbols matching those you just saw on the lever mechanism.
Find the three symbols (the semicircle, diamond, and circle) you also recently saw on the device, and note the color pattern that is associated with each of those symbols.
Semicircle = Yellow - Green - Purple.
Diamond = Blue - Purple - Blue.
Circle = Yellow - Red - Blue.
Go back to the lever device and click it for a closer look.
Set the top button to the diamond symbol if it isn't already showing.
Remember the color order for the diamond symbol that you saw in the picture a moment ago?
Change the three colored buttons to Blue on the left, Purple in the middle, and Blue on the right.
Screenshot.
Pull the lever to reveal the panel below the colored buttons. Memorize the patterns of the three diamonds that appear in the panel.
Each diamond has a red triangular section inside of it.
The left diamond has a red triangle in the upper left section, the middle diamond has a red triangle in the lower right section, and the right diamond has a red triangle in the upper right section.
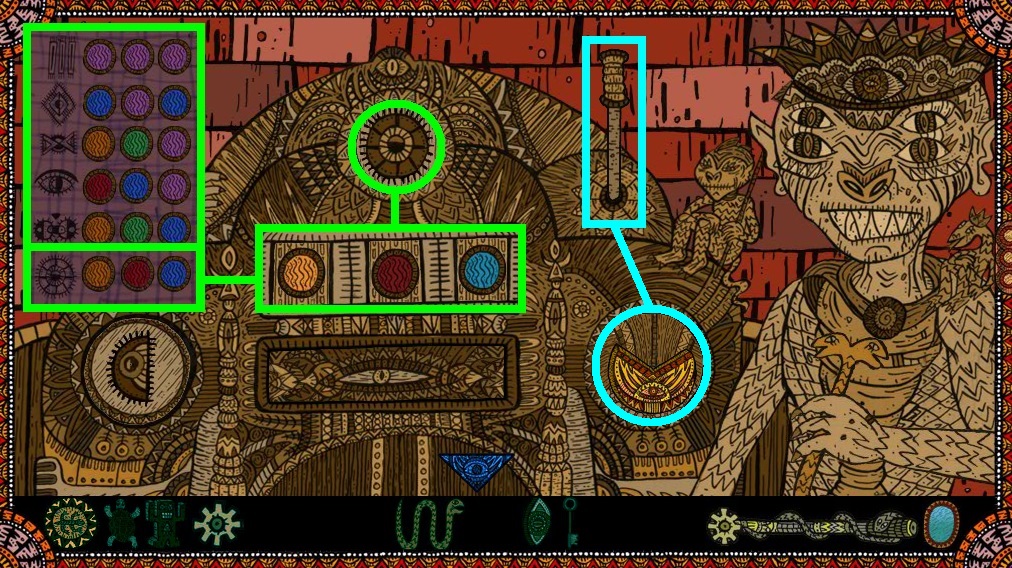
Next, click the button at the top to change its symbol from a diamond to a circle.
Adjust the colored buttons to match the pattern seen on the picture beside the circular symbol.
Left = Yellow, Middle = Red, Right = Blue
Screenshot.
Pull the lever to reveal a hidden compartment at the right side of the mechanism, and take MEDALLION PIECE (1/2) inside.
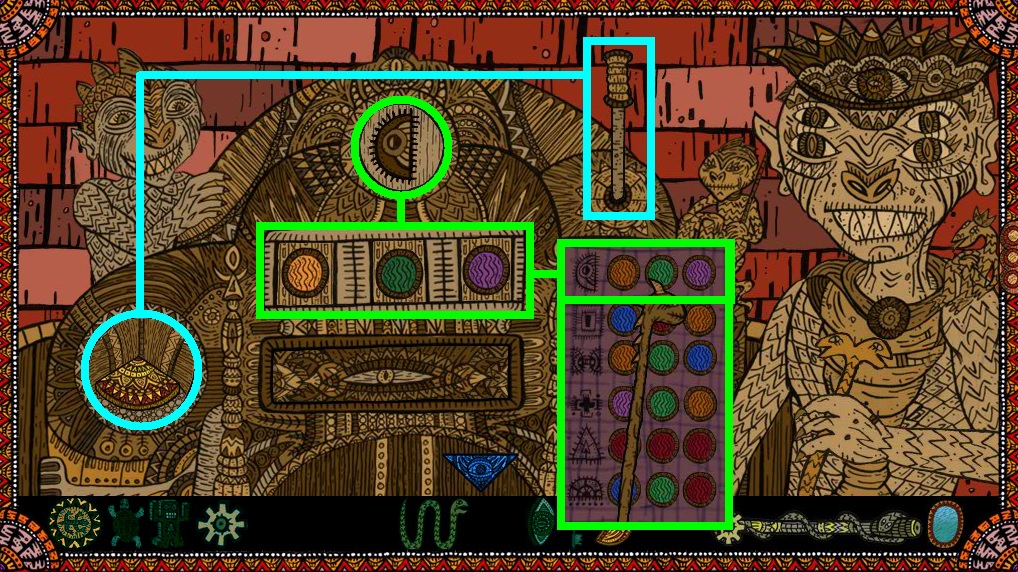
Change the top button once again from the circle symbol to a semicircle. Enter in the color pattern for the semicircle symbol that you found in the picture.
Left = Yellow, Middle = Green, Right = Purple.
Screenshot.
Pull the lever to open the second compartment. Take the MEDALLION PIECE (2/2) from the compartment revealed at the left side of the mechanism.
Add the two MEDALLION PIECES from your inventory together to create the completed MEDALLION.
Move back twice to return to the hallway.
Inspect the framed picture hanging on the left wall.
At the bottom of the frame you'll see a familiar pattern: three diamonds containing red triangles.
Click the diamonds to adjust the location of the red triangle within each diamond. Recreate the pattern you found within the panel on the lever device in the previous room.
The red triangle in the left diamond should be in the upper left quadrant.
In the middle diamond, the red triangle is at the lower right quadrant.
The red triangle in the right diamond is at the upper right quadrant.
Once the right combination is entered, click the painting to reveal the cache behind it.
Take the ORNATE TRIANGLE that the red snake statuette has its tail wrapped around.
Back up to the main view of the room, then go through the doorway at the end of the hall to enter the room containing a massive snake statue. From there, walk through the right doorway to the room with a female statue perched on top of a large, triangular stone.
Click the front of the triangular stone to remove the cover and reveal the mini-puzzle.
Click the sections of the triangle in the correct order to find the hidden secret inside.
When a correct section of the triangle is selected, the block will become highlighted with a reddish tint.
However, the puzzle will automatically reset if you click an incorrect block out of order.
Start with with the small piece at the top, then work your way counter-clockwise around the triangle.
The final order is: Top, upper left, lower left, lower right, upper right.
Screenshot.
After the puzzle is solved, insert the ORNATE TRIANGLE from your inventory into the empty space at the bottom of the stone triangle.
This will cause the giant snake in the adjoining room to open its eyes, shining a light that bounces off the mirrors and reflects all the way to the gorgon statue.
Follow the light back to the gorgon statue, then go through the left doorway into the snake king's room.
Do you remember the diagram of the snake king found on the third page of the book held by the left statue?
Place the MEDALLION from your inventory (that you combined from the pieces at the lever device) at the top of the snake king's staff.
Screenshot.
Note how the light shining from the snake king's staff passes between the hands of the short statue at the right side of the room.
Put the MIRROR you picked up in the closet into the impish statue's hands to reflect towards the gorgon statue in the other room.
Return to the gorgon statue room, then climb up the stairs on the right to go back to the room with the column. From there, click the left doorway to reach the waterfall.
On the ground to the right of the waterfall, you'll see a semi-circular device that should look familiar.
Refer to the diagram you found earlier at the side room, inside the book held by the right statue.
Add the LEVER AND GEAR from your inventory (make sure the two items are combined) to the device to repair the lever mechanism.
Pull the lever to stop the flow of the waterfall.
Screenshot.
Back up after the short cutscene to find a secret passage has appeared where the waterfall used to be. Enter the room to find the hidden chamber.
Insert the PATTERNED DISC (from the unlocked chest in the side room with the reading statues) into the round space on the standing statue's headdress.
Follow the beam of light that travels from her mouth back to the gorgon statue room.
At this point, all three beams of light from around the temple should be aimed at the orb the gorgon statue is holding.
Examine the button at the middle of the pedestal the gorgon is seated on.
Click the glowing hand to reveal the compartment behind it. Take the GREEN GEM inside the compartment.
Posted by: Trinn |
May 13, 2013 11:12 AM
|
May 13, 2013 11:12 AM