
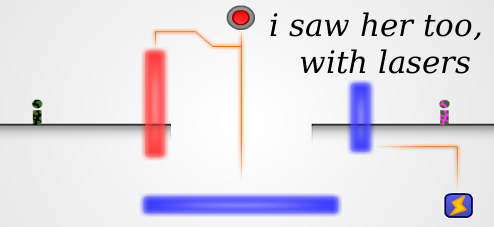
![]() Person meets girl meets grisly end... it's a tale as old as time, or at least as old as krangGAMES's zombie love story I Saw Her Standing There. It was a puzzle game about eternal devotion, misplaced affection, and the rending of flesh and stuff, and now with the sequel, I Saw Her Too, With Lasers, you get to carry on the legacy from a new perspective. Namely, as a scientist who is trying to find a way to cure our two zombified lovers who only want to be together... using the powers of lasers, holograms, and more to unite them in a peeling, squishy, smelly embrace. Still a better love story than... nah, that joke's old. Accurate, but old!
Person meets girl meets grisly end... it's a tale as old as time, or at least as old as krangGAMES's zombie love story I Saw Her Standing There. It was a puzzle game about eternal devotion, misplaced affection, and the rending of flesh and stuff, and now with the sequel, I Saw Her Too, With Lasers, you get to carry on the legacy from a new perspective. Namely, as a scientist who is trying to find a way to cure our two zombified lovers who only want to be together... using the powers of lasers, holograms, and more to unite them in a peeling, squishy, smelly embrace. Still a better love story than... nah, that joke's old. Accurate, but old!
 Your goal in each level is to guide your two zombie test subjects to reach one another by clicking the icons to activate various mechanisms around your lab. Lightning bolts activate and deactivate laser blockades and platforms, for instance, while holograms of delicious humans can be turned on to lure them around. Once close enough to each other, they'll automatically be drawn together, so all you have to do is make sure the coast is clear. Since the cure is all the way in the back of the lab because of... reasons, I guess, you need to work your two lovebirds through increasingly complex setups that get more and more dangerous to them. Just hit [R] to restart if you get stuck and would rather not send one zombie to an untimely redemise to reload the level.
Sound different from the original? Absolutely, and for some players perhaps too different. Instead of platforming, I Saw Her Too relies on timing and manipulation of your surroundings rather than giving you direct control of a character. It's challenging in a very different way, though its snarky sense of humour and clever premise remains happily intact. While the various mechanics are actually fairly clever and require a satisfying amount of planning to get around, scrambling to click on a bunch of icons strewn around the scene isn't everyone's idea of a good time, and having different hotkeys for each one might have made for a more streamlined experience... if perhaps a bit too much easier. The complexity of each level ramps up fairly quickly, though it usually feels like the difficulty is solely down to timing rather than actually figuring out what the proper course of action is. As most of gamers come with a genetic allergy to change, I Saw Her Too, With Lasers might be a bit much to swallow if you preferred the platforming elements of the original. But taken purely on its own merits, it's still a cheeky, smart twist on a puzzle game with some crafty challenges and a great sense of humour. It might be a little itchy... but it's definitely still tasty.


Walkthrough Guide
(Please allow page to fully load for spoiler tags to be functional.)
I Saw Her Too, With Lasers Walkthrough
(Reminder: "He" is the black zombie. "She" is the pink zombie.)
I clicked the power button down below, and the blue lasers turned off, allowing them to be together.
I made sure to turn on the rightmost power button before clicking the other two, so they wouldn't fall to their deaths (re-deaths?).
The round button only activated what it was tied to when held. It produced a hologram which she was attracted to. I got her above the platform he was on, then turned off the laser.
The zombies only responded to holograms on their horizontal level. I eased them down one platform each with the two top holograms, then used the bottom-most hologram to lure him off his platform. Immediately I had to hold the second button from the bottom to keep the blue laser on and give him something to stand on, while she jumped down to meet him.
I had to be careful of the red lasers, as they were deadly even to the undead. I turned off the blue laser on the right and immediately had to hold the button down, letting go once they were in free-fall so they could land on the horizontal blue laser.
I turned on the hologram, then had to hold the left button up above, then the right, to keep her safe from the red lasers. Once she was in free-fall, I quickly held the button down below to give her a safe platform, then let go once she was off the blue laser so neither of them would be fried by the red laser.
This was relatively easy; I just had to hold the button before they got there.
The glowing blue and orange spots on the ground were switches that toggled when they stepped on them. First I tripped the right power switch, then once she turned on the red laser I used the left power switch to drop them onto the platform below. They were safe there; he would toggle the other red laser.
First I used the upper-right hologram to lure her to the right, making sure she stopped ON the switch, not past it (otherwise she'd trip it again on the way back). Then I could use the other switch to lure her back to the left, stopping her on the blue laser. Now it was his turn; with the lower left hologram, I lured him so he tripped the other switch (it wasn't a big loss if he passed it). This made it safe for me to turn off the blue laser, dropping her to his level.
The green zombies were bad; they chased both her and him, and I had to avoid letting them touch either of them. I turned off the left blue wall first, so the green zombie would chase him and I could fry it with the red wall. I could then turn off the right blue wall and allow them to meet.
I first turned on the rightmost power switch, stopping the green zombie on the button. Then I used the holograms on the left to lure him off his ledge, and watched as the green zombie fried itself with the red laser on its way to her. Then I used the right switch again to lure him down to her level, and he turned off the red wall and united with her once more.
For this level I began with the rightmost switch, dropping her down to the green zombies' level. The next part was tricky: I had to use precise clicks to fry each green zombie with the red wall, but I had to be delicate so he wouldn't hit the other red wall. The important thing was to let each green zombie touch the left edge of the wall. Once they were all taken care of, I used the leftmost switch and she came down to him.
I used the middle switch to turn off the blue floor the green zombie was on, then quickly turned it back on and turned on the rightmost hologram. I then turned the leftmost switch back off with just the right timing so she made it across, but the zombie didn't; I also had to turn off the rightmost hologram before she reached the switch. The green zombie then fried itself trying to reach him, and I could use the rightmost hologram again to make her trip the switch, then use the leftmost hologram to lure her into the pit as well, where he and she could meet.
This was an exercise in timing. He moved when I held the rightmost button, but she moved when I didn't. After turning off the blue laser with the middle switch, I toggled the rightmost switch so he and she would turn off the lasers for one another until he could turn off the horizontal blue laser. Then I quickly used the leftmost button to turn her around, making sure she pressed the fourth button twice on the way back so that laser wouldn't get in their way.
The green laser was bouncy. I timed my toggling of the lasers so the green one would bounce him up to her level, and he would have something to land on.
I used the left button to drop the green zombie. Once it hit the switch to turn off the red lasers, I quickly bounced her into the air with the right button, then fried the green zombie with the middle button. It was then a simple matter of luring her down to him with the left button again.
The rightmost button was of no use other than to reset after messing up. I turned off the leftmost switch, then used the middle button to bounce the green zombie up to the upper level; I then quickly had to turn the left switch back on so he wouldn't fry himself. Once the green zombie had turned off both switches and fallen to its death, I could turn off the left switch again and use the middle button to bounce him up to her.
The purple lasers teleported zombies to one another. I turned the switch off and back on again with just the right timing so he would teleport to the left and they could meet.
This was another exercise in timing. I held and released the button with careful timing to guide them across the lasers as the green zombie turned them off and on. Once I learned to stop them at the edge of the platforms and let them move only immediately after a toggle, it was a lot easier.
I used the upper hologram to lure her all the way off the edge, the green zombies chasing after her, and watched as she teleported back to her starting point and the green zombies fried themselves. Then I used the lower hologram to lure him to the right and turn off the red laser, after which I could use the upper hologram again to bring her off the edge again, and they were together.
This one had to be done carefully. I dropped the green zombie down one level with the right button, and watched it teleport down. Then I used the left switch to bounce it back up to his level, and had to hold the right button again to guide him away. I stopped him just to the right of the purple laser, so the zombie would teleport again but he wouldn't. After the green zombie plummeted, I used the right button again to lure him to her.
Posted by: SonicLover |
November 2, 2013 11:48 AM
|
November 2, 2013 11:48 AM