
100 Doors: RUNAWAY
Platform: iOS, Android
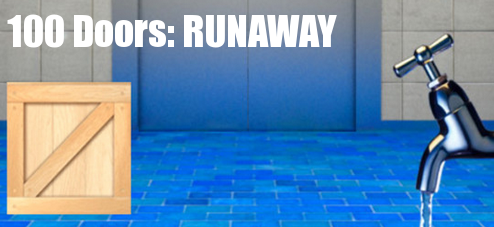
![]() From the prolific developer Gipnetix Games, creator of 100 Doors of Revenge and 100 Doors 2013, 100 Doors: RUNAWAY drizzles some new point-and-click room escape puzzles into your day, one locked door at a time. Featuring over 90 brand new levels, it's your job to solve a series of single screen puzzles by touching, swiping, pinching, shaking and tilting to manipulate on-screen objects so you can get the door open. 100 Doors: RUNAWAY boasts a more relaxing set of puzzles than previous games, focusing more on local logic than math-based riddles. Get ready to do some mobile experimentation as you scratch your head over the new brain teasers!
From the prolific developer Gipnetix Games, creator of 100 Doors of Revenge and 100 Doors 2013, 100 Doors: RUNAWAY drizzles some new point-and-click room escape puzzles into your day, one locked door at a time. Featuring over 90 brand new levels, it's your job to solve a series of single screen puzzles by touching, swiping, pinching, shaking and tilting to manipulate on-screen objects so you can get the door open. 100 Doors: RUNAWAY boasts a more relaxing set of puzzles than previous games, focusing more on local logic than math-based riddles. Get ready to do some mobile experimentation as you scratch your head over the new brain teasers!
NOTE: This game was played and reviewed on the Nexus 4. Game was available in the North American market at the time of publication, but may not be available in other territories. Please see individual app market pages for purchasing info.


Walkthrough Guide
(Please allow page to fully load for spoiler tags to be functional.)
100 Doors: RUNAWAY Walkthrough
Levels 1-9
Level 1
Drag the green arrow button to the right end of the slider.
Tap the open door to complete the level.
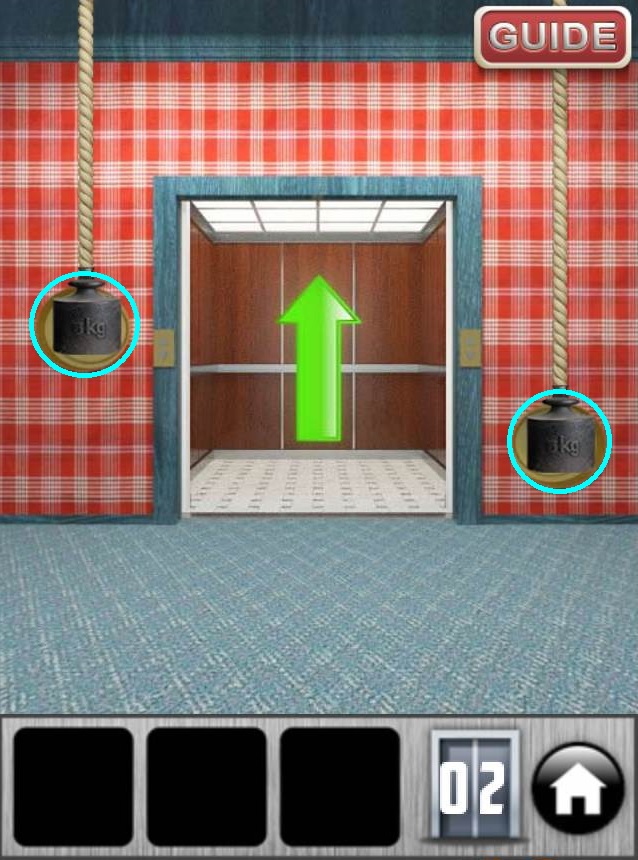
Level 2
You can tap and drag the weights hanging from the ropes to adjust their height.
Pull down both weights so that they are in front of the two buttons on the wall.
Solution
Tap the open door to complete the level.
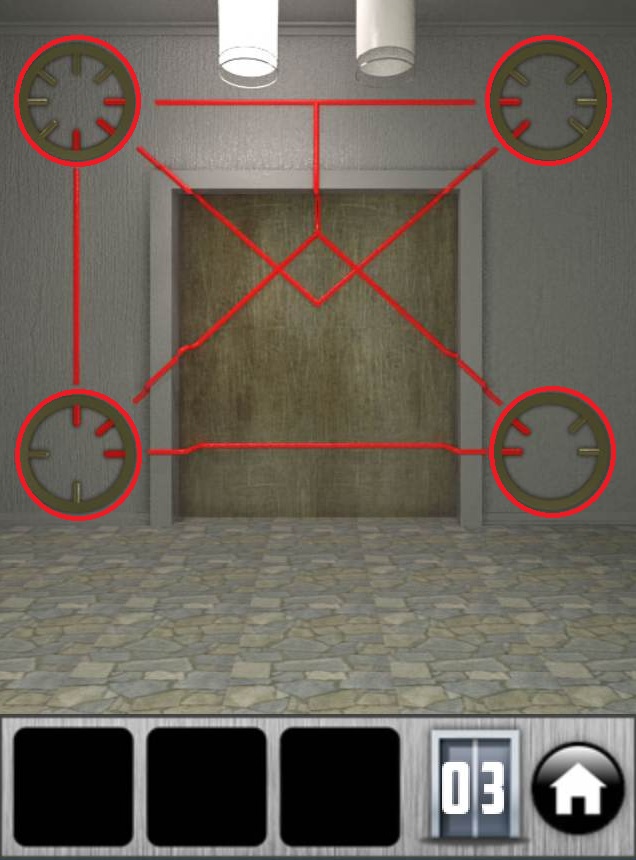
Level 3
Turn the wheels at each corner of the room so that the red pegs inside the wheel match up with the red lines in the pattern over the door.
Tap the upper left wheel three times, the upper right wheel twice, the lower left wheel once, and the lower right wheel three times to position each of them correctly.
Solution
Tap the open door to complete the level.
Level 4
Read the sign above the door: "Door No. *255"
It's a math equation. The door number is 4 (as in level 4) multiplied by 255.
4 * 255 = 1020.
Tap the electronic lock on the wall to the left of the door for a close-up view.
Press the buttons to enter the code 1020.
The green bulb at the lower right corner of the numpad will light up when the correct password is entered and the door will open automatically.
Tap the open door to complete the level.
Level 5
Place each object into the correct bin by dragging the item and releasing it over either the round trash can or the square trash can.
First, drag the crate into the square bin on the right.
Drop the ball into the round bin on the left.
Drop the television into the square bin on the right.
Drop the balloon into the round bin on the left.
Drop the globe into the round bin on the left.
Drop the footrest into the square bin on the right.
Tap the open door to complete the level.
Level 6
Note the diamond pattern on top of the door.
The 5 lines at the sides of the diamond indicate the correct positions of the switches on the left and right wall.
Leave the top and bottom switches untouched on both sides. They should be all the way in towards the door.
Tap the middle switch on the left side once so that it's all the way out, as far as possible away from the door.
Do the same with the middle switch on the right side, however you will need to tap that one four times rather than just once.
Lastly, adjust the second highest and second lowest switches on both the left and right sides so that they are in the middle of their sliders.
Solution
Tap the open door to complete the level.
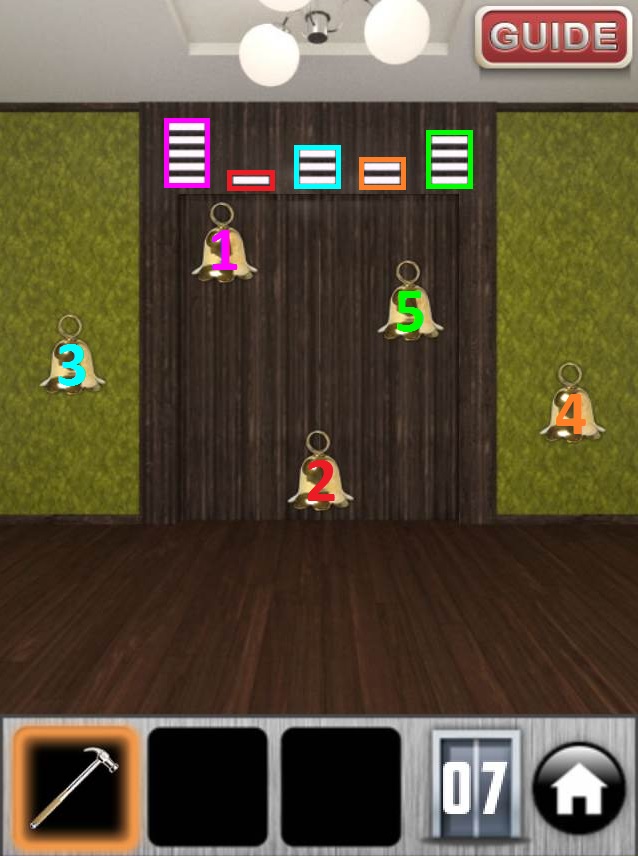
Level 7
Pick up the HAMMER on the left side of the floor.
Examine the sequence of lines at the top of the door.
The height of the lines refers to the height of the five bells and the pattern of the lines from left to right indicates the order that you must strike the bells.
In other words, since the first lines in the pattern are the highest (5 bars high), that means you hit the highest bell first. The next line is the lowest (only 1 bar high) so you hit the lowest bell second, etc.
Select the HAMMER in your inventory and use it to strike the bells in the correct order. Refer to the screenshot below for the solution:
Solution
Tap the open door to complete the level.
Level 8
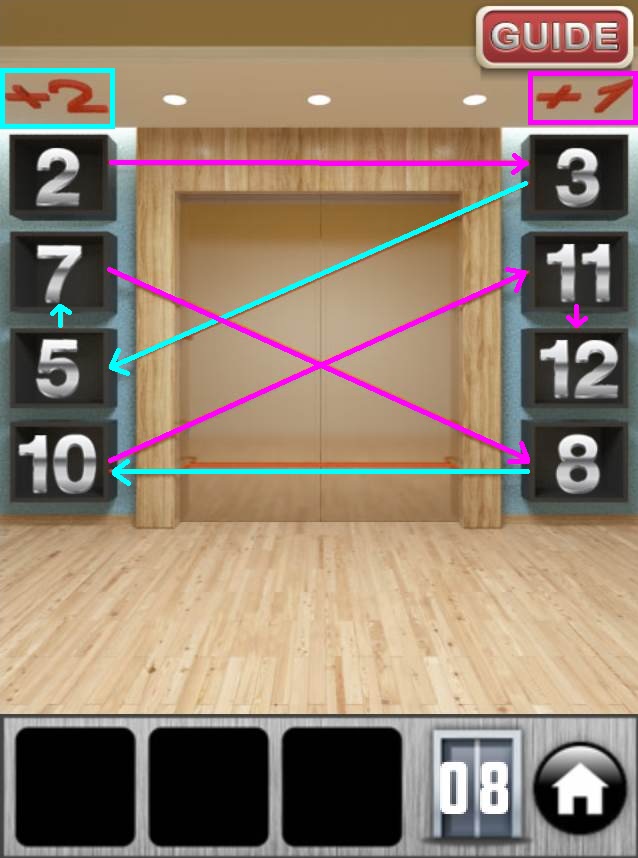
On either side of the door you'll see a column of numbers connected by a red string.
Note how the left side has a +2 above it and the right side has a +1.
If you follow the red line, you'll see it starts at 2 at the top of the left side, then moves to the top of the right side where the number changes to 3.
Continue to follow the line, adding +2 to the current number if it stops at the left side or +1 if it stops on the right. Simply tap the numbers to change them from 0 to 12.
Starting at the beginning of the line the final order is:
2 - 3 - 5 - 7 - 8 - 10 - 11 - 12.
Solution
Tap the open door to complete the level.
Level 9
Place the weights on the scales so that the left and right sides are both equal.
First take the 2T weight off the left side and move it to the right side (tap and drag the weight to move it, then release it to set it down.
The right side should now weigh 12T.
Next, put all four 3T weights on the left side.
Both sides are now 12T and the door opens!
Tap the open door to complete the level.
Levels 10-19
Level 10
Take a look out the window to see a starry night sky.
At the upper left corner is a clock stopped at 8:15. Since it's night out, you know it's 8:15 pm.
Tap the electric lock at the left side of the door to take a closer look.
Press the buttons to enter the time as you would in a 24 hour clock, a.k.a. military time, 20:15.
Tap the open door to complete the level.
Level 11
Pick up the BLUE ORB from the floor.
Place the BLUE ORB into the round hole at the lower left side of the green rectangular tunnel.
Turn your device counter-clockwise in a circle to roll the ball through the tunnel and into the goldfish bowl.
Tap the open door to complete the level.
Level 12
Collect the items scattered around the room (you can only take 3 at a time):
The HOCKEY PUCK is at the center of the tennis racquet on the wall.
The AIRPLANE is inside the fish tank.
The TENNIS BALL is in the goal.
The BOAT is out the open window.
The SOCCER BALL is on the end of the hockey stick.
Then put each of the items from your inventory where they belong:
Place the HOCKEY PUCK above the end of the hockey stick.
Place the airplane in the sky outside of the window.
Place the TENNIS BALL on to the middle of the tennis racquet.
Place the BOAT into the fish tank.
Place the SOCKET BALL inside the goal.
Tap the open door to complete the level.
Level 13
Note the diagram on the door, it shows a big square with an arrow pointing to a little square.
The picture indicates that you must tap the objects at the sides of the door in order from biggest to smallest.
Simply tap the image on the left or right side of the door to select the objects in this order:
Burj Al Arab (the sail-shaped building) - Airplane - House - Chair - Ball - Mouse.
Tap the open door to complete the level.
Level 14
The mass of 10's at the top of the door are your only clue: you must add the numbers at the right side of the door so that they equal 10.
Tap a number to select it, then tap a different number to add the 2 together.
If the sum is correct, you'll hear a chime. If it's incorrect, you'll hear a loud "ding-dong" sort of beep.
Pull the lever at the left side of the door by tapping it to change the set of numbers. You need to find a correct sum of 10 for each set of numbers to complete the level.
In the first set, tap 6 and 4.
In the second set, tap 2 and 8.
In the third set, tap 2, 3, and 5.
In the fourth set, tap all the numbers: 2, 2, 2, and 4.
Tap the open door to complete the level.
Level 15
Pick up the HAMMER on the floor.
Use the HAMMER to hit the red button on the device at the right side of the room.
Count how many button presses it takes for each square at the left side of the room to disappear.
You can reset the squares by pushing the "RESET" button at the upper right corner of the room.
The red gem at the top requires 4 pushes of the button.
The green gem requires 2 pushes.
The blue gem requires 5 pushes.
The multicolored gem requires 7 pushes.
Tap the electric lock on the wall above the door for a close-up view.
Enter the combination of button presses to open the lock: 4-2-5-7.
Tap the open door to complete the level.
Level 16
Take the glowing WAND in front of the door.
Place the WAND inside the space in the wall to the right of the door.
If you tap and hold the wand, it shoots a blue beam of light towards the round crystal which then reflects the light downward.
Position the crystal ball directly above the bucket. Tap and hold the wand to shine the light through the crystal and into the bucket.
If you shine the line into the bucket for a few seconds, a KEY will appear at the top of the bucket.
Take the KEY and use it to unlock the door, then tap the open door to complete the level.
Level 17
Drag the bear from the left side of the screen all the way to the tree on the right.
Shake your device to drop the bees nest into the bear's hands.
Tap the open door to complete the level.
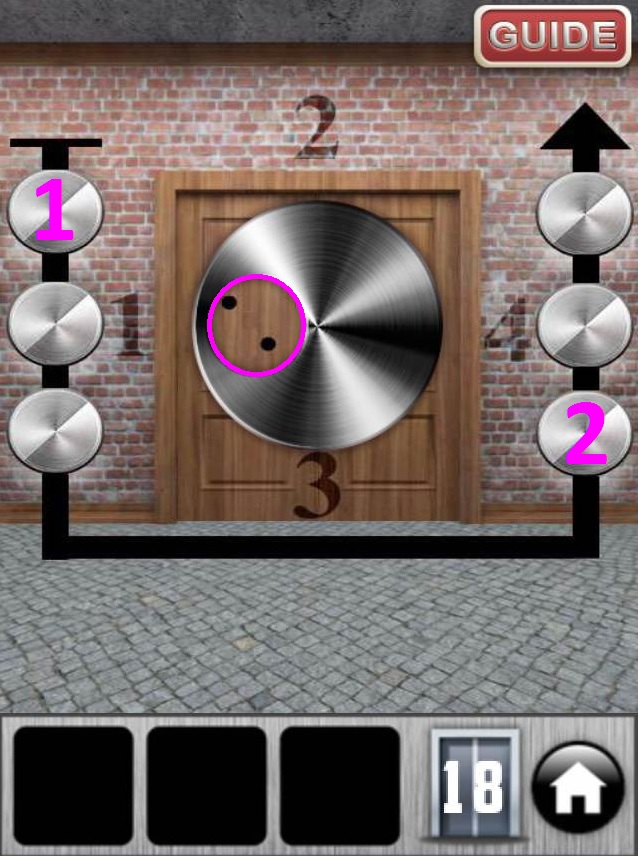
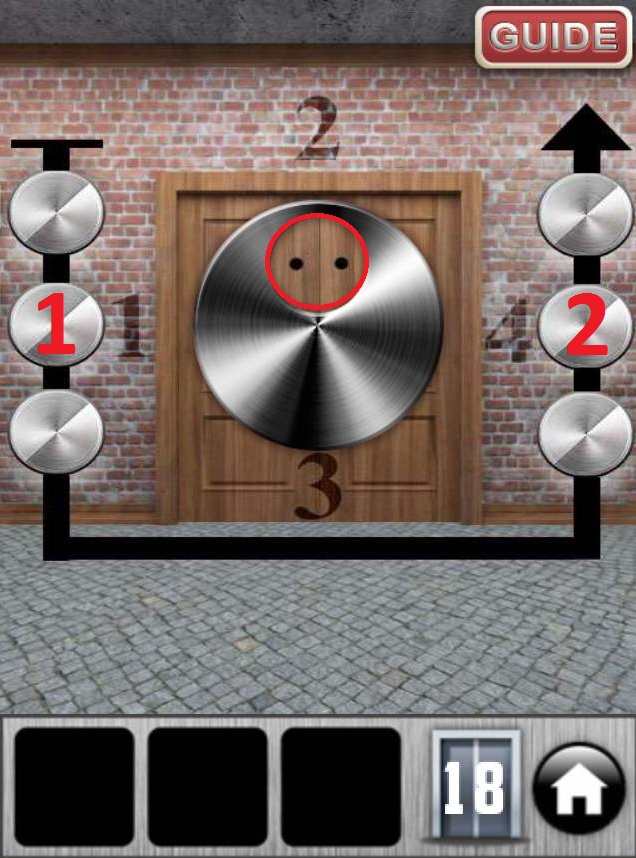
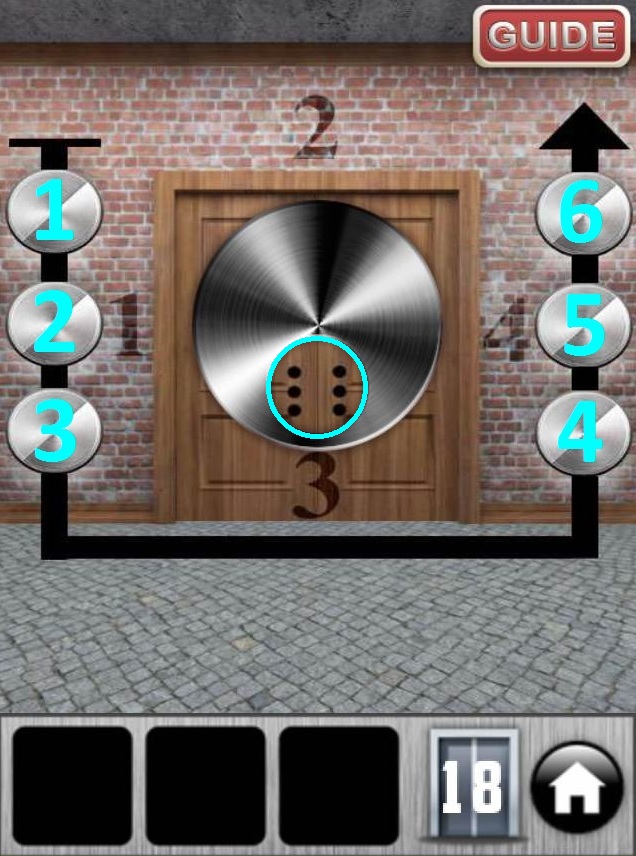
Level 18
Tap the disc over the door to rotate it. Pay close attention to the pattern of dots that appears in the window of the disc when it's positioned beside each number.
When the window of the disc is beside the number 1, you'll see two diagonal dots.
At point 2, you'll see two horizontal dots.
At point 3, there are six dots separated in rows of three.
At point 4, you'll find four dots positioned like the corners of a square.
Tap the buttons on the wall at the sides of the door in the same order indicated by the dots. Make sure to follow the line of the arrow!
First, you need to push the top left button and then push the bottom right button.
Solution
Next, push the middle button on the left side, then push the middle button on the right side.
Solution
After that, you have to push all six of the buttons, following the order of the line of the arrow. In other words, push the three buttons on the left side from top to bottom and then push the three buttons on the right side from bottom to top.
Solution
Lastly, push the upper left button, then the lower left button, then the lower right button, and finally the upper right button.
Solution
If you've entered all the button combinations correctly, the door will pop open. Tap the door to complete the level.
Level 19
Take the STICK leaning against the button of the left support beam.
Use the STICK on the giant gear at the right side of the room four times to open the door.
Tap the open door to complete the level.
Levels 20-29
Level 20
Note the equation on the wall above the door: triangle plus square = 7.
The points of both shapes are highlighted with a red dot, indicating that value of each shape is equal to the number of its points.
Follow the pattern of shapes on the door starting at the bottom and going up, as suggested by the arrow on the wall to the left of the door:
Square(4) - Triangle(3) - Square(4) - Triangle(3) - Circle(0) - Arrow(7) - Diamond(4).
Now tap the electric lock to the left of the door to zoom in.
Enter in the number of points of the shapes on the door. You don't need to add them together, just list them:
4-3-4-3-0-7-4.
Tap the open door to complete the level.
Level 21
Drag the items on the chains to pull them downwards. Arrange the objects from lowest to highest in order of heaviest to lightest.
Pull the oven all the way down, which will also tug the bottle all the way up.
Move the television down just slightly higher than the oven, which also pulls the apple just slightly lower than the bottle.
Lastly, pull the weight down until it's only a little bit higher than the television, which will also pull the teddy bear to a position slightly lower than the apple.
Solution
Tap the open door to complete the level.
Level 22
Drag the crate to the right so that it's directly under the red button on the ceiling.
Tap and hold the water tap to fill the room with water.
Wait until the crate rises up on the water and hits the red button to open the door.
Tap the open door to complete the level.
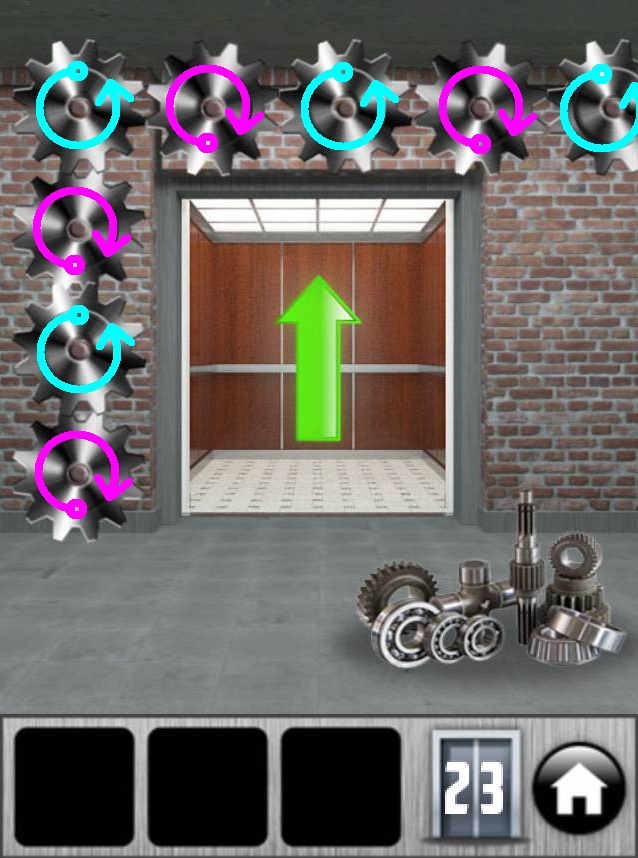
Level 23
Take some gears from the pile of parts on the floor, you can carry up to three at a time.
Place a gear on the pegs on the wall around the door to find the direction it spins, clockwise or counter-clockwise.
Arrange all eight of the gears on the wall so that only gears spinning in opposite directions are next to each other.
Solution
Tap the open door to complete the level.
Level 24
Tilt your device towards the left to roll a white ball down the slide, then tap the BALL to pick it up.
Throw the BALL at the peacock painting on the wall to smash it.
Gather up the pieces from the floor to get a BLUE TRIANGLE SHAPE, an ORANGE TRIANGLE SHAPE, and GREEN DIAMOND SHAPE.
Use the three shapes to fill the empty spaces in the geometric pattern on the door:
Place the ORANGE TRIANGLE SHAPE into the space at the upper left corner of the door.
Insert the BLUE TRIANGLE SHAPE into the space at the upper right corner of the door.
Lastly, put the GREEN DIAMOND SHAPE into the matching space at the left side of the door.
Level 25
Simply swipe across the door in the direction indicated by the arrows.
You'll hear a chime and the door will change each time you make a correct motion.
Swipe to the right on the first door.
Swipe to the left on the second door.
Swipe downward on the third door.
Swipe upward on the fourth and final door.
Level 26
Examine the different foot prints on the ground as well as the drawings on the wall above the door.
From left to right you'll see a human, a deer, a bird, a spider, and a snake.
Tap the electric lock to the left of the door for a close-up view.
Enter the number of legs for each animal drawn above the door.
The human has two legs, the deer has four, the bird has 2, the spider has 8, and the snake has none.
Therefore the code is: 2-4-2-8-0.
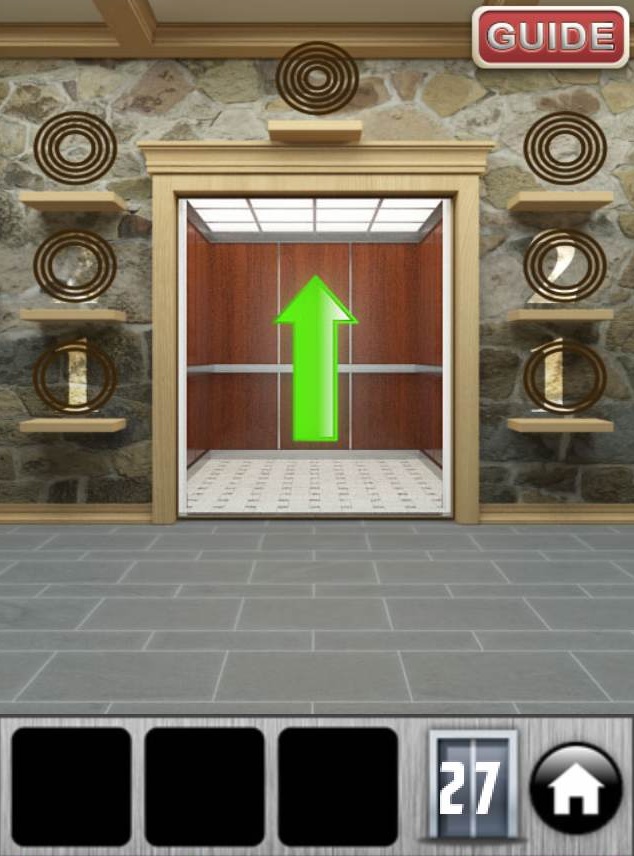
Level 27
Tap and drag the target on the shelf above the door to find that it's actually a stack of several different circles.
Note how many rings are inside each circle, then organize them on the shelves according to that number.
Circles with only one inner ring go on the two bottom shelves labelled "1"
Circles with two inner rings belong on the two middle shelves labelled "2"
Circles with three inner rings go on the two upper unlabelled shelves.
The last remaining circle with four rings should remain on the single shelf at the top of the door.
Solution
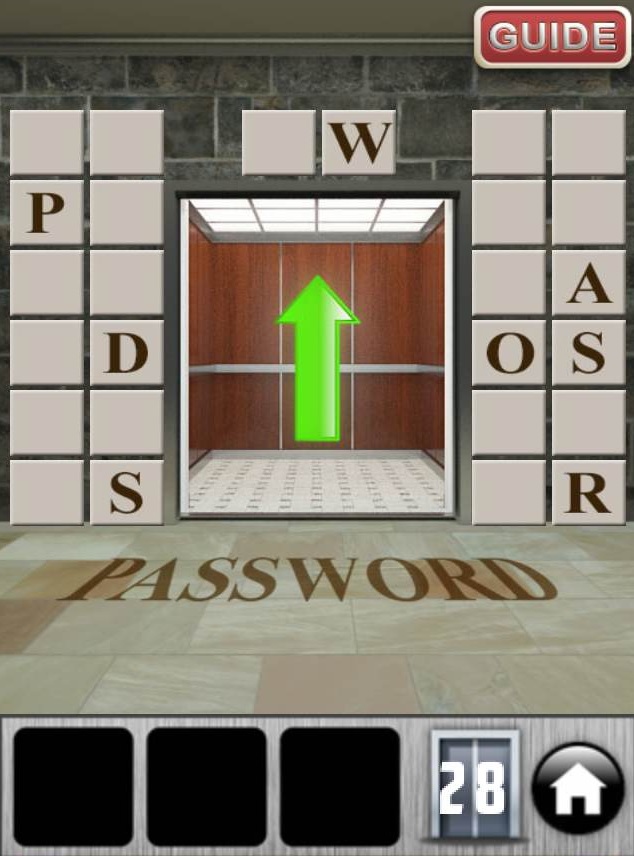
Level 28
Note the word "PASSWORD" written on the floor and the letter P tile on the wall to the left of the door.
Press the tiles to reveal the letters behind them. All of them will only flash momentarily, except for the letter A which stays revealed.
Locate the remaining letters of "PASSWORD" and press their tiles in the correct order until the entire word is revealed.
If you miss a letter tile, all of the uncovered tiles will reset and you will have to start from the beginning.
The locations of the correct tiles is randomized each game, so it's a matter of trial and error to find their positions.
Refer to the screenshot below as an example, but not as the definitive solution as yours may be very different.
Solution
Level 29
First hold your device upright so that the two blue orbs fall down to the lower red buttons.
Next, tilt the top of your device downward to roll the blue orbs into the red buttons at the top of the ceiling.
Now comes the tricky part: tilt the bottom of your device downward slightly until the two orbs are exactly in the middle of their paths.
At that point, quickly tilt your device towards its right side to drop the right orb into the side space beside its path.
Now you can move the left orb up or down without adjusting the right orb.
Tilt the top of your device down again to roll only the left blue orb into the top button.
Carefully tilt your device towards its left side to roll the right orb out of its side space.
Lastly, tilt the bottom of your device down so that only the right orb hits the bottom button. The door should then pop open.
In short, the pattern is:
Both orbs hit the bottom buttons.
Both orbs hit the top buttons.
The left orb hits the top button.
The right orb hits the bottom button.
Levels 30-49
Level 30
Tap the saw blade repeatedly until it starts rapidly spinning. You should also hear a clicking sound to indicate it's ready.
Quickly drag the spinning blade over the spears blocking the exit to remove them.
Press the green "OPEN" button to open the door, then tap the door to complete the level.
Level 31
Pick up the can of SPRAY PAINT at the left side of the room.
Use the SPRAY PAINT on the left and right ends of the plate above the door; you should hear two chimes to confirm you sprayed the right spots.
Tap the switch to the right of the door to turn off the lights.
While the lights are off, two 2-digit numbers should appear at the ends of the plate where you sprayed it.
You'll see the number 75 on the left and the number 39 on the right.
Tap the switch to turn the lights back on, then tap the electric lock to zoom in.
Enter the combination from the plate: 7-5-3-9.
Level 32
Take the MASK from the wall underneath the right chicken.
Drag all of the pillows to the area of the floor between the left chicken and the middle chicken. They need to be out of the way so that you can break the eggs on the floor.
Note the pattern of green dots on the door. Each dot has either a high, medium, or low height. The series when read left to right is:
Low, High, Medium, Medium, High, Low, Low, High.
Just like the dots on the door, if you take a look at the three chickens, you'll see they are on shelves of different heights.
The middle chicken is on the top height shelf, the right chicken is on the medium height shelf, and the left chicken is on the bottom height shelf.
Select the MASK in your inventory to put it on. Now you can use it to scare the chickens!
Tap the left, middle, or right chickens on the shelves to break their eggs on the floor in the same order as the dots on the door:
Left chicken - Middle chicken - Right chicken - Right chicken - Middle chicken - Left chicken - Left chicken - Middle chicken.
Level 33
Read the clues on the door and on the right side of the wall.
The clue on the door shows that the "code" is X, Y, and Z over 100.
The clue on the wall shows Y = X * X.
Find the value of X by counting the number of X's in the room. There are 6 yellow X's around the room and 1 white X on the door.
Therefore, X = 7. Now you can plug that into the equation on the wall.
Y = 7 * 7
Y = 49.
Now that you have the values of X and Y, you can enter them into the equation on the door.
7 + 49 + Z = 100.
56 + Z = 100.
Z = 44.
Tap the electric lock on the left side of the door to take a closer look.
Enter the values of X, Y, and Z into the lock:
7-4-9-4-4.
Level 34
Pick up the MALLET on the floor, the PAINT BRUSH in front of the paint can, and the BUCKET under the cement mixer.
Use the PAINT BRUSH on the paint can to coat the brush with white paint.
Fill the BUCKET with cement from the cement mixer.
Smash the three squares in the wall at the left, top, and right sides of the door with the MALLET.
Pour the cement from the CEMENT-FILLED BUCKET into the three holes.
Use the PAINT-COATED BRUSH on the newly refilled squares to paint them white.
Level 35
Pick up the pair of CLIPPERS off the ground at the lower left corner of the screen.
Tap the wire box to zoom in.
Cut the blue wire and both green wires with the CLIPPERS.
Leave the red wires untouched, both wires must be connected (you can re-use the CLIPPERS on a wire if you need to reattach them.)
Close the zoom window and tap the light switch on the left side of the door. Only the red lightbulbs should turn on.
Examine the wire box again.
This time, reattach the blue wire and cut all of the other green and red wires with the CLIPPERS.
Tap the light switch again. Only the blue light in the middle should turn on.
Inspect the wire box for the third and final time.
Use the CLIPPERS to reattach all the green and red wires, leaving the blue one untouched.
Now all of the wires should be reconnected.
Tap the light switch one last to turn on all the lights and open the door, then tap the door to complete the level.
Level 36
Tap and hold your finger over the wheel to rotate it, which lifts the bell off the floor.
While the wheel is held down, quickly tap the KEY on the ground to pick it up.
Use the KEY to unlock the door, then tap the open door to complete the level.
Level 37
Move the spinning gear to the different points to spin the other four gears as many times as the numbers at their center indicates.
Watch the white mark at the top of each gear to see when the gears make a full rotation.
First move the spinning gear up to Gear 5. Leave the spinning gear in place until Gear 5 makes five rotations, then move it back to the middle.
Although there's no particular order necessary to complete the level, I recommend starting with Gear 5 because the "Guide" button can obscure this gear.
Now move the spinning gear down to Gear 1. Keep the gear there just long enough to get Gear 1 moving, then quickly return the spinning gear to the middle so that Gear 1 only makes one rotation.
Next, drag the spinning gear to the left to Gear 3. Leave the spinning gear there until Gear 3 makes three rotations, then return it to the middle.
Lastly, move the spinning gear to the right towards Gear 4. After four rotations, return the spinning gear to the center.
If all of the gears made the correct amount of spins, the door should automatically open. Tap it to complete the level.
Level 38
Note the pattern carved into the wall at the top of the door:
Bottle, Bottle, Bottle, Light bulb, Light bulb, Door.
Count the amount of lightbulbs and bottles you see around the scene.
There are 3 lightbulbs on the floor and 6 hanging from the ceiling, totaling 9 lightbulbs.
There are also 9 bottles grouped at the right side of the floor.
Tap the electric lock to the left of the door to take a closer look.
Enter the code above the door by entering the number of each pictures object:
There are 9 bottles, 9 light bulbs, and 1 door so the combination is: 9-9-9-9-9-1.
Level 39
Tap the blue bin three times to take out three bottles.
Use each of the BOTTLES on the water faucet to fill them with water.
Next, use the water-filled BOTTLES on the white bin, which should turn all of them white.
Lastly, break the white BOTTLES on the rock at the middle of the floor.
Keep repeating this process to break the bottles on the rock until a KEY appears above the rock.
Use the KEY to unlock the door, then tap the open door to complete the level.
Levels 40-49
Level 41
Follow the arrow pattern on the door for the instructions to turn your device and tap the arrows on the wall.
First hold your device upright.
Tap all three arrows at the bottom of the door in order of: Right, Middle, Left.
Next, turn the device to its left side.
Tap two of the arrows on the left side of the door (which should now be at the bottom of your screen): first the Right arrow and then the Left arrow, do not tap the middle!
Now turn your device upside-down.
Tap all three arrows at the top of the door (which are currently at the bottom of your screen): Right, Middle, Left.
Finally, turn your device back to its left side again.
This time you have to tap the arrows at the right side of the door (which are at the top of the screen): first Left, then Right.
The door should automatically open, allowing you to tap it to move on to the next stage.
Level 42
Tap the tiles with light brown triangles that equal the sum of the numbers of the door: 11, 18, 9, and 15.
First tap the two adjacent 6 and 5 tiles at the lower right corner of the door.
6 + 5 = 11
You should hear a chime afterwards indicating a correct solution.
Next, tap the 8 tile at the center and then the two 5 tiles right beside it.
8 + 5 + 5 = 18.
Now tap the 3 and 6 tiles at the upper left corner of the door.
3 + 6 = 9
Lastly, tap the 7 and 8 tile near the lower left side of the door.
7 + 8 = 15.
When all the correct tiles have been pressed, the door should open automatically.
Level 43
Pick up the SCREWDRIVER on the floor.
Use the SCREWDRIVER on the open wire box to repair the wires.
Tap the top two lights at the right side of the door to turn them on.
Press the On/Off switch to activate them. You should hear a chime indicating a correct solution.
Turn off the top light and then turn on the bottom light instead. Hit the On/Off switch again to confirm the second solution.
Now turn off the middle light and tap the top switch to turn it back on again. Tap the On/Off switch one last time to open the door.
Level 44
Shake your device to drop the HAMMER down to the ground where you can pick it up.
Tap the hammer repeatedly on the glass wall blocking the door.
Every 6 taps, the glass will break a little move until the door is finally exposed after the 3rd round.
Level 45
Follow the clue of increasingly bigger squares at the top of door.
Tap the boxes within the door frame in order from smallest to largest.
Tap the open door to complete the level.
Level 46
Note the color clue above the door: a red R, green G, and a blue B.
Tap the "Play" button on the wall to send the orbs from the left pipe to the right pipe.
Count how many Red orbs, Green orbs, and Blue orbs you see in the air.
Tap the electric lock at the top left corner of the wall to zoom in.
Enter in the number of orbs per color as indicated by the RGB clue:
There were 4 red, 3 green, and 1 blue orb, so the code must be 4-3-1.
The door should open automatically when the correct code is entered, allowing you to exit.
Level 47
Take the BINOCULARS from the shelf.
Use the BINOCULARS on the small hole at the center of the ceiling to look through it.
You should see a set of numbers: 17539
Place the BINOCULARS on the large rock to break off a LENS.
Next, use the LENS on the bale of hay to burn through it, then pick up the KEY left on the floor.
Unlock the metal plate with the KEY, then tap the uncovered electric lock on the wall to take a closer look.
Enter the code seen through the hole in the ceiling, 1-7-5-3-9.
The door opens after the correct code is entered. Tap it to progress to the next level.
Level 48
Pick up the CHAIN SAW at the top of the door and the DOLLARS on the lower left corner of the ground.
Insert the DOLLARS into the money slot of the gas machine.
Use the CHAINSAW on the gas machine to fill it with fuel.
Select the CHAINSAW, then drag your finger along the yellow paint outline on the door to cut through it with the chainsaw.
This will only work if you start at the lower left corner of the door and end at the lower right corner.
Level 49
Take the CROWBAR the top left corner of the wall, where you should be able to only see its black handle.
Use the CROWBAR on the second highest right at the right side of the screen to pry it loose.
Now you should be able to pull out all of the rings to see the flags beside each one.
Solve the equation on each of the four tabs, going from top to bottom. The value of a flag is decided by the number of different colors it has.
The first tab at the top has the Ukranian flag (which has 2 colors) + the German flag (which has 3 colors).
2 + 3 = 5.
The next tab down is the South African flag, which has 6 different colors.
The third tab is the Selidovo flag (which has 4 colors) - the Polish flag (which has 2 colors).
4 - 2 = 2.
The bottom tab is the Bengali flag (which has 2 colors) * the Lithuanian flag (which has 3 colors).
2 + 3 = 6.
Tap the electric lock on the wall to the left of the door for a close-up view.
Enter the combination found from the flag equations: 5-6-2-6.
Levels 50-60
Level 50
Read the incomplete alphabet on the door and identify which letters are missing:
E, I, O, and U.
E is the 5th letter of the alphabet, I is the 9th, O is the 15th, and U is the 21st.
Tap the electric lock to the left of the door to zoom in.
Enter the combination of numbers found from the missing letters: 5-9-15-21.
Level 51
Take five LIGHTBULBS from the box - you can only carry up to three at a time - and place them into the light fixtures above the door.
Tap the switch on the wall to the left of the door to turn on the lights. The lights will come on in order from left to right.
Watch to see which lights stay on longest and which turn off more quickly.
Arrange the long-lasting lights in the left bulbs and the short lived lights in the right bulbs, then hit the switch to try again.
The door will open only if all the lights are illuminated at the same time.
Level 52
Pick up the SHOVEL from the floor.
Dig into the exposed ground with the SHOVEL to receive a pile of DIRT.
Use the SHOVEL on the ground for more times to dig out a SEED.
Place the DIRT and the SEED into the empty bucket.
Tap the water faucet five times to drip water into the bucket and grow the plant.
More coming soon!
Posted by: Trinn |
August 23, 2013 6:19 PM
|
August 23, 2013 6:19 PM