

![]() Ding! 47th floor. Now it's time to solve another puzzle that'll grant you access to the elevator car once again. Such is the progression through 100 Floors, a somewhat familiar escape puzzler by Tobi Apps Limited.
Ding! 47th floor. Now it's time to solve another puzzle that'll grant you access to the elevator car once again. Such is the progression through 100 Floors, a somewhat familiar escape puzzler by Tobi Apps Limited.
 The core concept of 100 Floors is simple. On each floor you're presented with a single screen containing an elevator door that you've got to figure out how to open. Tap, swipe, pinch, and do other things that your mobile device is capable of doing until finally the level is clear. If you pick up something, tap it in your inventory, then on the screen to use it. If you're getting frustrated, you can also tap the red "home" button to return to the main menu, or the blue "reset" button to restart the level.
"Wait a minute," I hear you exclaim. "Isn't this just DOOORS with an elevator and a bunch of new levels?" To which I reply, "Yes. Why, is there something wrong with that?" And there isn't. DOOORS had a good formula, and 100 Floors doesn't ruin it. Some of the puzzles lack polish—such as one where you have to be really good at tapping the screen rapid-fire—but they are creative and make good use of the device's capabilities. Plus, it's hard not to feel like a genius after cracking a particularly puzzling level.
100 Floors is a free app and is available for both iOS and Android devices. The team at Tobi Apps Limited is still adding puzzles to the game, but at the time of writing, the Android version features 70 floors, while the iOS version has 90. So go ahead and give it a try. I'll see you at the top floor!


Walkthrough Guide
(Please allow page to fully load for spoiler tags to be functional.)
100 Floors Walkthrough
(Note: This walkthrough is based on the iOS version. Although it assumes you are playing on an iPhone, you may substitute your own device as needed. This walkthrough will be updated as new floors are added.)
Main Tower
The game will walk you through this level. Just tap the green up button, then touch the green arrow to get into the elevator.
Slide the trash can out of the way and pick up the green button. Stick it in place above the red one, then repeat what you did on the previous level.
Shake your iPhone left and right, as the illustration shows. The doors should open.
Slide the doors apart (use two fingers simultaneously).
Tilt your iPhone towards you to make the ladder fall down, clearing the way to the elevator.
Tap the suns to turn them on. There's a fourth one hidden behind the plant on the right (slide it). Ignore the other three circles.
Tilt your iPhone left to slide the rock onto the red button.
Slide the fruit left and right to reveal the banana hidden under it all. Take it and give it to the gorilla.
Tap the large circles until they match the smaller circles. Don't forget, the borders change color as well.
Shake your iPhone back and forth to wake up the snake. Then slide your finger from the upper left corner of the door to the lower right. Start and end on the door!
Tilt your iPhone to get both balls onto the center circle and keep them there until all three lights turn on.
Tap the red buttons to make the black balls jump to the top. Tap lightly or they won't jump far enough.
Tilt your iPhone forwards to drop the hammer down (hold your feet to the fire, hold your face to the ground, etc., etc.), then pick it up and use it to smash the bricks. Keep at it until you've broken through.
Touch the hand sensor and don't move your finger until the door opens.
If you know a thing about pigpen cyphers, this'll be a breeze. Tap the numbers with borders corresponding to the symbols above. The solution is 1-6-4-3.
Take the screwdriver and use it to unscrew the panel, then take that as well (how are we even CARRYING that big thing?). Those trees look kind of upside-down, don't they? Hold your iPhone upside-down and the doors will open.
Tilt your iPhone left and right to roll the ball onto the buttons. Follow the lines on the doors: left once, right twice, left three times, left twice. If you do it right, the doors will open. If you screw up, just start over.
Tap the five blue squares; when they're all lit, the door will open, but each stays on for a different length of time. Best order to touch them: numbered from top to bottom, 1, 3, 4, 5, 2.
Take the red cloth and use it to clean the doors (rub).
Take the screw on the ground, slide the yellow sign away, put the screw in the exposed hole, and tighten it with the screwdriver.
Hold your iPhone upright vertically, perpendicular to the ground, and the eye should open. Keep it there until the doors open.
Smash the statue on the right with the hammer to reveal N-E-W-S. North is always up, so slide the door up, right, left, and then down.
Turn the light on (tap the green rectangle), then cover the buttons with the large grid you unscrewed several levels back. Note the arrow above the door; touch the four exposed buttons from right to left.
If you look hard, you can see two up arrows on the door. Slide the door up with two fingers, hold it, and touch the green arrow with a third finger. (I didn't even know the iPhone supported three-finger touches.)
Touch the buttons on the ground and listen to their tones. Set the leftmost slider at its lowest point, the second at its highest. The last two should be in the middle, but the third should be above the fourth.
You need to arrange the batteries to generate just amount of power to fill up the bar without overflowing it. The solution: 1 and 5 on the left, 1 and 20 in the middle, 5 and 20 on the right.
Slide the right silver box to the right to reveal a cracked wall, then smash it with the hammer. Take the crank and put it in the middle of the door, then turn, turn, turn.
This is all about tapping and pausing. Tap the door twice, wait a moment, tap three times, wait, tap once, wait, tap twice, wait. Make sure that the door doesn't go back to gray during a string of taps, but does in between.
Just put your iPhone down on a flat surface and wait for the bomb to explode. It won't hurt you.
Slide the minute hand around and around until the time on the clock matches the time on your iPhone, then pull the lever. If you're right, the door will open.
Unscrew the screws on the plaque, then slide it to turn it upside-down so it says "F 31".
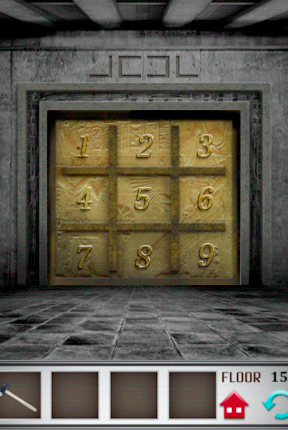
Every set of three must add to 12. Touch two hexagons to swap them; just put 4 in the middle and the rest should be easy.
Tap the buttons corresponding to the proper colors of the objects on the door: yellow pear, red fire, white cloud, and so on. Get five right in a row; you need to be fast.
"What's your name?" No, not YOUR name, the game's name. Touch squares to light them and spell "IOOFLOORS" in a sort-of zigzag path.
Plug in the cord on the right, then turn off segments to make the floor number (35).
Touch the five objects in order of increasing altitude: fish, dog, apple, plane, moon.
Slide the upper-left square down, then grab the ball behind it. Slide the barrel to the right. Tilt your device backwards to get the ball on the right off its button. When you've done all three of those things, the doors will open.
You want all three meters to be in the green at the same time. Tap the leftmost one first, then upper right, then lower right. You've gotta find just the right rhythm.
I know this puzzle! Marking the rows A-B-C-D and the columns 1-2-3-4-5, start on D4, then slide your finger to D1, then A4, then D4, then B2. This should turn all the gray circles green, opening the door.
Use the volume buttons to turn your iPhone's volume down to zero. You can turn it up again after the doors are open.
Set each square's symbol to simulate the path the nearest bug walks. On the top, triangle and line; on the bottom, hourglass and triangle.
Slide the doors left and right, then slide the next doors up and down. Each door has a symbol visible on it when you turn off the lights (switch on the lower right); set each of the shapes to the symbol that was directly covering it. One of each.
Slide the plants out of the way to reveal a hole and a button. Dump the ball in the hole, then tilt your iPhone to navigate it to the button.
Slide the plant away to reveal the rest of the hints. The four sections on the door are numbered from left to right; B is black, W is white, G is gray.
Take the knife (left, bottom of the wall). Use the hammer to smash the air-conditioner. With the knife selected, cut the balloon's string (you can't just tap, you have to slide across it), then tilt your iPhone to steer it to the button.
Touch the symbols on the door to rotate them until they match their reflection on the floor. Be careful, some of them look like they have rotational symmetry but don't. Pay attention to the little differences.
Rotate the tiles to make a path from the lightning bolt to the circle. Obviously they don't connect, but just pretend they do. Every tile will be used.
Cut away the vines with the knife (this time you can tap, tap, tap). Press each button corresponding to the number of flowers of its color: 5, 5, 4.
"Enter password". Take it literally. Enter Pa-S-S-W-O-Rd by tapping the appropriate panels.
Tap. Tap the door as rapidly as possible. It helps to use multiple fingers, tapping slightly out of sync with one another. Don't take a break until the meter fills.
Shade six circles to make a sideways cross, like the sword above the door. One, three, one, one.
Christmas-themed room? Let's try something Christmas-ish for the four-digit code. Like the date of the holiday: 12/25.
Slide the hook down to get the crate out of the way, then unplug the cord. Take the pliers and use them to cut the grate.
"ENTER CODE". There's a bunch of numbers and symbols, but the only one that matters is "A=01". Translate C-O-D-E into numbers the same way-- 03150405-- and enter it.
Let's play Tetris! Except not really. Tilt your device around to slide more pieces into view, and try to fill the grid completely. Use the colors as a guide. It may take a bit of work to bring things into view, so be patient.
Minesweeper? Touch each number until it equals the number of flags adjacent to it (diagonals count).
Hold the button until the hook is above the ball. Slide the hook down to catch the ball. Hold the button until the ball is in front of the door. Tap the ball several times to smash the door.
Higher Hz means higher frequency, which means further to the right on the keyboard. Numbering the keys 1-2-3 from left to right, it's 3-2-1-2-3-3-3-1-2-2-3-2-1. The last few lines of "Mary Had a Little Lamb".
Cold in here! Take the rock and use it to smash the window in the upper left. Rotate the lens until it sets the pile of wood on fire. Take the stray stick, set it on fire, and use it to thaw out the lever. Pull the lever.
Light the torches beside the door. Play the drums from left to right like the arrow above the door suggests; hit each drum as many times as the features of that color on the door. 4, 2, 1, 4.
6:30? But there's no way to make a 6 with those shapes... maybe it's 24-hour time. Drag and drop the white shapes to make 18:30. The L and its upside-down counterpart make up the 0; the 1 and 3 each have one shape; the last two make the 8.
Use the knife to chop the cable near the lower left (slide), then use the arrow buttons to move the laser's endpoints until they're as high up as possible. Each button cycles the endpoint on the other side.
Slide the rock onto the left button by tilting your iPhone, then mirror the still-on lights from the ceiling onto the wall panels.
Draw circles around the magnified eye with your finger until the meter is full. Direction doesn't matter. If the meter drops, try drawing your circles slightly faster or slower.
Take the brown ball (you might need to tilt your iPhone right to roll it into view) and stick it in the bottom of the tube. Then use your torch on the sprinkler above and watch the magic.
Take the stick on the lower right, use it to fetch the grappling hook on the middle left, use the hook to catch the loop on the door, use a good downwards swipe to bring the door down.
Slide the pot into the sunbeam, slightly to the right of its center. Touch the dandelion until a seed lands in the pot. Slide the pot to the far left, then tap the metal faucet to water the seed. Position the pot in the sunbeam again and the door will open.
Take the stone star on the ground (it's a little hard to see). Hold the lever to raise the box, and quickly take the wood panel under it. Raise the box again and put the stone star in the recess.
Glub glub! Touch the trap on the ceiling, then the clownfish on the right. You've got to get the timing just right so the two will collide. (Try tapping the fish when the trap is right in the center of the door.) Do it right and the octopus will move off the drain, after which you can chop the seaweed off the door with the knife.
Have the alien wander the maze until it reaches its UFO. Here's a cheat sheet: from room 1, go right, right, left, left, right, left, right, and you'll be in room 6. Then go right to finish.
Touch the three holes in the wall to complete the pattern. Each symbol must be a mirror image of the symbol across from it, with broken lines replaced with whole lines and vice-versa.
Slide the cars up and down. Count the sides on each shape; circle should be first, then triangle, square, pentagon, hexagon.
A sort-of maze. Slide a math operation towards the middle to change the number. The goal is to reach 73; a good rule of thumb is to get numbers you haven't gotten yet. A good solution: from 0, slide right, right, up, left, down, left, down, right, up, right.
Touch the hexagon on the floor and watch the lights. You need to make each triangle the color that's never seen in the corresponding position. The top is yellow; clockwise from there, blue, cyan, red, purple, green.
The theme is balance. Take the tiny weight from the right platform and put it on the left platform, then slide the three ground weights to the right platform. This'll turn on one green light; to turn the other on, hold your iPhone upright and perpendicular to the ground.
Slide puzzle! You want to make a square. Focus on one corner, then complete the two adjacent sides, one at a time. If you reach an impossible-looking situation, try swapping the two horizontal lines or the two vertical lines. When you've got it, stick the wooden panel from your inventory in the center.
Tap the circle on the floor to see the number 7. Hold the green button to make a light go around the white circles. Stop it one circle past the bottom (number 7 on an analog clock) to open the door. It'll take good timing.
What does the cube look like when unfolded? Touch the squares to cycle their colors. Pay attention to the orientation of the ?, too. The solution: the ? should have brown to the left, red and white to the right, blue above, and black below.
Ignore the dead-ends and make the lines mimic the solution to the maze on the floor. And I don't care what you did on earlier levels, do NOT mirror it vertically!
Those gray things are torches. The mirrored text above says "132. 54. 0. 53." Number the torches 1-5 from right to left, then light them according to the digits, pressing the button on the floor at every dot to extinguish the flames. The 0 means don't light any torches.
What number could we make? 81, the floor number! Note that the 6's are upside-down 9's (see the lines). Hold your iPhone upside down (yes, you have to do this!) and spell out "9 x 9" in the upper-right corner. Then press = to open the door.
Take the loose stone near the lower right (it's got a slightly more visible border and looks like a circle with two spikes) and take the dial under it. Then stick the dial in the hole and rotate it and its twin to match the hole: left on the left, down and right on the right. Take the stick that appears and put it in the hole near the upper right corner of the floor (it's hard to see unless you really look for it), then hold it to open the door. Use a second finger to tap the green arrow.
Tanagram! The large gray triangle goes in the upper left; the small blue triangle goes in the upper right; the yellow trapezoid goes along the bottom edge; the magenta square goes in the center. The rest should be easy.
The purple triangle means press all three buttons simultaneously. The red line means press the red button. The blue plus means press the two blue buttons simultaneously. Listen for the sound effects; a buzz means your timing's off. The timing is REALLY frustrating in this level, but doable, so bring a cold drink.
Number the candles from 1 to 3, left to right. A lit-up number means light that candle with the torch; a black number means snuff it out (tap it with nothing selected in your inventory).
Tap the numbers and they'll spin left or right. Drag the hand to rotate it left to 11:00, then right to 5, then further right to 1, then left to 8, then right to 12.
Shake your iPhone to wake the bear, then tap it and it'll move. Then put your iPhone down and do nothing until the bear falls asleep again, and you can push the up button with impunity.
Drag the upper left hat below the air vent, and the middle-right hat above the lower-right hat. Then tap the upper-right hat so it's facing upwards. Lastly, drag and drop the ball into the upper-right hat.
Those look like they came from the periodic table, but they're actually number abbreviations: SIx, SEven, TWo, and so on. See the up arrow to the right, and the fruits all around? And the V on the apple? Count the letters in each fruit from bottom to top, and input those numbers: Se (coconut = 7), Si (banana = 6), Ni (pineapple = 9), Fi (apple = 5), Fo (pear = 4).
Each yellow button will light up two lights at a time. Press the left button four times, middle three, and right two to light up six lights... but how to turn on the last light? See the big blue star near the upper right? Tap it once everything else is on to turn on the last light and open the door.
Take the brush in the lower right. No, you aren't going to paint the door. Use it to clean the white area near where you got it (rub the screen with one finger) to reveal the number 16... or 91 upside-down. Tap the 16 to make the door light up colors, then tap the colors until they match the prompt above, UPSIDE-DOWN.
This one's a bit airy in the logic department. See the letters O-P-E-N above the door? Use the lines below each letter to put them in order from longest line to shortest line (E-N-O-P). Find those letters in the eye chart on the left, and use the chart on the right to translate them into directions according to which way the "arms" of each E are pointing. Up-right-up-down should be the final solution.
Hold the left button for about nine seconds, and the right button for about three. You don't have to do them at the same time.
See the number 11 in the top middle? Adjust the spotlights so they display the Roman numeral that means the same number. (Make them look like XI.)
8/26 sideways? Well, there are 26 letters in the alphabet, and the 8th is H... turn the lights into a sideways green H. It doesn't matter what the other two lights are.
More fun with assembly! Tap to rotate, drag to move. The straight piece goes along the top, the square goes in the nook on the right, and the L goes upside-down along the left edge. The rest should be easy.
Use your knife to pop the balloon, then take the piece of paper and stick it with its companion above the door. Now, what's the code? Well, 30 goes to 235... I know, it's the number's factors in increasing order! 735's factors are 3, 5, 7, and 7, so enter that.
Use the brush on the lower-left corner to reveal the code 51782. But you'll have to translate it somehow if that text above the door is any indication. 49063 = 46665? It must be the number of segments in each digit! That means 51782 translates to 52375, so enter that.
This one's really tricky. You want to make a balanced equation where both sides equal 15. It's impossible with just the x, �, and = signs... well, it turns out you need to use the volume buttons on your iPhone for + and -. The correct solution is: 3 + 3 x 4 = 4 x 5 - 5.
Slide the metal slats left and right to view the star map underneath. Note the four yellow stars and how they're arranged on the polar grid; you want to mimic their positions with the holes where the metal slats aren't in order to open the door. The top row should have zero slats to the left of the hole, then two, then four, then five.
Annex
Chop the rope with the knife, then quickly grab the egg before it hits the ground. Stick the egg in the nest.
This looks like a puzzle from one of those online IQ tests, doesn't it? Think of it as a clock where one hand is twice as fast as the other. The answer is like the second image, but flipped horizontally. Trace it with your finger, then pull the lever.
Rock-paper-scissors? Uh... well, think of each as the number of fingers out: rock is 0, paper is 5, and scissors is 2. On NPC's side, the 2 is locked and there are two less-than signs, so set them to 0, 2, 5 (top to bottom). Now you need to win against him, so set Player's side to 5, 0, 2.
Watch the guitar player tap his foot. Tap, tap, tap-tap-tap, tap-tap, tap-tap. That's just like the dot pattern above! Figure out the rhythm, then beat the drum the same way as he taps; a dot should turn purple with each beat.
Tip your iPhone forwards to dump the books all over the floor. You can then slide each bookshelf left and right to see the X's and O's engraved on the shelves. Copy their positions to the door.
Posted by: SonicLover |
July 9, 2012 12:26 PM
|
July 9, 2012 12:26 PM