

![]() If you're a criminal, don't mess with plucky teens, avoid mustachioed Belgians, and whatever you do, if an adorable little old British lady starts investigating your series of murders, KILL HER FIRST. The murderer in Agatha Christie: 4:50 from Paddington didn't follow this piece of advice, which is a good thing, because otherwise it would be a very short mystery.
If you're a criminal, don't mess with plucky teens, avoid mustachioed Belgians, and whatever you do, if an adorable little old British lady starts investigating your series of murders, KILL HER FIRST. The murderer in Agatha Christie: 4:50 from Paddington didn't follow this piece of advice, which is a good thing, because otherwise it would be a very short mystery.
 Playing a hidden object game always means certain acceptable breaks from reality. For example, at one point in the game you have to go through an old lady's purse, and it is clearly not a real old lady's purse because there aren't any Werther's Originals. More seriously, if you're not familiar with the genre, in every scene you're given a list of objects which you must find hidden in the picture and click on. Occasionally the objects must be used within the scene itself, for example, returning candles to a candelabra. While some hidden object mysteries struggle to connect finding a chicken, a horseshoe, and the letter "D" to the plot, 4:50 from Paddington is blithely unconcerned, for the most part. It's only the mini-games that connect to the mystery: the aforementioned searching through a purse, testing for poison in a Mastermind puzzle, and matching clues by following the trails of rope. The game also offers you three opportunities to guess the murderer. The number of times you get it right affects your final score.
Analysis: This is the first game in the Agatha Christie hidden object series to focus on Miss Marple. The game continues in the tradition of the series by having well-drawn objects that are rarely unfairly small, and consistency in its time period and place. You won't be asked to find a cell phone, and if you're asked to find a hat, it's going to be something like a fedora or cloche, not a baseball cap.
 What's more, the game's plot and story has improved markedly over its predecessor Dead Man's Folly. In that game, the large cast and sparse amount of information given made even understanding who people were confusing, much less solving the mystery. In this game, one can click on the gallery at any time to view all the characters who have shown up so far and a short bio of them. The gallery also allows you to go back through the chapters and see all the dialogue and clues. And with a greater amount of dialogue, you'll get to know the characters fairly quickly and understand their motivations. All of this is essential to catching the killer.
You can play the game in both timed and untimed modes, and once you beat the game in any mode, you'll unlock "find all", in which you can attempt to find every single object in the game—over 500 items in all. In this mode, you're attempting to find every single object while using the smallest number of hints, adding a lot more replay value to the game.
As for the writing, well, it's Agatha Christie of course, so the plot is better than 95% of the hidden object mysteries out there. If you don't know the story, you're in for a real treat. If you've already read the novel, the murderer is the same, so it won't be surprising for you, but the hidden object finding and mini-games are still high quality enough to make this game worth the purchase.
![]() Windows:
Windows:
Download the demo
Get the full version
![]() Mac OS X:
Mac OS X:
Not available.
Try Boot Camp or Parallels or CrossOver Games.


Walkthrough Guide
(Please allow page to fully load for spoiler tags to be functional.)
AGATHA CHRISTIE: 4:50 FROM PADDINGTON WALKTHROUGH:
GENERAL:
The basic game can be played in timed mode, or carefree (untimed). If you played timed mode and run out of time, you must restart the chapter.
Once you beat the game, either timed or carefree, you unlock find all mode. In find all mode you can find every hidden object in the game.
The game gives tips for players new for the hidden object genre. Leave the tips on if you want basics explained.
You get at least three hints per chapter. If you go under three, your hint meter will refill slowly back up to three. By finding three items quickly in a row, you gain an extra hint. Extra hints above three carry over between chapters.
MINI-GAMES:
All mini games can be skipped. Hints cannot be used in mini-games except Rummage.
RUMMAGE:
Pull items out of the way with your cursor and click on the items in the list. The initial position of the items is random, and items can be dragged by other items, so screen captures are not helpful. Hints DO work in this mini-game.
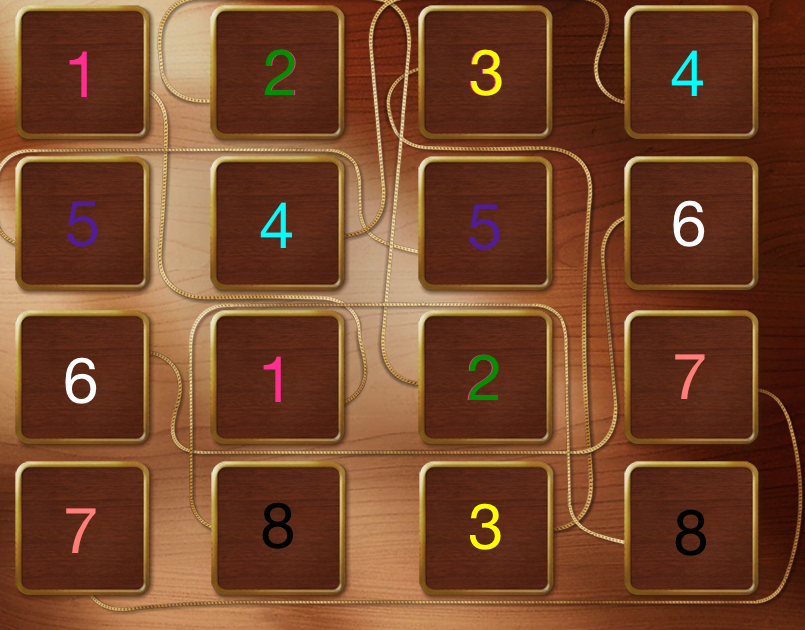
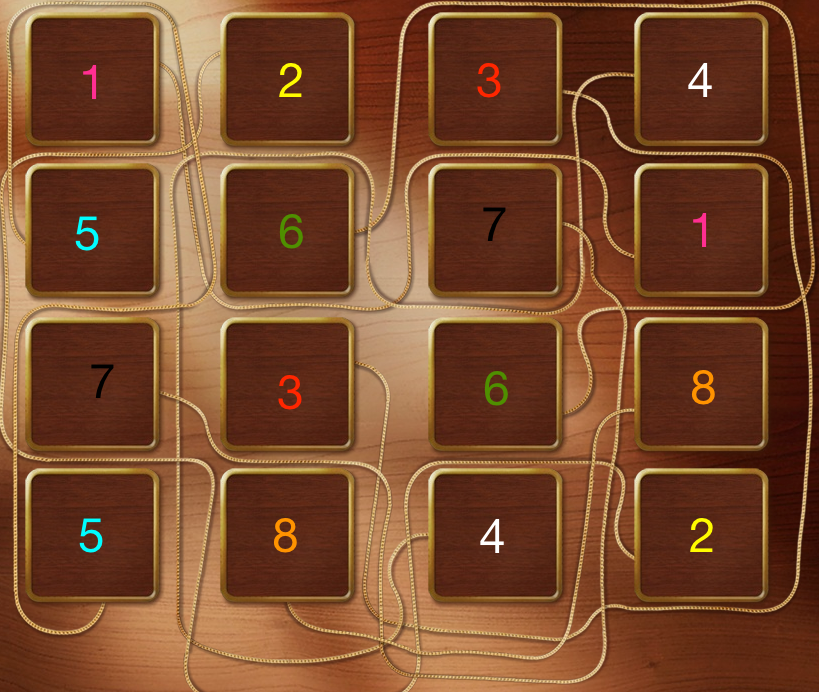
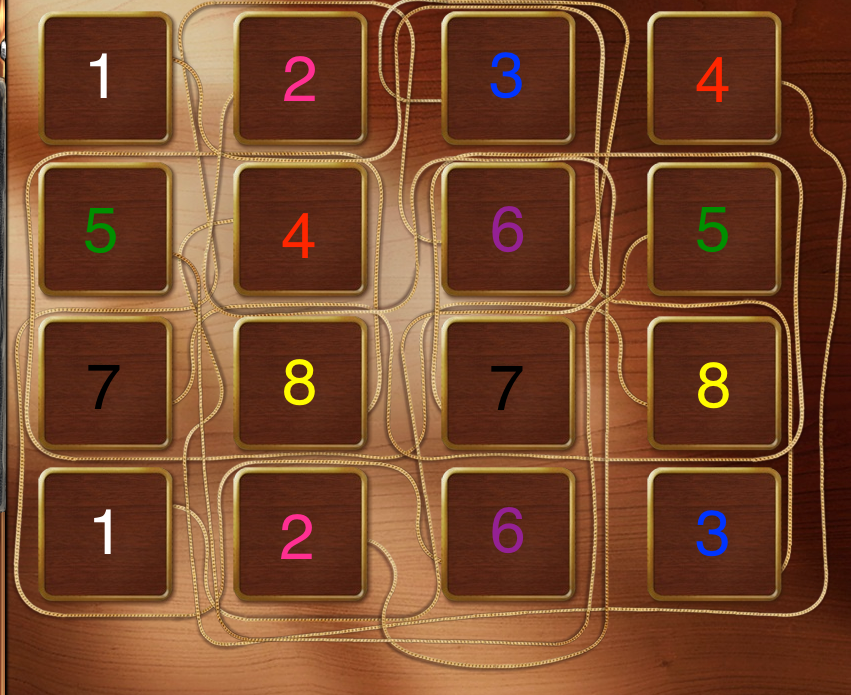
CLUE MATCHING:
Cards are matched to other cards by a thread. Click on the two cards which are attached to light them up and turn them over. The solution is not random, so check the walkthrough for the solution. The cards have been marked in the solution with the same numbers and color, so match a white 1 to a white 1 and a blue 2 to a blue 2, for example.
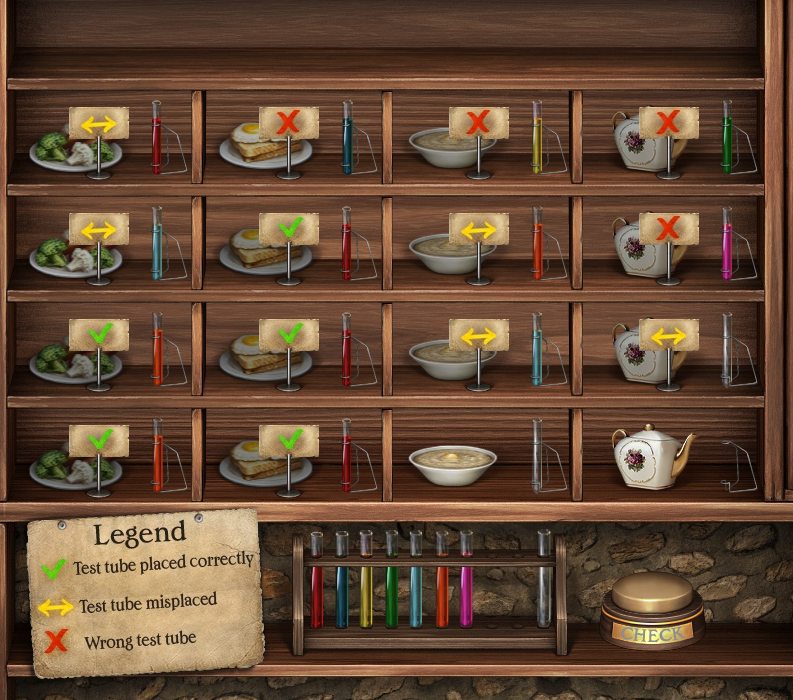
FIND THE POISON:
This is the famous logic puzzle Mastermind, basically. Here's an example solution. The solution is random, and unfortunately you can't use hints, so if you're bad at this kind of puzzle you may want to skip it.
SHREDDED PAPER:
An important document is in strips of paper which are out of order and also for some strange reason can be dragged as if they were loops. Lack of realism aside, you can look at the finished piece in the walkthrough to help you put it back together.
GUESS THE MURDERER:
You have three opportunities to guess by clicking on a picture and confirming it. Do you really want to be told?
This picture contains the answer if you want to be spoiled!
It's Dr. Quimper.
MAIN GAME:
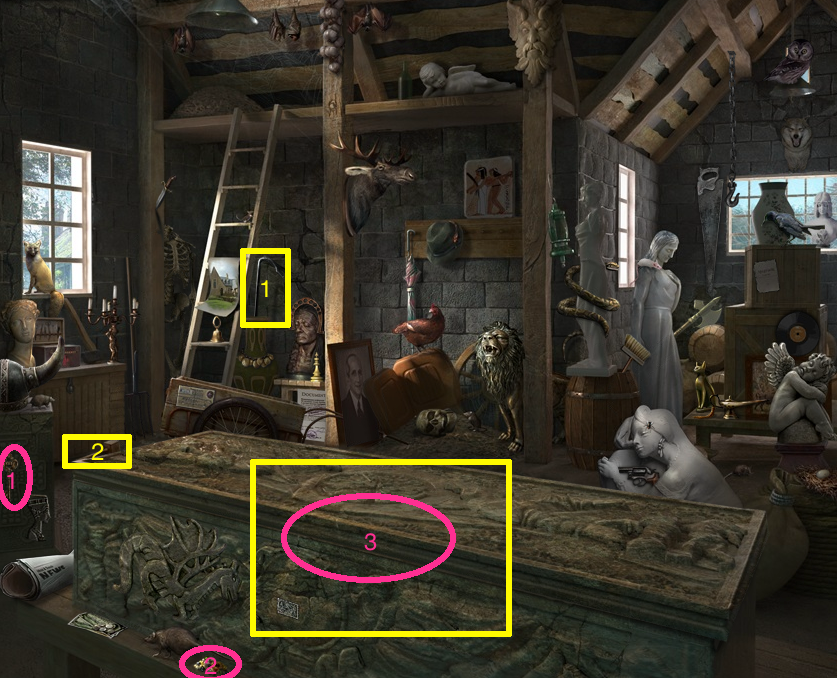
Storyline items are marked in the screen captures in bright pink and numbered in the order in which they must be picked up.
Items that are manipulated on the screen are marked in yellow and numbered if order matters.
Mini-games with set solutions are given in their chapters. Please check the mini-game section for help with mini-games with random solutions. That section also includes the identity of the murderer.
CHAPTER ONE:
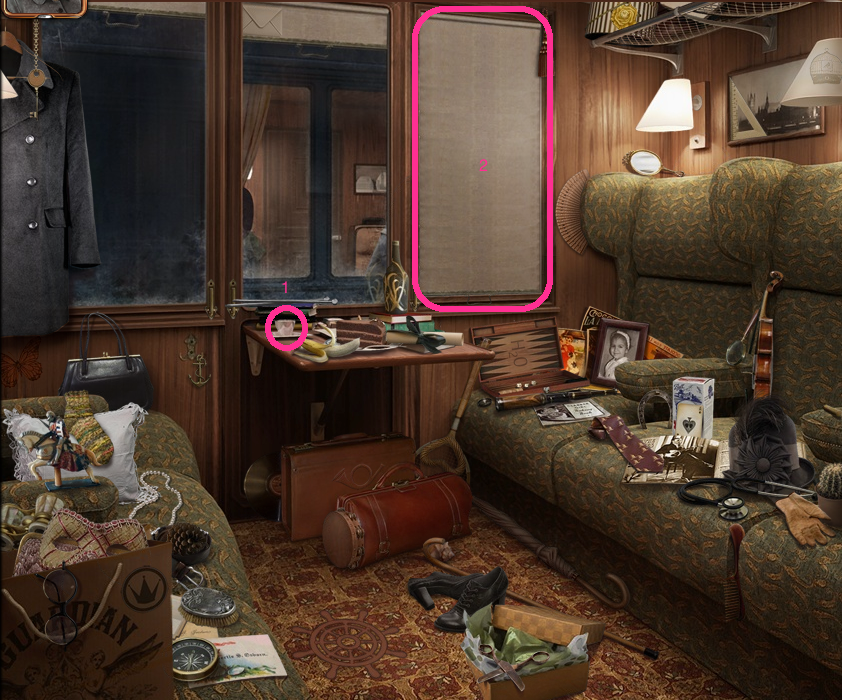
TRAIN CARRIAGE:
Collect the tea from the table. Click on the window blind.
Image.
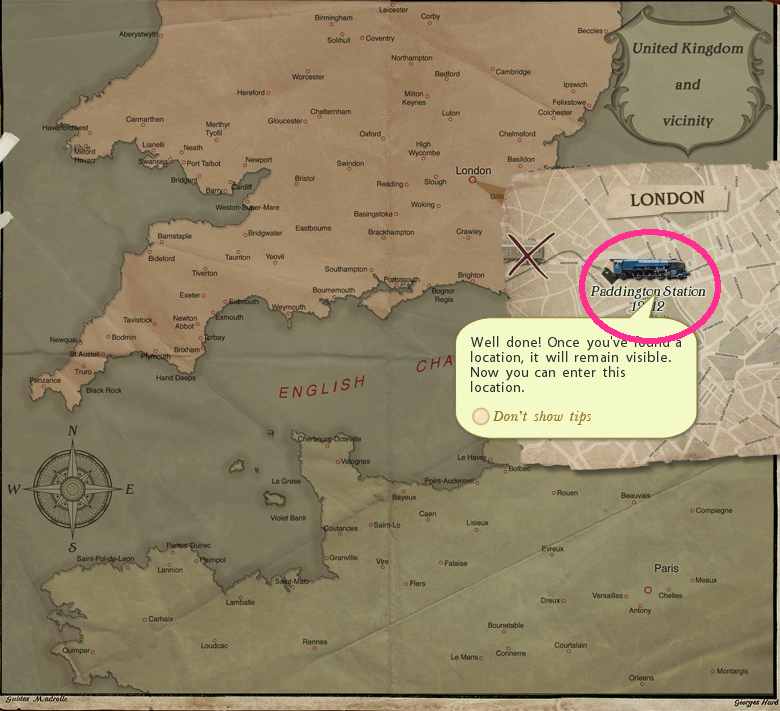
MAP:
Click just above Hyde Park in the London map to find Paddington Station.
Image
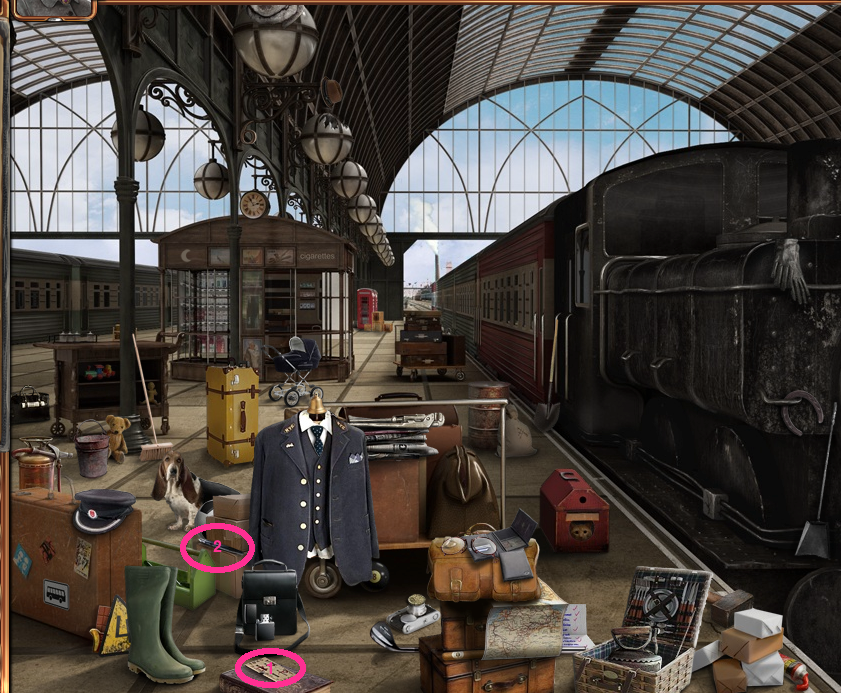
PADDINGTON STATION:
Click the ticket on the bottom edge of the screen, left of center.
Click the pen on the box left of the luggage cart.
Image
See mini-game section regarding Rummage levels.
CHAPTER TWO:
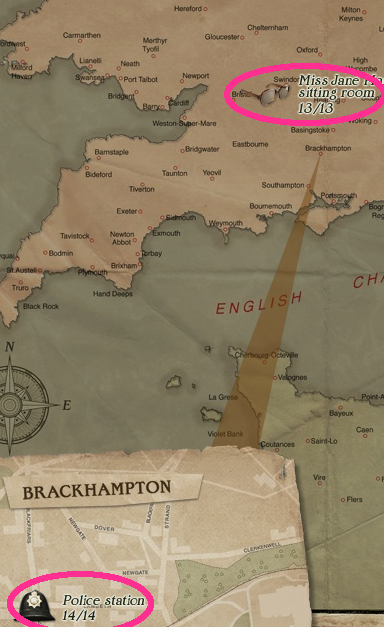
MAP:
Click near the center of the England landmass.
Click the intersection.
Image
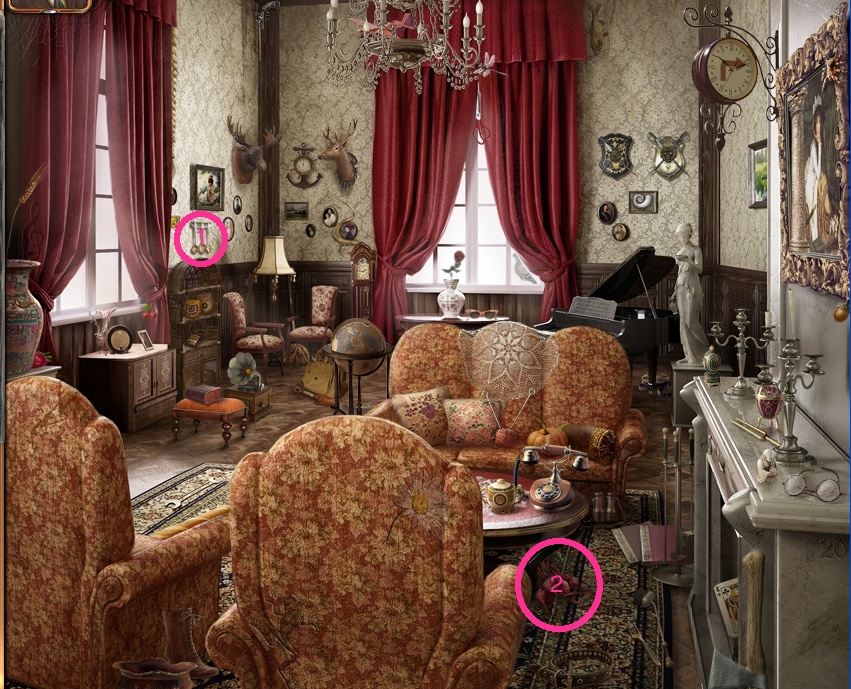
MISS MARPLE'S SITTING ROOM:
Click the cash near the globe.
Click the picture of a house on the table.
Click the puzzle piece on the arm of the chair.
Image
POLICE STATION:
Click the map on the wall.
Click the train above the map.
Click the file marked "Closed" on the left of the desk.
Click the six letters and place them into alphabetical order on the bulletin board.
Image
CLUE MATCHING:
Image Connected cards are marked with the same number in the same color.
CHAPTER THREE:
MAP:
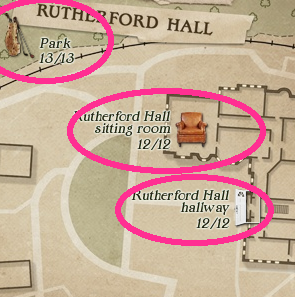
Click the upper left corner, the upper left room, and the middle room of the Rutherford Hall mini-map.
Image
RUTHERFORD HALL HALLWAY:
Click the fish to the left of the cage.
Click the picture of a castle above the fish.
Image
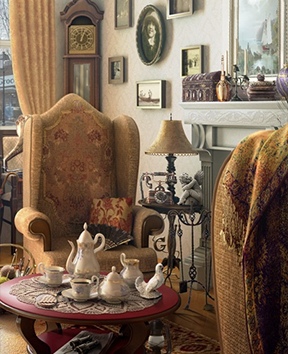
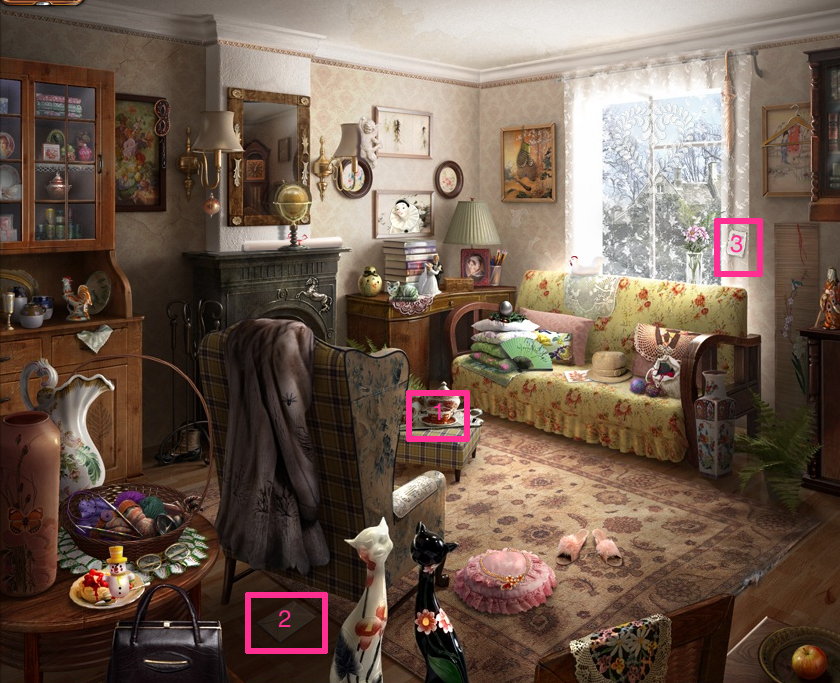
RUTHERFORD HALL SITTING ROOM:
Click the feather duster on the mantel.
Click the teacups on the coffee table.
Image
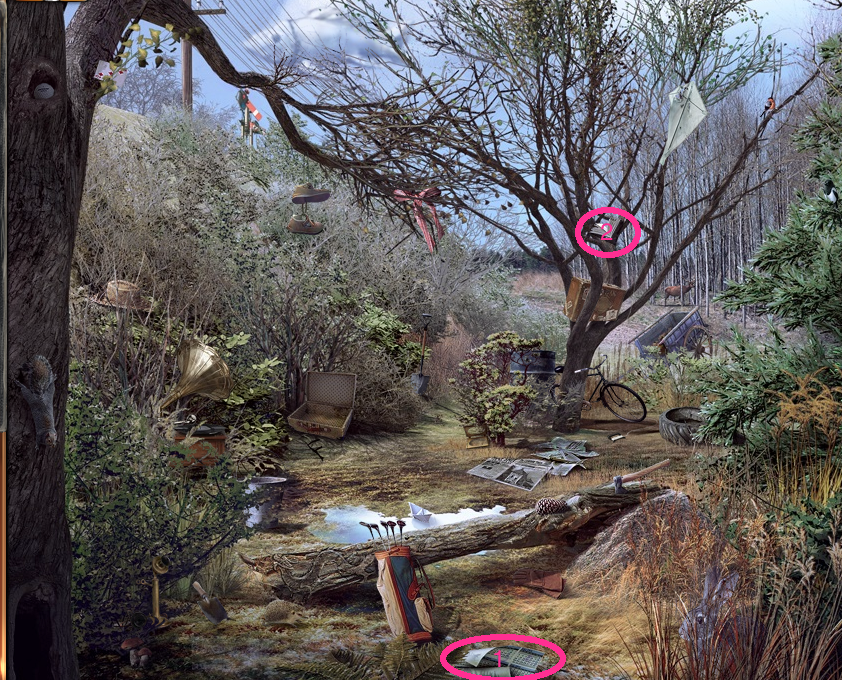
PARK:
Click the broken branch in the center of the scene.
Click the golf ball hidden in the brush in the lower right corner.
Click on five golf clubs and place them into the golf bag in the lower center.
Image
CHAPTER FOUR:
MAP:
Click the upper right room of the house.
Image
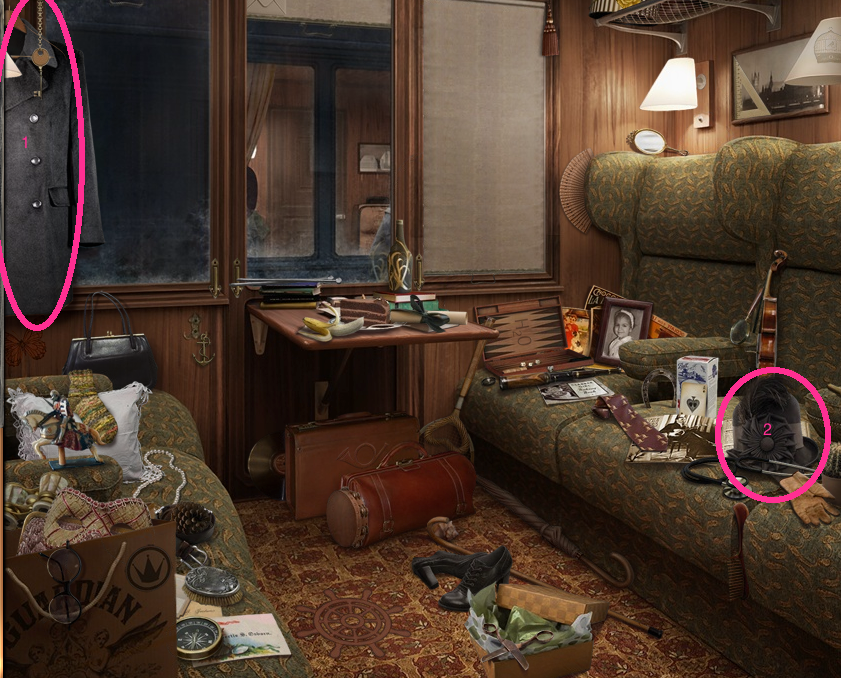
TRAIN CARRIAGE:
Click the coat on the left.
Click the black hat on the right-hand seat.
Image
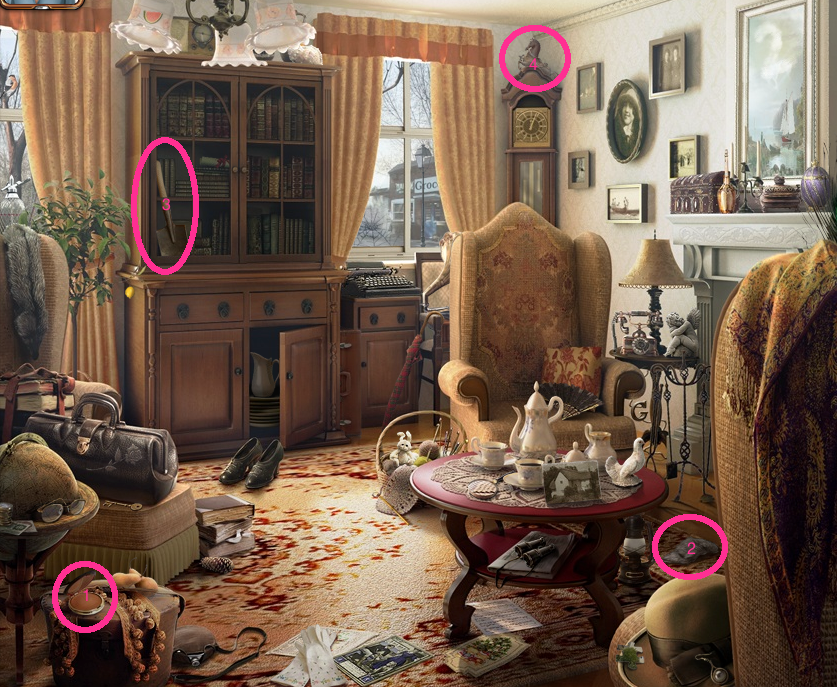
MISS MARPLE'S SITTING ROOM:
Click the powder compact in the lower left corner.
Click the scrap of fur in the lower right corner.
Click the shovel in the bookcase.
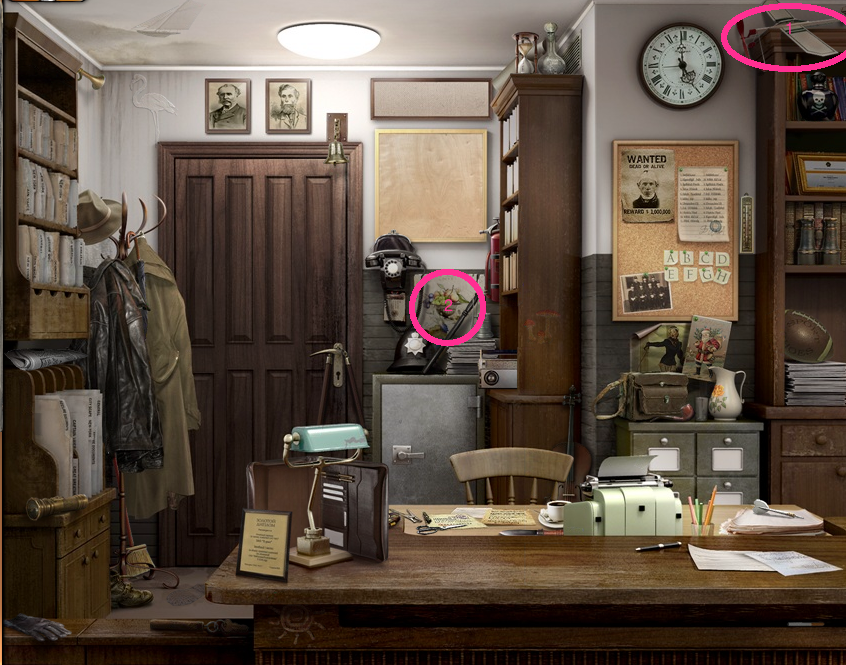
Click the horse on top of the clock in the upper right.
Image
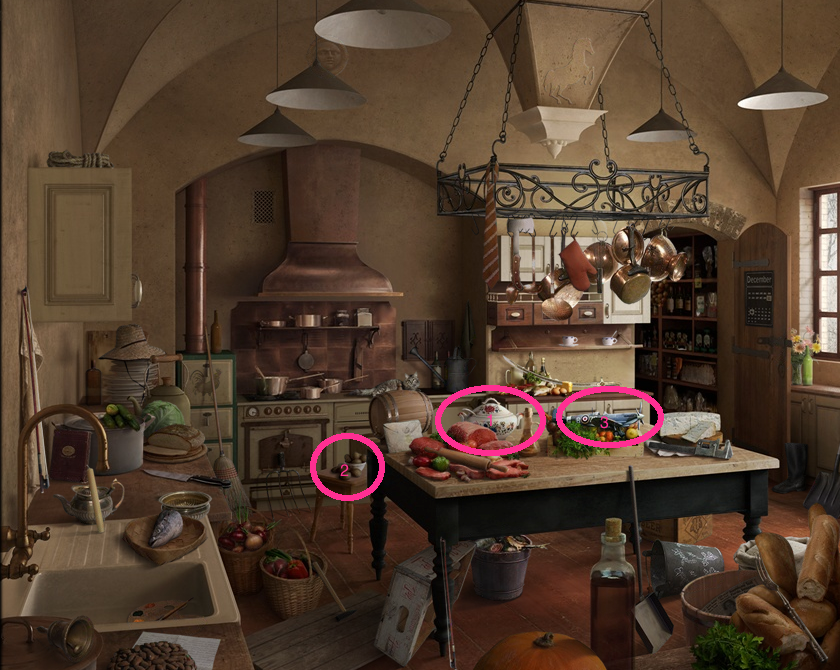
KITCHEN:
Click the tureen on the table.
Click the potatoes left of the table.
Click the plane right of the tureen.
Image
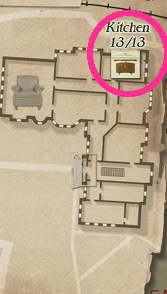
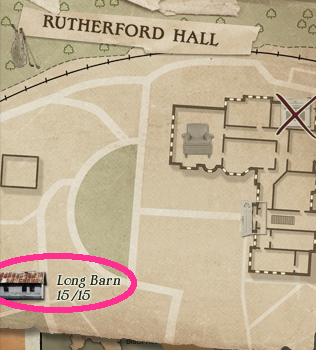
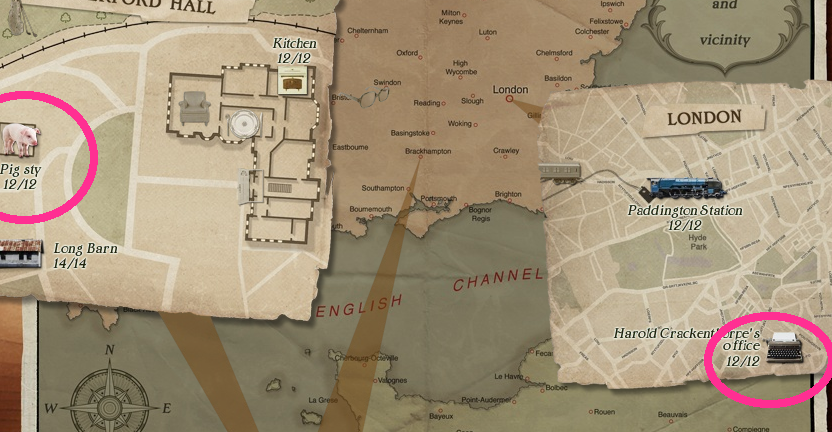
MAP:
Click the rectangular box in the lower left corner of the Rutherford Hall mini-map.
Image
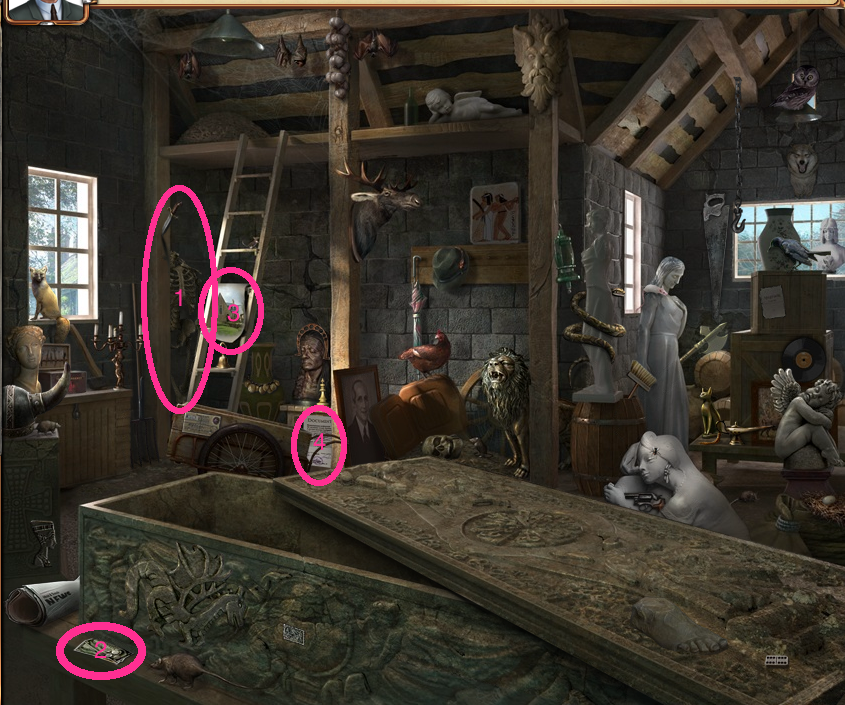
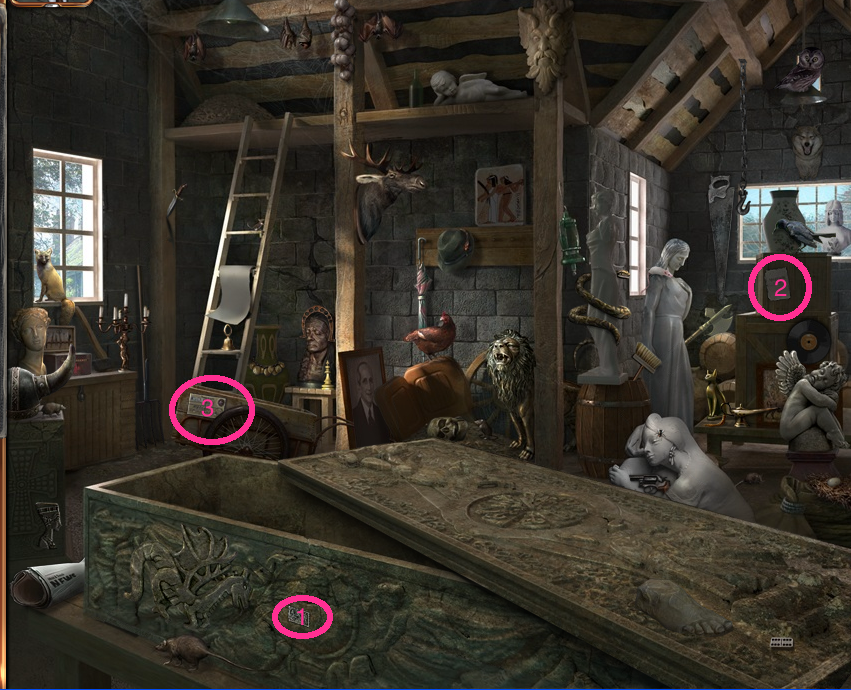
LONG BARN:
Click the key on the left under the horned helmet.
Click the gems on the center-left bottom edge.
Click the crowbar next to the ladder and use it on the sarcophagus.
Click the mallet right of the horned helmet and use it on the crowbar.
Click the coat inside the opened sarcophagus.
Image
CLUE MATCHING:
Image
CHAPTER FIVE:
MAP:
Click on the room in the center of the hall.
Click north of the police station.
Image
POLICE STATION:
Click the plane in the upper right corner.
Click the picture of fruit in the center.
Image
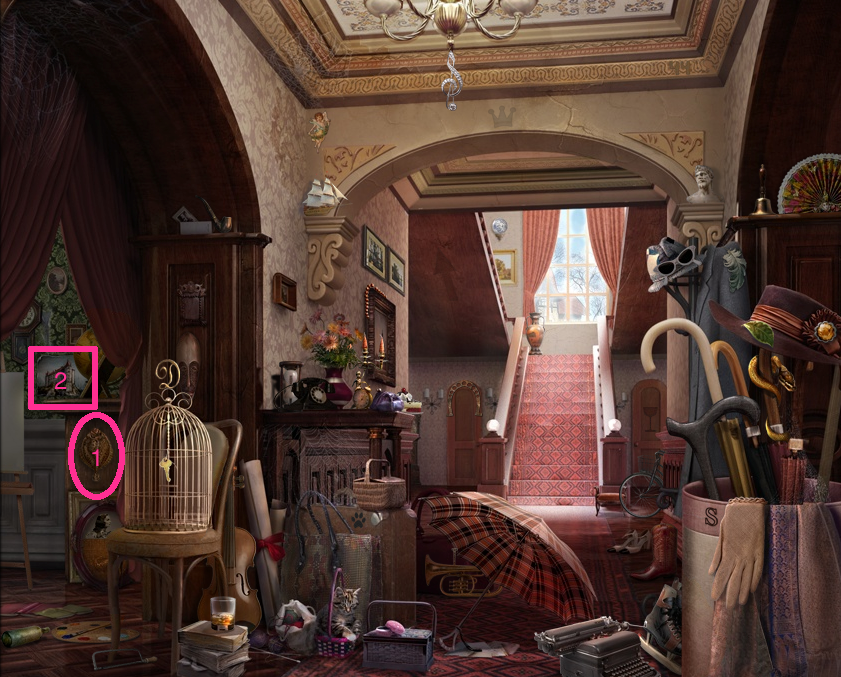
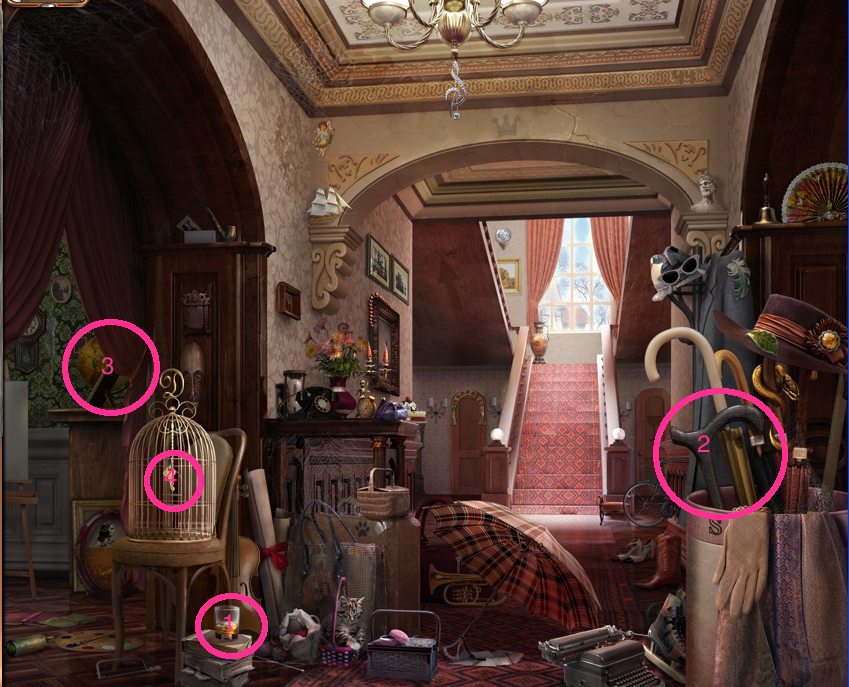
RUTHERFORD HALL HALLWAY:
Click on the whiskey glass sitting on the books.
Click the cane handle in the umbrella stand.
Click the globe behind the curtain.
Click the key on the birdcage.
Image
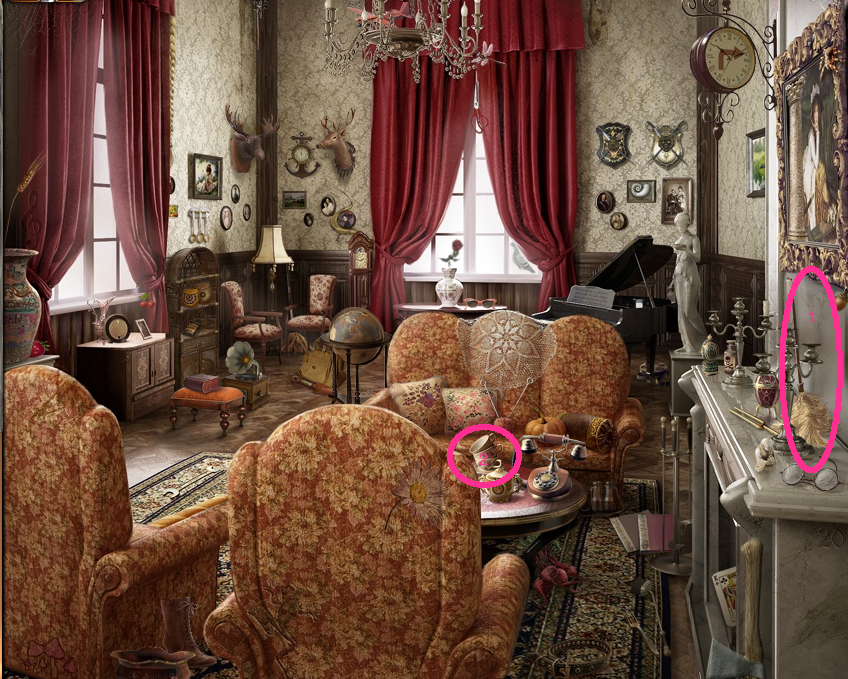
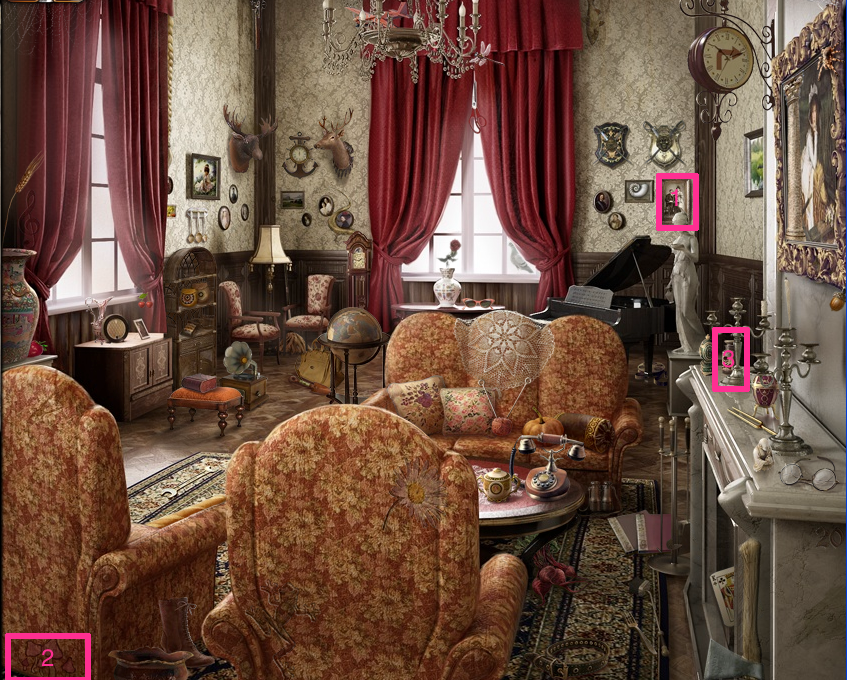
RUTHERFORD HALL SITTING ROOM:
Click the portrait above the piano.
Click the mushrooms on the bottom of the left armchair.
Click the poison on the mantel.
Image
MISS MARPLE'S ROOM IN TOWN:
Click the bracelet on the white cat's neck.
Click the dancer statue on the mantel.
Image
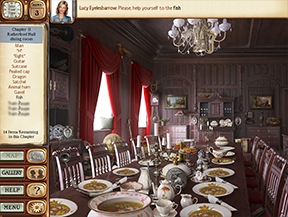
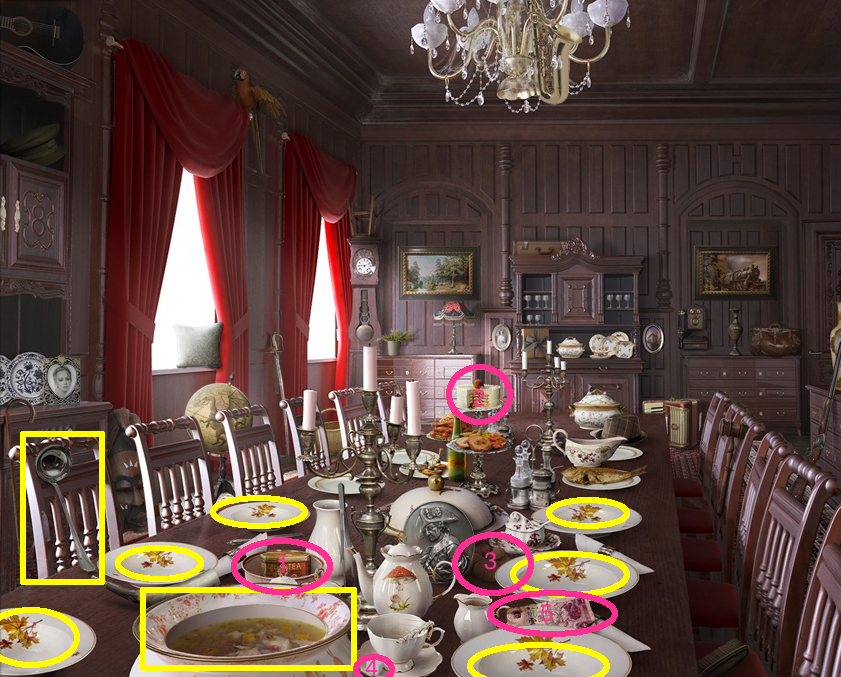
RUTHERFORD HALL DINING ROOM:
Click the box of tea above the soup tureen.
Click the cake on the far end of the table.
Click the biscuits in the center-right of the table.
Click the sugar at the center bottom edge.
Click the money to the right of the biscuits.
Image
See the mini-game section regarding the Find the Poison puzzle.
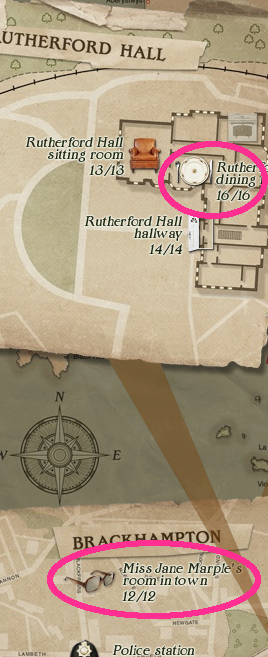
CHAPTER SIX:
MAP:
Click the box on the left side of the Rutherford Hall mini-map.
Click the lower-right corner of the London mini-map.
Image
PADDINGTON STATION:
Click the notes below the cat in the carrier.
Click the paint tube in the lower right corner.
Image
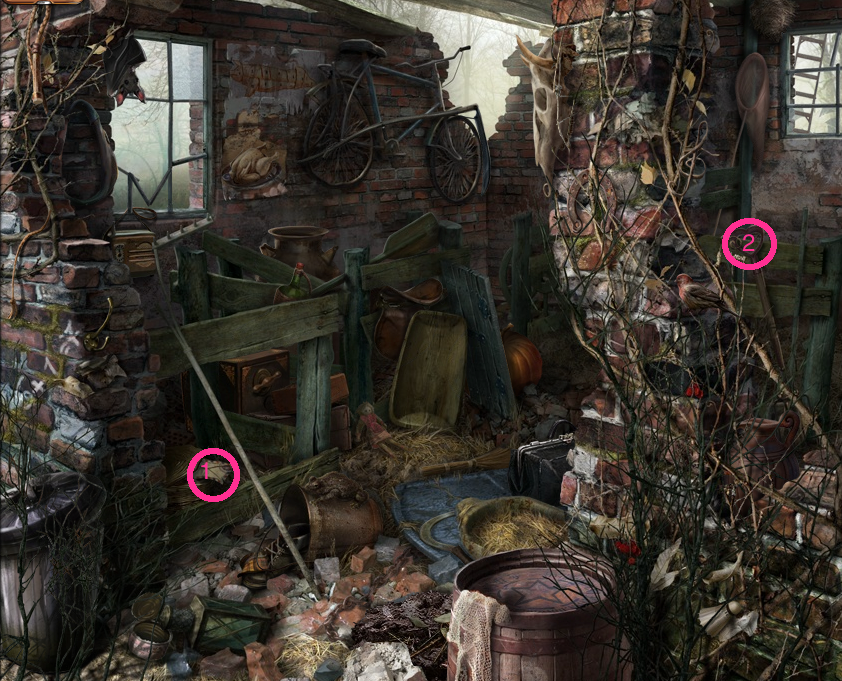
LONG BARN:
Click the skeleton right of the ladder.
Click the money in the lower left corner.
Click the picture of the house on the ladder.
Click the document at the bottom of the center beam.
Image
PIG STY:
Click the letter under the sink.
Click the heart on the handle of the shovel, on the right hand side.
Image
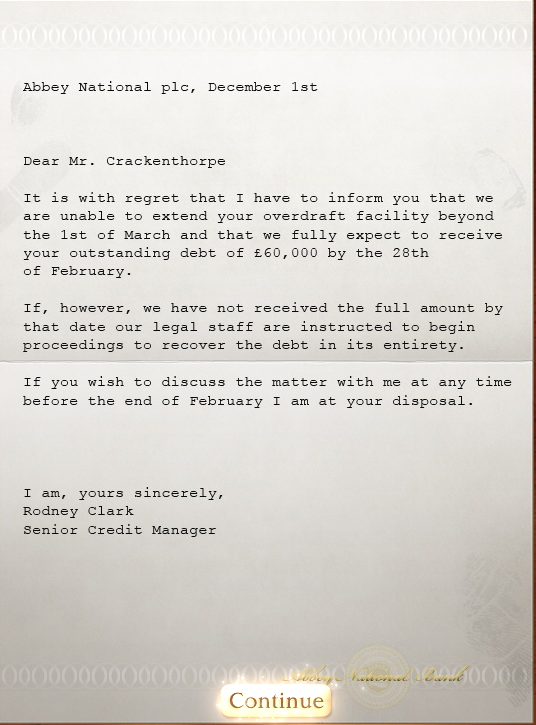
HAROLD CRACKENTHORPE'S OFFICE:
Click the shredding machine under the window.
Click on 12 strips of document.
Image
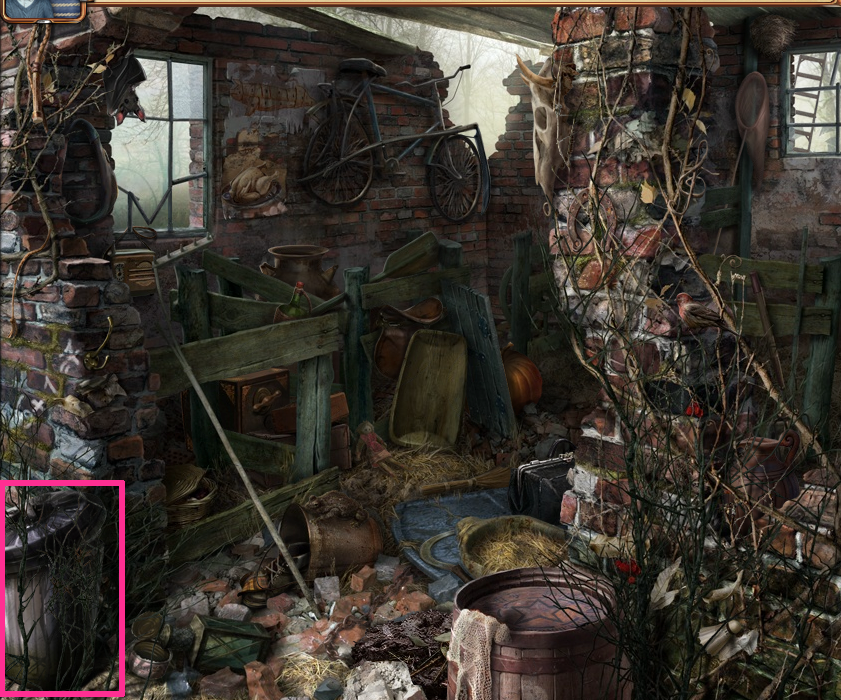
KITCHEN:
Click the letter below the sink.
Click the bucket of rubbish under the table.
Image
SHREDDED PAPER:
Image
CHAPTER SEVEN:
MAP:
Click the top center room in the Rutherford Hall mini-map.
Click on Paris in the lower right.
Image
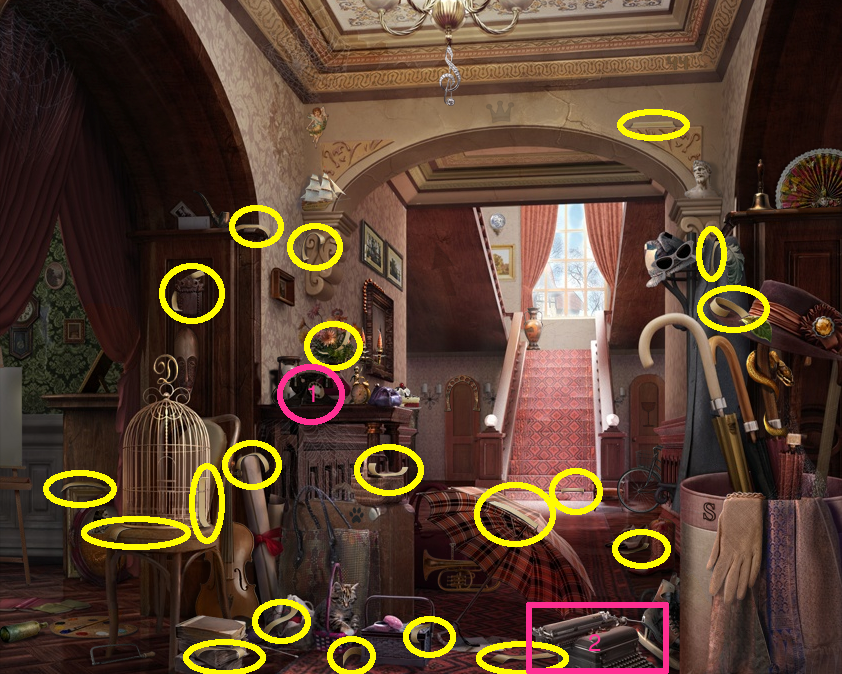
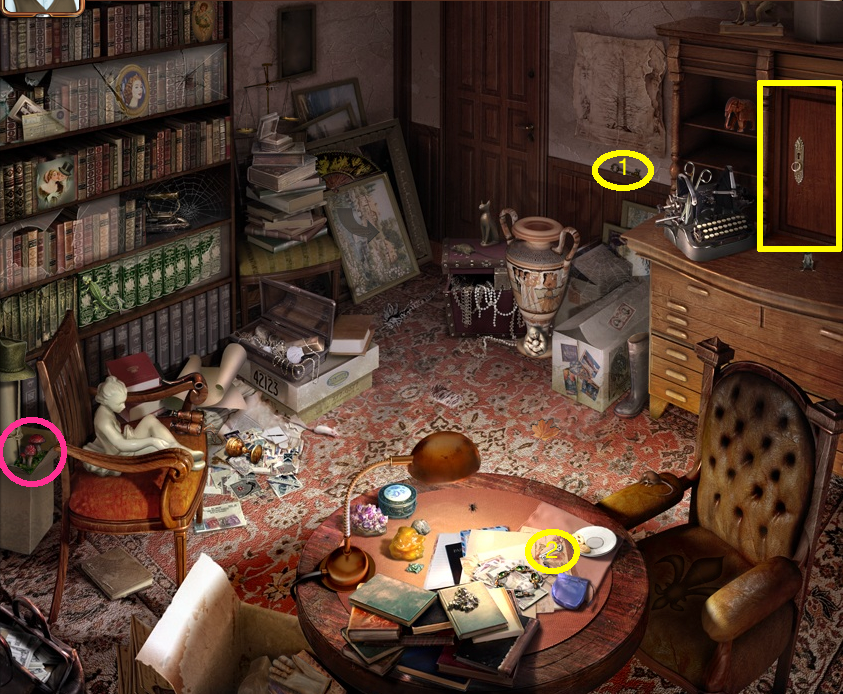
RUTHERFORD HALL HALLWAY:
Click the telephone on the table.
Click the typewriter left of the umbrella stand at the bottom.
Click on 20 pieces of document scattered around the scene.
Image
RUTHERFORD HALL SITTING ROOM:
Click the spoons to the right of the left hand window.
Click the beetroot under the coffee table.
Image
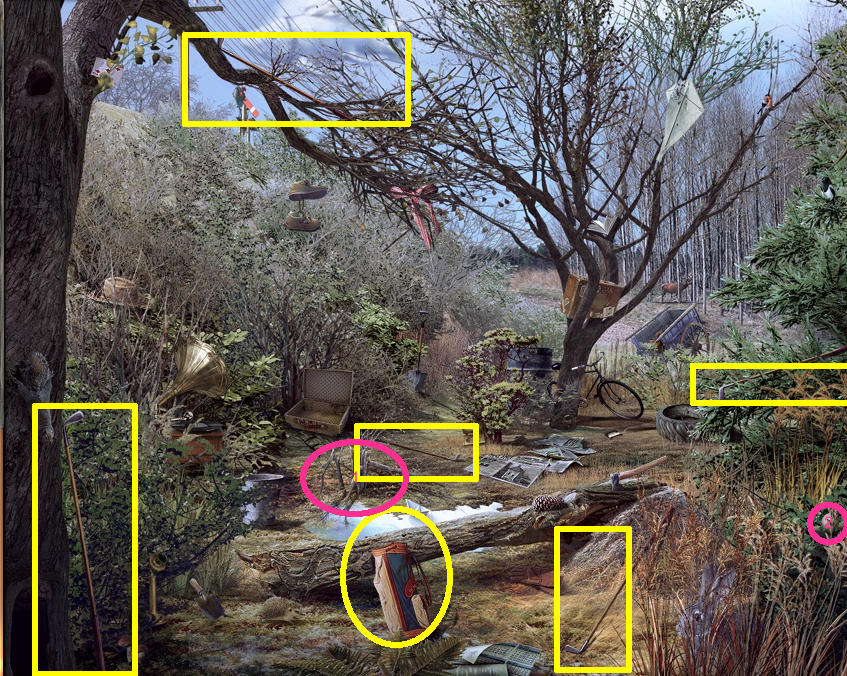
PARK:
Click the schedule at the bottom center edge.
Click the journal in the branches near the trunk of the center tree.
Image
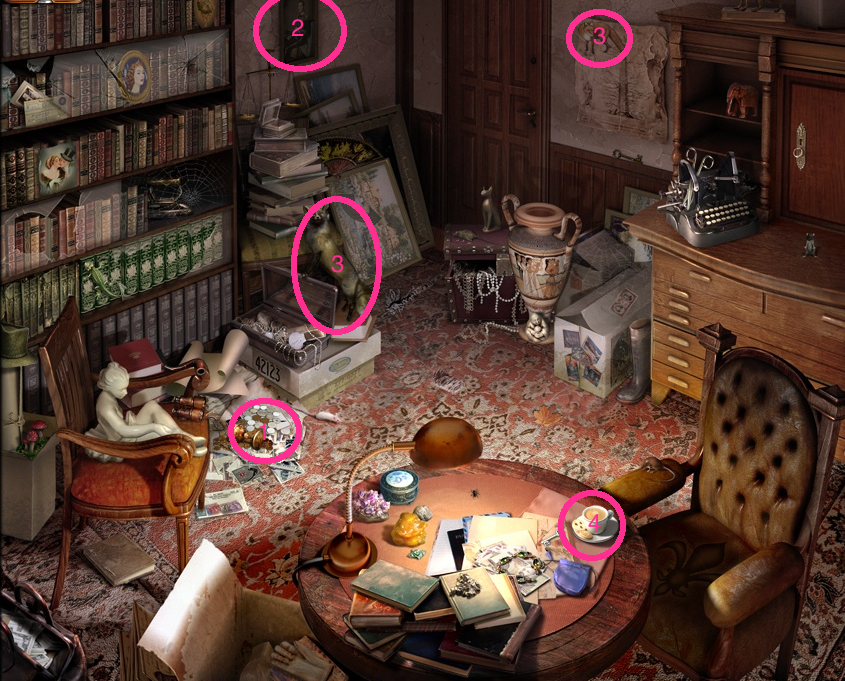
LUTHER CRACKENTHORPE'S TREASURE ROOM:
Click the coins left of center.
Click the picture of the king at the left of center on the top edge.
Click a stuffed fox near the center and a picture of a fox on the back right wall.
Click the coffee on the table.
Image
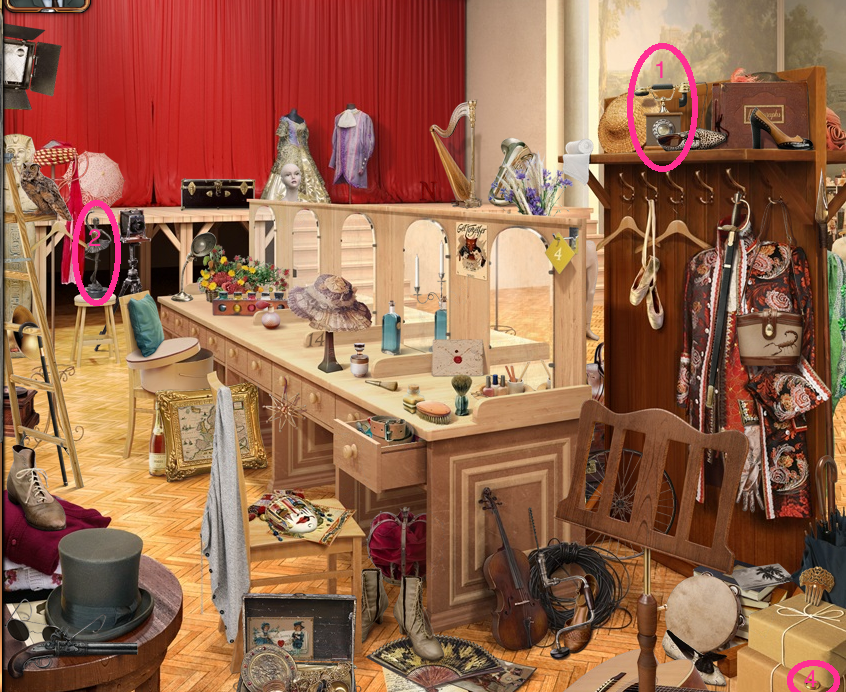
THEATRE BACKSTAGE:
Click the telephone on top of the coat rack.
Click the statue of a dancer on the left edge center.
Click the ring in the lower right corner.
Image
SHREDDED PAPER:
Image
CHAPTER EIGHT:
PADDINGTON STATION:
Click the tie on the suit.
Click the bus on the sticker on the left hand suitcase.
Image
HAROLD CRACKENTHORPE'S OFFICE:
Click the schedule at the top of the desk.
Click the journal on the desk chair.
Image
PIG STY:
Click the ash bin in the lower left corner.
Image
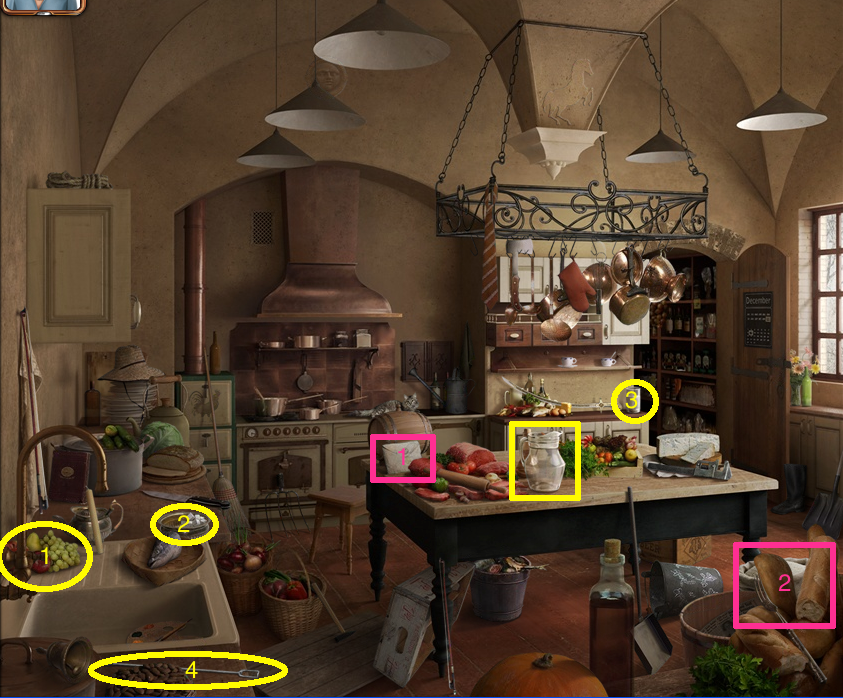
KITCHEN:
Click the letter on the left side of the table.
Click the flour sack which is in back of the objects in the lower right corner.
Click the fruits on the sink and put them in the jug on the table.
Click the sugar on the sink and put it in the jug.
Click the water on the back table left of the door and put it in the jug.
Click the stick on the lower edge of the sink and stir the jug.
Image
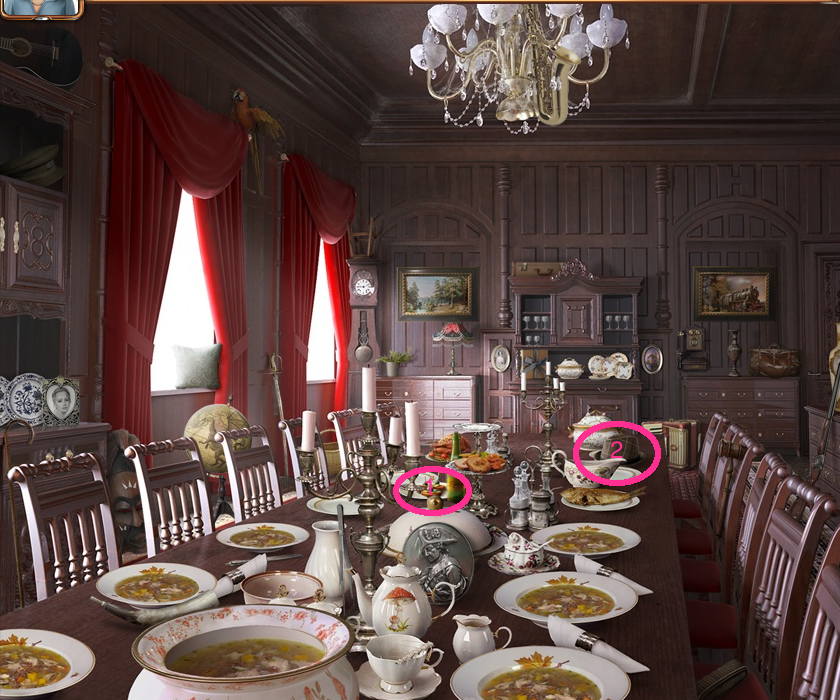
RUTHERFORD HALL DINING ROOM:
Click the canapé in the center of the table.
Click the hat on the upper right corner of the table.
Image
CHAPTER NINE:
MAP:
Click the lowest room in Rutherford Hall.
Image
MISS MARPLE'S ROOM IN TOWN:
Click the key on the door of the cupboard.
Click the train on top of the cupboard.
Image
LONG BARN:
Click the postage stamp on the sarcophagus.
Click the letter below the raven.
Click the envelope below the ladder.
Image
LUTHER CRACKENTHORPE'S TREASURE ROOM:
Click the mushrooms at the bottom left of the bookshelf.
Click the copper key right of the door and use it on the cupboard.
Click the silver key on the table and use it on the box in the cupboard.
Click on the open box to get the gold.
Image
THEATRE BACKSTAGE:
Click the postcard on the bottom edge in the box.
Click the sarcophagus on the left side.
Image
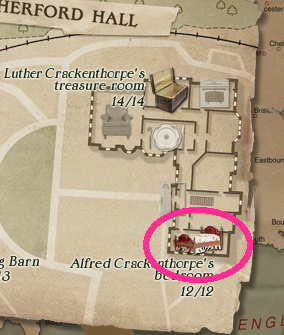
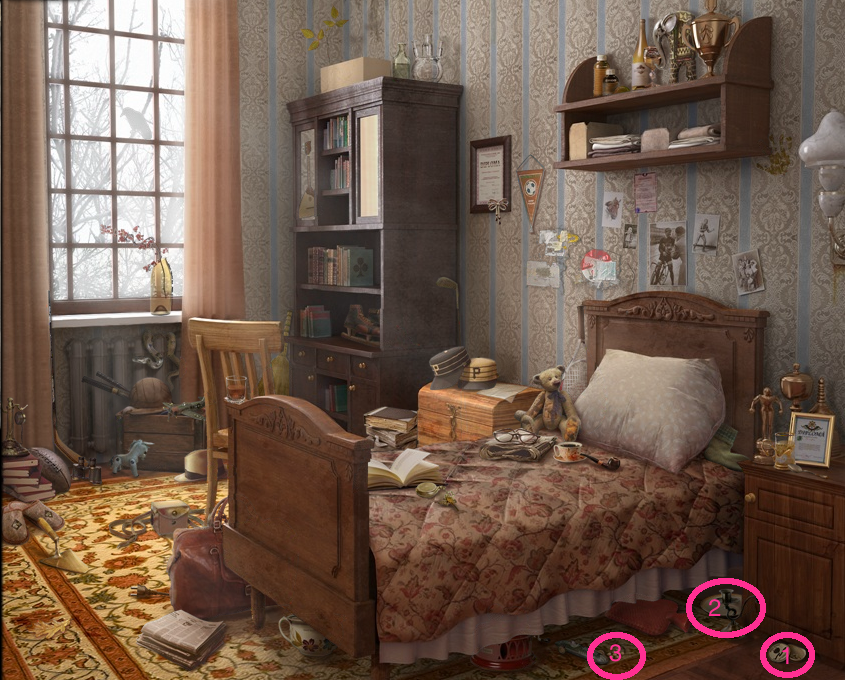
ALFRED CRACKENTHORPE'S BEDROOM:
Click the poison on the right-hand nightstand.
Click the leftovers on the left-hand nightstand.
Image
CHAPTER TEN:
TRAIN CARRIAGE:
Click the photo of the child on the right seat.
Click the lighted lamp over the right seat.
Click the mask in the box on the left seat.
Image
HAROLD CRACKENTHORPE'S OFFICE:
Click the bottle of medicine on the right side of the desk.
Image
POLICE STATION:
Click the mushrooms on the side of the bookcase.
Click the poison on the top shelf on the right.
Image
PIG STY:
Click the roasted chicken right of the window.
Click the tin in the bottom left corner.
Click the doctor's bag left of the column's bottom.
Click the muck left of the barrel.
Image
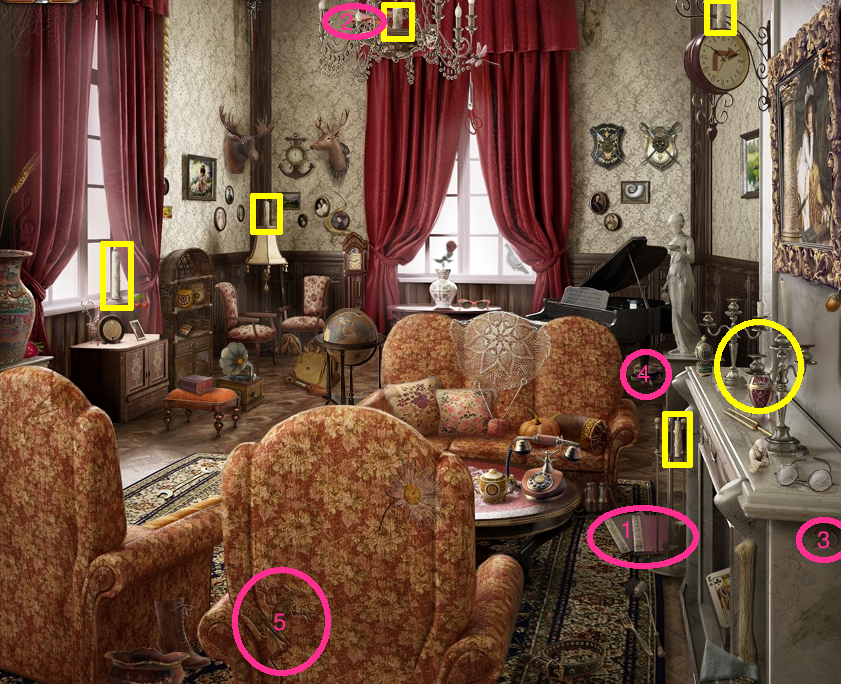
RUTHERFORD HALL SITTING ROOM:
Click the files left of the fireplace.
Click the plane on the chandelier.
Click the 20 on the side of the fireplace.
Click the film by the piano leg.
Click the frog on the back of the right armchair.
Collect five candles through the room and place them into the candelabra on the mantel. You have to sort of click in the center of the candelabra, not on the empty candleholders.
Image
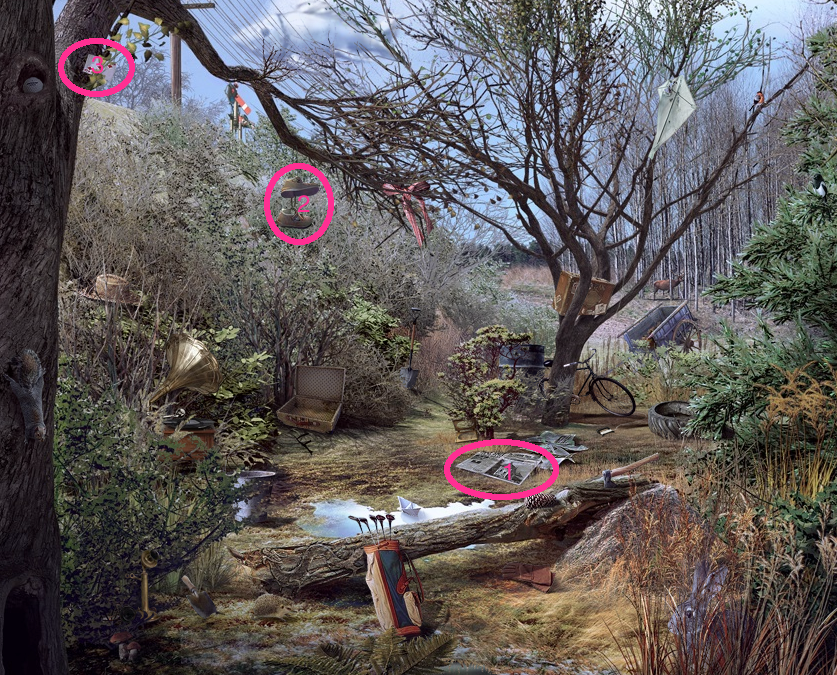
PARK:
Click the picture of a house in the center.
Click the boots hanging from the tree branch.
Click the three of diamonds at the top of the left hand tree.
Image
CHAPTER ELEVEN:
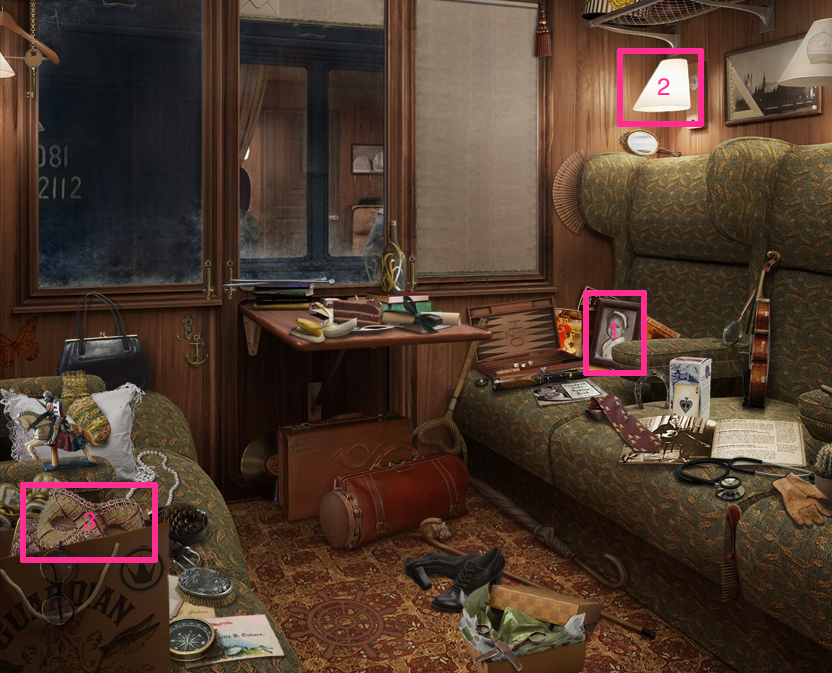
MISS MARPLE'S ROOM IN TOWN:
Click the teacup in the center.
Click the envelope under the chair.
Click the letter right of the window.
Image
RUTHERFORD HALL HALLWAY:
Click the cake on top of the table.
Click the candles left of the cake.
Click the 44 on the ceiling.
Image
ALFRED CRACKENTHORPE'S BEDROOM:
Click the open pillbox in the lower right corner.
Click the saucer, left and above that, under the bed.
Click the pills, left and also under the bed.
Image
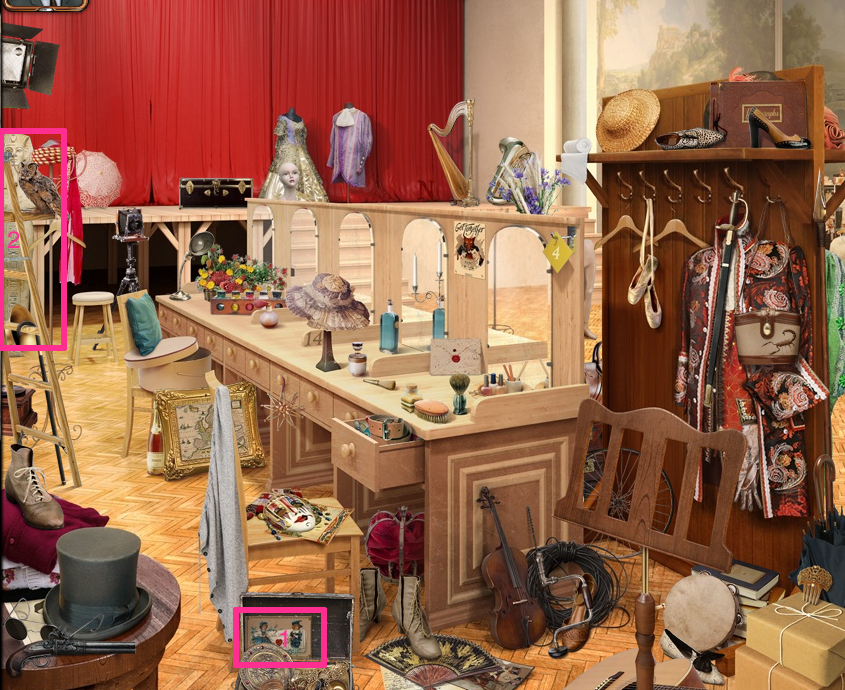
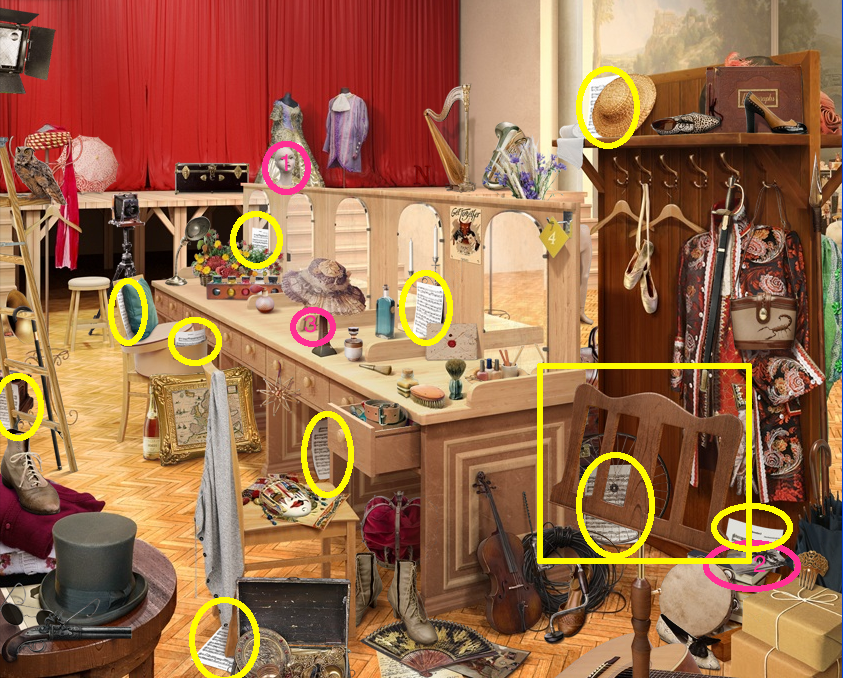
THEATRE BACKSTAGE:
Click the head on top of the dressing table.
Click the postcard on the boxes in the lower right corner.
Click the 14 in the center, on the divider.
Collect 10 sheets of music and place on the music stand.
Image
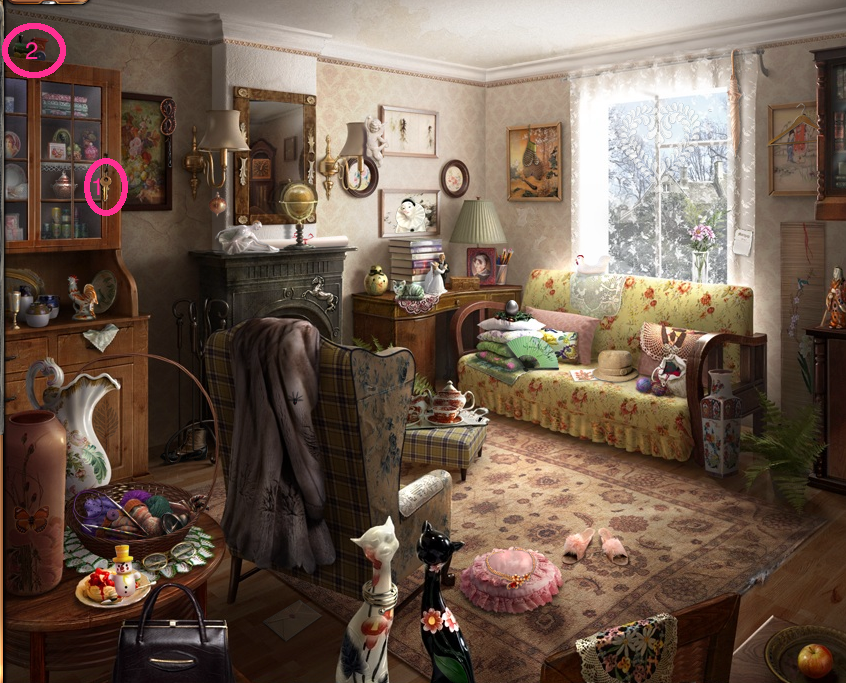
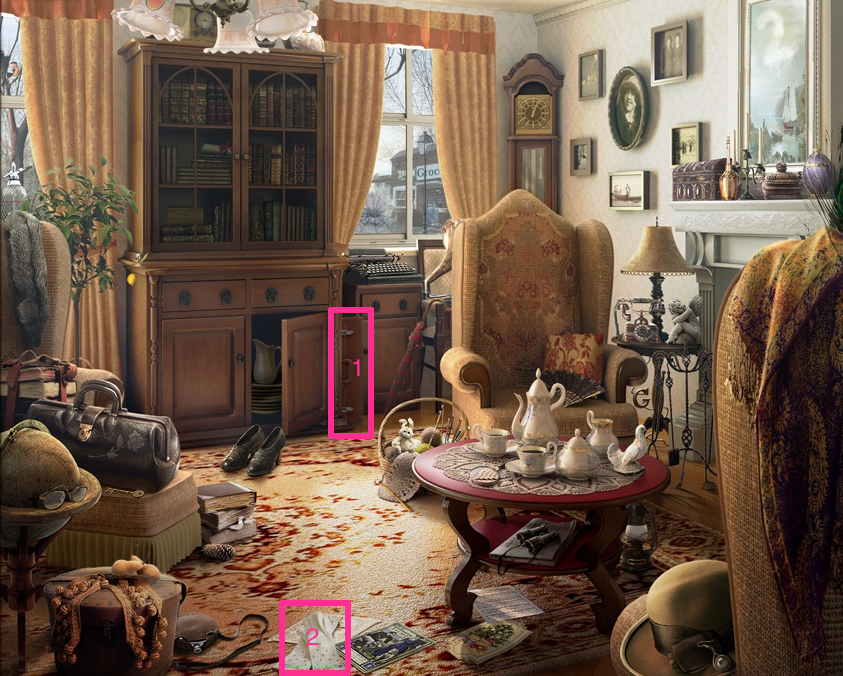
MISS MARPLE'S SITTING ROOM:
Click the suitcase right of the bookcase.
Click the gloves at the bottom edge's center.
Image
CLUE MATCHING:
Image
RUTHERFORD HALL DINING ROOM:
Click the fish on the back right of the table.
Click the fishbone atop the teacup at the bottom edge's center.
Click the forceps above the tureen.
Click the picture of a train on the right side.
Image
Posted by: joye |
June 26, 2010 8:55 PM
|
June 26, 2010 8:55 PM