
Amateur Surgeon 3: Tag Team Trauma
Platform: iOS
![]() Who needs a real doctor when you can give Dr. Payne a call? The unconventional surgeon "simulation" series from Adult Swim is back, retooled for mobile devices and featuring some new devices, new patients, and plenty of medical drama. Amateur Surgeon 3: Tag Team Trauma sticks you in the operating room with tools like a stapler, a pizza cutter, a chainsaw, and some crazy-cool healing gel. Using your, uh, medical knowhow, you'll patch up patient after patient with the greatest of ease!
Who needs a real doctor when you can give Dr. Payne a call? The unconventional surgeon "simulation" series from Adult Swim is back, retooled for mobile devices and featuring some new devices, new patients, and plenty of medical drama. Amateur Surgeon 3: Tag Team Trauma sticks you in the operating room with tools like a stapler, a pizza cutter, a chainsaw, and some crazy-cool healing gel. Using your, uh, medical knowhow, you'll patch up patient after patient with the greatest of ease!
 It starts off with a few moderately injured patients who just need a few patches here and there. Using a pizza cutter to get inside, you'll grab a pair of tongs and pull out all sorts of foreign objects from your patients. Once complete, use the stapler to patch up cuts, sear it shut with the lighter, then dab some healing gel to seal the flesh once and for all. The tag team element lets you summon a partner to give you or the patient certain buffs, like increasing the coins you earn for a successful surgery or freezing time for a few moments while you perform a delicate task.
The only real drawback to Amateur Surgeon 3 is the in-app purchasing system that goes just a little bit overboard. The game is a free download (with ads), but upgrading your tools, keeping your lives recharged, and buying new tag partners practically requires opening up your wallet. You earn coins and surgeon points naturally through play, but when the game throws some of its trickier situations in your face, you'll find yourself in dire need of some help.
Looking past the awkward free to play aspect, Amateur Surgeon 3 is still a respectable entry in the series. The touch controls work flawlessly, the humor is just as rude and crude as ever, and the visuals will practically turn your stomach. Hooray for unconventional surgery!
Want more simulated surgery action?
- Alan Probe: Amateur Surgeon (browser)
- Alan Probe: Amateur Surgeon 2 (browser, iOS)
NOTE: This game was played and reviewed on the iPad 3. Game was available in the North American market at the time of publication, but may not be available in other territories. Please see individual app market pages for purchasing info.


Walkthrough Guide
(Please allow page to fully load for spoiler tags to be functional.)
Amateur Surgeon 3: Tag Team Trauma Walkthrough
General Information and Tips
From the Main Menu, you can Play the game, view the credits and other games, check game news, and connect to the game center.
When you press Play, you will have your choice of selecting a saved game or starting a new one.
After you save Mr. Giblets, he will become your Tag Partner, but you can also purchase other Tag Partners with the SP money you earn.
A complete list of Tag Partners is available at the end of this walkthrough.
Be aware that as long as the injuries exist, the condition of the patient can decline and you could end up with an obituary, so timing and working rapidly are important.
After each procedure, Alan will pay you with Surgeon Point money you can use for purchases, such as Upgrades and additional Tag Partners.
You will also get a Surgery Report with a star rating and score, so obviously if you make no mistakes, your score and rating will be higher.
If you do not get your 3 stars, you have the option to go back and try again.
If you specifically select the Bonus Level options, you will have an opportunity to earn extra stars.
Sometimes you may miss a staple and it will say Fail: try cauterizing anyway because it could work so you can proceed.
When you fail, quit or retry a surgery, you use up a blood pack, and you need one to operate on a patient. They recharge every 30 minutes and you can carry up to 3 of them, but that is an in-app purchase so your other option is to quit playing until it recharges.
Once used, your Tag Partner needs time to recharge. You can either wait out the time or pay to have him recharge instantly.
You can check on patient's health by the upper left corner button: green is good, yellow is a warning, and red is not good, so give a health injection.
The game has in-app purchases that are available for real US Dollars should you decide you wish to avail yourself of them.
Since some of the directions in this walkthrough are pretty general from processes you have learned in playing the game, please feel free to ask specific questions for problems you are having during your gameplay because we will be happy to answer your individual concerns.
Scene Navigation
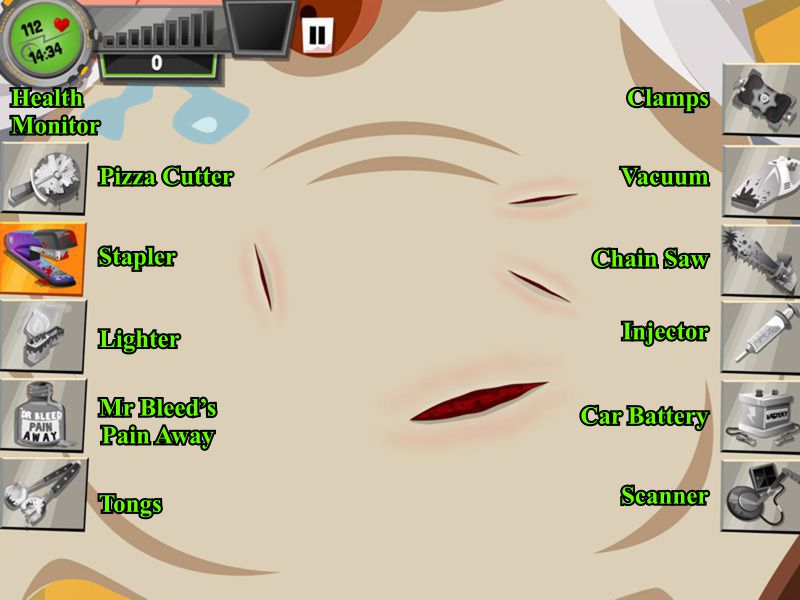
On the left and right side of the screen are your tools.
You will periodically be given a choice to upgrade your gear by spending your Surgeon's Points (SP). A complete list of upgrades follows this walkthrough.
Your basic tools include the following items.
A Pizza Cutter for cutting open on the orange dotted lines.
The Stapler closes large incisions.
A Lighter is used to cauterize all wounds, but use it quickly so you don't burn the patient.
Mr. Bleed Pain Away does just what it says.
Tongs are for extracting foreign objects.
Clamps stop spurting arteries and are used for limb replacements.
Vacuum Tool is used for sucking up things, such as fires.
Chain Saw for removing any type of concrete.
Injection tool is a syringe for injecting green fluid to increase the patients' health, but there is another syringe available when you tap on the icon. The red syringe is used for extracting unwanted fluid from your patients, such as poisons.
The Car Battery is used for zapping bugs.
A Scanner for seeing if there is anything under the surface when all looks fine.
Screenshot
Bunker
Mr. Giblets
Conditions: Lacerations, shards of glass
Staple the large incision.
Cauterize all the wounds and use Pain Away.
Secondly, open him on the dotted line with the Pizza Cutter.
Use the Tongs to slowly remove the glass shards from his heart to the tray.
Staple the incisions, cauterize them, and apply Pain Away.
Close up his tummy using the same procedure you just did.
You have saved Mr. Giblets, so he will become your new Tag Partner which is a good thing because he has healing slobber that is perfect for raising your patient's heart rate.
Tap on the question mark opposite Mr. Giblets to continue.
Proxy
Your next patient is the resident medical mannequin PRXY-4, but you can call him Proxy.
After you talk to him, start the procedure.
Conditions: Realistic injury simulation.
Staple the large incision, cauterize the wounds, and put Pain Away on them.
If he starts to fade away on you, don't forget to inject him.
Continue the same procedures as rapidly as possible, the cutting, stapling, cauterizing, and Pain Away, until you get your band aid of success.
Shanks-a-Lot Prison
Choose one of the question marks for a patient.
Neil File
Use the Chainsaw in a circular motion to remove the cement, then put Pain Away on the area.
Cut him open and get out the Chainsaw again for the two round cement blobs.
Use the Pain Away, and then follow the yellow dotted line with the Chainsaw.
Cross cut the cement and then remove the pieces to the tray with the Tongs.
Connect the transplant, burn it into place, and apply Pain Away.
Staple, cauterize, and apply Pain Away to the wounds, and cut him open with the Pizza cutter.
More cement to remove, so apply the same procedure with the two round cement blobs.
Staple the large wound, cauterize every wound, and apply Pain Away.
Cut around the first lung, get rid of the cement, and attach the transplant using the same procedure as before.
If his heart rate gets low, don't forget to inject him. Since you have cement to deal with, stick the needle into the connecting tube.
Do the same procedure with the second lung.
Staple him up, cauterize, Pain Away, and you're home free.
Clink on the next question mark.
Dale Break
Remove the foreign objects from the wounds with the Tongs and proceed as usual.
Cut him open, remove the toothbrushes, and fix up the wounds.
Don't forget to give him injections when you get a low heart rate warning.
Close up and use the cutter on the next area.
Remove the toothbrush and close up the wounds...don't miss the one on the blue artery.
Use the scanner on the upper left area, and when the outline turns green, cut.
Remove the object, close up the wound, close up the outside wound, and you're done.
Ed Scape
Condition: Burst Arteries and Fleas.
Use the Car Battery to kill the fleas, but wait till they land for best results.
Use the Tongs to remove the dead bugs to the tray, cauterize the wounds, and use Pain Away.
Cut him open, tap twice to apply the Clamp to the bleeding artery, and slowly turn it until the bleeding stops.
Staple the large wounds, cauterize everything, and apply Pain Away.
Keep up the same procedures for the rest of the surgery, and don't forget to check his health status.
Earnest Pickles
The procedure for taking care of Earnest is as follows.
Remove the cement with the Chainsaw, staple the large wounds, cauterize all the cuts, and put Pain away on everything.
Cut him open, use the Chainsaw on all the yellow lines, remove the rib with the Tongs, replace the new rib piece, use the Lighter on the black lines, and the Pain Away on the green lines.
Continue this same procedure for the next two ribs and watch his heart rate.
Close up the exterior wound and go on to object removal.
Staple the necessary wounds, cauterize and heal them.
Use the Chainsaw to remove any cement and to cut bones for replacement.
The Tongs will remove any cut bone pieces and replace them, as well as remove any foreign objects.
After a bone is replaced, cauterize black lines and use Pain Away on green lines.
Staple any large wounds, cauterize all wounds and apply Pain Away.
Mumbo Jungle
BugBite Mike
Cut open his back and use the Vacuum to get rid of the fire.
The Car Battery will get rid of the maggot...do it 3 times, and then use the Tongs to get rid of it.
Do your usual procedure with wounds and cuts.
Chainsaw the vertebrae, use the Tongs to get rid of it and put in a new one.
Do the usual bone procedure, then repeat the same process again for the next vertebrae. He should be good to go.
Tammy Gracefuls
Tammy has some unusual objects to remove before you can proceed, so zap the snake with the Car Battery to stun it, then use the Chainsaw 3 times to decapitate the snake.
Use the red syringe to get rid of the poison.
Use the Tongs to remove the other objects, then staple cauterize, and heal.
After you cut, you have another snake to deal with, so do the same procedure as before, including extraction of the other items.
Again, extract the poison with the red syringe and fix up all the wounds as usual.
Looks like she needs a replacement organ, so yellow is for Chainsaw, Tongs for removal and replacement, black for Lighter, and green for the healing.
Fix up her exterior wound and she's good to go.
Sweetmeats Pete
As usual, cut when you need to, extract when you need to, and heal everything wounded.
Use the Tongs to get rid of the piranhas as necessary and fix him up.
The Chainsaw will remove necessary parts when cut on the yellow line, and the Tongs will remove and replace what is necessary.
Clamp all necessary arteries (remember to double tap to close).
Use the Tongs to remove and replace all necessary arteries and broken bones, and do your usual healing procedure after that.
Lunacy Falls
Deceased Keith
Another animal situation. Zap the frog with the Car Battery and chase it 3 times with the Lighter until it is history.
Use the Tongs to get rid of it and extract the poison with the red syringe.
Cut him open and zap more frogs with the same procedure as before.
Use the Stapler on the deep wound and heal it.
Not looking good, so remove the organ with the Chainsaw, use the Tongs for removal and replacement and heal him up.
Fix the outside wound and he is a success.
Hisser
I suggest burning the critters with the lighter and using the Tongs on their tail.
Then you need to suck away the poison with the red syringe and proceed as usual with the wound heal process.
Take care of the deep wound as usual and you are done.
Drag Nammit
Use the usual cut, staple, cauterize, and heal procedure where necessary.
Extract the poison with the red Syringe.
For the transplants, use the Chain Saw on yellow lines, the Tongs to remove and replace parts, the Lighter on black lines, and Pain Away on green lines.
Zap any fleas with the Car Battery and remove them with the Tongs.
Batshift Crazy
Use the usual cut, staple, cauterize, and heal procedure where necessary.
The Tongs will extract the fangs and wood.
Use the scanner to locate deeply hidden wounds.
Scare each bat away, one at a time, with the Lighter, zap them dead with the Car Battery, and very quickly remove them with the Tongs.
Muta-Bear
Use the Tongs to extract the claws to the tray, staple, cauterize, and use Pain Away on the wounds.
Suck out the boils with the red syringe or use the Pizza Cutter/Vacuum method.
Cut him open and use the Pizza Cutter on the orange lines on the gray tubes.
Use the Tongs to pull out the wire, and suck out the poison using the red syringe.
Remove his heart by cutting on the yellow lines with the Chain Saw, do the same for the "Useful Inc." object, and extract them using the Tongs.
Replace the heart, cauterize, and use Pain Away.
Staple, cauterize and put Pain Away on his outside wound.
Robotopia
Upgrade Jade
Slice her eye open with the Pizza Cutter
The Vacuum will suck up the fires.
Use your usual procedure for healing all wounds, as well as for transplants, and repeat as necessary.
Bumps Grinder
Another fire victim, so use the Vacuum to suck up all fires.
Slice where necessary with the Pizza Cutter, and heal all wounds with the staple, cauterize, and Pain Away method.
Use the red syringe to extract all poison, or the Pizza Cutter and Vacuum can also be used.
The Chain Saw will break up the hard green mucus areas so you can suck out the poison.
Grinderella
Cut off the arm with the Chain Saw and use the Tongs to remove it and replace it with a new one, then heal it as usual.
Use the Clamps on the arteries, double tap them into position, and then close the valves.
The Vacuum will get rid of any fires, and the Chain Saw is for dotted yellow lines.
Always use your same healing method, and use your Tongs for removal and replacement.
Also remember the Lighter for black lines and Pain Away for green lines.
Reverend Apocalypse
All the scorpions will go bye-bye by first zapping them with the Car Battery, clamping them down with a Clamp, and then using the Chain Saw to finish them off.
Remove them with the Tongs, and I suggest using the Scanner to make sure you found all of the nasty little critters.
Use all your usual healing skills on everything necessary.
Repeat all procedures as needed, and use your Vacuum to put out any fires.
Exile Clinic
Muta-Brother
Get rid of the horns with the Chain Saw.
Use your favorite procedure for getting rid of boils and poisons.
As usual, all your healing skills include staple where necessary, cauterizing, and applying Pain Away.
The Vacuum gets rid of your fires, your favorite procedure gets rid of boils and poisons, and Tongs remove foreign objects.
Real Bumps Grinder
New problem is frostbites (snowflakes), but it really isn't a problem because your Lighter will get rid of any of them that you encounter.
Usual healing skills will always be necessary for any of these procedures.
Double tap Clamps for arteries and shut them down, and the usual dotted line procedure is necessary for any replacement parts.
Useful Brother
Take care of the frostbites with the Lighter, use the Car Battery to kill the ants, and use the Tongs to remove them.
Heal everything as usual and repeat the procedure until you have succeeded in saving the patient.
Alan
This one is fun because now you get to work on Alan, who started this whole thing.
Get rid of all frostbite and poison as you have previously learned to do.
Zap the frogs with the Car Battery, burn them with the Lighter, and remove them with the Tongs.
Suck out the poison using your favorite method.
More frostbites to remove and a really bad frog, so take care of the frostbites and then slam the big frog with the lighter 3 times, but just do the usual for the smaller ones.
Extract all the frogs, suck out the poison, and heal him up to save him.
Hubris
Suck up the fire and the poison as you have previously learned to do.
To get rid of all worms, you need to zap them with the Car Battery and remove them with the Tongs.
Fire gets vacuumed and poison gets sucked out by your favorite method.
Never forget your usual healing procedure because that always saves your patients.
For replacements, trace the necessary color lines with the proper tools.
Oops, just when all was going well, green worms show up. When they stop, use the Chain Saw on their heads 3 times, and get rid of their bodies with the Tongs.
Use the Chain Saw on the big batch of worms, get rid of it, and use the heal process.
Hospital
Thanks to Trinn for writing this section!
Karl Puccino
Main
Remove the boils with the red Injector tool or the Pizza Cutter and Vacuum.
The red Injector tool is the easiest to use because it can remove the boil without bursting it.
Although opening the boil with the Pizza Cutter and sucking up the released poison spores with the Vacuum takes longer, it also awards many more points.
Use the Detector tool to pinpoint the locations of hidden coffee beans.
Cut open the brain with the Pizza Cutter to reveal the beans, then extract all of them with the tongs.
There are 2 hidden coffee beans at the brain, 1 at the surface of the liver, and 2 inside the liver.
Heal the burst veins in the usual way - by closing it with the Clamps, then cauterizing the wound with the Lighter and healing it with the Healing Gel.
Bonus Challenge 1
Work as quickly as possible to complete the surgery in under 3 minutes.
Recommended Tag Partner for this level is Procrastibot for its ability to temporarily freeze the clock, granting you additional time to finish the level.
Useful upgrades for this challenge are:
"Bleed Buddies" which slows down the clock and "Magic Fingers" which adds extra seconds to the timer.
It's also helpful to memorize the locations of the coffee beans hidden under the skin. That way, you can use the Pizza Cutter to expose them without having to waste time finding the beans with the Detector.
Bonus Challenge 2
Earn a score of at least 30,000.
This challenge requires a lot of patience, a careful eye on the patient's health, and the Flowmaster Tag Partner.
Use the Pizza Cutter tool to open up the boils, but DO NOT suck up the poison with the Vacuum.
Instead, let the spores sit out. Eventually, they will re-infect the body with new poison pools, which you can cut open to create even more spores.
While you're waiting for the pools to appear - and keeping the patient's health stable - perform the rest of the surgery (extract the coffee beans, close the wounds, etc.) until your Tag Partner is ready to be called in.
Activate the Flowmaster and then use the vacuum tool to suck up all the spores you've left waiting around this whole time.
With Flowmaster's double combo ability, each single spore will grant you 100 points, which all adds up very quickly!
Use this strategy every time you see the boils and poison pools to inflate your score until you have 30,000 points. Make sure to watch the clock closely too so you don't run out of time.
Gossamer Rag
Main
Use the Lighter to chase the spiders to the outskirts of the screen, then kill the spiders with the flame of the Lighter as fast as possible.
Move the lighter in quick motions without staying on the same spot for too long to avoid burning the patient.
Pluck them off the brain with the Tongs once they're dead and place them on the tray.
Some of the spiders will twitch or rotate when you use the Tongs. Just ignore it, they're still dead as a doornail.
If you do not have the "Whip It Out!" upgrade, it's recommended to remove the the broken glass with the Tongs first, so that you don't accidentally grab the glass and pull it out too quickly when aiming for a spider.
Remove the black pools with either the red Injector tool or the Pizza Cutter/Vacuum combination of tools (which, again, will earn you more points than the Injector.)
The rest of the surgery is the kind of regular procedure you should be used to by now. Cut off the head and limbs along the yellow dotted line with the Chainsaw and replace the bug parts with human parts.
As usual for limb replacements, you must first close the gushing severed arteries with the Clamps by placing them about an inch or so away from the open end of the artery. Spin the valve at the center of the clamp until it's closed tight.
Reattach the clamped arteries with the Tongs, cauterize the wounds with the Lighter, and heal over each one with the Healing Gel.
Bonus Challenge 1
Complete the surgery in under 4 minutes. Although the title says "Don't Lose Your Head -Sudden Death- this is NOT an actual sudden death challenge. You can safely screw up as many times as you like.
Recommended Tag Partner for this level is Procrastibot for its ability to temporarily freeze the clock, granting you additional time to finish the level.
The following upgrades are especially helpful for this procedure:
"Clamping Down!" and "Clampgeddon" allow you to repair the severed arteries more quickly and efficiently.
"Firestarter" and "The Heat is On!" increase the effectiveness of the lighter, making it much easier to kill the fast-moving spiders.
"Bleed Buddies," "Magic Fingers," and "Chop Chop" all add extra seconds to the clock by performing quick combos, extractions, and chainsaw cuts respectively.
Bonus Challenge 2
Successfully complete the surgery without using the Injector tool and with "a lot of extra spiders."
The added spiders aren't really any extra challenge. Simply follow the same strategy as in the Main challenge: chase them to the edges of the area with the Lighter, and then burn them to death.
With the Injector tool removed, you must use the Pizza Cutter and Vacuum combination to remove the black pools and poison spores.
Recommended Tag Partner is Officer Brutality, who will rapidly perform several tasks (heal a wound, smash a creature, perform an extract, you name it!) over a period of a few seconds or Mr. Giblets for his healing ability which boosts the patient's heart rate.
However, do not try to use Officer Brutality to remove the spiders. Because he randomly selects which wound to remove, he will often automatically pick a poison pool which one of the spiders can easily replace.
Save his power instead for the head replacement, where his ability will instantly take care of the entire artery reattachment process.
Useful upgrades for this challenge are:
"B.F.Fs" and "A Helping Hand" for boosting your partner's ability and making it available more frequently.
"Sweet Relief," "Clinically Proven," and "Magic Fingers" for the boosts they provide to the patient's heart rate.
Chastity Belt
Main
This is a deceptively simple surgery that really only has a few steps repeated over and over. First, cut open the padlock with the Pizza Cutter to look inside.
Vacuum up all the flames as quickly as possible and then use the Vacuum tool to remove the ghosts.
Ghosts appear in three rounds: first as a large ghost, then a medium-sized ghost, and lastly a small ghost (the ghost will be completely banished after you've removed its smallest form).
You must wait a few seconds after removing one round of ghosts before the next round appears.
After you've gotten rid of all three intervals of ghosts, you can return to removing the seals - use the Chainsaw along the yellow dotted line in a circle around the left red seal.
Extract the seal with the Tongs and place it on the tray.
Take the gear from the tray and place it over the empty space where the seal was, then cauterize it with the Lighter and heal over it with the Healing Gel.
And there you have it! That's the basic recipe for this entire level. Where things start to get just a little more complicated is just after you've replaced the right red seal...
This time when you Vacuum the large ghost, it will "split" and return a few seconds later as 2 medium ghosts. After you Vacuum the 2 medium ghosts, they will return after a few seconds as 4 small ghosts.
Ghosts will not always split, but when they do, you have to be extra careful when removing the small ghosts.
Whenever you suck up a split small ghost it leaves behind an icy snowflake at the spot where the ghost was removed. Do not go over the icy spots with the Vacuum or it will freeze your screen.
Instead, vacuum as many small ghosts as possible without going over the same spot twice, then melt the ice with the Lighter. Repeat this process until all the small ghosts are removed.
The rest of the procedure is simply doing this strategy again and again: Cut open the sections of the belt, replace the red seals with the gears one at a time, vacuum any fires or large and medium ghosts as soon as they appear, then avoid and melt the ice crystals while vacuuming the small ghosts.
Once all of the locks have been removed you can use the Chainsaw to cut through the sides of the metal underpants, remove them with the Tongs and then put them on the tray..
Lastly, place the leather belt from the tray on to Chastity's waist with the Tongs.
Bonus Challenge 1
Complete the surgery in under 6 minutes and 40 seconds. If you follow the strategy explained in the Main section of this level, you should be able to finish the procedure with lots of time to spare.
To summarize, simply replace the seals and then suck up the ghosts as they appear in three waves of large, medium, and small ghosts.
Use the Vacuum tool to remove the large and medium-sized ghosts whenever they appear.
When the small ghosts arrive, be careful of the ice crystals they leave behind after they are vacuumed. Just remove as many as you can without moving over the same spot, then get rid of the ice crystals with the Lighter.
Recommended Tag Partner for this level is Officer Brutality. He will automatically smash to immediately remove ALL visible ghost and ice crystals while you can sit back and relax.
Although the Reverend should also be useful for this level because of his ability to "automatically select the right tool" (at the time of writing this guide) he currently does not switch quickly enough between the Vacuum and Lighter when removing the small ghosts and ice crystals to avoid freezing the screen and is therefore NOT recommended to use.
Useful upgrades for this challenge are:
"See-Saw" and "Chop Chop" for increased speed and bonus time added to the clock when using the chainsaw.
"Firestarter" and "The Heat Is On!" for improved Lighter tool effectiveness.
"Bleed Buddies" for slowing down the clock when performing quick combos (which is very often when removing multiple ice crystals with the lighter).
Bonus Challenge 2
Follow the same strategy as described in the Main section of this level.
The difference this time is that occasionally the screen will become covered with a ring of ice crystals.
Immediately melt all of the ice with the Lighter, then continue through the rest of the stage.
Recommended Tag Partner for this level is again Office Brutality. His ability to automatically remove all ghosts and ice crystals without you needing to lift a finger is unbeatable.
Emo-Shun
Main
First use either the Injector tool or the Pizza Cutter and Vacuum tool to remove the poison pool and its spores.
I recommend using the Pizza Cutter/Vacuum combo for this level because some of the objects hidden under the skin are very near a pool, so you can complete two steps at once.
Remove all of the objects lodged in the patient with the Tongs, then Staple/Cauterize (with the lighter)/Healing Gel the cuts as usual.
Carefully use the Chainsaw along the dotted yellow line around the clown's face.
Extract the sad facial features with the Tongs (first the mouth and second the eyes and nose), then replace them with the new facial features.
When you reach the heart, use the Detector to find two items - a hidden orb and a very long scarf which must be very carefully extracted.
Cut the dotted line all around the heart with the Chainsaw, then cut through the two yellow dotted lines through the middle of the heart to separate it into three sections.
Remove heart section with the Tongs, then replace them with the large Rainbow heart.
Bonus Challenge 1
Sudden death challenge - perform the surgery without making any mistakes. If the patient is accidentally injured in any way, he will automatically die.
Recommended Tag Partner is Lady Saturday who basically grants you a free "do-over" if you slip up. Her ability instantly revives a deceased patient.
Lady Saturday's revival ability will only work if pre-emptively activated it as soon as it becomes available. You can NOT tag her in after the patient is already dead!
Useful upgrades for this level are:
"Angel of Mercy" which grants you a 5 second window to revive a dead patient.
"Whip It Out!" which allows you to remove objects more quickly, significantly reducing the chance that you'll accidentally extract an item, especially the long scarf, too fast and kill your patient.
Bonus Challenge 2
Follow the strategy explained in the Main section of this level. The only major difference is that additional objects have been added to the patient, some of which are hidden under the skin.
Recommended Tag Partner is Mr. Giblets for his healing ability, which will come up very often thanks to the high number of extractions and poison spores (if you use the Pizza Cutter tool to remove poison) which rapidly fill the activation meter of your partner.
Useful upgrades for this challenge are:
"Whip It Out!" which allows you to perform extractions more quickly at a lower risk of damaging the patient (especially helpful for the long scarves).
"Cavity Search" which reveals the location of all objects hidden under the skin.
Le Flairground Fnatastique
Thanks to Trinn for writing this section!
Chartreuse Flair
Main
Start by cutting open the patient's arm along the orange dotted line with the PIZZA CUTTER.
Use the CHAINSAW along the yellow dotted line to cut through the broken bone.
Remove the sawed off section of bone with the TONGS and place them on the tray.
Use the TONGS again to pick up the new bone from the tray and place it in the patient's arm.
Cauterize the bone with the LIGHTER along the black dotted line, then heal over it with the HEALING GEL along the green dotted line.
Close the cut in the arm with the STAPLER, cauterize it with the LIGHTER, and heal it with the HEALING GEL.
Now you'll see a view of the patient's torso. Use the CAR BATTERY to zap the bouncing locusts.
Try to zap them as soon as they land on the body, not while they're in the middle of a jump.
Once you've fried a locust, remove it with the TONGS and place it on the tray.
Heal over any burns if you missed with the battery by using the HEALING GEL and cauterize any cuts left by the locusts with the LIGHTER and heal them over with the HEALING GEL as well.
Use the METAL DETECTOR to locate to hidden items in the patient's stomach.
Use the PIZZA CUTTER to cut open the skin and reveal the items.
Extract the spray can and the net with the TONGS, then place them on the tray.
Use the STAPLER, LIGHTER, and HEALING GEL to close and heal the two cuts.
Cut along the orange dotted line with the PIZZA CUTTER to look inside the patient.
Again, zap all the bouncing locusts with the CAR BATTERY and remove them with the TONGS.
Next, remove the four objects in the open wounds with the TONGS and place them on the tray.
Use the STAPLER to close all the large cuts, cauterize all of the wounds with the LIGHTER, and heal them over with the HEALING GEL.
Repair the final cut on the outside of the patient's stomach with the STAPLER/LIGHTER/HEALING GEL combo to complete the level.
Bonus Challenge 1
Work as quickly as possible to complete the surgery in under 2 minutes.
Recommended Tag Partner for this level is Procrastibot for its ability to temporarily freeze time.
Useful upgrades for this challenge are:
Chop Chop and Magic Fingers which both increase time remaining.
Bleed Buddies which slows down the game timer.
Cavity Search to immediately locate hidden objects.
You can save a little bit of time by skipping the use of the METAL DETECTOR if you already know the locations of the objects in the middle left and lower right side of the patient's torso.
Try to remove the locusts first, as their jumping can leave additional cuts on the patient.
Bonus Challenge 2
Complete the surgery with extra locusts.
Recommended Tag Partner for this level is Officer Brutality, who can quickly smash all those extra locusts (and any other wound) for you.
Useful upgrades for this challenge are:
Frying Freely which reduces damage caused by the Car Battery
B.F.F.s to increase your partner's effectiveness.
The number of additional locusts is actually pretty small. So as long as you use the CAR BATTERY and TONGS carefully, you should be able to complete the surgery exactly as you did during the main challenge.
Cobalt Flair
Main
Select the RED INJECTION TOOL (make sure to switch from the green one!), then inject each of the boils to extract the pus.
Alternatively, you could use the PIZZA CUTTER tool to cut open the boil and VACUUM up the spores, which takes longer but grants more points.
Close the large cut with the STAPLER, cauterize all the cuts with the LIGHTER, then heal over the wounds with the HEALING GEL.
Cut along the orange dotted line with the PIZZA CUTTER to view the patient's lungs.
Extract the pus from the boils again with the RED INJECTION TOOL. By the time you have all the boils removed, the small frogs should pop out of their bubbles.
First, zap the little frogs with the CAR BATTERY.
When a frog gets zapped, it will rapidly change colors and move around quickly. Burn it with the LIGHTER while it's doing this to kill it, then remove it with the TONGS.
Use the STAPLER/LIGHTER/HEALING GEL combo on the two large cuts.
Use the PIZZA CUTTER on the orange dotted line in the right lung to go inside.
Remove the boils with the RED INJECTION TOOL again.
When the frogs pop out of the bubbles, use the CAR BATTERY and LIGHTER again to kill them and then use the TONGS to place them on the tray.
Be careful while removing the frogs with the TONGS not to accidentally pull on the objects stuck inside the gashes in the patient.
Once you've taken care of the frogs you can use the TONGS again to pull out the stone piece and three figures sticking out of the four large cuts.
Close the cuts with the STAPLER, cauterize them with the LIGHTER, and heal them with the HEALING GEL to repair each wound.
Do the same with the large single gash on the patient's lung and on the patient's chest to complete the level.
Bonus Challenge 1
Work as quickly as possible to complete the surgery in under 2 minutes and 30 seconds.
Recommended Tag Partner for this level is Procrastibot for its ability to temporarily freeze time.
Useful upgrades for this challenge are:
Magic Fingers which increases time remaining while performing extractions.
Nine to Five Jab, Slip It In, and Concentrated Health, which all improve the injection tool.
Bleed Buddies which slows down the game timer when you perform a quick combo.
The frogs will run around in "panic mode" for quite a few seconds after being zapped. It can save you a lot of time if you can take out more than one frog at a time.
Attack them carefully with the CAR BATTERY (try to hit around 3) which you can then quickly finish off with the LIGHTER.
Bonus Challenge 2
In a sudden death challenge you must perform the surgery without making any mistakes. If the patient is accidentally injured in any way, he will automatically die.
This means you should be very, very careful when making extractions with the TONGS and using the CAR BATTERY against the frogs!
Recommended Tag Partner for this level is Lady Saturday, who can resuscitate a dying patient.
Make sure that you activate Lady Saturday's ability as soon as it becomes available because it needs to be enabled prior to the patient's death in order for her ability to work.
Useful upgrades for this level are:
Angel of Mercy which gives you 5 seconds after the death of a patient to revive them (with the green injection tool).
Whip It Out allows you to perform extractions more quickly, which significantly reduces the chance of you injuring the patient while removing an object.
Crimson Flair
Main
First use the VACUUM to suck up all of the fire before it has a chance to spread.
Next, carefully break away all the brimstone with the CHAINSAW.
After the stone is destroyed, VACUUM up all the black spores and the fire left behind by the stone.
Close the large cut with the STAPLER, cauterize the large and small cuts with the LIGHTER, then heal all of the wounds on the patient with the HEALING GEL.
Cut along the orange dotted line with the PIZZA CUTTER to view the patient's stomach.
Remove the flames with the VACUUM and then heal over all of the burn spots with HEALING GEL.
Use the METAL DETECTOR to locate the two hidden objects inside the stomach, then cut the area with the PIZZA CUTTER to reveal them.
Extract the matches with the TONGS and put out the fires with the VACUUM.
Heal the two cuts you made with the STAPLER/LIGHTER/HEALING GEL combo.
Use the PIZZA CUTTER along the orange dotted line to go inside the stomach.
Suck up the three fires with the VACUUM.
Destroy the two brimstones with the CHAINSAW, making sure to remove any fires and black spores with the VACUUM as they appear.
Take out the stone piece and three figures from the large cuts in the stomach with the TONGS and place them on the tray.
Use the STAPLER to close the large cuts, cauterize them with the LIGHTER, then heal over all visible wounds (including the brimstone burns) with the HEALING GEL.
Use the METAL DETECTOR to reveal the match, then extract the match with the TONGS.
Removing the match will light another fire, which you can suck up with the VACUUM.
Lastly, heal the three incisions with the STAPLER/LIGHTER/HEALING GEL to complete the level.
Bonus Challenge 1
Work as quickly as possible to complete the surgery in under 2 minutes.
Recommended Tag Partner for this level is Procrastibot for its ability to temporarily freeze time.
Useful upgrades for this challenge are:
Chop Chop ,which grants extra time for completing a chainsaw cut and See-Saw, which allows you to safely use the chainsaw tool more quickly.
Magic Fingers, which increases time remaining after performing an extraction.
Bleed Buddies, which slows down the game timer when you complete a quick combo.
Sucker! which improves the efficacy of the vacuum tool.
Cavity Search to immediately locate hidden objects.
Bonus Challenge 2
In a sudden death challenge you must perform the surgery without making any mistakes. If the patient is accidentally injured in any way, he will automatically die.
Recommended Tag Partner for this level is Lady Saturday, who can resuscitate a dying patient.
Make sure that you activate Lady Saturday's ability as soon as it becomes available because it needs to be enabled prior to the patient's death in order for her ability to work.
Useful upgrades for this level are:
Angel of Mercy which gives you 5 seconds after the death of a patient to revive them (with the green injection tool).
Whip It Out allows you to perform extractions more quickly, which significantly reduces the chance of you injuring the patient while removing an object.
Similarly, See-Saw allows you to use the chainsaw tool more quickly and minimizes the risk of accidentally damaging the patient.
Baby Awoooogah
Main
First use the CHAINSAW to destroy the three large, round stones inside the whale's mouth.
Heal the wounds left behind by the stones with the HEALING GEL.
Cut along the yellow dotted line on the whale's broken tooth with the CHAINSAW.
Remove the broken tooth with the TONGS, then replace it with the new tooth on the tray.
Cauterize the tooth with the LIGHTER along the black dotted line, then heal over it with the HEALING GEL on the green dotted line.
After you automatically switch to the view inside the whale, remove the two large stones again with the CHAINSAW.
Next, extract the six small figures from the open cuts.
Close the cuts with the STAPLER, then cauterize them with the LIGHTER.
Heal over all visible wounds, including the burns and the marks left behind by the stones, with the HEALING GEL.
Cut along the three orange dotted lines with the PIZZA CUTTER.
In the next area, you'll see four small figures and three sparking jellyfish.
Exterminate the jellyfish first by zapping them with the CAR BATTERY three times each. Remove dead jellyfish with the TONGS.
You can easily remove the small figures with the TONGS.
Most of the other tools can be used on them as well, such as the PIZZA CUTTERS which can slice them in half or the LIGHTER which will light them on fire.
Once you've destroyed and removed all the enemies in the scene, heal over any burn marks with the HEALING GEL.
Remove the broken tooth by using the CHAINSAW along the yellow dotted line, then use the TONGS to replace it with a new tooth.
Burn along the black dotted line with the LIGHTER and heal along the green dotted line with the HEALING GEL to set the new tooth in place.
At the next scene, extract the shark and the bird from the two large cuts with the TONGS.
Heal the cuts with the STAPLER/LIGHTER/HEALING GEL combo.
Next, use the CHAINSAW on the black stone statue along the dotted lines. Replace the three sawed off portions of the statue with the new stone pieces from the tray by using the TONGS.
Once the statue is complete, use the METAL DETECTOR to locate the hidden item at the left side of the screen.
Reveal the object by cutting it open with the PIZZA CUTTER, then remove it with the TONGS. Heal the cuts you made with the STAPLER/LIGHTER/HEALING GEL combo to complete the level.
Bonus Challenge 1
Complete the surgery with extra jellyfish.
Recommended Tag Partner for this level is Officer Brutality, who can quickly smash all those extra critters (and any other wound) for you.
Useful upgrades for this challenge are:
Frying Freely which reduces damage caused by the Car Battery
B.F.F.s to increase your partner's effectiveness.
In addition to increasing the number of jellyfish in the area with the floating figurines, there are also two new jellyfish in the broken statue scene.
So long as you are careful with the CAR BATTERY when attacking the jellyfish and prioritize their removal first, this challenge should not present any extra difficulty from the main level.
Bonus Challenge 2
In a sudden death challenge you must perform the surgery without making any mistakes. If the patient is accidentally injured in any way, he will automatically die.
Recommended Tag Partner for this level is Lady Saturday, who can resuscitate a dying patient.
Make sure that you activate Lady Saturday's ability as soon as it becomes available because it needs to be enabled prior to the patient's death in order for her ability to work.
Useful upgrades for this level are:
Angel of Mercy which gives you 5 seconds after the death of a patient to revive them (with the green injection tool).
Whip It Out, to perform extractions more quickly, thus significantly reducing the chance of you injuring the patient while removing an object.
See-Saw, which lets you move with the chainsaw tool more quickly and lowers the risk of accidentally damaging the patient when destroying the stones.
Upgrades
200 SP:
A Cut Above: Increases pizza cutter effectiveness.
Fire starter: Lighter becomes slightly more effective.
Prescription Dose: Increases injection fluid amount for more health.
D Batteries: Reduce cool-down time of scanner.
A Patient Patient: Increase time between combo actions to make them easier.
300 SP:
See-Saw: The chainsaw can be used slightly quicker.
Clamping Down x 4: Earn 4 clamps - handy for limb replacement.
Nine to Five Jab: Allows you to use the injection tool more frequently.
Sucker: Improve the power of the vacuum tool.
Smooth Moves x 2: Chain together movements for additional combo meter bars.
750 SP:
Gain the Edge: The pizza cutter causes no damage when cutting the patient.
The Heat is On: Increase lighter effectiveness.
Slip it in: Injection tool can be used faster...unlocked for 15 stars.
Needle in the Haystack: The scanner shows a directional arrow.
B.F.F.s: Improves Tag Partner power effectiveness.
1500 SP:
No More Saw-ness: Chainsaw minimized damage when cutting.
Sweet Relief: Healing wounds provides small health boost.
Clinically Proven: Using the healing gel boosts a patient's heart rate slightly...unlocked for 25 stars.
Whip it Out: Extractions can be performed faster.
A Helping Hand: Tag partner powers become available faster.
3500 SP:
Frying Freely: Decrease Car Battery damage to patients.
Super Stapler: Swipe to lay an automatic row of staples.
Concentrated Health: Increase the effectiveness of the injection tool...unlock for 40 stars.
Cavity Search: Holding finger down with the scanner reveals all hidden objects.
It's Cool, Bro: Allows you to keep your combo if you make one mistake.
7500 SP:
Chop Chop: Completing chainsaw cuts grants extra time.
Clamps only need half of their standard rotation to close.
Angel of Mercy: Gain 5 seconds of grace time when the patient dies to revive them...unlock for 55 stars.
Magic Fingers: Performing perfect extractions boosts heart rate and time remaining.
Bleed Buddies: In Flow mode, quick combos slow down the game timer.
Tag Partners
Lady Saturday: Tag Power - Bring a flat-liner patient back to life -Free for one-time use in Version 1.0.3.
Mr. Giblets: Tag Power - A genetically enhanced Pug with healing slobber power that is perfect for raising a patient's heart rate - Your partner by default if you want one.
Flowmaster: Tag Power - Every successful action builds your combo bar twice as fast - 500 SP.
Filthy Nowe: Tag Power - He's always on the hunt for shiny things, and his sidekick magpie, Evermore, gets you double coins for surgery - 4000 SP.
Procrastibot: Tag Power - Freezes time until a round of toast pops up from his plutonium-powered toaster head - 8500 SP.
Officer Brutality: Tag Power - He smashes injuries out of existence, so is perfect against creatures - 9800 SP.
Crumpet: Tag Power - You get fully upgraded tools for every occasion for the duration of the surgery - 7500 SP.
Posted by: Jazz |
August 26, 2013 3:20 PM
|
August 26, 2013 3:20 PM