

![]() As the robot slave of some sort of mad scientist, you are tasked with finding and waking Lenore (whoever, or whatever that is) in Chamber Door. In this point-and-click adventure from Silver Stitch, you and your sidekick Eleven delve into dark forgotten chambers to begin your search. Use either [A] and [D] or left and right [arrow] keys to move, and press [S] or down [arrow] to interact with the switch boxes. After you activate a switch, use the mouse to control Eleven.
As the robot slave of some sort of mad scientist, you are tasked with finding and waking Lenore (whoever, or whatever that is) in Chamber Door. In this point-and-click adventure from Silver Stitch, you and your sidekick Eleven delve into dark forgotten chambers to begin your search. Use either [A] and [D] or left and right [arrow] keys to move, and press [S] or down [arrow] to interact with the switch boxes. After you activate a switch, use the mouse to control Eleven.
 Inspired by The Raven by Edgar Allan Poe, the twisted story reveals itself through a series of scrolls found throughout the game. There is no inventory, so the puzzles are generally just a matter of clicking things in the right order on each screen. And although the cursor doesn't change for hot spots, various levers and knobs are fairly easy to spot. Chamber Door is great at setting a mysterious, somewhat creepy mood. The personality of the game reminds me somewhat of Windosill, but more spooky than whimsical. Short and simple, but with haunting piano tunes and wonderful atmosphere, Chamber Door offers up a solid little adventure even Poe would enjoy.


Walkthrough Guide
(Please allow page to fully load for spoiler tags to be functional.)
Chamber Door Walkthrough
Starting Room
The door on the right will open automatically after a few seconds.
Walk right to enter the Music Room.
Music Room
Position the robot over the control box in the middle of the floor.
The light on the control box should switch from red to green once you're in place.
Press the [down arrow] key or the [S] key to activate it, which will allow you to switch to your partner Eleven in cursor mode.
Click the rod in the middle of the large wheel to turn on the generator which powers the building.
This also turns on the music box. If you'd like to mute the music at any time, just click music note below the rotating cylinder.
Press down to release control of Eleven (which will deactivate your cursor and allow you to move the robot once again). Walk left twice to go to the Conveyor Belt Room.
Conveyor Belt Room
Stand the robot over the control box and press down to switch to cursor mode.
Click the third crate that comes down the conveyor to open it. A mechanical hand will shoot upwards from the crate and launch a white ball into the metallic raven head that is hanging above the conveyor belt.
Don't worry if you miss the crate the first time around, just open each crate until you find it.
Click the spokes at the opposite end of the rod attached to the raven head to roll the ball into the next room.
Click the scroll leaning against the wall on the right side of the conveyor belt to read Entry 1.
Press down to return control to the robot. Move right twice to return to the Music Room.
Music Room
Move the robot on top of the control box and press down to switch to cursor mode.
Click the gold mechanism with a green gem on the wall (you'll find it just a little to the left of the ball itself), which will knock the ball to the antennae on the wheel.
Once the ball is caught in the wheel's electric field, click the ball to launch it into the next room. The right door will also open at the same time.
Click the scroll on top of the music box to read Entry 2.
Press down to leave the control box and continue right into Subject 3's Room.
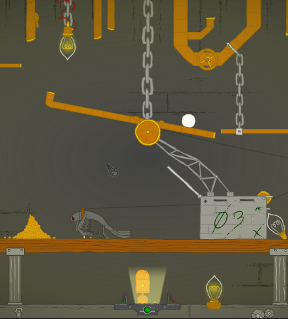
Subject 3's Room
Once again, position the robot on the control box and press down to switch to the cursor mode.
First turn the three valves around the room:
One valve is in the middle of the pipe attached to the floor at the lower left area of the room.
Another valve is on the pipe at the top right corner of the room.
The last valve in at the center of the ceiling pipe between the two middle chains.
Now flip the switch attached to the ceiling pipe (to the left of the upper glowing light bulb) to pour the bird seed onto the wooden platform below.
Open the cage labelled "03" to release the bird.
As the raven moves towards the bird seed, the rope on its leash will pull the pipe it's attached to and roll the ball into the next room.
Click the scroll on the far left end of the wooden platform to read Entry 3.
Press down to release control of Eleven. Don't follow the ball into the room on the right just yet. Instead, go left four times to enter the Study.
Study
Move the robot to the control box, then press down to go back to cursor mode.
Click the scroll sticking out of the umbrella stand to read Entry 4.
Next, click the scroll with the green ribbon on the right side of the work table to read the "Chemical Results".
Note that the first chemical, "Balm of Gilead" causes the subject to relax, while the chemical "Nepenthe" makes the subject flee.
Press down to leave the control box and switch back to the robot. Move right five times to enter Subject 6's Room.
Subject 6's Room
Stand the robot on the control box and press down to switch to cursor mode.
When you entered the room, the ball rolled into the left basket.
If you want to check the position of the ball, click a basket to shake it. If the ball is inside, it will peek out of the top of the basket.
Click the small, grey switch at the bottom of the mutant raven's perch three times to move the ball's basket to the bottom position.
Next, click the bottom basket to drop the ball into the metal bucket below it.
Click the lever in the middle of the right wall to move the metal bucket further right.
Now you can click the metal bucket to catapult the ball into the next room.
Click the scroll sticking out of the bottom of the large pipe in the right wall to read Entry 5.
Press down to release control of Eleven. Walk right twice to reach the Window.
Window
Go to the control box in the middle of the floor. Press down to switch to cursor mode.
Click the latches at the left and right sides of the window frame to unlock and open the window.
Click the ball, which has become trapped in the spiders web at the left side of the tree.
A spider will free the ball and move it on top of the nest at the right side of the tree. Click the ball to drop it into the nest.
Click the ball one more time...
So it wasn't a ball after all - it was an egg!
Pull the lever that the hatchling from the egg lands on to open the door on the right.
Press down to leave the control box. Move right once to enter Subject 9's Room, then continue right to reach the Laboratory on the other side of the room.
Laboratory
As always, move the robot to the control box and press down to switch to the cursor mode.
Examine the yellow and orange flasks hanging from the ceiling.
Remember the note from the study? You'll see the relaxant Gilead is in the yellow flask and the stimulant Nepenthe is in the orange flask.
But there's a section of the pipe missing underneath the orange Nepenthe flask.
Click the mechanical arm that's second from the right to fill the gap with the missing pipe.
Before you go, click the scroll held by the mechanical arm that's second from the left to read Entry 7.
Press down to release control of Eleven, then move left to return to Subject 9's Room.
Subject 9's Room
Position the robot on the control box and press down to switch back to cursor mode.
Click the right lever twice to drip the orange fluid on to the raven, which causes it run on the treadmill and powers the machine.
As a bonus, if you click the right lever one more time, the third drop of fluid will make the raven move fast enough to flee the treadmill.
Click the scroll stuck in the pipes at the top left corner of the room to read Entry 6.
Press down to leave the control box and switch back to the robot. Go right twice to reach the Chamber Door.
Chamber Door
Stand the robot on top of the control box at the middle of the room. Press down to switch to cursor mode.
Click the scroll on the table to read Entry 8.
Pull the handle hanging from the ceiling to raise the magnet and knock on the door.
Posted by: Trinn |
October 30, 2013 1:40 PM
|
October 30, 2013 1:40 PM