
![]() You've come a long, long way, baby, and in Rusty Lake's immensely popular creepy and surreal escape series, you've got miles to go before you sleep. In Cube Escape: The Mill, also free for iOS and Android, once again you're surrounded by four walls (plus a ceiling a floor, naturally) and a whole lot of cryptic contraptions that don't seem to be working. Click on things to interact, and use the tiny black arrows at the edges of the screen to move around the room. To use an item, click it in your inventory on the right, and then again wherever you'd like to try it. There is, as usual, no changing cursor, so make sure you hunt everywhere. Sometimes you may need to click things in the right spot to interact with them properly, and if things get weird, well... this is a Rusty Lake game we're talking about. And yes, you will want to gird your loins for a jumpscare or two.
You've come a long, long way, baby, and in Rusty Lake's immensely popular creepy and surreal escape series, you've got miles to go before you sleep. In Cube Escape: The Mill, also free for iOS and Android, once again you're surrounded by four walls (plus a ceiling a floor, naturally) and a whole lot of cryptic contraptions that don't seem to be working. Click on things to interact, and use the tiny black arrows at the edges of the screen to move around the room. To use an item, click it in your inventory on the right, and then again wherever you'd like to try it. There is, as usual, no changing cursor, so make sure you hunt everywhere. Sometimes you may need to click things in the right spot to interact with them properly, and if things get weird, well... this is a Rusty Lake game we're talking about. And yes, you will want to gird your loins for a jumpscare or two.
 Like most of the Cube Escape games, The Mill doesn't hold your hand. It leaves you to figure out how to solve its strange puzzles while it stands in a corner and stares, muttering disconcertingly. By now, you either love or hate the game's "sink or swim" approach to its gameplay, and some of its puzzles are flat-out baffling until you experiment with them to find connections and understand their mechanics, something compounded by, in one instance, a hard-to-see clue, and more often, finicky interaction. Just because something didn't do anything when you clicked there doesn't mean it wouldn't have something else for you if it clicked here, which isn't always intuitive. Though The Mill isn't the weirdest entry in the series we've had, it's still got its share of surprising mysteries, and that bit of slightly unnerved delight whenever you encounter something off the wall is a large part of the appeal. Though it really doesn't answer all the questions the series has raised, it connects a few dots in surprising ways, the sort of thing that makes you go "Hmmmm" in a wise, contemplative way to hide how baffled you are even though it might have the closest approximation of exposition we've gotten so far. Cube Escape: The Mill is morbidly gorgeous, creative, unexpected, and shocking, and will definitely have you on edge until the next installment.
![]() Cube Escape: The Mill (iPhone, iPod Touch, iPad)
Cube Escape: The Mill (iPhone, iPod Touch, iPad)
![]() Android:
Android:
Cube Escape: The Mill


Walkthrough Guide
(Please allow page to fully load for spoiler tags to be functional.)
My first walkthrough...here we go!
First the map of the mill
Click “The Living Room” it is the only part of the map available to you
The Living Room
First Wall:
You’re looking at a strange machine with a large gear to the right. Experiment with the arrows on the machine to see how the mechanism works. Turn left.
Second Wall
More large gears connected to the first are on this wall. Turn left again.
Third Wall
There is a picture of the mill map on the wall. You can use this map to skip to other areas once you’ve unlocked them. There is a stove in front of you. Two drawers and the large door on the stove open. Take the pot of water on the stove.
Look on the table. Take the matches. The other item is a key mold that you can’t take.
Take the stack of wood to the left of the table. Look up.
The Ceiling
On the ceiling you see a door with a golden lock that requires a key and something hidden in the cobweb.
Use the matches to burn away the cobweb. Take the key that remains. Look back down.
Turn left.
Fourth Wall
Here you’ll find a locked cabinet that requires a key. There is a locked door that requires a code. Click the door and see that the hint for the code is a church.
Use the key you got from the ceiling to open the cabinet.
Inside you’ll find…an old woman! Click the cabinet to get closer. Click the woman and she’ll open her mouth. Click her mouth and…
Inside you’ll find her teeth are covered in dots on top and roman numerals on the bottom. You want to eliminate teeth by selecting teeth on top and bottom that add up to the same number. You can only choose up to two teeth from each row at a time. Click the gold tooth to reset.
Click 4-dots and 6-dots then X
Click 1-dot then I
Click 5-dots then IV and I
Click 3-dots then II and I
Click 3-dots and 2-dots then V
Click 2-dots then I and I
Click 2-dots then II
Take the gold tooth.
Back out and turn right
Third Wall
Open the top drawer on the oven. Place the wood in here and light it with the matches.
Place the gold tooth on top of the lit logs and close the drawer.
Open the bottom drawer and remove the liquid gold.
Back away from the stove and click the table. Open the mold, place the liquid gold inside and replace to mold cover. Open the cover again and remove the gold key.
Back away from the table and click up to look at the ceiling.
Use the gold key on the ceiling. And climb the ladder.
Upstairs
First Wall
You are facing more gears and two windows. The view from the right window shows an impressive view of a lake, mountain and a church.
There is a parrot sitting in the left window. Click the parrot and he’ll poop on the window ledge. Pick up the parrot poop. Turn left.
Second Wall
Here is a spinning wheel, a flower pot and a note. Read the creepy note from Mr. Owl if you want nightmares and a hint as to what the machine in the living room is for.
Use the water from the stove on the sprout in the flower pot. You’re told the soil isn’t fertile. Use the parrot poop to fertilize the soil. Back away from the pot and notice grass grew.
Click on the pot again and take the scissors from behind it. Use them to cut the grass. Turn left.
Three Wall
The ladder leads back down to the living room. Click the picture on the right, you probably recognize the couple. Note the symbols at the top of the picture frame. Click the loose corner of the picture multiple times to reveal another note from Mr. Owl.
Click the note on the left. You’re looking at a diagram of a cow udder. Note which teat corresponds to each symbol from the picture frame.
Feed the grass to the cow. You have to click her head to get her to chew and click her again to get her to swallow. Click her udder.
Place the now empty pot on the floor under the udder.
Click the cow’s teats in the order determined by the picture frame.
Fourth, second, first, second, third, fourth
Nothing comes out until you finish.
Pick up the pot of milk. Turn left.
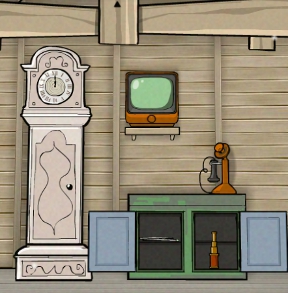
Fourth Wall
There is a grandfather clock with a locked cabinet and hands on the face you can adjust. There is a television and a cabinet with a phone on it. Remove the knitting needles from the left side of the cabinet and the binoculars from the right.
Click the TV and turn it on with the large button. Click the button again to change the channel *shudder*
Back away from the TV and noticed the image changed. Remember this guy? Click the TV again.
Click the button and the man disappears. Click it again and he reappears with a phone. The phone ringing.
Back away from the television and answer the phone. Click the phone to progress through the dialogue.
Back away from the phone and note the TV image has changed again. Click the TV.
Click the button and watch the image. Gears are turning.
Back away from the TV. Notice the clock is shaking. Turn left.
First Wall
Use the binoculars on the right window to get a good look at the church.
Zoom in multiple times with the binoculars. Note the number on the church is 1384. This is the code to the door in the living room.
Turn right twice and go down the ladder.
The Living Room
Turn left to face the door.
Click on the door and enter the code 1384. Open the door and head down the stairs to the wheel.
The Wheel
First wall
You are, indeed, facing a large wheel that isn’t turning. A trough leads from the wheel to the right. Turn right.
Second wall
The trough continues through a contraption and ends beneath a barred window. The contraption has a lever you can’t flip yet. Zoom in on the top of the window.
Note the time listed is 6:10. Back away and turn right.
Third Wall
You’re facing the stairs leading to the living room. The duck swims if you click on him. There are a few plants growing out of the damp wall. Turn right.
Fourth Wall
There is a wheel and a panel in the wall. Turn the wheel, the panel opens and the water level begins to rise. No worries, it stops rising before things get dangerous. If you turn away and turn back a fish appears. The fish swims if you click on it. Go all the way back to the upstairs.
Upstairs
Face the clock and set it to 6:10. The clock is now unlocked. Open the clock and…
JUMP SCARE. Click the body. Continue clicking the body until it disappears off the right side of the screen. Turn right.
Continue clicking the body until, *sigh*, it falls down to the living room. Go down the ladder to the living room. Turn left.
The detective is back on TV. Click the TV. Keep clicking the TV and watch the detective put the black cube and then the white cube in the screen. When the detective disappears and the cube remains click the button one last time. A white light fades in and then out. Turn left.
Notice the beam of white light in the right window. Check it out with the binoculars.
The light is going into the body of the detective. Click this scene again and Mr. Owl appears. Another click and it starts to rain. One last click brings you back to the wide view where you see the gears are turning. Go back downstairs to the living room.
The Living Room
Turn to face the machine. Note the gears are turning down here as well. Someone hung the body up for us….thanks?
This is unpleasant. Use the arrows to put the woman’s head in the machine. You don’t have to get it exactly. The light will come on when she is placed correctly. If the light is NOT on and you can’t move the arrows anymore, face a different wall and then turn back toward the machine.
Go back to the old woman in the cabinet. Give her the knitting needles then cut her hair. Go back upstairs.
Upstairs
Face the spinning wheel. Put the hair on the spindle and then press the foot pedal. Remove the “wool” from the spinning wheel. Go back downstairs.
The Living Room
Give the wool to the old woman. Click her and she should ask for warm milk.
Take the pot of milk and put it on the stove. It heats instantly. Take the hot milk and give it to the old woman.
After she drinks the milk click her and she’ll make you an oven mitt. Click her again and she’ll ask for grilled duck. Head downstairs to the wheel to get some duck.
The Wheel
Right now the duck is not fat enough to make a good meal. You have to feed him plants. Click him and he’ll swim to the lowest plant on the far right and eat it. Now you have to raise the water to the right level to get him to eat the other two plants.
Once the duck eats the third plant his head appears to fall off. Grab him and go back to the living room.
The Living Room
Put the fat duck inside the oven and shut the door. He cooks instantly. Take out the grilled duck with the oven mitt.
Give the grilled duck to the old woman. Click her and she’ll eat it. Click again and she’ll knit you a net. Click again and she’ll ask for grilled fish. Go downstairs to the wheel.
The Wheel
Use the net on the fish to catch it. That was easy. Go back to the living room.
The Living Room
Put the fish in the oven and close the door. Open the door and remove the instantly grilled fish with the oven mitt.
Give the fish to the old woman. Click her and she’ll eat it. Click again and she’ll knit you a strong rope. Take the rope and face the machine.
Select the rope and click the large gear on the right. The rope will connect the machine to the gear and the second light will come on.
Click the window of the machine where the woman’s face is. Two brain hemispheres appear. Click the brain.
You’ll see a close up of the brain hemispheres and a place to enter a three digit code on the left.
Click the brain again and you’ll see twelve blank squares. Click again and six pictures appear. This is a matching game. You have a few seconds to memorize where each pictures match is.
Match all the pictures and the white cube appears. Click it and the white cube comes out of the machine. Pick it up and head down the stairs to the wheel.
The Wheel
Make sure the small wheel is turned so panel is open and the water level is rising. This turns the large wheel. Face the contraption.
The water should be running through the contraption. Place the white cube in the top of the contraption and flip the lever. The cube falls down and then disappears. As the cube disappears, three numbers appear in the window.
I could barely make them out but they are 257
Go back up to the living room.
The Living Room
Face the machine and click the window with the brain hemispheres again.
Enter the 3-digit code to the left and flick the switch. You’ll have to play the matching game again. This time the pictures are less pleasant.
Once the matching game is solved the second time. The black cube appears. Click it and it will come out of the machine. Collect the black tube. Go downstairs to the wheel.
The Wheel
Put the black cube in the wheel and flick the lever. Things go dark outside. Go Upstairs.
Upstairs
There are a few spooky things to look at. The most important is the shadow person now standing next to the spinning wheel.
Click the shadow to progress through the dialogue. It will ask you to leave, but I couldn’t find anywhere else to go.
The shadow person stops talking, disappears and it looks like that’s it!
You’re looking at the ceiling. Note the location of the golden lock and the spider web. Click the down arrow
Posted by: crestlove |
September 5, 2015 8:38 PM
|
September 5, 2015 8:38 PM