
Dangerous Gen-Kan Escape 2

![]() You know, for such a narrow genre, room escapes actually contain a plethora of types. There are long and complicated escapes (anything by Neutral), there are short and breezy escapes (Robamimi), there are the classic four-wall one room escapes (Tesshi-e), there are room escapes that seem more like complete adventures containing a multitude of places (Dr. Stanley's House 2), there are scary escapes (The House 2), there are fun escapes (anything by 58 Works), there are goofy escapes (Minoto), and there are room escapes that are so bizarre as to defy description (I'm looking at you Detarou), but here at Weekday Escape we haven't featured many escape games that are potentially fatal. At least, that is, until we came across Kotorinosu's deadly Dangerous Gen-Kan Escape 2.
You know, for such a narrow genre, room escapes actually contain a plethora of types. There are long and complicated escapes (anything by Neutral), there are short and breezy escapes (Robamimi), there are the classic four-wall one room escapes (Tesshi-e), there are room escapes that seem more like complete adventures containing a multitude of places (Dr. Stanley's House 2), there are scary escapes (The House 2), there are fun escapes (anything by 58 Works), there are goofy escapes (Minoto), and there are room escapes that are so bizarre as to defy description (I'm looking at you Detarou), but here at Weekday Escape we haven't featured many escape games that are potentially fatal. At least, that is, until we came across Kotorinosu's deadly Dangerous Gen-Kan Escape 2.
 Dangerous Gen-Kan Escape 2 plays like the love-child of early Petithima design (single view escapes) and the Dismantlement series of point-and-clicks (i.e. the dangerous explosions). Yes, as with adventure games of yore, we're talking an escape where you might want to save before completing an action. That is, if you don't want to die and go back to the beginning. In Dangerous Gen-Kan Escape 2 there is only one way out but many ways to die! Well, perhaps many is an exaggeration. There are at least two ways to die that I've managed to stumble across, there may be more.
What you get with Dangerous Gen-Kan Escape 2 is a quick-and-dirty escape. No elaborate set-up, not a lot of space to explore in this single view of a room, giving new meaning to the phrase dead simple. Packed within such a confined space is a lot of puzzle solving goodness, though, a treat for any room escape fan who enjoys exploration, logic, and trying not to blow up. To be fair we're going to assume that most of you are in the latter category. There's no real navigation here, simply click on an area of the room for a close up and use a bar at the bottom of the screen to go back to the main view. Items that go into your inventory can be use with one click and viewed with a handy little magnifying glass that appears in the inventory window.
The tension is ratcheted up with the throbbing 70's cop show music (minus the wah-wahhhh guitars). Fortunately there is a handy mute button to turn it off if it becomes too much, right beside the very handy save button. You may find yourself using that save button often, at least you should. You can even go back and wipe out your previous saved data if you'd like to go back in and try it again, this time exploring how many ways you can die.
For such a simple game a lot of attention has been paid to the details. Crisp, clean, beautiful graphics greet the player along with the funky soundtrack. The controls are pretty intuitive as is the (very limited) navigation. The only thing that might be missing is a changing cursor, but in such a small space there are a limited number of options as to where to click, so there won't be a lot of pixel hunting involved. Beautiful to look at and with such a classic approach to escaping (i.e. getting yourself dead if you do something dumb), Dangerous Gen-Kan Escape 2 is not only a perfect mid-week break but a fantastic nod to the past oeuvre of point-and-click adventure gaming which spawned today's room escapes. Come on, you know you want to play, even if you do blow up.


Walkthrough Guide
(Please allow page to fully load for spoiler tags to be functional.)
Narrative Walkthrough:
Okay, so breaking into the facility may have been a bad idea. At least, getting caught within spitting distance of the lab wasn't a good idea. To give credit where it's due, they used tasers and not armor-piercing rounds, so I'm still breathing. Probably just locked into this room to wait while they round up the authorities.
If I can help it, they'll come to arrest an empty room.
Okay, so first step is to play pack-rat. What can I pick up?
Nothing, apparently, except for a key under the rug. I thought no one did that any more?
Well, it's a start at least. Where can I use it?
Ah, the top cabinet. Okay, nothing but books -- wait, there's an eraser on the left side.
Hm. Not big enough to use as a weapon. Not without getting someone to swallow it, which is unlikely.
But it'll erase all that scribbling on the picture. "Book", eh?
Okay, there's books in the cabinet. The word was green, so let's look at the green books.
They look like Roman numerals. II, IV, and VII.
Now we're getting somewhere. Someone's gone and left themselves a hint for one of the locks. "Never write down your password", they say, and still people do it. Keeping it close, too -- that code fits for the box right below it.
Click! And there's a tool. Nice. Anyone that sticks to the phrase "take what isn't nailed down" never brought along a claw hammer. What can I pry open now?
How about the grating? Might want to hang onto it, it could be useful.
Okay, so I've got two tools, and... oh, let's go out on a limb here.
Let's stick that grate over the picture taped on the wall, see what happens.
Interesting. The dots line up with the screw-holes. Looks like another pattern.
3, 3, 3, 1, 2, 2, 1, 3, 3, 1.
Where can I use that? What's got that many buttons?
Ah, the bottom cabinet. Just press each button in the right order.
So, the bottom button three times, then the top button, then the middle button twice, the top once, the bottom twice, and one more on top.
Done! Got a wrench this time.
My toolkit's growing. Nice to have options. What can I get into with this?
There's a nice pair of bolts to remove on the left side. What's under it?
Hm. Two arrow buttons and a slot. Let's see what happens. Whoa! That went fast! And the counter went down. Better get this right before it runs out.
Okay, it looks like there's a number hidden in there, just have to watch it as it goes by and figure out the digits.
IMPORTANT NOTE: This number changes each time you play.
Took a few tries, but I've got it. Where can I use a four-digit number?
Ah, the padlock! Not smart of them to leave a locked box just lying here.
And inside is a key.
Okay what haven't I opened yet?
Hm. The front panel won't take the key. Guess it's time to check out the box with the warning-labels.
No wonder it's labeled! There's a bomb in here, and it started going! I'd better grab that piece of paper and start figuring this out!
Okay, take a step back and think, while there's time.
Say, that mat on the floor has an odd color pattern.
NOTE: This changes each time you play.
What if I cut the wires in the same order?
Whew! Glad that worked. Now, what happened to the device? It sank into the cabinet.
Looks like it moved something down into that space where I got the clippers. A marble, with a key in it. But how do I get the key out?
Say, that Roman-numbered box had spaces for all sorts of tools. What if I fill them?
That did it! It's hammer time!
Okay, the last panel's open. Hm. Another keypad, this time with no numbers around.
There IS a switch, though. Let's see what happens.
Huh. Lights went out. Okay, what else changed?
Hm. That book picture has a couple parts of the letters glowing.
Those NON-glowing parts, though, look sort of like a number.
3001, in fact.
That might be it. Let's find out.
Turn the lights on, first. Gotta see the keys.
That did it! The door's open! Now let's find the nearest ventilation shaft!
Posted by: HeroForge |
May 11, 2011 1:24 AM
|
May 11, 2011 1:24 AM
Walkthrough
N.B. There is a color-sensitive part to this game and the pattern appears to be different every time, so there are no color-blind instructions, sorry!
Exploration
Let's poke around and see what we have first. Working the room left to right, we find:
Farthest to the left there's 1 thing:
A sliding cover with two bolts.
Just to the right of that there are three things to see.
Locked cupboards on the top.
A drawing (faces with bright white eyes and some... llamas? all very rectangular-y) and a box (locked) right below that.
Box seems to need some Roman numerals.
A cupboard beneath that with:
Two bottles and another box, this one with just three buttons.
Next up we have...
A door - the exit! But locked... of course. Next to it
A small panel that won't open.
Moving on to the right half of the room we see two things of interest.
A box marked "Danger"
A grate - there are some pliers or cutters behind there, but we have nothing to unscrew the grate with!
And now the far right. Two things we note:
Some kind of painting with scribbles on it.
A small treasure chest! The lock needs 4 numbers.
Is that all?
What about right in the Center?
Aha!! A rug. And underneath it, a key! The rug has some colored diamonds on it, but those probably are just for decoration.
Getting Out - The game goes mainly item-by-item, so each successive spoiler will stop when you've found the next item. This gives you a chance to work forward without exposing too many spoilers!
Well, we have our first key, let's see what it does.
After a little trial and error, it opens up the top cupboard on the left. What do we see?
A bunch of books - and on the left side, something sitting on top.
An eraser!
So... what needs erasing?
Anything that looks miswritten or scribbled?
Aha! The scribbles on that painting. Just a little elbow grease and... the word book... well that's not very exciting.
Ah, but the word is in green... maybe a clue!
Let's go back and look at the books in the upper cupboard.
Hmmm, 9 green ones, but there's no place where just "9" will help me. How about the formation?
Ah! If I just look at the green books, they spell some things out.
Not a word, though - roman numerals!
I've got the code to the box on the left!
II IV VII - input the code and... a screwdriver! Based on many locked rooms, I can state definitely that a screwdriver can get you out of anywhere. Seems like I'm missing a couple things, though - some cutters (I've seen those already!) and a wrench... hmmm.
Okay, armed with a screwdriver now - I'm basically invincible!
What can we unscrew?
That grate on the right side of the room was held on with screws.
Just work these out and...
Wire-cutters! Better keep this grate too, just in case.
Well, no wires to cut that I remember. Anything I can do with the grate?
Hmm, it has bands of metal and clear... any place with bands of stuff?
Oh, let's go look at that picture on the left.
Hmmm, I wonder if I take this grate and...
Line up the screw holes with the eyes. It's a pattern!
Where do I have three items I can match up to this pattern?
Oh! Right below me in the cupboard, that box with the three buttons.
Enter the pattern: three bottom, 1 top, 2 middle, 1 top, 2 bottom, 1 top and... voila! A wrench. I've completed my toolkit!
Armed with a wrench now... what can we use this for?
Oh, those bolts.
Remember? That sliding door all the way to the left. Let's remove those bolts and slide it open.
Hmmm, a vertical slit (done with my grate now, though) and two arrows. And a number "Last... 10" Wonder what these things do. Let's try them out.
Pushing one of the arrows makes some bands slide past the slit... they must mean something.
Other arrow makes the bands go back the other way.
Uh-oh.... that number's down to 8 now. Not sure why, but I don't think I should let that hit zero.
Let's try the arrows again, but pay close attention so we don't have to run them too many times.
Those bands - I'm only seeing part of them at a time. If I put together the whole picture...
Numbers! They're 4 numbers. I'll pay real close attention this time.
(The code is different each time, so you're on your own for this one :D I suggest saving before the number gets too low just in case.)
Okay, got those 4 numbers... only one thing left that needs a code for a lock.
The treasure chest on the right!
It opens and... a second key!
Okay, another key. We've only got three things that are left locked - the door, the panel and the "Danger" box. Hopefully this one opens the the one not labeled "Danger".
Just my luck! It opens the "Danger" box. Let's open it carefully (suggested save point before opening the box) and...
A counter... probably shouldn't let that reach zero. Maybe if I cut the wires... which ones though? Oh, on the cover there: a piece of paper. Take a look and...
The word "door"... great. What the heck is that supposed to mean? And that symbol with the arrow, that doesn't help at all. Well, let's take a look... 2 minutes left.
Not much here. The door, sure. What else can I see? The paper shows something in front of the door and a direction... Anything in front of the door? (Better hurry, can't be more than 1:30 left!)
The rug!! Of course... but how does that help me figure out the wires... 1 minute, at the most...
Aha! The arrow on the paper - passes through those colored diamonds on the rug. (30 seconds!!!)
That must be the order in which I cut the wires! (20 seconds!!!)
(This is the color-sensitive part of the game. Code is different every time, so there are no color-blind instructions.)
Cut them in that order and.... 3...2...1.... whew! Cut them just in time. Timer stopped and... hey! Where's it going? Receding down into the counter.
Guess I better poke around and find it...
Aha! It's down in that grate area... take a look and...
A key!!! Well.... a key trapped in a ball...
Okay, so we've got a key in a ball. My wrench, screwdriver and cutters don't seem to do anything.
Thought I could crush it in the door of one of the boxes or cupboards, but that's not working.
Those liquids in the cupboard don't even seem to be able to do anything.
Well, I appear to be done with my tools.
Maybe I should put them away?
Aha! I put them away and the bottom of the box opened up - a hammer!
Use the hammer to crush the blue ball and I've got my next key!
My newest key still doesn't open the door but it does open the panel next to the door. I've got a number panel and a switch.
Oh! The switch turns off the lights. Wonder if there's anything to see around here. Poke around a little bit and...
Hey - that picture looks a little different. It used to say "Book" but now it's different in the dim light.
Does it spell something else now?
Oh, the darker areas are giving me a number.
3001 - must be the door code!
Go back and enter that into the keypad and...
Guess I better turn the lights back on first so I can see the keys. Now enter it and... "OPEN" it says!
Check the door... I'M FREE!!!!!
Posted by: DuncmanG |
May 11, 2011 1:31 AM
|
May 11, 2011 1:31 AM
Dangerous Gen-Kan Escape 2 Walkthrough
General Information
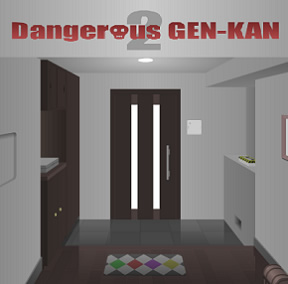
This is your only view, the door and all of the stuff along the side walls. No turning around here.
Some of the puzzle solutions change from game to game, so I will let you know how to figure the answer out.
I will include some directions for the colorblind, but one of the color puzzles changes from game to game.
There is one good way out and (so far) four ways to die.
Good luck!
Exploration
You begin by facing the exit door. There is a rug on the floor in front of you.
On the left wall is a panel near you, then an upper cabinet with doors, a shelf with some sort of box, and a lower set of cabinet doors.
On the wall to the right of the door is a panel.
On the right side of the wall is a picture of some sort (near you and only partially visible). Further down on the left is a shelf with a box, below which is some sort of vent.
Let's start on the left.
Click on the panel to the left (nearest you) for a close up. You will see that the panel is bolted down. Back up.
Click on the upper left cabinets. Great, you need a key. Back up.
Click on the shelf on the left. There is a box here that needs a three digit Roman numeral key, and a funky picture on the wall. Back up.
Click on the lower cabinet doors on the left. These doors you can open but all you will find are two bottles of poison and a box with three buttons. Back up.
Click on the panel to the right of the door and you will see that you need another key. Back up.
Click on the picture on the right nearest you (only partially visible) for a close up.
Great, someone has scribbled on the picture. Back up.
There is a chest of some sort below the picture, click on it.
Looks like we need a four digit code to unlock this puppy. Back up.
Click on the box on the shelf on the right for a close up. Great, it says "danger" and you need yet another key. Back up.
Click on the vent below the shelf and you will see that you need a screwdriver to open it. There is a pair of pliers inside. Back up.
Click on the lower left corner of the rug on the floor in front of you and take the key. Great, one key, three locks.
Time to solve some puzzles!
The Upper Left Cabinets
Use the key that you found underneath the rug to open the upper left set of cabinets.
Slide open the left door of the cabinet and take the small white object from on top of the books. You now have an eraser!
Back up.
The Scribbled Picture
Click on the picture on the right wall for a close up.
Use the eraser on the picture and you will see the word "Book" in green.
Back up.
The Roman Numeral Box
You now have the clues to open the Roman numeral box on the left.
Click on the upper left cabinet doors for a close up.
Open the left door and look at the books carefully, especially the green books. Looks like we have one Roman numeral and the beginning of a second.
Close the left door and open the right door. There's the second half of the second Roman numeral and then a third Roman numeral, spelled out in green books.
The code is II, IV, VII.
Back up from the cabinet and click on the box on the left.
Click on the box again and enter the Roman numeral code.
When the code is entered correctly you will hear a click, back up once.
Click on the top of the box to open it and take the screwdriver. Yes, with a screwdriver we can do anything!
Back up.
The Three Button Box
Now that you have a screwdriver, click on the vent on the right (below the "danger" box) for a close up.
Click on the vent a second time and then use the screwdriver to remove the four screws.
Once the screws are gone click on the vent to take it, then take the pliers as well. Back up twice.
Now click on the box on the left that held the screwdriver. Once you are in the close up, click on the picture above the box for a close up.
Pick up the vent from your inventory. Notice that the screw holes in the vent match the eyes in the figures in the lower left and upper right?
Hold the vent cover over the picture, lining up the screw holes, and you will see a series of long lines either on the top, in the middle, or on the bottom.
Perhaps this is a pattern for something?
Where have we seen something like this?
The three button box in the lower left cabinet has three long thin buttons just like these lines.
Put the vent cover back in your inventory and back up twice.
Click on the lower left cabinet for a close up and open the right door.
Click on the button box for a close up.
Use the pattern you found in the picture (with the vent) to push the buttons.
Bottom, bottom, bottom, top, middle, middle, top, bottom, bottom, top.
'
Once you click the buttons in the correct order the box will open. Take the wrench.
You now have three tools. Notice that the vent cover has disappeared from your inventory.
Back up twice.
The Chest
Click on the panel on the wall on the left, nearest you.
Use the wrench to remove the bolts.
Click on the panel to open it.
There are two arrow buttons here, a narrow slit, and a counter of some sort.
Click on the left arrow and watch the slit closely.
You will see that a four digit number is passing by below the slit, but you can only see portions of each number at a time.
This is the four digit number that will open the combination lock on the chest on the right.
Note: This four digit combination changes each time you play!
If you couldn't see the number the first time you push the button, push the right arrow button and the number will go by from last to first.
Once you've figured out the number back up.
Note: Don't use the arrow buttons more than 10 times.
Click on the chest on the right below the picture.
Click on the lock for a close up and enter the four digit code.
Once the lock unlocks back up once.
Click on the lock to remove it, then click on the chest to open it.
You now have another key! Take the key and back up.
The Danger Box
The key you just found in the chest is the key for the "danger" box on the shelf on the right.
Click on the box for a close up.
Click on the box again for a closer close up.
Use the key on the lock.
Click on the top of the box to open it.
You are now facing a bomb with a three minute timer.
There is a note taped to the open lid of the box, take it.
Pull up the note from your inventory then click on it to open it.
What the note shows is a pattern and the pliers.
This is probably a hint as to which wires to cut.
Note that each wire is a different color.
The note also indicates the door, so back up twice.
Hey, doesn't the pattern on the rug look a big like the one on the note?
The color pattern on the rug, from left to right, is the pattern of wires that you must cut. There are four colors on the rug and you should only cut four of the wires.
Note: This color pattern changes from game to game.
Once the wires are cut correctly and you didn't blow up the bomb will sink down.
Back up twice and then click on the vent twice for a close up.
There is now another object in the vent, a blue ball with a key. Take the ball.
Now what?
Back up twice.
Getting Out
Let's put away the tools we used, shall we?
Click on the box on the left, the one where you found the screwdriver.
Click on the top of the box to open it, then replace the tools into their slots, screwdriver, pliers, and wrench.
Once the tools are in place a secret compartment will open up, revealing a hammer. Take the hammer.
Back up.
Pull up the blue ball from your inventory. When it is in close up, use the hammer on it to get the last key.
Click on the panel to the right of the door for a close up.
Use the key on the panel then click on the panel to open it.
We have a keypad here and a light switch. But we have no idea what the code is.
Click on the light switch to turn off the lights and back up.
Click on the picture on the right wall (the one that says "Book".
Notice that with the light off it changes, The line in the "B" and the end of the "k" are lighter. What is left looks like a number, 3001.
Back up then click on the panel to the right of the door.
Click on the light switch to turn the lights on.
Enter the code 3001 into the keypad then click on the "E" button.
Back up then click on the door to open it and click again to escape.
Ways to Die
I've found four ways to die so far:
Let the timer on the bomb run down to zero. Boom.
Cut the wires on the bomb in the wrong order. Boom.
Use the red arrows in the left wall panel more than 10 times. Once the counter goes down to zero, if you push the red arrow buttons again, boom.
Open the lower left cabinet where the poison bottles are. Smash the bottles with the hammer. Boom.
Posted by: grinnyp |
May 11, 2011 2:12 AM
|
May 11, 2011 2:12 AM