
Dark Heritage:
Guardians of Hope
Platform: Mac, Windows

![]() Just when you thought secret societies were a thing of the past (literally, ha!), World-Loom brings them back to you in full force in their hidden-object adventure hybrid, Dark Heritage: Guardians of Hope. With some unique visuals and a good puzzle-to-hidden-object-scene ratio, Dark Heritage will have you feeling like Tom Hanks as you chase down a mysterious killer. You know, if Tom Hanks were a woman.
Just when you thought secret societies were a thing of the past (literally, ha!), World-Loom brings them back to you in full force in their hidden-object adventure hybrid, Dark Heritage: Guardians of Hope. With some unique visuals and a good puzzle-to-hidden-object-scene ratio, Dark Heritage will have you feeling like Tom Hanks as you chase down a mysterious killer. You know, if Tom Hanks were a woman.
 Professor Child has contacted you about helping him put together a special medallion. He thinks he's found the Philosopher's Stone and needs your wits to assist him in his search. Unfortunately, when you get to his office, he's nowhere to be found. What's happened to him? You travel to the United Kingdom to get to the small, desolate Cannon Rock Island to seek him out. It's prophesies and magical spirits for you as you get to the truth of the island's past.
Dark Heritage's controls work as most hidden-object hybrids do: click to interact with an area, a changing cursor will indicate what kind of interaction is available and sparkles appear (in both difficulties) to showcase a hidden-object scene. All objects needed will be listed at the bottom. Items in red require extra actions to reveal them, those actions indicated by a changing cursor over the scene. For many of the puzzles in the game, you have to find missing parts, which are found in other locations. While you can often interact with the puzzle beforehand, the exact instructions for the puzzle will not appear until all the missing items have been put back.
 Analysis: World-Loom has made an interesting experience with their unique mix of graphics. While most of the game is drawn in the way of many similar titles, Dark Heritage also includes live action cut scenes as well as a few mixed scenes that are reminiscent of Return to Zork. But behind the graphics there still lies a solid game with 3-4 hours of play in the standard edition.
What is uniquely offered in graphics seems to have taken away from the story. There's little mystery in what's going on and the main villain leaves a distinctly nondescript taste in your mouth making it seem more like you're traveling puzzle to puzzle instead of fighting him in the end. Despite this, the puzzles are varied enough to keep you entertained as you make your way through the game.
Dark Heritage: Guardians of Hope has a lot going for it, and while it's not perfect, it shows that World-Loom is another promising casual game developer. Try it out and see if you can uncover the mysteries of the Chosen One, Cannon Rock Island and the Philosopher's Stone that every character you meet seems to go on about!
A Collector's Edition is also available. It contains a bonus chapter, art gallery, strategy guide, and more. Remember that Big Fish Game Club Members pay only $13.99 for Collector's Editions (or 2 club credits), and collector's editions count 3 card punches of 6 total needed for a free game.
![]() Windows:
Windows:
Download the demo
Get the full version
Also available: Collector's Edition
![]() Mac OS X:
Mac OS X:
Download the demo
Get the full version
Also available: Collector's Edition


Walkthrough Guide
(Please allow page to fully load for spoiler tags to be functional.)
Dark Heritage: Guardians of Hope Walkthrough
GOAL: Finding Prof. Child
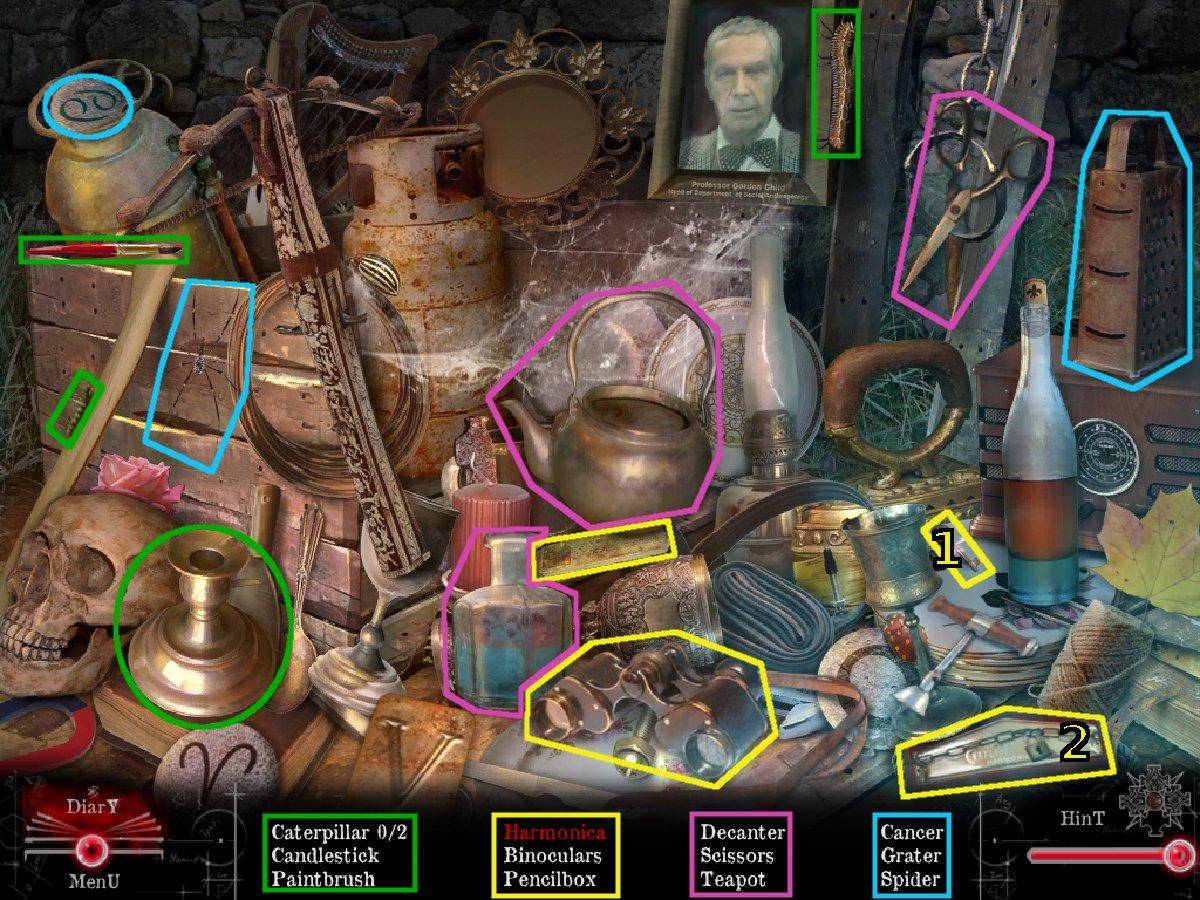
Child's Office
Collect the journal off the ground.
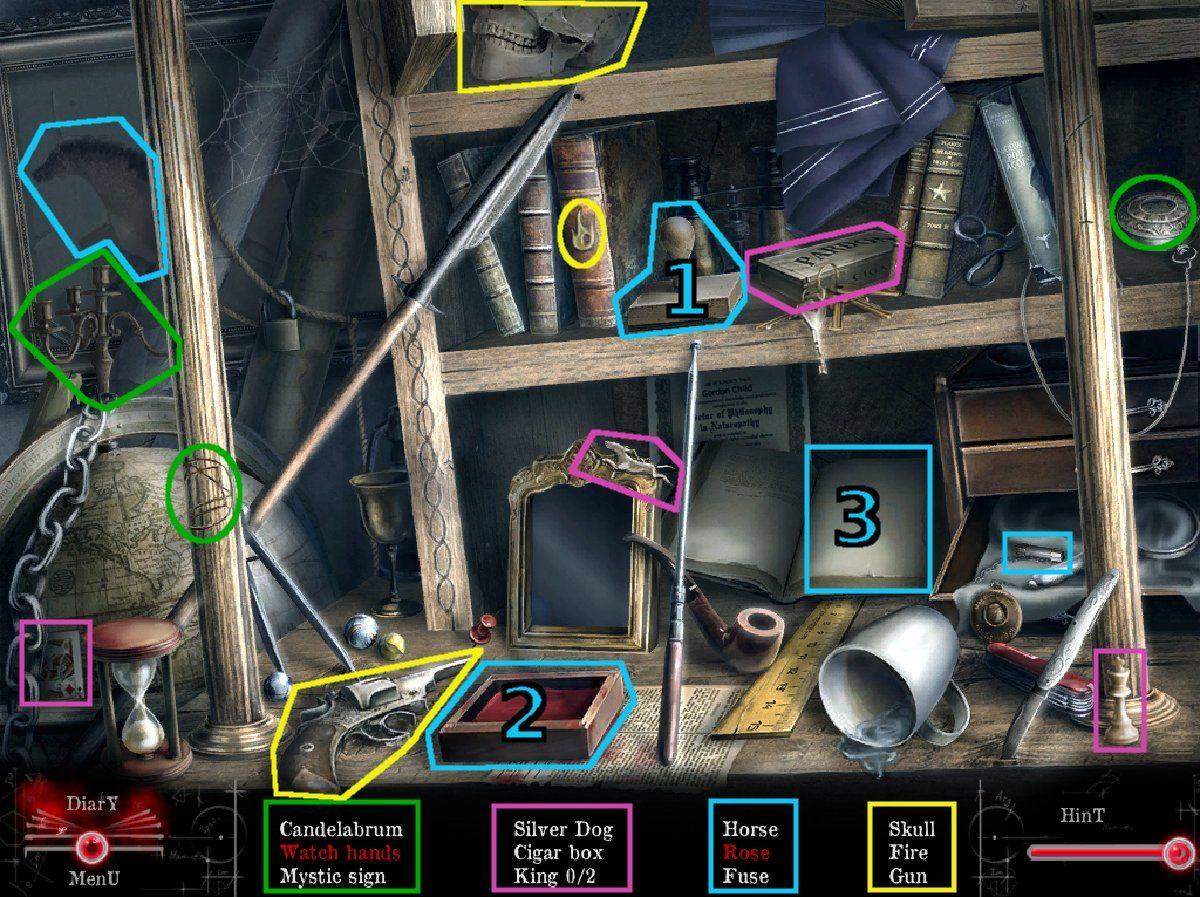
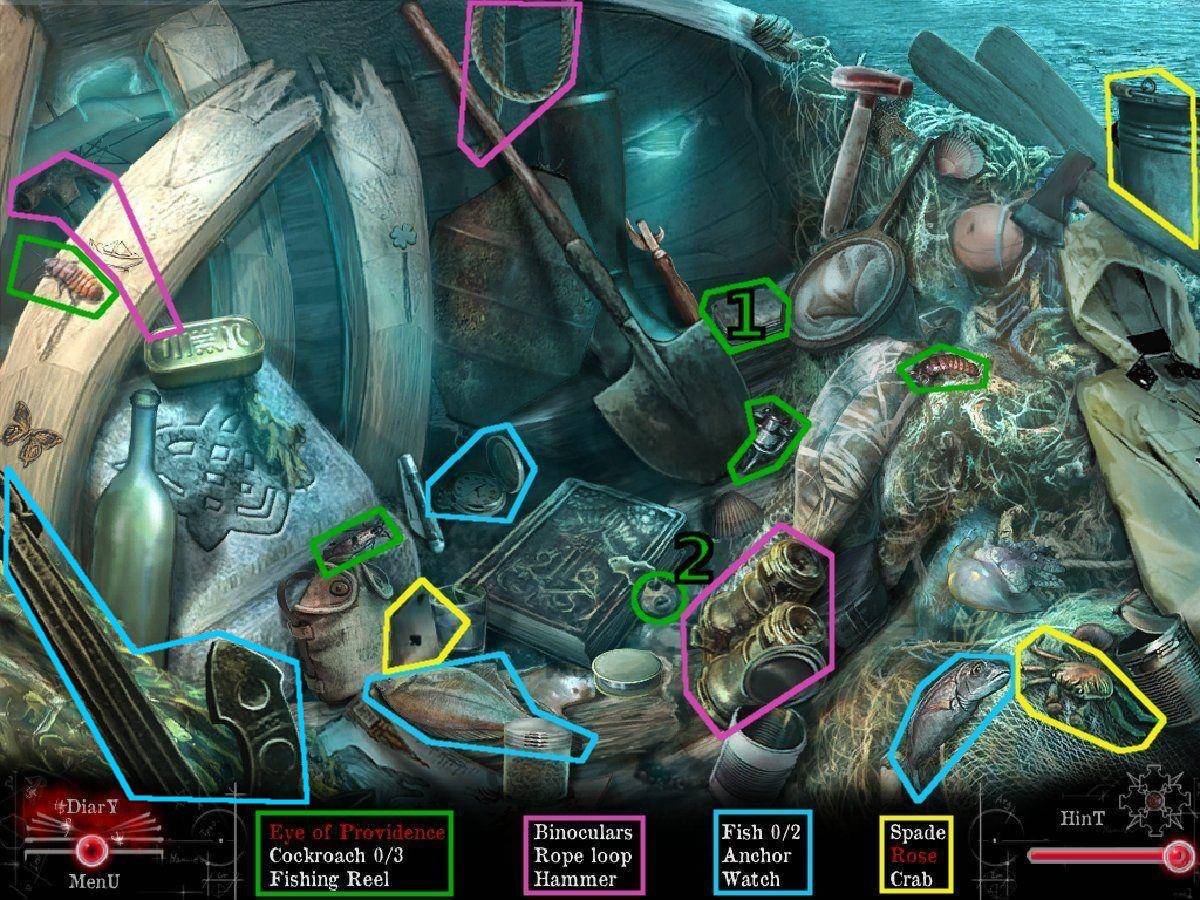
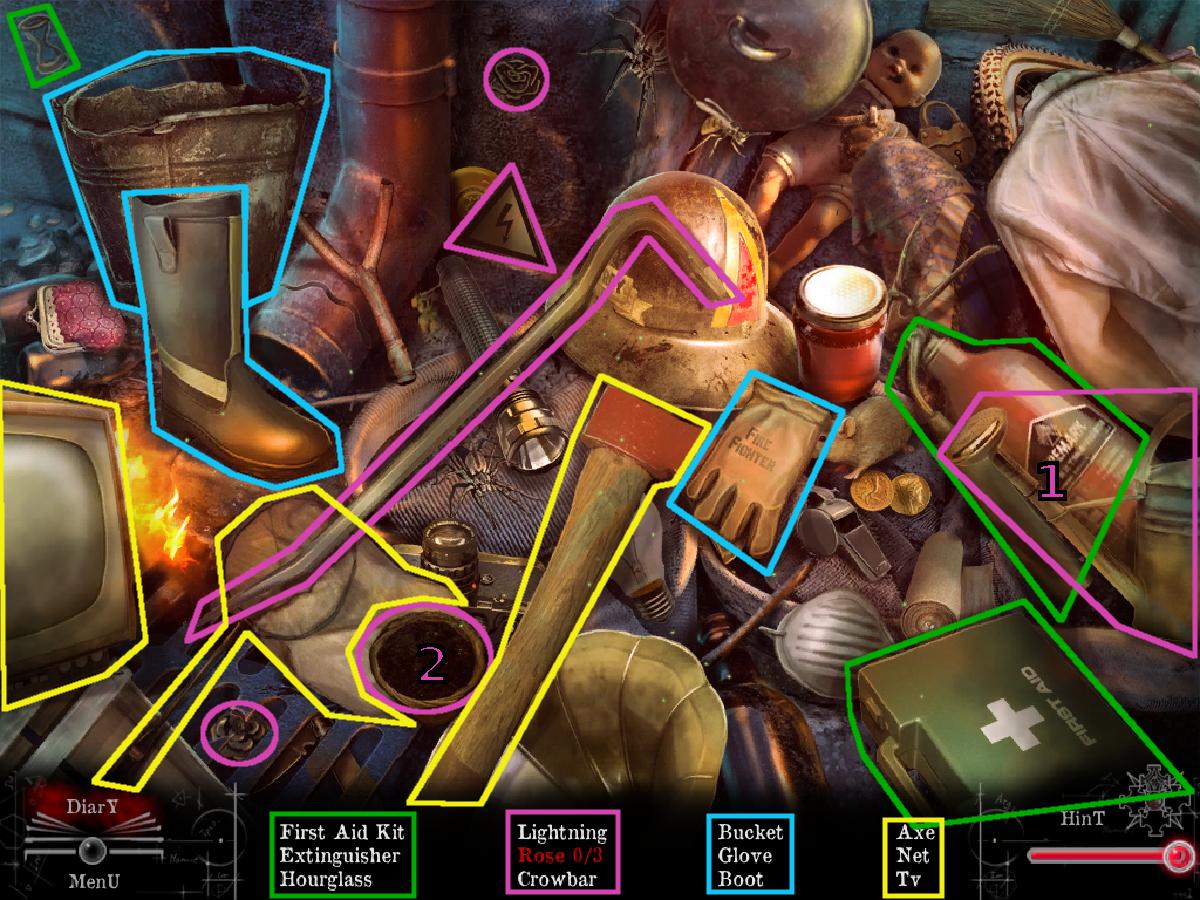
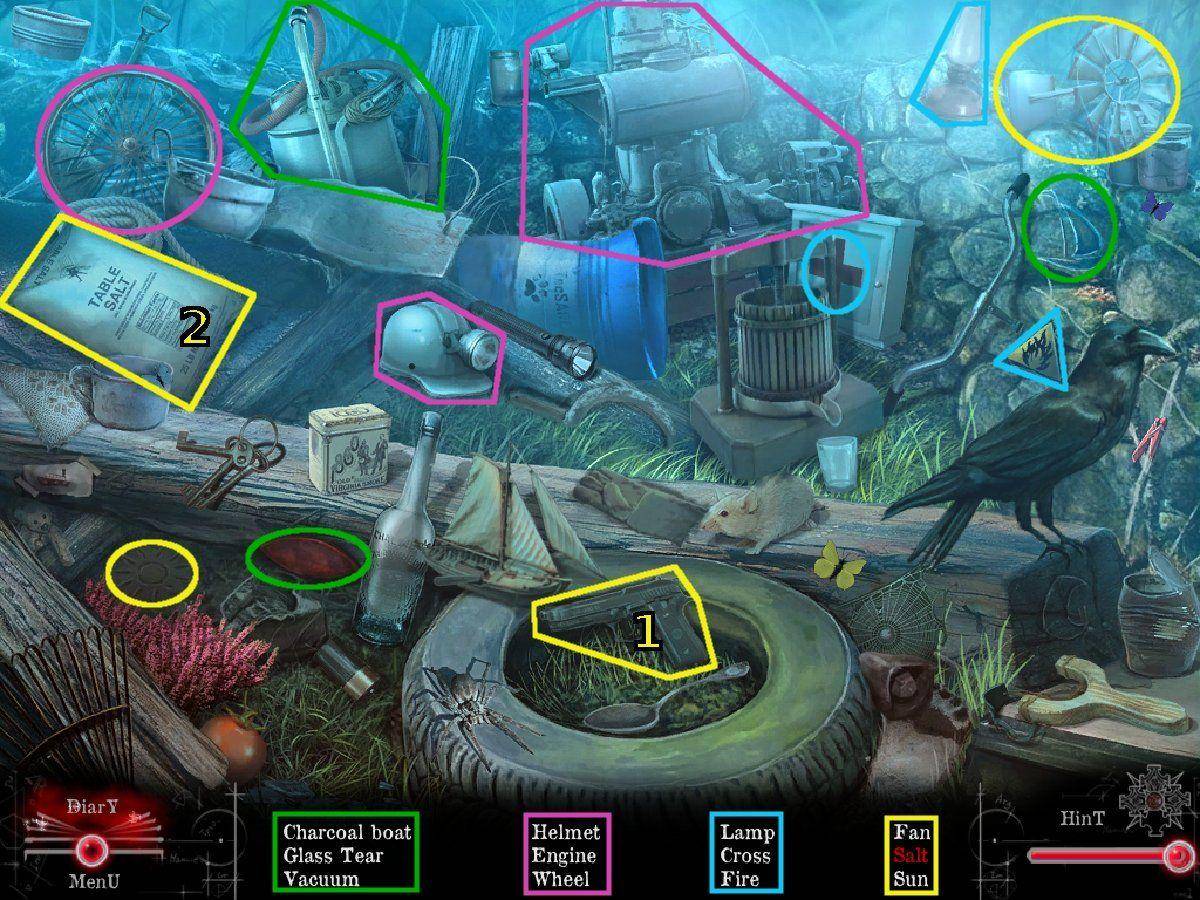
Click the cabinet on the right and solve the hidden-object scene.
Use the screenshot below for help.
Items are circled by color in groups.
For items needing more than one step, areas are numbered.
Screenshot
You acquire a Fuse.
Examine the electrical panel to the left and use the Fuse on the empty slot.
Solve the fuse puzzle by clicking the switches below until all switches are up.
Solution:
(numbered 1-6, left-to-right)
2, 5, 4, 1
Examine the desk and collect the Ball.
Now examine the door and use the Ball on the opening.
Solve the color match puzzle by clicking the red buttons to rotate the balls in the three intersecting circles.
Each area has the color of the matching ball as well as the symbol etched into the wood.
Solution:
lower-right, top, lower-left, top, lower-left (x2)
Head through the door.
Child's Secret Room
Collect the Screwdriver off the floor to the right.
Examine the stone counter, then examine the pieces of paper.
Now collect the first prophecy scroll and Part of mysterious disk.
Back up into the office.
Child's Office
Examine the grate to the lower left and use the Screwdriver (off the floor in the secret room) on all three screws.
Collect the second Part of mysterious disk and back up.
Open the red toolbox and collect the Crowbar.
Use the Crowbar four times on the wooden crate to reveal a box.
Examine the box and use both Part of mysterious disks (the first on the counter in the secret room) on the impression.
Collect the medallion holder and place the rose in the center.
GOAL: Freeing the Creature in Net
Dock
Click the man to try to speak to him.
Examine the street lamp and open the latch.
You can try to pull the handle, but there's no power.
Back up and head to the right where the man went.
Mountain Maze
Examine the pile of rocks and drag each rock to the side.
Collect the Little rock that is revealed.
Back up to the dock, then head left and continue to the beached ship.
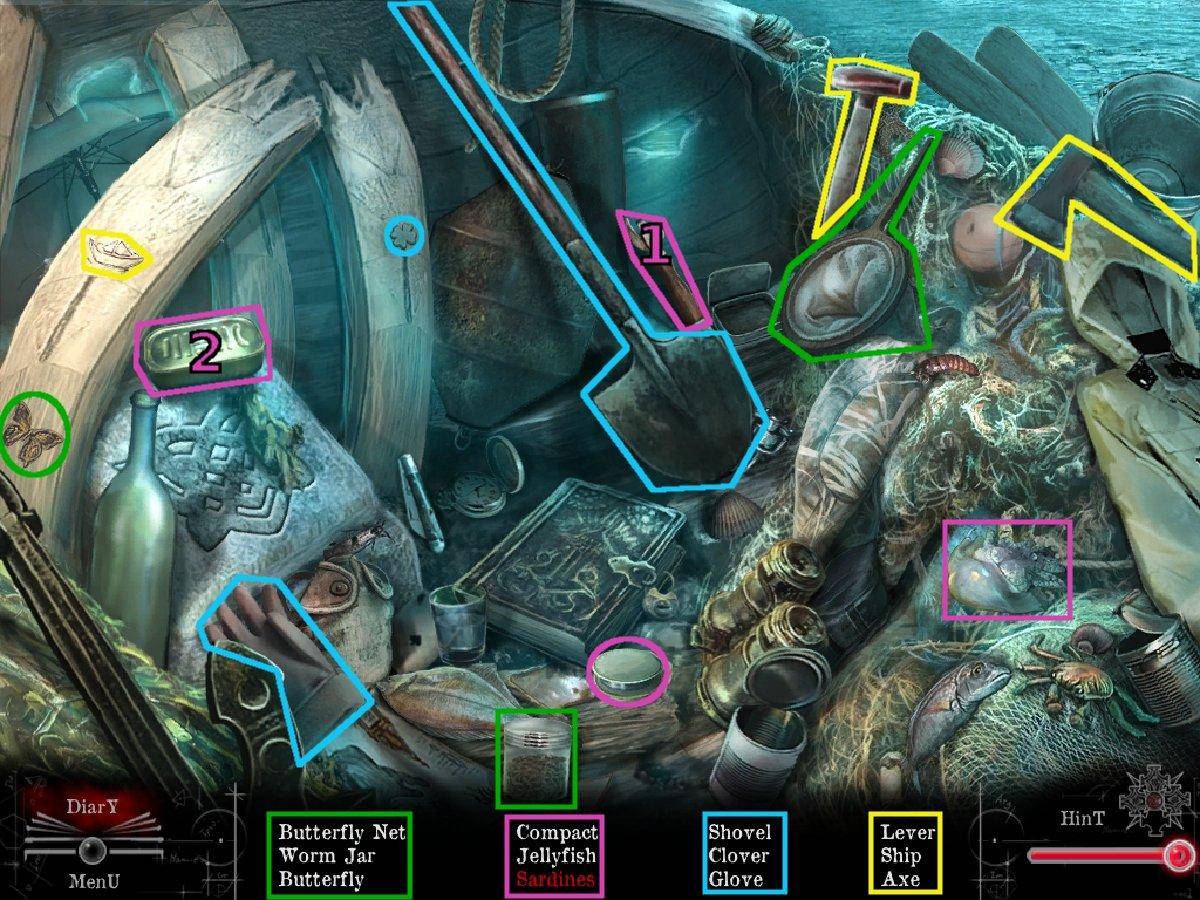
Beached Ship
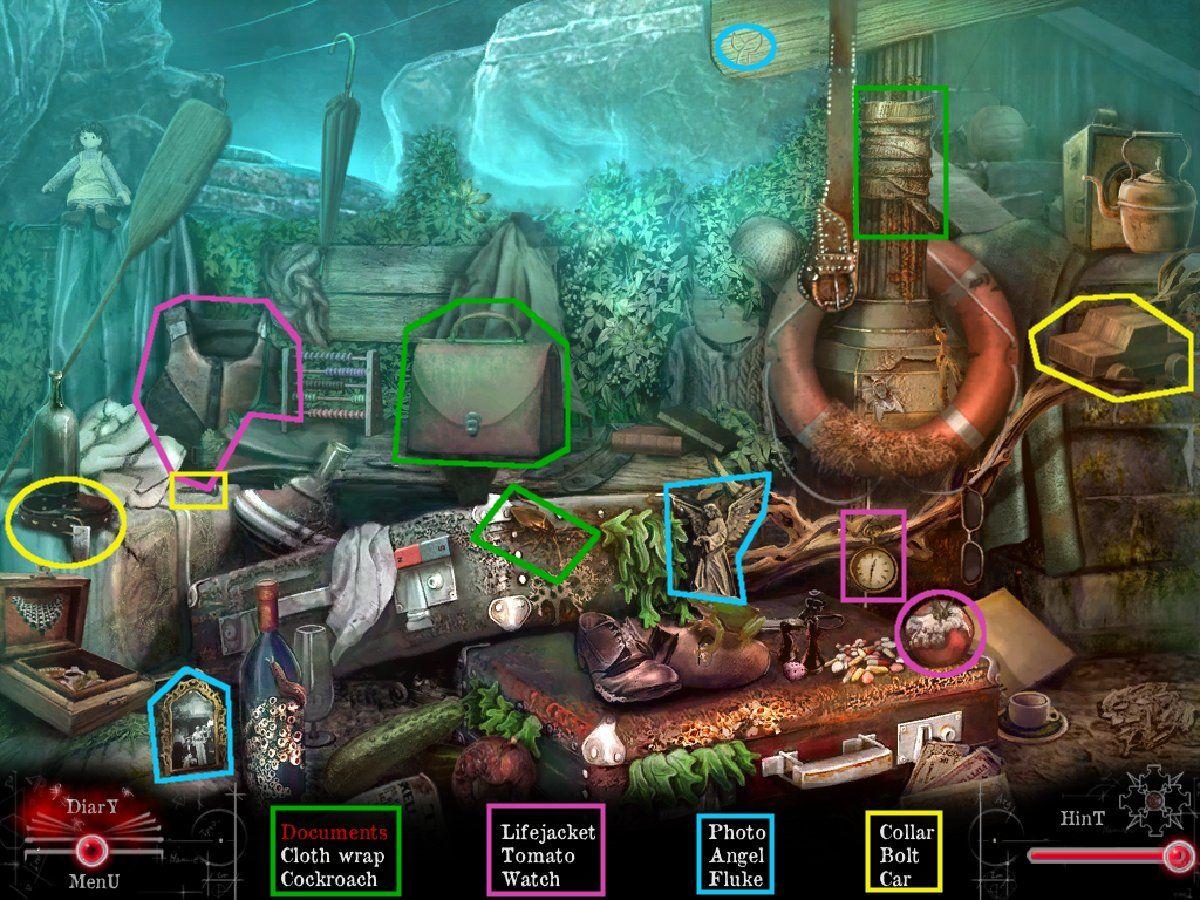
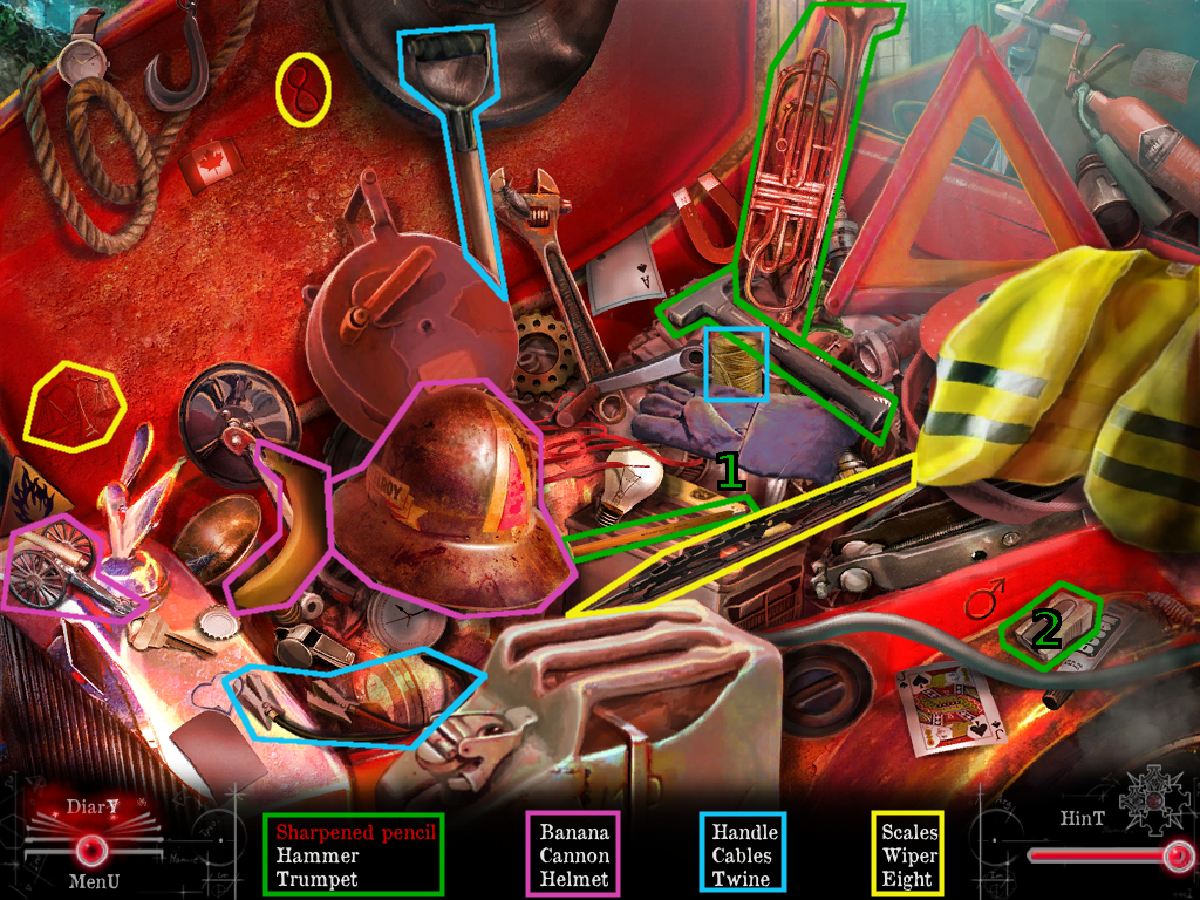
Examine below the statue and solve the hidden-object scene.
Use the screenshot below for help.
Items are circled by color in groups.
For items needing more than one step, areas are numbered.
Screenshot
You acquire an H Tile.
Examine the book to read about the ship and receive a clue.
Collect the Cloth off the anchor.
Back up to outside the ferry station.
Outside the Ferry Station
Examine the wallet in the puddle and pull out the ID.
Back up and examine the bulletin board.
Use the Little rock (from the pile in the mountain maze) three times on the glass.
Collect the Gear and back up.
Head back to the dock.
Dock
Use the Gear (from the bulletin board outside the ferry station) on the mechanism.
Turn the handle to free the blackbird.
Collect the Key that was under the bird.
Return to outside the ferry station.
GOAL: Traversing the Mountain Maze
Outside the Ferry Station
Examine the door of the ferry station.
Use the Key (from under the net in the dock) on the lock.
Enter the ferry station.
Ferry Station
Examine the electrical panel and lift the latch.
Click the switch to open electricity to the street lights.
Now examine the bulletin board and click through the pictures to get to the next prophecy scroll.
Examine the skeleton and move its left hand.
Collect the Button.
Back up to the dock.
Dock
Examine the streetlamp and flip the switch.
Back up, then solve the hidden-object scene.
Use the screenshot below for help.
Items are circled by color in groups.
For items needing more than one step, areas are numbered.
Screenshot
You acquire a Bolt.
Head up the steps.
Gates
Examine the lock on the gates and collect the A Tile.
Back up, then remove the debris to the left.
Collect the Lever that you uncover.
Go back down and into the ferry station.
Ferry Station
Examine the register and use the Button (from the skeleton in the station) in the missing spot.
Use the Lever (under the debris at the gates), then the Bolt (from the hidden-object scene at the dock) on the hole to the right.
Enter the code from the logbook at the beached ship, then turn the lever.
1614
Collect the M Tile.
Head back to the dock.
Dock
Examine the chest and solve the ring puzzle by dragging each circle in the proper place.
Working outside-in is easiest.
Use the insets along the edge to help determine the proper placement of each ring.
Examine the Diary for a visual reference.
Once the bottom panel opens, use all three Tiles on the openings.
Location of the Tiles:
H Tile from the hidden-object scene at the beached ship.
A Tile from off the lock at the gates.
M Tile in the register at the ferry station.
Now, using the clue from the rings above, enter the correct letter for each symbol.
Each symbol represents a single letter.
Be careful of the orientation of the symbols.
Solution:
LAPSIT
Open the Philosophia de Occulta for another clue.
Pull the scroll from under the cloth to the left of the book for the next prophecy scroll.
Back up, then head to the right.
Mountain Maze
Using the symbols from the Philosophia de Occulta, take the paths as indicated by the symbols in the rocks.
Right (only option)
Left
Right
Straight
GOAL: Entering the Fisherman's Home
Outside the Fisherman's Home
Click the man to try to speak to him.
Solve the hidden-object scene to the right.
Use the screenshot below for help.
Items are circled by color in groups.
For items needing more than one step, areas are numbered.
Screenshot
You acquire a Hammer.
Collect the Plank leaning on the steps.
Head left up the stairs.
Mine Entrance
Examine the shed and open the drawer.
Collect the Jigsaw blade.
Back up and head over to outside the Ferry Station.
Outside the Ferry Station
Examine the locked box on the path and use the Jigsaw blade (from the shed at the mine entrance) on the lock.
Collect the Hook.
Return to outside the fisherman's home.
Outside the Fisherman's Home
Examine the fishing rod and use the Hook (from the locked box outside the ferry station) on the end of the line.
Collect the Fishing rod.
Now examine the wooden grate in front of the door and use the Fishing rod on the knob below.
Collect the Handle.
Examine the door to the house and use the Handle on the opening.
Enter the house.
GOAL: Mending the Fisherman's Broken Heart
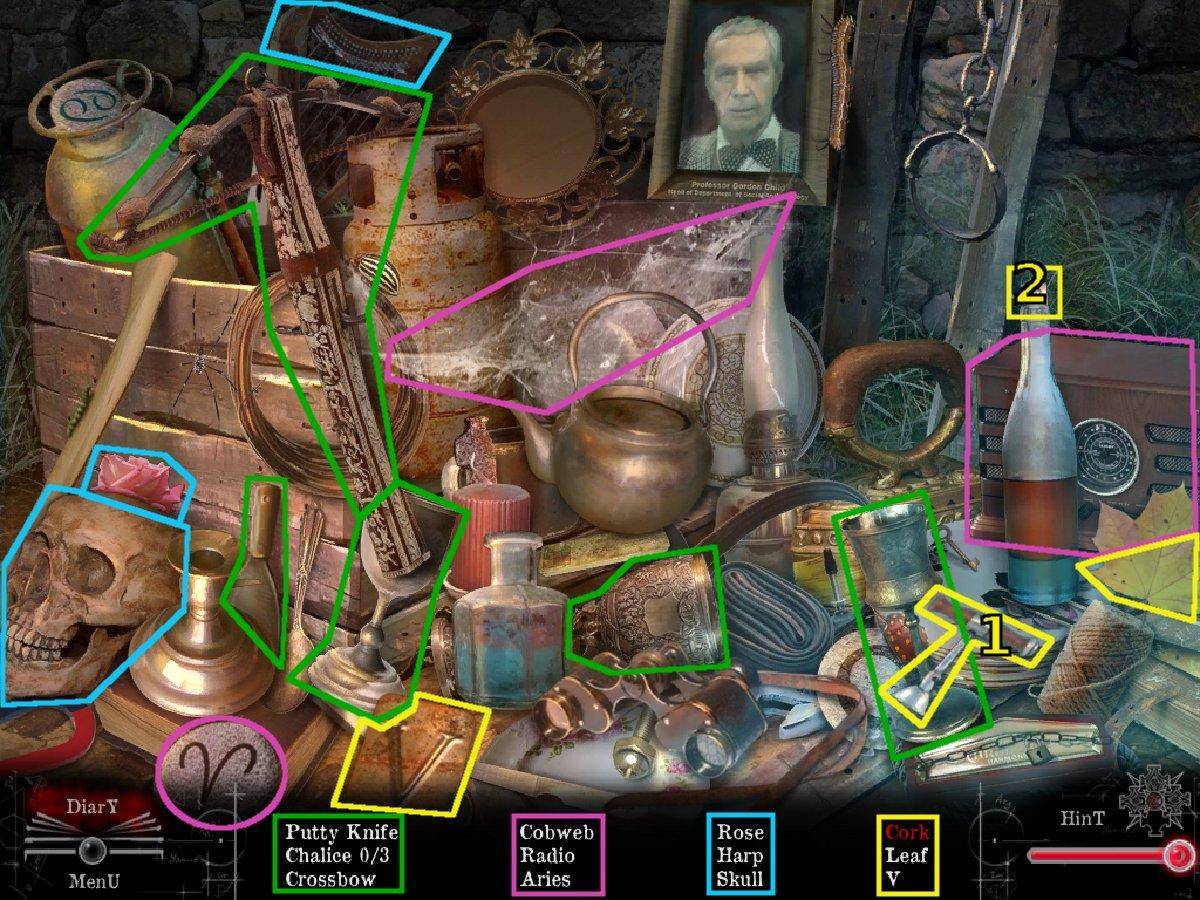
Fisherman's Home
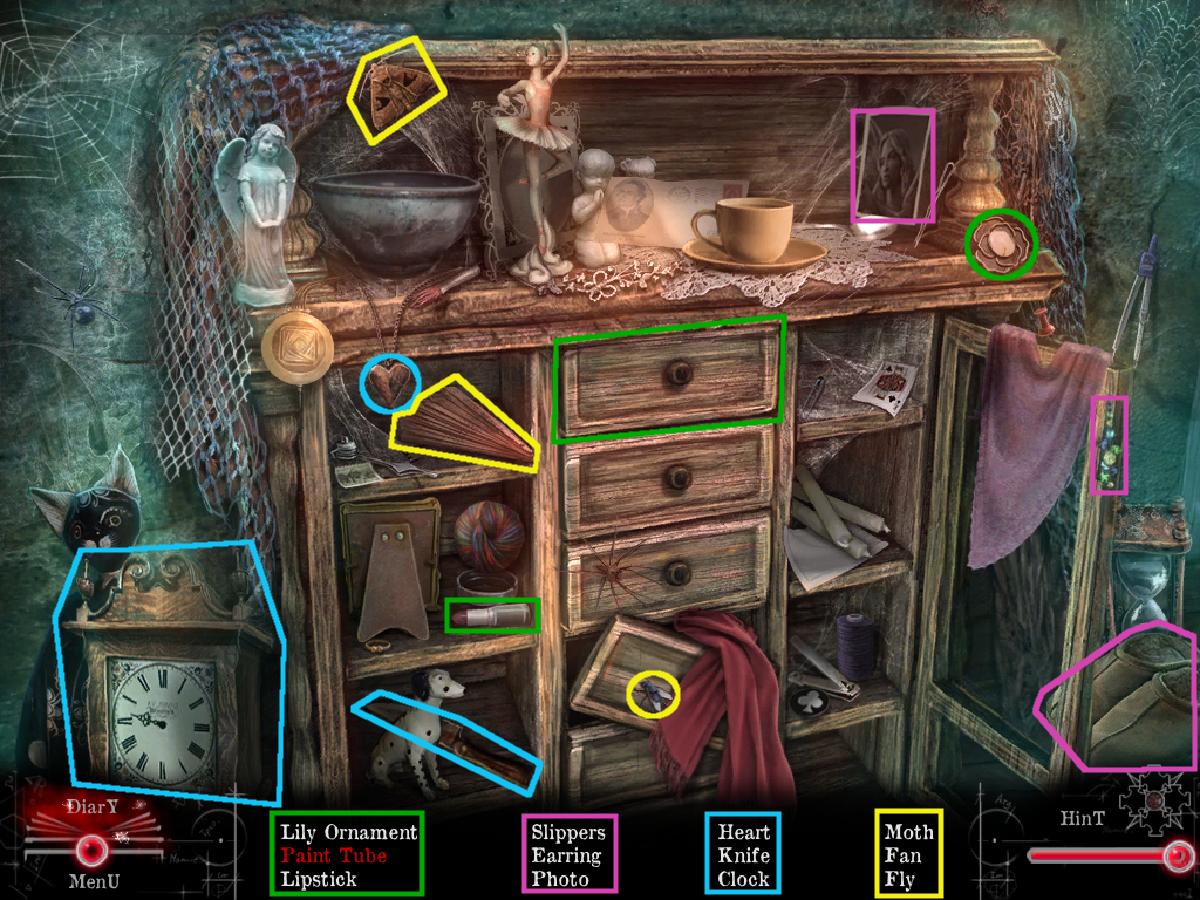
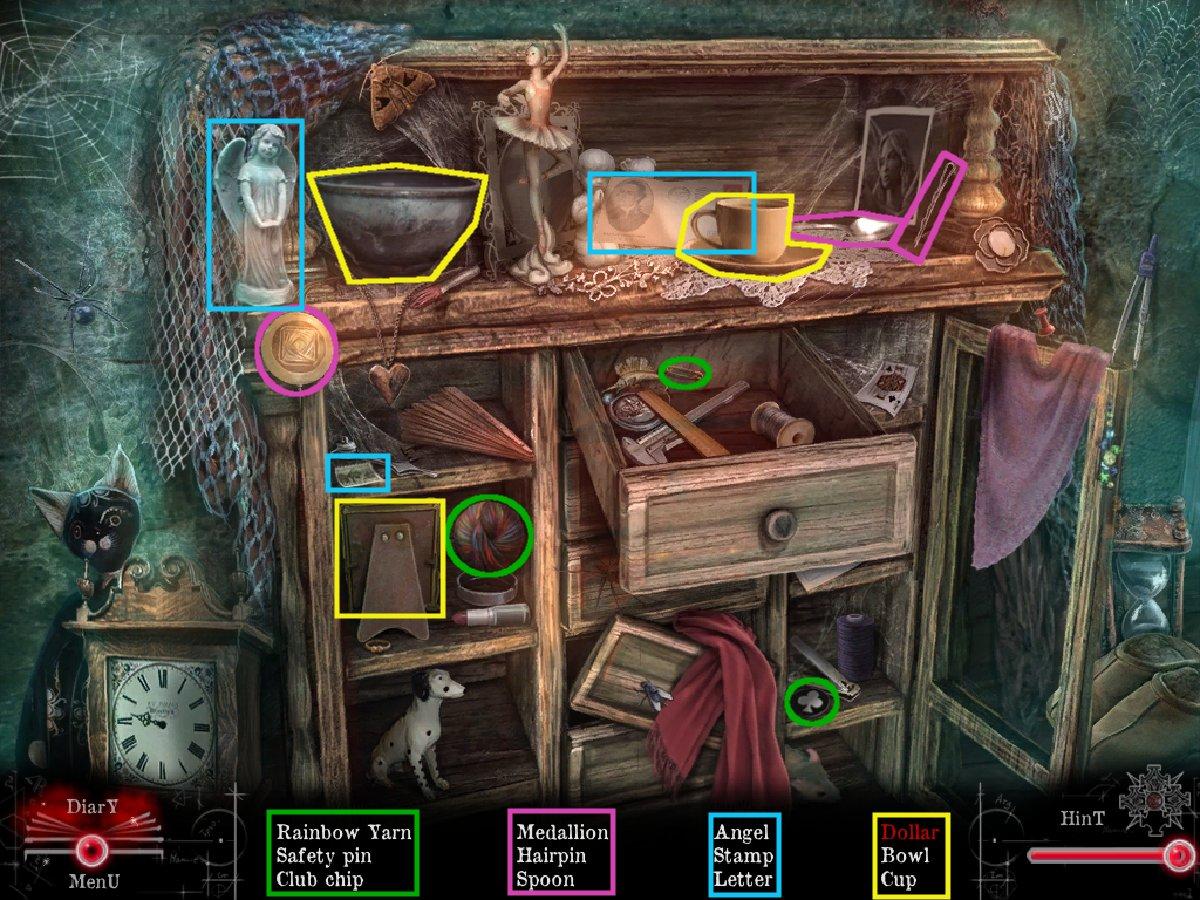
Click the cabinet to the left and solve the hidden-object scene.
Use the screenshot below for help.
Items are circled by color in groups.
For items needing more than one step, areas are numbered.
Screenshot
You acquire a Knife.
Use the Knife on the rope on the pillar to collect the Rusty key.
Head outside and back to the beached ship.
Beached Ship
Use the Knife (from the hidden-object scene in the fisherman's home) on the object caught in the net.
Collect the Boathook.
Back up and head inside the ferry station.
Ferry Station
Examine the map on the right wall and use the Knife (from the hidden-object scene in the fisherman's home) on the stitches.
Collect the Crystal heart.
Back up and out to the dock.
Dock
Examine the streetlamp and use the Jigsaw blade (from the shed at the mine entrance) on the two chains to the left.
Collect the Lever.
Use the Boathook (from the net at the beached ship) on the plank floating in the water.
Now collect the Plank.
Head up to the mine entrance.
Mine Entrance
Examine the closed door on the shed and use the Rusty Key (off the pillar in the fisherman's home) on the lock.
Collect the Matches on the top shelf and the Nails on the bottom.
Use the Lever (by the streetlamp at the dock) on the mine cart.
Flip the lever and collect the Pickax.
Examine the ladder to the left and use the Planks on it.
Location of the Planks:
Leaning on the steps outside the fisherman's home.
Floating in the water at the dock.
Use the Nails on the planks.
Now use the Hammer (from the hidden-object scene outside the fisherman's home) on each of the nails.
Examine the crystals at the top of the ladder and use the Pickax on the large one three times.
Collect the Crystal, then collect the Ladder.
Back up to outside the fisherman's home.
Outside the Fisherman's Home
After speaking to the blackbird, use the Ladder (from the mine entrance) on the chimney.
Examine the top of the chimney and collect the Colored lenses.
Head over to the dock and try to speak to the woman on the steps, then head to the beached ship.
Beached Ship
Examine the statue and use the Colored lenses (on the top of the chimney outside the fisherman's home) on the slots.
Use the Crystal (from the outcropping at the mine entrance) on the holder below.
Solve the lens puzzle by clicking each set to rotate them until each facing side matches the other.
Collect the Moonstone.
Go back to the fisherman's home.
Fisherman's Home
Examine the dolls on the table and pick each arm up and replace them.
Use the Crystal heart (in the map at the ferry station) on the man and the Moonstone (from the statue's puzzle at the beached ship) on the woman.
Collect the medallion piece and place it in the top slot.
Back out of the medallion screen and head into the fisherman's backroom.
GOAL: Opening the Gates
Fisherman's Backroom
Collect the Wire cutters off the wall to the left.
Examine the desk drawer and use the Wire cutters on both nails.
Collect the Rust Remover.
Now examine the hanging cabinet and open the left door, making note of the symbols on the other one.
Off the middle shelf, collect the Liquid.
Back up and examine the counter below.
Examine the paper and follow the instructions.
Pull the stopper out.
Turn the blue valve.
Use the Liquid on the brown liquid.
Pick up the container of red liquid and move it above the burner.
Use the Matches (from the top shelf behind the closed door of the shed at the mine entrance) on the burner.
Turn the dial on the burner.
Place the Little rock on the far right contraption.
Turn the contraption and collect the Stone fish.
Examine the book on the stand and use the Stone fish on the impression.
Collect the Fisherman's key and the next prophecy scroll.
Back up to the main room.
Fisherman's Home
Examine the painting on the wall and use the Fisherman's key (out of the book on the stand in the backroom) on the opening.
Solve the circle puzzle by clicking a block by the blank spot to move it to form a circle in the middle.
Once done, collect the Cipher.
Go outside and head up to the gates.
Gates
Examine the area the blackbird reveals and solve the ring puzzle.
Drag each ring to rotate it.
The outer two rings affect each other in rotation.
The accuracy does not need to be perfect.
Use the outer edge for help in orientation.
Use the Cipher on the opening that appears.
Solve the cipher puzzle by entering the correct letter in the lower left, given the symbols above and the code on the rings.
(listed clockwise, starting in the upperleft)
ELEEATNM
Collect the Rose.
Examine the lock on the gates and use the Rust Remover (in the drawer in the fisherman's backroom) on the rust.
Use the Cloth (off the anchor of the beached ship) on the rust twice.
Solve the eye puzzle by clicking eyes to close them all.
Each eye changes itself and the following two, going clockwise.
Solution:
Click each eye once.
Use the Rose on the impression.
Open the baggage and examine it.
Now open the red book and read it.
Back up and head up the steps.
GOAL: Getting into the Floating House
Overlook
Look through the telescope to see the castle.
Remove the branches on the left and collect the Wrench.
Examine the woman in the distance, then head to her house.
Outside the Floating House
Examine the front porch and try to open the door.
Collect the Axe.
Back up and examine the birdhouse on the left.
Use the Knife on the rock.
Collect the Photo part.
Back up and head left toward the church.
Cemetary
Move the branch and two planks off the tree.
Examine the tree and use the Axe (on the front porch of the floating house) on it three times.
Use the Matches on the red lamp to the left.
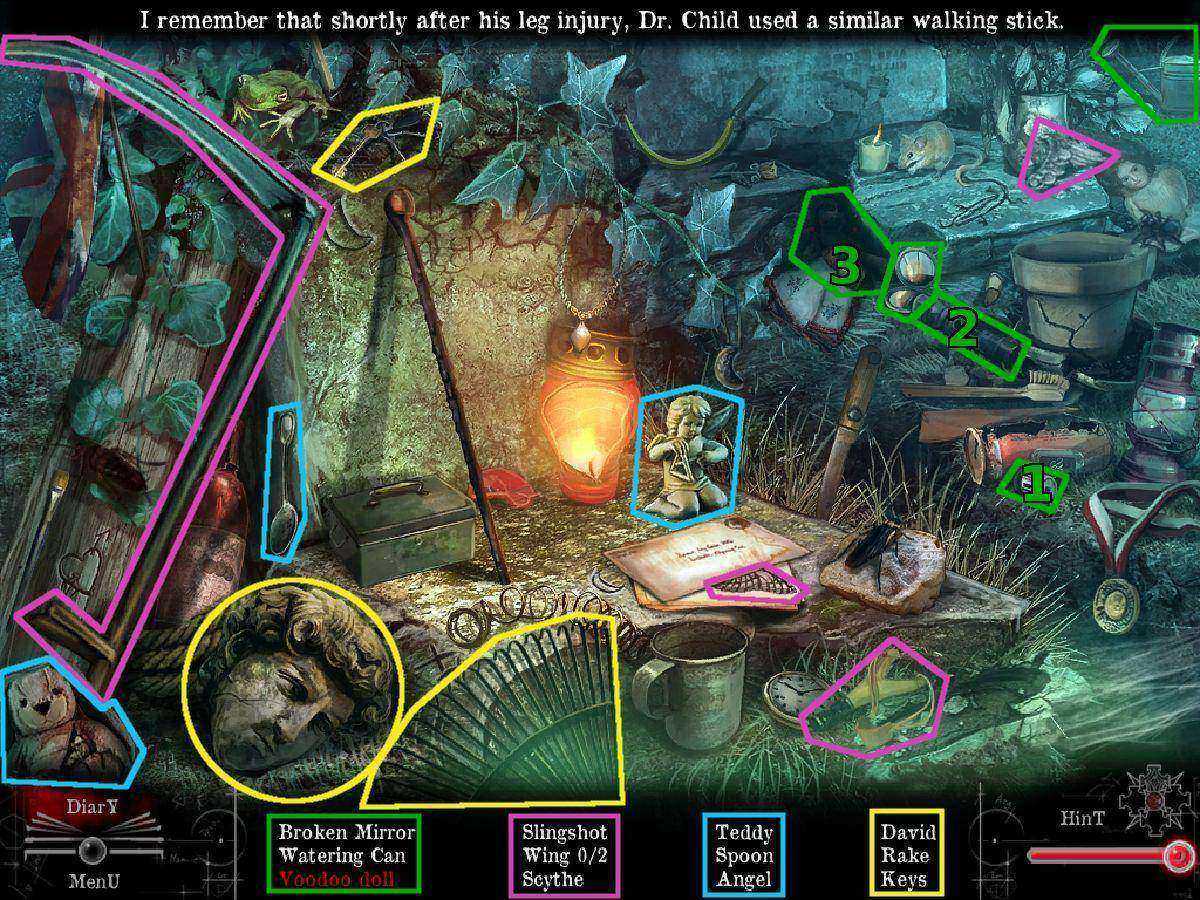
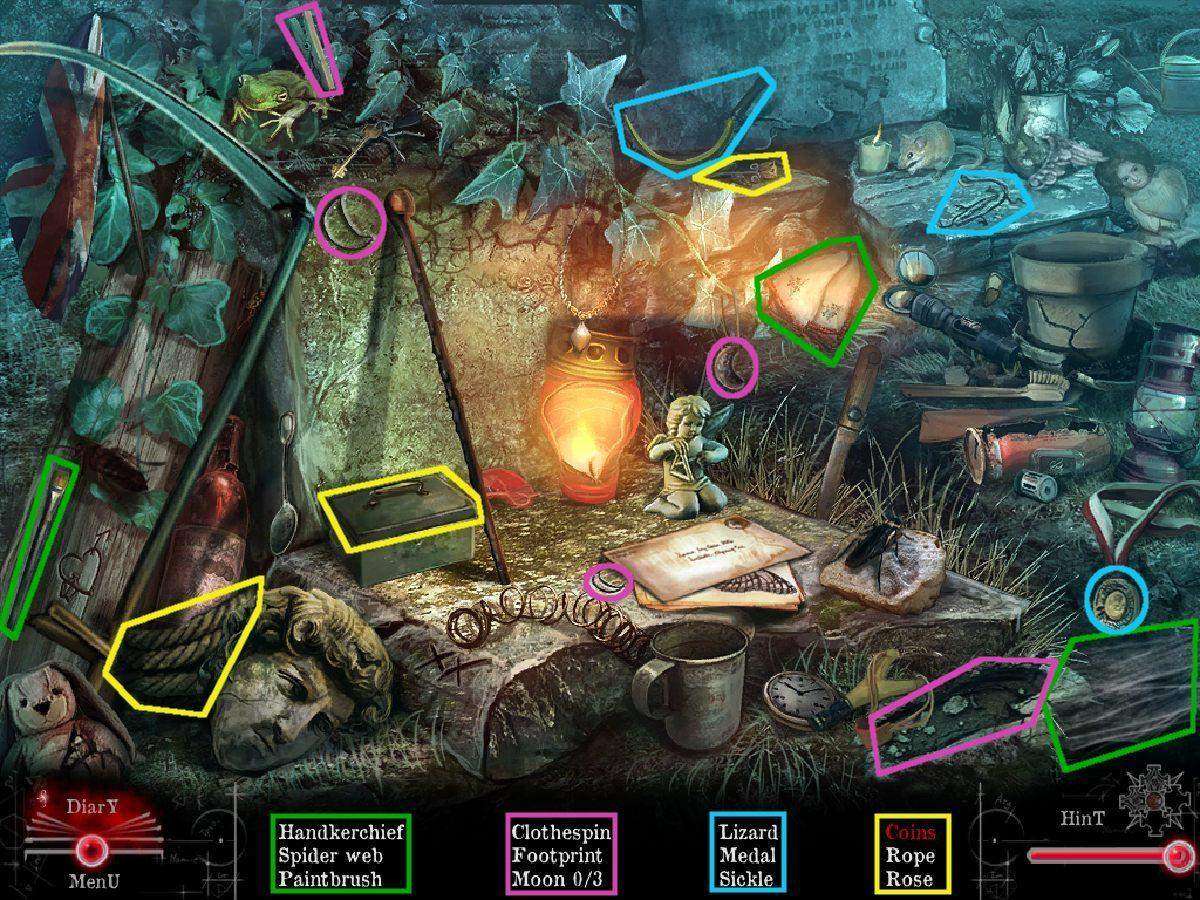
Click the left rock to solve the hidden-object scene.
Use the screenshot below for help.
Items are circled by color in groups.
For items needing more than one step, areas are numbered.
Screenshot
You acquire a Rake.
Enter the church.
Church
Collect the Small ladder by the rubble to the left.
Examine the glass case, collect the Ruler and back up.
Now examine the fresco to the right and solve the simon-says puzzle by clicking the pieces in the order indicated.
Collect the second Photo part.
Head back outside and go to the fire at the intersection.
Intersection
Move the vines to the left.
Collect the Crowbar.
Back up and go right toward the floating house.
Outside the Floating House
Examine the pile of leaves and use the Rake (from the hidden-object scene at the cemetary) three times.
Collect the Chain.
Use the Small ladder (from inside the church) below the window to the right.
Examine the window and use the Crowbar (in the vines at the intersection) on the glass.
Move the handle and lift the window.
Head inside the house.
GOAL: Setting the Clock
Floating House
Click the rubble to solve the hidden-object scene.
Use the screenshot below for help.
Items are circled by color in groups.
For items needing more than one step, areas are numbered.
Screenshot
You acquire Glue.
Head through to door into the kitchen.
Floating House Kitchen
Examine the cabinet below the sink and use the Ruler (from by the glass case in the church) to lift the latch.
Use the Wrench (from under the branches at the outlook) three times on each of the sections.
Collect the Strange Key.
Examine the broken stained glass window and solve the puzzle.
Now examine the area on the floor indicated by the light and use the Crowbar.
Use the Strange Key on the lock.
Collect the third Photo part.
Go outside and over to the cemetary.
Cemetary
Examine the headstone with the cross and use the Glue (from the hidden-object scene in the floating house) on the broken photo.
Now use all three Photo parts on the glue.
Location of the Photo parts:
Behind the rock by the birdhouse outside the floating house.
Below the fresco in the church.
In the chest under the floorboard in the floating house kitchen.
Collect the Sign.
Back up to the outlook.
Outlook
Examine the headstone and use the Sign (from the grave at the cemetary) on the opening.
Collect the Tap and Key cabinet.
Return to the floating house kitchen.
Floating House Kitchen
Examine the upper cabinet and use the Key cabinet (from the headstone at the outlook).
Collect the Corn from the top shelf and the Solution from the middle.
Make note of the time code and back up to outside the house.
Outside the Floating House
Examine the clock on the pillar and enter the times from the code in the kichen cabinet.
1:00, 7:30, 11:20
Collect the Cuckoo.
Now examine the front porch and use the Corn (from the top shelf of the kitchen cabinet) on the bucket.
After the rat comes out, collect the Bucket.
Back up and head inside the church.
Church
Examine the sink and use the Tap (from the headstone at the outlook) on the spigot.
Use the Bucket (from the floating house front porch) on the sink.
Turn the tap and collect the Bucket with water.
Head over to the intersection.
Intersection
Use the Bucket with water (filled at the sink in the church) on the fire.
Head into the town center.
Town Center
Click the man to try to speak to him.
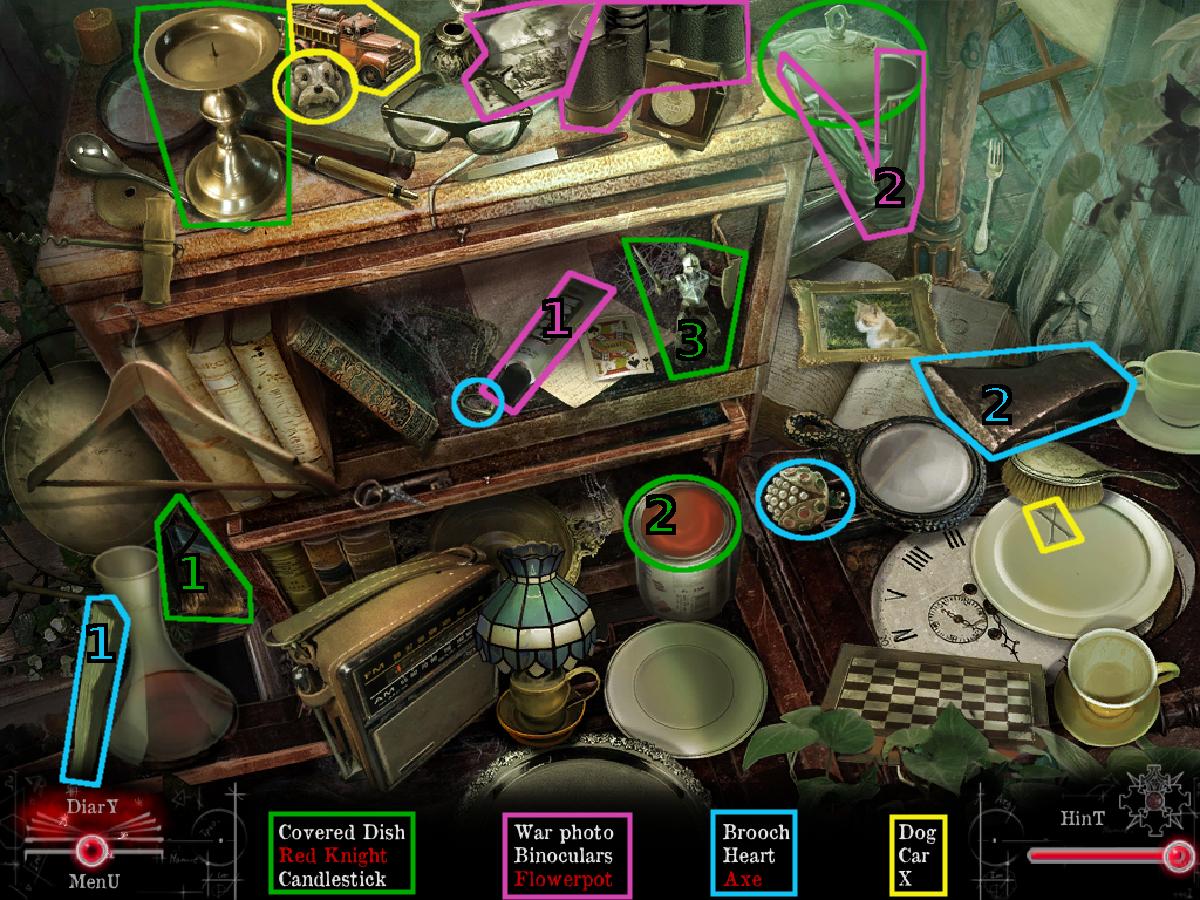
Now click the pipe to the far left to solve the hidden-object scene.
Use the screenshot below for help.
Items are circled by color in groups.
For items needing more than one step, areas are numbered.
Screenshot
You acquire a Butterfly net.
Examine the fire engine and lift the left sunshade to reveal a code.
Collect the Fireman photo off the dashboard.
Back up to the cemetary.
Cemetary
Examine the wall of photos and use the Fireman photo on the leftmost opening.
Solve the photo puzzles by placing the photos in the correct frame within each section.
Completing the leftmost section gives you the photo for the right section.
Completing the right section gives you the photo for the middle.
Collect the Pendulum and head into the floating house.
Floating House
Examine the jar to the right and use the Butterfly net (from the hidden-object scene at the town center) on each of the four fireflies.
Collect the Big Hand and Small Hand off the map.
Now collect the next prophecy scroll on the counter.
Examine the clock on the back wall and use the Cuckoo (from the kitchen cabinet) on the top.
Use the Pendulum (from the photo wall in the cemetary) below the clockface.
Finally, use the Big Hand and Small Hand on the clockface.
Solve the gear puzzle by placing them on the pegs to connect all the inner clock ones.
You'll know a gear is correctly placed when it's spinning (from being connected to the original spinning one).
Work your way from the bottom green gear to the left, right, then top green gears.
Collect the medallion piece and place it on the left opening.
Back up and click the rubble to solve the hidden-object scene.
Use the screenshot below for help.
Items are circled by color in groups.
For items needing more than one step, areas are numbered.
Screenshot
You acquire a Key.
Head outside and to the town center.
GOAL: Moving the Fire Engine
Town Center
Use the Key (from the hidden-object scene in the floating house) on the emergency door.
Head inside the building.
Emergency Lab
Examine the papers on the floor and collect the next prophecy scroll.
Move the Scalpel, then collect it.
Make note of the letter-number code and back up.
Examine the safe below the row of cubbies and solve the number code.
Use the code found on the floor plus the one in the fire engine.
Drag the dial in the direction indicated to the number indicated.
Solution:
R2.L5.R4.L7.R0
Remove the cover and collect the Recipe.
Examine the broken cabinet and move the papers on the shelf to collect the Car Key.
Use the Scalpel on the book binding and collect the Propolis.
Back up to the town center.
Town Center
Examine the fire engine and use the Car Key (from the cabinet shelf in the emergency lab) on the ignition.
Turn the key, then click the stick shift to put it in gear.
After moving the truck, head inside the firehouse.
GOAL: Helping the Fireman
Firehouse
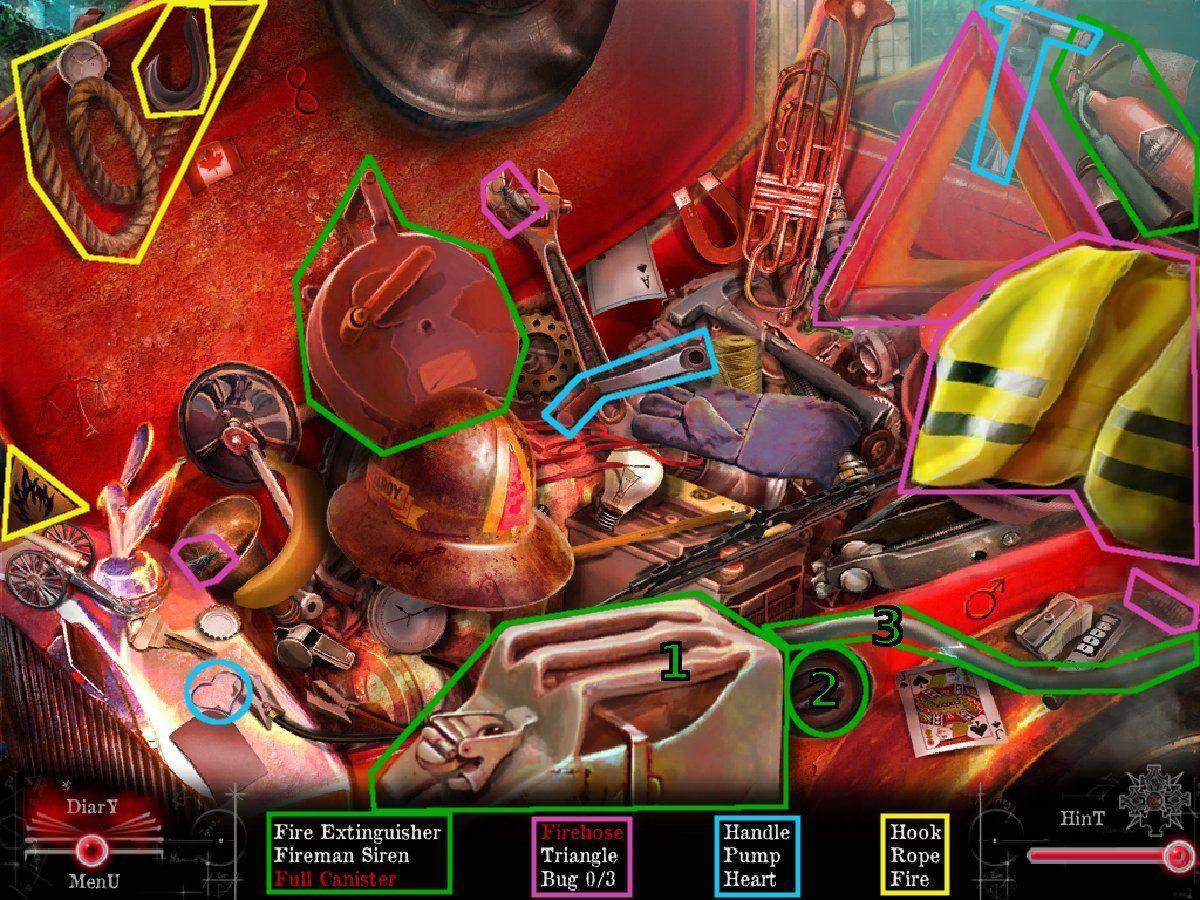
Open the hood of the fire truck, then click it to solve the hidden-object scene.
Use the screenshot below for help.
Items are circled by color in groups.
For items needing more than one step, areas are numbered.
Screenshot
You acquire a Handle.
Back up and head over to the cemetary.
Cemetary
Click the rock on the left to solve the hidden-object scene.
Use the screenshot below for help.
Items are circled by color in groups.
For items needing more than one step, areas are numbered.
Screenshot
You acquire a Sickle.
Enter the church.
Church
Examine the glass case and lift the cover.
Use the Sickle (from the hidden-object scene in the cemetary) on the St. John's wort to collect it.
Go outside and head to the town center.
Town Center
Click the pipe to the left to solve the hidden-object scene.
Use the screenshot below for help.
Items are circled by color in groups.
For items needing more than one step, areas are numbered.
Screenshot
You acquire a Pump lever.
Examine the statue water and use the Handle (from the hidden-object scene at the firehouse) on the object.
Collect the Valve.
Head inside the firehouse.
Firehouse
Use the Valve (from the water in front of the town center statue) on the pipe.
Turn the valve to stop the steam.
Head inside the office.
Firehouse Office
Examine the desktop and collect the Light bulb.
Move the chair, then examine the lamp.
Use the Light bulb on the socket.
Open the chest and examine it.
Remove the items, then collect the Lever.
Use the Handle on the shovel head.
Collect the Shovel.
Go outside and head back into the church.
Church
Use the Lever (from the chest in the firehouse office) on the device to the left.
Move the lever to reveal a grate.
Examine the grate, then lift it and collect the Bell clapper.
Go back to the firehouse.
Firehouse
Examine the bell and use the Bell clapper (from below the grate in the church).
Ring the bell, then collect the Owl Feather.
Head over to the emergency lab.
Emergency Lab
Examine the ledge by the window and use the Recipe (from the safe below the cubbies) on the counter by the spoon.
Follow the instructions on the recipe to make the salve.
Use the St. John's wort (from the glass case in the church) on the mortar.
Use the Solution (from the middle shelf of the floating house kitchen cabinet) on the pot.
Use the Matches on the burner.
Use the Owl Feather (from the firehouse) on the pot.
Use the Propolis (from the book in the broken cabinet) on the pot.
Pick up the St. John's wort from the mortar and put it in the pot.
Use the spoon on the pot and put it on the bandage.
Collect the Salve Bandage.
Go outside and into the firehouse.
Firehouse
Examine the fireman and use the Salve Bandage on his arm.
Take the piece of medallion and place it on the left opening.
Back up and click the fire engine to solve the hidden-object scene.
Use the screenshot below for help.
Items are circled by color in groups.
For items needing more than one step, areas are numbered.
Screenshot
You acquire a Firehose.
Go outside to the town center.
Town Center
Examine the statue base and open the hatch.
Pick up the dial and put it over the leaking steam.
Now pick up each of the gears and place them on the correct axles (a light impression indicates the size needed).
Place the black tube at the end of the piston.
Use the Chain (from under the leaves outside the floating house) on the gears.
Now use the Pump lever (from the hidden-object scene) on the end of the pipe.
Use the Firehose (from the hidden-object scene in the firehouse) on the pump lever.
Pull the lever handle, then examine the fire.
Activate the hose to put out the fire.
Head forward to the outskirts of town.
GOAL: Finding the Last Medallion Guardian
Outskirts of Town
Click the shed rubble to solve the hidden-object scene.
Use the screenshot below for help.
Items are circled by color in groups.
For items needing more than one step, areas are numbered.
Screenshot
You acquire a Piece of Stained Glass.
Examine the path to the mine.
Use the Axe on the tree three times.
Head forward toward the mines, then into the fisherman's home.
Fisherman's Home
Click the cabinet to solve the hidden-object scene.
Use the screenshot below for help.
Items are circled by color in groups.
For items needing more than one step, areas are numbered.
Screenshot
You acquire a Spoon.
Head out and to the dock.
Dock
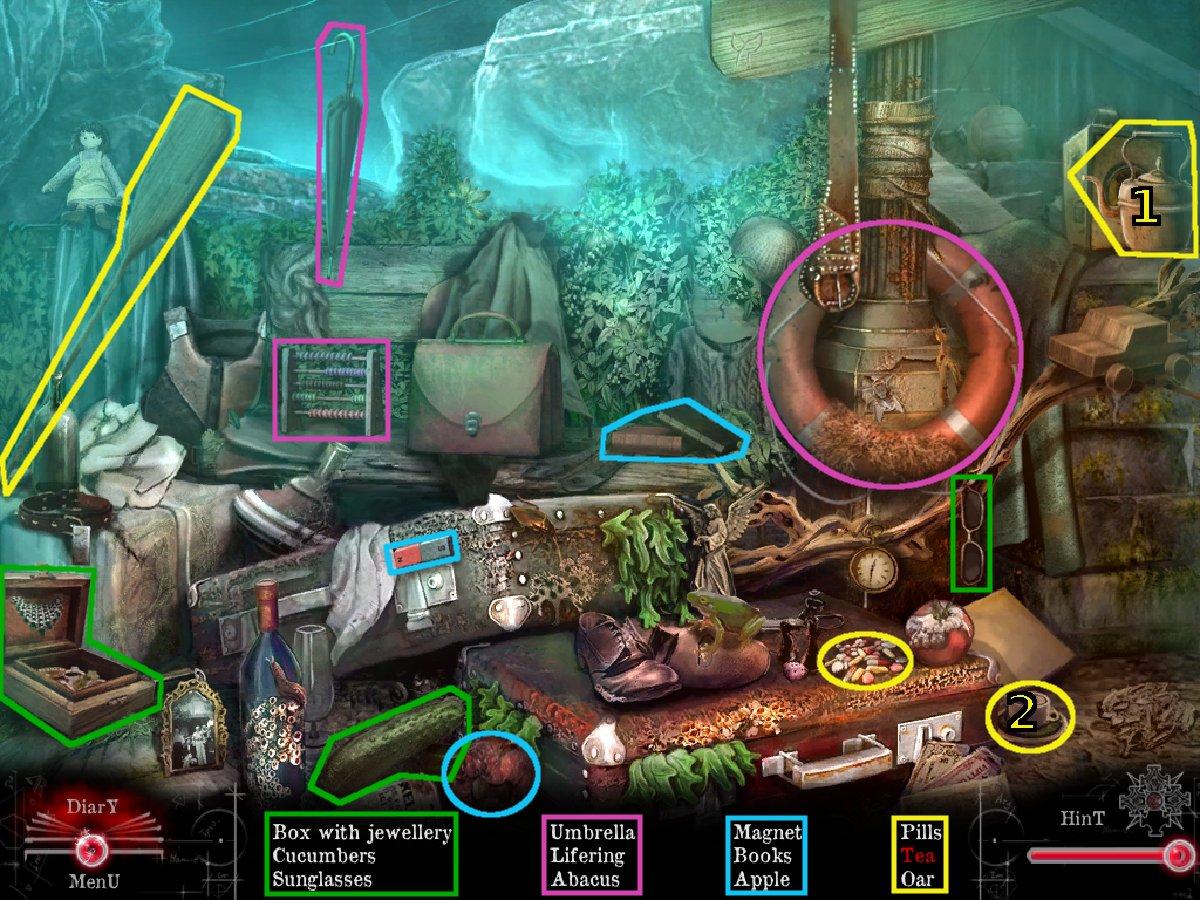
Click the luggage to solve the hidden-object scene.
Use the screenshot below for help.
Items are circled by color in groups.
For items needing more than one step, areas are numbered.
Screenshot
You acquire a Magnet.
Continue left to outside the ferry station.
Outside the Ferry Station
Examine the cellar by the window and use the Wrench on each bolt.
Collect the Pliers.
Head back to the outskirts of town.
Outskirts of Town
Examine the mailbox on the left and use the Pliers on the mail.
Collect the Rope.
Head left toward the school.
Outside the School
Examine the dollhouse and collect the Blue paint.
Now examine the dirt pile by the path and use the Shovel (from the chest in the firehouse office) three times.
Collect the Cross Screwdriver.
Examine the door and use the Rope (from the mailbox at the outskirts of town) on the hook.
Pull the rope to ring the bell.
Enter the school.
GOAL: Finishing the Painting
School
Examine the desk and collect the Star Key.
Use the Axe twice on the beams blocking the closet on the right.
Now examine the shelves and move the books.
Examine the Drawing to collect it.
Use the Spoon (from the hidden-object scene in the fisherman's home) on the eye.
Collect the Doll Eye.
Examine the bassinet and use the Doll Eye on the missing area.
Now collect the Push button.
Head outside and to the mine entrance.
Mine Entrance
Examine the control box and open the lid.
Use the Magnet (from the hidden-object scene at the dock) on the opening.
Now examine the keypad on the mine cart and use the Push button (from the doll in the school) on the opening.
Enter the code from the cabinet in the fisherman's backroom and hit enter.
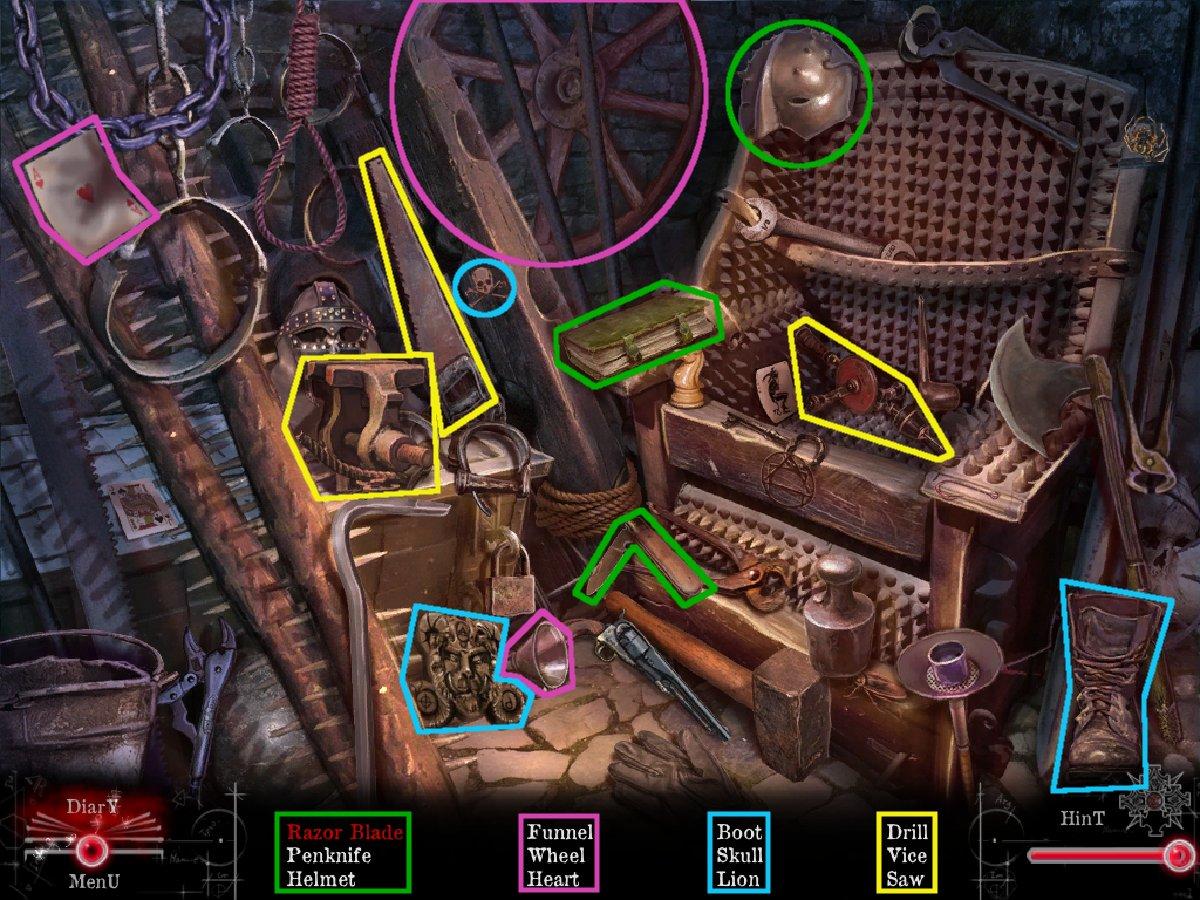
Torture Chamber
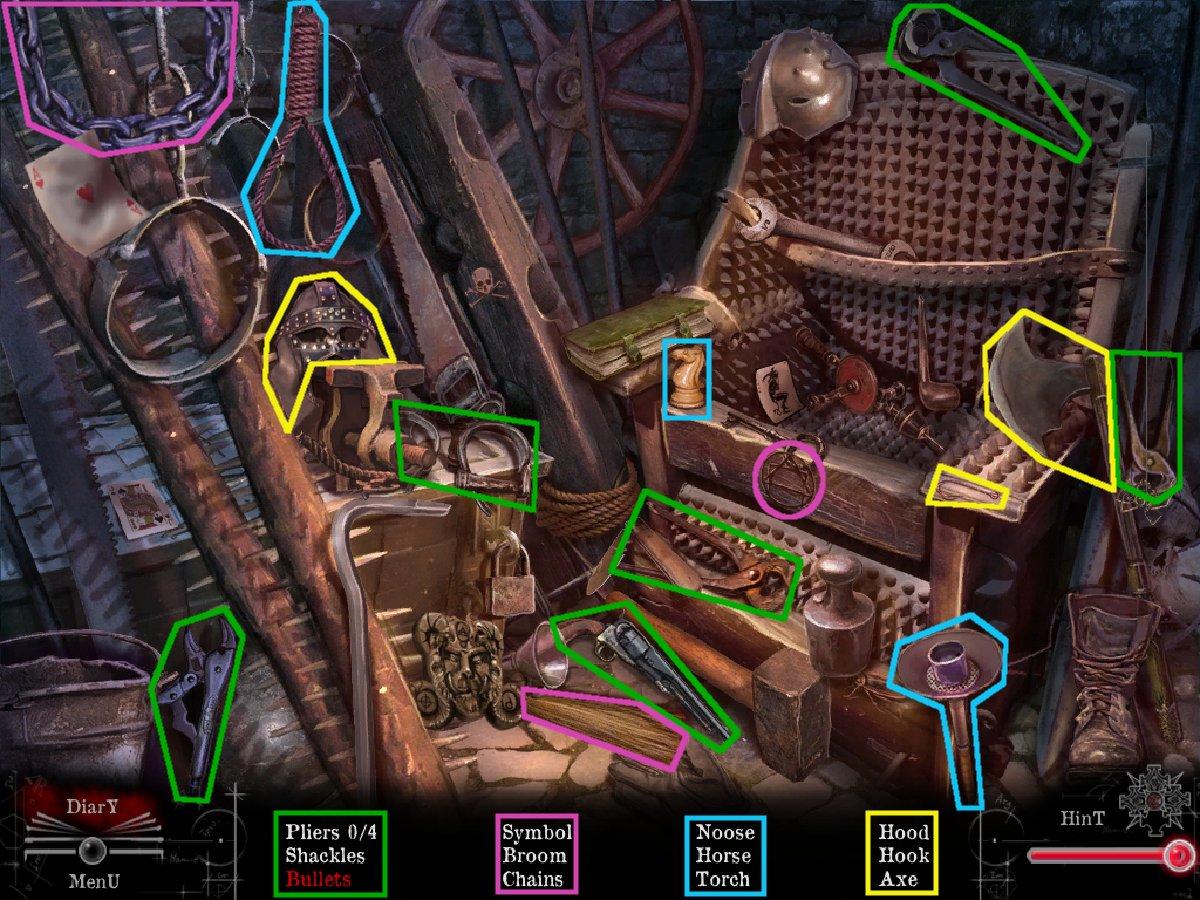
Click the spiked chair to solve the hidden-object scene.
Use the screenshot below for help.
Items are circled by color in groups.
For items needing more than one step, areas are numbered.
Screenshot
You acquire a Duster.
Examine the handles to the left and collect the File out of the middle slot.
Back up and open the container to the right.
Collect your first Lever.
Now collect the Firehook leaning against the wall.
Back up and go to outside the fisherman's home.
Outside the Fisherman's Home
Click the boat to solve the hidden-object scene.
Use the screenshot below for help.
Items are circled by color in groups.
For items needing more than one step, areas are numbered.
Screenshot
You acquire another Lever.
Head inside the home and into the backroom.
Fisherman's Backroom
Examine the window and use the Piece of Stained Glass (from the hidden-object scene at the outskirts of town).
Solve the puzzle by rotating the circle so the outer edges of each circle match in color to the middle (overlapping areas are white).
Solution:
(A=aqua, G=green, R=red, B=blue)
A/G/R/B
R(x2)/A/G/R(x2)
G/A/R/B
Collect the Water Stone.
Examine the carved stone on the floor and use the File (from the handles in the torture chamber) on the wooden box.
Collect the next prophecy scroll, the final Lever and the Key.
Go outside and up to the outskirts of town.
Outskirts of Town
Examine the electric box on the right and use the Star Key (from the desk in the school) on all four screws.
Solve the electricity puzzle by rotating the intersections so that none of the cells get power.
Once the power is gone, collect the Yellow paint.
Head left toward the school, then continue up.
Castle Entrance
Examine the castle to have the portcullis drop.
Now examine the pile of junk to the right to solve the hidden-object scene.
Use the screenshot below for help.
Items are circled by color in groups.
For items needing more than one step, areas are numbered.
Screenshot
You acquire a Paintbrush.
Examine the object strapped to the left chain and use the Pliers on all three sets of wires.
Collect the Blade.
Now examine the cage and use the Firehook (from the torture chamber) on it.
Use the Blade on the bag.
Collect the Dog Beast.
Examine the covered panel on the right and use the Duster (from the hidden-object scene in the torture chamber) three times on it.
Make note of the symbols you uncover, then back up and enter the school.
School
Examine the painting by the closet and use the Blue paint (from in the dollhouse outside the school) on the palette.
Now use the Yellow paint (from behind the eletric wires at the outskirts of town) and Paintbrush (from the hidden-object scene at the castle entrance).
Mix each of the pairs of colors to produce the rest of the rainbow.
Use the Drawing (from under the books in the closet) by the painting.
Fill in the faded colors to match the drawing.
You'll use each color in one basic area of the painting.
Red: childrens' cheeks and rose
Orange/yellow: sun stripes
Green: grass
Blue: children's uniforms
Purple: flowers
Collect the Music Box Part.
Return to the torture chamber.
GOAL: Reassembling the Music Box
Torture Chamber
Click the spiked chair to solve the hidden-object scene.
Use the screenshot below for help.
Items are circled by color in groups.
For items needing more than one step, areas are numbered.
Screenshot
You acquire the Lion Beast.
Examine the handles to the left and use the three Levers.
Location of the Levers:
In the container to the right.
From the hidden-object scene outside the fisherman's home.
In the wooden box on the floor of the fisherman's backroom.
Solve the switch puzzle by click the switches until they're all in the up position.
The switches affect more than themselves.
Solution:
(numbered 1-5, left-to-right)
2, 4, 5
Collect the Horse from the lowered cage.
Examine the door in back and use the Dog Beast (from the skeleton's bag at the castle entrance) and Lion Beast.
Enter the correct code from the clue at the castle entrance and the number/symbols on the beasts.
1/2/8/5/9
Step through the doorway.
Castle
Turn the handle below the Main Gate sign.
Head through the door.
Castle Entrance
Click the junk pile to the right to solve the hidden-object scene.
Use the screenshot below for help.
Items are circled by color in groups.
For items needing more than one step, areas are numbered.
Screenshot
You acquire a Putty knife.
Back up and head into the school.
School
Examine the desk and attach the bottom part of the music box to the base.
Place the top part above that.
Use the Music Box Part (from the behind the painting) and Horse (from the cage in the torture chamber).
Now use the Key (from the wooden box on the floor of the fisherman's backroom).
Collect the medallion piece, place it in the bottom opening and collect the Medallion.
Return to the castle.
GOAL: Defeating the Evil Master
Castle
Examine the panel on the far left and use the Medallion on the opening.
Use the Putty Knife (from the hidden-object scene at the castle entrance) three times on the cement.
Solve the cipher by using the codes around the puzzle and the numbered buttons to enter the correct letters.
Make note that some letters appear twice on the circle, meaning you'll have to plan ahead.
Click the arrows to change the direction you'll move the dial and click the number to actually rotate it.
Solution:
AETHERIS
2 clockwise
2 counter-clockwise
2 counter-clockwise
7 counter-clockwise
3 counter-clockwise
7 counter-clockwise
3 clockwise
3 clockwise
Pull the lever to the right of the solution.
Collect the prophecy scroll, then hit the yellow button.
Examine each pillar and click each section of stone to create a picture related to the element indicated below.
Once you get a pillar correct, you'll no longer be able to manipulate it, and a light will come out of it toward the circle.
Collect the Sun.
Head forward into the doorway that opens.
Sanctuary
Examine the ceiling and use the Sun on the slot.
Solve the puzzle by aligning the rings to the outermost one.
Solution:
(numbered 1-6, from the center-outward)
6/5/3/1
Collect the next prophecy scroll and the Tile at the base.
Examine the relief and put it back together.
Click the cross symbol and collect the Earth Stone.
Go outside and head to the outskirts of town.
GOAL: Finding the Philosopher's Stone
Outskirts of Town
Click the rubble to solve the hidden-object scene.
Use the screenshot below for help.
Items are circled by color in groups.
For items needing more than one step, areas are numbered.
Screenshot
You acquire a Part of statue.
Back up and head into the firehouse office.
Firehouse Office
Examine the radio and use the Cross Screwdriver on all three nails.
Collect the Air Stone.
Move the floor rug and examine the opening.
Use the Tile (from the sanctuary) on the first slot.
Solve the image puzzle by putting each row into order.
The bar to the right will retract when that particular row is in order.
Click each picture to get it to rotate.
No picture is used more than once, and there aren't extra pictures.
Solution:
Bulb/shovel/watering can/flower
Bunch/money/hand/vase
Dropping flower/dried/cobweb/chipped
Collect the second Part of statue.
Back up to outside and head over to the church.
Church
Collect the Fire Stone dropped by the blackbird.
Examine the middle of the floor and place the Water Stone, Earth Stone, Air Stone and Fire Stone in their appropriate grooves.
Location of the elemental stones:
Water Stone: from the stained glass window in the fisherman's backroom
Earth Stone: behind the relief in the sanctuary
Air Stone: in the radio at the firehouse office
Fire Stone: dropped by the blackbird
Head down the steps.
Beneath the Church
Examine the niche to the left of the statue and use the two Parts of statue.
Location of the Parts of statue:
From the hidden-object scene at the outskirts of town.
Under the tiled floor panel in the firehouse office.
Reassemble the miniature statue.
Collect the Mystic lever.
Examine the statue and use the Mystic lever on the hands.
Now examine the red stone and use the Medallion on the impression.
Congratulations! You've beat the game!!!
Posted by: Kyh |
July 11, 2012 2:33 PM
|
July 11, 2012 2:33 PM