
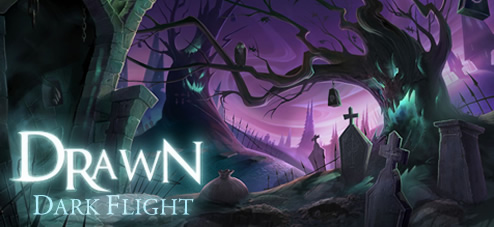
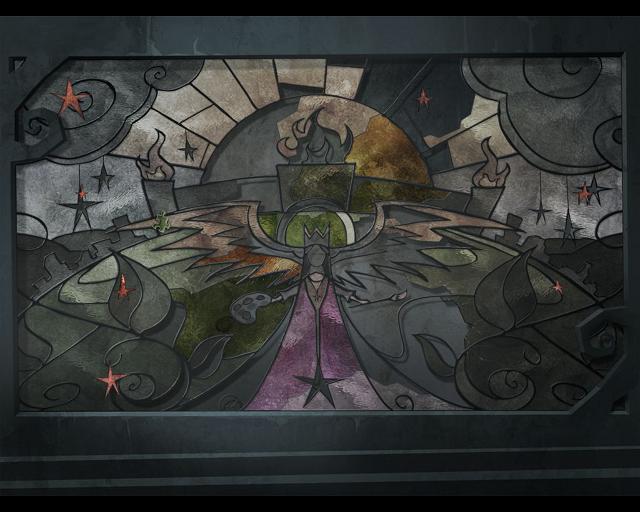
![]() Drawn: Dark Flight is the direct sequel to last year's hidden object/adventure hybrid Drawn: The Painted Tower, and it spins another intricate tale of dark mystery and intrigue. It pulls you in with a delicious atmosphere crafted by sublime visuals and strong storytelling, and its adventure-centric gameplay builds upon that by getting you to think about the environment, the items you find, and the puzzles in front of you. It's easily one of the best casual adventure games ever released.
Drawn: Dark Flight is the direct sequel to last year's hidden object/adventure hybrid Drawn: The Painted Tower, and it spins another intricate tale of dark mystery and intrigue. It pulls you in with a delicious atmosphere crafted by sublime visuals and strong storytelling, and its adventure-centric gameplay builds upon that by getting you to think about the environment, the items you find, and the puzzles in front of you. It's easily one of the best casual adventure games ever released.
 If you haven't played the original Drawn, some of the storytelling nuances will be lost on you. You can still dive right in, of course, as the sequel gives you a quick rundown before you begin, but the experience is so much richer having the first game under your belt. Iris, a young girl who can make her drawings come to life, escaped the evil king in the original game. Now, the Painted Tower has crumbled with you beneath it, and Iris has hidden herself inside a book. Your task is to work through the rubble and emerge in the library, then light the town's beacons
  to ward off the darkness so Iris can take her place as Queen.
Gameplay in Drawn: Dark Flight is very organic, leaving most obvious genre formulas hidden from view. Each small area contains a number of items you can pick up and store in your inventory. Use the items to gain access to other parts of the scenes, opening doors and moving objects out of the way so you can progress. Paintings serve as another layer of scenery, allowing you to complete pictures and dive inside to solve more puzzles for even more inventory items. Even when you complete an area, you'll still have leftover inventory items to use later on. Backtracking is an important part of the game, as is experimenting and paying close attention to plot details and events in each scene.
Short puzzles that serve as mini-games also appear in Drawn 2, but they're unlike anything you would expect from an adventure game. Instead of jigsaw puzzles or number riddles, you'll bang on metal bars in the right sequence, play with pop-up books, and assemble stone drawings by moving pillars and completing the picture. Drawn never breaks continuity and weaves these diversions right into the game, so you never leave the environment and your immersion stays complete.
 Analysis: Drawn: Dark Flight is absolutely mesmerizing. Very few games have the ability to pull you in so thoroughly. Right from the start you'll be riveted to your screen, soaking in all the details about Iris and her plight, wishing you could hop in the game and run around the rich world. The gameplay feels like an extension of the story, and these elements get along so well, you'll begin to wonder how you could ever play a second-rate adventure game again.
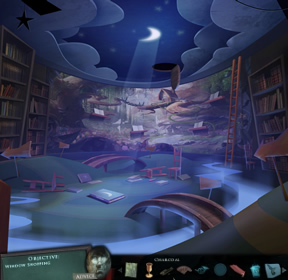
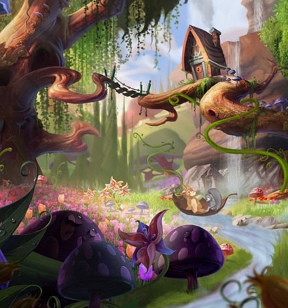
Visually, Drawn sticks to its roots with a largely soft palette of cool colors and dark settings. This changes later, of course, and the brightly-colored places show off just as much artistic flair as you would expect. Each area is like a painting and is a treat to look at. When you catch the multiple paper cutout scenes, you'll be even more impressed! The voice acting is nothing to turn your nose at, either, which is a great change of pace for a casual game.
Drawn: Dark Flight requires you to actually pay attention to the story and details in the environment to progress. In other words, you can't play this game while working on a sudoku puzzle on your phone. If you aren't devoting your full attention to the experience, you'll miss a lot of what the game has to offer, and you'll find yourself stuck every few minutes. Even if the next step isn't obvious, Drawn: Dark Flight offers a way out with unlimited advice and hint systems to nudge you on your way. Use them when you're in a bind, but don't spoil the game by overusing them! Mini-games can also be skipped after a short time, though usually you'll be far too engrossed to leave them behind.
There is absolutely nothing to find fault with in this game. It's perfectly sculpted from beginning to end, crafting a story that's intriguing, gameplay that never ceases to be interesting, and an overall experience that will leave you satisfied but ready for more. Easily one of the best casual adventure games ever released.
A Collector's Edition is also available. It contains a new quest with alternate ending, achievements to earn throughout the game, strategy guide, wallpapers, soundtrack, and more. Remember that Big Fish Game Club Members pay only $13.99 for Collector's Editions (or 2 club credits), and collector's editions count 3 card punches of 6 total needed for a free game.
![]() Windows:
Windows:
Download the demo
Get the full version
Also available: Collector's Edition
![]() Mac OS X:
Mac OS X:
Download the demo
Get the full version
Also available: Collector's Edition


Walkthrough Guide
(Please allow page to fully load for spoiler tags to be functional.)
Drawn: Dark Flight Walkthrough General Information
Basic Gameplay
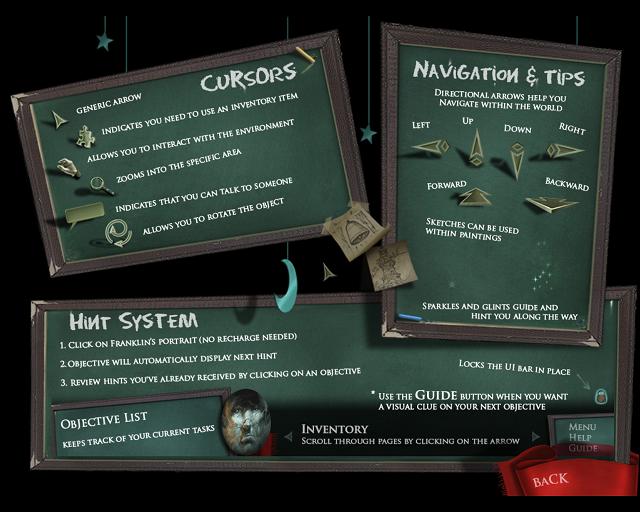
When you begin each scene, hover your cursor over the entire scene. The cursor will change into various shapes when you hit a hotspot.
A hand-shaped cursor indicates something you can pick up. When you see this, pick up the object.
A magnifying glass indicates something you can examine. Click for a close up of the item.
A puzzle shape indicates a task to be performed. This can mean that an object needs to be placed there, or it can indicate a mini-game or puzzle.
A dialogue box indicates that you can speak to the person (or thing).
A spiral shape indicates something that can be rotated.
Certain areas that need investigation will also throw off a shower of sparklies.
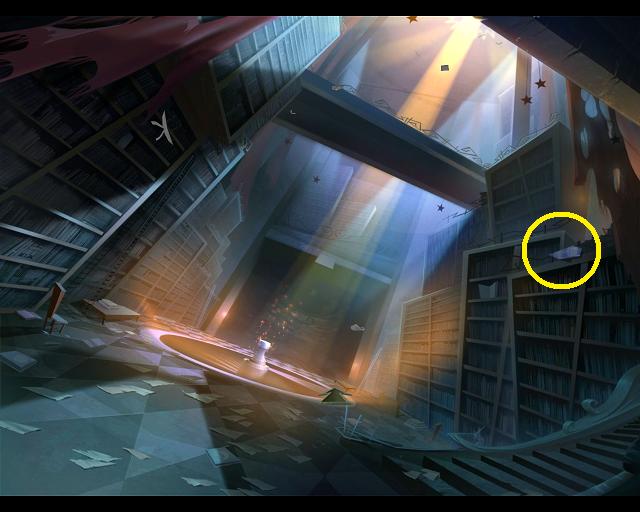
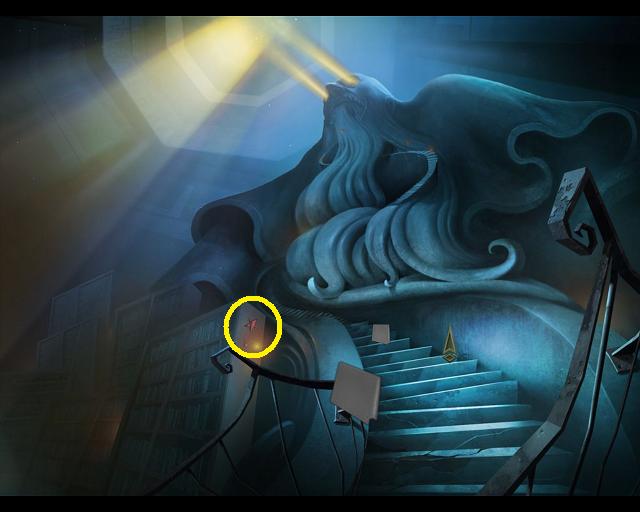
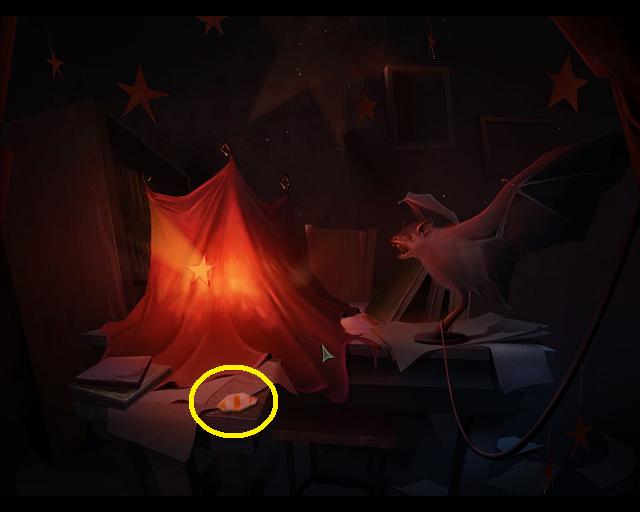
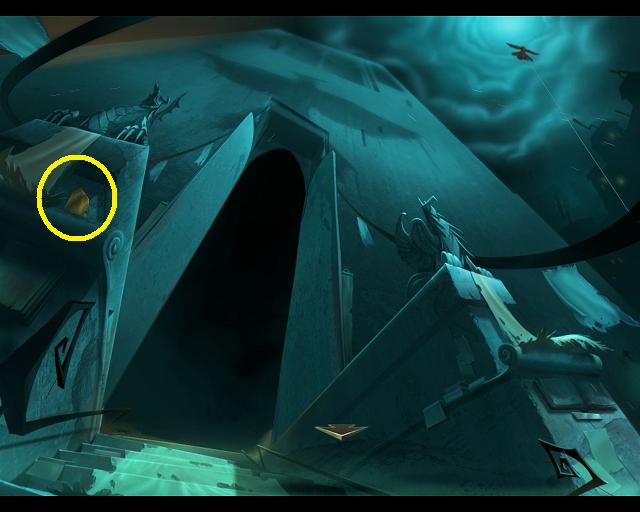
Screenshot.
Hints and Tips
To the lower left of your screen you will see a blackboard with the word "Objective". This board will give you your goals for the scene.
Next to the blackboard is Franklin, the faithful butler. Although he has been turned to stone and shattered, he is still around to give advice.
Franklin is one of your hint systems. Click on him and he will remind you of your goals, or give you a hint in which direction to go.
There are also hints available inside mini-games and puzzles.
On the lower right of your screen are the controls to take you to the main menu. Below that is a hint control that will give more blatant hints if you get stuck.
Screenshot.
Navigation
You can not only move around the tower and the town, you can also move into and out of certain paintings.
Hover your cursor around the edges of the screen, it will change into a directional arrow when you encounter a place you can move to.
Directional arrows can be forward, back, left, right, or up and down.
Screenshot.
Tasks
Your main tasks in the game are simple, light the 3 beacon towers and find Iris.
You will be responsible for lighting 2 of the beacons, Iris will light the 3rd.
Each task has many sub-tasks to perform to get to the main objective.
Watch your objective board to see what the main task is for any given scene. Don't forget to click on Franklin for advice.
You need to complete main tasks or objectives to move further into the world of Drawn.
Drawings
In the world of Drawn, drawings have real power.
Sketches of items can be used as the real thing. A sketch of a frog can be a frog, a sketch of a rope can be a rope, etc. Always pick up sketches as you find them.
Large paintings and posters can be walked into, taking you to different worlds. Some paintings and posters have been damaged, so you might need to find their missing pieces before you can go in.
A painting or drawing that is sparkling means that you can enter the scene.
Occasionally you will come across a scene where there is a dotted outline, not a finished sketch. These areas need your interaction to be activated.
When you find a dotted outline, use whatever drawing implement you might have in your inventory (brush, charcoal, crayon, etc.). Pick up the item from your inventory, then click and drag around the outline.
Pop Up Books
During the game you will encounter several pop-up books.
These books are interactive, and can contain several puzzles within them.
You can interact with the books by pulling on the tabs (click and drag with your mouse), by drawing in them, by adding other paper elements, and by manipulating parts of the paper scenery.
Screenshot.
Mini-Games and Puzzles
Scattered throughout the game are numerous mini-games and puzzles.
When a mini-game appears, look at the upper right corner of your screen. Click on the question mark there to learn how to play the mini-game.
For those that have a clear solution the solution will be included in the walkthrough.
Some of the games and puzzles are strictly random. In that case the walkthrough will give you directions on how to solve the puzzle, but the final solution is up to the player.
The Story and the Walkthrough
If you've never played the first game, Drawn: The Painted Tower, a brief overview of the story is given in the opening cut-scenes.
Basically you are a stranger who was trying to rescue Iris, the heir to the throne of this land, from the evil king who had usurped the throne and destroyed her family.
You managed to find Iris, but so did the evil king. Iris fled to hide in a book, you fell into the basement of the tower.
Now the story picks up where it left off. You must find Iris and light the beacons of the town to drive off the king.
You will handle lighting 2 of the beacons, Iris will light the last one.
The walkthrough is broken up into 3 chapters.
Chapter 1 covers the tower and your efforts to get out.
Chapter 2 covers the town, lighting the first beacon, the library, and the children's wing.
chapter 3 covers the theater district, the violin gate, and lighting the second beacon.
There will be an additional section for the extra gameplay available in the collector's edition.
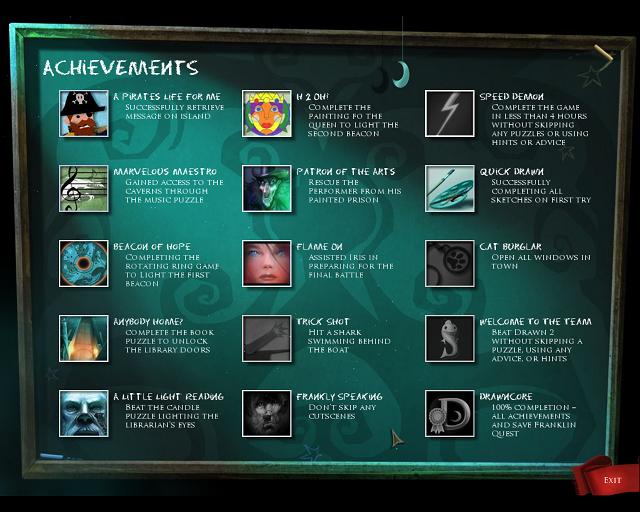
Trophies (Collector's Edition)
In the collector's edition it is possible to earn several trophies.
In the main menu section, click on extras, then click on achievements.
This will pull up a page with all of the trophies listed and what you need to do to earn them.
Screenshot.
Posted by: grinnyp |
September 4, 2010 10:37 PM
|
September 4, 2010 10:37 PM
Drawn: Dark Flight Chapter 1 Walkthrough
The Tower
You begin by the bell that has fallen through the floor of the tower.
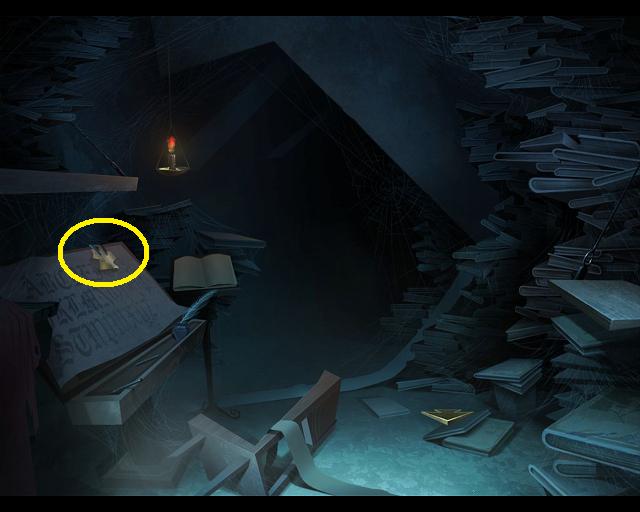
There are a few items scattered about, pick them up or examine them.
There is a drawing of a piece of rope, pick it up.
Read Franklin's note.
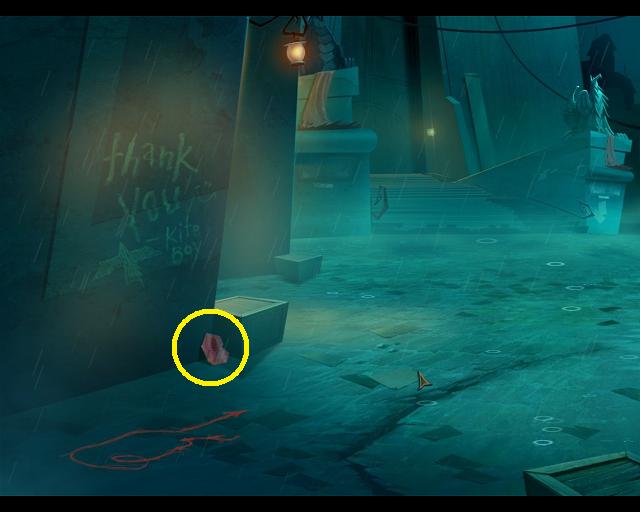
Pick up the rock.
Screenshot.
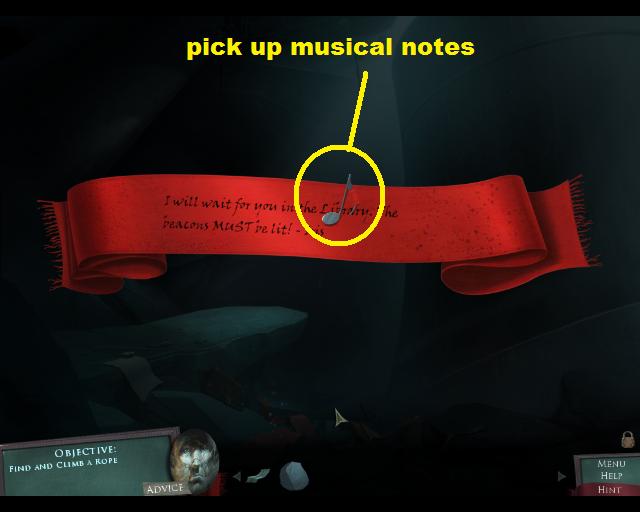
There is a bit of red scarf at the bottom of the scene. Examine it and read the note. On the note is a silver musical note, take it.
Screenshot.
You will find other musical notes scattered about as you proceed, always pick them up.
Near the top of the scene you will notice a hook with a bit of rope hanging from it. Place the rope drawing on this hook to create an exit to the main floor.
Climb up the rope.
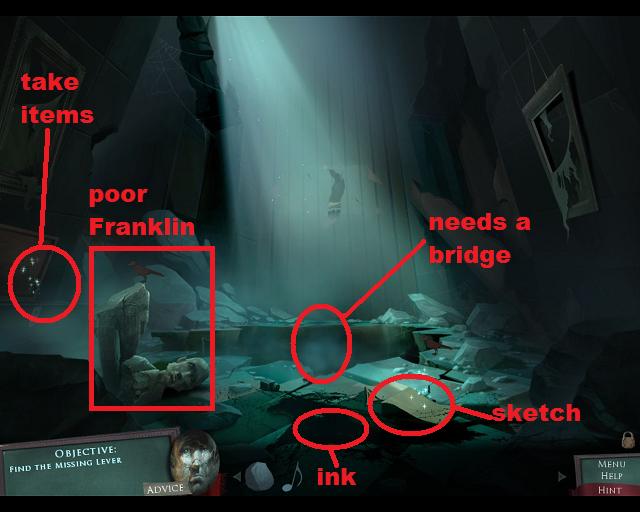
Up on the main floor you will find several things.
To the left of the scene is a trunk, click on it for a close up.
In the close up take the lever, the sketch of an orange, and the musical note.
Just to the right of the trunk is poor Franklin, broken into pieces.
In the middle bottom of the scene is some spilled ink.
To the right of the spilled ink is an incomplete drawing.
There's a large hole in the floor, but you can't get across it yet.
Screenshot.
Go back down to the bell.
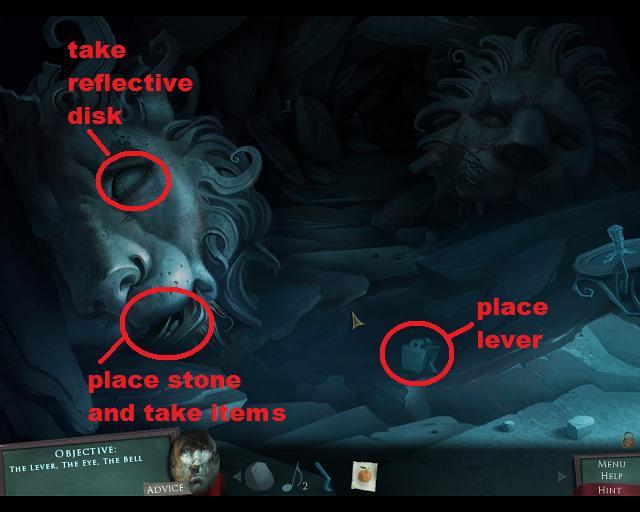
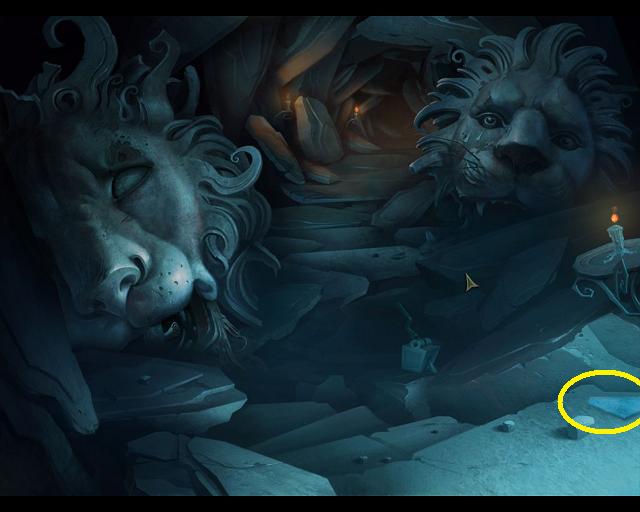
Once you are down, move forward and you will see some strange lion head statues.
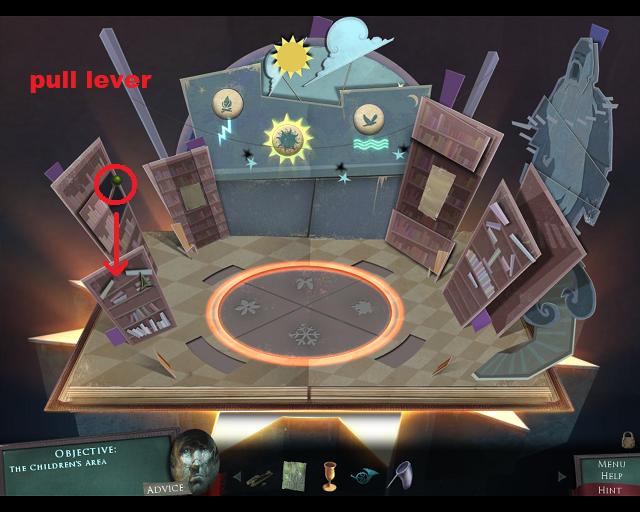
On the floor in front of you is a small mechanism that is missing a lever. Place the lever from your inventory on the mechanism.
Once the lever is in place, click on it. You will notice that the mouth and eye of the lion head on the left open, but soon fall closed.
Click on the lever again, and quickly click on the open eye to take the object (reflective lens).
Click the lever again. Once the mouth opens quickly place the rock in there to hold it open.
Inside the mouth is a note, along with a paper bird and another musical note. Read the note and take the bird and the silver note.
Screenshot.
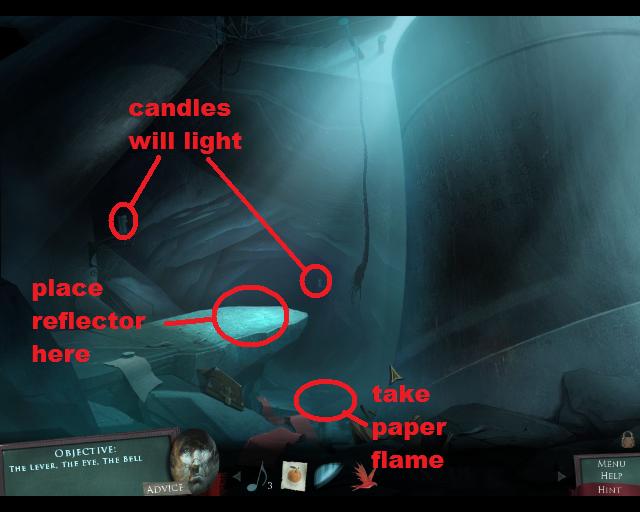
Back up to the bell room.
Notice that light is shining down on the slab of rock to the left of the bell.
Place the reflective lens on the slab of rock to light up the bell.
Once this is done you will see mysterious letters appear on the bell. The candles on the walls will be lit, and a paper flame will fall on the floor between the slab and the bell.
Pick up the paper flame and move forward to the lion heads.
Screenshot.
Pick up the paper flame on the floor.
Notice that the eye on the lion's head on the right is sparkling.
Click on the eye and you will see that it is missing 2 tears.
Screenshot.
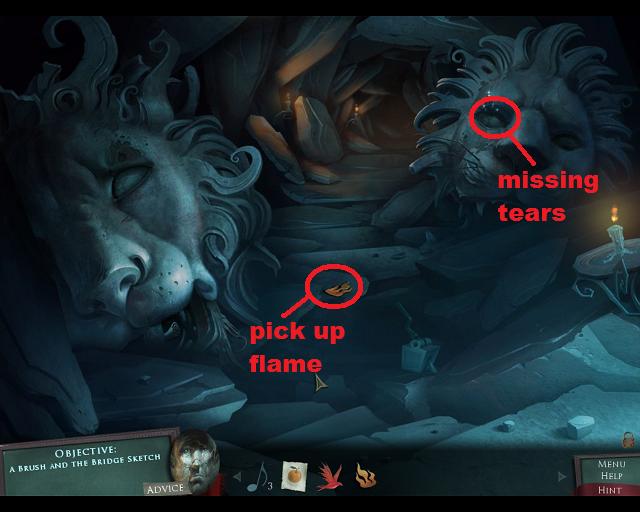
Move forward.
Lots to see here.
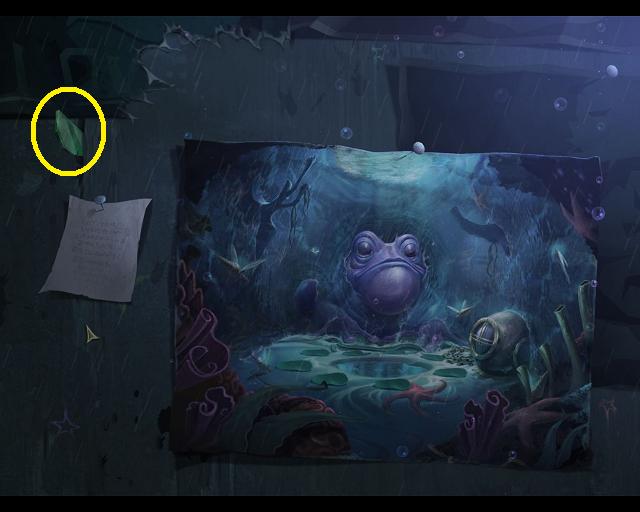
You will notice the painting with the ripped corner. You need to find the corner to enter the painting.
There is a third paper flame on the floor, pick it up.
On the back wall you will see yet another silver musical note, take it.
To the left is a note from Franklin. Read the note and take the scrap of paper sitting on it.
To the right is a pop-up book, click on it to open it.
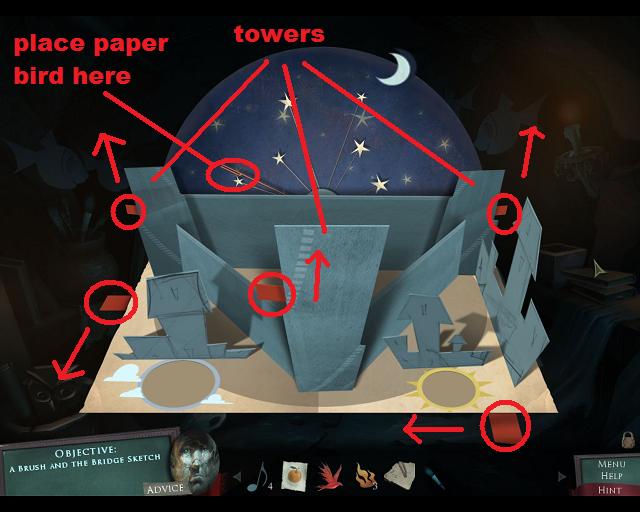
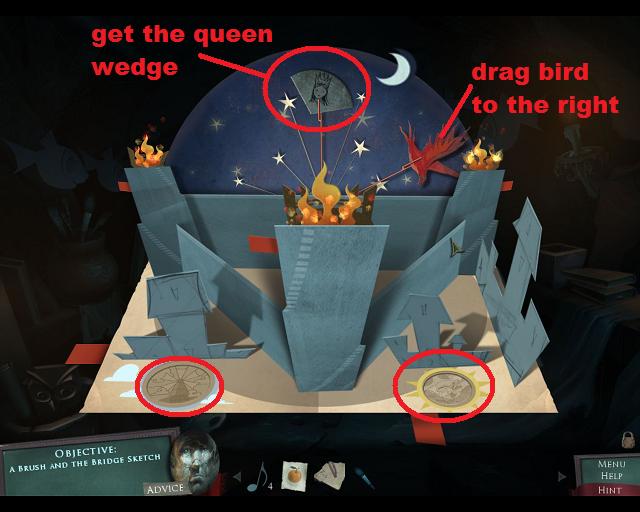
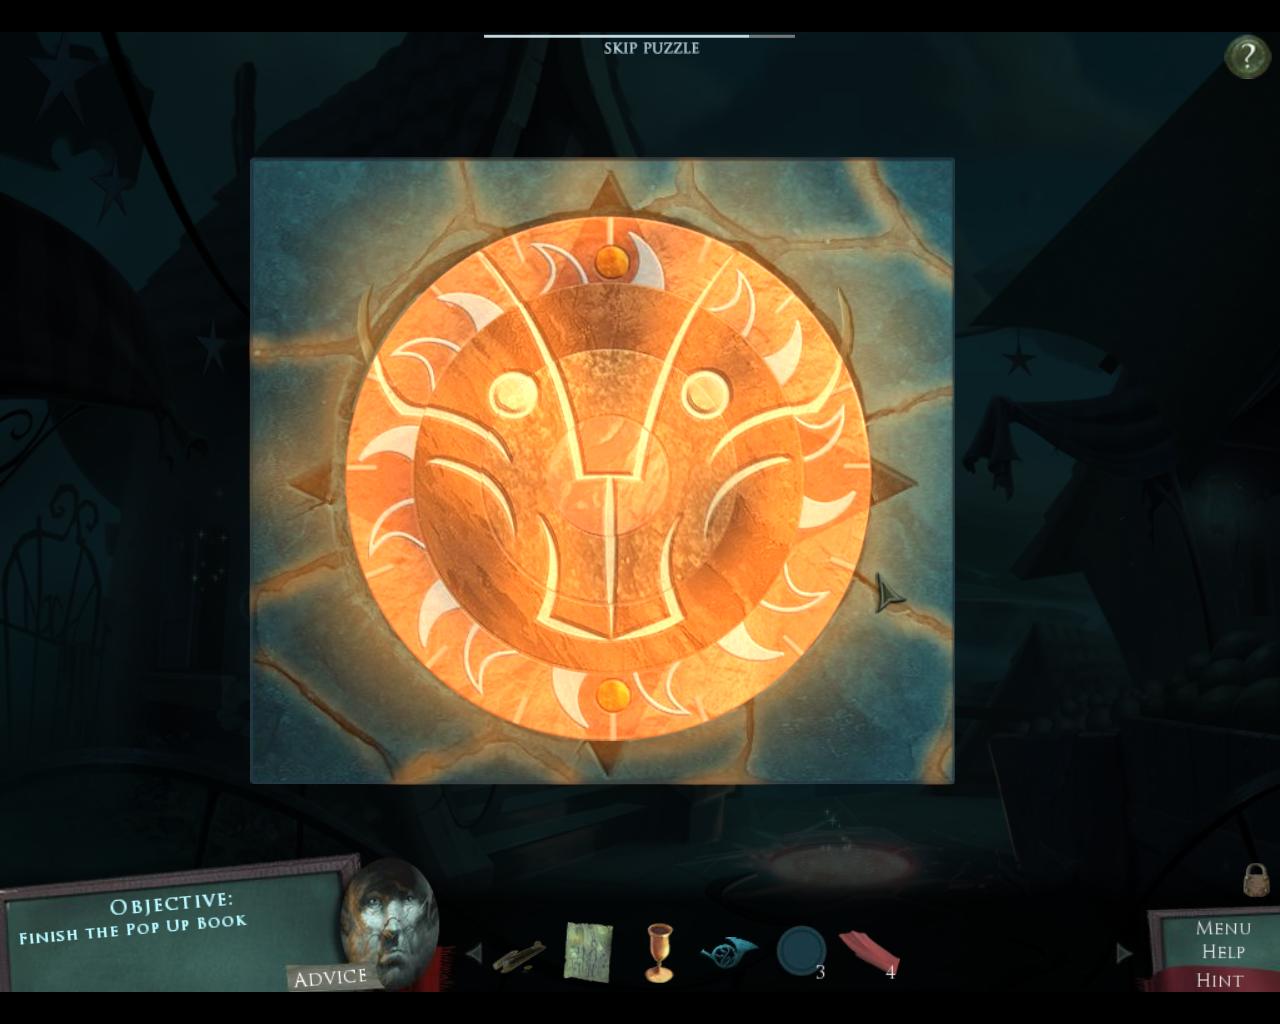
Pop-Up Book (Beacons)
Screenshot.
Notice the tabs on the pop-up book. The tabs on the towers need to be pulled up, the tab on the left needs to come forward, and the tab in the front needs to move to the left.
Notice that each tower now has an unlit beacon on top. Place the 3 paper flames on each tower to light the beacons.
Make sure that the sky is set to night (you can change it from day to night simply by clicking on it).
Place the paper bird in the holder on the left side of the sky.
Screenshot.
Once the bird is in place, click and drag it to the right side of the night sky. An object will pop up (queen wedge), take it.
Screenshot.
There's nothing more you can do here, so back up from the pop-up book, back up twice to the bell, then climb the rope to the main floor.
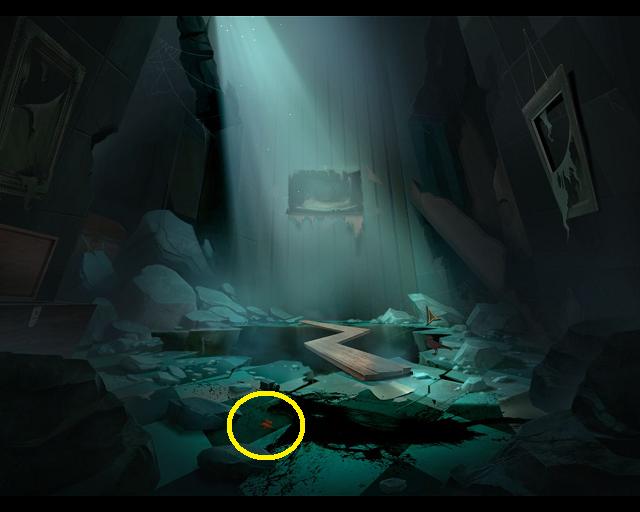
Once on the main floor, use the brush in your inventory on the ink on the floor.
Screenshot.
Now click on the incomplete drawing and use the brush to outline the drawing.
Screenshot.
When you complete the outline you will have a drawing of a bridge.
Place the drawing of the bridge on the hole in the floor to create a real bridge.
Go forward across the bridge.
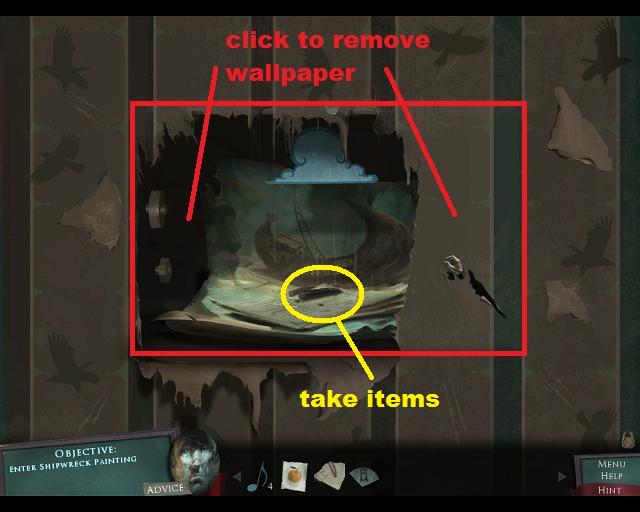
You are now facing a wall with torn wallpaper. Notice that there is something underneath the wallpaper.
Click on the wallpaper on either side of the hole to remove it.
Screenshot.
Once the wallpaper is removed, you will find several items in the cubby.
Take the charcoal, then click on the sketches for a close up.
Pick up the sketch of the lamplighter.
Once that is gone, pick up the silver musical note, then click on the next sketch.
On the bottom sketch there will be a small shovel, take that as well.
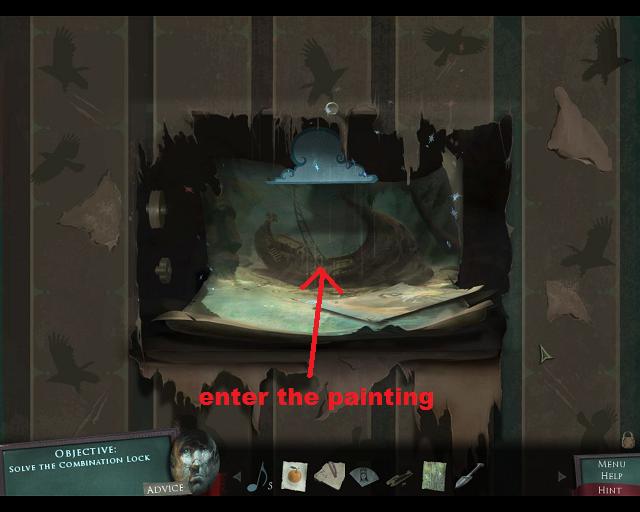
When you are done going through the sketches the painting will activate.
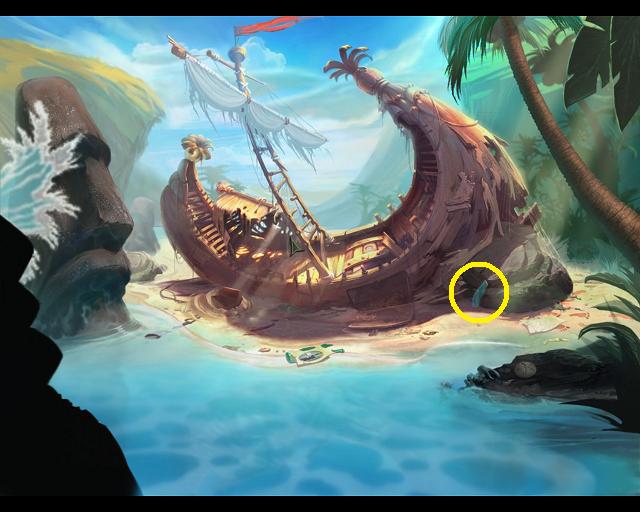
Storm Painting
Enter the painting.
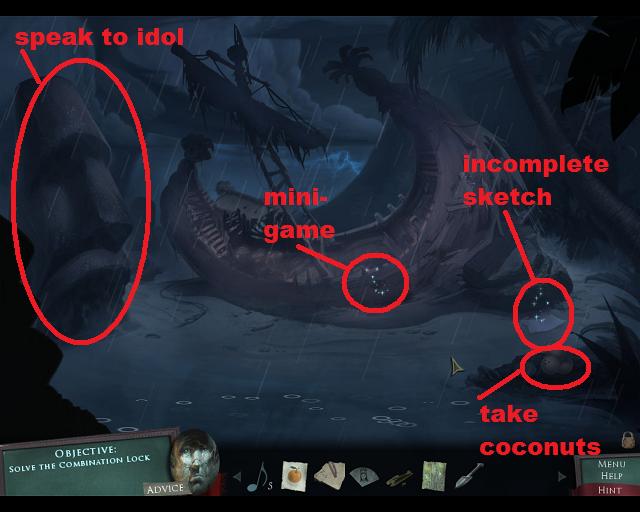
Screenshot.
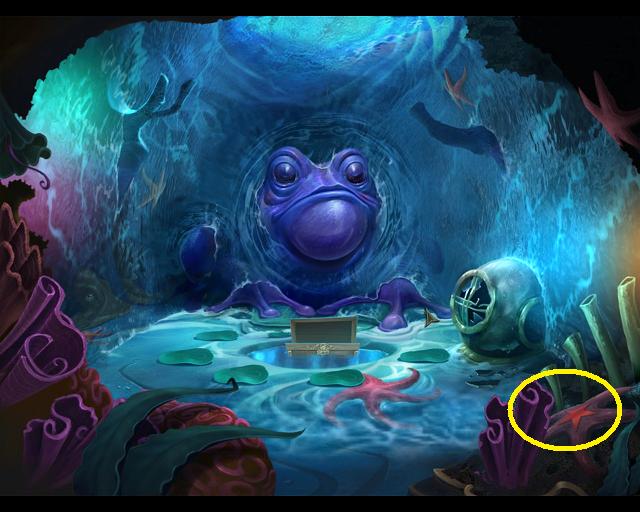
Once you are in the painting, you will see an Easter Island style idol to the left, click on the idol to speak to him.
The idol wants you to banish the storm.
On the lower right is a small pile of coconuts, pick them up.
Just above the coconuts is a sparkling area. Click on it for a close up.
Screenshot.
This is an incomplete sketch. Use the scrap of paper from your inventory on it to get a belt.
Also notice the directions written on the bottom of the paper.
Screenshot.
Close the piece of paper and notice the sparkling area on the ship. This is a mini-game. Click on the mini-game to open it.
Combination Mini-Game
This is a combination lock that looks like a compass.
The object is to rotate the needle to the desired number.
The clues for the combination are on the sketch where you found the belt.
Rotate the needle clockwise to 5 (V), then counterclockwise to SW (X), then clockwise back to 3 (III), then counterclockwise all the way around to the 6 (VI).
Screenshot.
As each number is hit successfully, you will see one of the wires in the lock turn.
When you have solved the combination lock, the side of the ship will open and several items will fall out.
Pick up the anchor, the goblet, the castle wedge, and the fan.
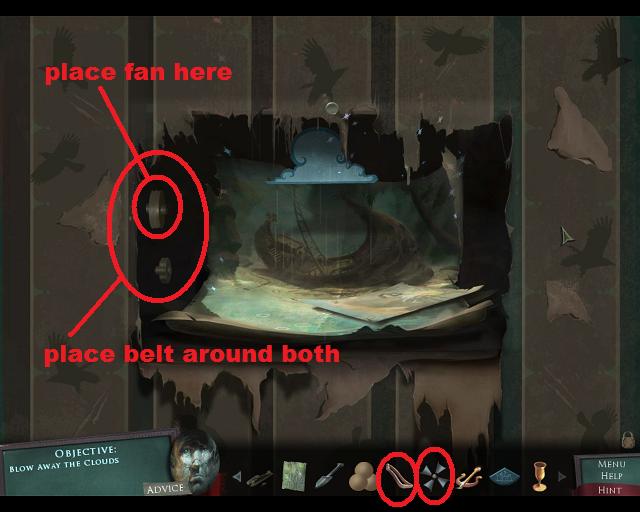
Back up from the painting.
Notice the two knobs on the left, one stationary, one turning.
Place the fan on the stationary knob, then place the belt around both the stationary and turning knob.
Screenshot.
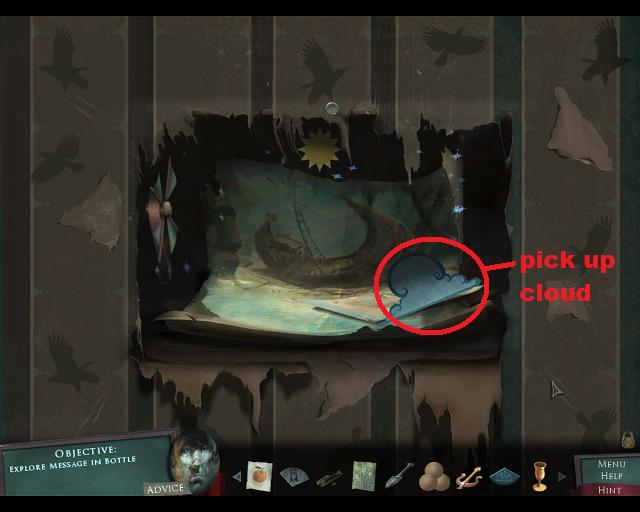
The fan will blow away the rain cloud.
Pick up the rain cloud, then re-enter the painting.
Screenshot.
The storm will blow away and a green bottle will drift into the scene.
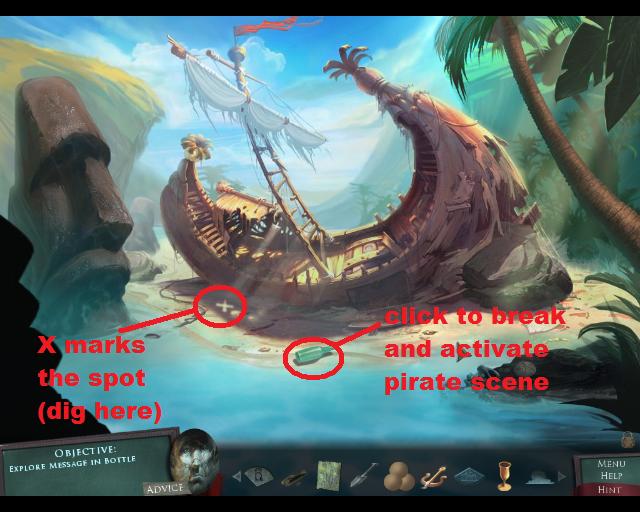
Notice that the sunlight through the broken railing on the ship creates a lovely X pattern on the sand.
use the shovel on the sand where X marks the spot (2 or 3 clicks) to dig up some buried treasure.
From the chest take the cannon and the glowing stone.
Screenshot.
Click on the bottle to break it.
Now click on the sketch that was in the bottle.
Pirate Adventures
You are now in a paper cut-out pirate adventure.
Yes, a painting inside of a painting.
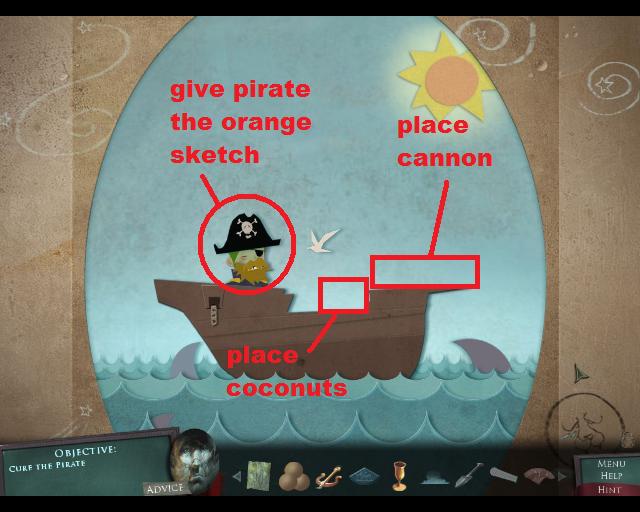
Poor pirate, he appears to be sick.
Click on the pirate to talk to him. He will tell you he has scurvy.
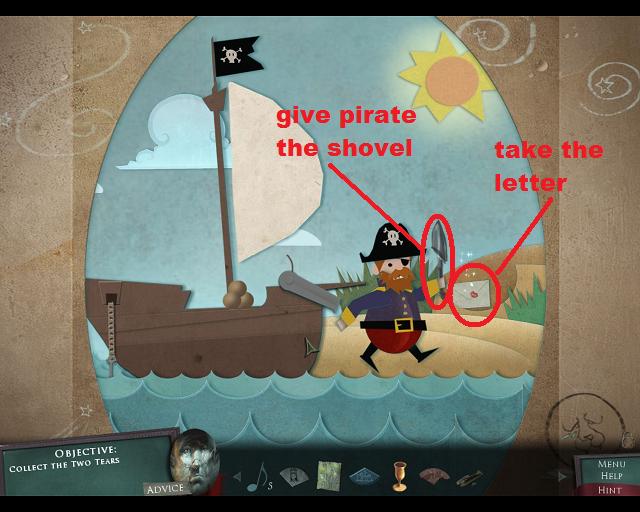
Give the pirate the sketch of an orange you have in your inventory. Vitamin C cures scurvy.
Once he is cured he will ask you to arm his ship. Place the cannon on the bow of the ship.
When he asks for ammunition place the pile of coconuts on the deck behind the cannon.
Screenshot.
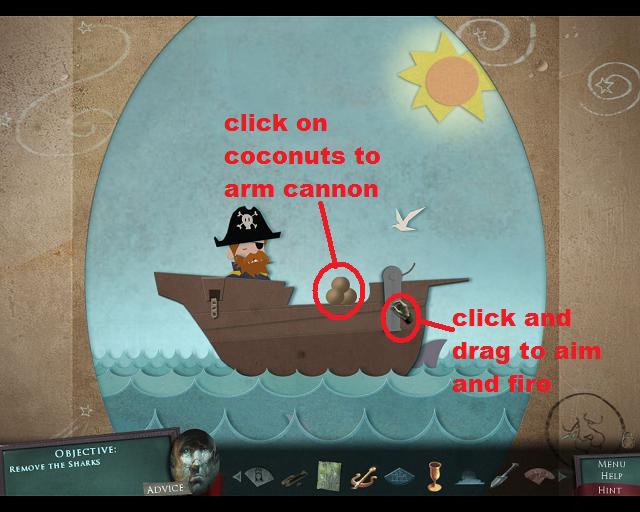
Click on the pile of coconuts to load the cannon.
Time to kill some sharks!
Click and drag the cannon to aim and release to fire.
Screenshot.
Remember to click on the pile of coconuts to reload each time.
Keep shooting until you destroy all of the sharks.
Now the pirate needs a sail.
Screenshot.
Use the charcoal in your inventory to outline the sail.
Place the cloud in the sky to generate a wind.
Enjoy the voyage.
Once you hit land, place the anchor on the anchor chain of the ship.
Screenshot.
Once the anchor drops the pirate will run ashore. When he is on shore, click on the green grass to move it.
Once the grass has moved, give the shovel to the pirate and he will dig up the letter. Take the letter.
Screenshot.
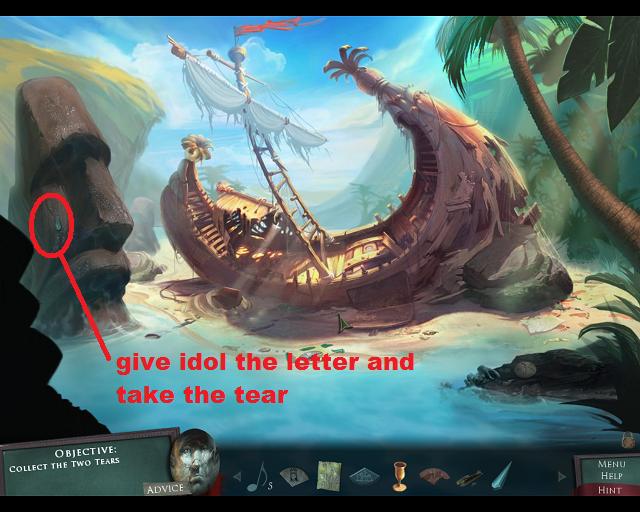
Read the letter and notice the crystal tear on the bottom. Take the tear.
Back out of the drawing.
You are now back to the main painting with the idol. Give the idol the letter and he will shed a tear.
Take the tear and back out of the painting.
Screenshot.
Back up to the hole, go down the hole, then go forward to the lion head statues.
Click on the sparkling eye of the right lion head, the one missing the tears.
Screenshot.
Place the tears in the slots below the eye.
Screenshot.
The eye will open, revealing an object. Take the object (scrap of canvas).
Go forward to the room with the pop-up book and the painting.
Place the scrap of canvas in the corner of the painting to repair it. This will automatically suck you into the painting.
Screenshot.
Jail Cell Painting Puzzle
To open the cell you need to rap out a tune on the bars on the door.
First, you need to take the metal hook from the sagging shelf.
Then, look at the numbers on the wall to the left, VII, V, XI, I.
This is the order that the bars need to be tapped.
However, the numbers on the door bars only go from 1 to 5.
Now turn your attention to the circle of numbers on the right wall.
This is a conversion chart.
The numbers running along the outside of the circle run from 1 to 12, like a clock.
The numbers in the inside of the circle run from 1 to 5.
Using the numbers on the left as your guide, the first number, VII (7), corresponds to the number II (2).
V (5) corresponds to 4.
XI (11) corresponds to 4.
I (1) corresponds to 5.
So, using the hook you just took, click on the 2, 4, 4, and 5 bars, in that order.
Screenshot.
Once the door opens go forward.
You are now in a lovely room with some skeletons.
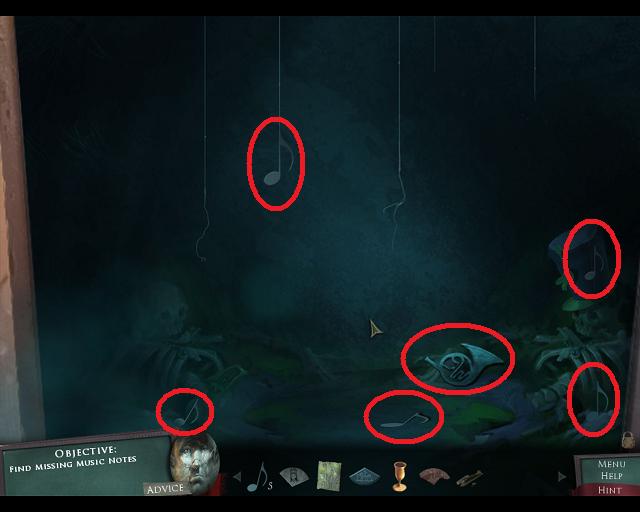
Find and pick up all of the silver music notes (5). Also pick up the French horn sitting on the ground.
Screenshot.
Back up twice until you are out of the painting.
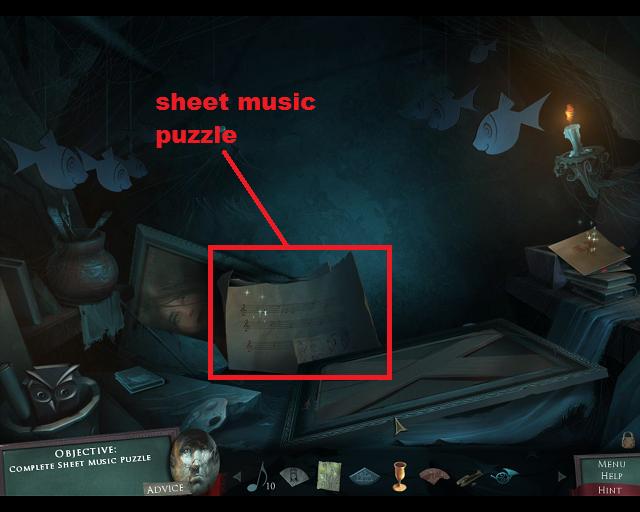
Once you've solved the puzzles and found all of the objects, when you back out of the painting it falls down, revealing some sheet music.
Screenshot.
Click on the sheet music to open the sheet music puzzle.
Sheet Music Puzzle
There are two parts to this puzzle.
First, you need to add the missing notes to the sheet music. Add the notes to each vertical line on the page.
Screenshot.
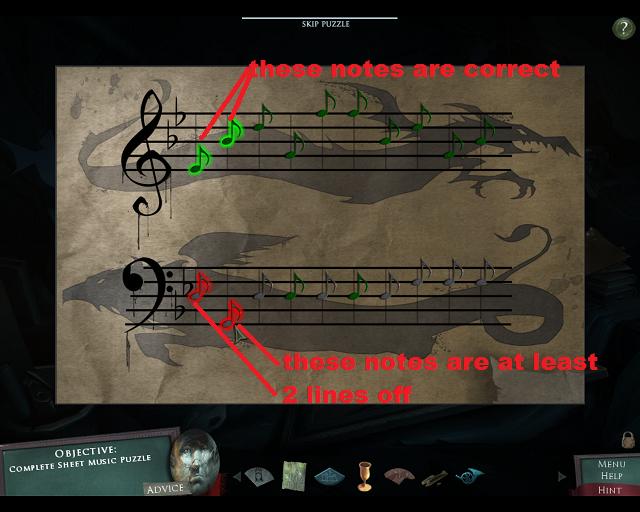
Once the notes are added, you will see that the tune is playing from left to right. As the tune plays, the notes light up.
Now you are paying attention to the horizontal lines that the notes are on.
The color of the note denotes whether it is in the correct position or not.
Green means that it is in the correct place. Orange means that it is one line off. Red means that it is at least 2 lines away from where it should be.
Screenshot.
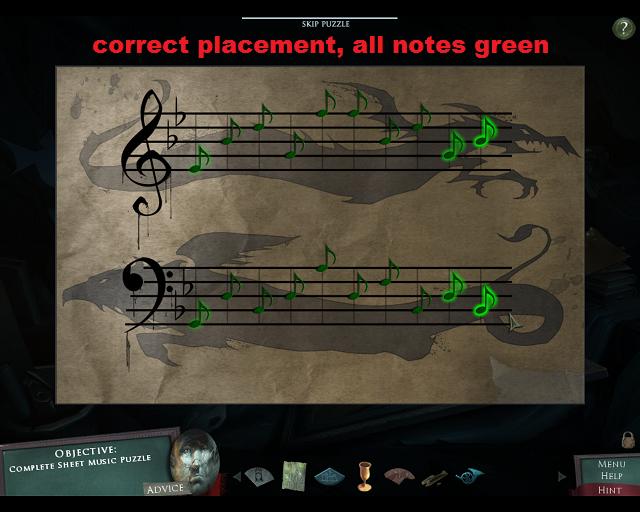
Move each note up or down by clicking and dragging until all of the notes turn green.
Once all of the notes are in the correct place they will all turn green.
Screenshot.
Once you solve the sheet music puzzle the back wall will collapse, revealing a tunnel. Go forward.
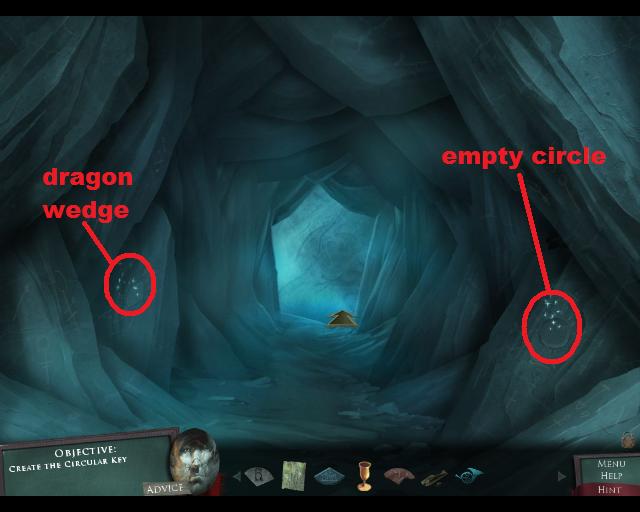
On the right side of the tunnel you will see a circle that needs 3 wedges. You already have the queen's wedge and the castle wedge, but not the third.
On the left side of the tunnel is the third wedge, the dragon wedge, but it is lodged in the wall tightly.
Screenshot.
Move forward.
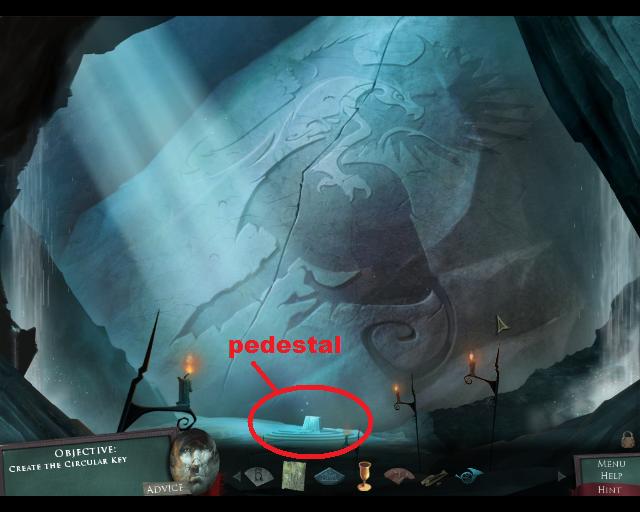
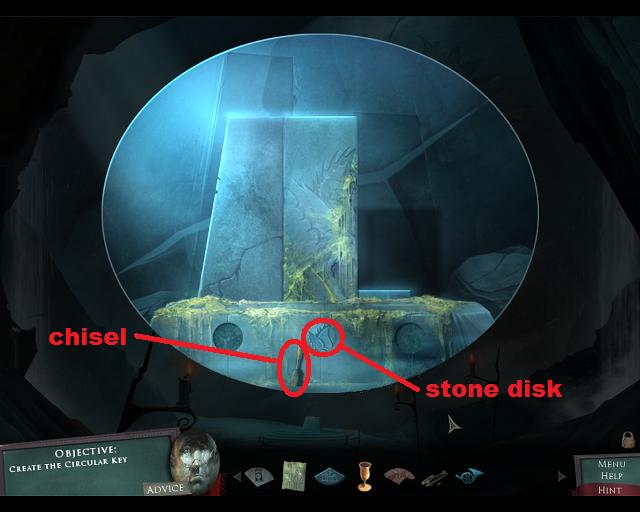
You are now in front of some mighty impressive gates. There is a small pedestal in front of the gates, click on it for a close up.
Screenshot.
This pedestal is a puzzle, but you don't have all of the tools to solve it right now. Instead, take the stone disk and the chisel and back up.
Screenshot.
Use the chisel to remove the dragon wedge from the left wall.
Now place the dragon wedge, queen wedge, and castle wedge in the circle on the right wall.
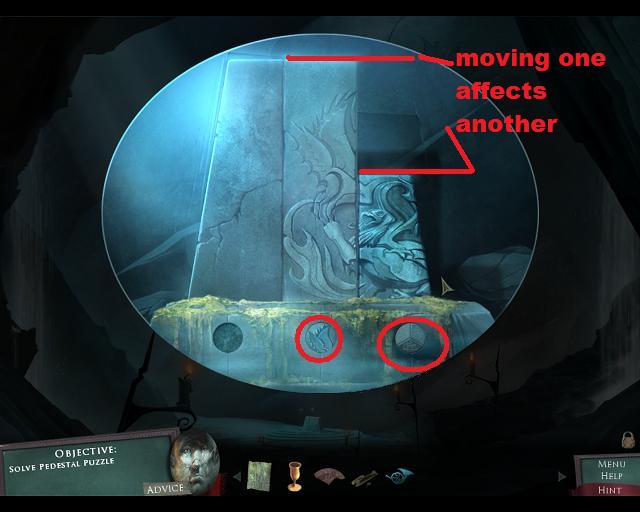
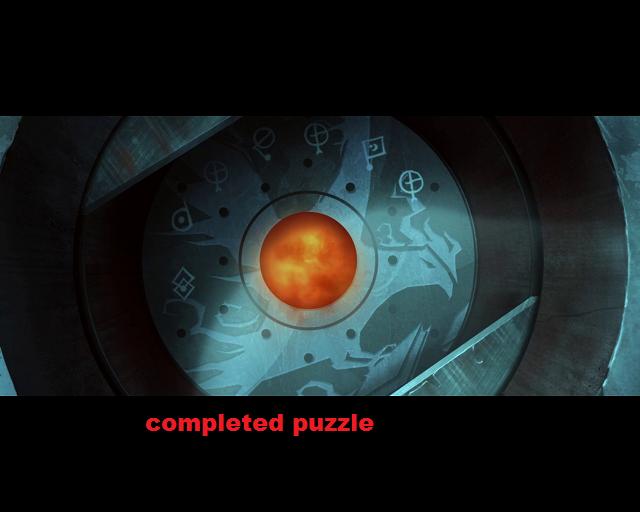
You should now have a second stone disk. Move forward to the gates and click on the pedestal.
Pedestal Mini-Game
Each column of rock is blank until you put a stone disk into the circle underneath it. Then, it will show a portion of a carving.
Placing the stone disks will cause the columns to shift. You can also shift the columns by clicking on them.
Each time one column moves it affects another.
First, place the two stone disks in the two circles to the right to show the columns. Experiment with moving the columns until you can see what the picture is supposed to look like, and what position the columns should be in.
Screenshot.
In the screenshot above, it is obvious that the pictures on the two columns should be shifted to the left. The carving that appears on the column is determined by which disk is inserted in the circle.
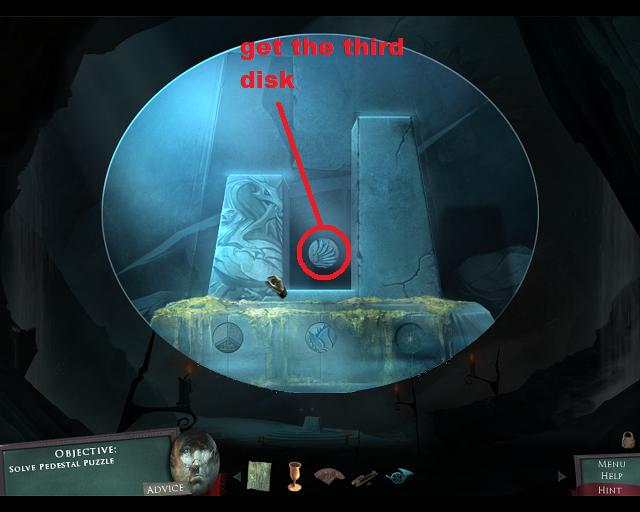
Continue to play around until you can get the center column to go all the way down into the pedestal. This will reveal a third disk on the wall.
Screenshot.
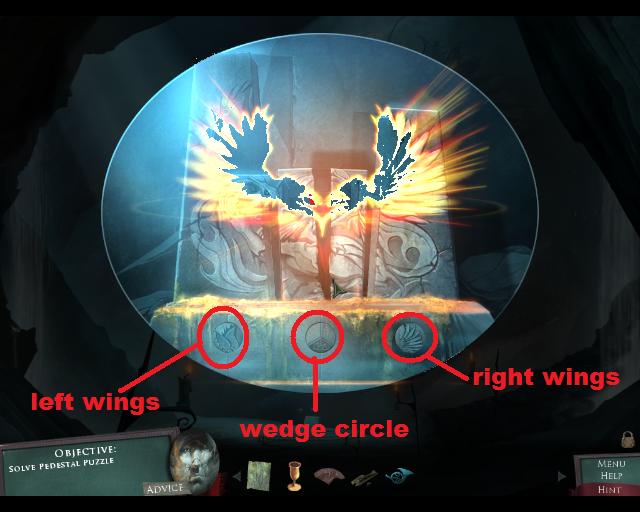
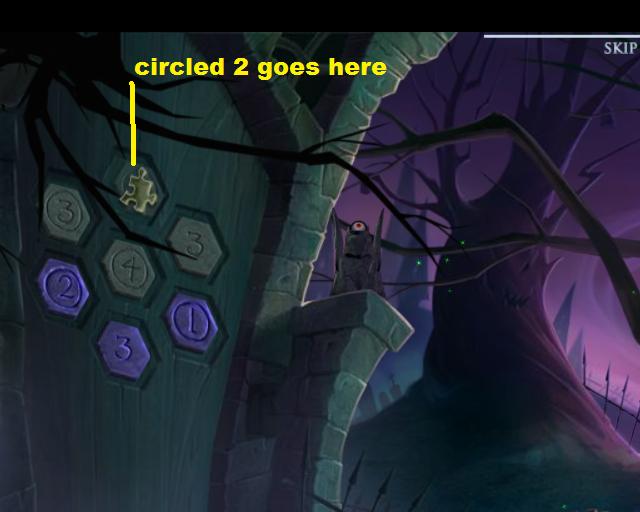
Place the disks in the proper circles: the disk you made from wedges in the center, the wings sweeping to the left on the left, and the wings sweeping to the right on the right.
Now move the columns so that the picture is complete. The left column should be all the way up, the middle column halfway up, and the right column 3/4 of the way up.
Screenshot.
When the pedestal lines up properly, the gates will open. Go through the gates.
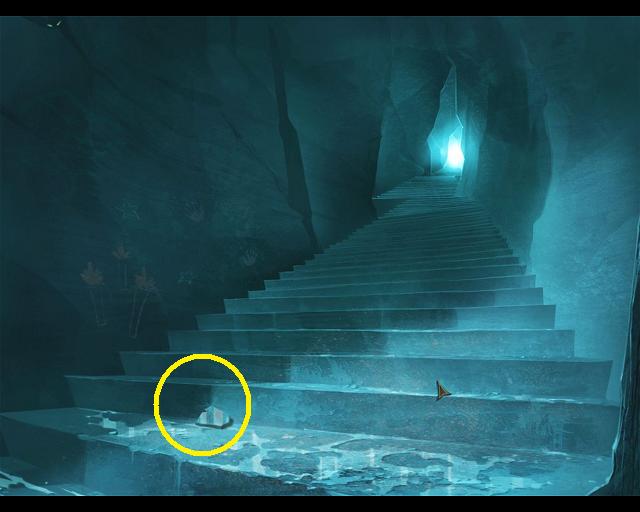
You will emerge on a staircase heading upwards. Pick up the round disk on the stairs and go forward.
Screenshot.
Enjoy the cut-scene. End of chapter 1.
Posted by: grinnyp |
September 4, 2010 10:44 PM
|
September 4, 2010 10:44 PM
Drawn: Dark Flight Chapter 2 Walkthrough
Lighting the Beacon
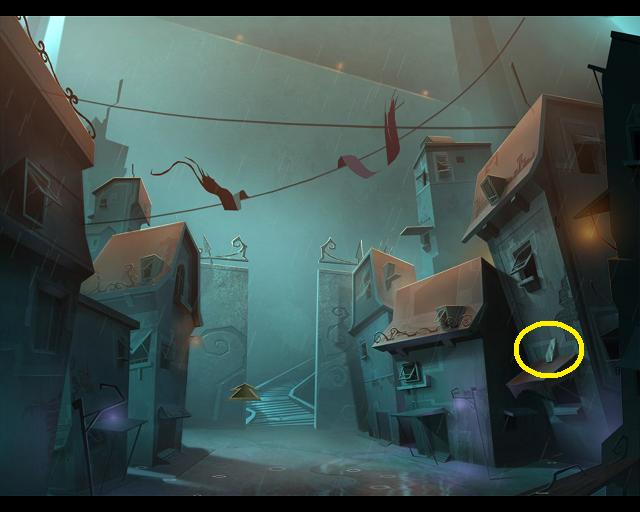
You are now facing the town. You have three choices of direction, left, forward, and right.
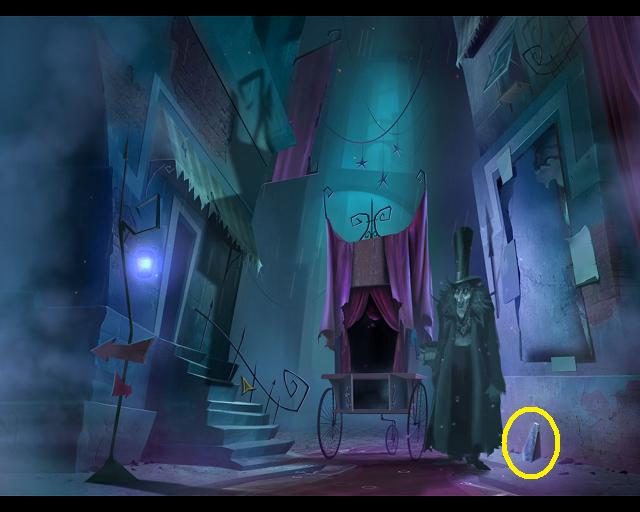
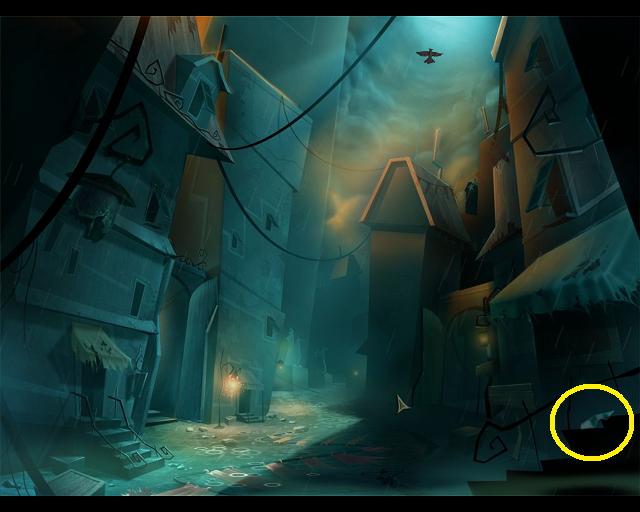
Before you go anywhere pick up the piece of red material hanging on the light on the left.
Screenshot.
Go left. You will see one of the town walls. Go left again.
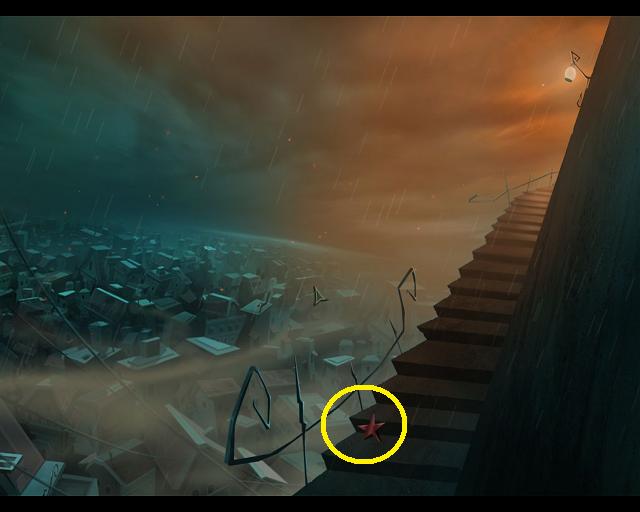
You are now on the staircase to the beacon. Pick up the red material on the steps and proceed forward.
Screenshot.
You are now standing at the first beacon. One of your main tasks this chapter is lighting this beacon.
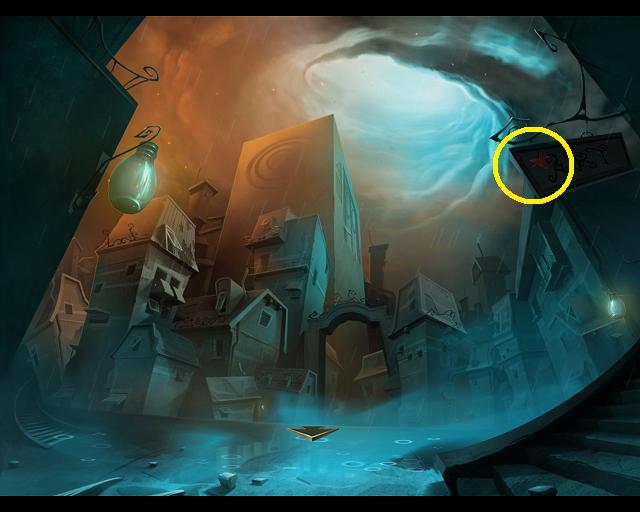
Pick up the scrap of paper sitting on the rim of the beacon (piece of a poster).
Screenshot.
You will also notice a ghostly scroll hovering over the beacon.
Back up 3 times, until you are back at the main view, facing the town.
Now go to the right.
You might notice that your objective now states "enter the shop in the town". You are facing steps that lead to the shop you need to enter.
On the left, underneath the rail, is a large disk, pick it up.
Lying on the stairs is a sketch of a hummingbird, pick it up.
Screenshot.
Go forward.
You are now facing the shop window. Does that crack in the window make it look like a mouth?
When you hover your cursor over the window, you will see the dialogue box. Click to talk to the shop window.
Screenshot.
The shop window will say "from blue light comes sight". Guess we need to find a blue light.
Back up twice until you are back at the main view, facing the town.
This time, go forward.
You are on a street, when suddenly shadows come pouring in, blocking your way further.
Pick up the piece of red material on the left.
Notice the lantern with a blue light on the right? Take it.
Screenshot.
Just for fun you can click on the windows of the buildings, some of them open.
Back up to the main view, then go right to the shop window.
At the upper right of the scene is a hook. Hang the blue light lantern on the hook. When you do, moths will fly in and become the store's eyes.
Talk to the store again by clicking on the window.
Once the window finishes speaking, it will open to let you in.
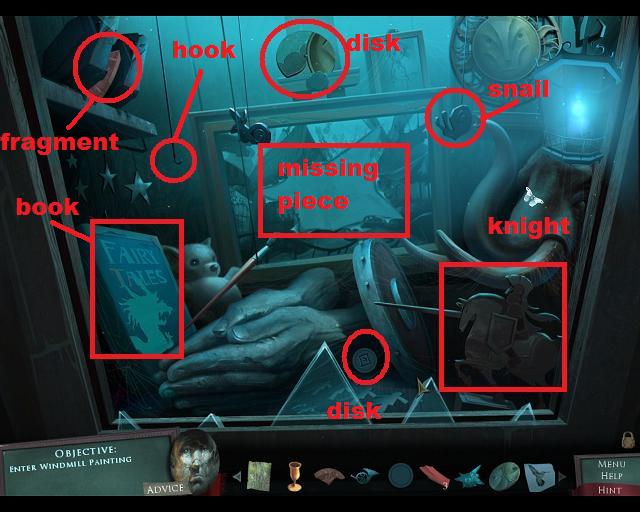
Notice the painting on the back wall, it is missing a piece.
Pick up the small stone disk on the ground by the hands, and pick up the large disk at the top of the easel.
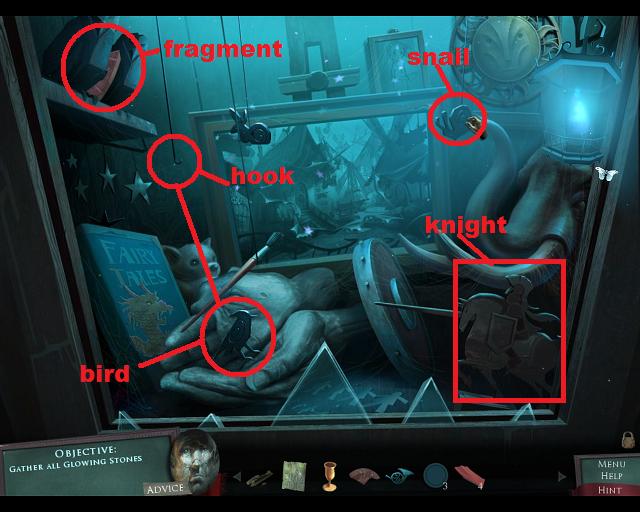
If you click on the snail that is hanging from the ceiling, a knight on a wooden horse will charge out in the direction of a book.
The book cover is missing a picture.
There is a piece of glowing stone on the shelf above the book, but it is trapped.
Notice that there is a third string hanging from the ceiling that doesn't have a wooden animal on it. The other two are the snail and the rabbit.
Screenshot.
Once you've picked up the disks you can use the poster fragment you picked up to repair the picture.
Fixing the picture will draw you into the windmill picture.
The Windmill Picture
You have a new objective, talk to the gardener.
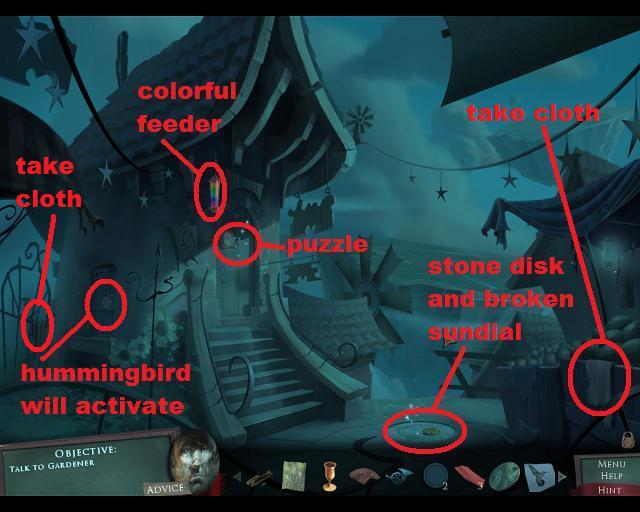
On the ground throwing off sparks is a small oval, click on it.
In close up you will find another small disk laying on a broken sundial.
You already have one piece for this sundial, the other is trapped in the shop.
On the right, hanging on a cart, is another piece of cloth, take it.
On the left, hanging on the gate behind the cottage is another piece of cloth, take it.
Hanging on the porch of the cottage is a rainbow-colored bird feeder. This is a hummingbird feeder.
Screenshot.
Place the hummingbird sketch on the colorful bird feeder and enjoy the animation.
When the hummingbird flies to the side of the cottage, you will notice that the shuttered window on that side will start sparkling. Click on it.
When the window opens you find yourself facing the gardener. He won't help you until you bring back the sun.
Pick up the small disk laying in front of the gardener.
Screenshot.
Back up to face the cottage.
Cottage Door Mini-Game
On the cottage door to your left is a circle that is sparkling. Click on it.
This is a mini-puzzle. Rotate the inner piece and you will find that there are three pieces missing, a large, medium, and small piece.
Screenshot.
You should now have all 3 pieces in your inventory. Place the pieces in their slots to start the game.
Once you place the pieces you will see that they need to be rotated in order to correct the picture.
Screenshot.
You can click and drag the circles around, but of course each one affects the other.
The small one (on the top) affects itself and the large circle.
The large circle affects all 3 circles.
The medium circle (on the bottom) affects itself and the large circle.
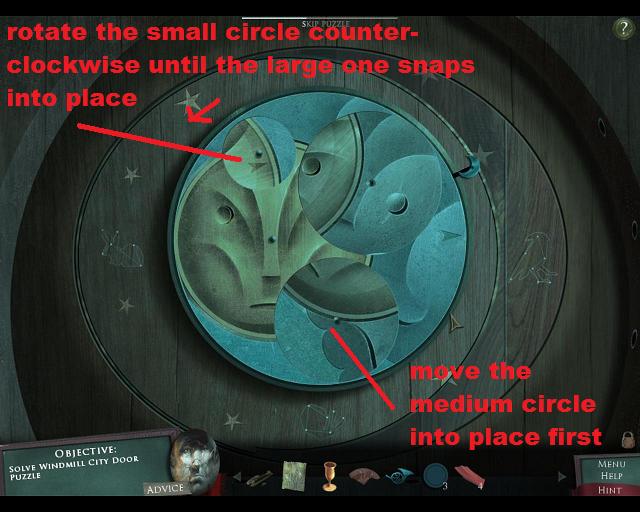
The easiest way to solve the puzzle is to move the medium circle (the one on the bottom) into place first.
Then, start rotating the small circle (the one at the top) counter-clockwise. Notice that although it turns the large circle, it turns at different rates.
Keep moving the small circle in a counter-clockwise direction and the large circle will slowly move into place. Eventually both will lock in at the same time.
Screenshot.
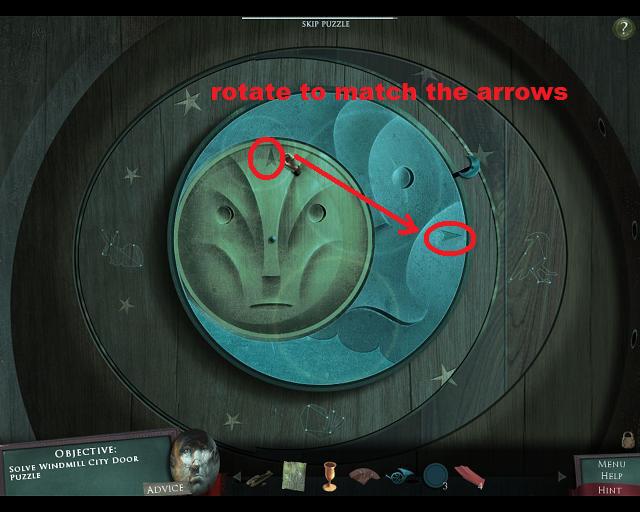
Once the face is complete, notice the arrows on the door. Grab the circle with the face and rotate it to match up with the other arrow.
Screenshot.
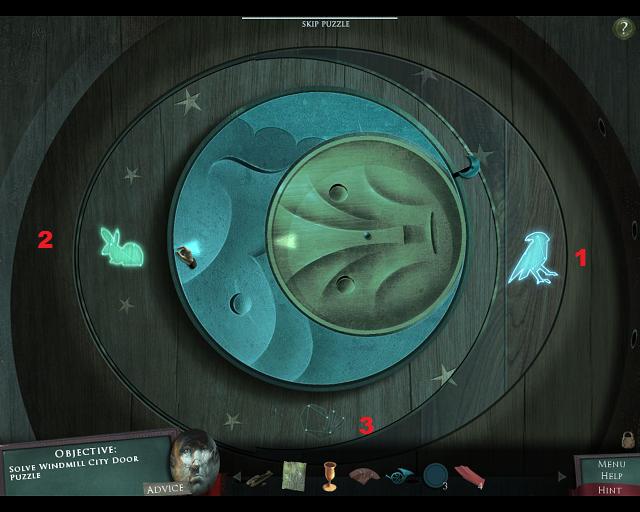
Once the arrows are lined up you can grab the outer blue circle and rotate it, so that both arrows are pointing in your chosen direction.
Notice that there are 3 animal constellations around the outside of the blue circle. To the right is a bird, to the left is a rabbit, and below is a snail.
You need to light up the constellations by dragging the blue circle around and pointing the arrows at the constellations, but it has to be done in a particular order.
First light the bird (on the right). Then drag the circle around 180 degrees and point to the rabbit and it will light up. Then drag the circle to the bottom and point to the snail to light it up.
Screenshot.
When all three constellations are lit, the circle will rotate on its own, exposing a dragon. Take the dragon.
Screenshot.
Back out of the mini-game.
Now that you have the dragon, back out of the picture into the shop window.
The cover of the fairy tale book is missing a dragon. Place the dragon you just got from the mini-game into the cover.
Screenshot.
Now click on the snail to make the knight charge. When he does, the dragon will burst into flame and a wooden bird will appear in the hands.
Screenshot.
Pick up the bird and hang it on the empty hook to free the glowing fragment.
Screenshot.
Once the fragment is free pick it up and go back into the painting.
Once in the painting click on the broken sundial on the ground for the sundial mini-puzzle.
Sundial Mini-Puzzle
First place the two glowing fragments into the sundial.
Screenshot.
Once the fragments are in, this becomes a "rotate the rings until you have a picture" puzzle. Below is a screenshot of the completed puzzle.
Screenshot.
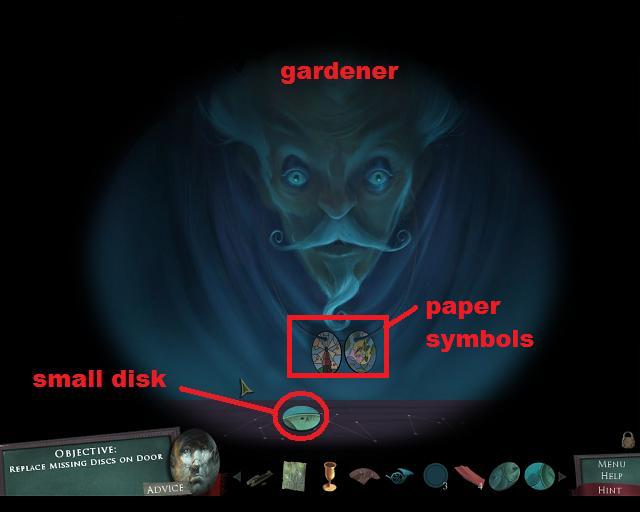
Once the puzzle is solved you will be back facing the gardener. Talk to the gardener.
When the gardener is done talking he will give you the paper symbols around his neck.
Screenshot.
Back out from the window.
Back out of the painting.
Back up twice until you are at the main view of the town.
Now back up 4 times until you are back in the tower, in the room with the pop-up book.
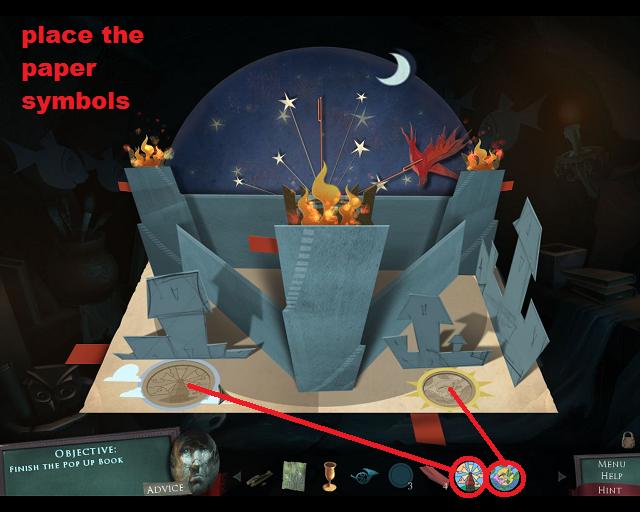
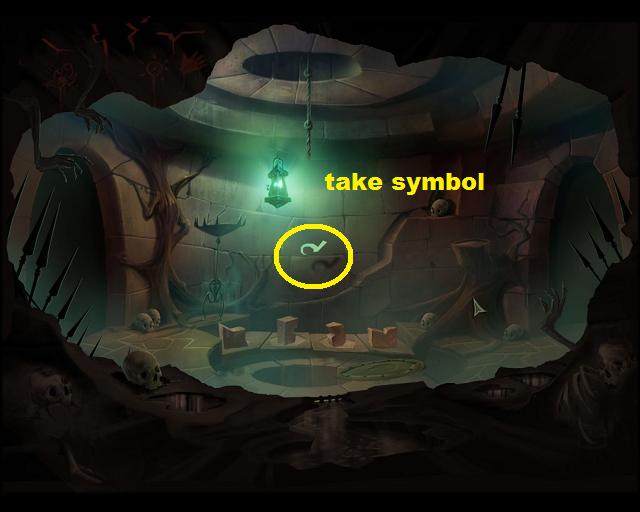
Click on the pop-up book to open it. Pull the tabs to put the symbols in the circles at the bottom.
Now place the two paper symbols that you got from the gardener, using the symbols in the book as a guide.
Screenshot.
The pop-up book will turn into a box that contains a scroll. Take the scroll.
Go forward to the first town view, then go left up the stairs to the beacon.
Once you are at the beacon, place the scroll on the ghostly scroll above the beacon.
Screenshot.
Once the beacon opens, click on it. This will trigger the beacon mini-puzzle.
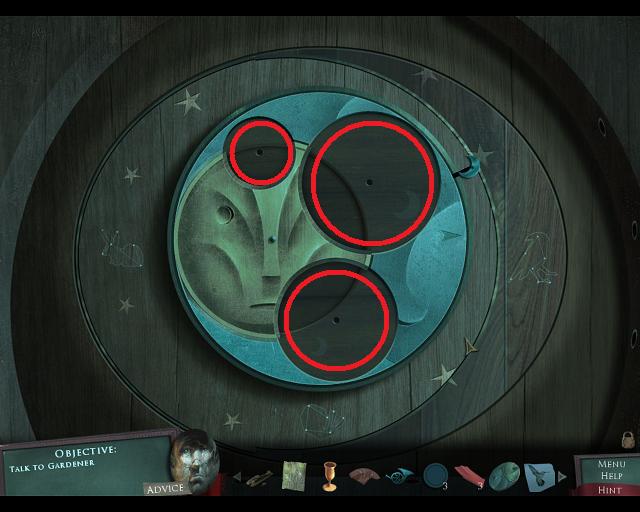
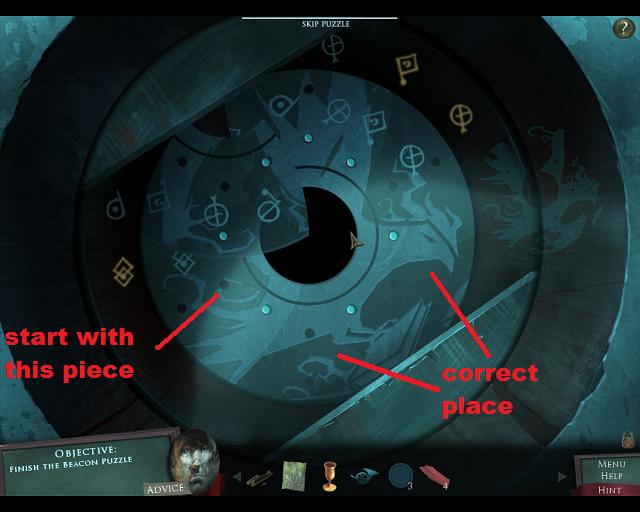
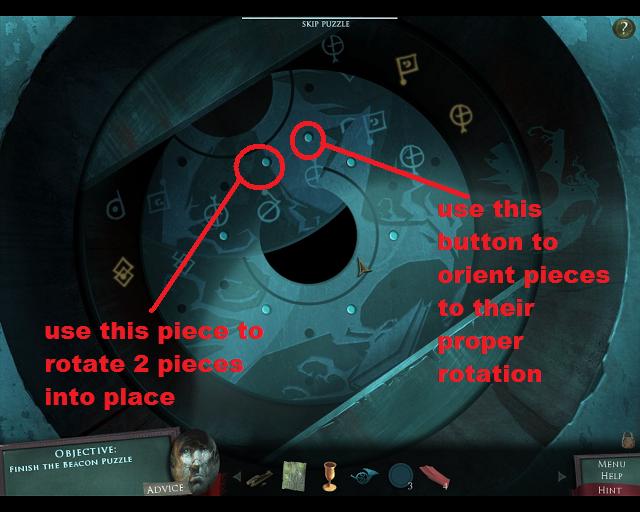
Beacon 1 Mini-Puzzle
This is a really tough rotating piece puzzle.
The object is to not only get the pieces in the correct place to form a picture, they also have symbols on the outer edges which must match symbols around the outside of the puzzle.
Screenshot.
The blue buttons on the inside of the circle will turn two pieces at a time. These buttons are spaced apart with empty holes. There is one button, however, at the top, between two other buttons. This button is the key, as it will only move one piece, rotating it.
Around the outer rim of the puzzle is the picture that you are trying to make. Examine the screenshot below, you will see that the piece in the lower left is already in the proper place.
Screenshot.
Start with this distinctive piece, and get it into place first. If, when you rotate it into place it is not in the correct orientation, move it over to the single button control and rotate it once or twice, then move it back.
Once the first piece is in place, you can start working your way around one side and the other, towards the rotating button.
Screenshot.
Eventually, you will be left with the two pieces near the button. Use the rotating button to orient them properly, then use the nearby button to rotate them into place.
Screenshot.
Screenshot.
Once you've completed the puzzle, the beacon will light.
Back up 3 times to the main town view.
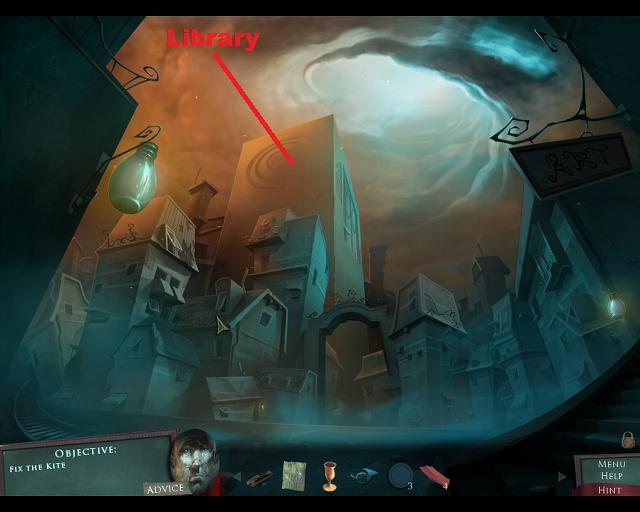
Finding the Library
You should be back at the main town view. Notice that everything is a bit lighter now.
You need to find the Library and find Iris.
Notice that you now have a new goal: fix the kite.
Go forward.
Screenshot.
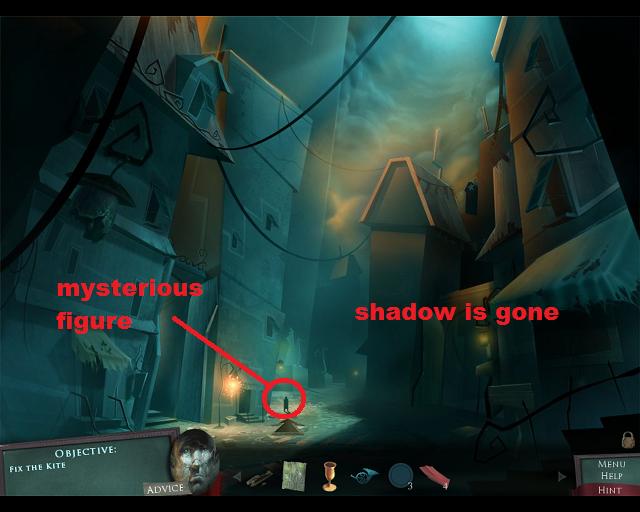
You are now at the place where you found the blue lamp. Notice that the light of the beacon has dispelled the shadow blocking your path.
There is also a small figure of a person in the distance. Go forward.
Screenshot.
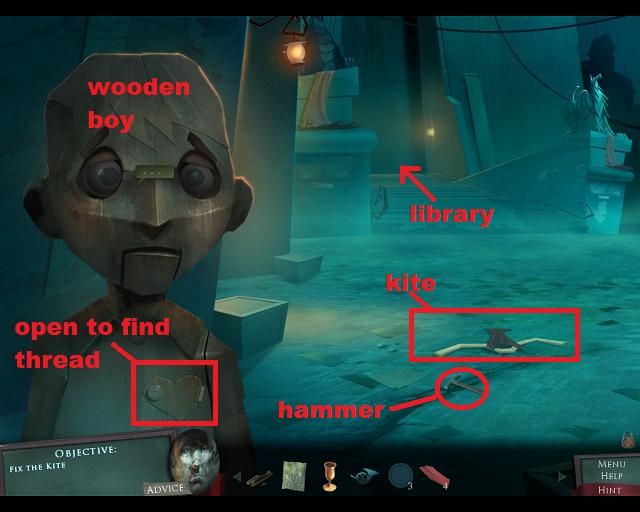
Well, it's not Pinocchio, but it's a real wooden boy.
Speak to the boy and find out that he needs his kite fixed.
The kite is on the ground, but first, click on the boy's heart to open it and find thread. Take the thread.
Screenshot.
Click on the kite and once in close up take the hammer and nails.
You're going to need wood and fabric to fix the kite, so move forward.
Now you are on the library steps. There is a swatch of red fabric here as well as a piece of wood. Take them.
Screenshot.
Back up to the wooden boy and click on the kite.
First lay down the piece of wood on the kite.
Then use the nails, then the hammer (use the hammer 3 times).
Screenshot.
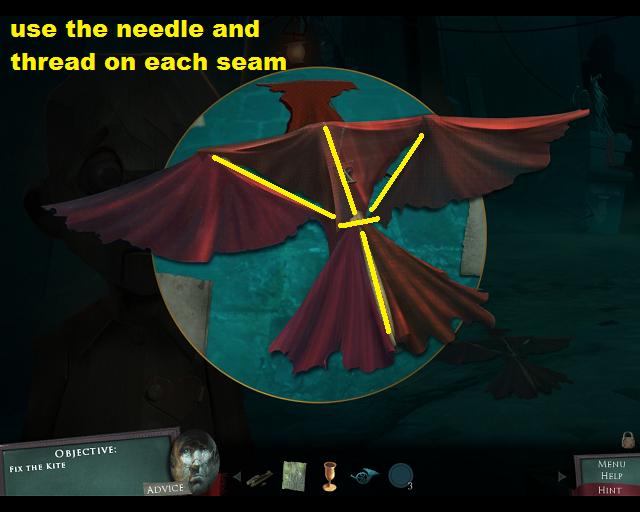
Then add all of the cloth (6 pieces).
Once all of the cloth has been added, pick up the needle and thread from your inventory and use it on each seam, until the kite is whole (5 seams).
Screenshot.
The boy will thank you and go off to fly his kite.
For some reason this knocks you backwards one scene, to the place where you found the blue lamp.
Go forward twice to the library steps.
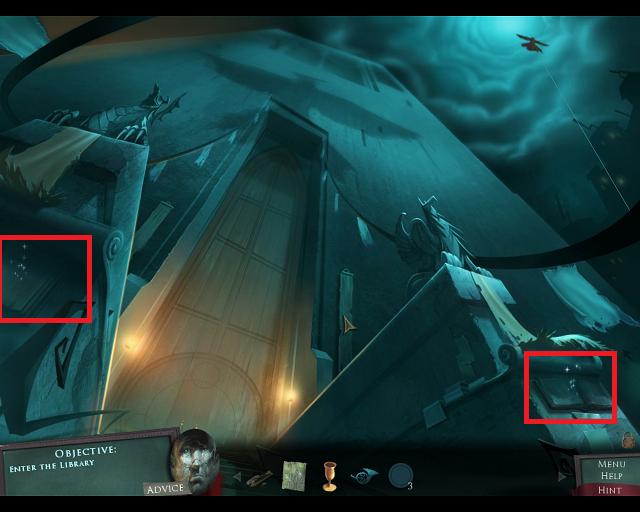
Wait a moment while the boy flies his kite. The shadow of the kite will activate the library door mini-puzzle.
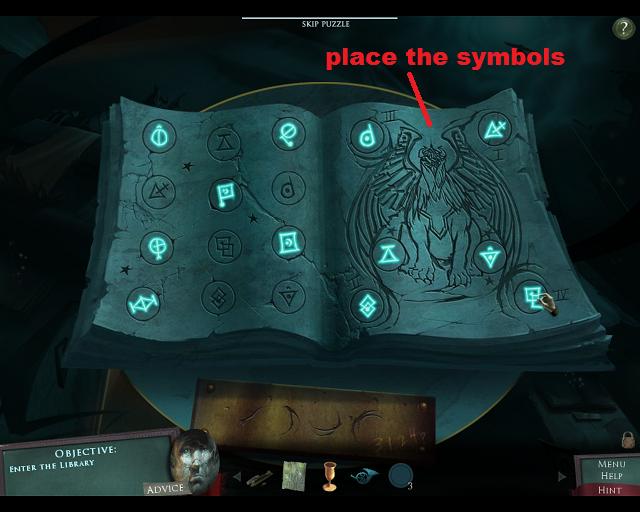
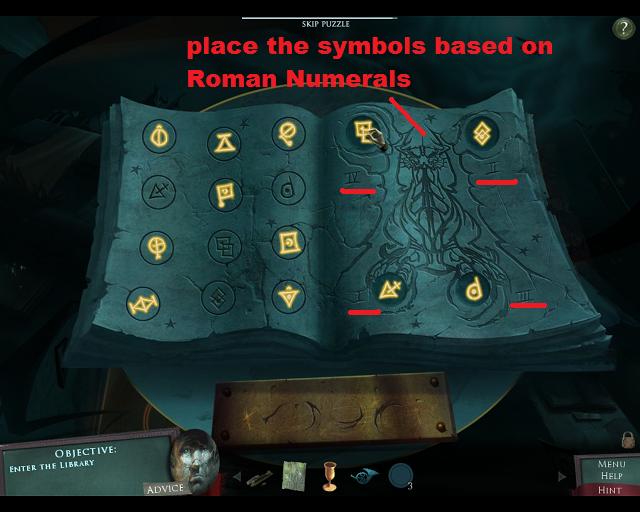
As you face the library entrance you see two giant dragon statues, one on each side.
Each of the dragons has a book underneath, it is in these books that you will find the puzzle.
You need to examine the book on the right to help with the solution on the left, and the book on the left to help with the solution on the right.
Screenshot.
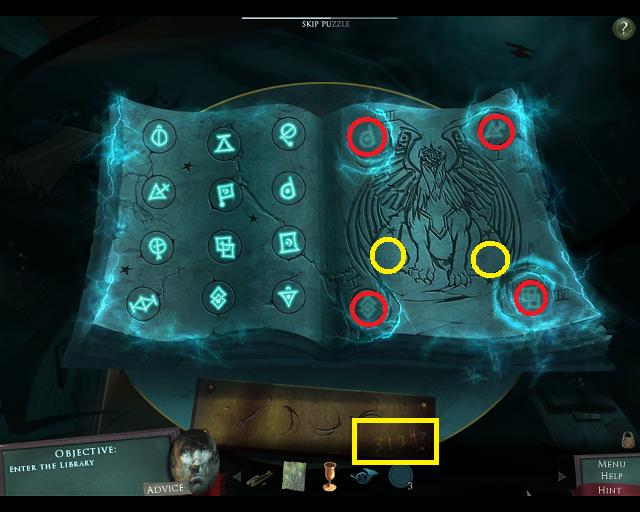
First look at the book on the left.
In close up, you will see that there are a bunch of symbols on the left. The object is to determine which 4 symbols go into the slots on the right.
The slots on the right have Roman Numerals next to each one.
Wait and keep watching the book. When lightning strikes you will see two ghostly symbols appear in the middle of the right page, near some stars.
Screenshot.
Now back away from the book on the left and click on the one on the right.
Wait for the lightning to strike and look closely: symbols will appear in the 4 circles on the right side of the book that have Roman Numerals. You might also notice that the Roman Numerals are not in the same position as the ones in the left book.
There are two additional circles on the right. They don't have Roman Numerals, but have stars near them.
At the bottom of the book you will see a sequence of numbers: 3, 1, 2, 4.
Screenshot.
You can pick up the symbols from the left of the book and place them in the circles on the right side.
First, fill in the two circles marked by stars, using the ghostly symbols you saw in the left book. That means on the left the triangle with a bar across the top, and on the right the triangle with a dot on the top.
Then, place the symbols in the outer circles according to what you see when the lightning hits. That means on the top left goes the "upside down P", on the top right goes the "shovel pointing southwest", on the bottom left goes the "double diamond pointing down" and in the bottom right goes the "double diamond pointing southeast".
Screenshot.
When you have placed the symbols correctly you will drop out of the view of the right book.
Time to place the symbols in the left book.
It is important to remember which symbol went with which Roman Numeral on the right book. If you can't remember, you can go back and look.
The "upside down P" was 3, the "southwest shovel" was 1, the "double diamond down" was 2, and the "double diamond southeast" was 4.
Now open the left book.
The top two circles have the Roman Numerals of 4 and 2, the bottom two have 1 and 3.
So the placement of the symbols here is: top left "double diamond southeast", top right "double diamond down", bottom left "southwest shovel" and bottom right "upside down P".
Screenshot.
When you have solved the puzzle of both of the books, the library door will open.
Go forward into the library.
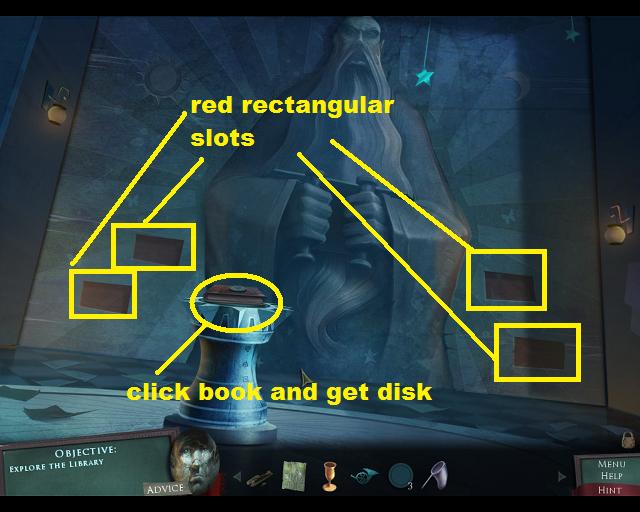
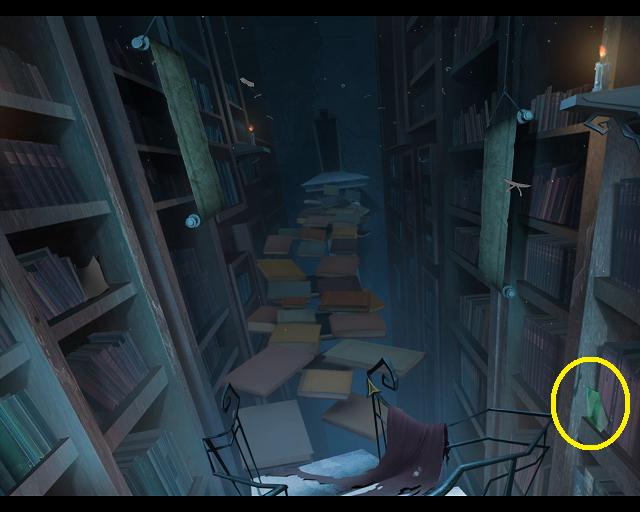
The Library
Welcome to the library! You have a new objective: explore the library.
Notice the flying books. There are two types, white flying books and red flying books.
You can move in two directions from here, forward and to the right.
There are areas of the shelves sparkling. On the left is a book with a dragon cutout. On the right is a book about the royal family.
Near the chair is another sparkling area. Click on it for a close up and take the net from the garbage can.
Screenshot.
Go forward.
There's a wall here, with 4 slots. There is also a book on a pedestal.
Notice that the slots are colored red.
Click on the pedestal for a close up of the book. Take the disk sitting on the book.
Screenshot.
Back up to the first view of the library, where the flying books are.
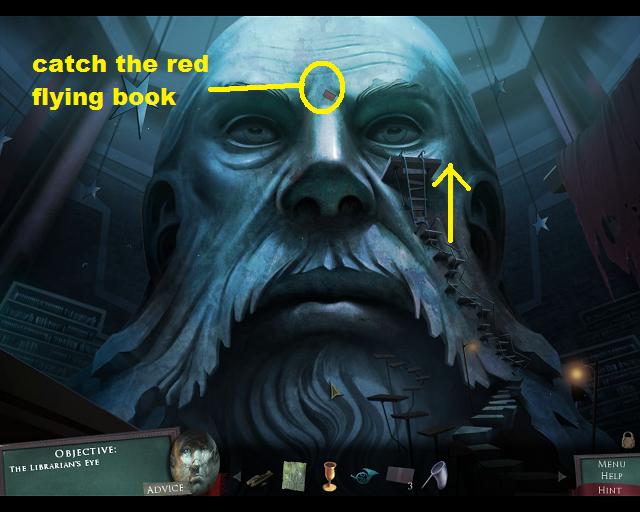
Since there are 4 red rectangular slots on the wall, let's catch some red flying books.
Pull up the net from your inventory. While holding the net click on a red flying book to capture it. You should be able to capture 2 books here in the main hall.
Put the net back into your inventory before you try to move to another location.
Hover your cursor to the right until it becomes an arrow pointing up and to the right. Go in that direction.
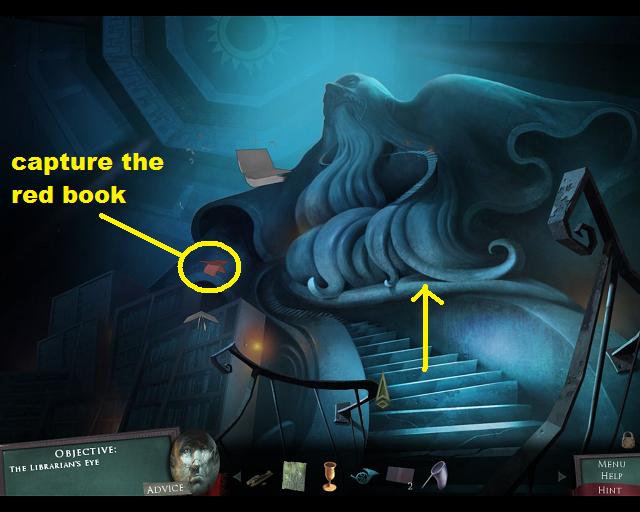
You are now on a set of stairs, looking at a giant statue. Notice that there are more flying books. Catch a red flying book with the net and then go up.
Screenshot.
You are now at the head of the giant statue. You can see one last flying red book here, catch it with the net.
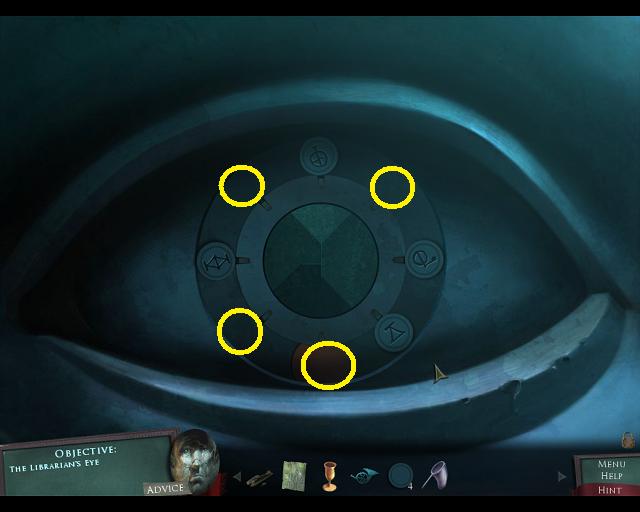
See the ladder going up to the right eye? Go up to the eye.
Screenshot.
The eye looks like it has some circular stone symbols on it. It also looks like 4 are missing.
What a coincidence, we have 4 circular stone symbols in our inventory.
Screenshot.
Place your 4 stone circles in the eye around the pupil. The order doesn't matter.
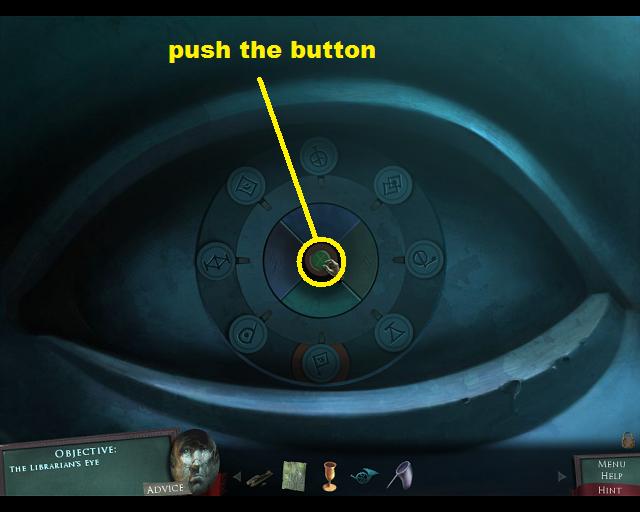
When all 4 stone circles are placed, the pupil will open revealing a green button. Push the button.
Screenshot.
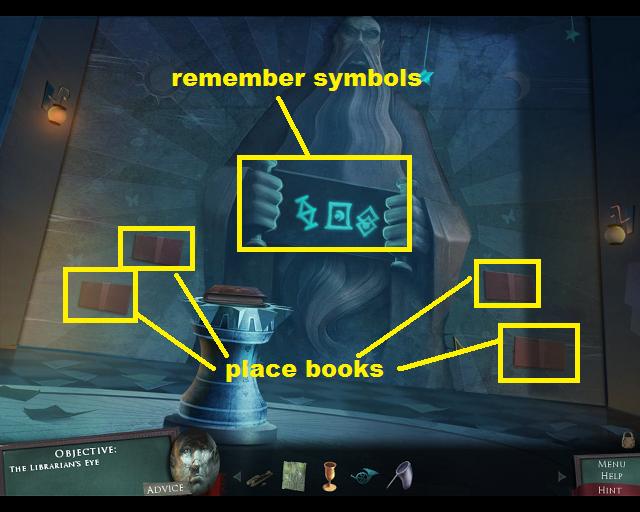
Okay, that doesn't do anything. Back up 3 times to the main hall then go forward to the wall.
Place the 4 red books in the 4 slots on the wall.
The image on the wall will unroll the scroll, revealing 3 symbols. Remember those symbols.
Screenshot.
Back up and head upstairs back to the statue's eye.
Statue Eye Mini-Game
The object of the game is to light up only the 3 symbols that you saw on the scroll downstairs.
I can't give you a precise solution because the symbols change each time you play the game.
Look closely at the 4 colors around the green button.
To light up a symbol you want it to land in the red circle at the bottom of the eye.
Each color rotates the symbols around either clockwise or counter-clockwise, either 3 or 4 symbols at a time.
The green button in the center will reset the puzzle if you get stuck.
The blue area at the top rotates in a counter-clockwise direction, with every 4th symbol stopping in the red.
The purple area on the left rotates in a clockwise direction, with every 4th symbol stopping in the red.
The olive area on the right rotates in a clockwise direction, with every 3rd symbol stopping in the red.
The green area on the bottom rotates in a counter-clockwise direction, with every 3rd symbol stopping in the red.
Screenshot.
When you get the 3 symbols lit, the mouth of the statue will open. Go inside.
Screenshot.
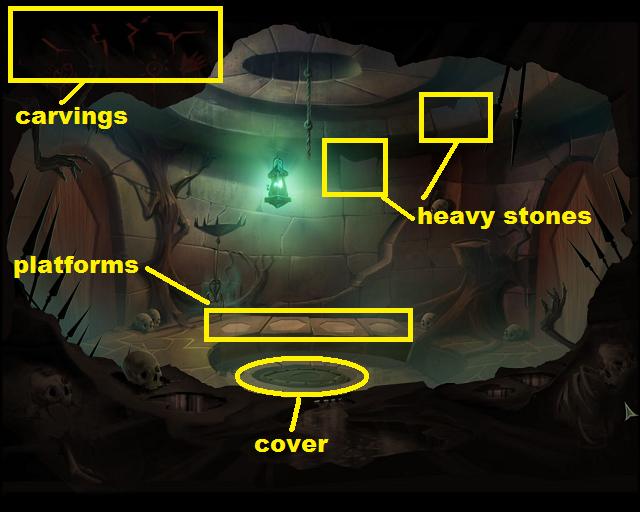
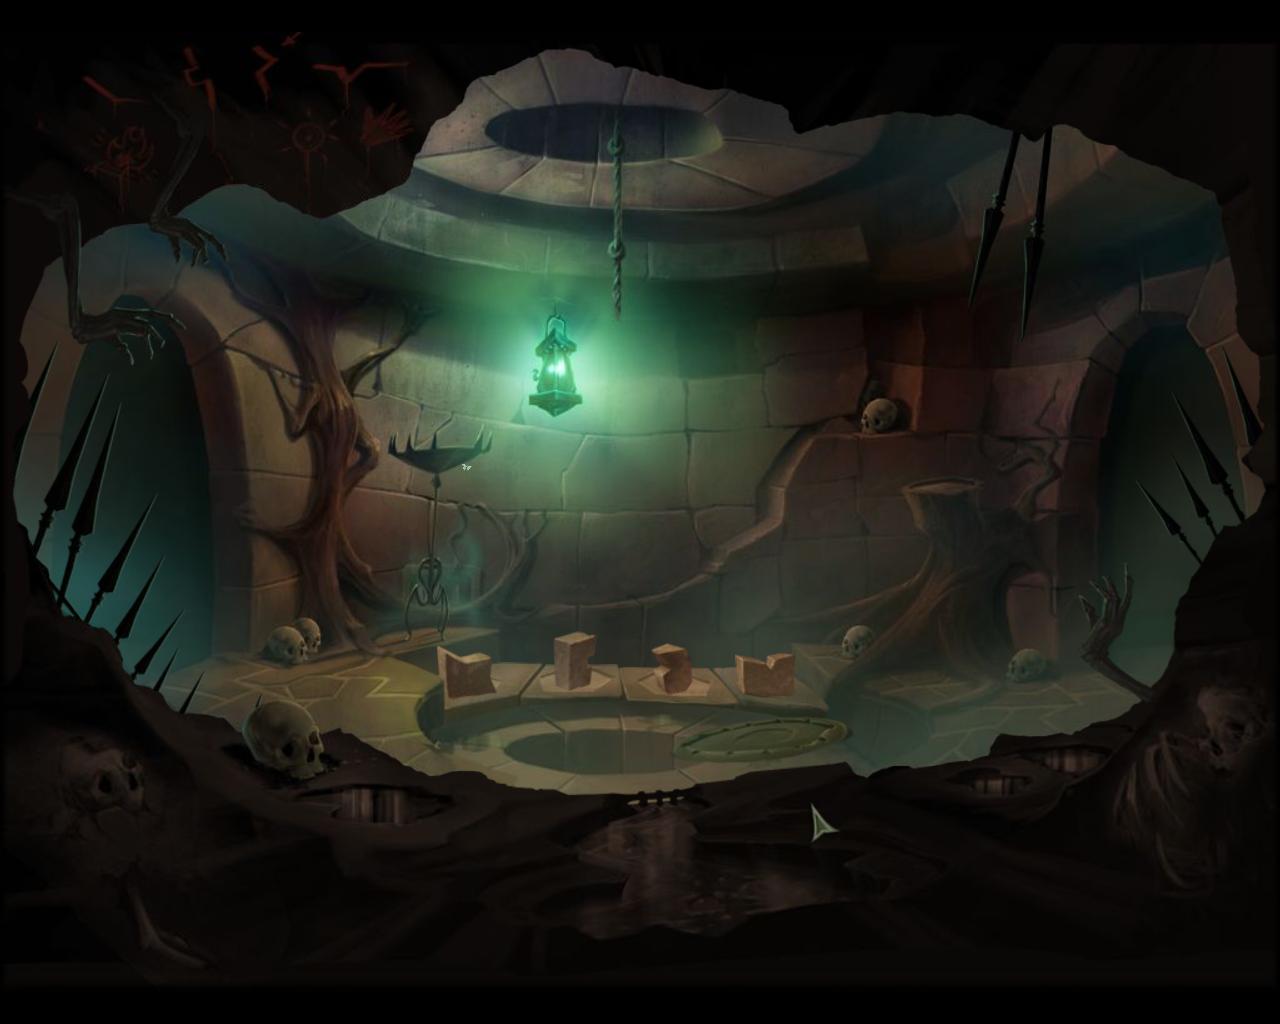
Once inside the mouth you will notice 3 sparkly areas.
Screenshot.
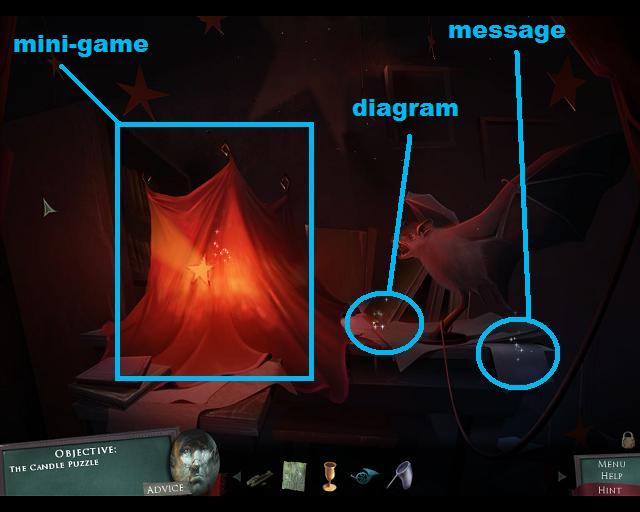
The area on the right is a message from Franklin.
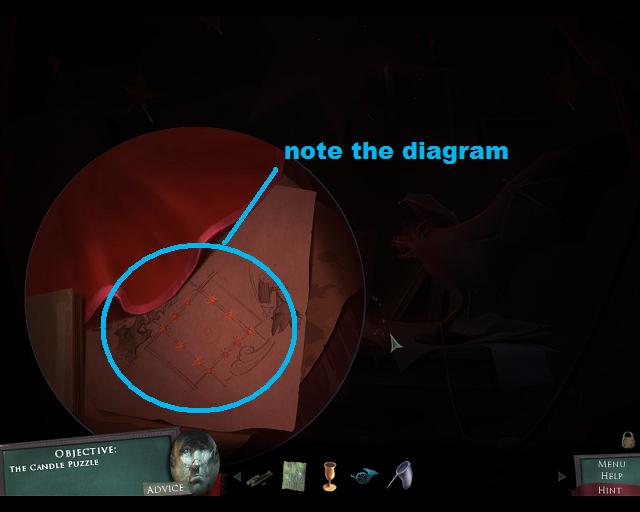
The message in the middle is a diagram. Remember it.
Screenshot.
On the left is the candle mini-game. Click on the red cloth to open the game.
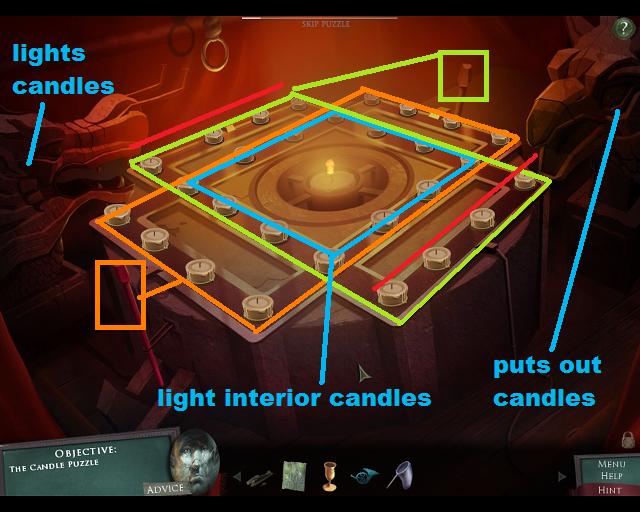
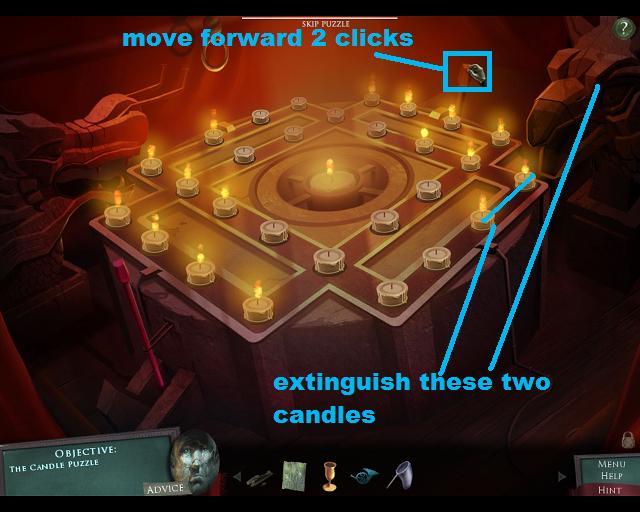
Candle Mini-Game
The object of the game is to light the interior square of candles.
The dragon on the left lights candles when you click on it, but only in that outer row that it is facing.
The gryphon on the right blows out candles when you click on it, but only in that outer row that it is facing.
The lever at the top controls one track of candles, the lever at the bottom controls another track (see screenshot below for details).
Screenshot.
This is a complex solution.
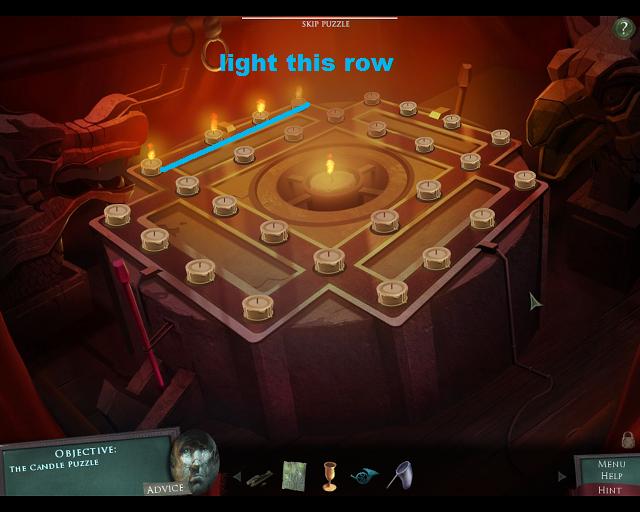
First, click on the dragon to light a row.
Screenshot.
Now, click on the top lever 8 times to move that row to the far right. Once the 4 lit candles are on the far right, click on the dragon again to light the left row.
Screenshot.
Now you're going to start alternating the levers. Starting with the top lever, click once, then click the bottom lever once. Keep alternating the top and bottom levers until the candles have moved to the outer top and bottom rows.
Screenshot.
Once the candles are in the top and bottom outer rows, click on the dragon to light 4 more candles.
Using the top lever only, click 8 times to move those 4 candles to the outer right row.
Screenshot.
Now light the outer row of candles with the dragon. You should now have all candles on the outer rows lit.
Screenshot.
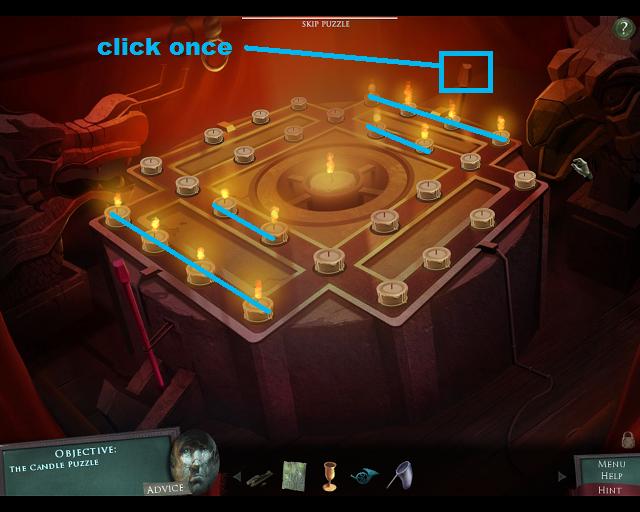
Here's the tricky bit: we have 4 too many lit candles. We need to extinguish some.
Using the top lever, click 2 times. This will leave you with 2 candles on the outer right edge. Click on the gryphon to extinguish those candles.
Screenshot.
Now click the top lever 8 times. This will again leave 2 candles on the outer right row. Click on the gryphon to extinguish them.
Screenshot.
Now click the top lever once. This will leave you with 2 candles in the inner top and bottom square.
Screenshot.
Once everything is lined up like the screenshot above, click on the bottom lever 4 times and the puzzle is solved.
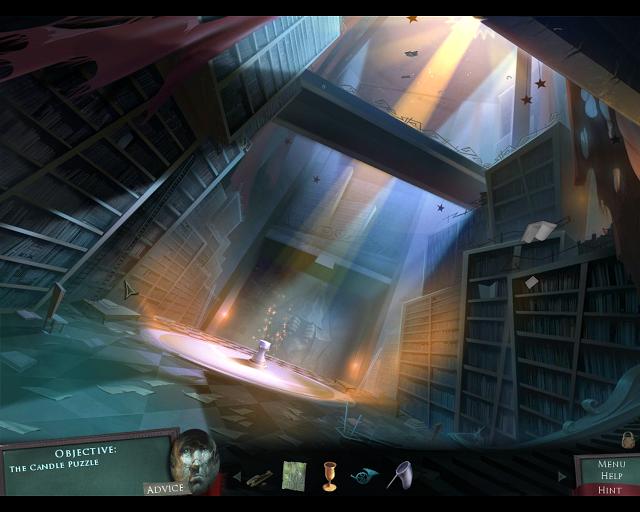
Once you solve the candle mini-game, enjoy the cut-scene.
You will end up back in the main hall of the library. Notice the new light source.
Screenshot.
Go forward.
The book on the pedestal is now glowing. Click on the book.
Screenshot.
Why yes, that's another pop-up book.
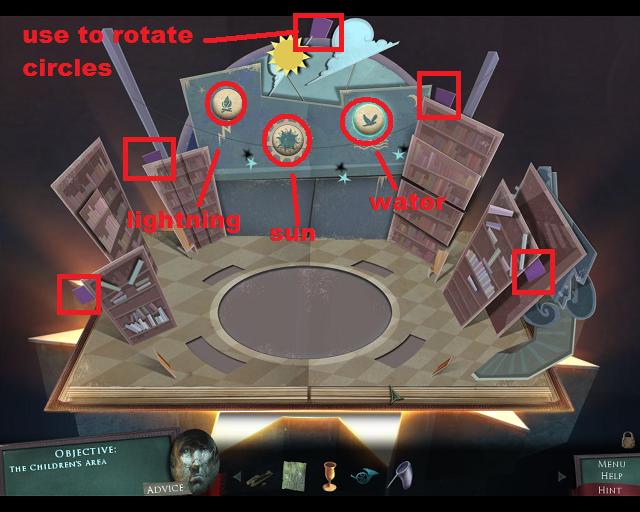
Library Pop-up Book
Solve this pop-up book to reach the children's library.
You can play with the tabs on the frowny face and the angry face bookshelves, but otherwise they don't have anything to do with the solution.
Take a look at the backdrop of the pop-up.
There are three circles there, each with a symbol around it.
The circle on the right has a water symbol, the circle in the middle has a sun symbol, and the circle on the left has a lightning symbol.
Screenshot.
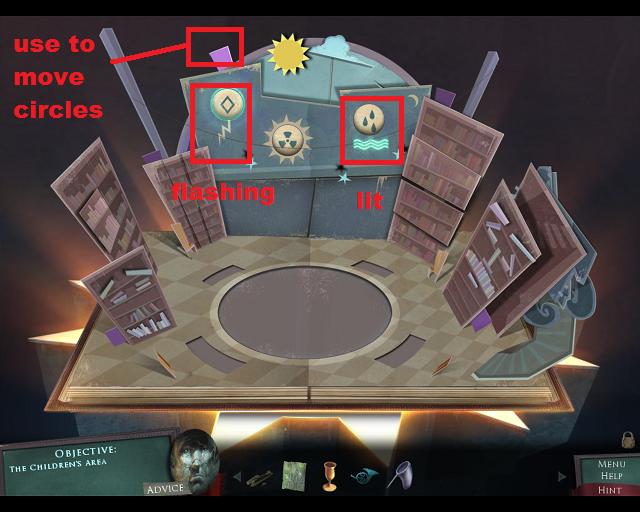
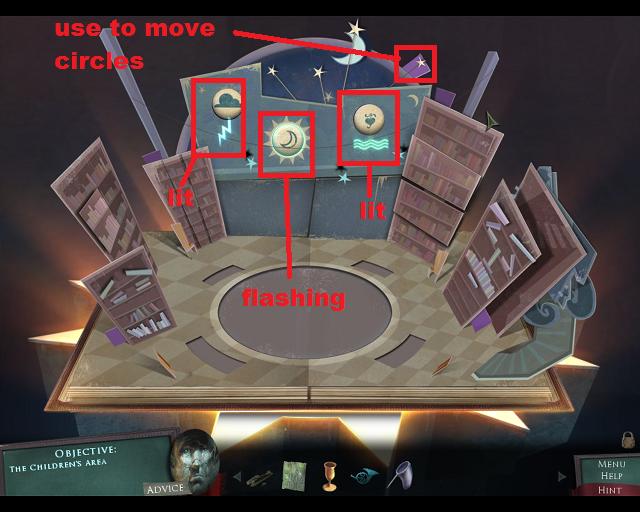
The circle on the right is flashing, so we need to solve that one first. Use the purple tab at the top of the backdrop and drag it left or right until raindrops appear in the circle with the water symbol.
Screenshot.
The right circle symbol is now lit up, and the one on the left is flashing. Use the tab at the top of the backdrop and drag it around until a cloud appears in the left circle (lightning symbol).
Screenshot.
Now the lightning symbol lights up, and the center circle is now flashing.
Use the tab at the top of the backdrop and drag until a sun appears in the center circle.
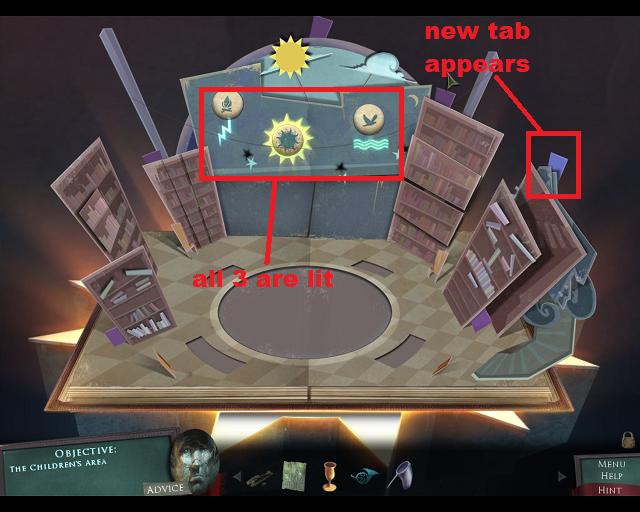
When all 3 symbols are lit, a new tab will appear on the right.
Screenshot.
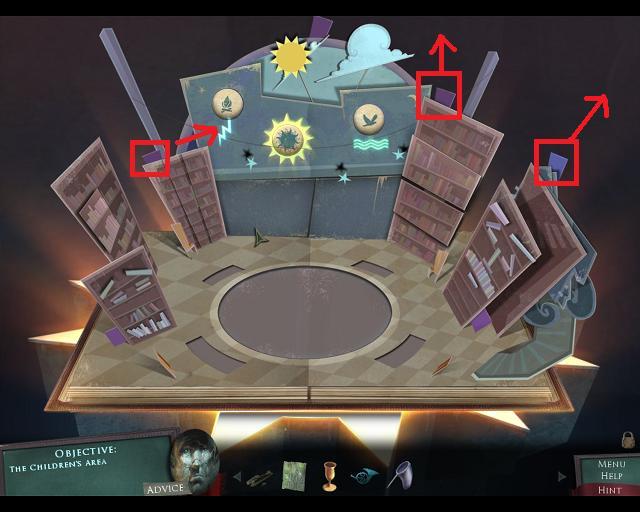
Now pull the tab on the left bookcase (next to the backdrop) to the right, pull the tab on the right bookcase (next to the backdrop) up, and pull the newly appeared tab upwards to pull up the statue. Once the statue is up you will have to wiggle it to the right a bit to get it all the way up.
Screenshot.
When the statue is all the way up its eyes will light up, the center circle will light up, and a new tab will appear on the left.
Screenshot.
Pull the new tab to the left and a green lever will appear.
Screenshot.
Pull down on the new lever and the wall will split open.
Screenshot.
You have now finished the main tasks in the library. Time to tackle the Children's Wing.
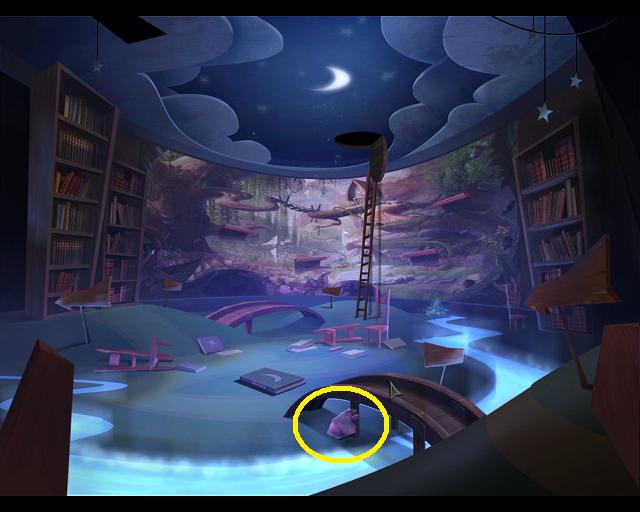
The Children's Wing
Move forward through the now open wall.
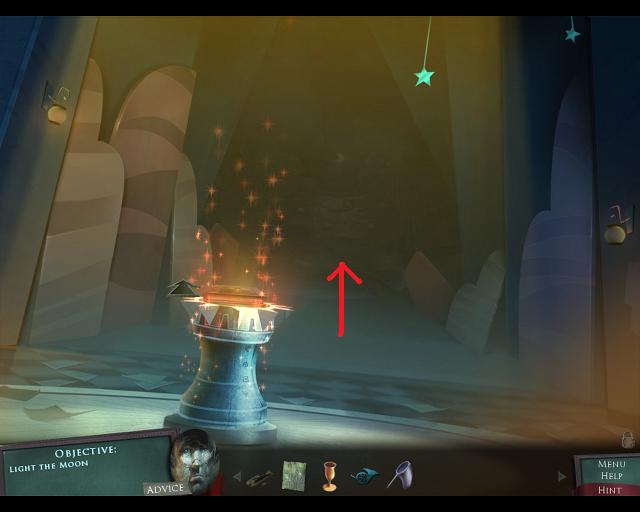
You have a new objective: light the moon.
You've stepped into the children's wing, but it's very dark.
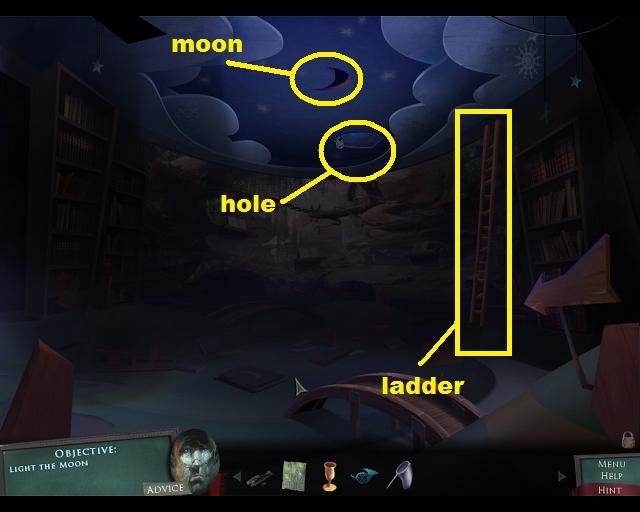
Notice the moon in the ceiling, as well as the hole in the ceiling and the ladder against the wall.
Move the ladder by clicking on it until it is at the hole.
Screenshot.
Looks like the hole is a door and it is locked.
Go left.
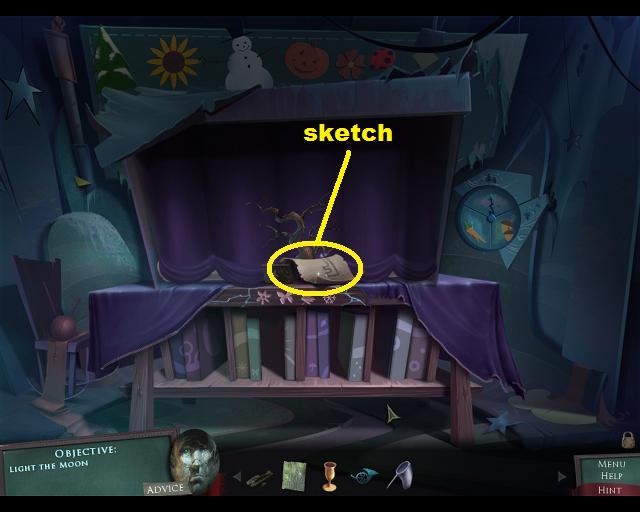
There's a little stage setup in this room. On the stage is a small tree, and there's a piece of paper lying at the base of the tree. Click the paper for a close up.
Screenshot.
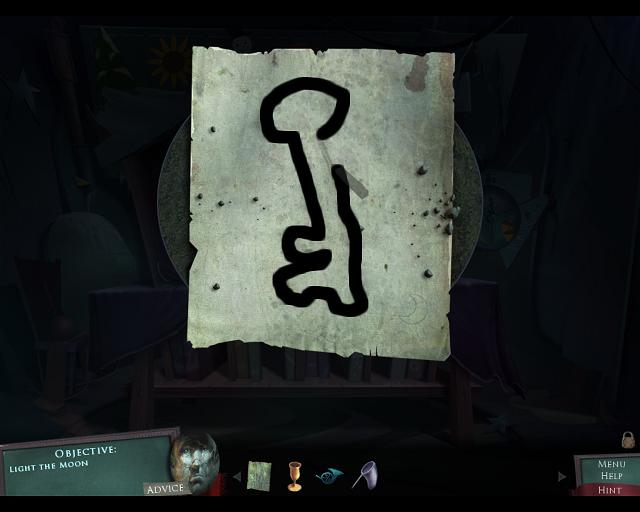
It's a sketch of a key. Use the charcoal in your inventory to outline the sketch and get a hatch key.
Screenshot.
Go back to the main room.
Use the sketch of a key on the locked hatch and go up.
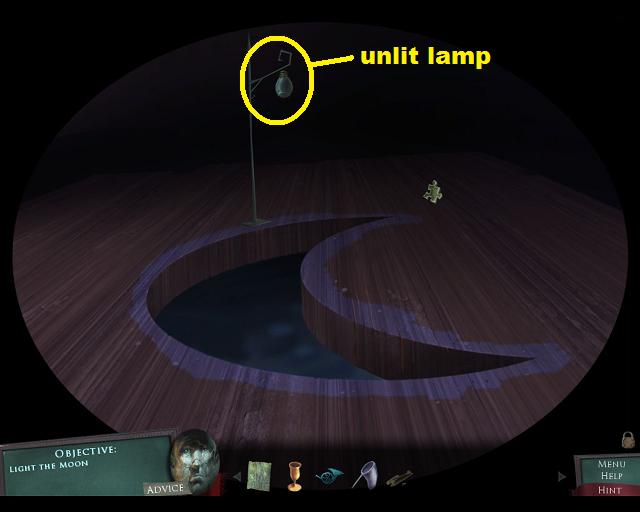
You are now in the attic area, and there's an unlit lamp up here.
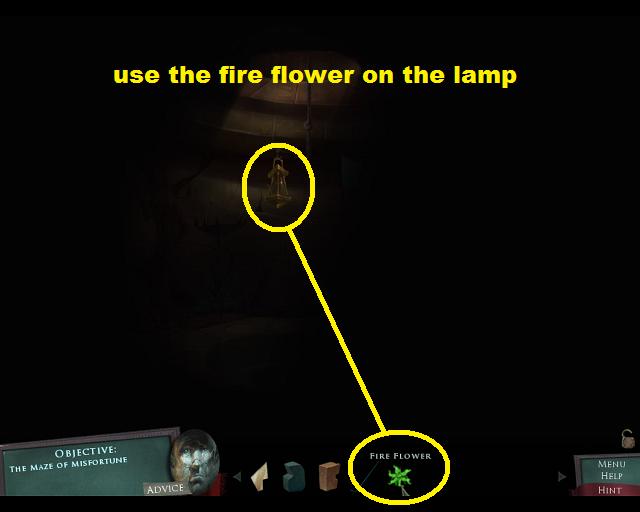
Use the lamplighter sketch that you've been carrying around on the lamp.
Screenshot.
Go back down to the main room.
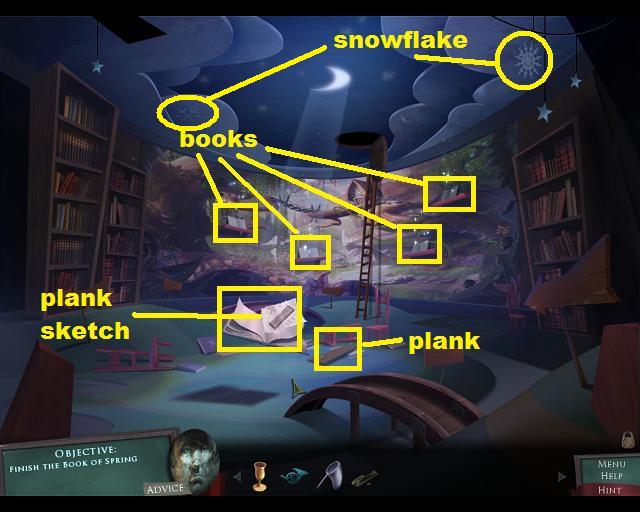
Suddenly there's lots to see here.
When the light comes into the room a book flies up from the floor. Click on it to get a sketch of a wood plank.
Just to the right of the book is a real wood plank, take it as well.
Hanging from the ceiling is a pretty snowflake, take it. There is another snowflake on the ceiling on the left, take it as well.
The entire back wall is a painting. On the wall are 4 shelves and 4 books.
Screenshot.
Click on each book to examine it and notice the missing items in each book.
Screenshot.
Screenshot.
Screenshot.
Screenshot.
Now enter the painting at the back of the room.
Children's Wing Painting
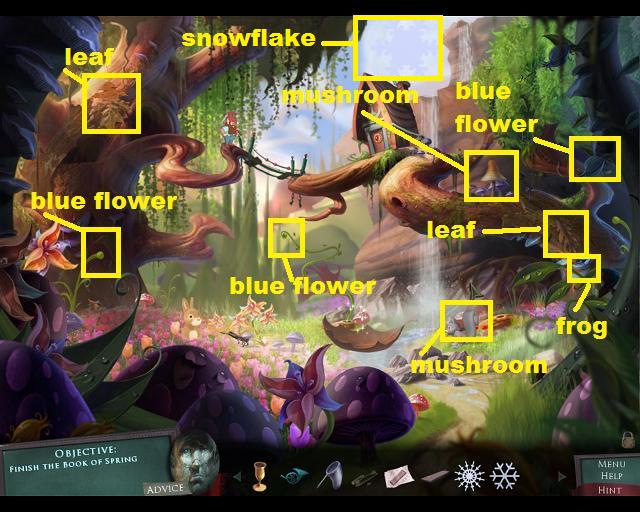
There's a lot of stuff to collect here.
First, watch the flowers blooming. Pick the 3 blue flowers when they show up.
There are two leaves in the scene to be found as well.
Above the gnome house, in the sky, is a snowflake. Take it.
Collect the 2 mushrooms and the frog. One of the mushrooms is usually hidden by the squirrel, wait until he moves away to get the mushroom.
Screenshot.
Once you've cleared out that stuff, you will notice some insects moving through the scene.
Use the net to collect a butterfly (green), a grasshopper, and a bee. If you watch you can see where their paths are.
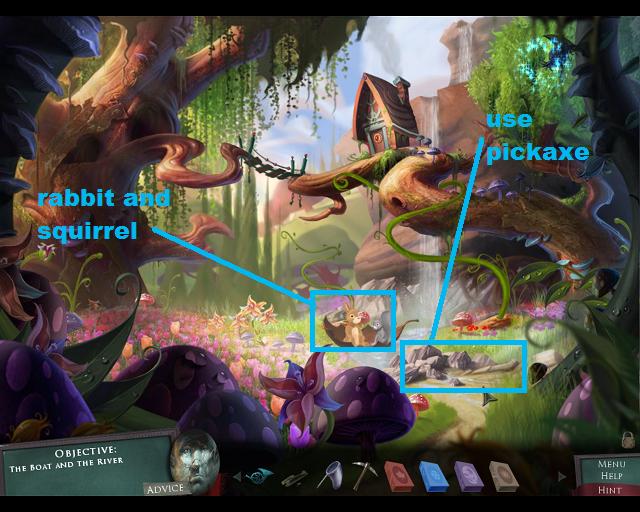
Once you have the insects you can turn your attention to the gnome in the tree.
He's disgruntled because the bridge to his house is broken.
Use the plank and the sketch of a plank to repair the bridge.
Once he goes home, take the pick that he leaves outside.
To the right of the waterfall is a mound of dirt.
Use the goblet from your inventory on the waterfall, then use the goblet of water on the dirt.
A vine will spring up and bloom a 4th blue flower, take it.
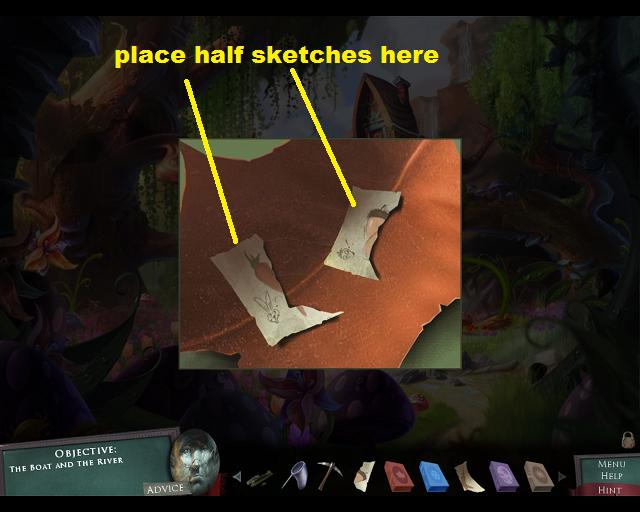
To the left of the waterfall is a large leaf. If you click on it, you will find 2 half finished sketches, one of a carrot and one of an acorn.
Screenshot.
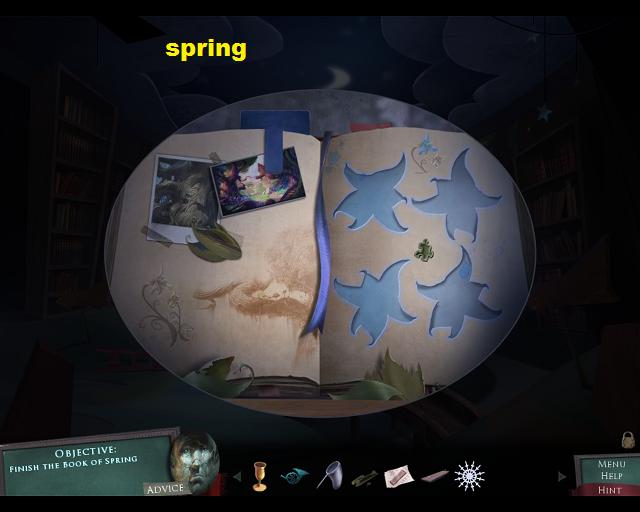
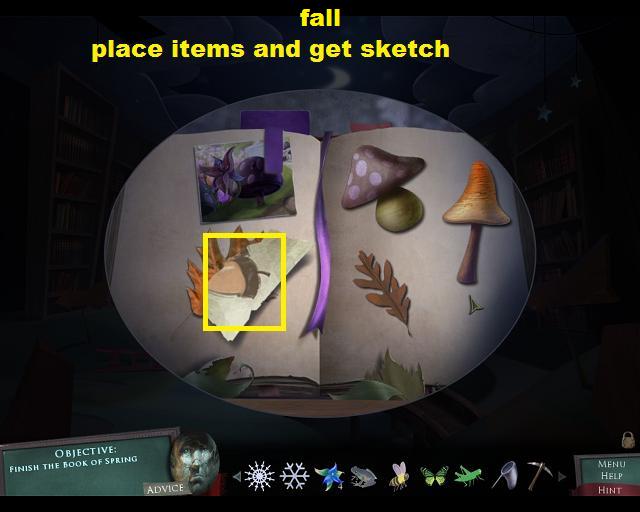
Back out of the painting and pull up the fall book (top left book). Place the mushrooms and the leaves in the book and you will get part of an acorn drawing. When you are finished the book will go into your inventory.
Screenshot.
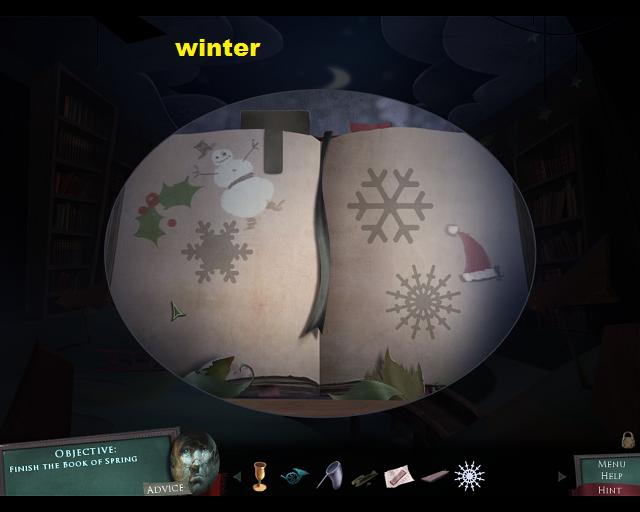
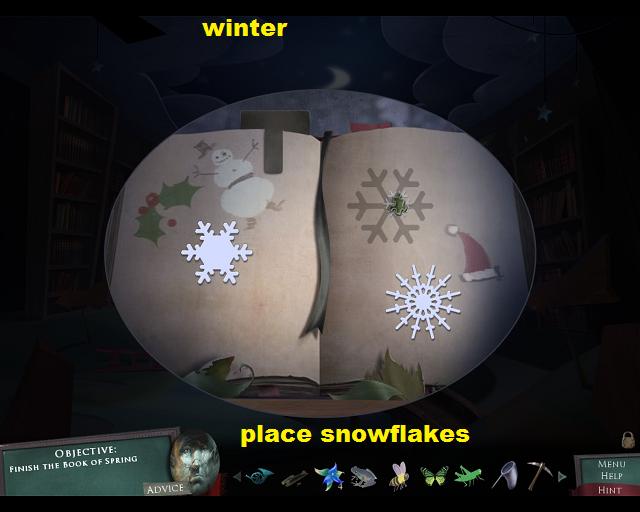
Pull up the book of winter and place the snowflakes in the slots. When you are done you will get the book of winter.
Screenshot.
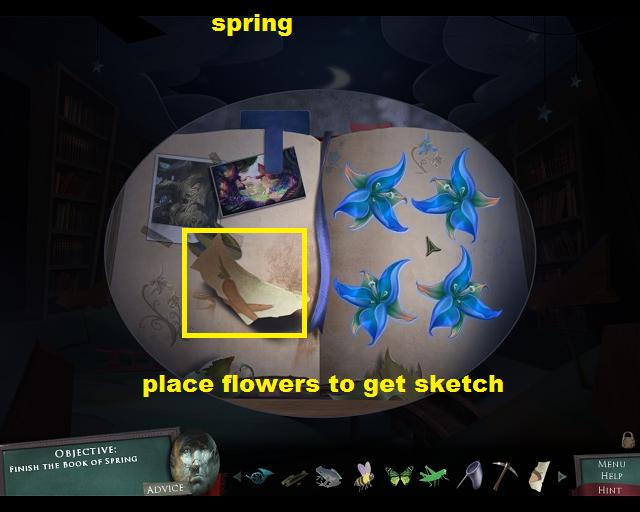
Pull up the book of spring and place the 4 blue flowers. This will get you half of a sketch of carrots. The book of spring will go into your inventory.
Screenshot.
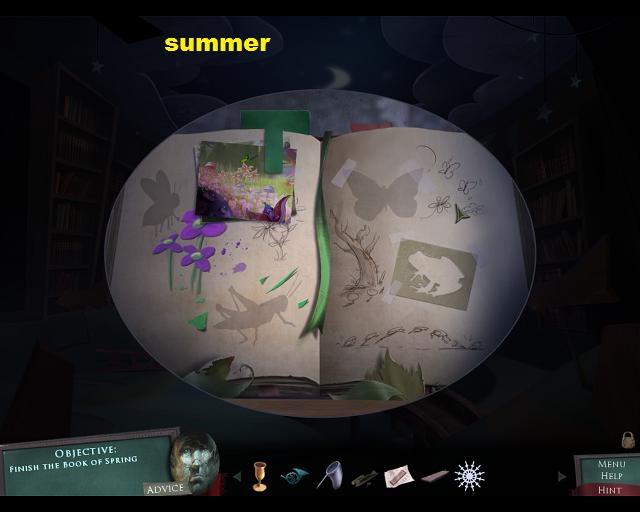
Pull up the book of summer and place the insects and the frog. This gets you the book of summer.
Screenshot.
Go back into the painting. Click on the large leaf to the left of the waterfall.
Place the half sketches of the acorn and carrots on the ones in the leaf.
Screenshot.
When you close the leaf, the rabbit and the squirrel will jump in.
To the right of the leaf is a pile of rocks. Use the pickaxe on the rocks to unblock the river.
Screenshot.
Back out of the painting.
Once you are back in the main room enjoy watching the river come to life. Once the rabbit and the squirrel have gone by, go left.
The rabbit and the squirrel have joined you in this little anteroom.
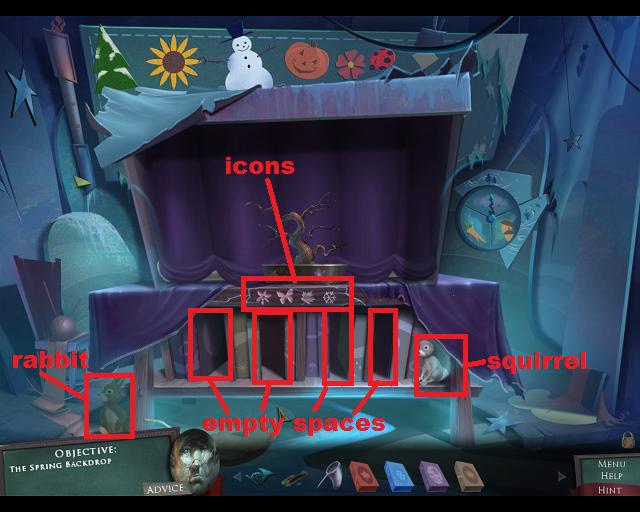
Notice that there are 4 gaps in the bookshelf.
Above the books are little icons. The stand for spring, summer, fall, and winter.
Place the books in the gaps, from left to right, in the same order as the icons: spring, summer, fall, and winter.
Screenshot.
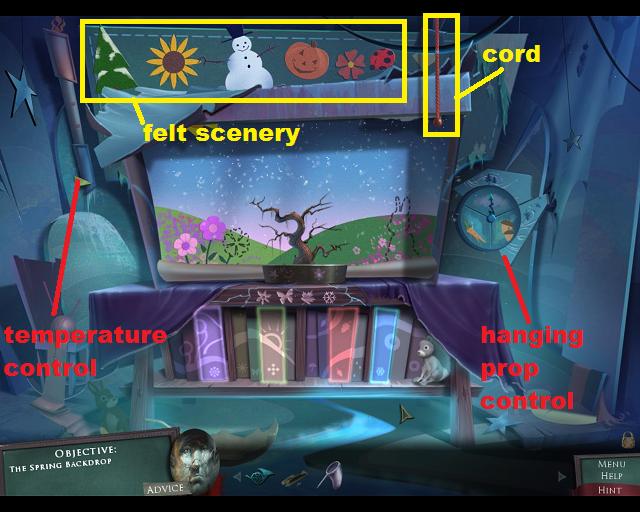
Once the books are in the proper place, the stage curtains will open.
The goal here is to recreate each season, starting with spring.
There is a temperature control on the left, which runs from hot (top, red) to cold (bottom, blue).
There is a hanging prop control on the right. Place the dial to the prop you need and it will appear.
Above the stage are felt pieces of scenery that you can pick up and place into the scene.
Screenshot.
You will start with spring. Move the temperature control to one notch below the warmest setting.
Set the dial to carrot and the rabbit will jump into the scene.
Pick up the felt flower and place it in the outline on the backdrop.
Screenshot.
When the scene is correct a pink flower will fly into the scene. Catch it with the net.
Pull the cord to move to the next scene.
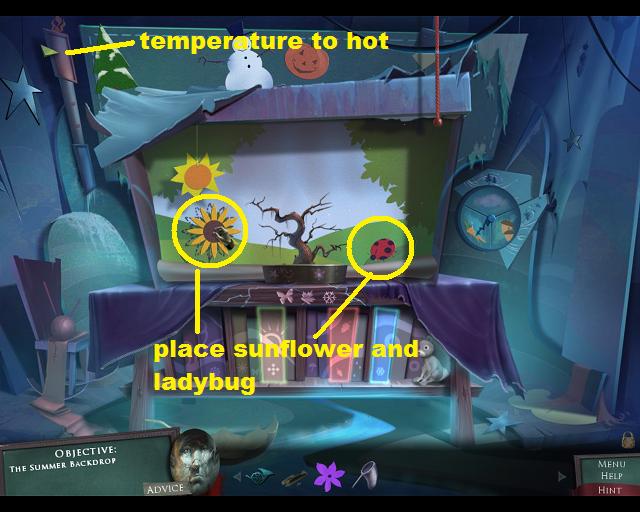
Time for summer. Move the temperature control to hot.
Place the felt ladybug and felt sunflower into the scene.
Screenshot.
A blue butterfly will appear, catch it with the net.
Pull the cord to move to the next scene.
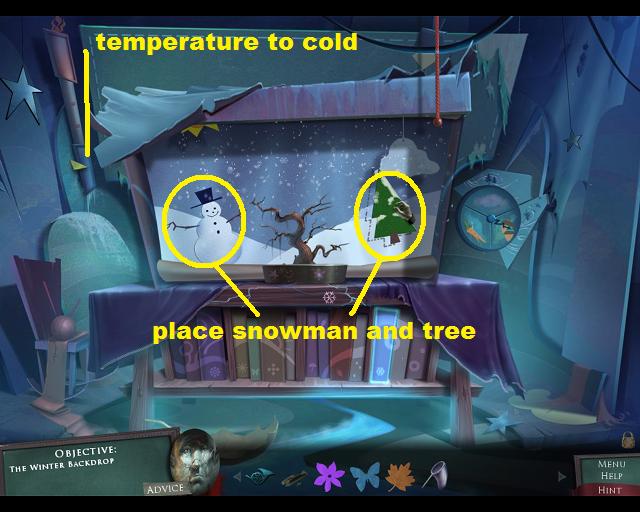
Now we're dealing with fall. Move the temperature control to cool.
Move the dial to acorn and wait for the squirrel to jump into the scene.
Place the felt pumpkin in the outline.
Screenshot.
Catch the leaf with the net.
Pull the cord to move to winter.
Move the temperature to cold.
Place the snowman and the tree.
Screenshot.
Catch the snowflake with the net.
Back up twice to leave the children's wing.
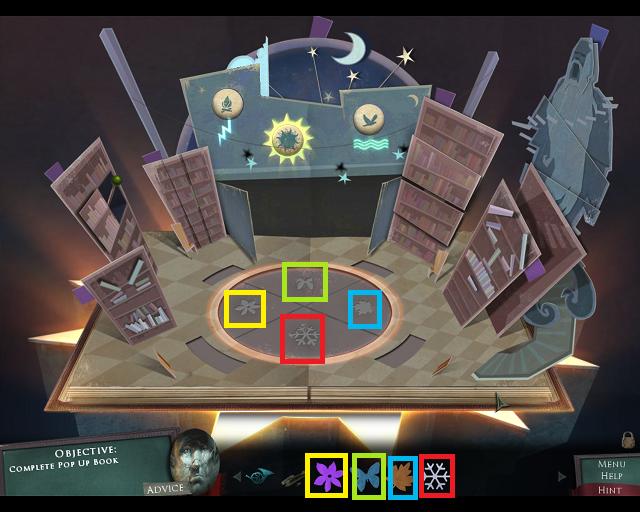
The Library Pop-up Book (Part 2)
Click on the book on the pedestal to open it.
Place the flower, butterfly, leaf, and snowflake onto their respective icons on the floor of the pop-up book.
Screenshot.
This will trigger a staircase to open beneath the book.
Go down the stairs.
Screenshot.
Leaving the Library
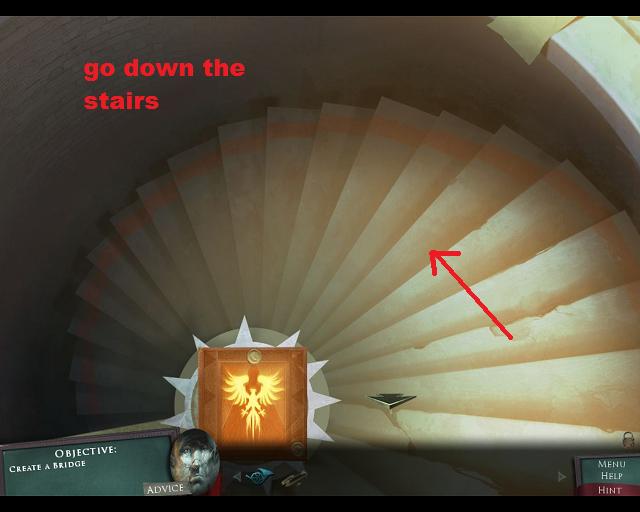
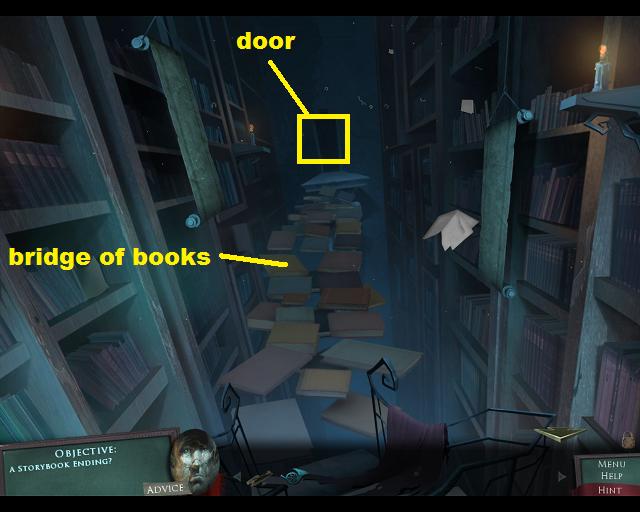
There is a door at the far end of the room, you need to build a bridge to get to it.
On the left is a sparkling piece of paper. Click on it to see an illustration of a hand throwing a paper plane.
There are two large scrolls, one on each side of the aisle. Click on one of them (it doesn't matter which).
Screenshot.
Catching Runes Mini-Game
This is an arcade-style game, so there is no fixed solution.
The object is to get certain symbols, or runes, to the left side of the page.
The runes will begin to fall on the right. Catch the proper ones by moving the girl with the book directly underneath the falling runes.
If the runes get past the girl, the fire at the bottom will eat them.
Runes caught by the book will appear on the left side of the page, floating upwards.
There are bands of black birds drifting by that will eat the runes if they touch.
At the top of the left page is the band showing which runes that you want. When a correct rune hits that band click on it and it will move into place.
There are 3 levels, each more difficult than the last. Each level will light up a word in the book: write, art, music.
The birds can be clicked and dragged away from the proper symbols so that they can pass.
If an incorrect symbol gets to the left page, you want the birds to eat it. If an incorrect symbol makes it to the band, it could knock out one of your correct ones that are in place.
Screenshot.
Screenshot.
When you've completed the runes mini-game a bridge of books will fly up to make a bridge, allowing you to move forward.
Screenshot.
Go forward across the bridge.
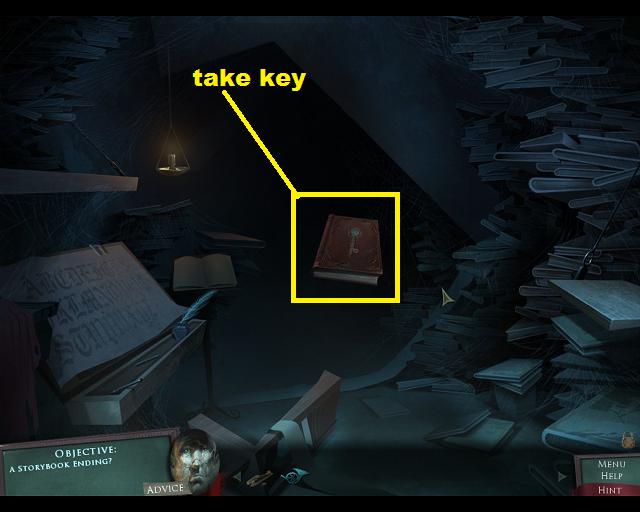
Now you're in a dimly lit room with a book floating in front of you.
Click on the book to take the key from its cover and release Iris.
Screenshot.
When the cut-scene ends move forward twice.
Enjoy the next cut-scene.
End of Chapter 2
Posted by: grinnyp |
September 4, 2010 10:57 PM
|
September 4, 2010 10:57 PM
Drawn: Dark Flight Chapter 3 Walkthrough
Lighting the Beacon
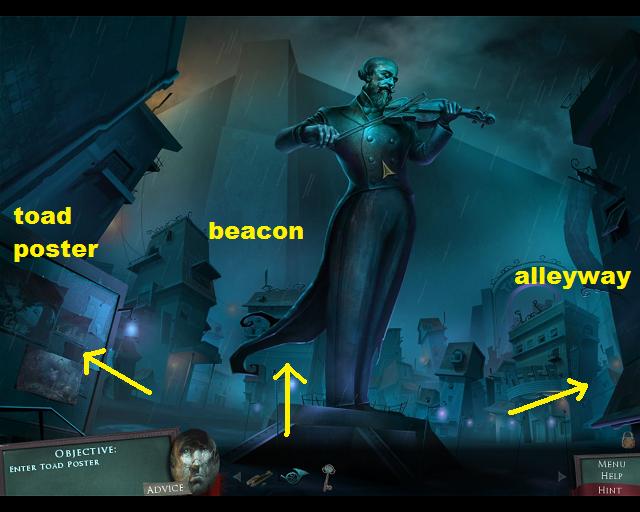
You have a new goal: enter the toad poster.
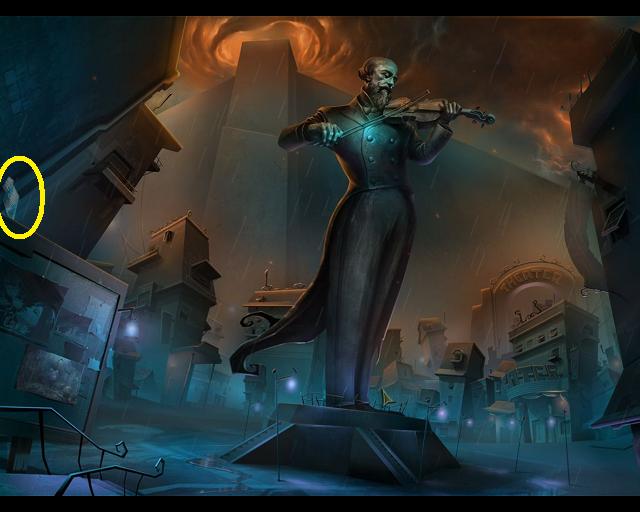
You are facing a giant statue of a violinist. You can move in three directions from here: left to a bulletin board with a ripped poster, right to an alleyway, and forward.
Screenshot.
Move forward.
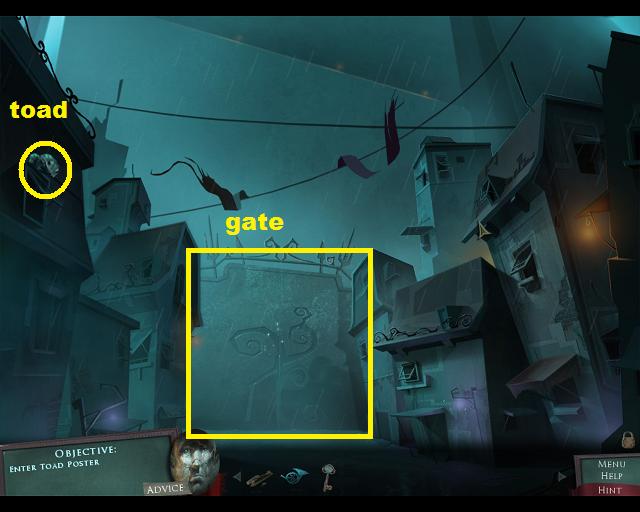
You are now facing a gate. There's a toad on the house on the left, take it.
You can also mess around and open people's windows on the houses.
Screenshot.
Click on the gate.
In the close up, use your key on the gate.
Once the gate opens, go forward.
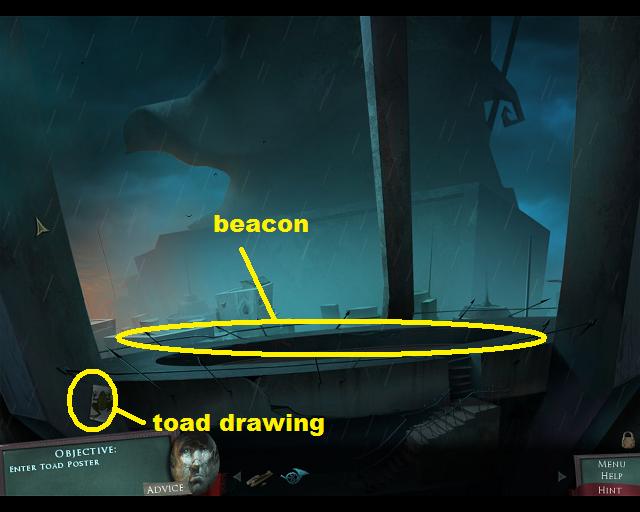
You have found the 2nd beacon. On the wall to the left is a sketch of a toad, take it.
Screenshot.
Click on the beacon for a close up.
This is a preview of one of the most difficult puzzles in the game. However, you can't solve it yet.
Near the bottom of the large head outline is a poster piece, pick it up.
At the top is a note from Iris, read it.
Screenshot.
Back up 3 times to the violinist statue.
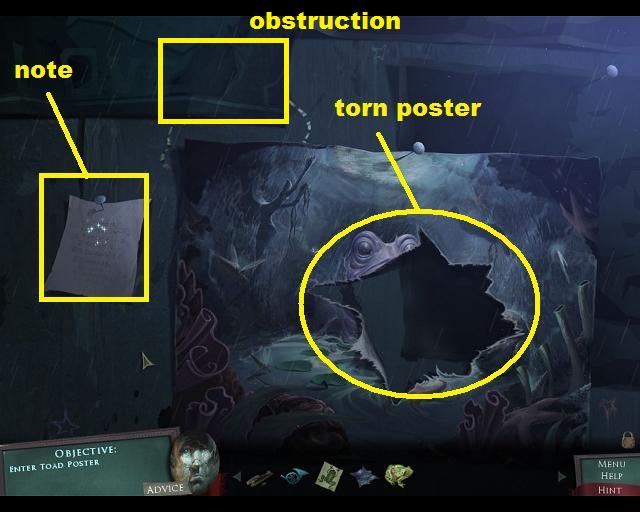
Go left to the bulletin board.
There's a note from Iris on the board, read it.
Place the poster piece on the torn poster to repair it.
Screenshot.
Once you repair the poster you will be drawn in.
The Toad Poster
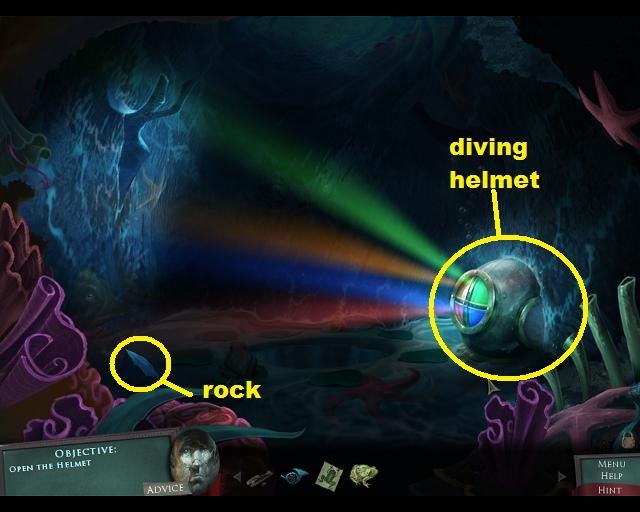
On the left you will notice a rock. On the right is a diving helmet throwing out 4 colors: red, blue, orange, and green.
Pick up the rock and smash the glass front of the diving helmet.
Screenshot.
Watch where the colors go when the glass is smashed.
This triggers the diving helmet mini-game.
Diving Helmet Mini-Game
A colored light will appear on the wall. You need to click on the tube to the right that represents that color (or combination of colors).
The tubes are, from left to right, 1. blue, 2. red, 3. green, and 4. orange.
The first color to appear is blue, so click on the 1st tube.
Screenshot.
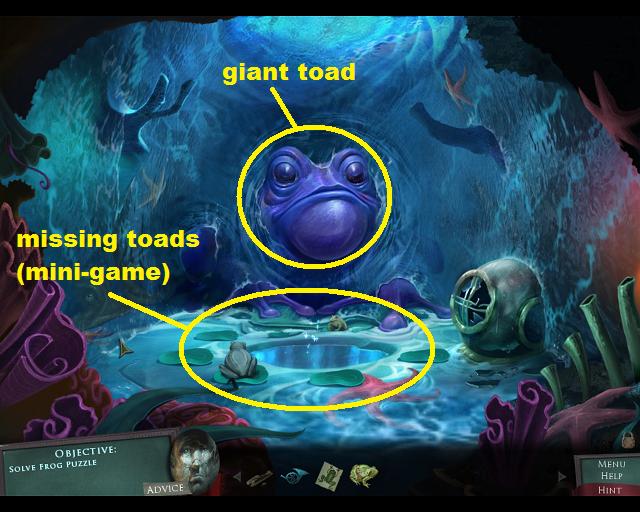
The colors will appear in this order: blue, red, green, orange, blue and orange, blue and green, red, blue, orange, red and green, red and green, blue, orange, green.
Solving the diving helmet mini-game will cause the giant toad to appear.
He's angry and wants his toads back. Now you must find his missing toads (6), of which you already have 2.
Screenshot.
Back up out of the poster.
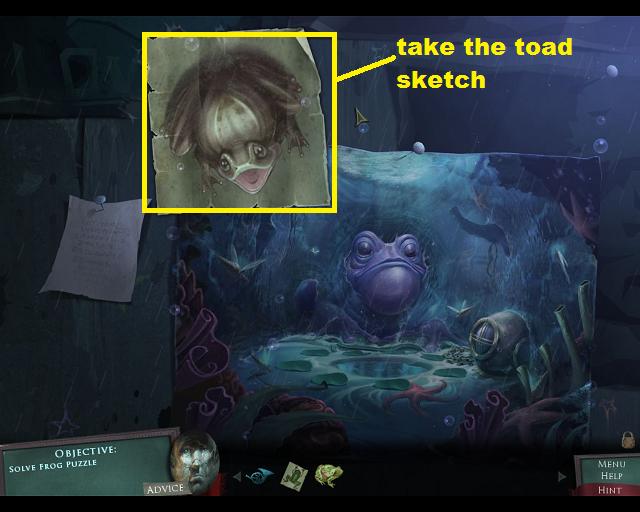
Look closely at the poster, there is an outline of something near the upper left corner, but there is a piece of paper obstructing it.
Screenshot.
Click on the paper to remove it and you will find the outline of a toad. Use the charcoal from your inventory to outline the toad and then pick up the toad sketch.
Screenshot.
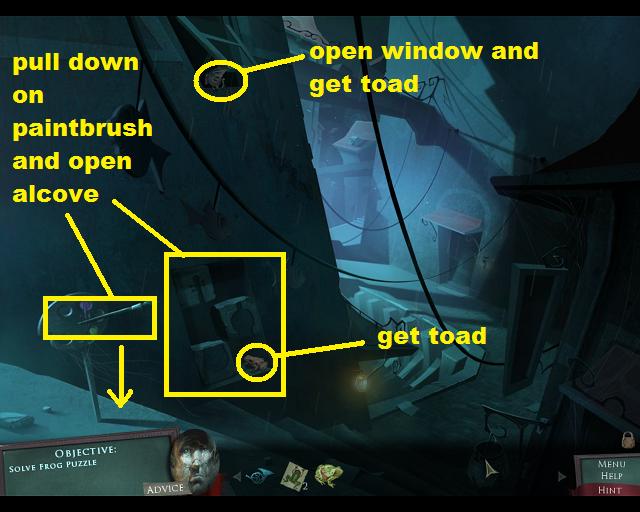
Back up and go right.
You are now in a narrow alley.
Above you is a closed window. Click on it to open it and take the toad.
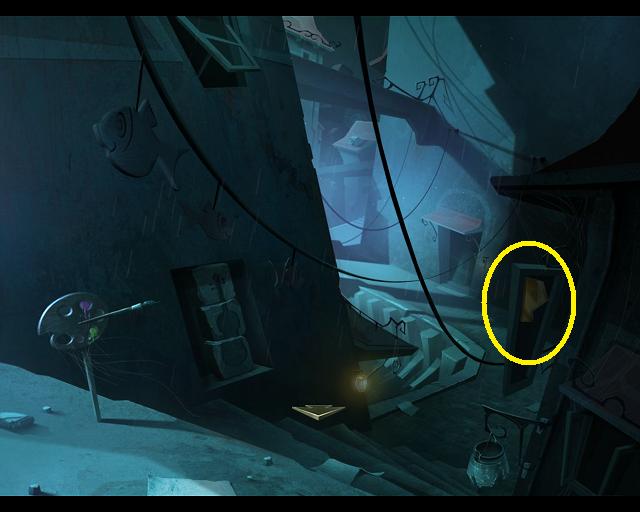
To the left is a paint palette with a brush. Click and pull down on the brush to open a hidden alcove.
Once the alcove is open take the toad.
Screenshot.
Go forward.
Yet another alley, and the way forward is blocked by shadows.
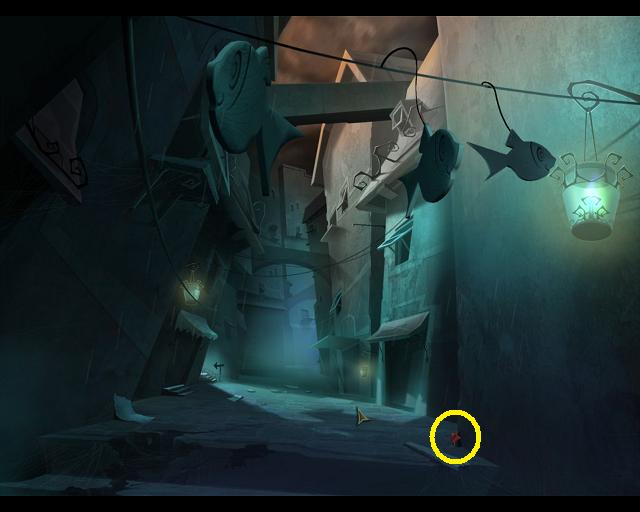
Look closely at the blue lamp in the right, there is a piece of paper behind it.
Click on the blue lamp to make it swing and when it swings away grab the toad sketch.
Screenshot.
You should now have 3 toads and 3 toad sketches.
Back up twice, go left, and enter the Toad Poster.
Click on the area below the giant toad for a close up.
Place toads (and toad sketches) on the empty lily pads.
Screenshot.
Time for a really nasty mini-game.
Toad and Fly Mini-Game
Once you place the toads on the lily pads it triggers the game.
The object of the game is to get all of the flies eaten. Each toad can only eat one fly.
When a toad eats a fly, the circle of flies moves in a clockwise direction. When a toad spits out a fly the circle of flies moves in a clockwise direction.
Click on a toad to make it eat a fly if one is directly in front of him. Click on a full toad and it will spit out a fly if there is an empty space in front.
You can click on the center of the water to reset the game.
Screenshot.
Here's the solution in 12 steps: Screenshot.
When you solve the game a chest appears in the pool. Click on it to open it and then take the 3 paints that are inside.
Screenshot.
Back up 3 times (out of the game, out of the poster, back to the violinist statue).
When you have finished with the toad poster you should have three colors of paint in your inventory: yellow, blue, and red.
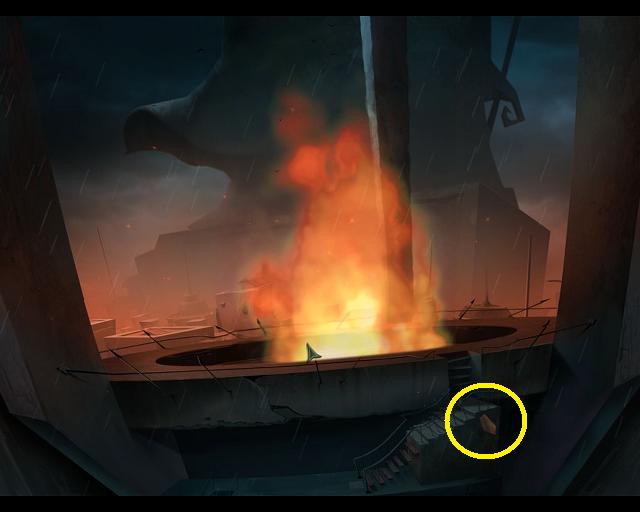
Go forward from the violinist statue twice to the beacon, then click on the beacon.
Welcome to one tough puzzle.
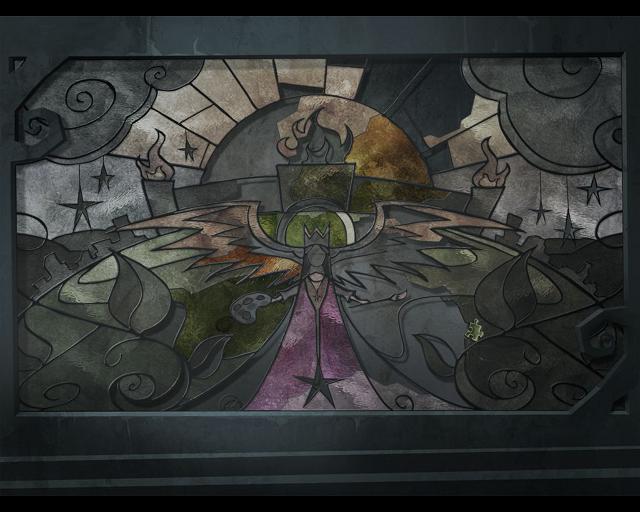
Beacon Mini-Puzzle
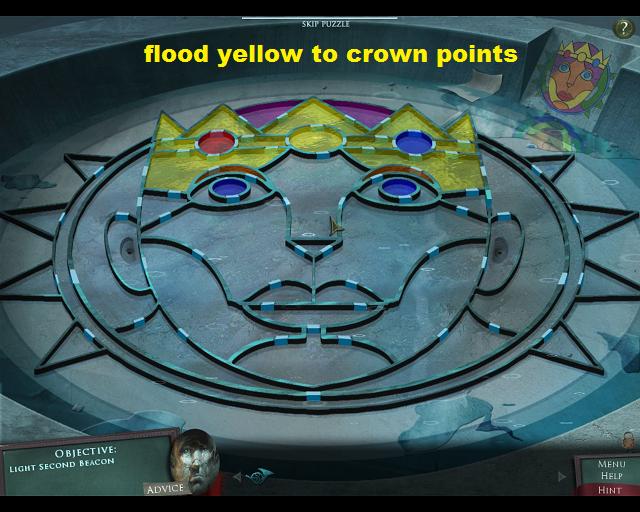
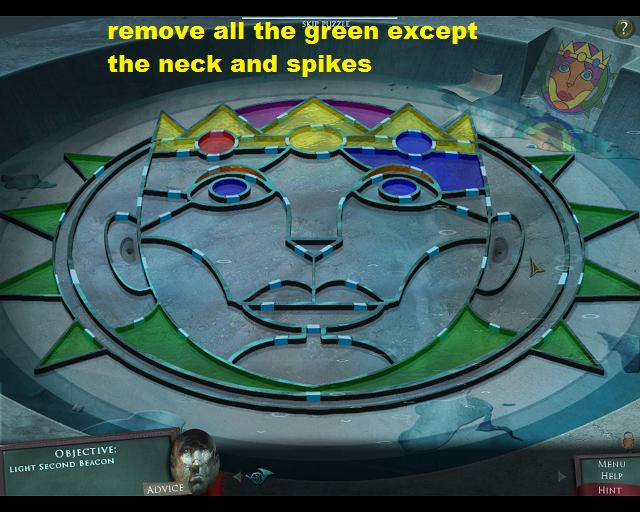
The objective is to color in the large queen's head with the same colors as shown in the small template in the upper right.
In the solution screenshots, the small circles indicate which gates to use.
First, place the three colors you have in the three circles in the crown, red, yellow, and blue. This activates the mini-puzzle.
Screenshot.
There are numerous small gates in the dividers. Click on a gate to lift it and click on a gate again to put it down. Some gates automatically shut (the ones by the color circles and the ones by the ears). The others don't, so watch and be careful.
It is vitally important to remember to close the gates once you've used them, otherwise you will get some strange color mistakes.
The ear holes can act as drains, removing unwanted colors from the face.
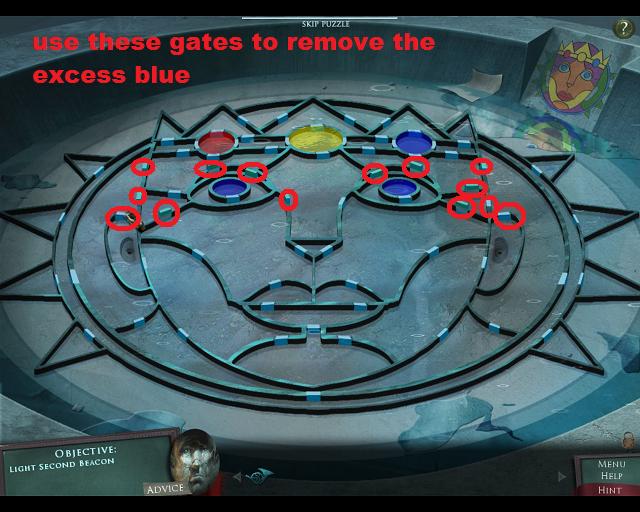
Start with the eyes and the eyebrows. You won't need to use these areas as major thoroughfares.
Fill the eyes with blue.
Screenshot.
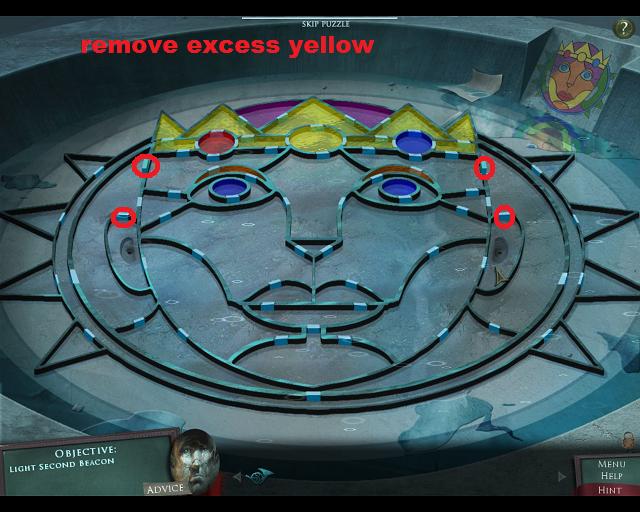
Now remove all of the excess blue, leaving just the eyes.
Screenshot.
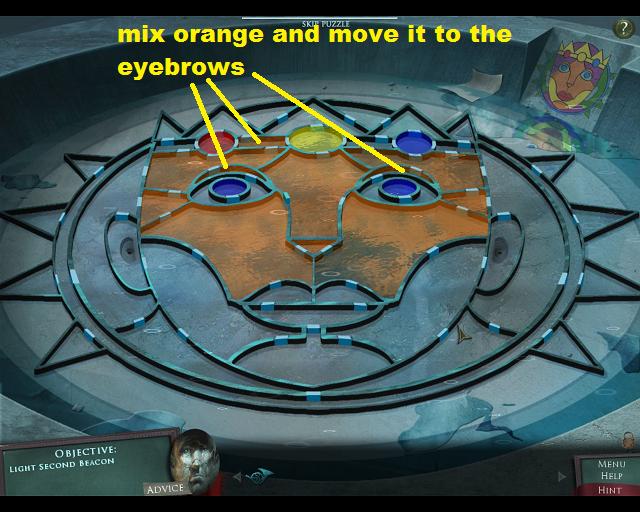
Now mix yellow and red to make orange, and spread the orange to both sides of the face, including the eyebrows.
Screenshot.
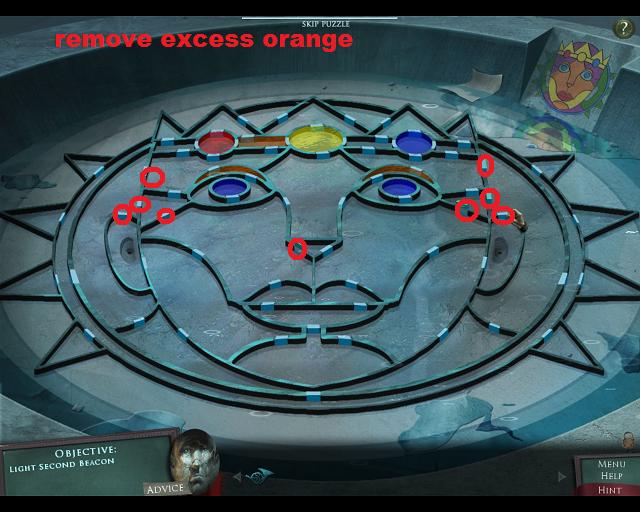
Now remove all excess orange except the eyebrows.
Screenshot.
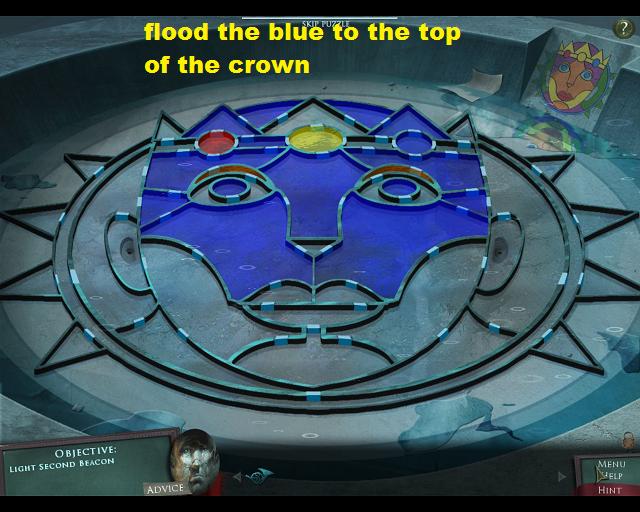
The crown is isolated at the top of the head, so it should be done next.
Flood blue around the face and up into the top section of the crown. Do not move it into that center triangle above the yellow, nor into the eyes or eyebrows.
Screenshot.
Now add red to the mix, again staying away from that center triangle.
Screenshot.
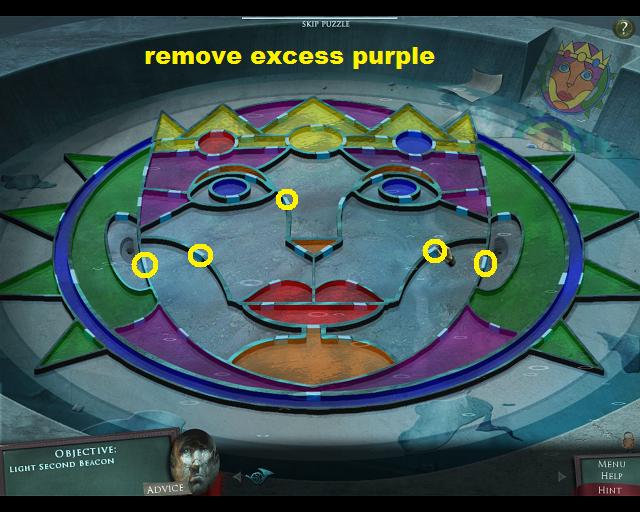
Remove the excess purple.
Screenshot.
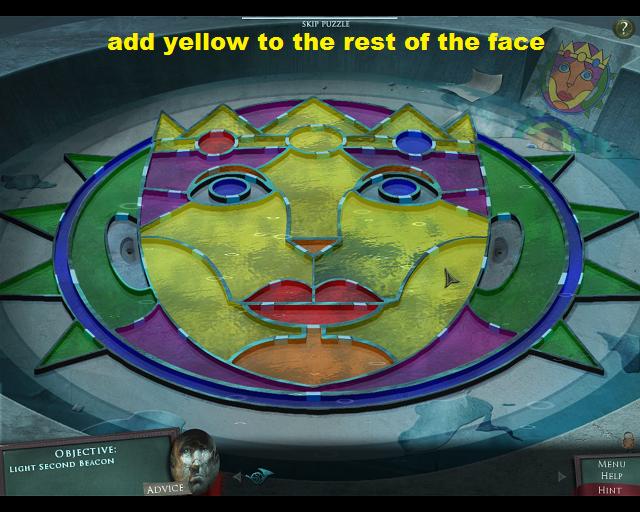
Now for the rest of the crown. Flood yellow into the face and points of the crown. Avoid the eyebrows and the eyes.
Screenshot.
Remove the excess yellow.
Screenshot.
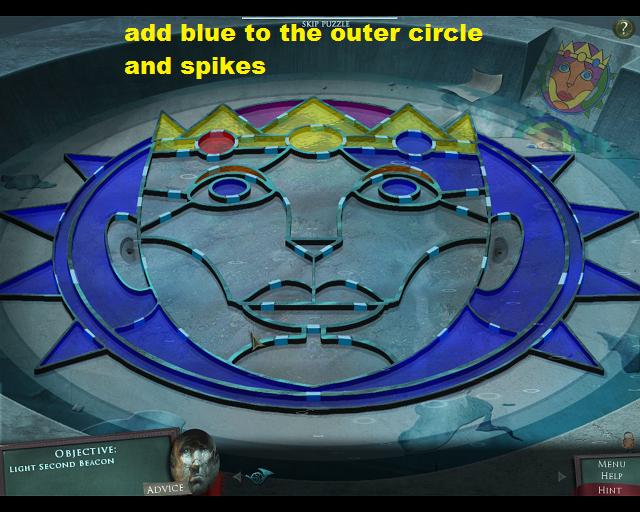
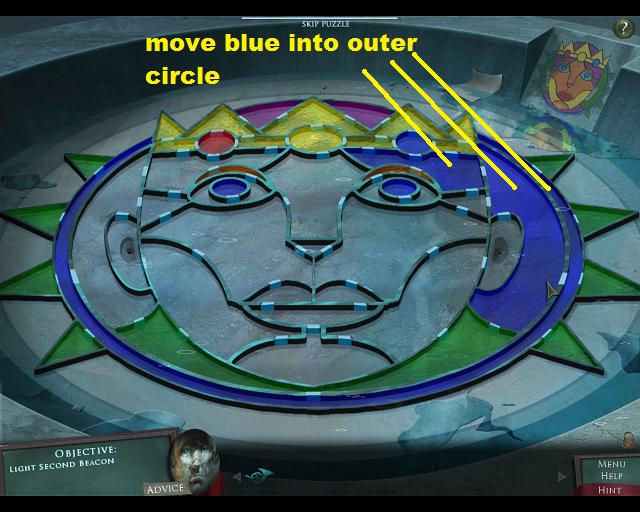
Time to tackle the outer circle of the picture.
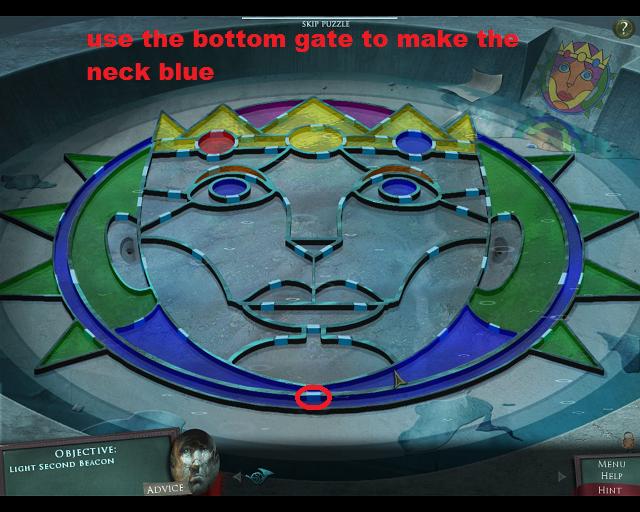
Flood the outer circle and the outer points with blue. Again, avoid the crown, eyes, and eyebrows.
Screenshot.
Bring yellow through the face, down to the neck, and mix it with the blue.
Screenshot.
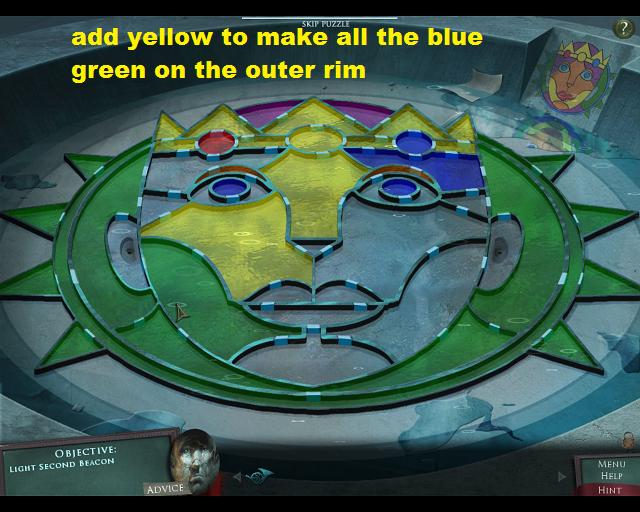
Remove all of the green except the green in the outer spikes and the green at the neck.
Screenshot.
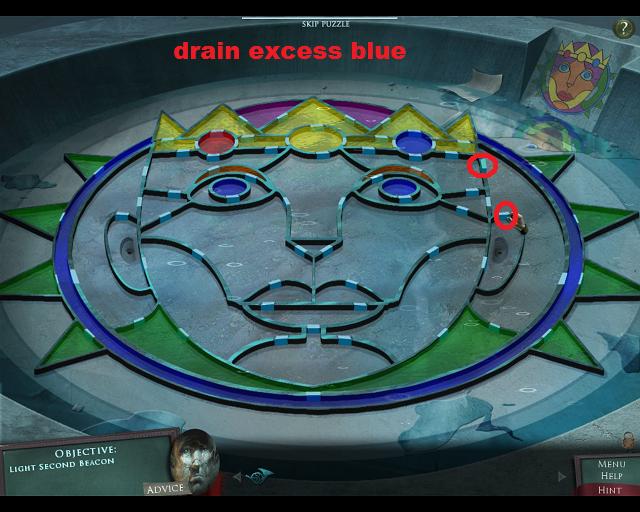
Now move the blue to the area around the right ear, then into the ring around the picture.
Screenshot.
Drain the blue from the area outside the right ear and the area above the right eye.
Screenshot.
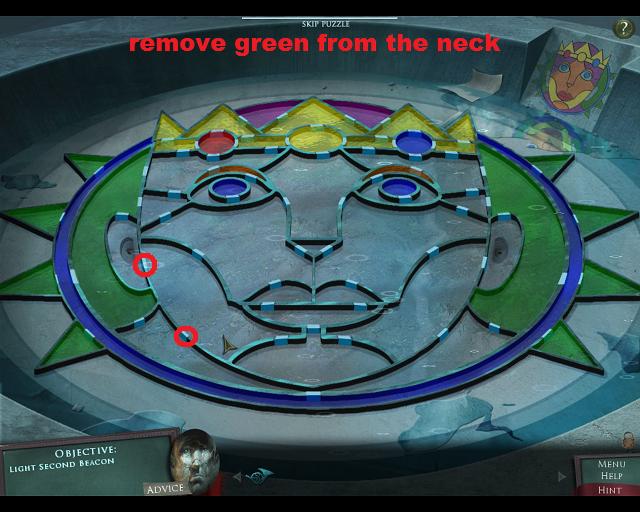
Now move the green from the neck into the areas outside both ears. Once you do this, you can no longer use the gates at the tops of the ears to drain. From now on, you can only use the gates between the ears and the cheeks to drain color.
Screenshot.
Drain the green from the neck through the gate to the left cheek and the gate between the cheek and the ear.
Screenshot.
Time to tackle the rest of the face and the neck.
Using the gate on the circle, move some blue into the neck.
Screenshot.
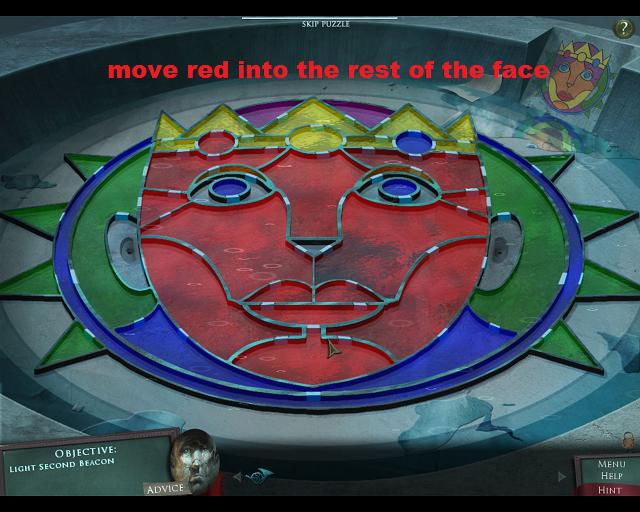
Flood the entire face and neck with red, avoiding the eyes and eyebrows.
Screenshot.
Open a gate between one of the cheeks and the neck to make the neck purple. This will also make the cheek purple. Drain the cheek through the ear, then move more red into the cheek. The face should be all red and the neck purple.
Screenshot.
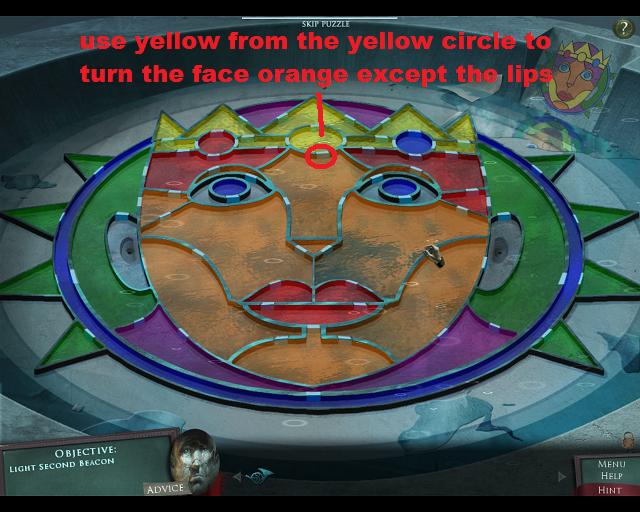
Now add some yellow from the circle in the crown and move it through the face, turning the face orange, except for the lips. Avoid the eyes, eyebrows, neck, and outer areas. Do not add yellow from any other area or your risk the original area turning orange. And don't forget the tip of the nose.
Screenshot.
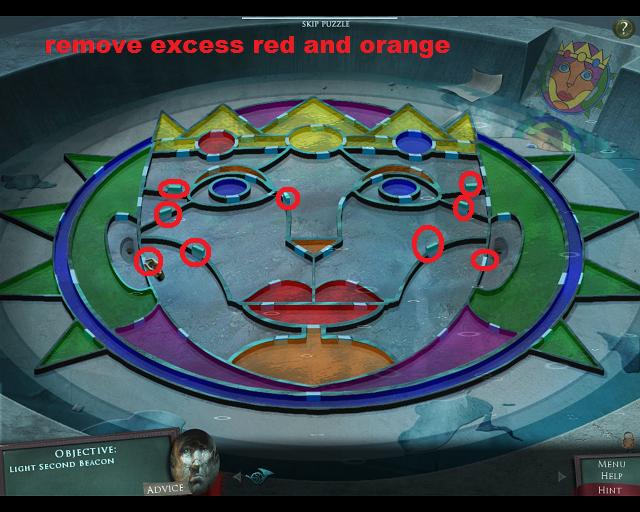
Now remove all of the orange and red from the temples and cheeks. Leave the chin and the tip of the nose orange. Leave the lips red.
Screenshot.
Move the blue into the temple area, the upper cheeks, across the nose, to the left upper cheeks and the left temple area. Once the area is blue move the red dye backwards through the same sequence, turning the area purple. Avoid the eyes and the nose tip.
Screenshot.
Screenshot.
Drain the nose and upper cheeks into the lower cheeks and then into the ear.
Screenshot.
Almost there! Now fill the empty spaces in the face with yellow, again avoiding the eyes.
Screenshot.
Now using the small gates at the tip of the nose, add orange from the tip to the upper cheeks on each side, and then the nose. The lower cheeks should remain yellow.
Screenshot.
Screenshot.
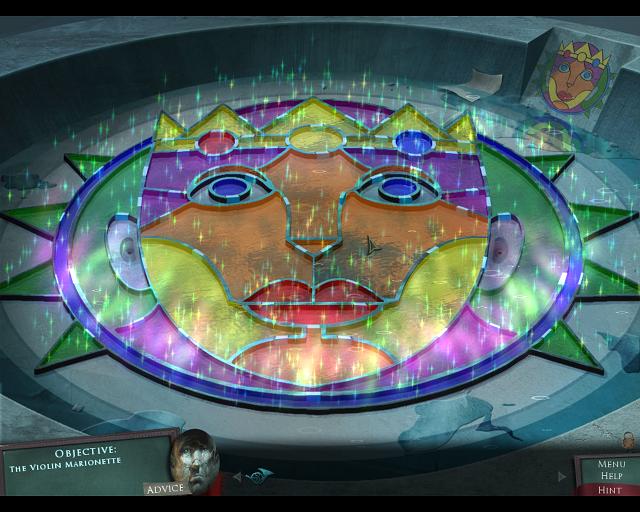
Congratulations, you've lit the beacon. Enjoy the cut-scene.
The Theater District
You have a new goal: the violin marionette.
Back up twice from the beacon until you are at the violinist statue.
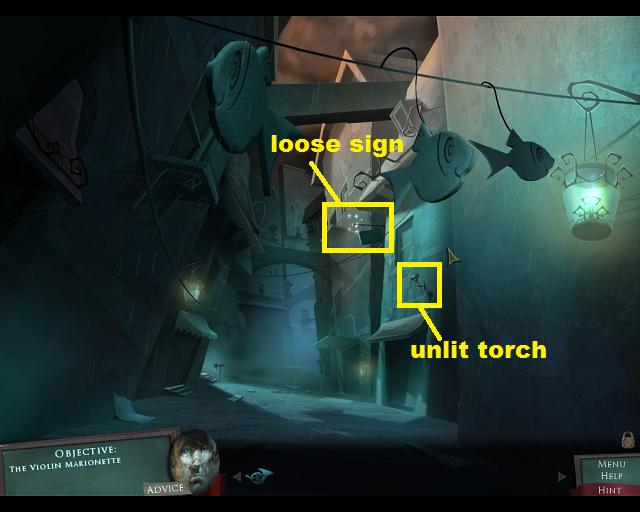
Go right into the alley then go forward to where the shadow was blocking the way.
The shadow is now gone. On the right you will notice an unlit torch and a sign hanging by a thread.
Screenshot.
Take the torch, back up twice to the violinist, then go forward twice to the beacon.
Use the torch on the beacon to light the torch.
Back up twice, go right at the statue, then go forward.
You should be back at the sign. Use the lit torch on the sign (on the loose rope) and pick up the piece that falls from it (partial stone block).
From here you can go either left or forward. Go left.
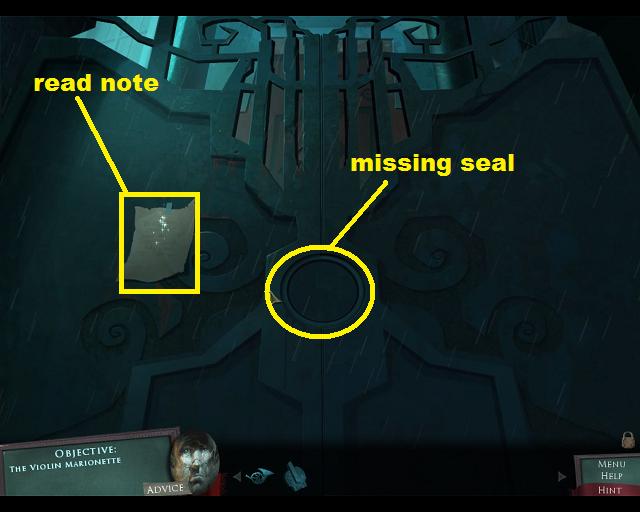
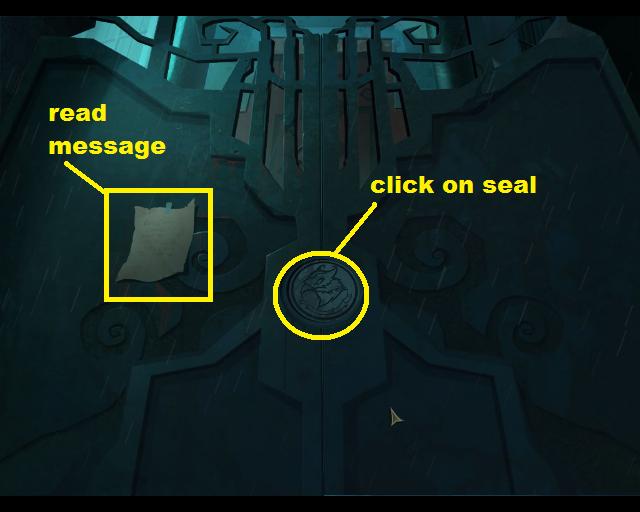
You are now at a gate with a note attached to it. Read the note. The gate is also missing a seal.
Screenshot.
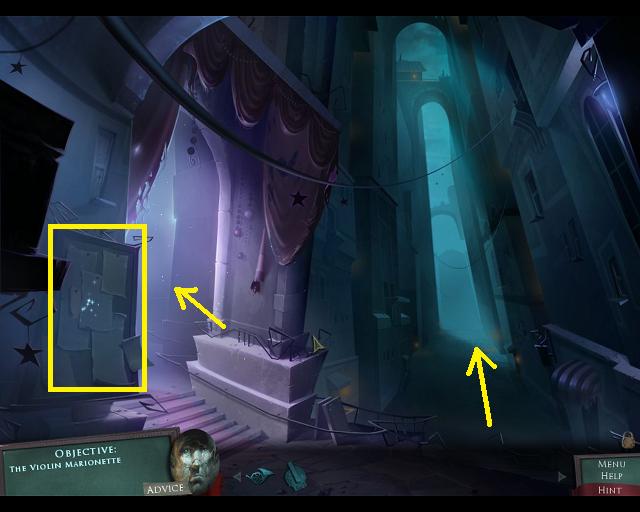
Back up once to the alley where the sign was and go forward.
You are now in a really narrow alley and you have 2 choices of direction, forward and left.
There is also a bulletin board on the wall to your left.
Screenshot.
Go left.
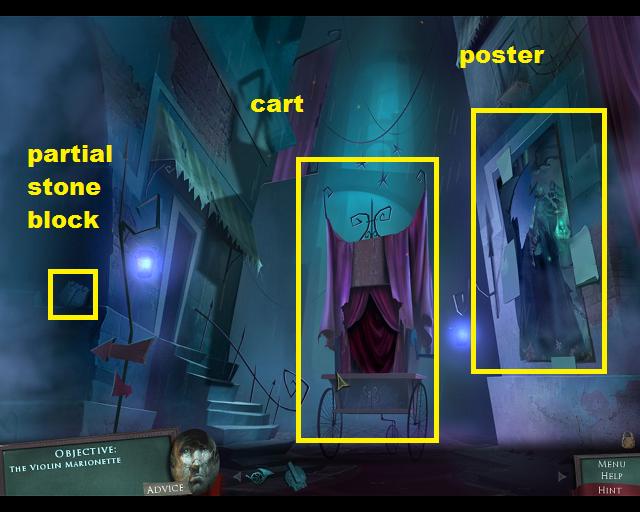
You are now facing an elaborate cart.
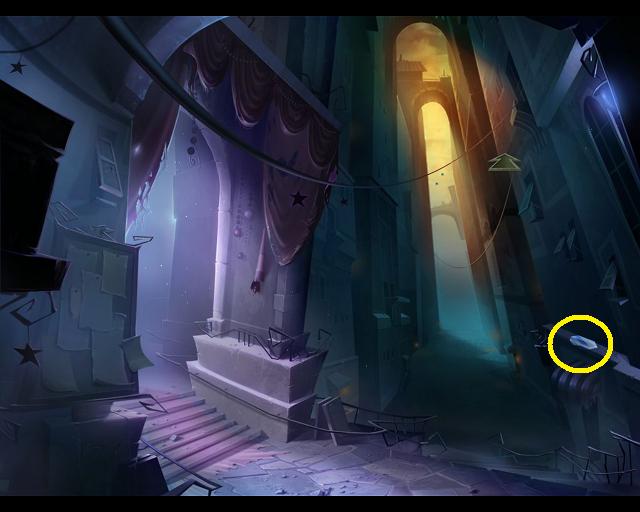
On the right wall is a poster, but it is damaged.
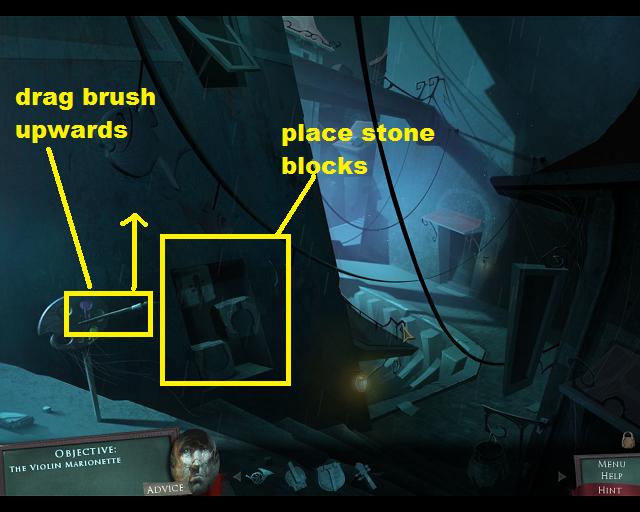
To the left, just above the sign posts, is a partial stone block. Take it and go left.
Screenshot.
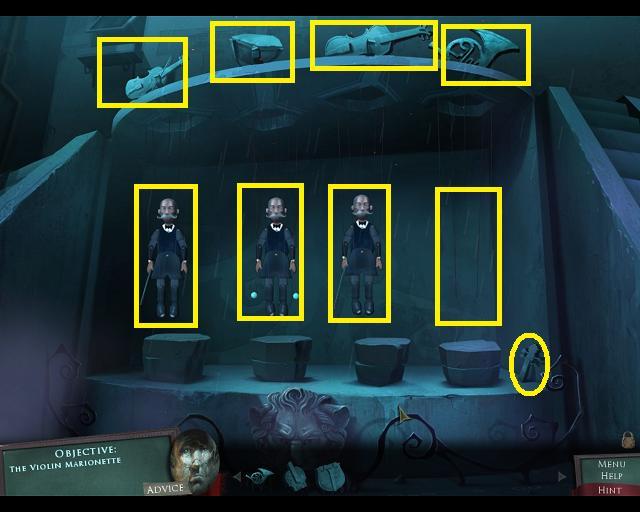
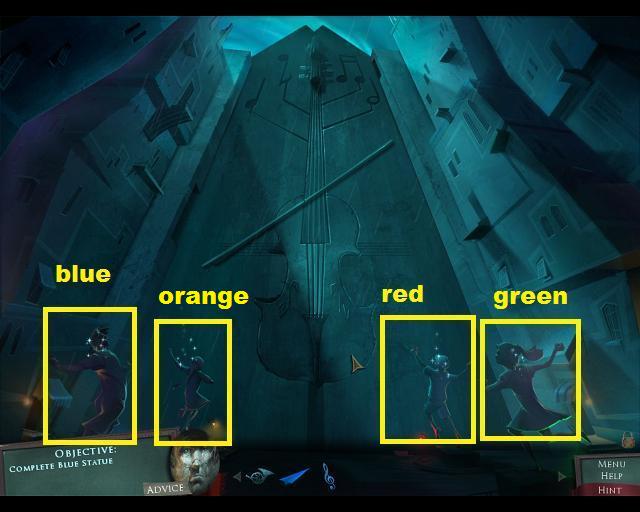
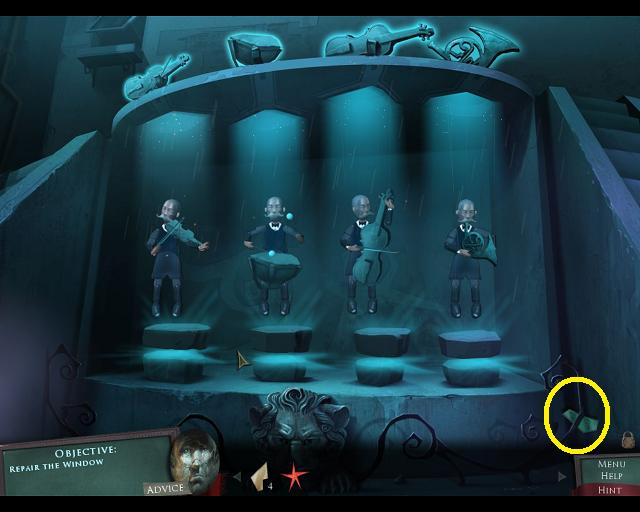
You are now facing a marionette show. There are 3 marionettes with space for a missing 4th.
Note that above each marionette is a little statue of the instrument they should be playing. From left to right: violin, drum, cello, and French horn.
To the right of the last marionette podium is a partial stone block. Take it.
Screenshot.
The object is to get each marionette his instrument to play. The first marionette needs a violin, and the 3 partial stone blocks you have are pieces of a violin.
Back up 4 times until you are in the alley with the paint palette.
Notice in the alcove on the left are notches where you can fit your partial stone blocks.
Fit your partial stone blocks into the notches and click and drag the paintbrush upwards.
Screenshot.
Take the violin and go forward twice and then left twice, back to the marionettes.
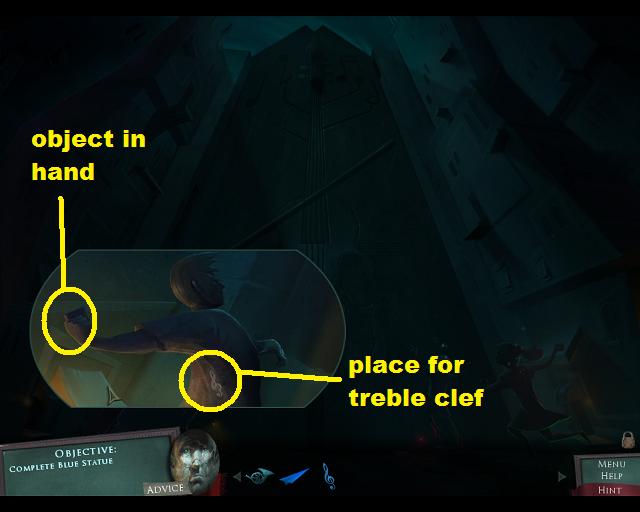
Give the violin to the first marionette.
When the marionette plays, his platform will open, revealing a blue paper airplane. You will also notice a blue treble clef floating around his head. Take both objects.
Screenshot.
Go back twice, to the alley with the bulletin board, then go forward.
You have arrived at an imposing gate, with 4 statues of cavorting children.
Screenshot.
Click on any of the statues and you will see that they have a notch for a treble clef in their backs and something in their hands.
Screenshot.
The blue treble clef will fit into the first statue on the left. Click on the statue for a close up.
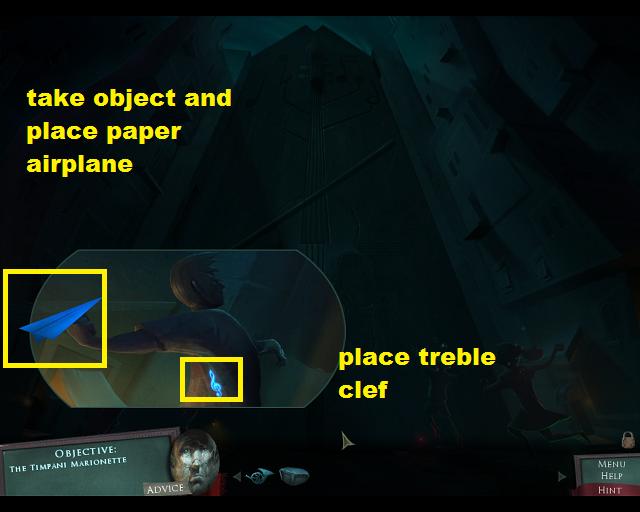
Place the treble clef and the statue's hand will open. Take the object from his hand (drum) and place the blue paper airplane there instead.
Screenshot.
Back up once and go left twice, back to the marionette show.
Give the drum to the second marionette. When he plays, take the red airplane and the red treble clef.
Back up twice and go forward once to the looming gate.
The red items go to the third statue from the left. Place the treble clef and the airplane and get a piece of a theater poster.
Back up once.
Click on the bulletin board on the left for a close up.
Cello Puzzle
The object in this game is to create a picture of a cello using the pieces on the board, as well as the piece you just got from the statue.
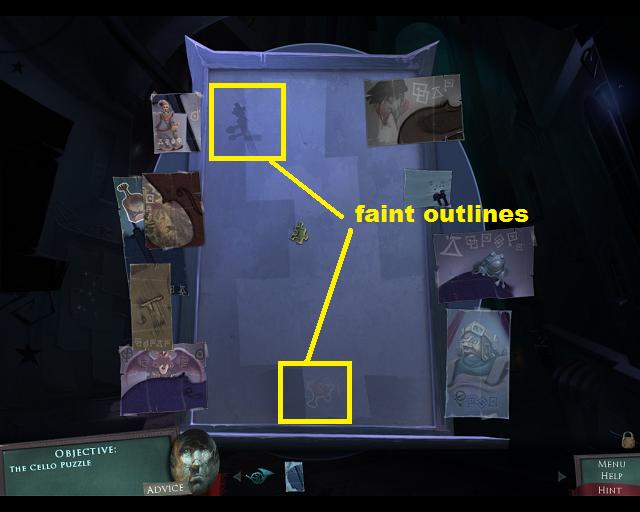
This is not a regular jigsaw puzzle. The pieces will not fit together neatly. Most of them overlap, and the only thing that matters on each piece is the bit that looks like part of a cello.
Basically you're creating a collage of a cello.
Each piece of paper on the board can be moved around by clicking and dragging it. If you click near the corners of a piece of paper the cursor turns into a spiral and you can rotate the paper.
First, move each piece of paper off of the board.
You will see faint outlines on the board, as well as part of the tuning knobs of a cello. This gives you somewhere to begin.
Screenshot.
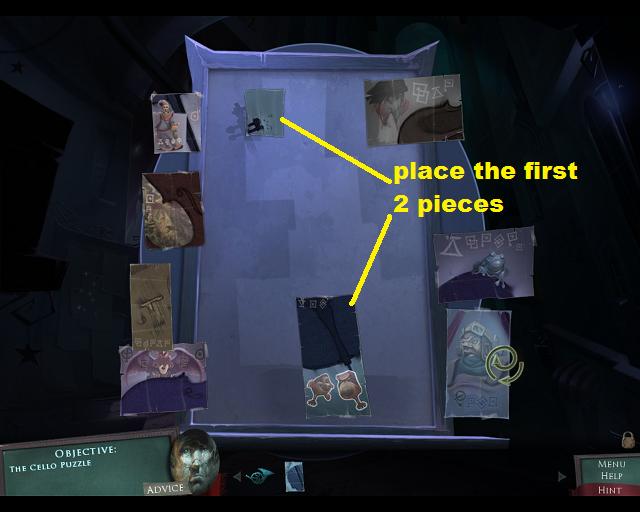
Place the theater poster from your inventory to activate the puzzle.
Start by placing the other tuning knobs and the bottom of the cello. Remember, you will have to rotate the pieces.
Screenshot.
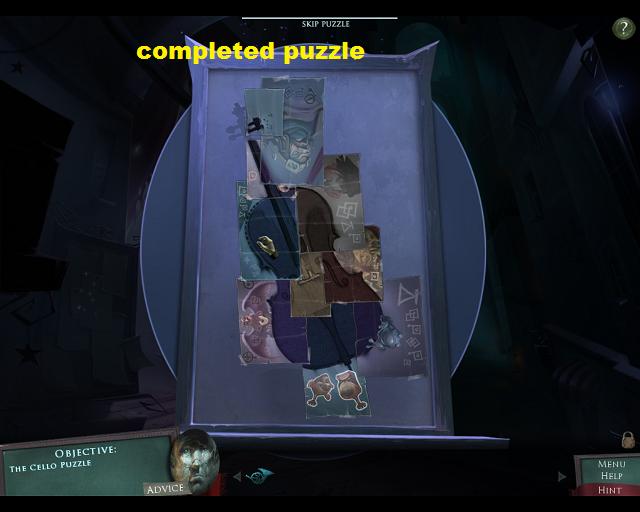
Then fill in the rest.
Screenshot.
When you finish the puzzle a cello will appear, take it.
Back out of the bulletin board, then go left twice to the marionette show.
Give the cello to the third marionette and get the green airplane and treble clef.
Back up twice and go forward once to the looming gate.
The green treble clef and airplane go to the statue on the far right.
From this statue you will get a scrap of poster.
Back up once and go left once, to the cart.
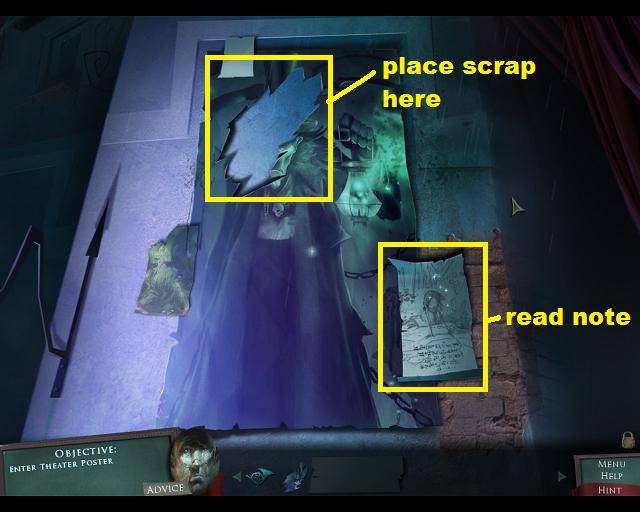
Click on the poster on the right wall.
Read the note from Iris and place the scrap of poster on the poster to repair it.
Screenshot.
Talk to the artist.
Screenshot.
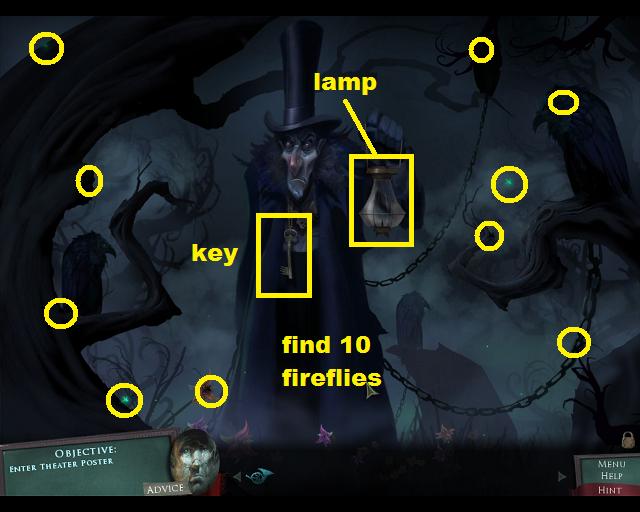
The artist would appreciate some light. Notice that there are fireflies twinkling in the scene. Collect 10 fireflies, then place them in his lamp.
Screenshot.
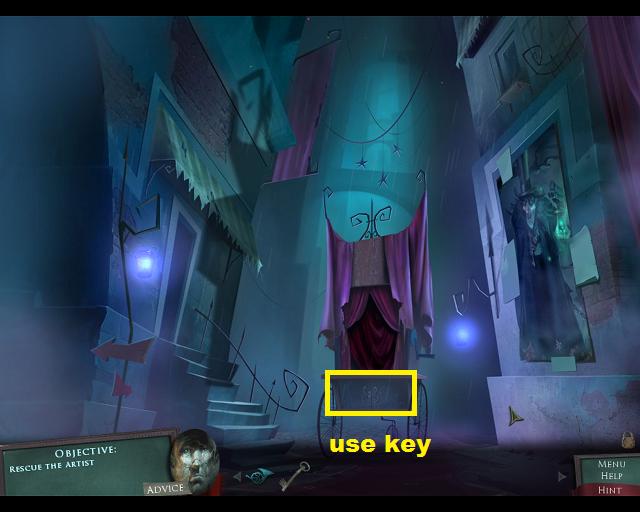
The artist will give you a key. Back out of the poster and back up once.
Use the key on the cart doors.
Screenshot.
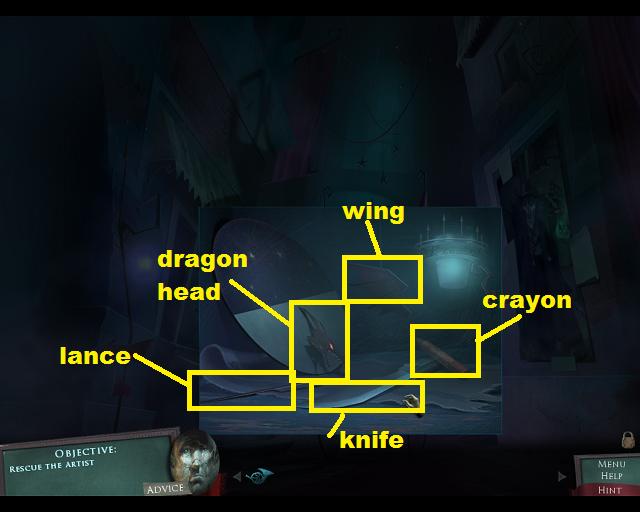
Once the doors open click on them for a close up.
Take all of the objects inside the cart: knife, crayon, dragon head, wing, lance.
Screenshot.
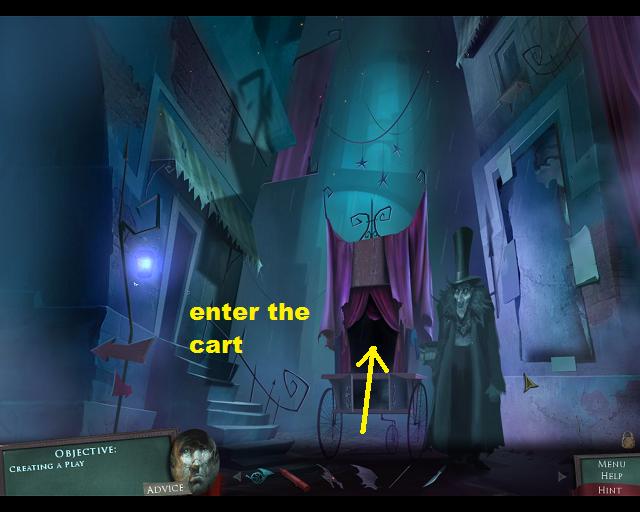
Back up from the close up and click on the poster again.
Notice the outline around the artist? Use the knife on this outline to release him from the poster.
Screenshot.
Once the artist leaves the poster, he will stand next to the cart. Enter the cart.
Screenshot.
The Story So Far...
This is an interactive story of the kingdom and what has happened to Iris and the ruling family.
You will need to interact with each scene to make it progress to the next.
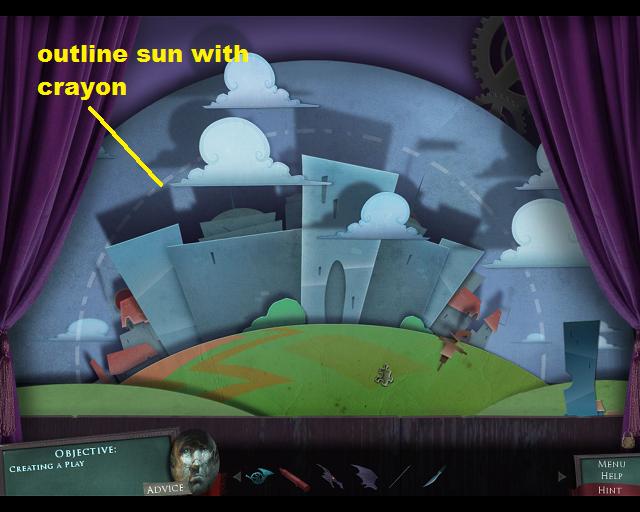
When the first scene comes up, use the crayon on your inventory to outline the sun.
Screenshot.
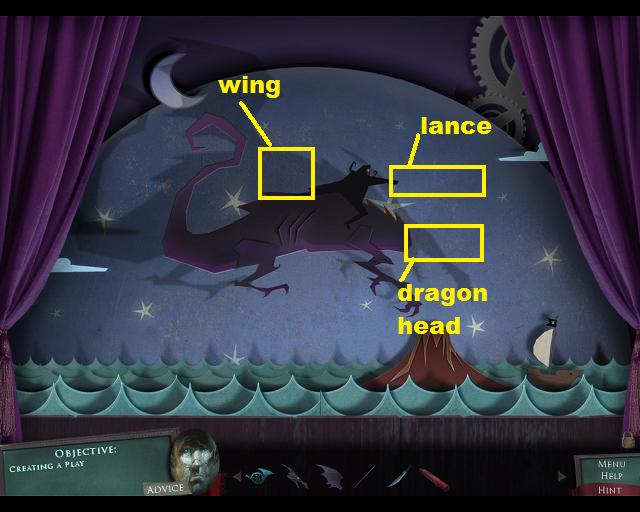
Now you will have to place the dragon head, lance, and wing to complete the second scene.
Screenshot.
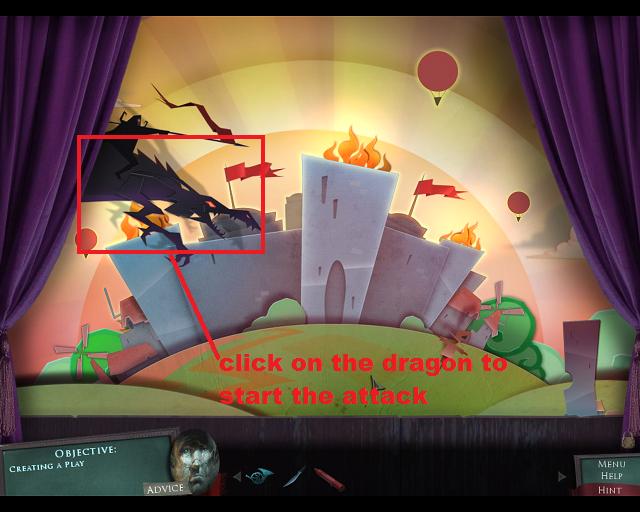
In the third scene click on the dragon to start the attack.
Screenshot.
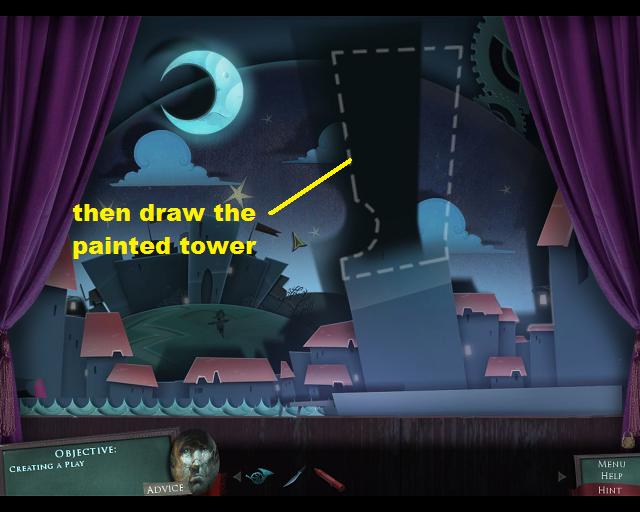
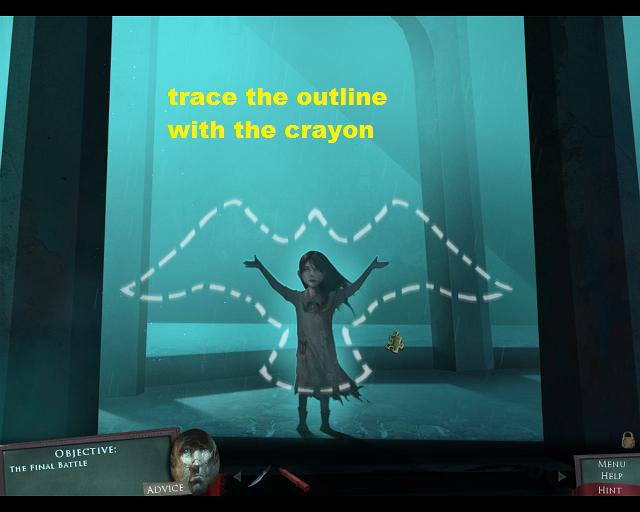
In the fourth scene use the crayon to draw the moon.
Screenshot.
Then draw the painted tower.
Screenshot.
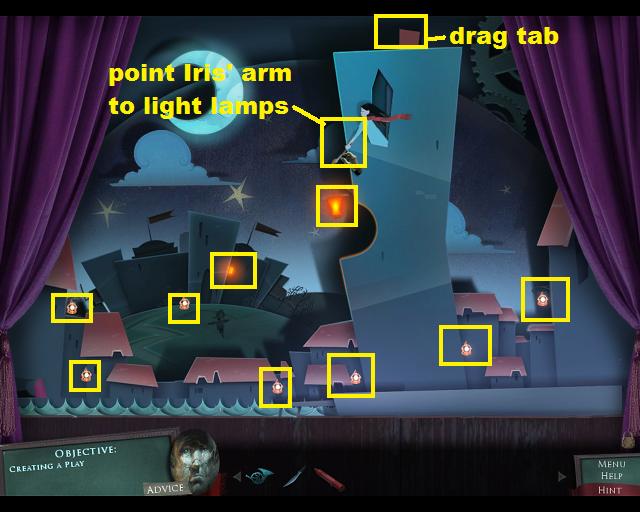
A tab will appear on top of the tower. Drag it to the left and Iris will appear in the window.
Iris' arm will shoot flames. Click and drag her arm to aim, release to fire, and use her to light the 9 lamps in the scene.
Screenshot.
When the play is over, take the marionette.
Screenshot.
Back up and go left to the marionette show.
Place the marionette in the empty position on the right. Give him the French horn.
When he plays, collect the orange treble clef and airplane.
Screenshot.
Back up twice and go forward once to the looming gates.
The orange treble clef and airplane go on the second statue from the left.
When you back out of the close up, the statues will activate the gate.
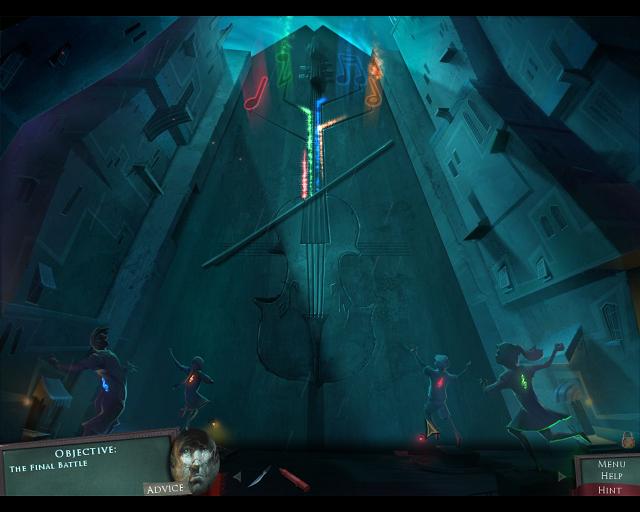
Enjoy the lightshow.
Screenshot.
The Final Battle
Go forward through the gates.
Click on Iris to speak to her.
When she is done talking an outline appears around her.
Trace the outline with the crayon.
Screenshot.
Enjoy the closing animation.
Posted by: grinnyp |
September 4, 2010 11:08 PM
|
September 4, 2010 11:08 PM
Drawn: Dark Flight Bonus Adventure Walkthrough (Collector's Edition)
To play this segment click on the "play bonus content" in the main menu. You will only get this bonus content if you have the Collector's Edition.
Iris will give you your task: restore Franklin.
You begin the task with 2 things in your inventory left over from the main game: the knife and the crayon.
After the cut-scene you will be in a very familiar place, the gate you saw in the main game that was missing a seal. Read the note from Iris and click on the seal to open the gate.
Screenshot.
You are now standing at the entrance to the Royal Tomb. There are some items scattered around, pick them up (crowbar, heavy stone, window shard).
The door to the tomb is locked, and appears to be missing 2 symbols.
On the right plinth is a carving of 6 arrows. It might be useful to remember that pattern.
Once you've collected the objects, you will notice a painting on the right. Click on the painting.
Screenshot.
Once the painting is in full view, click on it to enter.
Cool, a graveyard. There's a lot to do here, so let's take it in stages.
First, pick up everything that can be picked up. There's a shovel on the ground, a hex stone on a headstone, another hex stone on the cobblestones, and a heavy stone on the tomb on the left. When you remove the heavy stone you will find another hex stone.
Screenshot.
Now let's tackle things that can be done.
There's a sack sitting in the graveyard, use the knife to cut it open. This will get you another hex stone.
There's a fresh mound of dirt by a headstone. Use the shovel to dig up the grave (takes 3 clicks). Then use the crowbar to pry open the coffin. This will get you a piece of paper and a little green glowing worm.
Notice the tree in the distance? The one that is lit up from inside? Click on it and the light will fly over to the nearby tree, lighting it up from the inside.
Once the nearby tree lights up you will notice the hex stone in its mouth. Take it.
If you click underneath the branch of the tree that looks like an upraised arm, you wonder if it might be ticklish.
On a gravestone to the right are another bunch of 6 arrows, this time in purple. Might be good to memorize the combination.
Screenshot.
There's a bird on a tree branch in the center of the scene. Give it the worm and collect the feather when it flies away.
Use the feather on the ticklish tree and it will drop its lantern on the plant below. Once that happens, collect the hex stone and the fire flower.
Look closely at the tomb door. There are notches for 7 objects that look like hex stones, but we only have 6.
In the bottom right corner of the scene is a headstone with what looks like a hex stone carved into it.
Let's take a rubbing. Place the paper on the headstone, then use the crayon on the paper to get a sketch of a hex stone.
Screenshot.
Now place all of your hex stones into the tomb door, this triggers the mini-puzzle.
Tomb Door Mini-Puzzle
The object is to place the stones so that each is by the number of stones that is listed on the front of the stone.
However, we have two types of hex stones here, one kind with circles, one kind without.
So for the hex stone with a 1 in a circle, it needs to be next to no more than one other circled hex stone.
So for the circled hex stones, the numbers only count with other circled hex stones.
Start by removing the stones again, except for the 1.
Place the 1 anywhere around the edge, then put the non-circled 3s on either side of it..
The circled 4 goes in the center.
On the open sides of the non-circled 3s go the circled 2 hex stones.
That leaves the final open space for the circled 3 hex stone.
Screenshot.
Screenshot.
Solving the tomb door mini-puzzle causes the door to open. Go inside.
Tomb Maze
It's pretty dark inside, but you can see an unlit lamp.
Use the fire flower on the lamp to light the room.
Screenshot.
Now that you can see the room there's a lot to see.
Notice the 4 platforms on the floor, they need something heavy.
You already have 2 heavy stones, you need to find 2 more. They are in the walls, one just to the right of the end of the rope, and one further up, over a skull.
On the upper left of the ceiling is a carving, showing which stone goes to which platform.
Collect the stones and place them on the platform.
Notice the manhole cover? Use the crowbar to pry it up.
Screenshot.
Once you place the stones the doors on either side will open.
Screenshot.
However, if you go through either door, or down through the hole in the bottom, you end up in a series of twisty passages that all look alike. Er, I mean, each room looks identical.
If you click on the rope in the ceiling, you end up back in the graveyard.
To navigate this maze you need the 2 sets of directions found elsewhere, 1 in the tomb door scene, 1 on a headstone.
Go back up to the cemetery, then go back into the tomb.
Once in the tomb go right, right, down, left, down, right (directions from the tomb door scene).
You will find a room with a symbol floating in it. Take the symbol.
Screenshot.
Now use the second set of directions (arrows): left, left, left, left, down, left.
Take the second symbol and exit by clicking on the rope.
Back up twice until you are facing the tomb doors.
Place the two symbols in the doors and stand back.
Screenshot.
It would have been sufficient to just open the door.
Go forward into the now open tomb.
There's poor Franklin, and above him is the final puzzle.
Click on the stained glass window above Franklin for a close up.
Screenshot.
Your quest is to find the pieces of the stained glass window and repair it. This will necessitate revisiting almost every scene in the game.
You can do this in whatever order you choose. For purposes of this walkthrough, we will go forward to the last beacon and work our way backwards.
You will eventually collect 30 glass shards and 7 red stars.
Back out of the window and then back up twice until you are in the alley.
Here in the alley you will find your first piece, a red star. Collect it.
Screenshot.
Go forward.
You are now at the intersection that leads to the marionettes. There is a shard here, pick it up and move forward.
Screenshot.
There are no shards at the violin gate, so move forward.
There's a shard here at the beacon, collect it.
Screenshot.
Back up twice to the intersection and then go left to the cart.
Collect the shard here and then go left to the marionettes.
Screenshot.
Collect the shard at the marionettes.
Screenshot.
Back up twice to the intersection, then back up twice more, until you are in the scene with the palette and brush.
Collect the shard here.
Screenshot.
Back up to the violin statue and collect the shard here.
Screenshot.
Turn left to the bulletin board and collect the fragment here.
Screenshot.
Click on the toad poster to enter.
Collect the red star here and back up twice.
Screenshot.
Go forward.
Collect the shard here and go forward to the 2nd beacon.
Screenshot.
Collect the shard at the beacon and back up twice to the violinist.
Screenshot.
Back up once from the violinist and collect the shard in the tunnel.
Screenshot.
Back up once and collect the shard here.
Screenshot.
Back up once to the book bridge and collect the shard there.
Screenshot.
Back up twice to the top of the library stairs and collect the shard.
Screenshot.
Go forward into the children's ward and collect the shard there.
Screenshot.
Back up twice to the main library and collect the shard there.
Screenshot.
Go right up the stairs.
Collect the red star here and proceed upwards.
Screenshot.
Collect the shard here and go forward into the mouth.
Screenshot.
Collect the shard here and back up 3 times to the main library.
Screenshot.
Back up once to the library entrance and get the shard there.
Screenshot.
Back up once and pick up the shard there (this is where you met Pinocchio).
Screenshot.
Back up once to the street and pick up the shard there.
Screenshot.
Back up once to the intersection and collect the red star.
Screenshot.
Go left twice towards the beacon and collect the red star on the stairs.
Screenshot.
Back up twice to the intersection, then go right once towards the shop.
Collect the shard there and then go forward to the shop window.
Screenshot.
Collect the red star in the window and then go into the windmill painting.
Screenshot.
Collect the shard on the gate and then back up 3 times to the intersection.
Screenshot.
Back up once into the stairwell and collect the shard.
Screenshot.
Back up once to the pedestal and collect the shard there.
Screenshot.
Back up once into the tunnel and collect the shard on the floor.
Screenshot.
Back up once into the music puzzle room and pick up the shard.
Screenshot.
Back up once to the lion head statues and collect the shard.
Screenshot.
Back up once to the bell and then climb the rope up.
On the ground floor of the tower collect the red star (on the floor by the spilled ink).
Screenshot.
Go forward across the bridge.
Collect the shard from the alcove.
Screenshot.
Go forward into the painting in the alcove.
Collect the shard propped against the ship.
Screenshot.
At this point you should have 30 shards and 7 red stars. That's all you need to solve the stained glass window puzzle.
Back up twice and go down to the bell.
From here you need to go back to the tomb.
Go forward 11 times until you are at the spiral staircase in the library.
Go down the stairs (twice).
Go forward 3 times to the violinist statue.
Go right.
Go forward once.
Go left.
Go forward into the tomb and click on the stained glass window for a close up.
Stained Glass Window Puzzle
Puzzle pieces can be picked up from the center, and rotated from the edges.
The smaller pieces do not rotate.
The trick to solving the puzzle is to take it in sections.
Although the puzzle doesn't "activate" (i.e. the skip puzzle bar appears) until you put either your stars or shards into the scene, you can still place pieces in the puzzle.
The puzzle already has some pieces in it to start, so try to fit those first.
Don't rotate any of the pieces already in the puzzle! They are already oriented correctly, you just need to place them.
Screenshot.
Screenshot.
Once you have the pieces in place, you have an idea of what color goes where.
Now add just the stars from your inventory to the puzzle. These are easy to place.
Screenshot.
Screenshot.
Once everything else is in place, now add the 30 pieces from your inventory. This will "activate" the puzzle.
Screenshot.
Start with the obvious stuff, things that have a particular shape, i.e. the face, palette, crown, pieces of wing, etc.
Screenshot.
Pieces of her dress are a pretty obvious color (sort of pink), so place those.
Screenshot.
Then go for the large pieces. Move the smaller pieces to the outer edge of the puzzle so you can see them more clearly.
Screenshot.
After that it's pretty easy to fit the smaller pieces and you're done!
Screenshot.
Once you've finished the stained glass window, enjoy the cut-scene.
Posted by: grinnyp |
September 5, 2010 4:44 PM
|
September 5, 2010 4:44 PM