
Dreamland
Platform: Mac, Windows
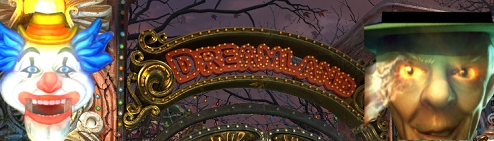
![]() The tinny sound of calliope music echoes in your ears, intermittently overcome by the shrieks of little children and the bellowing of barkers. Wandering, leaves crunching underfoot, wafts of familiar scents evoking pleasure, buttery popcorn, spun sugar, batter coated food frying overlay an undertone of machine oil. Dizzying sights of whirling lights pierce the darkness of night as a chill wind caresses the skin, raising goose bumps; magic and mystery are in the air tonight. The coming of fall brings one of childhood's delights, the traveling carnival, but as you get older doesn't it all seem a bit creepy? The bright lights cannot quite mask the rot and decay that is noticeable close up, and cast strange and frightening shadows on the faces of workers and fair-goers alike. Underneath the surface it seems as if something lurks, something perhaps evil, and Dreamland, the latest adventure/hidden object hybrid by AstarGames captures this mood perfectly. Perhaps a little too perfectly, as you might never view a traveling carnival or circus the same way again. Or sleep really well after playing.
The tinny sound of calliope music echoes in your ears, intermittently overcome by the shrieks of little children and the bellowing of barkers. Wandering, leaves crunching underfoot, wafts of familiar scents evoking pleasure, buttery popcorn, spun sugar, batter coated food frying overlay an undertone of machine oil. Dizzying sights of whirling lights pierce the darkness of night as a chill wind caresses the skin, raising goose bumps; magic and mystery are in the air tonight. The coming of fall brings one of childhood's delights, the traveling carnival, but as you get older doesn't it all seem a bit creepy? The bright lights cannot quite mask the rot and decay that is noticeable close up, and cast strange and frightening shadows on the faces of workers and fair-goers alike. Underneath the surface it seems as if something lurks, something perhaps evil, and Dreamland, the latest adventure/hidden object hybrid by AstarGames captures this mood perfectly. Perhaps a little too perfectly, as you might never view a traveling carnival or circus the same way again. Or sleep really well after playing.
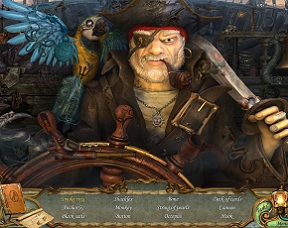
 A quick, frightening animation sets the scene as a young man flees for his life from a carnival that has come alive, attempting to keep him inside. That boy is your younger brother, who has not escaped unharmed, and it is up to you to trace his steps and fight the evil that has damaged his soul. The malignant dwarf who runs the carnival likes to play games, you see, and the price for failure is very high. You as the player must try to beat him at his own game, solving puzzles, finding hidden objects, and navigating your way through the maze that is this evil place, while your opponent gloats via a loudspeaker system that is everywhere. Can you succeed in saving your brother's soul?
Dreamland plays like a standard hidden object/adventure hybrid, with a changing cursor, navigation arrows, and the ever-present glittering dots in the scenery. Sparkles can indicate places to examine, hidden object scenes, objects that can be collected and mini-games and puzzles. Once you solve your way past the gates (requiring a minor blood sacrifice) there is a handy map to be found that allows you to not only navigate the area but also lets you know where new hidden object scenes have triggered and allows the player to "jump" from one location to another quickly. Every hidden object scene will yield one useful object that will go into your inventory, and each scene also includes at least one item that you must "create" either by assembling pieces or interacting with other objects.
 Navigation is not quite as simple as pointing and clicking, however. Areas of the carnival are protected by gates, each one a mini-game or puzzle. Once you solve your way through the gates, each attraction or ride requires a ticket, which can only be obtained by spending a special coin (found along the way) and playing the Wheel of Fortune, itself a match-3 mini-game that gets more difficult with each ticket earned. The first mini-games and puzzles are very easy, but the difficulty increases as you wind your way further and further into the dwarf's lair, hopefully attaining your ultimate goal of finding the heart of the carnival, beating the dwarf's puzzles, and rescuing your brother's soul.
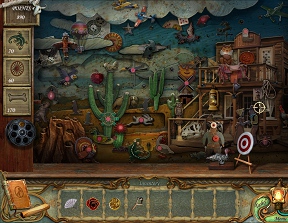
Analysis: What sets Dreamland apart from the crowd of adventure/hidden object hybrids is the fact that it has all the bells and whistles of a more expensive (read: Collector's Edition) game for the price of a standard release. Gameplay is gratifyingly longer than usual for the hybrids on the market and the puzzles, while familiar, are fun and actually increase in difficulty along the way. The hidden object scenes are tough, cluttered scenes and there are even two (not one, but two) side quests to search for extra objects as well.
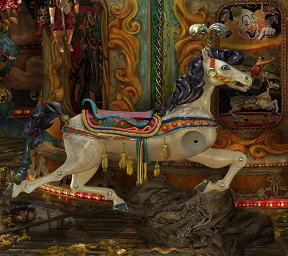
 The graphics are eerily beautiful, capturing both the magic and the underlying decay of the traveling carnie. Adding to the atmosphere is the unobtrusive yet creepy music, the haunting incidental sounds (creaking wood, rustling leaves, etc.) and the annoying boasting of your enemy over the loudspeakers as you progress from one location to the next. The hidden object scenes are dark and a little grainy, and very, very cluttered. A handy refilling hint timer (that fills extremely slowly) doubles as help within the hidden object scenes as well as outside, letting you know (if you dare to ask) where to go next. You also have the standard notebook which keeps track of the story and clues along the way as well as that magical map.
Ah, the map, one of the best features of the game. The map serves three purposes: it helps you keep track of the rides and attractions in this winding maze of a carnival, it allows the player to "jump" instantly from one place to another (cutting down on the "back and forthing" so common to many adventure hybrids), and it allows a player to find hidden objects scenes that have reactivated for a second (and/or third) time, cutting down on even more wandering while trying to figure out what to do next. The puzzles and mini-games are skippable after a certain amount of time as well.
The only minor downside to Dreamland is the graininess and darkness of some of the hidden object scenes, making them a bit difficult for old, tired eyes. The puzzles are not original and for the most part pretty easy, but also feature some amusing fun like a shooting gallery and an amazing evolution/progression puzzle similar to the Grow series of games. The atmosphere is spooky, the story hooks you immediately, and the gameplay is refreshingly long for a standard issue adventure hybrid. This is not a game that you will finish ten minutes after the demo runs out.
Beautiful, engaging, lengthy, difficult, Dreamland is everything that you could want in a hidden object/adventure hybrid and more. A feast for the eyes, ears, and brains, evoking that long ago distrust of the traveling carnival and showing the evil that can lurk beneath the surface of any childhood fantasy. Take the time to enjoy the experience and the thrills of Dreamland. And bonus points to anyone who can identify the closing quote.
"All the meanness we harbor, they borrow in redoubled spades. They're a billion times itchier for pain, sorrow, and sickness than the average man. We salt our lives with other people's sins. Our flesh to us tastes sweet. But the carnival doesn't care if it stinks by moonlight instead of sun, so long as it gorges on fear and pain. That's the fuel, the vapor that spins the carousel, the raw stuffs of terror, the excruciating agony of guilt, the scream from real or imagined wounds."
![]() Windows:
Windows:
Download the demo
Get the full version
![]() Mac OS X:
Mac OS X:
Download the demo
Get the full version


Walkthrough Guide
(Please allow page to fully load for spoiler tags to be functional.)
Dreamland Walkthrough
Awards
Dreamland awards can be found by clicking the "Awards" tab in the main menu.
Shooting Gallery Award
Score 1,500 points in the Shooting Gallery
Hint Award
Use the hint button less than 20 times.
Puzzle Award
Complete all puzzles in the game without skipping.
Timed Award
Complete the game in less than 5 hours.
Item Award
Successfully find all hidden items.
Starfish Award
Find all starfish in the game.
Marbles Award
Find all marbles in the game.
General Information
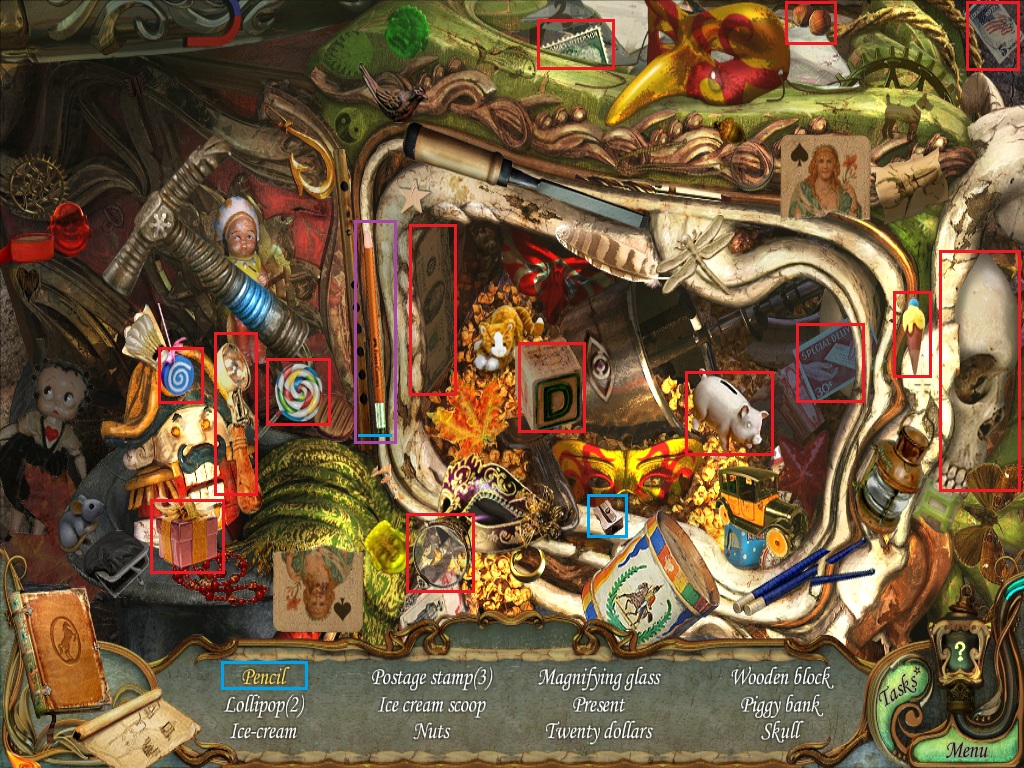
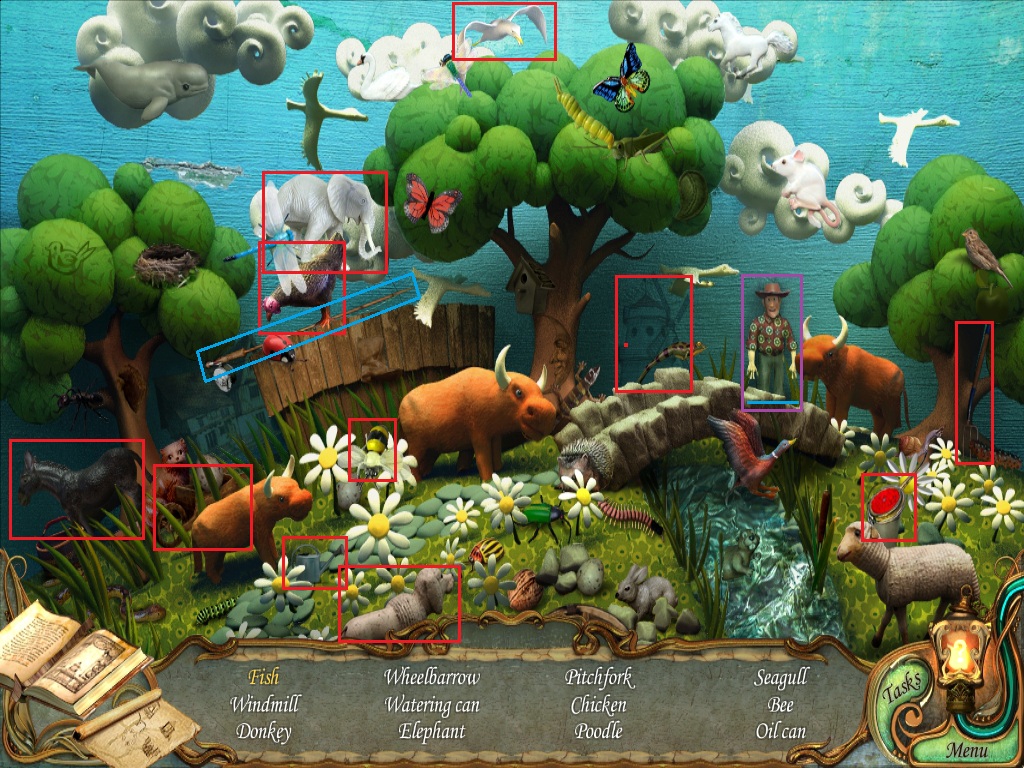
When the cursor is over an interactable object or area, the zone around it will glitter. In screenshots, these items or areas will be indicated with a purple square.
Hidden object scenes consist of a list of items that have to be found and collected; these items are indicated in screenshots with a red square.
In each hidden object scene, there is at least one item that needs to be manipulated, combined, or interacted with to be completed.
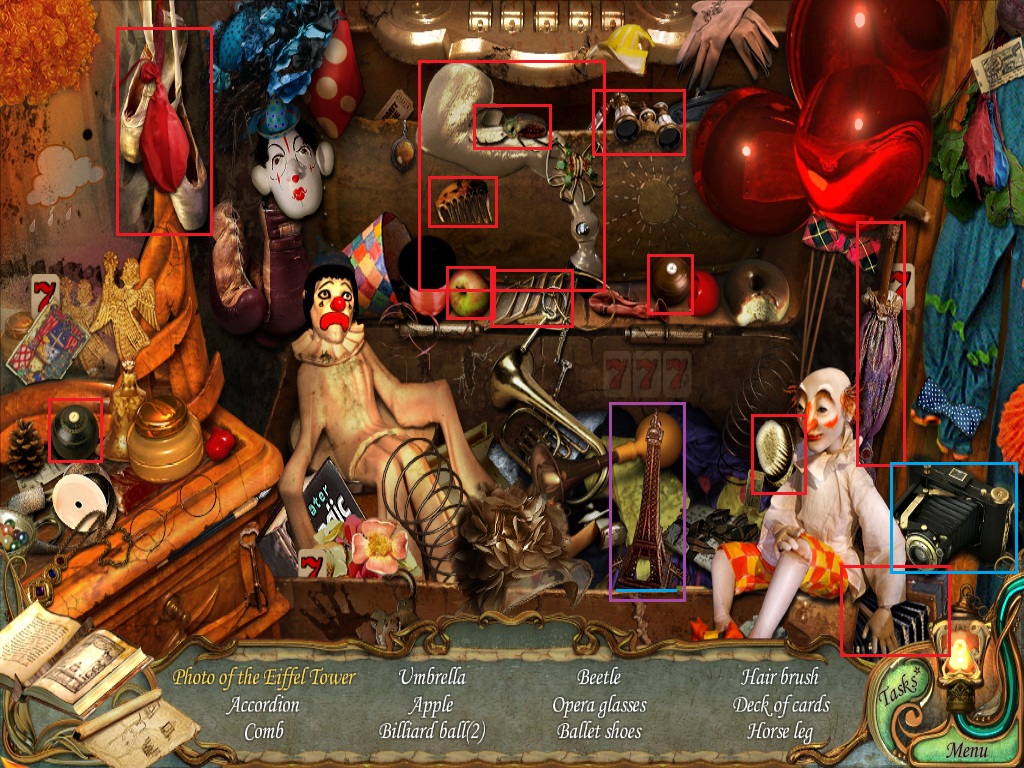
In the list of items, the interactive object's name is colored yellow.
In screenshots, the parts to these interactive items are indicated with a blue square.
The area in which the item or pieces of the item are used is indicated with a purple square and corresponding blue line.
If there is a zone that has an uncompleted and available hidden object scene, that area will glow yellow on the map.
Many of the hidden object scenes are repeated, so be sure to check your Map frequently for updates.
You can fast-travel to any location you have already visited by selecting the area on the Map in the lower left corner.
You can also fast-travel to areas with the Task button on the bottom right corner of the menu.
First, click the Task button.
Next, select an uncompleted task by clicking on it, and you will automatically travel to the location of that task.
The lantern next to the Task button is the Hint button. Clicking the Hint button provides helpful advice used to solve puzzles, reveals items in hidden object scenes, and shows the next step of your adventure if you're stuck.
The Diary in the bottom left corner contains important plot points, notes, and helpful information that can be used as a reference to solve certain puzzles.
The Inventory is listed at the bottom of the screen.
Mouse over the Inventory tab to raise the bar and view a list of your items.
Click the left or right buttons on the side of the inventory to scroll through the list.
Chapter 1
Main Entrance
Take the starfish for the Starfish Award on the left column, beneath the lion head.
Click the ticket booth to begin the hidden object scene.
Click the right door screen to slide it open, revealing the Clown Nose.
Click the left door screen to slide it open and reveal the Popcorn.
Click the basketball and drag it to the basket and make the Ball in a Basket.
Screenshot.
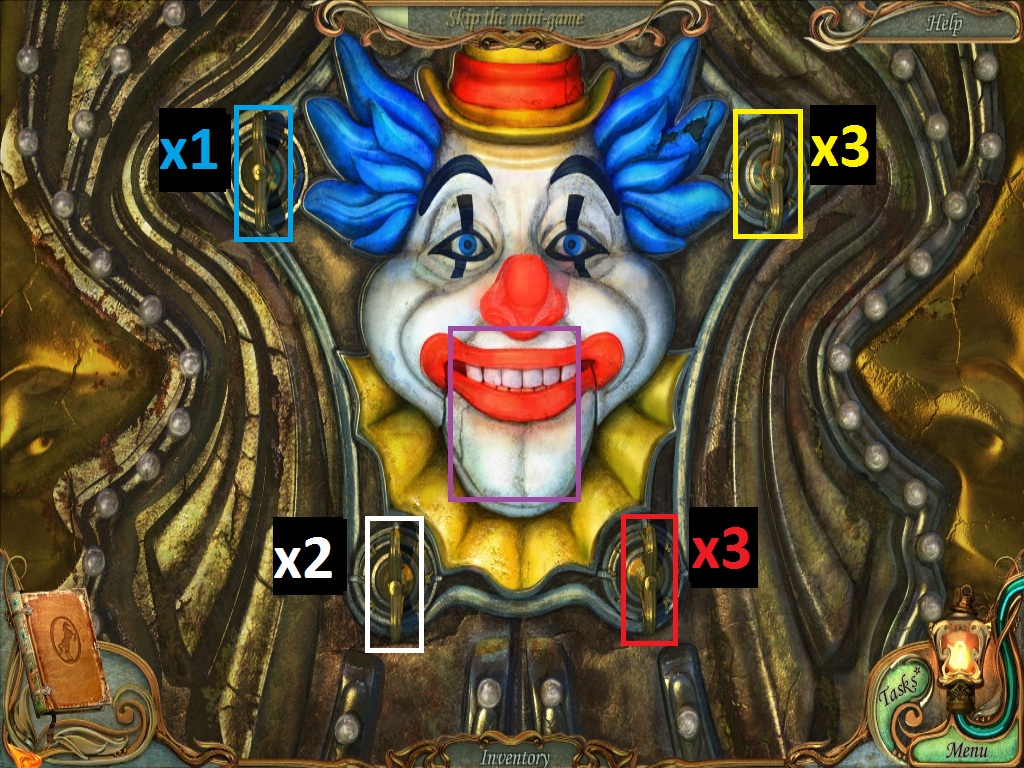
Click the clown head in the center of the entrance gate to zoom in.
Place the Clown Nose from your inventory on the clown head to start the clown puzzle.
To solve this puzzle, click each of the key handles until all four colors are illuminated.
Click the top left handle one time to illuminate the blue light.
Click the top right handle three times to illuminate the yellow light.
Click the bottom left handle two times to illuminate the white light.
Click the bottom right handle three times to illuminate the red light and open the clown's mouth.
Screenshot.
Place the Entrance Ticket from your inventory into the clown's mouth.
Go through the opened gate into the central square.
Central Square
Click the two pieces of painted wood at the foot of the stairs to add them to your inventory.
Click the map sign to the right to zoom in.
Take the paper copy pinned to the left corner to add it to your toolbar.
You can use the map at your toolbar by clicking it and then clicking any location you've already visited to instantly travel to that area.
Take the starfish for the Starfish Award at the bottom left corner of the map.
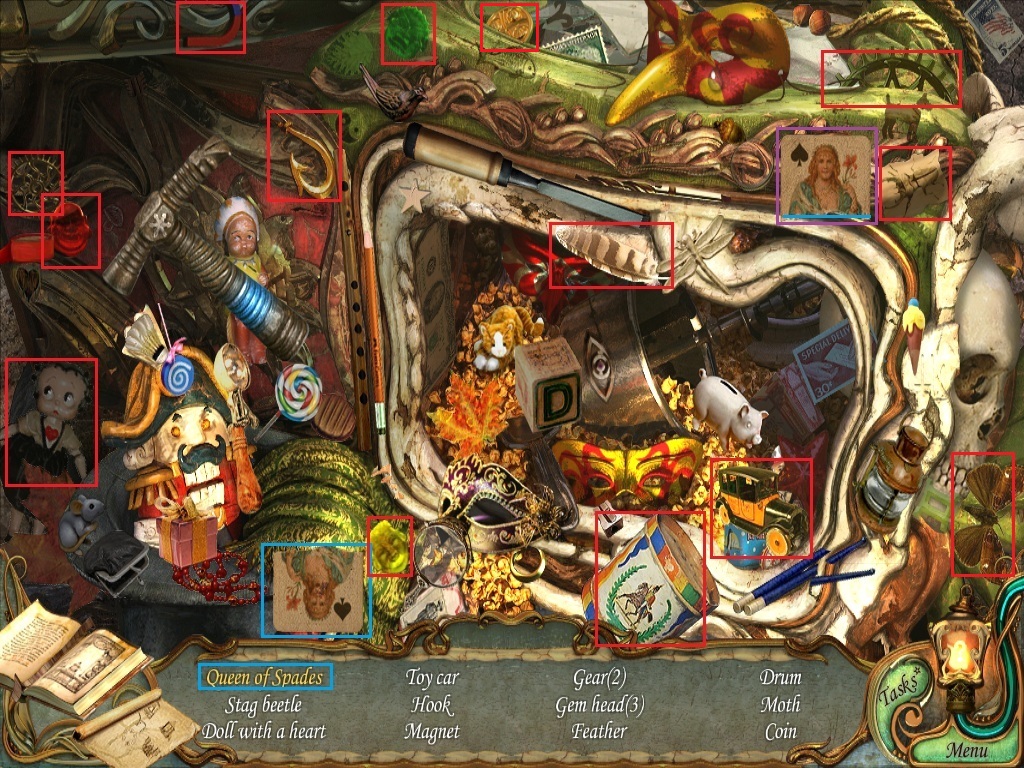
Leave the map view and click the popcorn stand to zoom in.
Click the lower half of the playing card and drag it to the top half to complete the Queen of Spades card.
Screenshot.
Click the wheel of fortune area to zoom in.
Take the starfish for the Starfish Award off the left railing, next to the leafy vine.
Use the Coin from your inventory on the coin slot to the right of the wheel.
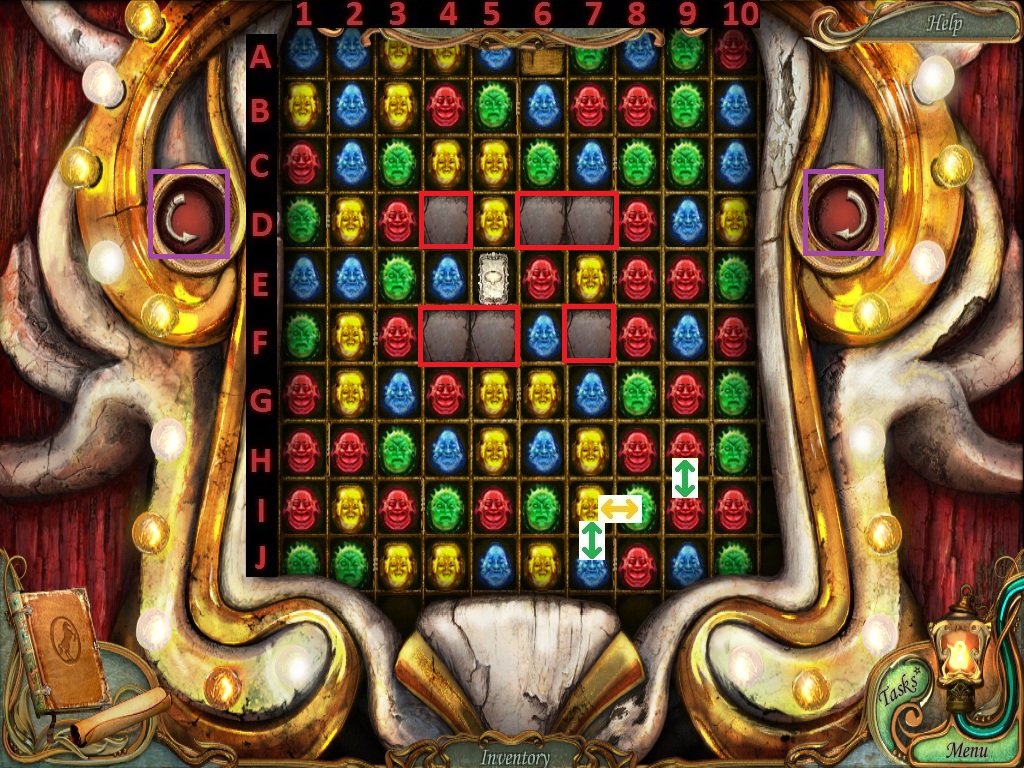
Once the wheel is finished spinning, click the colored panel at the bottom to start the ticket dispenser puzzle.
To Solve this puzzle, the ticket at the top of the panel must reach the flashing dispenser at the bottom.
Swap tiles to match three or more similarly colored tiles to make the row disappear, causing the ticket to drop down.
You can only switch the position of a tile with another adjacent tile.
To swap a tile, click it, drag it in the direction of the tile you want to switch places with, then release the mouse button.
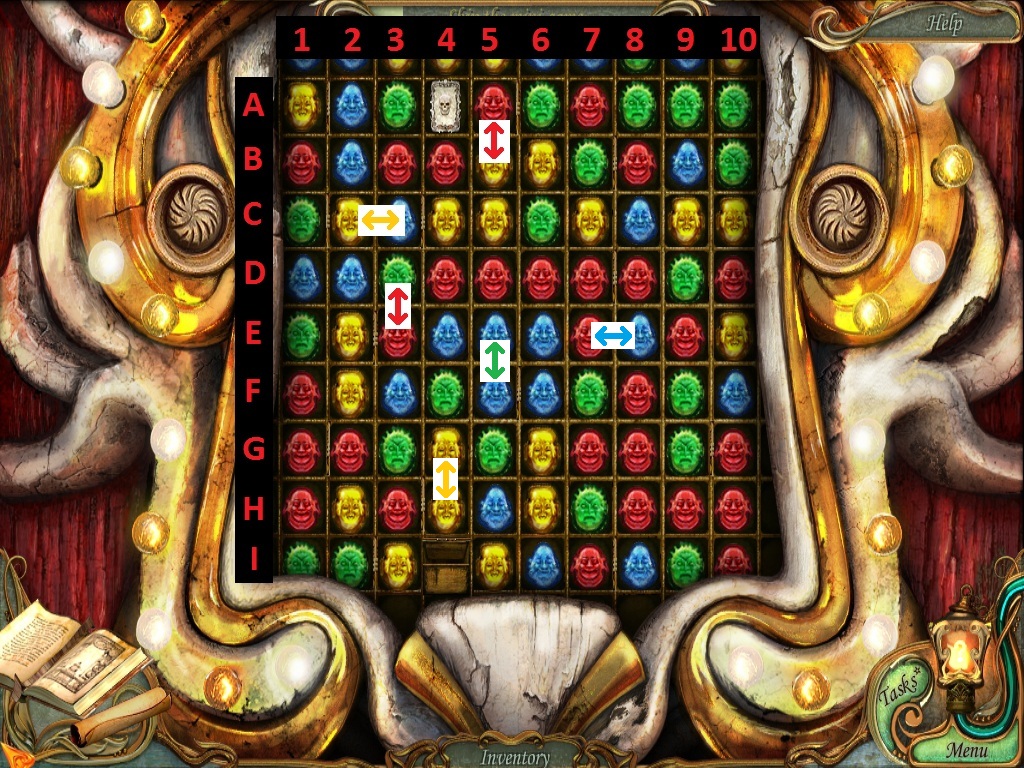
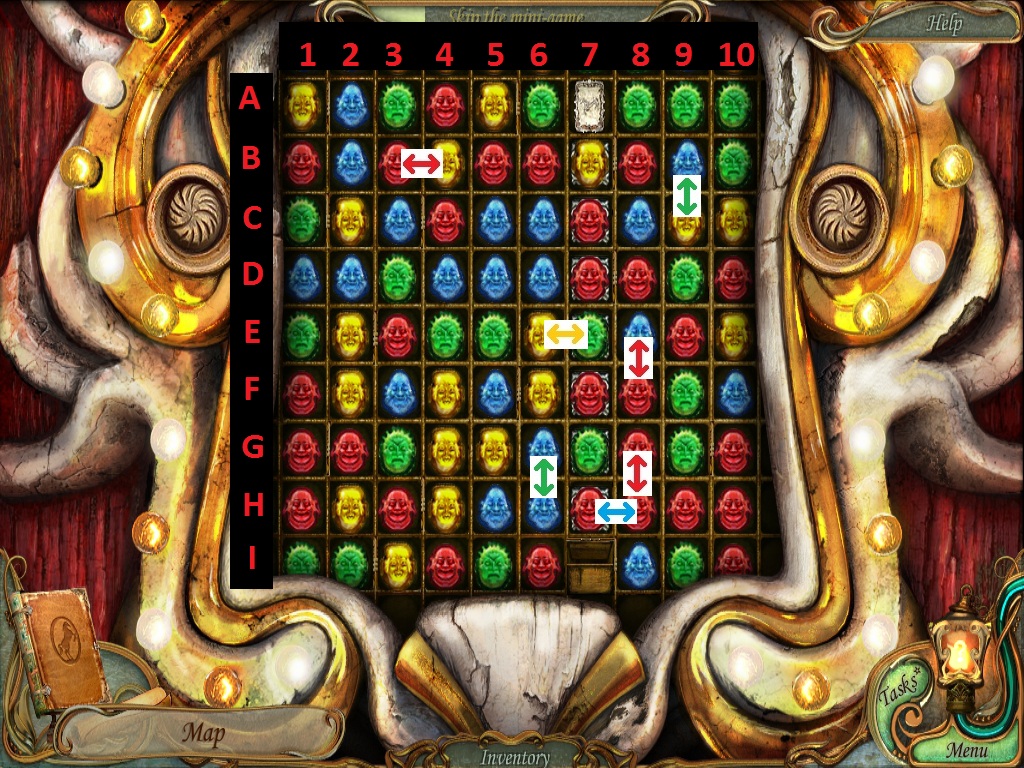
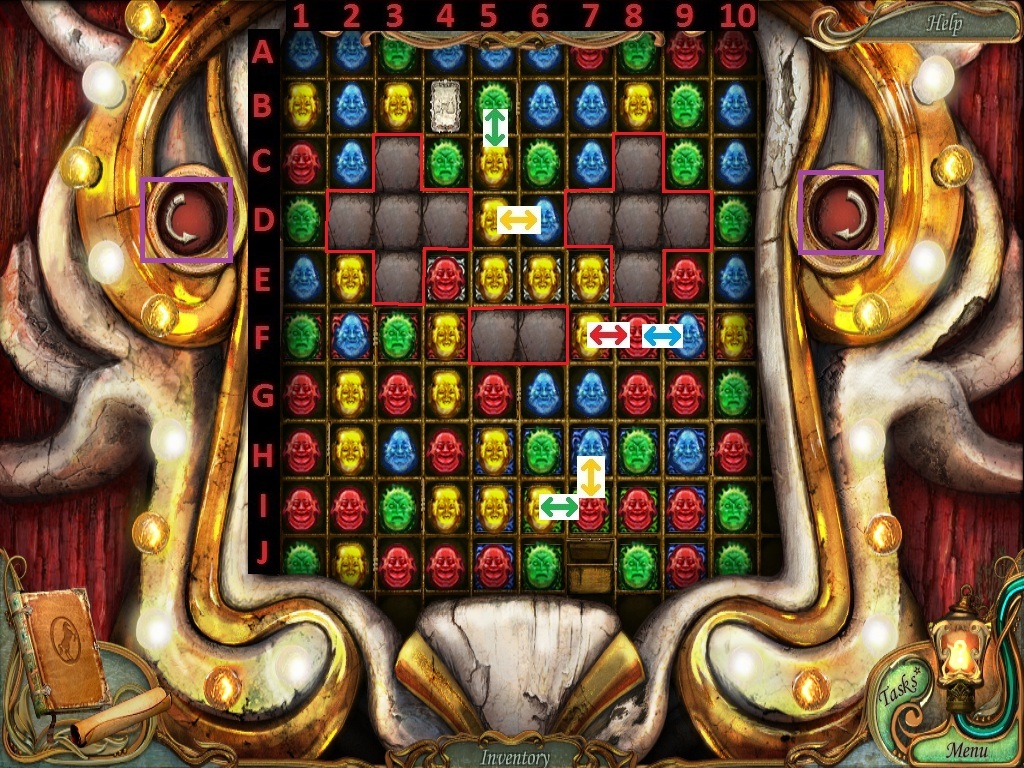
For this walkthrough, each space on the grid is ordered numerically by column and alphabetically by row. The top row, which is covered by the hint bar, is also covered by the column numbers in the following screenshot.
Because the tiles that drop from the top of the grid are randomized, the solution for each game is different. The following is a guideline:
Switch the Red tile at A5 with the Yellow tile at B5.
Switch the Yellow tile at C2 with the Blue tile at C3.
Switch the Green tile at D3 with the Red tile at E3.
Switch the Blue tile at E8 with the Yellow tile at E7.
Switch the Green tile at E5 with the Yellow tile at F5.
Switch the Yellow tile at G5 with the Yellow tile at H5.
Screenshot.
Once the puzzle is solved, take the house of horrors ticket from the ticket dispenser at the bottom of the wheel.
Click the area to the left of the ticket dispenser to zoom in.
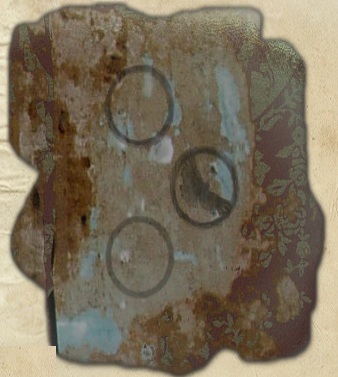
Take note of the three shapes scratched into the paint; this clue will also be added to the Diary.
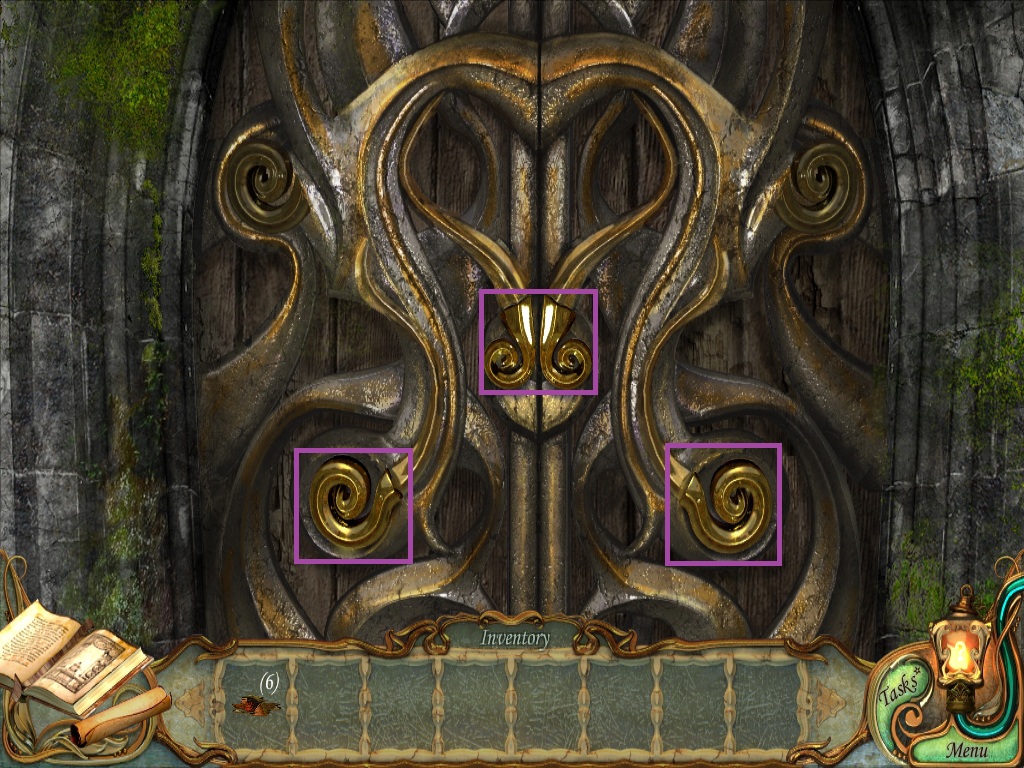
Click the right gate to start the gargoyle puzzle.
To solve this puzzle, click the up or down arrow to rotate through a set of pictures.
Align the matching pictures in each row to make a complete image.
Screenshot.
Go through the open gate to travel to the path.
Chapter 2
The Path
Pick up the third piece of painted wood to the right of the lamppost.
Take the starfish for the Starfish Award at the top of the lamppost.
Take the fourth piece of painted wood above the park bench.
Go through the open gate to the right to reach the entrance house of horrors.
The House of Horrors Entrance
Take the fifth piece of painted wood beside the right lamppost.
Pick up the sixth piece of painted wood next to the left gargoyle.
Click the Wing on the ground between the two gargoyles to add it to your inventory.
Use the Ticket from your inventory on the ticket box, and the bony hands will lift, no longer blocking your way.
Use the map in the toolbar to fast-travel to the main entrance.
The Main Entrance
Click the abandoned ticket booth to repeat the hidden object scene.
Add the propeller to the front of the toy plane to complete the plane.
Screenshot.
Leave the main entrance and return to the central square.
Central Square
Click the popcorn stand to repeat the hidden object scene.
Use the pencil sharpener on the pencil.
Screenshot.
Leave the square and return to the house of horrors entrance.
The House of Horrors Entrance
Use the Scythe from your inventory on the statue of Death.
Take the Twirl from Death's hand to add it to your inventory.
Put the Skull from your inventory on the skeleton to the left of the door.
Take the second Twirl from the skeleton's ribcage.
Use the Wing from your inventory on the gargoyle above the door.
Take the third Twirl from the gargoyle's open hands.
Click the door to zoom in.
Place the three Twirls from your inventory into the open spaces in the door.
Screenshot.
Go through the open door into the house of horrors.
The House of Horrors
Pick up the seventh piece of painted wood by the right skull pillar.
Take the eighth piece of painted wood in the top left corner of the screen.
Take the starfish for the Starfish Award to the right of the large, red vial.
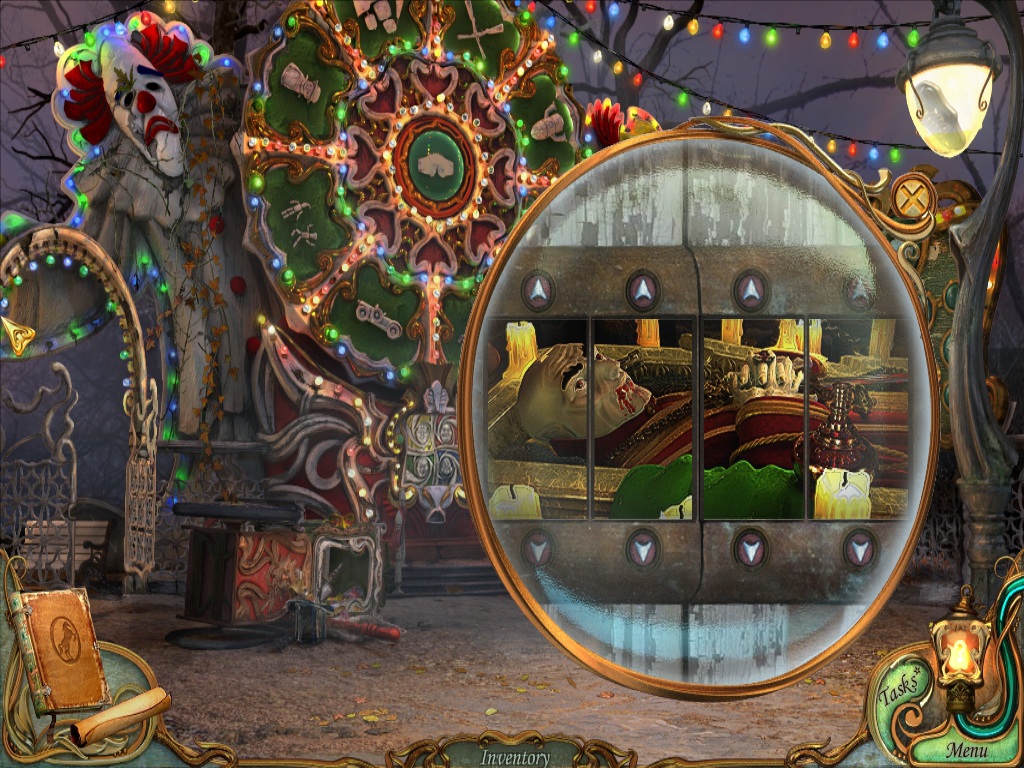
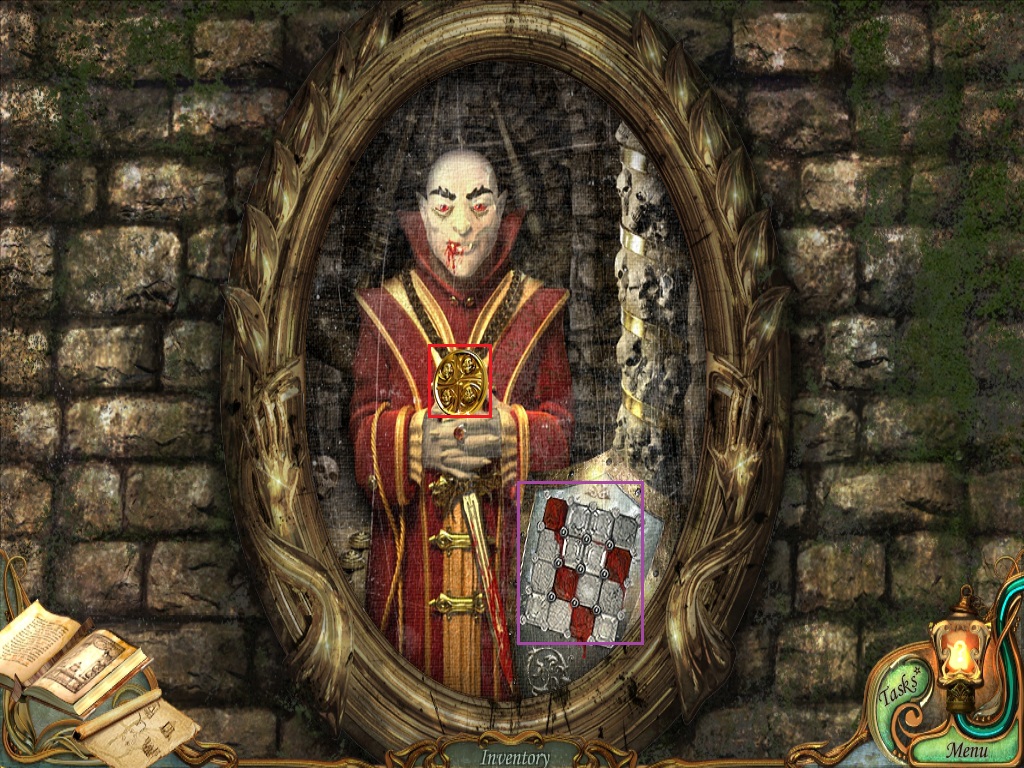
Click the portrait of a vampire on the right wall to zoom in.
Arrange all of the pieces of the portrait to complete the painting.
Screenshot.
Take the coin from the vampire's neck.
Note the pattern on the shield at the bottom of the portrait; this clue is also added to the Diary.
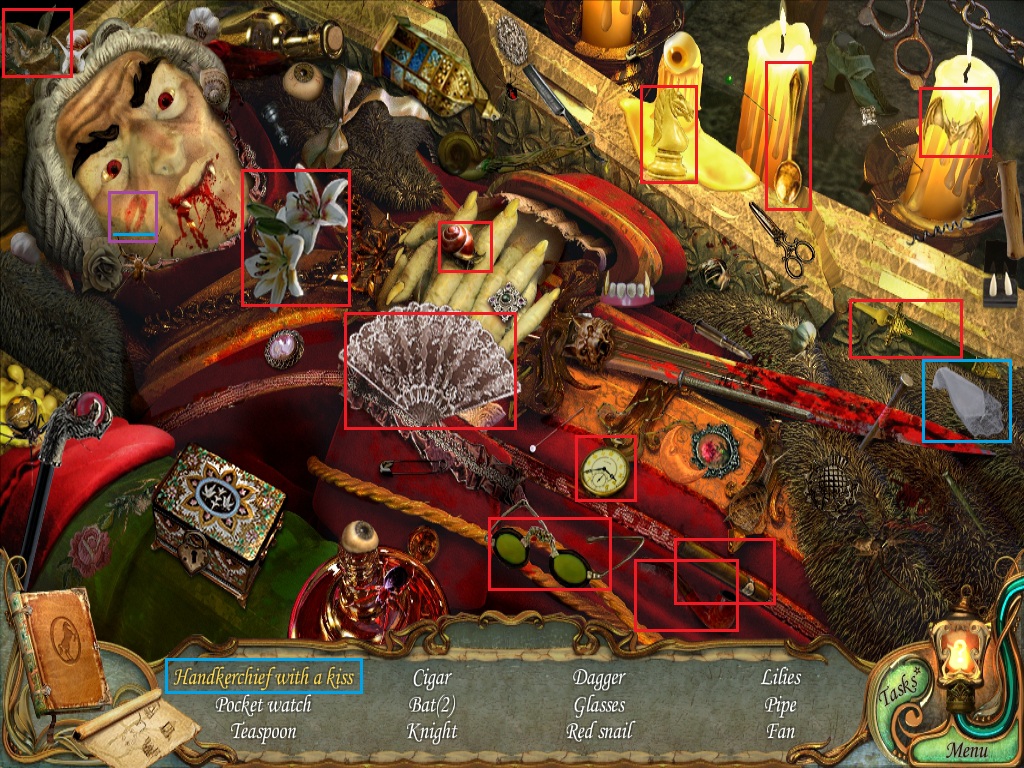
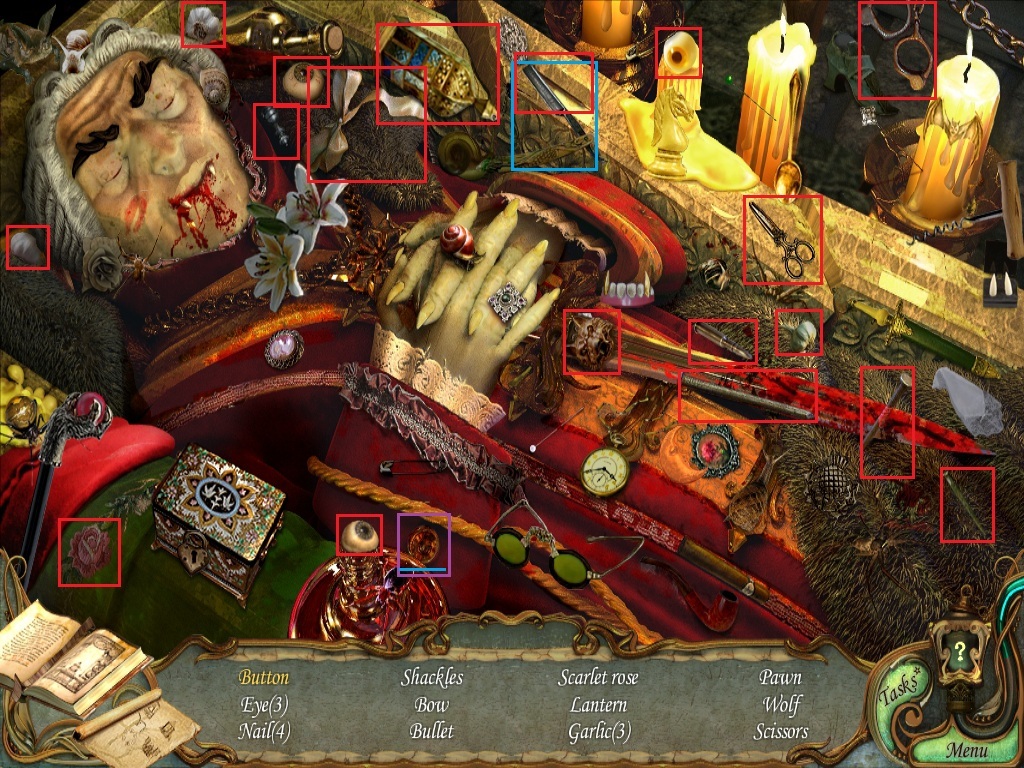
Click the vampire laying on the table to start the hidden object scene.
Use the handkerchief on the kiss on the vampire's cheek to make the Handkerchief with a kiss.
Screenshot.
Click the portrait of the girl on the left wall to zoom in.
Place the Fan from your inventory into the second hand on the frame of the portrait.
Leave the house of horrors and return to the central square.
Central Square
Click the wheel of fortune to zoom in.
Use the Coin from your inventory on the coin slot to the right of the wheel.
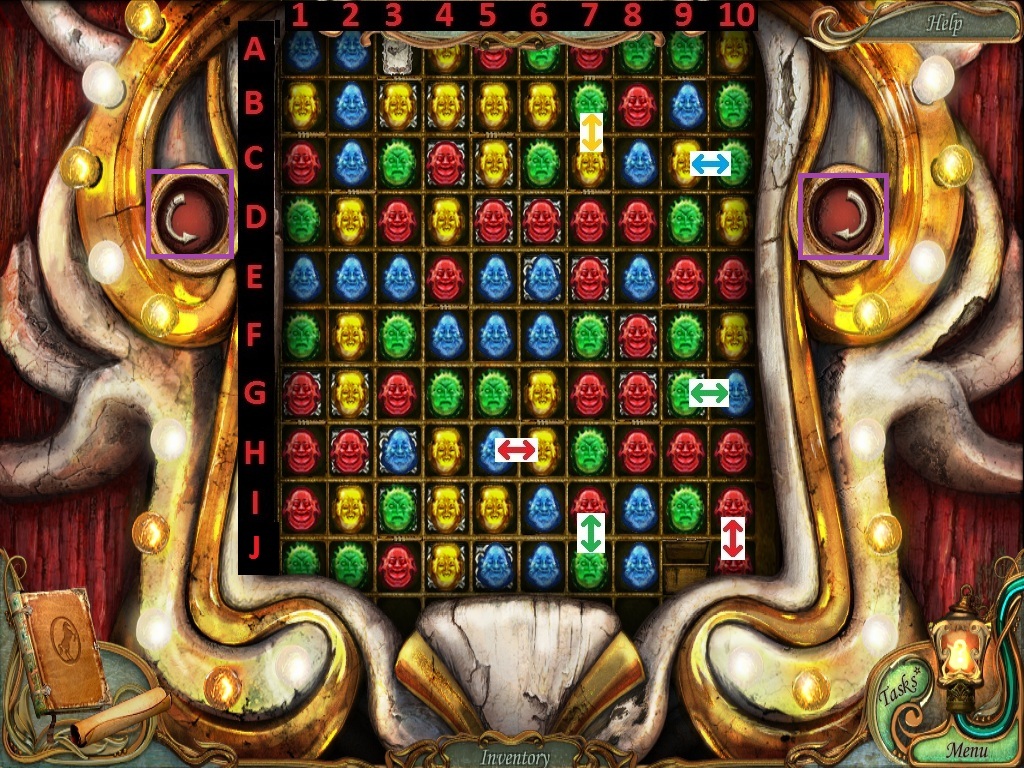
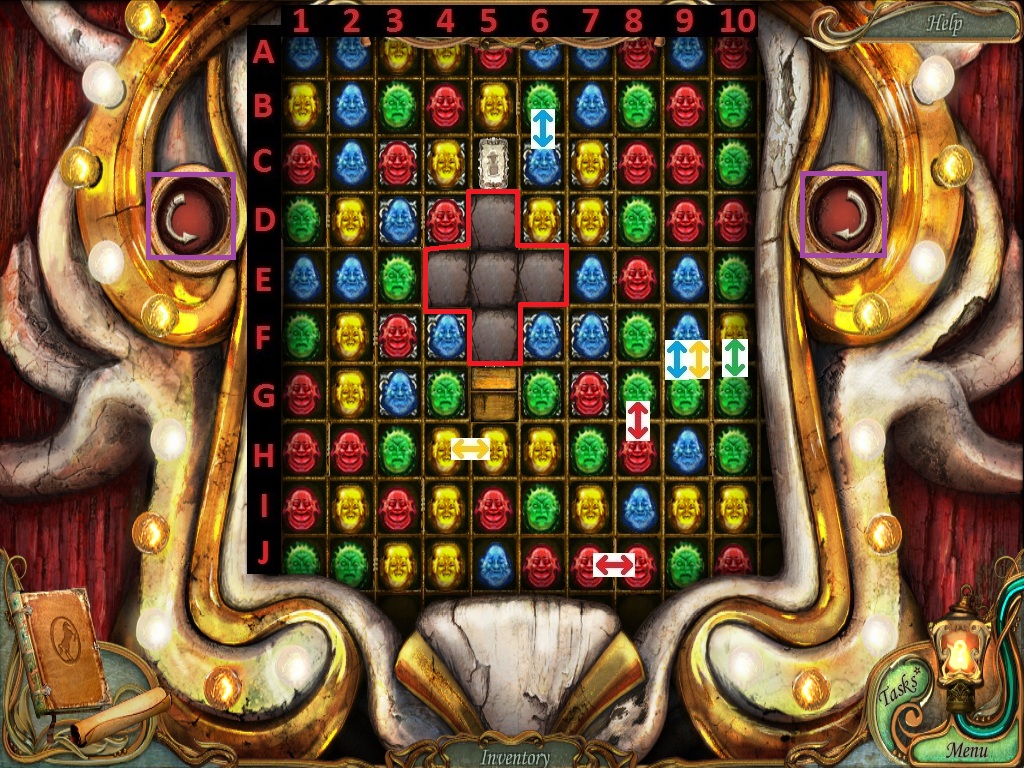
Click the colored panel to repeat the ticket dispenser puzzle.
To solve this puzzle, drop the ticket at the top of the panel to the dispenser at the bottom.
This puzzle is slightly different from the first time, in that tiles with a grey border cannot be moved.
Match three or more colored tiles with a grey bordered tile to break the grey border. Match the tile a second time to remove it.
Because the tiles that drop from the top of the grid are randomized, the solution for each game is different. The following is a guideline:
Switch the Red tile at G8 with the Red tile at H8.
Switch the Green tile at B9 with the Blue tile at C9.
Switch the Red tile at B3 with the Yellow tile at B4.
Switch the Red tile at E8 with the Blue tile at F8.
Switch the Yellow tile at E6 with the Yellow tile at E7.
Switch the Blue tile at H8 with the Green tile at H7.
Switch the Green tile at H6 with the Yellow tile at G6.
Screenshot.
Once the puzzle is solved, take the merry-go-round ticket from the ticket dispenser below the wheel.
Click the left gate to start the merry-go-round mini-puzzle.
To solve this puzzle, rotate the rings around the horse so all the matching colored tiles with a bead in the center are aligned.
Click a ring and drag it left or right to rotate it clockwise or counterclockwise.
Screenshot.
Go through the open gate to reach the merry-go-round.
Chapter 3
The Merry-Go-Round
Put the merry-go-round Ticket from your inventory into the ticket machine in front of the merry-go-round.
Click the horse to zoom in.
Take the red marble for the Marble Award off the flank of the giraffe to the right.
Take the starfish for the Starfish Award from the ground of the merry-go-round.
Click the ceiling to begin the hidden object scene.
Use the pencil on the white horse to turn it into the Zebra.
Screenshot.
Use the Map to fast-travel to the house of horrors.
The House of Horrors
Click the vampire on the table to repeat the hidden object scene.
Use the razor to remove the Button of the vampire's sleeve.
Screenshot.
Use the Bat Key from your inventory on the locked double doors.
Go through the door into the hall of swinging axes.
Hall of Swinging Axes
Entering the room begins the swinging axe puzzle.
To solve this puzzle, match the three symbols hanging from the ceiling with the pattern shown in the carving on the wheel of fortune and noted in the Diary.
Move a chain up or down to change its symbol, shape, or color.
Move Chain A to Position 2.
Move Chain B to Position 3.
Move Chain C to Position 1.
Screenshot.
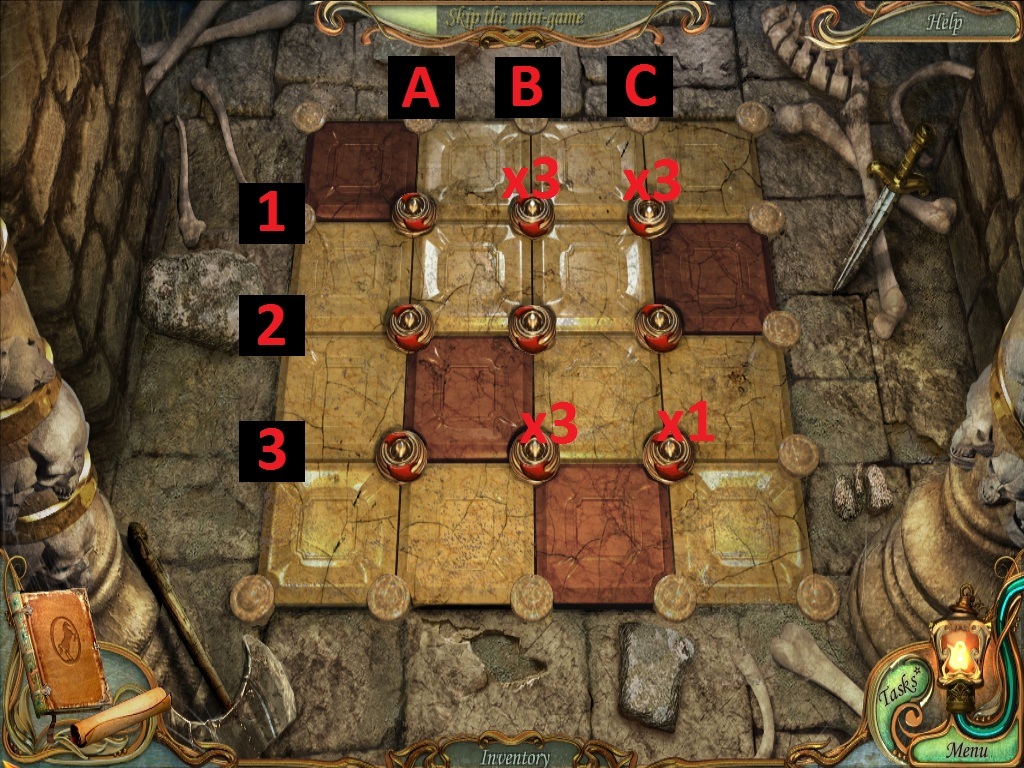
Once the puzzle is solved, click the device on the floor to begin the floor tiles puzzle.
To solve this puzzle, match the red tiles with the image from the vampire portrait, which is also noted in the Diary.
Click a button between the floor tiles to rotate the red tiles clockwise around the button.
Click the B1 button 3 times.
Click the C1 button 3 times.
Click the B3 button 3 times.
Click the C3 button 1 time.
Screenshot.
Once the puzzle is solved, take the coin from behind the hidden panel.
Take the starfish for the Starfish Award at the bottom of the right column.
Use the Map to fast-travel to the Central Square.
Central Square
Click the wheel of fortune to zoom in.
Use the Coin from your inventory on the coin slot to the right of the wheel.
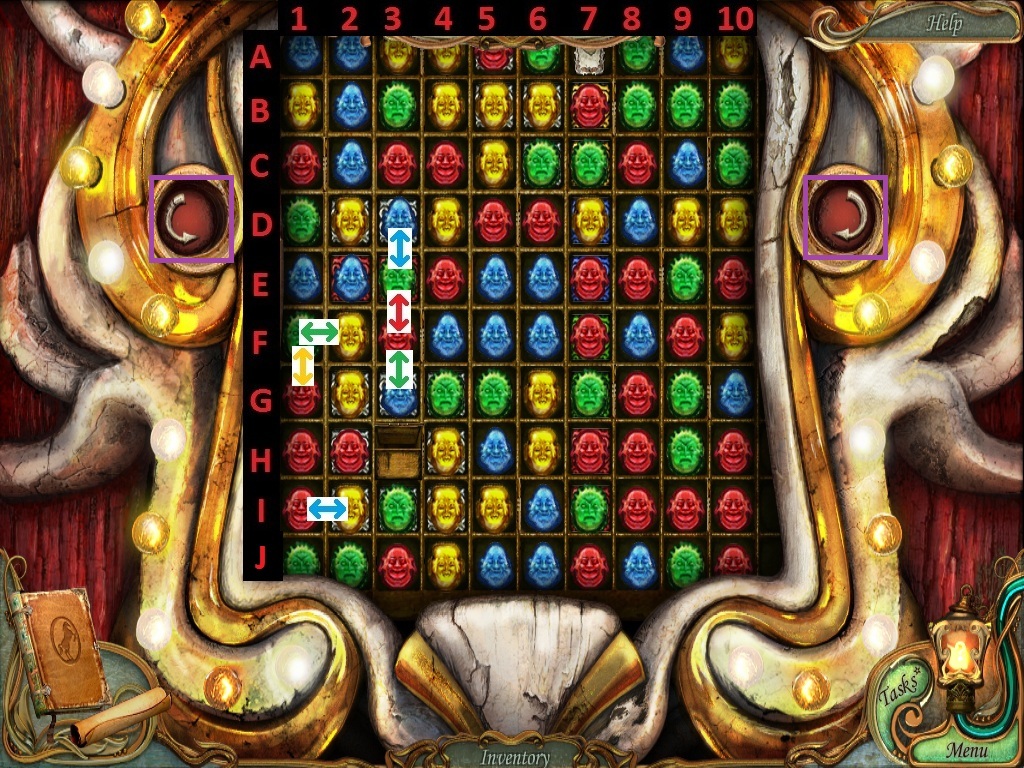
Click the colored panel below the wheel to repeat the ticket dispenser puzzle.
To solve this puzzle, drop the ticket at the top of the panel to the dispenser at the bottom.
This puzzle is slightly different from the others, in that tiles with a colored border block the path of the ticket.
To remove a color bordered tile, match three or more tiles that are the same color as the tile border.
Because the tiles that drop from the top of the grid are randomized, the solution for each game is different. The following is a guideline:
Switch the Blue tile at E5 with the Blue tile at E6.
Switch the Yellow tile at E5 with the Red tile at F5.
Switch the Yellow tile at E4 with the Green tile at F4.
Switch the Yellow tile at E2 with the Green tile at E3.
Switch the Green tile at C3 with the Red tile at C4.
Switch the Red tile at D3 with the Green tile at D4.
Switch the Blue tile at F3 with the Green tile at F4.
Switch the Red tile at A6 with the Green tile at A5.
Switch the Green tile at E3 with the Red tile at E4.
Switch the Yellow tile at I3 with the Green tile at H3.
Switch the Red tile at I3 with the Green tile at H3.
Screenshot.
Once the puzzle is solved, take the Shooting Gallery ticket from the ticket dispenser below the wheel.
Leave the central square and return to the hall of swinging axes inside the house of horrors.
Chapter 4
Hall of Swinging Axes
Go forward through the doors into the room with a shell game.
Room with a Shell Game
Take the marble for the Marble Award at the bottom of the left red curtain.
Move forward to the Cafe.
The Cafe
Take the starfish for the Starfish Award at the top of the right lamppost.
Move ahead one more time to reach the pirate ship.
The Pirate Ship
Take the ninth piece of painted wood off the side of the ship.
Pick up the starfish for the Starfish Award at the bottom of the right lamppost, to the left of the park bench.
Use the Map to fast-travel to the Merry-Go-Round.
The Merry-Go-Round
Click the Athlete's gate to zoom in.
Take the 10th and last piece of painted wood on the ground directly underneath the lantern.
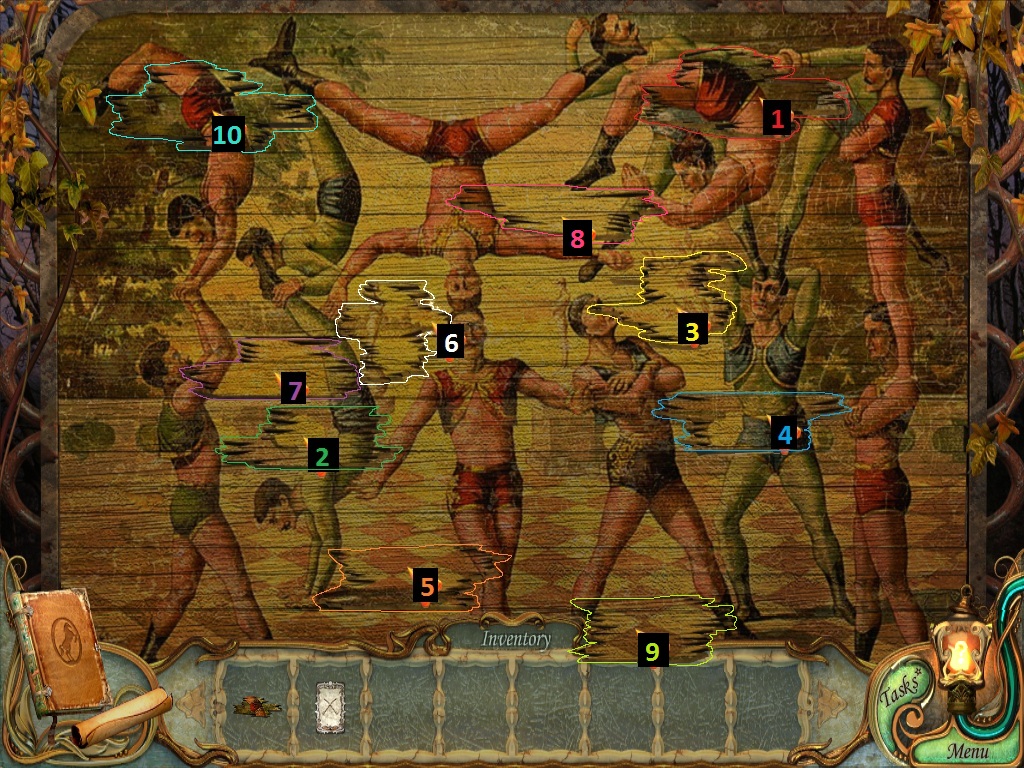
Click the gate to begin the athlete gate puzzle.
To solve this puzzle, place the pieces of painted wood in the correct space to complete the picture.
Click the pile of painted wood in your inventory to pick up one of the pieces.
Inspect the image on the piece, then place it in the corresponding position on the board.
If correct, the piece of wood will lock in place with the rest of the picture.
Screenshot.
Once the puzzle is solved, the gate will open, revealing the path to the fountain.
The Fountain
Take the starfish for the Starfish Award from the seal's tail at the top of the fountain.
Click the fountain to begin the hidden object scene.
Put the black and white picture inside the round frame to make the Portrait in a Frame.
Screenshot.
Click the small fountain to the left to zoom in.
Take the marble for the Marble Award under the left fin of the seahorse.
Move your cursor around the bottom of the water to push the leaves out of the way, revealing a pattern of symbols which is noted in the Diary.
Take the coin in the water.
Take the right path to the shooting gallery.
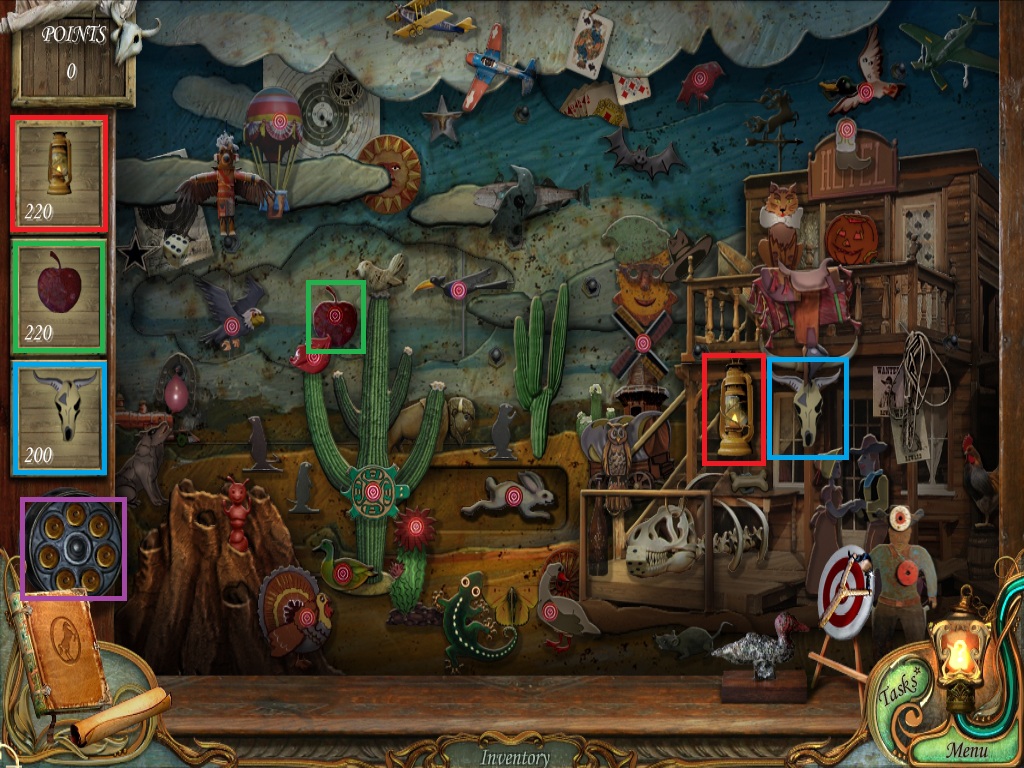
Shooting Gallery
Use the Shooting Gallery Ticket from your inventory on the ticket slot in front of the carnival game.
Take the red marble for the Marble Award off the roof of the shooting gallery, beneath the picture of the crossed rifles.
Go through the swinging doors to the shooting gallery puzzle.
Click the sign to start the shooting game.
To beat the shooting gallery game, click to shoot the three targets on the list of items on the left side of the screen.
Over time, the point value of each item will deteriorate.
Targets that are shot when they are not on the list will have 0 point value.
There are two rounds with 3 targets in each round.
You have 7 shots in total. If you miss too many shots, the game will restart.
Screenshot.
Once the game is over, the Raven Key is added to your inventory.
Replay the game and earn 500 points to receive the Coin and 1000 points to receive the Teddy Bear.
If you score over 1500 points in the shooting gallery game, you will earn the Shooting Gallery Award in the Awards tab of the main menu.
Take the Slingshot on the target at the bottom of the game booth to add it to your inventory.
Use the map to fast-travel to the central square.
Central Square
Click the wheel of fortune to zoom in.
Put one of the coins from your inventory into the coin slot to repeat the ticket dispenser puzzle.
To solve this puzzle, drop the ticket at the top of the panel to the dispenser at the bottom.
This puzzle is slightly different from the others, in that there are two buttons on the left and right side of the puzzle.
Because the tiles that drop from the top of the grid are randomized, the solution for each game is different. The following is a guideline:
Clicking the buttons will turn the grid either clockwise or counterclockwise.
Click the right button to flip the board clockwise.
Switch the Green tile at G9 with the Red tile at G10.
Click the left button to flip the board counterclockwise.
Switch the Red tile at B7 with the Yellow tile at C7.
Click the right button to flip the board clockwise.
Switch the Red tile at H5 with the Blue tile at H6.
Click the left button to flip the board counterclockwise.
Switch the Red tile at J10 with the Red tile at I10.
Click the left button to flip the board counterclockwise.
Switch the Blue tile at C10 with the Blue tile at C9.
Click the right button to flip the board clockwise.
Switch the Red tile at I7 with the Green tile at J7.
Screenshot.
Once the puzzle is solved, take the Roller Coaster Ticket from the ticket dispenser.
Put the second Coin from your inventory into the coin slot to play the ticket dispenser puzzle again.
Like before, this puzzle is solved by dropping the ticket at the top of the panel to the dispenser at the bottom.
This time, there are both the grey and color bordered tiles, as well as the turn arrows.
Because the tiles that drop from the top of the grid are randomized, the solution for each game is different. The following is a guideline:
Click the left button to flip the board counterclockwise.
Switch the Yellow tile at G1 with the Red tile at F1.
Switch the Green tile at F1 with the Green tile at F2.
Switch the Blue tile at I1 with the Blue tile at I2.
Click the right button to flip the board clockwise.
Switch the Blue tile at D3 with the Green tile at E3.
Switch the Red tile at F3 with the Green tile at E3.
Switch the Green tile at F3 with the Blue tile at G3.
Screenshot.
Once the puzzle is solved, take the Pirate Ship Ticket from the ticket dispenser.
Use the Map to fast-travel to the fountain.
Take the left path to reach the roller coaster.
Chapter 5
The Roller Coaster
Use the Roller Coaster Ticket from your inventory on the ticket machine.
Go forward into the control room.
Control Room
Take the marble for the Marble Award off the table next to the fan.
Take the starfish for the Starfish Award at the top of the old car.
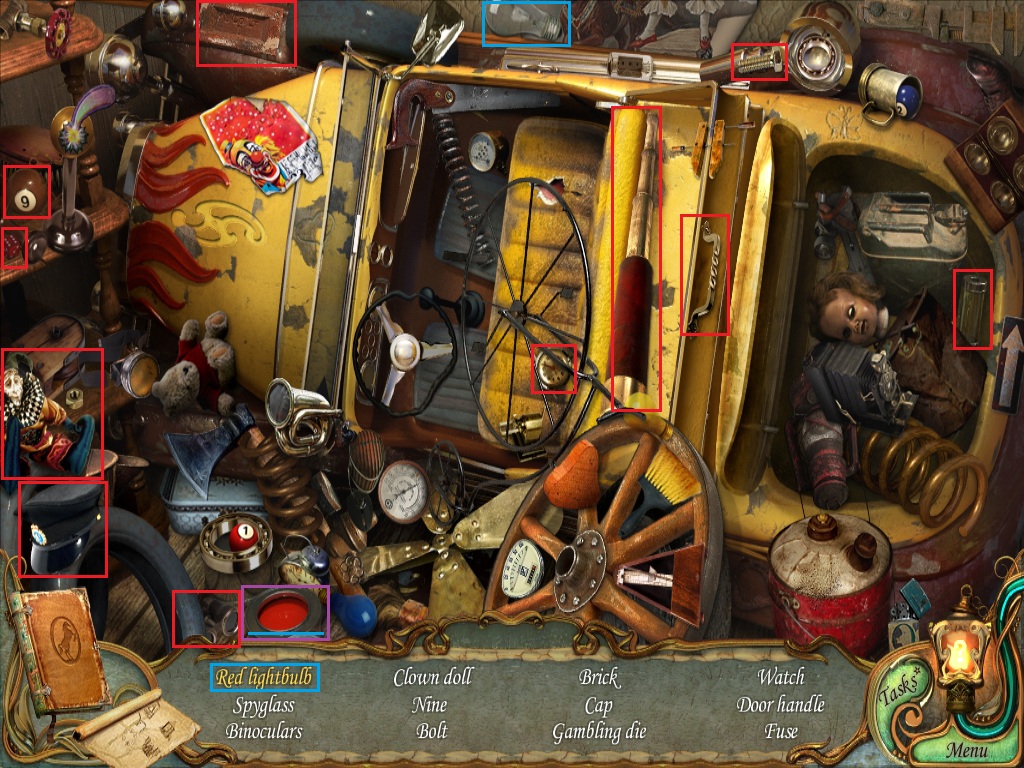
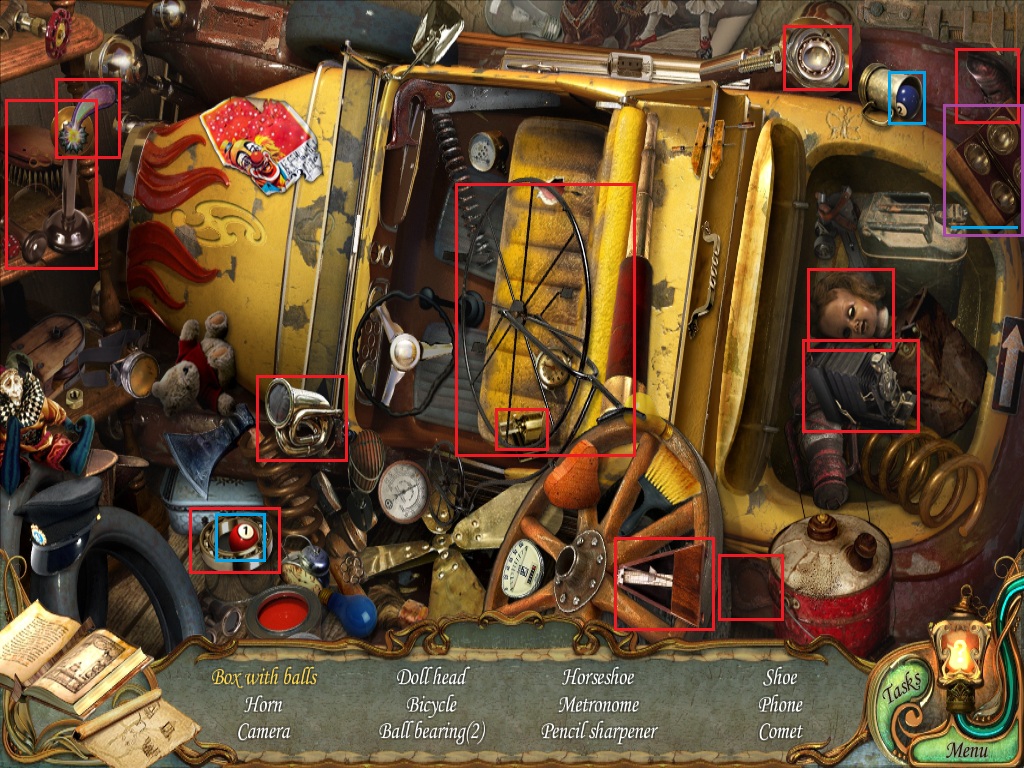
Click the Old Car to start the hidden object scene.
Use the lightbulb on the can of red paint to make it a Red Lightbulb.
Screenshot.
Put the Fuse from your inventory into the fusebox at the bottom of the control panel.
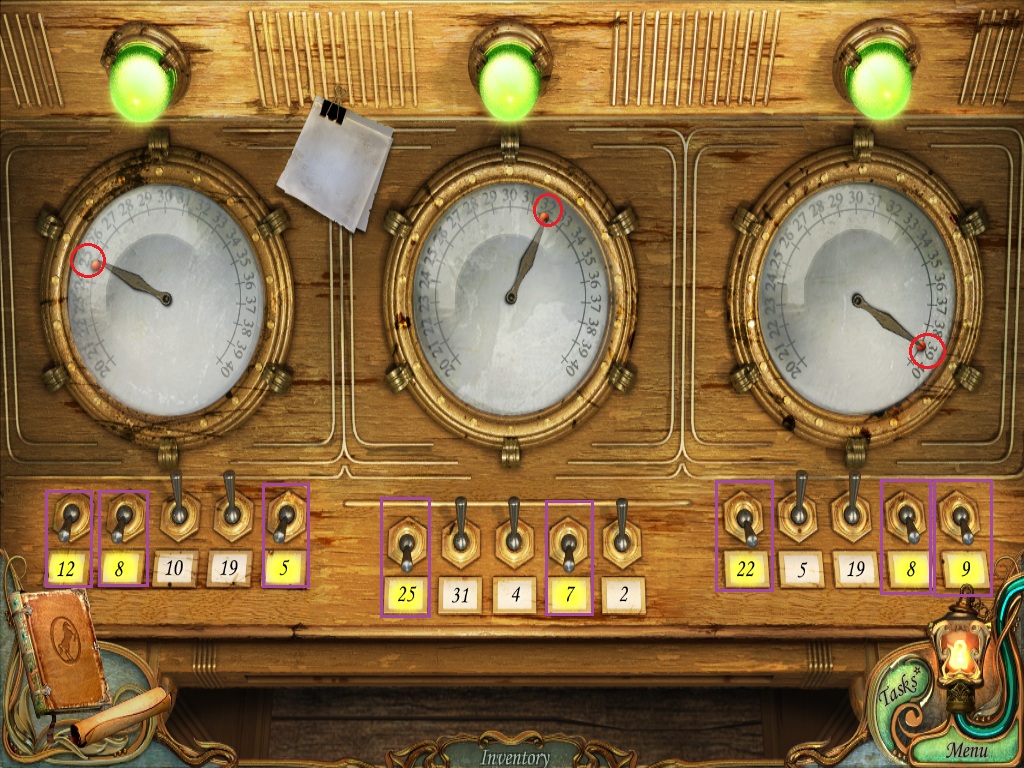
Click the control panel to zoom in.
To solve the control panel puzzle, set the three power meters by flipping the switches at the bottom of the panel.
To set the power meter, flip the switches whose numbrs add to the sum of the digit on the meter with a red dot next to it.
The first power meter is set at 25.
12+8+5=25 Flip switches 12, 8, and 5.
The second power meter is set at 32.
25+7=32 Flip switches 25 and 7.
The third power meter is set at 39.
22+8+9=39 Flip switches 22, 8, and 9.
Screenshot.
Once the puzzle is solved, power will be restored to the roller coaster.
Step back outside to return to the rollercoaster.
The Roller Coaster
Click the car with a teddy bear to zoom in.
Place the Bear from your inventory into the car.
Take the small White Gloves inside the dashboard.
Pick up the starfish for the Starfish Award on the brown bear's ear.
Take the marble for the Marble Award on the ground behind the bear's head.
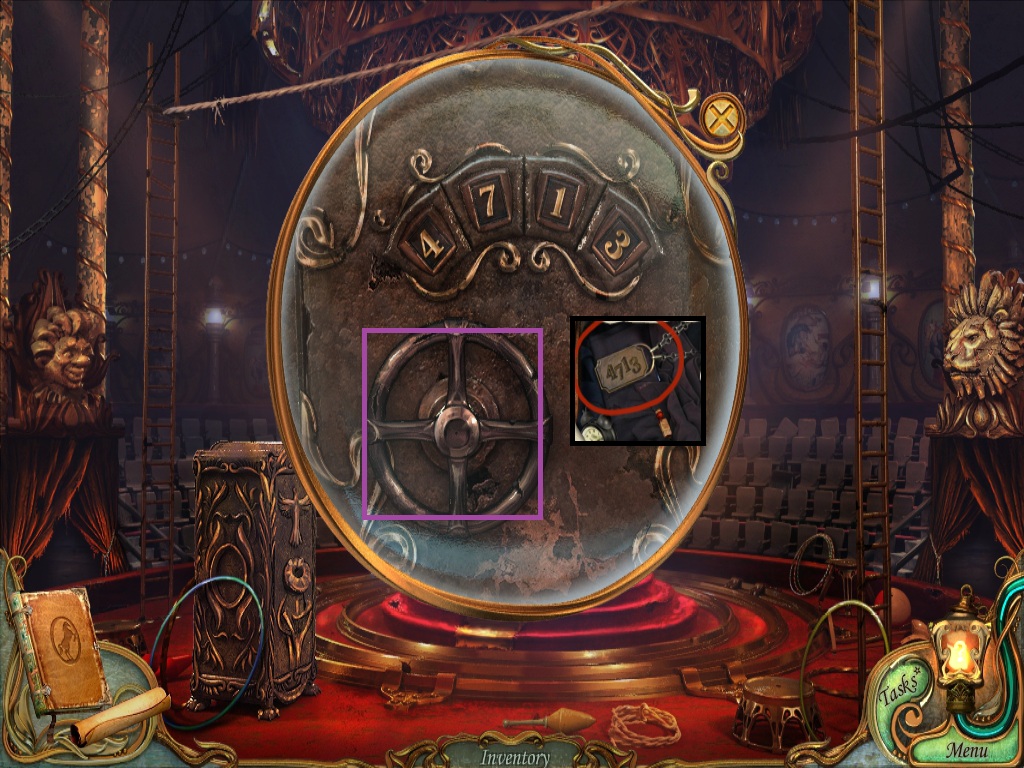
Take the Coin in the back seat beside the locked brown bag.
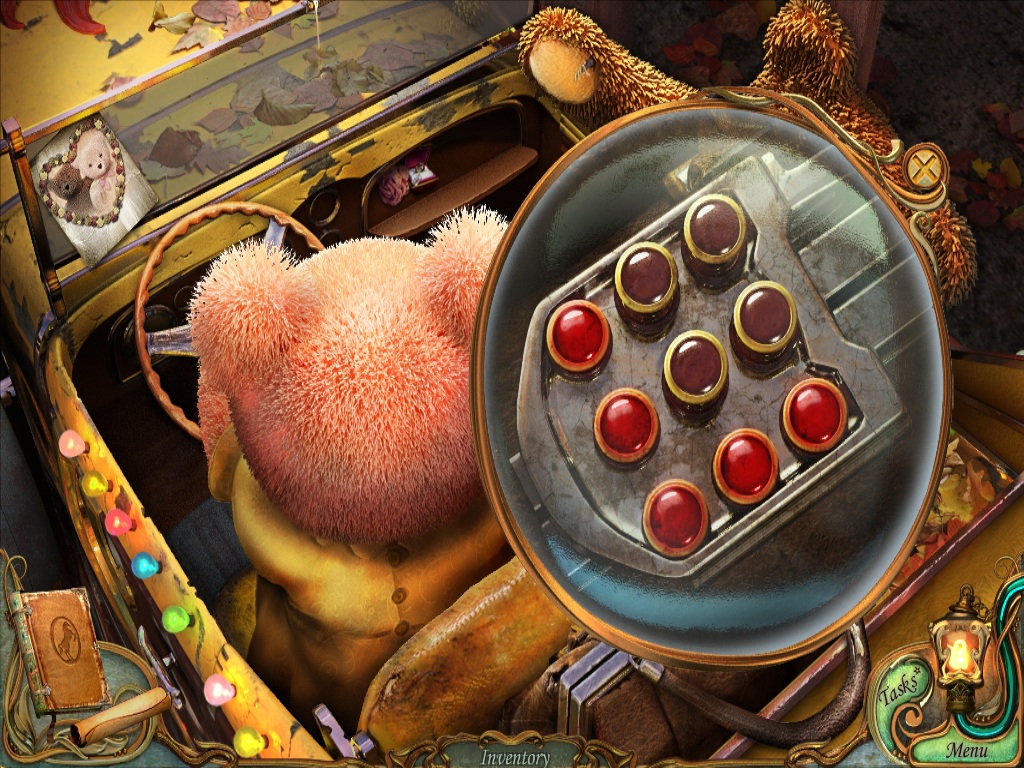
Click the dashboard to zoom in.
Click the red heart box to open it.
Click the tag on the ring to note that the holes make the shape of the letter "L".
Exit the dashboard view and click the locked brown bag to zoom in.
Push the red buttons to match the "L" shaped pattern on the tag of the ring.
Screenshot.
Take the Sun Key inside the bag.
Use the Map to fast-travel to the pirate ship.
The Pirate Ship
Use the Pirate Ship Ticket from your inventory on the ticket machine to draw the bridge to the ship.
Go across the bridge up to the deck of the ship.
Pirate Ship Deck
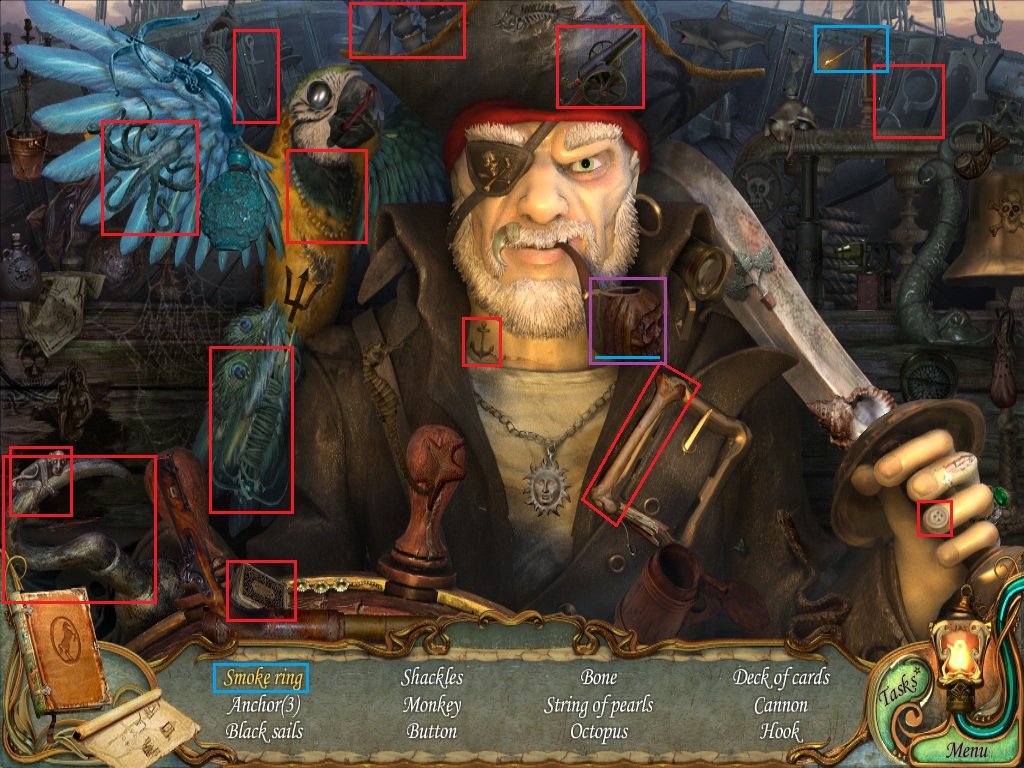
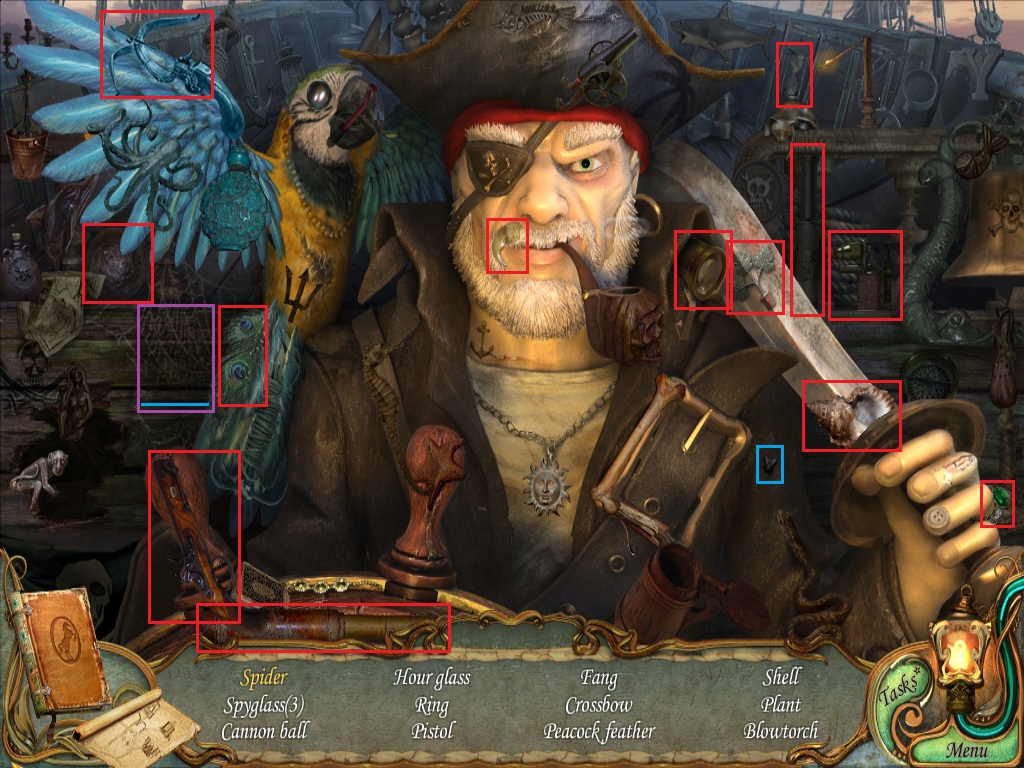
Click the wheel to start the hidden object scene.
Use the match on the pirate's pipe to make a Smoke Ring.
Screenshot.
Use the map to fast-travel to the roller coaster, then go into the control room building.
Control Room
Click the old car to repeat the hidden object scene.
Drop the teddy bear on the red tank to reveal the Star.
Screenshot.
Use the Map to fast-travel to the merry-go-round.
The Merry-Go-Round
Click the grate in front of the merry-go-round to zoom in.
Click the crumpled piece of paper to move it out of the way.
Use the Hook from your inventory on the keyring under the grate.
Click the horse to zoom in.
Use the Scissors from your inventory on the pieces rope to unveil the horse.
Leave the merry-go-round and return to the central square.
Central Square
Click the wheel of fortune to zoom in.
Use the Coin from your inventory on the coin slot to repeat the ticket dispenser puzzle.
To solve this puzzle, drop the ticket at the top of the panel to the dispenser in the middle of the grid.
This time, there are grey bordered tiles, turn arrows, and 5 immovable blocks in the center of the puzzle.
Because the tiles that drop from the top of the grid are randomized, the solution for each game is different. The following is a guideline:
Click the right button to flip the board clockwise.
Switch the Blue tile at G9 with the Green tile at F9.
Switch the Green tile at G9 with the Yellow tile at F9.
Switch the Red tile at J7 with the Green tile at J8.
Click the left button to flip the board counterclockwise.
Switch the Yellow tile at F10 with the Green tile at G10.
Click the left button to flip the board counterclockwise.
Switch the Blue tile at B6 with the Green tile at C6.
Click the right button to flip the board clockwise.
Switch the Yellow tile at H4 with the Yellow tile at H5.
Switch the Red tile at H8 with the Yellow tile at G8.
Click the left button to flip the board counterclockwise.
Screenshot.
Once the puzzle is solved, take the Cafe Ticket from the ticket dispenser.
Use the Map to fast-travel to the Cafe.
Chapter 6
The Cafe
Use the Cafe Ticket from your inventory on the ticket machine in front of the carnival game.
Click the booth to zoom in.
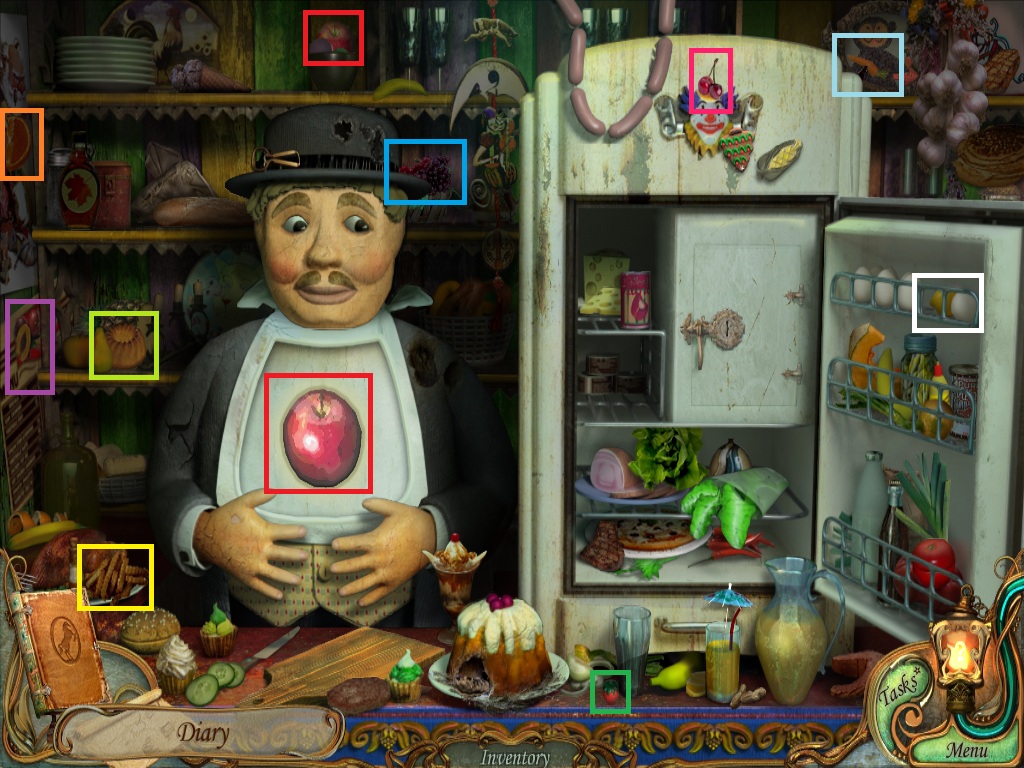
Click the handle to the refridgerater door to start the cafe puzzle.
To solve this puzzle, feed the hungry man the item of food shown on the picture in his stomach.
All of the 10 items are hidden around the room.
Screenshot.
Once the puzzle is solved, the panel under the man's shirt will lift, revealing the Leaft Key.
Click the Raven Key to add it to your inventory.
Use the map to fast travel to the main entrance.
Main Entrance
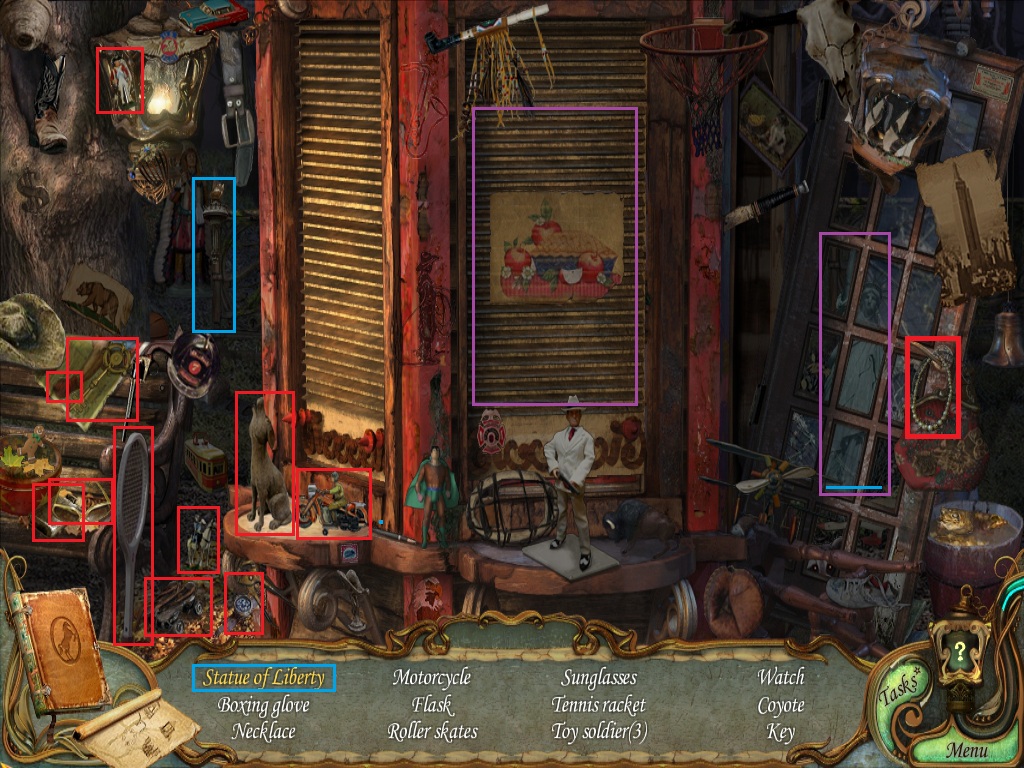
Click the abandoned ticket booth to repeat the hidden object scene.
Click the right screen to lift it up.
Take the Toy Soldier on the third row.
Use the torch on the statue to complete the Statue of Liberty.
Screenshot.
Once you've completed the scene, you will receive the Hidden Object Award for having found all the hidden objects at the ticket booth scene.
Use the Map to fast-travel to the Cafe.
The Cafe
Click the freezer box in the refridgerator to zoom in.
Use the gold Key from your inventory on the lock to open the freezer.
Use the Map to fast-travel to the pirate ship, then move up to the deck.
Pirate Ship Deck
Click the ship wheel to repeat the hidden object scene.
Put the fly on the web to lure out the Spider.
Screenshot.
Use the Map to return to the Cafe.
The Cafe
Click the booth to zoom in.
Click the freezer.
Use the Blowtorch from your inventory on the frozen head and the apple.
Go back once to travel to the Room with a Shell Game.
Room with a Shell Game
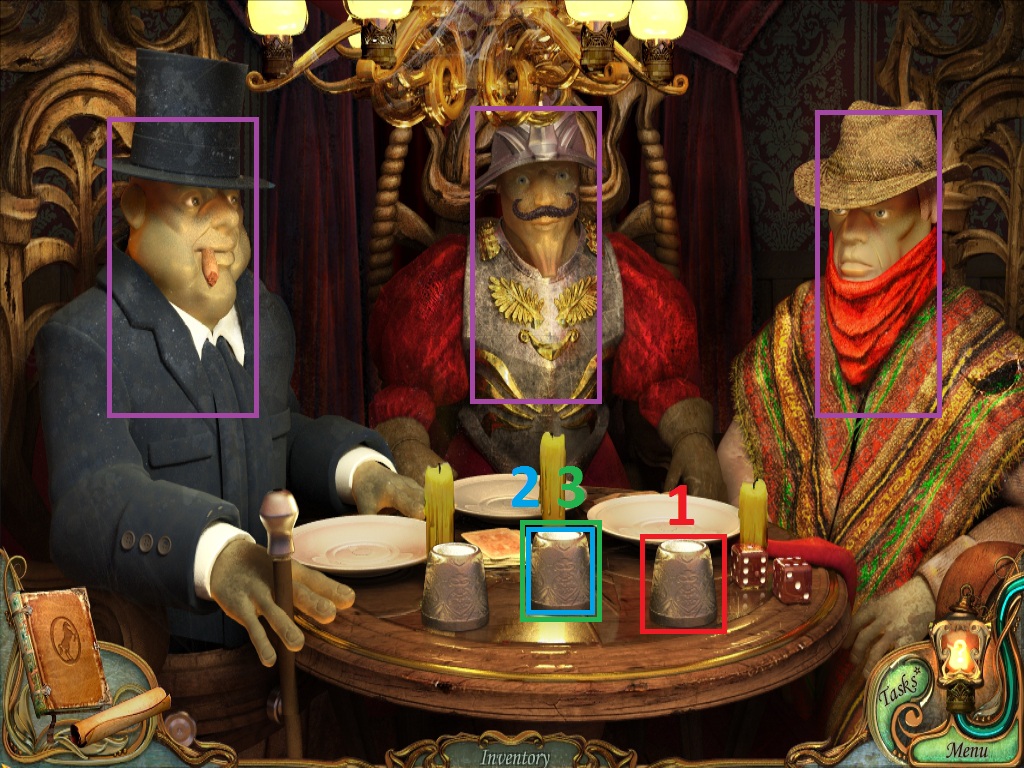
Click the table to zoom in.
Place the Head from your inventory on the left body, wearing the suit and top hat.
Put the conquistador head on the right plate on the middle body, wearing the chestplate and red shirt.
Put the cowboy head on the left plate onto the right body, wearing the poncho.
Click the cups to begin the shell game.
Watch the position of the ball while the cups are lifted.
Follow the cup with the ball underneath it as the three cups are moved and interchanged across the table.
Click the cup to lift it, revealing the ball if you've chosen correctly.
There are 3 rounds of increasing difficulty.
The order changes with each game, for the following example:
Round #1: Ball in right cup.
Round #2: Ball in middle cup.
Round #3: Ball in middle cup.
Screenshot.
Take the Coin from the table.
Use the Map to fast-travel to the Pirate ship, then go up to the deck.
Pirate Ship Deck
Click the pile of cannon balls to add one to your inventory.
Use the key from your inventory on the hatch to unlock the doors.
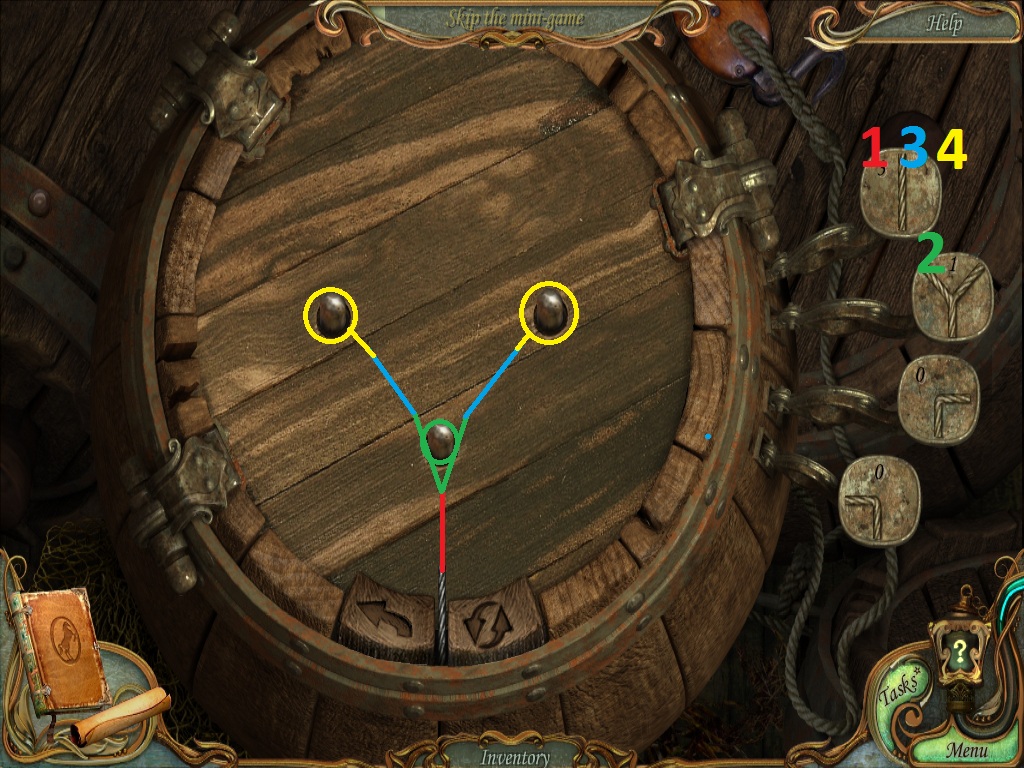
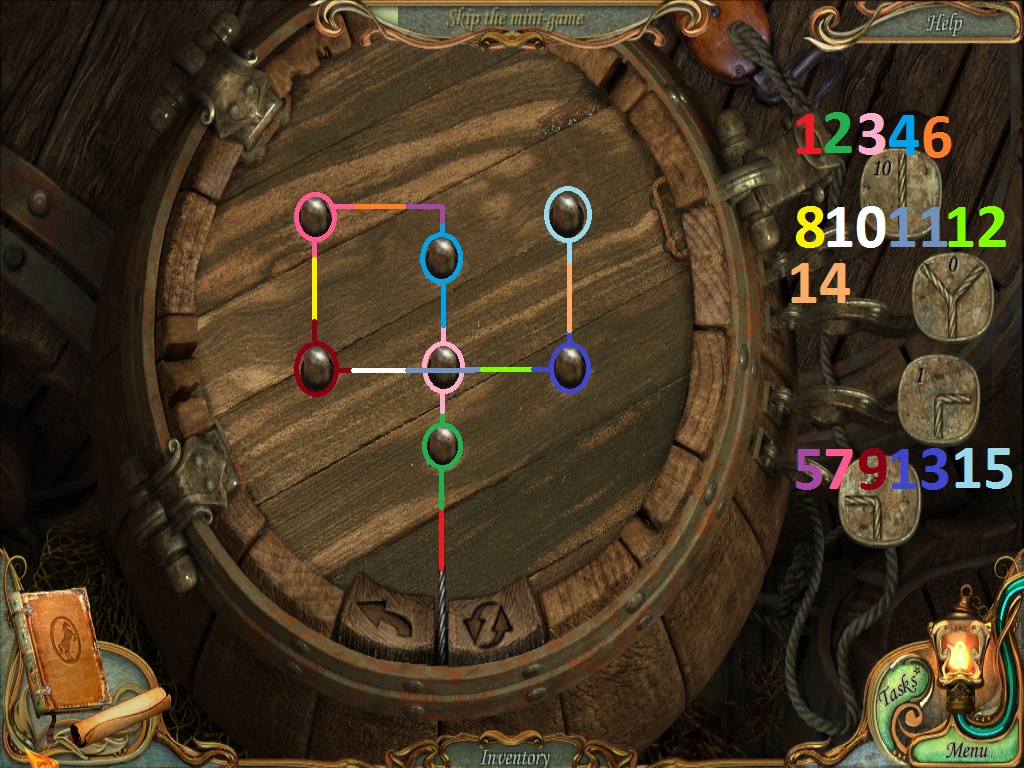
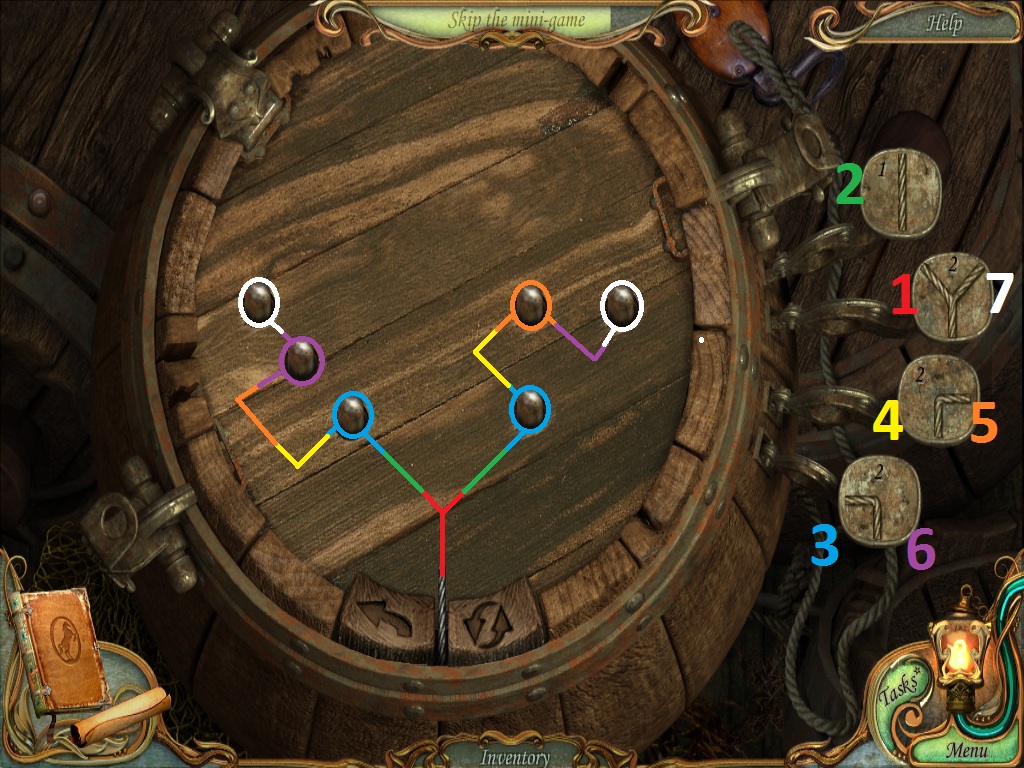
Click the doors to begin the ship's hold puzzle.
To solve this puzzle, connect all of the beads with the pieces of rope.
Clicking a button with a picture of a rope piece will attach a matching piece to the rope at the bottom of the barrel.
There are a limited number times each button can be pushed, indicated by the number at the top of the button.
Clicking the left arrow at the bottom of the barrel will undo the last move.
Clicking the refresh button will reset the whole board.
#1 Solution.
#2 Solution.
#3 Solution.
Once the puzzle is solved, the top of the gunpowder keg will slide down.
Click one of the bags of Gunpowder to add it to your inventory.
Use the Gunpowder from your inventory on the cannon.
Use the Cannonball from your inventory on the cannon.
Use the Lighter from your inventory on the torch.
Use the torch on the cannon to fire a cannonball.
Go through the open door into the captain's cabin.
Captain's Cabin
Take the Coin at the top of the birdcage.
Pick up the starfish for the Starfish Award on the wall above the shark jaws.
Click the shark jaws to zoom in.
Click the drawing to add a sktch to the Diary.
Use the Map to fast-travel to the fountain.
The Fountain
Click the fountain to repeat the hidden object scene.
Add the sails to the boat to make a Ship with Three Masts.
Screenshot
Use the Map to fast-travel back to the pirate ship, then return to the captain's cabin.
Captain's Cabin
Use the Crank Handle from your inventory on the device in the middle of the window.
The light from outside will shine through the shutters that cover the window, illuminating three letters on the carpet.
The letters "G", "D", and "N" in the word "golden" are glowing.
Enter the code on the alphabetic lock of the bird cage, then take the Rain Key inside the cage.
Use the Map to fast-travel to central square.
Central Square
Use the Slingshot from your inventory on the right lamppost to break it open.
Pick up the Fire Key on the ground by the shards of glass to add it to your inventory.
Click the wheel of fortune to zoom in.
Put the coin from your inventory into the coin slot to repeat the ticket dispenser puzzle.
This time, the puzzle has multiple immovable grey blocks, turn arrows, and tiles with colored borders.
Because the tiles that drop from the top of the grid are randomized, the solution for each game is different. The following is a guideline:
Switch the Green tile at B5 with the Yellow tile at C5.
Click the right button to flip the board clockwise.
Switch the Yellow tile at D5 with the Red tile at D6.
Click the left button to flip the board counterclockwise.
Switch the Red tile at F8 with the Blue tile at F9.
Switch the Yellow tile at F7 with the Red tile at F8.
Switch the Yellow tile at H7 with the Blue tile at I7.
Switch the Green tile at I6 with the Blue tile at I7.
Screenshot.
Once the puzzle is solved, take the Puppet Theater Ticket from the ticket dispenser.
Use the second Coin from your inventory on the coin slot to repeat the ticket dispenser puzzle.
This time, the puzzle has multiple immovable grey blocks, turn arrows, and tiles with both grey and colored borders.
Because the tiles that drop from the top of the grid are randomized, the solution for each game is different. The following is a guideline:
Click the right button twice to flip the board clockwise.
Switch the Red tile at I5 with the Yellow tile at J5.
Click the left button to flip the board counterclockwise.
Switch the Green tile at I9 with the Red tile at J9.
Click the left button to flip the board counterclockwise.
Switch the Blue tile at A4 with the Blue tile at B4.
Switch the Yellow tile at F7 with the Blue tile at F8.
Switch the Red tile at B6 with the Green til eat B7.
Switch the Blue tile at G6 with the Green tile at G7.
Click the right button to flip the board clockwise.
Switch the Yellow tile at F4 with the Yellow tile at G4.
Click the left button to flip the board counterclockwise.
Switch the Red tile at J8 with the Red tile at J9.
Switch the Green tile at H6 with the Red tile at H7.
Click the left button to flip the board counterclockwise.
Switch the Yellow tile at E8 with the Red tile at E9.
Switch the Red til eat G9 with the Blue tile at H9.
Switch the Green tile at D9 with the Blue tile at E9.
Switch the Green tile at H5 with the Yellow tile at H6.
Click the left button to flip the board counterclockwise.
Switch the Green tile at G8 with the Yellow tile at G9.
Screenshot.
Once the puzzle is solved, take the Moon Rocket ticket from the bottom of the ticket dispenser.
Use the Map to fast-travel to the house of horrors.
Chapter 7
House of Horrors
Go inside the house and click the portrait of a girl on the left wall.
Use the Rose, Apple, and Gloves from your inventory on the hands add them to the portrait.
One item is still missing for now, so exit the house.
Take the left path to the symbol gates.
Symbol Gates
Add the Raven Key from your inventory to the black space on the gate.
Add the Leaf Key to the green space on the gate.
Add the Sun Key to the yellow space on the gate.
Add the Rain Key to the blue space on the gate.
Add the Fire Key to the red space on the gate.
Go through the opened gate into the theater square.
Theater Square
Take the starfish for the Starfish award on the middle row of the left benches in front of the stage.
Use the Puppet Theater Ticket from your inventory on the ticket machine.
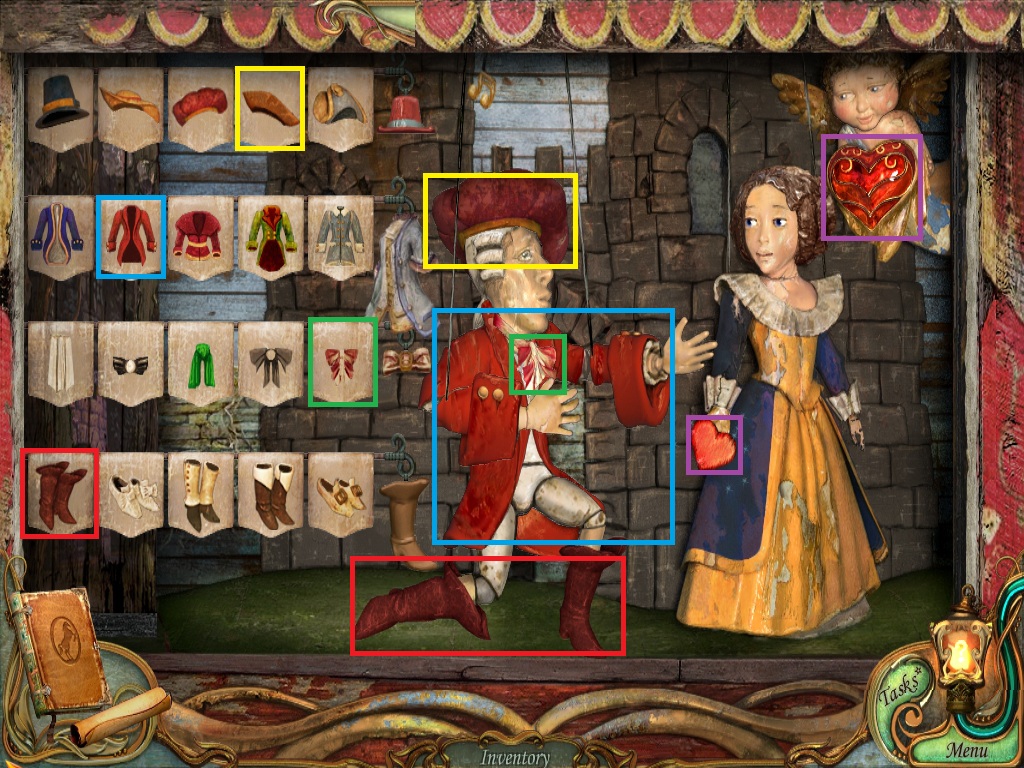
Click the stage to start the puppet theater puzzle.
To solve this puzzle, dress the male puppet in the correct outfit to please the female puppet.
There are four articles of clothing (Hat, Coat, Tie, and Boots) and five options per piece to complete the outfit.
Click a picture of clothing to add it to the male puppet's outfit.
Click the right curtain to draw the panel back to submit an outfit to the female puppet.
The number of clothing items correctly selected will result in a red bar in the heart above the female puppet's head.
Screenshot.
Once the puzzle is solved, take the Heart from the female puppet's hand to add it to your inventory.
Leave the stage view and take the right path to the moon rocket.
Moon Rocket
Take the yellow marble for the Marble Award in the lower hollow of the tree.
Take the starfish for the Starfish Award between in the treebranches.
Use the Moon Rocket ticket from your inventory on the ticket machine.
Go inside the rocket for a closer look.
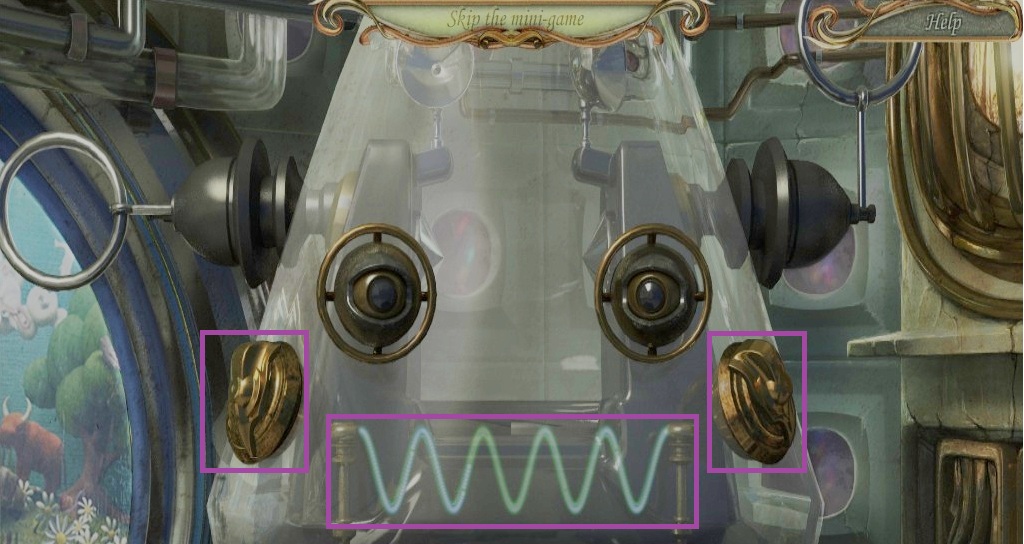
Click the robot's head to start the robot puzzle.
To solve this puzzle, change the phase and frequency of the blue wave to match the frequency of the green wave.
Clicking the left knob will alter the frequency.
Clicking the right knob alters the phase.
Click the left knob until it points directly downwards.
Click the right knob until it points to the lower right.
Screenshot.
Once the puzzle is completed, the object in the robots head will float down and the robot will become operational.
Click the earth scenery in the window to begin the hidden object scene.
Put the nut inside the hollow of the tree to lure out the squirrel.
Screenshot.
Add the Vacuum Tubes from your inventory to the robot.
Click the robot's chest panel to begin the riddle puzzle.
To solve this puzzle, move the fuse and key down to the yellow arrow at the bottom of the grid.
Clicking the up, down, left, and right arrows around the grid will move all objects in the corresponding direction.
Click Up, Left, Down, Left, Down, and the fuse will slide out of the grid.
Then click Right, Down, Left, Down, Right, Up, Left, Down, Left, Down.
Once the puzzle is solved, the key will slide out of the grid and be added to your inventory.
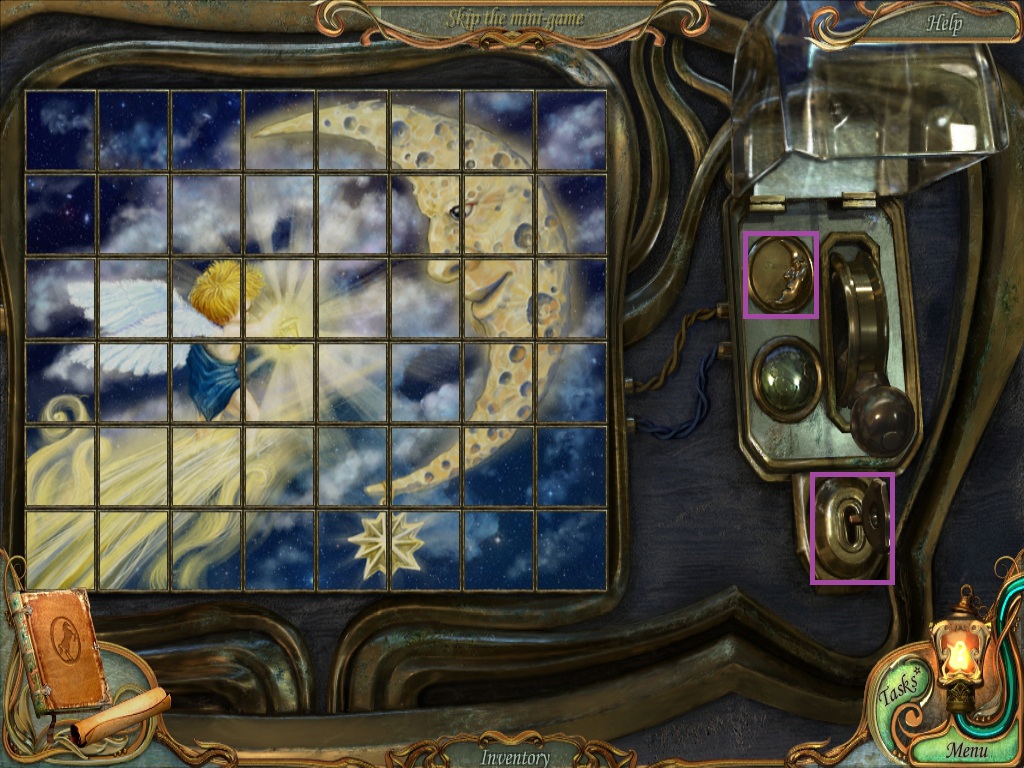
Click the rocket control panel to zoom in.
Use the Key from your inventory on the ignition to start the rocket control panel puzzle.
To solve this puzzle, slide the tiles into the correct position in order to complete the picture.
Only tiles in the incorrect position can be moved. If a tile is correctly placed, it will remain locked in place.
Click a tile to select it, click a second tile to exchange positions.
Solution.
Once the puzzle is solved, click the moon button to change the scenery.
As the panel is sliding, click the Coin to add it to your inventory.
Click the starfish for the Starfish Award on the left side of the window.
Click the window of the moon scenery to zoom in.
Take the blue marble for the Marble Award in the upper-right corner of the screen.
Use the Map to fast-travel to the central square.
Central Square
Click the wheel of fortune to zoom in.
Use the Coin from your inventory on the coin slot to repeat the ticket dispenser puzzle.
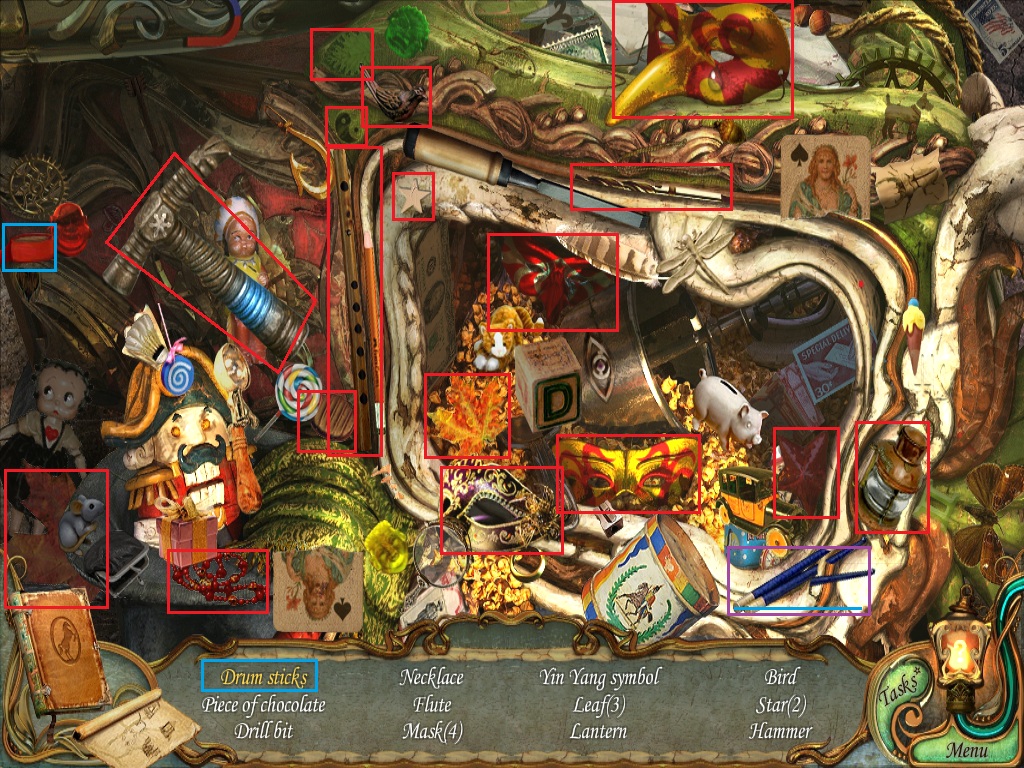
Ice cubes are blocking the panel, so close the wheel of fortune view and click the popcorn stand to repeat the hidden object scene.
Use the tape to repair the Drum Sticks.
Screenshot.
Once the hidden object scene is complete, you will receive another Hidden Object Reward for having completed the popcorn stand scene.
Click the wheel of fortune and zoom in to the ticket dispenser.
Use the Hammer from your inventory on the blocks of ice to repeat the ticket dispenser puzzle.
This time, there are only a few immovable grey blocks and turn arrows.
Because the tiles that drop from the top of the grid are randomized, the solution for each game is different. The following is a guideline:
Click the left button twice to flip the board counterclockwise.
Switch the Red tile at I7 with the Yellow tile at I8.
Switch the Red tile at I7 with the Green tile at J7.
Click the left button to flip the board counterclockwise.
Switch the Red tile at H9 with the Green tile at I9.
Click the right button to flip the board clockwise.
Screenshot.
Once the puzzle is solved, take the Circus Ticket from the ticket dispenser.
Use the Map to fast-travel to the theater square.
Chapter 8
Theater Square
Take the left path to the circus tent.
Circus Tent
Click the Butterfly at the top of the circus tent entrance to add it to your inventory.
Take the two marbles for the Marble Award inside the swirls on the left and right sides of the circus tent entrance.
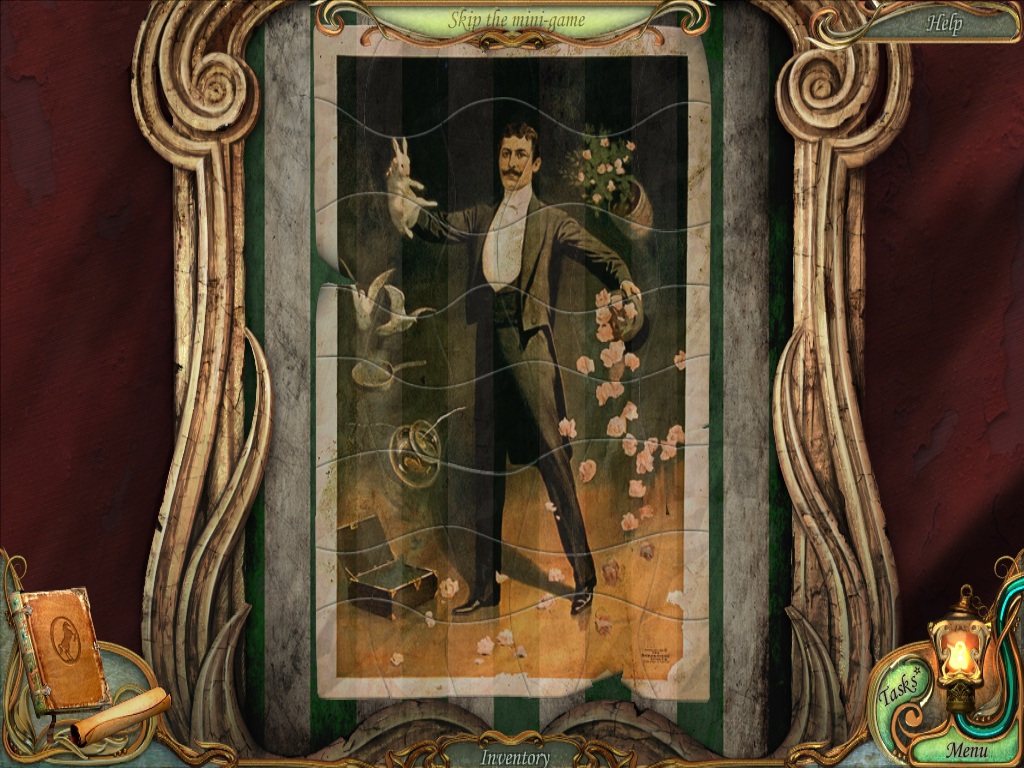
Click the left poster of a magician to zoom in.
Arrange the fragments correctly to complete the picture of the magician.
Click and hold a tile to select it, then drag and release it to place it on the board.
Matching tiles will stick together, and tiles that are correctly placed will lock onto the board.
Solution.
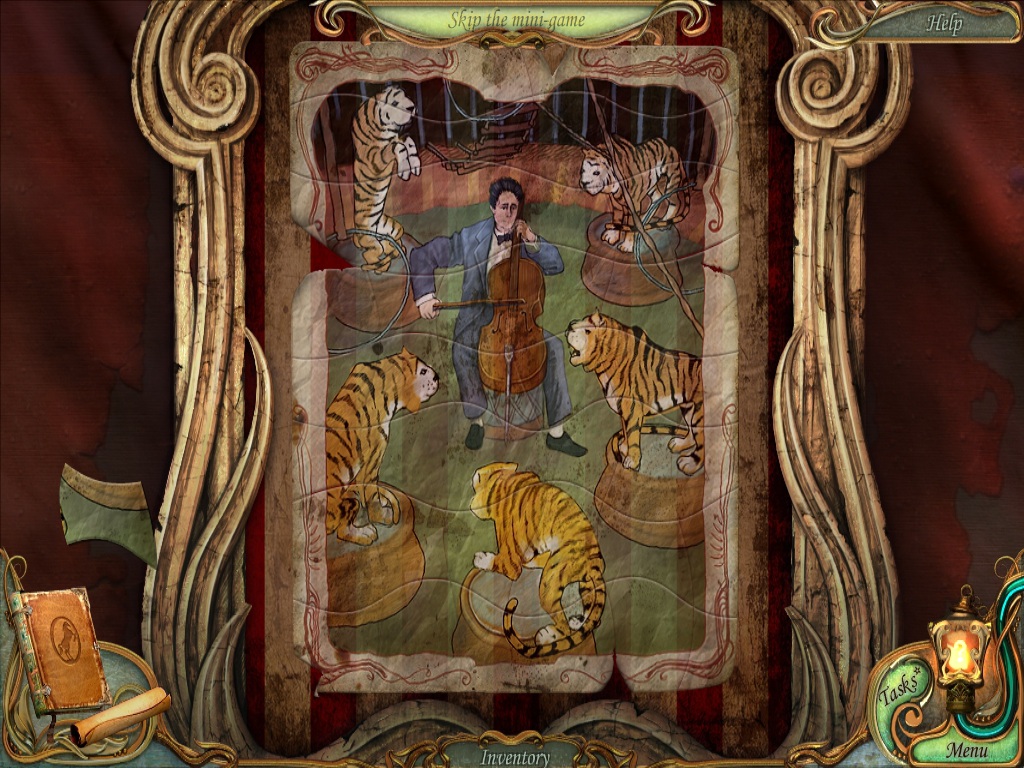
Leave the magician poster and click the poster of the animal tamer to zoom in.
Just as before, arrange the fragments to compelte the picture.
Solution.
After the picture is completed, you will receive the Puzzle Reward for having completed all the puzzles.
With both posters assembled, the eyes to the clown on the circus tent entrance will be open.
Use the Circus Tent Ticket from your inventory on the door.
Add the Heart from your inventory to the door.
Go through the open doors into the circus ring.
Circus Ring
Click the safe in the center of the room.
Click the left doorway to go into the Clown's Dressing Room.
Clown's Dressing Room
Take the starfish for the Starfish Award in the top right corner of the screen.
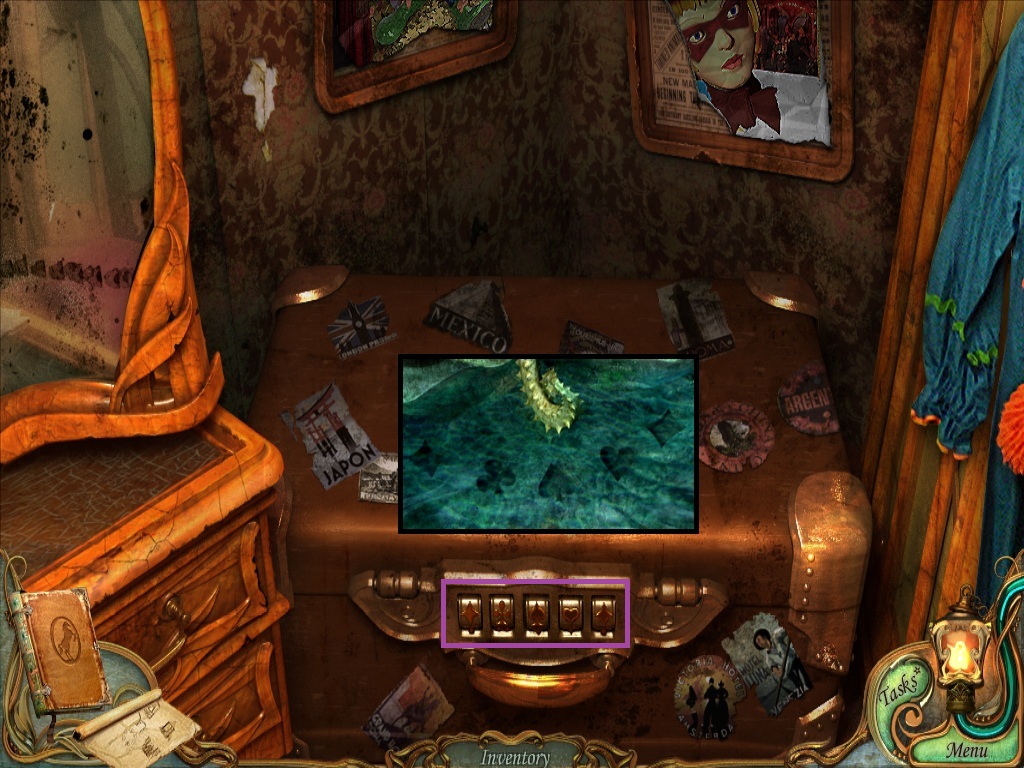
Click the locked trunk to zoom in.
To open the lock, click the buttons on the front of the trunk so that the symbols match the order of the pattern found earlier in the fountain (noted in the Diary).
The correct order is Diamond, Club, Spade, Heart, Diamond.
Solution.
With the correct combination, the chest will open, and a hidden object scene will begin.
Use the camera on the Eiffel Tower miniature to create a Photo of the Eiffel Tower.
Screenshot.
Leave the clown's dressing room and return to the circus tent, then take the right door into the animal tamer's dressing room.
Animal Tamer's Dressing Room
Take the red marble for the Marble Award to the left of the gramophone.
Take the starfish for the Starfish Award on the back of the gold lion statue.
Click the animal tamer's hiding place to begin the hidden object scene.
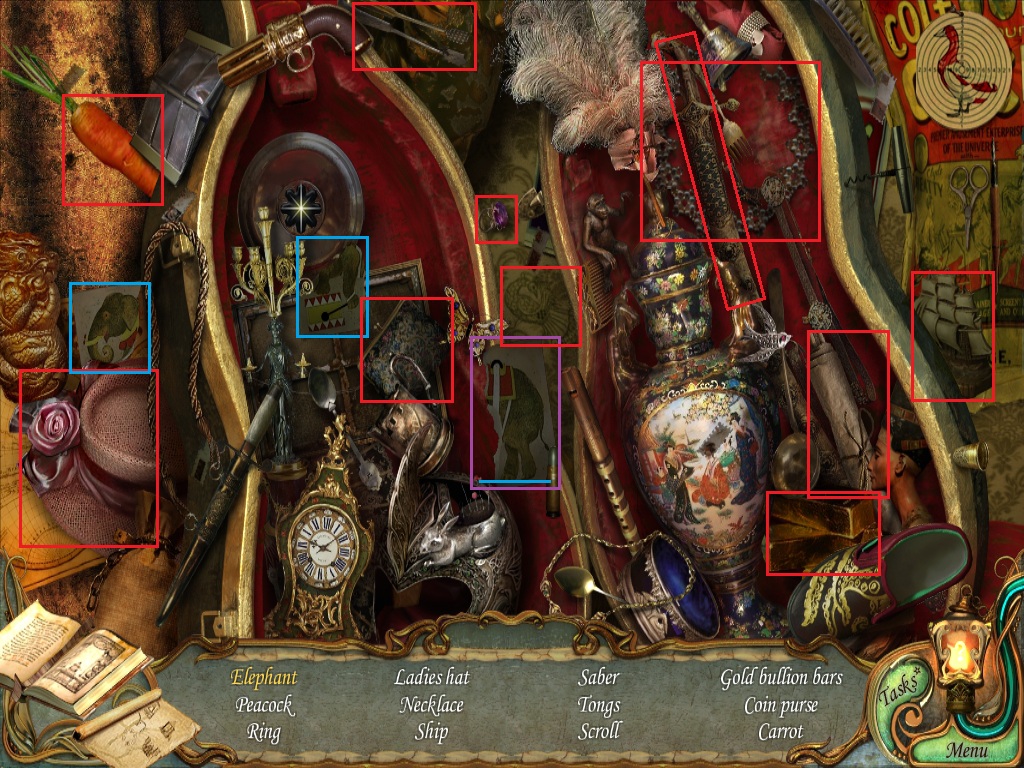
Add the pieces of the paper to the poster to complete the picture of the Elephant.
Screenshot.
Use the Map to fast-travel to the path.
The Path
Click the roots at the bottom of the tree to zoom in.
Use the Carrot from your inventory on the hole to lure out the rabbit.
Click the Rabbit to add it to your inventory.
Use the Map to fast-travel to the house of horrors and go inside.
House of Horrors
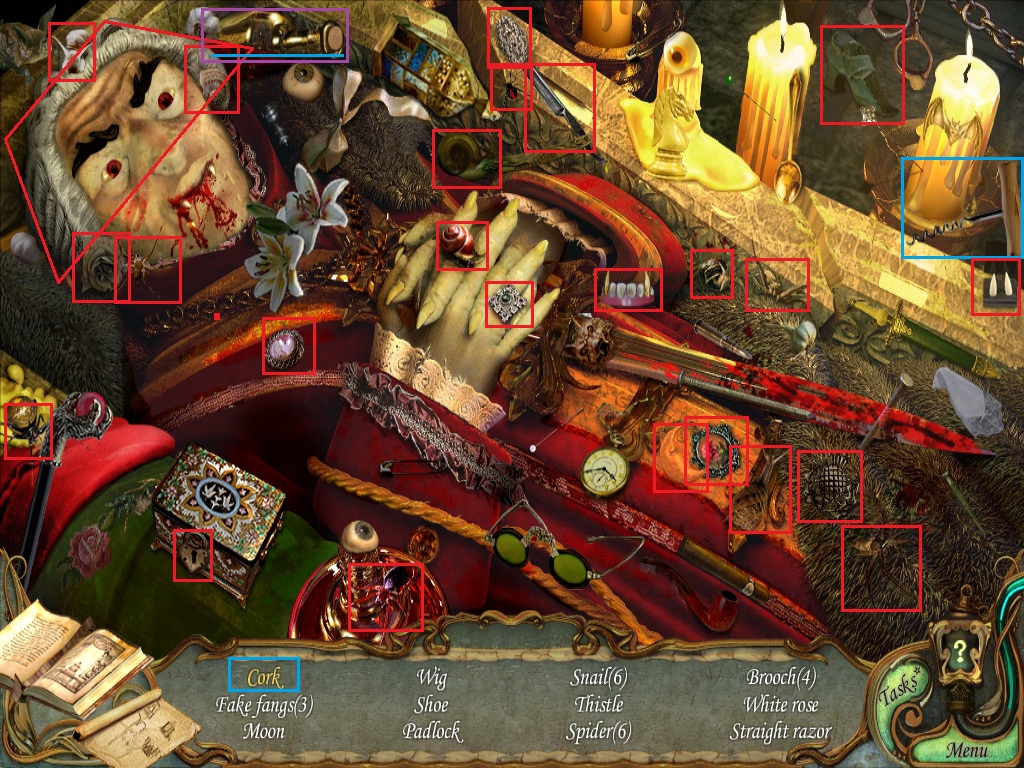
Click the vampire to repeat the hidden object scene.
Click the Padlock to open the jewelry box, revealing the Hidden Fangs.
Use the corkscrew on the bottle to remove the Cork.
Screenshot.
Use the Map to fast-travel to the fountain.
The Fountain
Click the fountain to repeat the hidden object scene.
Add the four keys to complete the Xylophone.
Screenshot.
Use the Map to fast-travel to the Cafe.
The Cafe
Click the game booth to repeat the hungry man puzzle.
Feed the hungry man the items depicted in the screen on his stomach.
This time, preparing his meal can take multiple steps per item.
Collect all four bananas to complete the bunch.
Put the pancakes on a plate, then add the maple syrup.
Put the hotdog in a bun, then add mustard.
Use the knife to slice a piece of the cake.
Use the bottle opener in the mans hat to pop the cap on the soda bottle, then pour the soda into the glass.
Add the meat, cheese, lettuce, and tomato to the bread to make a hamburger.
Screenshot.
Once the puzzle is solved take the Bronze Tiger under the man's hat.
Use the Map to fast-travel to the pirate ship, then go up to the deck.
Pirate Ship Deck
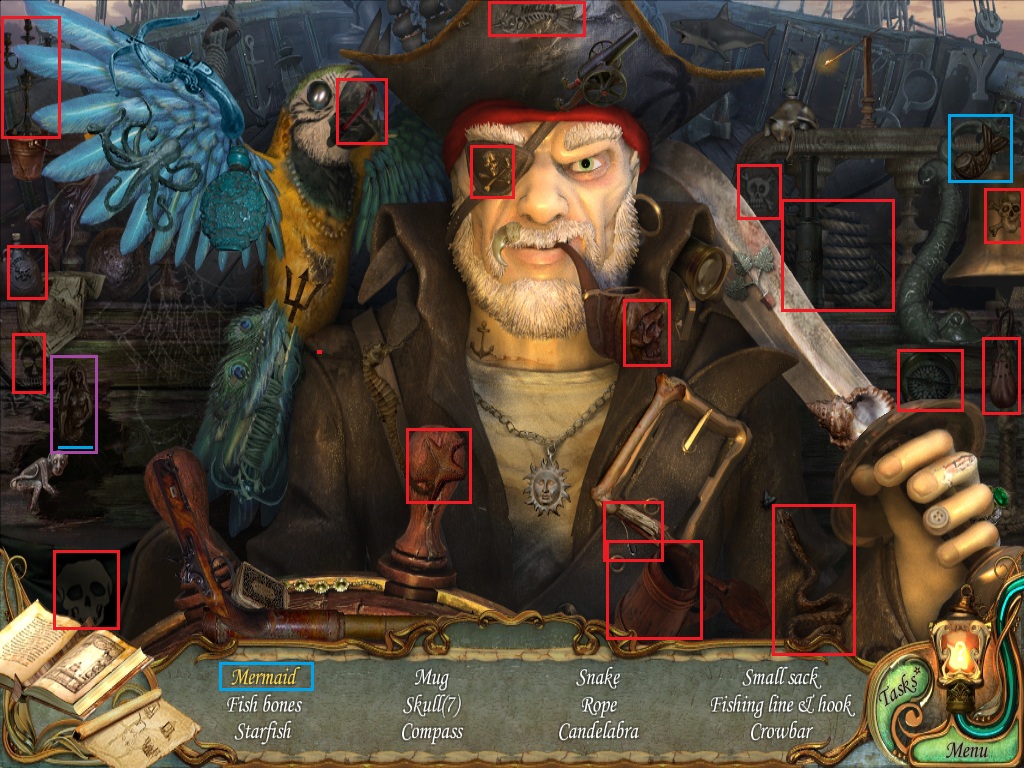
Click the ship's wheel to repeat the hidden object scene.
Add the tail to the statuette to complete the Mermaid.
Screenshot.
Use the Map to fast-travel to the merry-go-round.
The Merry-Go-Round
Click the horse to zoom in.
Add the Horse Leg to the horse to start the merry go round puzzle.
Position the horse to match the image on center panel of the merry-go-round.
Screenshot.
Take the Key from the horse's mouth to add it to your inventory.
Click the ceiling to repeat the hidden object scene.
Add the red bow to the toy cat to make the Cat With a Bow.
Screenshot.
Click the hidden panel to zoom in.
Use the Key from your inventory on the panel lock.
Use the Map to fast-travel to the Moon Rocket.
Moon Rocket
Go inside the rocket and click the earth panel to repeat the hidden object scene.
Use the fishing rod on the man to reel in the Fish.
Screenshot.
Click the earth panel once again to repeat the hidden object scene.
Put the three eggs inside the nest to complete the Bird in a Nest.
Screenshot.
Use the Map to fast-travel to the roller coaster, then go inside to the control room.
Control Room
Click the old car to repeat the hidden object scene.
Put the two billiard balls inside the box to complete the Box with Balls.
Screenshot.
Use the Map to fast-travel to the merry-go-round.
The Merry-Go-Round
Click the horse to zoom in.
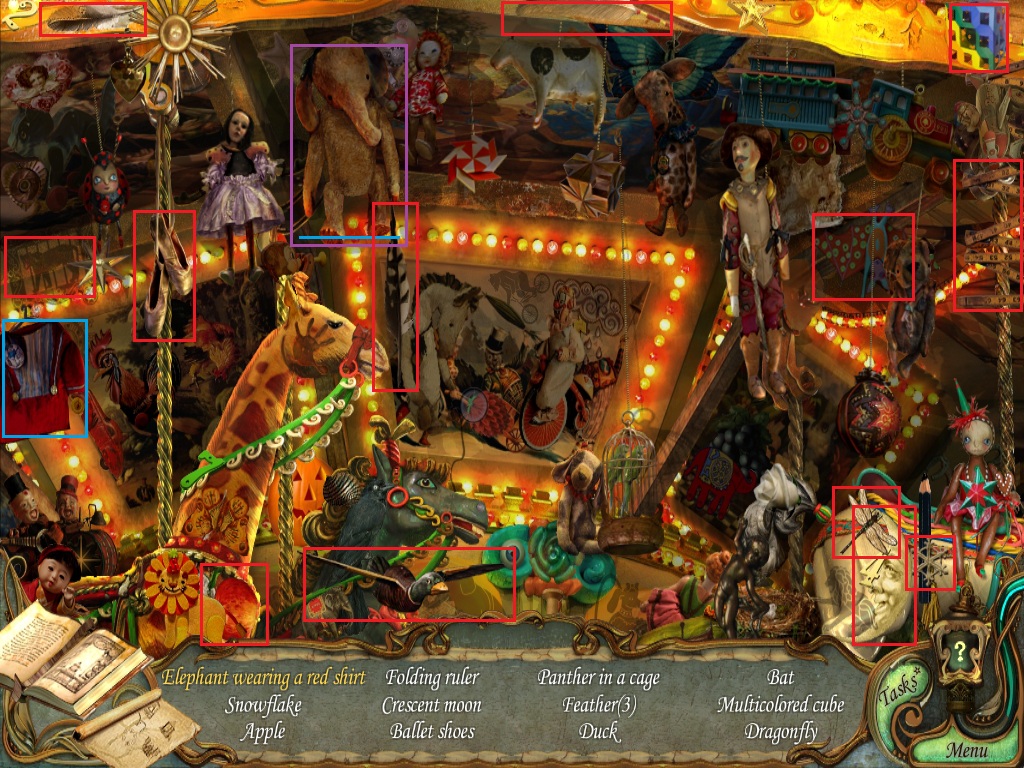
Click the ceiling to repeat the hidden object scene.
Put the red shirt on the toy elephant to make the Elephant Wearing a Red Shirt.
Screenshot.
Click the hidden panel to zoom in.
Add the Dragonfly and the Comet from your inventory to the panel.
Use the map to fast-travel to the circus ring, then go into the magician's dressing room.
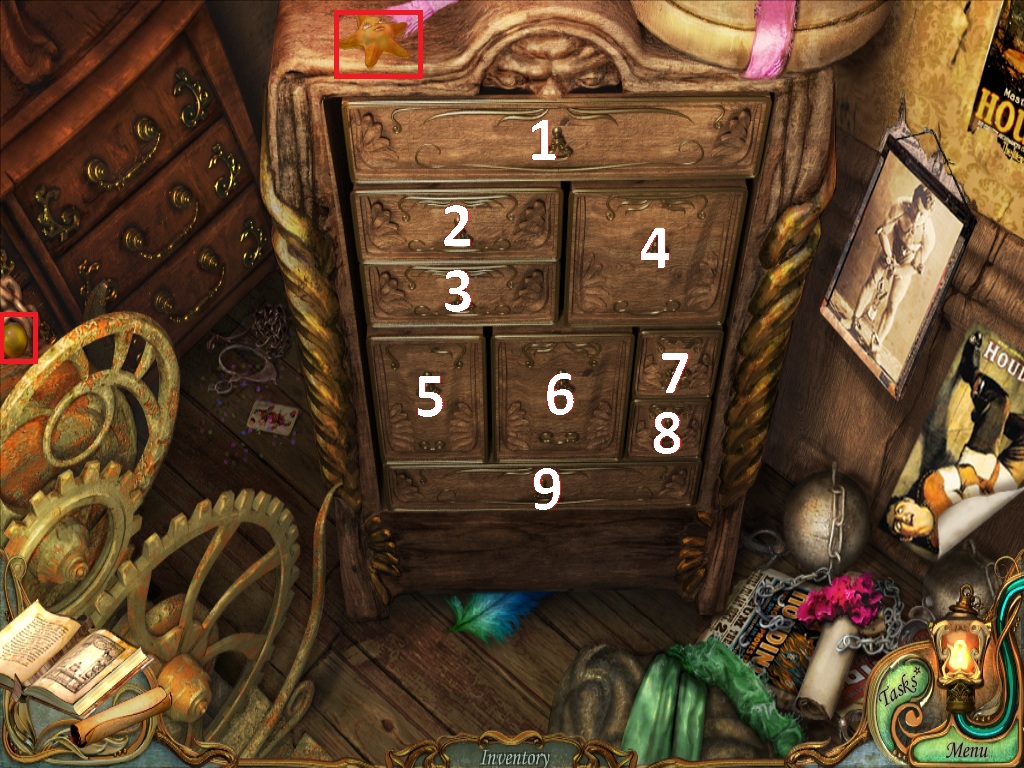
Magician's Dressing Room
Take the starfish for the Starfish Award on the wall above the dresser.
Click the dresser to zoom in.
Click the starfish for the Starfish Award on the top of the dresser
Take the yellow marble for the Marble Award above the round gear, to the left of the cabinet.
Click the metal tag in the top drawer to note the four digit combination in the Diary.
Click Drawer 2, then click Drawer 3.
Drawer 9 will open. Click the large Gear to add it to your inventory.
Screenshot.
Leave the drawer view to return to the magician's dressing room view.
Use the large Gear from your inventory on the mechanical device to the right of the water tank.
Click the gears to lift the chest from the tank.
Click the padlock on the tank to zoom in.
Use the Oil Can from your inventory on the padlock.
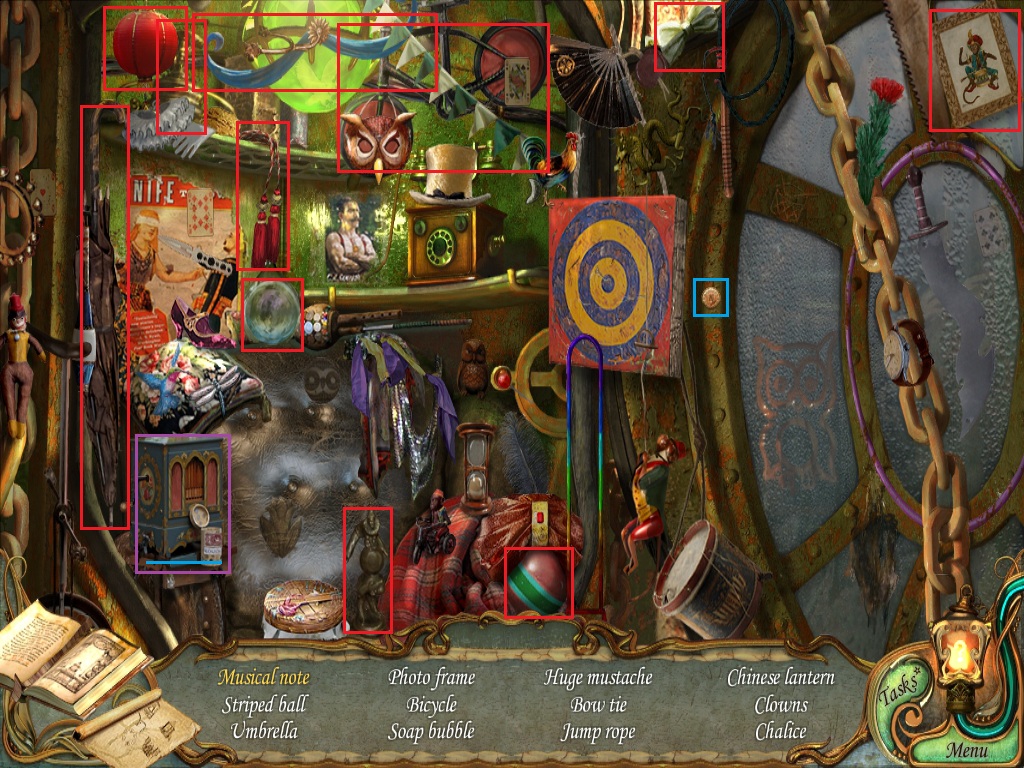
Click the magic chest to begin the hidden object scene.
Insert the coin into the music box to create a Musical Note.
Screenshot.
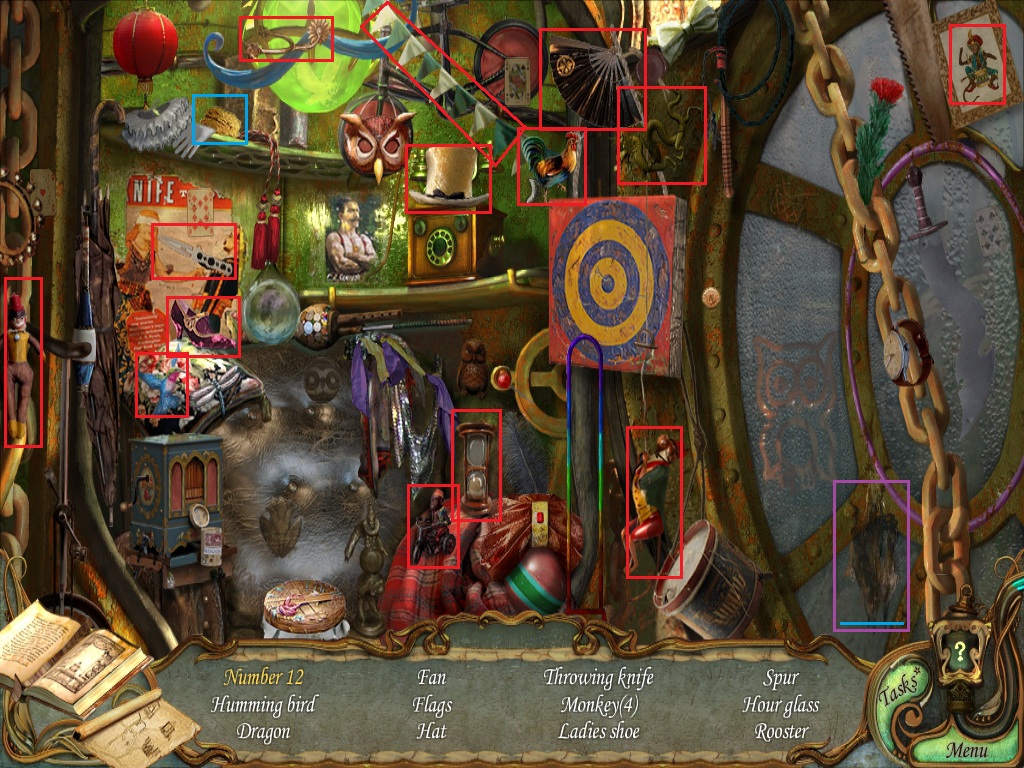
Click the magic chest again to repeat the hidden object scene.
Use the sponge on the dirt stain to reveal the Number 12.
Screenshot.
Leave the magician's dressing room and return to the clown's dressing room.
Clown's Dressing Room
Click the chest to repeat the hidden object scene.
Add the three sevens to their matching spaces to make the Jackpot.
Screenshot.
Leave the clown's dressing room and return to the animal tamer's dressing room.
Animal Tamer's Dressing Room
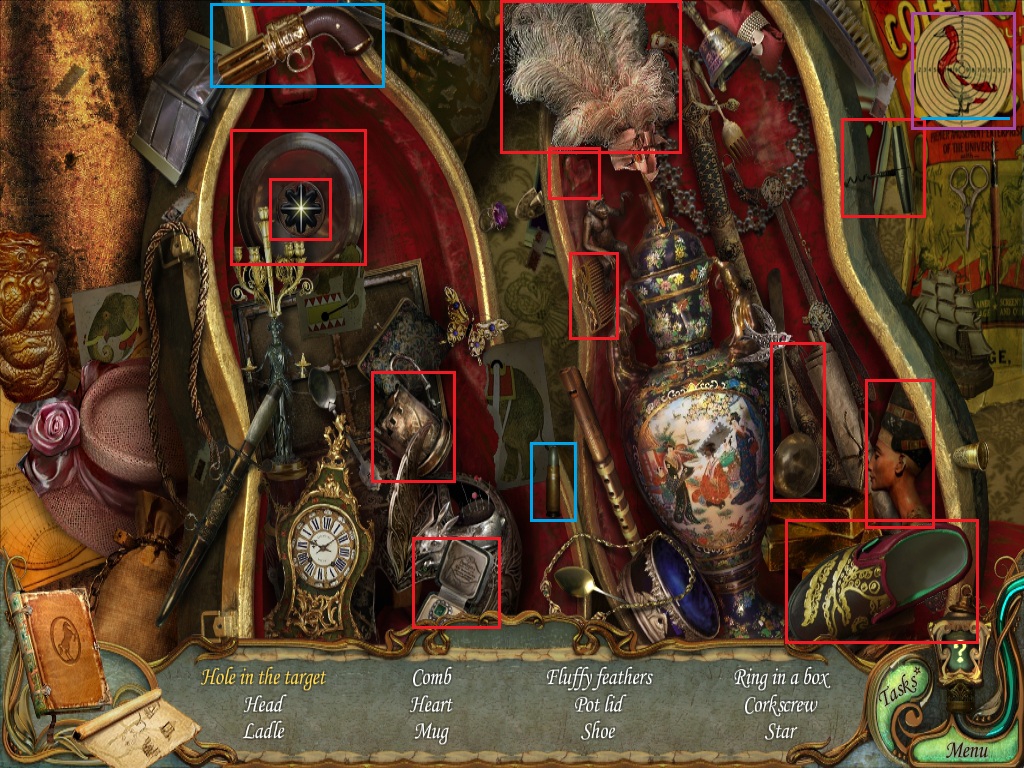
Click the hiding place to repeat the hidden object scene.
Add the bullet to the gun, then use the gun to shoot the target to make a Hole in the Target.
Screenshot.
Use the Straight Razor on the tamer's coat.
Take the red Mask out of the secret pocket.
Leave the tamer's dressing room and return to the clown's dressing room.
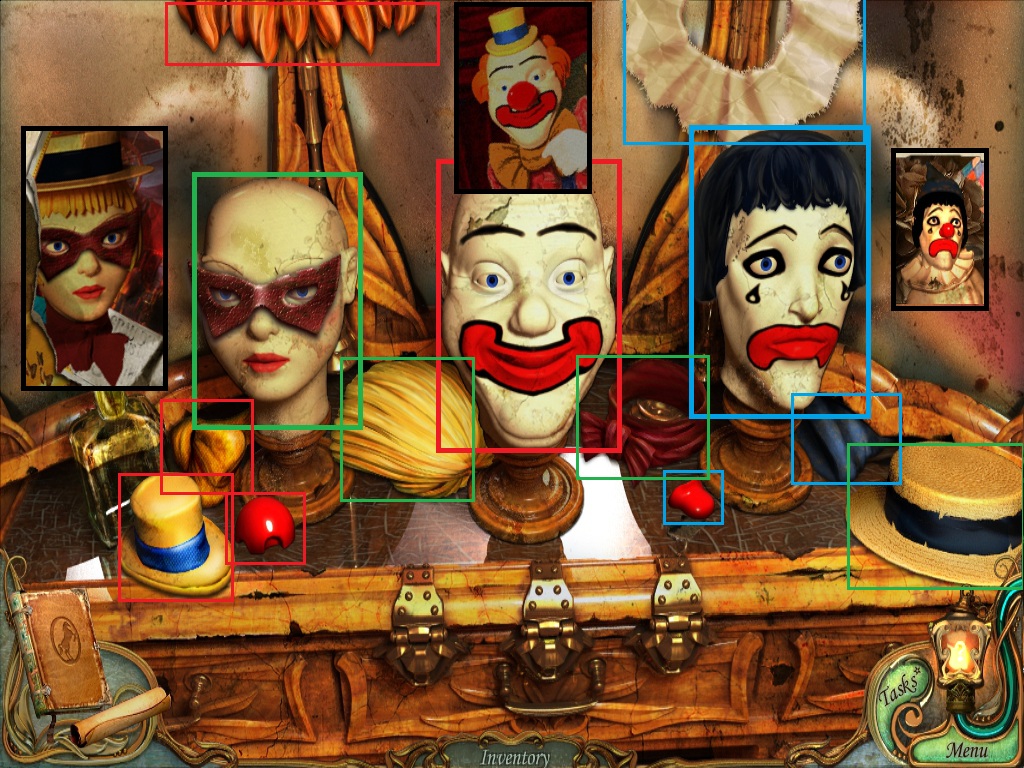
Clown's Dressing Room
Click the clown's wardrobe to zoom in.
Dress up each of the clown heads with the matching articles of clothing scattered around the wardrobe.
The correct costumes for the female clown and the happy clown can be seen on the wall posters in the dressing room; the sad clown costume is shown on the doll sitting in the trunk.
Add the Wig from your inventory to the sad clown.
Add the Mask from your inventory to the female clown.
Screenshot.
Once the heads are all correctly decorated, the drawer will open.
Click the Bat inside the drawer to add it to your inventory.
Use the Map to fast-travel to the house of horrors.
House of Horrors
Go inside the house and click the portrait of the girl to zoom in.
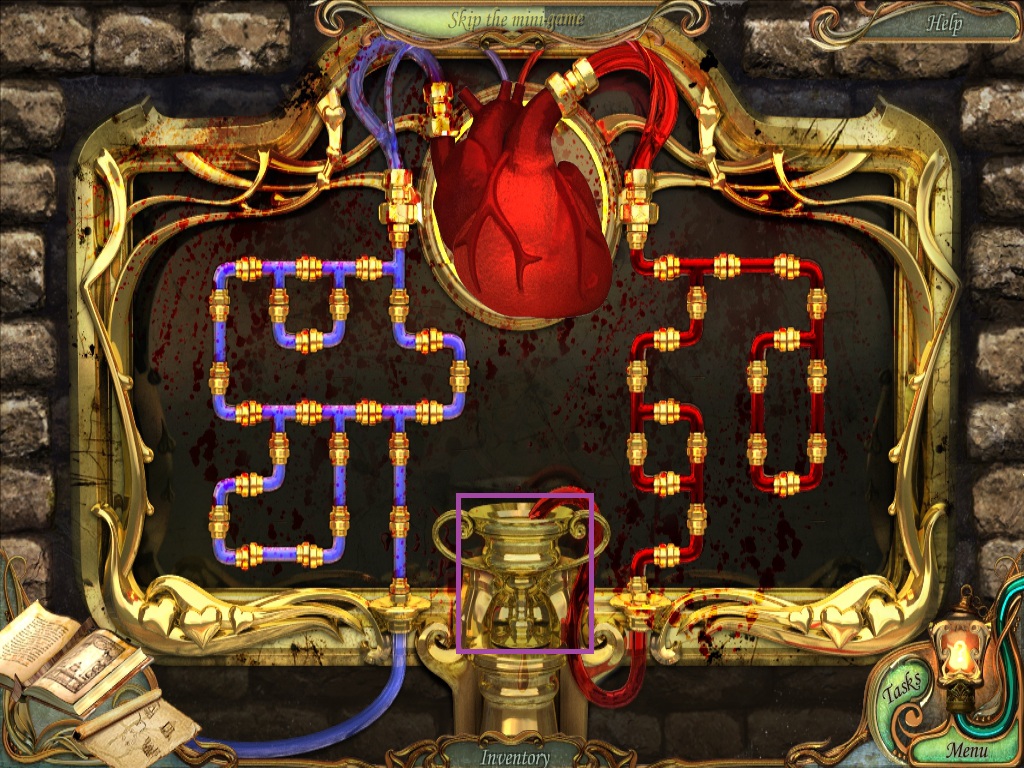
Use the Butterfly from your inventory on the portrait.
The painting will lift from the wall, revealing a hidden puzzle.
To solve this puzzle, connect all the tubes to create a path from the blue tube, through the heart, and into the chalice.
Click a tube to pivot it 90 degrees clockwise.
When a path of tubes is successfully made on the left side, the piping will turn blue as the blue gas passes through it.
When a path of tubes is successfully made on the right side, the piping will turn red as the red gas passes through it.
Screenshot.
Once the puzzle is solved, take the Rune floating above the chalice to add it to your inventory.
Use the Map to fast-travel to the moon rocket.
Moon Rocket
Go inside the rocket and click the control panel to zoom in.
Click the moon button to switch the view to the moon panel.
Add the Rune from your inventory to the stone slab on the moon to start the robot puzzle.
To solve this puzzle, assemble the robot by selecting the parts in the correct order.
Certain parts will cause other pieces to evolve, resulting in that item reaching a higher level.
All parts need to reach maximum level for the robot to be built successfully.
Click Part E
Click Part B
Click Part C
Click Part A
Click Part F
Click Part D
Screenshot.
Once the puzzle is solved, take the Wheel in the center of the robot's chest to add it to your inventory.
Use the Map to fast-travel to the merry-go-round.
The Merry-go-round
Click the horse to zoom in.
Click the hidden panel.
Add the Rooster, the Flower, the Star, and the Bat from your inventory to the panel.
Take the Circle Key revealed behind the clock of the panel to add it to your inventory.
Use the Map to fast-travel to the circus ring.
Circus Ring
Use the Round Key from your inventory on the large outer cage.
Go into the clown's dressing room.
Clown's Dressing Room
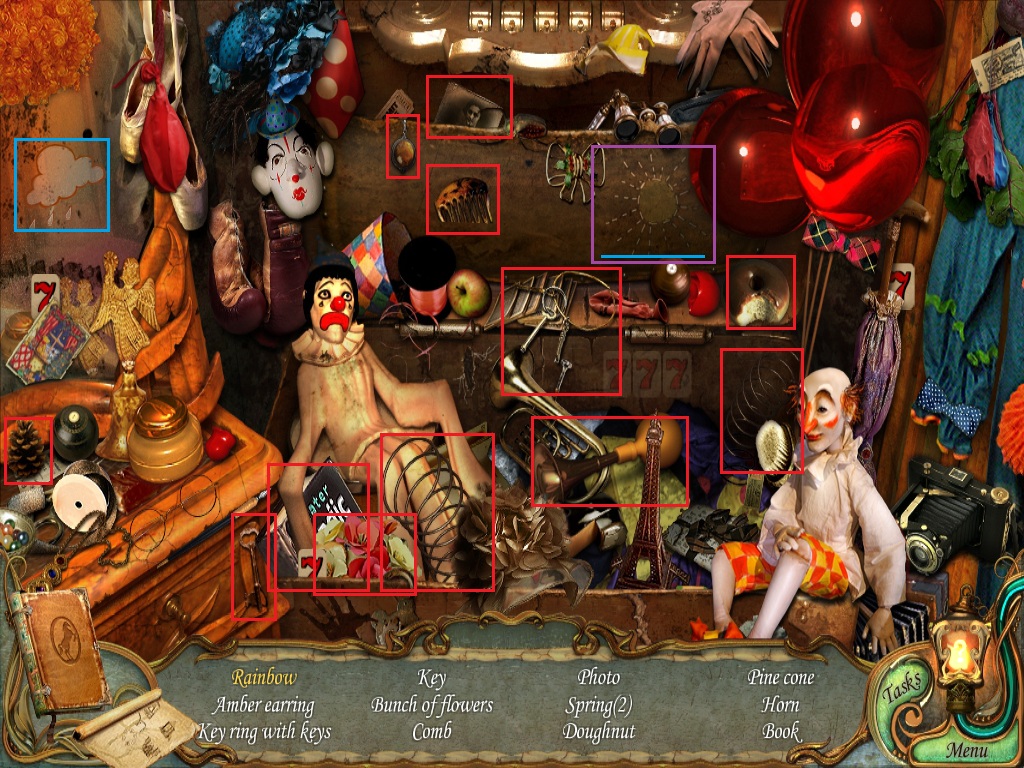
Click the chest to repeat the hidden object scene.
Add the raincloud to the sun to make a Rainbow.
Screenshot.
Leave the clown's dressing room and return to the magician's dressing room.
Magician's Dressing Room
Click the table with the magician's hat to zoom in.
Take the four marbles for the Marble Award on the table and the one marble on the floorboard.
Use the Rabbit from your inventory on the magician's hat.
Add the Book of Magic to the table.
Click the book and turn the page to see the transformation spell.
Click the magician's wand to pick it up.
Click and hold the wand, moving it in a figure eight in one continuous motion.
The top circle of the eight is drawn in a clockwise motion and the bottom circle of the eight in a counterclockwise motion, then release the mouse to cast the spell.
Screenshot.
Take the Bunch of Flowers in the hat then leave the table view.
Click the dresser to zoom in.
Click Drawer 9, then Drawer 7, then Drawer 8.
Place the Bunch of Flowers from your inventory in Drawer 4, then click Drawer 4 to close it.
Take the Star Key inside Drawer 6.
Screenshot.
Leave the magician's dressing room and return to the animal tamer's dressing room.
Animal Tamer's Dressing Room
Use the Crowbar from your inventory on the loose floorboard
Click the revealed Vinyl Record to add it to your inventory.
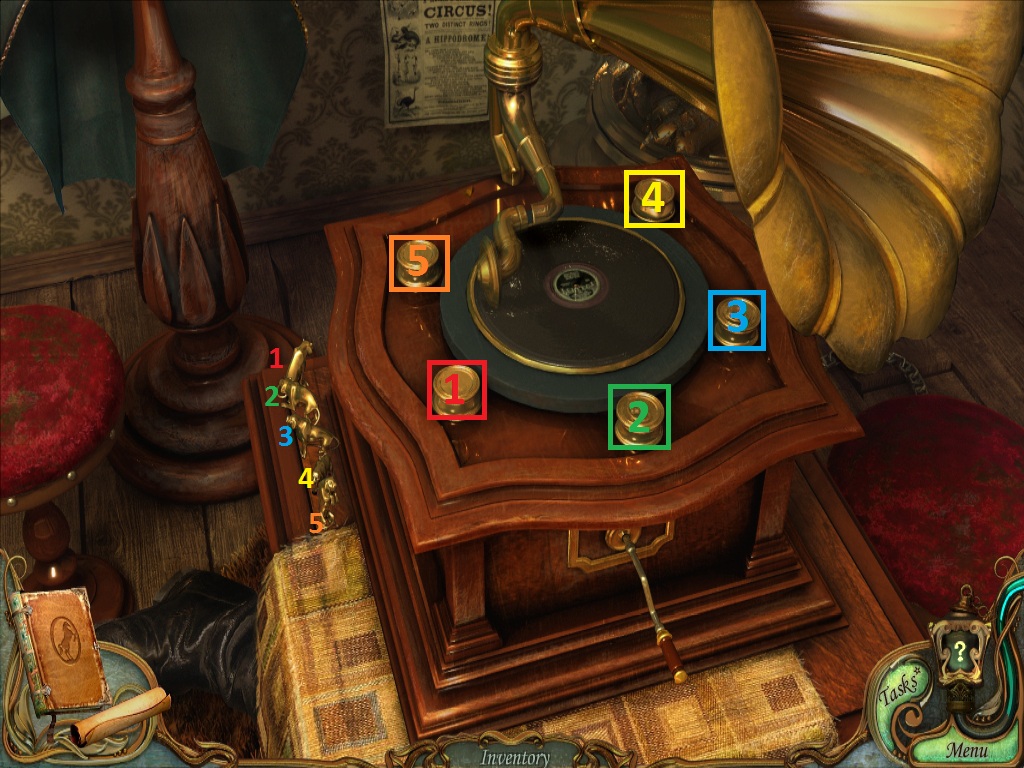
Click the gramophone to zoom in.
Place the three bronze Tiger figurines from your inventory onto the tabletop next to the gramophone.
Place the Record from your inventory on the player.
Arrange the five tigers in a circle on the pedestals, facing the center.
Screenshot.
Once the tigers are correctly set, a secret compartment in the side of the gramophone will be revealed.
Take the Square Key from the inside of the compartment.
Leave the animal tamer's dressing room and return to the circus ring.
Circus Ring
Use the Square Key from your inventory on the middle cage.
Use the Star Key from your inventory on the inner cage.
Click the safe to zoom in.
Add the Wheel from your inventory to the safe.
Enter the digits from the metal tag in the magician's dressing room to the combination on the safe.
Screenshot.
The End
Posted by: Trinn |
June 21, 2011 1:43 PM
|
June 21, 2011 1:43 PM
charman gonzalez, I couldn't say which of the marbels is the one you skipped or in what order you might have found them, so here is the location of all marbles:
Marble Locations
At the Merry-Go-Round, while viewing a close up of the ride to the right of the horse you can see the back end of a giraffe. There is a red marble(1/17) on the giraffe's right thigh.
In the Room With a Shell Game there is a part on the floor behind the headless gentleman's chair where the red curtains are touching the ground. On top of the curtain on the ground is another red marble(2/17).
At the Fountain if you click the seahorse fountain on the left, there is a green marble(3/17) nehind the seahorse statue's tail.
On the second floor of the Shooting Gallery from the outside there is a blue door. Directly above the blue door and below the crossed rifles is the red marble(4/17)
At the Control Room of the roller coaster there is a green marble(5/17) on the shelf right next to the fan.
Once you've solved the puzzle inside the Control Room, the rollercoaster car will roll down the track in front of you. Click on the car to zoom in and you will find the red marble(6/17) on the ground directly above the sad teddy bear's head.
In the area on the outside of the Moon Rocket there is a large tree covering the entire right edge of the screen. Inside the hollow near the bottom of the tree is a yellow marble(7/17)
If you switch to the night screen inside the Moon Rocket, there is a blue marble(8/18) in a semicircle at the top right corner of the moon scene.
At the entrance outside of the Circus Tent is a gate with green columns on each side. Above each of those columns are the green marbles (9/17) and (10/17)
The red marble(11/17) is on the table next to the gramophone inside the Animal Tamer's Dressing Room.
If you click the dresser inside the Magician's Dressing Room you can see part of the water tank on the left side of the screen. directly above the wheel on top of the two large gears is a yellow marble(12/17)
If you click the table with the magician's hat in the middle of the magician rooms you can find 5 marbles. Marbles (13/17), (14/17), and (15/17) are all in front of the house of cards. Marble (16/17) is partially hidden behind the house of cards. Marble (17/17) is on the floor between the leg of the table and the large bronze statue.
Hope that helps! :)
-Trinn
Posted by: Trinn |
August 28, 2011 7:56 PM
|
August 28, 2011 7:56 PM
Dreamland Extended Version (Chapter 9).
If your game save dates before August 4th, 2011, you will need to start a new game in order to access the extended version content.
Circus Ring
After entering the combination to the safe, you will receive the Cemtery Key.
Use the Map to travel to the path.
Path
Use the Cemetery Key from your inventory on the locked gate.
Go through the open gate into the cemetery.
Cemetery
Take the Ladder leaning against the far left tree.
Take the Metal Dove (1/7) on top of the headstone.
Use the Map to travel to the shooting gallery.
Shooting Gallery
Place the Ladder from your inventory against the left side of the building.
Climb up the ladder to the secret attic.
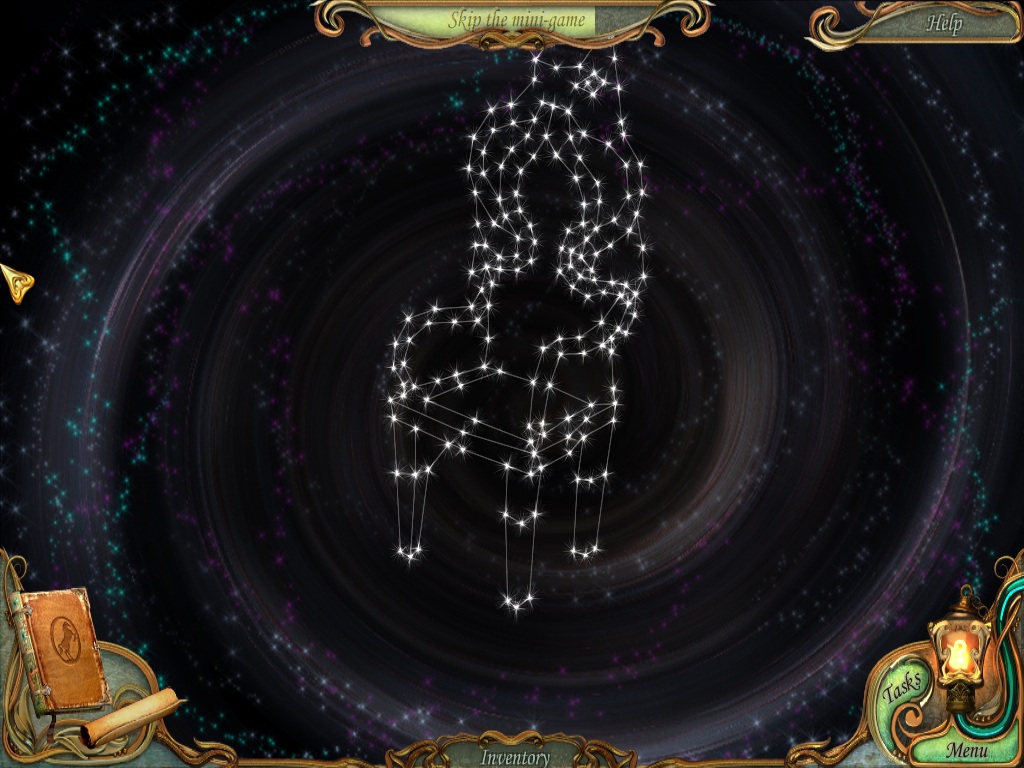
Secret Attic
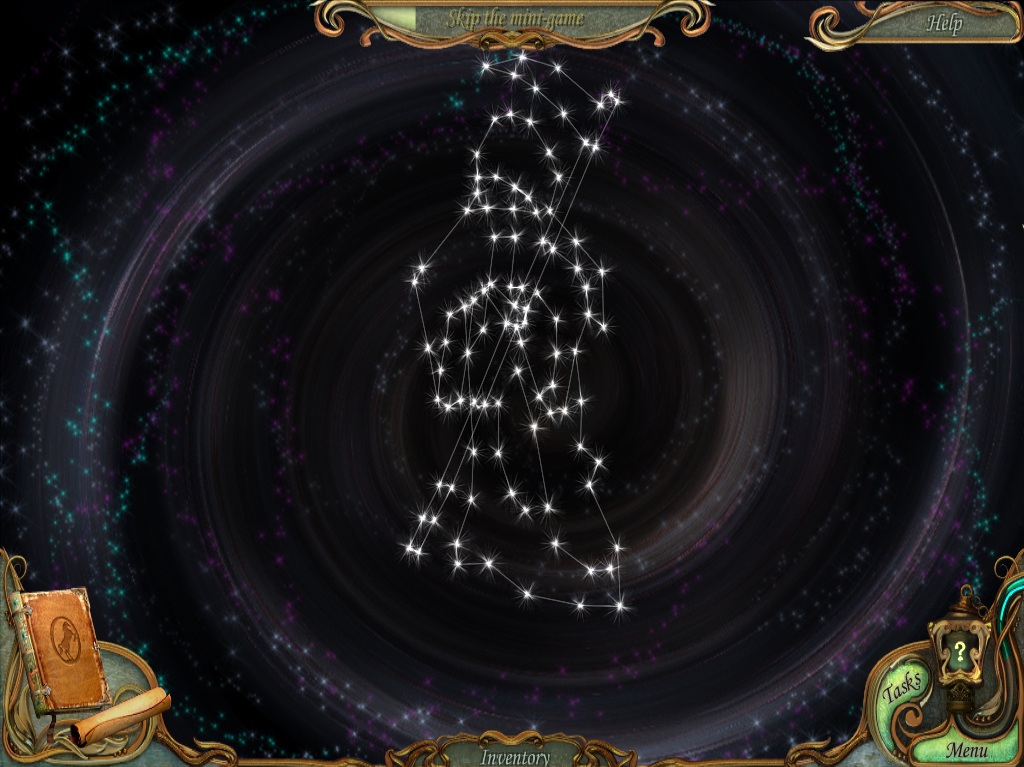
Click the map of the sky to start the mini-game.
Rotate the constellation to reveal the secret image.
Move the cursor around the area to pivot the stars.
Click the map of the sky to play the puzzle a total of 6 times
Solution #1.
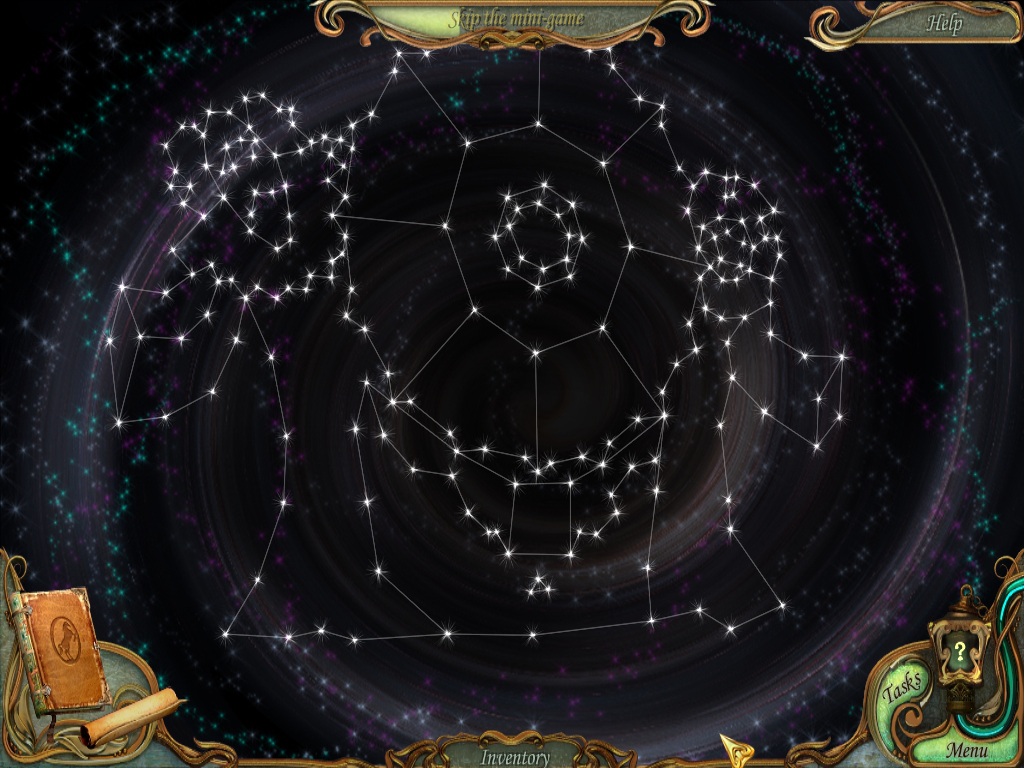
Solution #2.
Solution #3.
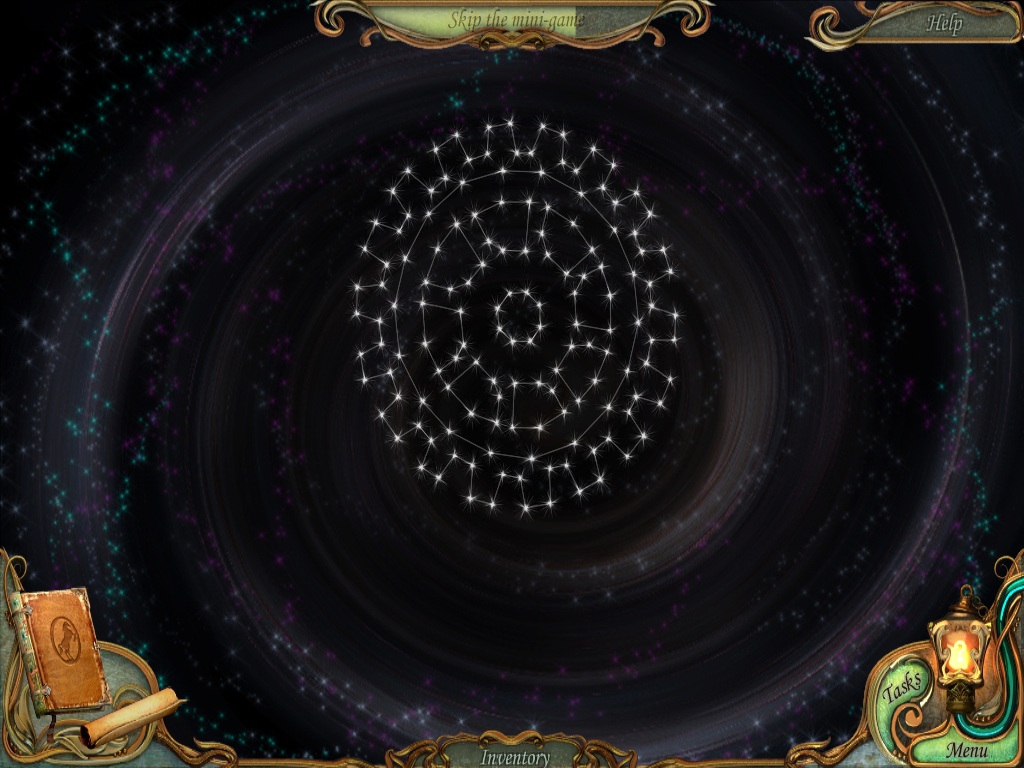
Solution #4.
Solution #5.
Solution #6.
Take the Part of Chart (1/6) on the wall over the sun-shaped carving, then put it in the wheel of fortune blueprints.
Take the Part of Chart (2/6) on the window, then put it in the blueprint of the gate.
Take the Part of Chart (3/6) on the rug between the pile of books and the rolled up map, then put it in blueprint of the roller coaster control room.
Take the Part of Chart (4/6) and (5/6) on the sides of the chest.
Put Part (4/6) in the floor plan of the house of horrors, then put Part (5/6) in the blue print of the roller coaster.
Take the Part of Chart (6/6) from the mirror on the table, then put it in the floor plan of the captain's cabin.
Use the Map to return to the main entrance.
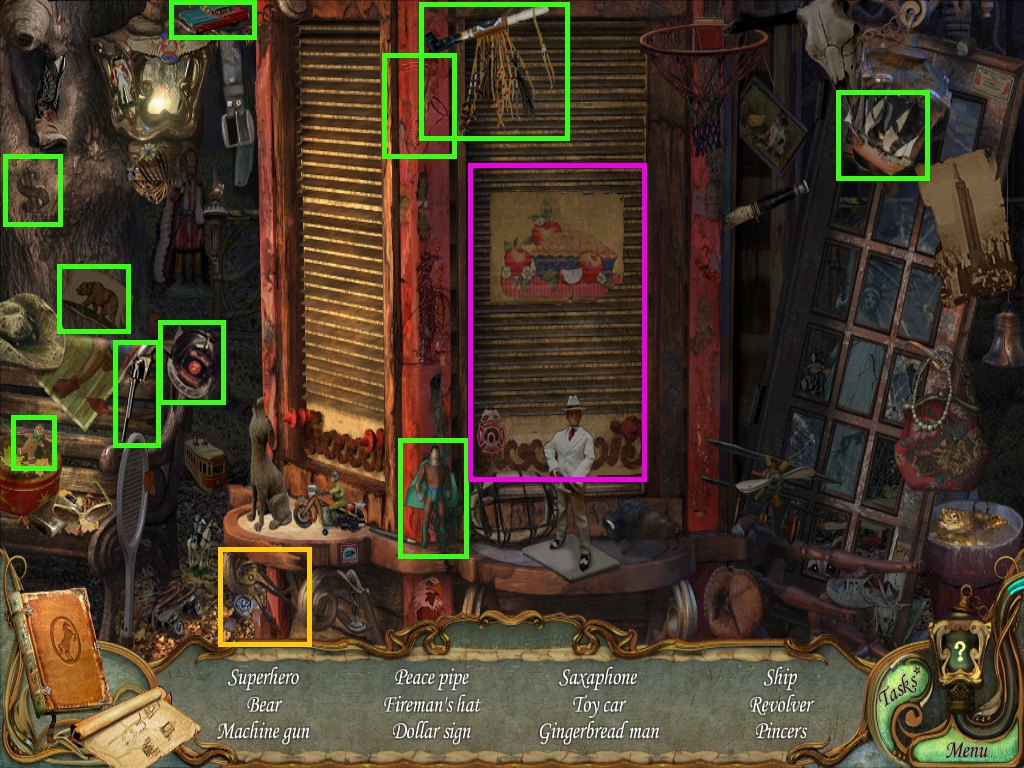
Main Entrance
Click the abandoned ticket booth to repeat the hidden object scene.
Click the blinds to reveal the Machine Gun.
Screenshot.
Once the hidden object scene is complete, you will receive the Pincers.
Use the Map to travel to the pirate ship.
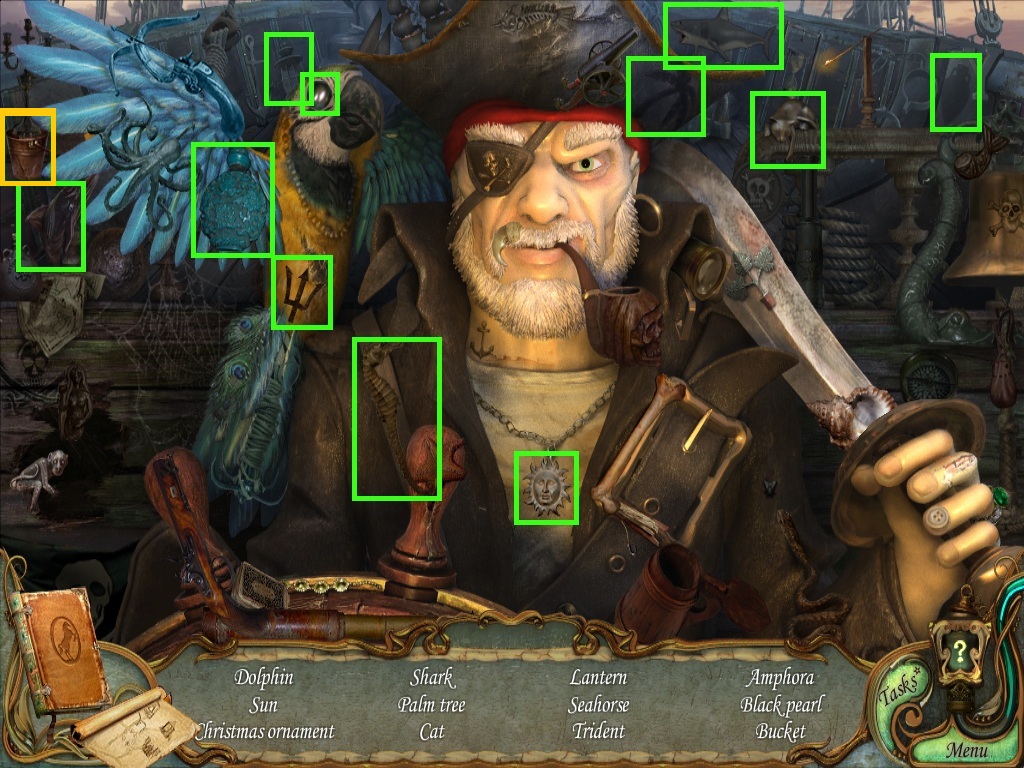
Pirate Ship
Click forward to move up onto the deck.
Click the ship's wheel to repeat the hidden object scene.
Screenshot.
Once the hidden object scene is complete, you will receive an Empty Bucket.
Go inside the captain's cabin.
Captain's Cabin
Use the Pincers from your inventory on the nailed up box.
Take the revealed Metal Dove (2/7) inside.
Use the Map to travel to the fountain.
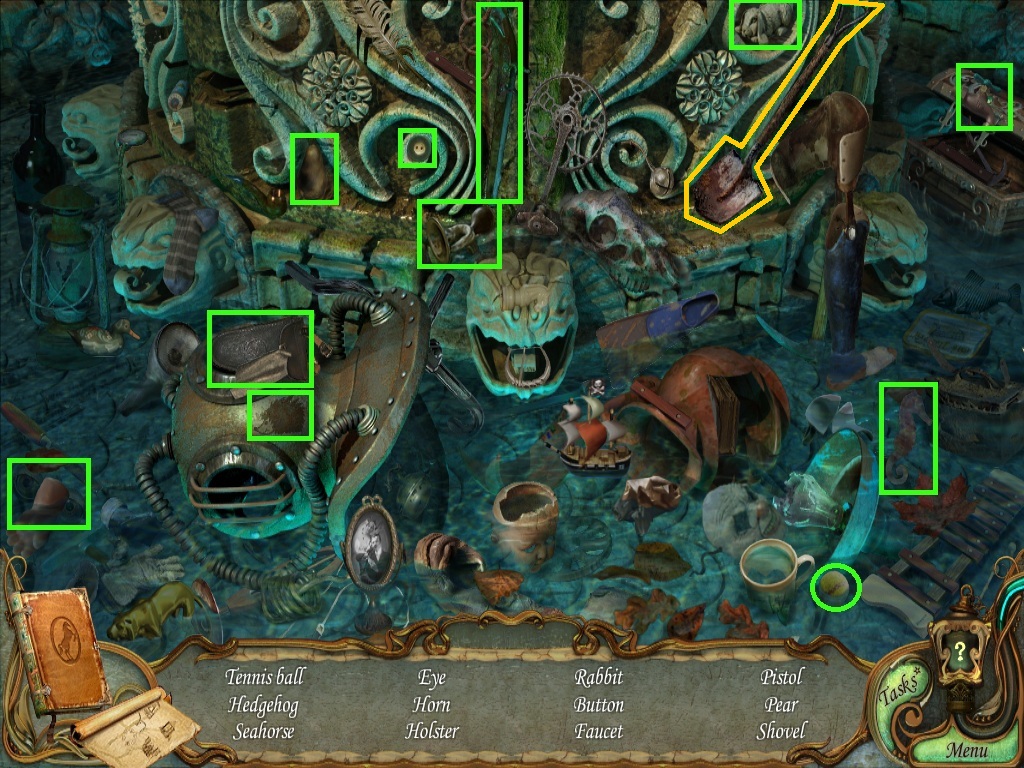
Fountain
Click the fountain to repeat the hidden object scene.
Screenshot.
Once the hidden object scene is complete, you will receive a Shovel.
Use the Empty Bucket from your inventory on the fountain to receive a Bucket Filled with Water.
Use the Map to travel to the central square.
Central Square
Click the overturned popcorn stand to repeat the hidden object scene.
Screenshot.
Once the hidden object scene is complete, you will receive a Chisel.
Use the Shovel from your inventory on the pile of dirt to reveal the Metal Dove (3/7).
Use the Map to travel to the roller coaster.
Roller Coaster
Use the Bucket Filled with Water from your inventory to douse the flames in the flower pot.
Take the revealed Metal Dove (4/7).
Go inside the control room.
Control Room
Click the old car to repeat the hidden object scene.
Screenshot.
Once the hidden object scene is complete, you will receive an Axe.
Open the telephone box to reveal the Metal Dove (5/7).
Use the Map to travel to the house of horrors.
House of Horrors
Use the Chisel from your inventory on the stone slab in front of the house entrance.
Take the revealed Metal Dove (6/7).
Use the Map to travel to the athlete gate.
Athlete Gate
Use the Axe from your inventory to chop down the puppet hanging from the gate.
Take the Metal Dove (7/7) on top of the puppet on the ground.
Use the Map to return to the cemetery.
Cemtery
Note that there are 7 swords stuck in the ground around the graves.
Each of the swords has a colored wire that attaches to the rings around the green tank.
The first sword on the far left has a yellow wire and is positioned next to a tombstone with an angel.
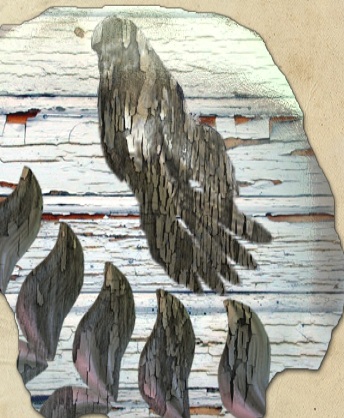
The picture found outside of the moon rocket shows an angel holding a perched dove in its hand.
Place the dove that matches the picture into the ring attached to the yellow wire.
Screenshot.
The picture on the wallpaper in the room with a shell game shows a dove with outstretched wings in the middle of three circles.
Place the dove that matches the picture into the middle ring on the right side of the tank.
Screenshot.
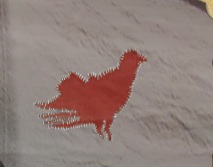
The picture sewn into the wagon outside the shooting gallery shows a brown colored dove.
Place the dove that matches the picture into the ring attached to the brown wire.
Screenshot.
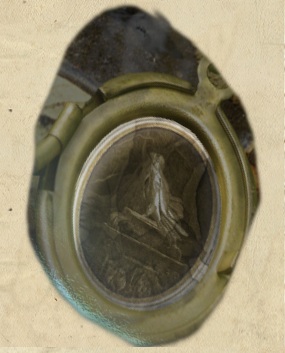
The picture in the medallion found in the puddle at the fountain shows a dove sitting on a tombstone.
The sword in front of the tombstone is connected to a green wire.
Place the dove that matches the picture into the ring attached to the green wire.
Screenshot.
The picture found on the red sail of the pirate ship shows a dove inside a cross.
The far right tombstone is the same cross shape as in the picture.
In front of the tombstone is a sword attached to a dark blue wire.
Place the dove that matches the picture in the ring connected to the dark blue wire.
Screenshot.
The picture on the wall of the food tent shows a dove perched on an intricate leaf.
The stone coffin with two carved flowers in the front has a similarly shaped leaf design.
In front of the coffin is a sword connected to a purple wire.
Place the dove that matches the picture in the ring attached to the purple wire.
Screenshot.
Place the last remaining dove into the center ring at the bottom, connected to the grey wire.
Solution.
Posted by: Trinn |
September 18, 2011 10:09 PM
|
September 18, 2011 10:09 PM