
![]()
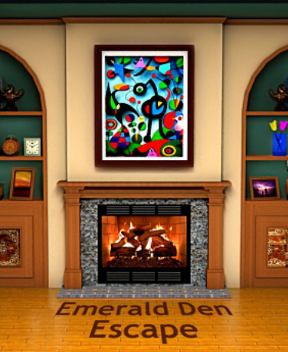 TeraLumina has looked deep into your minds and hearts and knows that you harbor secret cravings for riches, for mountains of gems to make you feel all dazzling and adorned. Knowing you would, if tempted with an open door as you're strolling along a lush tropical beach, step directly into the room without waiting on such formalities as invitations or trespass laws only to find yourself trapped, TeraLumina has bestowed upon you an escape game to indulge your every jewel obsessed whim: Emerald Den Escape.
Navigation in Emerald Den Escape is pretty standard; click on the sides or bottom of the game screen to turn or back up (an arrow in a grey bar indicates which is possible), and scan the scene with your cursor looking for interactive areas, clues, useful objects and twenty emeralds to collect (the cursor changes into a pointing finger in these places) via a simple click. While not all emeralds or objects are essential to escape, if you ever want to see the lovely white sands and deep blue ocean of your palm shrouded beach again, you'll have to crack the codes on the exit lock. Yes, codes, plural.
This isn't a quick, simple task. You won't be let off easy; the quest to find all four exit codes requires time and concentration. Several puzzles take on mini-game dimensions and you would be hard-pressed to complete Emerald Den Escape without paper and pencil handy to jot down notes. One puzzle in particular will have you checking and rechecking your clues. Those with diminished color vision may have particular trouble. Not only will your lateral thinking, deductive reasoning and math skills be challenged, but so will your ability to sort out heaps of information belonging to multiple puzzles. To the uninitiated, this could seem like torture. But, for those of us who treasure our escape games, it's a sublime experience: four walls all lavishly decked out with puzzles and hints and goodies to explore!
After indulging you in sapphires, rubies and diamonds for the mere effort of putting together a few clues in previous games, TeraLumina has pulled out all stops to make this his finest, and most challenging, escaper's endeavor to date—a shining example of what makes this genre so enjoyable. With its gorgeous graphics, thinky puzzles and cohesive gameplay, it's safe to say Emerald Den Escape shines amongst the best of them.


Walkthrough Guide
(Please allow page to fully load for spoiler tags to be functional.)
Emerald Den Escape: Tips, Solutions and Gem Collector's Guide
Directions for Using This Walkthrough:
Emerald Den Escape is mostly nonlinear, meaning you can solve many of the puzzles in any order you choose...those marked with an asterisk (*) are the exception.
Because there is no order for solving most puzzles, this walkthrough is organized by puzzle, letting you jump to the section you need.
Puzzles are listed by where they're located (in bold) and a description of what they involve (in italics).
If you'd prefer, start at the first puzzle in this walkthrough then continue to the next, all the way through to the end.
Emeralds are bonus items and are not required to escape.
You don't have to view all clues to finish a puzzle. At any time you wish, you can use the solutions provided in this walkthrough to open a cabinet door.
Yet, because the exit door lock must be fixed before you can use the codes to leave, all doors must be opened and the last puzzles must be completed in order to gain required items.
Once you've collected and used the items needed to fix the door lock, you can enter the four exit codes in any order and then click on the beautiful beach scene to leave.
Have fun!
Completing Puzzles and Gathering Materials: (Screenshots provided)
Panel on the Right Side of the Fireplace
A scrollwork tile puzzle
When you first start out, you're facing a fireplace. On either side of the fireplace are some shelves and, below the shelves, are two decorative panels. But, the panel on the right is messed up.
Directions: to open this panel, you must rearrange the jumbled tiles until they make a cohesive design:
Make this panel match the design on the panel on the left side of the fireplace (you can see what it looks like as you stand in front of the fireplace.)
Move a tile by first clicking on it, then clicking again in the spot to where you want it moved.
It helps to start with the corners and edges; a darker wood frame outlines the entire design.
When all the tiles are in the proper order, the cabinet will open and you can get:
a STOOL
Solution:
SCREENSHOT: Completed Tile Puzzle Image
The Long Cabinet, First Door
From facing the fireplace, turn right twice to see a long cabinet with sixth doors:
Click on it once to view it more closely.
Then, click on the first cabinet door. It's open! Take out what's inside:
a WOODEN CUBE.
Click the wooden cube to add it to your inventory.
Try clicking on the second door of the cabinet. It's locked and needs a 3-digit number to open; you'll need to look for clues (move on to next spoiler in this walkthrough).
The Long Cabinet, Second Door
The 3-digit Number Code
Directions: find and use a 3-digit number to open the second cabinet door.
The clue for this can be found by counting objects around the room.
Look for three groups of objects.
Such as the tulips on the shelf by the fireplace.
There's a certain number of tulips in each of the three cups...
232
Enter that code to open the door and get:
a CONTROL UNIT
The Long Cabinet, Third Door
Standard Lock, Needs a Key
Directions: find and use a key to unlock the third cabinet door.
To find the key that opens this door, look around the room for where it might be hidden...
Such as in that box on the shelf under the clocks, next to the fireplace...
A three-color code is needed.
Look around the room for an uncomplicated three-color pattern.
The vases on the other side fireplace, the ones that hold the tulips, provide the colors:
Blue - Red - Green
Colorblind Solution:
3 clicks -- 3 clicks -- 3 clicks
Use those three colors to open the box; inside is a KEY and a FUSE. Take them.
Once you get the KEY from the box, put it into the cabinet's second door lock to open it. Inside, you'll find:
a SCREWDRIVER!
The Long Cabinet, Fourth Door
Three Push Buttons
Directions: push the buttons in the correct order to open the door.
This one might trick you because some objects that gave you a clue on another code are used again, in a different way, to help you crack this code.
Look around the room for objects grouped by three.
The tulips by the fireplace are part one of the clue:
LEFT vase has a YELLOW tulip and a PINK tulip.
MIDDLE vase has RED, TWICE and also GREEN.
RIGHT vase has ORANGE and BLUE.
The tulips on the cabinet are part two:
1st=GREEN; 2nd=ORANGE; 3rd=PINK; 4th=RED; 5th=YELLOW; 6th=BLUE
Now combine the information gained from the two sets of tulips to know the button-pushing pattern:
Since there are two reds, you'll have to push red twice.
Push the buttons in this order:
middle--right--left--middle--middle--left--right
Open the door to get:
a WOODEN CUBE.
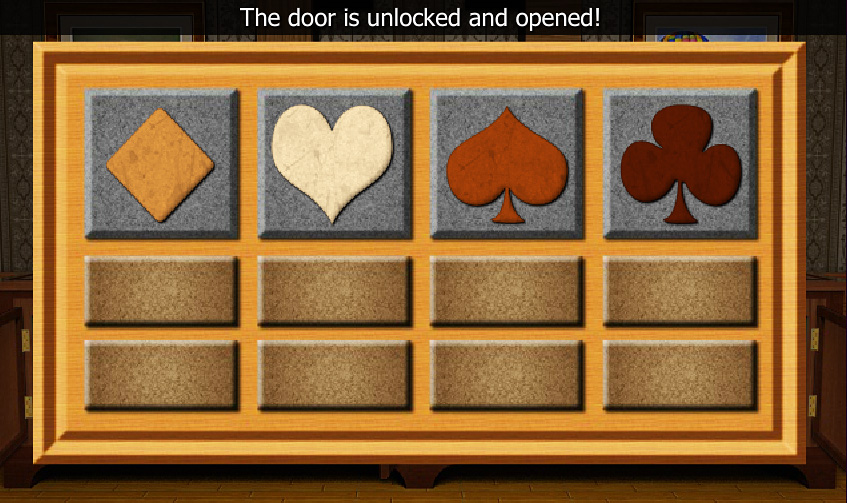
The Long Cabinet, Fifth Door*
The Shades of Brown Card Suit Symbols
Directions: change the shapes and hues on each of the four card suit symbols to open the cabinet door.
*You'll need to solve the puzzle on the fireplace panel to access a clue to this puzzle.
The top button changes the shade or hue: lightest to darkest.
The bottom button changes the shape from heart, spade, club and diamond.
Clues to what code opens the door can be found by the windows. First lower each window shade, then check each of the three patterns on the floor below to figure out the code.
To access all the clues, you'll have to gather a few items and perform a few tasks:
First, collect the supplies...
Complete the Scrollwork Tile Puzzle by the fireplace to get a STOOL.
Look under the middle pillow on the sofa to get a PAIR OF PLIERS.
While facing the long cabinet, zoom in on the plant in the left corner. There you should find:
a WAND FOR THE BLINDS.
Next, fix and close the window blinds...
Put the STOOL on the floor next to the window with broken blinds ("X" marks the spot).
Use the PLIERS to remove a PAPERCLIP from the middle blinds. Click again to close the middle blinds.
Put the PAPERCLIP on the broken blinds on the end to fix them. Then close them.
Replace the missing wand for the blinds on the left with the WAND FOR THE BLINDS and they will close automatically.
Then, with all three blinds closed, light from the window shines down from four holes in each to specific spots on a...rug? (Well, I'll just call them rugs for simplicity's sake.)
Zoom in to examine the patterns on each rug.
Start with the middle rug:
The lights shine on die-like images--just count the number of dots and note where on the grid they are located.
Now view the left rug:
The lights shine in a similar manner on four distinct spots on the "rug".
You can make the correlations between the middle rug's pattern to figure out the order of card suit symbols here on the left rug.
1st = Diamond;
2nd = Heart;
3rd = Spade;
4th = Club.
Lastly, take a look at the rug on the right:
Here the pattern indicates shade or hue.
The differences are subtle but it's easiest to mark on a scale of A to D, for example A for lightest and D for darkest.
Again, correlate this information with the clues found on the other two rugs:
1st = Diamond = shade B
2nd = Heart = shade A (lightest)
3rd = Spade = shade C
4th = Club = shade D (darkest)
Finally, you have everything you need to solve the card suit symbols code. Use the information gathered from the floors by the window to change the pattern on the cabinet door (see spoiler above or screenshot below).
SCREENSHOT: Shades of Brown Card Suit Symbol Code
Entering the correct code opens the door so you can get:
A WOODEN CUBE (needed in a later puzzle)
The Long Cabinet, Last Door
A Code Word, Seven Letters Long
Directions: change the letters, spelling out a word that will open the door.
On each letter, click until it changes to the letter you want. Luckily, your choices are limited; there's only 7 possible letters for each position.
Explore the entire room until you see the clue. When you find it, it will be obvious to you.
Look in the door mail slot...
When you correctly spell out the word...
A I R M A I L
The door will open so you can get:
an EMPTY DICE CUP!
an EMERALD.
The Dice Dispenser*
The device in the wall above the long cabinet; this is revealed after all six cabinet doors are opened.
Directions: push the buttons in the correct order to dispense dice into the cup.
*You'll need to solve the five puzzles--and open all the doors--on the long cabinet to access the dice dispenser puzzle.
After you have opened all six of the long cabinet doors, the square wooden panels will moved aside to reveal a device.
Put the DICE CUP (from the last cabinet door) under the dispenser.
Now, you need to press the buttons -- positioned North, West, South, East -- in the correct order. Back up and look around the room for a clue:
The doors of the cabinet open either to the north, west, south or east. From them you can determine the pattern:
1st = WEST
2nd = NORTH
3rd = EAST
4th = SOUTH
5th = NORTH
6th = EAST
When you push the buttons in the correct order, dice will be dispensed into the cup. Grab the cup and go look for a place to use them...
There's a backgammon board on the coffee table. Toss your dice out on it to get some goodies:
Two EMERALDS (one was already on the board)
a TOKEN
and a some dice with red and black dots (a CLUE perhaps?)
Getting and Using the Exit Door Codes:
The lock panel on the exit door requires FOUR CODES:
Code One: Appreciate Stone Sculptures
Look at the abstract stone sculptures on the shelves above the red sofa (from facing the fireplace, turn left once to see the sofa). The shapes of these sculptures resemble mirrored numbers:
2 - 1
-----
7 - 3
Across the room (turn left twice), on the left corner of the long cabinet, are stone spheres made of the same materials.
Match the colors/type of stone of the spheres to that of the numbers; this will determine how where to place each digit.
Solution:
3271
Code Two: Critique the Paintings
Several pictures are on display around the room; take a closer look at four of them: apples and flowers (by the red sofa), and birds and balloons (by the long cabinet).
There's also wooden sculpture on the right corner of the long cabinet: apple, balloon, flower, bird.
Put the two clues together by counting the subjects in each painting and using the wooden sculpture to get the correct code.
Solution:
3862
Code Three: Play a Board Game
In front of the red sofa is a table. Zoom in on it. Look at the dice on the backgammon board. Solve the dice dispenser puzzle then throw the dice onto the board...
The red dots indicate digit.
The black dots represent the numbers used.
Solution:
2536
Code Four: Do the Math!
First, gather items from around the room:
4 WOODEN CUBES. 3 wooden cubes can be found in the long cabinet (in the first, fourth, and fifth doors).... The 4th wooden cube is by the plant, far in the corner on the left side of the long cabinet.
a CABLE. This is lying in plane view, on the table next to the exit door.
the CONTROL UNIT, from the second cabinet door
Now, head over to the shelf under the three tulip vases. There you'll find an odd machine:
Put the four WOODEN CUBES in the box.
Put the CONTROL UNIT in its slot next to the box.
Then connect the both with CABLE (click on the control unti while the cable is highlighted in your inventory).
Press the flashing red button. The machine has burned something into the wooden cubes.That looks like mathematical function signs, but where are there some numbers needing a bit of math? Maybe you need to read up on this a bit.
Take a book down off the shelf above the tulips. Inside is the clue...9:23 = 923.
That 9:23 looks like time. So, head over to the clocks on the opposite shelves.
Collect the time from each clock, noting it as a single number. Since there are five clocks/numbers, and four mathematic functions, just alternate the numbers with the function signs. Solve from left to right:
1115 divided by 223 multiplied by 610 plus 433 minus 1010.
Solution:
2473
Before you can use the exit codes, fix the lock panel:
First, gather the tools...
FUSE:
In the box on the shelf under the clocks, by the fireplace)
SCREWDRIVER:
In the third cabinet door.
4 TOKENS:
On the backgammon board, after you've thrown the dice (see dice dispenser puzzle).
In the wooden cube machine, after you've used it (see code four: "do the math").
On the polished stone spheres (on top of the long cabinet, left side).
On the set of wooden sculptures (apple, balloon, flower, bird...on top of the long cabinet, right side).
KEYCARD:
Behind the little blue painting on the shelf under the clocks.
Then, repair the panel...
Use the SCREWDRIVER to take off the access panel.
Put the FUSE inside, between the red and green wires.
Place each of the 4 TOKENS in the lock machinism (left of the fuse).
Insert the KEYCARD in its slot (right side).
With the lock panel fixed, you can use the exit codes:
After inputing each number, press "E" to enter it.
If the code is correct, after you've pressed "E", one of the lock mechanisms will slide out.
When all four codes are entered, the door will open and you can go out.
Solution:
3271
E
3862
E
2536
E
2473
E
Ooooo...Isn't that a beautiful beach?!
But, before you click the door to leave, now's your chance to take a second look around the room. Do you want all twenty emeralds?
Emerald Hiding Places:
The twenty emeralds can be found in the following locations:
Behind orange picture under the clocks.
Behind purple sunset picture under the three tulip vases.
In a book, top shelf, right side of the fireplace.
On the floor, when facing the three windows.
Zoom in on floor pattern, under the first window.
Zoomed in on the floor, under the third window.
In red hat, on hat stand.
By wooden sculpture of balloon (on the right side of the long cabinet).
In the six rainbow tulips (in the middle of the long cabinet).
On first polished stone sphere (on the left side of the long cabinet).
On the plant in the left corner of the room when facing the cabinet.
Next to the plant on the table in the entry way.
On the exit door lock panel.
Under left sofa pillow.
Under right sofa pillow.
In shelves above the sofa.
On the backgammon table (before throwing dice).
In the dice cup, after throwing dice on the backgammon board.
Inside the sixth cabinet door.
By the dice dispenser, after opening the panel that hides it.
Note: the emeralds are optional; you don't need to collect them all to exit.
Posted by: elle |
March 11, 2012 6:19 PM
|
March 11, 2012 6:19 PM