
Enchanted Room Escape

![]() One thing you can count on with Strawberry Cafe designed room escape games is the color palette, a luscious mix of reds, pinks, and whites that together evoke images of strawberry desserts. This week, with Enchanted Room Escape, Strawberry Cafe moves the design from the subconscious idea of food to the conscious, because this time you're escaping a room filled with amazing looking desserts in every nook and cranny. For this week's Weekday Escape, be prepared for some drooling.
One thing you can count on with Strawberry Cafe designed room escape games is the color palette, a luscious mix of reds, pinks, and whites that together evoke images of strawberry desserts. This week, with Enchanted Room Escape, Strawberry Cafe moves the design from the subconscious idea of food to the conscious, because this time you're escaping a room filled with amazing looking desserts in every nook and cranny. For this week's Weekday Escape, be prepared for some drooling.
 Enchanted Room Escape is a pretty standard visual design for Strawberry Cafe, a simple one-room escape with basic navigation arrows and a simple inventory. However, Strawberry Cafe has jacked up both the difficulty level of the puzzles and the reliance on a single sense: sight. Aside from the visuals which are guaranteed to whet the appetite, the puzzles involved are heavily color-based and trickier than usual. Unfortunately the lack of a changing cursor does invite some pixel-hunting along the way. On the plus side the controls are pretty easy to master and include a save feature and a handy mute button.
Despite the minor flaws this is one of the better escapes from this designer, simple enough for a snack but complex enough to satisfy the appetite. As the player stumbles around this pretty plain room, bouncing from cakes to macaroons to...more cakes, along with the puzzles to feed the mind the gamer might feel the need for more substantial nourishment in the form of real food. Perhaps you'd better grab some munchies before you dive in, just in case, and prepare to be enchanted!


Walkthrough Guide
(Please allow page to fully load for spoiler tags to be functional.)
GENERAL NOTE:
Spread throughout the room are a series of double gold squares, one above the other. The top square will have a hexagonal notch with a backing of various colors. You will find gems of these colors throughout the room; you will need to match them to these notches to unlock the lower squares and access their puzzles and contents.
WALKTHROUGH:
THREE-TIERED TRAY SCREEN
From your starting point, click the gold squares on the right wall. Note the color of the notch. Back up.
Click on ribbed cup left of 3-tier tray. Take the pink gem from it. Back up.
Click on 3-tier tray.
Note the notched protrusion on the bottom. It rotates with the tray when you click the arrows that appear on the left and right of it.
Note the shapes, colors, and toppings of the 8 cakes on the bottom shelf, specifically in relation to the notch. Get familiar with its layout; it'll be used in a lot of puzzles.
Click the second tray. Grab the note from under the front biscuit.
Back up to your starting point.
COFFEE CUP SCREEN
Turn right.
Click the cups of tapioca pudding on the left side, then click on the left cup. Note the letters and shapes. Back up.
Click the next plate over, with the pink and yellow cakes on it. Note the position and color of the cakes. Back up.
Click the gold squares. Notice how it's got a pink backing? Use the pink gem on it to unlock your first puzzle...which, unfortunately, you can't solve at the moment. Remember it for later. Back up for now.
Click the giant coffee cup if you like, but there's no need. Even if you are that thirsty, it's too big for you to hold.Back up.
YELLOW TREATS SCREEN
Turn right, then click on the row of yellow treats to zoom in.
Click them again to get an overhead view. See how the swirls they make match the note you got earlier? Note their order and which way they face.
You can go back to the pink gem puzzle and try it if you like, but you apparently don't have everything you need to solve it yet.
Back up to the previous view.
Click the box with the pink plus-shape atop it. Note how it's actually a set of buttons. You don't have any clues to opening it yet, so back up for now.
More gold squares. You know the drill. Back up again once you're done.
Click the pink...yarn? Note the letters and shapes on the wall, then grab the key on the right corner of the plate. Back all the way up.
GIANT CAKE SCREEN
Turn right.
Click on the jar with the crystal heart on the lid, then click the square in the center for another puzzle.
Notice how the shape in the center matches the notched bottom of the 3-tier tray? You'll need to make the shapes match the shapes of the cakes positioned on the bottom tray relative to the notch.
Leave the top and bottom as circles, change the left to a triangle, and the right to a square, then click the Enter button.
Now you can pop the top off the jar and look inside. Grab the lime gem. Back all the way up.
Gold squares on the big cake. Click, note the color, yada yada yada.
ROW OF TREATS SCREEN
This time, turn back left and go back to the gold squares behind the yarn balls. The green gem will unlock its puzzle.
Once again it relates to the bottom tray and its 8 cakes. If you click one of the dots, it will switch between red and white. What was red on the bottom tray?
The strawberries topping some of the cakes. So which ones had strawberries?
Top, right, bottom-right, bottom, and left. Turn those red, hit Enter, and unlock the box to claim your prizes: a blue gem and another note with 6 colored squares on it.
Back all the way up.
THREE-TIERED TRAY SCREEN
Turn right twice, back to our starting location.
The blue gem will unlock the gold square puzzle here.
The eight circles once again relate to the cakes...but we don't have a notch to go by this time!
Clicking them will alternate them between brown and yellow, except for the upper-left and top two, which stay solid yellow. You can use that as a reference point.
Rotating the bottom tray so that the two adjacent yellow pieces are furthest from us, we find that the top-right, right, bottom, and left pieces are brown. Make those buttons on the puzzle that color, hit enter, and claim you prize: another note. On the front it shows an arrow going through a series of seven shapes. Be sure to check the back on this one, though: Another letter/shape pair is to be found. Anyway, back up all the way.
GIANT COFFEE CUP SCREEN
Turn right. Now it's time to conquer that pink gem puzzle.
The note you just got alludes to the swirly treats we referenced for the left/right buttons earlier. If we click the arrows in the order designated by the new note, we get...
Right, left 3 times, right 3 times, enter. Done! Open the box to get yet another note and a coffee cup. Check both of these out thoroughly; the coffee cup has your last letter/shape combination on it. Back all the way up.
Man, all this work is getting me thirsty. Time for a coffee break!
Click on the giant coffee cup on the right. Use your coffee cup on it, and when asked if you'll drink some coffee, say yes. Mmmm, good coffee. So good, in fact, I think a second cup is in order. ...Or you could just chug it all down, I guess. Hope that was decaf, or you're never sleeping again.
Now that the cup's empty, look inside. Note the latch on the bottom. You can unlock it with your key and find a box with 4 buttons on it.
You can get this open by referencing that note with the 6 colored squares on it.
The colors refer to the cakes on the tray to the left of the giant coffee cup.
Lower right, upper left, lower left, upper right, upper left, lower left. Open says-a-me! Take the yellow gem.
Back all the way up.
ROW OF TREATS SCREEN
Turn right, back to the row of yellow treats. Now, let's crack that plus-button box in the upper left, shall we?
The note you got from the coffee cup holds the key to this puzzle. Each arrow represents a 3-button combination to click.
Top center right, right center top, bottom center left, left bottom center.
Once its open, take the key, and back all the way up.
GIANT CAKE SCREEN
Turn right again. Time to open the gold squares on the giant cake.
The yellow gem does the trick here. Open it and access the last puzzle.
This one requires a 4-digit number, and shows block with the letters used in those letter/shape combinations you've been noting. But how can you get numbers from them?
Think of the shapes as halves of a number on a digital clock. You can piece them together in the pairs shown on the bottom of the puzzle to make the numbers for the combination.
3589. Punch it in, and watch the side of the giant confection fall off.
Inside the cake you'll find a door. Use the new key you got to open it.
And you're out! Piece of cake, no?
Sorry, couldn't resist.
Posted by: An Onyx Mouse |
October 19, 2011 3:01 AM
|
October 19, 2011 3:01 AM
Enchanted Room Escape Walkthrough
General Information
Examine everything carefully, especially things in your inventory.
There will be directions for the colorblind in this walkthrough.
A ramekin, for those who don't bake, is a small white straight-sided bowl for making soufflés and custards (amongst other things).
Definitely have some munchies on hand, this game will make you hungry.
Good luck!
Exploration
You begin facing a wall that has a giant, three tier dessert display. To the right of the display on the wall are two panels. To the left is a giant ramekin and a fork.
Click on the dessert display for a close up.
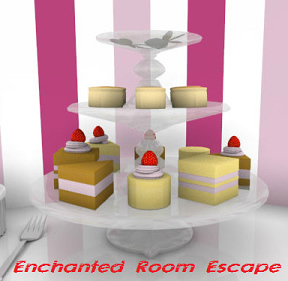
Now that you're closer to the display you can see several things. Firstly, the bottom (largest) tier has eight cakes of various shapes (and colors). On the middle tier appears to be round cakes.
Also note that at the base of the display is a small arrow-shaped notch pointing towards you.
If you hover your mouse to the right or left of the display arrows will appear. On the right the arrow indicates a counter-clockwise direction, on the left is an arrow that appears to point clockwise.
Click on the middle tray to look at the round cakes.
Right beside the closest round cake is a small gray square, click on it to get a clue (arrow note). Back up.
Use the arrows to turn the display, each click turns the display 90 degrees. This enables you to see all of the cakes on the bottom row.
There are three things to notice here: (1) whether or not there is a strawberry on top of a cake, (2) the shape of the cakes, and (3) the color of the cakes.
Going clockwise around the tier from the arrow/notch pointing towards you, the cakes are: strawberry, no strawberry, strawberry, strawberry, strawberry, no strawberry, strawberry, no strawberry.
Going clockwise around the tier from the arrow/notch pointing towards you, the shapes are: circle, triangle, square, triangle, circle, circle, triangle, square.
Going clockwise around the tier from the arrow/notch pointing towards you, the colors are yellow, brown, brown, yellow, brown, yellow, brown, yellow.
Back up from the display to the long view.
Click on the panels to the right of the display.
Looks like there's a slot for something hexagonal, and probably blue. Back up.
Click on the ramekin to the left of the display for a close up.
In the close up you can see that it is actually 2 ramekins. Notice the pink object in the right ramekin? Take it (pink jewel) and back up.
Turn right.
There's lots to see on this wall. To the right is a giant coffee cup and saucer. To the left of the coffee cup is another two panels on the wall.
To the left of the panels is a large plate with macarons (meringue cookies). Left of the plate with the cookies are what look like two shot glasses, or clear ramekins.
Let's start with the coffee cup. Click on it for a close up.
That's a BIG cup of coffee. Back up.
Click on the panels for a close up.
Looks like we need another six-sided shape here, in either purple or pink. Back up.
Click on the plate of macarons for a close up.
There are four colored macarons here in a square pattern. Upper left green, upper right yellow, lower left pink, and lower right brown.
Back up.
Click on the clear ramekins to the left of the macarons for a close up.
Hmmm, these ramekins appear to be filled with custard (crème brulee?). The left custard appears to have something on the top, click on it for a close up.
There's a clue here, the C/D clue. The top shape (C) is a box with the right side open, the bottom shape (D) is a box with the left side open.
Back up twice.
Turn right.
There is another two panel thing on the wall in back. In front is a large long tray with seven pieces of roulade (roll cake).
Click on the panels for a close up.
Hmmm, there are two objects behind the roulades. Don't know what kind of dessert they are, they look like balls of twine to me.
Click on the roulades for an overview.
This gets you a bird's eye view of the roulade plate. Notice that the roulade slices are in different directions. Have we seen that shape before?
Back up once.
Click on the right (purple) ball of twine for a close up.
On the square plate beneath the twine is a white key, take it.
Notice the clue on the back wall. This one is G (square), and H (left open box).
Back up once.
To the left of the left ball of twine (brown) is a clear box, click on it for a close up.
There's something in the box, but to get to it we need to find a clue for the buttons, which are in a + pattern on the top of the box. Back up once.
Click on the panel on the back wall. Looks like we need a green six-sided object here. Back up twice to the long view.
Turn right.
On this wall we have a large round yellow layer cake (actually a baumkuchen) on the right and what looks like a giant perfume bottle with a gem stopper on the left.
On the layer cake is another two panel deal, obviously needing another six-sided object.
Click on the perfume bottle for a close up.
There's a panel on the perfume bottle with a code key. This code needs four shapes.
Back up twice to the long view.
Turn right.
Now we're back to the three-tiered display.
Time to solve some puzzles!
The Perfume Bottle
Turn left once to face the giant yellow cake/perfume bottle wall.
Click on the perfume bottle for a close up.
Click on the code key on the bottle for a close up.
Okay, this key needs four shapes. If you click on the buttons you will see that those shapes are circular, triangular, or square. Where have we seen those before?
Maybe the shapes of the cakes on the bottom tier of the dessert display?
Notice that the four buttons are around a round shape with an arrow/notch at the top? Does that remind you of anything?
Like, say, the base of the dessert tier display?
There were 8 cakes on the bottom tier of the display. You need to remember the shapes for the ones at the 0 degree mark (where the arrow was), the 90 degree point, the 180 degree point, and the 270 degree point (or 12 o'clock, 3 o'clock, 6 o'clock, and 9 o'clock).
The shape of the cake at the arrow was a circle. The shape at 3 o'clock was a square. The shape at 6 o'clock was a circle. The shape at 9 o'clock was a triangle.
Set the buttons to the proper shapes. Top button circle. Right button square. Bottom button circle. Left button triangle.
Once you've set the code, click on the "enter" button.
Click on the jeweled top of the bottle to remove it.
Click on the top of the open bottle for a close up. Once in the close up take the green gem.
Back up.
The Green Gem
Turn left to face the tray of roulades (and those strange balls of twine).
Click on the panel on the wall twice for a close up.
Place the green gem in the top panel and a code key appears on the bottom panel.
Click on the code key for a close up. This one has eight buttons and appears to be a color code.
The buttons are either red or white. That sounds familiar, as does that circle in the center with an arrow/notch...
Again, the clue to this is the bottom tier of the dessert display. In this case it's whether or not the eight slices of cake had a strawberry or not.
The slices that had a strawberry are red, the slices without are white.
Going clockwise (on the bottom tier) they were: with, without, with, with, with, without, with, without.
From the top, clockwise, set the buttons to: red, white, red, red, red, white, red, white.
For the colorblind: click a button once to turn it red, don't click it to keep it white.
Once you've set the buttons, click on the "enter" button.
Click on the bottom panel to open it. Take the blue jewel and the note.
The note has six colored squares. From left to right: brown, green, pink, yellow, green, pink.
Back up twice.
The Blue Gem
Turn right (or left) twice to face the three-tiered display.
Click on the panel on the wall for a close up.
Place the blue gem in the top panel and a code key will appear on the bottom panel.
Click on the bottom panel. Another eight button color puzzle. This time the buttons will either stay yellow (if not pushed) or will turn brown if pushed.
Again we go back to the bottom tier of the display for the answer.
This time it's the color of the cakes on the bottom tier.
Although there's no arrow/notch on this key, the top button is the "arrow" (like all of the rest) at 12 o'clock.
Clockwise from the top, set the buttons to yellow, brown, brown, yellow, brown, yellow, brown, yellow.
Once the buttons are set click on the "enter" button.
Click on the panel to open it and take the note inside.
Back up.
The Pink Gem
Turn right to the giant coffee cup/macaron wall.
Click on the panel for a close up.
Place the pink gem from your inventory in the top panel. A code key appears on the bottom panel, click on it.
This is a code key that only has two buttons, a left and right arrow.
Have we seen arrows like this before?
There are three clues for this puzzle: (1) the arrow note found at the beginning, (2) the roulade cakes, and (3) the note found in the blue gem panel (the one with the spiral drawn on it.
If you look closely at the roulade slices on the tray, they curl either to the right or left, corresponding to the curls on the note that has the arrows.
From left to right: right, right, left, right, left, left, right.
However, this is not the order to push the buttons. You get the order from the spiral note.
Note the spiral starts in the center (the middle roulade slice) and circles clockwise around several times, passing through each slice.
The proper order is right, left, left, left, right, right, right.
Push the arrows in the proper order, then click on the "enter" button.
Click on the bottom panel to open it and take the small coffee cup and the arrow note.
Back up.
The Coffee Cup
All this escaping is making me hungry. And thirsty.
Click on the giant coffee cup to the right of the panel for a close up.
Use the small coffee cup from your inventory on the coffee. When it asks if you want to drink the coffee choose yes.
You will have to choose to drink the coffee twice. After the second time you will drink all of the coffee in the giant cup. Whoah, caffeine rush!
Once the giant coffee cup is empty, click inside it for a close up.
There is a small panel at the bottom of the cup, barely visible. And it needs a key.
Use the white key from your inventory on the panel.
Click on the panel to open it and take the item from inside (button box).
Back up.
The Button Box
Pull up the button box from your inventory.
The buttons are on a 2 x 2 grid. Have we seen something like this in the room?
There are two clues to this puzzle: (1) the plate with the colored macaron cookies and the note with the colored squares.
The macarons are also in a 2 x 2 grid, and their colors, pink, brown, green, and yellow are the same colors as the squares on the note.
There are six squares on the note, brown, green, pink, yellow, green pink. This is the order you push the buttons.
The macarons are upper left corner green, upper right corner yellow, lower left corner pink, lower right corner brown.
Therefore you push the buttons in this order: lower right, upper left, lower left, upper right, upper left, lower left.
If you push the buttons in the correct order the box will open, revealing a yellow gem. Take the gem.
The Clear Box
Turn right to face the tray of roulade cake slices.
Click on the wall panel once for a close up.
Click on the box to the left of the left ball of twine for a close up.
Click on the box once more for a close up of the buttons.
Now we just need to figure out the sequence to push.
The clue for this is the arrow note.
Look at the arrow note, each arrow line appears to be a series of three points, beginning, middle, and end.
These are the clues for pushing the buttons.
The first arrow seems to indicate top, middle, then right. The second arrow indicates right, middle, top. The third arrow indicates bottom, middle, left. The fourth arrow indicates left, middle, bottom.
Push the buttons in the order indicated by the clue (you will be making 12 clicks of the buttons).
Once you push the buttons your view will back out once. Click on the box to open it and take the key.
Back up twice.
Getting Out
Turn right to face the large yellow cake and the perfume bottle.
Click on the cake for a close up.
There's only one jewel left, so place the yellow jewel in the top panel.
Click on the bottom panel to see the code key. Looks like we need a four digit number.
Before we go any further, let's check the items in our inventory to see if there are any other clues.
Pull up the coffee cup from your inventory and click on the bottom of the cup.
Here is an A/B clue with two left open boxes.
Pull up the spiral note from your inventory.
Click on the note to turn it over and you will find an E/F clue, this one with two closed boxes.
We already found the C/D clue and the G/H clue in the room, so these must be the clues for the number code.
The clues are pretty simple. For each clue, simply put the shapes together to make a number.
For the A/B clue combine the two left open boxes and you get the shape of the number 3.
The C/D clue, when put together, makes the number 5.
The E/F clue, when put together, makes the number 8.
The G/H clue, when put together, makes the number 9.
Therefore the code is 3589.
Enter the four digit code, then click on the "enter" button.
A giant slice of cake will fall down, revealing something inside.
Click inside the cake twice for a close up to see a door.
Use the key on the door to unlock, then click on the door to escape.
Enjoy dessert!
Posted by: grinnyp |
October 19, 2011 3:48 AM
|
October 19, 2011 3:48 AM