
![]()
 If I escape here tomorrow, would you still remember TomaTea? Well, maybe that's not the way Lynyrd Skynyrd would have played it but we here at JIG love our escape games and have no plans to travel on anytime soon. When you open up and start exploring TomaTea's latest creation, Escape Bird, you'll be glad to see nothing has changed about the characteristic TomaTea style that you love so much.
Once again, you're locked inside a welcoming, well-composed room that invites you to explore its numerous chests and tasteful decor as you contemplate clues that are cleverly conveyed. A cursor that glows over hot spots and gentle reminders when a puzzle isn't ready to be solved continues TomaTea's venue as affable host while re-appearing is the use of picture tiles (this time with a slightly trickier trick) and color based puzzles (unfortunately for those less visually acute). Yet, as always, time spent here feels like a cup of tea and biscuits: only a touch of logic, lateral thinking and, perhaps, pen and notepad are all that are needed to be as free as a bird.


Walkthrough Guide
(Please allow page to fully load for spoiler tags to be functional.)
Solutions Guide
(Not a walkthrough, just a guide to how to solve the puzzles)
Hint for getting started
Have you looked under the lamp (on the wall with the mirror)?
Puzzles
Window wall
no puzzles here
Clock wall
Top drawer
Description:
4 buttons with letters
Clue:
under the lamp on the mirror wall (on top of the drawers)
Solution:
SOUL
Contains:
book
Bottom drawer
Description:
4 buttons with leaves
Clues:
paper with roman numerals (left picture); book pages corresponding to said roman numerals
Solution:
aspen-ivy-oak-maple
Contains:
puzzle piece
Clock
Description:
missing a weight and a minute hand
Locations of items:
Weight: circle puzzle box; Minute hand: middle picture (aka the puzzle)
Clue:
solved puzzle picture
Solution:
set the time to match the picture, 3:30
Contains:
the room key
Mirror wall
Corner cabinet
Description:
needs key
Solution:
Key is in the bottom drawer on the mirror wall
Contains:
xylophone, puzzle piece
Circle puzzle box
Description:
need screwdriver (puzzle is unsolvable in current configuration)
Clue:
left picture on door wall
Solution:
after flipping the bottom right piece and fastening it back in place, set the circles to match the left picture, i.e. yellow circle on top.
Contains:
clock weight
Top drawer
Description:
2 buttons, says "HERBARIUM" above the buttons
Clue:
front cover of book
Solution:
LRLRLLLLR
Contains:
screwdriver
Bottom drawer
Description:
4 buttons with numbers
Clues:
paper in right picture, word "TIME" on middle picture
Solution:
7081
Contains:
puzzle piece, small gold key
Door wall
Left picture
Description:
one big button that resembles the box under the mirror
Clue:
none, really, just observation
Solution:
solve the circle puzzle box
Contains:
metal plate (xylophone part), clue paper with roman numerals
Middle picture
Description:
6 sets of up/down arrows; one of the down arrows is missing, and it says "TIME" on the bottom
Locations of items:
arrow: in xylophone; puzzle pieces: see list below
Solution:
use the arrows to align the slices to form a picture. The top of the picture will be the apex of the clock.
Contains:
minute hand
Right picture
Description:
4x4 grid of buttons
Clue:
page III of book
Solution:
press the buttons that correspond to dark brown leaves.
X___
_XX_
_X__
__XX
Contains:
a ball on a stick (xylophone mallet), clue paper with letters
Xylophone
Description:
Missing a piece (and the screw to hold it in place)
Location of items:
Metal plate: left picture; screw: steal from the circle puzzle box; mallet: right picture
Clue:
page IV of book
Solution:
24563; hit the notes counting from the left.
Contains:
arrow for middle picture
Items
-book
top drawer on clock wall
-screwdriver
top drawer on mirror wall
-screw
circle puzzle box
-clock weight
circle puzzle box
-small gold key
bottom drawer on mirror wall
-xylophone
corner cabinet
-mallet
right picture
-metal plate
left picture
-arrow
xylophone
-minute hand
middle picture
-room key
clock
Clues which you can't pick up
-Paper with numbers
under lamp on mirror wall (on top of the drawers)
-Paper with letters
in right picture on door wall
-Paper with roman numerals
in left picture on door wall
-Word "TIME"
on middle picture on door wall
-Circles
on left picture on door wall
Puzzle pieces
-On table (window wall)
-In books (clock wall)
-Below lamp (mirror wall)
-Bottom drawer on mirror wall
-Corner cabinet
-Bottom drawer on clock wall
Posted by: Reka |
December 27, 2012 3:55 PM
|
December 27, 2012 3:55 PM
Escape Bird Walkthrough
Exploration and Gathering Clues
You begin facing the windows. Click the small table to move in closer...
Pick up PICTURE SLAT (1/6) from the table.
Back up and turn left. There are three boards on the wall. Examine each...
The board on the right has a 4x4 grid on it.
The middle board has a row of 6 up arrows on the top and 5 down arrows on the bottom (1 is missing). Its box reads "TIME."
The board on the left has a wheel of four colors, starting from the top and going clockwise: yellow, red, blue, and green.
Back up and turn left again. Now you're facing a mirror and a shelf that has several items on it. Start from the right and explore your way to the left...
After moving closer to the drawers on the right, you can click on the table lamp to view the top:
Pick up PICTURE SLAT (2/6).
Read the yellow paper under the lamp for a CLUE:
A series of four numbers: each seems to be arranged in a pattern.
Back up and look at the top drawer.
You're not ready to solve it but note that it has two buttons, left and right, and that it's labeled: "HERBARIUM."
Then note that the bottom drawer seems to require a 4-digit number code. Yet, for some reason, you're also not ready to solve it.
Back up and check out the box in the center of the counter:
It has four tiles on top; you can turn each but you can't seem to match the board on the wall. The bottom right tile has a screw in it.
Lastly, examine the cupboard in the left corner to see key is needed there.
Back up and turn left to face the counter with the clock and another two drawers...
Zoom in to examine the clock; it's missing a couple things:
It needs a weight and a minute hand.
While here in the close-up view of the clock, you can also see something sticking out of the top of the books on the left:
Get PICTURE SLAT (3/6).
Back up and look at the two drawers to the left of the clock...
You still have no clue how to solve the bottom drawer, but you can see that you'll need a sequence of four leaves to do it.
On the other hand, the top drawer--with a 4-letter code--is ready to be solved!
4-Letter Code Drawer
Use the clue from the yellow paper (found under the lamp on top of the other drawers).
Each series of numbers forms a letter...
ANSWER:
1=S
2=O
3=U
4=L
a.k.a. S O U L
...giving you the word you need to spell on the drawer.
Enter the correct letters into each digit then push the button to open the drawer:
Get the HERBARIUM BOOK.
Examine the herbarium book from cover to cover to get several clues:
There is a pattern to the letters on the cover.
There is a specific leaf (brown ivy) on the cover.
Pages I, II, III, and V have different leaf types on display.
Page III also has a pattern of different colors but same shape as the leaf on the cover.
Page IV has a series of numbers that grow in size.
Put the book away.
Back up. You're now ready to open the top drawer in the opposite corner of the room as well as the 4x4 grid on the bulletin board.
4x4 Grid
Turn around until you're facing the door and wall of bulletin boards things. Examine the board on the far right.
If you click a square on the 4x4 grid, it will be highlighted (click again to unselect).
In the HERBARIUM BOOK is another pattern of 4x4.
Using the two clues, figure out which squares to select on the 4x4 grid...
ANSWER:
There is a brown leaf on the cover of the book, so use only the brown leaves on page III as your guide. Select the squares indicated by "X":
X o o o
o X X o
o X o o
o o X X
When you have the proper squares highlighted, click the little button at the bottom and the shelf/box below will pop open...
Get two items from inside:
the XYLOPHONE MALLET
and a CLUE:
A series of letters that seem to form shapes.
Now you can open another drawer, the one with a 4-digit number, as well as still having the Herbarium drawer to still do.
4-digit Number Drawer
Turn left from the bulletin boards wall to face the mirror wall. Zoom in on the drawers on the right side of the counter.
Examine the bottom drawer:
Use the clue you found under the 4x4 grid plus the word under the middle bulletin board to determine the code.
ANSWER:
The series of letters T I M E each form a number:
7 0 8 1
Enter the correct code and click the button to open the drawer:
get PICTURE SLAT (4/6).
and a KEY!
Herbarium Buttons
Examining the top drawer next to the tea set, you'll see it has two large buttons, left and right.
The word "HERBARIUM" above the buttons matches the title of the book.
But also notice how the letters of the book title are written...
ANSWER:
Sometimes there are two letters, like the buttons, sometimes one.
If there are two letters, then you'll push the LEFT then the RIGHT buttons.
BUt if there is on letter, then you'll push only the left button.
Example: H E = Left Right.
So the sequence is this:
Left-Right-Left-Right-Left-Left-Left-Left-Right
Push the left/right buttons in the correct sequence then click the smaller button below them to open the drawer.
Get the SCREWDRIVER!
Back up. Now you can solve the color circles box.
Four Color Circles
Examine the box under the mirror.
Use the SCREWDRIVER to remove the screw from the bottom right square.
Pick up the COLORS SQUARE and examine it:
While in your inventory detail screen, click the colors square to flip it over. Now the colors are going the opposite direction, giving you the option to form new patterns on the box.
Replace the flipped COLORS SQUARE onto the box.
THEN, put the SCREW back in, using the SCREWDRIVER to secure it.
Now click each square until the color circles match those on the board on the other wall...
ANSWER:
Top=YELLOW
Right=RED
Bottom=BLUE
Left=GREEN
When you have the colors correct, the box will pop open (colorblind players: once you get the yellow circle on top, the other pieces easily fall into place).
From inside the opened box under the mirror, you can get:
the clock's WEIGHT.
Using your SCREWDRIVER, take back the SCREW again (it may come in handy later).
Back up and turn right and you'll notice the colors have disappeared from the circles board...
Click on the circles and the shelf/box under the board will pop open:
Get the XYLOPHONE KEY
and another CLUE:
Read the clue to see four roman numerals:
II III V I
Put the clue away and back up. Now you're ready to open the bottom drawer over by the tall plant.
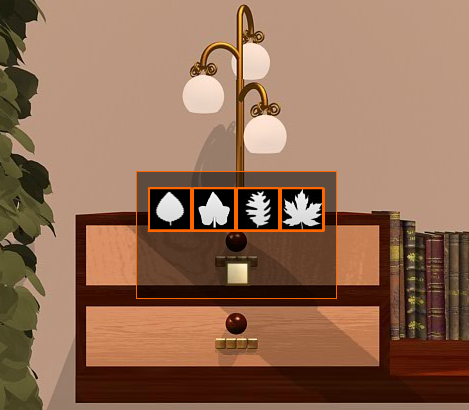
Four Leaves Drawer
Turn around until you're facing the wall by the clock and tall plant.
Then zoom in the the bottom drawer. To open this drawer, use the clues from inside the color wheel bulletin board and the herbarium book...
The card with the roman numerals give you the order and the pages to look at.
The pictures inside the book indicate which shape to use.
ANSWER:
From left to right:
1st - Aspen (rounded with one pointed apex.)
2nd - Ivy (two lobes on each side with a pointed apex.)
3rd - Redwood (or an Oak varietal?) (oblong, jagged edge.)
4th - Maple (several pointed lobes.)
Screenshot: Four Leaves Solution
Note: descriptions are not exact, just meant to help. I'm not an arborist!
When you have the correct leaf shapes entered, click the little button and the drawer will pop open:
Get PICTURE SLAT (5/6).
Xylophone, Picture Slats, Clock and Exiting
Turn to the wall with the mirror then click on the cupboard under the cello player statue on the left side of the counter:
Use the KEY (from the 4-digit number drawer) to unlock the cupboard door.
Get two things from inside:
a XYLOPHONE
and the last PICTURE SLAT (6/6).
Examine the XYLOPHONE:
Replace the missing XYLOPHONE KEY.
Then put in the SCREW*, using the screwdriver to secure it.
*If you haven't done so already, go get the SCREW from off the box under the mirror.
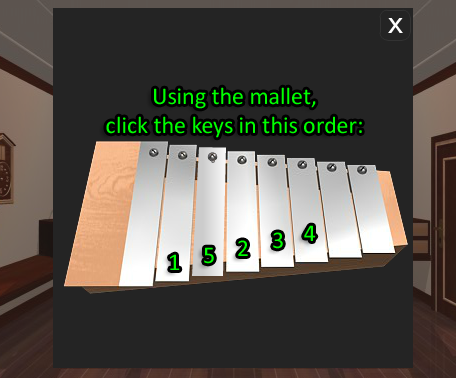
Now, with the xylophone repaired, select the MALLET from your inventory, but keep the xylophone in detail screen:
Use the clue from page IV of the herbarium book to know which keys to strike with the mallet.
ANSWER:
It's easy to get thrown off by this one.
The shape of the writing indicates that these numbers refer to the xylophone. There seems to be no other connection regarding size other than to try to throw you off.
Just like in the clue, number the keys from left to right.
Ignoring the size of the writing, strike the keys as indicated.
From left to right:
2nd-4th-5th-6th-3rd
Screenshot: Xylophone Solution
When you play the xylophone correctly, a little panel on it will pop open:
get the DOWN ARROW BUTTON.
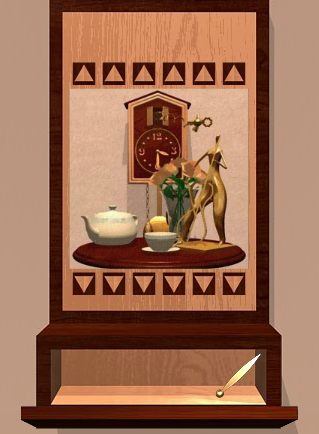
Turn around and examine the middle bulletin board:
Replace the missing DOWN ARROW BUTTON.
Then put the 6 PICTURE SLATS onto the board.
Using the up and down arrows, adjust the picture slats until the image is perfectly aligned.
ANSWER:
Screenshot: Picture Slats Solution
1st: 2 up
2nd: 6 down
3rd: 3 up
4th: 2 down
5th: 5 up
6th: 4 down
When the image is correct, the shelf/box will open and you can get the MINUTE HAND of the clock.
Back up, turn around twice and zoom in on the clock:
Replace the missing WEIGHT
Then put the MINUTE HAND back on the clock face.
Click each of the clock hands until its at the correct time, releasing the cuckoo bird.
But what is the correct time? You saw it recently.
ANSWER:
The time is in the picture you just completed:
3:30
When you set the clock to the correct time, the cuckoo escapes and, soon, you can also:
Take the EXIT KEY from the cuckoo's mouth.
Turn around to face the door, use the key and you're as free as a bird!
Posted by: elle |
December 27, 2012 4:20 PM
|
December 27, 2012 4:20 PM