
Escape from Frankenstein's Castle
Platform: Mac, Windows
![]() Things are not going well for Hannah. A motorcycle crash separated her from her husband, and she wakes up in a creepy castle staring at a strange figure in the window. Her head hurts, she can't remember anything, and the people in this place won't let her leave. A ghost named Isabella appears who says she once suffered the same fate, trapped in the castle and kept from the one she loved. Now, Hannah is determined to find freedom in the new casual adventure game Escape from Frankenstein's Castle.
Things are not going well for Hannah. A motorcycle crash separated her from her husband, and she wakes up in a creepy castle staring at a strange figure in the window. Her head hurts, she can't remember anything, and the people in this place won't let her leave. A ghost named Isabella appears who says she once suffered the same fate, trapped in the castle and kept from the one she loved. Now, Hannah is determined to find freedom in the new casual adventure game Escape from Frankenstein's Castle.
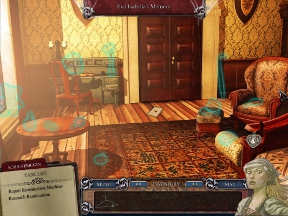 Shuffling about each room, one of the first things you'll notice about Escape from Frankenstein's Castle is that there are items to be found, but no lists. The game is decidedly more adventure than hidden object in nature, so you'll spend your time poking with inventory objects and gathering things to store for later use. When it's time to bring out a collected item, it'll be obvious what you need to use. Otherwise, Hannah or Isabella will let you know.
You'll spend a lot of time moving back and forth between rooms, gradually opening new places to explore. Because backtracking is such a big part of the experience, each area has layers of things to explore, many sub-zones and items only becoming active when they're needed in the story. Some of the books in the library, for example, seem innocent enough until you need a specific bit of knowledge from their pages. This rewards thorough explorers for clicking on everything in sight and remembering where certain items are located.
A really interesting feature of Escape from Frankenstein's Castle is the ghost, Isabella, and her memory ability. Certain rooms in the castle are familiar to her and will trigger a quick 3D refocus, replacing current items with what she remembers from the past. This usually works to give you a clue how to progress, such as showing you a blueprint for a device you're trying to fix. If you use this ability in the starting room, though, you'll slowly piece together Isabella's story using items you find throughout the mansion. It's a great device for filling out the backstory, and the idea of having unnamed items scattered throughout the game is always intriguing.
 Analysis: Escape from Frankenstein's Castle handles itself a bit differently than most casual adventure releases. It doesn't rely on hidden objects so much, which is always appreciated, and instead shoves the focus squarely on the story and the puzzles. While the plot is a bit contrived, it's told through silent cutscenes and quick conversations that really pull you in.
There are a lot of "figure it out yourself" puzzles that set you to a task and leave you alone, providing more information only if you start clicking on the task list at the bottom of the screen. This lack of hand holding is a great device that lets you adjust the difficulty on a per-puzzle basis. Even the mini-games just sort of throw you into the midst of things!
One thing baffles me about Escape from Frankenstein's Castle: loading screens. And not just a loading screen here or there. Moving through the first six rooms you'll encounter several loading screens, something I haven't seen since the days of CD-ROM gaming. Why they're necessary in a casual adventure game I have no clue, but they go by within a second or two, so they don't break the flow of the game up too much.
Escape from Frankenstein's Castle has a unique look to it and plays a little differently than most of its cousins. You'll enjoy the puzzles and the story, you'll scratch your head every time you see a loading screen, and when it's all over, you'll wonder why it wasn't twice as long.
![]() Windows:
Windows:
Download the demo
Get the full version
![]() Mac OS X:
Mac OS X:
Download the demo
Get the full version


Walkthrough Guide
(Please allow page to fully load for spoiler tags to be functional.)
Escape from Frankenstein's Castle Walkthrough
General Information
From the main menu you can play or quit, choose your Profile and Options which consist of music and sound fx volume and full or windowed screen.
Each time I started the game I found that I had to readjust my Options because it started in full screen mode.
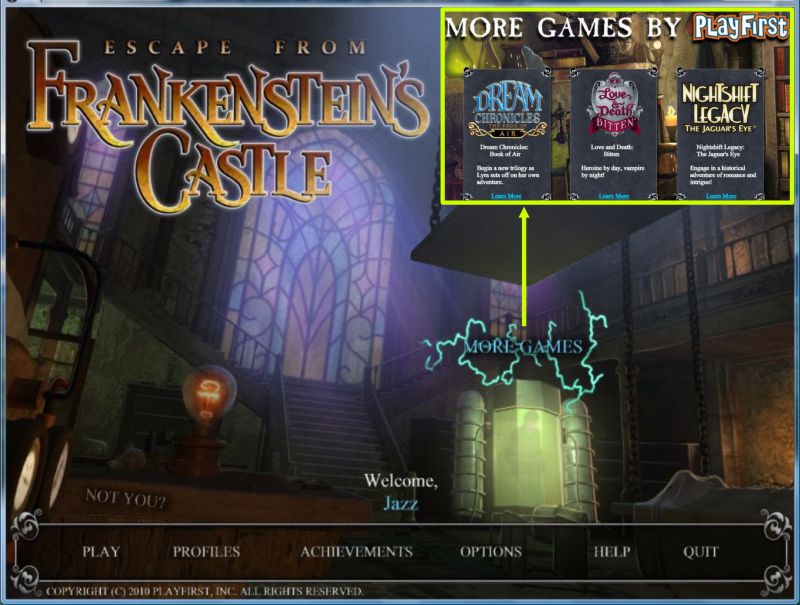
You can check out other games by PlayFirst and access your Achievements which will be discussed later.
You can also access a Help section which will show you how to navigate and what to expect.
There is no Cursor attachment or help for a close up but once you are in one you will need to exit out of it.
Hints are slightly different for this game so you need to wait to meet Isabella.
When you need help all you have to do is click on Isabella.
She might also remind you that you have the option of clicking on the particular item in your Task list for which you need help and it will tell you what is needed to finish the task.
Each time you change locations there will be a period of time for the scene to load which will vary depending upon your computer.
There are mini games and puzzles throughout your journey, most of which have a Skip Button.
Screenshot
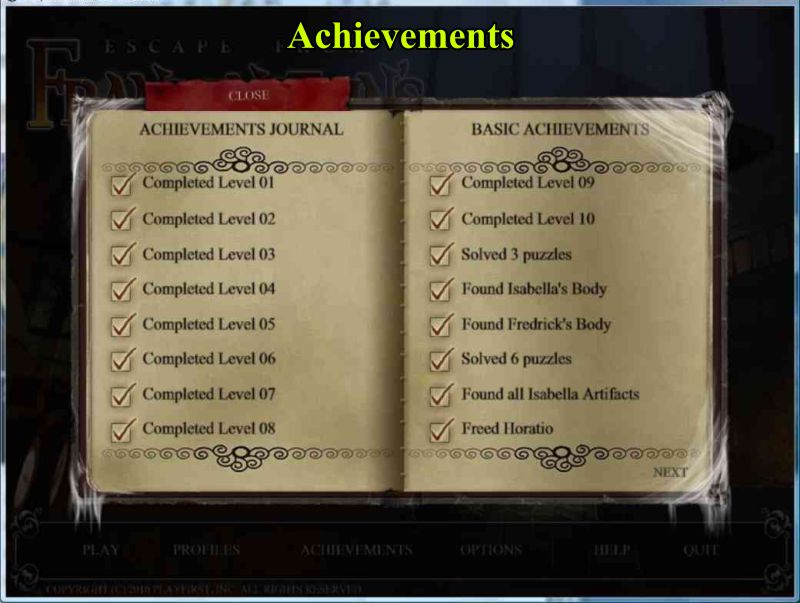
Achievements Journal
Basic Achievements include:
Completion of all 10 Levels
Solving 3 puzzles
Finding Isabella's Book
Finding Fredericks Book
Solving 6 puzzles
Finding all of Isabella Artifacts
Freeing Horatio
Screenshot
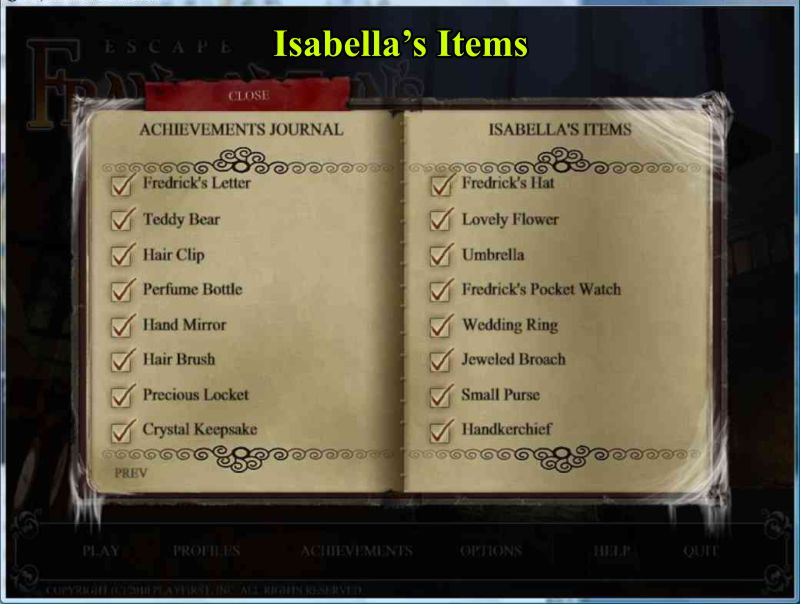
Isabella's Items:
Isabella's Items can be found as listed:
Frederick's Letter: Library Reference Books
Teddy Bear: Main Lab in Stasis Chamber area drawer
Hair Clip: Banquet Hall Window area
Perfume Bottle: Hidden Storage
Hand Mirror: Kitchen Bread Oven area
Hair Brush: Lab Storage Prep Table
Precious Locket: Window area of Hannah's Room
Crystal Keepsake: Kitchen Storage
Frederick's Hat: Small Lab Alchemy
Lovely Flower: Banquet Hall Table
Umbrella: Main Hall Left Staircase Fireplace
Frederick's Pocket Watch: Main Lab in Stasis Chamber area drawer
Wedding Ring: In Frederick's hand when his arm is reanimated in Private Study
Jeweled Broach: Lab Storage Prep Table
Small Purse: Main Hall front door area
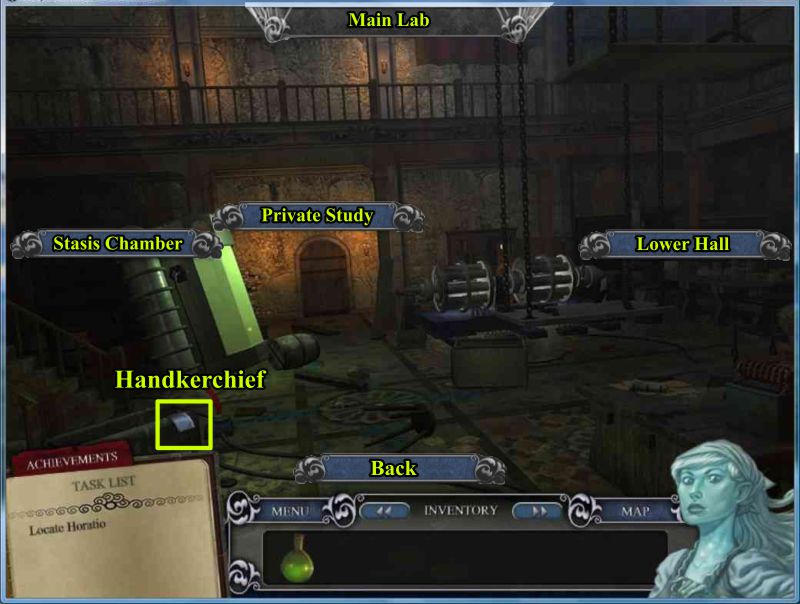
Handkerchief: Kitchen Storage
Screenshot
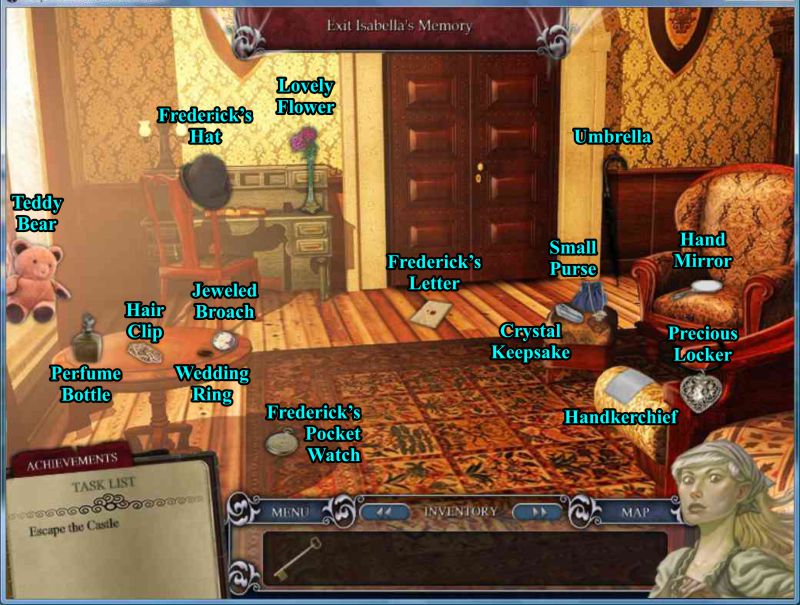
When you find one of Isabella's Memories you can go to Hannah's Room and click to view Hannah's Memories to find out what each item is so special to her.
Screenshot
Screen Navigation
There are many things to help you with your journey so check the screenshot to identify what they are.
You will also encounter dialogues which will sometimes have a "Tell Me More" option for you to gain more information about a situation.
You will need to close these dialogues to continue with the game.
Screenshot
Map and Navigation
One of the helpful tools available to you is the Map.
You can click on it at any point in time to find out exactly where you are in the Castle.
Part of what shows up on the Upper Floor is actually the view from the Upper Hall of the First Floor.
The Map screenshot shows those areas that are accessed in the game.
Screenshot
Level 1
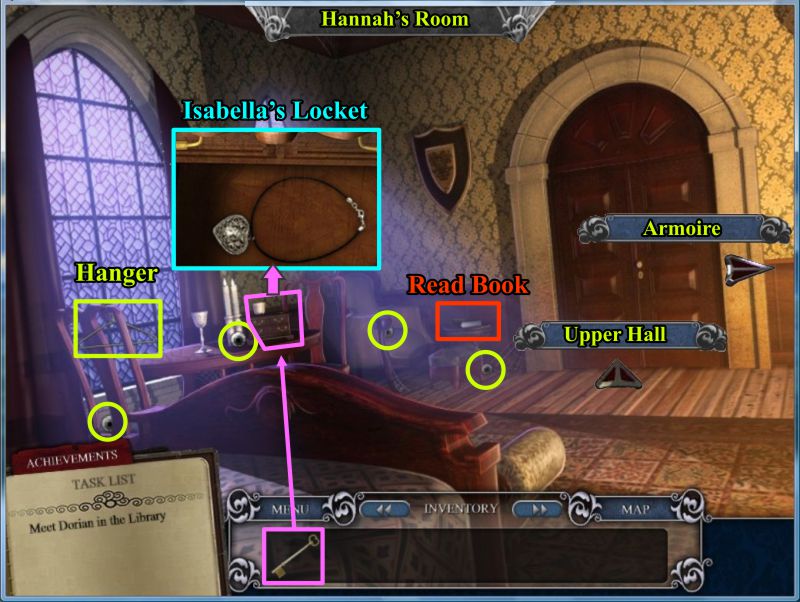
Hannah's Room Window Area
Collect the Hanger and the Eyeballs.
You will be back with a key to open the box on the table to collect Isabella's Locket.
Try to leave the room and you will meet Isabella.
Check out the book for information about what has happened and then go to the Armoire area.
Isabella also requests you visit her Memories so be sure to do that when the choice is available.
Screenshot
Hannah's Room Armoire
Collect the rest of the Eyeballs and the Hangers.
After you collect all of the available items click on the Armoire to collect the items there as well as the drawer behind Isabella for one more Eyeball.
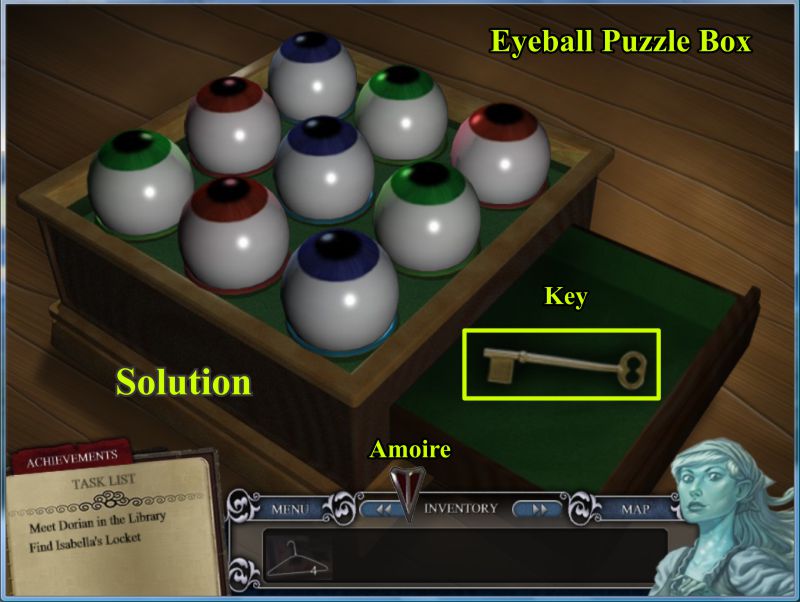
Once you have all 9 of the eyeballs, click on the puzzle box to place them.
Screenshot
Eyeball Puzzle Box Game
Place all of the eyeballs in their color coded positions and the box will open for you to collect a key.
Go back to the Window area and open the box containing Isabella's Locket.
Screenshot
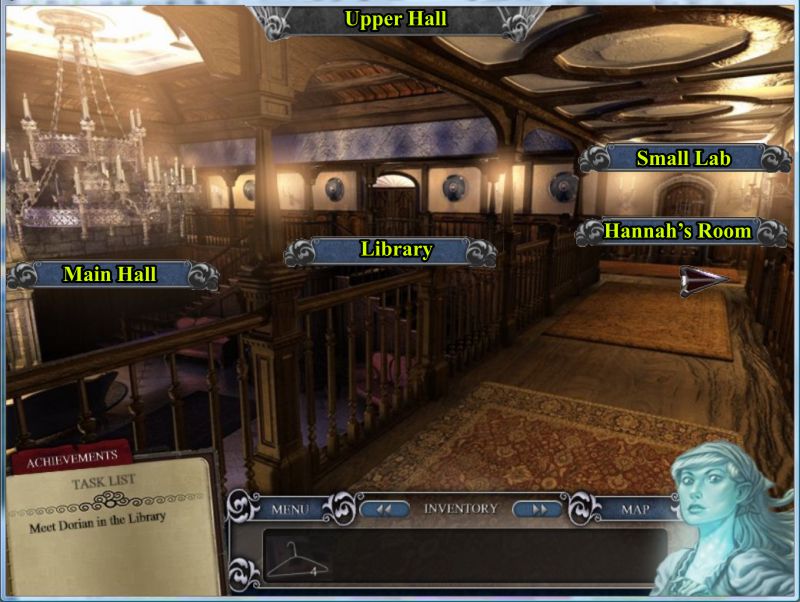
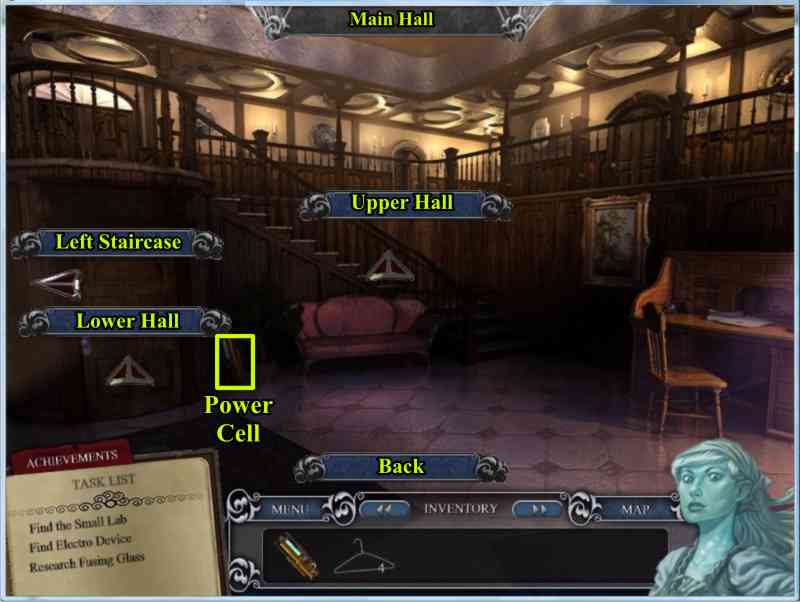
Upper Hall
Once Hannah leaves her room, this is where she finds herself on her journey to first meet Dorian in the Library and then in the Main Hall.
Go the end of the hall toward the Small Lab and turn left to access the Library.
Screenshot
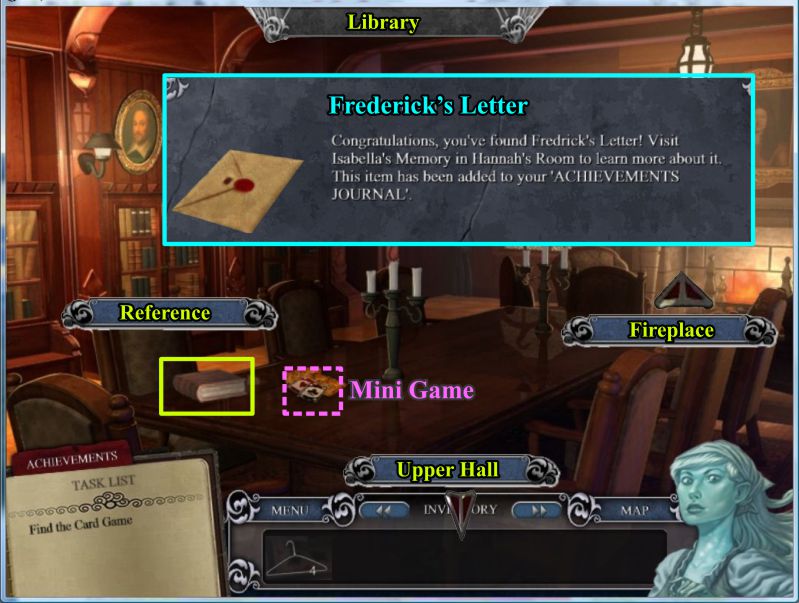
Library
Dorian wants you to play a card game and then dust the books.
When you are finished you need to check out the reference section and pick up all the books in the various sections of the Library.
Screenshot
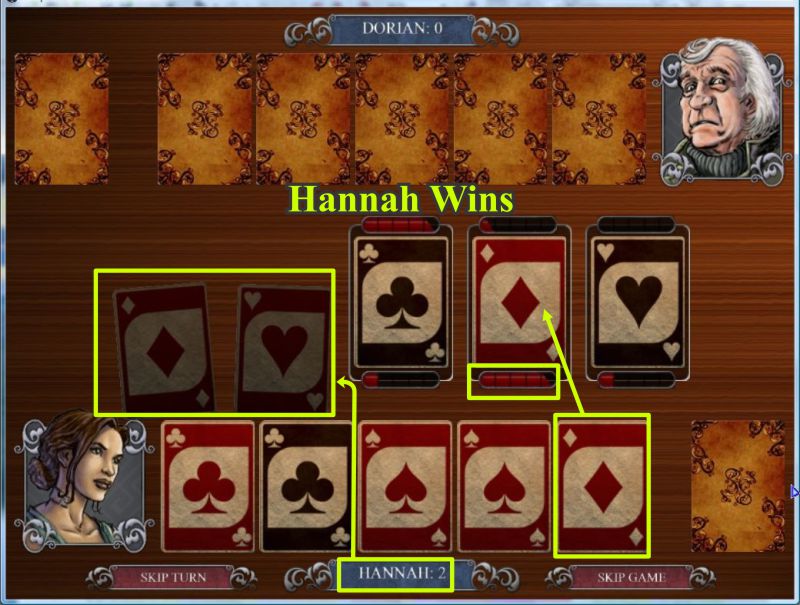
Tower Card Game
The object of the game is to get 3 Towers by matching cards on the play board.
Play a card from your hand on one of the 5 Tower cards in the center of the table.
If you play a card that exactly matches the one on the board by color and suit, you get one point.
If you choose to play a card of the same suit but a different color, you get ½ point.
If you play a card of the same color but a different suite, you get ½ point.
When you have completed all 5 of the red markings under your card, you win a Tower.
3 Towers wins the game so try to stick to just 3 piles to get a faster win.
A sample win is shown in the screenshot.
Screenshot
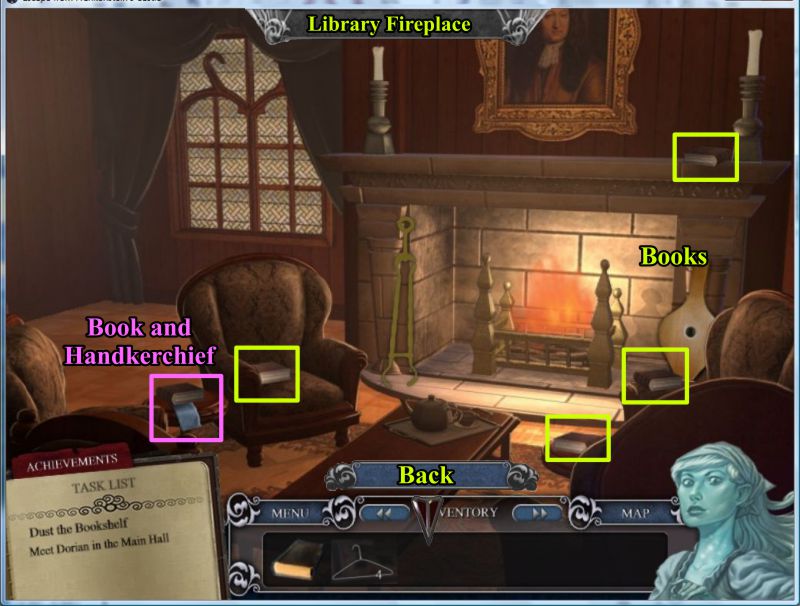
Pick up the book on the table and go toward the Fireplace.
Library Fireplace
Pick up all the books and the Handkerchief.
Screenshot
Library Reference
Go back and then toward the Reference.
Use the Handkerchief to get rid of the cob webs.
Note the symbol and place each book on the shelf to trigger a puzzle.
Swap the books so that the design looks like the symbol.
Screenshot
Level 2
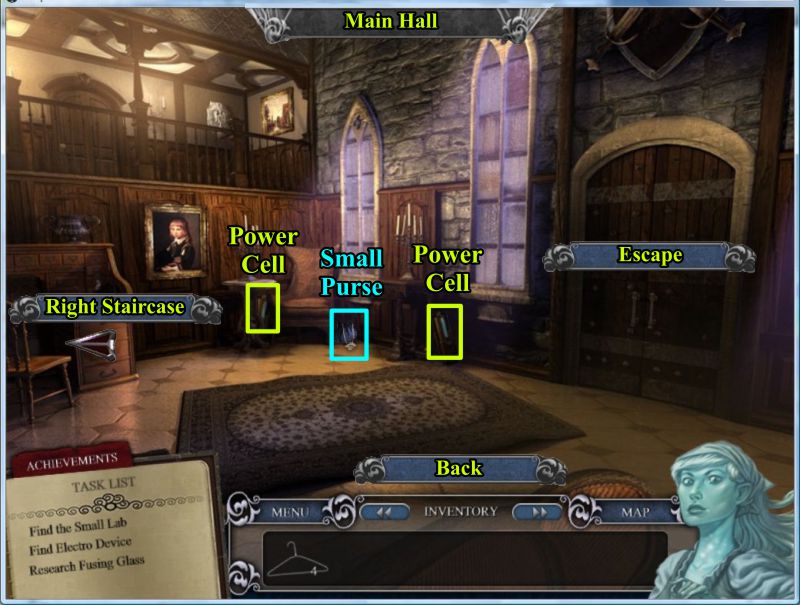
Main Hall
Pick up the 2 Power Cells and Isabella's Small Purse before going left to the Right Staircase.
Screenshot
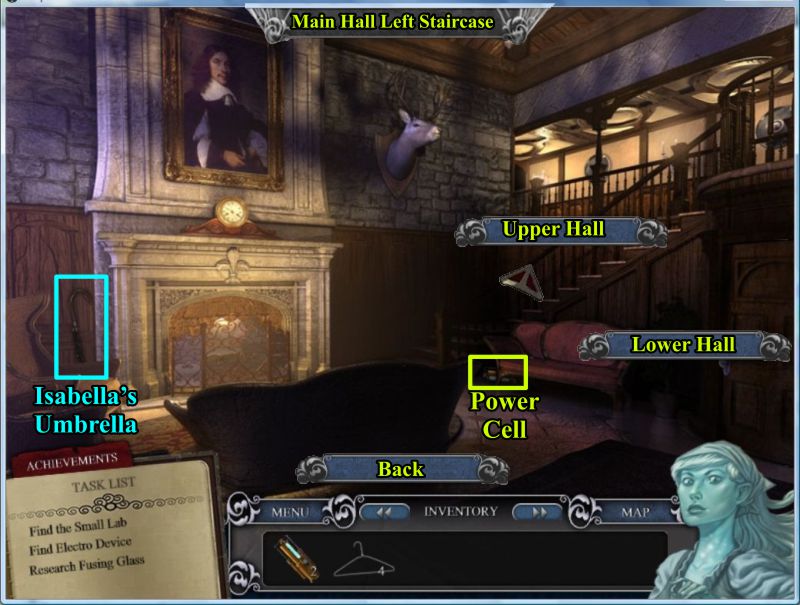
Pick up the Power Cell, note the Lower Hall door is locked, and go toward the Left Staircase.
Screenshot
Pick up the Power Cell under the sofa and collect Isabella's Umbrella before going upstairs to find the Small Lab.
Screenshot
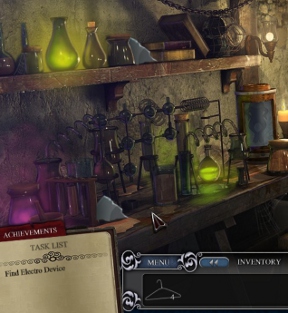
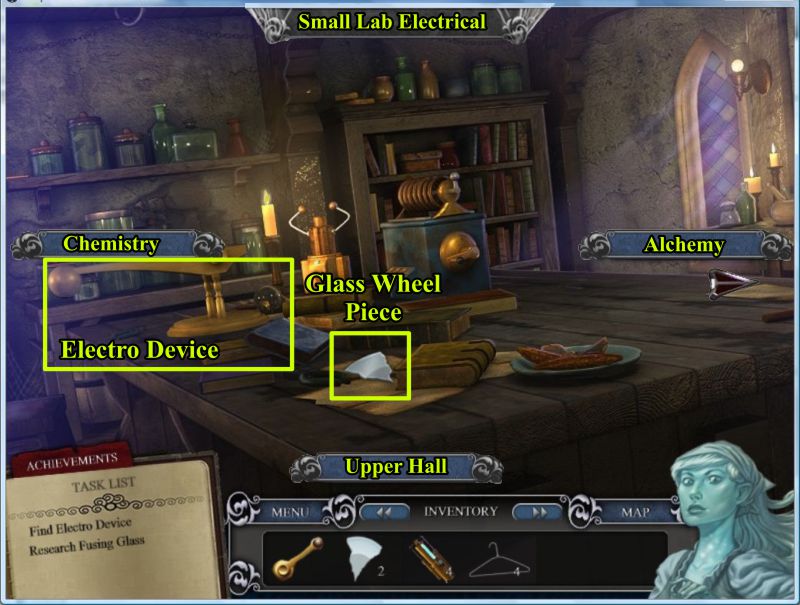
Small Lab
Note the Electro Device and pick up the piece of the Glass Wheel.
Go left to the Chemistry area of the lab.
Screenshot
Pick up the Glass Wheel pieces and the Handle.
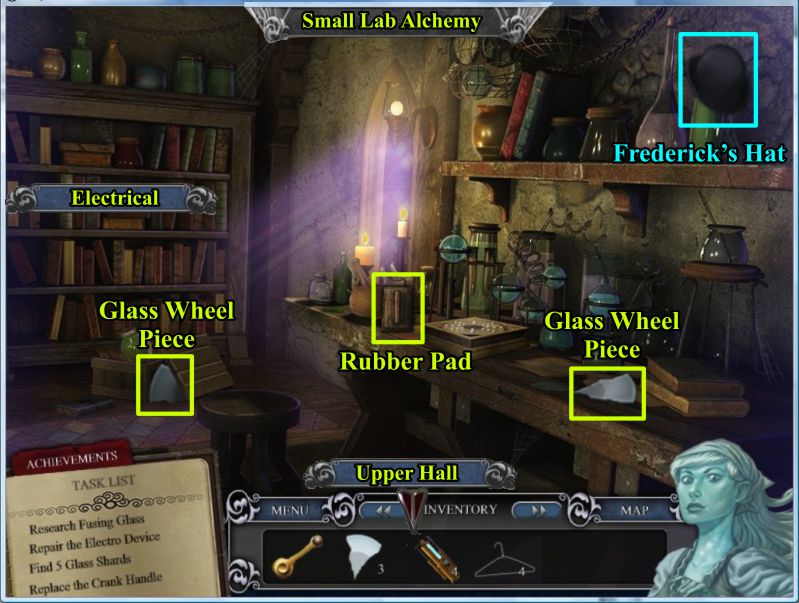
Note the Frog because you will come back for him later and go right through Electrical to Alchemy.
Screenshot
Collect the Glass Wheel pieces, rubber pad and Frederick's Hat.
Exit to the Upper Hall and go to the Library.
Screenshot
Library
Go to the Reference and click on the Glass Fusing book to find out how to assemble the Glass Wheel.
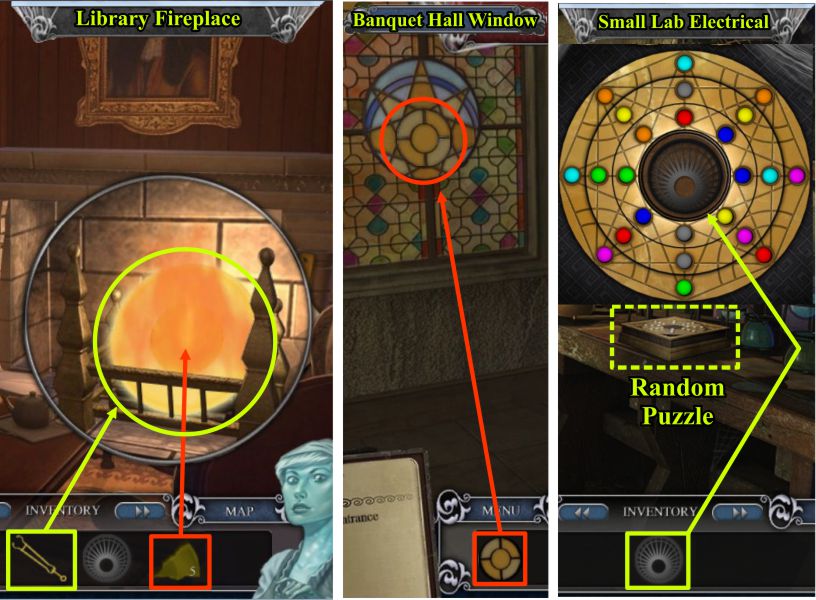
Go to the Fireplace and place each piece of the Glass Wheel in the Fireplace to fuse it.
Pick up the Tongs to grab the Glass Wheel and return to the Small Lab.
Screenshot
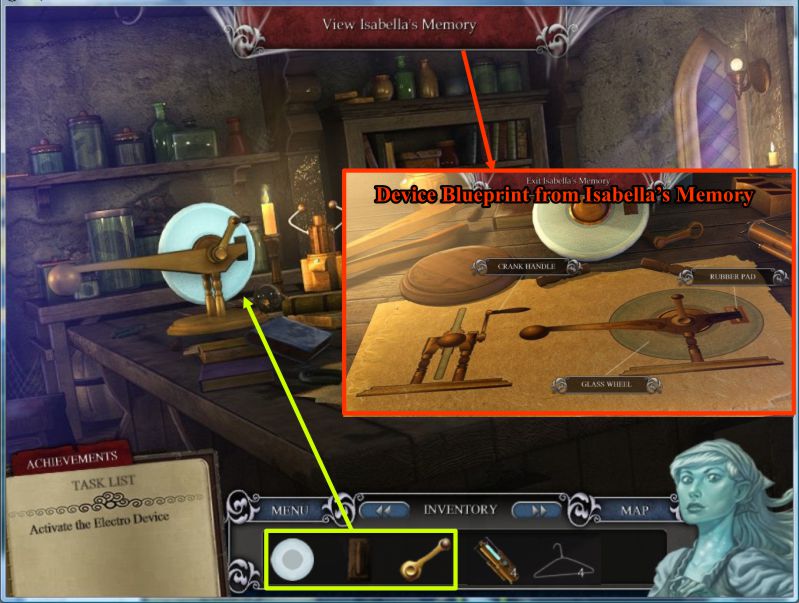
Small Lab Electrical
View Isabella's Memory to see the blueprint for the device.
Assemble the device according to the blueprint and then click the handle to try it out.
Dorian appears and says Victor would also like you to repair the reanimation machine.
Screenshot
Level 3
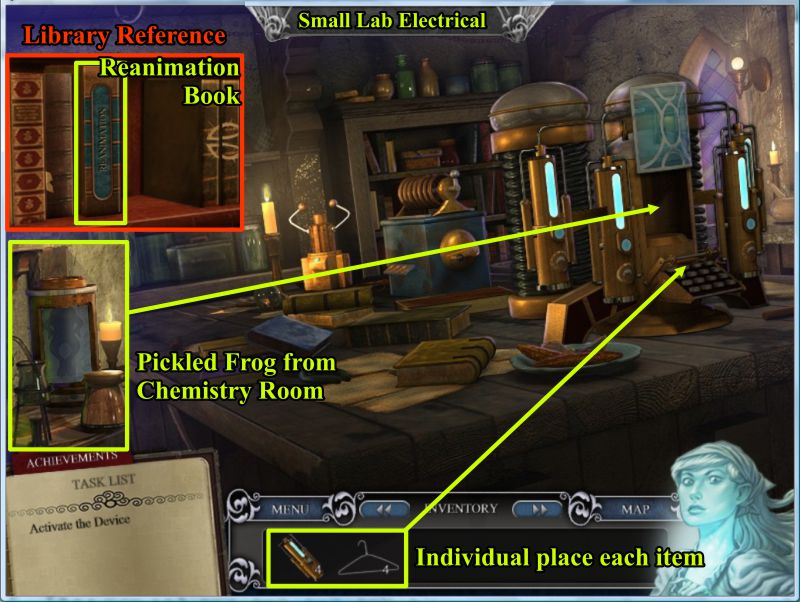
Go to the Library Reference to check what you need to do to the machine.
Place the 4 Hangers to wire it and the 4 Power Cells for batteries.
Go get the Pickled Frog from the Chemistry room and place him in the machine to trigger a mini game.
Screenshot
Reanimation Mini Game
Press the buttons on the machine in the order numbered to make them all light up.
Take the reanimated frog when you are done.
Screenshot
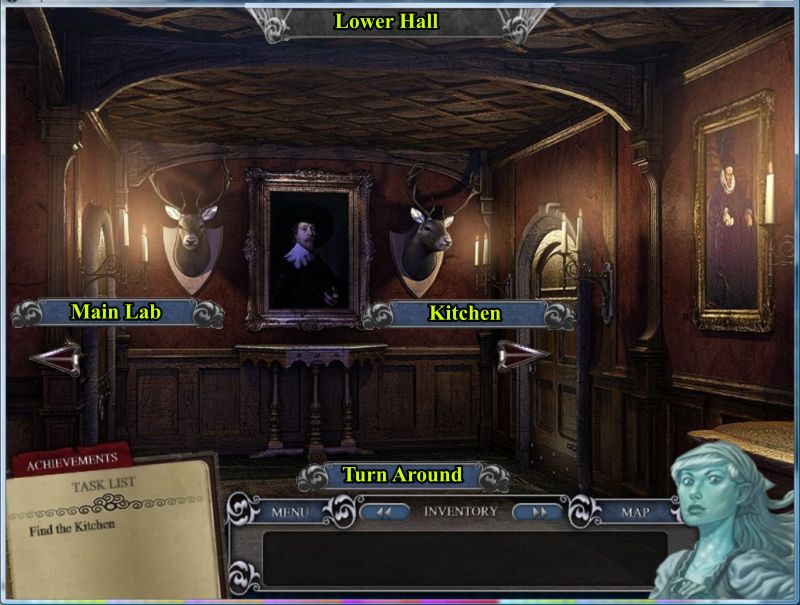
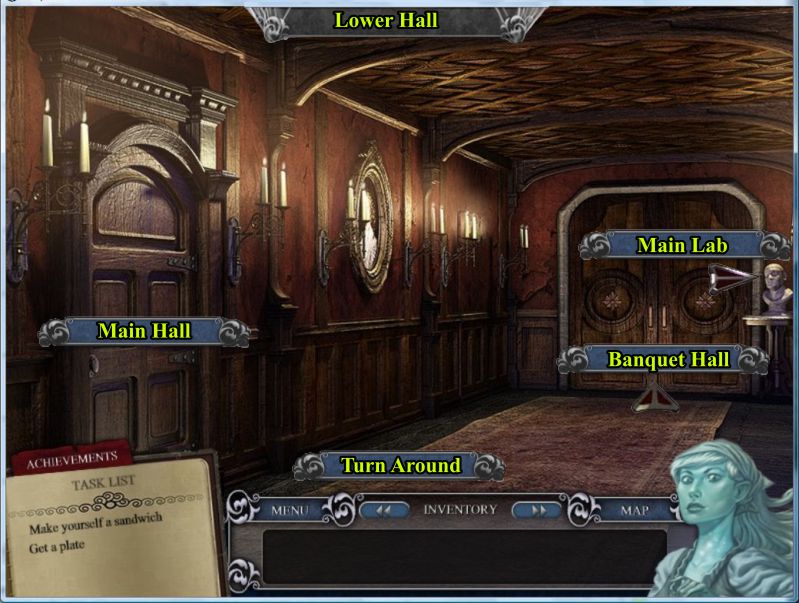
Lower Hall
Dorian had unlocked the Lower Hall so you can go to the Kitchen for something to eat.
Clicking on the Turn Around will show you the other end of the hall.
Screenshot
Level 4
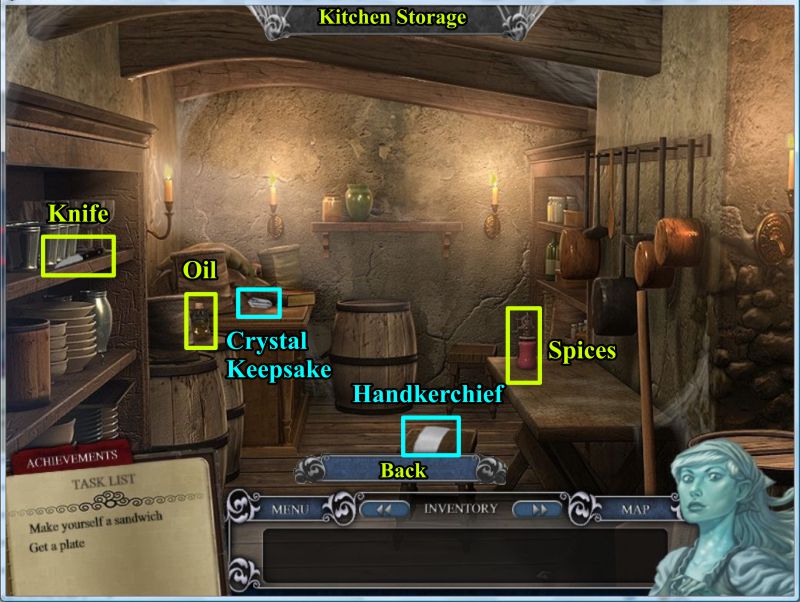
Kitchen
Go through the door in the back to the Kitchen Storage.
Collect the Knife, Oil, Spices, and Isabella's items.
Exit and go right to the Bread Oven.
Screenshot
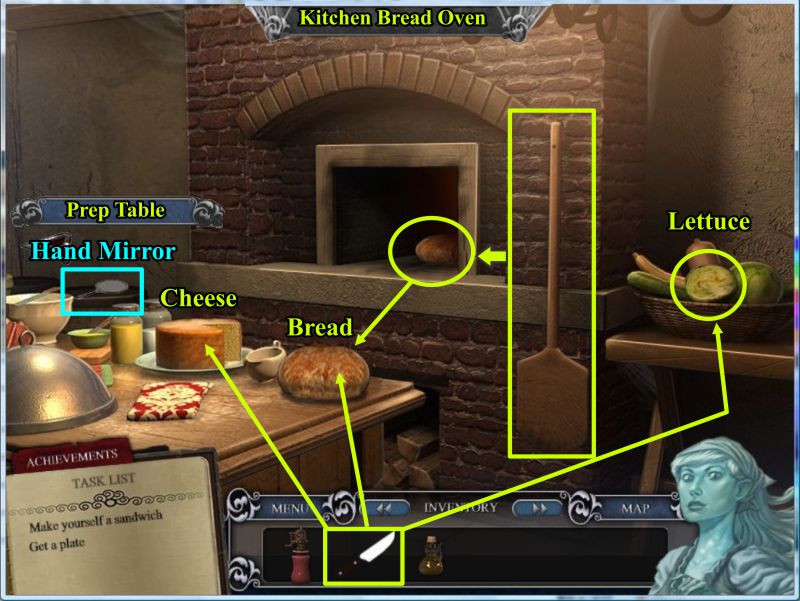
Use the bread paddle to take the bread out of the oven and it will land on the table.
Use the Knife to cut some lettuce, bread and cheese.
Pick up Isabella's Hand Mirror and go left to the Prep Table.
Screenshot
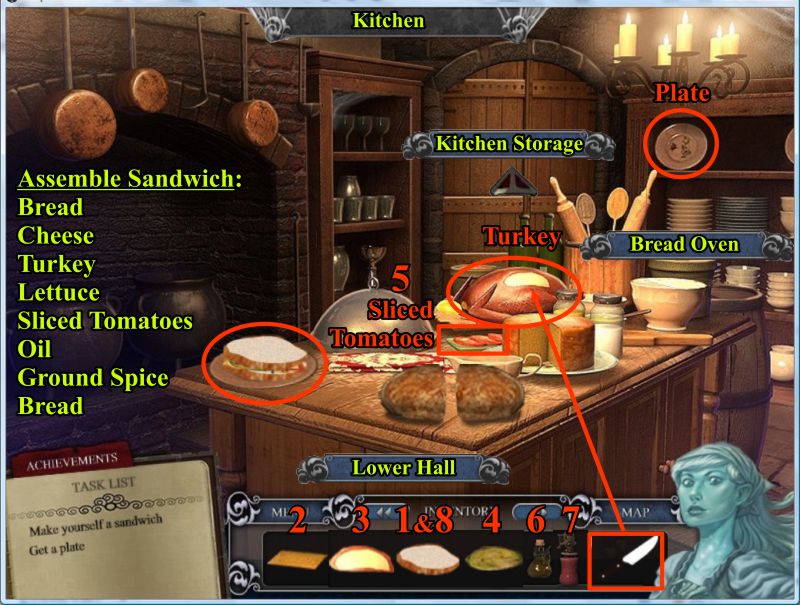
Pick up the Plate and it will land on the table.
Cut some Turkey and take some sliced Tomatoes.
Assemble you sandwich as follows:
A slice of bread
Cheese
Turkey
Lettuce
Sliced Tomatoes
Oil
Ground Spice
Top with another slice of bread and eat it.
Screenshot
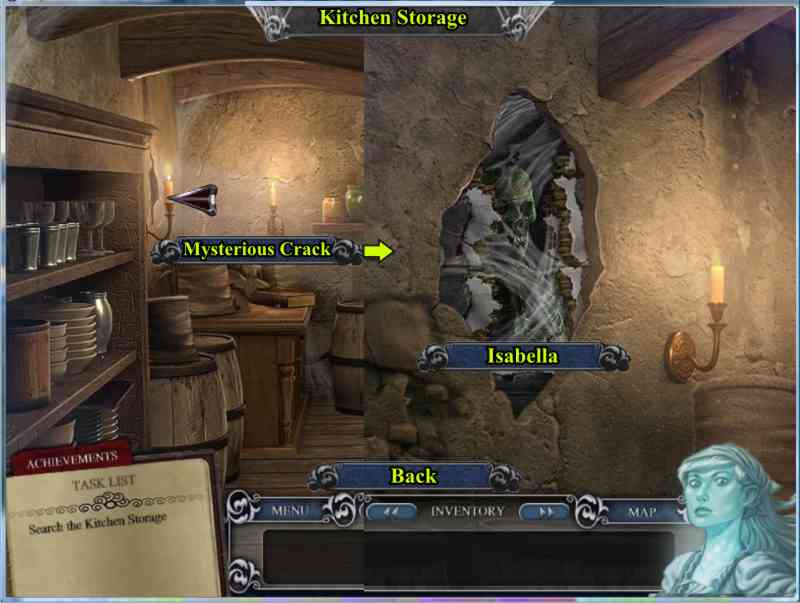
Isabella is feeling creepy about the Storage room so go back there and note the Mysterious Crack that has appeared.
Go to the crack and discover Isabella's bones.
Screenshot
Level 5
Lower Hall
Leave the Kitchen and turn around to go to the Banquet Hall.
Screenshot
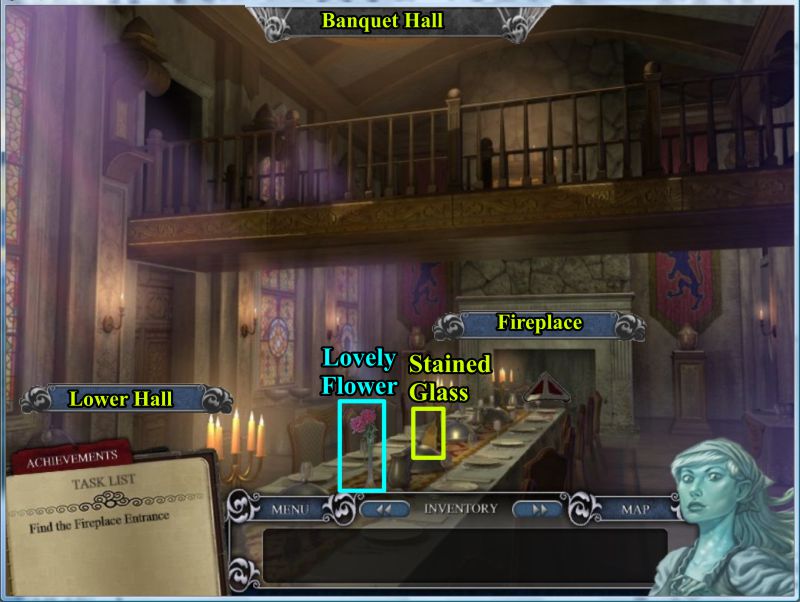
Banquet Hall
Pick up the piece of Stained Glass and the Lovely Flower and go toward the Fireplace.
Screenshot
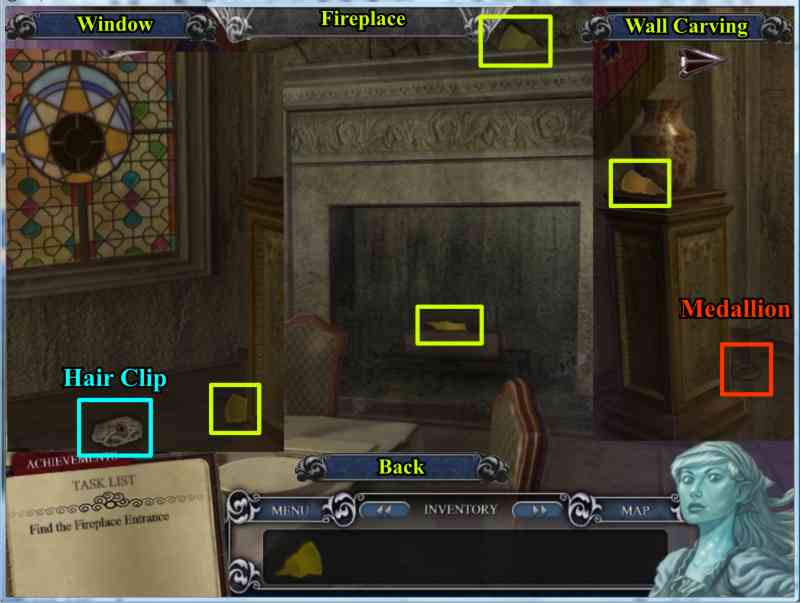
Pick up the Stained Glass pieces at the Fireplace and go both right and left to collect the remaining pieces.
Collect Isabella's Hair Clip at the Window area, the Medallion by the Wall Carving, go back, exit to the Lower Hall, and go upstairs to the Library Fireplace.
Screenshot
Place each of the Stained Glass pieces in the Fireplace and use the Tongs to pick up the fused piece.
Go back to the Banquet Hall Window and place the Stained Glass in the window.
Try the Medallion in the Wood Carving but it won't reflect so take it out and go upstairs to the Small Lab Electrical.
Click on the box on the table and place the Medallion in the center to start a mini game.
The initial configuration of the game is random each time it is started.
Screenshot
Transmuted Medallion Puzzle
All of the rings move clockwise so experiment until all the colors are lined up as shown in the solution.
Take the Medallion and go back to the Banquet Hall Wood Carving.
Place the Medallion in the carving and it will interact with the Stained Glass.
A secret panel opens in the Fireplace so go through it.
Screenshot
Level 6
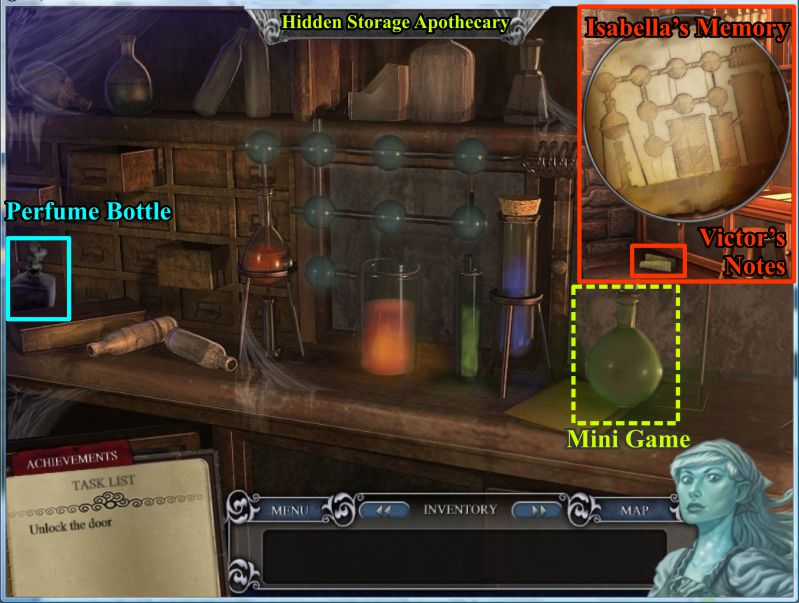
Hidden Storage
After Frederick and Isabella are reunited, go to the Apothecary bench and collect Isabella's Perfume Bottle.
Click on the green flask which will trigger a mini game.
View Isabella's Memory and finder Victor's Notes as to how to make the Dipple's Oil.
Exit her memory and click on the orange flask.
Screenshot
Dipple's Oil Mini Game
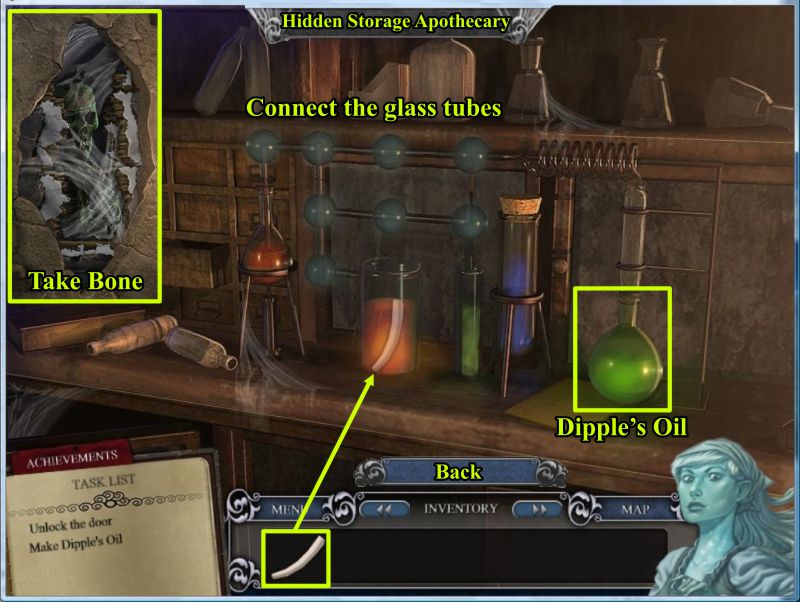
You've discovered that you need a bone for the orange solution so with Isabella's permission go to the Kitchen Storage and remove one of her bones from the Mysterious Crack.
Return to the Hidden Storage Apothecary and place the bone in the orange solution.
Connect all the glass tubes and you will have produced the Dipple's Oil so collect the flask.
Screenshot
Lab Storage Door Puzzle
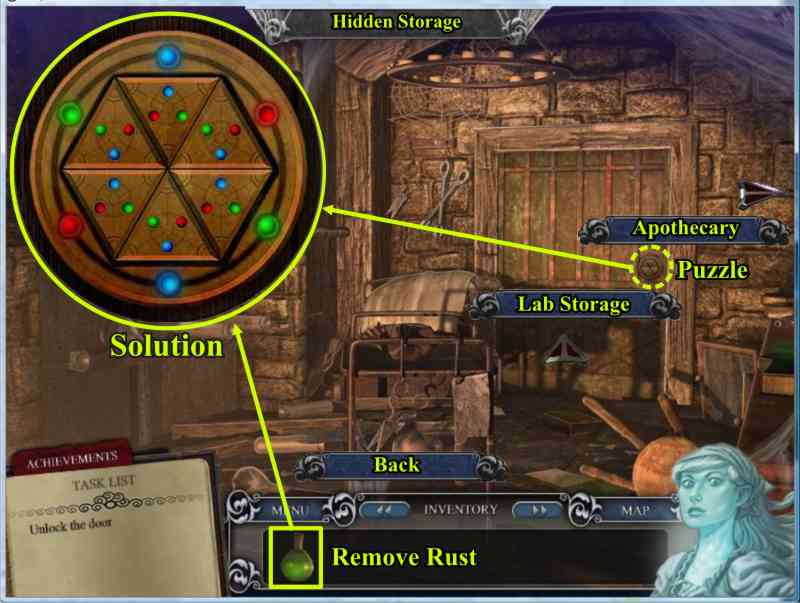
Go left from Apothecary and click on the Lab Storage door for a puzzle to unlock the door.
Use the Dipple's Oil on each of the panels and the outer ring to remove the rust.
Rotate the panels until the colors of the panels match the outer circle colors.
The door is open so enter the Lab Storage.
Screenshot
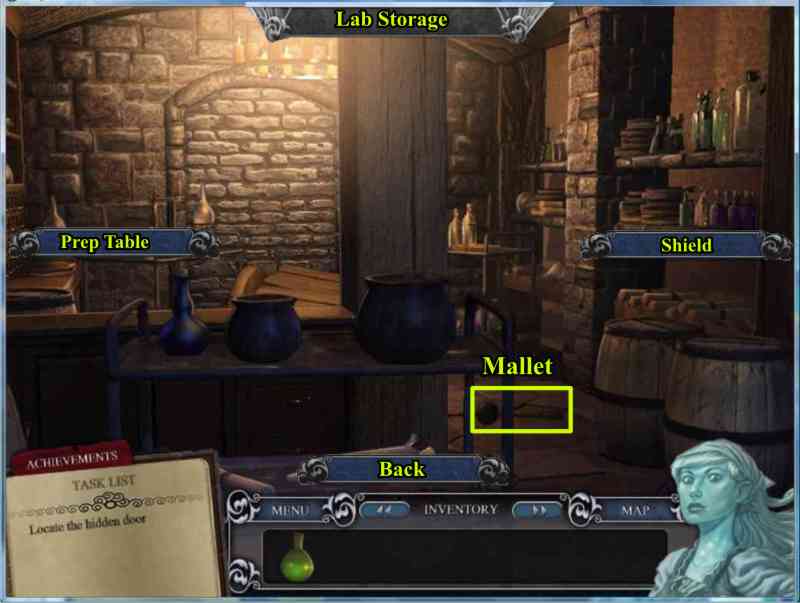
Lab Storage
Pick up the Mallet and check out the back wall and broken cart before going to the Prep Table.
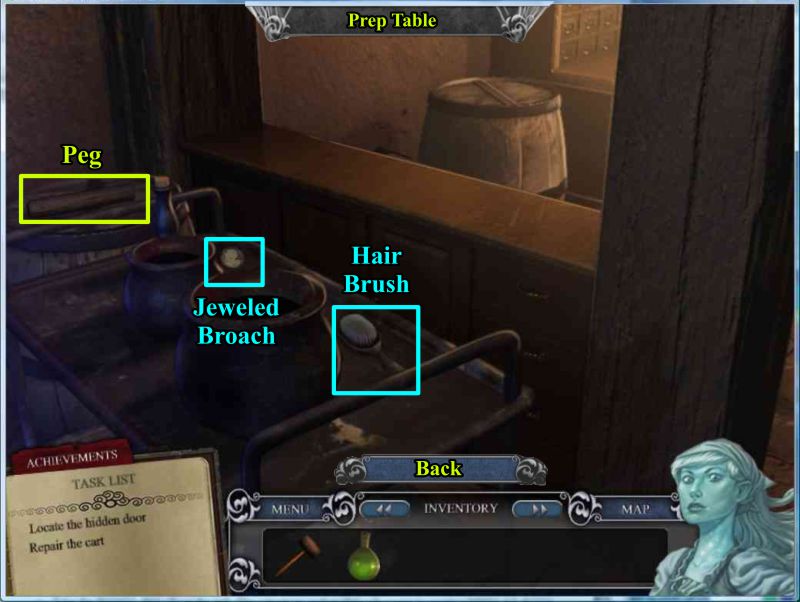
Screenshot
Pick up the Peg and collect Isabella's Hair Brush and Jeweled Broach.
Go back and then right to the Shield.
Screenshot
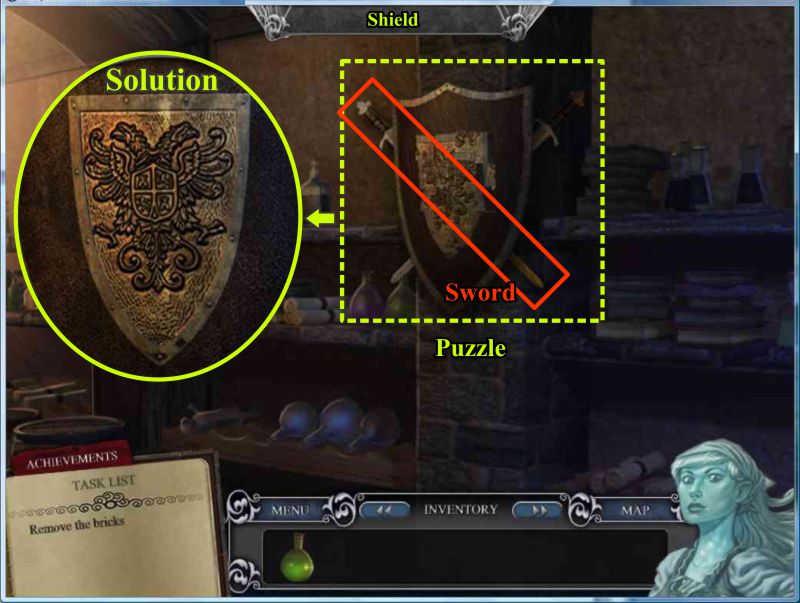
Lab Storage Shield
Click on the Shield to trigger a jigsaw puzzle.
Reassemble the Shield as shown in the solution and then exit out and take a sword.
Screenshot
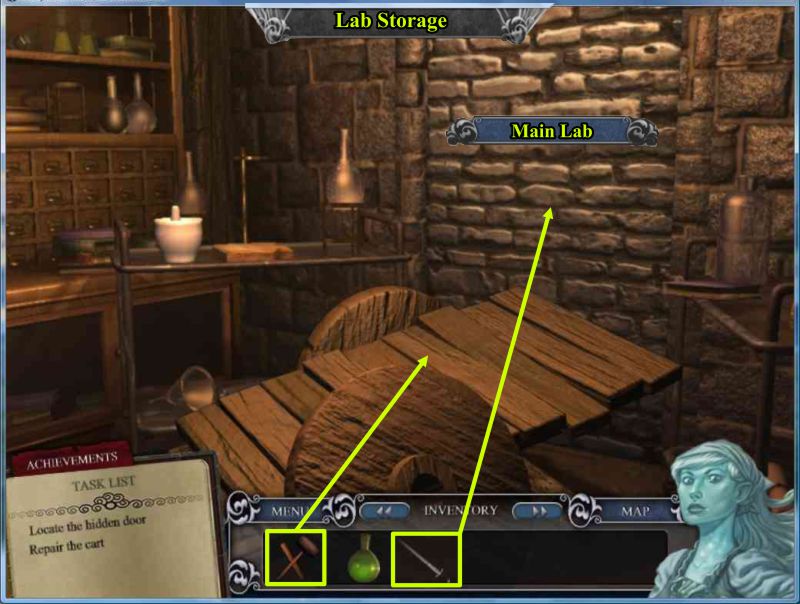
Go back and forward to the wall and cart.
Use the Mallet and Peg on the cart and it will roll out of the way.
Use the Sword to remove the brick from the Main Lab door.
Screenshot
Main Lab Door Puzzle
Click on the door knob to trigger the puzzle.
Use your Dipple's Oil on each of the panels and outer ring to remove the rust.
Rotate the panels so they match the colors on the outer ring and the door will open for you to enter.
Screenshot
Level 7
Main Lab
Pick up the Handkerchief and go to the Stasis Chamber.
Screenshot
Open the two top drawers and pick up the Gears.
Open the bottom right drawer and collect Isabella's Memory Items.
Use the Handkerchief to clean the Stasis Chamber and discover Horatio.
Click on the Access Panels to discover you need something to remove the screws.
Screenshot
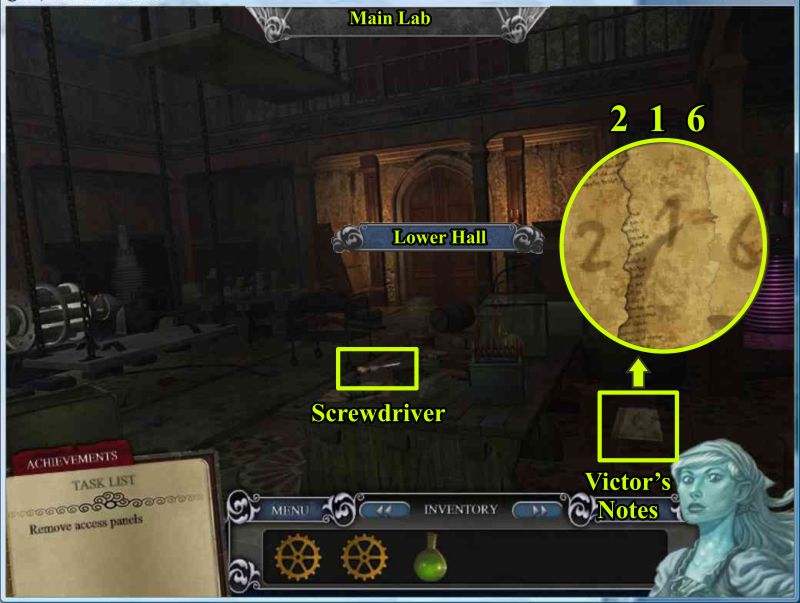
Go right and take the Screwdriver from the table.
Click on Victor's notes on the floor and then click on each section of it till it reads 216.
Screenshot
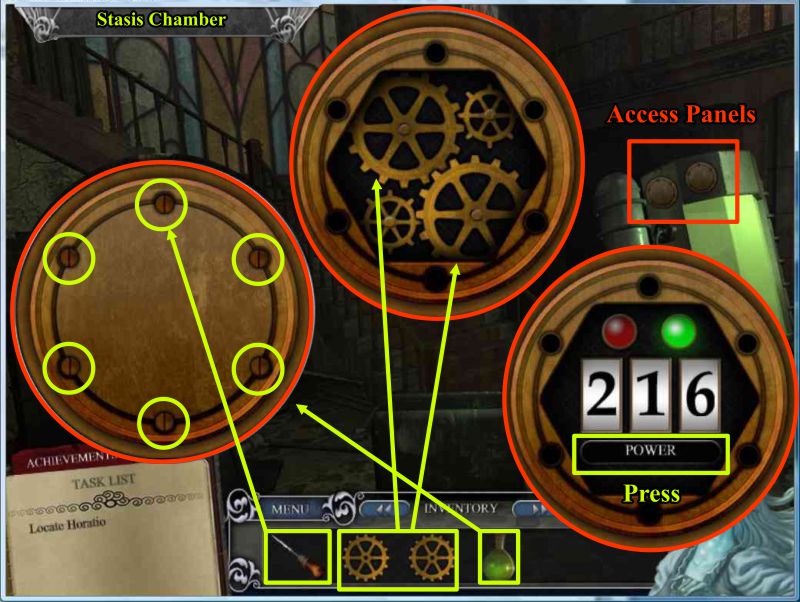
Stasis Chamber Access Panels
Back to the Stasis Chamber Access Panels, use the Dipple's Oil to clean up the panels.
Click on each one and remove each of the screws individually with the tip of the Screwdriver by clicking until they are completely unscrewed.
Click the center of the panels to open them.
Replace the broken gears in the one on the right with the gears from your inventory.
The left one will use the combination you found in Victor's notes so enter 216 and press Power.
Screenshot
Level 8
Private Study
Hannah gets caught and locked in Victor's Private Study.
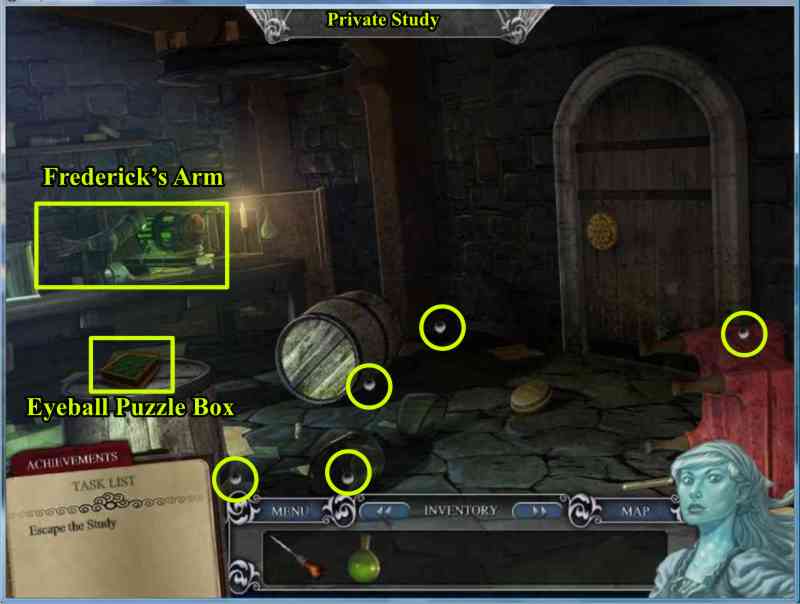
Collect the 5 eyeballs and when Isabella discovers Frederick's arm go to the workbench at the left.
Screenshot
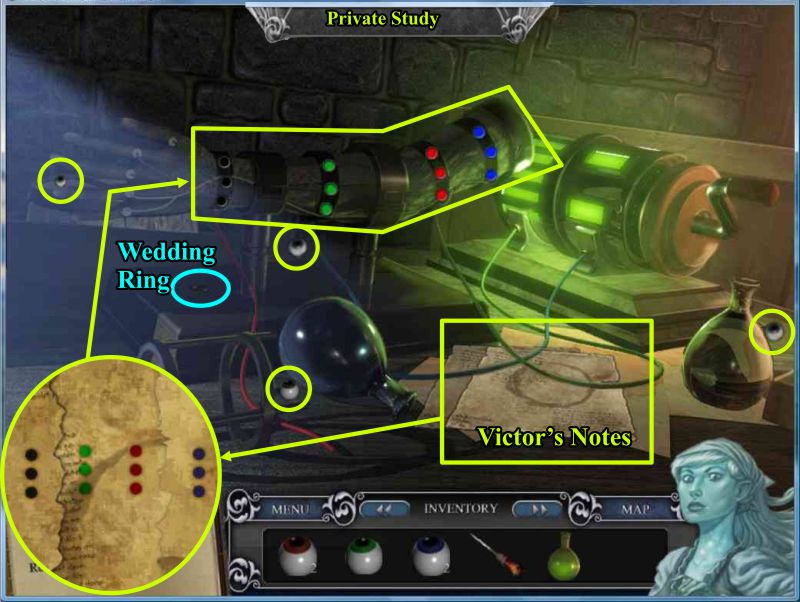
Collect the 4 eyeballs and click on Victor's Notes.
Click on each section until 4 rows of 3 dots appear.
Using the diagram, click on the 3 right bands of the arm to match the scheme.
Click on the handle of the reanimation machine and the hand will drop the Wedding Ring.
Collect the Wedding Ring and move away from the table.
Screenshot
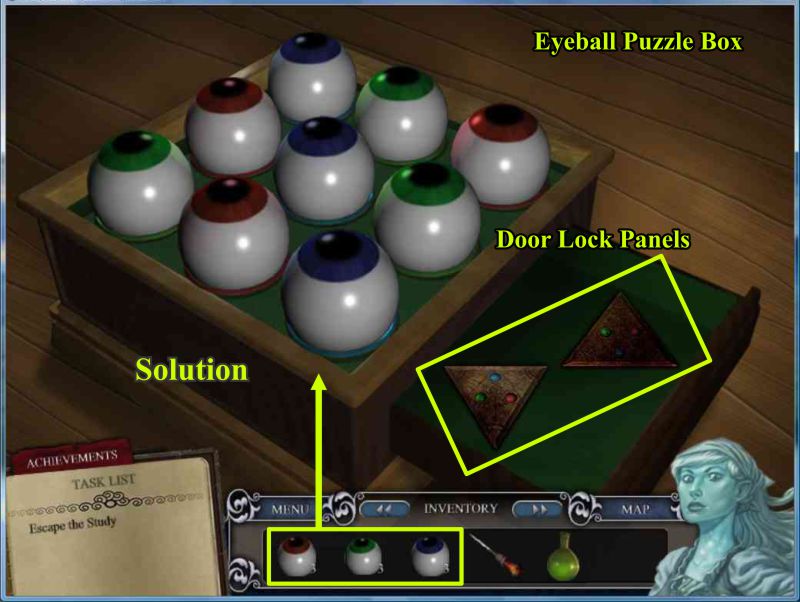
Eyeball Puzzle Box
Click on the Eyeball Puzzle Box and place the eyeballs.
The box will open to give you two panels for the door lock.
Screenshot
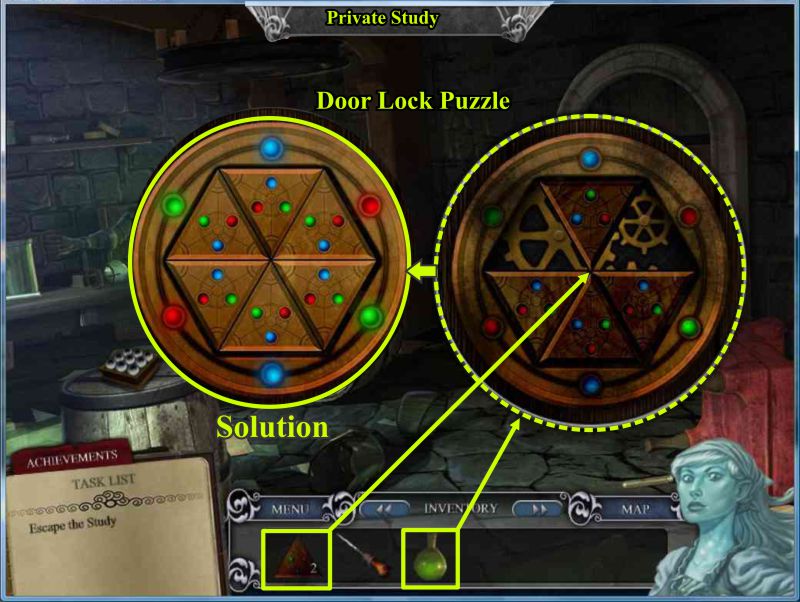
Private Study Door Lock Puzzle
Click on the door knob and place the two missing panels.
Clean the lock with the Dipple's Oil, and rotate the panels to match the outer ring colors.
Screenshot
Level 9
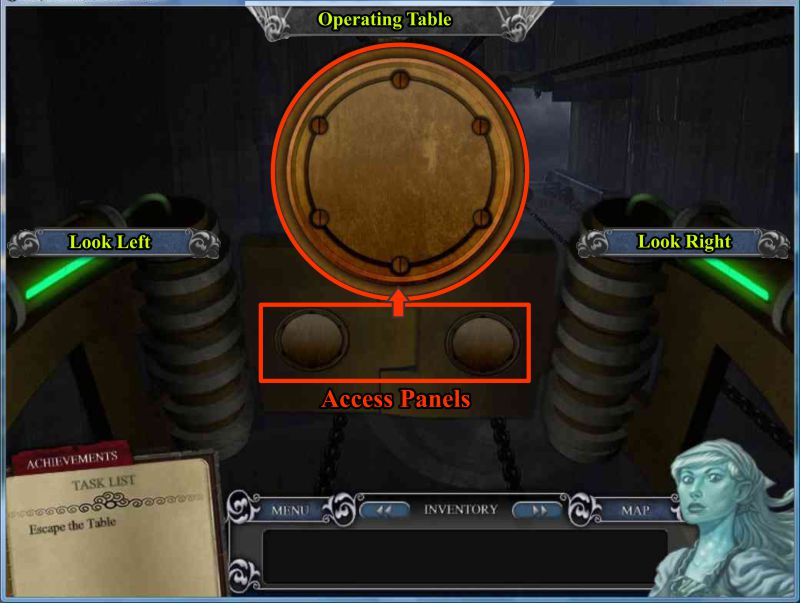
Main Lab Operating Table
Hannah gets caught and strapped to the operating table.
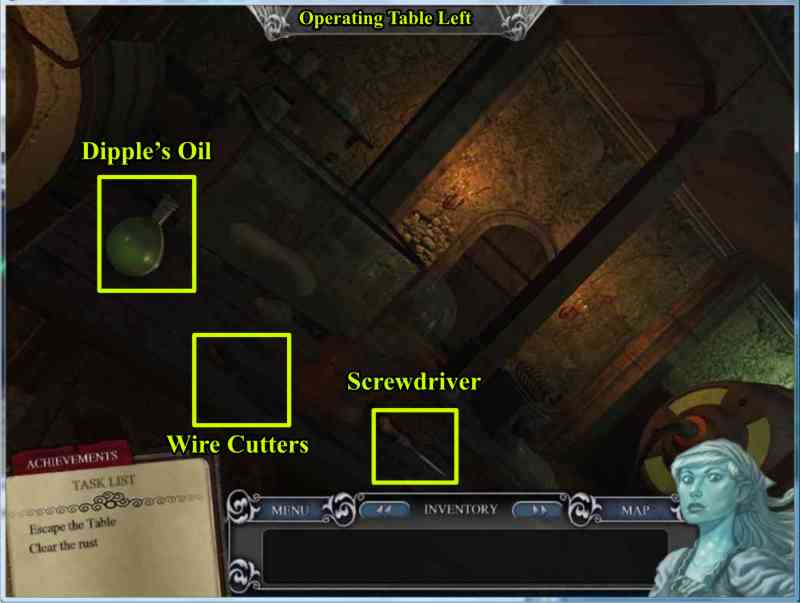
Click on an Access Panel to see it's rusted so look left for some help.
Screenshot
Take the Dipple's Oil, Wire Cutters, and Screwdriver from the table.
Screenshot
Operating Table Access Panels
Use the Wire Cutters to snip the wires on each of the power cells.
Click on each panel and use the Dipple's Oil to remove the rust.
Remove each of the screws individually with the tip of the Screwdriver by clicking until they are completely unscrewed.
Click the center of the panels to open them.
Use the Wire Cutters to snip the wires so you can release the gear brakes so the straps will release and Hannah can get off the table.
Screenshot
Level 10
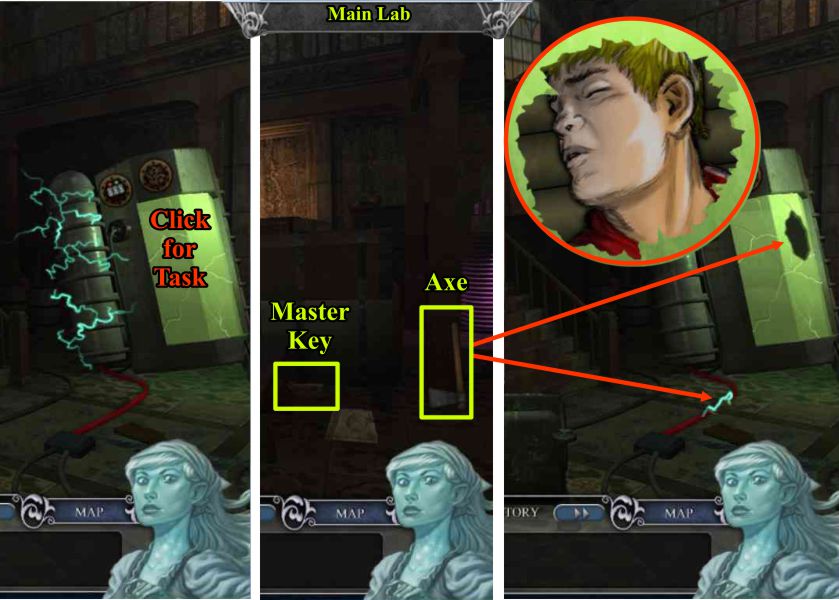
Main Lab
Go to the Stasis Chamber and see that it is sparking.
Click on it to find out what to do next.
Go to the main part of the lab and pick up the Axe and the Master Key.
Go back to the Stasis Chamber and use the Axe on the wires and chamber so you can grab Horatio and get him out of there.
Screenshot
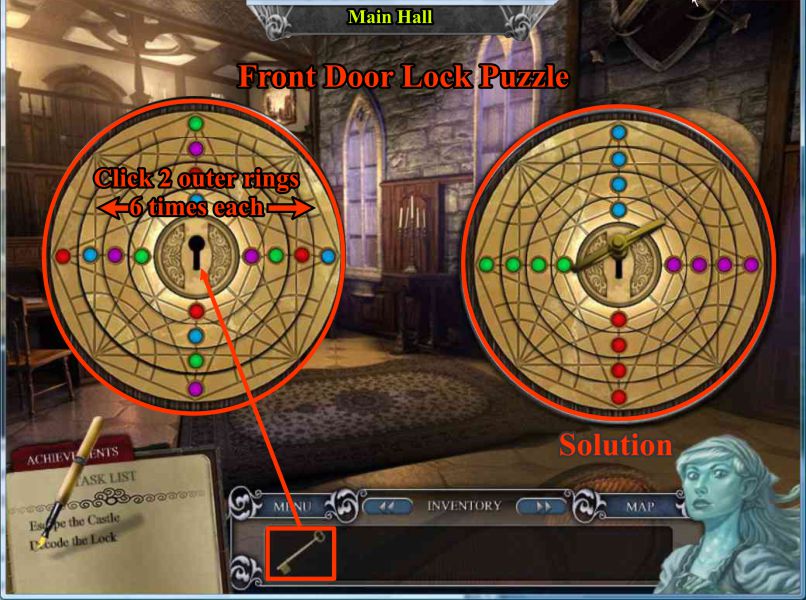
Main Hall Front Door Lock Puzzle
Go to the Main Hall and click on the front door for a puzzle to open the lock.
Place the key in the keyhole and rotate the 2 outer rings 6 times each to line up all the colors and open the door.
Screenshot
Congratulations! You have escaped Frankenstein's Castle so watch the final scene.
Special thanks to Jazz for this wonderful walkthrough!
Posted by: grinnyp |
September 28, 2010 2:54 PM
|
September 28, 2010 2:54 PM