
Escape from the Bar
![]() If you're an escape fanatic looking for a fix, look no further than the latest bit of fun from popular designer Tesshie, Escape from the Bar. Although, frankly, looking at the stash behind the bar, you might wonder who would want to escape this place!
If you're an escape fanatic looking for a fix, look no further than the latest bit of fun from popular designer Tesshie, Escape from the Bar. Although, frankly, looking at the stash behind the bar, you might wonder who would want to escape this place!
A bar that you used to frequent (probably the place from Escape from the Small Bar) has moved to a bigger space, and you've been invited to come and be locked in with all the booze as well as the comfy furnishings. And why are we escaping again? Oh, yeah, because we like the challenge, that's why, although most might be tempted to linger a bit and enjoy the lovely views and the libations before trying to unlock the main doors. It's all pretty standard Tesshi-e: lush surroundings, amusing puzzles, and a "friend" who likes to lock you into enclosed spaces, along with a clever mix of puzzles depending on logic, reasoning, and the use of some strange found objects. Find the happy coin, find your way out, and enjoy Tesshi-e's usual solid gameplay.
Although some of the puzzles may seem a bit "samey", and that wobbly picture puzzle needs to die a horrible death, there are still some fresh, new, and fun puzzles to be found in Tesshi-e's 72nd room escape effort. Enjoy the gorgeous decor, the logical puzzles, and a virtual drink or two as you solve your way out of tonight's second escape.


Walkthrough Guide
(Please allow page to fully load for spoiler tags to be functional.)
Here's a full Walkthrough. Hope it helps!
Initial Exploration
First Screen
Picture: notice it�s a wobbly-corner picture puzzle.
Goblin mask: get door handle
Bar: get Menu, look at symbols and back
Seating area: look at coffee table: �H15.�
Bar Screen
Wooden overhang: notice �S48�
Bar stools: note letter on back of chair, with Zodiac symbol. (L-R: N/Cancer; E/Leo; W/Virgo; F/Libra; A/Scorpio; I/Saggitarius, R/Capricorn.)
Liquor shelves: notice the hippos along top.
Door/Hall/Grand Entryway Screen
Blue panel & glass �Staff Only� door: locked
Main double doors: locked
Seating area on left: get screwdriver from plant, notice �M52� on the pot, note the dial and the radio/clock-like machine.
Window/Couches Screen
Right seating area: Note the blue Mr. Birdy on the table, he lifts off to show some kind of stand.
Left seating area: �H15� again.
Puzzles
Wobbly Picture
Go to the dial. Set it to I, II, then III, IV, etc., noting what happens to the lights� colors in the Entryway when you back out each time.
They (briefly) glow yellow (Y), green (G), or red (R): YG, RG, GR, GY, GR, GY.
Colorblind: lower left, upper right, upper left, lower right, upper left, lower right.
Grab the matches, and note the puzzle that appears behind.
Puzzle Behind Picture
Push a button-- a set of red/blue symbols appears for each. To figure it out, look at the hint on the Menu�s back.
�Start� is the red symbol. Square means go left, triangle is down, inverted triangle means right, and circle means up. Using these directions, go from the red starting symbol to the E (for Exit).
Each of the mazes traces out a number. Enter each below its button: 562.
Grab the batteries that appear in the slot.
Clock Box
Go to the little radio-like box sitting on a stool near the entryway.
Click on its right side to find a place to insert the batteries (retrieved from puzzle behind wobbly picture).
Now you have a clock-like interface; the arrows control the hour, minutes, and seconds. Where have we seen three two-digit numbers like these before?
The white numbers scattered around the room are H15, M52, and S48 (hours, seconds, minutes). Enter these and press the grey bar at the moment it turns 15:52:48.
Get the spade-shaped key.
Blue Panel (�YOU�)
Use the spade-shaped key (from the clock box) on the blue panel, revealing a 3-digit puzzle above the letters Y, O, and U. You need some kind of hint, or key.
Look at the glasses in the bar.
There are 6 martini glasses (Y), 2 round tumblers (O), and 5 rocks glasses (U). Enter 625.
The light turns green. Now you can go through the �Staff Only� door into the bar area.
Bar Area (Exploration)
Pick up a white candle from the counter. Note the working tap.
Note the wood wall panel at the end of the bar�a handle could go here, if you had screws.
Note the two locked cabinets and puzzles: Bird and PICNIC.
Mr. Birdy Puzzle
Light the candle (from the Bar area) with matches (from behind the wobbly picture). Go to the Mr. Birdy stand (Windows /Couches screen) and put the candle on the stand.
Come back to find Mr. Birdy now on his stand, glowing, with zodiac signs on his belly. Come in for a close up. The markings are Virgo, Sagittarius, Cancer, and Leo. You�ll use this hint later.
�Bird� Locked Cabinet
Use the code from Mr. Birdy�s belly.
They correspond to the letter/zodiac pairs on the bar: W/Virgo; I/Saggitarius; N/Cancer; E/Leo. Enter WINE and click the handle.
Get a corked bottle with screws inside, and note the letters in the corners inside the cabinet.
�PICNIC� Locked Cabinet
Where have you seen the letters in �PICNIC� before, or a 2x2 arrangement?
Inside the Bird cabinet:
Each letter corresponds to a position. I = upper left; N = upper right; C = lower right; P = lower left. Decode �PICNIC� with this key (lower left, upper left, lower right, upper right, upper left, lower right).
Get the corkscrew.
Wooden Panel
Use corkscrew (from PICNIC cabinet) to uncork bottle with screws (from Bird cabinet)�get screws. Put them in the handle. Then put the handle on the wooden panel in the bar area. Tighten with screwdriver. Open it and get the �card suits� part.
Tengu-Goblin Mask
Go to the red Goblin Mask (first screen, facing picture) and insert the Card Suits part into the empty space on the ledge. The suits are buttons, and light up when pressed.
The key is in the menu pages.
Page 1 is heart, 2 spade, 3 diamond, 4 spade, 5 club, 6 diamond.
Get the box from the goblin�s mouth and open it for the heart key. This is your escape key�hooray! Use it on the double doors if you want to get out now.
Happy Coin
Click on the box that held the heart key to take out the lining. It�s blank. What can we do to a note to reveal invisible ink or similar?
Turn on the tap in the bar and wet the note. Symbols appear (diamond, club, spade, club, heart, spade). Go to the Mask and enter them.
Got the Happy Coin!
Posted by: vyrastra |
May 2, 2012 5:24 PM
|
May 2, 2012 5:24 PM
Walkthrough: Escape from the Bar
Starting Out: Gathering Items and Getting Clues
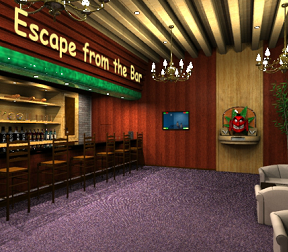
You begin facing the far end of the bar, as if you just walked in.
Zoom in on the red, grinning TENGU-GOBLIN MASK on the far wall:
Click on the front shelf to get:
A DOOR HANDLE
Back up from the mask and take a look at the PICTURE to its left:
Two children sit on a rooftop.
The picture wobbles as you touch it.
Each corner of the picture has two bars of color:
Top Left = green/red
Top Right = red/green
Bottom Left = yellow/green
Bottom Right = green/yellow
You can also see the columns in the entry way reflected in the picture's shiny surface.
Back out so that you have full view of the bar room again. Zoom in to the END OF THE BAR, where the counter meets the wall, to the left of picture. There you'll find a MENU:
Pick up the MENU...
Thumb through the menu pages and make note of page numbers and the symbols found on each page.
On the back of the menu are more symbols, with arrows.
Back up and notice the sofas and table to your right. Zoom closer to inspect the table:
Make a note of the letter and numbers there.
Back out and turn right, so you are facing the view out the enormous window (gorgeous!). Zoom in on the table to the right:
Here is a Mr. Birdy.
Looks like something goes inside Mr. Birdy.
Back up again, turn right again. Now you are facing the bar's entry hallway. Notice also the white lights at the top of the columns.
Zoom twice on the TREE in the corner to get a closer look:
On the plant's pot is another letter and numbers. Make another note.
From inside the plant, you can grab another useful object:
A SCREWDRIVER.
Back up once then move closer to inspect the DEVICE on the small table:
Currently, it's not functioning. Click on its right side to find a place to insert batteries.
Now back and up, to examine the switch on the wall, above the device:
There's six roman numberals on the switch's dial.
Turning the dial, nothing seems to happen.
But it probably does something. Turn the dial and take a look around the room, to see if you notice anything. (You'll need to be very observant, though.)
Back up twice. Still facing the entry hallway, you can see a BLUE PANEL on the wall to the right. Zoom in on it:
It needs a key to unlock.
There is a locked "staff only" door next to it.
Back up, turn right and face the bar straight-on:
Above the bar, on the left side, are another letter and numbers. Move in closer to look at them and note what they are.
Now take a look at each stool along the length of the bar:
Each chair has a letter.
On the bar top in front of each stool, there's an astrological symbol.
Finally, look directly ahead at the shelves behind the bar:
The bottom shelf is well-stocked with libations.
The middle shelf has a small number of glasses in a variety of shapes. (This seems note-worthy).
The top shelf has some Mr. Hippos who seem rather unremarkable.
Now you have explored as far as you can go without solving puzzles. Time to solve something...
The Wobbly Picture
The trick to solving this is looking for these two colors of rectangles around the room.
There are some rectangle shapes we did see in exploring the room:
The white rectangles/lights at the top of the columns, on either side of the entry hallway.
You'll need to find something to activate the colors on those rectangles...
I think that switch on the wall is like a light switch, sort of...don't you?
Turn the switch to "I" and step back to look at the columns....Now the rectangles at the top are colored.
How mean! The colors quickly fade away, though. Be quick and make a note of the colors for "I"
Do the same for all the numbers, until you have the pattern of colors for each.
Now that you have colors for sixth different numbers, you know how to click each corner of the wobbly picture...
Solution:
1 - bottom left
2 - top right
3 - top left
4 - bottom right
5 - top left
6 - bottom right
Opening the wobbly picture, you'll find:
A box of MATCHES. Grab them.
Another Puzzle.
3-digit Number Code (behind wobbly picture)
To solve this puzzle, use the clue on the back of the MENU (at the end of the bar) and the symbols shown as you punch each button:
Press the first button, above the first digit.
Some shapes light up on the grid to the right.
Starting at the RED shape, use the directionals on the back of the MENU to trace a figure on the grid.
This will give you the number for the first digit.
Do the same for the second and third digit.
Solution:
5 6 2
Solving this puzzle will give you:
Two BATTERIES.
Clock Device on the Small Table
When facing the windows, the device is on a small round table to the right.
Zoom in on it then click on its right side. You'll see the outline of a panel there.
Click to open the panel and then insert the BATTERIES.
Back up one time to look at the front of the device. It's a clock:
The first set of numbers is the Hour. The middle numbers are the Minutes. The last numbers are the Seconds.
You'll find those numbers around the room, labeled H - M - S.
Because the seconds are rapidly ticking, it's easier to set them to a lower number, let them tick up, then press the button.
When the Hour, Minute, and Seconds are correct, press the button and the device will open.
Solution:
15:52:48
Get the SPADE-SHAPED KEY.
Blue Panel/Employees Only
To the right of the "Employees Only" door is a blue panel in the wall.
Use the Spade-Shaped Key to open it.
Here you need another 3-digit number.
Look for a way to count things that look like Y, things that look like O, and things that look like U....
Hint and Solution:
Behind the bar, on the second shelf...
Counting the glasses by shape gives the answer:
6 2 5
When you enter the correct code, the light will turn green, and the employees' door will unlock.
"BIRD" Door
When you go through the employee door, turn right; you'll see a cupboard on your left. Take a closer look at it:
A 4-Letter code is needed.
Your clue is "BIRD"
Back up so you can see the counter behind the bar.
Grab the small white CANDLE off the counter.
Go back out to the Mr. Birdy, on the first table by the window.
In your inventory, light the candle with the MATCHES.
Lift up Mr. Birdy.
Put the candle inside Mr. Birdy's holder.
Replace Mr.Birdy and read the symbols across his chest.
Now with those four symbols, go back to where you saw them while exploring find the correspoding letters...
Solution:
W I N E
Enter those letters into the "Bird" cupboard to open it. Get a...
A BOTTLE of WINE.
Another clue. Note the letters in each corner.
"PICNIC" Door
If you go further behind the bar, the last cupboard on the left says "PICNIC" on it, and has four buttons to push.
Your clue to this cupboard door is in the other cupboard.
Where the letter is in the "wine" cupboard relates to which button to push.
Follow the word "PICNIC" to know the order.
Solution:
Bottom Left;
Top Left;
Bottom Right;
Top Right;
Top Left;
Bottom Right
When you've opened this cupboard, you'll get a...
CORKSCREW.
Wood Panel Behind Bar
Go straight to the back of the bartender's area; there is a wood panel in the wall.
Now that you have a wine bottle and corkscrew, use the corkscrew on the bottle then click again on the bottle to get:
SCREWS
Put the screws on the HANDLE (from Tengu Mask).
Put the handle on the PANEL.
Use the SCREWDRIVER.
Open the panel to get...
SOME KIND of PART.
Card Suits Puzzle
Go back to the TENGU GOBLIN MASK in the main part of the bar.
Put the SOME KIND of PART on front of its shelf.
The answer to this puzzle is in the MENU:
Look at each page in the menu, noting card symbol and page number.
This gives you the order in which to push each button.
Solution:
heart
spade
diamond
spade
club
diamond
Pressing the buttons in the correct order causes the goblin mouth to open. Inside it is a...
HEART KEY
You can now use the key to exit or....
Happy Coin
After you get the Heart-shaped Key, look inside the box it was in...
There's a blank piece of paper.
How to make something appear on that paper?
Get the paper wet.
Go behind the bar, run the water in the sink, put the paper under the water.
That gives you more card suit symbols. Enter them on the panel under the goblin mask to get the HAPPY COIN!
diamond
club
spade
club
heart
spade
Note: the code in the above spoiler won't work until you reveal the code on the paper.
Enjoy the view of a beautiful night sky!
Posted by: elle |
May 2, 2012 7:52 PM
|
May 2, 2012 7:52 PM