
![]() Fans of Escape the Museum rejoice, for a sequel is finally here! Gogii Games has brought us Escape the Museum 2, which, like the original is an adventure/hidden object hybrid that draws heavily on the room escape aesthetic for its intricate, logical gameplay. In this sequel, you are not escaping the museum itself, but escaping to the museum in an attempt to find your family. Yes, this time around it's David's story.
Fans of Escape the Museum rejoice, for a sequel is finally here! Gogii Games has brought us Escape the Museum 2, which, like the original is an adventure/hidden object hybrid that draws heavily on the room escape aesthetic for its intricate, logical gameplay. In this sequel, you are not escaping the museum itself, but escaping to the museum in an attempt to find your family. Yes, this time around it's David's story.
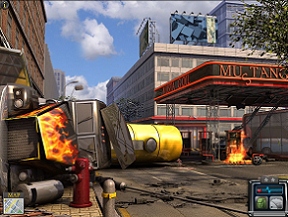 Players of Escape the Museum know the story of museum curator Susan who ended up trapped in her own workplace with her daughter when a massive earthquake struck. When Escape the Museum ended, young Caitlin had escaped the museum even as her mother, Susan, went back to rescue more artifacts. But what about Susan's husband and Caitlin's father, David? All we know from cell phone calls is that he made his way to the museum, at one point escaping police custody to do so. Now, in Gogii's sequel, Escape the Museum 2, follow the intrepid David as he attempts to run to the rescue of his family. Unfortunately for David, however, the earthquake damaged more than just the Museum. Power lines are down everywhere, bridges have collapsed, and there are a multitude of obstacles between one brave man and his family. A brave man with a blood pressure condition. Now isn't that a recipe for disaster?
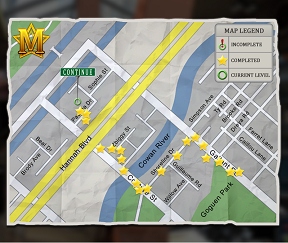
To start, David must find a map (he doesn't know the way to his wife's work?) and his cell phone. Then he goes out the door and on his adventurous way. Well, he goes out the door and meets a homeless person who immediately lets him know the situation and gloms on for the rest of the game. Each scene plays like a mini-escape game. There is always a main goal, whether it be making it to the next scene over or around some obstacle, or helping some civilian who has been trapped by falling debris. Hover the cursor around the area until a question mark or gears appear, marking the hotspots. Click on the correct hotspot(s), and you'll get a clue as to what needs to be done, as well as the appearance of sparkles indicating a hidden object scene. Collect items from a list in each hidden object scene, many of those items will end up being ones you need to solve the main puzzle. Figure out the main puzzle and use your handy map to navigate to the next area.
 Hints... well, the hint system in Escape the Museum 2 may be the most original ever featured in an adventure/hidden object hybrid. Remember the homeless guy? He will follow David constantly and act as a guru. Confused as to what steps to take to complete the main puzzle? You can click on a photo of the homeless dude and he will give you step-by-step instructions. Reached an area that is impassible? Homeless dude will offer to show you the way over, through, or around, in exchange for you finding 10 objects for his many precious "collections". Can't spot that one item in the HOG scene? Click on a picture of the homeless dude and a bottle will fly into the scene, shattering where the object in question resides. Yes, you heard me right. The homeless dude actually chucks bottles at things to show you where they are! Best. Hint system. EVER!
Each area that David visits has more than just the main puzzle. There are other hidden objects to find that will become very important later, as well as several side quests involving toys, lost pets, lost children, and worried adults. Stars will appear at the beginning of the scene by the menu/inventory area and will light up when a task is completed. So take time to explore! Oh, but be careful with the excess incorrect clicks. Remember, David has some sort of blood pressure condition, and multiple quick wrong clicks will drive his heart rate up into the danger zone, causing the screen to go a lovely shade of red while the sound of his rapidly beating heart overwhelms the background music.
Analysis: Escape the Museum was a pioneer in the Adventure/HOG field, and Escape the Museum 2 goes all-out to top the original. Better graphics, more tension, more adventure, and one of the funniest hint systems ever seen in a game. You might say, "but practically every hybrid coming out today has great graphics," and you would be right. Where Escape the Museum excels is in the gameplay as well, creating a tense, tight, wonderful adventure that can be enjoyed by the entire family.
 The artwork in the original Escape the Museum was good, but suffered from an unfortunate "graininess" which made it sometimes difficult to distinguish items in the dark, cluttered rooms. No such problems in Escape the Museum 2! The adventure and HOG scenes are bright, clear, sharp, and photo real. The story of David and his family is told in pretty, watercolor type cut-scenes in-between the adventure sequences. Appropriately frantic music and sound effects round out the gameplay experience.
As is the recent trend, Escape the Museum 2 is shorter than the original, although it still contains a full 30 escape scenes, each with its own puzzles, HOG scenes, and side quests. Not as long as Escape the Museum, but not as short as some games on the market today, Escape the Museum 2 should still deliver a good 2 - 3 hours of fantastic casual gameplay. And as with many games of the genre, a lot of the items from the HOG scenes have absolutely nothing to do with the ongoing story. You need to find a seagull to keep a gas station from blowing up? Really? Well, no, not really. The final big puzzle is quite intricate, but the game practically holds your hand through the whole thing, making it much simpler than it could have been.
Still, the adventure/escape gameplay is something to behold. Have fun as you try to escape downed wires; keep a gas station from exploding; escape from the back of a police cruiser using only chewing gum, a bobby pin, and and a dime; and rifle through some person's wallet and use their credit cards as well. What? They shouldn't have written down their PIN and left it in their wallet, should they.
Lapses in logic aside, Escape the Museum 2 is a colorful, wild ride that tops the original in just about every aspect. So buckle up, find that map, charge your cell phone, unleash your inner MacGuyver, and get ready to navigate your way through a collapsing city. Just ignore the homeless guy following you around like a lost puppy. Really, he's there to help.
![]() Windows:
Windows:
Download the demo
Get the full version
![]() Mac OS X:
Mac OS X:
Download the demo
Get the full version


Walkthrough Guide
(Please allow page to fully load for spoiler tags to be functional.)
Escape the Museum 2 - Walkthrough
General Tips
There is no time limit.
To move on click "Continue" on the map.
The gears right low corner will bring you main menu.
There is no save during the levels, closing the game will make you start the level from the beginning when you come back.
Frantic clicking will make your cursor unusable for a moment.
The bar low right shows your progress in the game.
The stars indicate the amount of tasks in the actual level:
1 star for moving on to the next level - finding the way into the next level is your minimal goal.
2 stars indicate, that you will have to find a part of the bridge OR a lost animal or other lost stuff or you will need to give something back.
Click windows of buildings to see, if someone will show up claiming one of your lost-found items.
3 stars indicate, that you will have to find both, bridge part and something else.
Fulfilling one of the tasks will highlight the star golden.
You can go back to locations, you already have been to finish tasks.
Finished locations are showing a star on the map.
Unfinished location a showing a circle with an exclamation mark.
Some objects shake a little when hovering over them with mouse - click them because there are objects or animals hidden behind.
Hovering over the scene with the mouse will show you different kind of cursors.
A question mark shows something to pick up.
Gears showing something to do.
A magnifier means you need to click for a closer view/hog-scene.
Hidden object scenes only appear, after you explored the scene and found out, what to do.
Inventory objects you find in hog-scenes appear at the right side of the scene as soon as you found them.
The will go into your inventory as soon as you completed the hog-scene.
You can leave a hog-scene with the cross top right.
When you find all the items, it will shut down by itself.
Your hint is the old homeless guy.
His picture will be colored, click it to receive a hint.
As long as the hint is reloading, the picture will be black and white.
Sometimes the homeless has a tip for you - but he will only tell, when you look for things for his collections.
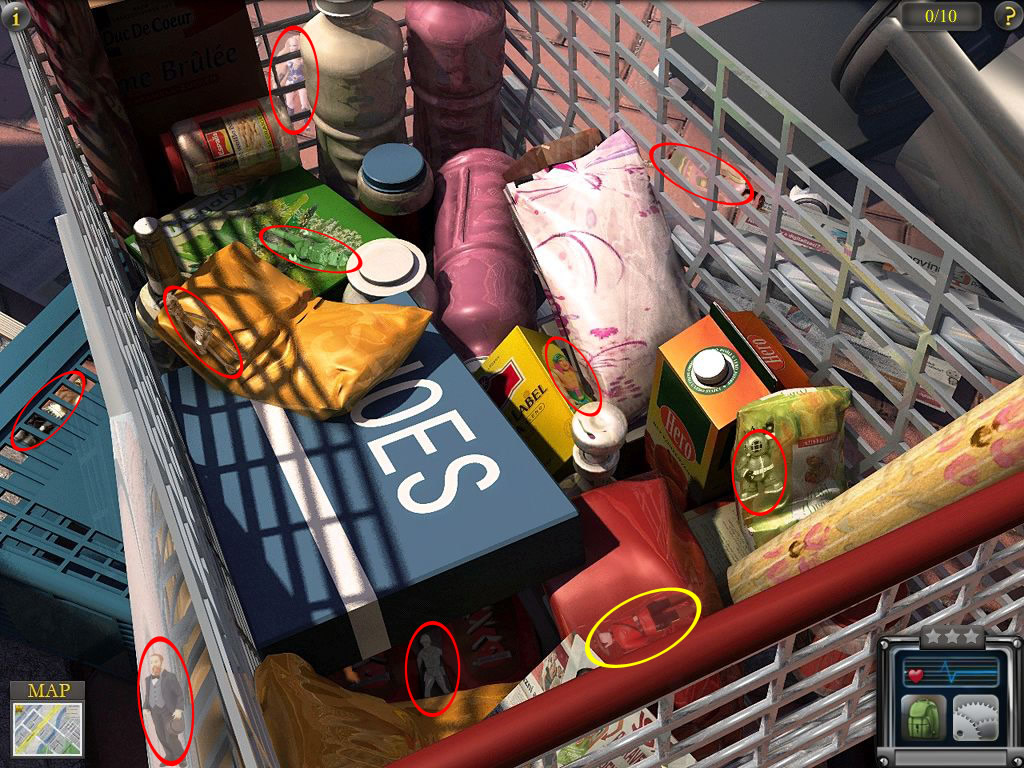
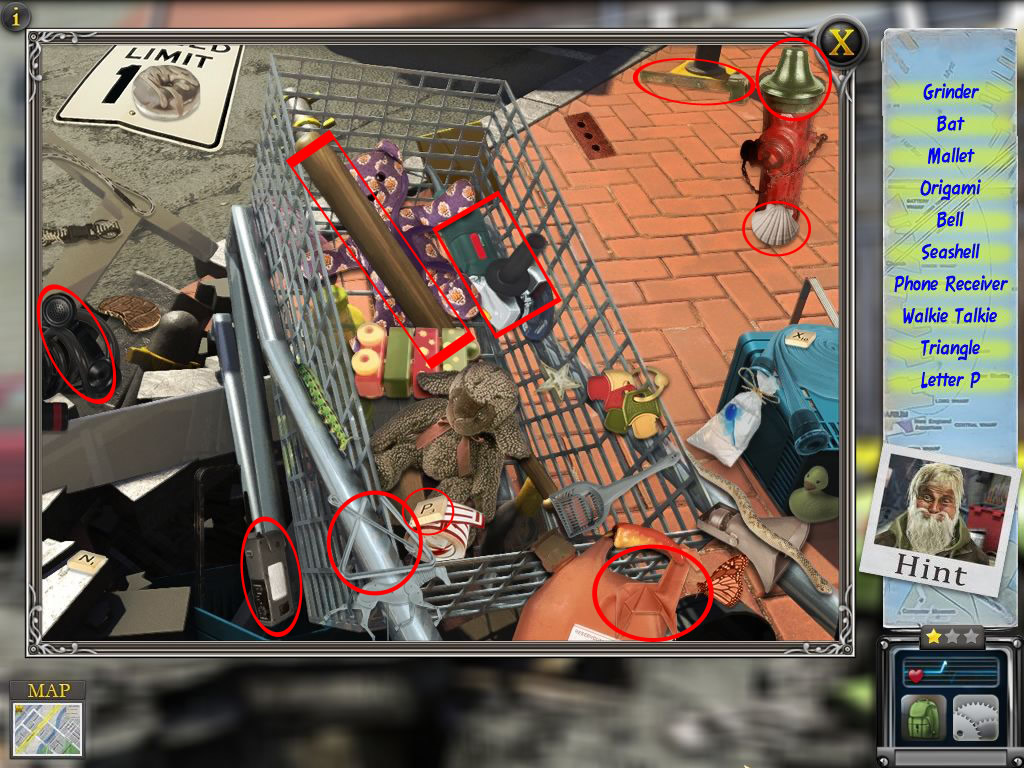
Click continue and you will be brought into a hidden object scene, where you always have to find 10 of a kind.
Finishing this, he will give you helpful tips to proceed in the game.
Click the little "i" button on top to get further information.
On the right side the picture of the homeless will appear, left of his photo you will find arrows.
Click them when you need additional help to proceed.
Normal inventory objects you will find at the lower part of the scene.
Some of them have to be combined - click first the one, the other one you want to combine.
The backpack is another inventory, here you will store 20 parts of a bridge to repair and lost 'n found items, where you will need to find the owner for.
The game contains 30 levels, 20 back pack inventory items and 7 side quest.
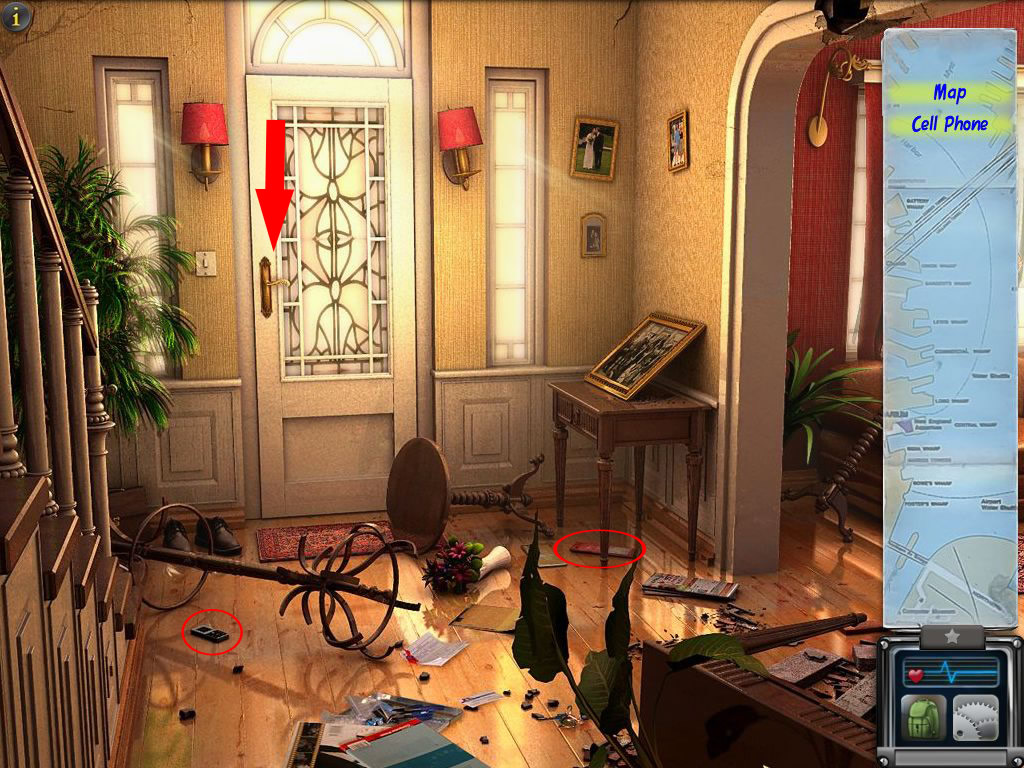
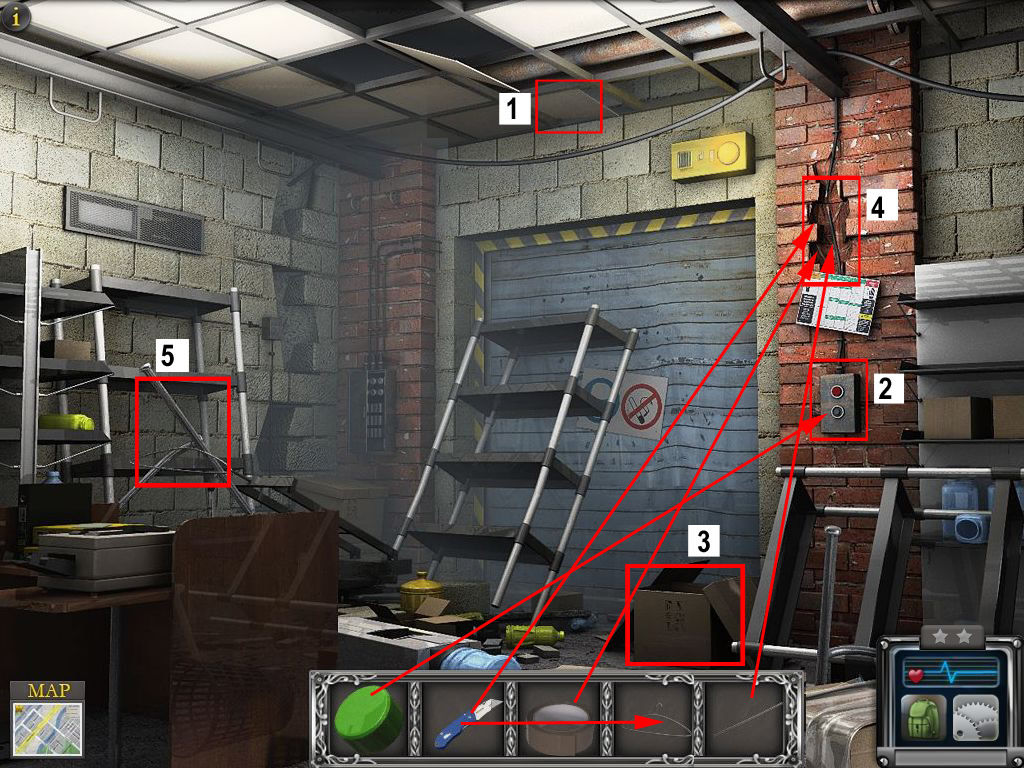
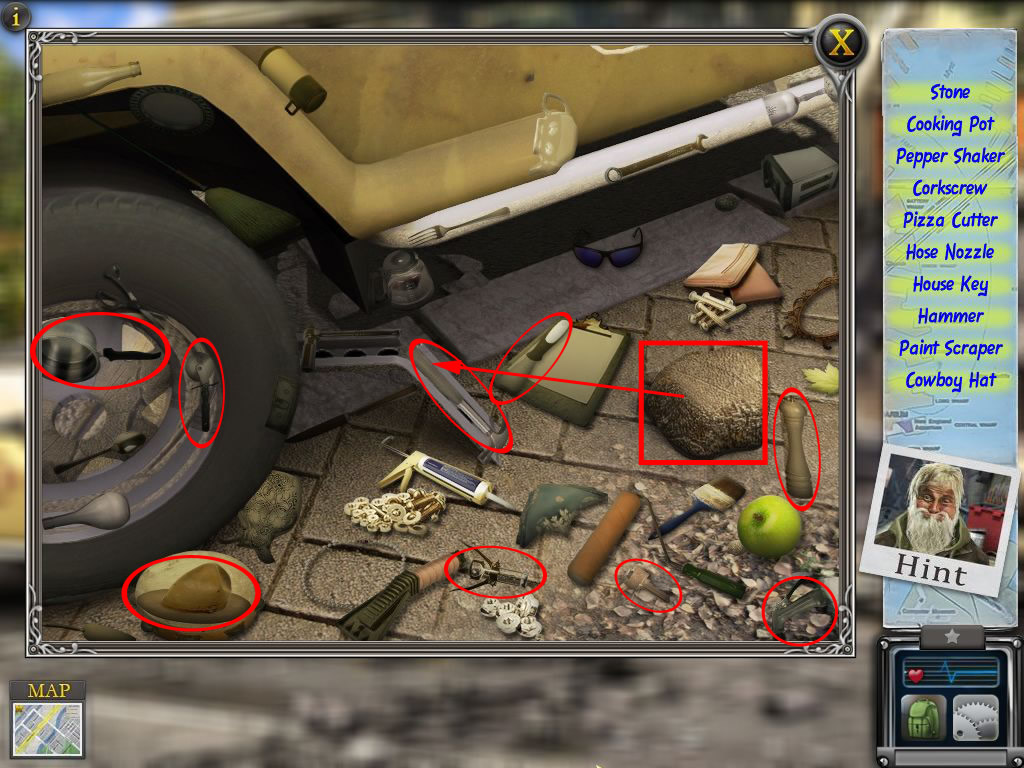
House Foyer
David needs his cellphone and a map to find his wife and daughter.
Both you will find on the floor, the phone on the left side of the stairs, the map right under the table.
Click the door to leave.
Screenshot
You will meet an old guy - he will give you needed hints and informations from now on.
Outside front steps
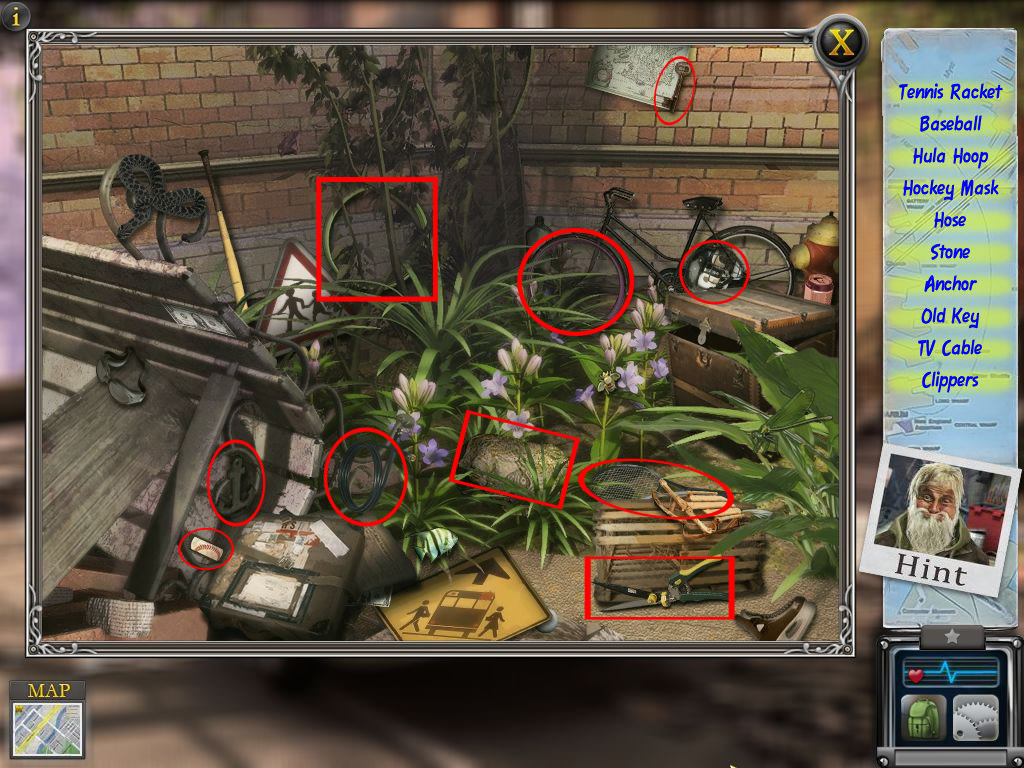
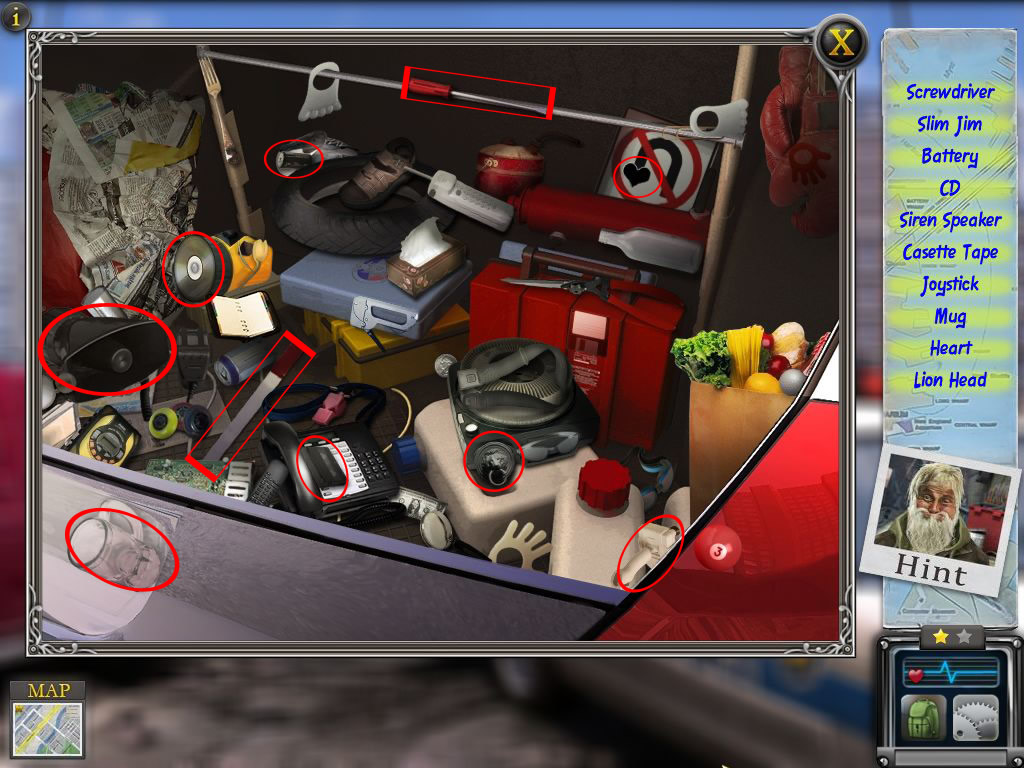
Click the green car in front of your house - you see, that someone is sitting inside.
Click the back window - that will activate the hog-scene of the bushes right side.
Find all the listed objects - the hose, stone and scissors will go into your inventory.
Screenshot
Use the stone to smash the back window of the car to get another hidden object scene.
The umbrella will go into your inventory.
Use the scissors to cut the seat belt.
Screenshot
Leave the car and place the hose at the branch, left side.
Use the umbrella to move the sparkling cables to the hose.
Enter the car over the back window and click the driver's leg to get her out.
Screenshot
Gallant Street
The way is blocked, but the old guy knows another one.
Click "Continue" and you will be brought to a hog-scene.
Collect the ten toy cars.
Screenshot
Click to move the suitcase right side.
You will find a little dog that lost his master. You will need to find him for the puppy.
Click the trunk of the car left side.
That triggers a hog-scene right side.
Find all listed objects, the crowbar will go into your inventory.
Screenshot
You will need to close the scenen with the X, as there is some left to do, you can't do yet.
Use the crowbar to open the trunks car.
Find all listed objects, the sub woofer, skateboard and the wrench will go into your inventory.
Screenshot
Go back to the other hog-scene and use the wrench to get the wooden sign.
Place the sub woofer next to the car's front wheel. On top of it goes the sign.
Click this ramp with the skateboard and you will jump over the gap.
Screenshot
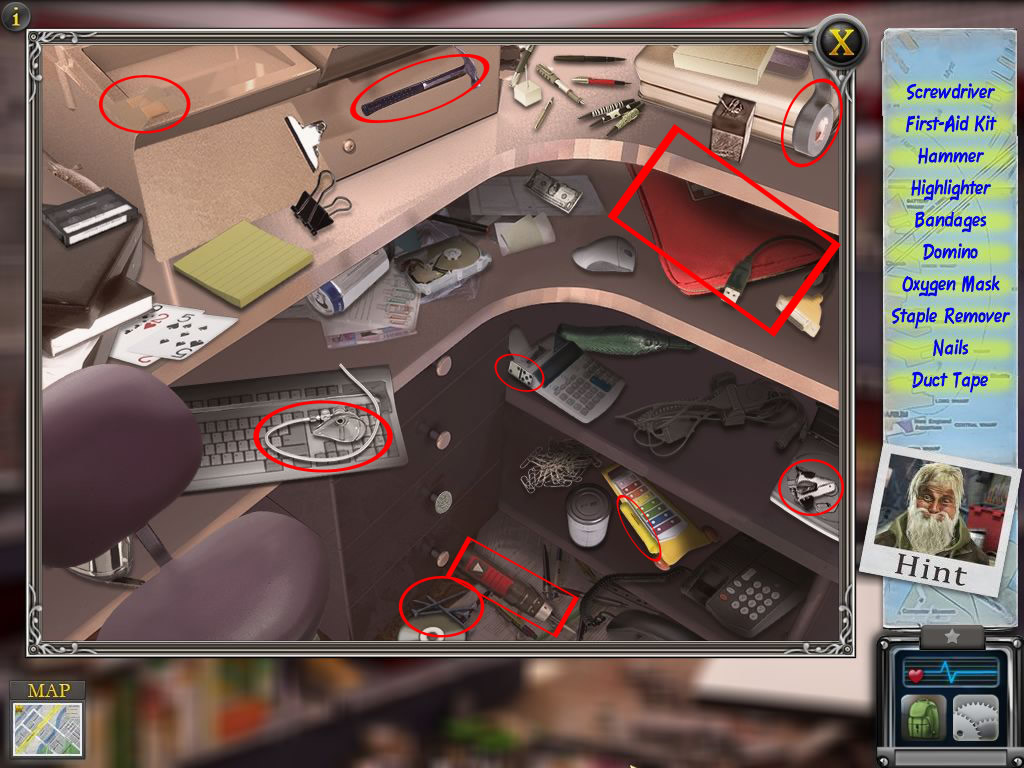
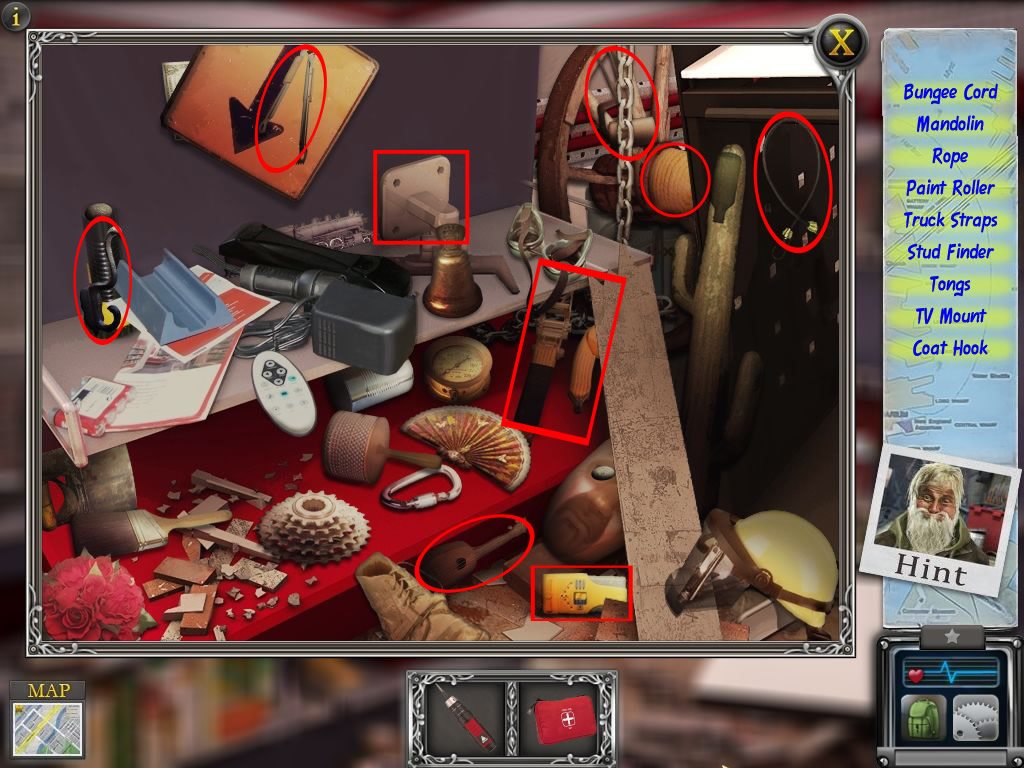
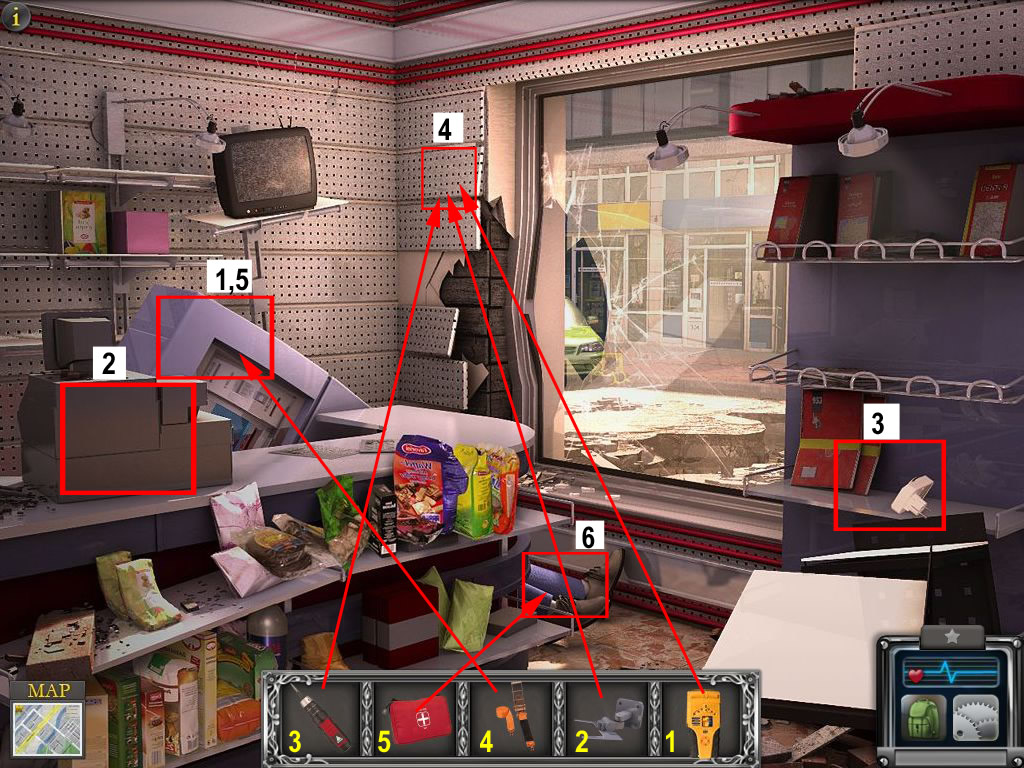
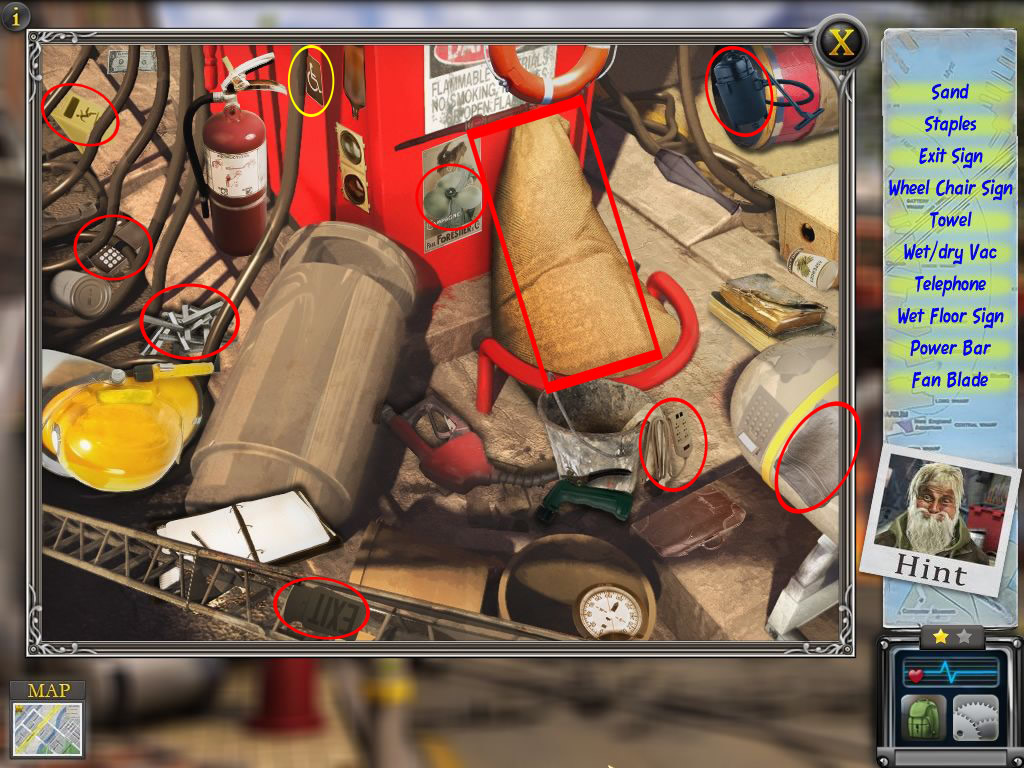
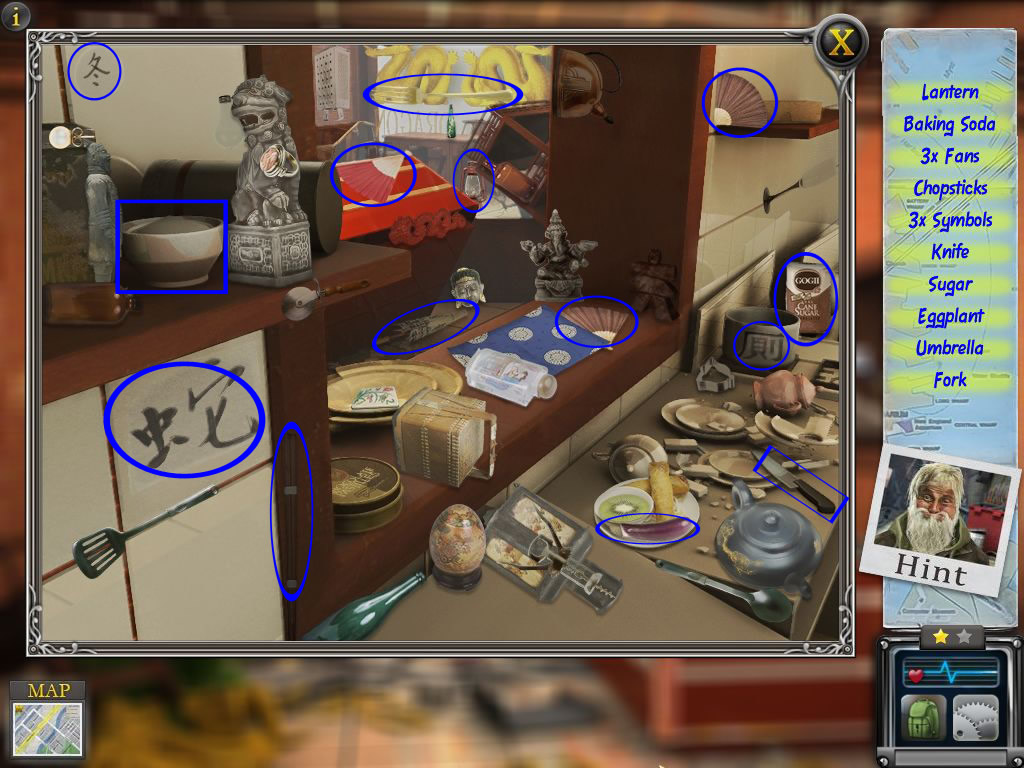
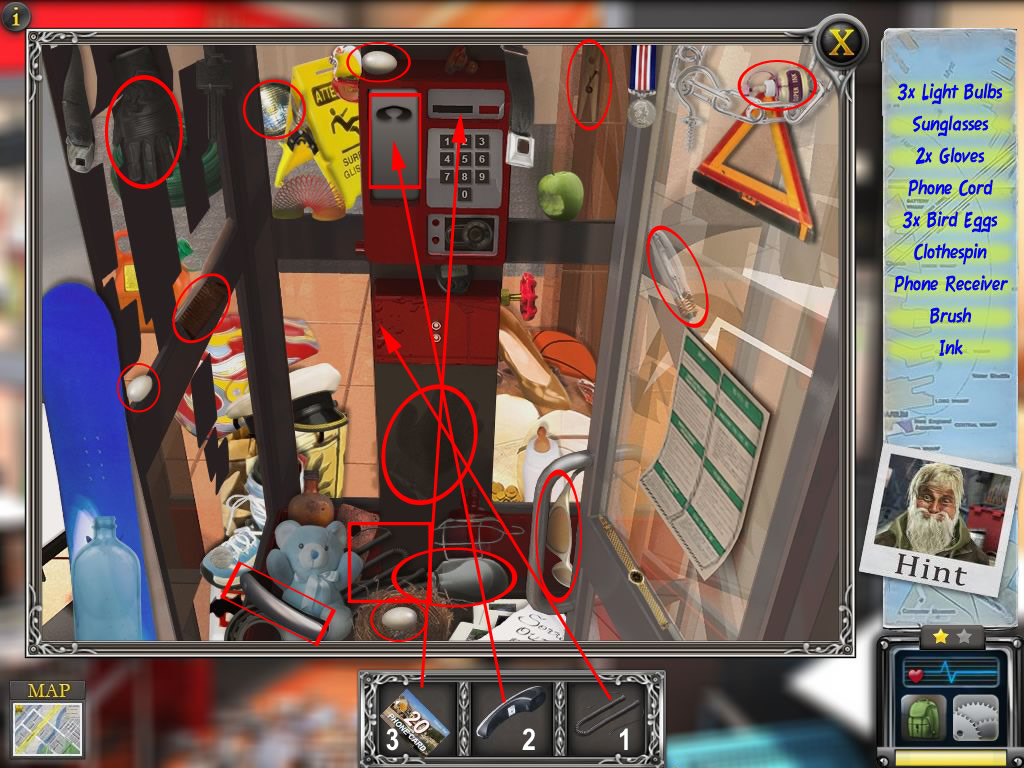
Shopsy's Convenience
You can see 2 legs at the showcase, someone needs your help.
Click the ATM, but it is to heavy to lift.
This triggers 2 hog scenes.
It does not matter, which one you solve first.
At the cash register the first-aid-kit and the screwdriver will go into your inventory.
Screenshot
At the shelf, the stud finder, a TV stand, and some truck straps will go into your inventory.
Screenshot
Use the stud finder at the wall left next to the window. A red X will appear when you click near the top
The stud finder will make a noise, so you can hear it as well, when playing with sound.
Place the tv stand there and use the screwdriver with it.
Click the truck straps at the ATM and it will be lifted.
Get the first-aid kit out of the inventory and click it at the guys feet.
Screenshot
He tells you, that the bridge to the museum can't be used, parts are missing.
You receive a brochure about the bridge, that will come in handy later.
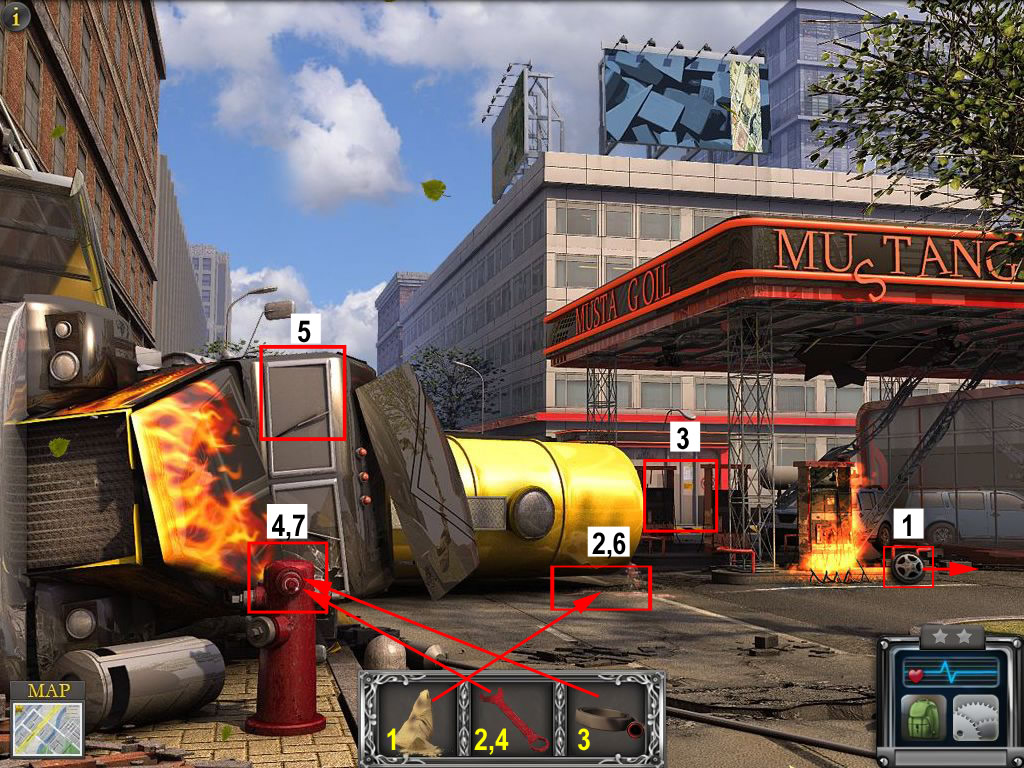
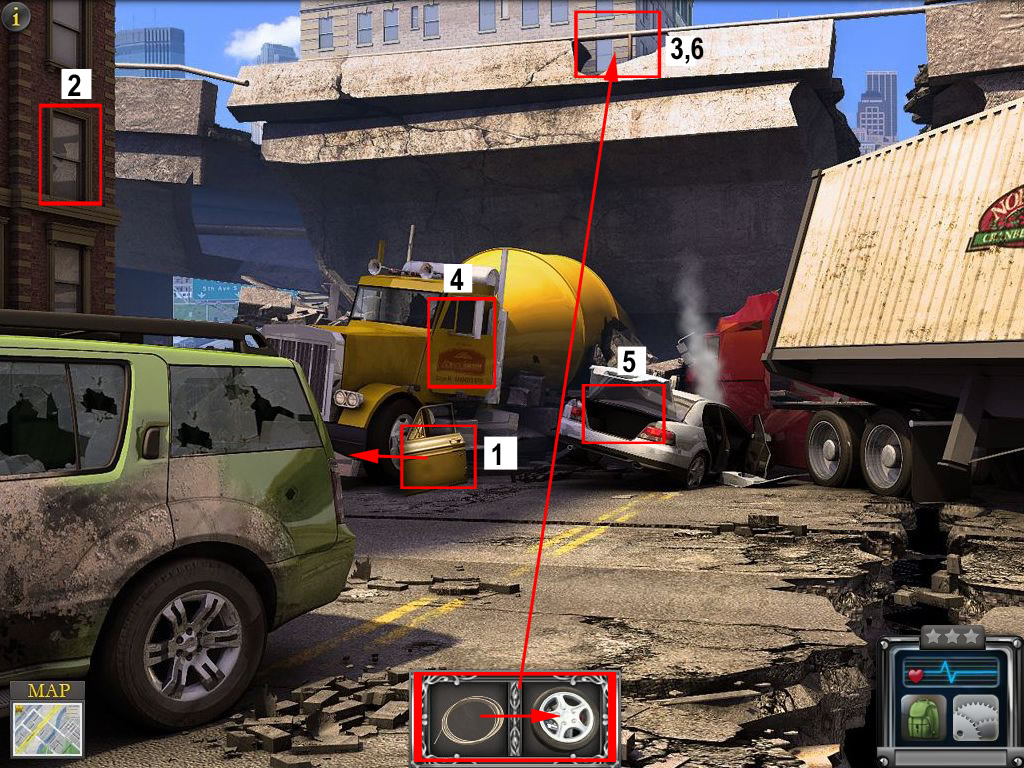
Mustang gas station
The gas station is burning and you need to extinguish the fire quickly.
Click the tires to find the first part of the bridge - it goes into your backpack inventory.
Click the ground, where gas is leaking out.
That triggers a hidden object scene, where a sack will go into your inventory.
Screenshot
Click the hydrant at its top to get another hog-scene.
Hose and wrench will go into your inventory.
Screenshot
Use the sack to place it on the ground, where the gas is leaking.
Use the wrench to open the hose opening of the hydrant.
Click the hose at the hydrant and click again with the wrench.
Screenshot
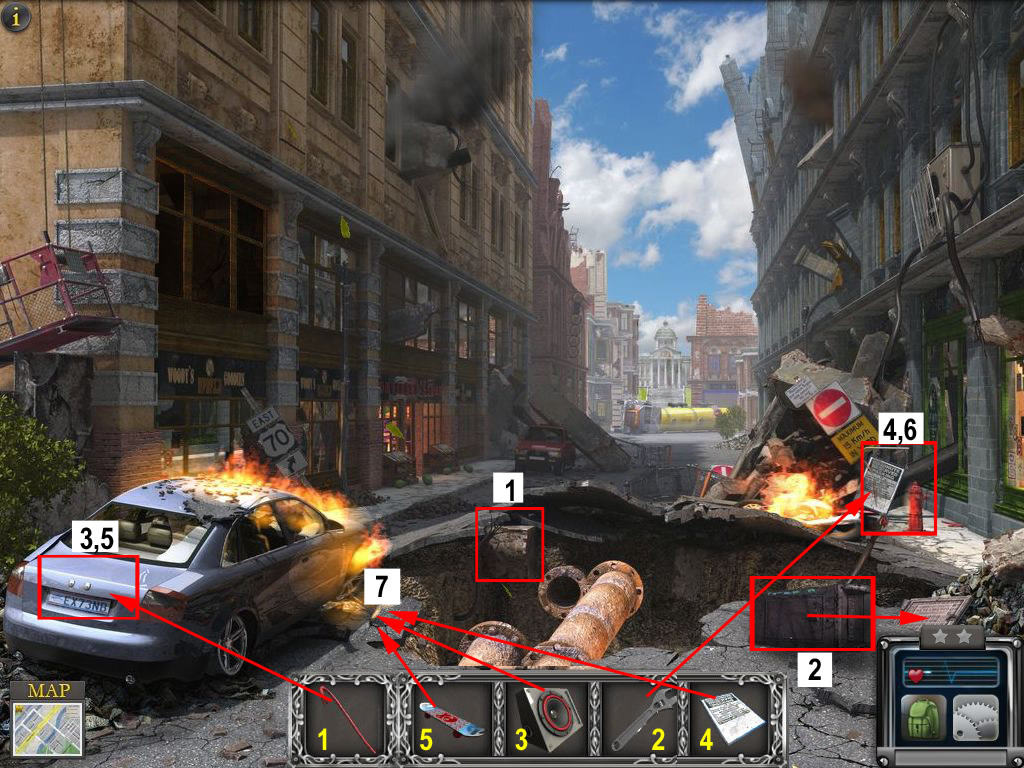
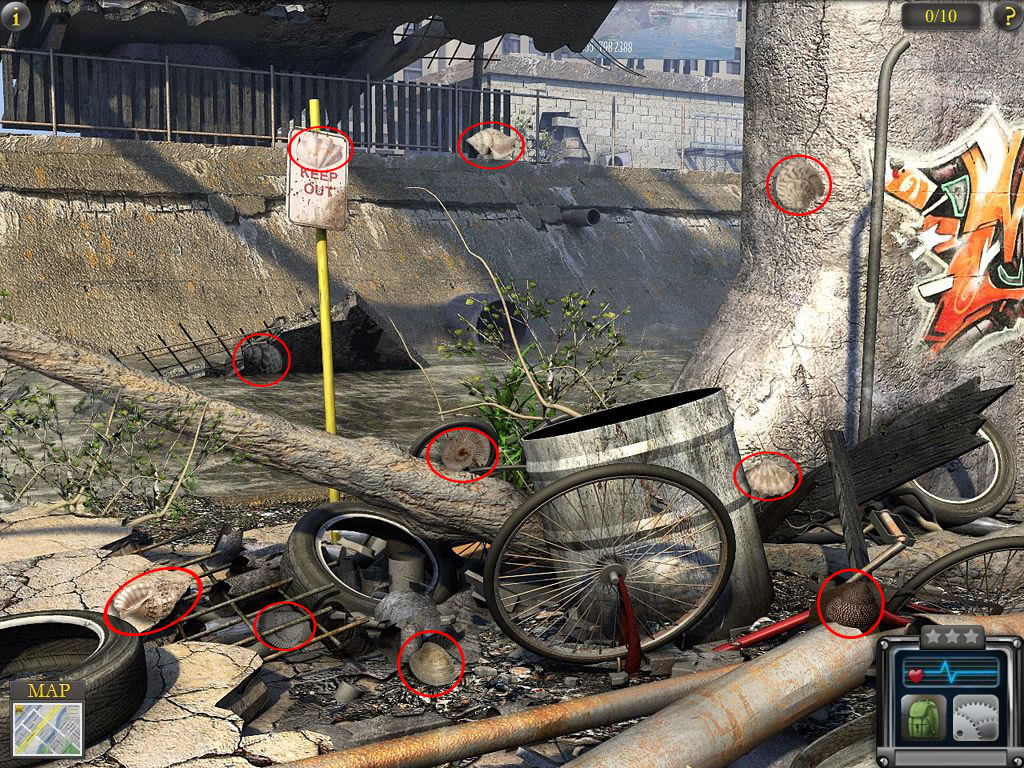
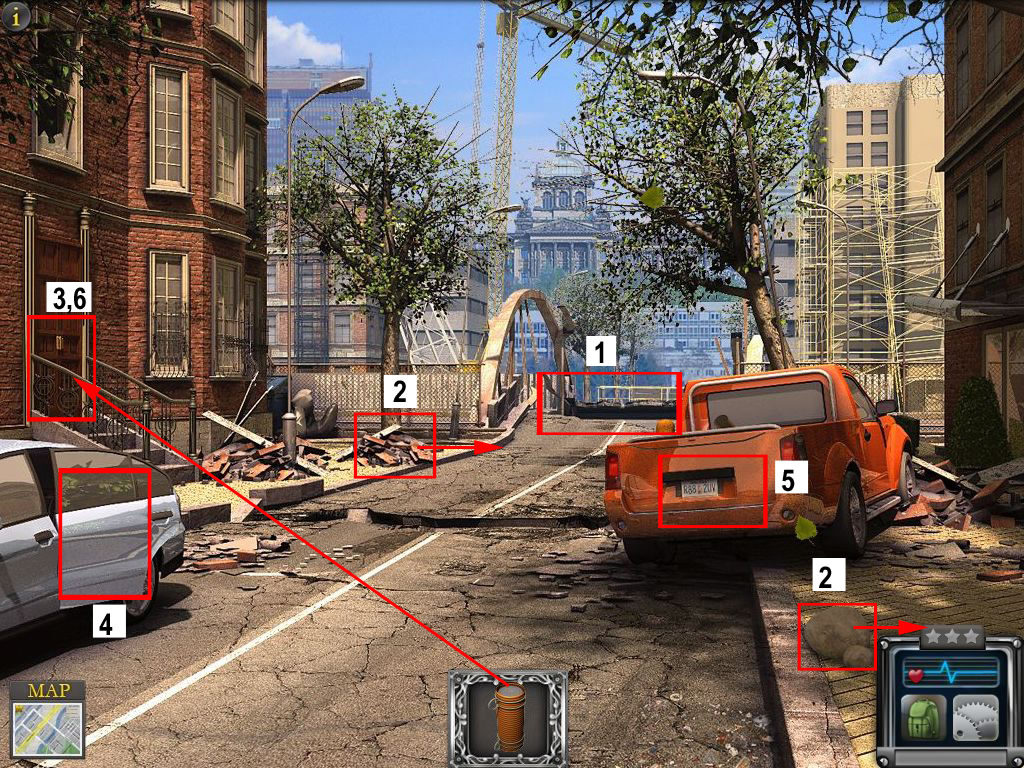
East Cowan Bridge
The old guy will tell you how to find a way as the bridge is broken as well.
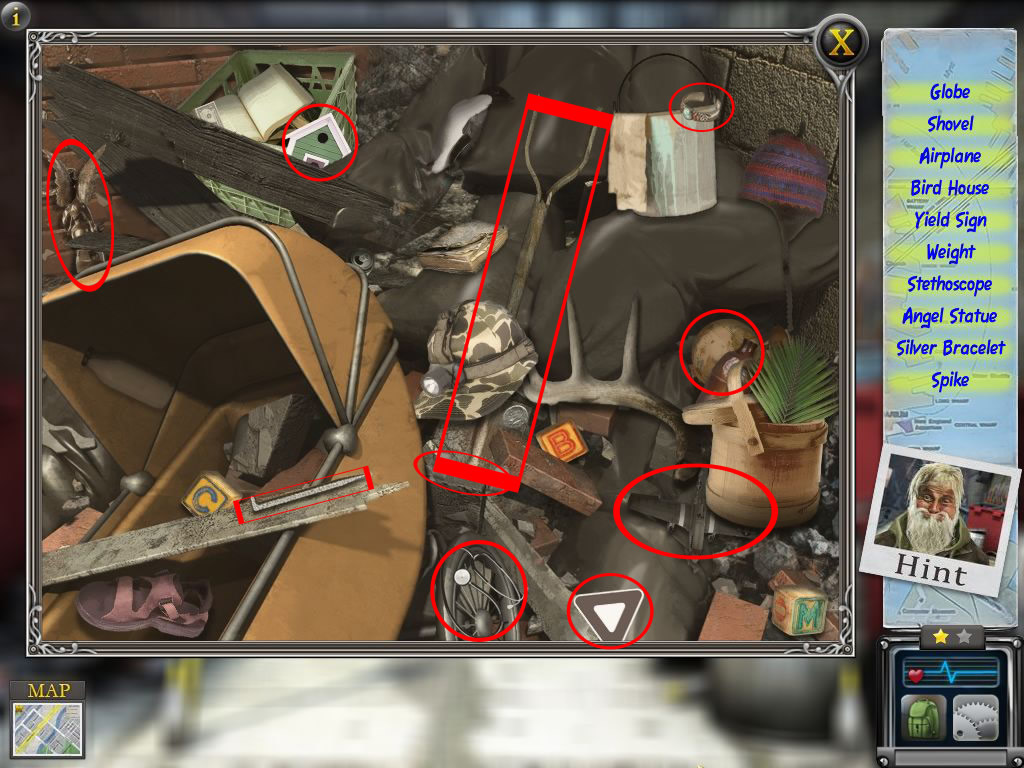
Click continue to trigger the hog-scene and find 10 shells.
Screenshot
Click the stone left side to find a part for the bridge.
Behind the wood pile left back, you will find a kitten you need to find a home for.
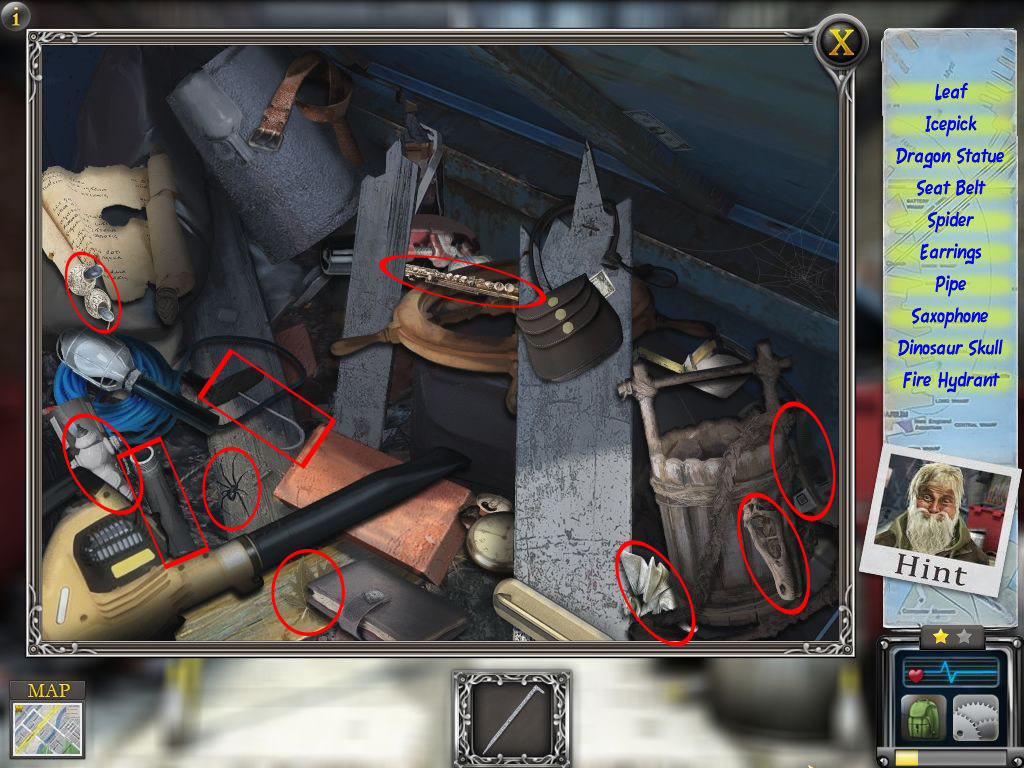
Click the door of the house left side to trigger two hog-scenes.
At the car you will receive two ropes and a water tank for your inventory.
Screenshot
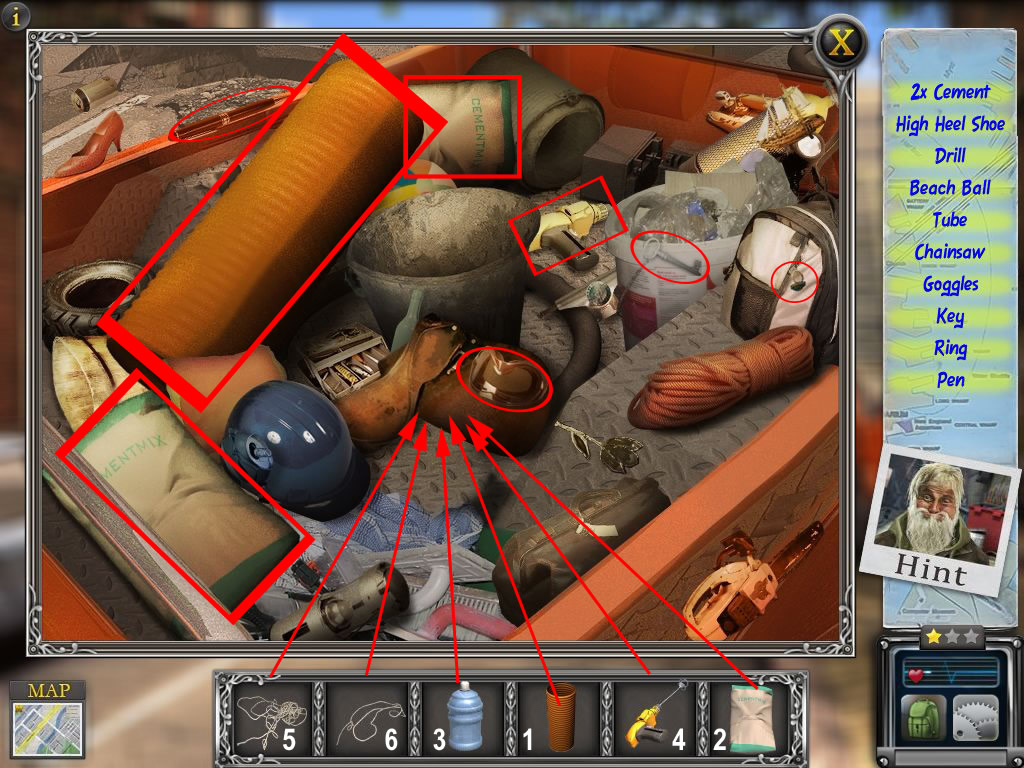
Now click the Pickup and find all objects from your list.
Cement, a tube and a drilling machine will go into your inventory.
Screenshot
Place the tube in front of the bucket.
Pour the cement inside and after this the water from the bottle.
Use the drilling machine to stir.
Click one rope at the top, one at the bottom of the tube to get a ram.
Now you have a ram - click to get it into your inventory.
Use it with the door.
Screenshot
Someone you know comes to the door: Marcus.
He tells you, that Susan and Caitlin are at the museum and try to find a way out.
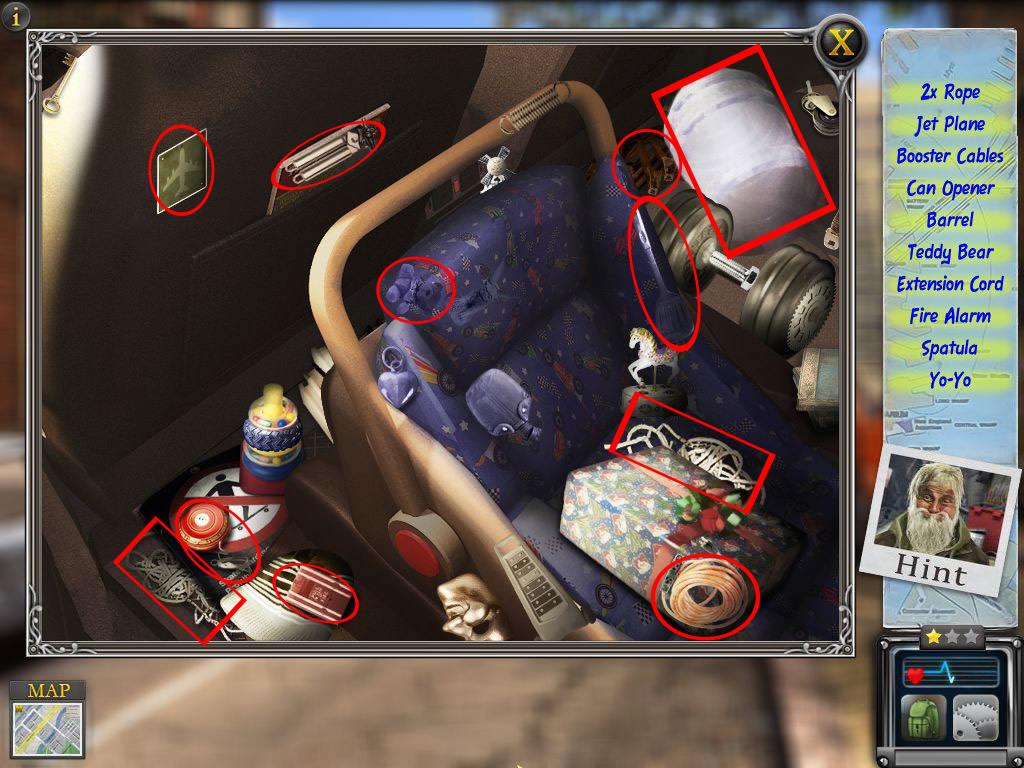
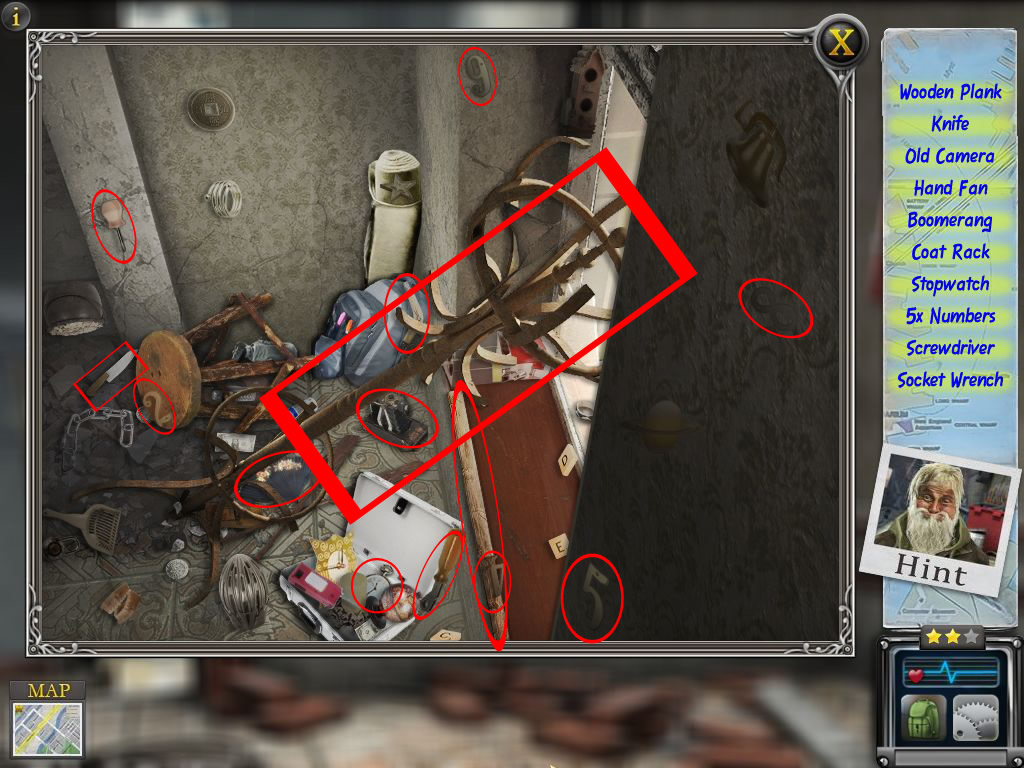
Riverside Apartments
Click above the broken stairs and you will get another point of view.
Click the brick at the bottom of the stairs to receive a part of the bridge.
Click the window above the stairs and you will find the puppy's master.
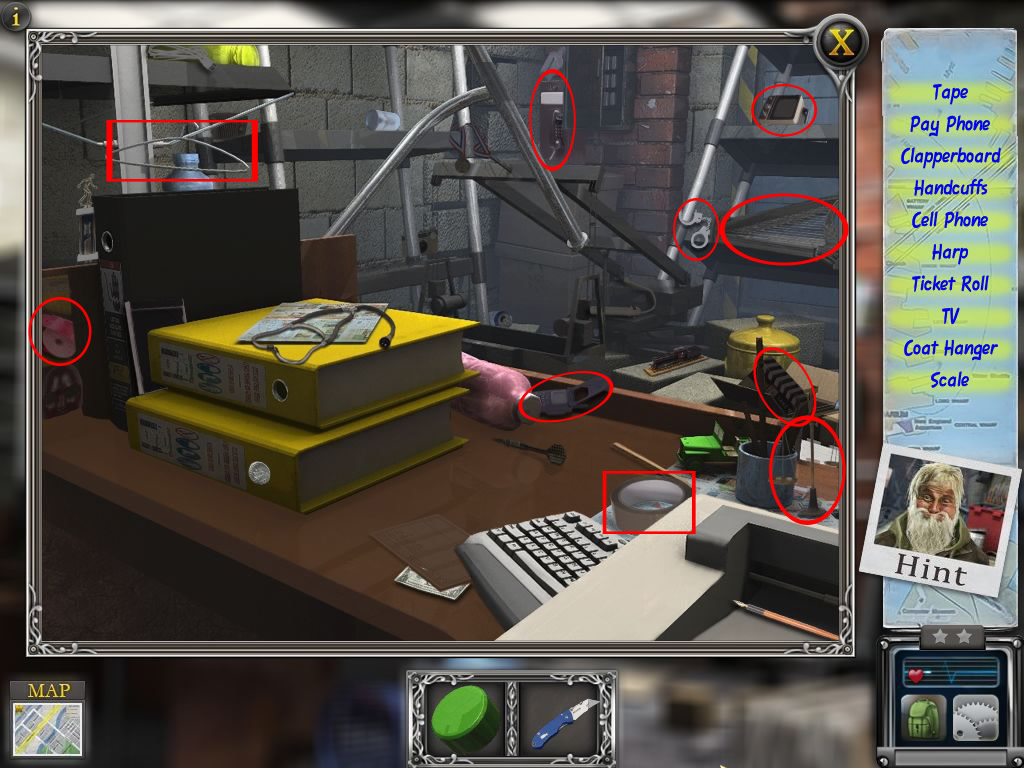
Click the hole on the stairs to trigger a hog-scene at the entrance with the fallen down coat rack.
The coat rack and the knife will go into your inventory.
Screenshot
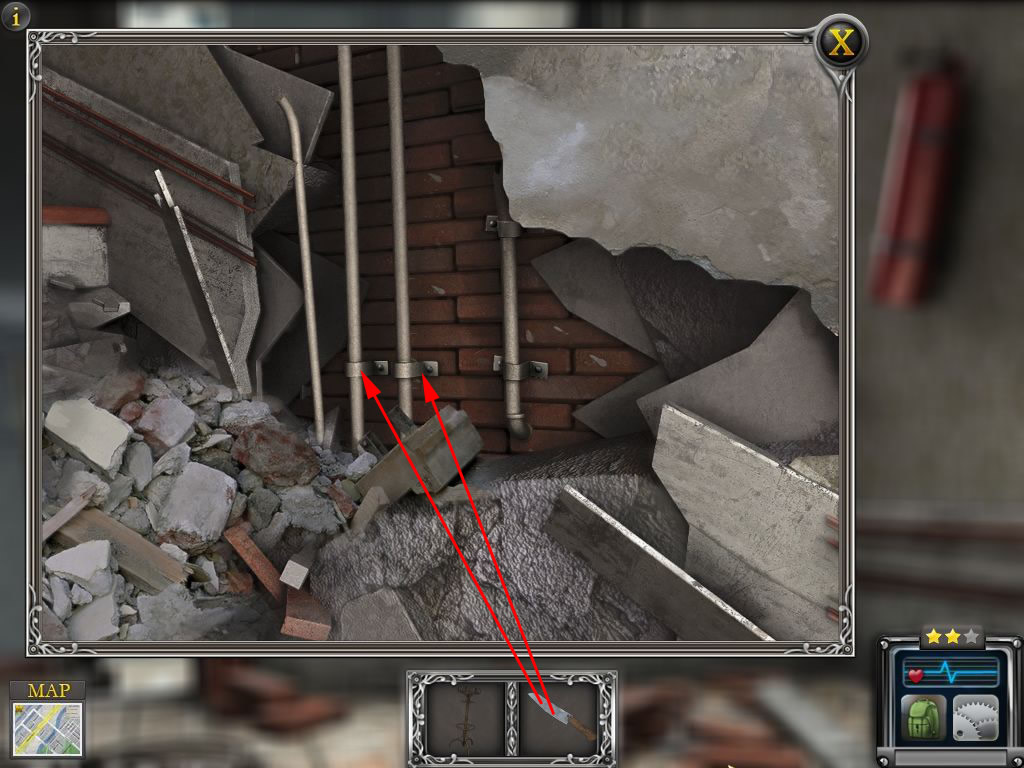
Now click the wall, where a part of the plaster fall off to get a nearby view.
Use the knife to loose to of the holders, they will go into your inventory.
Screenshot
Place the coat rack on the hole in the stars, place the holders at the rack's bottom and use the knife at them.
Screenshot
Click above the stairs to go up.
Click the door to end this level.
Riverside Apartments - Roof Top
You will need to come to the next roof.
Click the cans to find a teddy bear for your backpack-inventory.
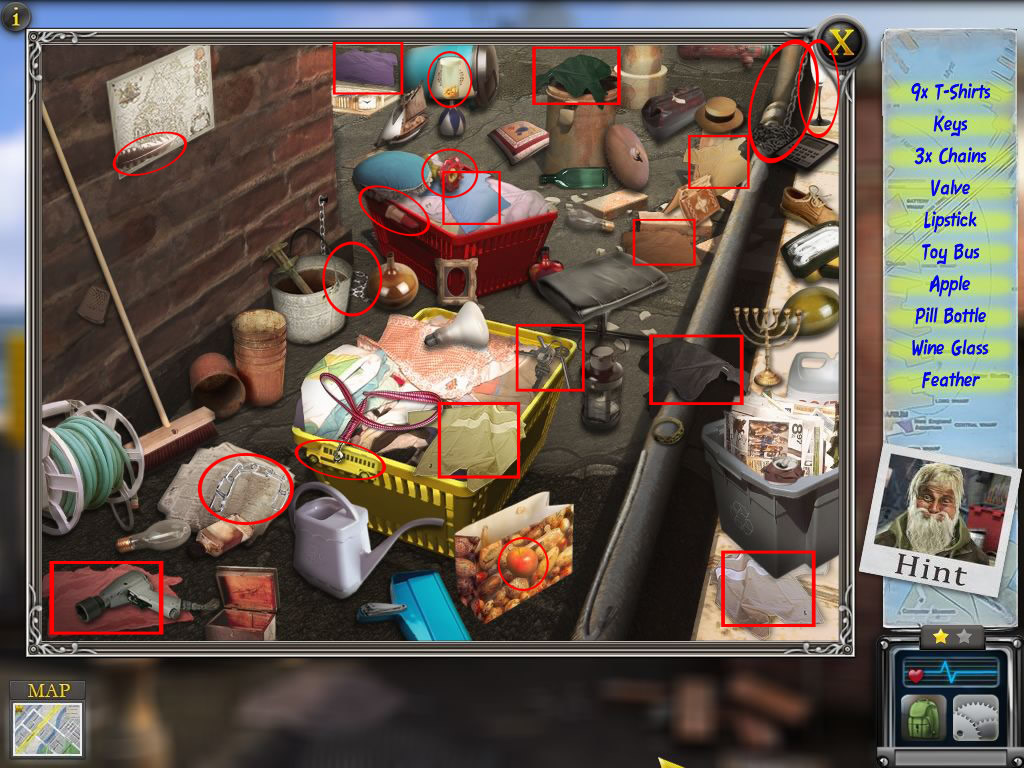
Click the moving letters at the house, this will trigger a hog-scene.
9 T-Shirts and a key will go into your inventory.
Screenshot
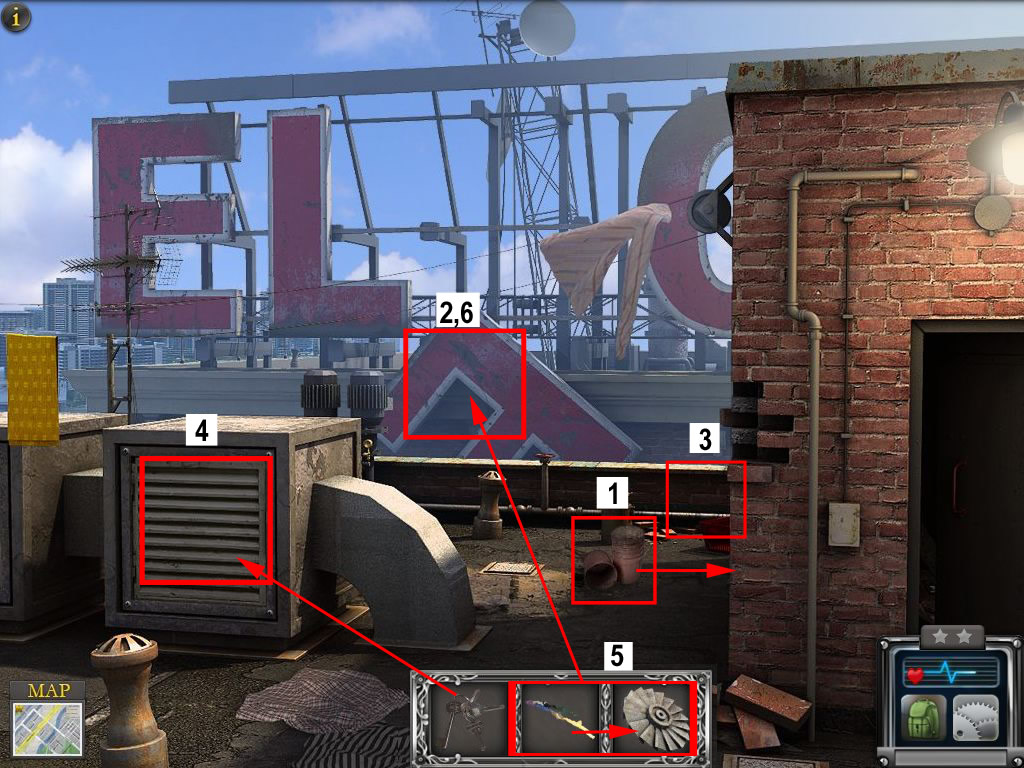
Open the air duct with the key to find another hog-scene.
The bicycle gear will go into your inventory.
Screenshot
Combine t-shirts and gear to get a grappling hook.
Click the letters on the other side with the hook and move to the next roof.
Screenshot
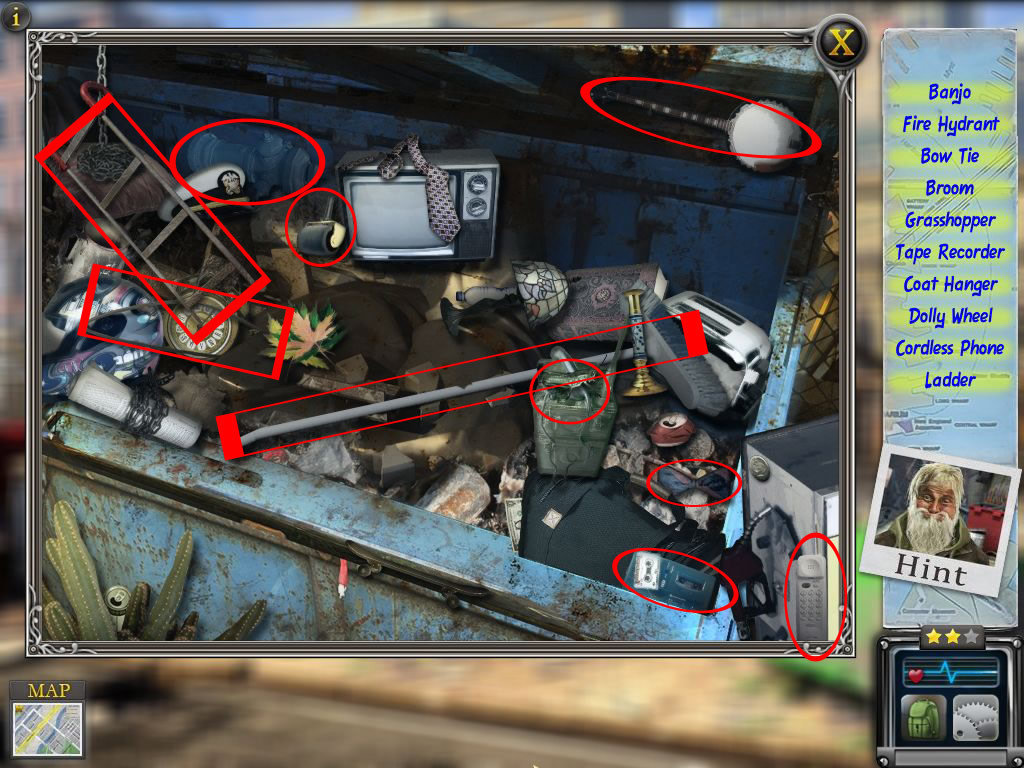
Crown Apartments - Roof Top
You will need to stabilize the post.
Click the wooden crate in the middle of the roof to receive a part of the bridge.
Another one you will find behind a stone in the back.
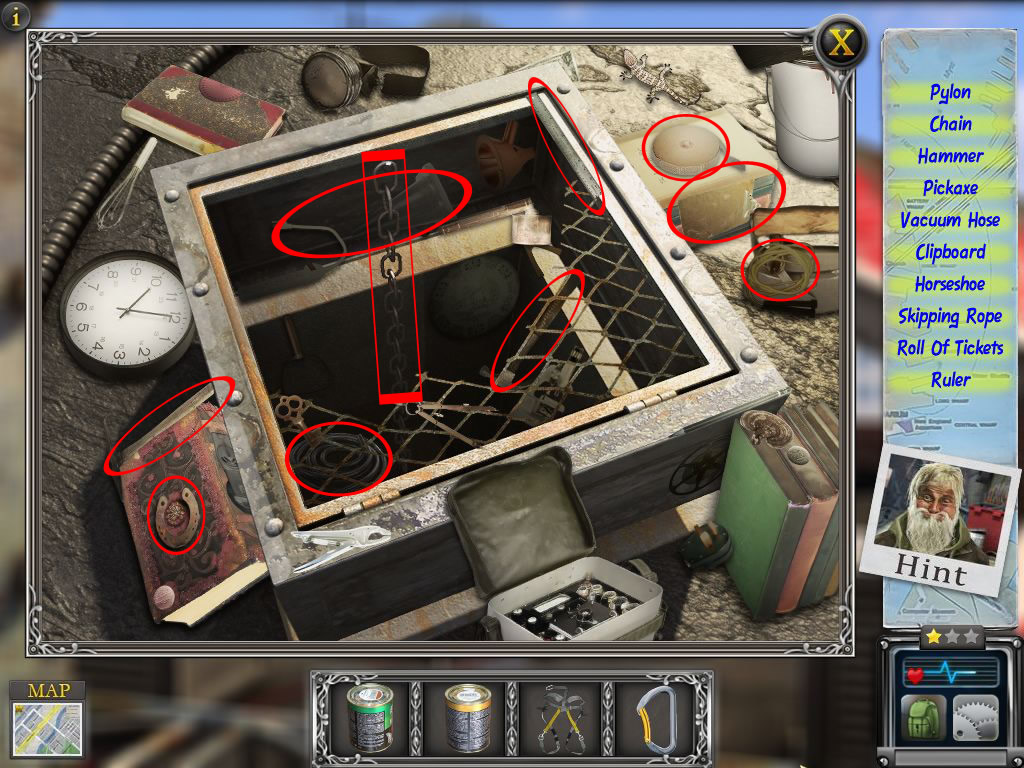
Click the pole to trigger two hog-scenes.
At the left wall two paint cans, straps and a hook will go into your inventory.
Screenshot
The right crate will bring you a chain for your inventory.
Screenshot
Use the straps at the chimney right side and the hook at the pole.
Use the chain to connect these two things by clicking it at the hook.
Place the paint under at the bottom of the pole.
Use the fire stairs to leave the roof.
Screenshot
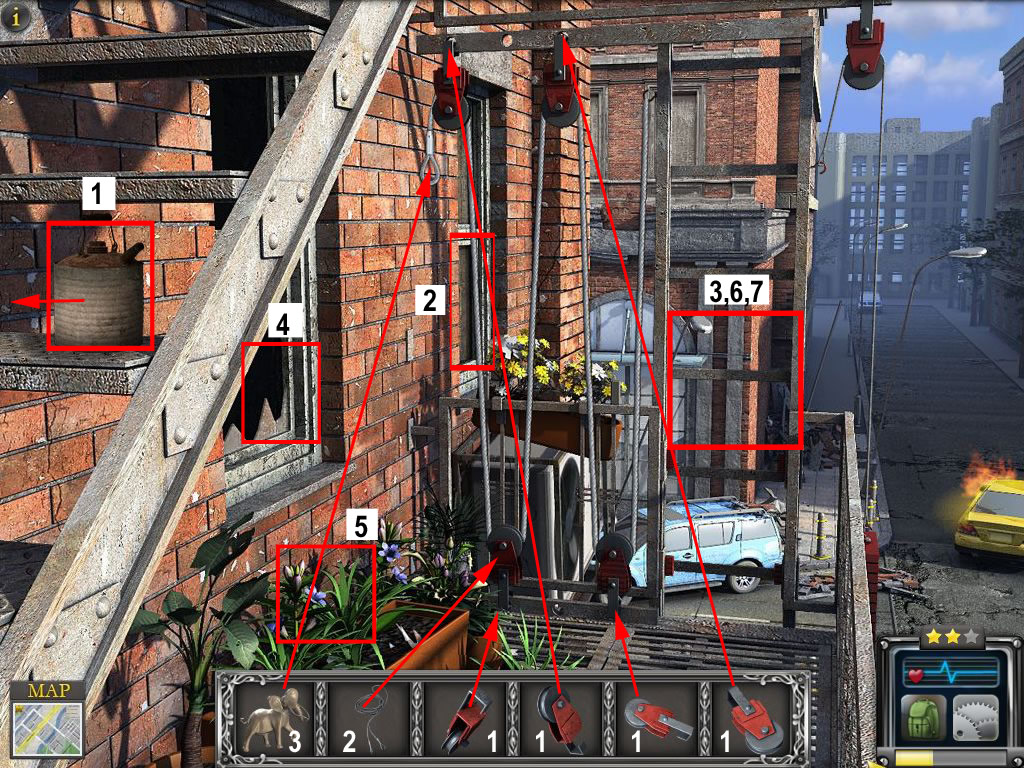
Crown Apartments - Roof Top
You will need to climb down the fire stairs, but for this, you need to move them down first.
Click the kettle to receive a part for the bridge.
Click the back window, a girl appears, happy to have her cat back.
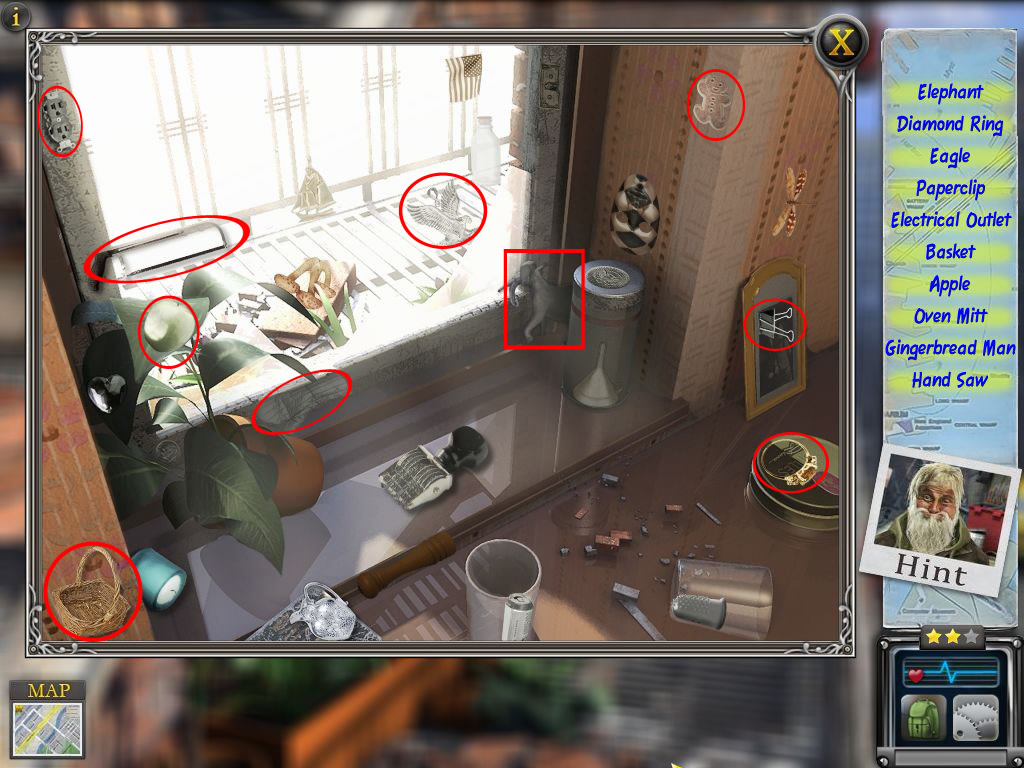
Click the fire stairs to trigger two hog-scenes.
At the window you will get an elephant for your inventory
Screenshot
The plant pot will give you four pulleys and and a wire.
Screenshot
Place the pulleys at the two outside most holes on the top and bottom of the ladder.
Click the wire at one of the pulleys and the elephant as counter weight at the left end of the wire.
Screenshot
Click the ladder again and it will go down.
Climb down.
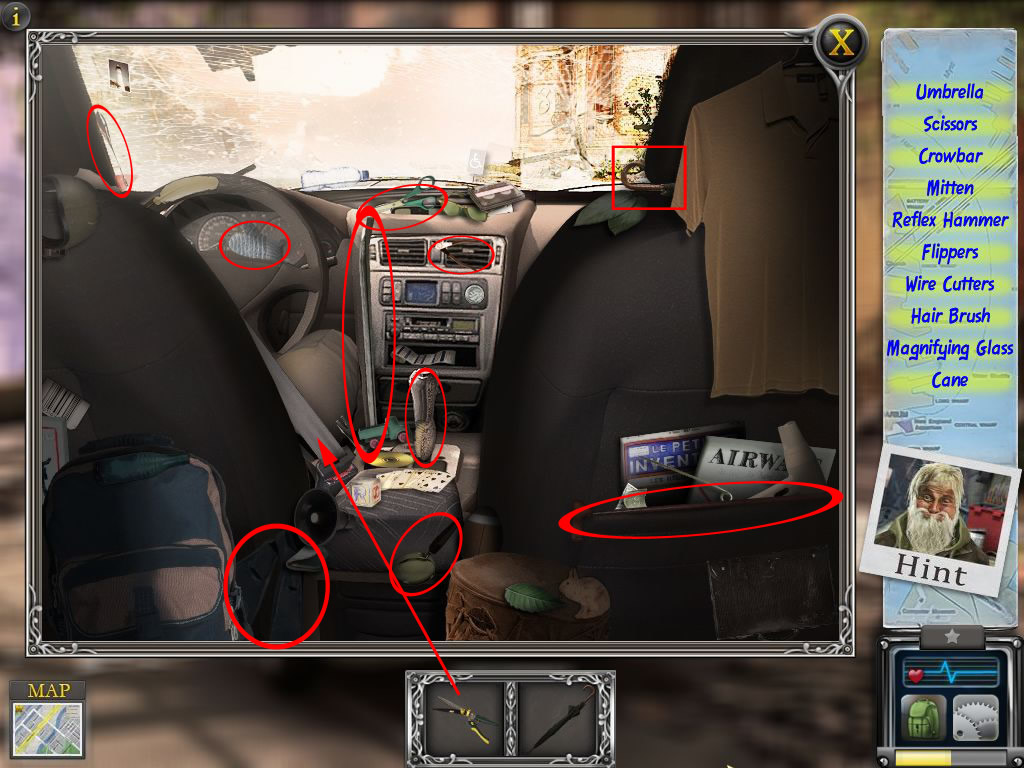
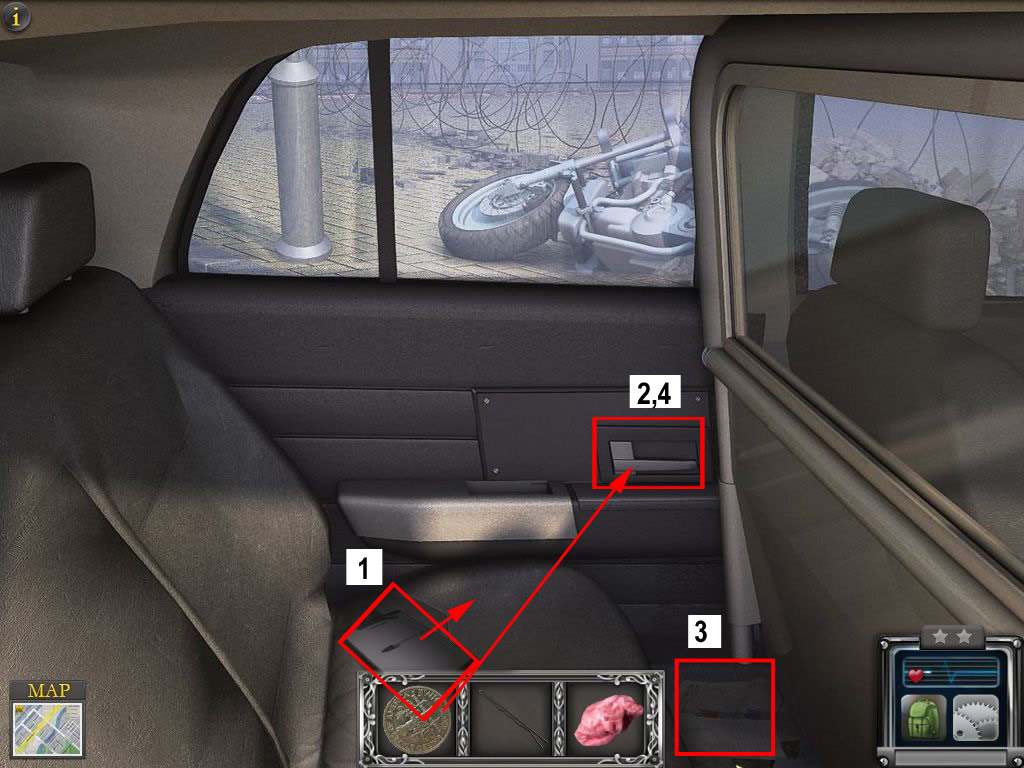
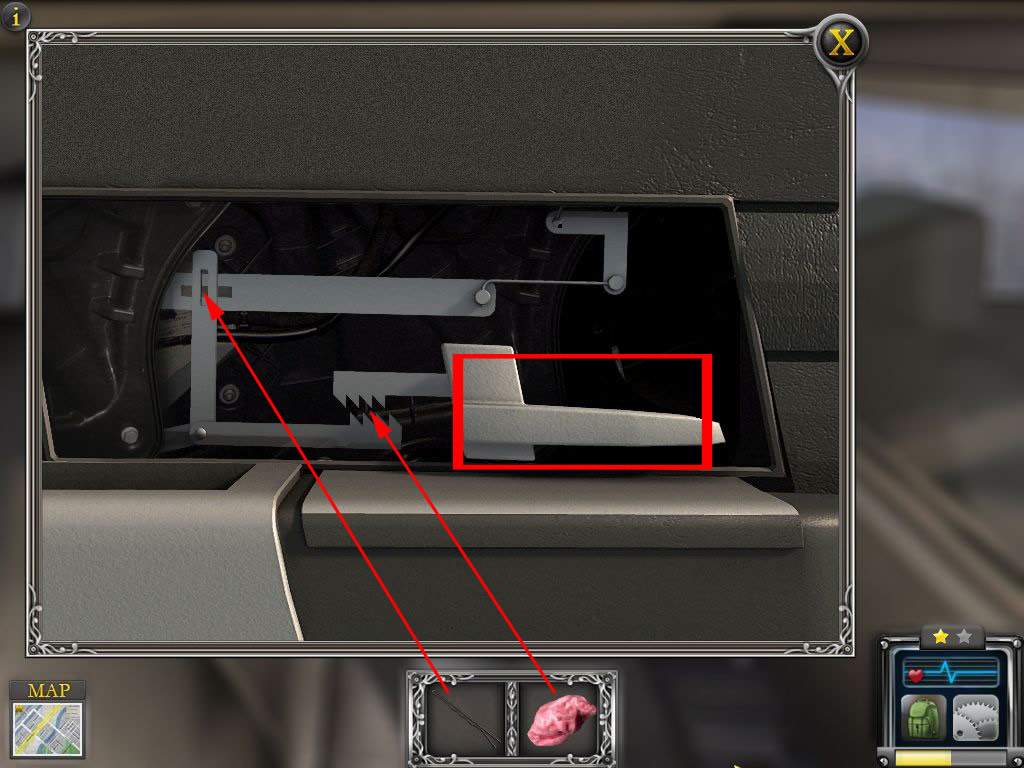
Police car - Backseat
Click the clip board to receive a part of the bridge.
Click the door pull to trigger a hog-scene.
A hair pin, chewing gum and a coin will go into your inventory.
Screenshot
Use the coin at the door pull and click again to get a nearby view.
Screenshot
Place the chewing gum between the metal teeth and the hair pin at the top left of the mechanism.
Click the door pull and leave the car.
Screenshot
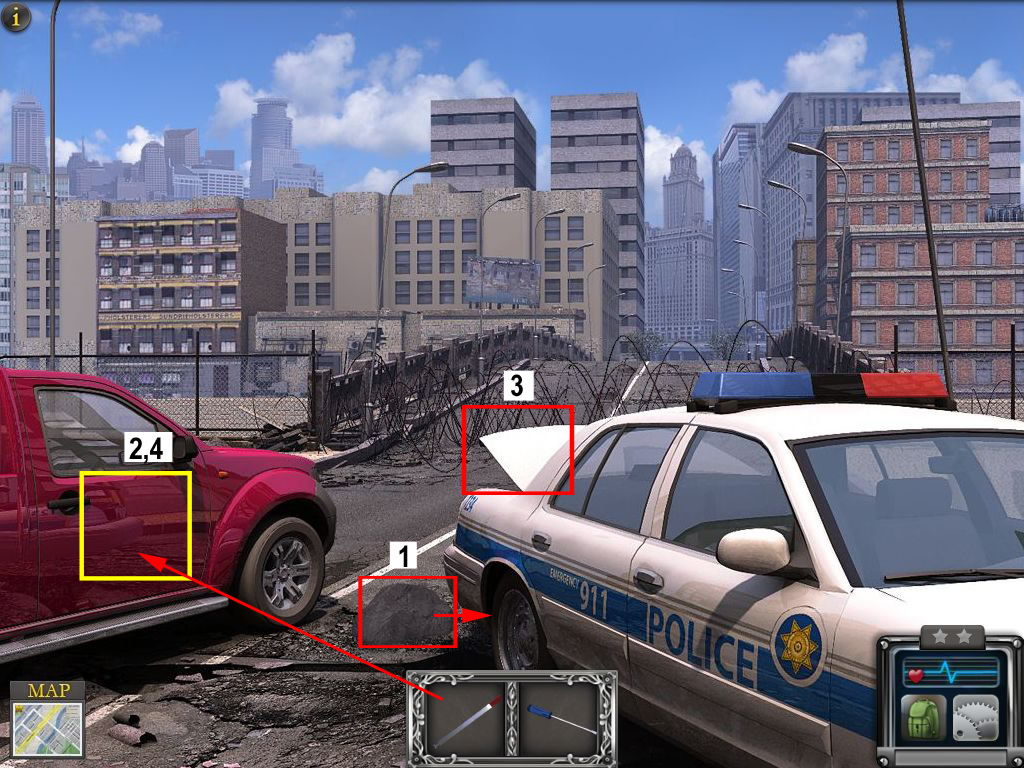
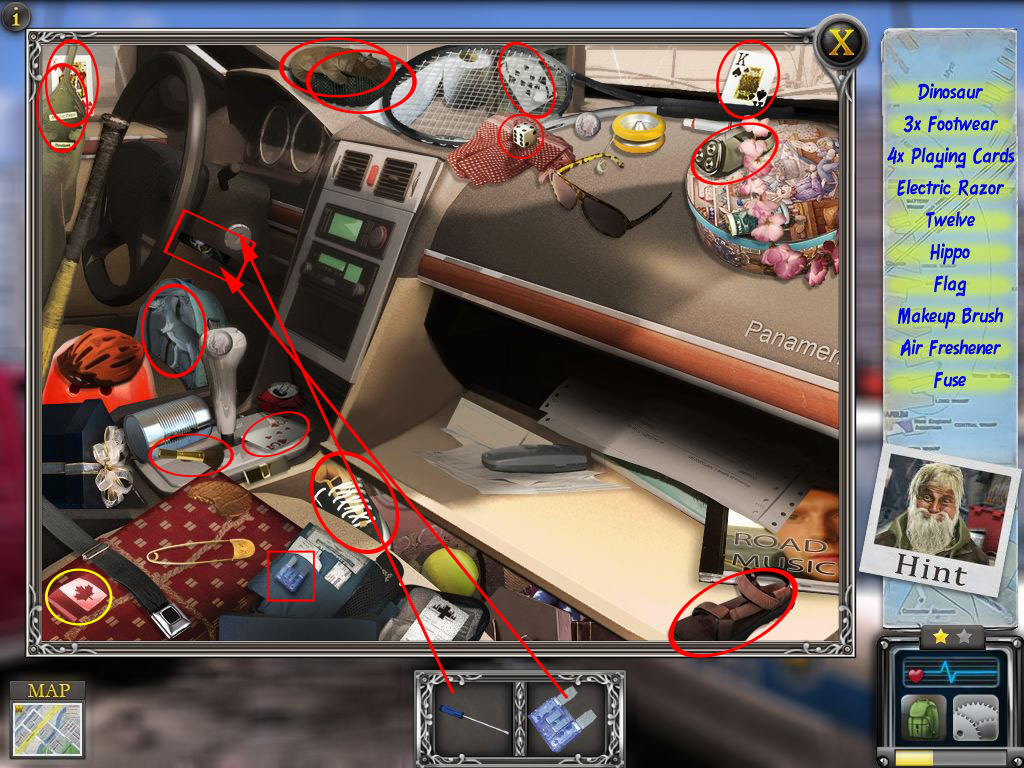
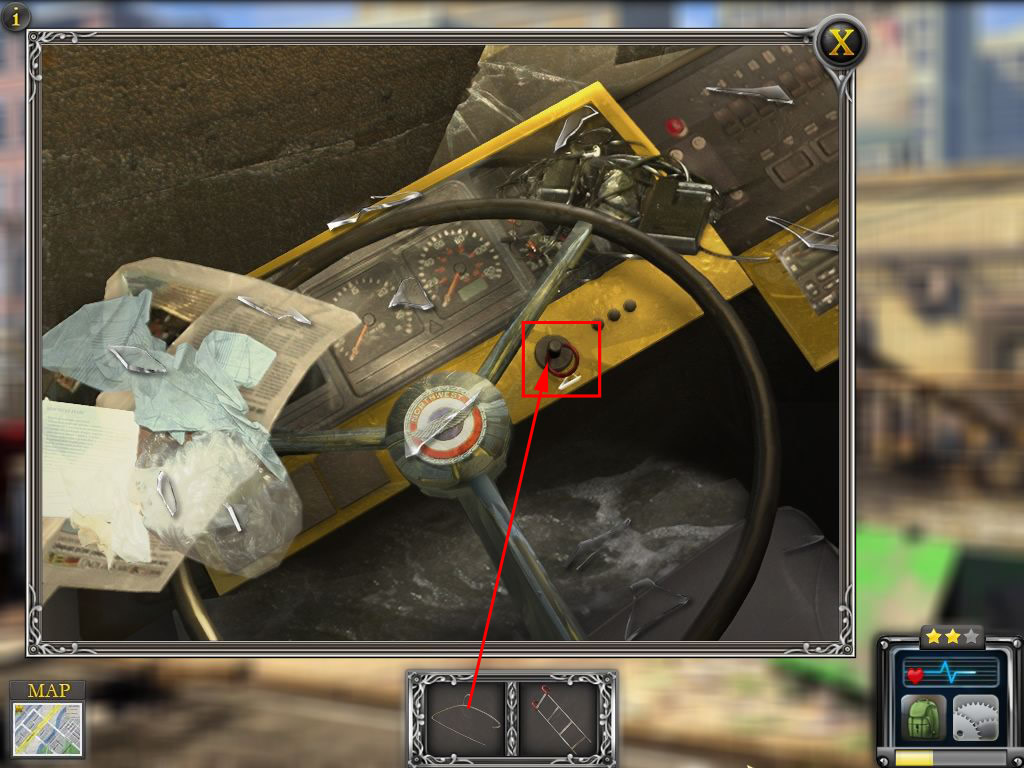
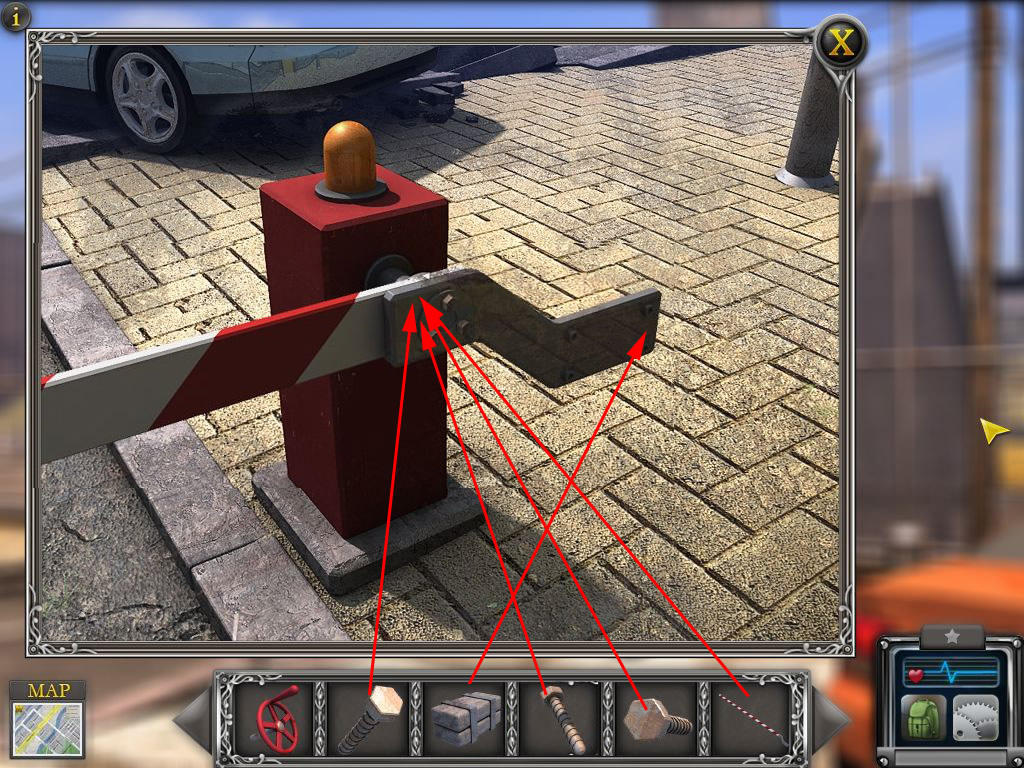
West Couture Bridge
To find another part of the bridge, click the stone between the cars.
Click the door of the red car - this will trigger a hog-scene at the police car's trunk.
The Slim Jim and the screwdriver are going into your inventory.
Screenshot
Use the Slim Jim to open the red car's door and find all the objects.
A fuse will go into your inventory.
Screenshot
Click the left side of the steering wheel and place the fuse at the place, where you see the red one.
Use the screwdriver at the lock to start the car.
Screenshot
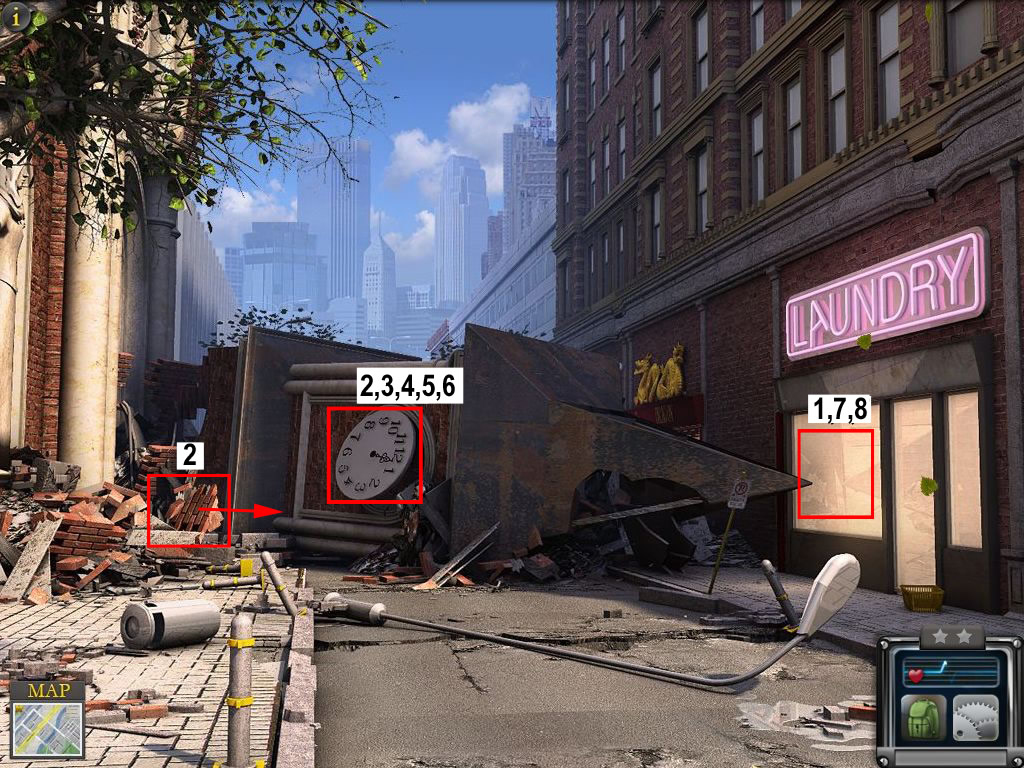
St. James Cathedral
Click the window of the laundry.
The old guy knows a way - click "Continue" to find 10 stamps for him.
Screenshot
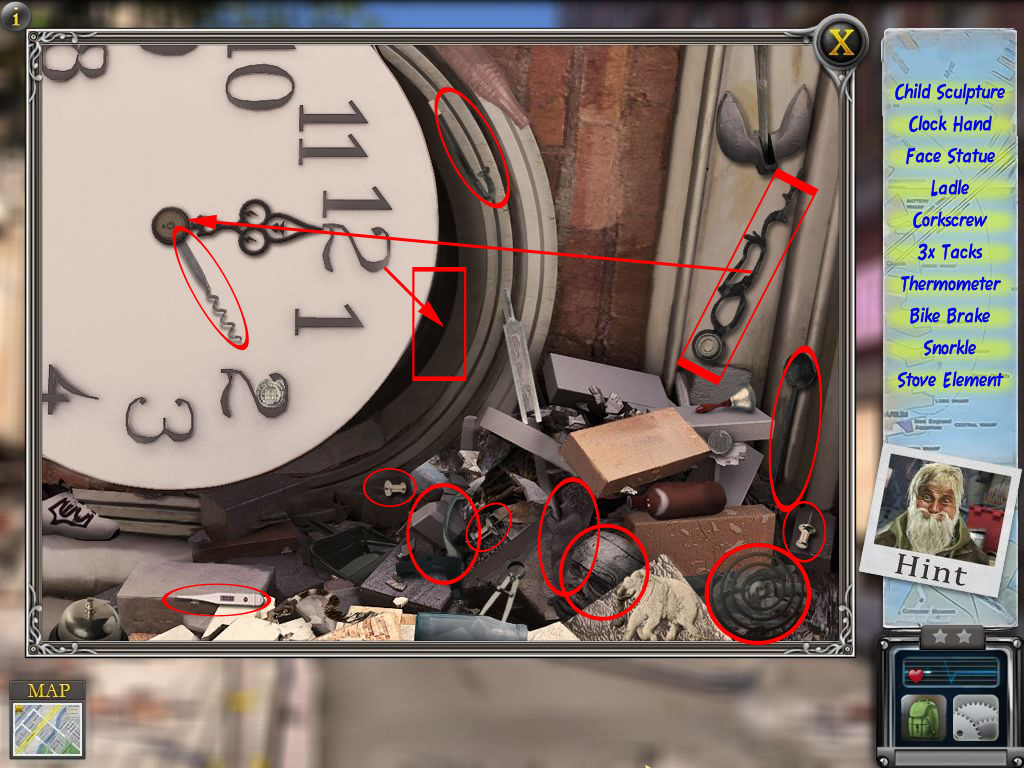
Click the stones left to the tower clock.
You will need to find the little boy's mum.
Click the window of the laundry again to trigger a ho-scene.
A clock hand will go into your inventory.
Click it at its place and come back into the scene.
Screenshot
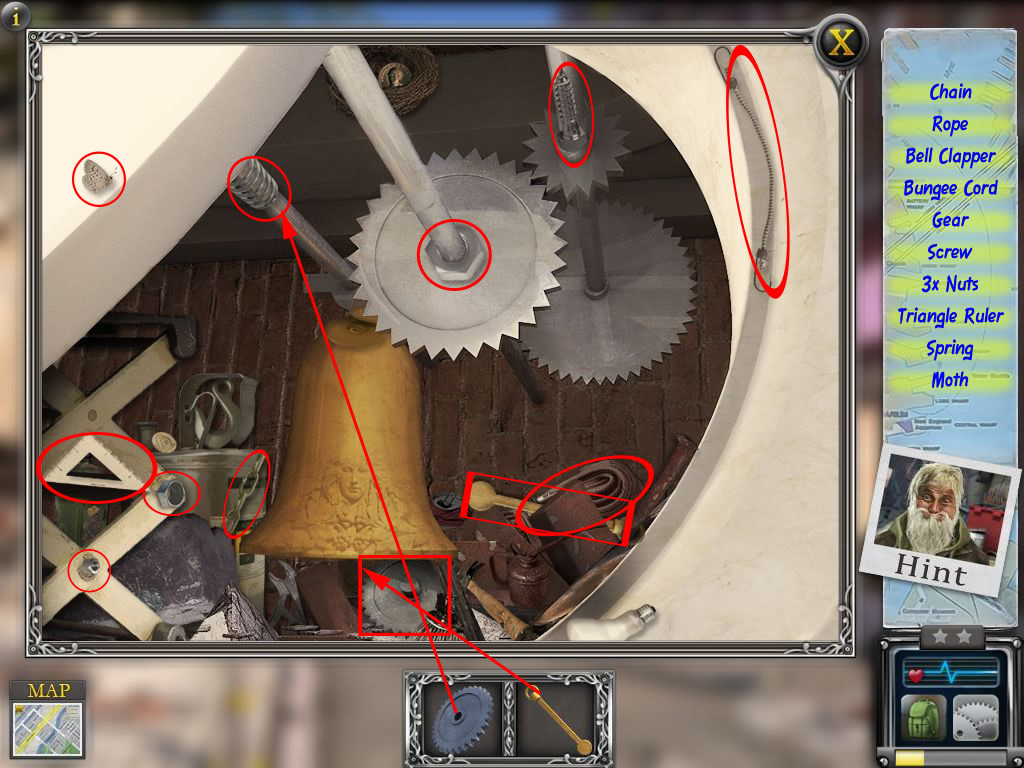
Click the spot between clock face and tower right side to trigger another ho-scene.
A gear and a clanker will go into your inventory.
Stay in the scene and place the clanker at the lower part of the bell.
The gear get at the upper left rod.
Screenshot
Leave the scene and click the clock face, till the bell will ring.
Do this till the window of the laundry breaks and you can enter.
Screenshot
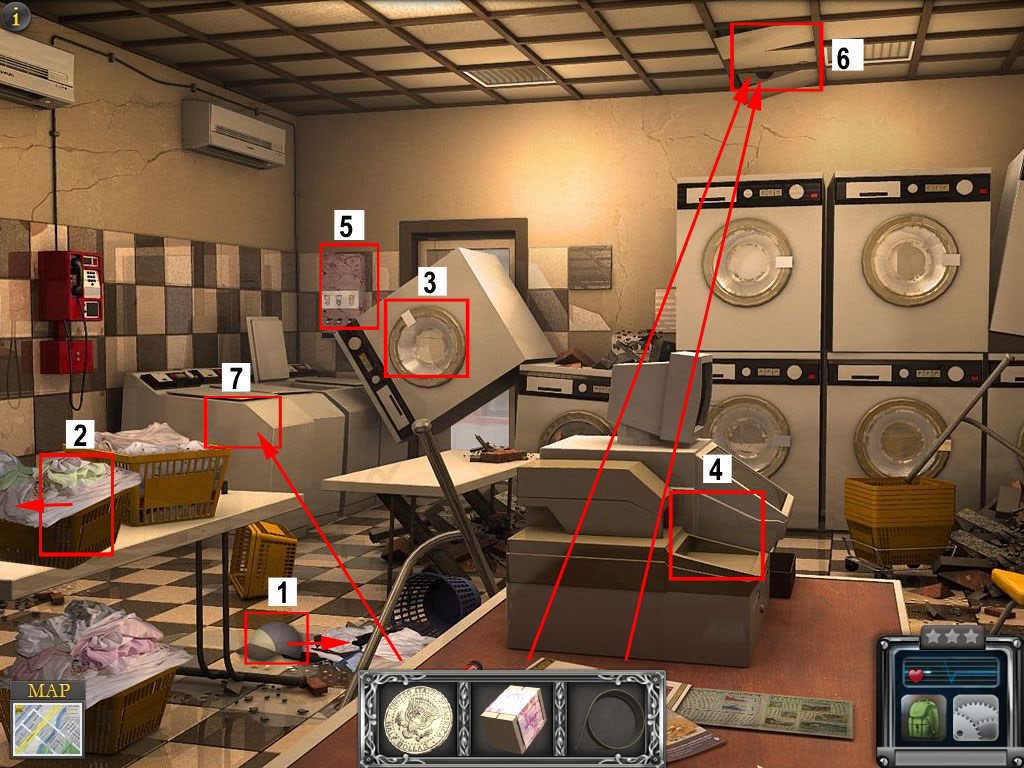
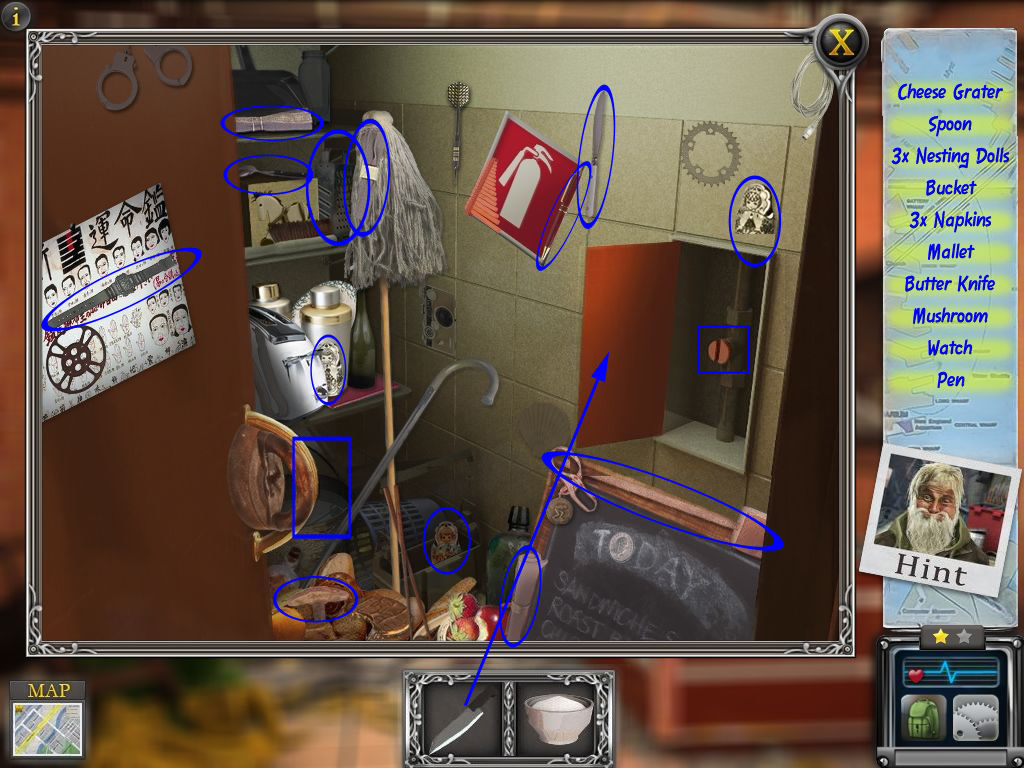
Flora's Laundry
The dryer is laying in front of the door, so you can't come through.
Click the hat left on the floor to receive a part of the bridge.
Click the left basket to find another puppy.
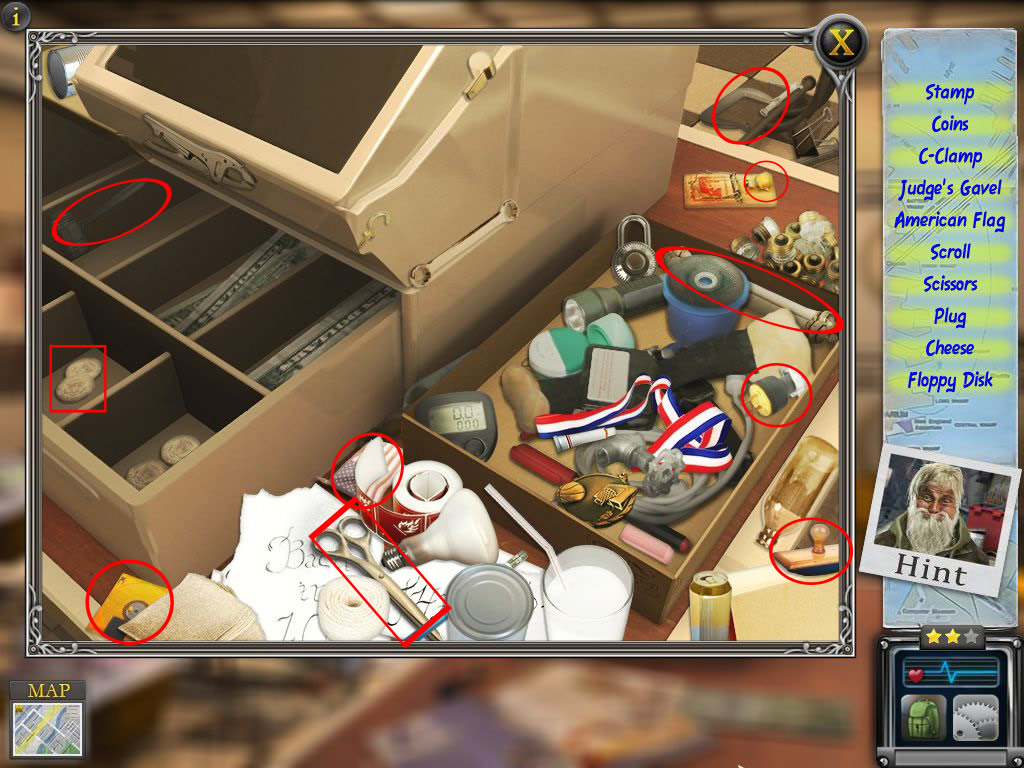
Click the dryer to trigger a ho-scene at the cash register.
Two coins and a scissor will go into your inventory.
Screenshot
Click the left corner next to the dryer to get a nearby view.
Click one of the coins at the coin slot and get a piece of soap.
Use the scissors to cut of a part of the wire - click the wire to get it into your inventory.
Screenshot
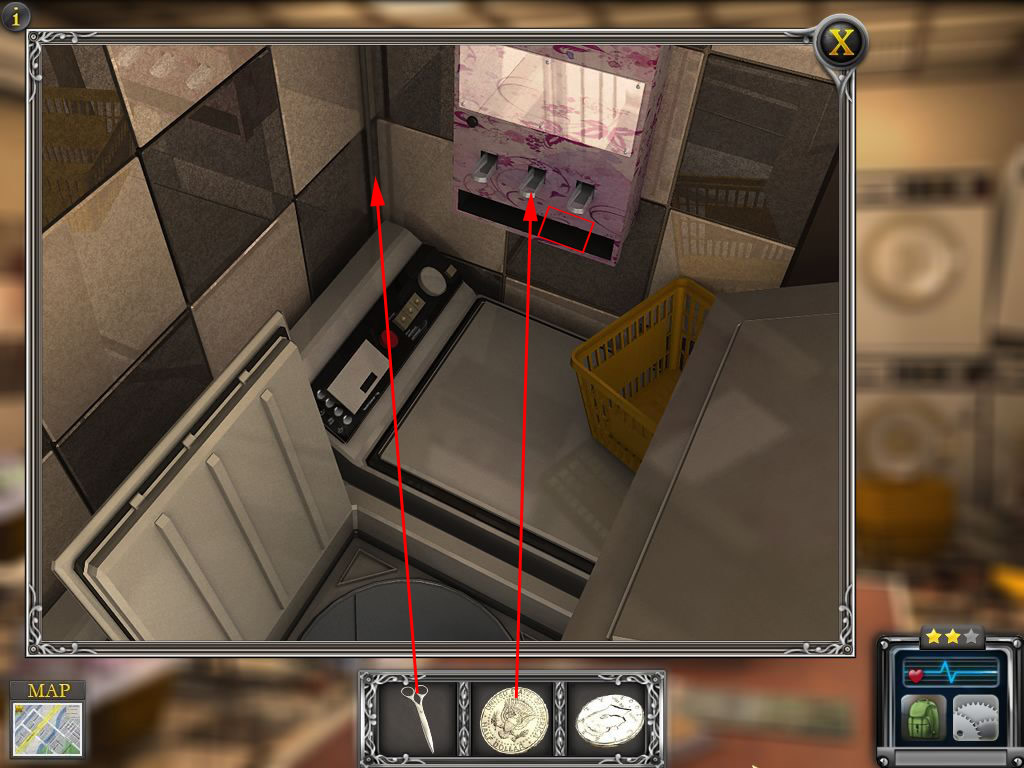
Two of the plates at the ceiling are loose, click them.
Place the cable at the pipes you will find underneath.
Use the soap after at the pipes.
Put the coin into the slot of the first washing machine, seen from the left.
Leave through the door.
Screenshot
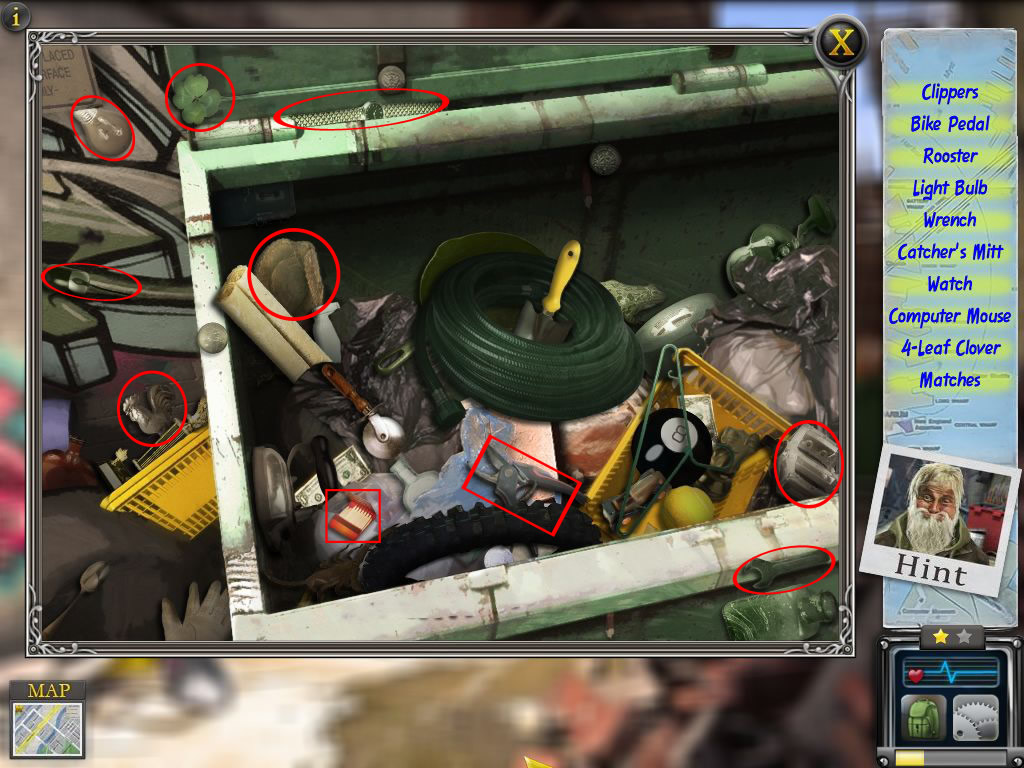
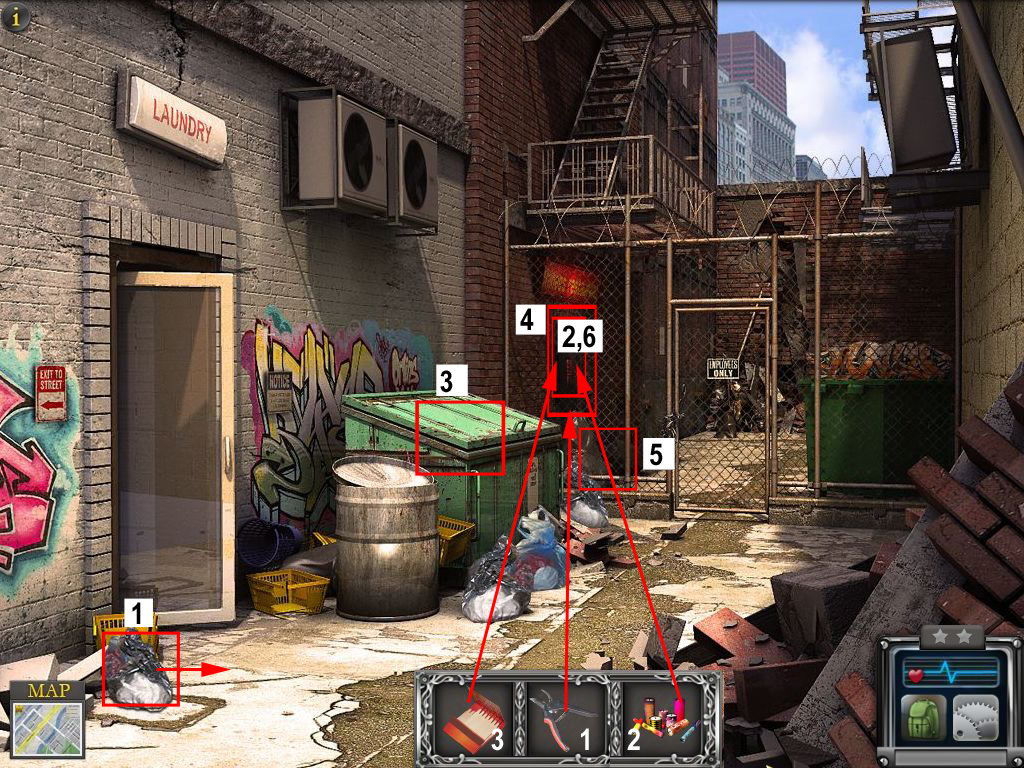
Flora's Alley
You need to reach the other side of the fence.
Click the trash sack to receive a part of the bridge.
Click the restaurant door behind the fence to trigger a ho-scene at the trash container.
Click the top to open the trash container and click again inside it.
Find all objects - matches and a wire cutter will go into your inventory.
Screenshot
Use the wire cutter to cut the fence.
Click the door to trigger another ho-scene.
The 10 fire cracker will go into your inventory.
Screenshot
Place the fire cracker next to the door and light them with the matches.
Enter the restaurant.
Screenshot
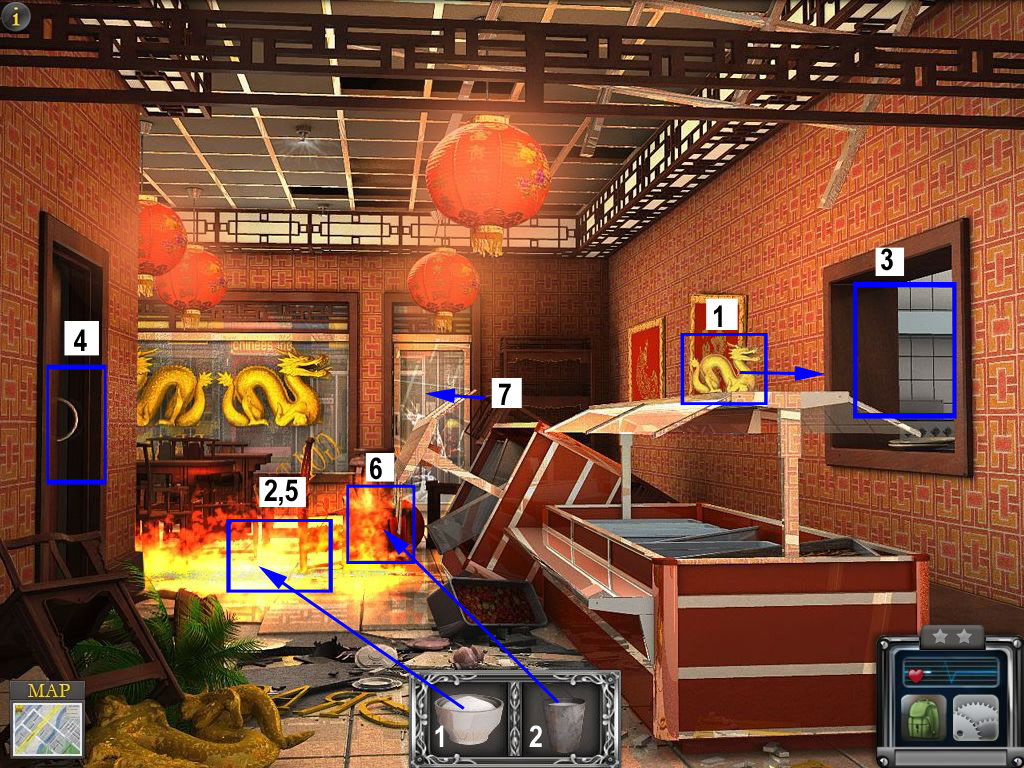
Wong's Chinese
Click the Chinese dragon to receive a part of the bridge.
Click the fire to trigger to ho-scenes.
At the right side you will receive a knife and baking powder for your inventory.
Screenshot
At the left you will get a bucket with water.
Use the knife to open the red lid and click the red button at the pipe.
Screenshot
Pour the baking powder on the flames and use the bucket with water at the burning chair.
Use the door straight ahead.
Screenshot
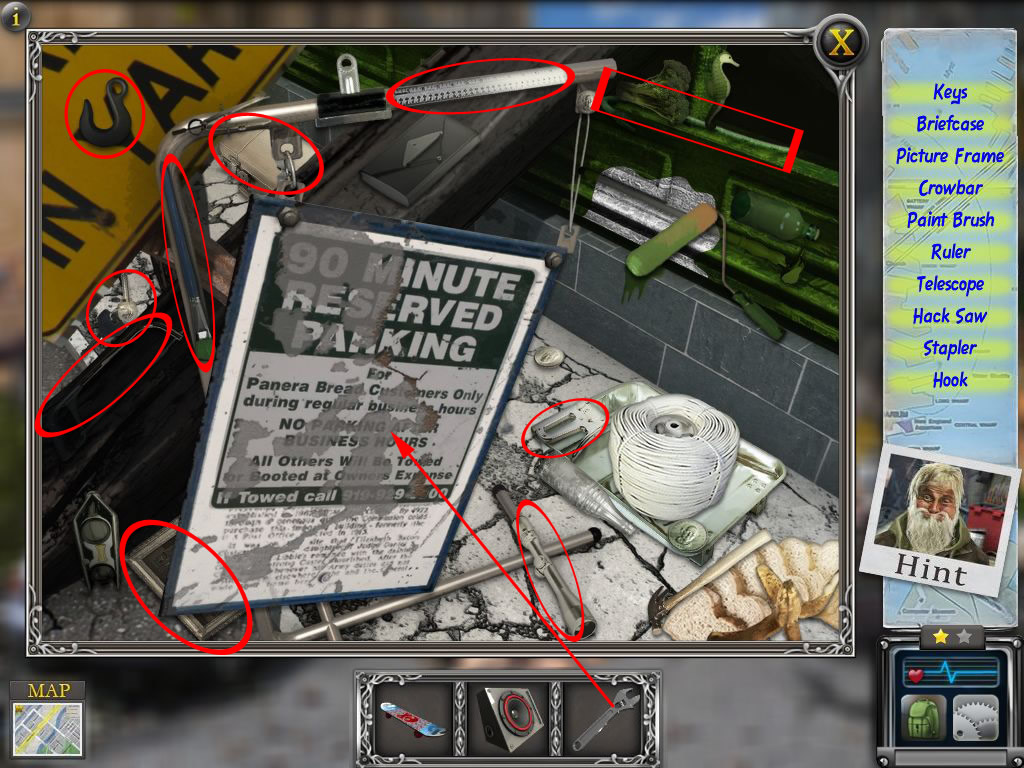
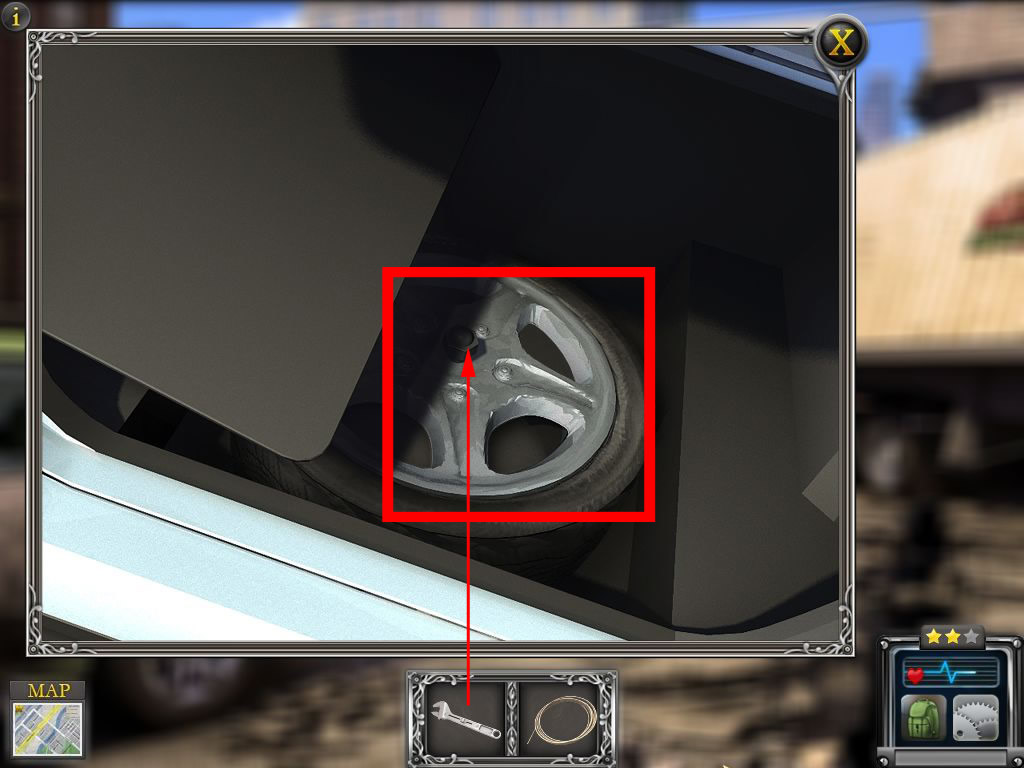
Hannah Boulevard - Overpass
Click the yellow part to receive a part of the bridge.
Click the middle window and the little boy is home again.
Click the railing on top of the bridge, that will trigger to ho-scenes.
Left side a wrench and a rope are going into your inventory.
Screenshot
Click the car's trunk and use the wrench at the spare tire.
Click the tire to get it into your inventory.
Screenshot
Combine the tire with the rope and click the railing with it.
Click the railing again to climb up.
Screenshot
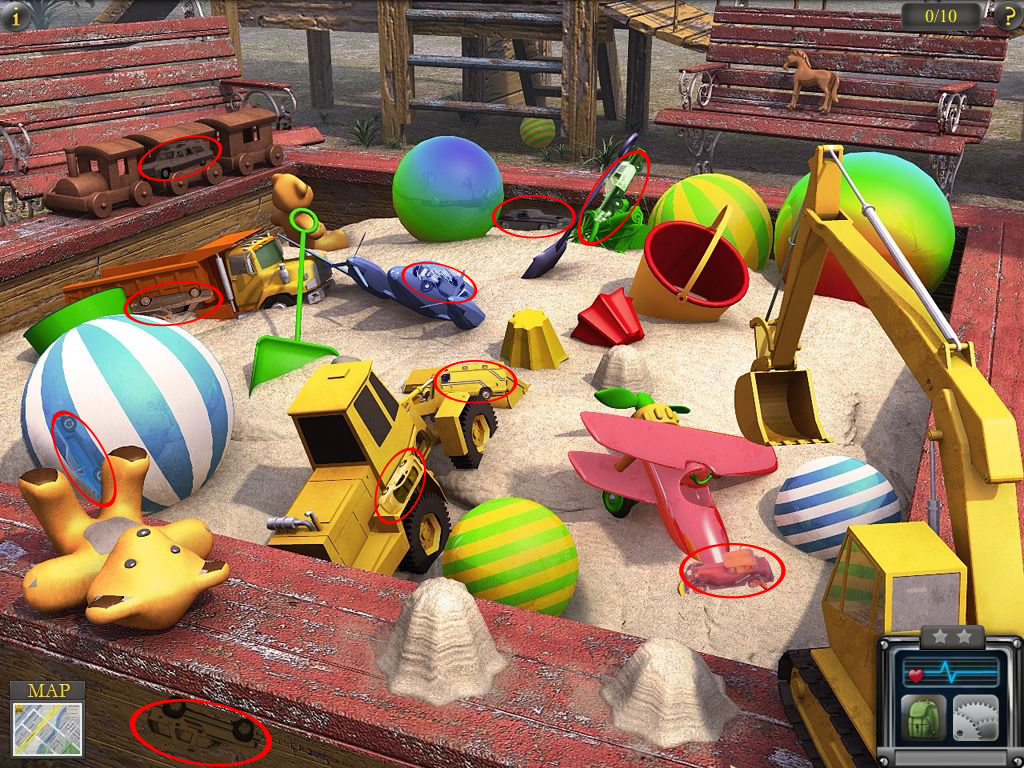
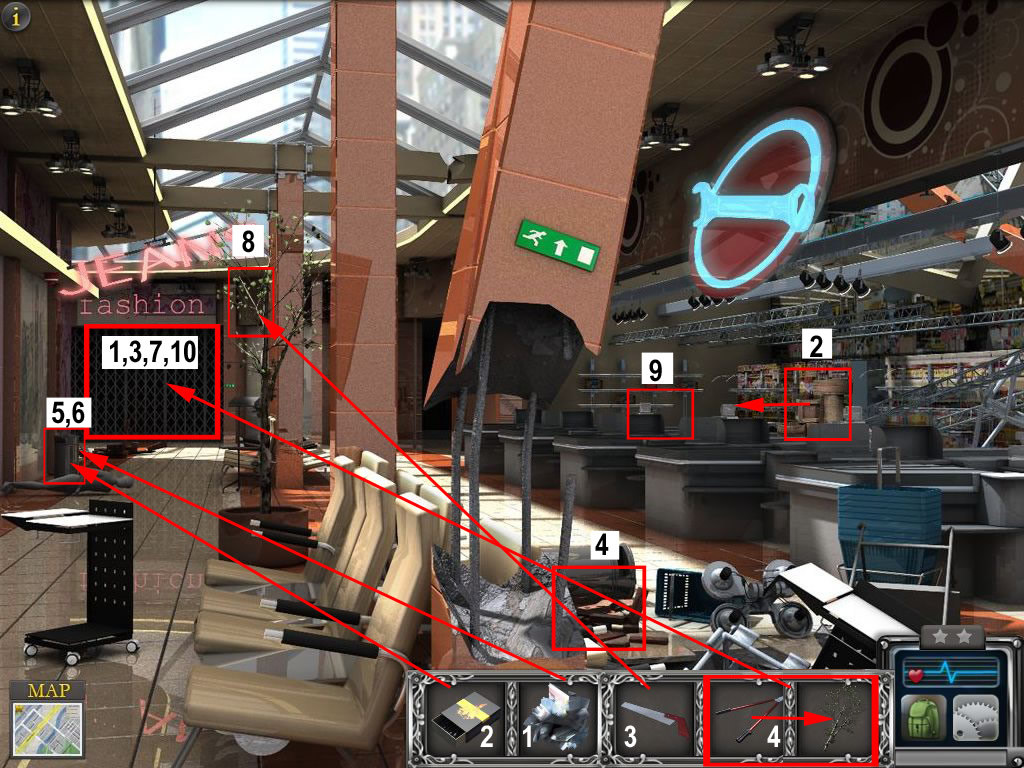
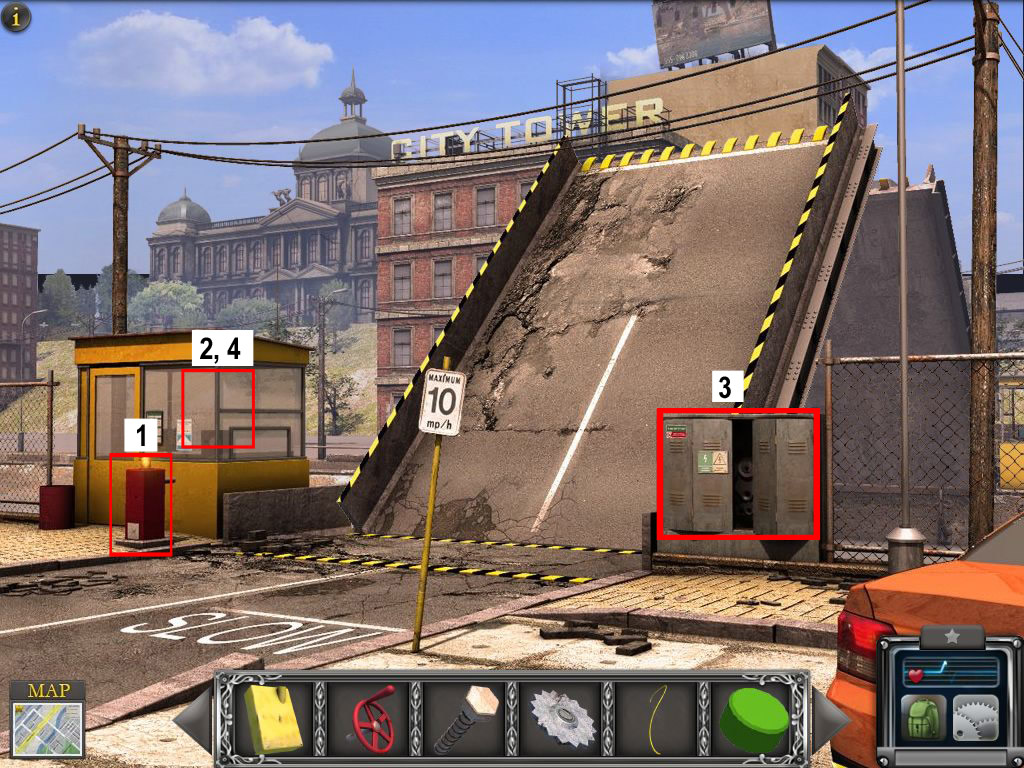
North side Mall-Main Entrance
Click the red car's trunk - the old guy will help you.
Find the 10 figurines for him.
Screenshot
Click the blue mail box to get a part of the bridge.
Click the ground to trigger a ho-scene.
The baseball bat and the angle grinder are going into your inventory.
Screenshot
Use the angle grinder at the pole to get a part of it.
With this part open the trunk of the red car.
Find all objects and the glass breaker will go into your inventory.
Screenshot
Use the glass breaker to break at least one window and enter the mall.
Screenshot
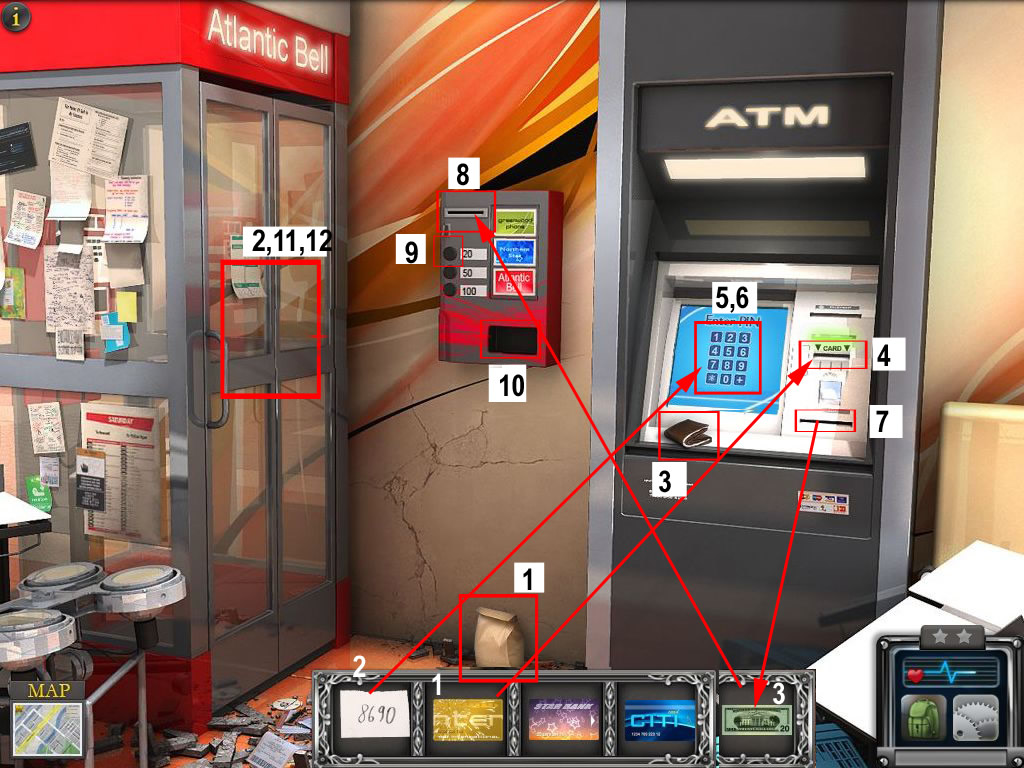
North side Mall-Vestibule
Click the paper bag to find a part of the bridge.
Click the phone boost to trigger a ho-scene.
Three credit cards and a note with the pin are going into your inventory.
Screenshot
Try all credit cards at the ATM slot - there is no right card, it will always be the last one.
Type the pin 8690 at the keypad and click the 20 - get the money for your inventory.
Get the card out of the slot and click the telephone boost again.
Screenshot
Find all objects, telephone receiver and cable are going into your inventory.
Click the cable at the telephone and replace the receiver.
Use the card at the card slot.
Click the receiver to call.
Screenshot
North side Mall-Vestibule
Click the grate left - the old guy will help you, so find 10 tickets for him
Screenshot
Click the boxes in the back, on the table - a mom is missing her son.
Click the grate of the jewelery to trigger a ho-scene.
Matches and paper scrapes will go into your inventory.
Screenshot
Place the paper at the fire alarm left and light it with the matches.
Click the branch right side to trigger another ho-scene.
The saw and the hedge cutter are going into your inventory.
Screenshot
Use the saw at the branch and combine it inside the inventory with the hedge cutter.
Click the grate with that branch.
Screenshot
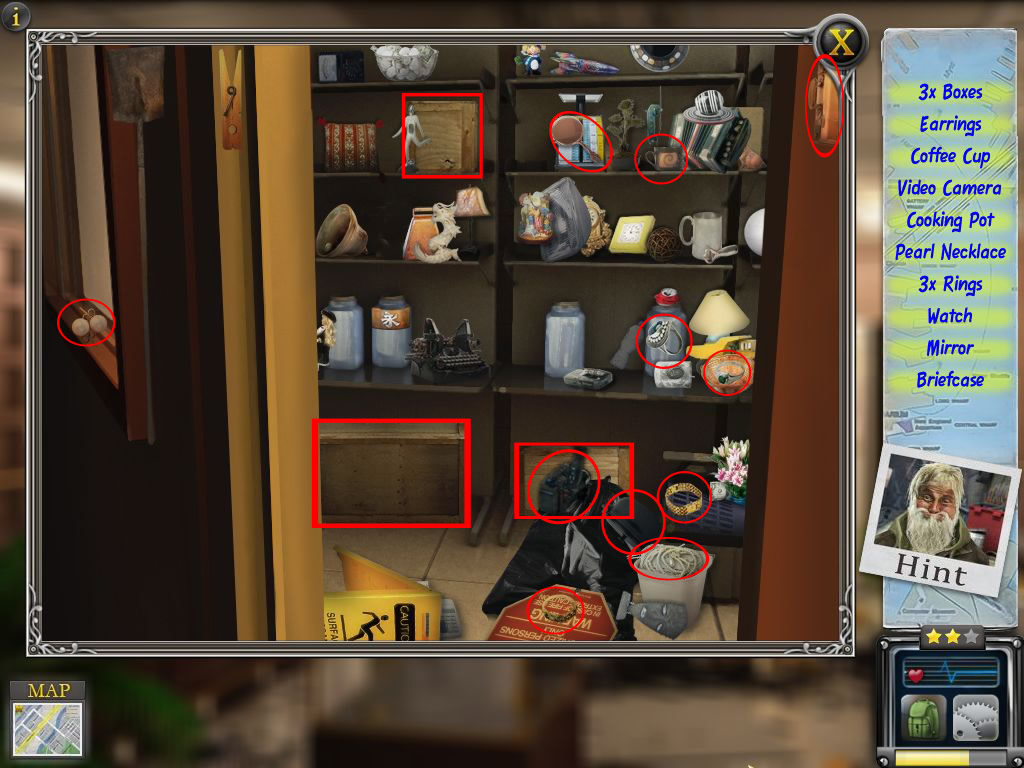
North side Mall-Simon's Jewelery
Click right the desk right side and you will find the puppy's owner.
Click the middle bust in the second shelf from bottom to get a part for the brigde.
Click the right door to trigger a ho-scene.
The key will go into your inventory.
Use it at the glass vitrine and get the diamond ring into your inventory.
Screenshot
Use the diamond ring at the glass of the right door.
Find all objects - three wooden crates are going into your inventory.
Screenshot
Use the crate to reach the air ducts - click them again to go through.
Screenshot
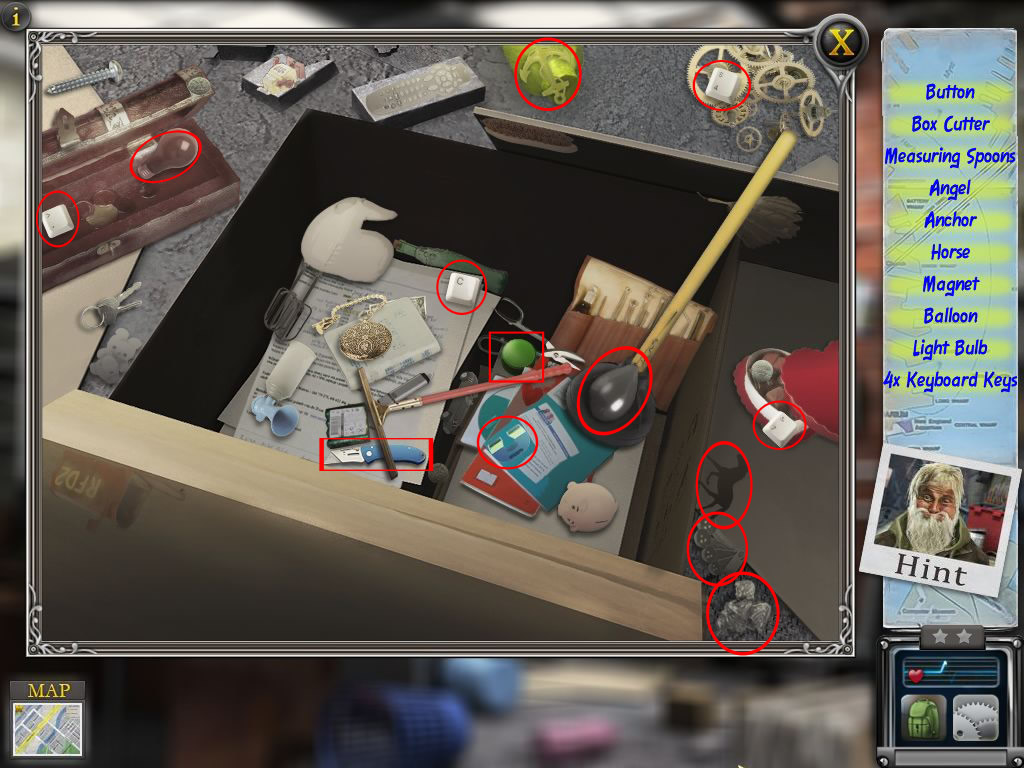
North side Mall-Loading bay
Click the ceiling above the rolling gate to get a part of the bridge.
Click the switch for the rolling gate to trigger a ho-scene
Box cutter and start button are going into your inventory
Screenshot
Click the cable above the switch to trigger another ho-scene.
Duct tape and hanger are going into your inventory.
Screenshot
Combine hanger and box cutter to get a piece of wire.
Place the wire at the other wires in the wall and fix it with the duct tape.
Place the button at the rolling gate and click the switch.
Click the little opening at the bottom to move on.
Screenshot
North side Mall-Loading zone
Click the bucket in front of the container to receive a part of the bridge.
Click the green lid right side - mom has her little boy back.
Click the shards in front of the fence to trigger a ho-scene.
Click the container and click inside again.
Find all objects - the hanger, broom and ladder are going into your inventory.
Screenshot
Use the broom to sweep away the shards.
Click left of the fence to get a nearby view of the bus.
Use the hanger to click the switch for the top lid.
Screenshot
Place the ladder at the fence and click the top of the bus to climb up.
Screenshot
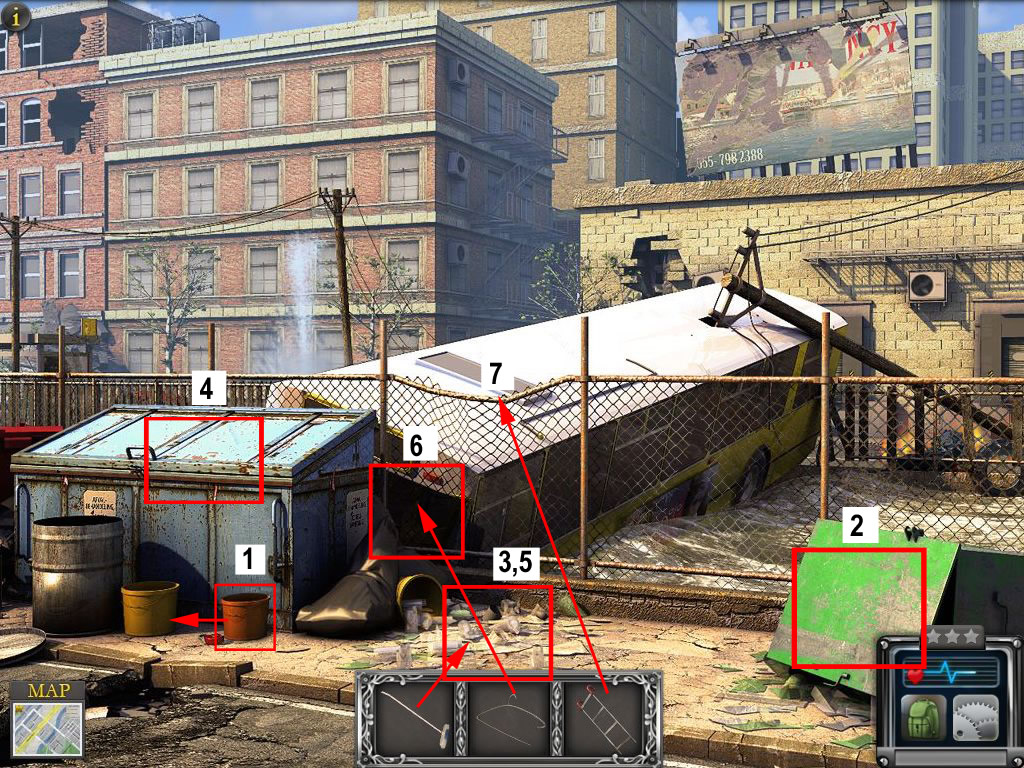
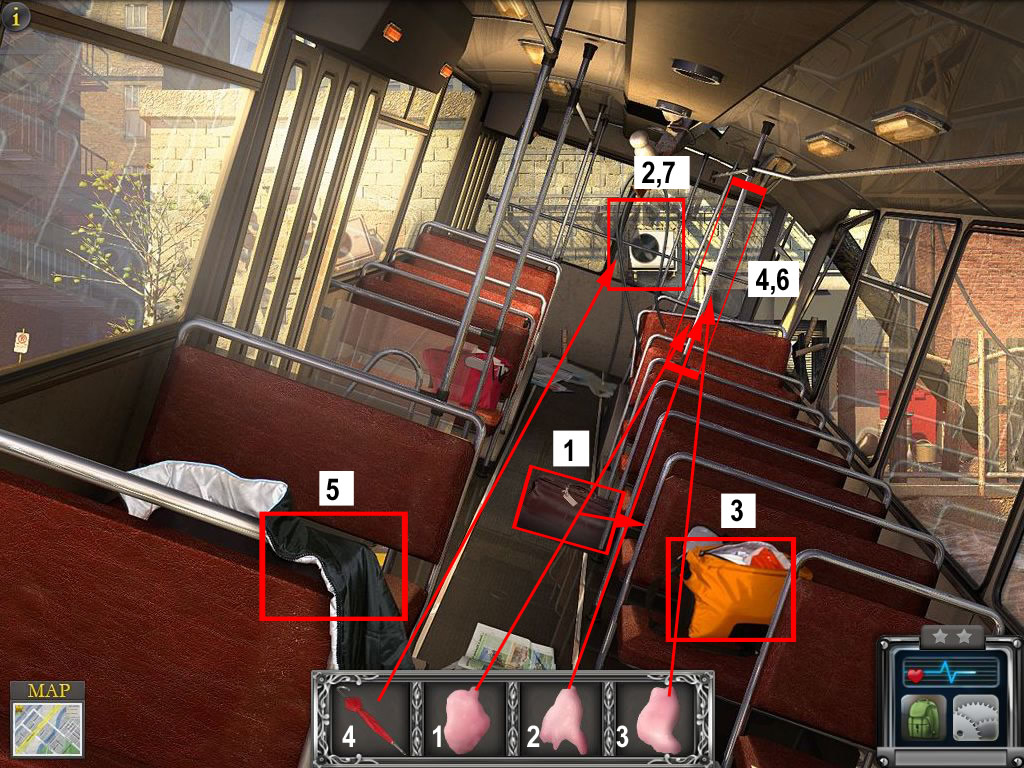
City Bus
Click the brown back to find another puppy.
Click the sparkling cables to trigger a ho-scene.
The umbrella goes into your inventory.
Screenshot
Click the pole left of the cables to trigger another ho-scene.
The three chewing gums are going into your inventory.
Screenshot
Use the chewing gums with the pole right next to cables
Use the umbrella to move the cables.
To move the bus, click the place where the cables have been.
Screenshot
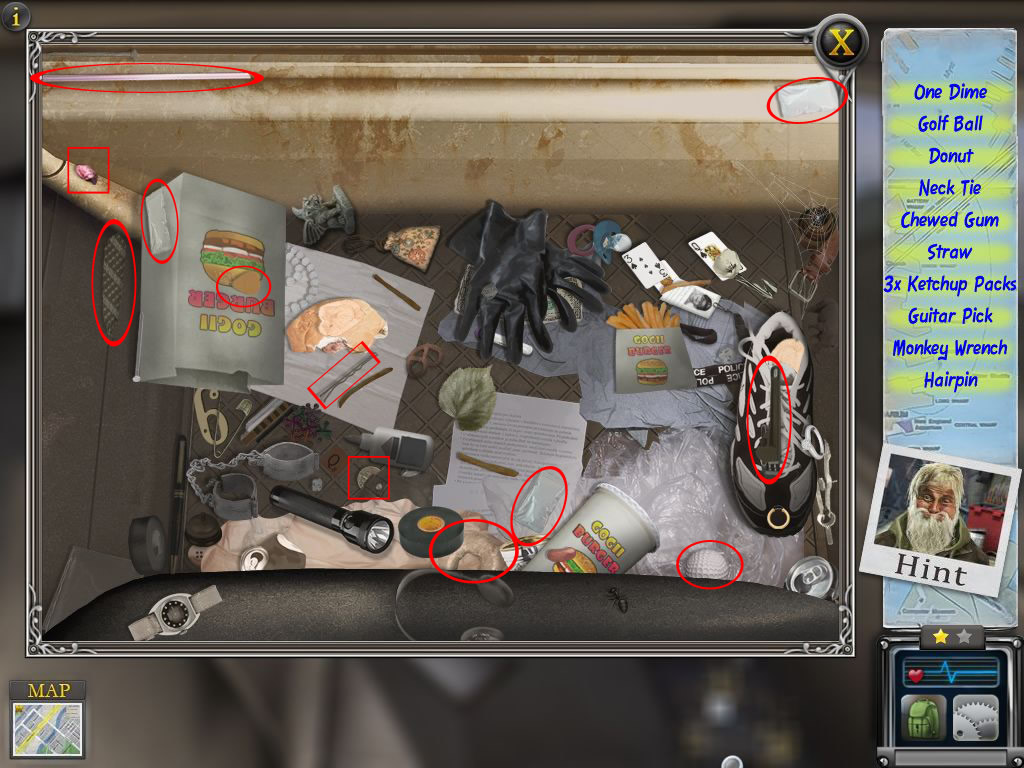
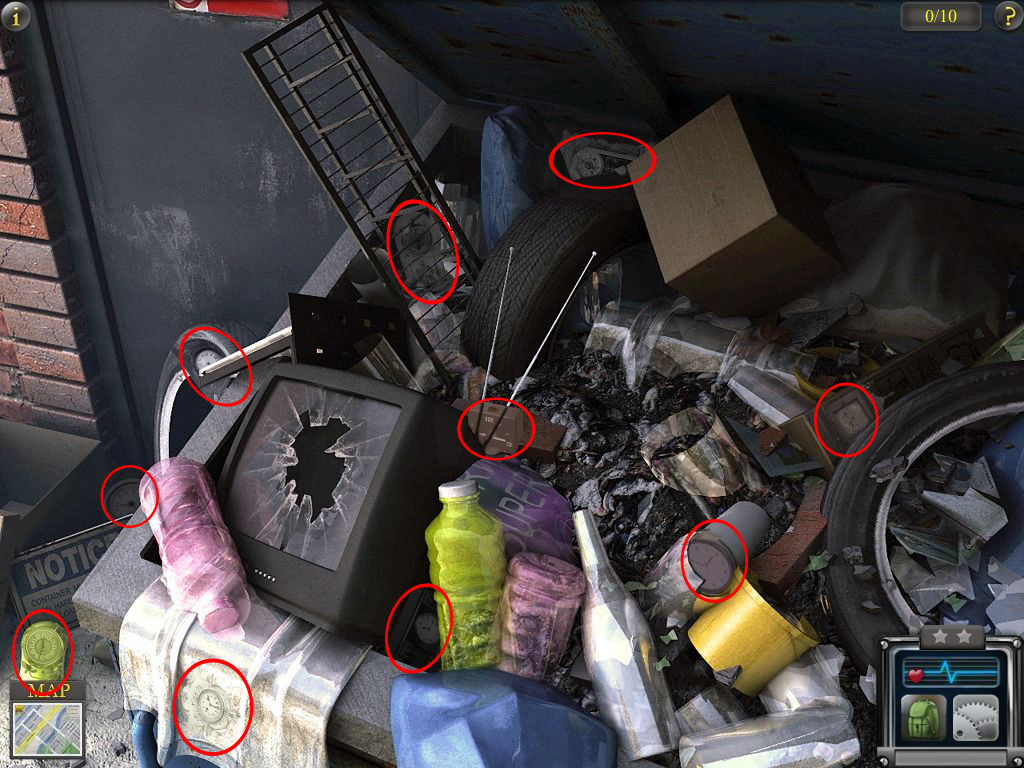
Dead End Alley
Collect 10 clocks for the old guy by clicking the wall in front of you.
Screenshot
Click the bottles left side to get another part of the bridge.
Click the drain cover to activate to ho-scenes.
The buggy will leave a shovel and a thorn in your inventory
Screenshot
Use the shovel to open the container and find all listed objects.
The pipe and the pick axe are going into your inventory.
Screenshot
Place the thorn at the drain cover and the pipe at the thorn.
Click the pipe and use the pick axe.
Click the hole to move on.
Screenshot
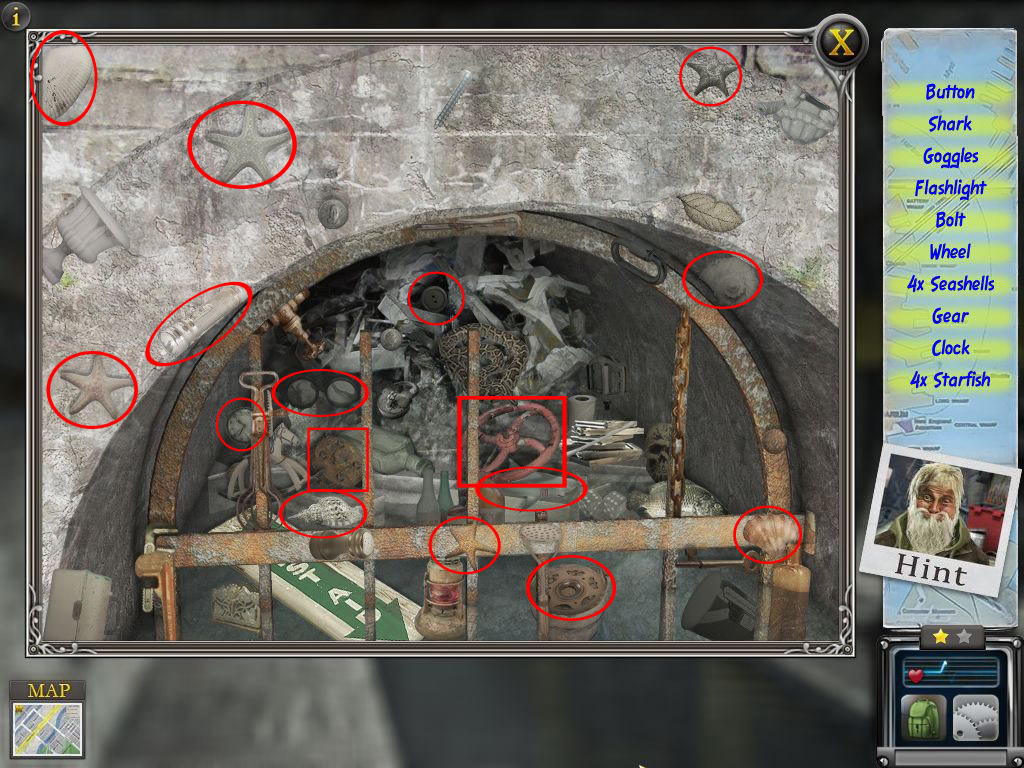
Service Tunnel
Click the stone left back to receive a part of the bridge.
Click the glass tube next to the leak - a wheel is missing.
Click the triggered ho-scene.
The wheel and a bolt are going into the inventory.
Screenshot
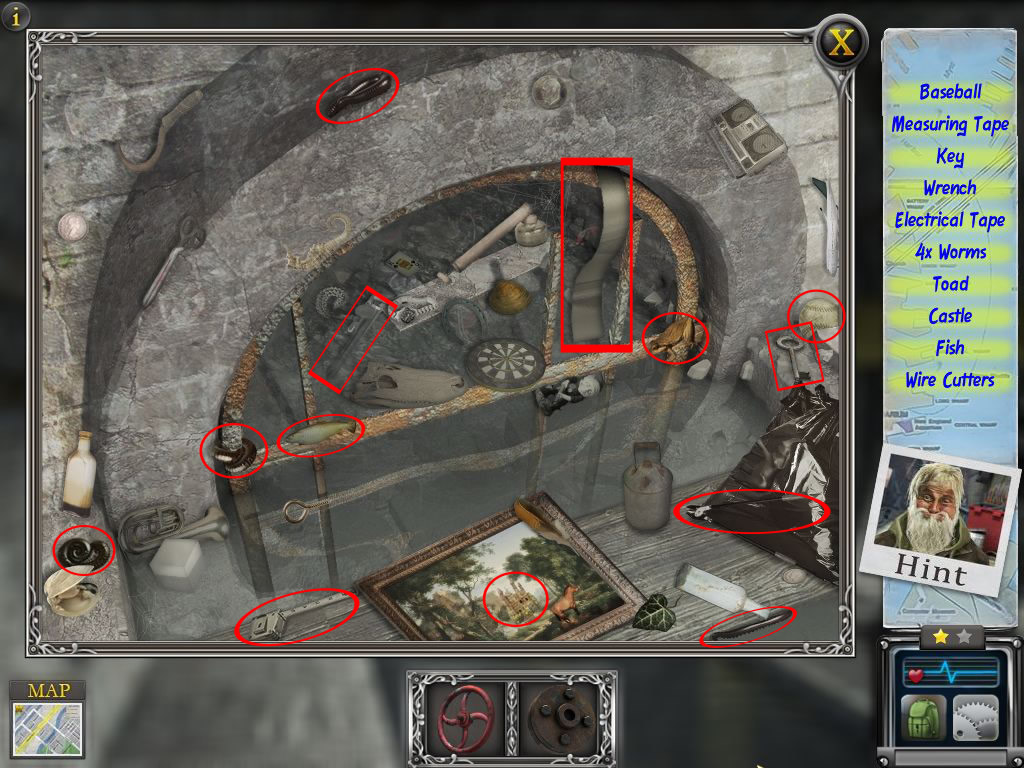
Click the broken pipe to trigger another ho-scene.
A wrench, isolation tape and a key are going into your inventory.
Screenshot
Use the wrench to remove the broken pipe. It will go into your inventory.
Place wheel and bolt onto the leaking pipe and use the one from your inventory to close the wheel.
Use the isolation tape at the sparkling spot above the door, use the key to open the door and leave.
Screenshot
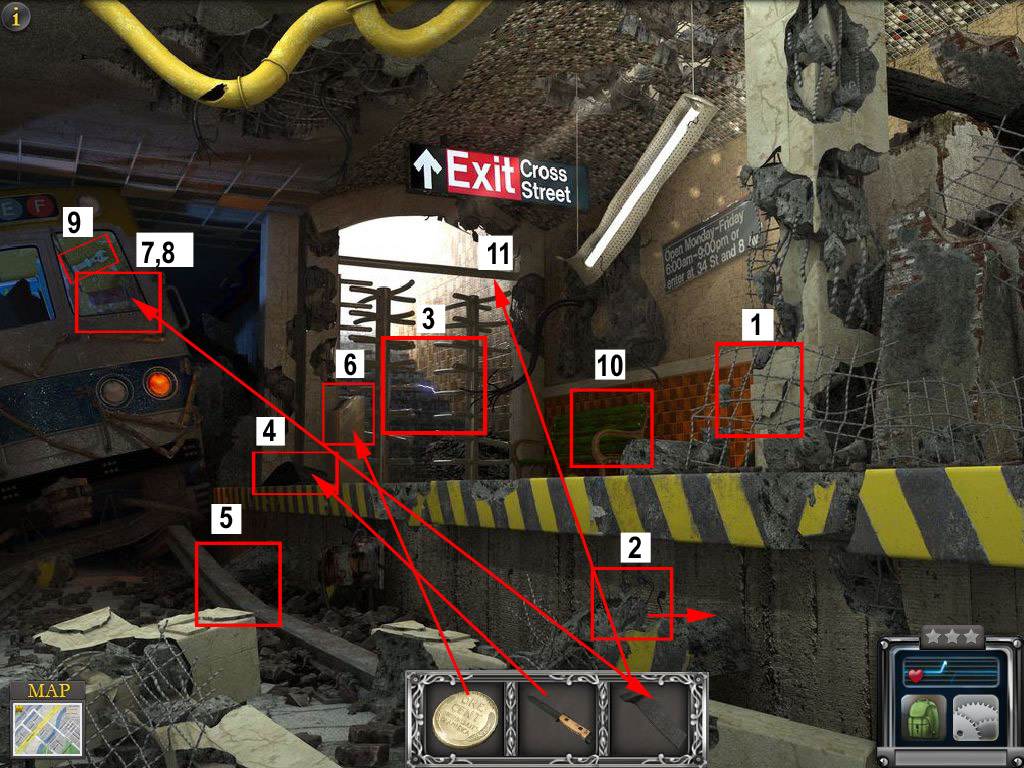
Subway Terminal North Stop
Click the right pole and give back the puppy.
Click the debris low right to get the last part of the bridge.
Click the gate, but you can't touch it.
Click the rubber mat left next to the gate to trigger a ho-scene.
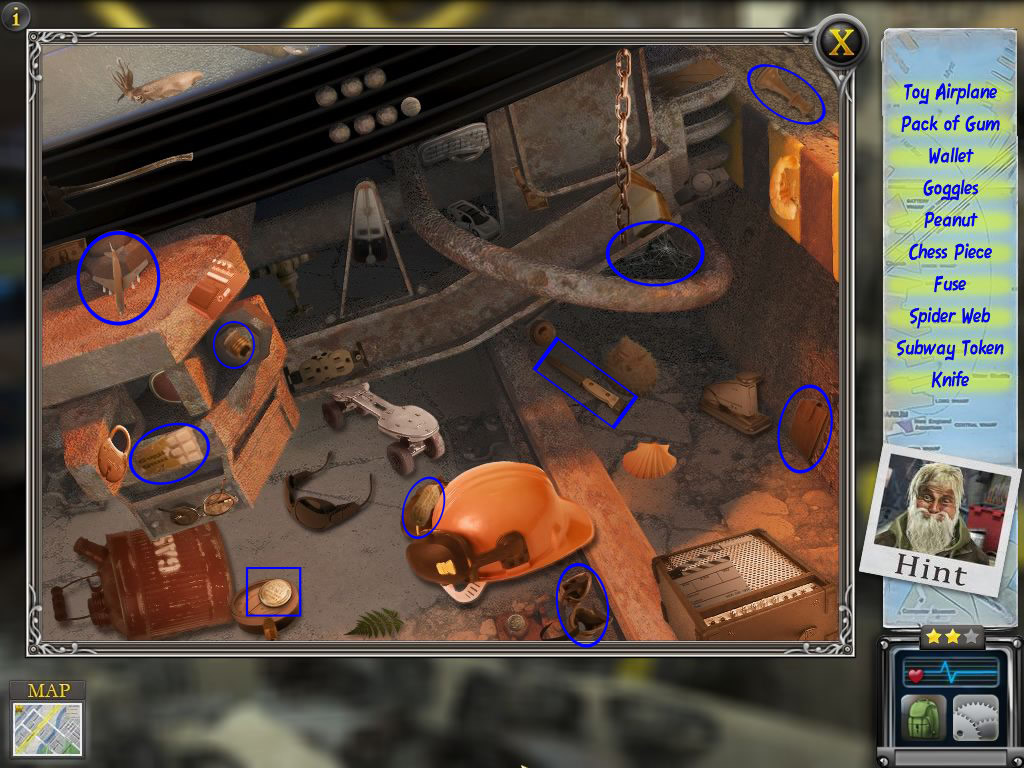
The knife and the subway token are going into your inventory.
Click the toke at the gate but this does not work.
Screenshot
Use the knife to cut of a part of the rubber mat, that goes into your inventory.
Click the right window of the subway and place the rubber mat there.
Get the wrench and click the rubber mat to get it back into your inventory.
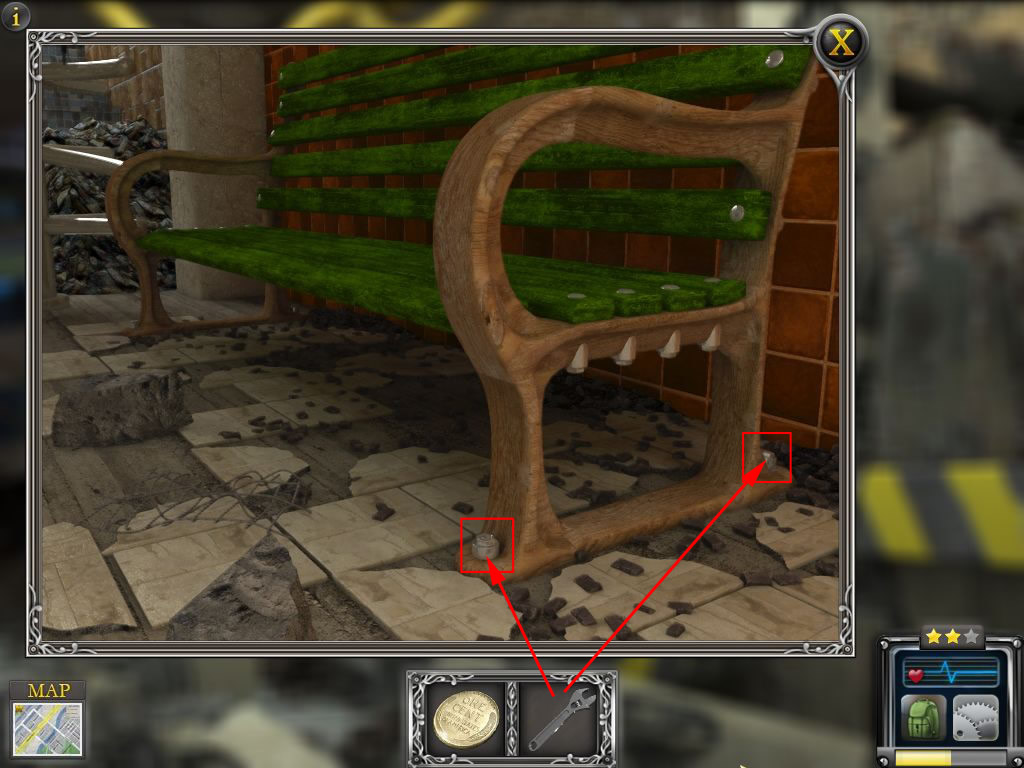
Click the bench and use the wrench to loose the two screws.
Screenshot
Place the mat at the bench.
Click again to climb up.
Screenshot
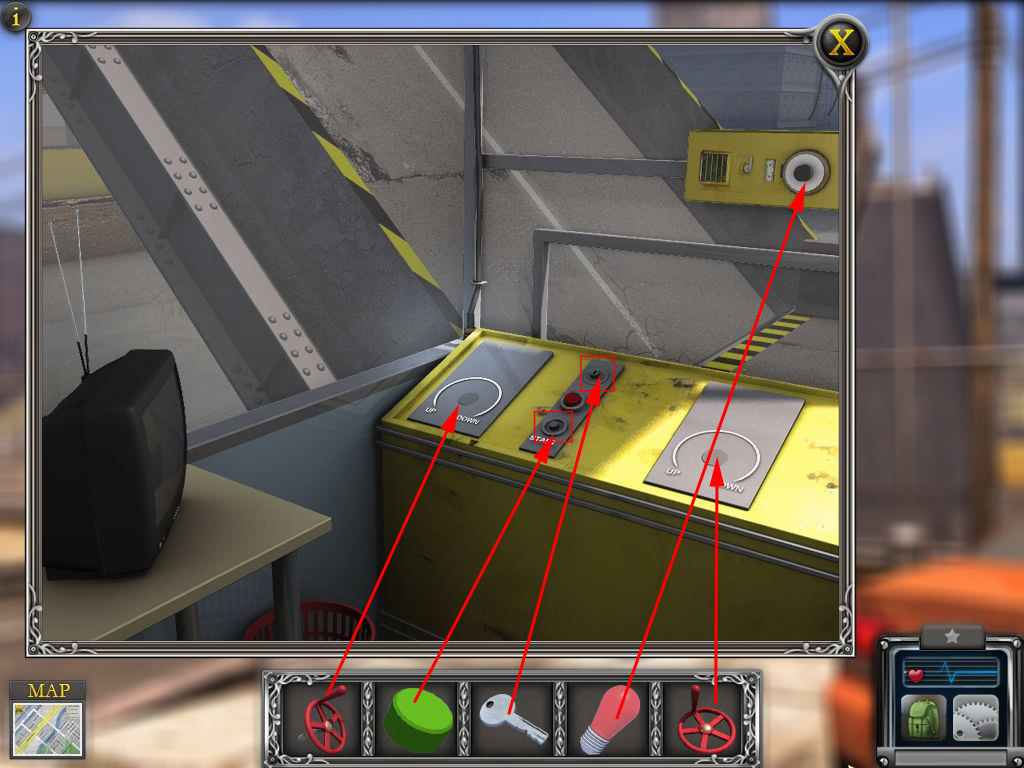
North Canal Draw Bridge
Screenshot
Everything from your backpack-inventory will be moved over into the normal one.
Use the arrows right and left to move the inventory.
Place the gate at the red base left side.
Place also the three screws and the weight at the end.
Screenshot
Click the house behind the red box - place the two wheels right and left at the control panel.
The red bulb goes at the ceiling.
The green butte goes to the "Start"-place on the control panel.
The key goes into the key hole.
Click the key to move it.
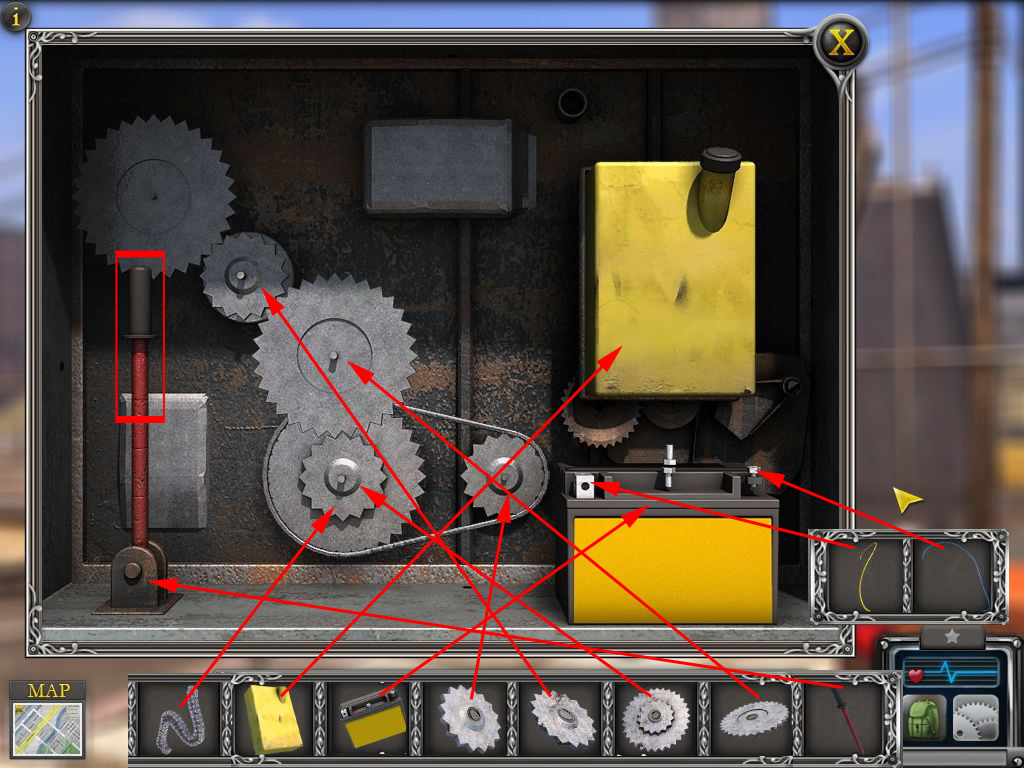
Screenshot
Click the box right next to the bridge and place the gas tank and the battery below it.
Connect the battery and gas tank right side with the blue, left side with the yellow cable.
Place the gears at their places and put the chain at the two lower ones.
Low left place the lever.
Click the lever to start.
Screenshot
Back to the house, click the green "Start" - button.
Click both wheels and go over the bridge.
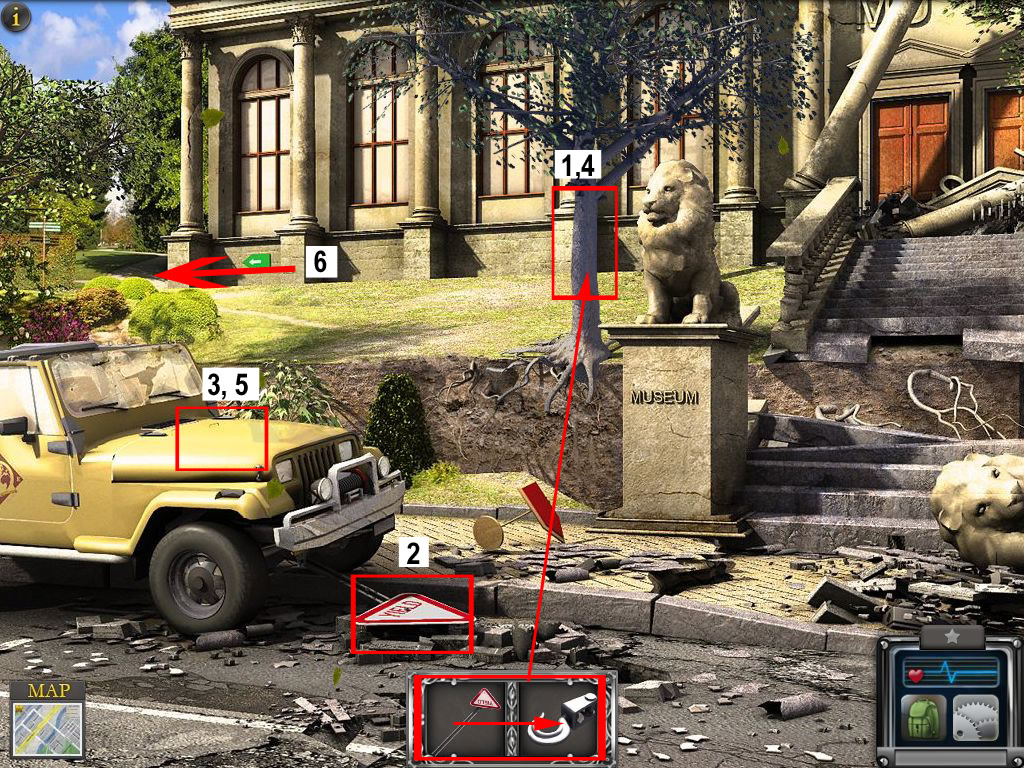
Museum - Front Entrance
Click the tree to trigger to ho-scenes.
At the traffic sign, you will get a stone for your inventory.
Use the stone to smash the pole of the traffic sign. Get it into your inventory.
Screenshot
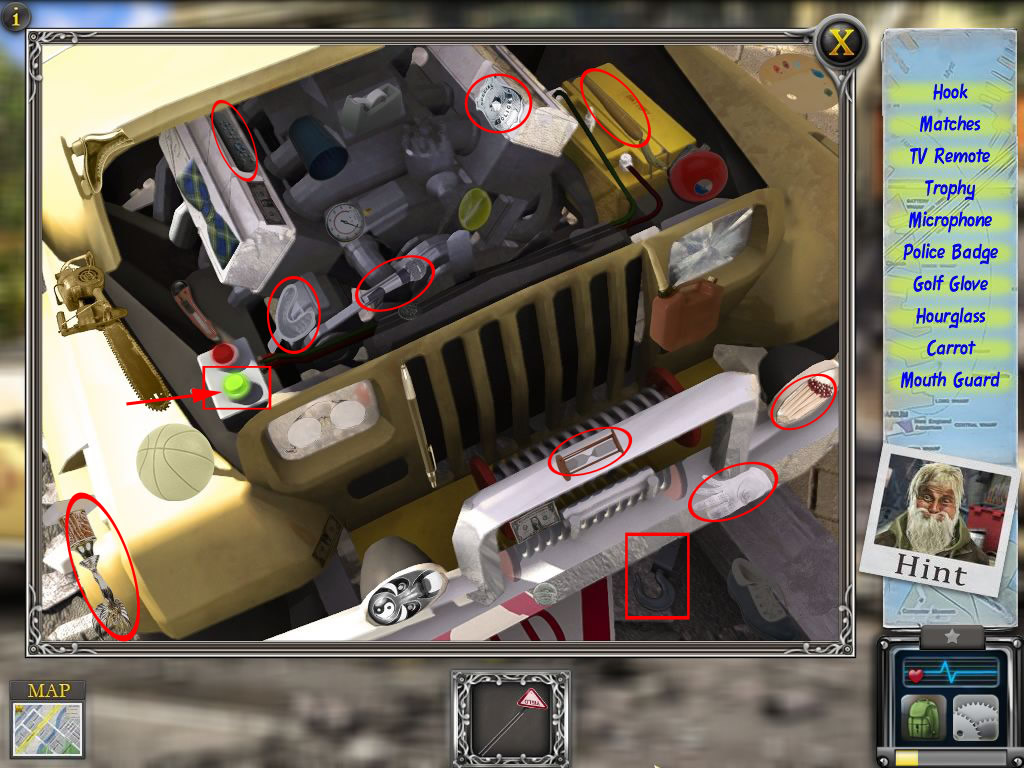
Click the car hood to open it and inside to find all objects.
The hook will go into your inventory
Screenshot
Leave the nearby view and combine the hook with the pole and click the tree with it.
Click the hood again and there the green button on the left.
Go to the left.
Screenshot
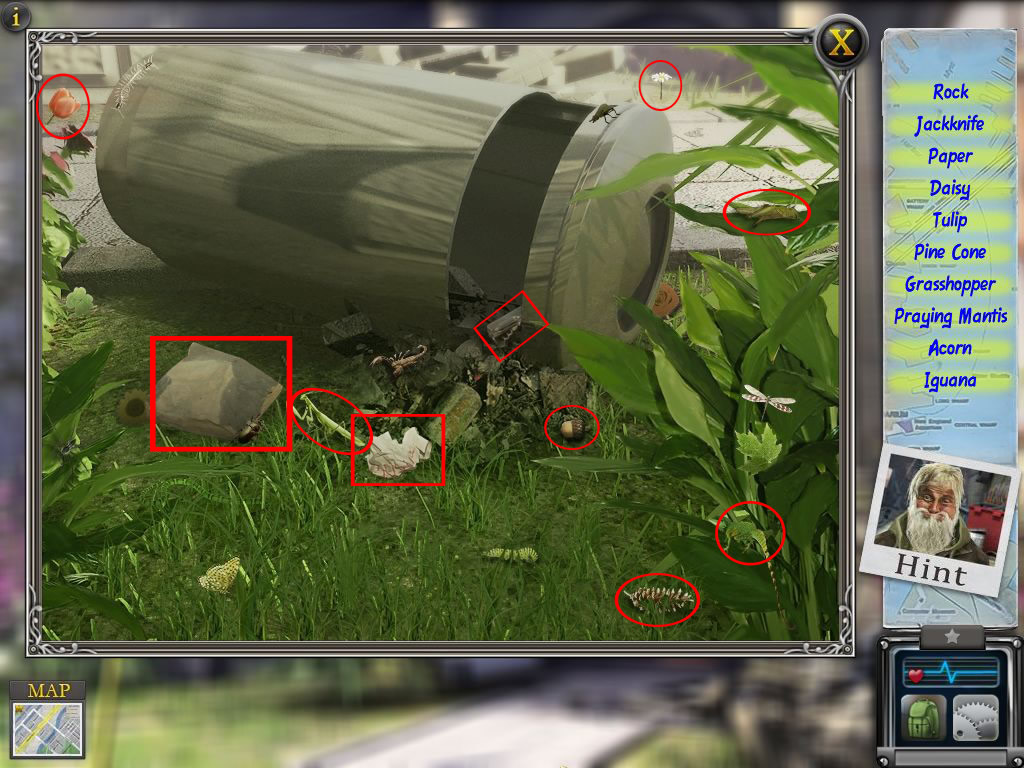
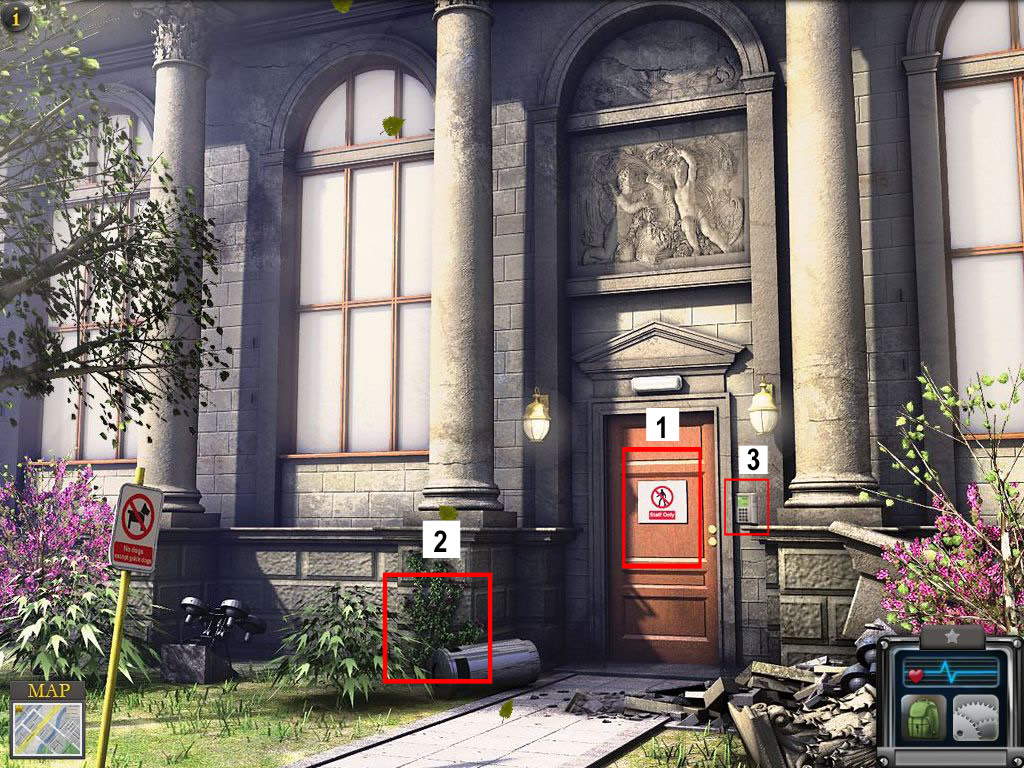
Museum - Side Entrance
Click the door to trigger a ho-scene.
Click the bushes and find all objects.
The note, pocket knife and stone going into your inventory.
Screenshot
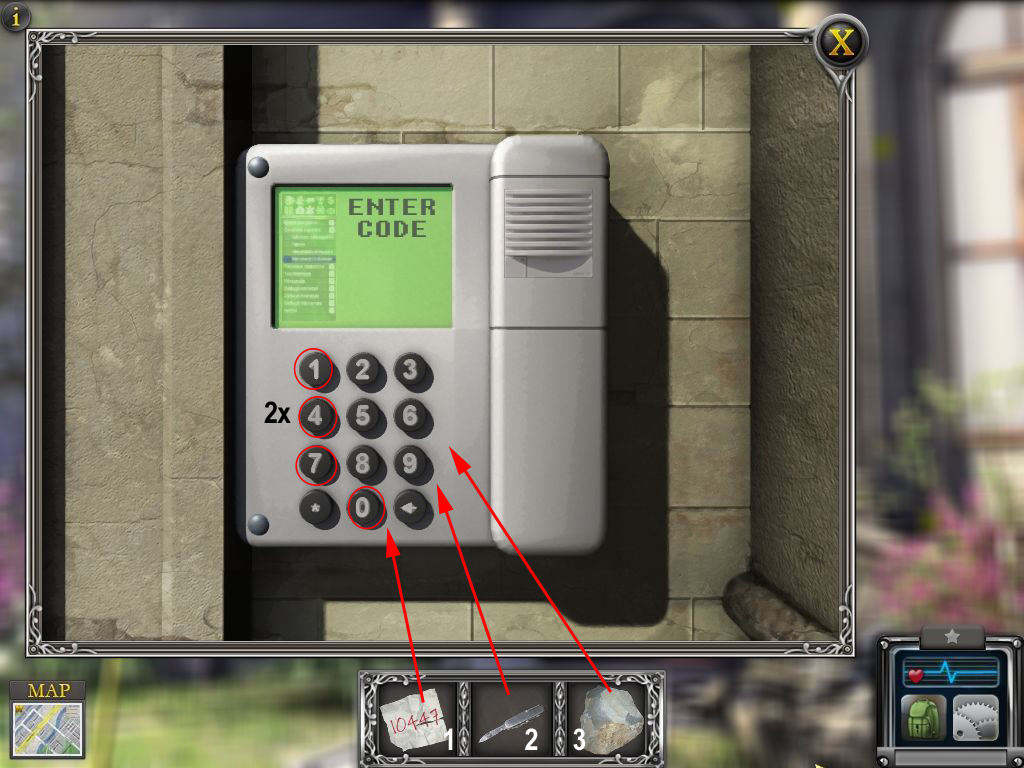
Click the code lock right next to the door and type 10447 - but nothing happens.
Click the key pad with the pocket knife.
Use the stone.
Screenshot
Click the door to enter.
Screenshot
Enjoy the ending
And a special thanks to Kayleigh for this Super duper walkthrough! \o/ Wooty-Tooty-Flip-Bam-Booty!
Posted by: Kero |
November 22, 2009 2:29 AM
|
November 22, 2009 2:29 AM