

![]() It's been quite a while since I've been genuinely excited about a hidden object game. They usually look fantastic with immense effort put into the artwork, but the hidden object aspect of things suffers from a lack of diversity along with a handful of poor mini-games thrown in because, well, that's the done thing these days, isn't it? So I'm very happy to say that Flux Family Secrets: The Ripple Effect is a quality addition to the hidden object genre. And I like it!
It's been quite a while since I've been genuinely excited about a hidden object game. They usually look fantastic with immense effort put into the artwork, but the hidden object aspect of things suffers from a lack of diversity along with a handful of poor mini-games thrown in because, well, that's the done thing these days, isn't it? So I'm very happy to say that Flux Family Secrets: The Ripple Effect is a quality addition to the hidden object genre. And I like it!
 Flux Family Secrets builds on the hidden object genre with a well-integrated adventure/mystery story, challenging tasks and fun trivia. You are Jesse Bennett, a woman seeking the answers to her mysterious past. Out of the blue, you receive a letter from Veronica Flux who claims she can help you. You accept the proffered plane ticket and go to meet Veronica, who suspects you may be a member of the Flux clan. Veronica then reveals the existence of "ripples" which affect great historical achievements, displacing treasures and spreading them around the world and through history.
The Fluxes are time travellers, moving through space and time to correct the effects of these ripples...
...or are they?
Ripples work by theme, apparently. Your first task is to sort out the mess caused in the world of Art, with objects spread around the dwellings of Shakespeare, Leonardo da Vinci and Hatshepsut. Where Flux Family Secrets gets interesting is that the objects are parts of an identified whole — you'll be finding pieces of the Mona Lisa in Shakespeare's room to put together and place in Leonardo's studio, thus allowing you to find that last bit of the golden cat statue for Hatshepsut's tomb, generating a mini-game, which you need to win to find the key to a chest in Shakespeare's room... Some objects are helper items that allow you to find the main items (keys, knives, scissors etc), others trigger interesting snippets of trivia about the person whose room you're rifling through.
Analysis: I really enjoyed the linkage between the different themes — the fact that Mozart appears in the Music section and the Wright Brothers in literature exposed me to new information (I didn't know the Wright Brothers ran newspapers before getting into the transport business) and is creative and thoughtful. Conversely, though, you meet the same six or so characters throughout the game, which made me think wonder why the developer put so much effort into different scenes but didn't bother to introduce new characters. You could have had Leif Ericsson in Travel, Jane Austen in Literature, maybe Nikola Tesla in Invention, all ready for their close-ups in the time it would have taken Hatshepsut's sarcophagus to render. Maybe the development team is more into artwork than history.
 I clearly am a bit of a sucker for great artwork, but part of the charm of Flux Family Secrets is the care that has clearly been put in to the scenery. For instance, when you return to Amelia Earhart's office, you can see the hangar outside from your previous search. Similarly, the Abbey Road studios can be seen from different views. The objects to be found are all relevant to the theme and setting — you're looking for a fire hydrant in a 17th century studio because it's essential for restoring Amelia Earhart's hangar, not just because you're looking for a random bunch of stuff.
The mini-games really shine. Although there are one too many incidents of Mastermind for my liking, I really like the Einstein game (you have to cause atomic reactions to clear the board of coloured dots), and some of the other games, while familiar (there's a Simon tone game, a Tic-Tac-Toe, a couple of sliding puzzles and jigsaws), are well executed and fit appropriately into the scenery (the Simon game takes place in the Abbey Road studios, for instance). I've played hidden object games where I've skipped through every mini-game — this is not one of those!
There's no penalty for hints, but you have to wait for them to refill. Wrong clicks add to your time penalty, and the game has a bit of a sarcastic touch — if you use an object somewhere it's not supposed to be, you'll trigger snarky little comments like "Just trying anything in the inventory, huh?" (YES I AM YOU HORRIBLE LITTLE MAN). The only reservations I had were a couple of weird little glitches where I managed to "win" a mini-game without actually doing anything, and where I passed through the final search part of one of the themes without having found the final object. Other than that, I can highly recommend Flux Family Secrets.
![]() Windows:
Windows:
Download the demo
Get the full version
![]() Mac OS X:
Mac OS X:
Download the demo
Get the full version


Walkthrough Guide
(Please allow page to fully load for spoiler tags to be functional.)
Flux Family Secrets: The Ripple Effect -Walkthrough
General Tips
The hint renews itself pretty quick
When you move with your mouse over the scene, you will see the shilouettes of the itmes, which do have to go there
All minigames can be skipped, but you have to wait a little, till the skip bar fills up
For skipping 20 minutes will be added to your all-over-playtime
For explainings about the minigames you have to click the little questionmark at the right lower corner of every mini game
To come back to the mini game, just click into the screen
Most of the mini games are random - Screenshots or solutions are only given as an examples
The Screenshots
The screenshots, showing what item-part is laying where and comes where, you will always find in the first spoiler of the chapter
The parts are colored marked - according to the color mark shown in the search bar
After the tutorial, objects, you have to put back, are copied into the screenshot and marked with a red pin
Objects for the toolkit-inventory are marked with pink circles
Parts, you have to click to open mini games or receiving items are marked with a red square
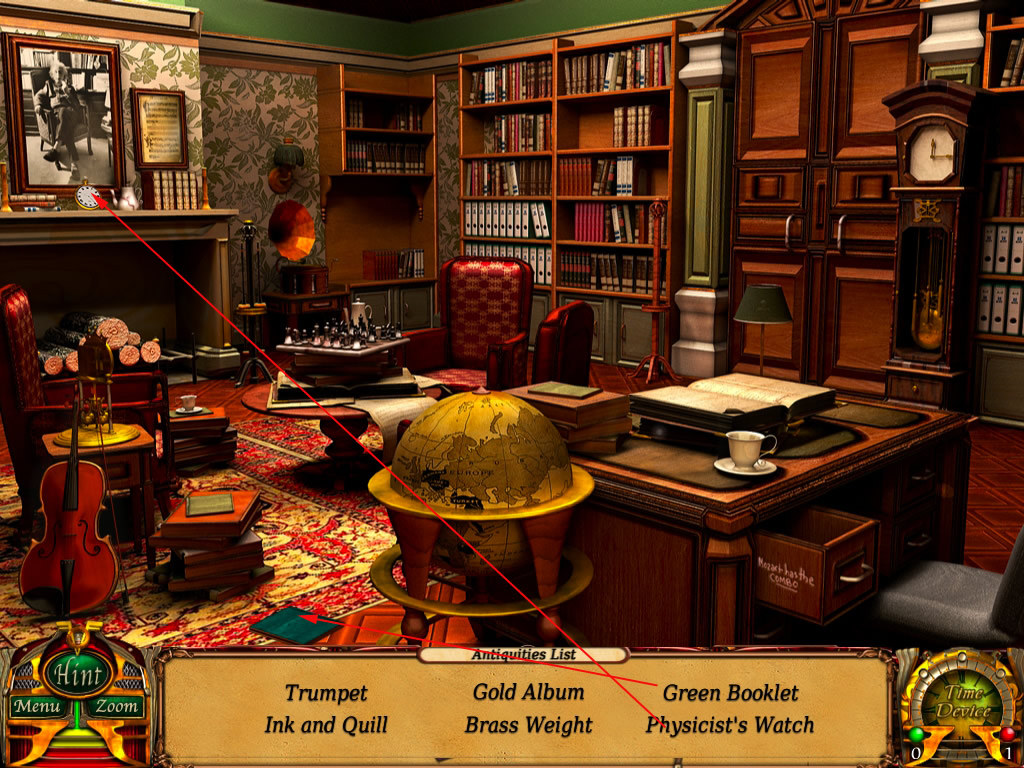
Flux Manison
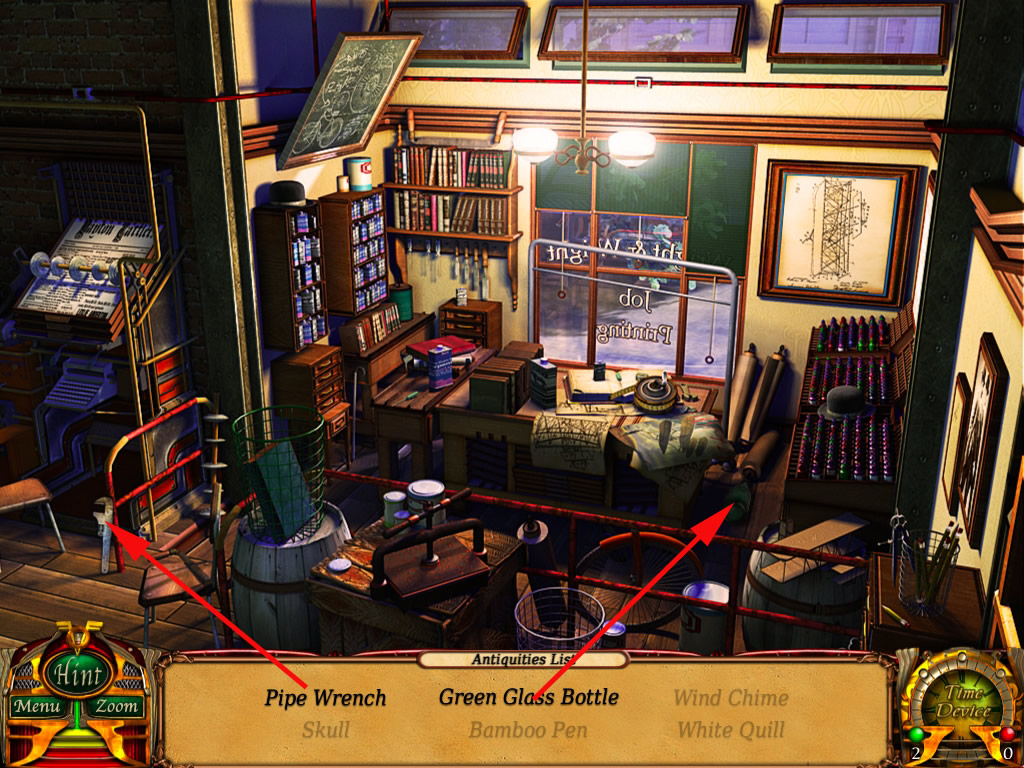
First room
After the tutorial find the objects for your search list
screenshot
After finding all three parts from the cryptex, get it out of the inventory and place it on the table
Click it to get a nearby look
The middle line has to show in all four parts the same symbol
Which symbol it is, is random - You hav to look, till you find a symbol, that is shown in all four rows
Click a symbol and move the symbols with pressed left mousebutton up or down
screenshot
Out of the cryptex a part of the fireplace clock is falling
After findin the other parts of the clock, place it on the right side above the fire place
Click it to get a nearby view and pick up the little golden button in the middle
screenshot
Now place the clock hands at the clock face of the grandfather clock
A nearby view does open
Move the clock hands, till the big clock shows the same time as the little clock in the low left corner
On top of the twelve the blade starts rotating
When it stops, you can get the puzzle piece
screenshot
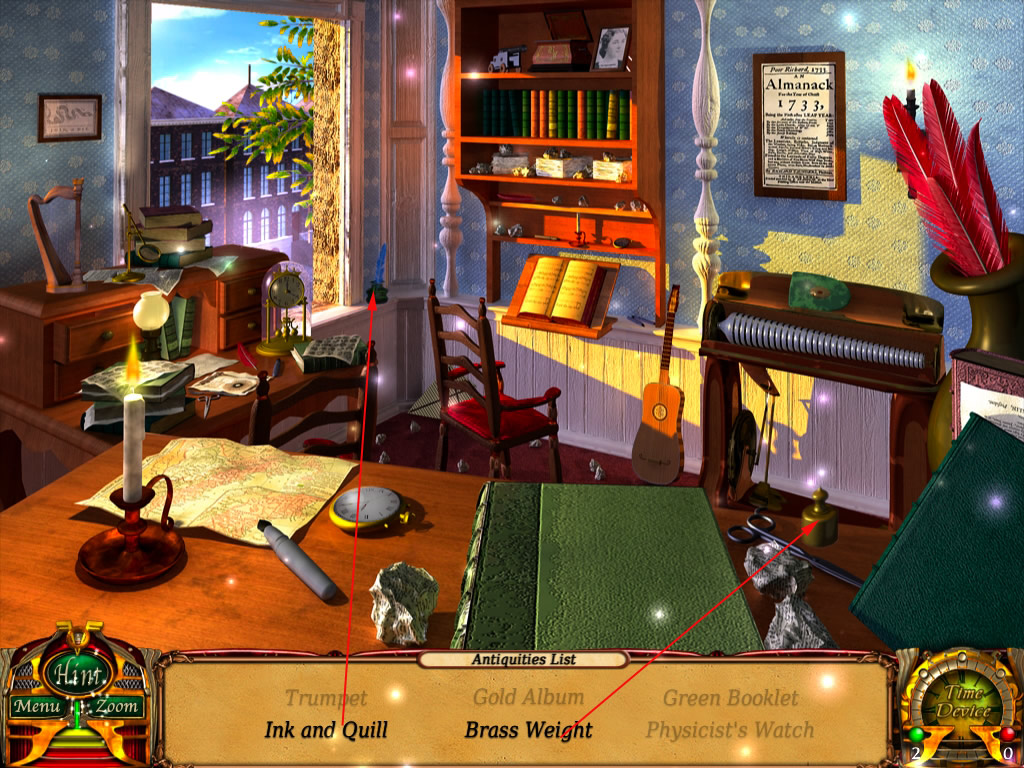
Second room
Find the parts for your search list
screenshot
After find the parts for the wall lamp, click it at the grey part of the wall right side
The lamp gives light and you can see left beside the telephone cable
After finding the two other parts of the telephone, place it on the little drawer at the bottom in the middle, next to the vase
The phone starts to ring, the vase falls down and breaks
Pick up the golden key from the floor now, right next to the drawer
Click the key at the drawer and you will get a near by new
Pick up the key, which is laying now next to the phone and open the drawer with it
screenshot
The drawer opens and you will find the last part of the family sign
Drag the family sign at the empty slot in the back top
At the left wall a comparment opens at the top
Place the puzzle piece from your toolkit-inventory there and a puzzle will open
Its a slider puzzle - by clicking on of the parts, it will go to the next empty spot
Redo the family sign
The part in the middle will be free at the end
screenshot
After you are done, a column comes up in the middle of the room
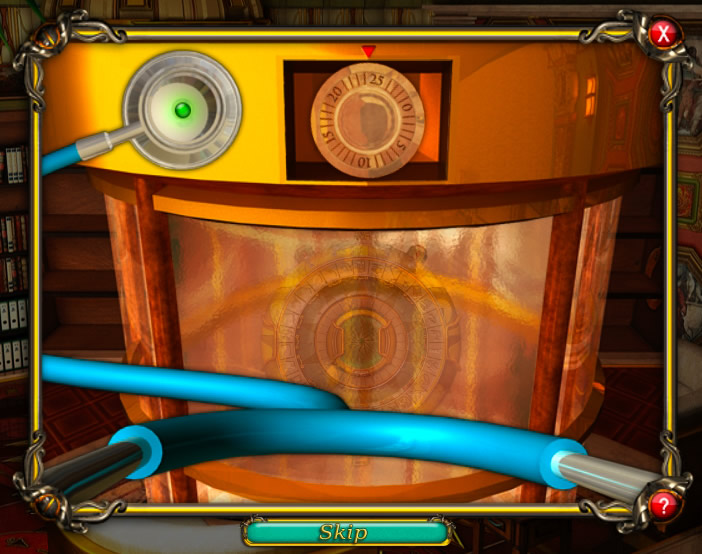
Get the stethoscope and click it at the column
You get a nearby view
You have to open the door, but for this you will need to find out the combination of the lock
On top you see a dial - when you move it with pressed left mouse button, you can see, that in the middle of the stethoscope head a red or green shows up
Red means, its the wrong number, left means it is the right number
Don't move the dial to fast, if you do, you will have to start all over again
The combination is random, to find out your combination you have to move the dial in the following order
For the first number, move the dial CLOCKWISE - stop, when you see the point show green
Now turn the dial COUNTER CLOCKWISE for the second number - stop when you see the point show green
For the last number turn the dial CLOCKWISE again till the point shows green
screenshot
The column door opens and you receive a strange advice
screenshot
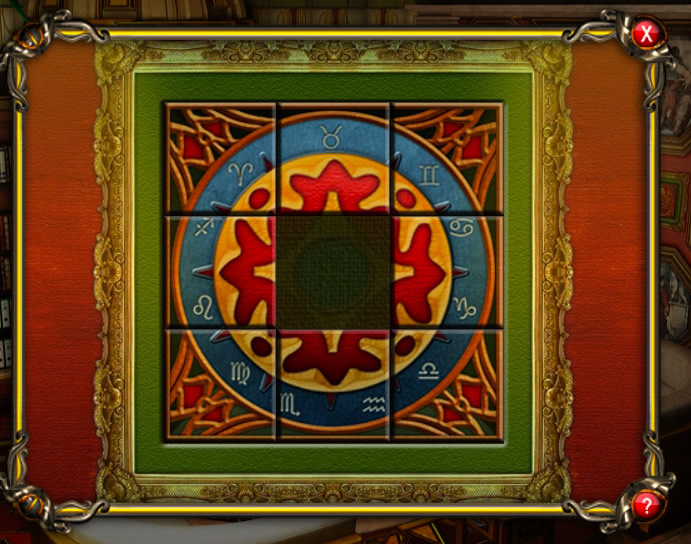
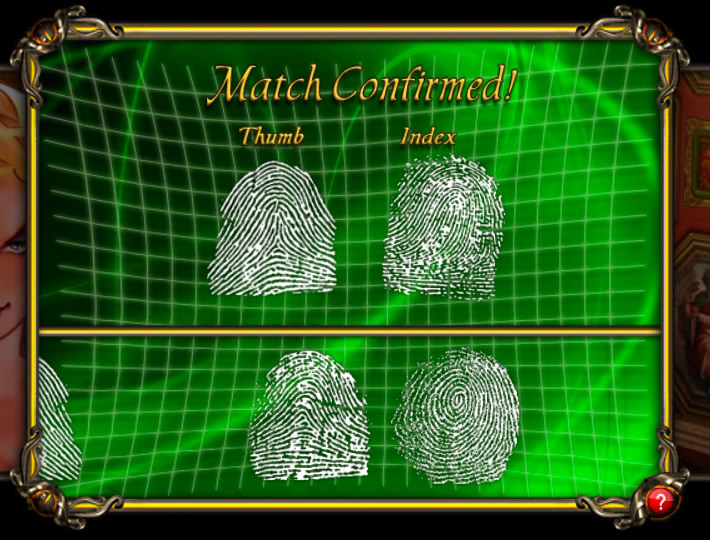
In the following video scene, you have to find in the lower part the two fingerprints fittig to the both in the top
If you think, you have the right one, click an drag it the lower one onto the top one
After finding the right prints, the chapter ends
screenshot
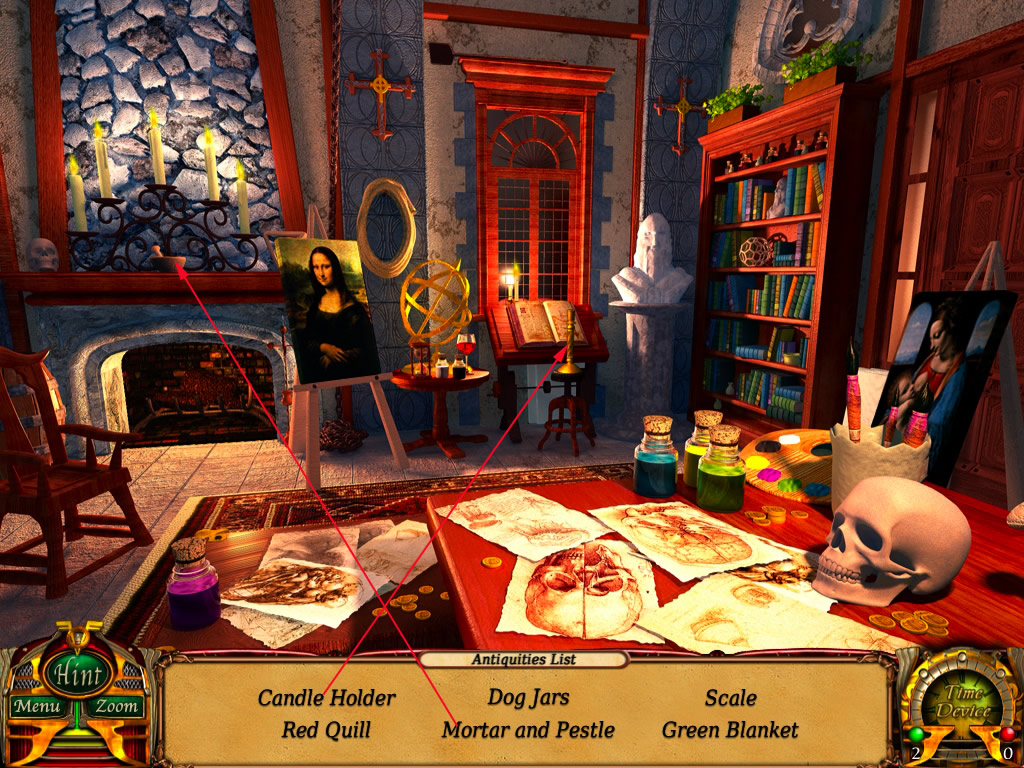
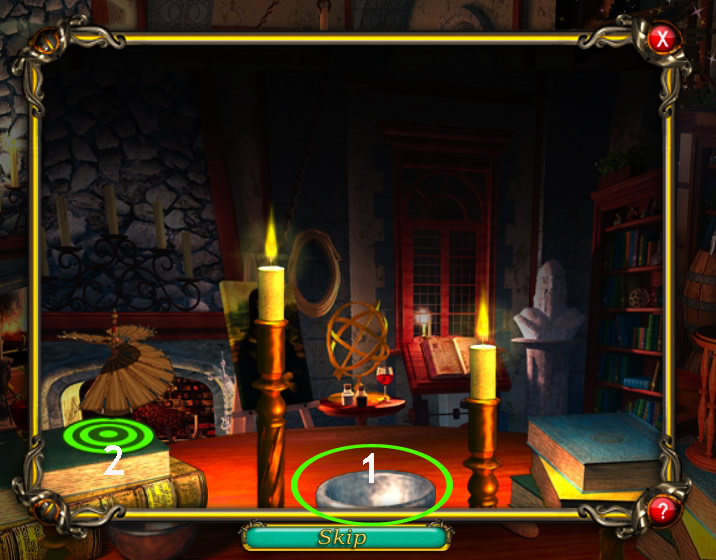
LOST TREASURE OF ART
Leonardo da Vinci, Work Study, c. 1515
Find the parts of your search list
The bust of Leonardo da Vinci goes on the post, in front of the window, right side
After finding everything else (a part of the golden dog can't befound yet) move on to queen Hathsepsut
screenshot
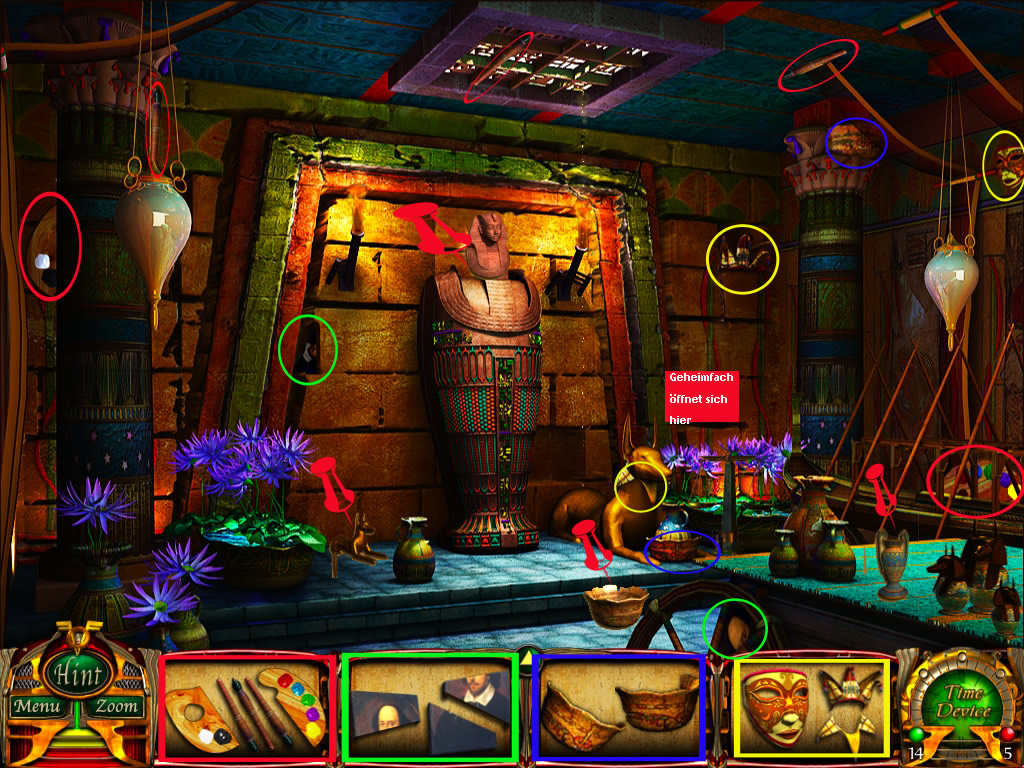
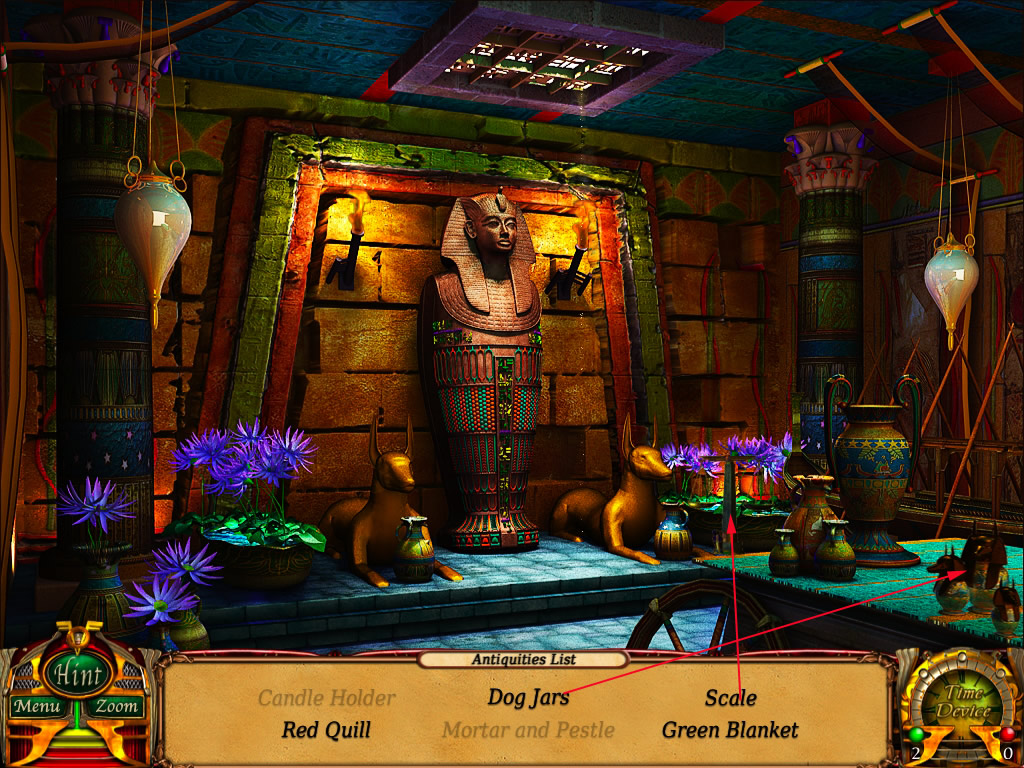
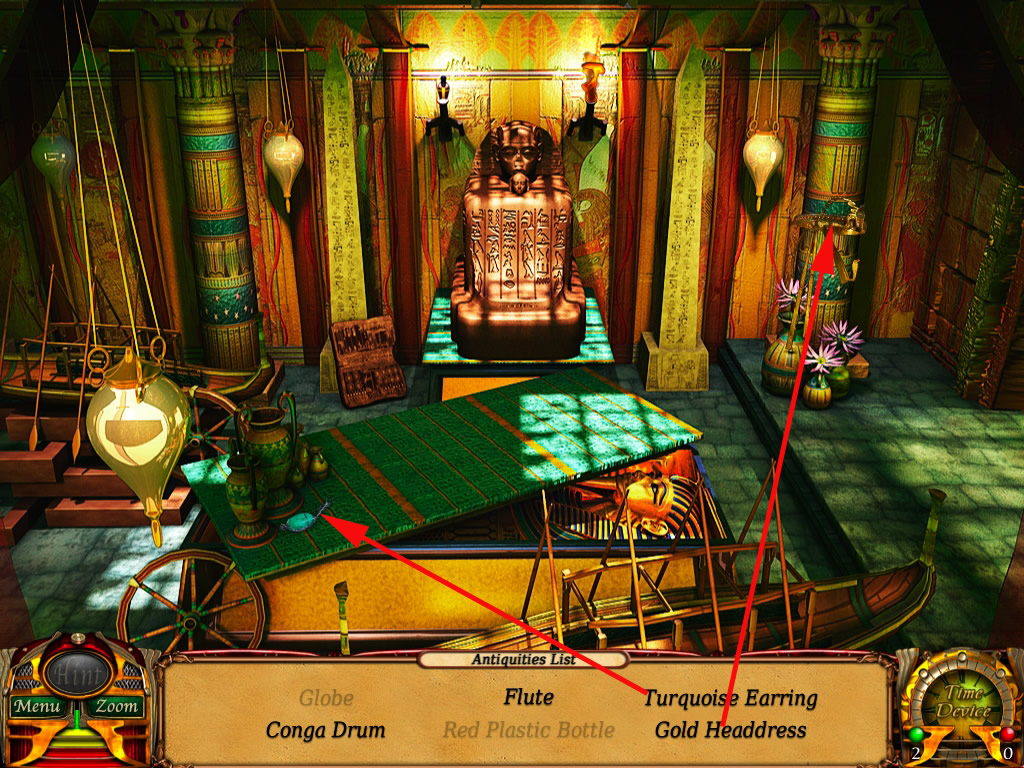
Queen Hatshepsut, Burial Tomb c. 1458 B.C.E.
Open your inventory and place the bust on the standing sarcophag in the back
Find the parts of your list
A part of William Shakespeare's portrait can't be found yet
Move on to William Shakespeare
screenshot
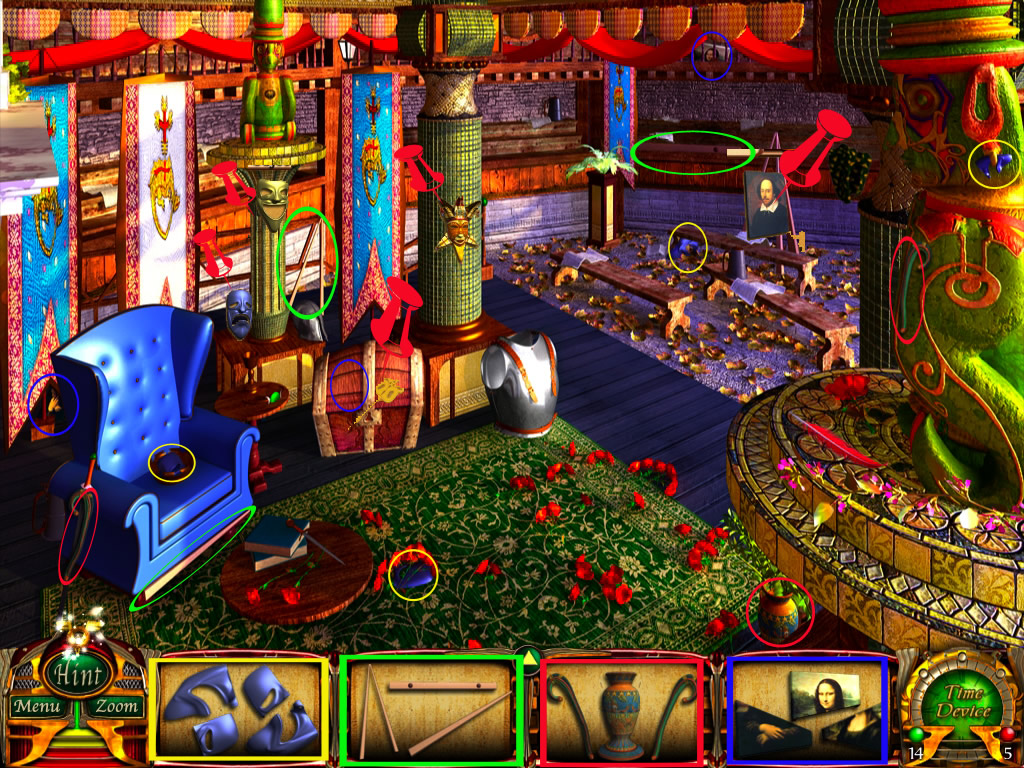
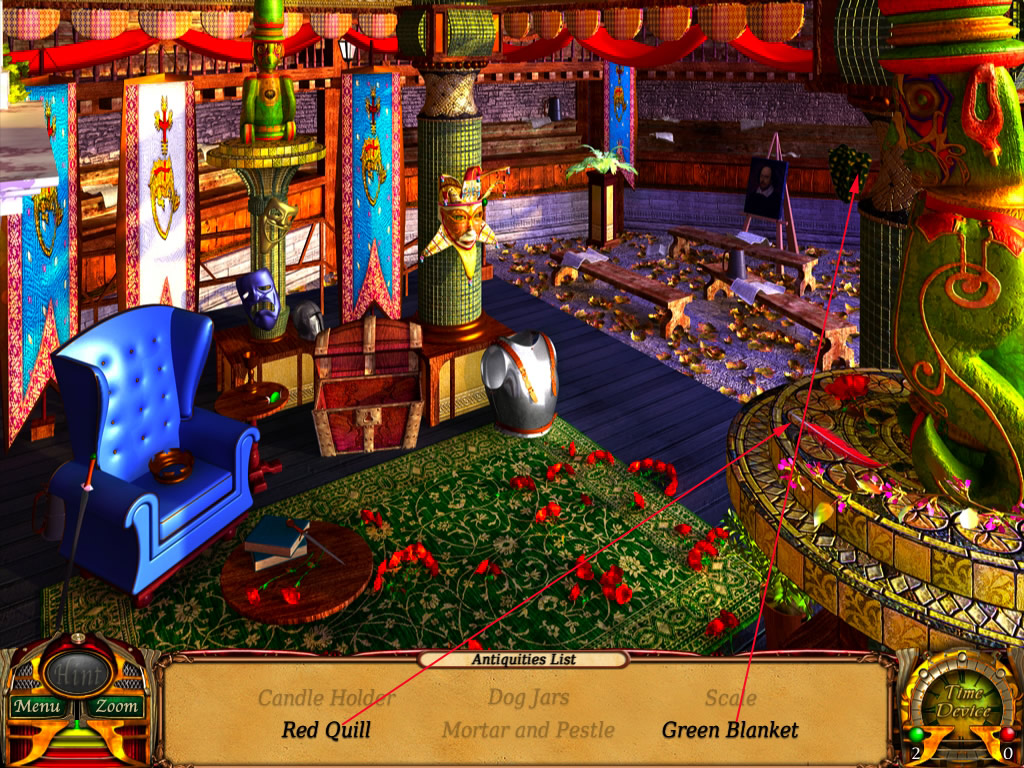
William Shakespeare, Globe Theatre, c. 1605
Find all parts of the search list
A part of the Mona Lisa portrait can't be found yet
The tragic mask belongs on top of the left column
The comedian mask belongs at the same column at the bottom
The venecian mask belongs at the right column
After finding all object-parts, go back to queen Hatsehepsut
screenshot
Queen Hatshepsut
Place the antique vase on the pedastal to the other ones
Place the bowl from your toolkit-inventory on the floor in front of the stairs, right
The sand coming from the ceiling will fill the bowl
Click it into your inventory again
Go back to Leonardo da Vinci
Leonardo da Vinci
Place the easel right in front of the fireplace
The palette belongs on the right side of the table, on top of the book
Get the with sand filled bowl out of the inventory and click into the fire
The extinguish the fire and you can pick up the last part of the golden dog
Go back to queen Hatsehepsut
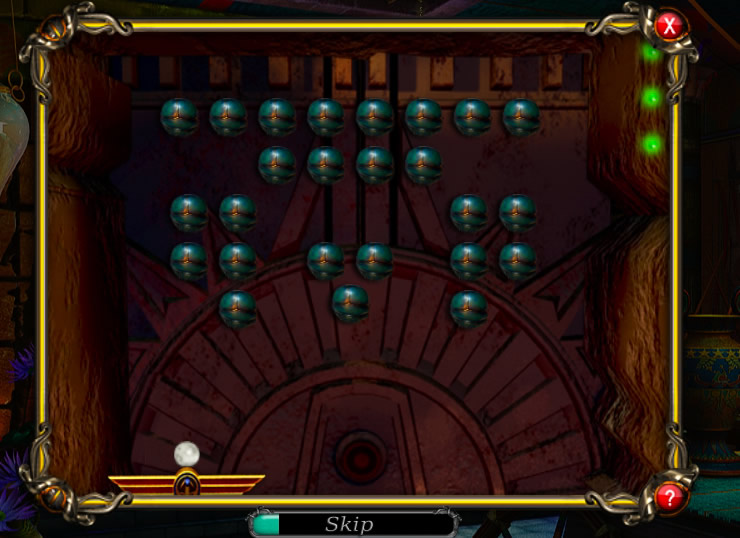
Queen Hatshepsut
Place the golden dog next left to the sarcophag on the pedestal
Right side at the backwall a hidden compartment opens
Click it to get a nearby view
The little board can be moved by moving the mouse from left to right and back
Click one time to let ball fly up
The ball will destroy the spheres on top of the scene
You have to get the ball with the ball, when ever it comes down again
After destroying the last sphere, you will receive the last part of William Shakespeare's portrait
screenshot
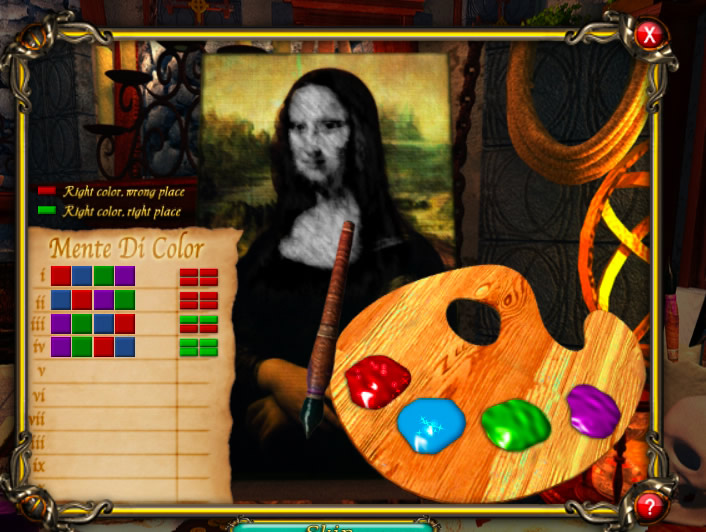
Leonardo da Vinci
Place the portrait of Mona Lisa on the easel, right next to the fireplace
Click it and a mini game will open
You have to find the right color combination
Click with the brush each color
On top you will see green and red bars
red means: the color is at the wrong place
green means: the color is right and the place is right
Click the colors again and make sure, that you use the same colors at the places, a green bar appeared before
screenshot
Last order
You have to collect six artefacts for Veronica, two in each location
screenshot 1
screenshot 2
screenshot 3
LOST TREASURE OF MUSIC
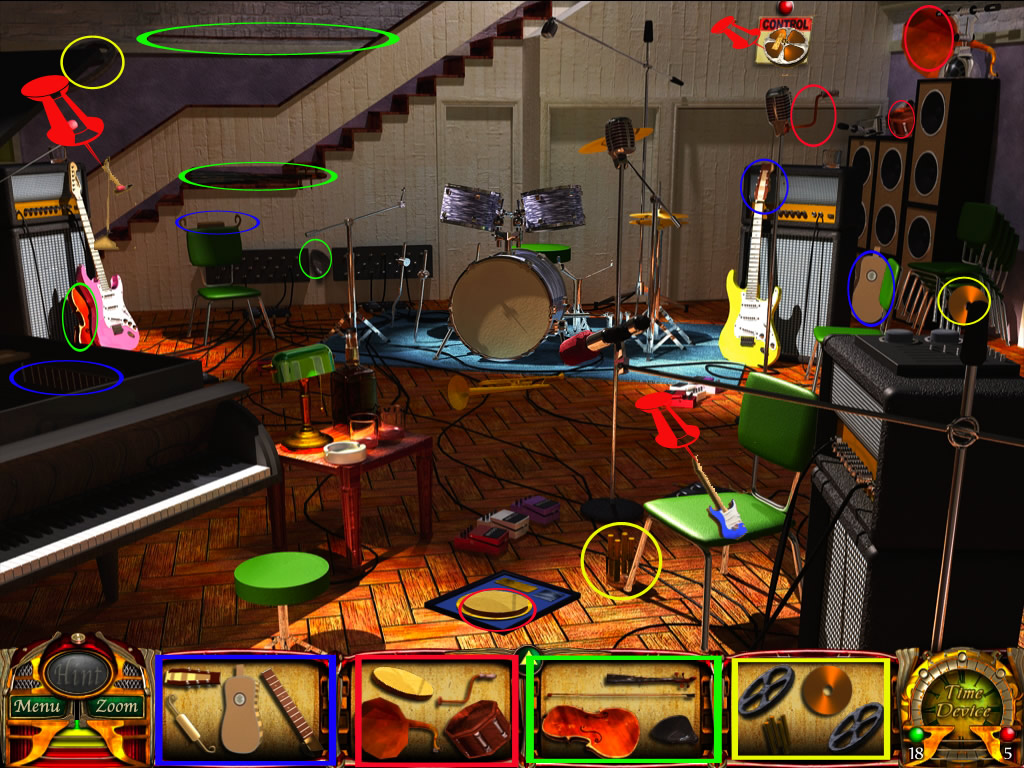
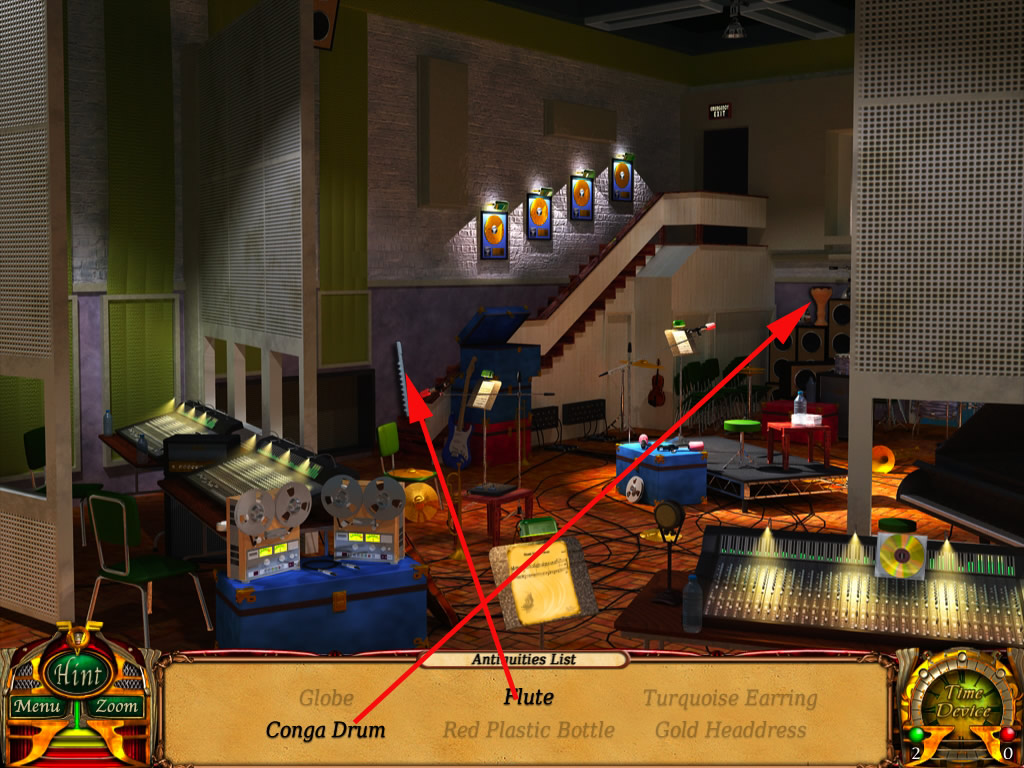
Abbey Road Studios, Studio Two, c. 1969
Look for the parts from your list
A part of the golden disc can't be found yet
Move on to Albert Einstein
screenshot
Albert Einstein, Office, c. 1938
Look for the parts from your list
A part of the radio can't be found yet
Move on to Benjamin Franklin
screenshot
Search for the parts of your needed objects
A part of Mozart's music sheet can't be found yet
Move on to the Abbey Road Studios
screenshot
Abbey Road Studios
Place the blue guitar right down on the green chair
Place the drums in the back to the rest of the drum
A mini game opens
Along the colored line, little colored balls will be shooten to the pedastels in front
You have to get the right moment-the pedastal will light up in the moment, the ball is right there, click it then
At the right side, you have a bar. It will fill up, when you click in the right moment and go down, when you click wrong or miss a ball
When the bar is filled, you will receive a screwdriver
Place the microphone left in the back, behind the piano
A circle will open - you see, that you will need the screwdriver and the spraycan
Drag both from your tookit - inventory into the circle
You will receive the last part of the golden disc
Click the sign "Control Room", in back top, right side
A minigame opens
Your goal is it to move the volume sliders in the right position until all the levels are green.
If there is a bit of green or yellow in the levels, you have to make some adjustments
You will receive a lockpick for winning this mini game
screenshot
You are completly done here - move on to Benjamin Franklin
Benjamin Franklin
Place the music box on the top shelf, right next to the window
The harp belongs left on the desk
The acustic guitar goes on the floor, next to the armonica drawer
Place the armonica at its drawer
Click it and a mini game opens
You have to play a Simon Says game
Look at the sequence of lights and replay it
You have to do it a total of 6 times in order to beat the game
The beginning of the sequence will always be the same, each time you have to complete another sequence one more light will be added
You will receive a key for that
Get the key out of the toolkit - inventory and open the left upper drawer of the desk
Click the piece of paper
You found the last piece of the music sheet
Move on to Albert Einstein
Albert Einstein
Place the violin in the low right corner
Place the grammophone on the little drawer in the back, middle
Get the lockpick out of the toolkit - inventory an click it at the locked drawer of the desk
A mini game opens
Your goal in this game is to click on the locks at the moment in which the springs are at their highest position
If you click to early or late, you will have to start all over again
It doens't matter in which order you click
Do this, till all locks are up
The drawer opens and you will receive the part of the radio
Place it on the desk, left behind the coffee cup
Get the note sheet an place it on the empty frame above the fire place
Click it again and you will get a nearby view
In the upper left corner, you will see a number
Now click the lock cabinet in the back
Change the number by clicking and dragging them with pressed left mouse button up or down
You need to change them according to the number you see on the music sheet
The cabinet door opens and you can pick up a piece of paper
screenshot
Last order
Find the items for Veronica
screenshot 1
screenshot 2
screenshot 3
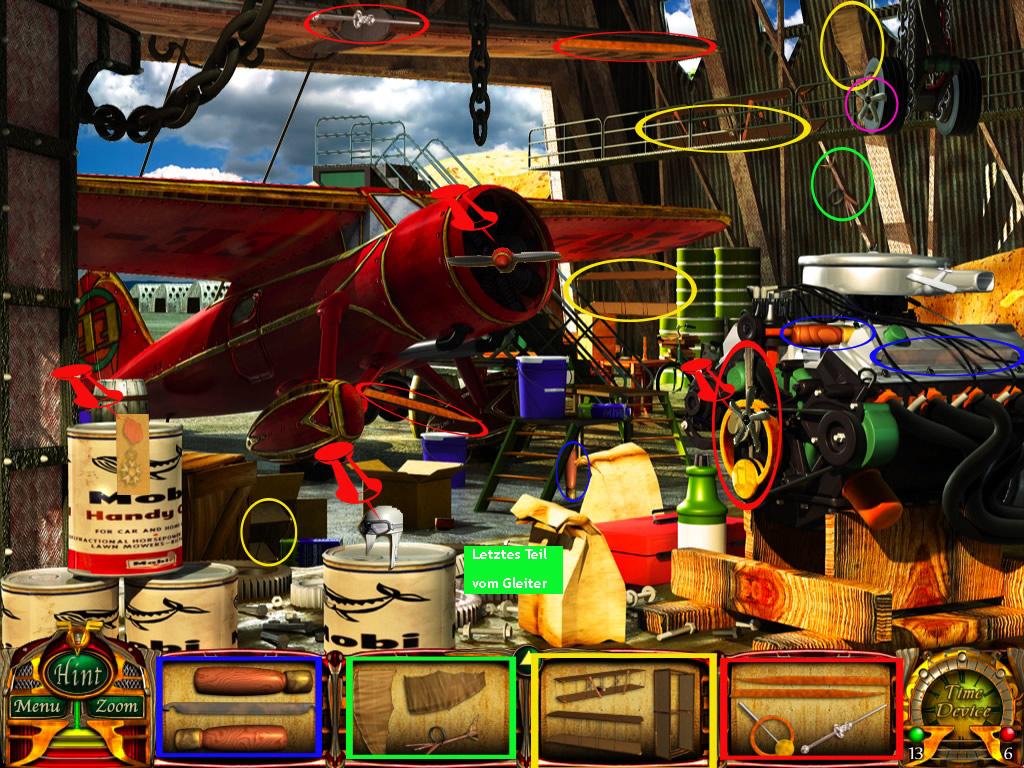
LOST TREASURE OF FLIGHT
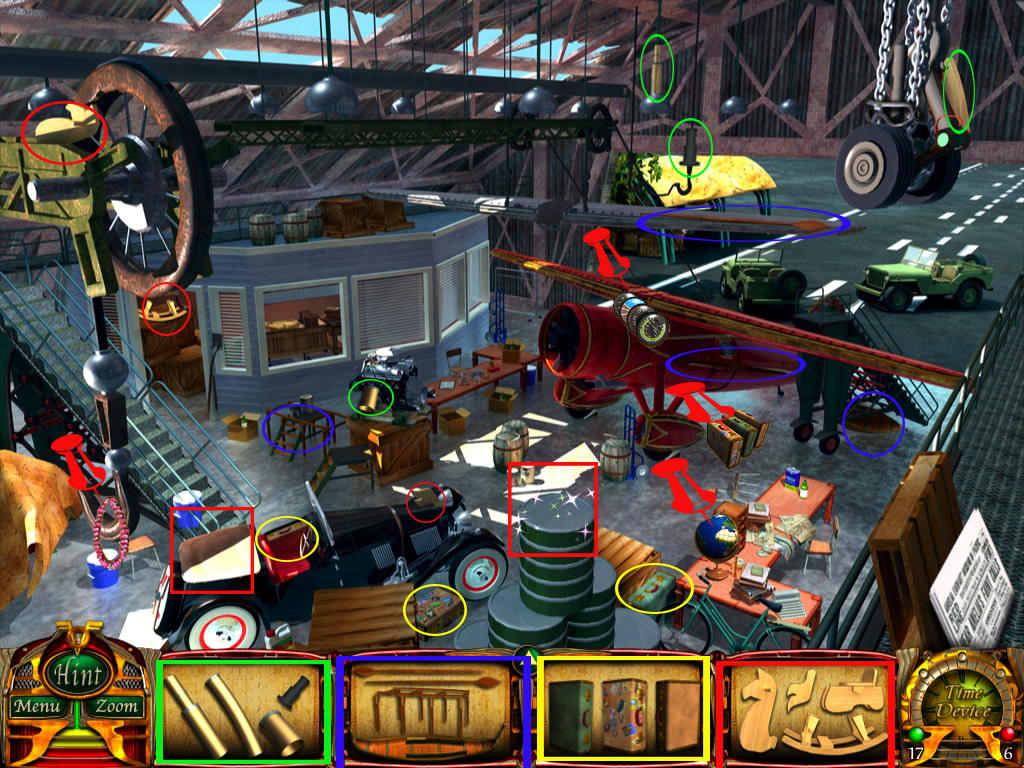
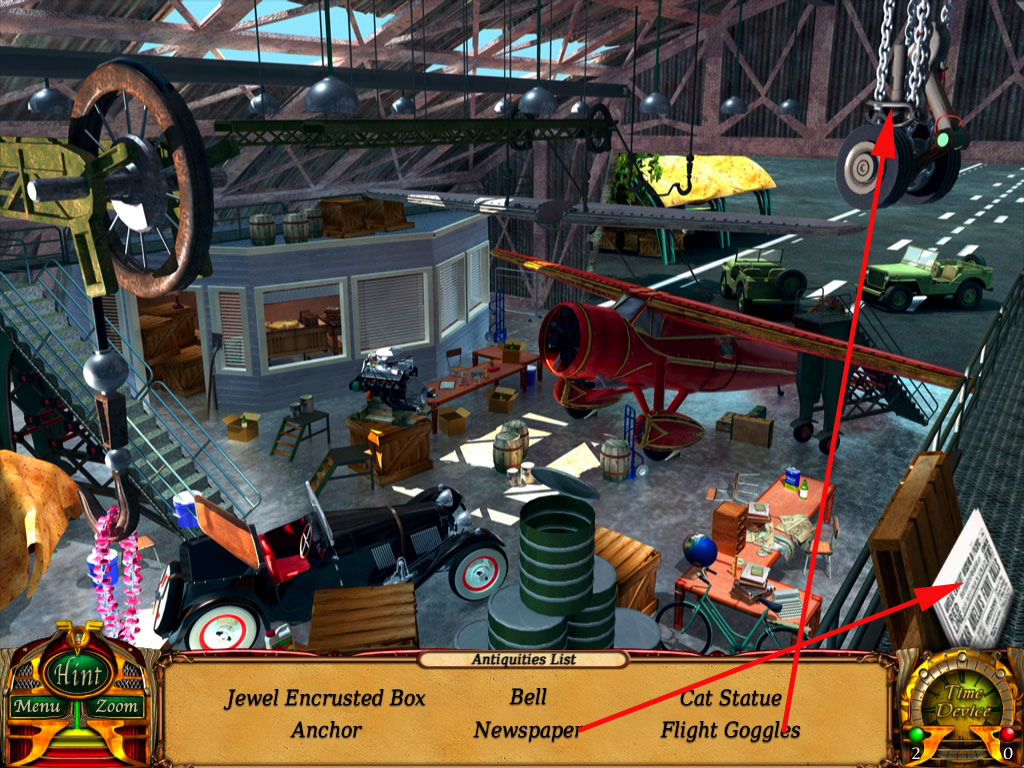
Amelia Earhart, Hangar, c. 1932
Find the elements from your list
Have a look at the toolkit-Inventory, you have to find the blinking items
Pick up the propeller, top right at the wheel
Click it at the machine at the right side and click again
A minigame opens
By clicking the color faucets, you have to find out the color combination
After you have done that, the propeller will blow the last piece of the glider on the floor
Move on to the Wright Brothers
screenshot
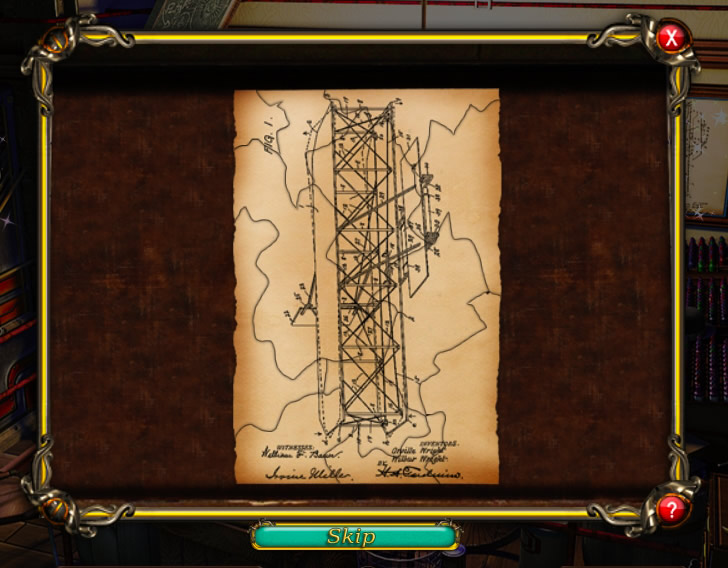
The Wright Brothers, Wright Cycle Co., c. 1902
Have a look in your toolkit-inventory and find:
A handle - right next to the door, in the middle
Gloves - left next to the door at the wall
A wrench: in the right upper book shelf
Click the tool box, which is blinking left next to the door
A circle opens - drag the handle and the gloves into it
A mini game opens:
Click the handle, till the bicycle, you see right on the top, is out of the way and you can pick up a part of the measuring tape
Get the wrench out of the toolkit-inventory and click the saddle of the bicycle left side
A mini game opens
You have to move the wrench with pressed left mouse button counter clockwise, till the saddle falls off
Get the last part of the drawing out of the tube
Move on to Leonardo da Vinci
screenshot
Leonardo da Vinci,Work Study, ca. 1515
Place the glider at the wall on top of the fire place and you will receive the last part of the early parachute
Place the parachute on the table, right side
Place the flying object which is on top, left next to the painting at the wall and a minigame will open
You see the flying object landing
Its your goal to lead it to the target between the two candles
When you move with pressed left mousebutton slowly up, the flyer will follow - same, when you move to the left and the right
When you release the mouse, the flyer will come down
You have to find the right balance between up and down, as the flyer will break, if it come down to fast
Also take care about the flames, if it comes to near it will burn
If the flyer breaks or burns you will get a new one
After landing on the first target, a second one will appear on the left
When you managed both, you will get the red cloth for the medal
screenshot
Pick up the brush, that is laying on the bench in front of the table
Get it out of the toolkit-inventory again and click it on the drawing on the table at the right bottom
Click the seal, that comes up in a circle
screenshot
You finished this location
Move on to Amelia Earhart
screenshot
Amelia Earhart
Click the medal at the paint can on the bottom
You finished this location - move on the the Wright Brothers
The Wright Brothers
Click the safe, left on the shelf
You will come into a nearby view
Get the seal out of the toolkit inventory and click it at the left book
screenshot
Now you have to find out the safe combination
The princip is the same as you did at the Flux-Mansion
Move the mouse slowly with pressed left mouse button CLOCKWISE till you see the little arrow on the deal turn green
For the second number, turn the dial COUNTER CLOCKWISE
For the third number, click again CLOCKWISE
The door opens, get out the piece of paper
Last order
screenshot 1
screenshot 2
screenshot 3
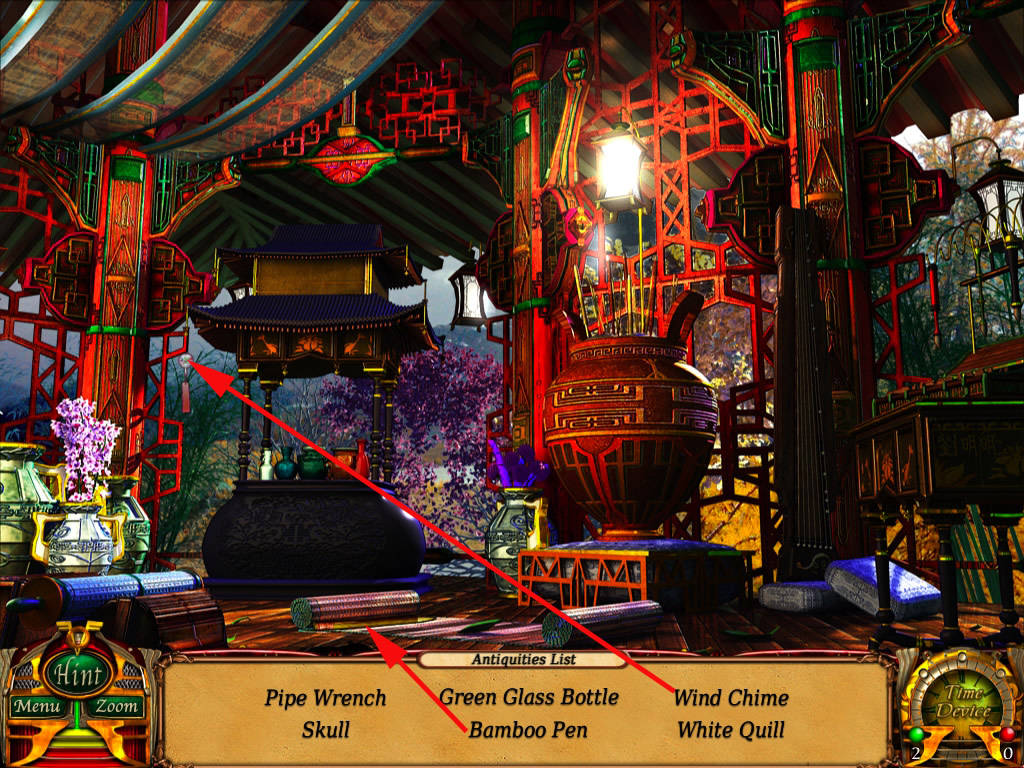
LOST TREASURES OF DISCOVERY
Christopher Columbus, Palos de las Frontera, c. 1492
Look for the items on your list
One of the tabacco leaves can't be found yet
Move on to Confucius
screenshot
Confucius, Temple, c. 490 B.C.E
First look for the red fireballs and the oranges
Get the match on the top right, it goes into your tooklit-inventory
Click the red balls on the right
A circle opens - drag the fire balls from your inventory and the matches into the circle
Your goal is it, to find one ball, which hides an item inside
To do so, you get one of the matches right side and click with it the fire balls
The lute will burn and the ball breaks
Click red balls, till you find the right one. You will see it, as the game stops and you will receive an item
Each match does not burn to long, so you have to hurry withclicking
When one match burns out, take the next one
If you use all matches without finding the right ball, you will have to start again
There is no special mark, which ball it is, will be is random
Now place Confucius' picture at the right column
Click it again and a mini game will open
At the right side you see a few small paper stripes, which are missing at the left
Drag the stripes to the right place
When you are correct, it will not move anymore
When you are done, you will receive the last part for your list
screenshot 3
Move on to Albert Einstein
Albert Einstein, Office, 1932
Place the equation at the black board
A mini game answers
Your goal is it to not have more than two stones of one color left on the board
When you click a stone, it will be activated
Clicking it again, it will be deactivated
Two activated stones of the same color will find their way to each other - by destroying stones from other colors, which are in their way
Three or more activated stones of the same color will detonate, when they do come together
When you activate two stones and deactivate one again, the otherone will still go its way
You can also activate only two stones of one color to get them out of the way
You have to do that four times, then you will receive a key for the toolkit-inventory
Get the telescope out of the inventory and place it on the wooden tripod, right in the back
A minigame opens
Move the dial at the right side, so that you will have a clear view about the picture in the middle
Click the bottle, when you see it clear
Look for the other bottle
Look for the planets and hang them up at the ceiling
Place the valve on the refrigerator at the back
Open the fridge with the key
You will find one of your items in it
Find all missing items and you are completly done with thislocation
screenshot
Move on to Confucius
Confusius
Place the antique guitar on the floor
Play the scrolls at the shelf on the right
A mini game opens.
You have to play of tic-tac-toe
You will play against an opponent
The first one to get three in a row wins the game
You have to win four times and will receive a part of the delphi device for it
Move on to Christopher Columbus
Christopher Columbus
Place the oranges onto the sack with other oranges in the low left corner
The sack dissapears and you will find a crowbar at its place - it goes into your toolkit-inventory
Get the magnifier out of the toolkit inventory and place it on the papers in the lower right corner
You will get a seal
Place the bottles on the scale, right side
A mini game opens
You have to bring the scale in balance
To do so, use the weight, standing on the table
Get one and click it on the right side of the scale
If its not enough, use a second one, till you have the scale in balance
If you have to much, try another one
From left to right, I had to use 1, 3 and 5 - but this might be random
You will receive a hammer for the toolkit - inventory
Click the shimmering chest
A circle opens - place the hammer and the crowbar into it and you will receive the last tabacco leave
Click the ship wheel shimmering in the upper right
Get th compass out of the inventory and drag it into the circle,do the same with the seal from the toolkit-inventory
A mini game opens
By draging the ship wheel with pressed left mouse button you have to move the ship into a specific direction
Which one, you can see on the seal in the lower right corner
It might be random, my seal said North West 270
Turn the ship wheel and have an eye on the compass in the lower left
The golden arrow has to be moved to the direction
When you are right, you will see a stone arch and when you are near, a piece of paper
Click it
screenshot
screenshot
You finished the last location
Last order
screenshot 1
screenshot 2
screenshot 3
LOST TREASURES OF PIONEERS
Amelia Earhart, Hangar, c. 1932
At the window, right next to the door, you will find a lock pick
Get is and open the green suitcase on the floor, right side
Its exacty as you did it before
Just take care, that the spring is at the highest point, when you click the lock
You will find the last piece of the ancient star map
screenshot
Move on to queen Hatshepsut
Queen Hatshepsut, Burial Tomb c. 1458 B.C.E.
Place the ancient star map at the upper part of the obelisk, standing right in the back, next to the green pedastal
Click the star map again and a slider puzzle will open
Move the parts by clicking them
At the end, the middle part of the puzzle has to be free
screenshot
After finding all pieces of the statue, place it in the middle of the pedastel
Place the sarcophag into the coffin - right side, where it is open
A part of the microphone can't be found yet
screenshot
Move on to the Abbey Road Studios
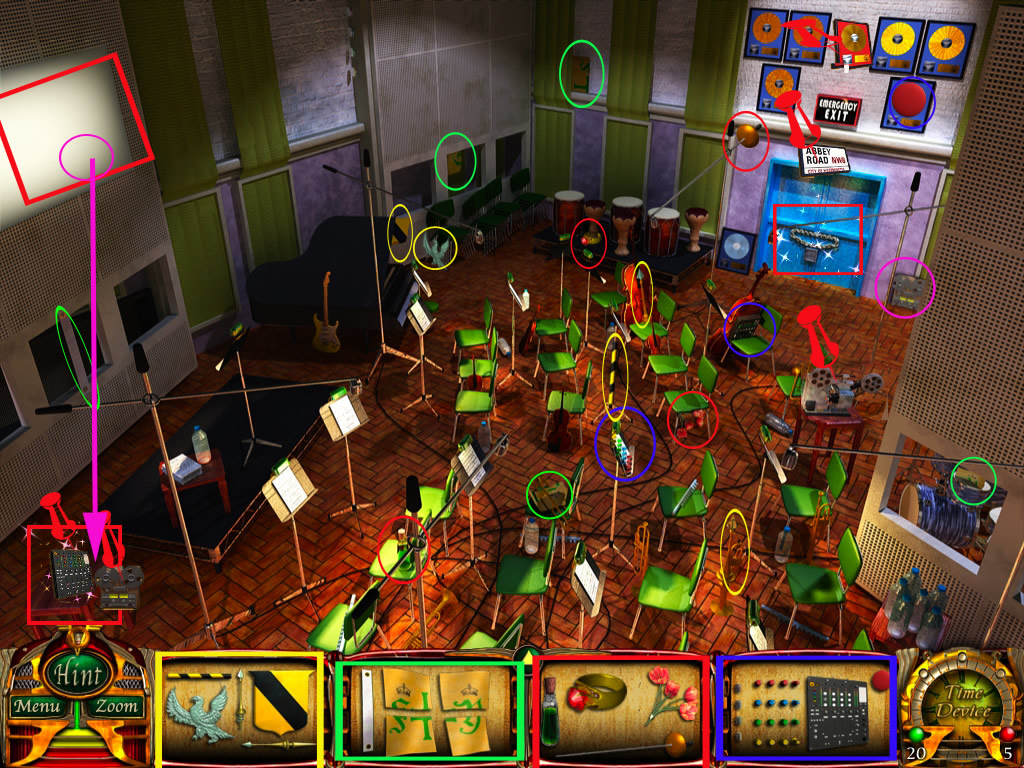
Abbey Road Studios, Studio Two, c. 1969
In the lower left corner you will find a golden lamp chain
Top right, under the ceiling you will find a bulb
Click the lectern in the middle
Place the lamp chain, the bulb and the music sheet into the circles
A puzzle opens
You have to redo the music sheet
Pieces which are connect to another right one, will stay connected
screenshot
You will see a magnifier lens on it, after you are done, with a written hint
Blue Chest 6.26.5 (number might be random)
Click the blue chest next to the stairs in the back
You will get a nearby view of the lock
Change the numbers of the lock according to the number of the hint
Place the recording device on the blue chest in the lower left corner
Get the key from your toolkit - inventory and click it at the piano at the right side
You will receive a list piece
Look for the other parts of your list
After finding the CD, click it on the empty cover, right side on the mixer - desk
A minigame opens
Your goal is it to find the correct order of colors
Click the color pins
Black: The color does not come at all
Red: The color is right, but not the place
Green: Color and place is right
For solving this puzzle, you will receive a piece from your list
Wenn Du die richtige Kombination gefunden hast, erhälst Du ein Element von Deiner Liste
screenshot
Move on to Amelia Earhart
Amelia Earhart
Place the board items at the cork board at the right side
Place the letter at Amelia's husband on the work-table, right side, on the drawings
Click the letter and a mini game opens
You have to drag the words, you will find at the right side into the correct empty spots at the left
Right words are locked and can't be moved anymore
You will receive a toolkit-item for this
Lege den Brief an Amelias Ehemann rechts auf den Arbeitstisch zu den Zeichnungen
The two-way radio goes on the right file cabinet under the window
You will get a key for it
Use the key to open the little chest, standing on the left file cabinet
It opens - click the paper, you will find there - a mini game appears
Its a normal puzzle, parts, which belong to each other will lock
You will receive another part for the delphi-device
You finished this location
Move to queen Hatshepsut
Queen Hatshepsut
Extinguish the flame of the left torch at the wall in the back with the fire extinguisher
Click the torch again at the place, where the flame has been and you will receive a tool
Place the obelisk right next to the statue in the back
Get the dagger out of the inventory and pick a hole in the silver sphere at the right
Make sure that it is really activated, when you do so (you see this at the white shadow around it)
The sphere breaks and you receive the last part of the microphone
You finished this location
Move on to the Abbey Road Studios
Abbey Road Studios
Place the microphone left next to the right mixer-desk
Last order
screenshot 1
screenshot 2
screenshot 3
LOST TREASURES OF LITERATURE
Confucius, Temple, c. 490 B.C.E
Find the parts of your list
A part of the newspaper and a part of the print press can't be found yet
At the big vase in the middle, you will find an old bone and at the column left you will find a flint - both items are going into your toolkit-inventory
screenshot
Move on to William Shakespeare
William Shakespeare, Globe Theatre, c. 1605
After looking for the parts from your list one part of the 5 Classics will remain
screenshot
Move on to the Wright Brothers
The Wright Brothers, Wright Cycle Co., c. 1902
You need to find five toolkit - objects
On the table in front of the window, you will find an ink bottle
In the lower right on the floor you will find a rolled roped
On the little cabinet right next to the barrel you will find a printing letter
Left you will find adhesive tape
At the left wall, right next to the printing press, you will find a holding ring
Click the shimmering part at the window
Place the holding ring, the adhesive tape and the rope into the circle
The blind goes up and you will find a part of the plans
After finding all parts of it, place them at the wooden board in the right back
A puzzle opens
screenshot
When you are done, you will receive a part of your list
A part of the first folio can't be found yet
screenshot
Move on to Confucius
Confucius
Click the shimmering part on top of the big vase
Drag the fireworks, bone and the flint into the circle
After the big boom, you will find the last part of the newspaper on the floor
Place the vases on the altar
Place the flowers in the vase left
Go back to the Wright Brothers
The Wright Brothers
Click the shimmering printing press
Drag the printing letter, the ink and the old newspaper into the circle
You have to answer two questions:
Question 1: What business did Orville & Wilbur start first? - Answer: Printing
Question 2: Kitty Hawk, North Carolina helped launch this business venture..." - Answer: Aeronautics
You will be rewarded with the last part of Shakespeare's folio
Place the blue book into the bin
Move on to William Shakespeare
William Shakespeare
Place on the table left: Inpot with quill, winebottle with goblet and the folio
After placing the folio, a mini game opens.
You have to answer three questions about Shakespeare's plays
There are at least four diffrent ones, which one you will get, is random
Question 1: "A power-hungry prince kills those who stand in his way to be King." - Richard III
Question 2: "They are part of two feuding families, yet fall in love and commit suicide." - Romeo and Juliet
Question 3: "He yearns to be the sole King of Scotland and is persuaded to kill the current king." - Macbeth
Question 4: "His father is murdered and his uncle takes his place as king." - Hamlet
After answering three questions right, you will receive a sword
Drag it to the left red curtain and you will receive the last part of the 5 Classics
You completed this location
Move on to Confucius
Confucius
Place the scroll left in the open drawer
Click it again and a mini game opens
Its a memory, just find the matching pairs
You will receive the last part of the printing press for it
You completed this location
Move on to the Wright Brothers
The Wright Brothers
Place the printing press on the barrel at the bottom
You will receive a part of the delphi-antenna
Last order
screenshot 1
screenshot 2
screenshot 3
THE LOST TREASURES OF SCIENCE
Albert Einstein, Office, c. 1932
After looking for the pieces from your list, you will find one part of the Nobel-Prize remaining
screenshot
Move on to Benjamin Franklin
Benjamin Franklin, Home, c. 1780
Look for the items of your list
A part of a prize and part of the skull can't be found
At the desk lamp you will find a key for your toolkit - inventory
screenshot
Move on to Leonardo da Vinci
Leonardo da Vinci, Work Study, c. 1515
Get the toolkit-objects from this scene
The bowl is standing on the floor, behind the book shelf in the back
The sphere you will find behind the easel
On the long table in the back a sponge is laying
Right on top of the door you will find a rag
Click the shimmering part of the round table
Drag the crane model, the sphere and the bowl into the circle
A mini game opens
Its your goal to move four of the six spheres with the crane into the bowl
You have to use the arrows in order to move the crane left or right. Once the crane is in the right spot, click on the arrow pointing downwards to pick up the ball.
The easiest way to finish this puzzle is to look at the shadow that the crane makes when it is over a ball. If the shadow covers the ball completely, then click on the arrow pointing down
You will receive a bottle for it
Click the stain on the floor
Drag sponge, bottle and rag into the circle
The stain dissapears and you can pick up the key
Use the key to unlock the chest next to the bench
You will find a piece from your list
Place the geometric model on the barrel right side, in front of the book shelf
Look for the other parts of your list
After completing the grinder, place it on the left side of the bench
screenshot
Move on to Albert Einstein
Albert Einstein
Place the brain into the glas on the cabinet
The set square belong onto the books, right back
Place the chess pieces onto the chess board
You will receive a strange looking wrench
Place it at the lamp, back right, next to the window at the wall
A minigame opens
You have to take care, that not more than two stones of the same color stay on the board
You will receive the last part of the Nobel-Prize
Place it on the table in front of the coffee cup
You will get an accu for the delphi-device
You finished this location
Move on to Benjamin Franklin
Benjamin Franklin
Click the window
Place the dragon and the key into the circle
You will receive a key knife
Get it out of the toolkit - inventory again and cut the seat of the chair with it
You will find the last part of the prize
Place the prize on the desk
The map belongs on the right side of the desk
The pocket watch belongs left side of the desk, onto the books
Click the pocket watch again and a minigame will open
You have to find the gears, which will connect the left and right gear inside the watch
For the solution please have a look at the screenshot
screenshot
You will receive an axe
With this, you have to smash the wall on top right next to the window
You will find the last part of the skull
You finished the location
Move on to Leonardo da Vinci
Leonardo da Vinci
Place the skull left side on the fire place
Last order
screenshot 1
screenshot 2
screenshot 3
LOST TREASURES OF TRAVEL
Amelia Earhart, Hangar, c. 1932
From the pieces of the list one part of the rocking horse will remain
screenshot
Move on to Christopher Columbus
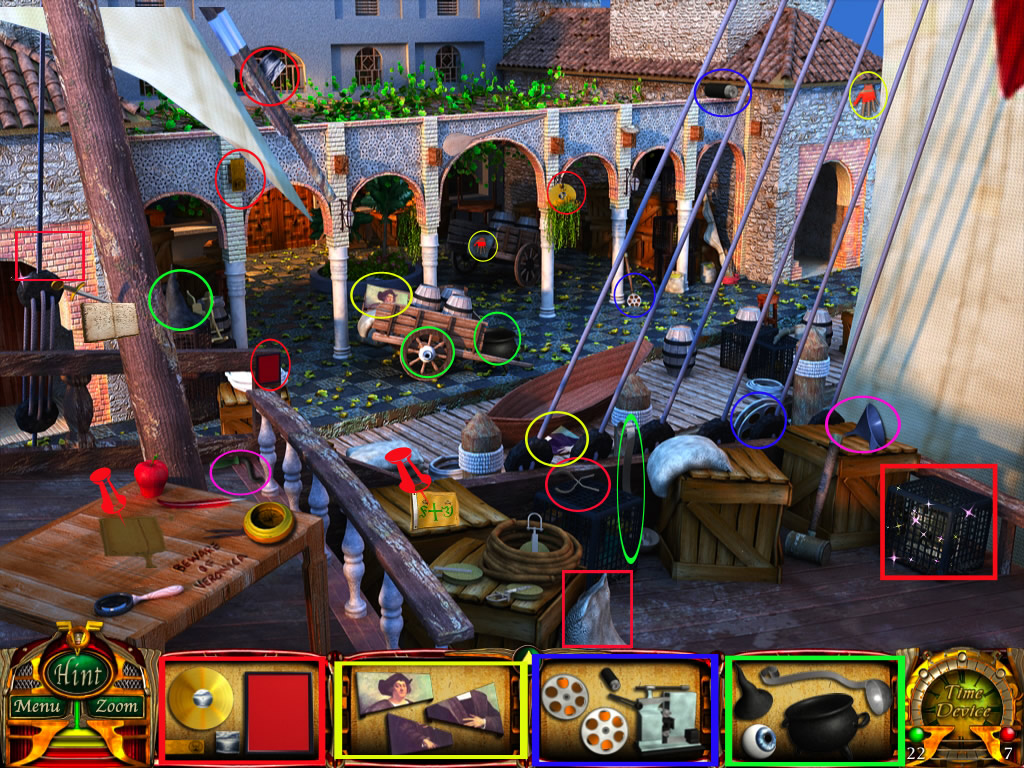
Christopher Columbus, Palos de las Frontera, c. 1492
Look for the toolkit-objects:
An old sifter - in middle on the stool
An axe - on the trolley in the second alley from the left
A knife - at the bottom, middle, at the side of the wooden crate
Place the knife at the laying barrel left next to the wooden crate
You will find a part of your list
Look of all other parts of your list
Move on to Queen Hatshepsut
screenshot
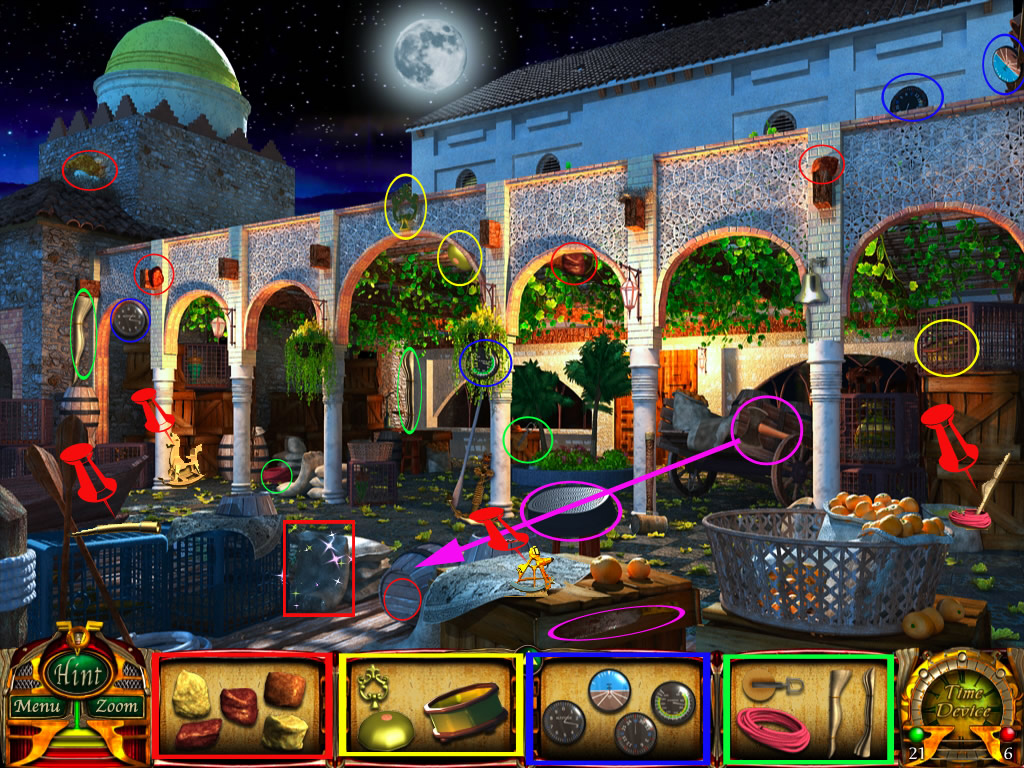
Queen Hatshepsut, Burial Tomb c. 1458 B.C.E.
At the right wall, you will find a scissors
Cut the left curtuin on the right top - you will find an element from your list
At the bottom you will find a little statue in the left vase,another one is standing on the floor, left side in the back
Click the scale in the middel and drag the box with mhyrre and the two stautes into the circle
A mini game opens
Your goal is it to bring the scale in balance
For this you have to place the statues onto the right scale till the scale is in balance
I don't know, if it is random, but for me it worked, seen from left to right, with the statues 1, 3 and 5
You will receive a spear head for it
Get it out of the toolkit-inventory and click it at the long sphere, which is hanging left side from the ceiling
It breaks and below the throne a compartment opens
Get the CPU for the delphi-device out of it
Look for all parts of your items
The elephant tears belong above the scale
The ship belongs on the table, lower left side
The chocolates belong on the golden plate on the table on the right side
screenshot
You finished this location
Move on to Christopher Columbus
Christopher Columbus
Place the sextan on the wooden crate in the middle
Place the telescope on the blue crates, lower left side
A mini game opens
Your goal is it, to find back the pearl three times
When you click on the playground , the coconut half will hide the pearl and all three coconut halfs will start moving
After they stopped, click the one, where you think, the pearl is hidden under
You have to win three times
You will receive a hand shovel
Click the paper sack and drag the needed objects in it
You will receive a key
Move on to Amelia Earhart
Amelia Earhart
Place the lei at the hook left side
The globe belongs on the desk
The suitcases belong under the plane
Place the instruments at the plane's front window
A mini game opens
Place the instruments in the correct empty spots
When you did so, click the little black switch at the bottom right (left of the two switches)
At the bottom left four points will show you , if you are right
If one of the points turns green, the instrument is placed right
If a point stays black, the instrument is at the spot
Seen from left to right, the first three points show the upperinstruments, the fourth one the instrument below
screenshot
You will receive a chisel for it
Get the key and open the trunk of the car, left
Get the hammer out of the trunk
Click the shimmering barrel and drag hammer and chisel into the circle
You will receive the last piece of the rocking horse
Move on to Christopher Columbus
Christopher Columbus
Place the rocking horse in front of the crates, left side
Last order
screenshot 1
screenshot 2
screenshot 3
LOST TREASURES OF INVENTION
The Wright Brothers, Wright Cycle Co., c. 1902
Pick up the funnel from the floor
The empty tin can opener you will find top right at the wall
Two parts will remain
Move on to Confucius
screenshot
Confucius, Temple, c. 490 B.C.E
Get the glas from the upper part of the left column
The fishnet is hanging the the cherrie blossoms, left
The knife you will find left side of the scene, right side of the top roof
The clay pot you will find right next to the statue on the floor
Get the glas and place it at the waterfall, left in the back
It will go back into your toolkit - inventory, filled with water
Collect the pieces from your list
After finding all fishes, click them onto the pond
Drag fishes, fishnet and the claypot into the circle
A minigame opens
Your goal is it to cause a ripple in the water so the ripple hits the fish that come in contact with it. The fish will dissapear
Click anywhere on the water and you will begin seeing ripples, the fish themselves will also create their own ripples once the ripples hits them
You can only click on the water once, if you clicked in the wrong spot and don't catch enough fish, you will have to start over
Try to click on areas that have a lot of fishes, so you can obtain a large ripple effect
Place the knife and cut the purple pillow in the low right corner
The statue belongs on the altar
You will find all pieces of your list
screenshot
Move on to Benjamin Franklin
Benjamin Franklin, Home, c. 1780
Get the gloves from the right wall
At the warderobe above a poker is hanging
The shooting powder you will find in the lowest shelf on the left
The lighter you will find on the left side of the scene on the desk
Place the battery on the floor right side
A mini game opens
Connect the pipes by rotating them until there is a straight line of pipes leading to both ends.
You will not need to connect all of the pipes, just some of them
There is more than one way to solve this puzzle, see screenshot shows one example
Once you're done the last piece of the wick will go into your toolkit
screenshot
Place the odometer in the lowest left shelf, there on the right side
Click the oven and drag the needed elements into the circle
You will receive part for your list
Look for all other parts
Place the lightning rod under the right shelf
Move on to Confucius
screenshot
Confucius
Place the lion statues on the pedastal on the left side
You will receive a lockpick for it
You finished this location
Move on to the Wright Brothers
Wright Brothers
Place the propeller on the small table in the right back
Place the axe-controll -system on the barrel in the middle
The motor belongs on the table under the black board
Place the bike at the ceiling above the black board
Click it again and a mini game will open
You have to place the items in the right order to rebuild the bicycle
1. Gear - 2. Back tire (right one in your bar) -3. Chain with cover - 4. Pedal - 5. Saddle - 6. Front antler - 7. Front tire - 8. Attachment for handlebar - 9. Handlebar
You will receive an empty can for it
screenshot
Click the shimmering paint cans
Place the needed objects into the circle
You will receive a list item for it
Use the lock pick at the small cabinet on the left
You have to do the lock - puzzle again
You will receive the last part of the spectacles
You completed this location
Move on to Benjamin Franklin
Benjamin Franklin
Place the spectacles on the desk
Last order
screenshot
screenshot
screenshot
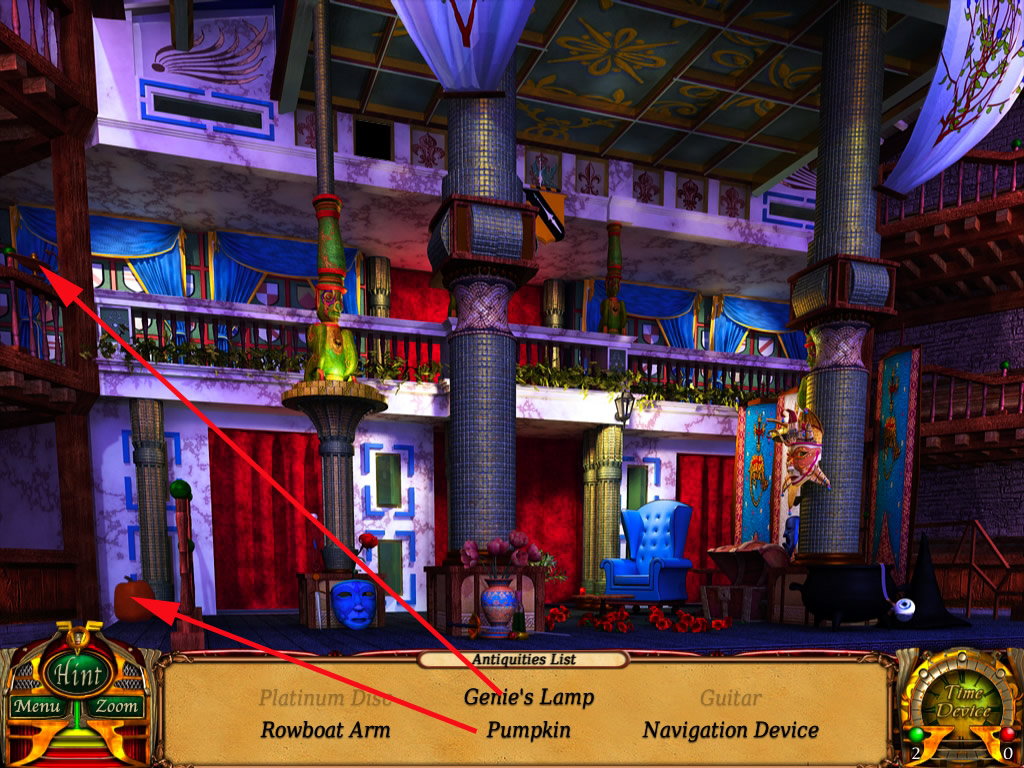
LOST TREASURES OF VISIONARIES
William Shakespeare, Globe Theatre, c. 1605
Find two toolkit - objects - one you will find at the left, theother one on the right column on the top
A part of the logbook can't be found yet
screenshot
Move on to the Abbey Road Studios
Abbey Road Studios, Studio Two, c. 1969
Find all parts of your list
A toolkit objects you will find on the floor right next to the blue door
screenshot
Move on to Christopher Columbus
Christopher Columbus, Palos de las Frontera, c. 1492
One glove you will find on the trolley in the right alley, a second one right under the roof of the right house
A funnel you will find on the right side on the crate
A handle you will find left, behind the table on the floor
Pliers are laying on the cage between the wooden crates
Click the shimmering part of the beam at the left
Drag gloves and the handle it
The canvas will move up and you will see a knife - take it
Now you can place the map at the beam
Look for the objects from your list
Open the sack, standing at bottom in the middle, right to the wooden crate, with the knife - you will receive a part for your list
The flag belongs on the left wooden crate
The portait goes in front of the left wooden crate
You will receive a chisel for it
A part of the projector will be remaining
screenshot
Move on to William Shakespeare
William Shakespeare
Place the roses with dagger at the bottom of the big left column
Place the mask at the little left column
Place the coat of arm on top next to the big left column
You receive the last part of the logbook
Place the cauldron right side on the floor next to the big right column
Click it again and a mini game will open
You will have to find out the right color combination again
You finished the location
Move on to Christopher Columbus
Christopher Columbus
Place the logbook on the table, right side
Click the right cage and drag the needed objects into the circle
You will receive the last part of the projector
You finished this location
Move on to the Abbey Road Studios
Abbey Road Studios
Click the projecter on the wooden stool right side in the back
Click it again and on top left a window opens
Get the cable and click the stool in the lower lef
Place all objects in the circle
A minigame opens
You will have to find the right gears to make them all move
screenshot
When you are done, you will see a number in the circle
For me it was 7 5 1 9 , but this can be random
Click the blue door - you will get a nearby view from the number lock
Change the numbers according to the number in the circle
The door opens and you will receive the last part for the delphi - device
Place the sign above the blue door
Place the golden disc above the sign, in the middle of the other discs
The last order
screenshot
screenshot
screenshot
Final
Rebuild the delphi-device
screenshot
screenshot
Now place all objects to the right person
screenshot
Special thanks to Kayleigh for writing this epicly long walkthrough! :D
Posted by: Kero |
April 18, 2009 1:19 AM
|
April 18, 2009 1:19 AM