
![]()
 So it's a lazy midsummer day, Weekday Escape has come and gone, yet you still have a hankering for an easy afternoon escape? Well, dear friends, we here at JIG are nothing if not aiming to please, ready to bring the world to you on a silver platter and so, voila! As a special Bastille Day treat, you are whisked away to beautiful Paris, France, to an enchanting little café named Golden Heart. Enjoy your stay, go take in the sights, the music, the dancers, the shops . . . but first, you need to find your way out in this newest escape game by TomaTea.
While here, we discover that a visitor's necklace broke, all the tiny heart charms scattered everywhere, and now he's worried about missing his wedding anniversary. No worries, sir. We can find the heart pieces and fix the necklace as we search for the keys. Like many other escape-the-room scenarios, click on the sides or bottom of the screen to navigate this little café-turned-trap. Also click items to pick them up or to examine them more closely. By solving some puzzles and deciphering a few codes, you'll be able to unlock cupboards, open doors, activate a lovely can-can girl music box and, ultimately, find the key so we can get out of here.
It's not such a bad situation to be in, really: the cheerful sounds of French accordion melodies and a very charming decor make our tasks light and amusing. Like TomaTea's other recent offerings, Pearl Room Escape and Blossom Spring Escape, each brain-teaser in Golden Heart is just complex enough to require thought without being overly perplexing. Although, one puzzle will be much easier to those who know how to read and play piano music, our host provides all the necessary information to elucidate even the tone deaf; it's challenging, but a bit of logic and experimentation will solve it. Soon we'll be out, laughing about the mishap, and sharing stories with friends back home of our funny adventure while in the city of lights.


Walkthrough Guide
(Please allow page to fully load for spoiler tags to be functional.)
GOLDEN HEART WALKTHROUGH
Part One: Putting Together Clues, Gathering Items and Opening Doors
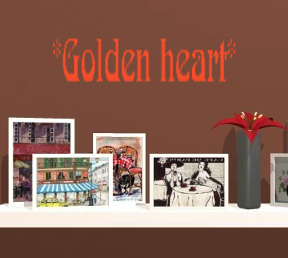
When you begin Golden Heart, you're facing a wall of shelves and cupboards. Click on each area to look more closely:
There is a locked music box, a locked cage (in which you can see the golden heart necklace), four locked cupboard doors, and a padlocked lattice gate. These are the doors you'll have to get past before you can find the exit key and leave the game.
Back up to view the whole room again then turn left. Now you're facing the front window and two booths. Focusing in on each table, you'll find some heart charms. You'll also find that:
Each table also has a number; notice how each table has a colored flower? Take note of that.
One more item to pick up from table 1: Matches.
Turn left again to see the door. Go ahead and try it. Don't take my word for it that it's locked. On either side of the door are two shelves. Focus on each:
On the right shelf . . .
There is a green heart on along with a clock. Hey, the time is even correct. Nothing else usual about it, though, I guess.
On the left shelf . . .
There are two more heart pieces and some interesting postcards. Let's read what's written on back . . .
Hmm. No secret love letters but there is a picture of a chef doing a happy dance (or practicing a tortured yoga stance . . .). Stash that away, maybe it will be fun to show friends back home.
Back up again, turn left again: the trees design on the wall is pretty, but better have a gander at these last two booths. These two tables are also . . .
numbered #2 and #4, each has different colored flowers, and some heart charms. Make more note of what you see and gather up the hearts.
While at number 4, reach down between the left side of the table and the chair to pick up an ivory piano key.
At this point, you should have enough information to open a cupboard door. Let's look at the cupboards again . . .
One of the nice things about TomaTea is that, when you click on a puzzle without sufficient information to solve it, a message pops up: "I have no clue how to solve this." Find the door without this message and you know you're prepared to decode it.
The four colors for the first code are . . .
found on each table.
Table 1 has a purple flower on it; table 2 a blue flower; table 3's is yellow and red is on table 4. That means . . .
Enter the colors, from left to right - PURPLE - BLUE - YELLOW - RED. If you're having trouble seeing colors . . .
click on the left button 4 times, the middle-left button 3 times, the middle-right button 1 time, and the right button 2 times.
When you open the cupboard, you'll get: a silver key and a silver rectangle with three colored hearts on it.
Use the key to open the padlocked lattice gate. Now you see a kitchen-area. Let's explore some more.
On the brown door is a funny chef figure. Looks like his arms, legs and head can be moved into different positions . . .
Use the drawing you found earlier behind the postcard:
Tilt his head to the left (your left). Send his left arm (on your right) strait up from the shoulder then at a 45-degree angle at the elbow so that it goes behind his head. His right arm (your left) goes straight out, then bend his right elbow at a 45-degree angle again. Four his legs, you need only to change the position of his feet, bending his knees in so that his left toe points straight down while his right is at a slight angle.
When you have opened the brown door, you'll discover: an ivory piano key, a stock pot and a green heart charm. Three colored hearts are painted on the shelf. Since those hearts look familiar . . .
Put the silver rectangle over them. Now the hearts have changed color. Note the color and sequence.
Now back up to focus on the stove:
Grab the heart there. Click on the dial to open the gas on the stove then use matches to light the flame. The empty pot, a logical choice, won't fit on the burner for some reason, though . . .
Go over to the sink:
Pick up another heart, turn on the water, and fill the pot.
Now the pot of water will sit on the stove flames. It gets hot but nothing more happens.
What else can we look at here in the kitchen?
Just a coffee maker, but there's no coffee around here (some café, eh?)
Well, pick up two more hearts and . . . wait a minute, something bronze is stuck in the machine's grate. Of course that ever-handy screwdriver is also missing.
Come to think of it, the dial on the coffee machine looks like another common item. One we saw in the other room . . .
The clock.
It's time to solve more puzzles and enter another code.
Go back to the first room's cupboards, click on the code box for the bottom left cupboard. You're ready to solve this based on what you found in the kitchen:
Purple Heart - Orange Heart - Green Heart.
Or, click on the left heart 4 times, the middle heart 2 times, and the right heart 6 times.
Inside this cupboard you'll get another heart charm and a red disc with five circular cut-outs on it. One is green. This shape should remind you of two things you've seen so far . . .
The clock.
The coffee machine.
Put all the clues together in the right way and in the right place and soon you'll have the bottom rightside cupboard open . . .
From the position of the coffee maker's dial, the green dot coordinates with the 10 o'clock position on the clock. Put the red disk over the clock with the green circle over the 10. Now you have four other numbers revealed.
The size of the circles tells you the order of the numbers. Just like in counting, go from smallest to biggest; in this case, smallest circle to biggest circle.
5 2 7 8
Enter the code from the clock to get the screwdriver and a red slip of paper with another clue on it.
Go back to the kitchen, now we can use the screwdriver to get that bronze item from the coffee machine: a music box key. While here, have another look at that red slip of paper . . .
Fold it over and little green bubbles are shown. Bubbles remind me of a nice hot bubble bath…or maybe just hot water…
Put the paper over the steaming pot of water to get a new code: PIXY
Back out in the main room, we have what we need to open the last cupboard, using the clue from the red slip of paper. Inside we get an elaborate gold key and another ivory piano key.
First go to the gold cage, use the key to take the locket. Have a look inside:
Take out a piece of paper illustrated with musical notes and a keyboard diagram on each side. This clue tells you what you need to know about the piano keys and playing music here at in Golden Heart. Examine the paper in your inventory to study (and learn from) each side of the clue.
Next, go over to the music box, use the bronze turn-key to open it, and place the 3 missing ivory keys back on the piano (if you don't have them all, you'll need to re-trace your steps to find them).
Part Two: Solving the Piano Puzzle and Getting Out
This is a challenging but fun logic puzzle for those who can't read sheet music. MUCH more simple if you do. But it IS possible to solve without resorting to google or spoilers for help. Give it a try!
If you'd like help getting started, here's a HINT:
On the first side of the clue, look at where each musical note is in relationship to the piano keys:
• The first note corresponds to an ivory key (the first one on left)
• The sheet music diagram shows simple scale, each note goes up by one position.
• So coordinate the position of the note (black dot) to the position of the keys.
In plainer terms:
• The piano keys are, from left to right: c, d, e, f, g, a, b.
• The lowest position of the musical notes represents the first "c" on the keyboard.
• Each step up on the sheet music represents those notes; so on the scale that goes up, starting with the lowest position: c, d, e, f, g, a, b.
The second side of the clue is misleading because it also shows the piano keyboard but take notice of how the sheet music changed. This tells you which notes you have to play and in what order.
Use the simple scale to help you get acquainted with each key's relationship to the notes on the sheet music to figure out how to play this song.
If you're still having trouble, open this spoiler:
From left to right, the ivory keys are: C ! D ! E ; F ! G ! A ! B
So, play the notes in this order: c, c, d, f, g, e, d, g, g.
Or . . .
Just number the keys from left to right: 1 ! 2 ! 3 ; 4 ! 5! 6 ! 7
Click each in this order: 1, 1, 2, 4, 3, 2, 5, 5
When you have finished your piano lesson and successfully played the correct notes, grab the last key and head for the door. Whew!
A note about the heart charms:
You are not required to find all the hearts before you can exit the game. Whether or not this makes the ending more - or less - special is, perhaps, just a matter of a perspective.
~* BONJOUR! *~
Posted by: elle |
July 14, 2011 7:25 PM
|
July 14, 2011 7:25 PM
Walkthrough.
You start looking at a pair of tables,
a gate on the left, shelves in the middle, Doors on the right and a table on the right.
Table 3 (on the left)
Zoom in on table 3.
Collect two hearts on the table.
Note 3=yellow (the flower)
zoom out,
click on the table on the right.
collect the heart on the table (#3)
collect the wooden thing on the floor (which looks kinda piano keyish)
note table 4 = red (flower)
zoom out.
turn right. Lets look at table 2
Collect heart #4 on the table.
note table 2 = blue (flower)
zoom out.
click on the shelf.
hmm. Pictures. (and hearts #4 and #5)
one of the pictures something on the back.
look at the drawing in your inventory.
back out, and zoom out.
Turn right again.
Zoom in on table 1 (on the right)
Collect the matchbook, and heart #6
note table 1 is purple.
zoom out.
Click on the right shelf.
collect heart #7
Note the clock (which doesnt appear to do anything)
Zoom out.
turn right twice.
The gate (on the left) is locked with a silver lock.
The bird cage is locked with a Gold lock.
The thing With the dancer on it appears to need a key.
There are 4 cupboards on the right.
Top left needs a 4 letter word (which we dont have)
Top left appears to need 4 colours.
Enter them
Purple, Blue, yellow, red
For the colour blind ...
1st button x4
2nd button x3
3rd button x1
4th button x2
And press the bottom button.
A Silver Key and a plaque with 3 hearts.
zoom out.
Zoom in on the gate, and use the silver key
A kitchen
Zoom in on the counter (with hobs)
collect heart #8.
Zoom out.
zoom in on the coffee machine.
Collect hearts #9 and #10
note the position on the green circle,
And that there appears to be something in the drip tray.
Zoom out.
zoom in on the stick-chef-figure
This looks familiar.
Re-position him to match the drawing.
Collect the wooden thing (2(3) top left, heart #11 and the big silver pot
hmm. hearts. Wonder what happens if i put the other hearts on it?
we get a 3 colour code
Purple, orange, green
zoom out.
zoom out.
look at the cupboards on the right.
The bottom left one needs a 3 heart code.
Enter it (for the colour blind)
Left x4
Middle x2
Right x6
and press the bottom button
Collect hearts #11 and #12
And the round thing.
It's round, What else have we seen that's round?
zoom out.
turn right twice, and zoom in on the right shelf.
use the round thing on the clock.
Then turn it till the green thing lines up with where it was on the coffee machine.
turn it till 10 oclock is green.
note that in order 5,2,7, and 8
Zoom out, turn around (right twice)
And zoom in on the cupboards.
The bottom left one needs a 4 number code.
Enter it.
Take the card, and the screw driver
Back up
hmm, the card folds, and has some green stuff on it.
Back to the kitchen
zoom in on the coffee machine.
Use screwdriver on the two screws, and take the Winder Key
zoom out.
Zoom in on the sink.
Collect hearts #13 and #14
Use the tap, and then fill the silver bowl.
zoom out, and zoom in on the hobs.
Turn on the gas (use knob)
Light gas (use matches)
Use the pan-o-water on the flame, and then use the card on the steaming bowl.
Then re-examine the card, and note the 4 letter word
PIXY
Zoom out, and back to the cupboards.
Enter the code into the top left door
Take the Wooden thing, and the Gold key.
Zoom out.
The Gold key seems to fit the lock on the bird cage. Take the big heart.
Examine the big heart, and find the clue inside.
Hmm a scale.
7 keys and 7 notes. But wait. click it, and see a tune
Zoom out, and click on the thing with the dancer ontop.
use the Winder Key on the slot, and it opens.
use the wooden things (keys) on the gap, and tap out the tune
Or, from the left, keys
1 1 2 4 3 2 5 5
And take the Exit Key.
Zoom out, Twice
Turn right twice, and use the remaining key on the exit door.
simple's
Posted by: john |
July 14, 2011 7:26 PM
|
July 14, 2011 7:26 PM
Heart pieces
There are 16 hearts to gather during the game, some are green and some are pink.
On the table with the number 1
On the table with the number 2
On the table with the number 3
On the table with the number 3
On the table with the number 4
On the shelf with the photos (left of the door)
On the shelf with the photos (left of the door)
On the shelf with the clock (right of the door)
Inside the cabinet with the 3 hearts lock (bottom left)
Inside the cabinet with the 3 hearts lock (bottom left)
Besides the stove
Besides the sink
Besides the sink
Besides the coffee machine
Besides the coffee machine
Inside of the cabinet in the kitchen (on the pile of plates)
Walkthrough
Gathering clues
Examine the left table, grab the two hearts (2/16).
Note the number and the color of the flower. Zoom out.
Examine the right table, grab the heart (3/16).
Grab the white piece on the floor as well (between the couch and the table, on the left)
Note the number and color of the flower. Zoom out.
Turn right.
Examine the table on the right, grab the heart (4/16)
Note the number and the color of the flower. Zoom out.
Examine the shelf with the photos.
Grab the 2 hearts (6/16).
Take a look at the 3rd picture starting from the left, a piece of paper is hidden behind it.
Take it. Zoom out.
Turn right.
Examine the shelf on the right of the door.
Grab the heart (7/16). Zoom out.
Examine the right table, grab the heart (8/16) and the matches.
Note the number and the color of the flower. Zoom out.
Getting in the kitchen
Turn right twice.
Examine the cabinets. Select the top right lock.
It asks for four colors in a specific order.
Use the numbers and the colors you've noted from the tables.
Pink, blue, yellow, red.
Grab the key and the color filter. Zoom out
Open the door on the left with the key.
Examine the right panel with the cook figurine.
Using the clue you got from the photos, reproduce the same pose.
Open the door, grab the heart (9/16)
Take the pot, and the white piece above it, on the pile of plates.
Use the color filter on the hearts, note the sequence. Zoom out.
Examine the coffee machine, grab the two hearts (11/16)
Note the green spot, where 10 o'clock would be. Zoom out.
Examine the sink, grab the two hearts (13/16)
Turn the water on, put some in the pot. Zoom out.
Examine the stove, grab the heart (14/16)
Turn the switch on, and use the matches on it.
Put the pot on the fire, zoom out.
Zoom out of the kitchen.
Opening the cabinets and solving the rest
Examine the cabinets. Select the bottom left lock.
Enter the combination you noted.
Purple, orange, green
Grab the two hearts (16/16), and the disk. Zoom out.
Turn right twice.
Examine the right shelf, then the clock.
Put the disk on it. As noted previously, turn the disk until the green spot is on the 10.
Note the numbers from the smallest circle to the biggest. Zoom out.
Turn right twice. Examine the cabinets. Select the bottom right lock.
Enter the combination you got from the clock
5278
Grab the paper and the screwdriver. Zoom out.
Go to the kitchen, then the coffee machine.
Unscrew the plate, take the key under it. Zoom out.
Examine the stove, put the piece of paper above the pot.
Examine the paper, fold the bottom. Note the code. Zoom out.
Exit the kitchen, examine the cabinets. Select the top right lock.
Enter the combination you got from the paper
PIXY
Grab the last white piece, and the key
Use the key to open the birdcage.
Take the necklace inside, and look inside it.
Grab the music sheet hidden inside.
Notice that on one side is noted which note corresponds to which piano key, and that you can look on the other side by clicking on it, getting a melody from french can-can.
Zoom out.
Examine the music box, open it with the key.
Place the white keys back in place.
Play the melody you noted previously.
(With 1 being the key on the far left)
11243255
Take the key.
Note that when I made a mistake, I had to zoom out and zoom in again, and replay the melody, to get the secret compartment to open. You may have to do the same.
Zoom out, turn right twice, open the door.
You're out!
Posted by: SpinelessCoward |
July 14, 2011 7:52 PM
|
July 14, 2011 7:52 PM