
Grim Tales: The Bride
Platform: Mac, Windows
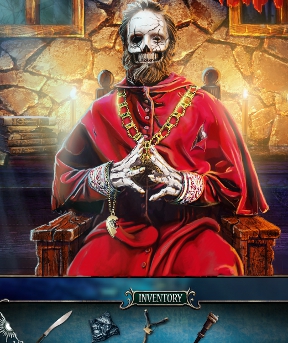
![]() Pushed from a bridge by a shadowy figure, your dear twin sister Luisa is dead. You haven't seen her since you were both children, but you find yourself driven by a burning desire to uncover her fate and the identity of her killer and return home for the first time in years. A mysterious creature offers you the chance to relive Luisa's memories and uncover the truth, maybe even save her, but if you fail, your soul will be forfeit. Will you be able to untangle the mystery surrounding the sister you thought you knew in Elephant Games' creepy time-trotting hidden-object adventure Grim Tales: The Bride? No, go ahead, it's cool. I'm sure you won't live to regret your deal with the devil at all. Those things always work out so well.
Pushed from a bridge by a shadowy figure, your dear twin sister Luisa is dead. You haven't seen her since you were both children, but you find yourself driven by a burning desire to uncover her fate and the identity of her killer and return home for the first time in years. A mysterious creature offers you the chance to relive Luisa's memories and uncover the truth, maybe even save her, but if you fail, your soul will be forfeit. Will you be able to untangle the mystery surrounding the sister you thought you knew in Elephant Games' creepy time-trotting hidden-object adventure Grim Tales: The Bride? No, go ahead, it's cool. I'm sure you won't live to regret your deal with the devil at all. Those things always work out so well.
 To uncover the truth about Luisa and maybe save her life in the process, you'll split your time between tracking down photos in your family home that transport you back in time, and tokens that have some sort of relationship with Luisa herself. While most of the gameplay can be summed up with "I can't open X without Y", you'll also solve puzzles, hunt for clues, master mental control over the insect realm, and... also, a chipmunk will bring you a slingshot at one point. (Curtis would be proud, you rodent whisperer you.) Depending on the difficulty setting you choose at the beginning, interactive areas may or may not be highlighted with Cullen sparklies, but if you examine each area carefully and watch for the cursor to change, you should be fine. In a pinch, clicking your unusual pocket-watch during ordinary gameplay will also tell you where to go next, and also can be used to skip particularly frustrating puzzles. Handy!
 Analysis: If you're going to take a trip through your estranged sister's increasingly miserable final days, it might as well be scenic, and The Bride has that in spades. The artwork is beautiful, the environments are atmospheric, and the soundtrack is actually surprisingly well done, mingling vaguely discordant tracks for an eerie feel in some locations and knowing just when to kick in or fade away. If the game falls short, it's because it initially fails to really marry its narrative and gameplay. You're left to infer a lot on your own and check your journal frequently to get a lot of context that really should have come across better within the game itself. It goes without saying that throughout the course of your journey back in time, you'll uncover a few dark family secrets, which is de riguer for any fashionable young lady these days. The occasionally goofy gameplay and item use at times feels as though it's at odds with the atmosphere and tone the game is striving for, but, well... I was on board the moment Darth Malak crawled out of the fireplace.
Fortunately for fans of the genre who prefer gameplay to story, there is a great deal of the former to be had. Throughout the course of the game you'll visit a remarkable number of different locations packed with all manner of hidden-object scenes that never repeat, which is a feat itself. There is a fair amount of backtracking, but there's also a remarkable amount of puzzles and new areas to explore so that just when a location is beginning to feel old, you're transported somewhere new. Depending on your play style, the game could take four hours or significantly longer, and maintains just the right amount of low-key creepiness throughout. While the ending seems a little abrupt, the bonus chapter in the Collector's Edition does, for once, feel like an actual bonus rather than a final installment of a story you need to play to understand the rest. While it doesn't quite reach instant classic status, Grim Tales: The Bride is a beautifully designed and well-made adventure from start to finish that offers a satisfying, meaty chunk of cheesy ghoulish fun. Try the demo before you buy it, but if you're a fan of the hidden-object hunting and impeccably dressed demons, you'll want to try it for sure.
A Collector's Edition is also available. It includes wallpapers, concept art, an extra adventure, and a built-in strategy guide. Remember that Big Fish Game Club Members pay only $13.99 for Collector's Editions (or 2 club credits), and collector's editions count 3 card punches of 6 total needed for a free game.
![]() Windows:
Windows:
Download the demo
Get the full version
Also available: Collector's Edition
![]() Mac OS X:
Mac OS X:
Download the demo
Get the full version
Also available: Collector's Edition


Walkthrough Guide
(Please allow page to fully load for spoiler tags to be functional.)
Grim Tales: The Bride Walkthrough Part 1
Chapters 1-3
General Information
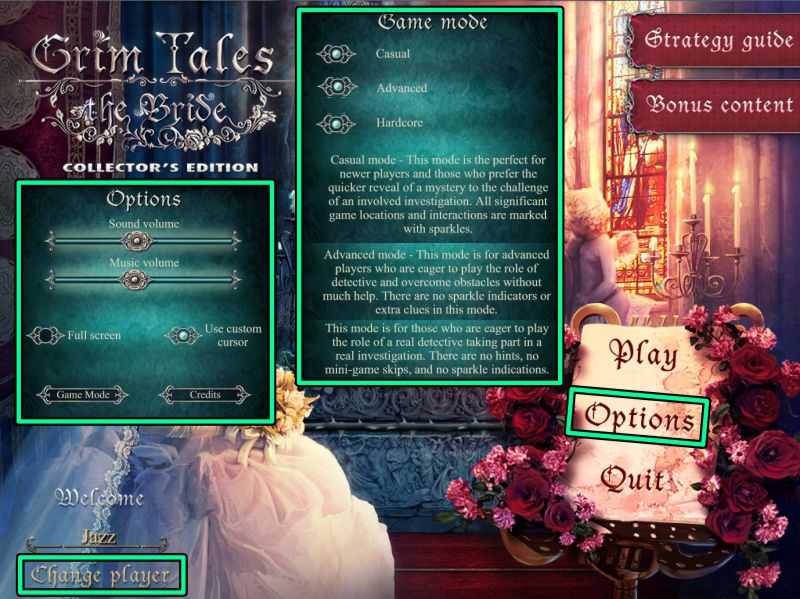
From the Main Menu, you Play or Quit the game, and choose your Options and Profile.
Options include Sound and Music volume, Full or Windowed screen, use of a custom cursor, plus Game Mode, and an opportunity to view the Credits.
If you purchased the Collector's Edition, there is a Strategy Guide and the Bonus Content will become available when you have completed the basic adventure.
Screenshot
When you begin to play, you will be asked to choose a Game Mode.
Casual Mode is for those players who prefer the quicker solution of the mystery with maximum sparkles.
Advanced Mode is for those players who are eager to play detective and overcome obstacles without much help. There are no sparkles or extra clues in this mode.
Hardcore Mode is for those of you who want to play with role of a real detective mode, with no hints, skips or sparkles.
As you begin, you will get a choice of having Interactive Help.
Scene Navigation
Hints are unlimited once the Hint button in the lower left corner refills, and there is no click penalty.
In the lower right corner is your Diary with observations and notations.
Below the Diary is the Menu, where you can change your Options and Game Mode, resume the game, or quit to the Main Menu.
In the center of your screen is your Inventory, and where Hidden Object Scene lists are shown.
If you need to identify an item in your Inventory, mouse over it for its name.
There are 12 items to locate in the Hidden Object Scenes, including one item for your Inventory.
The items to locate are the same for everyone, and the Inventory item will be marked in bright blue.
Mini Games have a Skip option when the button becomes full, and some also have a Restart button.
Objects and locations with a Magnifying Glass will have a name tag and need to be checked out for more information or to perform a task.
An Eye in a circle provides information.
A Hand wants you to pick something up.
A Hand with gears means it is a task you cannot yet complete.
Arrows to move on to another location will tell you where you are going.
Sometimes you won't need to travel to a location because a photo you find will transport you there.
Screenshot
Diary
Your Diary in the lower right corner will record useful information.
Screenshot
Preface to the Tale
Entrance
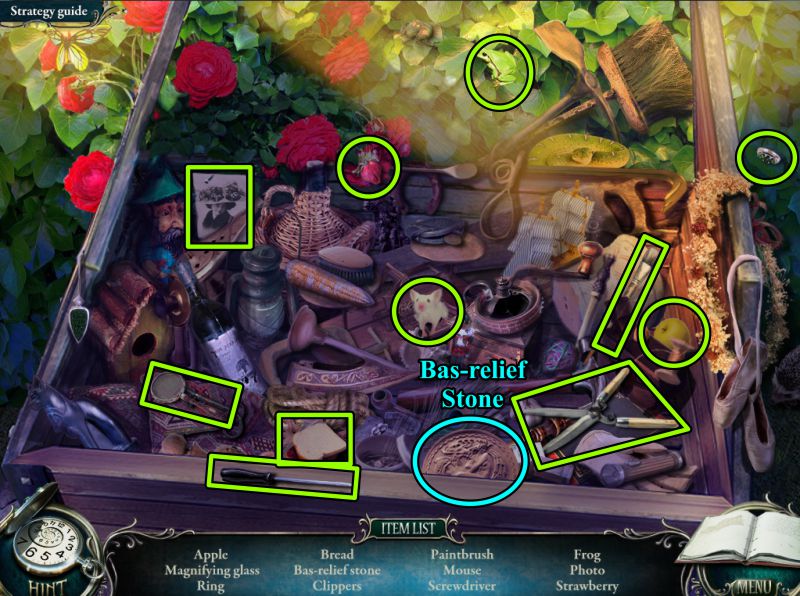
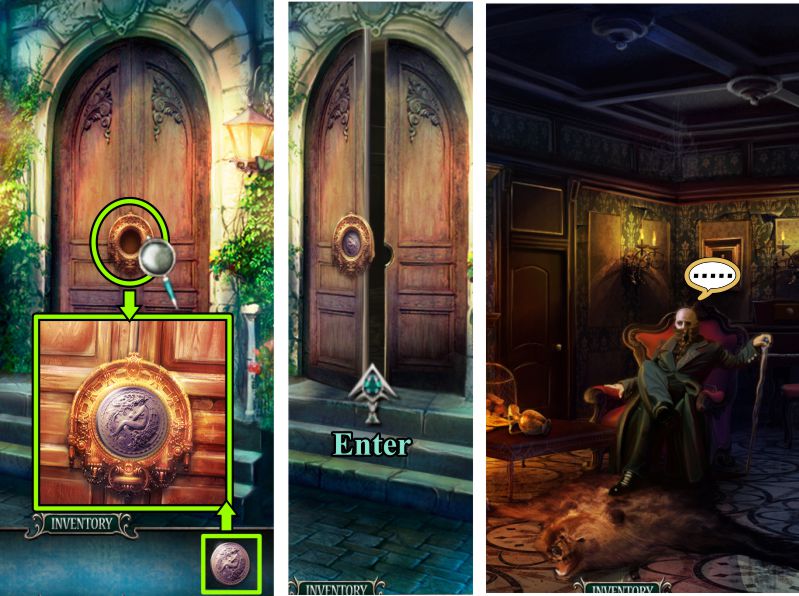
Check all the magnifying glasses, then play the Hidden Object Scene.
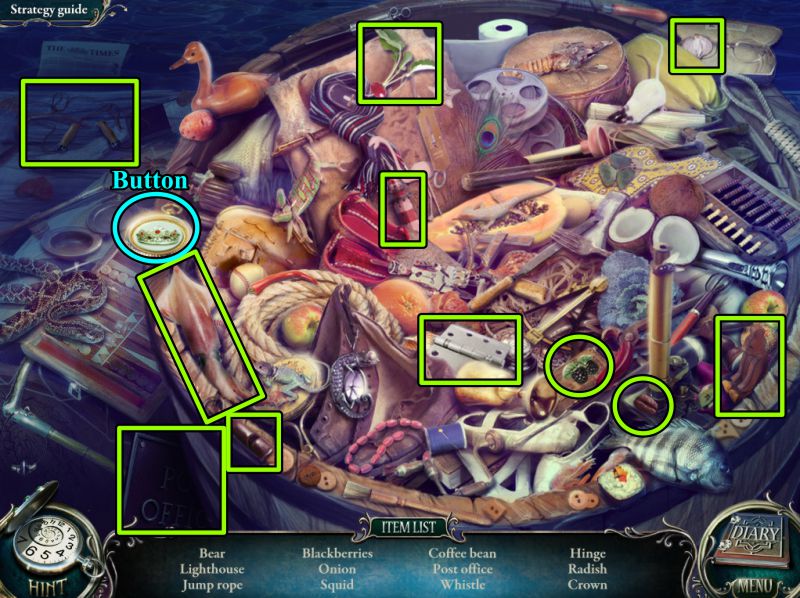
Entrance Hidden Object Scene
Collect everything to get the Bas-relief Stone.
Screenshot
Entrance Door and Living Room
Zoom in on the door and place the Bas-relief Stone.
Enter the mansion, and you will encounter a strange man who will make you a proposition to save your sister Luisa.
Screenshot
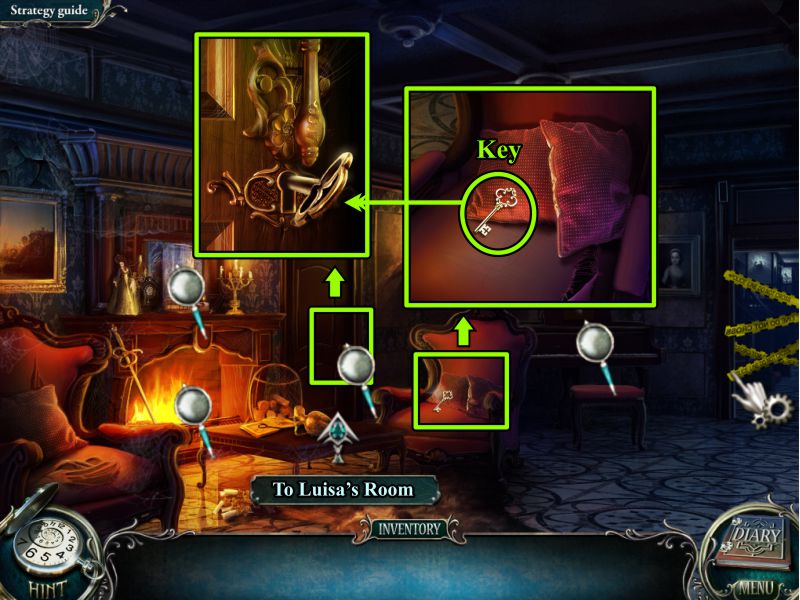
Living Room
Check out all the magnifying glasses, then grab the key left in the chair.
Zoom in on the door to Luisa's Room and use the key to open the door so you can enter.
Screenshot
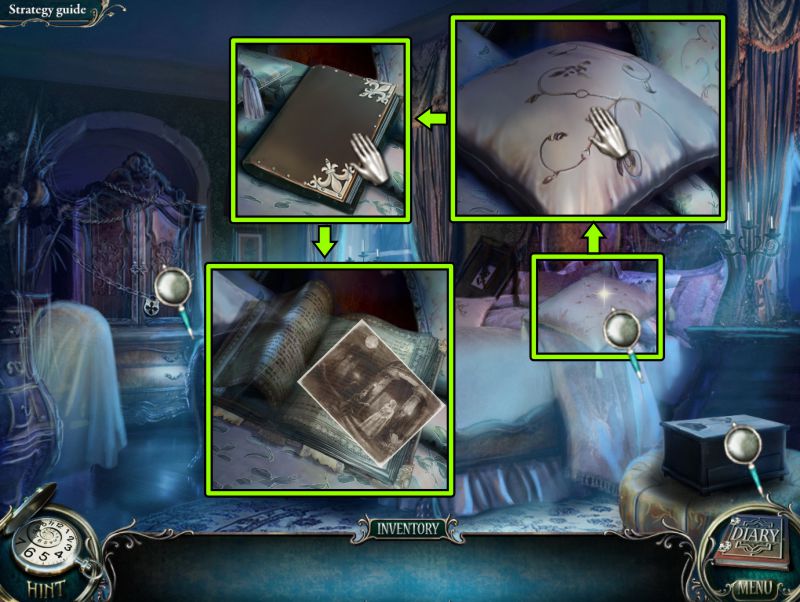
Luisa's Room
Your goal is to find Luisa's Diary. Check out all the magnifying glasses.
Zoom in on the pillow on the bed, move it, and open the Diary you find there.
The photo of John Gray and Luisa that you find will transport you to the Pavilion.
Screenshot
Chapter 1: The Ring
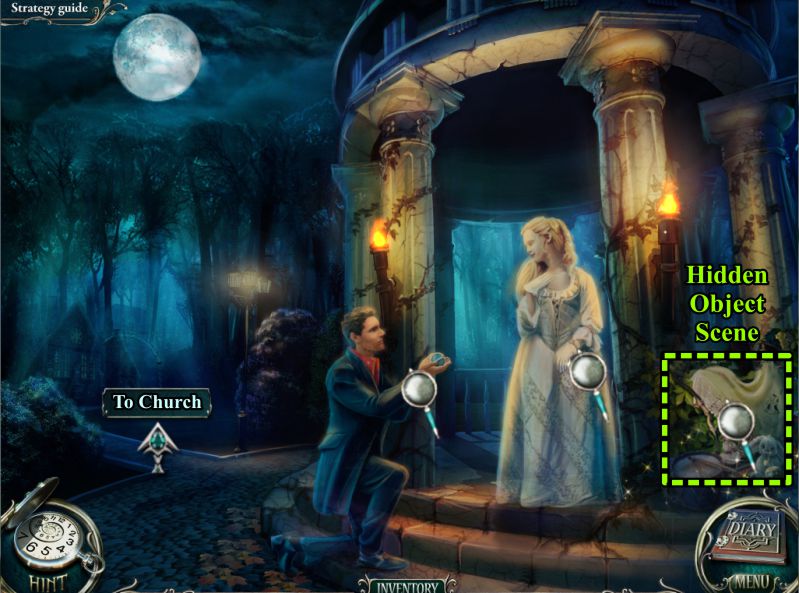
Rotunda
Check both John and Luisa's hands.
Play the Hidden Object Scene in the bush, and then head off to the Church.
Screenshot
Pavilion Hidden Object Scene
When you have collected everything, your Inventory object will be half of a Sun.
Screenshot
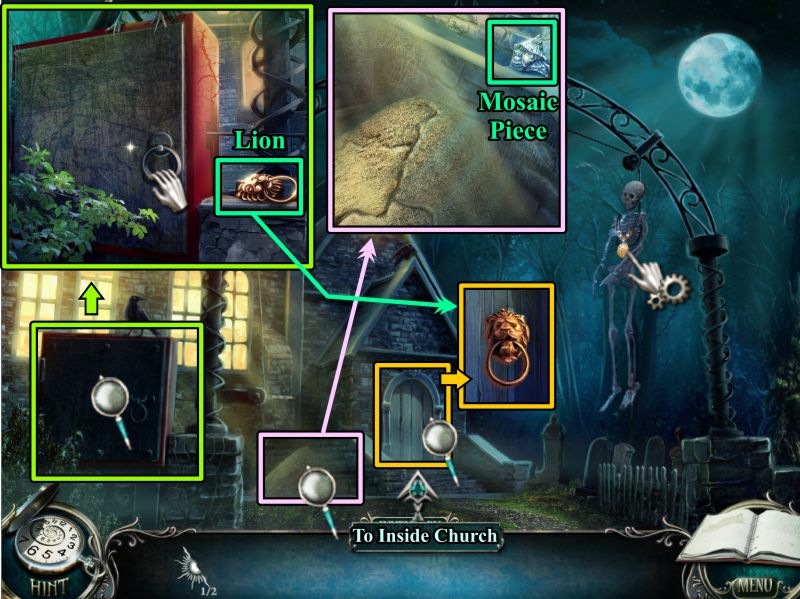
Church
Zoom in on the box at the left and take the Lion.
Check out the medallion on the skeleton.
Zoom in on the termite hill and take the Mosaic Piece.
Take a closer look at the Church Door, place the Lion to open the door and enter.
Screenshot
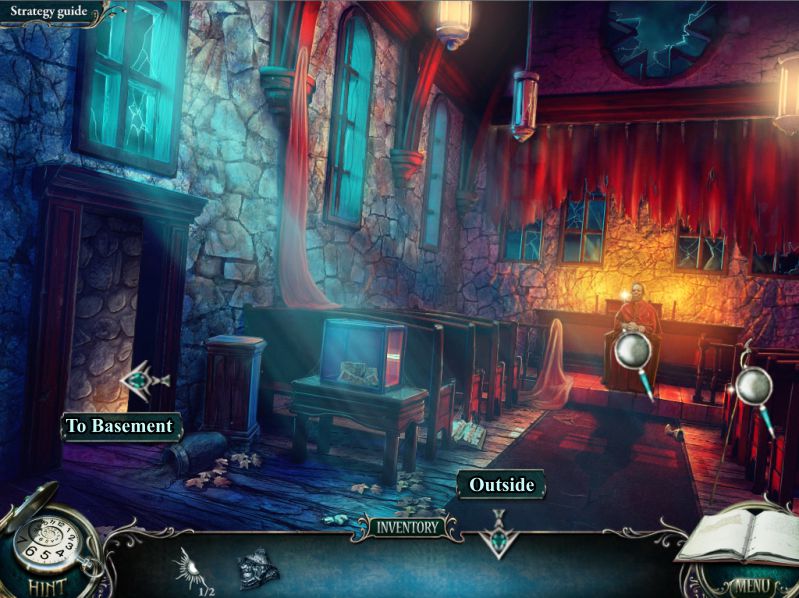
Inside the Church
Check the magnifying glasses, and go down to the Basement.
Screenshot
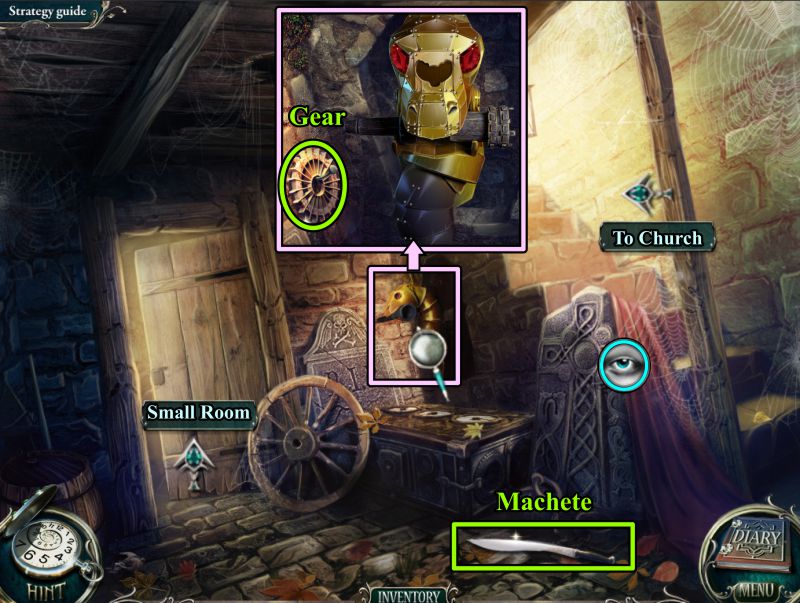
Navigation
Grab the Machete, look at the gravestone, and zoom in on the torch to take the Gear.
Go through the door to the Small Room.
Screenshot
Small Room
Check out the magnifying glasses to see that you need a few things to complete your tasks.
Return to the Basement, and go up the stairs and outside.
Screenshot
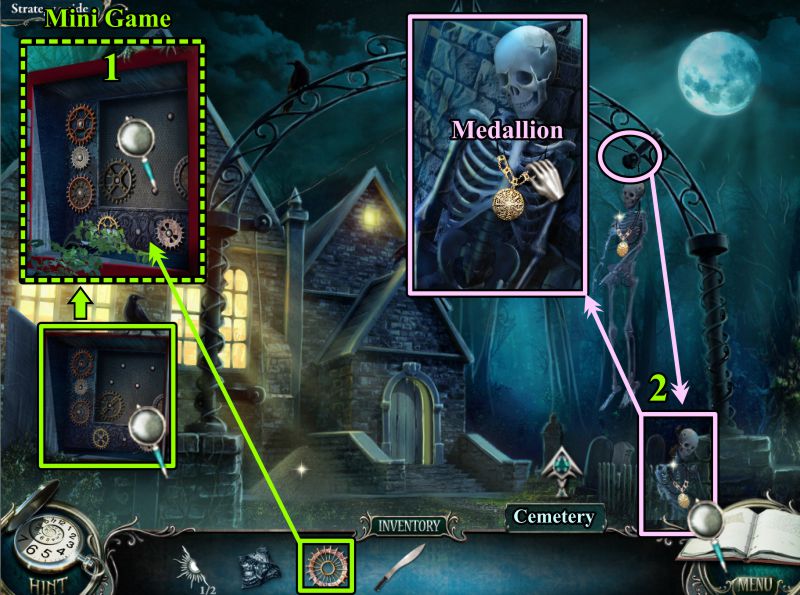
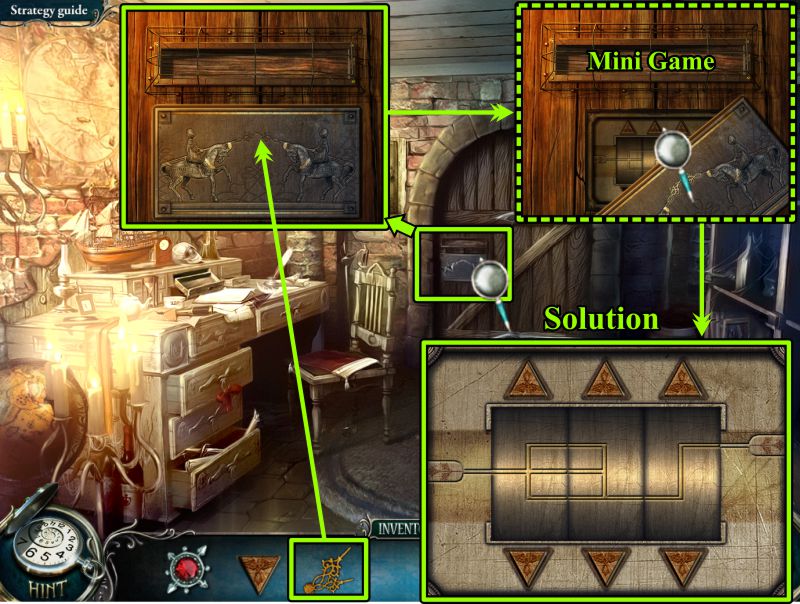
Navigation
Zoom in on the box, open it and zoom in for a Mini Game.
Place the Gear to activate the Mini Game.
At the end of the Mini Game, the skeleton will be lowered to the ground so you can take the Medallion.
Go to the Cemetery.
Screenshot
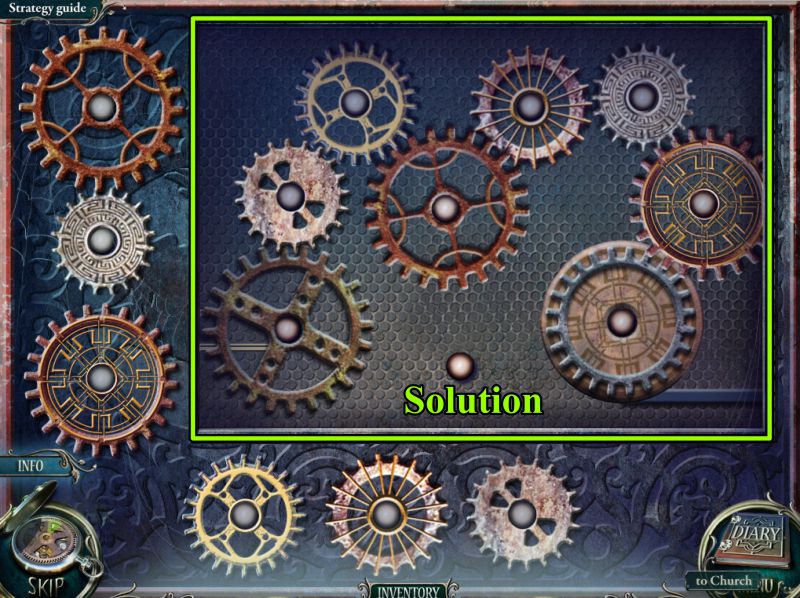
Gear Mini Game
Drag all the gears to their places as shown in the screenshot solution.
Screenshot
Cemetery
Check the RIP stone and the dog in the doghouse.
Note the Mother's grave and the open one.
Zoom in on the vines and use your Machete 3 times to get the Acorn.
Use the Machete again to clear the path to the Fountain.
Screenshot
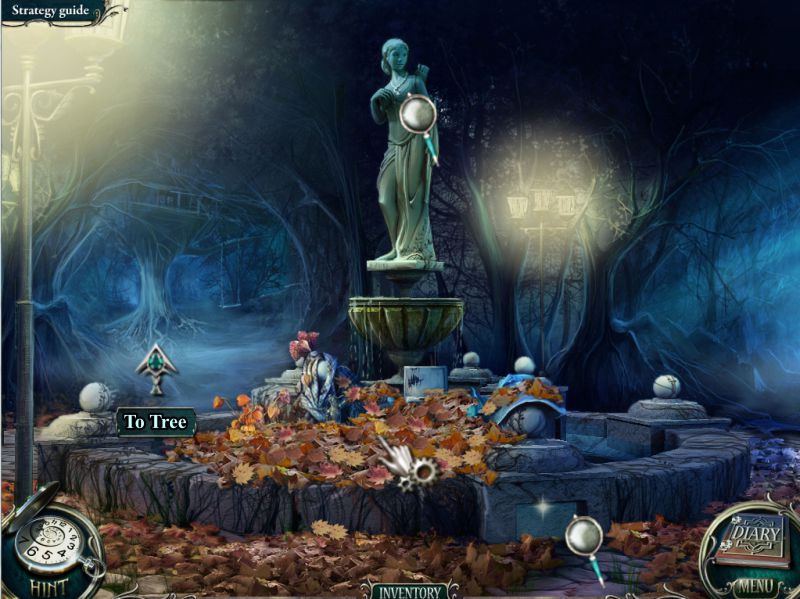
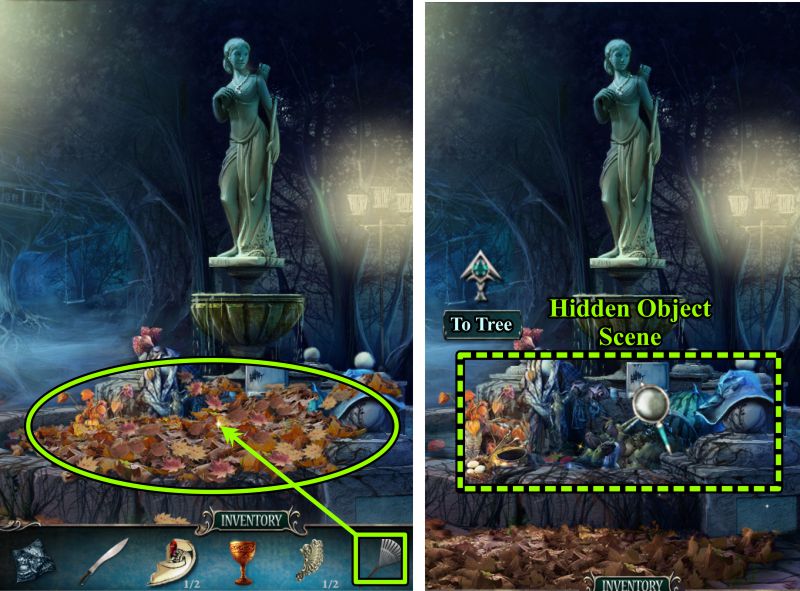
Fountain
Note all the leaves, the statue's necklace, and the tile in the stones, then head to the Tree.
Screenshot
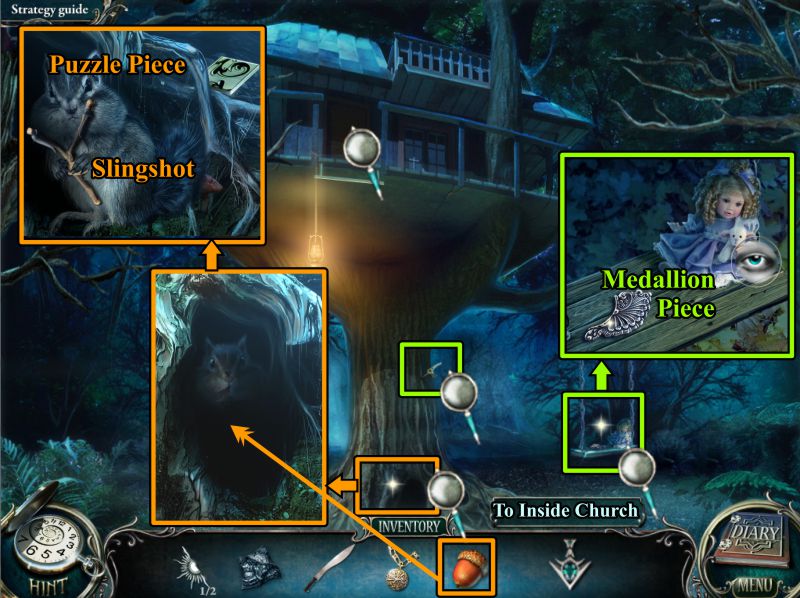
Tree
Zoom in on the swing and take the Medallion Piece.
Note the doll on the swing and the Ice Axe in the tree.
Zoom in on the hollow in the tree and give the squirrel the Acorn.
In return he has a Slingshot for you to take.
Grab the Puzzle Piece next to the Tree, then return to the Inside of the Church.
Screenshot
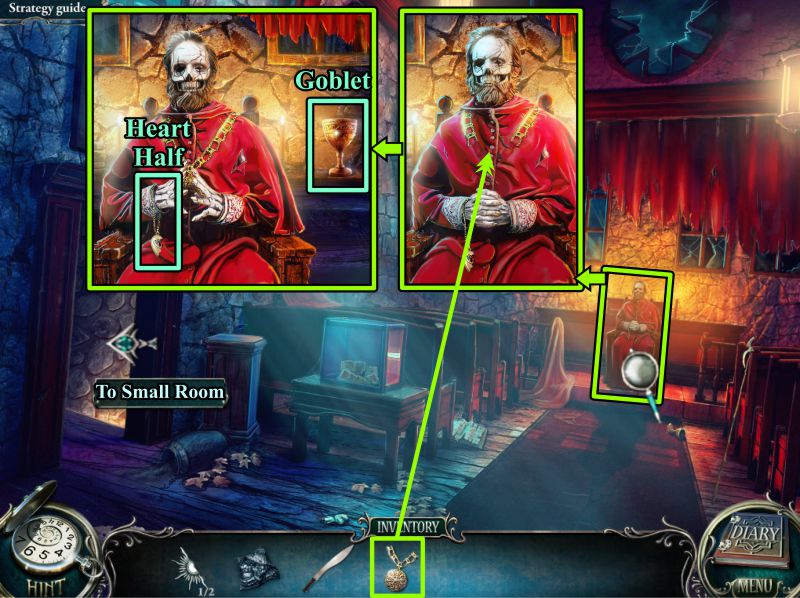
Inside Church
Zoom in on the Holy man and take the Goblet.
Place the Medallion on his neck, and he will release his hands so you can take the Heart Half.
Go downstairs to the Small Room.
Screenshot
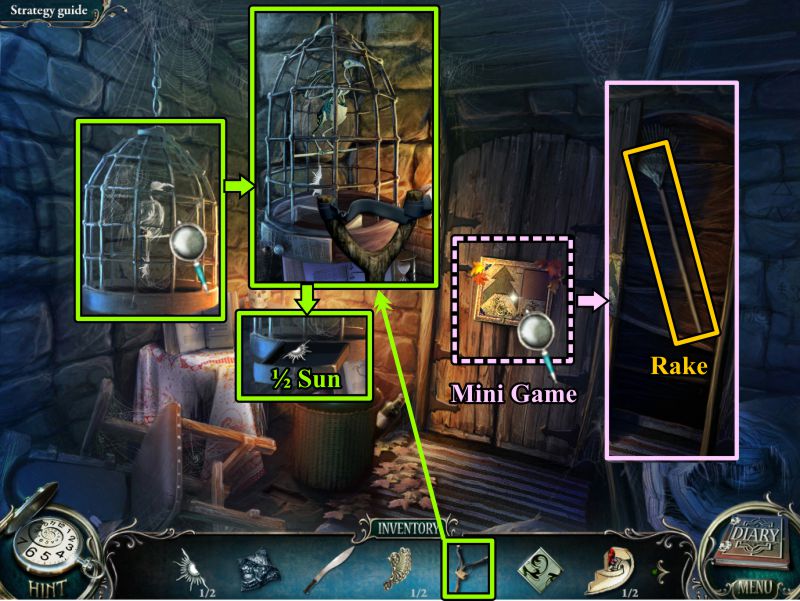
Small Room
Zoom in on the bird cage and use your Slingshot.
The bird will collapse and the drawer will open. Take the Half Sun.
Zoom in on the cupboard door for a Mini Game.
When the door opens, take the Rake and return to the Cemetery.
Screenshot
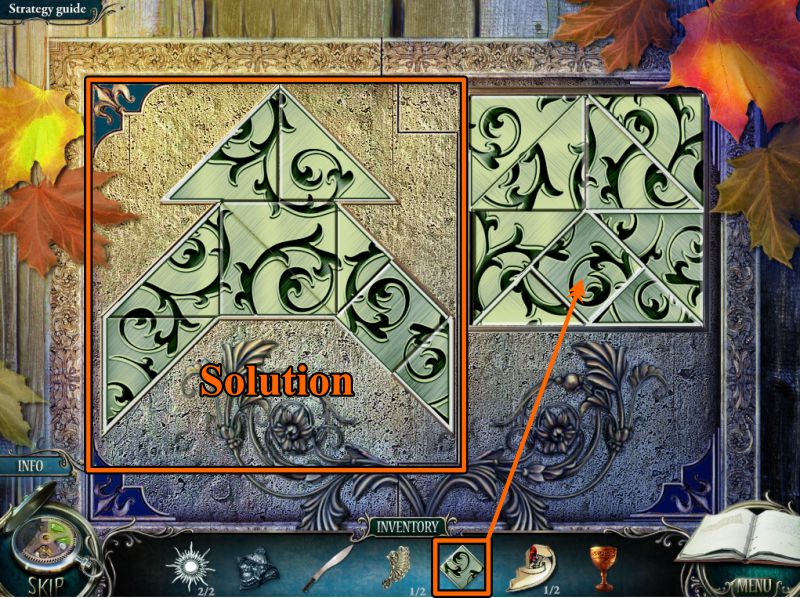
Cupboard Mini Game
Place your Puzzle Piece to activate the game.
Arrange all the puzzle pieces as shown in the screenshot solution.
Right-click on a piece to rotate it.
Screenshot
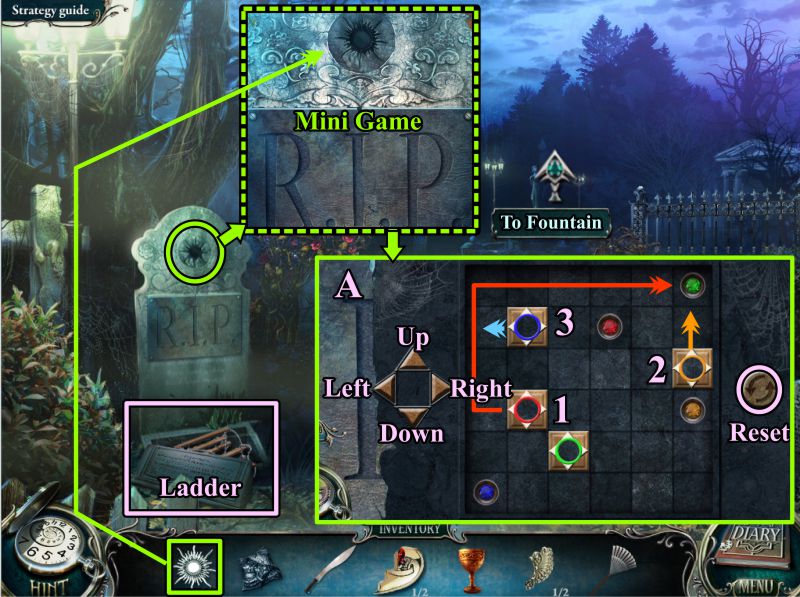
RIP Mini Game
Zoom in on the RIP gravestone and place the two sun pieces to trigger a Mini Game.
Your goal is to move the square pieces over the buttons so the drawer will open and you can take the ladder.
Use the arrows at the left to move the squares.
There is a Reset button if you need it.
See the screenshot for the first steps in moving the squares.
Screenshot
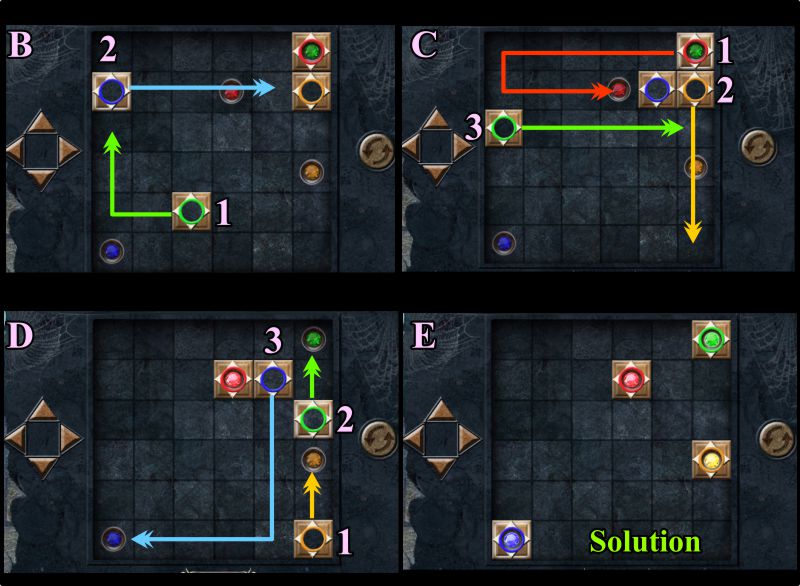
Continue moving the squares as shown in the screenshot until you arrive at the solution.
Take the Ladder and go to the Fountain.
Screenshot
Fountain
Use you rake to clear the leaves from the Fountain and generate a Hidden Object Scene.
Screenshot
Fountain Hidden Object Scene
Collect everything to get a Medallion for your Inventory.
Head to the Tree.
Screenshot
Tree and Tree House
Zoom in to place the ladder on the hooks.
Enter the Tree House to discover it is too dark to see anything.
Head back to the Church Basement to get that Torch.
Screenshot
Church Basement, Rotunda, and Tree House
Zoom in on the Torch holder and place your Medallion.
The torch has been released, so take it to the Rotunda to light it on the torch behind Luisa.
Head to the Tree House and light the lamp.
Screenshot
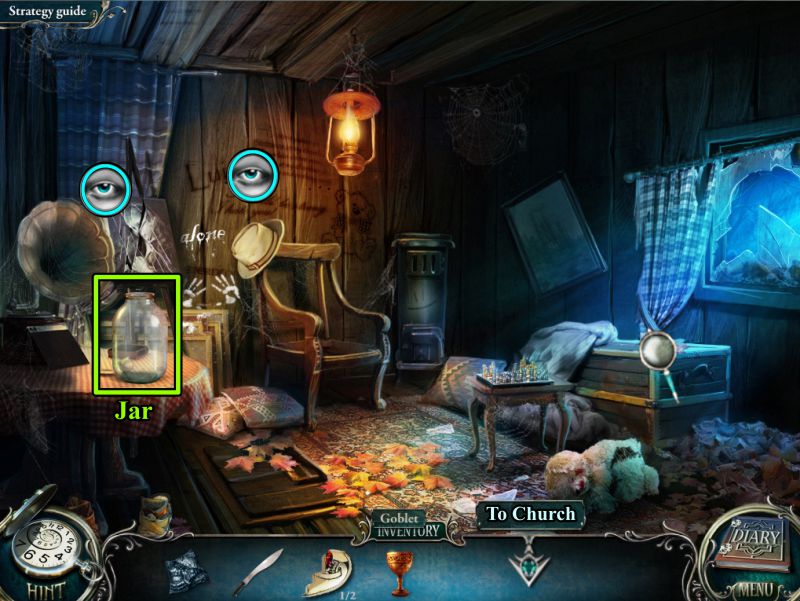
Tree House
Check the eyes and magnifying glass shown in the screenshot.
Take the Jar and go to the Church.
Screenshot
Church and Tree House
Zoom in on the termite hill and place your Jar to collect the termites.
Return to the Tree House and zoom in on the box by the window.
Place your jar of termites and watch them eat up the lid.
Take the Saw and go to the Inside of the Church.
Screenshot
Inside Church, Tree and Fountain
Zoom in on the pew and saw the stick off the axe.
Go to the Tree and zoom in on the Ice Axe.
Place the Stick to make a handle so you can take it.
Back down to the Fountain and zoom in on the Tile.
Use the Ice Axe on it 4 times and take the Ruby.
Go to the Rotunda.
Screenshot
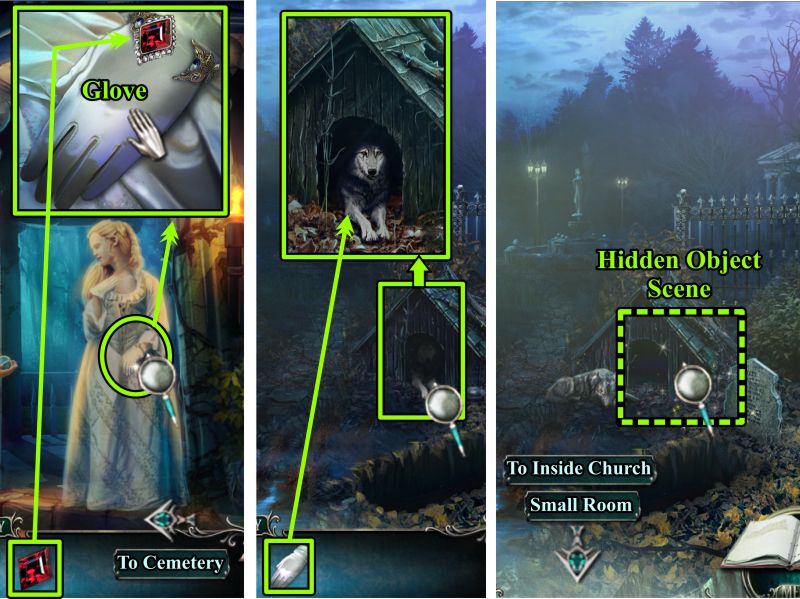
Rotunda and Cemetery
Zoom in on Luisa's hand and place the Ruby.
Take the Glove and go to the Cemetery.
You now have something of Luisa's to give to the dog, so zoom in and give him the Glove.
He will leave the doghouse and trigger a Hidden Object Scene.
Screenshot
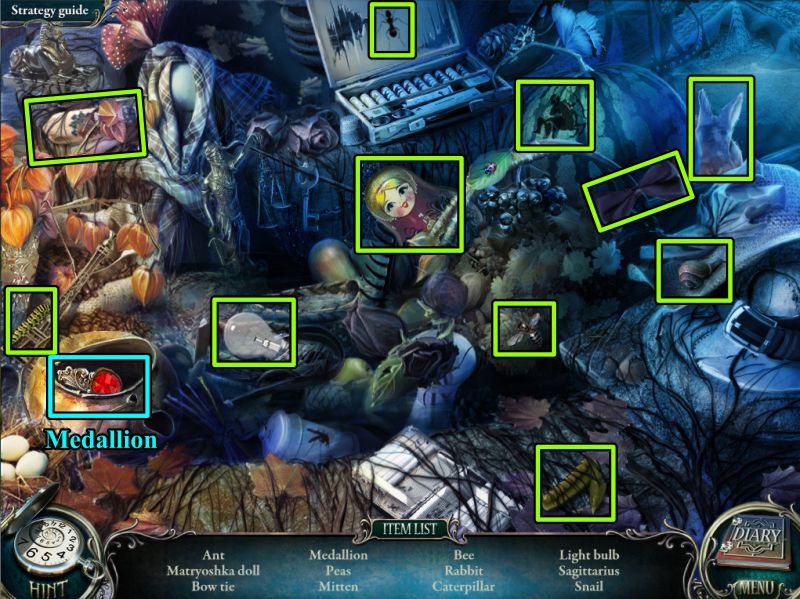
Doghouse Hidden Object Scene
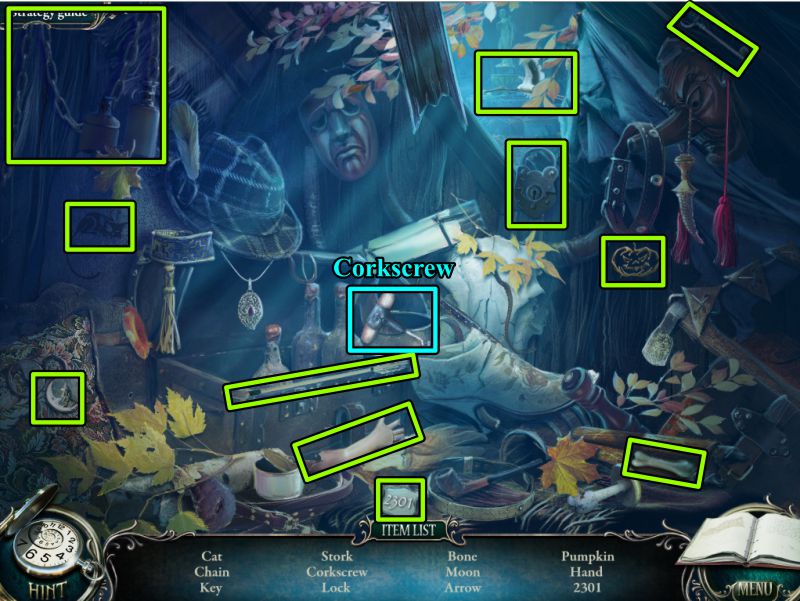
Once you have the Corkscrew, go to the Small Room in the Basement of the Church.
Screenshot
Small Room and Tree House
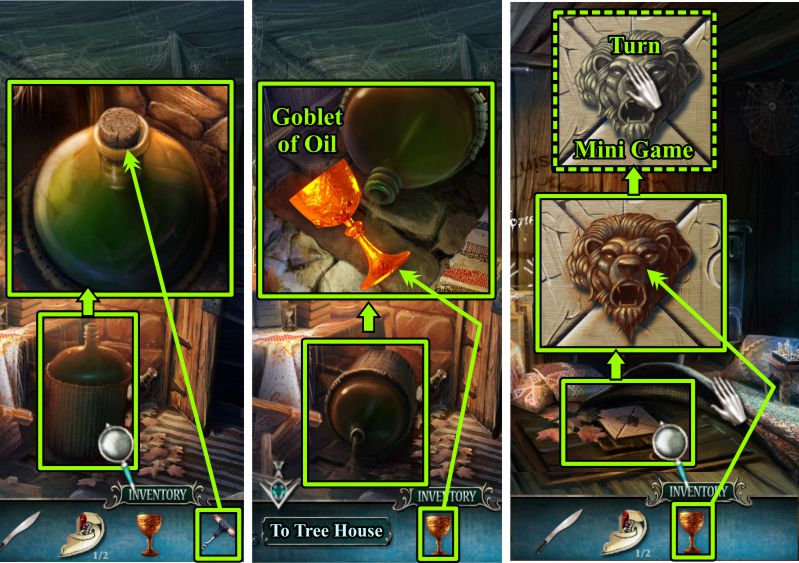
Zoom in on the large jug and remove the cork with the corkscrew.
The jug will tip over, so zoom in again and use your Goblet to collect the spilled oil.
Return to the Tree House and move the rug to the right.
Zoom in on the plaque on the floor and use your oil to clean off the rust.
Turn the lion's head to trigger a Mini Game.
Screenshot
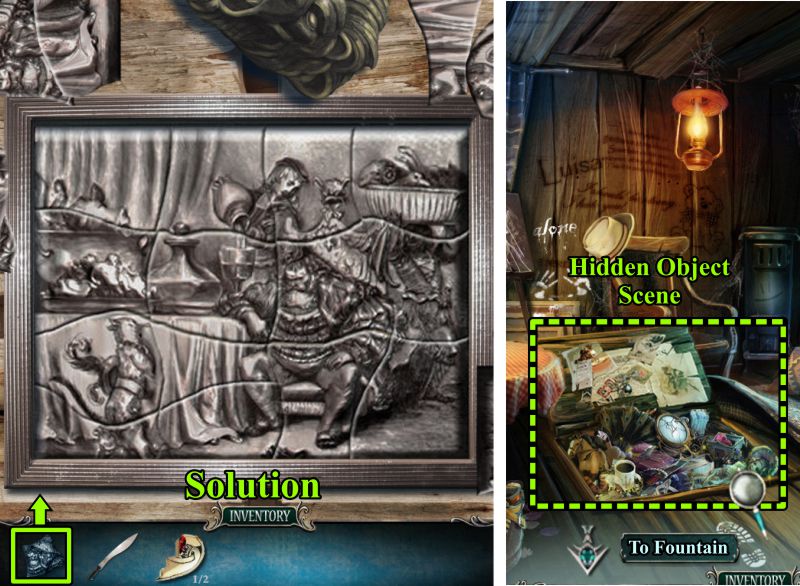
Mosaic Mini Game and Secret Hiding Place
Place your Mosaic Piece so you can complete the puzzle to the scene shown in the screenshot.
The Secret Hiding Place will open for a Hidden Object Scene, after which, head to the Fountain.
Screenshot
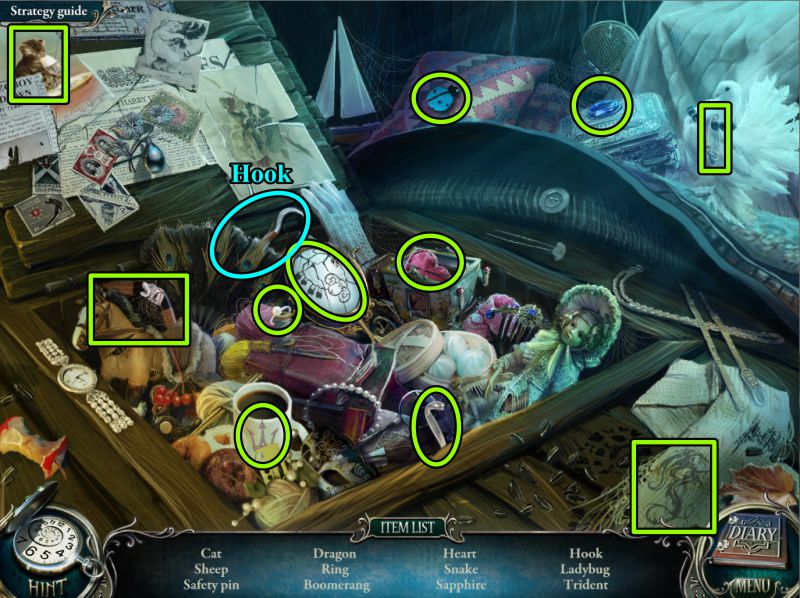
Secret Hiding Place Hidden Object Scene
Collect everything to get a Hook.
Screenshot
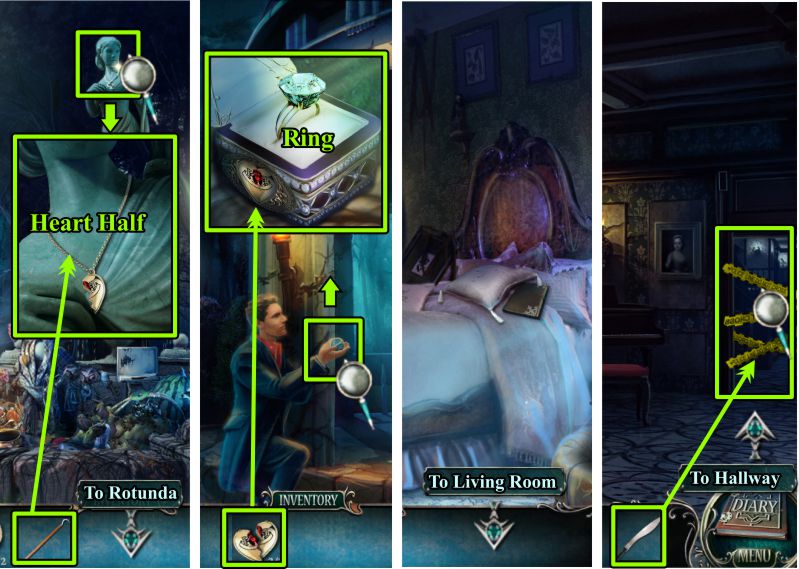
Fountain, Rotunda, Luisa's Room and Living Room
Use the Hook to grab the Heart Half necklace off the statue.
Go to the Rotunda and zoom in on John's hand.
Place the completed heart in the ring box, which will open for you to take the Ring.
You will be transported to Luisa's Room, so exit down to the Living Room.
Zoom in on the yellow tape blocking the Hallway, and use the Machete to remove the tape.
Go to the Hallway.
Screenshot
Hallway
Note that the Dining Room door is locked, then check out the Niche.
Grab the Scoop and go upstairs to the Second Floor landing.
Screenshot
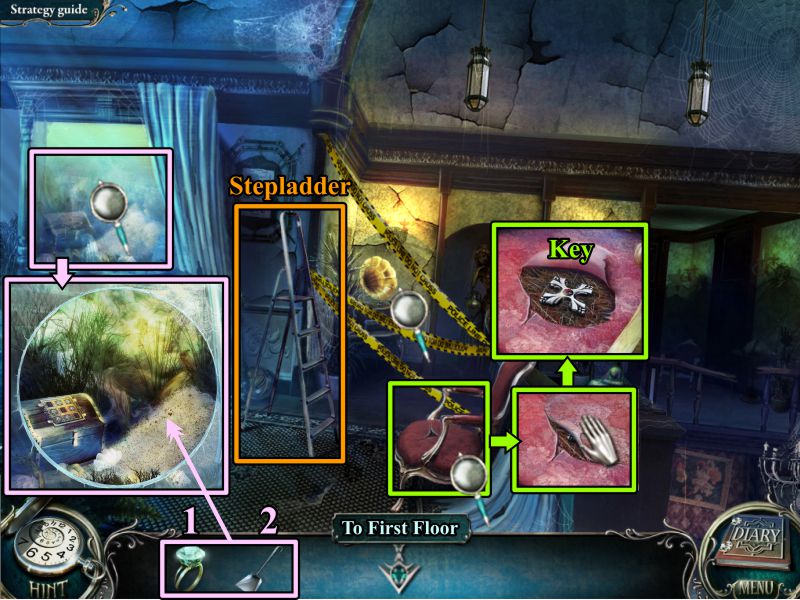
Second Floor
Zoom in on the Aquarium and use the Ring to cut the glass.
Take a scoop full of sand.
Collect the Stepladder for your Inventory.
Check out the yellow tape, then zoom in on the chair.
Open the gap in the fabric and take the Key.
Return to the First Floor.
Screenshot
Hallway and Living Room
Place the ladder under the chandelier, then take the Button you find there.
Go to the Living Room and zoom in on the fireplace.
Use your scoop of sand to put out the fire so you can get the Button.
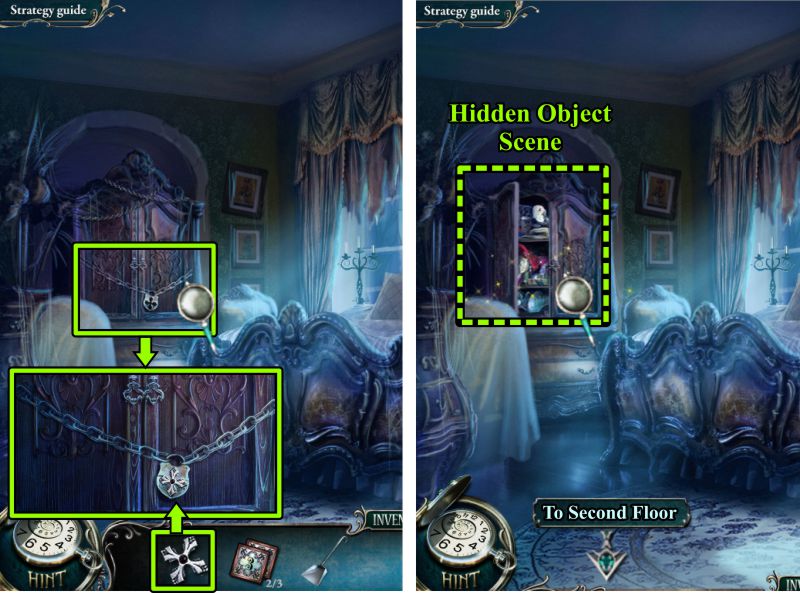
Go to Luisa's Room.
Screenshot
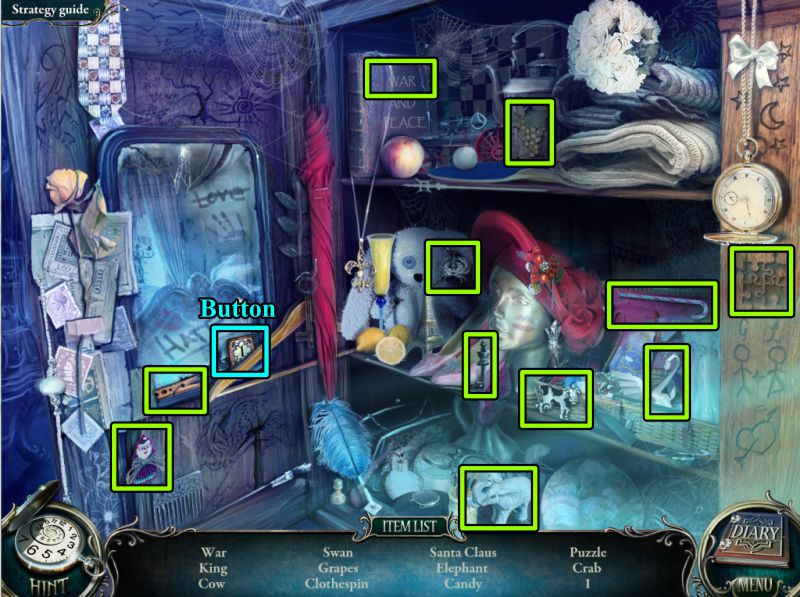
Luisa's Room
Zoom in on the cupboard and use your key on the lock to trigger a Hidden Object Scene.
Play it and then go to the Second Floor.
Screenshot
Cupboard Hidden Object Scene
You will get another Button when you have collected everything.
Screenshot
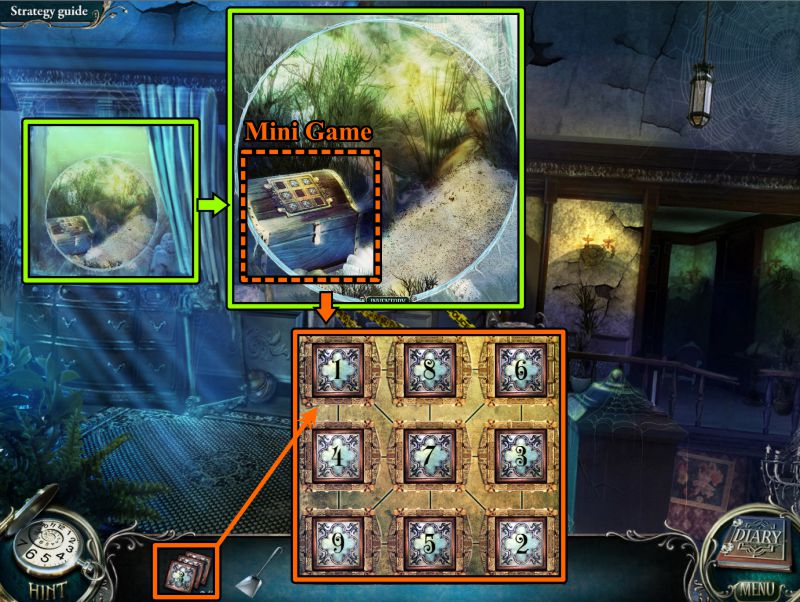
Aquarium
Zoom in on the Aquarium and then zoom in again on the chest.
Place your collection of Buttons to trigger a Mini Game.
Screenshot
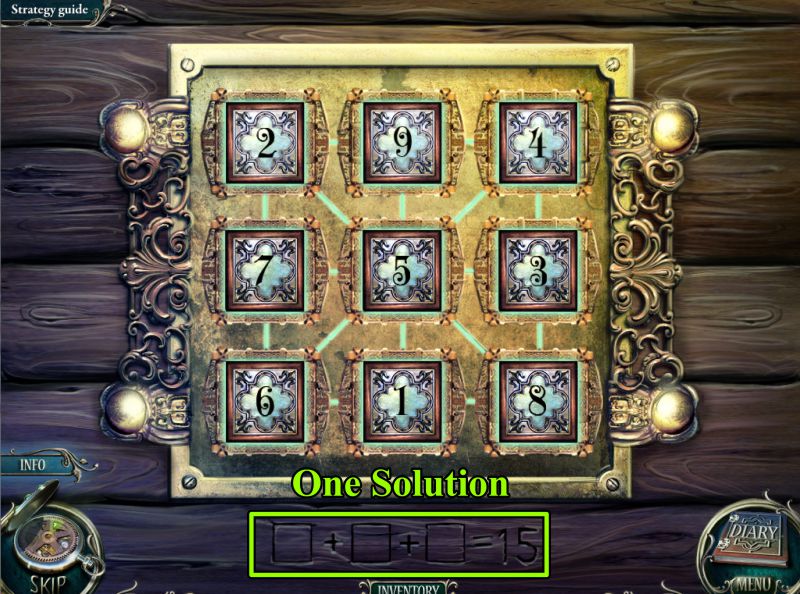
Aquarium Chest Mini Game
Your goal is to make all numbers (horizontal, vertical, and diagonal) total 15.
See the screenshot for one solution.
Once you have completed the game, you will receive another photo that will transport you to an Amphitheater stage.
Screenshot
Chapter 2: The Handkerchief
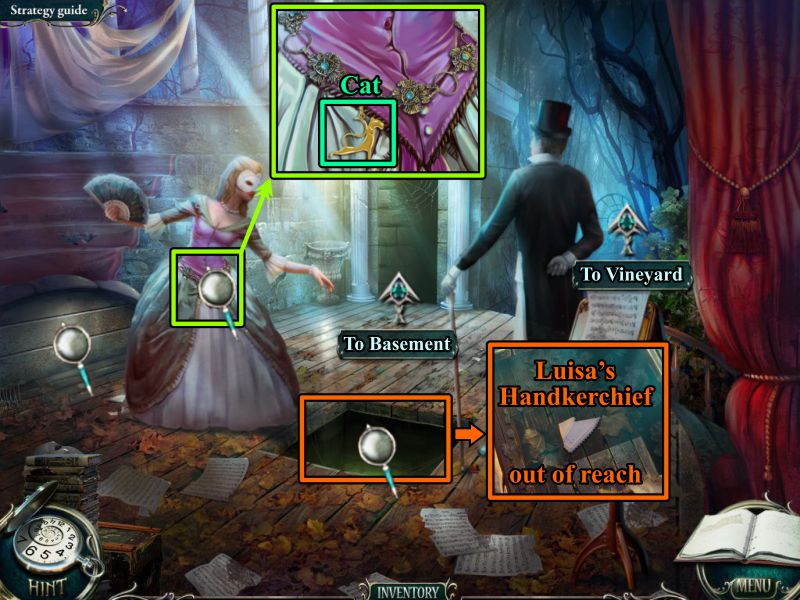
Amphitheater
Note the closed Prompt Box and the hole, where Luisa's Handkerchief is out of reach.
Zoom in on Luisa's belt and take the Cat.
Go downstairs to the Basement.
Screenshot
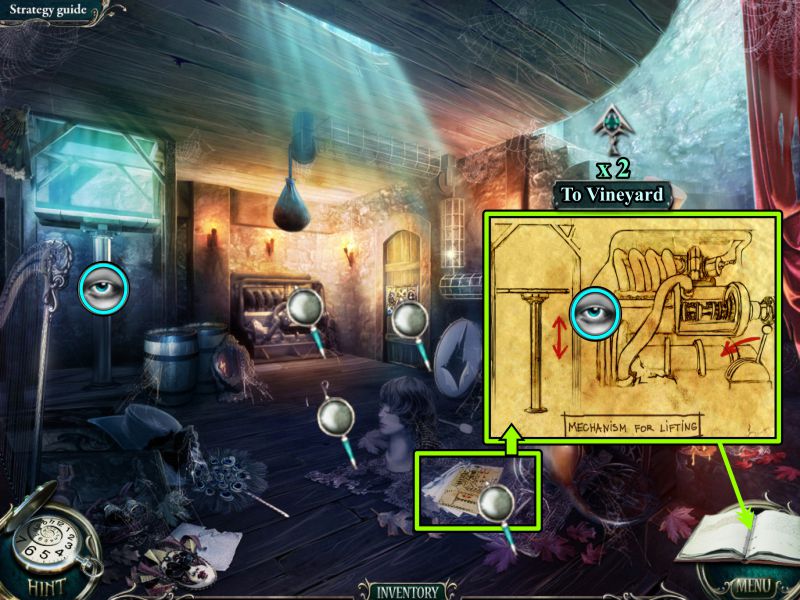
Basement
Check out all the magnifying glasses and eyes, taking special note of the instruction regarding the lift.
Go upstairs and forward to the Vineyard.
Screenshot
Vineyard
Check out the cabinet at the left to see you need something to get the funnel.
Use the Scoop to dig in the pile of dirt to get the Feather Duster.
Proceed forward to the Landing.
Screenshot
Landing
Check out the magnifying glasses shown in the screenshot and continue to the Boat Launch.
Screenshot
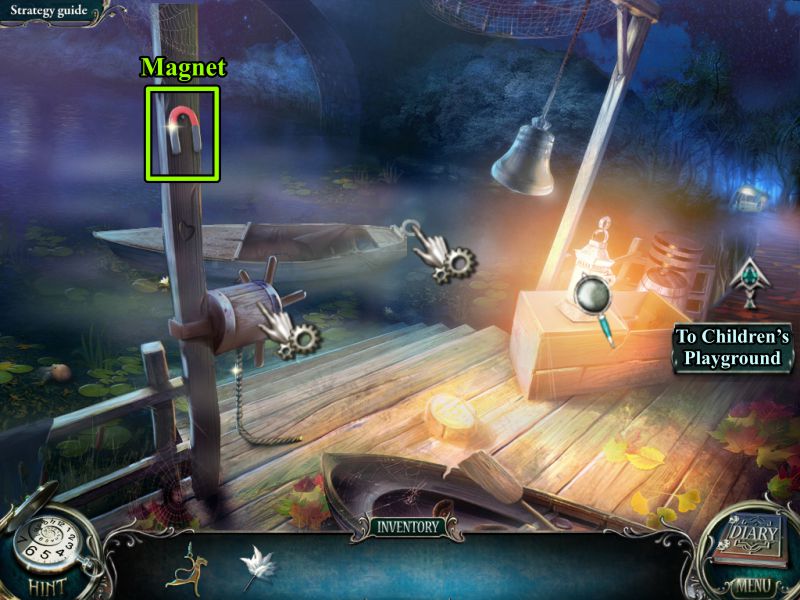
Boat Launch
Grab the Magnet, check the boat and lantern, and go to the Children's Playground.
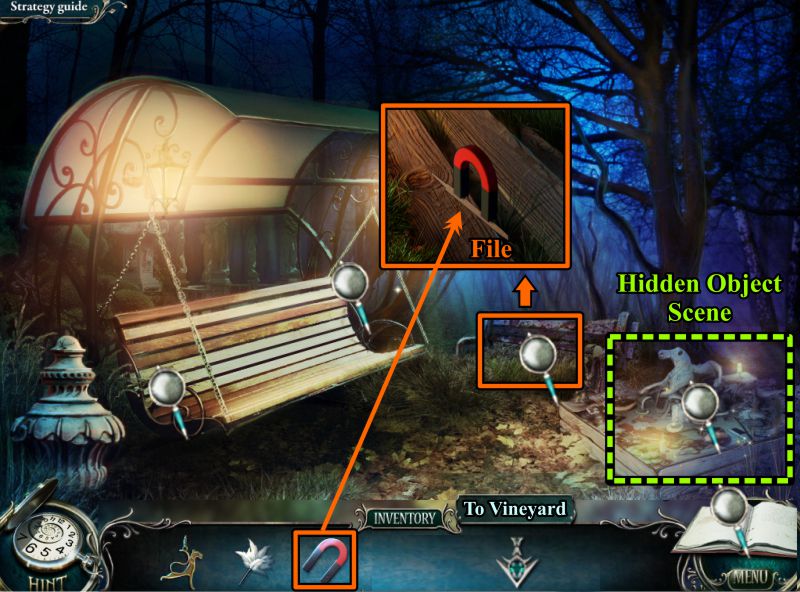
Screenshot
Children's Playground
Check out the swing, and zoom in to grab the File with the Magnet.
Play the Hidden Object Scene, and then return to the Vineyard.
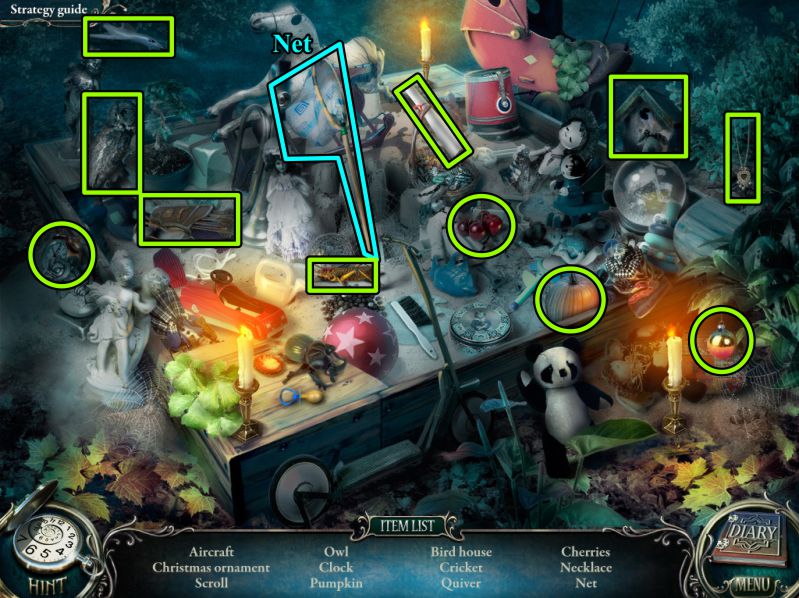
Screenshot
Sandbox Hidden Object Scene
Collect everything to get a Net for your Inventory.
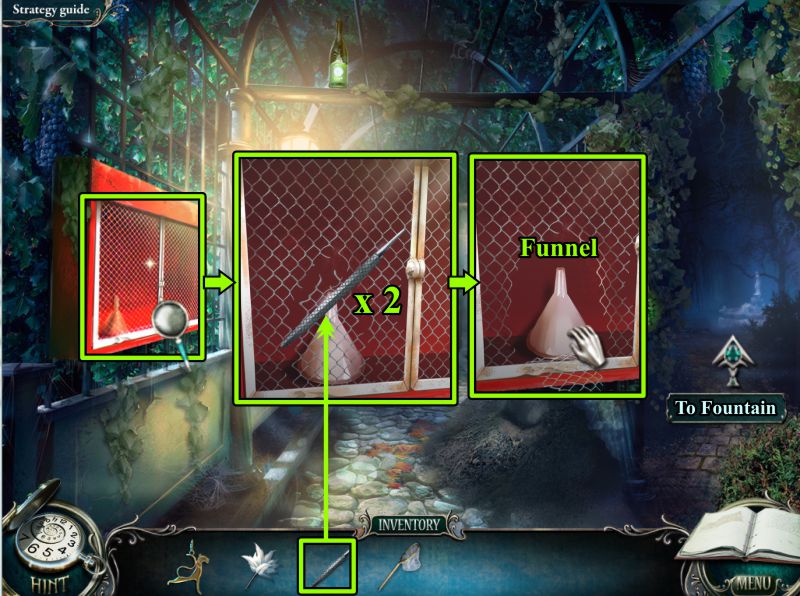
Screenshot
Vineyard
Zoom in on the cabinet with the Funnel. Use the File twice on the door to be able to collect the Funnel.
Head to the Fountain.
Screenshot
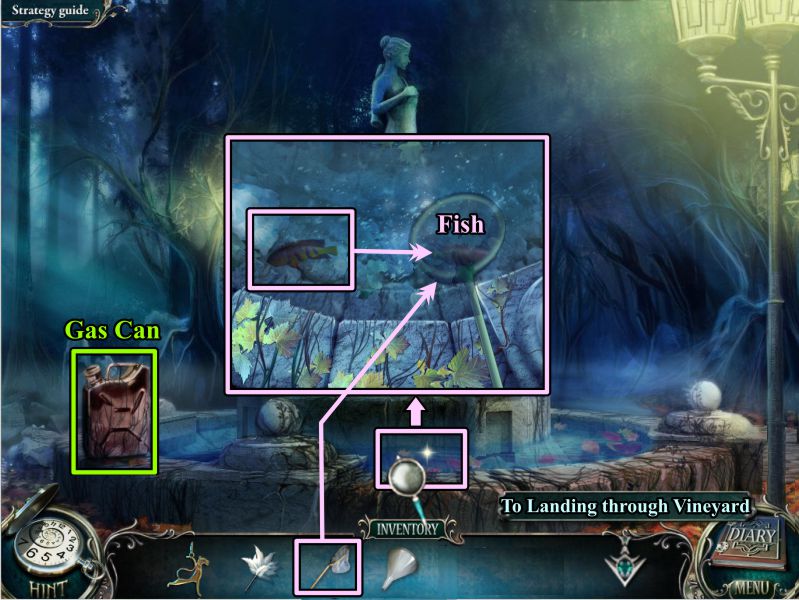
Fountain
Pick up the Gas Can, then zoom in on the Fountain.
Use your Net to catch the Fish swimming around.
Return to the Vineyard and go to the Landing.
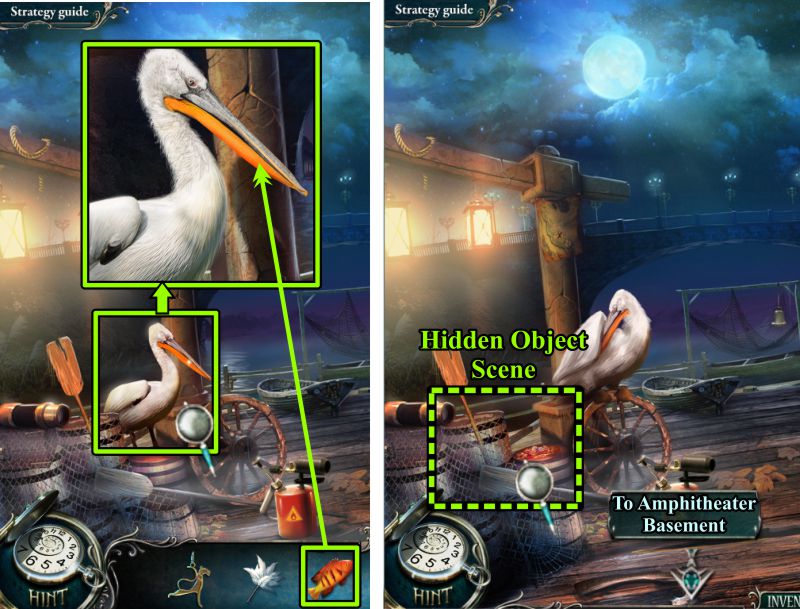
Screenshot
Landing
Give the Fish to the pelican so it will move off the barrels.
Play the Hidden Object Scene before going to the Amphitheater Basement.
Screenshot
Barrel Hidden Object Scene
Collect the Button as your Inventory item.
Screenshot
Basement
Zoom in on the Dressing Room door and place the Button to trigger a Mini Game.
Screenshot
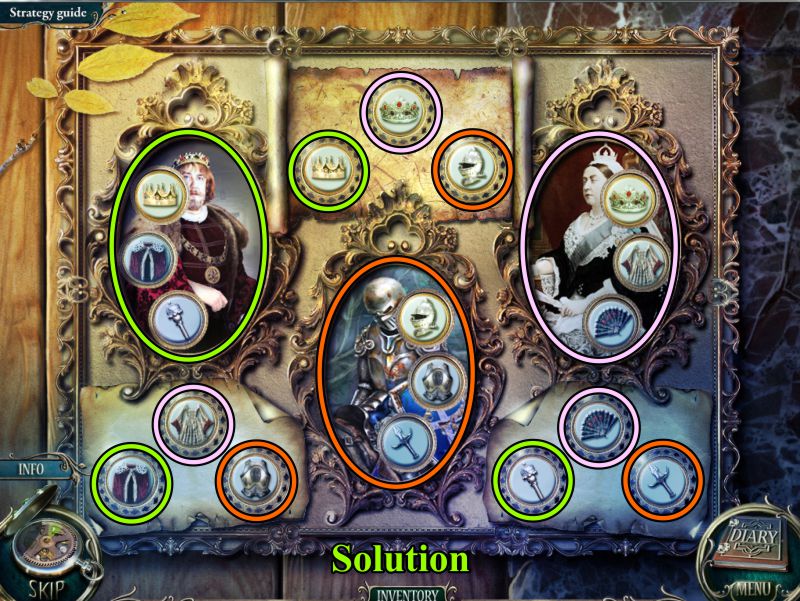
Dressing Room Door Mini Game
Your goal is to place the buttons in the correct picture and in their proper place within the picture.
See the screenshot for the color-coded solution.
Screenshot
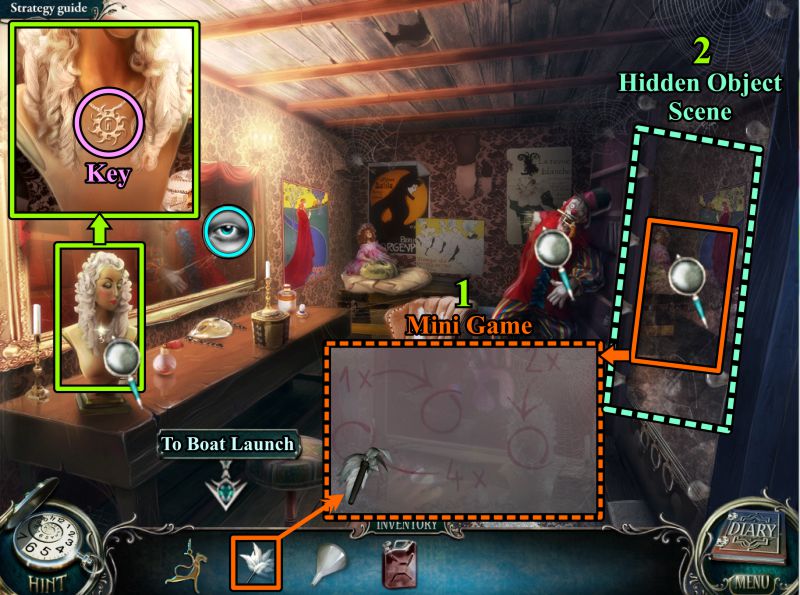
Dressing Room
Zoom in on the bust and take the Key.
Check out the mirror and the Clown.
Zoom in on the cabinet at the right for a Mini Game, and then a Hidden Object Scene.
Use your Feather Duster to clean up the glass and trigger the Mini Game.
Screenshot
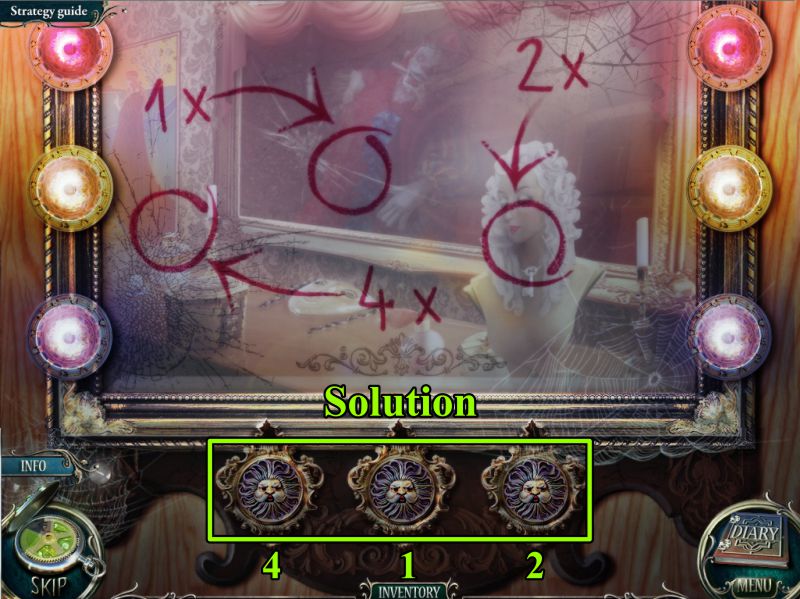
Mirror Mini Game
Your goal is to light up all the lights be solving which button needs to be pressed the number of times written on the mirror.
See the screenshot for the solution.
Screenshot
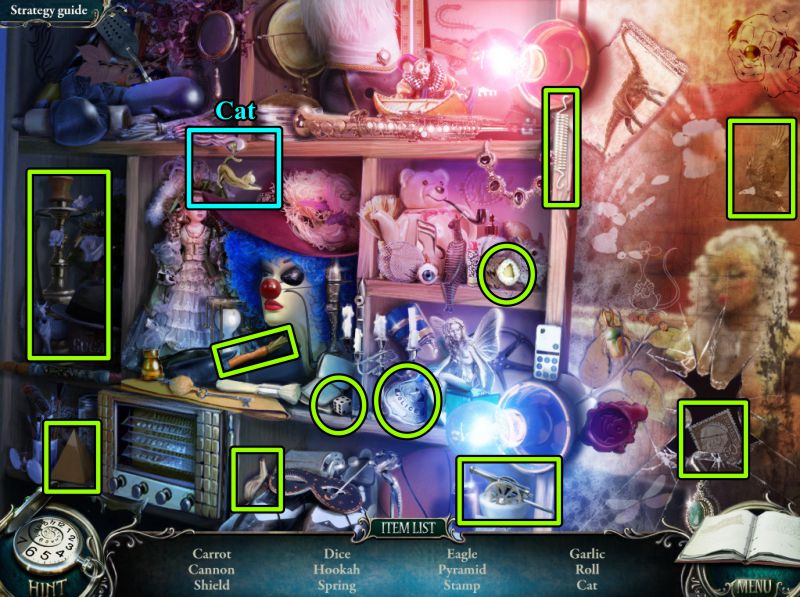
Cabinet Hidden Object Scene
Collect everything to get the Cat for your Inventory.
Go to the Boat Launch.
Screenshot
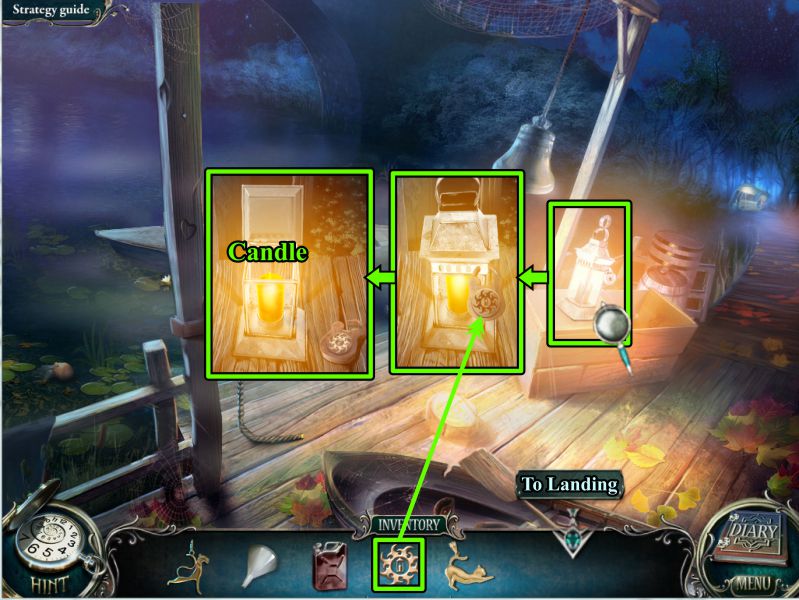
Boat Launch
Zoom in on the lantern and place the Key to open it.
Take the Candle and go to the Landing.
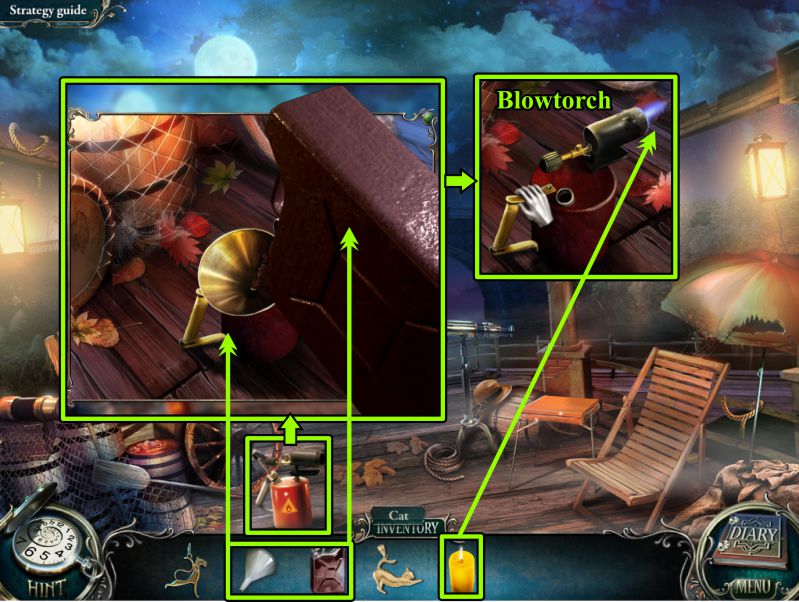
Screenshot
Landing
Zoom in on the Blowtorch, place the Funnel, pour in the gas from the Gas Can, and light it with the Candle.
Take the Blowtorch for your Inventory.
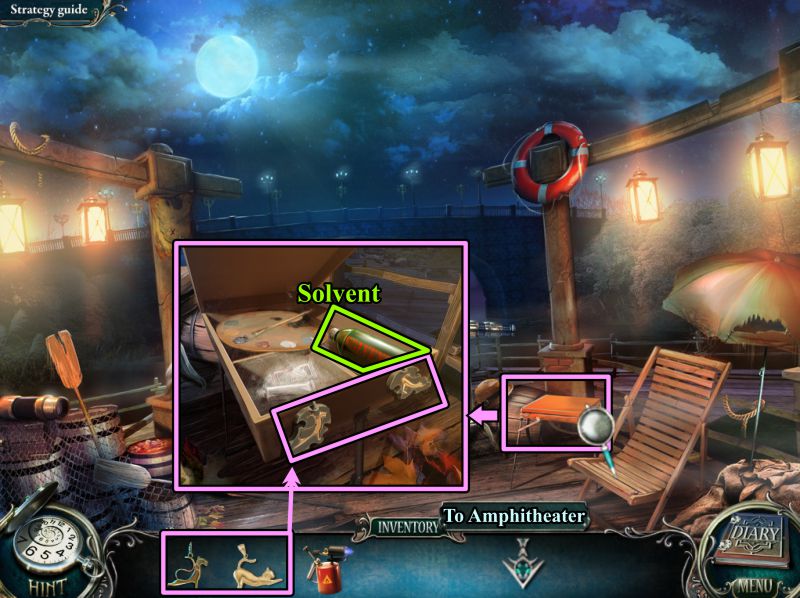
Screenshot
Zoom in on the art supply box and place both Cats in their proper places to open the box.
Take the can of Solvent, then head to the Amphitheater.
Screenshot
Amphitheater
Zoom in on the Prompt Box and use the Blowtorch to open it up.
Play the Hidden Object Scene, then go downstairs to the Dressing Room.
Screenshot
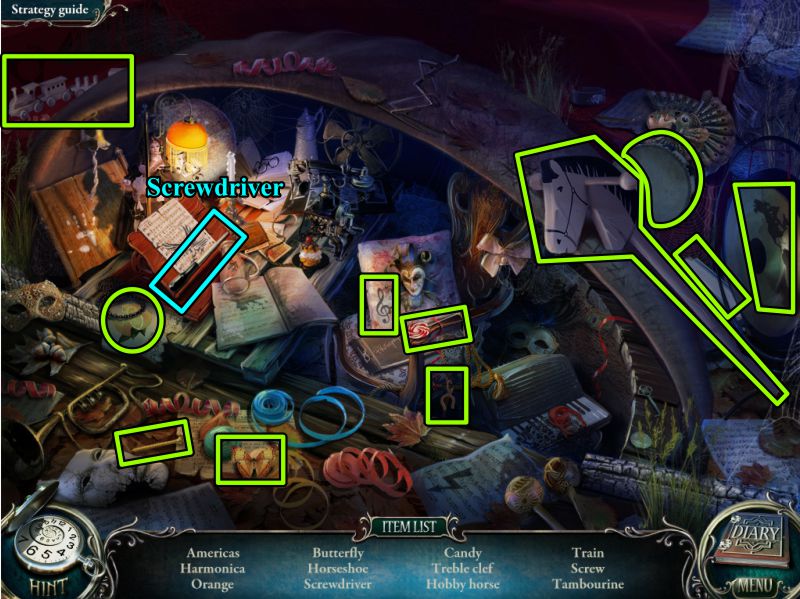
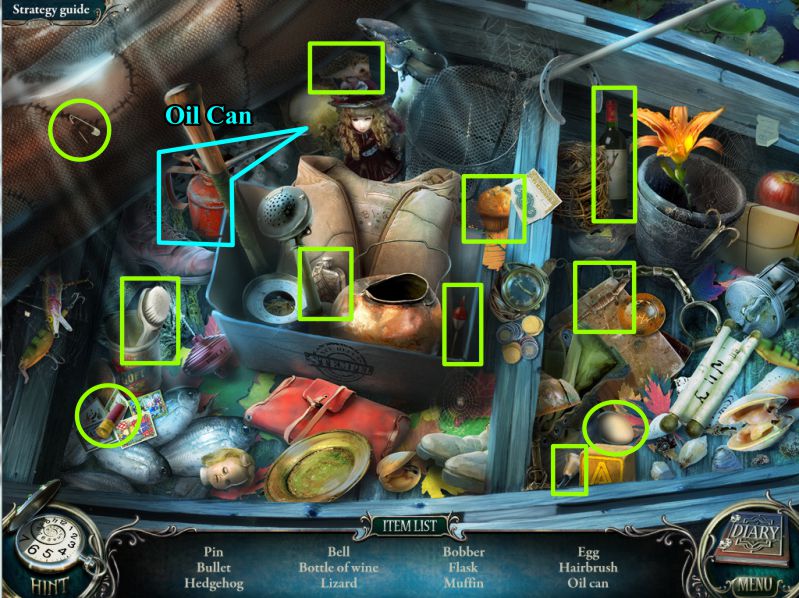
Prompt Box Hidden Object Scene
When you've collected everything, you'll get a Screwdriver for your Inventory.
Screenshot
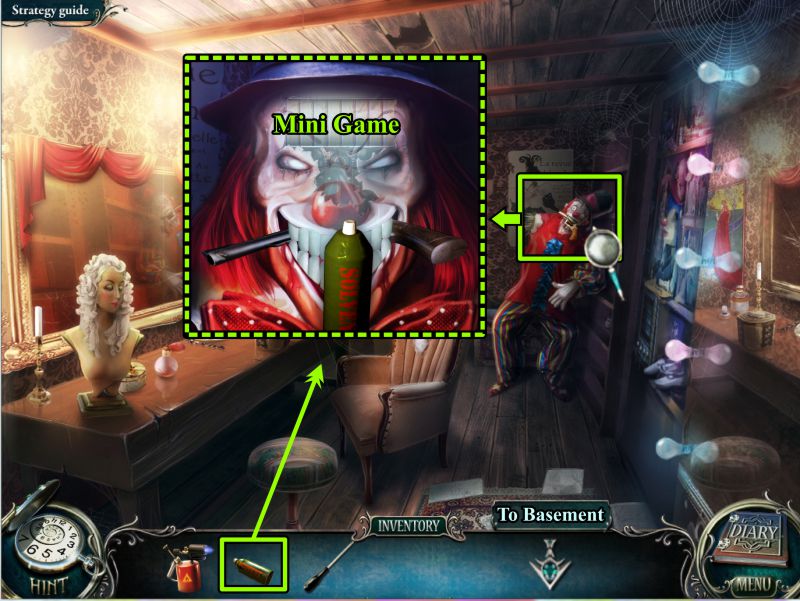
Dressing Room
Zoom in on the Clown and use the solvent to remove the paint and trigger a Mini Game.
Screenshot
Clown Mini Game
Your goal is to turn all the rollers so there is a complete row of dots, as shown in the screenshot solution.
A roller also turns one on either side of the one you move and will make the Clown's teeth disappear.
See the screenshot for which rollers to move.
When all the teeth are gone, take the Gun and back out to the Basement.
Screenshot
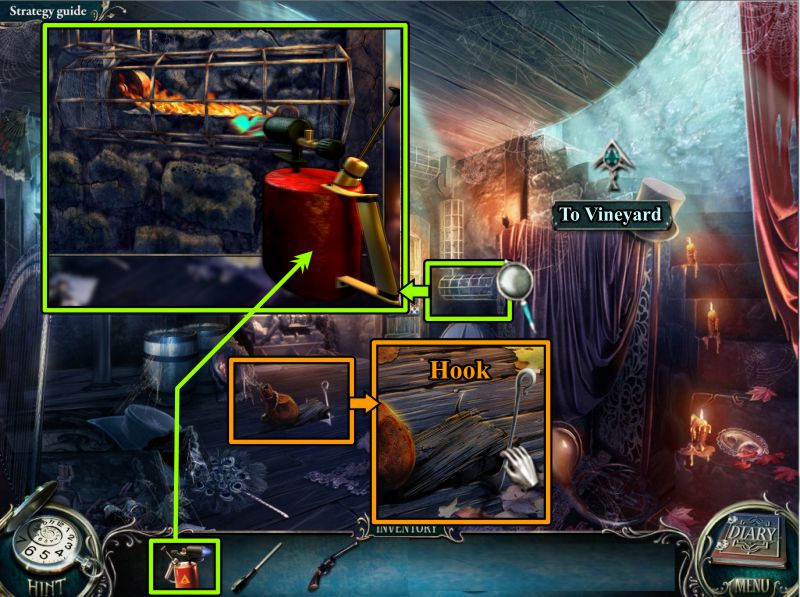
Basement
Zoom in on the mechanism at the right and use the Blowtorch on the rope in order to drop the sandbag.
Zoom in on the Hook to see that the sandbag broke a floorboard, so the Hook is free to take.
Go to the Vineyard.
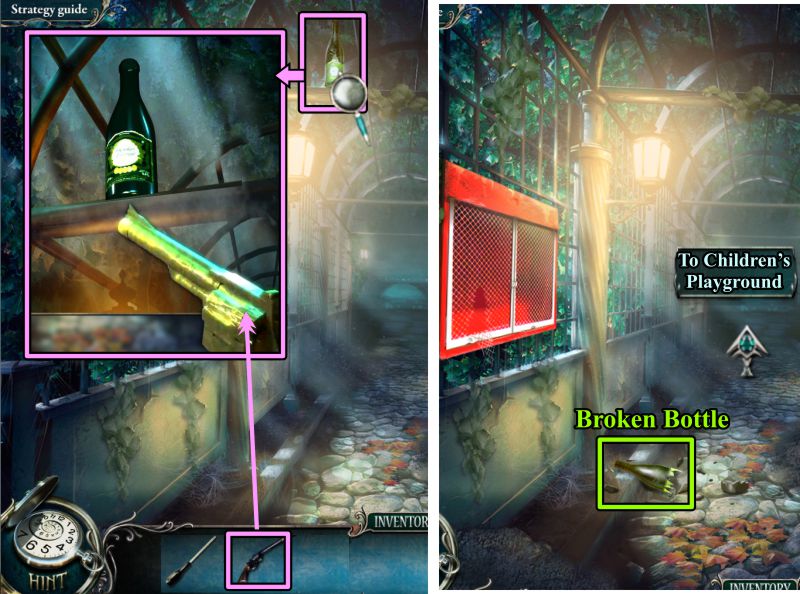
Screenshot
Vineyard
Zoom in on the bottle and take aim with the gun.
Pick up the Broken Bottle, then head to the Children's Playground.
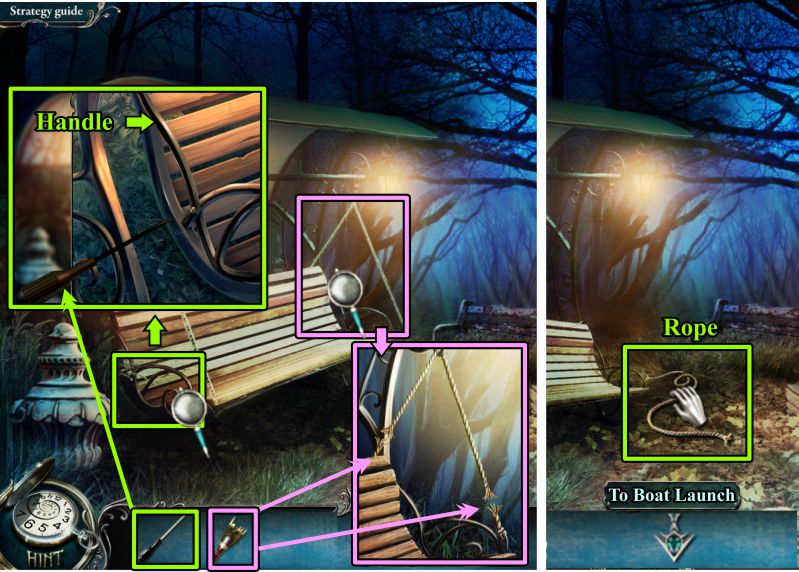
Screenshot
Children's Playground
Zoom in on the left side of the swing and unscrew the Handle with your Screwdriver.
Zoom in on the right side of the swing and cut the rope with the Broken Bottle.
Pick up the rope and go to the Boat Launch.
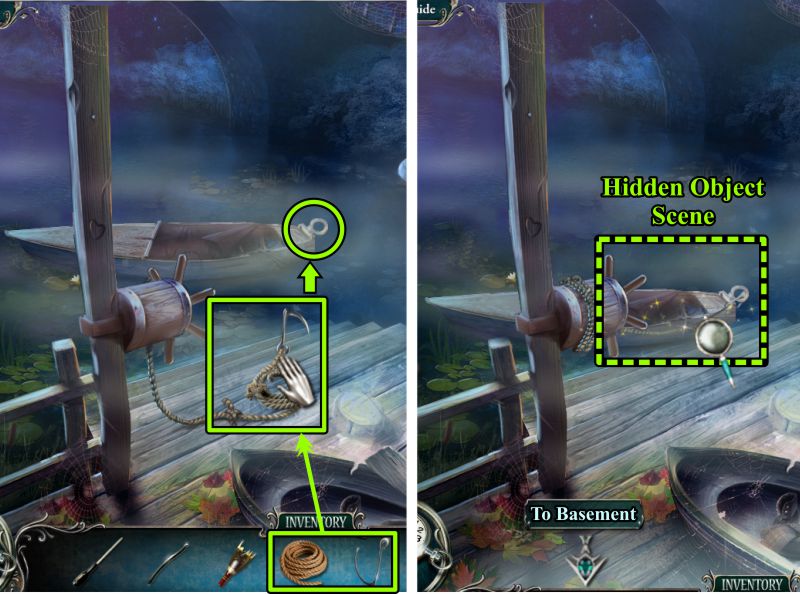
Screenshot
Boat Launch
Place the Rope and Hook on the winch, then place the hooked rope on the boat to reel it in.
Play the Hidden Object Scene on the boat, then head to the Basement.
Screenshot
Boat Hidden Object Scene
Your Inventory item will be an Oil Can.
Screenshot
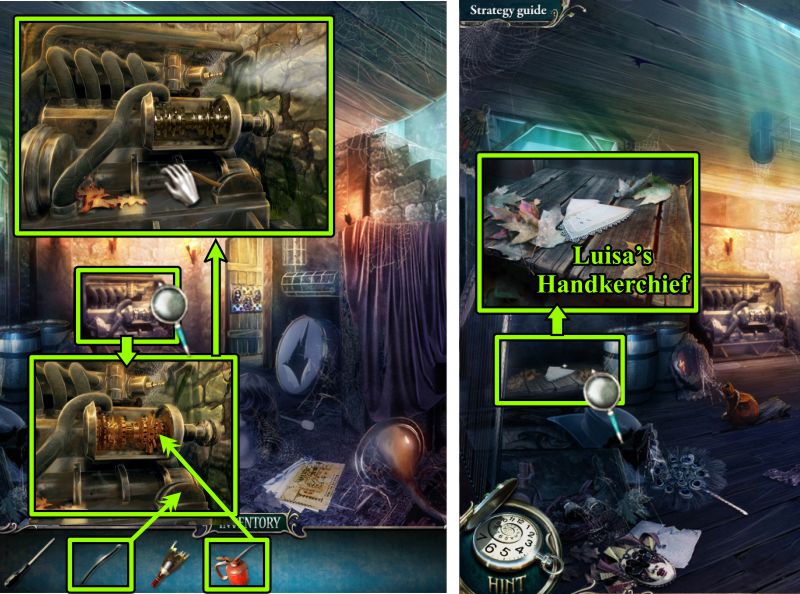
Basement
Zoom in on the lift mechanism and remove the rust with your Oil Can.
Place the Handle and pull it.
When the lift lowers, collect Luisa's Handkerchief.
Screenshot
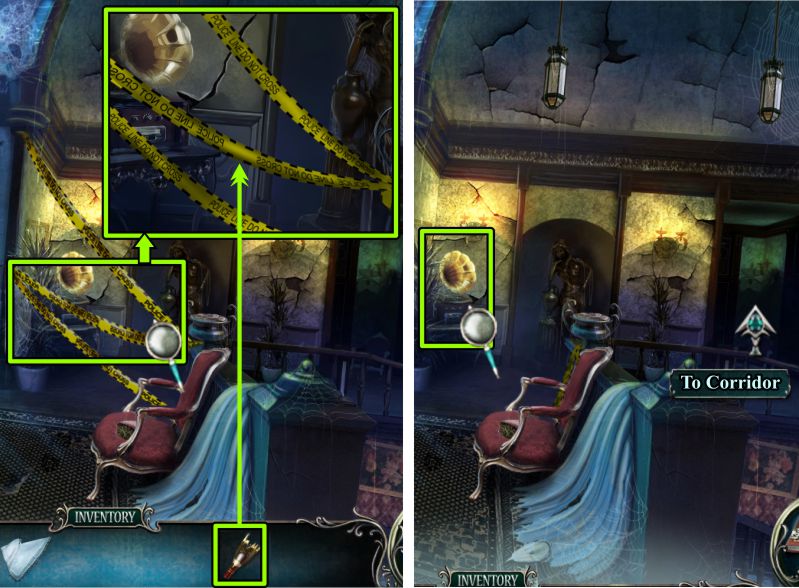
Second Floor Landing
You will be transported to the Second Floor Landing.
Zoom in on the yellow tape and use the Broken Bottle to cut it.
Note the missing handle on the gramophone, and go down the Corridor at the right.
Screenshot
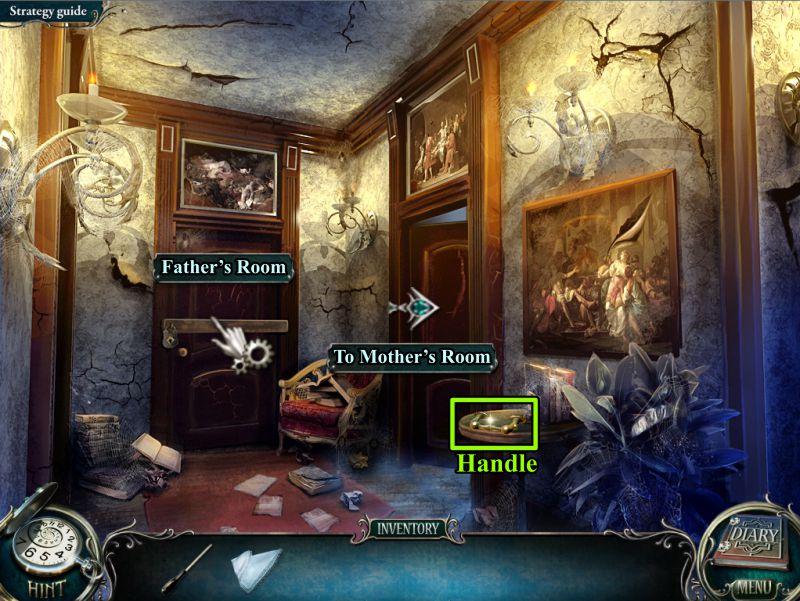
Corridor
Pick up the Handle on the table, note Father's Room is nailed shut, and enter Mother's Room.
Screenshot
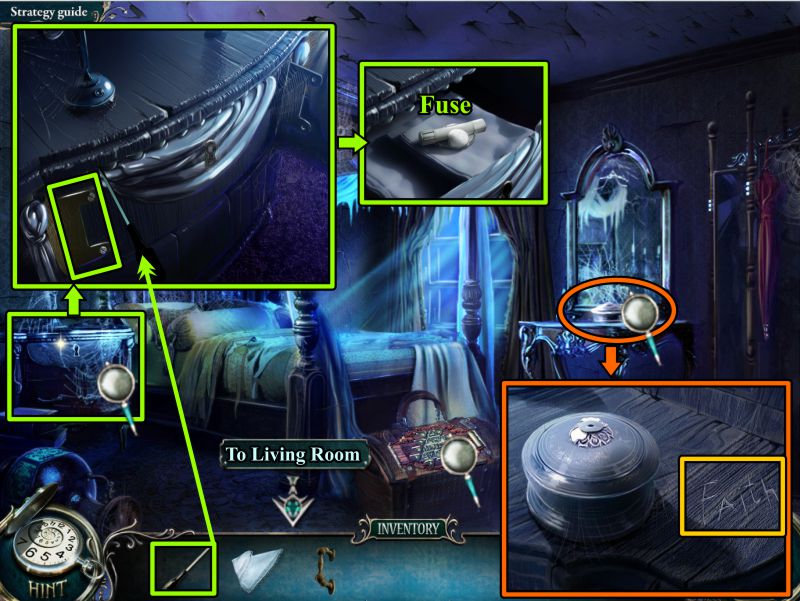
Mother's Room
Zoom in on the nightstand and unscrew the hinge.
Take the Fuse from the drawer.
Examine the chest and dressing table.
Note the word "Faith" etched on the dressing table top.
Go downstairs to the Living Room.
Screenshot
Living Room
Zoom in on the mantle and enter "Faith" to open the display, so you can take the Ballet Dancer.
Return to Mother's Room.
Screenshot
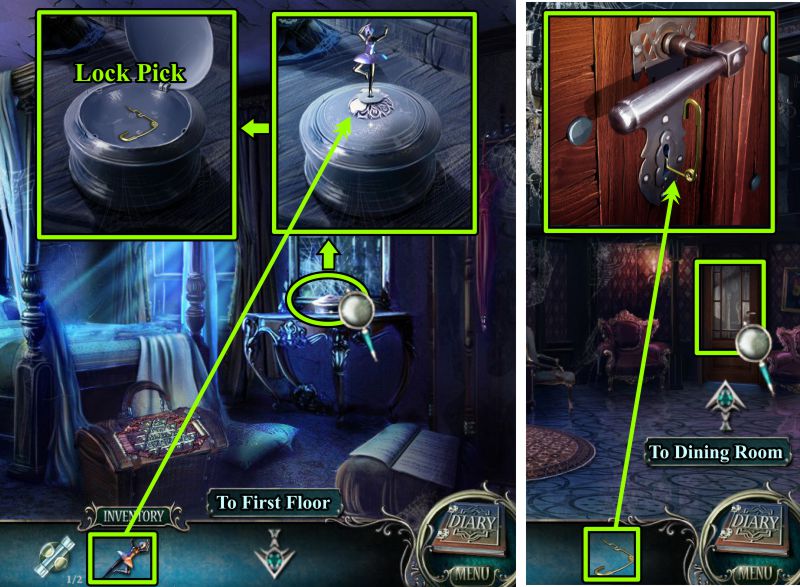
Mother's Room
Zoom in on the dressing table, place the Ballet Dancer on the music box, and take the Lock Pick.
Go to the First Floor Hallway, and zoom in on the Dining Room door.
Use the Lock Pick, then enter the room.
Screenshot
Dining Room and Hallway Niche
Place the Handle on the cabinet to trigger a Hidden Object Scene.
Once you have the second Fuse, go to the Hallway and zoom in on the Niche.
Use Luisa's Handkerchief to clean off the dust.
Place the Fuses to begin the Mini Game.
Screenshot
Dining Room Cabinet Hidden Object Scene
You will get a Fuse for your Inventory.
Screenshot
Fuse Mini Game
Your goal is to turn all the fuses horizontal.
One fuse will also turn other fuses.
See the screenshot for the numbered solution.
The curtains will part, producing a very angry looking picture of John Gray.
Screenshot
Chapter 3: The Rifle
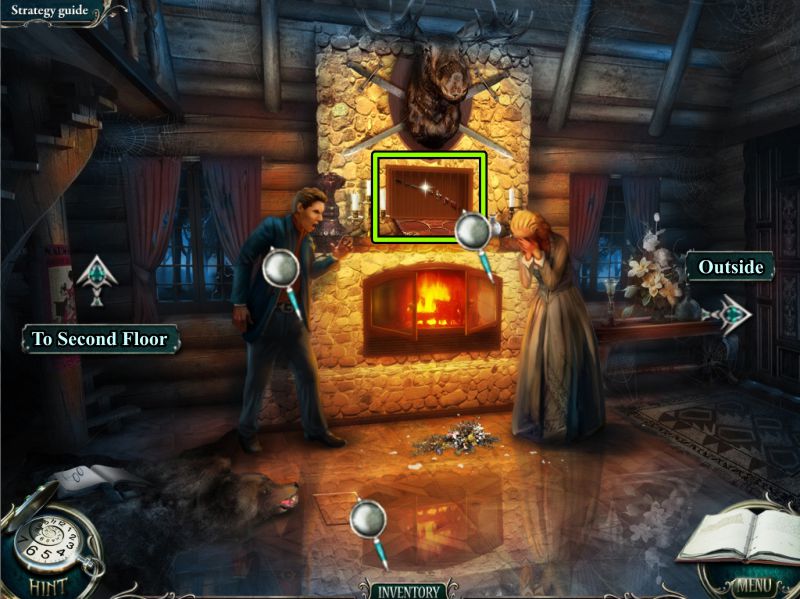
Hunting Lodge
You will be transported to a Hunting Lodge.
Check the magnifying glasses in the screenshot, and then go upstairs.
Screenshot
Second Floor
Grab the Bag and check the items of interest marked in the screenshot.
Go downstairs and Outside.
Screenshot
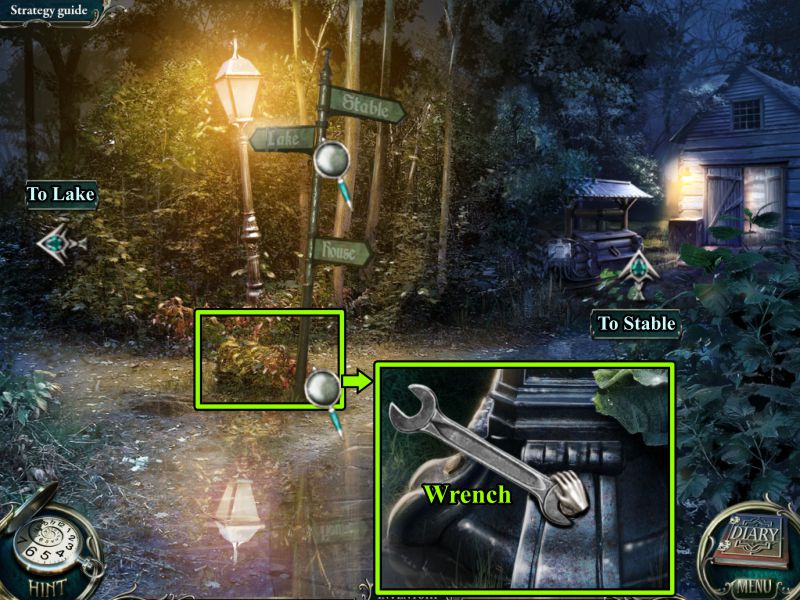
Sign
Zoom in on the base of the lamppost and take the Wrench.
Check out the Sign and go to the Stable.
Screenshot
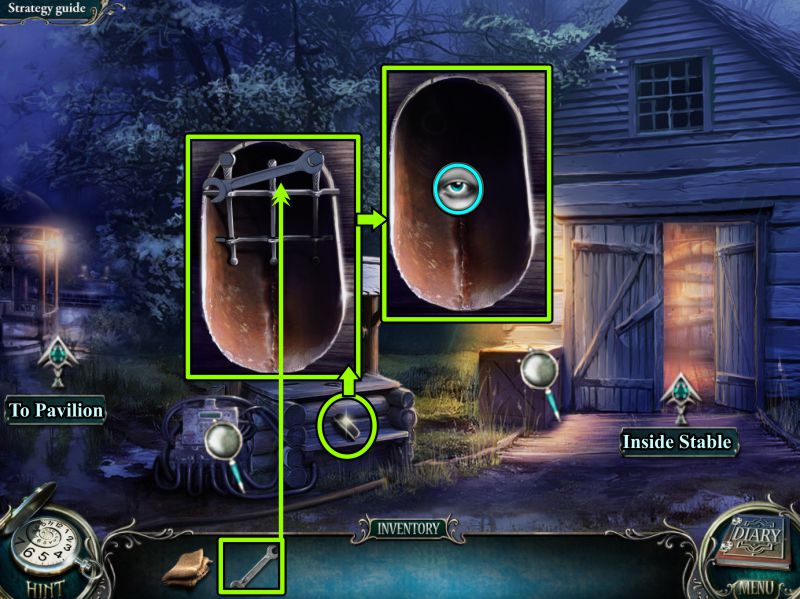
Stable
Check out the mechanism and crate, then zoom in on the well.
Use your Wrench to remove the two bolts. Note there is something stuck that will come out when the well is in working order.
Head off to the Pavilion.
Screenshot
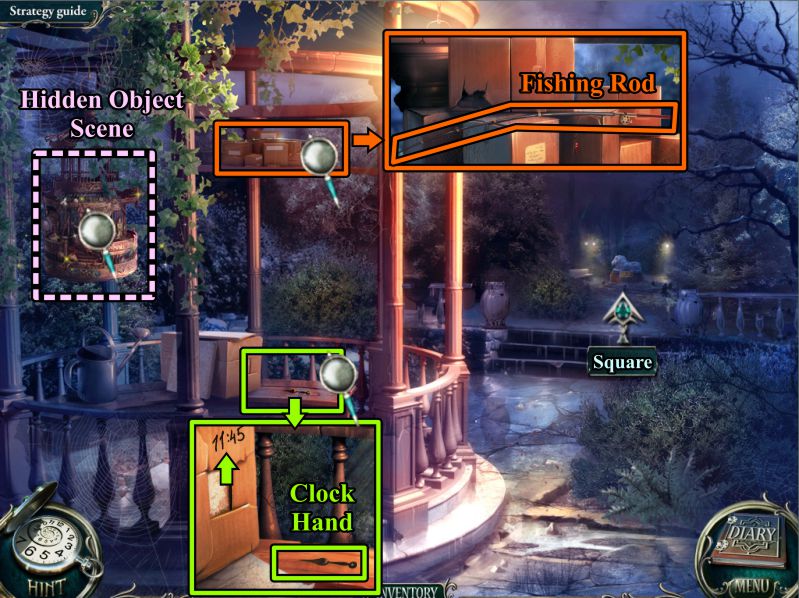
Pavilion
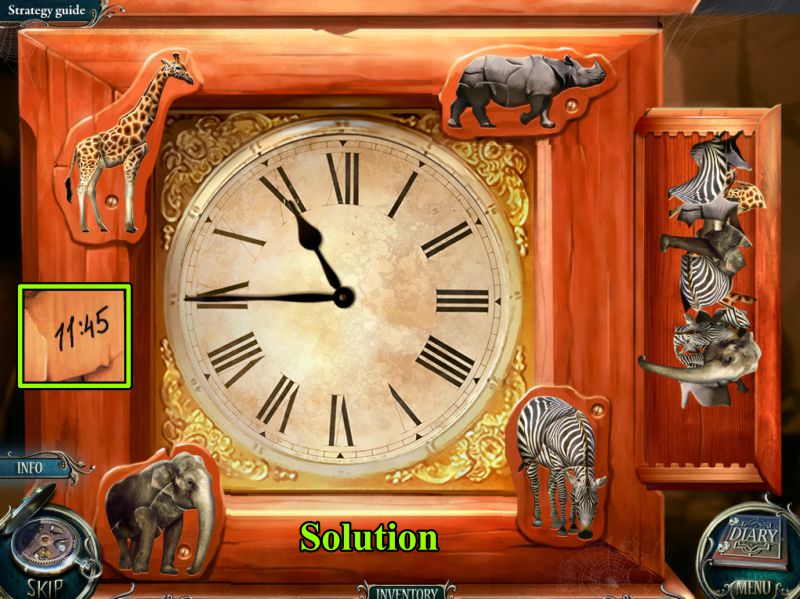
Zoom in on the seat and take the Clock Hand.
Note the 11:45 time on the box.
Zoom in on the shelf and grab the Fishing Rod.
Play the Hidden Object Game in the cage.
Screenshot
Bird Cage Hidden Object Scene
Collect everything to get a Spring Scale.
Go visit the Square.
Screenshot
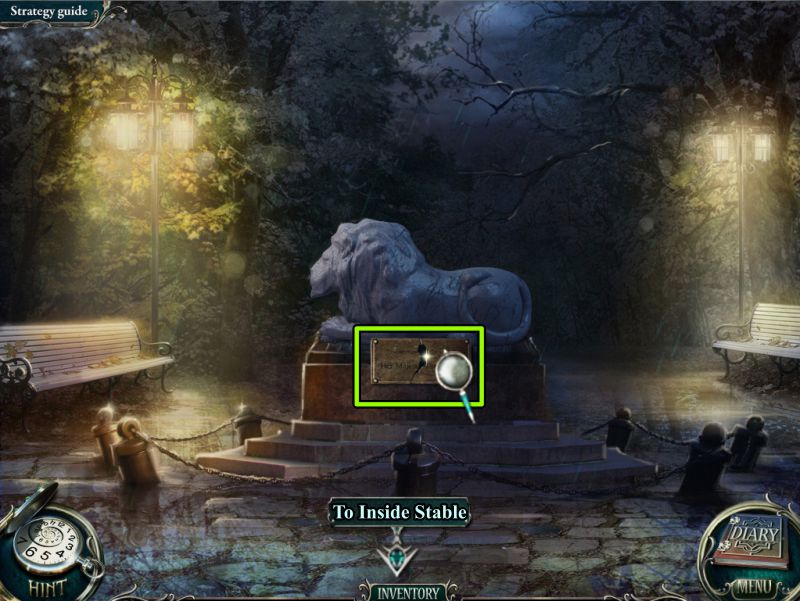
Square
There is nothing you can do here at the moment, except to zoom in on the plaque by the lion and note that you need something strong to get the Button wedged there.
Go to the Inside of the Stable.
Screenshot
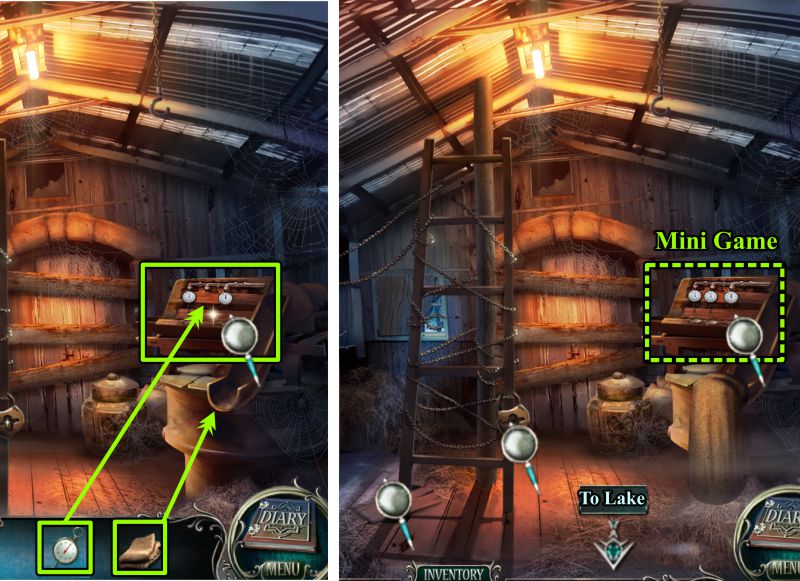
Inside Stable
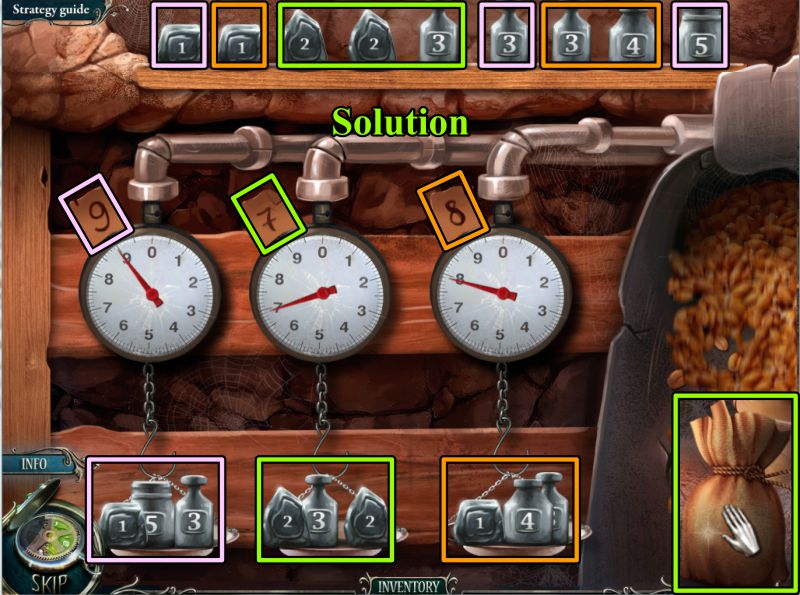
Place your Bag on the grain sorter and zoom in to place your Spring Scale to start a Mini Game.
Take note of the ladder and floorboard.
Screenshot
Grain Sorter Mini Game
Your goal is to use the weights on the scales to balance them to the numbers indicated on each scale.
See the color-coded solution in the screenshot.
Take the bag of grain and go to the Lake.
Screenshot
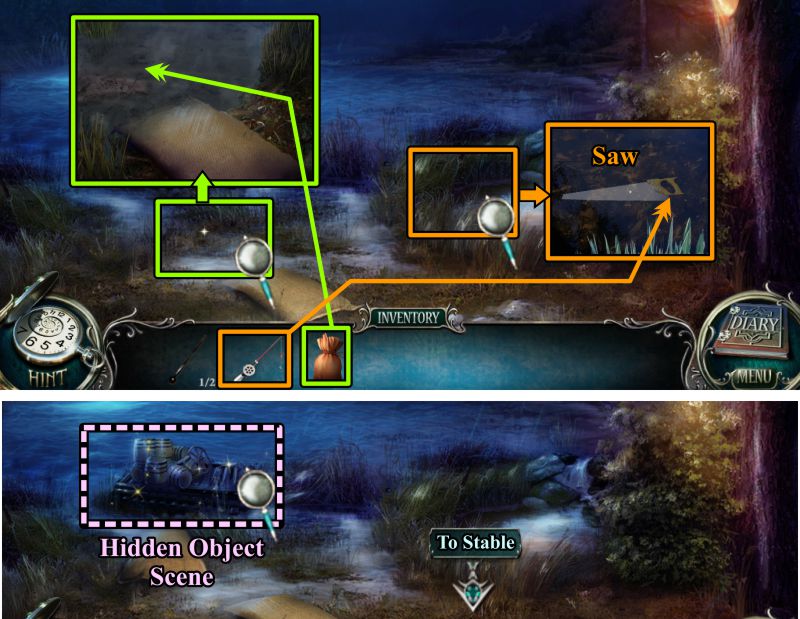
Lake
Use your Fishing Rod to retrieve the Saw from the pond.
Place the bag of grain in front of the other bag to trigger a Hidden Object Scene on the raft.
Screenshot
Raft Hidden Object Scene
You will get a Green Tube for your Inventory.
Go to the Stable.
Screenshot
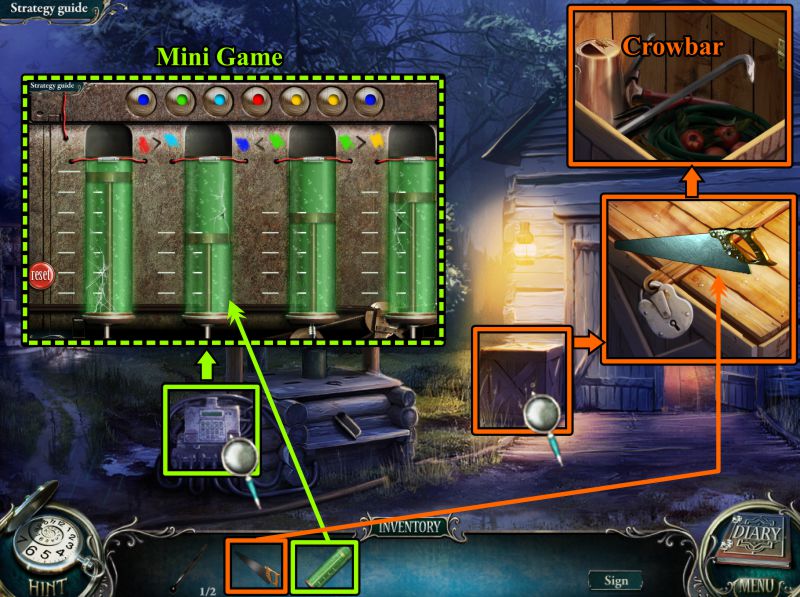
Stable
Zoom in on the crate. Use the Saw to remove the lock from the crate so you can get the Crowbar.
Zoom in on the well motor and place your Green Tube to trigger a Mini Game.
Screenshot
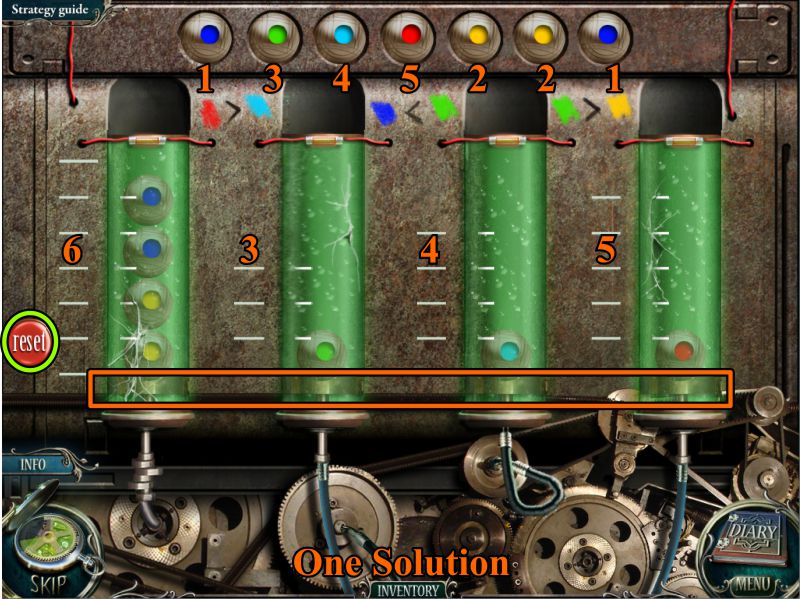
Well Motor Mini Game
You goal is to use the round weights at the top to push the bands of each tube to the bottom.
One solution is shown in the screenshot, as are the values of the weights and the amount it takes for each tube.
Screenshot
Well, Lodge Living Room and Hallway
When the water begins to flow, zoom in and take the scissors.
Go to the Lodge.
Zoom in on John's pocket, use the scissors to remove the stitches, and take the key.
Zoom in on the tile on the floor and use the Crowbar to lift it.
Take the Puzzle Pieces and go upstairs to the Hallway.
Zoom in on the door lock and use the Key to open it.
Go into the Bedroom.
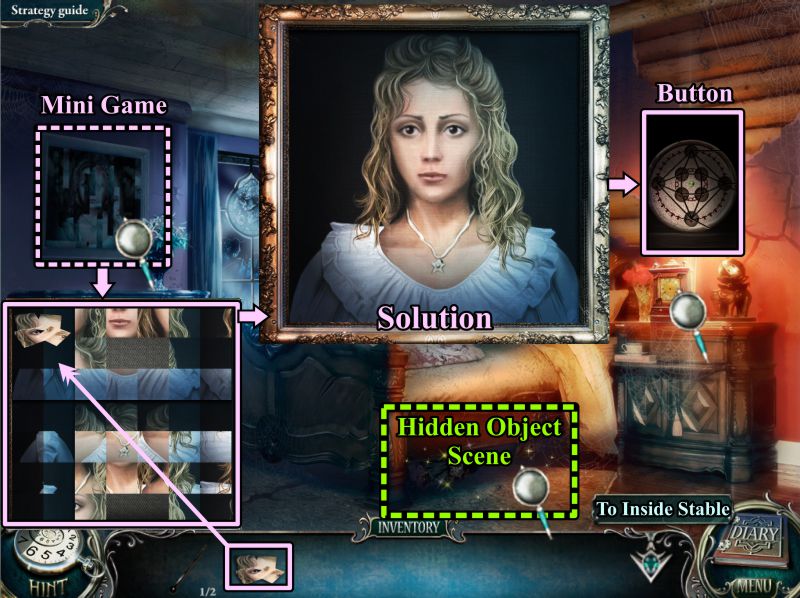
Screenshot
Bedroom
Zoom in on the picture on the left wall and place your Puzzle Pieces.
Your goal is to move the horizontal and vertical rows to complete Luisa's portrait, as shown in the screenshot.
The portrait will part, revealing a Button; take it.
Check out the clock on the nightstand, then play the Hidden Object Scene under the bed.
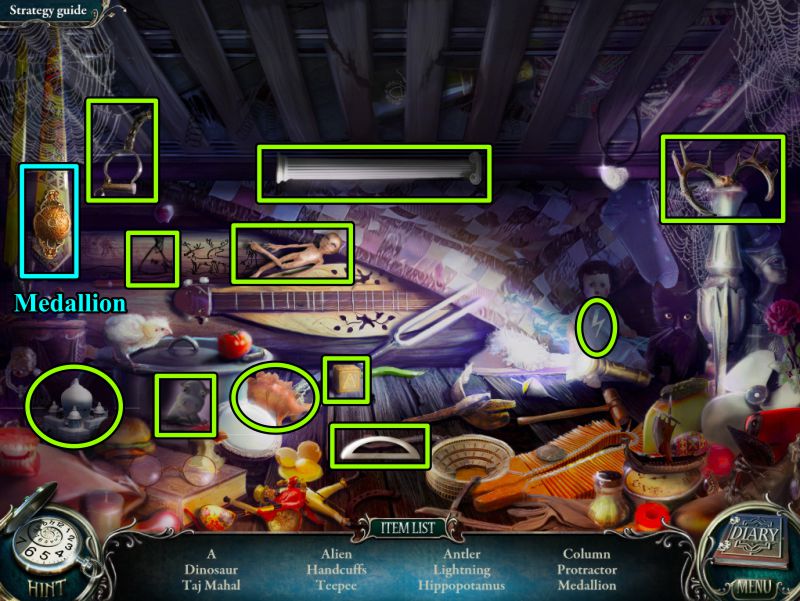
Screenshot
Bedroom Hidden Object Scene
Your Inventory item is a Medallion.
Go to the Inside of the Stable.
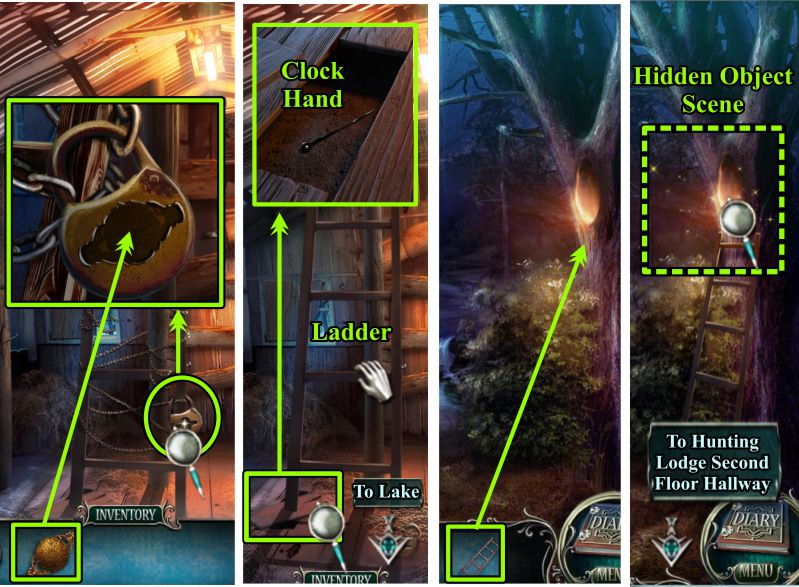
Screenshot
Inside Stable and Lake
Zoom in on the ladder lock, and place the Medallion to unlock the chain.
Take the ladder and zoom in on the gap in the floor.
Take the Clock Hand and go to the Lake.
Place the Ladder on the tree to trigger a Hidden Object Scene in the hollow.
Return to the Second Floor of the Lodge.
Screenshot
Tree Hollow Hidden Object Scene
Your Inventory item is a Mouse.
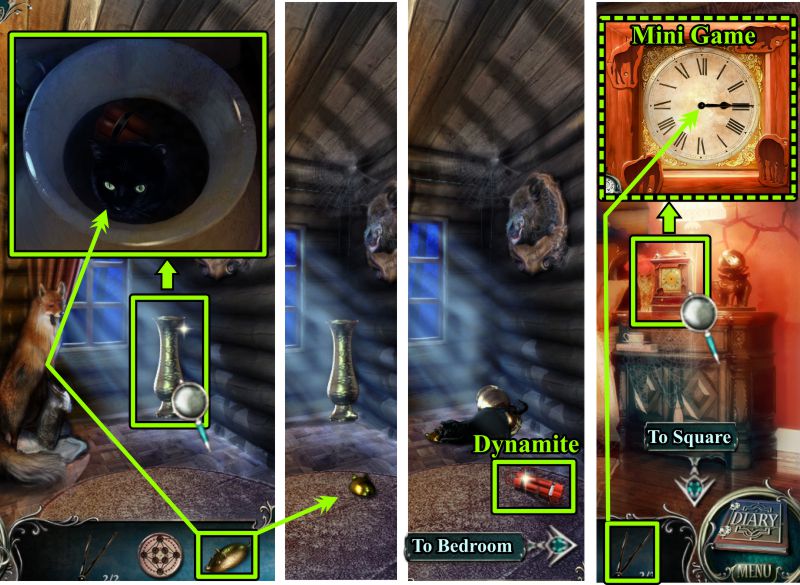
Screenshot
Lodge Hallway
Zoom in on the cat in the vase and place the Mouse.
The Mouse will automatically start running around, and the cat will tip over the vase to grab it while dumping some Dynamite on the floor.
Pick up the Dynamite and go into the Bedroom.
Zoom in on the clock and place the Hands for a Mini Game.
Screenshot
Clock Mini Game
Set the clock to 11:45, the time on the box in the Pavilion.
Puzzle pieces of the four animals will appear.
Your goal is to put the animals back together as shown in the screenshot.
The clock face will go into your Inventory, so head off to the Square past the Pavilion.
Screenshot
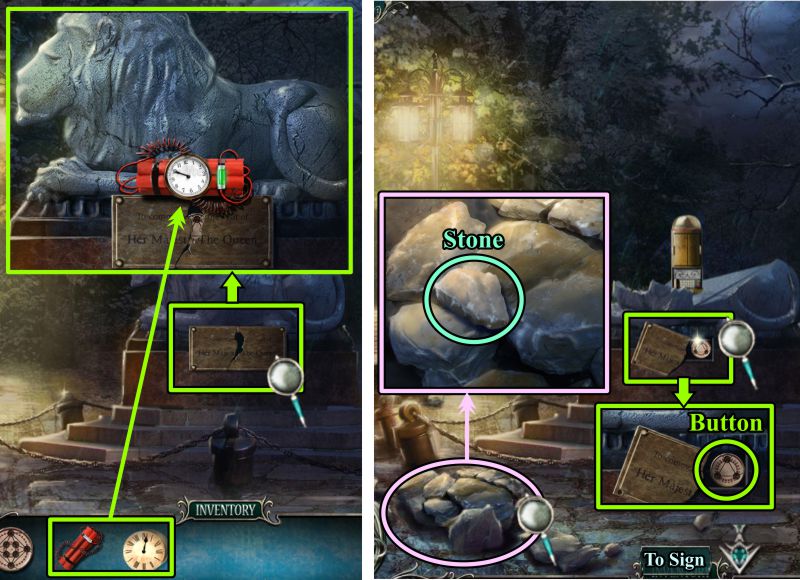
Square
You found something strong enough to open up the plaque, so zoom in on it.
Place the Dynamite and Clock on top of the plaque and stand back.
Zoom in on the pile of lion pieces and take the loose Stone.
Zoom in on the plaque and take the Button.
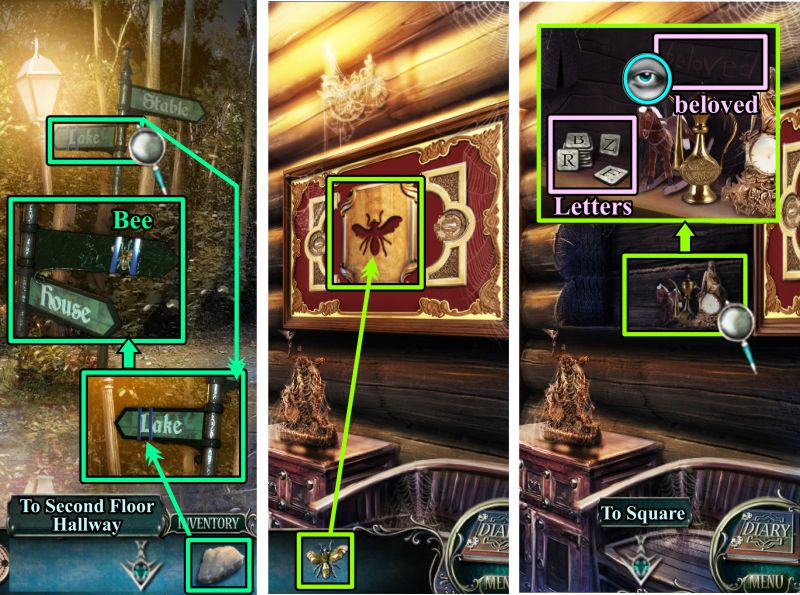
Go to the Sign outside the Lodge.
Screenshot
Sign and Second Floor Hallway
Throw the Stone at the Lake sign, and it will spin around, revealing a Bee taped on the back of it.
Take the Bee and go to the Second Floor Hallway of the Lodge.
Place the Bee on the picture at the right and it will open.
Zoom in on the shelf, take the Letters, and note the word "beloved" etched on the wall.
Return to the Square.
Screenshot
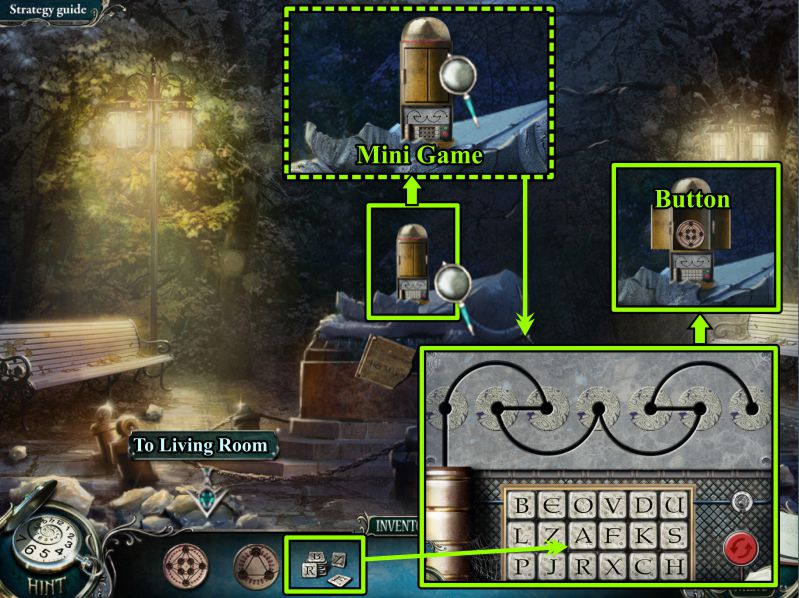
Square
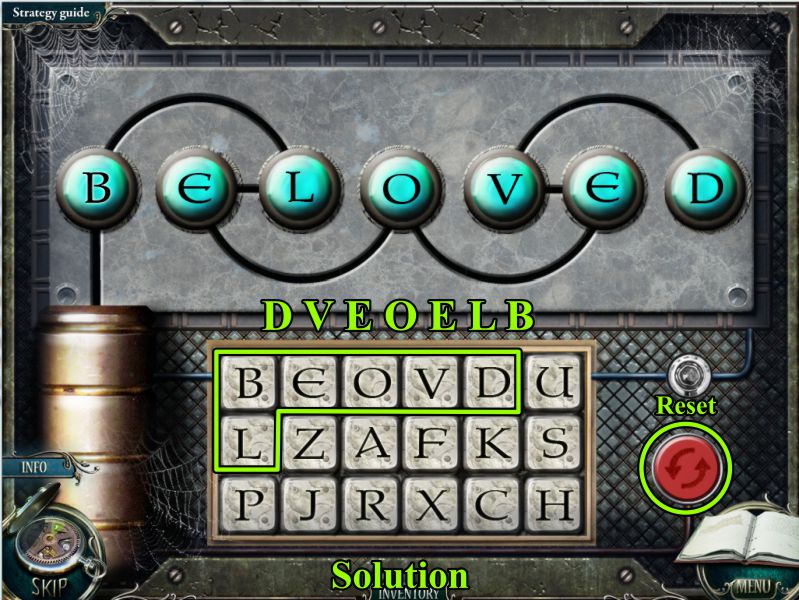
Zoom in on the mechanism where the lion use to be and place the Letters to start a Mini Game.
Your goal is to spell the word "Beloved" in the twisty circles above the Letters.
When it opens, you will get another Button.
Screenshot
Beloved Mini Game
If you need it, there is a Reset button.
See the screenshot solution for the order in which to enter the letters.
Take the Button and go to the Hunting Lodge.
Screenshot
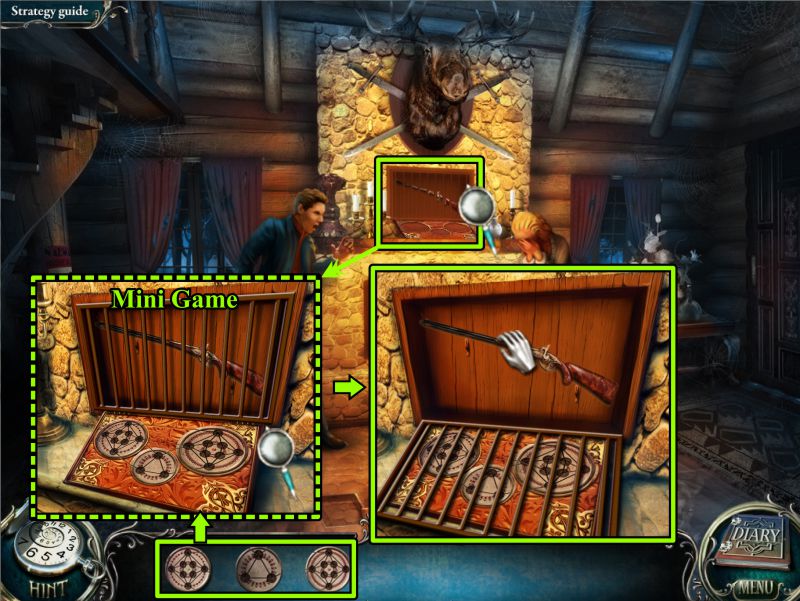
Hunting Lodge
Zoom in on the Rifle, and zoom in again to place the buttons to start the Mini Game to get the Rifle.
Screenshot
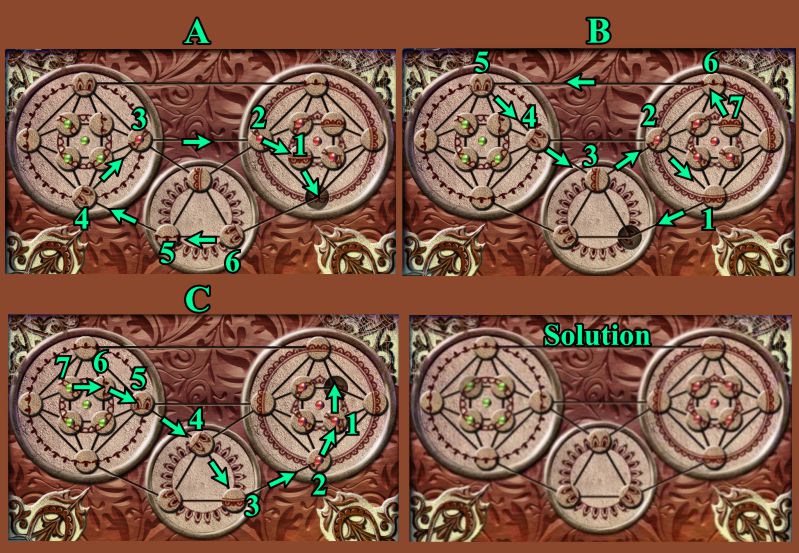
Button Mini Game
See the screenshot for a step-by-step-solution.
Screenshot
Mansion Hallway
Once you have the Rifle, you will be transported to the Mansion Hallway.
Go upstairs and to the Corridor.
Zoom in on the lock on Father's Room and use the Rifle to shoot it off.
Enter the room.
Screenshot
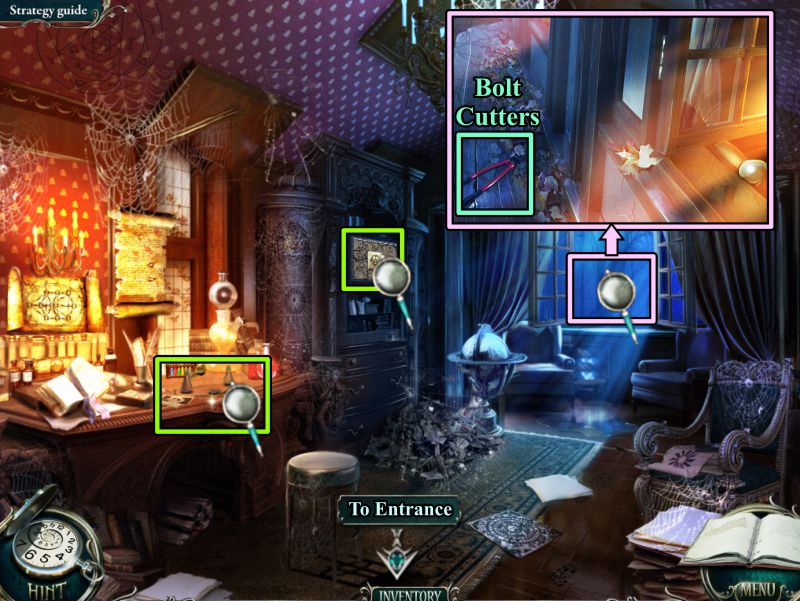
Father's Room
Check out all the magnifying glasses in the screenshot, and grab the Bolt Cutters on the roof.
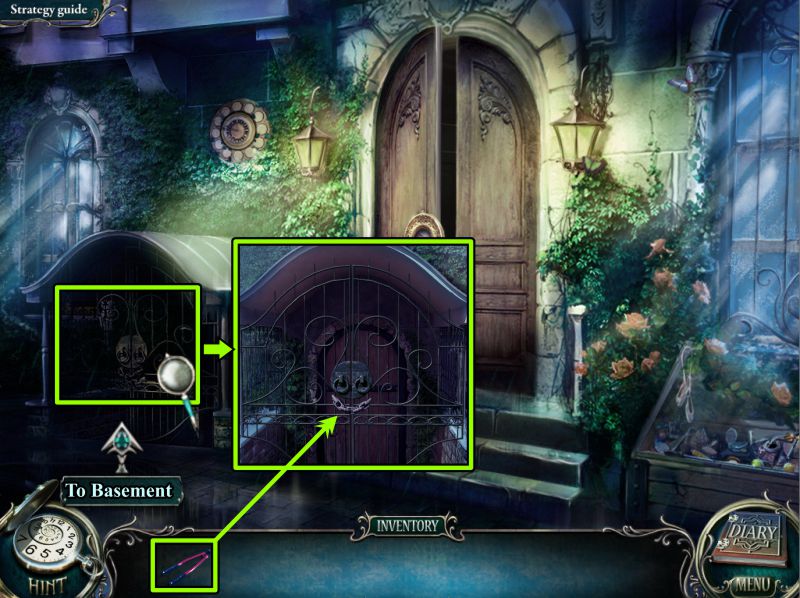
Go to the Entrance of the Mansion.
Screenshot
Entrance
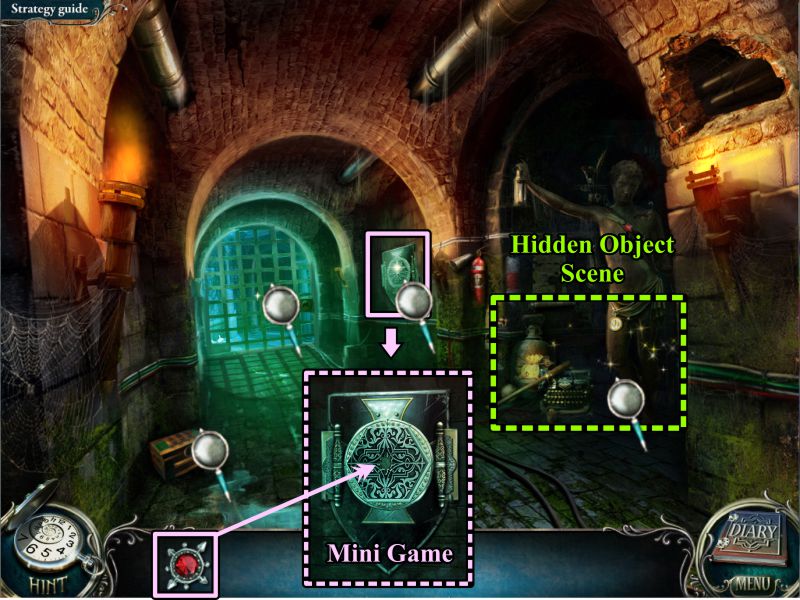
Zoom in on the Basement gate and use your Bolt Cutters to get rid of the chain.
Enter the Basement.
Screenshot
Basement
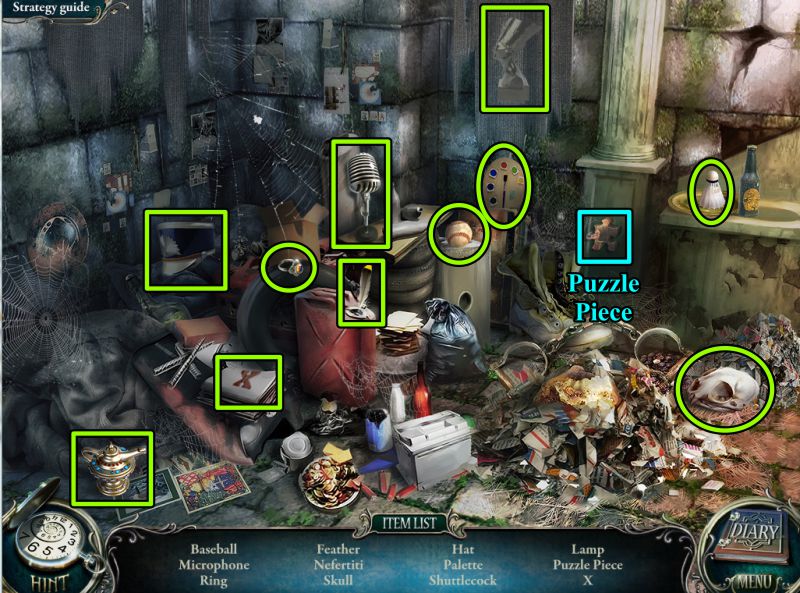
Check out all the magnifying glasses, then play the hidden Object Scene in the shelves to the right.
Return to Father's Room.
Screenshot
Basement Shelf Hidden Object Scene
You will get a Flask for your Inventory.
Screenshot
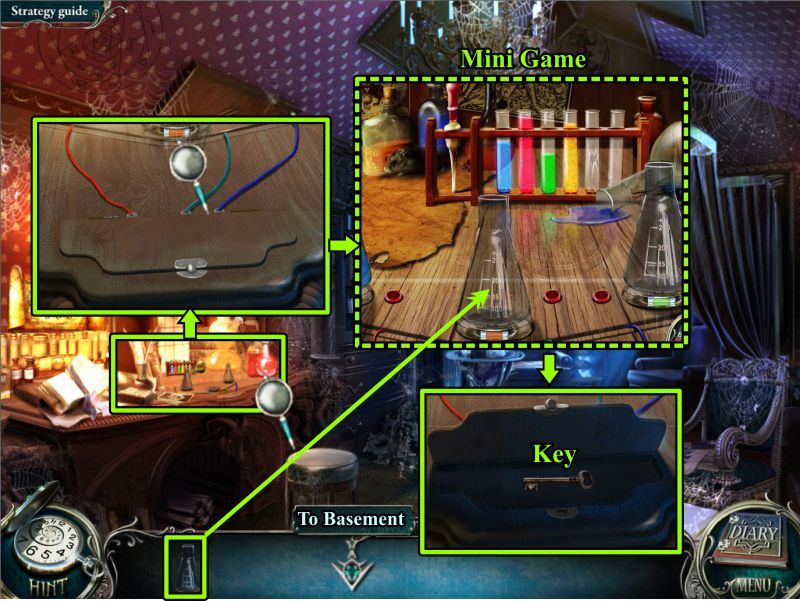
Father's Room
Zoom in on the desk, zoom in again on the flasks, and place your Flask to trigger the Mini Game to open the compartment and get a Key.
Screenshot
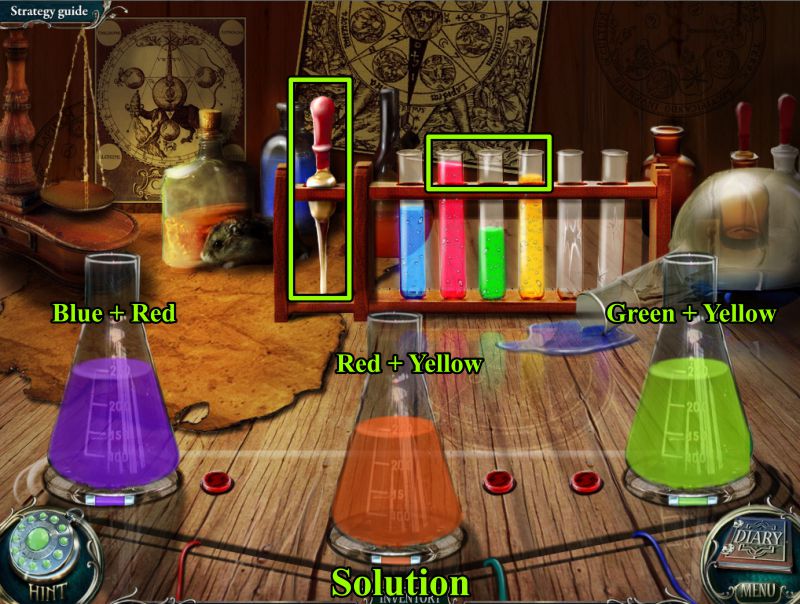
Flask Mini Game
Your goal is to match the liquid in the flasks with the colors under the flasks.
Use the eyedropper on the top portion of the tubes to get the liquid.
See the screenshot for the colors needed for each flask.
Screenshot
Basement
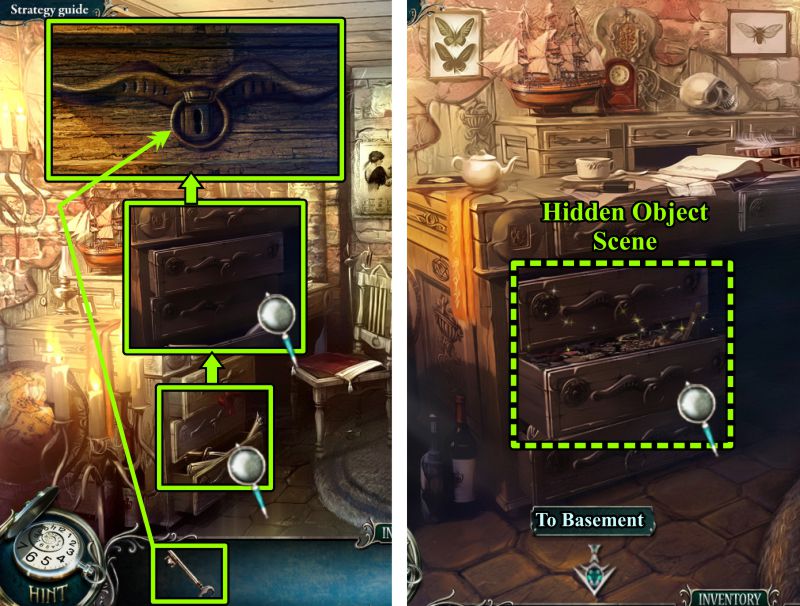
Zoom in on the desk, and zoom in again on the locked drawer.
Use your key to open it and trigger a Hidden Object Scene.
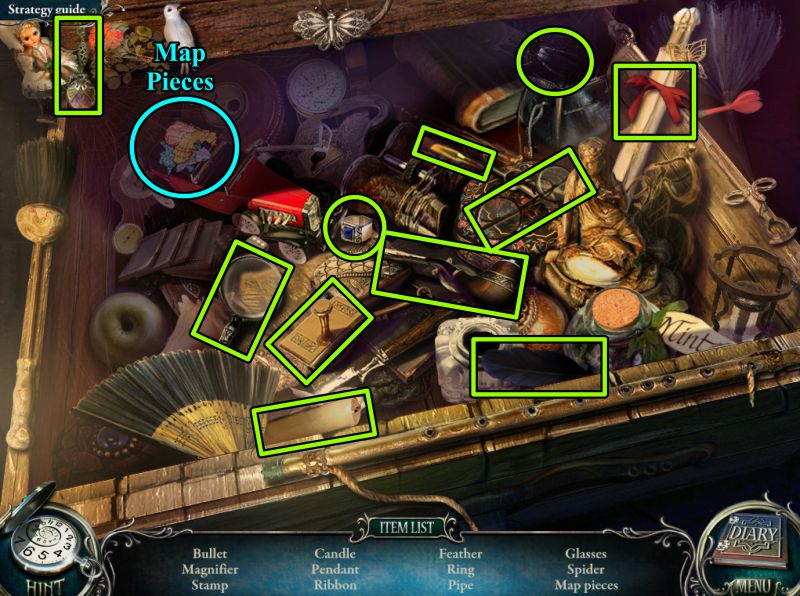
Screenshot
Desk Drawer Hidden Object Scene
You will receive some Map Pieces for your Inventory.
Back away from the desk to a complete view of the Basement.
Screenshot
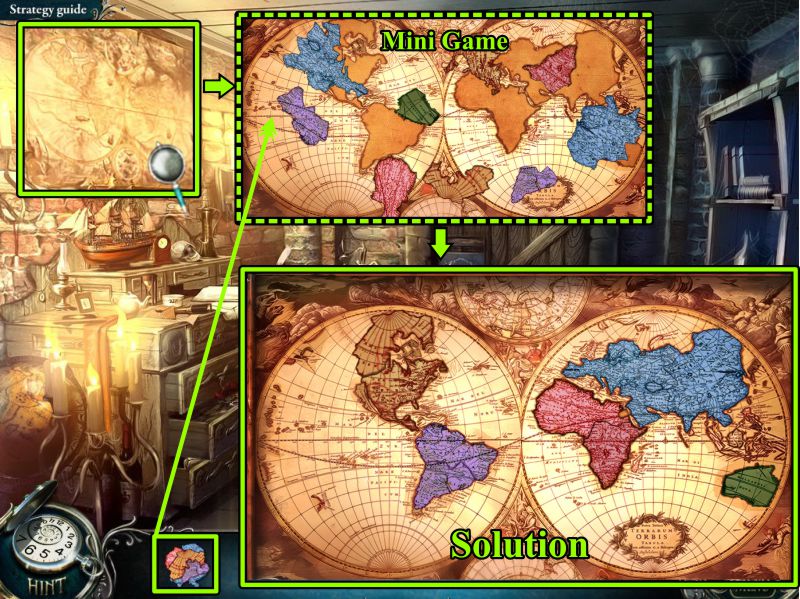
Map Mini Game
Zoom in on the map on the wall over the desk and place your Map Pieces to start the game.
Arrange the Map Pieces as shown in the screenshot solution.
Screenshot
You have completed the first 3 chapters of Grim Tales: The Bride.....to be continued.
Posted by: Jazz |
August 23, 2011 11:17 AM
|
August 23, 2011 11:17 AM
Grim Tales: The Bride Walkthrough Part 2 Chapters 4 - 6
Chapter 4: The Rose
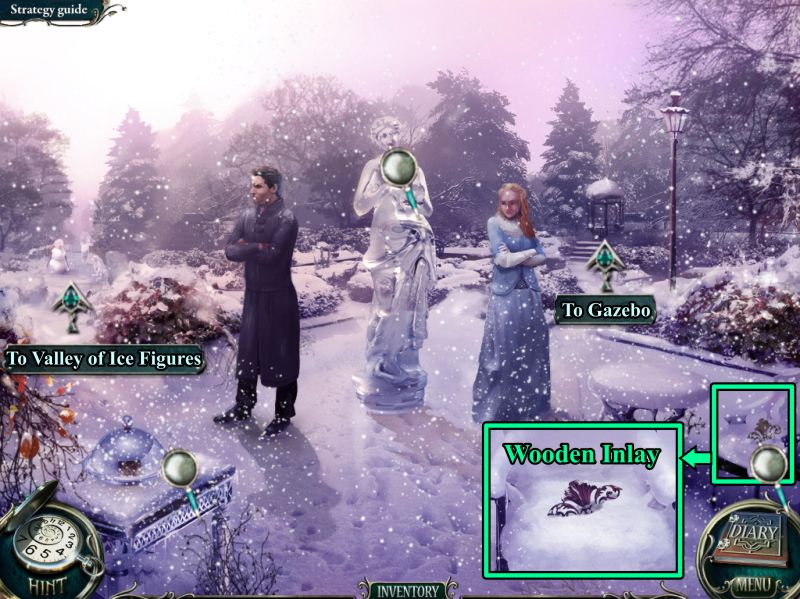
Winter Garden
Your goal is to bring the Rose, imbedded in the ice statue, to the Demon in one piece.
Zoom in on the chair and grab the Wooden Inlay piece.
Go to the Gazebo and then the Valley of Ice Figures.
Screenshot
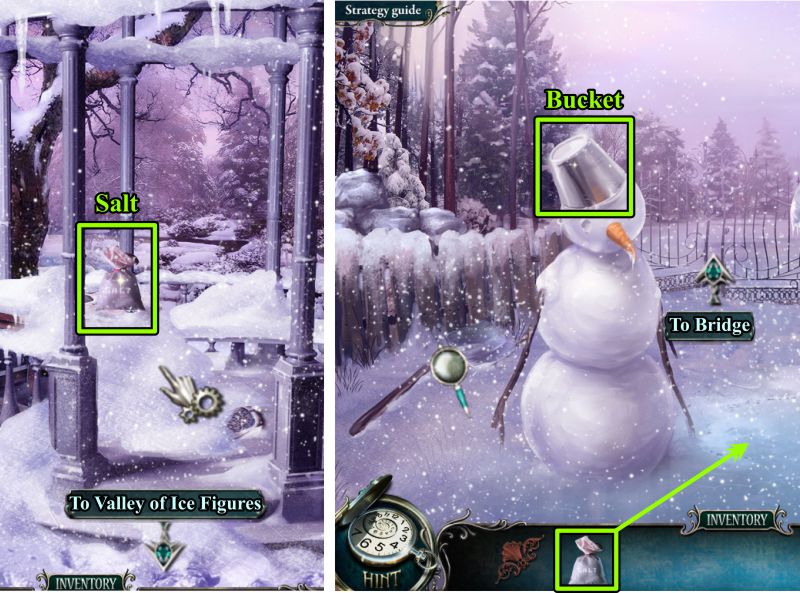
Gazebo and Valley of Ice Figures
Take the bag of salt, note all the snow, and go to the Valley of Ice Figures.
Sprinkle the Salt on the ice so you can walk on it.
Take the Bucket from the snowman's head, then go forward to the Bridge.
Screenshot
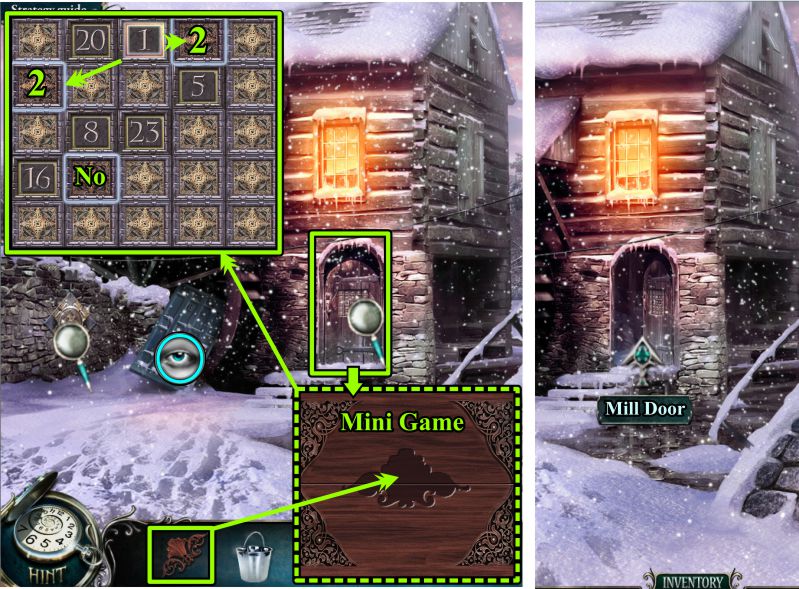
Bridge and Mill Door
Note the door stuck in the wheel, then check out the wall.
Zoom in on the door and place the Wooden Inlay piece to trigger a Mini Game.
Your goal is to change the cells to numbers from 1 through 25 in order to open the door.
You are given your choice of cells to choose for the next number, but you cannot place an odd number next to another odd number.
Same rule for even numbers. Look at the screenshot for choices for the number 2.
Screenshot
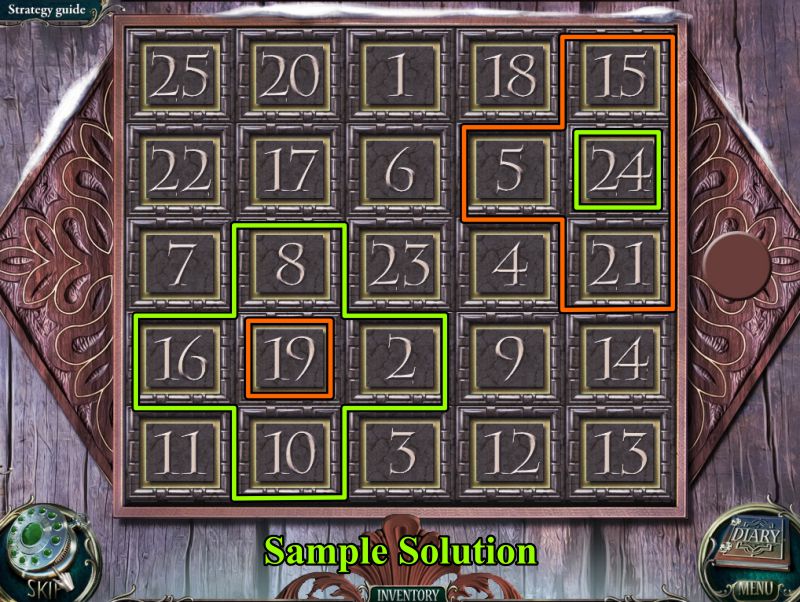
Mill Door Mini Game
See the screenshot for a sample solution.
Note the markings that show an odd number surrounded by even numbers, and an even number surrounded by odd numbers.
Screenshot
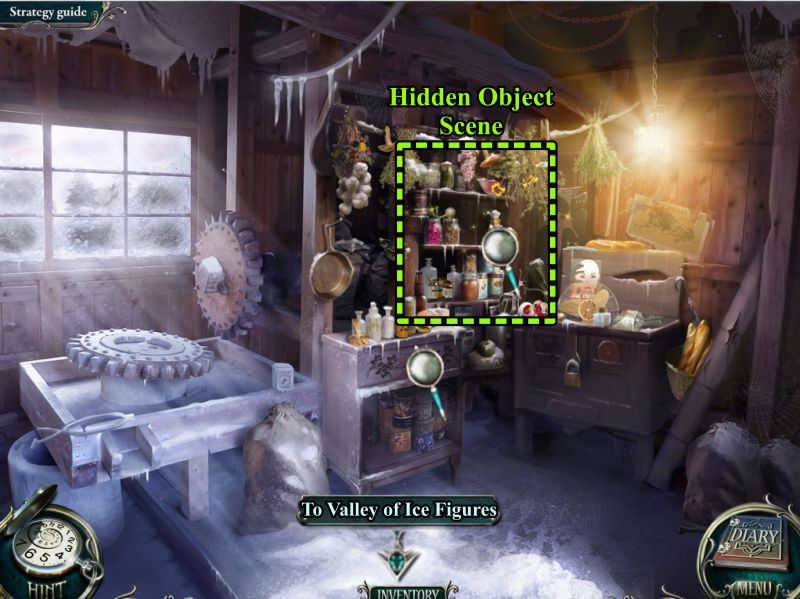
Inside Mill
Note the locked drawer, then play the Hidden Object Scene before going to the Valley of Ice Figures.
Screenshot
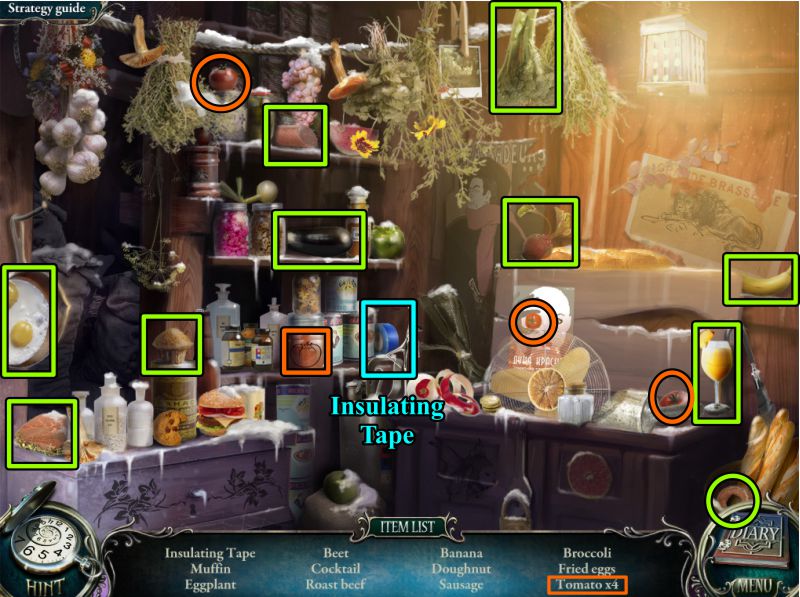
Mill Hidden Object Scene
Your Inventory item will be some Insulating Tape.
Screenshot
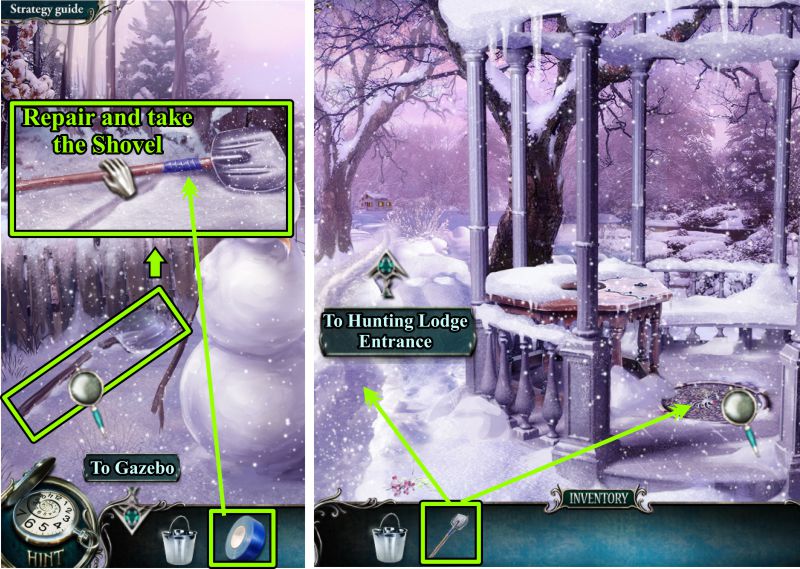
Valley of Ice Figures and Gazebo
Zoom in and repair the Shovel so you can collect it for your Inventory.
Go to the Gazebo, shovel the snow off the hatch, and create a path to go to the Hunting Lodge Entrance.
Screenshot
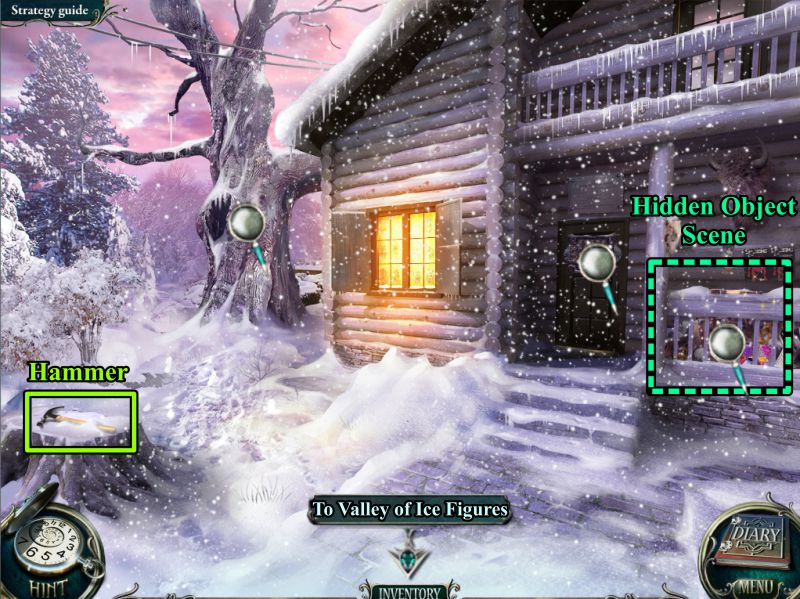
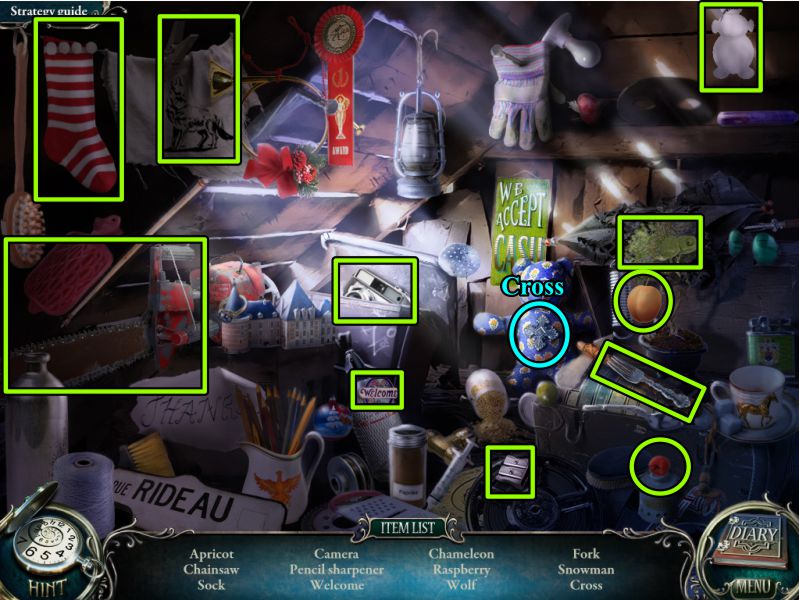
Hunting Lodge Entrance
Check out the tree and door, grab the Hammer, and play the Hidden Object Scene on the porch.
Afterwards, go to the Valley of Ice Figures.
Screenshot
Hunting Lodge Porch Hidden Object Scene
Your Inventory item will be some Nails.
Screenshot
Valley of Ice Figures and Hunting Lodge Entrance
Zoom in on the fence and use your Hammer to remove the 3 boards.
Return to the Hunting Lodge Entrance, zoom in on the tree, and nail the boards to the tree.
Use the make-shift ladder to climb up to the Roof.
Screenshot
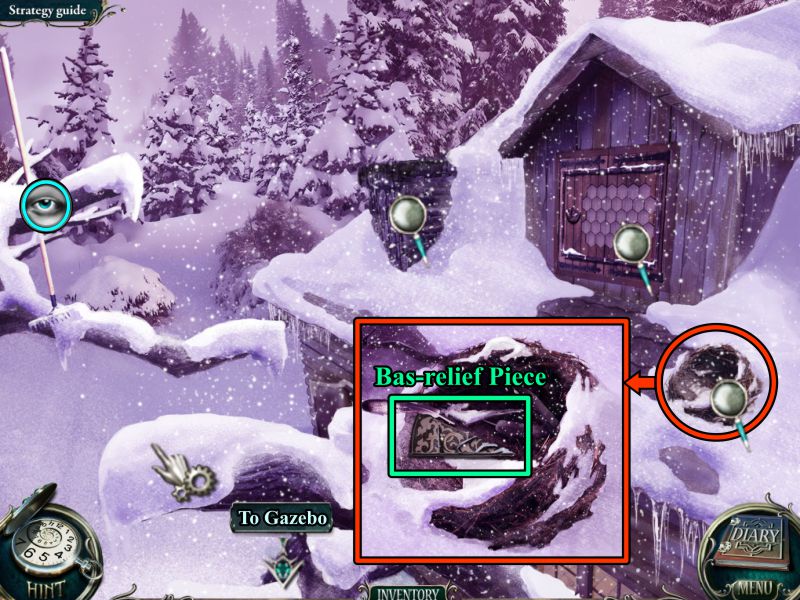
Mill Roof
Check out all the places to note in the screenshot.
Zoom in on the nest and take and Bas-relief Piece.
Go to the Gazebo.
Screenshot
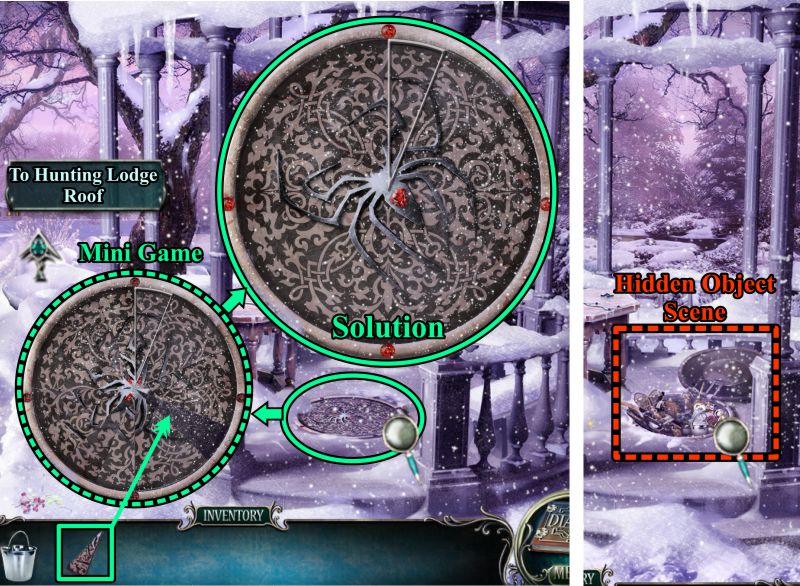
Gazebo
Zoom in on the hatch and place your Bas-relief Piece to trigger a Mini Game.
Swap out the pieces to complete the spider, as shown in the screenshot solution.
Play the Hidden Object Scene in the open hatch, then return to the Hunting Lodge Roof.
Screenshot
Gazebo Hatch Hidden Object Scene
Your Inventory item is an Eagle.
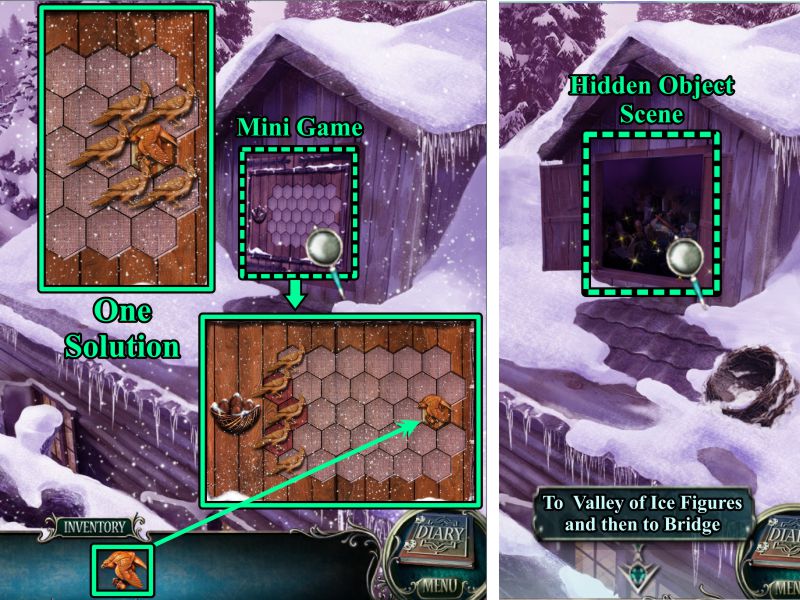
Screenshot
Attic Window
Zoom in on the window and place the Eagle as shown.
Your goal is to surround the Eagle with the birds so he cannot get to the nest.
One solution is shown in the screenshot, but you can also get him on either of the other edges.
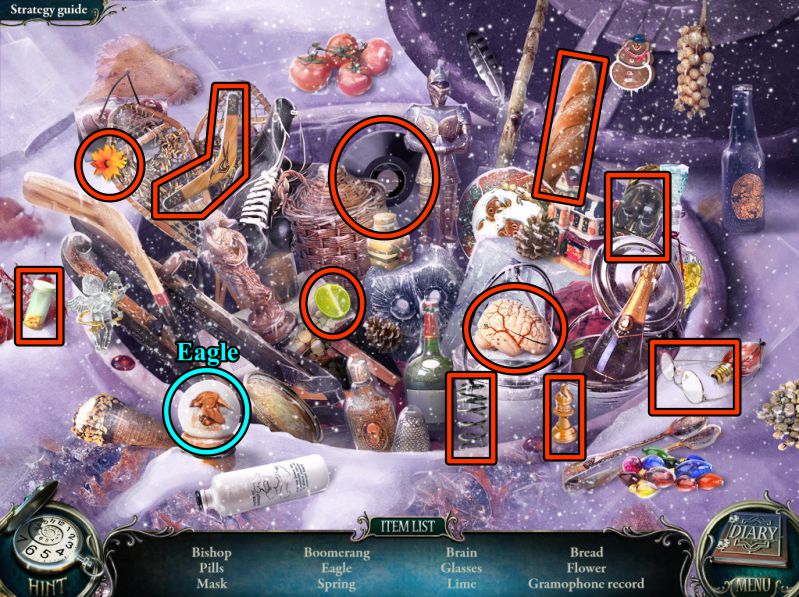
When the shutters open, play the Hidden Object Scene.
Screenshot
Mill Attic Hidden Object Scene
You will get a Cross for your Inventory.
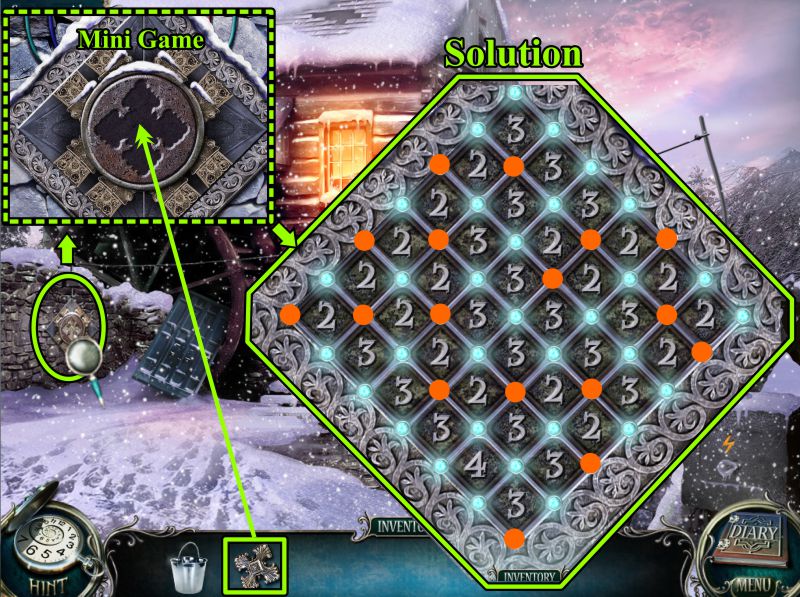
Screenshot
Mill Wall Mini Game
Zoom in on the wall at the left and place the Cross to trigger a Mini Game.
Your goal is to light up the lamps according to the number they surround.
For instance, a 2 can only have 2 lamps lit.
See the screenshot for the solution; do not light the lamps marked in red.
Screenshot
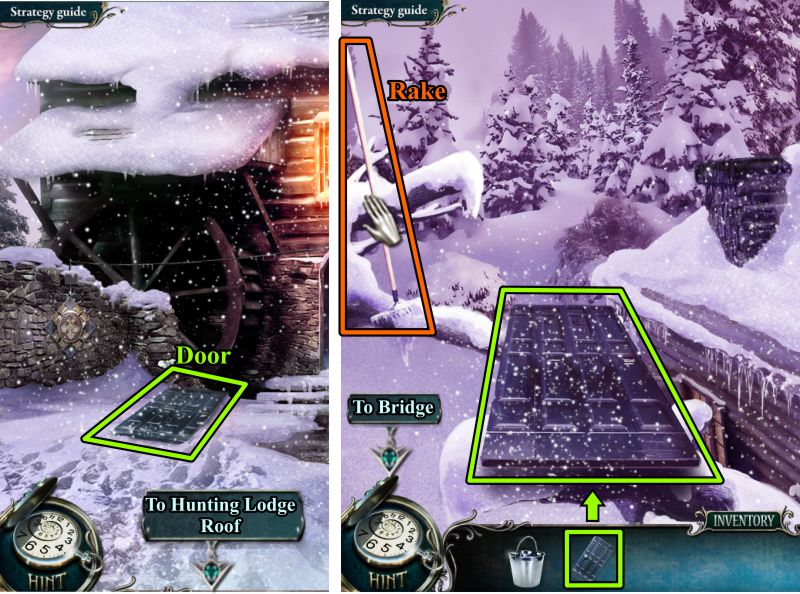
Mill Entrance and Lodge Roof
The Door comes away from the wheel, so pick it up and take it to the Hunting Lodge Roof.
Place the Door as a plank to be able to grab the Rake.
Return to the Bridge by the Mill.
Screenshot
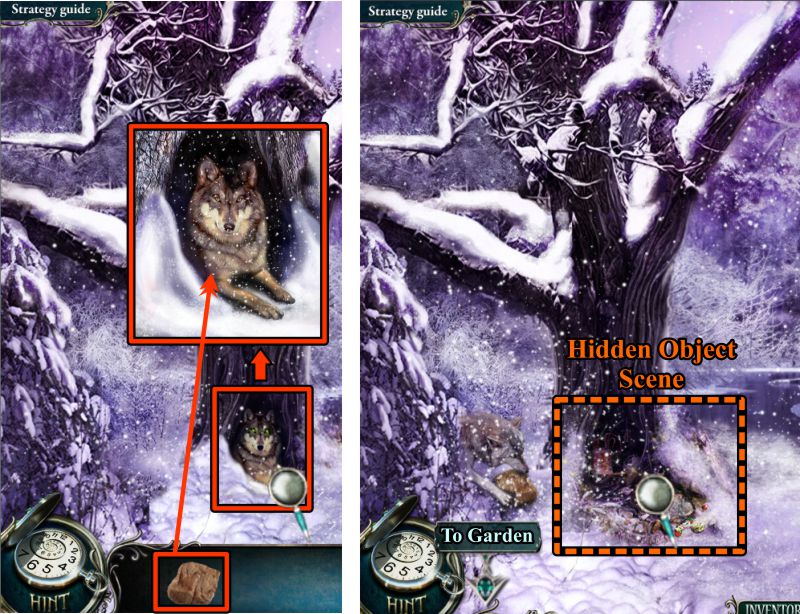
Bridge and Forest
Cross the Bridge to the Forest.
Take note of the hungry Wolf in her den, then zoom in on the icicle.
Use the rake to break it off so you can take the Star Jewel.
Go to the Hunting Lodge Entrance.
Screenshot
Hunting Lodge Entrance
Grab some of the loose snow with your bucket, then zoom in on the door.
Place the Star Jewel to trigger a Mini Game.
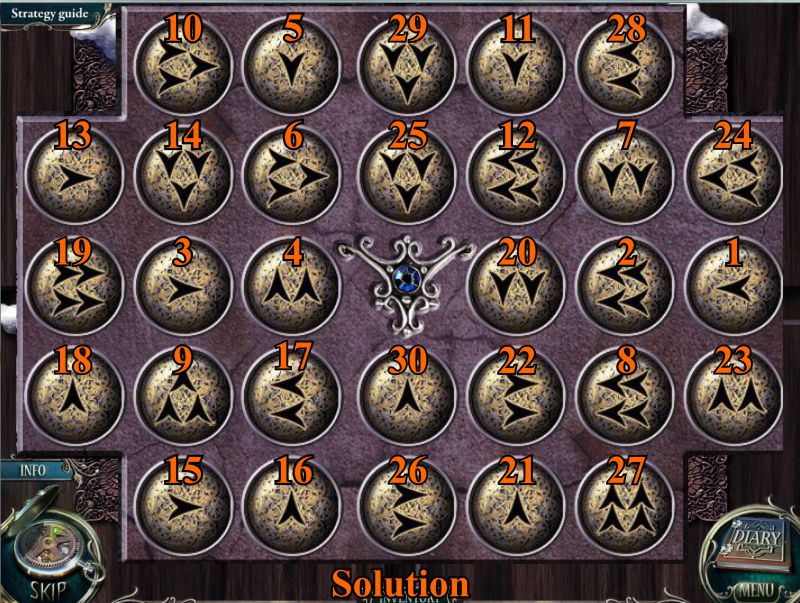
Your goal is to press every button in order to open the door and enter the Lodge.
The starting button is marked in the screenshot.
Screenshot
Hunting Lodge Door Mini Game
Keep following the directional arrows in sequence so the center Jewel Star is last.
You do not need to press the button next to the one you just pressed, but you do need to keep in mind which direction you want to go.
See the screenshot for a step-by-step solution.
Screenshot
Inside the Lodge and Up on the Roof
Check the fireplace to find a hook to hang something, then zoom in on the window.
Take the Cloth and go up on the Roof.
Zoom in on the chimney and use your Cloth to wipe away enough soot to find the Mill Key.
Go to the Mill.
Screenshot
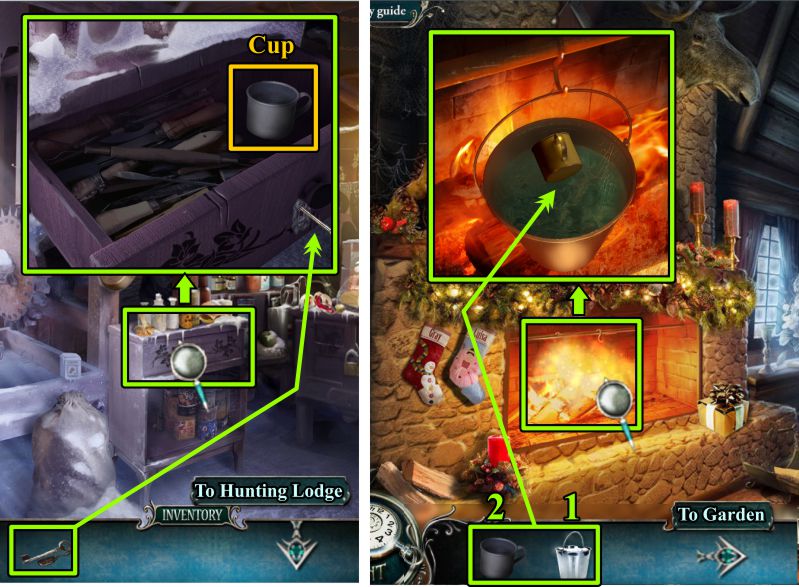
Mill
Zoom in on the drawer in the stand and use the Mill Key to open it.
Take the Cup and return to the Hunting Lodge.
Zoom in and place your Bucket with snow on the hook.
When it is melted, take a cup of hot water, then go to the Garden.
Screenshot
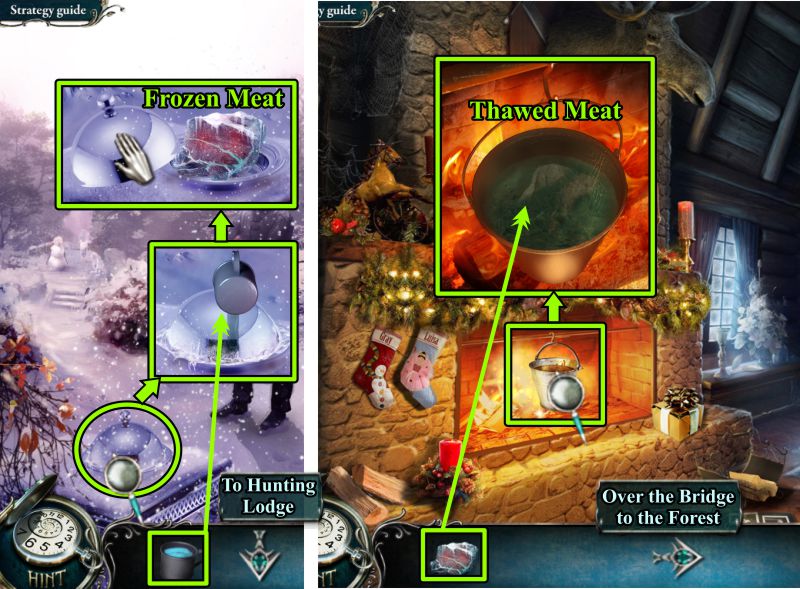
Garden and Lodge
Zoom in on the cart at the left and pour the hot water over the serving lid.
Open the lid and take the Frozen Meat.
Go to the Lodge, zoom in on the fireplace, and place the Frozen Meat.
Once it is thawed, take it and go to the Forest over the Bridge.
Screenshot
Forest
Zoom in on the Wolf and give her the meat to lure her out of her den.
While she is enjoying her meal, examine and play the Hidden Object Scene in her den.
Go to the Garden.
Screenshot
Wolf Den Hidden Object Scene
You will find a Chisel for your Inventory.
Screenshot
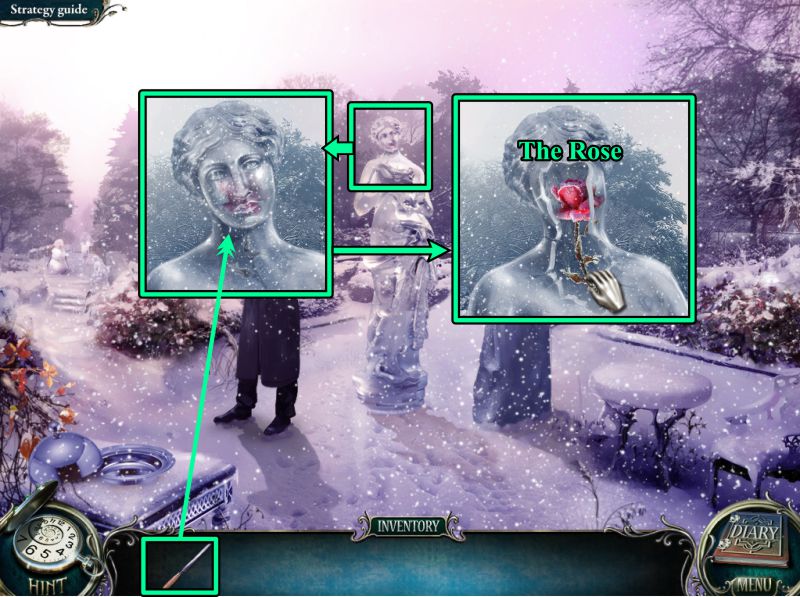
Garden
Zoom in on the ice statue, then use your Chisel to chip away the ice so you can collect the Rose.
Screenshot
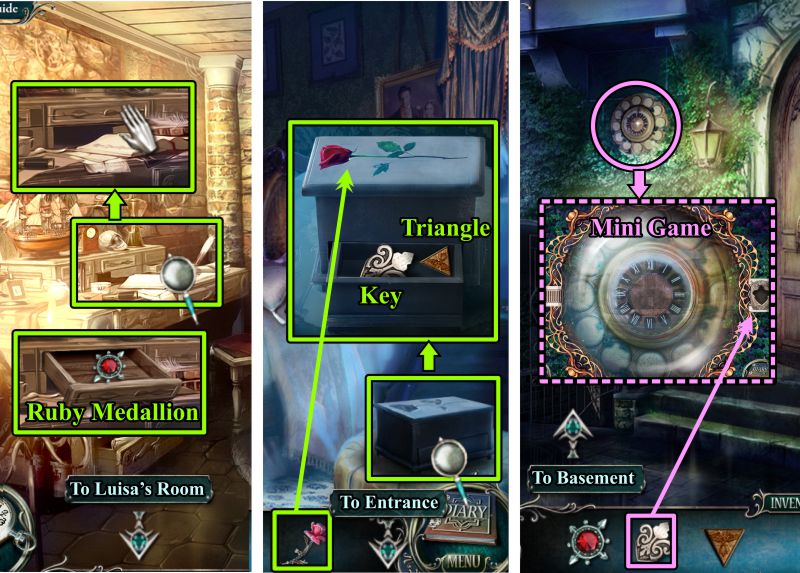
Mansion Basement, Luisa's Room, and Mansion Entrance
You will be transported to the Mansion Basement.
Zoom in on the desk, open the drawer, and take the Ruby Medallion before going to Luisa's Room.
Zoom in on the box on the table at the right and place the Rose on the lid.
Take the Key from the drawer and go to the Mansion Entrance.
Zoom in on the clock and place the key to trigger an Mini Game.
Screenshot
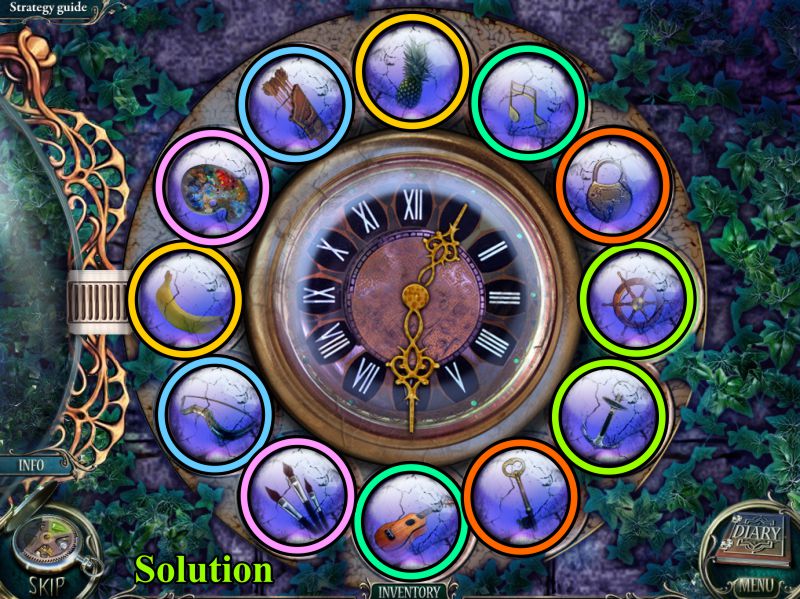
Mansion Clock Mini Game
Your goal is to find the related pairs by pointing the clock hands to those objects that are somehow related. See the screenshot for the solution.
The clock hands will be added to your Inventory.
Screenshot
Chapter 5: Demon Dad
Basement
You will go to the Basement.
Zoom in on the door and place the Clock Hands to trigger a Mini Game.
The panel will open just enough for you to zoom in to the lock.
Your goal is to use the arrows above and below to change the tumblers so you can make a connection between the left and right side.
See the screenshot for the solution, then enter the Basement Corridor.
Screenshot
Basement Corridor
Check out all the spots, play the Hidden Object Scene, and place your Ruby Medallion to trigger the Mini Game on the wall.
Screenshot
Wall Mini Game
Your goal is to complete the alphabet from the marked "A" to the ending "Z" showing in the screenshot.
In order to do so, you will need to pick the next alphabet letter in the in the highlighted radius that is shown from your last pick.
The solution is shown in the screenshot.
Screenshot
Basement Corridor Hidden Object Scene
A Sledgehammer will be added to your Inventory.
Screenshot
Basement Corridor
Once you have the Sledgehammer, zoom in on the wall with the missing brick and the hand that comes out of it.
Use the Sledgehammer 3 times on the wall and enter the Dungeon.
Screenshot
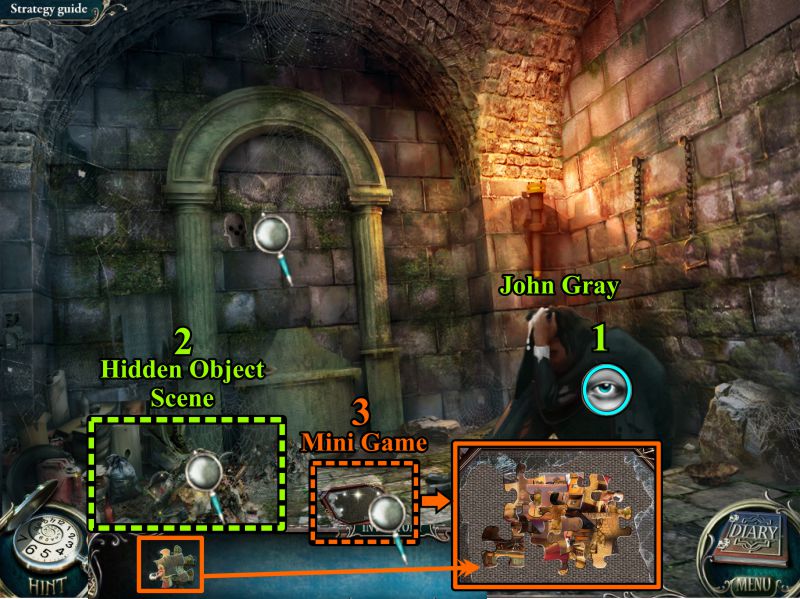
Dungeon
Check out the back wall.
Talk to John Gray.
Play the Hidden Object Scene.
Play the Mini Game with the puzzle pieces once you collect them from the Hidden Object Scene.
Screenshot
Dungeon Mini Game
Collect the Puzzle Piece to use for the Mini Game.
Screenshot
Dungeon Puzzle Mini Game
After you've placed the pieces, complete the puzzle as shown in the screenshot.
Screenshot
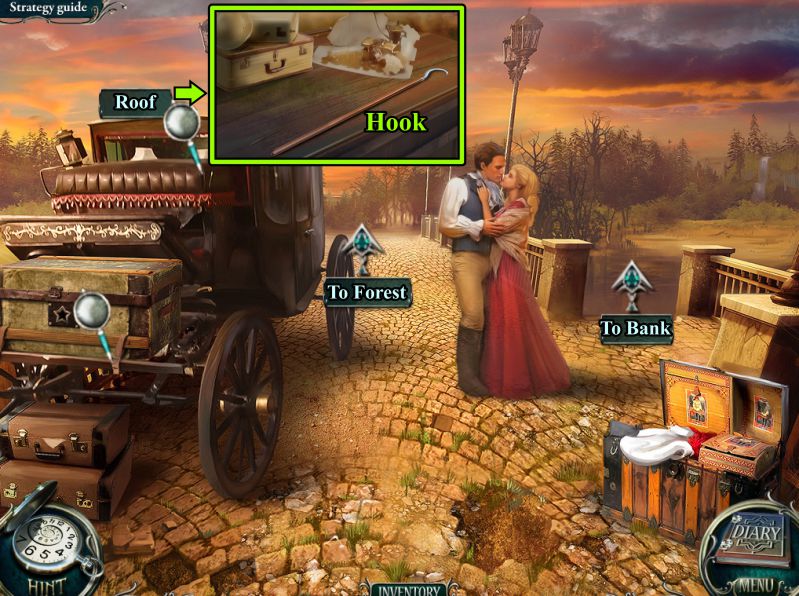
You will be transported to the scene in the puzzle.
Zoom in on the Roof of the carriage and take the Hook.
Two exits include the Bank and the Forest; first go to the Bank and then the Forest.
Screenshot
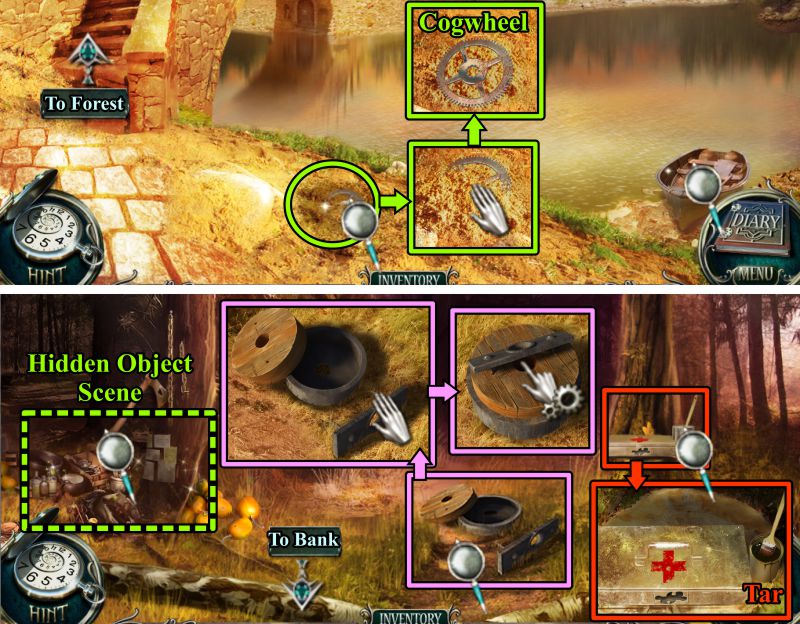
Bank and Forest
Check out the boat that need repair, then zoom in on the sand so you can take the Cogwheel.
Check the Medical Box, then pick up the Tar.
Zoom in on the wheel, but when you touch the parts, they all assemble and become useless.
Play the Hidden Object Scene.
Screenshot
Forest Hidden Object Scene
A Safe Lock will be added to your Inventory.
Go to the Bank.
Screenshot
Bank
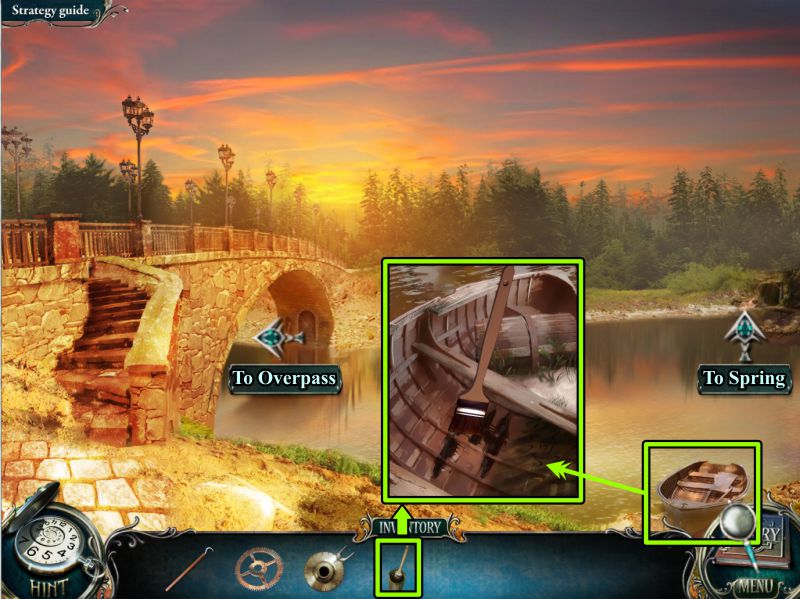
Zoom in on the boat and use your Tar to repair it.
You have two choices; first take the boat to the Spring, then to the Overpass.
Screenshot
Spring
You have traveled by boat to the Spring.
Zoom in on the Cage in the tree at the left.
Use your Hook to grab the Cage.
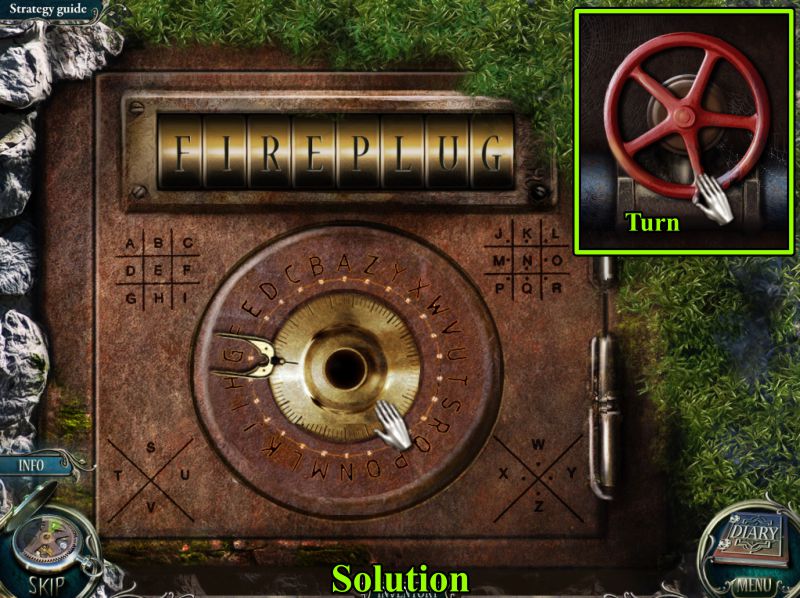
There is a safe next to the waterfall, so zoom in and place your Safe Lock to trigger a Mini Game.
Your goal is to match the symbols on the bar with the appropriate symbols surrounding the lock.
For instance, if a symbol has 2 corners and 3 lines, check the symbols at the left and choose the "F".
Screenshot
Waterfall Turn-off Mini Game
Match up all the symbols, or check out the solution in the screenshot.
Turn off the value that appears so you can enter the Mine.
Screenshot
Mine
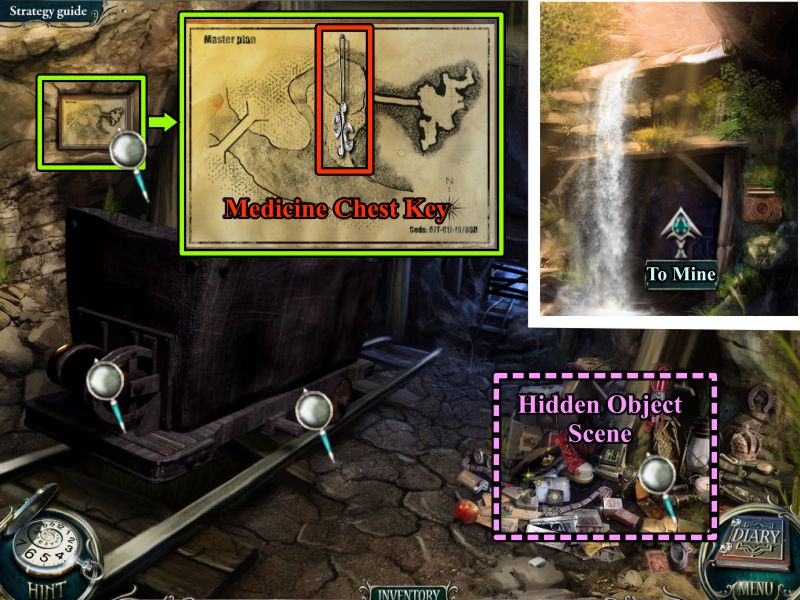
Once inside the Mine, check out the cart to see what it needs.
Zoom in on the wall and take the Medicine Chest Key.
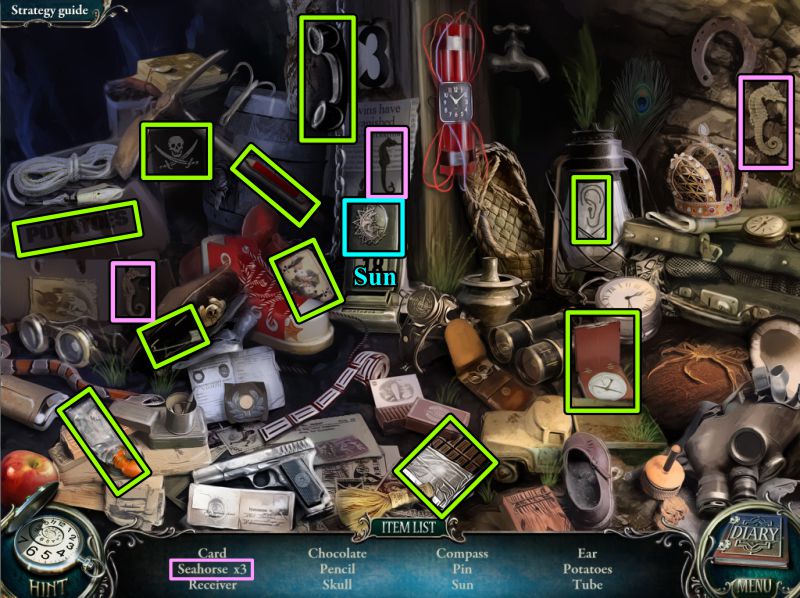
Play the Hidden Object Scene in the junk.
Screenshot
Mine Junk Hidden Object Scene
You will get a portion of a Sun to use later.
Go back to the Bank and to the Overpass.
Screenshot
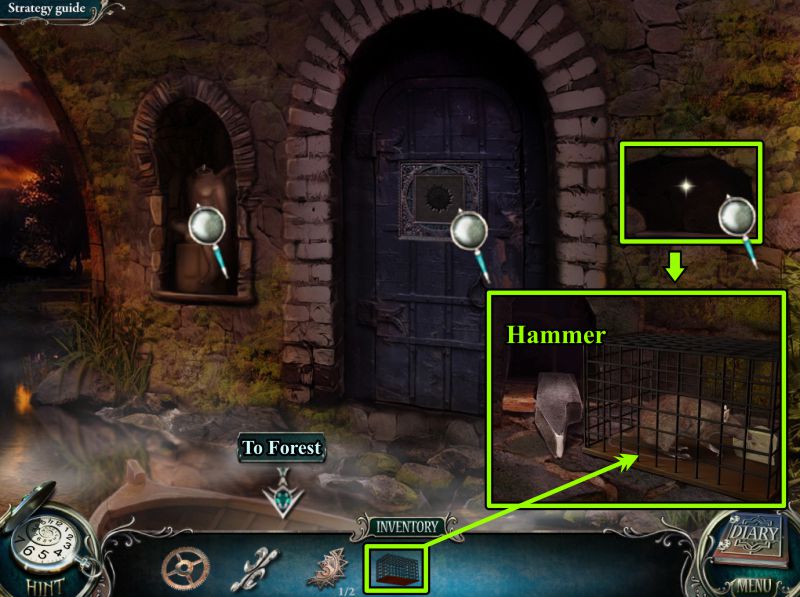
Overpass
Check out everything, including the hole with the Rat.
Place the cage to trap him and take the Hammer.
Go to the Forest.
Screenshot
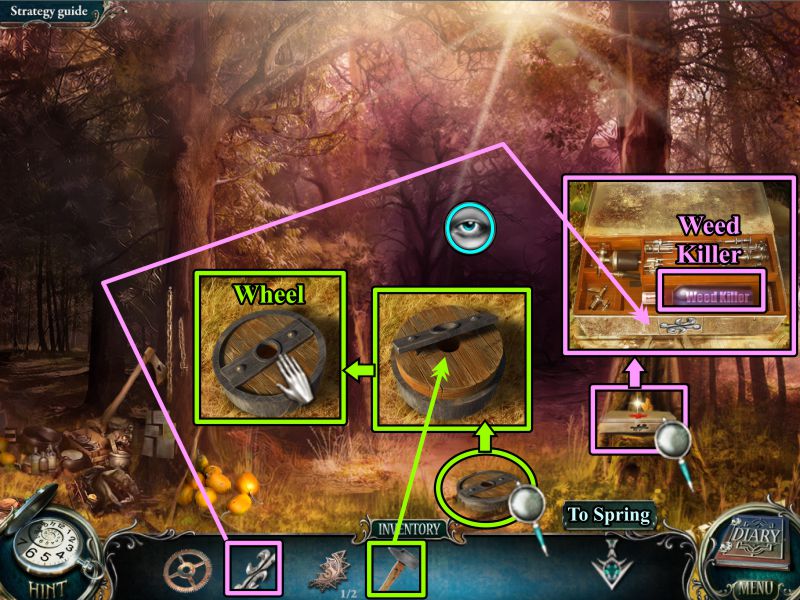
Forest
Zoom in on the Wheel and use the Hammer to put it back together for you to take.
Zoom in on the Medicine Box, place the Key and take the Weed Killer when it opens.
Go to the Spring.
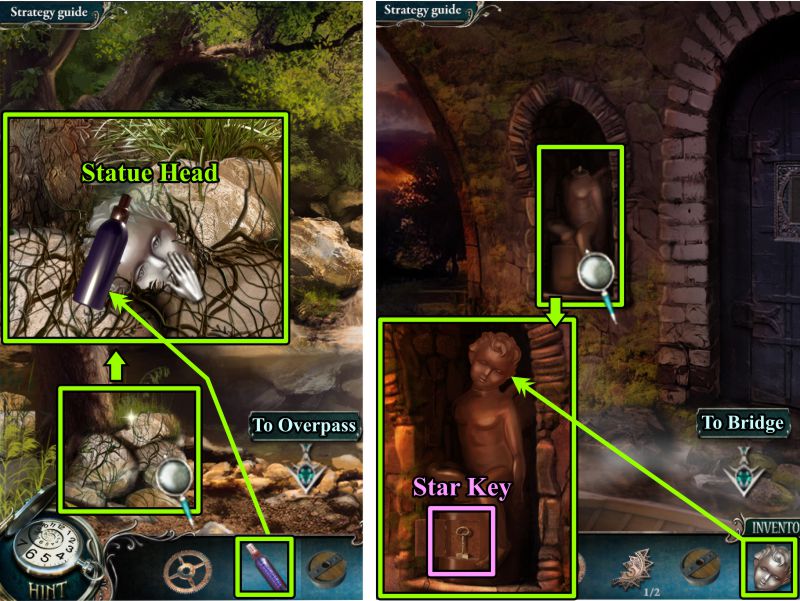
Screenshot
Spring and Overpass
Zoom in on the rocks and use the Weed Killer to remove the vines from the Statue Head so you can take it.
Go to the Overpass and zoom in on the statue in the niche.
Place the Statue Head and take the Star Key.
Go to the Bridge.
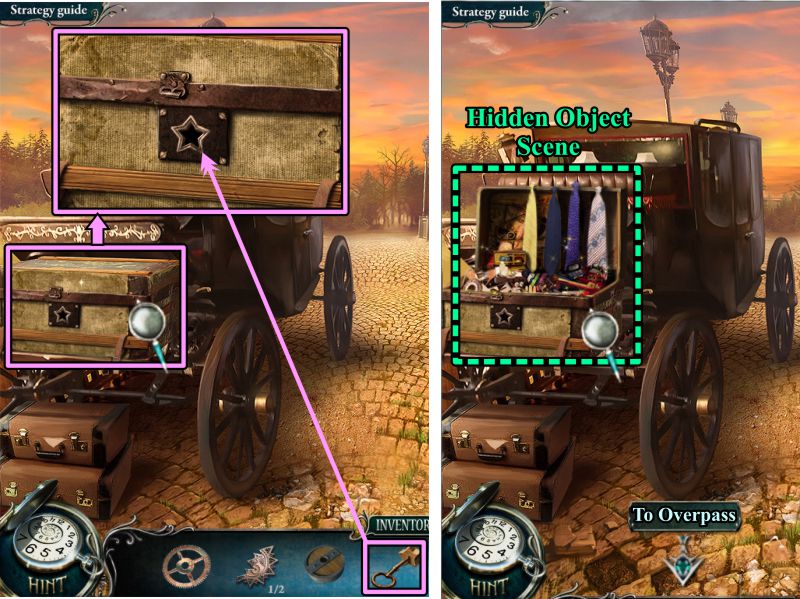
Screenshot
Mill
Zoom in on the trunk on the carriage and place the Star Key in the lock.
Play the Hidden Object Scene when the trunk opens.
Screenshot
Carriage Trunk Hidden Object Scene
You will get the other half of the Sun for your Inventory, so go to the Overpass.
Screenshot
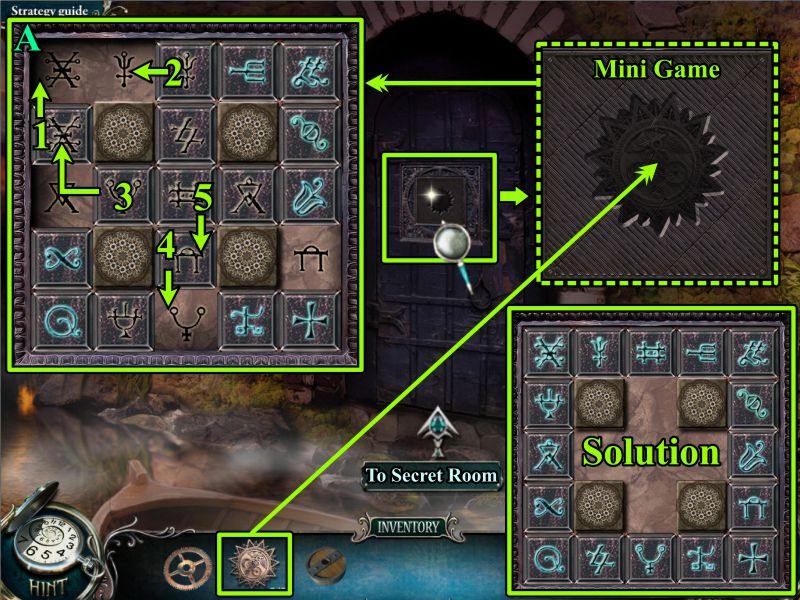
Overpass
Zoom in on the door and place the Sun to trigger a Mini Game.
Your goal is to slide the cubes so they cover their image on the board.
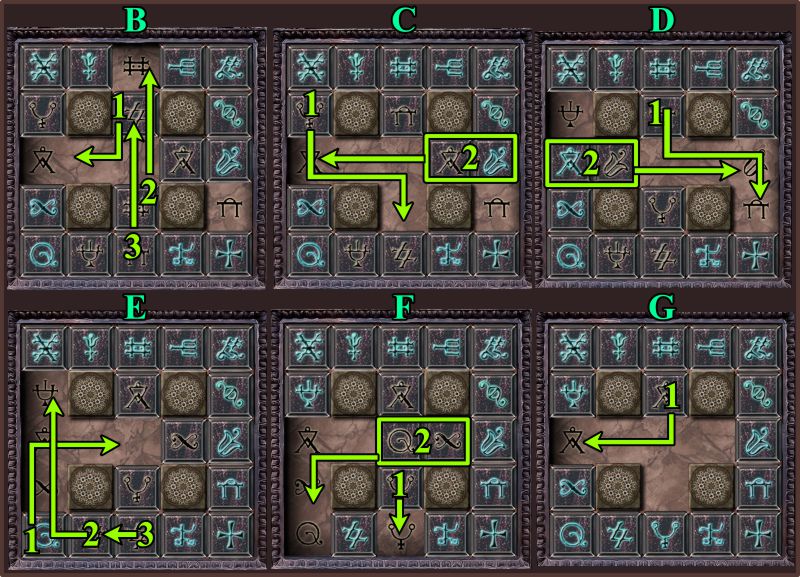
See the screenshot for the solution and the first part of the step-by-step way to the solution.
Screenshot
Overpass Secret Room Door Mini Game
The screenshot shows the continuation of the step-by-step solution.
Screenshot
Overpass Secret Room
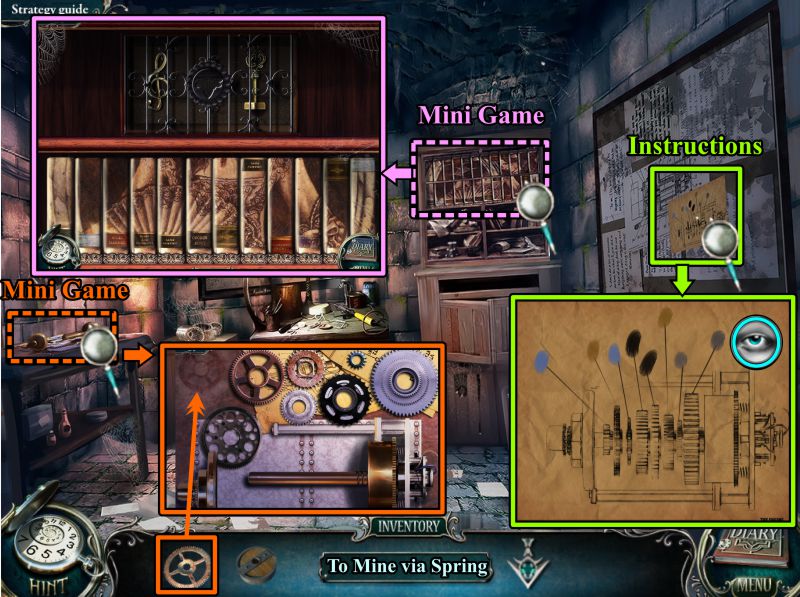
Check the Instructions for the engine posted on the right wall.
Zoom in on the engine on the table at the left and place your gear to trigger a Mini Game.
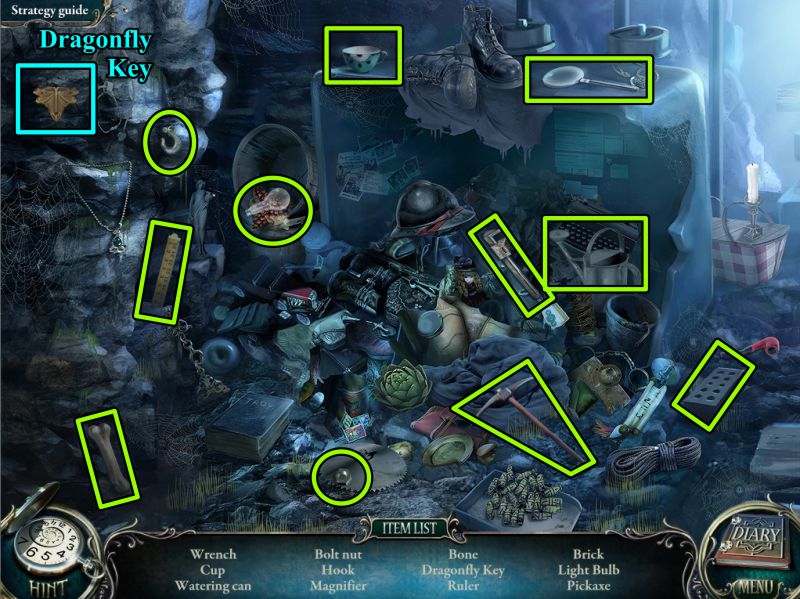
Zoom in on the books on the back wall for another Mini Game.
You need to find a Dragonfly Key before you can get the Clef and Triangular Key, so go to the Mine at the Spring.
Screenshot
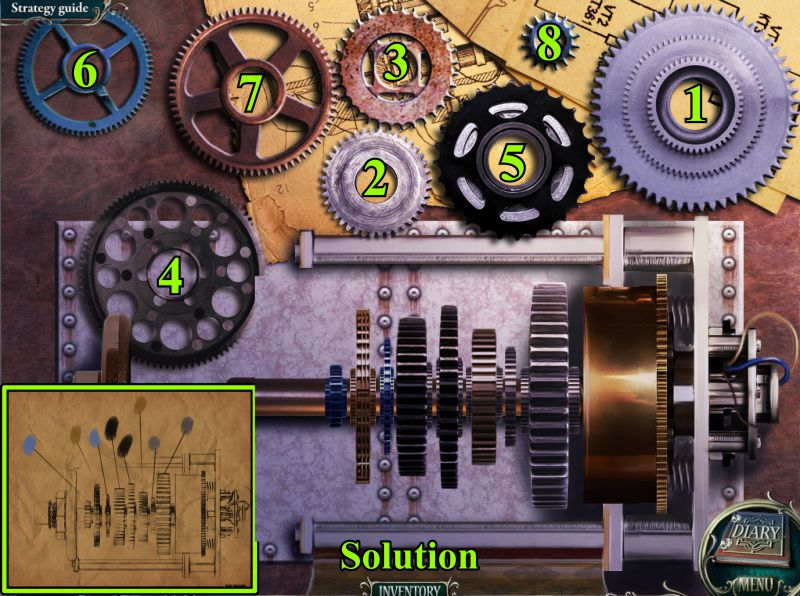
Engine Mini Game
See the screenshot for a numbered solution as to how to place the gears.
Screenshot
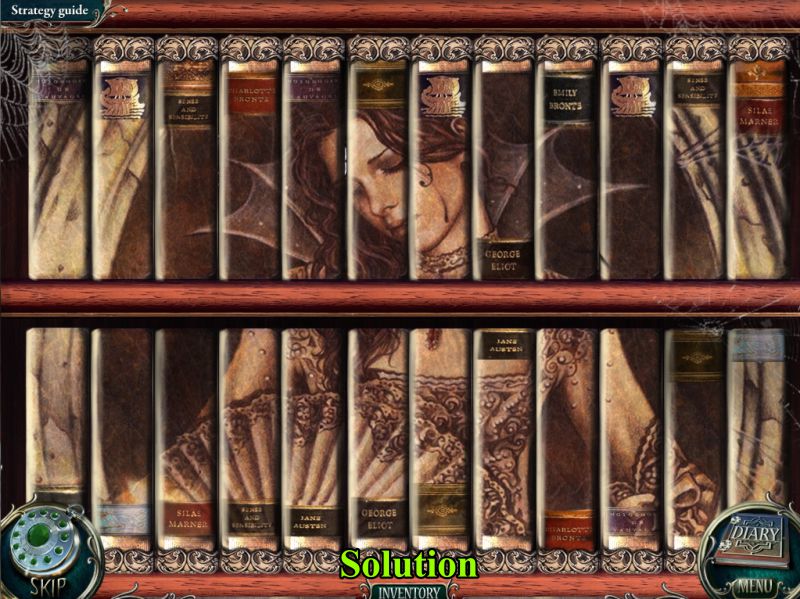
Books Mini Game
Swap the books to get the image shown in the screenshot.
Screenshot
Mine
Zoom in on the cart and place the Wheel.
Zoom in on the back of the cart and place the Engine.
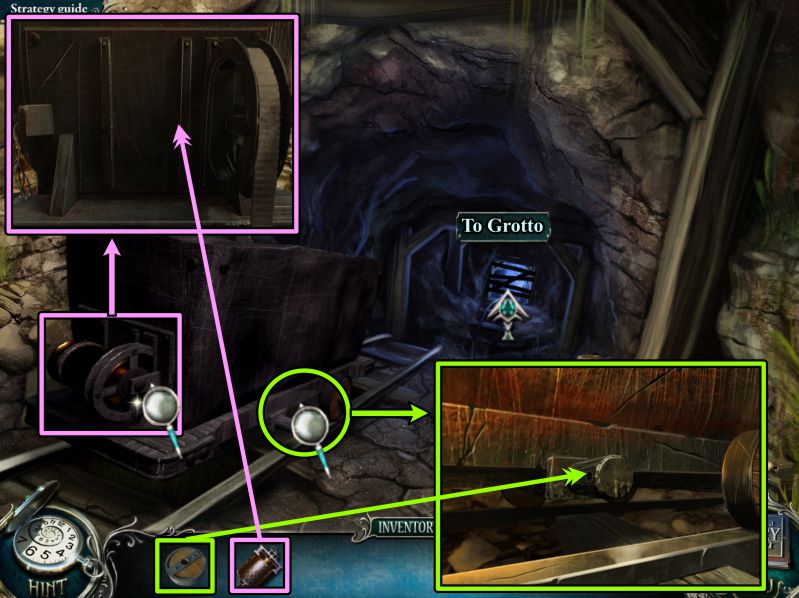
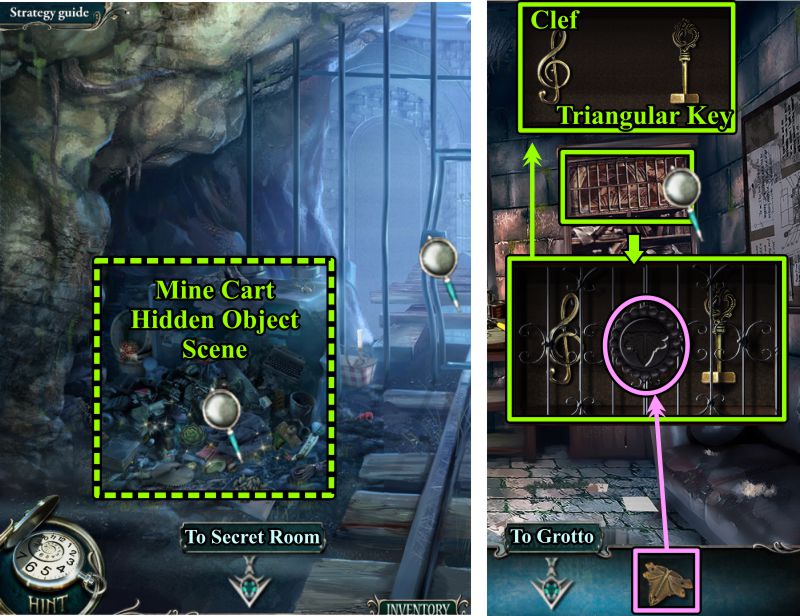
The mine cart will take off down the track and clear the way to the Grotto, so follow it there.
Screenshot
Grotto and Overpass Secret Room
Play the crashed mine cart Hidden Object Game, then check out the gate.
Go to the Overpass Secret Room and place the Dragonfly Key on the book grate to get the Clef and Triangular Key.
Return to the Grotto.
Screenshot
Mine Cart Hidden Object Scene
Your Inventory object is the Dragonfly Key.
Screenshot
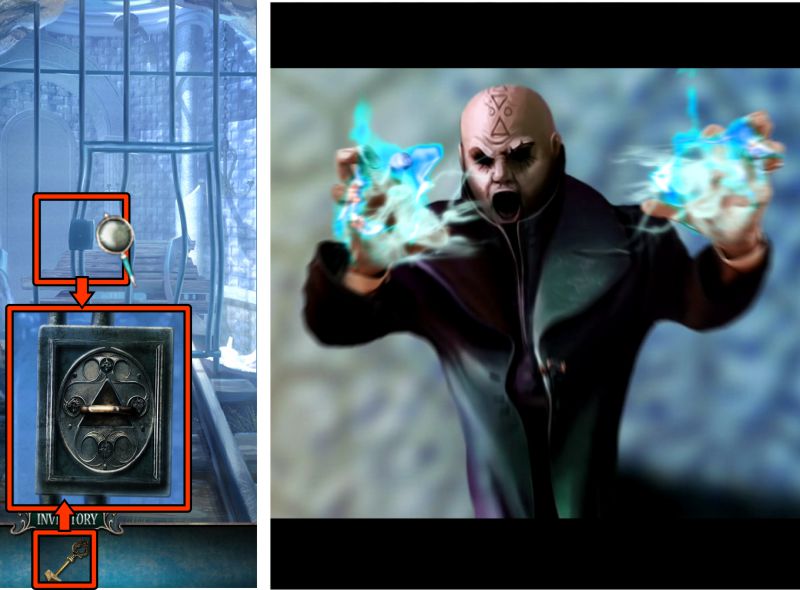
Mill
Place the Triangular Key to open the gate.
Demon Dad is not happy about your arrival and transports you to the Dungeon.
Screenshot
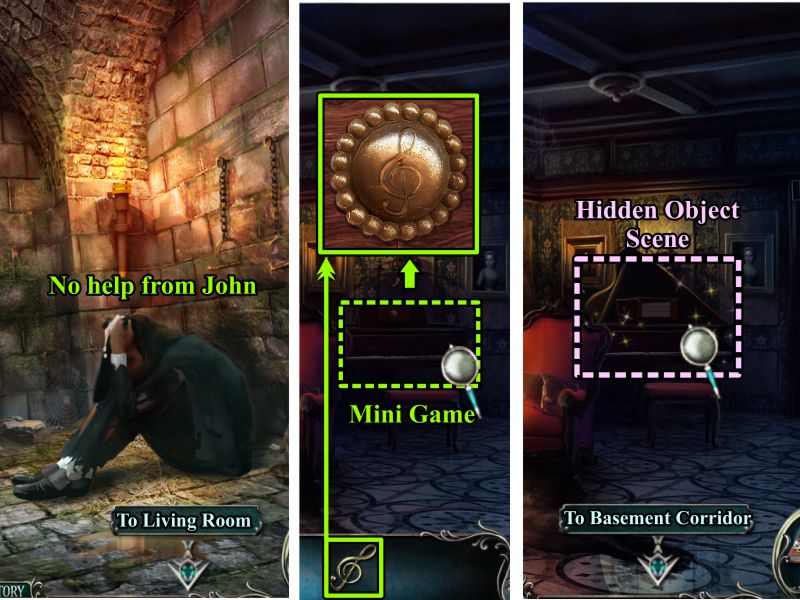
Chapter 6: Luisa
Dungeon and Mansion Living Room
John is still overcome with grief so cannot offer any help.
Go upstairs to the Mansion Living Room and zoom in on the Piano.
Place the Clef to trigger a Mini Game.
Once the game is over, play the Hidden Object Scene in the Piano before going to the Basement Corridor.
Screenshot
Piano Mini Game
Your goal is to play the melody on the sheet music by pressing the keys on the piano that relate to the pictures on the sheet.
When the sheet music item object is highlighted, press the color-coded piano key shown in the screenshot solution.
Screenshot
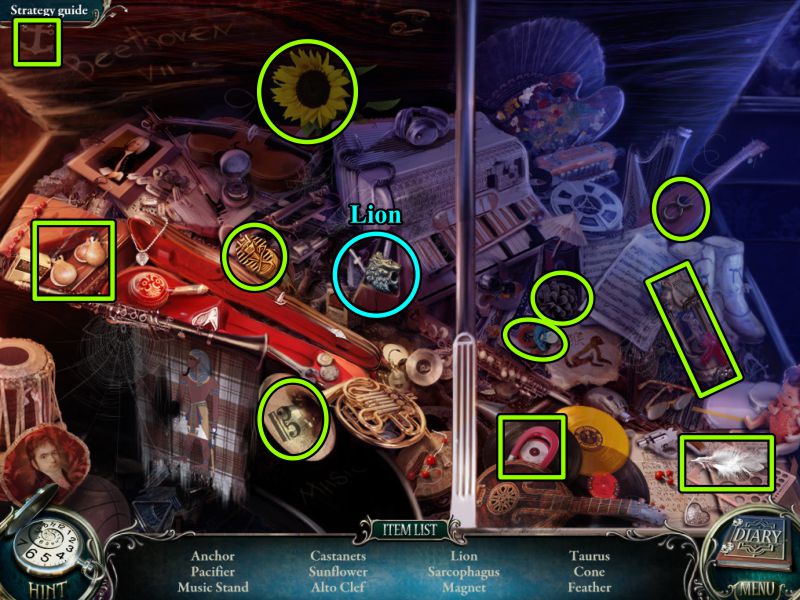
Piano Hidden Object Scene
Your Inventory item is a Lion.
Screenshot
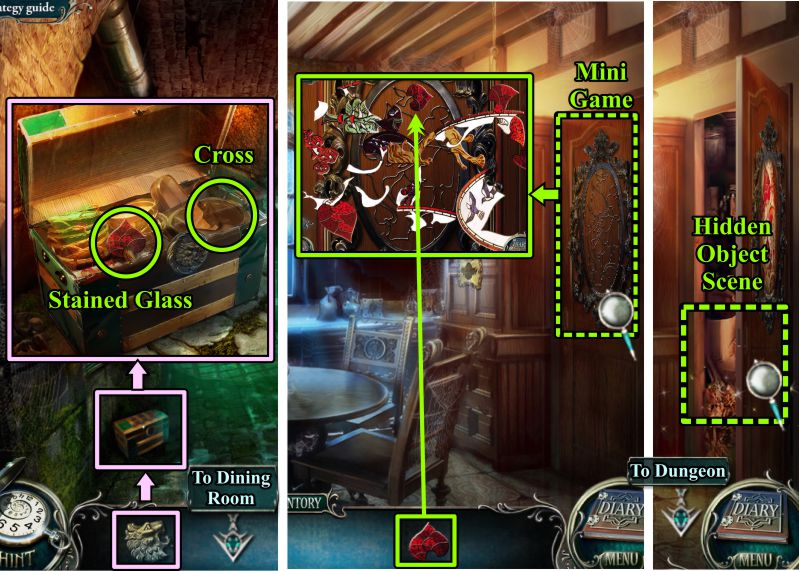
Basement Corridor and Dining Room
Zoom in on the small chest at the left and place the Lion to open it.
Take the Stained Glass and the Cross, then go to the Dining Room.
Zoom in on the frame at the right and place your Stained Glass piece to trigger a Mini Game.
When you have assembled the Stained Glass, play the Hidden Object Scene in the open cupboard.
Screenshot
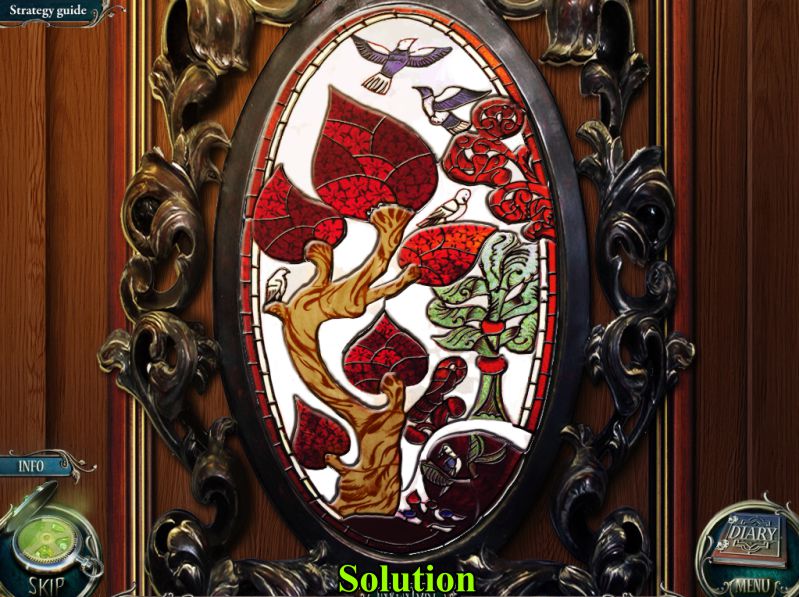
Stained Glass Mini Game
Assemble the Stained Glass as shown in the screenshot.
Screenshot
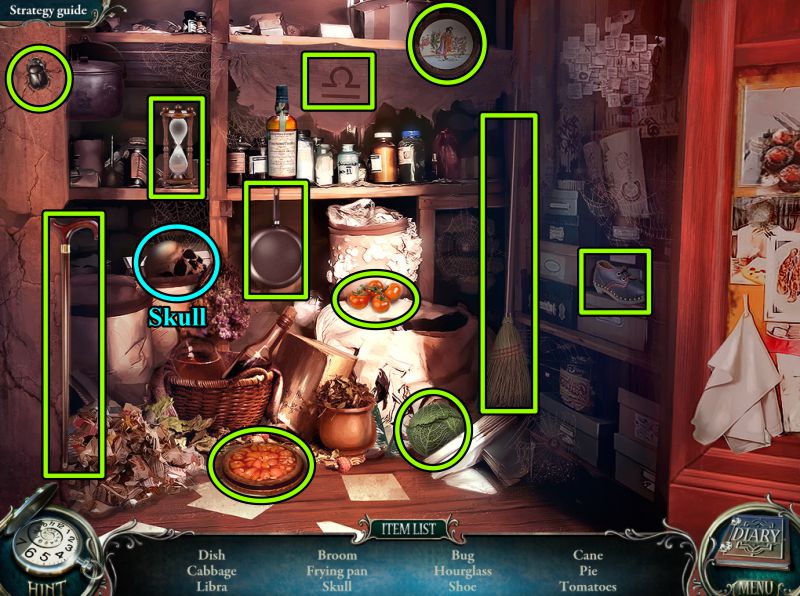
Cupboard Hidden Object Scene
Your Inventory item is the Skull.
Screenshot
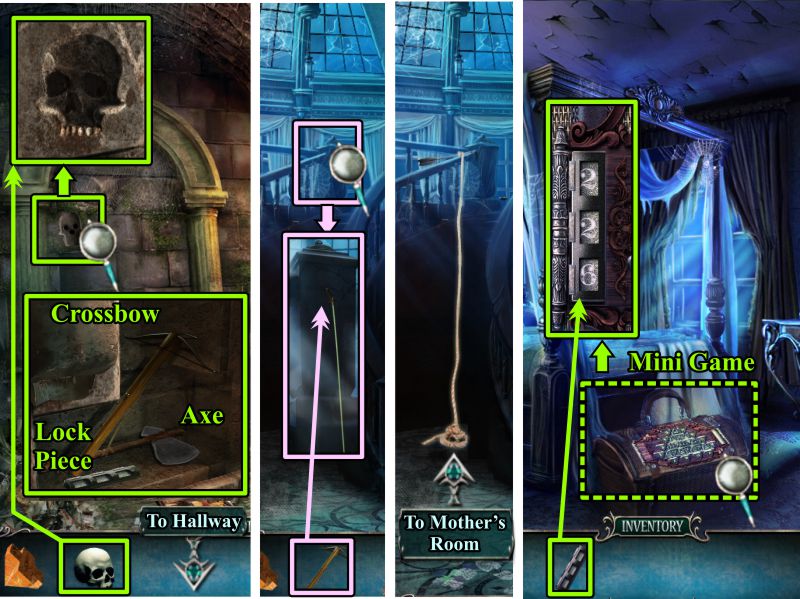
Dungeon, First Floor Hallway, and Mother's Room
Zoom in on the arched wall and place the Skull.
Take the Crossbow, Axe, and Lock Piece from the opening, then go to the First Floor Hallway.
Zoom in on the Second Floor post and shoot the Crossbow.
Use the rope to go to the Second Floor and down the Corridor to Mother's Room.
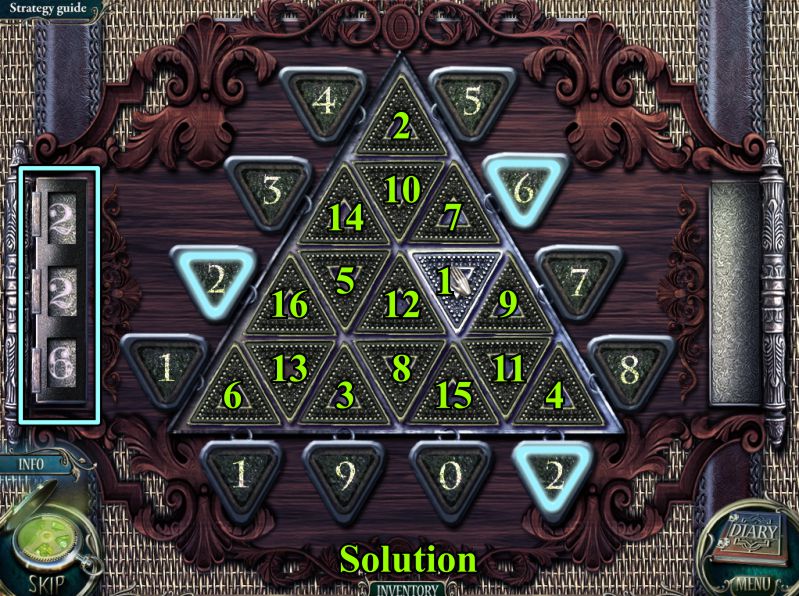
Zoom in on the chest and place the Lock Piece to trigger a Mini Game.
Screenshot
Chest Mini Game
Your goal is to open the chest by pressing the inner triangles to match outer triangles with the numbers on the roller.
By pressing the triangle numbered "1" in the screenshot, the outer triangles numbered 2-2-6 light up and match the roller numbers.
See the screenshot for the number sequence to use to match the roller numbers that appear.
Screenshot
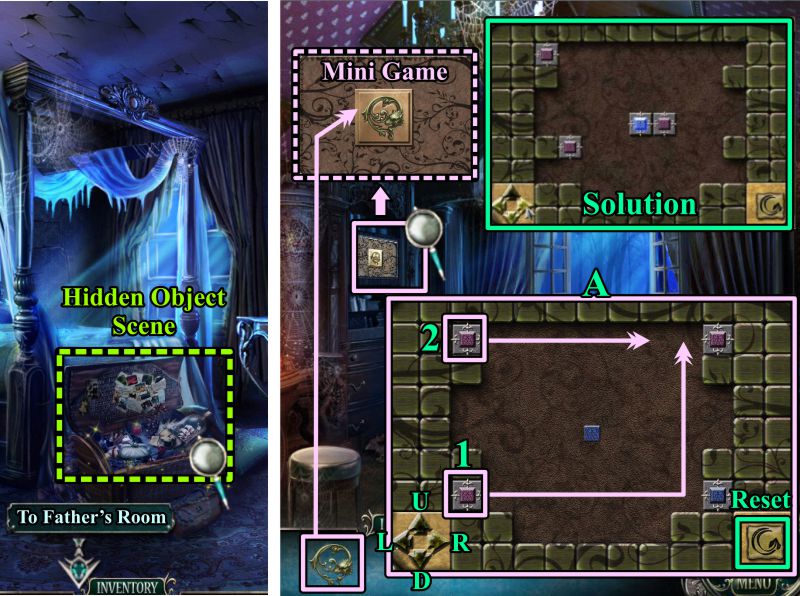
Mother's Room and Father's Room
The chest opens to reveal a Hidden Object Scene.
Once played, go to Father's Room and zoom in on the safe.
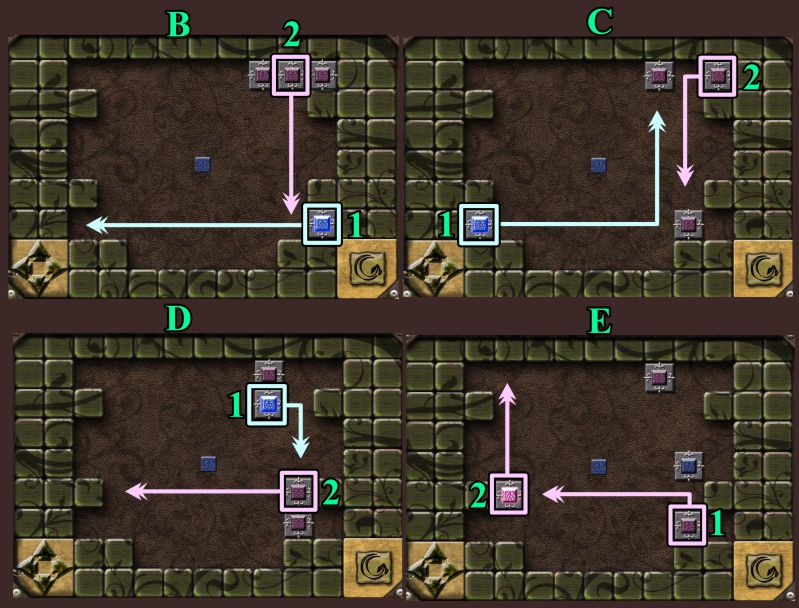
To trigger a Mini Game, place the Dragon Emblem you just received from the chest in Mother's Room.
Your goal is to move the squares so that the blue square is in the center and covers up the blue stone already there.
To move the squares, use the arrows in the lower left corner that are labeled in the screenshot.
U = up, R = right, D = down, and L = left.
There is a Reset button at the lower right of the screen if you need to start over again.
The solution is shown in the screenshot as is the first step as to how to get there.
Screenshot
Chest Hidden Object Scene
The Dragon Emblem is your Inventory item.
Screenshot
Safe Mini Game
Continue to follow the steps to the solution in the screenshot.
Screenshot
The final step-by-steps are shown in this screenshot.
Screenshot
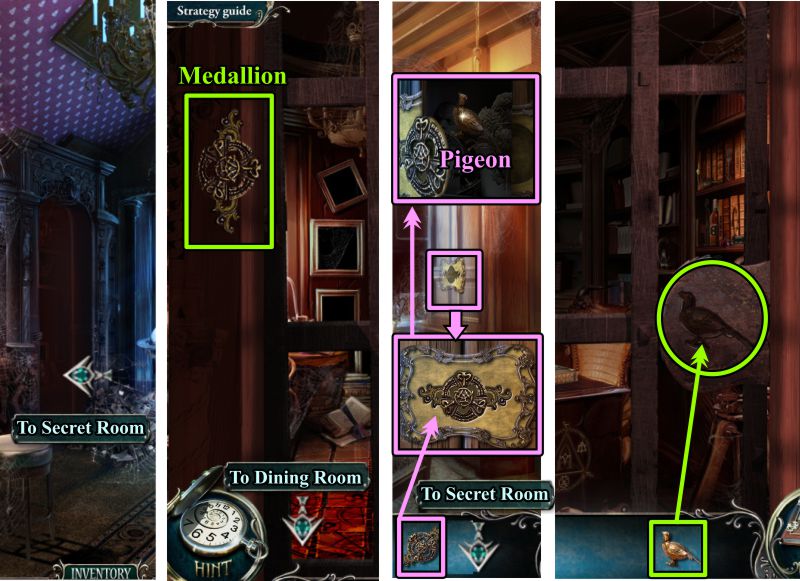
Father's Secret Room and Dining Room
Enter Father's Secret Room, at least as far as the gate, and take the Medallion.
Go to the Dining Room and zoom in on the sideboard.
Place the Medallion you just found and take the Pigeon when the door opens.
Return to the gate of Father's Secret Room and place the Pigeon as a key to open the gate.
Screenshot
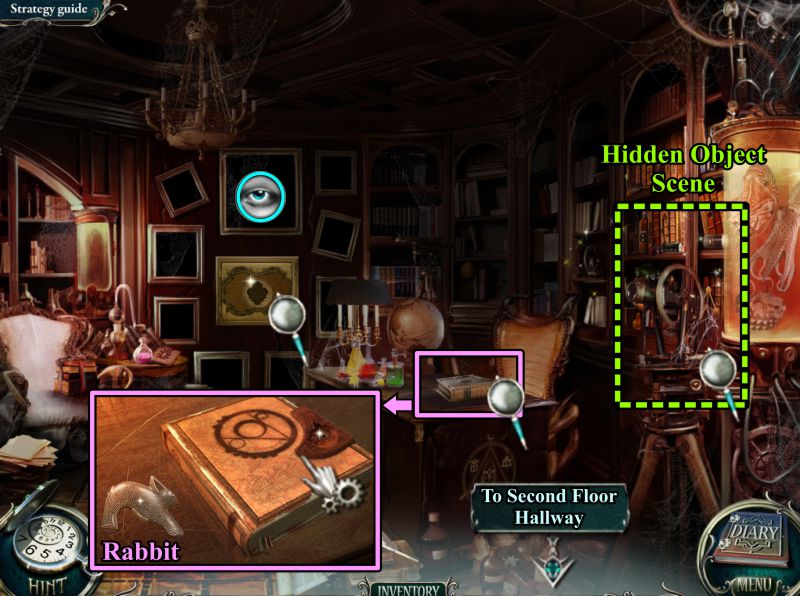
Father's Secret Room
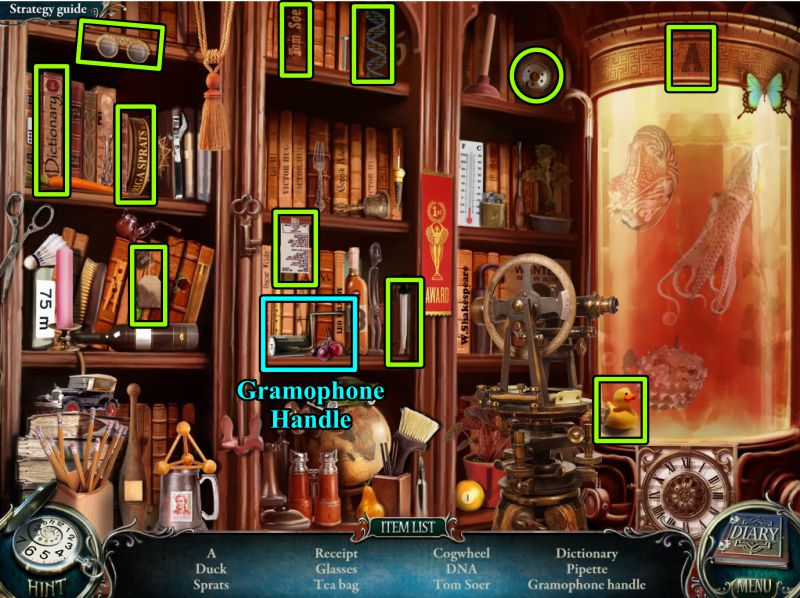
Check out the points of interest in the screenshot, grab the Rabbit, play the Hidden Object Scene, and go to the Second Floor Hallway.
Screenshot
Secret Room Hidden Object Scene
You will receive a Gramophone Handle for your Inventory.
Screenshot
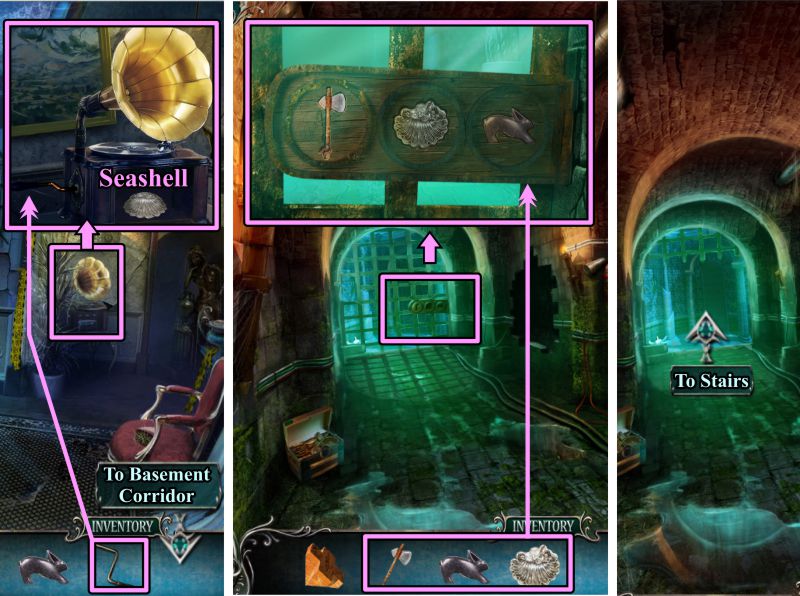
Second Floor Hallway and Basement Corridor
Zoom in on the gramophone and place the Handle.
A drawer will open for you to take the Seashell.
Go to the Basement Corridor and zoom in on the gate at the far end.
Place all the items needed to open the gate: Axe, Seashell, and Rabbit.
Go through the gate to the Stairs.
Screenshot
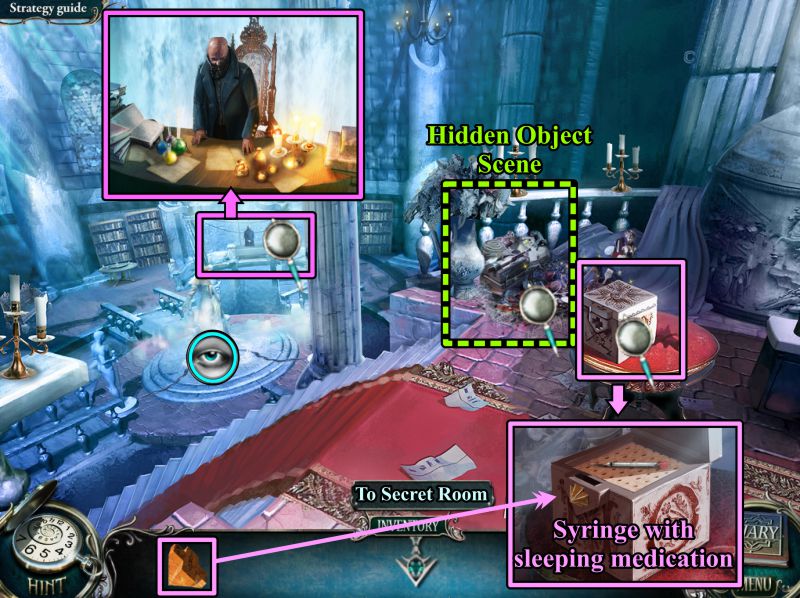
Stairs to Levitation Platform
Luisa is in a levitated state and Demon Dad is shuffling around his desk, so you cannot go downstairs.
Zoom in on the box on the table at the right and place the Cross from your Inventory.
Take the Syringe that is filled with sleeping medication.
Play the Hidden Object Scene and return to Father's Secret Room.
Screenshot
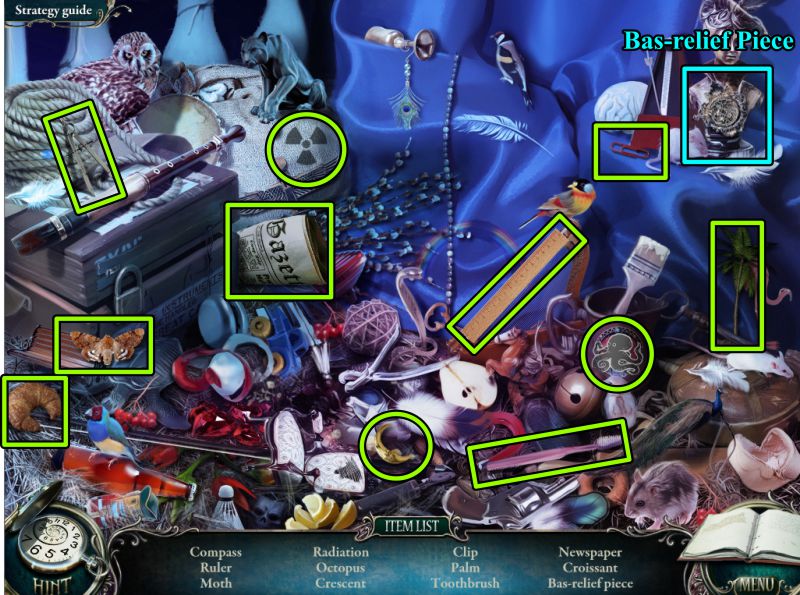
Stairs Hidden Object Scene
You will receive a Bas-relief Piece for your Inventory.
Screenshot
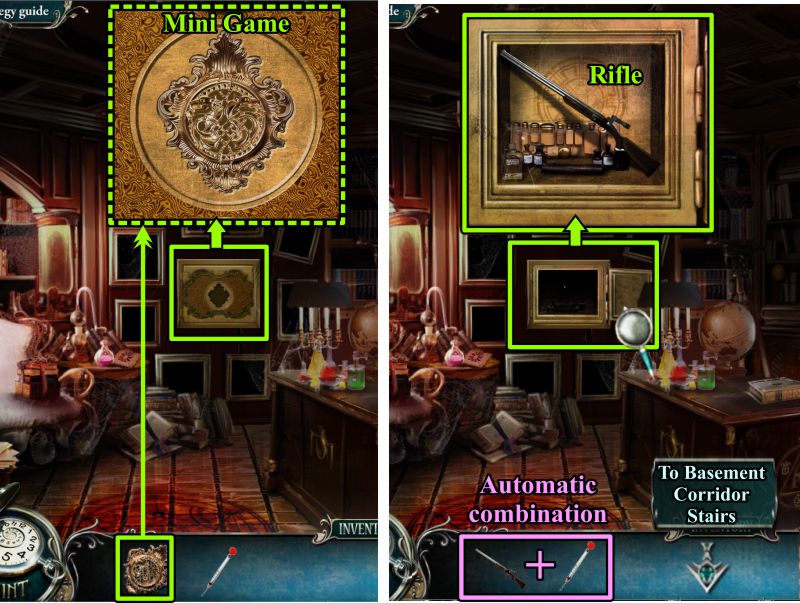
Father's Secret Room
Zoom in on the safe and place the Bas-relief Piece to trigger a Mini Game.
When the safe opens, take the Rifle that will automatically combine with the Syringe.
Return to the Basement Corridor Stairs above the Levitation Platform.
Screenshot
Father's Safe Mini Game
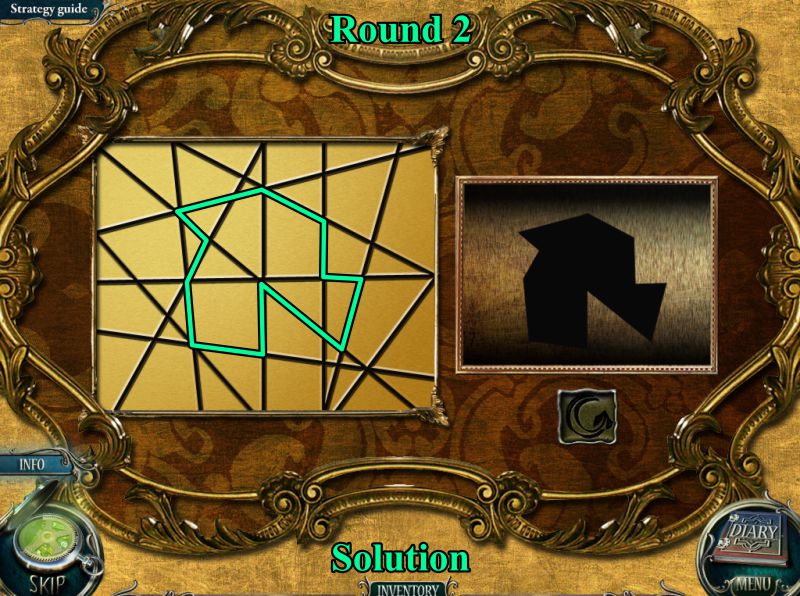
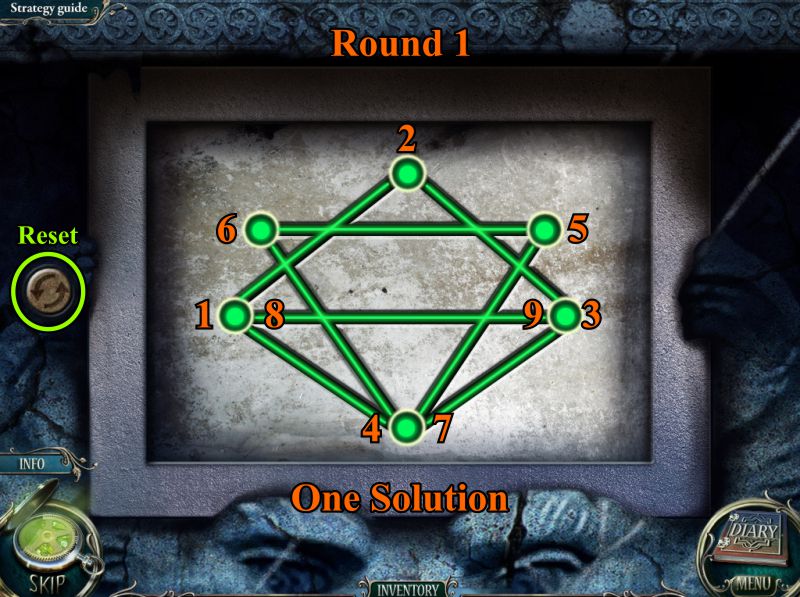
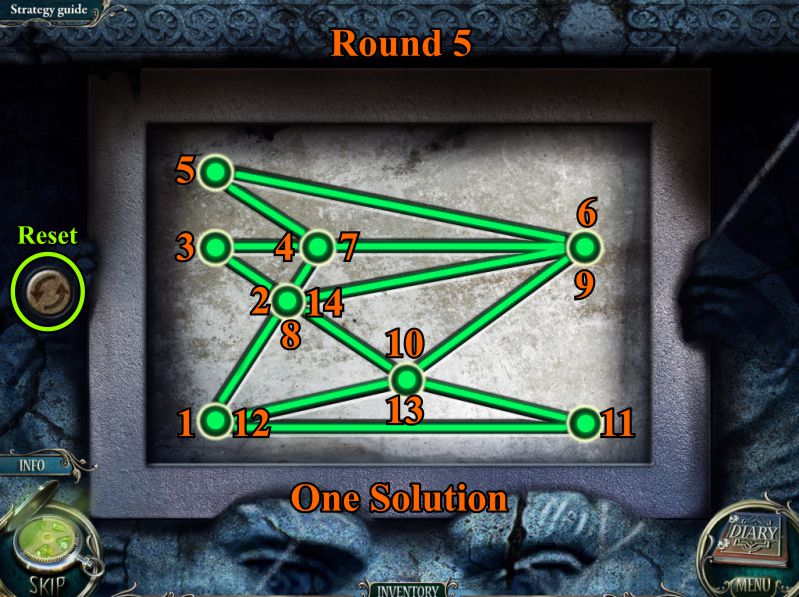
There are 3 rounds in this Mini Game in order to get the safe open.
There is a figure to the right of each round that you need to reproduce on the grid at the left.
Click on the necessary lines to create the figure.
See the screenshot for the solution to Round 1.
Screenshot
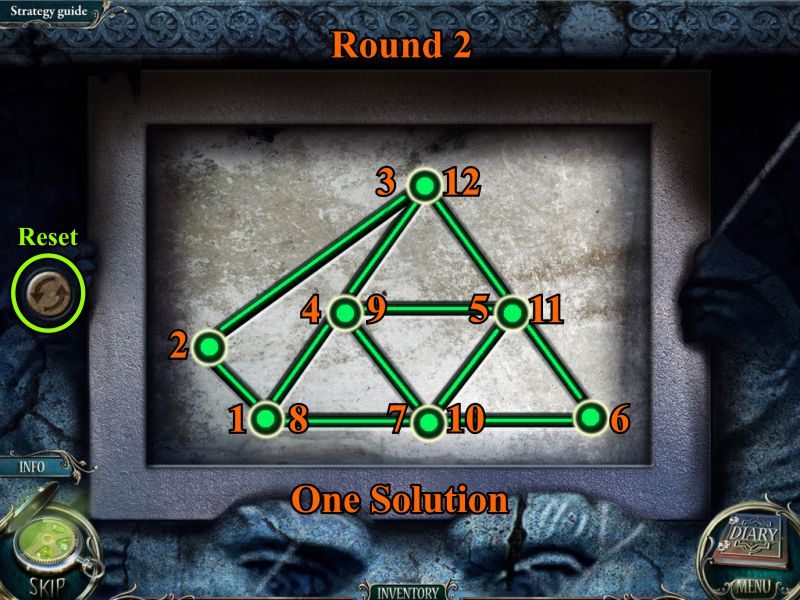
See the screenshot for the solution to Round 2.
Screenshot
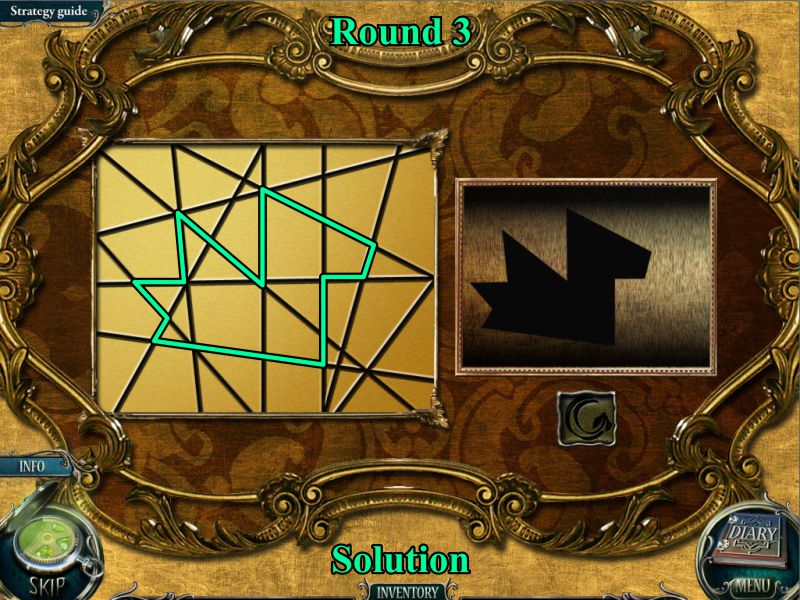
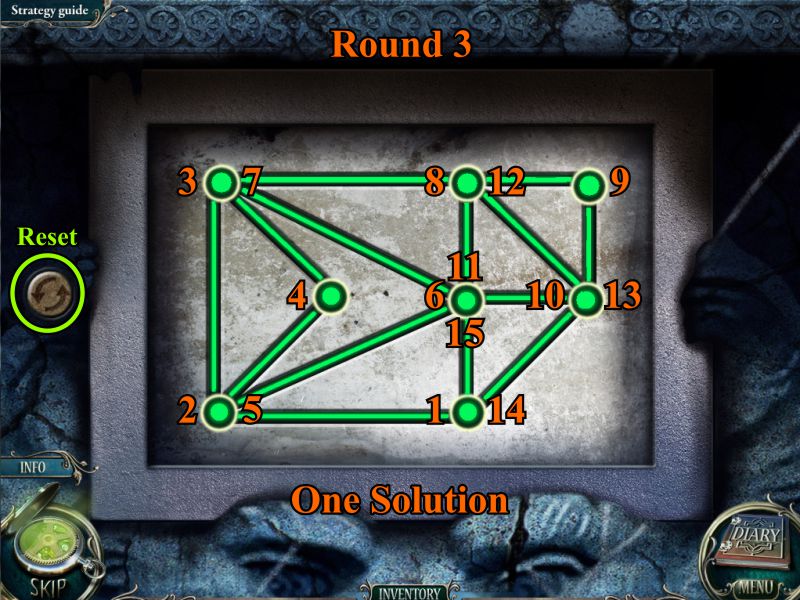
See the screenshot for the solution to Round 3.
Screenshot
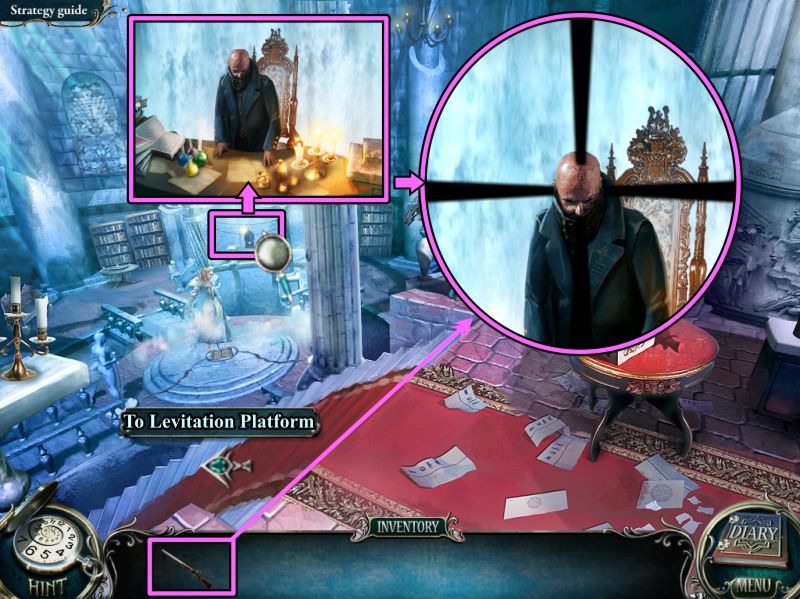
Stairs
Zoom in on Demon Dad and take aim with the Rifle equipped with the sleeping medication.
Shoot it and go downstairs to the Levitation Platform.
Screenshot
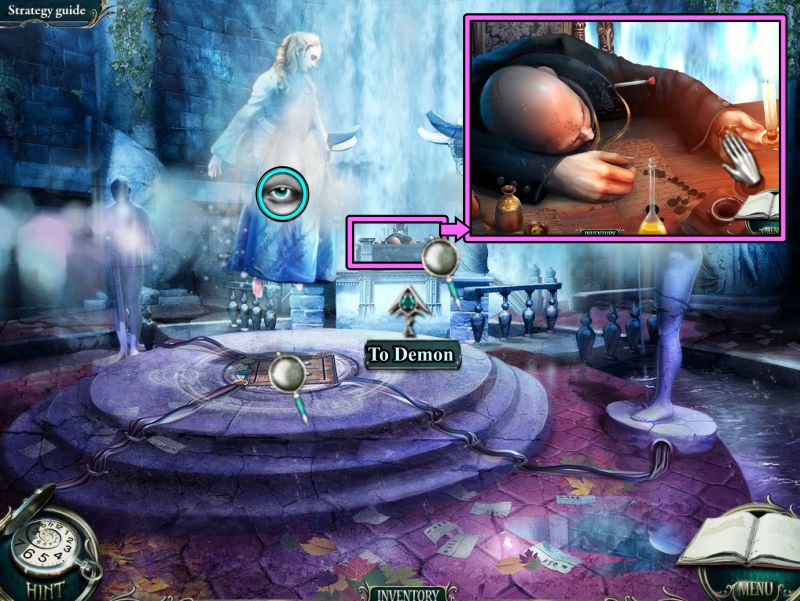
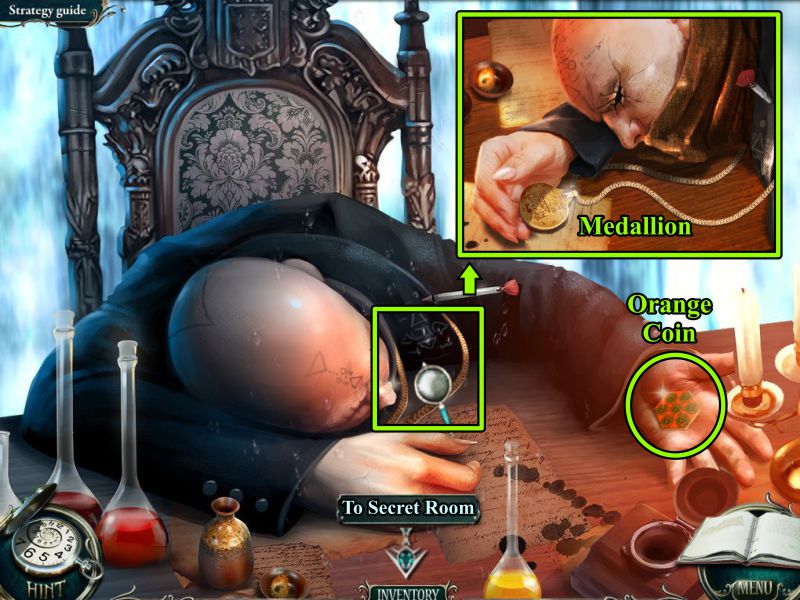
Levitation Platform
Luisa is alive but is in a levitated state above the platform, which you need to deactivate.
Go forward to the Demon, zoom in on his hand and open it.
Screenshot
Take the Orange Coin from his open hand and click for a close up of his chest.
Take the Medallion he is sheltering, and go to his Secret Room.
Screenshot
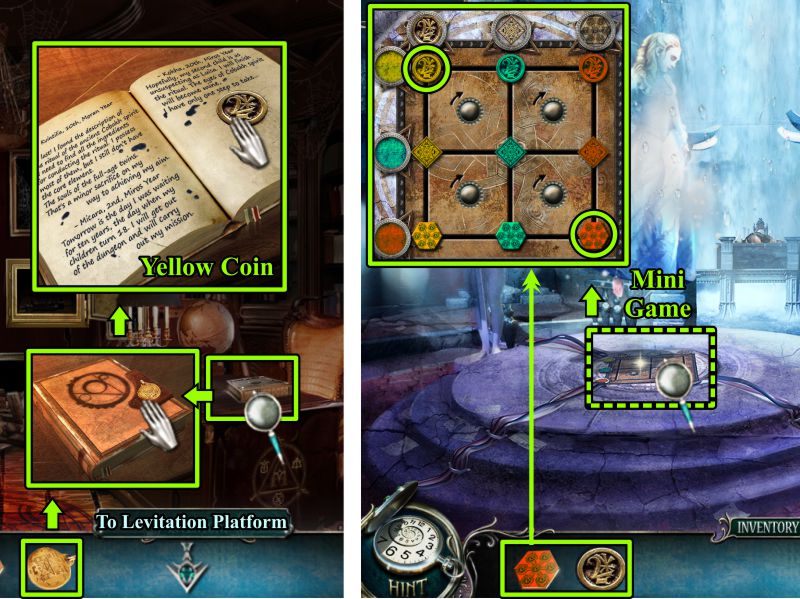
Father's Secret and the Levitation Platform
Zoom in on Father's desk and place the Medallion on his Diary.
Open it, read the notation, and take the Yellow Coin.
Return to the Levitation Platform in zoom in on the platform.
Place both the Orange and Yellow Coins to trigger the Mini Game.
Screenshot
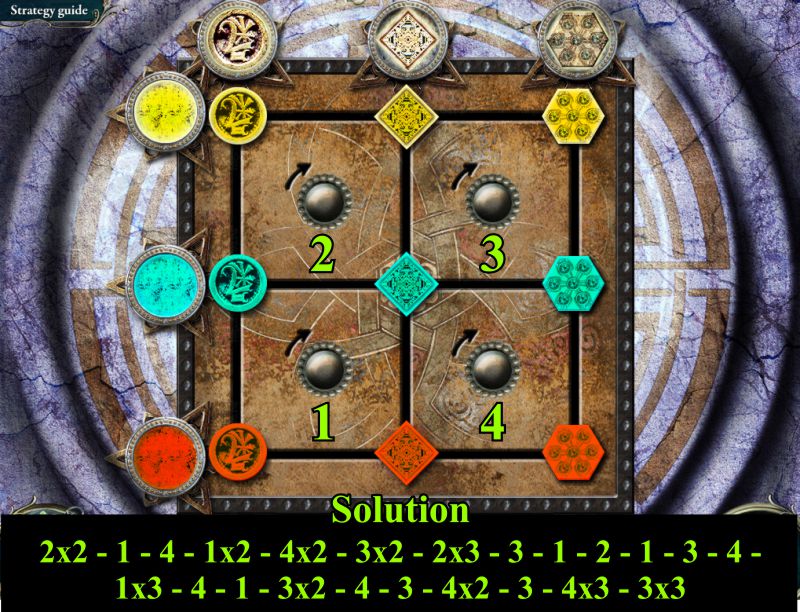
Levitation Platform Mini Game
Your goal is to line up the inner objects to match the outer objects in like kind and color.
To do this, you must rotate the squares and exchange the objects to their correct places.
See the screenshot for a step-by-step solution.
Rotate the numbered squares as indicated in the numbered solution.
Screenshot
Congratulation! You have saved Luisa, so watch the final scenes.
Posted by: Jazz |
August 28, 2011 7:54 PM
|
August 28, 2011 7:54 PM
Grim Tales: The Bride Bonus Walkthrough
General Information
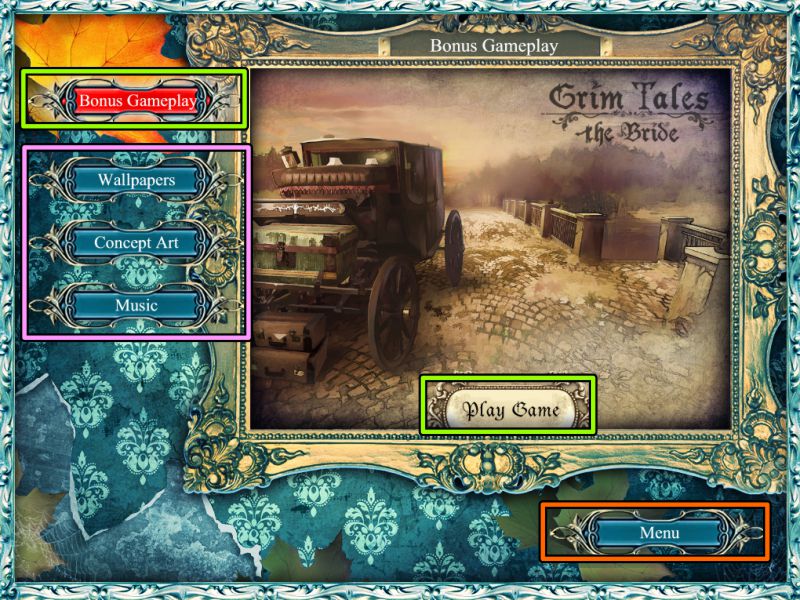
From the Main Menu, select Bonus Content in the upper right corner.
Bonus Content includes Wallpapers, Concept Art, and Music, as well as the Bonus Game.
Select Play Game on the picture to begin the game.
When you select Menu during game play and choose Main Menu, you are transported back to the menu shown in the screenshot.
Don't forget to check your Diary for information.
Screenshot
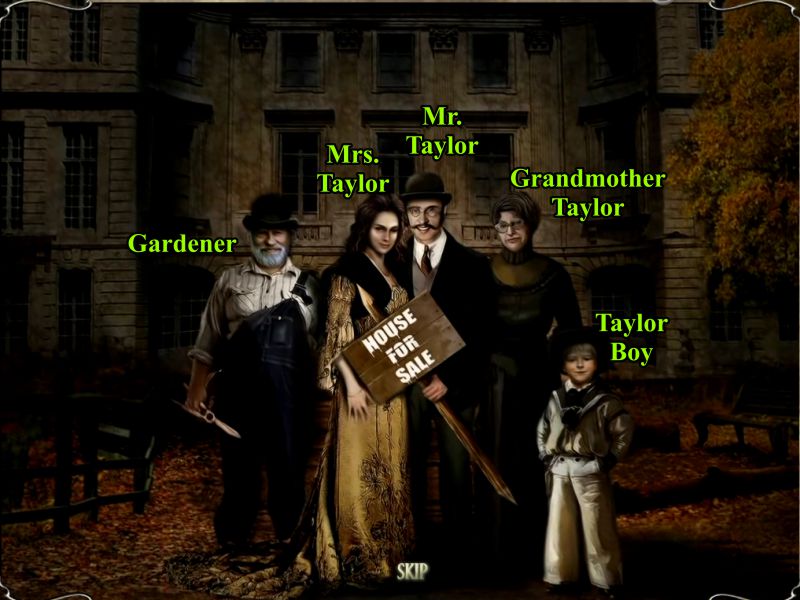
The Taylor Family
Luisa and John got married, and the mansion was sold to a family named Taylor.
The Taylor family moved in, but so did a ghostly figure.
All the Taylor's fell into some sort of a coma, and their souls became trapped in locked vases.
Your goal is to unlock the vases, release their souls, and save the Taylor family.
Screenshot
Part 1: Father's Vase
Pick up the Bas-relief Piece off the table, check out all points of interest in the screenshot, and go through the Hallway to the Dining Room
Screenshot
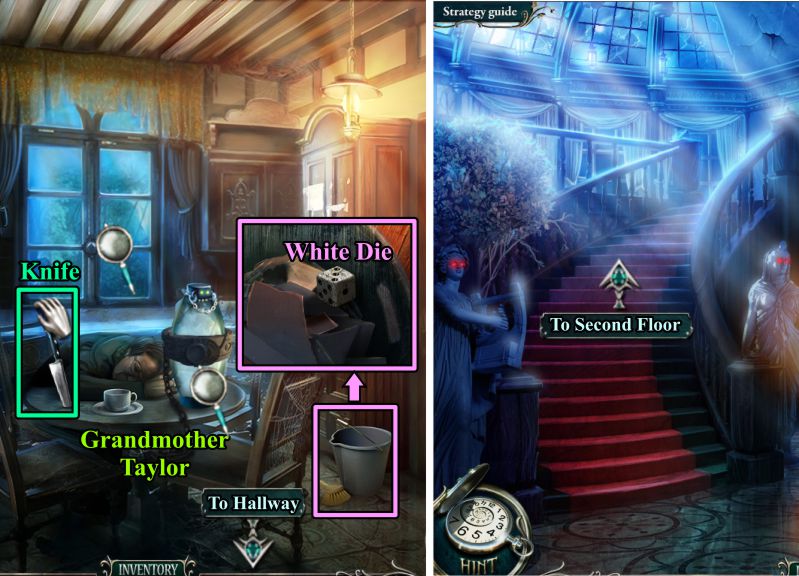
Dining Room and Hallway
Pick up the Knife.
Look in the bucket and grab the White Die.
Check out the Grandmother's Vase and the lock on the window.
Return to the Hallway and go to the Second Floor.
Screenshot
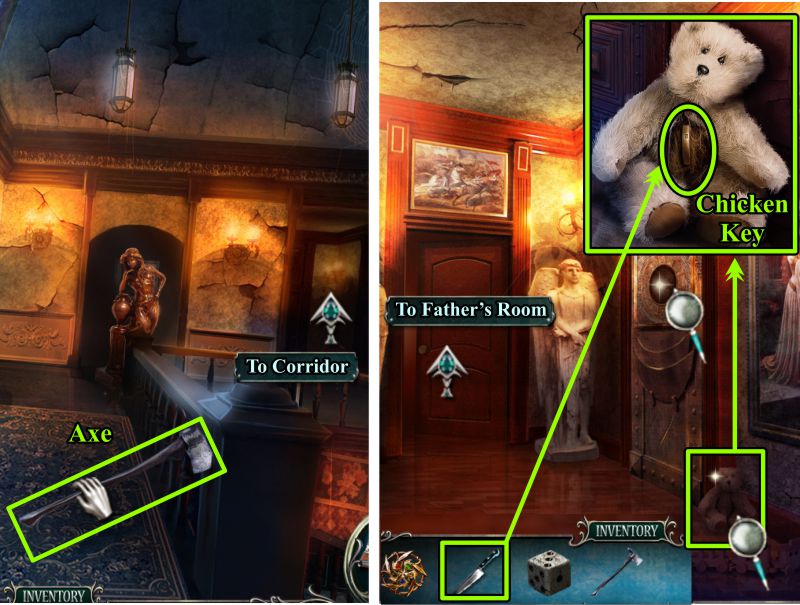
Second Floor Hallway and Corridor
Grab the Axe on your way to the Corridor.
Zoom in on the bear, use your knife to remove the stitches, and take the Chicken Key.
Go to Father's Room.
Screenshot
Father's Room
Watch the spirit capture the Taylor Boy's soul.
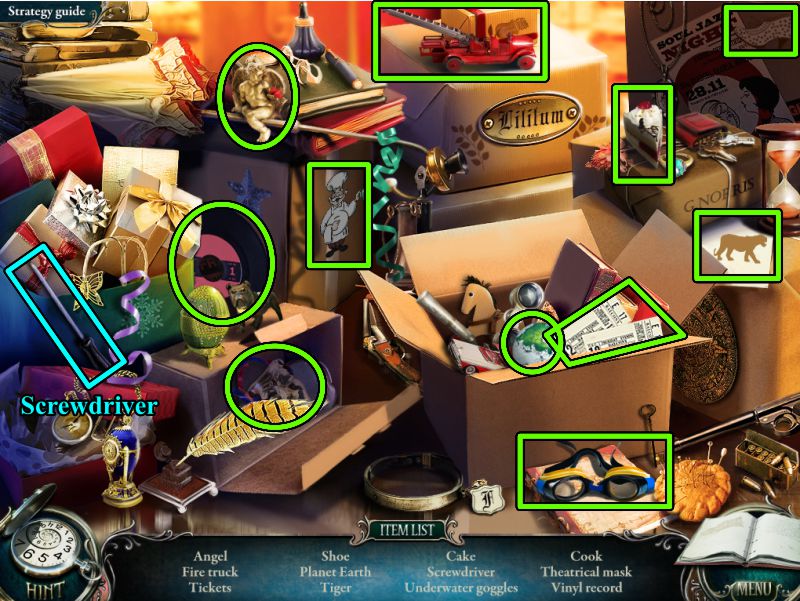
Check out all the magnifying glasses in the screenshot, play the Hidden Object Scene, and go to the Hallway.
Screenshot
Father's Room Hidden Object Game
You will get a Screwdriver for your Inventory.
Screenshot
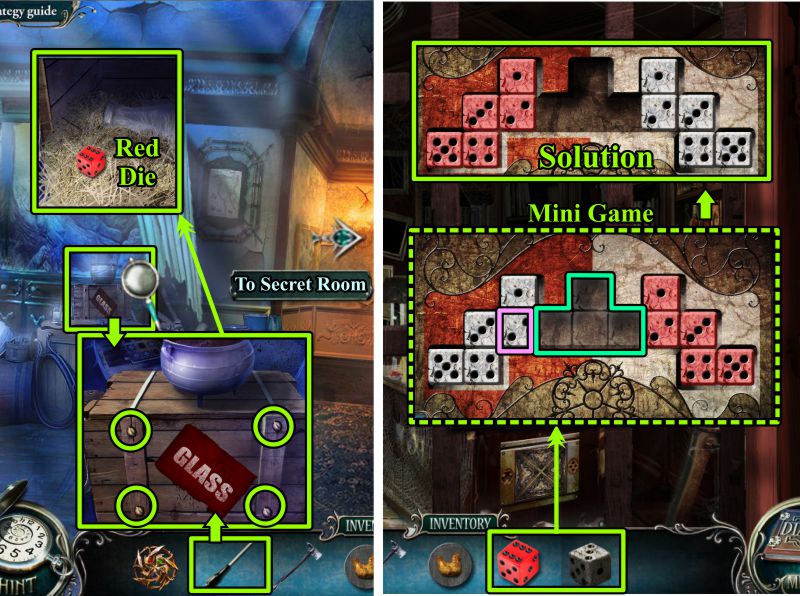
Hallway and Father's Secret Room Mini Game
Zoom in on the box and use your screwdriver to remove the screws.
Take the Red Die and go to the gate in Father's Secret Room.
Place the White and Red Dice to trigger a Mini Game.
Your goal is to move all the White Dice to the right and all the Red Dice to the left.
When you select a die, you will be given choices as to where to place it.
Keep working your way back and forth with the dice until you arrive at the solution shown in the screenshot.
If you get frustrated, there is always the Skip button, though this game has no Reset button.
Screenshot
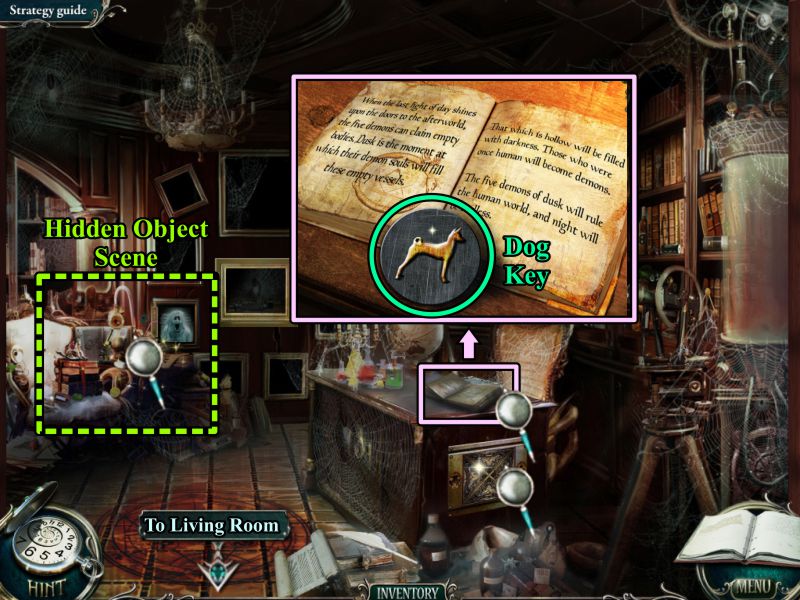
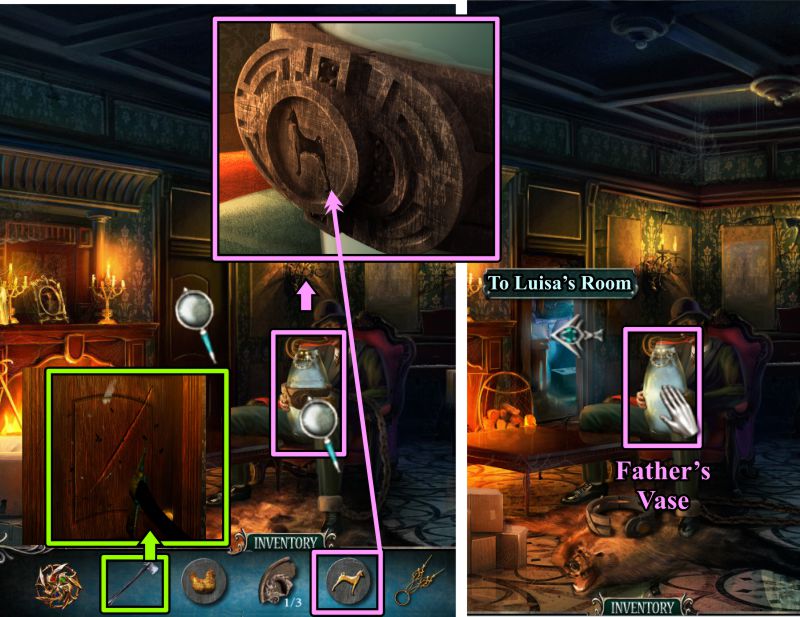
Secret Room
Zoom in on the book on the desk and take the Dog Key.
Check out the side of the desk and play the Hidden Object Scene.
Screenshot
Secret Room Hidden Object Scene
Clock Hands are your Inventory item.
Screenshot
Living Room
Zoom in on Father's Vase and place the Dog Key.
Use the Axe to break down the door to Luisa's Room.
Grab Father's Vase and enter Luisa's Room.
Screenshot
Part 2: Grandmother's Vase
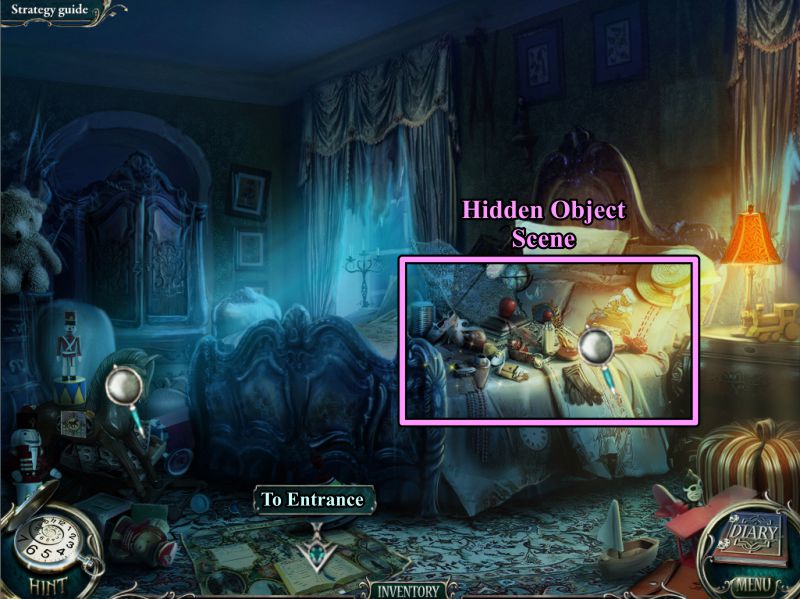
Luisa's Room
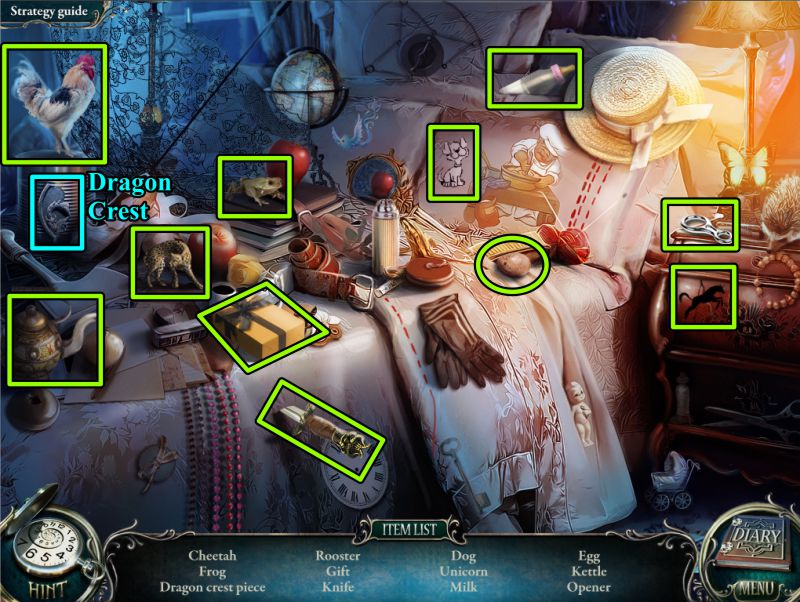
Check out the horse and play the Hidden Object Scene on the bed.
Go to the Entrance of the Mansion to check out the Basement.
Screenshot
Bed Hidden Object Scene
A Dragon's Crest will be added to your Inventory.
Screenshot
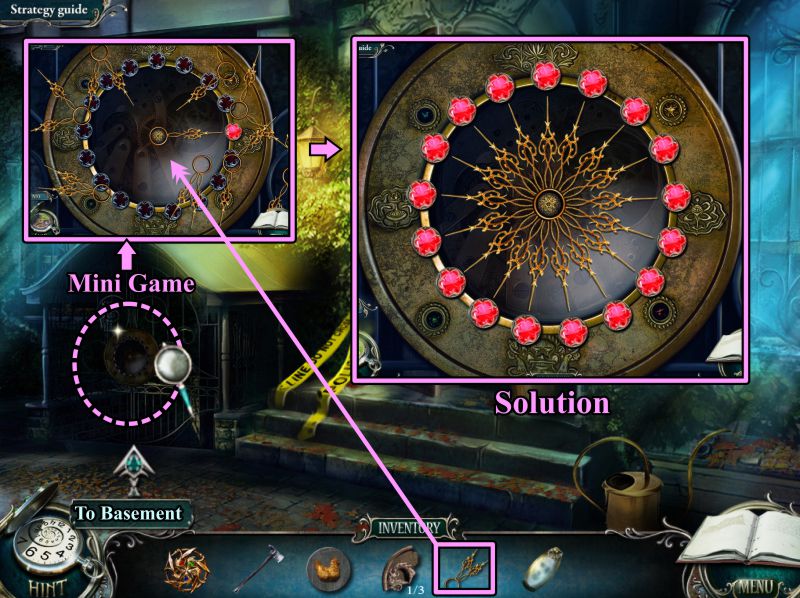
Basement Lock
Zoom in on the lock of the Basement and place your Clock Hands to start the Mini Game.
Place the Clock Hands so that all the lights shine brightly as shown in the screenshot.
Double click to rotate any of the hands that don't fit the way they are.
See the screenshot for the solution, and when you have finished the game, enter the Basement.
Screenshot
Basement and Basement Corridor
Check out the shelf at the right, then go to the Basement Corridor.
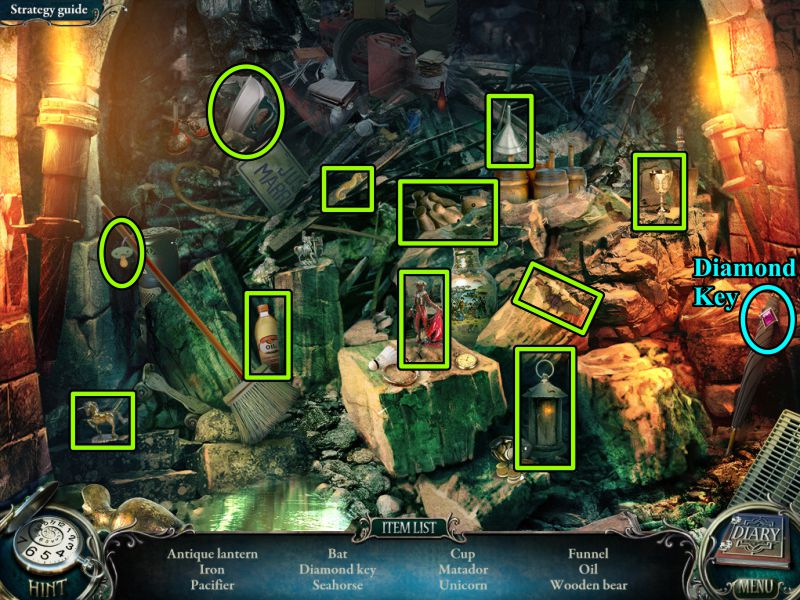
Have a look at the Gardener and his Vase, then play the Hidden Object Scene.
When you finish, go to the Dining Room.
Screenshot
Basement Corridor Hidden Object Scene
You Inventory item will be a Diamond Key.
Screenshot
Dining Room
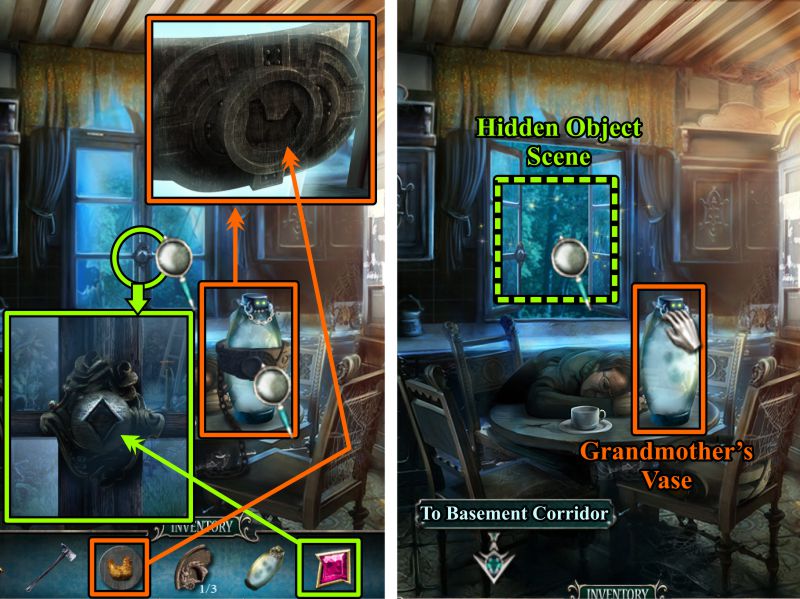
Zoom in on Grandmother's Vase and place the Chicken Key.
Zoom in on the window and place the Diamond Key.
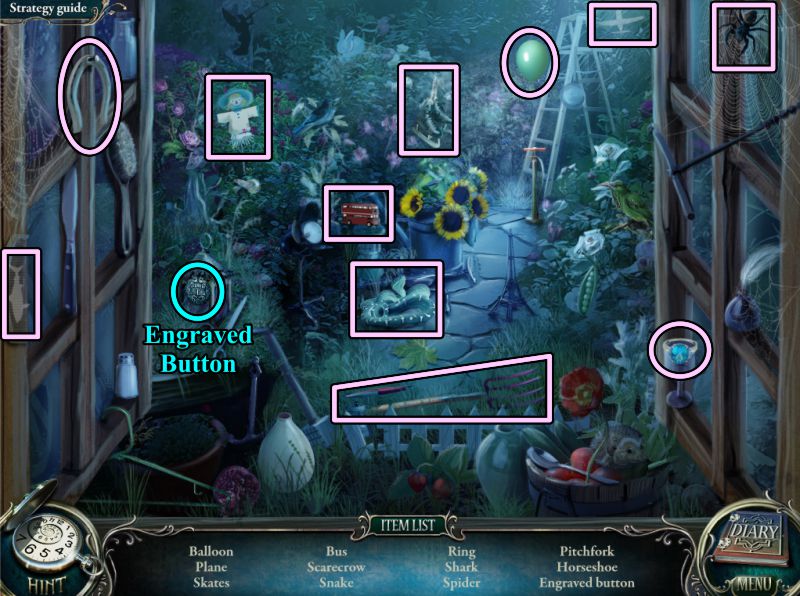
Take Grandmother's Vase and play the Hidden Object Scene at the window.
Screenshot
Window Hidden Object Scene
Find everything to get an Engraved Button.
Screenshot
Part 3: Gardener's Vase
Basement Corridor
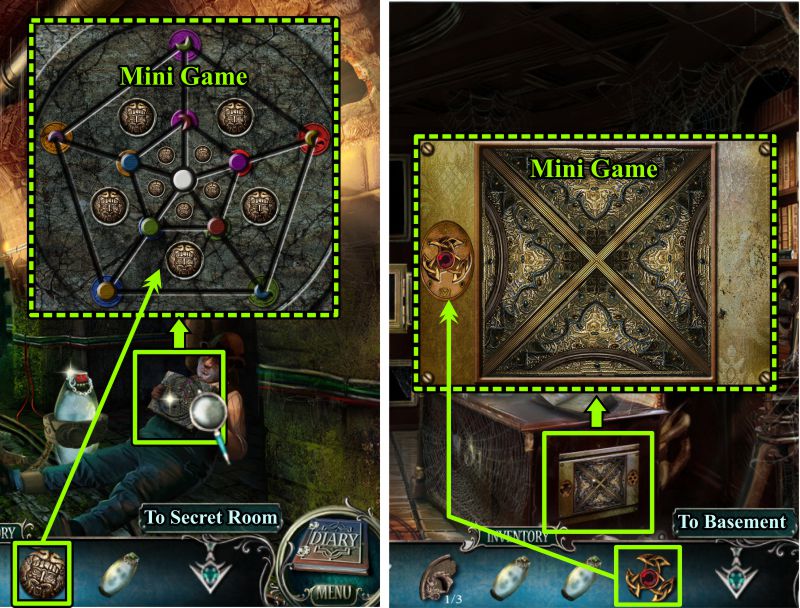
Zoom in on the plaque the Gardener is holding and place the Engraved Button to trigger a Mini Game.
When you have finished the game, go to the Secret Room.
Zoom in on the side of the desk and place the Medallion you received from the last Mini Game.
When you have completed this Mini Game, go to the Basement.
Screenshot
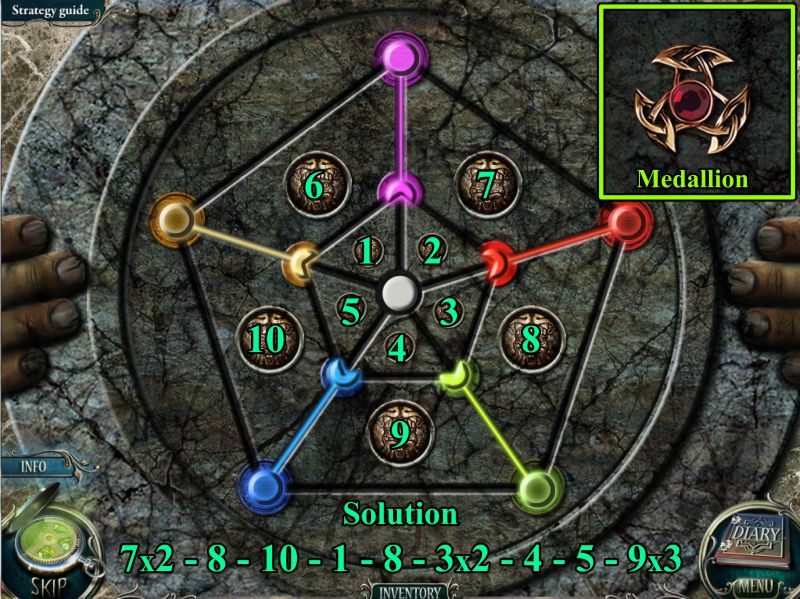
Gardener's Plaque Mini Game
Your goal is to move the three-quarter circles to the middle and the full circles to the outer pentagon using the buttons.
See the screenshot for a step-by-step solution.
Take the Medallion for your Inventory.
Screenshot
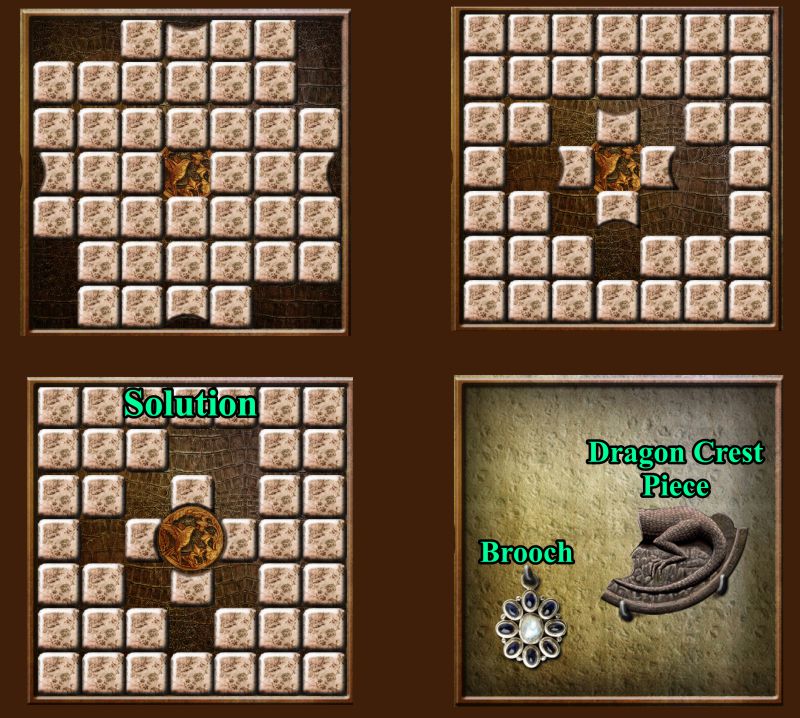
Secret Room Desk Mini Game
Your goal is to move the squares with the rounded edges to the center so that they surround the bird.
Move all the squares around to get the rounded squares with their flat edges against the center bird.
Be sure to leave sufficient room in the center so that you can now move the rounded square around the bird until the rounded edges touch the bird.
See the screenshot for the solution.
Take the Brooch and Dragon Crest Piece.
Screenshot
Basement and Second Floor Corridor
Zoom in on the box on the shelf and place the Brooch to open it and get the Dragon Crest Piece.
Go to the door of Mother's Room and zoom in.
Place the Dragon Crest to trigger a Mini Game.
Screenshot
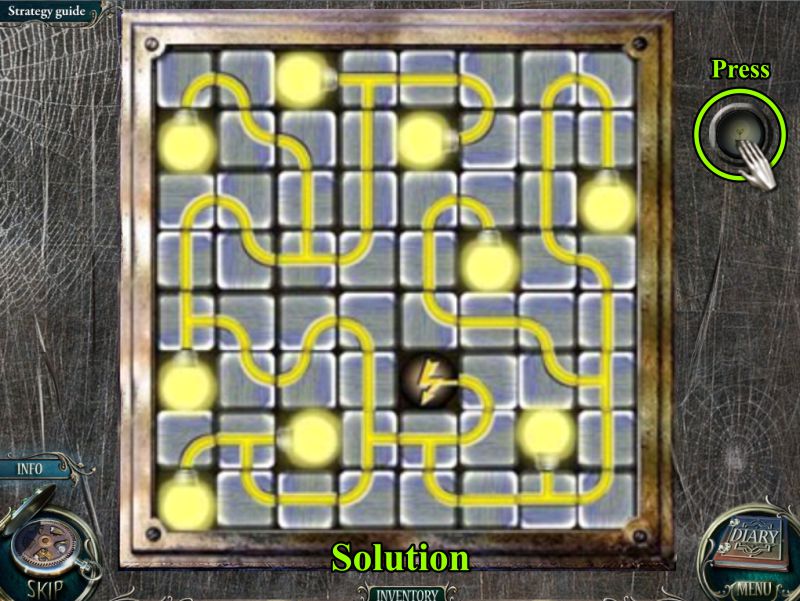
Basement
The lightning square is the power source.
You goal is to connect all the bulbs so that light up.
Use your left mouse button to rotate the connections and bulbs clockwise.
See the screenshot for the solution.
Press the button at the right to check your connections.
Enter Mother's Room when the door opens.
Screenshot
Mother's Room and Father's Room
Check out Mother's vase and the mirror.
Play the Hidden Object Scene, then go to Father's Room.
Zoom in on the radiator and use your newly acquired Rope on the knob.
The rope will fall out the window so you can go to the Garden below.
Screenshot
Mother's Hidden Object Scene
Collect everything to get the Rope.
Screenshot
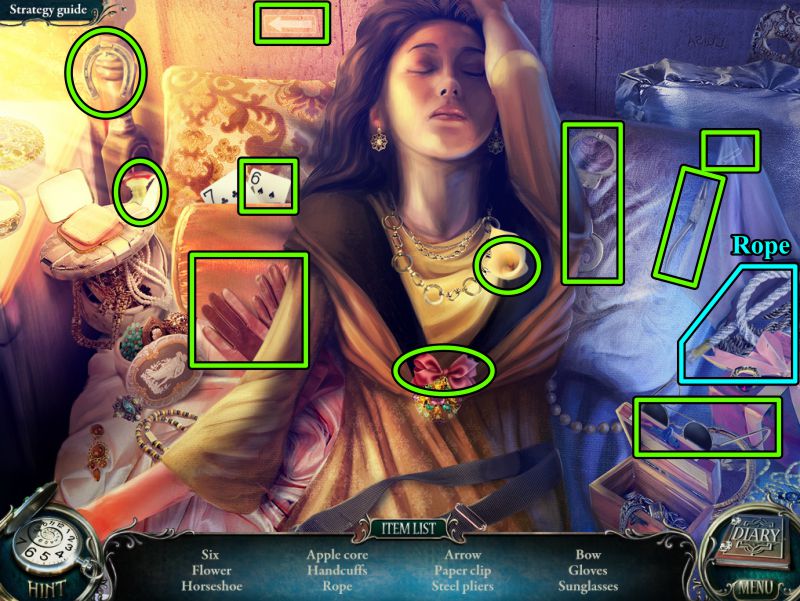
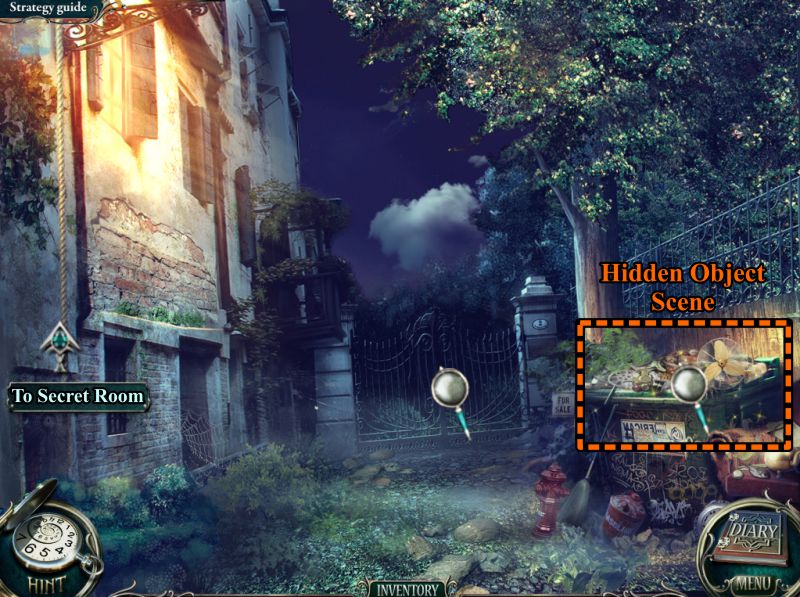
Garden
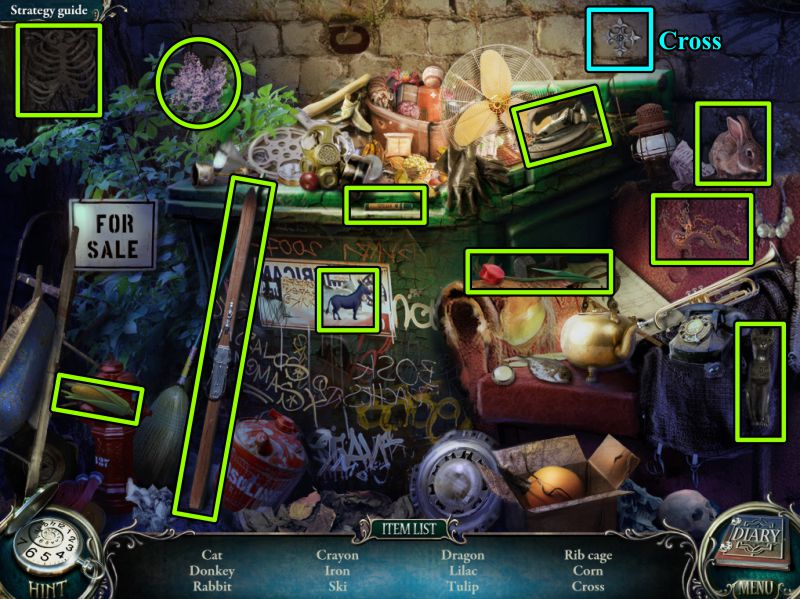
Note the Cemetery gate, play the Hidden Object Scene in the dumpster, and go up the Rope to the Secret Room.
Screenshot
Dumpster Hidden Object Scene
You will get a Cross for your Inventory.
Screenshot
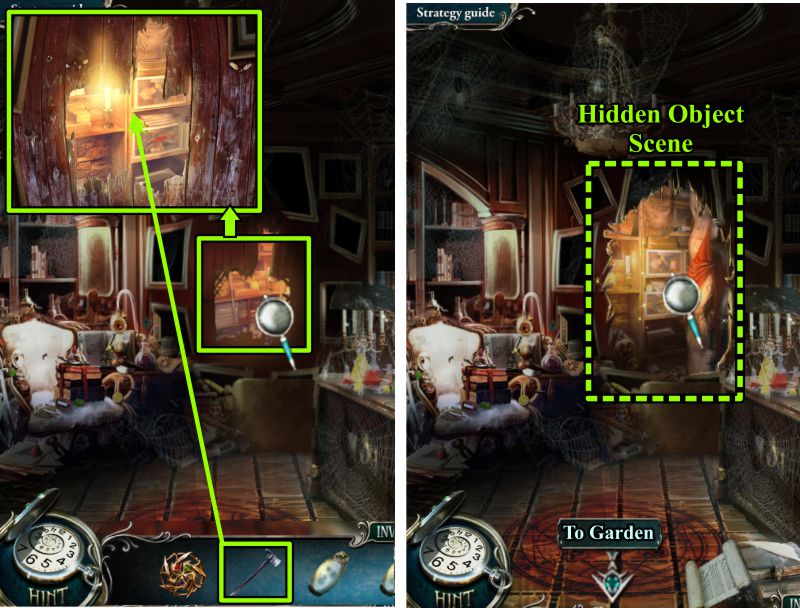
Secret Room
After the pictures fly around, zoom in on the closet in the wall.
Use your Axe to gain more access to the hole.
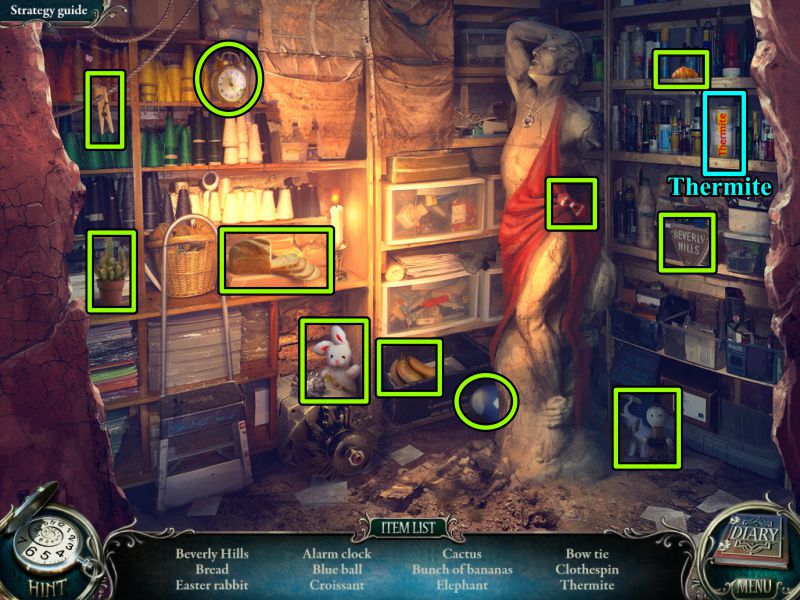
Play the Hidden Object Scene, and return to the Garden.
Screenshot
Secret Room Closet Hidden Object Scene
Your Inventory object will be Thermite.
Screenshot
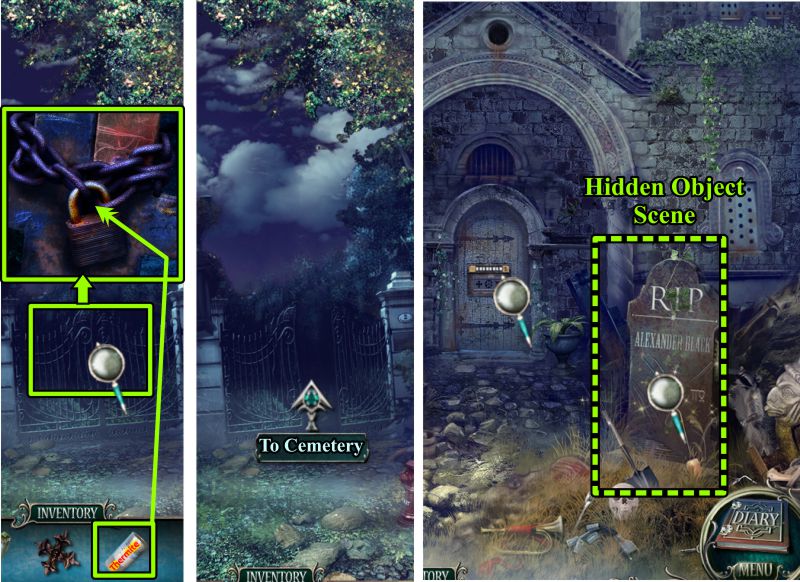
Garden and Cemetery
Zoom in on the gate and use the Thermite to melt the lock.
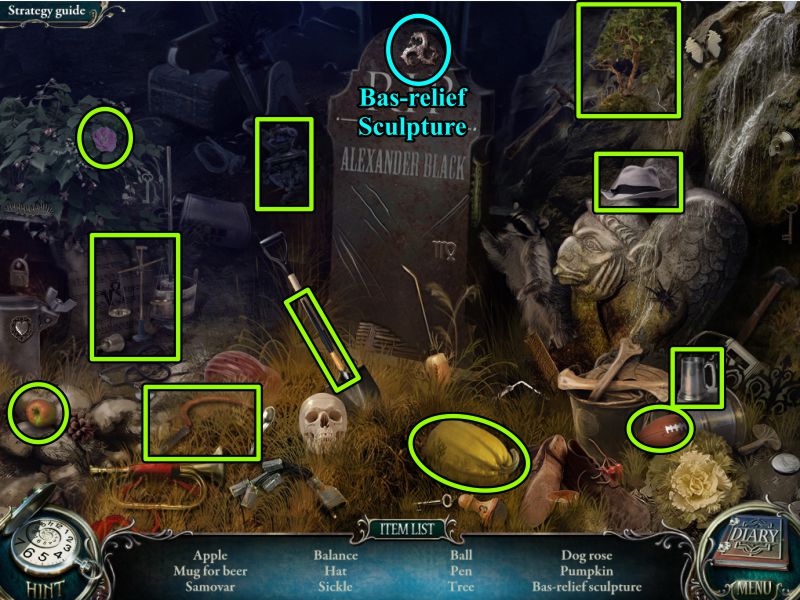
Go to the Cemetery, check the Shrine door, and plan the Hidden Object Scene.
Screenshot
Cemetery Hidden Object Scene
A Bas-relief Sculpture is your Inventory item.
Screenshot
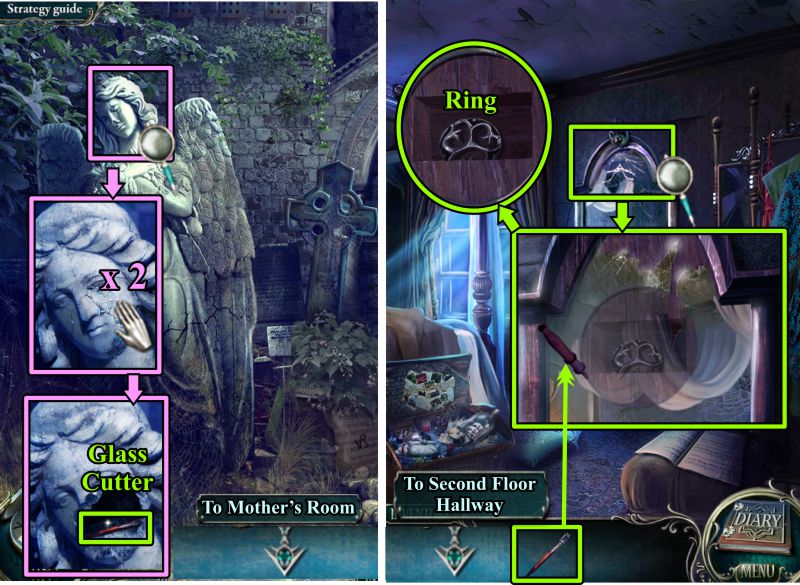
Cemetery and Mother's Room
Zoom in on the statue and press twice on the face.
Take the Glass Cutter and go to Mother's Room.
Zoom in on the mirror and use the Glass Cutter to be able to grab the Ring.
Go to the Second Floor Hallway.
Screenshot
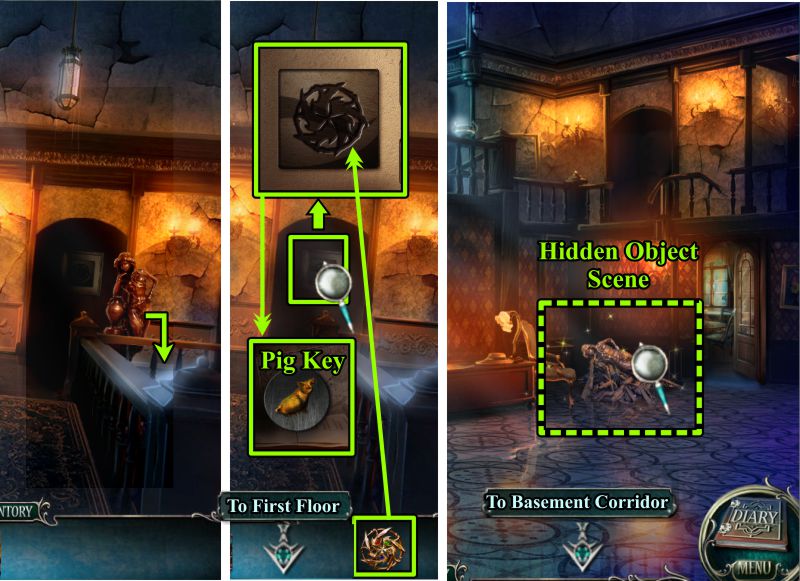
Second Floor Hallway and First Floor Hallway
As you arrive at the Hallway, the statue in the niche moves away and goes over the banister.
Zoom in on the niche and place your gold Bas-relief Piece to open the safe.
Take the Pig Key and go downstairs.
Zoom in on the rubble from the statue for a Hidden Object Scene, and then go to the Basement Corridor.
Screenshot
Broken Statue Hidden Object Scene
You will get a Triangle piece for your Inventory.
Screenshot
Part 4: Mother's Vase
Basement Corridor and Shrine Door
Zoom in on the Gardener's Vase, place the Pig Key, and take the Vase.
Go to the Cemetery and zoom in on the Shrine door.
Place the necessary shapes as shown in the screenshot.
Screenshot
Shrine Door Mini Game
Your goal is to put the pictures in order of age.
The gears spin the slots, and each gear is responsible for a specific picture.
Press the button in the center of the gear to keep that picture from spinning.
A solution is shown in the screenshot.
Screenshot
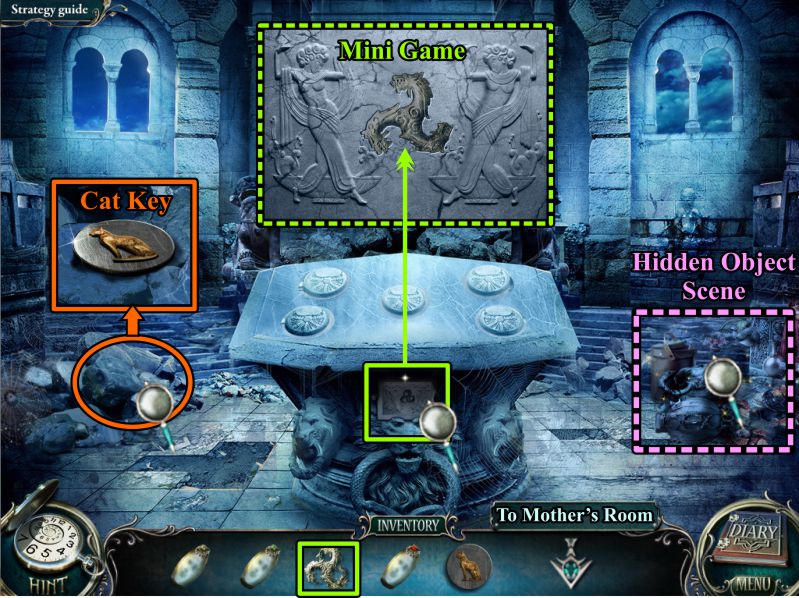
Shrine
Enter the Shrine and zoom in on the rocks at the left to get the Cat Key.
Play the Hidden Object Scene.
Zoom in on the front of the table and place your Bas-relief Sculpture to trigger a Mini Game.
Screenshot
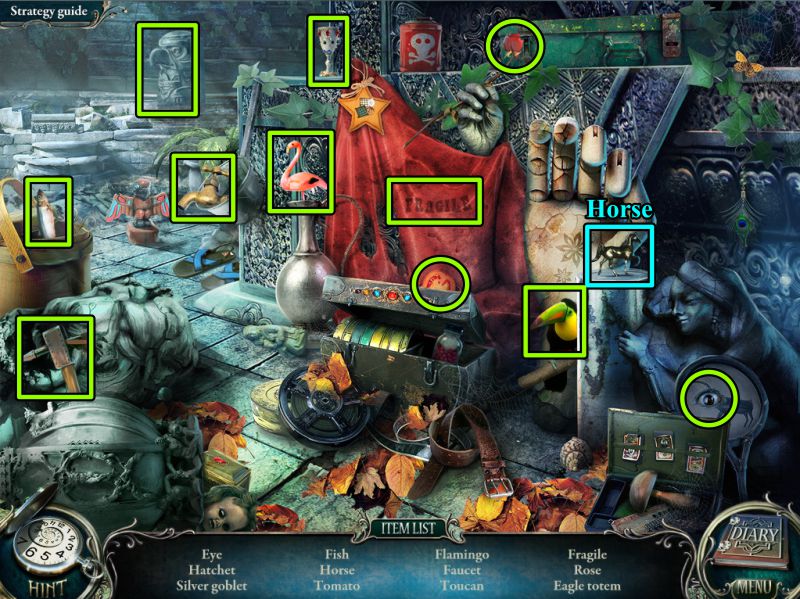
Shrine Hidden Object Scene
Your Inventory item is a Horse.
Screenshot
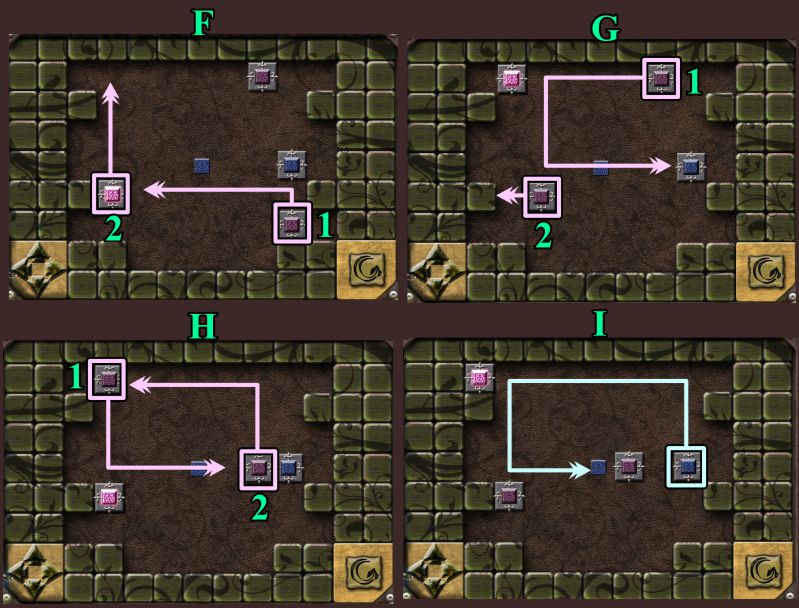
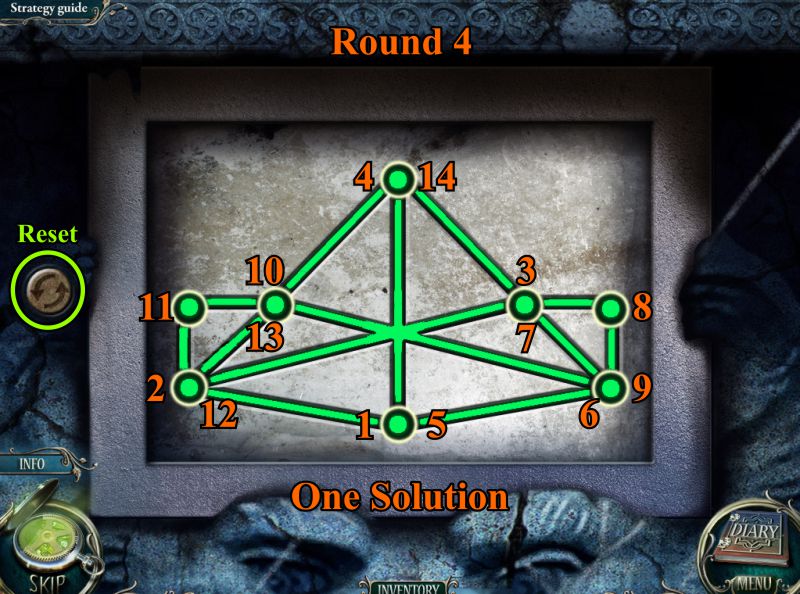
Vase Niches Mini Game
There are 5 rounds in this Mini Game in order to open each niche on the table.
A Reset button is available if your need it.
Your goal is to light up the diagram by pressing each button.
The catch is that you must follow in sequence and not cross and already lit line.
There is more than one way to solve each round; see the screenshot for one solution to Round 1.
Screenshot
One solution to Round 2 is shown in the screenshot.
Screenshot
See the screenshot for a sample solution to Round 3.
Screenshot
A solution to Round 4 is available in the screenshot.
Screenshot
See the screenshot as to how to solve Round 5.
Screenshot
Part 5: Boy's Vase
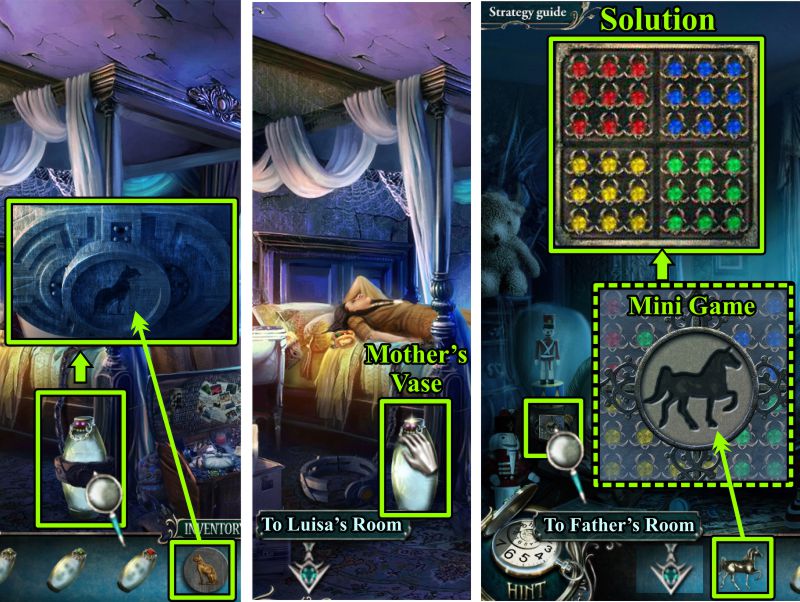
Mother's Room and Luisa's Room
Go to Mother's Room and zoom in on her vase.
Place the Cat Key and take Mother's Vase.
Go to Luisa's Room and zoom in on the horse.
Place the Horse from your Inventory to trigger a Mini Game.
See the screenshot for the solution.
Screenshot
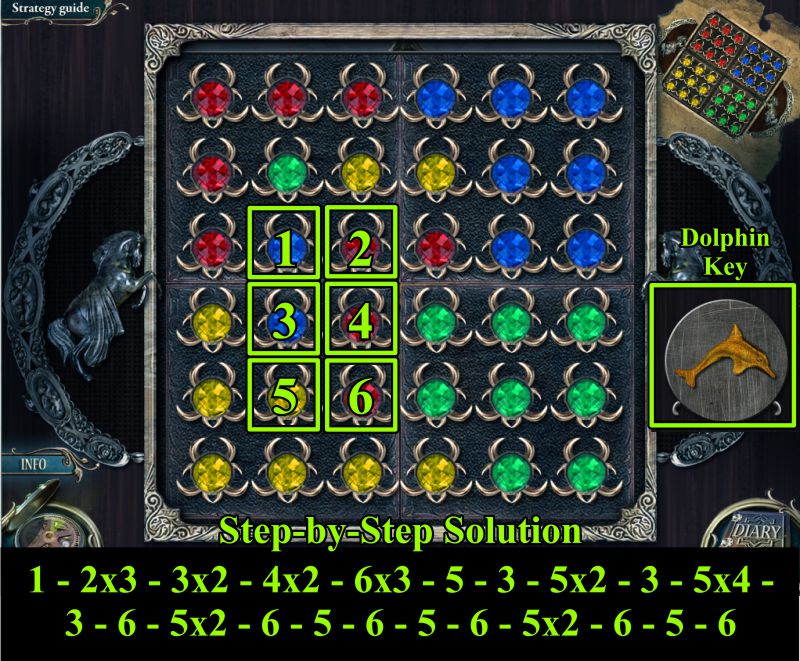
Horse Mini Game
Your goal is to make the panel match the small sample in the right corner
Click a stone to rotate the surrounding stones.
See the screenshot for a step-by-step solution.
Take the Dolphin Key and go to Father's Room.
Screenshot
Horse Mini Game
Zoom in on the Boy's Vase, place the Dolphin Key, and take the vase.
Go out the window to the Shrine in the Cemetery.
Screenshot
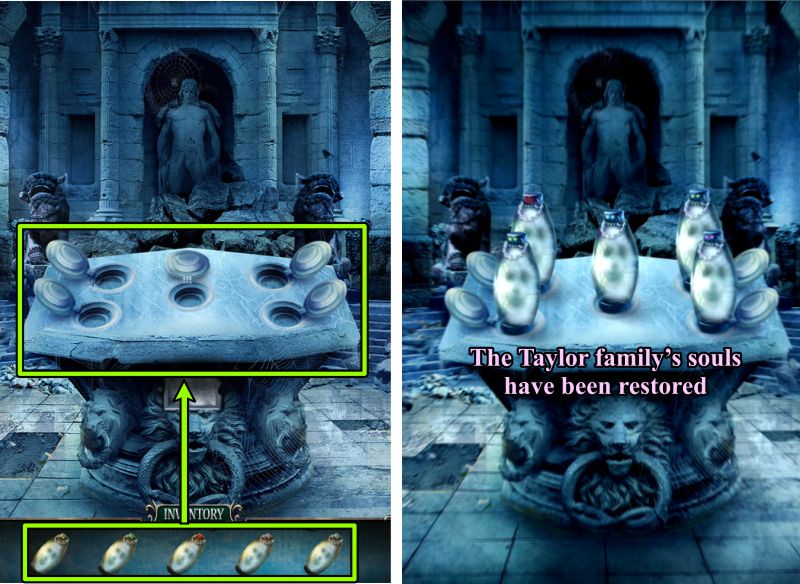
Shrine
Place each of the 5 vases on the table, and each will go to its proper niche.
Watch the ending scene to as the Taylor family's souls are restored.
Screenshot
Posted by: Jazz |
September 2, 2011 3:02 PM
|
September 2, 2011 3:02 PM