
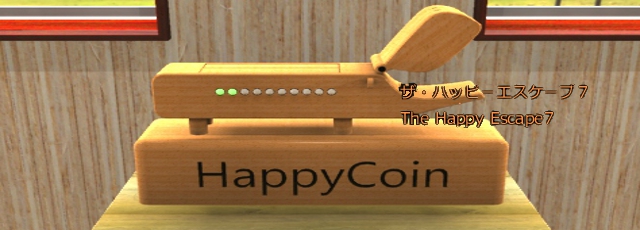
![]() It's codes and coins galore in Tesshi-e's latest escape game The Happy Escape 7, which has you scouring a room for ten Happy Coins hidden by a friend. Only she hasn't just tucked them into bowls and windowsills and under pillows. She's created an entire series of elaborate puzzles and codes you'll need to crack first. And squeaky hammers. And hippos. Because that's what real friends do. That's actually going in my letter to Princess Celestia this week. To play, just click to interact and use the bars that appear when you mouse over the edges of the screen to move around the room. There's no changing cursor, but a few locations will pop up with an arrow to indicate you can click to look around the side of something. When you're carrying an item in your inventory, clicking it once will highlight it for use in the game, or you can select "about item" for a close up view that can allow you to combine and manipulate. Pay close attention to your environment, because there are some seriously fiendish clues hiding around.
It's codes and coins galore in Tesshi-e's latest escape game The Happy Escape 7, which has you scouring a room for ten Happy Coins hidden by a friend. Only she hasn't just tucked them into bowls and windowsills and under pillows. She's created an entire series of elaborate puzzles and codes you'll need to crack first. And squeaky hammers. And hippos. Because that's what real friends do. That's actually going in my letter to Princess Celestia this week. To play, just click to interact and use the bars that appear when you mouse over the edges of the screen to move around the room. There's no changing cursor, but a few locations will pop up with an arrow to indicate you can click to look around the side of something. When you're carrying an item in your inventory, clicking it once will highlight it for use in the game, or you can select "about item" for a close up view that can allow you to combine and manipulate. Pay close attention to your environment, because there are some seriously fiendish clues hiding around.
 Annoying song or not, I think we can both agree that what Pharell was really singing about was a new Tesshi-e game. After all, what's happier than a Happy Escape with Happy Coins? This latest in the series might also be one of the cleverest, with a big emphasis on cracking codes, though you'll do a fair amount of "use X on Y" too. Some of which, incidentally, seems like a bit of a stretch when it comes to how intuitive it is, but hey, that's why I don't make escape games. It's harder than it sounds, since you'll need to figure out what codes go where, and also how to decipher (or even spot) a code to begin with. At first glance, the room seems almost sparse compared to other Tesshi-e games, but once you start looking around you'll realise there's a lot more going on than it seems. It's a very smart game, if not exactly a showstopper when it comes to visual design, but the soundtrack is catchy, and I could swear I've heard it somewhere before, so if one of you figures it out you'll probably save my sanity. Few things can put a smile on an escape game fan's face like a solid showing from Tesshi-e, and The Happy Escape 7 is definitely the sort of brain food the developer is best known for.


Walkthrough Guide
(Please allow page to fully load for spoiler tags to be functional.)
Walkthrough
You start facing the main door and the piano. Zoom in on the piano; it’s locked and the coin in the stand is screwed in. Look at the little heart. It looks like it takes a code. It doesn’t — it gives a code. Click on each of the boxes. Each one skips a number — so, the first one cycles through 0 1 2 3 5 6 7 8 9, skipping 4. The code overall is 4 7 2. Back up to the room.
Turn right. Zoom in on the low green bookshelves. Click on the centre books, and you’ll get a picture of a squeaky hammer turned into a water pistol. Now turn your head onto its right side and look at the shelves — they spell the code 2 3 6. Back up to the room.
Go right so that you’re facing the windows, then focus on the fruit on the glass table. Click around in the fruit bowl to get the happy coin. Back up to the room.
Turn right. Focus on the low cabinet, specifically the green thing atop it, which is a squeaky hammer. Pull the lever on it. Use the code from the squeaky-hammer-hint bookshelves, 236. Take the squeaky hammer.
Don’t back up yet! Pull the lever a couple of times to spill out a battery. Now back up to the room.
Zoom in on the lower shelves with the red bits. Those are hearts. Input the heart code, 472, to get a big hammer. Back up to the room.
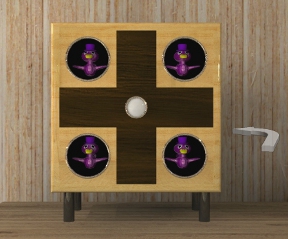
Zoom in on the plus-box on top of the cabinet. Click on the right side to see a battery panel and insert the battery. Go back to the box front. Click the button to see it say “Hit by the squeaky hammer!” and pop out the happy birds in the following pattern: upper left, bottom right, upper right, bottom left, upper right.
Don’t go yet: push the button again with the squeaky hammer highlighted in your inventory, then click on the birds as they pop out — they will light up. At the end, the box gives you a happy coin. Now back up to the room.
Turn right twice so that you’re facing the 236 bookcases. This time, zoom in on the picture above the shelves that says “Plus.” The corners move; click on them in the order from the plus box, UL BR BR UR BL UR. You get a happy coin and a diagram of an arch of numbers — screenshot that. Now back up to the room.
Turn right and zoom in on each of the windows in turn. Each one has a star in a pane. Use the diagram you just got to get the number 2 4 6 9. Back to the room.
Turn right, zoom in on the left side of the low cabinet, and enter that code in the four-digit code box. Get an electric drill, a happy coin, and a diagram like a sideways S. Note the pattern. Back up to the room.
Zoom in on the centre of the cabinet above the hearts. There’s a square of nine clickable boxes. Click them in the order of the S-diagram, starting with the dot and ending with the arrow. Get a happy coin and a rubber band. Back to the room.
Turn right so you’re facing the piano, but zoom in on the barrel instead. Whack the barrel with the big hammer (not the squeaky hammer). The lid splits. The barrel is full of water and there’s a key on the underside of the loose half of the split lid. Get it and back up to the room.
Now zoom in on the piano and unlock its keyboard with the key. Get a happy coin and a little saw. Note the pattern of musical notes printed above the keyboard. Back up to the room.
Turn left and zoom in on the right side of the cabinet. This last compartment has four levers on it. The pattern of notes from the piano tells you where these go. Open it, get the screwdriver and a little key. Back up to the room but don’t go anywhere.
Click on the plant in the corner. It’s bamboo. Use the saw to get a branch of bamboo. Cut that branch so that you have what looks like a short tube. Now back up to the room again.
Turn right twice. Click under the bed. Use the remaining leafy end of the bamboo to fetch the box and use the small key on it. There’s a cloth in there.
You’re not done with the box: when you take the cloth the box closes, but reopen it a couple of times and click on the bottom lining to get a happy coin and the code 4 5 3 6 5.
Now you’ll make the water pistol you saw in that book a while back. Use the electric drill on the short bamboo tube to drill a hole in the bottom. Now put the cloth on the bottom of the squeaky hammer and secure it with the rubber band. Focus on the bamboo tube and apply the squeaky-hammer-with-cloth to get a water pistol. Go back to the barrel to fill it. Now back to the room, face the 236 shelves, zoom in on the blue box on their upper left, and zoom in on the left of the box. Apply the water pistol. The ball will roll out of the box. Get the ball and open it for another happy coin.
Back to the room. Go to the piano. Zoom in on the screwed-shut stand atop the piano and use the screwdriver to get the ninth happy coin. And back to the room …
Turn around so you’re facing the windows. Zoom in on the HappyCoin hippo. Open the drawer below. The box inside the drawer has shapes on the buttons, shapes that respectively have six, four, five, and three sides. Those are broken: instead read them across as three, four, five, and six (the six and three are reversed). Use the code 45635 on the “real” order of the buttons to get the last happy coin.
Back to the hippo. Put the coins in its mouth and each light will light. After the tenth coin, the hippo opens and you get a gold happy coin and the key. Back to the main door by the piano and you’re free.
Posted by: tullia |
August 6, 2014 2:23 PM
|
August 6, 2014 2:23 PM