
Hidden Expedition: The Uncharted Islands
Platform: Mac, Windows
![]() According to folks in the know (most of whom write fantastical books about UFOs and Bigfoot), time runs a bit differently in the Bermuda Triangle. It's the interference of natural forces, or aliens, or whatever is the theory of the moment to account for the vast numbers of missing boats, planes, and people in that cursed region. Something must be messing with our sense of time, after all, because it seems like just yesterday we had entered the area looking for a missing pilot and here it is nearly two years later and we still haven't completed the task. Wait, don't tell me you forgot this important mission? Fortunately Hidden Expedition: The Uncharted Islands, the latest adventure/hidden object hybrid from Big Fish Games Studios and Floodlight Games, and the latest installment in the Hidden Expedition series, is here to remind us all.
According to folks in the know (most of whom write fantastical books about UFOs and Bigfoot), time runs a bit differently in the Bermuda Triangle. It's the interference of natural forces, or aliens, or whatever is the theory of the moment to account for the vast numbers of missing boats, planes, and people in that cursed region. Something must be messing with our sense of time, after all, because it seems like just yesterday we had entered the area looking for a missing pilot and here it is nearly two years later and we still haven't completed the task. Wait, don't tell me you forgot this important mission? Fortunately Hidden Expedition: The Uncharted Islands, the latest adventure/hidden object hybrid from Big Fish Games Studios and Floodlight Games, and the latest installment in the Hidden Expedition series, is here to remind us all.
 Yes, the long-awaited sequel to Hidden Expedition: The Devil's Triangle has finally arrived! H.E.A.T. (that's the Hidden Expedition Adventure Team to newbs) is back and is finally going to rescue the pilot! Well, maybe rescue the pilot. More like get involved in a 300 year old family feud involving an inventor who stole from DaVinci, his resentful daughter, and some dude named Baron Undertow who, as you may have guessed by the name, has no sense of humor (or fashion sense for that matter). But no matter, you have the whole team backing you up! Although, come to think of it, the team consists of (a) you, and (b) a somewhat loopy submarine pilot/mechanic who is stuck somewhere on the first island you encountered. Oops, looks like you're on your own with this one.
The story picks up as you wake up from the rather spectacular glider crash that ended The Devil's Triangle. You meet a mysterious woman named Kathy who immediately fills you in on the back story, so no playing of the first game is necessary (although you really should, it's a gorgeous, fun game in its own right). Kathy, caught in the middle between father and daughter (and apparent owner of a kicking gingerbread recipe) needs you to help this oh so dysfunctional family before the real villain of the piece, the Baron, manages to break the DaVinci node, the object that is keeping him, his minions, you, and everyone else trapped on this small series of islands. If the Baron isn't stopped he will take the fantastical technology developed by Gideon (the father) and unleash his evil upon the world.
 Hidden Expedition: The Uncharted Islands plays like a standard point-and-click adventure, with all actions accomplished with the click of a mouse. It features the usual tropes of a changing cursor to indicate items or navigation points, showers of sparkles to indicate areas of interest, a refilling hint feature, a puzzle skip timer, and the standard adventurer's notebook to keep track of the vast array of clues that you will stumble upon as you wander these islands, interacting with the poor folks who are stranded therein. Also involved is a lot of wandering around, puzzle solving, hidden object scenes, and mini-games, all of the bells and whistles of today's adventure hybrids.
The mini-games are a mix of the usual (sliders, pipe puzzles, etc.) and some nice original games as well. As for the hidden objects scenes there are four types: The standard "list" type (find a list of objects in a pile of junk); a "find the matching pairs" type (find two related objects that make a pair); general hint types of the "find all of the butterflies in the picture" mode; and most spectacularly a "layered" type which features digging through multiple layers of complexity involving a lot of finding, manipulation, and problem solving. For those who love hidden object gaming Hidden Expedition: The Uncharted Islands has something for everyone.
Analysis: Big Fish Games Studios is known for their stunning and amazing games, and Hidden Expedition: The Uncharted Islands is a worthy successor to that tradition, no matter how long it took to arrive. The quality shows in every area of the game: the complexity of the hidden object scenes, the dazzling array of puzzles, the gorgeous scenery, the wonderful music, and most especially the intriguing and amusing story and characters.
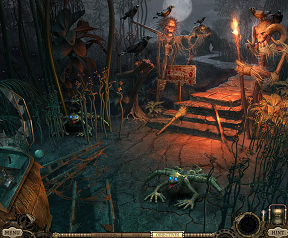
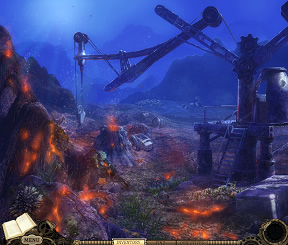
 The backgrounds are of course lovely to look at, although they do pale slightly in comparison to the luminous scenery of The Devil's Triangle. Visuals are crisp, clear, and easy on the eyes, even in the hidden object scenes. The music matches the mood perfectly to where you are in the story, be it on Noferia (sort of a second rate "island of lost boys"), the underwater scenes, or the final battle atop the island that houses the DaVinci Node. the difficulty levels of the mini-games range from mind-bogglingly easy (tic-tac-toe, seriously?) to head-bangingly hard, especially in the "extra" adventure that comes with the collector's edition. The hidden object scenes are very tough due to a combination of factors including the dreaded "shrink something down to thimble size and hide it behind something else" mentality that pops up every now and again.
There are a few minor problems with the gameplay that I found. The hidden object scenes, already tough from the "layering" and other variations, can be difficult to see especially if your vision isn't at its best. Hiding a small dark object in the corner of a dark background is not particularly clever. A couple of the puzzles are picky in their click points, which can stop a player in their tracks trying to figure out what went wrong. And the "clickable" areas in the hidden object scenes range from too small (it can take multiple tries to snag a really small object) to too large (the navigation area to move out of the scene can interfere with picking up items near the bottom of the screen).
So was the nearly two year wait for Hidden Expedition: The Uncharted Islands worth it? Without hesitation, a resounding: YES! Despite the minor flaws in the gameplay this is a fantastic game, permeated with the humor that the Hidden Expedition series is known for. And it's even worth playing just to read the constant narration in the "journal" set down by the intrepid explorer you are playing, as well as for the little touches like the signs, graffiti, conversations, and the various notes and articles scattered around the game. Who doesn't love reading an article in a newspaper called The Daily Peril (motto: "read about people worse off than you")? By refusing to take itself too seriously Uncharted Islands proves a breath of fresh air and an antidote to the glut of "dark, mysterious, spooky, angsty" hybrids flooding the market these days. With two modes of play, casual and expert, and the ability to turn off the tutorial, Hidden Expedition: The Uncharted Islands is fun for everyone, from newbies to the most hard-core adventure addicts. Most definitely worth the wait!
A Collector's Edition is also available. It includes wallpapers, concept art, screensavers, the soundtrack, an extra adventure, and a built-in strategy guide. Remember that Big Fish Game Club Members pay only $13.99 for Collector's Editions (or 2 club credits), and collector's editions count 3 card punches of 6 total needed for a free game.
![]() Windows:
Windows:
Download the demo
Get the full version
Also available: Collector's Edition
![]() Mac OS X:
Mac OS X:
Download the demo
Get the full version
Also available: Collector's Edition


Walkthrough Guide
(Please allow page to fully load for spoiler tags to be functional.)
Hidden Expedition: The Uncharted Islands walkthrough
General Information
Controls are with the mouse. Click on objects to add them to your inventory. Click on items in your inventory, then on hotspots in the game, to use an item.
All mini-games come equipped with brief instructions, which can be opened by clicking the question mark in the top right corner of the screen. All mini-games also come with a timer. You can skip a mini-game by clicking "skip" after the timer expires.
The adventurer's journal in the bottom left corner of the screen can often provide hints about what to do next if you read the entries carefully enough.
The bar at the bottom of the screen contains three tabs: Inventory, Find, and Objectives. Inventory contains all the items you have collected and can use in the game. Find contains lists of items that you need to find in hidden object scenes. Objectives lists tasks you need to complete to finish the chapter. Checking this when you're stuck might give you a hint as to what to do next.
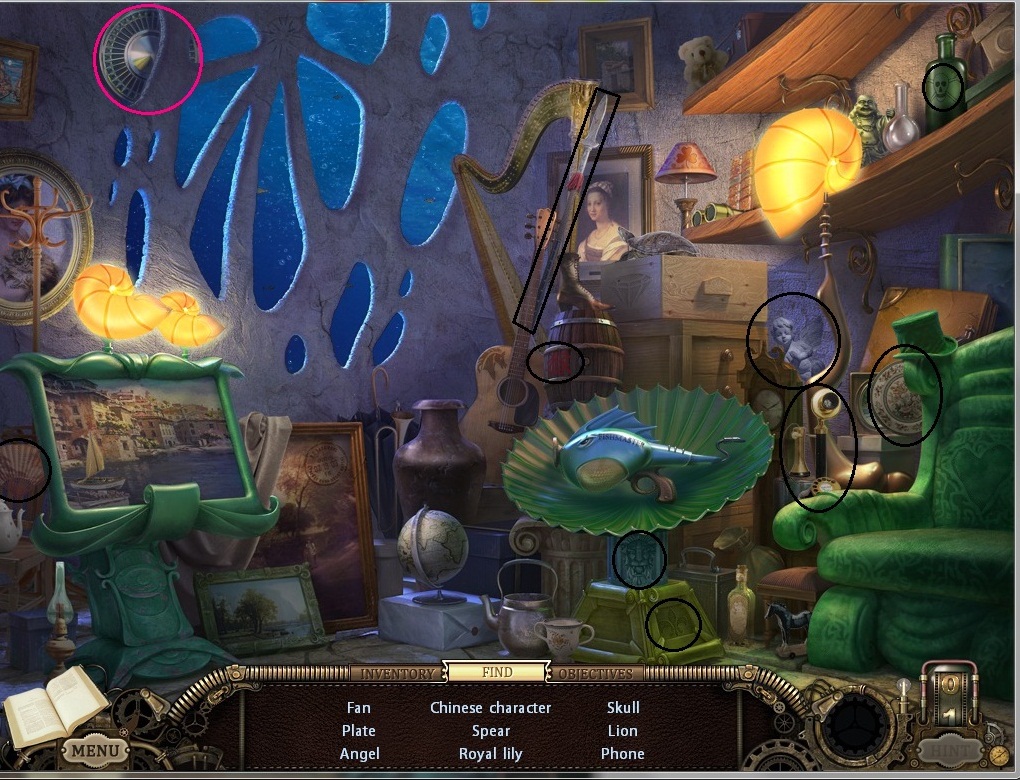
Almost all hidden object scenes have a final item or items that you can add to your inventory after finding the first series of items. In the screenshots, the collectable items are marked with a different color and shape than regular items.
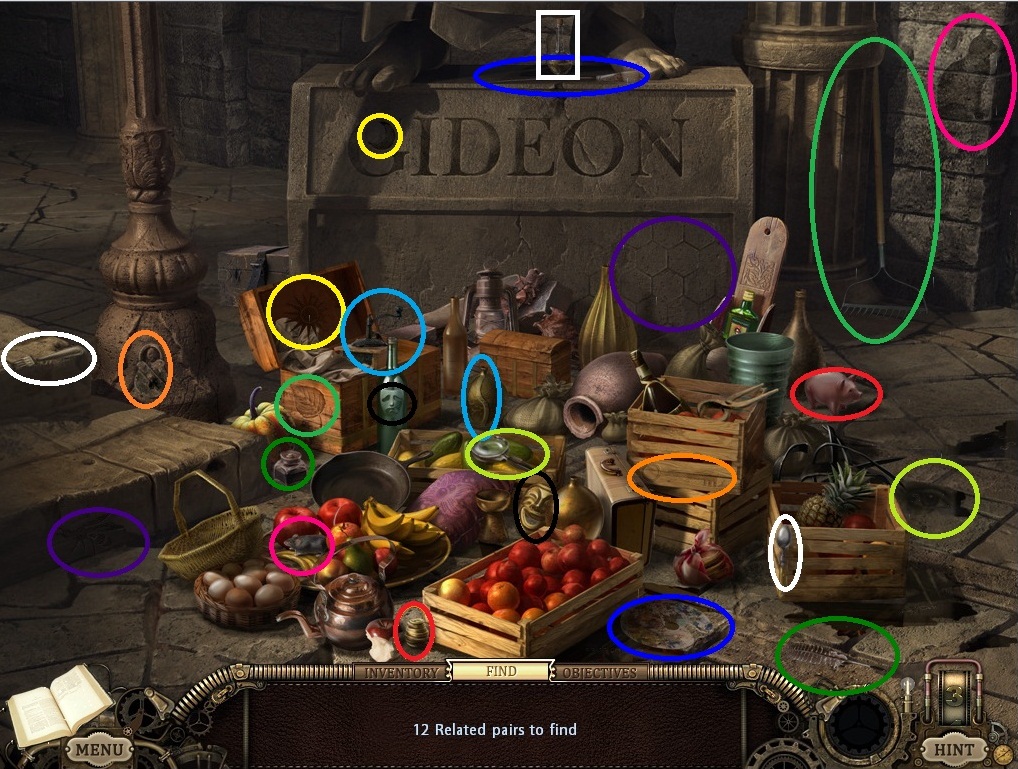
Some hidden object scenes require you to find pairs of items that go together; for example, a right and a left shoe, or a bar of soap and a soap bubble. In these scenes, clicking an item causes it to flash slightly. Clicking the matching item causes both to disappear. If you click a non-matching findable item, the first item will stop flashing. In the screenshots, matched pairs are indicated by sharing the same color circle.
There are three long minigames that are a series of linked hidden object and puzzle scenes. Items taken from the hidden object scenes go into a special inventory that is only open during the minigame. You will need to use all the items that get added to your inventory in order to progress through the game.
Additionally, you will need to frequently switch between the "Find" and "Inventory" tabs on the bottom of the screen for these mini-games. Detailed instructions are given in the walkthrough, or you can skip this game by waiting for the timer to expire.
Throughout the game, there are newspapers that provide back story for the islands, and notes from Undertow. These add an amusing layer to the storyline, but it is not necessary to find them all to finish the game.
All chapters require some backtracking. You will find items that are inaccessible, or doors that you don't have keys for, or items that you can't take until you discover that you need the item later in the game.
Chapter 1
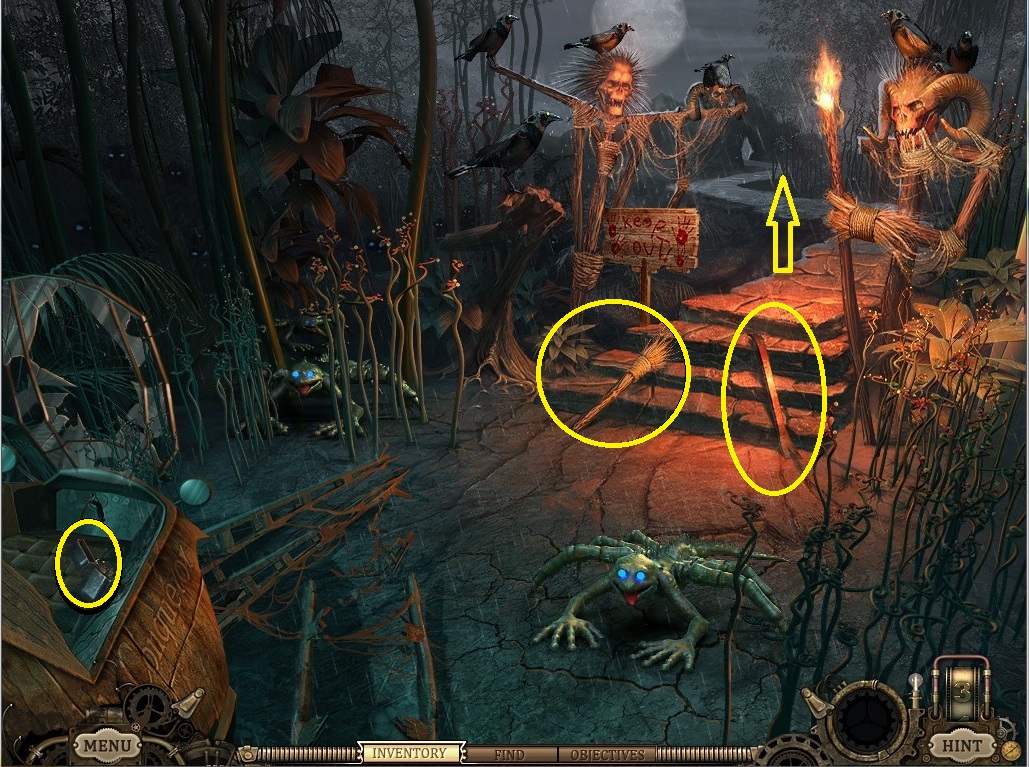
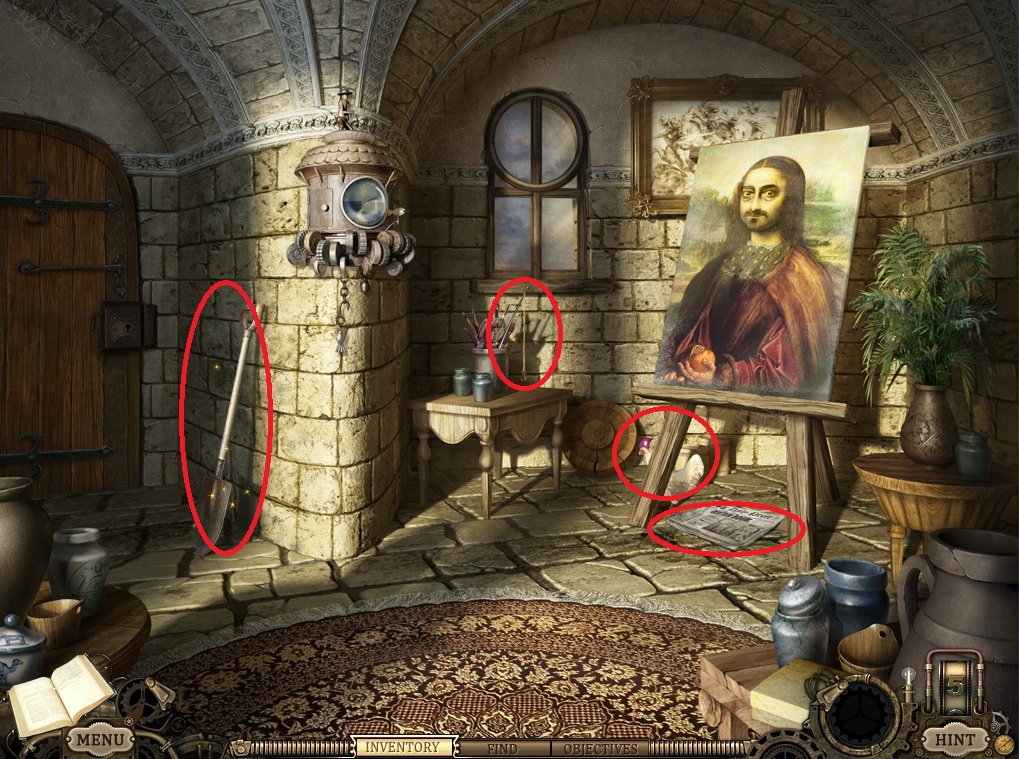
Pick up the broom, crowbar, and lighter from this scene.
Screenshot
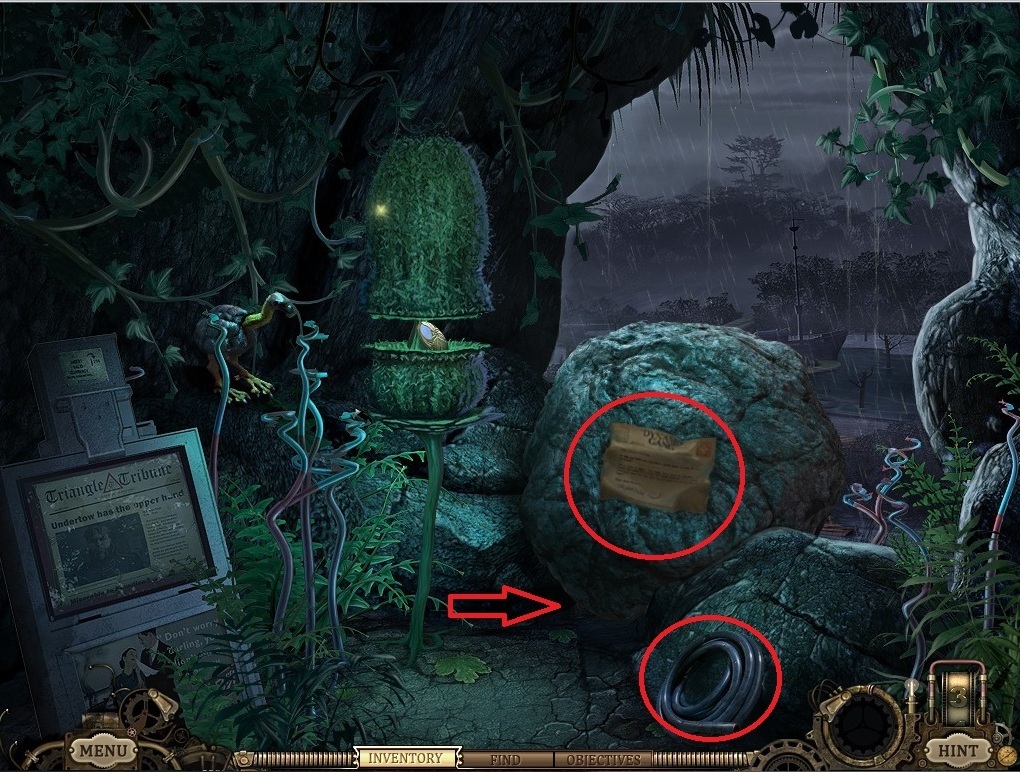
Take the hose and read the note on the rock.
Take the note off the plant. Even if you light the torch, the plant won't open yet.
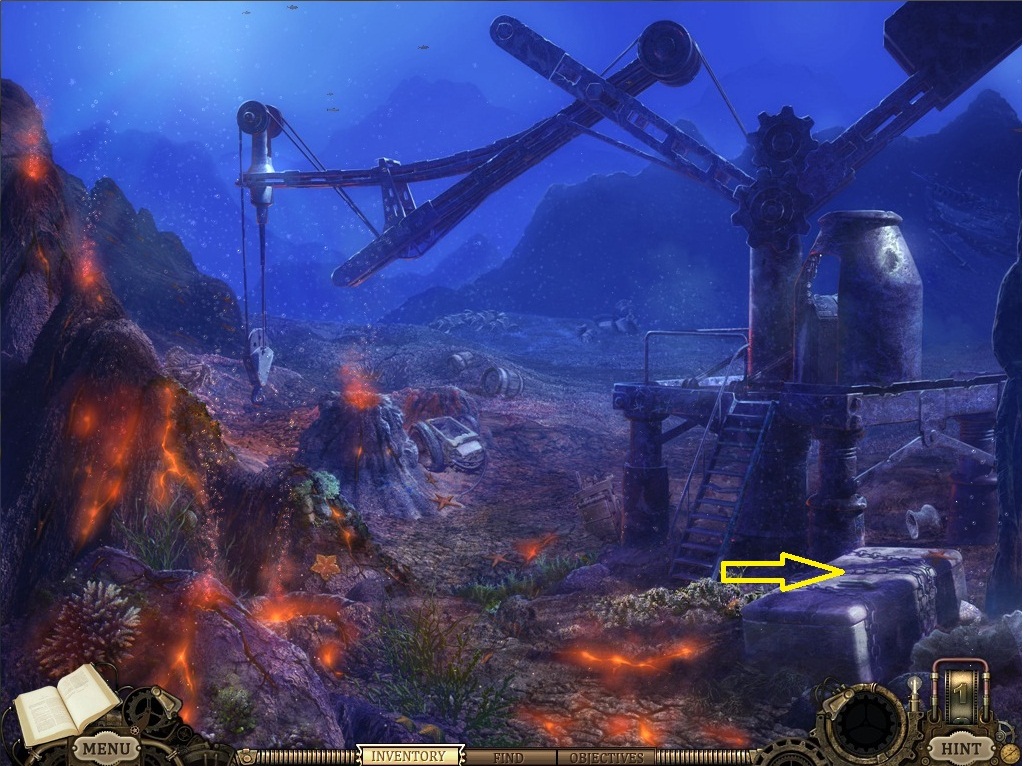
Use the crowbar on the boulder.
Screenshot
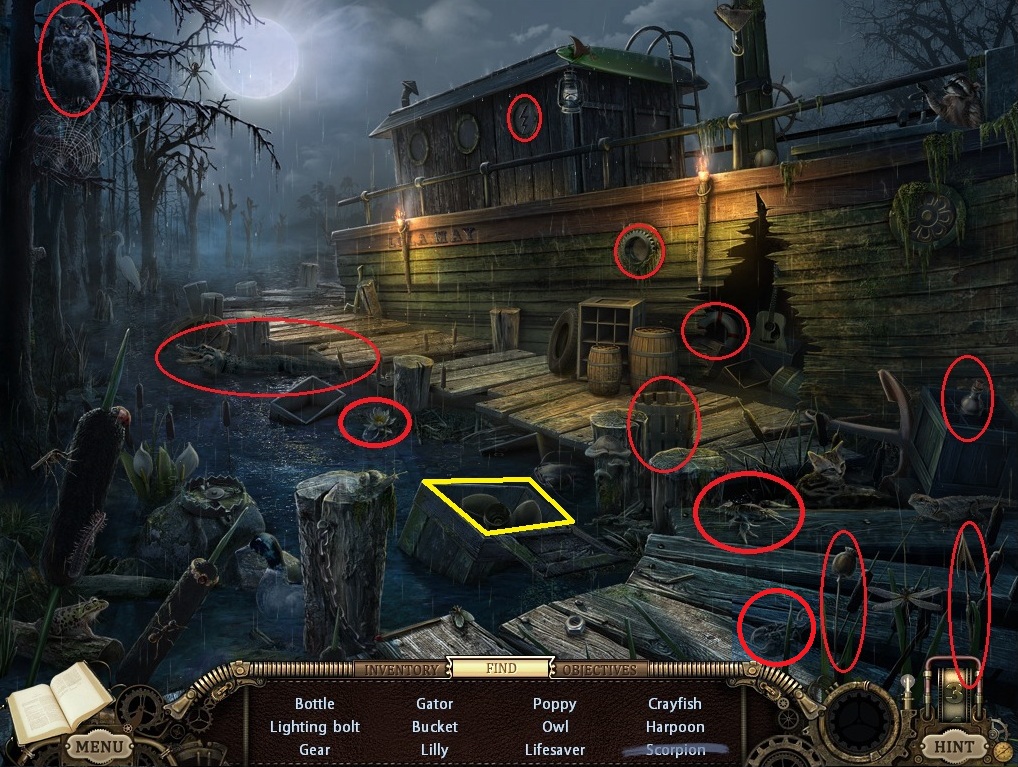
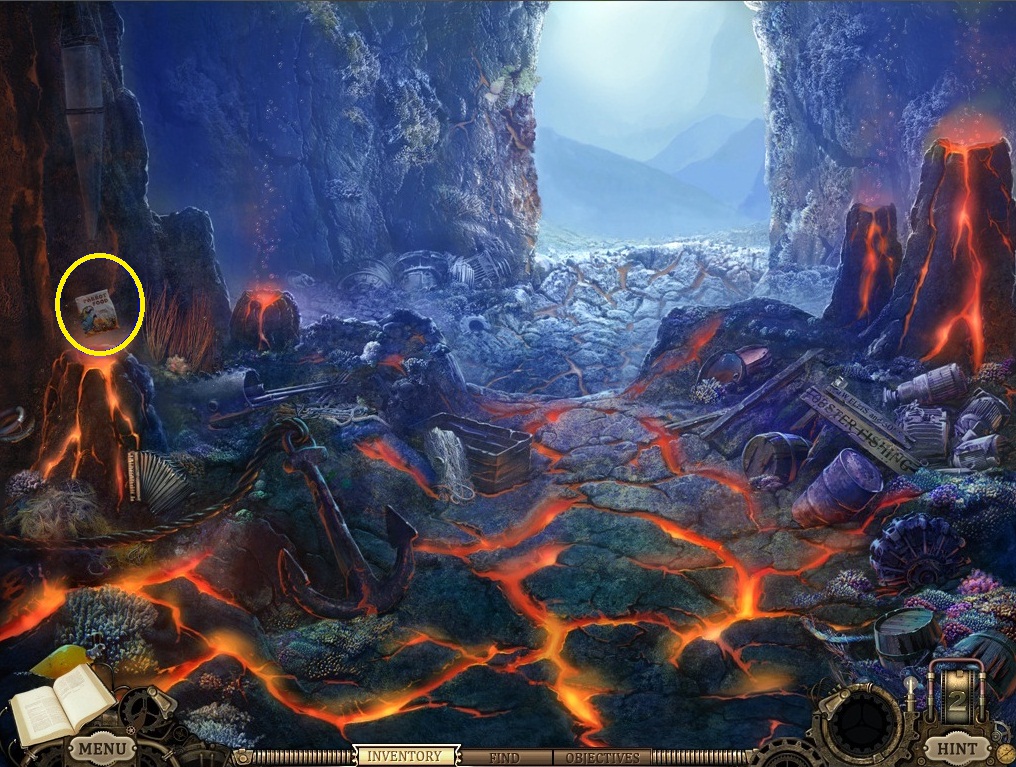
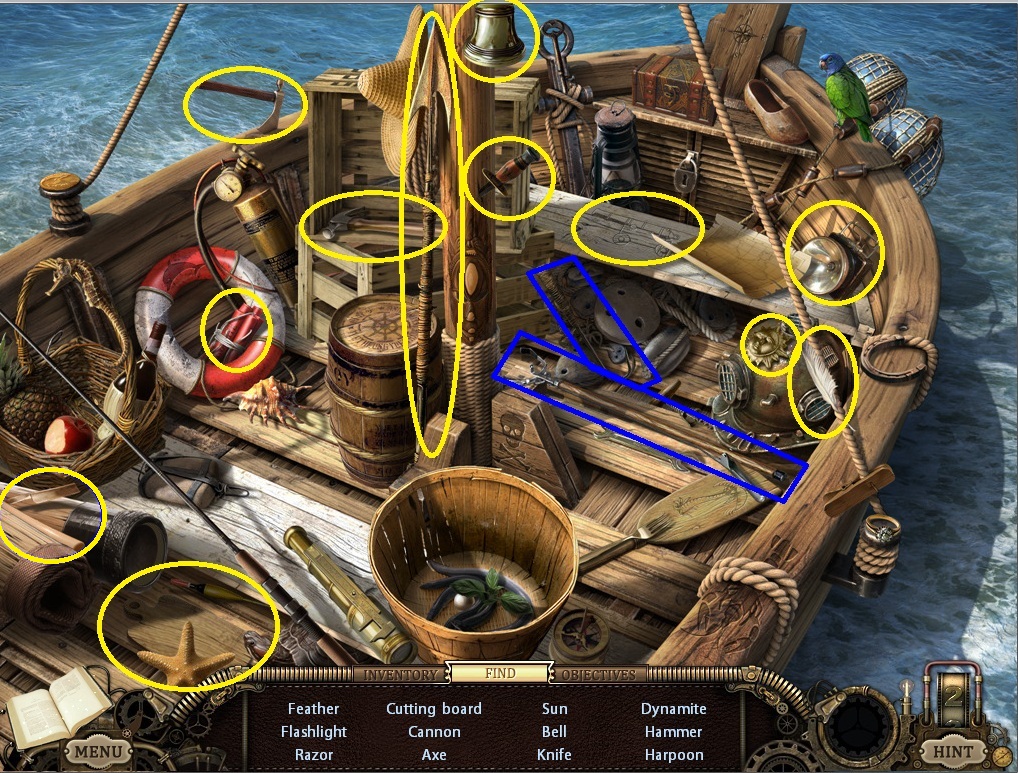
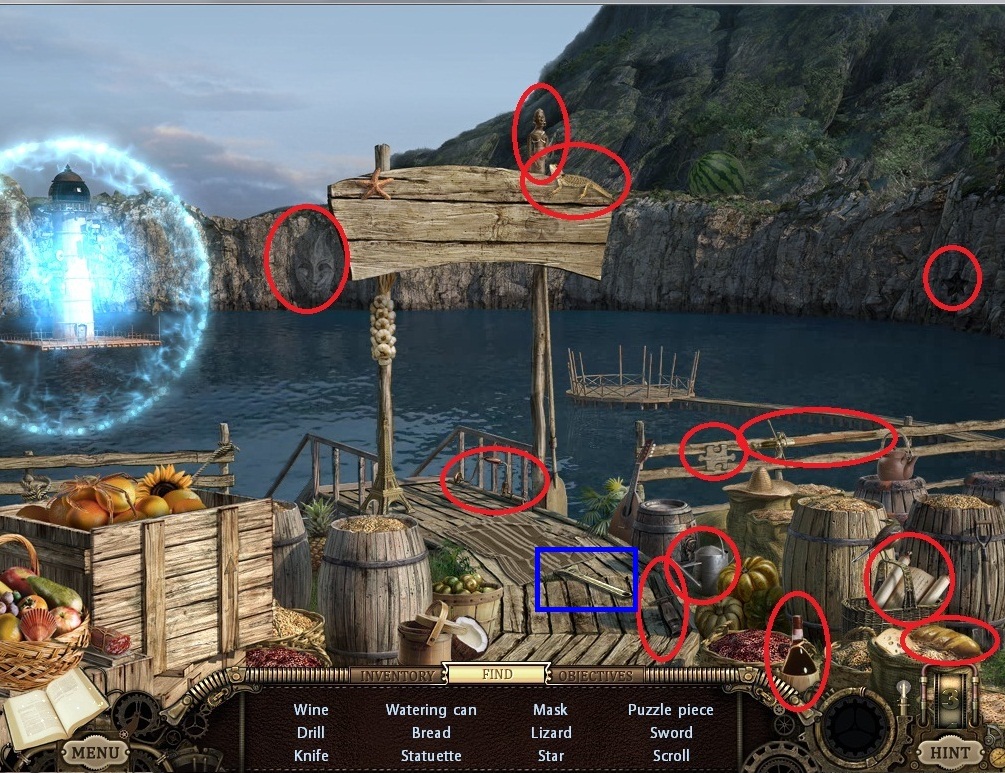
Use your lighter to light your torch, then use your torch to light the torch on the boat.
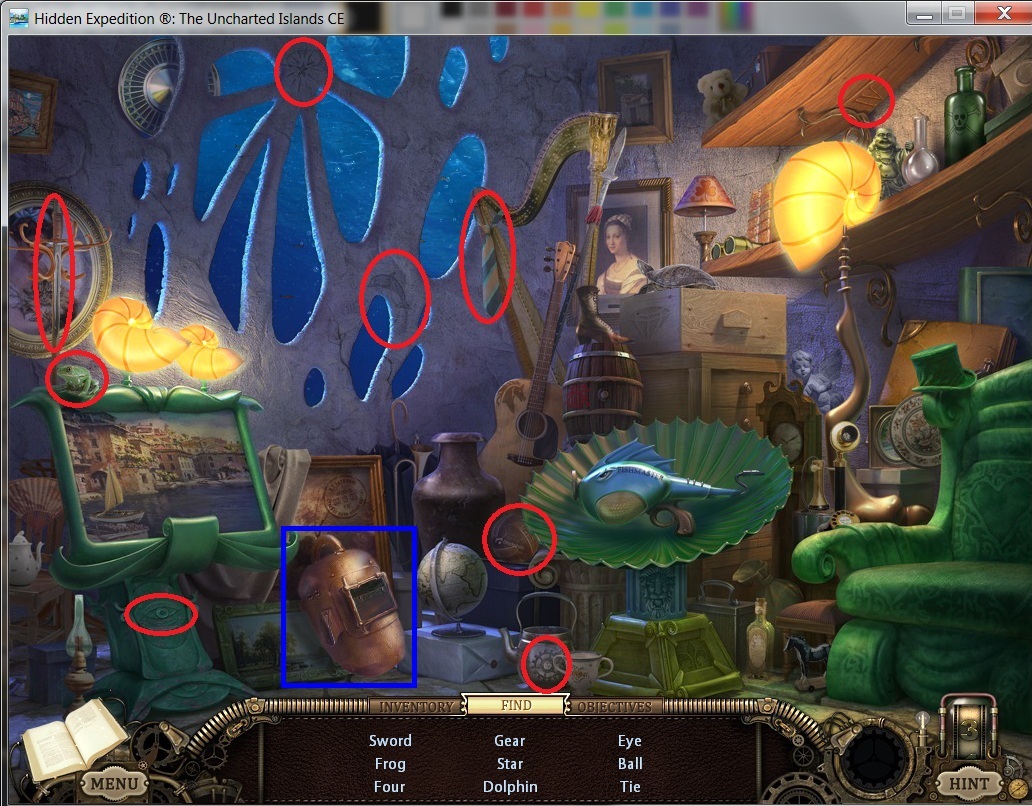
Once the torch is lit, the scene will transform to a hidden object scene. The final item is marked with a yellow box in the screenshot and cannot be taken until the first twelve items are collected.
Screenshot
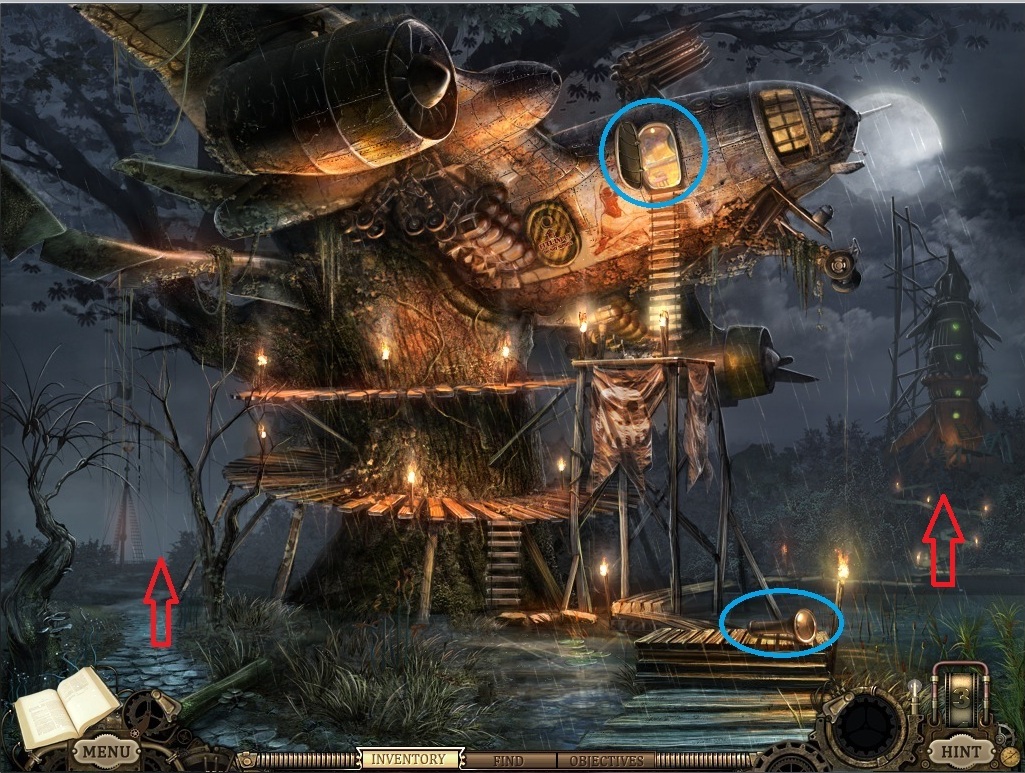
Click on the boy to learn that you need to find gunpowder and a button of power.
When you are done talking to the boy, take the bucket.
Click on the boat to learn that you need a motor. Take the gas can.
Note the alligator. You cannot take the item in its mouth until you find something to keep its jaw open.
Screenshot
Go forward and take the flashlight, then back up three times to the scene with the plant.
Screenshot
Use the flashlight on the plant and take the button of power.
Go forward two screens. Trade the button of power for a coin
Go back two screens. Use the coin on the newspaper machine. Take the newspaper and slingshot.
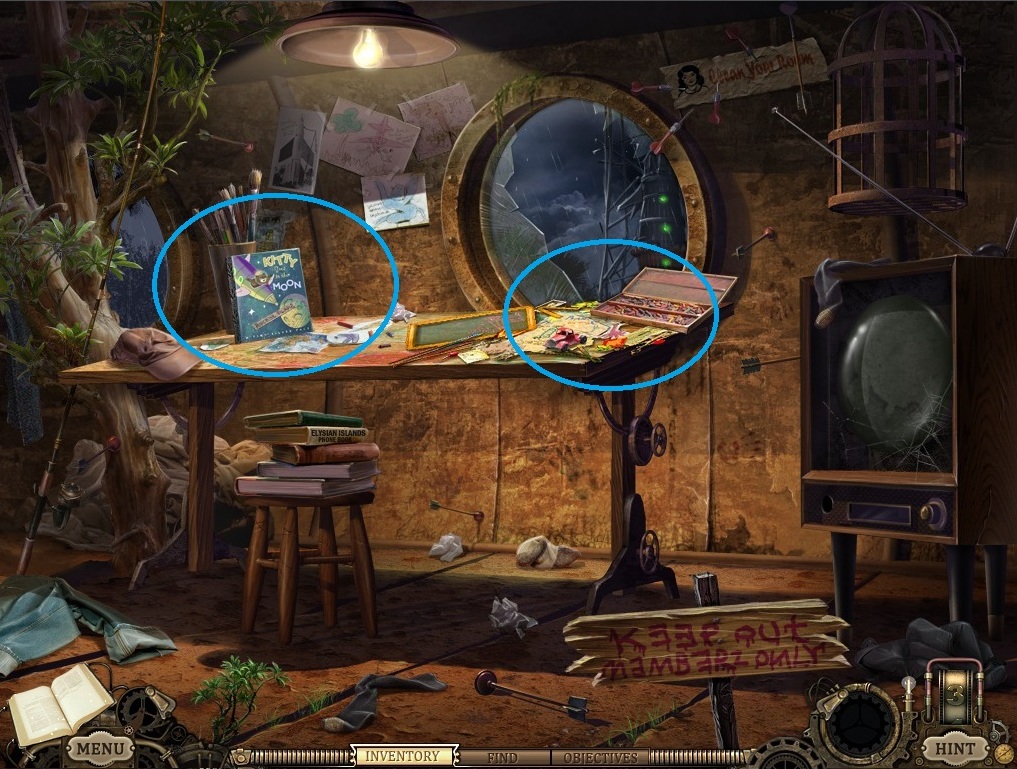
Go forward three times and go into the treehouse. Click the right side of the desk for a hidden object scene.
Screenshot
Solve the hidden object game to acquire a pullcord and hamster whistle.
Screenshot
Back out. Click the left side of the desk, then on a book to open a minigame.
To play the game, arrange the pieces of the spaceship in order from bottom to top. You can exit the game when the timer expires.
Take note of the word that appears when the puzzle is solved: CORNDOG
Exit the treehouse and go left.
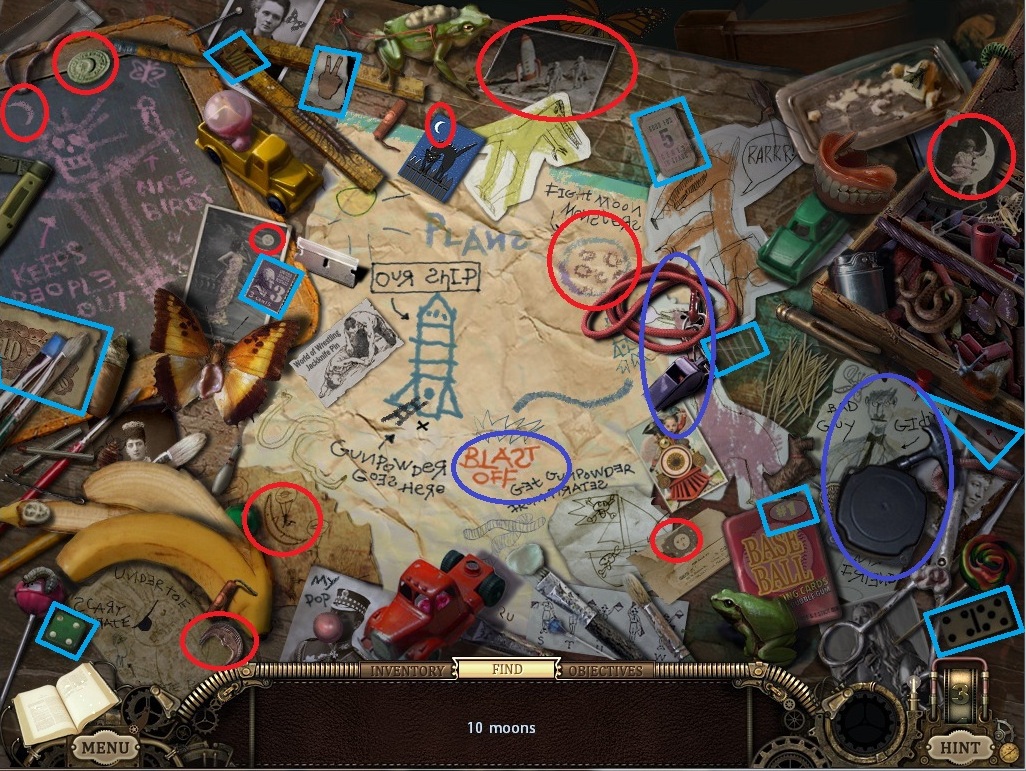
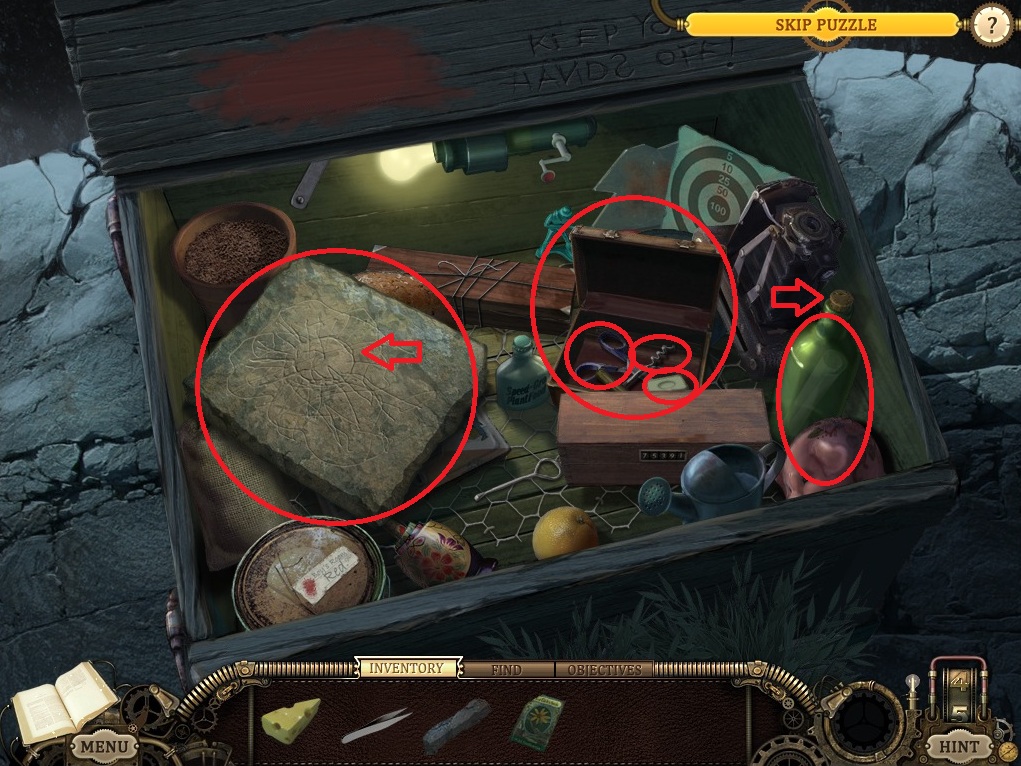
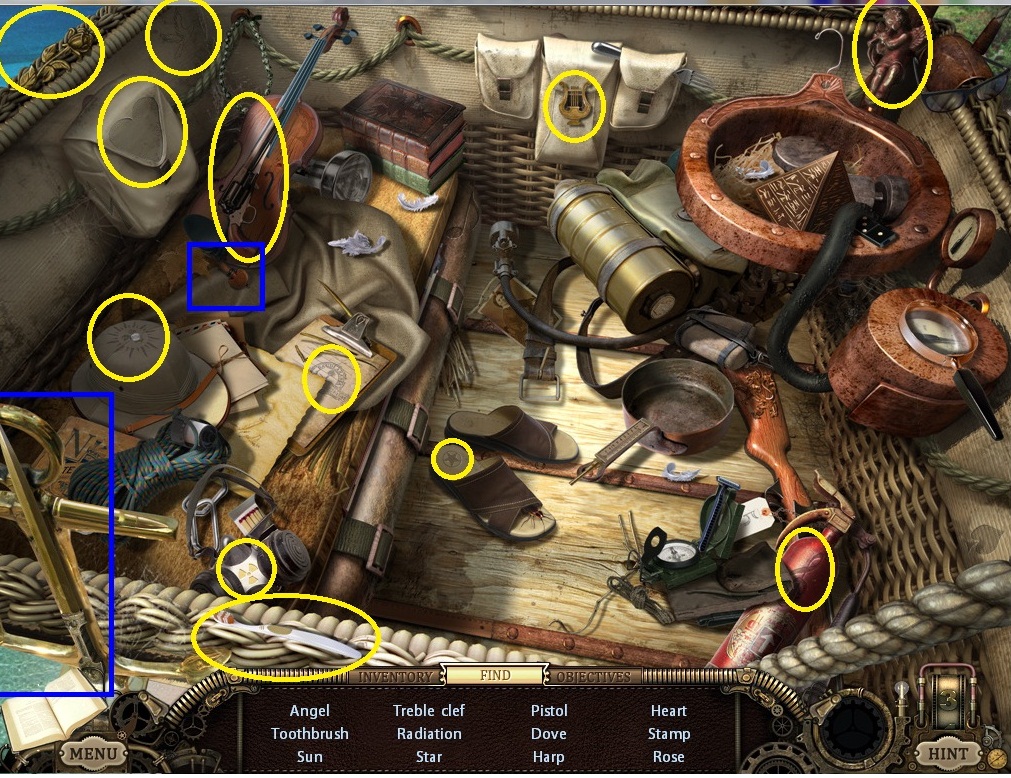
Click on the box to launch the first of several hidden object/puzzle minigames.
First Set of Items.
Click the lid of the box to open it.
Click the crank to turn on the light, and take the items.
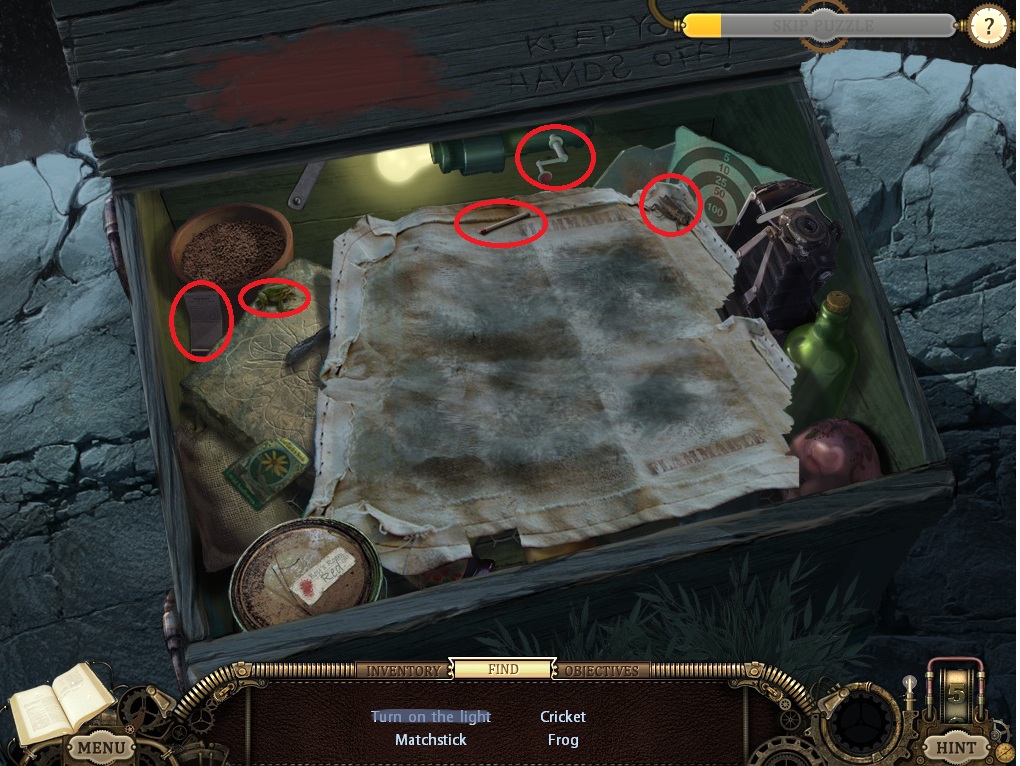
Second Set of Items.
Take the matchbook.
Light the match with the matchbook and burn the cloth.
Take the rest of the items.
Screenshot
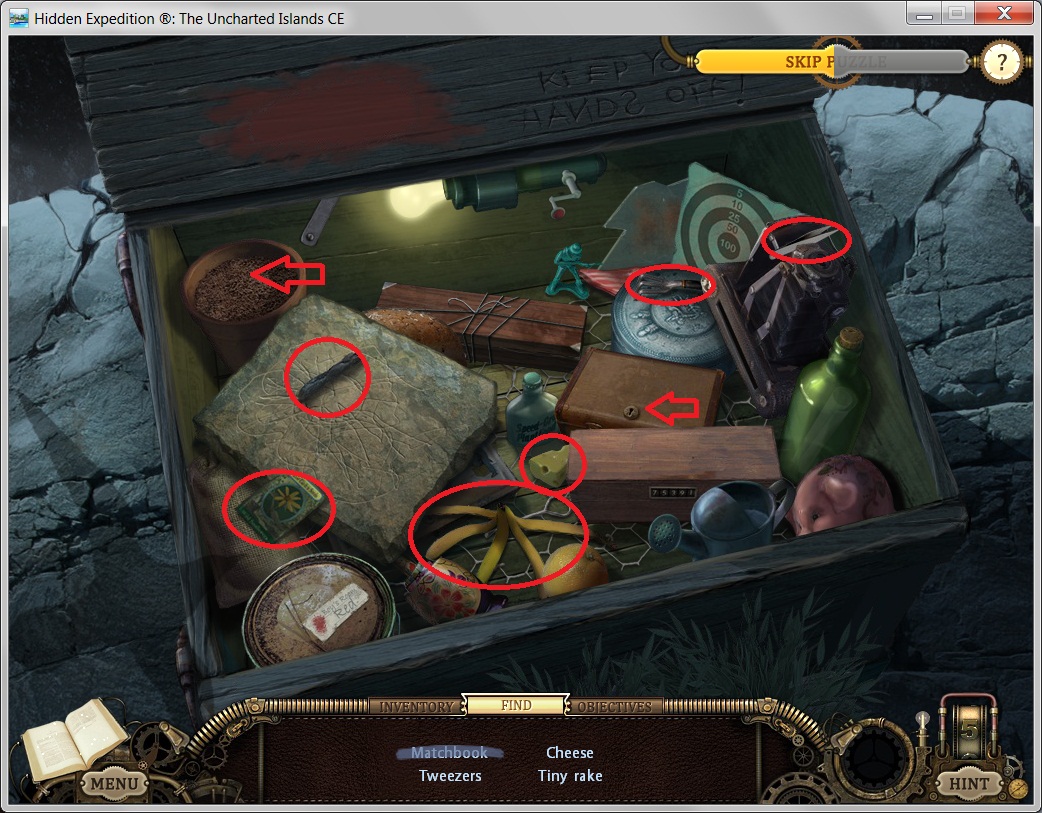
Third Set of Items.
Use the tiny rake on the dirt to get the key.
Take the rest of the items.
Screenshot
Fourth Set of Items.
Use the key on the box.
Take the corkscrew and soap.
Use the corkscrew on the bottle, then use the tweezers on it to get the paper.
Use the paper and charcoal on the stone to get the sun image.
Fifth Set of Items.
Take the next set of items
Screenshot
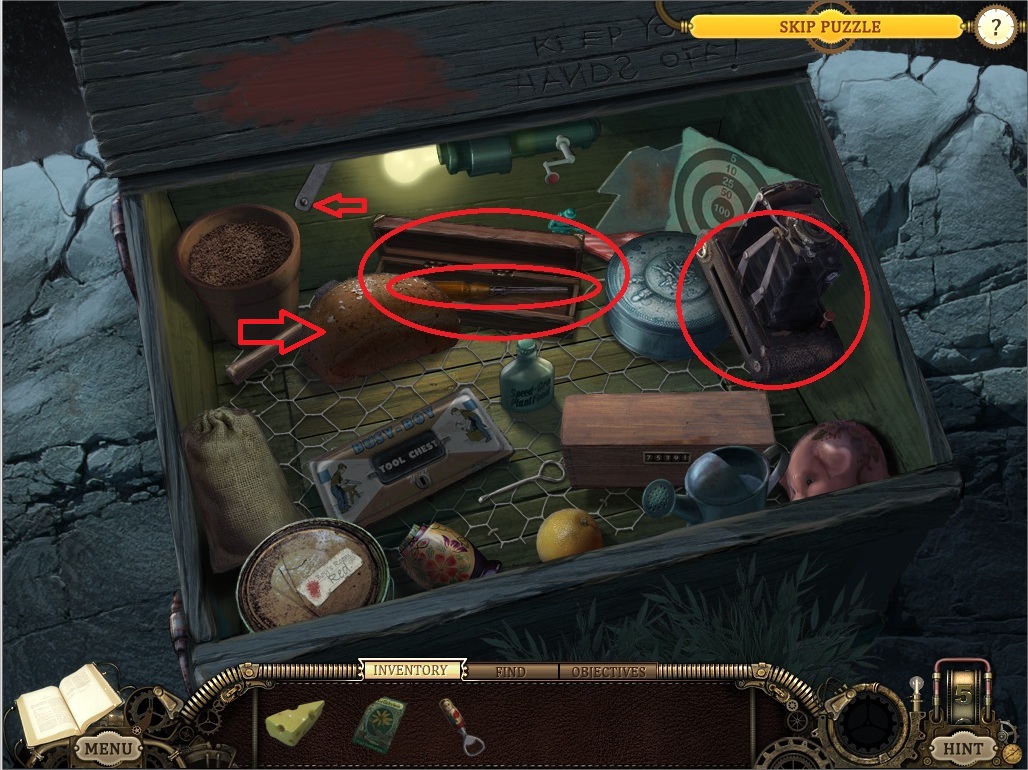
Sixth Set of Items.
Wait until the bird shadow is near the camera, then click the button to get the bird photo.
Use the scissors on the wire around the brown box to get the screwdriver.
Take the bottle opener.
Use the screwdriver on the the screw to get the sabre.
Screenshot
Seventh Set of Items.
Take the camera and wooden case.
Use the sabre on the bread to get sliced bread.
Take the paintbrush.
Screenshot
Eighth Set of Items.
Take the paint can opener, old rag, and paint remover.
Use the paint can opener and then the paint brush on the paint can.
Use the paint brush on the soldier.
Take the red toy soldier.
Screenshot
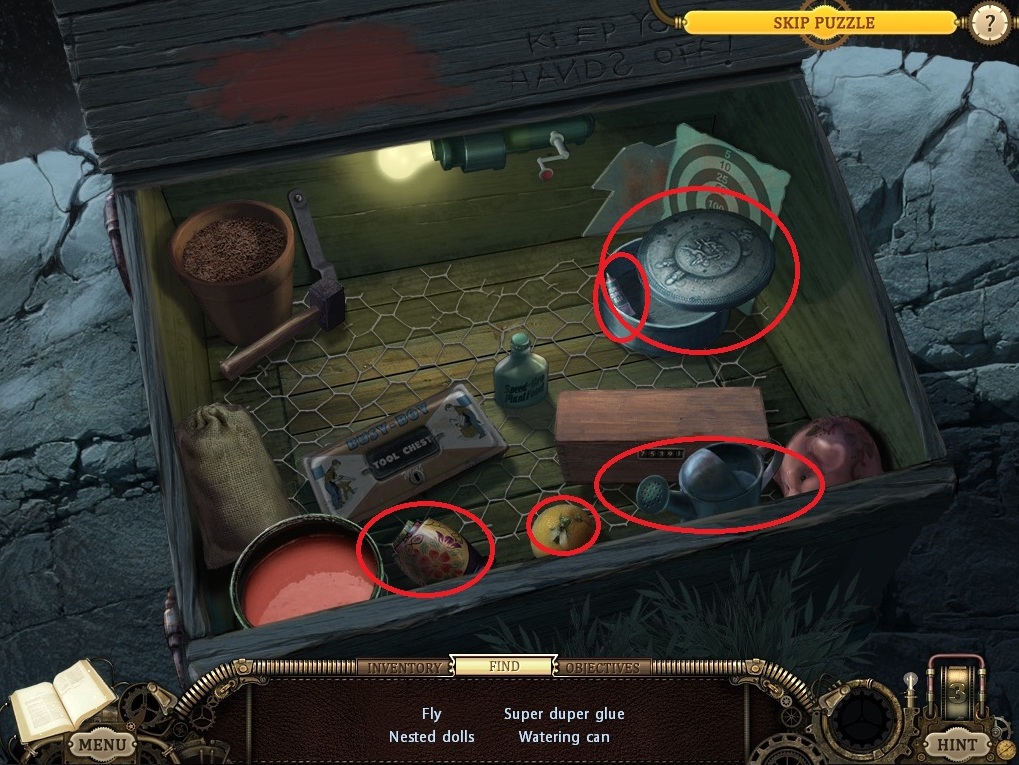
Ninth Set of Items.
Take the super glue, watering can, and nesting dolls.
Use the superglue on the orange to get the fly.
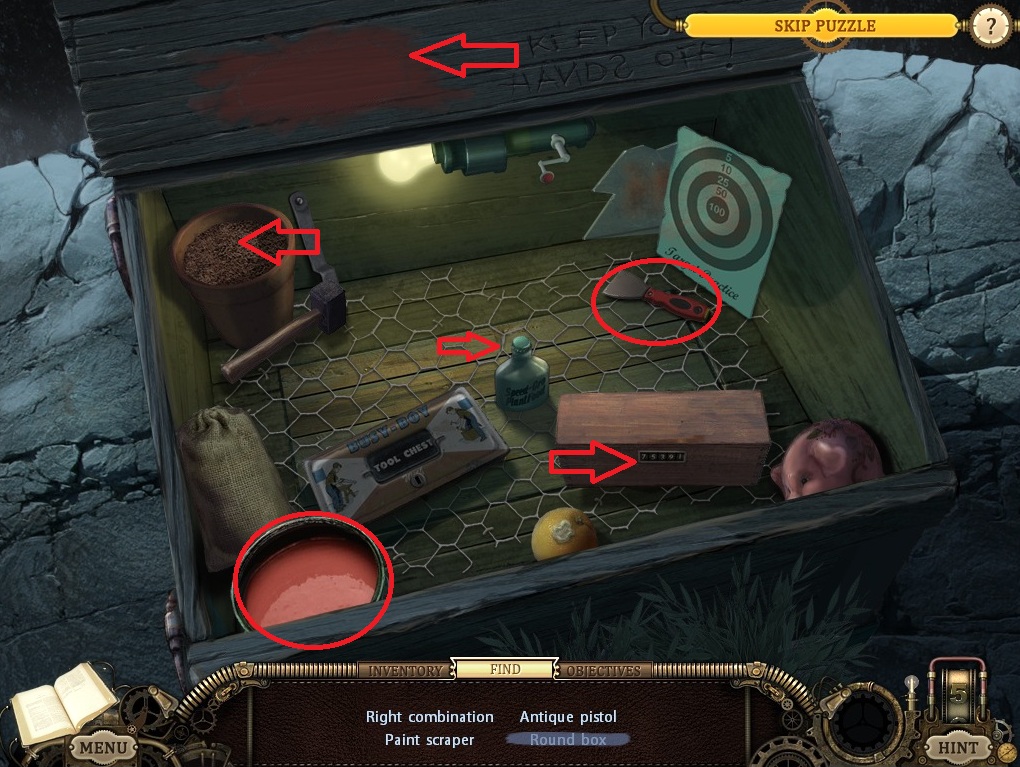
Tenth Set of Items.
Take the round box.
Take the paint scraper.
Use the paint remover and the paint scraper on the paint blotch to get the right combination.
Use the right combination on the wooden box to get the pistol.
Screenshot
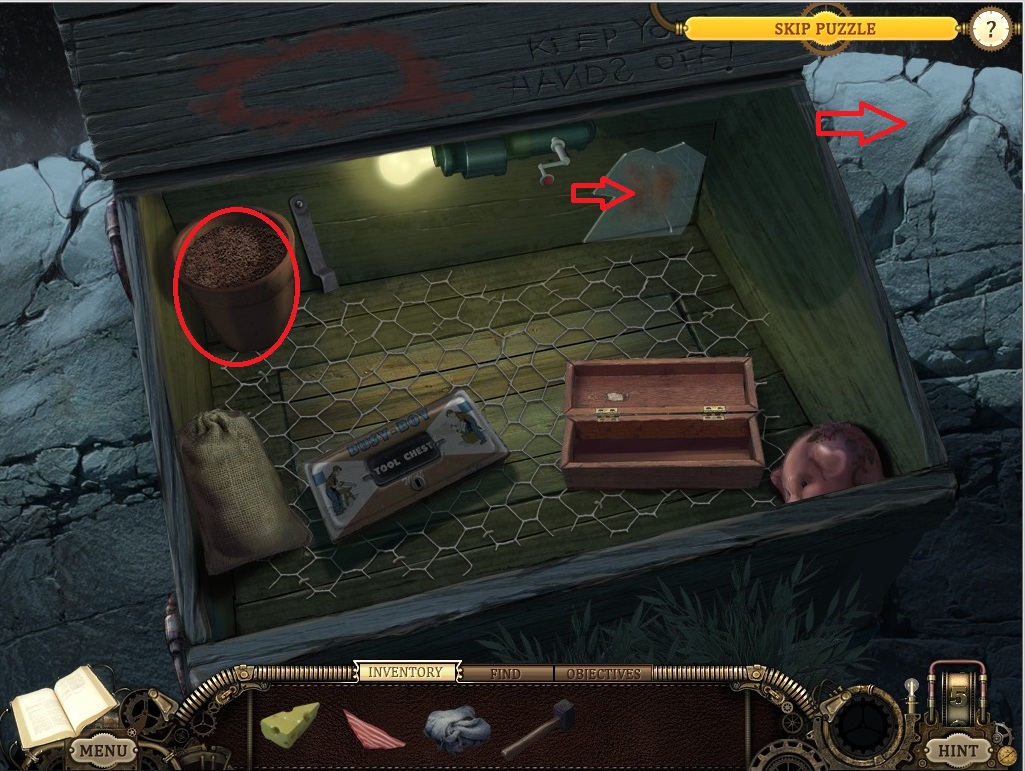
Eleventh Set of Items.
Use the bottle opener to get the plant food.
Use the seeds on the pot, then the plant food, then the watering can three times, to get a bee.
Take the paint can and the ammunition.
Screenshot
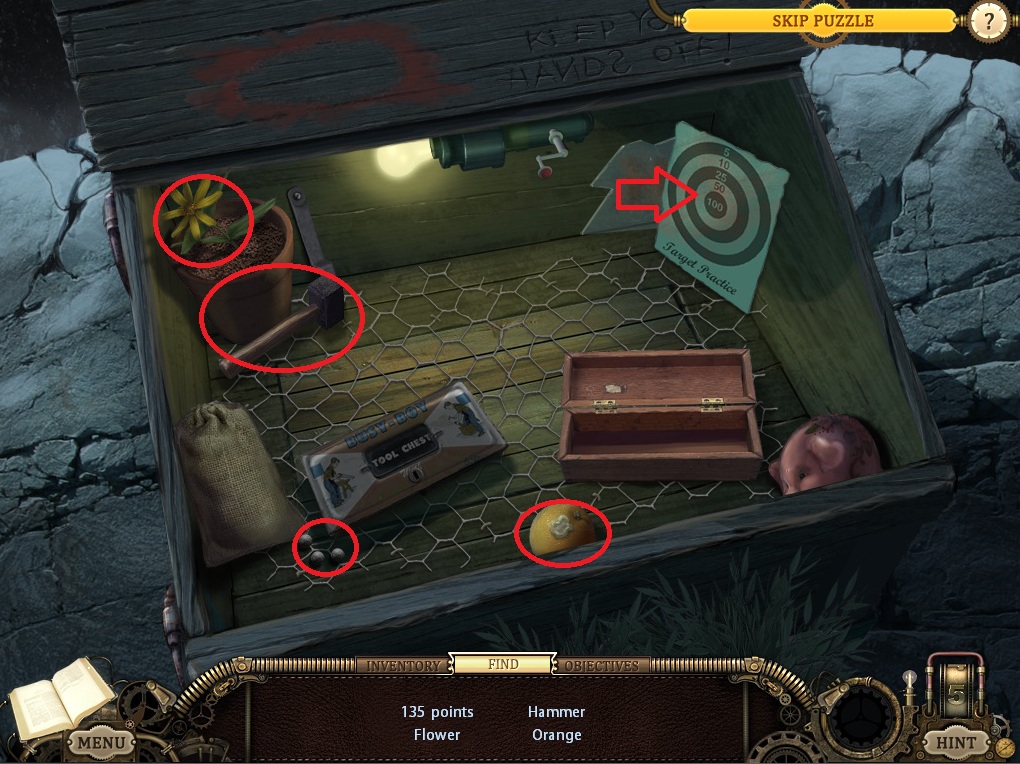
Twelfth Set of Items.
Use the ammo with the pistol, then use the pistol on the target.
Take the other items.
Screenshot
Thirteenth Set of Items.
Use the cheese to set a trap for the mouse.
Use the old rag on the broken glass to reveal a maple leaf carving.
Take the flowerpot.
Take the utility knife.
Screenshot
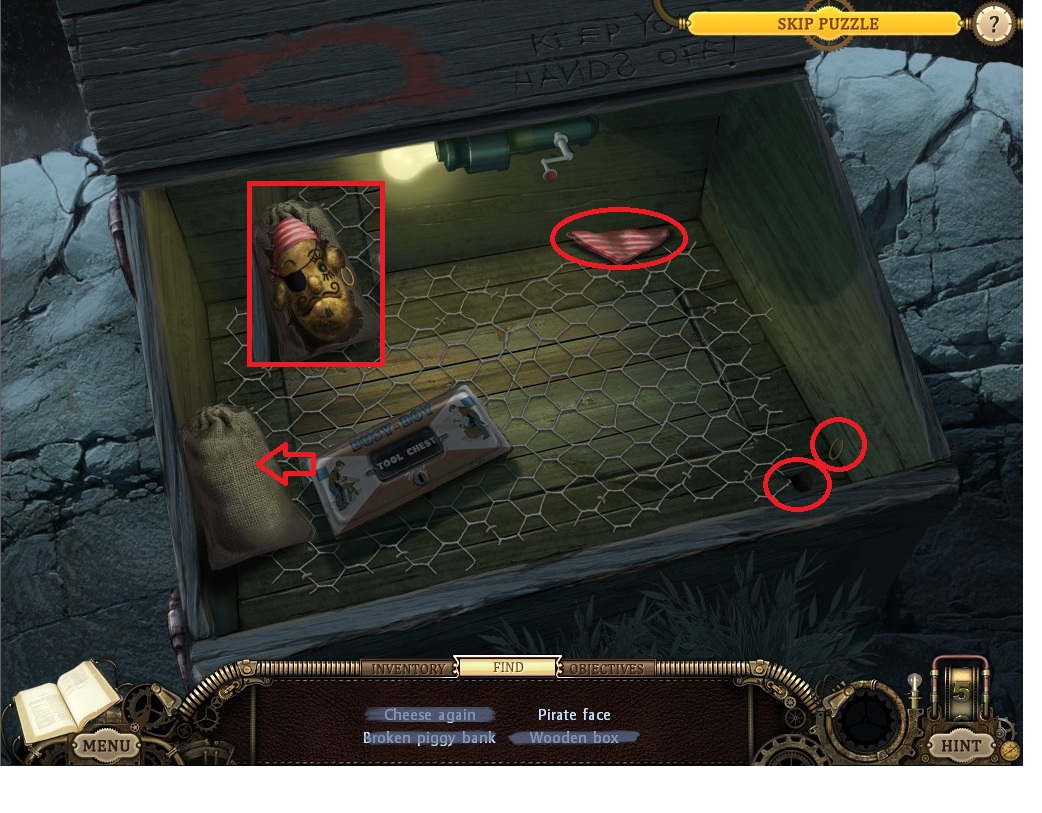
Fourteenth Set of Items.
Take the cheese and wooden box.
Use the hammer on the piggy bank to get a broken piggy bank.
Use the utility knife on the potato bag. Move the ring, eyepatch and bandana to the potato.
Screenshot
Screenshot
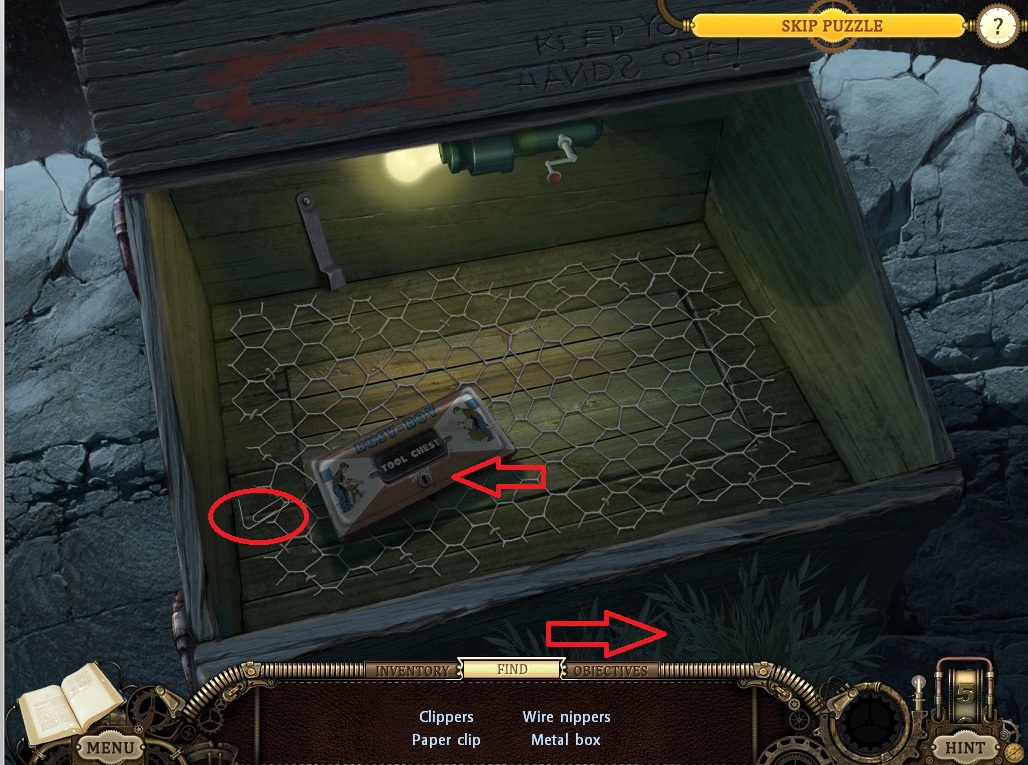
Fifteenth Set of Items.
Take the paperclip. Use the paperclip to pick the lock on the box.
Take the shears. Use them on the grass to get the wire nippers.
Take the box.
Screenshot
Last Item.
Use the wire nippers on the grate, then click the box floor to get the motor body.
Get fuel.
Go back to the scene with the rocket. Use the hose and gas can on the gas tank on the rocket.
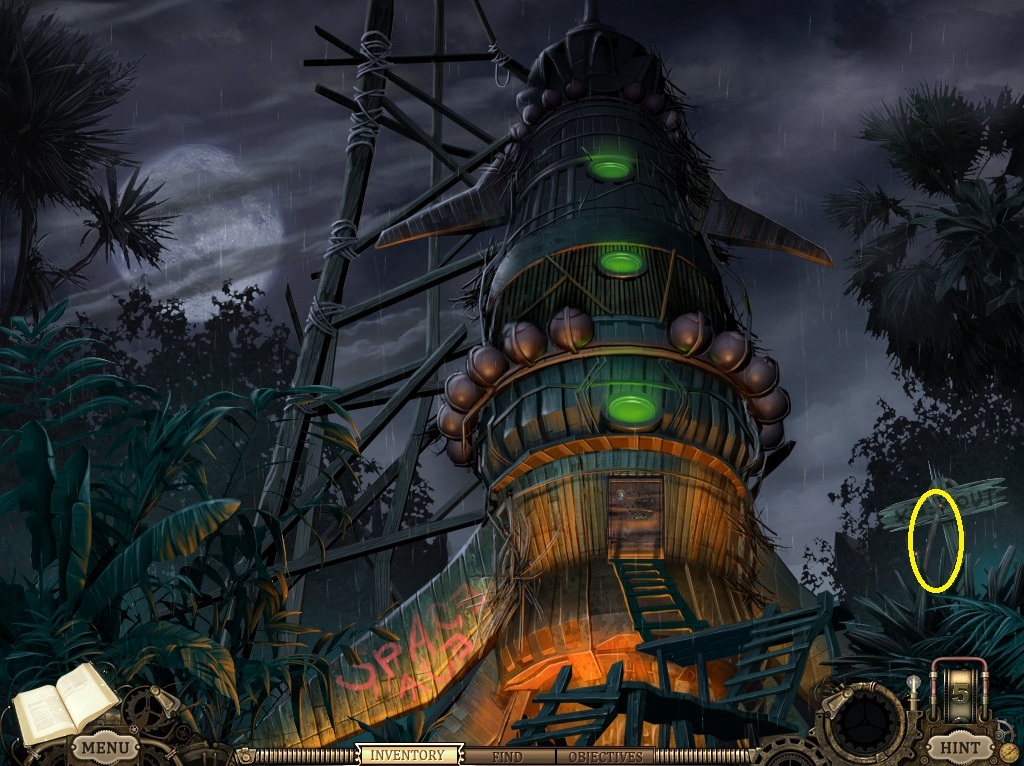
Go forward and right to the rocket.
Take the grabber hand.
Screenshot
Go back, and then forward left.
Use the slingshot to knock out the pirate.
Click on the cliff edge, then use the grabber hand to get the grappling hook.
Screenshot
Go back and get the boat.
Use the motor, propellor, gas can, and pull cord on boat.
Back out of the repair scene, then click the boat again.
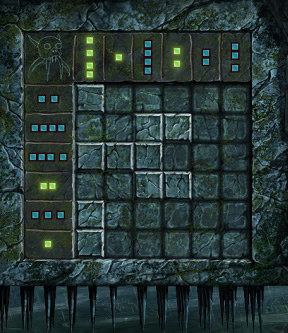
You now have three mini games to play. The numbers on the left column and top row indicate the number of blocks that need to be highlighted in each column/row. You can get more instruction by clicking the question mark in the top right of the screen, and after a short wait, you can skip the puzzle entirely.
The puzzles reset themselves each time you play. After each puzzle, you must click the lizard face that glows, and then attempt to go through the gate.
Screenshot
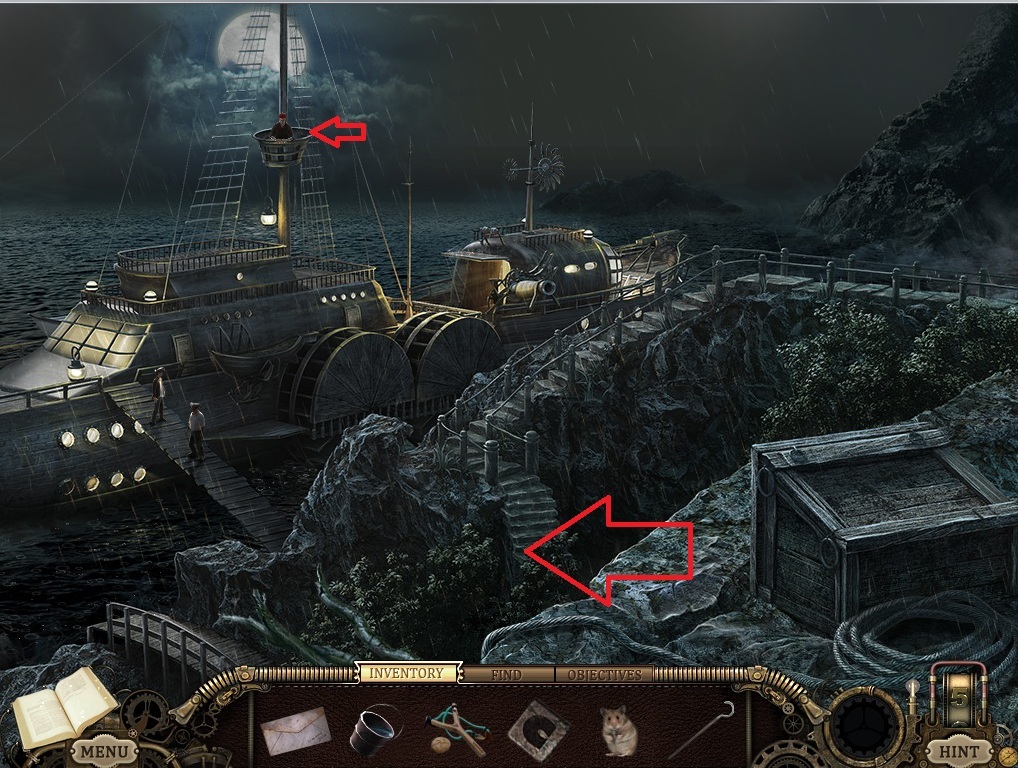
Use the grappling hook to get on the pirate boat.
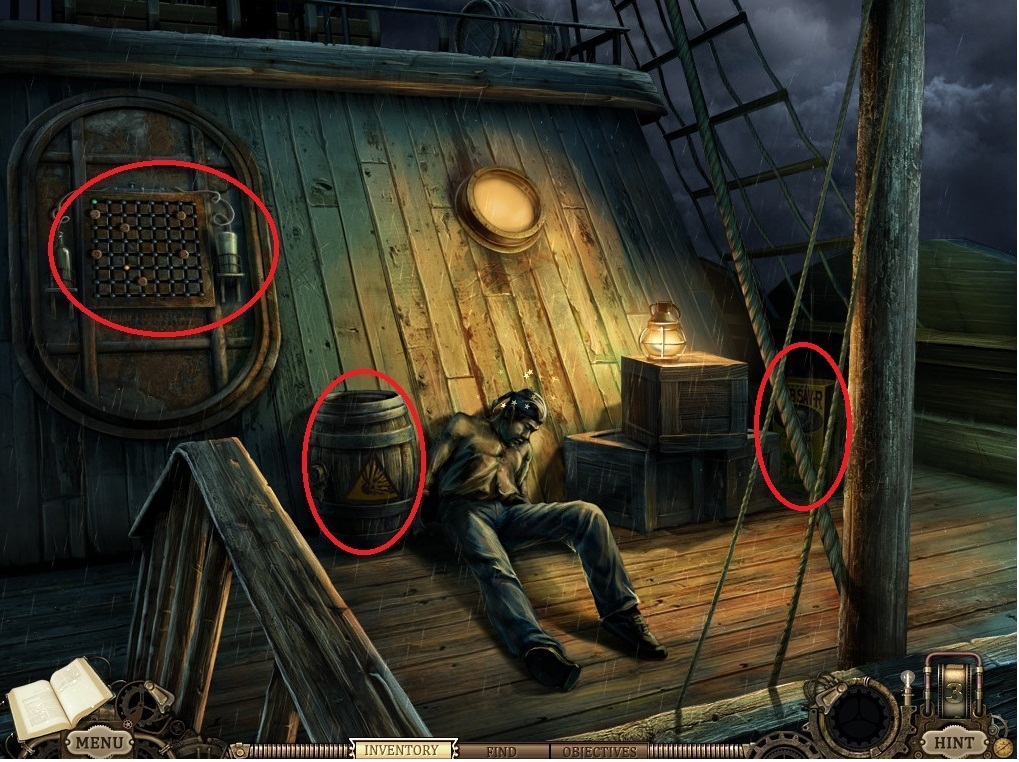
Take the barrel of gunpowder and the crocodile jack. Click the green board to open a mini-game to get into the hold.
Screenshot
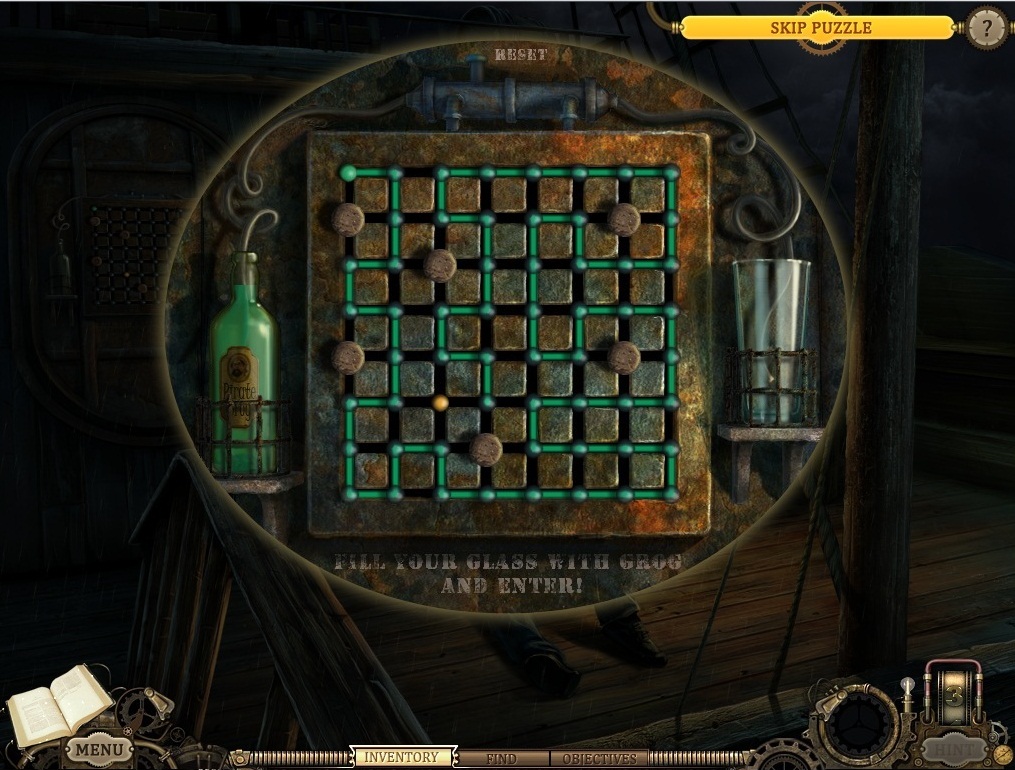
Play the mini-game, connecting the bottle of grog to the cup, making sure each segment of pipe turns green.
Screenshot
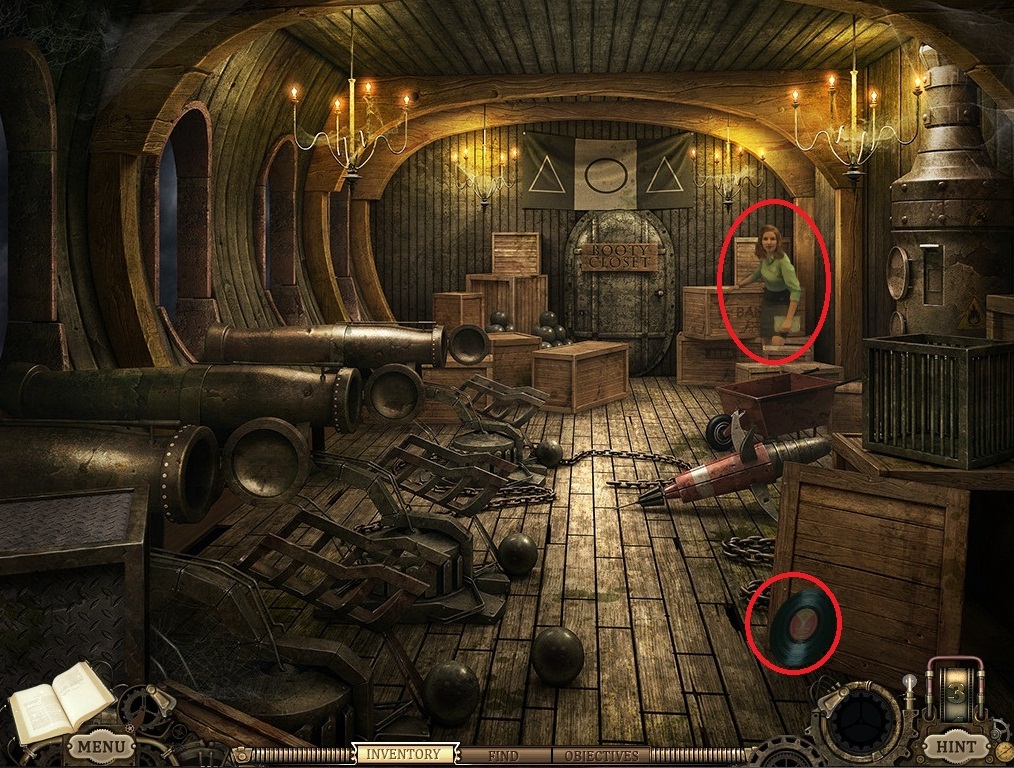
You can't do anything in this room yet, so proceed into the gun room.
Take the record, then click on the woman.
Screenshot
Exit to the hold. Use the record on the record player to calm the squid.
Take the trowel.
Screenshot
Back out to the crocodile scene. Use the croc jack on the crocodile and take Undertow's Library Card
Return to the gun room on the pirate ship. Use Undertow's library card on the door at the back of the gun room.
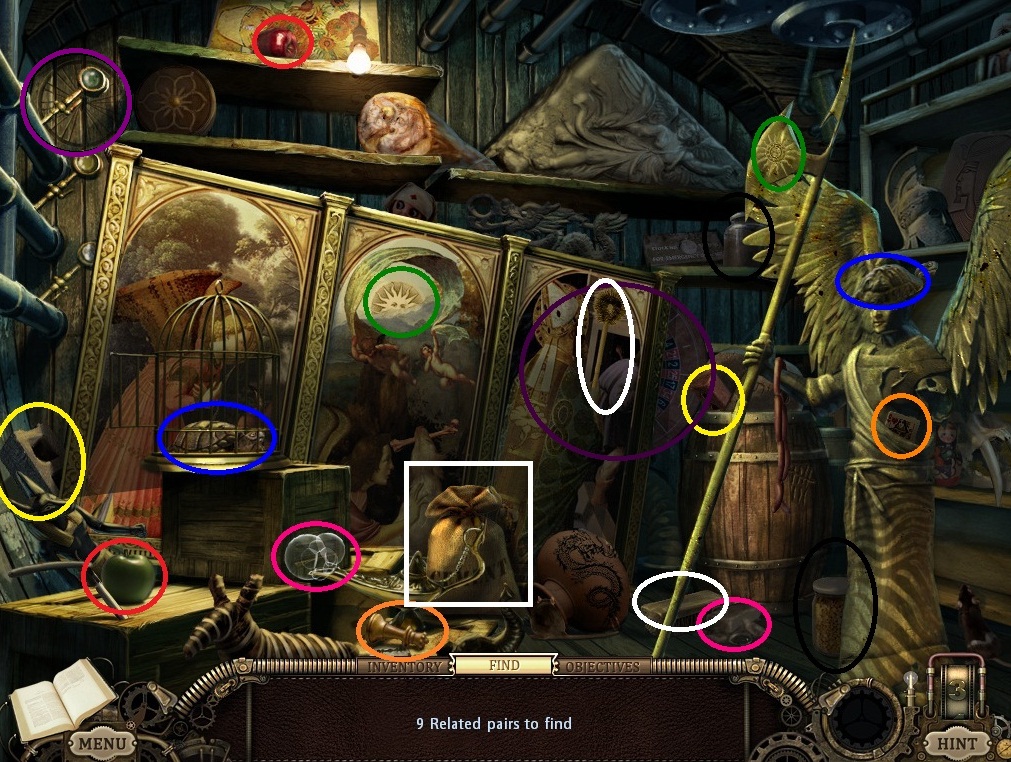
Collect the pairs of items and the bag of cement.
Screenshot
Screenshot
Make cement by using the bag of cement powder and the bucket of water on the wheelbarrow, then use the cement on each of the cannons.
Go back to the rocket. Use the hamster whistle to get the hamster.
Use letters "C" and "d" on the door to enter the password.
corndog
Use the gunpowder on the block in the middle of the room.
Take the key and use the key on the padlock on the cabinet.
Take the hamster chow. Put it in the dish and the hamster in the cage.
While zoomed in on the hamster dish, take the toy tool.
Screenshot
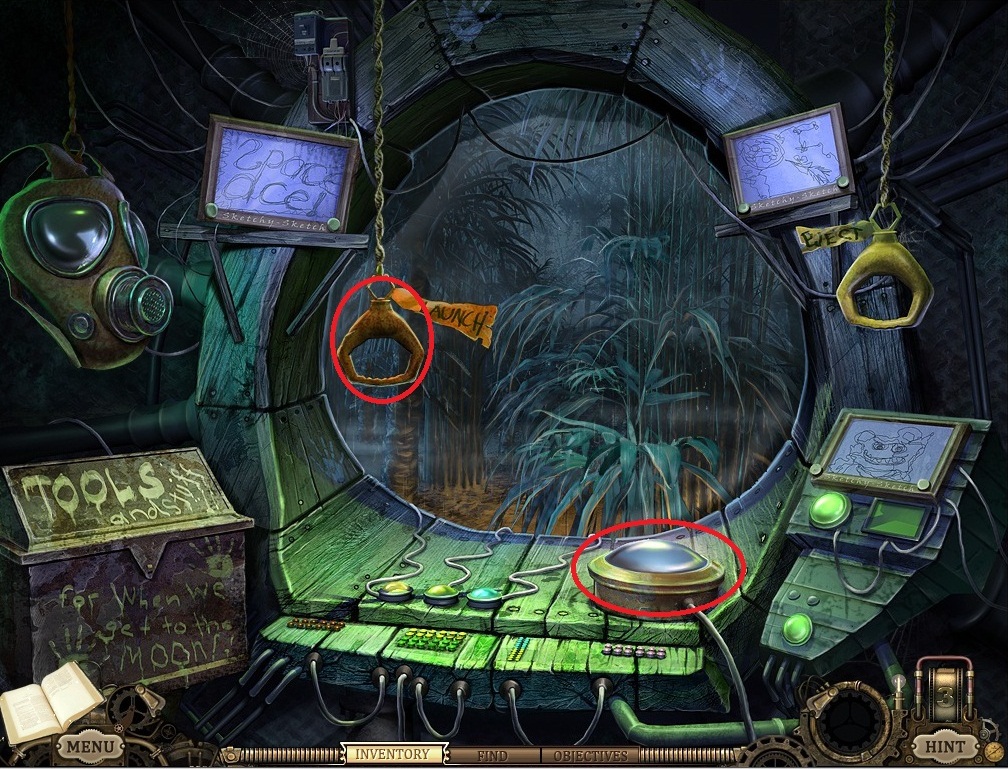
Use the toy tool on the locked toy chest and complete the hidden object scene.
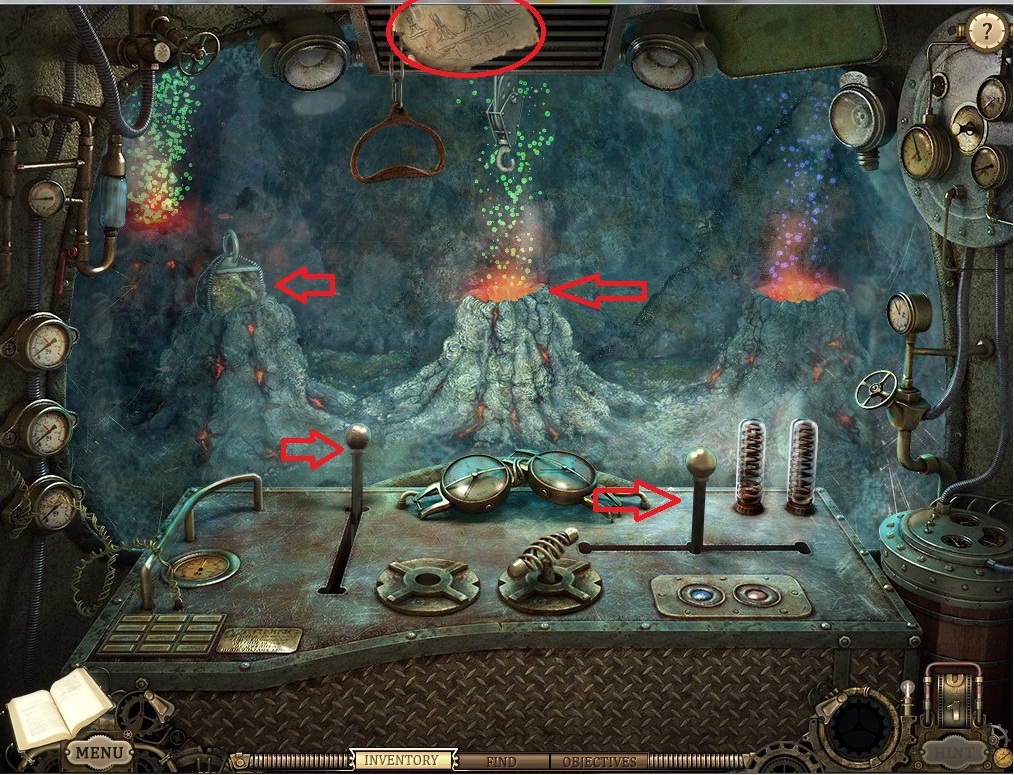
Zoom in on the radio and use the "F" and "10" keys. Zoom out and use the big shell on the radio speaker.
Pull down on the cord.
Go up the ladder and click on the controls. Set the switch to volcano lake and pull the cord to launch.
Screenshot
Chapter 2
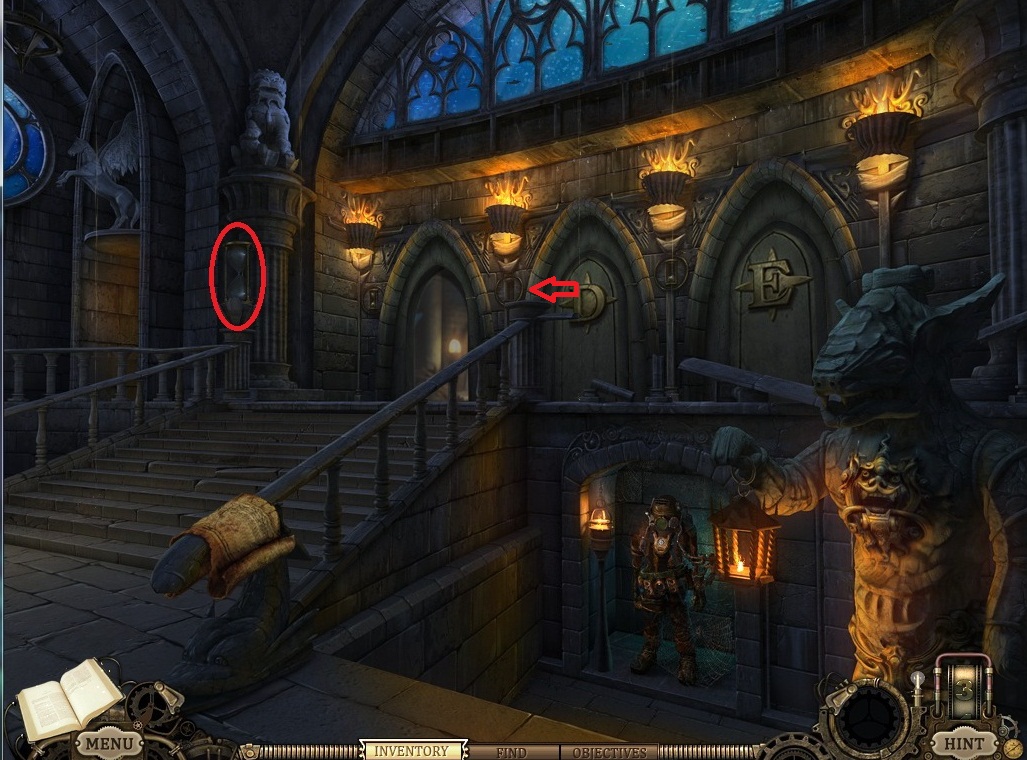
Take the tire iron and use it on the door.
Screenshot
Go through the left hand doorway to the hall of Gideon and solve the hidden object scene to get the sands of time.
Screenshot
Back out and take the hourglass. Combine it with the sands of time.
Use the filled hourglass on the center door to enter the Hall of Delia.
Screenshot
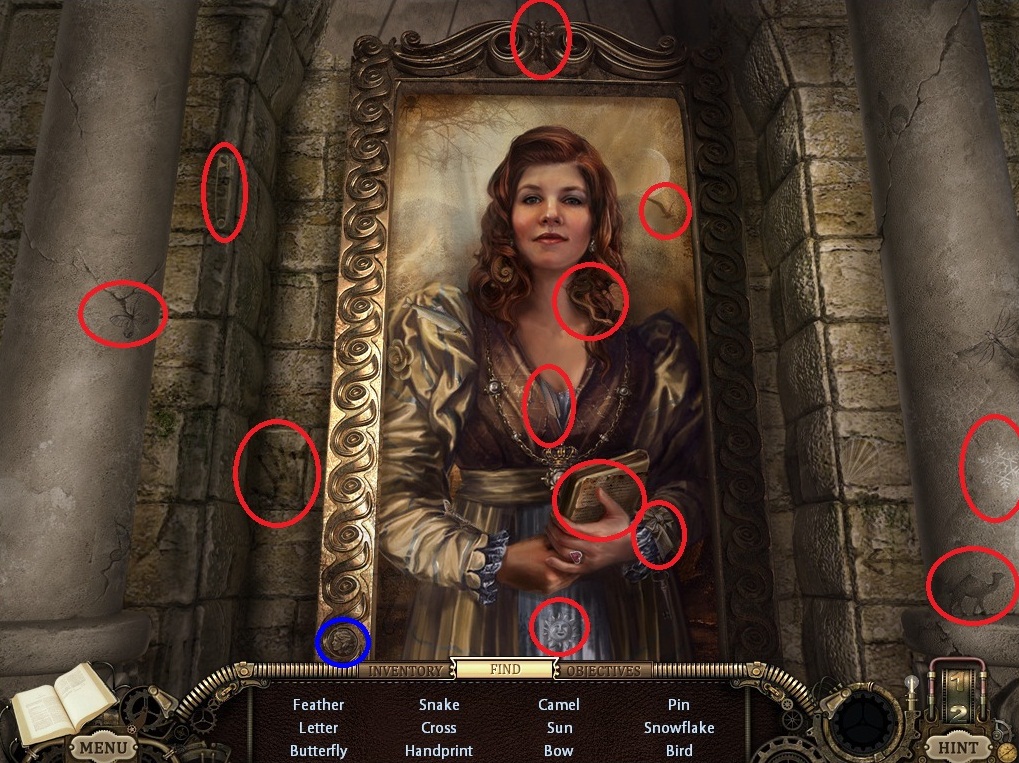
Click on the lefthand painting to launch a hidden object scene to get a Florin coin.
Screenshot
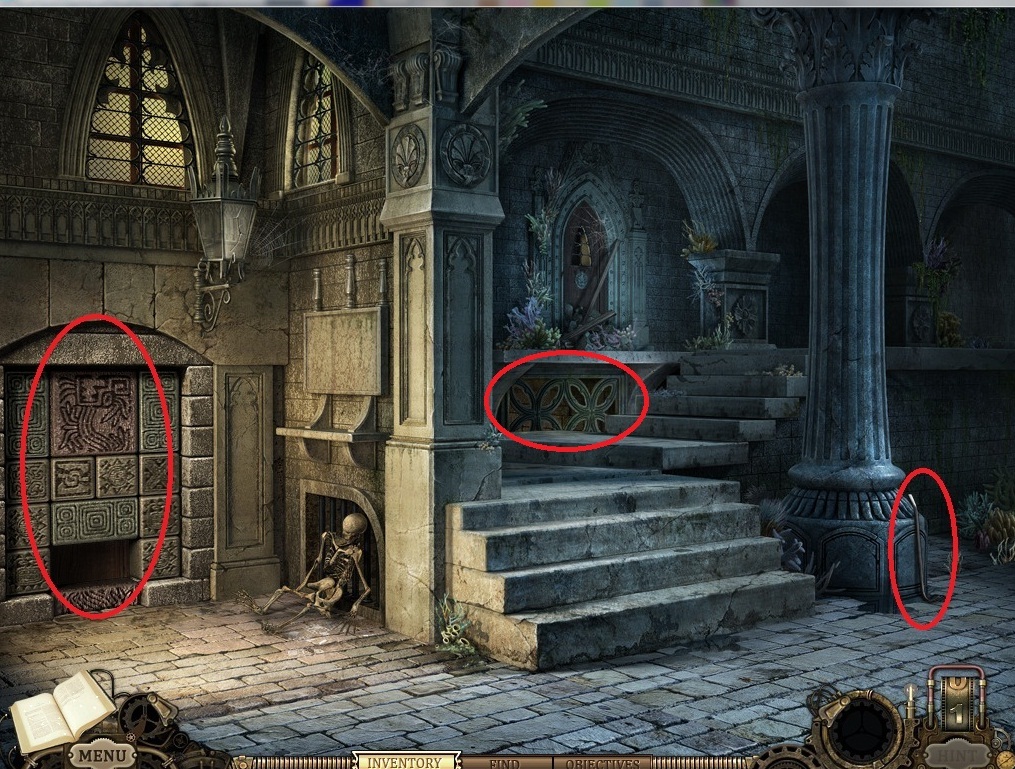
Continue forward and take the pry bar.
Screenshot
Click the skeleton for a clue for how to solve the puzzle. Click the stones on the left to open a slider puzzle.
Slide the blocks to allow the large square to exit from the bottom of the screen. You can skip this puzzle after a short wait.
Continue forward and take the hammer.
Collect pieces of the driving suits:
Click the diving suit on the left and use the hammer on its leg to get a suit leg.
Click the diving suit on the right and use pry bar to get suit arm.
Screenshot
Click the left doorway to launch a hidden object scene. Find the objects to get a screwdriver.
Screenshot
Back up and use the screwdriver on the square grate on the stairs landing. This will launch another hidden object/puzzle minigame that you may skip once the timer runs out.
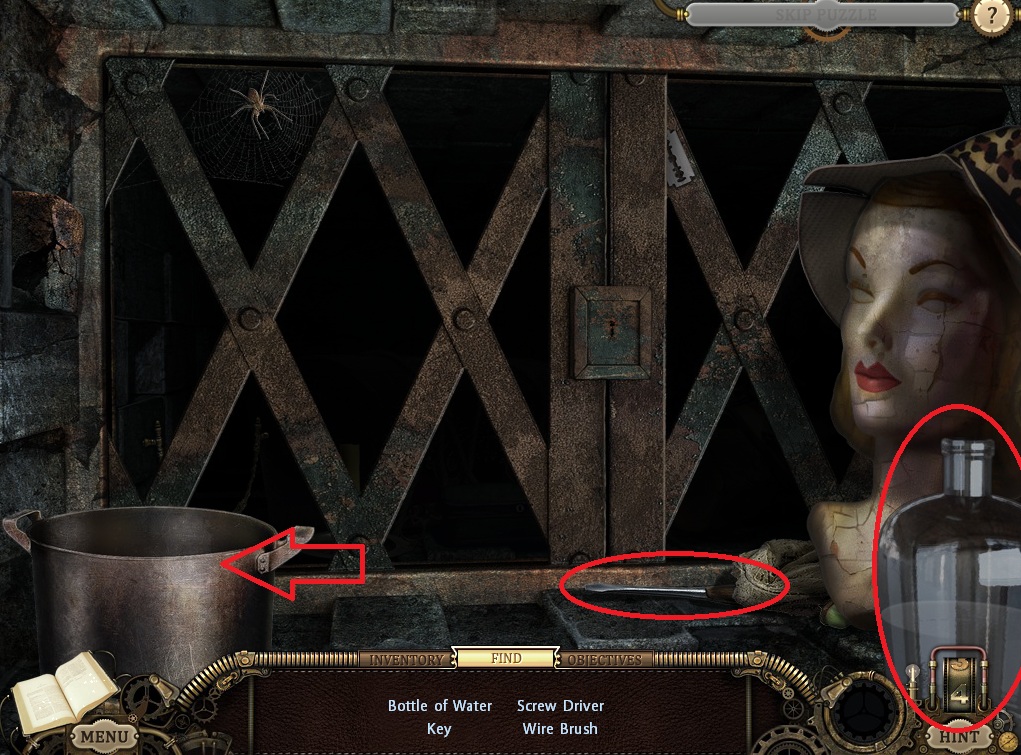
First Set of Items.
Take the bottle of water and the screwdriver.
Use the bottle of water on the pot to get the wire brush and the key.
Screenshot
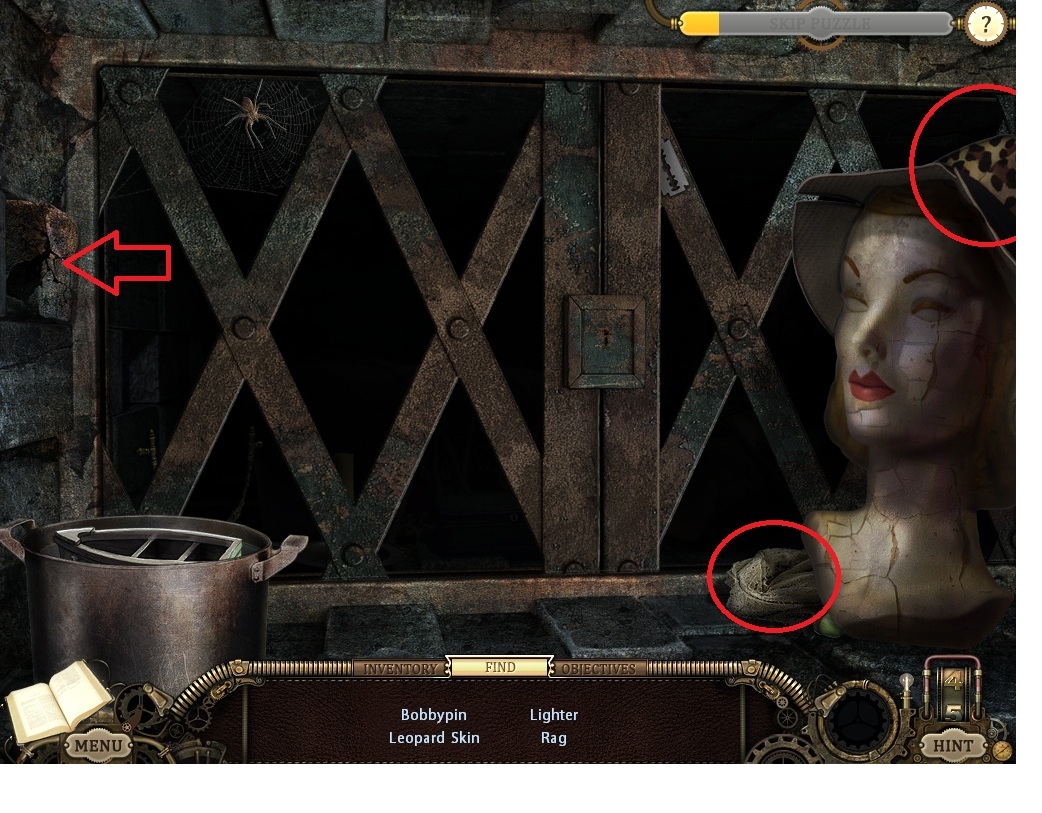
Second Set of Items.
Take the leopard print to reveal the bobby pin.
Use the screwdriver on the brick to get the lighter.
Take the rag.
Screenshot
Third Set of Items.
Screenshot
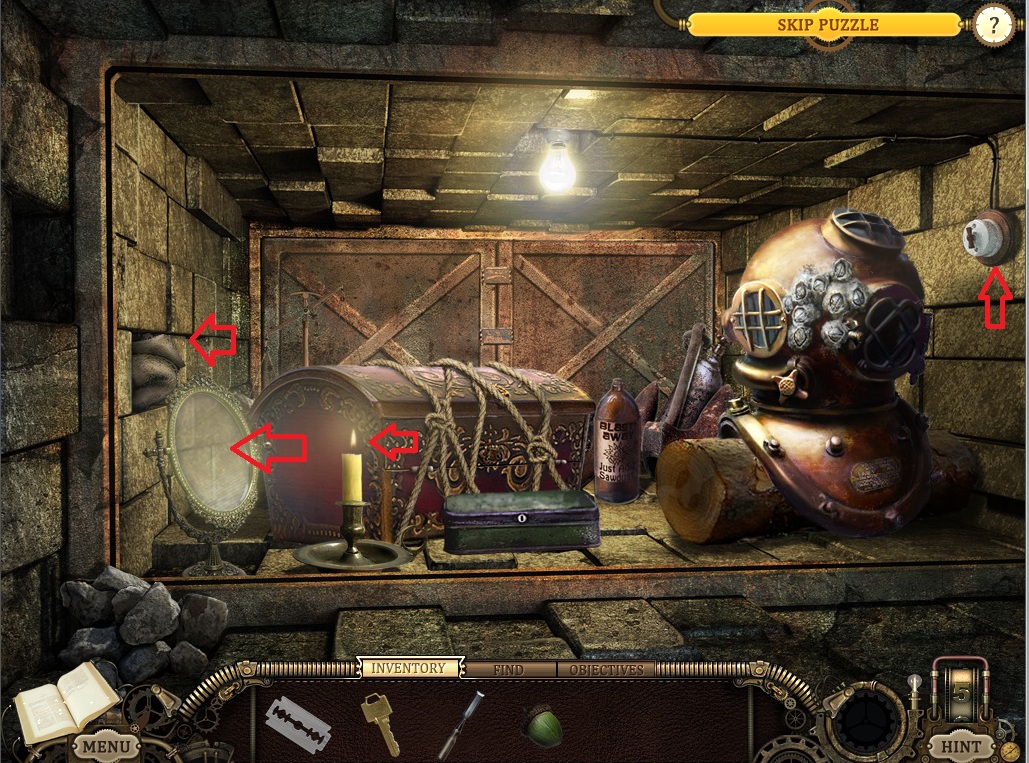
Fourth Set of Items.
Take the mannequin to reveal the mirror.
Take the pot to reveal the chisel.
Screenshot
Fifth Set of Items.
Use the wire brush and the bobby pin on the lock.
Now we need to turn on the lights.
Use the rag on the hole in the wall.
Use the lighter on the candle.
Use the mirror on the mirror stand.
Click the switch.
Screenshot
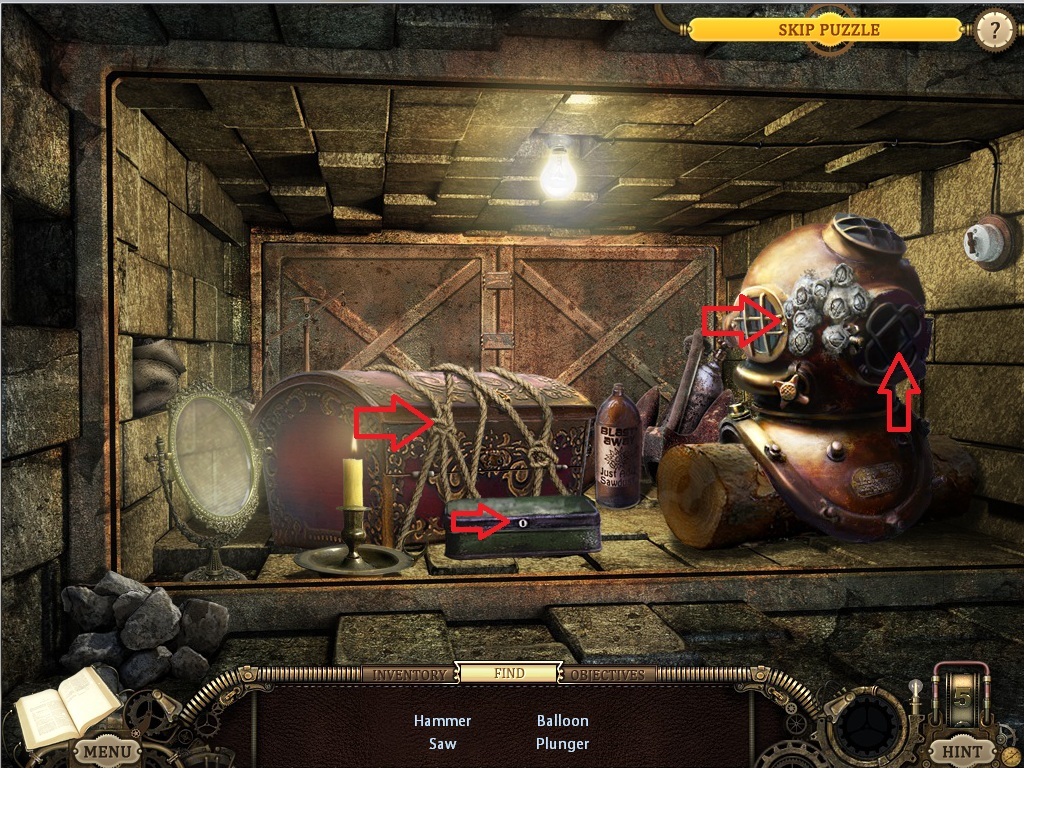
Use the razor on the ropes on the chest to get the hammer and plunger.
Use the key on the green box to get the balloon.
Combine the hammer and chisel, then use the combo on the helmet to reveal the helmet's faceplate. Open the faceplate to get the saw.
Screenshot
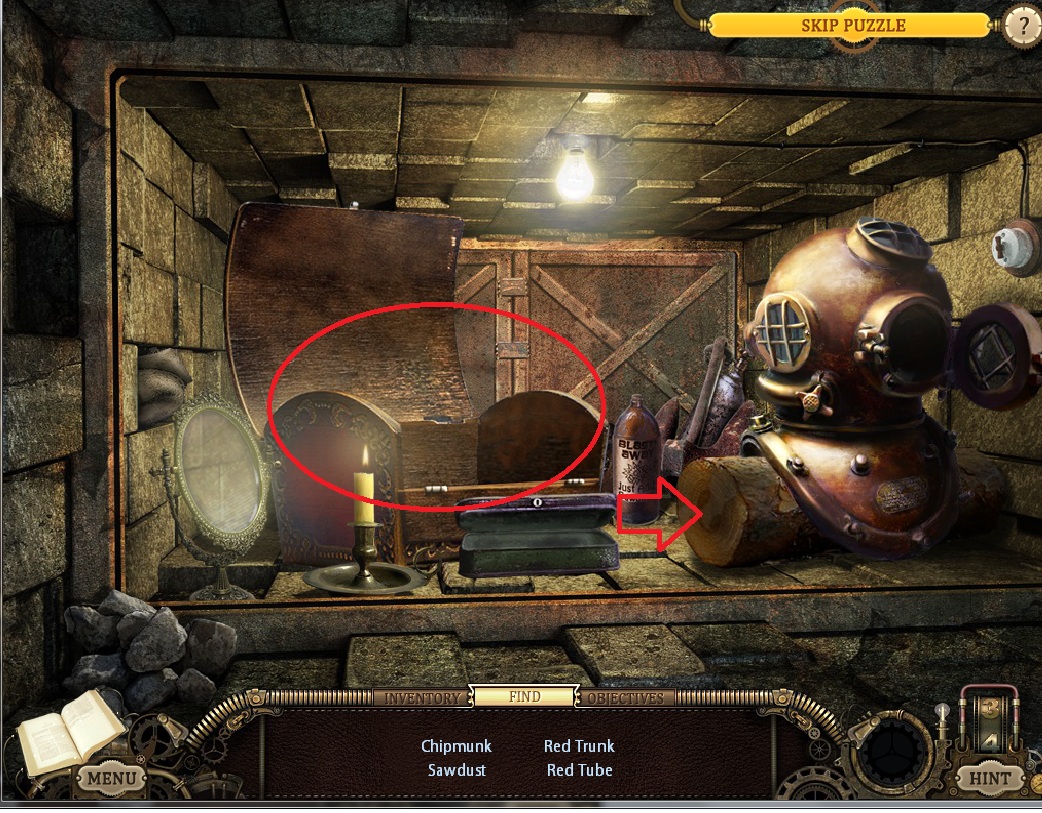
Sixth Set of Items.
Take the red trunk to reveal the red tube.
Use the saw on the log to get sawdust.
Use the acorn on the wood slice to get the chipmunk.
Screenshot
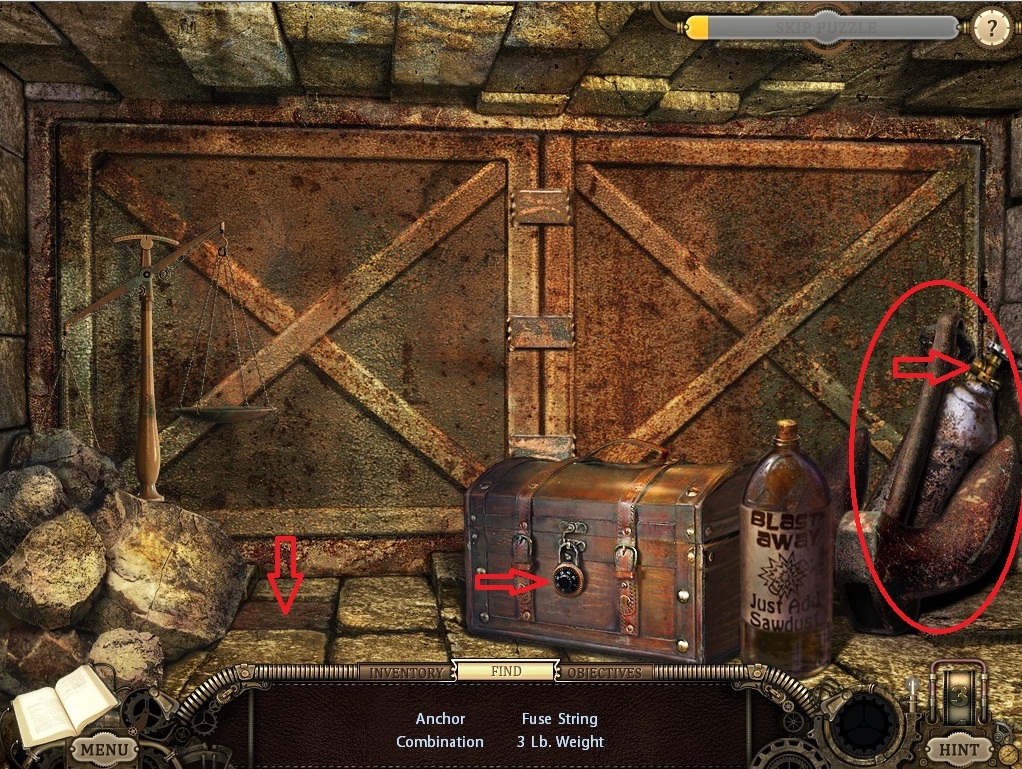
Seventh Set of Items.
Take the anchor.
Use the plunger on the loose tile to get the fuse string.
Use the balloon on the helium to get the combination.
Use the combination on the padlock to get the three pound weight.
Screenshot
Eighth Set of Items.
Use the weight on the balance to get the magnifying glass.
Take the rest of the items.
Screenshot
Ninth Set of Items.
Screenshot
Use the blowtorch on the locks.
Open the doors and take the trap.
Combine the sawdust and gunpowder.
Combine the explosive red tube with the fuse string.
Place the bomb in front of the window.
Use the magnifying glass to light the bomb.
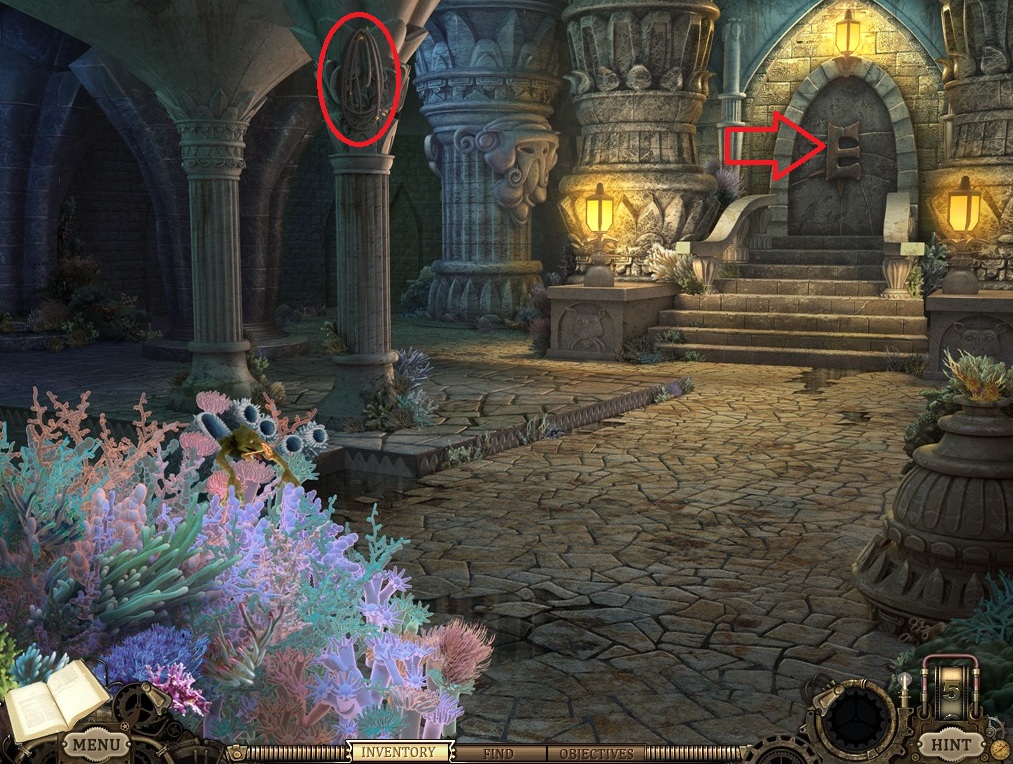
Go forward then go right.
Take the rope and exit via the E door. Click and drag the bolt to unlock the door.
Screenshot
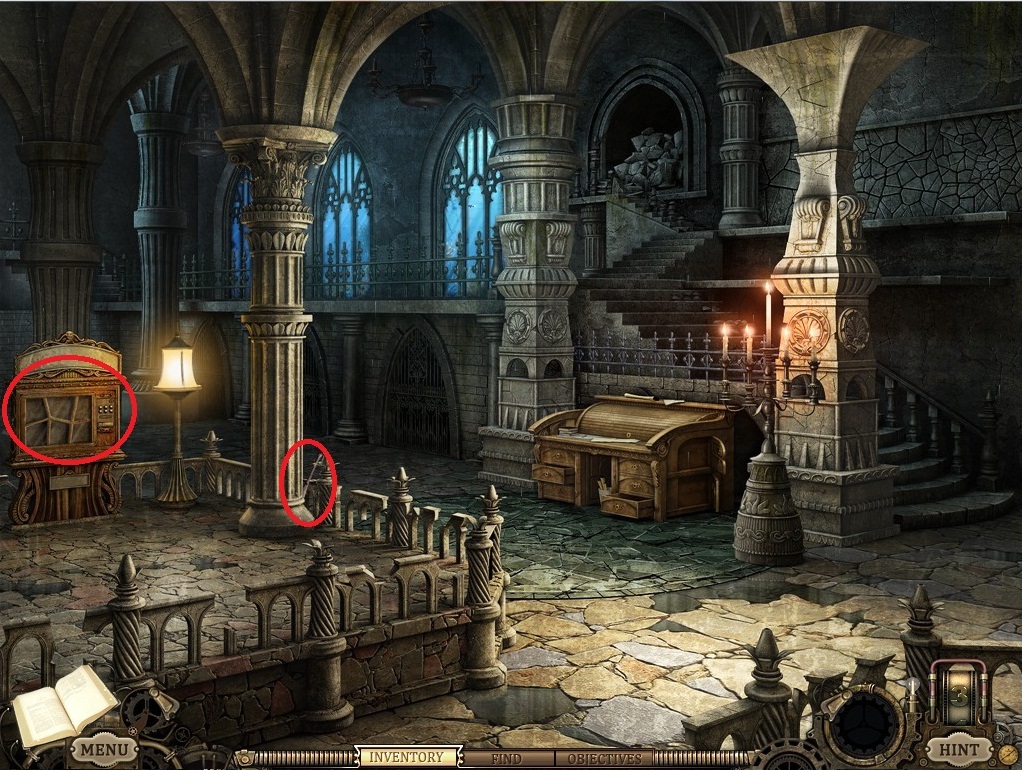
Go into Gideon's Hall (far left door) again. Go forward again into the second room.
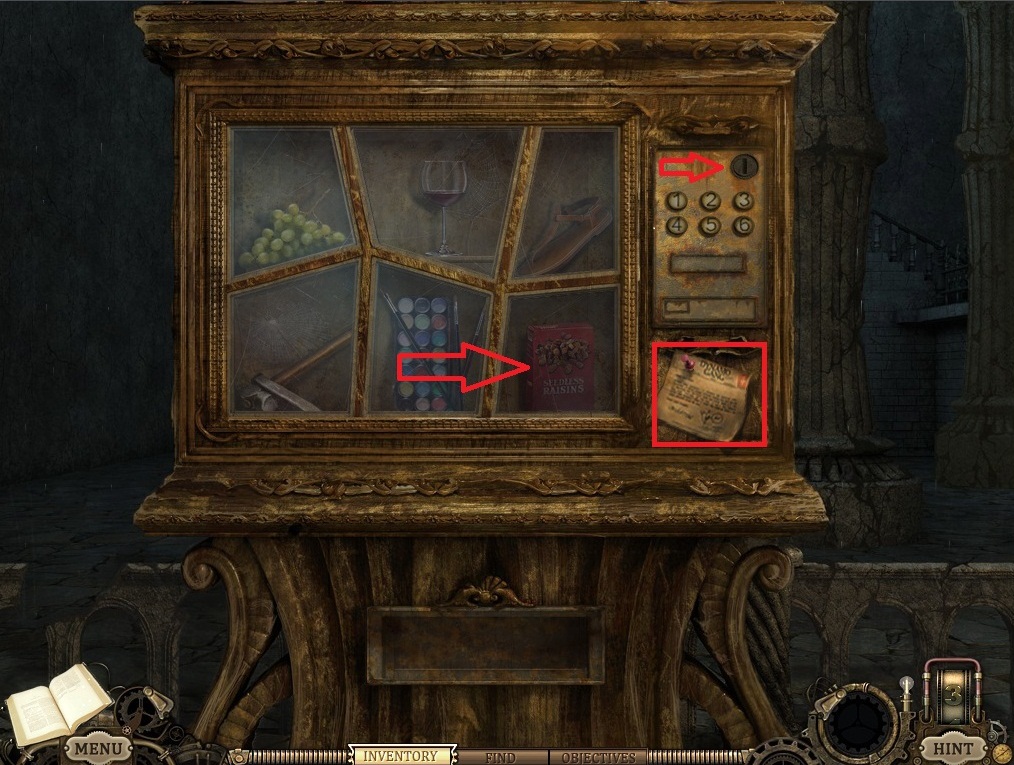
Take the bat, then click on the vending machine.
Screenshot
Take the note, then use the Florin coin on the vending machine.
No matter which button you press, the machine will malfunction. Use the bat on the machine and take the raisins.
Screenshot
Go back twice and go into the Hall of Ely.
Put the trap in the middle of the floor, then use the raisins and the rope on the trap.
Screenshot
Exit the room, then return to get the desk key.
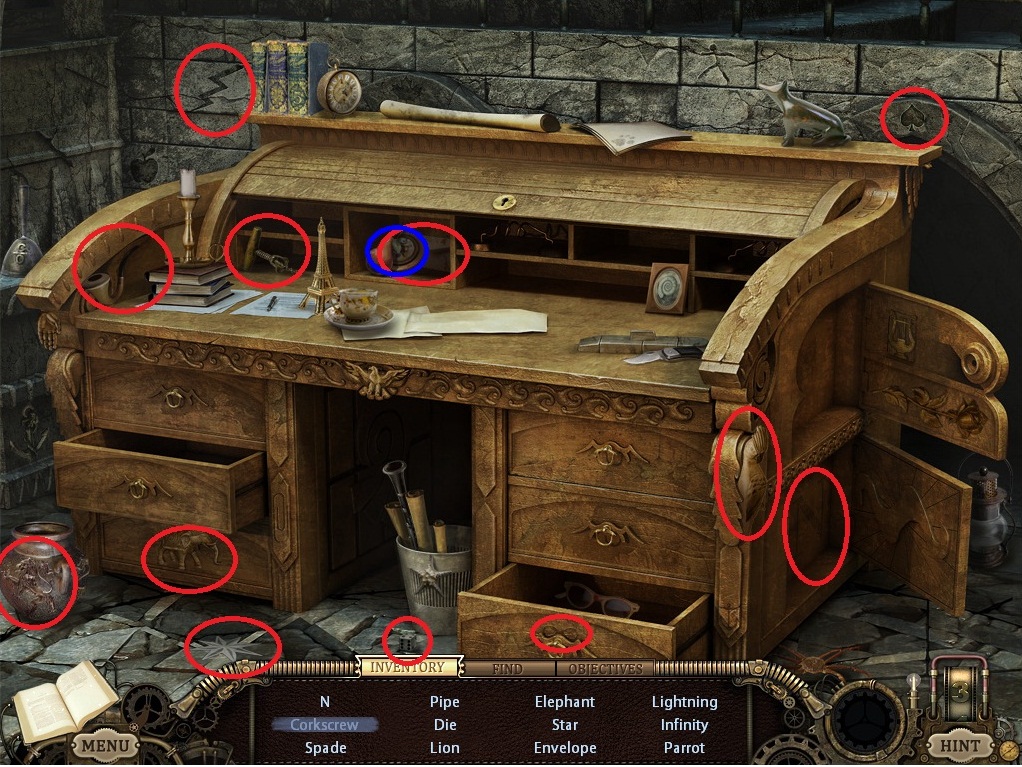
Go forward, then into Gideon's room. Go forward again and zoom in on the desk.
Complete the hidden object scene to acquire the navigation device.
Screenshot
Back up twice to the main room. Zoom in on the map on the banister and use the navigation device on the map to open a minigame.
Clicking on the colored buttons will produce two arrows that spin around the map. Your goal is to click the same button to stop the arrows when they line up with the colored lines on the map. Use the dial to control the speed of the arrows.
Click on the suit. Use the code from the map to solve the suit puzzle.
Click the dial and spin it until the number from the suit is aligned with the white dot at the bottom of the dial.
The dial will circle one letter and point to one two-digit number.
Enter the code on the combination lock below the dial.
The code is A43.
Take the helmet.
Go forward into Ely's room, then backwards into the hallway.
Click on the suit. Use the suit leg, suit arm, and suit helmet on the suit.
Take the suit.
Exit via the left door.
Chapter 3
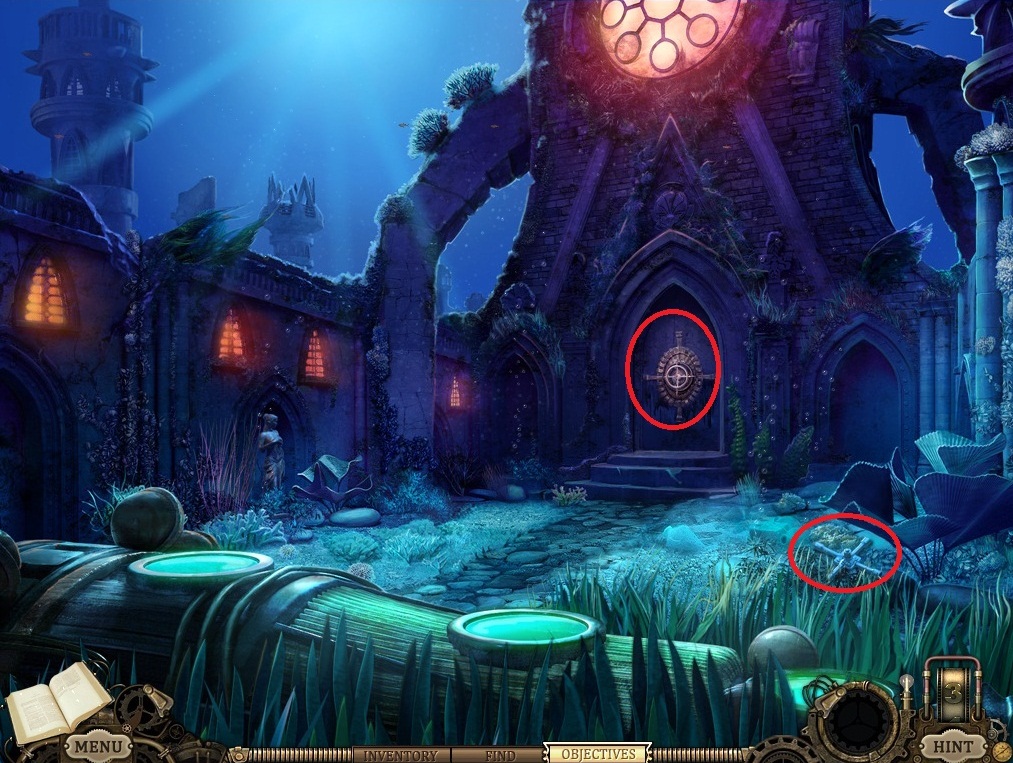
Go left.
Click the blowfish to start a hidden object scene. Find the objects to acquire the antidote.
Screenshot
Go forward and take the chaincutters.
Screenshot
Back up twice and go right.
Use the chain cutters on the fridge.
Screenshot
Take the note and keys
Back up and go left.
Zoom in on the locked gate and use the keys. You need to enter the correct key on each side of the lock, and the key in the correct depth, to unlock the gate. The solution changes each time you play.
Go forward and talk to the turtle man.
Go into his house and complete the hidden object scene to acquire the welder's mask.
Screenshot
Exit the house and go forward. Complete the hidden object scene to get the cutting torch.
Screenshot
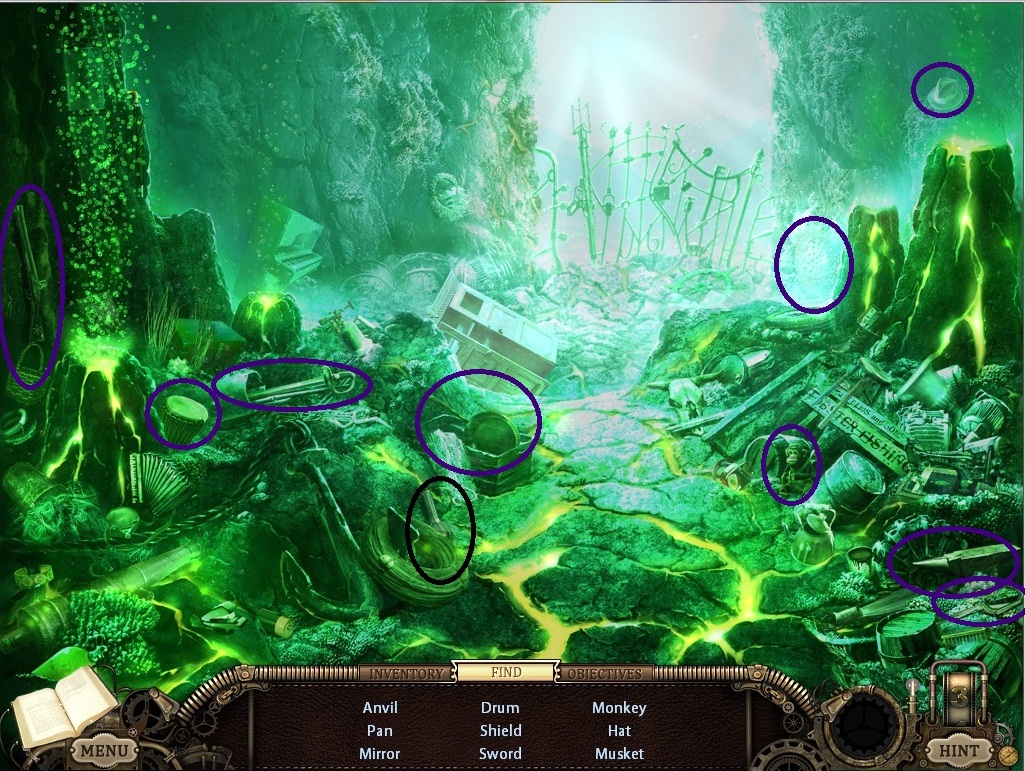
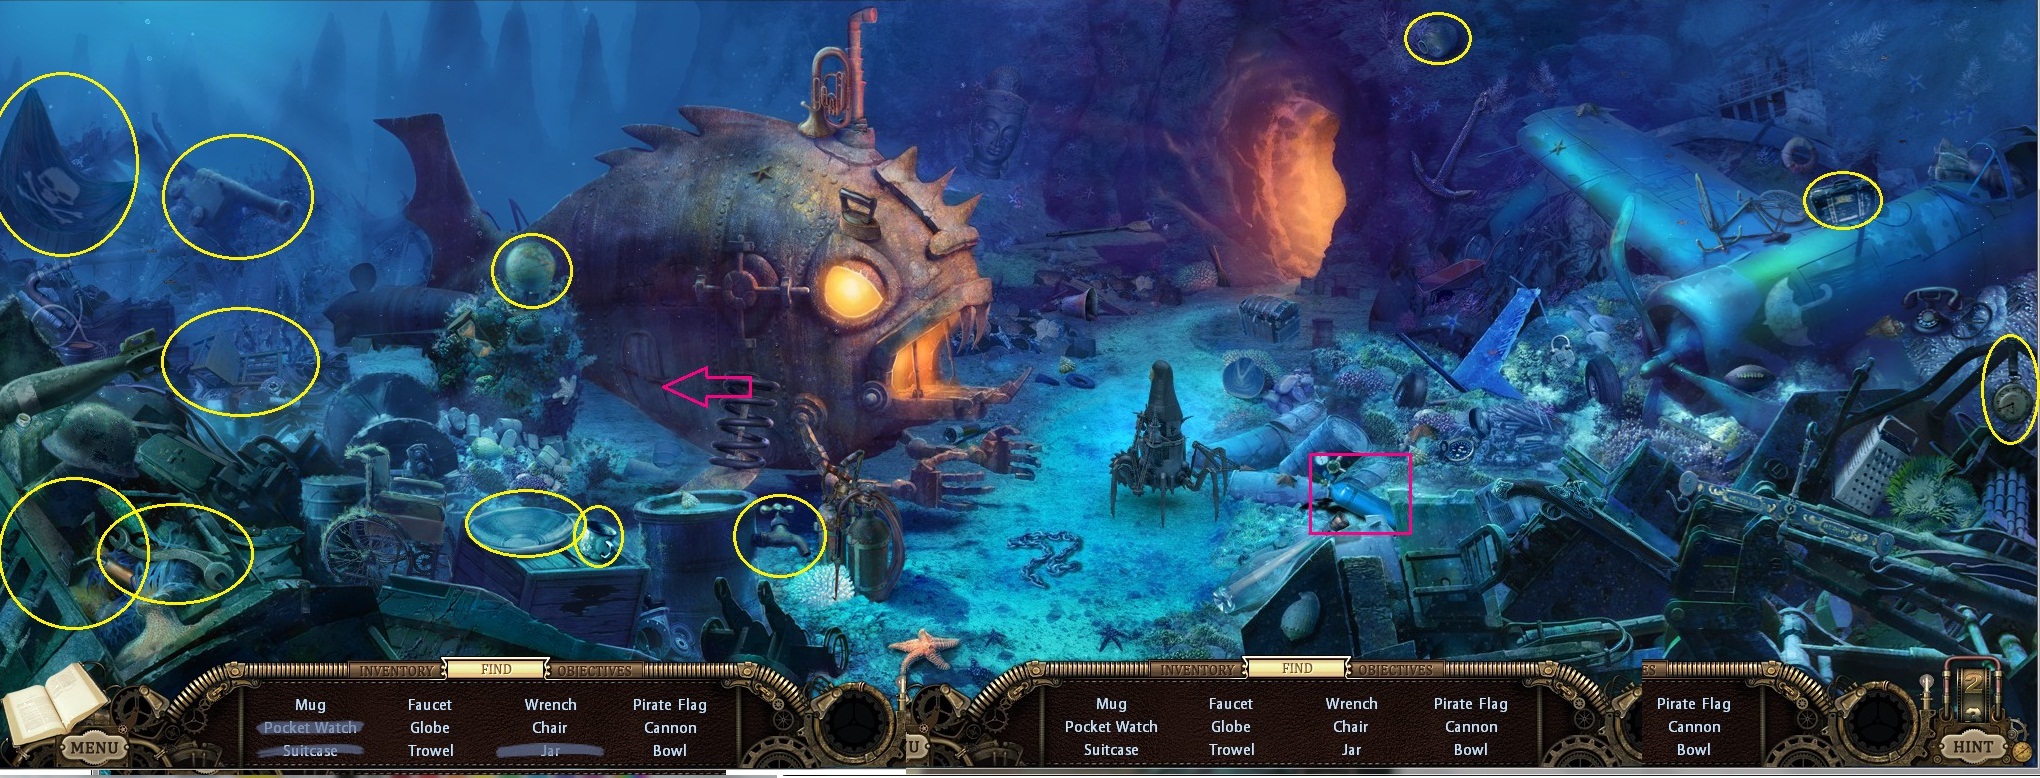
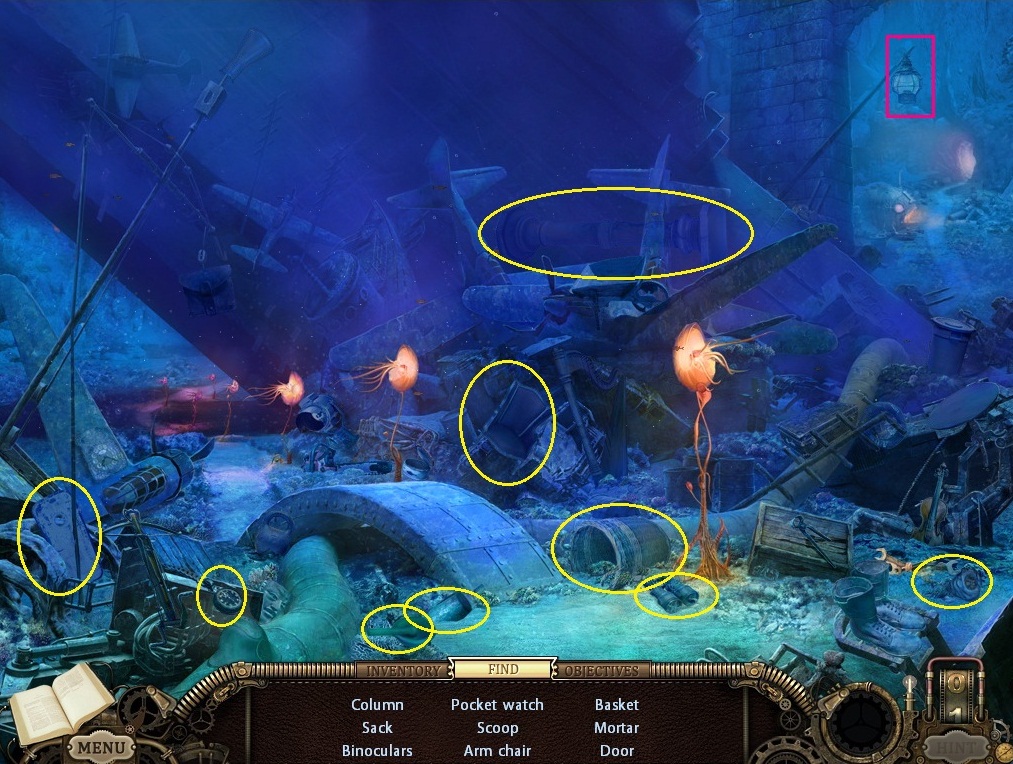
Go forward either to the left or right. Either way will take you to a very large hidden object scene, which requires scrolling from left to right to see all the objects. To scroll, simply move the mouse to the left or right edge of the screen.
Complete the hidden object scene to acquire the oxygen tank.
Screenshot
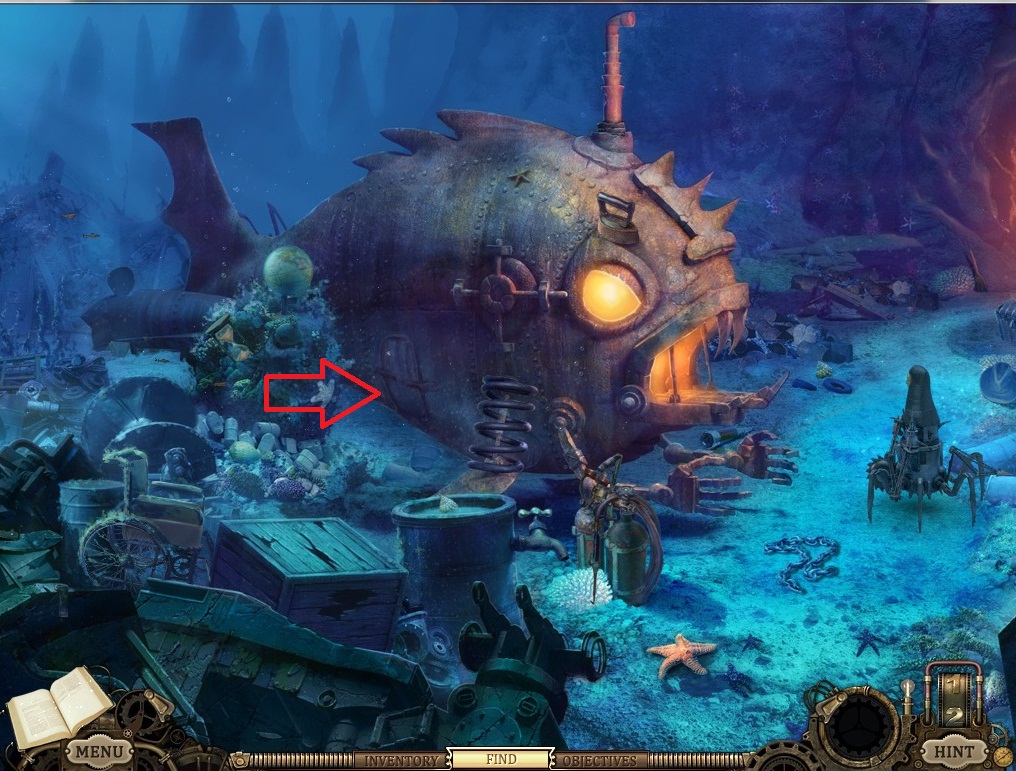
Get through the hatch on the sub.
Combine the oxygen tank with the torch.
Use the mask on the hatch on the sub.
Use the torch on the hatch.
Screenshot
Go into the sub and take the disguise. Then head upstairs.
Screenshot
Talk to Undertow, then head back out.
Complete the same three hidden object scenes (around Undertow's ship, the entrance to the junkyard, and in Sheldon's house) again.
Once you have solved all three hidden object scenes, return to Undertow. He will take the items and leave you alone in the sub.
Screenshot
Screenshot
Screenshot
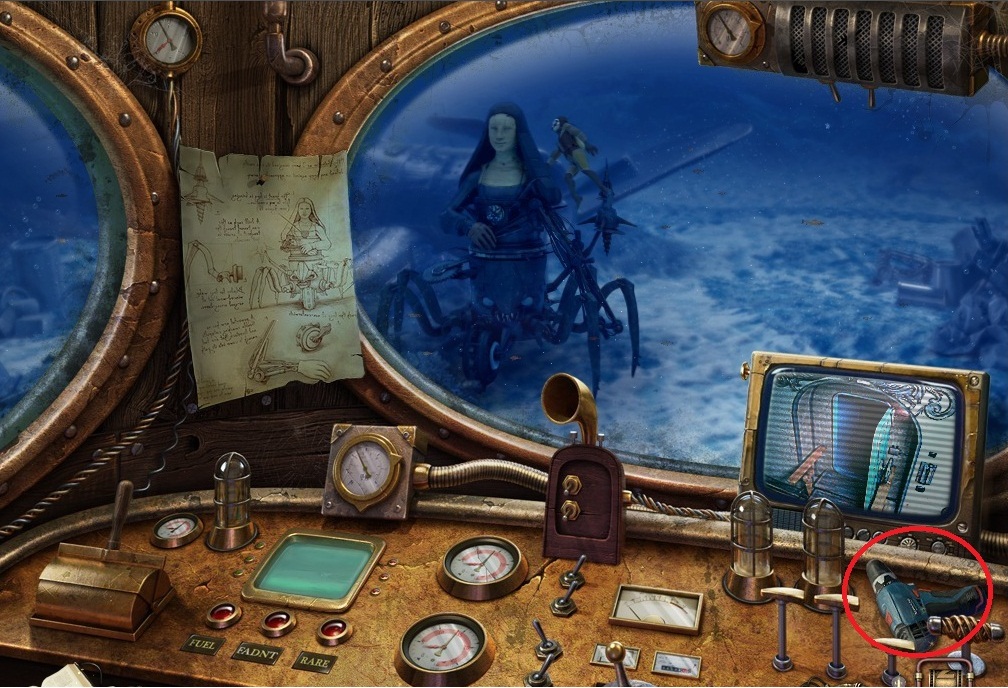
Click on the desk area, and take the drill.
Screenshot
Click the green screen to launch a tic tac toe minigame. You must win three games to unlock the door to the engine room.
Go back twice and left into the engine room. Complete the hidden object scene to acquire a crane key
Screenshot
Exit and back up all the way to the beginning of the chapter, then go right.
Go into the crane and use the key. The note at the top of the cab gives you a hint.
The object is to use the levers to move the weight to the center vent.
Right lever to the left.
Left lever down.
Left lever up.
Right lever to the middle.
Left lever down.
Screenshot
Go out and back, then left.
Take the parrot food and continue to the sub.
Screenshot
Once in the sub, give the parrot some parrot food to get a password. Go into the inner room and click the circle at the base of the center power core.
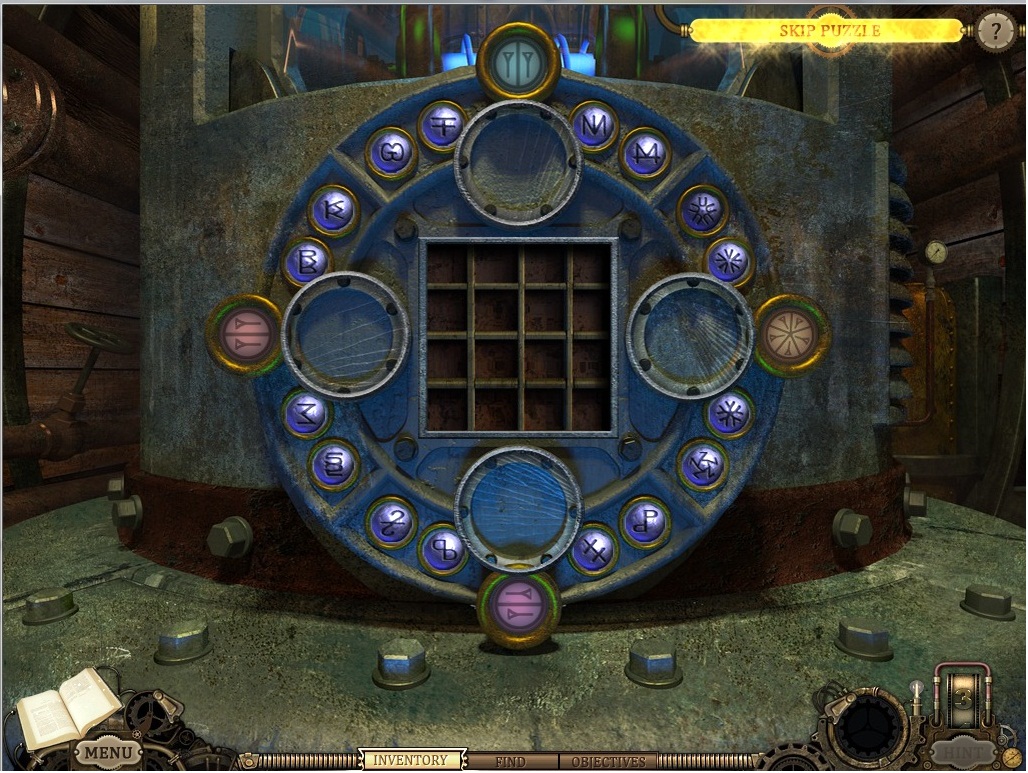
Time to solve a puzzle! As always, you can skip the minigame once the timer runs out.
In each large circle, click until you see an image that has the same kind of symmetry as the stick figures in the matching small circle.
Top:
Da Vinci sketch of human figure
Right:
Starburst
Bottom:
Yin yang
Left:
Swan on water
To solve the second part of the puzzle, each of the sixteen pieces must be put in slots on the ring. First determine what kind of symmetry the rune has, then put it in any of the four slots next to the sketch that has the same kind of symmetry.
Screenshot
To solve the last part of the puzzle, you need to correctly enter the password the parrot gave you.
In each quadrant of the circle, one of the runes is a letter from the password, mirrored or rotated. Click the large circle until the correct glyph comes up. Once you have all the glyphs, click the password letters and numbers on the 'keyboard'.
Screenshot
Take the drill bit and combine it with your drill.
Use the drill on the screws on the glass case in the center of the room. Take the power coil.
Back up several times until you are at Sheldon's house.
After you talk to Sheldon, go into his house and take the fish caller.
Go forward twice, then go into the cave behind the sub.
Click the fish hook to be rescued.
Chapter 4
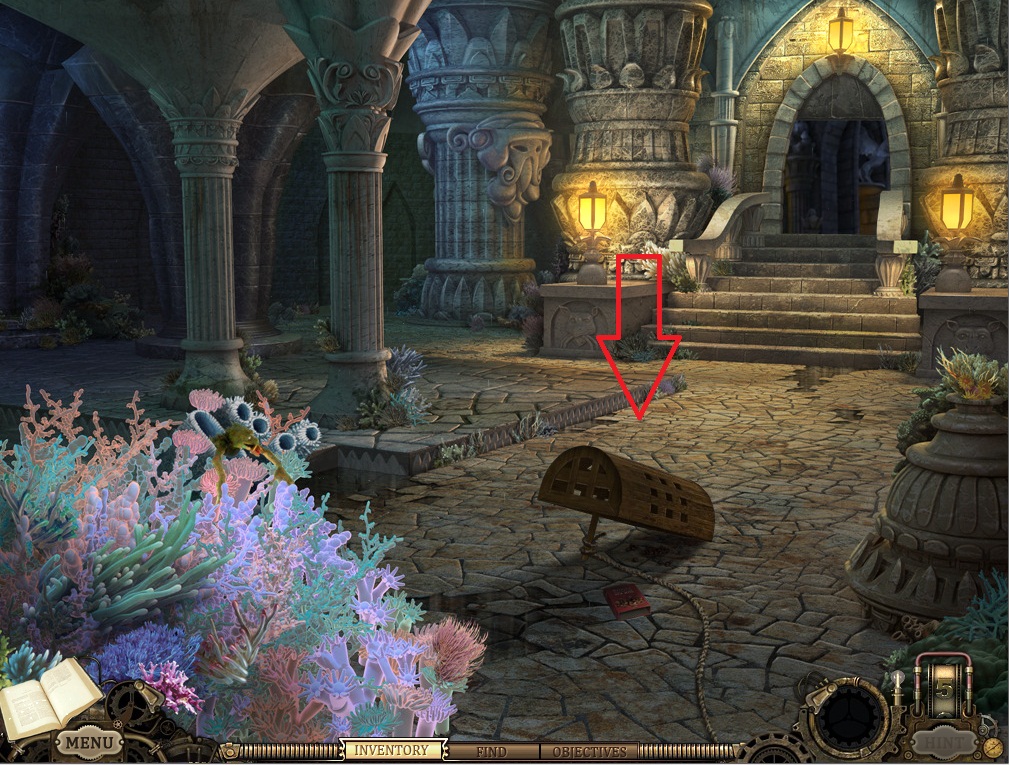
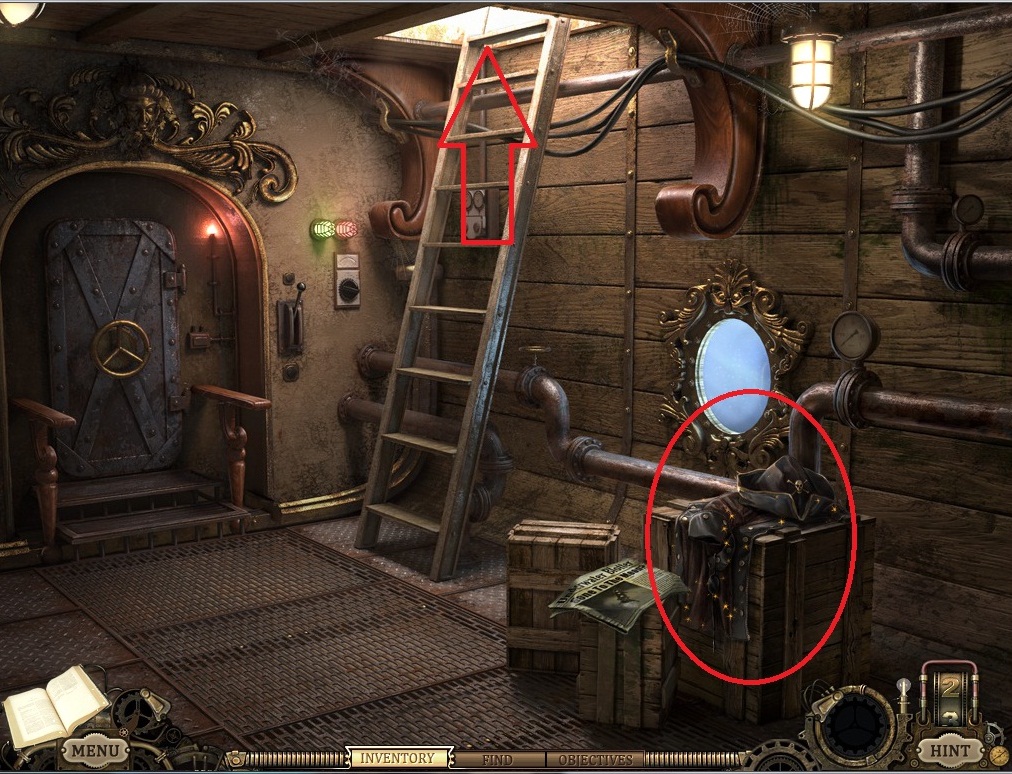
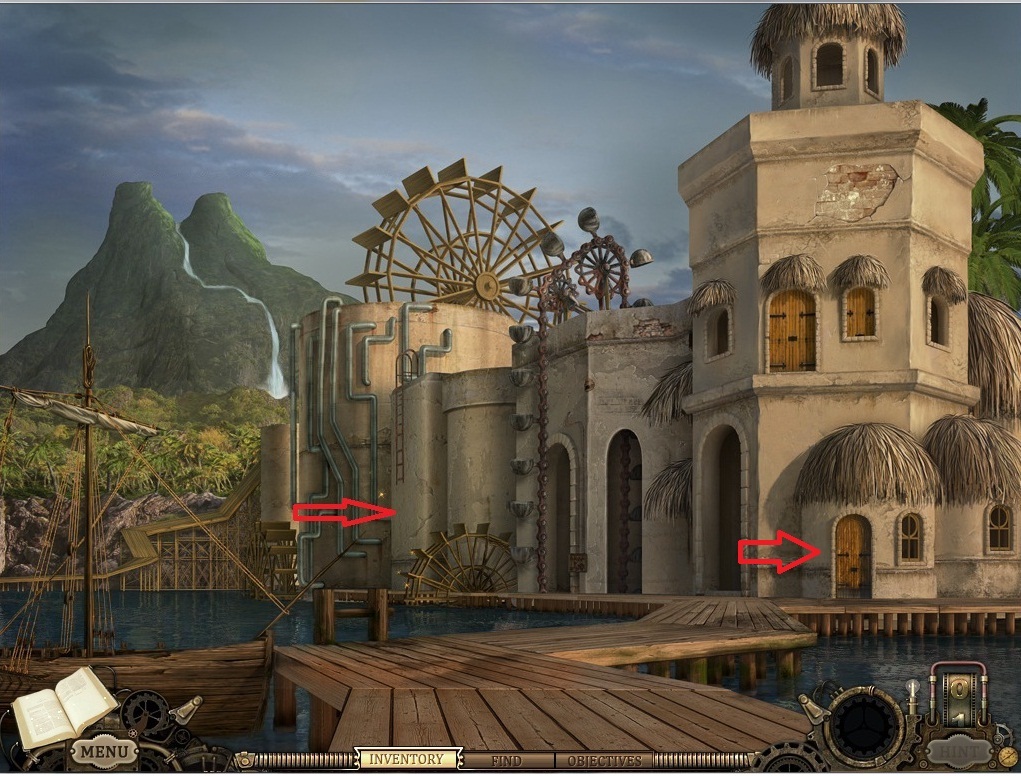
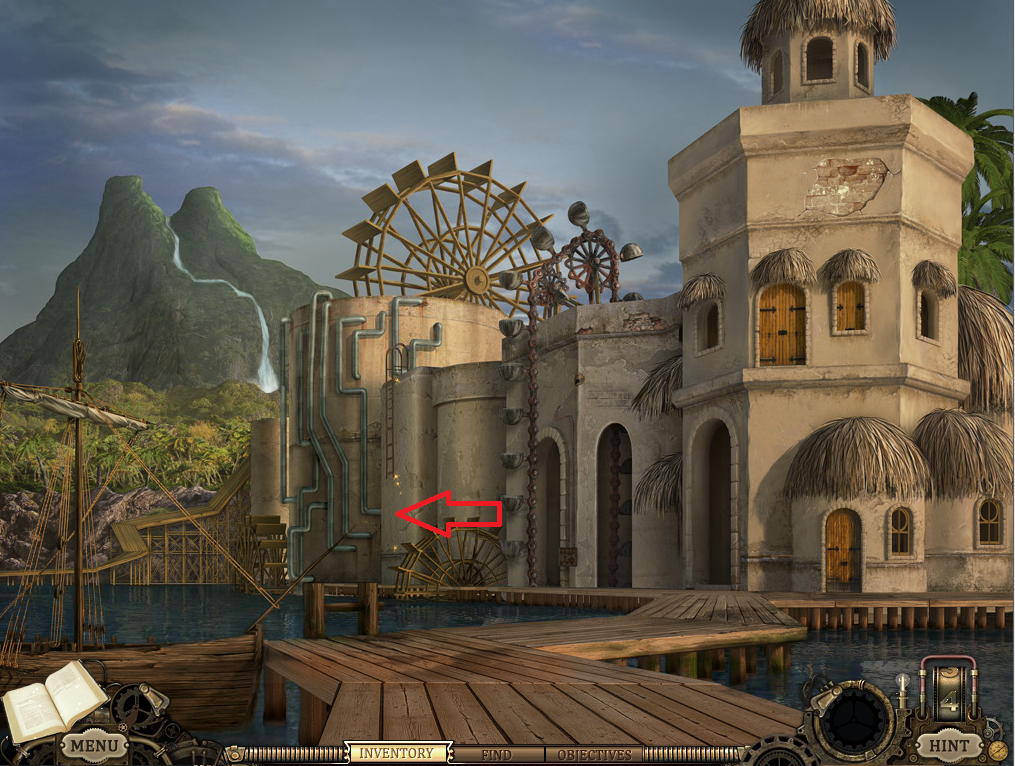
Click on Ralph DaVinci's door (right arrow in screenshot) and enter.
Screenshot
Take the shovel, newspaper, chicken (1), and toy fishing pole.
Click the clock and drag the fishing pole to the fisherman figure. Click the winding key on the right of the toy to start a minigame. Play the game to get the chain.
Screenshot
Exit Ralph's house and click on the waterwheel to open another puzzle.
Use the chain on the leftmost gears, then back up.
Take the ladder.
Click on the boat to launch a hidden object scene. Find the objects to get a hook and grabber.
Screenshot
Screenshot
Use the ladder you took earlier on the shortened ladder section on the wall.
Screenshot
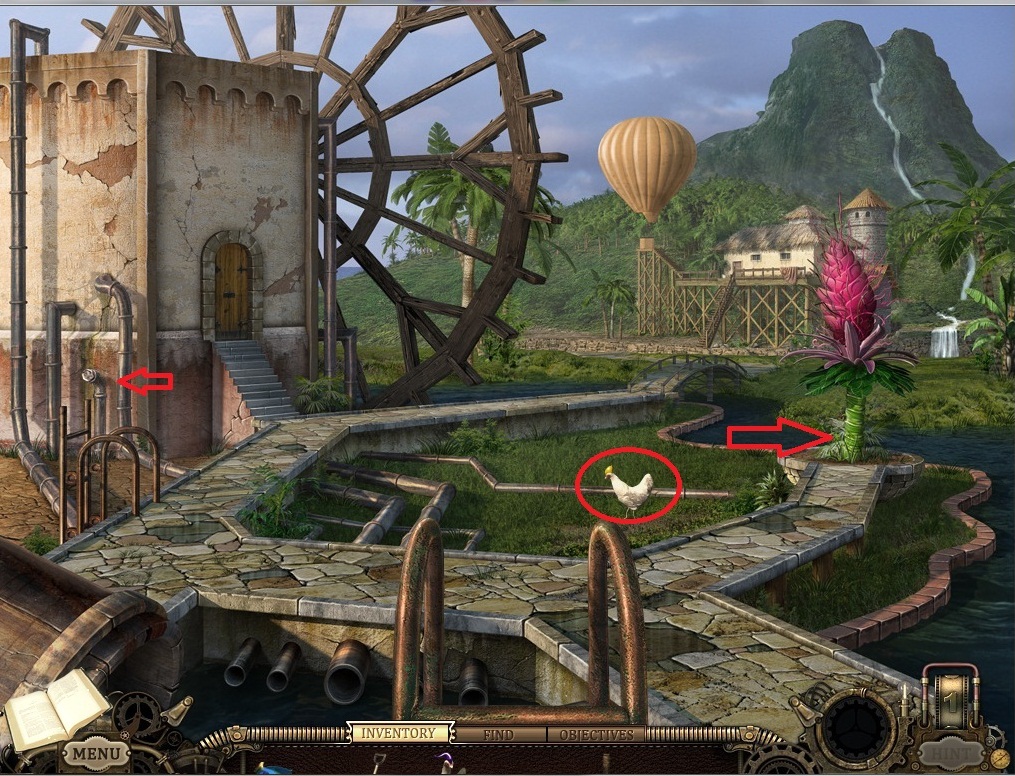
Go up then take the chicken (2).
Screenshot
Zoom in on the pink plant and use the shovel on the dirt.
Click on the lid to remove the dirt, then click again to zoom in. Use your hook on the cover to lift it.
Take the baseball.
Go through the door on the left. Use the grabber to get the chicken (3).
Click the box with yellow warning sign to get a fumigator.
Take the paint remover.
Screenshot
Go though the door on the left.
Use the baseball on the dog to get a key.
Click on the glass cabinet and use the key to open it. Take the canned smoke.
Click on the door on the right to launch another hidden object scene. Find the items to get a wrench.
Screenshot
Back up three times.
Click on the pipe to the left of the door. Use the wrench to get a cap.
Screenshot
Click the hole where the pink plant was. Use the cap to restore water pressure.
Go back up through the left door. Click on the cover to the water controls.
Combine the canned smoke and fumigator.
Use the fumigator on the cover to calm the bees. You can now play the mini-game.
Click on either Elysia or Noferia to start the first game. Click the pipes to rotate them with the goal of connecting the green and red boxes. After playing once, click the other island name and play again.
Back up and talk to Ralph. Then back up again to go back to town.
Click on the boat for another hidden object scene. Find the objects to get a gallery key.
Screenshot
Go into Ralph's house and use the key on the door on the left. Take the chicken (4) and find all the hidden objects to get a pair of scissors.
Screenshot
Use the paint remover on the painting on the left to get a diagram.
Exit Ralph's house and go back up the ladder. Go through the door on the left, through the next door, and through the door marked "NODE."
Click on the wooden dock on the right. Use the scissor on the chicken (5) hanging from the fishing pole.
Back up twice.
Click on the chicken nests in the back of the room. Take the diagram from the right wall.
Place the chickens in the correct nests. Use the diagram from Ralph's house, and match the color of the chickens' combs to the color of the shapes in the diagram.
Now use the diagram to determine the correct order to click the chickens to power the machine.
Finally, use the levers to move the water level in the meter from Danger to Target.
Exit the room, then exit the courtyard. Go forward twice, to the violin shop.
Click on the hot air balloon to start a hidden object scene. Find the objects to get a knife and a tuning peg.
Screenshot
Click on the door to the violin shop, and use the tuning peg on the violin.
You must move the letters so they appear in the order given on the bottom of the violin. Use the tuning pegs to move letters up and down, and use the green arrows to move letters left and right. When the letters are in place, click the bow to open the door.
Go into the violin shop, and click on the computer monitor on the right.
Screenshot
Play the mini-game to safely cover the acid.
Use the knife on the ropes holding Delia and Gideon. Get the amplifying cone.
Back up three times, then go into the building on the left. Go forward until you are again on the dock.
Combine the amplifying cone with the fishmaster, then use the fishmaster.
Posted by: MmeTurbulence |
September 13, 2011 7:01 PM
|
September 13, 2011 7:01 PM