
Howlville: The Dark Past
Platform: Mac, Windows

![]() Howlville: The Dark Past is a lightly-flavored science fiction-themed hidden object adventure game from N-Tri Studio. Featuring a balanced mix of puzzle solving, item hunting, and adventuring, Howlville manages to be a hidden object game without feeling like a rehash of the games that came before it, touching on common elements found in the genre but focusing intently on smart puzzles that really challenge the player. The result is something light and casual, recognizable but still different enough to offer mounds of enjoyment.
Howlville: The Dark Past is a lightly-flavored science fiction-themed hidden object adventure game from N-Tri Studio. Featuring a balanced mix of puzzle solving, item hunting, and adventuring, Howlville manages to be a hidden object game without feeling like a rehash of the games that came before it, touching on common elements found in the genre but focusing intently on smart puzzles that really challenge the player. The result is something light and casual, recognizable but still different enough to offer mounds of enjoyment.
 The protagonist Rachel lost her father when she was a child, and she's been searching for him her entire life. Gaining access to some "secret archives", she learned he was one of two scientists investigating a strange artifact in the town of Howlville. Something went wrong, though, and the town has since been declared off-limits, its location hidden from the public. Rachel eventually found the classified city only to be thrown in a mental institution shortly afterwards. Now she has escaped, and as the game begins, she's on her way to Howlville. As you probably guessed, things only get weirder from this point on, what with all the mad scientistry and whatnot...
Howlville (the game, not the place) is laid out in a series of small sections blocked by puzzles that require multiple steps to complete. As you explore each area, you'll pick up a number of items to keep in your inventory, most of which have logical uses later in the game. You'll also complete a number of mini-games to gain access to new areas, such as completing fuses to light up rooms, or gathering certain numbers of unusual items so you can open locked boxes, cabinets, and the like.
 Howlville features frequent hidden object scenes, all of which are packed with interactive elements to create a much more dynamic feeling. Instead of staring at a list, staring at a scene, then clicking, you get to move things around, pick up items and use them on things, or shift things around to uncover previously hidden objects. It's quite a small addition to the hidden object experience, of course, but it manages to chase off the dry feeling and get you more interested in the game.
Analysis: Howlville: The Dark Past sticks with the established hidden object formula, but it does so without sinking too deeply into it. The story features a smattering of elements we've all seen before, such as mysteriously vanishing grandparents, a protagonist from a mental institution, and a dark, semi-haunted town to explore. But Howlville is almost parodical in nature, lightly skimming the surface of the hidden object genre just as an excuse to deliver a series of wonderfully-constructed puzzles.
The story and setting are simple but interesting, but the visuals do manage to stand out as being crisp and easy to see. The game doesn't support widescreen, however, which is a bit of a shame seeing as how it looks so good. Most of the time you'll be so focused on the unique mini-games and strange puzzles you won't be thinking about things like aspect ratios or black bars on the side of your screen.
Simply enjoyable is a good way to describe Howlville: The Dark Past. The game doesn't veer too far in any particular genre-defined direction, allowing it to maintain its likeability without alienating any type of player. It's got gameplay where it counts, though, and both the in-game puzzles and mini-games and are some of the most satisfying puzzles around!
![]() Windows:
Windows:
Download the demo
Get the full version
![]() Mac OS X:
Mac OS X:
Download the demo
Get the full version


Walkthrough Guide
(Please allow page to fully load for spoiler tags to be functional.)
Howlville: The Dark Past Walkthrough
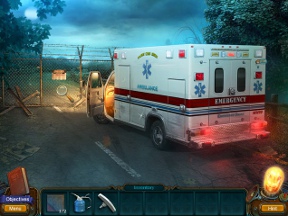
Chapter 1—The Ambulance
Street
Find the Lamp 1/20 at the upper right corner of the back of the ambulance to receive an additional hint.
Open the car door at the front of the ambulance.
Click the open door to go to the Driver's Seat.
Driver's Seat
Pick up the OILER on the floor in front of the right chair.
Flip the lever at the side of the steering wheel.
Turn the steering wheel to reveal the PUZZLE PIECE 1/2 on the dashboard.
Move the junk on top of the seat of the right chair to uncover the SCREWDRIVER.
Use the SCREWDRIVER to open the stuck door to the glove compartment.
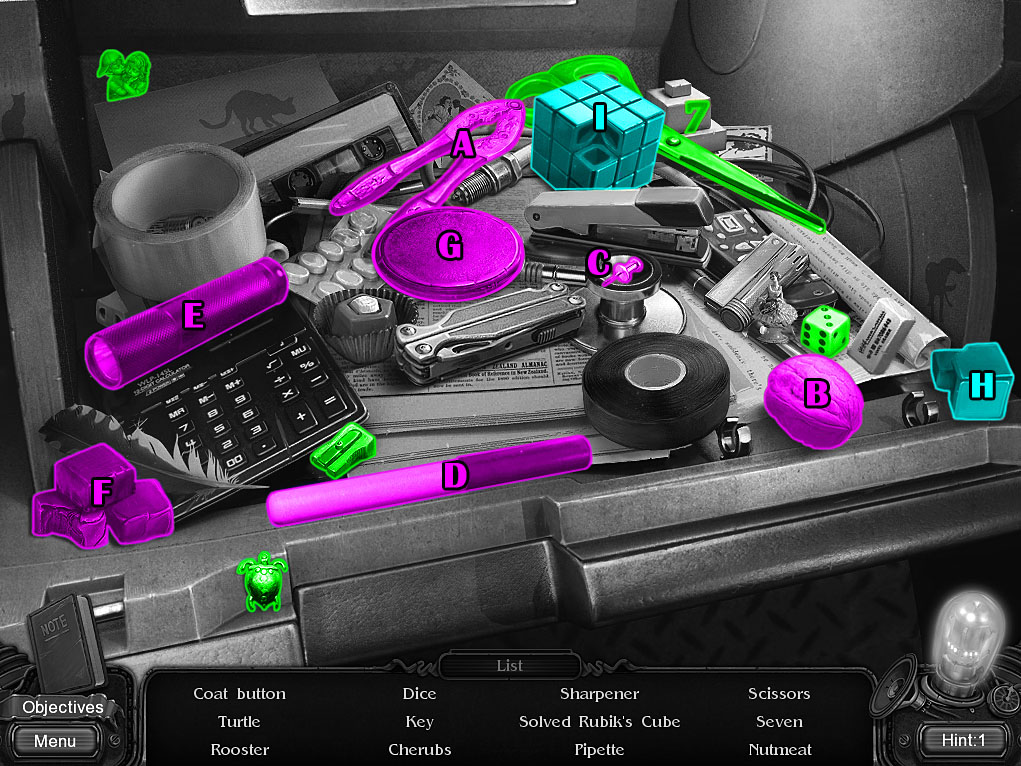
Click the opened glove compartment to start the hidden object scene.
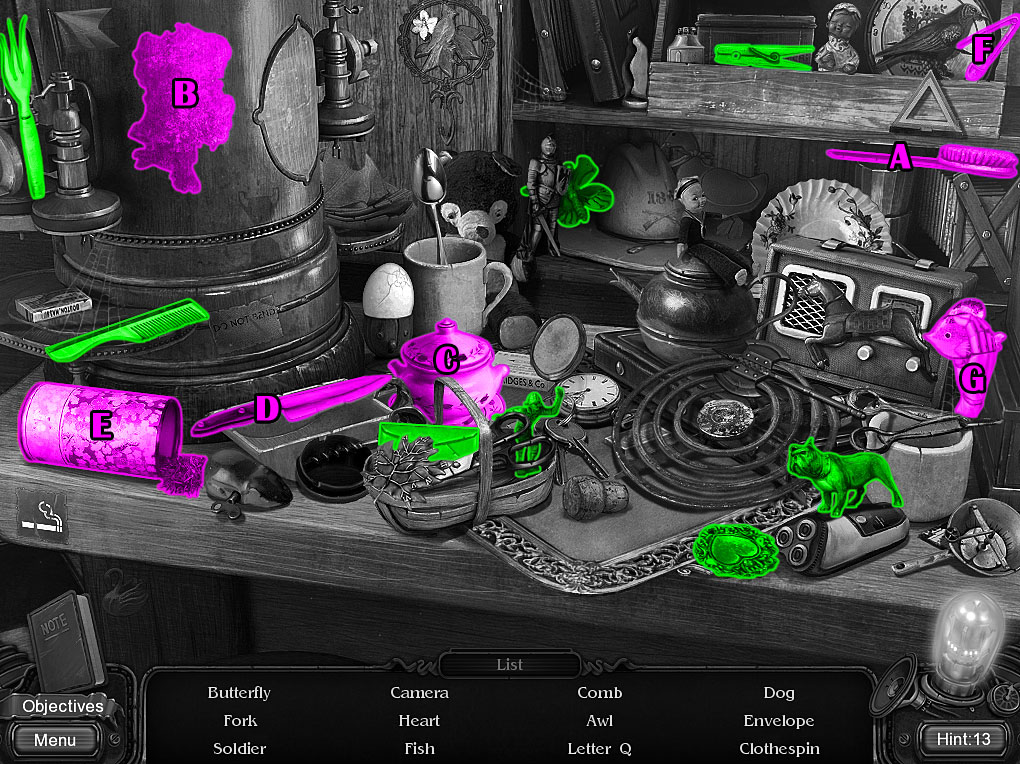
Use the nutcracker (A) on the walnut (B) to find the Nutmeat.
Use the thumbtack (C) to open the tube container (D) and reveal the Pipette.
Move the flashlight (E) to find the Coat Button.
Move the three chocolates (F) to uncover the Rooser.
Move the compact (G) to reveal the Key.
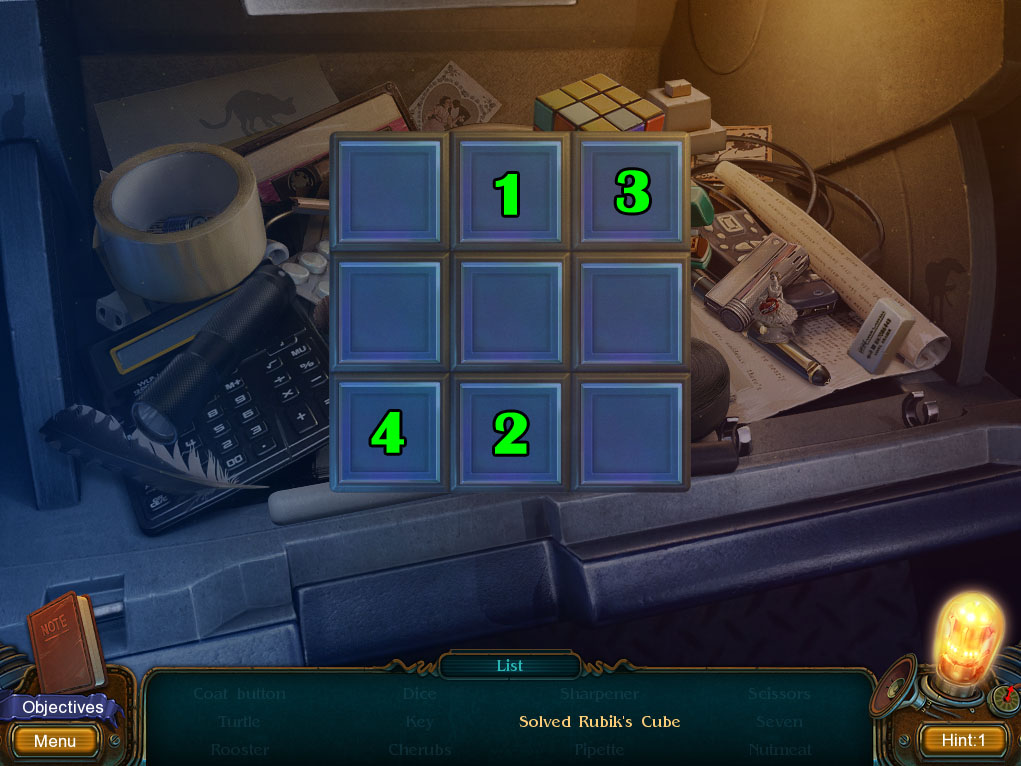
Add the square (H) to the Rubik's Cube (I) to start the minigame.
Click the squares to turn all of them blue.
If you click a middle square, it will also turn the adjacent squares to the left and right.
If you click a corner square, it will only turn itself.
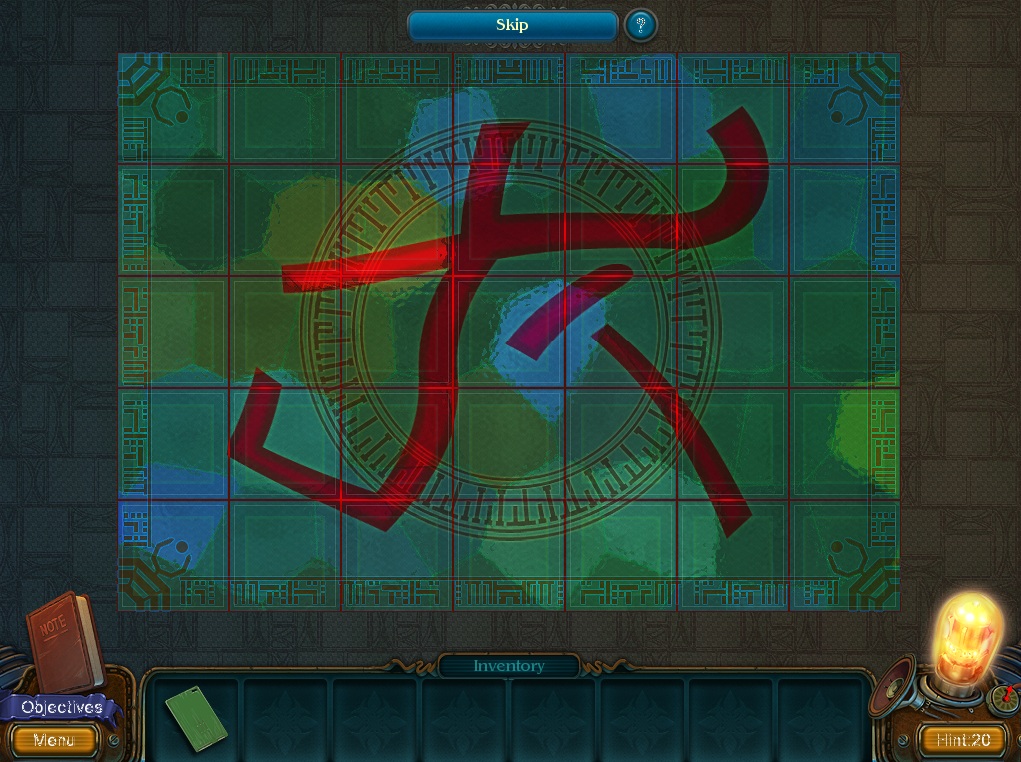
Click the squares numbered 1-4 in the image below to solve the puzzle.
Rubik's Cube Screenshot.
Click the Solved Rubik's Cube after the minigame is solved to complete the hidden object scene.
Screenshot.
Once the hidden object scene is complete, you will receive the back door KEY.
Go back out to the Street.
Street
Click the doors at the back of the ambulance for a closer look.
Use the KEY (from the Driver's Seat hidden object scene) to open the lock.
Go through the open back doors into the Patient Compartment.
Patient Compartment
Find the Lamp 2/20 at the bottom of the electric device on the right bench to receive an additional hint.
Pick up the side door KEY on the seat of the right bench.
Open the black panel door above the counter to find the EMERGENCY ESCAPE HAMMER.
Use the EMERGENCY ESCAPE HAMMER on the cracked glass door over the medicine cabinet.
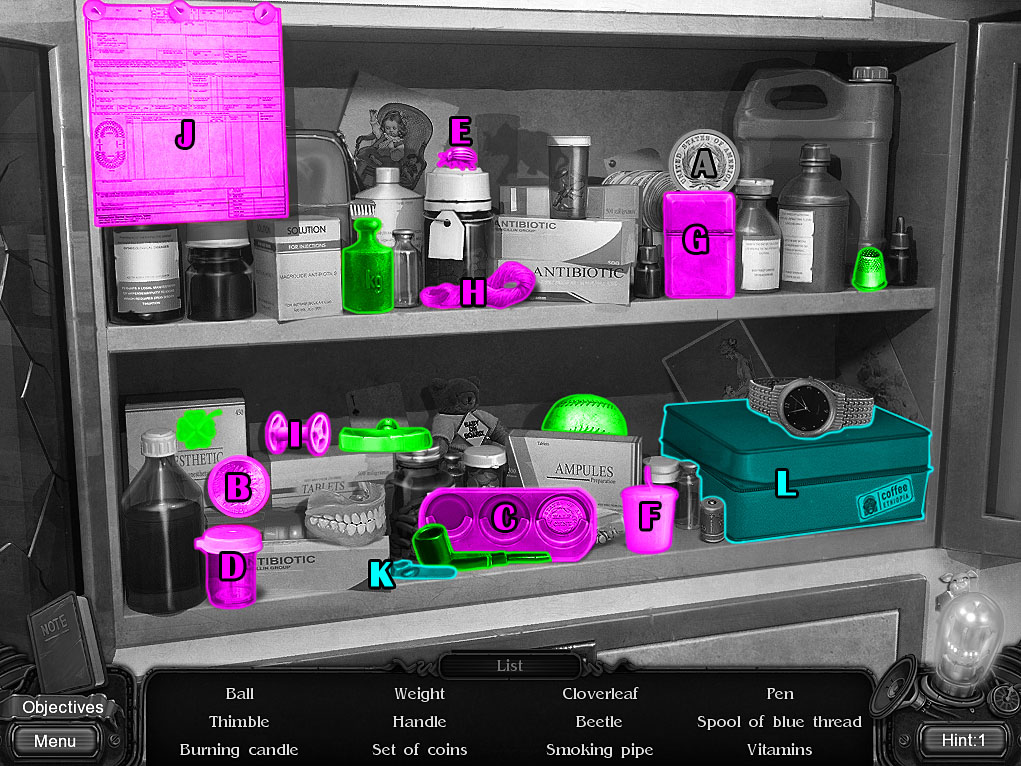
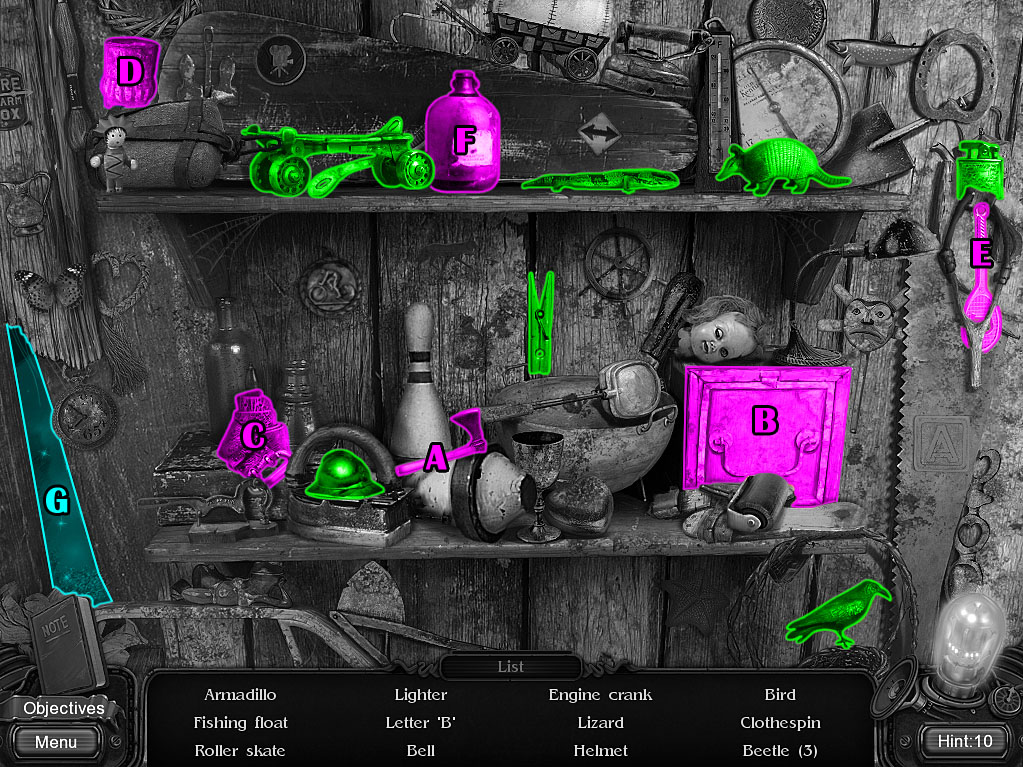
Open the broken glass doors, then click the medicine cabient to start the hidden object scene.
Put the two coins (A & B) into the case (C) to complete the Set of Coins.
Use the small plastic container (D) to capture the Beetle (E).
Light the candle (F) with the lighter (G) to make the Burning Candle.
Add the blue string (H) to the bare spool (I) to complete the Spool of Blue Thread.
Tear the paper (J) three times to reveal the Pen.
Place the zipper puller (K) on the green case (L), then click the zipper to open it.
Click the opened green case to start the minigame.
Move the objects around the bag to find the green, red, and blue vitamins, then sort the vitamins into the correct categories.
Click and drag the objects to move them around the case; release a vitamin to drop it into the right section.
The three green vitamins with the bone symbol belong in the left section with the picture of a dog.
The three blue vitamins with the fish symbol belong in the middle section with the picture of a cat.
The three red vitamins with the corn symbol belong in the right section with the picture of a bird.
Vitamin Case Screenshot.
Click the bottle of Vitamins after the minigame is solved to complete the hidden object scene.
Screenshot.
Once the hidden object scene is complete, you will receive the HANDLE.
Use the OILER (from the floor of the car at the Driver's Seat) on the base of the broken chair.
Click the locker to the left of the chair for a closer look.
Add the HANDLE to the door of the locker to open it.
Move away the objects on top of the red bag inside the locker to reveal the ENGRAVED GLASS.
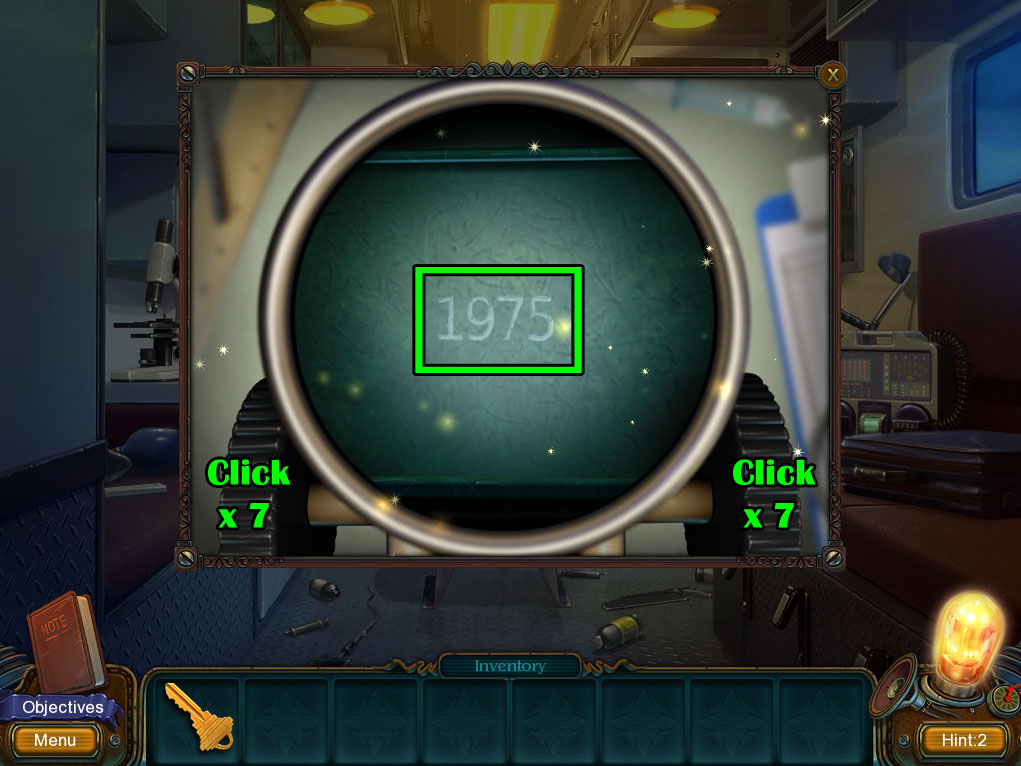
Click the microscope on top of the counter to zoom in.
Place the ENGRAVED GLASS under the lens to start the minigame.
Turn the dials at the left and right sides of the lens to focus the image and find the combination.
Click one dial seven times to rotate it until you see the first half of the image, then turn the other dial seven times to find the second half.
Note the discovered combination under the lens: 1975.
Solution.
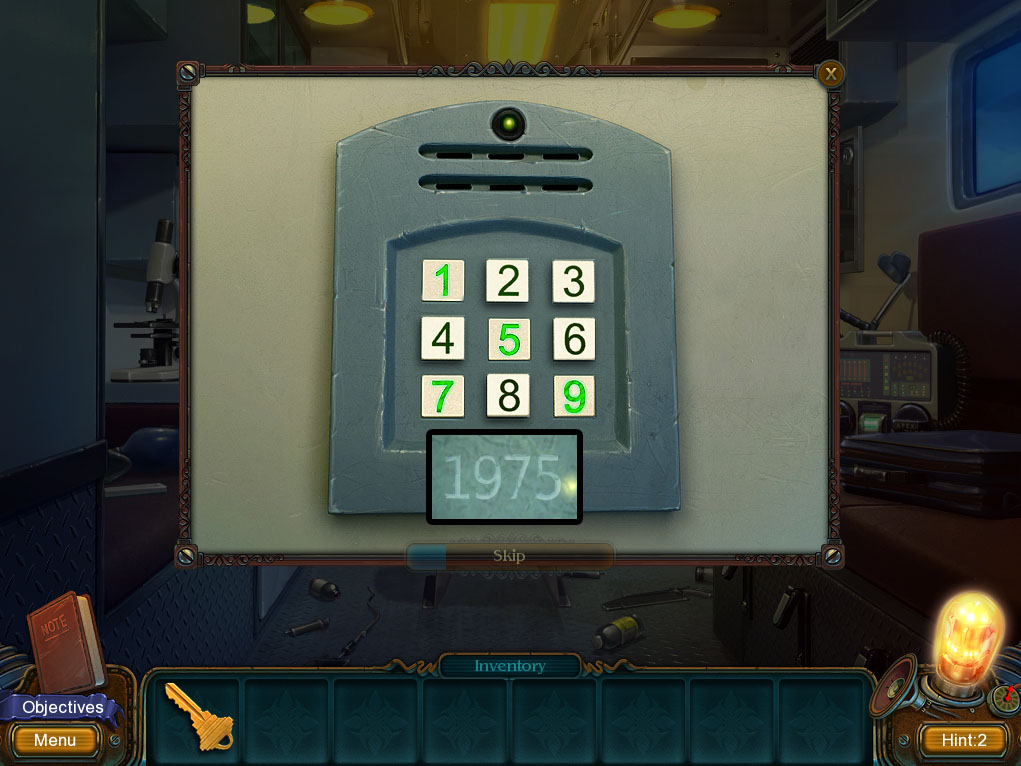
Inspect the keypad lock in the middle of the cabinet directly above the chair.
Enter in the combination found on the microscope.
Press the keys 1-9-7-5 to open the lock.
Screenshot.
Look inside the opened cabinet to find the PUZZLE PIECE 2/2.
Go back outside to the Street.
Street
Click the small door beside the ambulance tire for a close-up view.
Use the side door KEY (from the bench in the Patient Compartment) to open the lock.
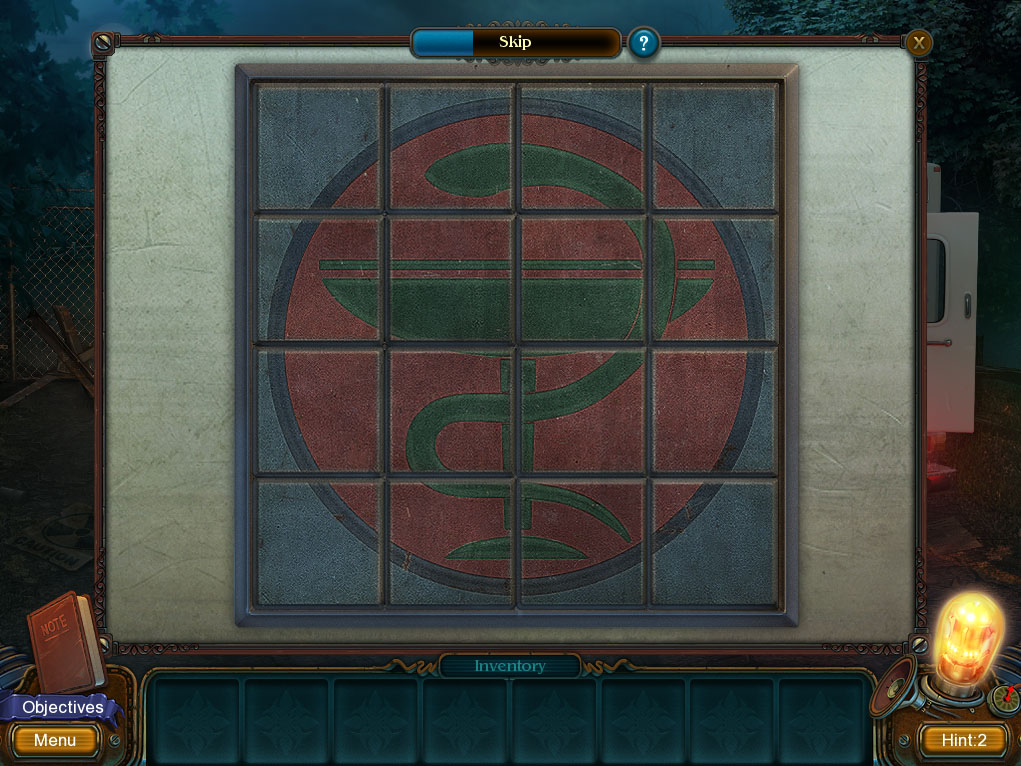
Inspect the puzzle box beside the spare tire, then add the two PUZZLE PIECES to start the minigame.
PUZZLE PIECE 1/2 is from the steering wheel at the Driver's Seat.
PUZZLE PIECE 2/2 is from the locked cabinet in the Patient Compartment.
Arrange the tiles to complete the image.
Click one tile to select it, then click a different tile to swap their positions.
Solution.
After the puzzle is solved, take the NIPPERS from the opened puzzle box.
Click the fence blocking the street for a closer look.
Use the NIPPERS to cut through the metal fencing.
Continue forward through the fence to the Guest House Entrance.
Chapter 2—The Guest House
Guest House Entrance
Find the Lamp 3/20 on top of the wall at the lower left corner just above the Notebook to receive an additional hint.
Click the middle of the short stone wall to zoom in.
Pick up the STRAIGHT RAZOR on top of the wall and the ENGRAVED DISC 1/4 lying in the grass in front of the wall.
Move forward to the Front Door.
Front Door
Use the STRAIGHT RAZOR (from the stone wall at the Guest House Entrance) to cut through the bag on the left side of the steps.
Take the ENGRAVED DISC 2/4 inside the opened bag.
Ring the bell hanging to the right of the door.
Pick up the ENGRAVED DISC 3/4 that falls from the bell to the ground.
Click the large stone planter under the left window to zoom in.
Take the MATCHBOX inside the planter.
Pick up the DISH 1/3 on the ground beside the planter.
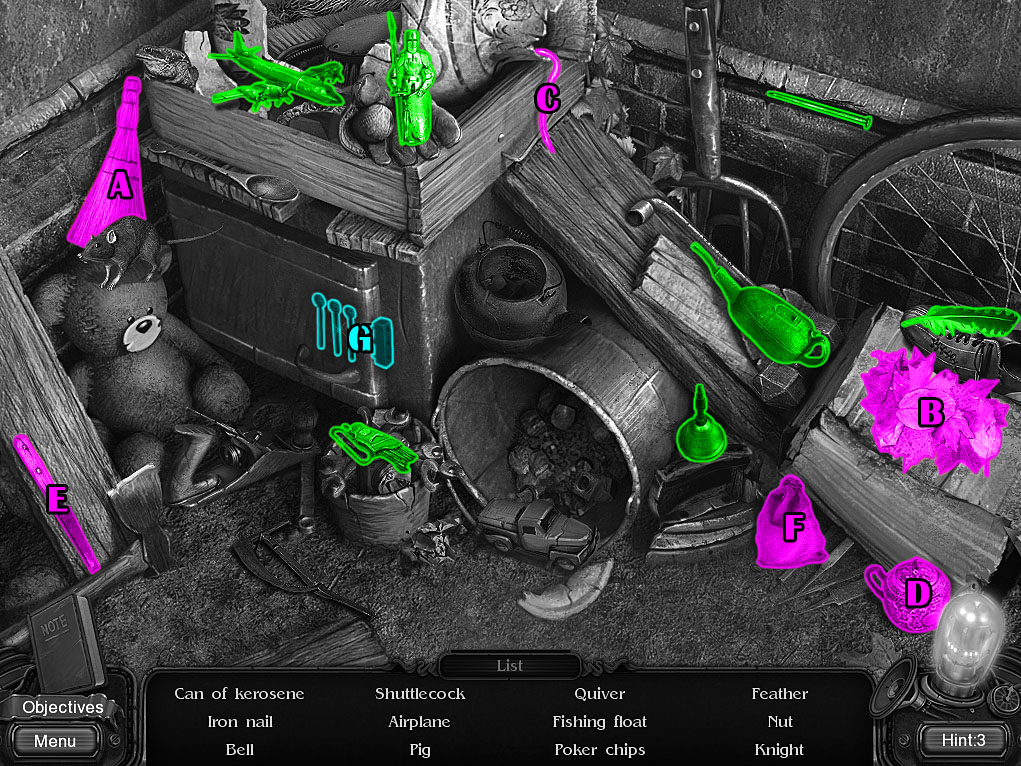
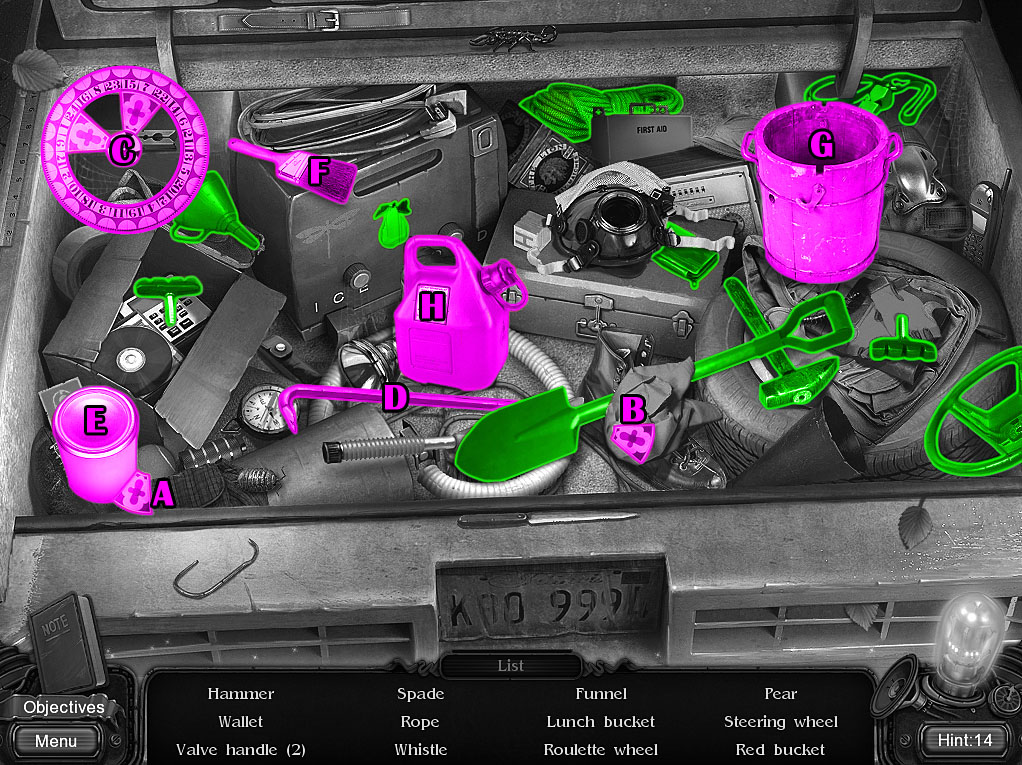
Click the pile of junk underneath the right window to start the hidden object scene.
Use the broom (A) to brush away the pile of leaves (B) and reveal the Fishing Float.
Pull the string (C) to drop the Shuttlecock.
Open the closed pot (D) with the knife (E) to find the Nut.
Move the small bag (F) to reveal the Pig.
Click the lock in the middle of the safe (G) to start the minigame.
Set the sliders in the correct position to retract all three bars of the lock.
Click a sliders to move it to the next point.
When a slider is set at the right point, its corresponding bar will move out of the lock.
Clicking the middle slider (1) moves all three sliders, so set it first.
Clicking the left slider (2) moves both the left and right slider, so set it second.
Clicking the right slider (3) moves only itself, so set it third.
Locked Safe Screenshot.
Click the Poker Chips inside the opened safe after the minigame is solved to complete the hidden object scene.
Screenshot.
Once the hidden object scene is complete, you will receive the CAN OF KEROSENE.
Go back to the Guest House Entrance, then continue left to the Side Door.
Side Door
Open the side of the lantern hanging to the left of the door, then click the lantern for a closer look.
Use the CAN OF KEROSENE (from the hidden object scene at the Front Door) on the empty kerosene lamp.
Light the lamp with the MATCHBOX (from the planter at the Front Door).
Pick up the BRUSH and the ENGRAVED DISC 4/4 on the ground at the corner of the wall beside the door.
Return to the Guest House Entrance.
Guest House Entrance
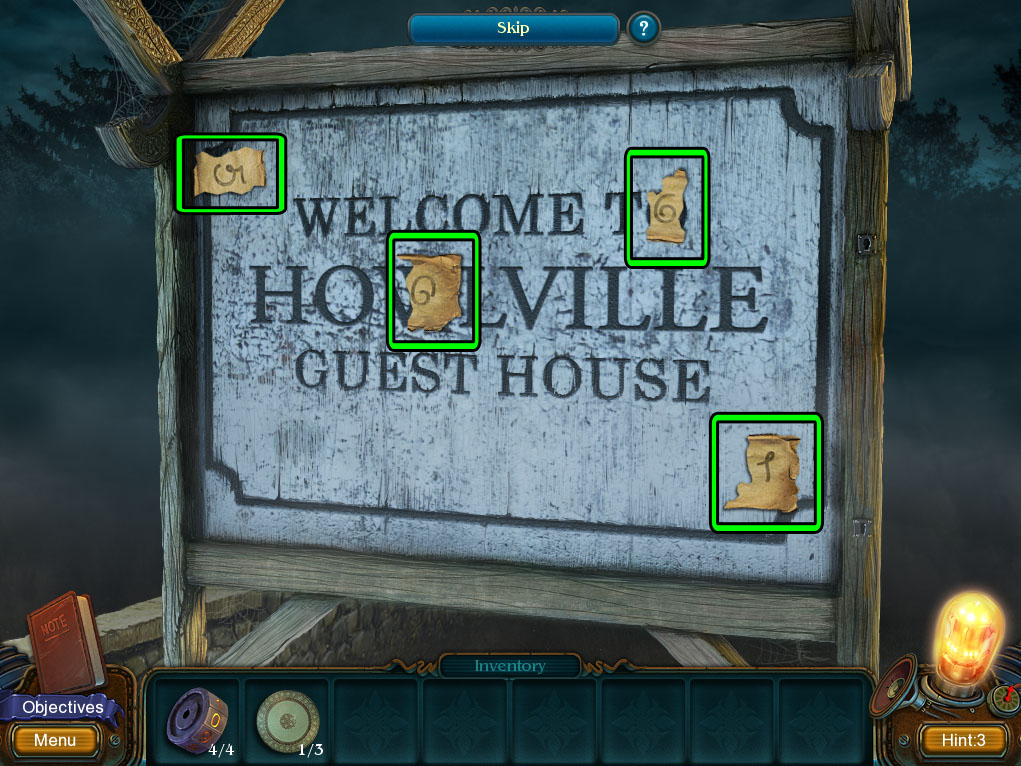
Inspect the sign board in the middle of the sidewalk to the right of the wall.
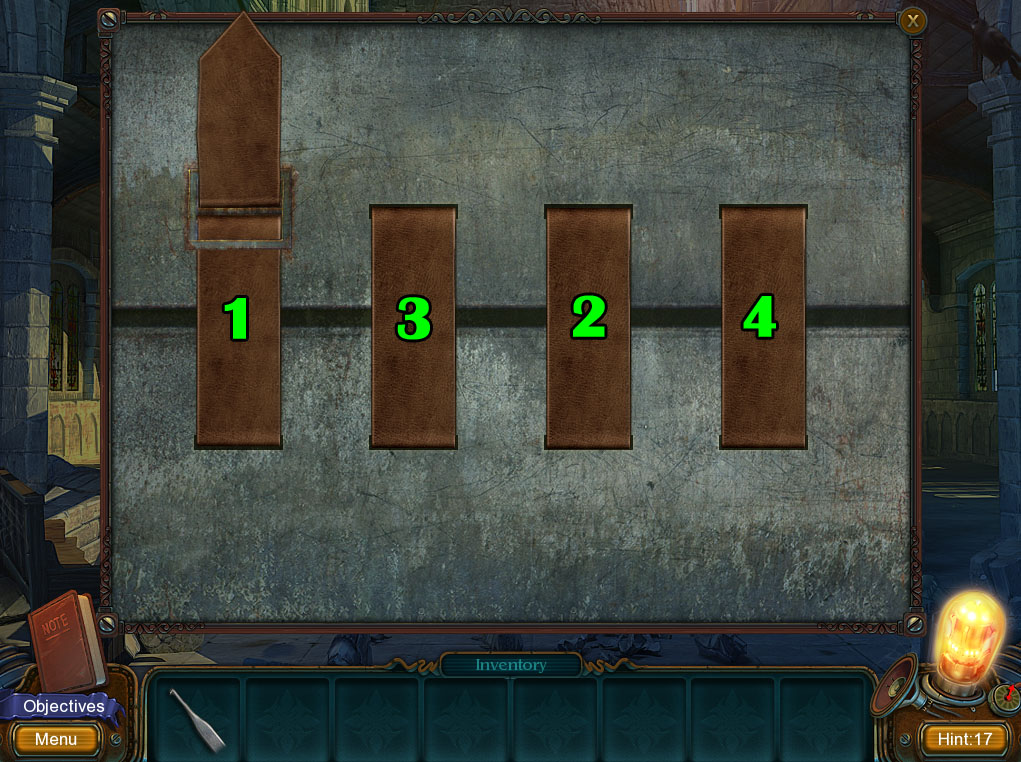
Use the BRUSH (from the ground at the Side Door) on the board to start the minigame.
Clean off the board with the brush to find all of the scraps of paper.
Click and drag the brush across the board to remove the layers of dust.
Click the four scraps of paper on the board to complete the note with the combination 0591.
Solution.
Move left to the Side Door.
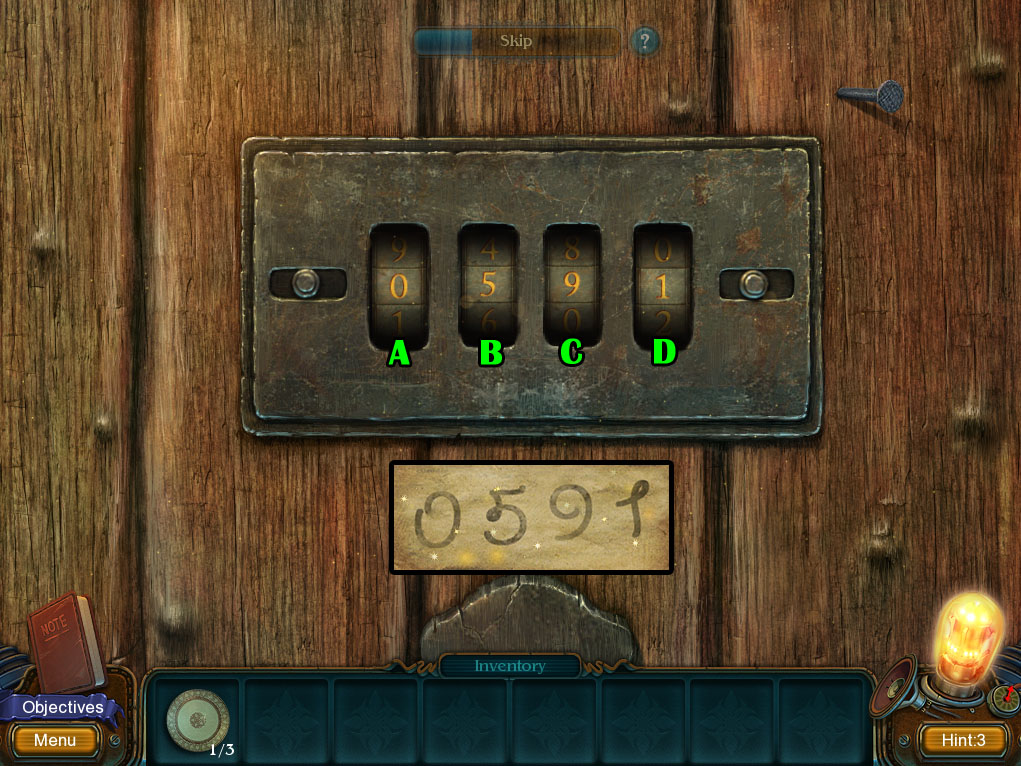
Side Door
Click the lock in the middle of the door for a closer look.
Add the four ENGRAVED DISCS to the lock to start the minigame.
Turn the discs to set the combination found from the board puzzle at the Guest House Entrance: 0-5-9-1.
Set disc D first, which rotates both D and A.
Set disc B second, which rotates both B and A.
Set disc A third, which rotates both A and C.
Set disc C last, which only rotates itself.
Solution.
After the puzzle is solved, go through the open door to the Storeroom.
Storeroom
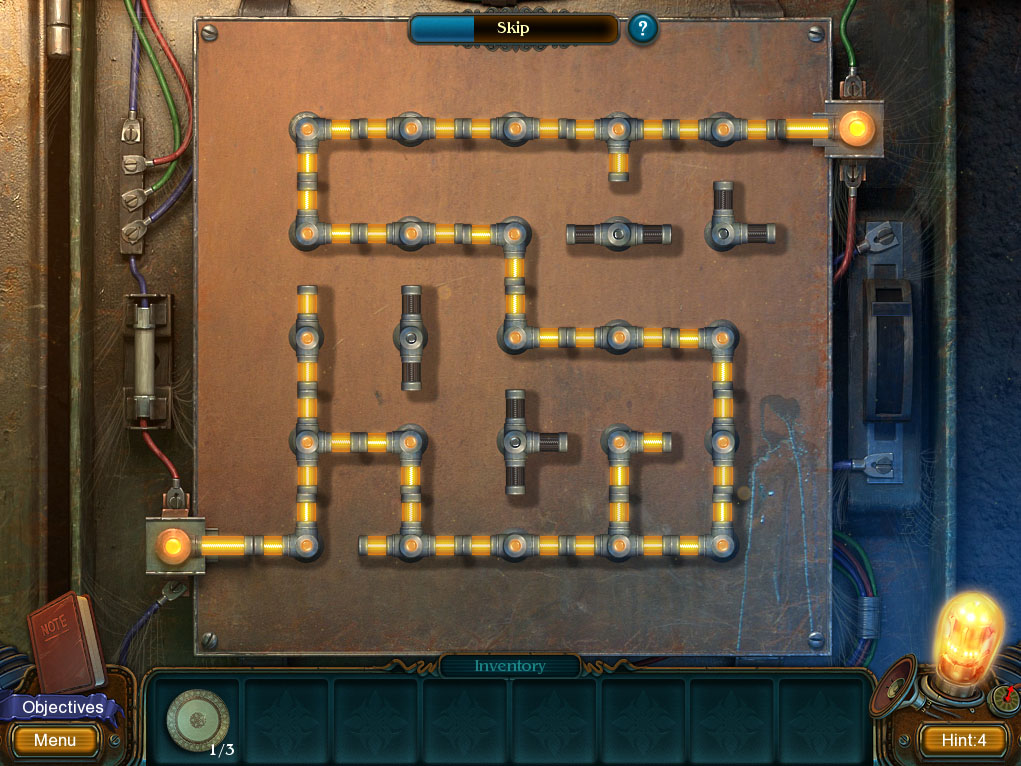
Open the door to the fuse panel on the wall beside the cupboard.
Inspect the panel to start a minigame, but first Find the Lamp 4/20 on the tube at the left side of the board to receive an additional hint.
Turn the tube to create a path of light from the bulb at the bottom left corner to the bulb at the top right corner.
Click a tube to rotate it 90 degrees clockwise.
When the ends of two tubes are touching in a path connected to the lower left bulb, they will light up and change color.
Solution.
Pick up the DISH 2/3 beside the barrel under the table.
Find the Lamp 5/20 on top of the cupboard to receive an additional hint.
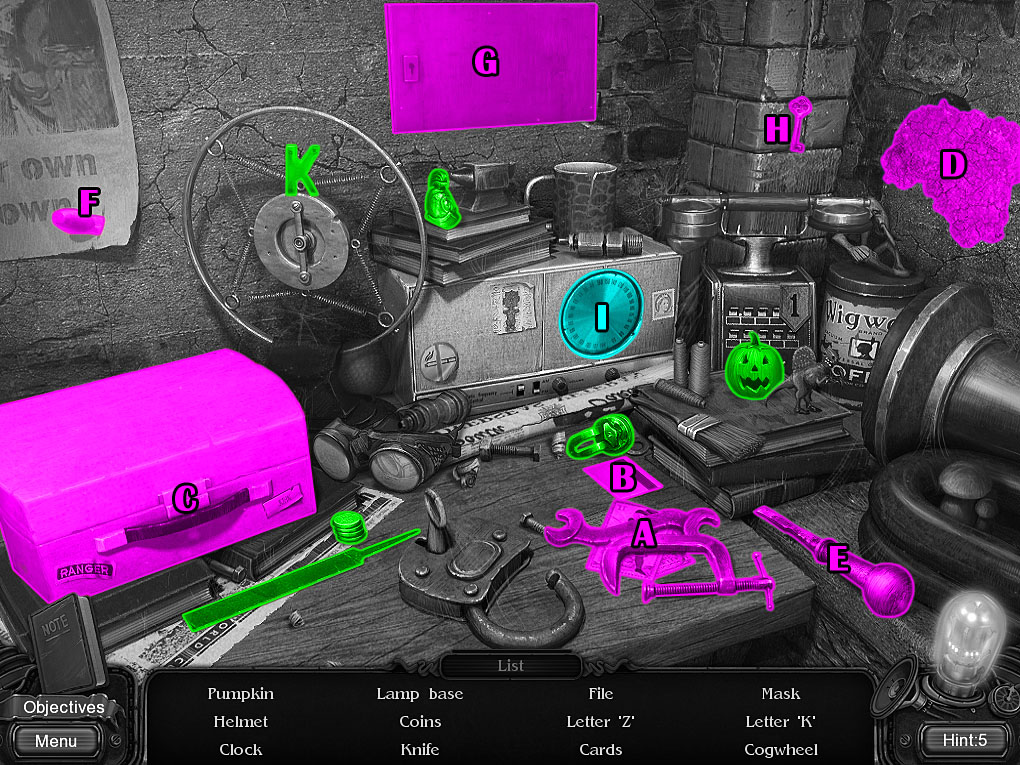
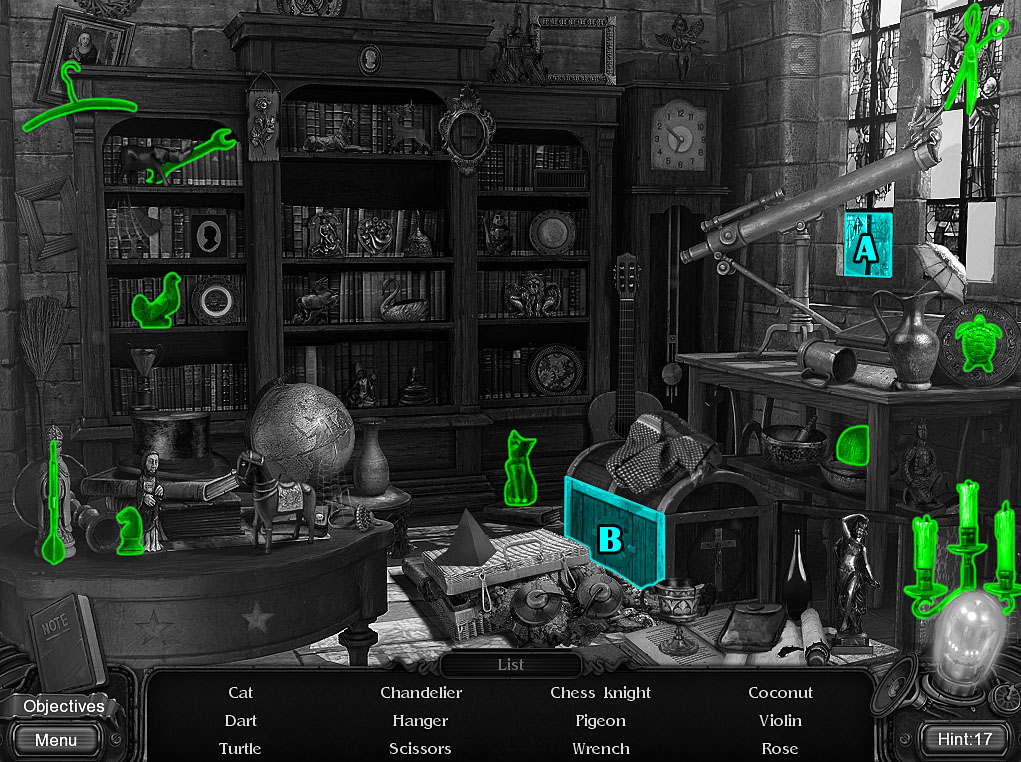
Click the items scattered on top of the table to start the hidden object scene.
Move the pile of tools and cards (A) to uncover the Clock.
Use the blue card (B) to open the trunk (C) and find the Cards.
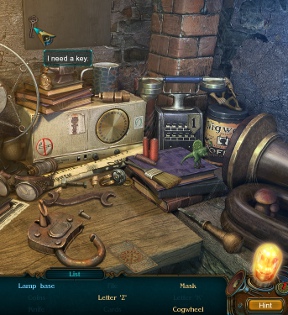
Break the plastered section of the wall (D) with the chisel (E) to reveal the Letter 'Z'.
Pull out the Knife (F) stuck in the corner of the poster.
Open the safe (G) with the key (H) to find the Mask.
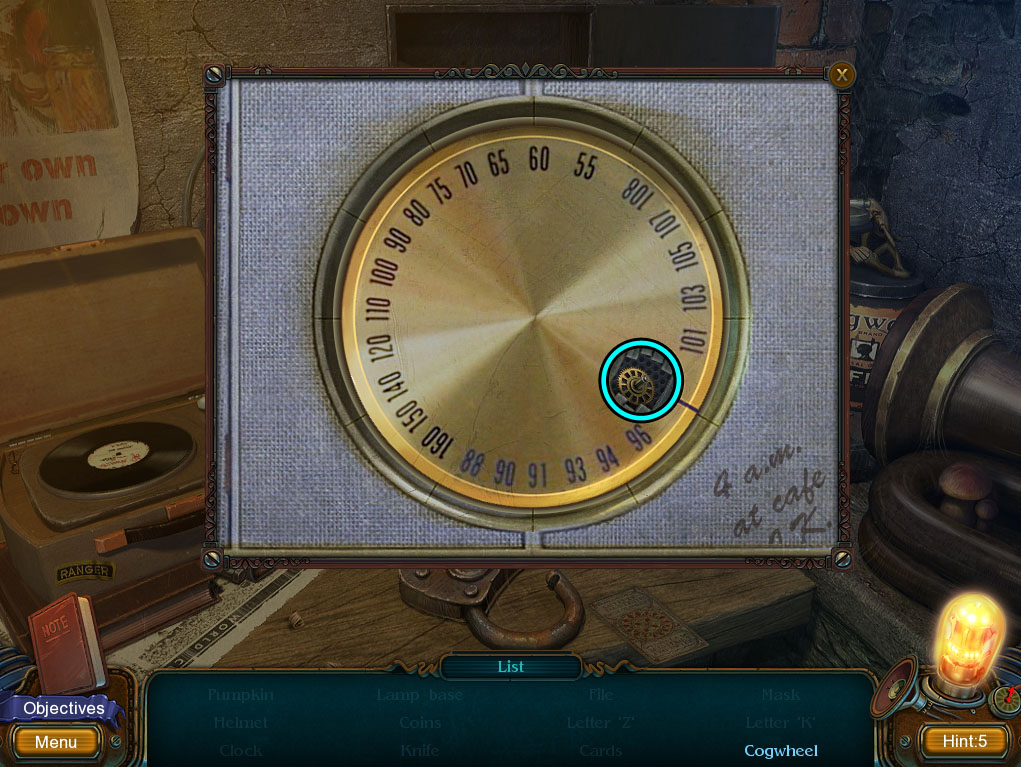
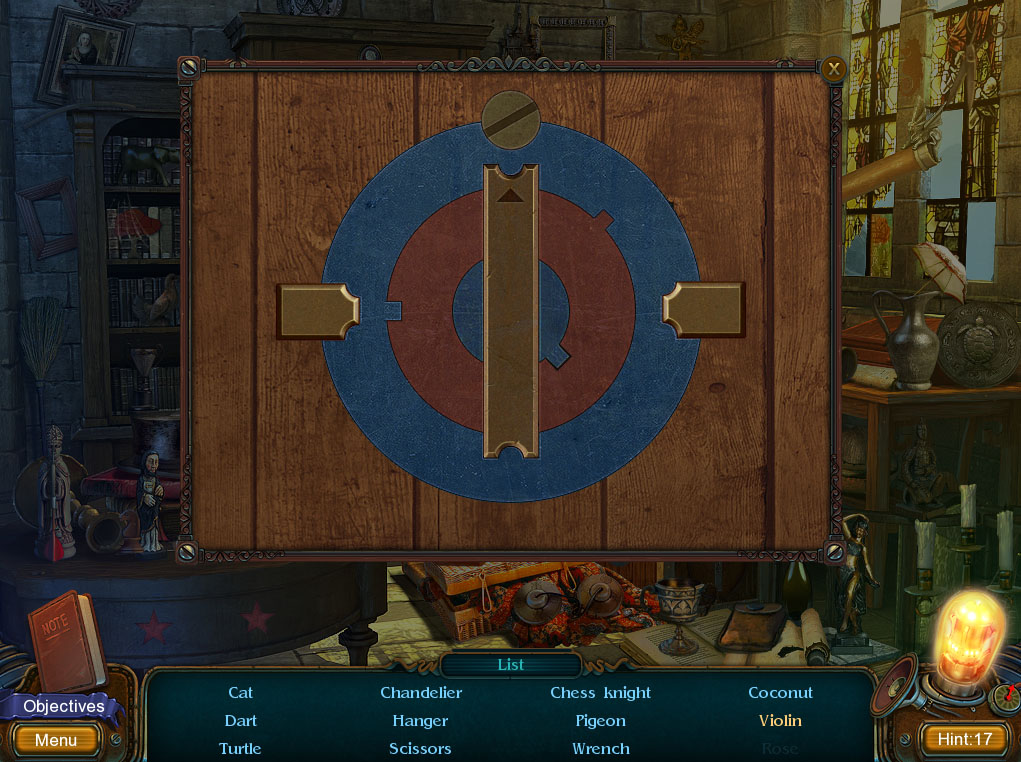
Click the metal disc (I) to start the minigame.
Click the gold disc 7 times so that the hole is placed at 4 o' clock.
Click the silver disc underneath until its hole is also at the 4 o'clock position.
Gold & Silver Discs Screenshot.
Click the Cogwheel after the minigame is solved to complete the hidden object scene.
Screenshot.
Once the hidden object scene is complete, you will receive the KNIFE.
Click the cabinet under the cupboard to zoom in.
Use the KNIFE to cut through the string tied around the handles.
Take the DISH inside the opened cabinet.
Inspect the two shelves at the top of the cupboard.
Add the three DISHES to the bottom shelf to start the minigame.
DISH 1/3 is from the planter at the Front Door.
DISH 2/3 is under the table in the Storeroom.
DISH 3/3 is from the cabinet under the cupboard.
Organize the plates on the top shelf in the correct order according to the size of the silhouette.
Click a plate on the lower shelf to select it, then click an empty stand at the upper shelf to place it.
If a plate is incorrectly positioned, it will revert back to the lower shelf; if it is set on the correct stand, however, it will lock in place.
Solution.
After the puzzle is solved, look inside the opened drawer under the cupboard.
Take the SMALL KEY inside the drawer.
Click the suitcase on top of the table for a closer look.
Use the SMALL KEY to open the lock above the leather handle.
Click the opened suitcase to find the CROWBAR.
Use the CROWBAR to open the nailed lid of the crate on the floor.
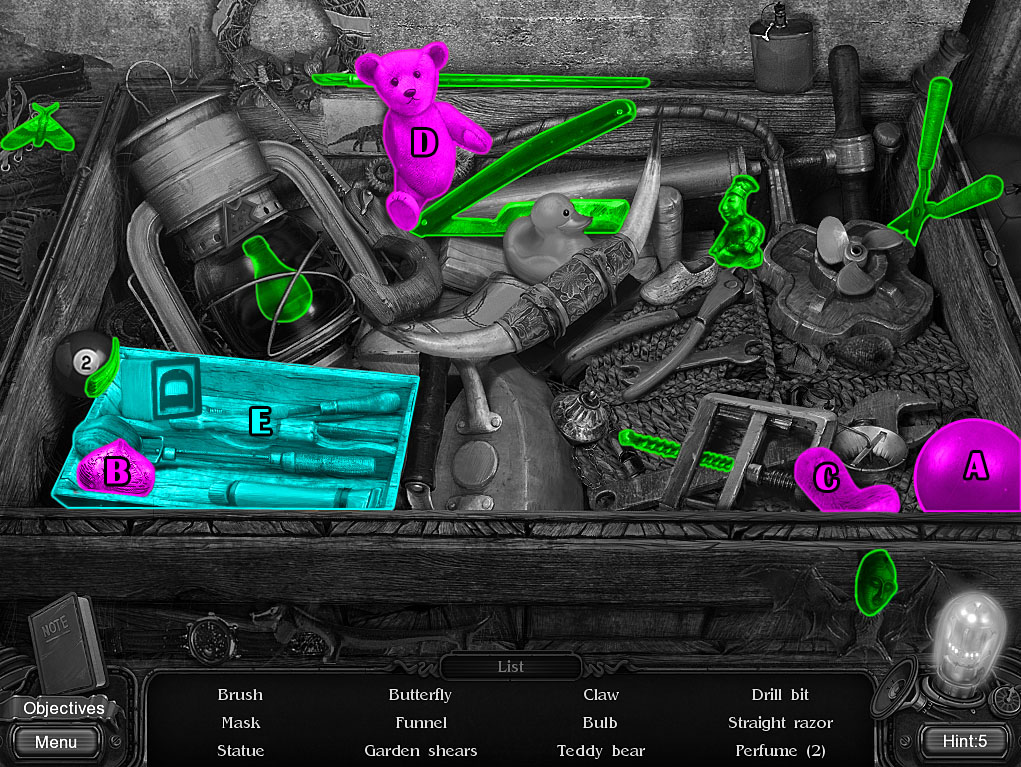
Click the opened crate to start the hidden object scene.
Move the red ball (A) to uncover the Funnel.
Move the ornament (B) to find the arm, then attach the arm and the leg (C) to complete the Teddy Bear (D).
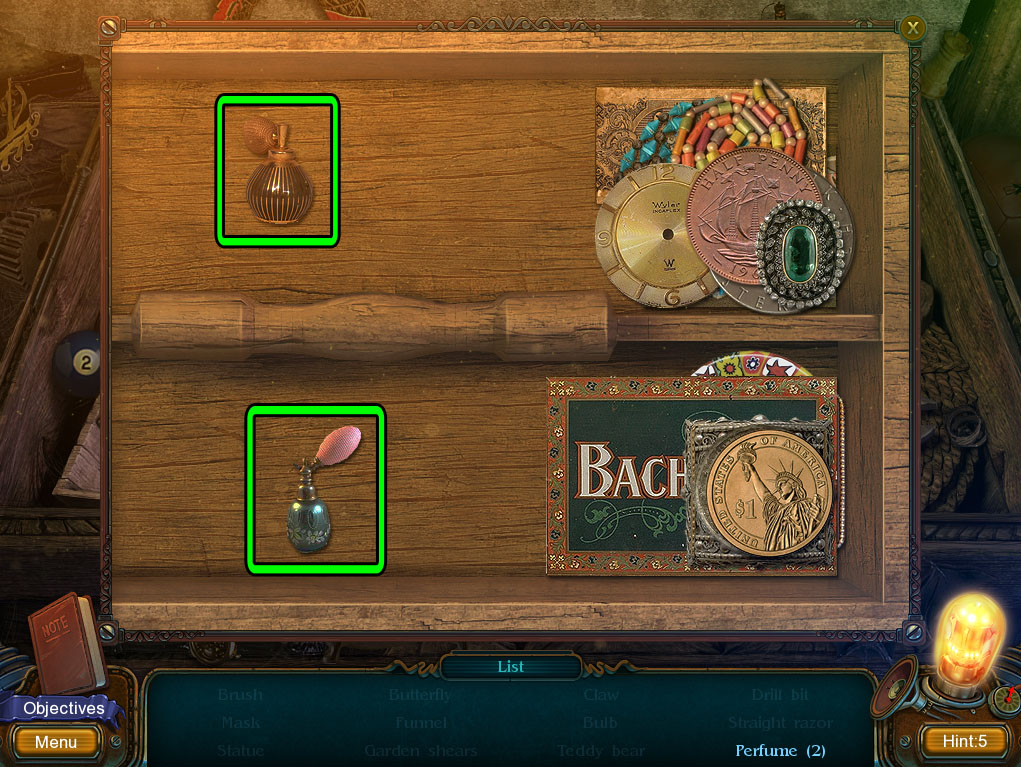
Click the toolbox (E) to start the minigame.
Move away the items in the top and bottom sections of the box to find the two perfume bottles.
Perfume Bottles Screenshot.
Click the uncovered Perfume x2 after the minigame is solved to complete the hidden object scene.
Screenshot.
Once the hidden object scene is complete, you will receive the GARDEN SHEARS.
Go back to the Front Door.
Front Door
Use the GARDEN SHEARS (from the hidden object scene at the Storeroom) four times to cut away the ivy blocking the door.
Open the door and continue forward to the Reception Desk.
Reception Desk
Click the bookshelf behind the counter to zoom in.
Open the book to find the NUMBERED KEY 1/3.
Find the Lamp 6/20 on the top shelf of the bookcase to receive an additional hint.
Click the items on the couch to start the hidden object scene.
Move the napkin (A) to reveal the knob, then add the knob to open the drawer (B) and find the Handle.
Move the cone (C) to uncover the Medallion.
Open the small drawer (D) to reveal the Stone.
Click the globe (E) to start the minigame.
Place the paper fragments in the correct spaces on the map.
Click a piece to select it, then click a hole on the map to set it in place.
Map Screenshot.
Rotate the globe and click the Chip after the minigame is solved to complete the hidden object scene.
Screenshot.
Once the hidden object scene is complete, you will receive the MUSIC BOX HANDLE.
Click the music box on the seat of the stool for a closer look.
Use the MUSIC BOX HANDLE on the space at the front of the blue box.
Take the SWITCH from the opened box.
Move the curtain to find the closet, then click the closet for a close-up view.
Add the SWITCH to the socket on the wall to turn on the light.
Click the closet to start the hidden object scene.
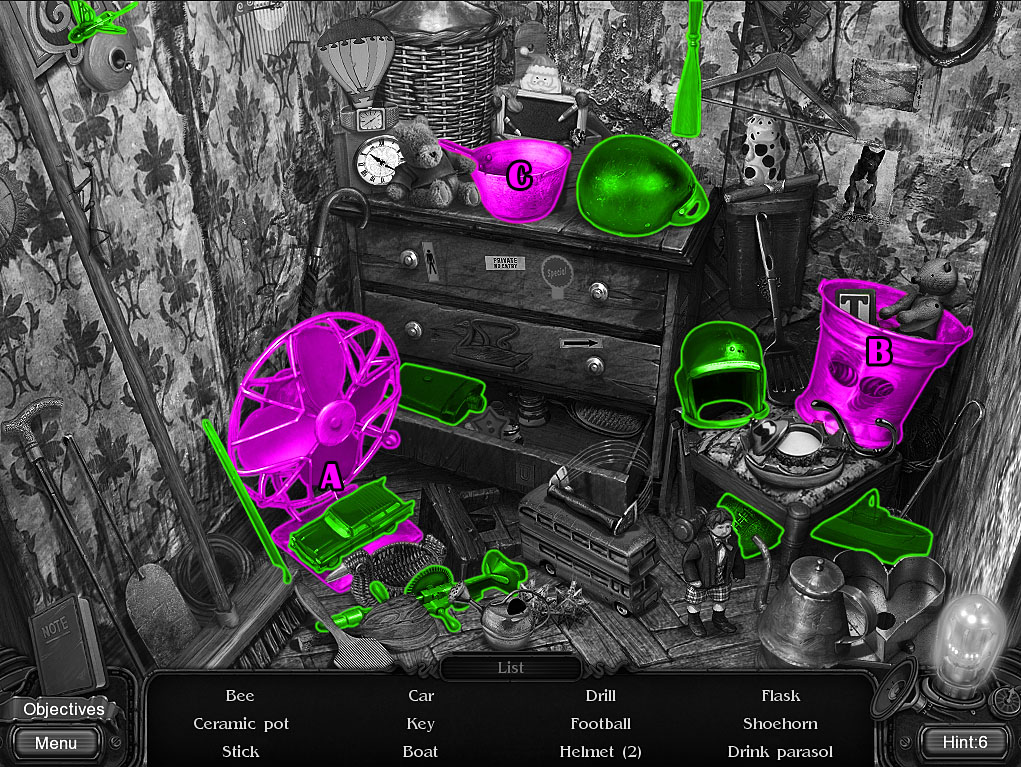
Press the button on the fan (A) to blow out the Drink Parasol.
Click the bucket (B) twice to reveal the Ceramic Pot.
Move the pot (C) to find the Key.
Screenshot.
Once the hidden object scene is complete, you will receive the NUMBERED KEY 2/3.
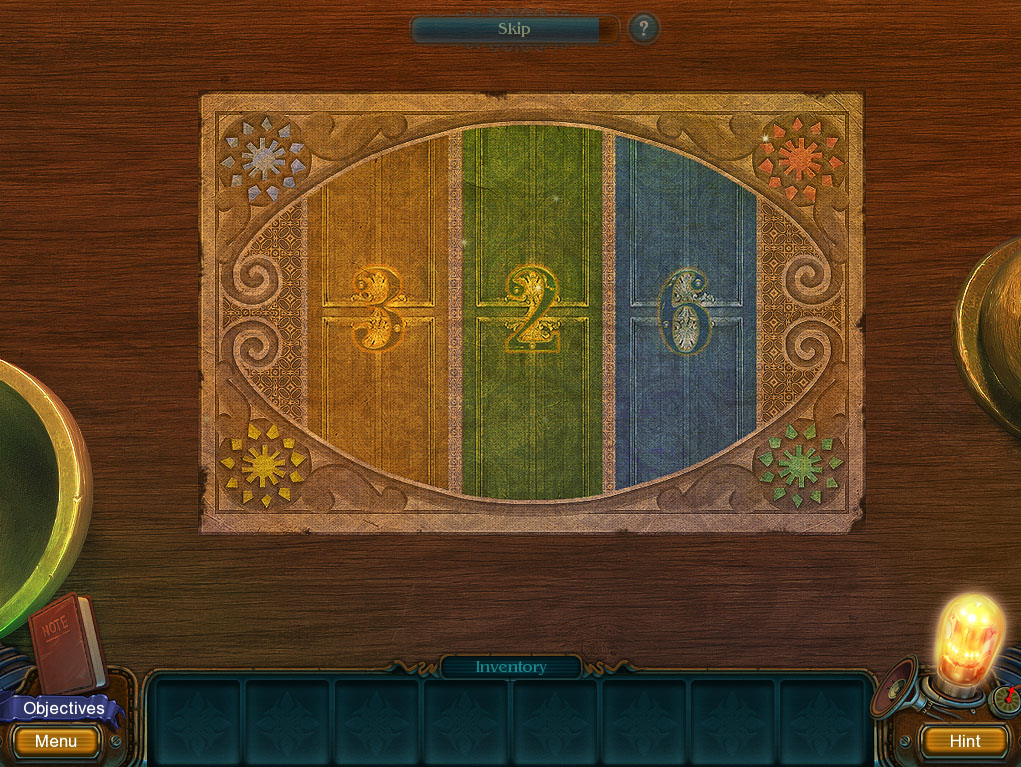
Click the counter of the reception desk to start the minigame.
Arrange the fragments to complete the image.
Left click and drag a piece to move it around the board or right click a piece to rotate it.
If you release a piece over the correct section of the board, it will lock in place.
After all the pieces are in place, note the three numbers in the center: 3-2-6.
Solution.
Go up the steps on the right to the Stairway Landing.
Stairway Landing
Pick up LONG CANE leaning against the corner of the left wall.
Go back downstairs to the Reception Desk.
Reception Desk
Inspect the chandelier hanging from the ceiling.
Use the LONG CANE (from the Stairway Landing) to pull down the key from the empty lamp.
Pick up the NUMBERED KEY 3/3 when it falls to the floor.
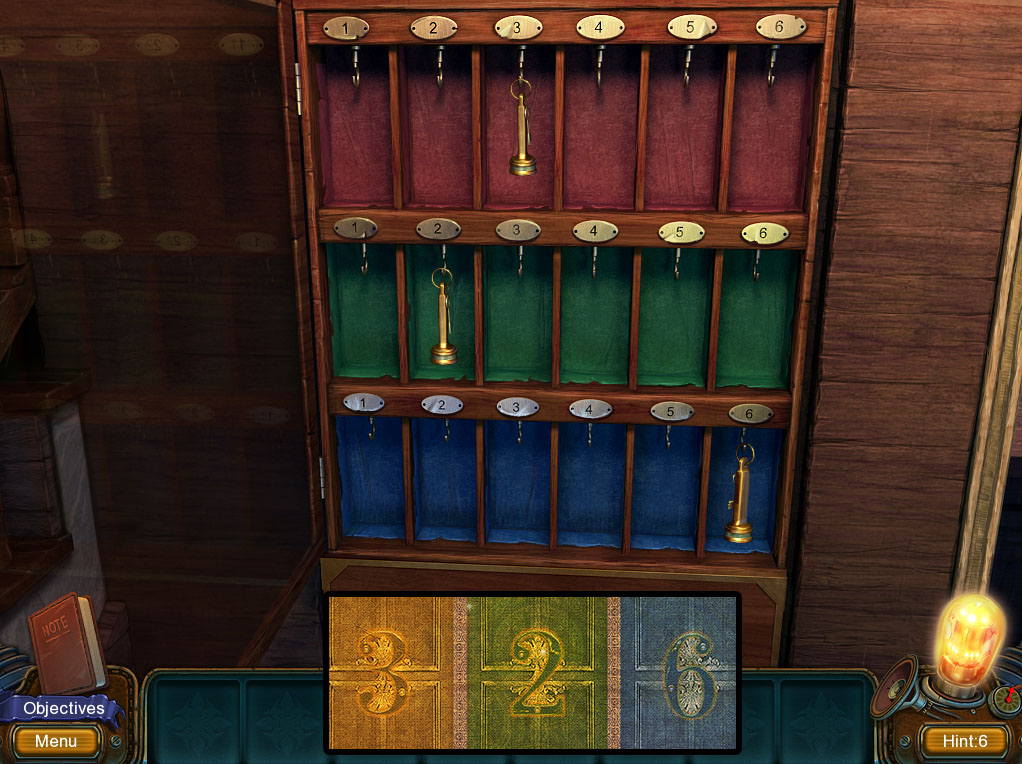
Open the glass door over the key rack behind the reception counter, then click the rack to zoom in.
Add the three NUMBERED KEYS to the key rack to start the minigame.
Place each key in the correct space by number and color, according to the clue in your notebook from the paper fragments puzzle.
Click a key to select it, then click one of the hooks to hang the key at that space.
Place the key at the blue bottom rack on the hook at space 6.
Place the key at the green middle rack on the hook at space 2.
Place the key at the red top rack on the hook at space 3.
Solution.
After the minigame is complete, take the DOOR HANDLE from the compartment underneath the key rack.
Return to the Stairway Landing.
Stairway Landing
Click the middle of the door for a closer look.
Add the DOOR HANDLE (from the key rack minigame at the Reception Desk) to the socket.
Open the door and continue forward to the Bedroom.
Bedroom
Find the Lamp 7/20 in the middle of the chandelier hanging from the ceiling to receive an additional hint.
Watch the clip on the television on top of the bed.
Pick up the HAMMER on the seat of the chair.
Use the HAMMER to smash the ceramic jar on the floor, then click the smashed jar to zoom in.
Move away the broken fragments in the jar to reveal the STRANGE DISC 1/5.
Click the pillow at the end of the bed to find a CHOPSTICK.
Click the large crack in the floor boards for a close-up view.
Use the CHOPSTICK to pull the STRANGE DISC 2/5 out of the crack.
Inspect the peeling wallpaper beside the door to find the STRANGE DISC 3/5.
Click the overturned cabinet to zoom in.
Move the book to reveal the STRANGE DISC 4/5.
Click the large cabinet to start the hidden object scene.
Move the framed photo (A) to uncover the Rabbit.
Use the scissors (B) to cut the right pillow (C) and reveal the Small Disc.
Move the lizard (D) on top of the left pillow to find the Star.
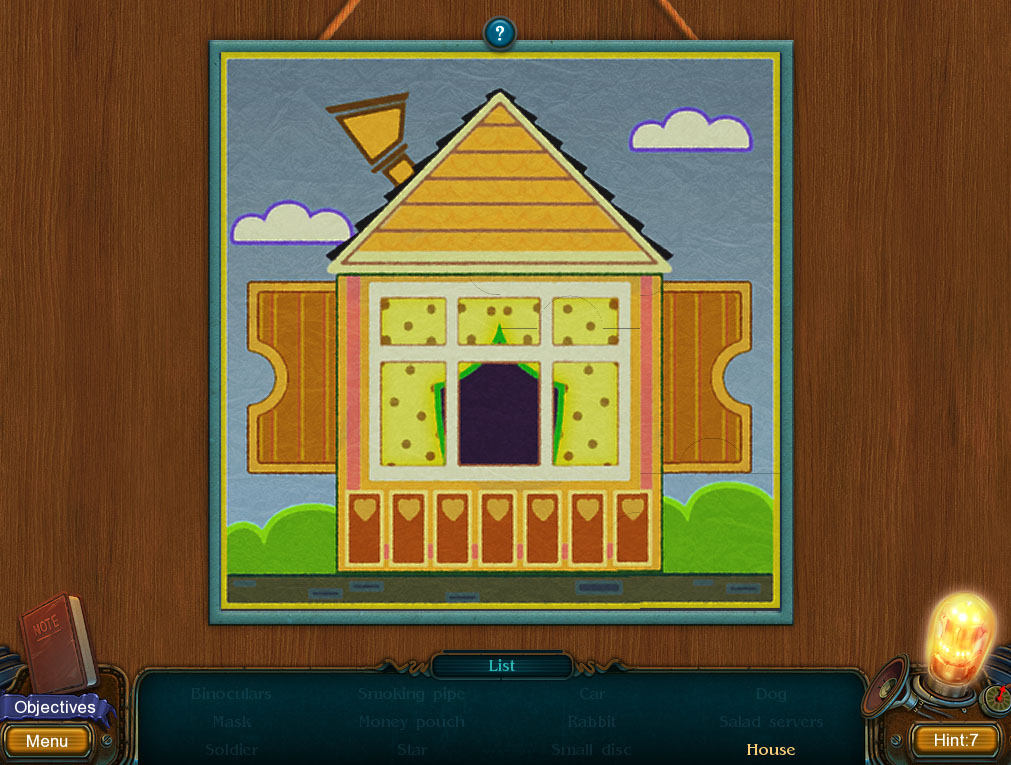
Click the jigsaw puzzle board (E) to start the minigame.
Arrange the puzzle pieces to complete the picture of a house.
Each of the pieces is part of a small group—selecting one piece will also move all the other pieces in its group.
Click the pieces to select them, then click the board to place them on the board.
If the pieces are correctly positioned, they will lock in place.
House Puzzle Screenshot.
Click the House after the minigame is solved to complete the hidden object scene.
Screenshot.
Once the hidden object scene is complete, you will receive the STRANGE DISC 5/5.
Inspect the large trunk at the foot of the bed.
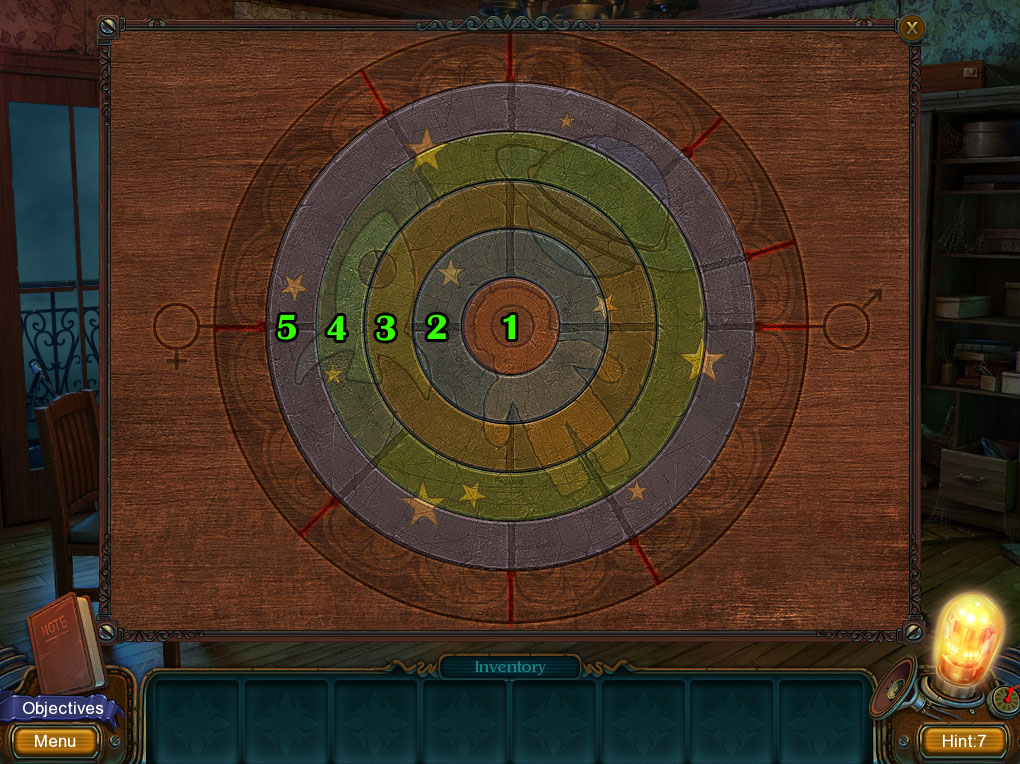
Add the five STRANGE DISCS to the rings in the middle of the trunk to start the minigame.
Arrange the discs to complete the image.
Click a disc to rotate it clockwise; moving some discs will also rotate one or more other discs.
Disc 5 rotates Disc 2, Disc 3, and Disc 5.
Disc 4 rotates Disc 2 and Disc 4.
Disc 3 rotates Disc 1 and Disc 3.
Disc 2 rotates only itself.
Disc 1 rotates Disc 1 and Disc 4.
You can find the alignment of the discs by matching the carved lines on Disc 5 with the red lines in the wooden ring around the disc.
Solution.
After the puzzle is solved, look inside the opened trunk to find the ROPE LADDER.
Open the left door and go out to the Balcony.
Balcony
Hang the ROPE LADDER (from the discs puzzle trunk in the Bedroom) over the gap in the railing.
Continue forward to the Yard.
Chapter 3—The Cliff
Yard
Find the Lamp 8/20 on the left side of the roof over the shack to receive an additional hint.
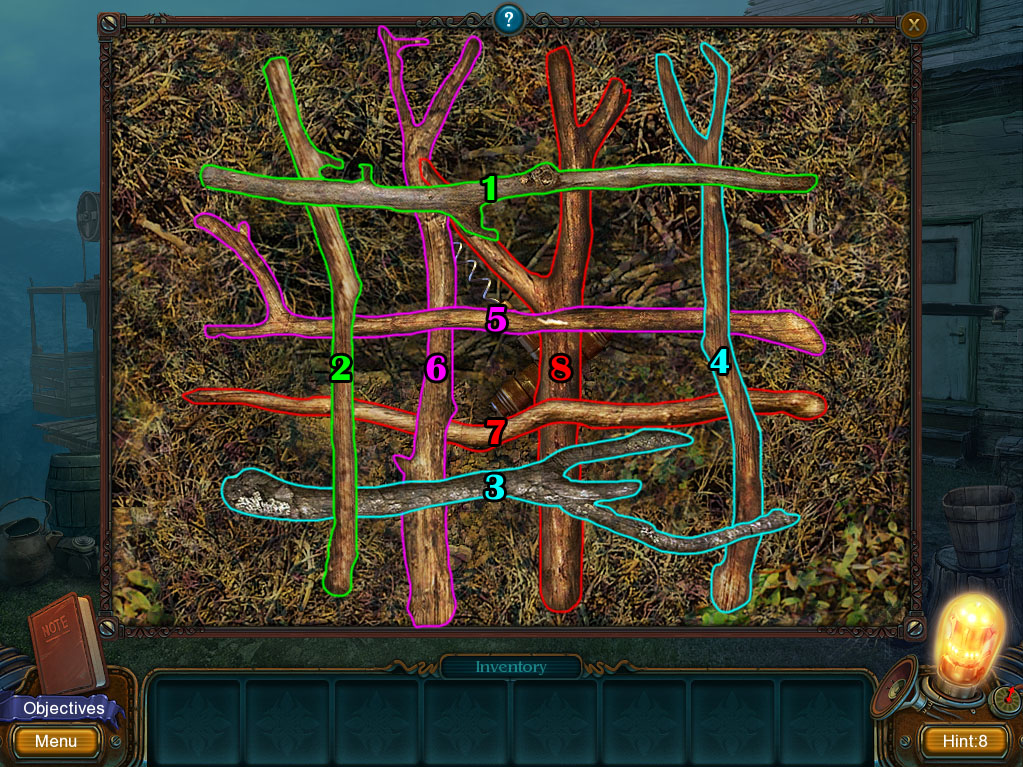
Click the pile of sticks on the ground to start the minigame.
Remove the sticks one at a time to uncover the corkscrew at the bottom.
Click a stick to select it; if it's at the top of the pile it will disappear, but it will only shake if it is blocked by another stick.
Solution.
After the minigame is complete, take the CORKSCREW from the hole in the ground.
Click the bottom of the large barrel for a close-up view.
Use the CORKSCREW to remove the cork from the hole in the barrel.
When all the water drains out, look inside the barrel to find a HAMMER.
Click the bar over the door to the right to zoom in.
Use the HAMMER to break the rusted lock over the bar.
Go through the open door into the Destroyed Lounge.
Destroyed Lounge
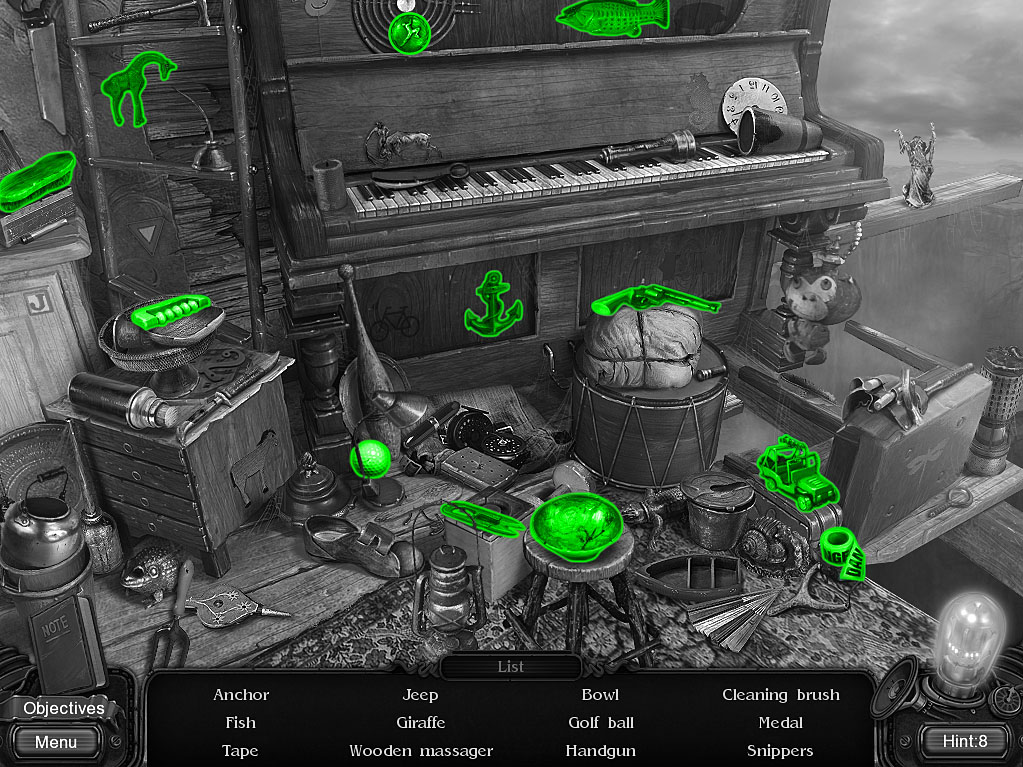
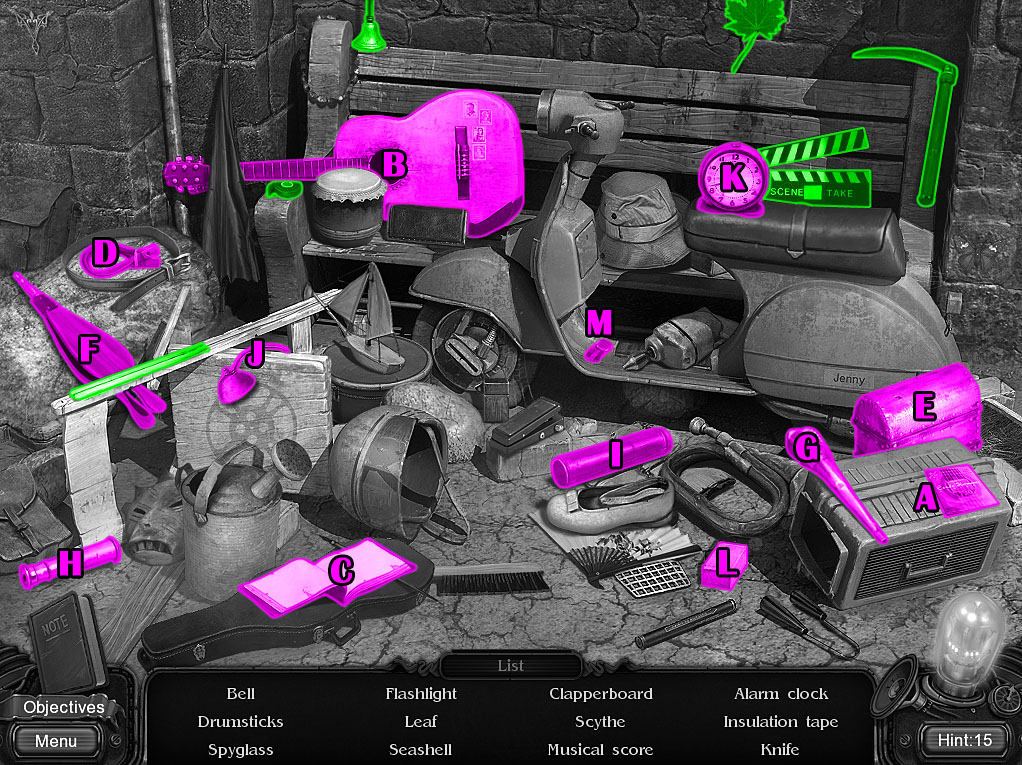
Click the piano to start the hidden object scene.
Screenshot.
Once the hidden object scene is complete, you will receive the SNIPPERS.
Inspect the sofa chair beside the door to the right.
Use the SNIPPERS to cut the wire sticking out of the hole in the seat of the chair.
Take the exposed PIECE OF WIRE sticking out of the sofa.
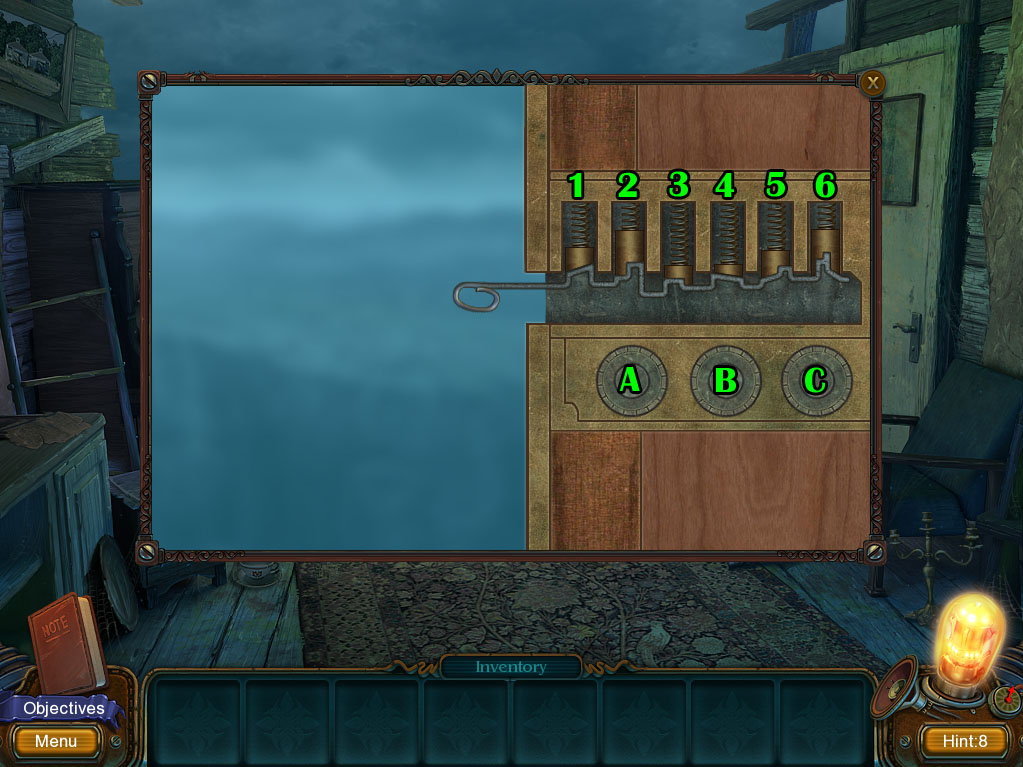
Use the PIECE OF WIRE on the lock to start the minigame.
Raise the tumblers of the lock to fit the shape of the wire.
Click the dials to raise and lower the lock sections.
Dial A moves tumblers 1, 2 (every 3 clicks), 3, 5, and 6.
Dial B moves tumblers 2, 3, 4, and 6.
Dial C moves tumblers 4, 5, and 6.
Solution.
After the minigame is complete, go through the open door to the Kitchen.
Kitchen
Find the Lamp 9/20 hanging over the left pot holder above the stove to receive an additional hint.
Click the kitchen counter to start the hidden object scene.
Add the head (A) to the statuette body (B) to complete the Cook.
Move the funnel (C) to uncover the Spices.
Use the chalk (D) on the bottom of the pan (E) to write the word 'CLEAR'.
Put the coffee (F) in the grinder (G) to make the Ground Coffee.
Add the light (H) to the stand (I) to complete the Lamp.
Screenshot.
Once the hidden object scene is complete, you will receive the FRIDGE HANDLE.
Click the upper left side of the fridge for a close-up view.
Add the FRIDGE HANDLE to the socket to open the door.
Click the opened fridge to start the hidden object scene.
Click the ice box (A) to start the minigame.
Move away the coffee beans to find the cow.
Click and drag the beans to move them around the box.
Cow Screenshot.
Click the Cow after the minigame is solved to complete the hidden object scene.
Screenshot.
Once the hidden object scene is complete, you will receive the SEALED HOSE.
Click the gas tank to the left of the oven to zoom in.
Add the SEALED HOSE to the valve at the top of the tank to attach it to the stove.
Inspect the buttons at the front of the stove.
Click the red knob to turn on the oven.
Take the GEARS from the rack in the oven.
Go back out to the Yard, then continue left to the Shed.
Shed
Find the Lamp 10/20 in the hole in the wall above the car door to receive an additional hint.
Click the shelves on the wall to start the hidden object scene.
Use the small hatchet (A) to open the box (B) and reveal the Engine Crank.
Move the belt (C) to uncover the Bell.
Drop the stone cup (D) to reveal the Letter 'B' on the wall.
Use the bottle opener (E) on the jug (F) to find the Fishing Float.
Click the space (G) to the left of the bottom shelf to start the minigame.
Chase out and catch the bugs hiding under the objects.
Click an item to scare out the bug; each bug will run between two of the objects around the minigame area.
Bug 1 runs between object A and B.
Bug 2 runs between object C and D.
Bug 3 runs between object E and F.
3 Beetles Screenshot.
Catch all three of the beetles to complete the hidden object scene.
Screenshot.
Once the hidden object scene is complete, you will receive the ENGINE CRANK.
Add the ENGINE CRANK to the engine attached to the winch.
Turn the crank and click the open panel at the side of the engine for a closer look.
Add the GEARS to the panel to start the minigame.
Place the gears on the pegs to rotate the gear at the lower right corner.
Starting beside the moving gear at the upper left corner, click and drag the gear to move it, then release it over peg on the board to place it.
If two adjacent gears are close enough to fit, but not too close as to overlap, the first gear will rotate the second.
Solution.
After the minigame is complete, move right to enter the Lift.
Lift
Find the Lamp 11/20 above the lift buttons to receive an additional hint.
Press the down arrow button to travel to Cafe Counter.
Chapter 4—The Cafe
Cafe Counter
Find the Lamp 12/20 on the side of the coffee machine to receive an additional hint.
Take the VINYL RECORD 1/3 on the seat of the stool.
Inspect the middle of the wall just to the right of the jukebox.
Take the SPARK PLUG 1/4 up against the wall.
Click the bottom of the overturned stool for a closer look.
Pick up the SPARK PLUG 2/4 from the floor beside the stool.
Go left to the Cafe Dining Area.
Cafe Dining Area
Find the Lamp 13/20 over the plank of wood on the tile floor to receive an additional hint.
Pick up the VINYL RECORD 2/3 on the underside of the fallen table.
Take the VINYL RECORD 3/3 from the shelf at the top of the left wall.
Click the top of the bench seat against the wall to zoom in.
Take the SPARK PLUG 3/4 between the folder and the pen.
Inspect the section of the floor where the tile floor meets the bare ground to find the SPARK PLUG 4/4.
Click the pile of junk blocking the door to start the hidden object scene.
Screenshot.
Once the hidden object scene is complete, you will receive a SMALL GOLDEN KEY.
Go right to the Cafe Counter.
Cafe Counter
Click the cash register for a closer look.
Use the SMALL GOLDEN KEY (from the Cafe Dining Area hidden object scene) to open the lock on the register drawer.
Take the COIN from the middle compartment.
Click the top of the jukebox to zoom in.
Add the three VINYL RECORDS to the record changer rack.
Inspect the coin slot in the middle of the juke box.
Insert the COIN into the slot beside the dollar sign.
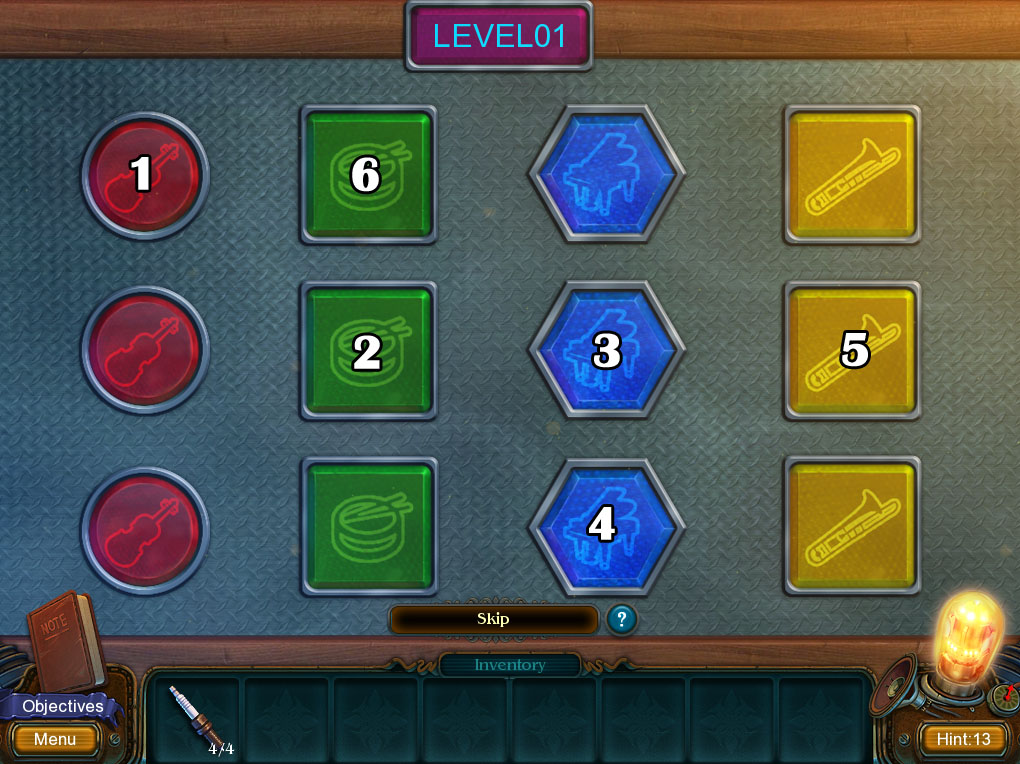
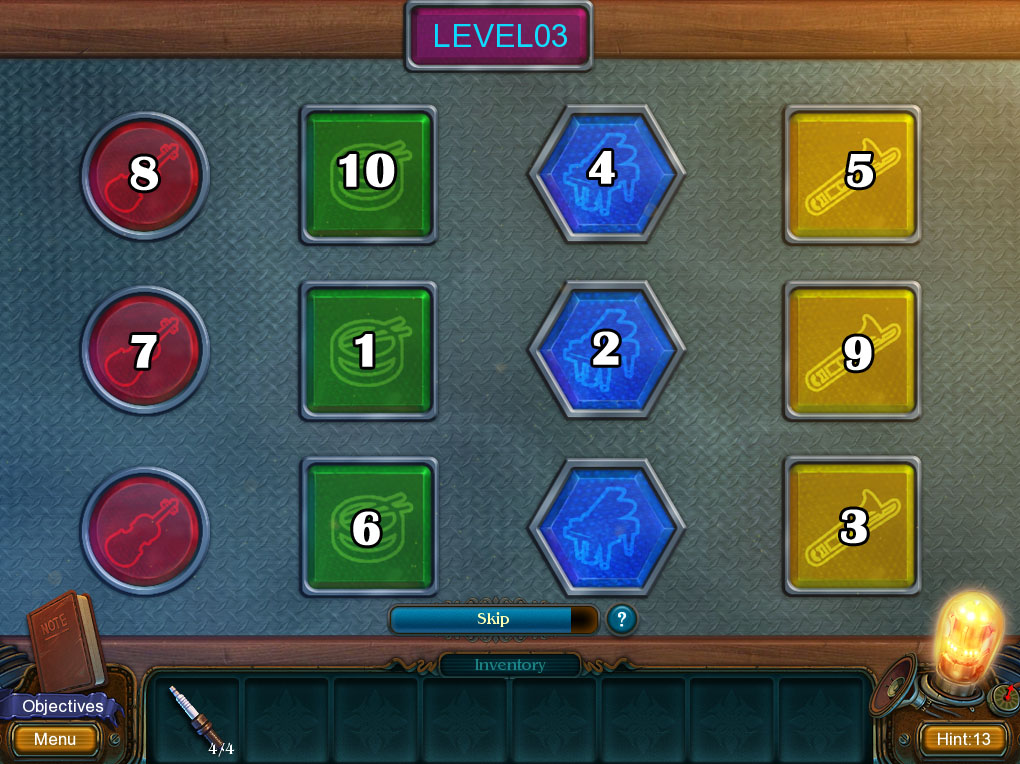
Click the glowing button panel on the jukebox to start the minigame.
Press the button at the top to watch the machine play a series of buttons, then copy the same order to complete the level.
Each row of colored buttons represents an instrument; when a button is played by the machine, it will light up and make the sound that matches its instrument.
Solution Part 1.
Solution Part 2.
Solution Part 3.
After the minigame is complete, take the SCREWDRIVER from the revealed cache under the button panel.
Click the vent at the top of the right wall for a closer look.
Use the SCREWDRIVER to remove the screws at the corners of the grate.
Take the STARTER HANDLE inside the vent.
Click the area of the counter between the register and the coffee maker to start the hidden object scene.
Use the brush (A) to clean the stain on the coffee machine (B) to reveal the Camera.
Open the ceramic teapot (C) with the knife (D) to find the Awl.
Click the tin can (E) twice to find the Letter Q.
Use the safety pin (F) on the hand (G) to release the Fish.
Screenshot.
Once the hidden object scene is complete, you will receive the AWL.
Move left to the Cafe Dining Area.
Cafe Dining Area
Click the bottom of the car for a close-up view.
Use the AWL (from the Cafe Counter hidden object scene) to pop the car tire.
Inspect the engine under the hood of the car.
Take the area map on top of the engine to add it to your notebook.
Place the four SPARK PLUGS into the holes at the top of the tank.
Put the START HANDLE (from the vent at the Cafe Counter) into the socket under the front bumper.
Turn the handle to start the car.
Click the ceiling fan to drop the METALLIC HANDLE onto the floor, then click the handle to add it to your inventory.
Click the hatch in the floor to zoom in.
Add the METALLIC HANDLE to the hole in the trap door to open it.
Go down the steps to travel to the Garage.
Garage
Find the Lamp 14/20 on top of the broken wall at the upper right corner to receive an additional hint.
Click the middle of the wood bench to zoom in.
Take the MOUNTAINEERING BUCKLE from the seat of the bench.
Move left to reach the Footbridge.
Footbridge
Pick up the STONE on the plank of wood by the sidewalk.
Click the stack of crates on the left side of the street to start the hidden object scene.
Move the tool belt (A) to reveal the Compass.
Use the net (B) to catch the Butterfly (C).
Click the Dish (D) to shake off the oil can and tweezers.
Move the cloth (E) to uncover the Bulb.
Click the metal pipe (F) two times to find the Can.
Screenshot.
Once the hidden object scene is complete, you will receive the ROPE.
Return to the Garage.
Garage
Click the window on the driver's side of the car to zoom in.
Use the STONE (from the ground at the Footbridge) to break the glass.
Pull the switch beside the steering wheel to open the trunk.
Click the trunk to start the hidden object scene.
Add the two tiles (A & B) to complete the Roulette Wheel (C).
Use the crowbar (D) to open the can of paint (E), then dip the brush (F) in the bucket and use it to paint the Red Bucket (G).
Move the gas can (H) to uncover the Lunch Bucket.
Screenshot.
Once the hidden object scene is complete, you will receive the SPADE.
Go left to the Footbridge.
Footbridge
Click the metal rod sticking out of the dirt for a closer look.
Use the SPADE (from the Garage hidden object scene) to dig a hole in the ground around the rod.
Take the uncovered CLIMBING HOOK from the ground.
Click the pile of junk in front of the cafe building to start the hidden object scene.
Screenshot.
Once the hidden object scene is complete, you will receive the EXPLOSIVE CHARGE.
Click the spear gun on the stand beside the broken rope bridge to zoom in.
Load the CLIMBING HOOK into the end of the spear gun.
Add the EXPLOSIVE CHARGE to the barrel.
Attach the ROPE (from the hidden object scene at the Footbridge) to the hook to complete the weapon.
Click the spear gun to shoot the rope across the chasm.
Attach the MOUNTAINEERING BUCKLE (from the bench at the Garage) to the start of the rope to move across the chasm to the Church Entrance.
Chapter 5—The Church
Church Entrance
Find the Lamp 15/20 over the left headlight on the crashed trolley to receive an additional hint.
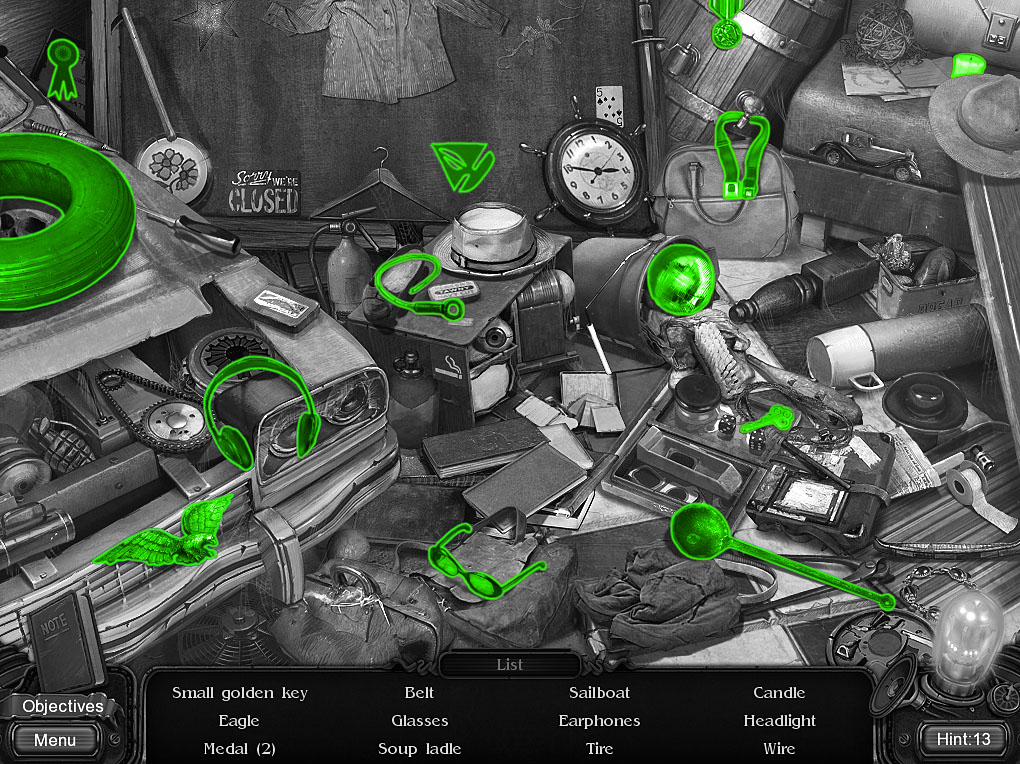
Click the pile of junk on top of the bench to start the hidden object scene.
Add the box of strings (A) to the guitar (B) to play the Musical Score (C).
Put the strap (D) on the lunchbox (E) to find the Flashlight.
Use the bellows (F) on the funnel (G) to blow out the Seashell.
Add the eyeglass (H) to the cylinder (I) to complete the Spyglass.
Place the bells (J) to complete the Alarm Clock (K).
Put the cement block (L) on the scooter pedal (M) to reveal the Knife.
Screenshot.
Once the hidden object scene is complete, you will receive the INSULATION TAPE.
Click the front doors to the building to zoom in.
Take the IRON PIECE shaped like a 3 on the left side of the door.
Click the bottom of the utility pole for a closer look.
Use the IRON PIECE to slide the SMALL KEY out from under the round stone.
Click the metal box in the middle of the utility pole for a close-up view.
Use the SMALL KEY on the lock above the handle.
Repair the broken red wire with the INSULATION TAPE, then flip the switch to turn on the power.
Go through the open doors into the Trolley Car.
Trolley Car
Find the Lamp 16/20 beside the handle strap hanging from the left side of the ceiling to receive an additional hint.
Take the BUTTON from the hat on the left bench.
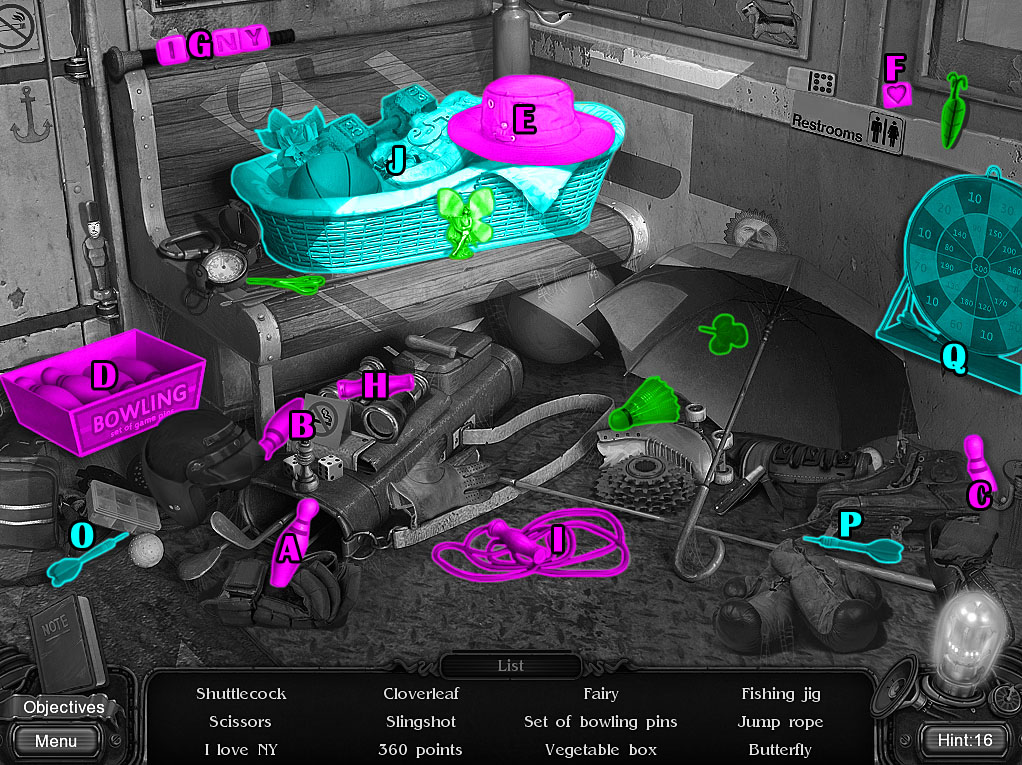
Click the right bench to start the hidden object scene.
Put the three pins (A, B, & C) in the box (D) to complete the SET OF BOWLING PINS.
Move the hat (E) to uncover the Slingshot.
Place the heart (F) to the tiles (G) to create message "I Love NY".
Add the handle (H) to complete the Jump Rope (I).
Click the basket (J) for a close-up view.
Place the tomato (K), pepper (L), and carrot (M) inside the crate (N) to complete the Vegetable Box.
Butterfly & Vegetable Box Screenshot.
Add the two darts (O & P) to the shelf under the dart board (Q) to start the minigame.
Pick up the darts and put them on the sections of the target so that the sum of their points equals 360.
360 Points Screenshot.
After the minigame is solved, click the 360 Points on the score board to complete the hidden object scene.
Screenshot.
Once the hidden object scene is complete, you will receive the SCISSORS.
Inspect the red button beside the broken window.
Use the SCISSORS to cut the wire above the button.
Pull down the red lever to open the door to the driver's seat.
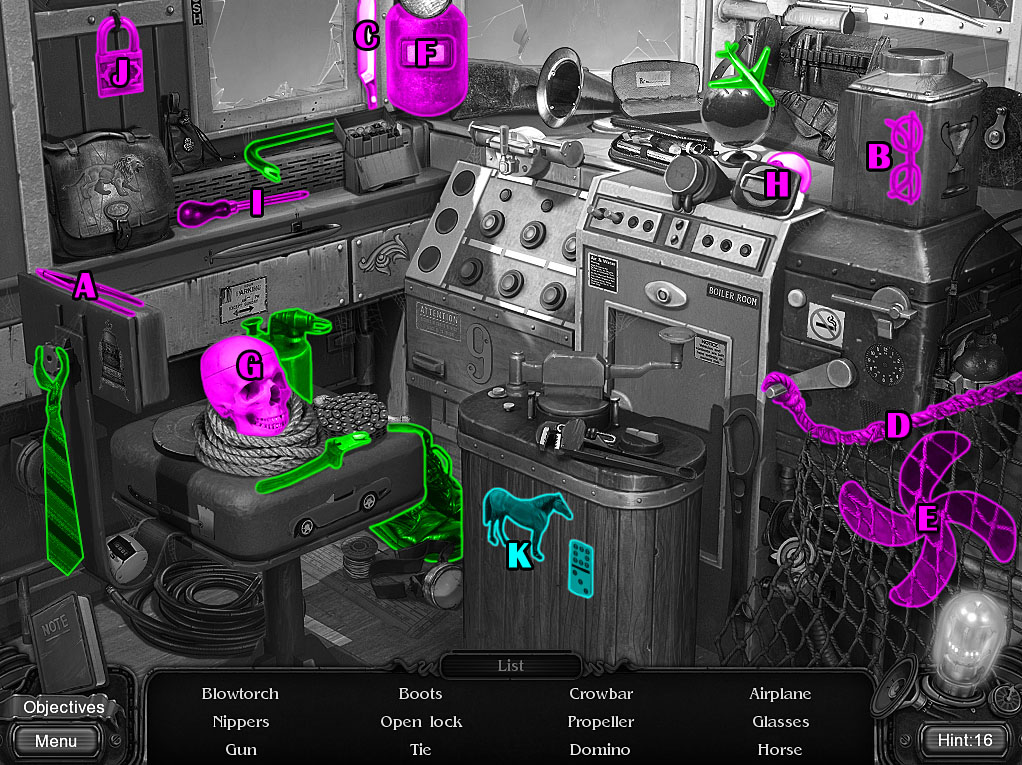
Click the driver seat area behind the opened door to start the hidden object scene.
Use the tweezers (A) to pull the Glasses (B) out of the case.
Use the knife (C) to cut the top of the net (D) and uncover the Propellor (E).
Lift the window of the welding helmet (F) to reveal the first glass eye, then place it in the skull (G); put the second glass eye (H) in the skull to reveal the Gun.
Use the screwdriver (I) to force the Open Lock (J).
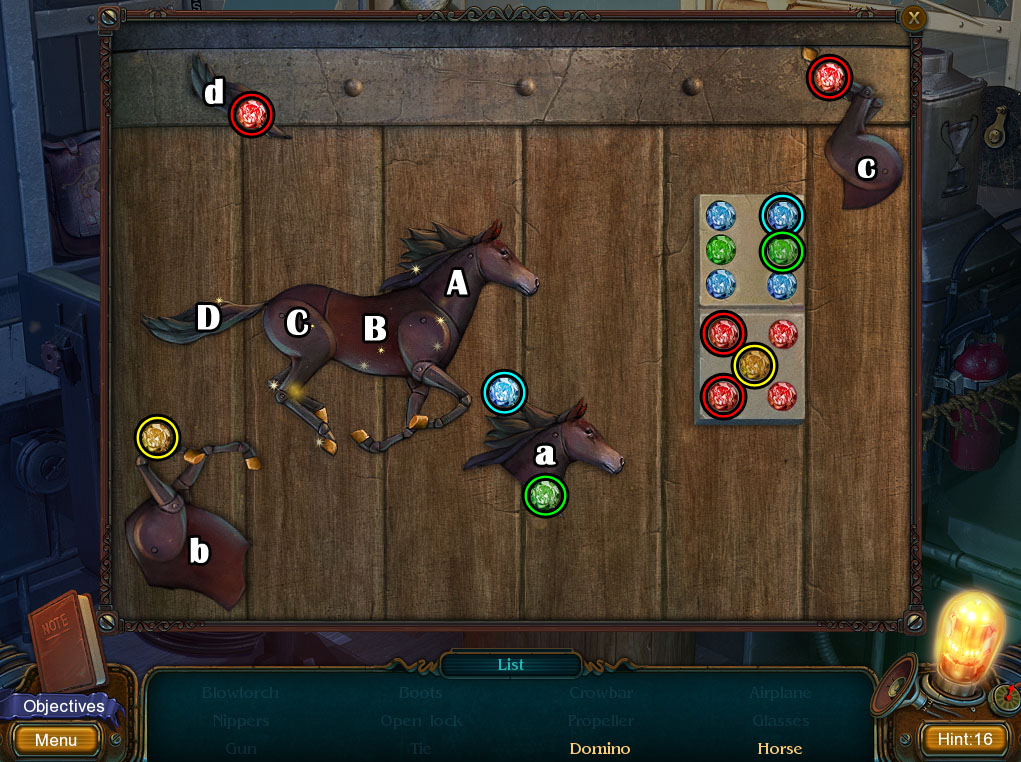
Click the horse and domino (K) on the pedestal under the door lever to start the minigame.
To complete the Horse, place the parts of the horse (labeled a to d) in the correct positions on the horse silhouette.
Click a part to select it, then click a section of the carved space to set it in place.
To complete the Domino, set the colored gems into the correct sockets.
Click a gem pin to select it, then click a hole on the domino to place it inside.
Arrange the gems on the domino so that the right side of the tile matches the left side.
Horse & Domino Screenshot.
Click the Horse and the Domino after the minigames are solved to complete the hidden object scene.
Screenshot.
Once the hidden object scene is complete, you will receive the BLOWTORCH.
Go back out to the Church Entrance.
Church Entrance
Inspect the puzzle box beside the rocks to the left of the trolley.
Add the BUTTON (from the bench at the Trolley Car) to the space at the lower right corner of the box to start the minigame.
Rotate the tiles to connect a path from the four wires at the top to the red button at the bottom.
Click the wires to rotate them into the correct positions, then press the button to enter your solution.
Solution.
After the minigame is solved, take the HEX DRIVER from the opened puzzle box.
Return to the Trolley Car.
Trolley Car
Click the small blue door to the left of the doorway to zoom in.
Use the HEX DRIVER (from the puzzle box at the Church Entrance) to open the door.
Take the HAMMER from the opened compartment.
Go outside again to the Church Entrance.
Church Entrance
Click the doors to the church for a closer look.
Use the BLOWTORCH (from the Trolley Car hidden object scene) on the chains to heat them up.
Use the HAMMER (from the blue compartment at the Trolley Car) to break apart the chains.
Go through the open door to the Church Interior.
Church Interior
Find the Lamp 17/20 on the rafters between the front right archway to receive an additional hint.
Inspect the section of the floor in the aisle beside the nearest right bench.
Take the NEEDLE from the crack in the floor tile.
Click the straps at the side of the chest plate in the suit of armor on the ground to zoom in.
Use the NEEDLE to unbuckle the first strap on the left, then remove the straps numbered 1-4 in the following screenshot.
Screenshot.
After the straps are removed, pull the HALBERD out of the armor.
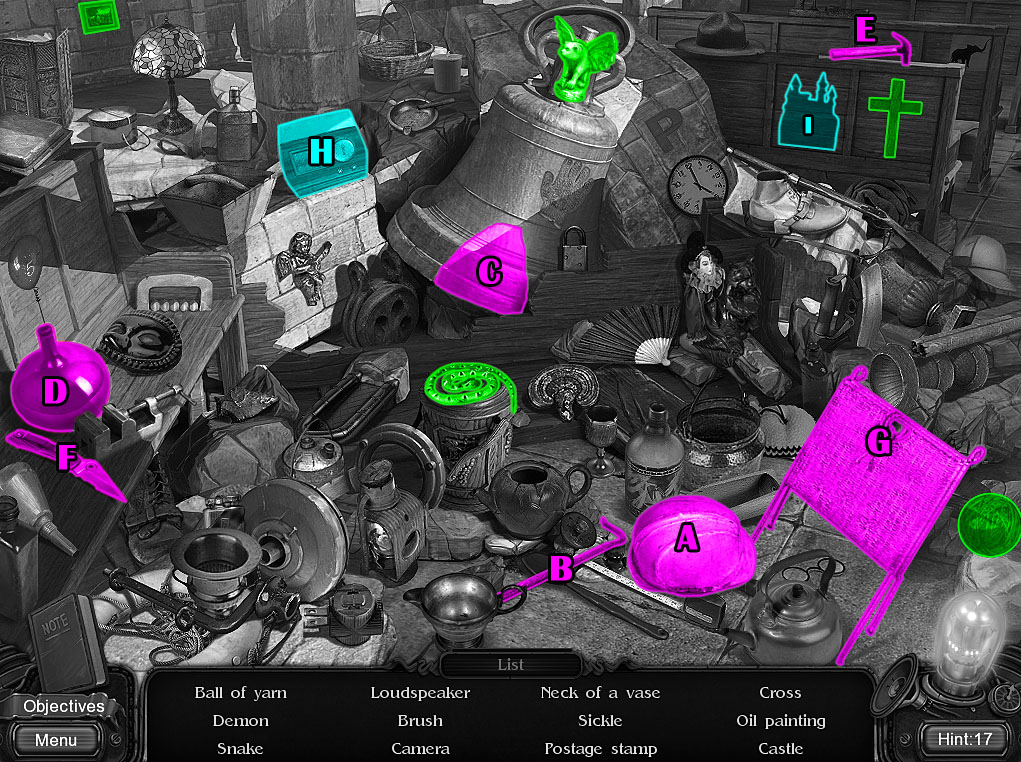
Click the bell in the pile of rubble to start the hidden object scene.
Move the helmet (A) to uncover the Sickle.
Use the crowbar (B) to break the bottom of the bell (C) and reveal the Loudspeaker.
Hit the vase (D) with the hammer (E) to break off the Neck of a Vase.
Use the knife (F) to cut the rope on the basket (G) to find the Brush.
Click the radio (H) to start the first minigame.
Collect the Stamp at the lower left side of the radio.
Read the numbers carved in the wood to find the 3 digit combination.
Turn the red and blue dials to match the combinations.
If the arrows are set correctly, the panel at the upper left side of the radio will lift to reveal the Camera.
Stamp & Camera Screenshot.
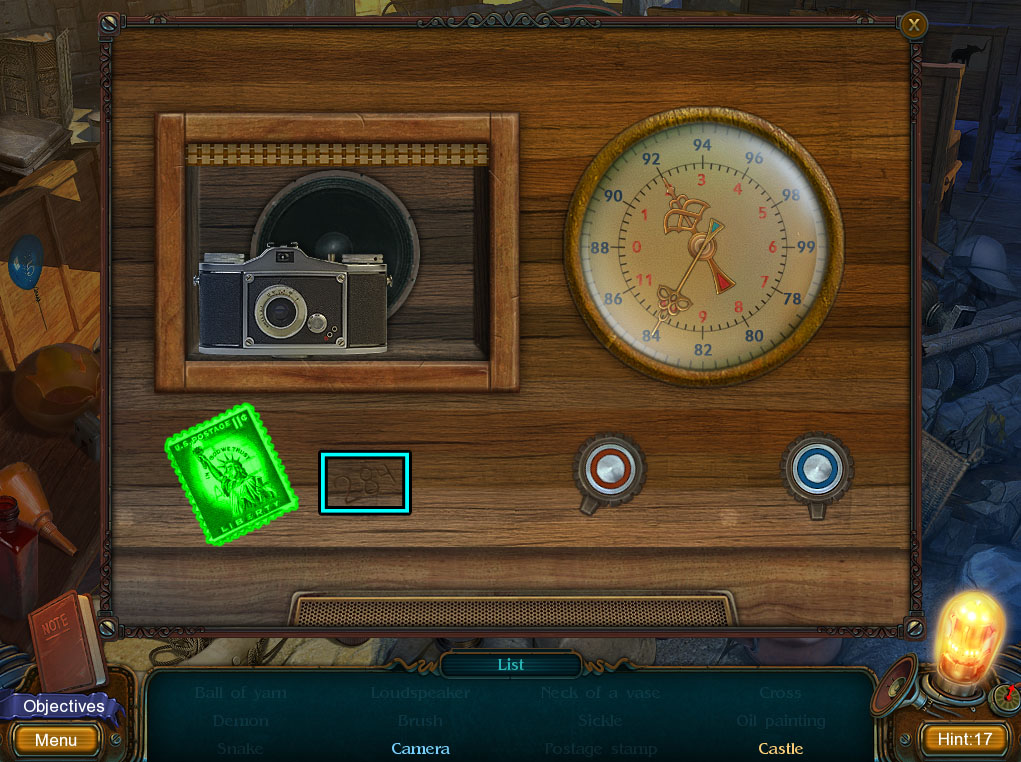
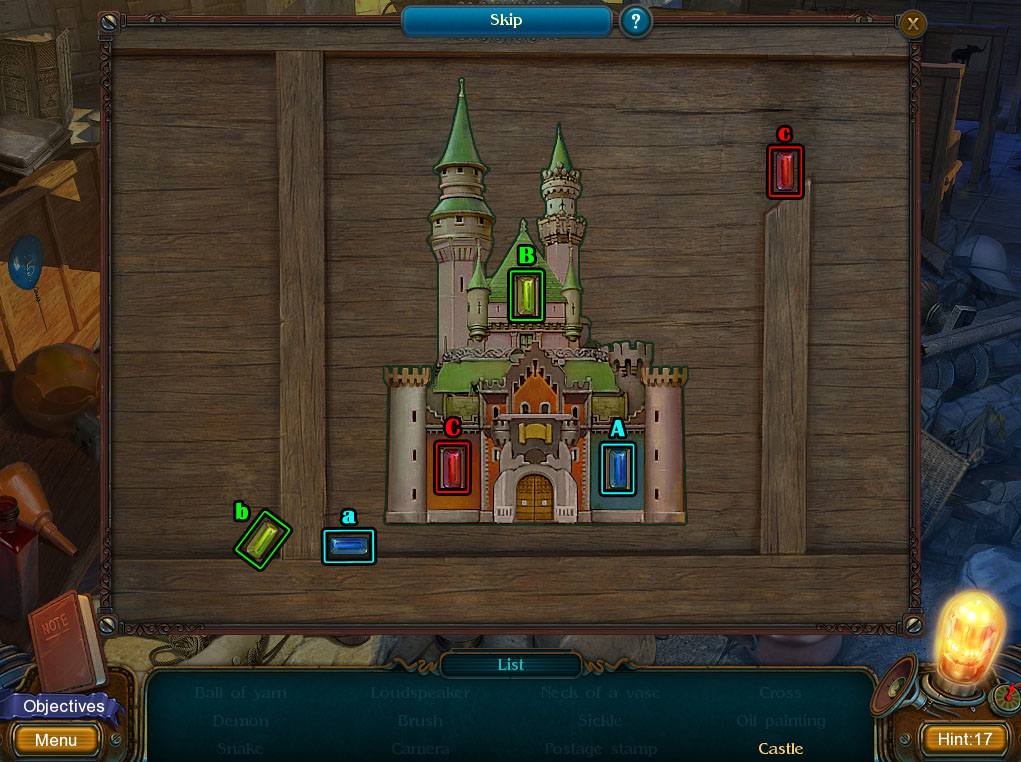
Click the silhouette of the castle (I) to start the second minigame.
First arrange the pieces of the castle to fit inside the outline.
Click a fragment of the castle to select it, then click an area inside the silhouette to set it in place.
Break the top section of the right beam to reveal the red gem.
Wipe off the dust in the lower left area to uncover the green gem.
Put the blue gem (a) in the window on the blue section of the castle (A), the green gem (b) in the window on the green section of the castle (B), and the red gem (c) in the window on the red section of the castle (C).
Castle Screenshot.
Click the Castle after the minigames are solved to complete the hidden object scene.
Screenshot.
Once the hidden object scene is complete, you will receive the LOUDSPEAKER.
Use the LOUDSPEAKER to scare away the crow sitting at the top of the front right column.
Pick up the COGWHEEL the crow drops to the ground.
Use the HALBERD to cut down the wooden beam hanging on the ropes from the ceiling.
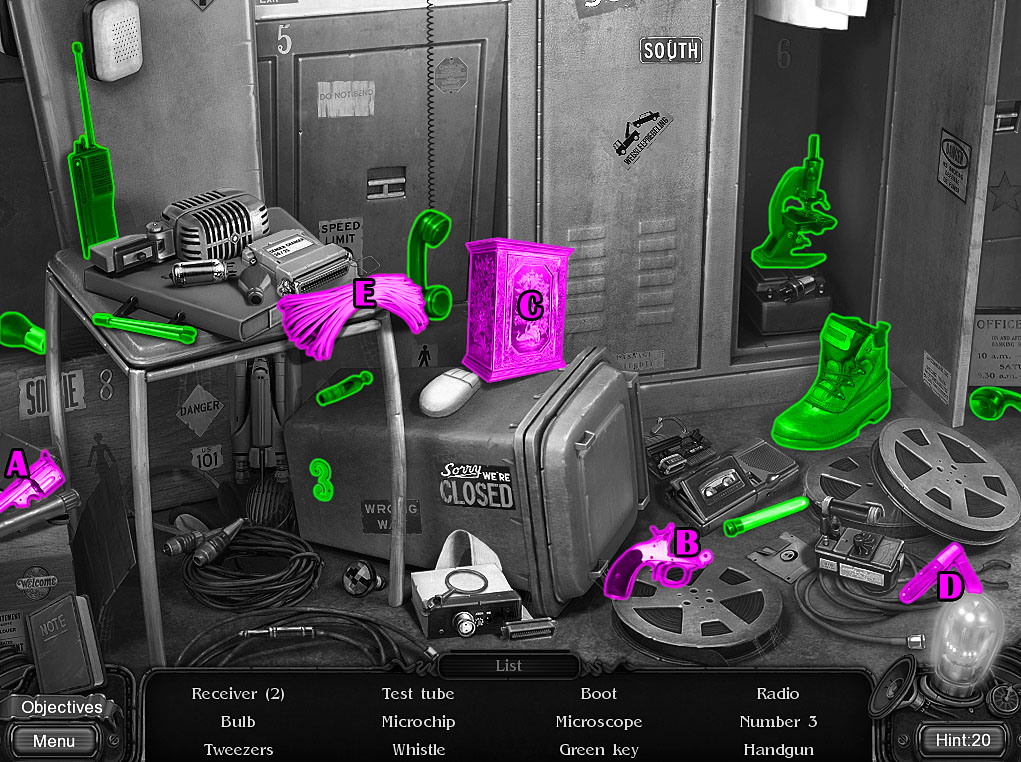
Click the bookcase in the rear right section of the room to start the hidden object scene.
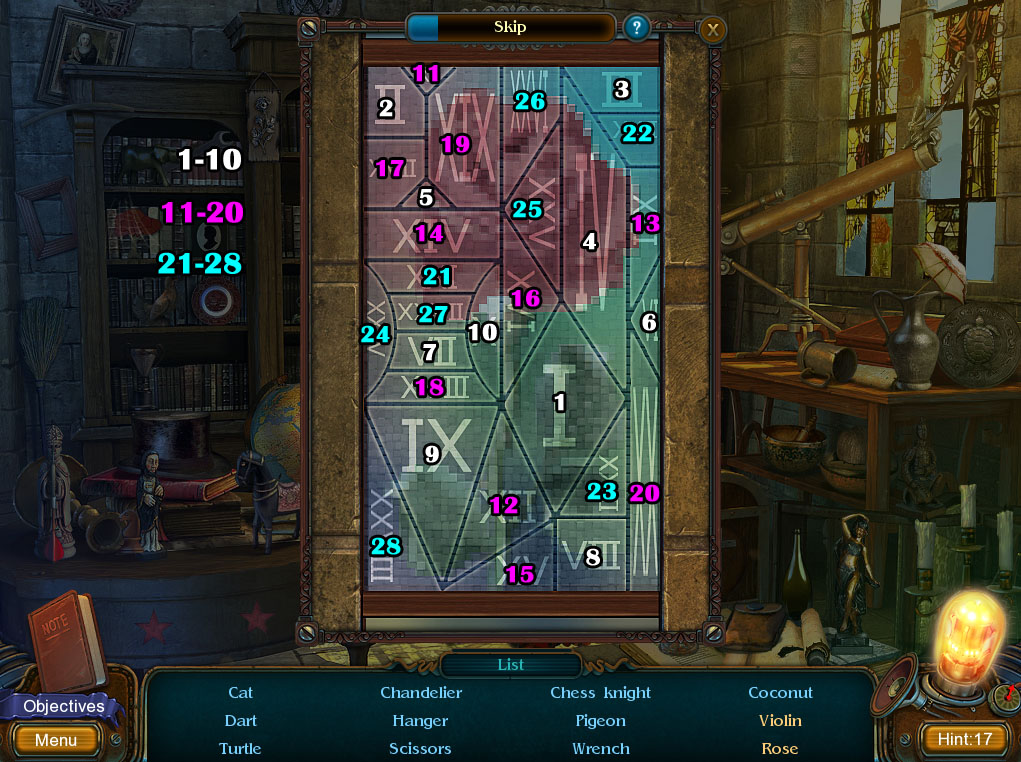
Click the bottom of the stained glass window (A) to begin the first minigame.
Click each of the sections of the window in numeric order to highlight them.
To read Roman numerals, remember that I = 1, V = 5, and X = 10.
Read the whole number from left to right; if the values in the number go from largest to smallest, then add the numbers together to find the whole number.
For example XVI is 10 + 5 + 1 = 16.
However, if a smaller number is before a larger number, then you subtract it from the sum.
Move the I one space left to make XIV, and it's now 10 - 1 + 5 = 14.
Rose Screenshot.
Click the lock in the middle of the chest (B) to start the second minigame.
Arrange the sections of the lock into the correct positions.
Click and drag a piece of the lock to rotate it around the circle.
Align each piece to fit with the metal shapes at the sides of the disc and small square pegs in the circle.
Chest Lock Screenshot.
Take the Violin from the chest after the minigame is solved to complete the hidden object scene.
Screenshot.
Once the hidden object scene is complete, you will receive the WRENCH.
Click the electric panel beside the giant vault door for a closer look.
Use the WRENCH to remove the bolts at the corners of the panel to remove it.
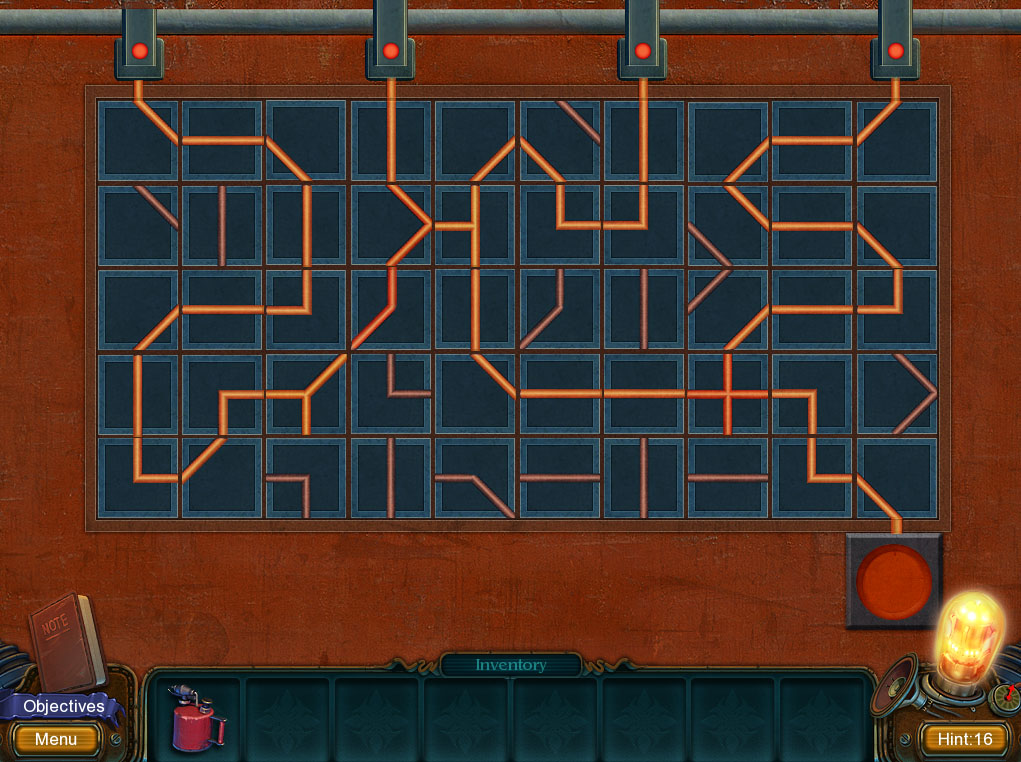
Place the COGWHEEL in the center of the device to start the minigame.
Direct the path of lights from the green light at the bottom to the three red lights around the circle.
Click a button to send a light to every adjacent bulb that is connected on the path.
To complete the puzzle, you must find the way to light the three red bulbs in 6 or fewer clicks.
Solution.
After the puzzle is solved, go through the opened vault door to the Laboratory.
Chapter 6—The Laboratory
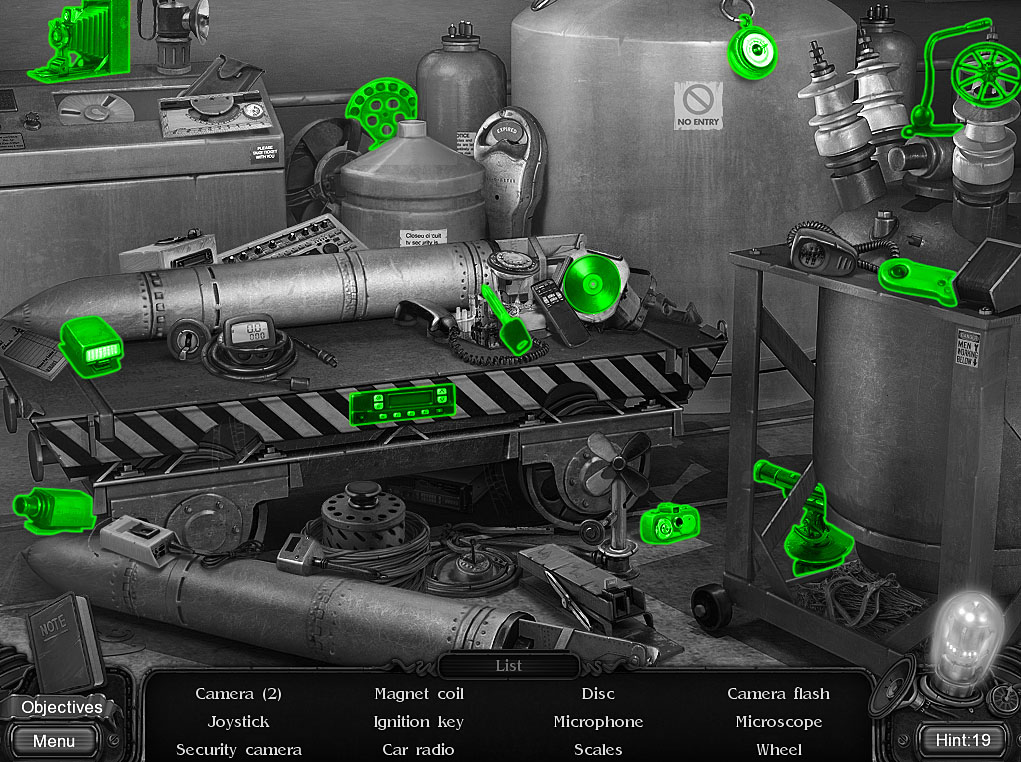
Ferrand's Lab
Find the Lamp 18/20 in the middle of the large pipe at the top of the wall to receive an additional hint.
Pick up the CLOTH beside the blue trash can under the desk and the CORNER PIPE on the floor below the lab coat.
Take the LABORATORY BURNER ot the top of the red pipe and the COIL PIPE on top of the machinery against the right wall.
Click the pocket of the lab coat for a close-up view.
Shake the pocket to reveal the KEY.
Click the desk drawer to zoom in.
Use the KEY to open the lock, then click the open drawer to look inside.
Move aside the objects in the desk to uncover the five MICROCHIPS and the PLIERS.
Screenshot.
Click the switch to the left of the door for a closer look.
Click the handle to break it, then use the PLIERS to turn the broken switch and ventilate the smoke.
Inspect the upper left corner of the dirty window.
Use the CLOTH to wipe the grime off the glass.
Note the four digit number carved backwars on the window: 3491.
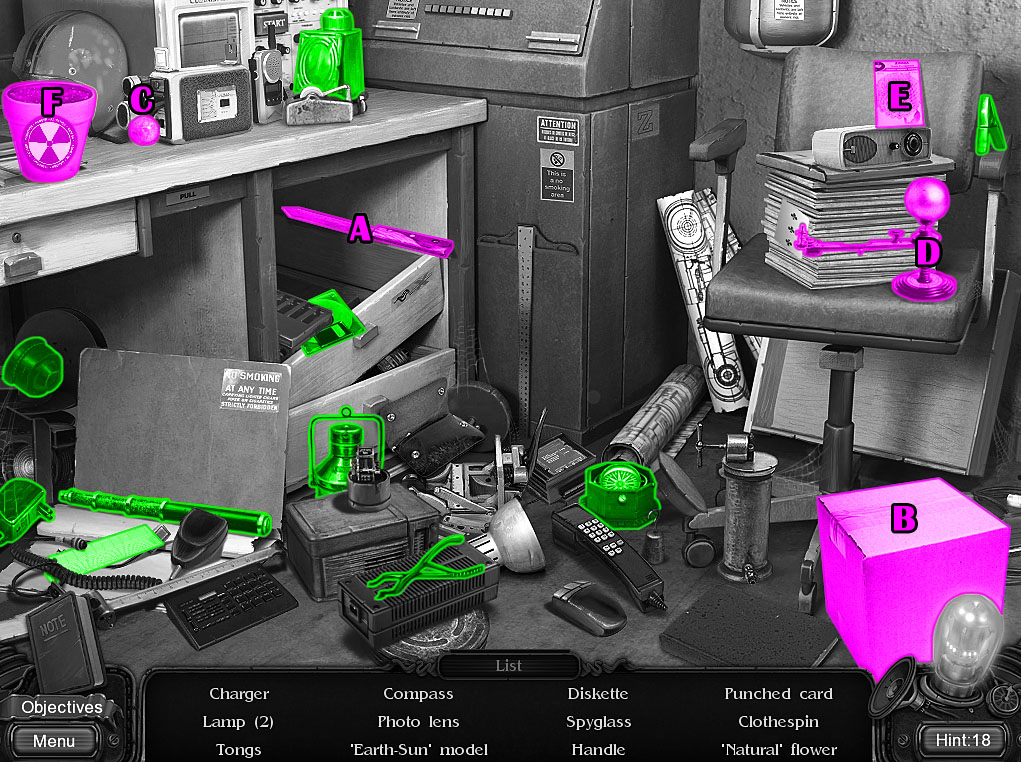
Click the area under the right side of the desk to start the hidden object scene.
Use the knife (A) to cut open the cardboard box (B) and reveal the Handle.
Place the small earth model (C) on the diagram (D) to complete the 'Earth Sun Model'.
Plant the bag of seeds (E) in the pot (F) to grow the 'Natural' Flower.
Screenshot.
Once the hidden object scene is complete, you will receive the HANDLE.
Click the vials on top of the radio on the desk for a closer look.
Add the LABORATORY BURNER, CORNER PIPE, and COIL PIPE to the stand, then click the vials to start the minigame.
Use the beakers to fill the vial with the correct amount of liquid.
Click a beaker to select it, then click either another beaker or the vial to pour into it.
A beaker cannot hold more than the maximum amount of liquid indicated by the number at the top of the measuring line.
Fill the vial on the right to the amount indicated by the red line.
Part 1: Pour Beaker C into the vial, pour Beaker A into Beaker C, Pour Beaker B into Beaker A, pour Beaker B into the vial.
Solution Part 1.
Part 2: Pour Beaker A into the vial, pour Beaker C into the vial, pour Beaker B into Beaker A, pour Beaker A into the vial.
Solution Part 2.
Part 3: Pour Beaker A into the vial, pour Beaker B into Beaker A, Pour Beaker A into the vial.
Solution Part 3.
After the minigame is solved, take the VIOLENT CHEMICAL SOLUTION from the clasp.
Place the HANDLE on the valve at the top of the centrifuge against the right wall.
Turn the handle to open the compartment in the middle, then click to zoom in.
Place the VIOLENT CHEMICAL SOLUTION into the empty tube, wait for the centrifuge to spin, then take the tube of ACID.
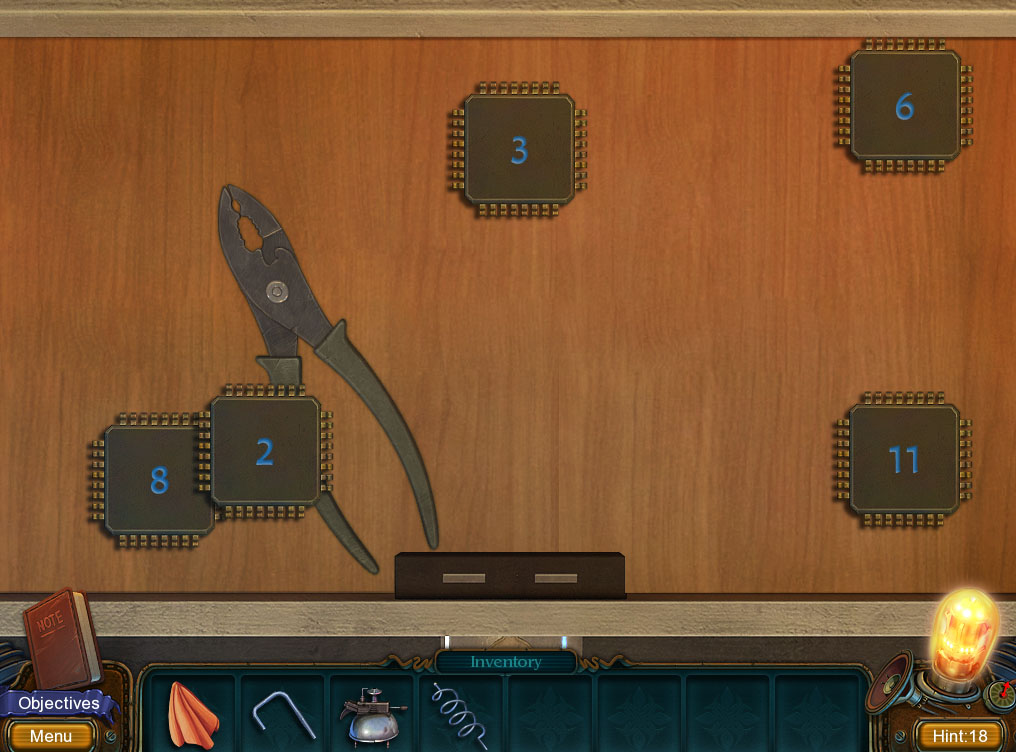
Click the computer board on top of the desk to zoom in.
Use the tube of ACID on the rust covered board, then place the five MICHROCHIPS into the empty spaces to start the minigame.
Arrange the numbered tiles on the board so that they add to equal the numbers at the top of the board.
There are three numbers, 11-25-24, at the top of the computer board, and each number is connected by blue, yellow, or red wires to the squares on the board.
Place the microchips into the squares that are connected to the numbers that you want to add the value of the microchip to.
To make the first number 11, you must place 2, 3, and 6 into the spaces connected by the blue wire to the number 11.
To make the second number 25, you must place 6, 8, and 11 into the spaces connected by the yellow wires to the number 25.
To make the third number 24, you must place 2, 3, 8, and 11 into the spaces connected by the red wires to the number 24.
Solution.
After the minigame is solved, click the COMPUTER BOARD to add it to your inventory.
Insert the COMPUTER BOARD into the slot in the computer on the left side of the desk.
Click the computer to zoom in.
Enter in the four digit password seen on the dirty window: 3491.
When the computer accepts the password, the next minigame will begin.
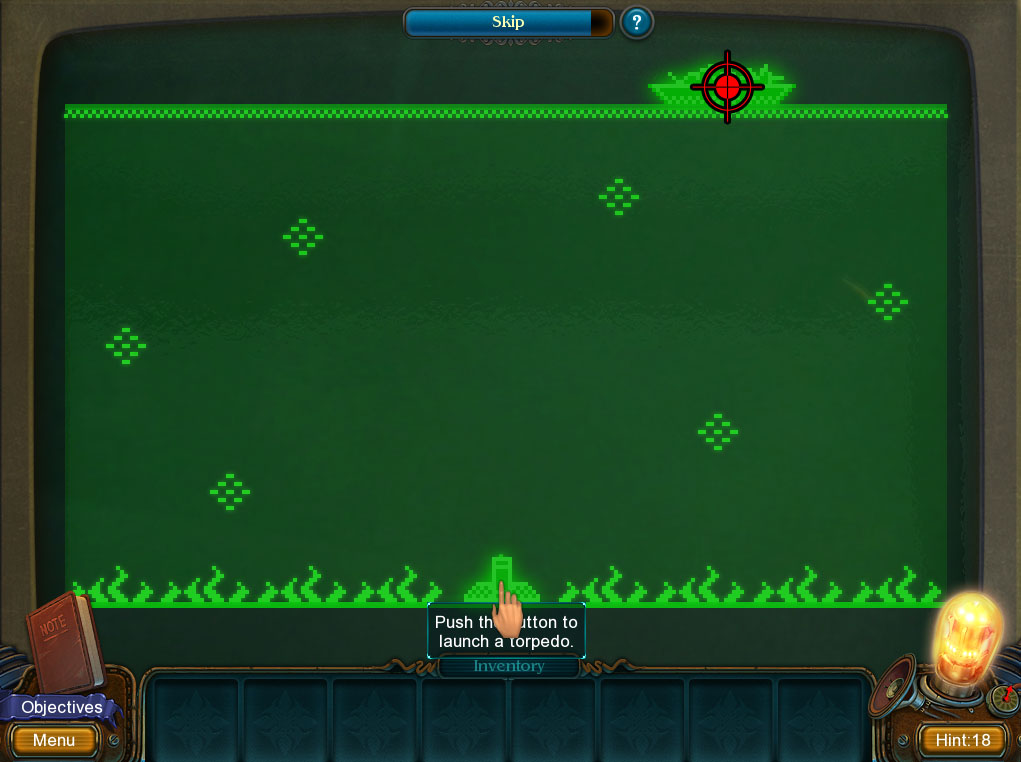
Fire the torpedo to destroy the battleship as it crosses the water.
Watch the battleship to see how quickly is moves, then click the torpedo at the correct time to fire it so that it hits the surface of the water while the ship is moving across the center.
The first ship moves at a constant quick pace, so fire the shot when the ship is about 1/3rd of the distance from the end; when the ship comes around a second time, it will meet with the torpedo.
Solution Part 1.
The second ship moves in very slowly; wait until it's moved forward just one space before firing the shot.
Solution Part 2.
The third ship moves in a series of three spaces and then pauses. Wait for it to reach about 1/4th of the way to the end before firing the shot to hit ship when it comes around again.
Solution Part 3.
Go through the open door to the Portal Room.
Portal Room
Find the Lamp 19/20 on top of the red toolbox in the lower left corner of the room to receive an additional hint.
Click the missile on top of the cart to start the hidden object scene.
Screenshot.
Once the hidden object scene is complete, you will receive the IGNITION KEY.
Click the rear left corner of the room to move to the Forklift.
Forklift
Inspect the wooden skid on the floor behind the road block to find the BLUE KEY.
Click the forklift to look inside.
Use the IGNITION KEY (from the hidden object scene at the Portal Room) to lower the safe to the ground.
Click the safe to start the minigame.
Turn the dial to set the combination using the clues written in green on the right side of the safe.
If you follow the line starting at Julius, the order goes Julius, Januarius, Marius, Febrarius.
Julius represents July, the 7th month of the year; Januarius represents January, the 1st month of the year; Marius represents May, the 5th month of the year; and Febrarius represents February, the 2nd month of the year.
Click and drag the dial to 70 -> 10 -> 50 -> 20.
Solution.
After the minigame is solved, click the opened safe to zoom in and take the RED KEY.
Go back to the main area of the Portal Room.
Portal Room
Click the left side of the control panel for a closer look.
Insert the RED KEY into the slot above the red bar.
Click the control panel again to start the minigame.
Find the pairs of matching symbols from the paper on the left and the plate on the right.
Click a symbol on the left side to select it, then click the identical symbol on the other side to remove the pair.
After all the pairs are gone, click the single remaining symbol to complete the minigame.
Solution.
When the minigame is complete, an image of the first red Strange Symbol will be added to your Notebook.
Go up the ladder into the Control Room.
Control Room
Find the Lamp 20/20 on the shelf in the right locker to receive an additional hint.
Pick up the rubber GLOVE on top of the cardboard box.
Click the red chair to start the hidden object scene.
Add the barrel (A) to the handle (B) to complete the Gun.
Open the decorated box (C) with the switchblade (D) to reveal the Green Key.
Move the bundle of wires (E) to uncover the Microchip.
Screenshot.
Once the hidden object scene is complete, you will receive the GREEN KEY.
Click the control panel on the left side of the room to zoom in.
Take the diagram to add the picture to your notebook.
Insert the BLUE KEY (from the skid at the Forklift) into the slot above the blue bar.
Click the left control panel again to start the minigame.
Rotate the tiles to complete the image of the symbol.
Click a tile to rotate it and every adjacent tile touching it.
Start with the border pieces around the outside of the picture, then align the tiles in the center.
Solution.
When the minigame is complete, an image of the second blue Strange Symbol will be added to your Notebook.
Return to the Forklift.
Forklift
Use the GLOVE (from the cardboard box at the Control Room) to pull the CROWBAR out of the electrified machinery.
Click the machine for a closer look.
Insert the GREEN KEY (from the Control Room hidden object scene) into the slot above the green bar.
Click the machine again to start the minigame.
Find and match the pairs of identical symbols hidden behind each circular window.
Click a window to reveal its symbol, then click another window to attempt to pair them.
If the symbols match, then the symbols will stay open; if the symbols are not identical, then the windows will close again.
Solution.
When the minigame is complete, an image of the third green Strange Symbol will be added to your Notebook.
Go back to the main area of the Portal Room.
Portal Room
Click the small door in the middle of the control panel for a close-up view.
Use the CROWBAR (from the electrified machinery at the Forklift) to pry open the door.
Take the SMALL KEY on the box inside the opened compartment.
Go up the ladder to the Control Room.
Control Room
Click the button case on the left side of the control panel under the window.
Use the SMALL KEY (from the compartment in the Portal Room) to open the lock at the bottom of the case.
Press the red button to fire the laser.
Go back down to the Portal Room.
Portal Room
Click the bottom of the laser to start the minigame.
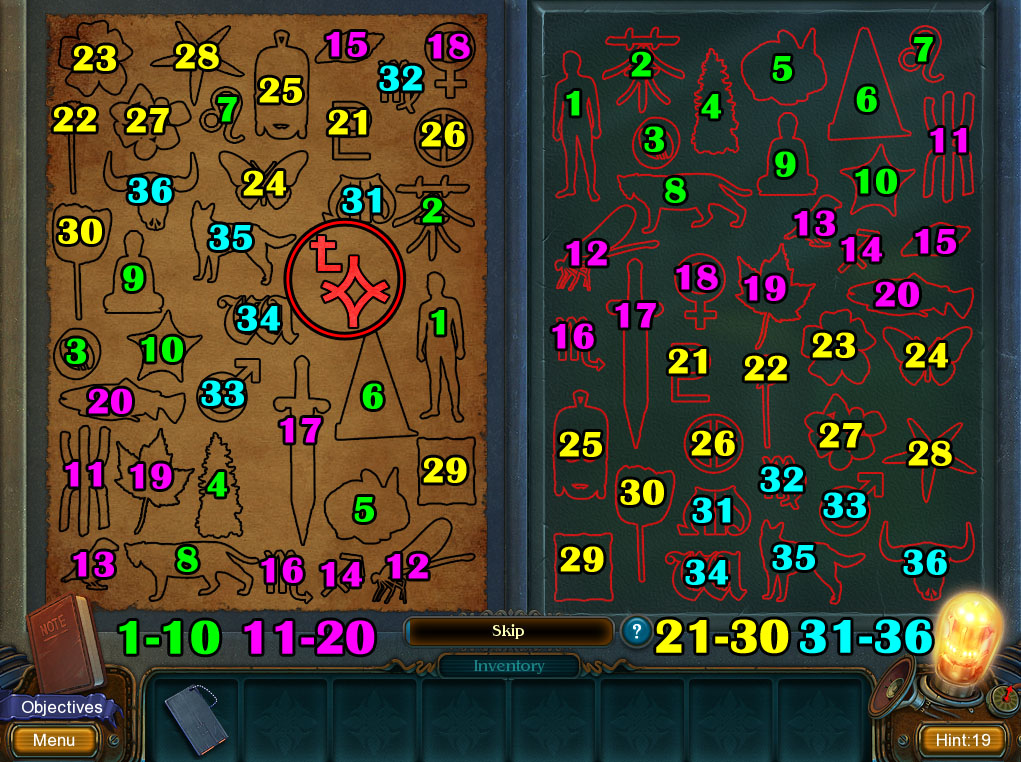
Highlight the sections of the three screens to create the red, blue, and green Strange Symbols found in your Notebook.
Solution.
Posted by: Trinn |
July 19, 2012 9:46 PM
|
July 19, 2012 9:46 PM