

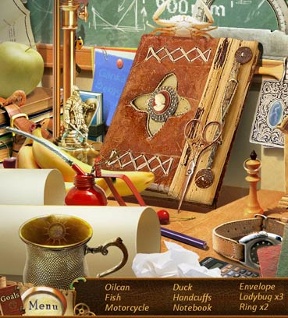
![]() Kate Arrow: Deserted Wood is a new hidden object adventure game created by relative newcomer to the casual gaming scene, Mariaglorum. Kate's grandfather, an explorer with all the trimmings, saved a native tribe decades ago, and now he's devoted his life to tracking down the sacred idols the tribe has lost. He finally accomplished his goal, but in his haste to return them, he left the final idol at home. Your first tasks in this gradually unfolding story are to find the idol, find grandpa's map, and locate your camera so you can set off to adventure.
Kate Arrow: Deserted Wood is a new hidden object adventure game created by relative newcomer to the casual gaming scene, Mariaglorum. Kate's grandfather, an explorer with all the trimmings, saved a native tribe decades ago, and now he's devoted his life to tracking down the sacred idols the tribe has lost. He finally accomplished his goal, but in his haste to return them, he left the final idol at home. Your first tasks in this gradually unfolding story are to find the idol, find grandpa's map, and locate your camera so you can set off to adventure.
 Kate Arrow is divided into chapters that play out within half a dozen or so rooms. You can travel back and forth between these rooms just like in any point-and-click game, and you'll need to do just that in order to complete the objectives for the area. Hunting down pieces of a key inventory item, for example, often requires you to move between scenes, completing hidden object puzzles and solving other riddles in the process. It's a very organic experience that feels quite natural, never bordering on the dangerous "Hey, you just made me do that just to take up more time" zone.
Most of the time you'll be poking around fairly empty rooms looking for a few stray items or special areas you can interact with. A locked cabinet looks awfully appealing, as does that dark staircase in the corner. Often, though, you can't reach these places without first locating another item. You do this by visiting rooms with hidden object scenes and finding a dozen or so items there. Key object in hand, you can return to the rest of the game, solve a puzzle, complete a mini-game, and continue on your journey.
Analysis: So much about Kate Arrow: Deserted Wood is straightforward, fuzzy around the edges, and easy to predict. The game isn't going for massive blockbuster status, it simply aims to be an understandable and enjoyable hidden object game you can play without pulling your hair out. It accomplishes just that, with a soft visual style, relaxing music, and a generous hint system that's always there if you get stuck.
In fact, Kate Arrow's strengths can also be its weaknesses. Don't expect too much challenge from this game, either from the puzzles, the mini-games, or the hidden objects themselves, as everything is pretty much right in front of your face. You'll have to hunt and poke around a few times, but your synapses will barely have to fire up to get things done. Also, the game is unfortunately another one of those short ones, clocking in around four hours, give or take.
Kate Arrow may be a fairly standard hidden object adventure game, but its emphasis on story and the serene presentation make it a pleasant experience to settle into. Everything is quiet, interesting, and completely casual on every level.
![]() Windows:
Windows:
Download the demo
Get the full version
![]() Mac OS X:
Mac OS X:
Not available.
Try Boot Camp or Parallels or CrossOver Games.


Walkthrough Guide
(Please allow page to fully load for spoiler tags to be functional.)
Kate Arrow: The Deserted Wood
General Tips And Hints:
Options give you a choice of music, sound, and environment volume; full screen versus window mode; custom cursor or your own.
There is a tutorial that you can choose to use.
Hints are unlimited but take time to refill and there is no timer.
At the lower left of the scene is a book of Goals you can access to see what you are currently suppose to do.
To pause the game in full screen select Menu or in window mode just touch the desk top.
In the lower center of the screen is your Inventory which is the same area that will give you your Hidden Object list.
There are 3 types of scenes in the game: a main scene from where you will pick up a few objects and check out close ups for information or to perform a task.
Areas where your cursor turns into a magnifying glass require a closer look.
From the main scene you will also access Hidden Object scenes and Mini Games which will be marked.
Hidden Object scenes are sort of random but you will visit the same scene more than once so they will be marked to help you out since some items are well hidden.
There is a key object you will receive at the completion of a Hidden Object scene which will be indicated.
Mini Games are to complete a necessary task or to give you an object you need for your Inventory.
There is a prologue, 5 chapters, and an epilogue in the game with a lot of running around between scenes.
The walkthrough will be organized slightly different than you are use to in hopes of making it easier for you to navigate so keep in mind that what is shown in the Inventory may not be exactly what yours shows.
Walkthrough
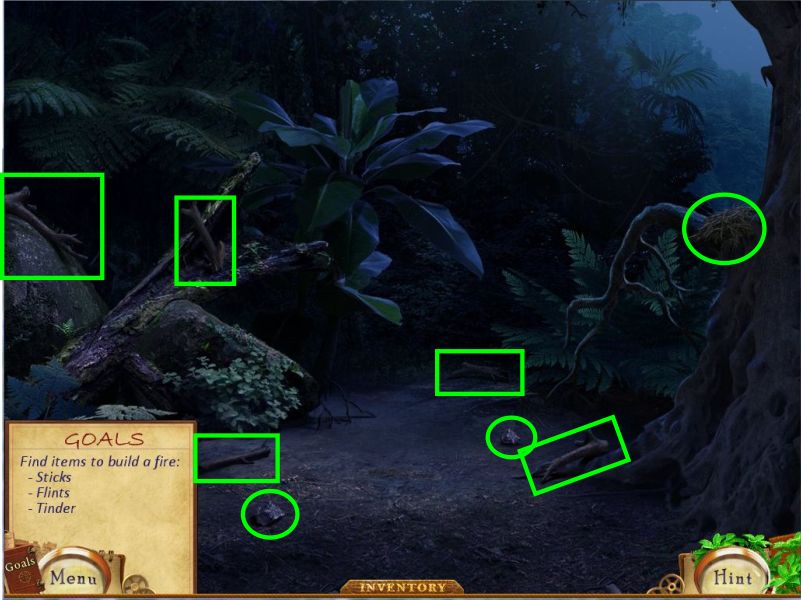
Prologue: Somewhere in the Deep Jungle
Your goal is to build a fire so you need to collect 5 pieces of wood, tinder and 2 pieces of flint.
Screenshot
Place what you have collected in for fire area in the order numbered.
Screenshot
Chapter 1: Home
Computer Desk
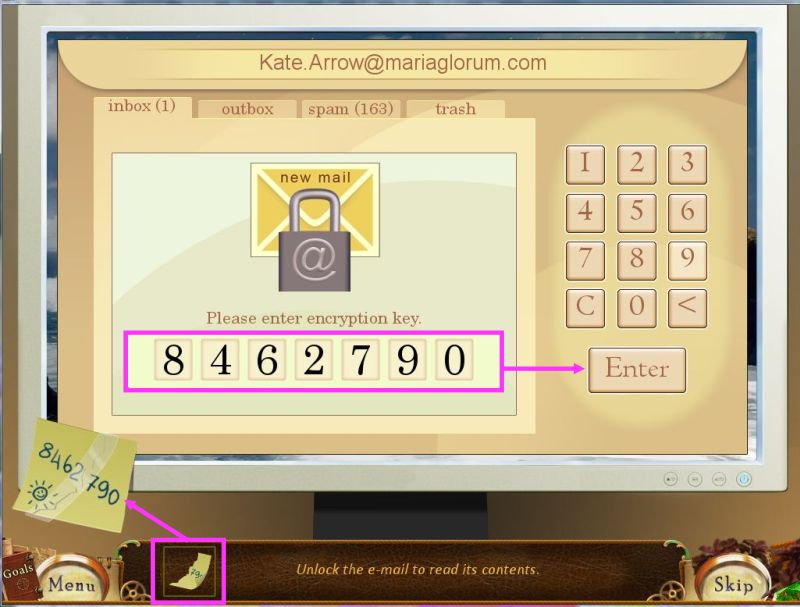
Your first stop at home will be the computer desk so you can find out your ultimate goal for the game.
Click on the computer for a closer look and attempt to read your mail but you are missing the rest of the password.
Exit down to the desk and complete your Hidden Object list to get the paper scrap with the rest of the password.
Screenshot
Zoom in again and attach the paper piece to the other piece on the computer.
Computer Password Mini Game
Enter the numbers 8462790 on the keypad and press enter to be able to read your mail.
Screenshot
Home Locations:
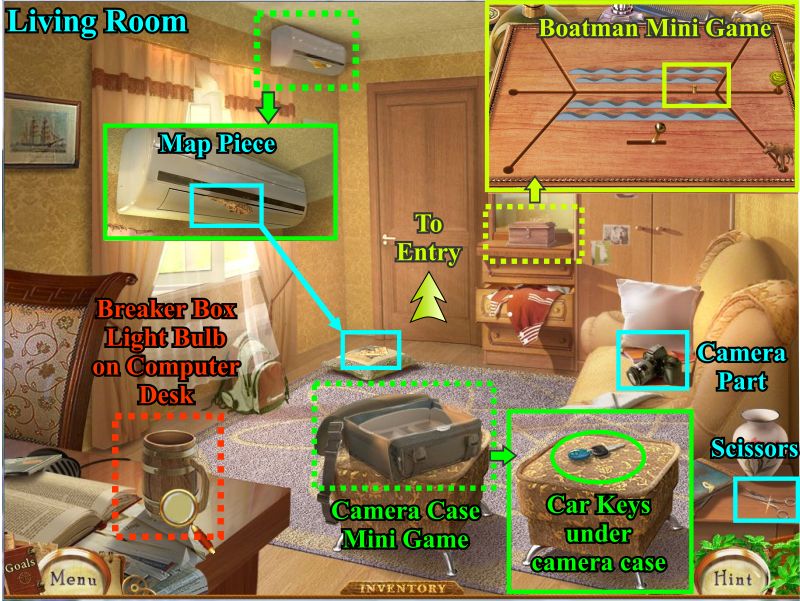
Living Room
Areas of interest include the Camera Case, Computer Desk, AC Unit, and Box on the chest.
First stop: Pick up the camera part and scissors and exit to the Entry.
Second Stop: Click on the mug for a Hidden Object on the Computer Desk and return to the Garage.
Third Stop: When you have the AC Remote click on the AC and use the remote to get the map piece which lands on the pillow below for you to collect.
If you have all the camera parts, you can place them in the camera case and get the Car Key.
If you have the Boatman, click on the box on the chest for the Mini Game to open the box and get a map piece.
Screenshot
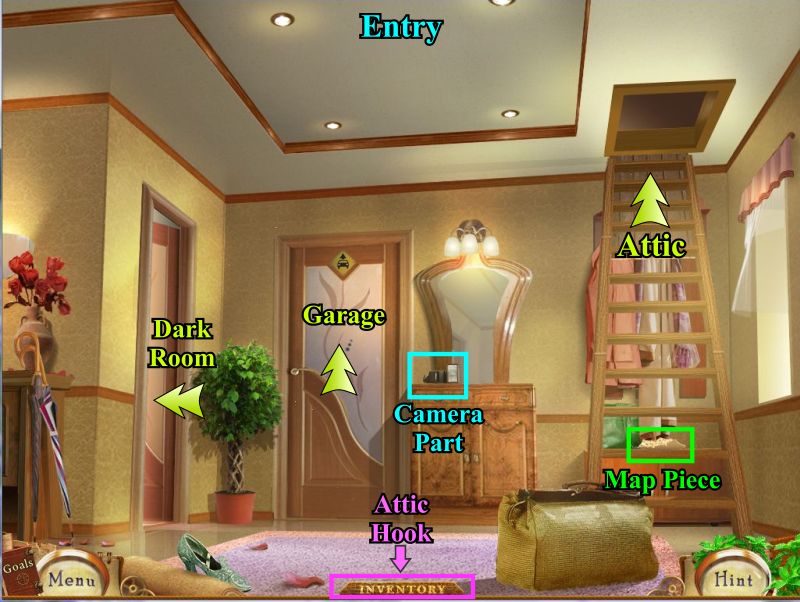
Entry
First Stop: Pick up the camera piece, check the Dark Room to find out there is no light and exit to the garage.
Second Stop: Enter Dark Room.
Third Stop: Use the attic hook to open the attic access and a map piece will land on the ladder so collect it and go to the attic.
Screenshot
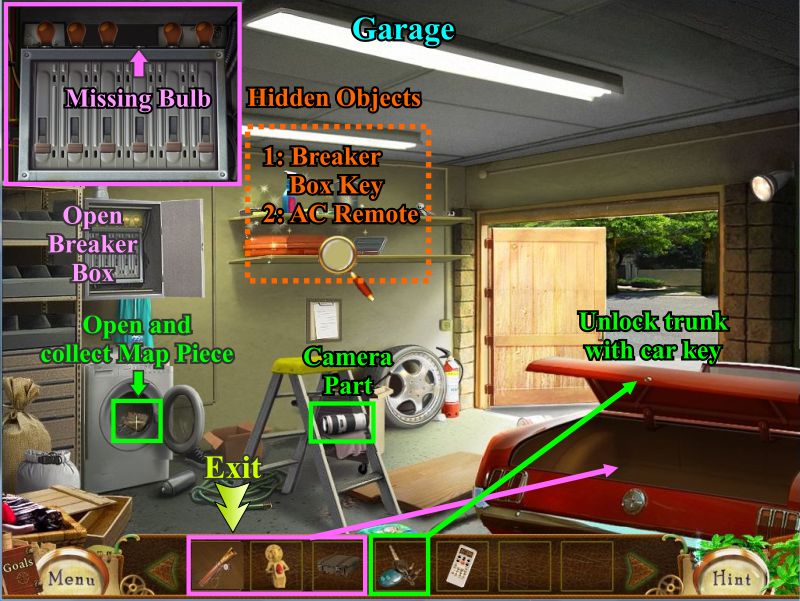
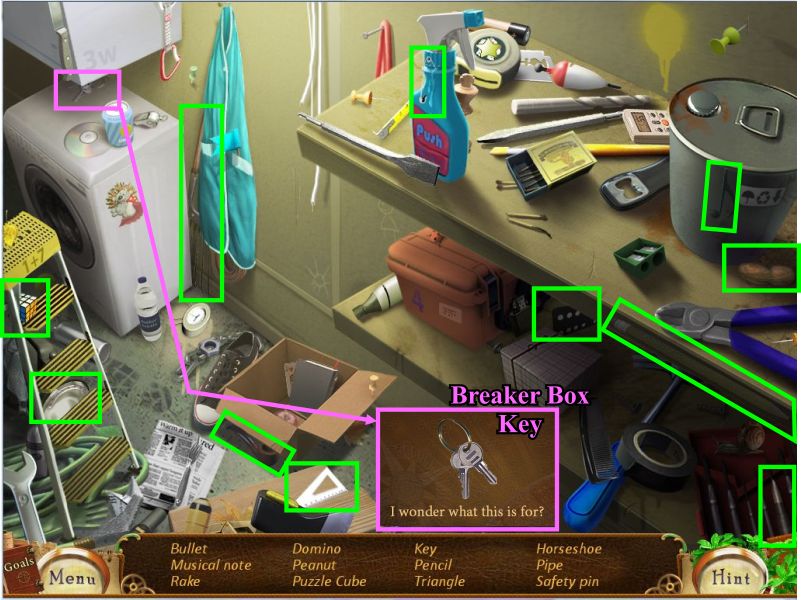
Garage
First Stop: Pick up the camera piece and open the appliance door to collect the map piece.
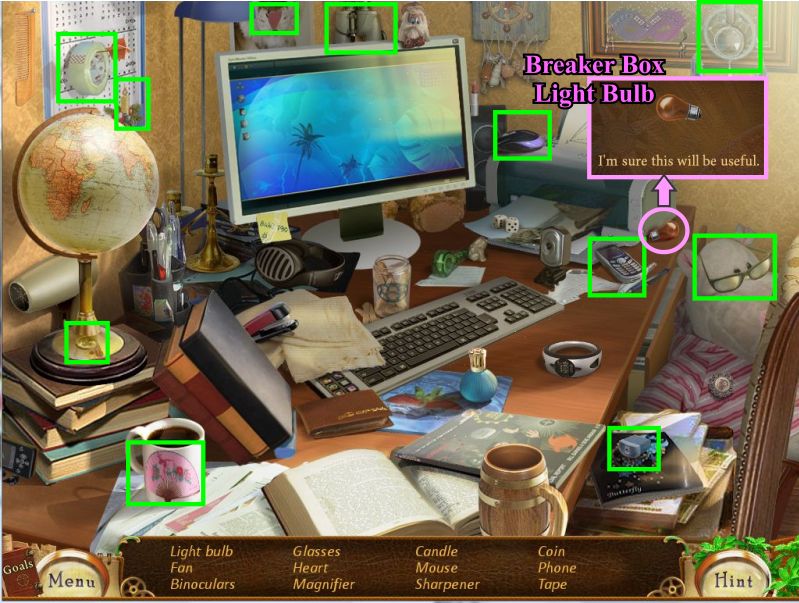
Click on the sparkles for a Hidden Object to get the Breaker Box Key.
Open the Breaker Box to find out there is a bulb missing so go back to the Living Room.
Second Stop: Place light bulb in Breaker Box for a Mini Game.
Third Stop: Hidden Object to get the AC Remote.
Fourth Stop: Open the trunk, pack the car and go to the airport.
Screenshot
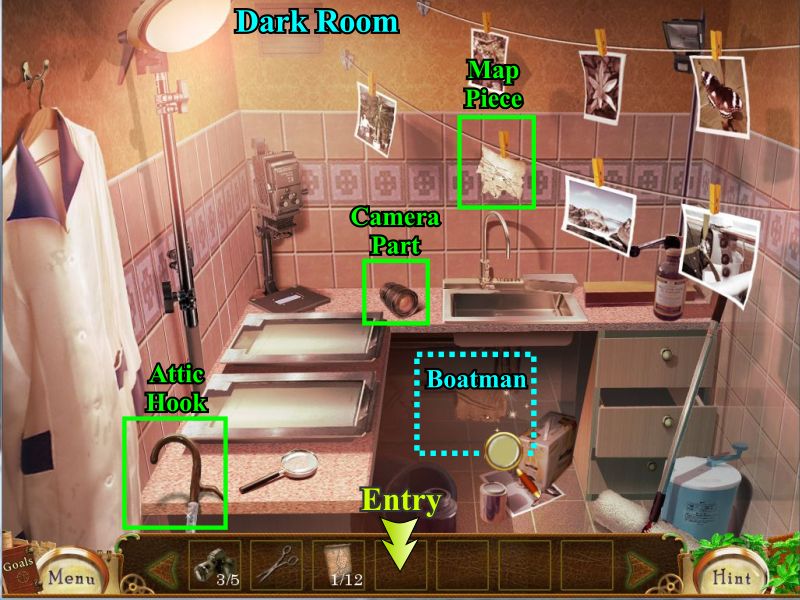
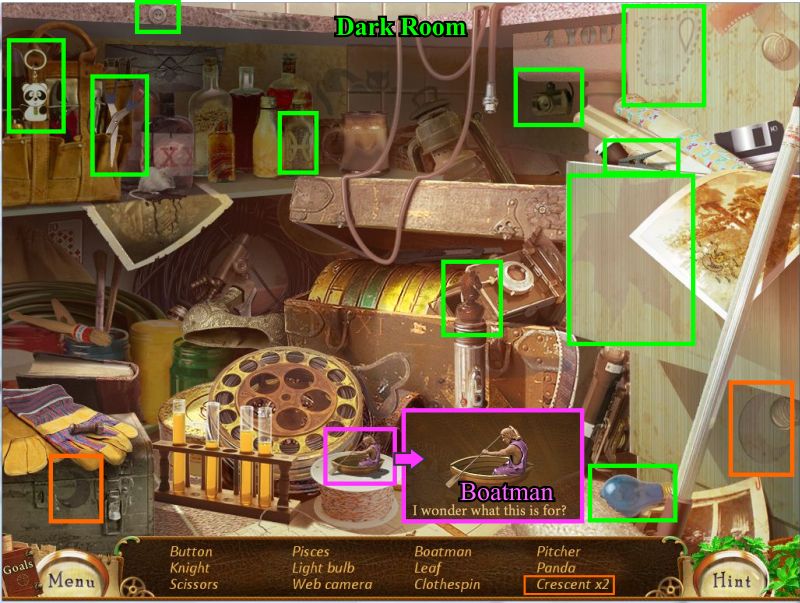
Dark Room
After you fix the breaker box go into the Dark Room.
Pick up the map piece, camera part and attic hook.
Click on the Hidden Object scene to get the Boatman and exit to the Entry.
Screenshot
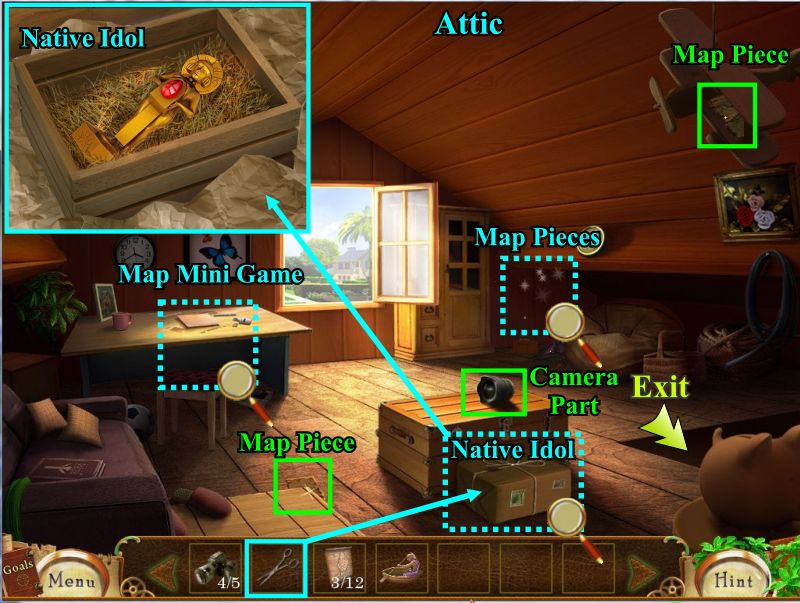
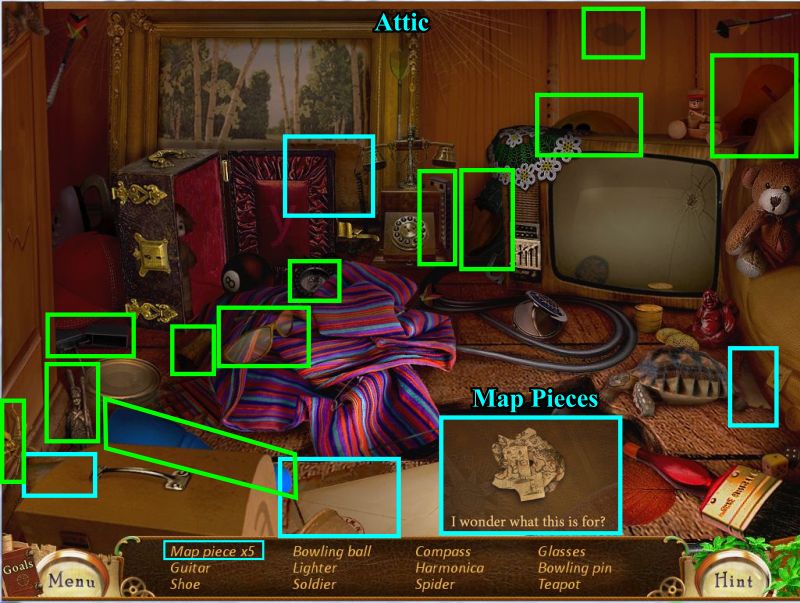
Attic
Pick up the 2 map pieces and camera part.
Use your scissors on the box to get the Native Idol.
Click on the corner area for a Hidden Object to get 5 map pieces and exit to the Living Room.
After you have all 12 map pieces click on the table for a Mini Game to assemble them.
Screenshot
Home Hidden Objects:
Living Room Computer Desk
Click on the mug to get the light bulb for the breaker box and go to the garage.
Screenshot
Garage
Click on the shelves to complete your list and get the Breaker Box key.
Screenshot
Click on the shelves to complete your list and get the AC Remote.
Screenshot
Dark Room
Click under the sink to complete your list and get the Boatman.
Screenshot
Attic
Click the corner to complete your list and get the 5 map pieces.
Screenshot
Home Mini Games
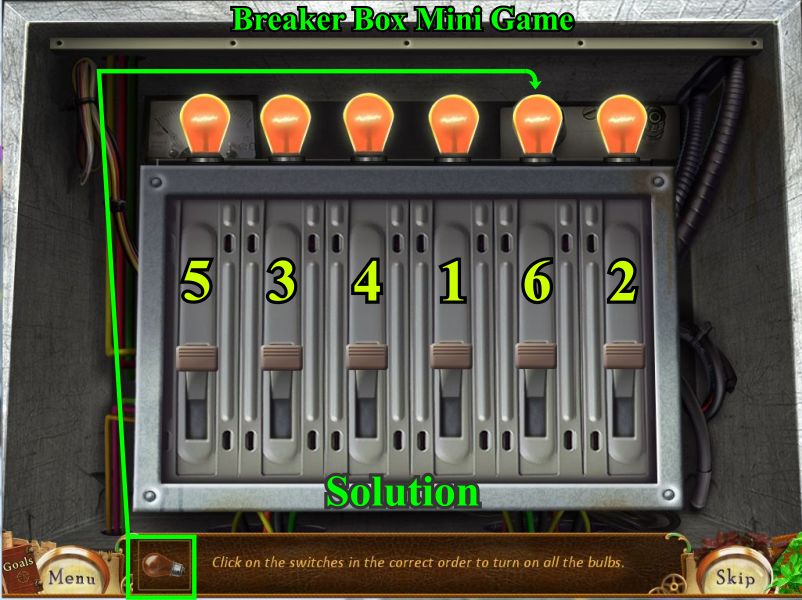
Garage: Breaker Box Mini Game
Place the light bulb in the box and click on the breakers in the order shown.
The lights should now be on in the Dark Room.
Screenshot
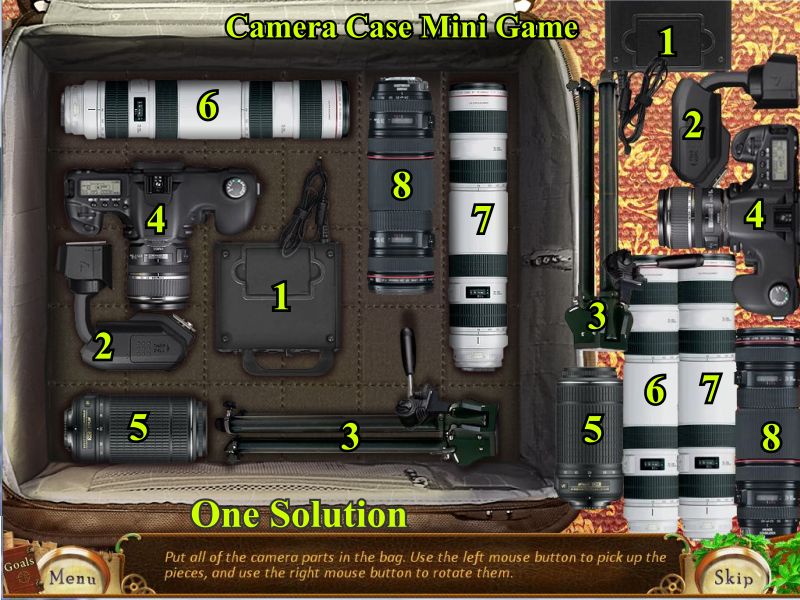
Living Room: Camera Case Mini Game
Click on the Camera Case and place the camera parts in it.
There is more than one solution.
When you have finished collect the Camera case to get the Car Keys.
Screenshot
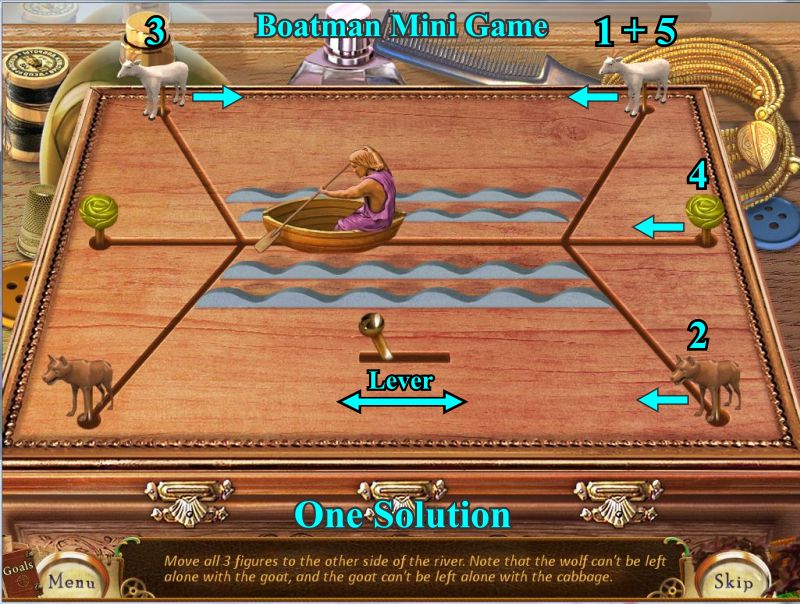
Living Room: Boatman Mini Game
Place the missing Boatman on the river where he belongs.
Your goal is to get the goat, cabbage and wolf to the left side of the board with no hazards because the wolf will eat the goat and the goat will eat the cabbage so make sure that doesn't happen.
A numbered solution is shown but there is more than one way to go about it.
Be sure to flick the lever in the direction you want to go.
Take the goat from right to left.
Go back for the wolf and take him from right to left.
Take the goat back to the right side.
Take the cabbage from right to left so you now have the wolf and cabbage on the left.
Go back to the right side for the goat and take him to the left side.
You have accomplished your mission and will get another map piece.
Screenshot
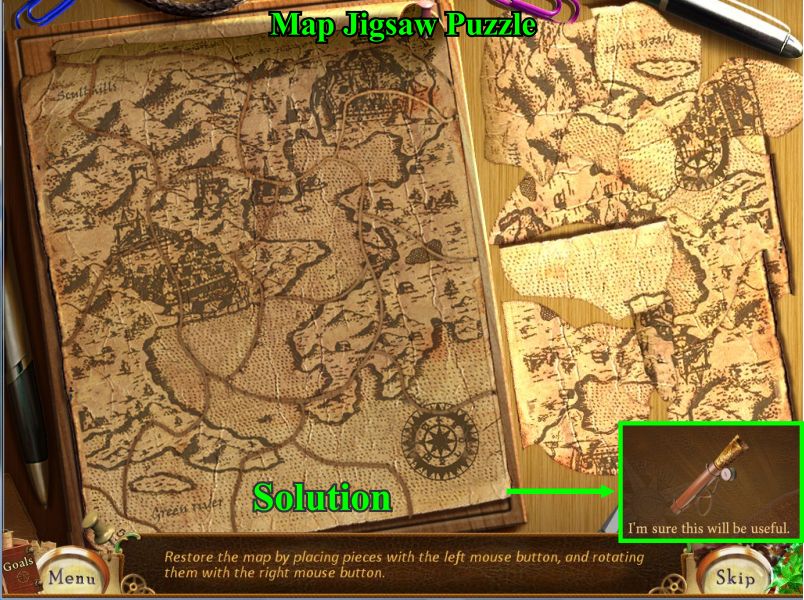
Attic: Map Mini Game
When you have collected all 12 map pieces go to the Attic and click on the table to assemble them.
This is a jigsaw and a right click will turn the piece.
The solution is shown on the left and you will get a rolled up map piece to go pack in the car.
Screenshot
Chapter 2: Hangar
Hangar Locations:
Hangar
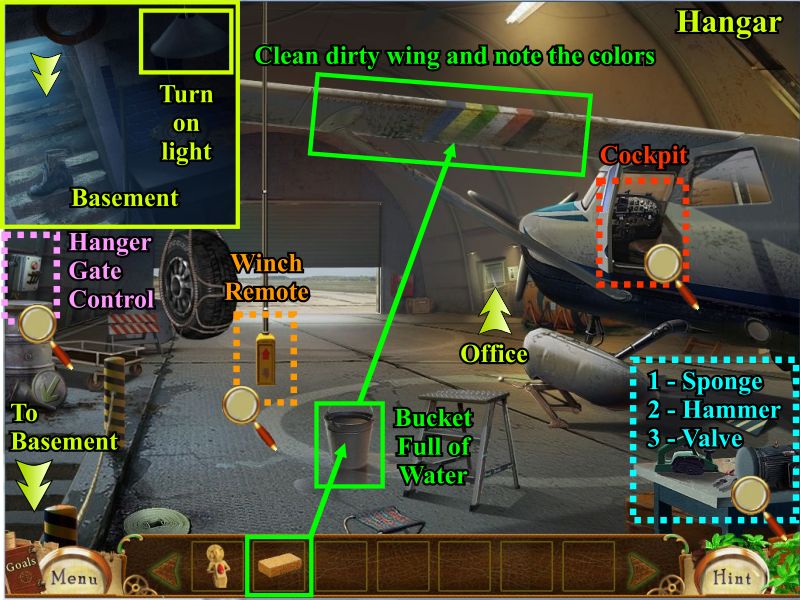
First Stop: Check the cockpit to find out there is a fuse missing and the plane needs gas.
The plane has a missing tire and both the winch remote and gate control need repair.
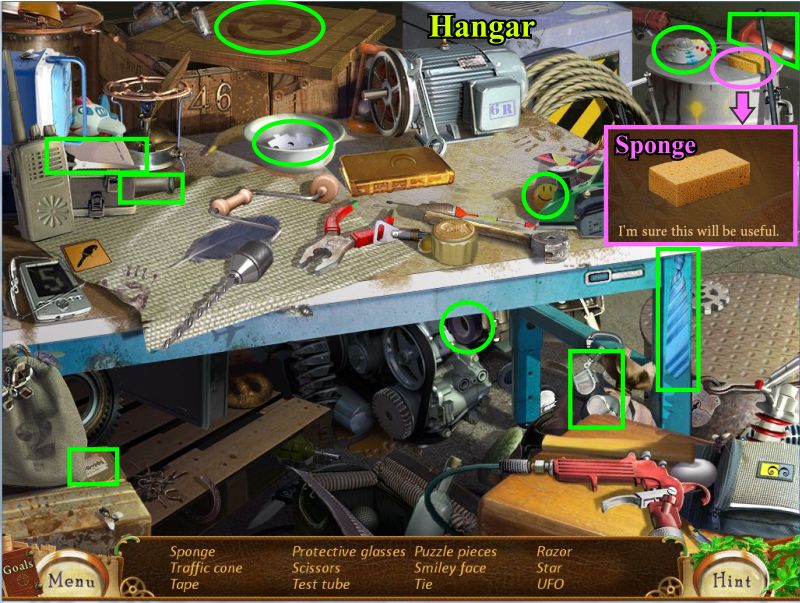
Click on the Hidden Object area to get a sponge.
Use the sponge to clean the dirty wing and then head to the office.
The door is locked so play the mini game to open it.
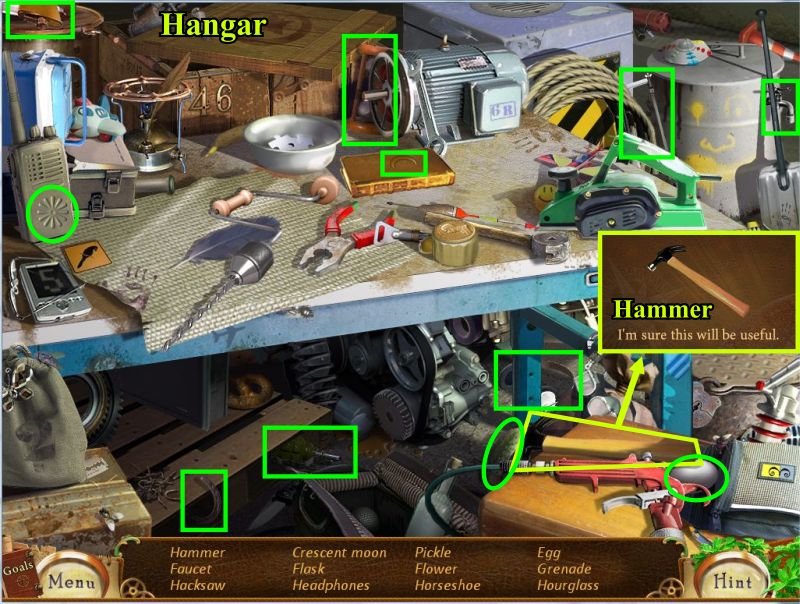
Second Stop: Click on the Hidden Object area to get a hammer and then head back to the Office.
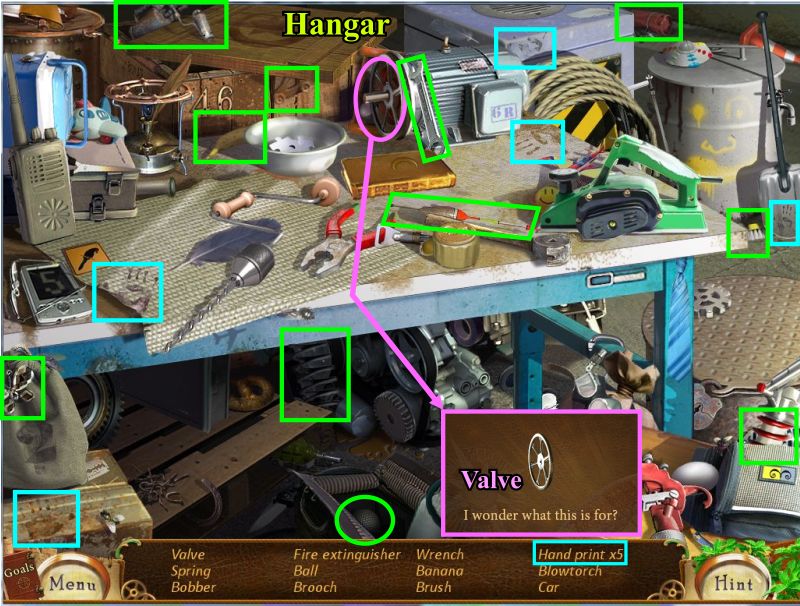
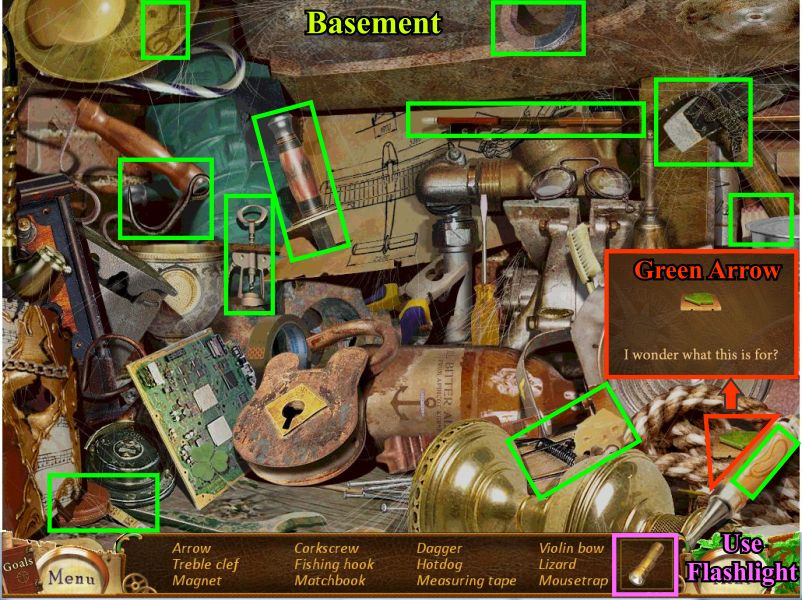
Third Stop: Play the Hidden Object scene to get the valve, head downstairs to the Basement and click on the light so you can see what you need to do.
Screenshot
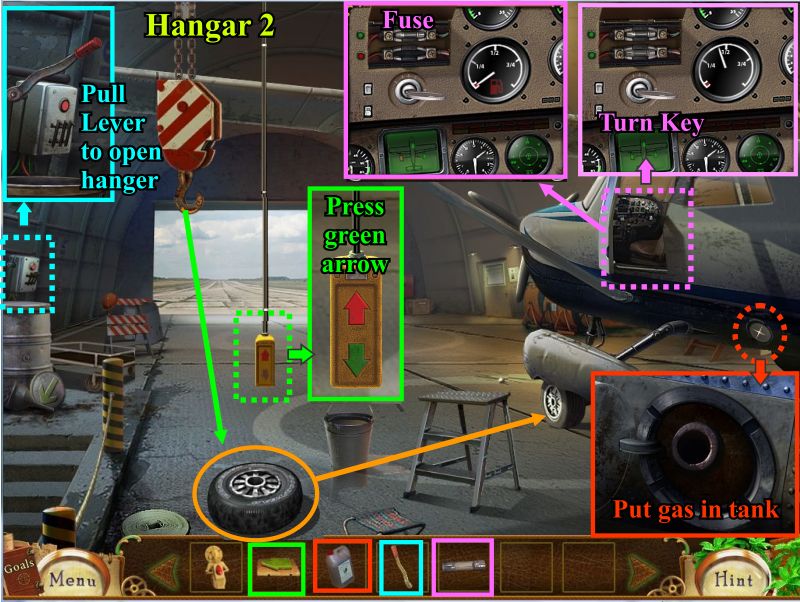
Final Stop: Click on the Cockpit and install the fuse.
Click on the gas cap to open it and then pour in the gas.
Place the green arrow on the Winch Remote and press it.
Pick up the tire and place it on the jack.
Place the lever on the Hanger Gate Control and click it.
Go back to the Cockpit and place the key so you can turn it to be on your way.
Screenshot
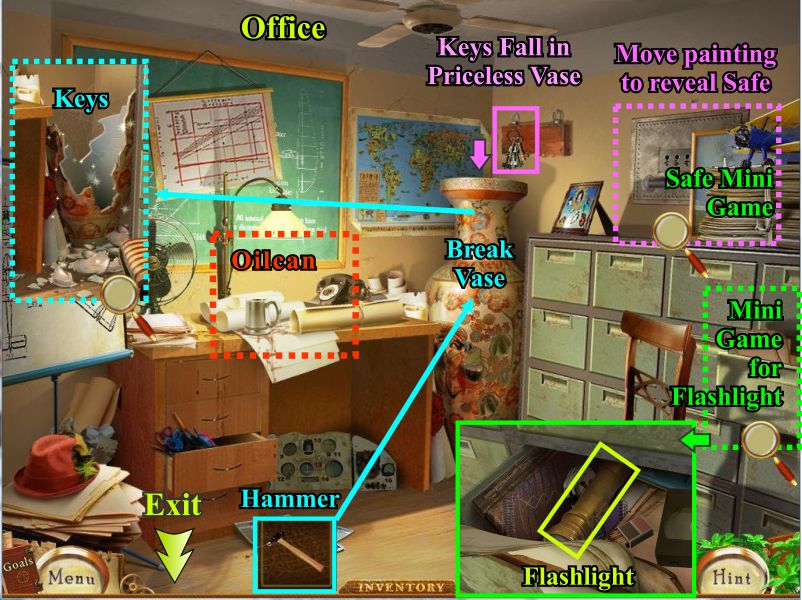
Office
Your goals for the office are to get the keys, an oil can, a flashlight, and find a fuse
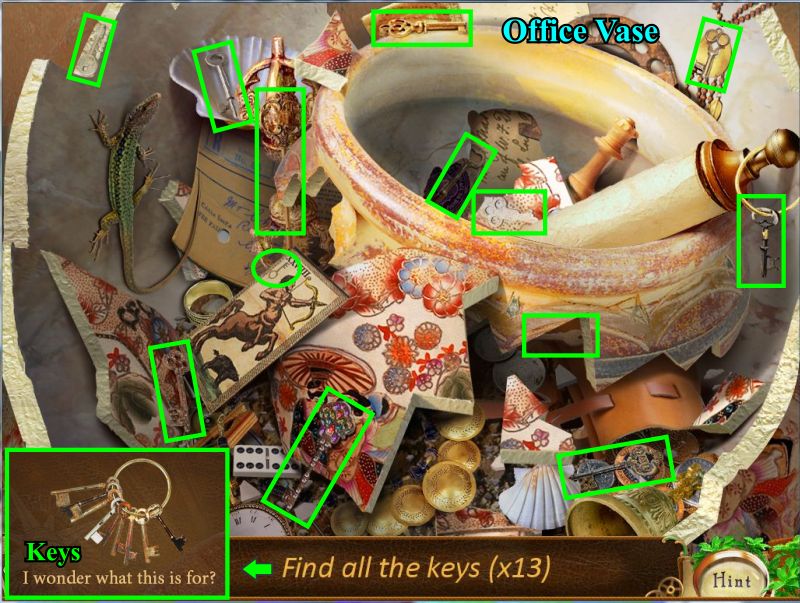
First Stop: Try to grab the keys and they fall in the priceless vase.
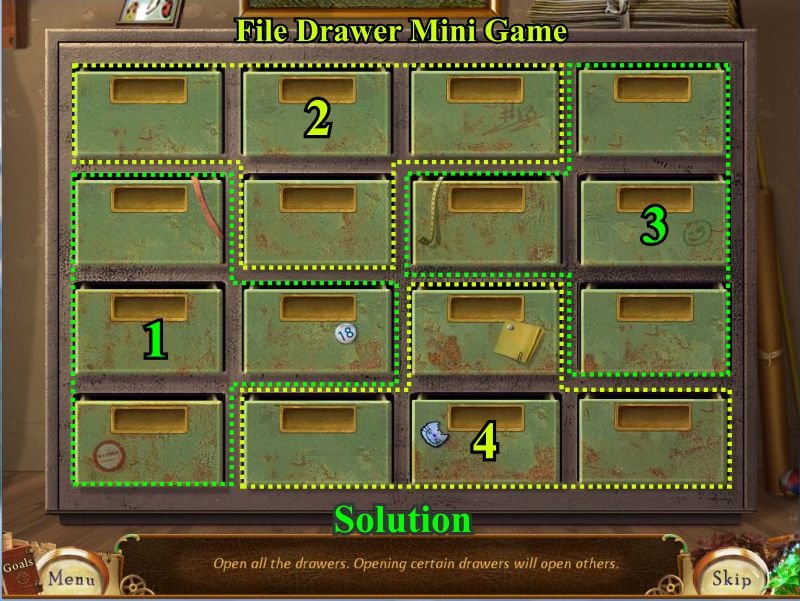
Click on the file cabinet to open it for a mini game to get the flashlight.
Complete the Hidden Object scene.
Go back to the hangar to get a hammer.
Second Stop: Destroy the priceless vase with the hammer and click on it to gather the keys.
If you have completed the File Drawer Mini Game, click on the open drawer and pick up the flashlight.
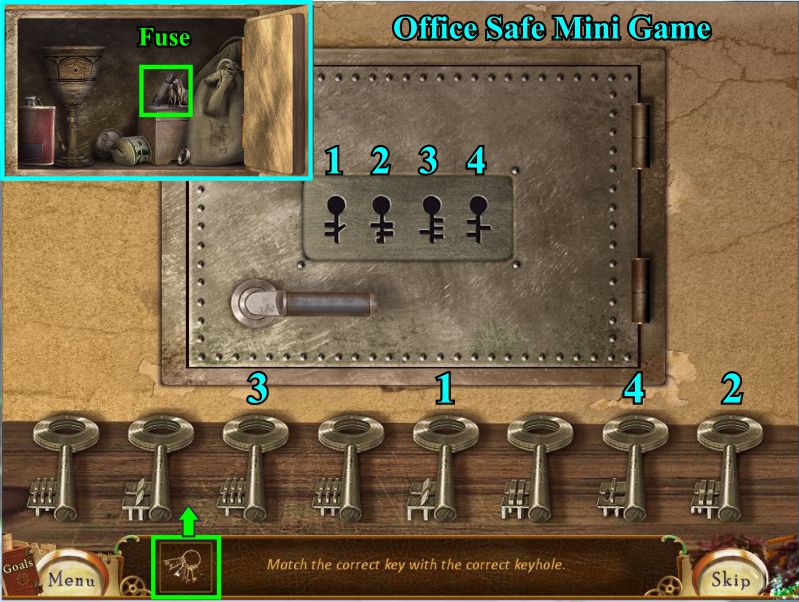
After you have all the keys click on the picture to move it so you can click on the safe for a mini game.
Take the fuse, oilcan and flashlight back to the hangar.
Screenshot
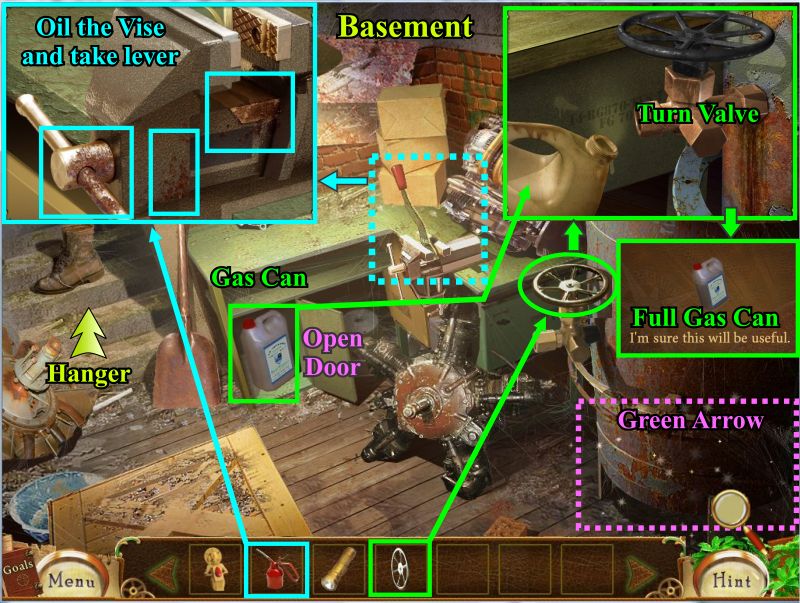
Basement
Open the cabinet door and pick up the empty gas can.
Use your oilcan in on the vise in the 3 places shown so you can pick up the lever.
Place the valve where it belong, place the gas can under it and turn the valve to get a full can of gas.
Click on the Hidden Object area to get the green arrow and return to the hangar.
Screenshot
Hangar Hidden Objects:
Hangar
Complete your list to get the sponge.
Screenshot
Complete your list to get the hammer.
Screenshot
Complete your list to get the valve.
Screenshot
Office
Complete your list to get the oilcan.
Screenshot
Collect all of the keys.
Screenshot
Basement
Complete your list to get the green arrow.
Screenshot
Hangar Mini Games:
Office Door
The buttons you need to press to open the door are the colors on the plane wing so press the colors as numbered and click on the handle to open the door.
Screenshot
Office File Drawer Mini Game
Your goal is to open all the drawers.
Some drawers open other drawers so look at the grouping and press the numbered drawers.
It isn't necessary to click on them in numerical order but those are the drawers you do need to use in order to ultimately get the flashlight.
Screenshot
Office Safe Mini Game
After you have collected all the keys click on the safe for a mini game to open it.
Place your keys in the scene and they will randomly line up.
If you make a mistake, the keys will be reshuffled and you will have to start over.
Since the arrangement of the keys is random, pay close attention to the numbered keys in order to get the correct one where it belongs.
When the safe opens take the fuse.
Screenshot
Chapter 3: Jungle
Jungle Locations:
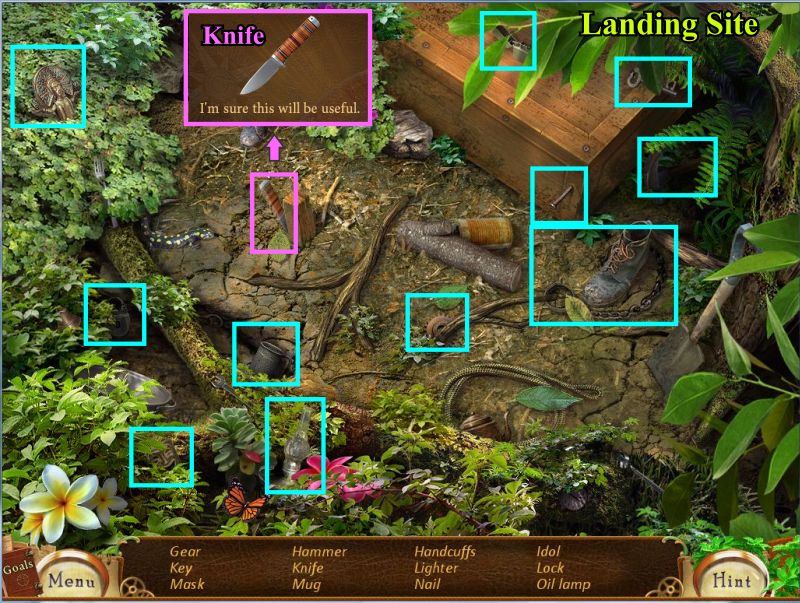
Landing Site
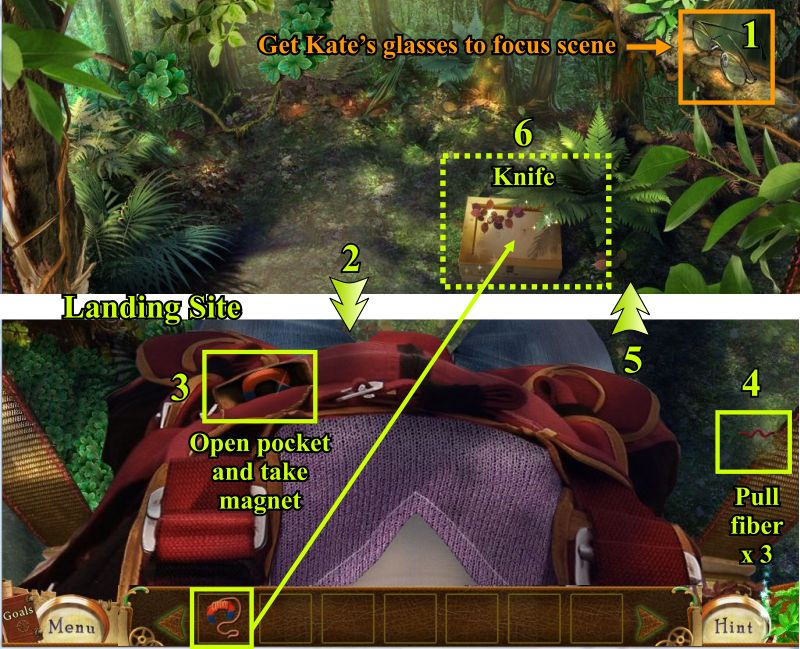
First problem is that the scene is out of focus because Kate lost her glassed so get them the give them to her so we can all see what we are doing.
Click down to find her and open the pocket shown to get the magnet.
Click on the frayed parachute strap on the right 3 times to get some string which will automatically combine with the magnet.
Click back up and place the stringed magnet on the box for a Hidden Object scene to find a knife.
Once you get it click back down to Kate.
Screenshot
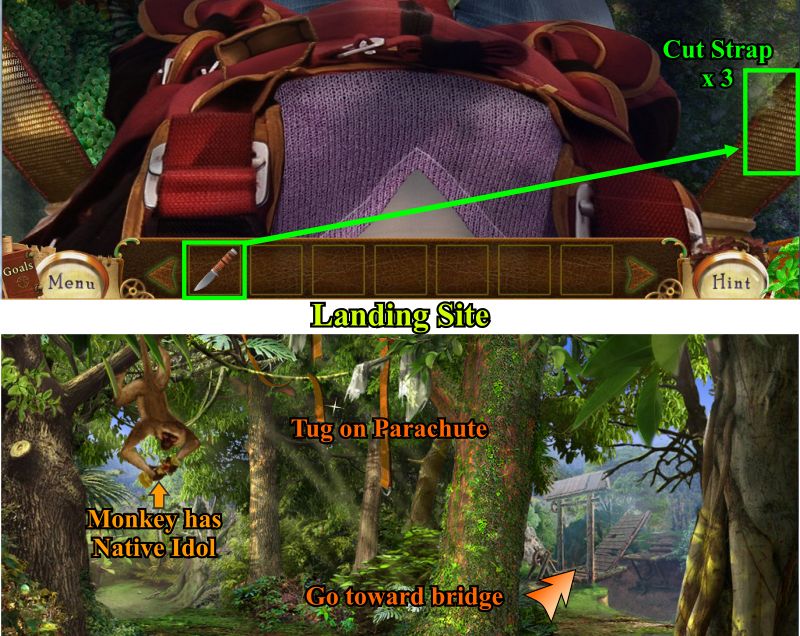
Second Stop: Use the knife 3 times to cut the strap.
Once you are on the ground tug on the parachute to expand it, note the monkey fell in love with the Native Idol and head off to the Bridge in search of your plane.
Screenshot
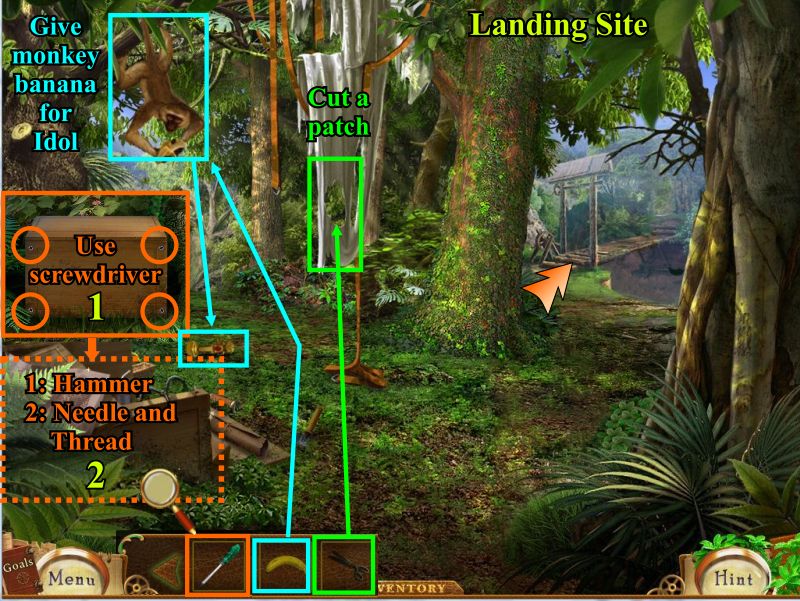
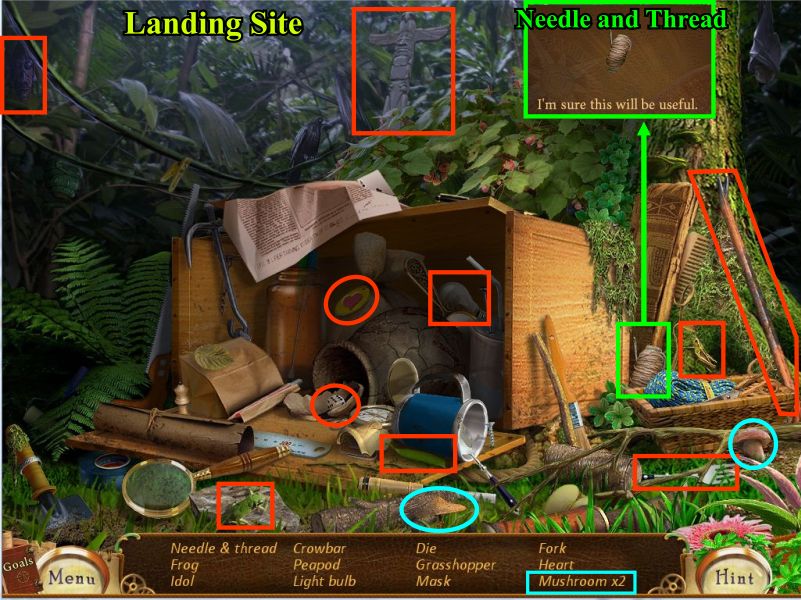
When you come back again to the Landing Site you have a few tools to take care of some necessities.
Use the screwdriver to open the box and click for a Hidden Object scene to get the hammer.
When you have the scissors use them to cut a patch from the parachute.
Once you have the banana swap it for the Native Idol the monkey is holding and don't forget to collect it when it drops.
Screenshot
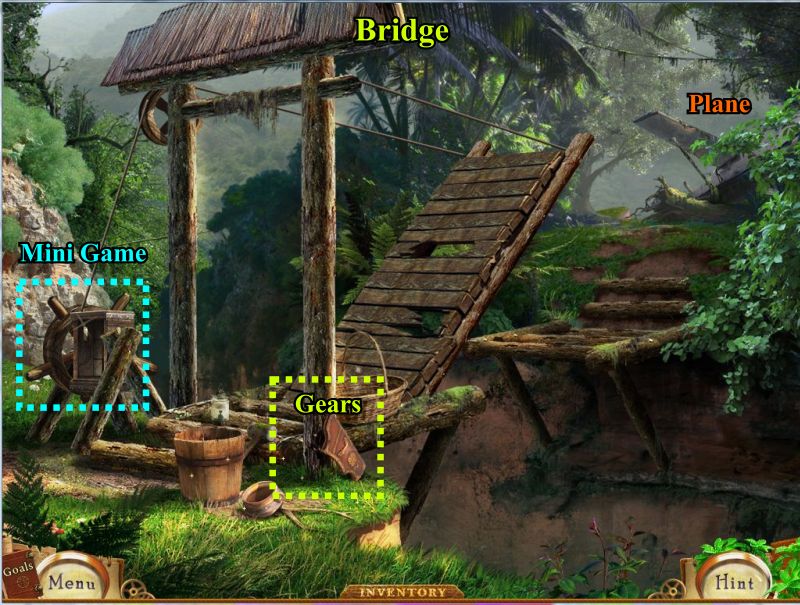
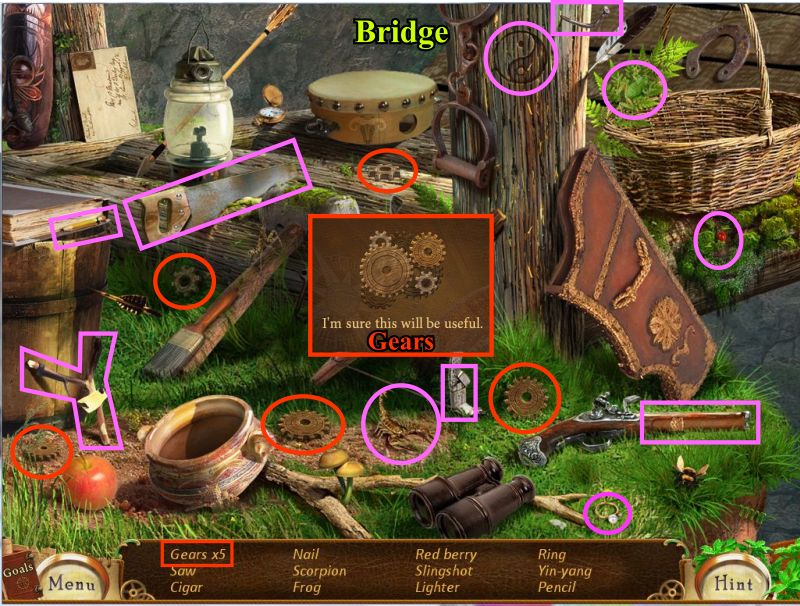
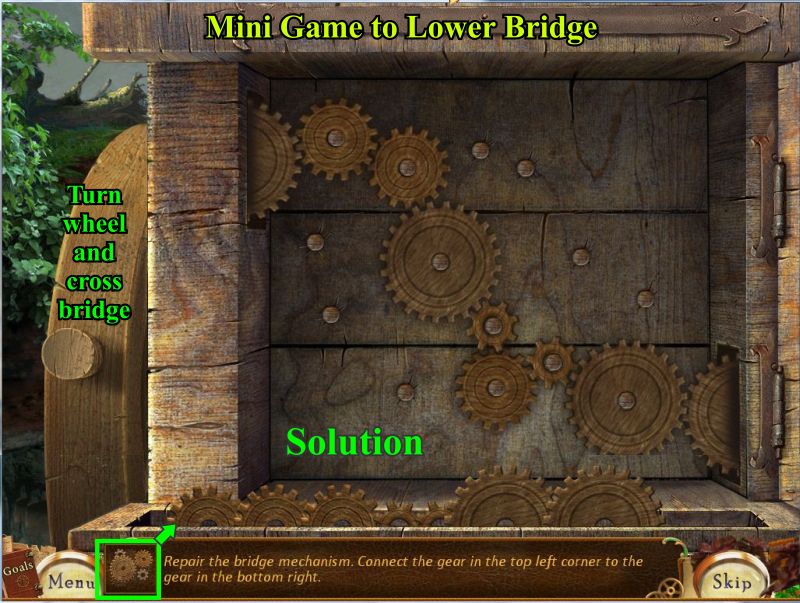
Bridge
You can't cross the Bridge because it is up so click on the Hidden Object scene to get the gears to lower it.
Once you have the gears click on the mini game to install them to lower the bridge and cross over to check out your plane.
Screenshot
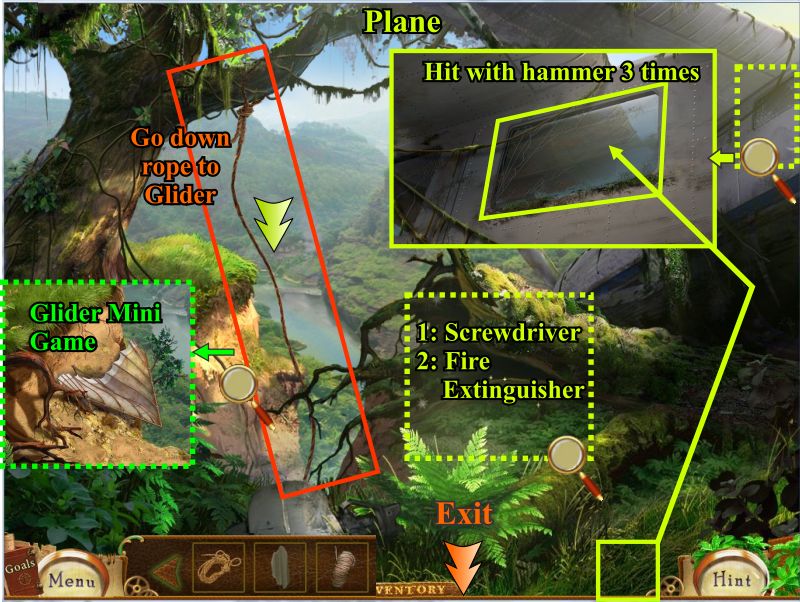
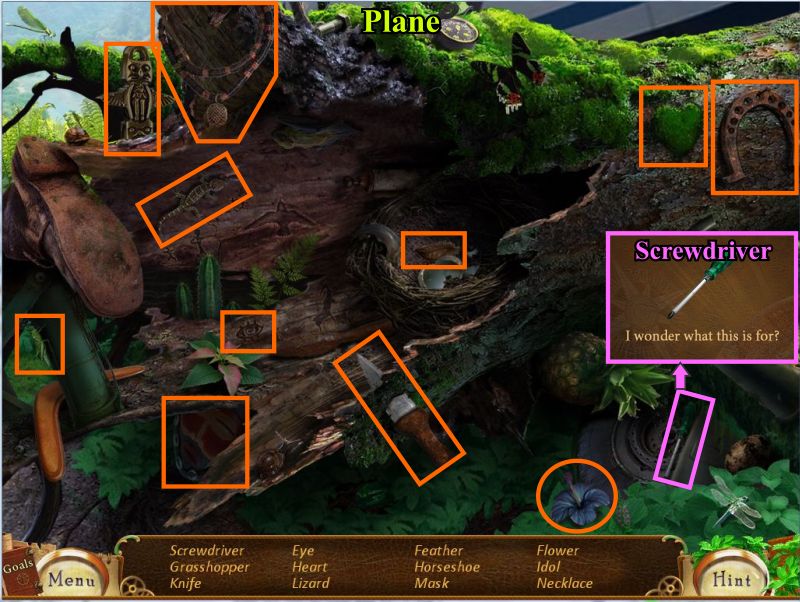
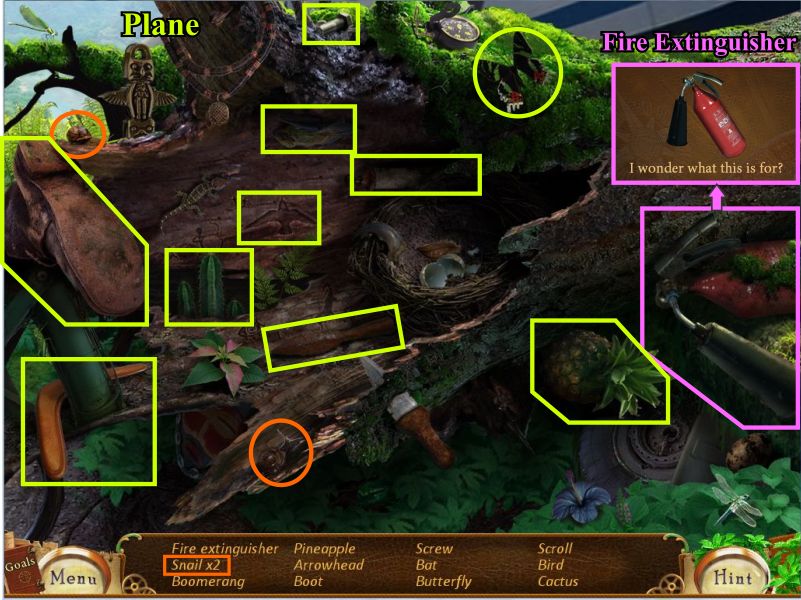
Plane
First Stop: Click on the Plane window area to find out the door is somehow locked.
Click on the Hidden Object area to get the screwdriver to open the Crate in the Landing Site and then go there.
Second Stop: Get the Fire Extinguisher from the Hidden Object scene.
Use the hammer 3 times to break the plane's window and enter.
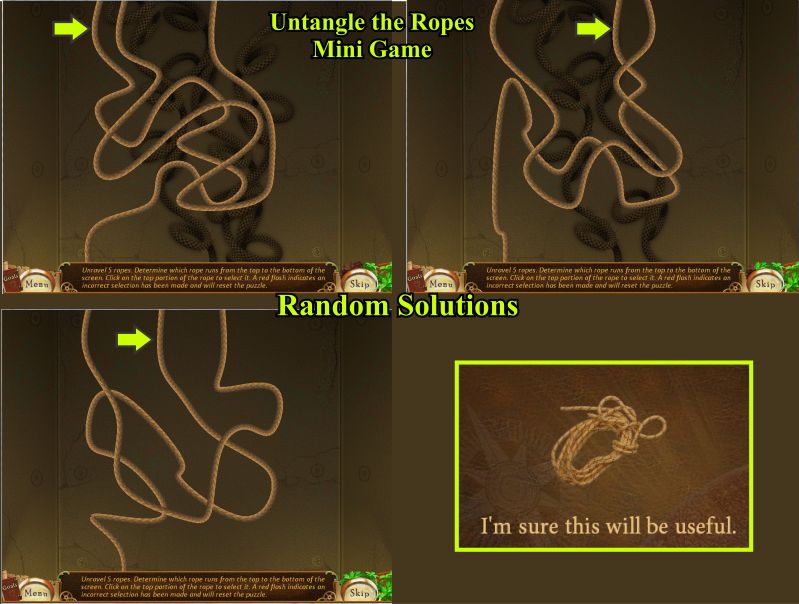
Third Stop: Check out the glider below, use you acquired rope and go down to the glider so you can click on it for a mini game.
Screenshot
Cockpit
First thing to do is put out the fire so use your Fire Extinguisher on the 3 areas indicated.
Pick up the scissors marked in red.
Click on the backpack to bring up a close up, open it and grab the banana.
Next, click on the seat area for a Hidden Object scene.
Finally, use your key to open the upper compartment and play the mini game.
The exit is out the window.
Screenshot
Jungle Hidden Objects:
Landing Site
Collect the items on your list and get the Knife.
Screenshot
Collect the items on your list and get the Hammer.
Screenshot
Collect the items on your list and get the Needle and Thread.
Screenshot
Bridge
Collect the items on your list and get the 5 Gears.
Screenshot
Plane
Collect the items on your list and get the Screwdriver.
Screenshot
Collect the items on your list and get the Fire Extinguisher.
Screenshot
Cockpit
Collect the items on your list and get the Key.
Screenshot
Jungle Mini Games:
Lower the Bridge
Place the gears in the game and then arrange them as shown.
Screenshot
Untangle the Ropes
This is a random presentation of the ropes.
There are 5 rounds you must complete so the screen shots will show you some of the possibilities you may encounter.
Screenshot
At the completion of the game you will get a completed rope.
Screenshot
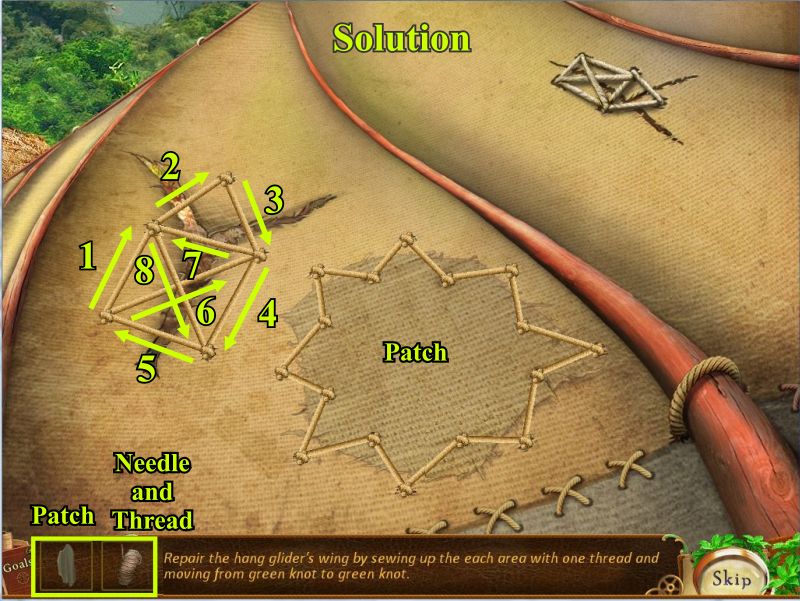
Glider Mini Game
Place your patch where shown and start on that area to sew it up with your needle and thread.
You can begin anywhere you like but you need to follow the green knots for your next move.
The pattern for the patch part is an outside to inside move in sewing it up and don't forget to connect to where you started for the final move.
Your thread will disconnect for you to go sew up the tear.
If you make a mistake on any of this, you will have to start over.
Follow the pattern for the tear and it should work.
When you have completed it you will be gliding off to the Tribal Village.
Screenshot
Chapter 4: Wild Tribe
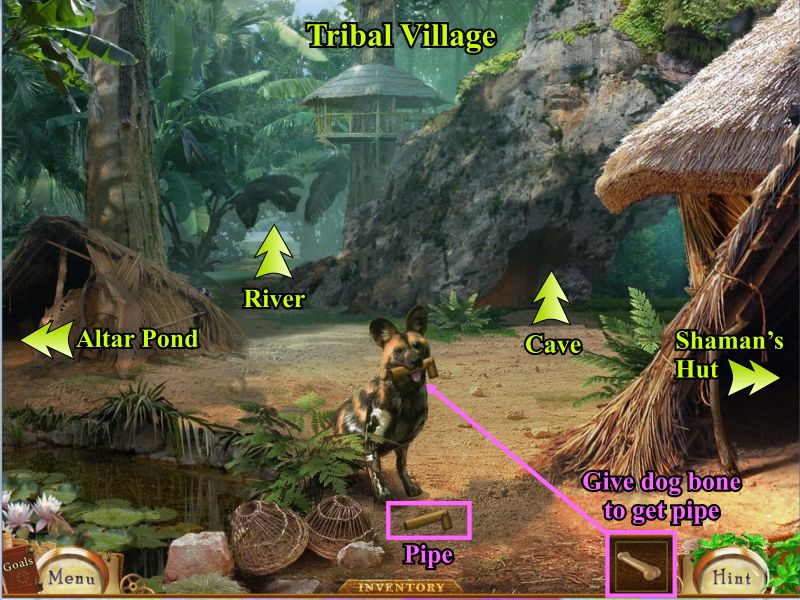
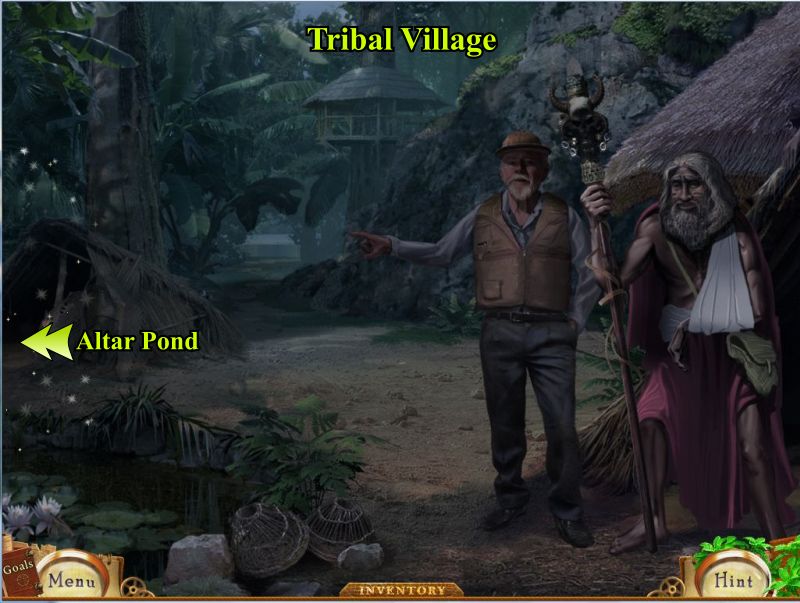
Tribal Village
There are 4 areas to visit from the main part of the Village and you also get to make friends with the dog.
Once you have collected the bone from the Shaman's Hut, you can swap it for the piece of pipe you need.
Screenshot
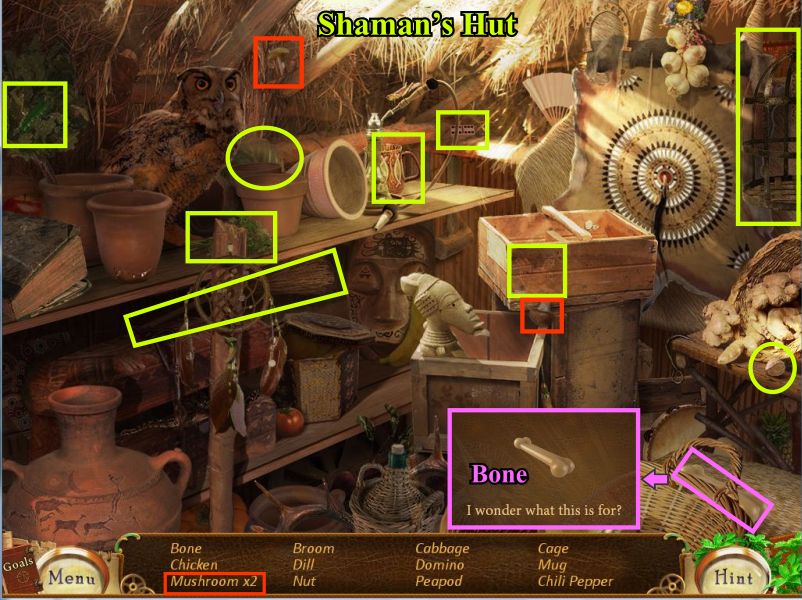
Shaman's Hut
First Stop: You have been told the Shaman is very sick so your goal is to cure him so that you can gain more information about your Grandpa.
Pick up the empty bowl and click on the elixir area to see what you are going to need to do.
Click on the Hidden Object area to get the Mortar and Pestle before exiting back to the Village area.
Screenshot
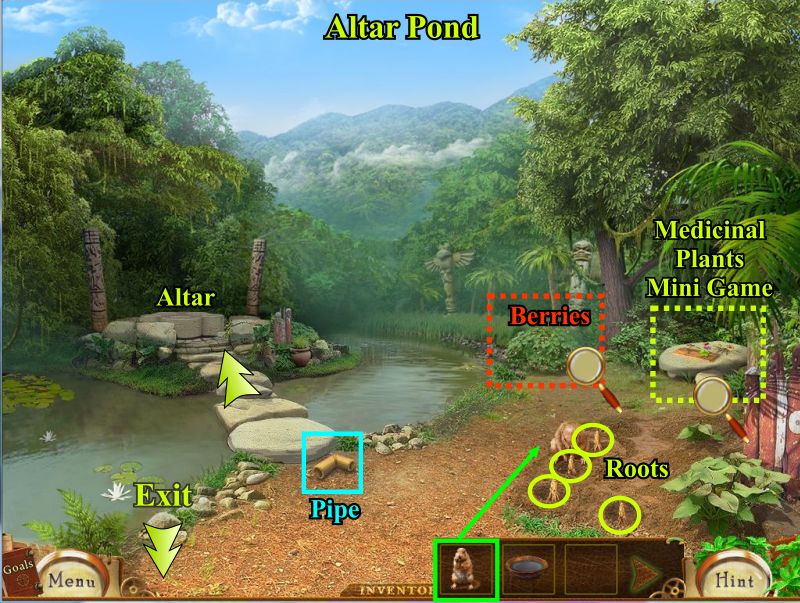
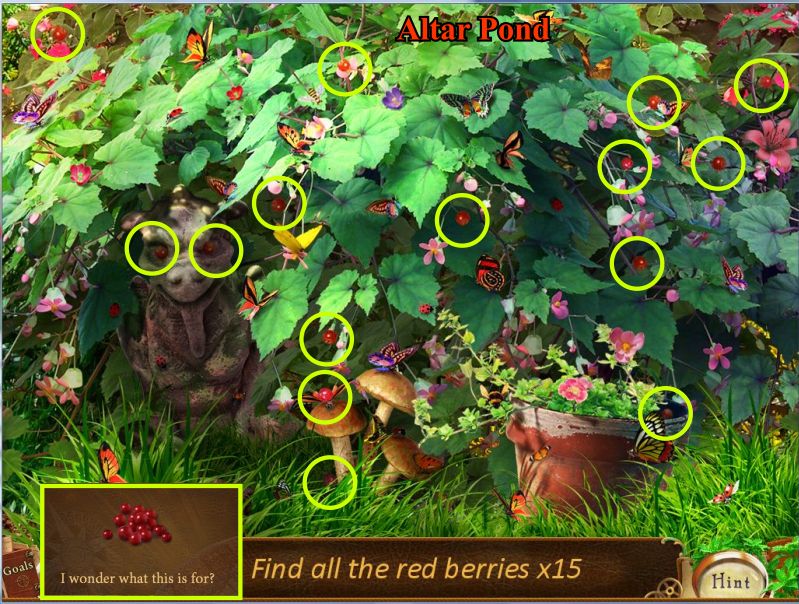
Altar Pond
Go left to the Altar Pond and pick up the pipe.
Click on the Altar to see that you need all the Idols.
Click on the Hidden Object area to collect the Berries.
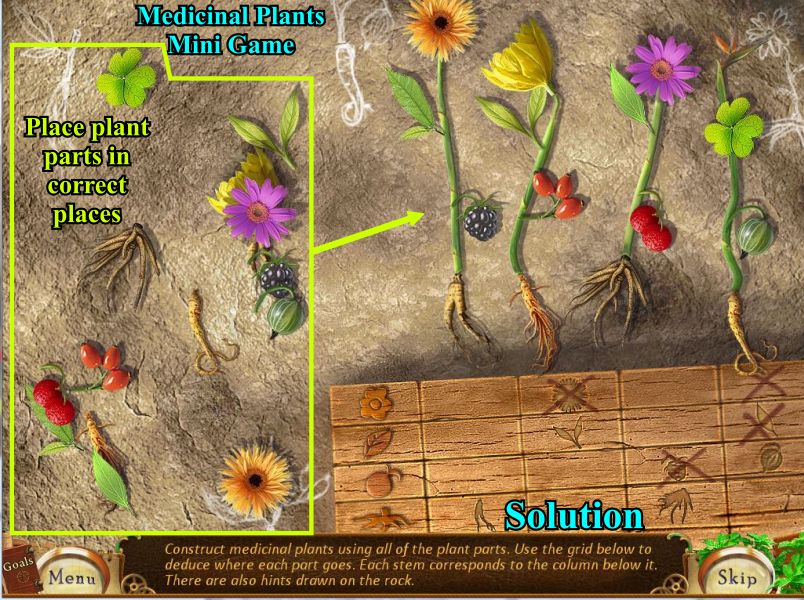
Click on the mini game to find out about the Medicinal Plants and complete the game to collect one.
Go back to the Village and choose another path.
Second Stop: Bring the gopher you won to dig up the roots.
Screenshot
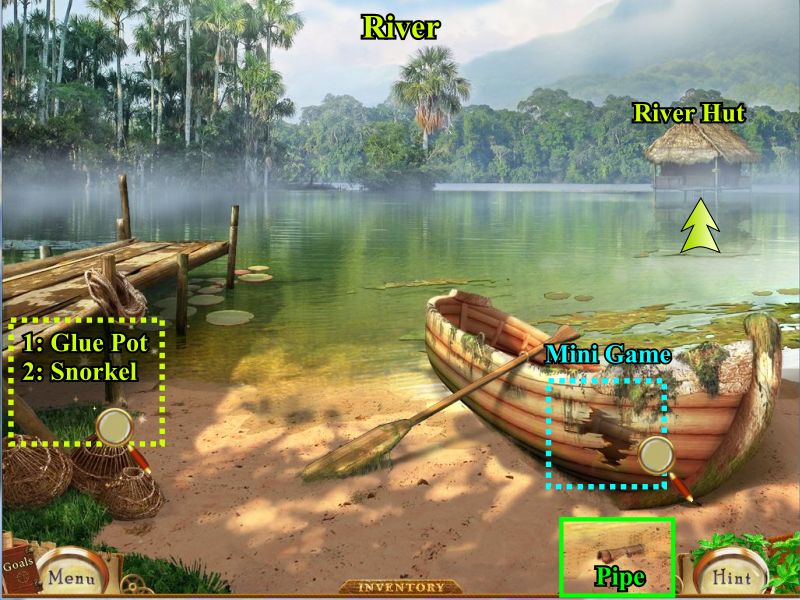
River
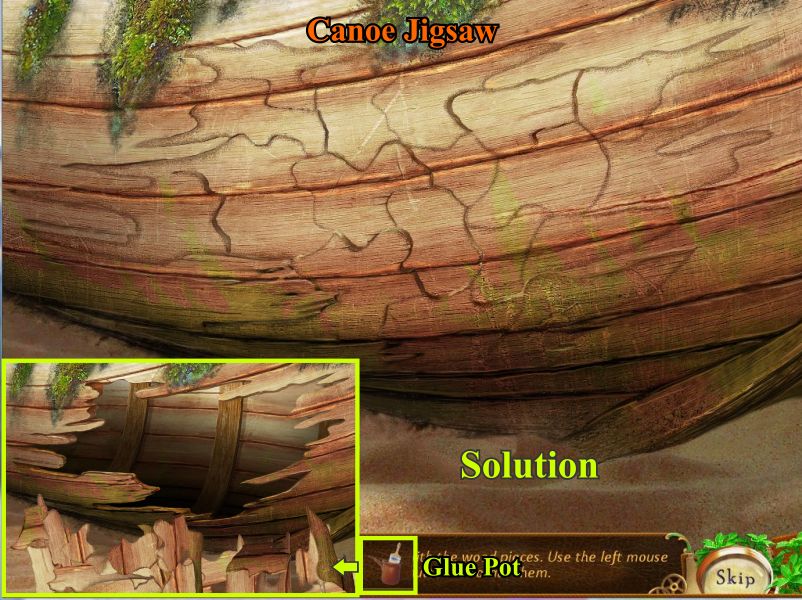
First Stop: There is a canoe in need of repair so click on the Hidden Object scene to see if you can get help.
Once you get the Glue Pot you can click on the canoe to repair it.
The canoe will move forward when it is repaired and a pipe piece will be visible for you to pick up.
When your canoe is useable you can go visit the River Hut.
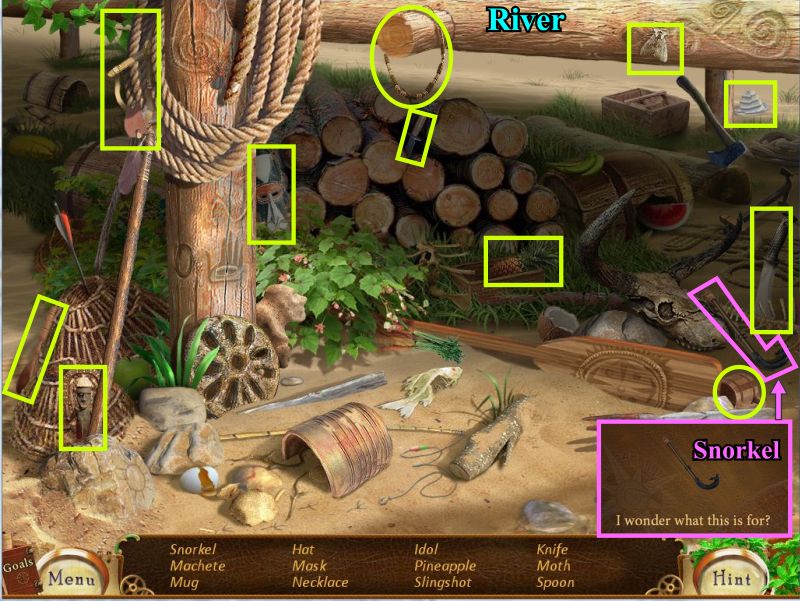
Second Stop: You need to find a Snorkel in the Hidden Object area so get it and go to the River Hut once you have the Snorkel and the Monkey.
Screenshot
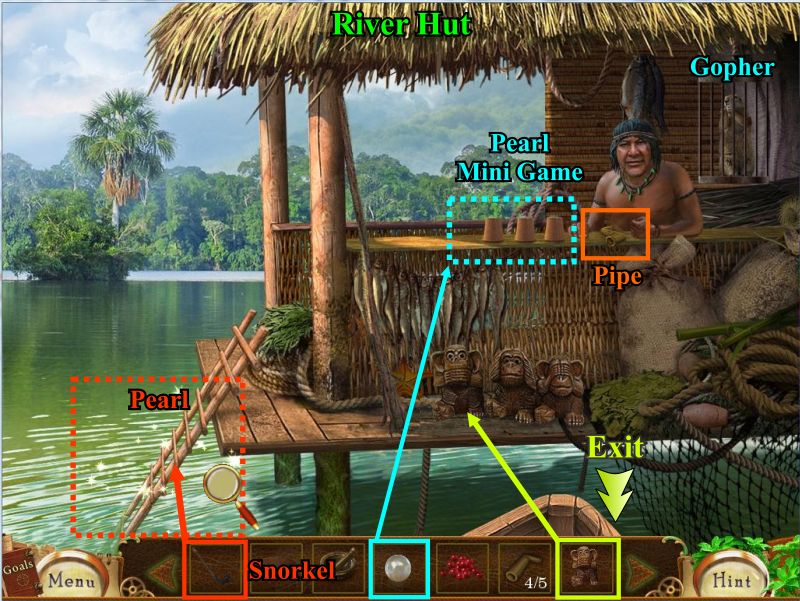
River Hut
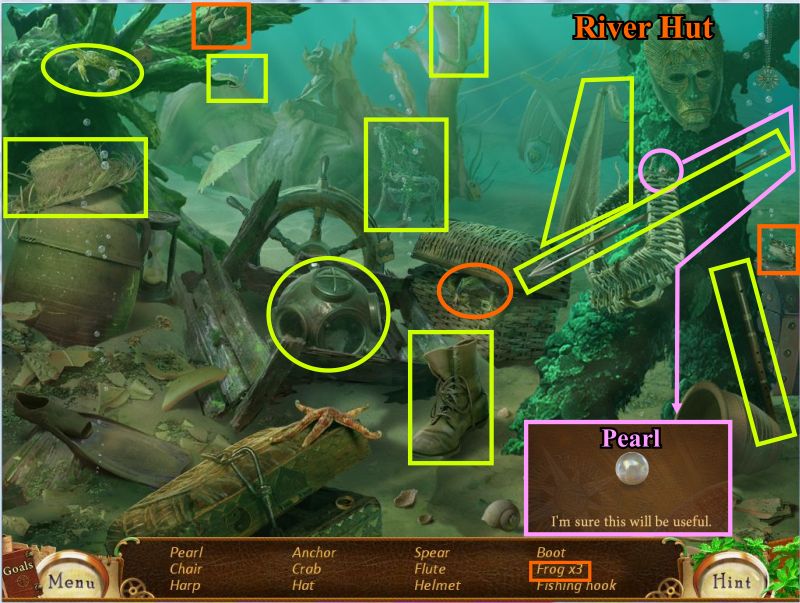
First Stop: You need to take a trip out to the hut and see what is going on.
The native won't give you the pipe you need so go back to shore and look for what he wants and the snorkel to check out the underwater scene.
When you get the Pearl you need to give it to the native since he lost it anyway.
He will play you a sort of shell game to give you the good digger gopher.
Screenshot
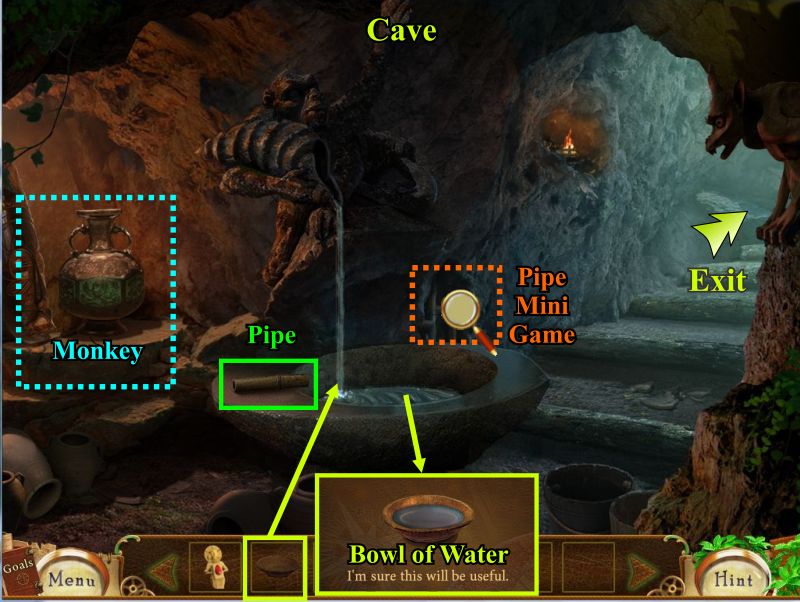
Cave
First Stop: Pick up the pipe piece.
You need to find all the pipes to complete the Pipe Mini Game.
Getting the Monkey for the native is a good idea so click on the Hidden Object area.
Second Stop will be when you have all the pipes so click on the mini game area.
Screenshot
Wild Tribe Hidden Objects
Altar Pond
Collect the 15 Berries.
Screenshot
Shaman's Hut
Collect all the items on your list to get the Mortar and Pestle.
Screenshot
Collect all the items on your list to get the Dog Bone.
Screenshot
River
Collect all the items on your list to get the Glue Pot.
Screenshot
Collect all the items on your list to get the Snorkel.
Screenshot
Cave
Collect all the items on your list to get the Monkey.
Screenshot
River Hut
Collect all the items on your list to get the Pearl.
Screenshot
Wild Tribe Mini Games
Altar Pond: Medicinal Plants
Place all of the plant parts on the left where they belong on their stems to create the solution.
Screenshot
River: Canoe Jigsaw
Apply the Glue Pot to the boat pieces and then complete the jigsaw puzzle to repair the canoe.
Screenshot
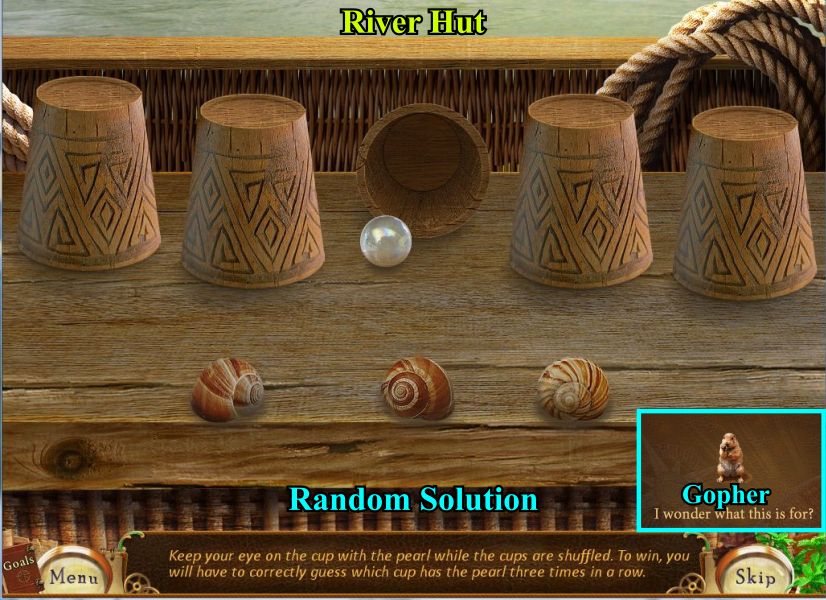
River Hut Pearl Mini Game
The Native offered you the good digging gopher if you can win him in a sort of shell game with the pearl.
The game is random and starts with 3 cups, expands to 4 cups and ends up with 5 cups.
Keep your eye on the pearl and the cup that it goes into to win the 3 rounds.
Screenshot
Cave Pipes Mini Game
Once you have all of the pipe pieces you need to go to the cave and complete the mini game to make the water flow.
Place the pipes and arrange them and then throw the lever when you are done.
Screenshot
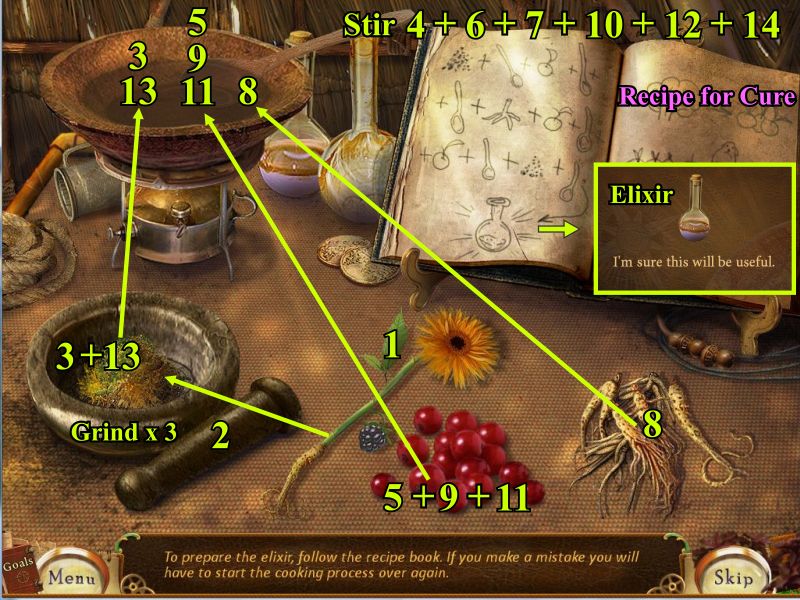
Shaman's Hut: Elixir Mini Game
When you have collected everything for the elixir to cure the Shaman, go to his hut and click on the table at the right.
Place the bowl of water on the burner and all the ingredients on the table.
Start adding the ingredients according to the recipe or just follow the numbers to complete the game.
When you are done give the elixir to the Shaman.
Screenshot
Chapter 5: Pirate Bay
Pirate Bay Locations
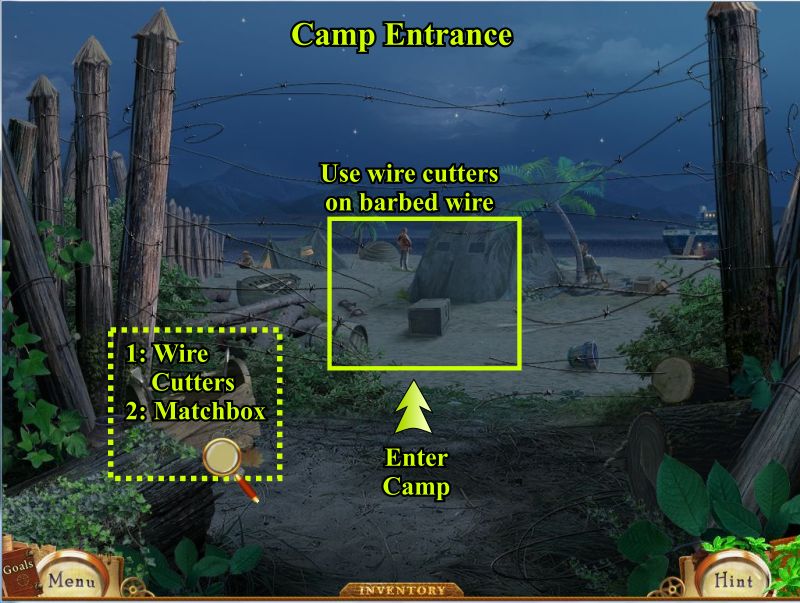
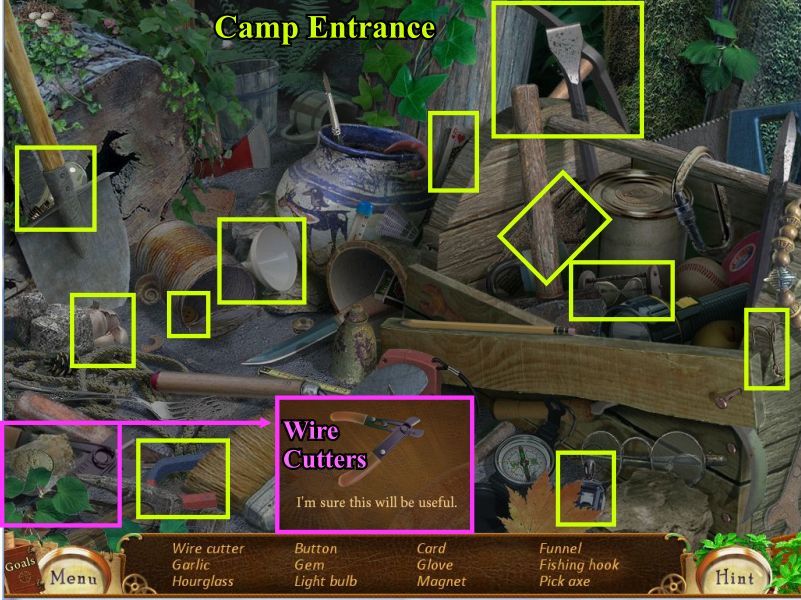
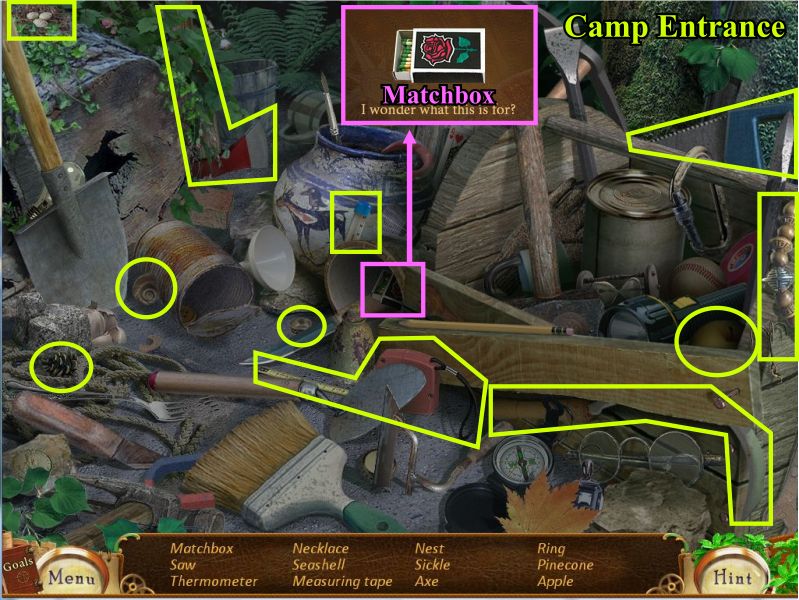
Camp Entrance
Play the Hidden Object scent to get the Wire Cutters to get into the camp.
Next stop here will be to play the Hidden Object scene again to get the Matchbox.
Screenshot
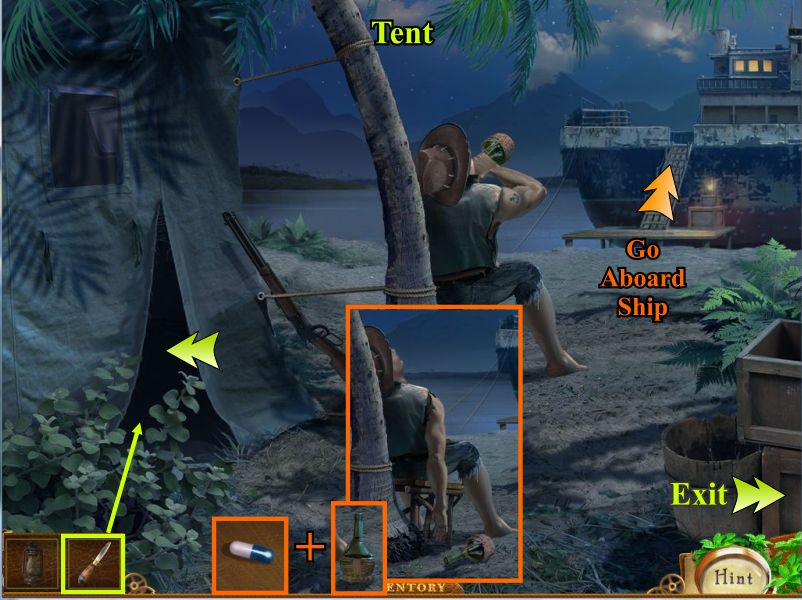
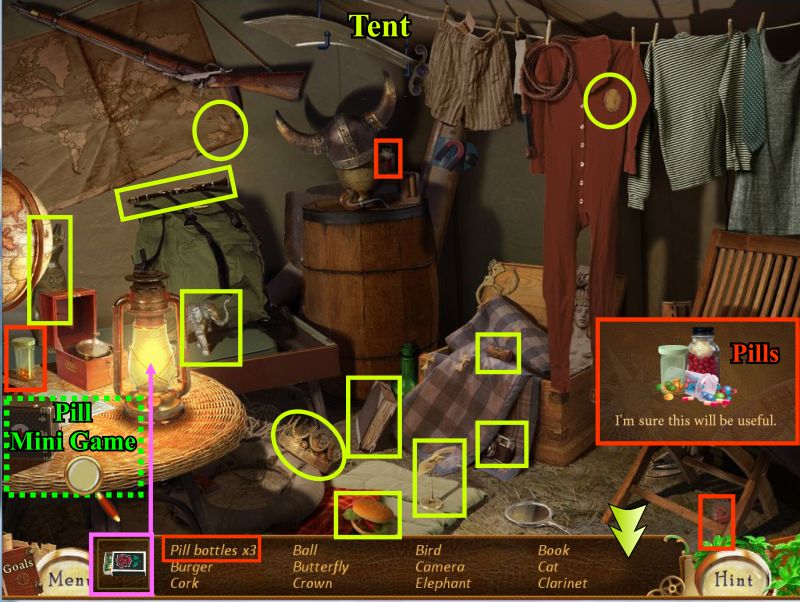
Tent
There is a guard in your way so you need to figure out how to get rid of him.
Go right to get supplies.
Second Stop: When you return with a knife and lantern cut open the tent and enter.
You've now been inside the tent and found a sleeping pill so put it in the guard's wine.
When he falls asleep go aboard the ship.
Screenshot
Place the lantern but you have no matches so go to the Camp Entrance.
Once you get the Matchbox light the Lantern and the tent for a Hidden Object scene.
Screenshot
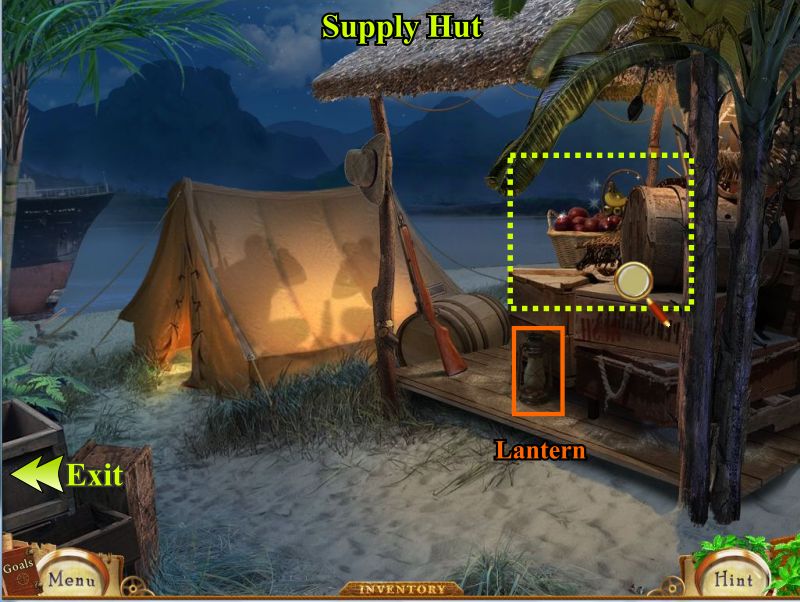
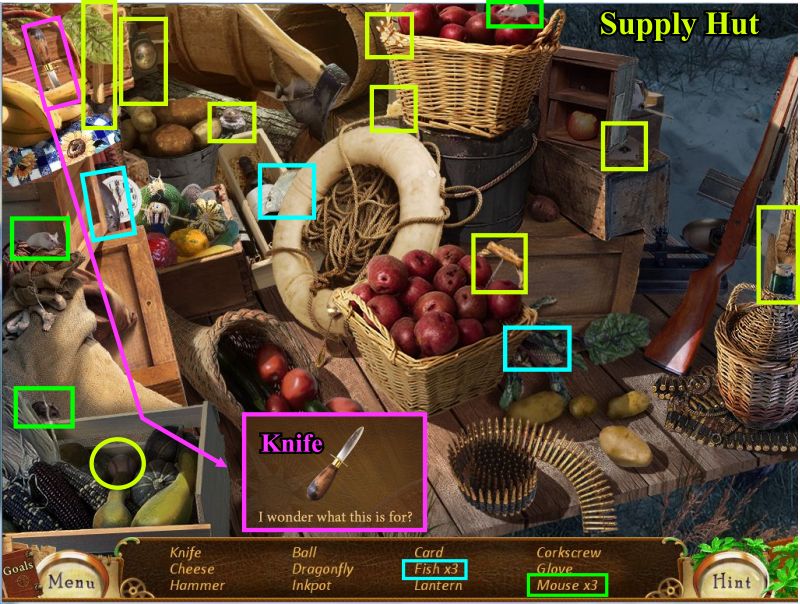
Supply Hut
The guards are busy drinking in the tent so pick up the lantern and click for the Hidden Object scene to get the Knife to cut open the tent.
Screenshot
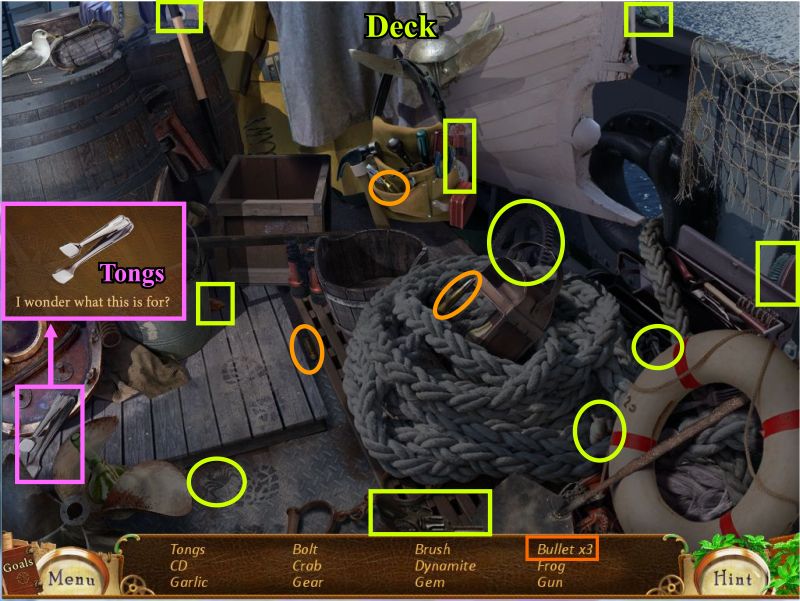
Ship's Main Deck
First Stop: You can't go Aft because there is a sparking wire.
Go to the Bridge and check on the fish bowl with the crab.
You can't get the game piece and need to find something to help so back down to the deck.
Click on the Hidden Object to get the Tongs.
Once you have done everything else you need to do, click on the electrical panel for a mini game so you can eliminate the sparking wire and go Aft.
Screenshot
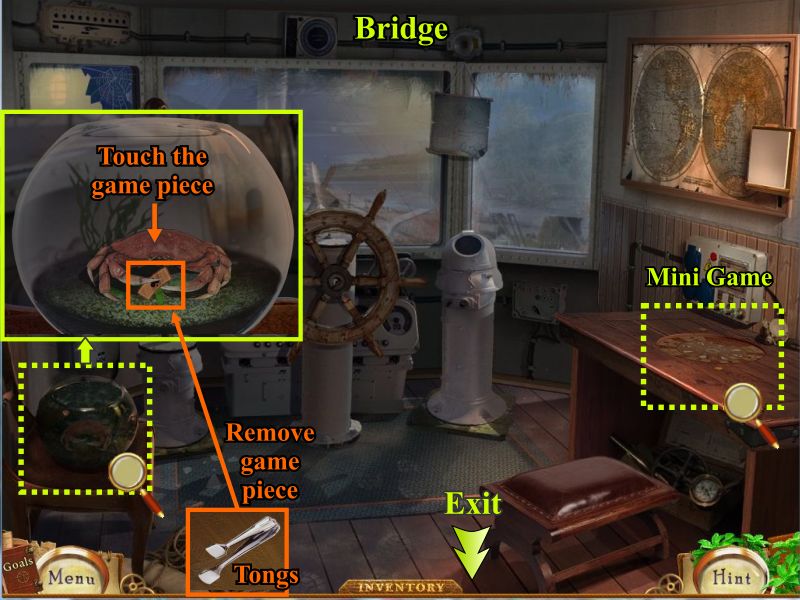
Ship's Bridge
First Stop: Click on the crab bowl and determine you cannot reach in to get the game piece so must find something to help.
Go back to the deck in search of a tool to help you.
Second Stop: Use Tong to get game piece and click on the table at the right to bring up a Mini Game.
Screenshot
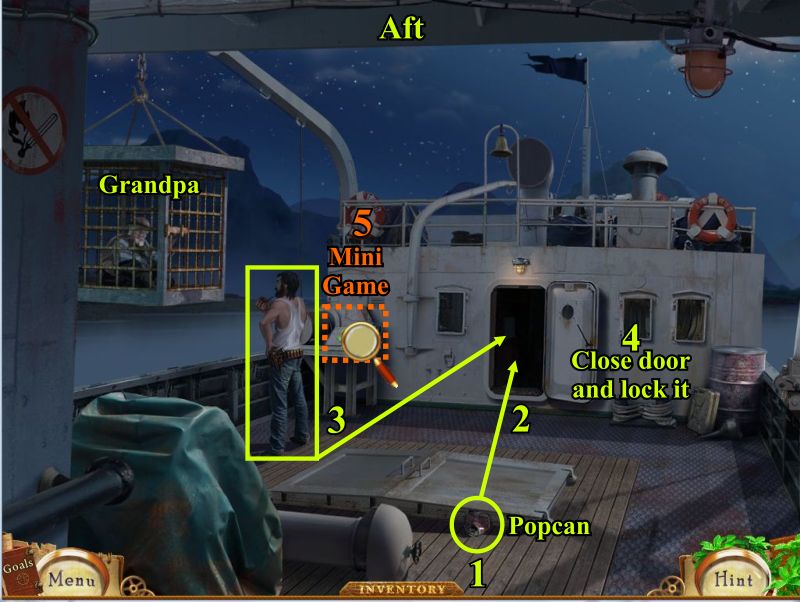
Aft on the Ship
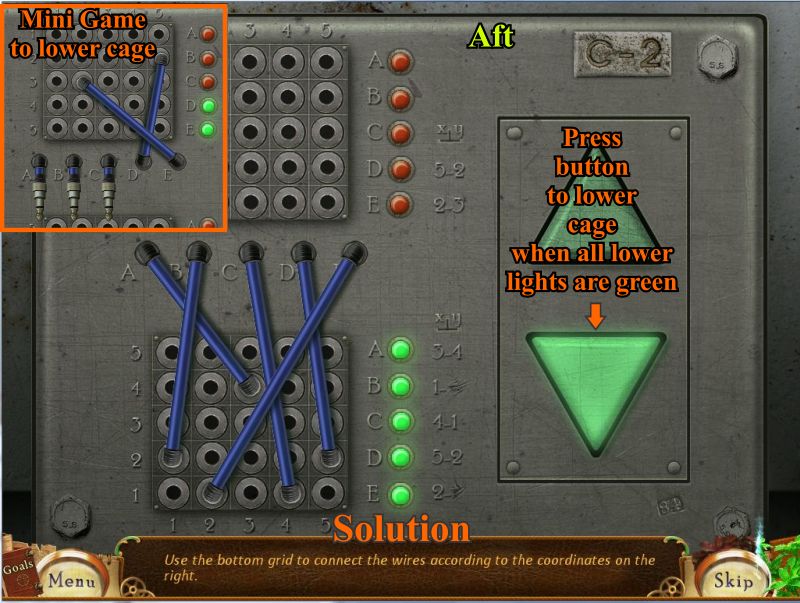
Once you have gotten rid of the sparking wire you can now go Aft where you find Grandpa in a cage and a guard looking after him.
Pick up the pop can and throw it down the hold.
The guard hears the sound and decides to investigate so when he goes down into the hold, close the door and lock it.
Click on the mini game to complete it and start freeing Grandpa
Once you have lowered the cage you will have to complete another mini game to open the cage.
Screenshot
Pirate Bay Hidden Objects
Camp Entrance
Complete your list and get the Wire Cutters.
Screenshot
Complete your list and get the Matchbox.
Screenshot
Supply Hut
Complete your list and get the Knife.
Screenshot
Tent
Complete your list and get the Pills.
Screenshot
Ship's Main Deck
Complete your list and get the Tongs.
Screenshot
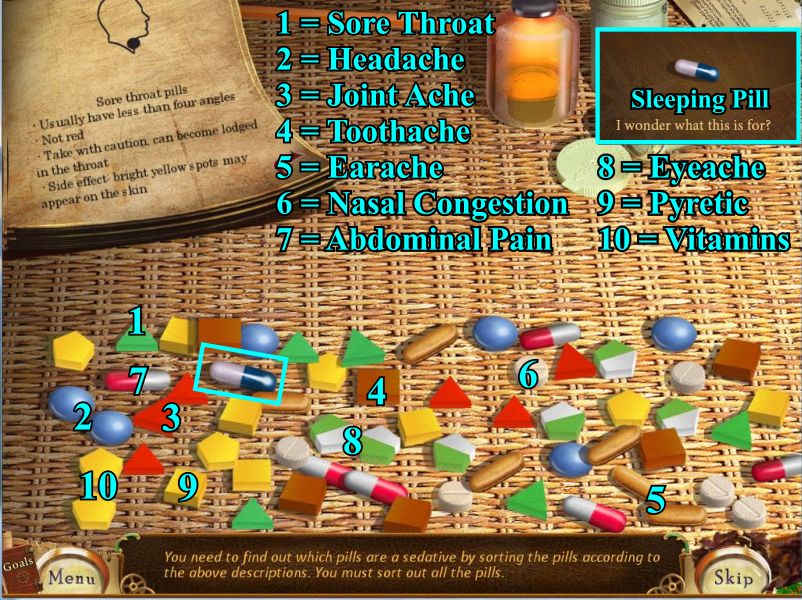
Tent
Your goal is to end up with the sleeping pill that is marked in green.
In order to do so you need to collect each of the 6 pills for all the ailments.
They are numbered in the order you need to collect them and if you mess up, you will need to start all over again.
Screenshot
Bridge
Since you have the game piece from the crab, you can now complete the game to get the Idols.
Place the missing piece at the lower left where indicated when you start the game.
The object of the game is to line up the outer and inner circles so that they are like-kind with the stationary circle in the middle.
The rotation circles are marked for both inner and outer circles as are the spaces where you can move the tiles and then rotate the circles to place them elsewhere.
The solution is shown and your reward is all of the other Idols which you will need to individually collect for your inventory.
Screenshot
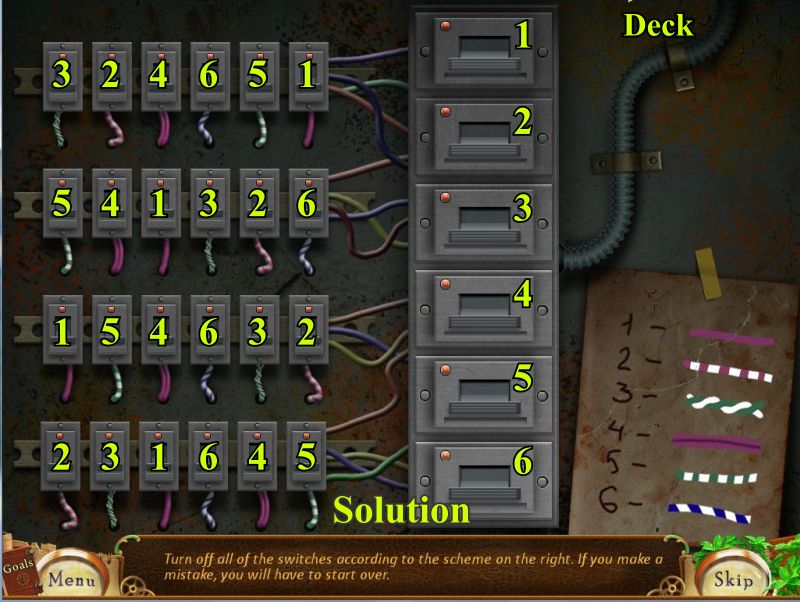
Ship's Main Deck Circuit Box Mini Game
In order to get past the sparking wire you need to turn off the circuits in the box.
The scheme at the right shows which wires need to be turned off in which order.
What it doesn't say is how so you need to click on the 4 panels at the left in numerical order to do so.
But, you cannot do it on one panel at a time because what you need to do is for example click on number 1 in row 1, number 1 in row 2, number 1 in row 3, number 1 in row 4 and then click the main number 1 switch.
Repeat the same process for number 2 and go to each row when number 2 is marked and then click the main number 2.
Keep repeating the process for all 6 numbers until they all turn red.
If you mess up, you get to start over but at the completion you will get to go Aft on the ship.
Screenshot
Aft on the Ship
Rearrange the wires as shown to lower the cage and get Grandpa down.
Screenshot
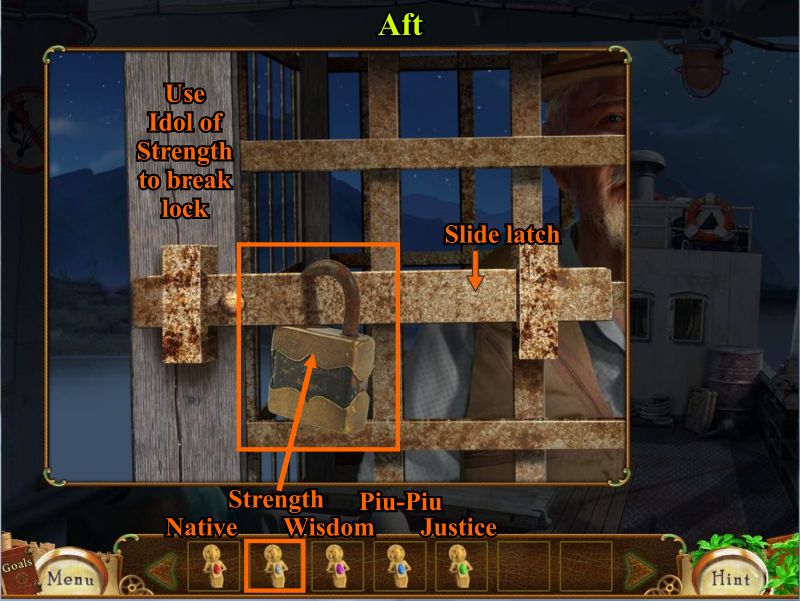
Grandpa is now lowered to the deck but to unlock the cage you will need to call upon the Idol of Strength so place it on the lock to break it and then slide the latch.
Screenshot
Epilogue: Tribal Village
Kate and Grandpa made it back to the village with the help of the tribe but the Idols need to be restored to the altar so you need to help Kate take them there by exiting left to the Alter.
Screenshot
Idol Mini Game
Place all of the Idols in their appropriate places on the altar.
Rotate all of the pipes so that the energy is distributed to all of the Idols.
Screenshot
Congratulations. You have completed all of your goals and finished the game.
Special Thanks to Jazz for this fabulous walkthrough!
Posted by: grinnyp |
August 2, 2010 2:21 PM
|
August 2, 2010 2:21 PM