
Lilly Looking Through
Platform: Mac, Windows, Linux
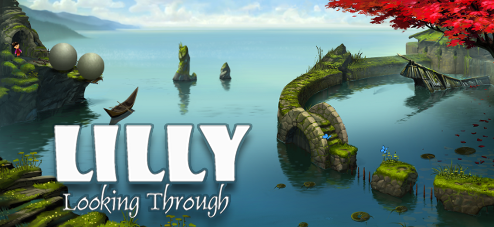
![]() Lilly and Row are playing outside, doing things kids do, when something mysterious comes along, leading them on a journey through a surreal world. The mystery and magic increase when Lilly finds an usual pair of goggles that...well, bring an astonishing way of looking at her situation. Lilly Looking Through is an animated adventure by Geeta Games that will enchant your eyes and evoke your sense of wonder. You get to share in Lilly's fascination and curiosity, and innocently earnest explorations, solving playful puzzles to carry on this expedition into the fantastical.
Lilly and Row are playing outside, doing things kids do, when something mysterious comes along, leading them on a journey through a surreal world. The mystery and magic increase when Lilly finds an usual pair of goggles that...well, bring an astonishing way of looking at her situation. Lilly Looking Through is an animated adventure by Geeta Games that will enchant your eyes and evoke your sense of wonder. You get to share in Lilly's fascination and curiosity, and innocently earnest explorations, solving playful puzzles to carry on this expedition into the fantastical.
 Gameplay is intuitively point-and-click: a changeable cursor will help guide your actions as you seek out ways to move Lilly to the exit of each stage and onward to the next. Although the environments are lush, with multiple layers that shift as you click and drag the screen to and fro, there is no navigation outside of certain active areas where you can send Lilly, provided obstacles have been overcome.
Outside of the goggles, you have no inventory to bother with, either. If Lilly is near an item and it is currently usable on screen, you'll be able to pick it up and it will glow when placed over its action spot. If you are at a loss what to do next, clicking the "?" button will highlight currently active areas but it will not overtly indicate what you should do next. This eliminates pixel hunts while leaving the work of figuring out the task-based riddles squarely on your shoulders. In that way, there are a good number of challenges to work through. Geeta Games recommends collaboration in these cases, as the game is meant to be enjoyed by all ages, although solo players with any amount of adventure gaming know-how will do just as well. There's ten chapters total, some equal in length to those in the demo, some a bit longer or shorter, which makes Lilly Looking Through roughly 4-5 hours to complete, depending on how readily you can work out solutions. Save points at the beginning of each chapter mean you should try to make it through the end of a chapter before leaving the game for the break.
 Analysis: The goggles create a neat turn of perspectives, making puzzles playful as well as challenging. These task-based puzzles are built into the environment and are very Myst-like, so it's no surprise that Geeta Games' Steve Hoogendyk worked for Cyan, the creators of Myst and Riven. A Hayao Miyazaki influence is also discernible. It's in the beauty of the architecture and natural settings, the casting of an unabashed young girl as the lead protagonist, and the overall sense of wonder that is evoked in us players, both as participants and audience. While Lilly's own quest is far from identical to Spirited Away, that the designers were inspired by some of their favorite animated films is readily recognizable. In fact, a large team collaborated in the making of Lilly Looking Through, and when looking at the seamless integration of gorgeous artwork, sweeping music, environmental sounds and personality-laden character sprites, it's truly something to remark upon. The Geeta Games team's love and enthusiasm for their creation is etched in every detail.
 The cinematic aspect can make gameplay slow moving in that you're not participating during animated sequences. The player has more of a passive role, or it at least it sometimes feels that you're an onlooker with the omniscient power to intervene, pulling a few strings here and here and pushing a button over there...then observing what happens. You'll need to wait as actions are completed, sometimes backtracking and rethinking your steps in order to ponder out the solution, so if you're not a patient game player, you might be hopping on your heels. Puzzles build on each other so there's a solid interior logic on how everything is completed, although it does tend toward repetitiveness more often than not. Even so, since hands-on puzzle solving is an integral part of Lilly Looking Through, your immersion is a given. I found it immensely satisfying to play but the ending left me questioning and hoping for something more. Whether a sequel is planned, though, Hoogendyk said it depends on Lilly Looking Through's sales.
More of this beautiful game would certainly be welcome! So if anything in the above review grabbed your attention, get Lilly Looking Through—you won't regret it. If there are disappointments in it to be had, they are amply overshadowed by the wealth of jaw-dropping sights, amusing character interactions and the fun of puzzle adventuring. This is a game that lavishes you through the entire experience with beautiful sights and a charming story; it is as much about adventuring into fantastic places and beholding the wonder of your surroundings as completing puzzles and reaching the end.
![]() Windows:
Windows:
Download the demo
Get the full version
Get the full version (via GOG)
![]() Mac OS X:
Mac OS X:
Download the demo
Get the full version
Get the full version (via GOG)
![]() Linux:
Linux:
Download the demo
Get the full version


Walkthrough Guide
(Please allow page to fully load for spoiler tags to be functional.)
Lilly Looking Through Walkthrough
Chapter 1: Forest Hut
When you begin, follow the short tutorial that shows how to use the controls. When the tutorial is over, it leaves Lilly in a situation in which she needs to climb a steep slope:
Trying to run up the slope won't work as it's too steep.
So, try to push the rickety CART to use as a ramp, but it won't budge.
At this point, Row comes around the corner and notices the goggles. You can interact as Row, as well:
As Row, attempt to grab the GOGGLES to realize it's out of reach.
Pull the PLUG out of the barrel to empty out the water.
Then, push the BARREL under the goggles to use as a boost.
Get the GOGGLES.
Now Lilly has an object to help her up:
Pick up the ROUND BAND from the broken barrel and use it to fix the CART's wheel.
Use the repaired CART as a ramp and Lilly will climb up and over the slope.
Now Lilly is closer to reaching the red scarf, but a few more obstacles stand in her way...
Pick up the CATTAIL REED that Row discarded earlier.
Light it on the BURNING CATTAIL by the pond.
Use the FLAME to burn the rope that's holding up the ramp.
Now climb up the ramp to the hut and Lilly will run to the tree branch in the distance, where the red scarf is tangled.
Trying to grab the RED SCARF will initiate an animated scene. Afterwards, Lilly needs to find a way to continue on...
Earlier, when the scene began, you may have noticed how the fern reacted to the falling fruit as well as the fire...
Wiggle the tree branch a few times to drop two more fruits on the fern.
Now use the extended fern/vine as a a bridge to the next hut over.
From there, grab the RAPEL/PULLEY and zipline over to the forefront hut.
Pick up Row's hat and then head through the exit in the back of the forest. This will end chapter 1 and send you to the next stage.
Chapter 2: Frog Pond
Row is carried off by the scarf and the goggles are stuck on an out-of-reach bamboo stalk. The path is blocked by another fern-like vine. Remembering some details from the first chapter will help you remove the...
The fern/vine reacts to heat by shrinking, so take a nearby CATTAIL REED and light it up on the LANTERN above Lilly.
Use the FLAME on the fern to make it shrink.
Now you can walk forward to the edge of the boardwalk.
Once Lilly reaches the other side, a pond and high cliff prevents her from following Row.
Now you'll have to solve a puzzle to create a path for Lilly:
Run over to the frog pond, noting how the edge near the inner pond sinks down when Lilly steps on the stone semi-circle before the levers.
Playing with the levers, you will discover different effects depending on when they're pulled. Using the step as a button will also play into your puzzle solving.
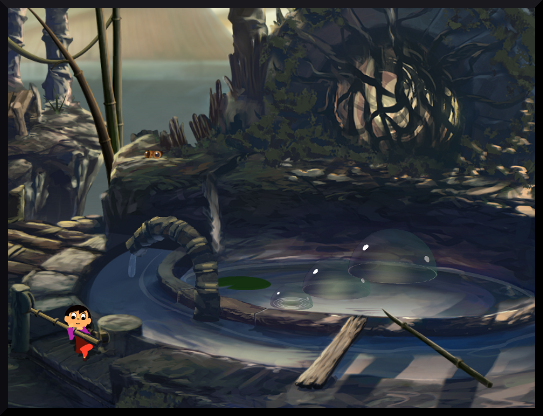
Try to create a series of bubbles that will allow Lilly to reach the cave entrance at the back of the scene*.
SOLUTION:
First, shift the LOWER LEVER to turn the pipe device.
Next, pull the UPPER LEVER to blow a medium-sized bubble.
Now you need inflate the bubble so it's big enough to reach the cliff, but if you try to add more air to the medium-sized bubble, it gets too big and pops. So, you need a way to size it just right. (If the frog is still there, first, run over to the side of the pond to scare him off)...
Shift the LOWER LEVER again to reposition the pipe.
Pull the UPPER LEVER to deflate the bubble.
Shift the pipe back to the bubble blowing position and pump another blast of air into the first bubble. Now it's the perfect size!
Jump on the STONE STEP to lower the side of the lower pond. The flow of water will send this large bubble over to the cliff-side of the pond.
Now you need medium and small bubbles to complete the bubble bridge:
The next-sized bubble step is easy to make, since it's the first size that comes out when you blow a bubble.
After blowing a medium-sized bubble, jump on the STONE to wash it to the middle of the pond, next to the large bubble.
Finally, make the last part of the bubble bridge by using the levers to shift the pipes and suck out a bit of air from a third, medium-sized bubble.
*If you make a mistake anywhere in the process, you can use the SHARP BAMBOO ROD to pop a bubble(s) and start again.
Screenshot: Way Across the Frog Pond
Cross over this new bridge to reach the ledge.
Pick up the GOGGLES and put them on; now you see things in a new perspective!
For now on, whenever you need to transform the environment, press the picture of LILLY at the bottom of the game screen to put on/take off the goggles.
With GOGGLES ON, step through the TUNNEL entrance to end chapter 2.
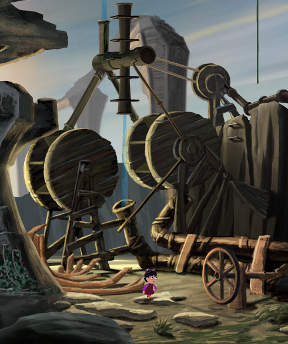
Chapter 3: Waterfall Tower
When you first enter this stage, goggles on, you see a beautiful spiraling tower surrounded by water.
You can't move forward because the drawbridge is raised.
Take the GOGGLES OFF and watch as Row is carried further away.
Grab the VINE in front of Lilly and swing across to the tower.
As Lilly tries to run across the path, part of it breaks and she is stuck...
Put GOGGLES ON and now you can run down to the bottom of the tower.
Then, remove your goggles again.
At the bottom of the crumbling tower, GOGGLES OFF you need to find a way up to the cliff where you see the remmnets of an old bridge.
A number of items on scene should help you do this. Note how all the pipes, large and small, connect to each other and experiment with how they respond to a tug or a turn of the wheel.
SOLUTION:
First, tug on the narrow pipe at the back of the screen, near where water is pouring into a larger pipe (A). (See screenshot)
This makes the upper rod at the top of the water wheel shift out of place, unlocking the upper funnel mechanism (B).
Next, turn the wheel/spigot (C) twice until water is pouring into the left waterwheel.
The sprocket then will move to the bottom position on the forefront pipe.
Pick up the SUPPORT ROD (D) that fell from the tower's crumbled pathway and insert it into the SPROCKET (E).
Turn the wheel/spigot two more times (F) and the bridge rope will fall down (G) to where Lilly can reach it.
Screenshot: Pipes and Water Wheels
Before grabbing the ROPE to climb up to the bridge, you need to do a few more things...as you'll discover later once you reach the top (so don't open the following spoiler unless you want a shortcut).
With goggles on, you can cross the bridge and reach the top of the tower. But once over there and goggles are off, then what? Do you have a steady way across the pipes to follow Row's path?
You need to set the locking pin back into the funnel mechanism.
Make sure the upper pipe/funnel mechanism is level, flowing into the rear waterwheel, then push up on (B) again to set the rod back into place.
Now you can climb up the rope, put your GOGGLES ON to see the functioning bridge again and cross the bridge, to the top of the tower.
Remove the goggles again and...
Grapple across the secured pipe to the other ledge.
Grab hold of another ROPE VINE and climb up, ending chapter 3.
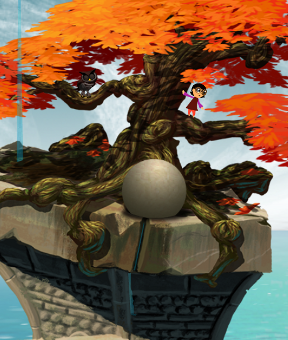
Chapter 4: The Acorn Tree
Arriving at the top of a pillar, googles off, you see an old dead tree. Put your googles ON to see things from a new view.
Now the tree is lush and leafy, but you're still stuck with no way across the pillars.
If you push on the giant SPHERE to lift it slightly, you see that a stream of water is sent of the right edge of the pillar you're on...
Climb up onto the tree's lower limb.
If you jiggle the limb to drop an acorn, a squirrel snatches it and runs back into his hole. every. time.
For now, you need to find a way to cross these pillars all the way to the right side of the screen....
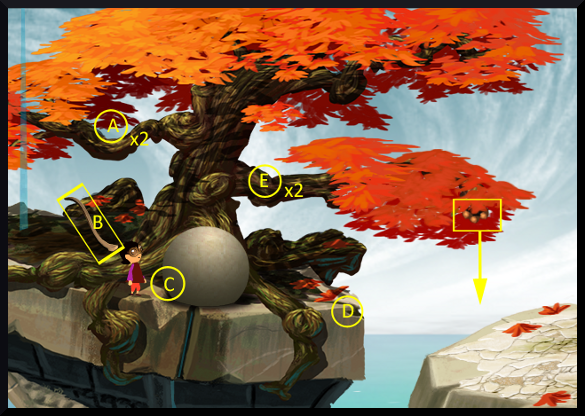
SOLUTION:
Climb over to the limb with the OWL (A) (see screenshot)...
Mess with the OWL a few times until it flies away, knocking Lilly out of the tree along with a piece of the branch.
Using the BRANCH PIECE (B) as a fulcrum against a root, shove the giant SPHERE (C) off the top of the pillar.
Now take the BRANCH PIECE and use it to direct the stream of WATER (D) onto the other pillar.
Finally, climb back into the tree's LOWER LIMB (E) then jiggle it to cause another acorn to fall.
The squirrel comes out after it, but this time your friend the owl, ushers the squirrel away.
Jiggle the limb to send another ACORN onto the water-soaked pillar.
Screenshot: Acorn Tree
After doing all that, take your goggles OFF to see the results of your handiwork...
Here is a beautiful green tree! Climb across it to the middle pillar.
Standing now on the middle pillar, it's time to find a way over to the pillar on the far right...
Put your goggles ON.
Pick up the ACORN by your feet and plant it over on the other pillar, in the middle of the grass.
Take your goggles OFF.
Now you can walk across this lovely tree to reach the pillar on the far right.
You've gone as far as you can go: Lilly's standing on a pillar with another giant sphere in the middle of it. With goggles ON, a waterfall is pouring into the top of the sphere and out of culverts on the sides. Somehow you need to manipulate these elements to create an exit...
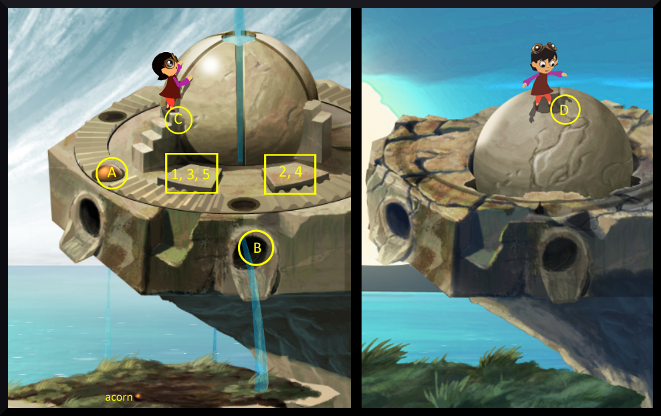
SOLUTION:
With goggles ON, you can see two buttons in the front of the sphere operate the rotation of a dial around the pillar:
The LEFT BUTTON rotates the dial clockwise 3 spaces.
The RIGHT BUTTON rotates it counterclockwise 2 spaces.
You want to get the COPPER BALL (A) from the left culvert to the front culvert (B). So, step on the buttons in this order:
LEFT, RIGHT, LEFT, RIGHT, LEFT
If you have already moved the ball out of its starting place...just keep going until it's in front (this method is essentially the same as moving it forward 1 segment at a time).
When the copper ball's in place, climb up the STEPS (C) on the side of the waterfall sphere and take OFF your goggles.
Now Lilly will stand on the top of the old DRY SPHERE (D) and the pillar is significantly more eroded without the protection of the tree...
Screenshot: Waterfall Spheres
Jump up and down a few times until the exit opens and chapter 4 ends.
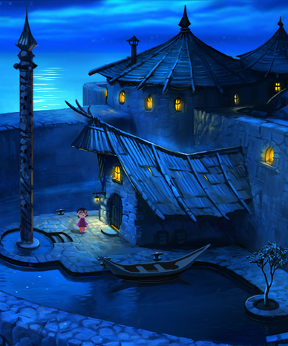
Chapter 5: Moonlight Bay
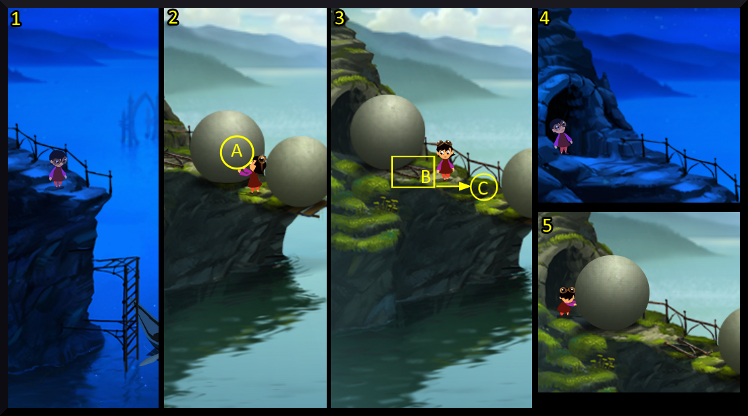
At the beginning of this chapter, Lilly is standing on a high cliff above the bay. There's two giant spheres here, blocking her way. If you can find a way down to the boat, you might be able to reach the village gate...
With goggles ON, move to the end of the cliff.
Take your goggles OFF; now Lilly's standing between the two spheres. Push the LEFT SPHERE (A) twice to roll it up the slope until its up in the tunnel opening. (See screenshots)
Pick up the TRACK (B) and move it over to the groove (C) nearest the sphere on the end.
Put ON your goggles, run up to the tunnel opening.
Now take your goggles OFF and push the top SPHERE. It will roll to the end of the cliff and knock the other sphere into the water.
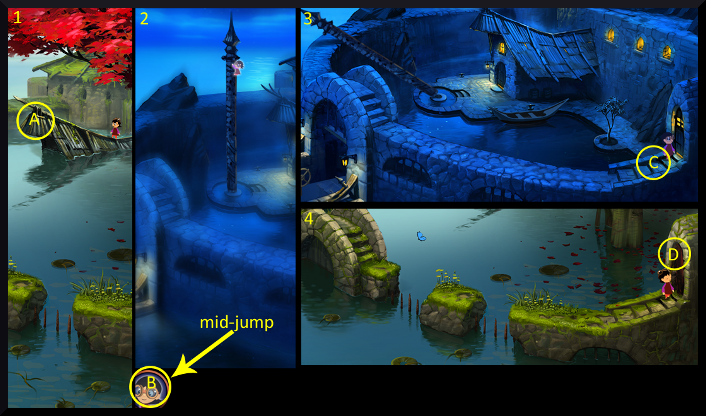
Screenshot: Moonlight Bay, part 1
With goggles ON, run to the end of the cliff.
Take your goggles OFF again, grab on to the edge of the cliff/pier (A). Hover your cursor over the water until it's a down arrow, then click to jump into the water.
Send Lilly, in the boat, to the village gate.
Once at the inlet, you need to work out how to get the gate open...
SOLUTION:
Pull up on the GATE LOCK (B).
Shift the LEVER (C).
Turn the LEFT WHEEL (D).
Pull the ROD (E) to lower the wheels.
Turn the RIGHT WHEEL (F).
Screenshot: Moonlight Bay, part 2
Now you're inside the village and need to find your way inside.
SOLUTION:
Take your goggles OFF and climb up on the roof (A).
Run off the point of the roof and, when you're mid-jump, click the GOGGLES ON BUTTON (B).
Now walk from where the pole has landed to the DOOR (D) on the far right side of the wall, which is locked.
Take your goggles OFF and click the unlocked DOOR (E).
Screenshot: Moonlight Bay, part 3
Lilly walks through the door, ending chapter 5.
Chapter 6: Dark Cave
At the beginning of this chapter, Lilly's inside a very dark cave and a bat has stolen her goggles.
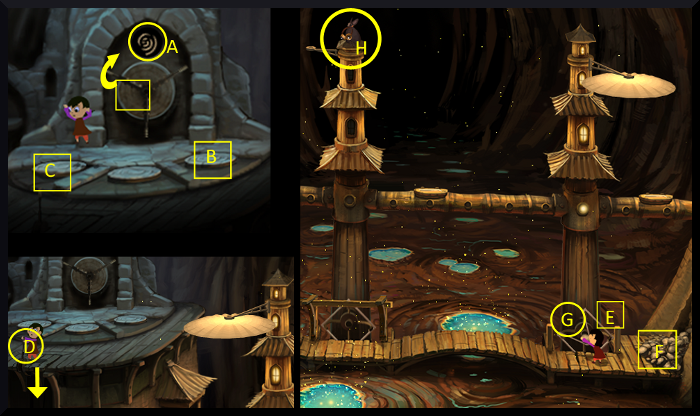
First, to find some light...Run over the dais: it has three buttons and a crank.
Turn the CRANK to a SWIRL design (A).
Step on the BUTTON on the right (B) to open the right tower's light umbrella.
Then step on the left BUTTON (C).
Now you have light on two towers, but the bat is preventing the middle tower's light from popping up. Additionally, fiddling with the other levers, you're unable to get the tower on the right to spin...
Use the ELEVATOR (D) to travel to the lower floor.
Go over to the last tower and remove the ROCK (E) from the gear belt by slinging it away.
Now you know how you can move the bat...
Pick up another ROCK from the pile (F).
Put the ROCK on the left side of the gear belt (G), aim for the BAT (H) by pointing on him, and release. The rock will scare the bat off the middle tower.
Screenshot: Bat Removal
Once the bat is gone, you can ride the elevator back to the upper platform, and step on the middle button to turn on the lights for the middle tower.
Now, to find a way across to the door on the far right side of the cave...
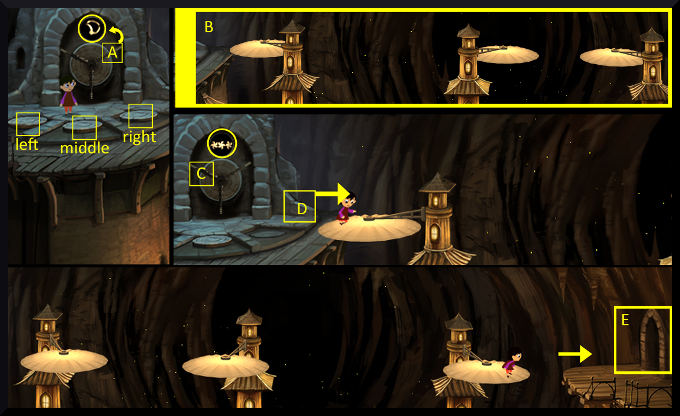
First, make sure all the towers' light umbrellas are open (see instructions above).
Then, turn the CRANK until the design showing is a HALF CIRCLE (A).
Stepping on the LEFT, MIDDLE and RIGHT buttons, adjust each of the towers until their UMBRELLAS ARE LINED-UP (B), as shown in the screenshot below.
Turn the CRANK to THREE SWIRLS (C). Now the umbrellas are continually rotating. If you've adjusted them correctly, your path is set.
Move to the platform edge (D) and, hold your cursor over the edge until it turns into an ARROW. Click to jump onto the first umbrella.
Continue this way, jumping across the umbrellas until you reach the exit (E).
Screenshot: Dark Cave Exiting
Go through the door to end chapter 6.
Chapters 7 & 8: Bells Above and Below
When you first enter this scene, you can see the bat with Lilly's goggles the roof of the bridge island. Row is still battling with the scarf in a window across the bay.
Move Lilly to the island to try to retrieve the goggles...
SOLUTION:
Pull the cord for the YELLOW BELL so the bat will fly off, leaving the goggles behind.
Pull the cord for the GREEN BELL.
Notice that the green bell sent waves of green into the water.
Pull the cord for the BLUE BELL several times...
Notice that the blue bell caused the blue to be pulled up from the water, leaving only yellow behind (and making the water much clearer.
Keep pulling the blue bell until the goggles fall into the water.
Dive down into the water and go through the opening at the bottom, to an underwater cavern. Here you see glowing phosphorescent-like bits on the pillars in various colors.
Swim to the diving dome on the left side of the cavern. Here there are three colored "bells" as well:
Blue, Yellow and Red bells
Or, you can pull on the bottom portion of each bell to change Blue to Orange, Yellow to Green, and Red to Purple.
To sound a bell, pull on the plunger at its very top.
The bottom looks very dark; you need to find a way to light it up and find those goggles. Try experimenting with the bells..
SOLUTION:
Just as you did with the bells on the bridge to clear the water, try to brighten up the floor of this cavern.
First, use change the YELLOW bell to GREEN. Then, pull the top portion to sound it.This will send green waves out, changing three of the five pillars to green.
Next, sound the BLUE bell to pull out all the blue, leaving just yellow and red behind.
Now adjust the blue bell to ORANGE. Sound it. This sends out waves, changing all the pillars to orange.
Finally, sound the RED BELL.All the red will be pulled out, leaving behind only YELLOW, which is bright enough to light the entire cavern.
With the cavern lit up, you can swim down to the bottom and pick up the GOGGLES again.
The power of the goggles button has been returned!
Swim over to the right side of the cavern. Here, the opening is closed up by a rock that has fused to the wall.
Put the goggles ON.
Click once on the ROCK to move it away from the cavern wall.
Take the goggles OFF.
Now there's an opening where the rock has decayed. Swim through the opening.
Chapter 9: Deep Dark Cavern
After leaving the underwater cavern, you'll come to an extremely dark cave full of purple phosphorescent-like bits.
Using your goggles proves no help here, since you'll be frozen in place.
You can swim out of this cavern, and through either of the holes at the top of the underwater cavern, but in both cases, you'll end up stuck, goggles on or off.
So, like before, find a way to light up this cavern so you can figure out where to go next.
SOLUTION:
What isn't obvious at first is that the color bells in the other cavern will affect the lights here, too. So, all you have to do is use the same trick as before to change the lights to yellow:
Swim back into the diving dome.
Sound the BLUE BELL. This pulls all the blue color from the other room, causing it to turn red.
Now sound the ORANGE BELL. This changes everything to orange, darkening this room as well.
So, lastly, sound the RED BELL. All the red will be pulled away, in both rooms...
With goggles still off, swim back into the other cavern and you'll find it's lit up.
Now that you can see inside this cavern, climb out of the water then walk over to the right side of the room.
Maybe, if you can reach the opening at the top of the cavern, you can escape? Experimenting with goggles on and off, you discover Lilly cannot leap far enough to make it to the top mushroom-like step.
SOLUTION:
With goggles ON, jump onto the lowest step.
Next, leap toward the LEFT and -midjump- press the GOGGLES OFF button to change the scene. Lilly will land on the next step.
Do the same thing again, leaping LEFT and putting GOGGLES ON -midjump- to land on the next step.
Keep goggles on and jump LEFT again, to land on the last step.
Now, JUMP RIGHT and take the GOGGLES OFF -midjump- to land on an even higher step.
From there, keeping the goggles off, JUMP LEFT to the highest step on the end.
Lastly, jump LEFT toward the stalactite and -midjump- put the GOGGLES ON. Lilly will grab onto the frozen stalactite and break off its tip.
Pick up the pointy FROZEN TIP.
Take the GOGGLES OFF and swim back into the underwater cavern and swim up through the hole on the top right.
Now put the GOGGLES ON and click on the ICY SURFACE of the hole...
If you've picked up the pointy FROZEN TIP of the stalactite (see previous spoiler), Lilly will use it to break open the ice and climb up out of the water.
Run to the back of the scene, take OFF the goggles. Now you're standing at the door below Row.
The door is locked, but you need to go in to reach Row. Put GOGGLES ON and move a short distance to the right.
Take the GOGGLES OFF. Now Lilly's inside the house and will open the door from the inside.
Click on Row to help him down from the gable.
Finally, follow him through the door to end chapter 9.
More on the way!
If you need help with something not yet covered in this walkthrough, please post in the comments section below.
Posted by: elle |
November 1, 2013 6:53 PM
|
November 1, 2013 6:53 PM