
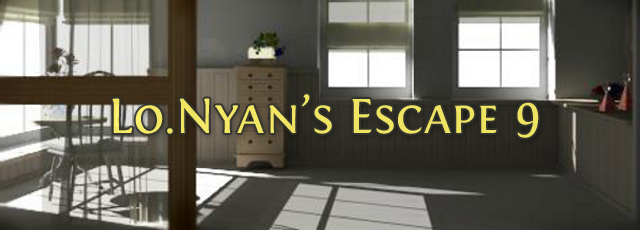
![]() If you're like me, although you do revel in the fun of pitting your mental prowess against the wits of the game creator, you truly love escape-the-room games because they let you travel to interesting locales and stay in beautiful surroundings. Never mind the whole point is to leave such places! Being able to poke around in and explore this pretty, imaginary world is the main draw. That's why it's no surprise that fans of Myst are also avid escape game enthusiasts, always seeking the next fix. So, as far as pretty aesthetics go, Lo.Nyan's Room Escape 9 makes a wonderful first impression. But as you work your way around the room, gathering up clues and items, opening up drawers and cupboards, you'll also be glad to find a number of cleverly enjoyable puzzles to compliment the scene.
If you're like me, although you do revel in the fun of pitting your mental prowess against the wits of the game creator, you truly love escape-the-room games because they let you travel to interesting locales and stay in beautiful surroundings. Never mind the whole point is to leave such places! Being able to poke around in and explore this pretty, imaginary world is the main draw. That's why it's no surprise that fans of Myst are also avid escape game enthusiasts, always seeking the next fix. So, as far as pretty aesthetics go, Lo.Nyan's Room Escape 9 makes a wonderful first impression. But as you work your way around the room, gathering up clues and items, opening up drawers and cupboards, you'll also be glad to find a number of cleverly enjoyable puzzles to compliment the scene.
 Lo.Nyan's instructions are standard for the genre: pop-up arrows at the edge or bottom of the screen (depending on where you can go) will guide your navigation while active areas can be zoomed in on and inventory items picked up with a mere click. There is no changing cursor but nearly every surface is available to explore, and you'll want to look everywhere if you're going to find all the necessary agents of your escape. The "About Item" button is also a required component, as several puzzles can only be completed within your inventory. Outside of the challenge of finding all the hidden items, these puzzles are few yet fun, depending on logic and thinking skills to solve. Also, it's helpful to note that some codes can't be broken until you've viewed all the clues.
Like thorns on roses, not all is perfect. A few prickly flaws mar the pretty surface—pop-up messaging obscures the bottom navigational arrows, even though you can usually still click there to back up; a few active areas are picky about where you need to click, some of the graphics are unpolished, and there is no save button. The latter becomes an issue if you're not patient enough to replay the game to experience both endings. This is partly made up for by the time-saving, user-friendly addition of a camera. Even with these inconsistencies, Lo.Nyan's Room Escape 9 is a welcome addition to the JayIsGames archives of lovely escapes, one I can wholly recommend on its charming setting as well as its clever mind.


Walkthrough Guide
(Please allow page to fully load for spoiler tags to be functional.)
Walkthrough: Lo.Nyan's Room Escape 9
Beginning and the 2x2 Box Puzzle
When you begin, you'll be facing a two windows with a little tea table alcove on one side and a bench area on the other. Next to the windows is a chest of five drawers; zoom in on it:
Open the second drawer on top to find:
A SPADE TILE
Open the fourth drawer to find:
A 2x2 BOX PUZZLE
From the last drawer, you'll get:
A CAMERA
After getting these three items, and before backing up, note the roses here in the rectangular vase: two yellow roses and one blue
Back up from the chest of drawers and turn left to look at the little tea table:
Zoom in on the table to better view the three red roses here.
While in that view, take the DIAMOND TILE from the top of the table.
Back up from the table and turn left twice to view what's on the alcove bench...
Note that the clock is missing three numbers: 3, 6 and 9.
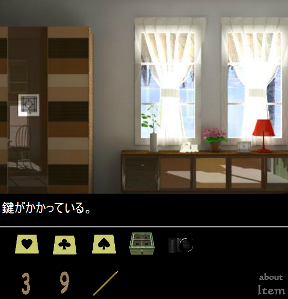
The white cabinet needs a key.
Examine the three prism-shaped bottles and note the toppers are cats.
Then, zoom in on the dish of roses:
get the HEART TILE
make note of the red and blue roses, then back up again.
Zoom in on the hutch. Examine the corkboard and take in the information on the three note cards pinned there.
Then, pick up the cute robot
examine the back of the robot to get a CLUB TILE.
Now you're ready to solve the first puzzle—examine The 2x2 Box Puzzle in your inventory:
Place the four tiles on the box in the proper order according to the clues.
SOLUTION:
The cards pinned to the corkboard tell you how each tile relates to each other....
HEART - SPADE
CLUB - DIAMOND
When each tile is in the correct square, pull the pin in front of the box and it'll open:
Get the BRONZE KEY.
More Explorations, The Clock and Opening the Second Room
After getting the BRONZE KEY from the 2x2 box, use it to open the little white corner cabinet on the alcove bench:
Pick up the jar of Strawberry Jam and examine it:
get the CLOCK NUMBER 6 from inside the jar
then make a note of the design on the jar's lid.
Click the cylinder on the bottom shelf of the cabinet to turn on the light and back up.
Now that the cabinet is open and the light is on, examine the cat prisms/perfume bottles again...
Make a note of their "shadows".
To leave the alcove bench area, turn left then back up to the original starting point.
Turn left to face a desk by a large window. Zoom in on the right desk drawer and open it:
get A PENCIL
Go to the desk's left drawer and open it:
get the CLOCK NUMBER 3
Now look at the blue vases on top of the three-drawer chest next to the desk:
make note of the two yellow roses then pick up something from between the two blue vases...
CLOCK NUMBER 9
The chest itself is locked (one key for all three drawers), so you'll need to come back to it later.
Now that you have all three numbers, return to alcove bench where the clock is hanging...
Place the numbers 3, 6 and 9 back on the clock face and a hidden drawer will open:
get the SILVER KEY.
Back up from the clock, turn left, back up twice, then turn left twice to face two doors.
Use the SILVER KEY on the white door.
Inside the Other Room and Opening the Striped Wardrobe
After opening the white door with the key you got in the clock, enter the second room and have a good look around.
On the table in front of you is a bowl of red roses; zoom in for a closer view:
Pick up the NUMBER TILE "8" that's next to the roses
then make a note of the number of red roses in the bowl
Back up and study the white sideboard/stained glass cupboards:
There's a canister of some sort on top that's out of reach.
Zooming in, you'll see both the bottom doors and top drawers are locked.
But, you can open the cubbies in the middle:
from the right get a NUMBER TILE "9"
from the left side, pick up the Orange Jam jar:
get the NUMBER TILE "6" from inside the orange jam
then note the design on the jar's lid.
Back up once to leave the cabinet area then turn left to behold the lovely stained glass windows in this room...
As you get close to each window, your CAMERA (from the fourth drawer in the chest by the tea table) will flash:
Click on the CAMERA in your inventory then use it to take a picture of each side of the stained glass windows...
Now you'll have 2 PICTURES added to your inventory.
Back out of the other room and turn left to face a large striped wardrobe:
In between the door sides of the striped wardrobe is a design that should look familiar; zoom in on it.
Use "About Item" to open the LEFT (PINK) PICTURE in your inventory and it'll appear next to the stained glass puzzle. Use it to guide your hand in re-coloring this design.
When it matches, click the small rectangular button below the design. This unlocks the left side of the wardrobe.
Back up and open the left door:
Get the LADDER.
Now do the same for the RIGHT (GREENER) PICTURE, which will unlock the right side of the striped wardrobe.
Open the right door of the wardrobe and zoom in on the middle shelves to find...
a NUMBER TILE "2"
and, moving aside the purse, a picture of roses
Rose Picture Code and the Stained Glass Cupboard
After opening the right side of the striped wardrobe, move aside the purse on the middle shelf and zoom in to see a rose picture:
two small KEYS are secured by a code at the top of the picture
using the clues you found around these rooms, solve the code to open the lock and get the keys.
SOLUTION:
There is a yellow, red and blue number needed. Go around the room to count all the roses by color to get the answer...
4 9 2
When you enter the correct code, the bar will unlatch. Back up and take the PAIR OF KEYS.
Back out of the wardrobe, turn right, and return to the other room.
Use the LADDER you got from the left side of the wardrobe to reach the item at the top of the stained glass sideboard:
A WHITE CANISTER with a dial lock
Now zoom in on the stained glass cupboard doors...
Use the PAIR OF KEYS to unlock the doors and open them.
Explore all the shelves to gather more helpful items:
Top, right shelf--open pot to get NUMBER TILE "7"
Bottom, right shelf--move aside oil/vinegar bottles to get NUMBER TILE "4"
Bottom, left shelf--open rose tea can to get NUMBER TILE "5"
Middle, left shelf--turn over wine glass to get the GOLD KEY.
Desk Drawer and Cat Picture Code
After getting the GOLD KEY from the wine glass, back out of the dining room and turn right to face the desk.
Zoom in on the middle drawer and use the GOLD KEY to unlock it...
from inside this drawer, get the PAD OF PAPER.
Using the PENCIL (found in the right side desk drawer) on the PAPER PAD will make a new clue appear.
Go back to the alcove to look at the cat perfume bottles...
If you haven't already, turn on the light in the tiny white corner cabinet to see numbers in the prism shadows.
On the wall, to the right of the desk, there is a picture of a cat. Zoom in on it.
Enter the correct 3-digit code
You need to have seen all the clues to solve this.
SOLUTION:
With the light on in the tiny cabinet, the perfume bottles cast shadows...each has a different number (412). The pencil rubbing on the paper pad tells you how to multiply those numbers. Put the numbers in the order of the ears--short red, short blue, long red--as indicated by the symbols shown in each square (if you miss it the first time, back up and zoom back in to reset it).
8 4 3
When the answer is correct, the lock automatically opens.
Back up and take the FANCY KEY.
3-Drawer Chest, White Canister and Bottom Cupboard
After solving the cat picture code, back up and examine the 3-drawer chest next to the desk...
Use the FANCY KEY to unlock the chest. Open each drawer to find more items:
NUMBER TILE "1" (top drawer)
NUMBER TILE "3" (bottom drawer)
Jar of Blueberry Jam (middle drawer)
From inside the blueberry jam, get a SLIP OF PAPER and read it.
Also make a note of the design on the jam jar lid.
Now you can solve the code for the white canister:
Examine the white canister in your inventory and enter the correct 3-Letter Code to unlock it.
SOLUTION:
Colors and designs on the slip of paper point to the three different jam jars found around the rooms--in the tiny white cabinet (STRAWBERRY), in the left drawer of the dining room cupboard (ORANGE), and in the middle drawer of the chest by the desk (BLUEBERRY). Where indicated, enter the first letter of each jam flavor to form the code:
B-S-O
Open the white canister to get:
A TINY ROUND KEY.
Go back into the other room. Zoom in on the bottom part of the stained glass cupboard:
Use the ROUND KEY to unlock the bottom doors of the cupboard and open them up...
Get the 3x3 BOX
Don't solve anything yet. The way you solve this 3x3 box will determine how you end the game...
Normal Ending
By now, you should have nine number tiles and a 3x3 box.
If you want the normal ending, you need to have nothing else, especially no secret items, in your inventory but those ten things.
Open the 3x3 box in your inventory and set about solving it:
Look at the backs of each number tile.
Solve this box the way you solved the 2x2 box earlier.
SOLUTION:
The backs of the tiles tell where they do in relation to the others...
5 2 8
7 1 6
3 9 4
When done, press the white button and, if you're correct, the box will open...
Inside the box is a SLIP OF PAPER. Open the paper and read it.
Back in the main room, turn to the green door and examine the four colored panel next to it:
Press the colored buttons in the correct order.
SOLUTION:
Green
Red
Green
Yellow
Blue
Yellow
Red
There is no sound or other indicators that you are correct, so if you think you are, just back up, click the door and, if you entered the right code, it will open.
Perfect Ending
Before opening the 3x3 box, you need to find the secret item (you might have found it by accident...
It's in the striped wardrobe...
on the rose picture...
a FOUR-LEAF CLOVER.
Now that you have the secret item, solve the 3x3 box as explained in the "normal ending" walkthrough.
This time, when you open the box, instead of a slip of paper, you get a CAT TOY.
Use the CAT TOY on the little house next to the green door...
As the kitty plays, he'll tap out the solution to the door code:
Green, Red, Green, Yellow, Blue, Yellow, Red
Use that code to unlock the door and you'll have the "purrfect" ending!
Posted by: elle |
March 4, 2014 5:24 PM
|
March 4, 2014 5:24 PM