
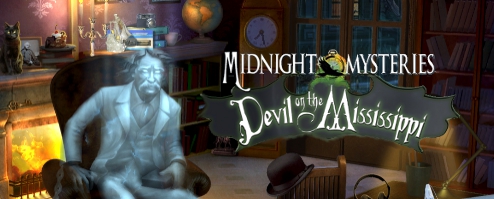
Midnight Mysteries:
Devil on the Mississippi
Platform: Mac, Windows
![]() The Ghost Busters must be pretty mad at you, since these days when there's something strange in the neighbourhood, it seems like you are the one who always the one who gets the call, whether you want it or not. After helping the unquiet souls of Edgar Allen Poe and Nathaniel Hawthorne, you probably thought you deserved a little R'n'R. Unfortunately, you don't get to rest on your laurels for long before undead Mark Twain shows up. But don't worry, he doesn't want to eat your brains, he just wants you to give him a helping hand in Midnight Mysteries: Devil on the Mississippi, the third installment in everyone's favourite hidden-object adventure series from Mumbo Jumbo about dead writers harassing you to do incredibly dangerous tasks.
The Ghost Busters must be pretty mad at you, since these days when there's something strange in the neighbourhood, it seems like you are the one who always the one who gets the call, whether you want it or not. After helping the unquiet souls of Edgar Allen Poe and Nathaniel Hawthorne, you probably thought you deserved a little R'n'R. Unfortunately, you don't get to rest on your laurels for long before undead Mark Twain shows up. But don't worry, he doesn't want to eat your brains, he just wants you to give him a helping hand in Midnight Mysteries: Devil on the Mississippi, the third installment in everyone's favourite hidden-object adventure series from Mumbo Jumbo about dead writers harassing you to do incredibly dangerous tasks.
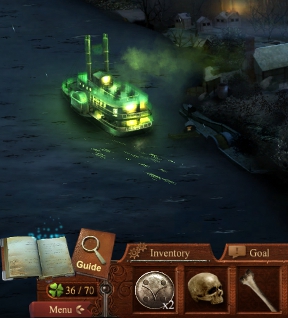 It seems ol' Mark Twain (real name Samuel Clemens) not only had a knack for spinning a good tale... he may also have had certain unique cognitive abilities. In his youth he worked on a riverboat, shooting for his boat pilot's license, and one fateful evening had a premonition that would haunt him for the rest of his life. Of course, now that his life is actually over, he can't remember what it was. Now you're stuck in the past on a riverboat with a host of ghostly travel companions... and something very dark and very unfriendly who graduated with a Masters in "makin' things go all freaky and whatnot while big mean things flash by the windows". Even once you get off the steamer, things don't start getting any easier for you, and as you travel around the world (and back in history) you just might end up solving a mystery that stretches back to a conspiracy hundreds of years old. Just make sure you strap on your boots so the jump scares don't spook them right off of you.
Devil on the Mississippi doesn't have any alternate modes of difficulty, and the game offers a lot of little visual nudges in the right direction; items you can pick up give off faint little green glowies, places you can use an item you're carrying give off little blue-white glowies when you mouse over them with the object in hand, and while your skeleton cursor unfortunately doesn't have any glowies of its own, it will change to indicate whenever you're over an area transition or place you can interact with. Keep your eyes peeled for four-leaf-clovers, which will unlock a special play mode, and ravens, which are much more important to you at the present time because they're needed to get hints. Click on the raven sitting atop the lantern in the bottom-left corner during regular gameplay and you'll be pointed towards the next step in your current objective, or you can use a hint during a hidden-object scene to find the item of your choice. Don't use a hint right away, however, since just clicking on an item name in your list will cause the corresponding silhouette to appear in the lantern, and might just give you the clue you need to track it down.
 Analysis: At this point, if you're at all familiar with their work, when you hear a game is made by Mumbo Jumbo you probably expect it to be well done, and they definitely don't disappoint here. Beautiful artwork, highly detailed and animated environments, not to mention a fantastic use of atmospheric sound for most of the soundtrack, makes Devil on the Mississippi one of the most highly polished games in the genre. While you might spend the first half of the game more than a little confused as to what's going on and how all the clues and scenes are supposed to tie together, the story actually does a surprisingly good job of doing just that, even if there are times it feels like the game is trying a bit too hard to stealth-educate you about Mark Twain's career and a certain other literary giant.
 Compared to its predecessors, however, the third installment in the Midnight Mysteries series doesn't feel like its quite as tightly designed. There are more mildly irritating fetch quests from characters who feel like they only exist to derail you from the main plot long enough to pad the gameplay a little more, and some of the puzzles are, frankly, a little boring and downright repetitive; one don't-touch-the-walls maze game is repeated four times in a row. Of course, that's not to say it's bad, since I wouldn't be sitting here with you recommending it if it was. Devil on the Mississippi is, in fact, good. Not perfect, but very good nonetheless. The puzzles that are more complicated than the rest are refreshingly challenging because the game doesn't hold your hand, and while the story can be a little hard to follow at first due to a heavy reliance on communicating with the player through found clues, it's actually the sort of grand-scale historical mystery George and Nico probably would have been great at solving.
The game is fairly lengthy at around four-five hours depending on your playstyle, and for once the extras the Collector's Edition come packed with actually feel like welcome bonuses and not pieces the game needed to be coherent. There has clearly been a massive amount of love and effort put into Midnight Mysteries: Devil on the Mississippi, and the end result is a satisfyingly meaty adventure with a lot to see and do and a creative twist on alterna-history and edutainment. It's another creepy, gorgeous romp that will send you travelling through important points in history. In the end, after so many dangerous encounters, otherworldly beasts, and uncontrolled time-travel, I just have one question remaining... when do I get my sonic screwdriver?!
A Collector's Edition of this game is also available. It contains a bonus chapter to play, wallpapers, strategy guide, and more. Remember that Big Fish Game Club Members pay only $13.99 for Collector's Editions (or 2 club credits), and collector's editions count 3 card punches of 6 total needed for a free game.
![]() Windows:
Windows:
Download the demo
Get the full version
Also available: Collector's Edition
![]() Mac OS X:
Mac OS X:
Download the demo
Get the full version
Also available: Collector's Edition


Walkthrough Guide
(Please allow page to fully load for spoiler tags to be functional.)
Midnight Mysteries: Devil on the Mississippi - Walkthrough
General
There is no time limit.
There are two modes in the normal game, three in the Collector Edition of the game.
Story Mode is the game as it.
Unlimited Hidden Object Mode: You will have to find 70 shamrocks, hidden in the scenes, search scenes and close ups to unlock this mode.
The Collector Edition provides an additional Exclusive DemBones Mode where you look in all rooms of Mark Twain's home for 80 bones.
Inside the chapters (and depending on what you already opened) you may go wherever you want.
You will have to interact with characters. They will give you tasks or tell you something to advance the story.
To comine two objects, use the two boxes at the right end of your inventory.
Drag the objects in the boxes and press the plus symbol - a correctly combined object will go back into your inventory.
If the objects in the box are not correct, you will see a flame and the single pieces will go back into your inventory.
The raven in the low right corner is your hint.
You will find additional ravens in the scenes, in search scenes and close ups.
The hint can be used inside and outside search scenes. It will show you an object, tell you where to go or what to do next.
Ravens and shamrocks are not part of the search list when they are hidden in a search scene.
If you click inside search scenes to fast a cat will replace the raven for a moment. You can use the hint as soon as the cat leaves and the raven comes back.
There is a "Goals" button at your inventory bar - use it when you are unsure about your current task.
Puzzles can be skipped after waiting a short time.
There is a journal in the low left corner. It will keep track of all events and collect notes, important clues and newspaper scratches for you. You can also find all conversations there in case you want to look up what was said.
Except for inventory objects, all items in the search scenes are random.
There are 15 achievement in the normal version, 16 in the Collector Edition you can earn. To get all achievements you will have to play all modes of the game.
Chapter 1 - Midnight Mysteries Study
1. Midnight Mysteries Study
You will need to follow the tutorial, there is no way to skip it.
Play the search scene - the key will go into your inventory.
To find the raven, open the door to the balcony.
Find the shamrock in the frame top right.
You will be sent automatically to Chapter 2.
Chapter 2 - Board the Boat
2. At the River
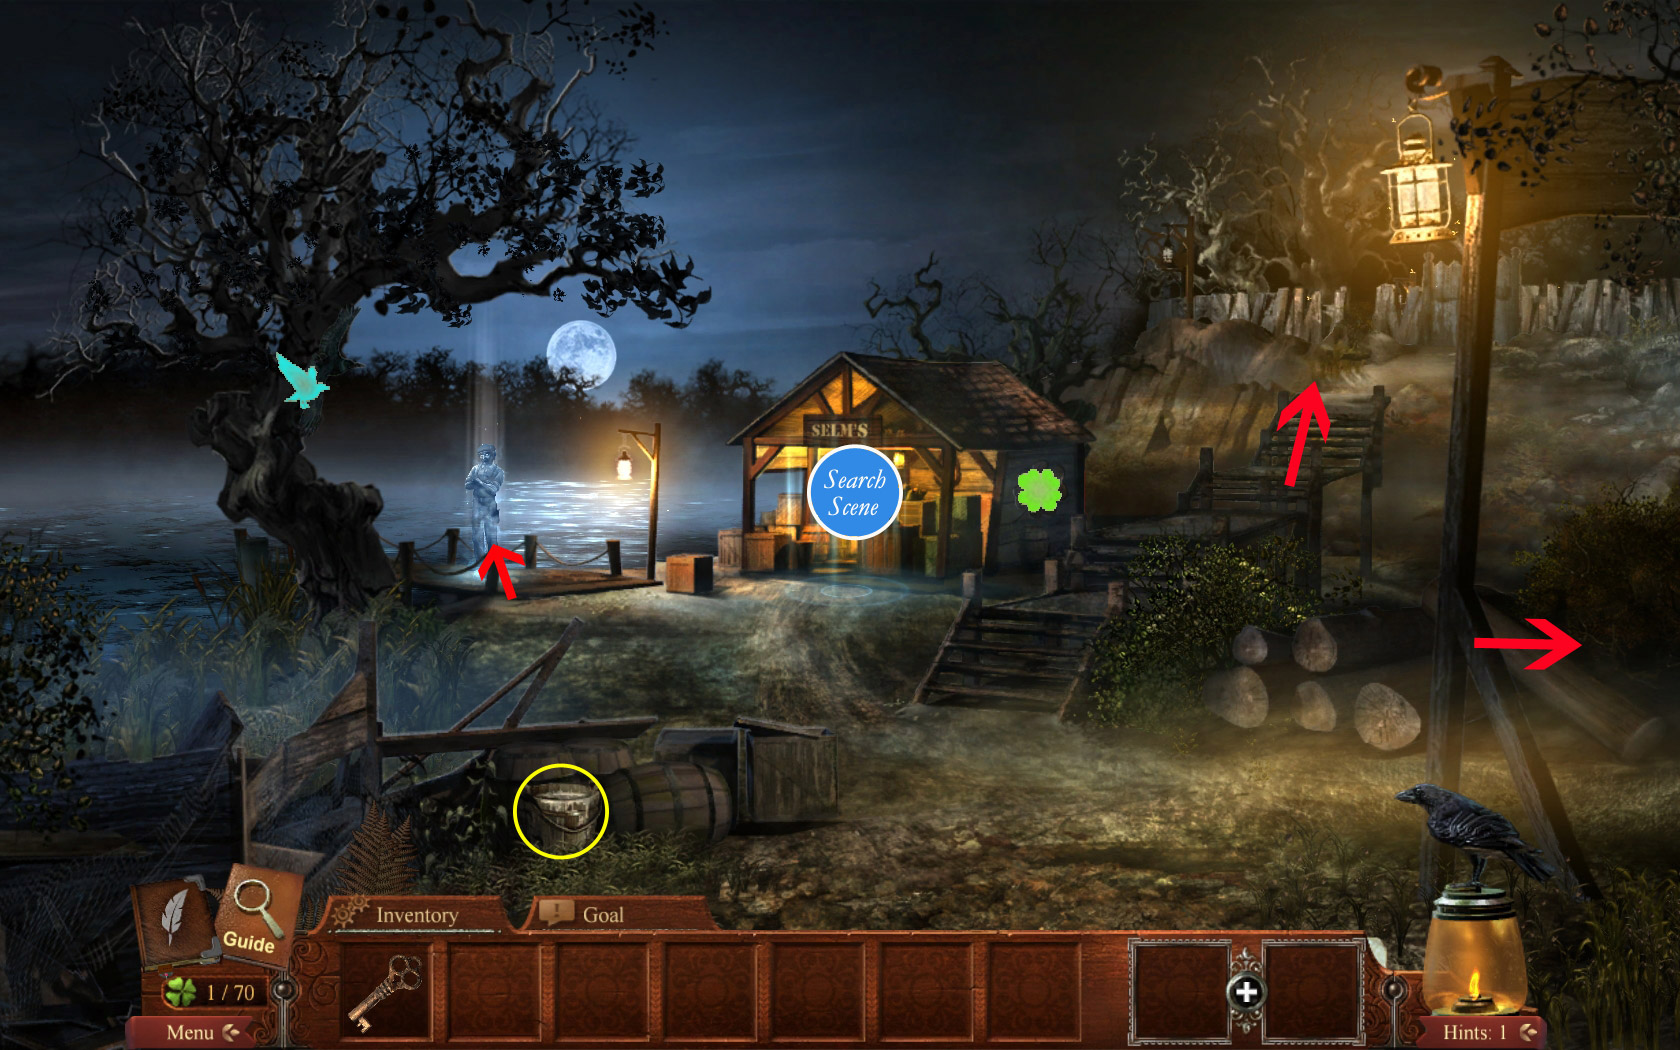
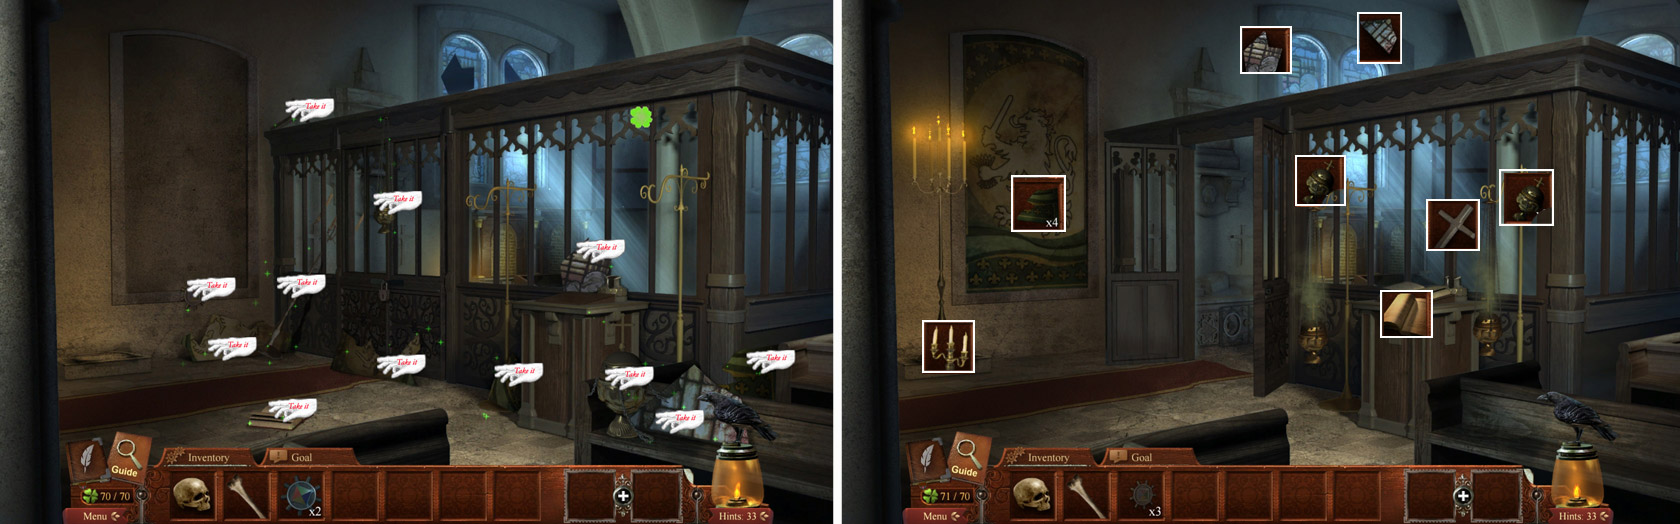
Take the raven from the tree on the left and the shamrock from the wall of the shed in the far middle.
Take the paint bucket on the low left.
Zoom in on the shed and play the search scene.
There are two shamrocks on top right and one on the back wall.
The measuring rope and the scythe will go into your inventory.
Screenshot
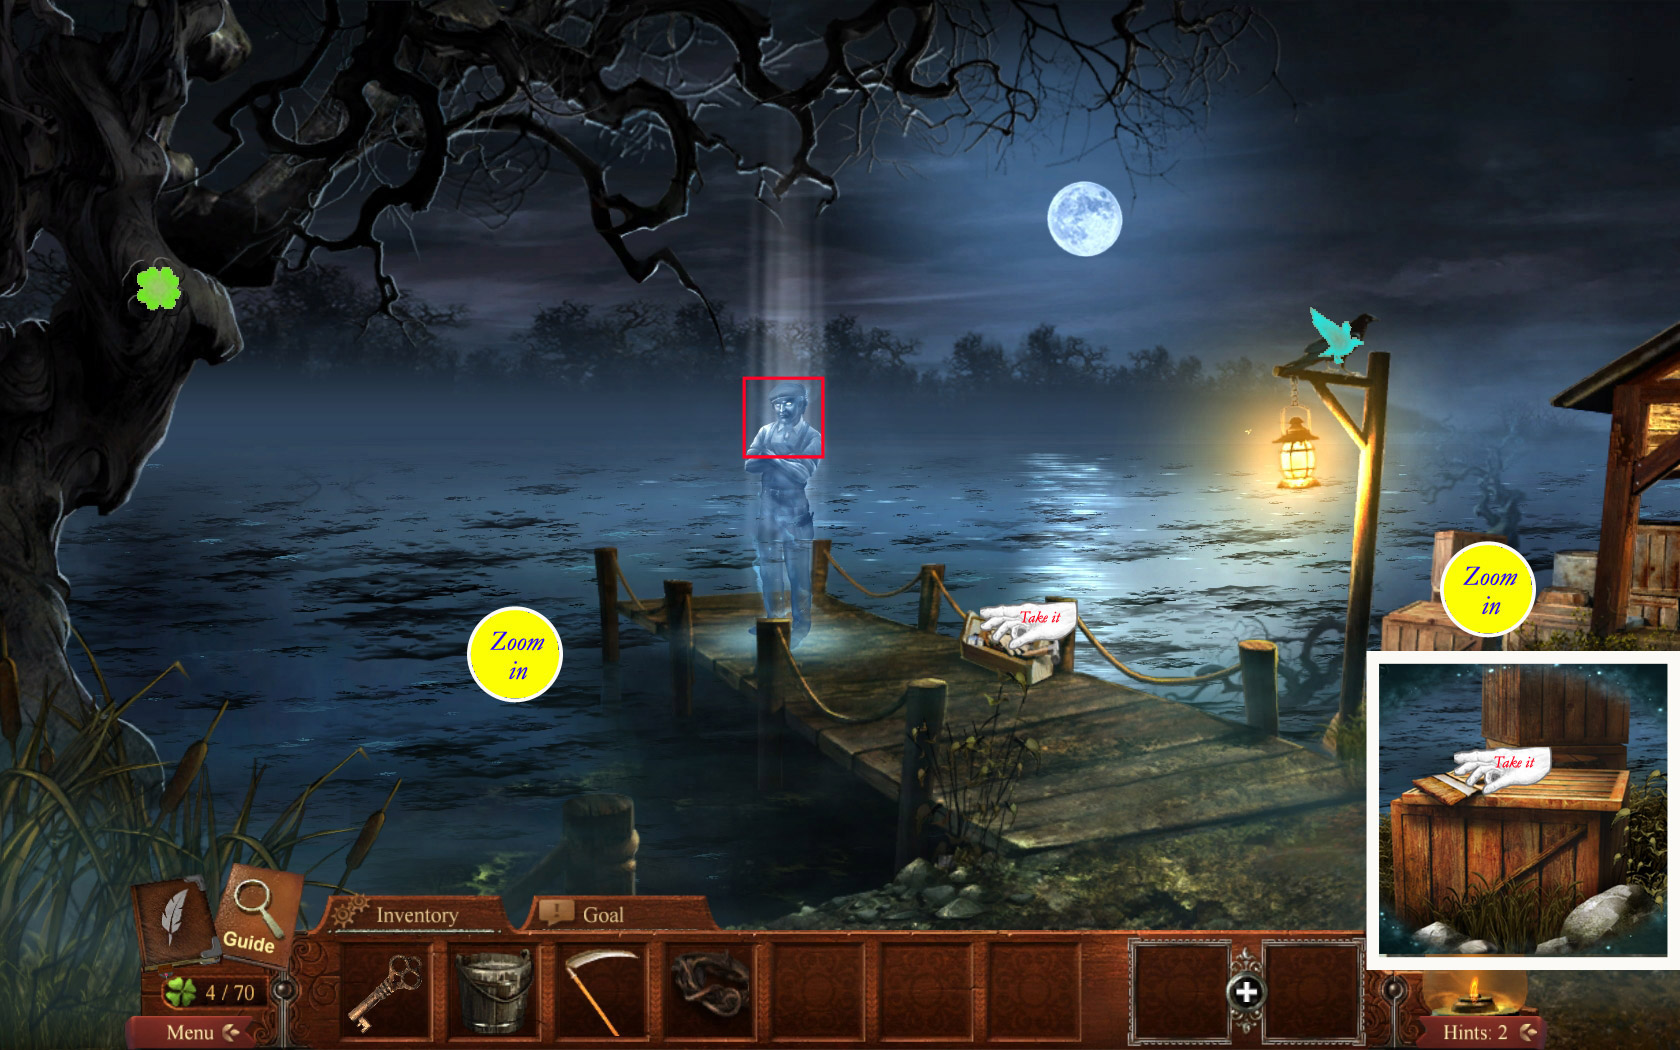
Go to the landing stage where the ghost is visible.
Take the shamrock (5/70) from the tree on the left and the raven from the lantern post on the right side
Zoom in on the crates on the right and take the paintbrush; combine the paintbrush and paint bucket inside the inventory to get paint bucket with brush.
Hand over the measuring rope to the ghost and wait until you see something rising out of the water on the left side.
Zoom in on this part to access a mini game.
Remove the wooden logs in the right order - some of the logs are stuck to others.
You can try as often as you want.
Click a log to remove. If it is free, it will slide out of the scene.
The Mississippi Boat will appear and the ghost will give you the book The Adventures of Tom Sawyer.
Screenshot
Another ghost appears; click him to learn that you will need a ticket to go on board.
Step back and go to the right.
3. Road Crossing
Take the raven on the right and the shamrock in the grass, lower middle of the scene.
Use the scythe (Spoiler 2) with the grass covering the skeleton on the right path.
Zoom in on the skeleton and take the dull knife.
Screenshot
Step back once and go up the stairs.
4. Fence/Graveyard
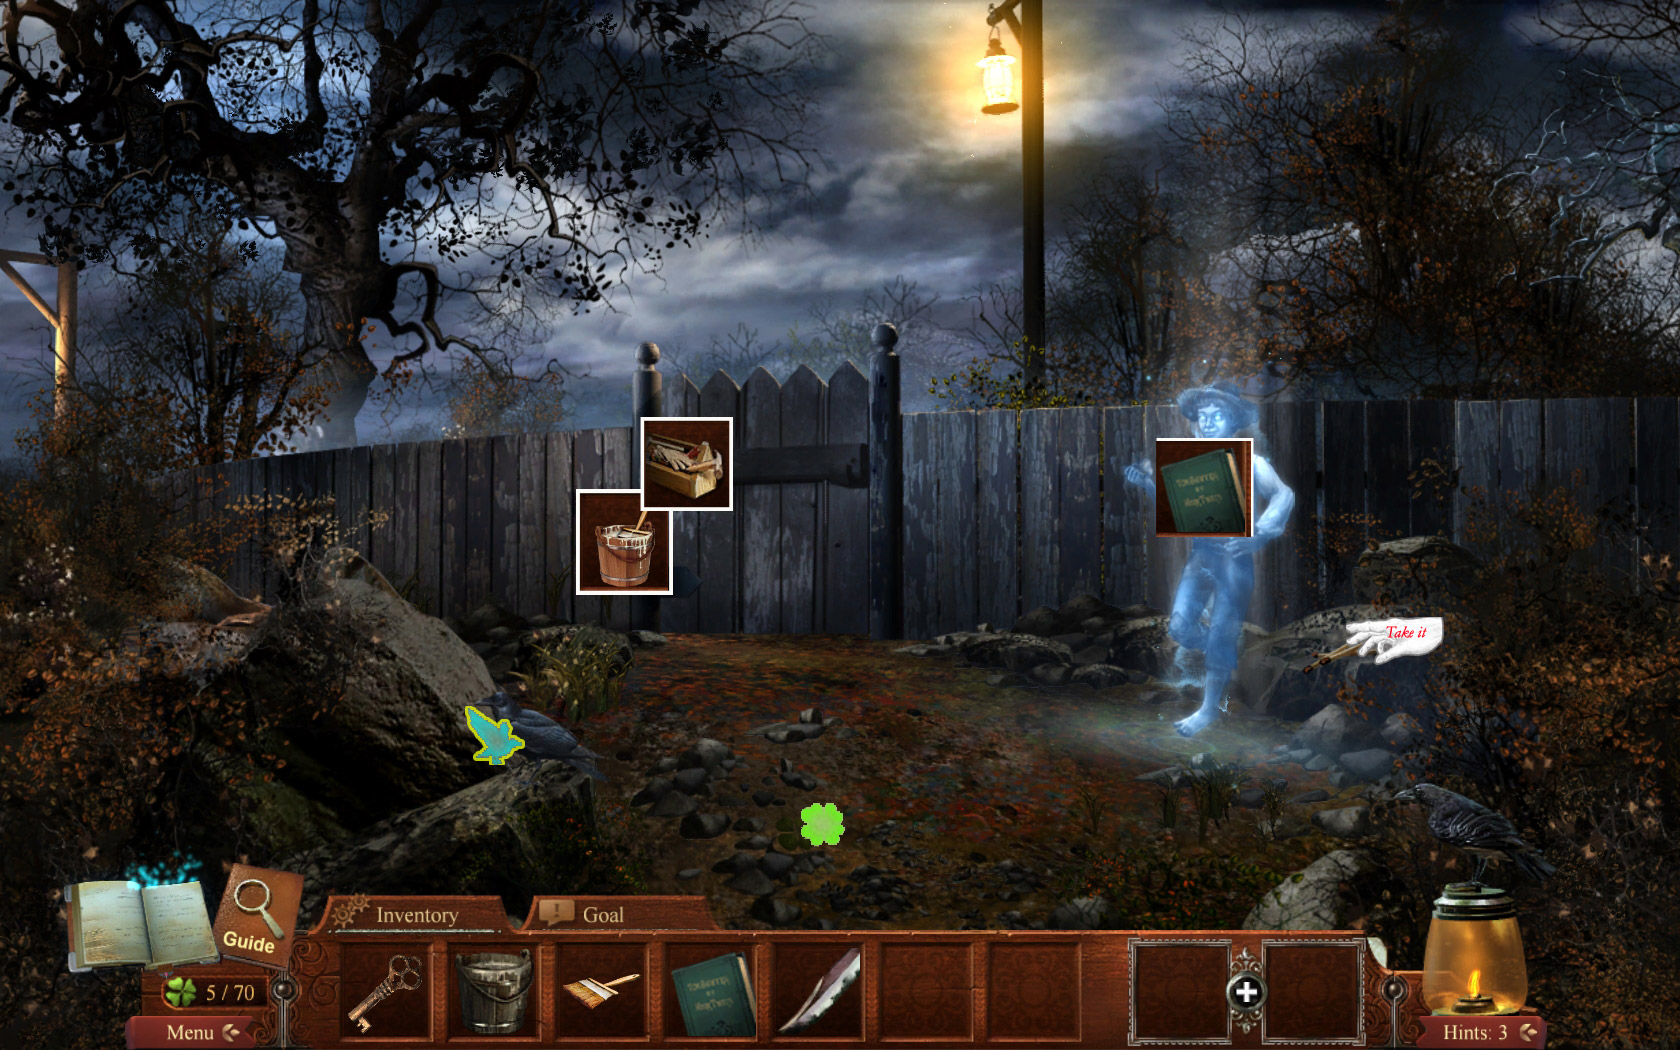
Take the raven on the right side on the stone and the shamrock from the path, low middle.
Use the toolbox (Spoiler 2) to repair the fence.
The ghost of Tom Sawyer will appear; give him the book (Spoiler 2).
Take the matches from the stone behind Tom.
Use the paint bucket with brush (Whitewash, Spoiler 2) on the fence. Tom will disappear and the gate to the graveyard open.
Screenshot
Go through the gate.
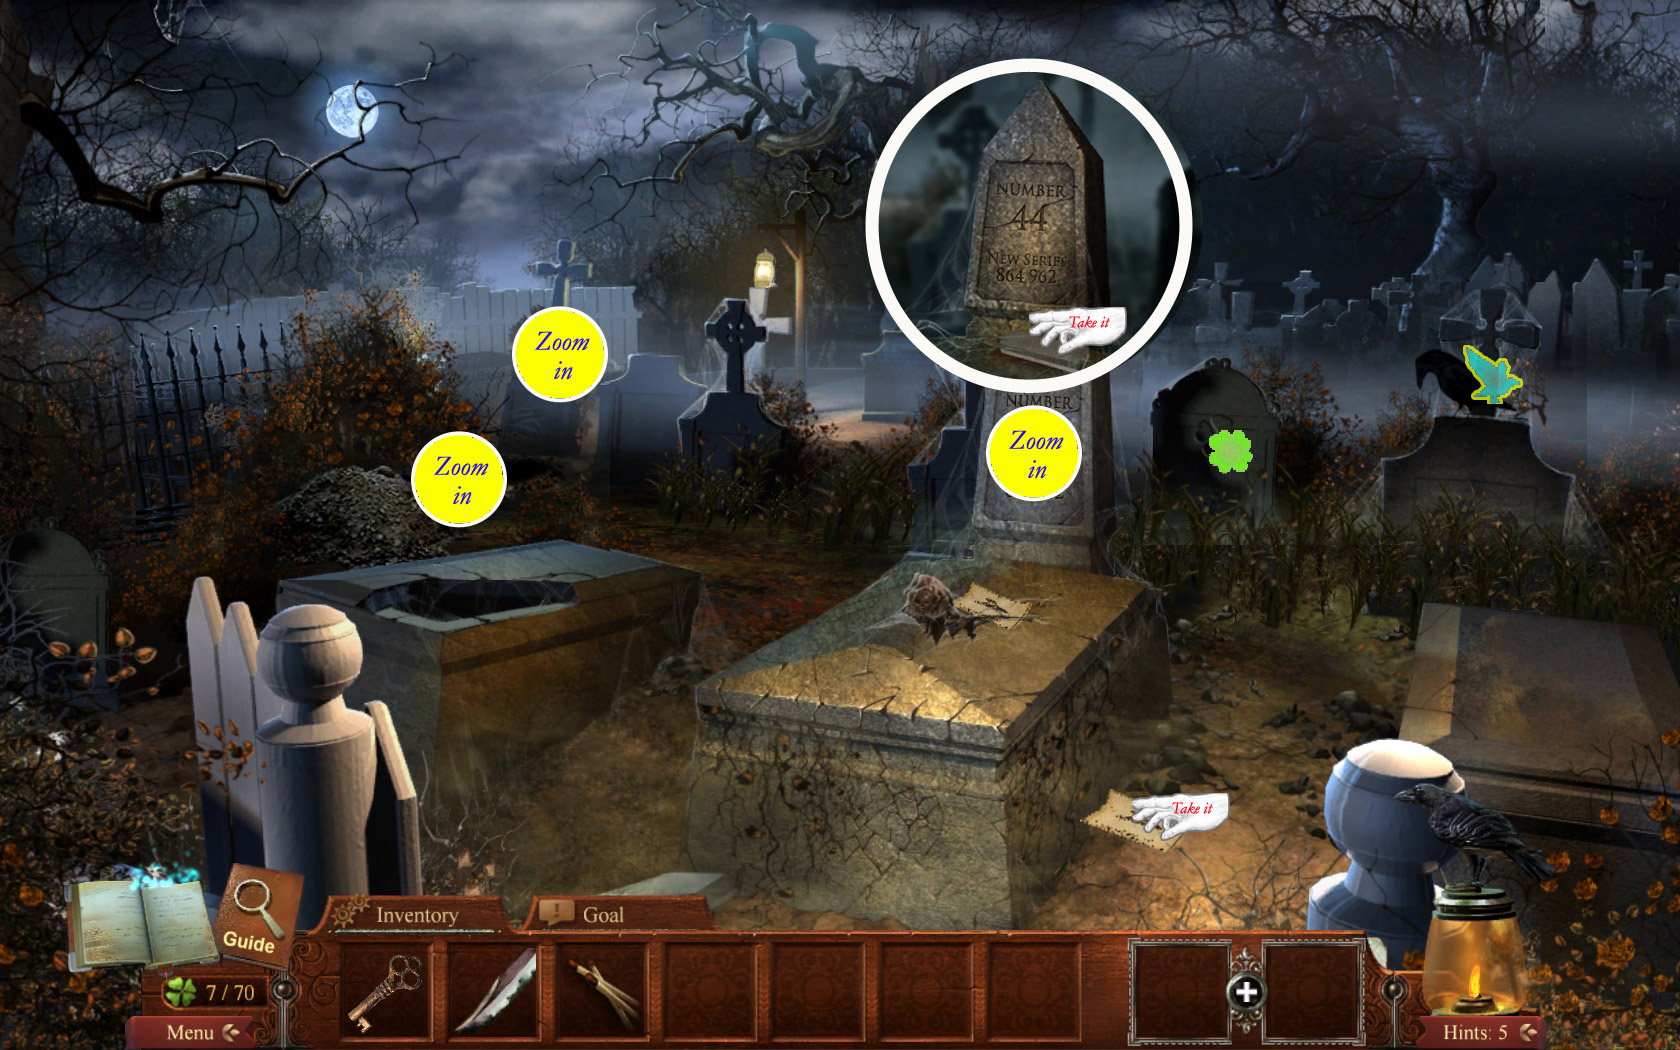
Take the shamrock (8/70) and the raven from the gravestones on the right side.
Click on the note on the gravestone at the bottom.
Take the note after the cutscene from the ground on the right, next to the grave. It is your ticket for the boat.
Return to the Landing Stage.
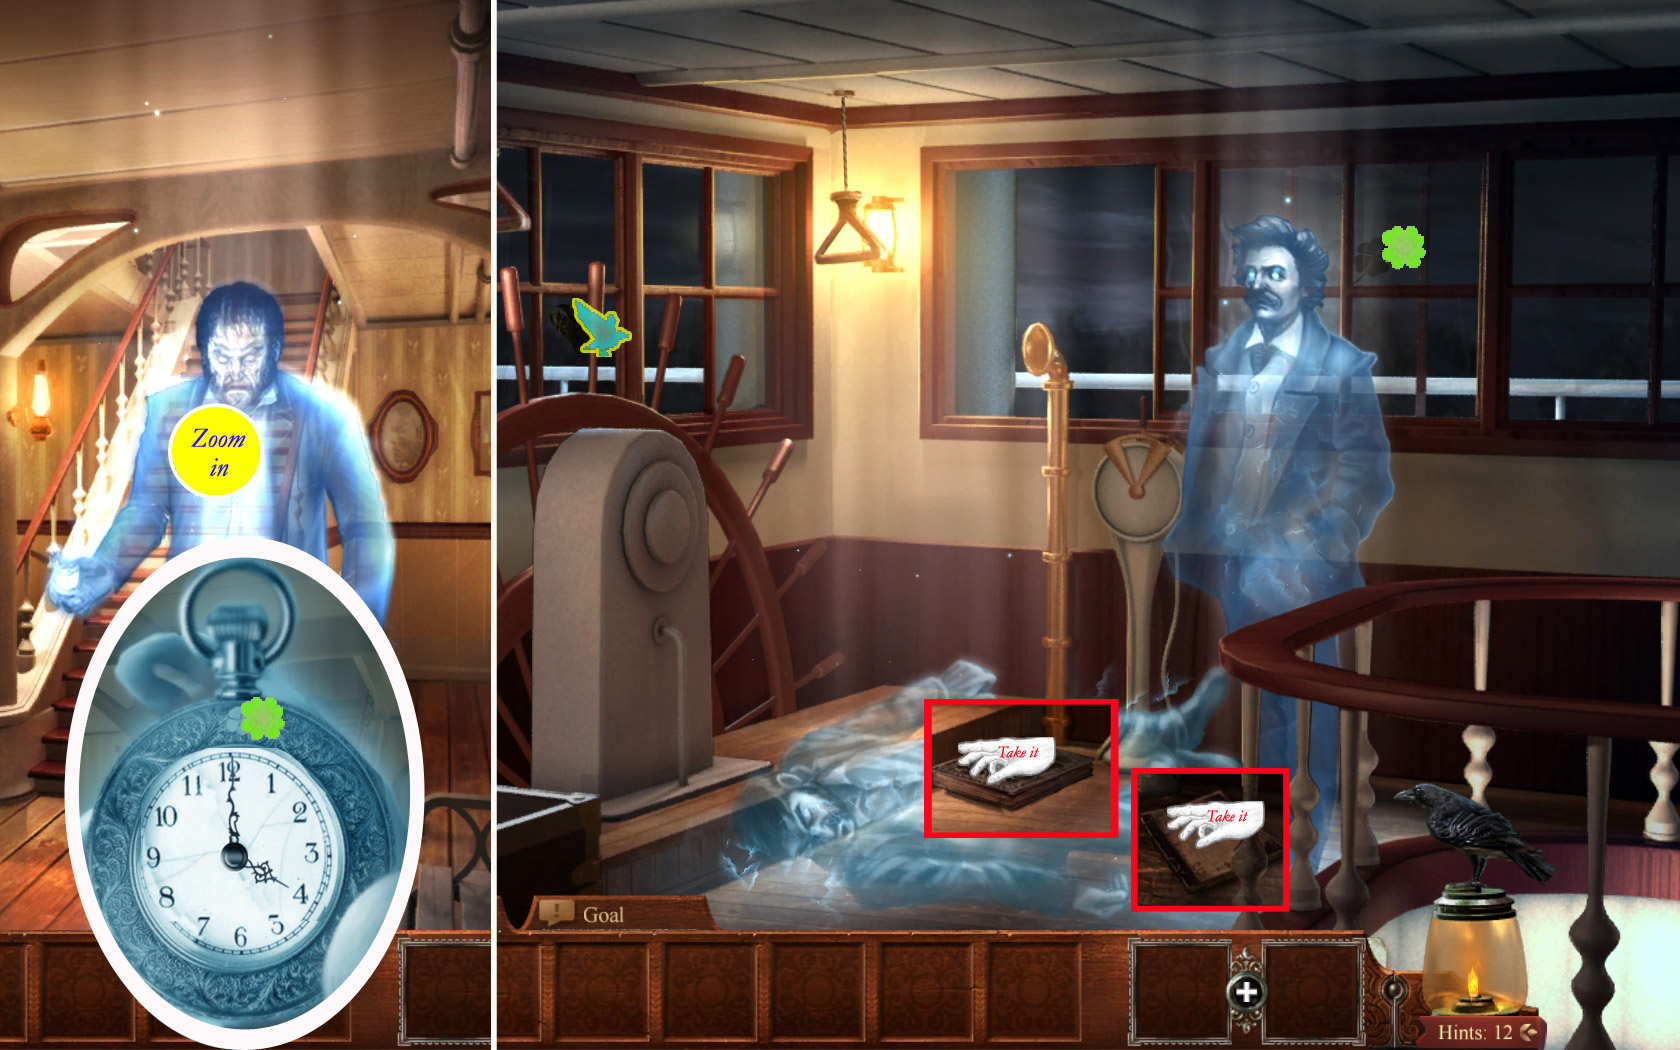
5. Boat/Main Cabin
Give the ticket (Spoiler 4) to Captain Klinefelder and enter the boat through the door on the left, next to the lower windows.
Use the matches (Spoiler 4) to light the chandelier.
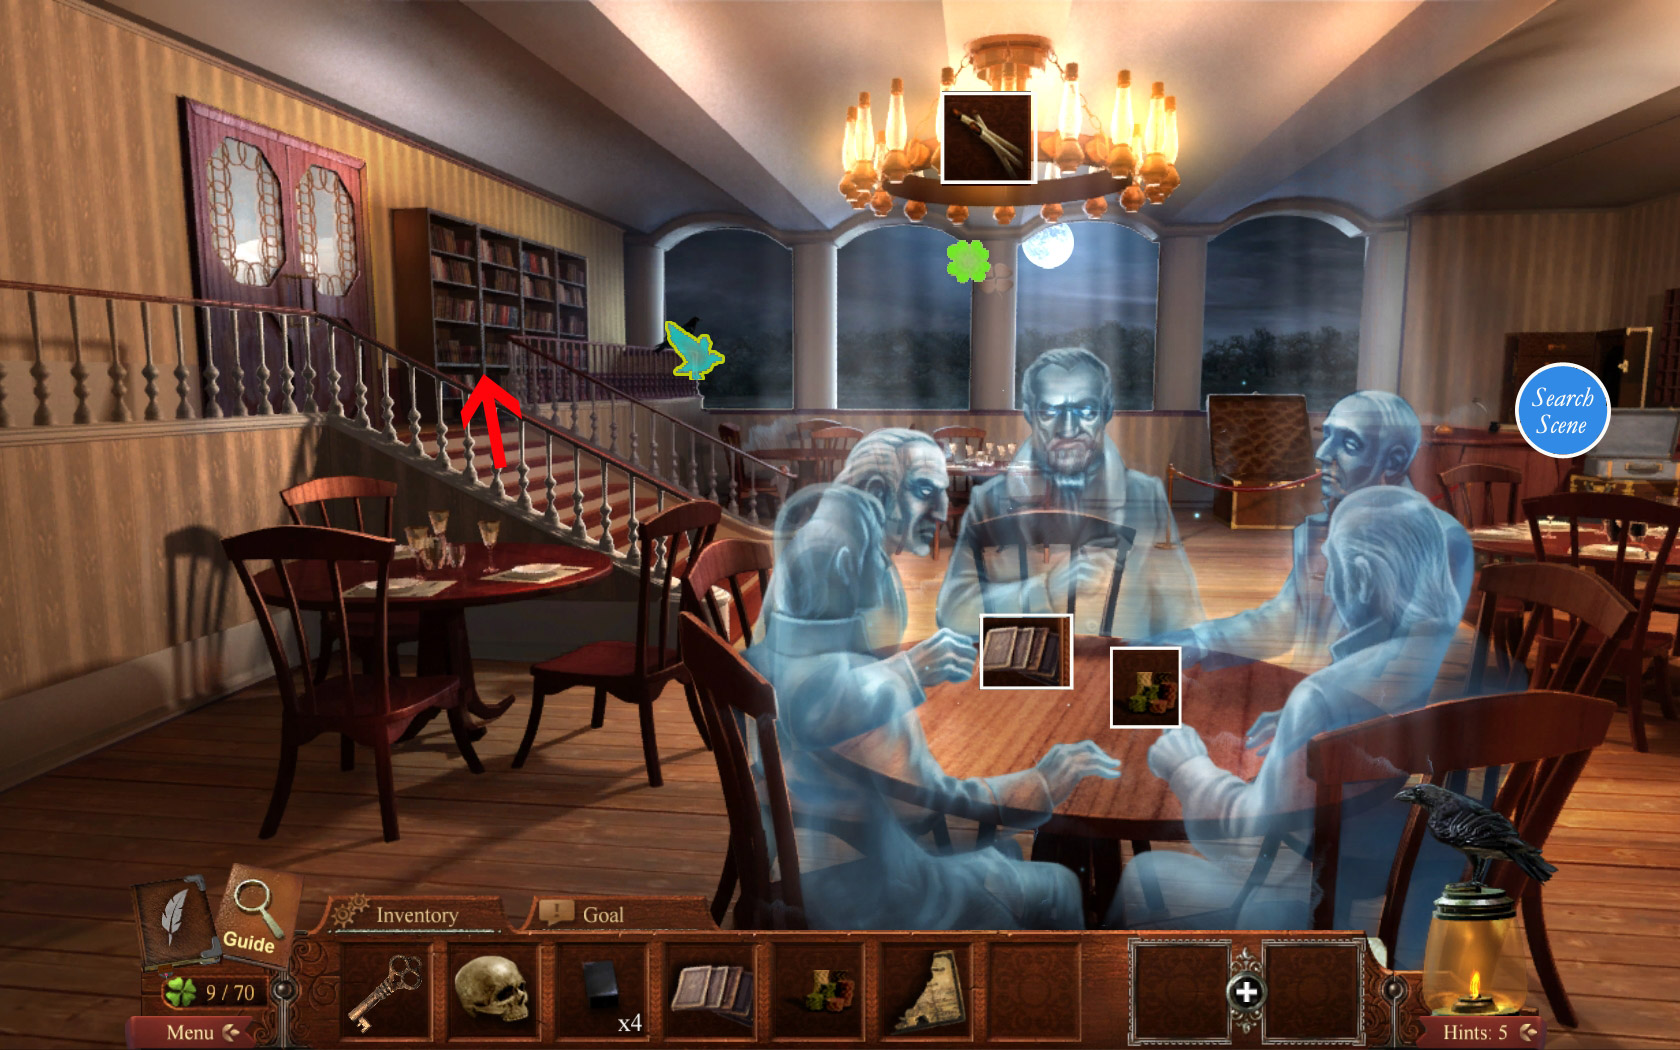
Take the raven (far left next to the windows) and the shamrock (middle column between the windows).
Click the table at the bottom of the scene.
Zoom in on the search scene at the bar on the far right.
The search scene contains 2 shamrocks
To find all objects, you will need to open the chest low right and one of the drawers of the file cabinet far right. You will get a piece of a license, poker chips and playing cards.
Place the poker chips and the playing cards on the table.
Talk with the ghost in the middle.
You will get the book "William Shakespeare: As you like".
Screenshot
Go to the bookshelf on the far left.
Take the shamrock from the wall low left next to the door and the raven from the banister on the right side.
Zoom in on the shelf - an empty shelf will open.
Place the book there and see other books appearing; note the titles.
Take the ivory inlay.
Screenshot
Return to the Graveyard.
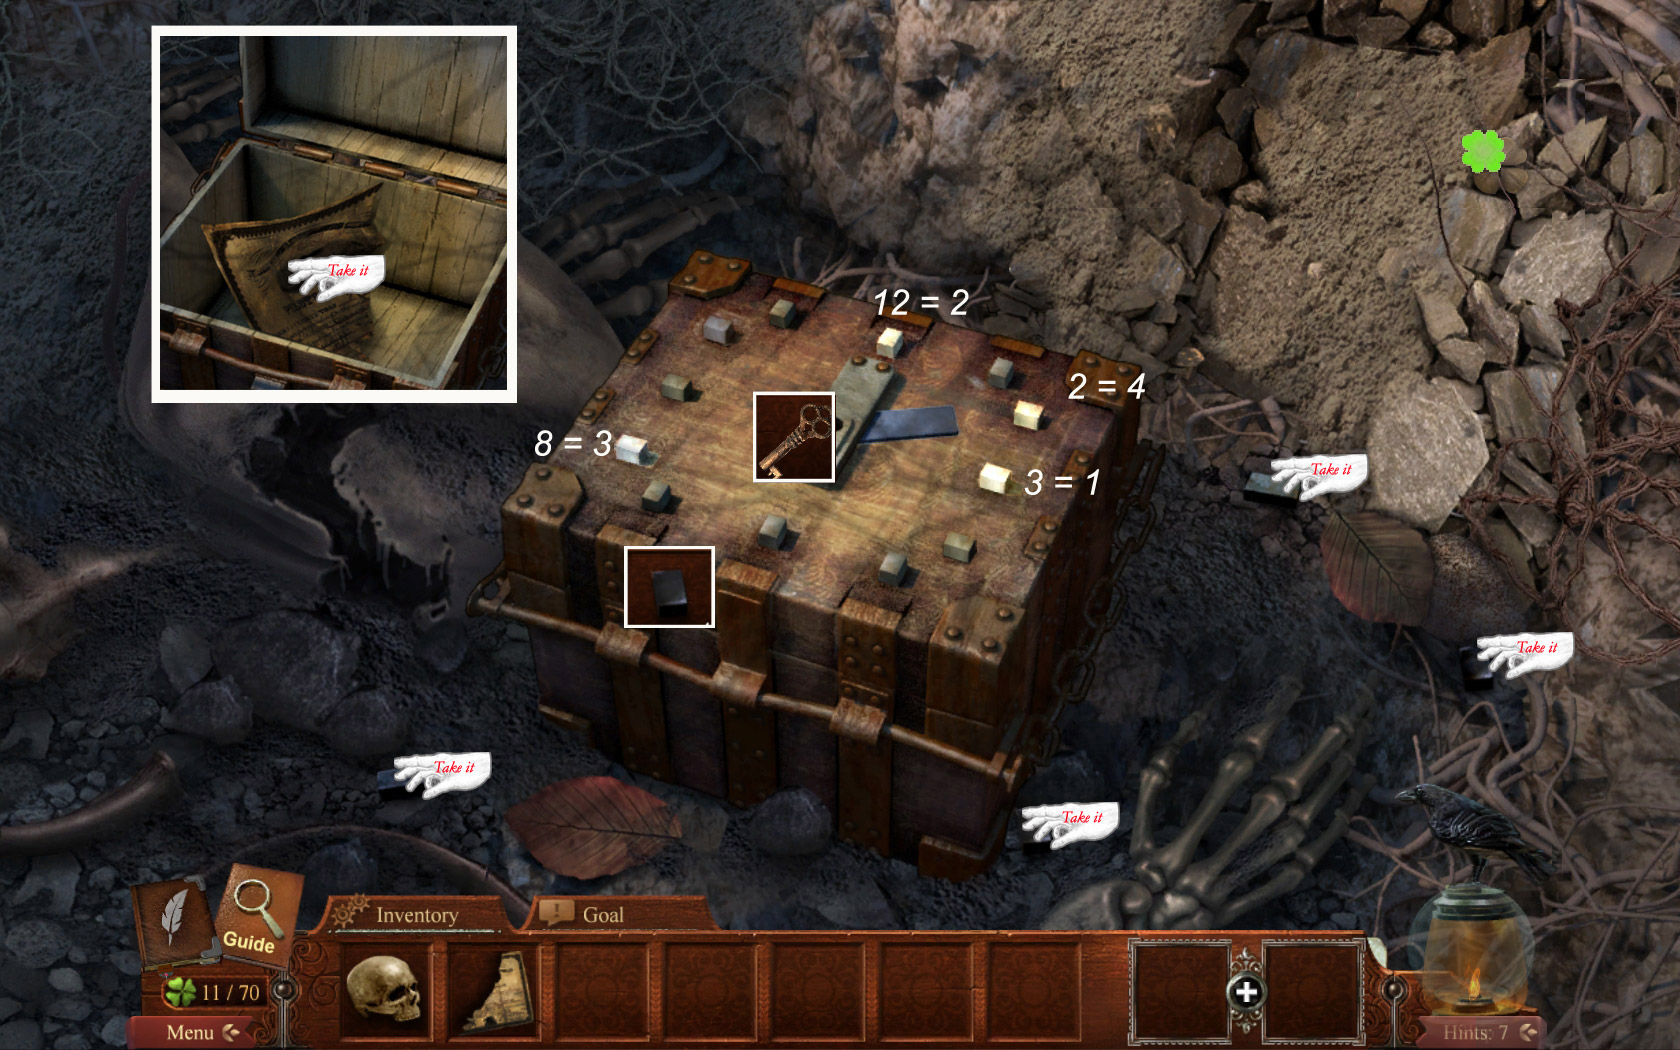
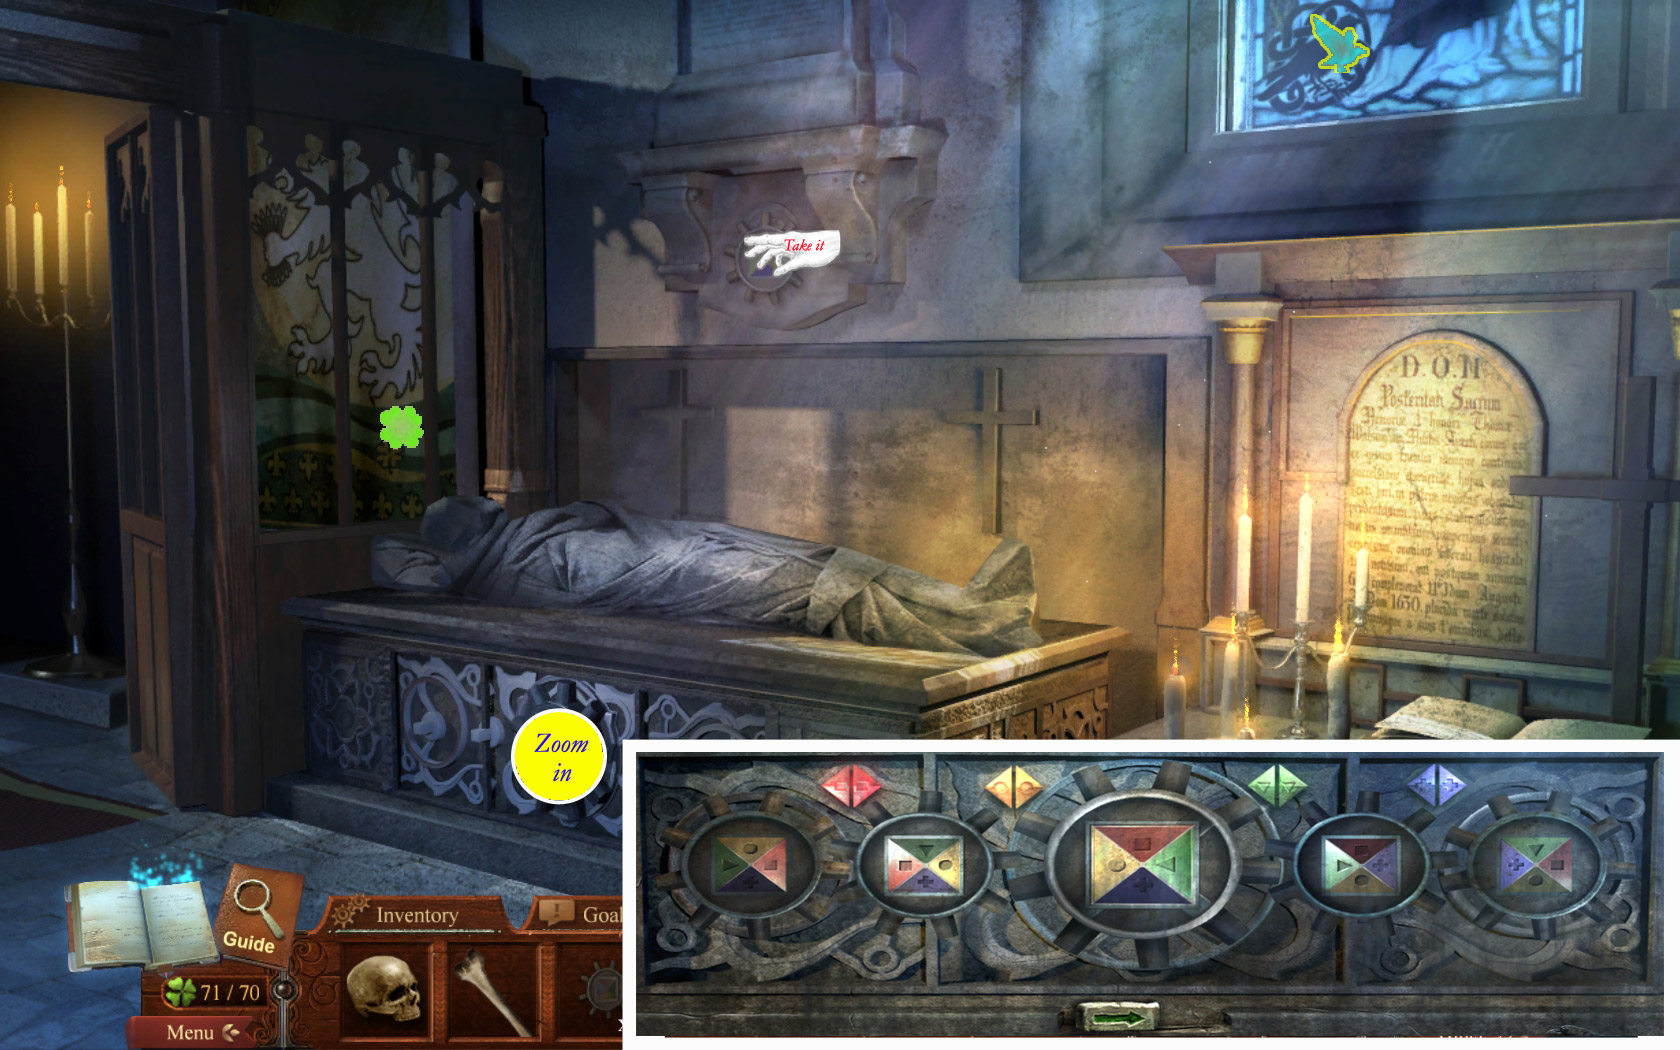
6. Graveyard (Box-Puzzle)
Zoom in on the gravestone in the front and take the whetstone.
Combine the whetstone and dull knife (Spoiler 3) to get a sharp knife.
Zoom in on the gravestone on the far left. The ghost of Joe will appear.
Give him the sharp knife and he will give you the skull of Yorick.
Click the grave - the ghost of John Clement appears; talk with him.
Zoom in on his open grave.
Screenshot
Take the four ivory inlays and the shamrock (back wall)
Place all five inlays into the empty slots of the box.
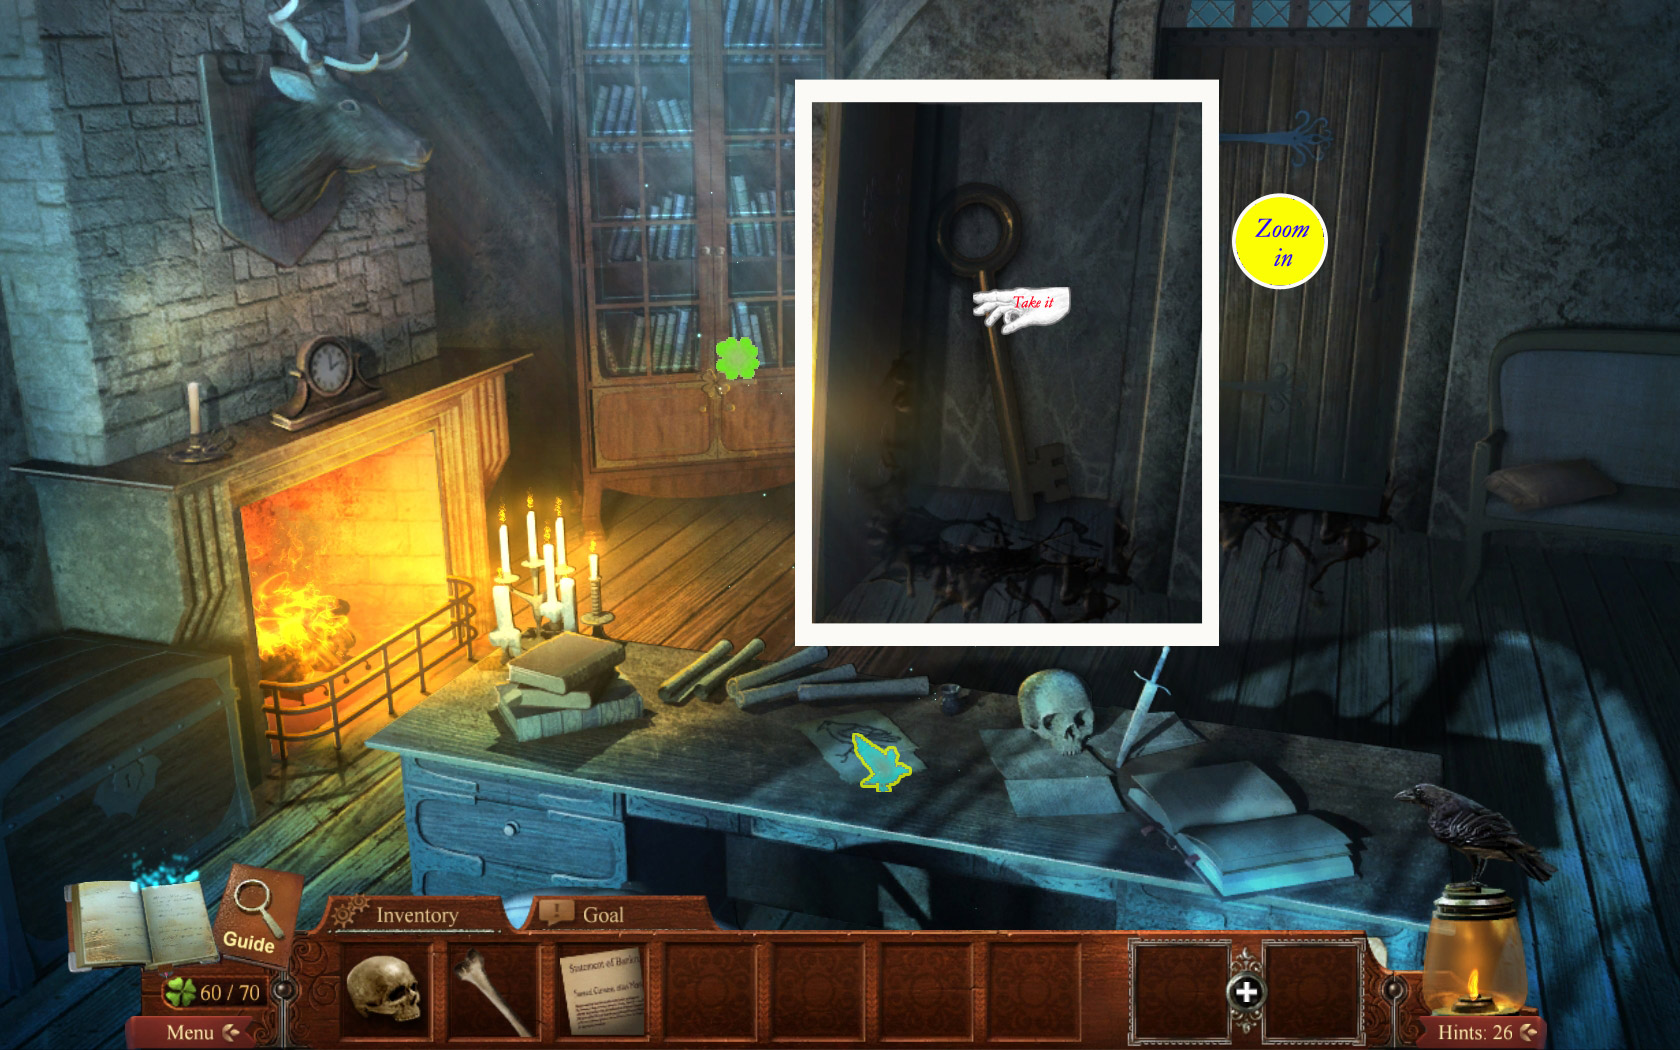
Use the key (Spoiler 1) and the keyhole. A metal slide appears.
Note that the inlays are arranged like a clock face.
Remember the book titles from the sitting room, some of them had numbers in their names.
Move the metal slide to the inlays representing the numbers in the book title from top to bottom.
The right inlay will light up.
Your journal keeps a picture of the books.
Richard III (3), Twelfth Night (12), Henry VIII (8), The Two Gentlemen of Verona (2).
The lid opens; take the piece of a license.
Combine the two pieces (Spoiler 5 and here) to get a Pilot's License.
Screenshot
Return to the Main Cabin and try to go through the door on the left.
Chapter 3: Help Recall My Dire Premonition
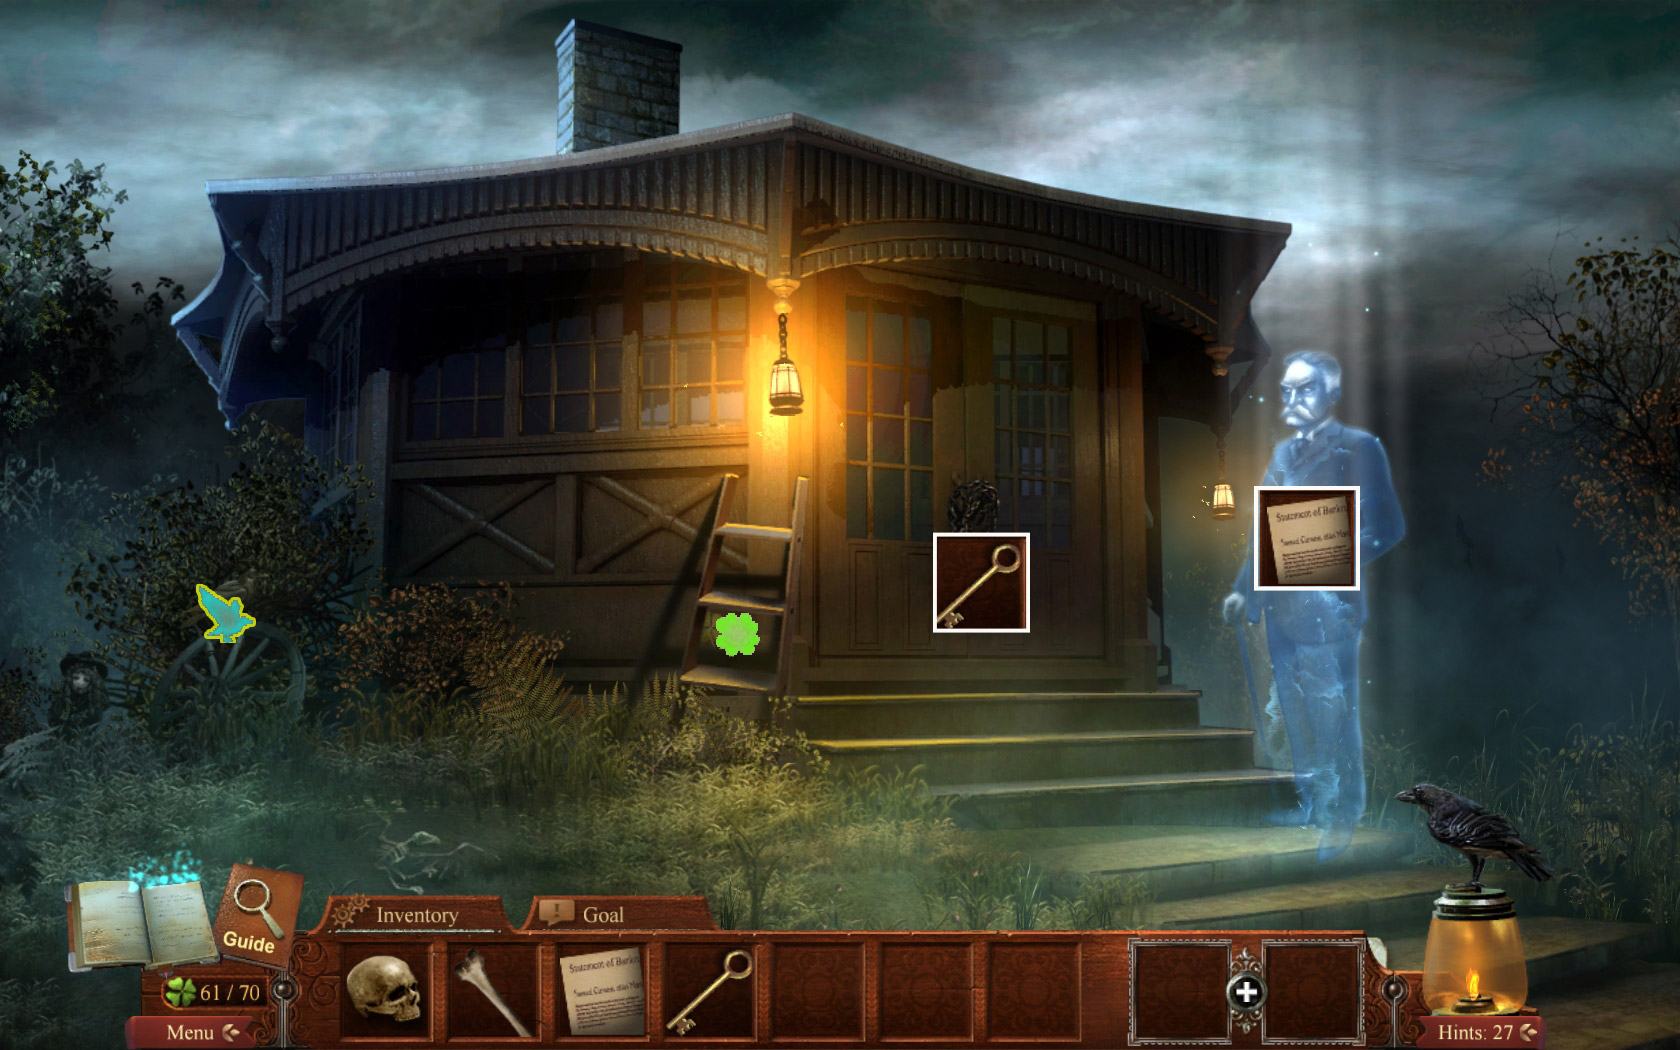
7. Get the key for the Cabin, right side
Hand over your license (Spoiler 6) to the ghost on the stairs and go through the door.
Talk with Mark Twain and return to the Main Cabin.
Click the table on the left with the female ghosts.
They will disappear and leave behind a bell clapper on the floor. Take it.
Zoom in on the bartender on the far right.
Take the shamrock and click the ghost to receive a key.
Screenshot
Return to the quarters hall.
Take the crowbar on the far right, the bell on the bench left side, the raven (above the pictures on the far right) and the shamrock (low left side of the stairs).
Combine bell and bell clapper to get a complete bell.
Use the key from the bartender on the door to your right and enter the crew quarters.
Screenshot
8. Crew Quarters/Pilot's Quarters
Take the gauge housing from the shelf on the left, the raven (right side on the pillows) and the shamrock (wall on the left).
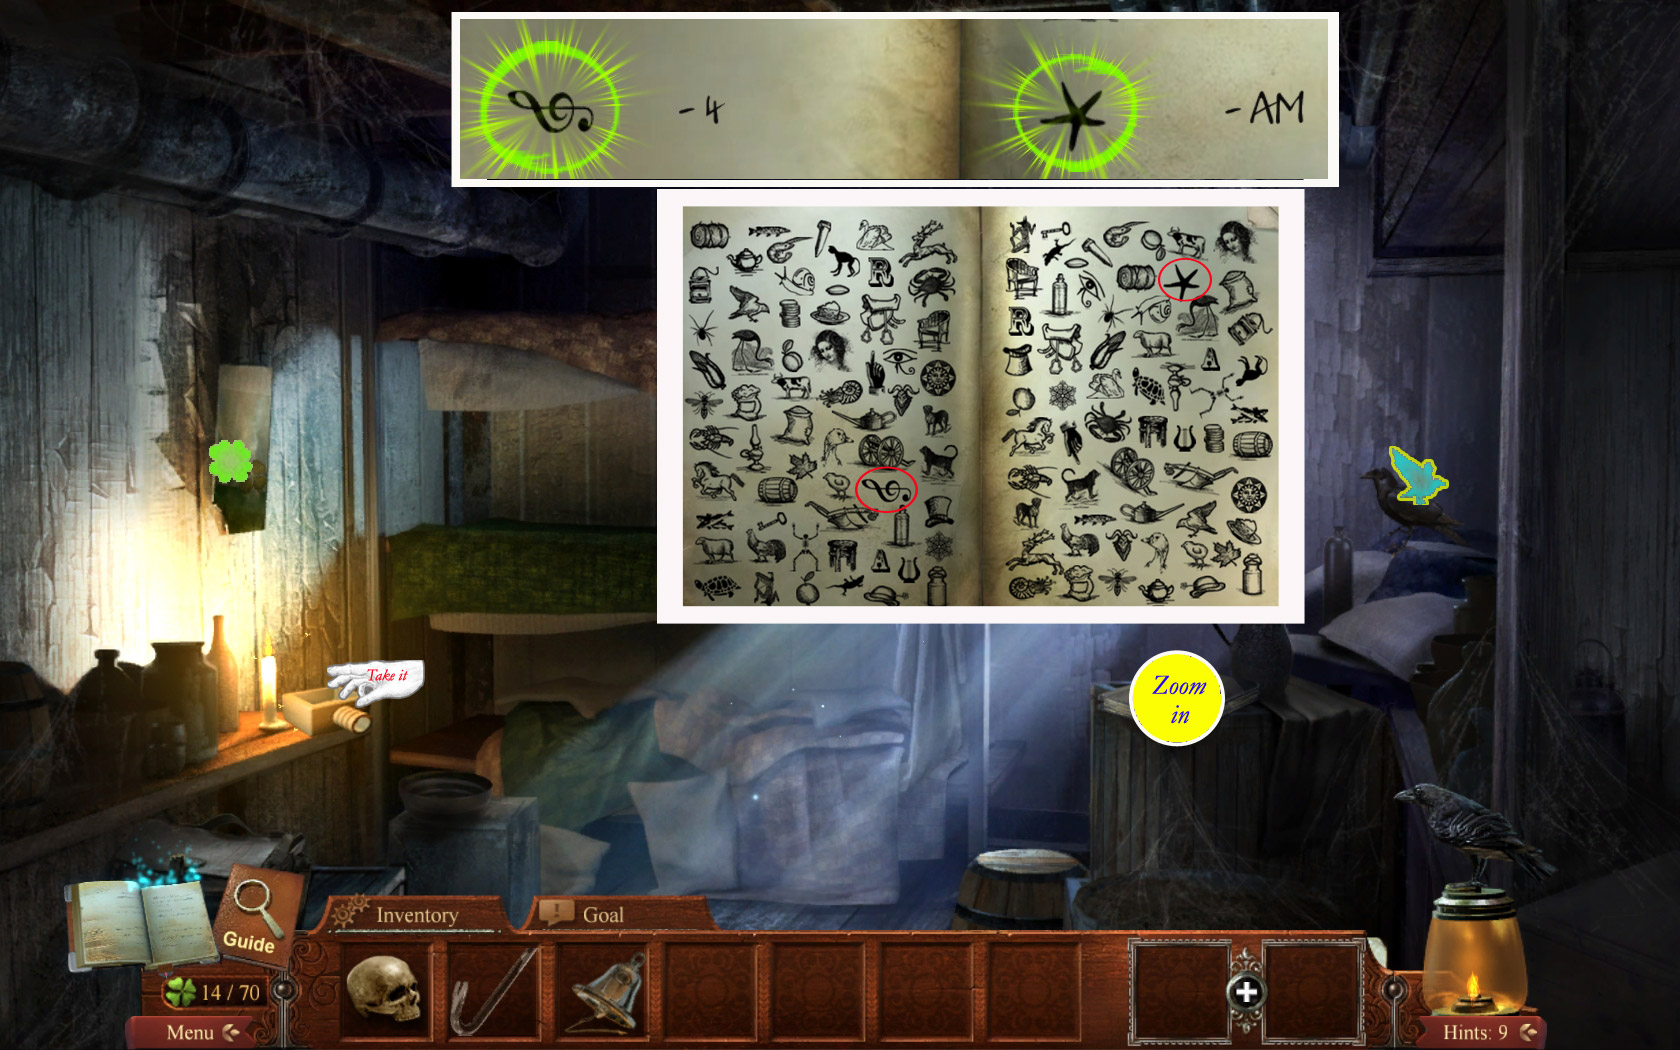
Zoom in on the book on the barrel below the window.
All items on the left do have a match on the left, except the treble clef.
On the right side a starfish will not find its match with the objects on the right side.
Find all matching pairs.
The starfish and the treble clef do have a special code which is 4 am; you may keep this in mind.
Screenshot
Talk with the ghost of Henry Clemens afterwards to obtain a key.
Leave the crew quarters and use the key on the door on the left side.
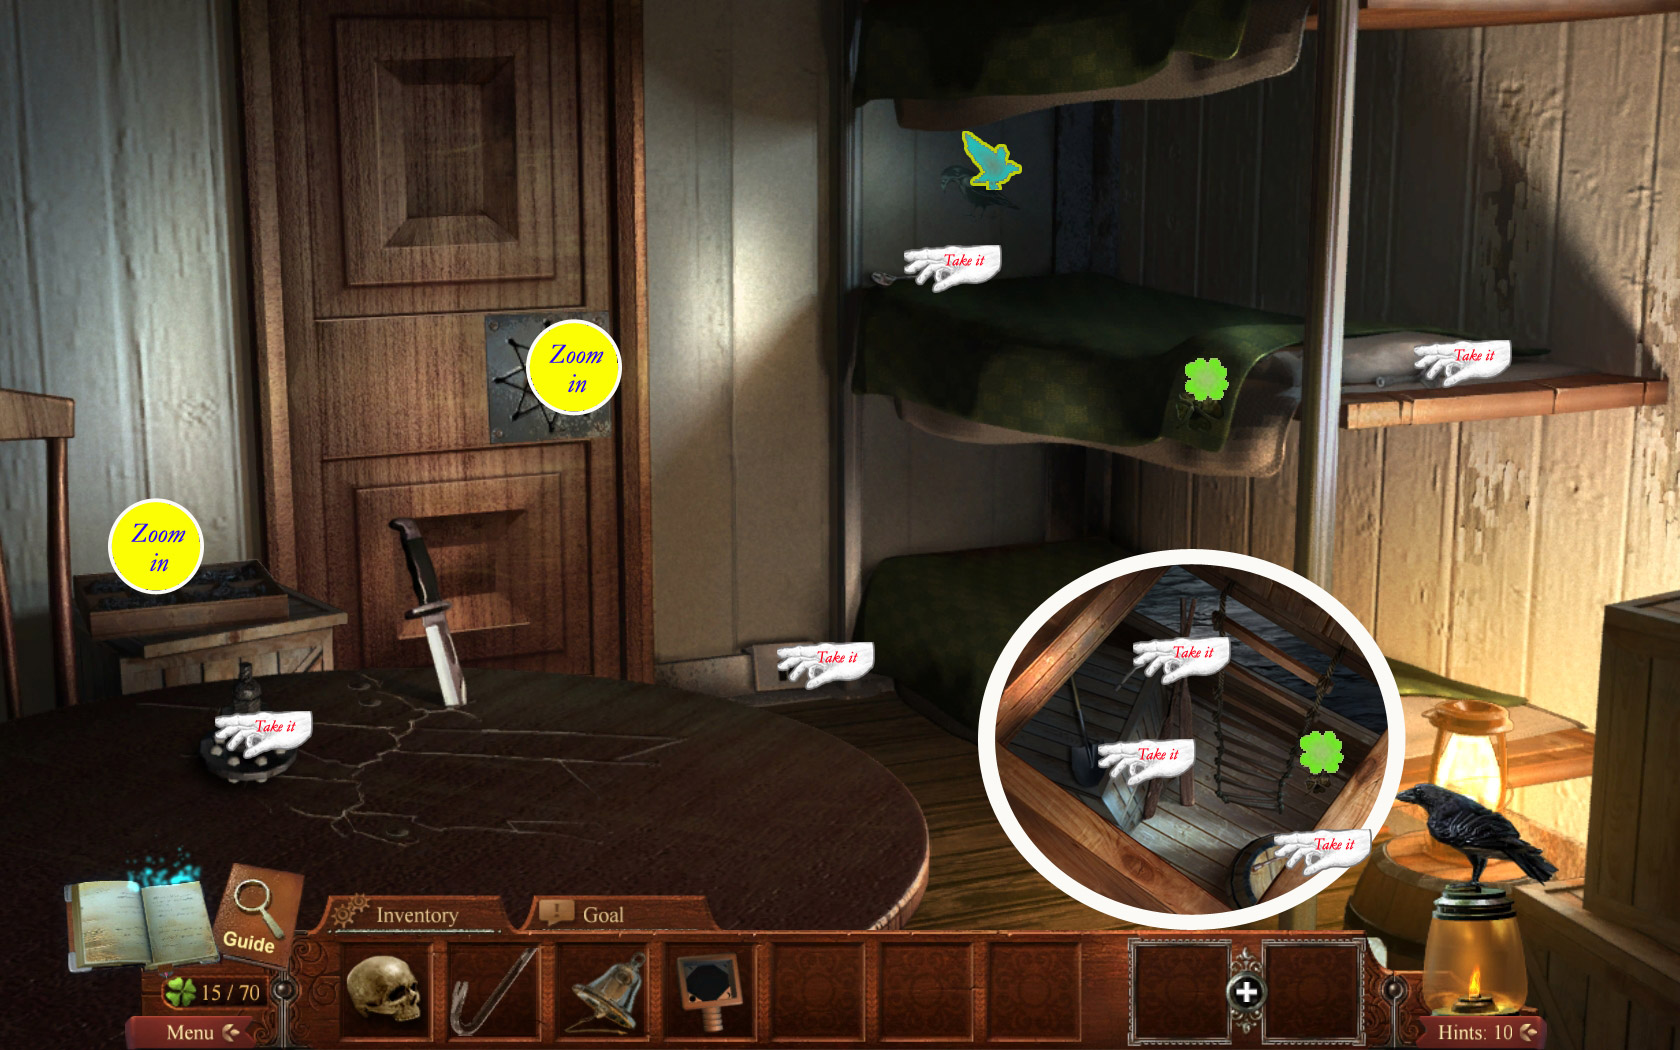
Enter the pilot's quarters on the left.
Take the steam valve on the table low left, the switch on the floor right next to the door, the two keys on the upper bed (left and right), the shamrock at the front side of the upper mattress and the raven at the wall on the left side of the upper bed.
Click the lower bed on the right side and open then now visible hatch with the crowbar (Spoiler 7).
Zoom in on the hatch and take the shovel, the two keys and the shamrock.
Screenshot
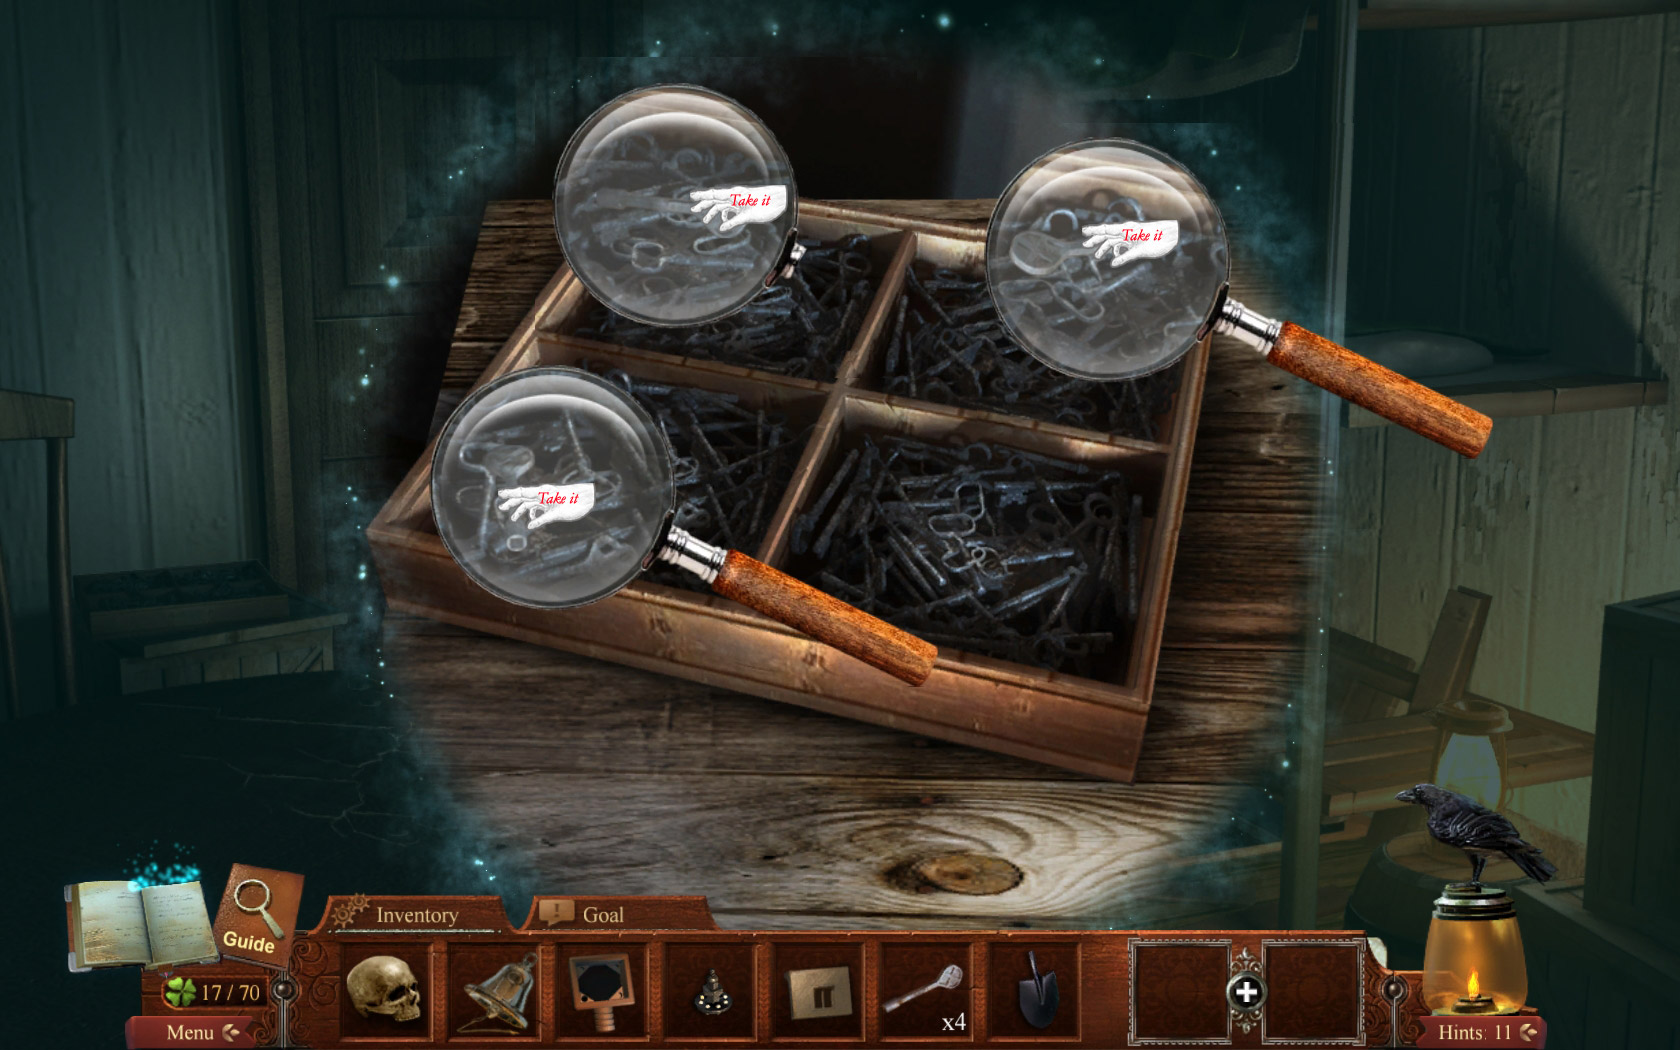
Zoom in on the box with nails left next to the door.
Inside the box are three keys to find.
Use the magnifier to hover over the compartments and click when you see a key.
Screenshot
Zoom in on the star on the door.
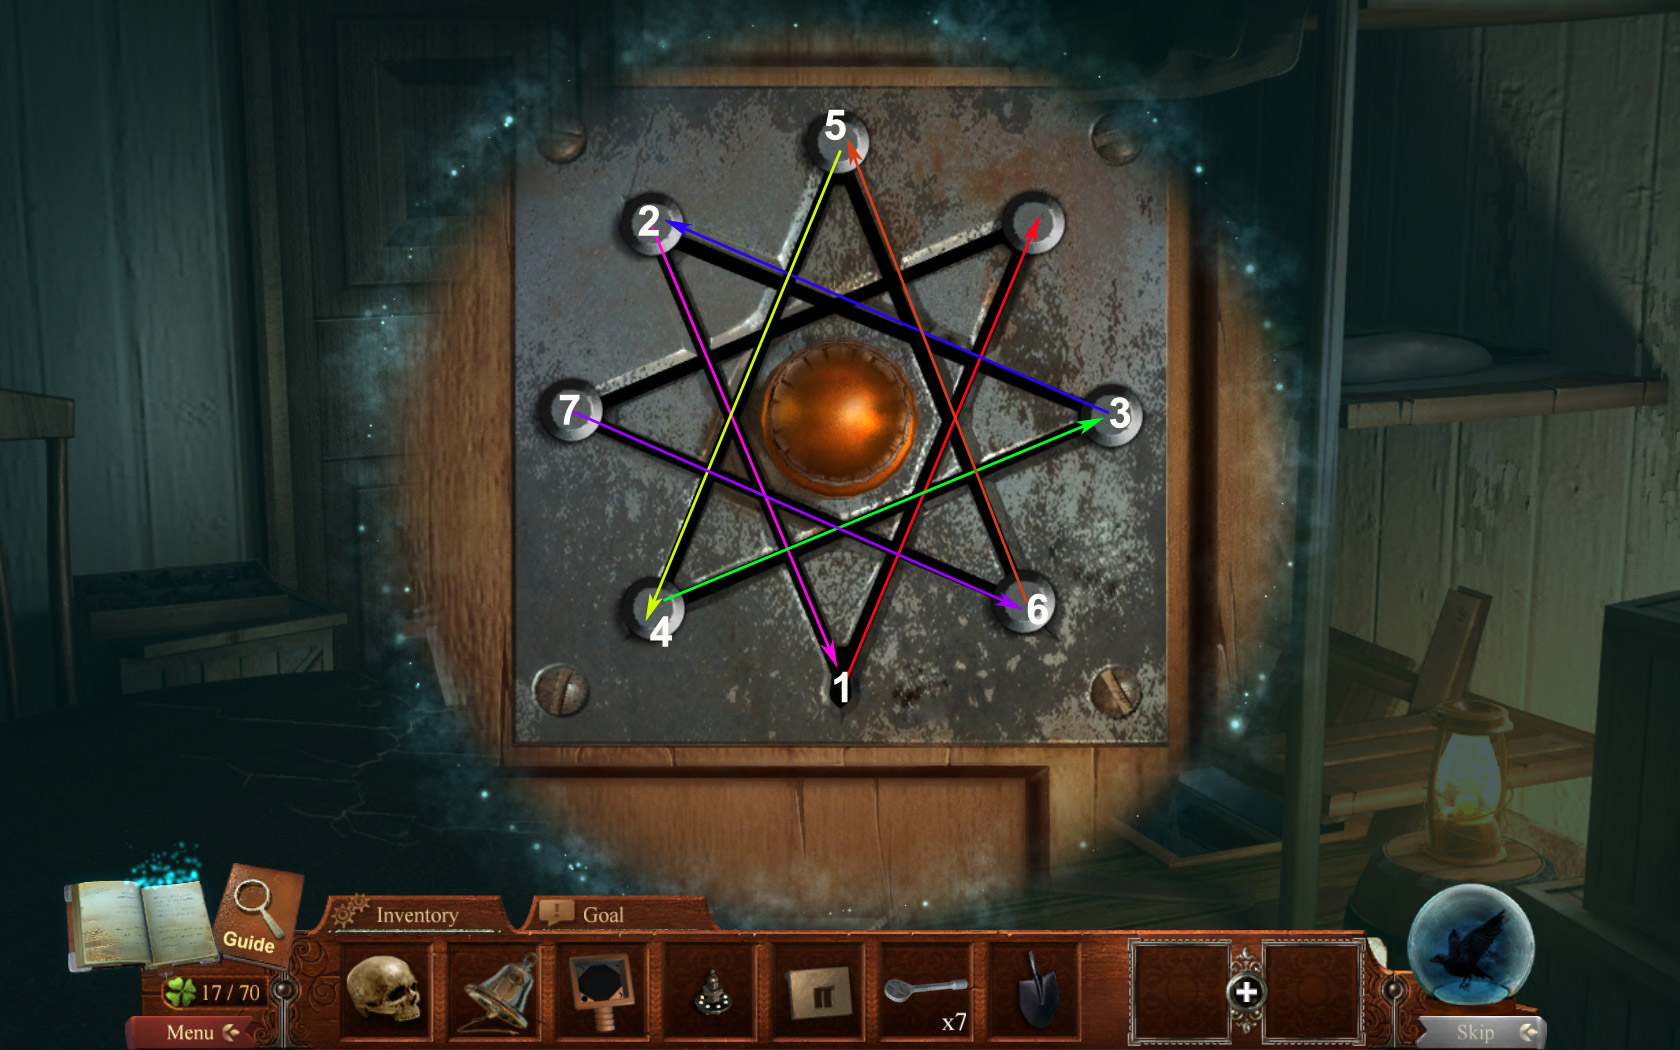
Your goal is to place all 7 keys in the right keyhole, one keyhole will stay empty.
Place a key on an open keyhole and shadows appear to two other keyholes.
Decide which one you want and drag the key into it.
The trick is that key can only go into a slot where it has a line connection with.
Start at the middle keyhole at the bottom and drag the key to the second one the right side.
Now make sure, that the next key ends, where you started with the first one.
The one after this needs to end in the keyhole you started before this one.
As this you go on until the end, the last key goes on the low right, the left middle stays free.
Screenshot
The door opens, enter the captain's quarter's.
9. Captain's Quarters
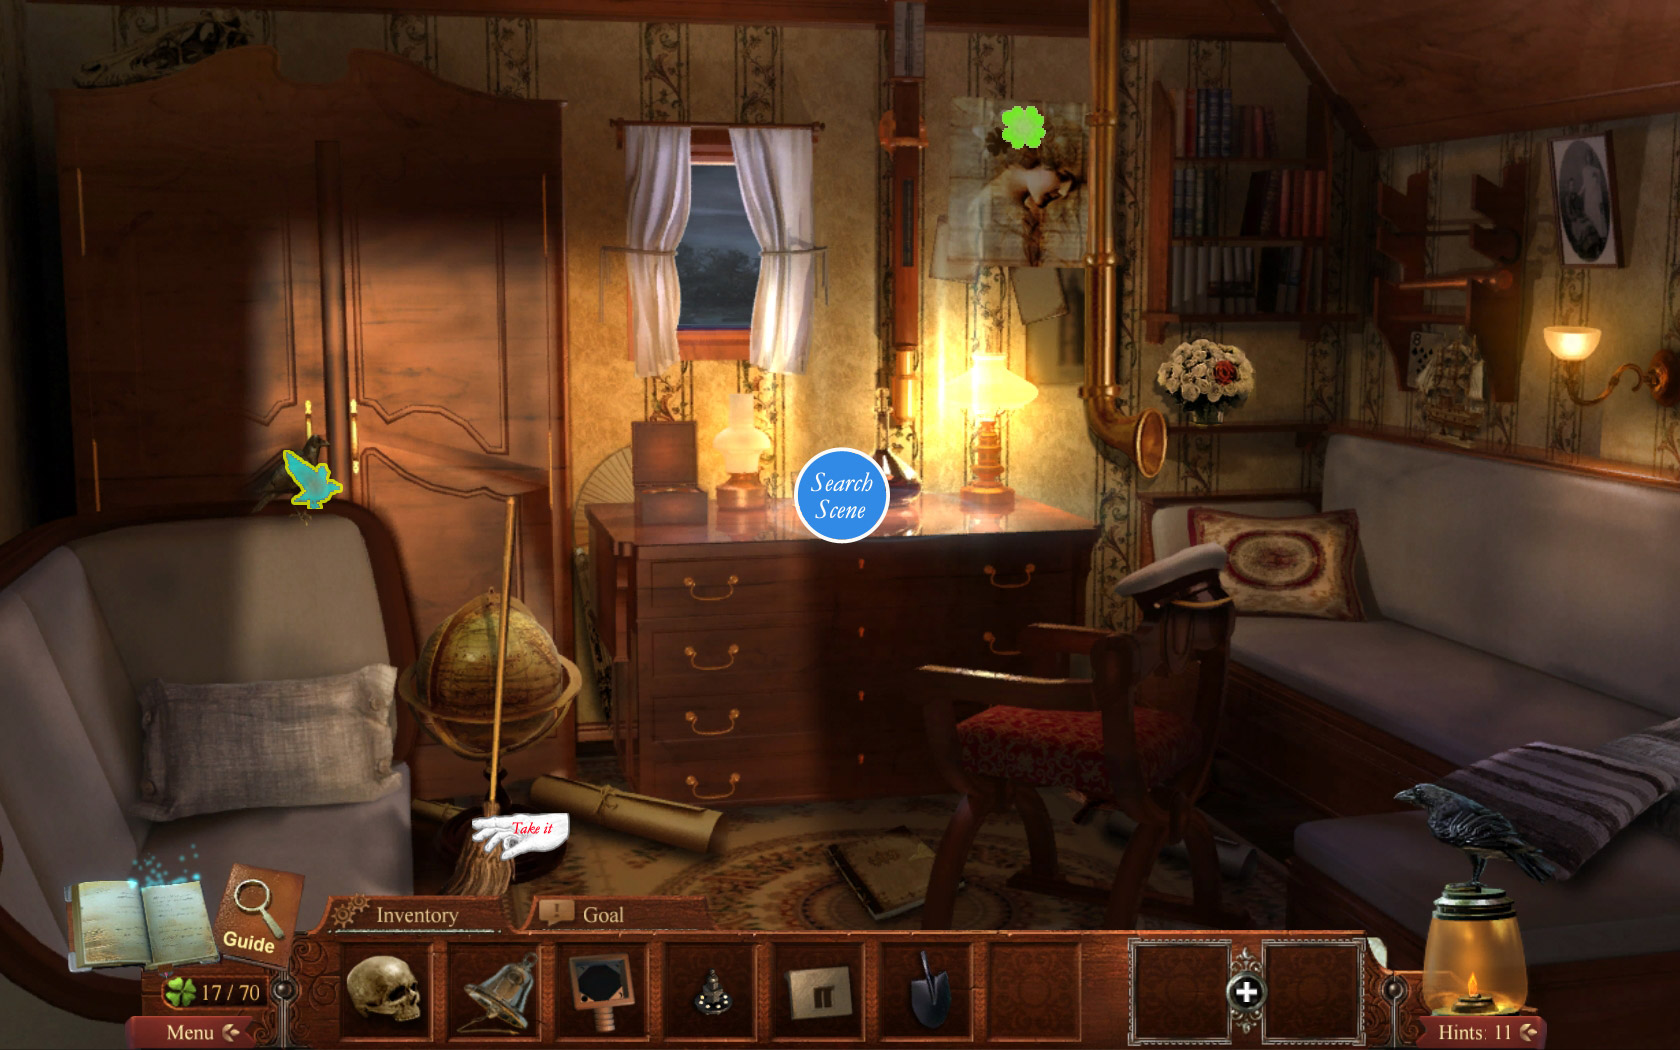
Take the broom on the left side, the shamrock at the poster above the desk and the raven on the right side.
Zoom in on the desk to play a search scene.
To find all objects you will need to open the upper desk drawer and move the pillow on the couch right side.
On the right side of the desk you will find a shamrock.
The metal polish goes into your inventory.
Screenshot
Return to the quarters hall.
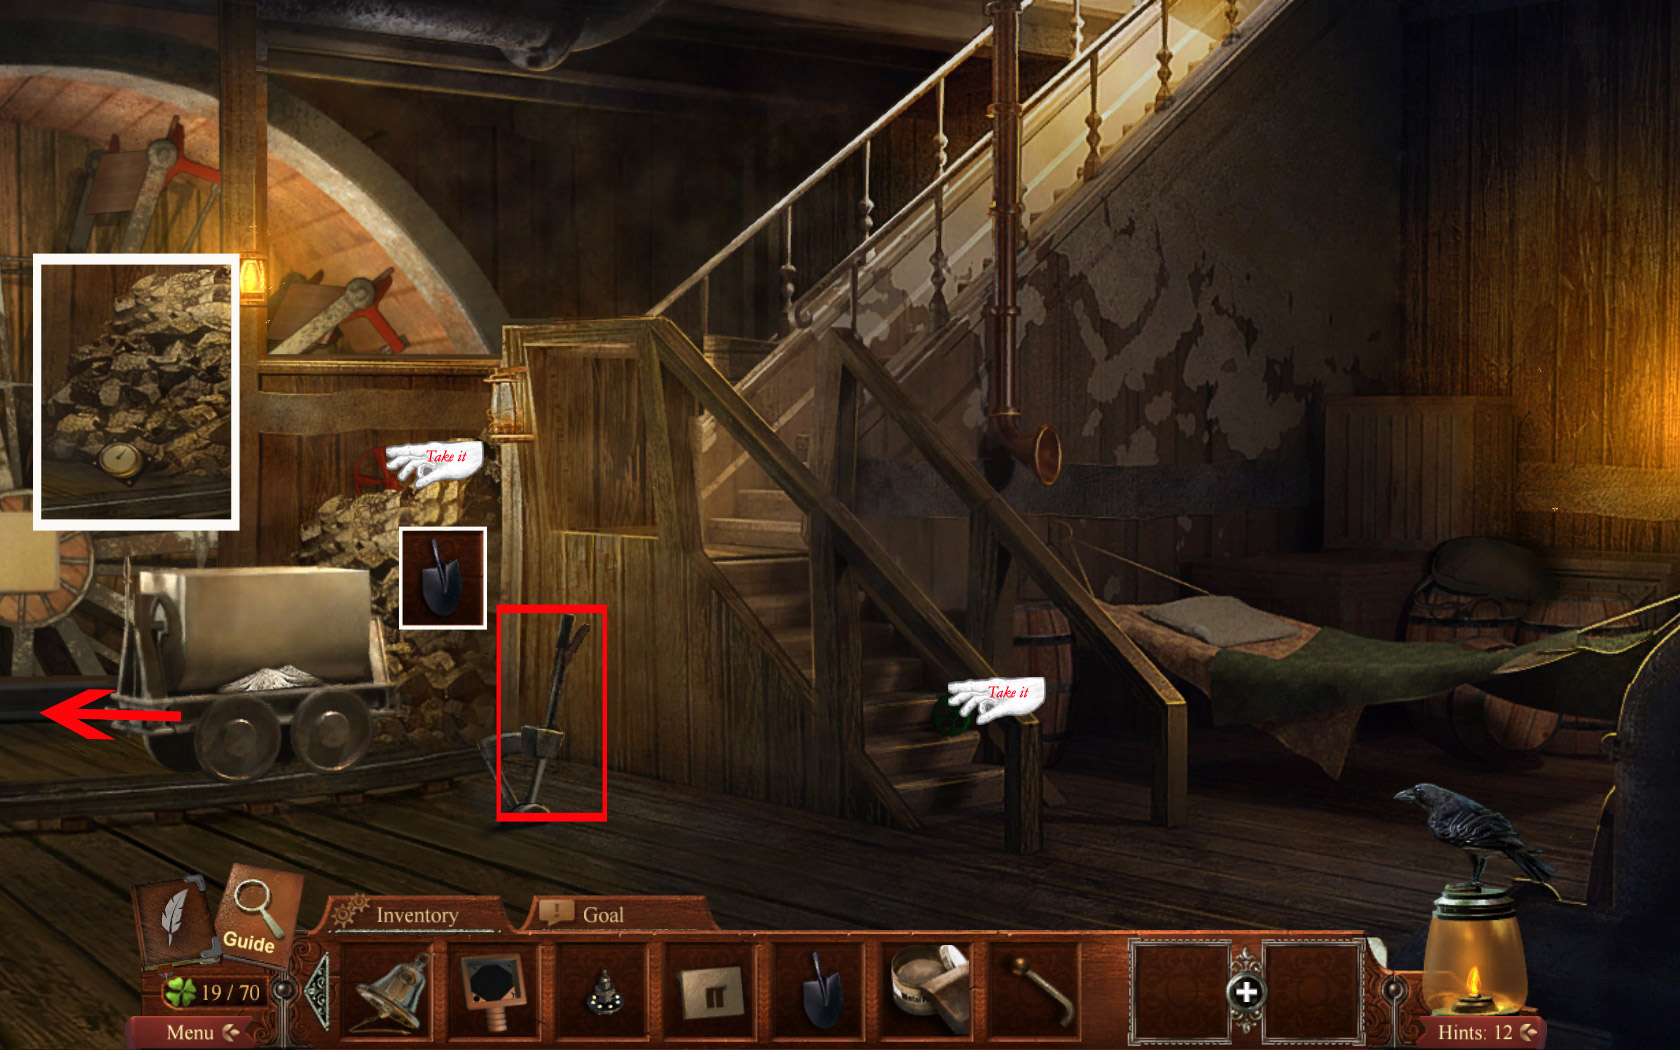
10. Quarters Hall/Engine Room
Try to go up- or downstairs.
Use the broom (Spoiler 9) on the dirt spot in front of the stairs.
Take the lever the ghost drops when you are done.
Go down into the engine room.
On the left side: take the red and green valve.
Use the shovel (Spoiler 8) with the coal heap.
Click the lever to make the coal trolley move.
Pick up the the gauge which was hidden behind the trolley.
Combine the gauge and the gauge housing (Spoiler 8) to get a temperature gauge.
Follow the trolley to the right.
Screenshot
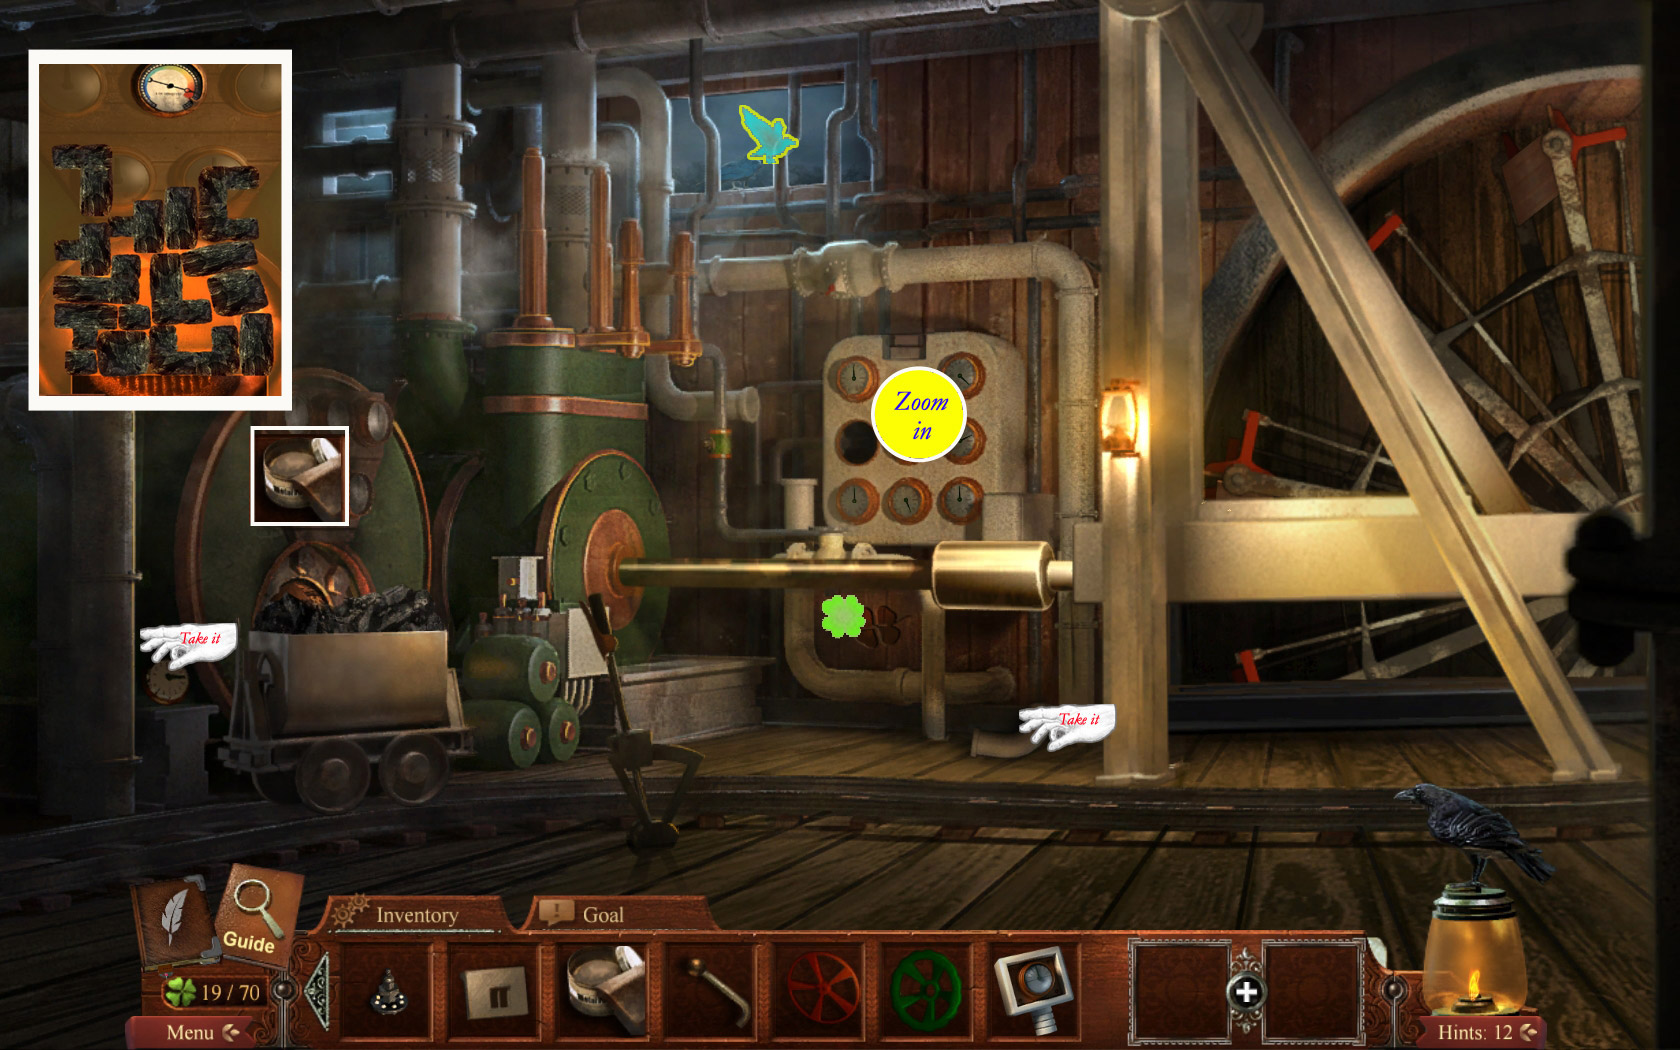
Get the raven at the window top left and the shamrock left above the engine.
Pick up the pipe and the gauge face.
Click the lever in front of the trolley to empty the coal into the oven. A mini games starts.
Your goal is to stack the coal which will appear at your cursor until the gauge hand reaches the end of the red spot.
You can't rotate the coals or change the order; you have to take what you get.
Try to build as steadily as possible. If one coal falls off into the fire, you will have to start over.
Screenshot
Now use the metal polish (Spoiler 9) on the outside of the oven.
Zoom in on the engine.
Take the shamrock and the raven.
Place the pipe and the gauge face, the temperature gauge, the red and the green valve (all this Spoiler), the bell (Spoiler 7) and the switch (Spoiler 8)
Screenshot
Go to the right, exit the engine room and go upstairs.
11. Bridge/Quarters Hall
Take the raven from the window on the right and the shamrock from the window behind Mark Twain.
Click the ghost on the ground and take the book when he disappears.
Talk with Mark Twain.
Take the book he leaves behind, when he disappears.
Go downstairs.
Zoom in on the ghost to access a puzzle. Take the shamrock at the top of the watch.
You will only be allowed to go, when you can give the right time.
Remember the matching puzzle in the crew's quarter - the remaining symbols said 4 am.
Turn the clock hands until they show 4 am.
Screenshot
Leave the boat
Chapter 4. Find and open Shakespeare's Tomb
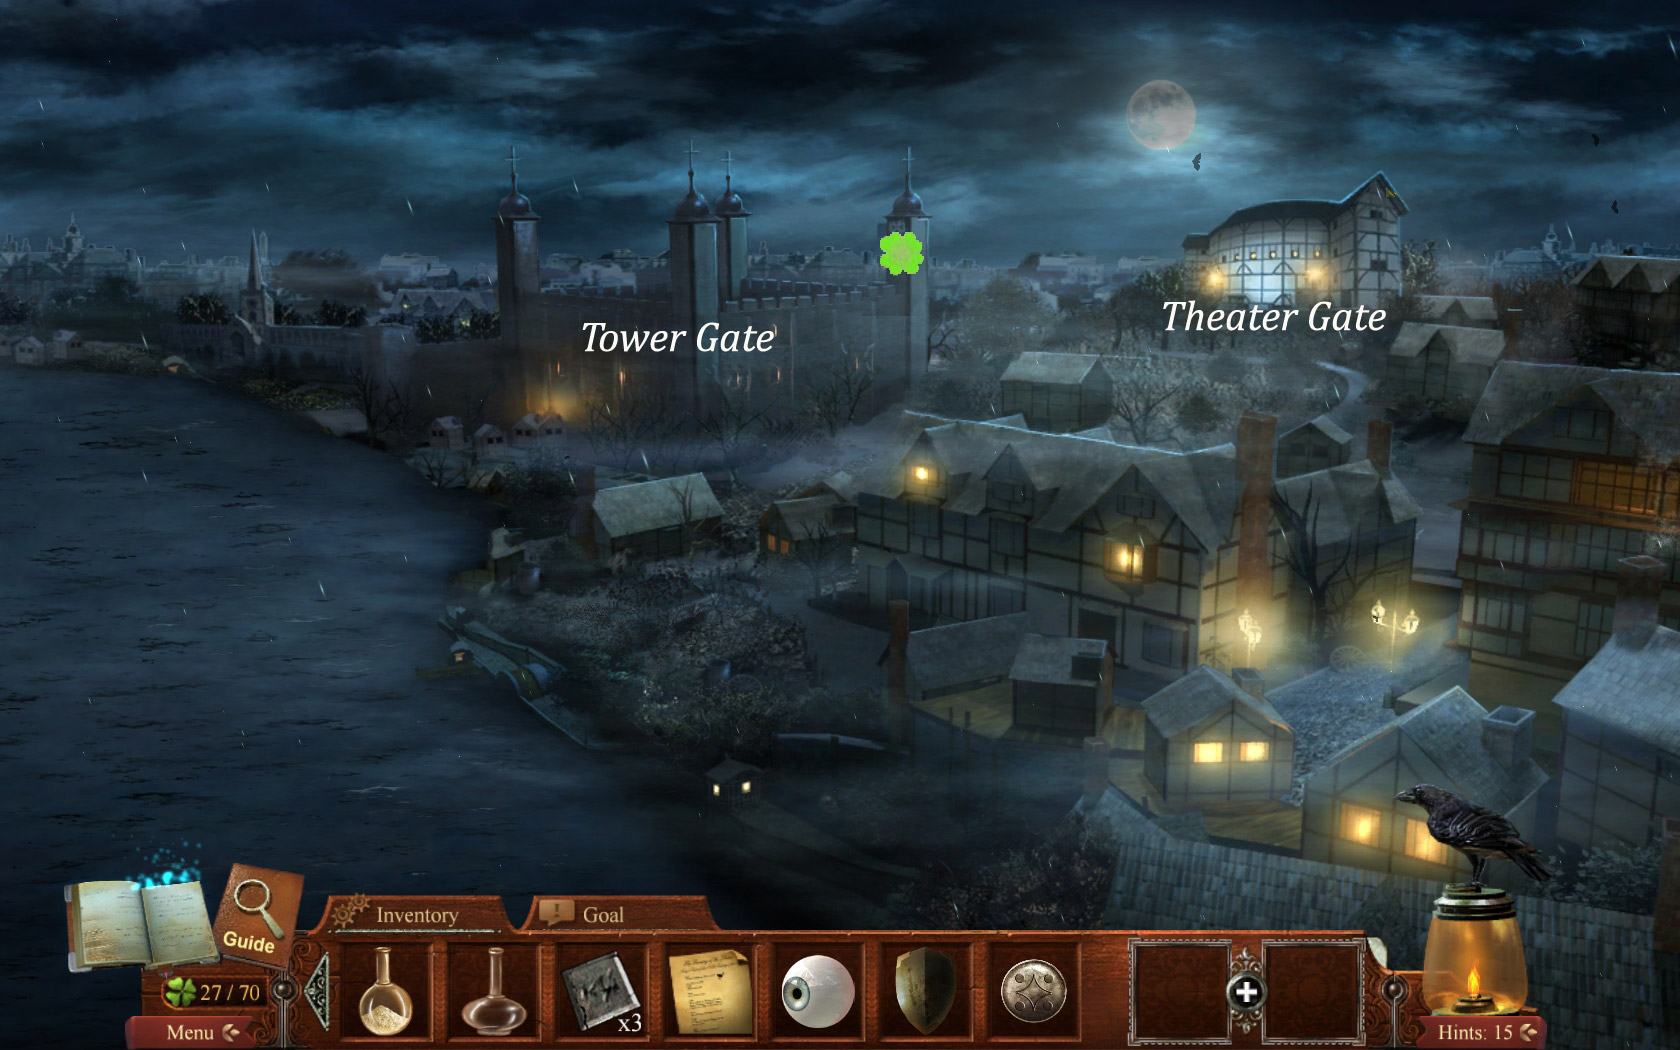
12. Theater Gate/Back Stage
Take the shamrock from the right tower and go to the right to the Theater Gate.
Screenshot
Take the shamrock on the right side of the Theater and the raven on the left next to the gate.
Enter through the door.
Screenshot
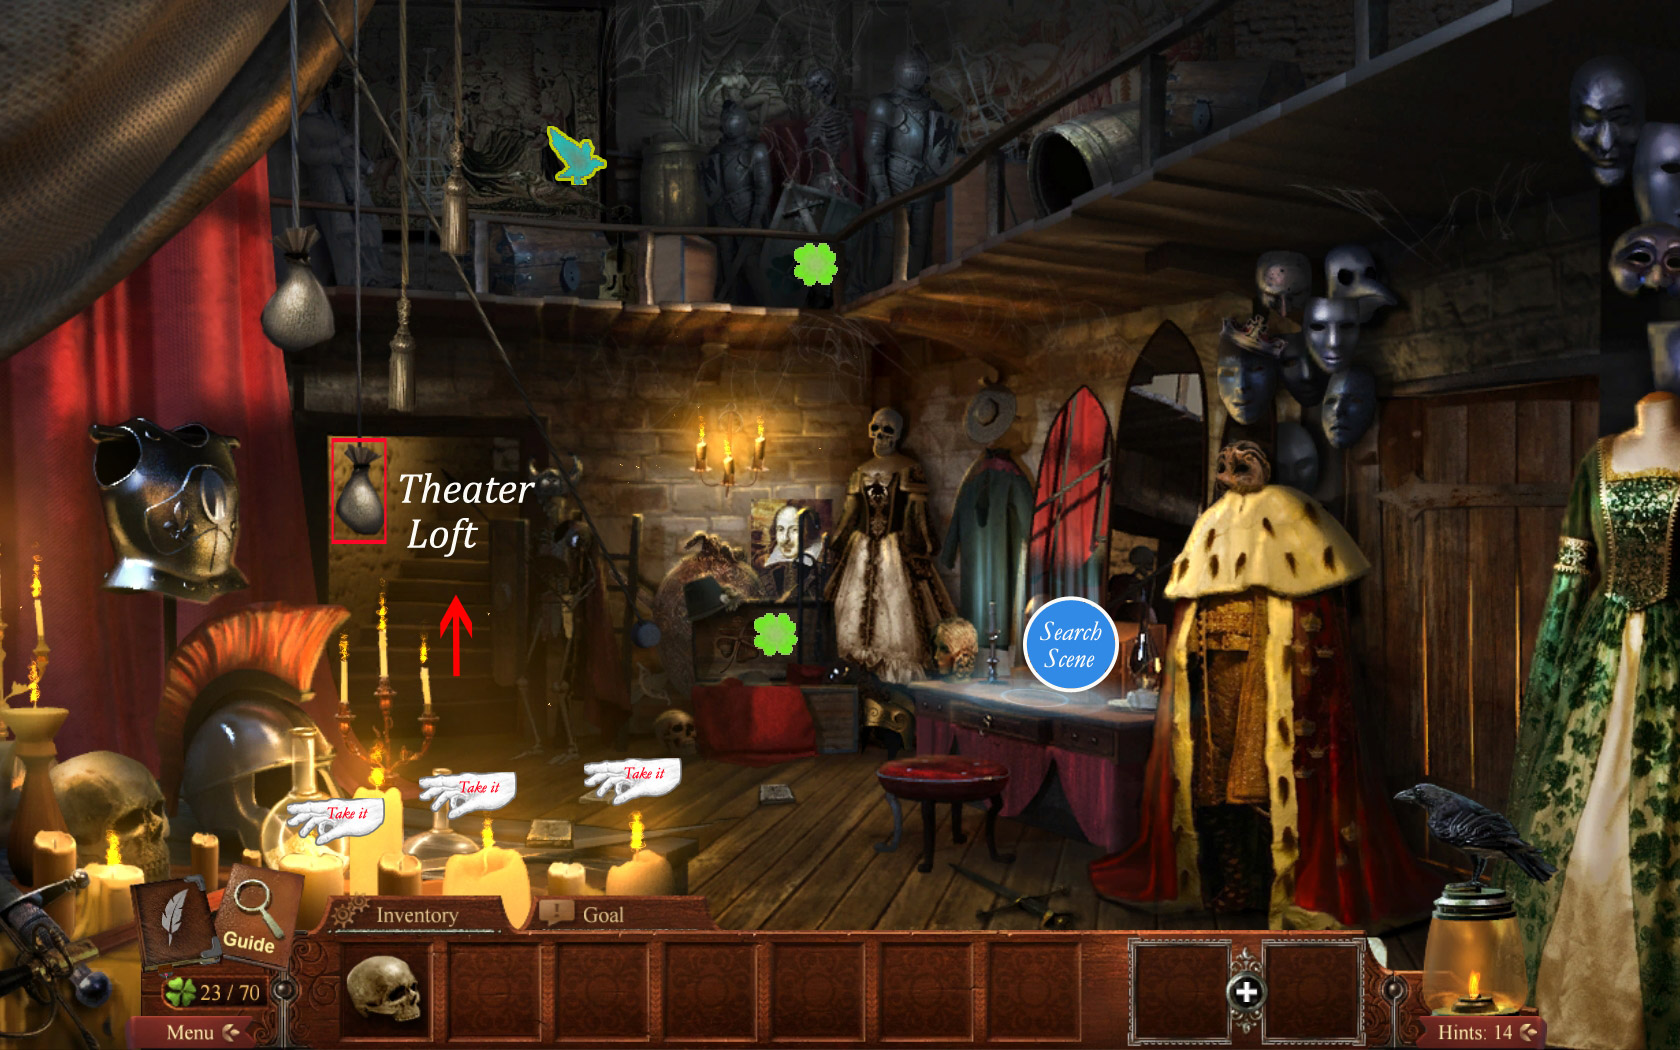
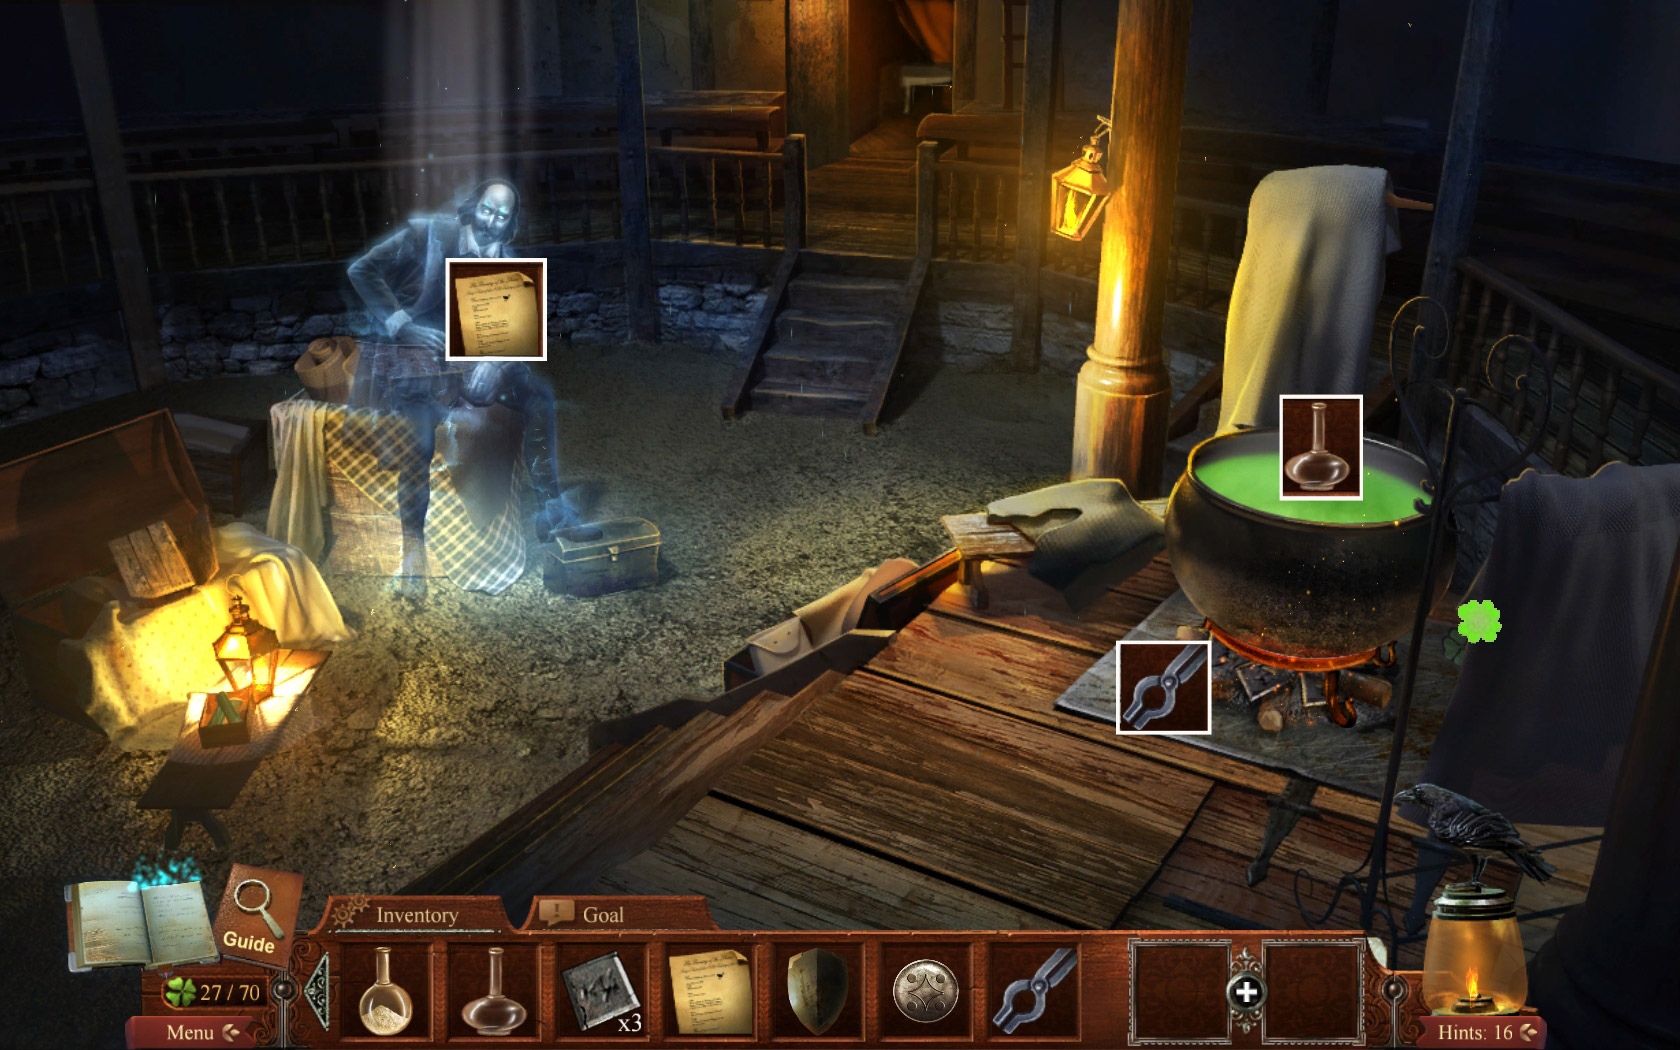
Take the two shamrocks (at the shield between the two knights on top, at the lid of the chest in the far middle) and the raven (banister, top left side).
Grab the flask with acid powder and the empty flask from the table in the low left corner.
Click one of the curtain weights on the left side and three number tiles (3/11) fall down. Click one to pick them all up.
Zoom in on the desk on the right to play a search scene.
Take the two shamrocks (one on the right desk drawer, one below the garlic on the right side).
Find all objects to obtain the manuscript, eye,coin (1/8) and shield.
Open the drawers to find all objects.
Go forward to the Theater Loft.
Screenshot
13. Theater Loft
The loft has four floors and each floor is a maze.
Click and drag the lantern to the only open door.
When you touch a side line you will stop for a moment.
At the fourth floor you will have to leave the floor at the bottom, not through one of the doors.
Screenshot
Enter the Stage with the arrow at the bottom.
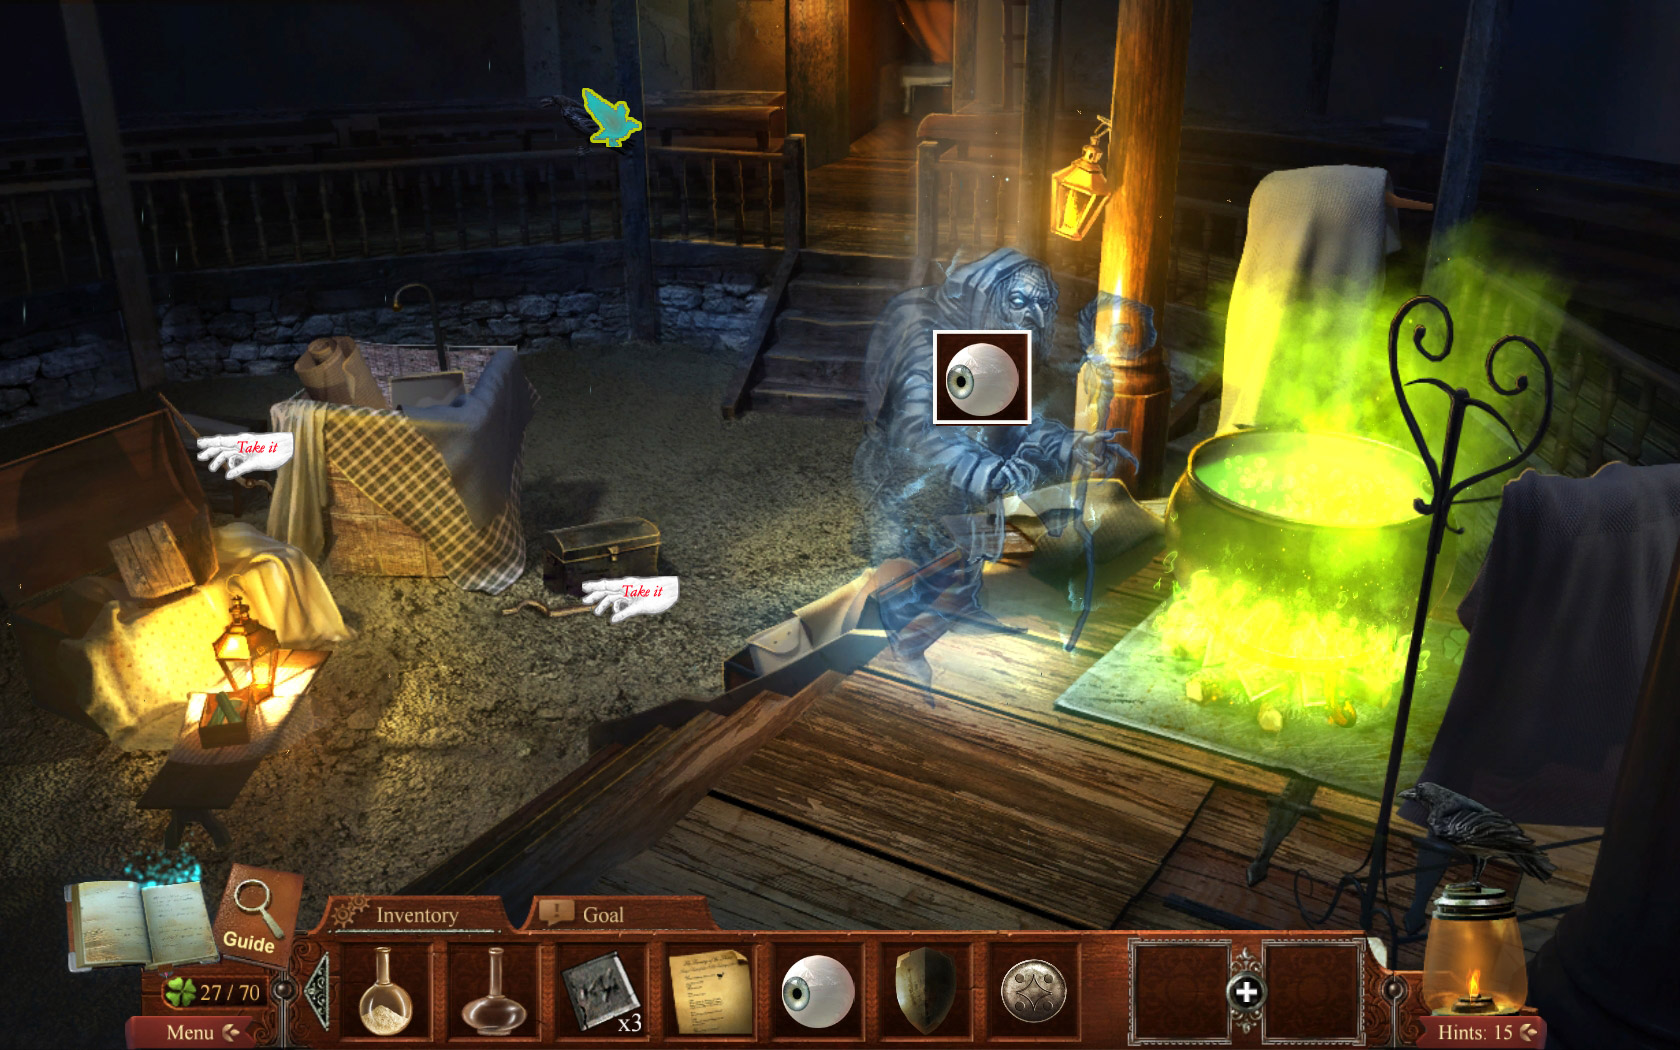
14. Stage
Collect the two tong parts and combine them into tongs.
Take the raven on the left side of the banister.
Click the witch ghost and give her the eye (Spoiler 12).
Screenshot
The ghost disappears. Take the shamrock at the right side of the cauldron.
Use the tongs to get the three number plates (6/11) out of the coals below the cauldron.
Place the empty flask (Spoiler 12) in the fluid inside the cauldron.
Combine the flask with acid powder (Spoiler 12) and the flask with the witch's fluid to make corrosive acid.
Talk to the ghost of William Shakespeare and trade the manuscript (Spoiler 12) for two numbered tiles (8/11) with him.
Screenshot
Exit the Theater until you are standing in front of the gate.
Zoom in on the Shakespeare poster on the left wall and click to remove it.
Use the corrosive acid at the grate and take the 3 numbered tiles (11/11).
Step back once and go to the left to the Tower Gate.
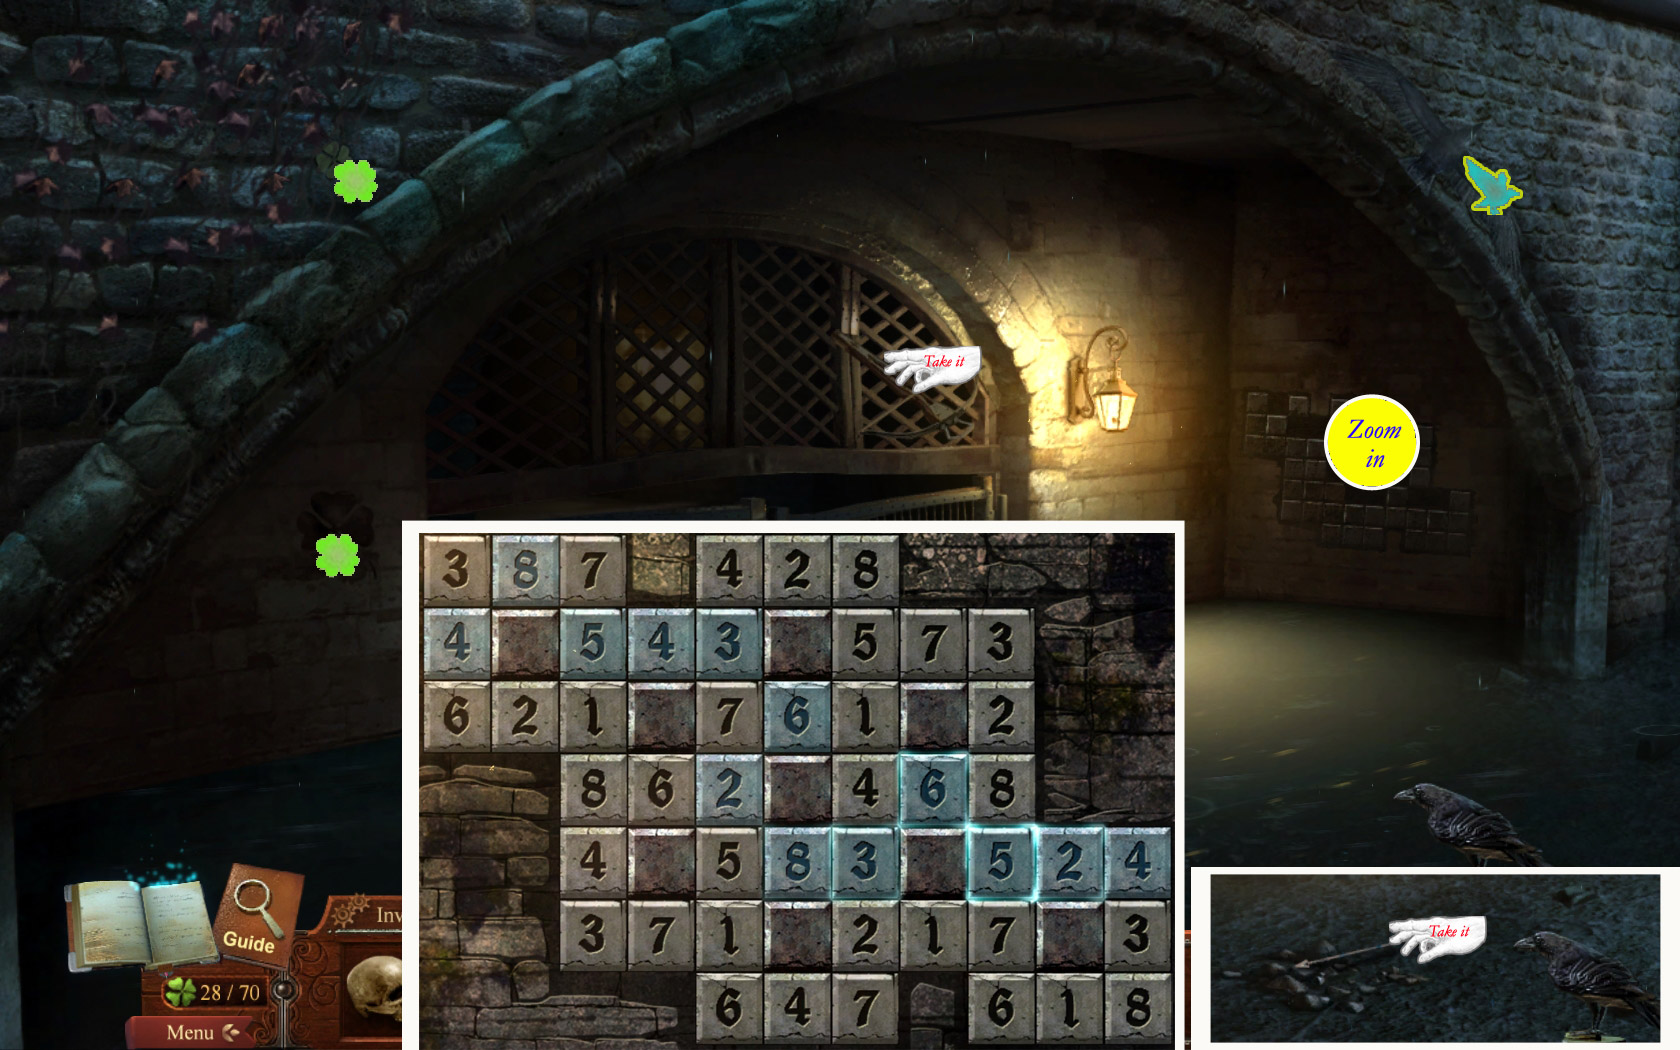
15. Tower Gate
Take the two shamrocks (wall left side, top and middle) and the raven (wall right side).
Take the crossbow from the right side of the gate.
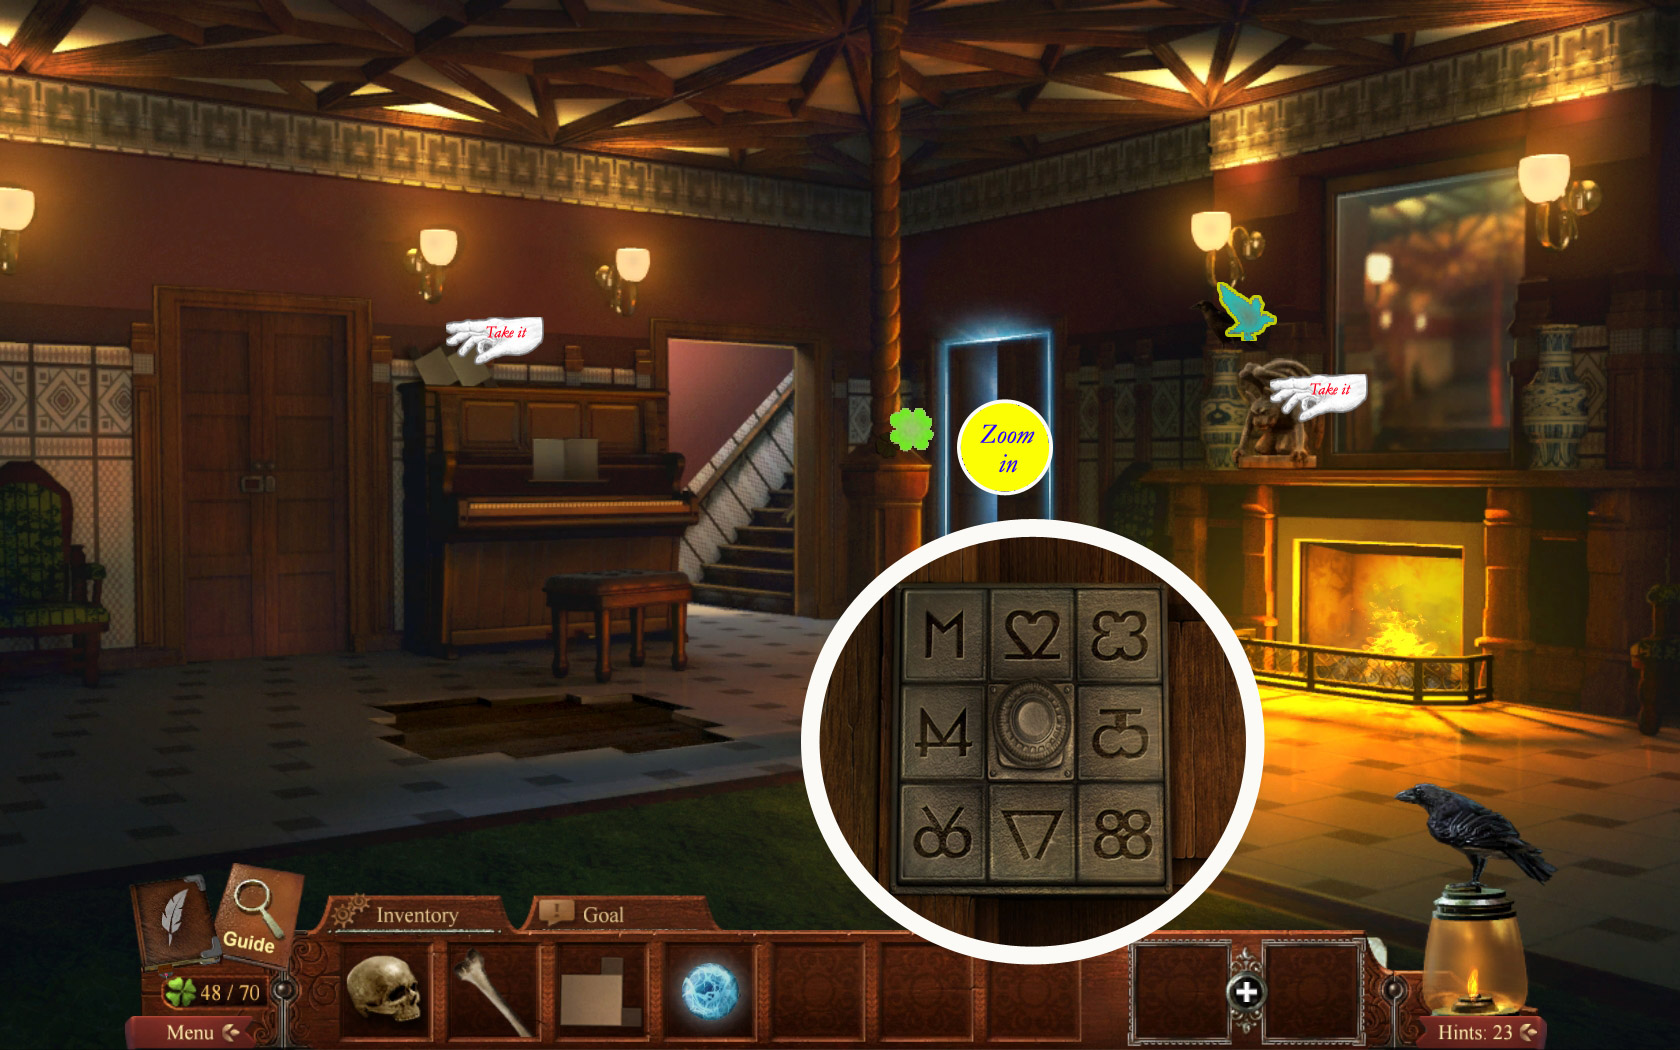
Zoom in on the right wall and place the numbered tiles on the board. Your goal is to drag and drop these tiles into the board and place them so that each stone inside the board is surrounded by the numbers 1-6.
When you finish, the water will fall and the gate will open. Take the arrow from the ground after there is no more water.
Screenshot
Combine the arrow with the crossbow to get a loaded crossbow.
Enter Walsingham's Office.
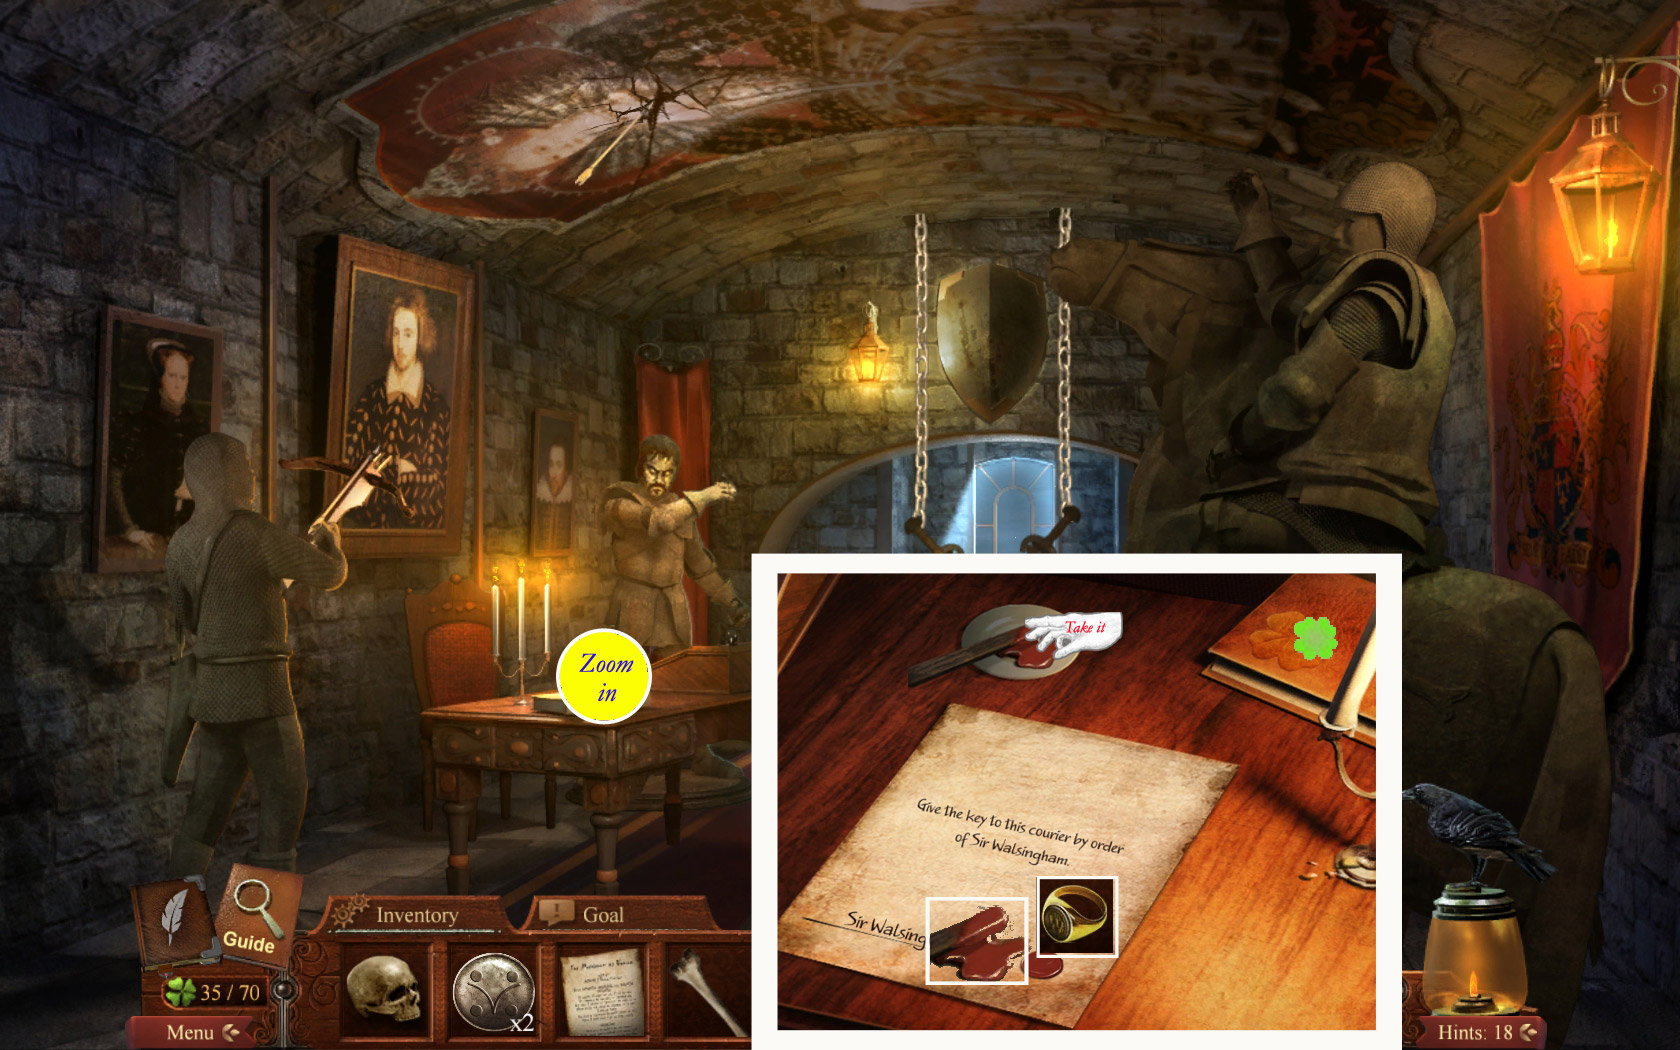
16. Walsingham's Office
Wait until Walsingham's ghost gives you the coin (2/8) and disappears.
Take the raven and the shamrock, both at the horse on the right side.
Take the two swords from the statues.
Place the shield (Spoiler 12) at the empty spot on the arch.
Place the two swords on the shield.
Give the statue on the left the loaded crossbow.
He will shoot at the ceiling and a scroll will fall on the table; take the scroll (manuscript).
The two swords and the shield cast a shadow on the floor. Zoom in on this spot.
Remove the bone that is blocking the mechanism; it will go into your inventory.
Click again; the way is free now. Go down 1x and take the shamrock from the step.
One step is lighter and shows a few scratches; click to remove it and take the signet ring.
Return to the office.
Screenshot
Zoom in on the table on the right and take the stick with sealing wax.
Take the shamrock on the book top right.
Press the sealing wax onto the orders.
Press the signet ring into the wax.
Take the orders.
Screenshot
Go through the hatch down to the Dungeon.
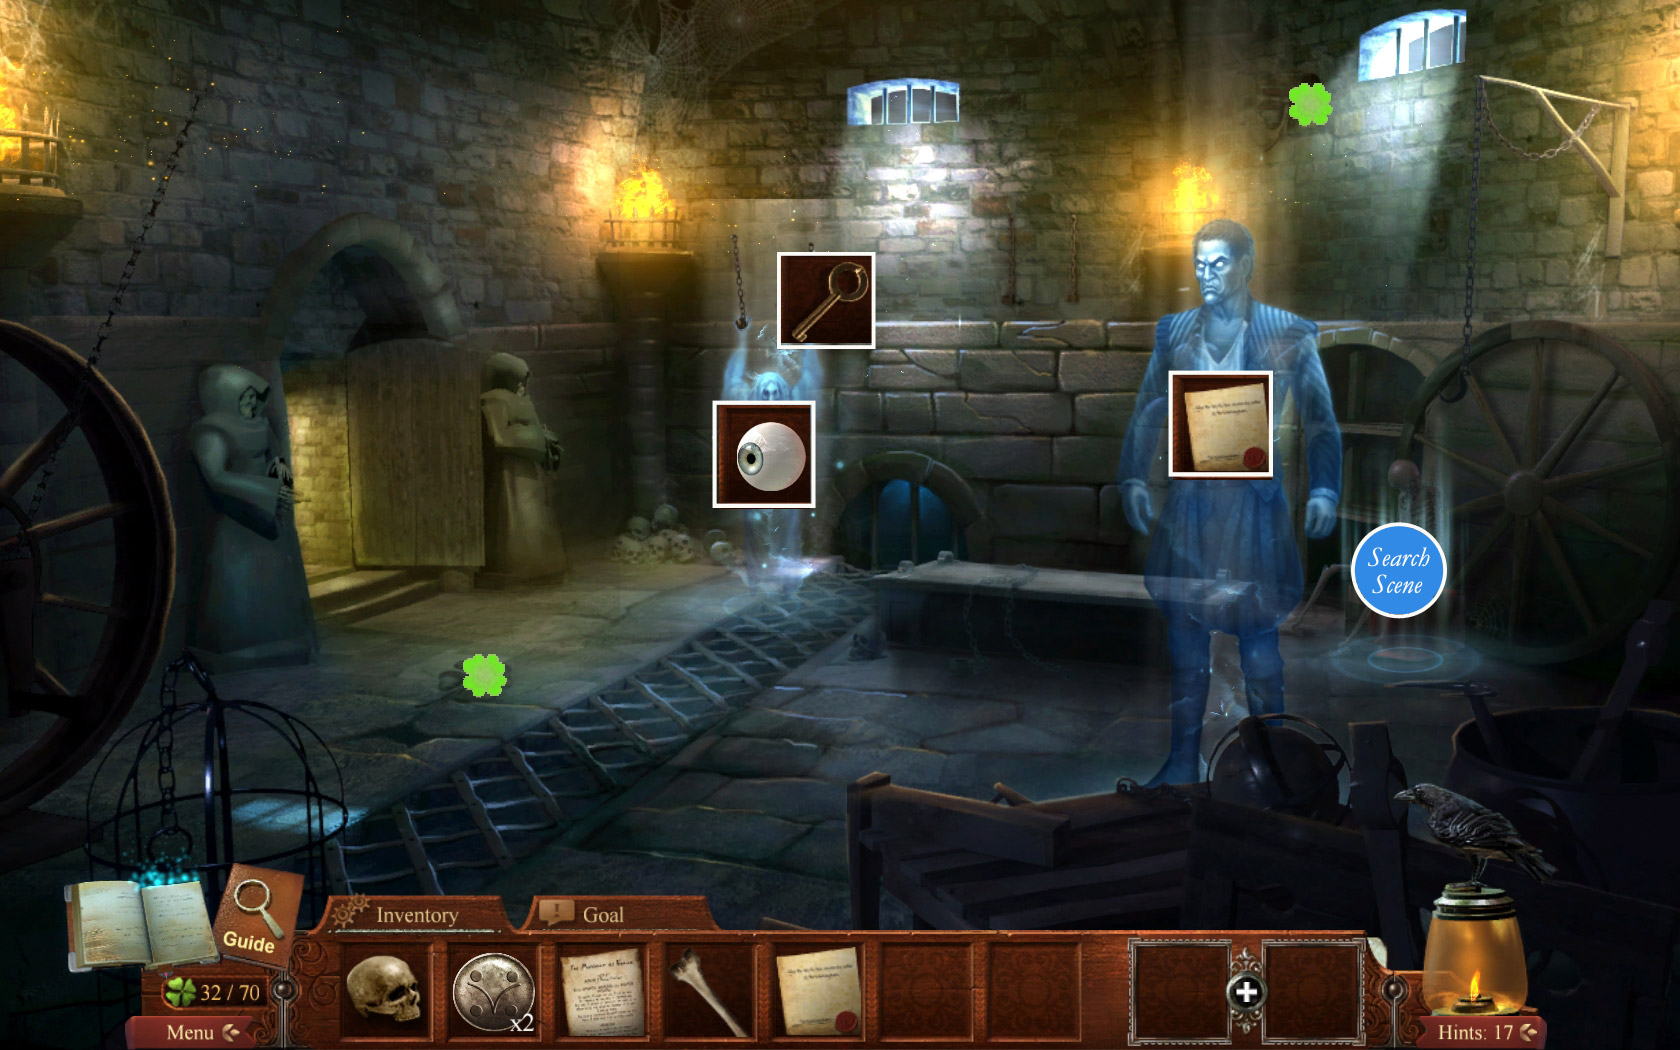
17. Dungeon
Give the orders to the ghost and talk to him to receive a key.
Take the two shamrocks (on the ground left side and at the back wall).
Zoom in on the heap of stuff in the far right and play the search scene.
Take the two shamrocks (top right and lower left between the skeleton's legs).
To find all items, open the iron maiden and the skeleton's back.
The eye will go into your inventory. Use the key to free the witch on the far left and give her the eye.
Talk to her.
Screenshot
Return to the Stage.
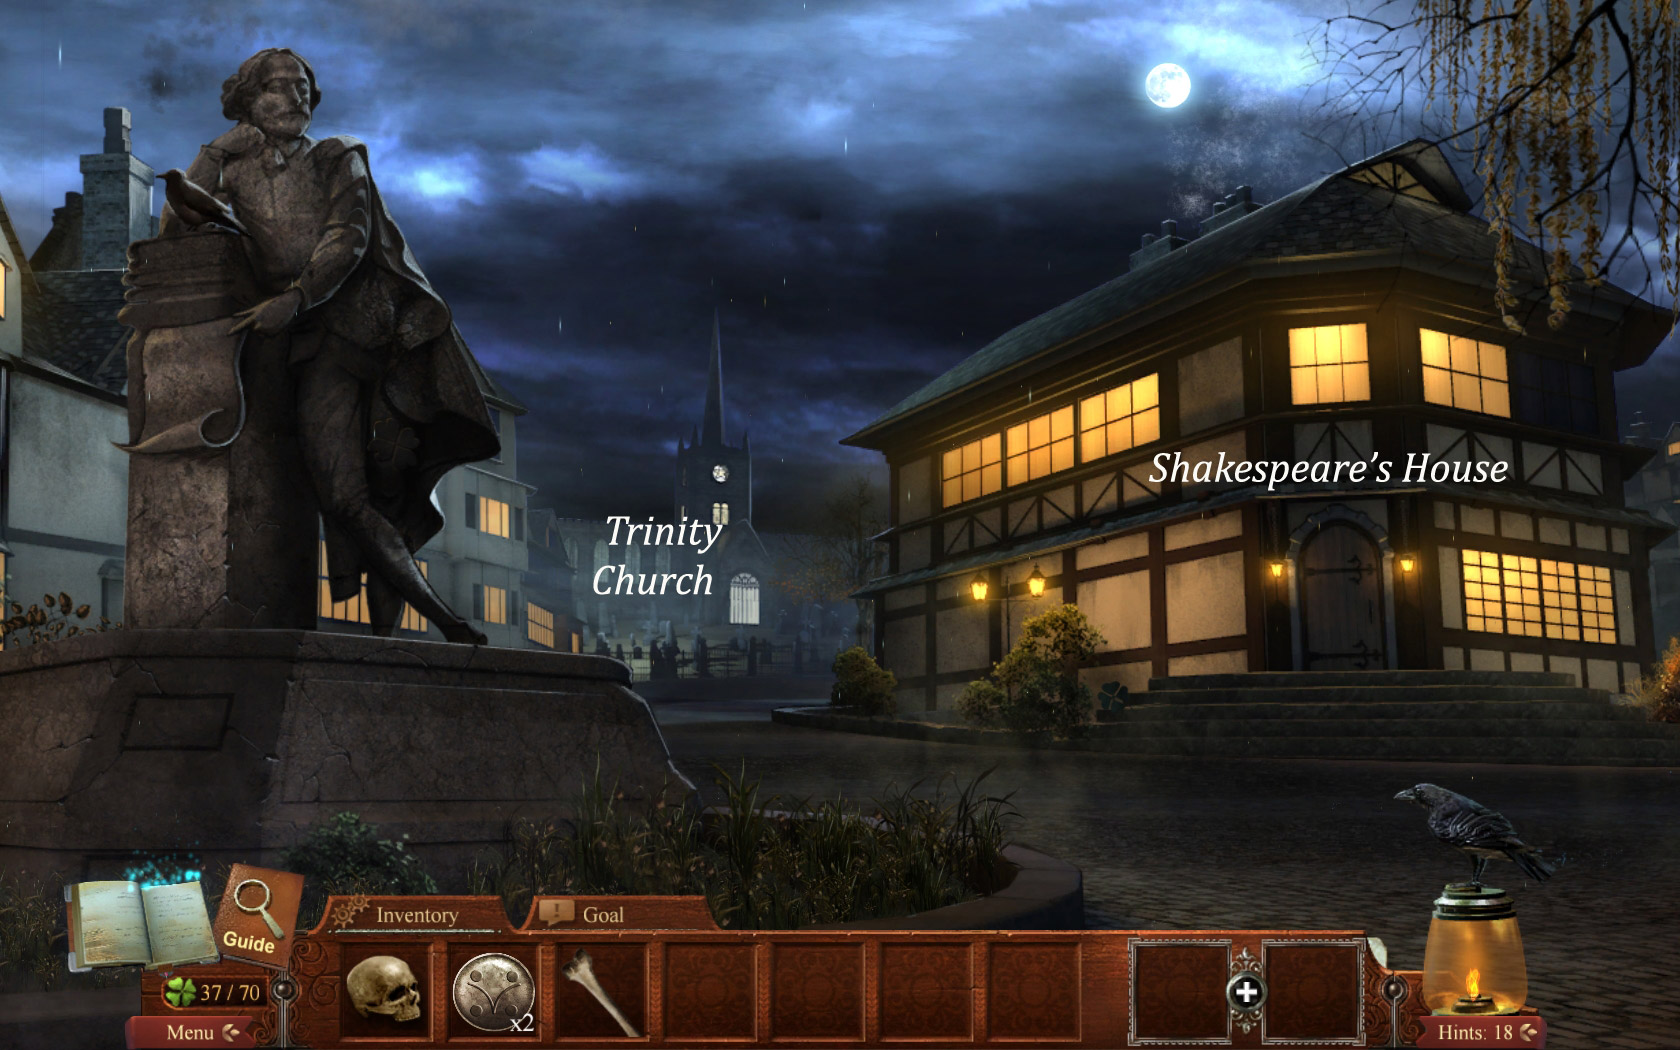
18. Stage/Main Square/Shakespeare's House
Give William Shakespeare the manuscript (Spoiler 13).
Return to your starting point and click the boat to reach his hometown Stratford upon Avon.
Take the raven (at the statue) and the two shamrocks (one at the statue, one at the house).
Go to the doorway on the right side and take the shamrock (top left).
Click the door to enter.
Screenshot
Take the stained glass (1/8) from the bench in front the bed.
Take the shamrock from the mannequin on the far right and the raven from above the clock in the far right.
Zoom in on the table left next to the bed and take the shamrock top right.
Take the manuscript.
Screenshot
Exit the House and go straight ahead to the church.
19. Trinity Church
Take the shamrock on the ground, left side of the gate and the raven on the gate, right side.
Take the stained glass piece (2/8) on the right side of the church leaning in the edge.
Screenshot
Enter the church.
Take the shamrock on the ground far left and the raven at the window far left.
Get the 2 stained glass pieces(4/8) from the altar on the left and in front of this altar on the ground.
Zoom in on the statue above the left altar.
Take the two stained glass pieces (6/8) and the shamrock.
Zoom in on the tomb and take the two stained glass pieces (8/8) and the shamrock.
Zoom in on the stained glass window above the tomb and place the pieces in their proper places. You will obtain 6 coins (6/6) for this.
Screenshot
Zoom in on the tomb again and place the coins (Spoiler 12, 16 and here). Your goal is to do a little geometry: Place the coins in the correct slot according to their intersection.
Screenshot
The tomb will open, but it is empty. Exit the close up; Walsingham's Ghost appears and will give you a book.
Follow Mark Twain to London (the boat) and give him the book.
Chapter 5: The Mysterious Stranger
20. Front yard
Get the glowing sphere from the wagon on the low left.
You will also find a raven and a shamrock there.
Zoom in on the patio and talk with the ghost.
Take the floor tile piece (1/5) on the ground left, next to the entrance, and the shamrock from the left side of the top stair.
Screenshot
Enter the house.
21. Reception Room
Take the floor tile piece (2/5) from the piano and the gargoyle from the fireplace mantle.
There is a shamrock at the middle of the column and a raven at the left lamp on the right wall.
Zoom in on the door on the right.
Each tile contains a number next to its mirror image. Rearrange the numbers so that they increase from left to right in each row. Clicking one tile and then another will make them swap places.
Screenshot
The door opens; enter the Laboratory.
22. Laboratory
Take the shamrock from the machine in the low left corner.
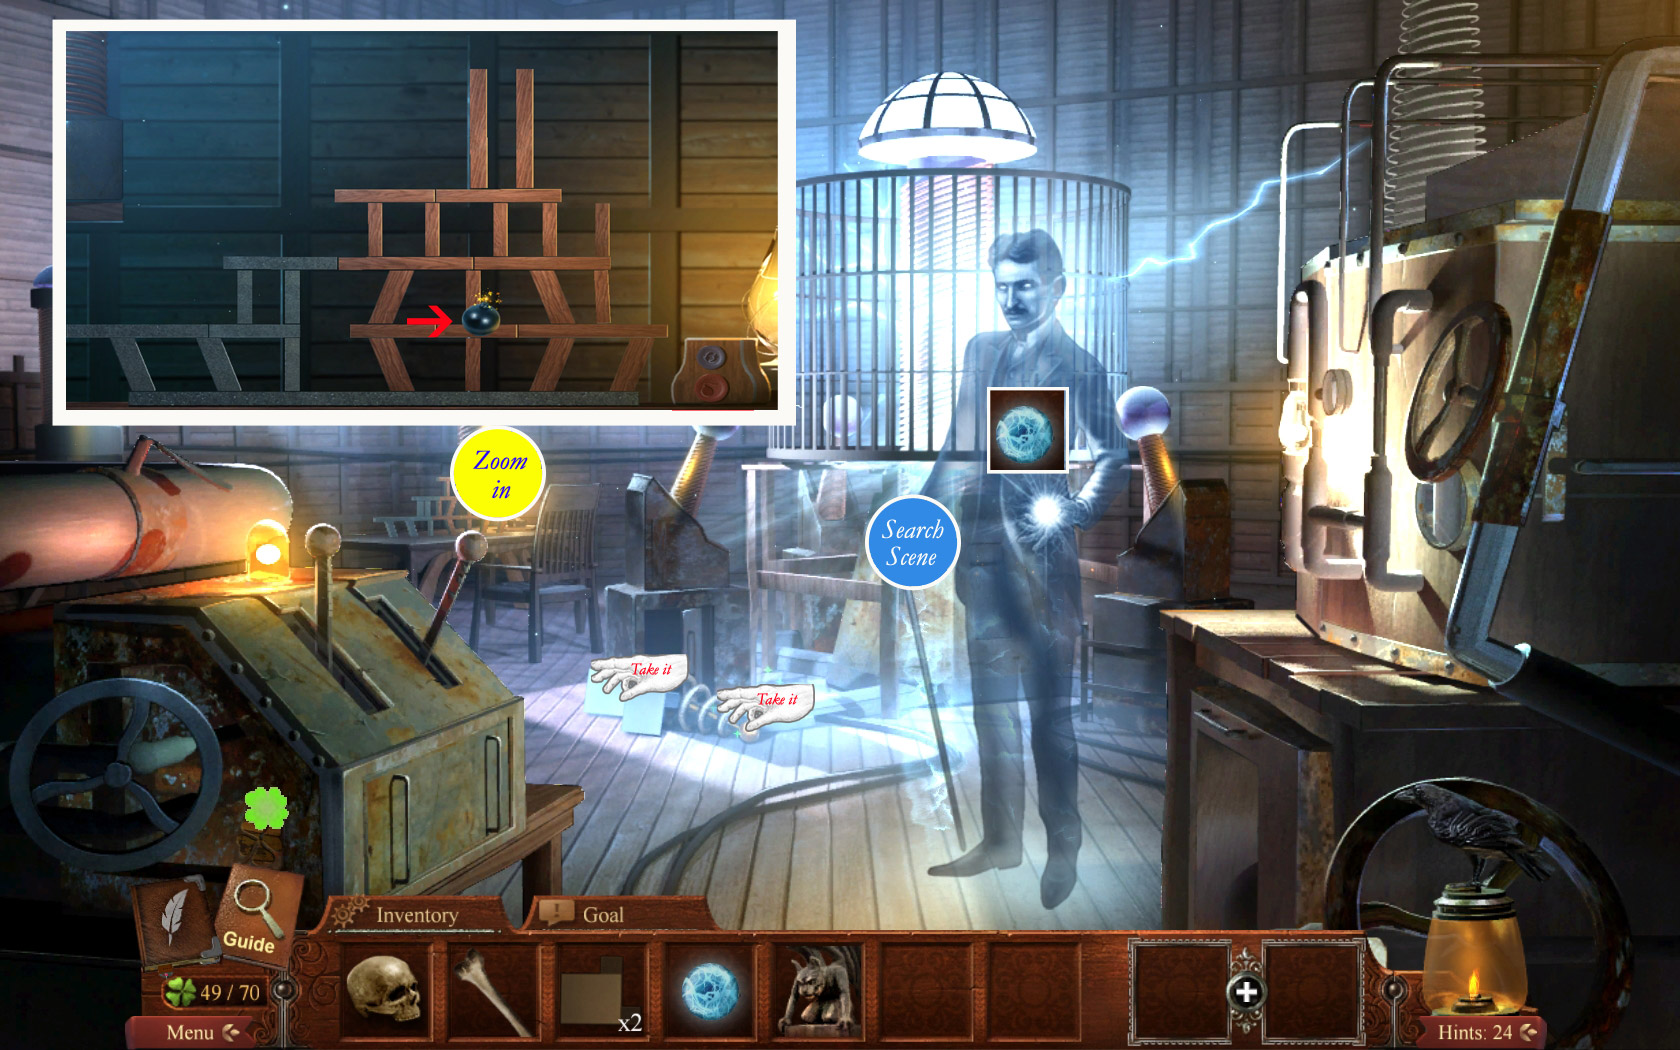
Grab the floor tile piece (3/5) and the tesla coil on the floor in front of the machine in the middle.
Hand over the glowing sphere (Spoiler 20) to Tesla and talk with him.
Zoom in on the machine on the far left. You will have to do an experiment. Click the gray button on the low right side and a bomb will appear.
Your goal is to place the bomb in such a way that it explodes and only destroys the brown tiles.
If gray tiles are falling, you will have to start over.
Click and drag the bomb to the place you want it to detonate and press the red button on the right side.
When you have to start over, press the gray button again.
Screenshot
After Tesla gives you the key and disappears, play the search scene at behind where he was standing.
There are two shamrocks in the scene, one at the column top left and one at the machine on the low right side.
You will receive a cue ball.
Exit the room and go upstairs.
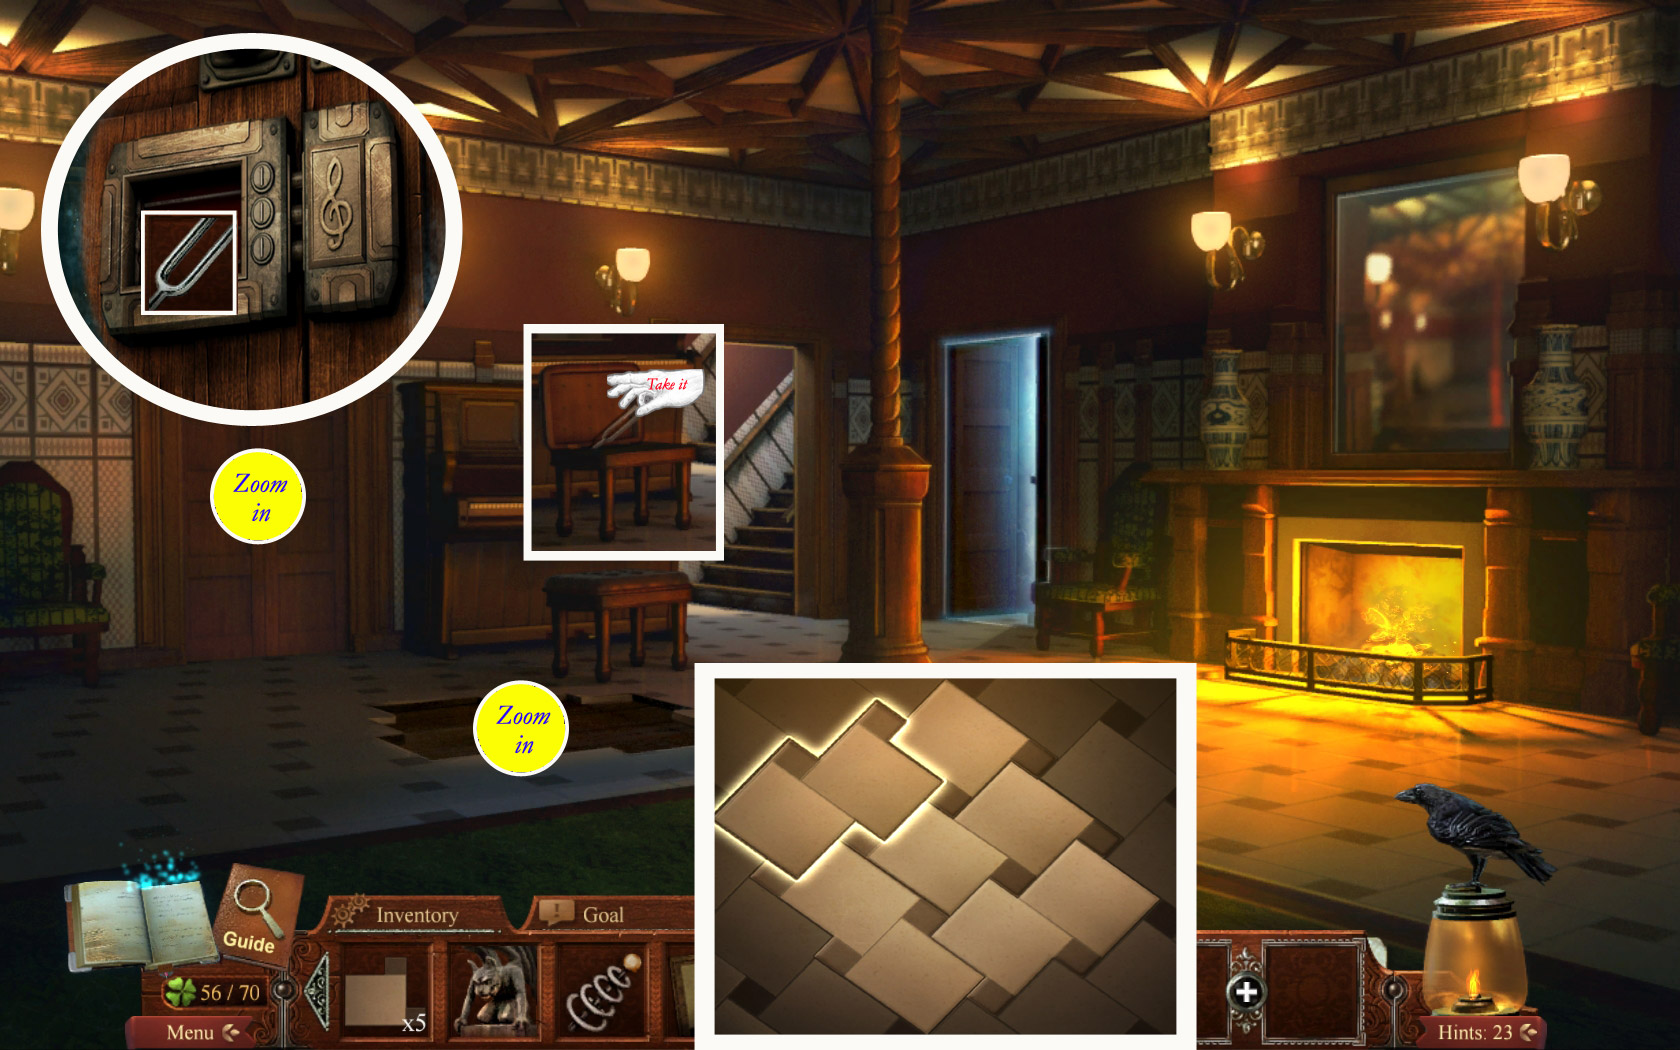
23. Stairs/Billiard Room
Take the floor tile piece (4/5) sitting on the banister left side, the shamrock on the banister right side, and the raven
Click the door straight ahead.
After both ghosts are gone, use the key (Spoiler 22) at the door and enter the Billiard Room.
Screenshot
Take the raven from the picture at the far wall, right side and the shamrock on the top right side of the shelf above the fire place.
Take the painting from Mark Twain from the easel on the right side and the cue stick at the fire place.
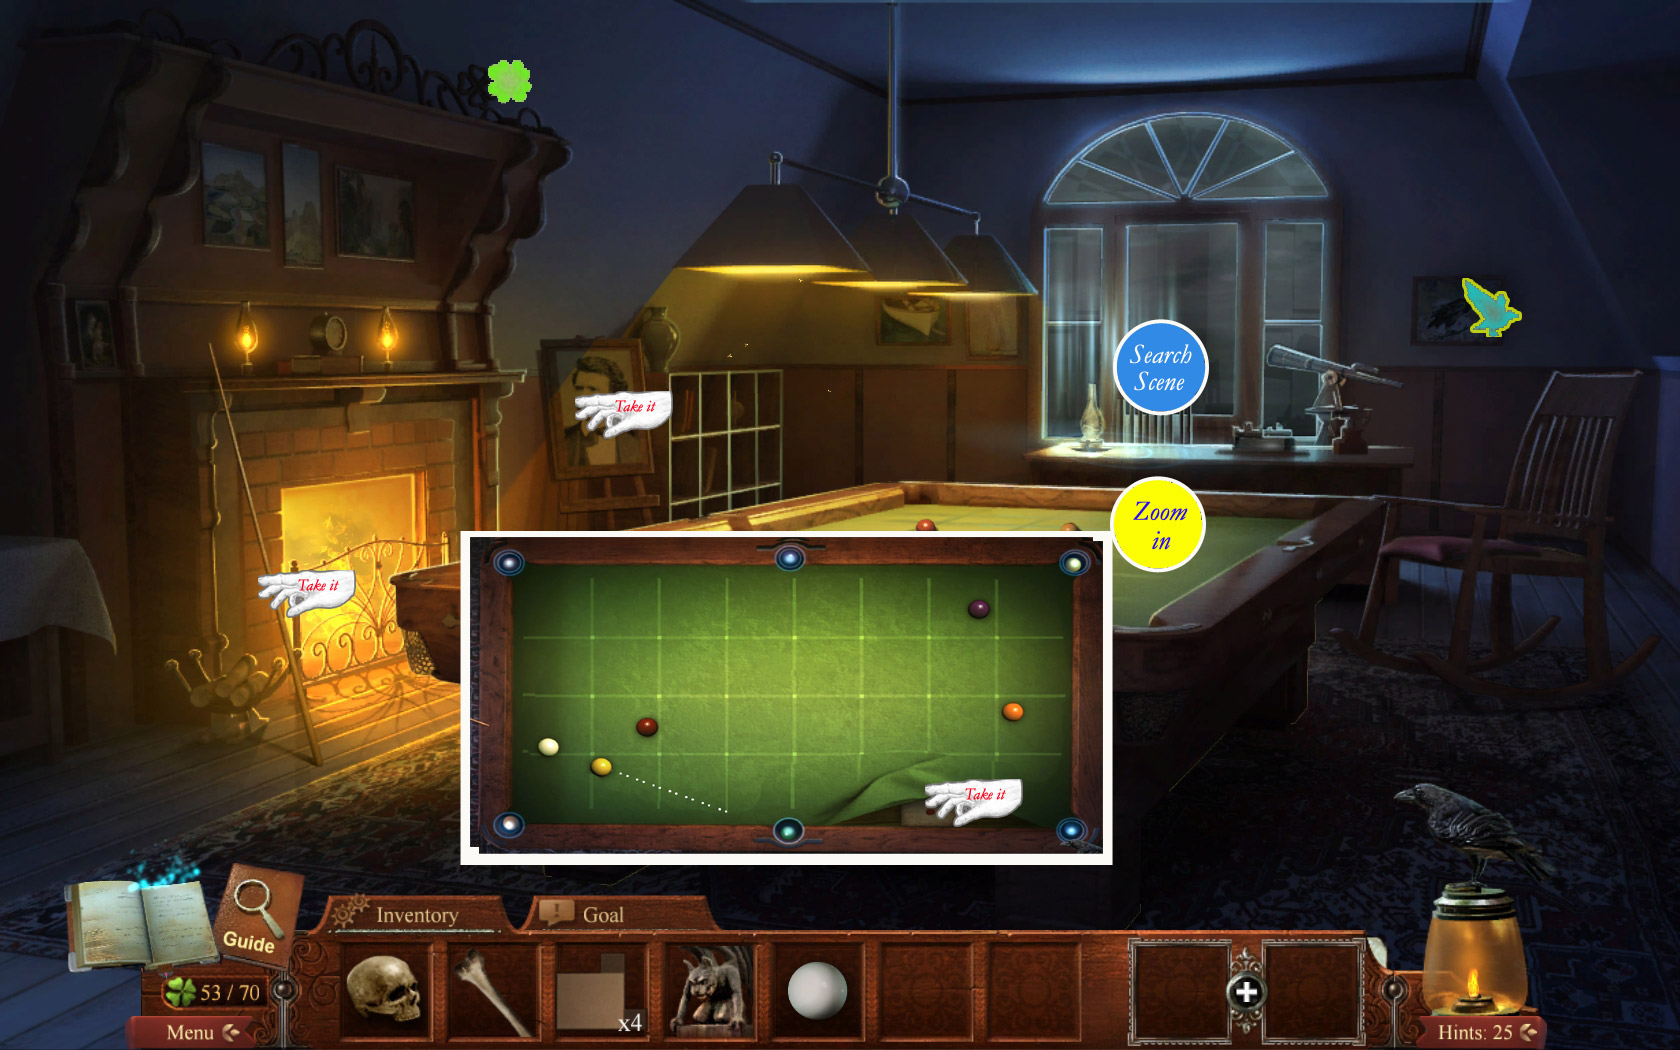
Zoom in on the the billiard table.
Place the white ball wherever you want.
Now take the cue stick, choose which ball you want to play first.
Click the stick and drag the mouse back. Let it go, when you are ready.
Your goal is to knock one ball in each hole. When you are done, you will find the bankruptcy document.
Play the search scene at the desk in front of the window.
The wedding ring will go into your inventory.
Exit the room and go left to the Upper Hall.
Screenshot
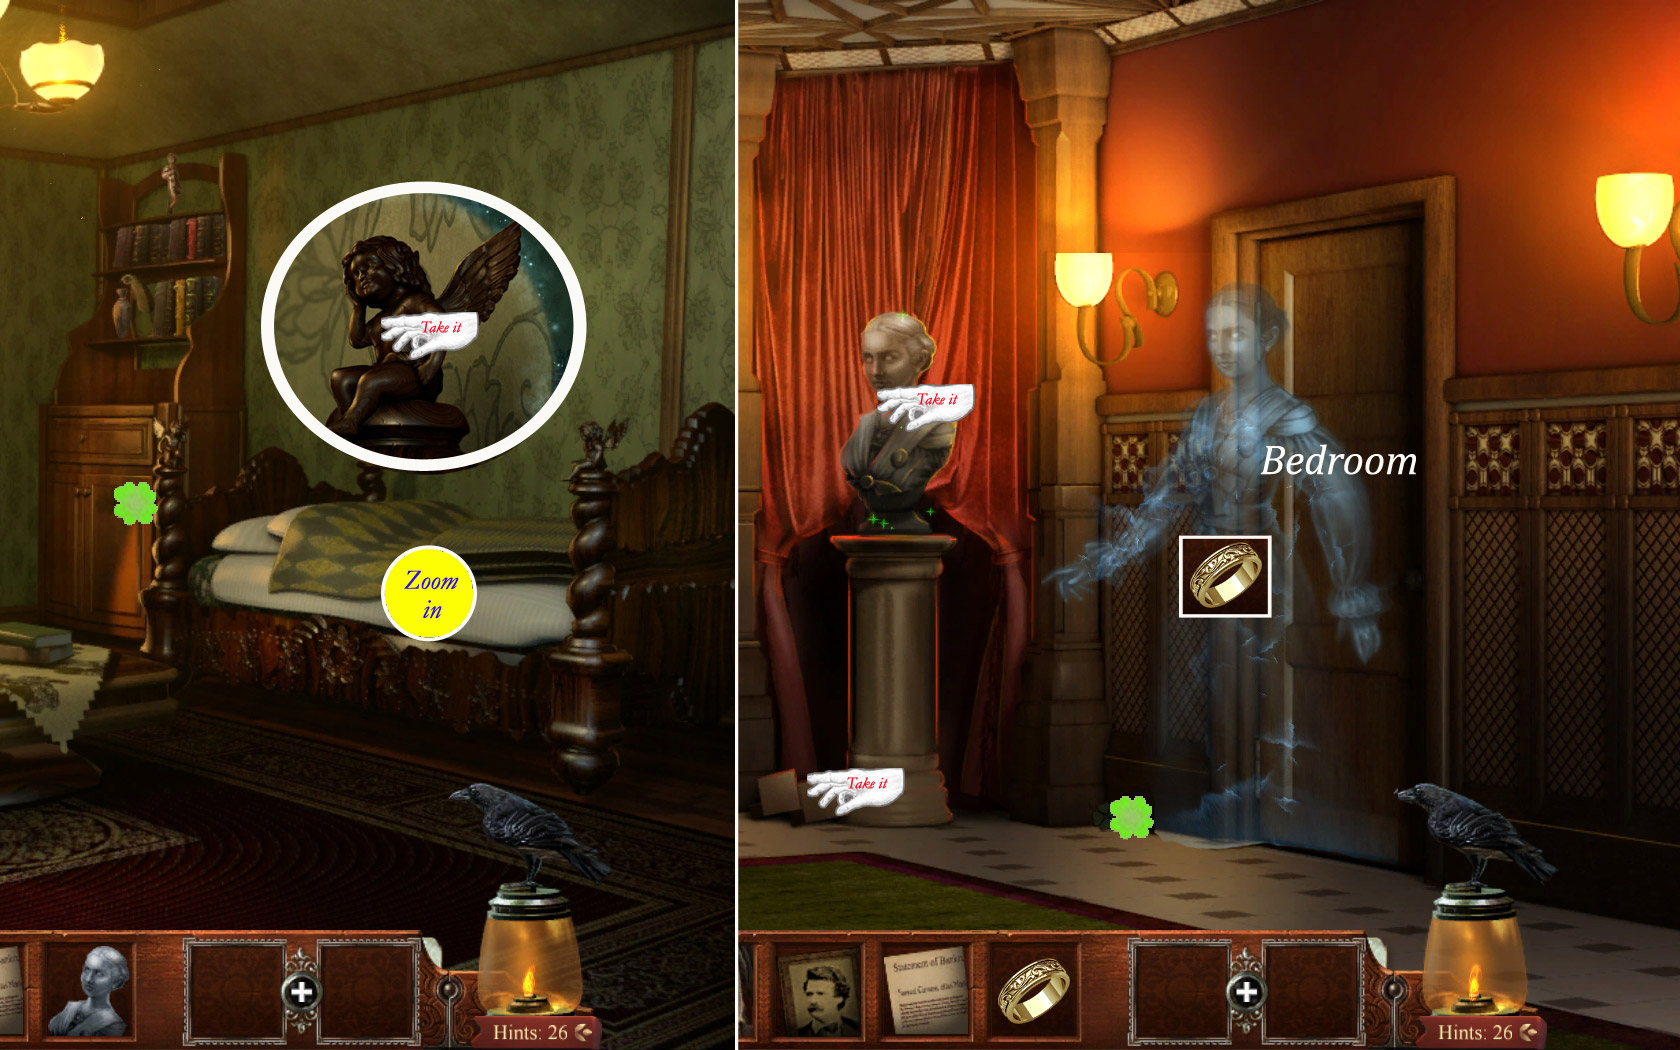
24. Upper Hall/Bedroom
Take the floor tile piece (5/5) left next to the bust stand on the floor.
Take the shamrock left next to the door on the ground.
Take the bust.
Hand over the wedding ring (Spoiler 23) to Livy.
Enter the bedroom.
Take the shamrock on the door of the hanging closet on the far left and zoom in on the bed.
Take the angel.
Screenshot
Exit the bedroom and return to the Reception Room.
25. Reception Room
Zoom in on the broken part of the floor.
Place the 5 floor tiles (Spoiler 21, 22, 23, 24).
Click and drag the tiles into the empty spaces. A tile at the right place will look and changes the color.
Finishing this puzzle will open the piano stool. Take the tuning fork.
Zoom in on the door on the far left and use the tuning fork at the slot.
Screenshot
Enter the Parlor.
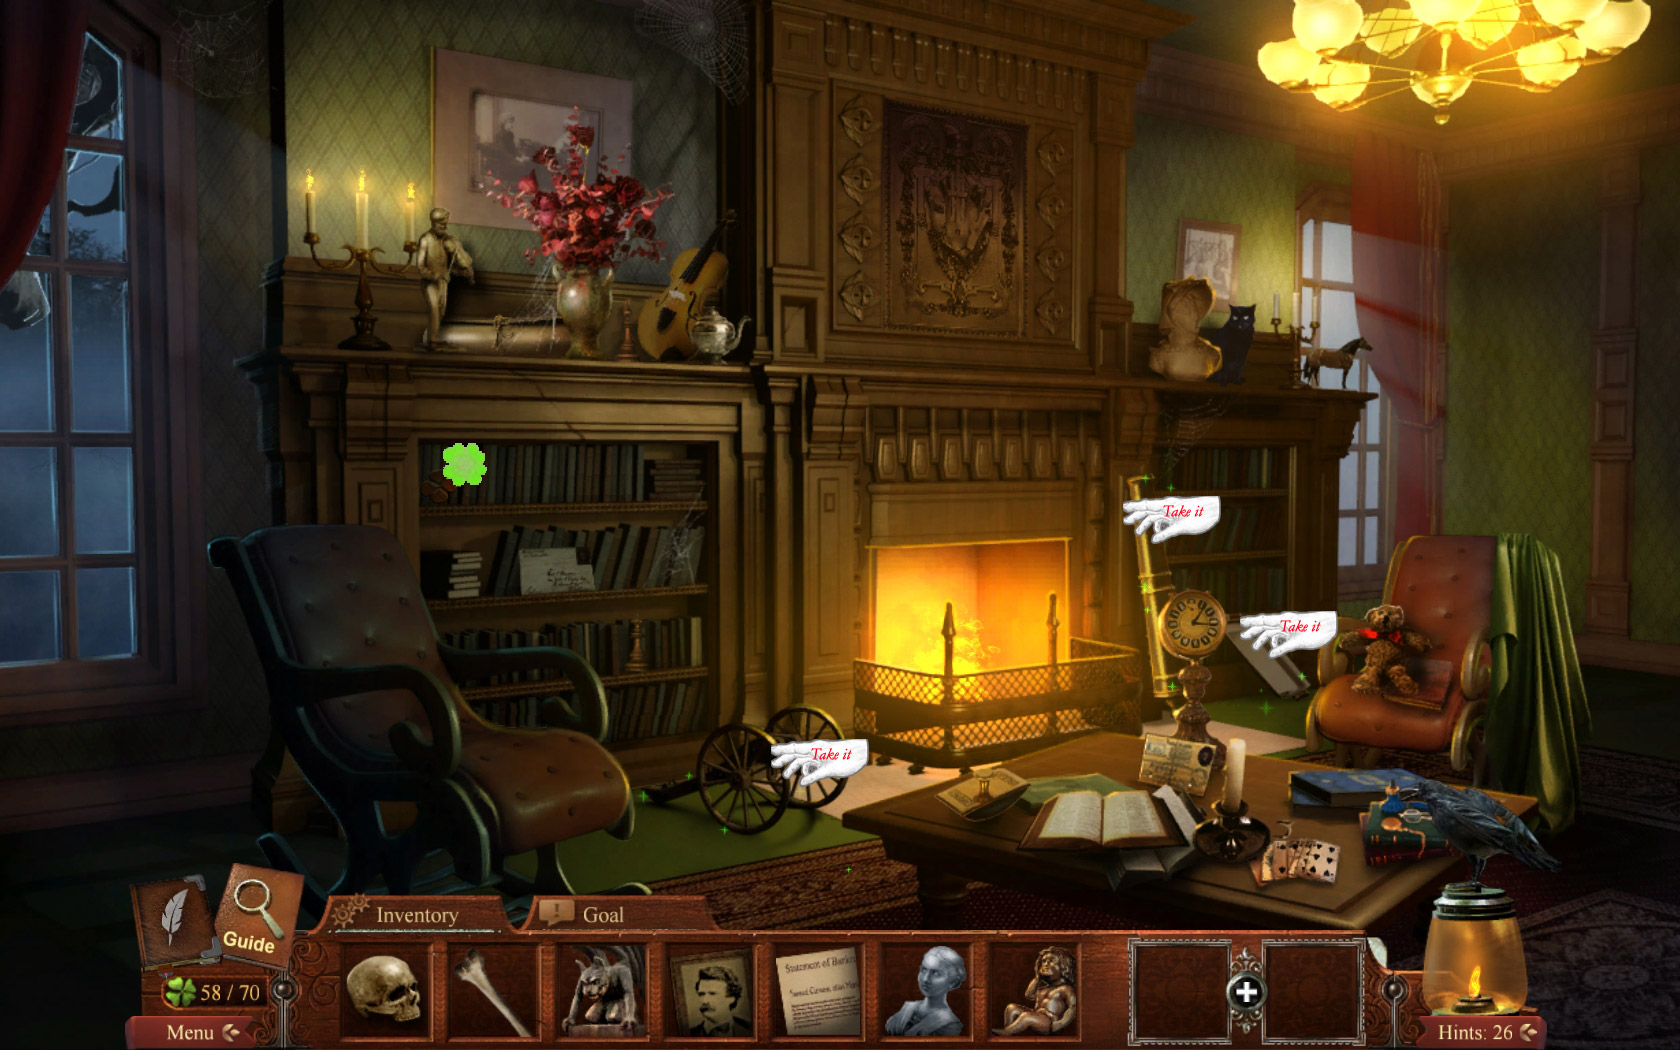
26. Parlor/Children's Room
There is one shamrock at the upper book shelf on the left side.
Take the canon mount, the canon and the serving tray.
Combine the canon mount and the canon.
Screenshot
Exit the Parlor, go upstairs and left to the Upper Hall.
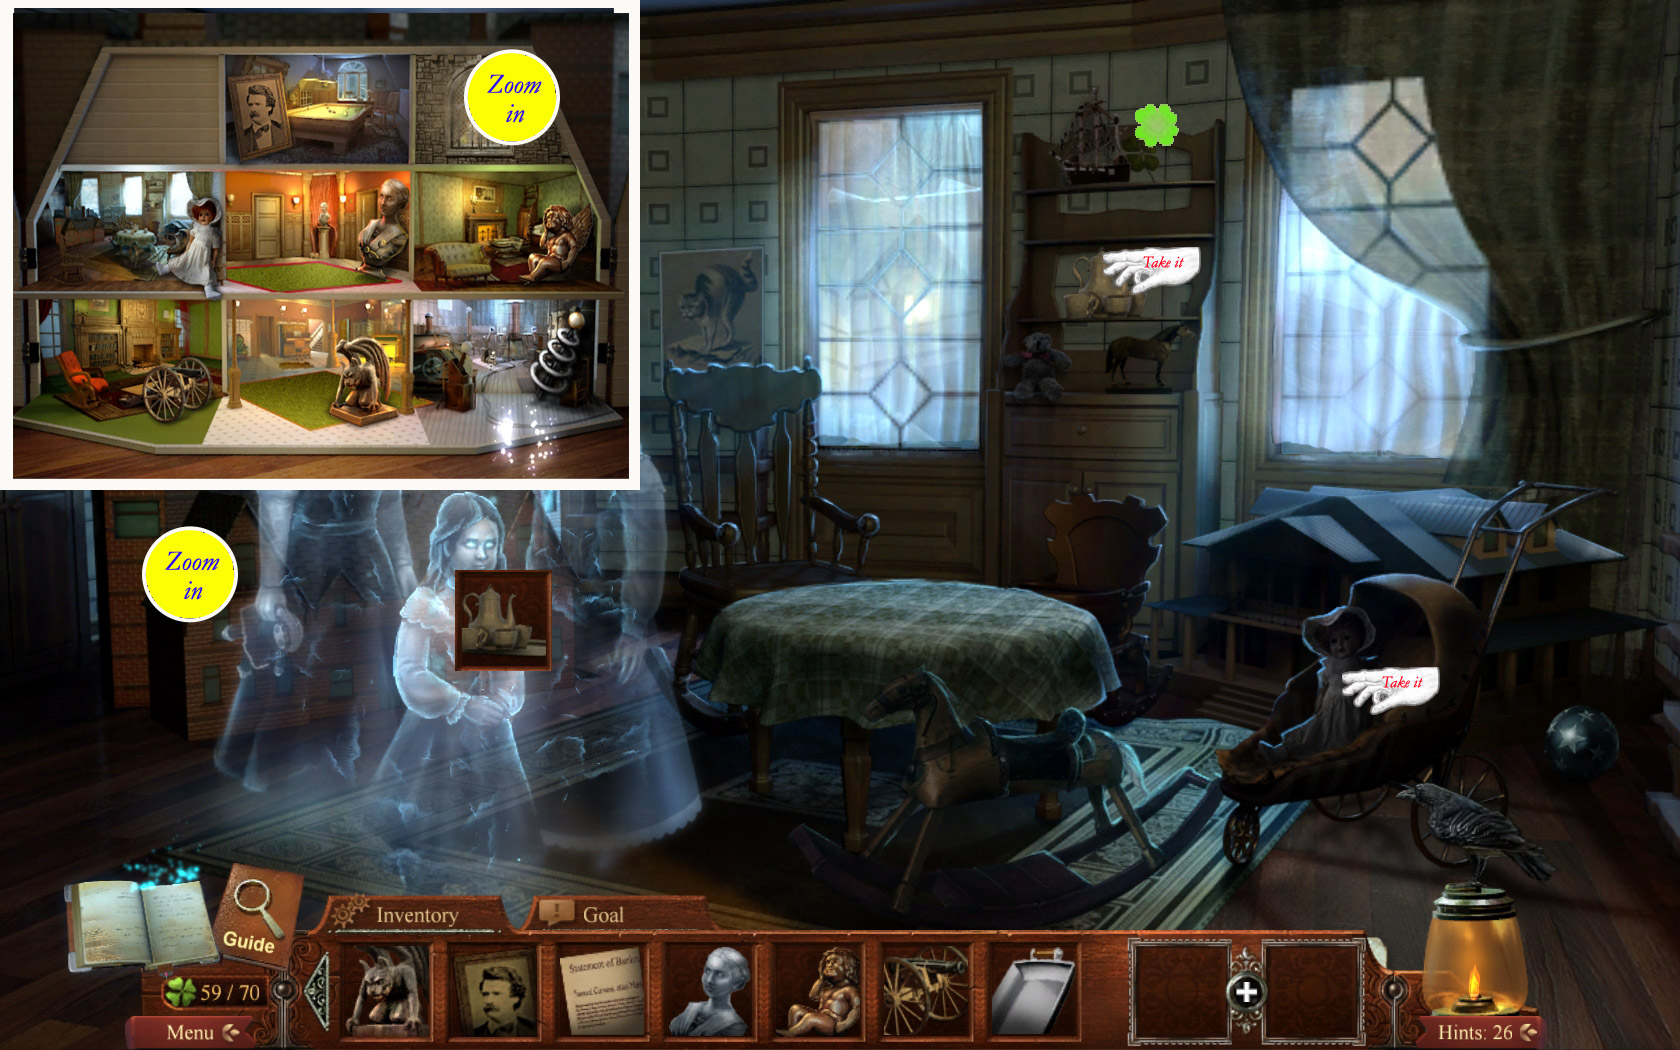
Enter the Children's Room on the left.
Take the shamrock and the tea service, both on the shelf at the back between the windows.
Combine the tea service with the serving tray to get a tea set and give this to the children.
Take the doll from the chair on the right side.
Zoom in on the doll house and place the gargoyle (Spoiler 21), the tesla coil (Spoiler 22), the painting (Spoiler 23), the bust and angel (Spoiler 24), the canon (Spoiler 25) and the doll in the appropriate silhouettes. This will open an additional room top right in the doll house.
Screenshot
Zoom in to discover the Secret Room.
27. Secret Room/Hilltop Study
Zoom in on the door and take the key.
Take the shamrock from the door of the book shelf in the far left corner and the raven from then paper on the desk.
Screenshot
Go back until you are in the front yard and go right up the stairs.
Hand over the bankruptcy document (Spoiler 23) to the ghost.
Take the raven and the shamrock, both on the left side and use the key to open the lock.
Screenshot
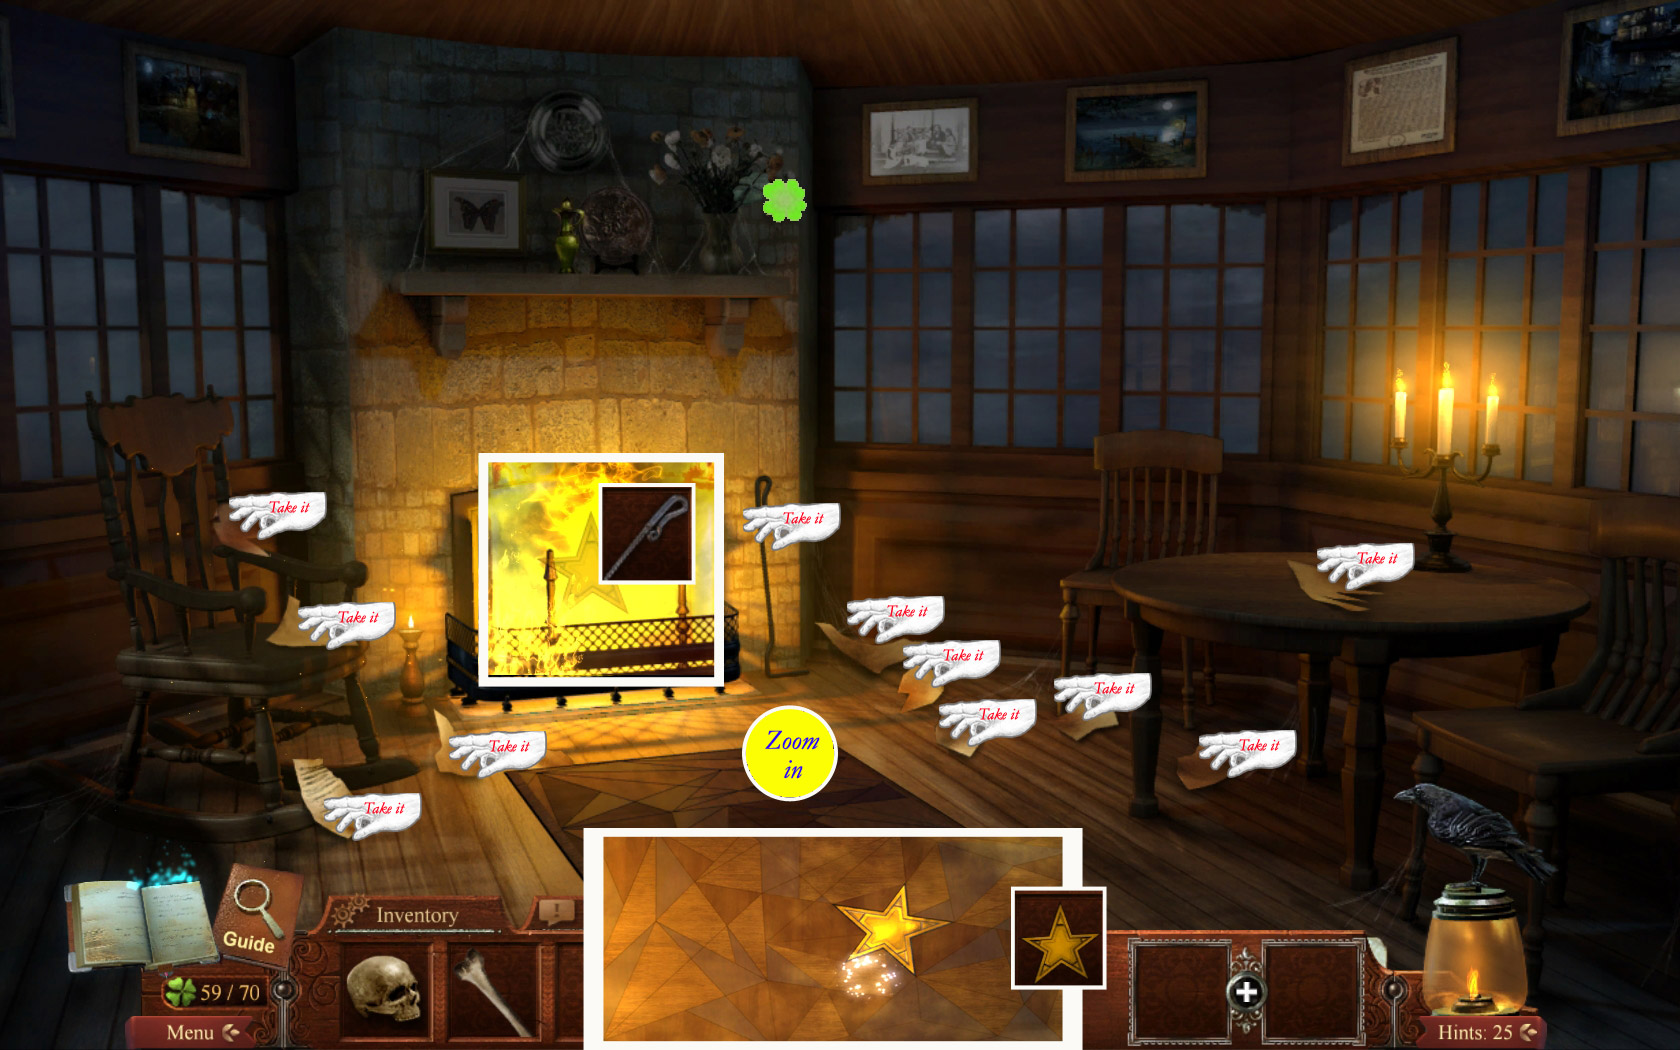
Collect the shamrock on the top left of the fire place mantle.
Take the poker and the pieces of the manuscript.
Use the poker to get the star out of the fire place.
Zoom in on the carpet and place the star into the star pattern on the floor.
Screenshot
Enter the secret passage.
Enter the ship.
Chapter 6: Reveal the Plot
28. Landing Stage/Main Square
Take the shamrock from the barrel between the swords on the left side and the raven from the lamppost on the far right side.
Zoom in on the floating wood on the right side and take the cannon balls from the skeleton.
Screenshot
Go straight ahead to the Main Square of Deptford.
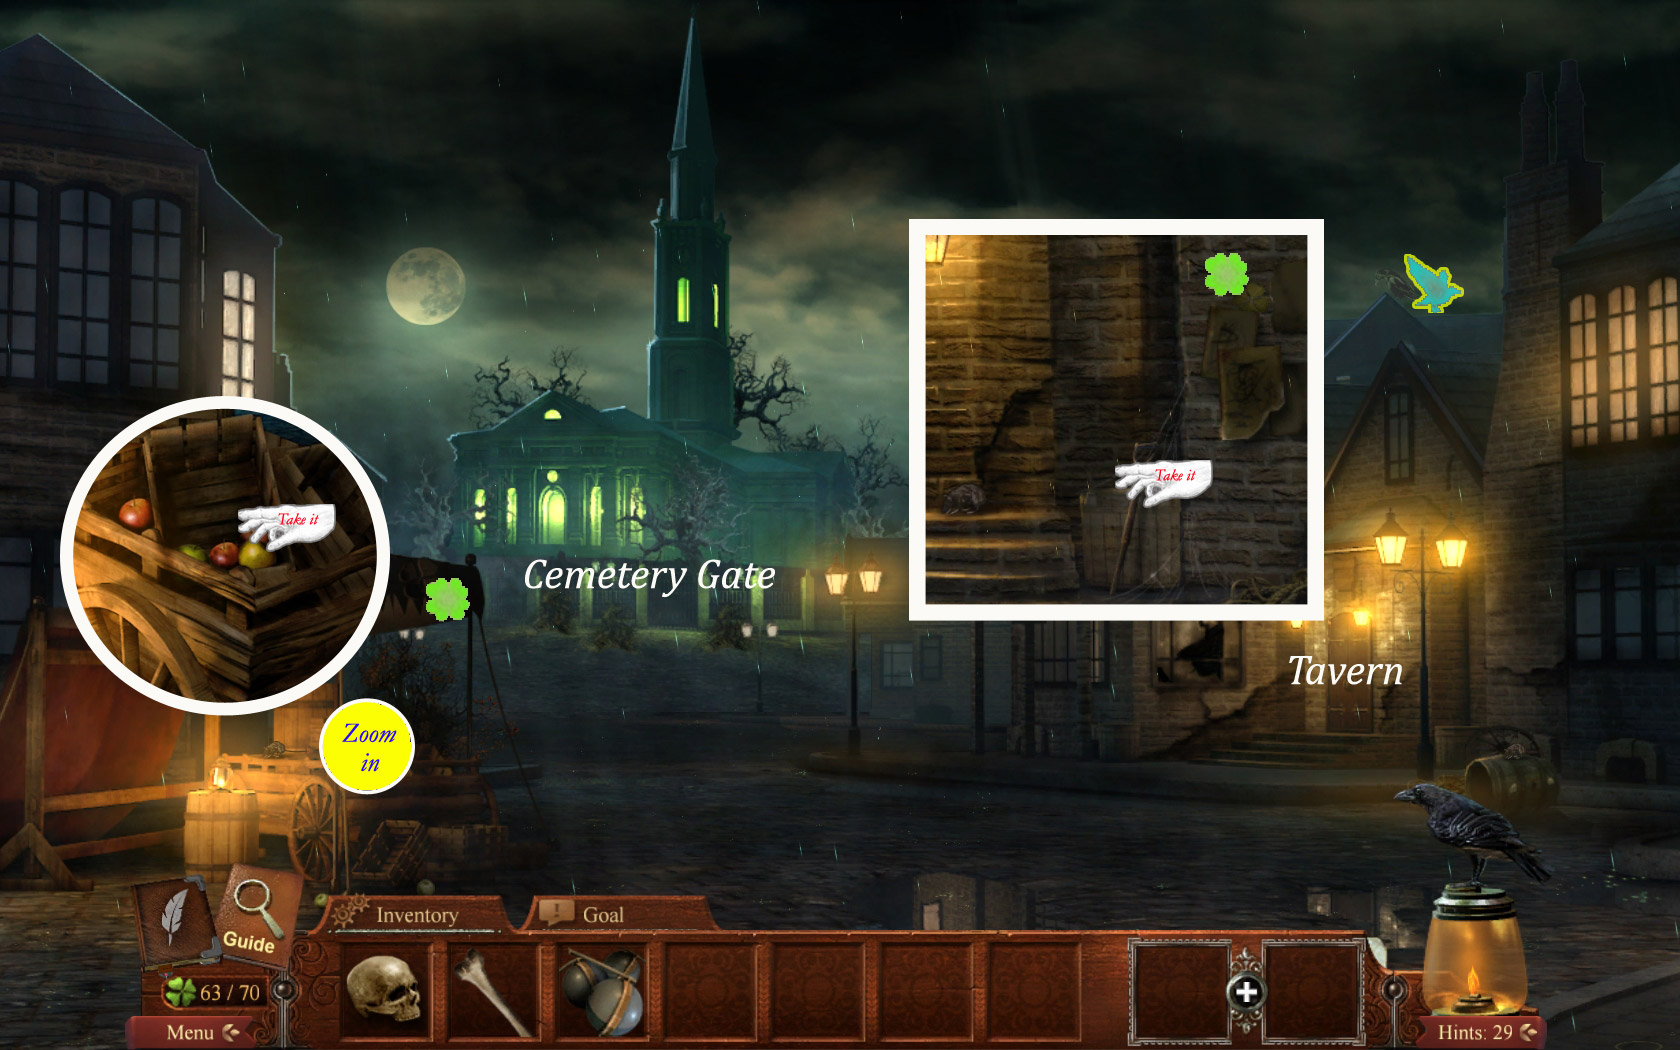
Take the shamrock from the vendor stand's blind on the left and the raven from the roof on the right side.
Zoom in on the vendor stand and take the apples.
Go right to the Tavern's entrance and take the shovel handle right next to the stairs.
Collect the shamrock from the right wall between the posters.
Screenshot
Enter the Tavern.
29. Tavern
Collect the shamrock from the far right corner.
Grab the bottle and the turkey on the far right.
Place bottle, turkey and apples (Spoiler 28) on the table.
Talk to the ghosts to receive a key.
When the ghosts are gone, take the cannon barrel leaning against the back wall behind the left ghost.
Screenshot
Exit the Tavern to the Main Square and go straight forward to the Cemetery Gate.
30. Cemetery Gate/Cemetery
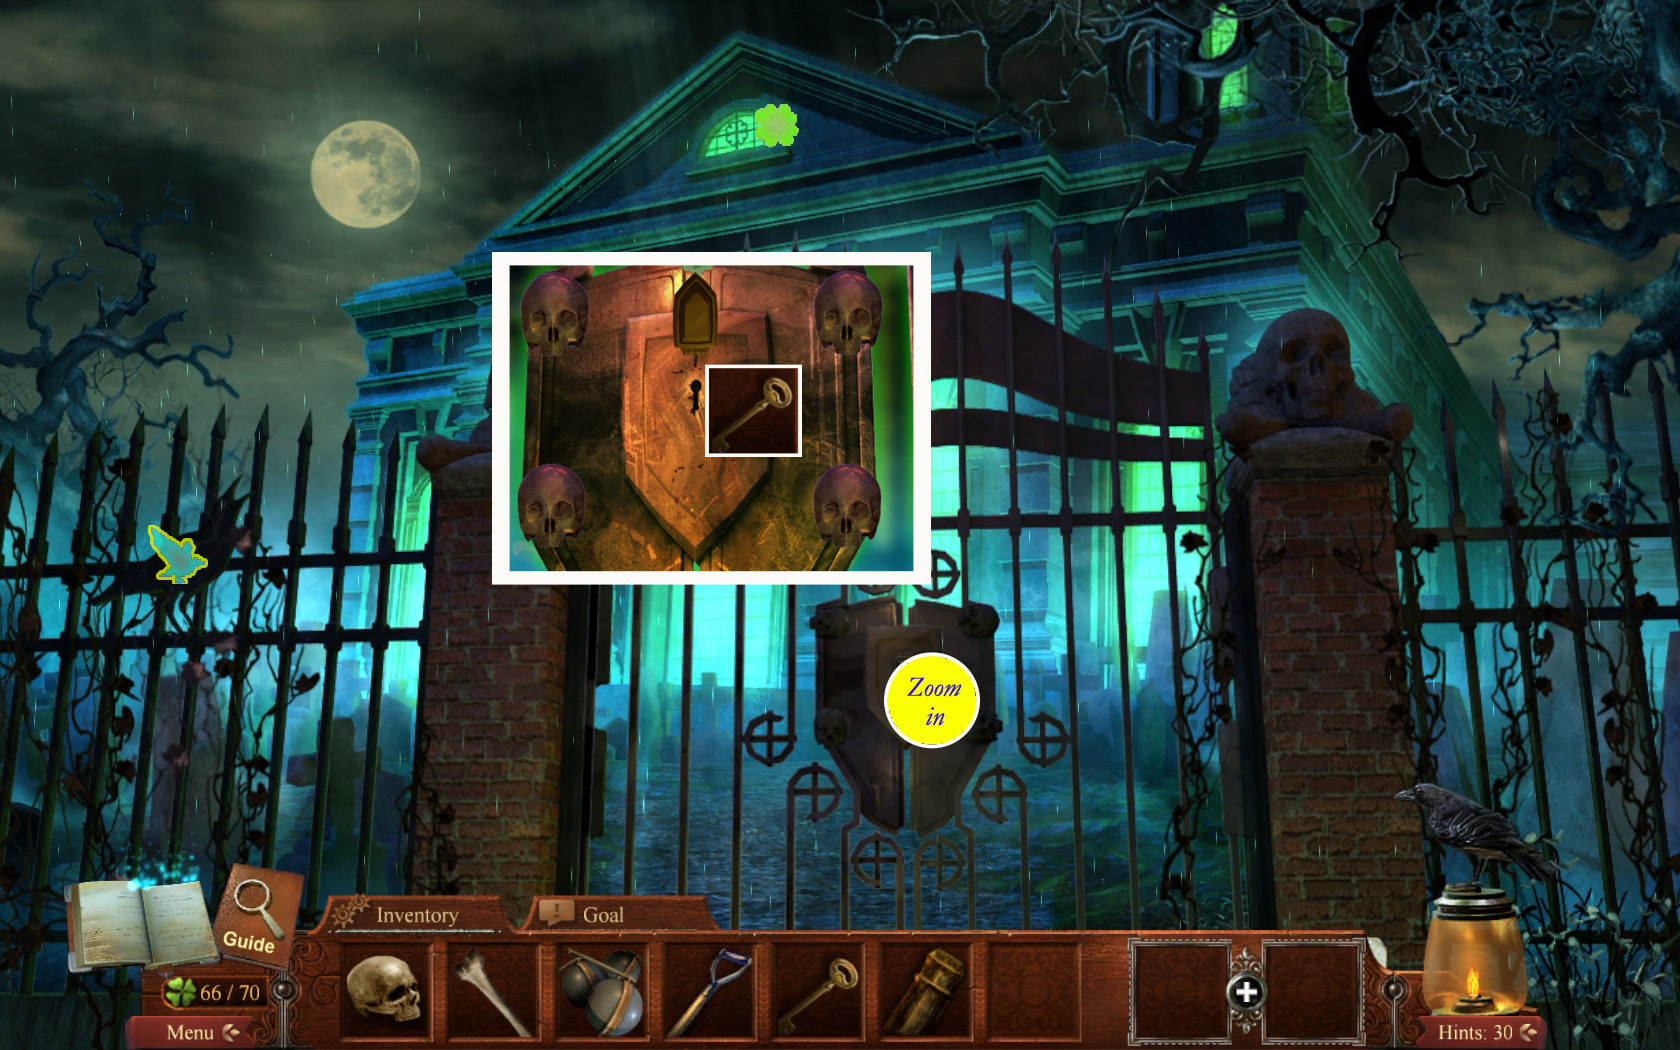
Collect the shamrock from the top window of the church and the raven from the gate on the right.
Zoom in on the gate.
You have to make sure that at last all skulls are upside down.
Start with the skull low left, low right and top left - move them all upside down.
Move the skull top right so that he looks to the right.
The skulls will turn; use the key (Spoiler 29) to open the gate and enter the cemetery.
Screenshot
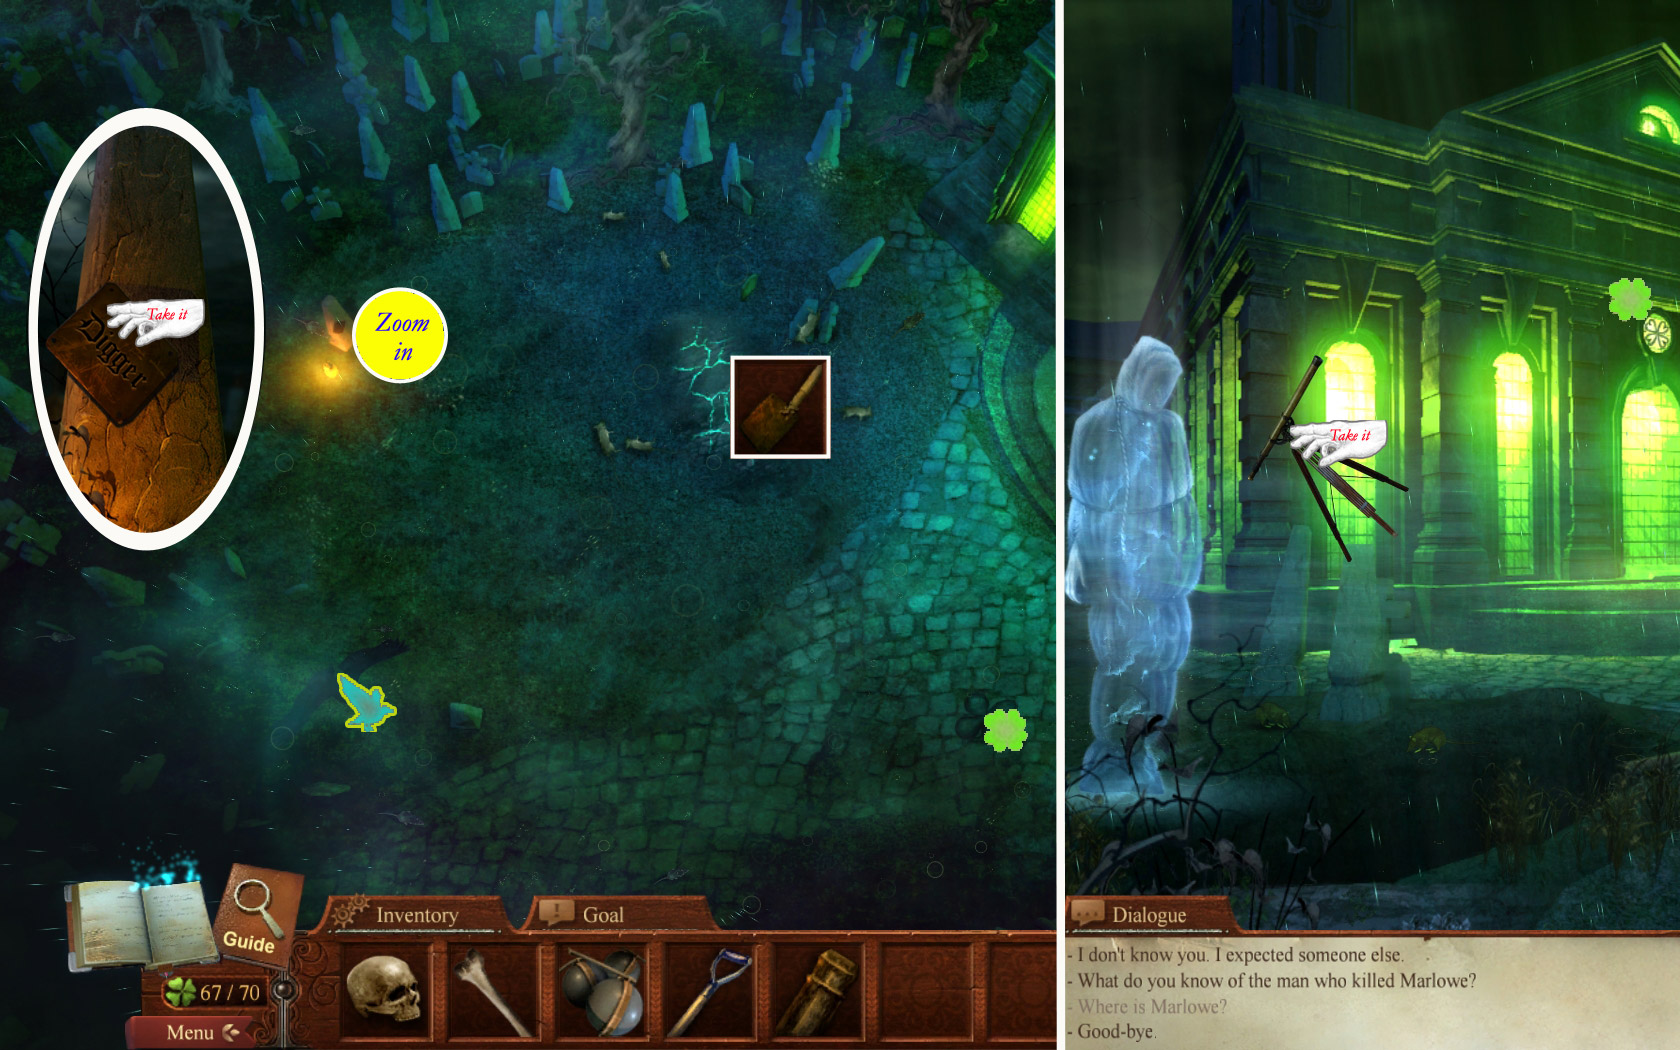
Take shamrock from the ground in the low middle of the scene and the raven from the low right side.
Zoom in on the highlighted gravestone on the far left side and take the name plate.
Combine the name plate with the shovel handle (Spoiler 29) and use the shovel on the grave on the left, next to the church entrance.
Talk to the ghost and take the aiming tripod.
Collect the shamrock from the window above the entrance.
Screenshot
Return to the Landing Stage.
31. Landing Stage
Place the cannon barrel (Spoiler 29) on the cannon mount, then the cannon balls (Spoiler 28).
Place the aiming tripod (Spoiler 30) right next to the cannon.
Click the cannon to access a mini game.
Your goal is to find all boats. The number and the size you can see in the top right corner.
The number in the top left corner shows how many cannon balls you have left.
The numbers along the grid's sides indicates how many squares in this row or column are occupied by a ship.
Click a square to fire a cannon ball.
A hit will be shown in green; when you hit all of the necessary squares the ship will be revealed.
If you use all cannon balls before revealing all ships you will have to start over.
This puzzle is random, the positions of the ships will change with every new start.
Screenshot
When you are done your ship appears; enter it.
32. Outside/Inside Church
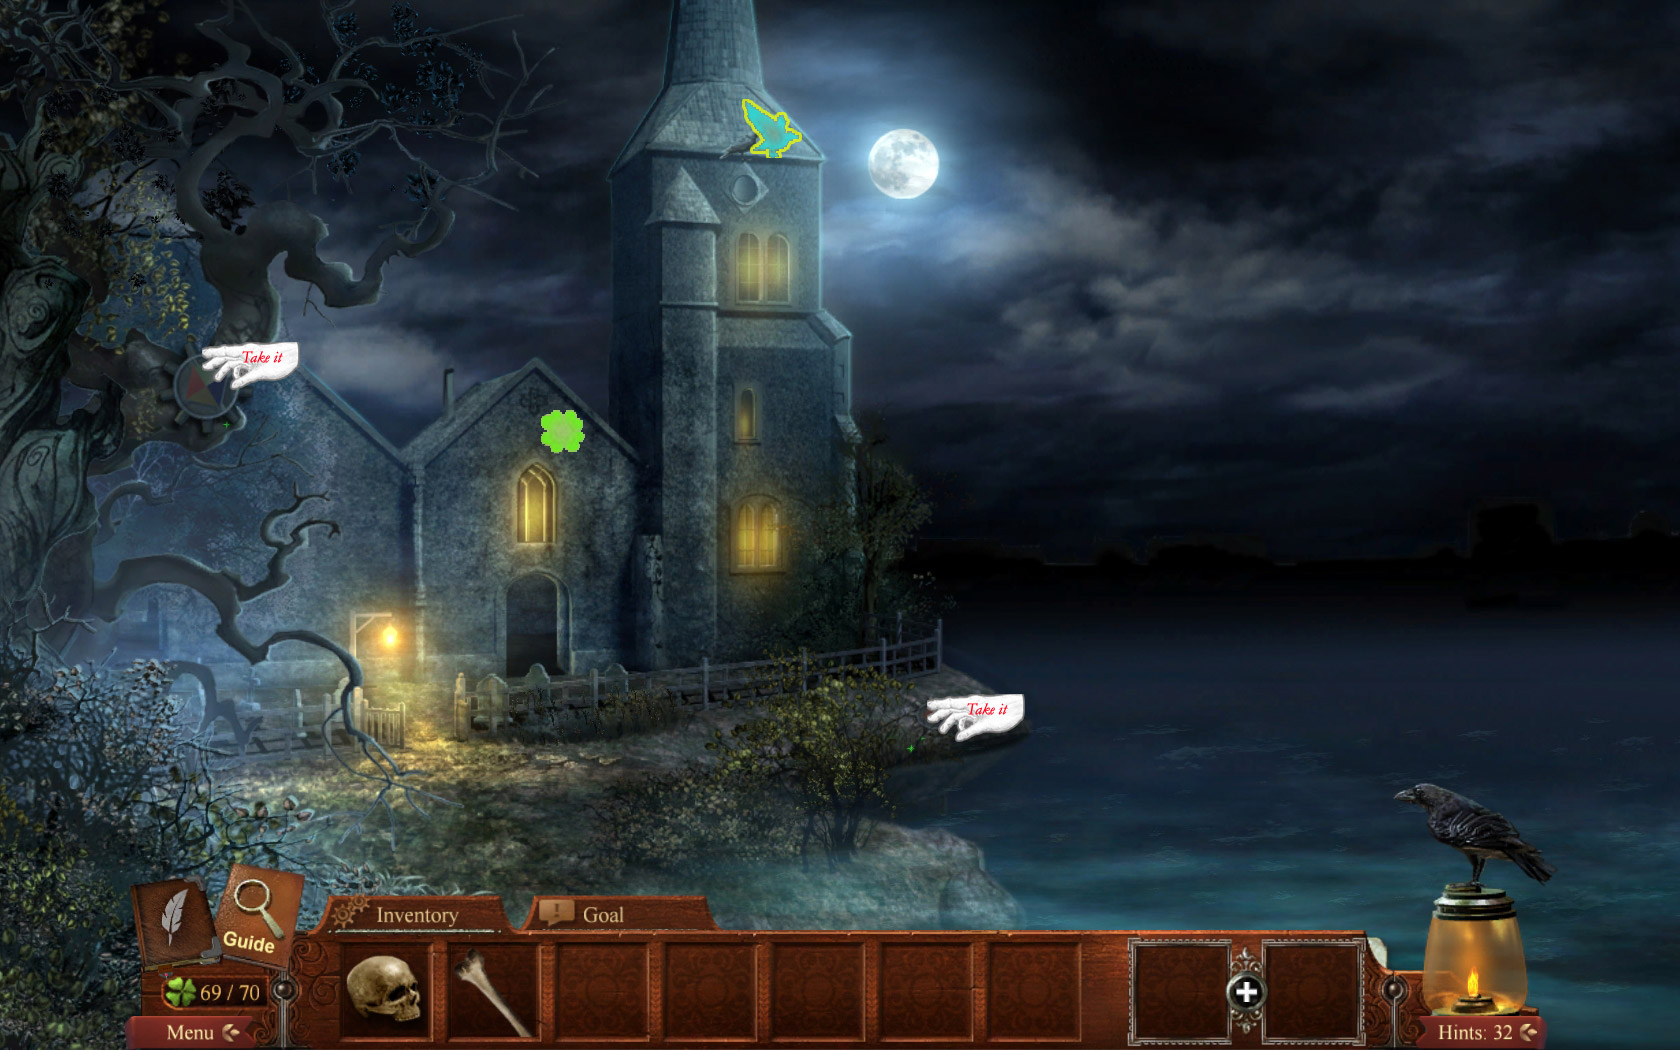
Get the shamrock and the raven from the church.
Take the 2 gears (2/4) and enter the church.
Screenshot
There is a shamrock above the altar.
Collect the items: 2 window pieces, 4 fresco pieces, 2 incense burner, a book, a cross, a gear (3/4), and a candle holder.
Now replace all items to their proper places.
The 4 fresco pieces go in the wall on the left (will be placed automatically in the right spot), the two window pieces at the windows top right above the tomb.
Hang the incense burner from the stands to the left and right of the altar and place book and cross on the altar.
Place the candle holder on the stand in the far left.
This all will open the door to Walsingham's tomb; enter.
Screenshot
33. Walsingham's Tomb
Collect the shamrock on the right and the raven on the left window.
Take the gear (4/4).
Zoom in on the tomb and place the gears.
Clicking the arrow button at the bottom will rotate the middle gear 90 degrees, and the middle gear will turn the small gears as well.
Your goal is to swap the small gears, so that the rotation will match the colors of all gears.
You can always use the arrow button to see how the positions will be.
Screenshot
The tomb will open and reveal a hidden passage. Go downstairs.
34. Labyrinth
At the entrance of the labyrinth you will three ways to go.
Take the shamrock from the ground.
Go to the left into the catacombs and take the shamrock from the upper rest place on the right side and the cross key from the wall straight ahead.
The right cave is empty, but if you still need shamrocks or ravens, you will find one of each kind there.
Enter the hallway of the middle cave.
After the first click forward, you can find a shamrock at the left wall.
Go one more step forward.
Take the shamrock on the top right side of the gate and place the cross key in the middle.
Enter the Well Chamber.
There is a shamrock at the lantern in the far middle
Go right into the Snake Chamber, take the shamrock and the star key (1/2).
Exit and go left to the Altar Chamber Entrance.
There is a shamrock at the low right side of the arch.
Go 1 step further into the Altar Chamber.
Take the shamrock from the ground low left side and the star key (2/2) from the pedestal in the middle of the chamber.
Go to the left, take the shamrock from the lantern top right side and use the two star keys to open the gate.
Enter the Hall of Skulls and take the shamrock at the left wall, next to the torch.
Go forward to the Labyrinth Hub. There you have the left and right Claw Chamber and in the middle the Tomb Doorway.
Enter the left Claw Chamber and take the key blade; there is also a shamrock on the left wall.
Enter the right Claw Chamber and take the key handle, there is a shamrock at the left side of the claw as well.
Combine the key blade and key handle to get a dagger key.
Go to the Tomb Doorway and use the dagger key to open the gate; there is a shamrock at the right torch.
Enter the Tomb.
Take the Pardon.
Take the shamrock on the far left side.
Now go 5x back and to the right (there is a shamrock top right next to the open gate) and 1x forward.
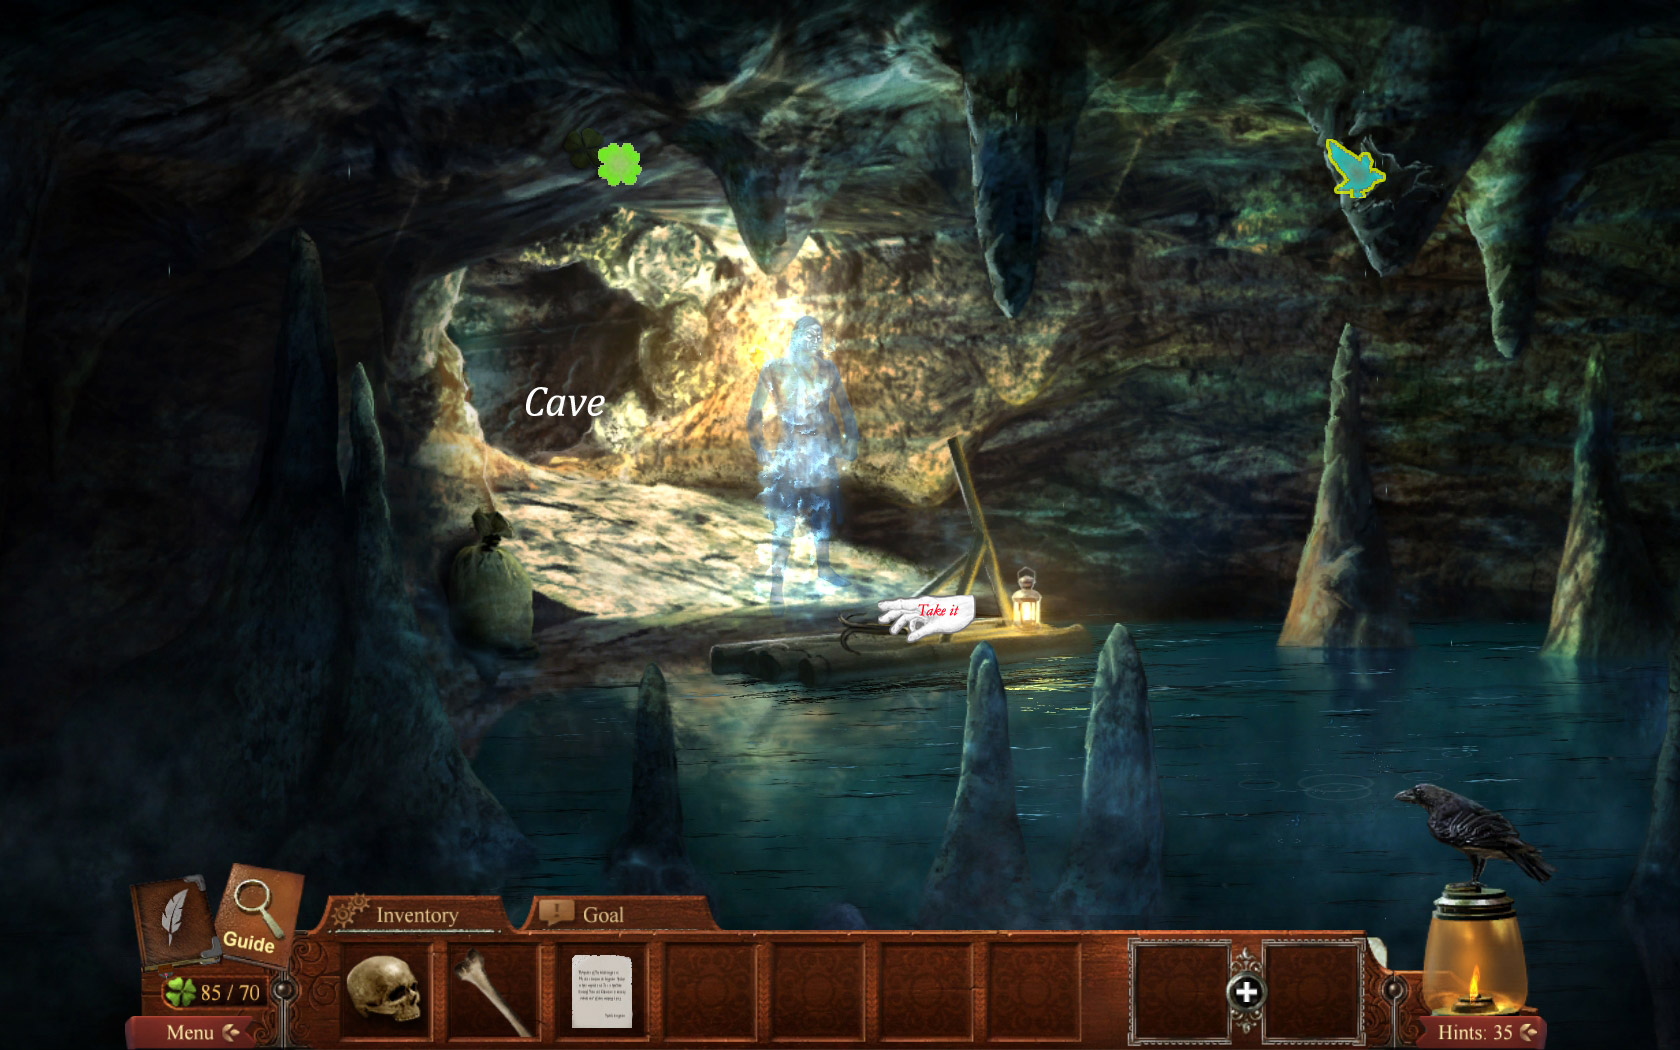
35. Cave/Cave Shore
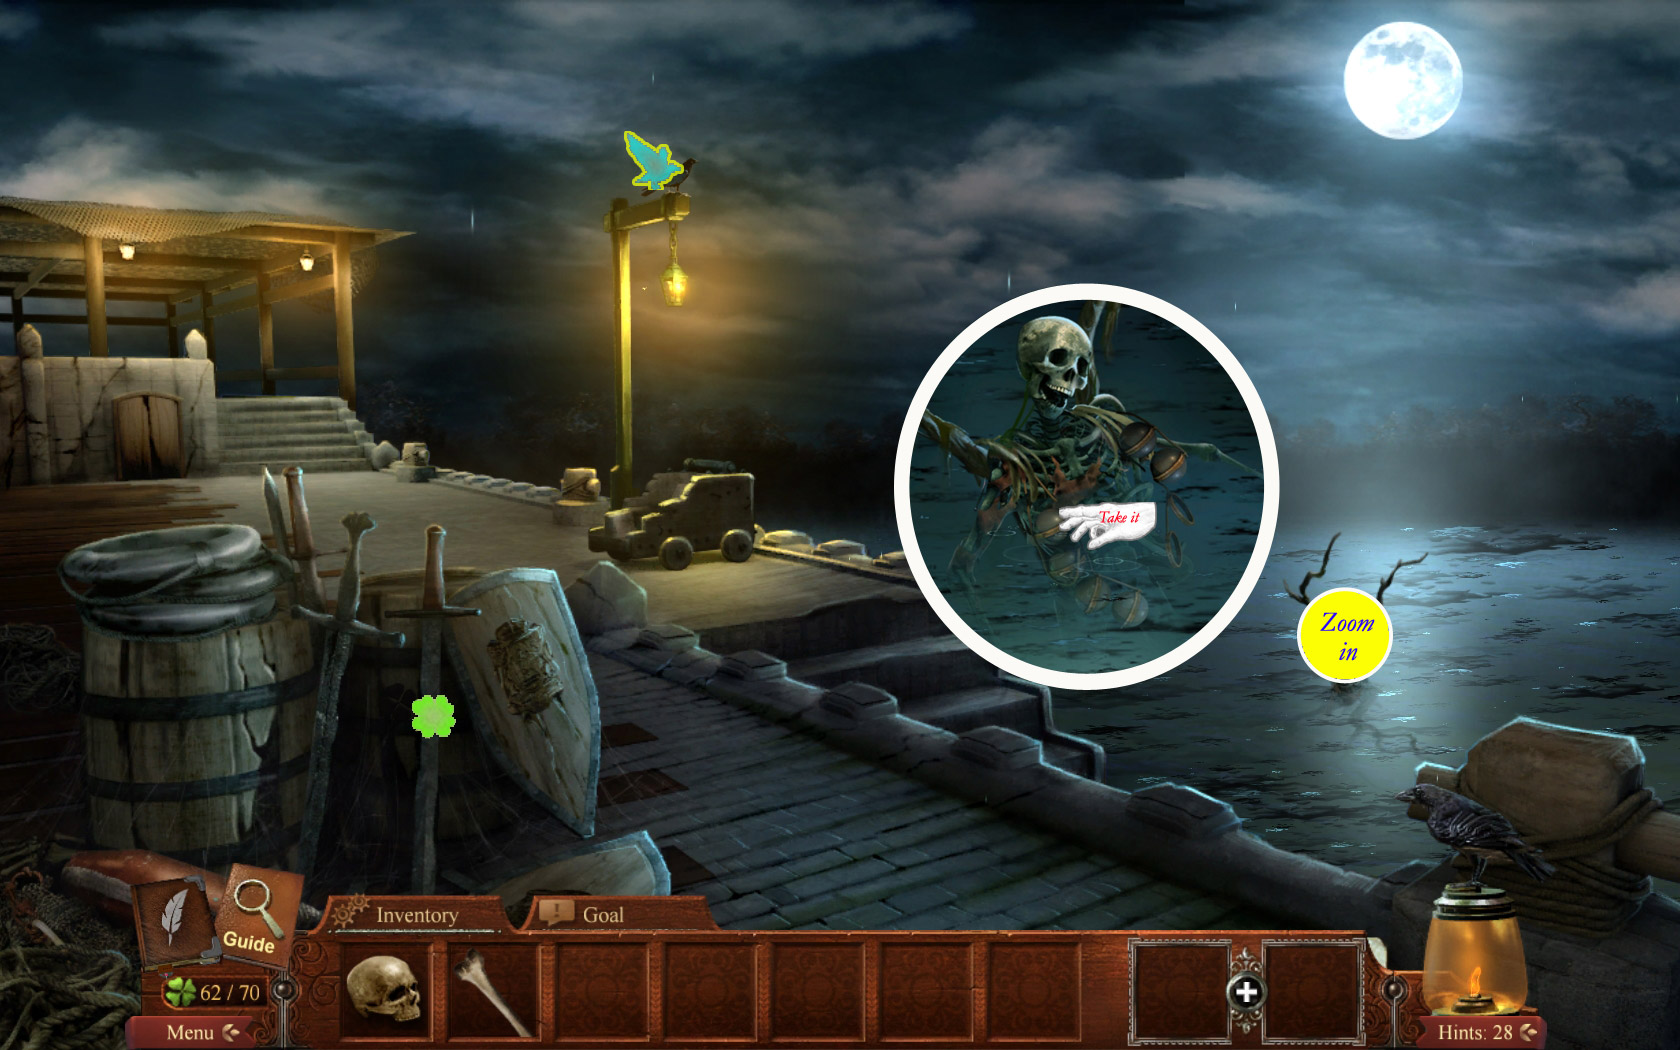
Give Joe the Pardon (Spoiler 34) and take the leg bone.
Take the hook from the raft, the shamrock left above Joe and the raven on the right upper side.
Screenshot
Follow Joe into the cave and the rope on the low left side.
Combine the rope and hook to get a grappling hook.
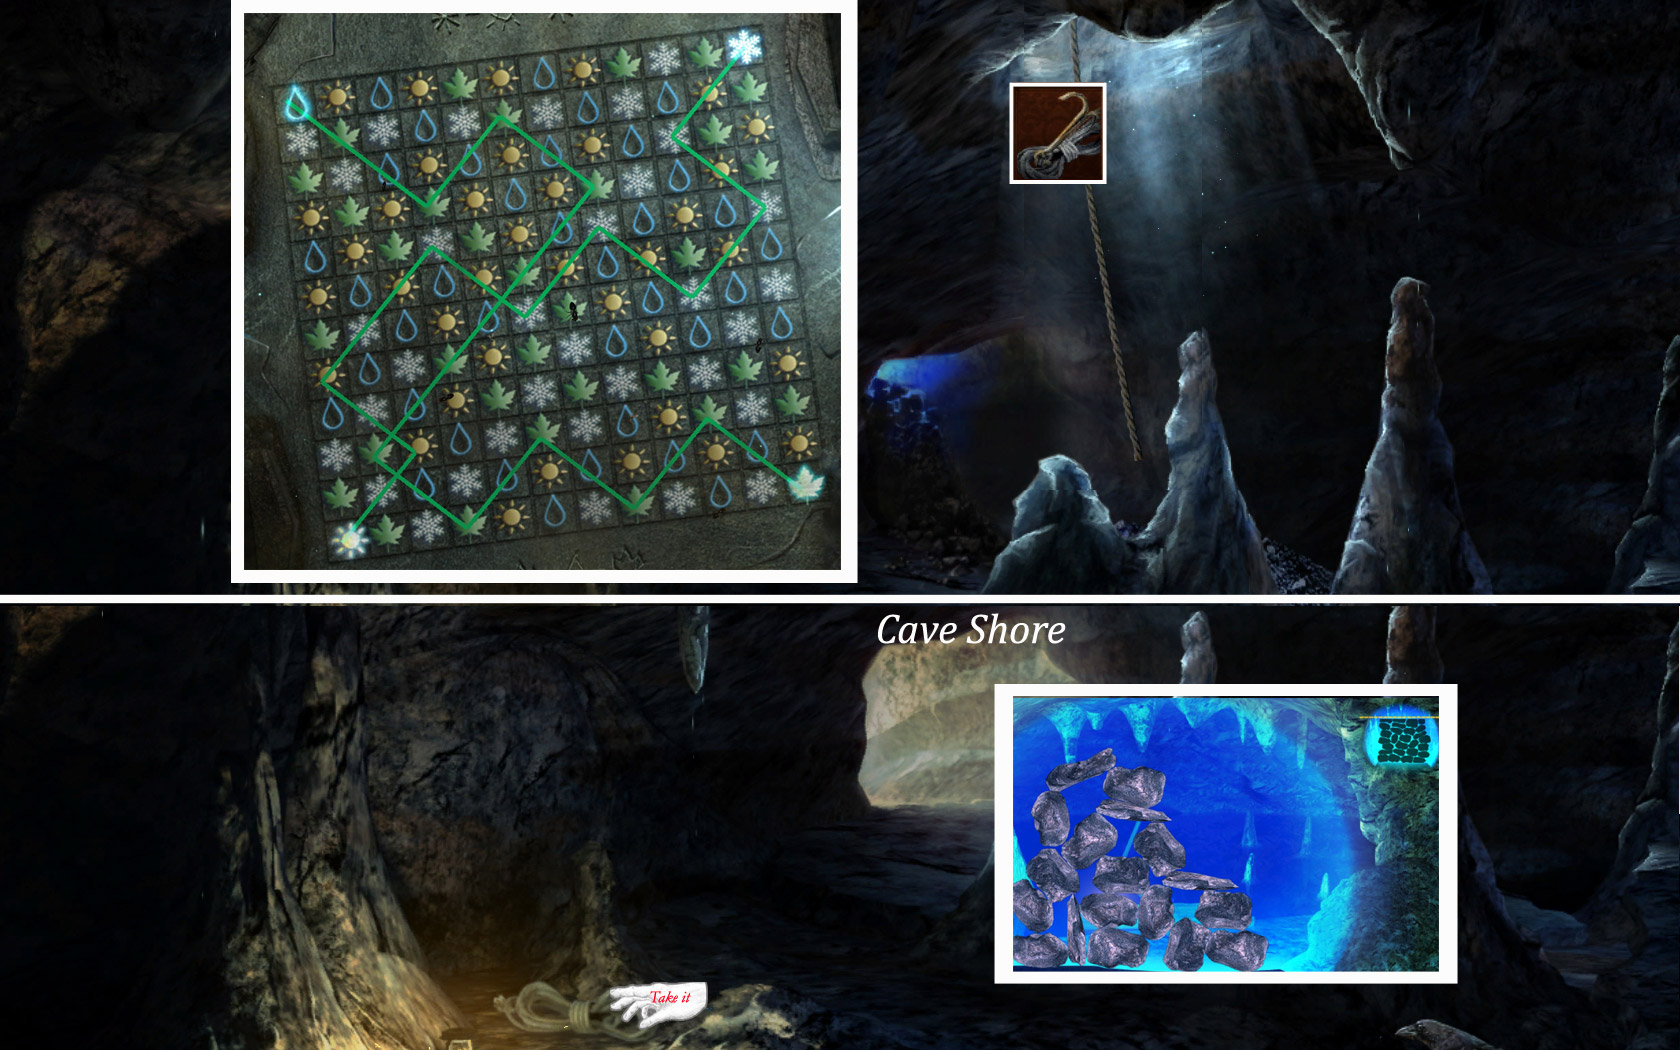
Go one 1 Step further.
Your goal is to build a wall. On the top right you can see how far you have to build.
Click to place the stones hanging at your curser.
If one of the stones falls down, you will have to start over.
When you are done, use the grappling hook at the exit on the top.
There is one more obstacle.
You will need to connect the symbols top left and top right with their opposite part low left and low right.
Alternately click the snow and sun symbol (water drop/leaf).
Symbols always need to be connected diagonally.
Each possible connection will be highlighted; if there is no further move, you will have to start over. Simply click the symbol at the top again.
Screenshot
You are at the cemetery again. Go backwards two times.
36. At the River
Zoom in on the shed and play the search scene to obtain a key.
Go back to the Crossroad and take the pelvis on the left way.
Go along the right way two times.
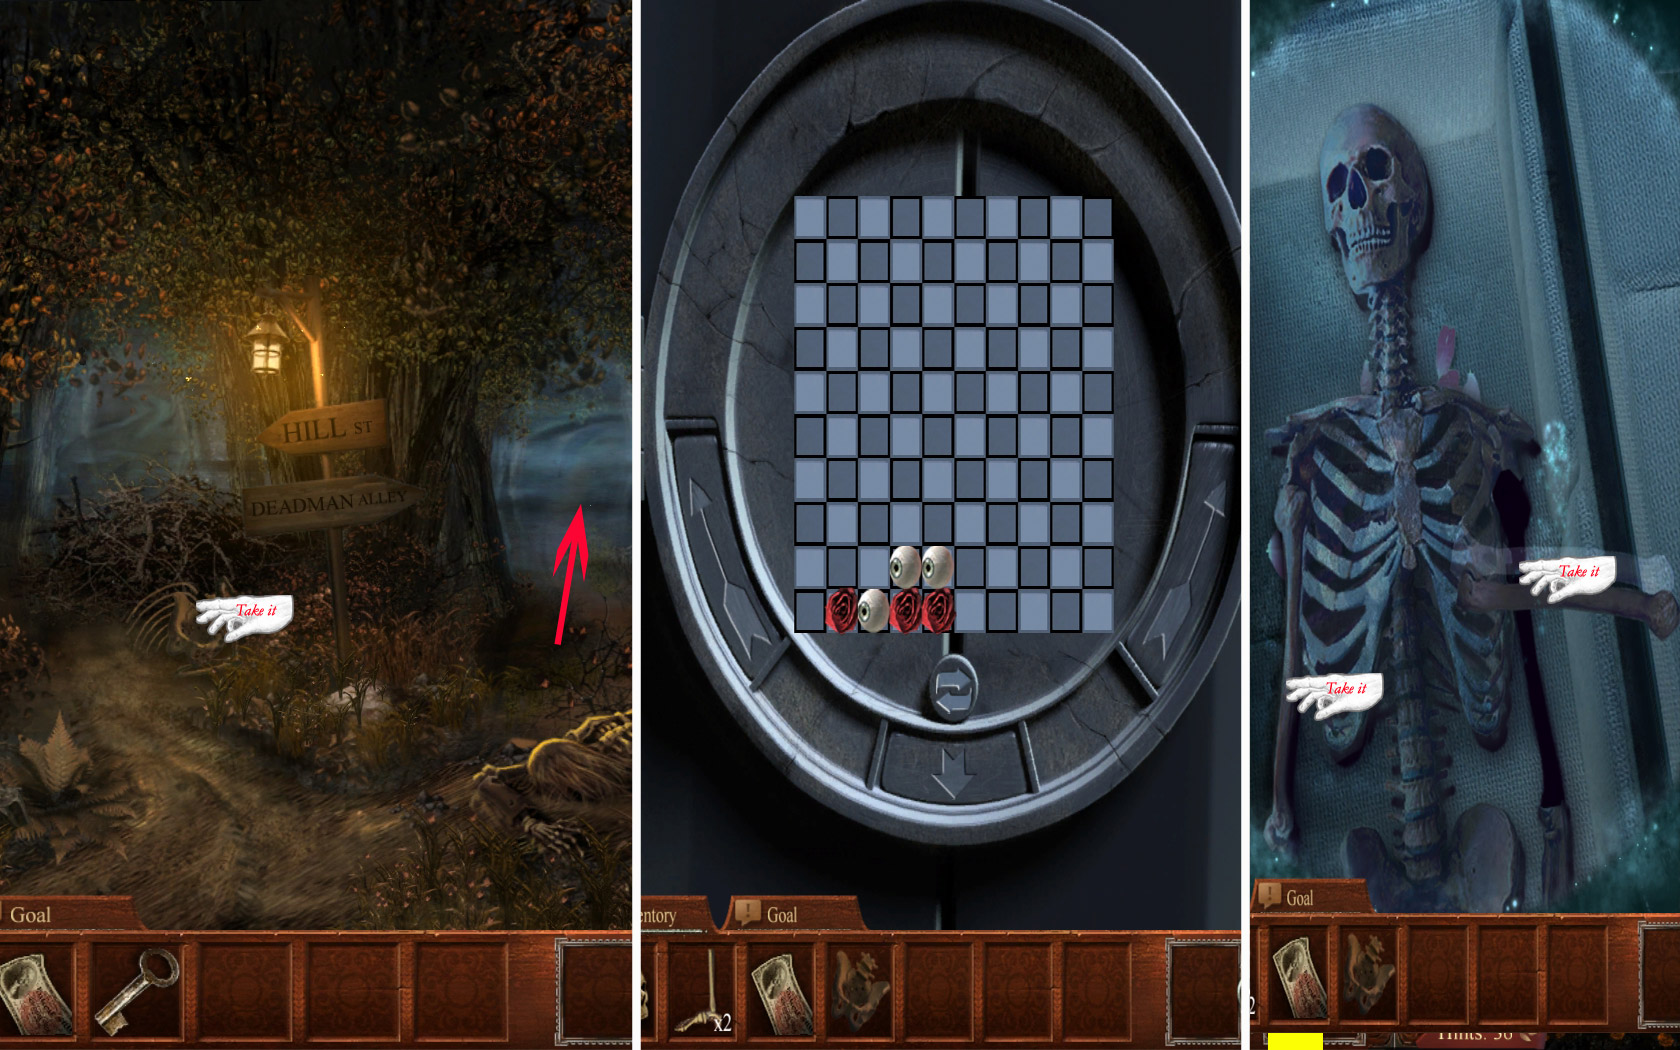
Zoom in on the carriage and use the key to open it. This will activate a puzzle.
You will need to bring the symbols to groups of three of a kind to make them disappear.
To do so use the left, right and down arrows.
To restart the puzzle use the double arrow.
When done, click the coffin to open and click to remove all flowers and petals.
Take the left and right arm bone.
Screenshot
Return to the Cemetery.
37. Finale
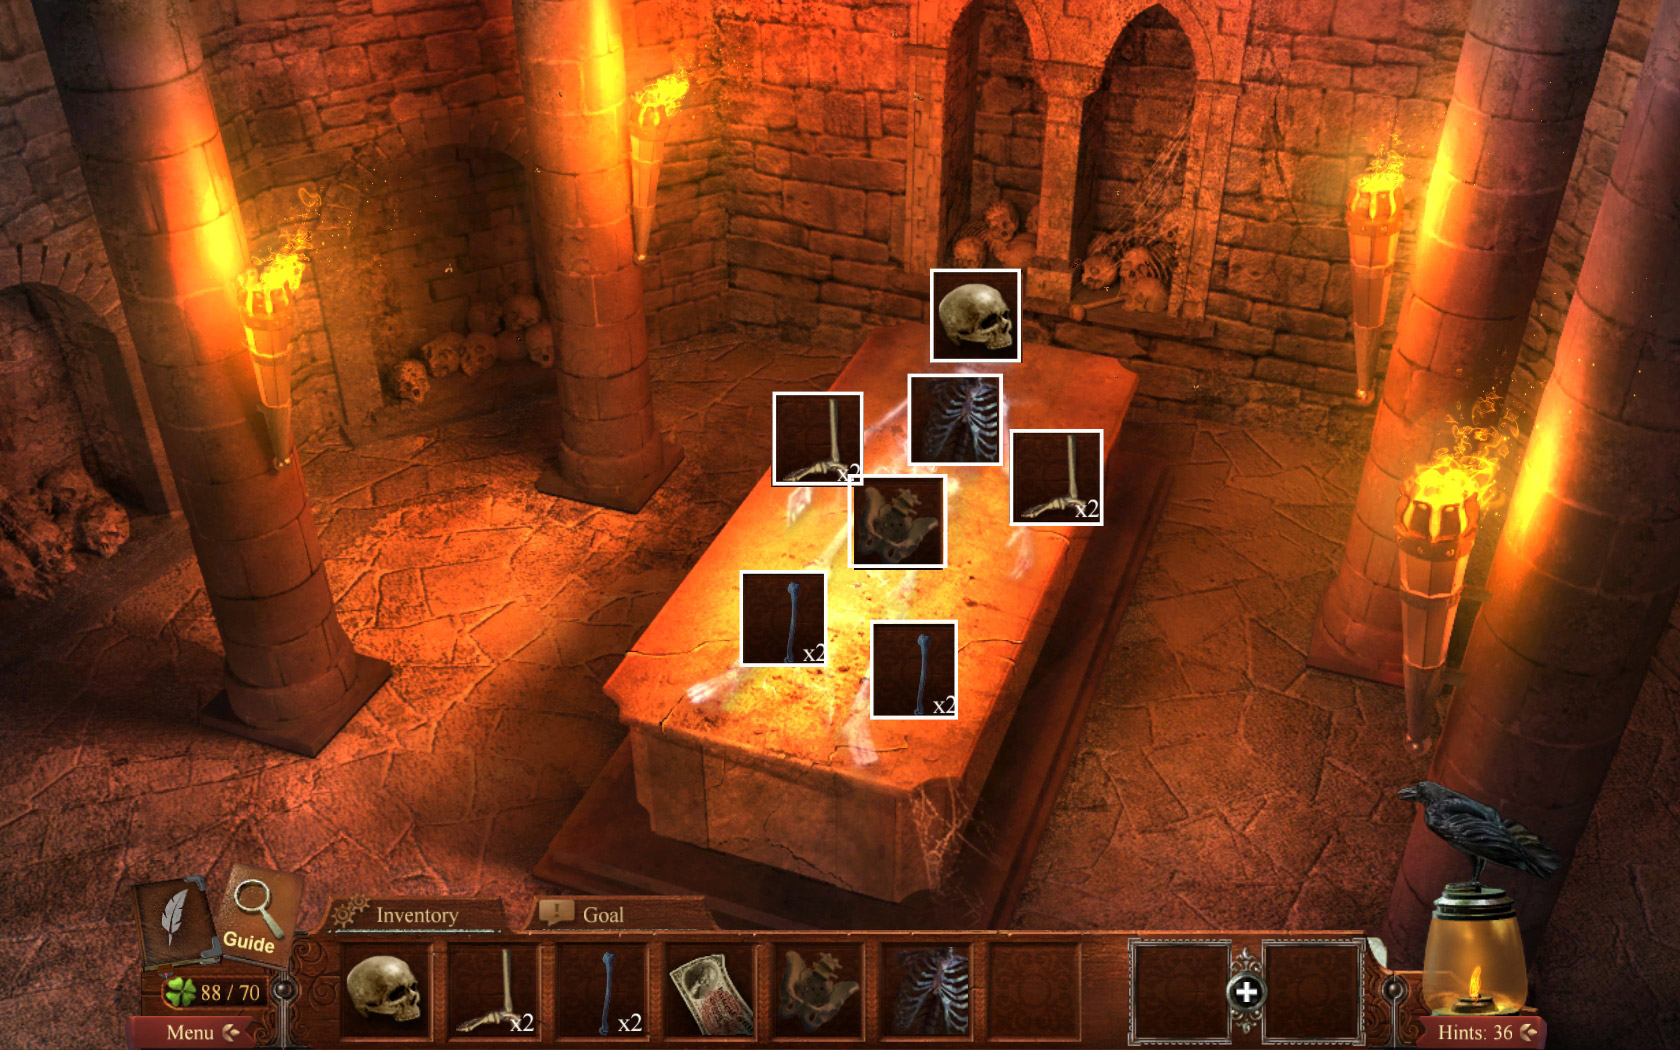
Go down the grave and towards the cave.
Take the rib cage.
Go 1x back and 5x forward.
Replace the two leg bones, arm bones, skull, pelvis and rip cage.
Screenshot
Enjoy the END!
Thanks to Kaleigh for the walkthrough!
Posted by: Mike |
June 2, 2011 8:53 PM
|
June 2, 2011 8:53 PM