
Monkey GO Happy Roundup 7
 It's our seventh batch of monkey puzzles. If you're feeling particularly lucky today, try your hand at some of these below!
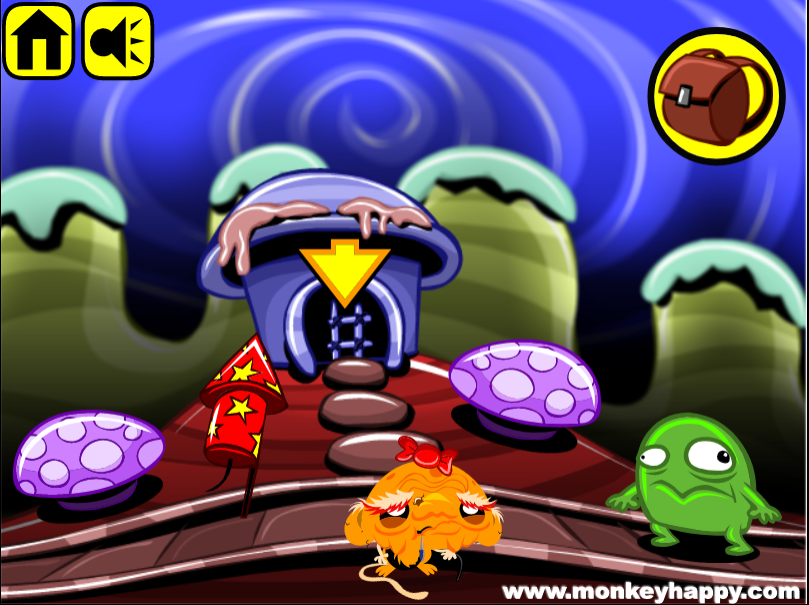
You're in a colorful scene with a firework (perhaps leftover from New Year's celebrations?) in the foreground, and a weird creature demanding...oval shapes? Help figure out what's going on in here.
In our second stage, the monkey is outside with the burning sun setting slowly in the background. It's time for him to explore inside and solve some weird puzzles to progress!
The third stage continues this setting for our poor little monkey, confused and heading through doors in and out, trying to find his way. Can you solve this one, too?
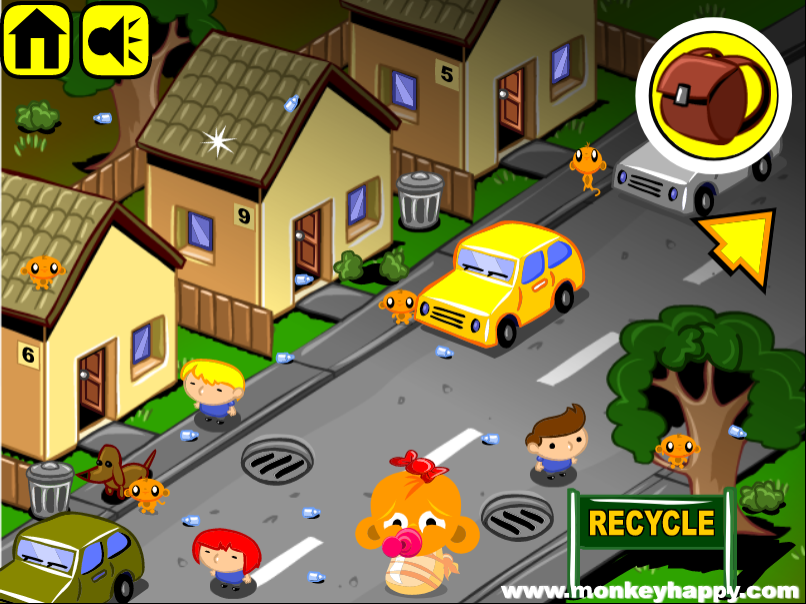
A recycle sign adorns a city neighborhood, but its people seem to scorn it. Just look at only some of the water bottles scattered throughout the city! Help the monkey beautify it by cleaning things up and increase monkey happiness as a fortunate byproduct!


can't wait for the walkthroughs :)
Monkey GO Happy Roundup 7 (Stage 149–152)
Stage 149: Festive Rooms
Exploration
You start off on a road with a green alien guy who wants 20 round things. There's two purple mushrooms and a single unlit firework. There's nowhere else to go but into the mushroom house in the distance!
So descend the ladder to a dimly lit room with a choice of doors to enter. Pick up the 2 candy blobs on the right doorway and lower-right corner and Mini Monkey around the room, and then push the large rock aside to get another Mini Monkey.
Also pick up the candy on the ladder, for a total of 3.
Right path:
Enter the right room, which forks into two more paths! Before you rush forward, take a note of the clue on the wall, and then push the rock aside and pick up 2 candy pieces and the 2 Mini Monkeys.
Enter the right door here. In this room, there's a device that displays shapes and another that displays numbers. Leave them alone for now, and pick up the 2 candy pieces from the room.
Go back and enter the left door, where an almost identical room has 2 candy pieces and also a Mini Monkey.
(You should now have 9 pieces of candy and 5 Mini Monkeys.)
Left path:
Go back and enter the left room, which also branches into two paths. Read the map on the wall (which isn't completely accurate!), and then pick up 2 candy pieces.
Go to the right room, which has the same devices as before. Push the rock aside and pick up the piece of candy and Mini Monkey.
Go left twice to a room with a locked panel that's missing a lever. Push the rock aside and pick up the piece of candy and 2 Mini Monkeys.
Also pick up the candy piece hiding on the ladder, for a total of 2 in this room.
Go down the ladder to another room with two doors. Pick up the 2 candy pieces here.
Go through the left door to find a room with the same devices as before. Pick up the purple pin from the ground, as well as the piece of candy and the Mini Monkey.
Go back and enter the right door for another similar room. Pick up the lever and piece of candy.
You should now have 18 pieces of candy and 9 Mini Monkeys. So close!
One puzzle
Use the clues from both paths to set all five devices correctly.
The map tells you what pattern to put in each device, and the other clue with dots tells you what numbers to use.
For instance, the map tells you that the left room in the basement has a square hump, and the clue from the right path tells you that the number for that symbol is 3.
So you should click the devices in that room once (for the pattern) and thrice (for the number).
Similarly, the right basement room devices should be clicked 2 (number) and 5 times (pattern).
For the room right of the map, it's 2 (pattern) and 1 (number).
For the room left of the dot clue, it's 4 (pattern) and 3 (number).
For the room right of the dot clue, it's 2 (number) and 3 (pattern).
When all the devices are set, place the lever in the slot and pull it to open the locked panel. There's an empty matchbox inside.
Inflated
Leave the rooms and go outside. Those mushrooms seem to be hiding something…
Use the pin to break each of them. Pick up the last 2 candy pieces.
Collection
Give all 20 candy pieces to the alien, who chomps vigorously on them. Pick up the match from his feet.
Spark
Combine the match with the matchbox to light it, and then use it to set off the firework.
As it bursts into a beautiful display, pick up the last Mini Monkey from behind.
Your bonus clue for this stage is M=1.
Stage 150: Red Sands
Exploration 1
The red sun shines on a red tractor with a flat red tire outside the red house, beside which a red robot gives you a non-red clue. While you ponder over it, pick up the red jack and push the red rock next to it. Take 3 Mini Monkeys.
Lift
Use the jack on the tractor to raise it off the flat tire. Pick up the squarish lever from the gap.
Then place the lever in the house door and use the robot's clue to unlock it.
Click the panels beside the house door (4 and 5 times) until the lower-left panel glows yellow and the upper-right one glows white.
Then pull the lever to open the door.
Exploration 2
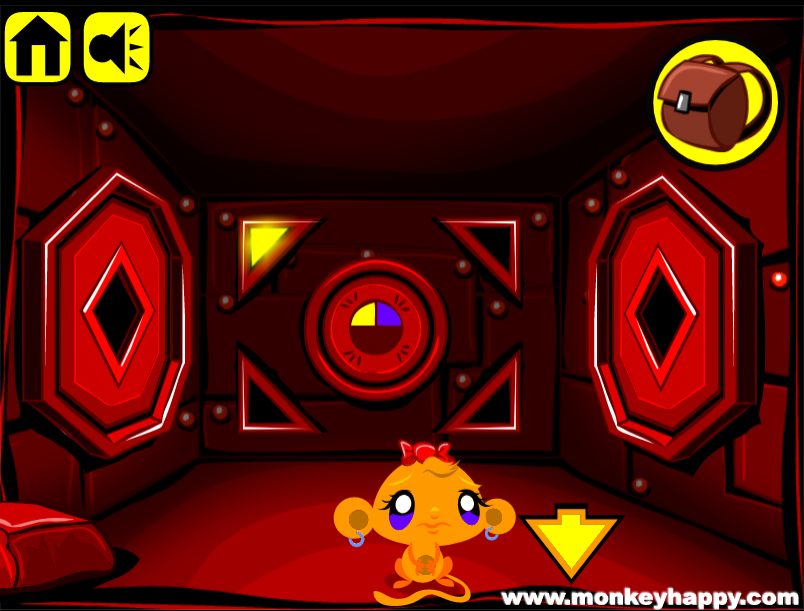
The room is entirely red except for a button on the back wall which has a circle colored one-quarter yellow and one-quarter purple with lines spreading out of it. It's surrounded by four triangular buttons, one in each corner of the wall. The left and right walls have octagonal panels with diamond-shaped holes. Push the rock on the floor aside and pick up 3 Mini Monkeys.
Radiant
Use the button clue to unlock the back wall.
The clue tells you that the panels outside should have yellow in the top left and purple in the top right.
So click the panels 6 and 3 more times to match.
The lines coming out of the circle indicate that all four corner buttons should be lit up.
So push each of them to light them up.
Now push the button to open it up. Take the two diamonds from inside.
Alternate
Insert the diamonds into the side walls.
Talk to the robot outside, and use his clue to open the left wall.
The robot's clue tells you to set the panels to purple in the top left and yellow in the bottom right, so click the buttons 5 and 3 more times.
It also tells you to set those two corners to white and the other two to black. So click the bottom-left and top-right buttons to turn them off.
Push the diamond to open the wall, then take the tyre iron and Mini Monkey from inside.
Inky
Talk to the robot again, and he gives you another clue to open the right wall.
The speech bubble is entirely black, so turn all the lights off by clicking the door panels 6 and 3 more times and the other two corner buttons once.
Push the diamond to open the wall, then take the air pump and Mini Monkey from inside.
Fix
Use the tyre iron to remove the flat tyre, then inflate it by combining it with the air pump, then place it back on the tractor.
As the robot drives away, pick up the last 2 Mini Monkeys hiding behind.
Bonus clue for this stage: W=2.
Stage 151: Red Factory
Exploration
The red nightmare continues into this room with a variety of devices on the back wall, each of which lights up in four steps before turning off again. There are also two pointers on the wall. Pick up the clogged pipe on the floor next to you, as well as the 3 Mini Monkeys around the room.
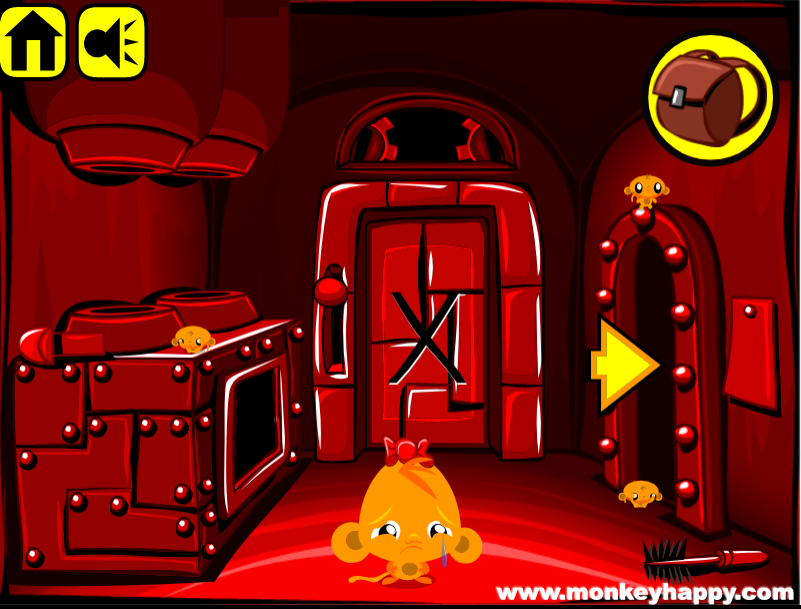
Go right to another room with more devices, more pointers, and a door with a lever slot cutting through a letter Z. Pick up another clogged pipe and 2 Mini Monkeys.
Go left twice to another room. There's a bulky machine on the left which seems to be missing two pipes. Its display can be clicked to show different letters. The X door at the back of the room seems to be controlled by a lever, but its mechanism is missing a gear. When you're done reading the note beside the door, pick up the pipe cleaner under it, the lever on the machine, and the 3 Mini Monkeys around the room.
Flow
Combine the pipe cleaner with each pipe to clean them, and then place them in the machine.
Then use the clues from the note to unlock the door in the right room.
The letter Z at the top of the note indicates that you should set the machine to Z.
The shapes in the middle should be filled up according to the numbers beside them, so go to the center room and click the wedge device 4 times, the tall rectangle 3 times and the semicircle 2 times, then go to the right room and click the circle 3 times, the triangle 1 time and the wide rectangle 4 times.
The numbers at the corners of the note indicate positions on a clock. So go to the center room and set the pointers to 12 (up) and 6 (down), and then go to the right room and set both pointers to 3 (right).
Once all that is done, place the lever in the Z door and pull it down to open it. There's a clogged gear and Mini Monkey inside, along with another note with clues on it.
Work
Combine the pipe cleaner with the gear to clean it, and place the gear above the X door.
Then use the clues from the second note to unlock it.
The note starts with an X at the top, telling you to set the machine's display to X.
In the middle, there's 3 wedges, 1 tall rectangle, 4 semicircles, 2 circles, 2 triangles and 3 wide rectangles, so adjust the displays to light up that many sections.
At the bottom, W ×4 is a clue that each of the four pointers should point West. So return each of them to their original position pointing left.
Once all that is done, pull the lever next to the X door to open it. The last Mini Monkey stands in the flashy doorway.
Bonus clue for this stage: WW=4.
Stage 152:Green Drive
Exploration
The screen is crowded with many trees, cars, houses, etc. but the green sign in the lower right tells you to focus on recycling. Evidently, there's a serious water bottle issue here.
So you start by picking up the 4 bottles visible on the trees, road and middle roof.
Next up, click the bushes on the upper left, middle and lower right of the screen to find 3 bottles, and then click the top of the tree to uncover one more bottle.
Click the cars to move them out of the way, and pick up the 3 bottles where they were.
Next, move each pedestrian and the dog, allowing you to pick up 4 bottles.
Knock over the bins and open the manhole covers to find a total of 4 bottles.
Finally, open each house door and window to find 8 bottles.
If you haven't already, pick up the 6 Mini Monkeys.
Unsatisfied with the 27 bottles you collected from your rampage through the town, you travel along the road up to the next screen, which looks very similar except for the house numbers and a payphone along the street.
Pick up 4 bottles in the open, 3 bottles in the bushes and tree, 2 bottles under the cars, 3 bottles under pedestrians and the dog, 3 bottles in the bins and manhole, 8 bottles in the doors and windows, and 2 Mini Monkeys if you somehow haven't already done so.
You should now have 50 bottles and 8 Mini Monkeys total.
Call
The phone takes a five-digit number, but where do you get the five digits?
The colors of the asterisks displayed match the colors of the cars.
The gray, yellow, purple red, olive cars were parked outside houses 5, 9, 1, 4, 6, before you shoved them aside.
So dial 59146 in the phone, and a recycling truck backs up into the street.
So give it all 50 bottles, and it drives away, leaving behind the last two 2 Mini Monkeys (where did they come from?).
Bonus clue from this stage: MM=1. Click through for the bonus stage.
Bonus Stage 38
The bonus clues from each stage combine to form 1241, so enter that in the box and open it!
Update