
Mystery Case Files: Dire Grove
Platform: Mac, Windows

![]() There's something deeply disquieting about a snow storm. The muffled sounds, the diffuse light, the eerie stillness... beautiful, yet silently deadly. It's in the midst of one such raging storm that you will find yourself in Mystery Case Files: Dire Grove, the much-anticipated follow-up to Mystery Case Files: Return to Ravenhearst. Once again Mystery Case Files has produced a stunning adventure/hidden object hybrid that will send shivers of cold up and down your spine.
There's something deeply disquieting about a snow storm. The muffled sounds, the diffuse light, the eerie stillness... beautiful, yet silently deadly. It's in the midst of one such raging storm that you will find yourself in Mystery Case Files: Dire Grove, the much-anticipated follow-up to Mystery Case Files: Return to Ravenhearst. Once again Mystery Case Files has produced a stunning adventure/hidden object hybrid that will send shivers of cold up and down your spine.
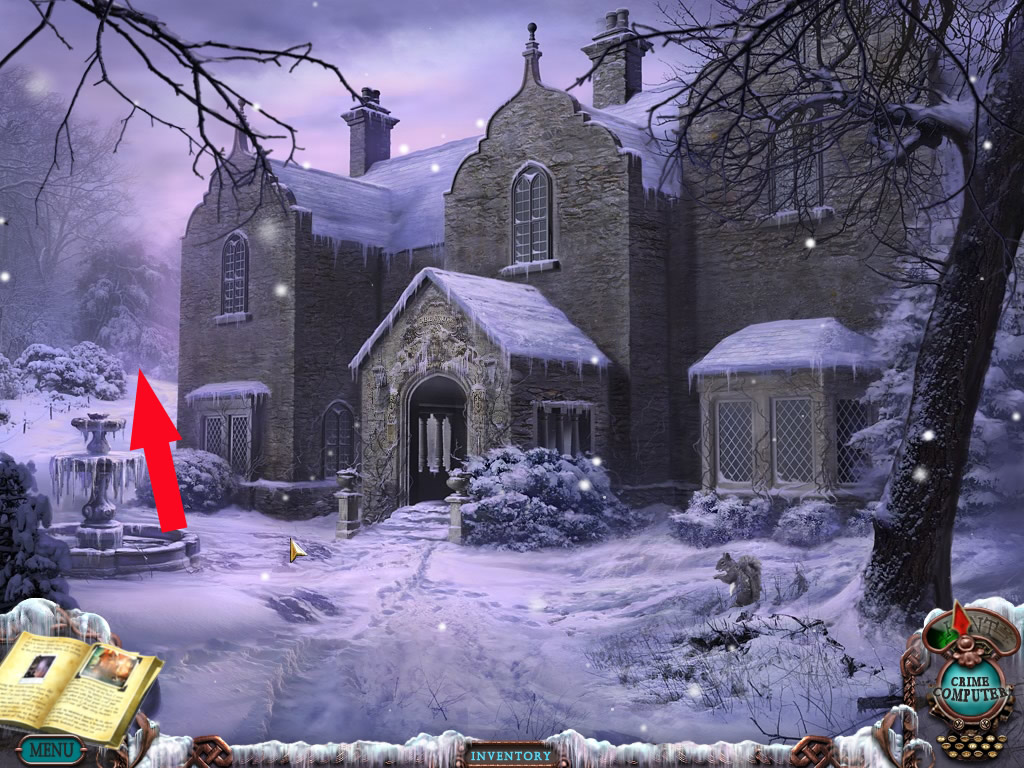
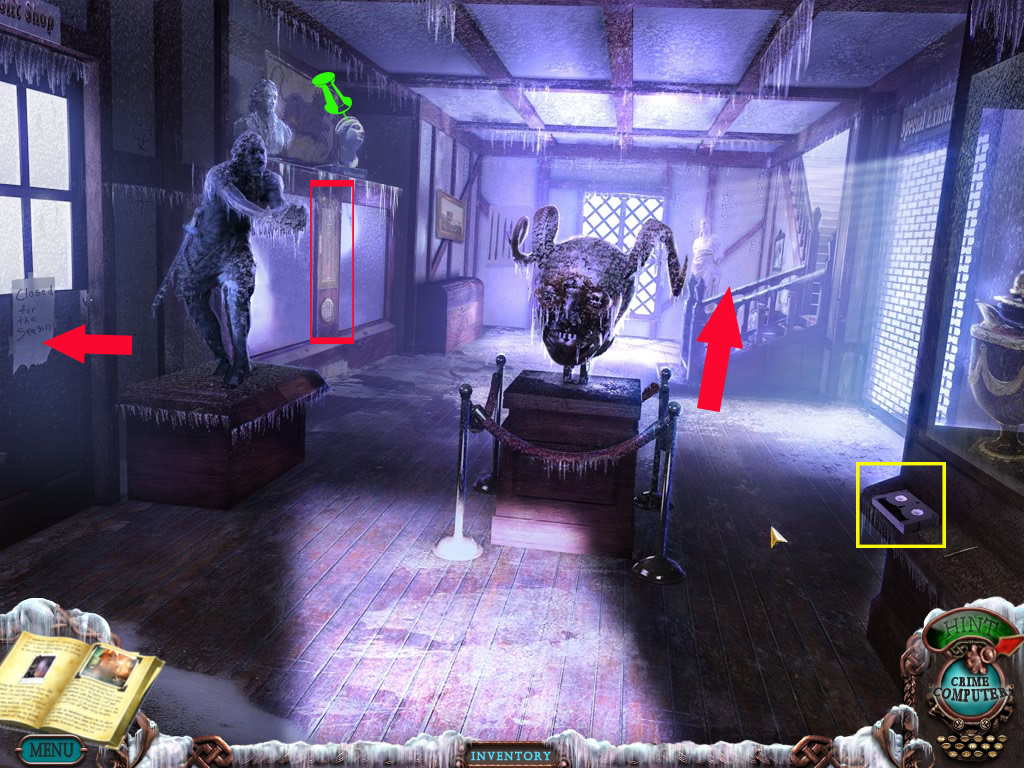
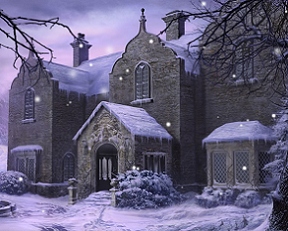 This is, as you might expect, a sequel to all of the previous Mystery Case Files games in which the player plays the role of the Mystery Case Files detective. Dire Grove picks up as you are driving home from the events that transpired during Return to Ravenhearst. And although it continues the over arching story line, Dire Grove is a standalone game that incorporates little shout-outs to the titles that came before it. The story begins as you, the anonymous detective, find yourself traveling through an unexpected and unseasonal snow storm. You come across the small hamlet of Dire Grove, closed for the season, and a mysteriously abandoned car. Cue spooky music...
A quick search of the car reveals no living person, only a handy video recorder and a deeply disturbing note. Continue your explorations and you will begin to come across video tapes scattered in various places, each tape a short vignette into the story of four college students and their trip to Dire Grove. What happened here? Where are the students? Where are all the people? Why is it so darned cold? Perhaps you'd better explore further.
Mystery Case Files: Dire Grove, like its predecessor, is built around three things: point-and-click exploring, puzzle solving, and the classic hidden objects scenes the MCF series is known for. Navigation is simple, just move your mouse cursor around and directional arrows will appear. The cursor changes to a magnifying glass when something needs to be looked at closer, or a hand-shaped cursor if you've passed over something that can be taken or manipulated. Objects or places of interest will catch the eye with a brief single sparkle, and hidden object scenes are denoted by a shower of sparklies.
 Upon entering a hidden object scene, you will be confronted with a list of items to find, one of which will end up in your inventory and be useful later. It can be surprising, sometimes, which objects end up in the inventory. Some items you will find a use for pretty quickly, and some you will be toting around for quite a while before you discover their purpose.
And, of course, there is always the handy Detective's Casebook, which jots down information as you come across it, remembering everything that you might not. The hint system works with a refilling timer in your mystery crime computer. Use them to find hidden objects or to skip certain puzzles. Some puzzles involving found objects or information cannot be skipped, so be warned.
Analysis: Yes, after a long wait, the newest Mystery Case Files is finally here! How does it stack up against its predecessors? Well, let's start with the visuals. The developers have gone all out to make the look and feel of Dire Grove something to behold. The locations, the hidden object scenes, the puzzles, everything is flat-out gorgeous. Bright, vivid, and three dimensional, Dire Grove even manages to capture that eerie diffuse light you get during a snow storm. And boy, is it snowing. The video tapes, incidental sounds, and musical score that ranges from plaintive to creepy to dramatic, all heighten the immersive factor of the game. Play Mystery Case Files: Dire Grove for very long and you will begin to feel the cold creeping in.
 The hidden object scenes, like everything else, are sharp and clear, reducing the graininess and clutter of scenes from previous Mystery Case Files games. Those with older eyes will appreciate the clarity which will reduce eye-strain significantly. The story hangs together well, told in dribs and drabs by the video tapes, correspondence, journals, and other found items as you make your way in and around the town. Yes, it's all a bit Blair Witch Project, but compelling nonetheless. Although the story is original to the game, you can still find slight shout-outs and references to previous Mystery Case Files adventures, especially the return of the lovely mysterious, morphing objects from Mystery Case Files: Madame Fate. See if you can find all of them hidden in the scenery as sort of a bonus side quest.
The puzzles... well, here's where Dire Grove perhaps fails to meet expectations. The Mystery Case Files series have long been known for their tricky, original, elaborate puzzles. Although there are some nice brain-teasers here, much of it is pretty familiar. Perfectly enjoyable, mind you, but if you've played a lot of hidden object games, you won't encounter a lot of original puzzle designs. A small off note in what is otherwise an excellent game.
Although Dire Grove is perhaps not as long as Return to Ravenhearst, it still manages to buck the current trend of ever-shrinking gameplay time now seen in most adventure/hidden object hybrids. Between the exploration, the hidden object scenes, and the puzzles you are looking at hours of fantastic casual gameplay.
Why are you still reading this? Go play Mystery Case Files: Dire Grove!
A Collector's Edition is also available. It contains bonus gameplay, more hidden objects to find throughout the game, strategy guide, and more. Remember that Big Fish Game Club Members pay only $13.99 for Collector's Editions (or 2 club credits), and collector's editions count 3 card punches of 6 total needed for a free game.
![]() Windows:
Windows:
Download the demo
Get the full version
Also available: Collector's Edition
![]() Mac OS X:
Mac OS X:
Download the demo
Get the full version
Also available: Collector's Edition


Walkthrough Guide
(Please allow page to fully load for spoiler tags to be functional.)
Mystery Case Files 6: Dire Grove - Walkthrough
General Tips
Hovering over a scene with the mouse will let yellow arrows appear in the directions you can go to.
Ho-scenes are random - the objects from our lists are marked in the screen shots.
Inventory objects are not random - they are of course also marked.
An inventory item will only go into your inventory when you find all listed objects.
Not everything you can look at or use will be needed for the story, but as you never know click everything that might be of any interest.
You will also have to find 50 morphing objects (Collectors Edition only) - objects that change for example color or a face goes from sad to happy or a sign changes what it says.
You will also have to find 16 video tapes, you can watch by opening the crime computer - Watch them closely as some of them give you needed information.
You will need to find them all, otherwise you won't be able to get access to the last puzzle.
Frantic clicking in ho-scenes will make your cursor freeze for a moment.
The hint needs time to reload, but will also reload outside the ho-scenes.
The journal in the left low corner will copy all information you find and may need during the game.
You do not need to go the ways as the walkthrough does - just be aware that somethings described in the spoiler might not work if you you haven't done something else yet.
A lot of puzzles are random - . Same for telephone numbers and codes. It is possible that you will have different solutions than I have.
Puzzles can be skipped.
First Student
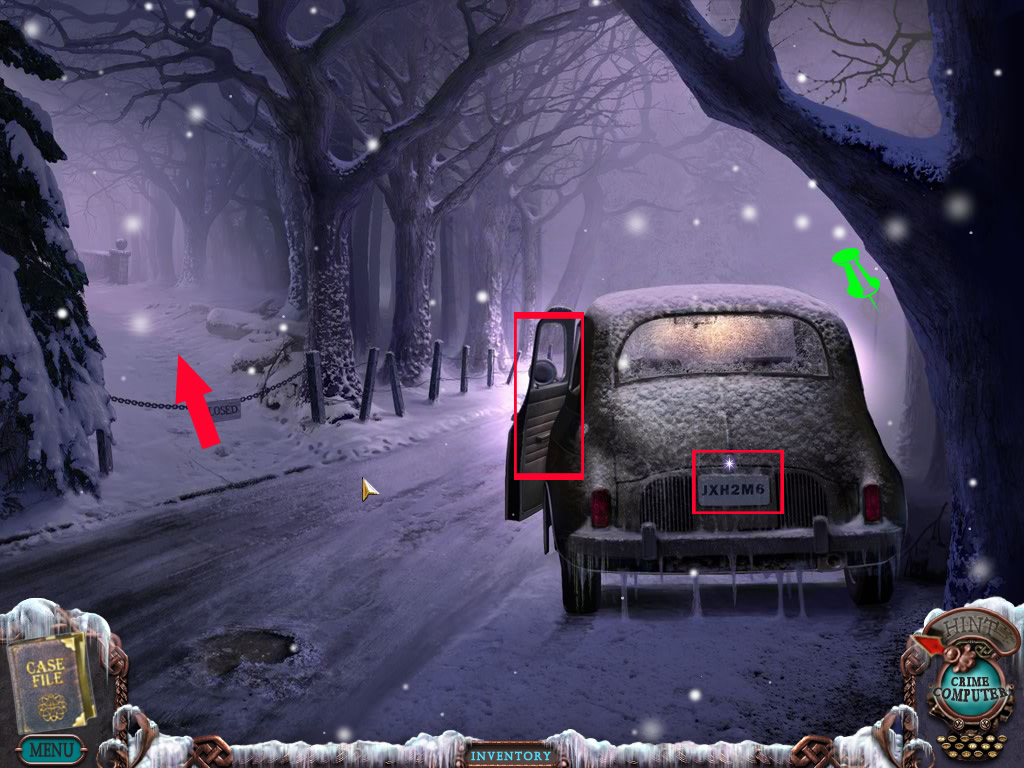
Car outside
Go to the car and click the trunk - it's locked.
Leave the nearby view and recognize the license plate - JXH2M6
Click the street sign right in front of the car.
It is your first morphing object.
Click the door of the car to get inside.
Screenshot
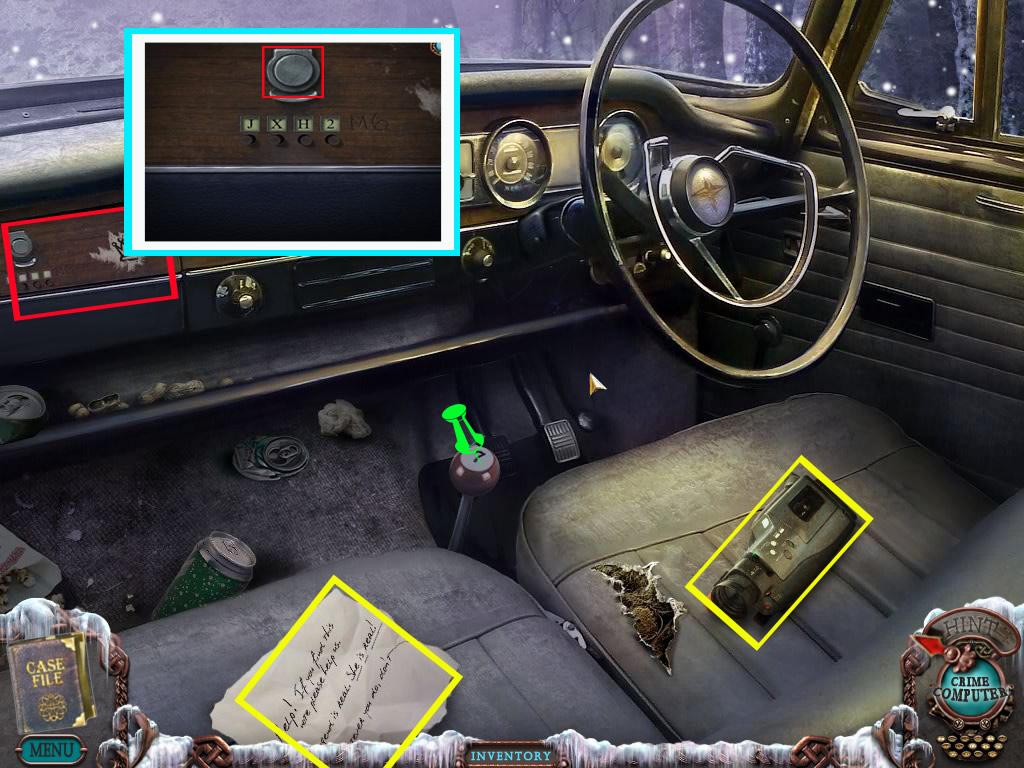
Car inside
Get the note from the seat and read it. The note will be copied to your journal.
Get the video camera from the other seat - a short video cut shows you, what happened.
Click the top of the gearshift. The image belongs to the morphing objects.
Click the glove compartment left side - you see four empty spots.
See the engraved M6 at the end. You have seen this before.
Right, the license place, it ended in M6.
So click the black buttons below the spots till you have JXH2 M6.
Click the silver button above the letters and the compartments opens.
Get the key out and leave the car.
Screenshot
Trunk
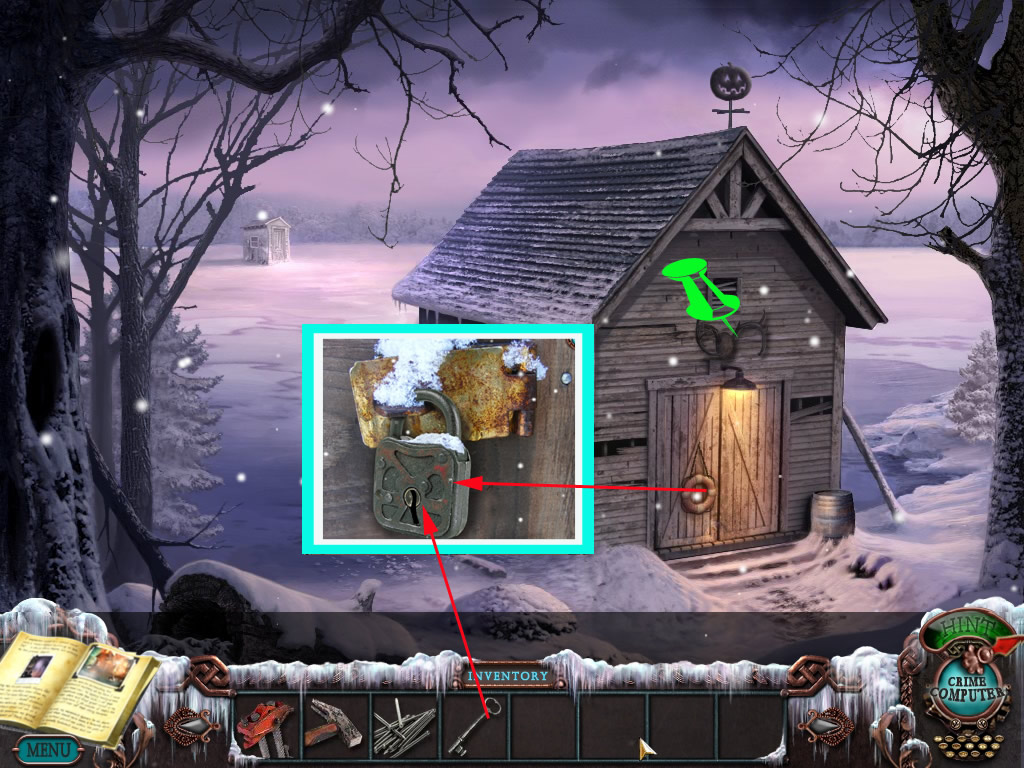
Click the trunk to get a nearby view and open it with the key.
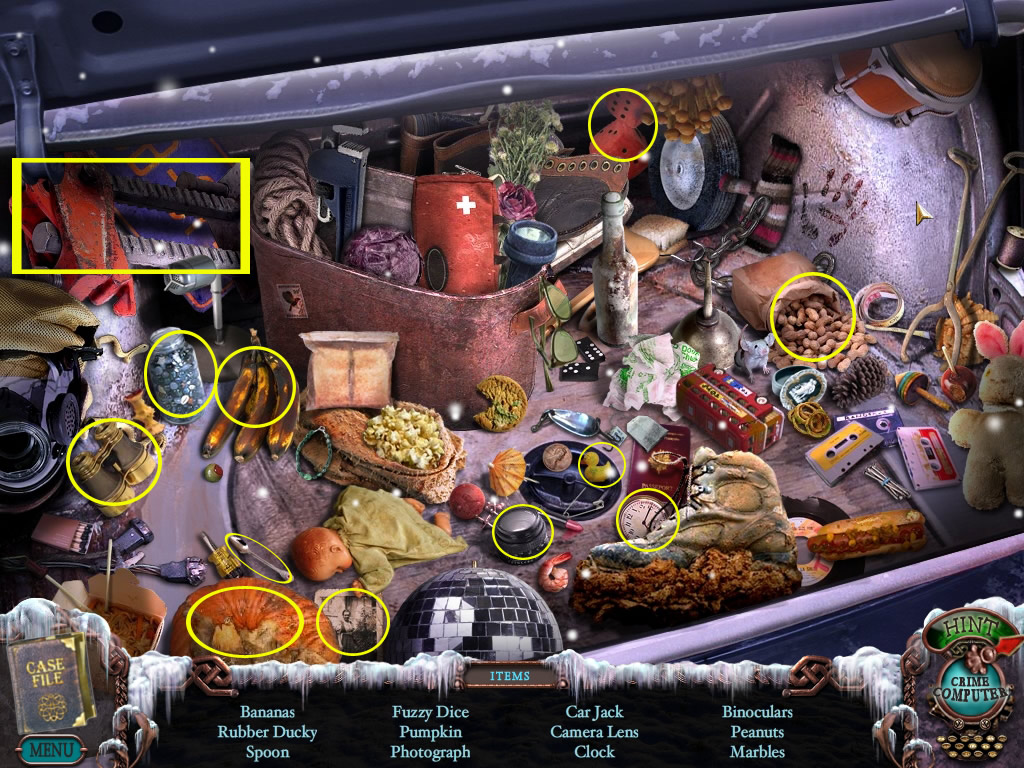
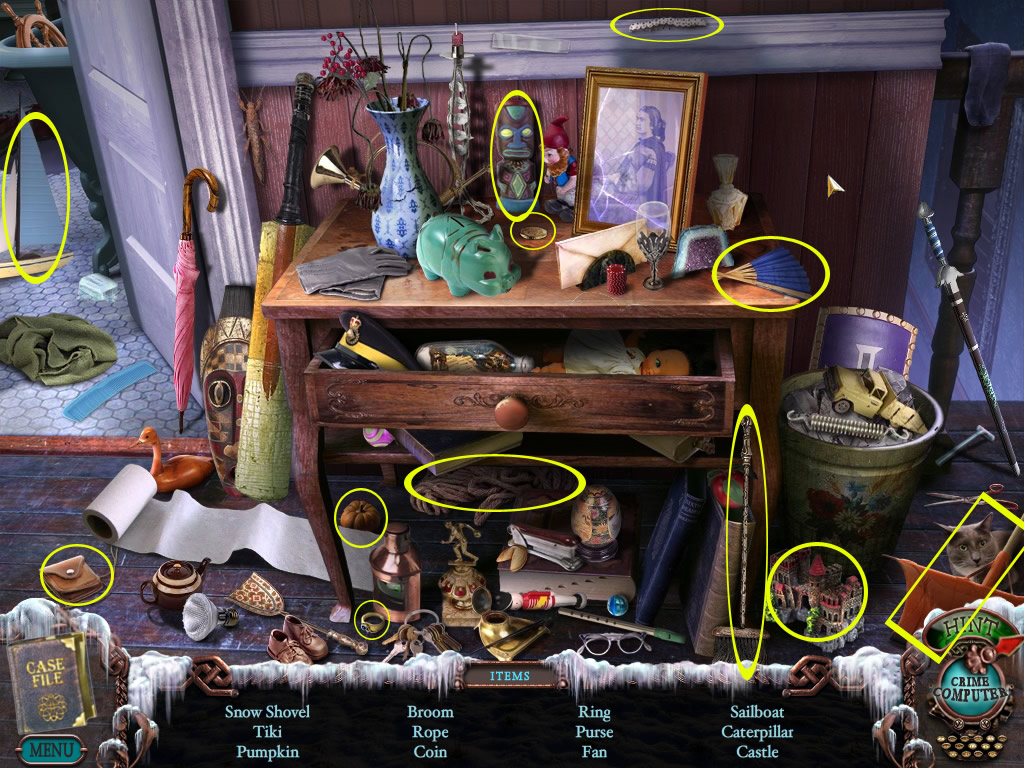
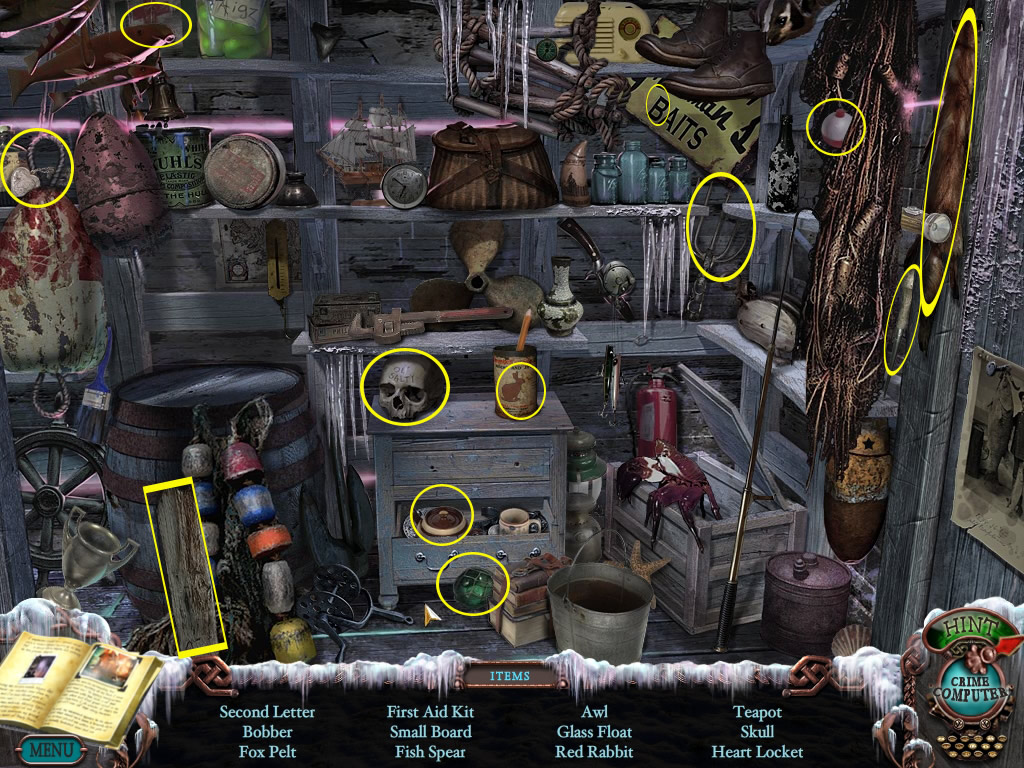
Find all listed items.
The car jack goes into your Inventory.
Screenshot
The scene exits automatically.
Go left.
Way to the hotel
On the way have a look at the sneaker and the fire wood.
Go straight ahead.
At the left side you can see a video tape in the snow.
You can have a look at it at the crime computer, if you want.
Your possibilities here are: back to the car, to the right, to the left or further on to the hotel.
Go straight ahead.
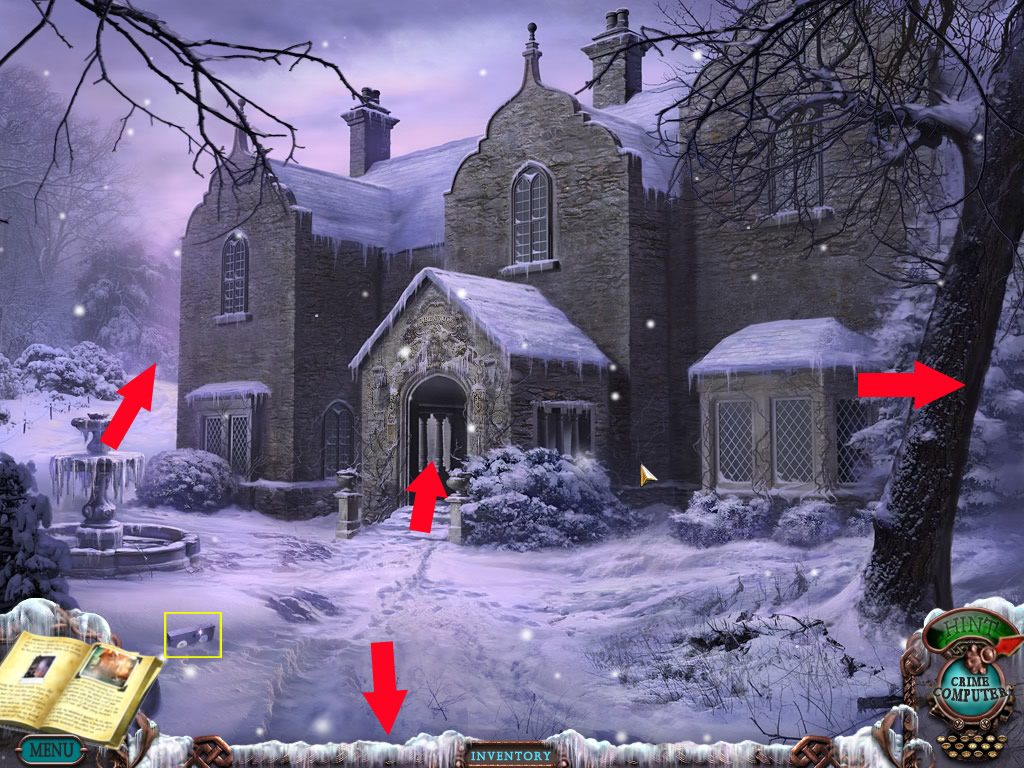
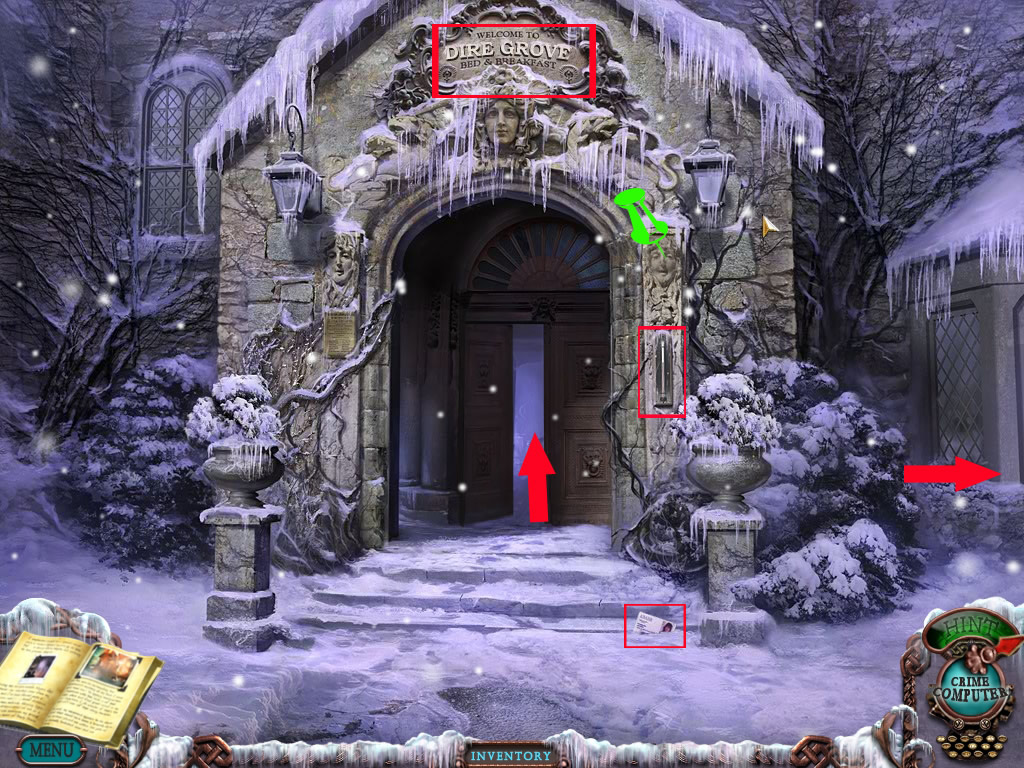
Screenshot
Have a look at the id card left in front of the stairs.
The stone face right side belongs to your morphing objects.
You can also look at the Dire Grove sign on the top and the thermometer at the right.
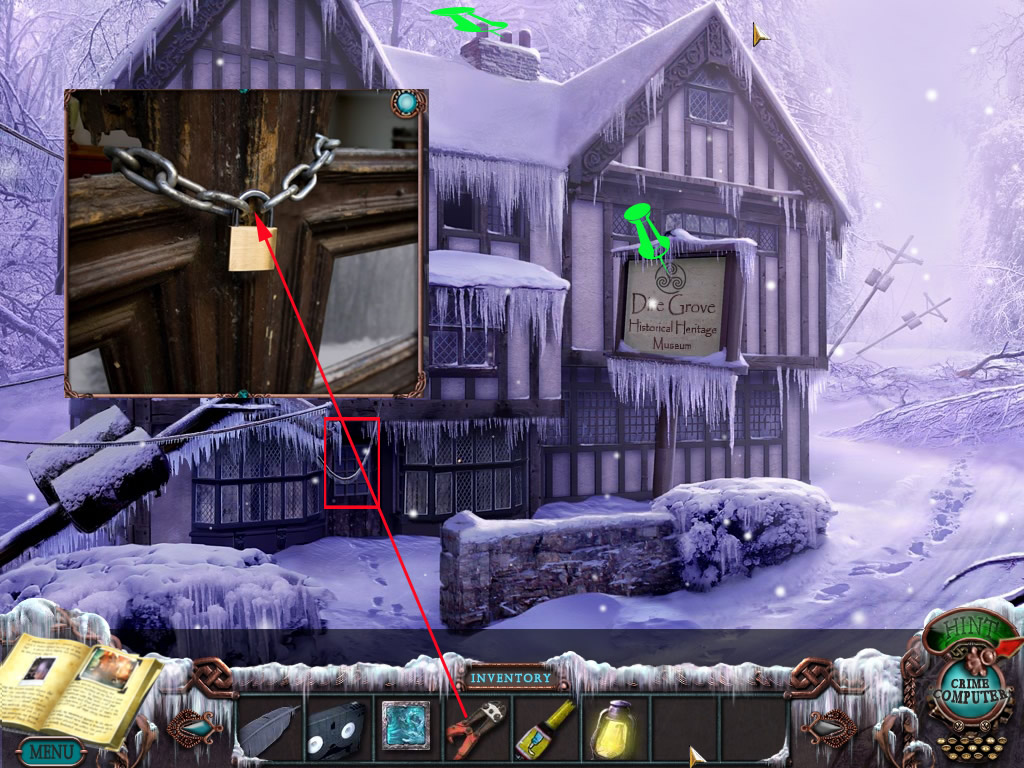
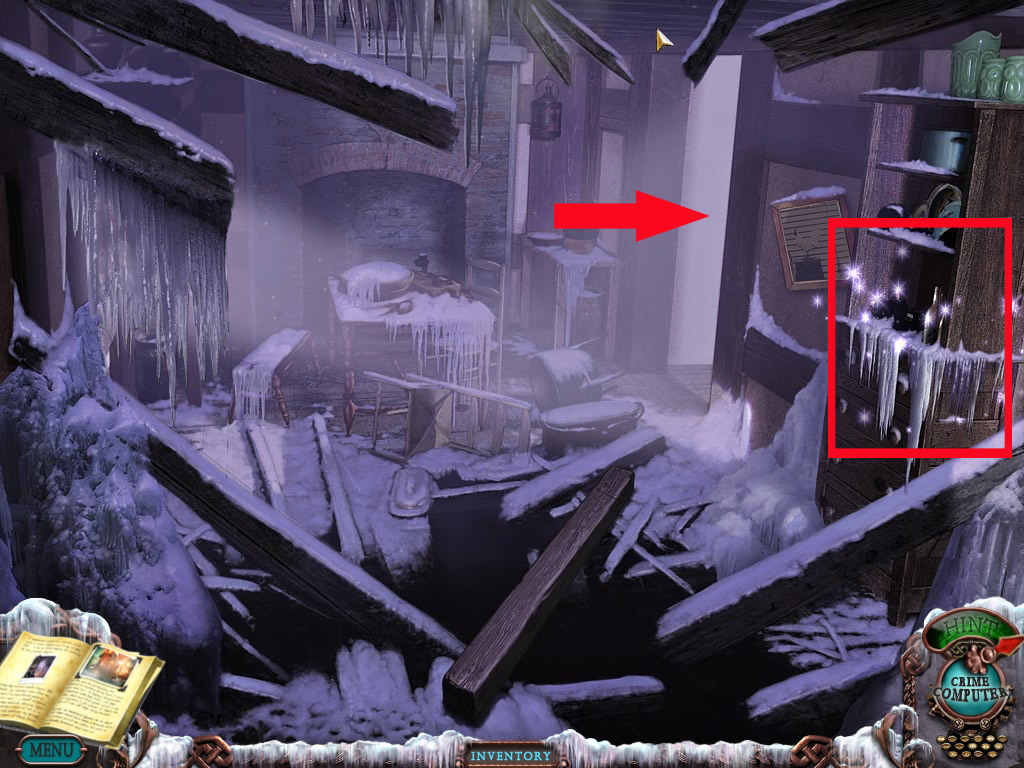
Enter the house.
Screenshot
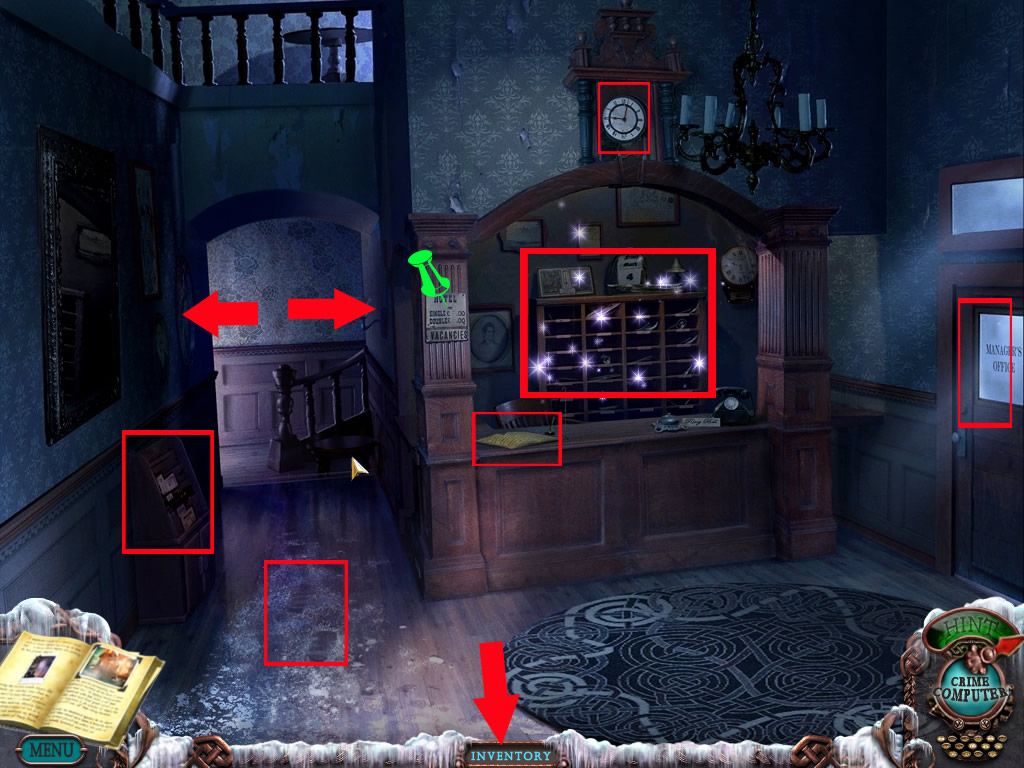
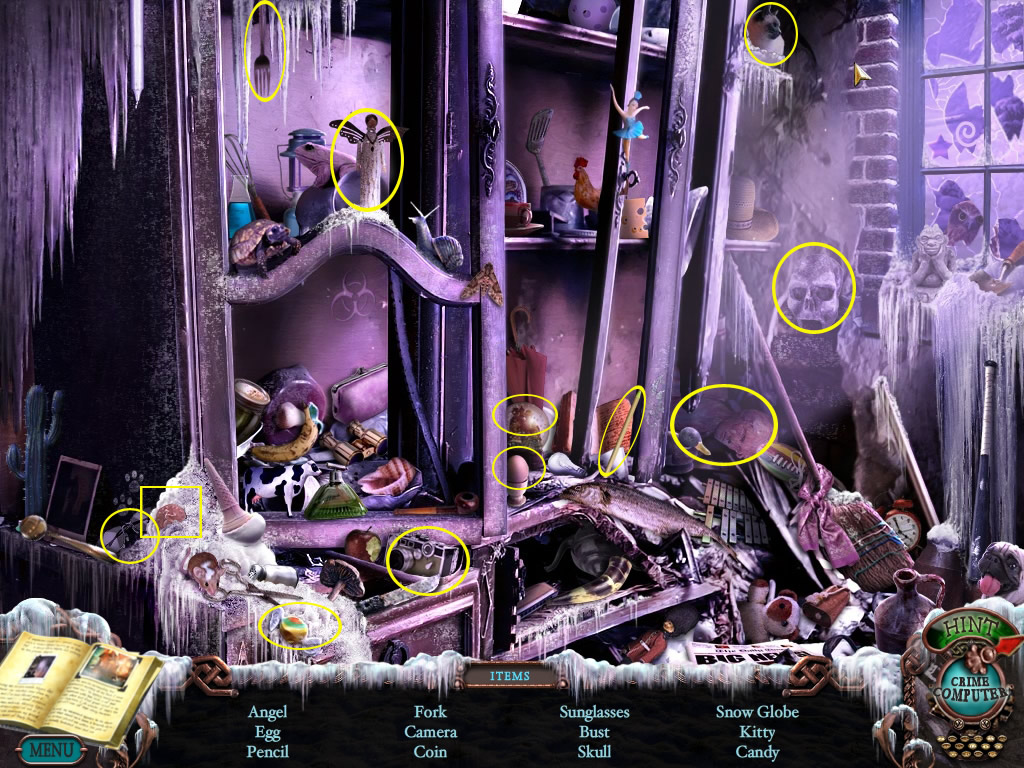
Reception
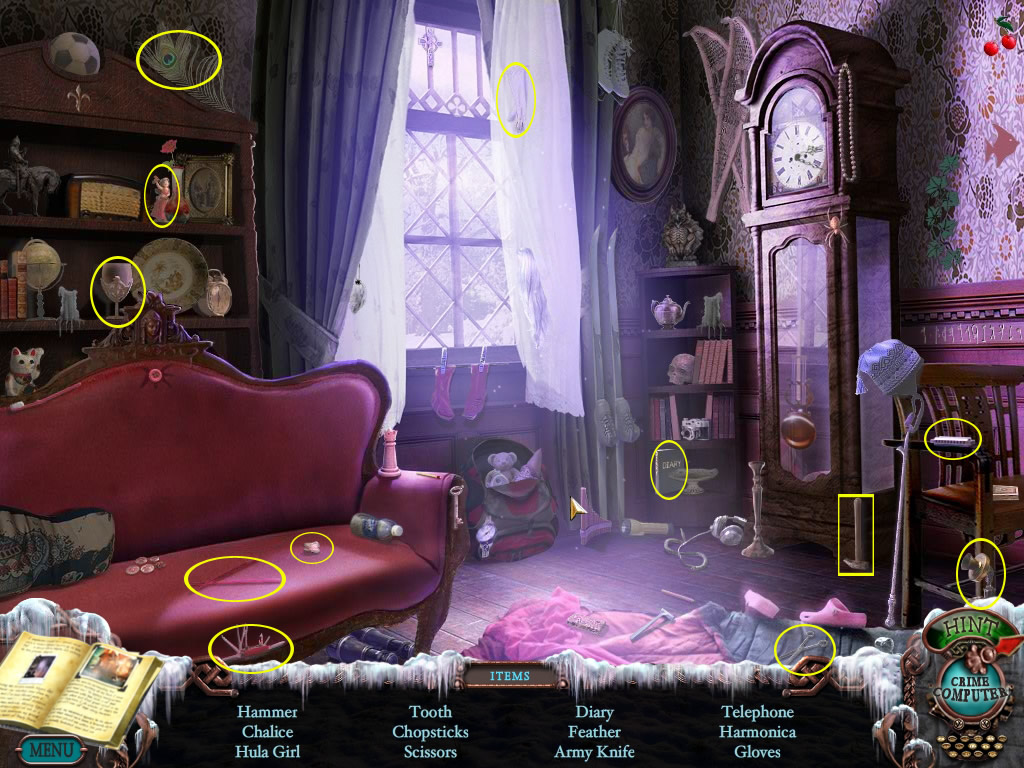
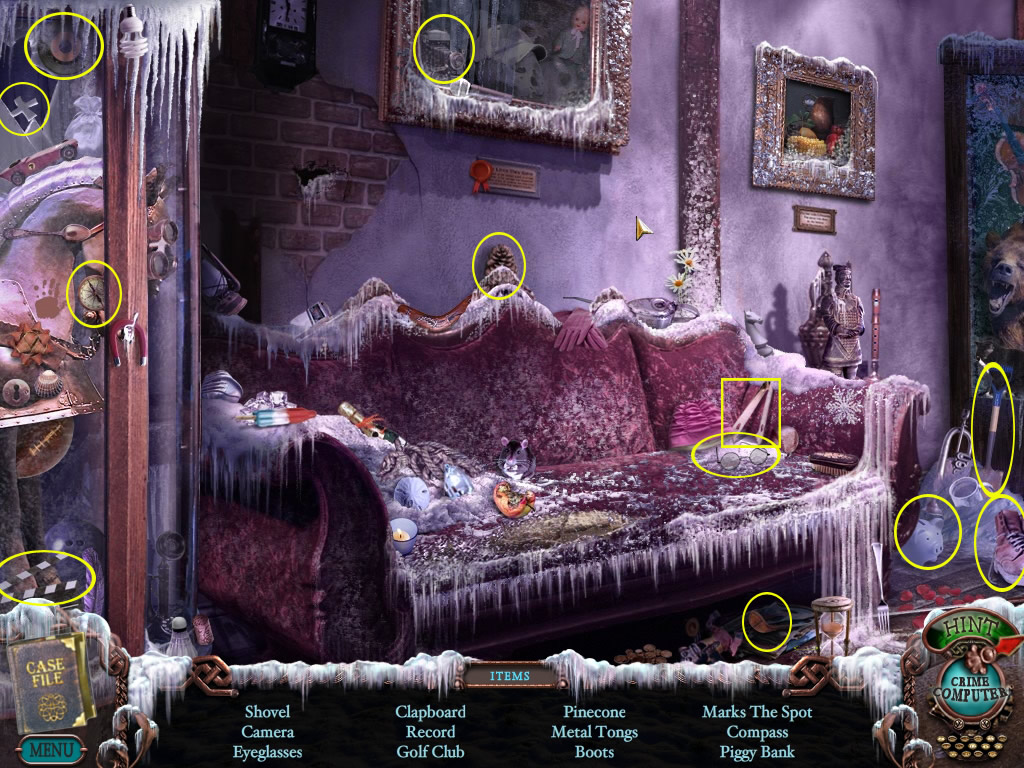
The reception is a ho-scene - the room key goes into your inventory.
Screenshot
Look around:
The sign above "VACANCIES" right at the reception is a morphing object.
Click the guest book left side of the reception counter.
Most of the entries are as usual, but you also see a note saying the same as the one in the car.
The clock above the reception is running backwards.
The brochure stand left side let's look you at the first two brochures more closely.
Click the right low corner to turn the front page.
There are footprints in the snow.
The manager office is locked.
You can leave the house here, or left to the reception to the left or the right.
The walkthrough goes left first.
Screenshot
Lobby - left side
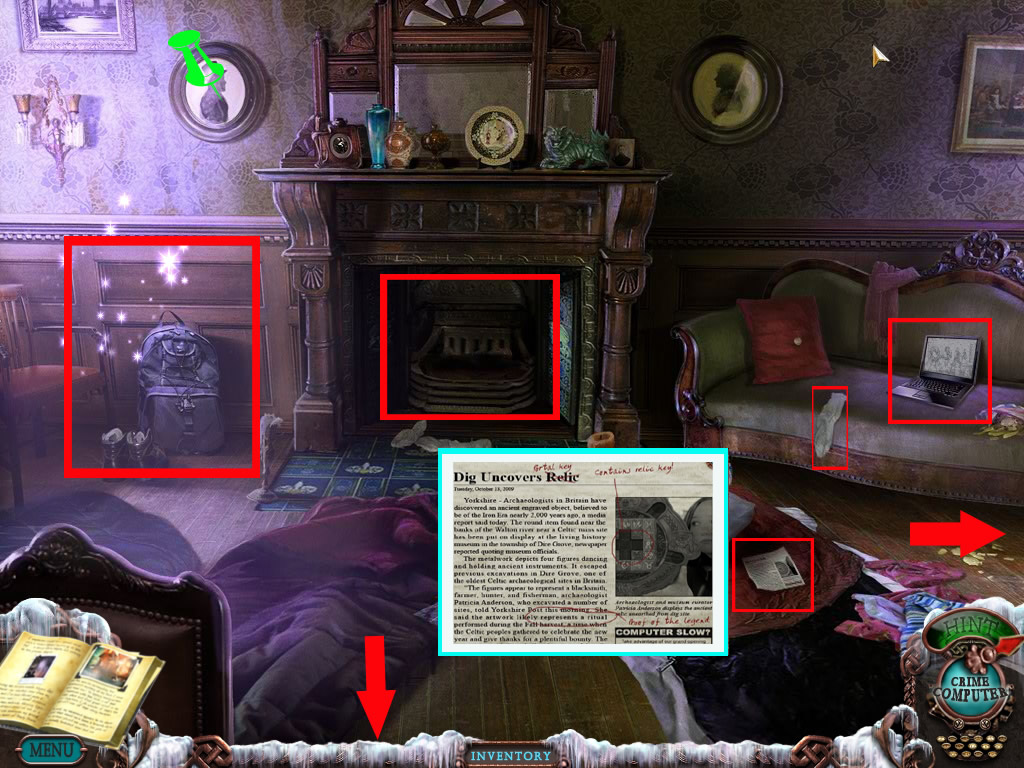
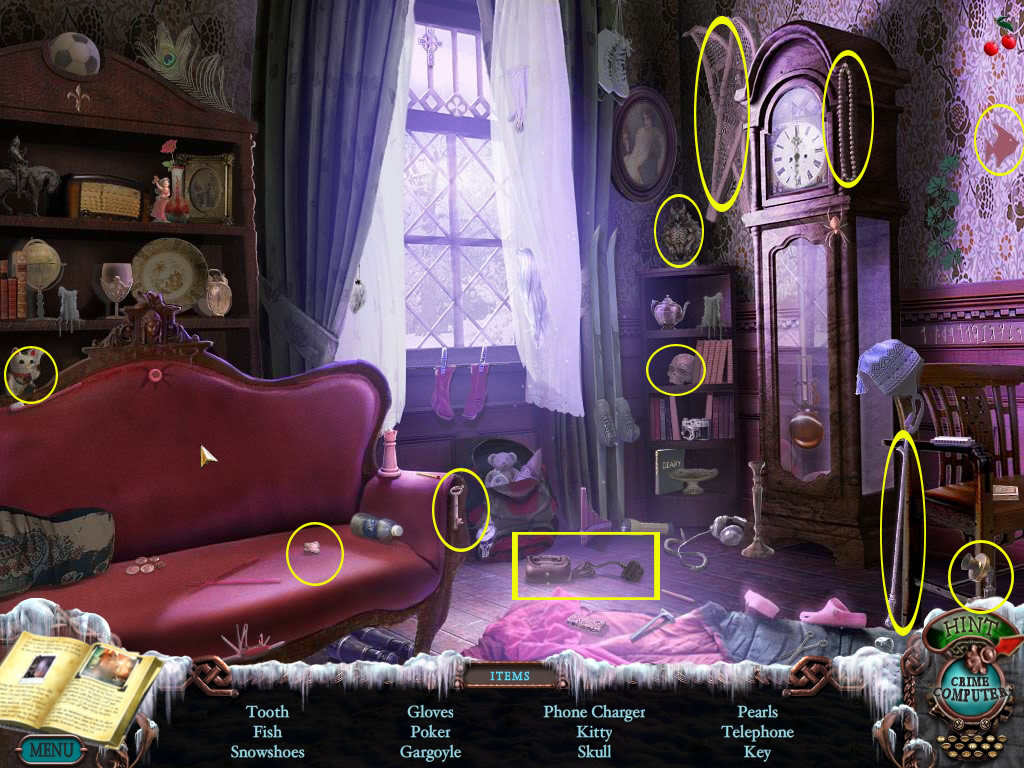
The backpack left is a ho-scene - the hammer will go into your inventory.
Screenshot
The picture left next to the fire place is a morphing object.
Click the fireplace to learn that there is no air to feel.
Click the sleeping bags on the floor and the sock on the couch right side.
Click the laptop, its running low on batteries and shows strange symbols.
Click the note on the floor, its an article about a found Celtic relic and has handwritten notes. It will be copied to your journal.
Go to the right.
Screenshot
It is also the lobby but the right side of the room - you can reach this part also from the reception going right.
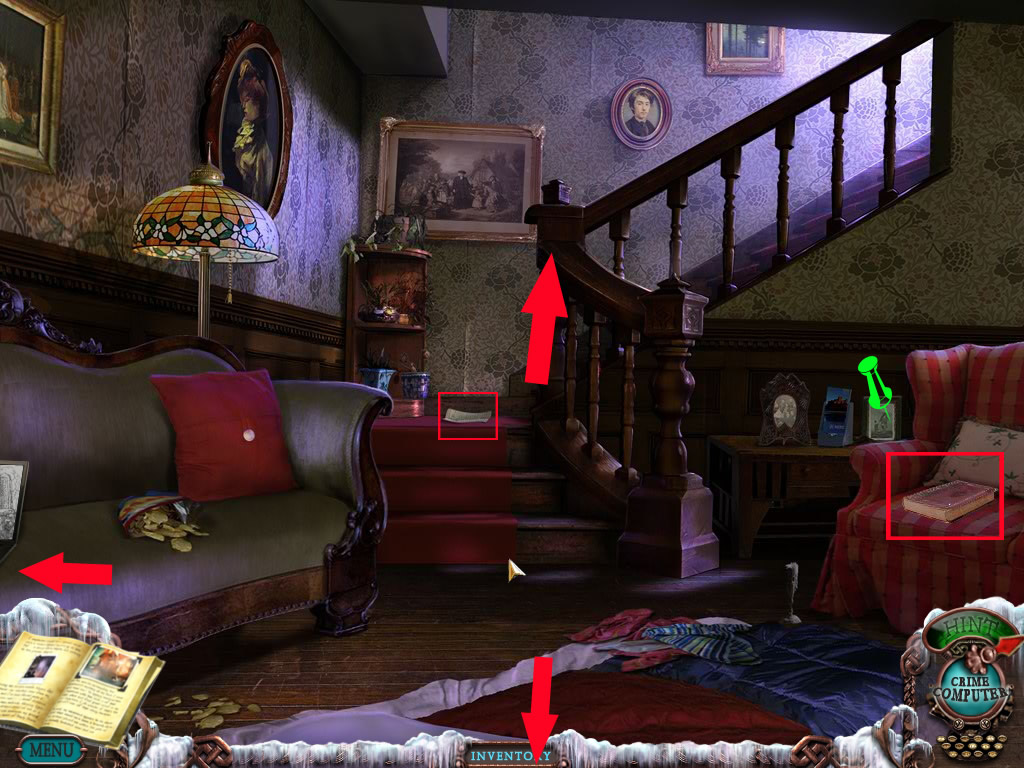
Lobby - right side
This is the same room as the one you can enter from the reception going right, just the other side of it.
Going left will bring you to the left side of the lobby.
The book right side on the chair goes about Celtic mysteries.
On the table left next to it, the third picture from the left is a morphing object.
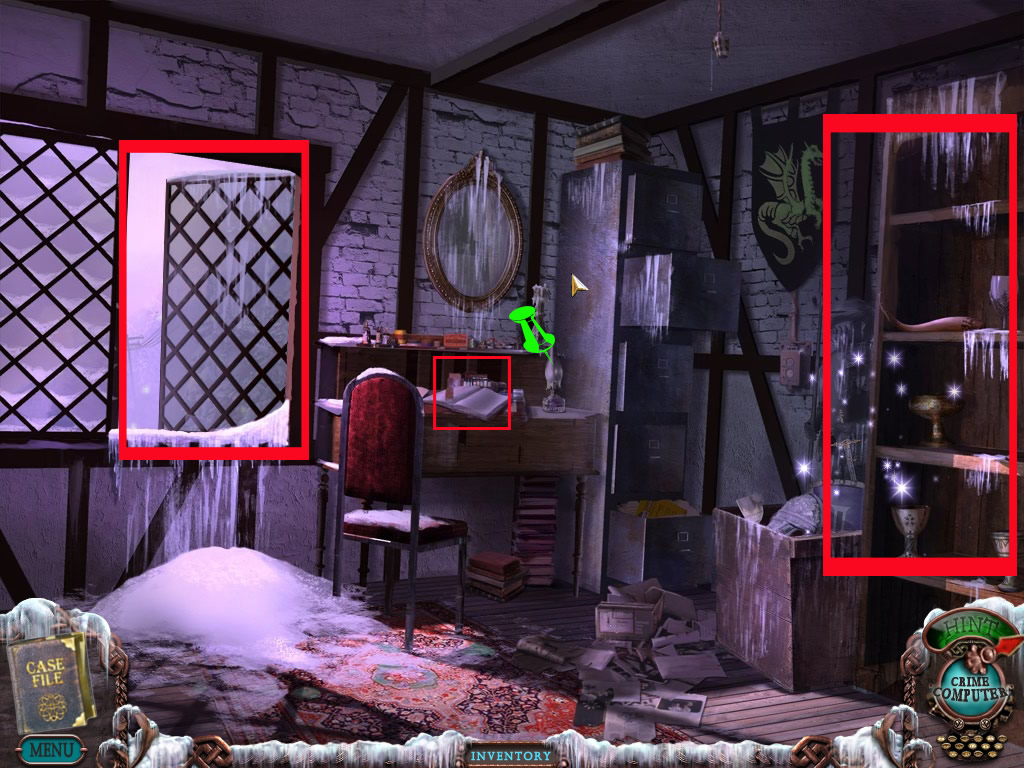
On the stairs you will find a note with tasks for the winter season and information how to get water, energy and a door opener.
Screenshot
Go upstairs.
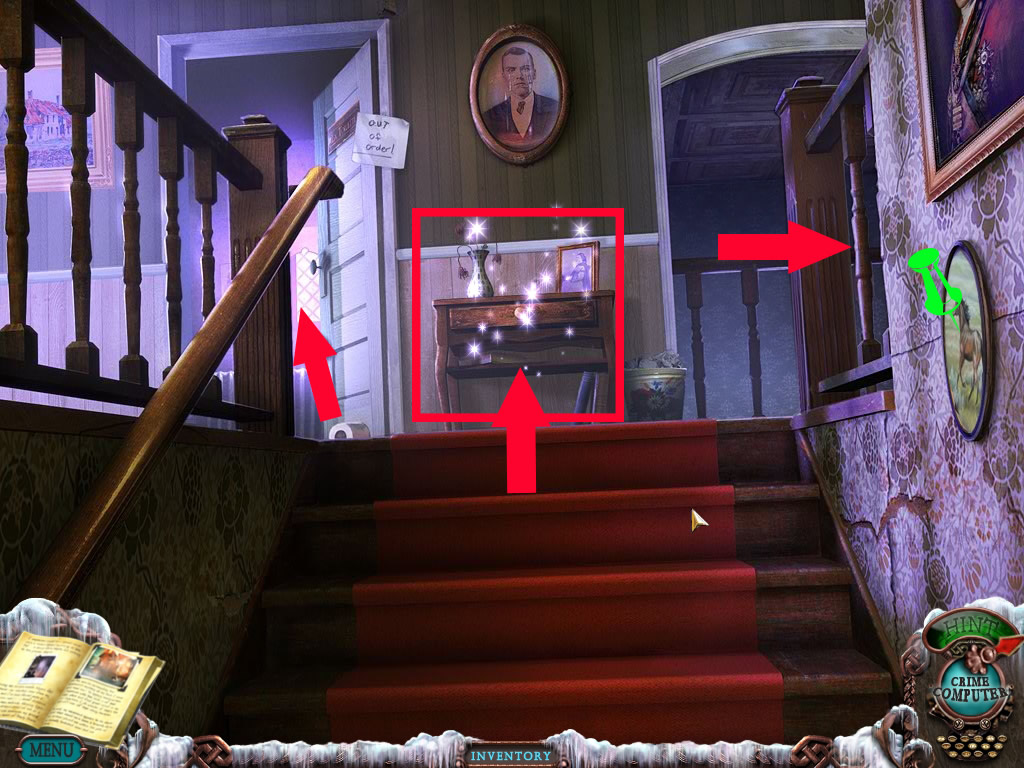
Stairs
The oval picture at the right is a morphing object
To the left there is a bathroom to the right a hallway.
Screenshot
The table in front of you contains a ho-scene, the snow shovel is your inventory object.
Screenshot
Go right.
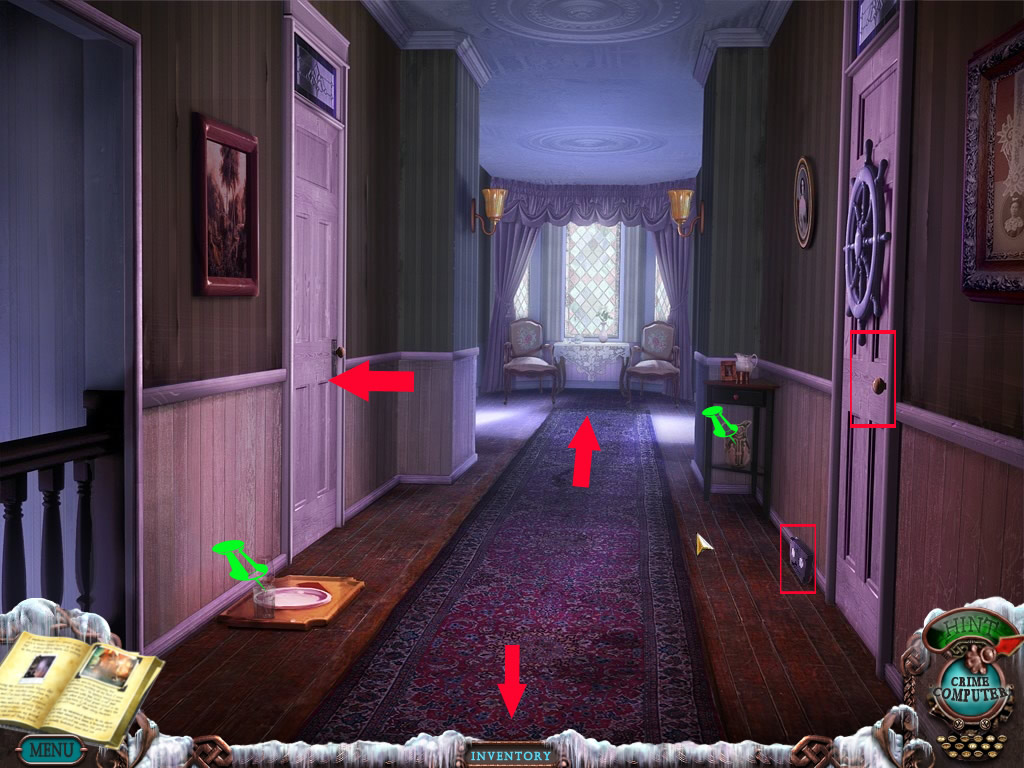
Hallway
On the floor left a tablet is standing - the glass on it is a morphing object.
The jar on the lower shelf right side is also a morphing object.
Get the video tape, right side on the floor.
The door to your right is locked.
Straight ahead you come to the back part of the hallway.
Enter the room to your left.
Screenshot
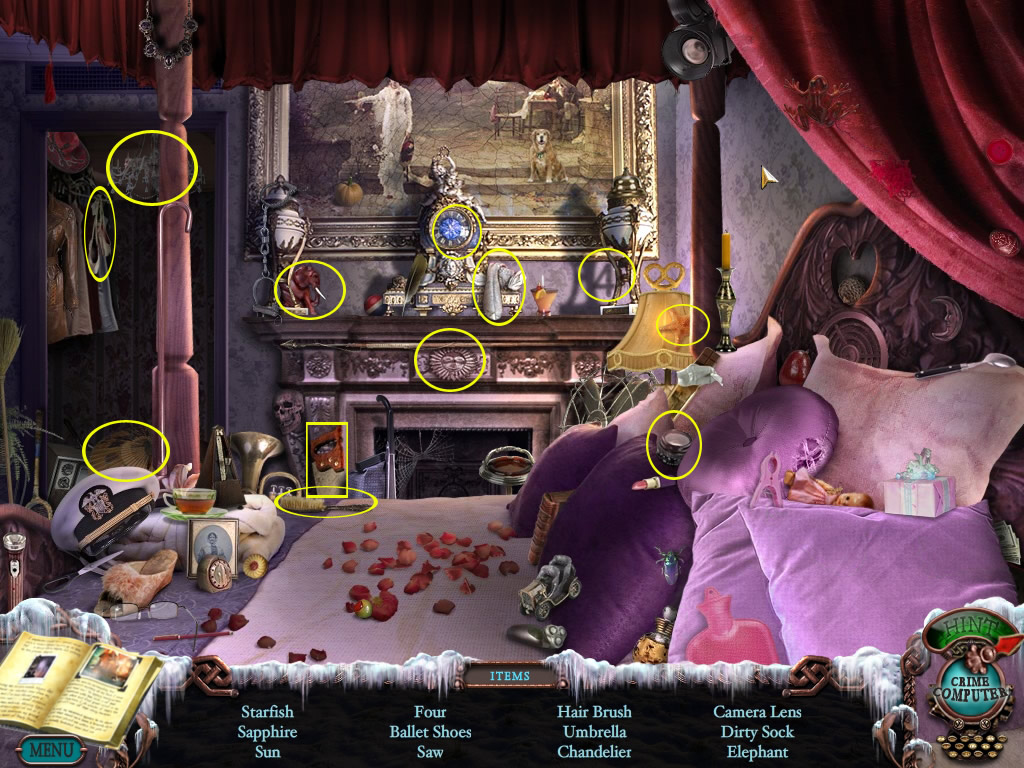
Bedroom right side - Hallway front
Get the video tape from the floor, right side of the bed
The lamp at the wall left side of the bed is a morphing object.
The laying books on the lower shelf left to the bed is a morphing object.
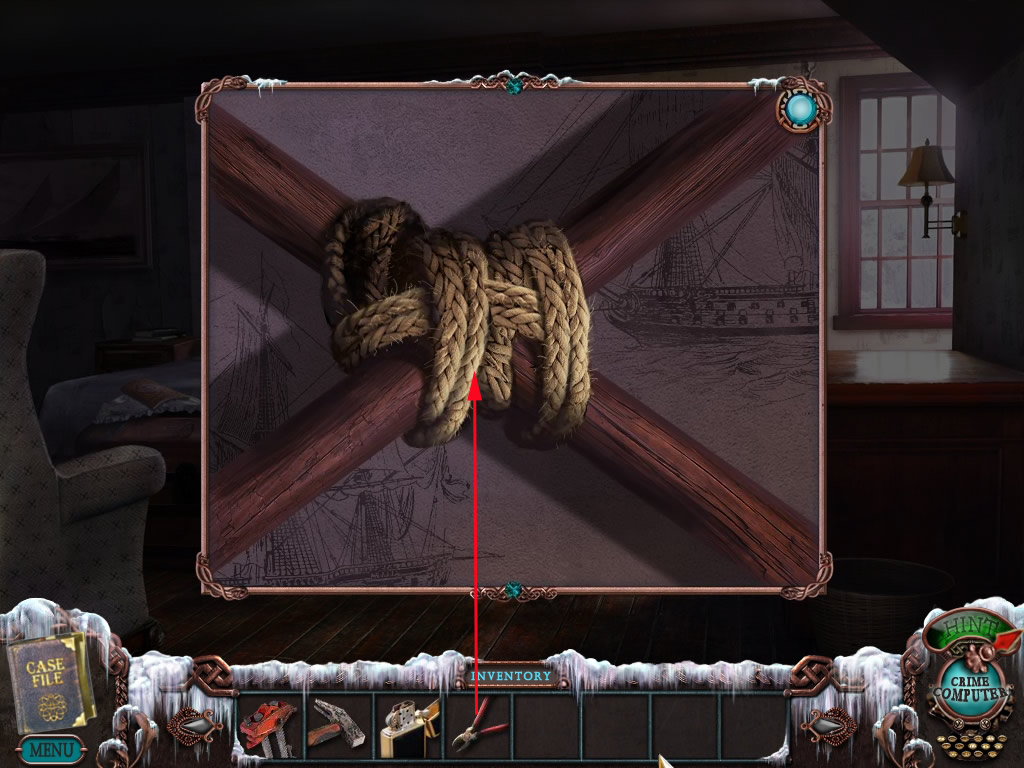
Click the oars above the bed - they are tightly knotted.
For using the outlet, you will first need to get the power back.
Screenshot
Click the trunk in front of the bed and a puzzle opens.
You will need to arrange the hands so that all lights are on.
No hand should lay on another one.
You can turn the hands by clicking them.
There are different solutions possible:
I numbered the hands from low left to low right from 1 to 7.
Click: 1=9x, 2=4x, 3=1x, 4=5x, 5=6x, 6=1x, 7=6x
Screenshot
Bedroom left side - Hallway front
The head on the painting right side is a morphing object.
Click the champagne and see what happens ;)
Screenshot
The bed is a ho-scene - your inventory object is the mattress
Screenshot
Go back and in the back part of the hallway.
Hallway - part
The vase on the table in front of you is a morphing object.
The first picture on the left side is a morphing object.
The door to your right is locked.
Enter the library to your left.
Screenshot
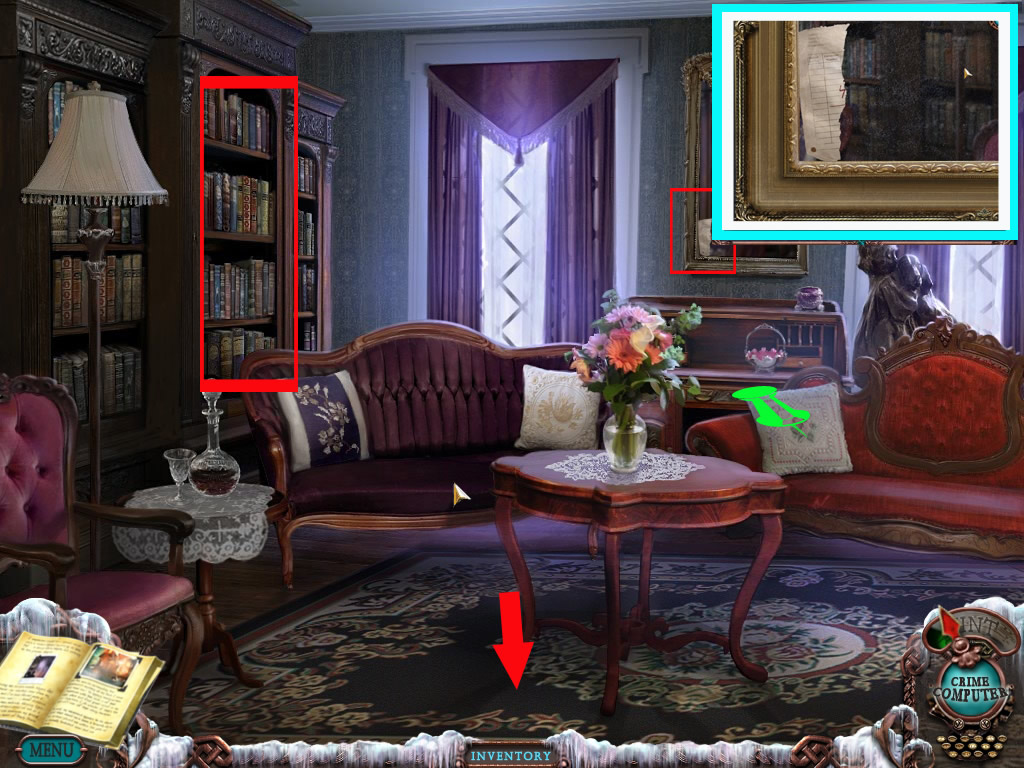
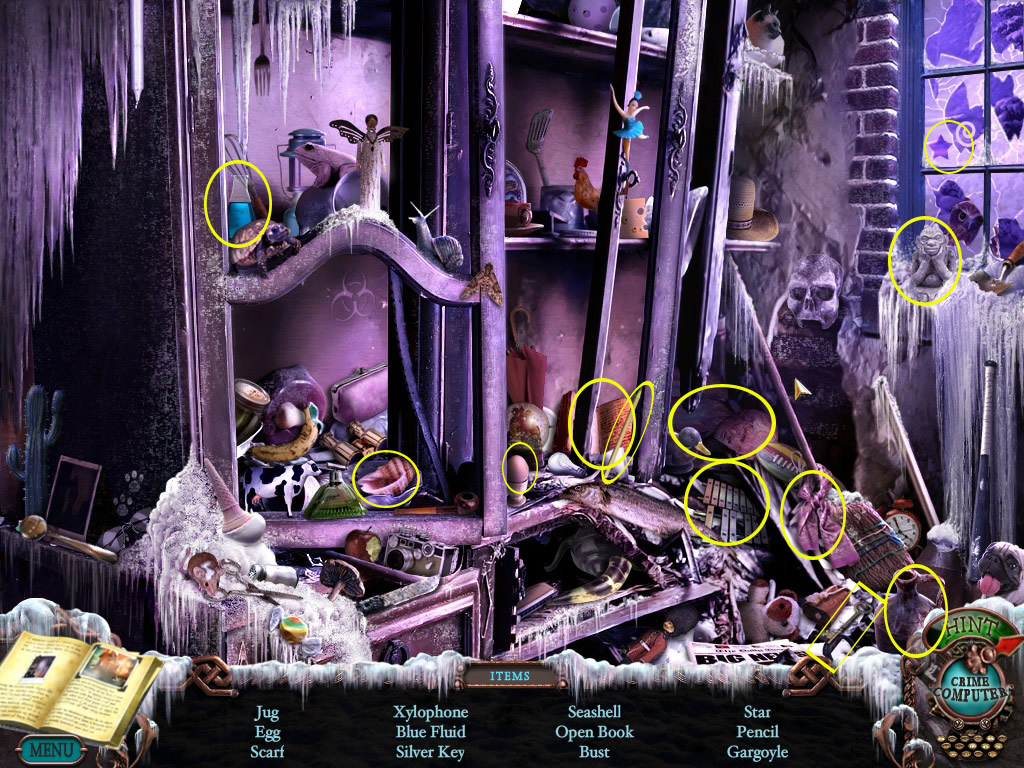
Library
The pattern on the right couch pillow is a morphing object.
Click the mirror - a paper scrap is stuck in the frame.
Screenshot
Click the bookshelf left side - two of the books art interesting and you can read in them.
Top shelf Celtic History of Medieval Britain and upper shelf Folklore: Fact & Fiction.
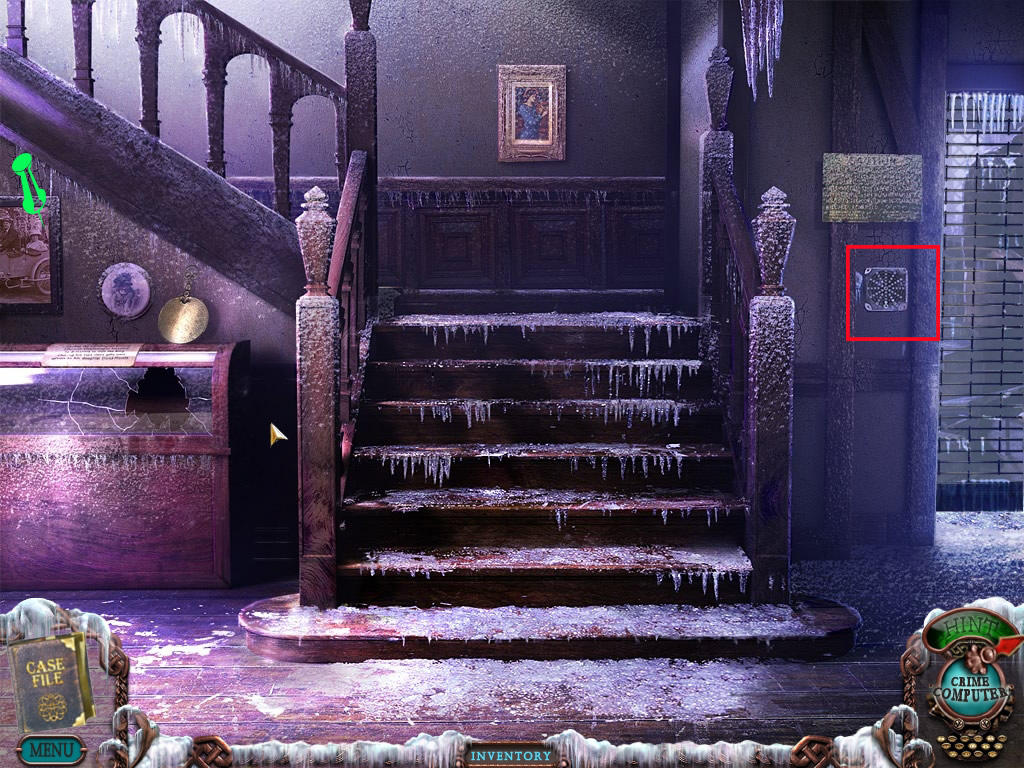
Go down to the reception, there appears another ho-scene.
Reception
Find all objects.
The nails are going into your inventory.
Screenshot
Leave the house and go to the right and then to the left.
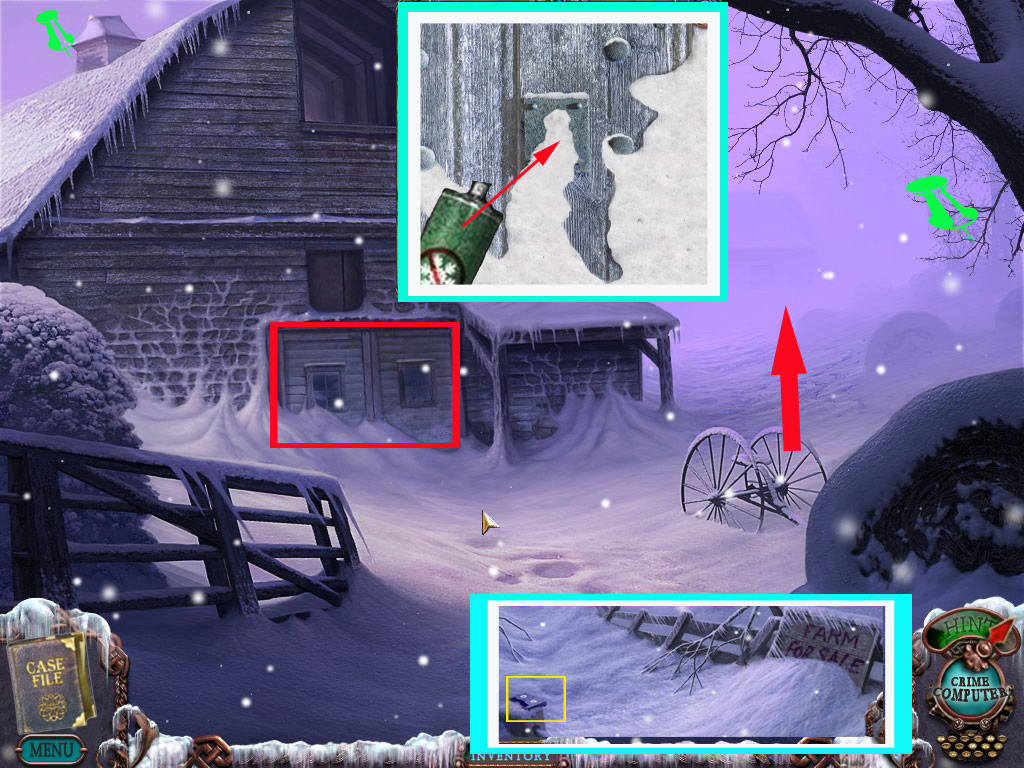
Generator
When you stand outside you need to go right.
Again right would bring you to the garage, left you will come to the generator.
Go left.
Screenshot
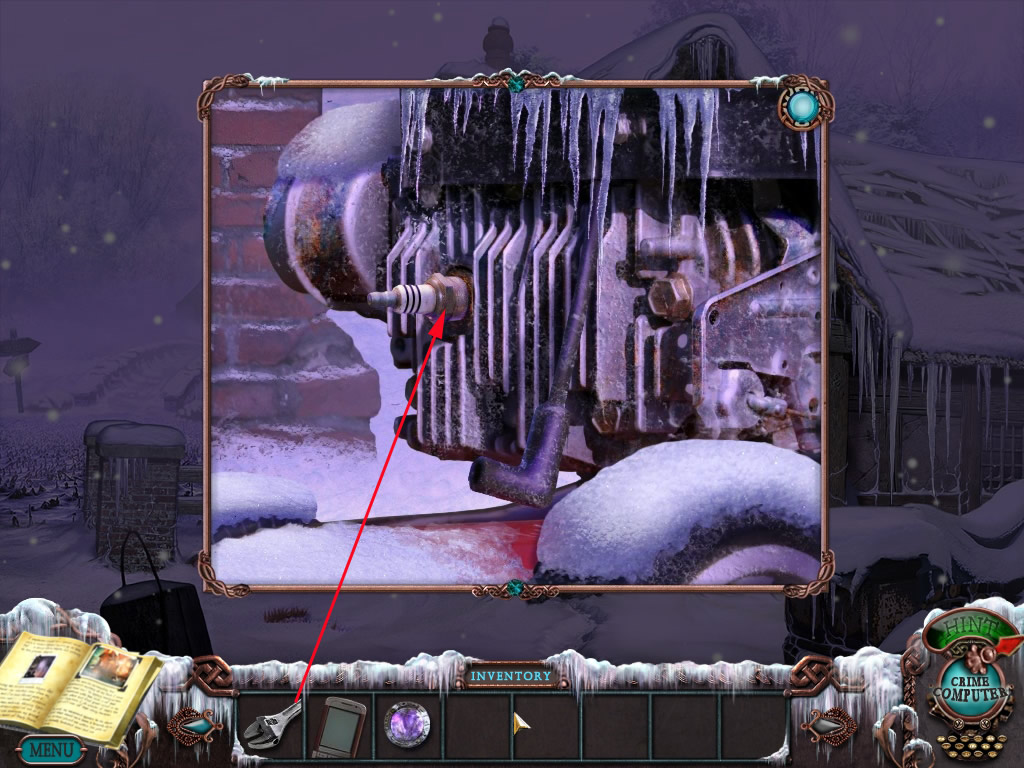
Click the generator - you will learn that a spark plug is needed.
Get the snow shovel out of your inventory and remove the snow at the bottom of the statue.
You will have to click a view times, than you can pick up a garage opener.
Screenshot
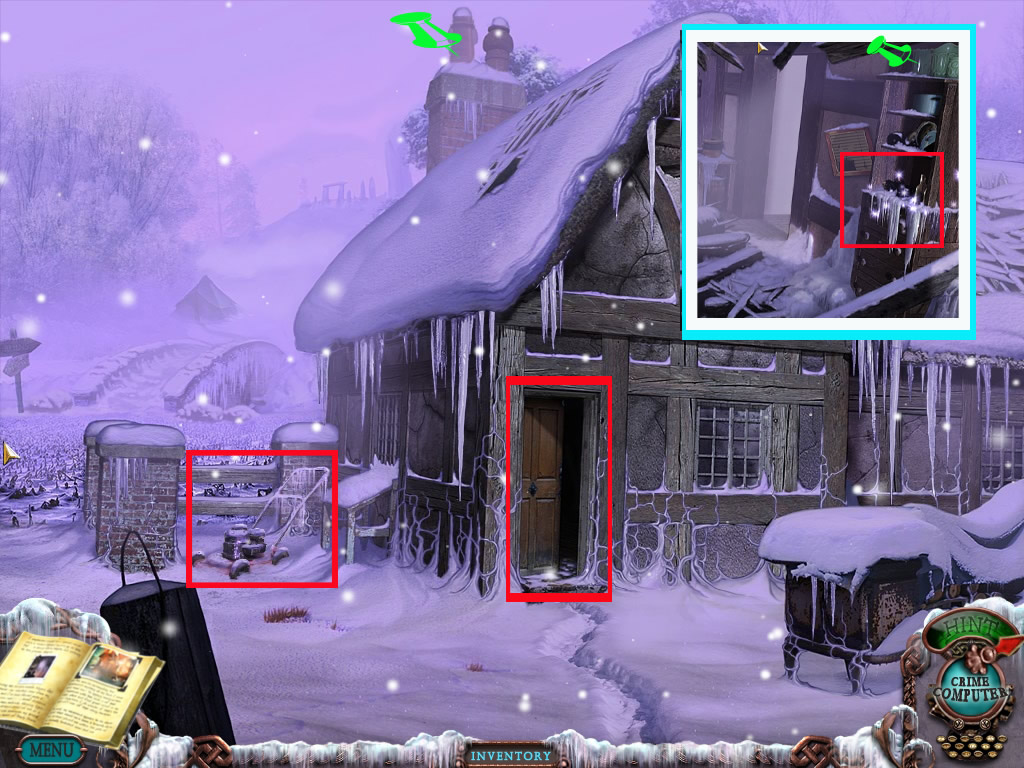
Now go to the garage (1x back, then right)
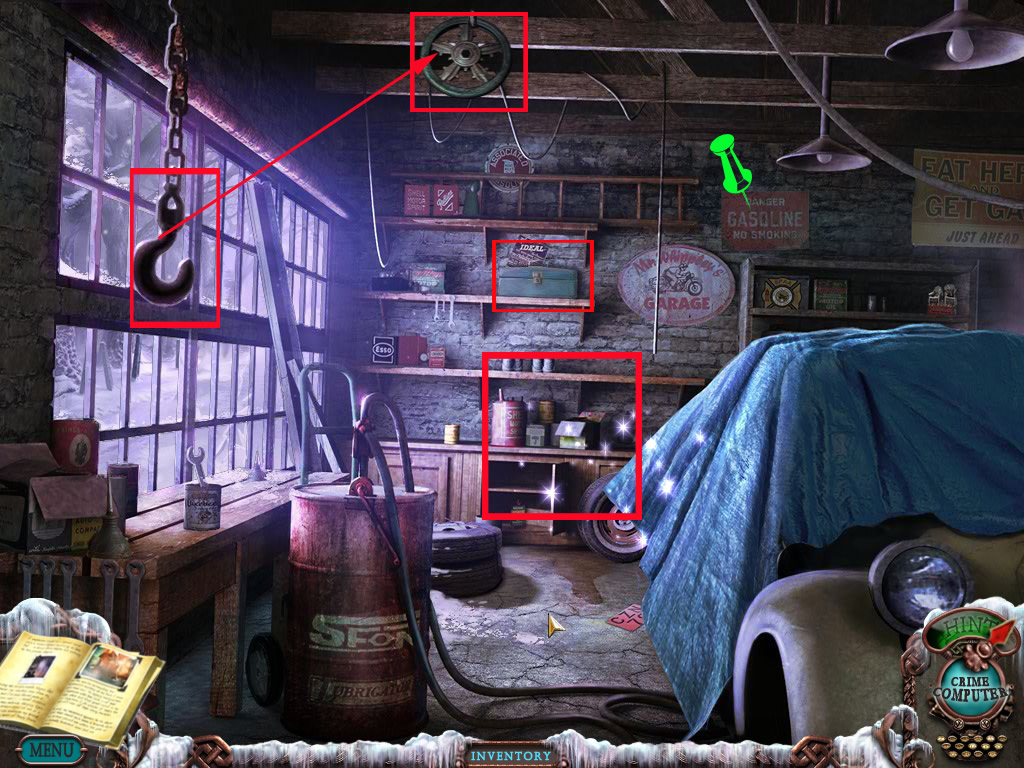
Garage
Click the thing, standing on the laying tire right next to the garage - its a morphing object.
Left side you see a circle lid under the snow - click it to learn that you can't move it and there is not the right tool in your inventory yet either.
Open the garage door with the garage opener from your inventory and enter.
Screenshot
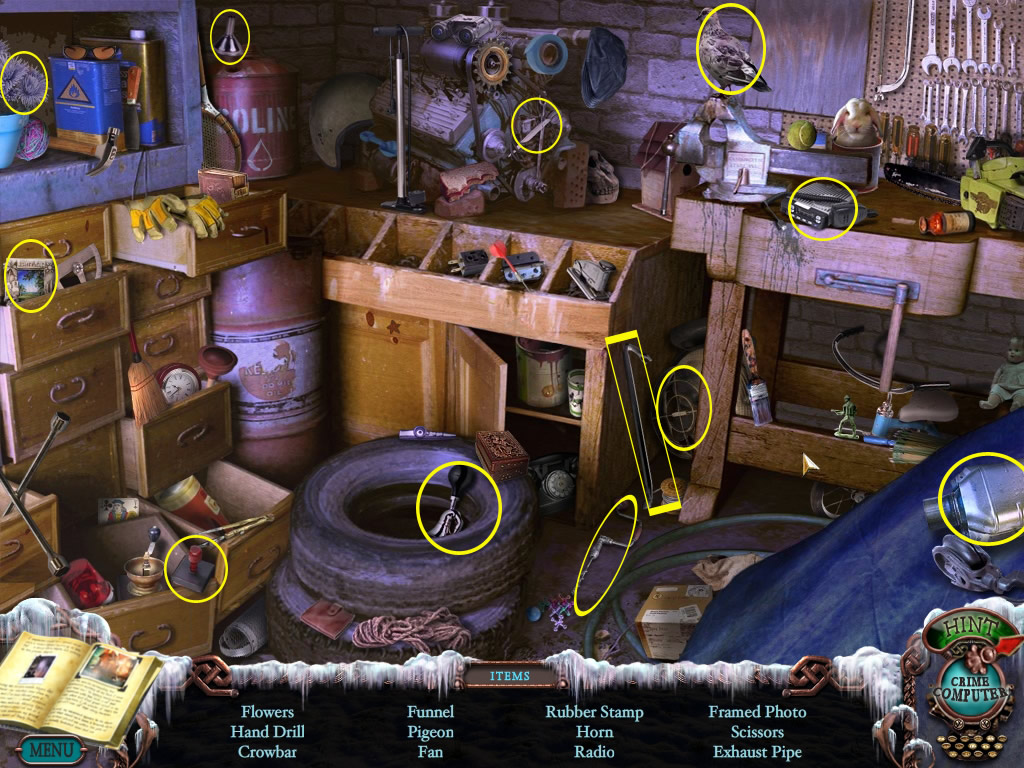
There is a ho-scene - find all items. The sledgehammer will go into your inventory.
Screenshot
Click the hook at the chain upper left till the wheel at the wall above the ladder falls on the ground - pick it up.
The red sign right next to the ladder - the word "Kerosene/Gasoline" is a morphing object.
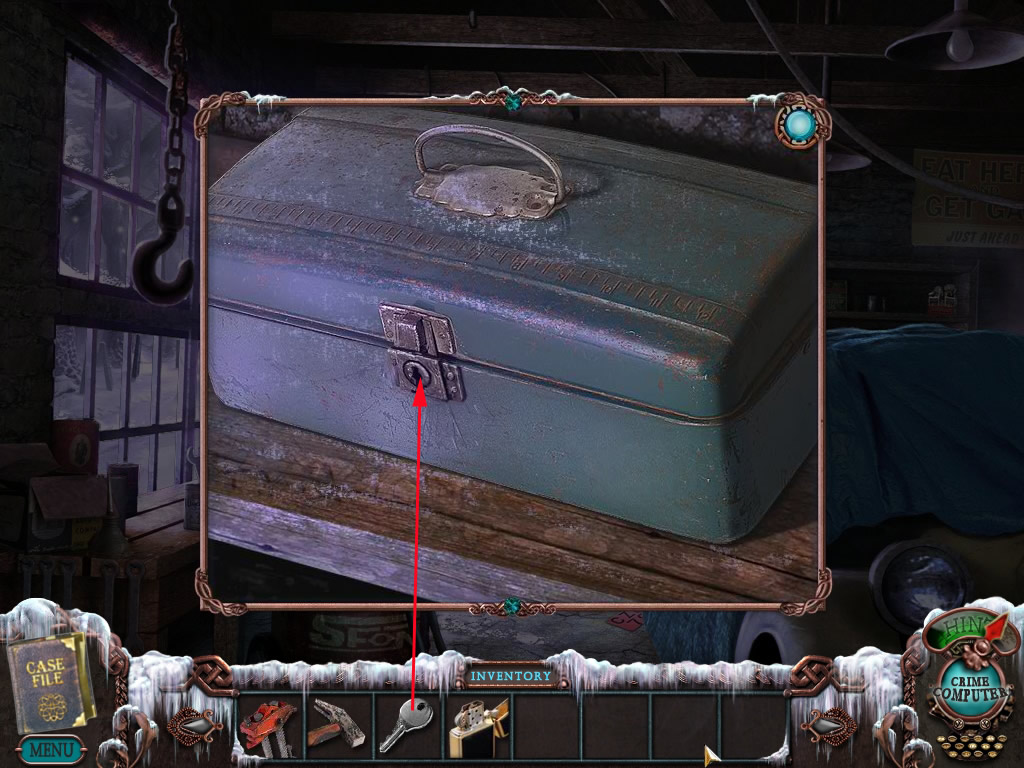
The green box on the shelf needs a key.
Screenshot
Go back to the hotel and into the bathroom.
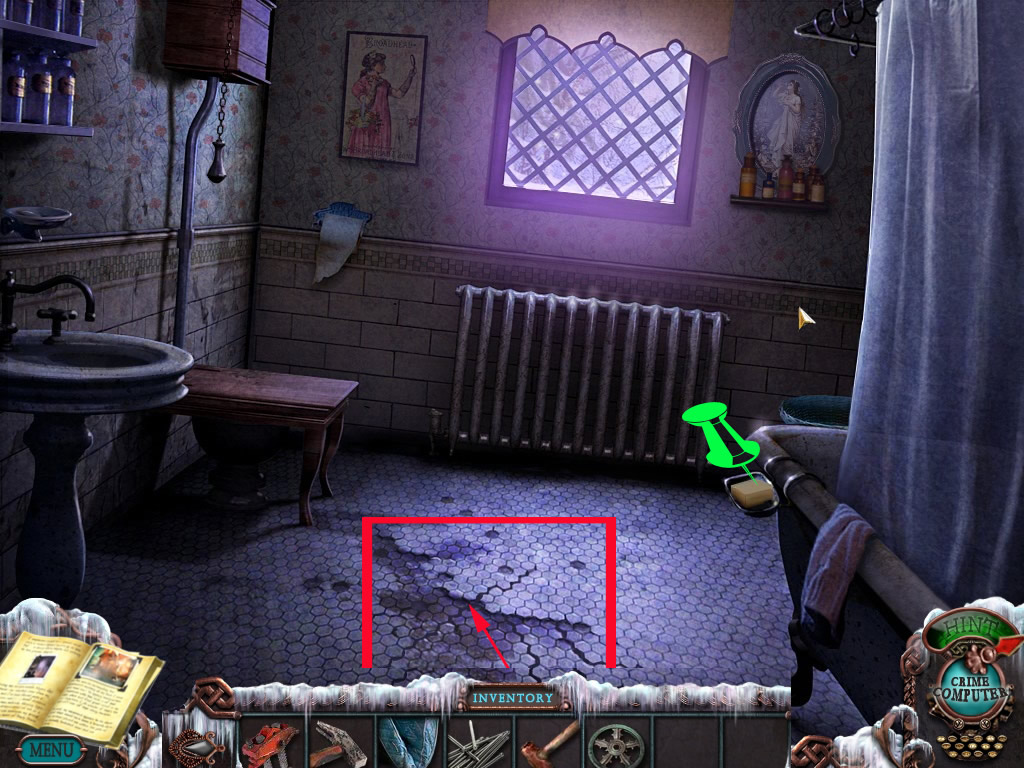
Bathroom
The soap right side at the tub is a morphing object.
Use the sledgehammer from your inventory and smash the ground, till you can see the managers office below.
Unfortunately you also hit the water pipe.
Screenshot
Go back to the garage.
Garage
Another ho-scene is active.
Find the objects, the crowbar will go into your inventory.
Screenshot
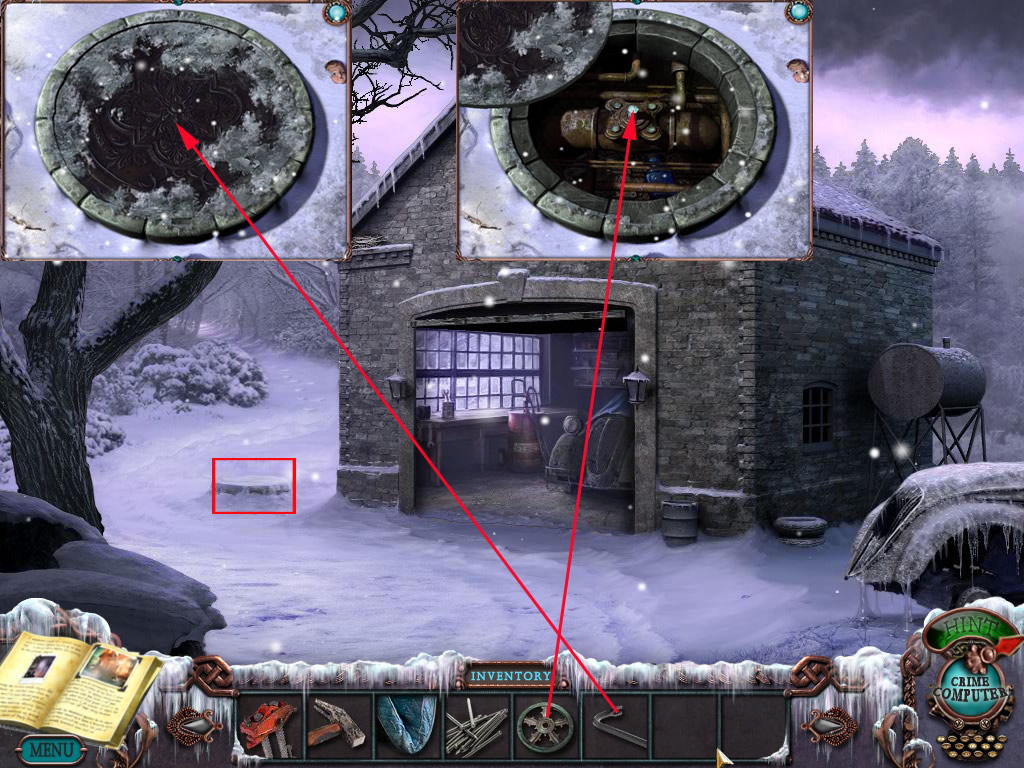
Leave the garage and click the cover right side in the snow.
Cover
Use the crowbar and click it a few times in the middle of the cover to move it.
Get the wheel out of your inventory and place it right at the main out.
Click a few time to shut the water off.
Screenshot
Go back to the bathroom
Bathroom
The water stopped - get the mattress out of your inventory and place it on the hole.
You will have to click a few times, till it falls down.
Click again to jump down.
Screenshot
Manager office
Click the ho-scene and find all listed items - the iron key goes into your inventory.
Screenshot
The books on the desk are morphing.
Click the painting at the wall, you need to pry it.
Use the crowbar from your inventory.
You need a code for it, but you do not have on yet.
Screenshot
Leave the office through the door and go outside
Boathouse
Go to the garage and there top right.
On your way, you will find an video tape.
Go further - the symbol above the door is a morphing object.
Click the door and open the lock with the iron key.
Screenshot
Play the ho-scene - the small board will go into your inventory.
Screenshot
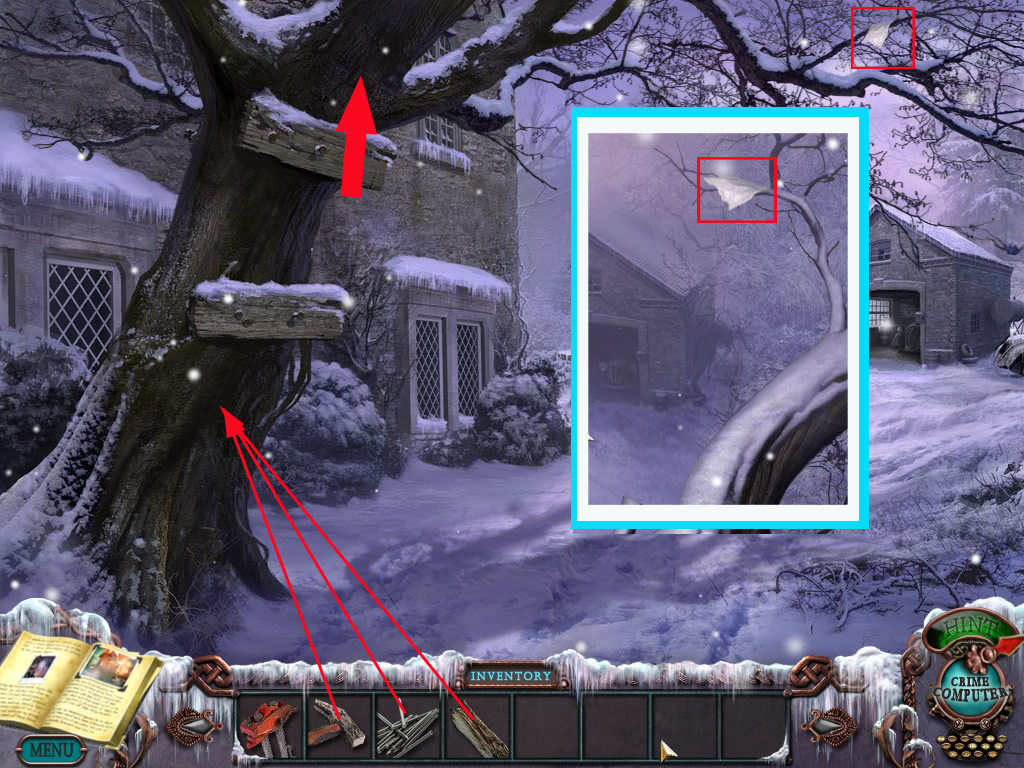
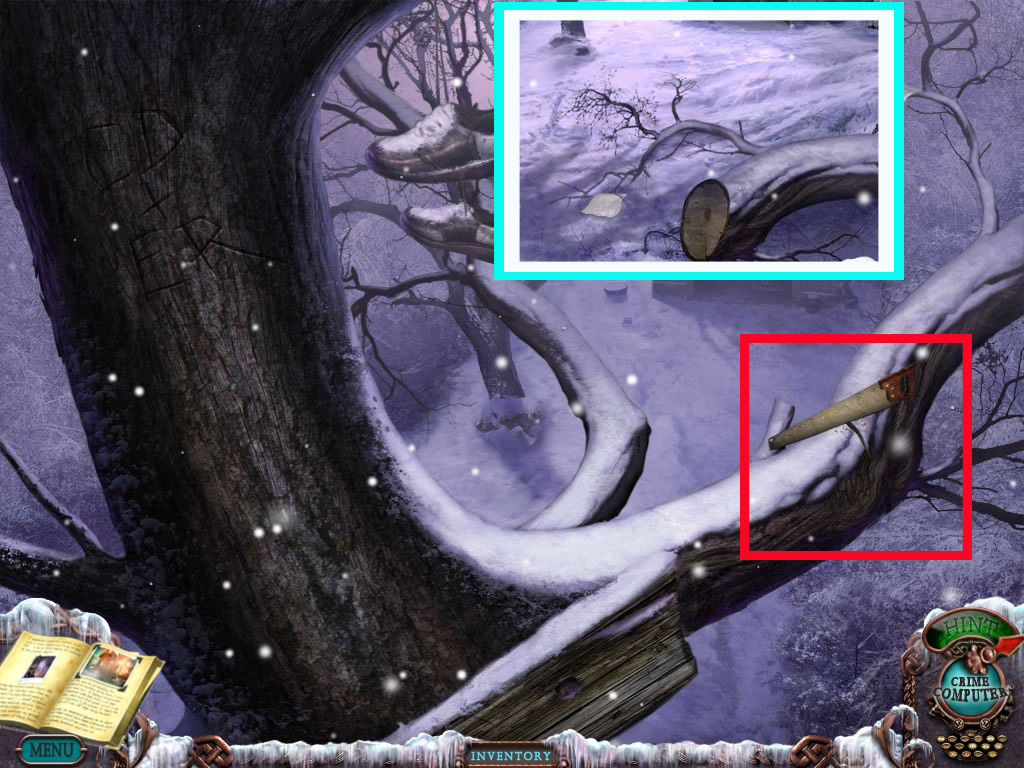
Go back to the hotel, but stop at the tree right after the garage.
Tree
Look up and see a paper scrap at one of the branches.
You can't reach it.
There are already two steps nailed at the tree, but this is not enough.
Place first your small board at under the other ones, then the nails onto it and use the hammer.
Now you can climb up - click the paper to learn that you still can't reach it.
Screenshot
Climb down, go into the hotel and up into the bedroom front hallway left side.
Bedroom left - Hallway front
Play the ho-scene, the handsaw will go into your inventory.
Screenshot
Go back to the tree.
Tree
Climb up again and use the saw at the middle of the branch.
You will need to click three times till the branch will fall down.
Climb down and garb the paper.
Screenshot
Go into the hotel.
Library
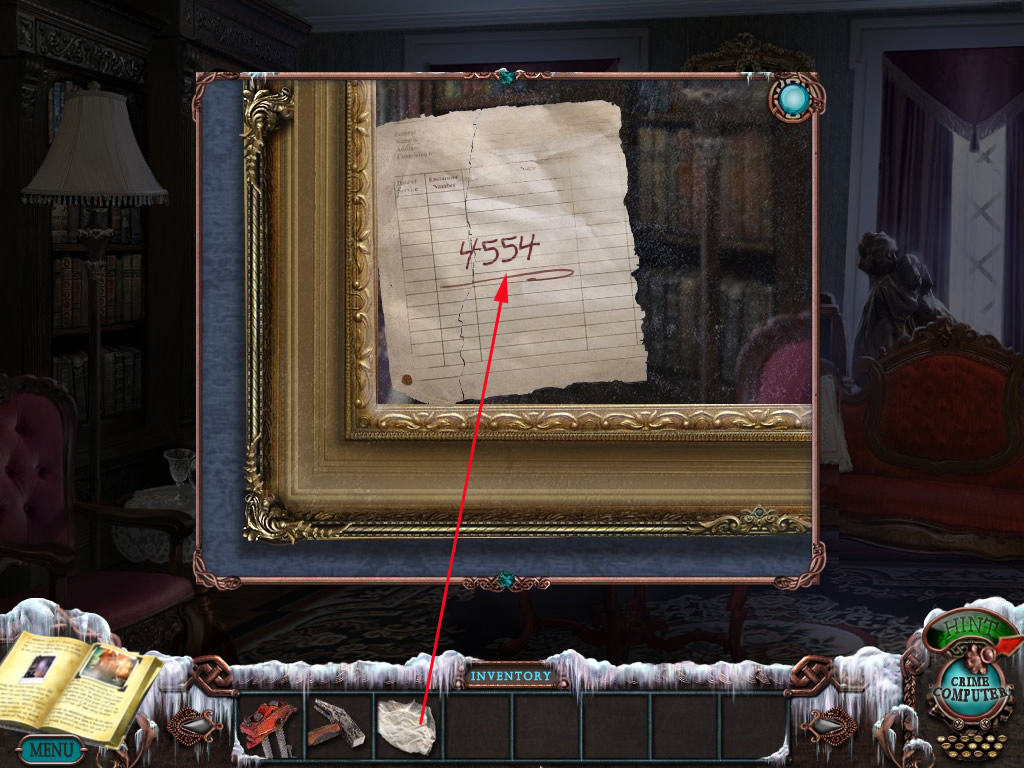
Click the mirror with the piece of paper.
Place your paper next to it and you will see four numbers.
The numbers are random, I had 4554, 5774, 6335, you might have a complete different one.
Screenshot
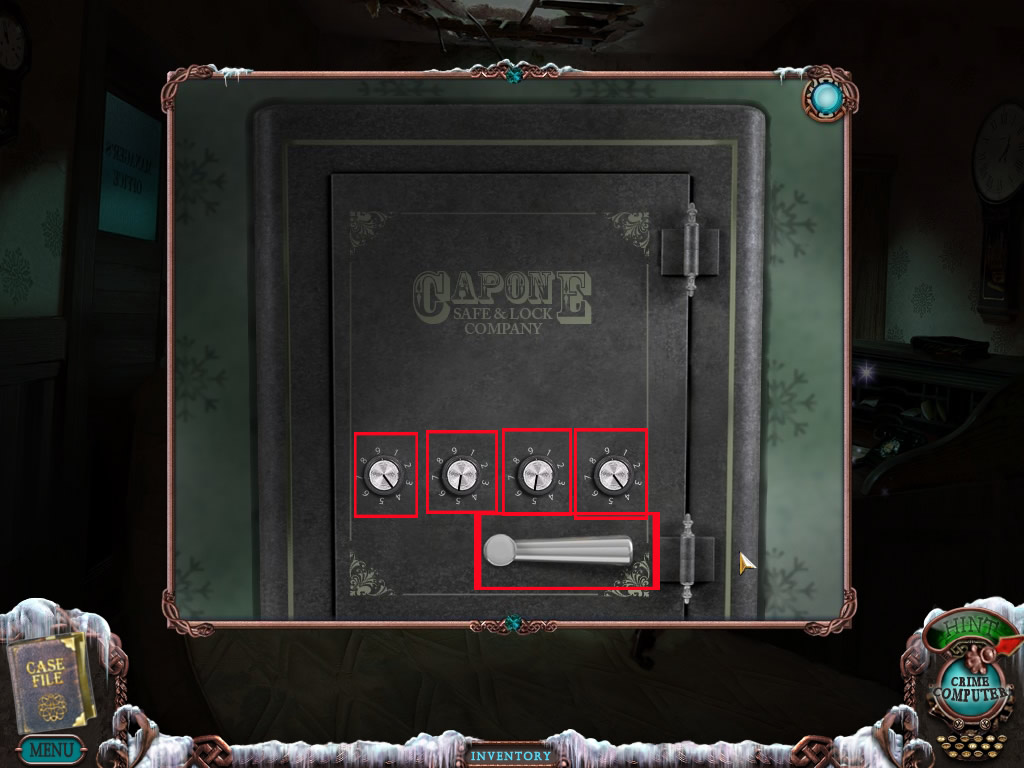
Go down to the manager's office.
Manager Office
Click the safe and change the knobs according to the numbers you found at the mirror note - it is also copied in your journal.
Click the handle below and the safe opens.
Get the key out.
Screenshot
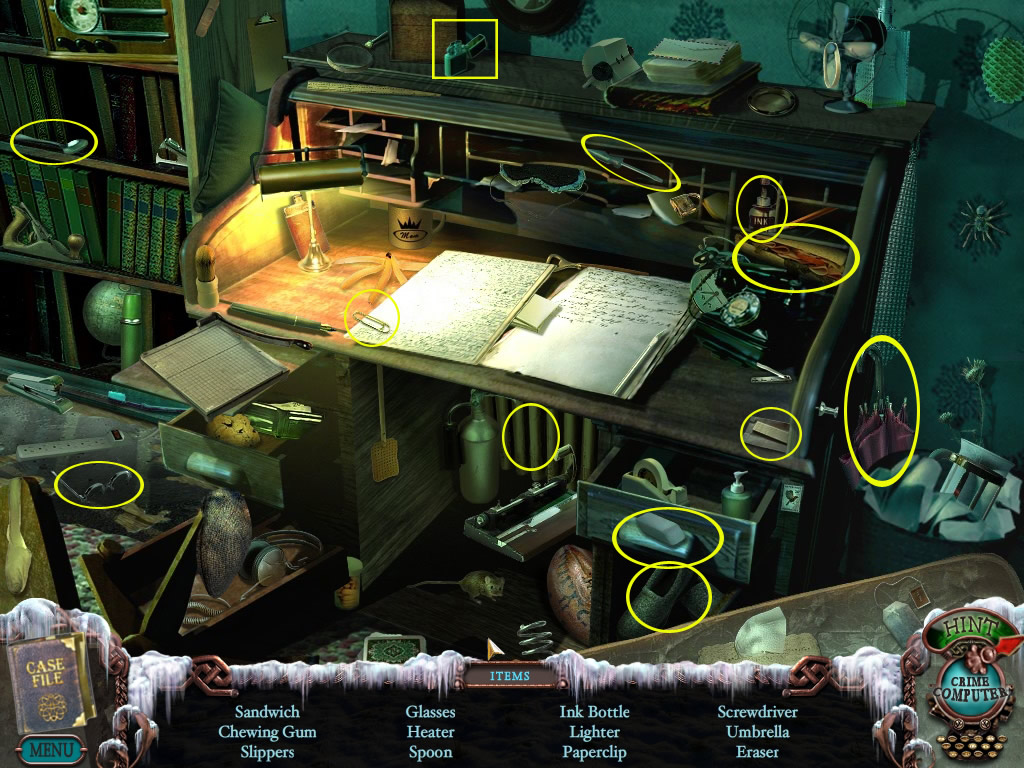
Play the ho-scene, the small little key will go into your inventory.
Screenshot
Leave the office and go to the garage.
Garage
Click the green box on the shelf and open it with the small key.
Screenshot
Go to the bedroom right side, hallway front.
Bedroom right - Hallway front
Click the oars at the wall and use the pliers to remove the rope.
The oars will go into your inventory automatically.
Screenshot
Leave the hotel and go back to the boathouse
Boathouse
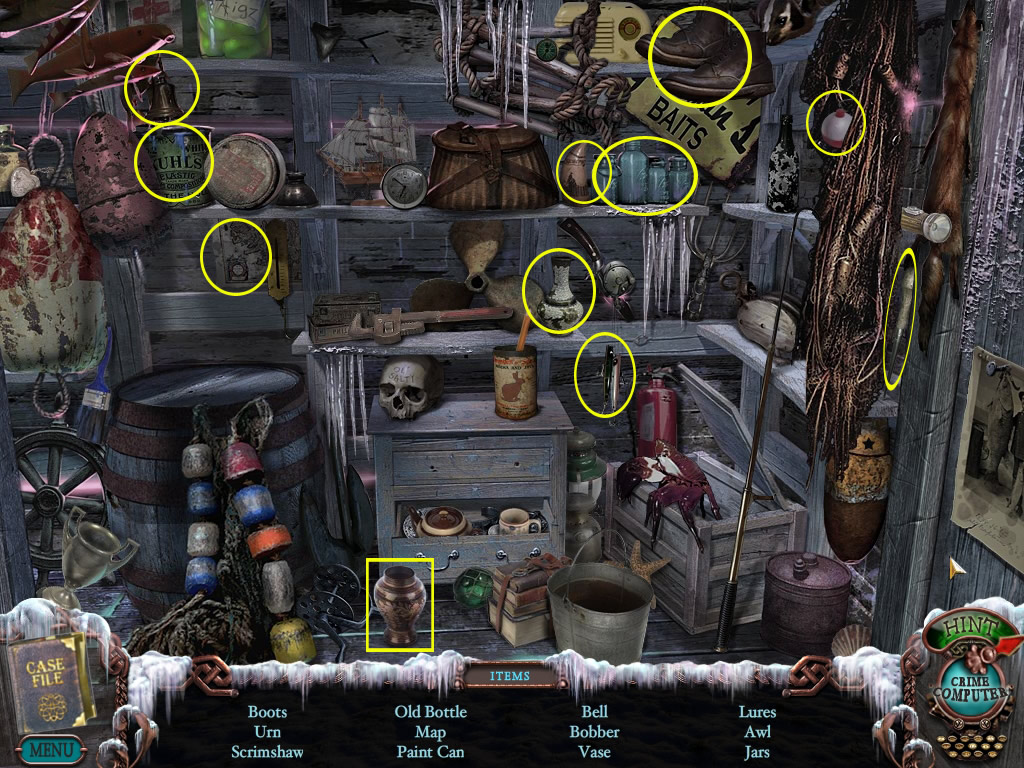
Play the ho-scene - the urn will go into your inventory.
Screenshot
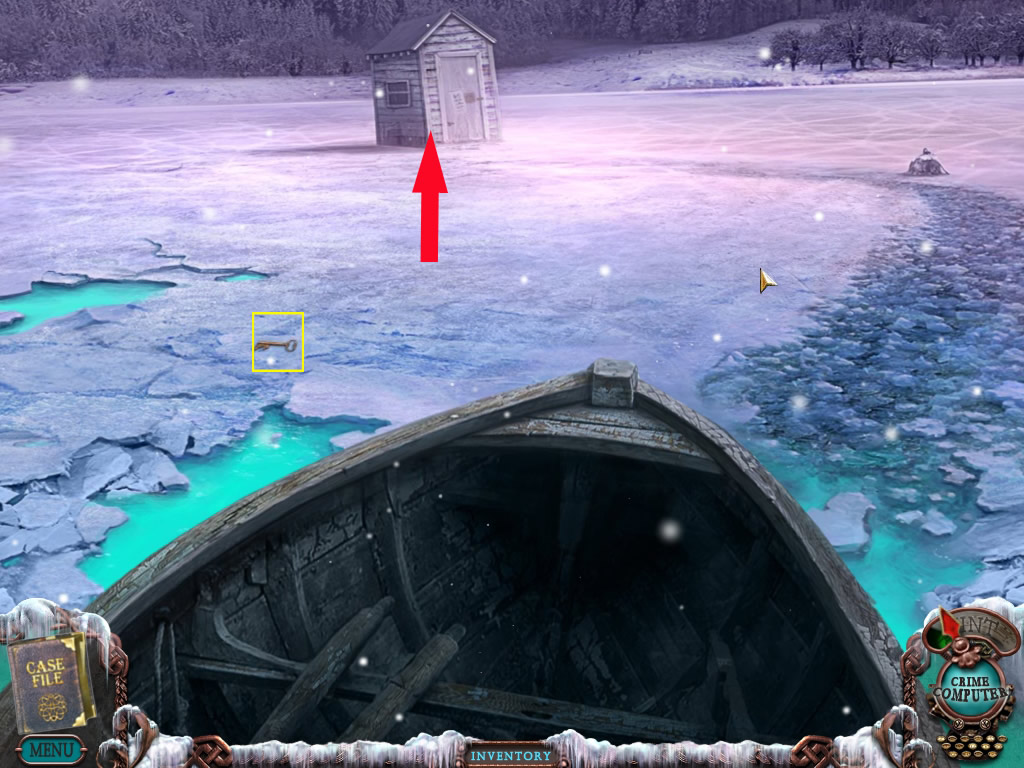
Place the oars from your inventory on the boat and click the boat to enter.
Click the arrow at the door to leave the boathouse
Screenshot
Fishing Shanty
Grab the hotel room key on the ice left side and click the shanty to reach it.
Screenshot
Click the door.
Congratulations, you found your first student.
Click the big amulet the student is holding.
A puzzle opens.
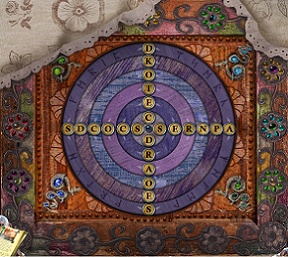
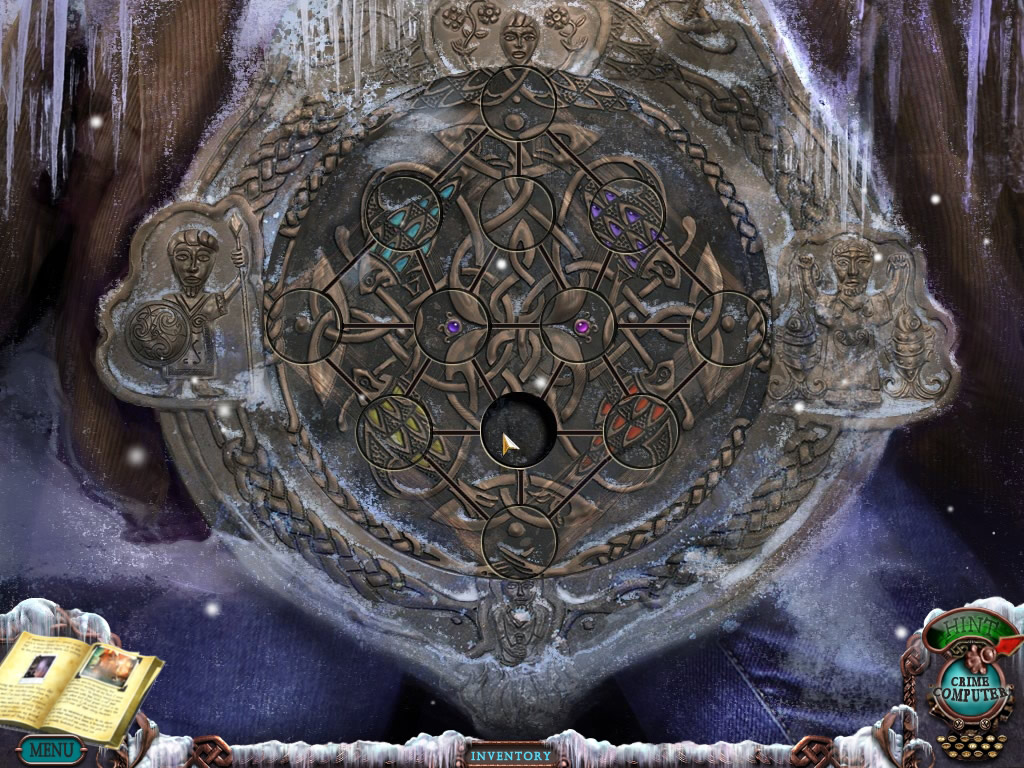
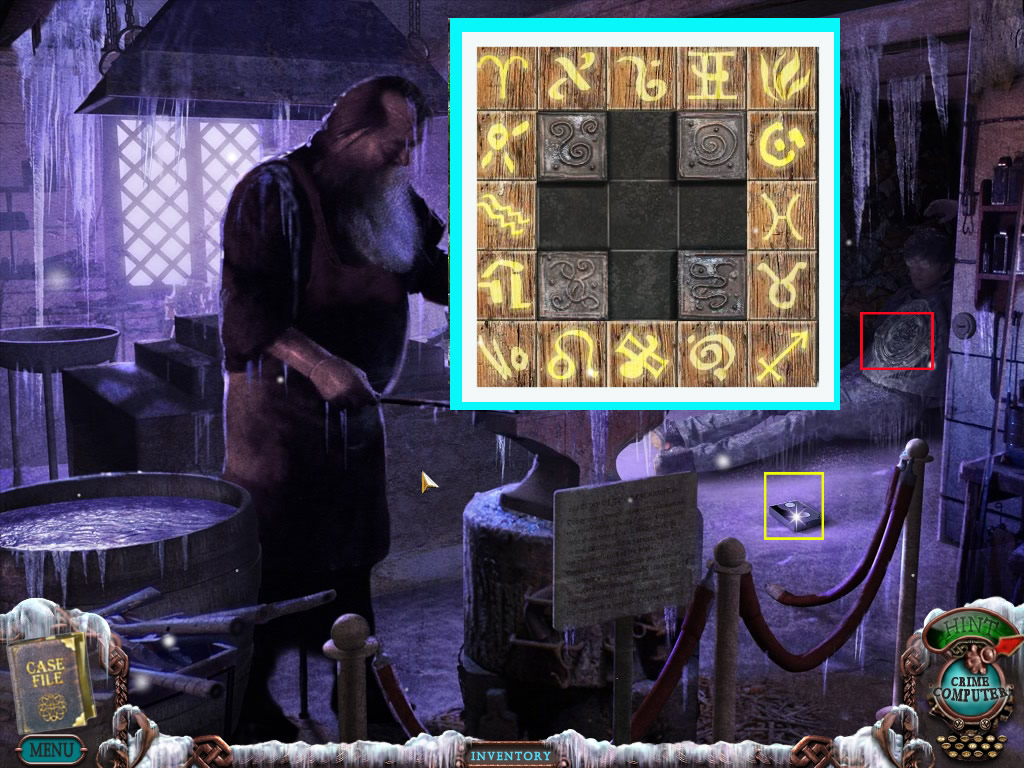
Your goal is it, to reassemble the picture by clicking the circles to move them to their proper positions.
You can move a circle only onto a free spot along the shown line.
The starting positions of the puzzle is random, so that I can only provide the solution.
Screenshot
Grab the turquoise shape, that appears, it goes into your inventory.
Go back to the hotel and there upstairs to the back hallway.
Second Student
Bedroom right, hallway back
Use the hotel room key to open the door and enter.
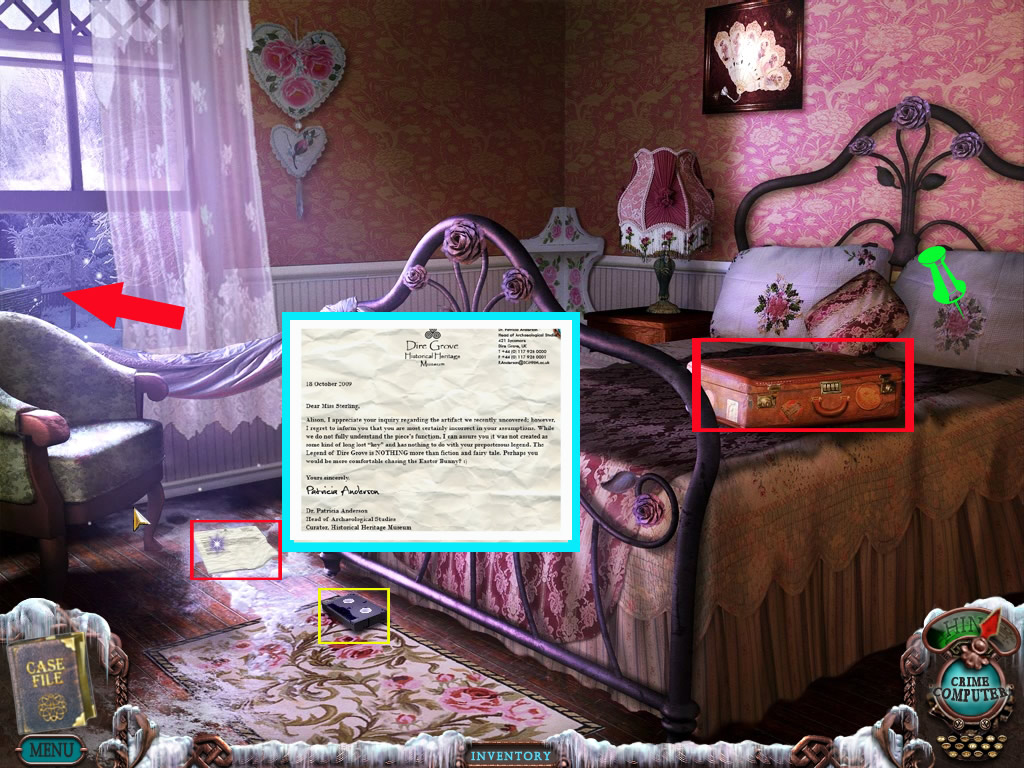
Pick up the video tape on the floor and read the note, laying on the floor behind the tape.
The pattern of the right pillow is an morphing object.
Click the suitcase to learn that you need a combination code for it.
Watch and listen to this video as it provides needed informations about the code for the suitcase.
Screenshot
For those, which do not have sound for what ever reason:
You will be told, the suitcase is locked with the last 4 numbers of Alison's cellphone number
Leave the room and go downstairs to the left part of the lobby.
Lobby, left side
The backpack contains another ho-scene.
The telephone charger will go into your inventory.
Screenshot
Go upstairs, right bedroom, hallway front.
Bedroom right, hallway front
Click the outlet at the wall right next to the bed and drag the telephone charger to it.
Nothing happens as we do not have power yet.
Screenshot
Go back to the bedroom right, hallway back and click the window to come into the backyard.
Backyard
Screenshot
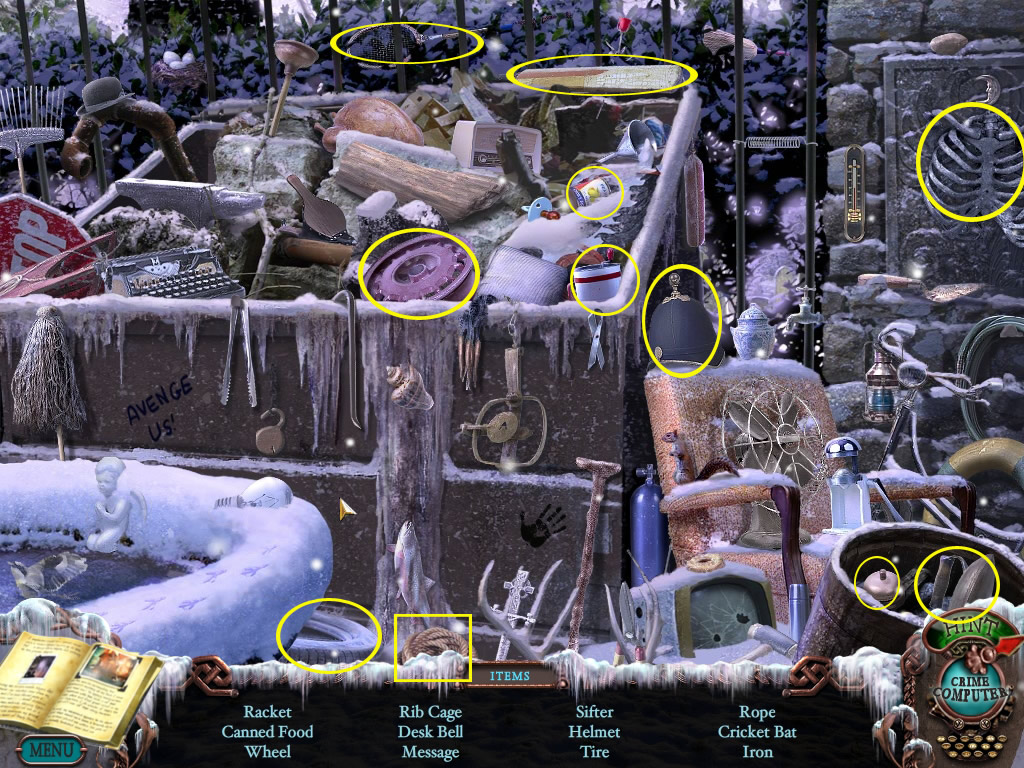
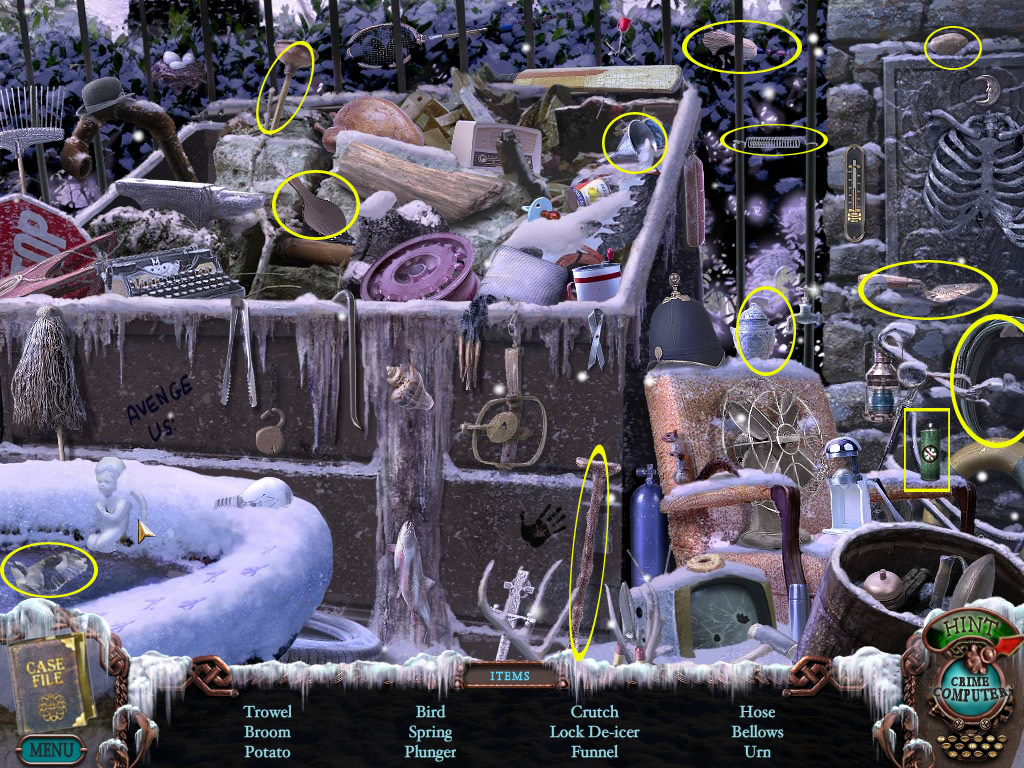
Click the trash container to play the ho-scene.
The rope will go into your inventory.
Screenshot
Use the arrow at the window, to go back and leave the hotel.
When you face the hotel go to the top left.
Screenshot
Bridge
The sign above the bridge is a morphing object.
Click the bridge to enter.
Above you there is a beam with a kind of metal band.
Click your rope there - you have now a way over the abyss.
Go there.
Screenshot
Crossing
To the right sparking cables are laying - you can't go there.
Pick up the video tape right side of the way.
Click the Word "Lodge" at the wooden sign, it is a morphing object.
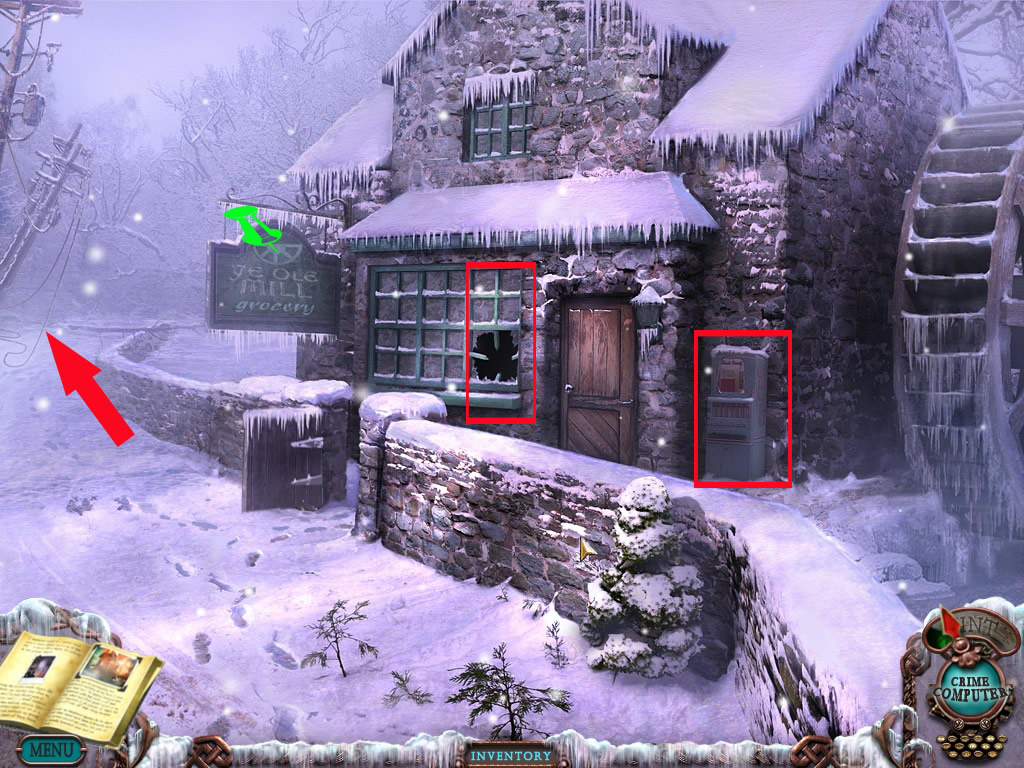
Go straight ahead and click the grocery one time to come more near.
Screenshot
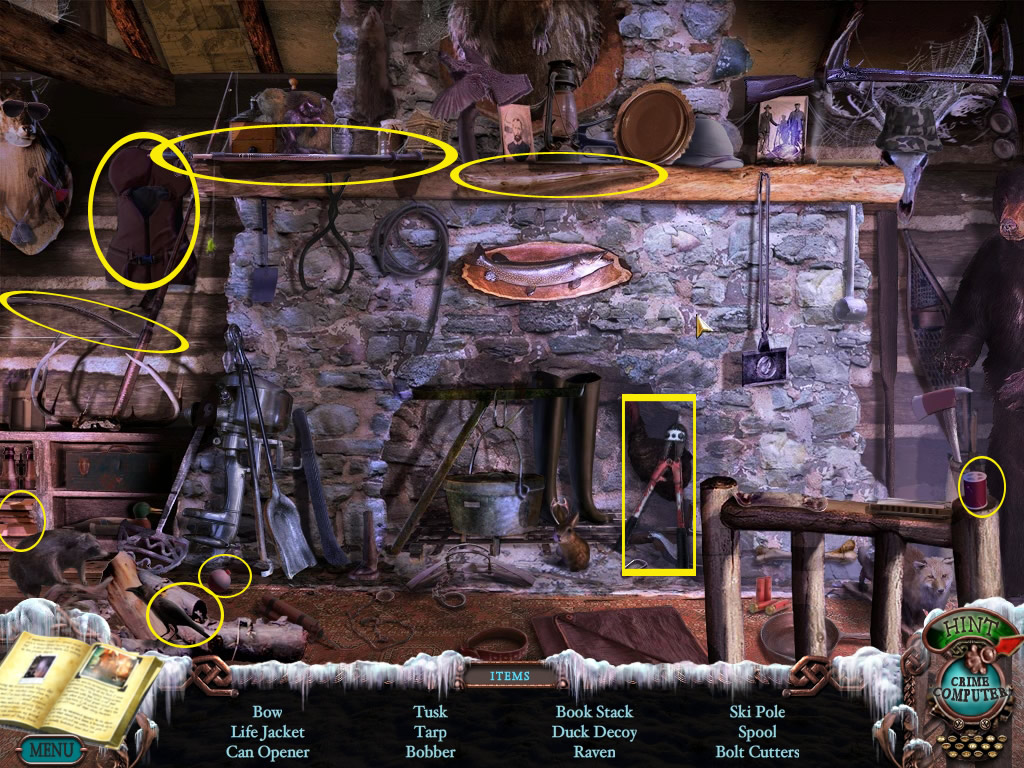
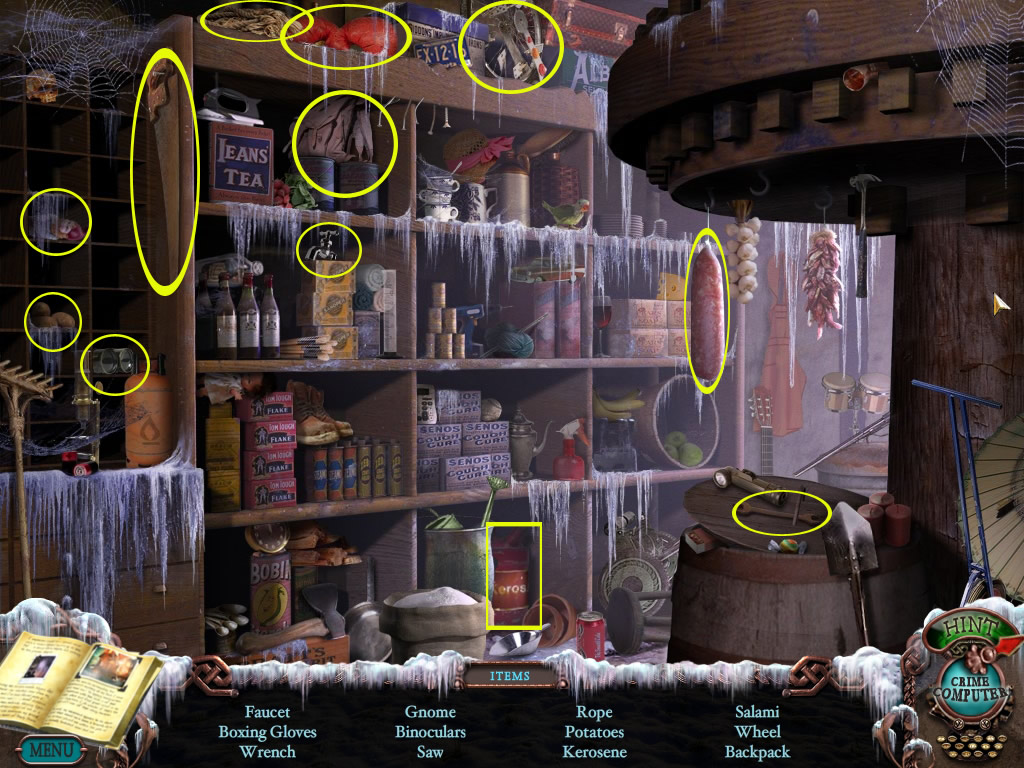
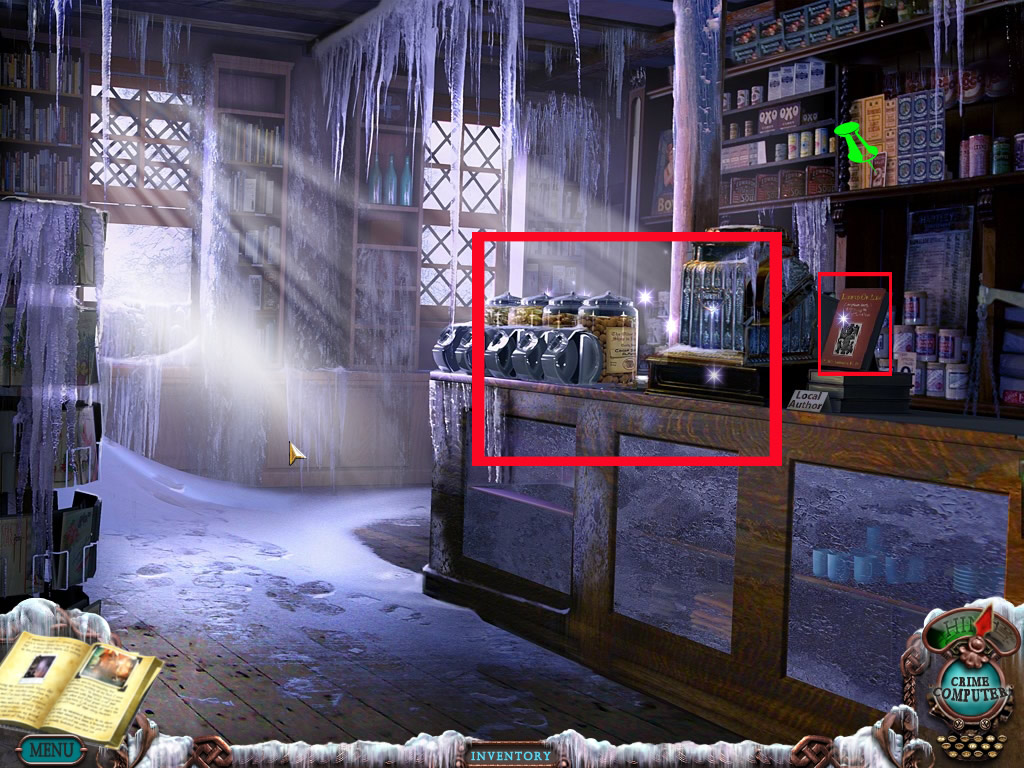
Grocery
Click the symbol on the grocery sign - it is a morphing object.
Click the vendor right side, but you need coins for it.
Enter the grocery through the broken window.
Screenshot
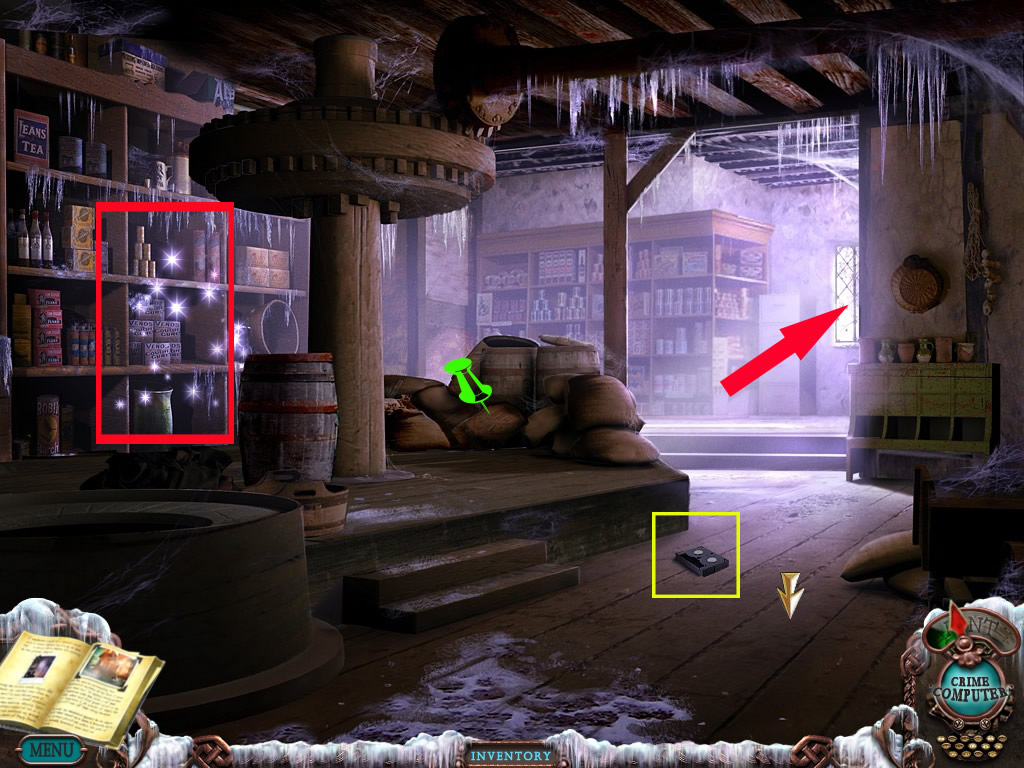
Grocery-inside
Pick up the video tape.
Click the sack with the red print, it is a morphing object.
Screenshot
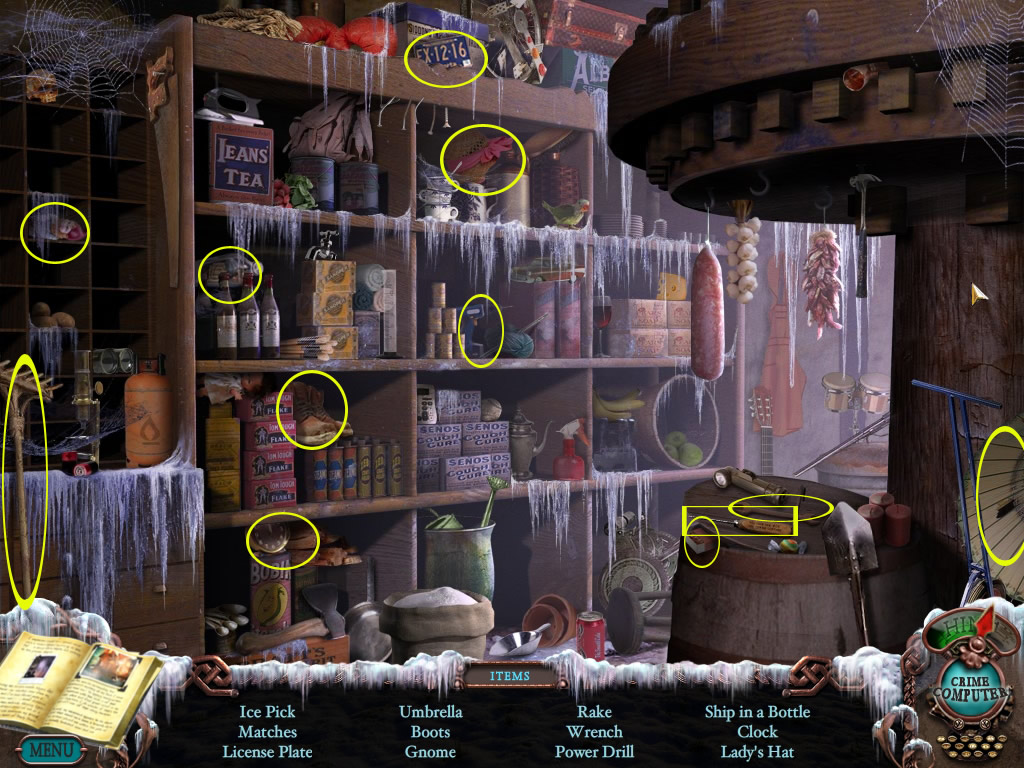
Click the ho-scene.
The ice pick will go into your inventory.
Screenshot
Use the way left to the back room.
Click the counter door left and get the axe out.
It goes into your inventory.
Click the lower drawer of the file cabinet to find a diary.
Read it then go to right in the basement.
Screenshot
In this room you can also click the carpet and it will move beside, revealing a trapdoor - this door is part of the Extra-Content, which is not included in this walkthrough.
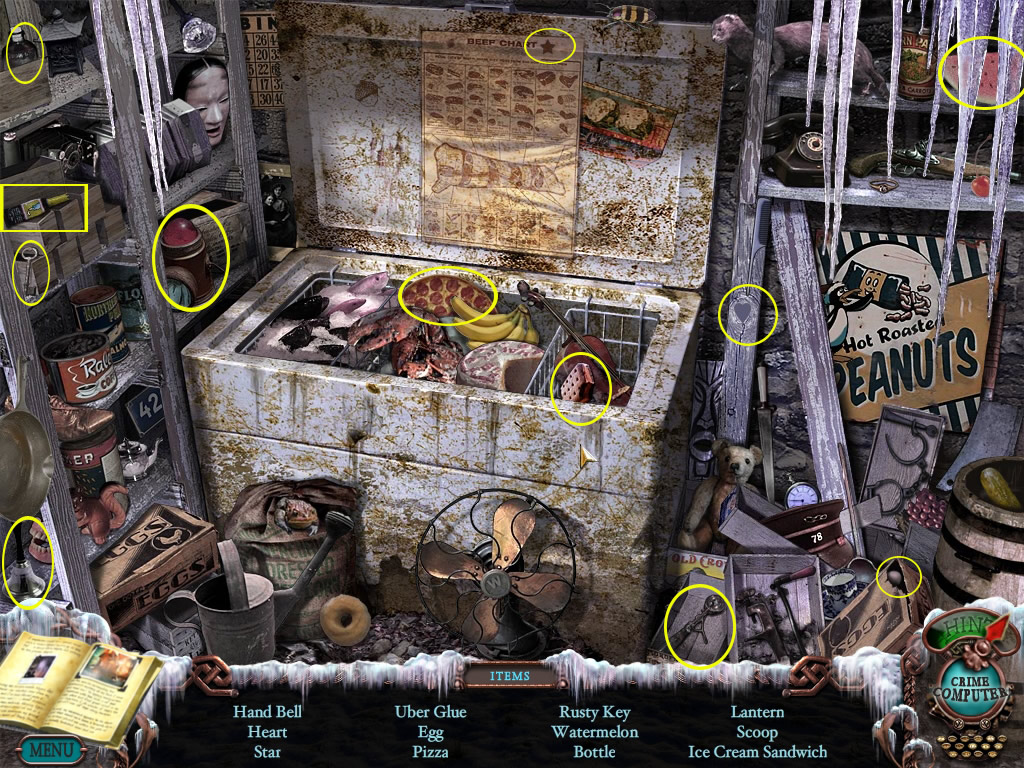
Grocery-Basement
Get the car jack out of your inventory and place it at the grate left to the freezer.
Click it a few times and the grate will let you get the snowshoes - they go into your inventory.
The jar on the second shelf from top left side is an morphing object.
Screenshot
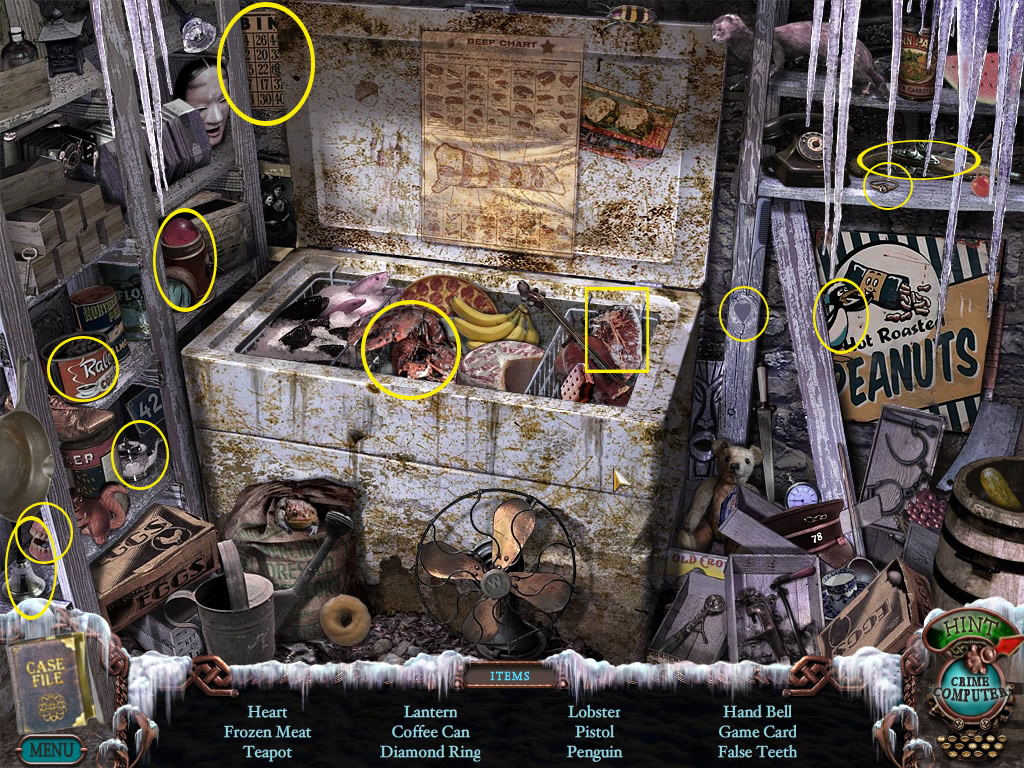
Play the ho-scene. The frozen meat will go into your inventory.
Screenshot
Go upstairs again.
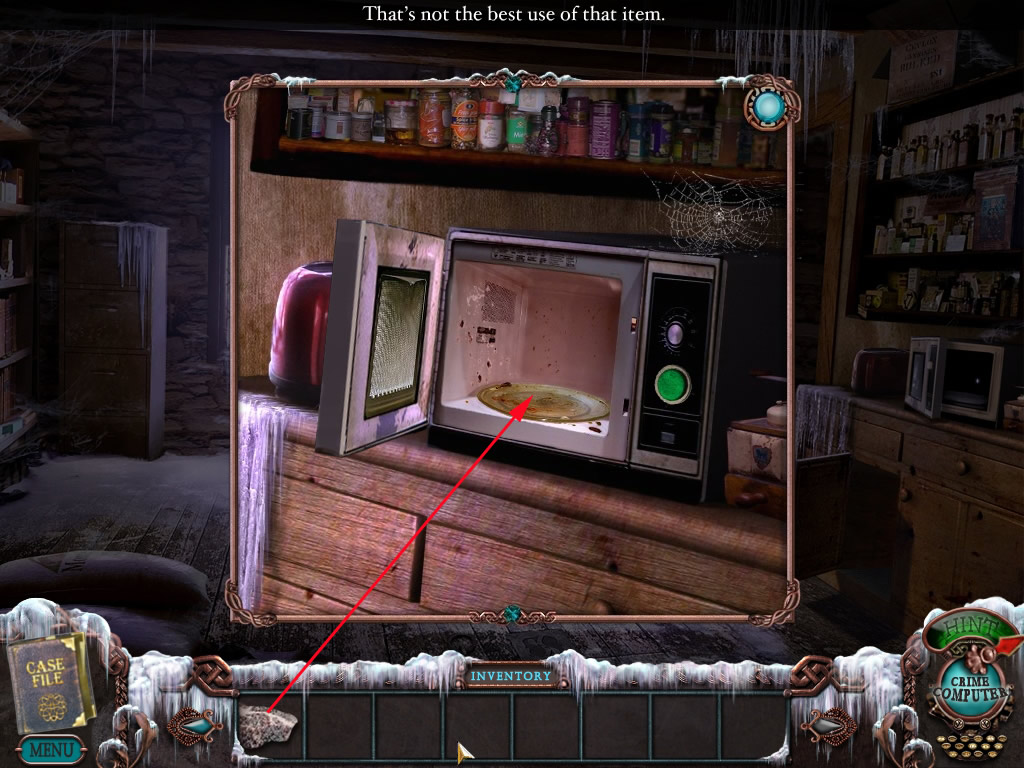
Grocery-back room
Click the micro wave and click again the door, when you have the nearby view.
Place the frozen meat into it, close the door and press the green button.
Wait till the micro wave stops flashing, open the door and get the defrosted meat.
It will go into your inventory.
Screenshot
Leave the grocery and go back to the hotel, into the backyard.
Backyard
The trash container is again a ho-scene.
The lock defrost will go into your inventory.
Screenshot
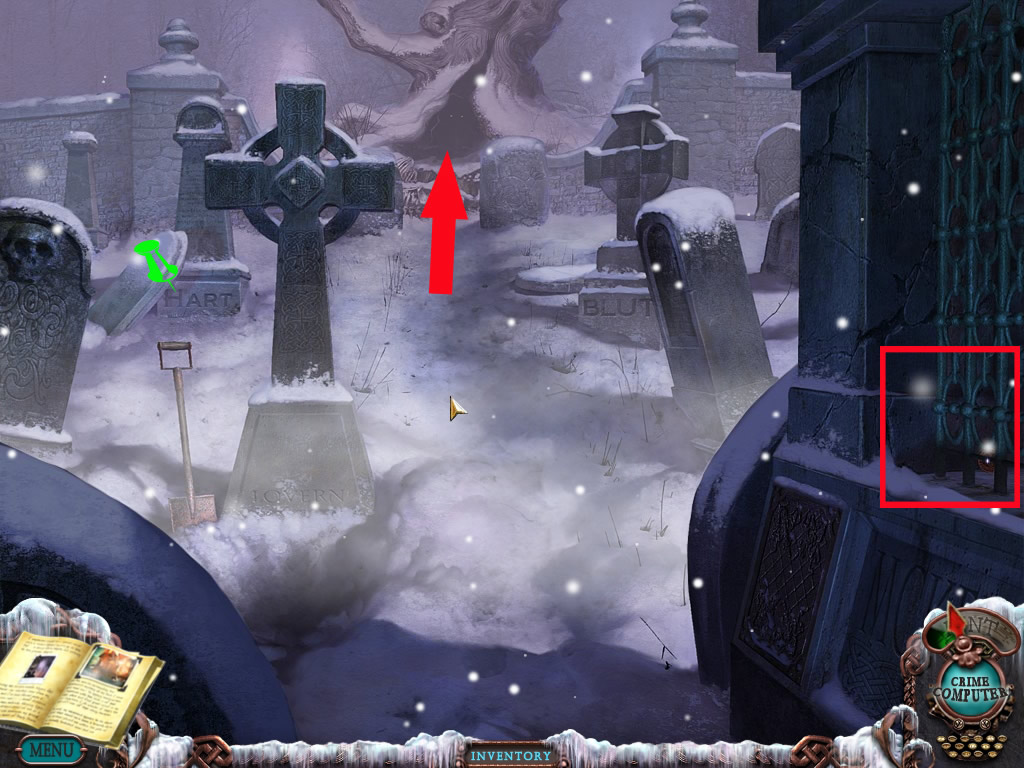
Go straight ahead on the cemetery
Cemetery
Right side a coin is laying, but you can't reach it yet.
The F or H on the left grave stone is a morphing object.
Screenshot
Go straight ahead.
Crossing with beast
Place the meat in front of the beast and you can move on.
Screenshot
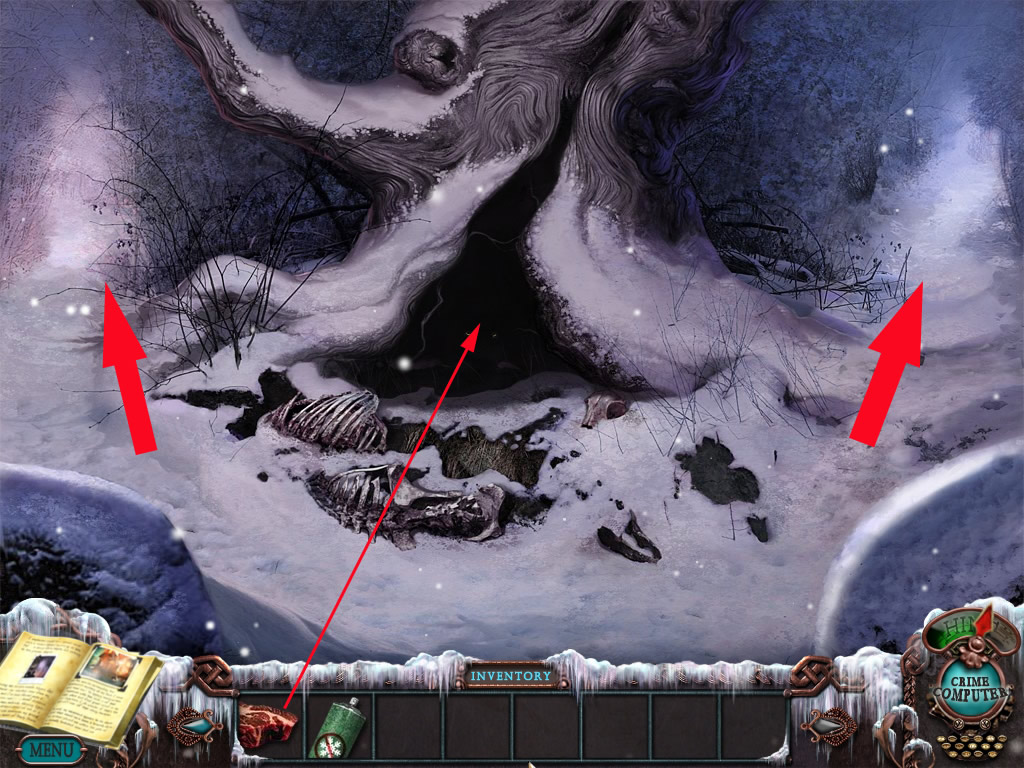
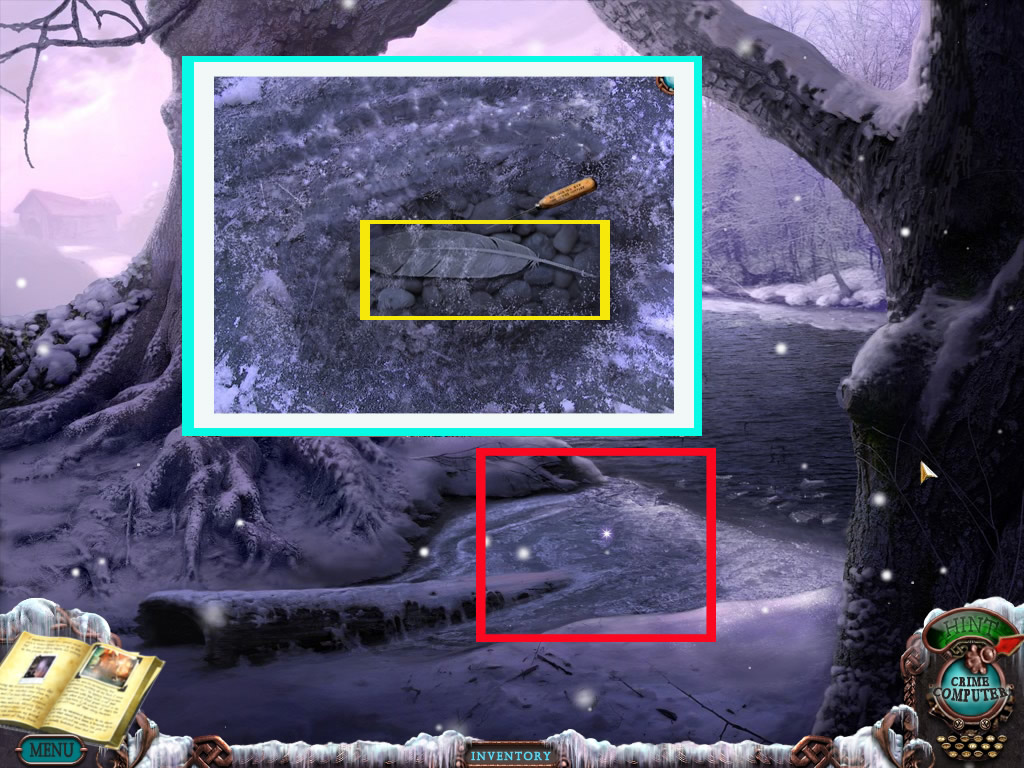
Go left first.
River
Click the ice on the ground.
There is a feather underneath.
Get the icepick out of your inventory and use it to get the feather.
It will go into your inventory.
Screenshot
Go back at right at the crossing.
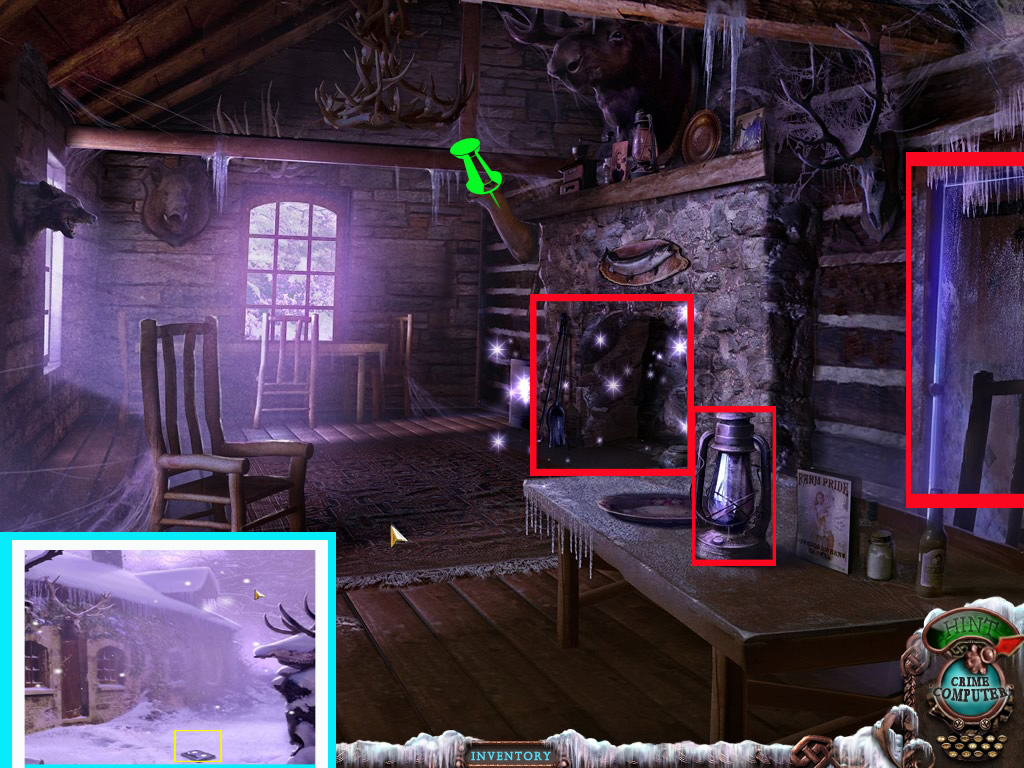
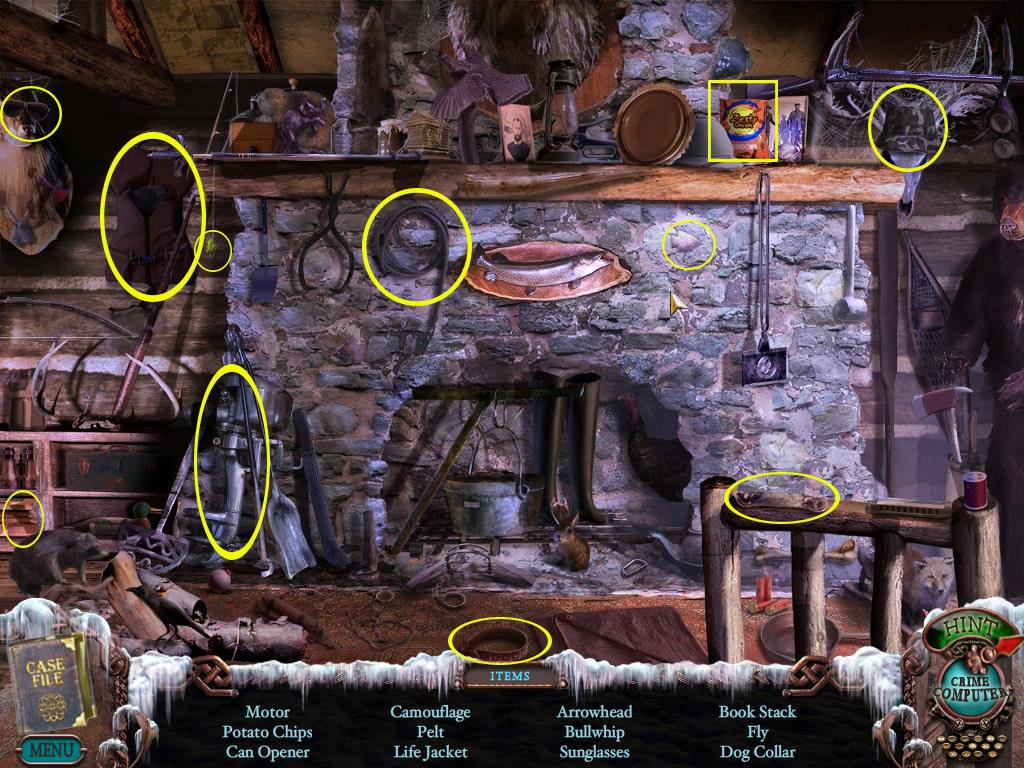
Hunting Lodge
Pick up the video in front of the logde and enter.
The deer had left above the fire place is a morphing object.
Click the oil lamp on the table, it will need oil.
Screenshot
Play the ho-scene - the bolt cutter will go into your inventory.
Screenshot
Click right from the table and remove the ice on the door knob with the ice pick.
Enter.
Congratulation, you found the 2nd student.
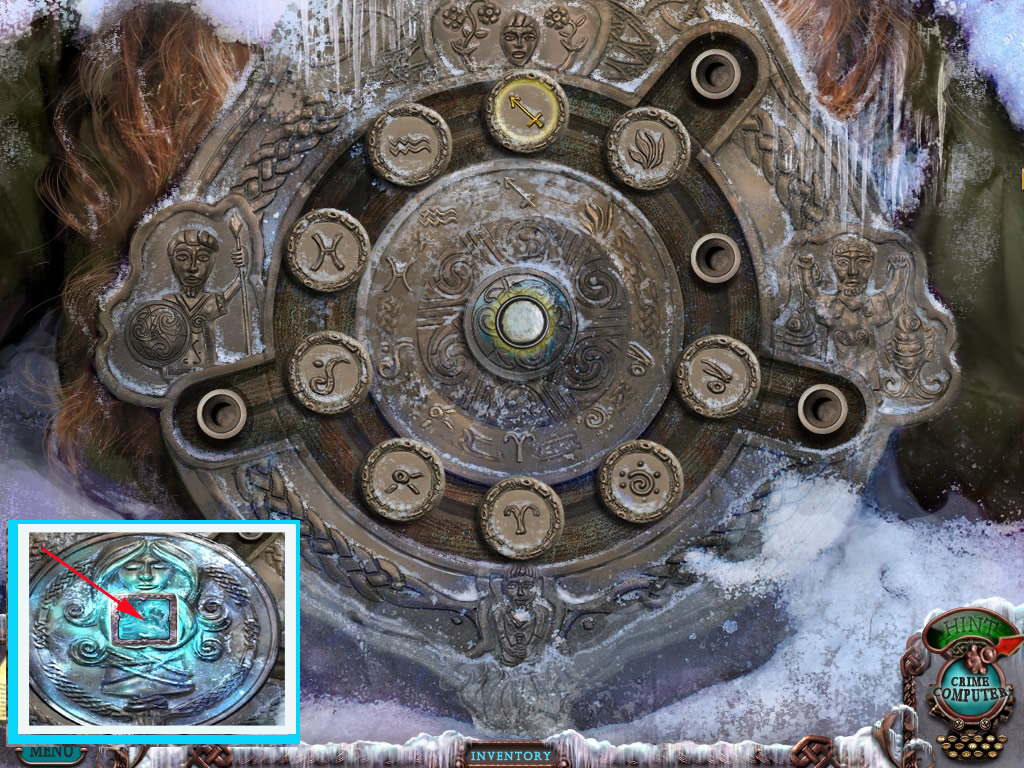
Click the amulet in her hand - a puzzle opens.
You will need to place the big circles in the same order as seen on the outside of the two inside circles.
Clicking a big circle first and then a free slot next to it, will make it move to this slot.
To move the big circles around, click the inner circle.
The slots at the figurines you can use to park circles.
The start positions are random again, so I can only provide the solution.
Screenshot
Leave the hut and go back to the grocery.
Third Student
Grocery inside/basement
The shelf contains a new ho-scene - a kerosene can goes into your inventory.
Screenshot
Go down to the basement - this ho-scene will give a super glue.
Screenshot
Return to the hunting lodge.
Hunting Lodge
Click the oil lamp on the table right side and place the kerosene at the opening.
Go back to the grocery and there top left to the museum.
Screenshot
Museum outside
The symbol on the museum sign is a morphing object.
The middle chimney on the roof is also an morphing object.
Click the door and open the lock with the bolt cutter.
Screenshot
Museum Vestibule/Gift shop
Right side on the piano, you can pick up a video tape.
The bust in the far left top is a morphing object.
Far left you see sparkles, when you click, you might see an exhibition, but its not working properly.
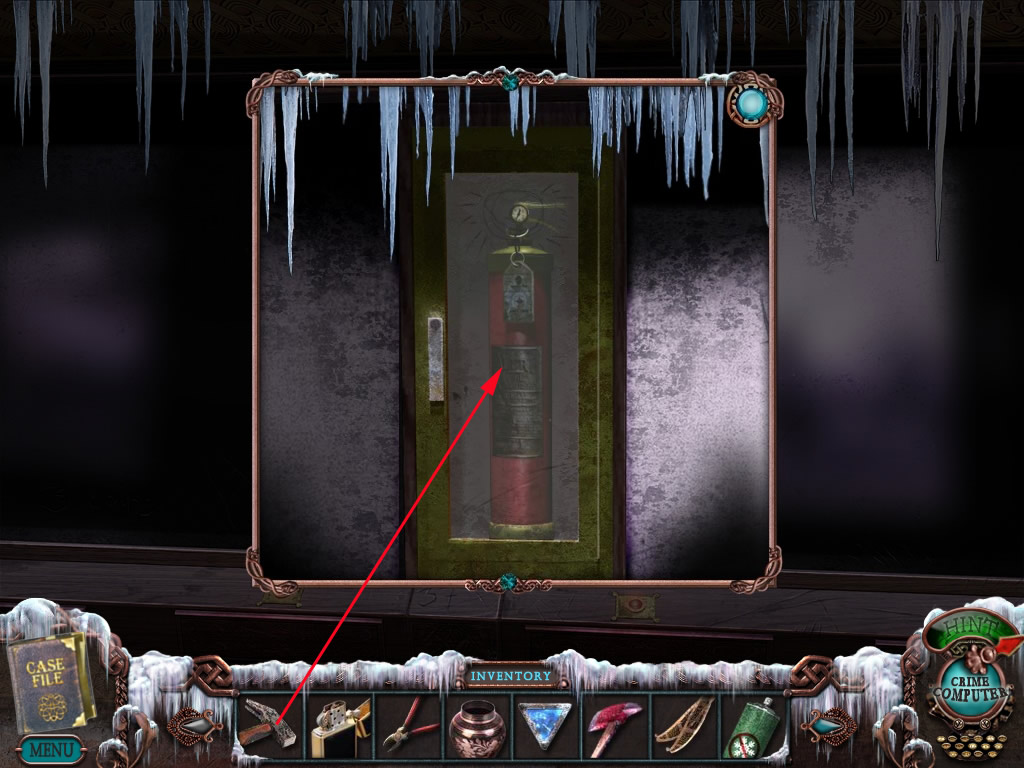
But there is a fire extinguisher - use the hammer from your inventory to smash the glass and get the fire extinguisher out.
Screenshot
Screenshot
To the down left, you reach the gift shop, go there.
You can click the book and read a bit more about the Dire Grove legend.
Above the book, the number sign is a morphing object.
Screenshot
Play the ho-scene - a coin will go into your inventory.
Screenshot
Leave the gift shop and go in direction of the stairs.
Left to the stairs, the painting most left is a morphing object.
Right side you see something sparkling. Click it, it is a puzzle.
Screenshot
You need to press the letters from A - Z in the right order, but the next to press letter has to be connected with a green line.
You will start by pressing the letter A first.
This puzzle is NOT random, so that the solution should be helpful for everyone.
Screenshot
A door right side opens - enter.
Museum - Blacksmith exhibition
Congratulation, you found your third student.
Pick up the video tape on the floor.
Then click the student and the amulet he is holding.
Another puzzle awaits you.
It is a slider puzzle - underneath the symbol tiles you will also see symbols.
Slide the tiles, till everyone is laying on it right place.
A tile on its right place will be shown in red.
The solution is NOT random.
Screenshot
Leave the room and back to the crossing with the sparking cables.
Fourth Student
Museum upstairs/office
The ho-scene will give you an ice scraper for your inventory.
Screenshot
Go into the office.
You can read the letter on the table.
The lamp on the desk is a morphing object.
Screenshot
Play the ho-scene to get a tape reel.
Screenshot
Click the open window.
Use the ice scraper to remove the ice from the windowsill
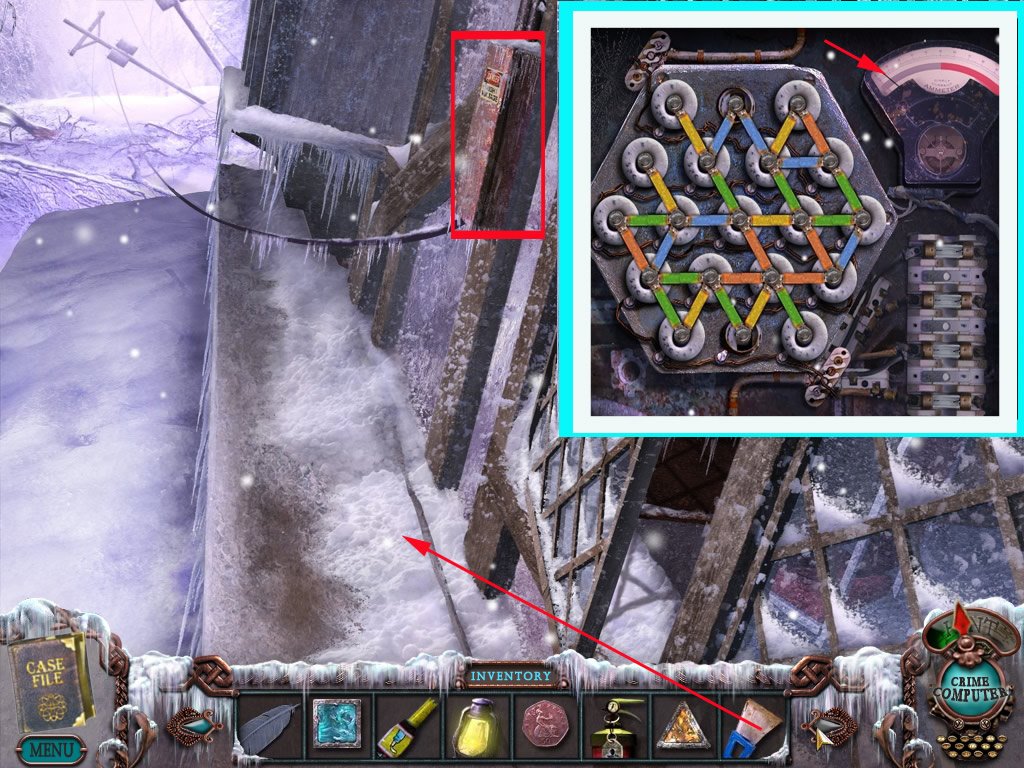
Click the fuse case and then the lever right next to it.
Your goal is it to connect the fuses, so that all cables are connected with the right color.
If you do it well, the power meter top right will go to zero.
To swap fuses click the two you want to change places.
As far as I can tell, this puzzle is NOT random, so that the screen shot shows the solution for everyone.
Screenshot
Go inside, leave the office and play the second ho-scene at the showcase.
The metal tongs will go into your inventory.
Screenshot
Leave the museum and go to the crossing.
The cables are no longer sparkling, so go left.
Barn
On your way pick up the video tape to your left.
The chimney on top of the barn is a morphing object.
One of the tree branches right side is a morphing object.
Click the barn door and use the lock defrost.
You will need a key so go right next to barn.
Screenshot
Farm House
The chimney is a morphing object.
Click the lawn mower - there is a plug, but you can't use it yet.
Enter through the door.
Screenshot
Play the ho-scene right sight.
Screenshot
The silver key will go into your inventory.
Go back to the barn.
Barn
Open the barn with the silver key.
The left beam is a morphing object.
Climb up the ladder.
Play the ho-scene.
The fallen beam will go into your inventory
Screenshot
Go back to the farm house.
Farm House
Place the beam above the abyss as shown on the screen shot and play the second ho-scene.
Screenshot
The coin will go into your inventory.
Screenshot
Go far right into the dining room.
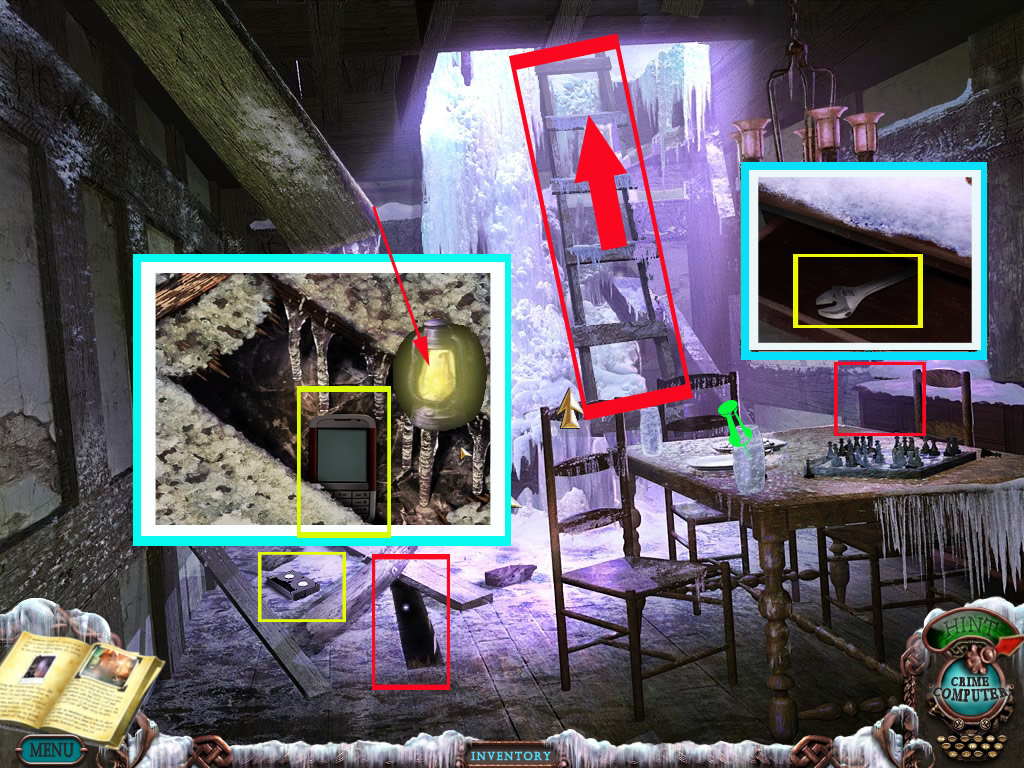
Farm House - dining room
Pick up the video tape left side on the floor.
Click the hole on the floor left side.
As you can't see any, place the oil lamp from your inventory there.
Pick up the cellphone.
Click the drawer right side and get out the wrench
Click on the top - you need a ladder.
Go back into the barn and grab the ladder.
Go back and place it to reach the upper floor.
Screenshot
Go up - Congratulations: You found the 4th student.
Pick up the video tape left side.
There is an object far right that appears and disappears - it is a morphing object.
Click the amulet on the students chest, a puzzle appears.
You will want to drag the parts for the circles to reassemble the picture.
Please see screen shot for the the solution.
Screenshot
Leave the farm house.
Final
Farm House - outside
Click the lawn mower and use the wrench to get the fuse.
Screenshot
Go to the hotel generator.
Generator
Place the fuse at the yellow cable.
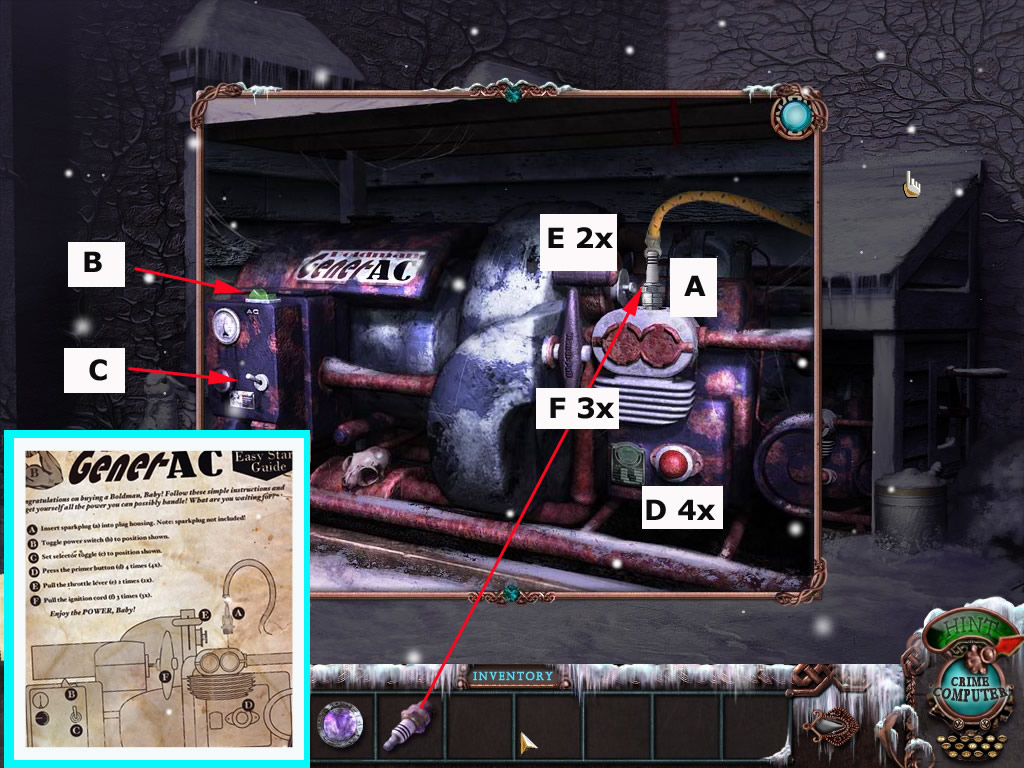
Latest now you should solve the trunk puzzle, bedroom right hallway front.
Inside you will find the manual for the generator.
It was copied to your journal, page 6.
Read the manual - you will need to click the switches left side.
Press after the red button left side 4x.
Click the upper handle 2x, the lower 3 times.
Screenshot
For me it never worked out the first time, I always had to redo my steps here twice or three times.
So don't you worry, it works, just keep trying.
Enter the hotel, go into the manager office and go downstairs.
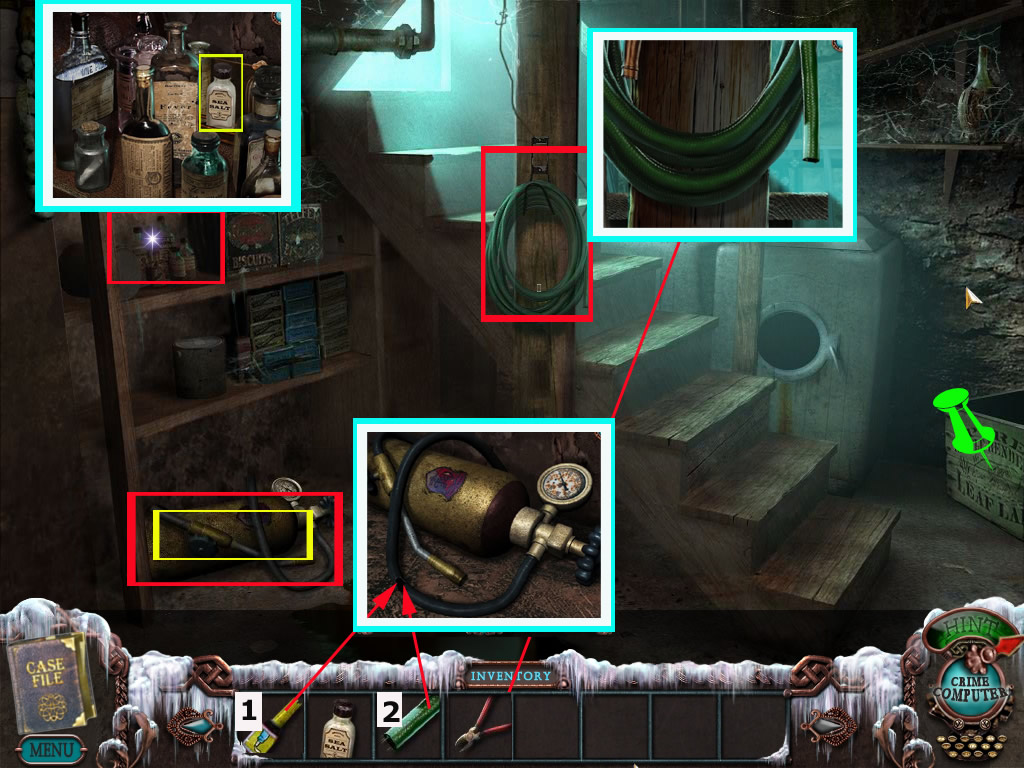
Hotel basement
Far right - the print on the wooden crate is a morphing object.
Click the shelf and pick up the bottle with sea salt.
Click the green hose and use the clipper from your inventory to cut of a piece of it.
Click the acetylene torch on the ground in front of the shelf.
There is a hole - fix it with super glue and place the part of the hose onto it after.
Click it to get it into your inventory.
Screenshot
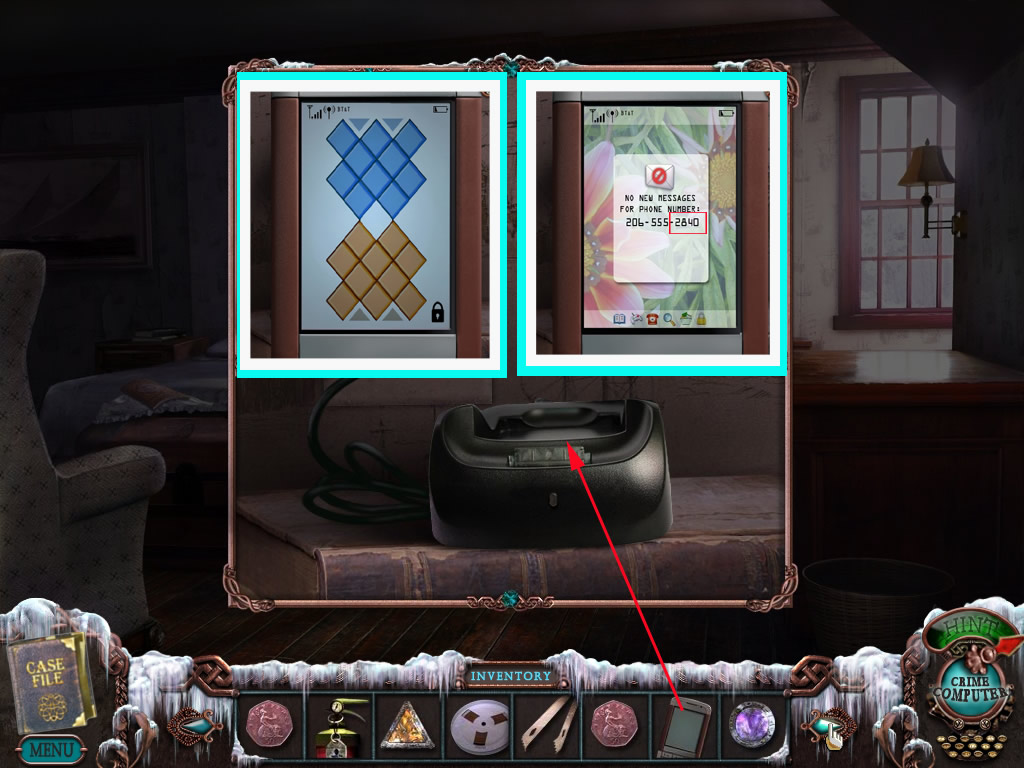
Go upstairs into the bedroom right, front hall.
Bedroom right, front hall
Place the telephone charger at the outlet right next to the bed, when you haven't already done this before.
Place the cellphone into the charger.
The following puzzle is a slider puzzle.
Just move the orange tiles into the top field and blue ones at the bottom.
To move the tiles click it. It will go onto the next free field or jump over the one in front of it, when there is a free field behind.
You can jump and move forwards and backwards, you can jump over tiles of the same color.
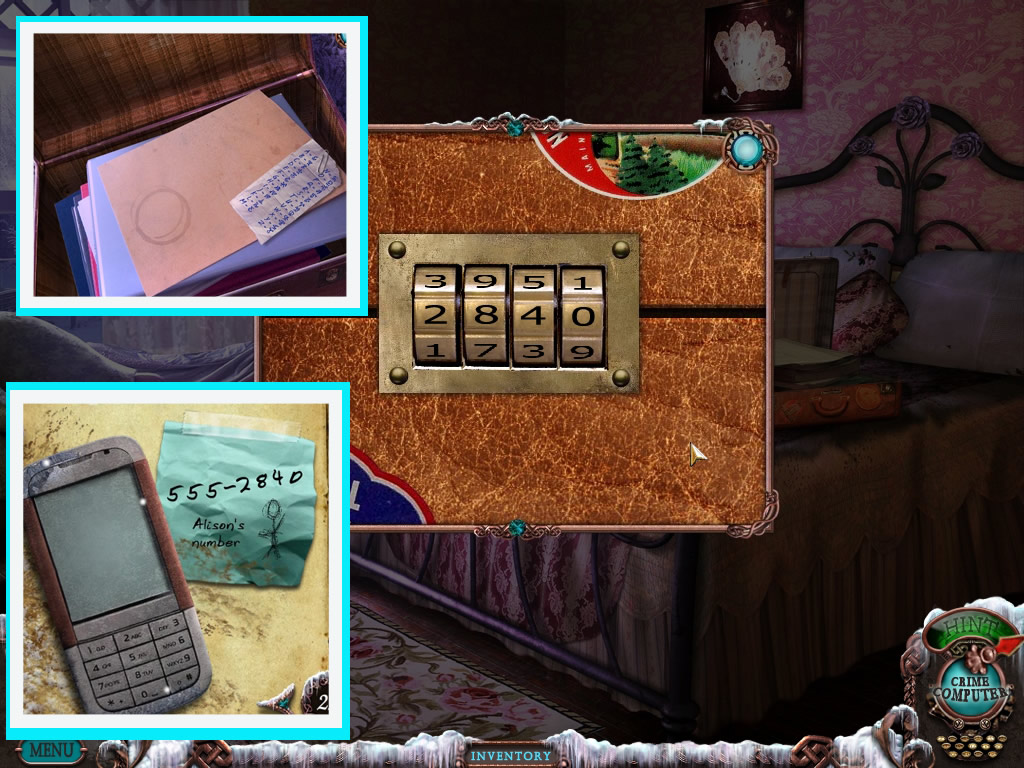
You will see, that there are no new messages for xxxxxx a telephone number follows, it will be copied into your inventory.
This telephone number, especially the last four digits, are random.
Watch (LISTEN) to the second video to find out, what these numbers are for.
You need these four digits to open the suitcase in the bedroom right, hall back.
Screenshot
Enter the bedroom with the suitcase.
Bedroom right, hall back
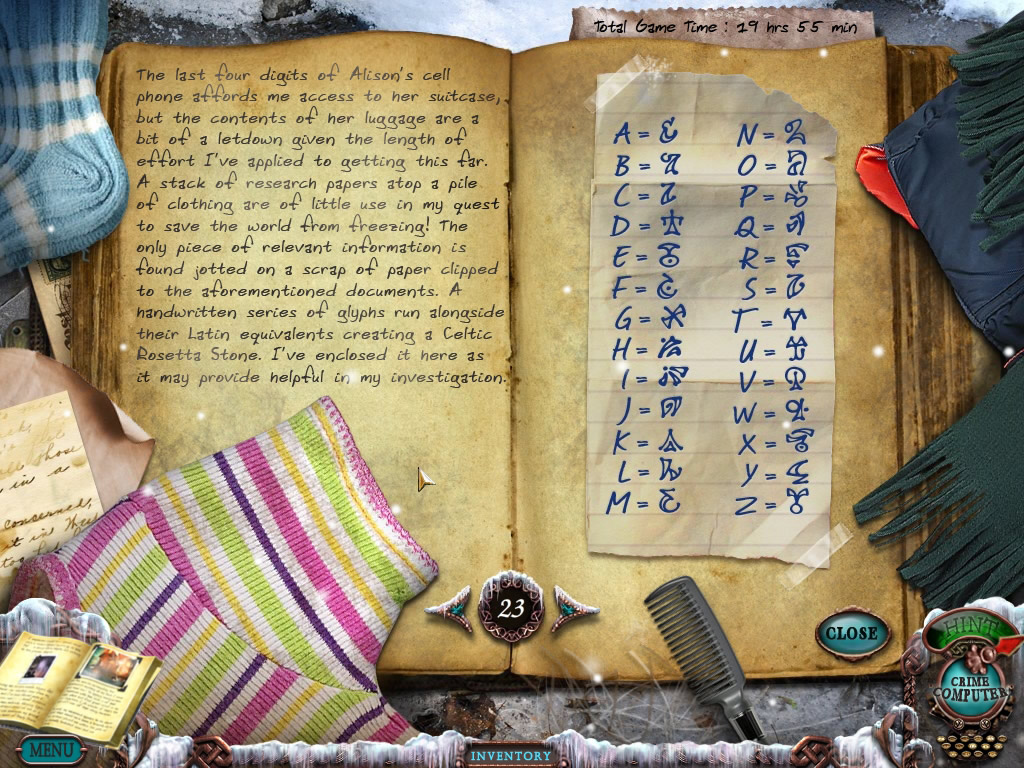
Click the suitcase and change the number lock according to the last four numbers of Allison's telephone number.
It is copied page 22 in your journal.
The suitcase opens and you will find a list with letters according to symbols.
The list will be copied into your journal.
Screenshot
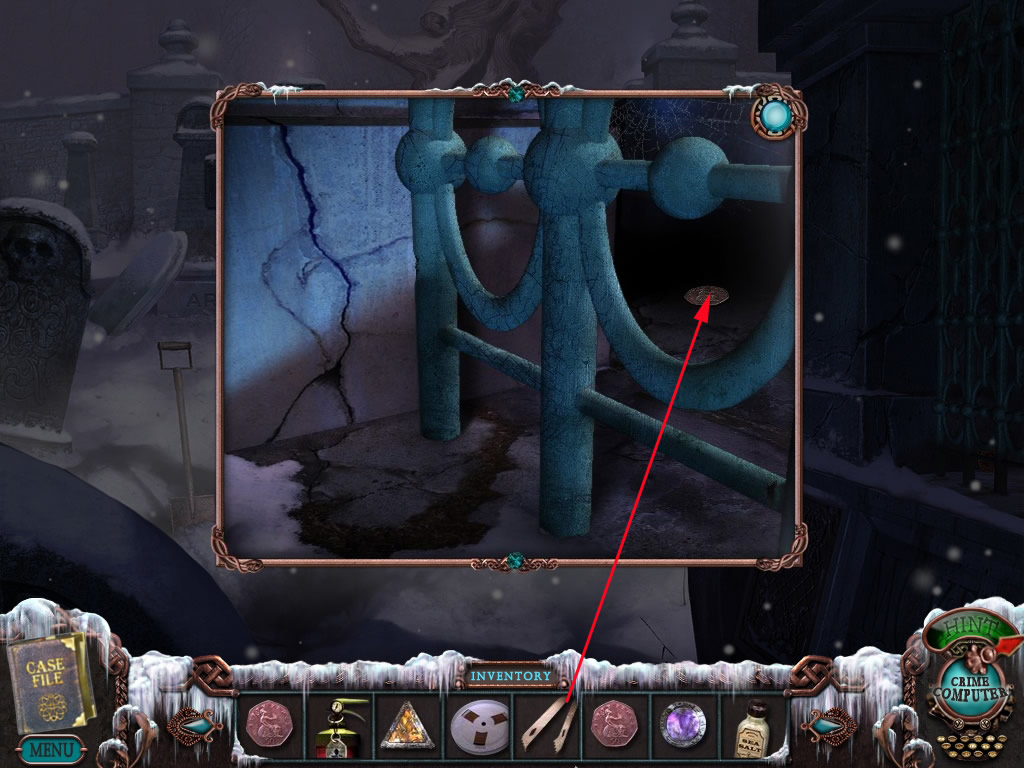
Go to the cemetery.
Cemetery
Use the metal tongs to get the coin.
Screenshot
When you haven't already done it, go to the hunting lodge.
Hunting lodge
Play the 2nd ho scene.
A bag of potato chips will go into your inventory.
You will need it for the extra content, which is NOT part of this walkthrough.
Screenshot
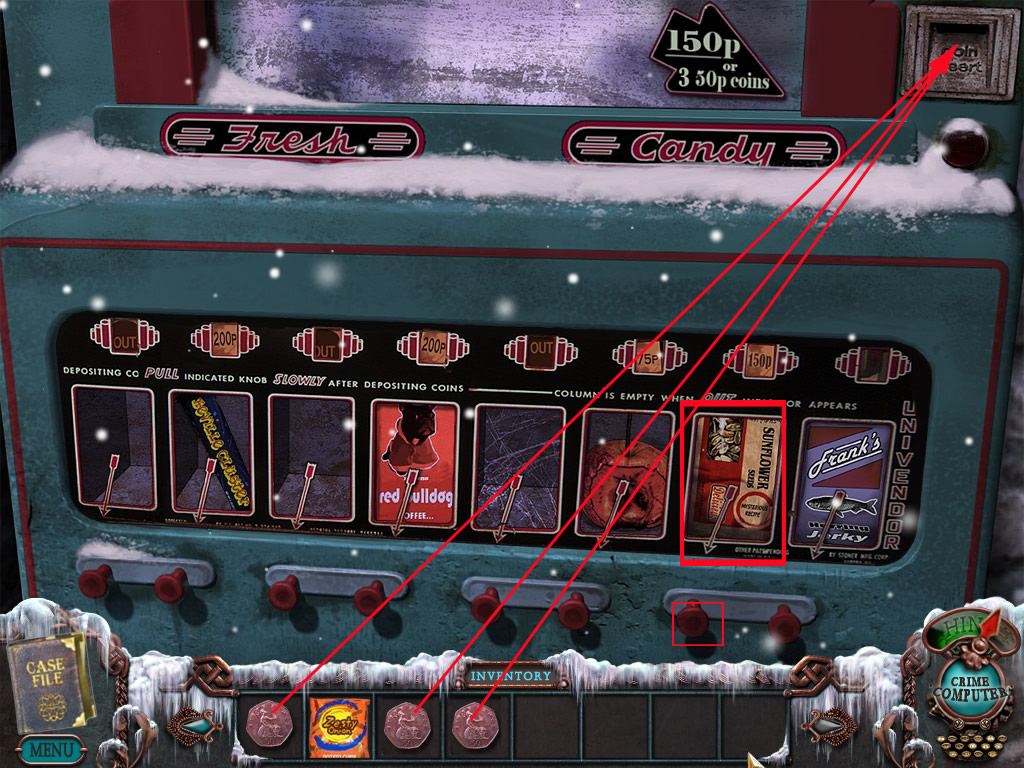
Go to the grocery
Grocery
Click the vendor right side of the grocery and place all coins at the coin slot top right.
Click the button for sunflower seeds, a packet will go into your inventory.
Screenshot
Now go the farm house and follow the way there up left.
Bridge to the ruins
The word Runes/Ruins on the wooden sign is a morphing object.
Get the Acetylene-torch out of your inventory and move it with pressed mouse button a few times over the bridge to remove the ice.
When you do not have the snow shoes yet, then you have to go back to the grocery. There you will find them in the basement. (See for this also spoiler "2. Student"
"Grocery basement".)
You do not need to "wear" them, having them in the inventory is enough.
Screenshot
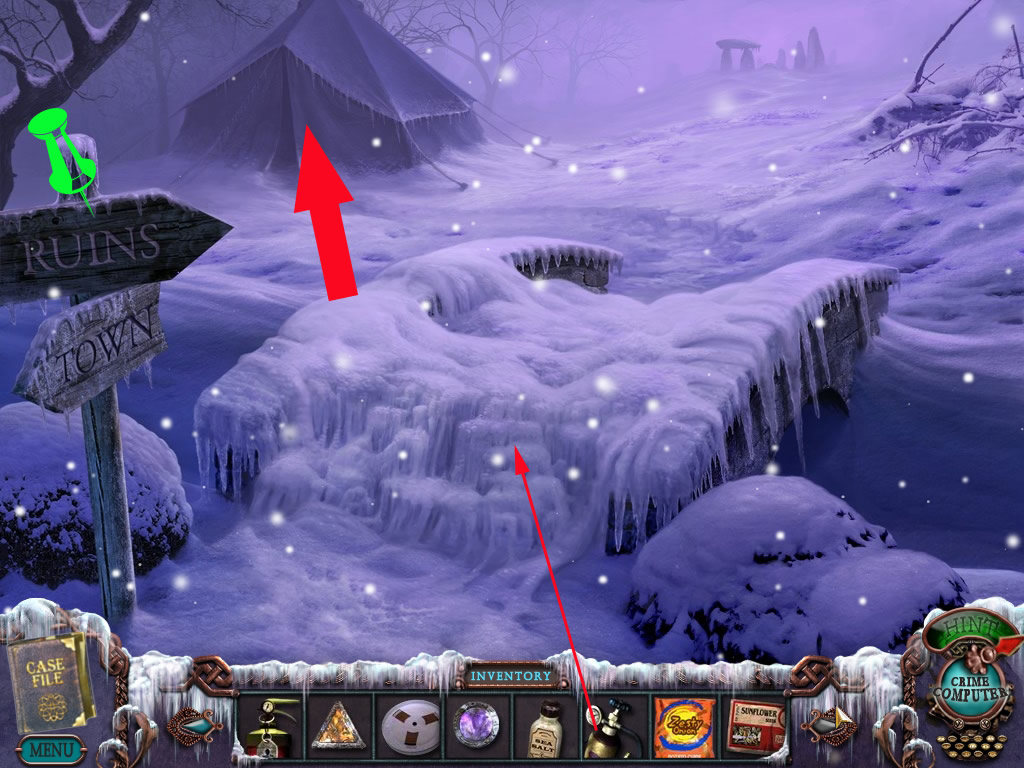
Enter the tent.
Tent
The bowl on the table left side is a morphing object.
The shoes under the bed are morphing as well.
Click the tape recorder right side on the table and place the tape reel.
You will hear a woman talking about, that maybe the legend is real.
Play the ho scene in the back - a glass vial will go into your inventory
Screenshot
Leave the tent and go back to the hotel.
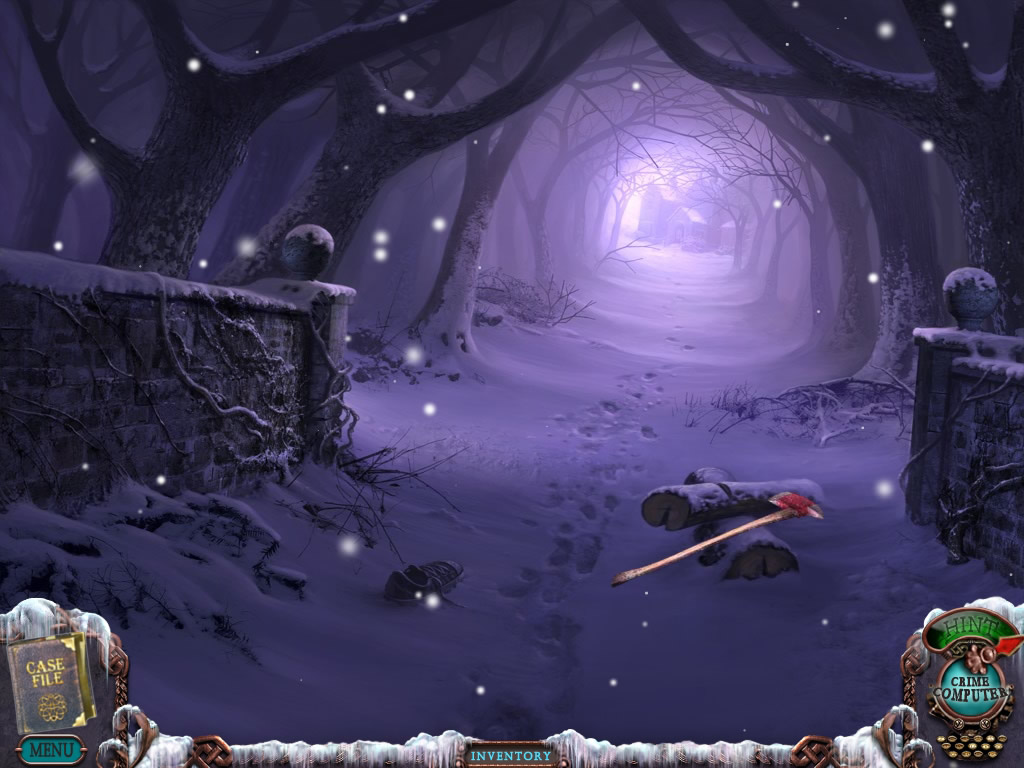
Way to car/hotel outside and inside
Go back on the way to the car.
Use the axe to cut fire wood from the logs on the way.
Screenshot
Go back to the hotel entrance and click the thermometer at right side.
Use the hammer to smash the thermometer.
Place the glass vial underneath to catch the drops of mercury.
Screenshot
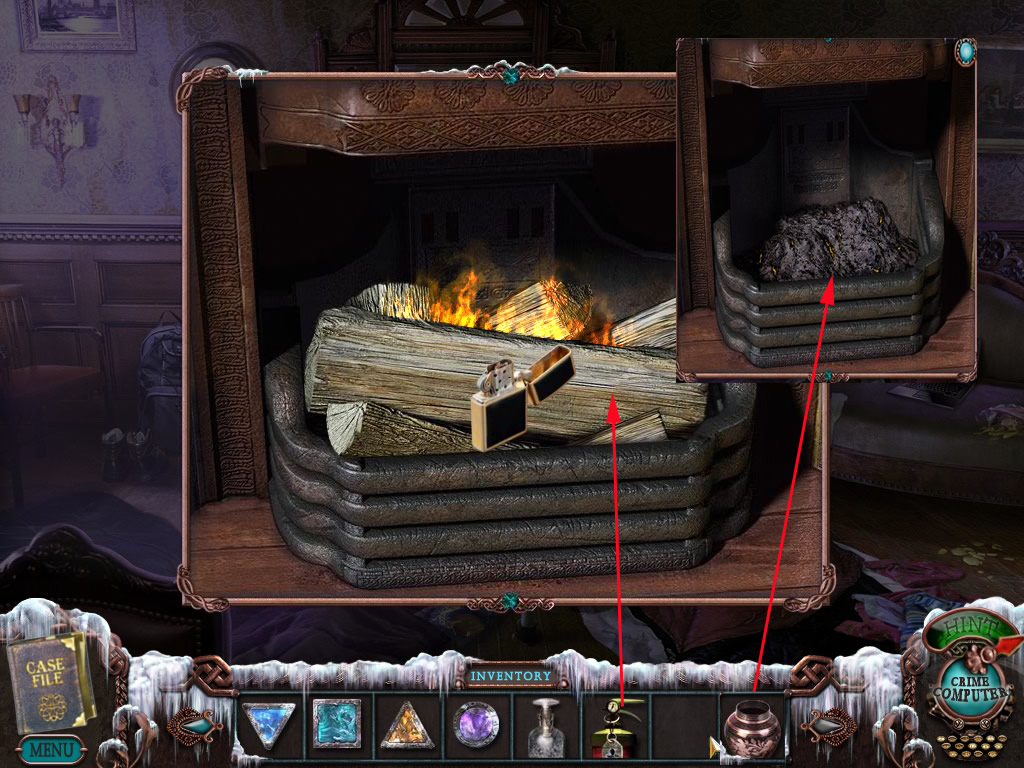
Go inside the hotel, lobby left side.
Place the fire wood into the fire place.
Light with your lighter.
Extinguish the fire with the fire extinguisher.
Place the urn at the ashes.
Screenshot
Make sure you also have the feather and the seeds:
Feather = Crossing with the wolf left side.
Seeds = Candy vendor right side of grocery.
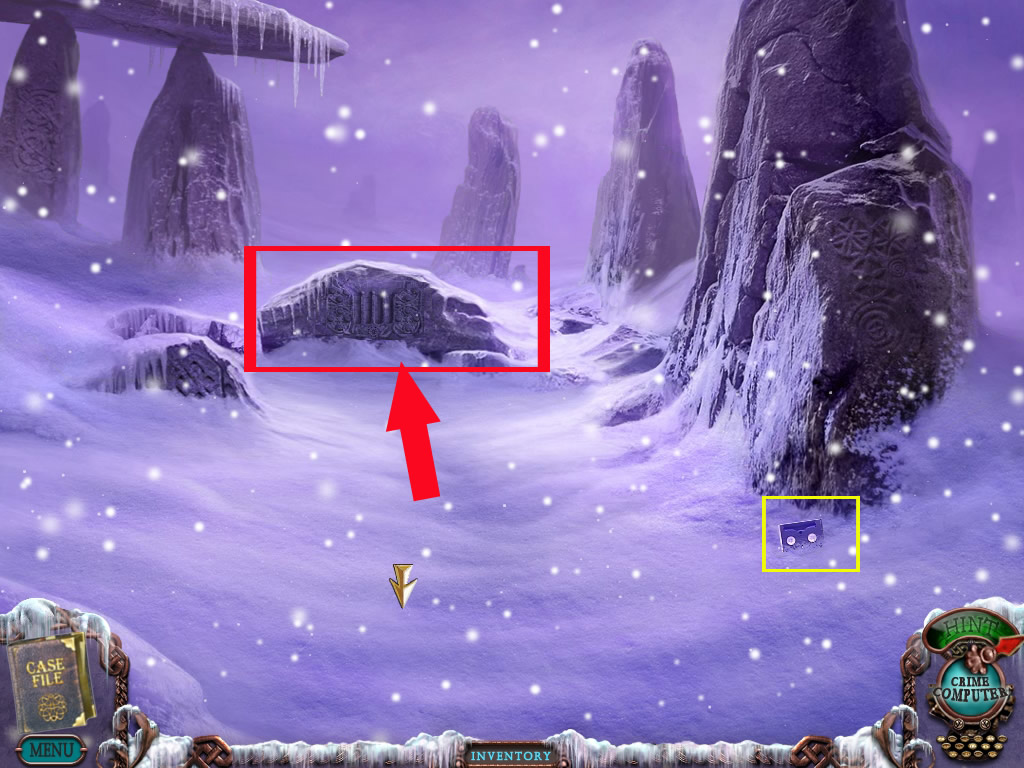
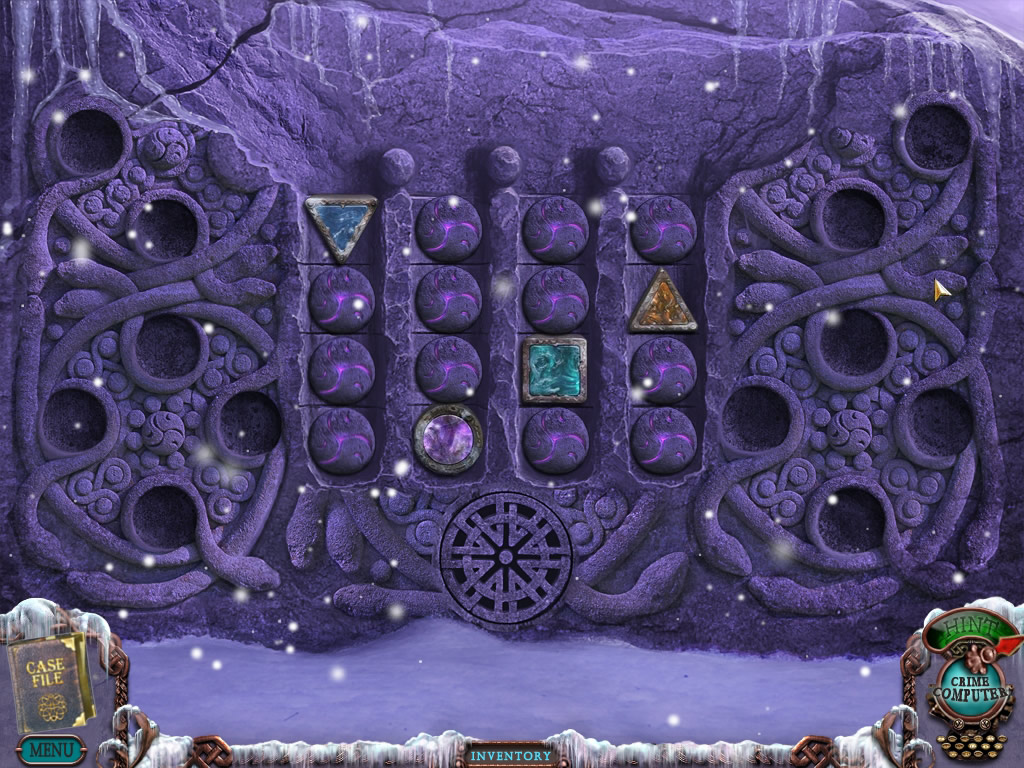
Ruins puzzle
Pick up the video tape to your left.
Screenshot
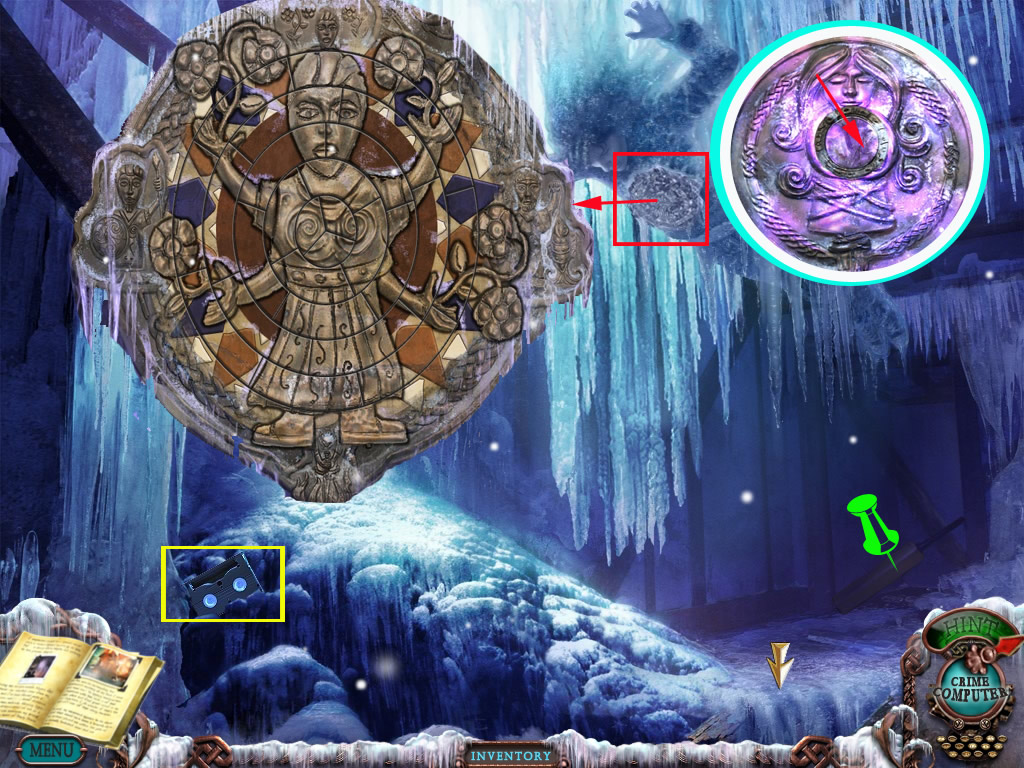
Click the ruins to get a nearby view.
For the now following puzzle you need to have 15 video tapes.
When you are still missing a tape go back and see, where you might have missed on.
See also the spoiler below the walkthrough "Locations of all video tapes"
Open up your crime computer as if you were going to watch one of the videos.
Look closely at the video screens, they are in the same 4 x 4 grid pattern as the puzzle.
Screenshot
Keep watching and the shapes will flash over the screens in the positions that they need to go in the puzzle.
Once you have the positions, use the extra stones at the puzzle to fill in spaces so that the four shapes (the four things you found with the students) are in
the correct position.
To move the stones click first a stone and click then the row you want to place it.
If you have it right, then the ground will open up.
Incidentally, this solution is random, so I cannot tell you exactly what it will look like.
Screenshot
WARNING: Before you enter the ruins, make sure, that you have in your inventory: A feather, a package of seeds, a urn with ashes, a glass vial with mercury. Starting the final puzzle without one or more of this objects can ensure a serious bug, which will NOT LET YOU FINISH THE GAME! You will have to start all over in this case.
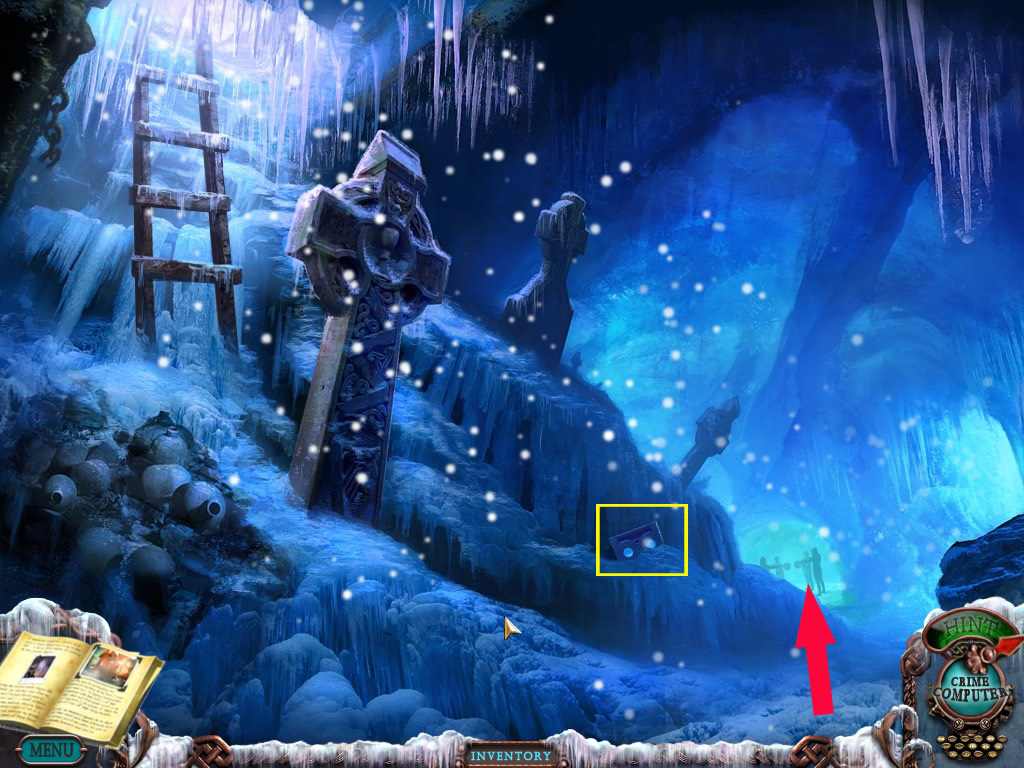
Ruins
Enter the ruins.
You will come to a hole, to deep to jump, you will need the ladder.
Go back to the farmhouse to learn that it is missing. Allison must have awaken and climb down.
Go back to the ruins - the ladder is there now.
Climb down.
Pick up the last video tape and go over to the four students.
Screenshot
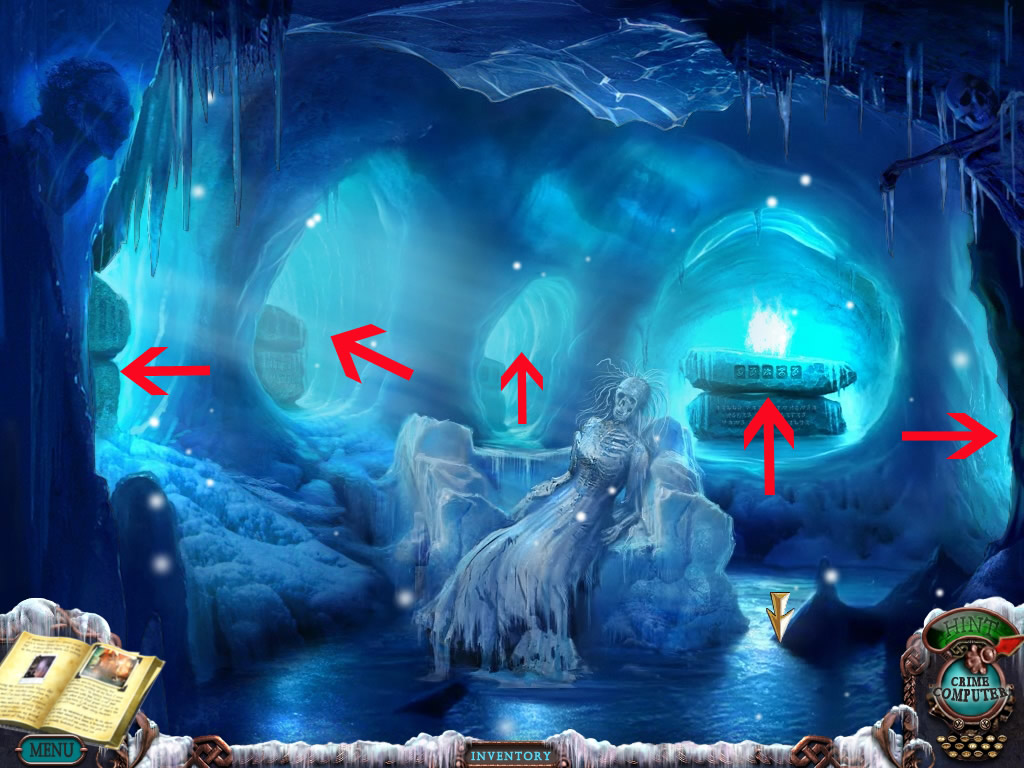
Watch the cut scene and click on the huge white sparkle.
Click the four niches and learn that you will have to solve five riddles.
Screenshot
Above the riddles, you see symbols.
First you need to find out the meaning of the riddle.
After you know, change the symbols by clicking, so that they do spell the riddle-solution.
To do so, you will need to look at the list from Allison's suitcase.
The easiest way: Print out this screen shot - so you will have the list next to you and do not have to change between scene and journal all the time.
When you spell it right, a stone board will come up - get the object out of your inventory and place it at the space shaped as the object.
Screenshot
The riddles are seen from left to right:
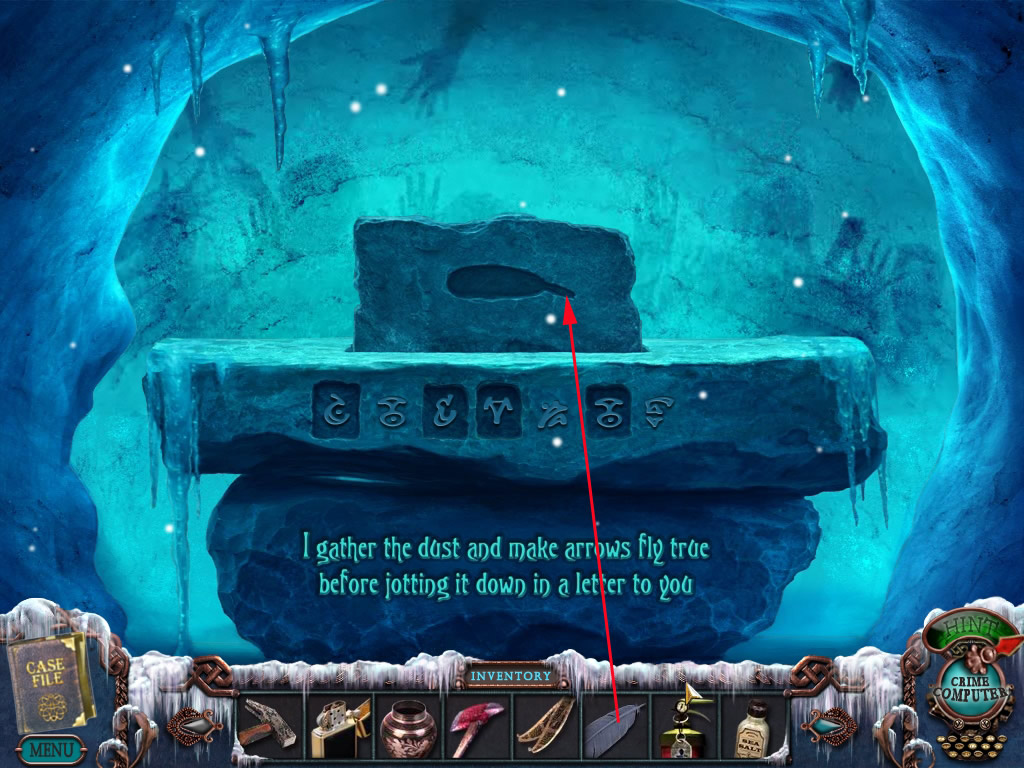
I gather the dust, make arrows fly true before jotting it down in a letter to you = FEATHER
Screenshot
Go to the next niche.
A grain of hope an the reaper's toil. My body sends life through the rock and soil = SEEDS
Screenshot
Go to the next niche.
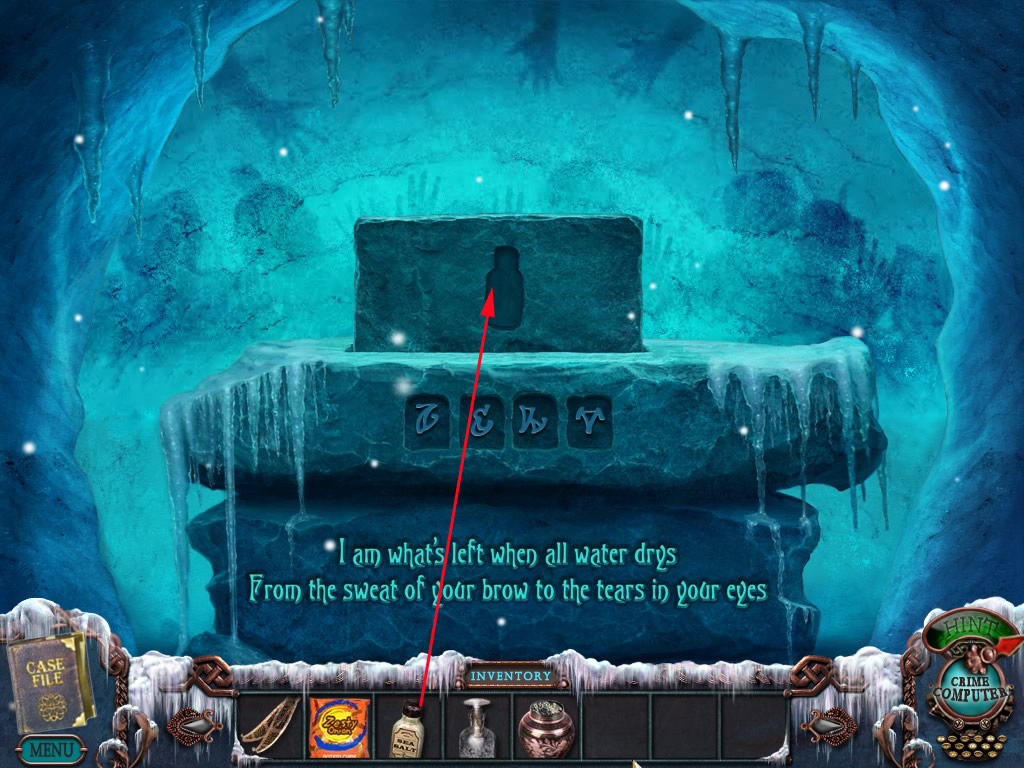
I'm what's left when all waters drys. From what sweat of your brow to the tears in your eyes = SALT
Screenshot
Go to the next niche.
All life variance of form, mass, and hue.Soon wither to me 'neath the grate and the flue = ASHES
Screenshot
Go to the next niche.
Messenger god of trade and exchange. My size relies on the brightest star range = MERCURY
Screenshot
Leave the niche and enjoy the end.
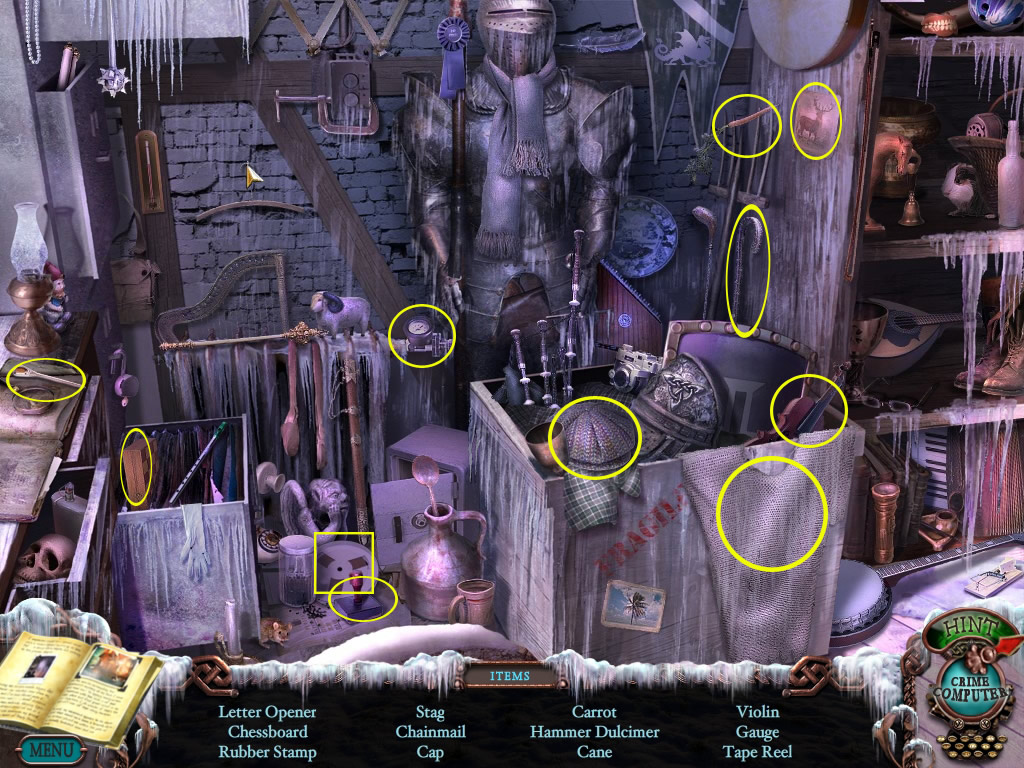
List of all inventory items - location and use
Key - glove compartment car on the street - to use: opens trunk.
Room key - ho-scene reception - to use: hallway front, bedroom right side
Hammer - ho-scene back pack, lobby left side - to use: tree, right side from hotel/thermometer at right hotel column(do late in game)/exhibition in museum
Snow shovel - ho scene table at stairs - to use: use outside at rabbit statue next to generator
Mattress - ho-scene bedroom left, hallway front - to use: use at hole in bathroom
Nails - 2nd ho-scene reception - to use: tree, right side from hotel
Sledgehammer - ho-scene garage - to use: bathroom
Wheel - garage - to use: left next to garage at water main out
Crowbar - 2nd ho-scene garage - to use: cover for water main out, painting in manager office
Iron key - manager office - to use: boathouse
Small board - boathouse - to use: tree
Saw - 2nd ho-scene bedroom left, hallway front - to use: tree
Lighter - 2nd ho-scene manager office - to use: oil lamp hunting hut
Small key - safe manager office - to use: green box in garage
Pliers - green box in garage- to use: bedroom right, hallway front with oars
Urn - 2nd ho-scene boathouse - to use: thermometer hotel
2nd room key - ice on way to fishing shanty - to use: bedroom right, hallway back
Turquoise shape - 1. student - to use: Celtic ruins puzzle
Telephone charger - 2nd ho-scene backpack lobby left - to use: bedroom right, hallway front.
Rope - ho-scene backyard - to use: bridge to town.
Ice-pick- ho scene grocery - to use: River, door inside hunting lodge
Axe - counter-back room grocery - to use: museum exhibition/wood on way to hotel
Snow shoes - grate, basement grocery - to use: Without them in your inventory you can't make it to the ruins, you will be told the snow is too deep. You do not have to wear them, it is enough to just have them in your inventory.
Frozen meat - ho-scene basement grocery - to use: microwave back room grocery
Meat - Microwave back room grocery - to use: feed the wolf
Lock-De-frost - 2nd ho-scene backyard - to use: keyhole barn
Feather - river left from beast crossing - to use: final puzzle
Bolt Cutter - ho-scene hunting lodge - to use: museum entrance
Kerosene - 2nd ho-scene grocery - to use: oil lamp hunting lodge
super glue - 2nd ho-scene grocery basement - to use:
Potato Chips - 2nd ho-scene hunting lodge - to use: Extra Content
Oil lamp - hunting lodge (needs kerosene) - to use: Farm house hole in floor
Coin - ho-scene museum/gift shop- to use: candy vendor grocery
Fire extinguisher - Museum exhibition - to use: fire place lobby left side
Ice scraper - ho scene museum showcase - to use: windowsill museum office
Tape reel - ho scene - museum office - to use: tent near ruins
Metal tongs - 2 ho scene museum showcase - to use: cemetery grate
Silver key - ho scene farm house - to use: barn
Fallen beam - ho scene barn - to use: farm house
Coin - 2nd ho scene farm house - to use: candy vendor grocery
Wrench - farm house dining room drawer - to use: lawn mower outside farm house
Cellphone - farm house dining room hole in floor - to use: telephone charger
Fuse - farm house outside lawn mower - to use: Generator
Part of a hose - hotel basement - to use: at acetylene torch hotel basement.
Sea Salt - hotel basement - to use: final puzzle
Coin - cementery - to use: candy vendor grocery
Sunflower seeds - candy vendor grocery - to use: final puzzle
Glass vial - ho scene tent - to use: container for mercury
Glass vial with mercury - thermometer at hotel - to use: final puzzle
Urn with ashes - hotel lobby left side - to use: final puzzle
List of all video tape locations
Car inside (with camera)
Way to the hotel - left side in the snow
Right side on the floor, hallway front
Bedroom right side front hall way
Bedroom right side, hallway back
Way to boat house
Crossing Town/River
Grocery
In front of the hunting lodge
Museum - Vestibule
Museum - Vestibule - Exhibition Blacksmith
Way to the barn
Farm house dining room
Farm house upstairs
Way to ruins
Inside ruins
The locations of the morphing objects
Street sign -right in front of the car
Stone face - entrance right side
Gearshift - car inside
Sign at reception above "Vacancies"
Picture left next to the fire place - lobby left side
Third picture from the left on the table next to the red chair - lobby right side
Oval picture at the wall - stairs from lobby right side
Glass - tablet in hallway
jar on the lower shelf right side - hallway
Head on the painting right side - bedroom left side hall way front
Left lamp upon bed - bedroom right side, hallway front
Books lower shelf - bedroom right side, hallway front
Vase on the table - back part hallway
First picture on the left side - hallway back
Pattern on the right couch pillow - library
Tire standing on tire - right next to the garage
Red sign next to ladder - garage
Soap - bathroom
Books on desk - manager office
Sign above door - boathouse
Pattern right pillow - bedroom right side, hallway back
Sign - above bridge to town.
Word Lodge - sign after bridge
Symbol - on sign of grocery
Sack with red print on - grocery
Object - top shelf grocery basement.
H or F on gravestone - cemetery
Dear head - hunting lodge
Symbol - museum sign outside
Chimney - museum (middle one)
Bust - museum vestibule
Number sign - museum gift shop
Painting - museum vestibule next to stairs
Lamp - museum office - desk
Branch - right side in front of barn
Chimney - on top of barn
Left beam - inside barn, lower part
Chimney - Farm house
Vase - Farm house top shelf
Vase - Farm house dining table
Thing - Farm house - right side 4th student
Print on wooden crate - hotel basement
Word Runes/Ruins - sign at bridge to ruins
Bowl - table in tent
Shoes - under bed in tent
Tent - nail at end of the rope
Museum - footprint upper hallway
Hotel outside - chimney
Museum - Blacksmith exhibition, lower right
Library - Banshee Book on shelf/skull
Bonus Content
First: The second time you are in an HOG scene in the hunting lodge you will get a bag of onion flavored potato chips (yummy!) as your inventory item. When you go back towards the cemetery you feed them to the wolf, this opens an extra HOG scene in the tree above the wolf. The inventory item you get from the scene is a golden felix (bigfish symbol).
Second: When you are in the museum there is a little card you can find in that upper room that has a little rebus explaining how to get the second golden felix. You have to hit the ornamental rabbit back at the house (next to the generator) 10 times with a hammer, which removes his head. You then take the head to the grocery store and put it in the microwave. This opens another extra HOG scene above the microwave, and the inventory item is a golden felix.
Third: In the same back room of the grocery store where the microwave is there is a large rag rug on the floor. If you click on it to move it it reveals a trap-door with two felix shaped indentations. Place the two golden felixes (felices?) in the indentations and it opens the door. This is the "extra content" for the collector's edition. Go down into the secret basement and there's some stuff down there. You'll find a box of laundry soap to take, there's a phone there with no receiver, the word puzzle that was in the nautical room is there on a barrel, and there's a strange picture of a kid on the wall. Solve the puzzle to open the barrel and there's some stuff in there that are probably clues to the next MCF game, looks like Victor will be back for revenge.
Fourth: In the basement of the hotel (once you get the generator going and the lights on) you do the regular stuff with the hose, acetylene torch and getting the salt. But you can also click on the washing machine down there. When you do and you open the door, there's dirty clothes inside, so add the laundry detergent, close the door, and turn it on. Rather amusingly the machine goes into overdrive and spills suds all over the basement, and opens yet another extra HOG scene. The found object this time is a phone receiver.
Fifth: Go back to the trap door room and you can wire the receiver to the phone, but you don't know the number to call. I tried calling the cell phone number, etc. but nothing worked. Then, when the game was over, I watched the entire credits sequence (long!) and at the very end a puzzle appears written in small letters around the entire screen. Starting from the upper left it reads:
Presidentsaddress x squareroot9 + yardsinmile + yearthekingleftthebuilding - pacmanghosts + decimal(101011101011) x felixaddress - californiapolicepenalcodemurder + columbussailedtheoceanblue x lettersracheaelraymiddlename - spaceneedleheightinfeet + shaqshoesize - allisonareacode / atomicnumbersilicon.
If I did my math correctly, the answer is 2156246, which I guess is the number that will make the phone work
Special thanks to Kayleigh for writing up this massive walkthrough! \o/ And GrinnyP for the guide to the Bonus Content Guide! Wooty tooty!
Posted by: Kero |
November 25, 2009 4:08 PM
|
November 25, 2009 4:08 PM