
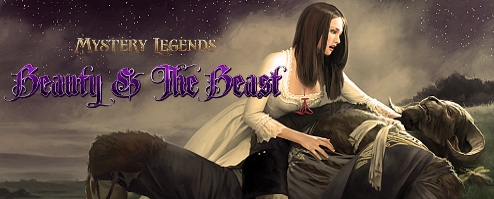
Mystery Legends:
Beauty and the Beast
Platform: Mac, Windows
![]() You experienced the thin line between love and obsession in The Phantom of the Opera, and now Pixel Storm Entertainment leads you down a darker path towards familiar but twisted territory with their latest hidden-object adventure, Mystery Legends: Beauty and the Beast. When Belle's love saved the Beast from the curse placed on him by an evil enchantress, they were supposed to get their happily-ever-after, but a bizarre and unsettling letter calling Belle back home may bring a premature end to their fairytale. Turns out when you scorn and best an evil enchantress, they don't exactly take it very well, and this one is out to rain on your parade in the most elaborate, mua-ha-ha-ha fashion possible, and unlike burly Frenchmen, she doesn't have the decency to take a swan-dive onto a wrought-iron fence. Will Belle break the curse and save the kingdom from eeeeeeeeeeeevil or has her luck run out?
You experienced the thin line between love and obsession in The Phantom of the Opera, and now Pixel Storm Entertainment leads you down a darker path towards familiar but twisted territory with their latest hidden-object adventure, Mystery Legends: Beauty and the Beast. When Belle's love saved the Beast from the curse placed on him by an evil enchantress, they were supposed to get their happily-ever-after, but a bizarre and unsettling letter calling Belle back home may bring a premature end to their fairytale. Turns out when you scorn and best an evil enchantress, they don't exactly take it very well, and this one is out to rain on your parade in the most elaborate, mua-ha-ha-ha fashion possible, and unlike burly Frenchmen, she doesn't have the decency to take a swan-dive onto a wrought-iron fence. Will Belle break the curse and save the kingdom from eeeeeeeeeeeevil or has her luck run out?
 As Belle, you'll travel a long way to save your Prince from his Beastly imprisonment... a long, long way, since the entire kingdom has been blighted with the enchantress' magic. There are three levels of difficulty to choose from at the start of the game, but all of them will have you solving puzzles, scouring hidden-object scenes, and performing tasks to aid the residents of the kingdom in their de-cursing. (It's like a de-lousing, but more magical.) The cursor changes to indicate an interactive area, and the usual hint and skip buttons make an appearance for the impatient in the crowd. If you tap the hint button in normal gameplay, it'll only tell you if you can do something in the location you're currently in, but luckily for you, your journal has a map. The map not only displays your current location, but highlights places you can go to and accomplish something in, so make sure you check it frequently if you're stuck. Just don't go looking to Beast for help, since he's supremely useless. "Heeeeeeelp me, Belle! Find the Magic MacGuffins, Belle! Chase these spiders away, Belle!" As if being turned to stone is any excuse for not being useful! At least Gaston had a catchy song, and was probably just as hairy.
 Analysis: Beauty and the Beast might just be the most visually stunning and cinematic hidden-object adventure to come along in quite some time. Sporting fantastic voice acting, gorgeous artwork, and a rich, imaginative fantasy theme, it's the sort of adventure you really can get lost in. Locations are beautifully made, and exploring them feels appropriately like stepping into another world with just the right spice of danger. While twee fairytale critters with names like "Mr Beak" and mildly cheesecake-ish characters like "Saucy the Leprechaun" mean this doesn't quite capture the eerie, foreboding atmosphere of Phantom of the Opera and isn't as story-driven, the sheer quality of the whole thing means there's likely something for everyone inside it. Just because it's comparatively lighter in tone doesn't mean us creep-fiends won't find a lot to love in the style and design.
The fantasy design extends to the gameplay as well, with "adventure logic" here being replaced by "fairytale logic". While you'll find your share of objects with straight-forward uses, many places require a little bit of abstract thinking. A request for gold, for instance, might not be literal, while clockwork doggies require a special sort of fuel. Since you can always refer to your map for direction, getting stuck is unlikely. While this time around each hidden-object scene consists of items you'd probably be likely to find in that location rather than a random mish-mash of junk, the trade-off is that some of them are... kind of boring to look at, especially when they start repeating. Seen one enchanted toyshop, seen 'em all, amirite? Fortunately, the game offers up several creative puzzles, and the too-brief jaunts into other fairytales are a nice touch.
It isn't the sequel Phantom Phans (hurr hurr) have been waiting for, although you should keep your eyes peeled for a few references, but Mystery Legends: Beauty and the Beast is a big, gorgeous adventure worthy of praise in its own right. Most players will probably spend between four and five hours on the main adventure, with the unlockable Collector's Edition "bonus chapter" tacking on close to another hour. Packed with charm, magic, danger, and beauty, this is one fantastical fairytale that you should definitely check out. Highly recommended, especially if you're fond of chipper butler bots with "genocide modes".
A Collector's Edition is also available. It contains a bonus chapter, art gallery, strategy guide, and more. Remember that Big Fish Game Club Members pay only $13.99 for Collector's Editions (or 2 club credits), and collector's editions count 3 card punches of 6 total needed for a free game.
![]() Windows:
Windows:
Download the demo
Get the full version
Also available: Collector's Edition
![]() Mac OS X:
Mac OS X:
Download the demo
Get the full version
Also available: Collector's Edition


Walkthrough Guide
(Please allow page to fully load for spoiler tags to be functional.)
Mystery Legends: Beauty and the Beast Walkthrough
Navigation/General Information
The cursor changes to indicate how it is used: an arrow to move to a new area; a magnifying glass to examine areas more closely; a gear for a puzzle or interactive scene; a question mark to get more information; or a grabbing hand to pick things up.
Items that can be used will glow when held over the area they work in; if items are meant to work as a group, you cannot use them until all pieces are collected. Items that fit together will be automatically added together in your inventory. If there are more than one of an item, the item will have a (found#/total#) next to it in your inventory.
Sometimes an event will change a scene; keep an eye out for new puzzles or new areas to explore whenever you complete a task, experience a story cutscene, or finish a puzzle.
This walkthrough contains key item locations, puzzle solutions, and screenshots of most scenes.
Most hidden object scenes are randomized each game. Each hidden object scene rewards you with a specific "Key Item", which is always identified in the screenshots. Some other objects are circled only as general guidance but not as a definitive solution as your list will vary.
Some hidden object scenes—hidden roses that earn "Soul Shards"—are not randomized. In that case, all the hidden roses are circled.
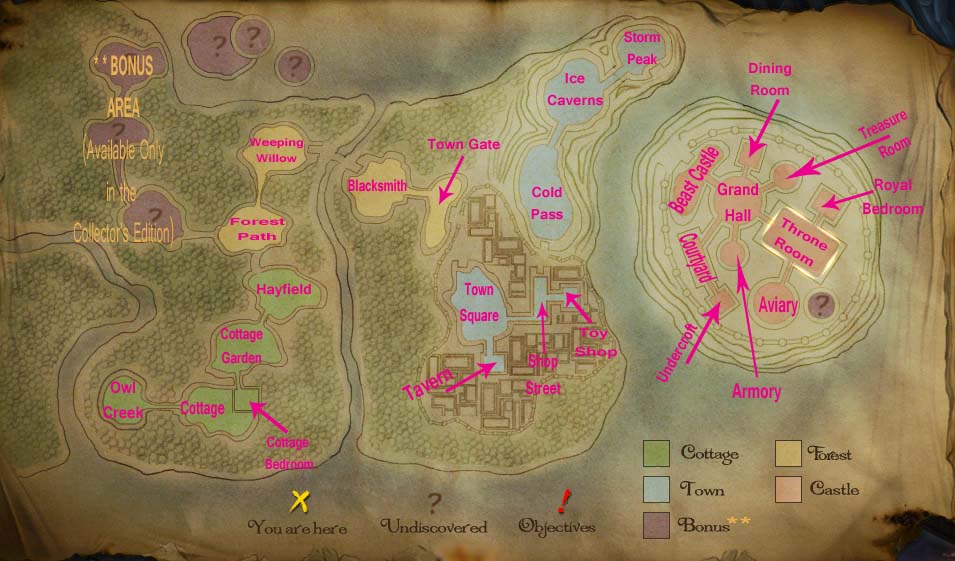
World Map Screenshot
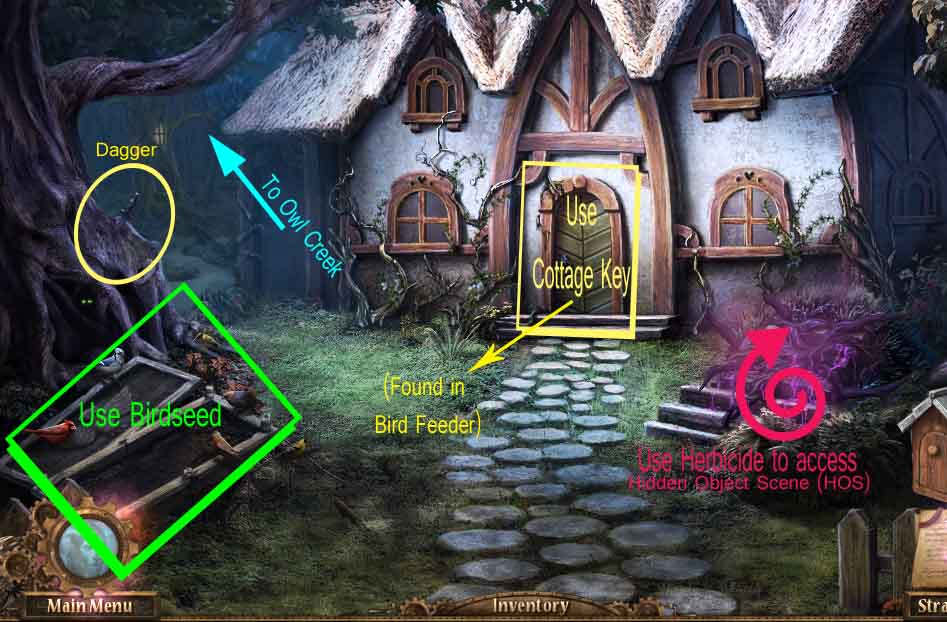
Getting into the Cottage
At the cottage:
Click on the dagger stuck in the tree (just above the green eyes blinking in a dark knothole); this will give you a new clue in your journal and allow you to take the DAGGER.
Click the area to the left of the cottage to go to Owl Creek.
Screenshot
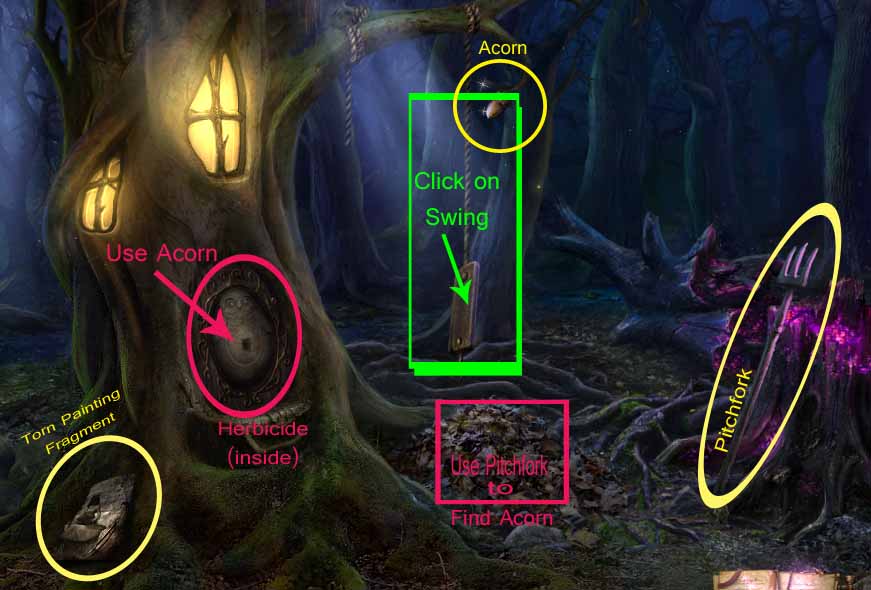
Owl creek:
Pick-up the TORN PAINTING FRAGMENT from between the tree branches.
Grab the PITCHFORK that's leaning against a cursed stump.
Click on the swing to make the acorn above it fall into a pile of leaves.
Zoom in on the leaf pile; use the pitchfork to rake them until the ACORN is revealed—take it.
Zoom in on the owl-shaped door in the tree; use the acorn to open the door.
Mr. Beak isn't home, but there is a HERBICIDE SPRAY; take it.
Go back to the cottage.
Screenshot
Back at the cottage:
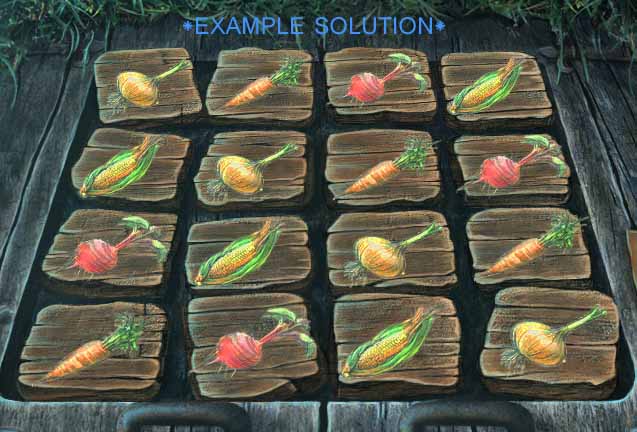
Use the herbicide to remove the cursed vines blocking the root cellar door; this reveals a new puzzle.
Zoom on the root cellar door to begin a game of Veggie Sudoku; your objective is to swap tiles until only one type of a vegetable is contained in each row and column.
Click on the tle you want to move, then click on the place where you want to move it (See screenshot below for solution).
Screenshot
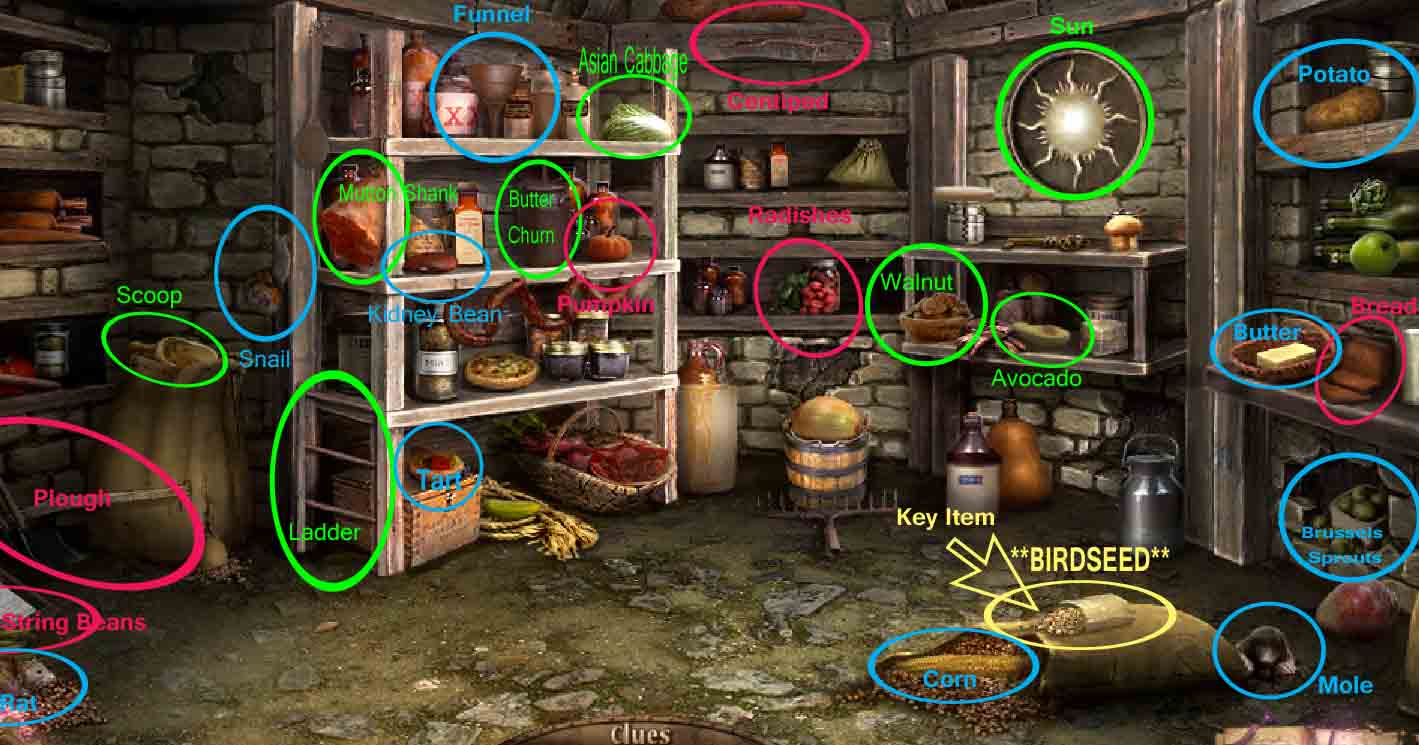
When you've arranged the veggies correctly, a swarm of bats will fly out; then you can click the root cellar opening to begin the first hidden object scene . . .
This screenshot identifies most items to be found in this scene (key item is always the same). Your list will vary:
Screenshot
Find all the objects on your list to earn the key item— BIRDSEED.
Use the birdseed (earned from completing the root cellar hidden object scene) on the empty bird feeder. This will start the next puzzle.
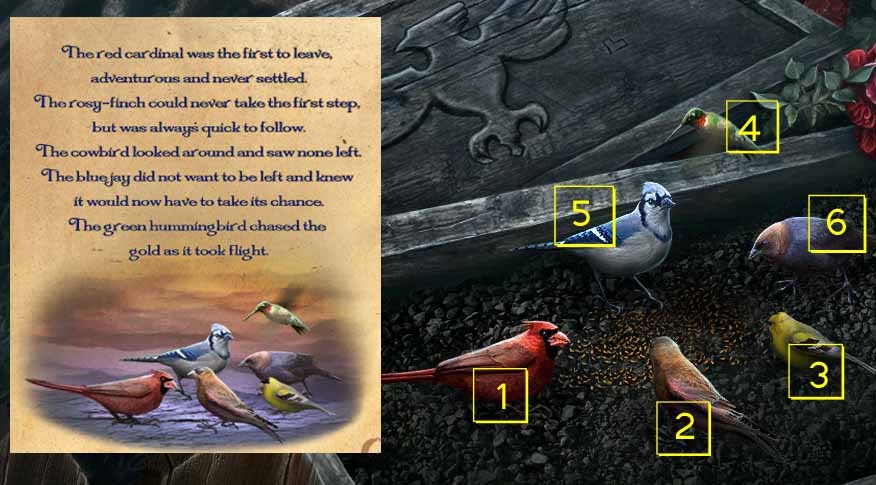
The Bird Feeder Riddle: Read the riddle in your journal; it tells in which order to click on the birds.
Click on the birds in the correct order until all have moved away.
When all the birds have moved back, pick up the COTTAGE KEY from the spot where the cowbird stood.
1st is red cardinal; 2nd is rosy-finch; 3rd is gold finch; 4th is green hummingbird; 5th is bluejay; 6th (last) is the cowbird (black with brown head). When all birds have been moved away you can pick up the COTTAGE KEY which was hiding under the cowbird.
Screenshot
Go to the cottage door, insert the key in its keyhole, and click once on the key to turn it, opening the door. Enter the Cottage Bedroom.
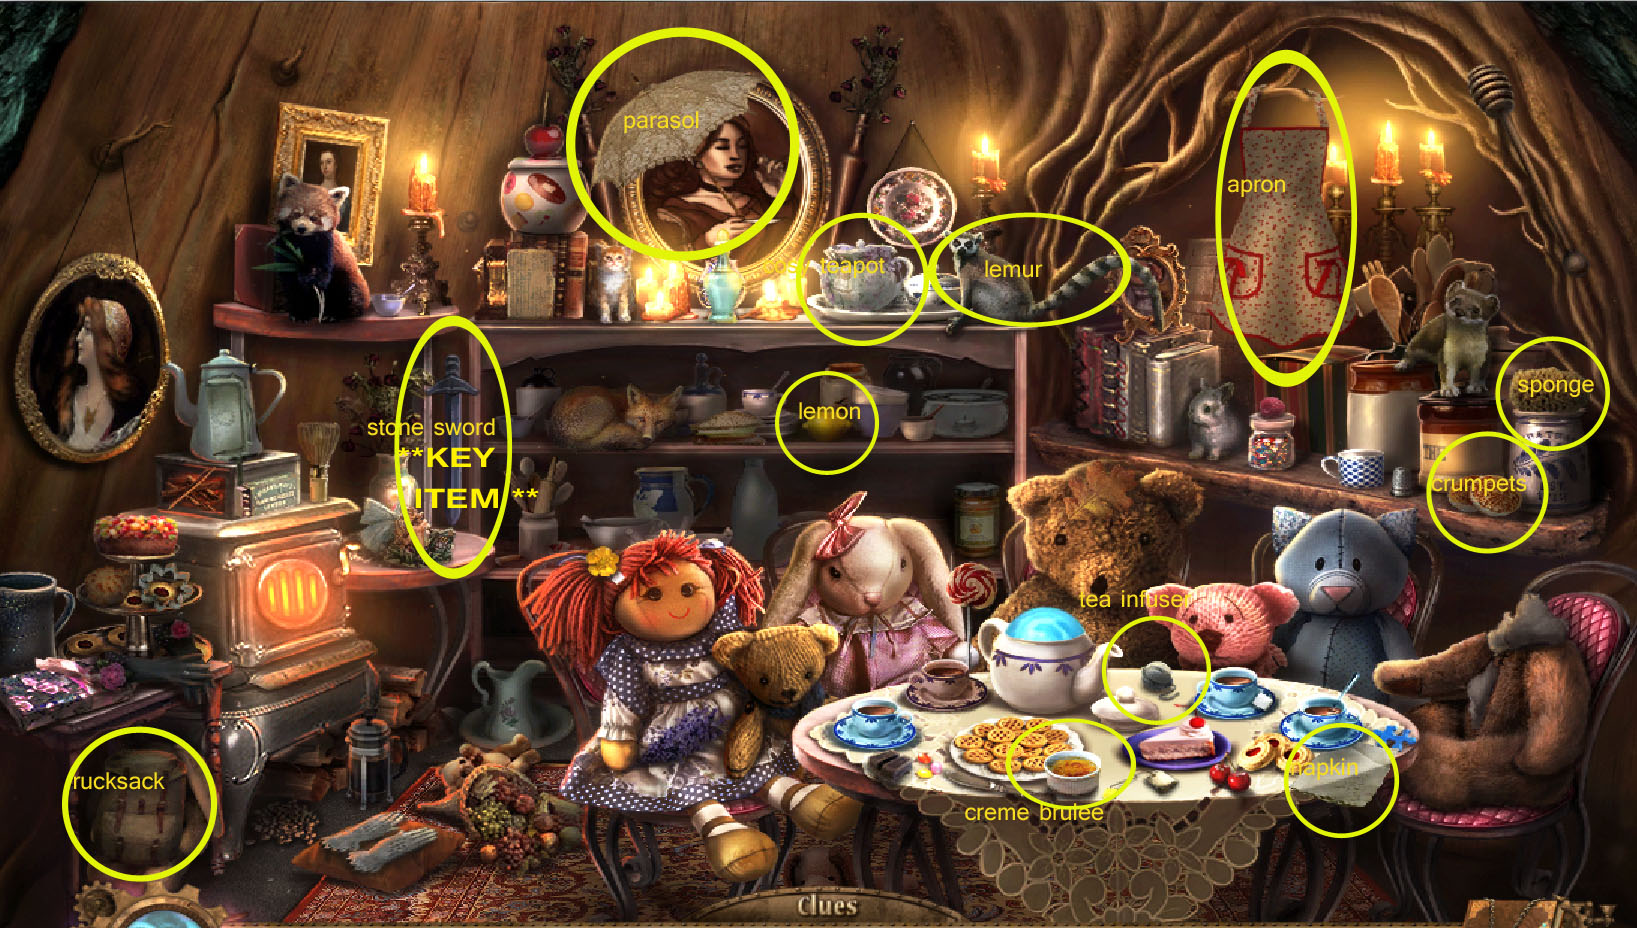
From the Cottage Bedroom to the Hayfield
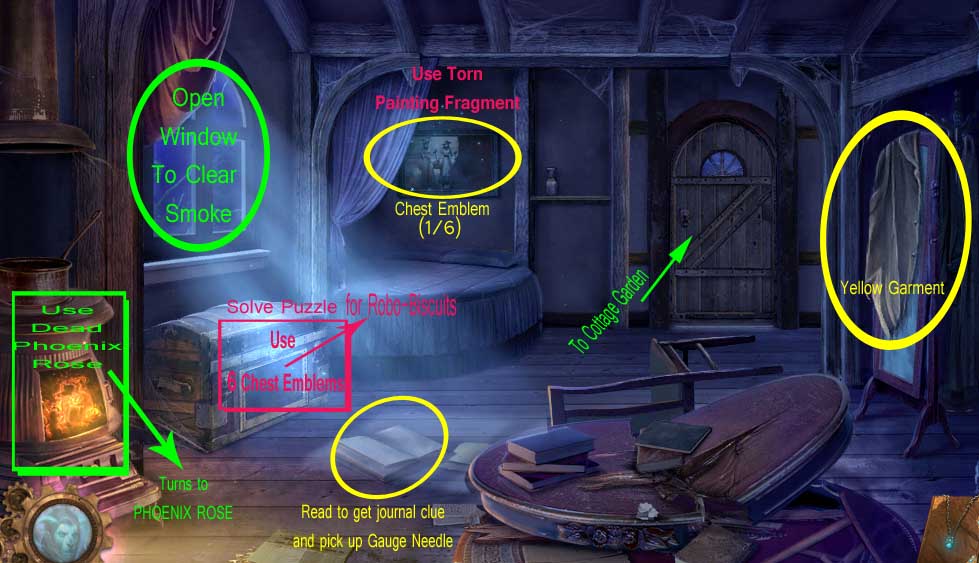
Inside the cottage bedroom, pick up some items and clues to start with, ignoring the backdoor for now:
Grab the YELLOW GARMENT off the mirror.
Click on the open book on the floor, under the window. Take the GAUGE NEEDLE from the center crease. This will also enter a new clue in your journal.
Focus on the painting over the bed. Use the Torn Painting Fragment from your inventory to complete the painting. This will reveal a niche behind the painting containing a CHEST EMBLEM (1/6); take it.
Click twice on the back door to open it. This will begin a story cutscene; when it's over, the room fills with smoke.
Open the window to clear the smoke.
Exit out the backdoor to the Cottage Garden.
Screenshot
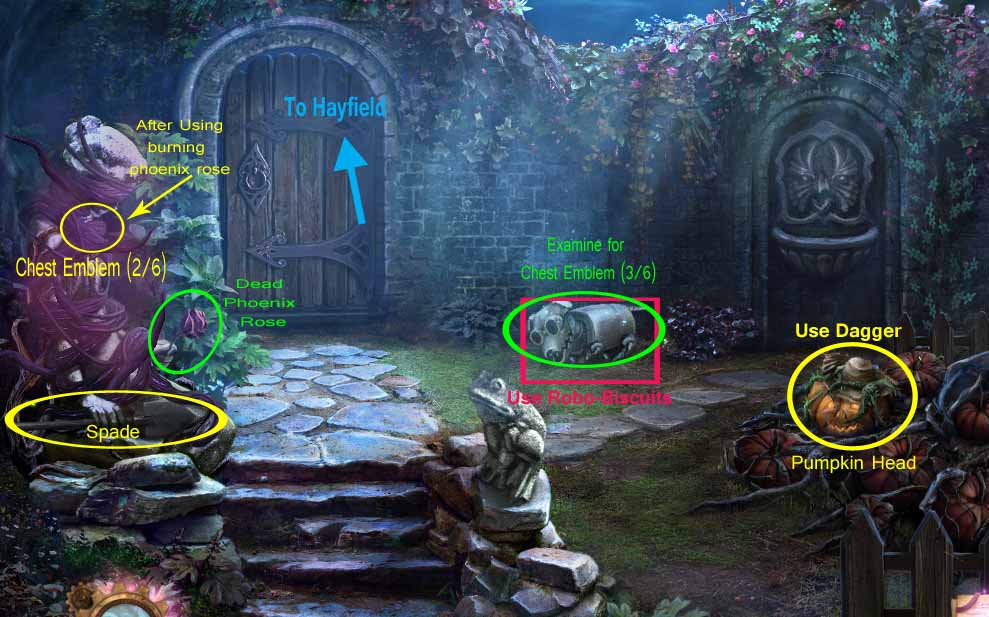
In the garden, you'll notice a stone woman figure covered in more cursed vines. Follow these steps to Uncurse the stone figure:
Take the DEAD PHOENIX ROSE from the stone statue's hands.
Return to the Cottage Bedroom.
Place the Dead Phoenix Rose on the stove's hot coals; this will turn it into a burning PHOENIX ROSE. Take it.
Go back out to the garden and place the burning phoenix rose from your inventory on the cursed stone figure; this will burn away the curse and reveal another emblem on her necklace.
Remove the CHEST EMBLEM (2/6) from the uncursed stone figure's necklace.
Take a closer look at the tin dog toward the back of the scene; his name is "Tinbot."
Inside Tinbot, find the CHEST EMBLEM (3/6) and take it.
Leave out the back gate to the Hayfield.
Screenshot
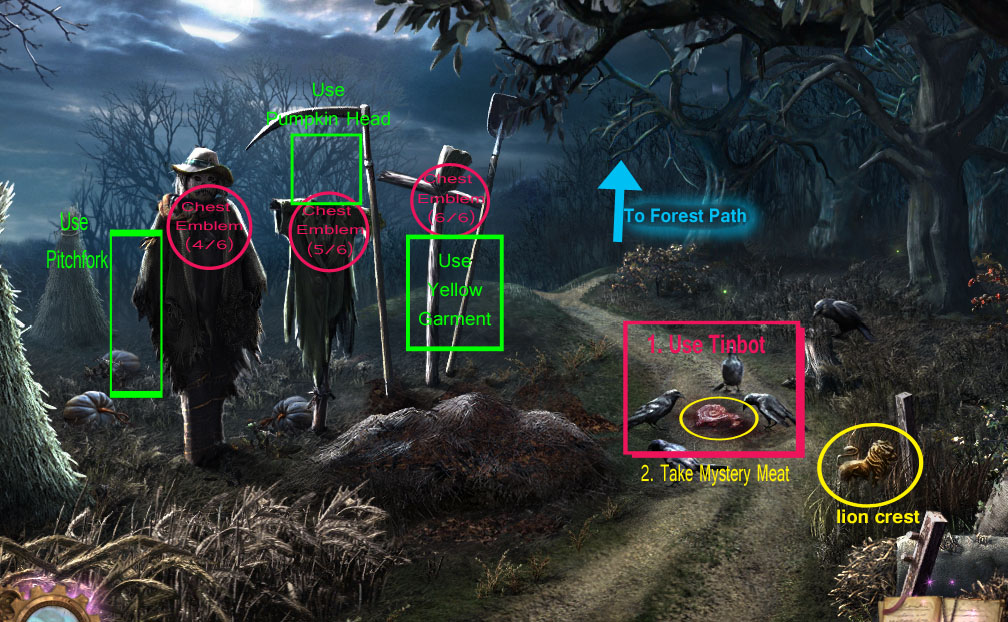
When you enter the hayfield, you'll notice your path toward the blacksmith's is blocked by a murder of crows. Three disheveled scarecrows need your help.
First, grab the LION CREST that's nestled in the grass on the right side of the road.
Then, put the scarecrows back in order by giving them the objects they need — left scarecrow=pitchfork; middle=pumpkin head; right scarecrow=yellow garment.
When the scarecrows are complete, you'll find three more CHEST EMBLEMs around their necks. Take them.
Screenshot
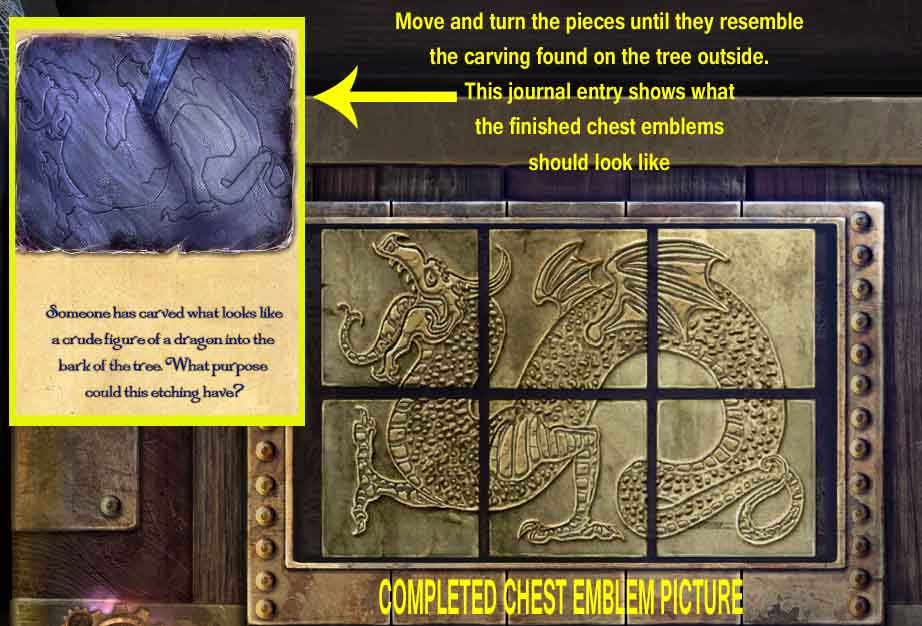
Return to the cottage bedroom and place the six chest emblems on the chest that's under the window. This will start a new puzzle:
The object is to arrange the chest emblem pieces until the picture matches the dragon carving found on the tree outside the cottage. Check your journal for the clue.
Move an emblem by clicking on it, then clicking on the spot where you want it to go.
Turn an emblem by hovering the cursor over it until a blue gear piece appears, then click the gear piece until the emblem is properly oriented.
When you've correctly aligned the pieces to form a picture of a dragon, the chest will open.
Screenshot
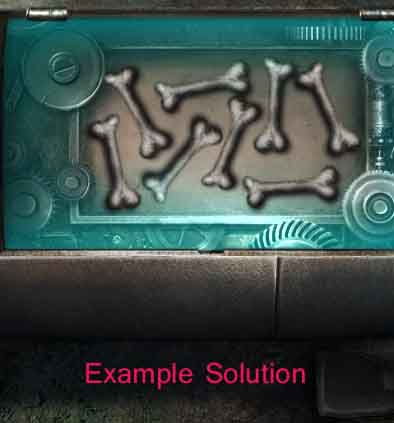
Take the ROBO-BISCUITS from inside the opened chest and go back out to the garden.
Focus on Tinbot and place the Robo-biscuits inside.
Solve this puzzle by arranging each biscuit until no biscuit touches the sides, nor another biscuit.
Screenshot
When you've arranged the robo-biscuits correctly inside Tinbot, pick him up and head back to the Hayfield.
Place tinbot on the road to scare off the crows; he'll chase them off before exploding into a dozen pieces.
Pick-up the MYSTERY MEAT.
Before you go on, Tinbot needs to be re-assembled; select a piece by clicking on it, then click on the spot where it should go. Correctly placed pieces will "lock in."
Screenshot
When Tinbot's back together again, pick him up and continue down the path to the Forest Path.
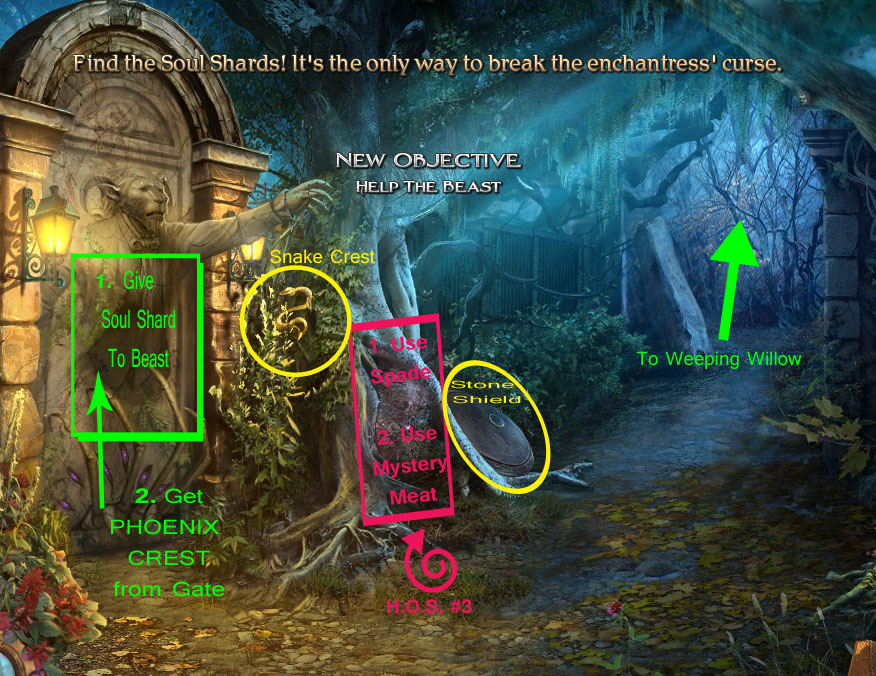
Forest Path, Willow, Blacksmith on through the Town Gate
When you first enter the forest path, another story cut-scene begin. Here you find Beast's form, frozen in stone. He beckons you to find soul shards to free him from the curse.
Screenshot
Pick up the STONE SHIELD leaning against the tree (left/middle of scene).
Take the SNAKE CREST from just under Beast's outstretched arm.
Use the Spade on the hollow under the tree; turns out it's a fox's den in there.
Place the Mystery Meat on the ground just outside the fox's den; this causes the fox to take the meat and run away.
Click on the fox den to begin a hidden object search . . .
Note: Hidden object scenes are randomized each game. Your list will vary.
Screenshot
When you've found all the items on your list, you're rewarded with a STONE SWORD.
Take the stone sword and head up the path to the Weeping Willow.
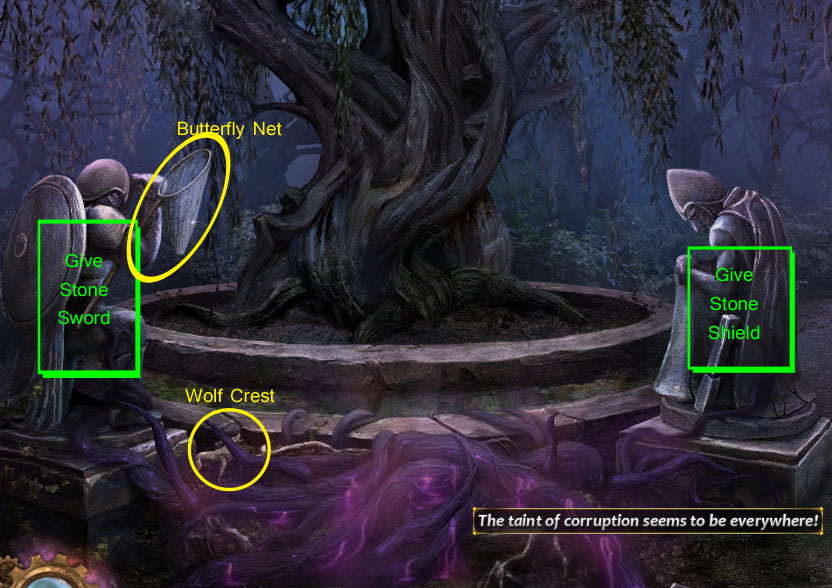
At the Weeping Willow, you notice more cursed vines that need to be cleared away. Completing this area will give you the first soul shard needed to help Beast.
Screenshot
Pick up the WOLF CREST hidden in the vines.
Take the BUTTERFLY NET from the statue on the left.
Give the left statue the Stone Sword; give the right statue the Stone Shield.
That will cause the willow to start weeping; the willow tears clear away the curse, revealing a lidded rabbit hole. As you examine the rabbit hole, you discover the lucky coins are missing. Move up the road to the Blacksmith, because at the moment there's nothing more to do here.
Screenshot
The Blacksmith's house has a puzzle on its door, a beehive hanging in a tree to the left, and a pool of water on the right. There also appears to be a gauge missing on the chimmeny pipe.
Screenshot
Pick up the BEAR CREST from the ledge just under the chimmeny pipe.
Use the Butterfly Net to fish a PRESSURE GAUGE out of the water.
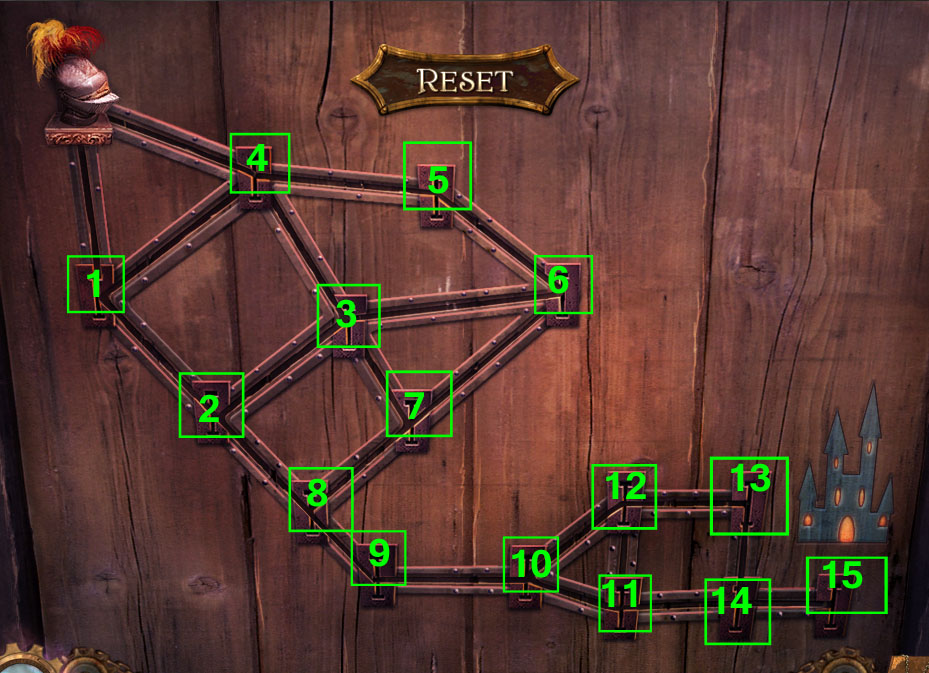
Click on the Blacksmith's door to to begin a maze puzzle; the object is to move the knight from the left side of the screen to the castle on the right without ever traveling through the same intersection twice.
Screenshot
When you've solved the knight to castle maze, the door will pop open and smoke pours out of the house.
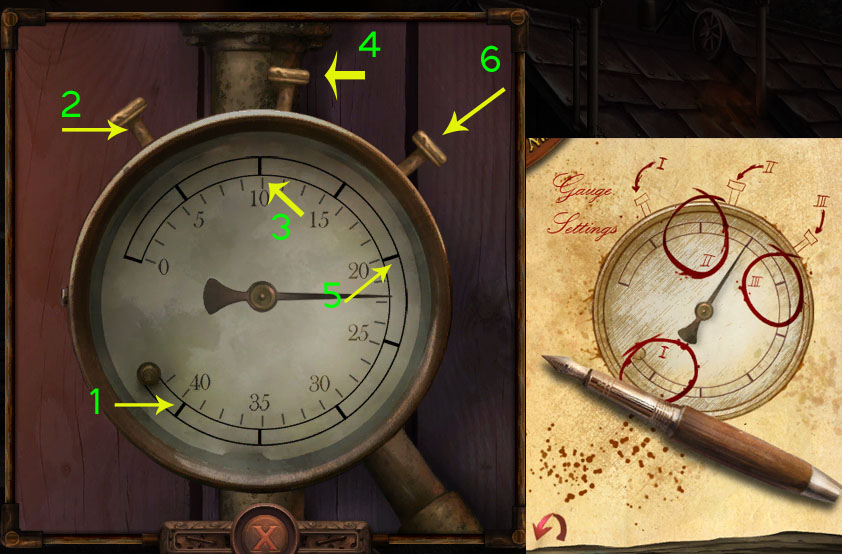
Now focus on the end of the chimmeny pipe: replace the Pressure Gauge and the Gauge Needle to do the next puzzle.
Open your journal and go back a few pages to find a depiction of the pressure gauge and a clue to the solution.
Screenshot
By clicking spots on the pressure gauge in the correct order, the blacksmith's house will clear and a new Hidden Object Scene will appear.
I - Click on the 40 line of the gauge, then click on the top left button.
II - Click on the 10 line, then click on the middle button.
III - Click on the 20 line, then click on the last button.
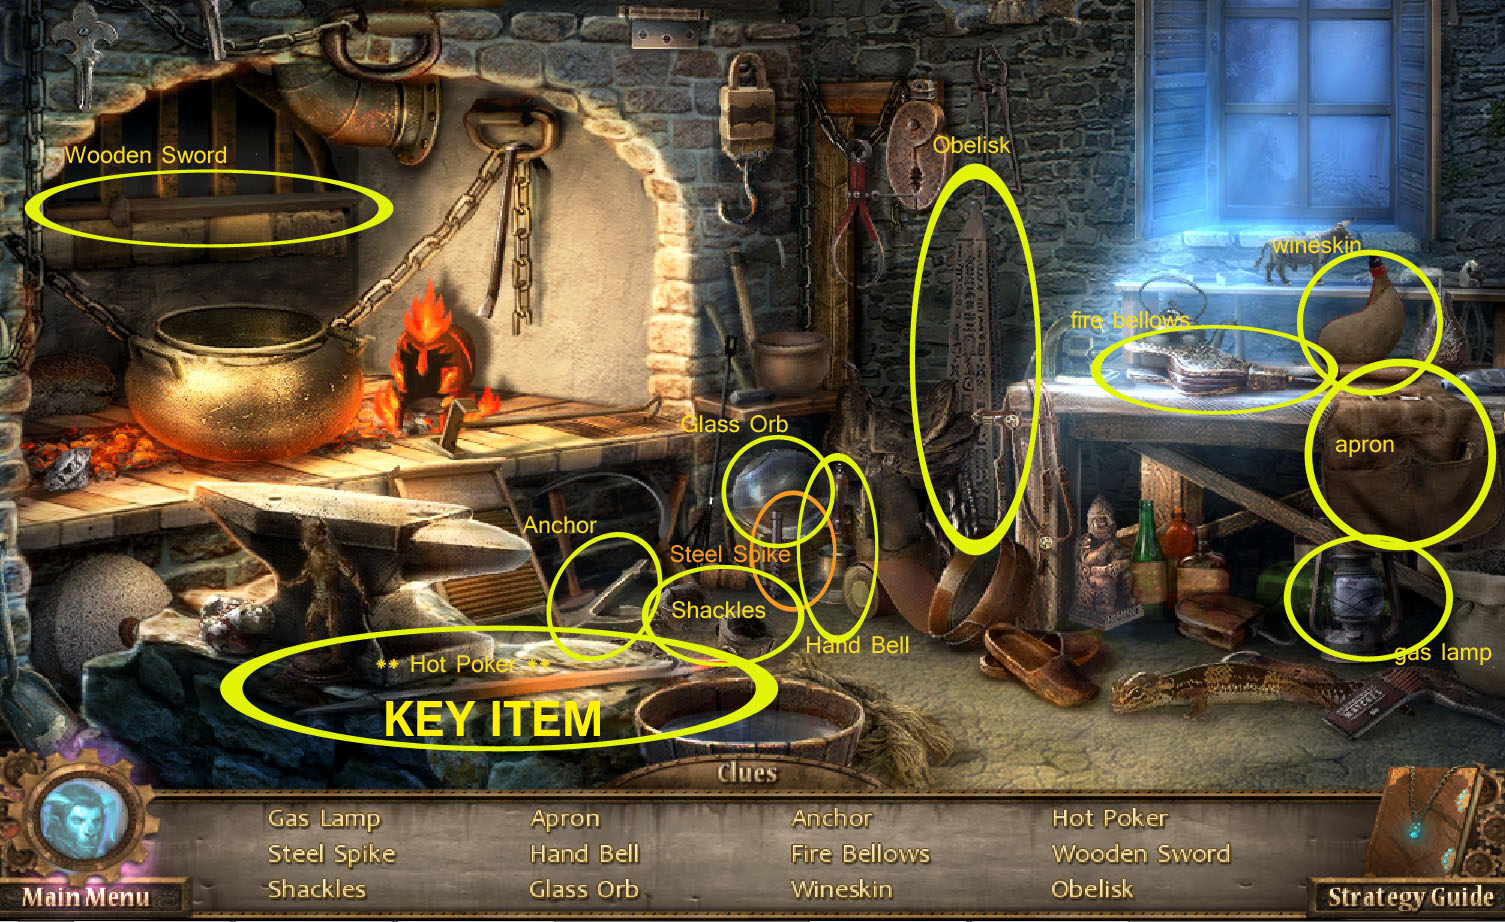
Click on the Blacksmith's door to begin Hidden Object Scene #3, The Blacksmith House.
Note: Hidden object scenes are randomized each game. Your list will vary.
Screenshot
Finding all the objects on your list gains you the HOT POKER.
Go up the road to the Town Gate.
The Town Gate looms large in front of you; search the area for clues.
There is a wanted poster posted on the left column of the gate; click on it to read it. That will start a game of Hide-and-Seek with a saucy Leprechaun.
Play with hide-and-seek with her by finding (and clicking on) her shadow; when you've caught her three times in a row, she'll hand you an EMPTY POT. She wants something golden and, according to the poster, she's known for stealing honey.
Take the Empty Pot and go back to the bee hive at the blacksmith's.
Use the Hot Poker to open the hive and cause the honey to flow. Next, place the Empty Pot under the hive to capture the honey.
Go back to the saucy Leprechaun at the Town Gate. She'll want to play Hide-and-Seek once again. Find her three more times and she'll appear. Hand her the POT OF HONEY.
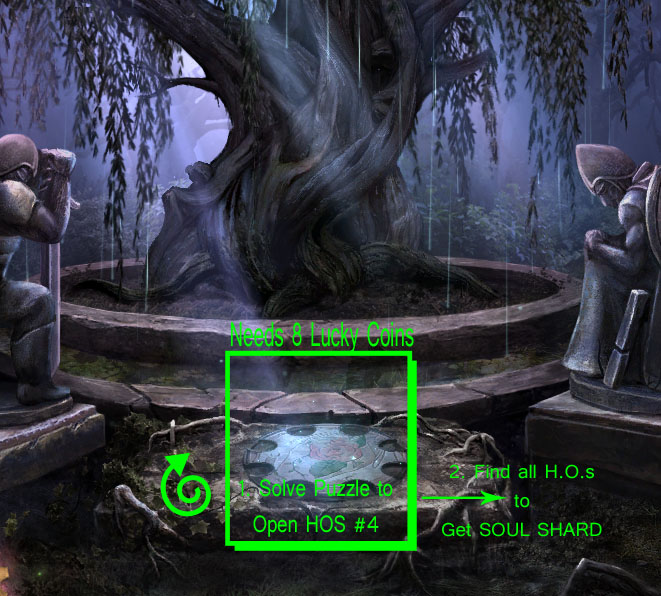
She disappears and leaves behind LUCKY COINS. These are the very same Lucky Coins needed to open the rabbit hole; head back to the Weeping Willow.
Back at the Weeping Willow . . .
Zoom in on the Rabbit Hole lid; place the Lucky Coins into the game to begin the puzzle.
Solve the puzzle by correctly completing the picture. Switch coins by clicking on the one you want to move then clicking on the spot where you want it to go. Turn coins by hovering your pointer over the coin, then clicking on the blue gear that appears on it.
Screenshot
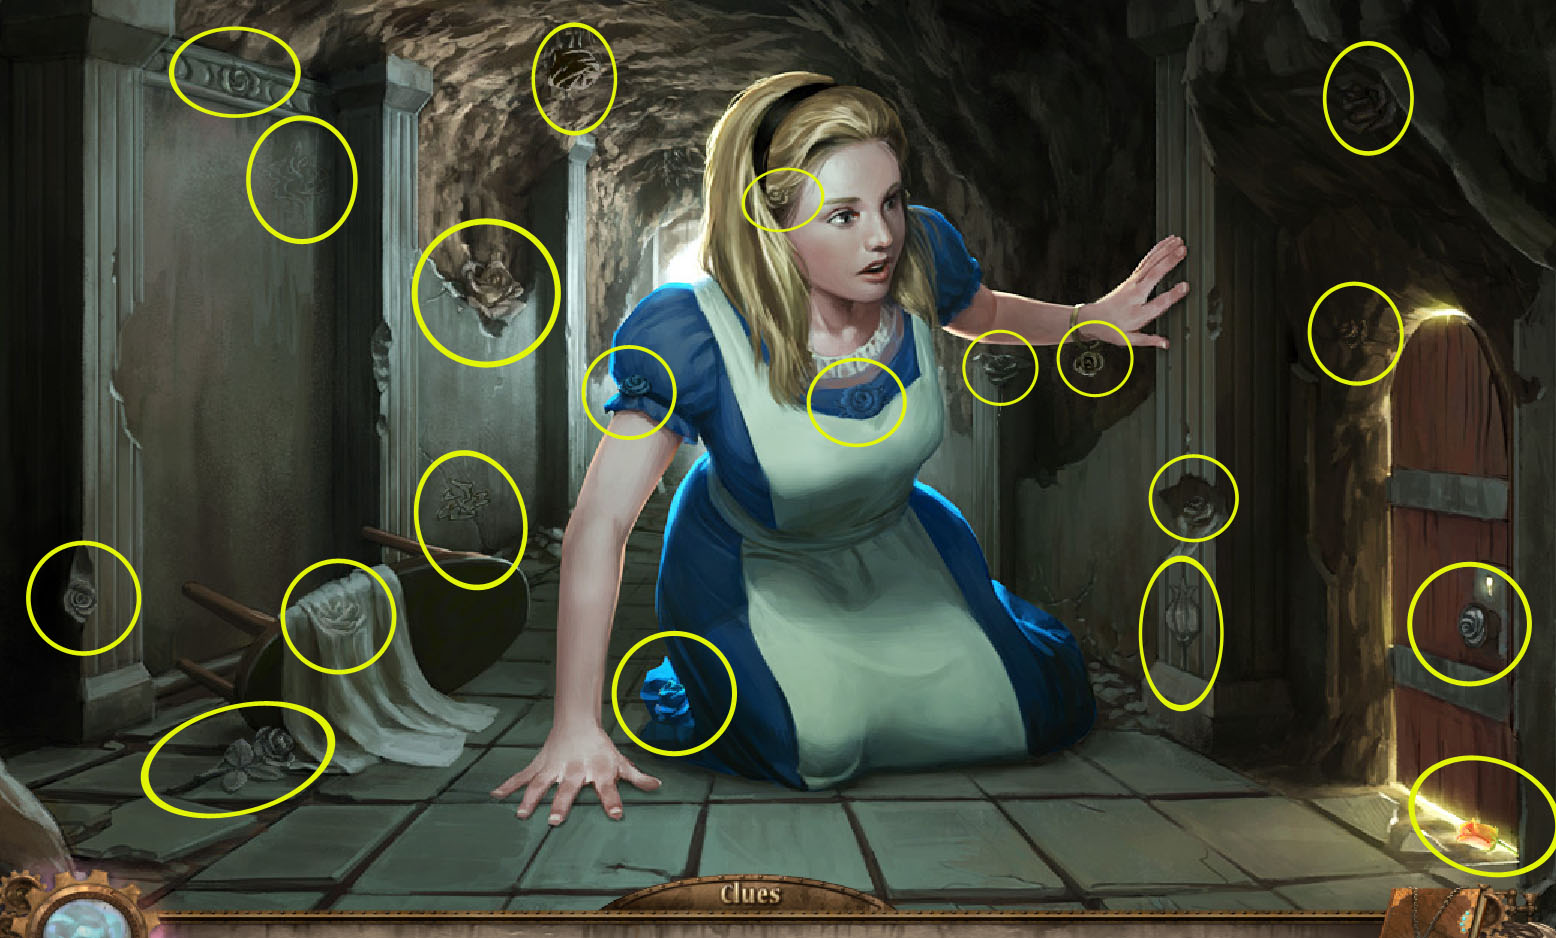
When all the coins are arranged properly, the rabbit hole opens to reveal a soul shard embedded in a book: Alice in Wonderland. Pick up the book to begin another hidden object scene, this time to find 20 roses.
Screenshot
When you find all 20 roses, you're rewarded with a SOUL SHARD; take the Soul Shard back to Beast at the Forest Path.
After giving the Soul Shard to Beast, and he leaves, take the PHOENIX CREST off the iron gate. By this point, you should have five crests. Go back to Town Gate.
Replace each of the crests—lion, snake, wolf, bear and phoenix—into their respective spots on the Town Gate crest. This will open the gate so you can enter Town Square.
Town Square Before Entering the Toy Shop
The Town Square is also cursed: a menancing demon statue dominates the scene while a tavern is tucked up along the right side.
Screenshot
Barely visible at the demon's foot is a bottle of WISHING DUST; pick it up.
On the tavern's window ledge is an ENGRAVED STONE; grab that, too.
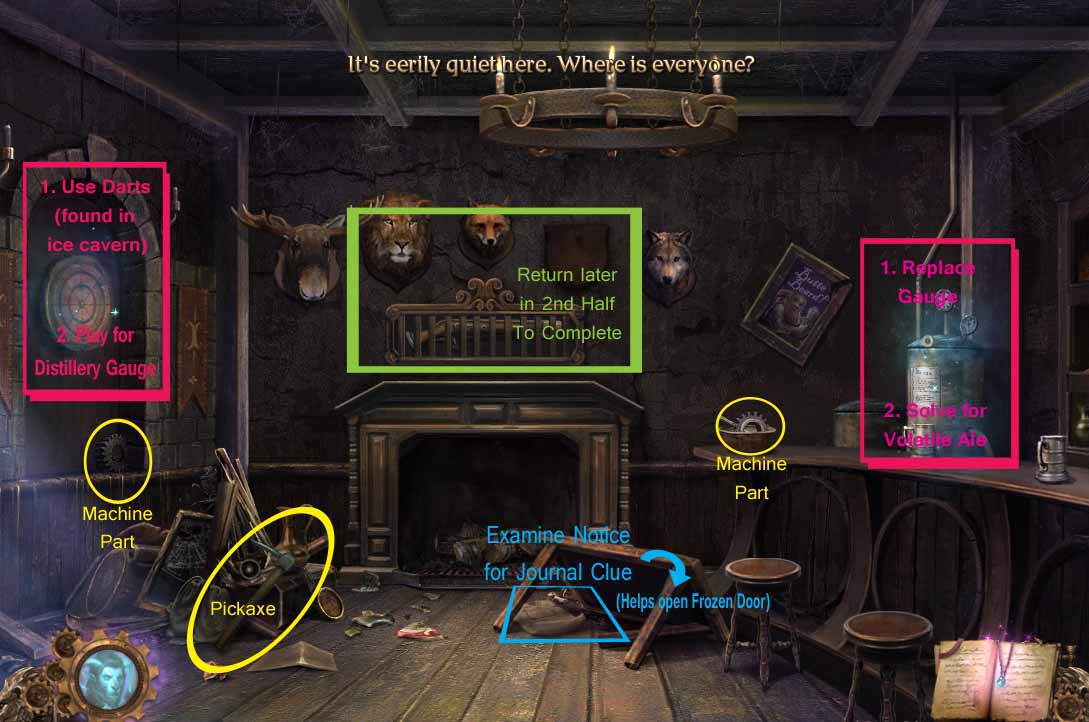
Now head inside the Tavern.
Screenshot
Inside the tavern, pick up MACHINE PARTS (1/10) and (2/10) from under the dartboard and in a bowl on the bar.
In a pile of rubble to the left of the hearth is a PICKAXE to pick up.
Under an overturned table is a Notice That You Should Read—it contains a very important clue for opening a frozen door coming up soon. Examining the notice will add a new entry to your journal.
There's nothing more to do in here for now, so exit out to Town Square.
Then head up the street to Shop Street.
From Shop Street, you can see Beast's Castle high on a snowy peak. Here is also a Toy Shop and Street Vendor's cart.
Screenshot
Pick up ENGRAVED STONE (2/3) from the Toy Shop Steps.
Take the TOY ROCKET from the chest next to the steps.
Click on the Toy Shop window to add a new clue to your journal entries.
Then, click on the Street Vendor Cart to begin another Hidden Object Scene (earns the SLINGSHOT).
Note: Hidden object scenes are randomized each game. Your list will vary.
Screenshot
You'll receive a LOADED SLINGSHOT when you find all the hidden objects in the street vendor cart.
Use that slingshot on the Weather Vane to make it drop a WIND-UP KEY.
Put the Wind-Up Key in the Toy Shop door then figure out the 5-digit code needed to open the door. Look in your journal for a clue.
4 Blue - 2 Orange - 1 Green - 2 Red - 3 Purple.
When you've correctly entered the colored-number code, the Toy Shop opens. Go in.
Toy Shop and Icy Caverns
The walls of the Toy Shop are covered with shelves and cabinets filled with toys. There are several puzzles or items to complete here, plus a hidden object scene up in the attic workshop.
Screenshot
There are 4 MACHINE PARTS in this scene: in the top shelf of the cabinet; in a box of toys; below the bottom step; hanging on a drawer-knob.
Tucked just behind the staircase banister is a pair of SNOW BOOTS; grab thidden-object scenee.
Take the third ENGRAVED STONE (3/3) from the lap of a cat doll.
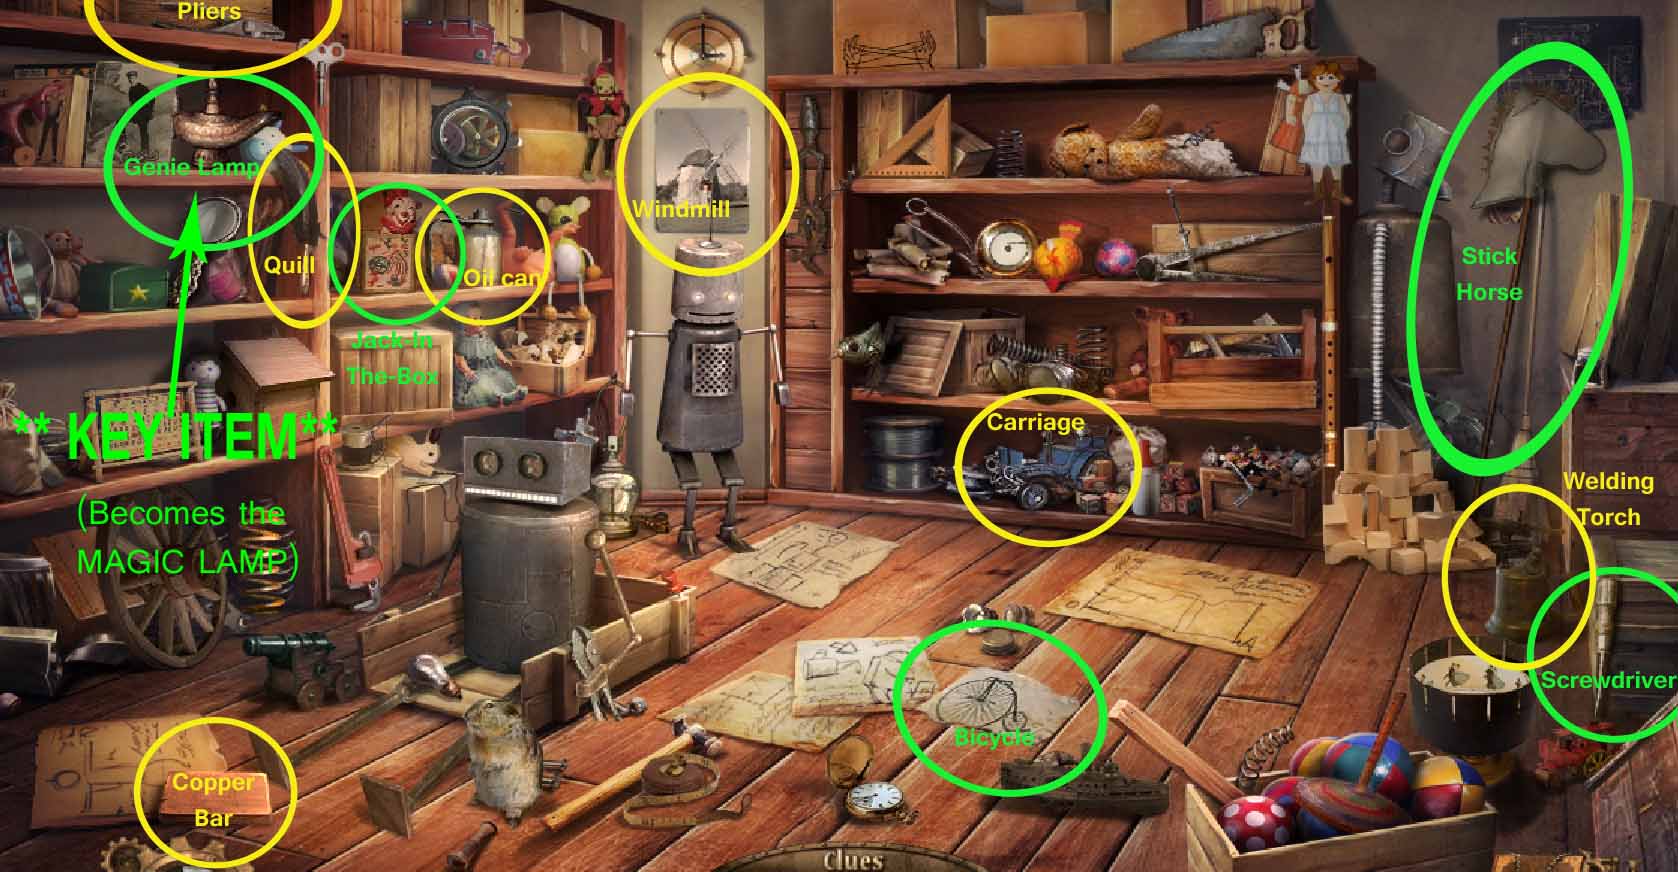
Next, head upstairs for another Hidden Object Scene in the toy workshop (earns a MAGIC LAMP).
Note: Hidden object scenes are randomized each game. Your list will vary.
Screenshot
When you complete the hidden object search, you'll be rewarded with a MAGIC LAMP.
Put the Magic Lamp on its stand (in a niche on the right wall); Then, add the Wishing Dust (found on the demon statue outside). That will produce a WAND OF POWER. Take it.
Click on the Pinnochio doll by the bookshelves. Play his game of cards by clicking on the card wherever it appears in his scene. Find the card four times and then take his long nose. It becomes a WAND OF LIFE.
The last puzzle cannot be completed until after you go to the Icy Caverns, so head outside and up the road to the Cold Pass.
When you arrive at the Cold Pass, you'll need the Snowboots to go on. Take the Snowboots out of your inventory and click on the scene. The evil enchantress will appear again, warning you away. After she leaves, you can progress.
Screenshot
First pick up the MACHINE PART partially hidden in the left snowbank.
Then, click on the frozen door. Use the Pickaxe to break a sheet of ice from the door to begin another puzzle.
Solve the Frozen Door puzzle by arranging the colored stones to match up with their corresponding symbol. To move a stone, click on it then click on the space where you want to put it. The Yeti warning in your journal provides the clues.
Black = Skull
Yellow = Sun
Purple = Crown
White = Cloud
Red = Rose
Orange = Flame
Blue = Water Drop
(by process of elimination or sheer intuitive genius) Green = Tree
Solving the puzzle opens the way to the Ice Caverns. Go on inside.
Another Beast form frozen in place is found here in the Ice Caverns; there's also an opening up to Storm Peak that has collapsed. You'll need a few items, including a rope, before you can proceed.
Screenshot
Pick up the MACHINE PART just above some skulls in a snowdrift.
To the left of that, partially emerged in the snow is TOY CANDY; take it.
Near the back of the cavern is an armored skeleton hunched over a basket; zoom in for a closer look, then grab the DARTS off the top of the basket (a snake will hiss at you). As you do this, a new entry will be written in your journal.
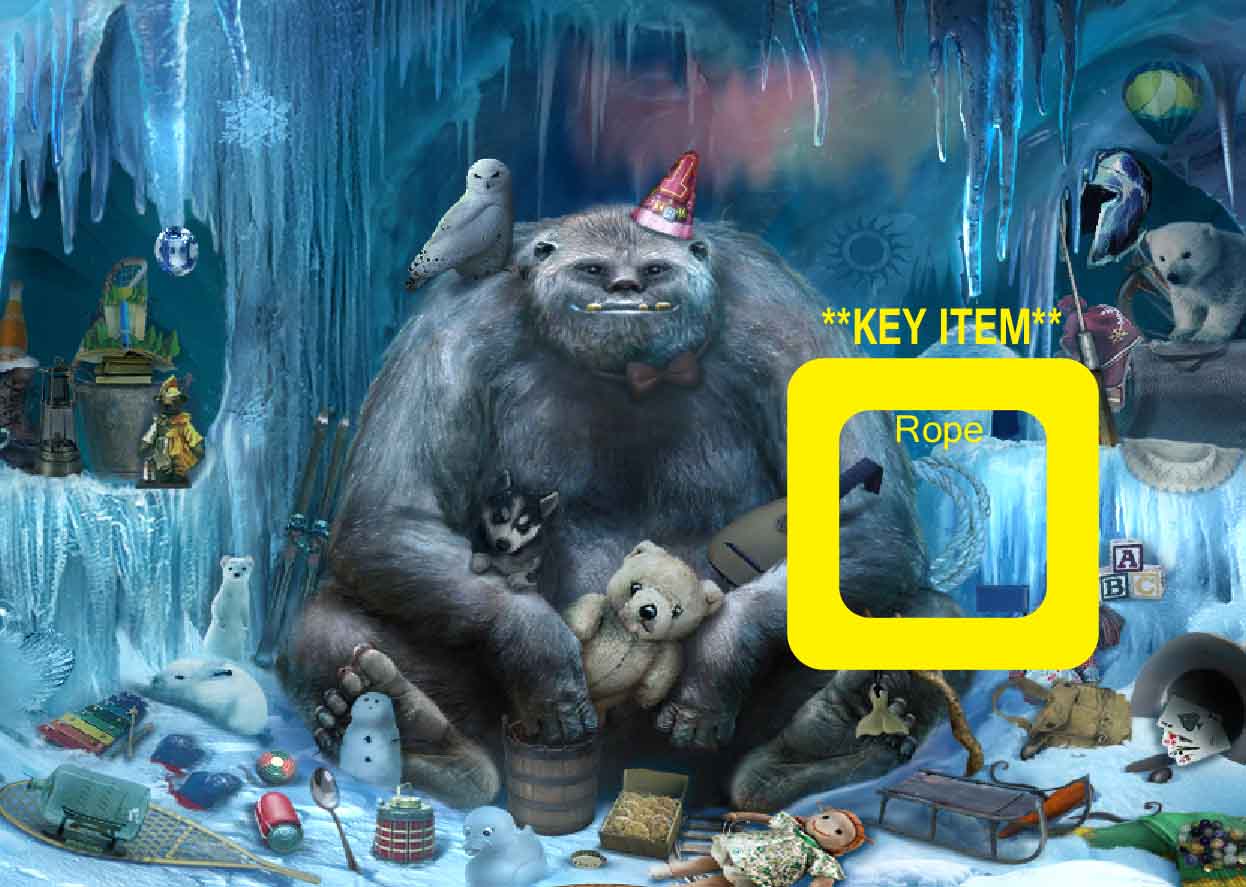
Now use the Toy Rocket to access the Yeti Cave on the right scene of the screen. This will open a new Hidden Object Scene; complete it to get ROPE.
Note: Hidden object scenes are randomized each game. Your list will vary.
Screenshot
You'll earn the ROPE by finding all the objects hidden in the yeti cave.
But before you go to storm peak, you should go back to the tavern and toy shop to finish out some puzzles.
Storm Peak and the Zeppelin
After completing the Yeti Cave hidden object search and gathering up items from the Icy Caverns, complete some puzzles back in town before repairing the Zeppelin to travel to Beast's Castle.
First, go back to the Toy Shop and add the Playing Card (won from Pinnochio's game) and the Toy Candy (found in the ice cavern) to the toy diorama.
Rearrange the toys in each cubby, forming pairs that morph into a new item (as written on the label). To move an object, click on it, then click on where you want it to go. Solution:
Enchantress = Blue Doll + Star Wand
Red Riding Hood = Red Hat + Doll in Red Dress
Hot Air Balloon = Basket + Purple Balloon
Sand Castle = Pile of Sand + Picture of Castle
Prince = Beast + Rose
Mouse King = Mouse + Crown
Jack in the Box = Box + Jack Playing Card
Disguise = Glasses + Mustached Nose
Werewolf = Moon + Man
Pegasus = Carousel Horse + White Wing
Candy Cane = Striped Candy + Wooden Cane
Robin Hood = Robin + Quiver of Arrows
Pairing all the objects correctly will open the panel so you can take the WAND OF DREAMS. Now you should have all three wands: Wand of Dreams, Wand of Life, and Wand of Power.
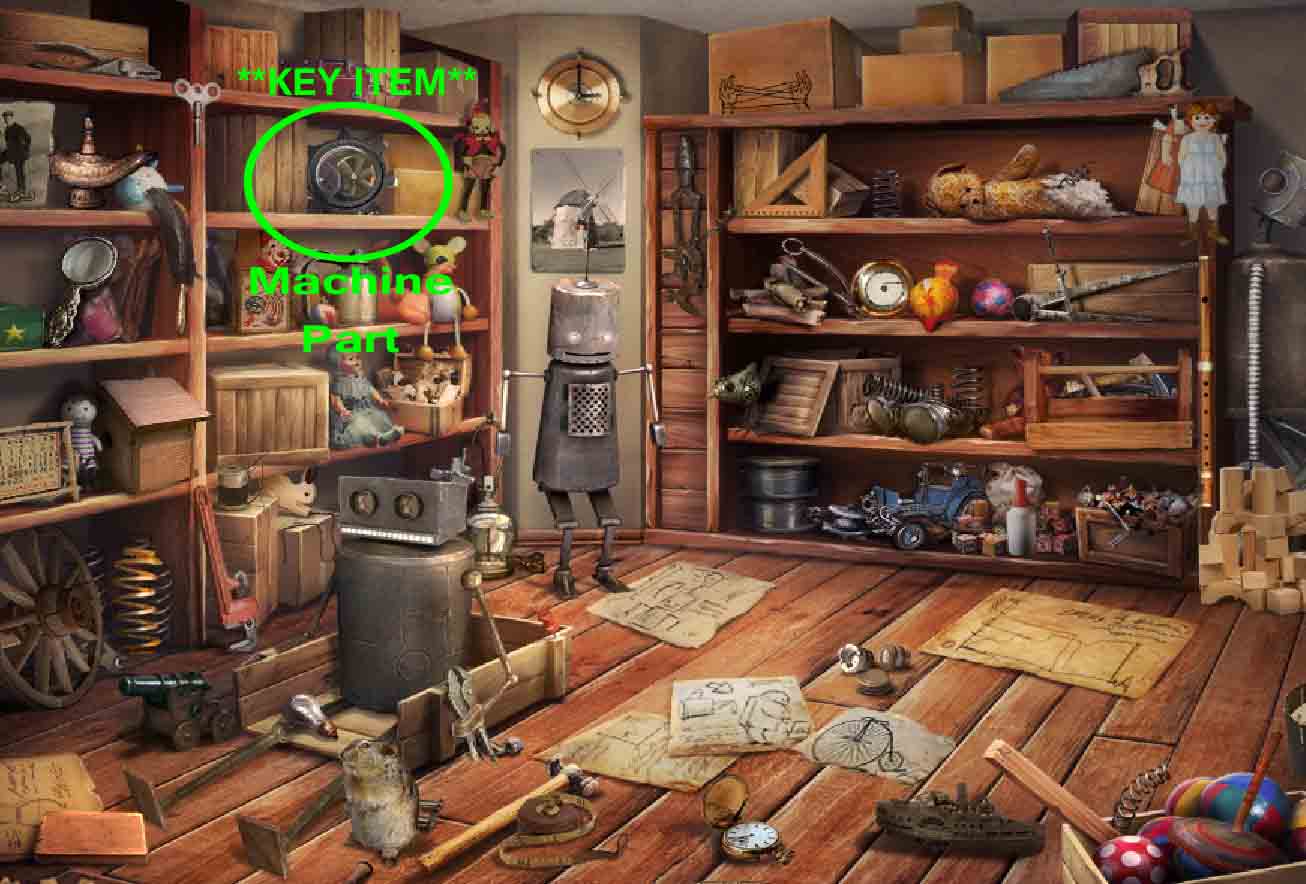
Before you go leave the Toy Shop, head back upstairs to the toy workshop for one more hidden object scene. This time you'll find one more MACHINE PART (9/10).
Screenshot
NOTE: Hidden object searches are random each game; your list will vary.
After you complete the hidden object scene in the toy workshop for the 9th MACHINE PART, and with the three wands in your possession, head back for Town Square.
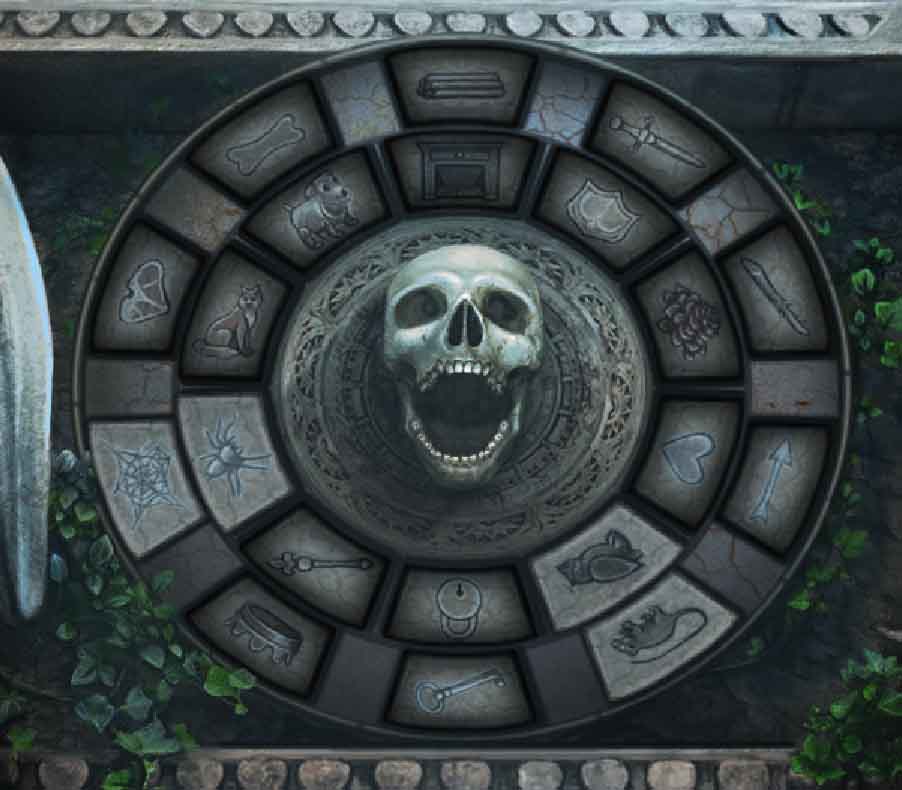
In the town square, zoom in on the well stone at the base of the demon statue. Add the 3 Engraved Stones to begin a new puzzle:
Match each image to its corresponding symbol. To move a stone, click on it, then click where you want it to go. Solution:
Dog with Bone; Spider with Web; Sword with Shield; Key with Lock; Heart with Arrow; Wood with Fireplace; Owl with Mouse; Fox with Meat; Rose with Thorny Stick.
Screenshot
When you've matched up every symbol, the well stone sinks and three fairy statues rise up to encircle the demon.
Give the Wand of Life, Wand of Power, and Wand of Dreams to the fairies (it doesn't matter which order). This will turn the demon into an Angel. The problem is, the Angel statue is still engulfed in cursed vines.
Go back into the Tavern.
In the Tavern, take your darts (found in the ice cavern) and place them in the dart board to begin the puzzle.
Aim the red X carefully in the center ring of your desired number, releasing the dart just as it hovers near that red x (don't hit the outer rings where the skulls are lined up).
Look in your journal for the dart master's score. Solution:
9 + 7 + 20 = 36
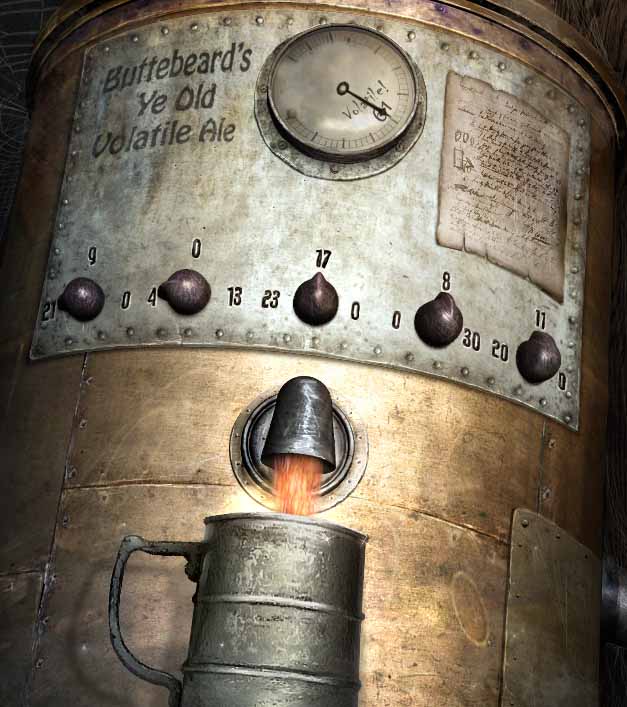
Winning the game of parts opens a hidden panel; take the DISTILLARY GAUGE.
Now zoom in on the distillery behind the bar and replace its missing Distillery Gauge. This starts another puzzle.
The goal is to reach 61, the volatile number.
Screenshot
From left to right, the dials should be set to: 21, 4, 17, 8, 11
The correct number combination causes VOLATILE ALE to pour into the awaiting tankard. Take it and head back outside.
Screenshot
Back at the Angel Statue in Town Square, use the tankard of Volatile Ale to burn away the cursed vines.
The uncursed angel holds another soul shard book. Click on it to begin another hidden object search: Hansel and Gretel.
Screenshot
Find all 20 roses and a SOUL SHARD is freed. Take the Soul Shard and go back to Beast in the Ice Caverns.
Back in the Ice Caverns, give the Soul Shard to Beast. He'll thank you and tell you to find more, then disappear.
In the spot where Beast once stood is a ZEPPELIN KEY. Pick it up.
Use the Rope on the high opening in the back of the ice cavern; Then, climb up the rope and out to Storm Peak.
At Storm Peak, you'll find a big purple blimp—The Zeppelin. You should also notice the last MACHINE PART lying on the path in front of you.
Screenshot
Pick up MACHINE PART(10/10) then click on the engine box on the bottom left side of the zeppelin.
From here, facing the engine gear box, you'll notice that it lacks a source of power. What do you have in your possession that might provide mechanical power?
Use Tinbot. This opens the geat box lid. Place the ten Machine Parts from your inventory inside to start the next puzzle.
The goal is to move each engine part into the slots so that they fit perfectly.
Screenshot
When you've completed the engine box puzzle, click on the zeppelin again to view its ship's wheel. Insert the Zeppelin Key into the keyslot and click the key once to turn it on, then away you go to Beast's Castle (but not without some interference from the evil enchantress!).
Beast's Castle: from Front Door to Undercroft
When you arrive at Beast's Castle, your zeppelin crashes (but surprisingly it's not beyond repair), and the front door is locked.
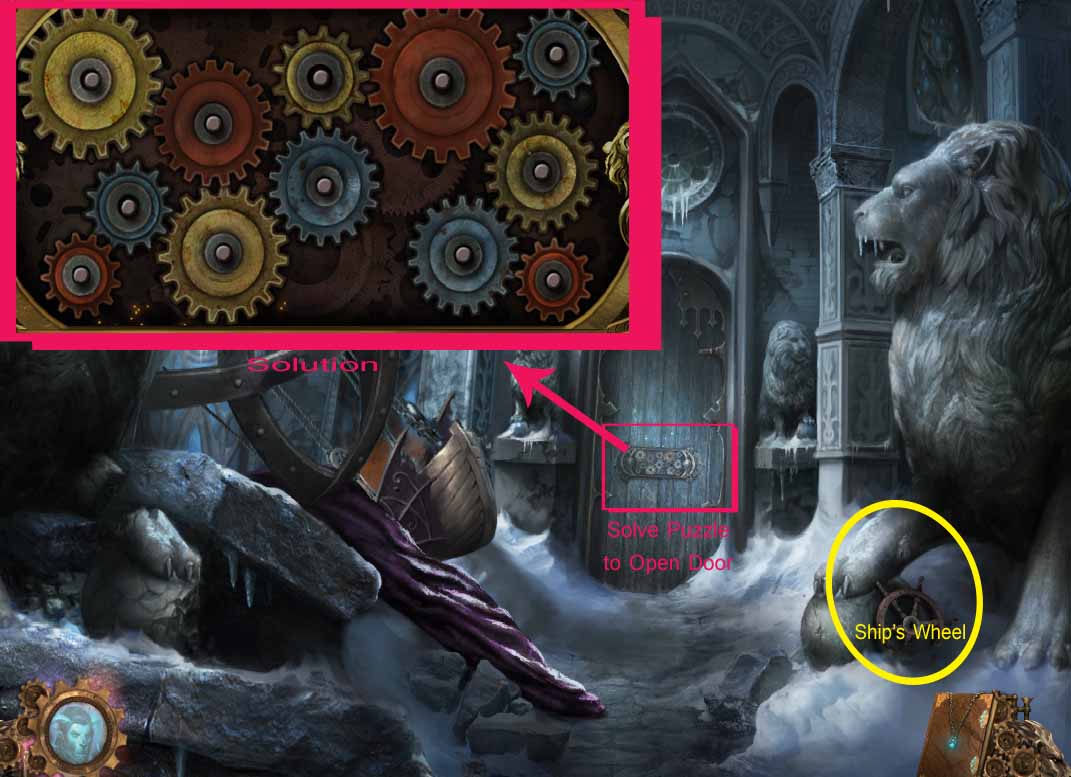
First, pick up the SHIP'S WHEEL by the foot of the lion on the right.
Next, click on the front door to begin a puzzle which unlock's the door; the goal is to move all the gears into place so each spins—a gear of one color cannot connect to another of the same color.
Screenshot
When you have correctly arranged the gears, the door opens for you; Go inside.
Your first time inside the Grand Hall you are able to move in four directions (dining room, treasure room, armory and courtyard) but you cannot go upstairs.
Screenshot
Illuminating the Grand Hall seems to be the only way to find out what's upstairs. It's too dark in the dining room as well. Since there isn't much to do here right now, do some exploring in the other rooms . . .
Enter the Armory (doorway to right of the stairway).
Screenshot
From here in the armory, go upstairs to start a hidden object search to find the MACE.
NOTE: Hidden object searches are random each game; your list will vary.
Screenshot
When you've found all the hidden objects here, take the MACE and go back to the Grand Hall.
Enter the Treasure Room (off Grand Hall, second door on left).
Screenshot
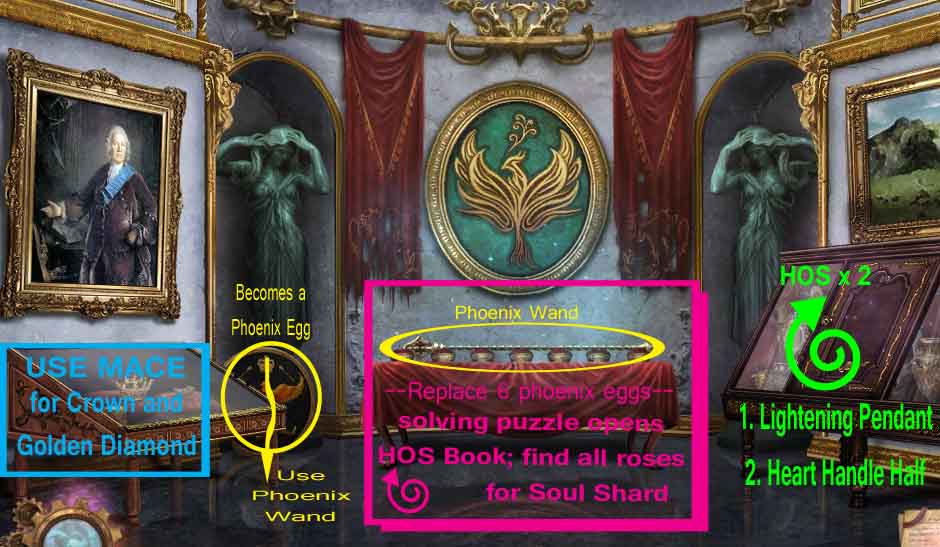
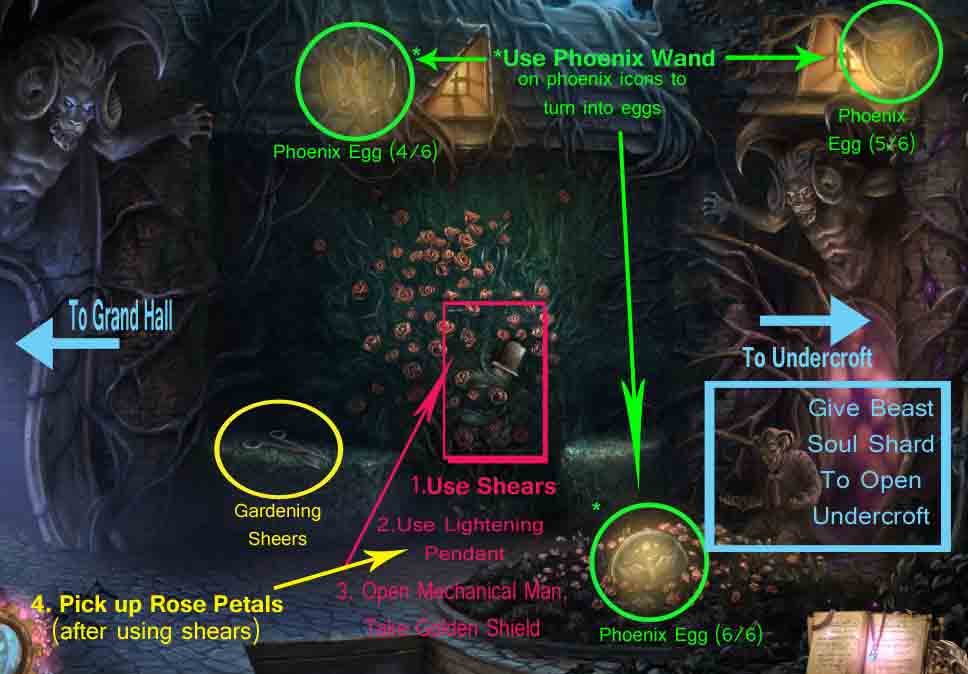
Zoom in on the table draped in red cloth in front of you; take the PHOENIX WAND. You'll use the wand on certain phoenix icons around the castle, turning them into phoenix eggs (Although there are seven stands on the table, only 6 eggs need to be collected.).
Use the Phoenix Wand on the phoenix icon hidden by a case on the left, then take the PHOENIX EGG (1/6).
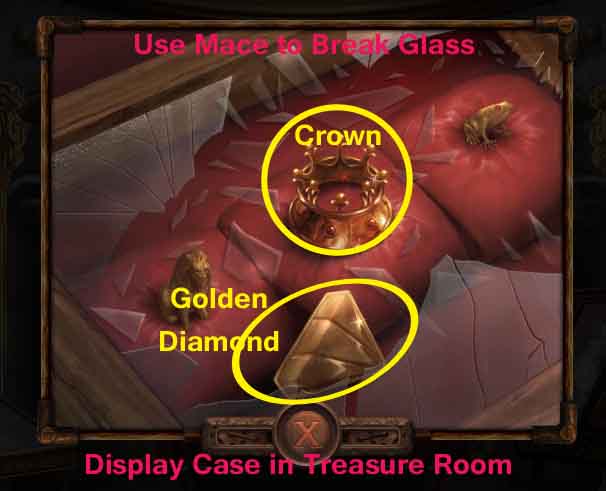
Use the Mace on the case on the left; take the CROWN and the GOLDEN DIAMOND.
Screenshot
The case on the right side of the room will prompt two hidden object searches; one now, one a bit later. Click on the case now to start a hidden object search to gain the LIGHTENING PENDANT:
Screenshot
When you've found all the objects on your list and have the LIGHTENING PENDANT, exit the Treasure Room.
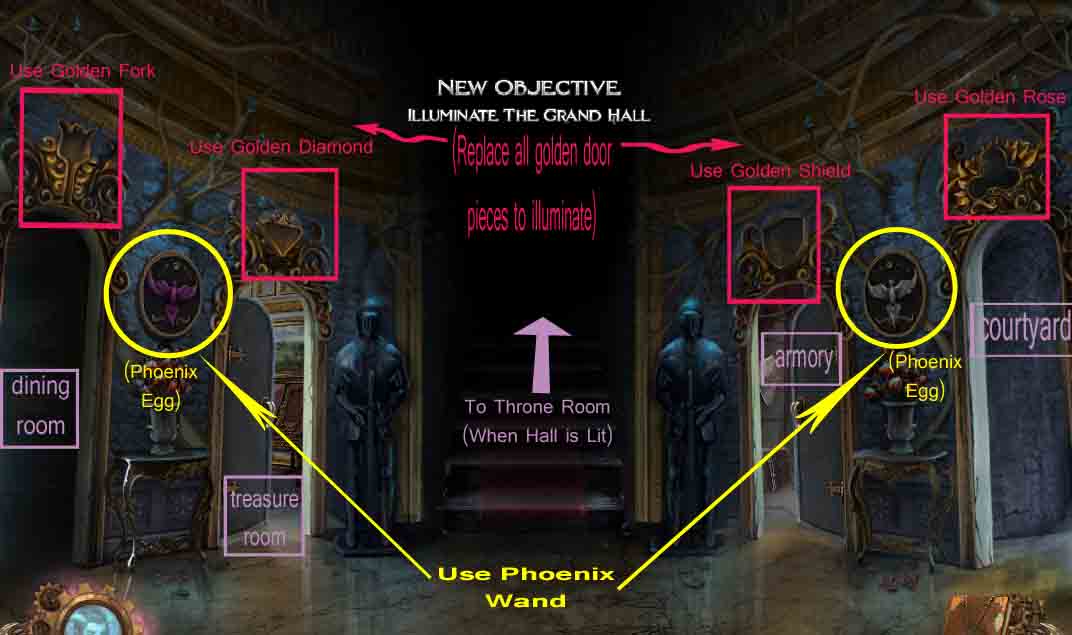
In the Grand Hall, use the Phoenix Wall on the two Phoenix Icons on the wall; remember to grab both PHOENIX EGGs (2/6) and (3/6)
Go to the Courtyard (last door on right from the grand hall).
In the Courtyard you'll find another Beast statue; he's blocking the way to the Undercroft, which you can't enter yet. For now, gather some more items here, including three more phoenix eggs.
Screenshot
Pick up the GARDENING SHEERS (on hedge, left of rose bush).
Use the Gardening Sheers to uncover a Mechanical Man in the rose bush; use the Lightening Pendant (found in the treasure room hidden-object scene) to open the Mechanical Man; take the GOLDEN SHIELD.
Pick up the ROSEPETALS from the ground (below Mechanical Man).
Use the Phoenix Wand on the three phoenix icons (by each window and in the flower bed). Take the last three PHOENIX EGGs (4/6), (5/6) and (6/6).
Now you have 6 Phoenix Eggs (the three found here, two from the hall, and one in the treasure room). Go back through the Grand Hall to the Treasure Room.
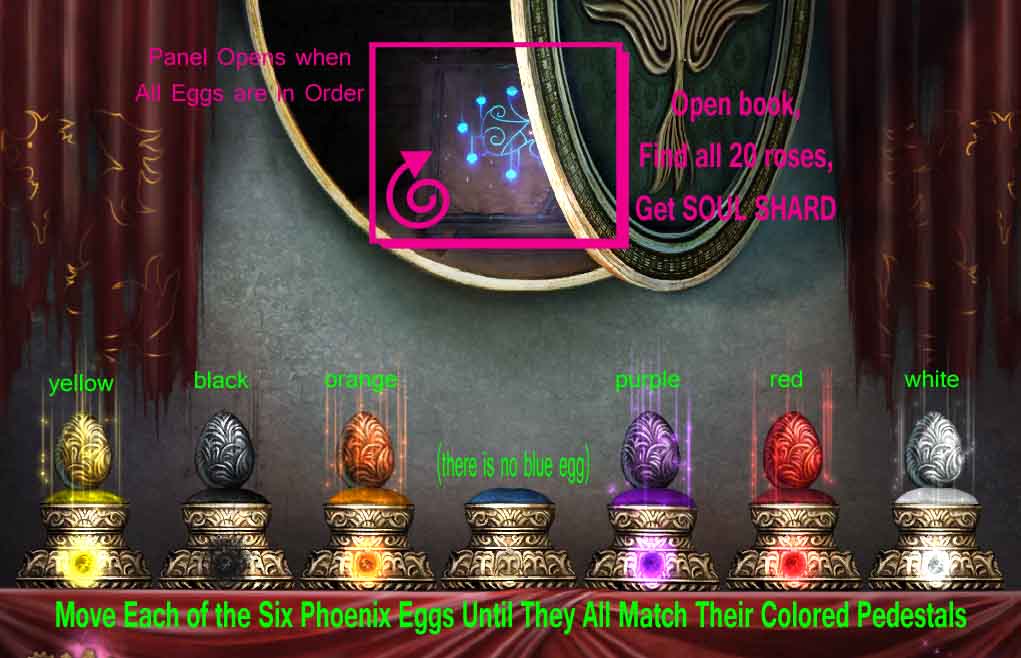
Back in the Treasure Room with 6 Phoenix eggs . . .
Zoom in on the red cloth-draped table to start a new puzzle:
Solve the puzzle by moving the eggs to their coordinating colored pedestals; eggs can only move one space over in either direction, although they can jump over one egg at a time.
There's several ways (it will take close to 30 moves or more) you can do this, but if you get stuck, back away and return to the table to try again then use this order:
Orange - left to blue stand.
Yellow - left over black to purple stand.
Black - right to white stand.
Orange - right over yellow to red stand.
Purple - right to blue stand.
Yellow - left over purple to orange stand.
Purple - right to purple stand.
Red - right over yellow to blue stand.
White - right to black stand.
Yellow - left over white to come to a final stop on its Yellow Pedestal.
White - right to orange stand.
Red - left over white to the black stand.
White - right to blue stand.
Purple - left over white to orange stand.
Orange - left to purple stand.
White - right over orange to red stand.
Orange - left to blue stand.
Black - left over white to purple stand.
White - right to come to a final stop on its White Pedestal.
Orange - right over black to the red stand.
Black - left to the blue stand.
Purple - right over black to the purple stand.
Red - right to the orange stand.
Black - left over red to a final stop on its Black Pedestal.
Red - right to the blue stand.
Purple - left over red to the orange stand.
Orange - left to the purple stand.
Red - right over orange to a final stop on its Red Pedestal.
Orange - left to blue stand.
Purple - right over orange to a final stop on its Purple Pedestal.
Orange - left to come to a final stop on its Orange Pedestal.
Screenshot
When all six eggs are matched to their pedestals, the panel above them will open to reveal another book: Geppetto. Click on it to begin.
Find all 20 hidden roses in Geppetto's story to receive a SOUL SHARD.
NOTE: This hidden object scene is the same for every game; all roses are circled in the screenshot here:
Screenshot
After you've found the 20 roses, take the SOUL SHARD.
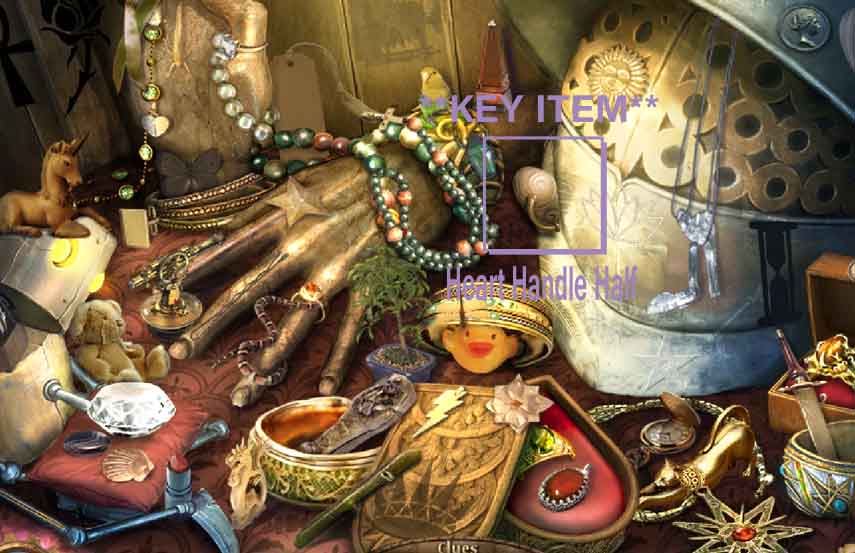
There's now a new hidden object search in the display case on the right. Find all thidden-object scenee objects for a HEART HANDLE HALF.
Screenshot
NOTE: Hidden object searches are random each game; your list will vary.
Now you should have a HEART HANDLE HALF after completing the search in the treasure case.
Leave the treasure room and go out to the courtyard to give Beast another Soul Shard.
From the Undercroft to Illuminating the Grand Hall
To enter the Undercroft, give Beast the Soul Shard (from Geppetto's story).
Inside the Undercroft, you'll notice a couple barrels, a note on the wall, a table of bottles, stairs to a mudroom, and a key rack.
Screenshot
Use the Mace on the Broken Barrel (the one on the right) one time to split it open; Take the GOLDEN ROSE.
Use the Mace on the Broken Barrel a second time to turn it into FIREWOOD; pick it up.
On the left corner of the table is a box of MATCHES; take them.
Click on the note on the wall to get a new journal clue about rosewater; place the ROSEPETALS in the "pristine brewing water." This makes rosewater, but you have nothing to carry it in for now.
Zoom in on the Key Rack on the left wall to begin another puzzle; the goal is to match each key to its partner. Keep in mind that some keys may be hanging backwards on the hooks. When you've paired off all the other keys, take the AVIARY KEY.
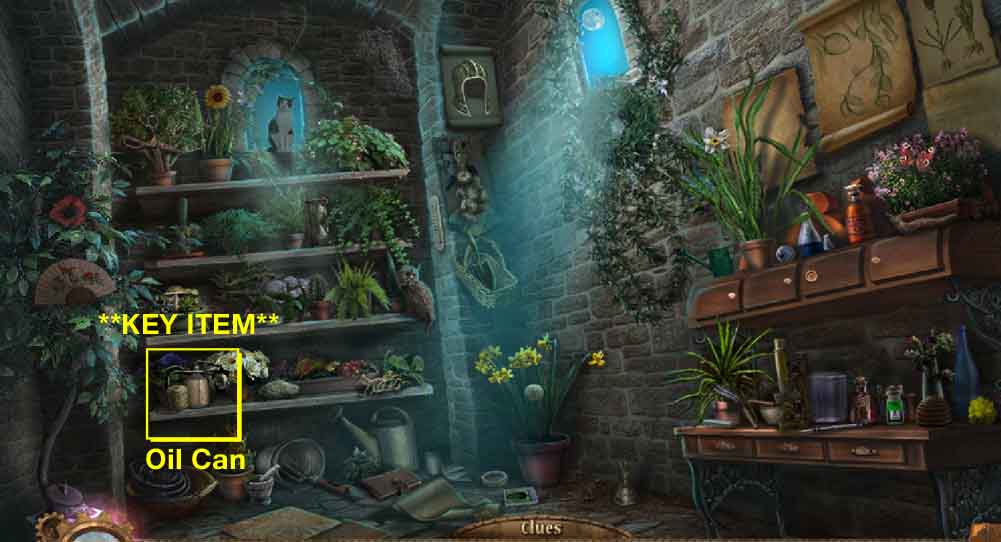
Now head up the backstairs (to a sort of mudroom) to start another hidden object search:
Screenshot
NOTE: Hidden object searches are random each game; your list will vary.
When you've found all the items in the mudroom, you'll receive an OILCAN.
Go back inside to the Dining Room (first door on left from the grand hall).
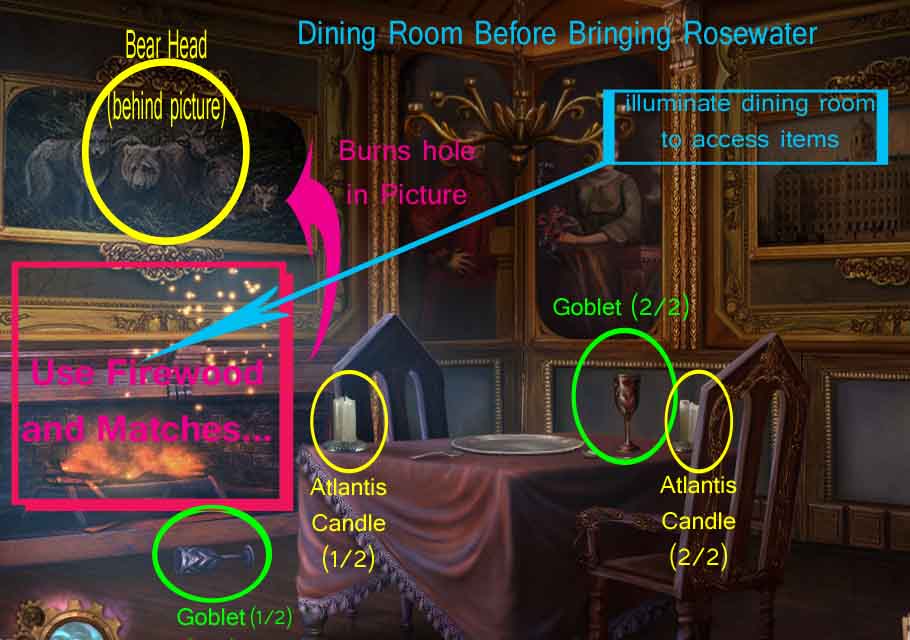
The Dining Room is too dark, so you need to light it before you can access more.
Screenshot
Put the Firewood in the hearth, then light it with the Matches.
A spark from the fire burns a hole in the picture, revealing a BEAR'S HEAD; Take it.
Pick up two (2) ATLANTIS CANDLES from the table.
There are also two (2) EMPTY GOBLETS; one on the table, one on the floor by the fire . . . pick up both.
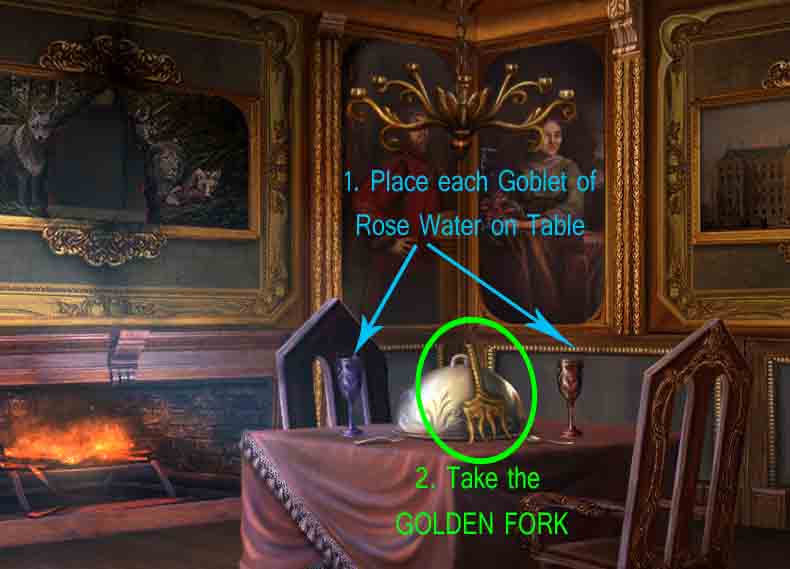
Go back to the undercroft and fill both Empty Goblets with rosewater (in the barrel), then come back here. Place each GOBLET OF ROSE WATER on the table... This causes the main course to appear in the center of the table:
Screenshot
Take the GOLDEN FORK from the dish and go back into the Grand Hall.
Now in the Grand Hall with all four golden door decors (scroll left and right through your inventory to view them), you're ready to illuminate this room.
Replace each of the Golden Decorations above the doors in the Grand Hall; from left to right: The Golden Fork, The Golden Diamond, The Golden Shield, and The Golden Rose.
This causes the chandelier to light up and illuminate the whole room; now you can access the stairs to the Throne Room.
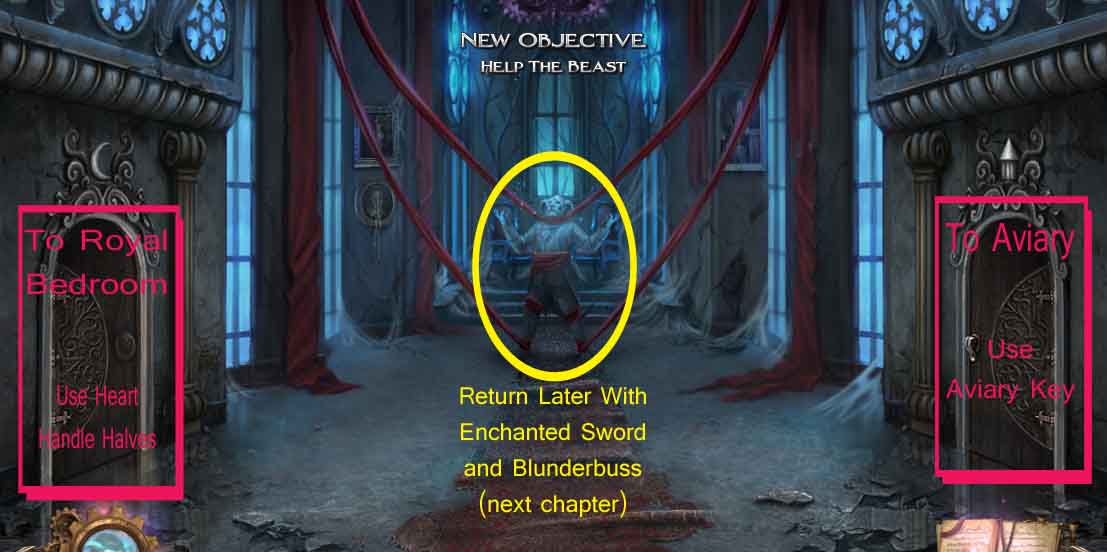
From Throne Room to Fixing the Zeppelin
When you first enter the Throne Room, you see Beast bound-up in long ribbons of red cloth. You'll need several tools to free him.
Screenshot
Use the Aviary Key (found in the undercroft key rack) to open the door on the right; go inside.
Screenshot
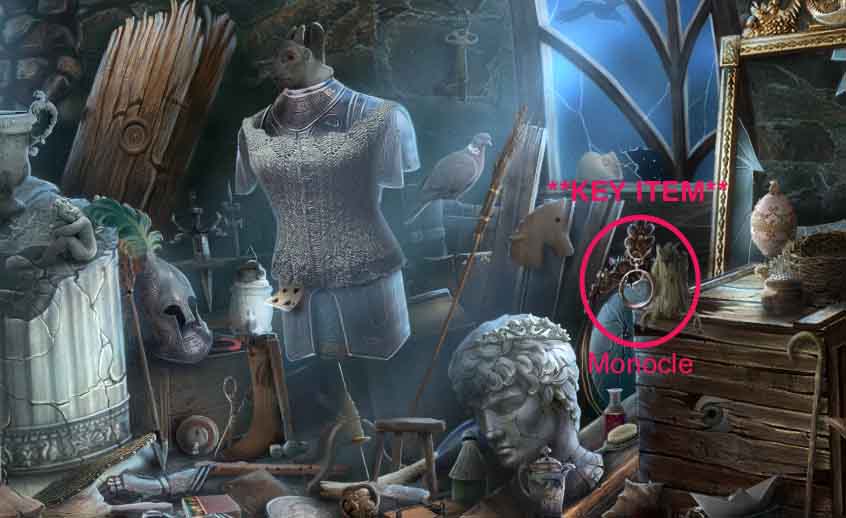
When you first enter the Aviary, click on the junk pile in the right corner to begin a hidden object search to find the MONOCLE:
Screenshot
When you've found all the hidden objects on your list, you receive the MONOCLE.
Next, click on the box of spools under the window to begin a puzzle. Match up all the spools to earn a SPOOL OF THREAD.
Put the Ship's Wheel on the Spinning Wheel, then click on the Spindler; he needs oil so use the Oil Can on him. Then, give him the Spool of Thread. Click the handle a few times to turn the wheel and the spindler will knit a RED SCARF. Take it.
Give the Scarf and the Monocole to the owl, Mr. Beak. He'll fly away home and leave behind a HEART HANDLE HALF. Take it.
Finally, take back the SHIP'S WHEEL from the Spindler and pick up the FEATHER DUSTER under the left window.
Go back out to the Throne Room.
To open the door on the left, use both Heart Handle Halves (one from the mechanical man in the courtyard, one from the owl in the aviary). Go inside the Royal Bedroom.
Screenshot
In the Royal Bedroom, use the Feather Duster two times on the mirror; then place each Atlantis Candle in the holders on either side. Beast will appear and hand you the ROYAL CHEST KEY. Take it.
Open the royal chest to find the MECHANICAL HEART. You remember that the mechanical man was missing his, so head back out to the courtyard.
Out in the Courtyard, focus on the mechanical man entwined in the rose bush.
Place the Mechanical Heart inside the mechanical man's back. This causes him to come to life and cut his way free.
A Reliquary is revealed there under the rose bush; examine it more closely to find out you need 4 venoms. At the base of the Reliquary is a ZEPPELIN REPAIR KIT. Pick it up.
Go back out to the front of Beast's Castle.
The mechanical man, Barnesworth, is waiting outside the Castle for you.
Hand the Zeppelin Repair Kit to Barnesworth; soon the ship is ready to go.
Replace the Ship's Wheel and climb in; You're now on your way back to the Cottage, on a mission for venoms.
Return Trip: Gathering 4 Vials of Venom and 4 Helms
You return to find the Cottage is now overrun with an evil purple curse.
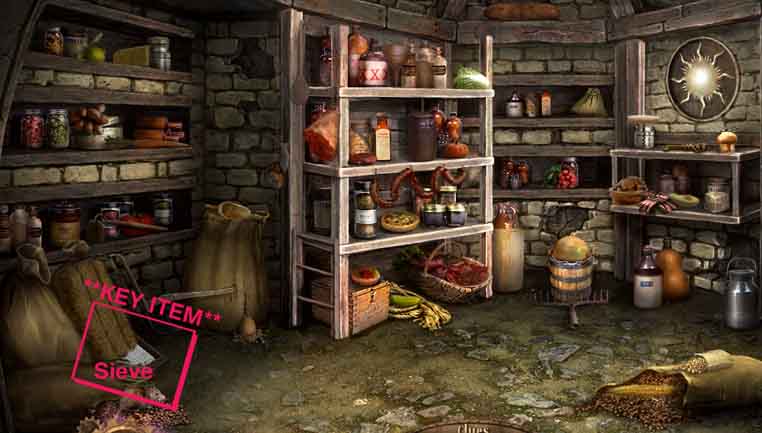
Click on the hole to the root cellar to begin another Hidden Object search:
Screenshot
When you've found all the hidden objects on your list, you'll be awarded the SIEVE.
Take the sieve over to Owl Creek and use it in the river to get the GEM.
Click on Mr. Beak, the owl, to see inside his house; take the TEACUP that's on a shelf behind him, right under the window.
Screenshot
Now go back through the cottage to the Cottage Garden. In the garden, give the crown to the frog to get another GEM.
With the two gems, zoom in on the owl-shaped fountain at the back of the cottage garden. Replace the two gems in the owl eyes and use the Teacup to get MOON TEA.
Take the Moon Tea back to Mr. Beak in Owl Creek. Give it to him and he gives you the MAILBOX KEY (take it from inside his vest).
Unlock the mailbox and see a book on poisonous creatures; open the book for four (4) EMPTY VIALS. Take them.
Go through the cottage, through the garden, past the hayfield and to the forest path.
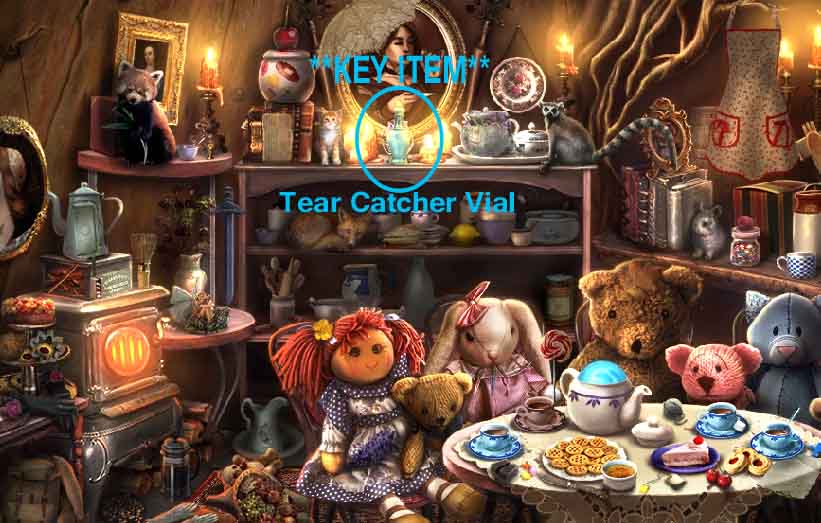
At the forest path, click on the fox's den (inside the tree hollow) to start another hidden object search.
Screenshot
Find all the hidden objects on your list to get the TEAR CATCHER VIAL.
Go to the Weeping Willow Tree and use the Tear Catcher Vial to collect TEARS OF DROWSINESS.
Continue down the path to the Blacksmith's. In the pond by the Blacksmith's house is a poisonous frog.
Use the Tears of Drowsiness on the frog to make it sleep; Then, use an Empty Vial to get VIAL OF FROG VENOM.
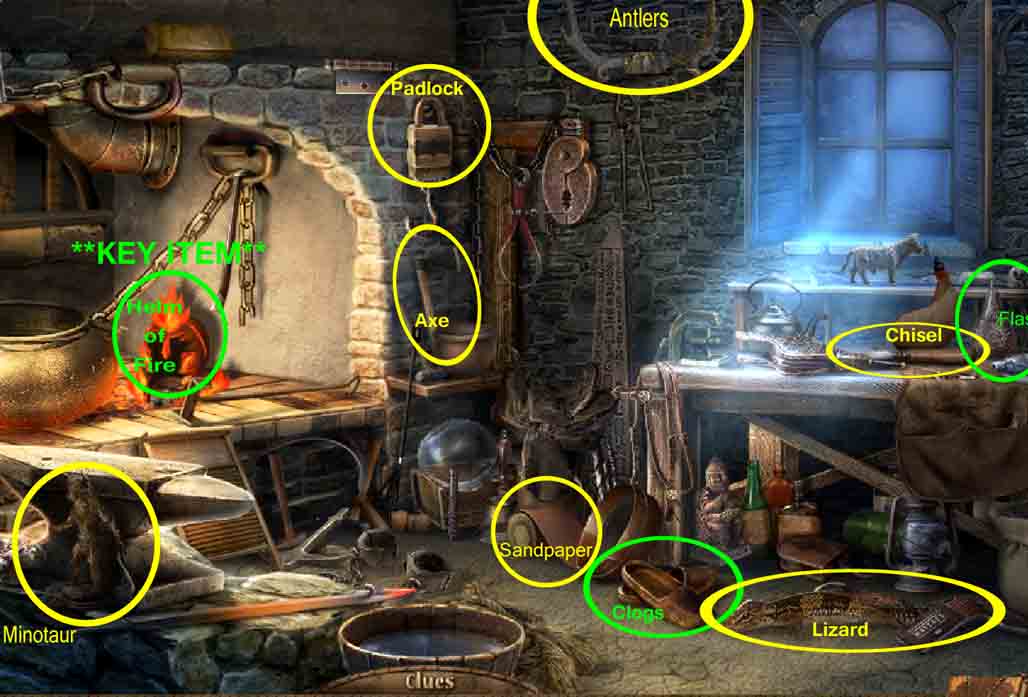
Click on the Blacksmith's door to start another hidden object search:
Screenshot
Find all the hidden objects and you'll come away with the HELM OF FIRE.
Head up the road, through the town square to the Tavern.
Go inside the Tavern and you'll notice a familiar picture...
Replace the Bear Head on the wall; this will begin a new puzzle. Move the heads to match the picture in your journal.
(from left to right) wolf, bear, moose, lion, fox.
Correctly arranging the heads will open the catch below them. Take the BLUNDERBUSS.
Go outside and up the road to Shop Street. Click on the vendor cart to begin a new hidden object search.
Screenshot
Find all the objects to get a SERPENT FLUTE.
Go back up to the Ice Cavern.
Click on the basket by the armored skeleton. Use the Serpent Flute to charm the snake, then use another Empty Vial to collect a VIAL OF SNAKE VENOM.
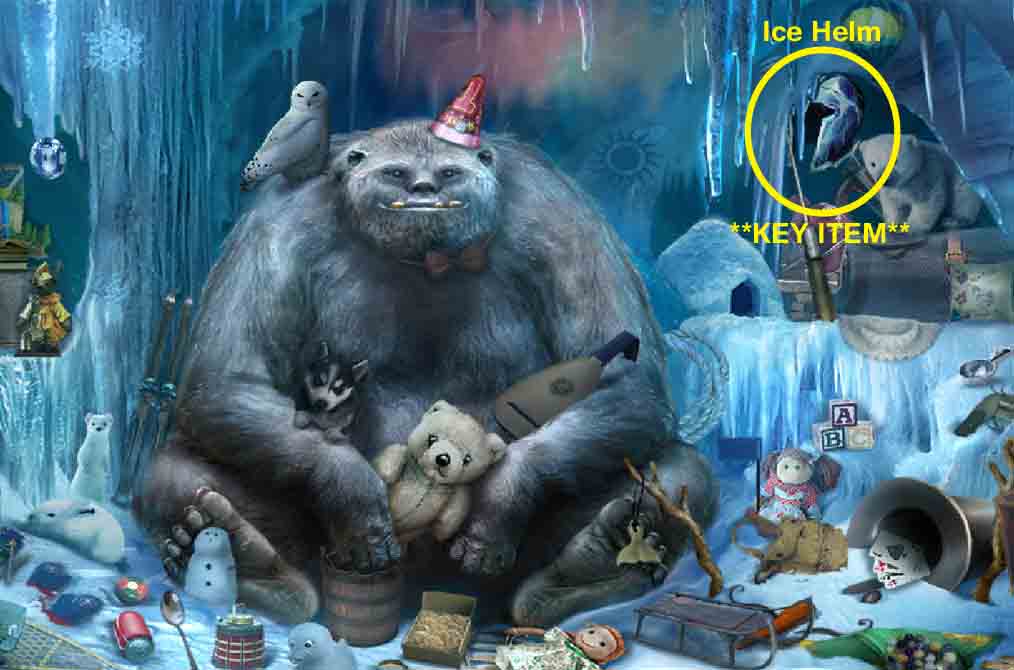
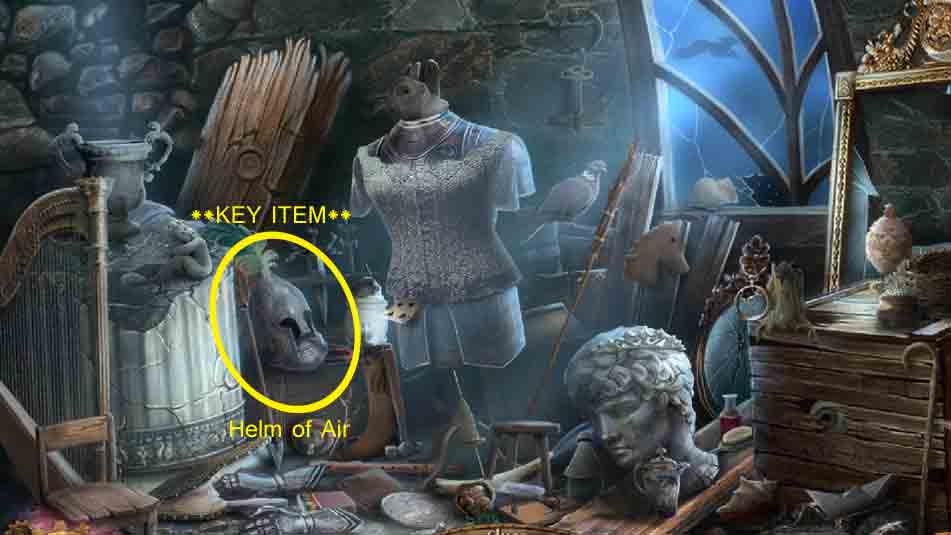
Next, click on the yeti cave in the back right corner for another hidden object search:
Screenshot
Find all the objects on your list to get the HELM OF FROST.
Climb the rope up to Storm Peak and take the zeppelin back to Beast's Castle.
Final Chapter: Freeing the Prince
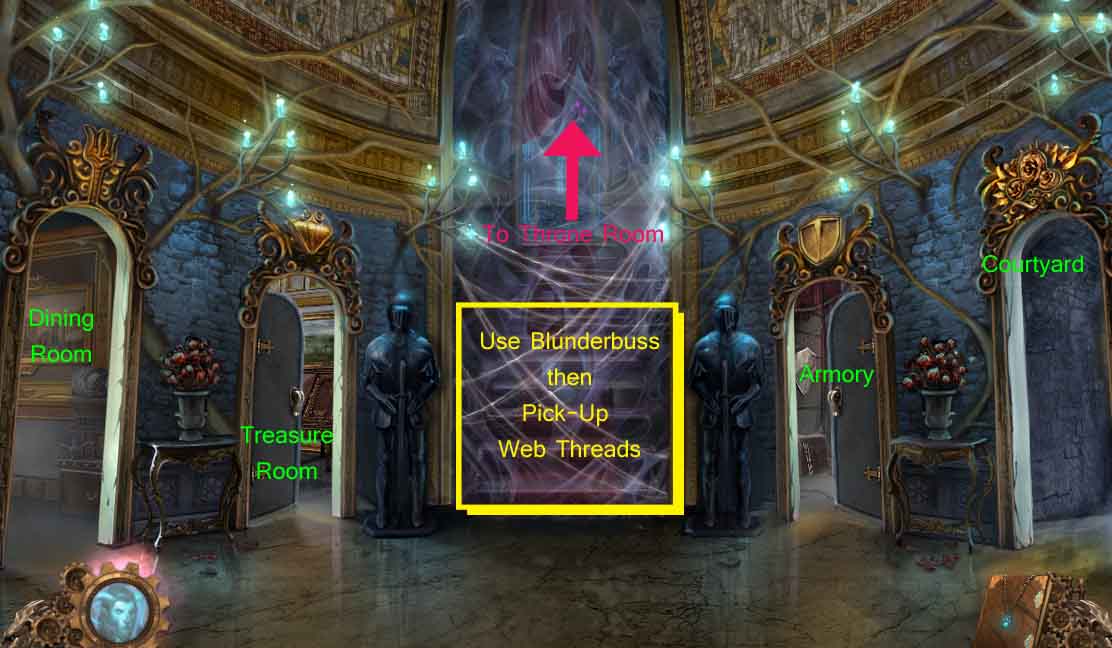
When you re-enter the Grand Hall, you see it's overrun with spiders. Now the final showdown is near, but you need to gather up a few more items in preparation.
Screenshot
Use the Blunderbuss to shoot the web that's blocking the staircase. Then, pick-up the WEB THREADS.
Go upstairs and into the Aviary. Give the Web Threads to the Spindler (he doesn't need a wheel). This time get THREAD OF BINDING.
Click on the junkpile in the corner for another hidden object search:
Screenshot
After finding all the objects on your list, you'll have the HELM OF WIND.
Go back to the Dining Room.
Under the lid of the serving platter is a Scorpion. Tie up the Scorpion with the Thread of Binding (from the spindler weaving the web threads).
Use an empty vial to collect VIAL OF SCORPION VENOM from the tied-up scorpion.
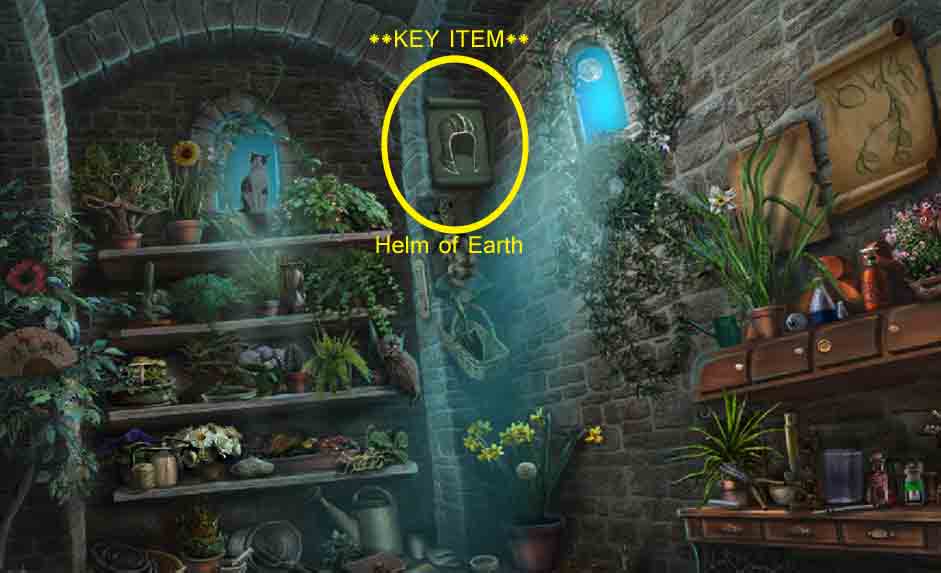
Go back through the courtyard to the undercroft. In the undercroft, click on the stairwell in the back to start another hidden object search:
Screenshot
When you find all the objects on your list, you'll have the HELM OF EARTH.
Go inside to the Armory. Go through the back room to find another hidden object search:
Screenshot
Find every item on your list, come away with the GAUNTLET OF STRENGTH.
Go back to the Armory.
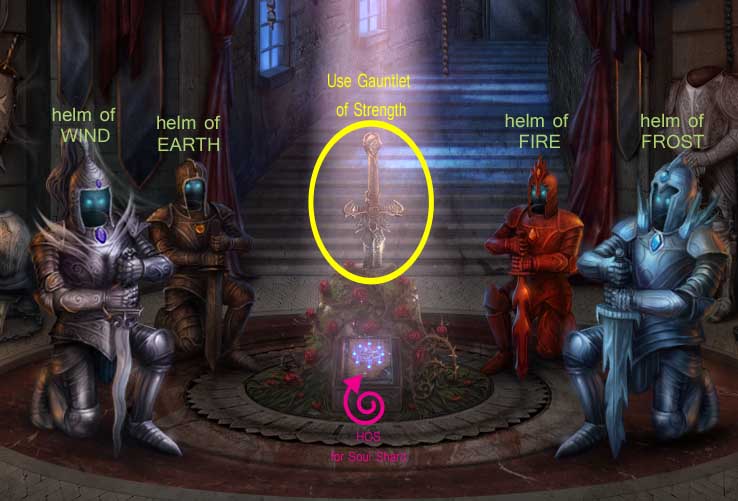
In the Armory — By this point you should have 4 Helms (helm of fire, helm of frost, helm of wind, and helm of earth) plus a Gauntlet of Strength.
Screenshot
Replace each of the missing helms on kneeling armored knights. From left to right: Wind, Earth, Fire, Frost.
When all knights have their helms, a sword embedded in stone will rise up. Use your Gauntlet of Strength to pull out the ENCHANTED SWORD.
Next, click on the book at the base of the stone to begin another hidden object search: Beauty and the Beast.
Screenshot
After you find all 20 stones, you'll earn the last SOUL SHARD.
Go back to the Throne Room.
In the Throne Room, approach Beast. Spiders are swarming all around him.
Use the Blunderbuss to shoot the spiders. Try to line up more than one spider in your shot, as you have to kill all the spiders in each round but only have three shots before you have to reload.
When you have finally eliminated the spiders, approach Beast again. Using the Enchanted Sword, cut away the ribbon binding his neck. Doing this will start the final battle:
Apparently the Mother of all Spiders, a giant monster, is none too happy that you're there. She'll attack you and will also send more spiders (her "childern") after you.
Use the Enchanted Sword to slash at the monster spider and cut down her spider childern. In between waves of spiders and when the monster is resting, slash the ribbons that still bind Beast. Continue until Beast is free and the monster is dead.
Zoom in on the dead monster spider, and use the final empty vial to collect a VIAL OF SPIDER VENOM.
Give the Soul Shard to Beast; he'll give you one last task.
Go out to the Courtyard.
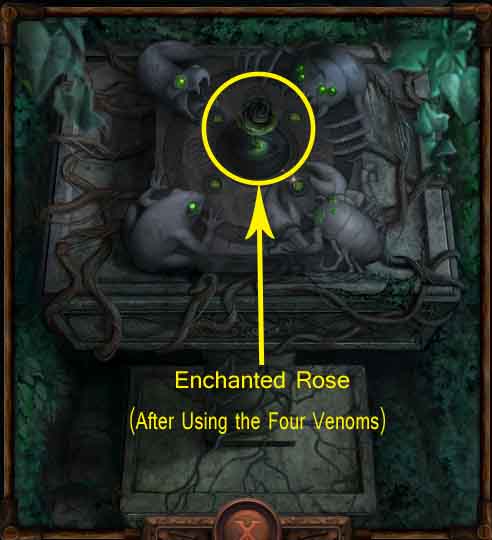
In the Courtyard, approach the Reliquary (the pedastal in the rose bush).
Give the Vials of Venom, one by one, to each of the creatures represented on the reliquary.
Screenshot
When the eyes of all four venomous creatures are lit, a rose will appear in the center of the reliquary. Pick up the ENCHANTED ROSE and bring it back to beast.
Enjoy the ending!
That concludes the Standard Edition of Mystery Legends: Beauty and the Beast. There is more content and additional chapters in the Collection's Edition, available from Big Fish Games.
Posted by: elle |
October 2, 2011 11:57 AM
|
October 2, 2011 11:57 AM