
Nancy Drew Dossier:
Lights, Camera, Curses!
Platform: Windows
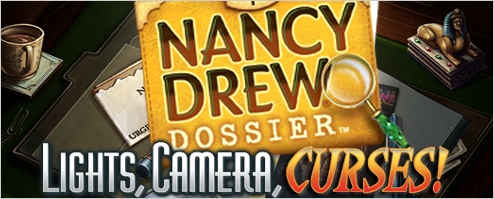
![]() With the increase of popularity of hidden object games, it seems there has been an almost equal rise in hybridization of the genre in an attempt to keep things nice and fresh, and Nancy Drew Dossier: Lights, Camera, Curses! is no exception. True, much of the gameplay involves hunting around different settings for specific objects, but from the very beginning you'll realize that this isn't your run-of-the-mill object finder.
With the increase of popularity of hidden object games, it seems there has been an almost equal rise in hybridization of the genre in an attempt to keep things nice and fresh, and Nancy Drew Dossier: Lights, Camera, Curses! is no exception. True, much of the gameplay involves hunting around different settings for specific objects, but from the very beginning you'll realize that this isn't your run-of-the-mill object finder.
Tinsel Town, home of the stars, birthplace of movie magic. Starry-eyed yokels make pilgrimages there in the hopes of becoming the next big thing, while the paparazzi lurks around every corner with the hopes of turning the current big things into washed up has-beens. Glamour, glitz, and gold reign supreme in the world of ditzy divas and domineering directors and who on earth would turn down an invitation to be a part of that? Especially if that invitation were a personal invitation to the sound stage of the much talked about upcoming blockbuster, "Pharaoh."
 Okay, so maybe your invitation comes as the result of a series of mysterious accidents. Maybe those accidents are thought to be caused by the same curse that led to the death of the leading actress in the original 1930's production. Maybe we would rather just stay home. Luckily for us casual gaming enthusiasts, the young amateur sleuth, Nancy Drew, is not one to be daunted by such perils.
As the ingénue teen detective, you are called up by a frantic producer eager to have your help in getting to the bottom of a string of unexplainable accidents that threaten not only the future of the film, but also the health and well-being of the crew. As your investigation proceeds, you'll come to look upon everyone as a suspect in a twisting plot involving a priceless reel of film, and an even more priceless gem.
Instead of a daunting list of items to find, in Nancy Drew Dossier: Lights, Camera, Curses! you will be presented with a single challenge for every scene, and it's up to you to find the items you'll need to meet that challenge, and what you have to do once you have found them. Mix that with some rather clever mini games such as mixing smoothies, picking locks, and blowing up rocks, and what you have is a game that feels less like a hidden object game, and more like a true to form adventure game that has been streamlined for the casual gaming set.
Analysis: While I was intrigued by the title of this game from the beginning, I also was a little apprehensive. For starters, I tend to be about two decades and a gender away from the Nancy Drew target audience, and I was really skeptical of the hidden object mechanics that deviate so far from the norm.
 Happily, my worries were proven baseless almost from the beginning. For one, the hidden object aspect of the game is brilliantly executed and does a very good job of integrating the game play with the story. How many times have you played a hidden object game and thought to yourself, 'Is finding a hotdog really vital to my ulterior motives at this point?' No, in Nancy Drew, every single object you find is an integral part of the story.
Speaking of story, I couldn't help but fall in love with not just the story, but how it was told. Through a combination of stylized cartoon/comic-book cut scenes, discovered articles, and live voice acting, the convoluted web of mystery and deception is told in a way that is both intriguing and sometimes funny. Eda's voice drips with Hollywood diva-ism, while I felt that the director's Australian accent was a nice touch (Disclaimer: Not being from Australia, I fully recognize that the accent may be completely off). Combine this with beautifully drawn settings and it is clear that a lot of effort was put into making this Nancy Drew adventure a gift to both the eyes and the ears (and one that the designers intended for you to enjoy whether you wanted to or not; you are frequently quizzed on what has happened up to that point).
That's not to say that this game doesn't come without it's faults. Most notably missing is the all-important hint feature that no hidden object game should be without, especially one in which you aren't given a list of things to find in the first place. Usually what you have to find is pretty obvious, but occasionally you can find yourself a little too close to pixel hunting for comfort.
Also, the mini-games could probably use a little tweaking; the first time or two you play one of the mini games they are a little too easy, and then all of a sudden they become hard enough to invoke the worst profanities out of even the most patient of gamers.
But these minor complaints aside, Nancy Drew is just gaggles of fun bundled up with a nice story that should be entertaining for kids and adults alike. Promise of a special ending for getting the highest detective rank is a nice incentive to play the game again, but is hardly necessary given how fun it is all on its own.
![]() Windows:
Windows:
Get the full version
![]() Mac OS X:
Mac OS X:
Not available.
Try Boot Camp or Parallels or CrossOver Games.


Walkthrough Guide
(Please allow page to fully load for spoiler tags to be functional.)
Nancy Drew Dossier: Lights, Camera, Curses Walkthrough
General Information
There are 25 chapters in this game, each with at least one (or more) areas to check out.
There are 2 possible endings to the game, dependent upon which detective rank you achieve.
The top achievement, Ultimate Private Eye, is possible only by running a near perfect game, achieving lots of bonuses and making very few mistakes.
Move your cursor around and watch for sparkles. Sparkles indicate an area to examine or that can be used.
The best strategy is to go over the entire area and identify all usable places first before starting to combine objects.
In the lower right of your screen you will see your goals for the area and the number of hidden items you need to find.
Click on an item once and it is in a large circle with a description. Click on the item a second time and it goes back to normal, but will still have a small circle around it marking its spot.
You start out with a tool bar that has an eye (for looking at things and reading notes), a flashlight (for illuminating dark corners), and a hand (for taking things). Later you will add other things like lock picks, etc.
To use the tools just click on an item in the scene until it is in a large circle then click on the tool. The tool bar will turn blue indicating that you can use a tool on an item.
In this walkthrough the instructions to "look at", "examine", or "read" something refer to using the eye tool. "Pick up", "turn on", "move", etc. refer to using the hand tool.
Also next to the toolbar is your detective notebook. Refer to the book to go over old clues, to see what your detective ranking is, to see what chapter you are on, to hear audio clues, etc.
Remember what goes on in the scenes. When you have a conversation at the end you will need to remember details.
You get the most points for answering each question in the conversation correctly the first time. The score for each answer goes down with each incorrect answer.
You also get bonus points for completing matches in a row without making mistakes, which is why it is best to identify everything in the scene first before performing any actions.
The mini-games are timed, but in most of the regular scenes you can take as much time as you need. Towards the end of the game, however, there are a few exceptions and you will run across some timed scenes. Work quickly.
Points add to your detective ranking. If you can complete the top ranking there is a special bonus ending to the game.
At the end of certain chapters a bonus mini-game will appear. This is a timed match game. Match as quickly as you can to gain more bonus points.
The mini-games are random, so there will be no precise guide. The best I can do is advice on how to play.
It is best not to play on mute, as there are certain audio cues that you should not miss.
Some areas to be manipulated will only show up after other things have been done, so once you've completed some tasks sweep the area again.
Watch the sketches during the closing credits, there are some fun and cute ones, like Nancy driving to LA with her feet. :-)
If you let the credits run to the end you get a sneak preview of the next Nancy Drew game.
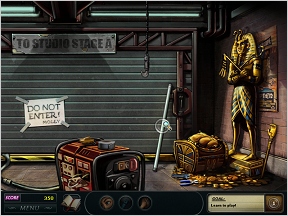
Chapter 1: Welcome to Hollywood
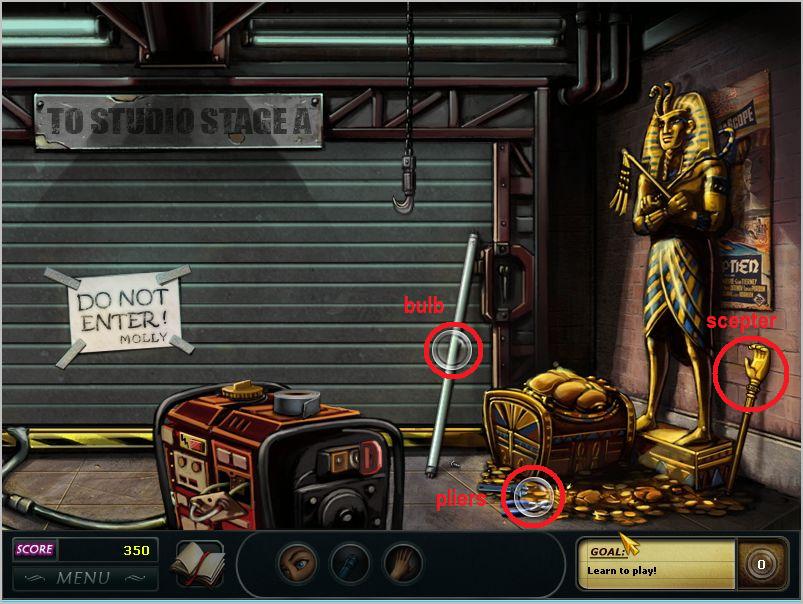
Tutorial/Sound Stage
Screenshot
The tutorial will walk you through fixing the sign and examining the fluorescent bulb.
Use the pliers on the bulb to straighten the bent end.
Use the scepter to replace the bulb.
Done!
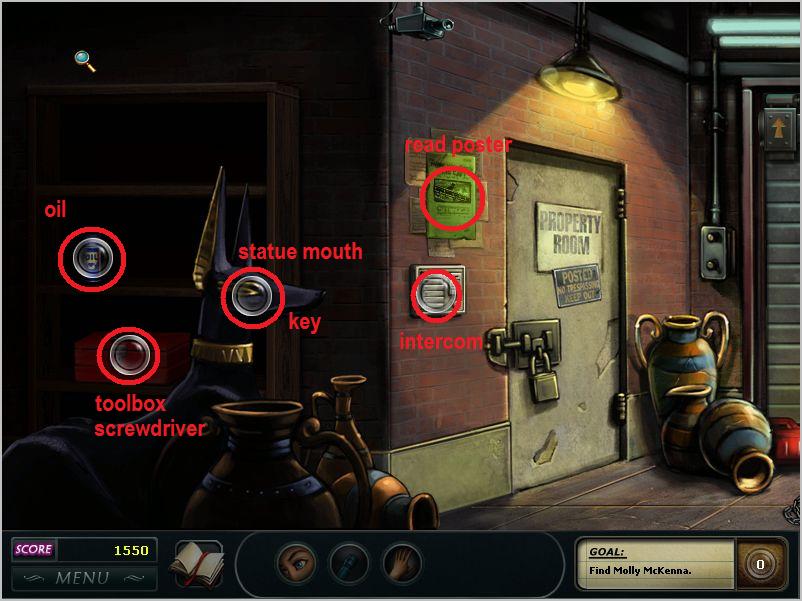
Intercom
Screenshot.
Read the poster.
Use the oil on the statue mouth to get the key.
Use the key on the toolbox to get the screwdriver.
Use the screwdriver on the intercom to fix the button.
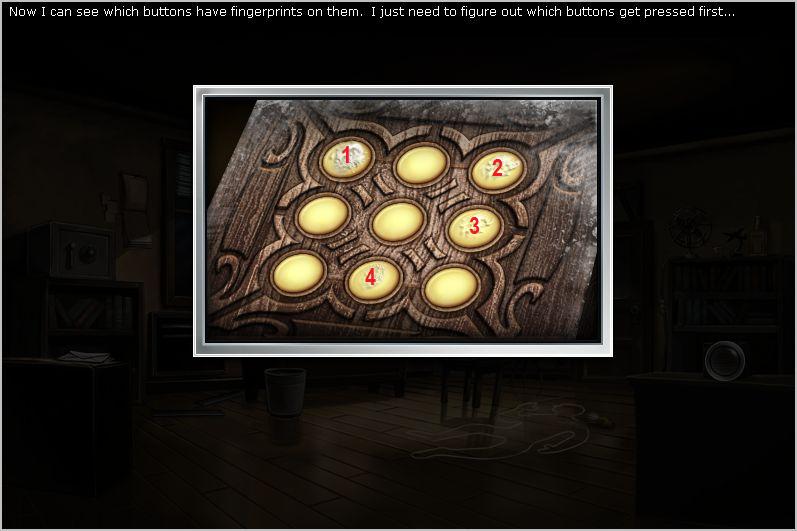
Look at the intercom (it will become full-screen).
Push the "Stage A" Button then push the "Talk" button.
Done.
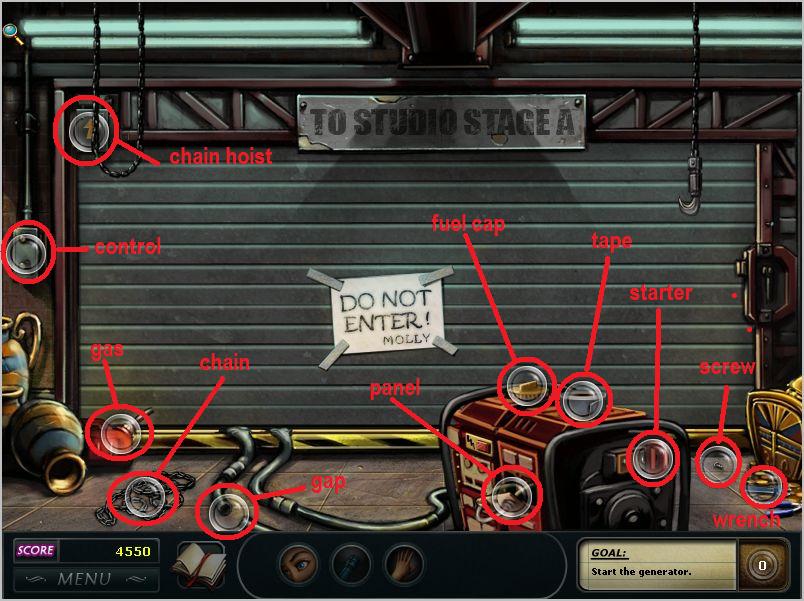
Generator
Screenshot.
Combine the screw and the panel to fix the panel.
Use the tape on the gap to fix the gap.
Use the wrench on the gas cap to open.
Use the gas on the gas cap to fill the motor.
Put the chain on the chain hoist to fix.
Click on the control and click on the hand icon to open the door.
Click on the starter and click on the hand icon to start the generator.
Molly arrives.
Molly Conversation
Here are the conversation answers:
"I fixed the..." - "generator".
"Because of the..." - "creepy accidents".
"It was a um..." - "wanted poster of a black cat".
Chapter 2: Cat Noir
Find the Ankh
Screenshot.
Put the packing peanuts in the trash, this exposes a note.
Read the note, this exposes a battery.
Connect the battery to the flashlight tool icon.
Pick up the bobby pin. You now have a lock pick in your toolbar.
Click on the door lock then click on the bobby pin tool to unlock the door.
Mini-game: Lock pick mode.
The game is to reproduce a pattern given to you by dropping objects into the playing field. The first go-round is very simple as you are only working with one color.
Reproduce three patterns to unlock the door and return to the game.
The door is now open and there is a crate in the doorway.
Look in the dark area next to the trash can again to find the screwdriver.
Use the screwdriver to remove the grate and find an audio clue.
Go to the detective notebook to listen to the audio clue (there is an audio icon next to chapter 2 in the notes section).
Click on the crate in the doorway and use the hand icon to open.
You've found the Ankh! Watch out for that darn cat.
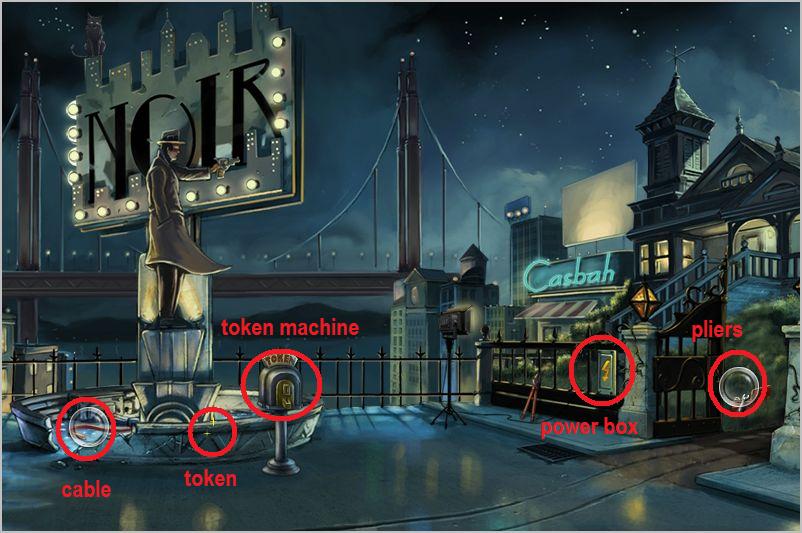
Catch the Cat (Noir Statue)
Screenshot.
Use the hedge clippers on the brambles on the gate and beside the gate.
You can now see tools behind the locked gate and a power box to the left of the gate.
Use the bobby pin icon on the gate to open.
Lock pick mini-game again. This time there are two colors. Make sure to drop unneeded colors to one side or the other. Do not pile the pieces too high, it can end the game before you are finished and you will have to start over.
The open gate reveals the toolbox and pliers.
There is a spot on the fountain below the statue that highlights. Click on this area then click on the eye icon to see the token.
Use the token on the machine. Yikes! Electrocution danger!
Screenshot2.
Now highlight the power box to the left of the gate and use the hand icon on it to shut down the power.
Use the pliers on the cable.
Turn the power back on.
Put a token in the machine.
Cool! A shooting statue!
A red arrow will appear on the left, click on it.
You are back in front of the pawn shop. The cat is in an upper left window.
Click on the cat and click on the eye icon.
Done!
Chapter 3: Here kitty, kitty, kitty!
Office 1
Screenshot.
Look at the vent. The cat will escape and you will see a key that you can't reach.
Use the duct tape on the broken cord.
Turn on the fan.
Use the fan on the note on the ceiling.
When the note falls down read it. Once you do you can find the book underneath the safe.
Put the trash in the trash can.
Look into the trash can to find the gum.
Put the gum into the coffee to soften it (ewww).
Put the gum on the pencil.
Use the gummy pencil to get the key from the vent.
Use the key on the file cabinet.
Look into the file cabinet to see the metal object.
Use the metal object on the book beneath the safe.
Use the key from the book on the desk.
Look into the desk to read the note.
The phone will ring. Use the hand tool on the phone to answer it.
Bonus match round! Make as many matches as quickly as possible for bonus points.
Molly Conversation
Conversation time!
Answers:
"I got a strange call from..." - "a man with a deep voice".
"and he said..." - "get back to the sound stage".
"That explains the..." - "old detective statue".
"I tried putting a coin in the old detective statue, and the first thing that happened was..." - "the detective's eyes glowed".
"But then, something went wrong, because..." - "a puddle of water became electrified!"
"So, regarding the latest accident, I'd really like to check out that collapsed..." - "scaffolding."
Chapter 4: Action!
Dolly
Screenshot.
Click on the dolly and read the note.
Read the shooting schedule.
To move the dolly click on it and then click the circles in the order of the screenshot. 1 - initiate. 2 - raise half-way. 3 - raise all the way. 4 - move dolly.
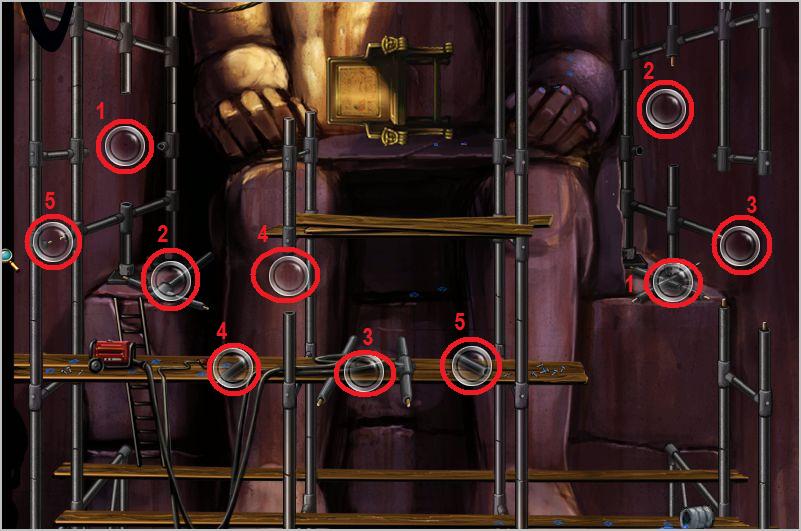
Scaffolding Part 1
Screenshot.
There are 5 breaks in the scaffolding and 5 pieces to place. Check the screenshot, each piece and where it is to be placed has the same number. 1 to 1, 2 to 2, etc. until repaired.
Scaffolding Part 2
Screenshot.
There are 5 breaks in the scaffolding and 5 pieces to place. Check the screenshot, each piece and where it is to be placed has the same number. 1 to 1, 2 to 2, etc. until repaired.
Scaffolding Part 3
Screenshot.
There are 5 breaks in the scaffolding and 5 pieces to place. Check the screenshot, each piece and where it is to be placed has the same number. 1 to 1, 2 to 2, etc. until repaired.
The cat will appear and run down the scaffolding to the level below.
Scaffolding Part 4
Screenshot.
The cat is just to the right of the overturned chair/throne. Try to catch the cat using the hand tool. It will run away.
Click on the chair and move it. This will reveal a note and a bolt.
Read the note.
Look closely at the bolt.
Just at the foot of the left chair leg is a little bead. Look at it.
Sabotage!
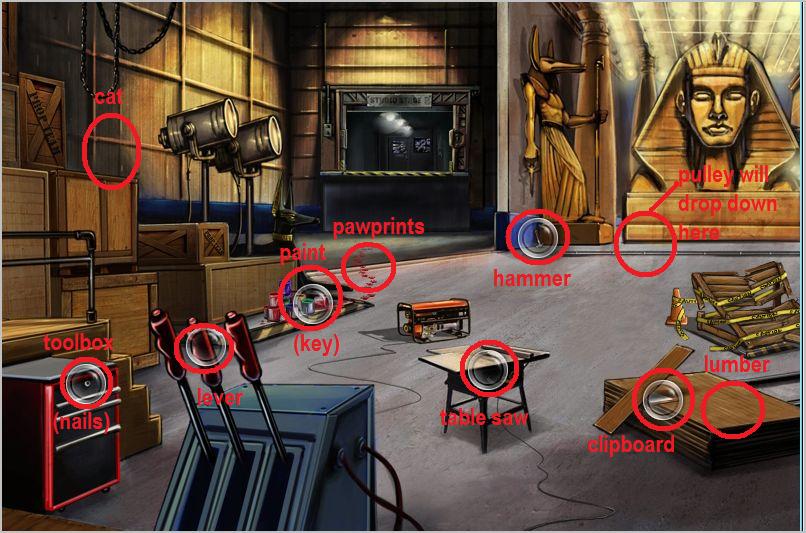
Chapter 5: Under Construction
Pharaoh Set
Screenshot.
The cat will be sitting on some crates to the left. Try to pick up the cat, it will run away.
Look at the clipboard on the pile of lumber (on the right).
Pull the middle lever, a pulley will drop down.
Combine the paint with the paw prints, then look in the paint can. You will get a paint-covered key.
Combine the key with the toolbox. Look in the toolbox to get nails.
Put the lumber on the table saw. Operate the table saw (with the hand tool).
Combine the hammer and nails.
Combine the hammer/nail combo with the wood on the table saw. Congratulations, you've made a ramp!
Combine the ramp with the pulley.
Pull the middle lever to move the ramp.
Wait for ramp to be placed.
Bonus Round!
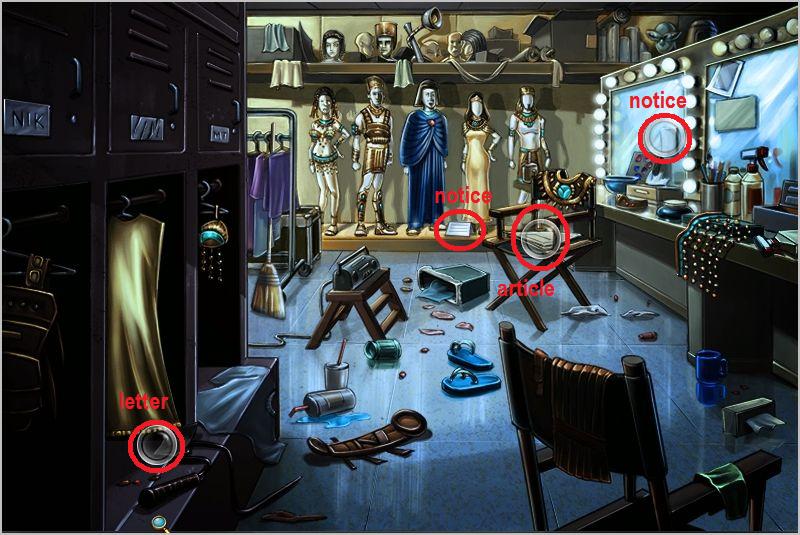
Chapter 6: Dressing the Part
Wardrobe Room
Screenshot.
Find and read the letter in the locker.
Find and read the article on the chair.
Find and read the notice on the mirror.
Find and read the notice on the floor below one of the costumes.
Time to clean up!
Screenshot.
In the screenshot each locker is labeled with a letter, A, B, and C. Items that go in that locker will be similarly labeled. Pick up all the costume items that are reachable and place them in the proper locker.
Use the whip to get the left first two heads that are on the upper shelf and place them in the appropriate locker.
Use the whip to get down the head on the right. Place the tiara with the head then place the head/tiara combo in locker B.
Click on the broom and use the hand tool to clean the room.
A bead will roll out of the middle (B) locker. Examine it closely. A screwdriver will also appear underneath the make-up table.
Click on the nameplate on the middle (B) locker and match it to the screwdriver.
Conversation time!
Conversation with Eda
Answers:
"I saw Tatiana's note..." - "and she was really scared of the accidents."
"By any chance is your costume..." - "missing a bead?"
"Do you get upset when you read those tabloid articles by..." - "Lydia Lynn?"
"How did the nameplate on your locker..." - "get all scratched up?"
"Were you on the set..." - "when the scaffolding collapsed?"
Time for a drink!
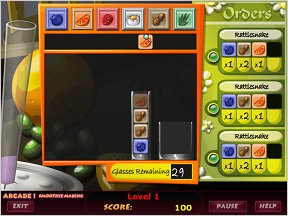
Chapter 7: Smooth Moves
Club Casbah
Mini-game time. The mini-game itself is random. The task is to make smoothies until the meter on the left has filled up.
Drop ingredients into the glasses as they move down the conveyor. The recipes will be on the right.
You need to fill up the meter before you run out of glasses. Mix as fast as you can and be sure to listen for gossip at the same time.
When you've finished the mini-game you'll be in another conversation.
Conversation with Jorge Jackson
Answers:
"I hear Arthur Hitches is..." - "really making you angry these days."
"I hear Eda..." - "can be hard to work with."
"Why do you think this production of 'Pharaoh' is..." - "having so many accidents?"
"So you don't believe..." - "in any 'curse'?"
Time to go snooping!
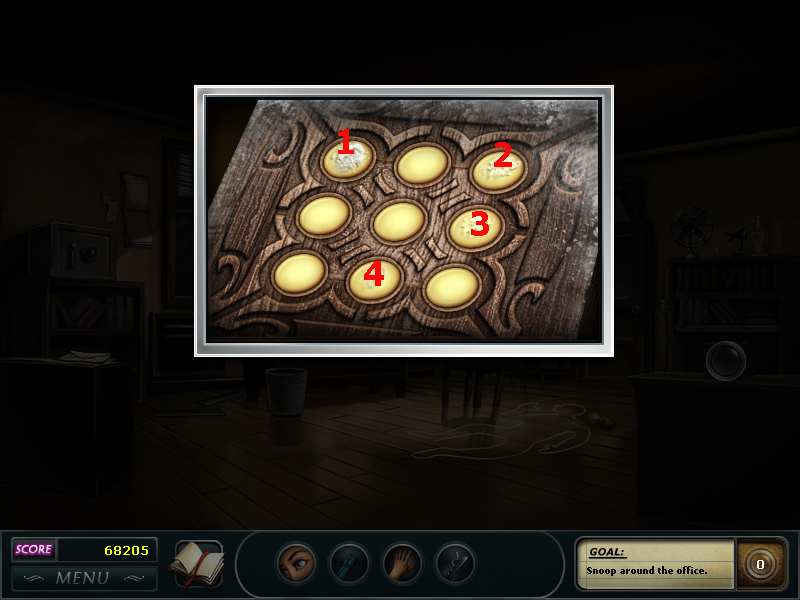
Chapter 8: Get a Clue
Arthur's Office
Screenshot.
Examine hatband to get key.
Use key on file cabinet.
Examine open drawer.
Use hand tool to open valise to expose a shaving brush.
Examine the code box on the right.
Use the shaving brush on the chalk outline.
Use the shaving brush on the code box.
Screenshot.
Push the buttons in the order shown in the screenshot (most powder to least powder).
Examine the code box and read the note.
Find and examine the book "The Telltale Heart" on the bookshelf.
Locate the proper floorboard (to the right of the trash can).
Use the screwdriver on the floorboard.
Examine the gap in the floorboards to find the decoder.
Mini-game time.
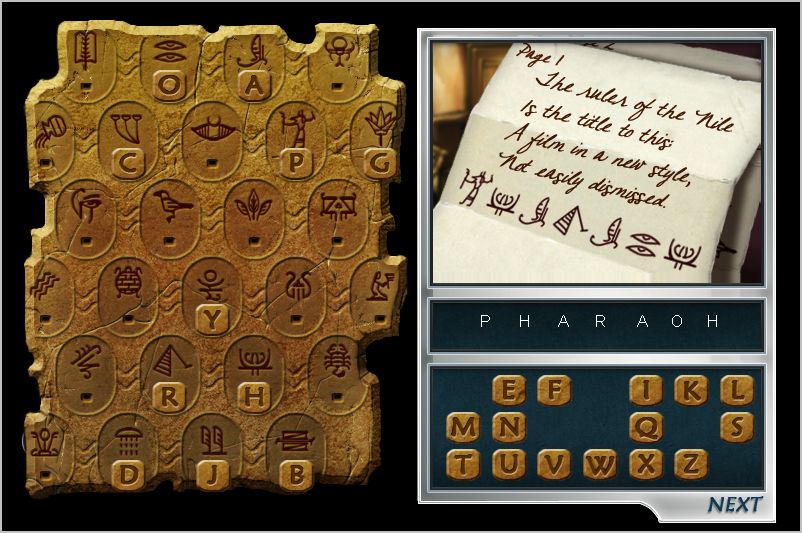
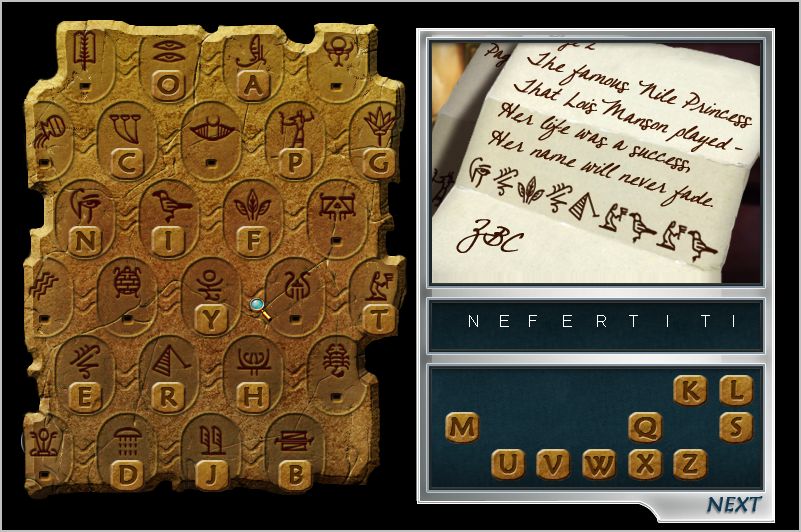
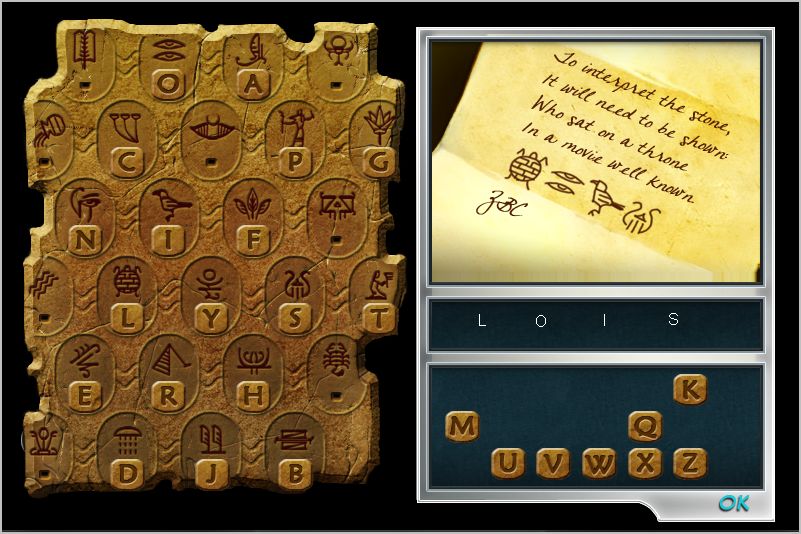
Decoder Game
You will be basically solving the hieroglyphs on each note you've found in a simple substitution. The text of the notes is a clue to the word. Click on the letter then click on the corresponding symbol on the decoder.
The answer to page 1 is "Pharaoh". Screenshot.
The answer to page 2 is "Nefertiti". Screenshot.
Third note answer is "Lois". Screenshot.
When the puzzle is completed you will hear a voicemail.
Conversation with Arthur Hitchins
Answers:
"I hear you intend to build..." - "another theme park right here."
"When you said the 'real' reason I was hired..." - "it wasn't to investigate all the accidents, was it?"
"That director...was his name by any chance..." - "ZB Collingwood?"
You not only get a nifty lock pick kit, it's bonus round time!
Make as many matches as you can within the time limits for extra points.
Chapter 9: Get a Room
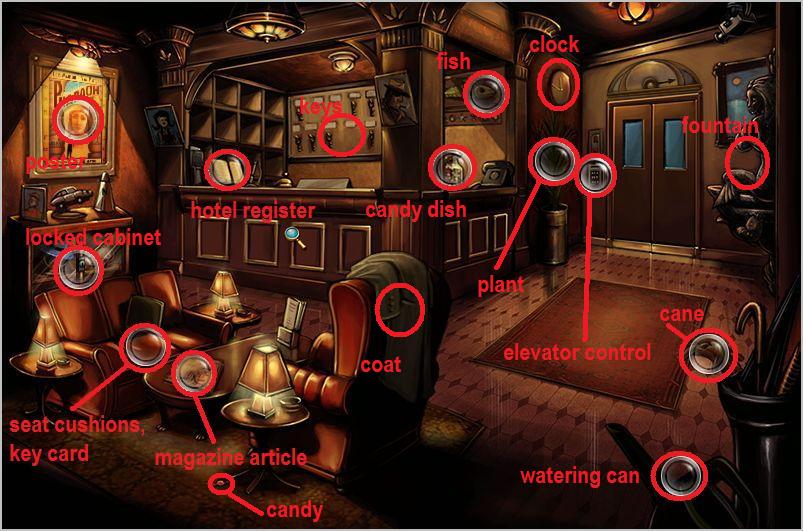
Hotel Lobby
Screenshot.
Read the article on the table.
Examine the hotel register.
Look closely, one of the names is an anagram for Molly McKenna.
Click on Molly McKenna then click on "Kelly M. Conman". This gives you the hotel room, 614.
Look between the seat cushions, you will find an elevator key card.
Examine the poster, this will open a decipher mini-game.
Decipher the sides of the poster using the decoder. The answer is: Find the Najahaje.
Try to use the key card on the elevator. You can't use it until you are disguised.
The coat over the back of the chair is now highlighted, as well as the keys behind the desk.
Look closely at the keys.
Pick up the candy from the floor and place it in the candy dish on the counter.
Examine the candy dish and read the note. You can now highlight the clock.
Use the cane to change the time on the clock.
The fountain is now running. Use the watering can on the fountain to fill it.
Use the now full watering can on the thirsty plant.
Watering the plant exposes an artificial eye. Place the eye in the stuffed fish.
Examine the fish's mouth to find a key.
Use the key on the cabinet lock.
Opening the cabinet exposes a hat. Combine the hat with the coat.
You are now in disguise. Use the key card on the elevator.
Done!
Chapter 10: Room Service
Lock pick mini-game
Click on the door lock and click on your lock pick tool to start the game.
Again, the patterns are random. You are still only using 2 colors. Remember, you can build your pattern on top of another row of tumblers if necessary, it doesn't have to be on the base.
When done you will be in Molly's Room.
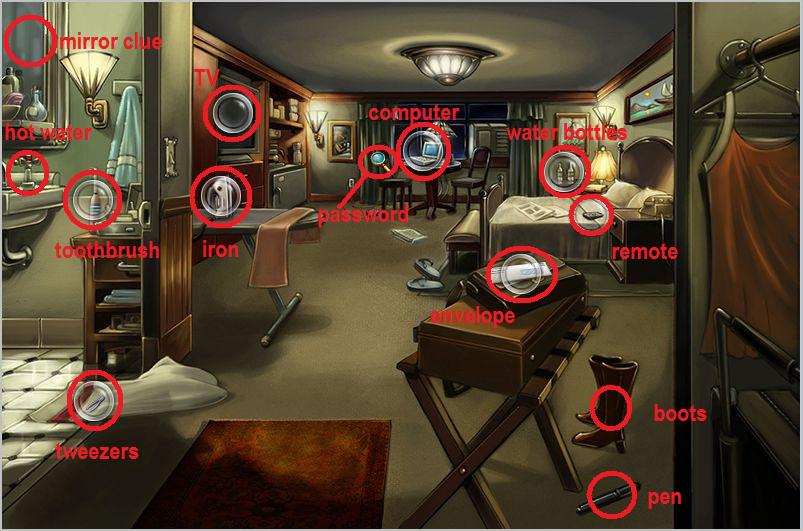
Molly's Room
Screenshot
Examine the computer. Password protected, of course.
Put the water in the iron.
Use the hand icon on the iron. Now you have steam!
Use the iron to steam open the envelope.
Read the note. You are looking for the two pieces of Molly's password.
You can now highlight the boots and the pen on the floor.
Look closely at the boots (eye tool)
Read the card that comes out.
Examine the pen.
Use the tweezers on the pen cap.
Read the note.
Use the hand tool on the electric toothbrush (batteries).
Use the batteries on the TV remote.
Use the TV remote on the TV.
Examine the TV schedule. The clue is 10 pm on channel 6 - "Dex".
Use the hand tool on the hot water faucet.
The steam will highlight the mirror clue.
Combine the mirror clue with the TV clue to get the computer password: Rolodex. This highlights the password next to the computer.
Combine the password with the computer.
Chapter 11: Sensitive Materials
Conversation with Arthur Hitchins
Answers:
"I checked out her laptop, and the last website Molly visited was..." - "Pharaoh Philes."
"In his letter, why did Jorge..." - "accuse you of lying?"
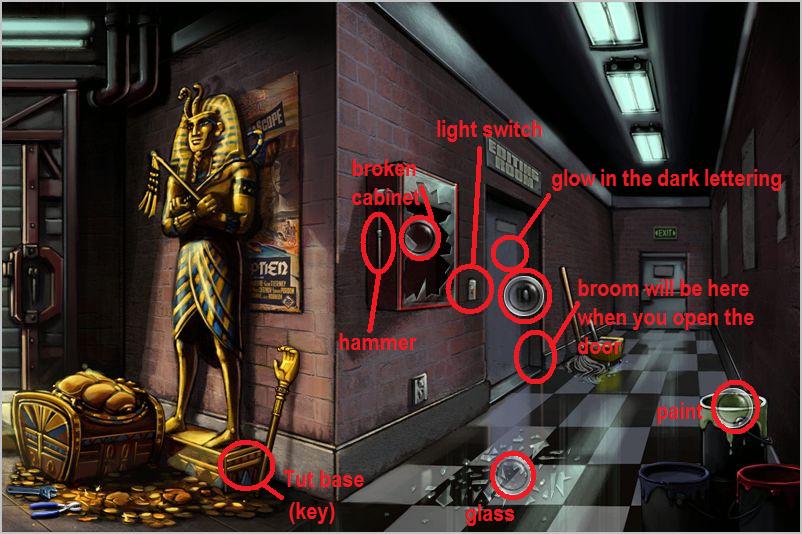
Outside Editing Room
Screenshot.
Examine the broken glass cabinet. Oh oh, missing fire axe!
Examine the green paint. Oh look, it glows in the dark! The light switch next to the editing room can now be highlighted.
Turn off the light switch and notice the lettering on the editing room door.
Examine the lettering to find the phrase "key in the Tut base."
Turn the lights back on.
You can now highlight the base of the statue and the small hammer on the side of the broken cabinet.
Use the hammer on the base. This exposes a key.
Use the key on the editing room door. Notice the broom just inside the door.
Use the broom to clean up the glass.
A red arrow will appear, click on it to shift the scene to the generator room.
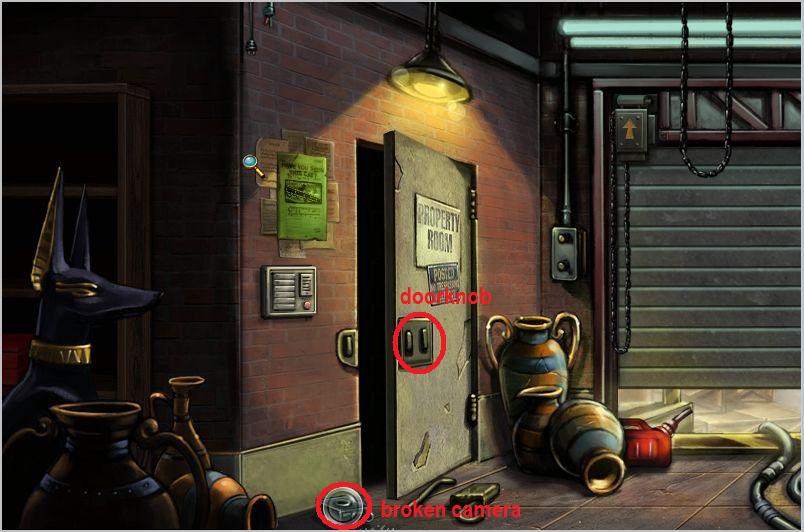
Screenshot.
Use the hand tool on the broken camera to get the data chip.
Use the hand tool to open the door.
End scene.
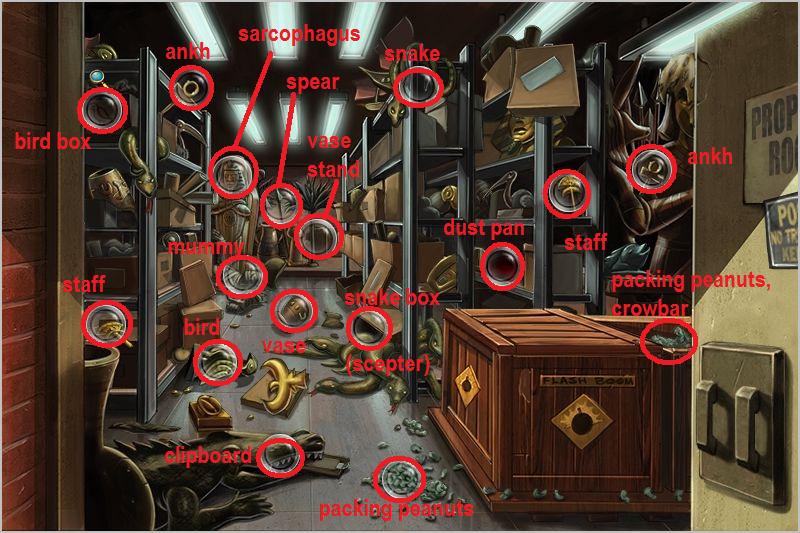
Property Room
Screenshot.
Combine the two staff props together.
Combine the two ankhs together.
Put the mummy in the sarcophagus (notice the strange impression).
Put the vase on the vase stand.
Put the bird in the "bird box".
Use the spear to knock the snake down from the top shelf.
Put the snake in the snake box.
Examine the snake box, there is a scepter in there. Gee, it looks like the impression on the sarcophagus.
Use the dust pan on the packing peanuts. You can now highlight the crate behind the "flash boom" crate.
Put the packing peanuts in the newly highlighted crate.
Examine the crate, you should see a crowbar.
Use the crowbar on the alligator mouth to retrieve the clipboard.
Use the scepter from the snake box on the sarcophagus.
Examine the object revealed in the sarcophagus (canopic jar). You will find a packing manifest.
Combine the packing manifest with the clipboard.
All clean!
Screenshot.
Use the crowbar to pry open the flash boom crate.
Examine the crate closely. Hmmm, no flash booms.
You have now triggered another conversation with Molly.
Conversation with Molly
Answers:
"If there's nothing valuable in here..." - "why was the room locked?"
"I saw a crate of flash boom..." - "it was completely empty."
"I checked out the scaffolding, I found..." - "a bolt that was shaved off and a bead from Eda's costume."
"The chip that was inside the camera..." - "is still intact."
Time for a bonus round! Make as many matches as possible in the time allowed.
Chapter 12: Hack and Chips
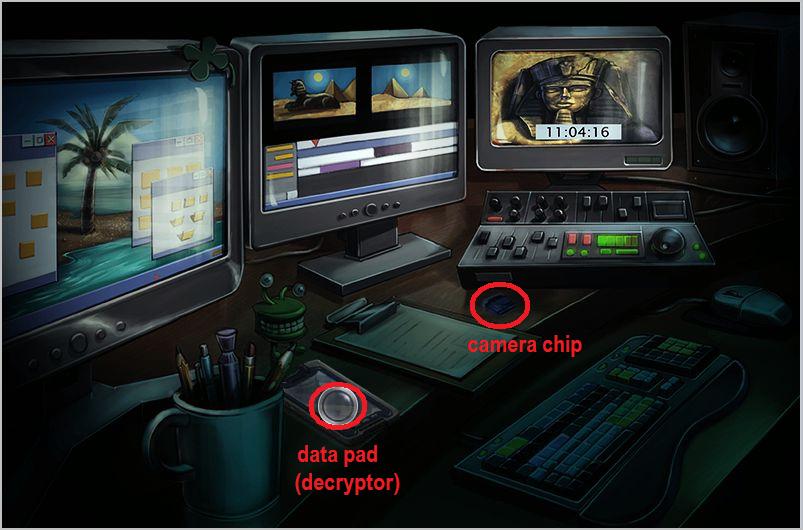
Editing Room
Screenshot.
Examine the data pad. It's a decryptor!
The decryptor is now in your tool box. Use the decryptor tool on the camera chip to open a mini-game.
Decrypting Mini-Game
This game is a bit like Tetris, but it scrolls to the side. The object is to drop the different sizes of chips into the pattern to completely fill the pattern before it disappears on the left of the screen.
Fill as many gaps as possible. If you leave too many gaps (20) you will have to start over. Drop the pieces by using the left click on your mouse, rotate pieces by right clicking.
Chapter 13: Jewel of Karnak
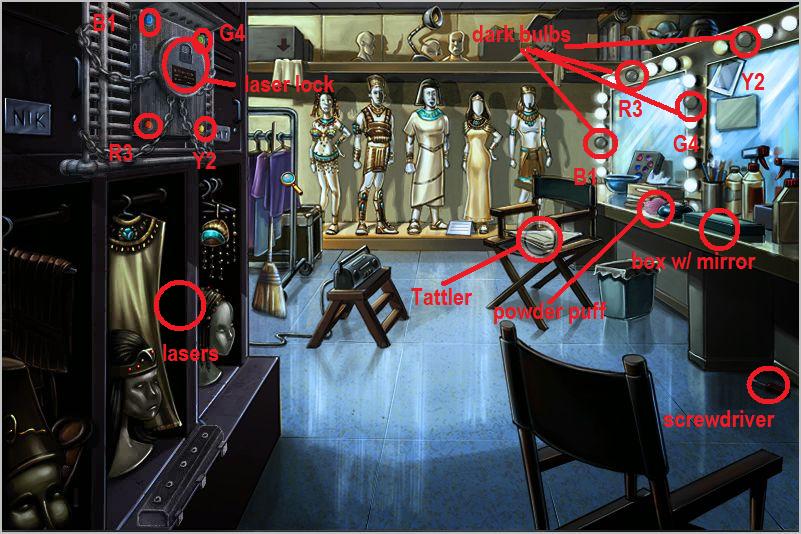
Wardrobe Room
Screenshot.
Read the new edition of the "Tattler".
You can now highlight several things: The laser lock on Eda's locker, a powder puff, a screwdriver beneath the make-up table, and a box on the make-up table.
Open the box with the hand tool. Goody, a mirror.
Use the powder puff on the laser lock. Look, lasers!
Use the screwdriver to remove the mirror from the box.
Use the mirror on the lasers.
Examine the lock to read the note.
The note refers to the "dark ones". This means the four burnt out bulbs in the vanity mirror.
Use the hand tool on each of the dark bulbs, then examine each one. Each one has a code.
Use each of the now empty sockets on the colored dots of the lock in numerical order: B1 on the blue, Y2 on the yellow, R3 on the red, and G4 on the green.
Watch out for snakes!
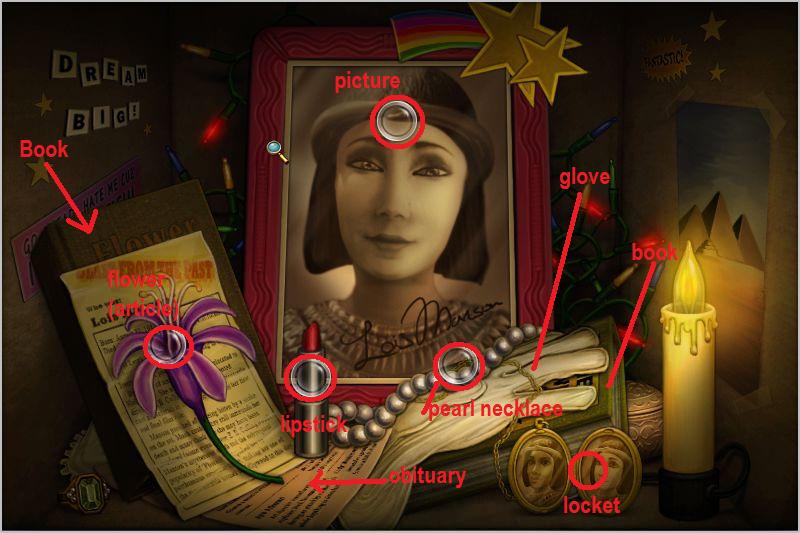
Eda's Locker
Screenshot
A shrine! Creepy!
This scene is an exercise in layers. Each layer removed exposes something else.
Move the flower, lipstick, and pearl necklace using the hand tool.
You should now be able to highlight the article and the locket.
Read the article. This exposes a book called "Flower of the Nile".
Examine the locket and the photograph.
Examine the book.
You can now seen an obituary. Read it.
You can now highlight the glove. Move the glove.
Now there's a book called "The Jewel of Karnak". Examine the book.
Ooops, hi Eda.
Conversation time.
Conversation with Eda
Answers:
"I'm not really a production assistant..." - "I'm a private detective."
"I hate to tell you this, but..." - "that snake came from your locker."
"I saw this book in your locker..." - "it's about the Jewel of Karnak."
Chapter 14: Snakes on a Cane
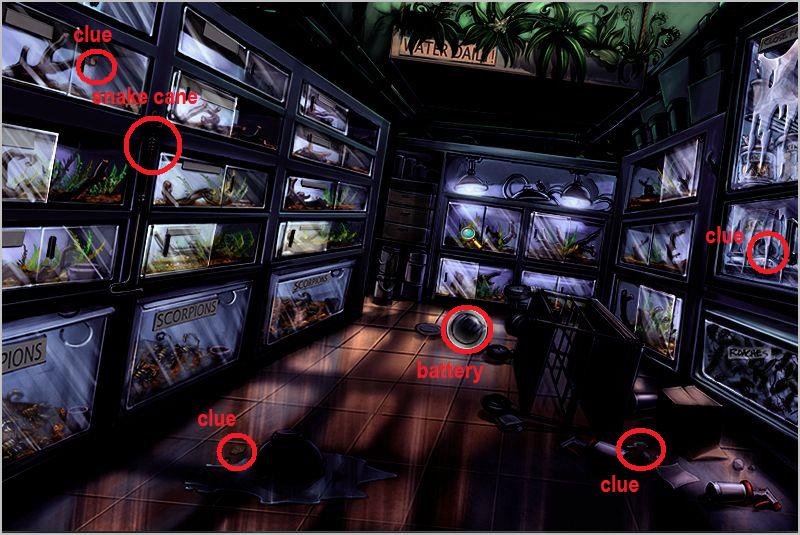
Reptile Room
Screenshot.
Warning, the snakes and lizards are loose!
There is a battery already highlighted on the floor. Click on the battery and click on your flashlight tool.
At this point a snake cane hanging on the wall will be highlighted. You will need this to catch the snakes.
You can see the shadows of the snakes and lizards as they move across the floor, up the walls, and across the top of the room.
As the snakes and lizards move randomly, I cannot give you a screenshot where they are.
To catch a reptile: click on the cane then click where you think a snake or lizard is (watch for their shadows). You will see sparkles when your flashlight passes over one.
Move fast!
Once all the snakes and lizards are caught you can look for clues.
Examine each of the clues (see screenshot for locations).
Bonus match round time! Make as many matches as possible within the time limits.
Chapter 15: The Lobby
Hotel Lobby
Click on the poster and examine it closely.
When the poster is in close up click on the snake and examine it.
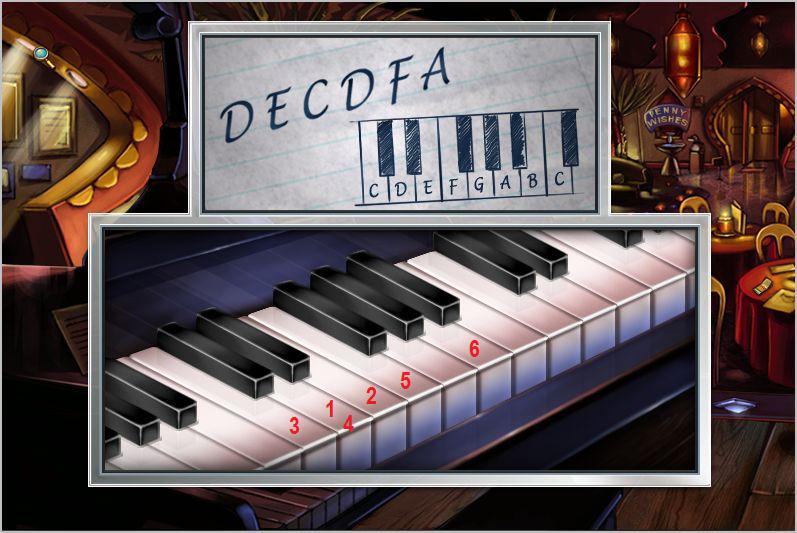
When the snake is in close up decrypt the symbols by clicking on the symbol then its equivalent on the decoder. The answer is: DECDFA.
Conversation time!
Conversation with Jorge
Answers:
"Someone put a snake..." - "in Eda's locker."
"When I was in the reptile room..." - "I found this swizzle stick."
"What about the actress from the original 'Pharaoh' movie..." - "Lois Manson. How did she end up with a poisonous snake on the set?"
"The prop room that Molly McKenna keeps locked..." - "was broken into tonight."
"No, but I do know the thief..." - "was wearing a hooded cloak."
"How did you know..." - "the thief stole the Flash Boom?"
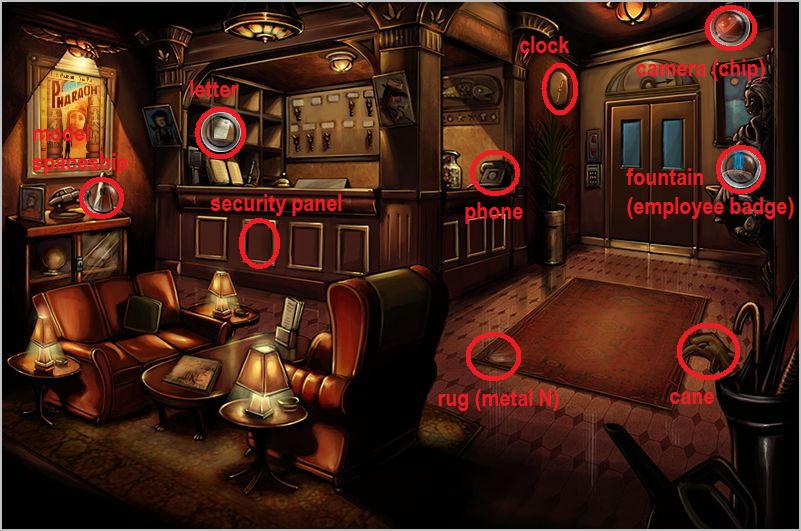
Hotel Lobby
Screenshot.
Examine the fountain, there's something in there.
Once you've examined the fountain you can highlight the clock and the cane.
Use the cane on the clock to change the time.
Examine the fountain again. There's an employee badge in the fountain.
Examine the letter behind the front desk. It's about the security system.
Once you examine the letter the phone will flash.
Use the hand tool on the phone to check the messages.
Use the employee badge on the phone to hear the message.
Once you listen to the message you can highlight the lower left corner of the rug.
Use the hand tool on the corner of the rug to find a metal N.
Use the metal N on the model rocket ship. It will open to reveal a button.
Push the button to reveal the security panel (use the hand tool).
Use the hand tool on the security panel to turn off the camera.
Use the hand tool on the camera to remove the chip.
Use the decryptor on the chip.
This will open the decrypting mini-game. Remember to leave as few gaps as possible.
Completing the game will give you the code to Jorge's penthouse suite.
Done!
Chapter 16: The Shower Scene
Penthouse Suite (Bathroom)
First, turn on the lights (light switch just to the left of the doorway).
You'll see a makeshift photography lab, then the bulb will burn out.
The scene will shift to the Penthouse Suite.
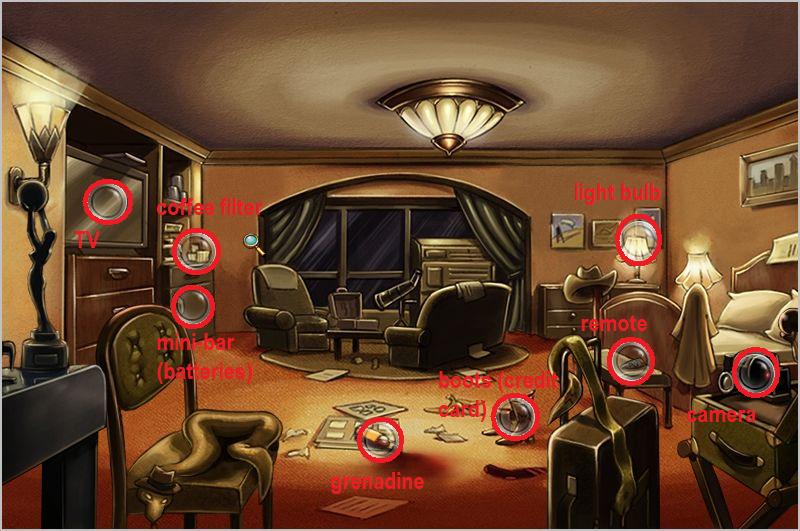
Penthouse Suite
Screenshot.
Examine the boots to find Arthur's Credit Card.
Use the remote on the TV.
Use the credit card on the TV to pay Jorge's bill.
Open the mini-bar (using the hand tool) to find batteries.
Use the batteries on the camera to get the film.
Use the grenadine on the coffee filter to turn it red.
Use the coffee filter on the light bulb.
The scene will now shift to the bathroom/darkroom.
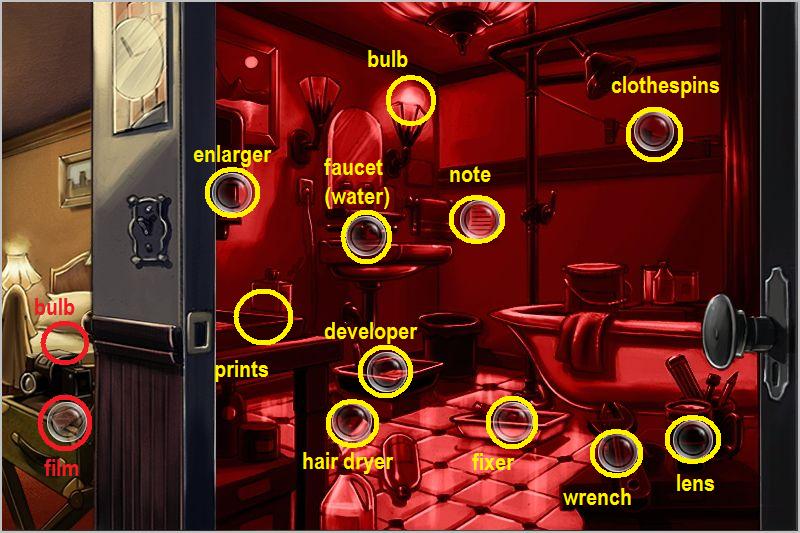
Penthouse Suite (Bathroom)
Screenshot.
Find the burnt-out bulb in the bathroom.
Use the new red bulb (located on the bed) to replace the burnt-out bulb.
Use the wrench on the faucet. You now have a sink full of water.
Read the note on the wall to learn the developing process. Remember, black tub (developer), then water (sink), then white tub (fixer).
Put the telescopic lens in the enlarger.
Time to process the film.
Put the film in the black tub, then in the water, then in the fixer.
Now put the negatives in the enlarger.
The prints will show up at the base of the enlarger.
Now put the prints through the same process as the film with one additional step: black tub, water, white tub, clothespins.
Now use the blow-dryer on the hanging prints.
Examine the prints.
Jorge is a Stalker!
Conversation time.
Conversation with Arthur and Molly
Answers:
"Do you have any idea why Jorge Jackson..." - "would be taking pictures of Eda on the sly?"
"Is Jorge..." - "still at the Casbah?"
Time to go mix more drinks!
Chapter 17: Play it Again
Club Casbah Smoothie Game
Time for the smoothie mini-game again. This time they've added double drinks, so remember to double your ingredients when you get to an extra large glass.
When the game is over it's time to search for clues in the club.
Club Casbah
Screenshot.
Use the dolly to move the box. This will expose a smaller box underneath.
Open the smaller box to get a light bulb.
Put together the blender top with the base. You can now highlight the apples on the upper right of the screen.
Put the apples in the blender.
Use the hand tool on the blender.
Pour the stuff from the blender into the bin. This allows you to highlight the screwdriver in the briefcase next to the blender.
Use the screwdriver to open the plate over the burnt out light.
Replace the light bulb with the one from the box.
Examine the light fixture. "Break at 25 Hz."
Attach the cord to the microphone.
Use the hand tool on the microphone.
Highlight the electrical box just above the locked cabinet, then use the hand tool on it.
This will break one of the glass bottles on the top shelf.
On one of the barstools is a towel. Use the towel on the broken bottle to retrieve the key.
Use the key on the locked cabinet to obtain an audio adapter.
This will shift the scene to the other side of Club Casbah.
Club Casbah (Piano)
Screenshot.
Use the hand tool to move the loose picture. You've found another audio clue!
Go to the detective notebook to listen to the audio clue.
Put the cushion back in the booth. This will highlight a penny.
Use the penny on the penny wishes fountain in the back of the room.
Examine the penny wishes fountain to find an allen wrench.
Light the candle with the matchbook. This will illuminate some scotch tape.
Use the scotch tape on the torn sheet music.
Put the repaired music on the music stand.
Use the allen wrench to open the piano.
Combine the sheet music with the piano keyboard.
Mini-game. Play the notes you got from the Lobby poster.
Play the notes from the poster. There is a sketch of the keyboard to help you along.
If the sketch doesn't help here is a screenshot of the keys to push and the order.
Bonus Round time! Play the timed match game for extra points.
Chapter 18: Dead at the Wheel
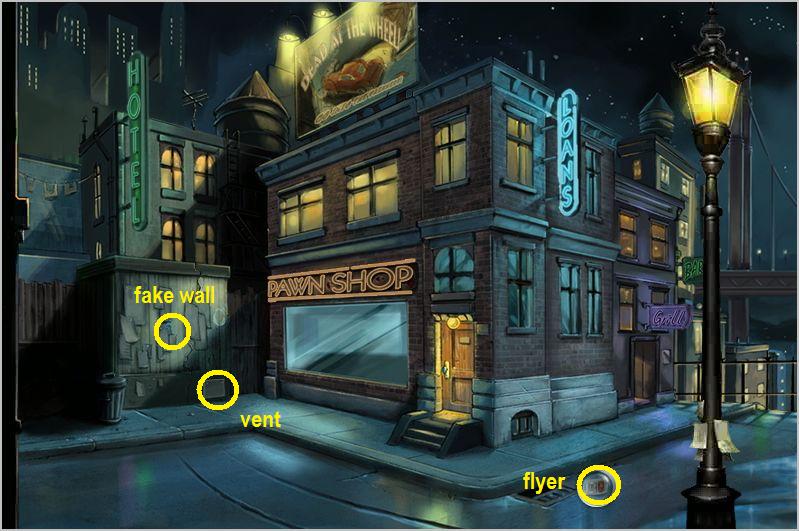
Pawn Shop
Screenshot.
A flyer will fall to the ground. Read it.
After you read the flyer you can highlight the wall to the right of the trash can. Combine the wall with the flyer.
Once you combine the flyer with the wall, you can highlight the little vent at the bottom of the wall. Examine the vent to see the blueprints.
Once you've examined the blueprints use the hand tool on the wall. You can't break it.
Scene will now shift over past the Detective Statue to the Car area.
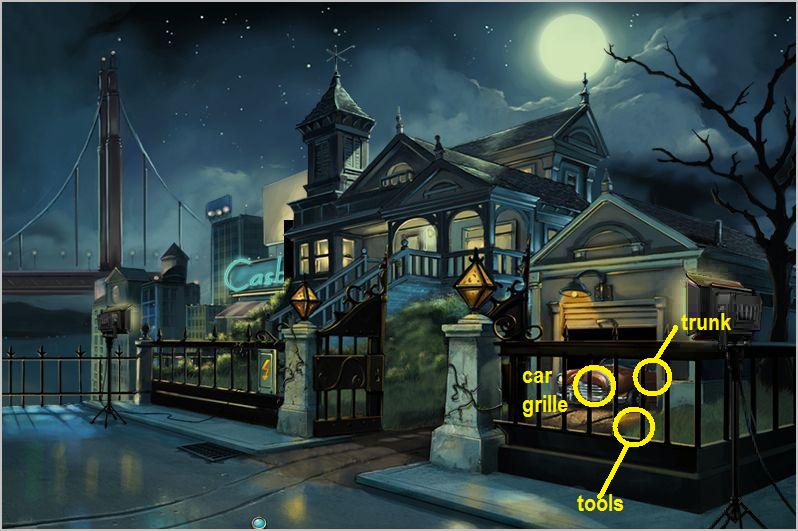
Car
Screenshot.
At first all you can highlight is the car grille. Highlight the car and use the hand tool to start it.
The car will not start, but now you can highlight the car trunk. Highlight the trunk and try to pick the lock.
Lock-pick mini-game.
A third color has been added to the game to increase the complexity. Remember to spread the objects evenly and not stack too deeply.
Once the lock has been picked examine the trunk. A toolbox will appear next to the car.
Combine the tools with the car grille to fix the car.
Highlight the car grille and use the hand tool to start the car.
The scene will shift to the Detective Statue area.
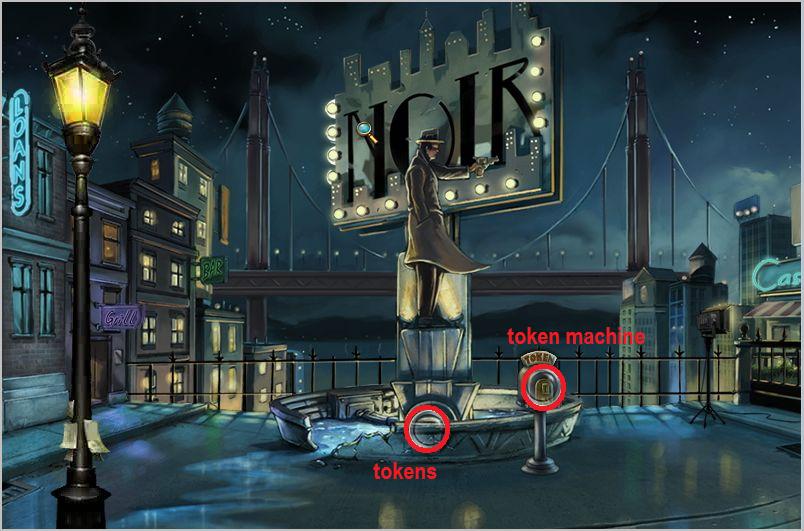
Detective Statue
Screenshot.
Highlight the area of the fountain just below the statue and examine it to find a token.
Use the token on the token machine.
Enjoy the car crash!
When the cut scene is over you are back in front of the Pawn Shop. Where the wall used to be there is a big sign for the Docks. Click on the sign and examine it.
Congratulations, you've found the docks. End scene.
Chapter 19: Fishing for Evidence
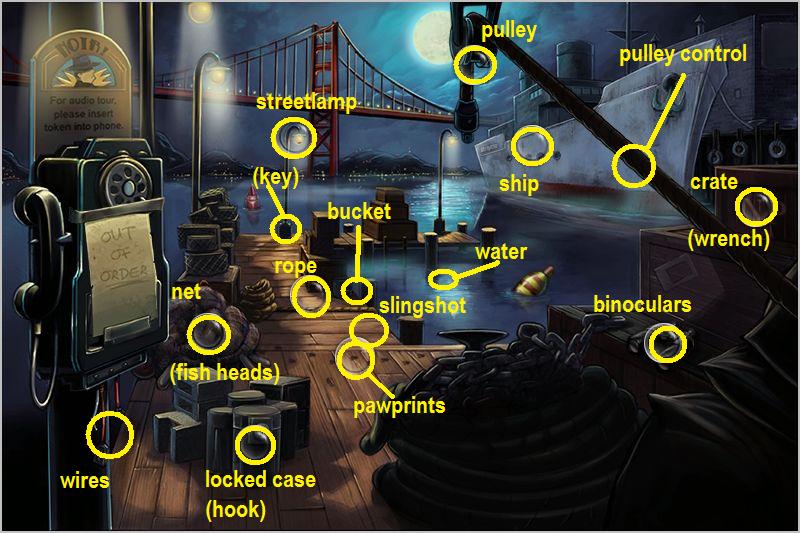
The Docks
Screenshot.
At the bottom of the phone audio tour there are some hanging wires. Highlight the wires and use your decryptor on them.
Time for the decrypting mini-game. Remember, fill in as many gaps as possible as quickly as possible. Right click rotates the pieces and left click drops them.
Once you've finished the mini-game you'll hear the audio tour.
Now you can highlight lots of stuff on the docks.
Pull on the rope (use the hand tool). This will pull up a slingshot.
Use the binoculars on the ship and on the streetlamp at the end of the dock. You'll see that the ship is the Nile Princess and that there is a key in the streetlamp.
Open the crate to find a wrench.
Combine the paw prints on the dock with the net to find fish heads (roly, poly fish heads!).
Combine the fish heads (eat them up, yum!) with the slingshot.
Now combine the loaded slingshot with the streetlamp.
The key falls out of the streetlamp but it is too hot to touch.
There are two more areas you can highlight, a bucket just above where the slingshot was, and the water.
Combine the bucket with the water.
Now combine the filled bucket with the hot key.
Combine the key and the locked case.
Examine the now opened case to find a hook.
Combine the hook with the pulley.
Combine the wrench with the hook/pulley combo to tighten it.
Now an area about halfway up the pulley rope is highlighted. Use the hand tool on this area to drop the hook.
Use the hand tool again to bring up your find.
Examine the box that you bring up.
Examine the blueprints.
End scene.
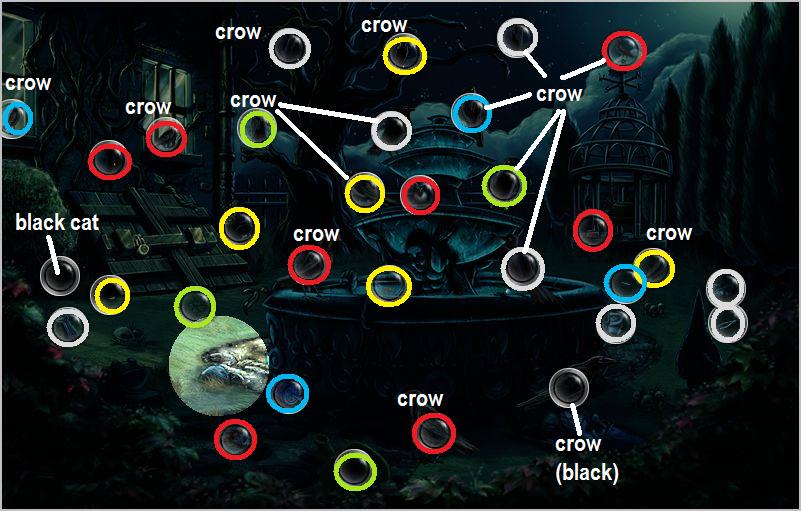
Chapter 20: Eating Crow
Crows
Screenshot.
Brace yourself, this is a timed scene, and a tough one.
Once you pick up the batteries the time starts counting down. There are 16 crows and 16 objects in the scene. You need to match the objects to the crows that have that color leg band (green to green, silver to silver, etc.). The two exceptions are: crows that match with red objects have red eyes, not leg bands. One crow you can see neither leg band nor eyes, it matches with the black cat.
How to read the screenshot: I have highlighted all 32 crows and objects by their color. The crows are labeled, the objects are not. The black cat and the black crow are labeled but are not circled in any color.
Best strategy: Find and highlight all the objects so you know their colors. Then start clicking on crows and match them to the nearest object of the same color.
When the scene first appears there are some batteries already highlighted. Combine them with your flashlight. You will see a yellow bar start counting down the time at the bottom of the screen. Start matching!
Once you've completed the matching pick the lock on the cellar door.
Lock picking mini-game.
This level of the lock picking mini-game is tough. The patterns are much more elaborate and you have three colors. Remember, you can put extra colors above or below your pattern.
End Scene.
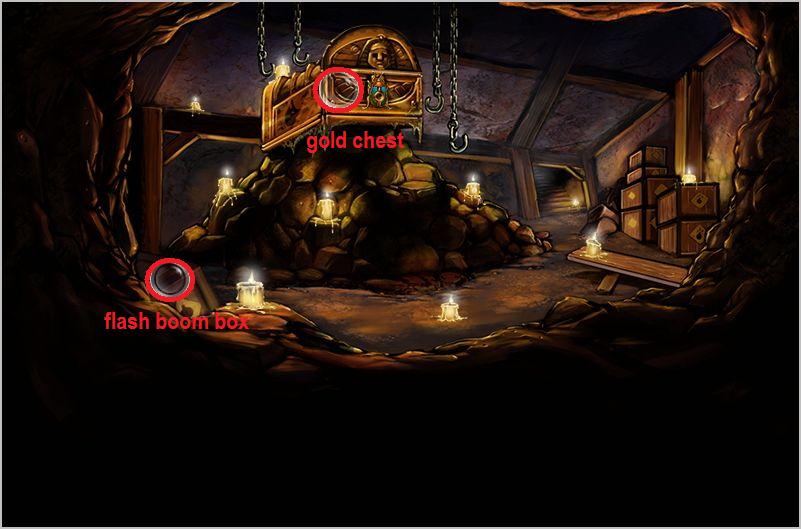
Chapter 21: Let There Be Light...
Candle Cave
Screenshot
Welcome to another timed scene.
There are 10 candles in the scene, and one matchbook. You can go through and find all the candles first, and highlight them.
Do not, under any circumstances, start lighting the candles until you've highlighted everything first. The timer starts when you light the first candle.
As the scene is dark until all 10 candles are lit, your memory will be very important here. You can only see an area of the screen lit by your flashlight.
Once you have identified all candles and the matches, start combining the matches with each of the 10 candles. You will see a yellow bar start counting down time once you light the first candle.
Good luck and light fast!
Screenshot.
Once the scene is lit examine the flash boom box.
Examine the gold chest. It has a lock you cannot pick.
You hear a noise! Time for a conversation.
Conversation with Eda
Answers:
"Arthur sent me to look for you..." - "because you didn't show up for your meeting at the Casbah."
"I think I've discovered..." - "who has been spying on you."
"Maybe he's the reason for..." - "your premonition."
"Do you think Jorge Jackson is..." - "responsible for the accidents?"
End scene.
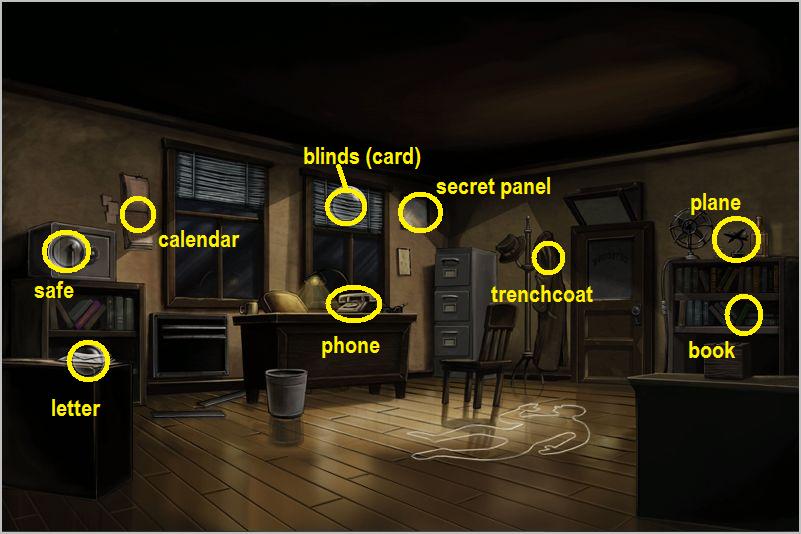
Chapter 22: Safe Keeping
Arthur's Office
Screenshot.
Use the hand tool on the blinds to raise them.
Read the card that is revealed.
You can now highlight the model plane on the bookcase on the right.
Use the hand tool on the model plane. This opens a secret panel above the file cabinet.
Examine the secret panel. You will read the following: left - Sammy's birthday, right - Treasure Island Volume, left - coat inspector.
Now find and highlight the three areas mentioned: The calendar on the wall, the trench coat, and the bookcase.
Examine each of the new areas highlighted.
Combine each of the items with the safe in this order: First the calendar, then the book, then the trench coat.
Use the hand tool to open the safe. Examine the safe contents.
Highlight the phone and use the hand tool.
Read the letter.
End scene.
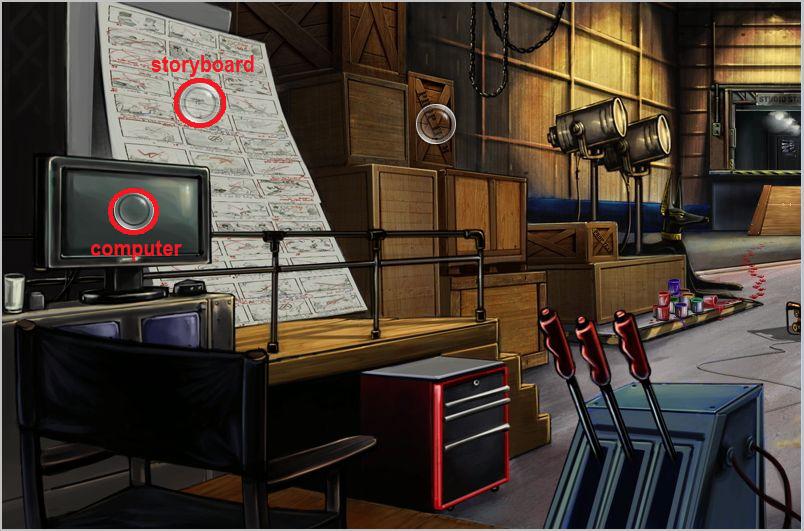
chapter 23: Valley of the Kings
Movie Set
Screenshot.
Turn on the computer.
Combine the computer with the storyboard. This will tell you the crate you are looking for.
Scene shift.
Movie Set (Right Side)
Examine crate 73.
Open crate 73.
You can now highlight the prop obelisk. Move the prop.
You can now highlight an area of the set where an object is buried.
Combine the shovel with the buried item.
Examine the ark.
Time to decrypt the lock!
Using your hieroglyph decoder spell out the answer to the clue.
Push each button in the lock in the order of the answer to the riddle, starting with "E".
The answer is "Egyptian Cobra".
When the ark opens you get a special lock pick.
Conversation time!
Conversation with Molly, Eda, Jorge, and Arthur
Answers:
"Jorge, I saw..." - "your makeshift photo lab."
"I was trying to calm her down after..." - "someone put that snake in her locker."
"You knew the wardrobe room would be my next stop..." - "after I saw the cloak on the video chip."
"She realized I actually knew what I was doing and was afraid I might somehow..." - "keep her from finding that lost footage."
Time for a matching bonus round! Make matches as quickly as possible before time runs out.
Chapter 24: The Fire Within
Candle Cave (Revisited)
Screenshot.
Once again, light all 10 candles before time runs out.
Use the new lock picking tool on the gold chest.
Lock picking mini-game.
Once you get the lock picked a red arrow will appear pointing downward. Time to go deeper.
Excavation Mode
Excavation mode is a mini-game with bombs and fuses.
You need to stack two same colored bombs and a same colored fuse to remove the rocks.
Drop unneeded bombs on the floor away from the rest of play. DO NOT drop the same colored fuses on them if they are not near a rock, otherwise it will bring more rocks down.
Don't let things stack up to the top of the playing field or you will have to start again.
Good luck!
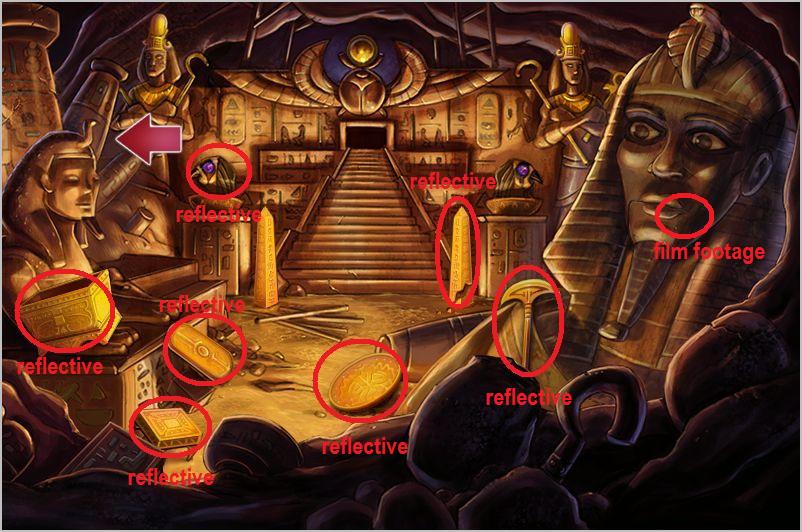
Chapter 25: The Final Scene
The Original Pharaoh Set
When the scene starts all you can see is a shaft of blue light. At the bottom of the light are batteries.
Combine the batteries with your flashlight.
Screenshot.
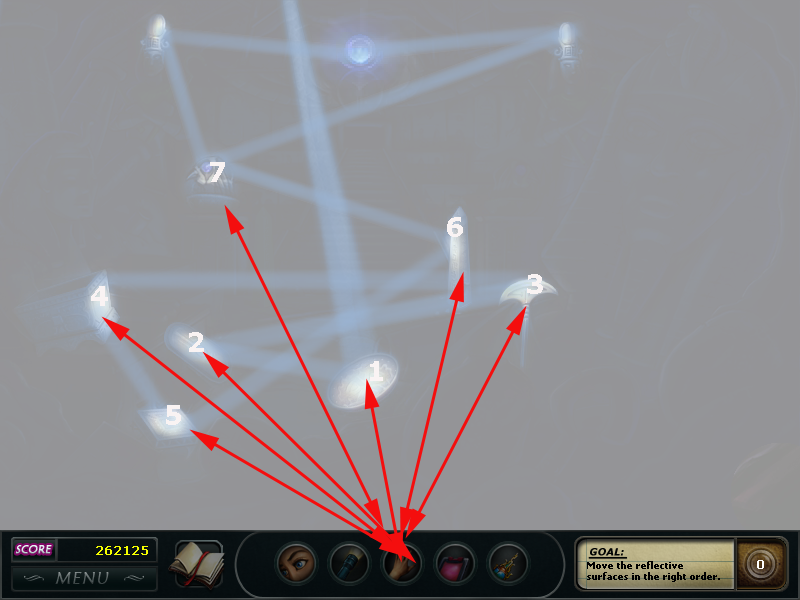
Once your flashlight is working you have a limited field of vision. There are seven reflective objects in the room which can be manipulated to light the place up.
This is on a timer, so move quickly!
Start at the base of the beam of light. There is a gold plate there. Use the hand tool on it.
Follow the beam of light to the next object and use the hand tool on it. Continue until the room is lit.
The screenshot above shows what the reflective objects look like.
Once the room is lit a red arrow will appear. Click on it.
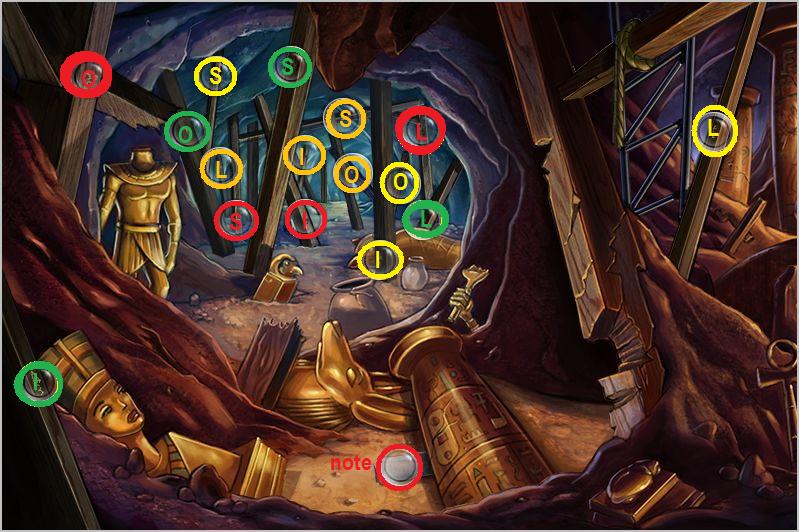
The Original Pharaoh Set (Left Side)
Screenshot.
Read the note, it gives the clue about the order of removing the beams. Remove each beam using the hand tool.
You are removing the beams in the following order: spelling out the name "Lois" in each object mentioned in the note.
So you would remove the L-O-I-S beams with a bird on them, then the ones with rain, then the ones with a scorpion, then the ones with a pyramid.
How to read the screenshot: The bird beams are orange, the rain beams yellow, the scorpion beams red, and the pyramid beams green.
When the beams are removed in the correct order, the scene will shift back to the right side of the Original Pharaoh Set.
The Original Pharaoh Set
Screenshot.
The beam of light will be directed back at the large figure on the right, and its mouth will open, revealing a roll of film.
Examine the film and you will get the film and a note from the original director.
Oh, hi Eda! Conversation time.
Conversation with Eda
Answers:
"By being..." - "the star of this movie, maybe?"
The short conversation leads to another mini-game, head to head excavation mode.
Remember to not detonate anything in empty space, it will cause more rocks to fall down.
Good luck!
Ending 1
This is the regular ending. You will watch the footage and realize that Lois Manson did not really die on the set, it was an elaborate hoax. The remake of "The Pharaoh" is a flop, Eda has a nervous breakdown, and the proposed theme park never materializes.
Ending 2
This ending is unlocked if you managed to accumulate enough points to make "Ultimate Private Eye". The footage of Lois Manson is the same with one small but crucial difference, she has the Jewel of Karnak, and hid it on the set before vanishing into the mists of history. The jewel is recovered and "The Pharaoh" is a hit. Eda still has her nervous breakdown, though.
Posted by: grinnyp |
September 6, 2009 4:47 PM
|
September 6, 2009 4:47 PM