
Nick Chase: A Detective Story
Platform: Windows
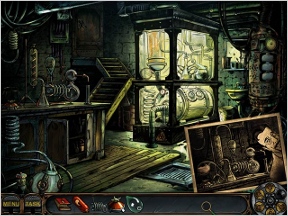
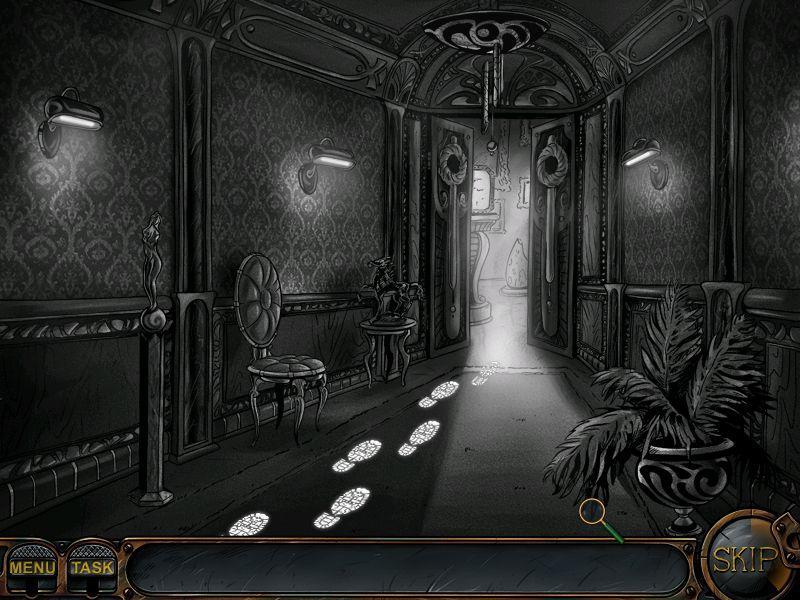
![]() Nick Chase: A Detective Story is a gritty, film noir-style casual adventure game flavored with hidden object scenes and loads of delicious inventory puzzles. Based on classic detective stories and graphic novels, you follow the down-and-out Nick Chase as he embarks upon his first job in ages. From his messy office to shady hideouts of even shadier characters, you'll have to use your own detective skills to piece together evidence and solve puzzles. It's one of the most enjoyable detective games I've played in quite a while, and the stellar voice acting and gorgeous hand-drawn art scores major points in my book.
Nick Chase: A Detective Story is a gritty, film noir-style casual adventure game flavored with hidden object scenes and loads of delicious inventory puzzles. Based on classic detective stories and graphic novels, you follow the down-and-out Nick Chase as he embarks upon his first job in ages. From his messy office to shady hideouts of even shadier characters, you'll have to use your own detective skills to piece together evidence and solve puzzles. It's one of the most enjoyable detective games I've played in quite a while, and the stellar voice acting and gorgeous hand-drawn art scores major points in my book.
 The hard-boiled Private Investigator is in sore need of a job. When a mysterious man known as The Collector calls, Nick is in no position to turn him down. Staring at his cluttered office, one of your first puzzles involves finding a brush to clean the fishtank, then hunting for food to feed the poor little fishy. Not much of a challenge, of course, but it serves as an introduction to the style of puzzles you'll be solving throughout the game.
At the bottom left of the screen is a tab marked "TASK" that contains, as one might suspect, the current objective you're working on. Missions are generally straightforward and involve some item finding along with inventory-object assembly and a few quick, entertaining mini-games. A great example of this is in a "scientist's lab" where you must find parts of a contraption, assemble them and figure out how to turn the machine on, all to get a little analysis done on a drop of blood you discovered.
After completing a scene the story unfolds through a series of black and white comic book-style cut scenes where Nick narrates his thoughts and actions. These serve more than to simply advance the plot, as they do a spectacular job setting the stage for the entire film noir experience. The story itself is really interesting and could stand on its own as an enjoyable read. The text is skippable, however, but a big chunk of the experience is reading (or listening to) the well-written dialogue. So, you know, don't skip it!
Hints are dispensed in a rather creative manner: bullets loaded into a revolver's barrel. Find and click the shiny little things hidden amongst the clutter in some of the areas, and when you need a helping hand, click the barrel and watch what happens.
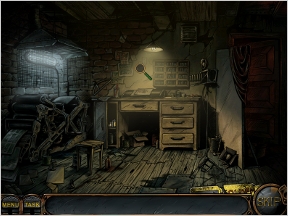 Analysis: Ok, it's true. I couldn't possibly lavish more praise upon the visual style and overall presentation of this game. I've never been a fan of the detective genre, per se, but it's beyond delightful to see such a faithful transition of a film/comic book style into the relatively new media of a video game. Developer Gestalt Games gets everything right, too, with almost perfect voice acting, puzzles and mini-games that fit the setting like a glove, and an art style that may as well have been lifted from a graphic novel itself. Ooh, I do love atmospheric games like this!
From a gameplay perspective, Nick Chase: A Detective Story does stray from the norm a bit, though not to a great extent. No lists of objects to find (thank Odin!), no pointless wandering from scene to scene, just puzzles, dialogue, mini-games, and gritty rooms filled with mystery. I'll admit, however, that the puzzles are rarely much of a challenge, so you'll probably breeze through much of the game without getting stumped more than a couple of times.
A huge success on every front, Nick Chase: A Detective Story goes above and beyond the hidden object/adventure game genre with a great storyline, believable atmosphere, and more gritty detective references than you can shake a fedora hat and magnifying glass at.
![]() Windows:
Windows:
Download the demo
Get the full version
![]() Mac OS X:
Mac OS X:
Not available.
Try Boot Camp or Parallels or CrossOver Games.


Walkthrough Guide
(Please allow page to fully load for spoiler tags to be functional.)
Here's the complete walkthrough for Nick Chase: A Detective Story. A big thank you to the awesome Kayleigh for writing the walkthrough and providing the screen shots!
Nick Chase: A Detective Story
General Tips
At the main menu, you will find two nice old fashioned video games, which you can play from the beginning.
One is "Tennis", the other "Break the Bricks".
The game has no general time limit, you can play at your own pace.
You will start with three hints.
In every scene you will find hidden bullets. They will give you additional hints.
You can see how many hints you have in the revolver magazine in the lower right corner.
Six hints is the maximum. You can't have more than that.
When you have a full hint magazine, you do not have to look for the bullets.
Your mouse pointer is a magnifying glass - when it spins around, it means that there is something interesting for you.
From time to time a popup window opens to give you a nearer view. Most of the time you can close it with the red cross on the right upper side.
If this is not possible, it means that this puzzle has to be solved now.
There is no way to save the game between the chapters.
Saving is done automatically by the game at the end of each chapter. If you leave the game earlier, you have to do the whole chapter from the beginning.
Walkthrough
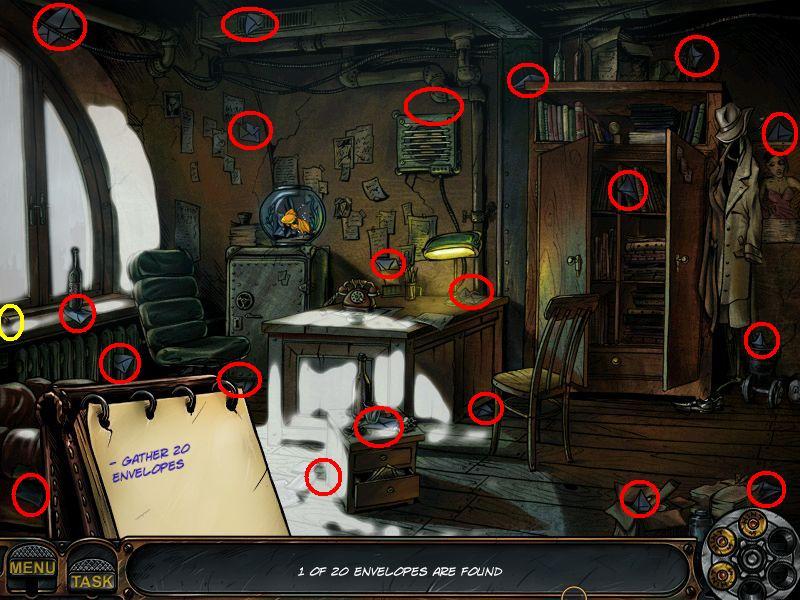
Tutorial/Find 20 envelopes
Follow the tutorial to get comfortable with the game basics.
Get the brush in front of the desk and click it at the fish bowl in the back on the safe, to the right of the window.
Felix' bowl is clean now, but he is hungry, so click at the closet in the back, left side - the door opens and you can get out the fish food.
Click it at the fish bowl.
The telephone on the desk is ringing - click it to answer the phone.
You have to find 20 blue envelopes.
For the position of all envelopes please see screen shot.
20 envelopes
An unexpected obstacle:
Click at the door and a puzzle will appear.
You have to find out how to open the door.
Seen from left to right, you have 4 squares 1, 2, 3, 4.
When you click them, every square will do something else
1 is only changing its own position.
2 will change the positions of all squares.
3 will change the position of itself and 1
4 will change the positions of all, except 2.
Find out the right position for each square.
Click on square number 2 a total of 3 times.
Click on square number 3 a total of 2 times.
Click on square number 4 a total of 2 times.
Click on square number 1 a total of 2 times.
To see how it has to look, please see the Door - Screen shot
Find evidence
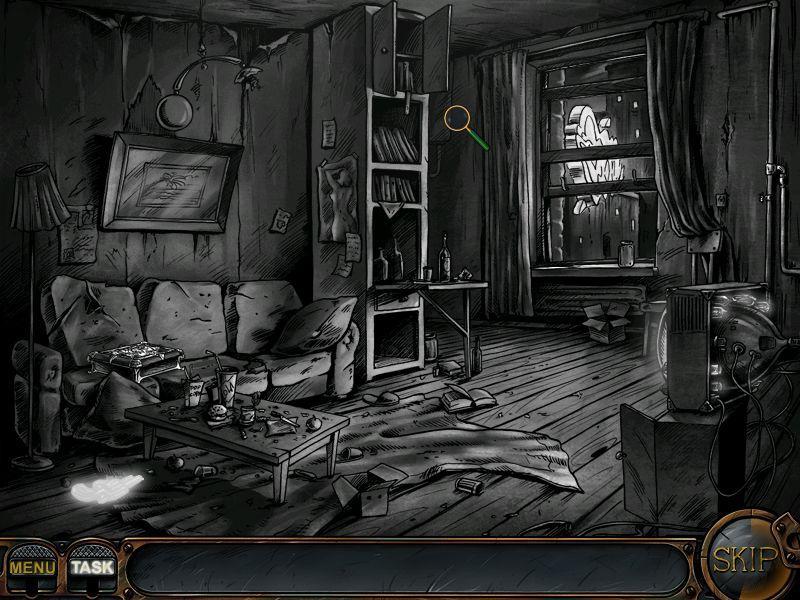
Use the magnifying glass to look around the scene
You have to find:
Blood
Hair
Blue Thread
Fingerprint
Button
Piece of red cloth.
Brown smudge
To see all positions, please have a look at the screen shot
Flashback - Look into the past
The scene is mirror inverted and not in the right order.
By clicking the single parts of the scene, you can turn them.
Please have a look at the screen shot for the right view
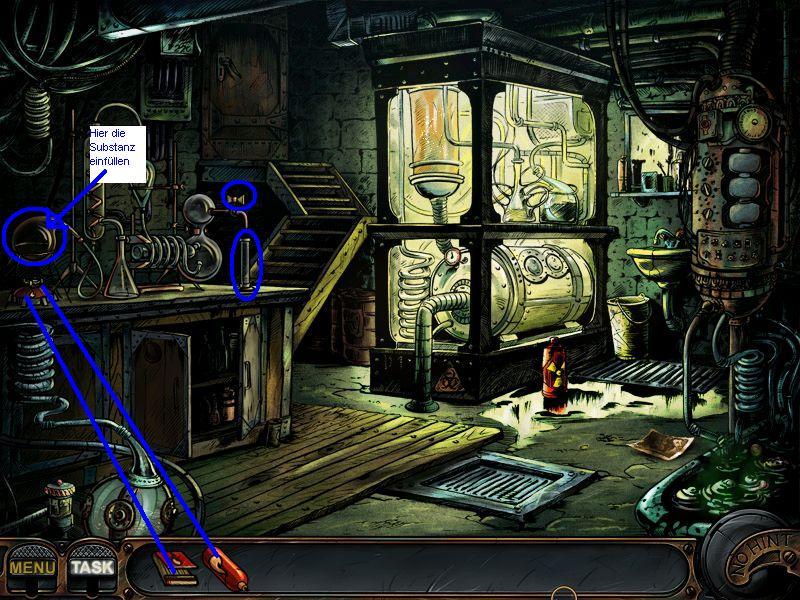
Find 10 pieces of the analyzer and assemble them
First find the picture that will help you to assemble the analyzer (right lower side on the floor).
By clicking the photo you can make it appear and disappear.
Now find all 10 parts that you need.
For all parts, please have a look at the Screen shot
You have to assemble the parts now on the table at the left side.
For the right positions please see Screen shot
Reagent/Gauge/Glass reagent
Click the reagent at the right side of the screen to get a closer look.
Click on the green button when the needle reaches the green part of the gauge. The green part will move to a different part of the gauge.
Do the same as before for all three times.
In the next part, you have to change the handles, so that you can see a glass reagent.
You do that by clicking the handles until the part of the picture shows the right one.
For the right picture please see the Screen shot
Button Sequence/Reagent Formula
Click the green button to start the next puzzle.
You will see three yellow lamps.
Have a good look and reproduce the sequences, which are shown with the buttons and levers.
If you make a mistake, you have to start from the beginning.
Now click the faucet at the right side and click the filled bottle to go into your inventory.
Put the formula into the beaker, left side.
Place first the fuel into the burner and then use the matches to light it.
Turn the faucet on the right side to fill the reagent and take it after it's filled.
For a further look, please have a look at the Screen shot
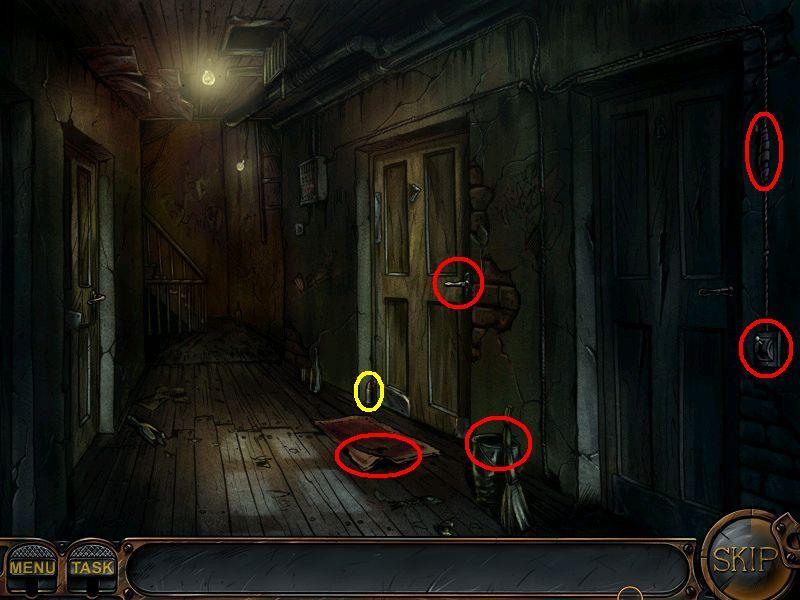
Enter Joe's room
On the floor between the two doors you see a bucket.
Click it and get out the isolation tape.
Fix the cable with it, on the right side where you can see the sparking.
Click the light switch.
The second door is the door to Joe's room.
When you knock, you will get no answer.
Click the door mat in front of the door and pick up the key.
Use the key at the door.
Please have a look at the Screen shot for further information
A puzzle will open.
Place the key in the keyhole, click on the deadbolt lock above the keyhole ONE time and then click on the handle. The first deadbolt will open.
Click on the deadbolt lock 3 times (until the small end of the lock is facing upwards) then click on the handle again. The second deadbolt will open.
Click on the deadbolt lock 3 times so the lock is facing to the left and the door will open.
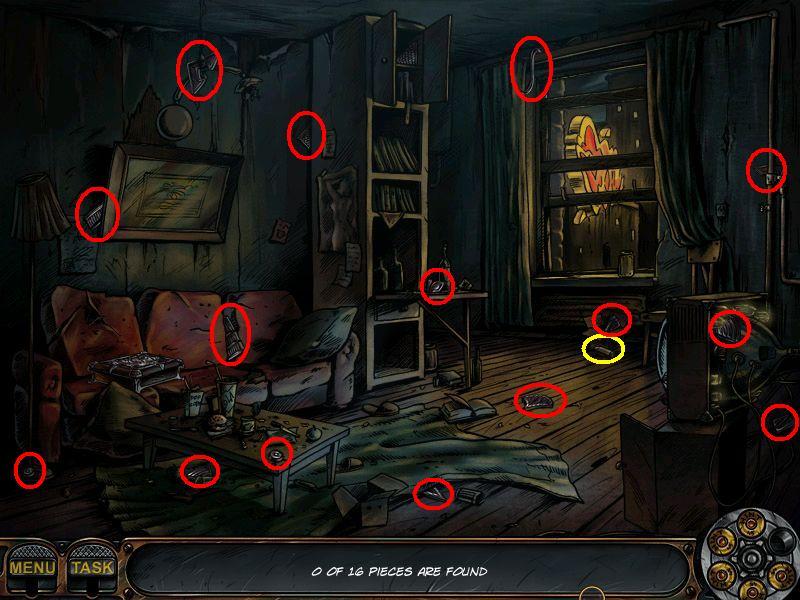
Find the pieces for the chest and open it
Find all 16 pieces for the chest.
For all positions please have a look at the screen shot
Now get the pieces out of the inventory and click them at the chest on the couch, left side.
You have to put all the parts on the chest.
If a part is at the right place, you will see a "Ok".
For all positions, please have a look at the screen shot
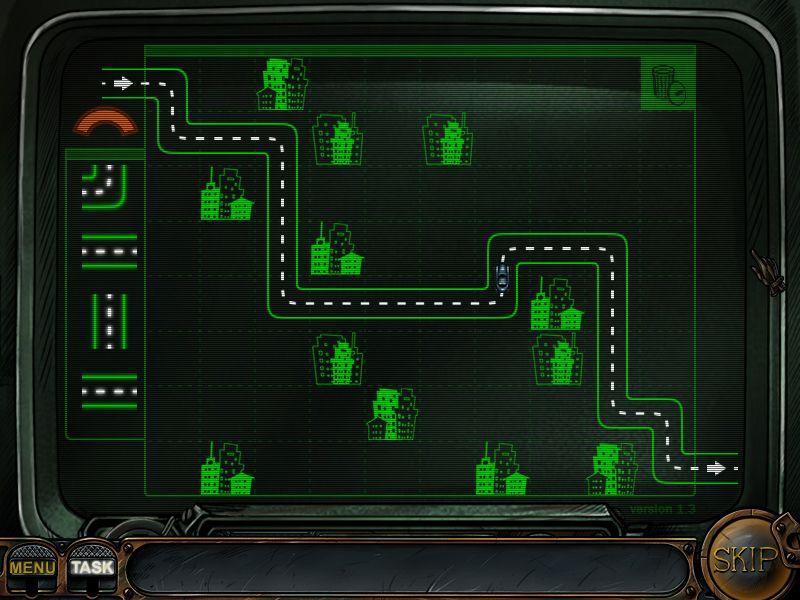
Road to the club
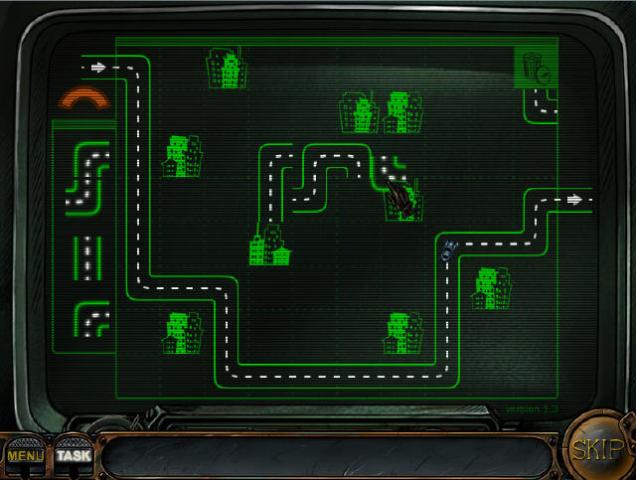
Your goal is to build a street between the start in the left upper corner and the club in the lower right corner.
To do so, use the pieces that are given to you and click them in the working manner into the little squares.
You do not have any control about the pieces that are given to you.
Pieces, you do not need, you can throw into the bin in the right upper corner or place them on the board at part, you don't need to reach your goal
In the left upper corner you will see a red curve. That is the time that is given to you.
When the time is up, the car will start driving.
It will drive until there is an obstacle or no road left.
While the car is driving, you can still go on building.
When the car has to stop, you have to redo it with new pieces.
As it is completely random which pieces are given to you, the screen shot only shows an example, not the "one-and-only"-solution
Strangers Part Puzzle
You have to arrange all the pieces to see the VIP pass.
Please have a look at the screen shot for a full view
Donnie's Workshop
You have to make a copy of the VIP pass.
Click on the desk door on the left side, get the film out and place it at the camera, right next to the desk.
Click the camera to take a picture.
Click on the drawer that is on the lower right side and it will open, click on the gold paper and you will see a gold VIP card appear in the top left corner of the scene.
Grab the red pen that is on the left side of the desk and it will go into inventory.
Place the pen on the light table and you will get a closer view of Ron's signature.
See screen shot please for all locations
Your goal is to trace the parts of the signature that are in red. As you finish one part another will highlight. Go on till you do the whole signature.
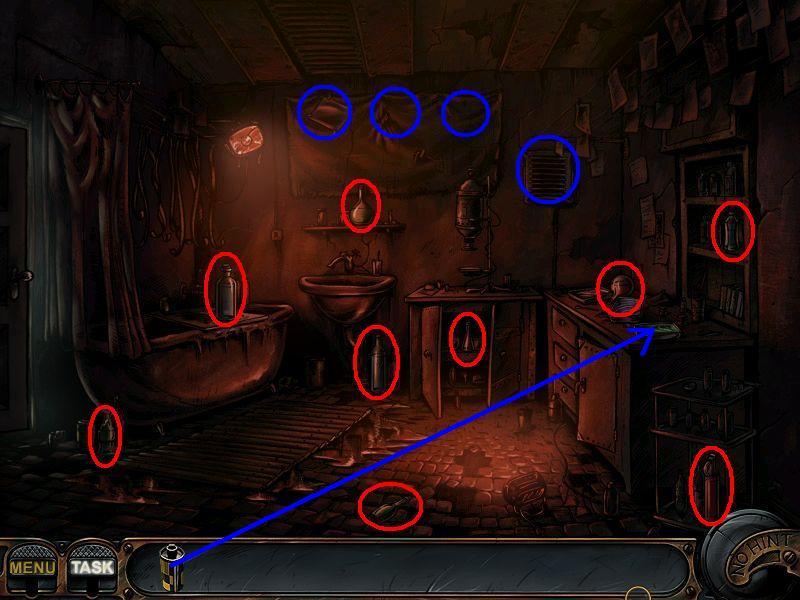
The dark room
Click the door to the right to enter the dark room.
First you have to darken the room by clicking the light sources.
Click the vent in the back, right side and the three holes in the cloth in front of the window.
Close the door at the left.
Now collect 9 bottles.
Three are filled with green liquid, three with red and three with blue liquid.
For all positions please have look at the screen shot
Click the film from your inventory onto the first tray right on the table.
A puzzle is coming up.
Your goal is to place the ingredients on the tray so that each color measures exactly 60.
For this you add
50" and "10" of the green bottles.
"40" and "20" of the red bottles.
only the blue bottle marked "60".
When you have done it right, a negative will go into your inventory.
Place it on the ''photographic enlarger'' that is on the back wall, above the cabinet that is next to the sink.
The picture will go into inventory.
Go back to the workshop by clicking the door.
Click the picture on the top of the VIP pass.
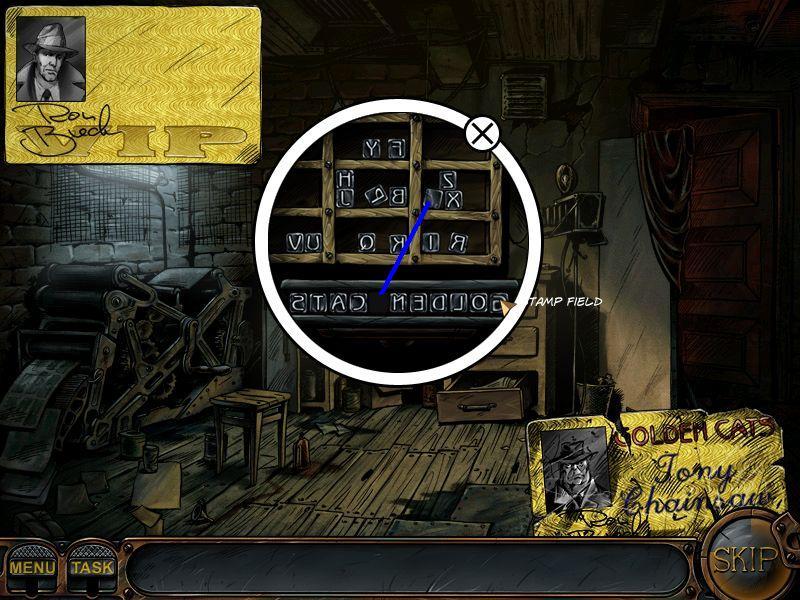
Above the desk you see a board with letters.
Click it to get a closer look.
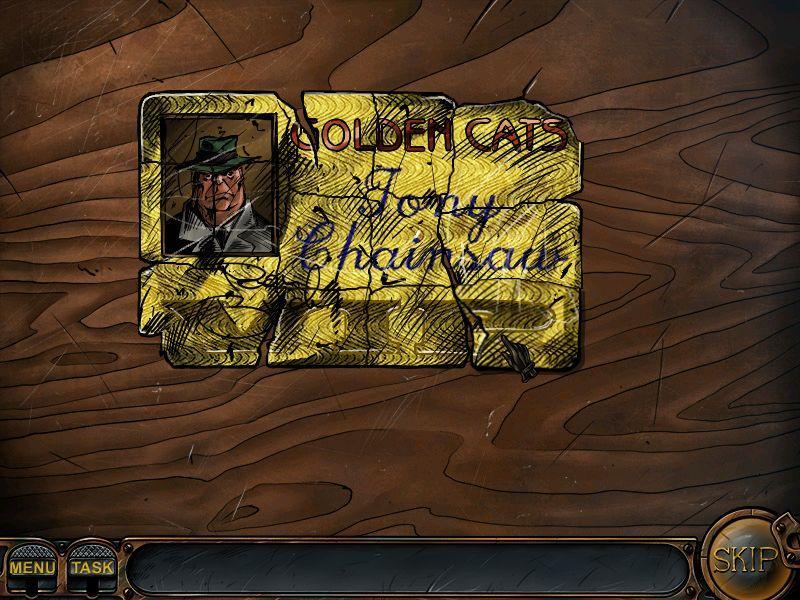
It contains the mirror inverted letters you need to spell the words "Golden Cats"
They have to be placed backwards, so you have to place the tiles on the holder as STAC NEDLOG.
You also have to place the free space between the words.
For details please the screen shot
Once the last tile has been placed correctly. the stamp will go into inventory automatically.
Get the stamp and place it on the VIP pass.
Flashback - Look into the past
The scene is mirror inverted and not in the right order.
By clicking the single parts of the scene, you can turn them.
Please have a look at the screen shot for the right view
Click the pistol after you are finished.
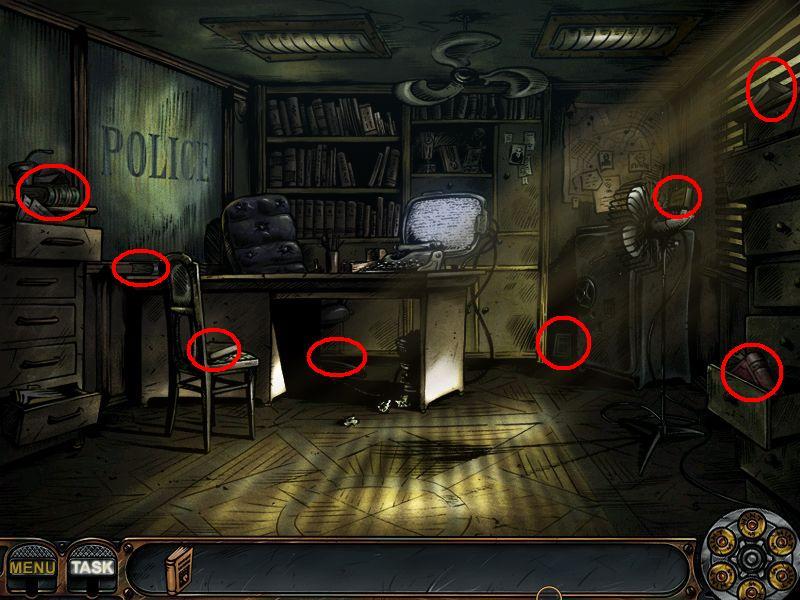
McKenzie's office - get access to the database
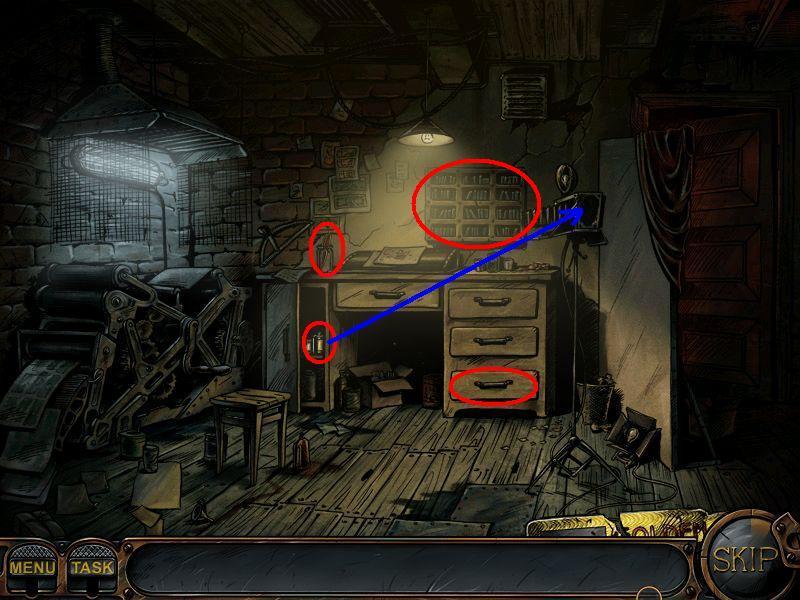
Click the bookshelf at the back wall.
Some books are missing and you have to find them.
Please have a look at the screen shot for all locations.
After you find them, the books have to to in the right order into the shelf.
There is no order given, it's just trial and error. Click each book in one of the empty spaces of the shelf.
Each time a book is the right place, a number will appear on its spine.
Keep the numbers in mind, write them down or just leave this window open to see the right order.
The Code for the Safe is according to the numbers on the book spines:
5482 on the top
1837 down
For details please see the screen shot
Get the punch card that is inside the safe and click it at the safe.
Enter the password
Your goal is to find the right password.
You can type in the answer by clicking on the keyboard that is on the scene or by entering the code on your own keyboard.
Enter whichever letter comes to mind. If the letter is in the password, it will show up on the monitor. If it's not in the solution, then that letter will go under the asterisks.
The first password is random.
These are the words we had while playing:
Parole, Password, Margaret, Teddy, Pass
Put the word "Frankie" or "Fatso" into the following search field.
This is a tip that the "Task" is giving you.
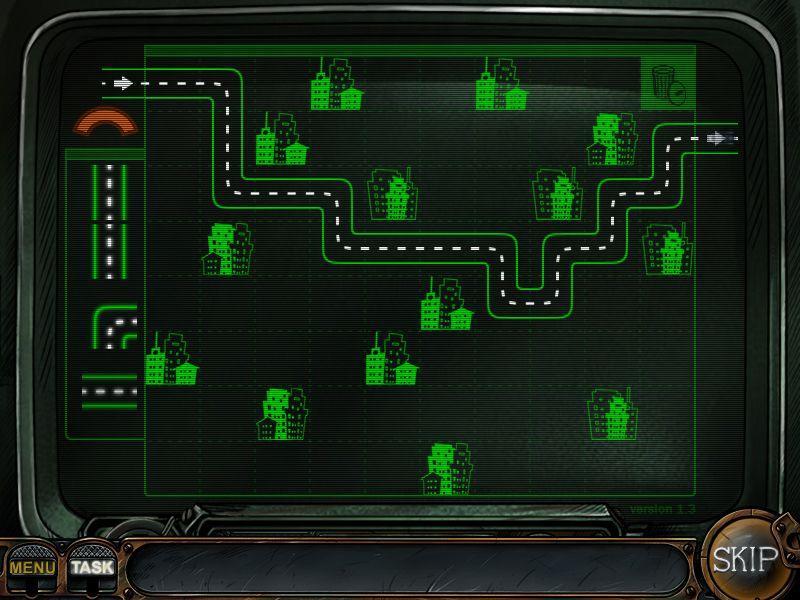
On the road
Your goal is it to build a street between the start in the left upper corner and the house in the lower right corner.
To do so, use the pieces that are given to you and click them in the working manner into the little squares.
You do not have any control about the pieces that are given to yo
Pieces you do not need you can be thrown into the bin in the right upper corner or place them on the board at points you don't need to reach your goal.
In the left upper corner you will see a red curve. That is the time that is given to you.
When the time is up, the car will start driving.
It will drive until there is an obstacle or no road left.
While the car is driving, you can still go on building.
When the car has to stop, you have to redo it with new pieces.
As the pieces given to you are completely random, the screen shot only shows an example, not the "one-and-only"-solution
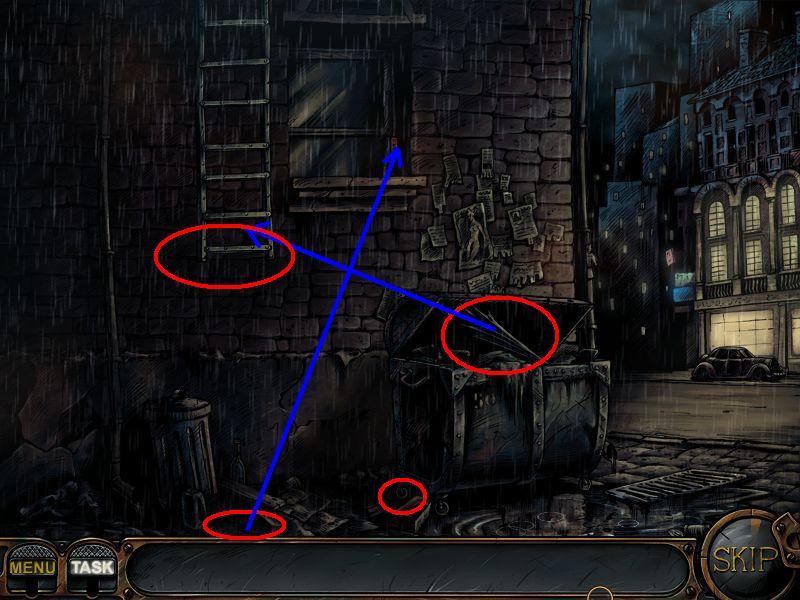
Dirty backyard
Click the trash bin to find an old umbrella.
Click the ladder to climb up.
When you try to climb up the ladder, the lower part will fall down.
Click left next to the trash bin to release the brakes.
By clicking, you push the trash bin below the ladder.
You can pick up a knife in front of the small trash bin.
By clicking the umbrella at the ladder, you will get it down.
Use the knife on the alarm system at the window and a puzzle will open.
Please see screen shot for the details
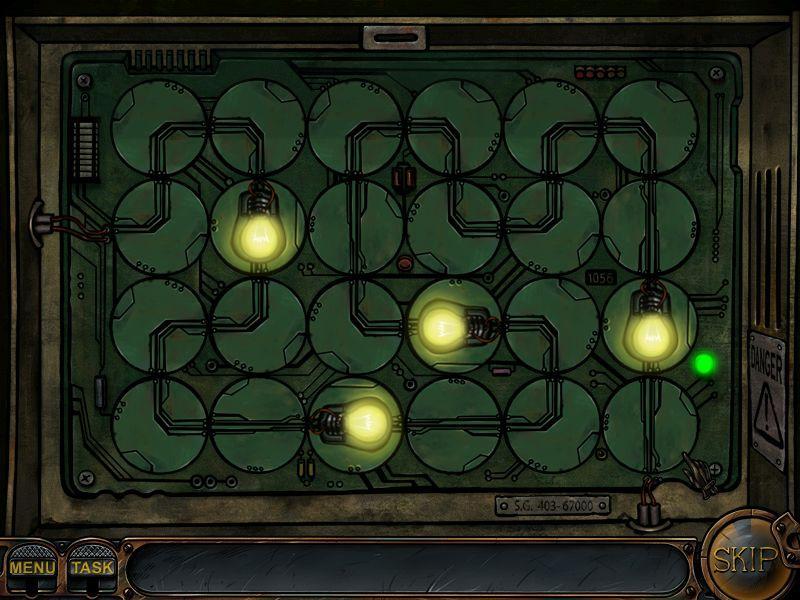
The alarm system
Your goal is to turn off the alarm system.
To do so, the cables have to be connected from the left upper corner to the right lower corner and turn on all the light
By clicking, you can turn on the lamps as well as the cables,
Please see screen shot for the solution
Frankie The Fatso's Room - Find and open the safe
The room is dark.
You have to find the opening mechanism for the safe.
Click the ship's wheel at the wall, right side.
Click the vase on the left side of the desk.
Push the golden golf club deeper in the bag.
Click the Statue of Freedom, left side on the drawer.
Now click the painting - it will move to the side.
The code is shown on the carpet.
When you click a button on the code pad, it will change its color.
When you click it again, it will change the color back.
The right code is:
yellow, green, green, yellow
yellow, green, yellow, green
green, yellow, green, green
yellow, yellow, green, yellow
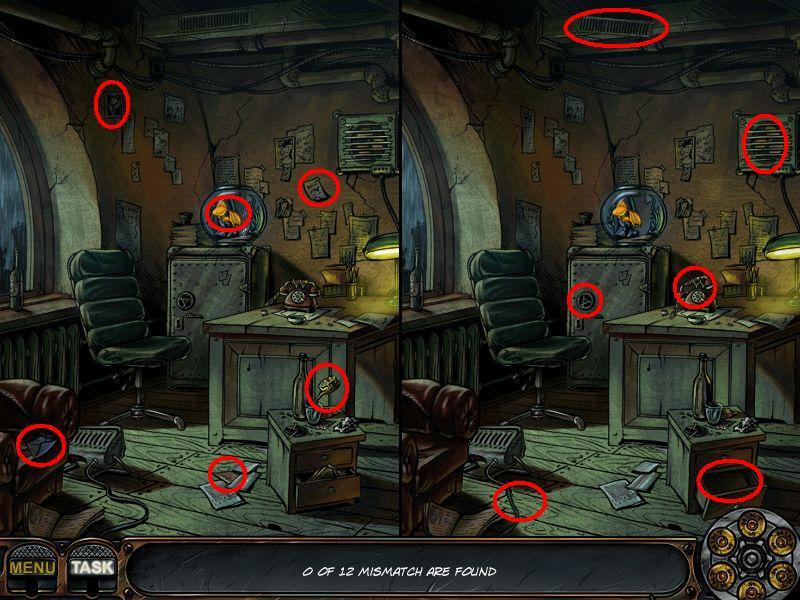
Chase's office again
Find the twelve differences between the pictures.
For all differences, please have a look at the screen shot
After this, you have to find what Chase needs.
Look for the objects - the silhouettes are shown at the bottom of the scene.
For all objects, please have a look at the screen shot
On the road again
Your goal is, to build a street between the start in the left upper corner and the house in the lower right corner.
To do so, use the pieces that are given to you and click them in the working manner into the little squares.
You do not have any control over the pieces that are given to you.
You can throw the pieces you do not need into the bin in the right upper corner or place them on the board at points you don't need to reach your goal.
In the left upper corner, you will see a red curve. That is the time that is given to you.
When the time is up, the car will start driving.
It will drive until there is an obstacle or no road left.
While the car is driving, you can still go on building.
When the car has to stop, you have to redo it with new pieces.
As the pieces given to you are completely random, the screen shot only shows an example, not the "one-and-only"-solution
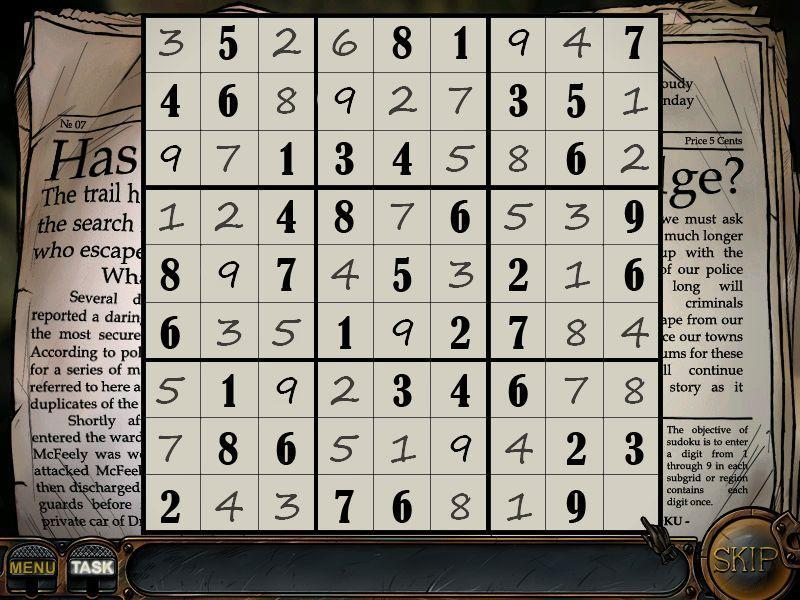
Motel room - Wait for the night - Sodoku
Wait for the night.
To do so, click the newspaper that is laying at the left end of the bed on the floor.
Click the Sodoku puzzle in the right lower corner.
For the solution, please have a look at the screen shot
The last empty square on the screen shot has to be filled with a 5.
Motel room - Find the door to the neighboring room
Click on the curtains to close them.
Pick up the screwdriver that is on the nightstand behind the bed.
Click the vacuum cleaner, the television, and the radio to turn it on and make noise.
Click with the lighter from your inventory in the lower left corner, next to the dresser.
Then click on the lower right side of dresser again but without the lighter and it will move to the side, revealing Graham's door, but it has no handle.
Pick the screwdriver from the inventory and click the dresser to get a handle.
Place the screwdriver on each screw until one by one they all come off.
For details, please have a look at the screen shot
Now click the handle at the other door and you will see a combination lock.
Click on the lock and turn it clockwise until you hear it click, wait for the lock to drop.
Click on the lock again, but this time turn it counter-clockwise until you hear it click, let the lock drop.
Lastly, click on the lock and turn it clockwise until you hear it click and let the lock drop one last time.
Catch up to the other driver
The goal here is to lay the road down just right in order to catch up with your opponent.
In this scene, you have to lay 3 pieces of the road at a time.
Each time you drop 3 pieces on the road, your opponent will do the same.
Whatever tracks you don't want to use must go in the trash can.
Flashback scene - Slider puzzle
You have to slide the pieces to rebuild the newspaper.
Have a look at the screen shot, to see how it has to look.
Through the building - Find a safe route for the cradle
You have to find a safe way without being caught by the lights.
At the moment when no lights are passing, you run from bush to bush.
To start running, lick on the bush you want to go to.
There is one bush where you have to be quick because the lights go over it.
See screen shot for the first part of the way and the "dangerous bush"
If you get caught, you will have to do it again.
On your way to the fifth bush, you will fall into a trap.
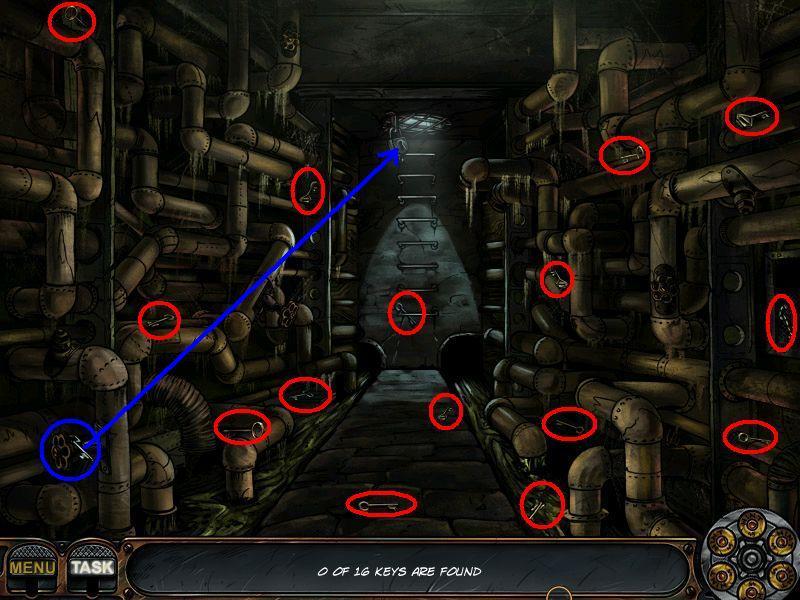
Find 16 keys in the devil's hatchway/rest of the way
You have to find all 16 keys.
For all positions, please have a look at the screen shot
After finding all of the keys, you will find them available in your inventory.
Use them on the lock that you will see at the top of scene, near the ladder.
You find yourself back with the lights again.
Your goal now is first to get the shears and then run to the cage at the right side.
The shears go automatically into your inventory when you pass through them.
Go back to the last bush where you were before and a mini game will open.
Again you have one bush where you can't stay too long, as the lights will catch you there.
For details, please have a look at the screen shot
The mini game is a typical match-3 game. The only difference is that you have to drag a row in order to slide towards other gems that match it.
Your goal is to eliminate all the pieces of the fence so Nick can get through it.
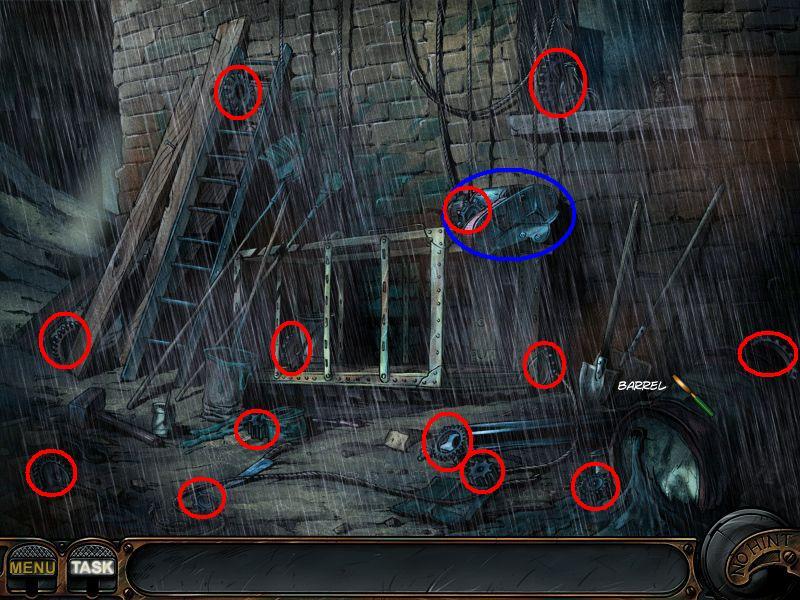
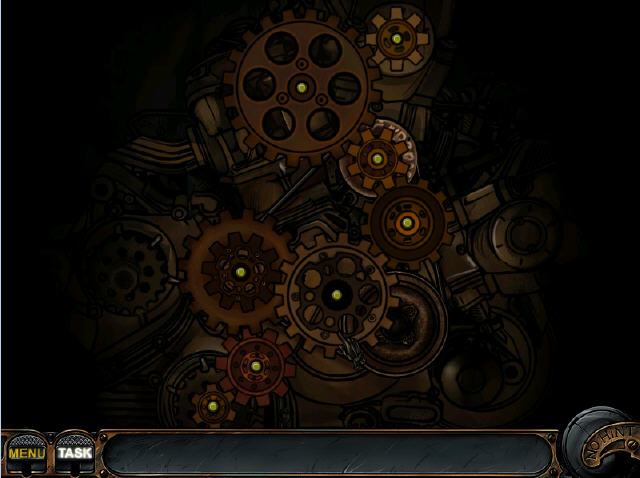
Near the finished skyscraper - Collect and connect the gears
Click the motor on the right side.
You have to find 13 gears now.
Please have a look at the screen shot for the positions of all gears
Place the gear at the motor after all are collected and a puzzle will open.
Place the gears so that they all will rotate ( screen shot)
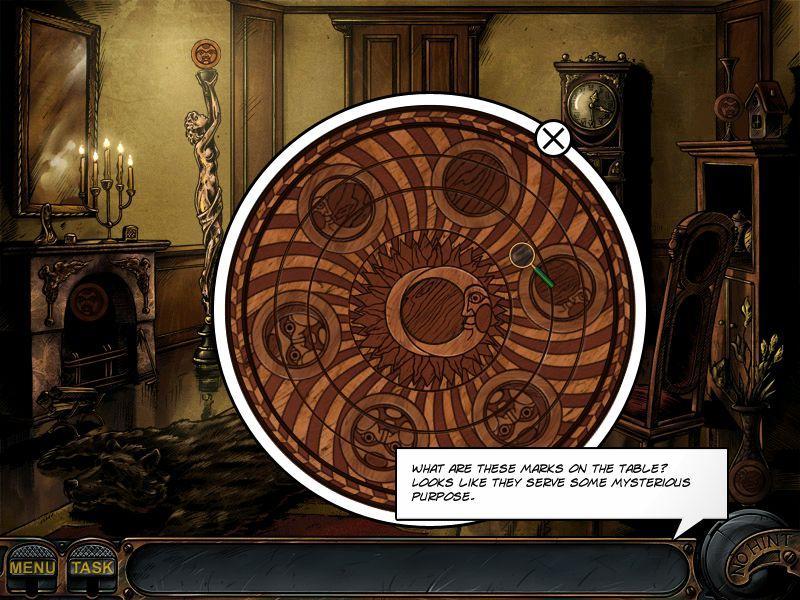
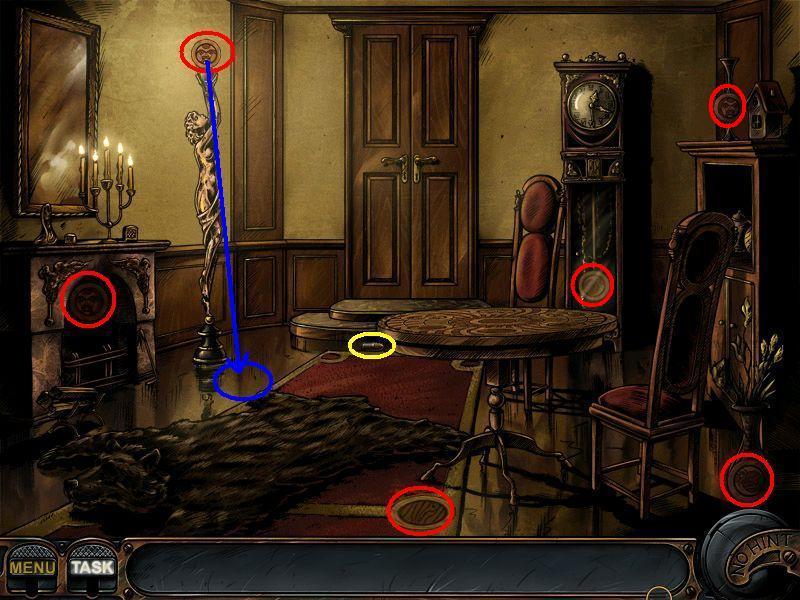
Strange room - Open the secret door
Click the table und spin the middle and the inner circle to complete the symbols.
To see how it looks, please see the screen shot
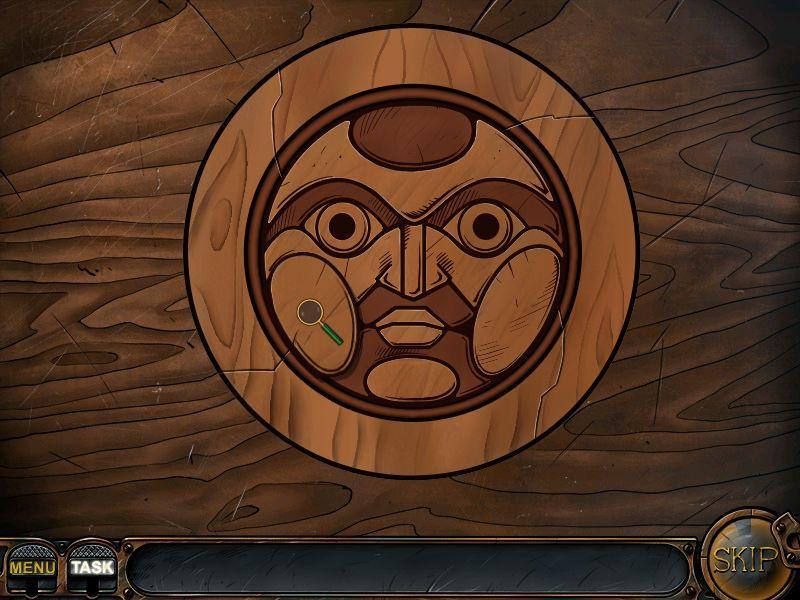
Now collect all moon symbols in the room (screen shot)
One will break and you have to put it together again (screen shot)
Click all pieces at the table now and put them in the right places (screen shot)
A hidden compartment opens in the middle of the table and you can grab a key.
Click it on the door in the back.
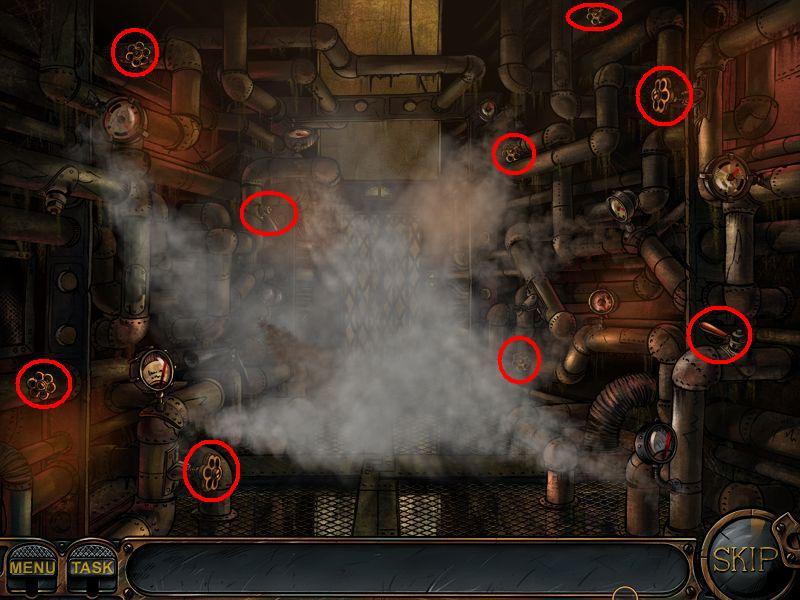
Clear the passage to the elevator
Your goal is to turn off the valves.
This only works when the steam does not come out for a moment.
Look for a gauge that is not moving and then click on the valve that is connected to it (Screen shot)
When the steam is gone, click on the elevator door.
A puzzle will open.
You need to push the buttons in such a way that all lights are lit.
When you push a button, it will activate or deactivate all buttons which are connected to it - horizontal, vertical and diagonal.
To reverse a step you did not want to make, just click on the last button you pressed.
After the elevator stops again, you have to solve a puzzle.
Just click two buttons to see the picture.
Click equal buttons to match them.
When the elevator stops the third time, your goal is again to light all lights.
When you push a button, it will activate or deactivate all buttons which are connected to - horizontal, vertical and diagonal.
To reverse a step you did not want to make, just click on the last button you pressed.
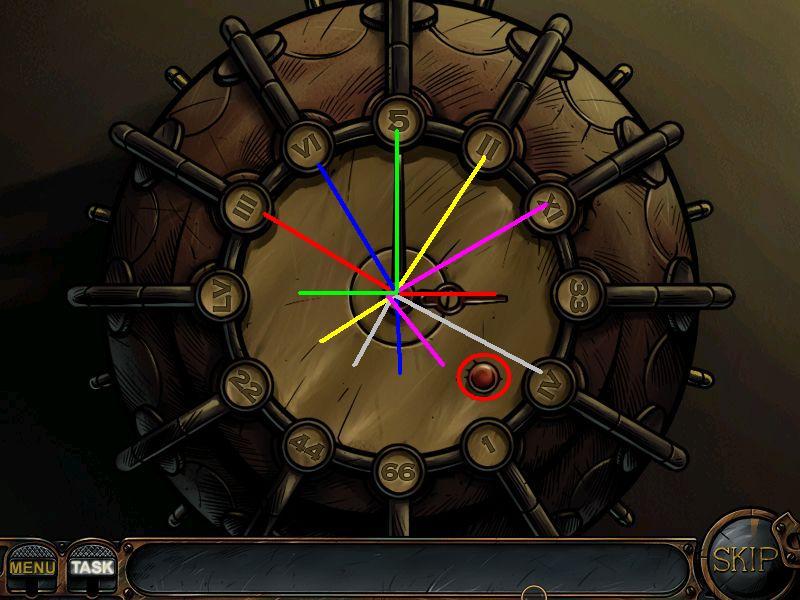
The Penthouse - The clock
Click on the blinking red light.
A puzzle with a clock will open.
Attention - if you click the red button in the following puzzle and have a wrong solution, you have to start the penthouse-chapter from the beginning.
Your goal is to put the minute hand and the hour hand on matching numbers.
A matching pair is always an Arabic number and a Roman numeral.
It doesn't matter which hand goes on which number as long as the numbers match.
After each matching, you have to press the red button.
Match the following pairs
1 - XI (11)
3 - III (3)
4 - IV (4)
5 - LV (55)
22 - II (2)
66 - VI (6)
For details please have a look at the screen shot
The Penthouse - The puzzle
Your goal is to place all the tiles in the right order.
To do so, click the tiles to rotate them.
Once the pictures are all in place, you need to click on the red button so you can move on to the final puzzle (screen shot)
The Penthouse - Finale Puzzle
Your goal is to find the wire that connects both sides.
It's the first green one on the left side (screen shot)
Posted by: Pam |
February 12, 2009 2:06 AM
|
February 12, 2009 2:06 AM