
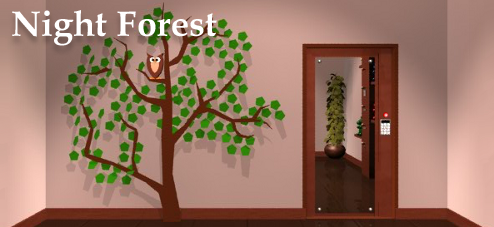
![]() This pretty little escape game, a first by Amajeto, has a charming design that channels a very TomaTea vibe, especially in the artwork and presentation. Each of the four walls has only a sparse amount of furnishings, all designed to be puzzling or informative all while being aesthetically appealing. Barely glimpsed outside the window is a lovely starry night, but before you can stroll through this Night Forest, you must piece together the clues and solve you way out the locked door.
This pretty little escape game, a first by Amajeto, has a charming design that channels a very TomaTea vibe, especially in the artwork and presentation. Each of the four walls has only a sparse amount of furnishings, all designed to be puzzling or informative all while being aesthetically appealing. Barely glimpsed outside the window is a lovely starry night, but before you can stroll through this Night Forest, you must piece together the clues and solve you way out the locked door.
 A changing cursor will guide you toward active zones, where you can click to pick up items, study hints or interact with enigmatic devices. You can look closer at your inventory by clicking the lower right corner of an item's box or click the center of the item to ready it for use (or attempted use). As much as Amajeto looks and feels like TomaTea's alter ego, it is rather more tricky since it's a bit tighter with its clues. No messaging will tell you if you're ready to solve a puzzle or not, so you're left with your power of deduction and a bit of guessing. While the first puzzle is straight-forward and the last is easier since your clues have been narrowed down, you might find yourself muddling through the middle. Still, the logic holds up to scrutiny and most players will make make their way through this short escape before long, rewarded by a beautiful scene and a happy feeling of accomplishment to go along with it.


Walkthrough Guide
(Please allow page to fully load for spoiler tags to be functional.)
Night Forest Walkthrough
OK, pheeze here, long time first time. Here's a walkthrough. Thanks to hgvillatoro for their help with the bear puzzle. It's a small room, so I haven't bothered to give click-by-click instructions where to look; it should be pretty obvs. Let me know if not.
To begin
From the start (facing the shutters), click on the plant. Click again to take the stick, and again to take the red tape.
Turn right (facing the bench). Click on the lower shelf to get a view from underneath. Take the note taped under the shelf.
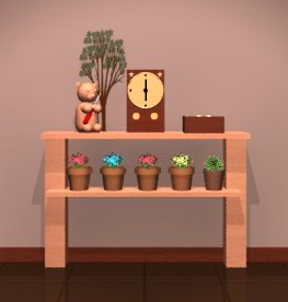
Turn around so you're facing the shelves. There are two 4-digit codes, one 4x4 grid, one locked cabinet, one that just plain won't open, and one 4-colour puzzle. Time to start solving!
4-colour puzzle
Examine the stick, and click at the top end to get a close-up of four animal head shapes. Note that they correspond to the four animal dolls on the shelves.
In order from left to right, they are the cat, the rabbit, the teddy, and the guinea pig (or at least I think that's what it is!).
In order, that's red, blue, yellow, green. Enter the code and take the "STARS" note.
The bear with the screwdriver
Note that you can press both of the bear's eyes, and that it has arrows on its paws. The left paws are up/down; the right paws are left/right.
Look at the stars on the wall to the left of the bear. Note that each star EITHER has vertices that point up and down, OR left and right.
These correspond to the bear's eyes. Note also that the stars are mounted on a series of arrows pointing upwards. So, reading from bottom to top, press the eyes for the appropriate directions.
R - R - R - L - R. Take the screwdriver.
The star panel
Use the screwdriver to remove the screws from the brown panel with the star on it. Inside you will see a cut wire.
Use the red tape to mend the wire. Press the star panel to open the shutters.
The clock
This one had a lot of people stumped. You will need the STARS note to solve this one.
Note that the numbers underneath the word STARS correspond to the letters of the alphabet (S is the 19th letter, T is the 20th, A the 1st, and so on). How can this help with the clock?
Those buttons don't say 1 and 0...
...they say I and O!
These correspond to the numbers 9 and 15. Set the clock to 9.15 and the stars will flash.
The 4x4 grid
Go to the shutters and look out. Now that you have fixed the clock, five stars will appear glowing in the sky.
Note that the window is a 4x4 grid. Note down in which squares the stars appear: this is the code for the grid lock.
The code is as follows:
...x
.x..
x.x.
x...
Take the transparency sheet.
The 4-digit codes
You now have a piece of paper and a transparency, both with similar shapes on them. I can't think of many things to do with those!
Examine the white paper in your inventory. While it is up on screen, click the transparency to lay it over the paper.
Note that the transparency has up/down arrows on it, indicating that it can go above or below the shapes on the paper. Put it in both places to get two codes.
2385 (upper) and 5382 (lower). Use these codes to open the cabinets. Take the battery and the wooden board.
Behind the blue bunny
Zoom in on the blue rabbit on the upper left shelf. Click to look behind it. There is a panel with holes in it.
Examine the wooden board in your inventory. You can click on the dots to make dowels extend outwards (never mind how that's even possible). Set the dowels in the right places to fit in the holes. (Of course, you will need to flip the pattern left to right as the dowels will be facing away from you when you put it in).
Looking at the board in your inventory, the pattern is:
..x
xx.
.xx
Open the cabinet to the right of the rabbit and take the second battery.
The owl
Click on the owl in the tree to examine it. Click again to see the back, and again to open the battery case. Insert the batteries.
There is a button just to the left of the owl, behind one of the pentagonal "leaves". Click the leaf to move it, and press the button.
The owl moves its feet and winks its eyes. Note down his movements. What could we use that for?
The owl moves four parts of its body, and the box on the bench has four buttons. The owl's feet correspond to the bottom buttons; the eyes to the top buttons.
The code is: DL UR DR UL DR DR DL. Take the key.
Getting out
Use the key to open the last cabinet in the shelves. Take the knob.
Go to the shutters. Use the knob on the little slot at the top of the window. Click the knob to bring up a mirrored grid with numbers on it.
No need to get a pen for this one. Walk to the door, where you will see the grid reflected in the mirror.
Click the buttons in the order shown on the grid to open the door.
7359
And you�re out!
Posted by: pheeze |
August 20, 2013 4:46 PM
|
August 20, 2013 4:46 PM