

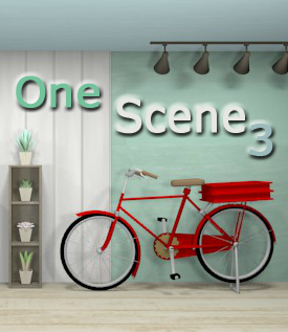
![]() When one is very good, you're not going to pass up on more, especially when a Robamimi escape game is concerned. Take One Scene 3, for example. This charming single scene—pretty enough to frame and put on display—is an ample offering of puzzles and code-breaking all taking place along a single wall.
When one is very good, you're not going to pass up on more, especially when a Robamimi escape game is concerned. Take One Scene 3, for example. This charming single scene—pretty enough to frame and put on display—is an ample offering of puzzles and code-breaking all taking place along a single wall.
 As nice as it is to gaze upon, though, your goal is to "escape" and it's such an irresistible compulsion to explore, play with and solve until you reach the end. Like in most other games of this genre, gameplay centers on finding puzzles and useful bits of information through scanning the scene for interactive areas to point-and-click on. That's just about everything you can behold, which means the changeable cursor is almost unnecessary.
Robamimi is a favorite of ours not only for the gorgeous, 3D-quality graphics, but also because of the relaxing affability of the game interface; a notepad to work out your solutions is the only thing not provided. Clues are cozily nestled amongst the surroundings, not sequestered into obscurity, while the hint function provides reassurance that you'll never be stuck. An intuitive inventory function is also easy to use, so clues and items won't be fumbled. All this kind helpfulness is a bit of a flaw, if anything could be called flawed in such a beguiling design; as much as you'll enjoy playing One Scene 3, you may feel shorted the opportunity to truly rub some neurons together.
Just as One Scene 2 was a step up in style and gameplay from One Scene, this third installment is even more impressive. Besides all the quality features that show Robamimi's enthusiasm for creating great-looking, fun escape games, One Scene 3 has a unique charisma that sets it apart. The reveal at the end and the happy, waltzy music, similar to what you'd hear in a Hayao Miyazaki film, add to this fantasy effect. I think you'll agree—although it's short, this is the best one scene from Robamimi to date. So stop reading and go enjoy some more!
Not loading? Try the alternative link: One Scene 3.


Walkthrough Guide
(Please allow page to fully load for spoiler tags to be functional.)
One Scene 3 Walkthrough
General Information
Controls and Functions:
Before pressing "Start" to begin the game, click to select your language: English or Japanese.
The cursor will change from an arrow to a hand when hovered over interactive areas (such as a puzzle, clue, or an item to pick-up).
When you pick up an item, you'll see a close-up view of it. Click to close the inspection mode and the item will automatically be added to your inventory at the bottom of the game screen.
To inspect an item in your inventory, click on its top edge to "view" it.
To use an item from your inventory, select "use" to highlight it, then click on the area in the scene where you'd like to use it.
You'll find clues everywhere in the scene--it's very helpful to write down what you find so you can work out the solutions with paper and pencil.
A "HINT" button in the bottom left corner of the game window will tell you where you need look or what you need to do next.
"BGM OFF" will turn off the music while the up and down arrow buttons will increase or lower the volume.
"SE ON/OFF" determines whether sound effects (chimes, etc.) are left on.
If you need to leave the game before you're finished, click on the "SAVE" button in the bottom right corner.
Using this Walkthrough:
Because the game is nonlinear, this walkthrough is structured by puzzle so you can jump directly to the area where you'd like help.
Each section gives a basic explanation of the puzzle along with an indication how/where to find solutions.
All solutions and more direct hints are hidden by spoiler tags so you can open up any section without having too much revealed at once.
If you'd like instructions on how to get from beginning to end, start at "starting out" and work your way down for step-by-step directions for getting through the game.
Have fun :)
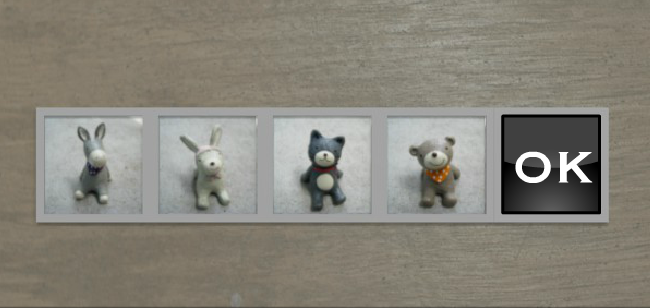
Starting Out: 4 Pictures
On the wall, just under the word "JUNK" is a string of FOUR PICTURES. Click on them to look more closely.
Make note of the pictures and their order, from left to right.
Zoom in on the BOX below the four pictures:
Change the images on the box to match the pictures hanging on the wall. Then, click "OK."
SOLUTION:
Donkey -- Rabbit -- Cat -- Bear
screenshot: 4 pictures puzzle
Inside the box you'll find:
a PANEL.
Look behind the panel to see it has a square peg. Perhaps it fits somewhere?
Note that the panel also gives you another clue. Save that information for a little later.
Back out to the starting screen again. You're ready to open more doors.
Opening the Cabinet
Zoom in on the front of the CABINET.
Insert the PANEL WITH THE PEG ON BACK (found in the 4 Pictures box) into the square on the cabinet door. This will change it from "close" to "open."
Back up once and click the cabinet doors to open them.
Left Inner Door of the Cabinet
The left inner door of the cabinet has a 3x3 grid of buttons. You'll need to push the correct buttons, in order, to open the door.
The letters on the books below this door also form a 3x3 grid.
Look around the room for more letters...
SOLUTION:
J U N K is spelled out on the top of the wall.
Each letter represents a button on the 3x3 grid so push only J, U, N, and K buttons in that order.
When the code is entered correctly, the door automatically opens. Get:
another PANEL.
The Box Above the Cabinet
Click on the RED BIKE to zoom in on it.
Look under the bike SEAT to find a...
POSTER.
From your inventory, "view" the poster to examine it. This gives you the information needed to open the 4-Button Box Above the Cabinet.
HINT:
The angled brackets around the numbers refer to the interior border of the buttons.
For example, the L-shape means the top right button.
SOLUTION:
Push the buttons in this order:
top left
bottom left
bottom right
top right
top right
bottom right
bottom right
bottom left
bottom left
When you've entered the code correctly, it will say "Open." Click the door to look inside and find a...
SPRAY ADHESIVES.
Back out twice.
Right Inner Cabinet Door
Click inside the opened cabinet and again on the RIGHT INNER CABINET DOOR. You need a 3-digit number to open it.
First, solve the Box Above the Cabinet to get a POSTER and SPRAY ADHESIVES.
Click the area on the green wall, just under the lights. There's a slight demarkation...something should hang there.
Open the POSTER in your inventory and click it to turn it over to the blank side.
Then use the SPRAY ADHESIVES on the poster.
Put the POSTER on the wall under the lights.
There's nothing remarkable about it so far--more light is needed.
Find the lightswitch at the end of a cord running down the wall from the lights.
The LIGHTSWITCH is two yellow buttons that need to be pushed in a certain order. Look around the room for the answer.
HINT:
Look in the RED BASKET on the back of the bike.
SOLUTION:
Push the yellow buttons in this order:
left - right - left - right - right - left
When the lights go on, you'll have your 3-digit code.
Enter that code into the right inner cabinet door...
The lights shine on three numbers on the poster:
6 8 2
From inside the right inner cabinet:
get another PANEL.
Back out to the wide view of the scene again.
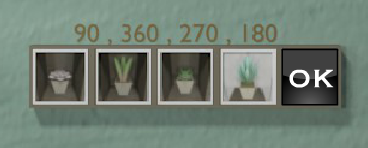
Blue Box
Zoom in on the BLUE BOX on the left side of the room. You'll need a 5-digit number to open it.
Its hint tells you it has something to do with a "clock" and you should go from "H" to "L".
The panels you already have in your inventory, as well as the shelves of plants will help you complete the solution:
HINT:
"Clock" refers to the time on each plant's pot (zoom in on each to inspect them).
"H -> L" means High to Low.
SOLUTION:
Start with the "time" on the High plant (top shelf)...it's 6 o'clock.
Following suit, you'll end up with these numbers:
6 9 3 1 2
Enter that number into the BLUE BOX and click "OK" to open it.
Inside the blue box you'll get...
another PANEL.
Back out once.
Four Squares Panel (right side of bike)
This is the final puzzle of the game.
To the right of the red bike, just under the yellow lightswitch, there is a panel with for squares on it.
You should have four panel pieces by this time...remember to go back to the CABINET and take out the panel you used to open it.
The pegs indicate that the panel pieces will fit into it.
Which order should they go in?
HINT 1:
The numbers above each square indicate degrees on a circle.
See if you can find those same degrees by looking around the room.
HINT 2:
Look on each plant and you'll see that hands of the "clock" form angles.
So, 3 o'clock equals 90 degrees on the circumference.
SOLUTION:
screenshot: final puzzle solution
From left to right, the panel pieces go in this order*:
Short, pale pink leaves (3 o'clock)
Tall, green, straight-up leaves (12 o'clock)
Short, bright green leaves (9 o'clock)
Tall, fat, orange-tipped green leaves (6 o'clock)
*Panel pieces are indicated by a description of the plant pictured (with clock picture in parentheses).
When all the panel pieces are in the correct order, click "OK" to finish the game.
Enjoy!
Posted by: elle |
June 6, 2012 3:56 AM
|
June 6, 2012 3:56 AM